
Grow A Garden 2 Base Price List
What's the most valuable crop?![Evomon Best Starter [Leafbun, Blazpup, or Bubble?]](/wp-content/uploads/2026/06/evomon-best-starter.jpg "Evomon Best Starter [Leafbun, Blazpup, or Bubble?]")
Evomon Best Starter [Leafbun, Blazpup, or Bubble?]
Grass-type, Fire-type, or Water-type?![Evomon Tier List [META and BEST Evomon]](/wp-content/uploads/2026/06/evomon-tier-list.jpg "Evomon Tier List [META and BEST Evomon]")
Evomon Tier List [META and BEST Evomon]
The Evomon dream team.
![[Roblox] Evomon Shiny Hunting Guide – Including Prismatic and Pris Shinies!](/wp-content/uploads/2026/06/evomon-shiny-hunting-guide.jpg "[Roblox] Evomon Shiny Hunting Guide – Including Prismatic and Pris Shinies!")
Empress of the Deep: The Darkest Secret Walkthrough
Check out the official Gamezebo strategy guide for Empress of the Deep: The Darkest Secret.


- Prefer Gamezebo on Google

General Information
Main Menu

- The blue button at the top-right corner of the main menu displays the profile window. Select one of the blue buttons to create a profile, the red X button to delete a profile from the list or the Cancel button to return to the main menu.
- The Play button starts the game with the currently selected profile.
- The Options button displays a window where there are options to adjust the volume for music, effects and voice. There are also toggle buttons for high quality, hardware cursor and full screen mode.
- The Help button displays a single page summary of information about the game.
- The Quit button exits the game if Yes is selected or returns to the main menu if No is selected.
Normal Locations
- Move the cursor around the screen until it changes. The types of cursor that are used vary depending on whether the hardware cursor is selected.
- With hardware cursor mode on, the default cursor is the standard white Windows arrow. A large magnifying glass appears over objects that can be examined and a pointing arrow appears over exits.
- With hardware cursor mode off, the default cursor is the white hand. A hand holding a magnifying glass is shown over objects that can be examined, and a hand with a pointing finger is shown over exits.
- Single left click on an area when a cursor is shown to perform an action.
- A single sparkle is shown over objects that can be picked up.
- Sparkles are shown over areas that can be examined more closely.
- A gold star will be shown at the top-left corner of the screen when the area has been completed.
- The menu button can be selected at the bottom-left corner of the screen to display the game menu. From here you can resume the game, view the options window, return to the main menu or quit the game.
- The notebook above the Menu button at the bottom-left corner of the screen has tabs to shows notes, maps, clues and flowers that have been collected.
- Move the mouse cursor to the inventory tab to display the inventory. Any items that have been collected will be stored here. Select an item by left clicking it or return it to the inventory by left clicking. All items that are stored in the inventory are used on another object in the game.
- The hint button can be selected at the bottom-right corner of the screen to reveal the location of an area that should be explored next. Another hint can be used after 30 seconds.
- A white arrow will sometimes appear in the area above the hint button. Pressing this arrow exits a close-up view or moves back to another area.
Hidden Object Locations
- The aim in these locations is to find all of the objects that are displayed in the list. The hidden objects are always in the same places every time the game is played.
- After finding all of the hidden objects, a new object can be examined in the middle of the screen. Examining the object adds an important piece of information to the notebook.
- The hint button can be selected at the bottom-right corner of the screen to reveal the location of a hidden object. Another hint can be used after 30 seconds.
- Clicking too quickly causes the mouse cursor to move randomly for two seconds.
Mini-Games
- There are various mini-games in the main adventure which must be solved in order to make further progress with the main game.
- Completing a mini-game causes a new object or exit to appear in the location where the mini-game was solved.
After one hint has been used in the mini-game, the skip button becomes active active after 30 seconds. When active, the skip button can be pressed to pass the puzzle.
Walkthrough – Chapter 1: The Royal Sceptre
Mausoleum
The game starts in the mausoleum. The following hotspots are available:
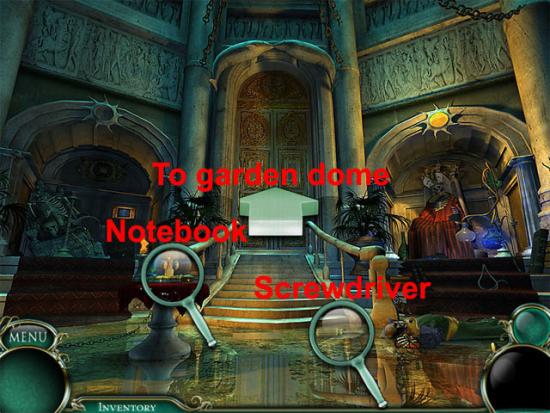
Take the screwdriver on the floor. Examine the notebook on the table to see a close-up. Examine the blue panel on the notebook and it will be added to the slot at the bottom-left corner of the screen. The notebook can now be selected to reveal notes, a map, clues and flowers that have been collected. Exit the view of the notebook and back away from the table. New hotspots are available:
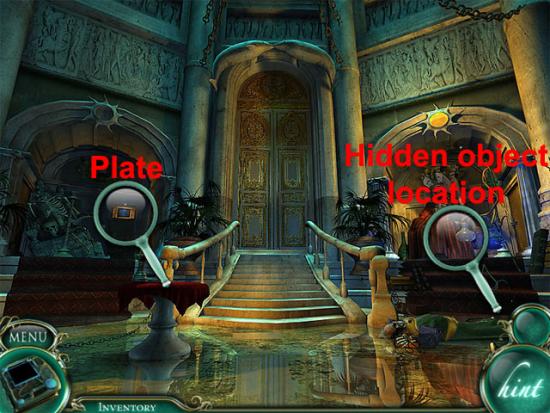
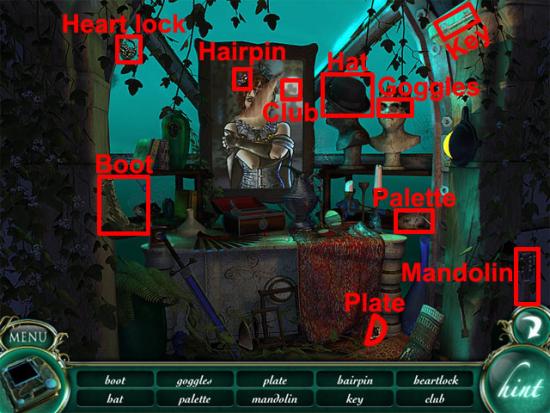
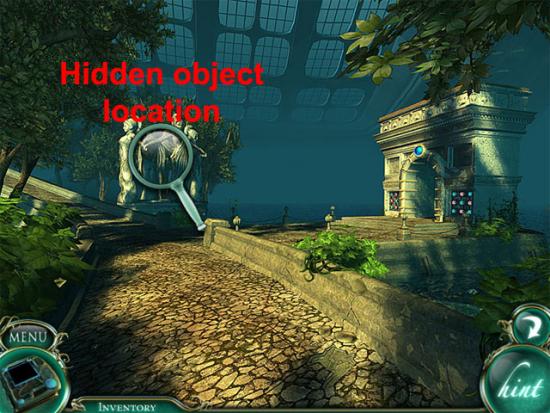
Examine the hidden object location. Find all of the hidden objects on the list:
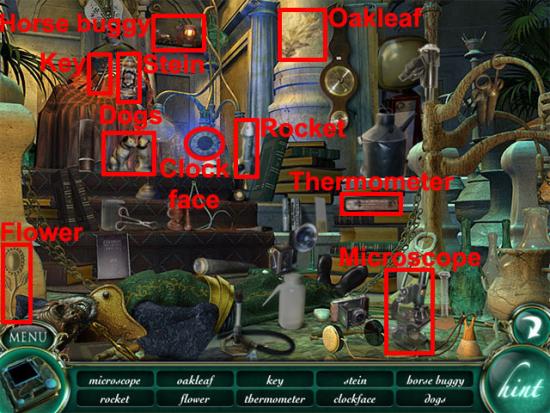
After finding all of the hidden objects, examine the microscope to see a slide. Examine the slide to add the symbol to the notebook. Examine the plate. Use the screwdriver on the screw in the middle of the plate. Remembering the symbol that was recorded in the notebook, move the blue bars to the following positions and then select the handle:
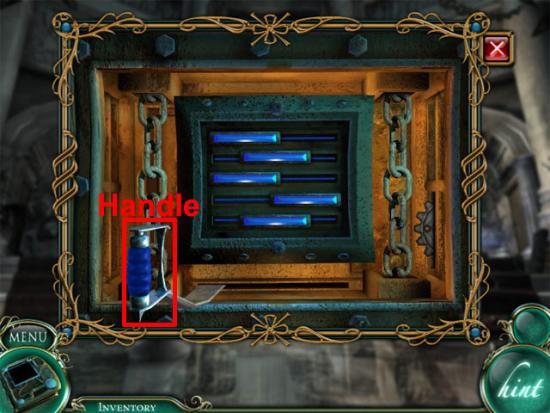
The door will open and a flower will be added to the notebook. Move forward through the doorway to enter the garden dome.
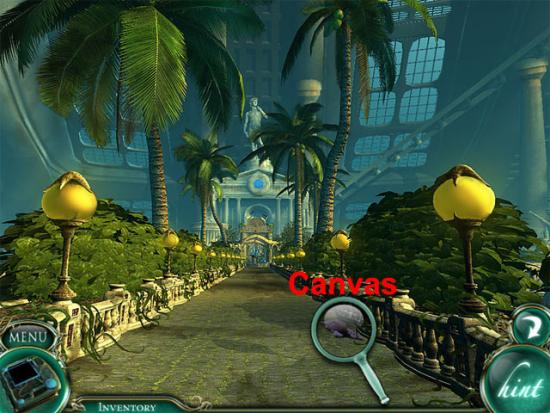
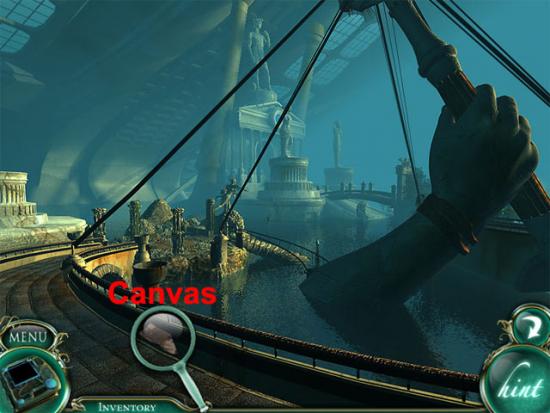
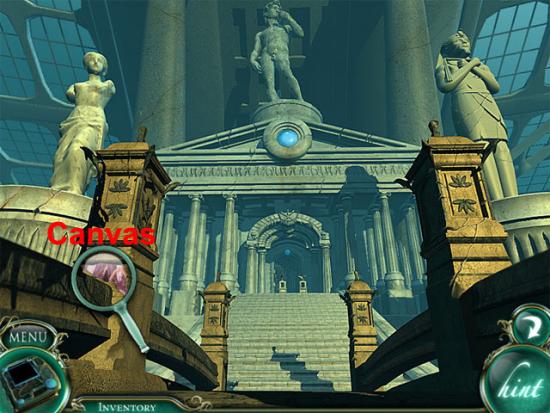
Garden Dome
Move forward and take the fragment of canvas on the path:
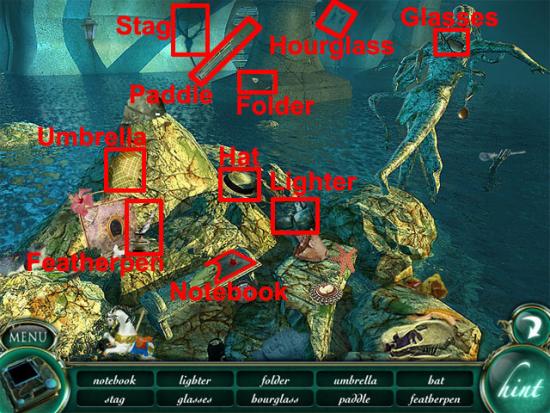
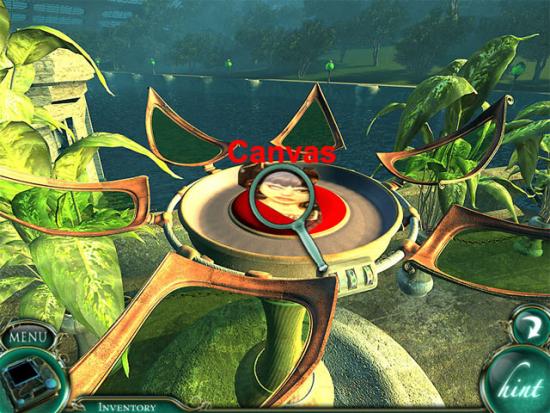
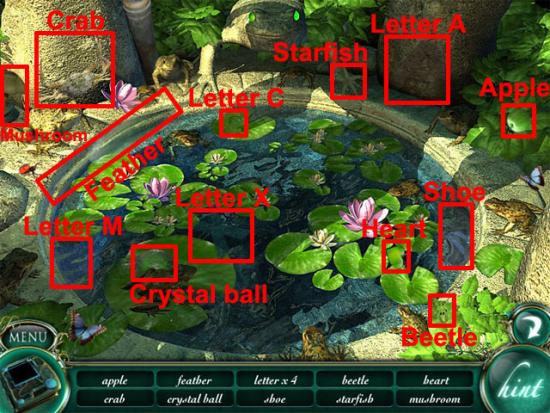
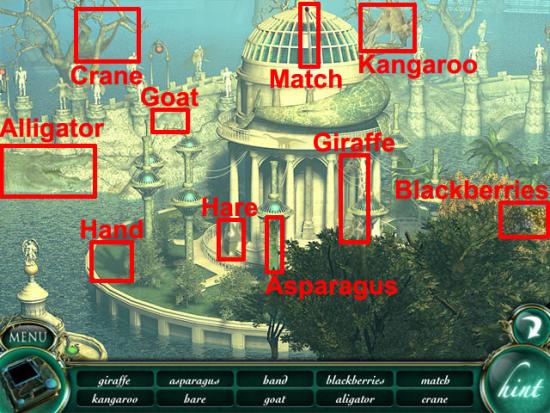
Move forward once to the crystal fountain. Examine the fountain to enter a hidden object location. Find all of the hidden objects on the list:
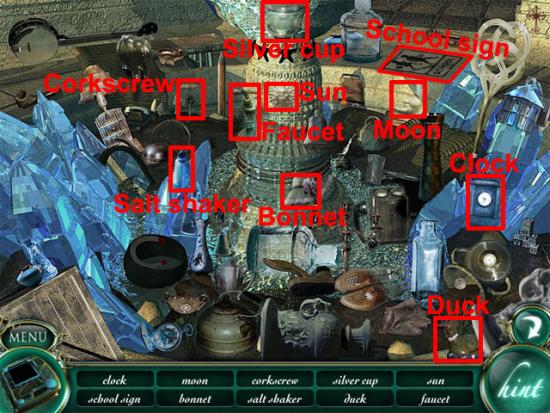
After finding all of the hidden objects, examine the sun to see another symbol. Examine the symbol to add it to the notebook. Move left. Take the jeweled eye:
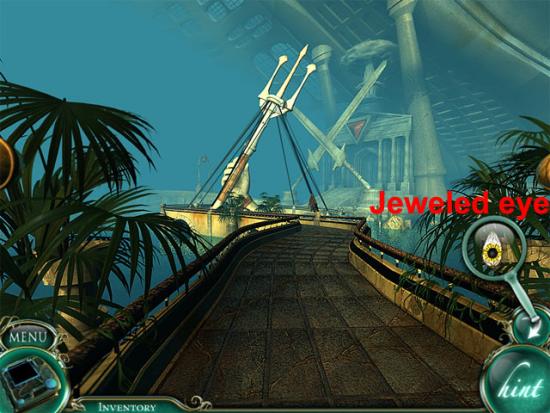
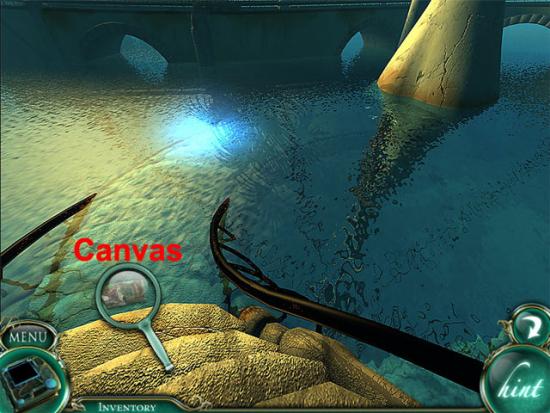
Move forward. Take the fragment of canvas:
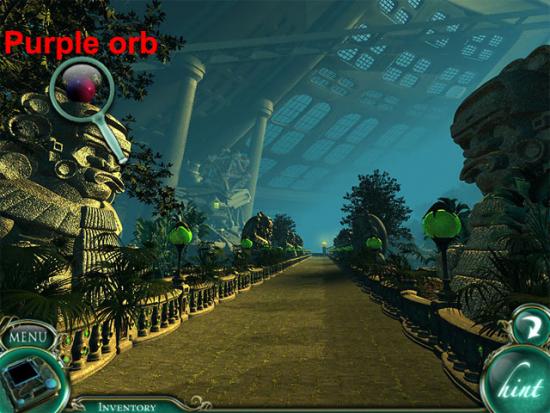
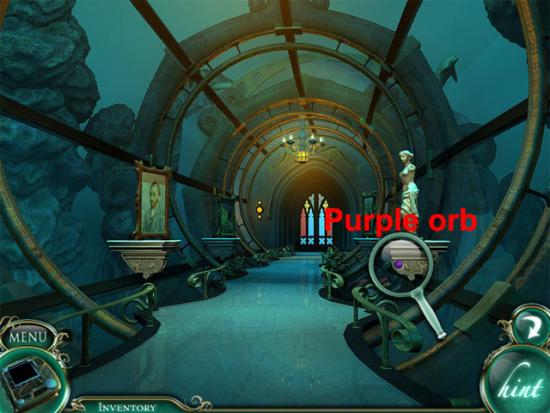
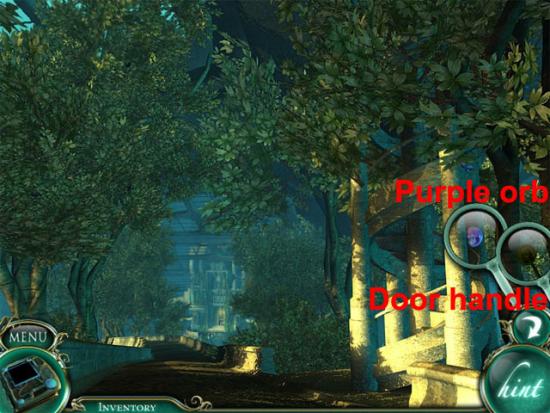
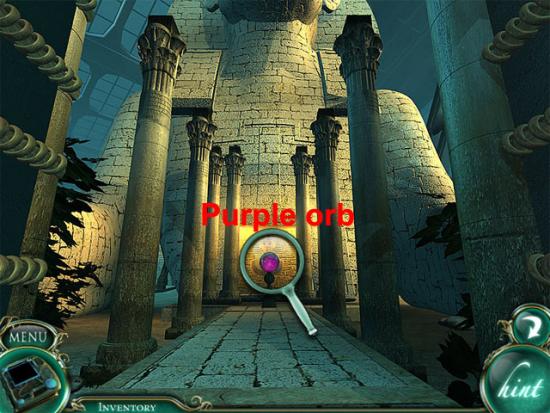
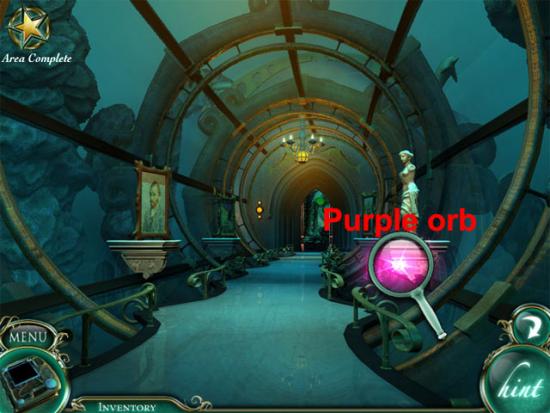
Move forward. The following hotspots are available:
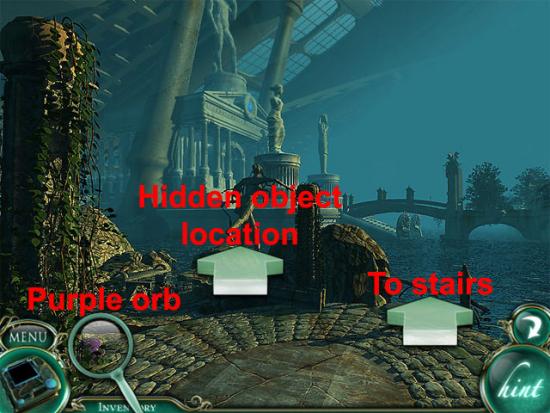
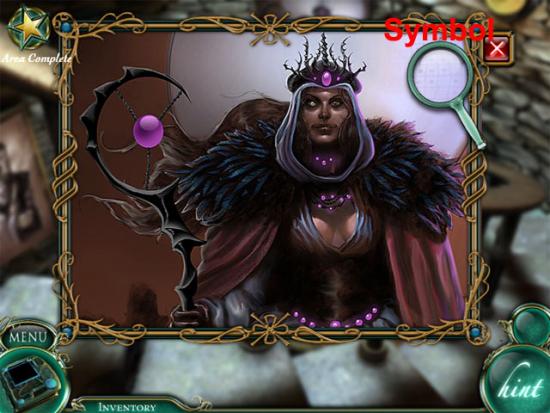
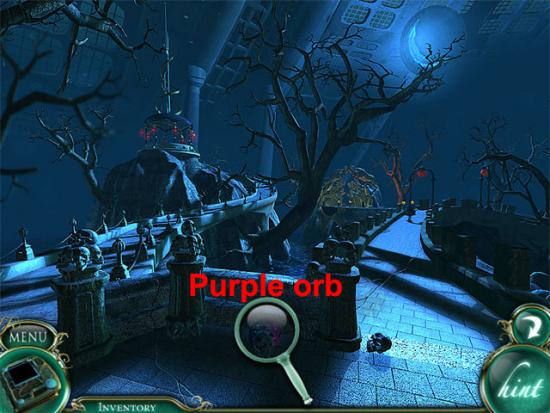
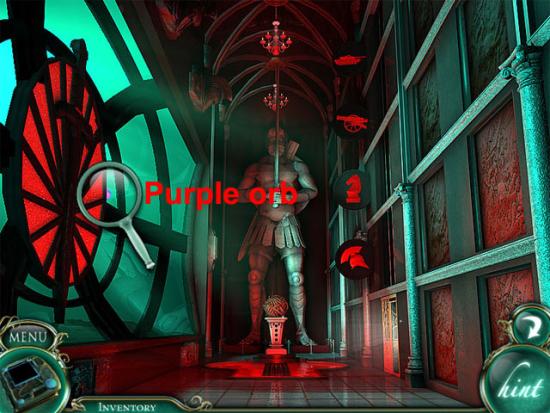
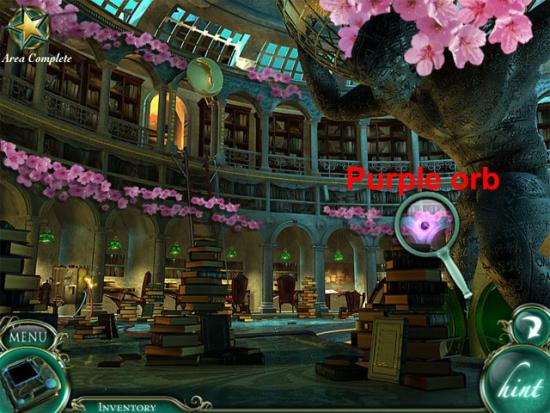
Select the purple orb: A voice asks if you can find nine more of them. Examine the hidden object location. Find all of the hidden objects on the list:
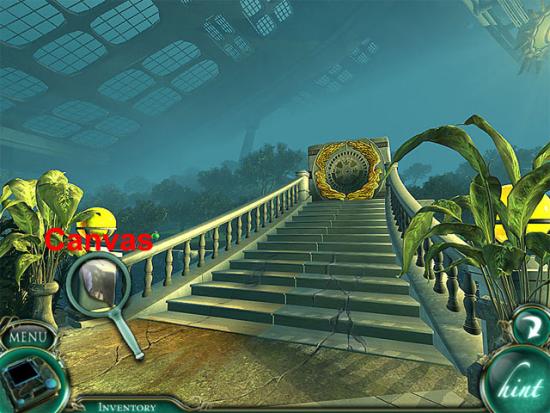
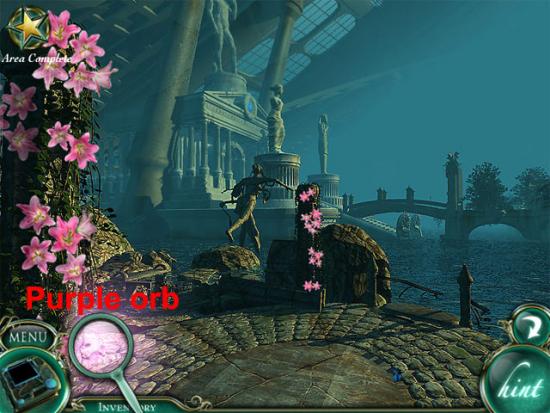
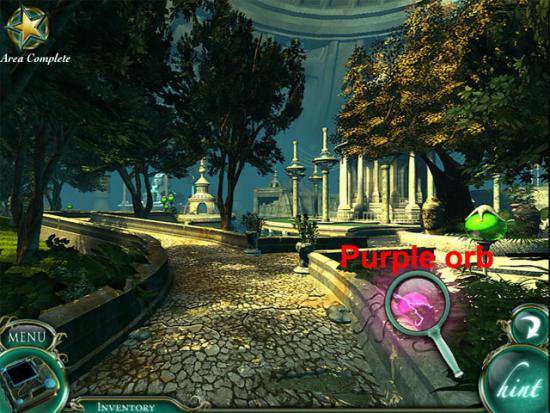
After finding all of the hidden objects, examine the notebook to see another symbol. Examine the symbol to add it to the notebook. Move forward to the stairs. Take the fragment of canvas:
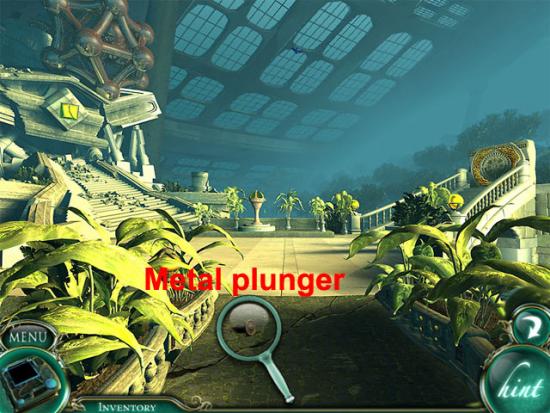
Move back four times to the crystal fountain and then move right. Select the purple orb:
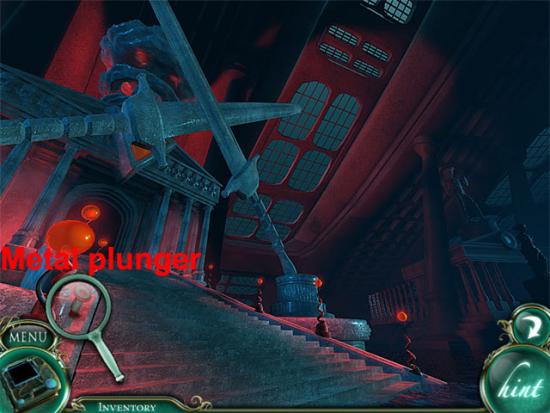
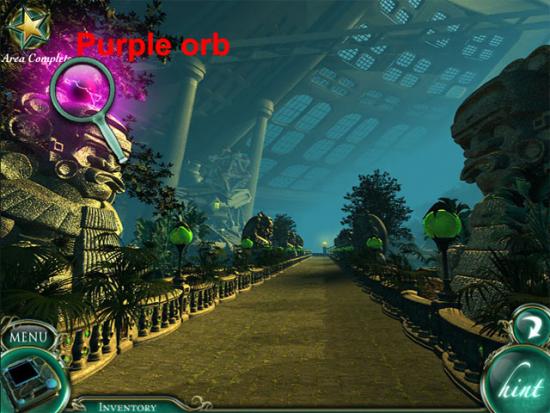
Move forward and take the metal plunger:
Move left to the vault of science ruins. The following hotspots are available:
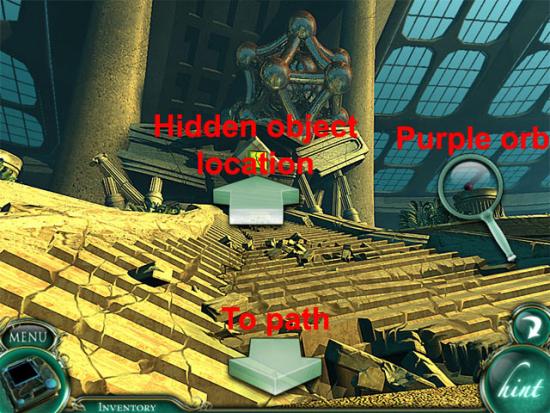
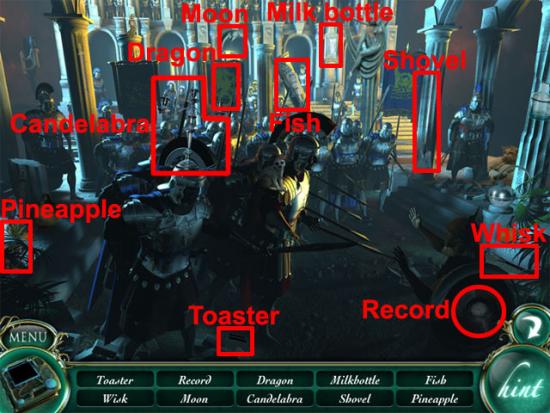
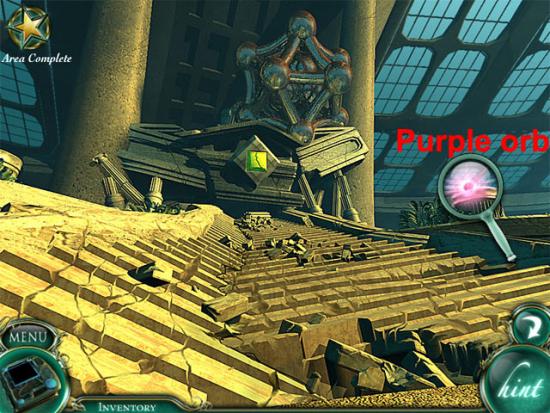
Select the purple orb. Examine the hidden object location. Find all of the hidden objects on the list:
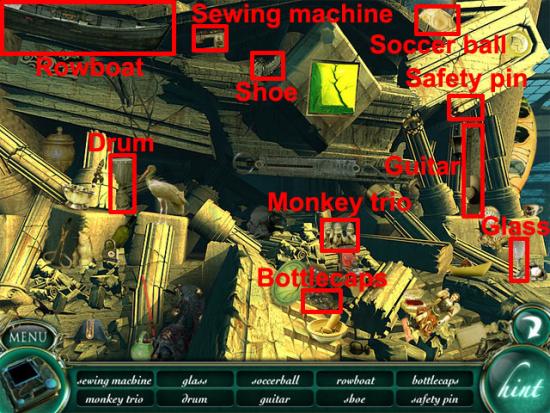
Examine the monkey trio statue to see another symbol. Examine the symbol to add it to the notebook. Move back and examine the glass dome:

The clues in the notebook show the three symbols that have been recorded. Examine the switches on the glass dome and press the switches to change the symbols to the ones shown below:
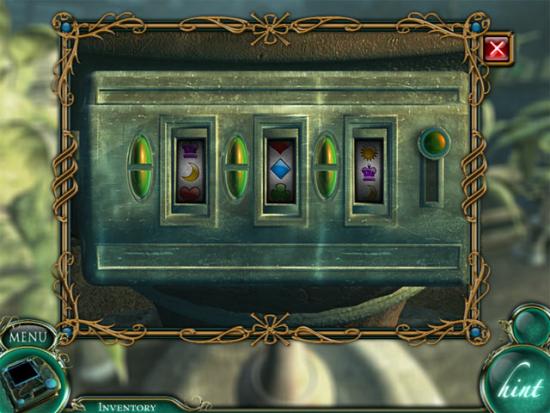
Press the yellow button to open the glass dome. Take the fragment of canvas:
Move right and take the fragment of canvas:
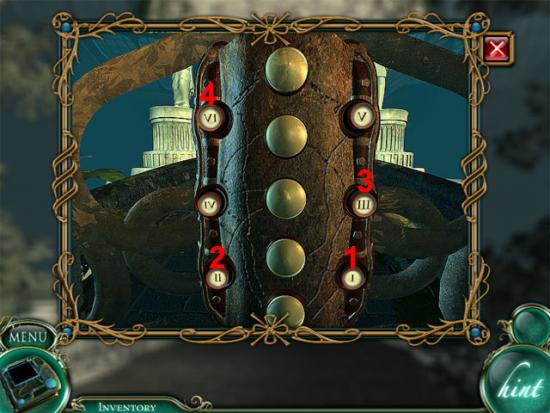
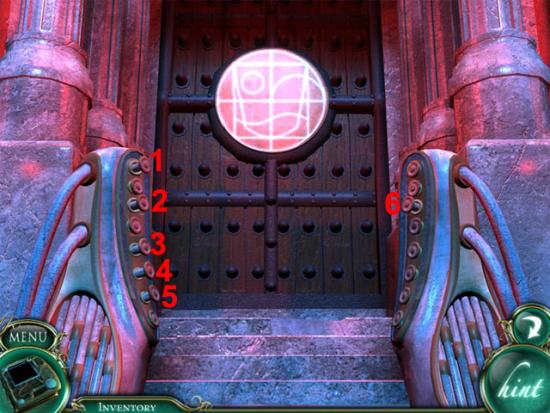
Move back three times to the crystal fountain. Move forward to the gate. Examine the buttons on the gate. Press the buttons in the following order:
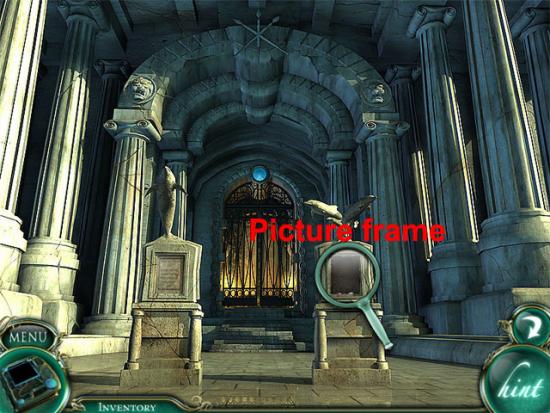
Move forward and take the fragment of canvas:
Examine the picture frame on the pedestal:
Move the six pieces to the correct places on the frame. When all six of the pieces have become fixed in place, use the six fragments of canvas from the inventory on the frame and move them to the correct places. The completed picture is shown below:
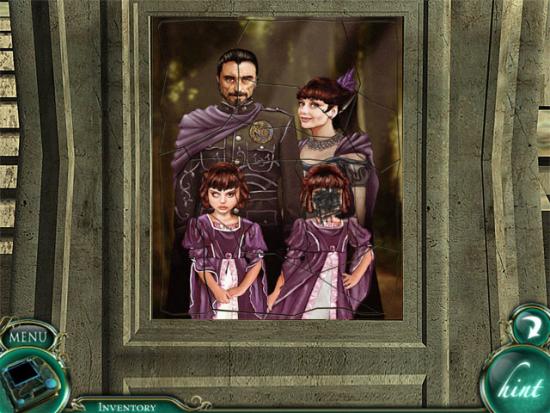
Move forward through the doorway to enter the vault of art.
Vault of Art
Move forward and select the purple orb:
Move forward twice to enter the hall. Go through the left doorway and find all of the hidden objects on the list:
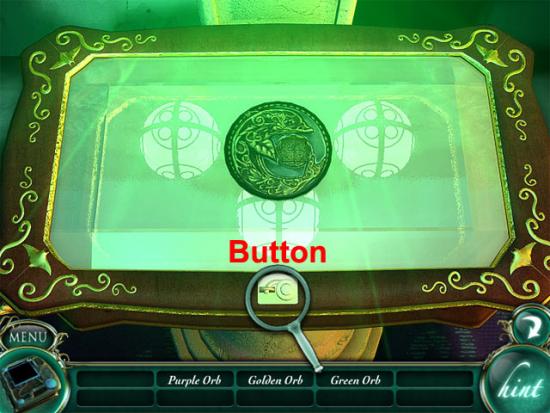
After finding all of the hidden objects, wait a few seconds for the golden lid to open and then pull the lever to turn the green light on. Move forward and press the button at the bottom of the display case:
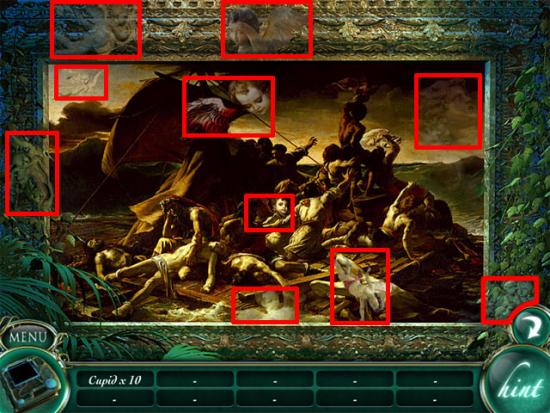
Select one of the green orbs. Back away from the display case. Go through the top-right doorway and find the ten cupids:
After finding all of the hidden objects, wait a few seconds for the golden lid to open and then pull the lever to turn the purple light on. Move forward and take one of the purple orbs from the display case. Back away from the display case. Go through the bottom-right door and examine the tablet:
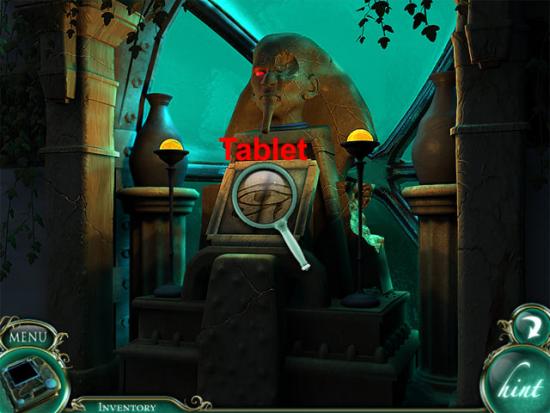
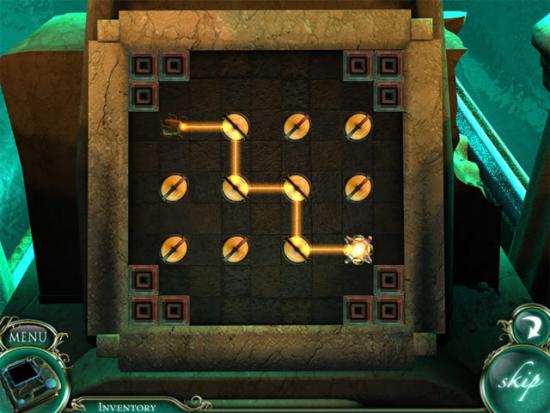
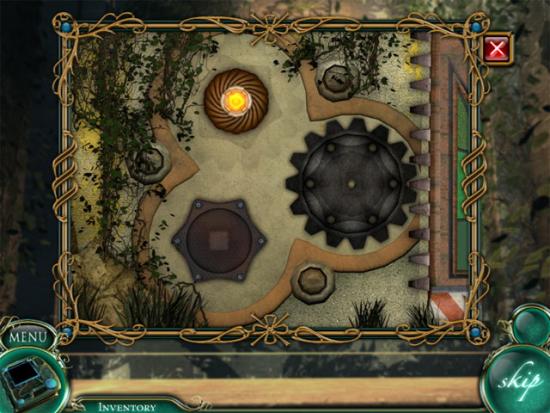
The aim in this mini-game is to rotate the mirrors, splitters and scarabs so that all of the dark orbs are lit. There are four levels of this mini-game to complete.
Level 1:
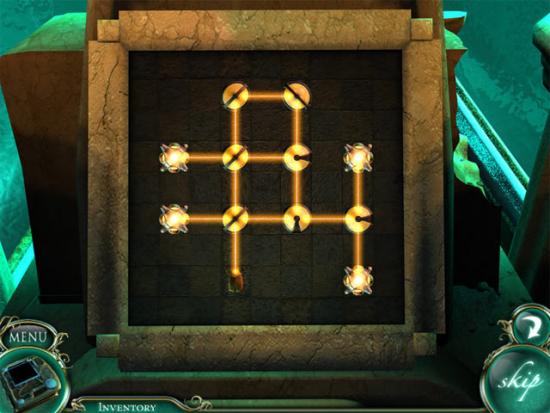
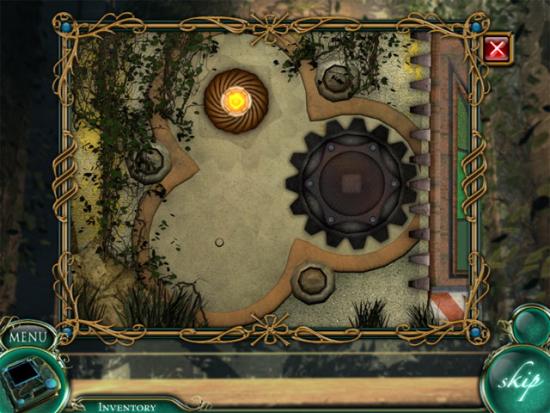
Level 2:
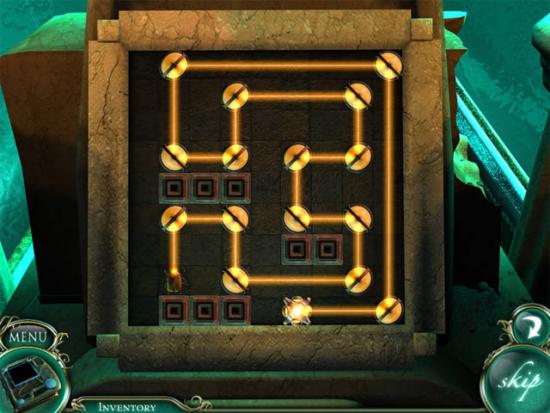
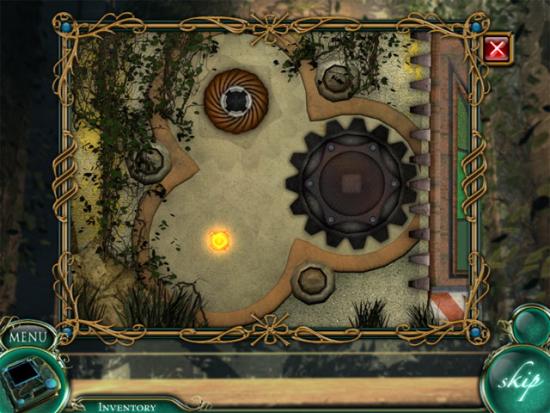
Level 3:
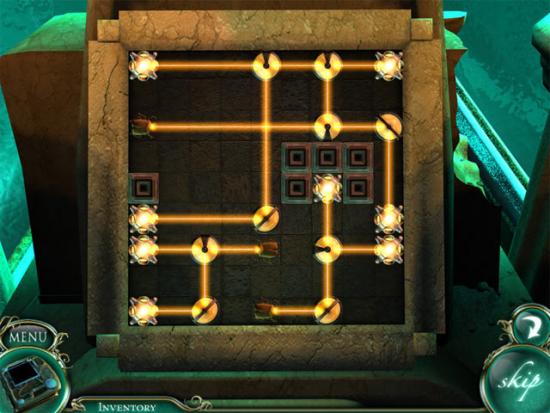
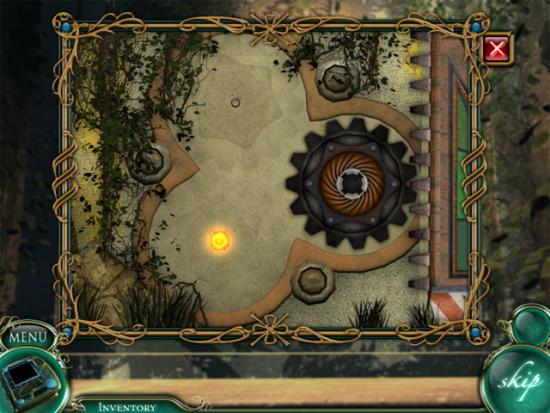
Level 4:
After finding all of the hidden objects, wait a few seconds for the golden lid to open and then pull the lever to turn the gold light on. Move forward and take the remaining golden orb from the display case. Move forward to the display case to take the first imperial relic, the royal sceptre. Move back seven times, right, forward, right and forward to the gate.
Chapter 2: Royal Family Crest
Garden Dome
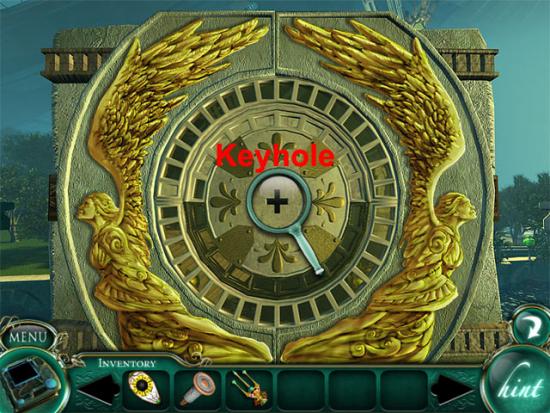
Use the royal sceptre on the keyhole to open the gate:
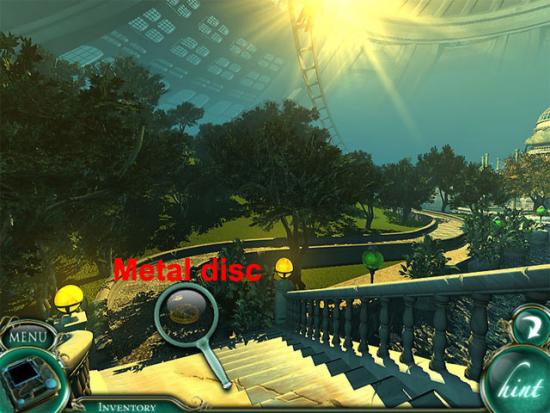
Move forward twice and take the metal disc:
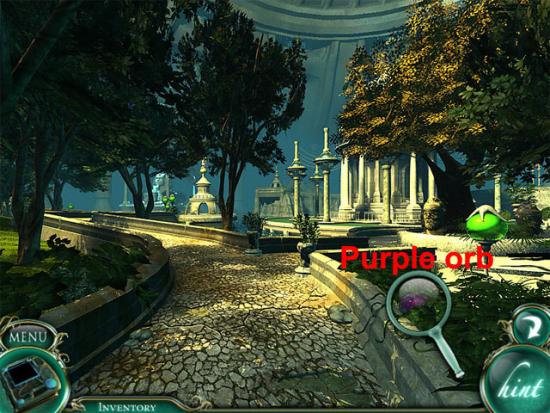
Move forward and select the purple orb:
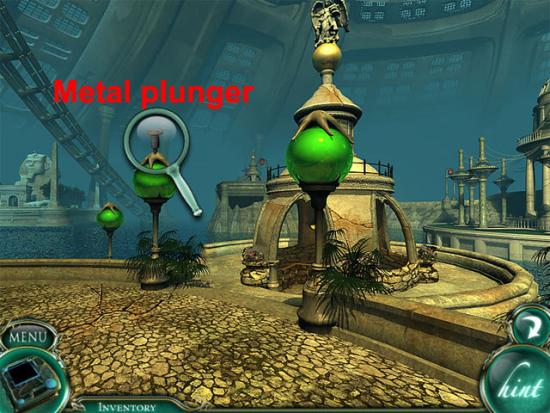
Move forward on the top-left exit and take the metal plunger:
Move left and examine the statues to enter the hidden object location:
Find all of the hidden objects on the list:
After finding all of the hidden objects, examine the apple three times to add the word “truth” to the notebook. Move left to the bottom of the lookoff and select the purple orb. Take the door handle:
Move forward and take the metal disc:

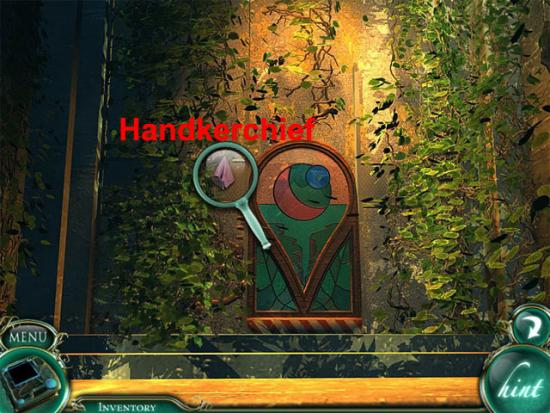
Move forward and take the handkerchief:
Move back four times and move forward on the top-right exit into the tower. Take the glass disc on the wall. Examine the painting of the young queen:

Examine the painting of the empress. Examine the sketch at the top-right corner of the painting and it will be added to the notebook:
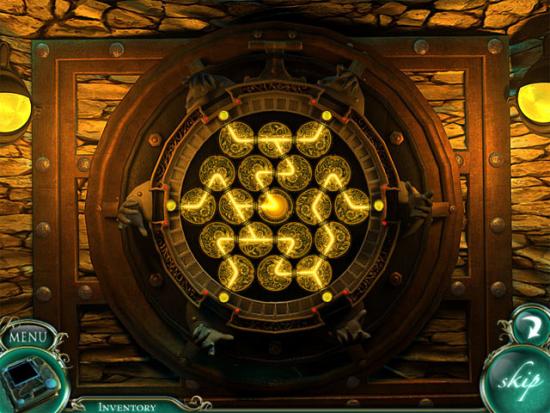
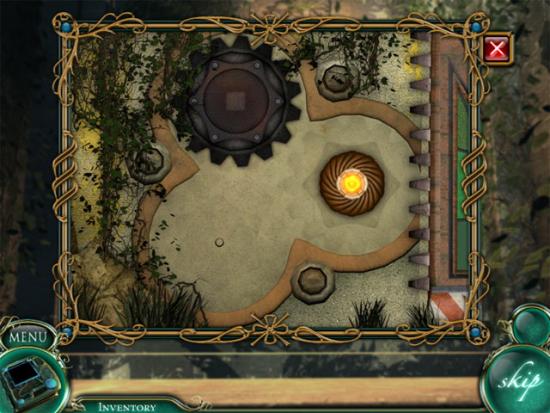
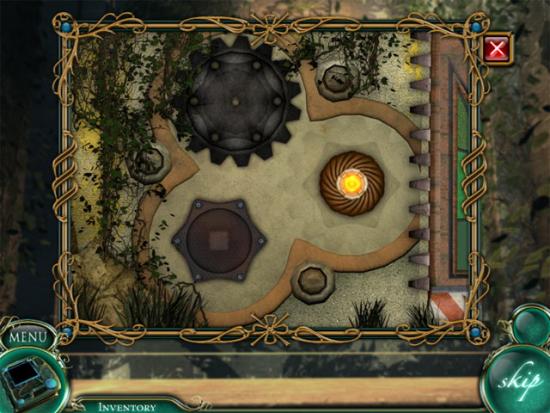
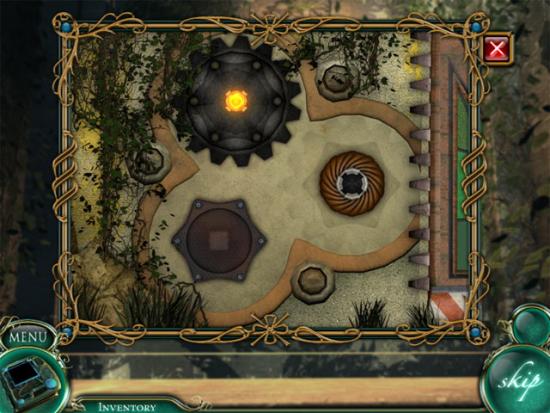
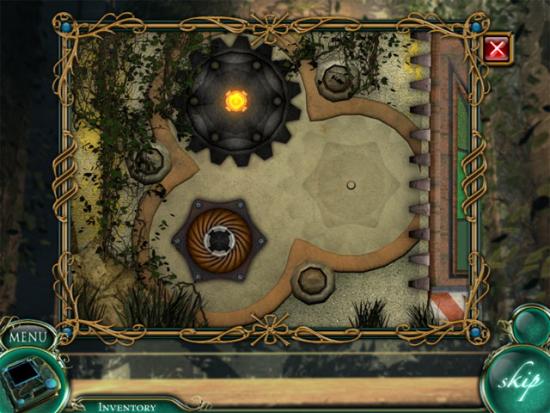
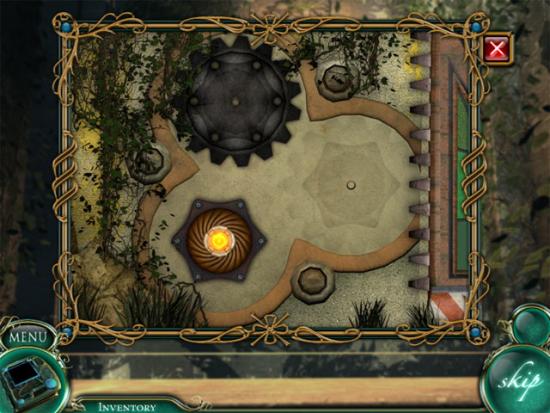
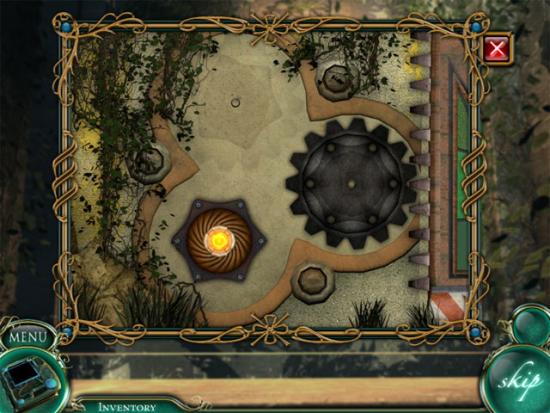
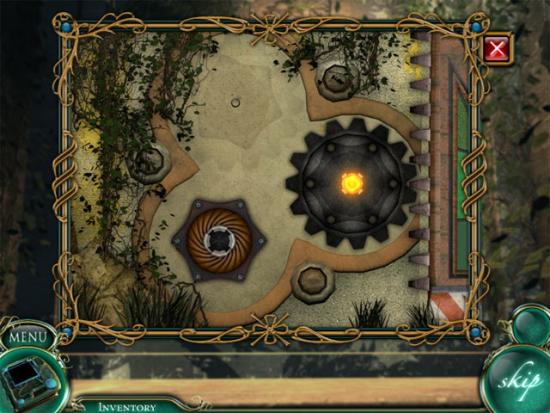
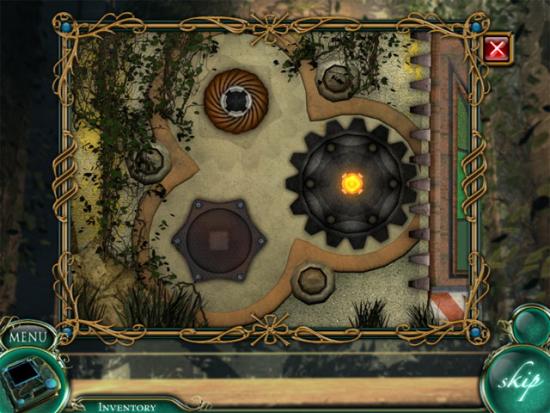
Move forward to see a disc puzzle. Use the three metal discs from the inventory on the puzzle. The aim now is to rotate the discs to supply power to the six hands. The completed puzzle is shown below:
After completing the puzzle, the hatch will open. Move forward into the tunnel. Examine the window at the left side of the tunnel:
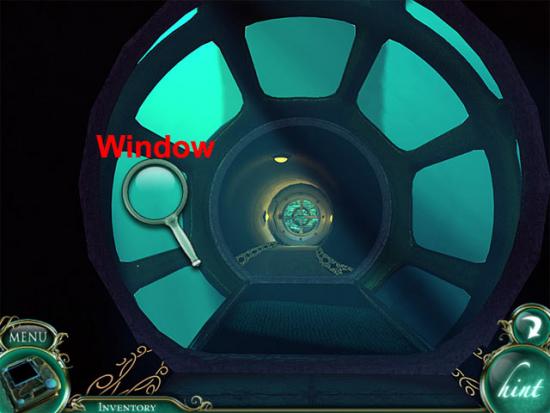
Use the handkerchief on the window to reveal a large statue. Back away from the window and move forward in the tunnel to see a door. Take the jeweled eye. Use the door handle on the door handle slot:
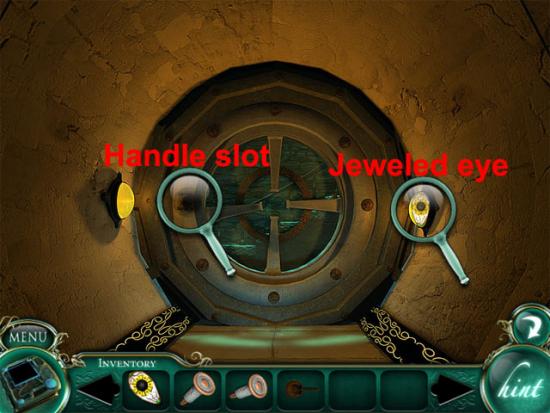
Select the door handle to open the door. Move forward and select the purple orb:
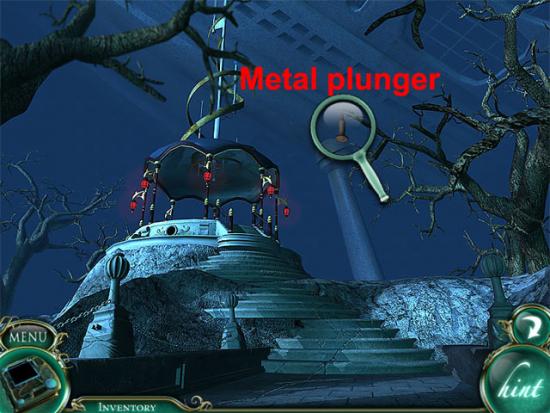
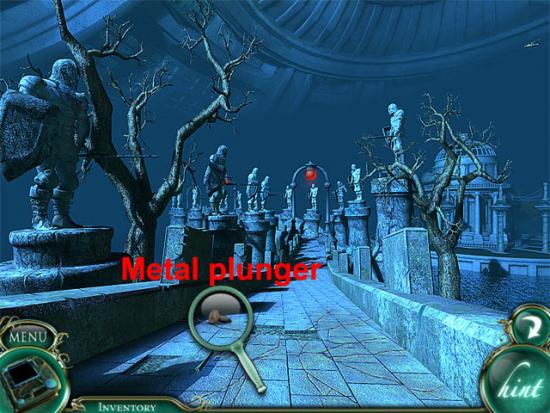
Move forward on the top-left exit. Take the metal plunger:
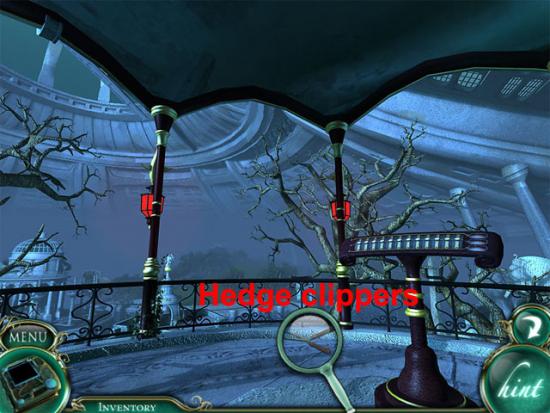
Move forward into the gazebo. Take the hedge clippers:
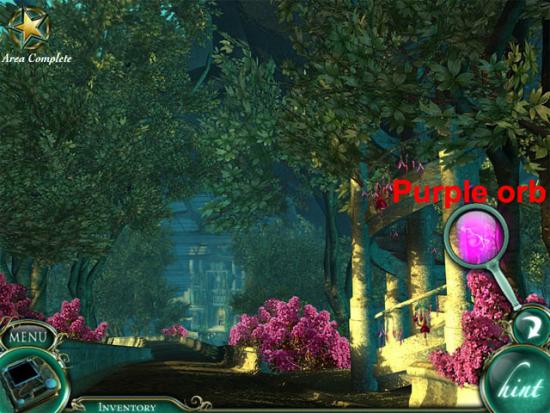
Move back twice and then move forward on the top-right exit. Examine the trees to enter the hidden object location:
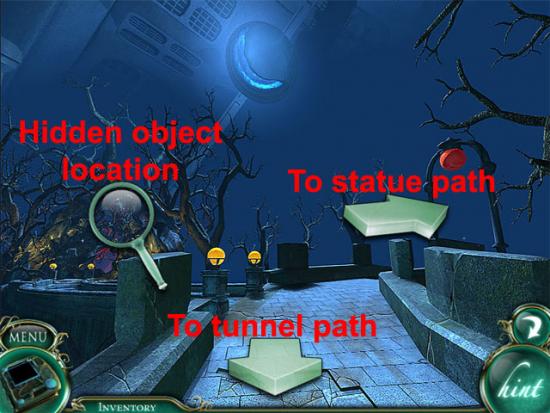
Find all of the hidden objects on the list:
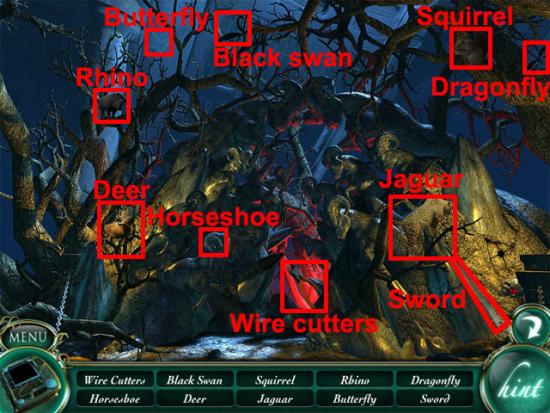
After finding all of the hidden objects, examine the sword twice to add the word “error” to the notebook. Move right to the statue path and take the metal plunger:
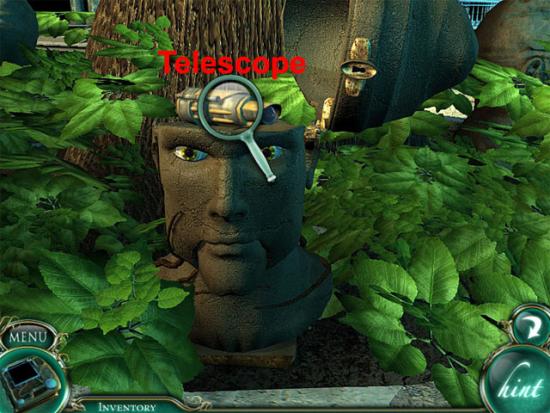
Move back nine times and then move forward on the top-right exit to see a statue. Use the jeweled eyes on the holes and the mouth will open. Take the small key from the mouth and use it on the lock on the head of the statue. Take the telescope:
Back away from the statue. Move forward on the top-left exit, left twice and forward on the top-right exit to climb up to the lookout. Use the telescope on the frame:
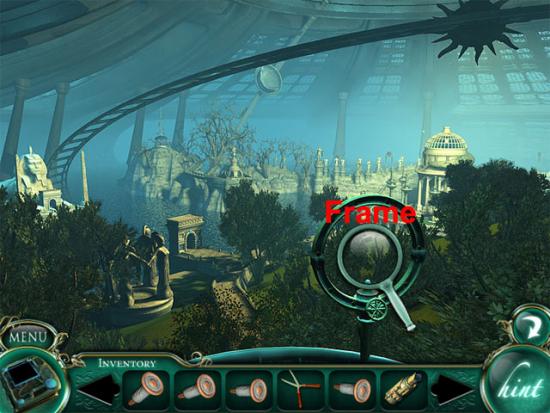
Examine the telescope and find all of the hidden objects on the list:
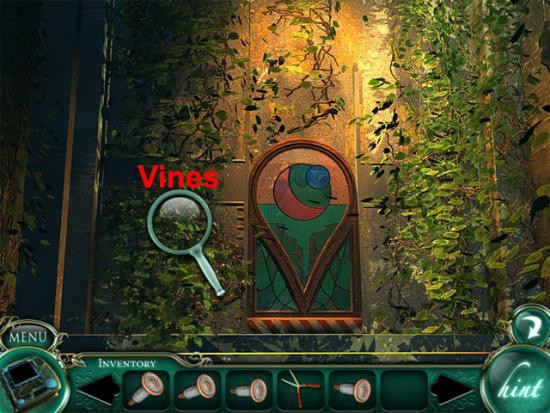
After finding all of the hidden objects, examine the word to add the word “precedes” to the notebook. Move back and the eighth flower will be added to the notebook. Move forward on the top-left exit. Move forward to the stained glass window. Use the hedge clippers on the vines:
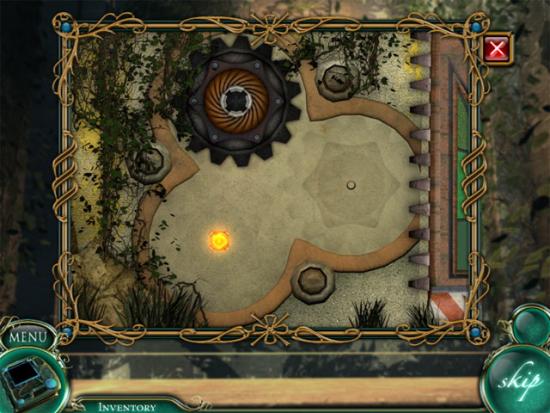
Examine the puzzle at the left side of the window to see a disc mini-game. The aim is to move all of the discs to the right peg, with the rule that only smaller discs can be placed on top of larger discs. To make following the instructions below easier, the discs will be named 1 to 4 in order of smallest to largest. Start by moving 1 to the left peg:
Move 2 to the right peg:
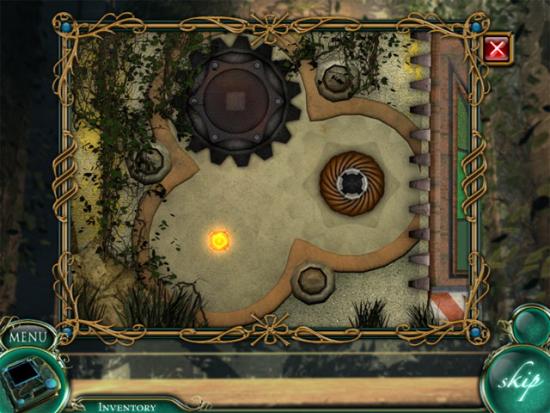
Move 1 to the right peg:
Move 3 to the left peg:
Move 1 to the top peg:
Move 2 to the left peg:
Move 1 to the left peg:
Move 4 to the right peg:
Move 1 to the right peg:
Move 2 to the top peg:
Move 1 to the top peg:
Move 3 to the right peg:
Move 1 to the left peg:
Move 2 to the right peg:
Move 1 to to the right peg to complete the puzzle:
Move forward through the doorway. Examine the lever:
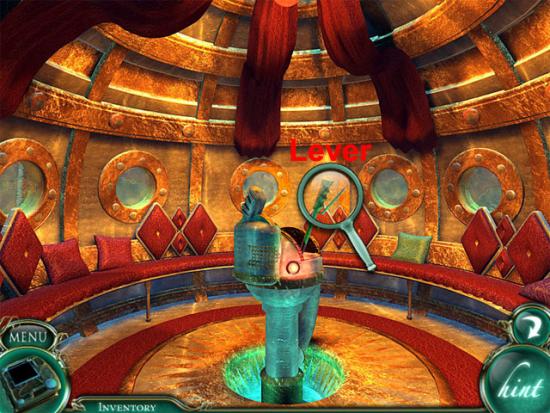
Providing that the words “error”, “precedes” and “truth” have been found, you will now travel to the vault of science.
Vault of Science
The following hotspots are available:
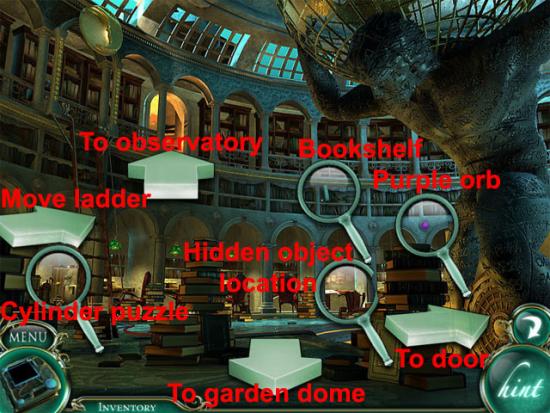
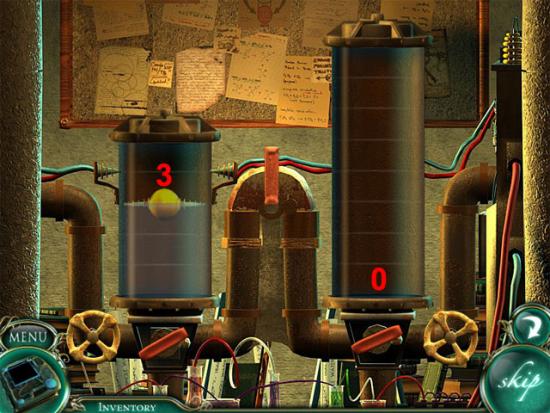
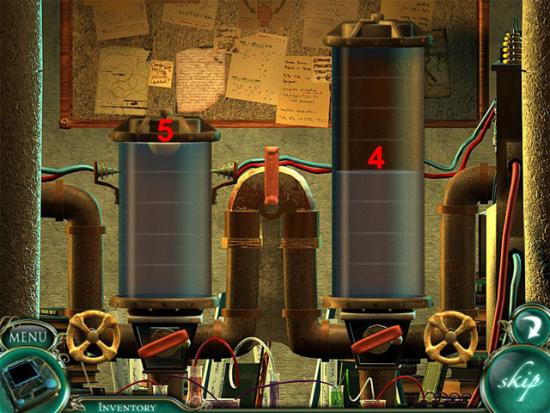
Select the purple orb. Examine the cylinder puzzle below the ladder:
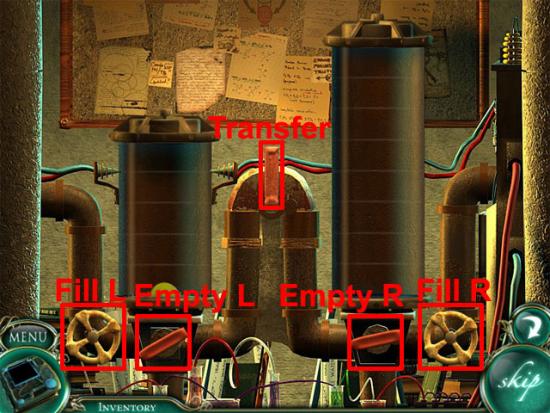
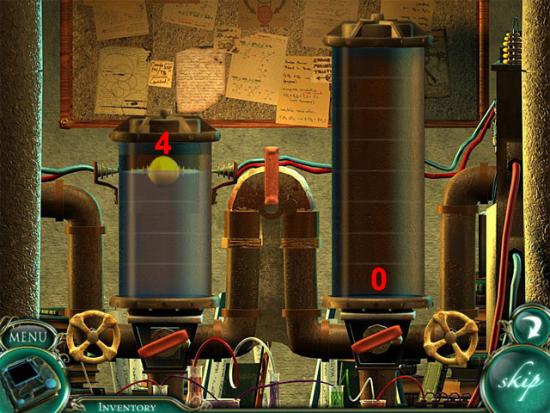
The aim is to fill the left cylinders to 4 to make a connection between the wires. Select the right wheel and then drag the switch to the left:

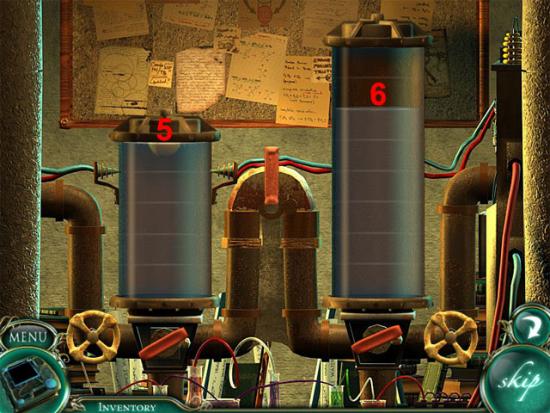
Select the left handle and then drag the switch to the left:
Select the right wheel and then drag the switch to the left:
Select the left handle and then drag the switch to the left:
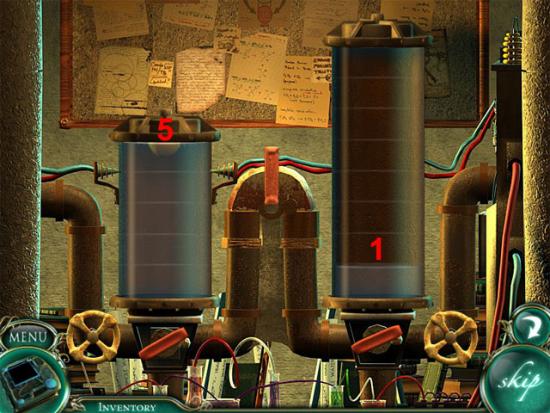
Select the left handle and then drag the switch to the left:
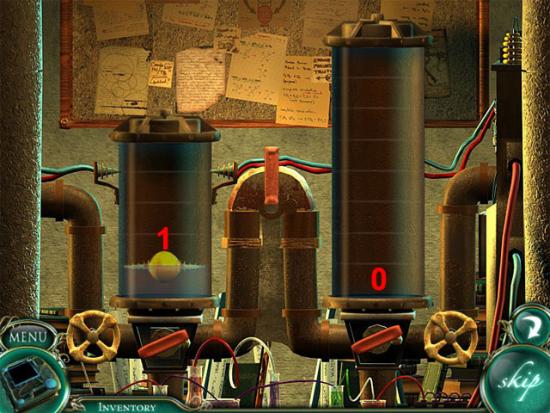
Select the right wheel and then drag the switch to the left:
Select the left handle and then drag the switch to the left to complete the puzzle:
Move to the hidden object location and find all of the hidden objects on the list:
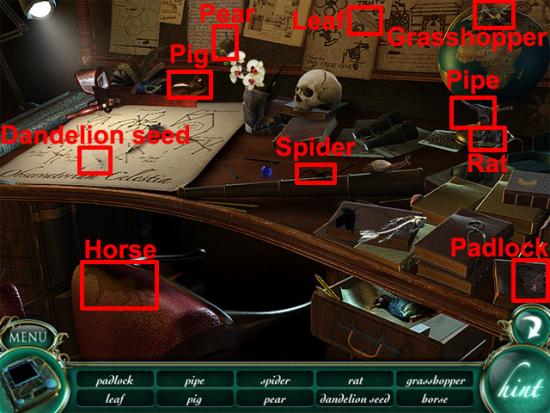
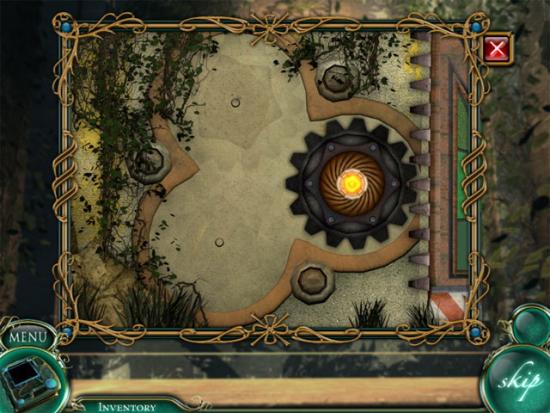
After finding all of the hidden objects, examine the pipe twice to record the number 775 in the notebook. Move the ladder twice to the right position and then examine the bookshelf. Examine the blue book:
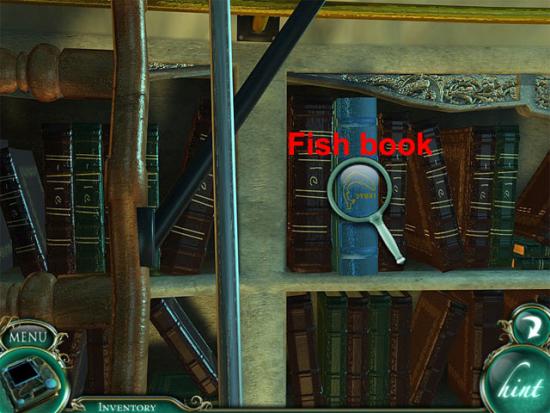
Examine the diagrams of the fish to record them in the notebook. Back away from the bookshelf. Move the ladder twice to the middle position. Enter the observatory. The following hotspots are available:
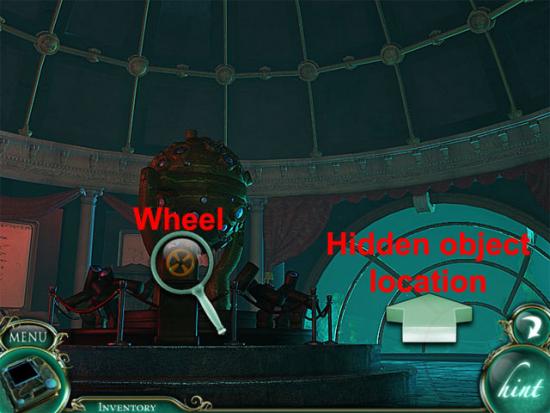
Select the wheel on the telescope to view constellations. Drag the constellations to the correct positions in the sky:
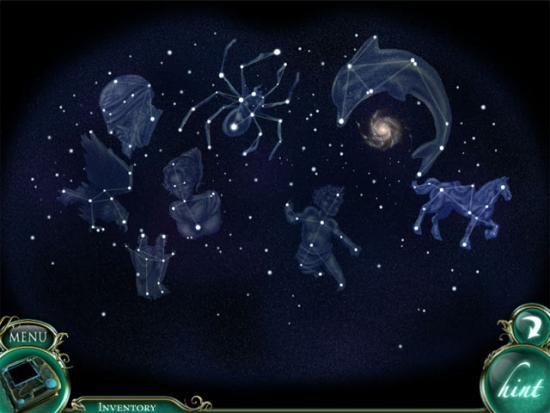
After completing the puzzle, examine the constellations to record the number 34 in the notebook. Move to the hidden object location and find all of the hidden objects on the list:
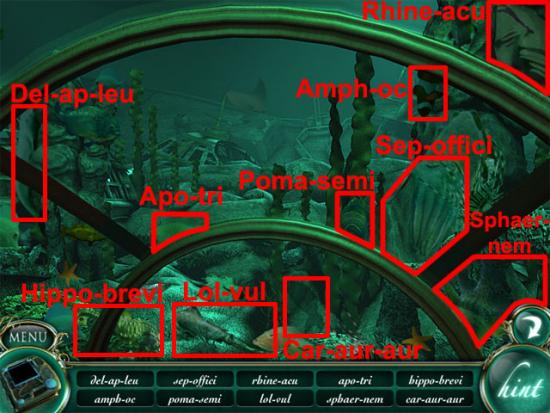
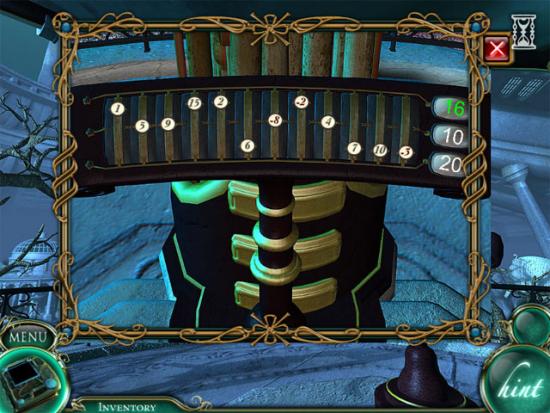
After finding all of the hidden objects, examine the fish to record the number 787 in the notebook. Move back and right to the door. Examine the door to see the lights mini-game. The aim is to move the blue lights to the right side of the lock and the red lights to the left side of the lock. Start by moving the blue lights to the following positions:
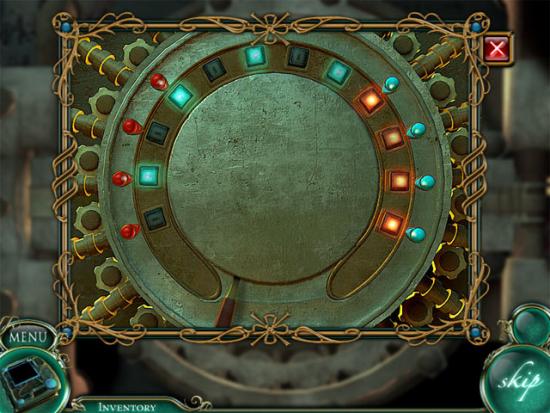
Press the top-right red light four times. Move all of the blue lights one slot to the right:
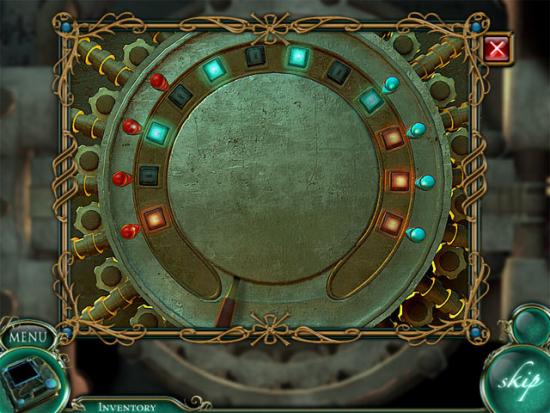
Press the top-right red light four times. Move all of the blue lights one slot to the right:
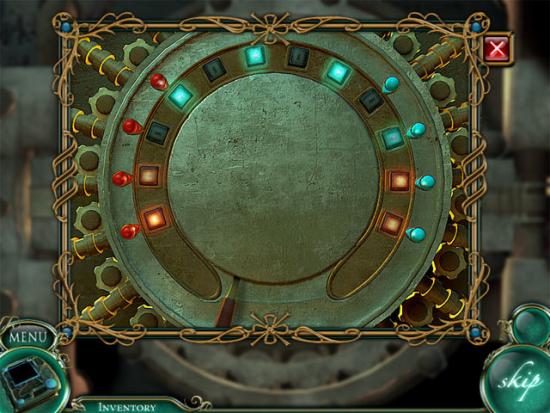
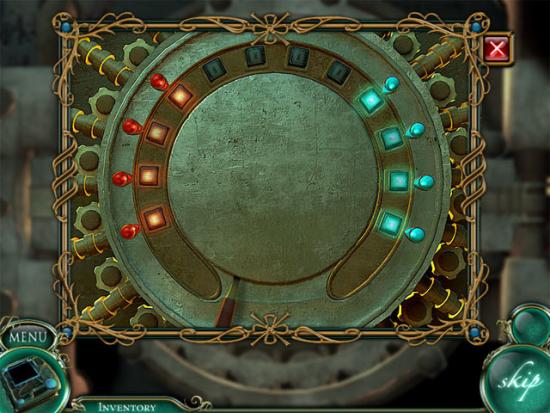
Press the top-right red light four times. Move all of the blue lights one slot to the right:

Press the remaining right red light four times. Move all of the blue lights to the right side of the lock to complete the puzzle:
Move forward to enter the archive room. Move forward twice to see the computer. The required coordinates have been recorded in the logbook. Enter the following coordinates:
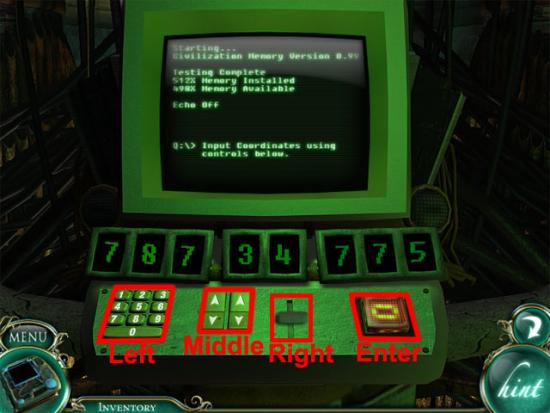
Press the enter button to take the second imperial relic, the family crest. Move back four times to receive the ninth flower. Move back to exit the vault of science.
Chapter 3: The Imperial Signet Ring
Garden Dome
Move back four times, forward seven times, right and forward to the stairs. Take the metal plunger:
Move left to the vault of war entrance. Use the five metal plungers in the holes at the left side of the door. The aim is to move the plungers to make the same shape as the family crest diagram in the notebook. Select the following plungers:
Vault of War
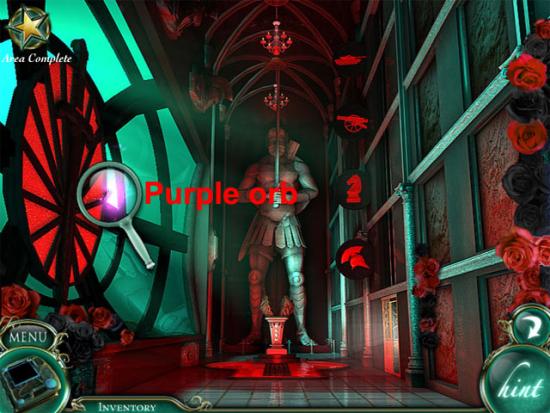
Select the purple orb:
Move right to the elevator. Press the second button from the bottom and then move forward to enter the classical period. Find all of the hidden objects on the list:
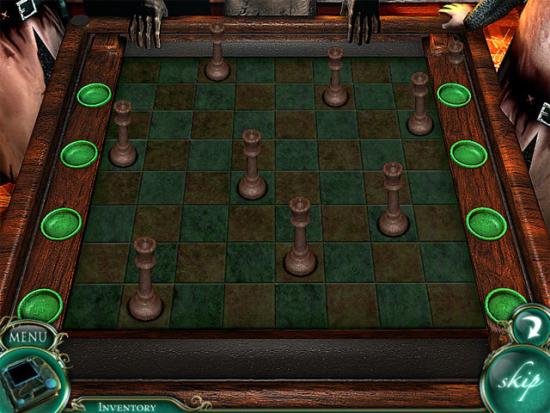
After finding all of the hidden objects, examine the classical war token to add it to the inventory. Press the middle button at the right side of the elevator and then move forward to enter the medieval period. Examine the chessboard. Place the queens on the board so that none of them are attacking each other. There are many ways to solve this puzzle. One way is shown below:
After completing the puzzle, examine the medieval war token to add it to the inventory. Press the second button from the top at the right side of the elevator and then move forward to enter the renaissance period. Find the ten differences between the room and the picture on the panel:
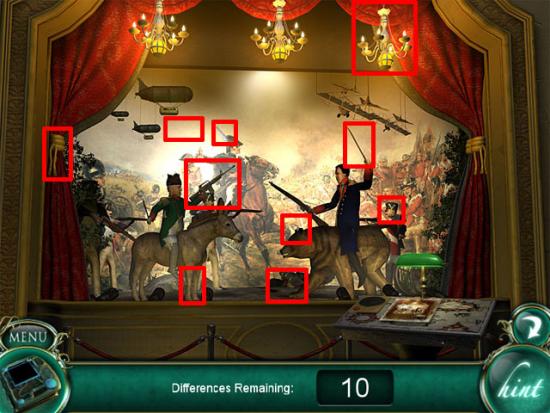
After finding all of the differences, examine the renaissance war token to add it to the inventory. Press the top button at the right side of the elevator and then move forward to enter the modern period. Examine the table. The aim in this mini-game is to move the grey ships so that the blue ship can be moved to the right side of the board:
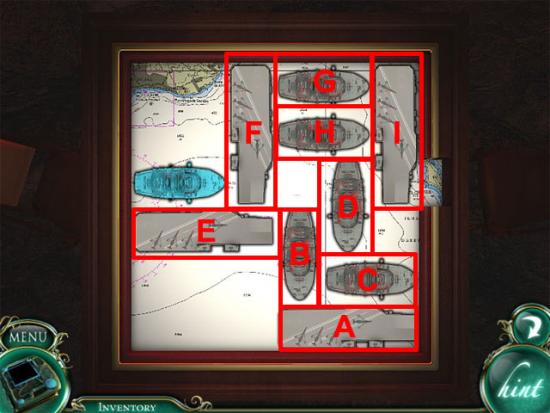
A: Left 3
B: Up 1
C: Left 4
B: Down 2
D: Down 2
E: Right 3
F: Down 2
G: Left 3
H: Left 3
F: Up 2
E: Left 3
B: Up 4
D: Up 4
E: Right 3
A: Right 3
F: Down 3
Blue ship: Right 3
F: Up 3
E: Left 1
A: Left 1
I: Down 3
Blue ship: Right 2 to complete the puzzle. After completing the puzzle, examine the modern war token to add it to the inventory. Move back from the elevator and then move forward. Examine the floor. Press the tiles in the following order:
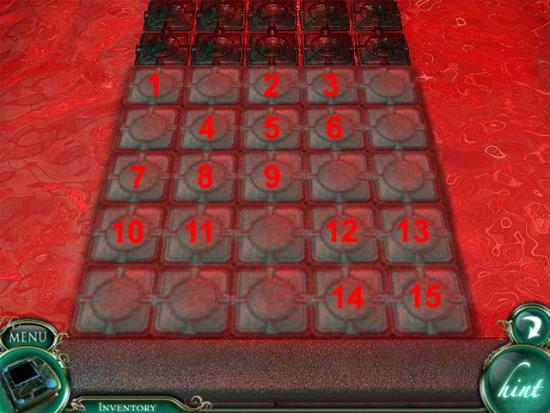
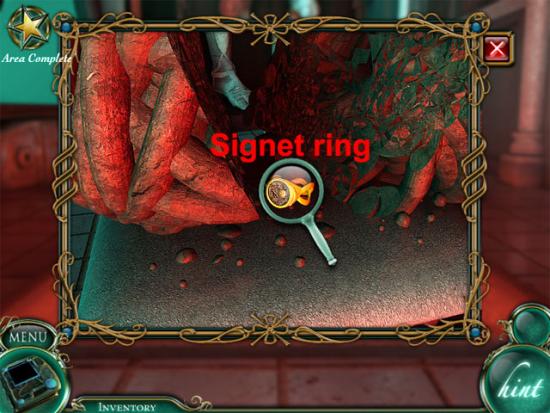
Move forward to the pedestal. Put the war four tokens on the pedestal. Move forward and examine the pedestal. Take the signet ring:
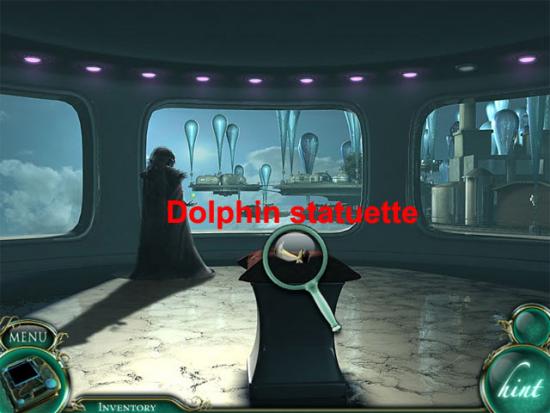
Move back five times and then move forward on the top-left exit. Move forward again to enter the gazebo. Examine the machine and move the levers to the following positions:
After solving the puzzle, take the dolphin statuette:
Garden Dome
Move back eight times and left. Examine the mini-game:
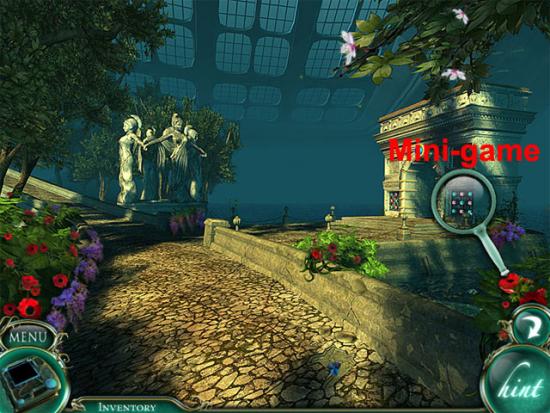
Use the dolphin statuette on the top-right tile. The aim is to press the tiles so that the blue shapes are on the blue tiles and the pink shapes are on the pink tiles. After solving the mini-game, move forward twice to the sphinx island. Select the purple orb:
Move back twelve times to return to the mausoleum. Jacob says that the ten orbs must now be deactivated.
Chapter 4: Deactivating the Orbs
Find the Purple Orbs
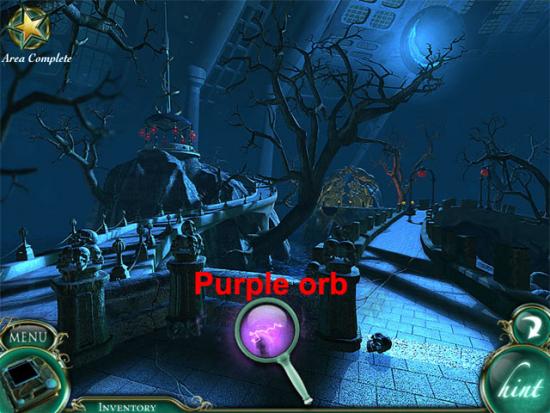
Move forward three times, left and forward twice. Select the purple orb:
Move back three times and right. Select the purple orb:
Move forward and left. Select the purple orb:
Move back three times and forward five times. Select the purple orb:
Move back five times, right, forward, right and forward three times. Select the purple orb:
Move forward on the top-left exit and then move left twice. Select the purple orb:
Move back twice and forward six times. Select the purple orb:
Move back six times, left twice and forward three times into the tram. Examine the lever to travel to the vault of science. Select the purple orb:
Move back to exit the vault of science. Move back four times, forward seven times, right, forward, left and forward to the vault of war. Select the purple orb:
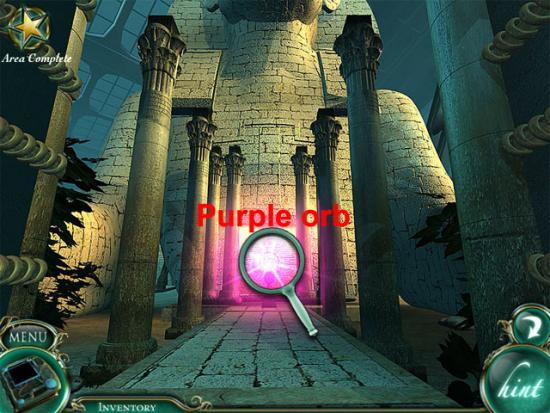
Move back eleven times, left and forward twice to the sphinx island. Select the purple orb:
Move back nine times, left and forward five times to enter the pod. Press the red button to complete the game.

More articles...
-
Grow A Garden 2 Base Price List
What's the most valuable crop? -
Evomon Best Starter [Leafbun, Blazpup, or Bubble?]
Grass-type, Fire-type, or Water-type? -
Evomon Tier List [META and BEST Evomon]
The Evomon dream team.