
Grow A Garden 2 Base Price List
What's the most valuable crop?![Evomon Best Starter [Leafbun, Blazpup, or Bubble?]](/wp-content/uploads/2026/06/evomon-best-starter.jpg "Evomon Best Starter [Leafbun, Blazpup, or Bubble?]")
Evomon Best Starter [Leafbun, Blazpup, or Bubble?]
Grass-type, Fire-type, or Water-type?![Evomon Tier List [META and BEST Evomon]](/wp-content/uploads/2026/06/evomon-tier-list.jpg "Evomon Tier List [META and BEST Evomon]")
Evomon Tier List [META and BEST Evomon]
The Evomon dream team.
![[Roblox] Evomon Shiny Hunting Guide – Including Prismatic and Pris Shinies!](/wp-content/uploads/2026/06/evomon-shiny-hunting-guide.jpg "[Roblox] Evomon Shiny Hunting Guide – Including Prismatic and Pris Shinies!")
Empress of the Deep 2: Song of the Blue Whale Walkthrough
Welcome to the Empress of the Deep 2: Song of the Blue Whale walkthrough on Gamezebo. Empress of the Deep 2: Song of the Blue Whale is a Hidden Object game played on the PC and Mac and published by Gogii Games. This walkthrough includes tips and tricks, helpful hints, and a strategy guide on how to complete Empress of the Deep 2: Song of the Blue Whale.


- Prefer Gamezebo on Google

Empress of the Deep 2 – Game Introduction
Welcome to the Empress of the Deep 2: Song of the Blue Whale walkthrough on Gamezebo. Empress of the Deep 2: Song of the Blue Whale is a Hidden Object game played on the PC and Mac and published by Gogii Games. This walkthrough includes tips and tricks, helpful hints, and a strategy guide on how to complete Empress of the Deep 2: Song of the Blue Whale.
General Tips
• Hidden Objects Scenes vary every time you play.
• Hint Meter takes approximately 30 seconds to refill.
• You have unlimited Hints available.
• The Skip Button takes approximately 1 minute to fill.
Guide Tips
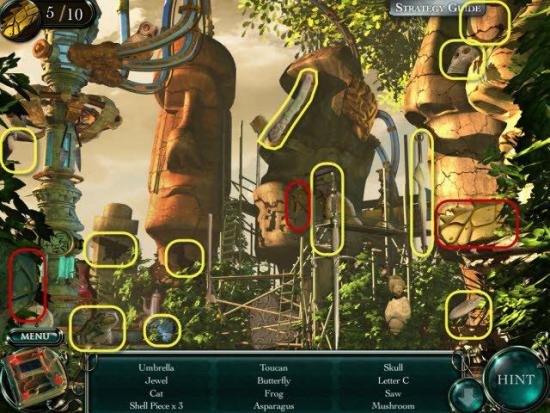
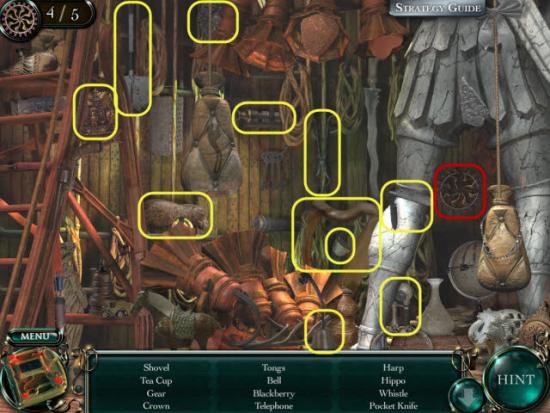
• Hidden Objects are highlighted in Yellow.
• Items are highlighted in Red.
• Special Items are highlighted in Orange.
• Interactive Areas are highlighted in Green.
• Locations are highlighted in Blue or Purple.
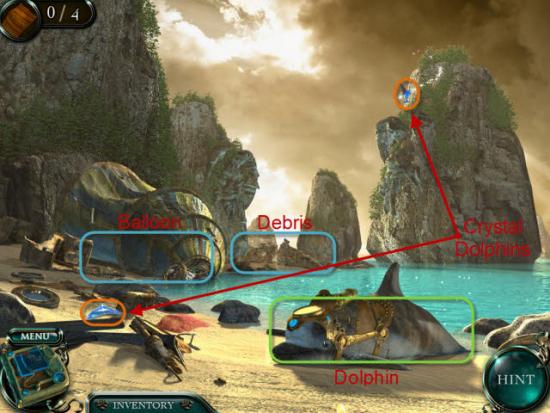
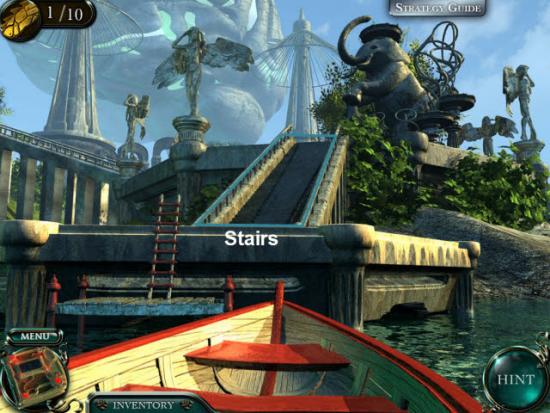
Beach

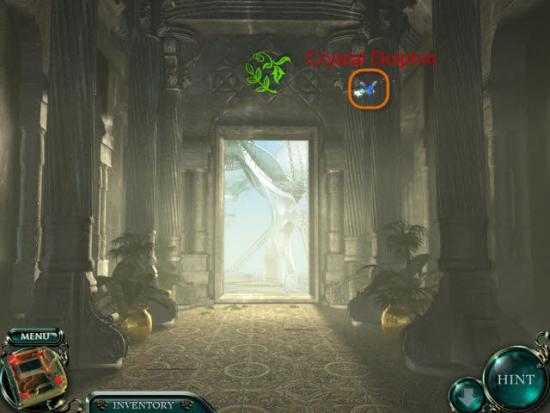
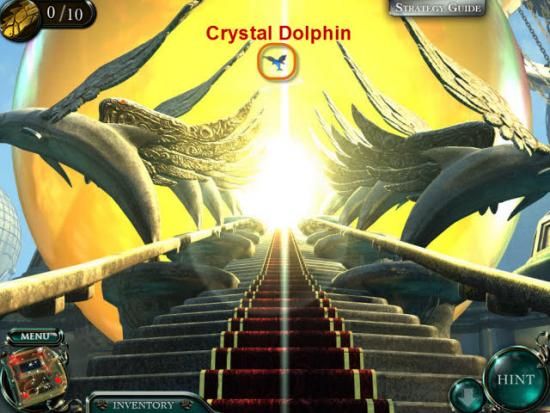
Gather the two Crystal Dolphins, Special Items, highlighted in Orange.
Gather the Balloon Patch highlighted in Red.
Talk to the Dolphin highlighted in Green.
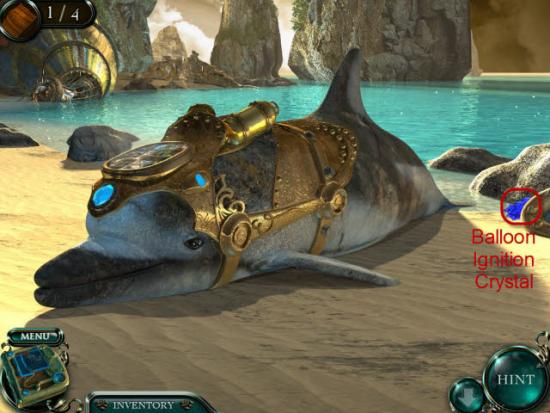
Gather the Balloon Ignition Crystal highlighted in Red.
Move back one screen.
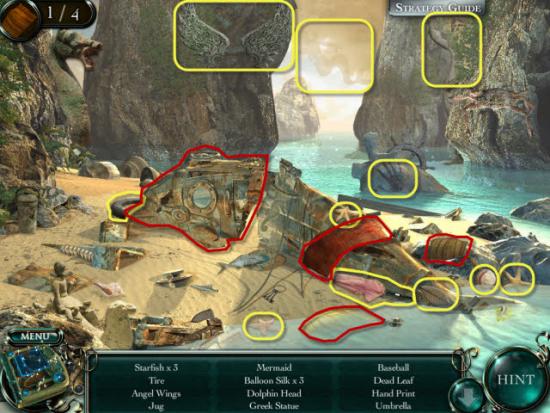
Move to the Debris on the Beach, highlighted in Blue.
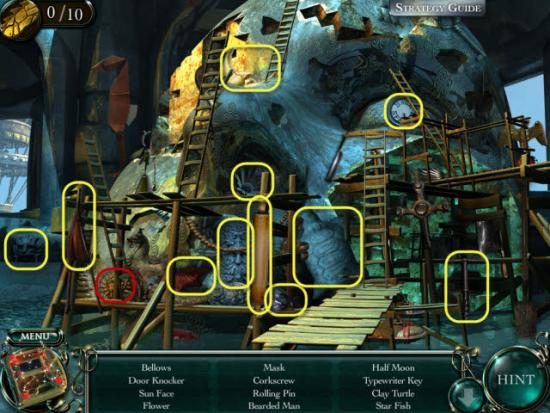
Gather the three Patches and Metal Dolphins Head highlighted in Red.
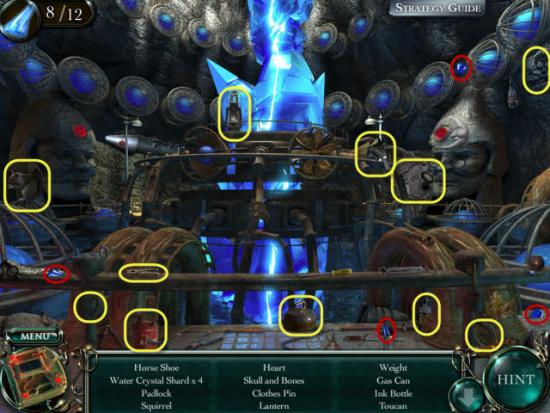
Gather the Hidden Objects highlighted in Yellow.
Move back one screen.
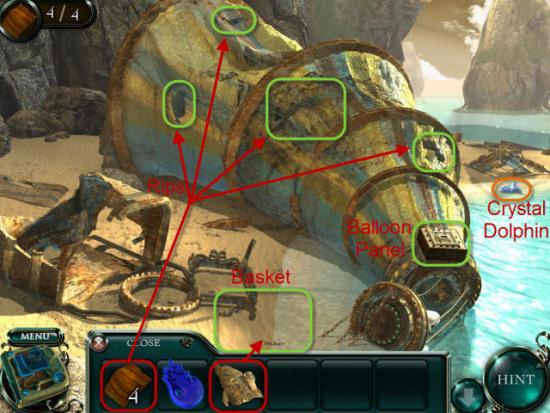
This time move to the Balloon.
Gather the Crystal Dolphin highlighted in Orange.
Place the Patches, highlighted in Red, over the Rips in the Balloon, highlighted in Green.
Place the Metal Dolphin Head, highlighted in Red, to the Basket Area, highlighted in Green.
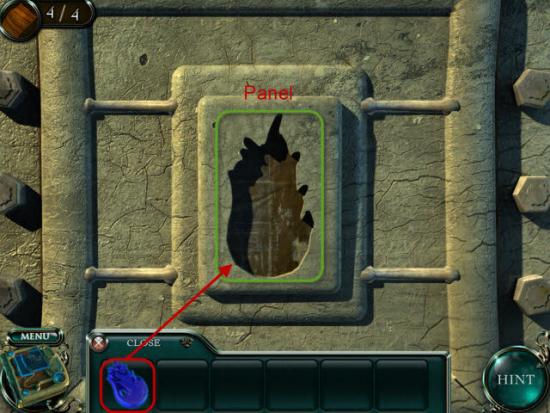
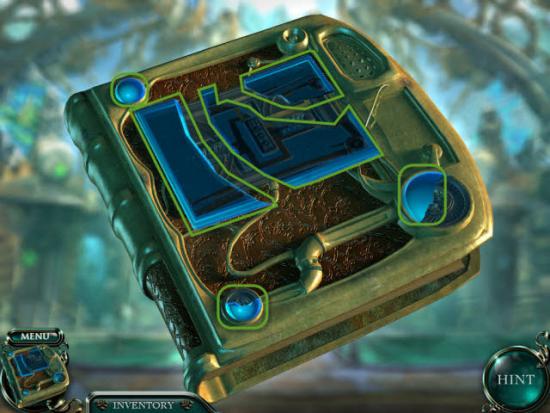
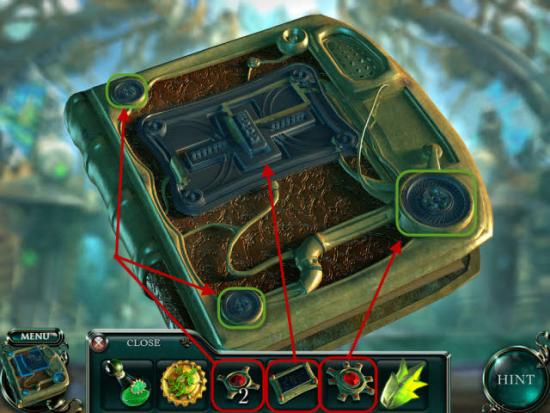
Examine the Balloon Panel highlighted in Green.
Use the Crystal, highlighted in Red, on the Panel, highlighted in Green.
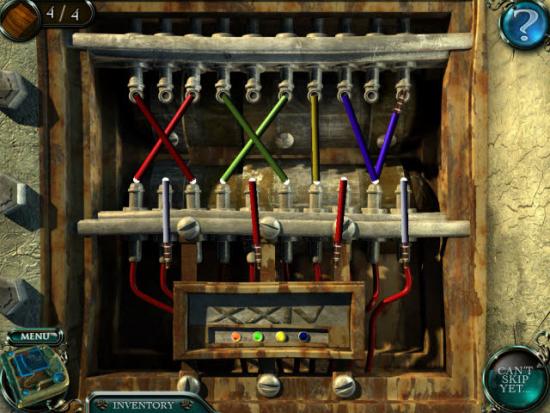
To solve this Mini-Game you need to attach the Wires in the correct order using the Clue Panel for directions.
Solution:
• First Red Cable to the third Hole.
• Third Red Cable to the first Hole.
• Yellow Cable to Hole seven.
• Two Blue Cables to Hole eight and ten.

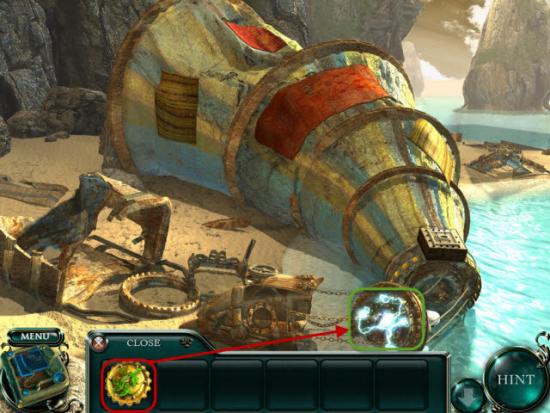
Return to the Beached Dolphin.
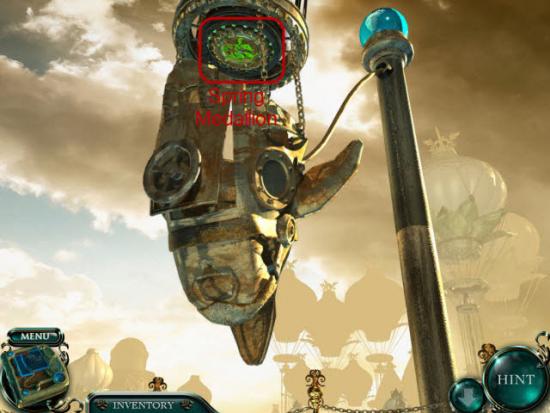
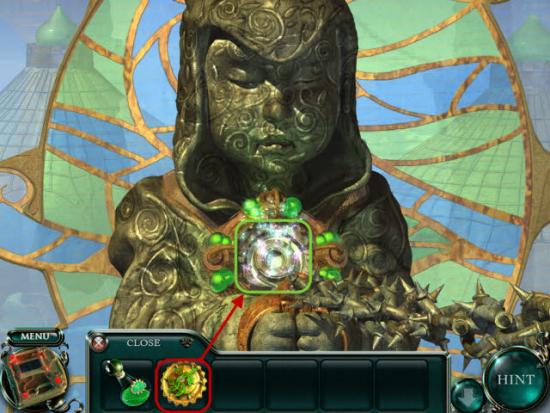
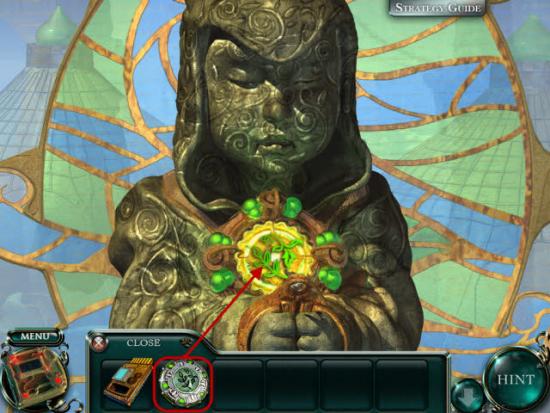
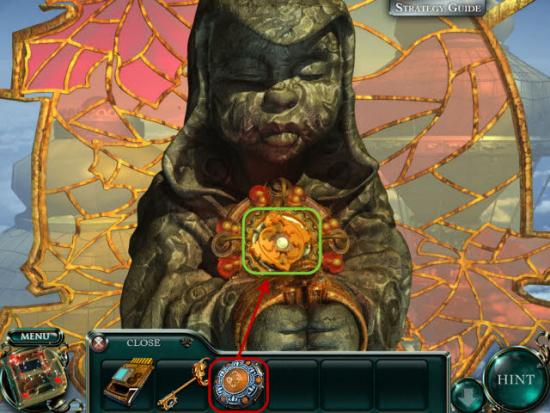
Examine the Collar on the Dolphin.
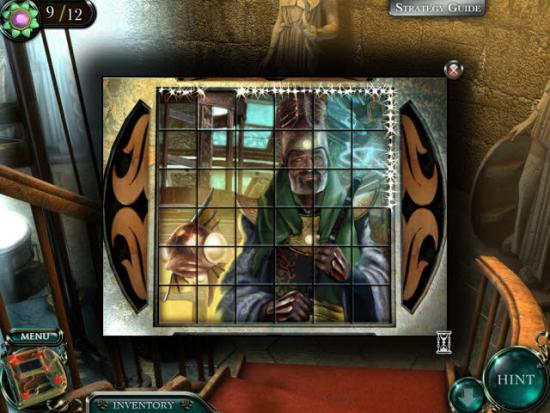
You need to assemble the correct image.
Click each tile to flip the Image.
Each Tile features two or three Images.
There is only one correct solution.
Flip all Tiles till the Image is completed, see the Image for Solution.
Click on the Dolphin to heal him and remove the Collar.
Receive the Spring Medallion.
Return to the Balloon.
Place the Spring Medallion, highlighted in Red, into the Balloon, highlighted in Green.
Temple
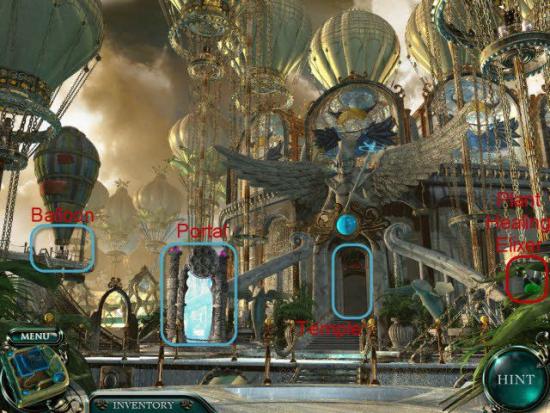
Gather the Plant Healing Elixir highlighted in Green.
Head back to the Balloon highlighted in Blue.
Gather the Spring Medallion highlighted in Red.
Head back one screen.
Head to the Temple.
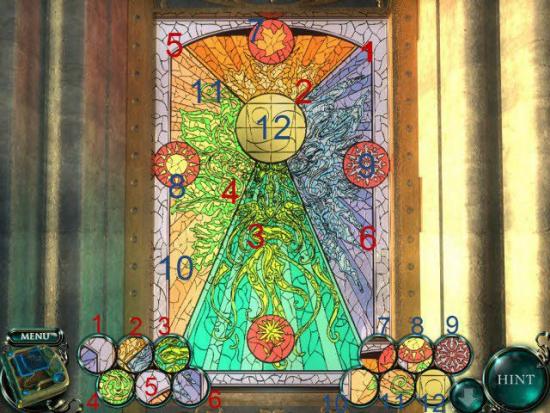
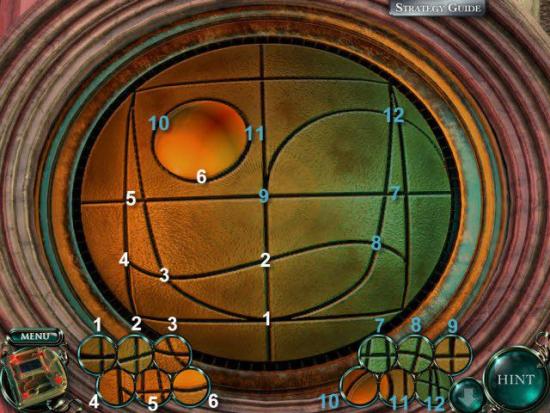
Examine the Stain Glass Window.
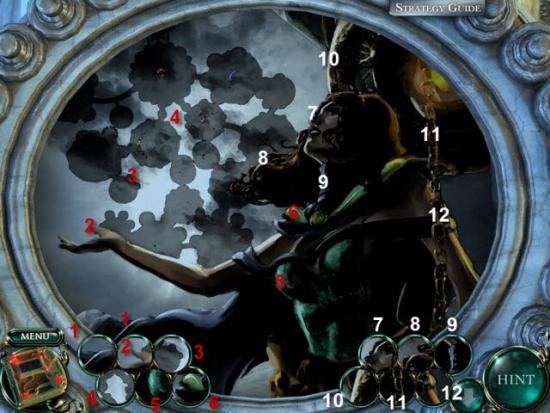
Place the twelve Stained Glass Pieces into the Stained Glass Window in the matching spots.
Once all twelve Pieces placed the Door will open.
Enter the Temple.
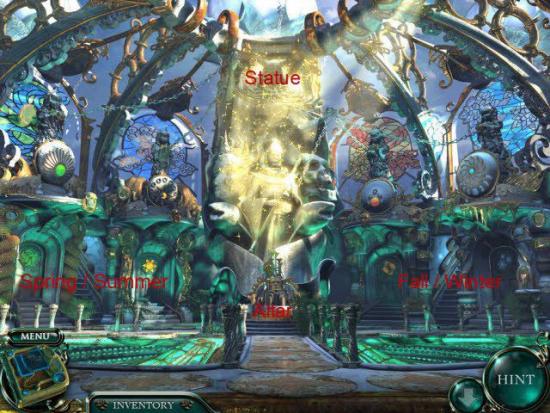
Move to the Altar.
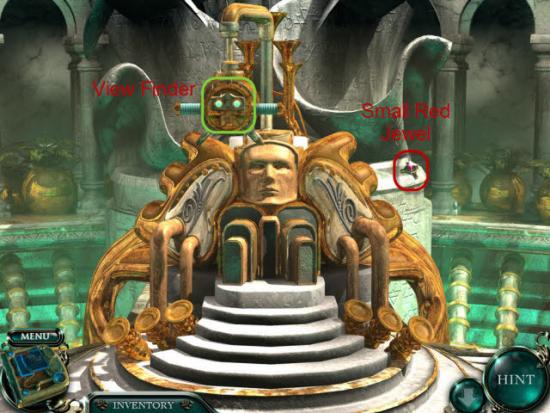
Gather the Small Red Jewel highlighted in Red.
Examine the View Finder highlighted in Green.
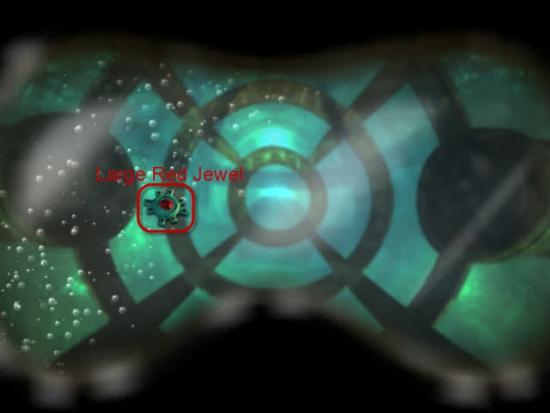
Gather the Large Red Jewel highlighted in Red.
Return two Screens to the Temple.
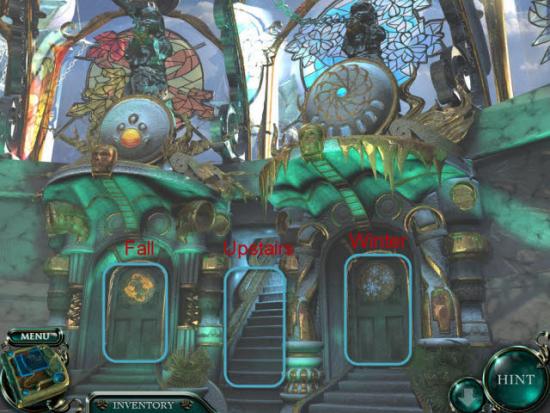
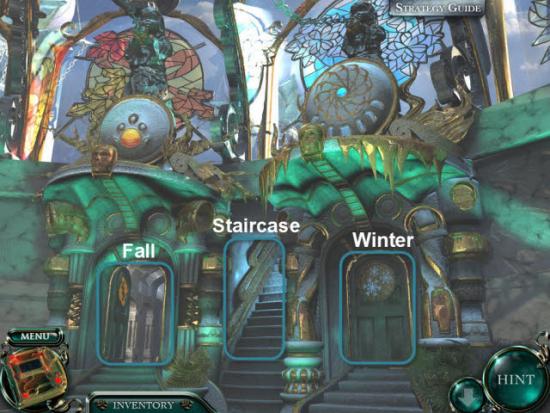
Head to the Fall / Winter side of the Temple.
Head Upstairs.
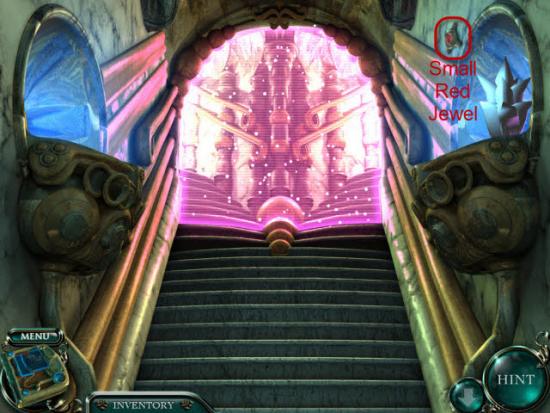
Gather the Small Red Jewel highlighted in Red.
Head Back two Screens back to the Temple once again.
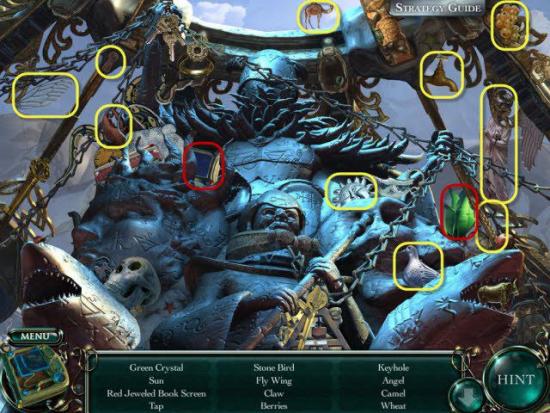
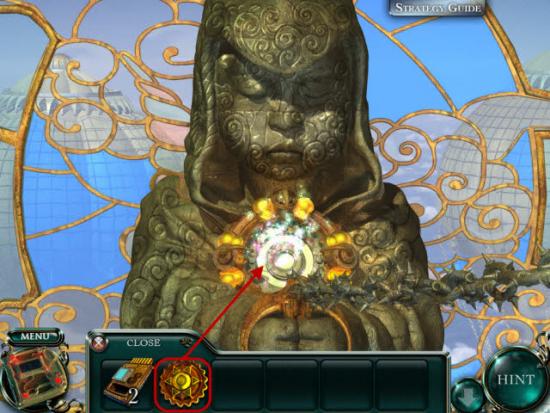
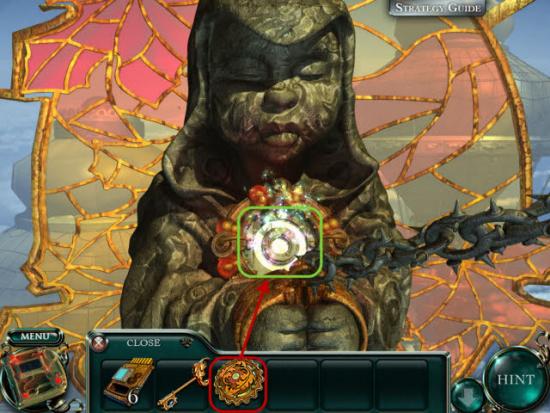
Examine the Statue.
Gather the New Book Screen and Green Crystal highlighted in Red.
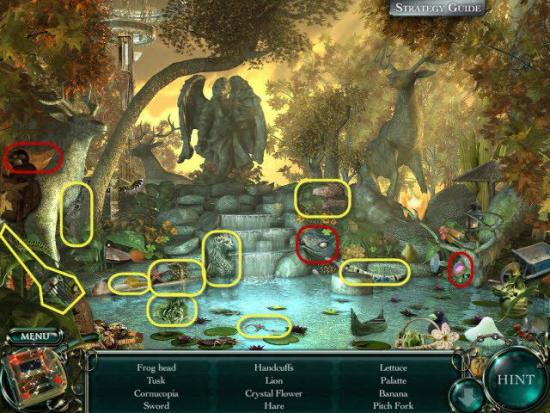
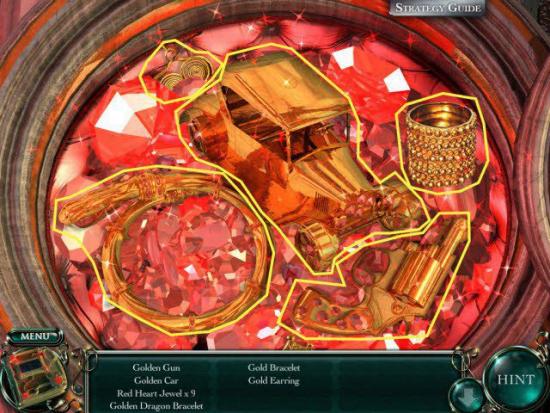
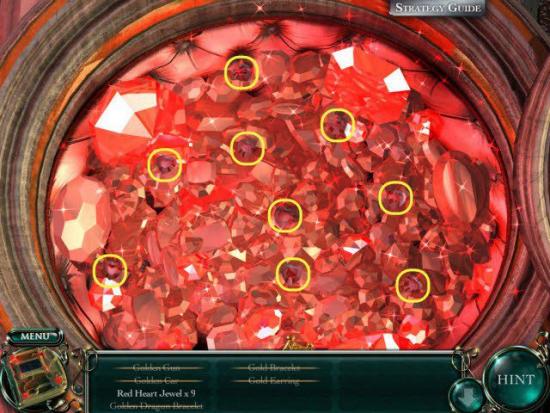
Gather the Hidden Objects highlighted in Yellow.
Remove the broken Blue Pieces, highlighted in Green, from the Book.
Next add the new Red Pieces, highlighted in Red, to the Book.
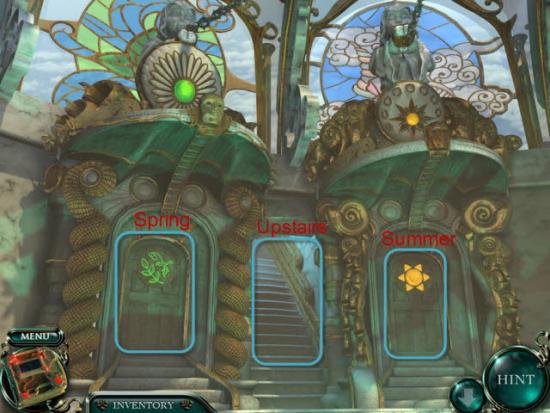
Move over to the Spring / Summer Doors.
Climb up the Stairs.
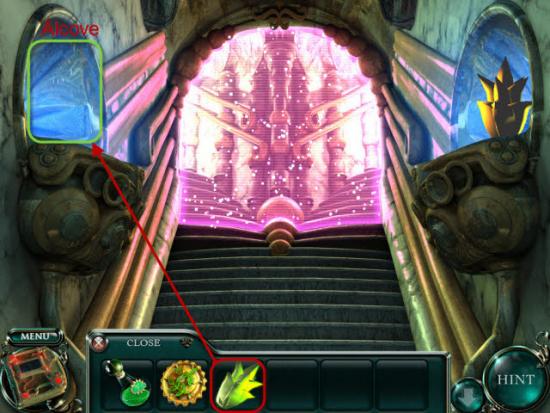
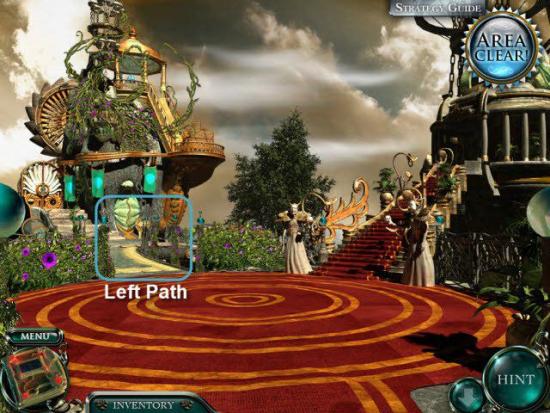
Place the Green Crystal, highlighted in Red, into the Alcove on the left, highlighted in Green.
This will open the staircase.
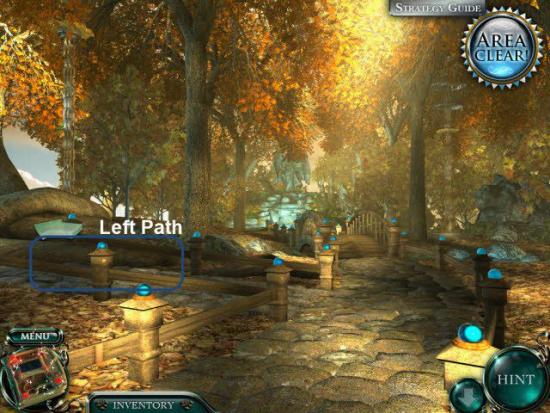
Take the Left Path.
Place the Medallion of Spring, highlighted in Red, into the Statue, highlighted in Green.
Return to the Spring / Summer Doors.
Enter the Spring Door.
Spring
Gather the Crystal Dolphin highlighted in Orange.
Head forward.
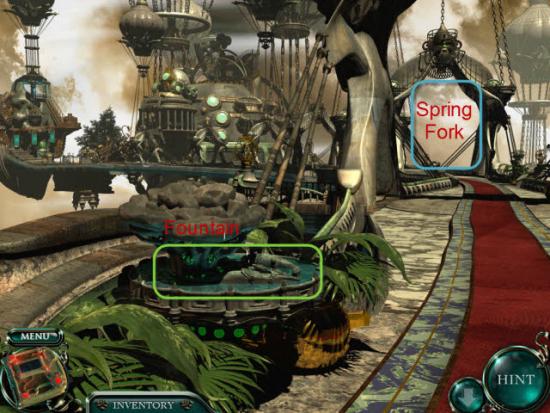
Examine the Fountain, on the left, highlighted in Green.
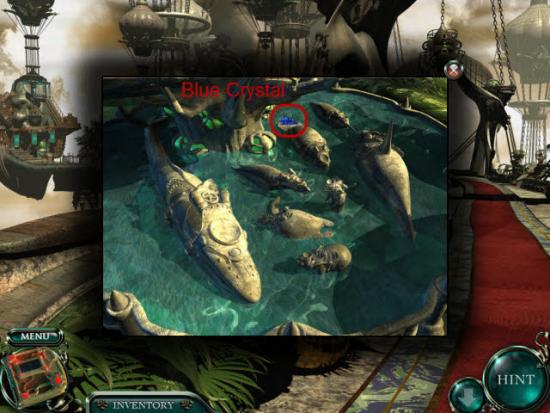
Gather the Water Crystal highlighted in Red.
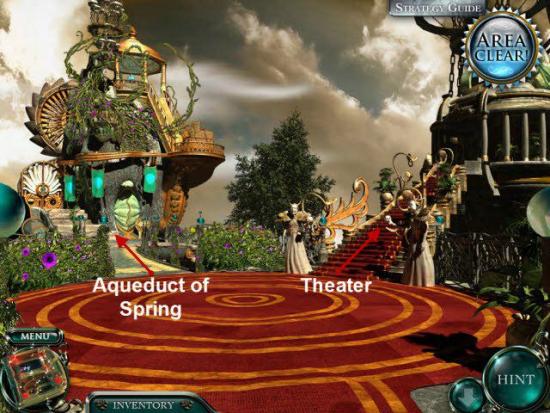
Head forward to the Spring Fork.
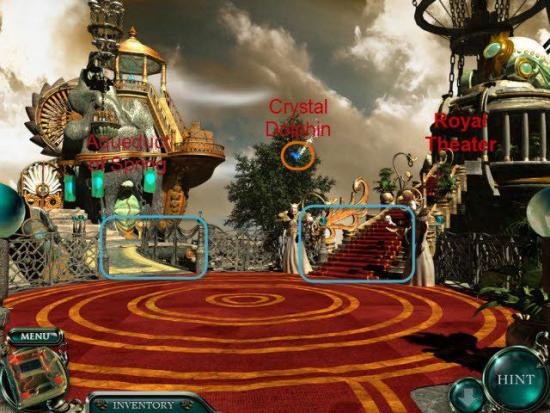
Take the left fork toward the Aqueduct of Spring.
Gather the Crystal Dolphin highlighted in Orange.
Head forward to the Aqueduct of Spring.
Take the right path to the Fountain.
Gather the three Water Crystals and the Leafy Face highlighted in Red.
Gather the Hidden Objects highlighted in Yellow.
Go back one screen.
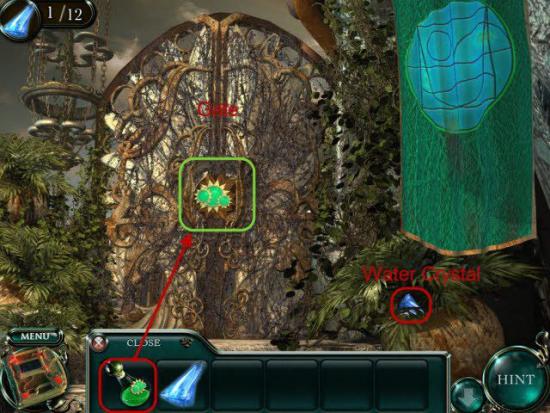
This time take the left path to the Gate.
Gather the Water Crystal highlighted in Red.
Use the Plant Elixir, highlighted in Red, on the Gate, highlighted in Green.
Continue up the Stairs.
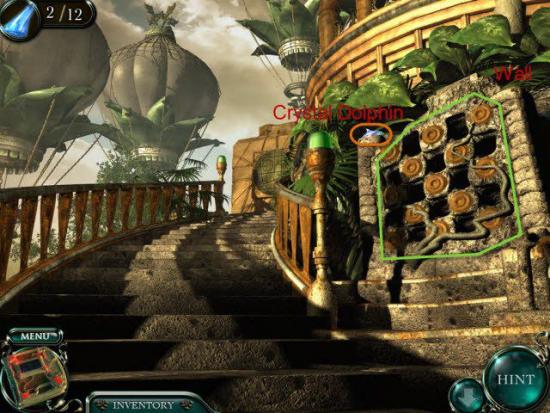
Gather the Crystal Dolphin highlighted in Orange.
Examine the Wall highlighted in Green.
Gather the Water Crystal highlighted in Red.
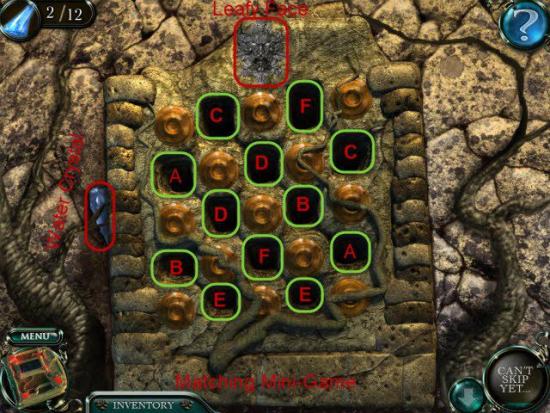
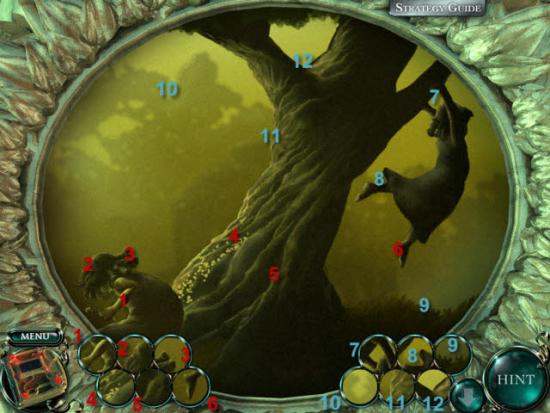
This Mini-Game is a simple Matching Game.
Click on each Hole to reveal an animal.
Match two Animals to clear the Holes.
Once all Animals have been matched, you will receive the Leafy Face.
Continue up the Stairs.
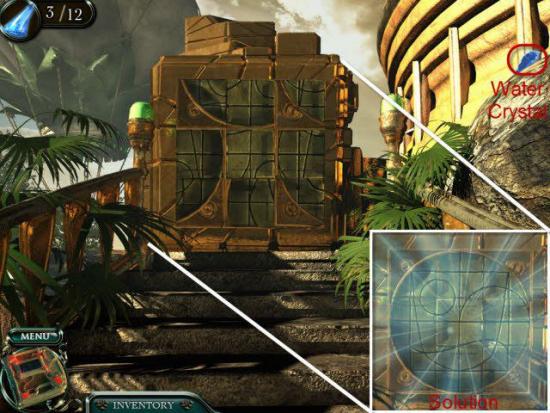
Gather the Water Crystal highlighted in Red.
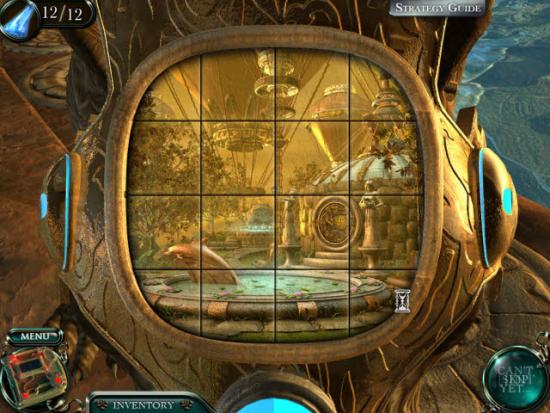
To solve this Mini-Game you must rotate the Tile to form the original Symbol.
Click on each Tile to rotate the Tile.
Once all Tile are back in the correct order the Staircase will open up.
Continue up the Stairs.
Gather the Crystal Dolphin highlighted in Orange.
Gather the Water Crystal and Leafy Face highlighted in Red.
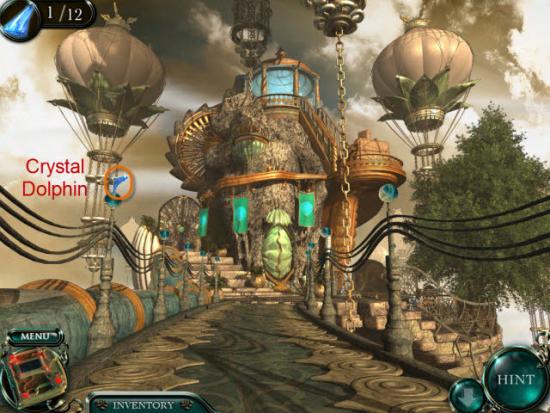
Head back to the bottom of the Stairs and move forward toward the Tree.
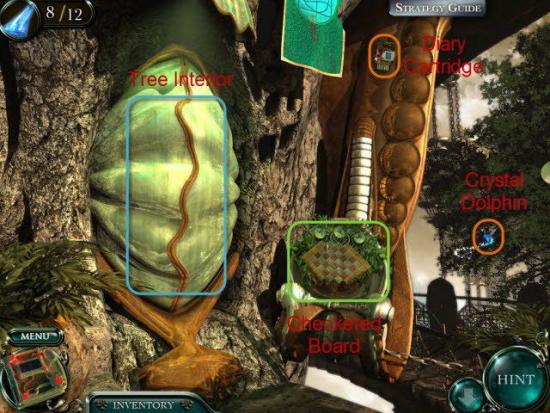
Gather the Crystal Dolphin highlighted in Orange.
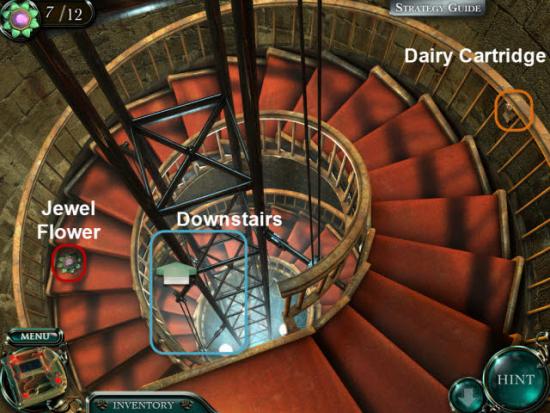
Collector’s Edition: Gather the Dairy Cartridge highlighted in Orange.
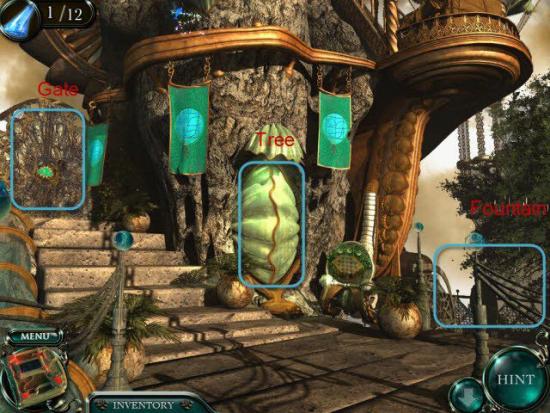
Examine the Checkered Board.
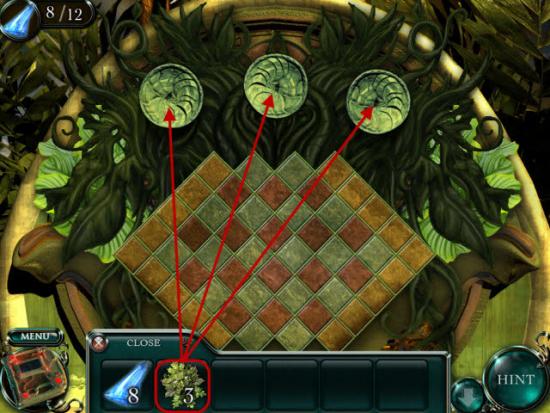
Place the three Leafy Faces, highlighted in Red, onto the Display
Next, you will need to solve three Mini-Games.

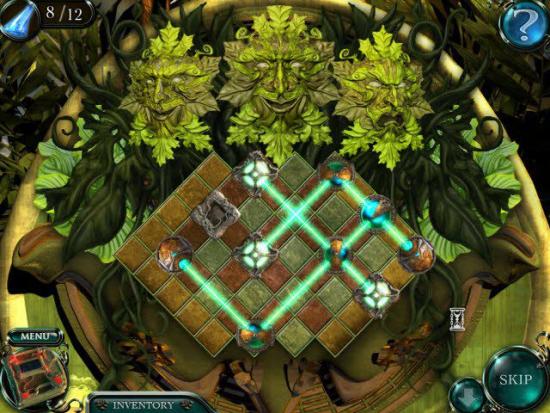
To solve these three Mini-Games you will need to rotate the Pieces till the Laser Lights light up all Pieces of the Puzzle.
Click on the Pieces to rotate each Piece.
See the above Images for the Solutions to this Mini-Games.
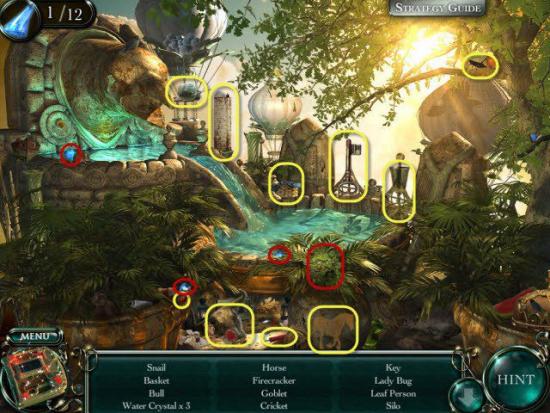
Enter the Interior of the Tree.
Gather the four Water Crystals highlighted in Red.
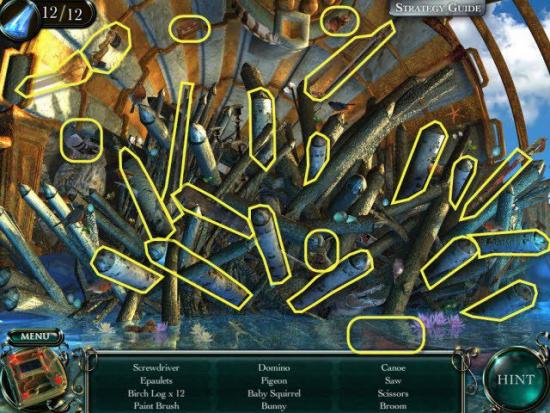
Gather the Hidden Objects highlighted in Yellow.
Leave the Tree and return to the top of the Stairs.
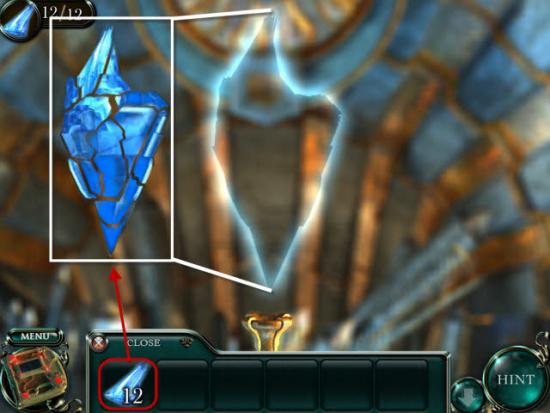
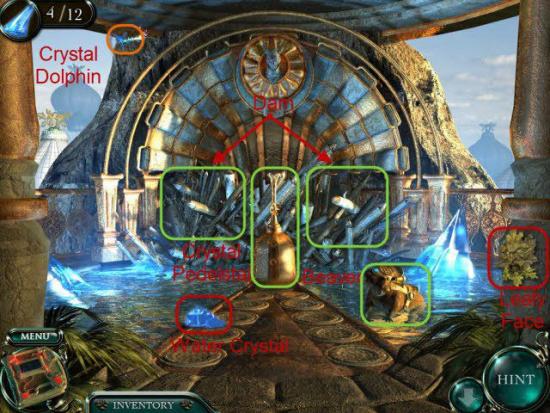
Examine the Crystal Pedestal.
Place the twelve Water Crystals into the outline to rebuild the Crystal.
Examine the Dam.
Gather the Hidden Objects highlighted in Yellow.
Examine the Collar on the Beaver.
Flip the Tiles to complete the the Image.
Click on the Beaver one more time to heal the Beaver.
Receive the Jewel of Spring.
Return to the Spring / Summer Doors.
Head up the Stairs, take the Left Path once again.
Place the Jewel of Spring, highlighted in Red, over the Medallion of Spring.
You have freed the Child of Spring.
The Door to Summer is now open.
Enter the Summer Door.
Summer

Gather the Crystal Dolphin highlighted in Orange.
Head to the Right toward the Face.
Gather the Sun Face highlighted in Red.
Gather the Hidden Objects highlighted in Yellow.
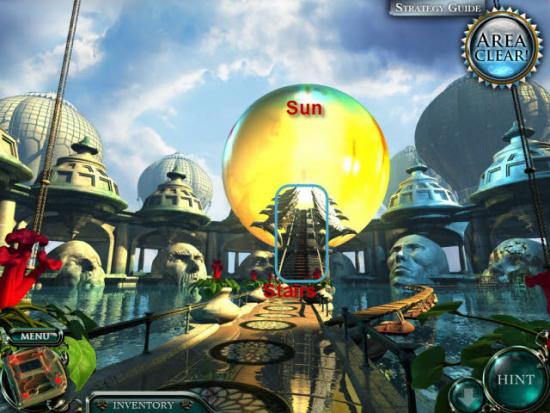
Climb the Stairs toward the Sun.
Gather the Crystal Dolphin highlighted in Orange.
Continue up the Stairs.
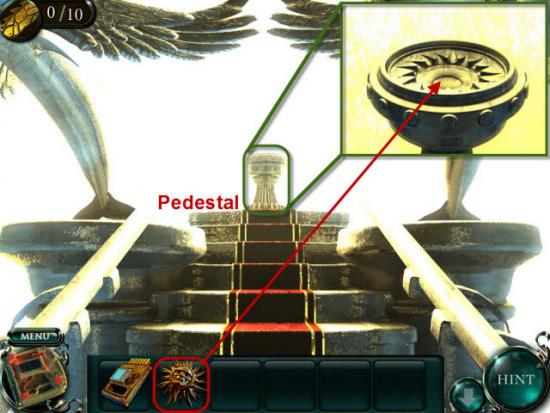
Examine the Pedestal highlighted in Green.
Place the Sun Face, highlighted in Red, into the top of the Pedestal.
Take the Left Path.
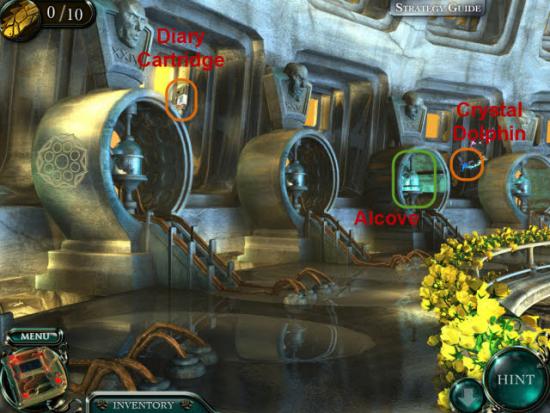
Gather the Crystal Dolphin highlighted in Orange.
Collector’s Edition: Gather the Dairy Cartridge highlighted in Orange.
Examine the Alcove highlighted in Green.
Gather the Shell Piece highlighted in Red.
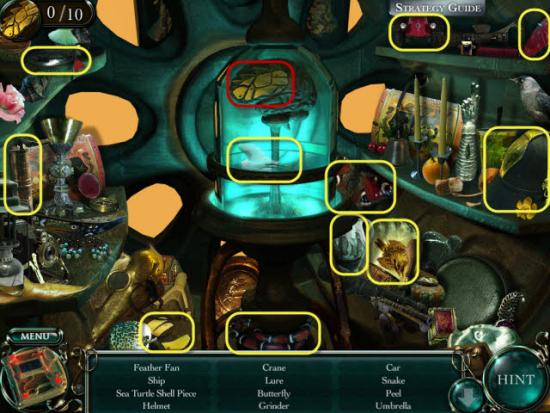
Gather the Hidden Objects highlighted in Yellow.
Head back one screen.
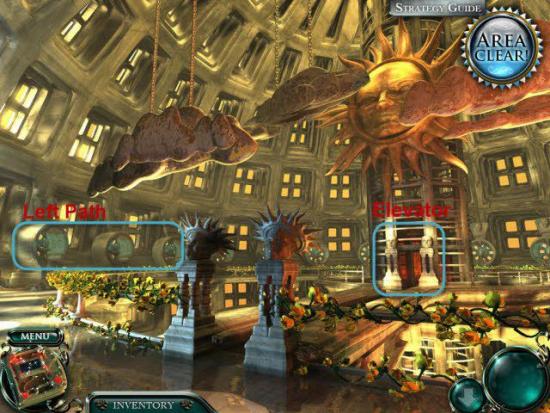
Take the Right Path to the Elevator.
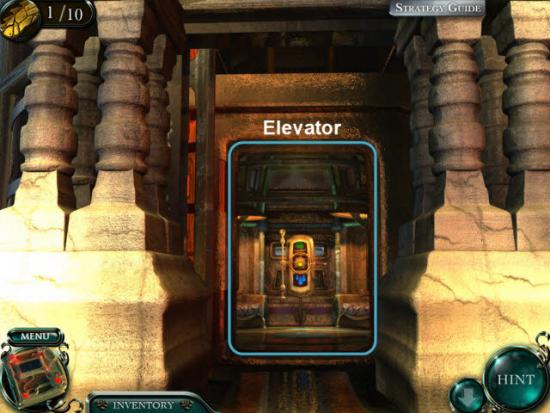
Click to open the Elevator Door.
Enter the Elevator.
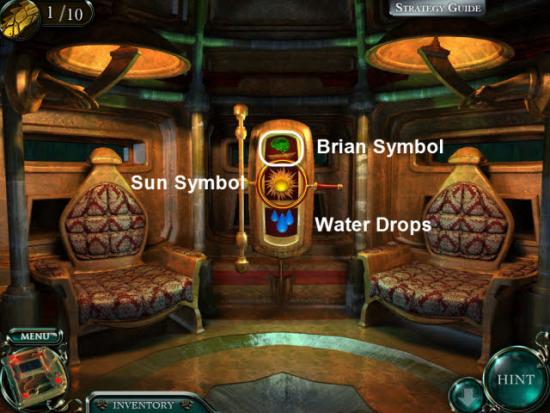
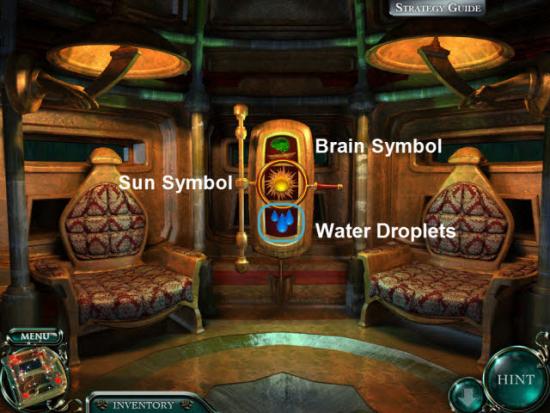
Click on the Green Brain Symbol highlighted in White.
Climb the Stairs.
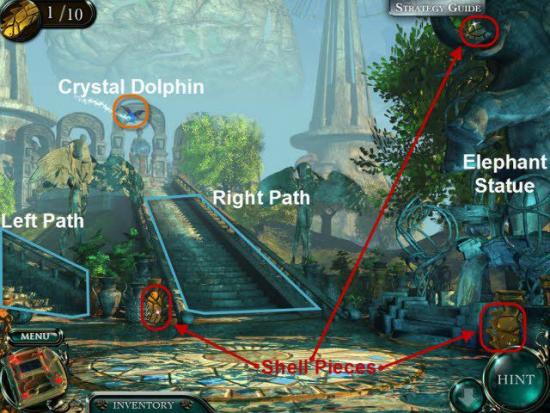
Gather the Crystal Dolphin highlighted in Orange.
Gather the three Shell Pieces highlighted in Red.
Take the Left Path.
Gather the Crystal Dolphin highlighted in Orange.
Gather the two Shell Pieces highlighted in Red.
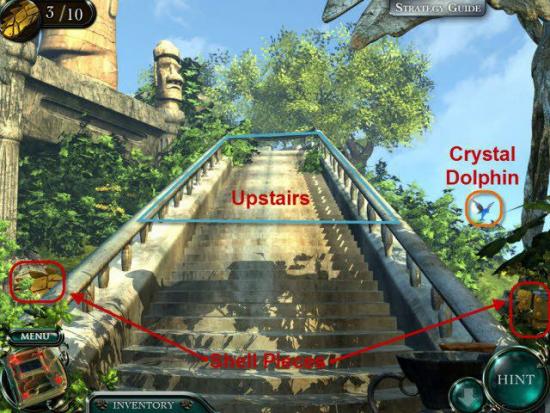
Climb up the Stairs.
Gather the three Shell Piece highlighted in Red.
Gather the Hidden Objects highlighted in Yellow.
Return to the Elephant Statue.
Head Right up the Main Staircase.
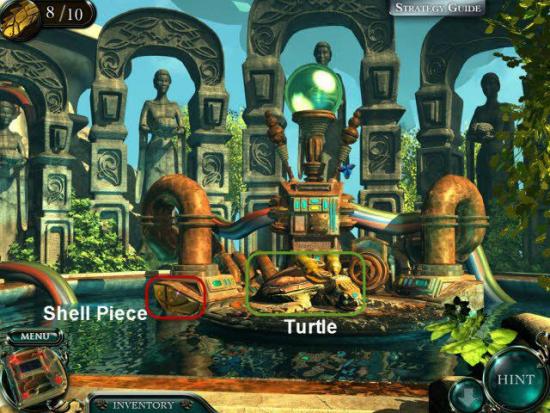
Gather the Shell Piece highlighted in Red.
Examine the Turtle highlighted in Green.
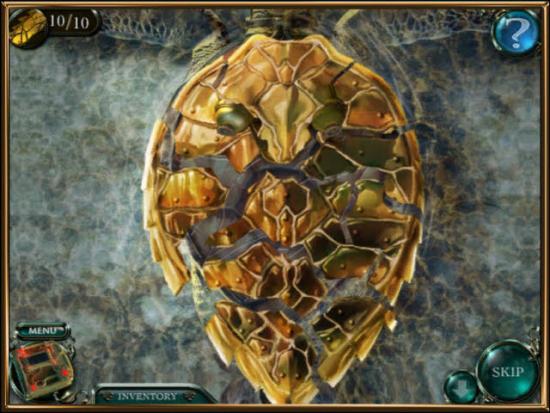
Place the ten Shell Pieces onto the Turtles Back to repair the Turtles Shell.
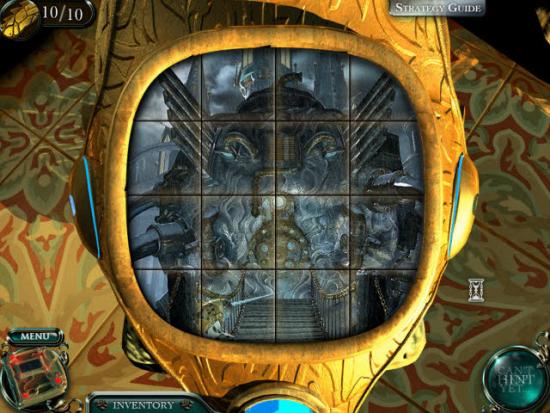
Click to flip the Tiles until the Image is complete.
Click the Turtle once more to heal the Turtle.
Receive the Medallion of Summer.
Head Back all the way to the Spring / Summer Doors.
Climb the Staircase between the Spring and Summer Doors.
Take the Right Path.
Place the Medallion of Summer, highlighted in Red, onto the Statue.
This opens the Fall Door.
Fall
Enter the Fall Door.
Continue forward till you reach the Ferry Wheel.
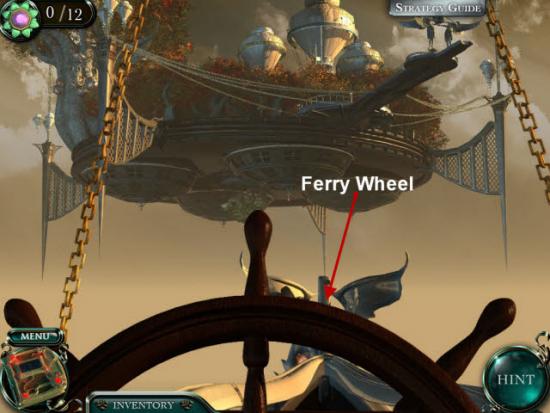
Click the Ferry Wheel to cross the the Floating Island.
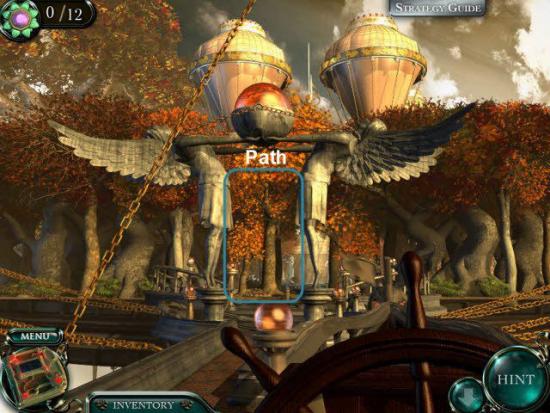
Head forward down the path, toward the Pool.

Gather the Crystal Dolphin highlighted in Orange.
Continue on down the Path.
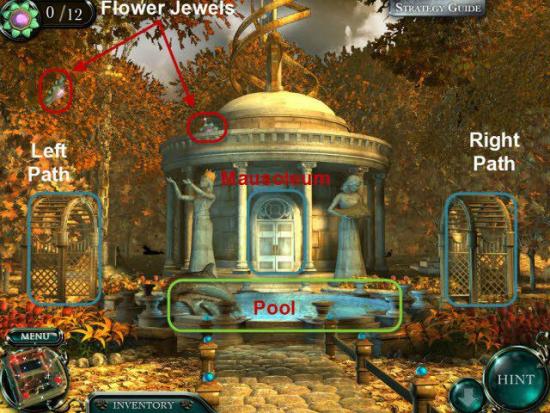
Gather the two Flower Jewels highlighted in Red.
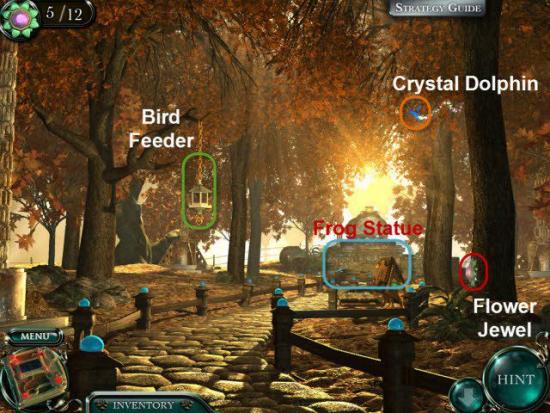
Take the Left Path.
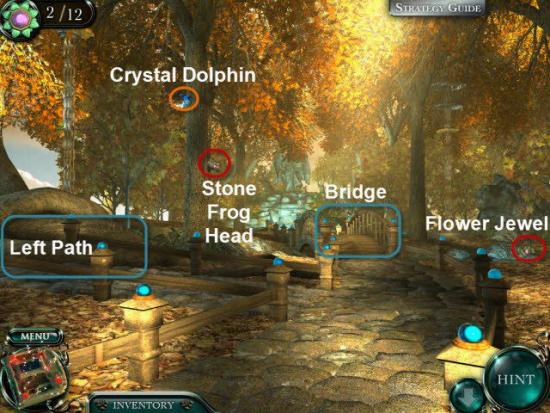
Gather the Crystal Dolphin highlighted in Orange.
Gather the Flower Jewel and Stone Frog Head highlighted in Red.
Take the Left Path.
Gather the Crystal Dolphin highlighted in Orange.
Return back one screen.
Head forward toward the Bridge.
Gather the Flower Jewel, Stone Frog Head, and Cornucopia highlighted in Red.
Gather the Hidden Objects highlighted in Yellow.
Return to the Pool.
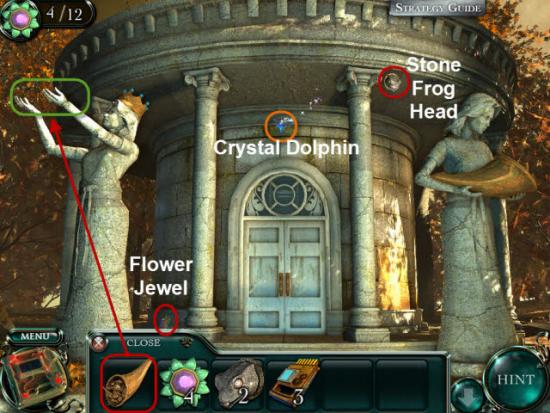
Move forward to the Mausoleum.
Gather the Crystal Dolphin highlighted in Orange
Gather the Flower Jewel and Stone Frog Head highlighted in Red.
Place the Cornucopia, highlighted in Red, into the Arms of the Statue, highlighted in Green.
Go back one screen.
Take the Right Path.
Gather the Crystal Dolphin highlighted in Orange.
Gather the Flower Jewel highlighted in Red.
Head toward the Frog Statue.
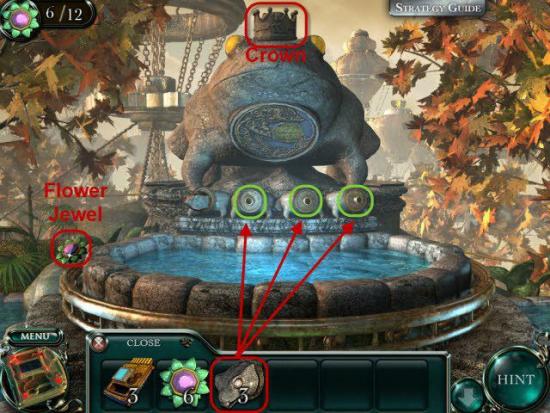
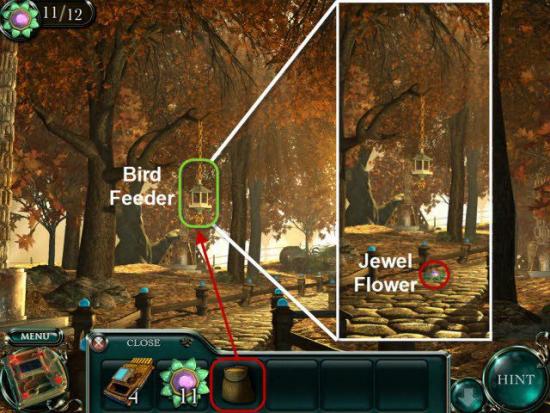
Gather the Jewel Flower highlighted in Red.
Place the three Stone Frog Heads, highlighted in Red, onto the Frog Statue.
To solve this Mini-Games you need to click and rotate each Stone Frog Head until they all are facing down toward the Water.
Turning Head 1 will also affect Head 2 and Head 4
Head 2 turns alone.
Turning Head 3 will also affect all four Heads.
Turning Head 4 will also affect Head 2.
Solution:
• Turn Head 3 two times.
• Turn Head 1 one time.
• Turn Head 4 two times.
• Turn Head 2 two times.
Once all the Stone Heads are turned downward to the Water, you can gather the Crown on the Frog Statue’s Head.
Return to the Pool.
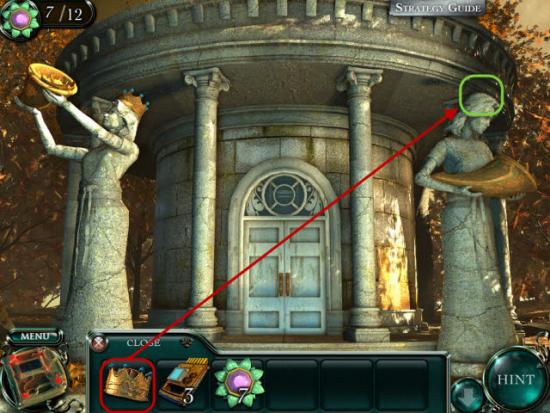
Move forward to the Mausoleum once again.
Place the Crown, highlighted in Red, onto the Statue’s Head, highlighted in Green.
Mausoleum Doors will open.
Enter the Mausoleum.
Collector’s Edition: Gather the Diary Crystal highlighted in Orange.
Gather the Jewel Flower highlighted in Red.
Head down the Stairs.

Gather the Crystal Dolphin highlighted in Orange.
Gather the Jewel Flower and Bird Seed highlighted in Red.
Examine the Grate highlighted in Green.
To solve this Mini- Game click and rotate the Tiles until the Image is complete.
This will open the Man Hole.
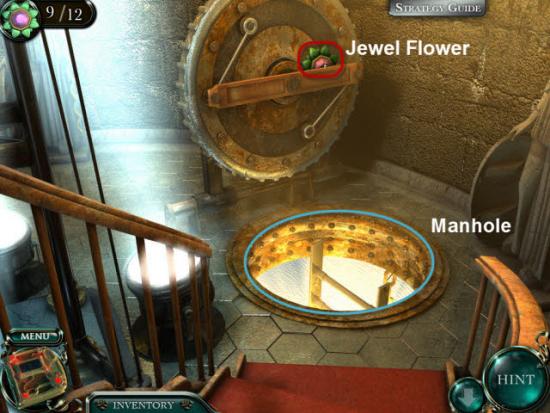
Gather the Jewel Flower highlighted in Red.
Head down the Man Hole.
Gather the Jewel Flower highlighted in Red.
Gather the Hidden Objects highlighted in Yellow.
Return to the Pool.
Take the Right Path again.
Put the Birdseed, highlighted in Red, into the Bird Feeder, highlighted in Green.
Cardinal will drop a Jewel Flower.
Gather the Jewel Flower.
Return to the Pool again.
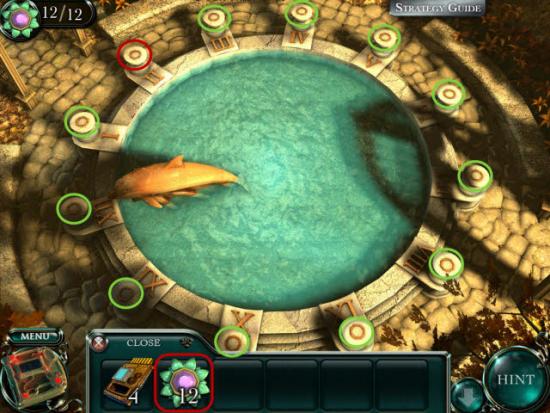
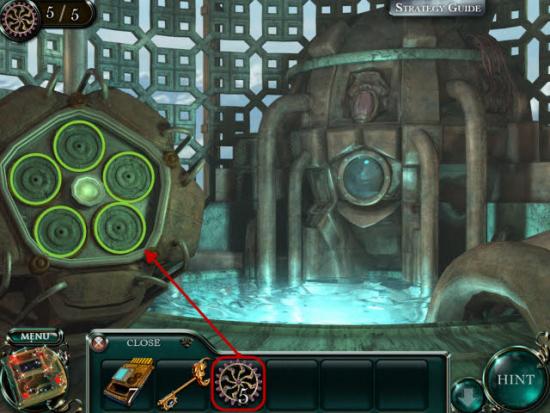
Examine the Pool
Place the twelve Jewel Flowers on the Numbered Pedestals surrounding the Pool.
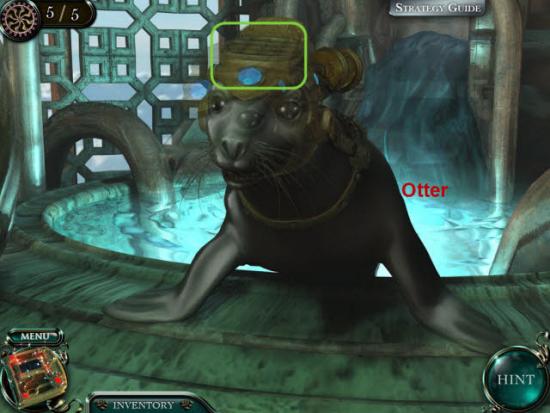
This Mini-Game is a simple Simon Says game.
The Otter will highlight number/numbers, click on the number/numbers in same order that the Otter does.
Solution:
• III
• III, I
• III, I, IV
• III, I, IV, I
• III, I, IV, I, V
• III, I, IV, I, V, IX
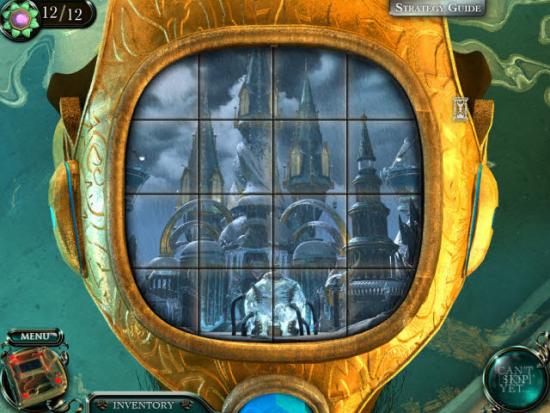
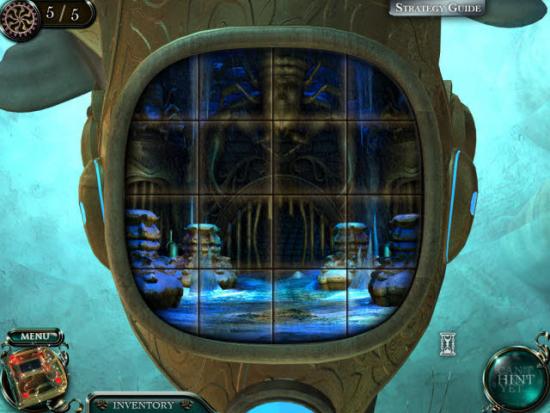
Next click the Tiles to form the correct Image.
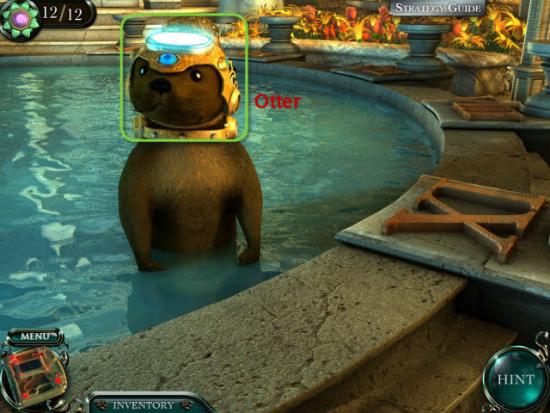
Click on the Otter to heal him.
Receive the Jewel of Summer.
Return to the Temple.
Head to the Spring/Summer Doors.
Take the Staircase between the Spring/Summer Doors.
Take the Right Fork.
Place the Jewel of Summer, highlighted in Red, onto the Statue, highlighted in Green.
Winter
The Winter Door opens.
Move forward two screens.

Gather the Crystal Dolphin highlighted in Orange.
Collector’s Edition: Gather the Diary Cartridge highlighted in Orange.
Move forward.
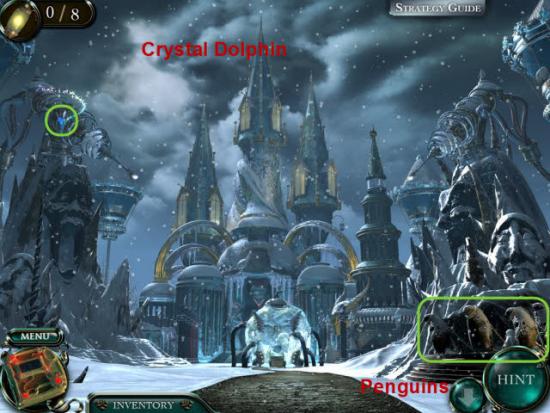
Gather the Crystal Dolphin highlighted in Orange.
Examine the Penguins highlighted in Green.
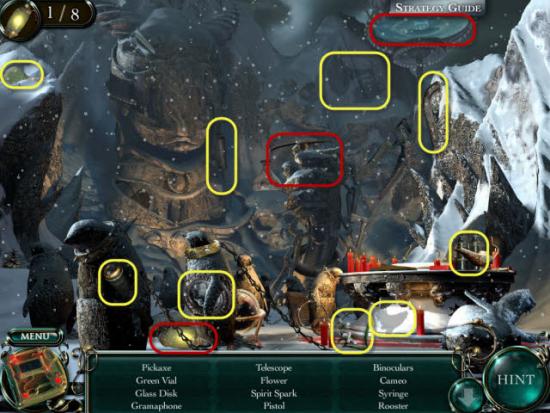
Gather the Spirit Spark, Glass Disk, and Pick Ax highlighted in Red.
Gather the Hidden Objects highlighted in Yellow.
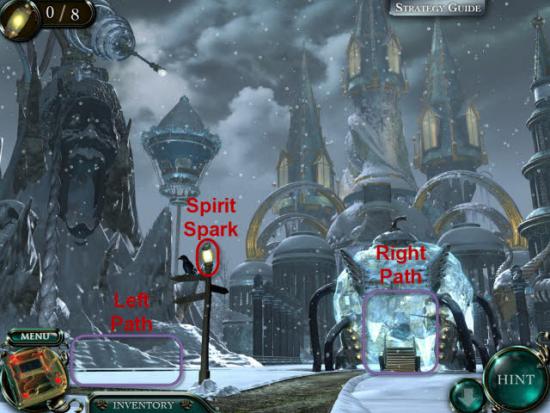
Move forward.
Gather the Spirit Spark highlighted in Red.
Take the Right Path.
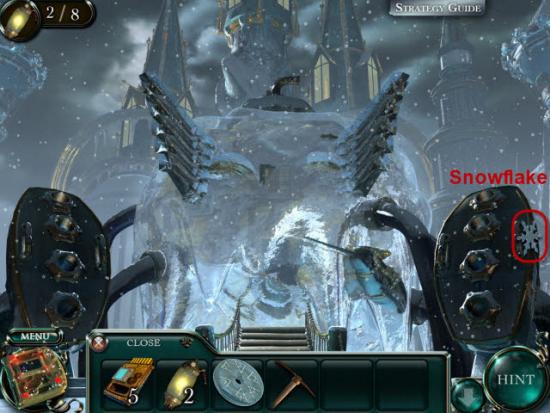
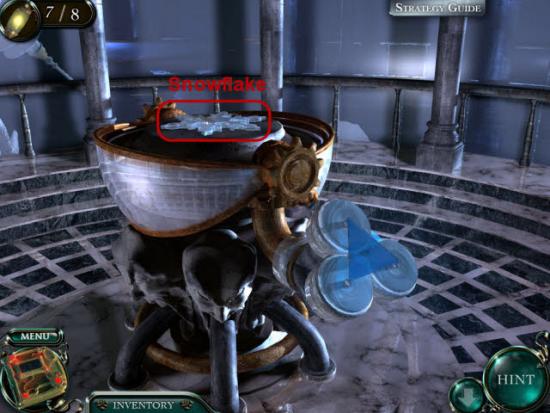
Gather the Snowflake highlighted in Red.
Move forward.
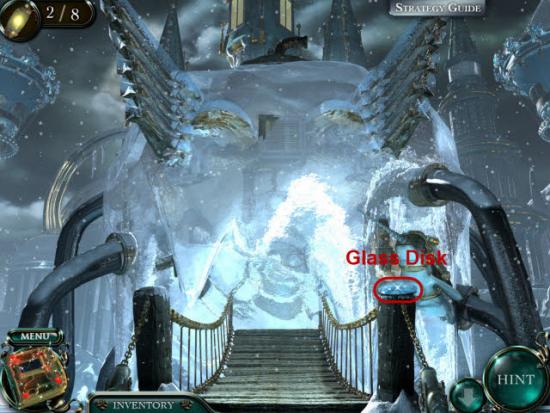
Gather the Glass Disk highlighted in Red.
Go Back two screens.
Take the Left Path.
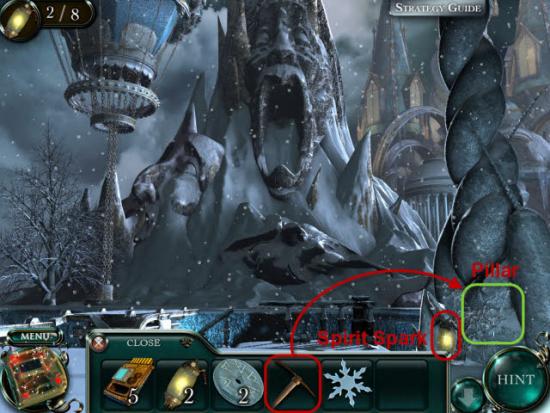
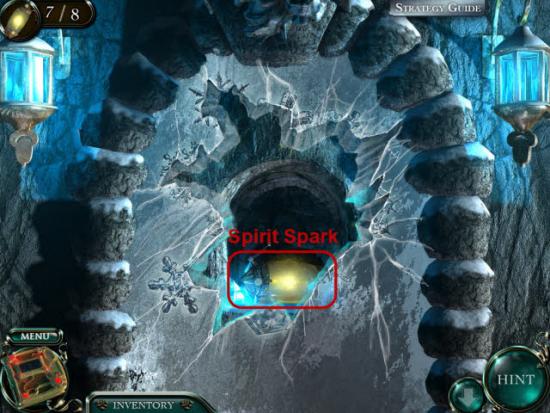
Gather the Spirit Spark highlighted in Red.
Use the Pick Ax, highlighted in Red, on the Pillar, highlighted in Green.
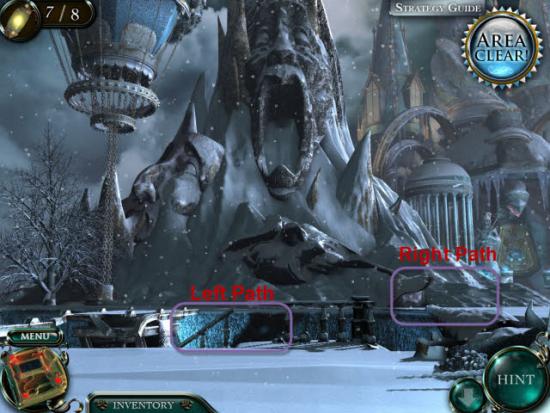
Take the Left Path.
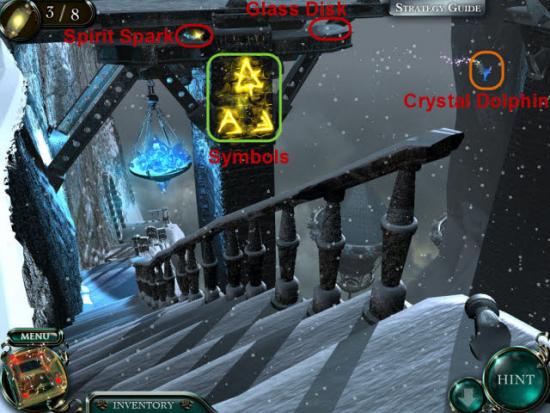
Gather the Crystal Dolphin highlighted in Orange.
Gather the Spirit Spark and Glass Disk highlighted in Red.
Examine the Symbols highlighted in Green.
Go Back one screen.
Take the Right Path across the Gap.

Gather the Crystal Dolphin highlighted in Orange.
Head Left toward the Crows.
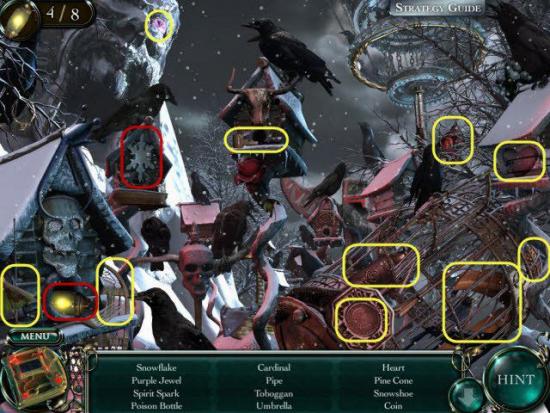
Gather the Snowflake and Spirit Spark highlighted in Red.
Gather the Hidden Objects highlighted in Yellow.
Head toward the Palace.
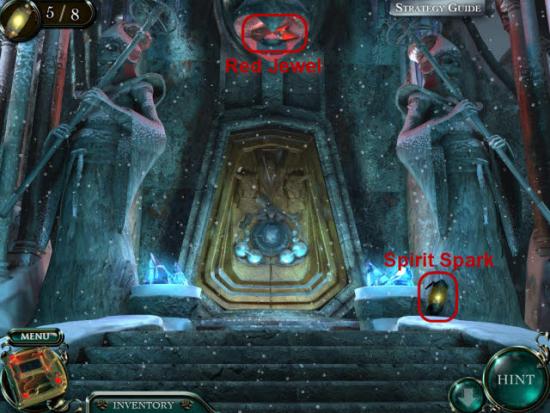
Gather the Spirit Spark and Red Jewel highlighted in Red.
Go Back one screen.
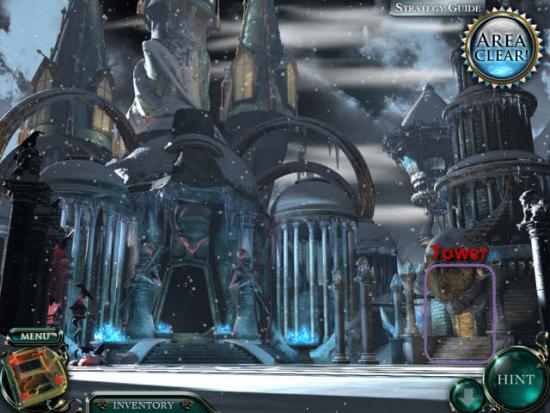
Head to the Tower on the Right.
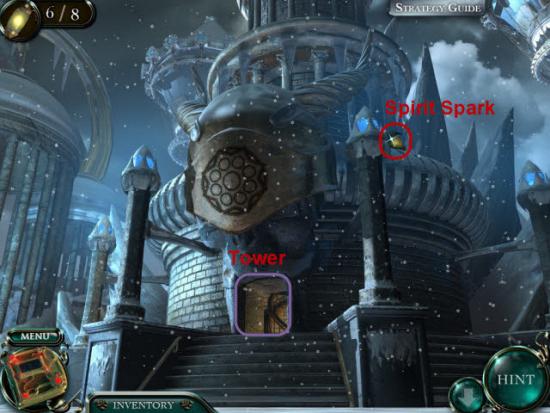
Gather the Spirit Spark highlighted in Red.
Enter the Tower.
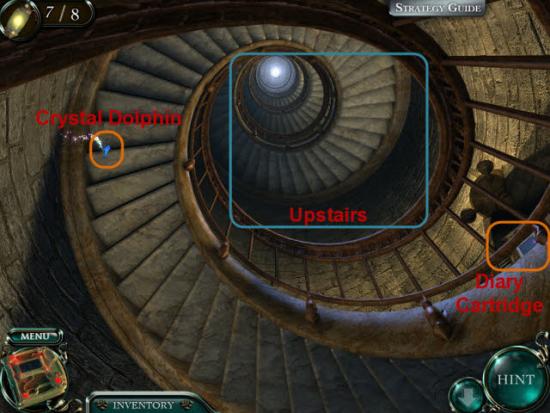
Gather the Crystal Dolphin highlighted in Orange.
Collector’s Edition: Gather the Diary Cartridge highlighted in Orange.
Climb the Stairs.
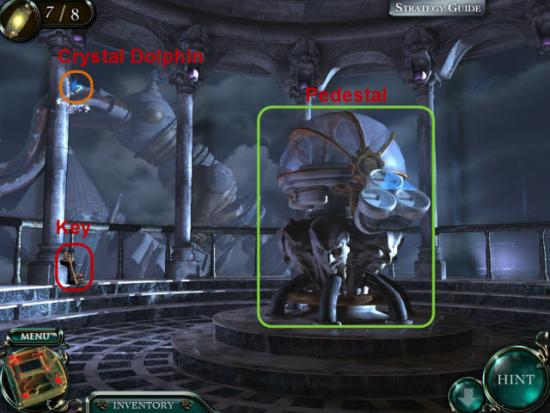
Gather the Crystal Dolphin highlighted in Orange.
Gather the Key highlighted in Red.
Examine the Pedestal highlighted in Green.
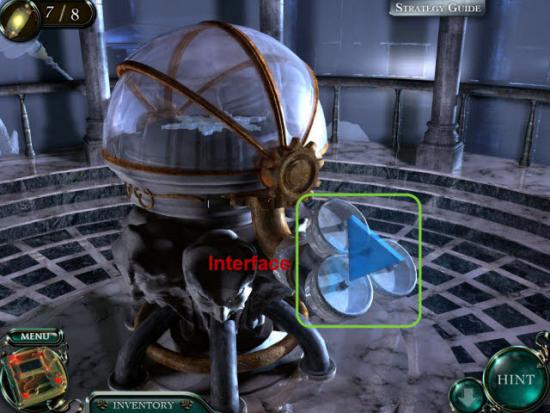
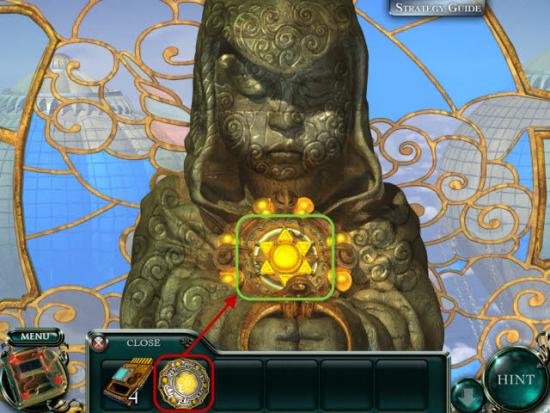
Examine the Interface highlighted in Green.
Place the three Glass Disks, highlighted in Red, into the Interface, highlighted in Green.
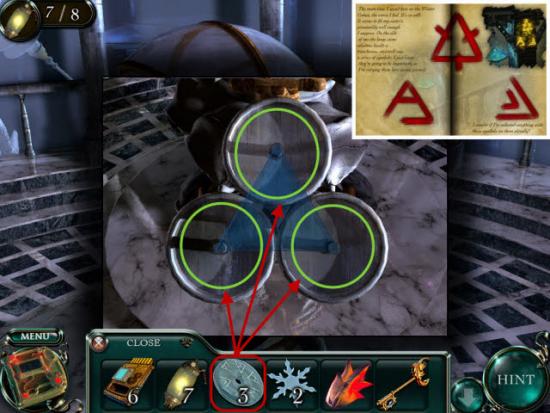
To solve this Mini-Game, rotate the three Glass Disks to match the Symbols you examined earlier.
Each Disk rotates independently.
The Dome will open when the Symbols are in the correct position.
Gather the Snowflake highlighted in Red.
Head back across the Gap.
Head down the Left Path again.
Head to the Bottom of the Left Path.
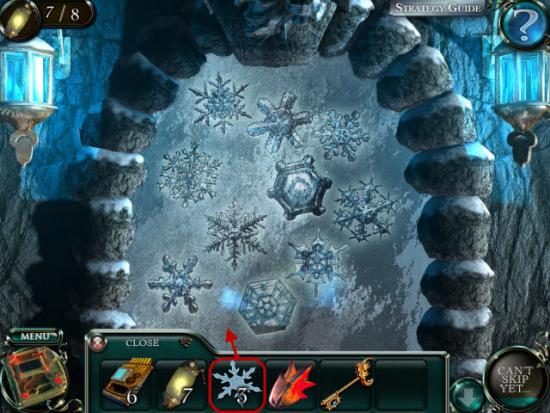
Place the three Snowflakes from your Inventory.
Next match each Snowflake to its matching Outline.
Gather the Spirit Spark highlighted in Red.
Go Back three screens.
Take the Right Path once more.
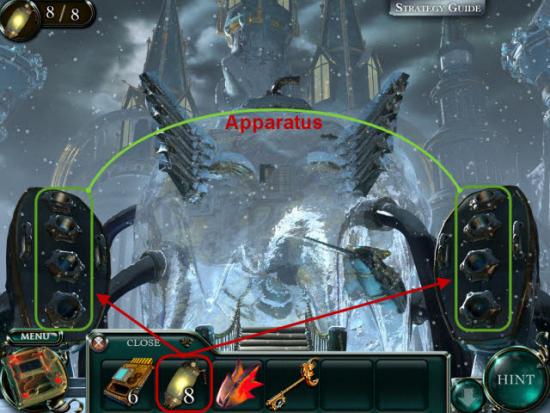
Place the eight Spirit Sparks, highlighted in Red, into the two sides of the Apparatus, highlighted in Green.
Next, click to insert each Spirit Spark.
The Spirit Spark will sparkle red when inserted.
Solution:
• Push in Spark 4, Spark 5, Spark 6, and Spark 8.
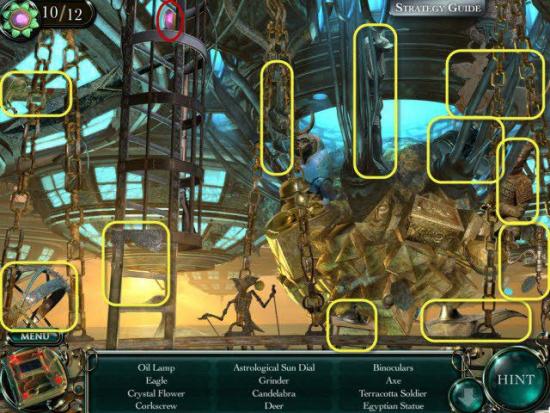
Once all Spirit Sparks are pushed in you will face another Hidden Object Scene.
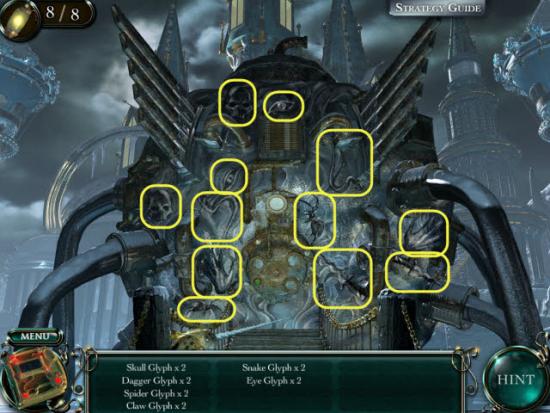
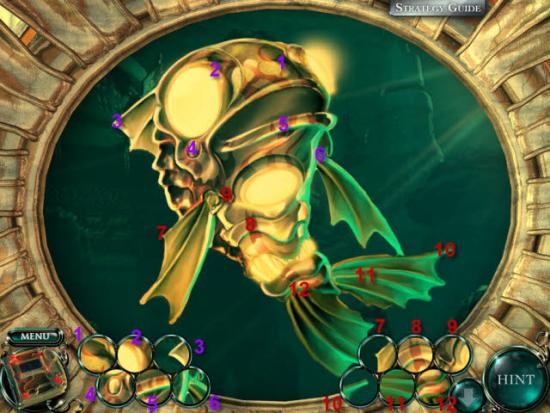
Gather all the Glyphs highlighted in Yellow
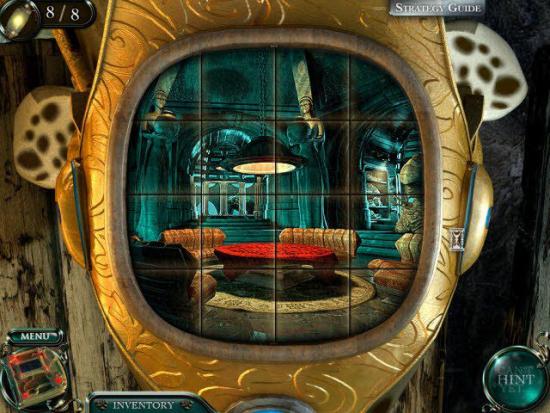
Click to flip the Tiles and complete the Image.
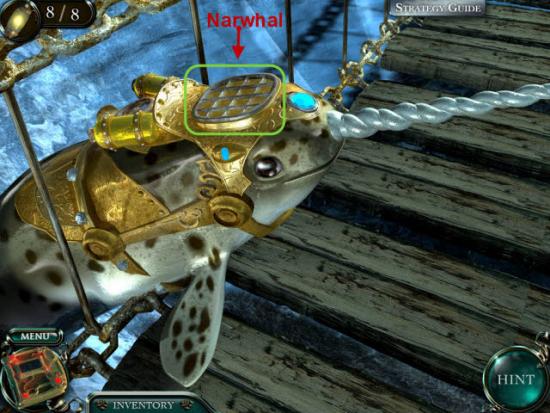
Click on the Narwhal to heal him.
You will receive the Medallion of Autumn.
Return to the Temple.
Head up the Stairs between Autumn and Fall Doors.
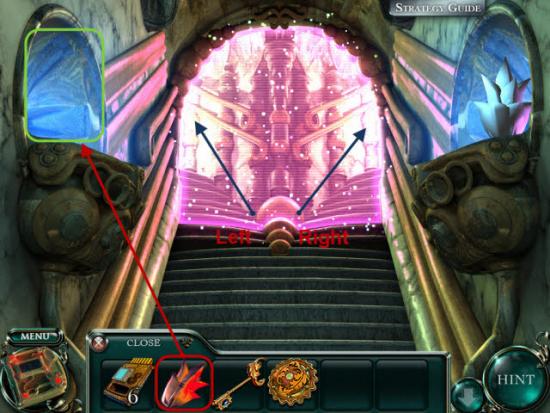
Place the Red Jewel, highlighted in Red.
Take the Right Fork.
Place the Medallion of Autumn, highlighted in Red, onto the Statue, highlighted in Green.
Theatre
Return to the Temple.
Head to the Altar.
Examine the Telescope.
Receive the Spring Seahorse.
Head back to the Temple.
Head over to the Spring Door.
Enter the Spring Door.
Head forward to the Spring Fork.
Take the Right Path.
Climb the Stairs.
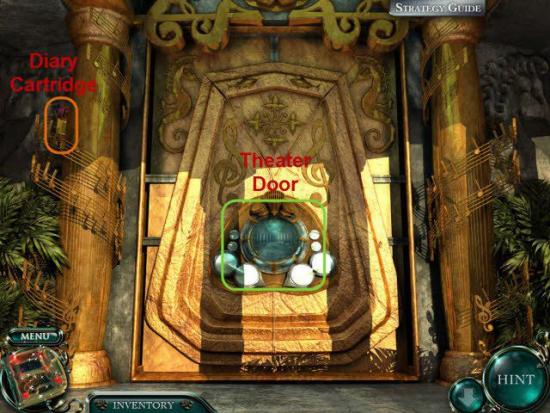
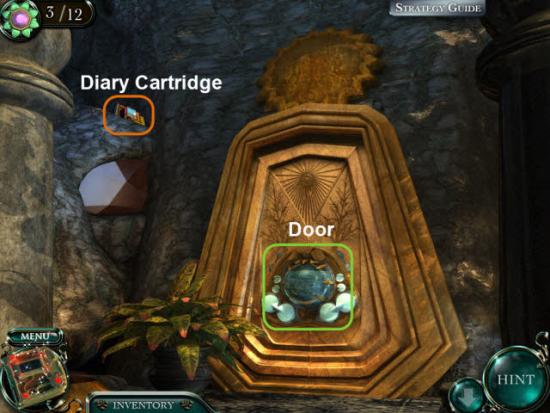
Collector’s Edition: Gather the Diary Cartridge highlighted in Orange.
Examine the Door highlighted in Green.
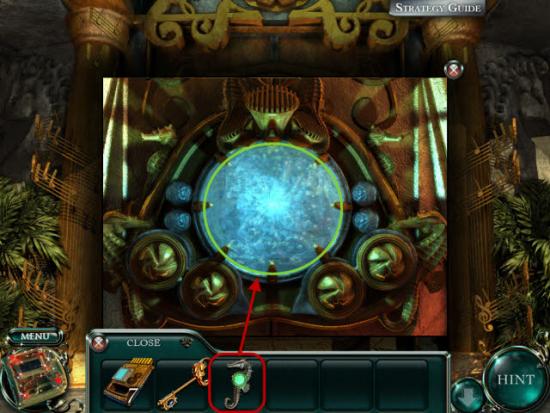
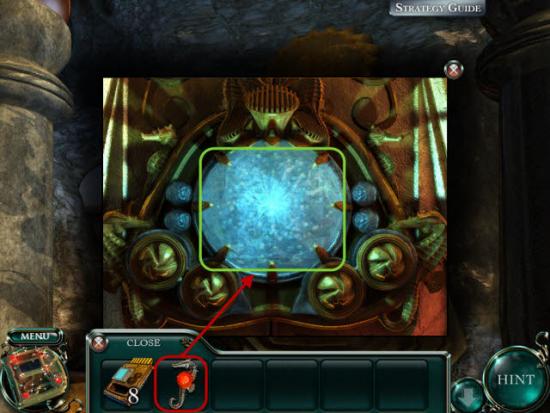
Place the Spring Seahorse, highlighted in Red, into the Door.
Enter the Theater.
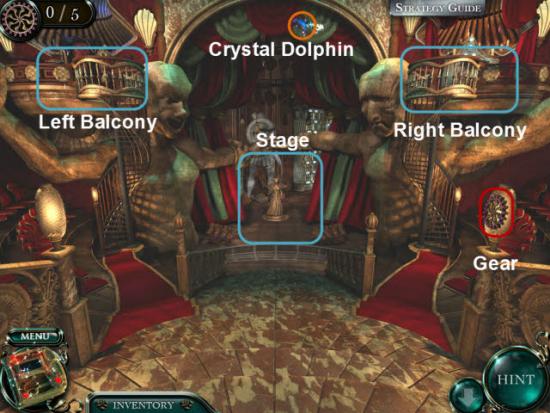
Gather the Crystal Dolphin highlighted in Orange.
Gather the Gear highlighted in Red.
Head to the Right Balcony.
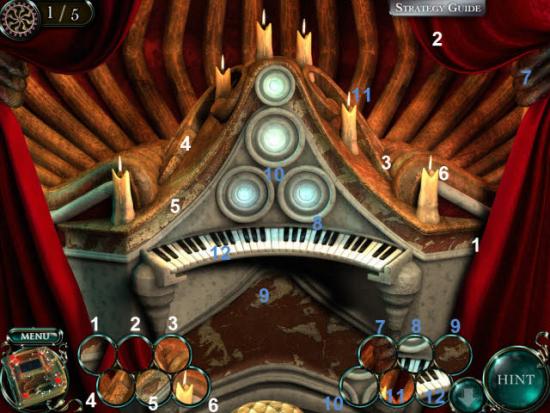
Place the Image Pieces into the matching spots in the Scene.
This is just like the Stained Glass Window earlier.
Receive a Gear.
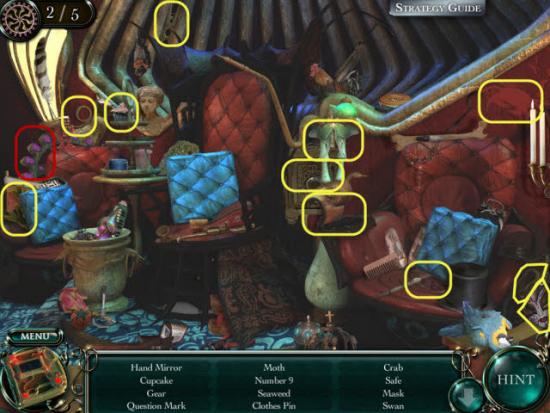
Head to the Left Balcony.
Gather the Gear highlighted in Red.
Gather the Hidden Objects highlighted in Yellow.
Head toward the Stage.
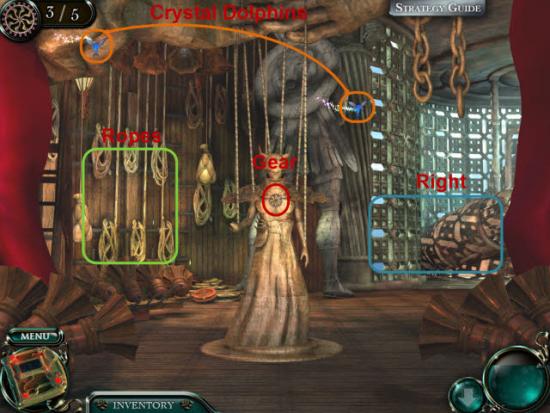
Gather the two Crystal Dolphins highlighted in Orange.
Gather the Gear highlighted in Red.
Examine the Ropes.
Gather the Gear highlighted in Red.
Gather the Hidden Objects highlighted in Yellow.
Head to the Right.
Place the five Gears, highlighted in Red, into the Mechanism.
Click to flip the Tiles to complete the Image.
Click on the Otter to heal him.
Receive the Jewel of Autumn.
Return to the Temple.
Head to the Fall/Winter Doors.
Take the Staircase between the Fall/Winter Doors.
Take the Left Path.
Place the Jewel of Autumn onto the Statue.
Secret Lounge
Head to the Alter once again.
Examine the Periscope.
Receive the Summer Seahorse.
Go back two screens.
Head to the Spring/Summer Doors.
Enter the Summer Door.
Climb the Stairs to the Sun and enter.
Go to the Elevator.
Click on the Water Droplets to go down.

Collector’s Edition: Gather the Diary Cartridge highlighted in Orange.
Examine the Door highlighted in Green.
Place the Summer Seahorse, highlighted in Red, into the Door.
Enter the Secret Lounge.
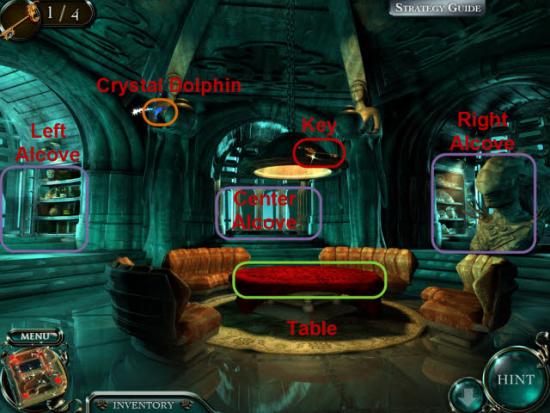
Gather the Crystal Dolphin highlighted in Orange.
Gather the Key highlighted in Red.
Click to Uncover the Table.
Head to the Left Alcove.
Gather the Red Star and Key highlighted in Red.
Gather the Hidden Objects highlighted in Yellow.
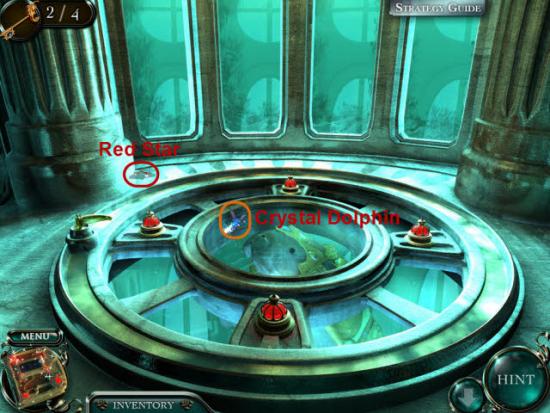
Head to the Center Alcove.
Gather the Crystal Dolphin highlighted in Orange.
Gather the Red Star highlighted in Red.
Go Back one screen.
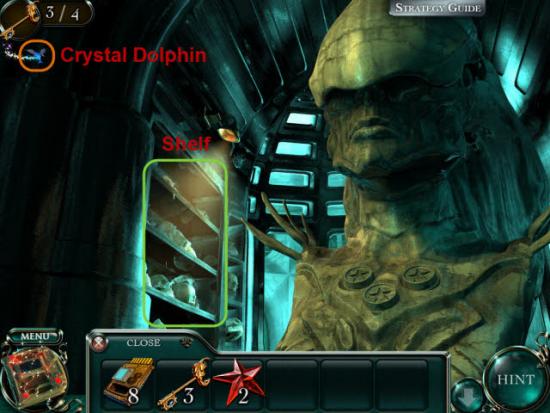
Head to the Right Alcove.
Gather the Crystal Dolphin highlighted in Orange.
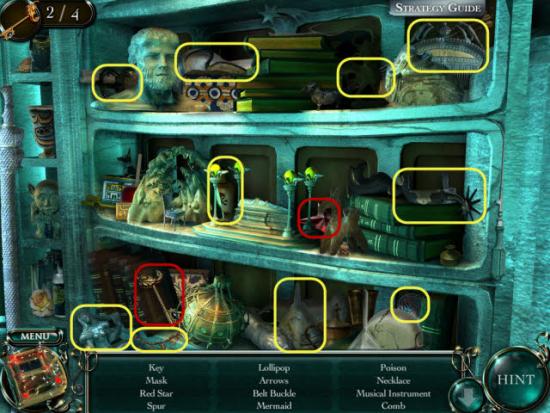
Examine the Shelf highlighted in Green.
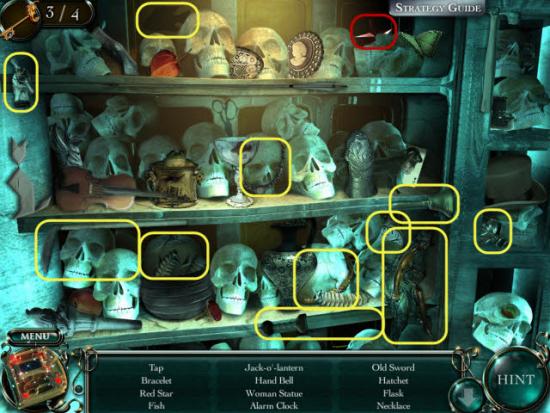
Gather the Red Star highlighted in Red.
Gather the Hidden Objects highlighted in Yellow.
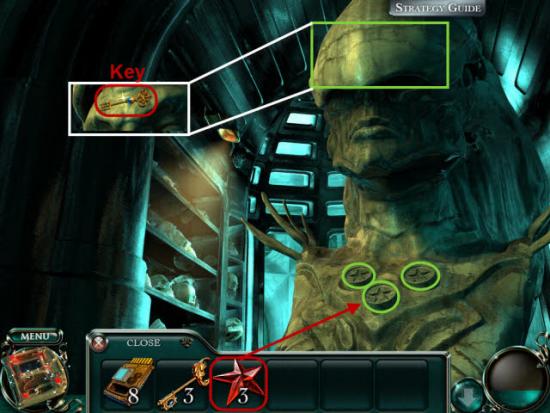
Place the three Red Stars, highlighted in Red, onto the Statue, highlighted in Green.
The Visor will rise.
Gather the Key highlighted in Red.
Head back one screen.
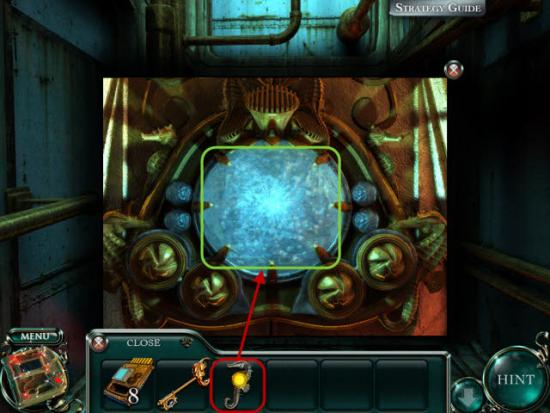
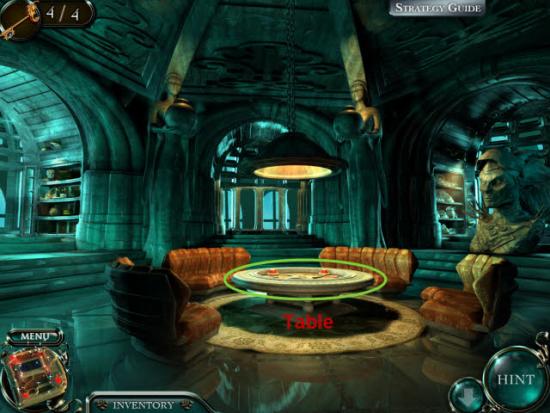
Examine the Table.
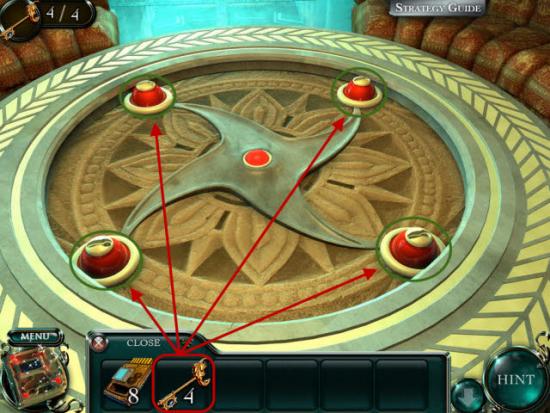
Place the four Keys, highlighted in Red, into the four Key Holes, highlighted in Green.
Click to turn each Key.
Once all Lights are Green, go Back one screen.
Head to Center Alcove.
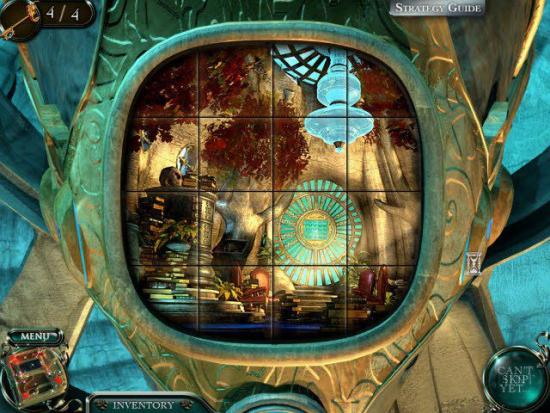
Click to flip the Tiles to complete the Image.
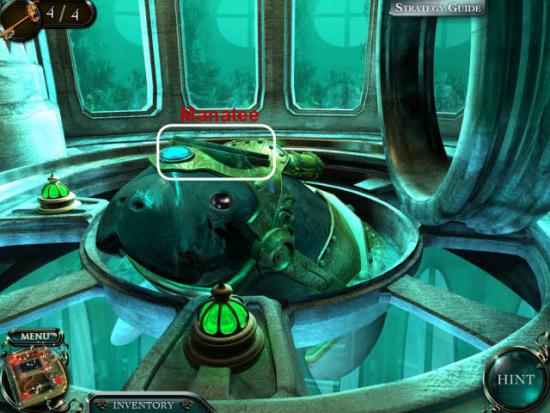
Click to Heal the Manatee.
Receive the Medallion of Winter.
Return Back to the Temple.
Head over to the Fall/Winter Doors.
Go up the Stairs between the Fall/Winter Doors.
Take the Right Path.
Place the Medallion of Winter, highlighted in Red, onto the Statue.
Jacobs Study

Head back to the Altar.
Examine the Periscope.
Receive the Autumn Seahorse.
Go back two screens.
Head to the Fall/Winter Doors.
Enter the Fall Door.
Head to the Pool.
Take the Left Path.
Take the Left Path once more.
Climb the Stairs.
Collector’s Edition: Gather the Diary Cartridge highlighted in Orange.
Examine the Door highlighted in Green.
Place the Autumn Seahorse into the Door.
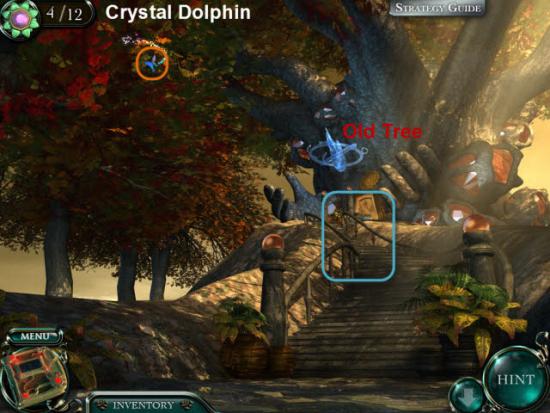
Enter the Tree.
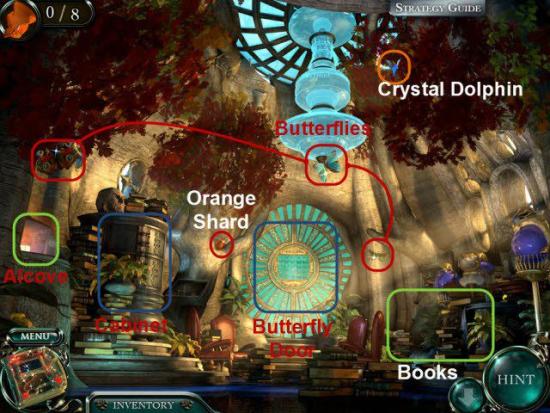
Gather the Crystal Dolphin highlighted in Orange.
Gather the Orange Shard and three Butterflies highlighted in Red.
Examine the Books on the right.
Gather the Orange Shard and three Butterflies highlighted in Red.
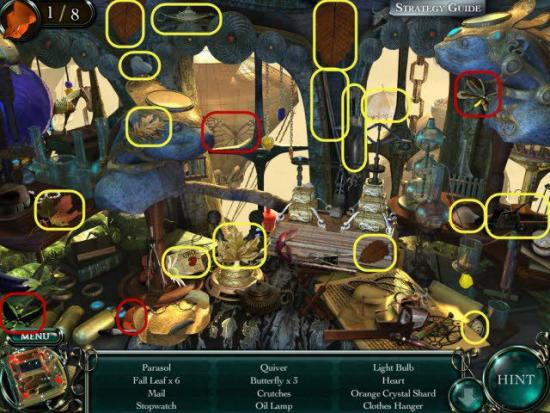
Gather the Hidden Objects highlighted in Yellow.

Head over to the Cabinet on the left.
Gather the Crystal Dolphin highlighted in Orange.
Gather the Butterfly highlighted in Red.
Find each of the Symbols on the Cabinet in the Scenery, highlighted in Yellow.
Cabinet will open once all Symbols have been found.
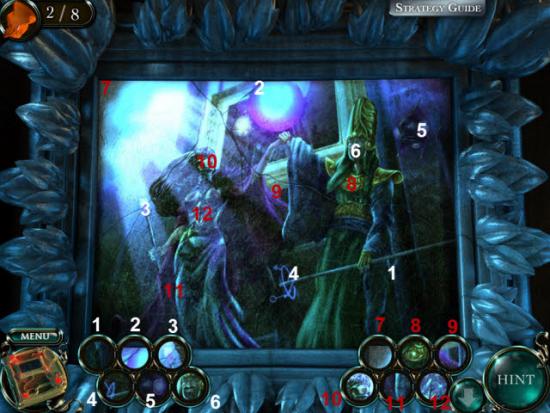
Examine the Painting.
Match the twelve small Images to the Painting.
Once all the smaller Images have been matched to the Painting, you will receive a Butterfly.
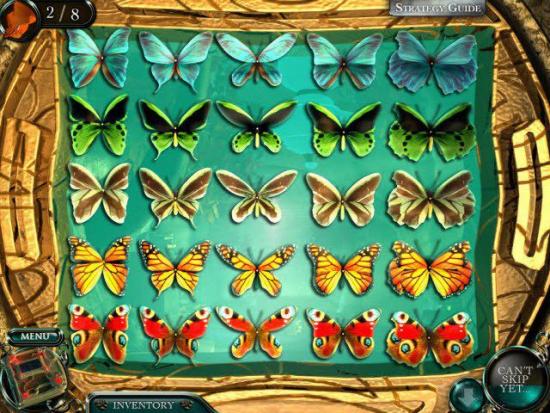
Move forward to the Butterfly Door.
Place the eight Butterflies into the matching Outlines.
Enter the Butterfly Door.
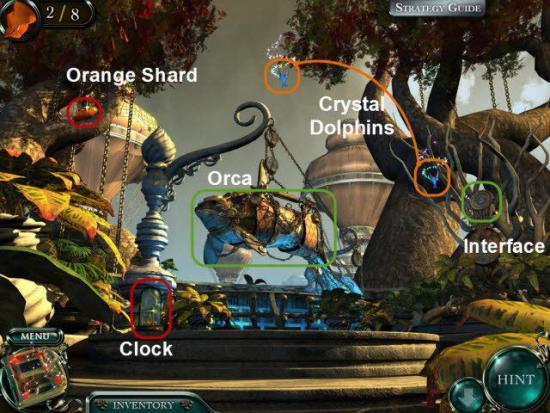
Gather the two Crystal Dolphins highlighted in Orange.
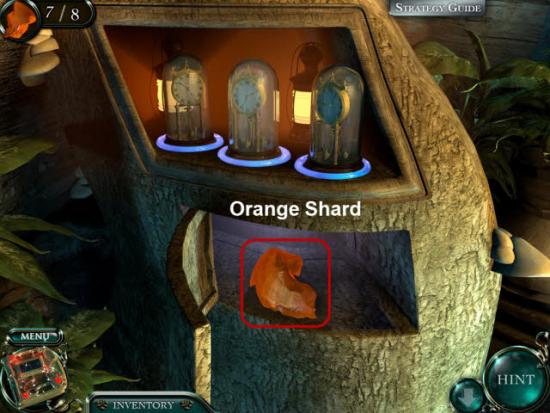
Gather the Orange Shard and Clock highlighted in Red.
Examine the Orca.
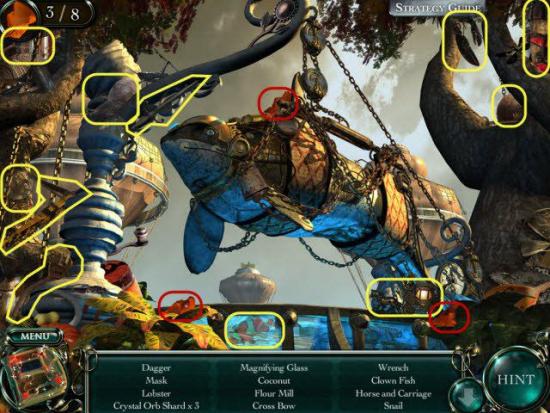
Gather the three Orange Shards highlighted in Red.
Gather the Hidden Objects highlighted in Yellow.
Go Back one screen.
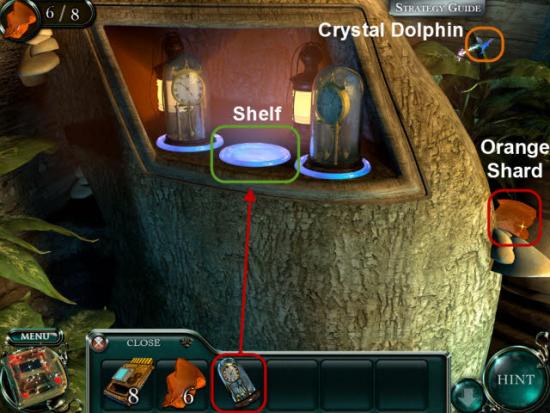
Examine the Alcove.
Gather the Crystal Dolphin highlighted in Orange.
Gather the Orange Shard highlighted in Red.
Place the Clock, highlighted in Red, onto the Shelf, highlighted in Green.
Door will open in the Trunk.
Gather the Orange Shard highlighted in Red.
Go Back one screen.
Head back to the Orca.

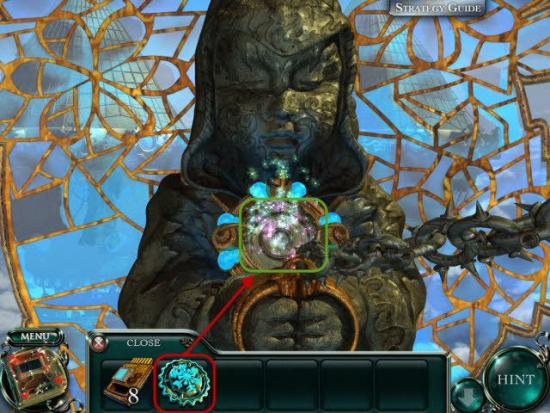
Examine the Interface.
Place the eight Orange Shards, highlighted in Red, into the Interface.
Reassemble the Orange Gem.
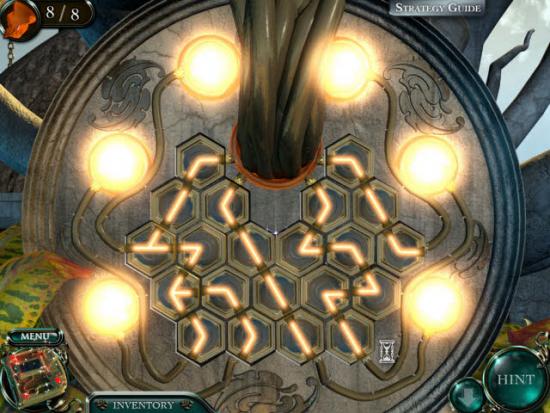
For this Mini-Game you need to Light up all the Orange Orbs.
Click to rotate the Pipes until all the Orange Orbs are Light.
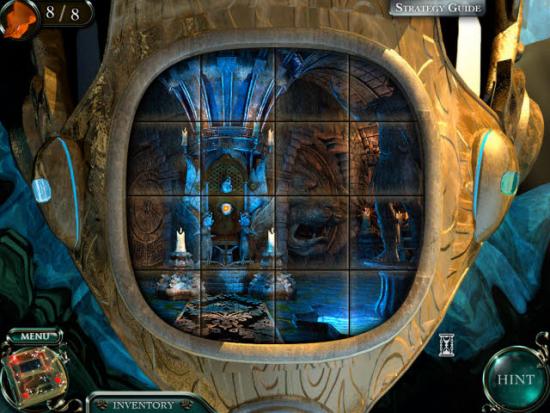
Flip the Tiles to complete the Image.
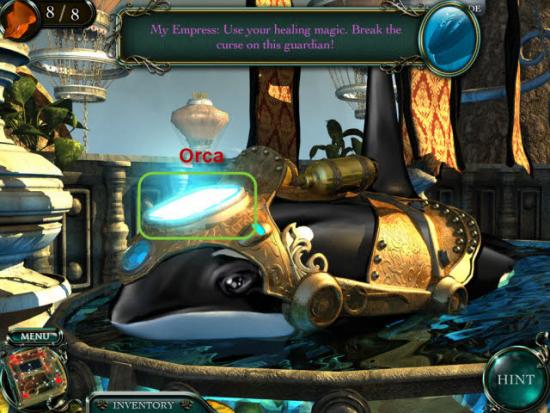
Click to Heal the Orca.
Receive the Jewel of Winter.
Return to the Temple.
Head to the Fall/Winter Doors.
Climb the Stairs between the Fall/Winter Doors.
Take the Right Path.
Place the Jewel of Winter, highlighted in Red, onto the Statue.
Pandora’s Castle
Return to the Altar, one more time, and Examine the Periscope.
Receive the Winter Seahorse.
Go Back two screens.
Head to the Fall/Winter Doors.
Enter the Winter Door.
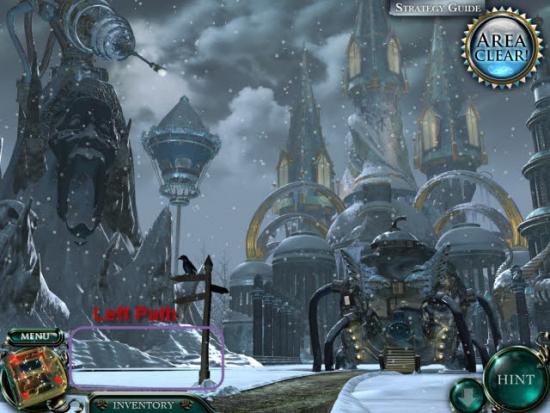
Continue into Winter till reach the first Branch.
Take the Left Path.
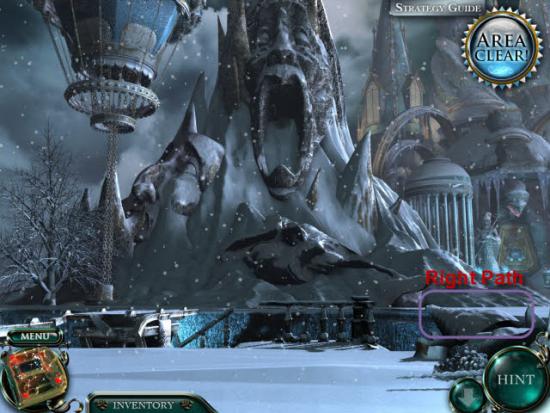
At the next Branch take the Right Path.
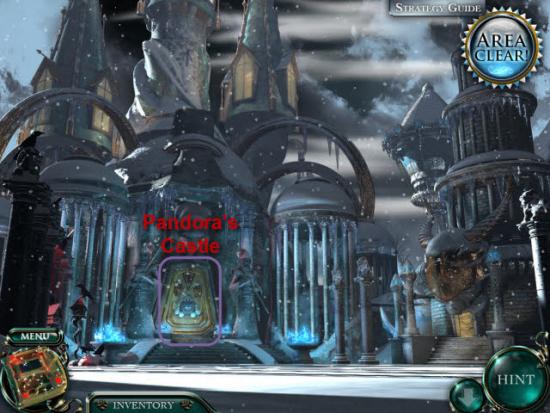
Move forward toward Pandora’s Palace.
Examine the Door.
Place the Winter Seahorse into the Door.
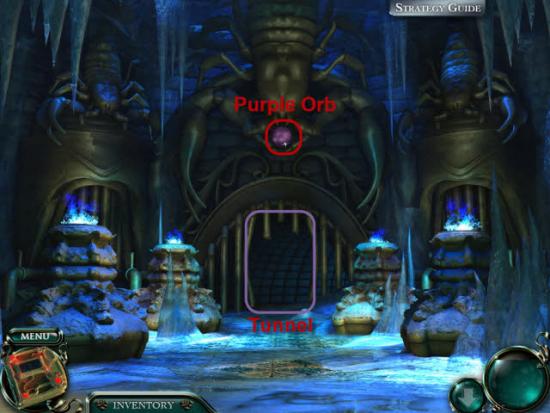
Enter the Palace.
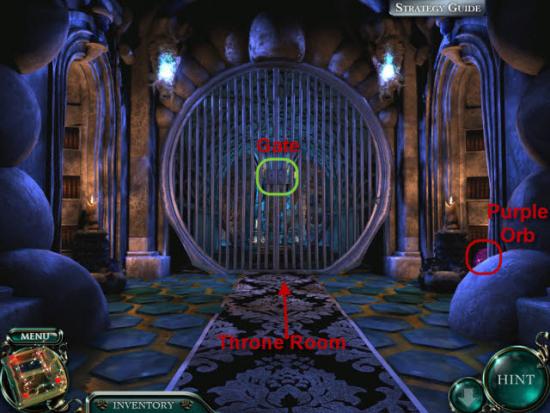
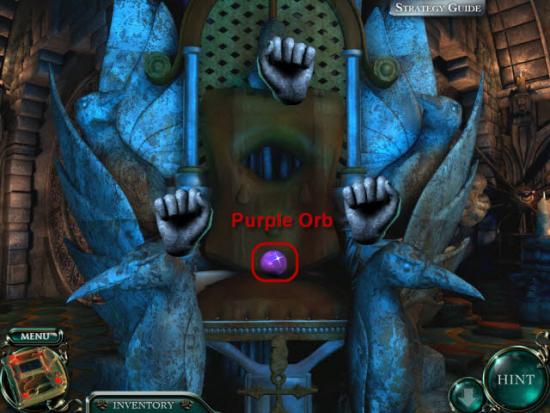
Gather the Purple Orb highlighted in Red.
Click to open the Metal Gate.
Enter the Throne Room.
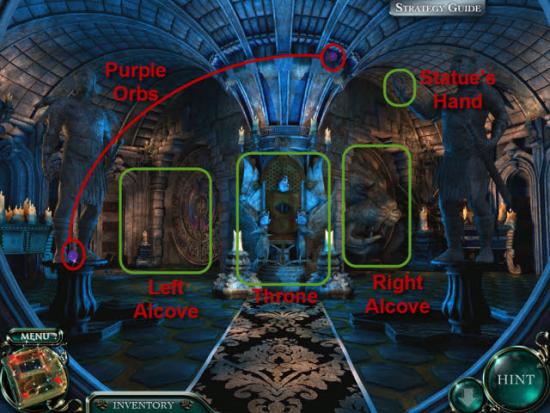
Gather the two Purple Orbs highlighted in Red.
Click on the Statue’s Hand highlighted in Green.
Examine the Right Alcove.
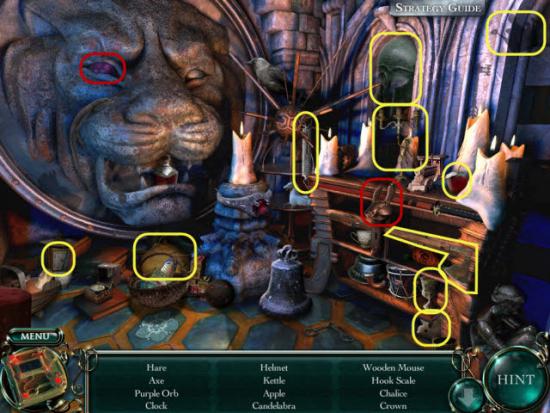
Gather the Purple Orb and Metal Hare highlighted in Red.
Gather the Hidden Objects highlighted in Yellow.
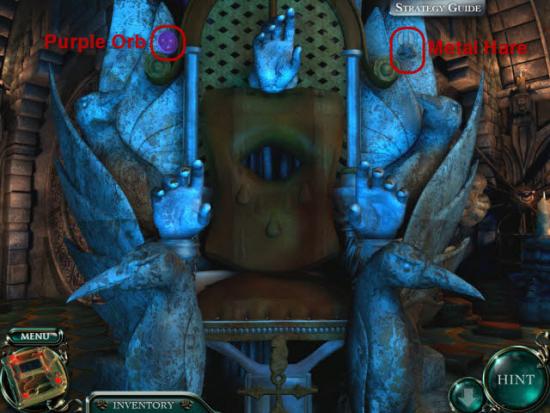
Examine the Throne.
Gather the Purple Orb and Metal Hare highlighted in Red.
Go Back one screen.
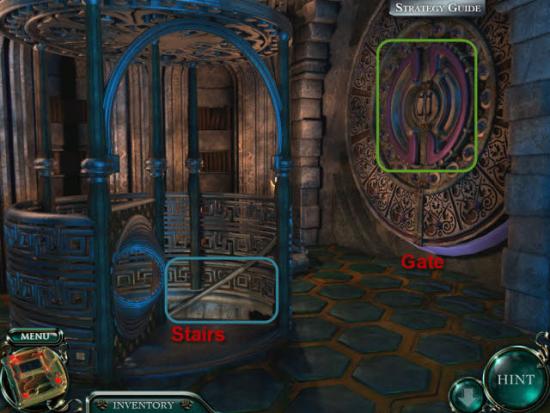
Head to the Left Alcove.
Head down the Stairs.
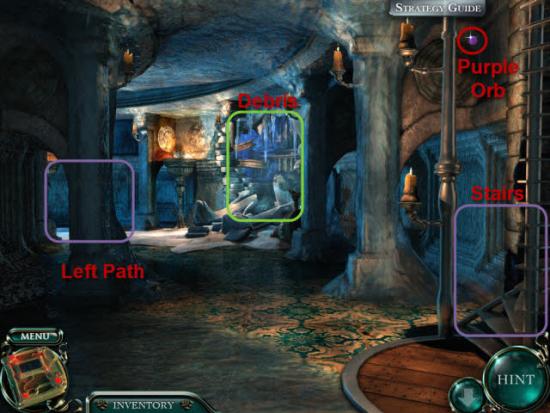
Gather the Purple Orb highlighted in Red.
Examine the Debris highlighted in Green.
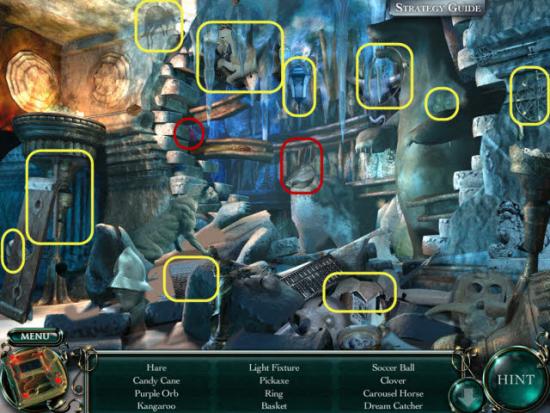
Gather the Purple Orb and Metal Hare highlighted in Red.
Gather the Hidden Objects highlighted in Yellow.
Head down the Left Path.
Gather the Purple Orb highlighted in Red.
Move Forward.
Gather the Purple Orb highlighted in Red.
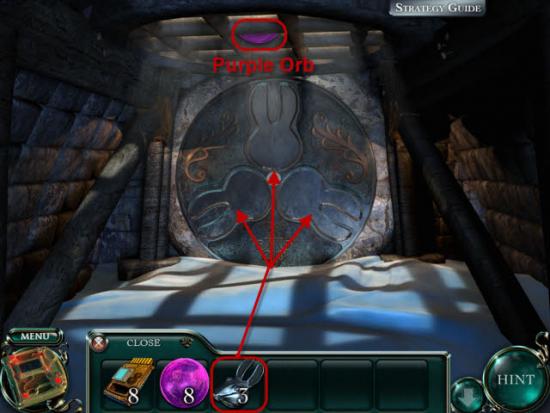
Place the three Metal Hares, highlighted in Red, into the Door Panel, highlighted in Green.
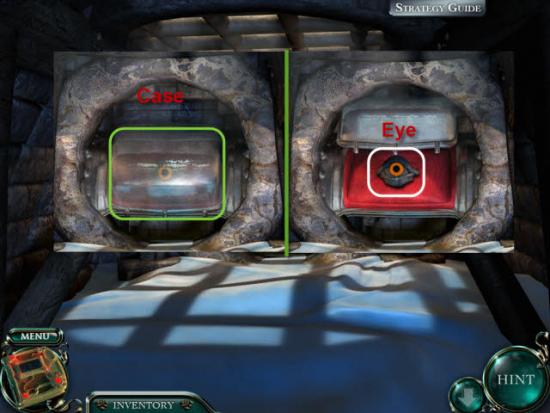
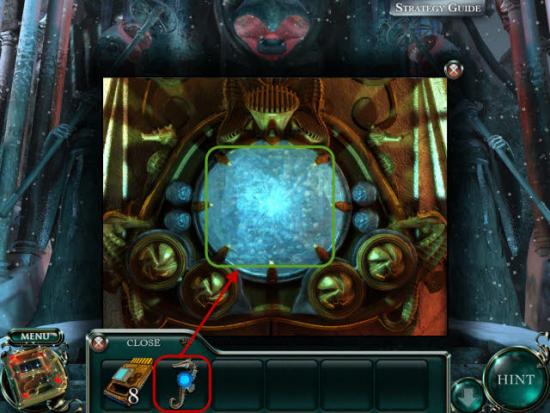
Open the Case and gather the Eye highlighted in White.
Return back up Stairs, to the Throne Room.
Examine the Throne once again.
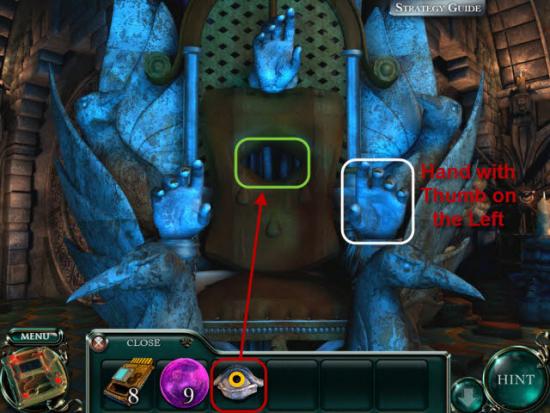
Place the Eye, highlighted in Red, into the Throne, highlighted in Green.
For this Mini-Game you must follow the shuffling of the Hands and find the Hand holding the Eye.
If you lose track of the Hand holding the Eye, always choose the Hand with the Thumb on the Left Side of the Hand.
That Hand will always hold the Eye.
Find the Eye four times.
Gather the Purple Orb highlighted in Red.
Go Back one Screen.
Head back to the Left Alcove.
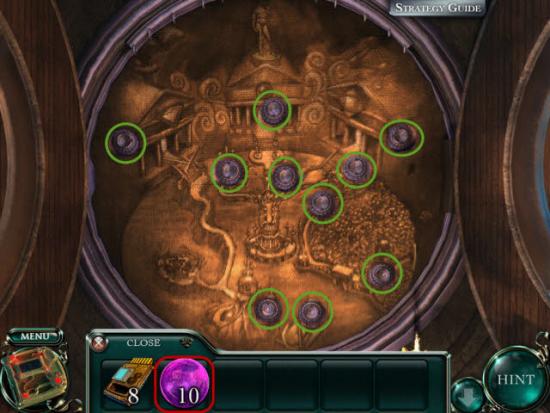
Examine the Gate, twice.
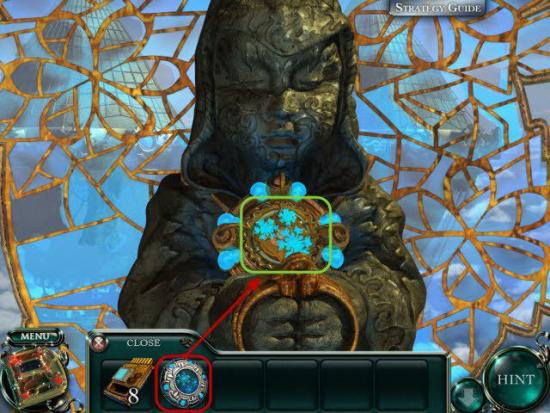
Place the ten Purple Orbs onto the Image in the Little Pedestal highlighted in Green..
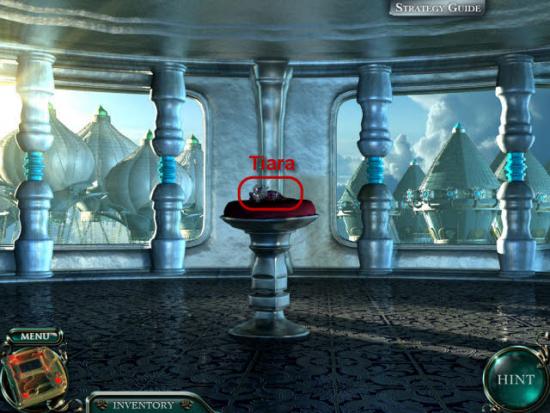
Examine the Throne once more.
Gather the Tiara highlighted in Red.
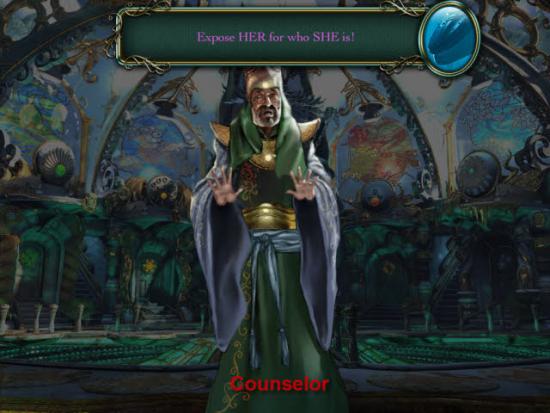
When the Whale Guardian directs you, click on your Counselor to heal him.
Congratulations you have completed Empress of the Deep 2: Song of the Blue Whale.
If you have the Collector’s Edition, you now have access to one final Area.
Collector’s Edition Bonus Chapter
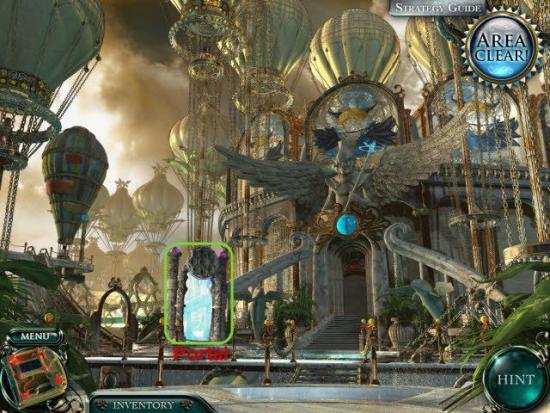
Head Back two screens to the Landing Platform.
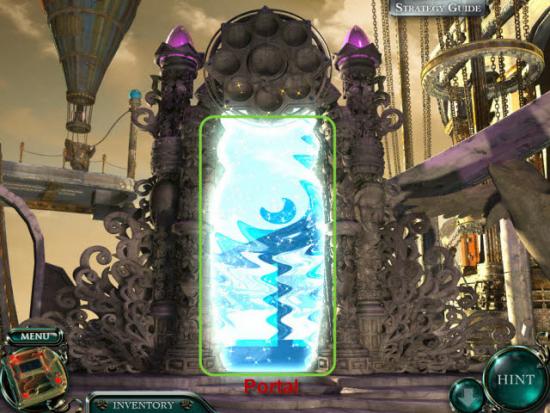
Head to the Portal.
Enter the Portal.
Move to the Desk.
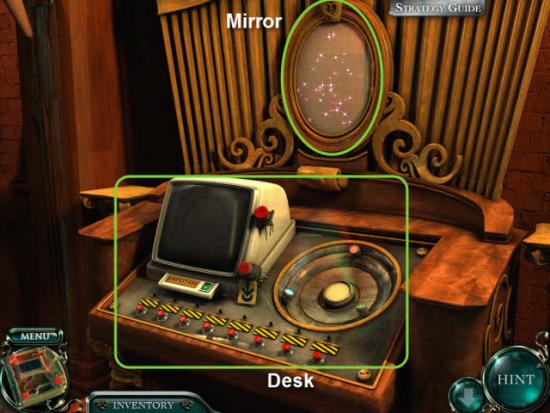
Examine the Computer.
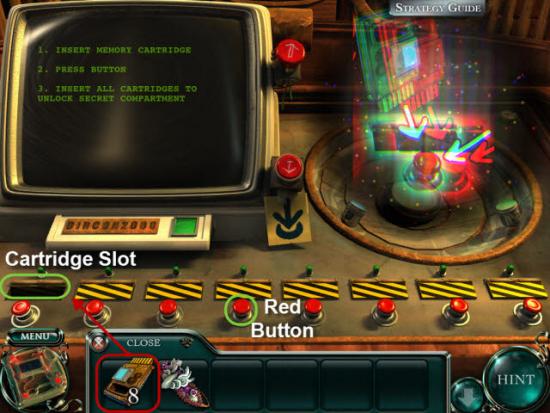
Place the Cartridge, highlighted in Red, into the Slot, highlighted in Green.
Push the Red Button under the Cartridge.
Read the Entry.
Repeat for all eight Cartridges.
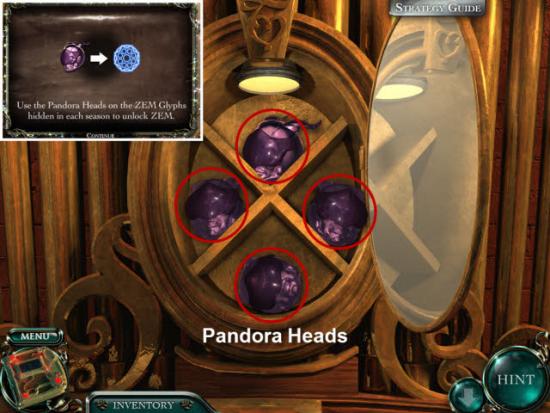
After placing all Eight Cartridges and reading the Entries, head Back one screen.
Examine the Mirror.
Gather the four Pandora Heads highlighted in Red.
Return to the Landing.
Head into the Temple.
Move to the Spring/Summer Doors.
Enter the Spring Door.
Head to the Spring Fork.
Take the Left Path.
Head to the three way Split.
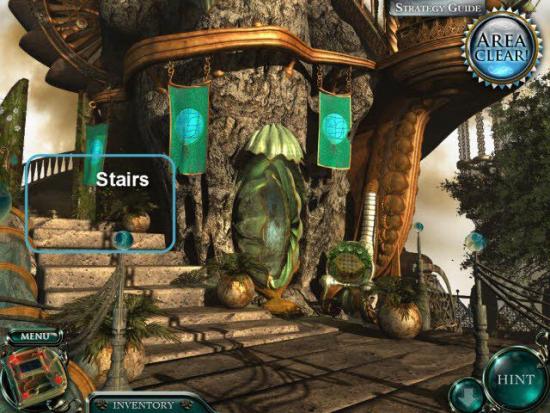
Climb up the Stairs.
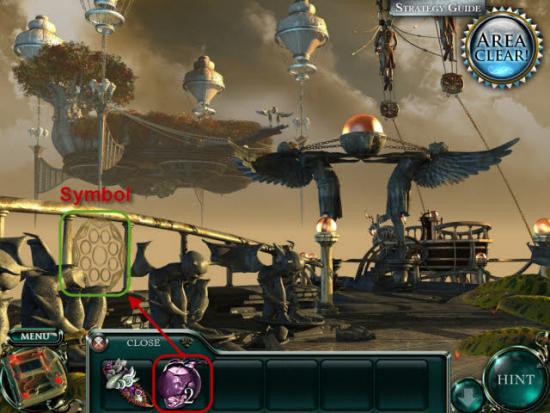
Place the Pandora Head, highlighted in Red, onto the Symbol, highlighted in White.
Return to the Temple.
Enter the Summer Door.
Climb the Stairs to the Sun.
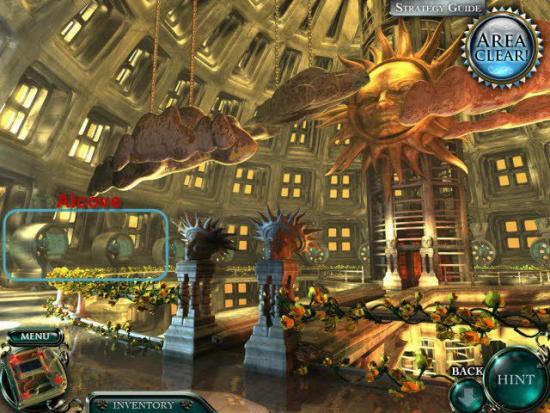
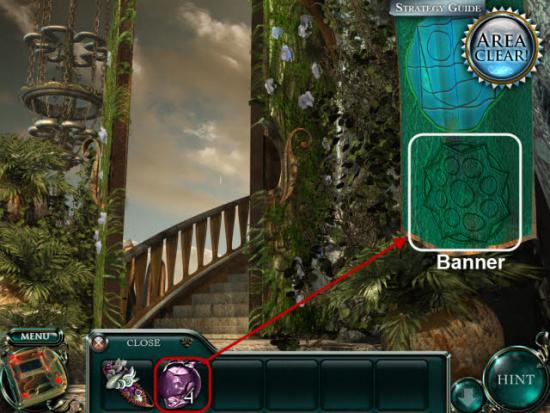
Examine the Alcove on the Left.
Place the Pandora Head, highlighted in Red, onto the Banner, highlighted in Green.
Return to the Temple.
Head over to the Fall/Winter Doors.
Enter the Fall Door.
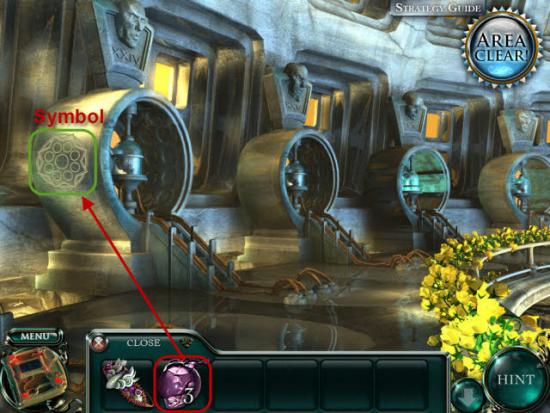
Place the Pandora Head, highlighted in Red, onto the Symbol, highlighted in Green.
Return to the Temple.

Enter the Winter Door.
At the first Branch, take the Left Path.

At next Branch, take the Right Path.
Head over to the Tower.
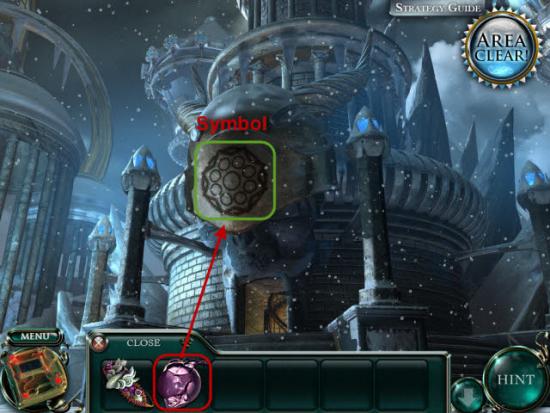
Place the Pandora Head, highlighted in Red, onto the Symbol, highlighted in Green.
Return to the Landing.
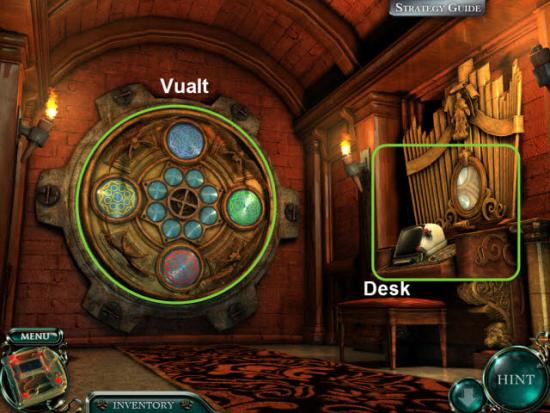
Enter the Portal.
Enter into the Vault.
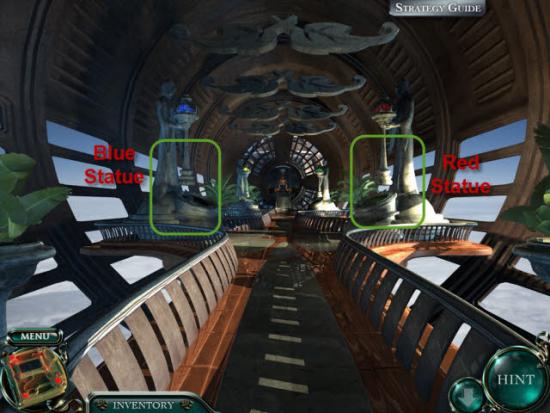
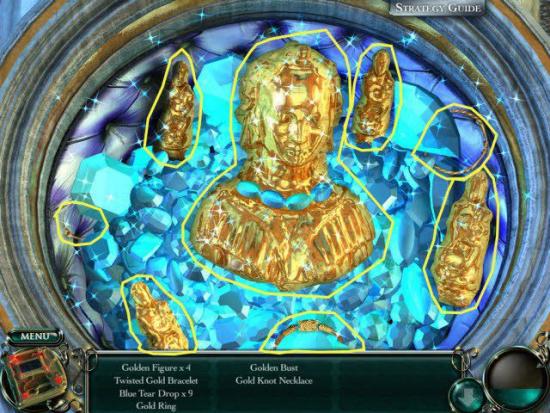
Examine the Red Statue on the right.
Match the twelve Small Images to the Picture.
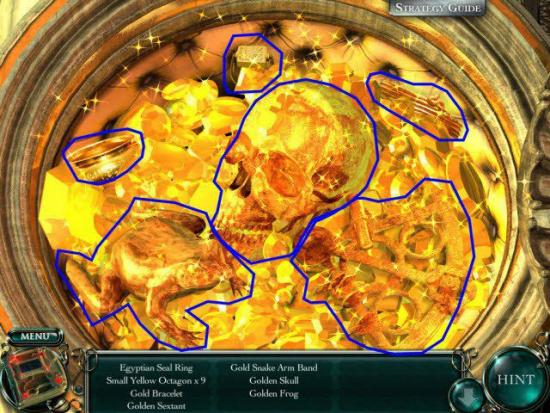
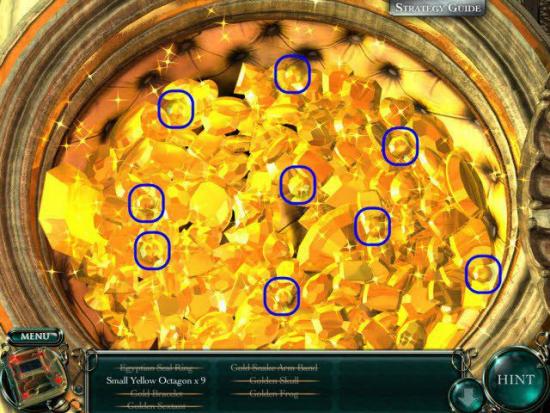
Gather the Hidden Objects highlighted in Yellow.
Gather the Hidden Objects highlighted in Yellow.
Examine the Blue Statue on the right.
Match the twelve Small Images to the Picture.
Gather the Hidden Objects highlighted in Yellow.
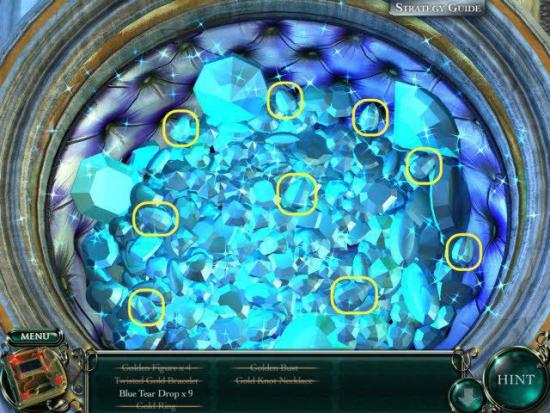
Gather the Hidden Objects highlighted in Yellow.
Head forward down the passageway.

Examine the Green Statue on the right.
Match the twelve Small Images to the Picture.
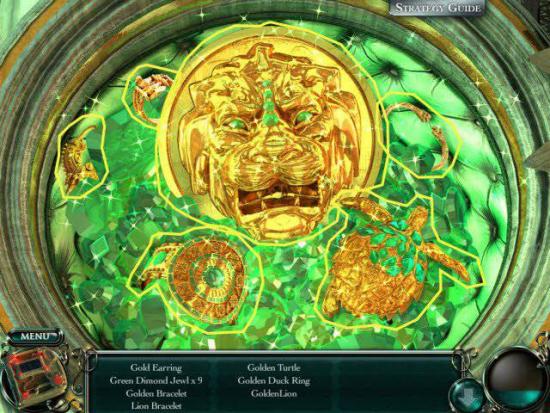
Gather the Hidden Objects highlighted in Yellow.
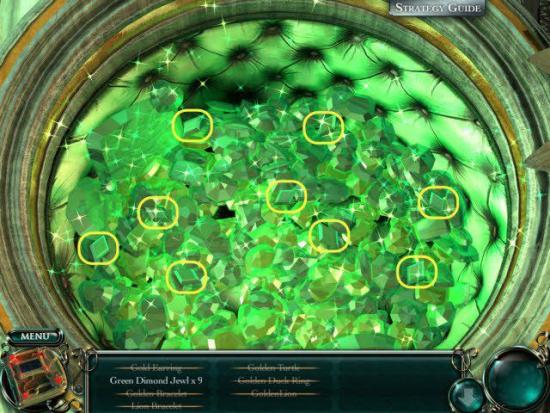
Gather the Hidden Objects highlighted in Yellow.
Examine the Yellow Statue on the right.
Match the twelve Small Images to the Picture.
Gather the Hidden Objects highlighted in Blue.
Gather the Hidden Objects highlighted in Blue.
Head forward to the Lounge.
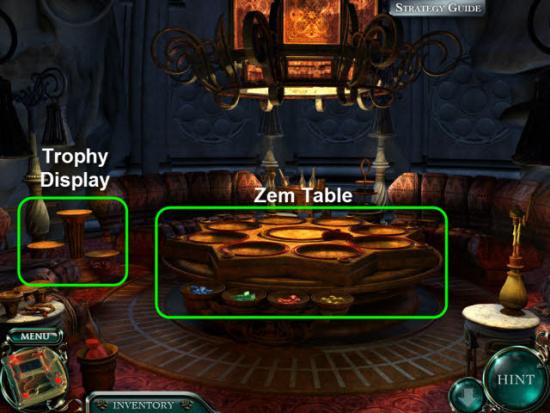
Click on the Table to play a game of Zem.
Examine the Display on the Left.
This is where your Zem Trophy’s will be Displayed.
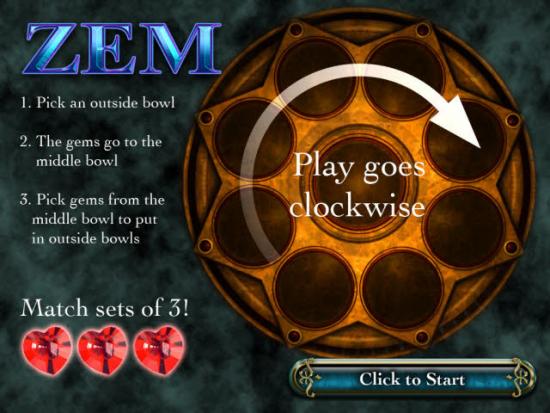
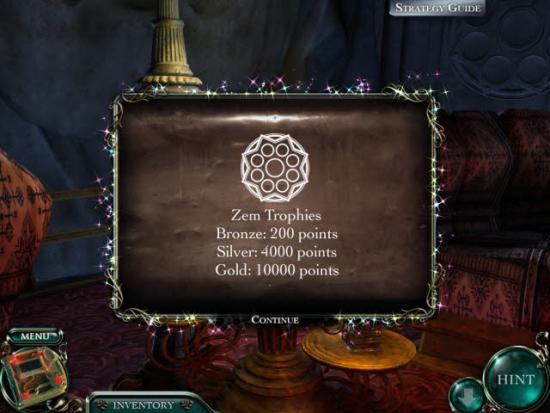
Enjoy the Zem Mini-Game and see if you can achieve all three Trophy’s.

More articles...
-
Grow A Garden 2 Base Price List
What's the most valuable crop? -
Evomon Best Starter [Leafbun, Blazpup, or Bubble?]
Grass-type, Fire-type, or Water-type? -
Evomon Tier List [META and BEST Evomon]
The Evomon dream team.