
Best Horror Games On Itch.io – July 2026
Across a bounty of subgenres.
Grow A Garden 2 Base Price List
What's the most valuable crop?![Evomon Types Guide [Strengths, Weaknesses, Resistance]](/wp-content/uploads/2026/06/evomon-types.jpg "Evomon Types Guide [Strengths, Weaknesses, Resistance]")
Evomon Types Guide [Strengths, Weaknesses, Resistance]
Your companion guide during battles.
![[Roblox] Evomon Shiny Hunting Guide – Including Prismatic and Pris Shinies!](/wp-content/uploads/2026/06/evomon-shiny-hunting-guide.jpg "[Roblox] Evomon Shiny Hunting Guide – Including Prismatic and Pris Shinies!")
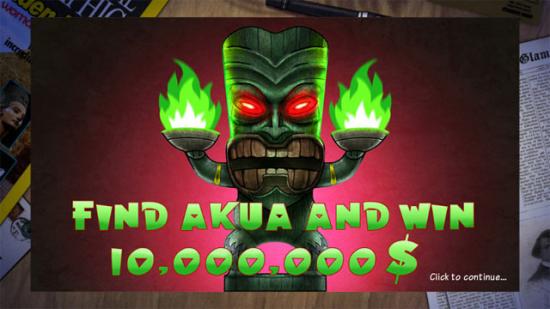
Eden’s Quest: The Hunt for Akua Walkthrough
Welcome to the Eden’s Quest: The Hunt for Akua walkthrough on Gamezebo. Eden’s Quest: The Hunt for Akua is an adventure game created by OUAT Entertainment. This walkthrough includes tips and tricks, helpful hints, and a strategy guide to how to complete Eden’s Quest: The Hunt for Akua.


- Prefer Gamezebo on Google

General Information
Welcome to the Eden’s Quest: The Hunt for Akua walkthrough on Gamezebo. Eden’s Quest: The Hunt for Akua is an adventure game created by OUAT Entertainment. This walkthrough includes tips and tricks, helpful hints, and a strategy guide to how to complete Eden’s Quest: The Hunt for Akua.
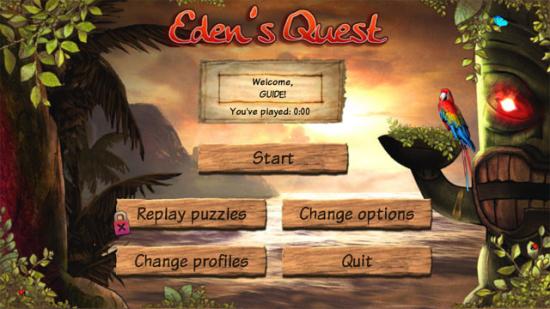
Main Menu

- The Start button begins the game with the currently selected profile. When a profile has been started, the Start button is replaced with the Resume Game button which continues the game from the position that has been reached.
- The Replay Puzzles button is unlocked after the first totem challenge has been completed. You can choose to replay totem challenges, tangram puzzles, lock puzzles and the YoX game.
- The Change Profiles button displays the profile window where up to four profiles can be created. Click a blank profile space to create a new profile, press the Delete button to remove a profile from the list, press the Rename button to change a profile name, press the Return button to return to the main menu with the previous profile, or press the OK button to return to the main menu with a newly selected profile.
- The Change Options button displays a window where there are sliding bars to change the music and sound volume. There is an option for full screen mode, the screen resolution can be changed and the Credits button can be selected to view a list of people involved in making this game.
- The Quit button exits the game if the tick is selected or returns to the main menu if the cross is selected.
Game Basics
- The standard cursor is the white arrow. Move the cursor around the screen until it becomes green over a hotspot. A green arrow with no icon indicates that the area can be examined. A green arrow with a blue gear icon means that the hotspot (such as a challenge totem) can be activated, while a speech bubble cursor means that a conversation can be started.
- The aim in the game is to travel through the different zones of the island to reach the treasure. On the way, you will have to play a wide variety of different challenges and puzzles. Challenges are found by selecting the challenge totems, lock puzzles are started by examining orange gates, YoX puzzles can be found by talking to Douglas and Heidi at different points in the game, and tangram puzzles are found at the end of each island zone. There are also some jigsaw puzzles and scenes where a number of objects must be found.
- A tangram piece is awarded after completing each totem challenge, and these pieces are needed to solve the tangram puzzle at the end of the island zone. All of the challenge totems must be completed in order to have the required number of tangram pieces.
- Conversations occur with characters at different stages of the game. You often have the choice of two or more options in conversations, where one presses for more information while the other quits the conversation. Asking a character for more information on a subject is optional, as you can still complete the game by quitting a conversation early.
- Coins can be found throughout the game which are used to give hints in the challenge totem puzzles. The method of finding the coins will change as you progress through the game. To start with, the coins will glitter slightly in the locations to reveal their location. Further on in the game when it becomes dark, the flashlight can be used to find coins. When it becomes light again later on in the game, the detector device can be used to reveal the location of all the coins in an area.
- Gates will frequently block off areas of an island. A red gate shows that a red totem puzzle must be completed in the area. An orange gate can be selected to play a lock puzzle. A green gate can be passed.
- Pressing the home button at the bottom-left corner of the game window displays the game menu, where there are options to resume the game, return to the main menu, quit the game or view the diary. The diary displays tabs for help, documents that have been found and Eden’s memos.
- The mini-map displayed at the bottom-right corner of the game window shows the current location in orange with green dots to represent other nearby locations. The magnifying glass can be selected on the mini-map to show the full map, where the zones of the island are shown and the mouse can be moved over the dots to show the number of totems that remain.
Types of Puzzles
Jigsaw puzzles display a number of pieces that have to be rotated and placed in the correct locations on a frame. Left click a piece to rotate it and hold down the left mouse button over a piece to drag it.
Challenge puzzles are found by selecting the challenge totems in the game. There are a total of 81 challenges of all different types, ranging from some that ask simple questions which can be answered by clicking the correct button to more complex challenges that require multiple steps in order to complete.
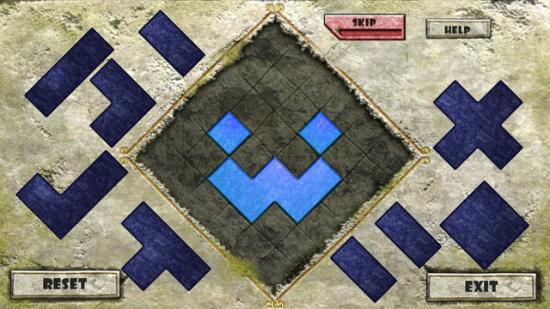
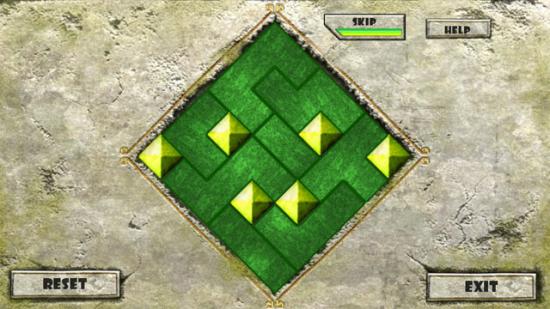
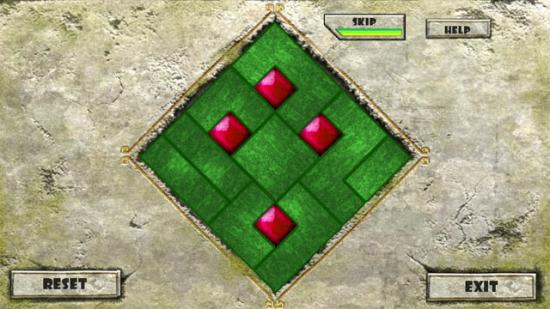
After all challenge totems have been completed in a zone, selecting the final totem will reveal a tangram puzzle. The aim is to rotate the pieces so that they all fit into the tangram. The skip button becomes active on tangram puzzles after one minute.
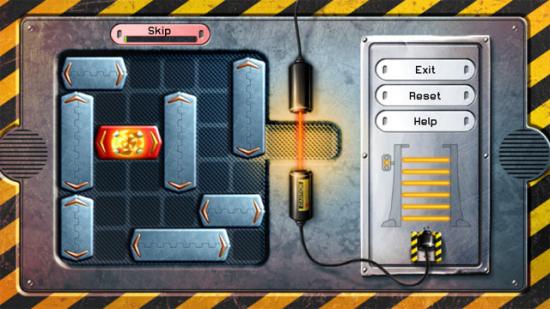
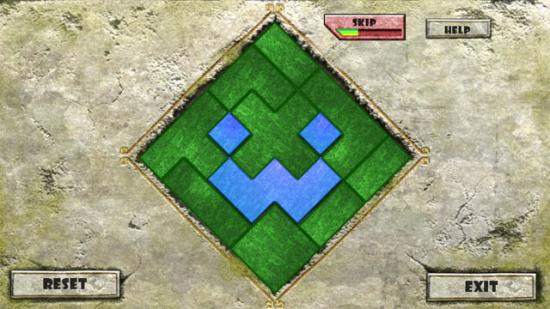
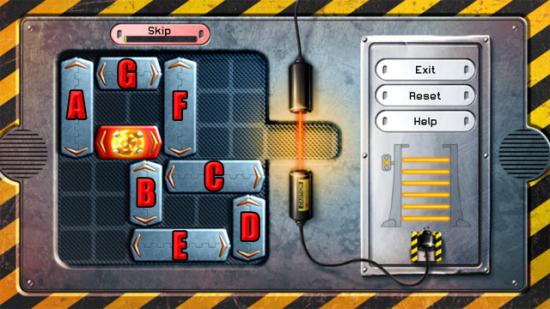
The aim in the lock puzzles is to move the red block to the gap at the right side of the grid. To do this requires moving all of the blue blocks out of the way first, some of which can moved horizontally and others vertically. The skip button becomes active on lock puzzles after one minute.
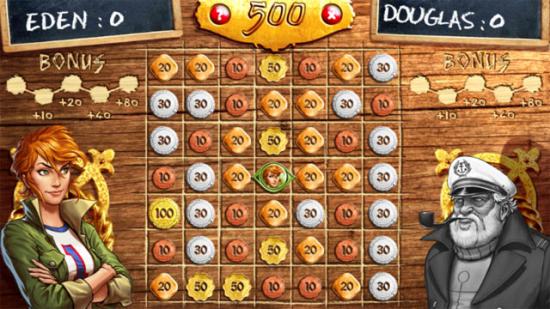
YoX is a game that is played against Douglas and Heidi at different points in the game. Eden always moves horizontally across the board while her opponent always moves vertically. The aim is to be the first to score 500 points. Collecting a string of coins which are the same value gives bonus points.
WALKTHROUGH – Prologue
Office
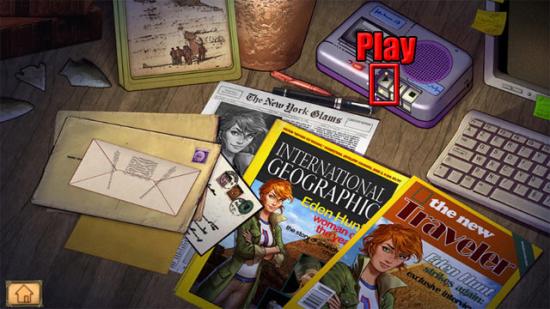
The game starts in Eden’s office. Select the play button on the answering machine:
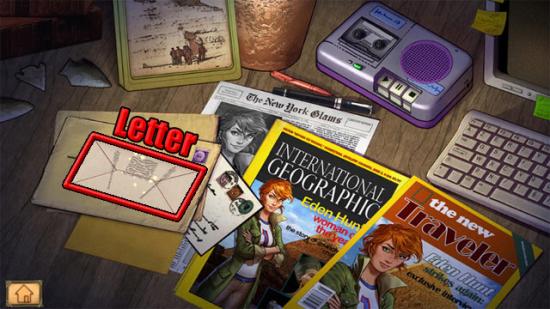
The voice mentions a letter that Eden should have received, and says that a boat will await her at Bay Harbor on Friday. Select the letter:
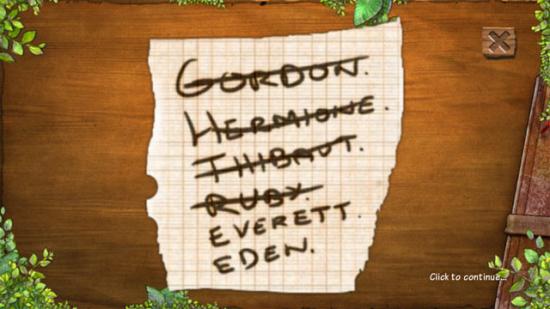
Four pieces of a document were found in the letter. The aim is to put the pieces of the document in the correct places on the frame. Left click a piece to rotate it, or hold the left mouse button down on a piece to drag it. Rotate and move the pieces to the following positions:
Select the envelope to take three hint coins.
Boat
Several days later, Eden is on the boat travelling to Akua Island. Douglas mentions stone statues on the island that issue challenges. Shortly after the conversation, the boat docks at Akua Island.
Landing Stage
Select Eden and the woman standing next to her can now be selected. Select Maeva:
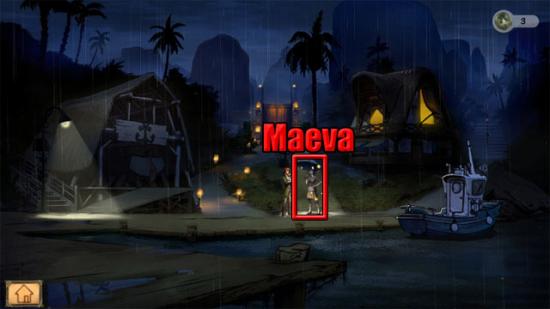
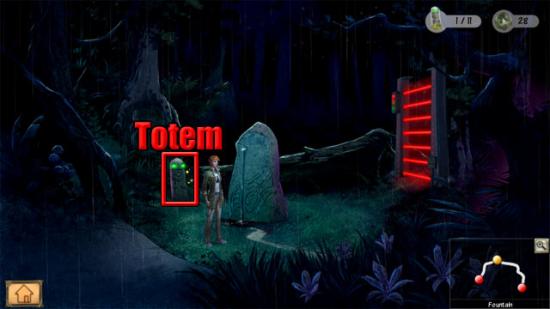
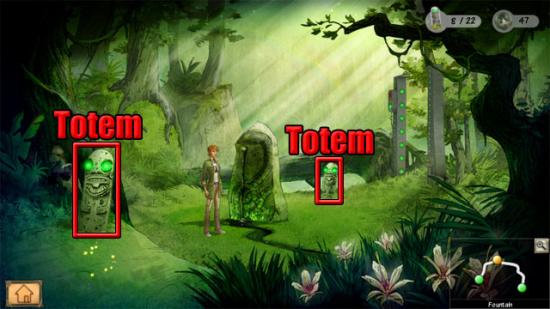
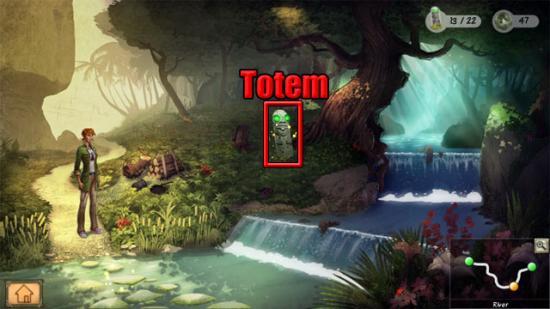
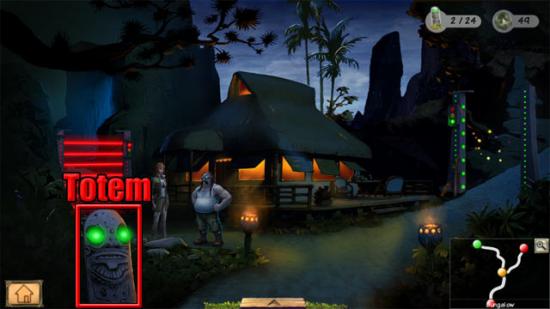
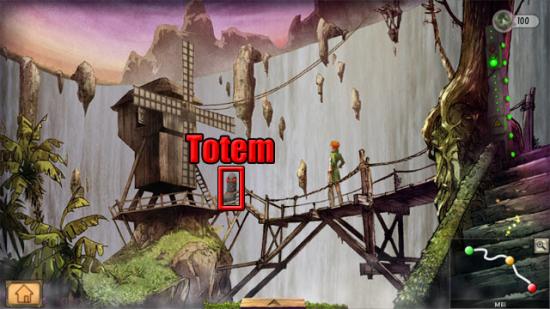
Maeva explains that she welcomes candidates to the island and gives out instructions on the hunt. The main goal is to find the treasure in the Cave of Akua, but a series of challenges must be completed to find the cave. After the conversation has ended, select the totem:
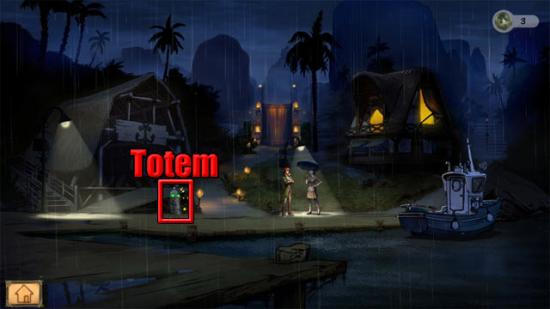
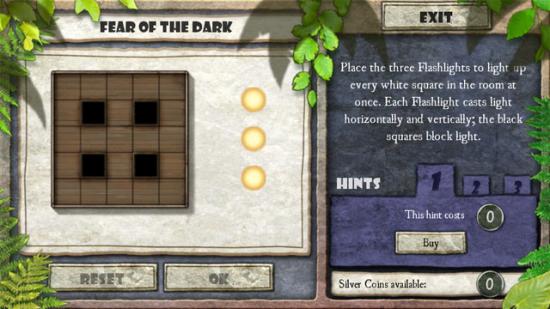
Challenge 001 – Fear of the Dark
The aim in this challenge is to position the three flashlights so that every white square in the room is illuminated. Put the flashlights on the following squares:
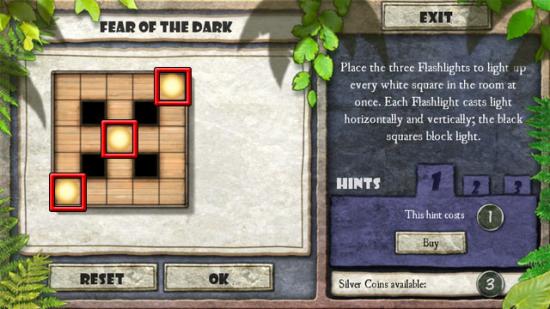
Press the OK button to complete the challenge.
Landing Stage
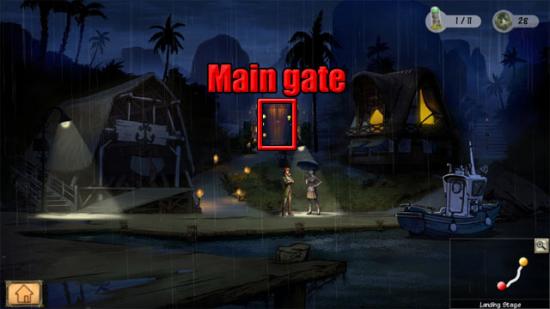
Press the OK button to complete the puzzle. Maeva gives Eden 25 silver coins and a map of the island. The mini-map will now be displayed at the bottom-right corner of the screen, but the map can be enlarged by pressing the magnifying glass icon on the mini-map. Press the magnifying glass icon again to put the map away. Maeva now tells Eden to go through the main gate to visit Gordon. Move forward through the main gate:
Chapter Chapter 1
Bungalow
Gordon explains how the portals on the island work, with red being shown when a totem puzzle needs to be completed first, orange being shown when a brainteaser needs to be completed first and green being shown when the portal is open. The portal in this area is currently broken, so select the orange gate for now.
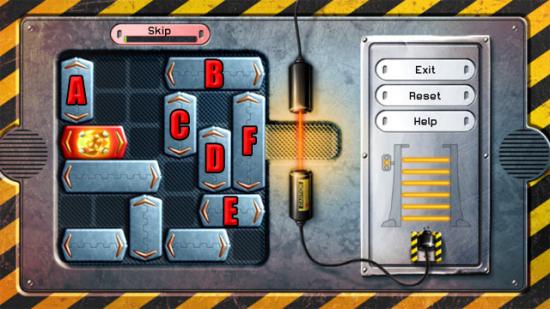
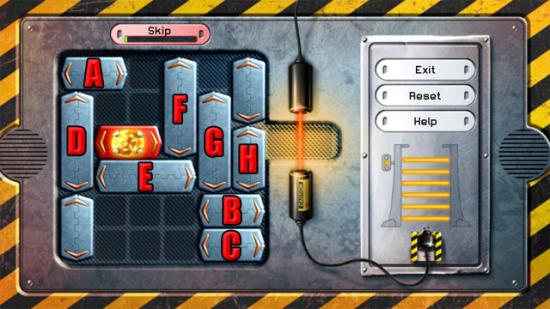
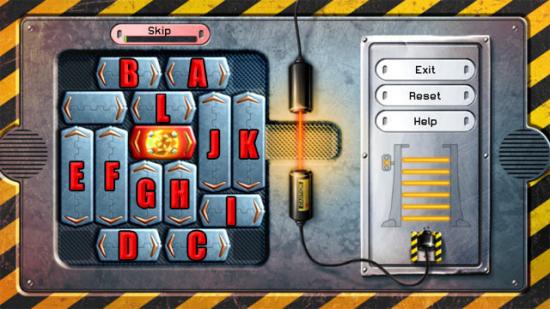
Lock Puzzle 1
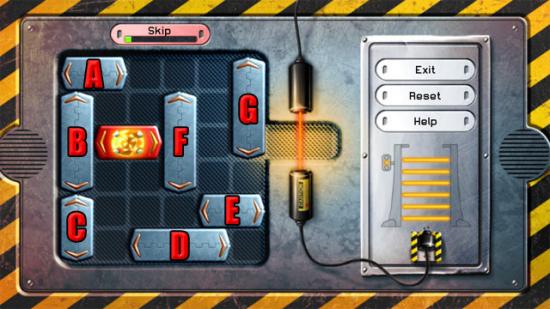
Follow the directions below to complete the lock puzzle:
1 – A: Right 1
2 – B: Up 1
3 – C: Up 1
4 – D: Left 2
5 – E: Left 3
6 – F: Down 2
7 – G: Down 3
8 – Red: Right 5
Bungalow
After solving the first lock puzzle, the orange bars will disappear from the gate and it will become green. Gordon offers to show you the different zones on the map of the island, which you can choose to accept or decline. Move through the green gate to the fountain.
Fountain
Eden finds a piece of the magazine cover after arriving in the area. Find the remaining seven pieces of the magazine cover:
Rotate and move the pieces to the following positions:
Examine the totem:
Challenge 002 – Macaw Blimey!
The aim in this challenge is to give the correct answer to the macaw question. With the boat travelling to the island at a speed of 9 mph, it will take 1 hour for the boat to make the 9-mile journey to the island. The macaw flies at a speed of 34 mph. Select the following answer:
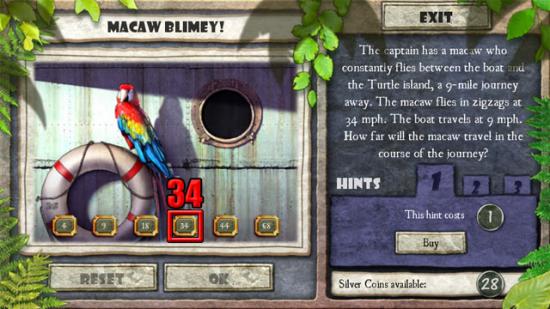
Press the OK button to complete the challenge.
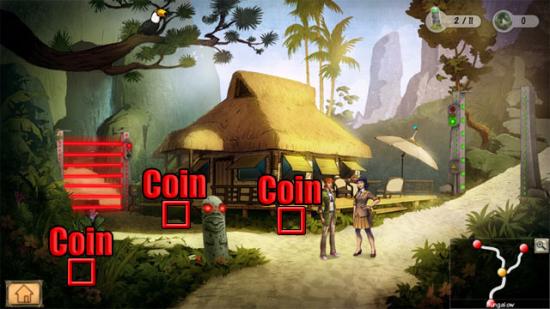
Fountain
After completing the challenge, move left to the bungalow.
Bungalow
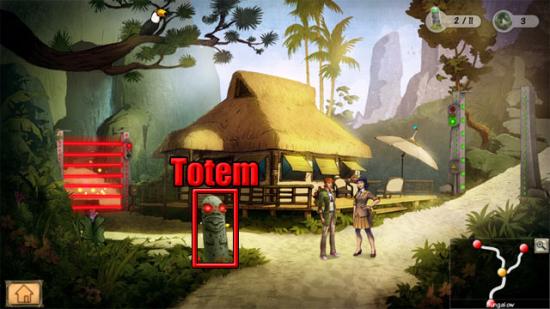
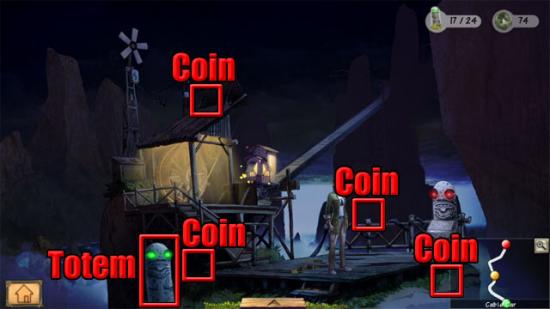
Talk to Maeva: She tells Eden that there are rivals on the island that are also looking for the treasure. After the conversation, Eden sleeps until morning. When she wakes up, she finds that all of her hint coins have been stolen. Exit the conversation with Maeva and select the following places to find coins:
After finding the coins, select the totem to play a challenge:
Challenge 003 – Chocky-Block!
The aim in this challenge is to place the ingredients on the board so that the correct chocolate deserts can be made when reading horizontally or vertically:
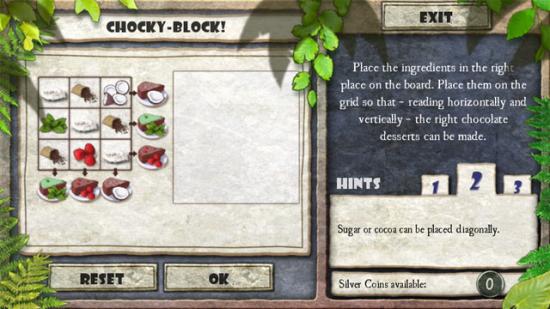
Press the OK button to complete the challenge.
Bungalow
After completing the challenge, select the orange gate to play a lock puzzle.
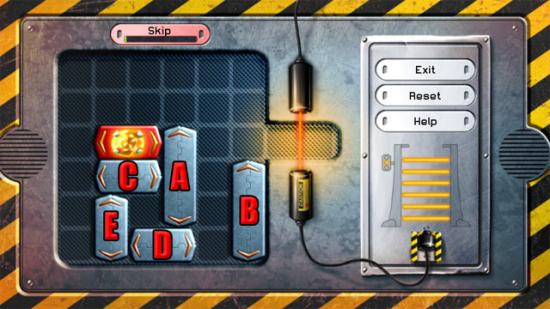
Lock Puzzle 2
Follow the directions below to complete the lock puzzle:
1 – Red: Right 1
2 – A: Down 1
3 – B: Left 3
4 – C: Up 1
5 – D: Up 2
6 – E: Left 1
7 – F: Down 2
8 – Red: Right 5
Bungalow
After completing the lock puzzle, move forward to the reservoir.
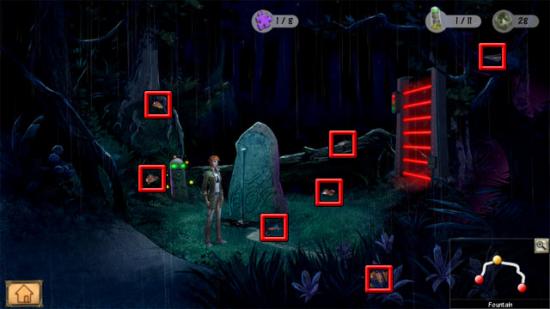
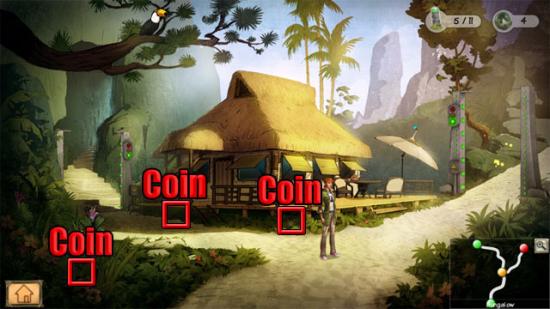
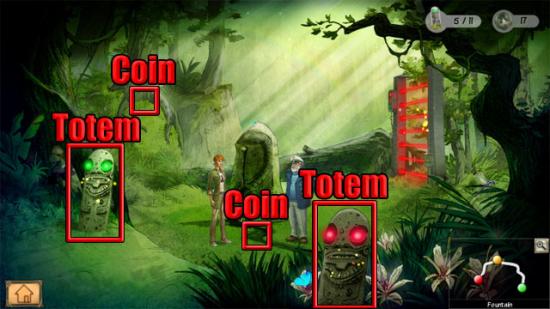
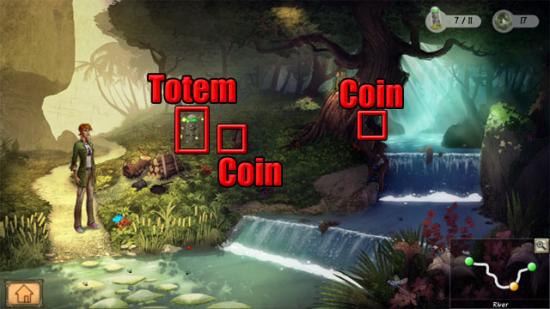
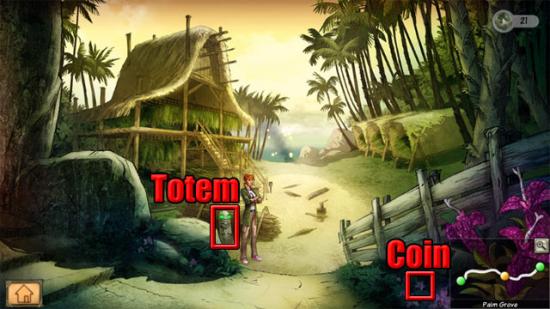
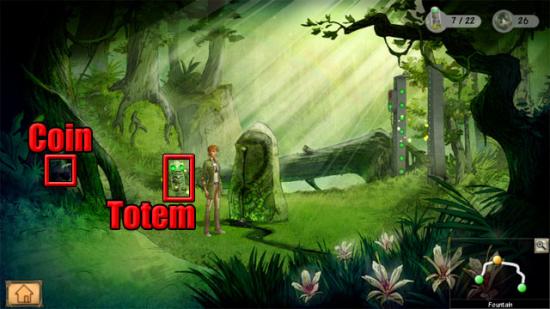
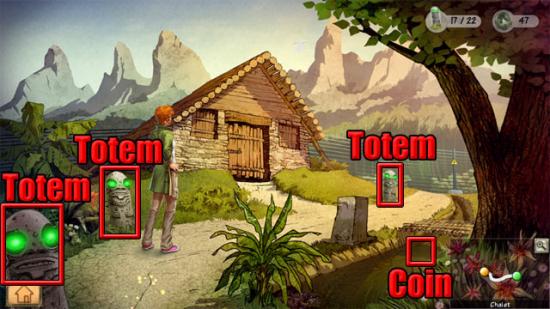
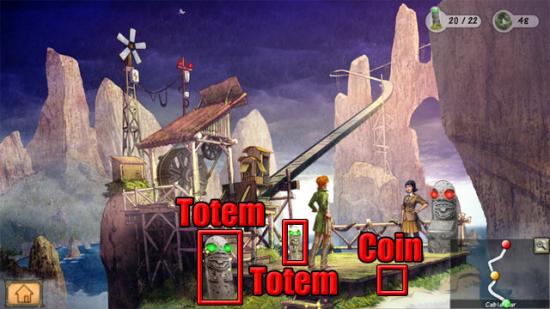
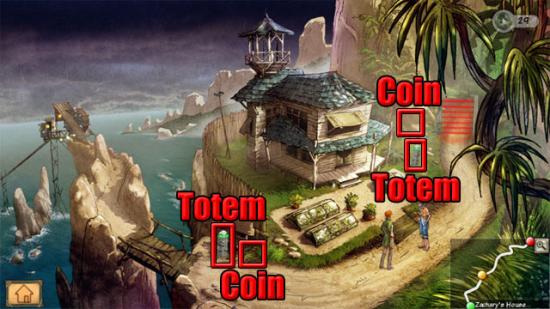
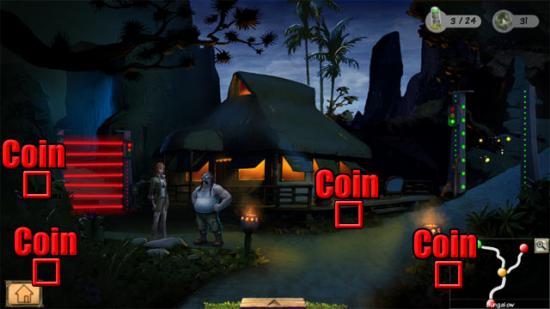
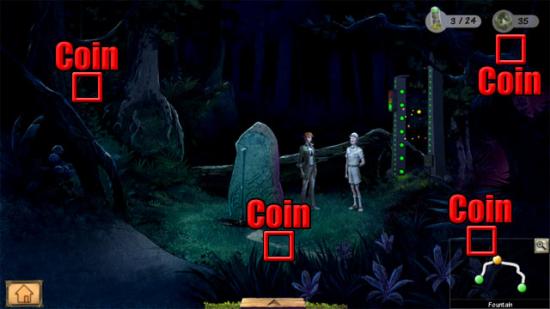
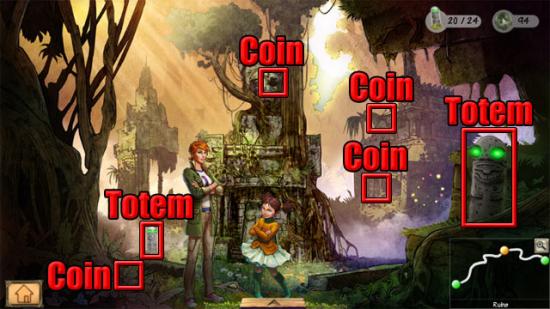
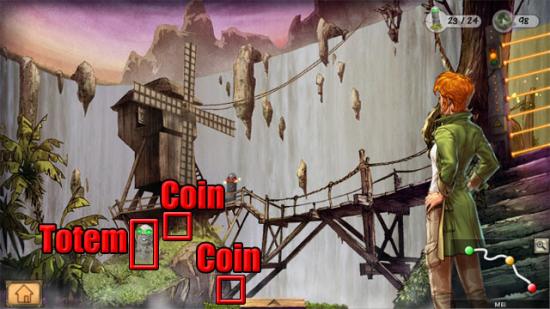
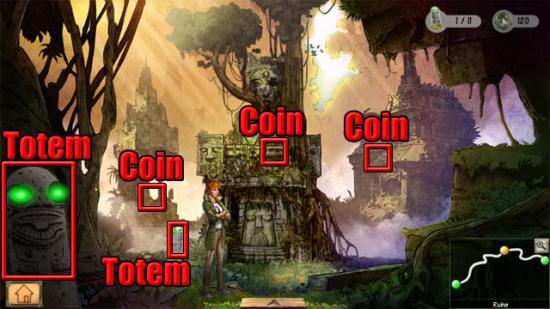
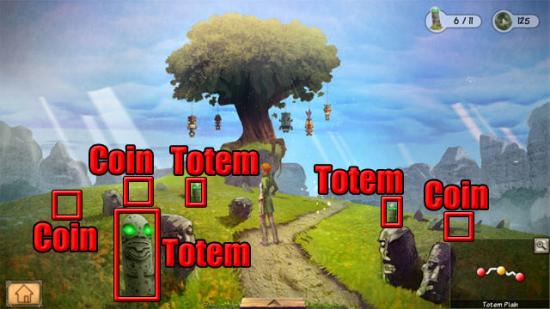
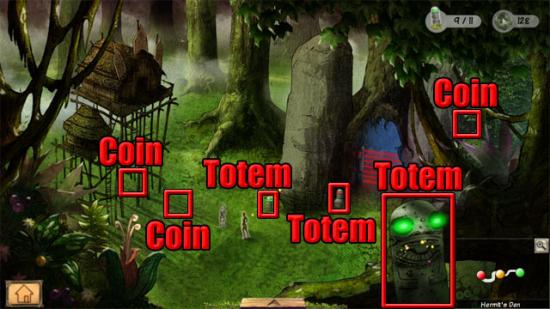
Reservoir
Talk to Robert: He tells Eden that all of the totem challenges must be completed in a zone before the tangram puzzle can be completed at the end of each zone. The coin and totems in this area are shown below:
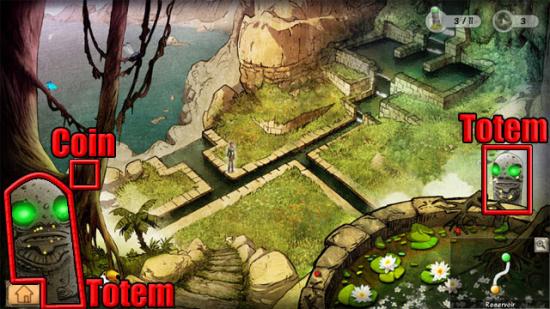
Take the coin. Select the left totem to play a challenge.
Challenge 004 – They’re Coco-nuts?
The aim in this challenge is to select the correct answer for the height of the tree. Select the following answer:
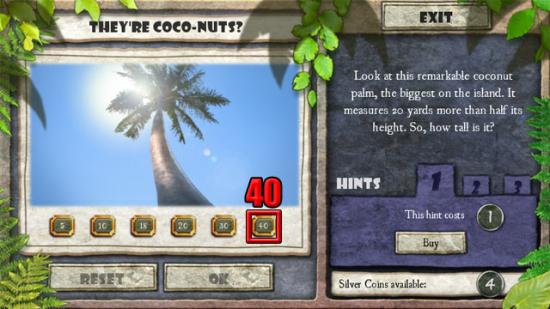
Press the OK button to complete the challenge. Select the right totem to play a challenge.
Challenge 005 – Mosaic Misfit
The aim in this challenge is to select the piece on the mosaic which is different from the other pieces. Select the piece shown below:
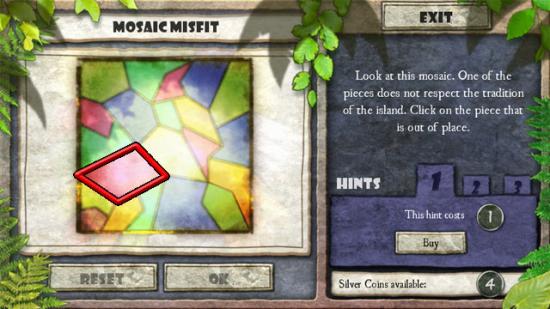
All of the other pieces have five sides. Press the OK button to complete the challenge.
Reservoir
Move back to the bungalow.
Bungalow
Maeva tells Eden to meet her at the refuge once the challenges have been completed. Select the three silver coins:
Move right to the fountain.
Fountain
Talk to Douglas and he will explain about a game called YoX. Select yes when he asks if you want a game to play YoX:
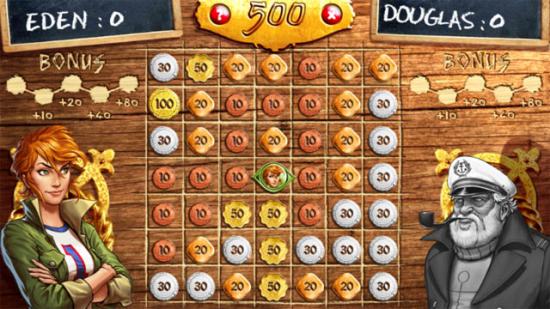
Points are scored by collecting coins of different values, or by scoring combos which are made by collecting coins of the same value. Eden always moves horizontally across the board while Douglas always moves vertically. The aim is to be the first to score 500 points.
After winning the game, Douglas will give Eden 10 silver coins. You can return to Douglas to play YoX again if you run out of silver coins. The coins and totems in this area are shown below:
Take the coins and select the left totem to play a challenge.
Challenge 006 – Snake Pills!
The aim in this challenge is to select the number of minutes that are taken before the competitor is cured. Select the following answer:
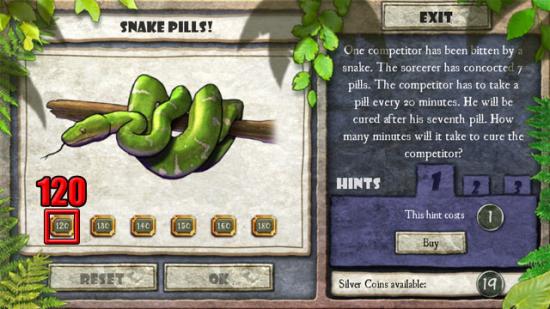
Press the OK button to complete the challenge. Select the right totem to play the next challenge.
Challenge 007 – The Final Word
The aim in this challenge is to select the correct sentence. Select the following sentence:
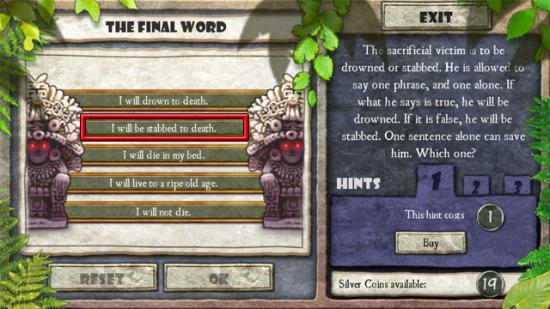
Press the OK button to complete the challenge.
Fountain
The red gate will become orange after the challenge has been completed. Select the orange gate to play a lock puzzle.
Lock Puzzle 3
Follow the directions below to complete the lock puzzle:
1 – A: Up 2
2 – B: Up 3
3 – C: Right 3
4 – D: Right 2
5 – A: Down 3
6 – Red: Right 1
7 – E: Up 4
8 – Red: Left 1
9 – A: Up 3
10 – C: Left 3
11 – D: Left 3
12 – A: Down 3
13 – B: Down 3
14 – Red: Right 5
Fountain
After completing the lock puzzle, move right to the river.
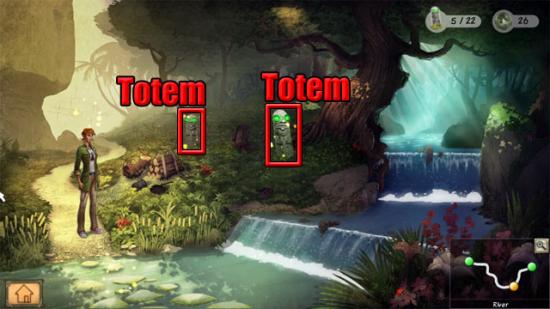
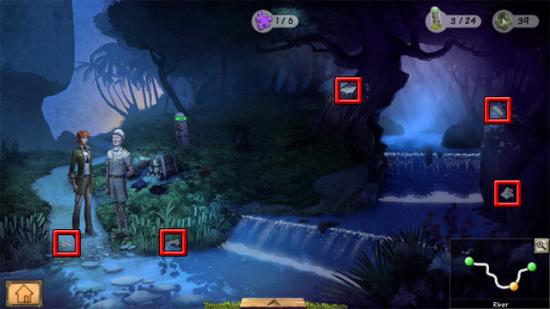
River
The coins and totems in this area are shown below:
Take the coins and select the totem to play a challenge.
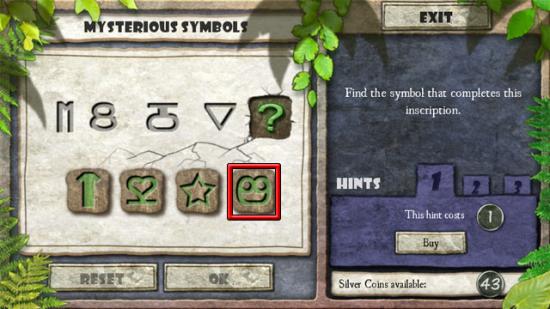
Challenge 008 – Mysterious Symbols
The aim in this challenge is to select the symbol that completes the inscription. Select the following symbol:
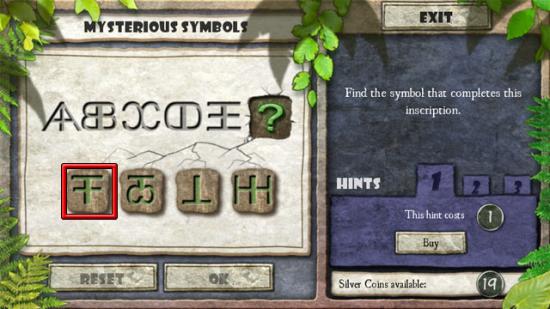
Press the OK button to complete the challenge. Select the new totem to play the next challenge.
Challenge 009 – Shells for Sale
The aim in this challenge is to select the correct three boxes to collect the amount of items shown on the list. Select the following boxes:
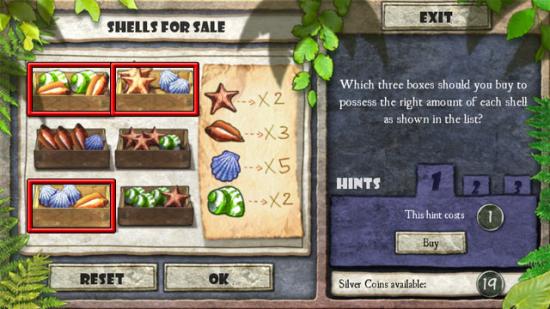
Press the OK button to complete the challenge. Select the new totem to play the next challenge.
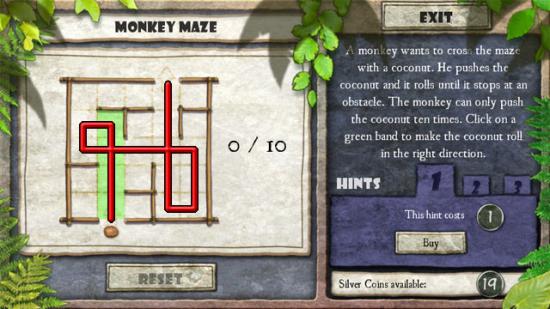
Challenge 010 – Monkey Maze
The aim in this challenge is to roll the ball through the maze in less than ten moves. Follow the route shown below:
River
Move across the river to the refuge.
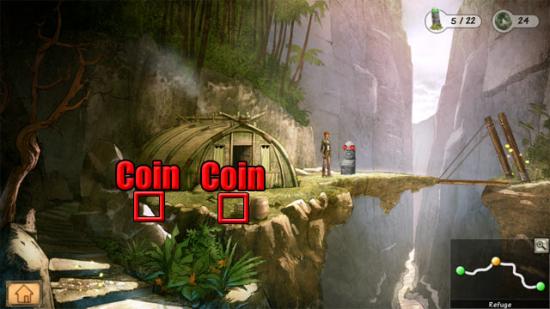
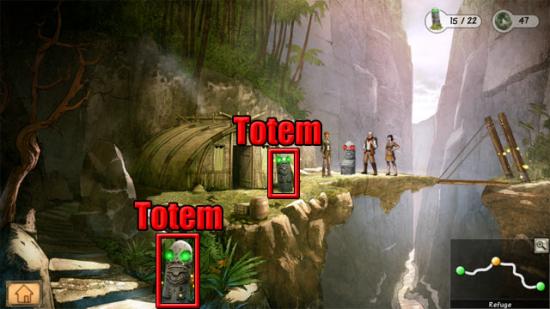
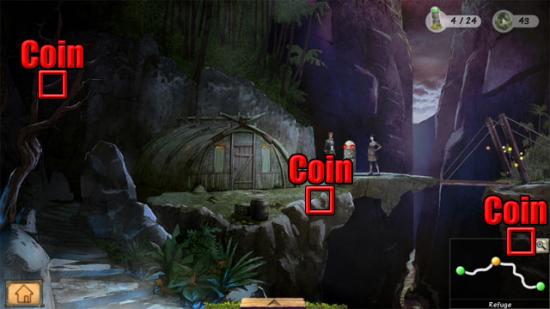
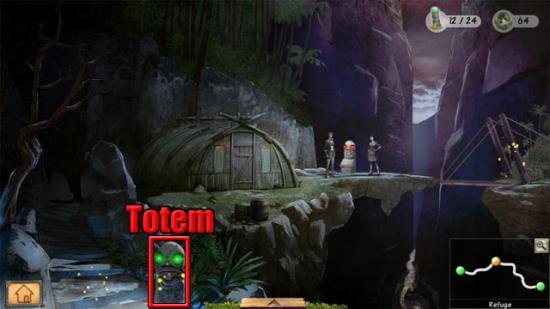
Refuge
The coins and totems in this area are shown below:
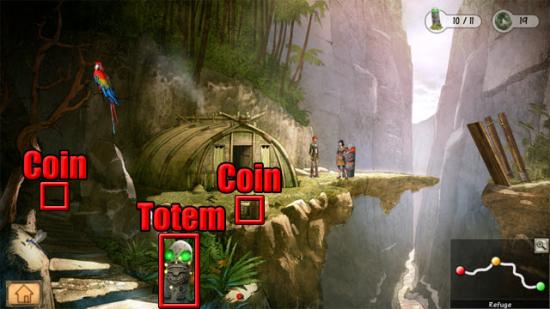
Take the coins and select the totem to play a challenge.
Challenge 011 – Shark-infested Waters
The aim in this challenge is to select the shark that is identical to the model. Select the shark shown below:
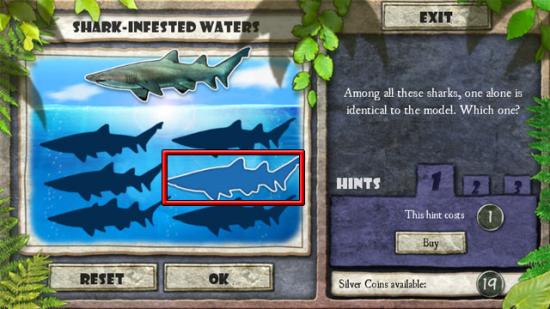
Press the OK button to complete the challenge.
Refuge
Talk to Maeva. If you have scored 500 points by now, skip the next challenge and continue on to the tangram puzzle. If you have scored less than 500 points, you will need to play the catchup challenge shown below.
Challenge 012 – Sorcerer Sums (Catchup Challenge)
The aim in this challenge is to find the missing figure. Multiplying a number on the bottom line to a number on the top line gives the number in the middle line. Select the correct number for the missing figure:
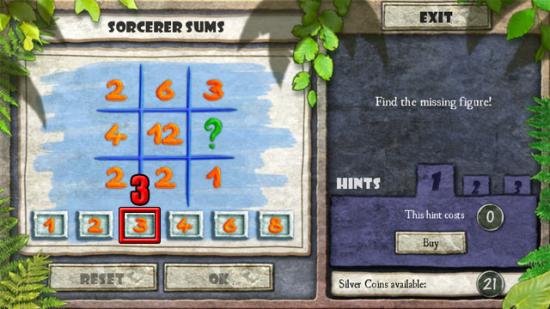
Press the OK button to complete the challenge.
Tangram Puzzle 1
The aim in every tangram puzzle is to rotate the pieces at the side and position them in the empty squares on the grid. Each piece does not have to be used in a specific place, but the piece must not overlap with the fixed pieces or the edge of the puzzle. One way of completing the puzzle is shown below:
Refuge
After completing the tangram puzzle, move right to palm grove.
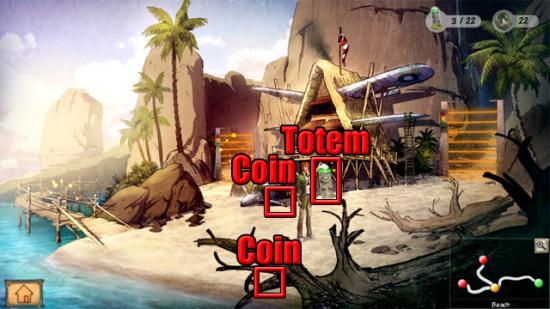
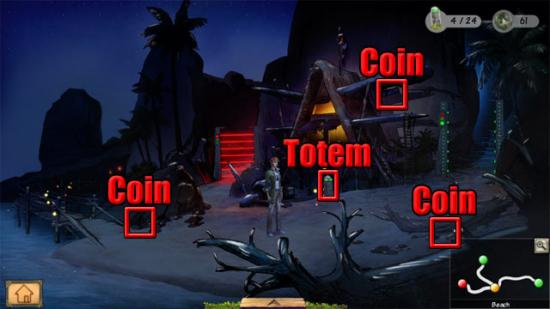
Palm Grove
The coin and totem in this area is shown below:
Take the coin and then select the totem to play a challenge.
Challenge 013 – Not a Mushroom Left!
The aim in this challenge is to select the correct mushroom. The sequence of the numbers on the mushrooms follow the Fibonacci sequence, where the number on one mushroom is found by adding the numbers of the two previous mushrooms. Select the correct mushroom:
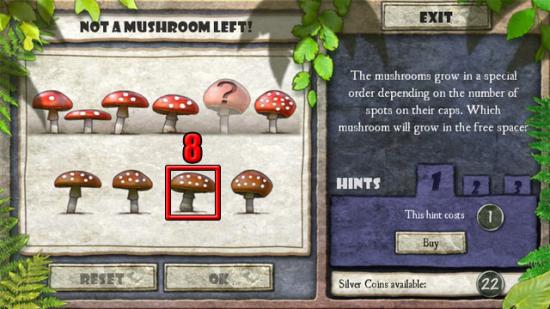
Press the OK button to complete the challenge. Select the new totem to play the next challenge.
Challenge 014 – What’s the Time?
The aim in this challenge is to figure out the state of the clocks. Put the state of the clocks in the following order:
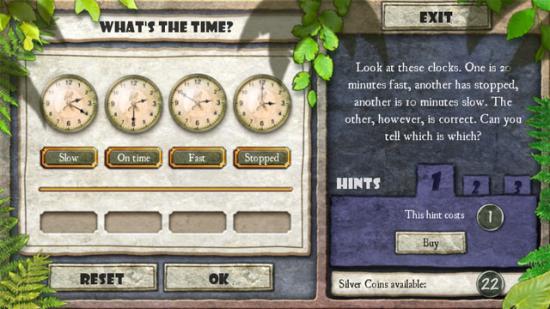
Press the OK button to complete the challenge. Select the new totem to play the next challenge.
Challenge 015 – Crate Work!
The aim in this challenge is to move the three crates from A to C, with the rule that smaller crates can only be placed on top of larger crates:
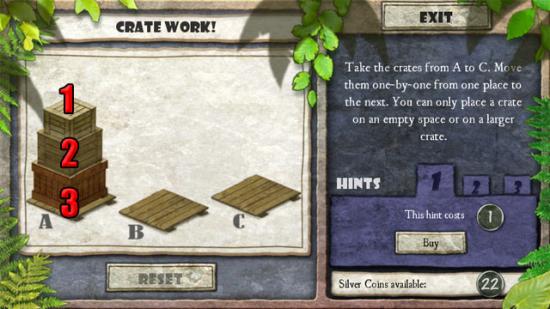
Follow the directions below to complete the challenge:
1 – Move 1 to C
2 – Move 2 to B
3 – Move 1 to B
4 – Move 3 to C
5 – Move 1 to A
6 – Move 2 to C
7 – Move 1 to C.
Palm Grove
After completing all of the challenges in this area, move forward to the beach.
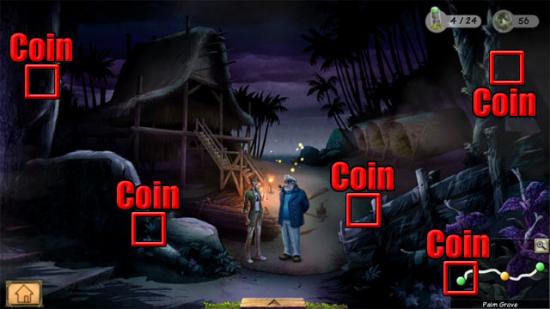
Beach
Eden meets Octavio on the beach, who tells Eden that Maeva is looking for her. Maeva explains that a speed challenge has just started on the island, where five challenges must be completed in a set time.
Chapter 2
Beach
The coins and totems in this area are shown below:
Take the coins and then select the totem.
Challenge 016 – Welcome Bloom
The aim in this challenge is to place the flowers in the correct positions based on the description. Put the flowers in the following positions:
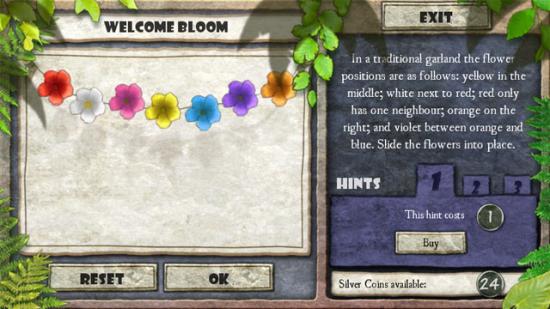
Press the OK button to complete the challenge. Select the new totem to play the next challenge.
Challenge 017 – The Three Brothers
The aim in this challenge is to figure out which of the brothers is telling the truth, which is lying and which is a lunatic. Place the tags in the following positions:
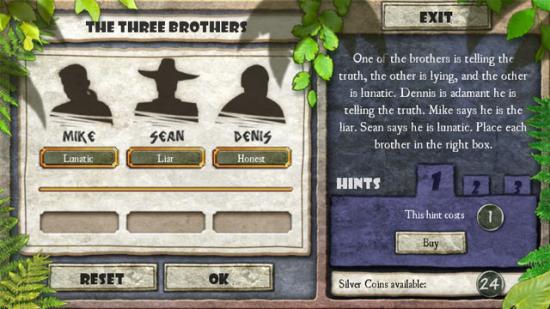
Press the OK button to complete the challenge.
Beach
After completing all of the challenges in this area, move left twice to the refuge.
Refuge
Take the coins:
Move back to the river.
River
The totems in this area are shown below:
Select the left totem to play a challenge.
Challenge 018 – Uncle Tom’s Cabin
The aim in this challenge is to show the correct design that was used to make the cabin. Select the following design:
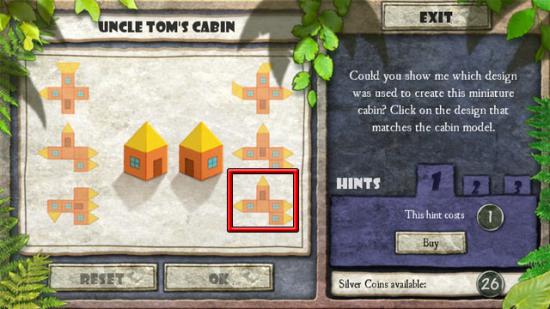
Press the OK button to complete the challenge. Select the right totem to play the next challenge.
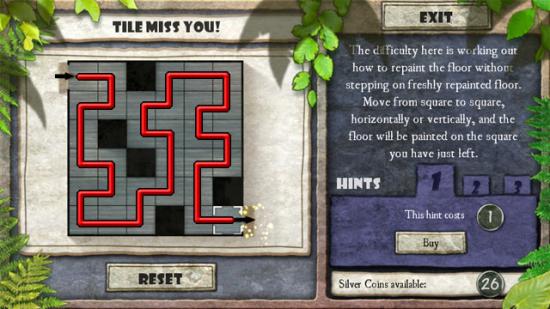
Challenge 019 – Tile Miss You!
The aim in this challenge is to step on every tile without touching the same tile twice. Follow the path shown below:
River
After completing all of the challenges in this area, move forward to the fountain.
Fountain
The coin and totem in this area is shown below:
Take the coin and then select the totem to play a challenge.
Challenge 020 – Total Amnesia
The aim in this challenge is to select the correct day based on the description. Select the day shown below:
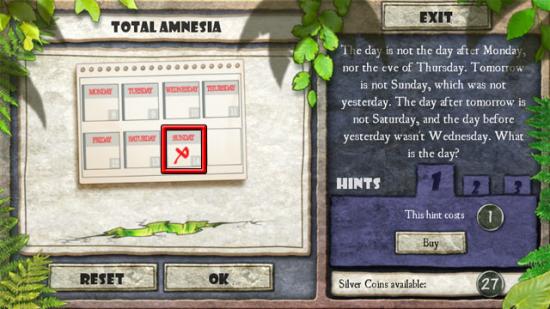
Press the OK button to complete the challenge.
Fountain
After completing the challenge, move right and cross the river to return to the refuge.
Refuge
Talk to Maeva to receive the prize. No matter how quickly you have completed the previous five challenges, you will always come third and receive 20 coins. Move back to the river and forward to the fountain.
Fountain
The totems in this area are shown below:
Select the left totem to play a challenge.
Challenge 021 – Family Affairs
The aim in this challenge is to figure out how many girls there are in the family based on the description. Select the following answer:
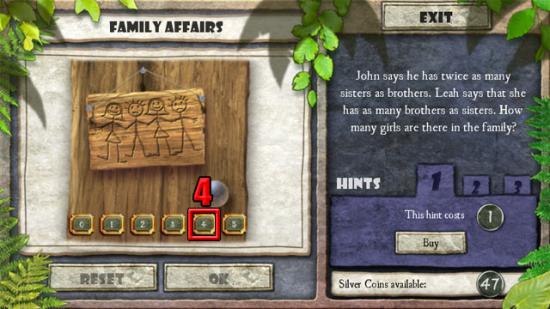
Press the OK button to complete the challenge. Select the right totem to play a challenge.
Challenge 022 – A Pile of Junk
The aim in this challenge is to find the one fragment that can be seen in the photograph. Select the following fragment:
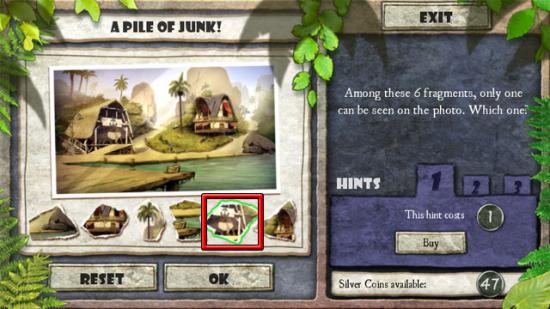
Press the OK button to complete the challenge.
Fountain
After completing all of the challenges in the area, move left to the bungalow.
Bungalow
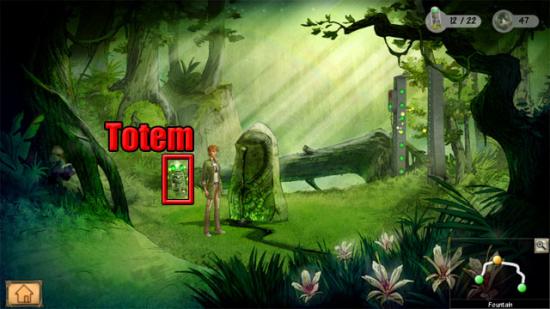
Eden sees a woman trapped behind the red door. Select the totem to play a challenge:
Challenge 023 – Fruit Salad
The aim in this challenge is to place the fruit in the correct places on the grid, with the rule that each line and column must contain different fruit. Put the fruit in the following positions:
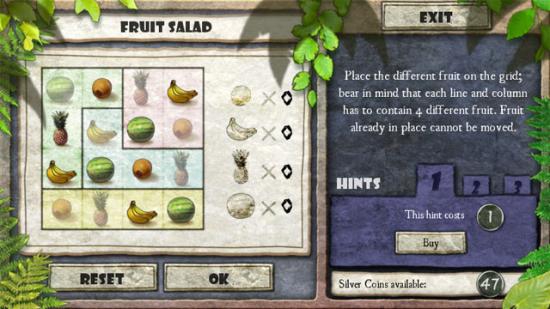
Press the OK button to complete the challenge. Select the new totem to play the next challenge.
Challenge 024 – Flower Power
The aim in this challenge is to fit all of the flower troughs onto the grid:
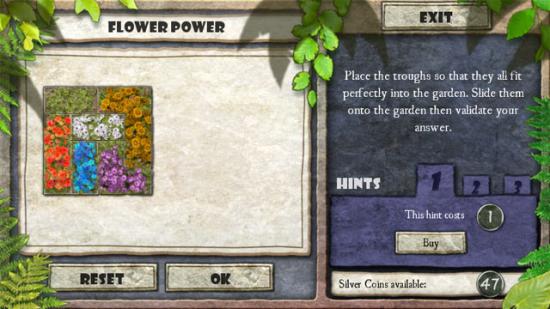
Press the OK button to complete the challenge. Select the orange gate to play a lock puzzle.
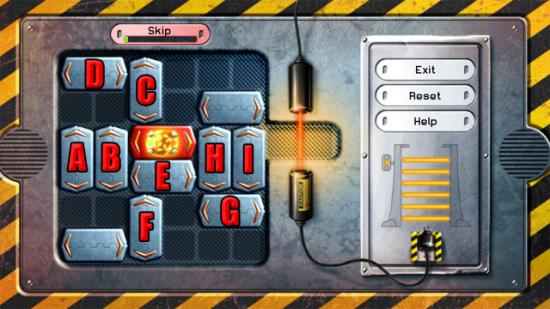
Lock Puzzle 4
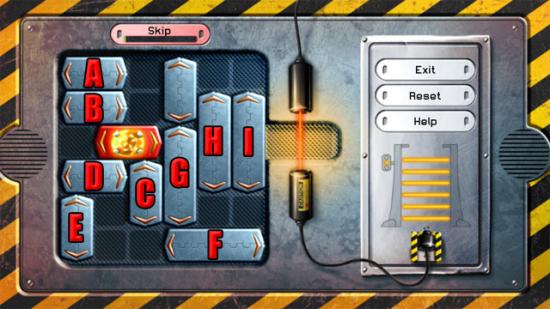
Follow the directions below to complete the lock puzzle:
1 – A: Right 1
2 – B: Right 1
3 – C: Down 1
4 – D: Right 1
5 – E: Up 4
6 – D: Left 1
7 – C: Up 1
8 – F: Left 3
9 – G: Down 1
10 – H: Down 2
11 – I: Down 2
12 – Red: Right 5
Bungalow
After completing the lock puzzle, Eden realises that the woman is the famous actress Ruby Page. Go through the right exit to the fountain.
Fountain
Select the totem to play a challenge:
Challenge 025 – Wear-House
The aim in this challenge is to move the four crates from A to C, with the rule that smaller crates can only be placed on top of larger crates:
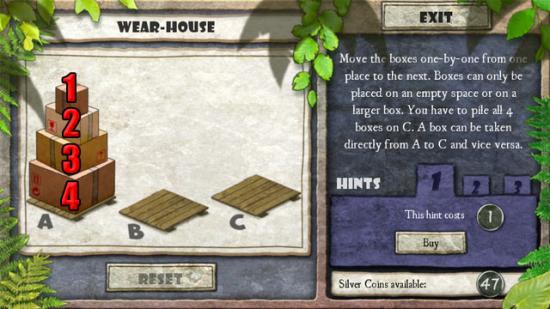
Follow the directions below to complete the challenge:
1 – Move 1 to B
2 – Move 2 to C
3 – Move 1 to C
4 – Move 3 to B
5 – Move 1 to A
6 – Move 2 to B
7 – Move 1 to B
8 – Move 4 to C
9 – Move 1 to A
10 – Move 2 to C
11 – Move 1 to B
12 – Move 2 to A
13 – Move 1 to A
14 – Move 3 to C
15 – Move 1 to B.
16 – Move 2 to C
17 – Move 1 to C.
Fountain
After completing the challenge, move right to the river.
River
Select the totem to play a challenge:
Challenge 026 – Family Fun
The aim in this challenge is to figure out the name of the sixth child. A clue is to look at the number of letters in the name of each child. Select the following answer:
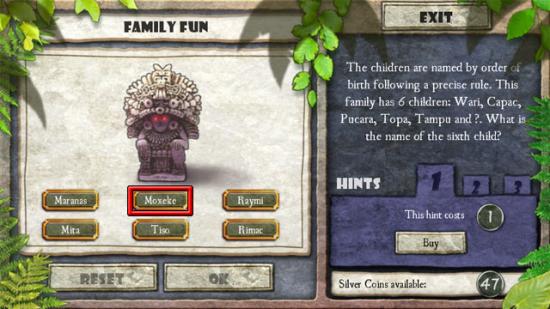
Press the OK button to complete the challenge. Select the new totem to play the next challenge.
Challenge 027 – Terrible Timetables
The aim in this challenge is to figure out what day the boat will arrive at island C if it sets out from island A on Friday. The quickest journey will be from A to E, E to D and then D to C. Select the following day:
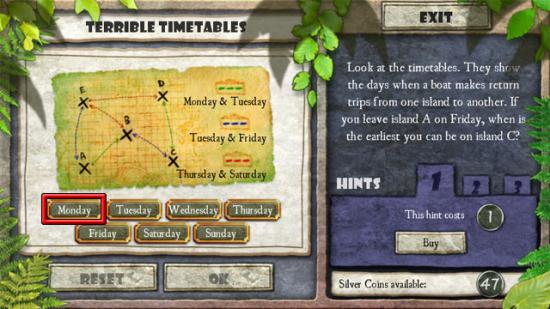
Press the OK button to complete the challenge. Cross the river to the refuge.
Refuge
The totems in this area are shown below:
Select the left totem to play a puzzle.
Challenge 028 – The Shadow of a Doubt
The aim in this challenge is to select Eden’s real shadow. Select the shadow shown below:
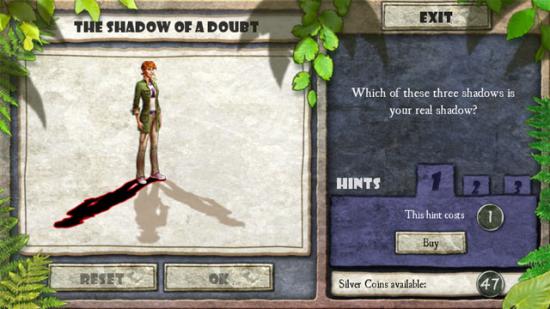
Press the OK button to complete the challenge. Select the right totem to play the next challenge.
Challenge 029 – Colour and Charm
The aim in this challenge is to place the plates of metal so that they all fit on the square. Put the plates in the following positions:
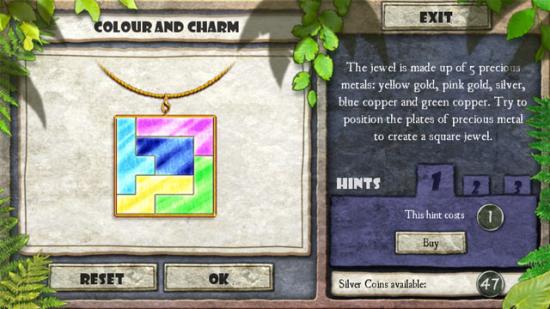
Press the OK button to complete the challenge.
Refuge
After completing both of the challenges in the area, move right to Palm Grove and then forward to the beach.
Beach
Select the left orange gate to play a lock puzzle.
Lock Puzzle 5
Follow the directions below to complete the lock puzzle:
1 – A: Down 3
2 – Red: Left 1
3 – B: Up 3
4 – Red: Right 1
5 – A: Up 3
6 – C: Left 3
7 – D: Left 2
8 – E: Down 3
9 – Red: Right 5
Beach
Move forward through the green gate to the chalet.
Chalet
The coin and totems in this area are shown below:
Take the coin and then select the left totem to play a challenge.
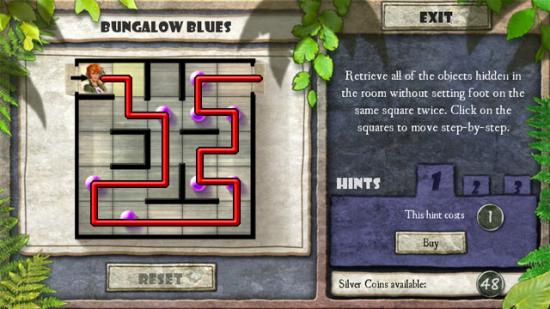
Challenge 030 – Bungalow Blues
The aim in this challenge is to collect all of the objects in the room without stepping on the same square twice. Follow the path shown below:
Select the middle totem to play the next challenge.
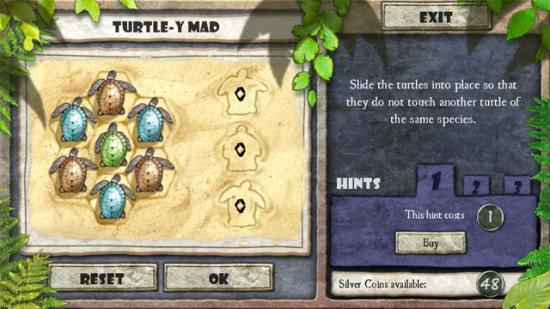
Challenge 031 – Turtle-y Mad
The aim in this challenge is to position the turtles in the correct places with the rule that turtles of the same species do not touch. Put the turtles in the following places:
Press the OK button to complete the challenge. Select the right totem to play the next challenge.
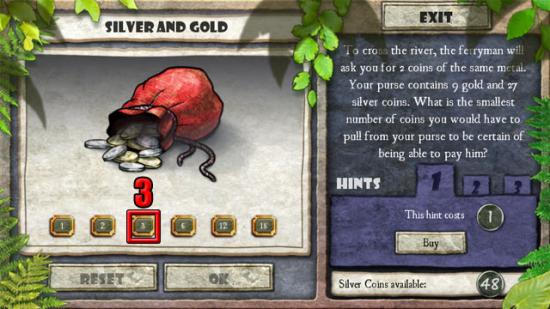
Challenge 032 – Silver and Gold
The aim in this challenge is to figure out the smallest number of coins needed to pay the ferryman. Select the answer shown below:
Press the OK button to complete the challenge.
Chalet
After completing the three challenges in this area, move back to the beach.
Beach
Select the right orange gate to play a lock puzzle.
Lock Puzzle 6
Follow the directions below to complete the lock puzzle:
1 – A: Right 1
2 – B: Left 3
3 – C: Left 3
4 – D: Up 1
5 – E: Left 1
6 – F: Down 3
7 – G: Down 2
8 – H: Down 2
9 – Red: Right 5
Beach
Go through the right green gate to the cable car.
Cable Car
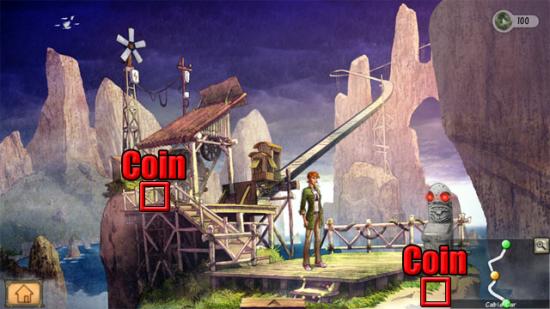
Eden meets the hermit of the island, who warns her that Akua’s vengeance will be terrible and then disappears. The coin and the totems are shown below:
Take the coin and then select the left totem to play a challenge.
Challenge 033 – Crazy Bugs
The aim in this challenge is to move only three fireflies to make the triangle point up instead of down. Move the fireflies to the following positions:
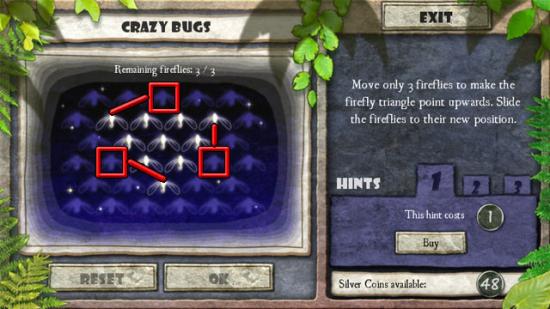
Press the OK button to complete the challenge. Select the middle totem to play the next challenge.
Challenge 034 – Twinsets and Shells
The aim in this challenge is to find the shell which is identical to the model. Select the following shell:
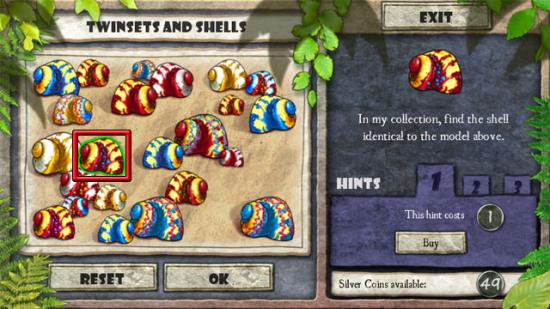
Press the OK button to complete the challenge.
Cable Car
After completing the two challenges in the area, talk to Maeva. If you have scored 2200 points by now, skip the next challenge and continue on to the tangram puzzle. If you have scored less than 2200 points, you will need to play the challenge shown below.
Challenge 035 – Nuisance Numbers (Catchup Challenge)
The aim in this challenge is to figure out how many times the painter will need to paint the number 9. Select the answer shown below:

Press the OK button to complete the challenge.
Tangram Puzzle 2
One way of completing the tangram puzzle is shown below:
Cable Car
After completing the puzzle, select the cable car to travel to Zachary’s House.
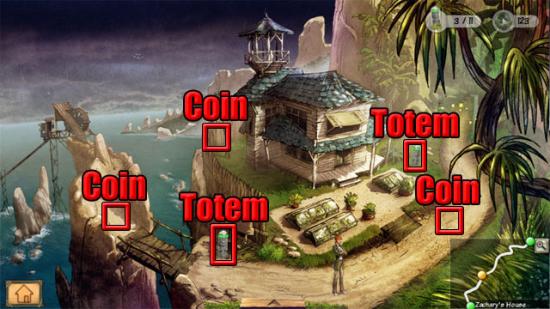
Zachary’s House
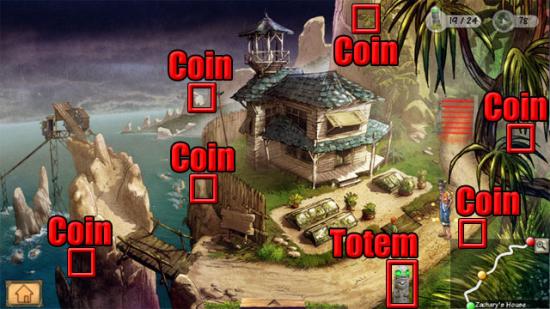
Zachary tells Eden that he needs copper wire from Octavio to fix the portal. The coins and totems in this area are shown below:
Take the coins and then select the left totem to play a challenge.
Challenge 036 – Tourist Trouble
The aim in this challenge is to figure out how many people were going to the pyramid. Select the answer shown below:
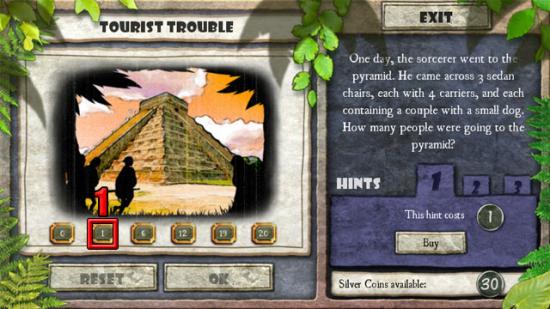
Press the OK button to complete the challenge. Select the right totem to play a challenge.
Challenge 037 – Heaven on Earth
The aim in this challenge is to select the folded picture that would look the same as the unfolded picture. Select the following picture:
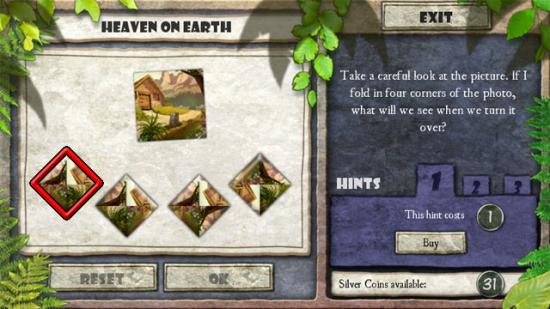
Press the OK button to complete the challenge.
Zachary’s House
Select the cable car to travel back down to the cable car station.
Chapter 3
Cable Car
Ruby says that Octavio is at the bungalow. Move down to the beach and take the left exit to Palm Grove.
Palm Grove
Talk to Douglas here for a game of YoX if you want. Move left to the Refuge.
Refuge
Eden meets treasure hunters Hermione and Thibault de Blainville after returning to the refuge. Move down to the river, forward to the fountain and left to the bungalow.
Bungalow
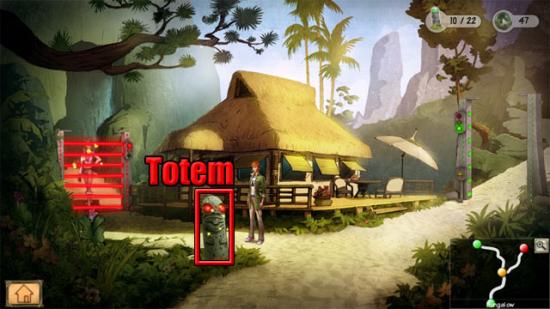
Talk to Octavio and the copper wire will be added to the inventory. Select the totem to play a challenge:
Challenge 038 – The Miracle Bottle!
The aim in this challenge is to figure out how many shells the empty bottle would cost. Select the answer shown below:
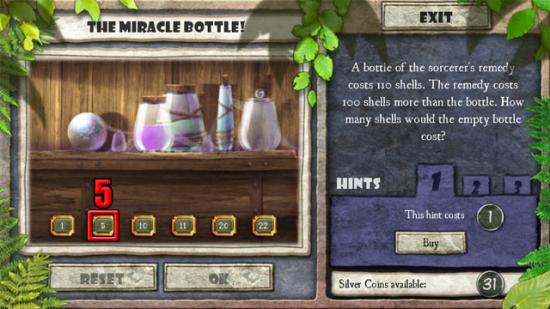
Press the OK button to complete the challenge.
Bungalow
Move right after completing the challenge.
Fountain
Thibault says that the portal has trapped his wife on the other side. Select the orange gate to play a lock puzzle.
Lock Puzzle 7
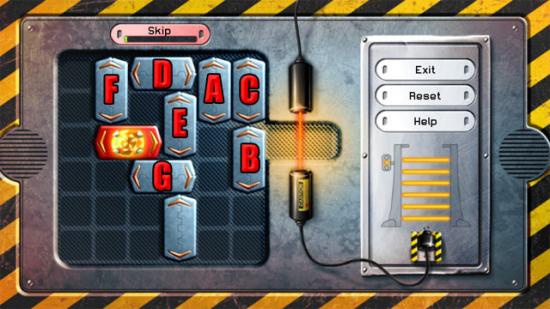
Follow the directions below to complete the lock puzzle:
1 – A: Down 4
2 – B: Down 2
3 – C: Down 2
4 – D: Right 2
5 – E: Up 1
6 – Red: Right 1
7 – F: Down 4
8 – G: Left 2
9 – Red: Left 1
10 – E: Down 1
11 – D: Left 4
12 – E: Up 1
13 – C: Up 2
14 – Red: Right 5
Fountain
Thibault will give Eden his flashlight after the lock puzzle has been completed. The flashlight can be used to find coins in the area. Move left to the bungalow.
Bungalow
Select the flashlight and then take the coins shown below:
Move right to the fountain.
Fountain
Select the flashlight and then take the coins shown below:
Move right to the river.
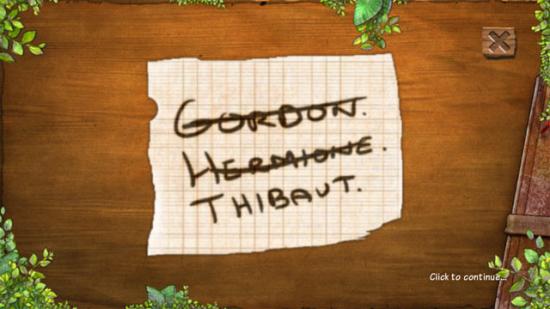
River
Thibault finds a piece of a list near the river. Find the remaining pieces of the list:
Rotate and move the pieces to the following positions:
After Thibault leaves the area, select the flashlight and take the coins shown below:
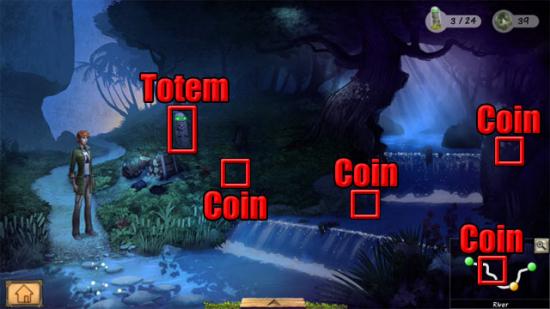
Select the totem to play a challenge.
Challenge 039 – Mysterious Symbols
The aim in this challenge is to find the symbol that completes the inscription. A clue to solving this challenge is to cover the left half of each symbol. Select the symbol shown below:
Press the OK button to complete the challenge.
River
After completing the challenge, move down to the refuge.
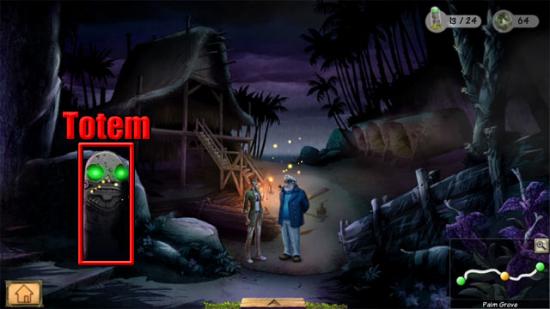
Refuge
You can choose to ask Maeva about the Hermione’s disappearance, ask about the hermit or leave the conversation. After leaving the conversation, Maeva says that another speed challenge has now started where 11 totem challenges have to be completed. Select the flashlight and take the coins shown below:
Move right to Palm Grove.
Palm Grove
Select the flashlight and take the coins shown below:
Move forward to the beach.
Beach
Select the flashlight and take the coins shown below:
Select the totem to play a challenge.
Challenge 040 – Shell Gold
The aim in this challenge is to remember the image that was shown so that the necklace can be put back together. Put the pieces back on the necklace in the order shown below:
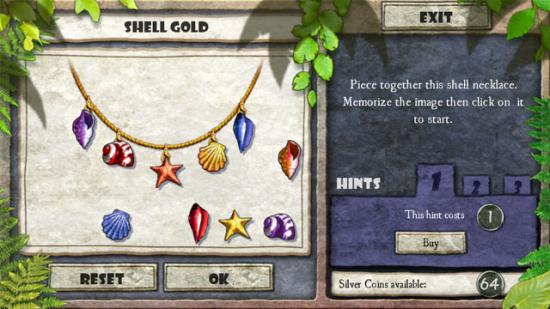
Press the OK button to complete the challenge. Select the new totem to play the next challenge.
Challenge 041 – Now Boarding
The aim in this challenge is to rotate and place the characters on the boat according to their needs. Put the characters in the positions shown below:
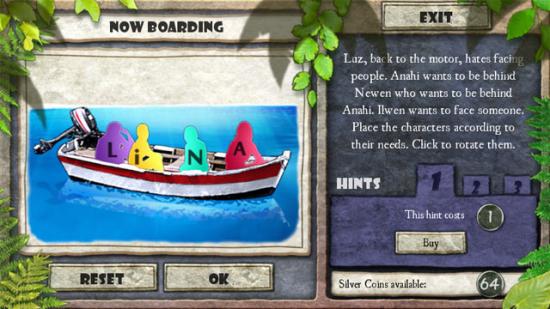
Press the OK button to complete the challenge.
Beach
More totems have now appeared on zone 1 of the island. Take the left exit to Palm Grove.
Palm Grove
Select the totem to play a challenge:
Challenge 042 – I-wrist-istable
The aim in this challenge is to rotate the bracelets to have the blue beads on the left and the green beads on the right:
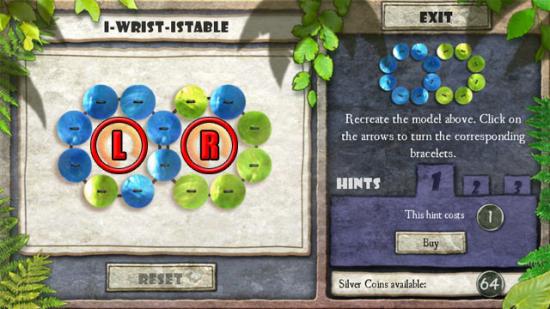
Follow the directions below to complete the challenge:
1 – Left 1
2 – Right 2
3 – Left 1
4 – Right 6
Select the new totem to play the next challenge.
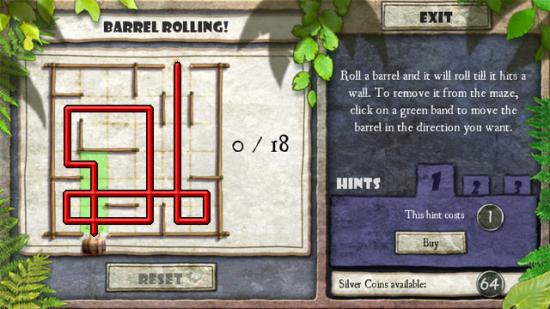
Challenge 043 – Barrel Rolling
The aim in this challenge is to roll the barrel out of the maze in less than 18 moves. Follow the route shown below to complete the challenge:
Palm Grove
After completing both challenges in the area, move left to the refuge.
Refuge
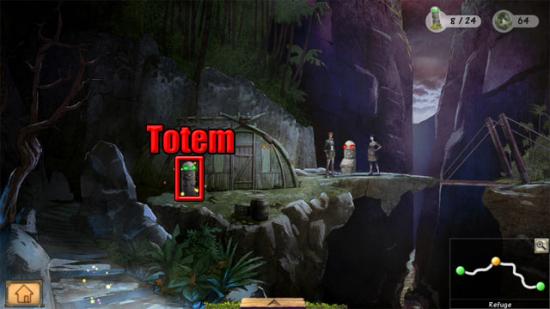
Select the totem to play a challenge:
Challenge 044 – Changing Landscapes
The aim in this challenge is to select the new feature that has been added to the landscape. Select the feature shown below:
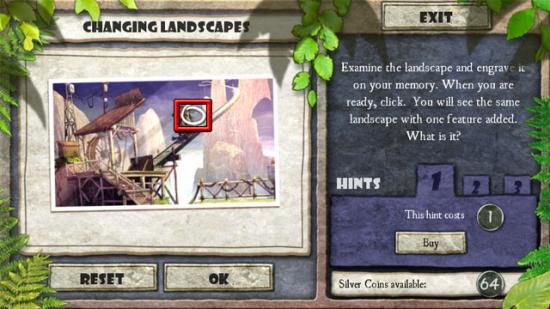
Press the OK button to complete the challenge.
Refuge
After completing the challenge, move down to the river.
River
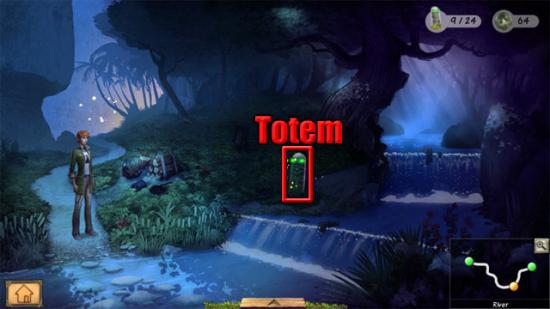
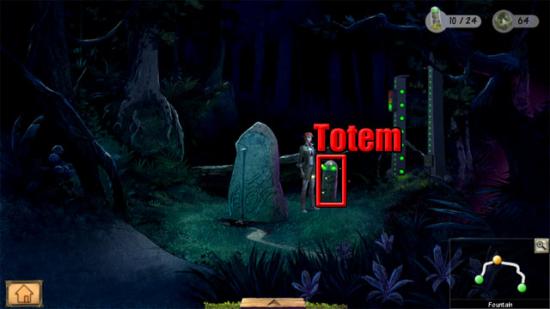
Select the totem to play a challenge:
Challenge 045 – Crab a Stone!
The aim in this challenge is to find the correct place for each crab based on the description. Put the crabs in the following positions:
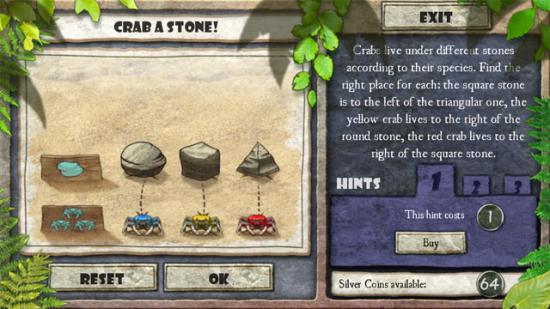
Press the OK button to complete the challenge.
River
After completing the challenge, move forward to the fountain.
Fountain
Select the totem to play a challenge:
Challenge 046 – The Ripped Map
The aim in this challenge is to rotate and place the pieces in the correct places on the map. Put the pieces in the following positions:
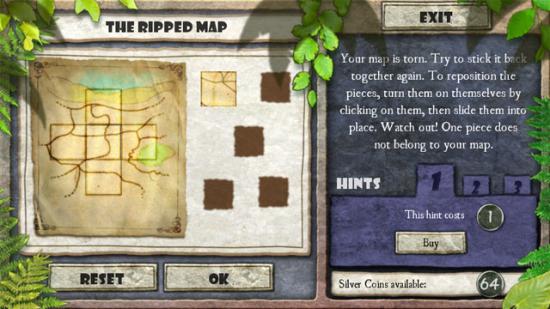
Press the OK button to complete the challenge. Select the new totem to play the next challenge.
Challenge 047 – Snap Happy
The aim in this challenge is to select the folded photograph that is the same as the unfolded top photograph. Select the following photograph:
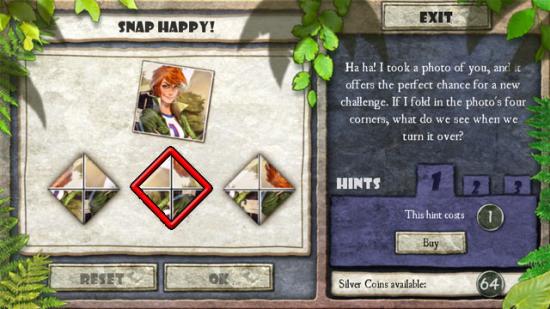
Press the OK button to complete the challenge.
Fountain
After completing the two challenges, move right to the river and then cross the river to the refuge.
Refuge
Select the totem to play a challenge:
Challenge 048 – Errare Humanum Est
The aim in this challenge is to select the five differences between the photographs. Select the differences shown below:
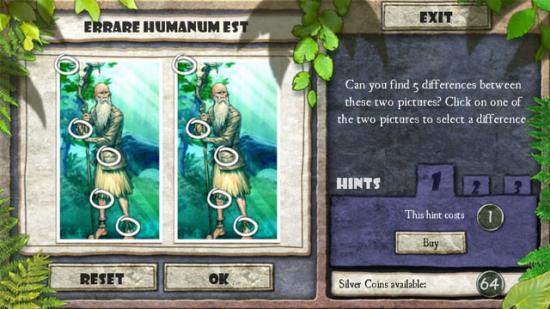
Press the OK button to complete the challenge.
Refuge
After completing the challenge, move right to Palm Grove.
Palm Grove
Select the totem to play a challenge:
Challenge 049 – Weight Problem
The aim in this challenge is to figure out the minimum number of times the coins have to be weighed in order to find the forged coin. Select the following answer:
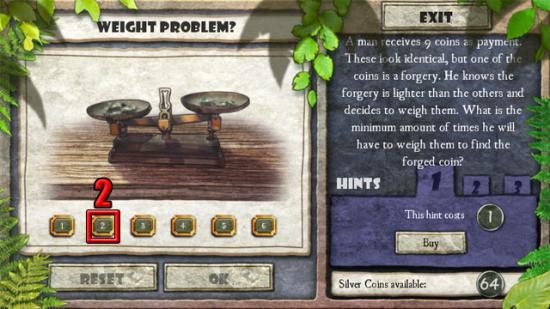
Press the OK button to complete the challenge. Select the new totem to play the next challenge.
Challenge 050 – Camping it Up
The aim in this challenge is to sort the statements into the true and false columns based on the picture that was shown. The following statements are true or false:
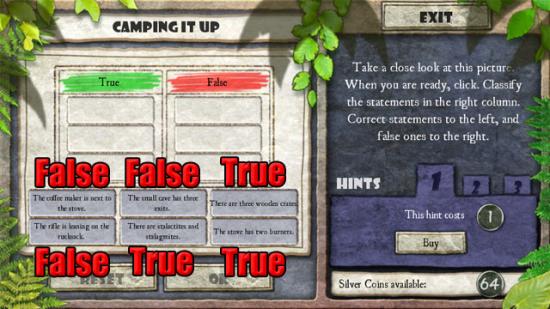
Put the statements into the true or false columns and then press the OK button to complete the challenge.
Palm Grove
After completing the challenge, Eden will say that it is time to go and see Maeva. Move left to the refuge.
Refuge
Talk to Maeva to win the detector prize, which can be used in the daylight to find coins. Maeva also explains about the Tiki Room, a secret room where Eden will have to place a Tiki from each zone of the island to reveal the Cave of Akua. Move right to Palm Grove.
Palm Grove
Talk to Douglas if you want another game of YoX. Move forward to the beach.
Beach
Select the totem to play a challenge:
Challenge 051 – Candle Calculations
The aim in this challenge is to figure out how many days can pass before the hermit will need to return to the hardware store. Select the following answer:
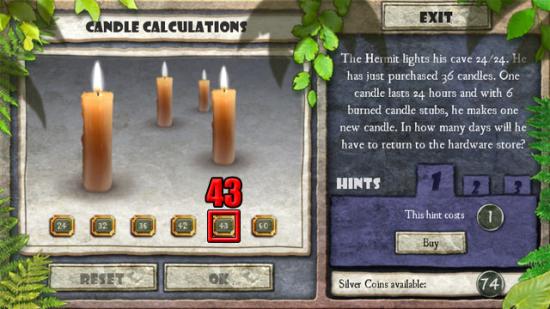
Press the OK button to complete the challenge. Select the new totem to play the next challenge.
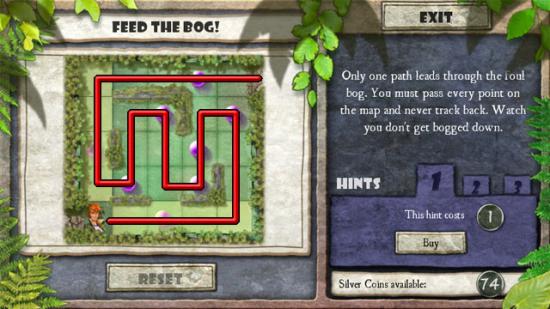
Challenge 052 – Feed the Bog!
The aim in this challenge is to pass every point in the bog without moving back. Follow the route shown below:
Beach
After completing both challenges, move through the right gate to the cable car.
Cable Car
Select the flashlight and take the coins shown below:
Select the totem to play a challenge.
Challenge 053 – Problem Dividing
The aim in this challenge is to figure out which numbers can be divided by 2. Select the following answer:
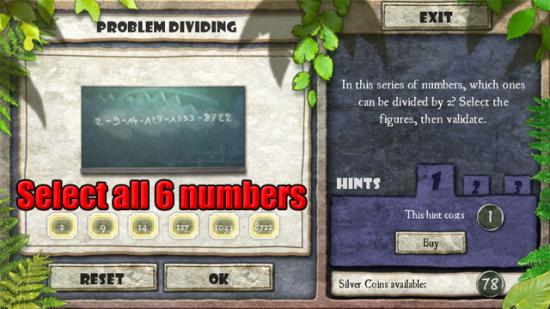
Press the OK button to complete the challenge. Select the new totem to play the next challenge.
Challenge 054 – Light Work!
The aim in this challenge is to place the five candles around the room so that every white square is illuminated. Put the candles in the following positions:
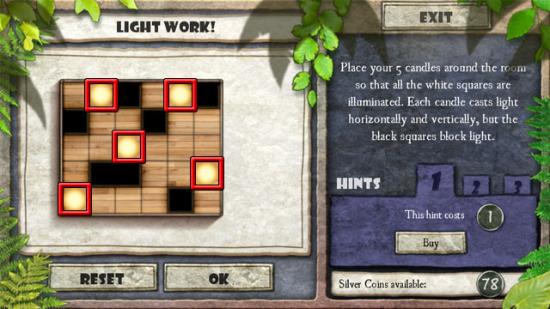
Press the OK button to complete the challenge.
Cable Car
After completing both challenges, select the cable car to ride up to Zachary’s House.
Zachary’s House
Now that it is daylight, the detector can be selected from the inventory to reveal the locations of coins in the area. Take the coins shown below:
Select the totem to play a challenge.
Challenge 055 – Farewell Feast
The aim in this challenge is to figure out how many male guests will be at the meal. Select the following answer:
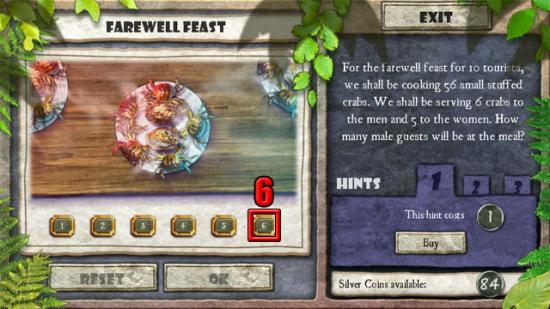
Press the OK button to complete the challenge.
Cable Car
After completing the challenge, talk to Zachary to give him the copper wire.
Chapter 4
Cable Car
Select the orange gate to play a lock puzzle.
Lock Puzzle 8
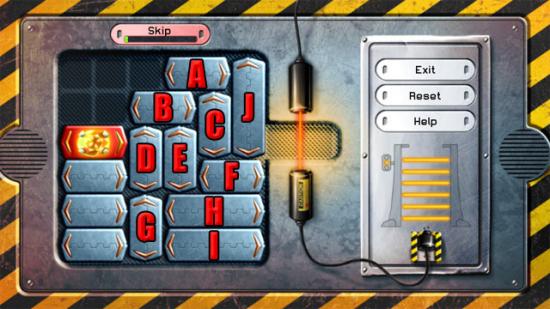
Follow the directions below to complete the lock puzzle:
1 – A: Left 3
2 – B: Left 2
3 – C: Up 1
4 – D: Up 2
5 – E: Up 2
6 – Red: Right 3
7 – F: Left 1
8 – G: Up 2
10 – H: Left 1
11 – I: Left 1
12 – J: Down 3
13 – Red: Right 3
Cable Car
After completing the lock puzzle, go through the gate to the ruins.
Ruins
Eden meets Naomi at the ruins, and a game of YoX automatically starts. Win the game to receive 10 coins. After the game of YoX has finished, take the coins:
Select the left totem to play a challenge.
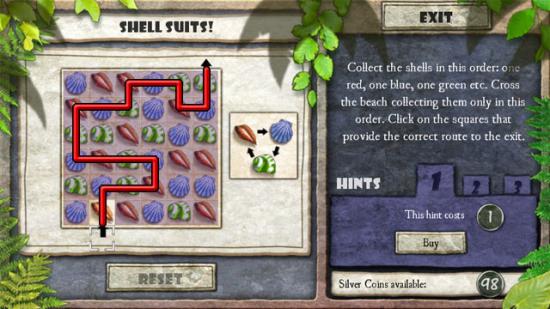
Challenge 056 – Shell Suits!
The aim in this challenge is to find the way to the exit by following the shells in the order red, blue and green. Follow the route shown below:
Select the right totem to play the next challenge.
Challenge 057 – Prudent Pirates
The aim in this challenge is to figure out how many padlocks have to be opened to obtain 50 diamonds. Select the answer shown below:
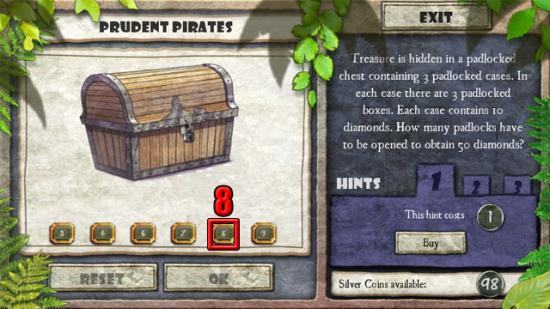
Press the OK button to complete the challenge. Select the new totem to play the next challenge.
Challenge 058 – Spot the Bug
The aim in this challenge is to select the next ladybird that will land on the leaf. Select the ladybird shown below:

Press the OK button to complete the challenge. Move right to the mill.
Mill
Take the coins shown below:
Select the left totem to play a challenge.
Challenge 059 – A Chesty Code
The aim in this challenge is to enter the correct code for the chest. Enter the following code:
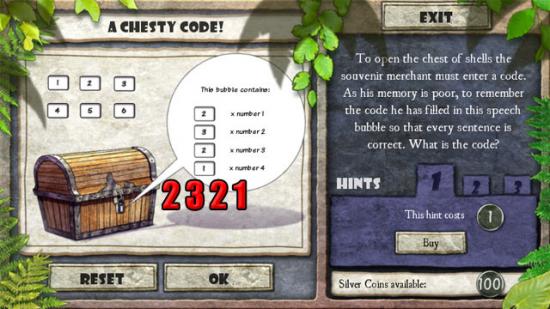
Press the OK button to complete the challenge. Select the orange gate to play a lock puzzle.
Lock Puzzle 9
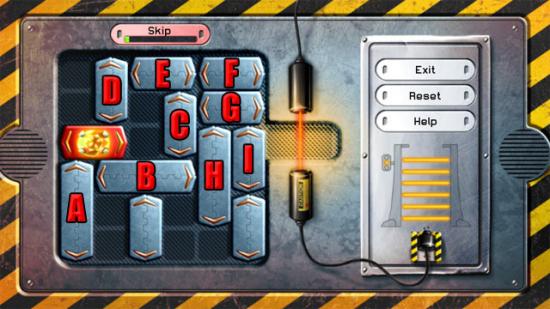
Follow the directions below to complete the lock puzzle:
1 – Red: Right 1
2 – A: Up 3
3 – B: Left 1
4 – C: Down 3
5 – Red: Right 1
6 – D: Down 1
7 – E: Left 1
8 – F: Left 1
9 – G: Left 2
10 – H: Down 1
11 – I: Up 2
12 – Red: Right 4
Mill
After completing the lock puzzle, select the totem:
If you have scored 3600 points by now, skip the next challenge and continue on to the tangram puzzle. If you have scored less than 3600 points, you will need to play the catchup challenge shown below.
Challenge 060 – That Rings a Bell (Catchup Challenge)
The aim in this challenge is to figure out how many seconds it will take for the bell to chime midday. Select the following answer:
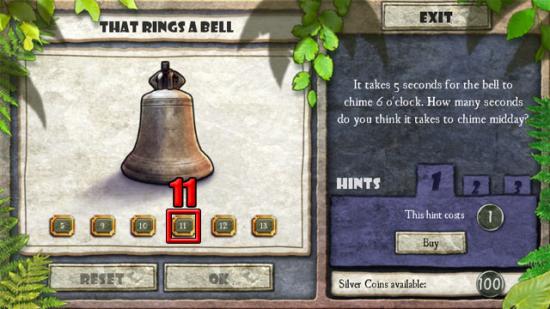
Press the OK button to complete the challenge.
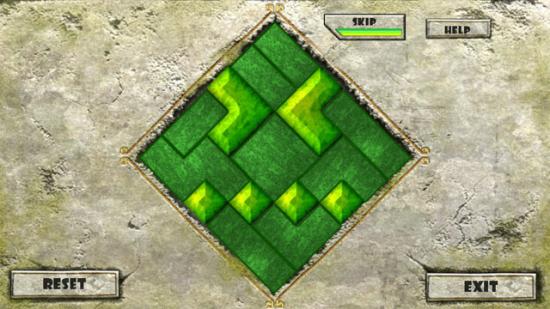
Tangram Puzzle 3
One way of completing the tangram puzzle is shown below:
After completing the ruins, move down to the ruins and left to Zachary’s House.
Zachary’s House
Talk to Zachary to receive the screwdriver. Move forward to the ruins and right to the mill.
Mill
After hearing Ruby scream, move left to the ruins.
Ruins
Find the seven pieces of paper:
Rotate and move the pieces to the following positions:
Move left to Zachary’s House.
Zachary’s House
Maeva says that Octavio may have some rope. Select the cable car.
Cable Car
Take the coins shown below:
Move down to the beach.
Beach
Talk to Octavio and he will ask you to put the diagram back together. Rotate and move the pieces to the following positions:
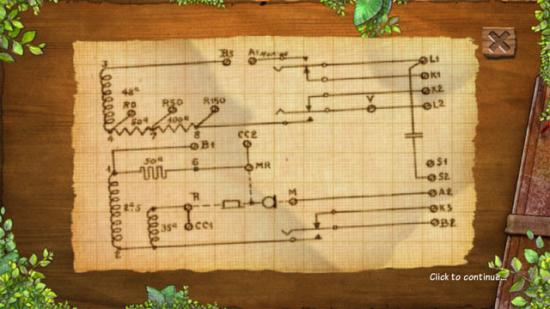
The rope will be added to the inventory. Take the coin shown below:
Move right through the gate to the cable car.
Cable Car
Talk to Douglas if you feel like a game of YoX. Select the cable car to travel to Zachary’s House.
Zachary’s House
Move forward to the ruins and right to the mill.
Mill
Eden fixes the lift and travels to the third zone of the island.
Waterfalls
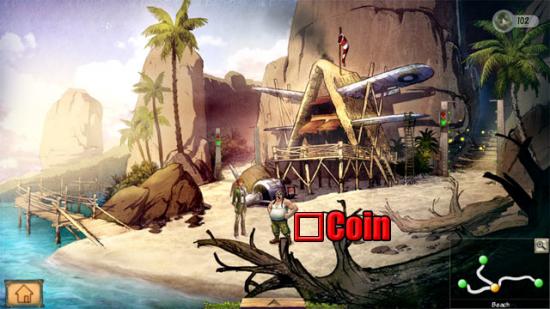
After arriving at the waterfalls, Eden notices Ruby’s stuff on the floor.
Chapter 5
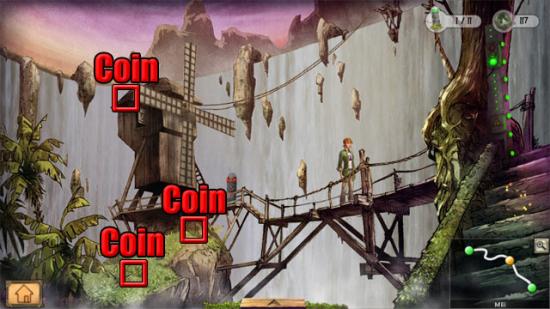
Waterfalls
Take the coins:
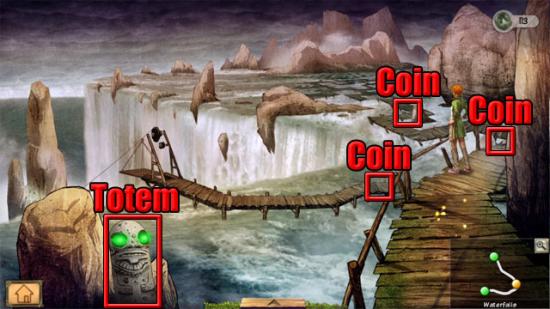
Select the totem to play a challenge.
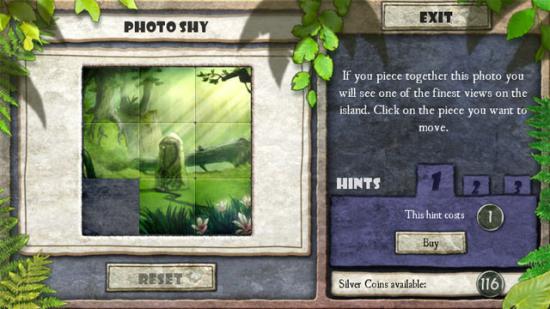
Challenge 061 – Photo Shy
The aim in this challenge is to move the tiles to put the picture back together. Make the picture shown below:
Waterfalls
After completing the challenge, move down to the rope bridge.
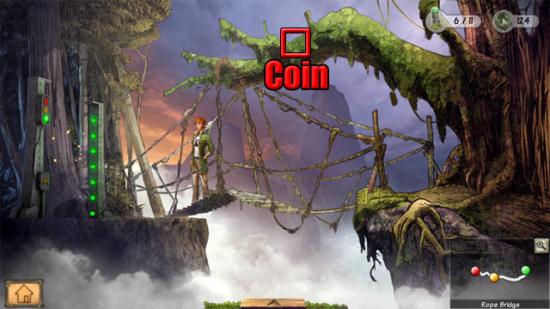
Rope Bridge
After the hermit leaves the area, take the coins shown below:
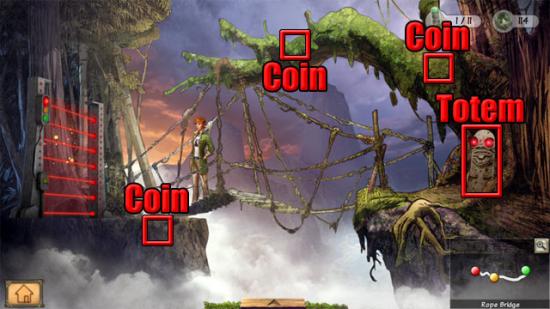
Select the totem to see that a fuse is missing. Move right to the waterfalls and select the lift to travel to the mill.
Mill
Take the coins shown below:
[eden_132]
Move down to the ruins.
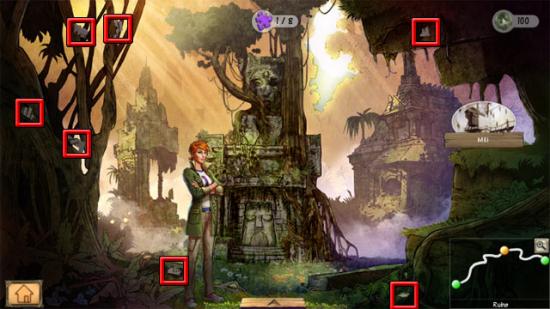
Ruins
Select the coins shown below:
Select the left totem to play a challenge.
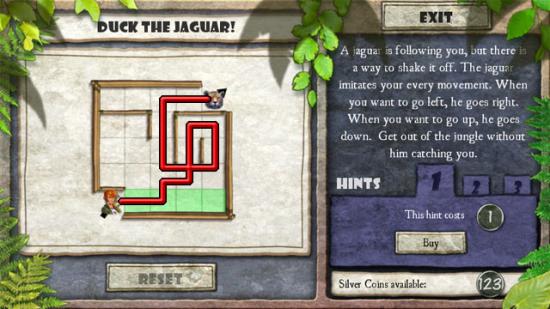
Challenge 062 – Duck the Jaguar
The aim in this challenge is to move through the jungle without being caught by the jaguar. Follow the route shown below:
Select the right totem to play a challenge.
Challenge 063 – An Even Tan
The aim in this challenge is to place the towels to create sections which differ in colour but have the same shape and size. Place the towels in the positions shown below:
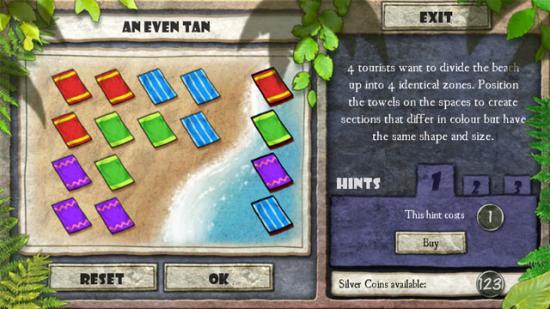
Press the OK button to complete the challenge.
Ruins
After completing both challenges, move left to Zachary’s House.
Zachary’s House
Talk to Octavio to receive a fuse. Take the coins shown below:
Select the left totem to play a puzzle.
Challenge 064 – Snip Snap
The aim in this challenge is to select the fragment that is not featured on the picture. Select the fragment shown below:
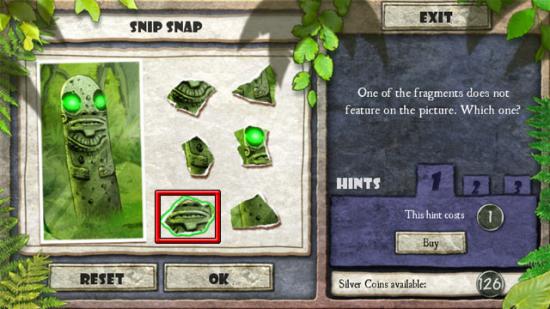
Press the OK button to complete the challenge. Select the right totem to play a challenge.
Challenge 065 – Snap Decision
The aim in this challenge is to rotate the tiles to the correct positions. Make the picture shown below:
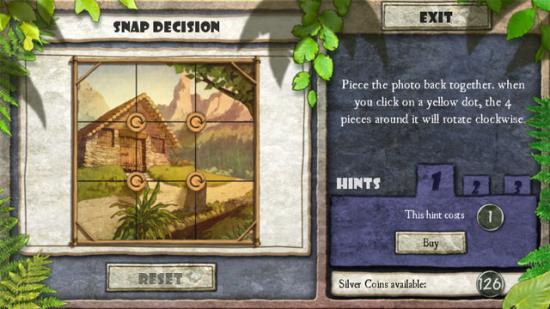
Zachary’s House
After completing both challenges, move forward to the ruins, right to the mill and select the lift to travel to the waterfalls.
Waterfalls
Take the coin shown below:
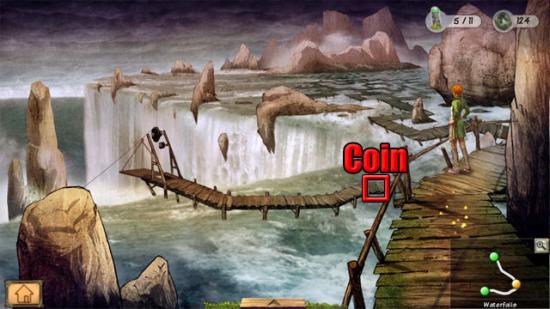
Move down to the rope bridge.
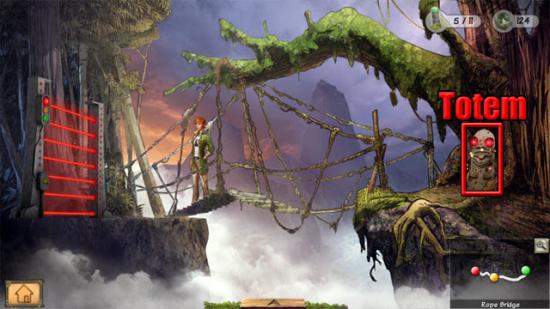
Rope Bridge
Select the totem to play a challenge:
Challenge 066 – Watch the Birdie!
The aim in this challenge is to place the birds on the correct shadows. Put the birds on the following shadows:
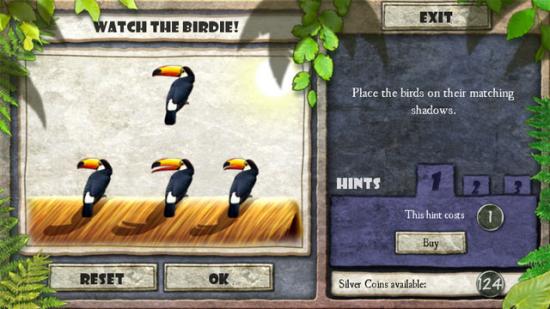
Press the OK button to complete the challenge. Select the orange gate to play a lock puzzle.
Lock Puzzle 10
Follow the directions below to complete the lock puzzle:
1 – A: Left 1
2 – B: Up 1
3 – C: Right 2
4 – Red: Right 2
5 – D: Down 4
6 – E: Right 1
7 – F: Right 1
8 – G: Up 2
9 – C: Left 3
10 – Red: Left 2
11 – H: Up 3
12 – C: Right 3
13 – I: Left 1
14 – J: Left 1
15 – D: Up 1
16 – K: Right 1
17 – G: Down 3
18 – E: Left 1
19 – F: Left 1
20 – Red: Left 1
21 – D: Up 3
22 – C: Left 1
23 – B: Down 3
24 – A: Right 1
25 – H: Up 1
26 – Red: Right 6
Rope Bridge
Take the coin shown below:
Go through the gate to the totem plain.
Totem Plain
Eden notices a part of the hermit’s necklace. Find the other six parts of the necklace:
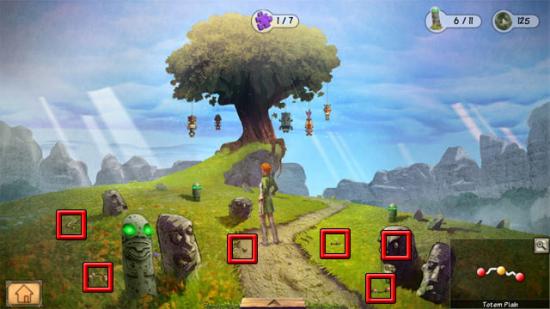
Take the coins shown below:
Select the left totem to play a challenge.
Challenge 067 – The Pelican Brief
The aim in this challenge is to figure out how many pelicans there are. Select the following answer:
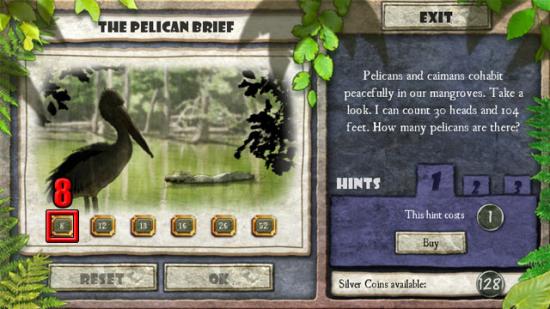
Press the OK button to complete the challenge. Select the middle totem to play the next challenge.
Challenge 068 – Monkey Business
The aim in this challenge is to move through the maze without meeting the marmoset. Follow the route shown below:
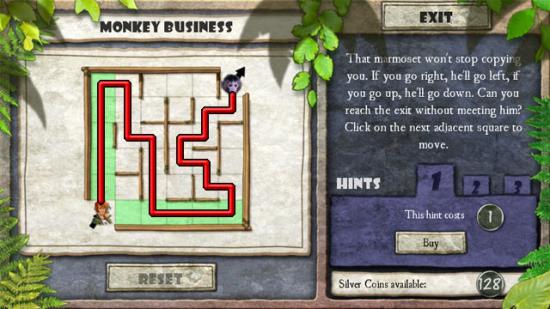
Select the right totem to play the next challenge.
Challenge 069 – Twice as Old
The aim in this challenge is to figure out what the number would be if the father and son added together their age and years of birth. Select the following answer:
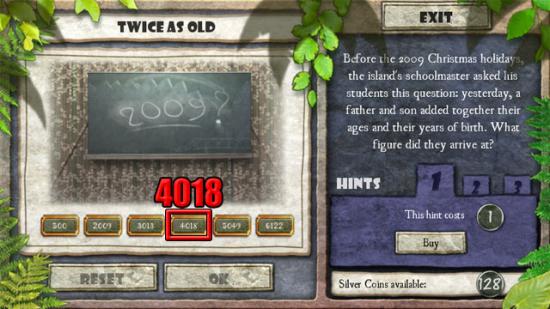
Press the OK button to complete the challenge.
Totem Plain
After completing the three challenges, move forward to the hermit’s den.
Hermit’s Den
Take the coins shown below:
Select the left totem to play a challenge.
Challenge 070 – Crab Invasion
The aim in this challenge is to create two fences so that each fence separates the crab from its mate. Make the fences shown below:
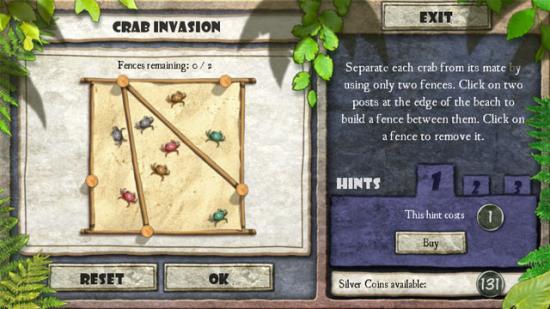
Press the OK button to complete the challenge. Select the right totem to play the next challenge.
Challenge 071 – Night and Day
The aim in this challenge is to find the five differences between the photographs. Select the differences shown below:
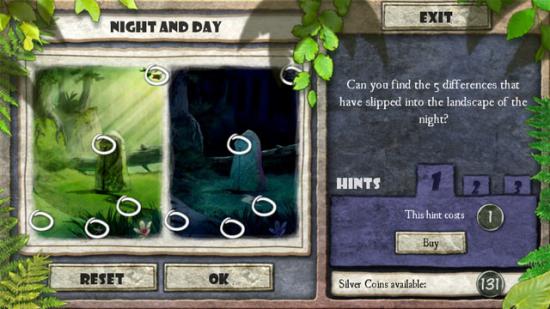
Press the OK button to complete the challenge. Select the middle totem. If you have scored 2200 points by now, skip the next challenge and continue on to the tangram puzzle. If you have scored less than 2200 points, you will need to play the challenge shown below.
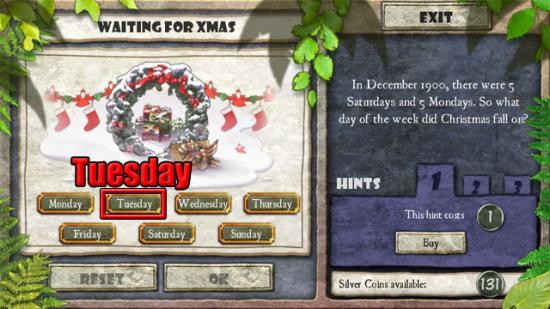
Challenge 072 – Waiting for Xmas
The aim in this challenge is to figure out the day of Christmas in December 1900. Select the answer shown below:
Tangram Puzzle 4
One way of completing the tangram puzzle is shown below:
Hermit’s Den
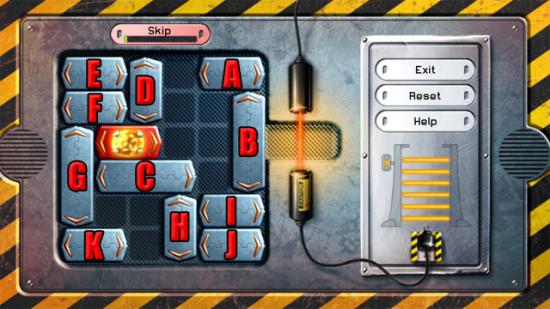
After completing the tangram puzzle, select the orange gate to play a lock puzzle.
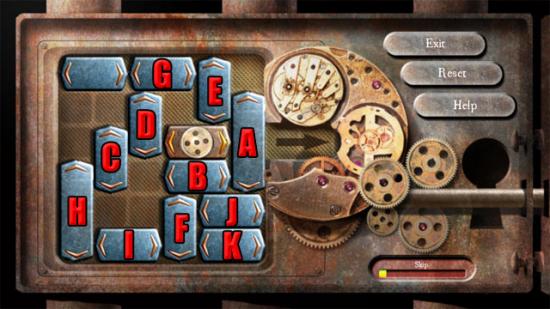
Lock Puzzle 11
Follow the directions below to complete the lock puzzle:
1 – A: Down 3
2 – Red: Left 1
3 – B: Up 2
4 – C: Left 1
5 – D: Up 3
6 – C: Right 1
7 – E: Right 1
8 – B: Down 3
9 – Red: Right 1
10 – A: Up 3
11 – C: Left 3
12 – F: Down 1
13 – G: Right 3
14 – F: Up 1
15 – C: Right 3
16 – A: Down 3
17 – Red: Left 1
18 – B: Up 4
19 – Red: Right 1
20 – A: Up 3
21 – C: Left 3
22 – E: Left 3
23 – F: Down 3
24 – D: Down 2
25 – Red: Right 5
Hermit’s Den
After completing the lock puzzle, go through the gate to enter the Tiki Room.
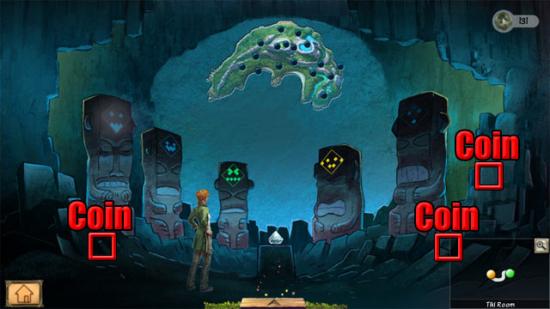
Tiki Room
Eden realises that there is one more emblem left to find. Take the coins shown below:
Move back to the hermit’s den.
Hermit’s Den
Naomi knows where some more challenges are, but first she wants to play a game of YoX. After the game, Naomi says that the entrance is beneath the tree in the totem plain. Move back to the totem plain.
Totem Plain
Select the tree and put all of the statues in the correct places on the board:
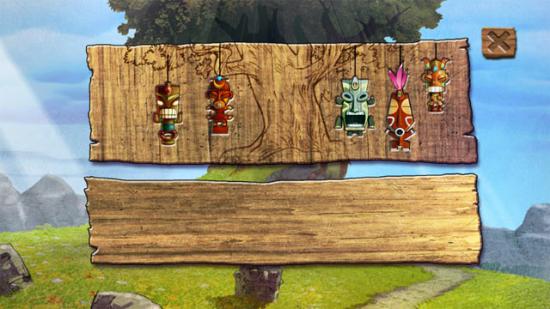
Select the tree to enter the secret chamber.
Secret Chamber
Take the coins shown below:

Select the first green totem on the left to play a challenge.
Challenge 073 – A Bridge Too Far
The aim in this challenge is to figure out the weight restriction for the bridge. Select the answer shown below:
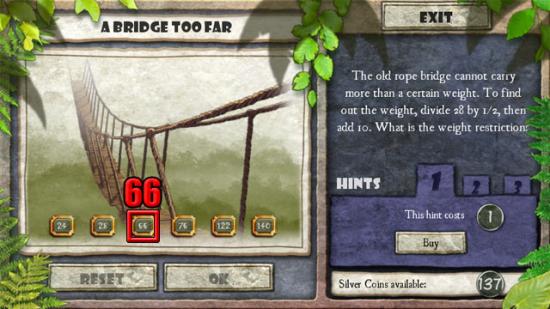
Press the OK button to complete the challenge. Select the left green totem to play the next challenge.
Challenge 074 – Photo-Montage
The aim in this challenge is to select the original photograph. Select the photograph shown below:
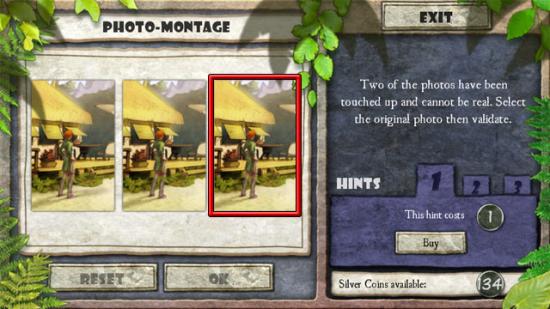
Press the OK button to complete the challenge. Select the left green totem to play the next challenge.
Challenge 075 – Snap Happy!
The aim in this challenge is to rotate the tiles to the correct positions. Make the picture shown below:
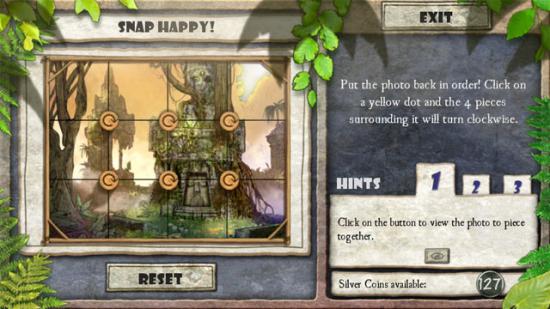
Select the left green totem to play the next challenge.
Challenge 076 – Lucky Dozen
The aim in this challenge is to place the figures so that every line, column and diagonal equals 12. Place the numbers in the following positions:
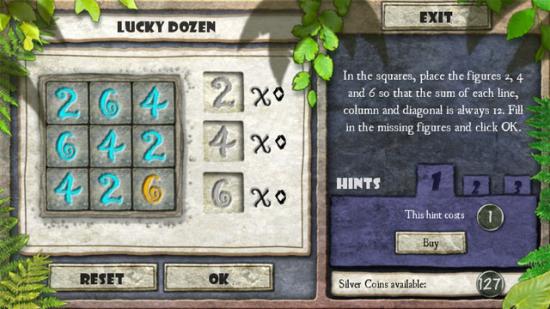
Press the OK button to complete the challenge. Select the left green totem to play the next challenge.
Challenge 077 – Monkey Maze
The aim in this challenge is to move the brown monkeys through the maze to help the other monkeys escape as well. Follow the route shown below:
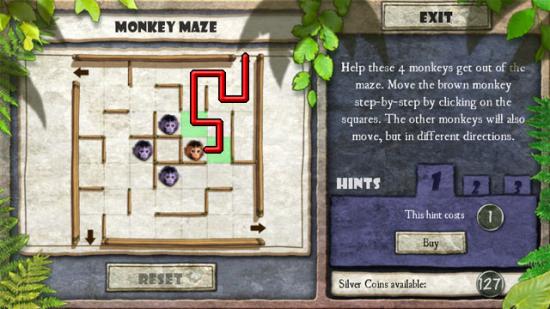
Select the left green totem to play the next challenge.
Challenge 078 – Jungle Art
The aim in this challenge is to move the tiles to put the picture back together. Make the picture shown below:
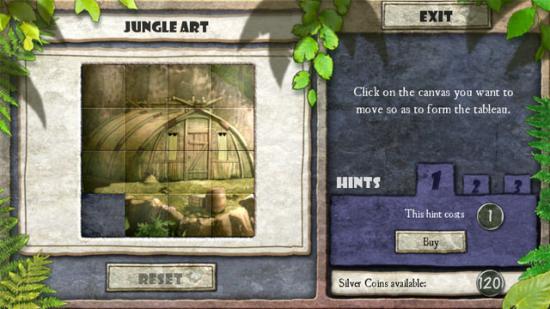
Select the left green totem to play the next challenge.
Challenge 079 – Inca-redible!
The aim in this challenge is to position the pieces in the correct places on the diagram based on the pieces on the pyramid. Place the pieces in the following positions:
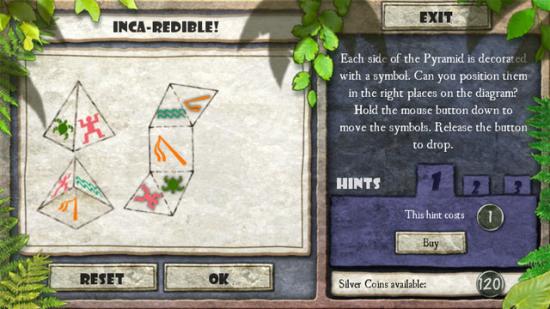
Press the OK button to complete the challenge. Select the remaining totem. If you have scored 1750 points by now, skip the next challenge and continue on to the tangram puzzle. If you have scored less than 1750 points, you will need to play the challenge shown below.
Challenge 080 – Captain Maths (Catchup Challenge)
The aim in this challenge is to figure out how old the captain is. Select the following answer:
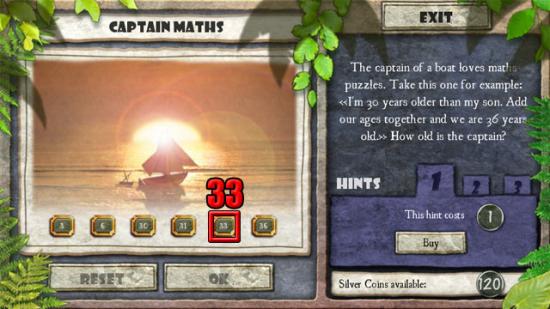
Press the OK button to complete the challenge.
Tangram Puzzle 5
One way of completing the tangram puzzle is shown below:
Secret Chamber
After completing the tangram puzzle, move left to the totem plain, forward to hermit’s den and forward to the Tiki Room.
Tiki Room
The location of the treasure is shown at the reservoir. Move back through the island to the ruins.
Ruins
Select the door to the camp to see an orange gate. Select the orange gate to play a lock puzzle.
Lock Puzzle 12
Follow the directions below to complete the lock puzzle:
1 – A: Right 2
2 – B: Up 1
3 – C: Left 2
4 – D: Up 3
5 – C: Right 2
6 – E: Right 3
7 – B: Down 3
8 – Red: Right 1
9 – F: Down 1
10 – A: Left 3
11 – D: Up 1
12 – Red: Right 2
13 – B: Up 3
14 – C: Left 1
15 – E: Left 1
16 – G: Down 3
17 – Red: Right 3
Ruins
After completing the lock puzzle, go through the door to enter the camp.
Camp
Another lock puzzle starts as soon as Eden enters the camp.
Lock Puzzle 13
Follow the directions below to complete the lock puzzle:
1 – A: Up 1
2 – B: Right 1
3 – C: Down 1
4 – D: Down 2
5 – Goal piece: Left 3
6 – D: Up 2
7 – E: Down 1
8 – F: Up 3
9 – B: Left 2
10 – A: Down 1
11 – G: Right 2
12 – D: Up 1
13 – F: Up 1
14 – Goal piece: Right 2
15 – C: Up 2
16 – H: Up 2
17 – I: Left 1
18 – J: Left 4
19 – K: Left 2
20 – A: Down 2
21 – E: Down 2
22 – Goal piece: Right 4
Camp
After completing the lock puzzle, select the red beams to play another lock puzzle.
Lock Puzzle 14
Follow the directions below to complete the lock puzzle:
1 – A: Down 1
2 – B: Down 1
3 – Red: Left 2
4 – C: Down 1
5 – D: Right 4
6 – C: Up 1
7 – Red: Right 2
8 – A: Up 3
9 – B: Up 3
10 – E: Left 2
11 – Red: Left 2
12 – F: Up 2
13 – G: Left 4
14 – F: Down 2
15 – H: Down 2
16 – I: Down 2
17 – Red: Right 6
Camp
After completing the lock puzzle, Eden travels to the reservoir.
Reservoir
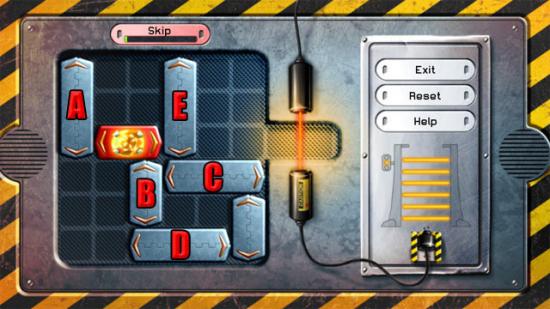
Select the orange gate to play the final lock puzzle.
Lock Puzzle 15
Follow the directions below to complete the lock puzzle:
1 – A: Right 1
2 – B: Left 1
3 – C: Right 1
4 – D: Right 1
5 – E: Down 1
6 – F: Down 1
7 – Red: Left 2
8 – G: Up 1
9 – H: Up 1
10 – I: Left 2
11 – J: Down 1
12 – K: Down 1
13 – L: Right 2
14 – G: Up 2
15 – H: Up 2
16 – Red: Right 2
17 – E: Up 1
18 – F: Up 1
19 – D: Left 2
20 – C: Left 2
21 – J: Down 1
22 – K: Down 1
23 – Red: Right 4
Cave of Akua
Select the totem to play the final challenge.
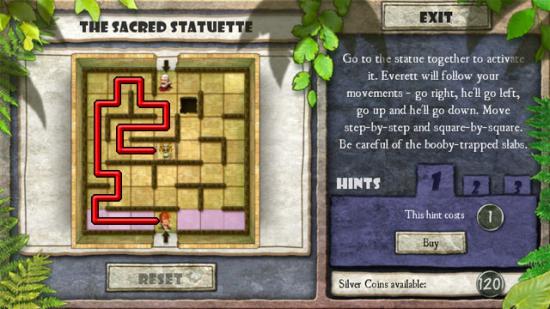
Challenge 081 – The Sacred Statuette
The aim in this challenge is to move through the pyramid so that Eden and Everett arrive next to the statue at the same time. Follow the route shown below to complete the game:

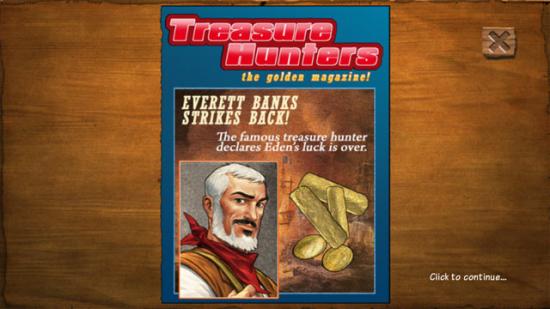
More articles...
-
Best Horror Games On Itch.io – July 2026
Across a bounty of subgenres. -
Grow A Garden 2 Base Price List
What's the most valuable crop? -
Evomon Types Guide [Strengths, Weaknesses, Resistance]
Your companion guide during battles.