- Wondering how to get Monopoly GO! free rolls? Well, you’ve come to the right place. In this guide, we provide you with a bunch of tips and tricks to get some free rolls for the hit new mobile game. We’ll …
Best Roblox Horror Games to Play Right Now – Updated Weekly
By Adele Wilson
Our Best Roblox Horror Games guide features the scariest and most creative experiences to play right now on the platform!The BEST Roblox Games of The Week – Games You Need To Play!
By Sho Roberts
Our feature shares our pick for the Best Roblox Games of the week! With our feature, we guarantee you'll find something new to play!All Grades in Type Soul – Each Race Explained
By Adele Wilson
Our All Grades in Type Soul guide lists every grade in the game for all races, including how to increase your grade quickly!
Echoes of the Past: The Revenge of the Witch Walkthrough
Welcome to the Echoes of the Past: The Revenge of the Witch walkthrough on Gamezebo. Echoes of the Past: The Revenge of the Witch is a hidden object adventure game created by Big Fish Games. Make your way through the kingdom of Orion on a quest to defeat the evil witch and rescue the kingdom from her wicked rule! Gamezebo’s walkthrough will provide you with detailed images, tips, information, and hints on how to play your best game.
Game Introduction – Echoes of the Past: The Revenge of the Witch
Welcome to the Echoes of the Past: The Revenge of the Witch walkthrough on Gamezebo. Echoes of the Past: The Revenge of the Witch is a hidden object adventure game created by Big Fish Games. Make your way through the kingdom of Orion on a quest to defeat the evil witch and rescue the kingdom from her wicked rule! Gamezebo’s walkthrough will provide you with detailed images, tips, information, and hints on how to play your best game.
General Tips
Difficulty
- When starting a new game, you can choose between one of three difficulty levels: Casual, Advanced, or Expert Mode.
- Casual Mode features additional hints, and active zones are highlighted with sparkles.
- In Advanced Mode, active zones are not indicated.
- In Expert Mode, there are no hints and no tutorial. Minigames cannot be skipped.
Hidden Object Scenes
- Hidden Objects Scenes (HOS) are pretty straightforward; find the items listed at the top of the screen. Items are not randomized, and therefore all objects will be shown in the guide below.
- There are three types of objects in a HOS: normal (listed in yellow) where you only have to click on the object to collect it. Additional Action Objects (listed in red) require you to interact with the area in some way, i.e. opening a box, or combining items, before you can collect them and cross them from the list. Finally, once you’ve found all the items on the list, a KEY ITEM (also known as an Inventory Item, identified with CAPS in the guide below) will become available. These are circled in blue in the guide below.
- There is another type of HOS will you encounter on occasion. Instead of finding the objects listed at the top of the screen, you will be placing objects at the top of the screen into their correct locations in the scene below. These locations will be shown in the guide below.
- Finally, one last kind of HOS you will encounter. There are scenes where you must assemble an item by finding various components scattered throughout the area. Some of these will be hidden underneath piles of debris, which you must click on to scatter. Items of this nature will be outlined with a square instead of a circle in the guide below, indicating the item is located underneath or inside something.
General Layout
- The Menu button can be found in the upper left corner of the screen. Click on this to pause your game, access options, or visit the Main Menu at any time.
- The Journal can also be found in the upper left corner of the screen. This will keep track of important clues or story details you find throughout the game. If you can’t remember a puzzle clue or important detail, you may want to check here.
- The Hint Button is located in the upper right corner of the screen. Here, there is a mirror, which acts as your Hint button.
- Your Inventory Bar is located at the top of the screen. By default, it will be unlocked, and you will need to move your cursor over the top of the screen to cause it to drop down. You may choose to lock it in place by clicking on the small lock icon next to the Journal. There are arrows on either side for when you have more items that can be displayed at one time.
Hint, Skip, and Restart Buttons
- The Hint Button is in the same location, the upper right corner, no matter if you’re in main gameplay or a puzzle. Once fully charged, the word “Hint” will appear over the mirror that acts as your Hint Button. You can use this for general pointers, or to find a specific object. Hints are unlimited, though they require a certain amount of time to recharged. It should be noted that Hints are disabled in Expert Mode.
- The Skip button appears during puzzles. If you become frustrated on a puzzle and would rather skip it, this button will become usable after a certain amount of time has passed. It should be noted this feature is disabled in Expert Mode.
- The Restart button appears during puzzles. If you find yourself confused, or needing a fresh slate, this button is immediately usable without penalty.
Collector’s Edition
- This walkthrough covers the Collector’s Edition content of Echoes of the Past: The Revenge of the Witch.
- Once you’ve completed the main adventure, the Bonus Adventure will become available. You can access this by visiting the Main Menu and selecting “Extras”, then choose “Bonus Adventure”. This becomes unlocked upon completing the game on any difficulty.
- Additional Collector’s Edition features include Minigames, where you can replay minigames you encountered in the main adventure, and Game Designer, where you can make your own!
Chapter 1: The Knight and the Dogs
Forest Edge
- Click on the MAGIC STAFF lying on the ground to add it to your inventory. This can always be found in the first inventory slot, as you will need to collect 10 Magic Gems for it.
- Click on the bird perched on top of the rock on the left to shoo it away, then click on the DAGGER balancing at the top to add it to your inventory.
- Proceed forward to the next area.
Gate Entrance
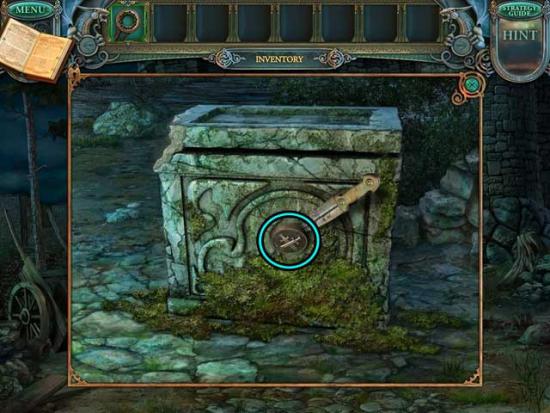
- Examine the stone block on the ground on the right. Use the DAGGER to pry the PLATE WITH SWORD loose, then click on it to add it to your inventory.

- Examine the toppled cart on the left. Place the PLATE WITH SWORD into the slot in the top of the box to trigger a panel to open on the side.
- Click on the open side panel to enter a puzzle.
- Light all the crystals to open the chest. Click on the lines to light the crystals. Single crystals require one line going through it to become lit; double crystals require two lines. The solution is shown below.
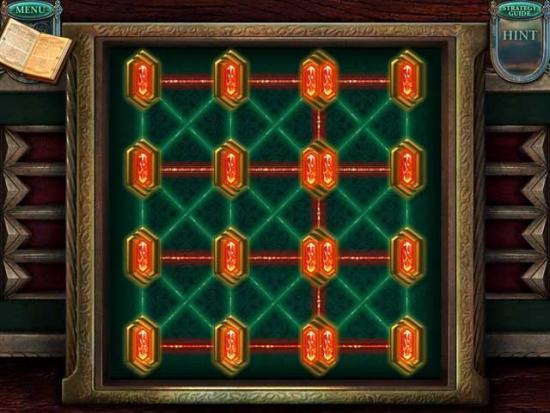
- Upon completing the puzzle, click on the Scroll and the MAGIC POWDER inside the box to collect them.
- Use the MAGIC POWDER on the Knight to restore it to normal.
- Click on the MAGIC GEM 1/10 that appears to collect it.
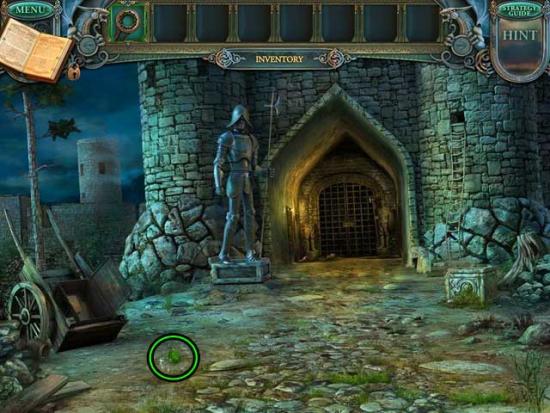
- Proceed forward to the next area.
Town Gate
- Click on the origami figure on the lower right to collect it.
- Click on the DRY BRUSH at the foot of the statue on the right to add it to your inventory.
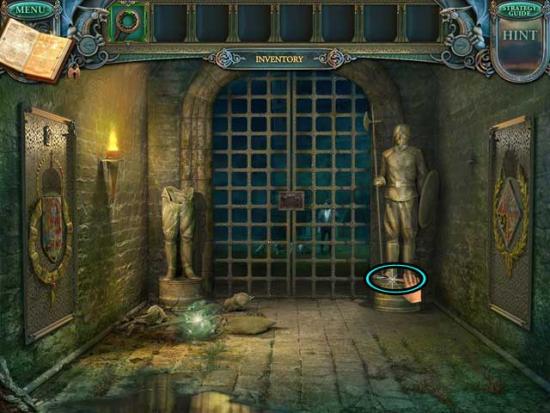
- Return to the Forest Edge.
Forest Edge
- Take a closer look at the hole in the tree on the right. Use the DRY BRUSH on the bronze-colored sap at the upper right corner of the close-up to obtain the BRUSH WITH GLUE.
- Return to the Town Gate.
Town Gate
- Examine the debris on the ground in front of the broken statue on the left.
- Find all the pieces of the broken bas-relief. Their locations are shown below.
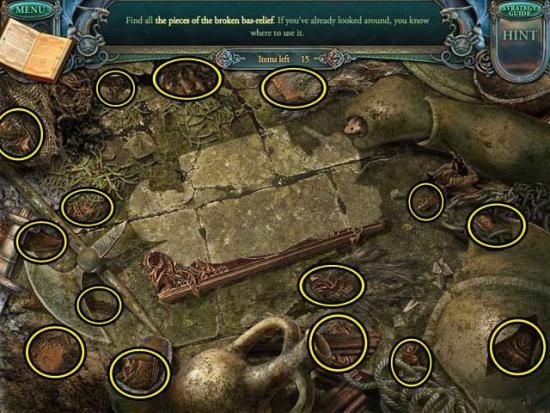
- Upon finding all the pieces, use the BRUSH WITH GLUE to restore the BAS-RELIEF and add it to your inventory.
- Back in the main area, examine the gate ahead. Use the BAS-RELIEF on the lock slot in the gate. This will trigger a puzzle.
- Solve the puzzle to open the town gate. Place all the elements so that the heraldic symbols on the neighboring elements coincide. The solution is shown below.
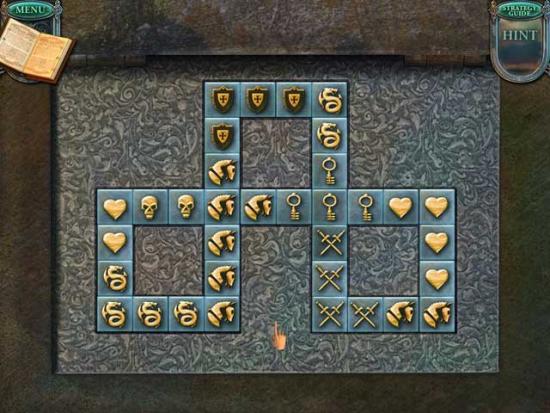
- Upon completing the puzzle, the gate will open. Proceed forward to the next area.
Courtyard
- Proceed left into the Apothecary.
Apothecary
- Click on the hidden object area over the desk on the right.
- Find the objects listed at the top of the screen. Items listed in red are outlined in red and require an additional action before they can be collected. The Key Item is circled in blue.
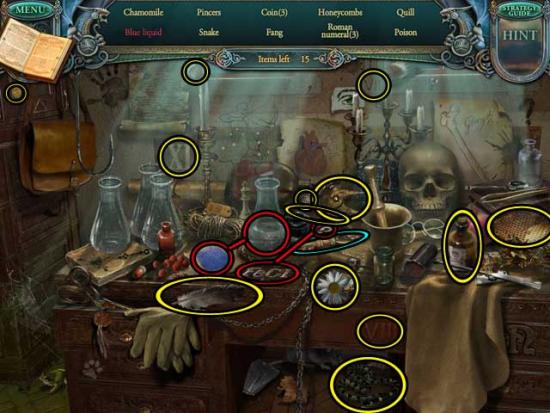
- Upon completing the area, the CUPBOARD KEY will be added to your inventory.
- Click on the pile of debris in the lower right corner to scatter it, then click on the KINDLING and the Scroll to collect them.
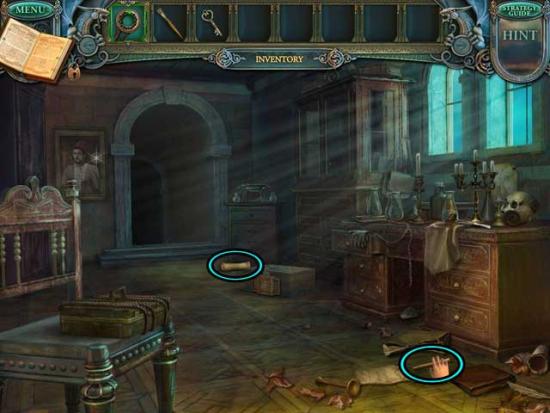
- Examine the cupboard on the right wall next to the desk. Use the CUPBOARD KEY on the lock to open it, revealing a hidden object area.
- Take the misplaced items and put them in their proper places. The solution is shown below.
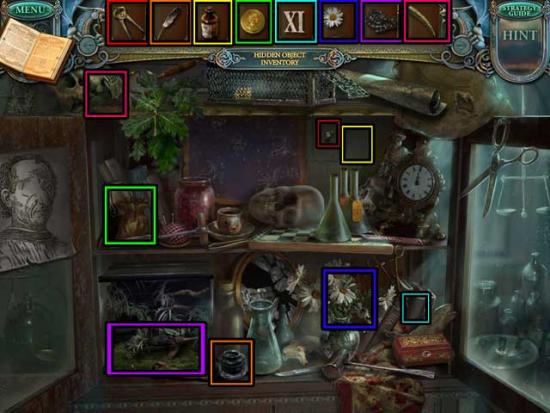
- Upon completing the task, the EMPTY OIL CAN will be added to your inventory.
- Examine the painting to the left of the arch at the back of the room. Click on the TINY SKELETON ARM to add it to your inventory.
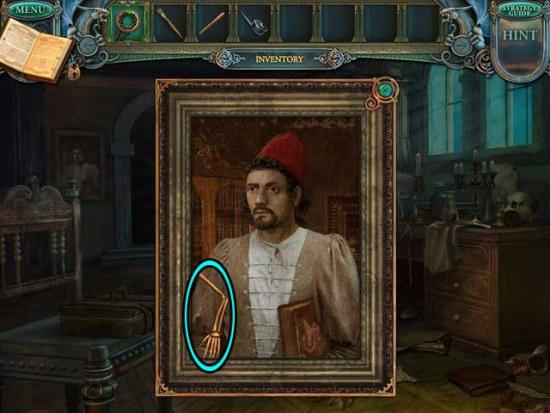
- Exit to the Courtyard.
Courtyard
- Examine the lamp hanging from the lamppost on the right. Use the EMPTY OIL CAN on the leaking oil, then click on the FULL OIL CAN to add it back to your inventory.
- Go down to the Town Gate.
Town Gate
- Use the KINDLING on the torch on the left to light it, adding the BURNING KINDLING to your inventory.
- Return to the Apothecary.
Apothecary
- Proceed through the archway at the back of the room.
Aquarium
- Examine the chandelier hanging above the table towards the right. Use the FULL OIL CAN, followed by the BURNING KINDLING on the lamp to light it, restoring light to the room.
- There are three items to collect in the immediate area: Click on the debris on the floor to scatter it, revealing the CROWN. Click on the edge of the table cloth on the right to reveal the LENS. Click on the leather case on the right side of the right table to open it, revealing the SCALPEL. All their locations are shown below. Click on them to add them to your inventory.
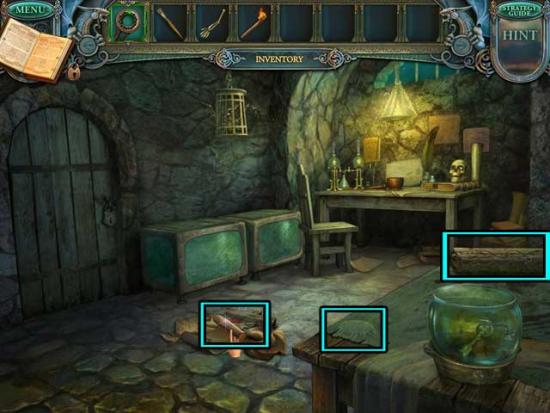
- Return to the Apothecary.
Apothecary
- Use the SCALPEL on the ropes holding the box on the immediate left shut. Click on the TINY SKELETON LEG inside to add it to your inventory.
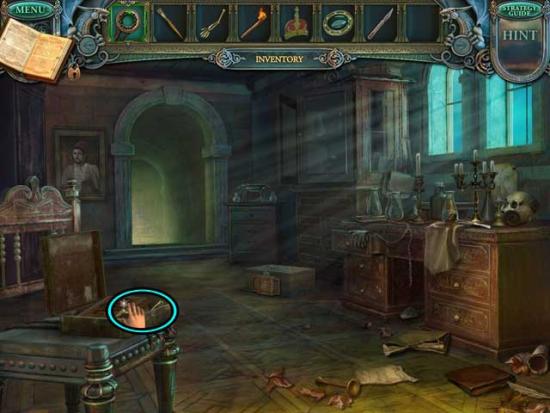
- Go back to the Town Gate.
Town Gate
- Use the CROWN on the slot above the shield on the plaque on the left. Click on the STOREROOM KEY that’s revealed to add it to your inventory.
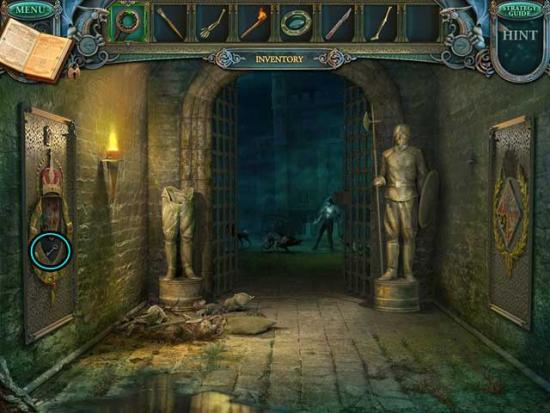
- Make your way back to the Aquarium.
Aquarium
- Take a closer look at the locked door on the left. Use the STOREROOM KEY on the lock to open it.
- Proceed through to the next area.
Storeroom
- Click on the HOOK under the debris, the CERAMIC DECORATION, and the ELDER LEAVES to add them to your inventory.
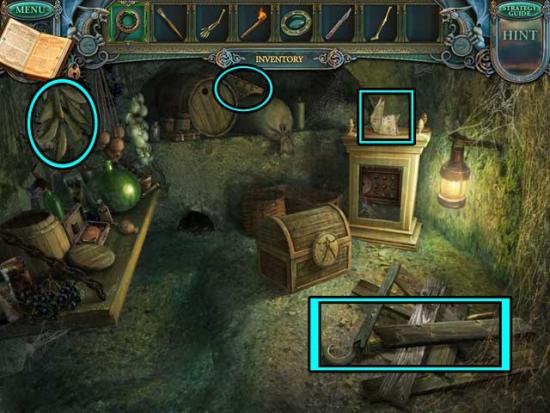
- Click on the origami rabbit (shown above) to collect the note.
- Examine the chest sitting in the middle of the floor. Use the TINY SKELETON ARM and the TINY SKELETON LEG on the lock.
- Exit for now and make your way back to the Gate Entrance.
Gate Entrance
- Examine the tower with the ladder on the right. Use the HOOK to retrieve the gold necklace from the skeleton, then click on the TINY SKULL to add it to your inventory.
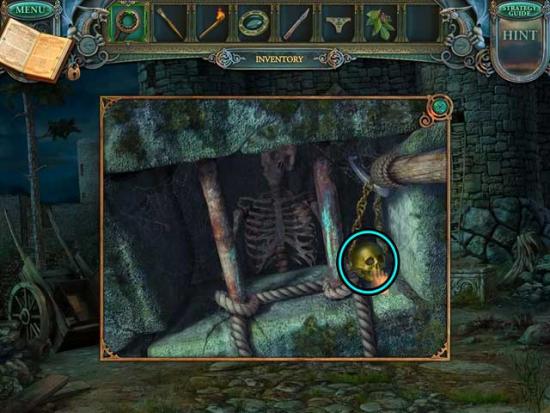
- Return to the Storeroom.
Storeroom
- Examine the chest on the ground again. Use the TINY SKULL on the lock to complete it.
- Once the chest is open, click on the TWEEZERS inside to add them to your inventory.
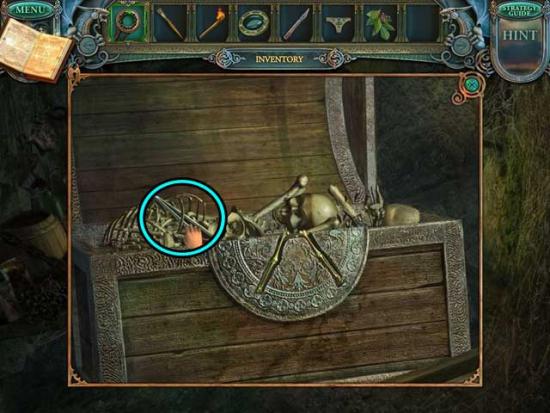
- Exit to the Aquarium.
Aquarium
- Use the TWEEZERS on the fishbowl in the lower right corner to retrieve the AQUARIUM HANDLE and add it to your inventory.
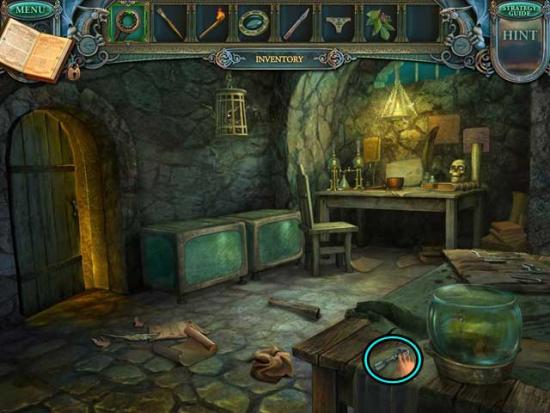
- Examine the aquarium on the left. Use the AQUARIUM HANDLE on the lock to open it, triggering a puzzle.
- Make the water creatures eat the poisonous seaweed to get a plate for the chest. Move the partition to let the water creatures pass from one part of the aquarium to the other. When all the creatures are gathered in the right part of the aquarium, they will eat the seaweed. A good strategy is to move the partition so that you deflect creatures on their way towards the left side of the tank. Also, when you see one moving towards the right side, move the partition so they can get to the other side smoothly. The solution is shown below.
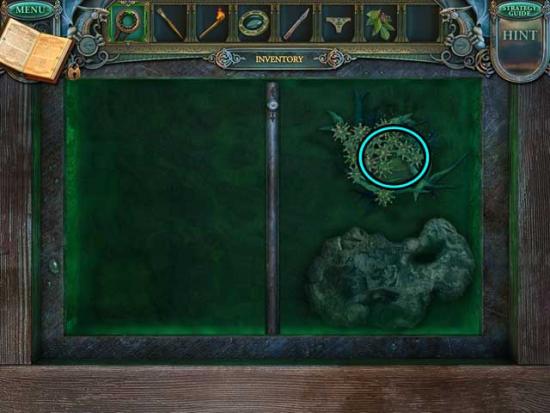
- Upon completing the puzzle, click on the PLATE WITH DOG PAW to add it to your inventory.
- Go to the Apothecary.
Apothecary
- Examine the box on the floor between the desk and the rear archway. Place the PLATE WITH DOG PAW into the slot at the top of the box to trigger a panel moving, revealing a puzzle.
- Light all the crystals to open the chest. Click on the lines to light the crystals. Single crystals require one line going through it to become lit; double crystals require two lines. The solution is shown below.
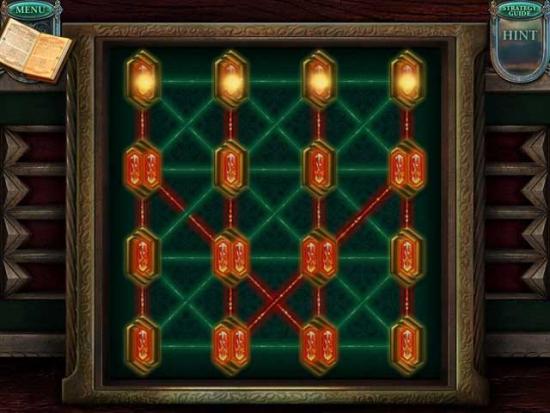
- Upon completing the puzzle, click on the Scroll and the MAGIC POWDER inside the box to collect them.
- Exit to the Courtyard.
Courtyard
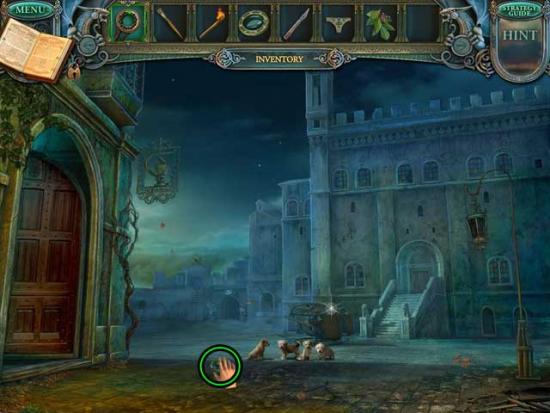
- Use the MAGIC POWDER on the dog beasts to transform them back to normal.
- After speaking with the Doctor, click on the MAGIC GEM 2/10 to collect it.
Chapter 2: The Archway and the Fire
Courtyard
- Examine the broken down carriage behind the puppies. Click on the GUNPOWDER BARREL to add it to your inventory. Then, use the SCALPEL on the leather strap to obtain the LEATHER HARNESS.
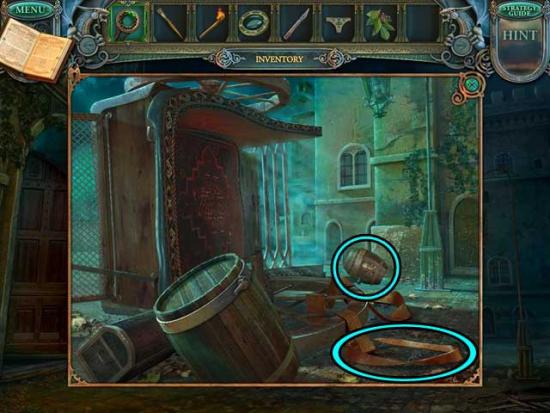
- Proceed forward (to the right of the puppies) towards the staircase.
Central Entrance
- Take a closer look at the middle section of the steps on the left. Click on the METAL LOCK PART to add it to your inventory. Next, click on the lion statue on the left to rotate it and collect the SHIELD PART inside the secret compartment below.
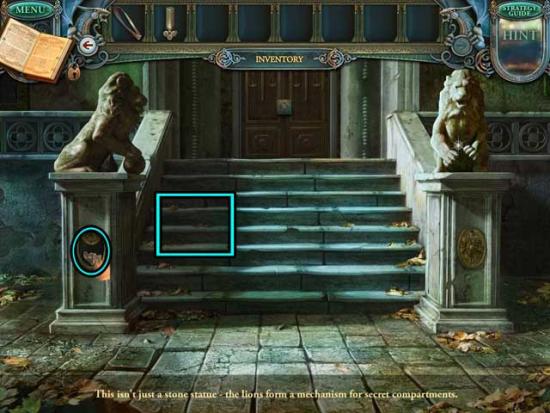
- Go back to the Courtyard.
Courtyard
- Proceed forward (to the left of the puppies) to the next area.
Clock Plaza
- Click on the hidden object area over the second caravan on the left.
- Find the objects listed at the top of the screen. Items listed in red are outlined in red and require an additional action before they can be collected. The Key Item is circled in blue.
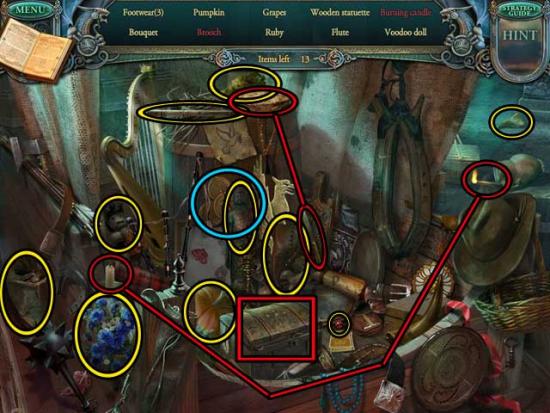
- Upon completing the area, the WOODEN QUARTREFOIL will be added to your inventory.
- Take a closer look at the first caravan on the left. Click on the CERAMIC DECORATION (2) to add it to your inventory.
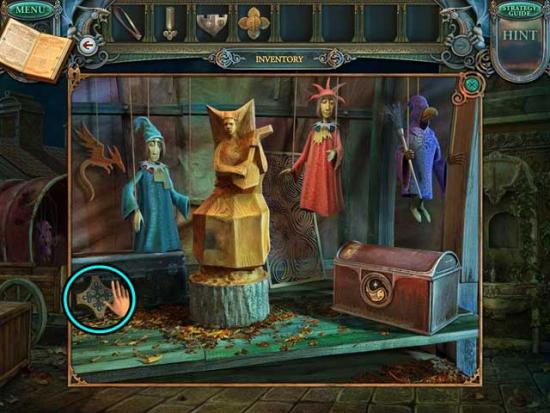
- Back in the main area, examine the base of the clock tower.
- Find all the boards here. They will help you repair the broken ladder. Their locations are shown below.
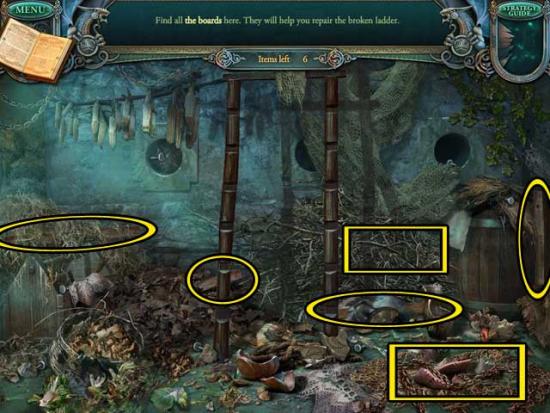
- Next, find all the the nails- the boards won’t hold without them. Their locations are shown below.
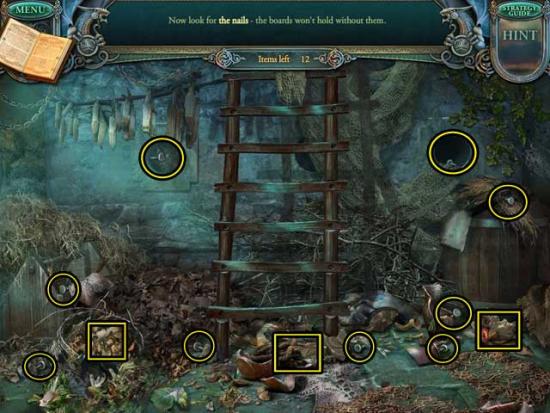
- Exit for now and return to the Central Entrance.
Central Entrance
- Take a closer look at the door. Use the WOODEN QUARTREFOIL on the slot in the door to trigger a puzzle.
- Solve the puzzle to open the door to the town hall. Place the plates into empty slots. The image on the plate should correspond to the picture above the slot. Every plate will move together with the neighboring plates. The solution is as follows (refer to the screenshot below):

- 1)Click the Lion and move it to the 2nd slot on the upper right.
- 2) Click the Keys and move it next to the Scroll on the lower left.
- 3) Click the Scroll and move it to the 1st slot on the upper left.
- 4) Click the Quills and move them to the bottom left slot.
- 5) Click the Shield and move it to the 2nd slot on the lower right.
- 6) Click the Quills and move them to the 3rd slot on the upper left.
- 7) Click the Tree and move it to the 3rd slot on the lower left.
- 8) Click the Tower and move it to the 3rd slot on the lower right.
- 9) Click the Tower and move it to the 2nd slot on the upper right.
- 10) Click the Owl and move it next to the Tree.
- 11) Click the Owl and move it to the 1st slot on the lower right.
- 12) Click the Lion and move it to the 3rd slot on the upper right.
- Upon completing the puzzle, the doors will open. Proceed through to the next area.
Town Hall Entrance
- Note the box on the ground to the left of the leftmost statue.
- There’s nothing to do here at the moment, so proceed forward to the next area.
Town Hall
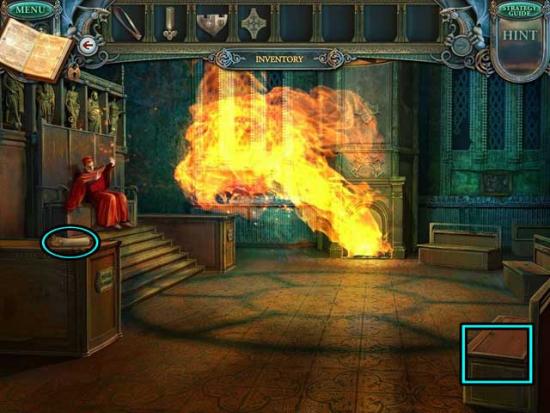
- Click on the Scroll on the left to collect it, then open the box seat on the right and click on the PLATE WITH FISH EGGS inside to add it to your inventory.
- Go back to the Town Hall Entrance.
Town Hall Entrance
- Proceed left to the next area.
Side Hall
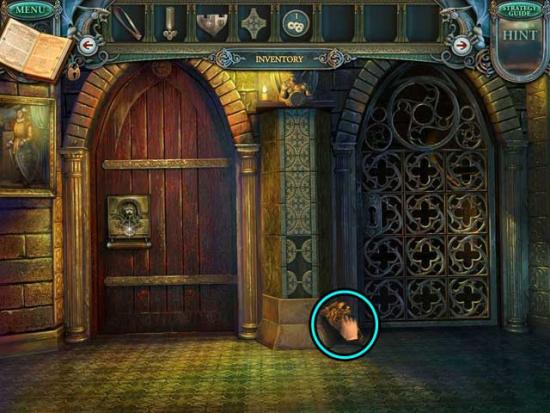
- Click on the painting hanging on the left to knock it off the wall. Note the code puzzle beneath.
- Click on the FOUNTAIN PART to add it to your inventory.
- Make your way back to the Apothecary.
Apothecary
- Click on the hidden object area over the desk on the right.
- Find the objects listed at the top of the screen. Items listed in red are outlined in red and require an additional action before they can be collected. The Key Item is circled in blue.
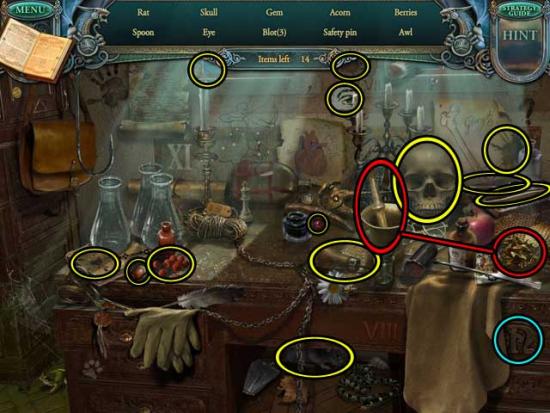
- Upon completing the area, the LETTER N will be added to your inventory.
- Go to the Storeroom.
Storeroom
- Examine the gold case towards the right. Use the PLATE WITH FISH EGGS on the panel to trigger a puzzle.
- Solve the puzzle to open the safe. Click on a tile to move it to a nearby empty slot. Place all the tiles so that their numbers correspond to the numbers shown near each slot. The solution is shown below. In order to reach the solution, click on the numbered tiles in the following order: 1, 4, 7, 3, 9, 6, 3, 7, 4, 8, 5, 9, 6, 3, 2, 4, 7, 5, 8, 7, 4, 1.
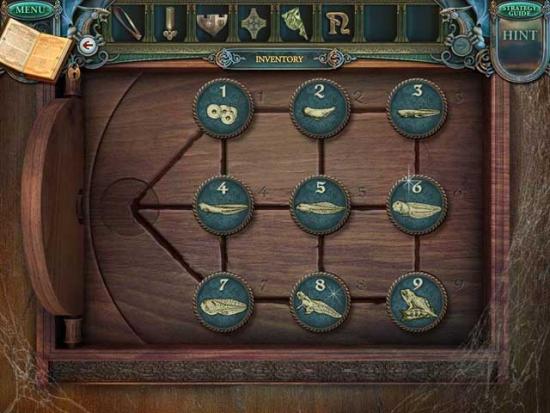
- Upon completing the puzzle, click on the Scroll, the HAMMER, and the FOUNTAIN PART (2) to collect them.
- Return to the Clock Plaza.
Clock Plaza
- Use the FOUNTAIN PARTS (x2) on the slot at the top of the fountain on the right. Click on the METAL SNAKE that appears to add it to your inventory.
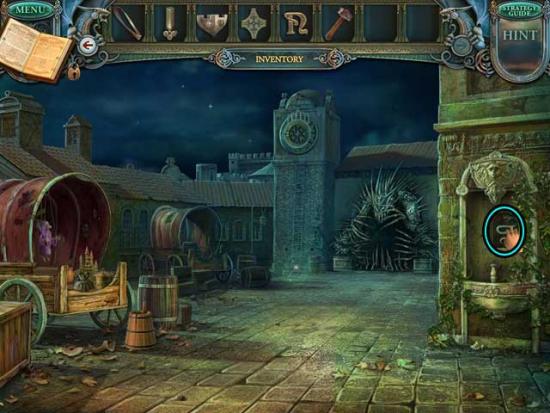
- Examine the base of the clock tower for a closer view. Use the HAMMER on each of the nails on the ladder to repair it. Examine the face of the clock tower, which is now accessible, and note the figure slots.
- Return to the Apothecary.
Apothecary
- Use the METAL SNAKE on the box on the chair on the left to open it, then click on the AQUARIUM HANDLE inside to add it to your inventory.
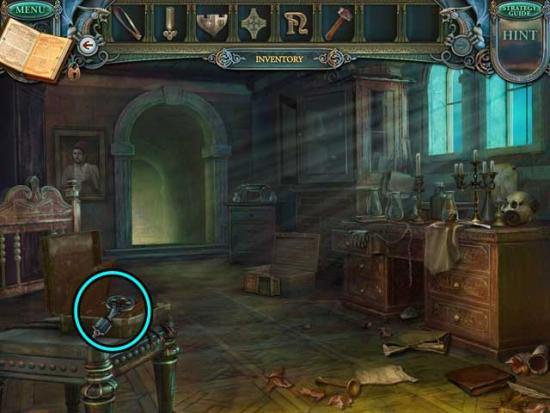
- Go to the Aquarium.
Aquarium
- Take a closer look at the aquarium on the right. Use the AQUARIUM HANDLE on the lock to open it, triggering a puzzle.
- Make the water creatures eat the corresponding seaweed to get the item hidden beneath it. Move the partition to let the water creatures pass from one part of the aquarium to the other. The water creatures will start eating the corresponding seaweed only when the green and red ones are completely separated from each other. The solution is shown below.
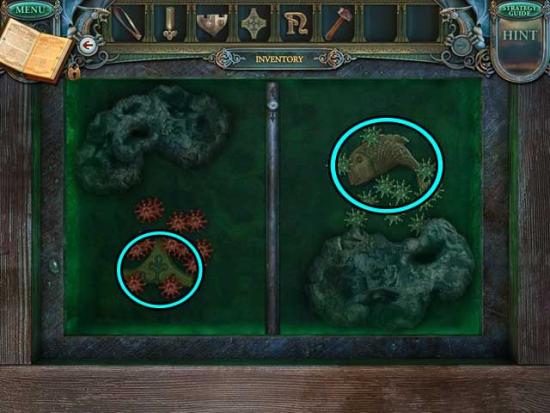
- Upon completing the puzzle, click on the CERAMIC DECORATION (3) and the METAL FISH to add them to your inventory.
- Go back to the Apothecary.
Apothecary
- Click on the cupboard to enter a hidden object area.
- Take the misplaced items and put them in their proper places. The solution is shown below.
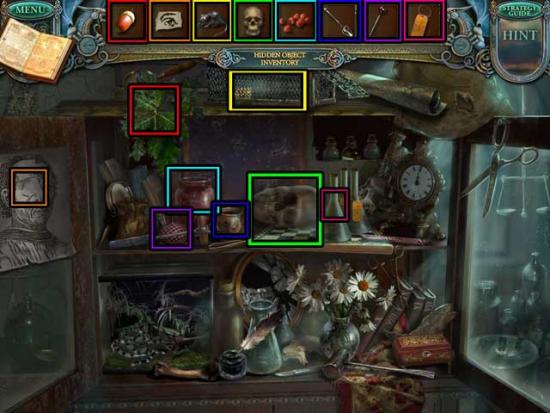
- Upon completing the area, the FIGURINE PART will be added to your inventory.
- Return to the Clock Plaza.
Clock Plaza
- Examine the first caravan on the left. Use the METAL FISH on the lock on the box on the right to open it, then click on the LETTER A inside to add it to your inventory.
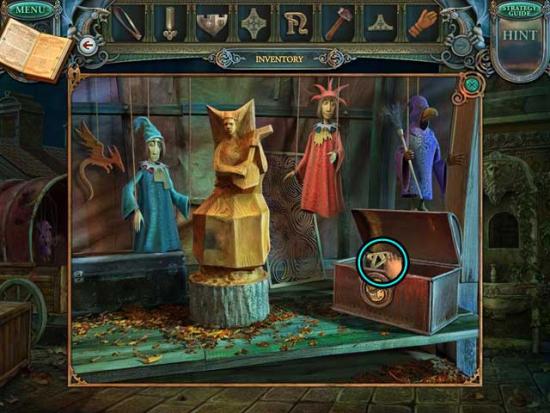
- Backtrack to the Side Hall.
Side Hall
- Use the CERAMIC DECORATIONS (x3) on the slots at the bottom of the pillar between the two doors. This will reveal a secret compartment. Click on the LETTER D inside to add it to your inventory.
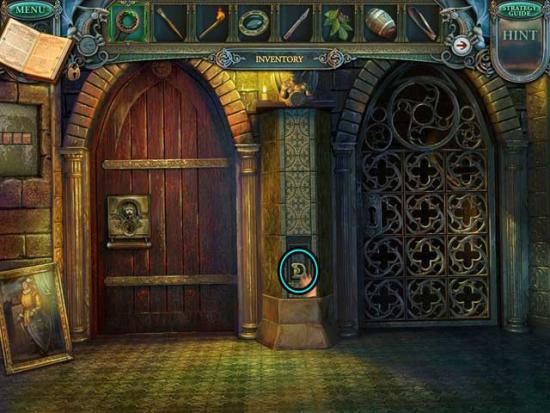
- Return to the Town Hall.
Town Hall
- Examine the plaque on the front of the first box on the left. Use the LETTER N, the LETTER A, and the LETTER D on their corresponding slots, then click on the PLATE WITH CROWN that’s revealed to add it to your inventory.
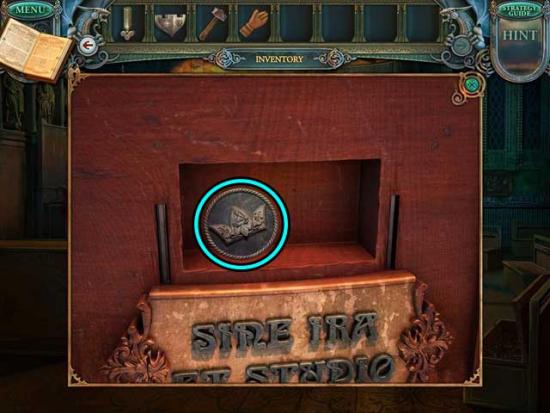
- Go back to the Town Hall Entrance.
Town Hall Entrance
- Examine the box on the floor to the left of the leftmost statue. Use the PLATE WITH CROWN on the slot at the top of the box to reveal a secret panel. Click on it to trigger a puzzle.
- Light all the crystals to open the chest. Click on the lines to light the crystals. Single crystals require one line going through it to become lit; double crystals require two lines. The solution is shown below.
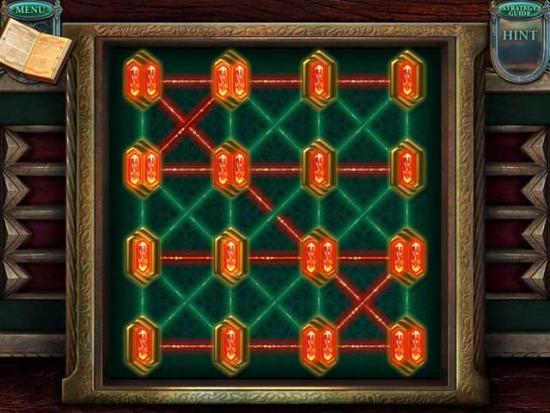
- Upon completing the puzzle, click on the Scroll and the MAGIC POWDER inside to collect them.
- Go to the Clock Plaza.
Clock Plaza
- Use the MAGIC POWDER on the monster in the archway to restore the archway to normal.
- Click on the MAGIC GEM 3/10 that appears to collect it.
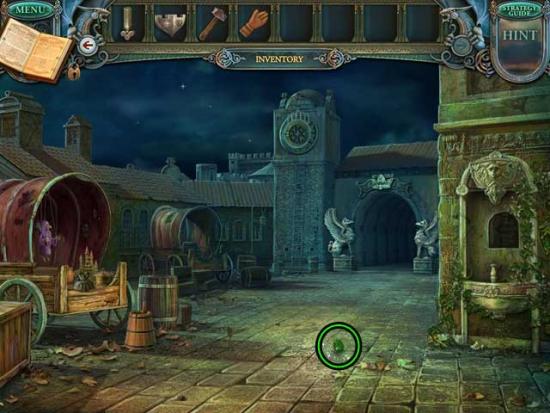
- Proceed forward through the archway to the next area.
Side Street
- Click on the origami figure and the WORMWOOD to collect them.
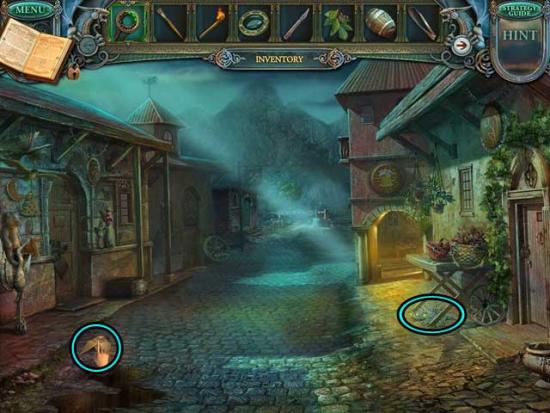
- Examine the surrounding area and note the box next to the first door on the left.
- Proceed forward through the lit archway on the right into the Brewery.
Brewery
- Click on the hidden object area towards the right at the back of the room.
- Find the objects listed at the top of the screen. Items listed in red are outlined in red and require an additional action before they can be collected. The Key Item is circled in blue.
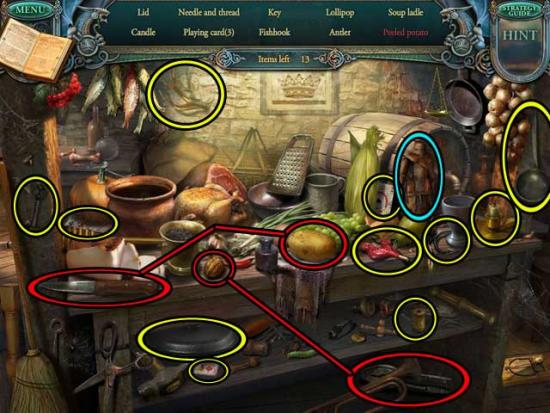
- Upon completing the area, the WOODEN FIGURINE will be added to your inventory.
- Back in the main area, click on the CROWN to add it to your inventory.
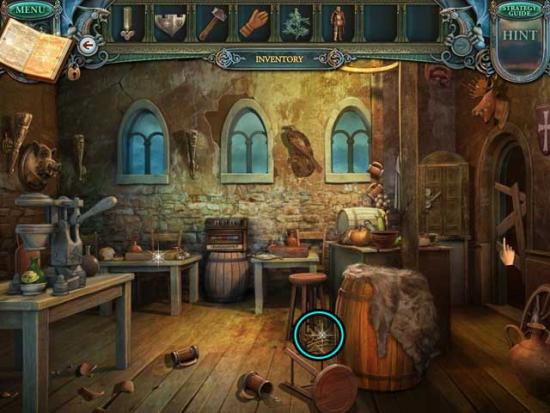
- Exit back to the Side Street.
Side Street
- Proceed forward up the street to the next area.
Well
- Click on the SPADE propped up against the house on the left to add it to your inventory.
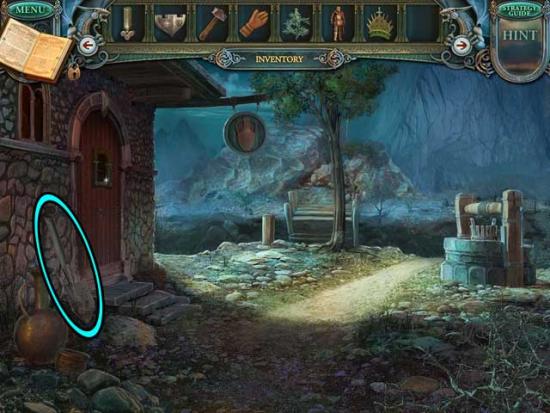
- Make your way back to the Town Gate.
Town Gate
- Use the CROWN on the slot at the top of the plaque on the right. Click on the PICTURE SCRAP revealed within the secret compartment to add it to your inventory.
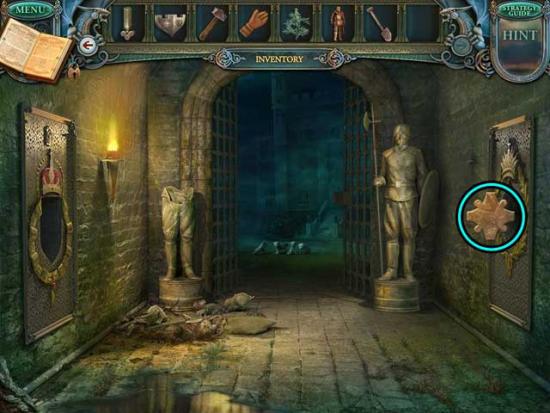
- Make your way to the Storeroom.
Storeroom
- Use the SPADE on the dip in the ground on the left to dig it up, then click on the METAL DECORATION to add it to your inventory.
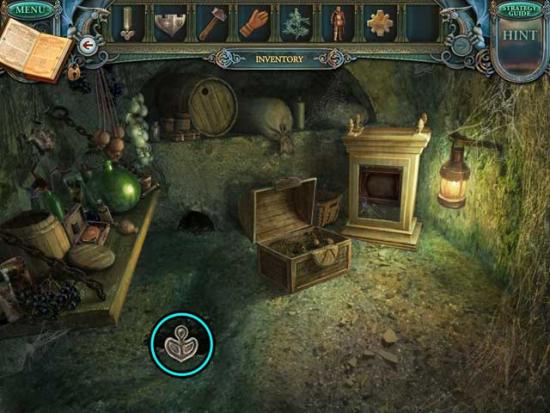
- Go to the Town Hall.
Town Hall
- Examine the picture frame on the far wall on the right. Use the PICTURE SCRAP on the missing slot to trigger a puzzle.
- Solve the puzzle to open a secret niche. Restore the initial picture by finding a correct place for every part of it. The solution is shown below.
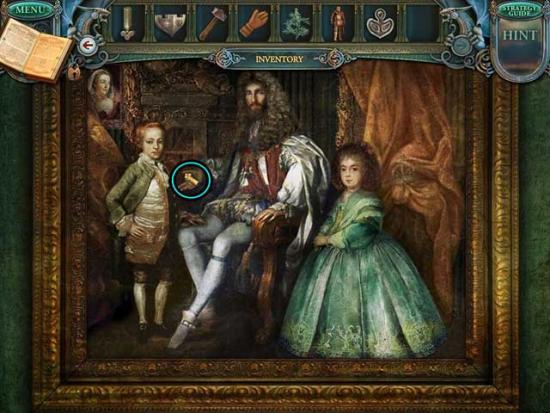
- Upon completing the puzzle, click on the METAL LOCK PART (2) to add it to your inventory.
- Return to the Well.
Well
- Proceed forward down the dirt path on the right.
Riverbank
- Click on the satchel lying on the ground on the left to open it, then click on the REAGENT inside to add it to your inventory.
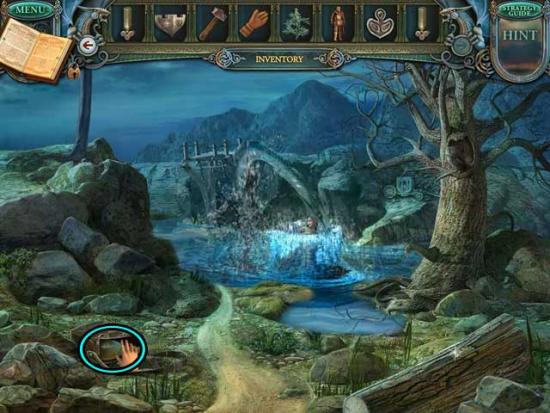
- Make your way back to the Apothecary.
Apothecary
- Examine the small cabinet at the back of the room, between the archway and the cupboard on the wall. Use the REAGENT on the basin to trigger a puzzle.
- Separate the mixture of drops to get two kinds of liquid. Drive all the drops into the corresponding beakers. If one of the wrong color goes into the wrong beaker, several of the same color will reappear within the basin. A good strategy is to move all of one color first, then all of the other color.
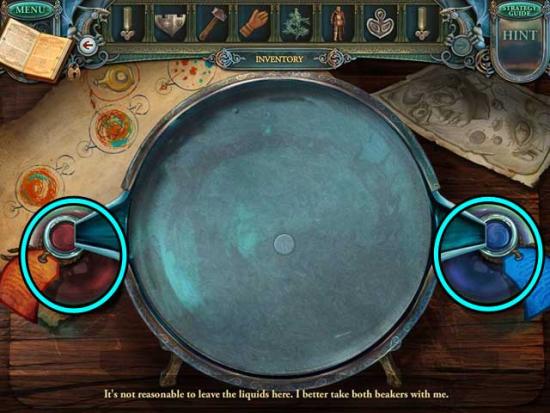
- Upon completing the puzzle, click on the HERBICIDE and the OIL to add them to your inventory.
- Go to the Well.
Well
- Use the HERBICIDE on the thicket on the lower right to clear it, then click on the METAL LOCK PART (3) to add it to your inventory.
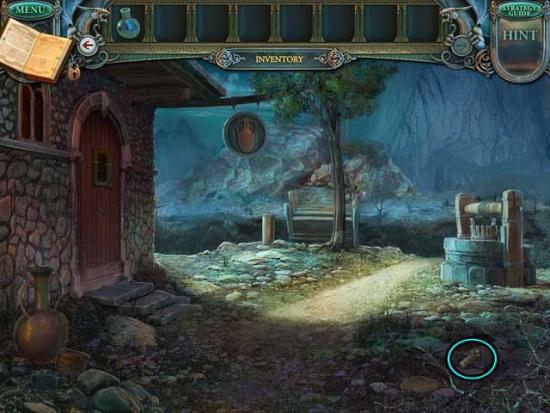
- Go down to the Side Street.
Side Street
- Examine the first door on the left for a closer view. Use the METAL LOCK PARTS (x3) on the empty slots, then click on the wheel on the right to open the door.
- Enter through the doorway to the next area.
Toy Shop
- Click on the METAL TONGS, the GEAR, and the CARVING KNIFE to add them to your inventory.
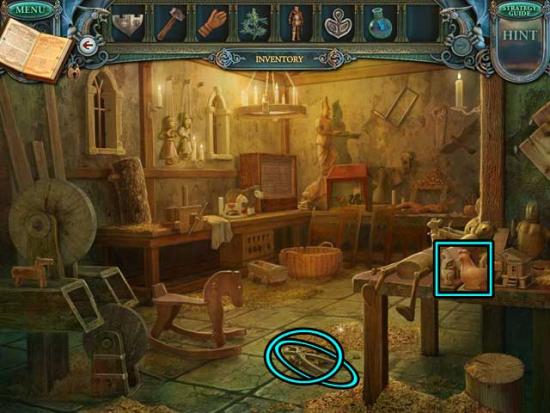
- Examine the workbench at the far, right end of the room. Use the DRY BRUSH on the jar of glue and the FIGURINE PART on the incomplete arm.
- Back in the main area, note the sharpening wheel on the left. Use the LEATHER HARNESS on the wheels on the left to restore it to working order.
- Exit the Toy Shop and return to the Clock Plaza.
Clock Plaza
- Take a closer look at the first caravan on the left. Use the CARVING KNIFE on the wooden figure, then click on the completed WOODEN FIGURINE (2) to add it to your inventory.
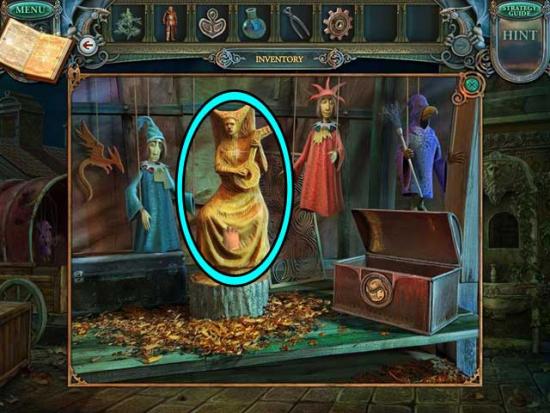
- Go to the Brewery.
Brewery
- Take a closer look at the cabinet in the rear right corner of the room. Use the GEAR on the empty slot between the gears to restore it, then click on the lever to open the cabinet.
- Click on the MINT LEAVES to add them to your inventory.
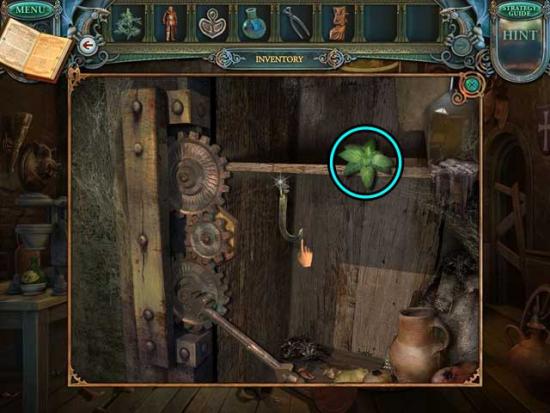
- Return to the Apothecary.
Apothecary
- Click on the hidden object area over the desk on the right.
- Find the objects listed at the top of the screen. Items listed in red are outlined in red and require an additional action before they can be collected. The Key Item is circled in blue.
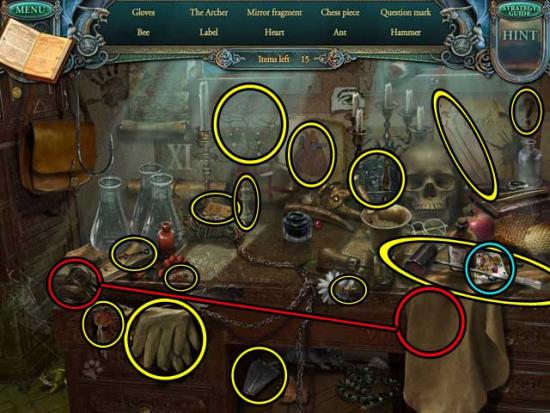
- Upon completing the area, the CARD will be added to your inventory.
- Go to the Aquarium.
Aquarium
- Examine the table at the back of the room towards the right. Use the MINT LEAVES, the WORMWOOD, and the ELDER LEAVES on the mortar. Next, use the pestle to crush all the leaves.
- Use the OIL from your inventory on the mortar to complete the mixture, then click on the INSECTICIDE to add it to your inventory.
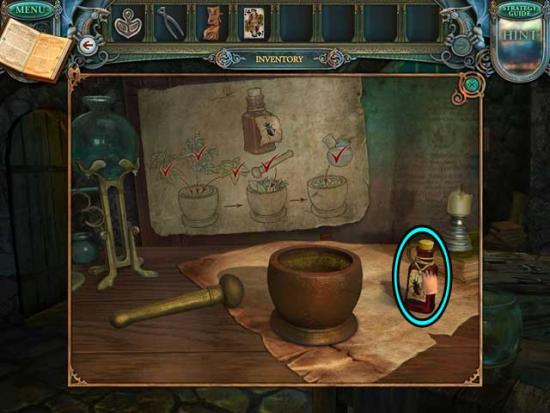
- Backtrack to the Forest Edge.
Forest Edge
- Take a closer look at the hole in the tree on the right. Use the INSECTICIDE on the insects within the tree to get rid of them, then click on the TINY SWORD to add it to your inventory.
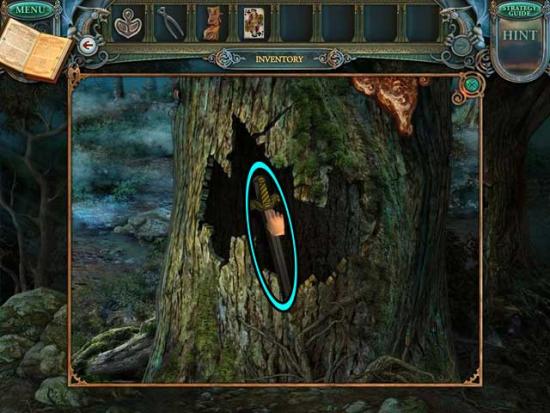
- Return to the Toy Shop.
Toy Shop
- Take a closer look at the puppet box beneath the tall statue in the corner of the room. Use the TINY SWORD on the knight, then click on the TOY PRINCESS to add it to your inventory.
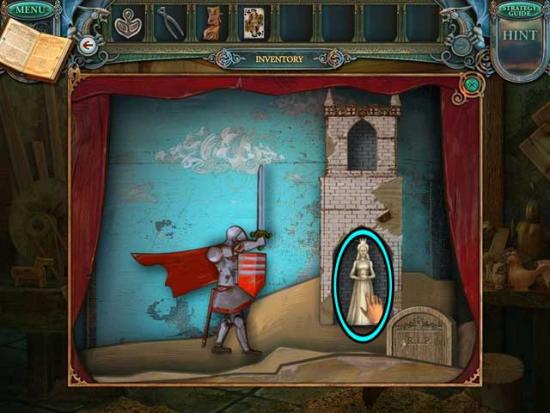
- Next, take a closer look at the large box to the left, also in the corner of the room. Use the TOY PRINCESS on the outline in the lower left corner to trigger a puzzle.
- Solve the puzzle to open a secret niche. Drag and drop the figurines to move them. When you drag a figurine, the second one will move in the same direction. If a figurine is moved into a “trap”, the puzzle will start over from the very beginning. Move both figurines to the green cells in the upper part of the screen. The solution is as follows and is shown below:
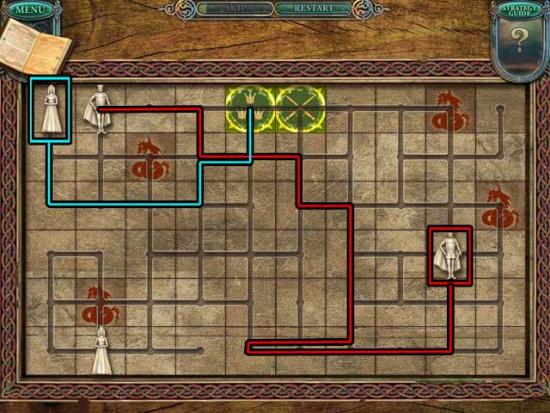
- Move the Prince figurine along the red path. Once both figurines are in the upper left corner, move the Princess figurine along the blue path to solve the puzzle.
- Upon completing the puzzle, click on the FIGURINE PART to add it to your inventory.
- Examine the rightmost portion of the right table on the back wall. Use the FIGURINE PART on the figurine, then use the brush with the glue to repair it.
- Once finished, click on the WOODEN FIGURINE (3) to add it to your inventory.
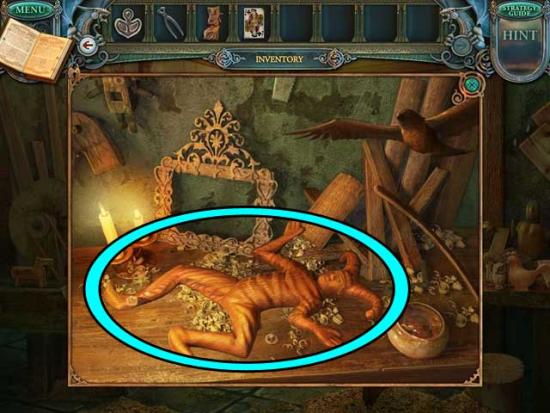
- Exit and go to the Brewery.
Brewery
- Examine the barrel with the fur pelt on top towards the right. Use the CARD on the bottom slot to trigger a puzzle.
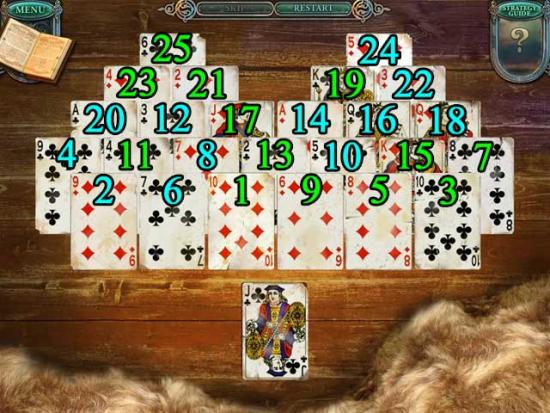
- Play solitaire to find out what is hidden under the cards. Click on a card to move it. Only uncovered cards in the pyramid and top cards of the stock are available for play. You can move cards from the pyramid to the stock as long as they are one rank lower or higher than the card they are moved onto. The cards can be moved regardless of suit. Move all the cards from the pyramid to the stock to win. The numbered solution in which you should move cards is shown below. Odd numbers are green and even are blue to make it easier to find the next card you should click, i.e. 1=green, 2=blue, 3=green, etc.
- Upon completing the puzzle, note the design in the wood and click on the SAFE HANDLE to add it to your inventory.
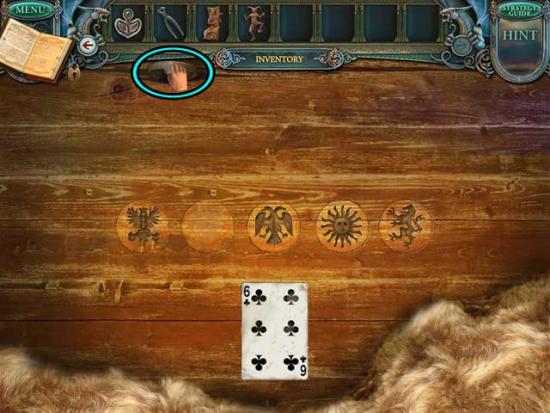
- Return to the Toy Shop.
Toy Shop
- Examine the safe underneath the table on the left wall. Use the SAFE HANDLE on the empty slot to trigger a puzzle.
- Solve the puzzle to open the safe. Restore the initial picture by finding the correct sequence of pictures (the same you just saw from the previous puzzle you solved). You can see these pictures in your Journal, too. Click on the dials to toggle through pictures. The solution is shown below.
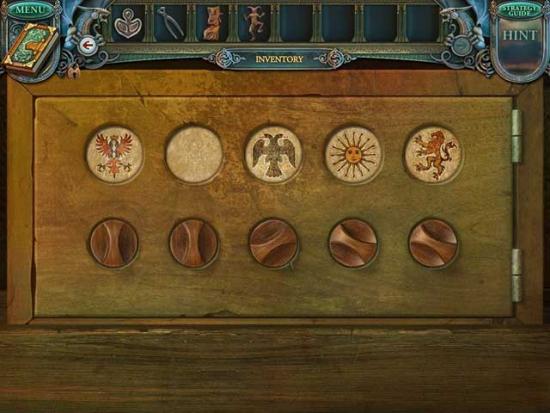
- Upon completing the puzzle, click on the WOODEN FIGURINE (4) to add it to your inventory.
- Proceed to the Clock Plaza.
Clock Plaza
- Examine the clock face. Place the WOODEN FIGURINES (x4) in their respective slots. Once completed, they will all turn around. Click on the PLATE WITH FIRE SIGN to add it to your inventory.
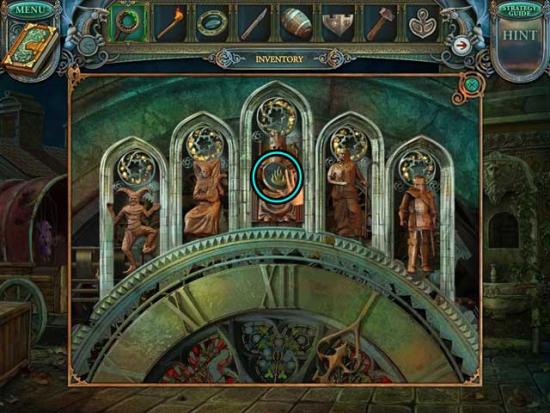
- Go to the Side Street.
Side Street
- Examine the box next to the first door on the left. Use the PLATE WITH FIRE SIGN on the slot in the top of the box to reveal a secret panel containing a puzzle.
- Light all the crystals to open the chest. Click on the lines to light the crystals. Single crystals require one line going through it to become lit; double crystals require two lines. The solution is shown below.
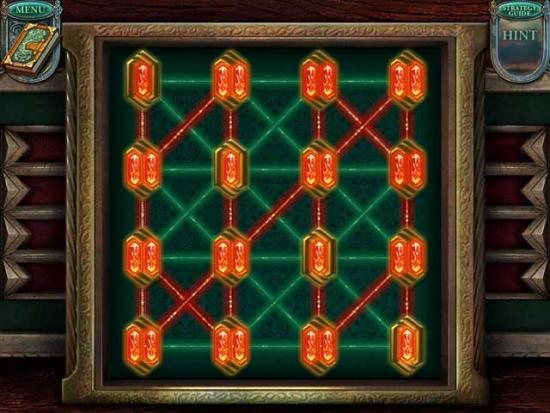
- Upon completing the puzzle, click on the Scroll and the MAGIC POWDER to collect them.
- Return to the Town Hall.
Town Hall
- Use the MAGIC POWDER on the raging fire to quench it.
- Click on the MAGIC GEM 4/10 that appears to add it to your inventory.
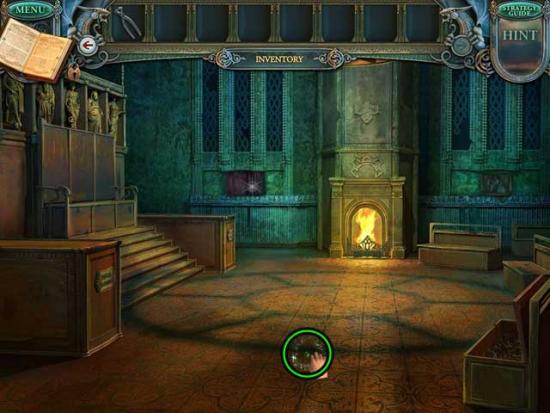
Chapter 3: The River and the Skeleton
Town Hall
- Take a closer look at the large box on the far side of the steps on the left, specifically the plaque on the front. Click on the SIGNET to add it to your inventory.
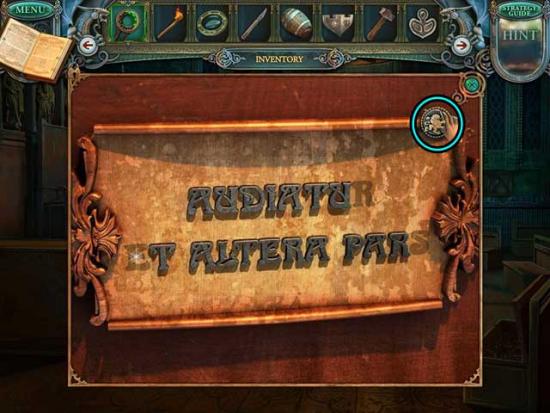
- Return to the Side Hall.
Side Hall
- Examine the lock on the door on the left. Use the SIGNET on the slot to open the door.
- Proceed through the door to the next area.
Archives
- Click on the Scroll and the DECORATIVE ELEMENTS to collect them.
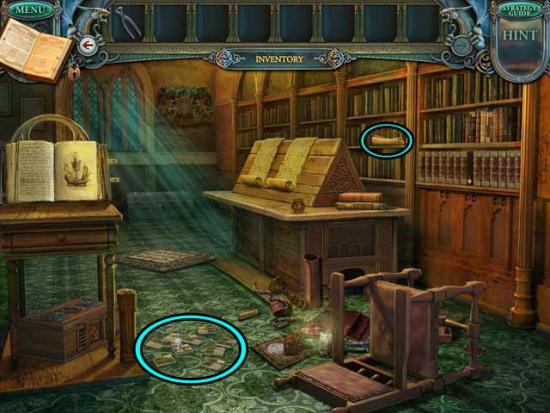
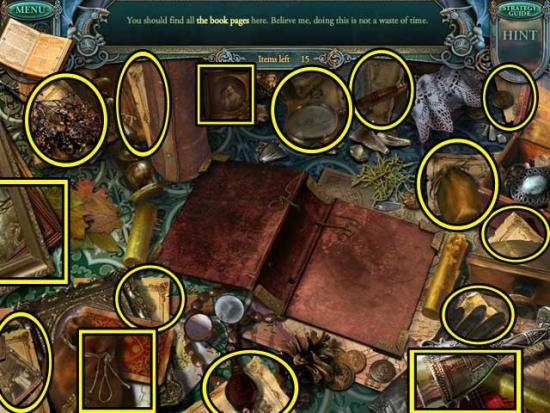
- Take a closer look at the debris on the floor.
- You should find all the book pages here. Their locations are shown below.
- Once that’s done, exit for now and make your way back to the Side Street.
Side Street
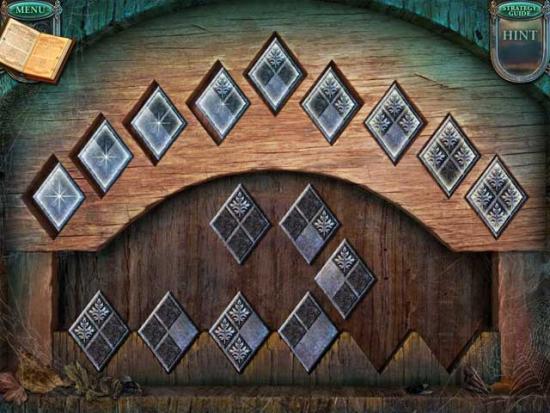
- Take a closer look at the second door on the left (further ahead). Use the DECORATIVE ELEMENTS on the door close-up to trigger a puzzle.
- Solve the puzzle to open the door to the smithy. Click on the metal plates to pick them up and then place them into empty slots. The pattern on each plate must differ from the pattern on the previous plate only in one element. The solution is shown below.
- Upon completing the puzzle, enter the Smithy.
Smithy
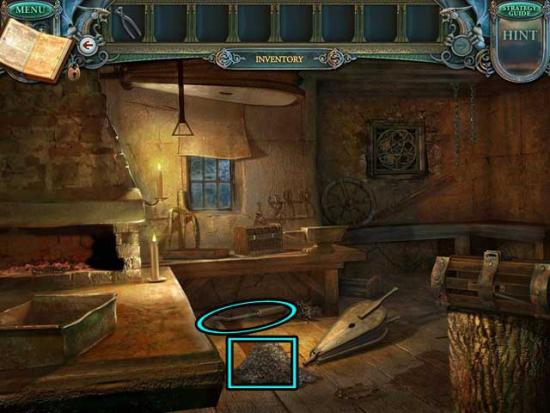
- Click on the bellows to blow the dust on the floor away, revealing the WRENCH. Click on the WRENCH and the NAIL DRAWER to add them to your inventory.
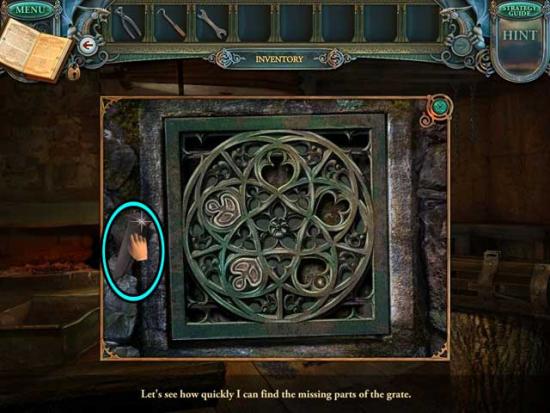
- Next, take a closer look at the grate on the back wall towards the right. Take note of the slots, then click on the METAL WEDGE to add it to your inventory.
- Exit the Smithy and return to the Brewery.
Brewery
- Use the NAIL DRAWER on the boarded-up doorway on the right, revealing a hidden object area.
- Take the misplaced items and put them in their proper places. The solution is shown below.
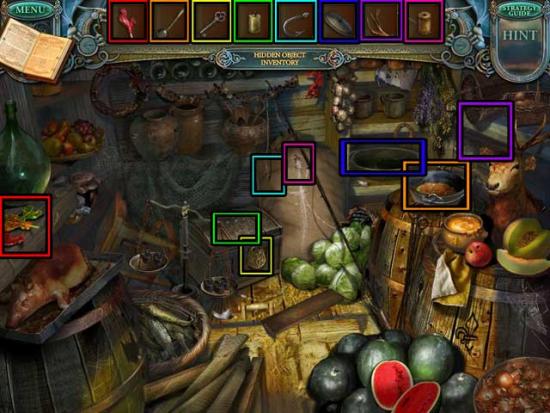
- Upon completing the area, the PIECE OF CHEESE will be added to your inventory.
- Backtrack to the Storeroom.
Storeroom
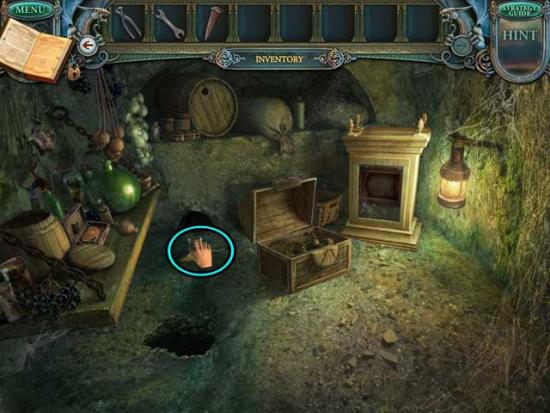
- Use the PIECE OF CHEESE on the hole towards the back of the Storeroom.
- Click on the MOUSE that appears to add it to your inventory.
- Go to the Apothecary.
Apothecary
- Click on the hidden object area over the cupboard towards the right.
- Take the misplaced items and put them in their proper places. The solution is shown below.
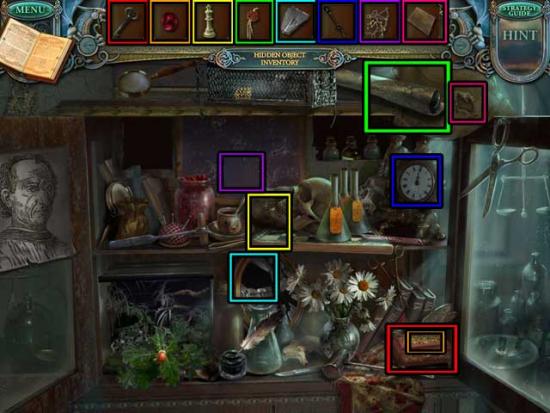
- Upon completing the area, the LETTER R will be added to your inventory.
- Go outside to the Courtyard.
Courtyard
- Take a closer look at the crashed carriage behind the puppies.
- Use the WRENCH to loosen the bolt on the METAL HOOP around the top of the closest barrel and add it to your inventory.
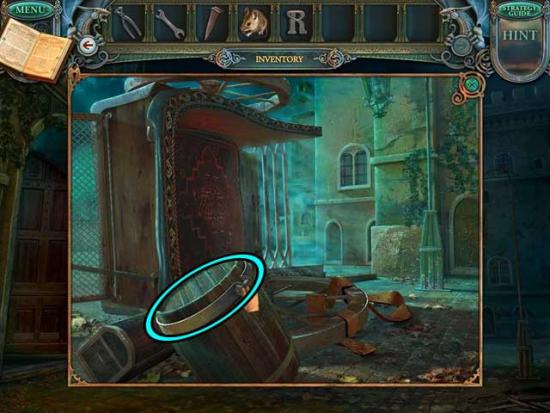
- Make your way to the Well.
Well
- Examine the well on the right for a closer view.
- Use the METAL HOOP on the wooden bucket to restore it, then click on the BUCKET to add it to your inventory.
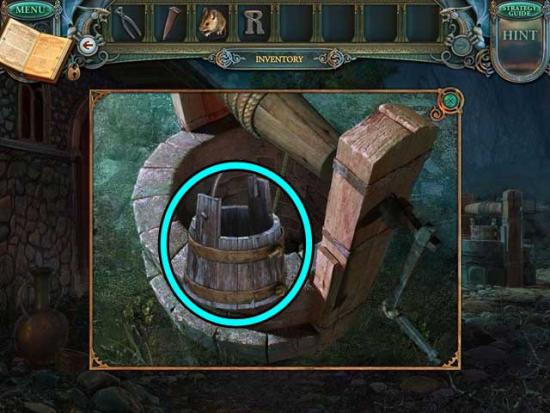
- Proceed forward to the Riverbank.
Riverbank
- Place the METAL WEDGE into the log on the right, then use the HAMMER to split it.
- Click on the GEAR to add it to your inventory.
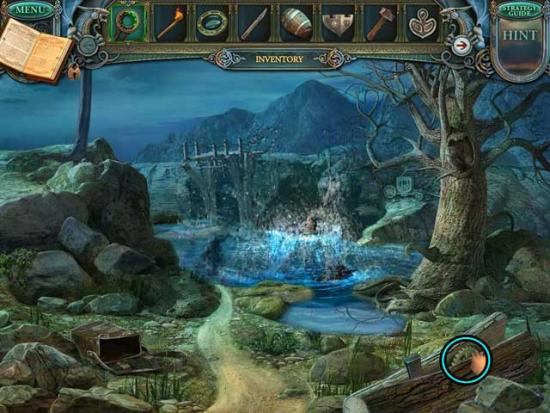
- Take a closer look at the hole in the tree on the right.
- Give the MOUSE to the owl in the tree, then click on the DOMINO PIECES revealed inside its nest to add them to your inventory.
- Return to the Brewery.
Brewery
- Click on the hidden object area at the back of the room towards the right.
- Find the objects listed at the top of the screen. Items listed in red are outlined in red and require an additional action before they can be collected. The Key Item is circled in blue.
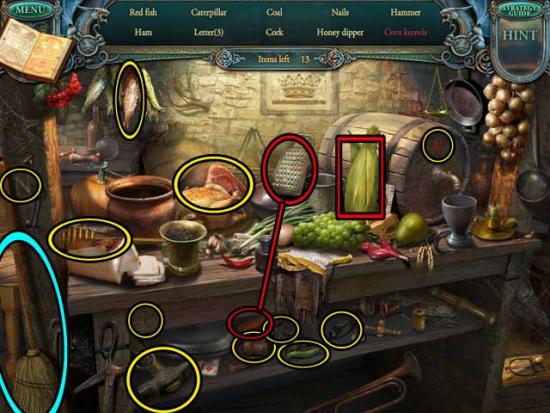
- Upon completing the area, the BROOM will be added to your inventory.
- Examine the far left table at the back of the room. Use the DOMINO PIECES on the table to trigger a puzzle.
- Solve the puzzle to open a secret niche. Place all the elements so that the heraldic symbols on the neighboring elements coincide. The solution is shown below.
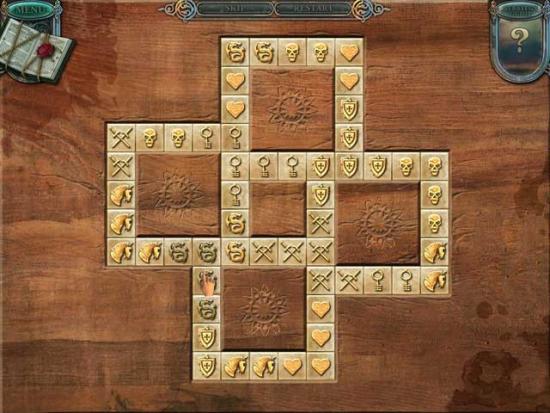
- Upon completing the puzzle, click on the METAL DECORATION (2) inside to add it to your inventory.
- Go to the Toy Shop.
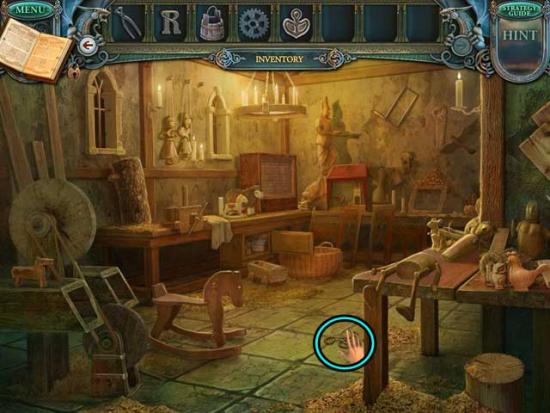
Toy Shop
- Use the BROOM on the sawdust on the floor to uncover the ROPE. Click on it to add it to your inventory.
- Return to the Archives.
Archives
- Examine the debris on the floor again. Use the ROPE on the book to finish binding the pages, triggering the next phase of the puzzle.
- Now it’s necessary to find the letters from the title. Their locations are shown below.
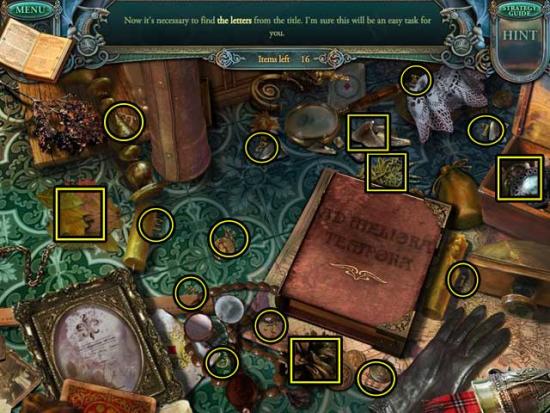
- Once you’ve found all the letters, click on the completed ANCIENT BOOK to add it to your inventory.
- Examine the bookshelf on the right. Use the ANCIENT BOOK on the empty slot to reveal a secret passage on the right.
- Enter through the secret passage.
Torture Chamber
- Click on the origami figure and the METAL GOAT to collect them.
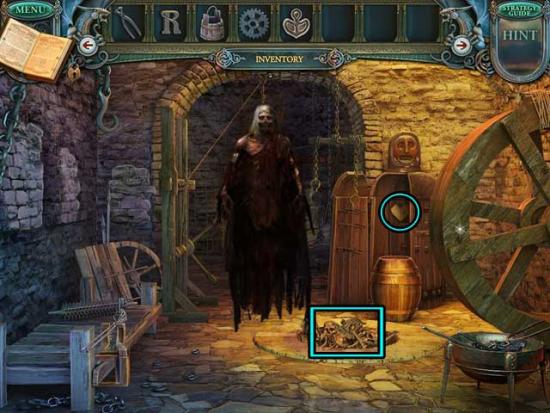
- Click on the large wheel on the right to rotate it, then take a closer look at the skeleton.
- In the close-up, use the SCALPEL on the ropes to cut them, then click on the TOWER KEY between the skeleton’s arms to add it to your inventory.
- Go back to the Side Hall.
Side Hall
- Use the TOWER KEY on the door on the right to open it, then proceed up to the next area.
Tower
- Click on the Scroll to collect it.
- Click on the plaque on the lower right to reveal a secret compartment, then click on the STONE BALL to add it to your inventory.
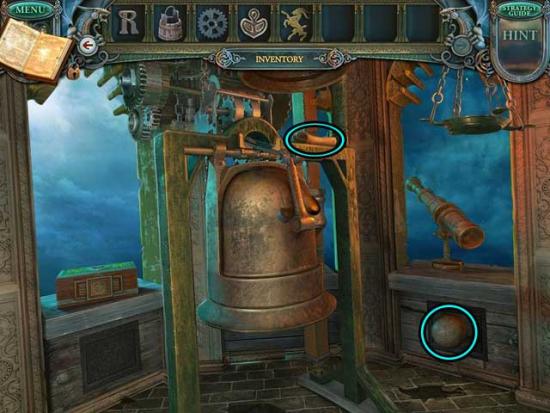
- Use the LENS on the telescope on the right.
- Take a closer look at the mechanism above the bell. Use the GEAR on this area, then exit for now.
- Make your way back to the Central Entrance.
Central Entrance
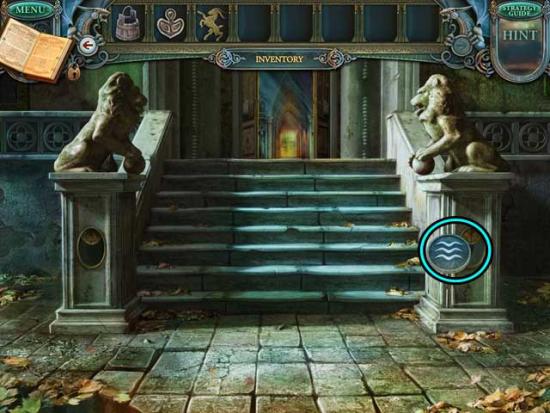
- Use the STONE BALL on the lion statue on the right, then click on it to rotate it.
- Click on the PLATE WITH WATER SIGN in the secret compartment to add it to your inventory.
- Go to the Archives.
Archives
- Take a closer look at the box beneath the book stand on the left. Use the PLATE WITH WATER SIGN on the slot on top of the box to reveal a secret panel. Click on it to trigger a puzzle.
- Light all the crystals to open the chest. Click on the lines to light the crystals. Single crystals require one line going through it to become lit; double crystals require two lines. The solution is shown below.
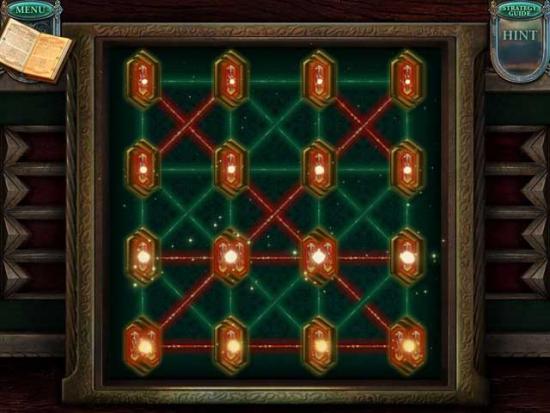
- Upon completing the puzzle, click on the Scroll and the MAGIC POWDER to collect them.
- Proceed to the Riverbank.
Riverbank
- Use the MAGIC POWDER on the water surrounding the Princess.
- After speaking with the Princess, click on the MAGIC GEM 5/10 to collect it.
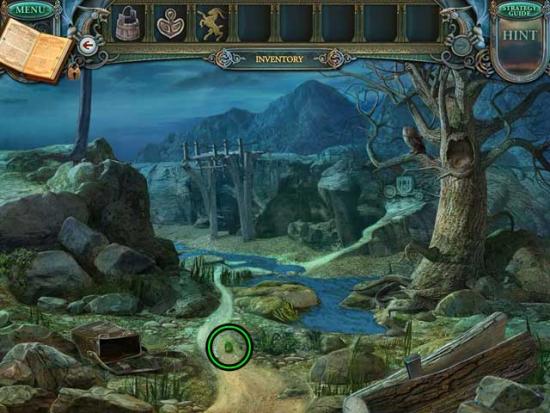
- Click on the WEED to add it to your inventory, then use the BUCKET on the pool of water (outlined with a square in the screenshot below) to obtain the BUCKET WITH WATER and add it to your inventory as well.
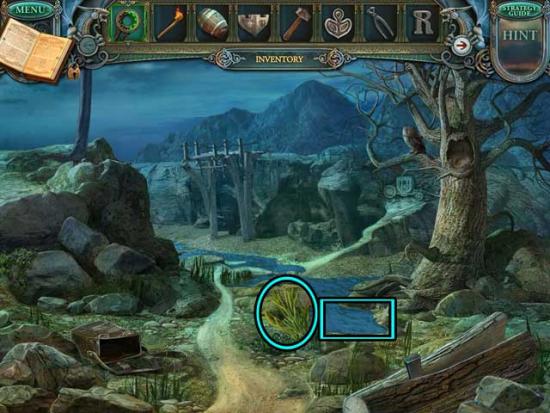
- Proceed forward across the river to the carriage.
Mountain Path
- Click on the origami figure, the GEAR, and the QUILL to collect them.
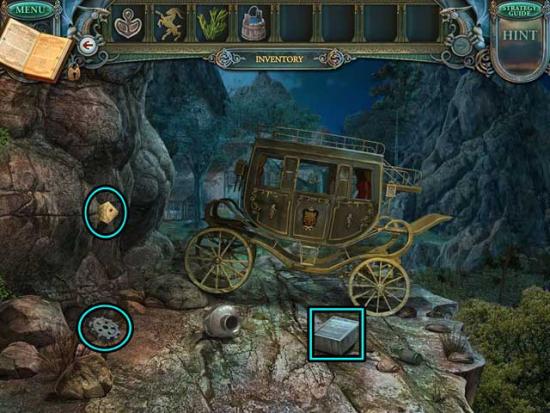
- Take a closer look at the carriage and note the royal emblem on the door.
- Return to the Archives.
Archives
- Take a closer look at the scrolls ahead. Use the QUILL on the inkwell in the bottom right corner to trigger a puzzle.
- Correct the mistakes in the text to get a secret code. Find the differences between the two texts and spot them using the quill. The solution is shown below.
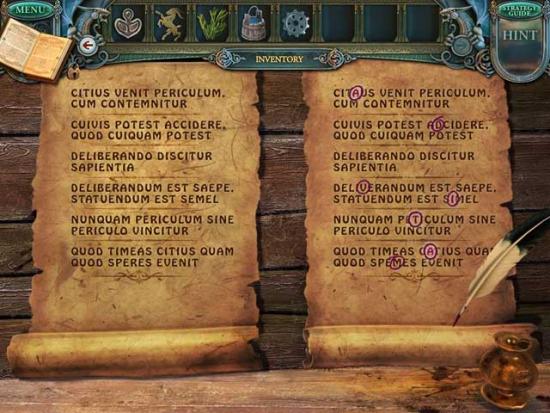
- Upon completing the puzzle, note the code. The scroll on the left will move aside. Click on the STONE LETTER to add it to your inventory.
- Exit to the Side Hall.
Side Hall
- Take a closer look at the section of wall on the left that was previously behind the painting. Use the STONE LETTER on the empty slot to trigger a puzzle.
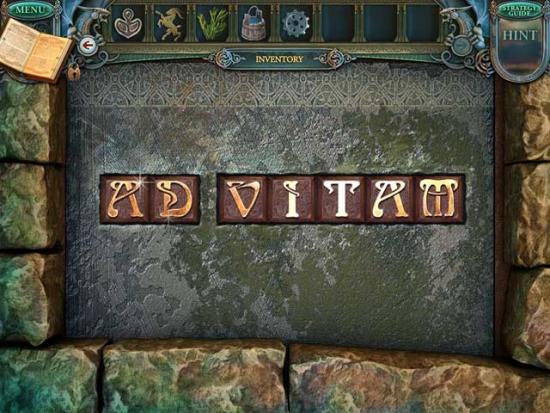
- Solve the puzzle to open the safe. Click on two buttons to swap them and restore the correct order of the buttons. The correct order is the secret code unveiled in the previous puzzle, “Ad Vitam”. The solution is shown below.
- Upon completing the puzzle, click on the TELESCOPE HANDLE to add it to your inventory.
- Go up to the Tower.
Tower
- Use the TELESCOPE HANDLE on the telescope on the right.
- Take a closer look at the telescope on the right. Note the shape of the shield on the flag.
- Make your way down to the Clock Plaza.
Clock Plaza
- Click on the hidden object area over the second caravan.
- Find the objects listed at the top of the screen. Items listed in red are outlined in red and require an additional action before they can be collected. The Key Item is circled in blue.
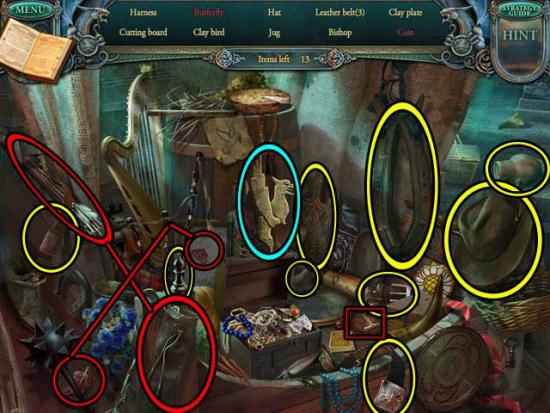
- Upon completing the area, the METAL GRYPHON will be added to your inventory.
- Make your way back to the Mountain Path.
Mountain Path
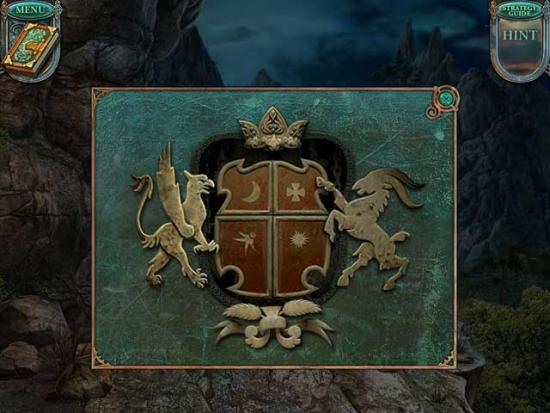
- Take a closer look at the door of the carriage. Use the METAL GOAT and the METAL GRYPHON on either side of the royal emblem to trigger a puzzle.
- Solve the puzzle to open the carriage door. Click on part of the shield to replace it with another shape. Recall the hint on the flag through the telescope, also recorded in your Journal. The solution is shown below.
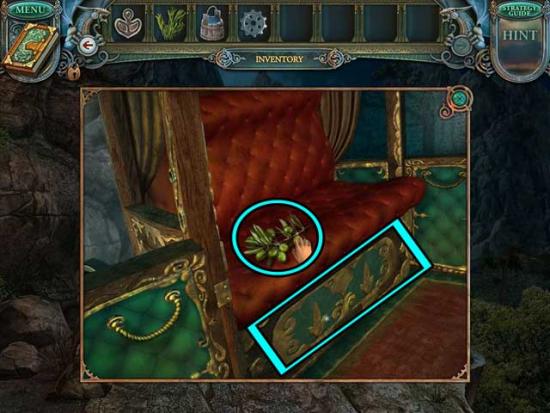
- Upon completing the puzzle, take a closer look inside the carriage.
- Click on the OLIVES and the CURTAIN HANDLE inside the carriage to add them to your inventory.
- Make your way back to the Brewery.
Brewery
- Place the OLIVES into the press on the left, then click on the OLIVE OIL to add it to your inventory.
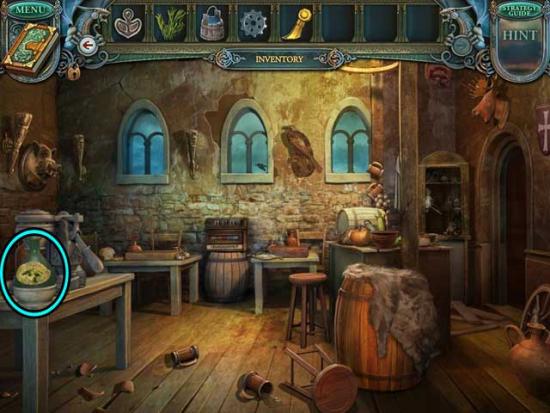
- Go to the Town Hall.
Town Hall
- Take a closer look at the small curtain at the far end of the room, to the left of the fireplace. Place the CURTAIN HANDLE on the metal piece on the right to restore it, then click on it to trigger a puzzle.
- Restore the painting to see what’s behind the screen. Complete the picture by filling the holes with the correct picture scraps. The correct scrap order is randomized, however you can click on a scrap and move it over the hole to see whether or not it lines up correctly. The completed solution is shown below.
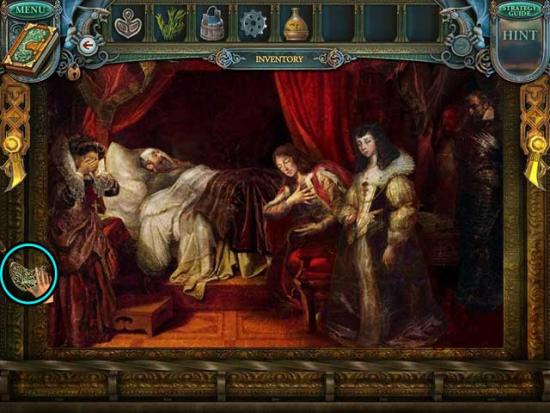
- Upon completing the puzzle, click on the METAL MEDALLION to add it to your inventory.
- Proceed to the Smithy.
Smithy
- Use the OLIVE OIL on the rusty hinges of the container on the right, then click on the CROWBAR inside once it opens to add it to your inventory.
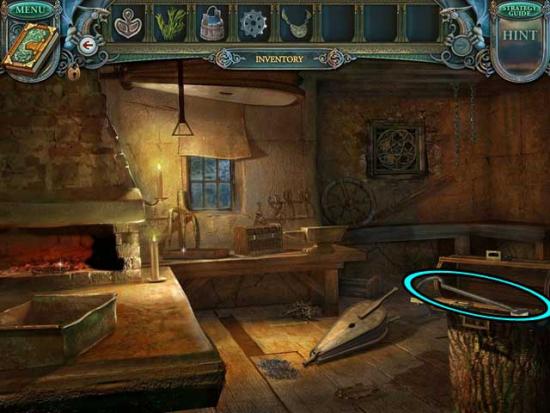
- Use the BUCKET WITH WATER on the tray on the left to fill it.
- Go to the Riverbank.
Riverbank
- Refill the BUCKET WITH WATER and add it back to your inventory.
- Go to the Central Entrance.
Central Entrance
- Use the CROWBAR on the loose stone on the lower left, then click on the METAL DECORATION (3) beneath to add it to your inventory.
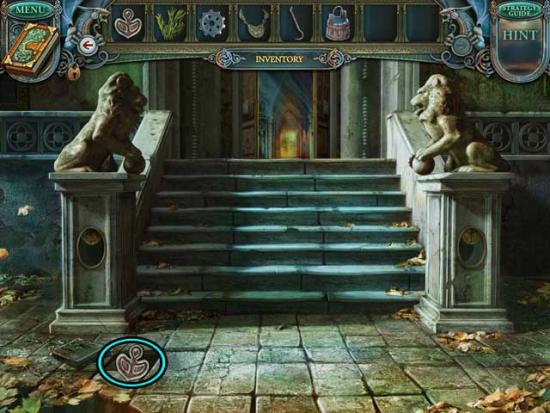
- Return to the Smithy.
Smithy
- Examine the grate in the back right corner on the far wall. Use the METAL DECORATIONS (x3) in the slots to complete the grate, then click on the LETTER S inside to add it to your inventory.
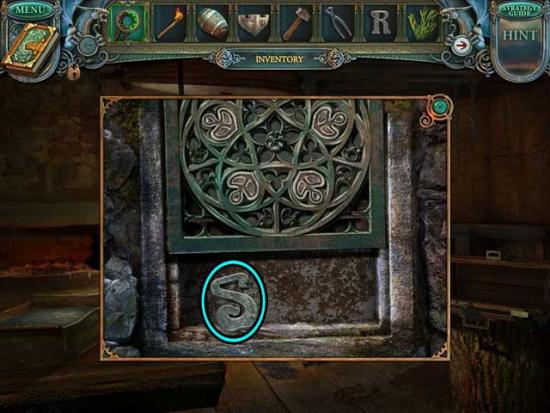
- Go to the Mountain Path.
Mountain Path
- Use the CROWBAR on the stone propped under the wheel on the right to roll the carriage off the path.
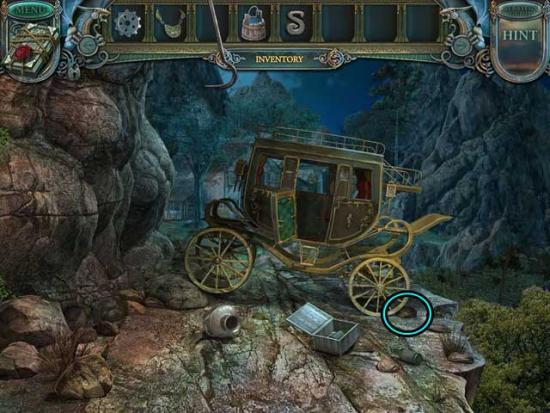
- Proceed forward to the next area.
Cottage
- Take a closer look at the grated addition to the Cottage on the left. Click on the traps to move them aside, then click on the PICK beneath to add it to your inventory.
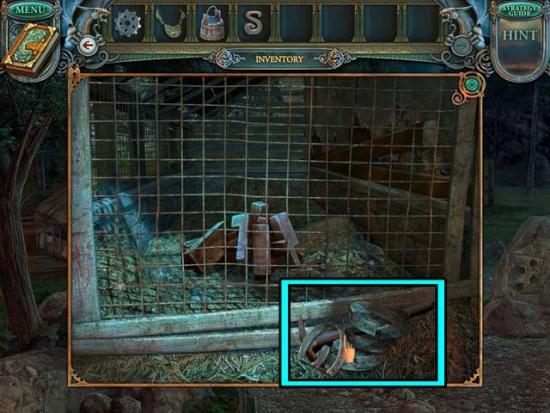
- Back in the main area, click on the large brown clump on the left to break off a piece of CLAY, then click on it to add it to your inventory.
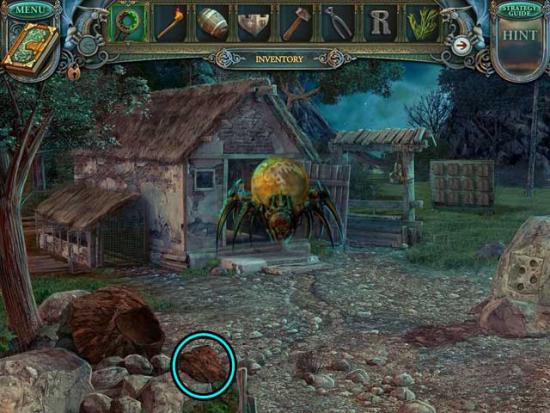
- Make your way back to the Torture Chamber.
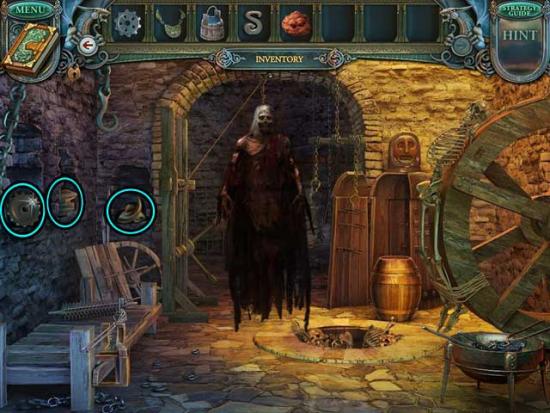
Torture Chamber
- Use the PICK on the three bricked-over sections of wall on the left. Click on the GEAR, the DECORATIVE PLATES, and the RAM HORNS to add them to your inventory.
- Make your way up to the Tower.
Tower
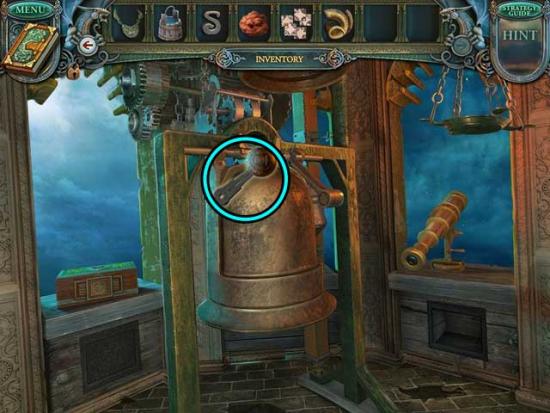
- Examine the mechanism above the bell. Place the GEARS (x2) on the pegs to restore the mechanism to working order.
- Back in the main area, click on the BARREL-ORGAN HANDLE to add it to your inventory.
- Go to the Brewery.
Brewery
- Click on the hidden object area on the right.
- Take the misplaced items and put them in their proper places. The solution is shown below.
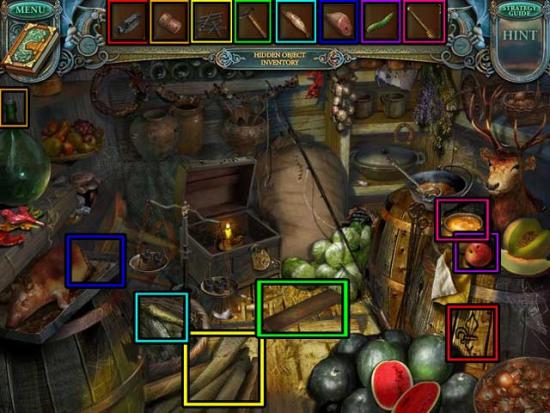
- Upon completing the area, the WOODEN FLOWER will be added to your inventory.
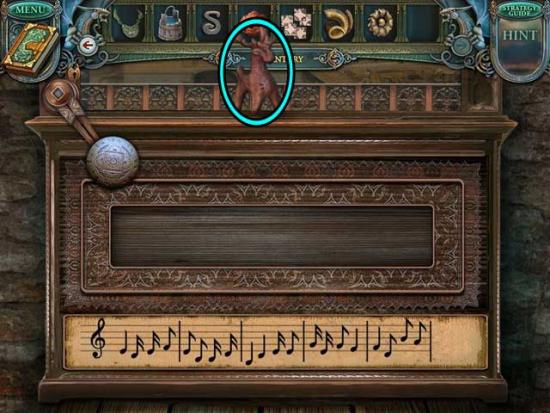
- Back in the main area, take a closer look at the musical box on top of the barrel at the back of the room. Use the BARREL-ORGAN HANDLE on the peg on the upper left to trigger a puzzle.
- Solve the puzzle to get a statuette. Click on the handle of the barrel-organ to play the melody. Create the correct sequence of notes by swapping the barrels. The note sequence at the bottom of the screen will serve as your guide. The solution is shown below.
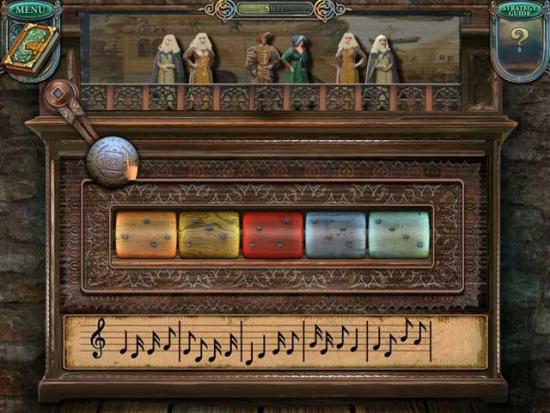
- Upon completing the puzzle, click on the STATUETTE to add it to your inventory.
- Go to the Well.
Well
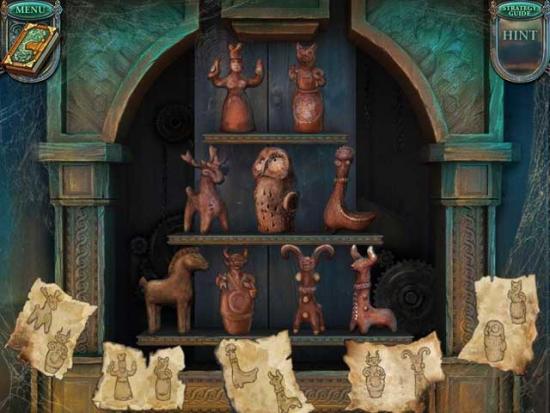
- Take a closer look at the door on the left. Place the STATUETTE on the empty spot on the shelf to trigger a puzzle.
- Rearrange the figures according to the hints shown at the bottom of the screen. The solution is shown below.
- Upon completing the area, enter the Pottery Studio.
Pottery Studio
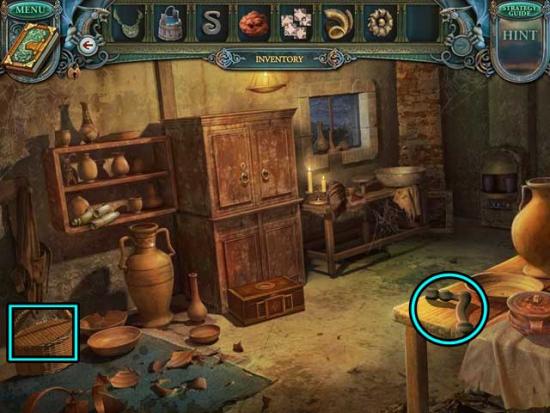
- Click on the LEVER and the STATUETTE HAND to add them to your inventory.
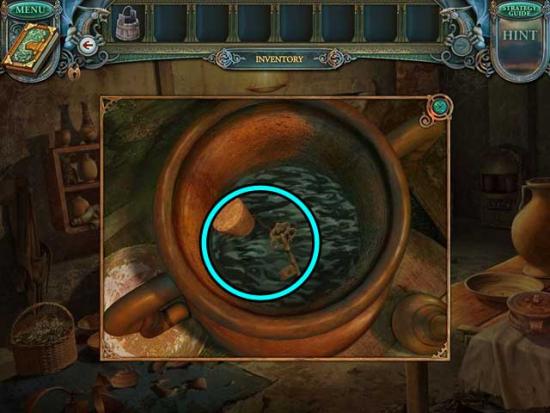
- Take a closer look at the large jar towards the left. Use the BUCKET WITH WATER on the jar to raise the water level, then click on the CUPBOARD KEY to add it to your inventory.
- Examine the cupboard ahead. Use the CUPBOARD KEY on the lock to open it, then click on the PLATE WITH SKULL to add it to your inventory.
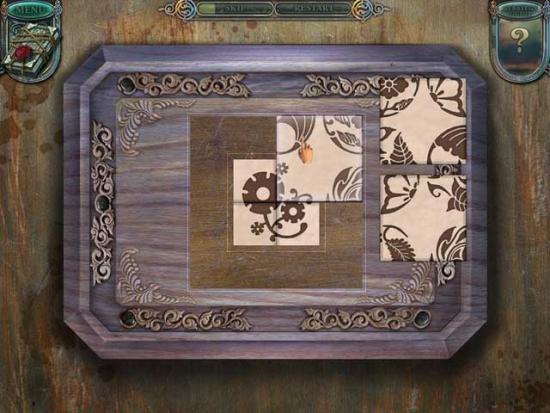
- Examine the small box on the lower right. Use the DECORATIVE PLATES on the box to trigger a puzzle.
- Solve the puzzle to open the box. Create an integral pattern in the center of the cover by placing proper plates. The solutions are shown below.
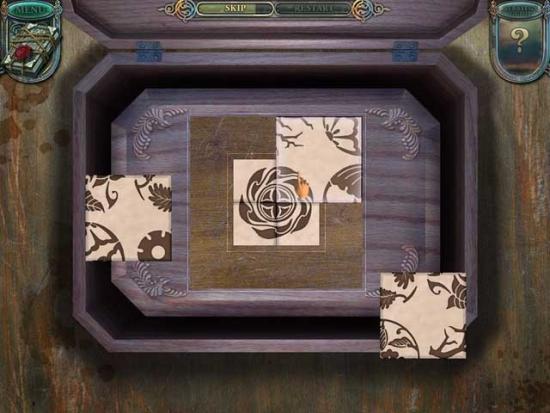
- Upon completing the puzzle, click on the STONE WITH FISH IMAGE to add it to your inventory.
- Proceed to the Riverbank.
Riverbank
- Refill the BUCKET WITH WATER and add it to your inventory.
- Return to the Pottery Studio.
Pottery Studio
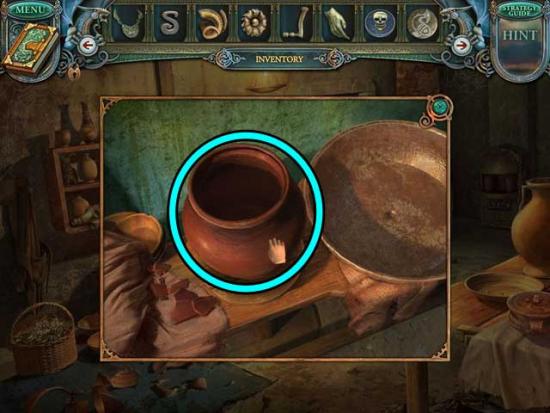
- Examine the table beneath the window towards the right. Use the BUCKET WITH WATER on the basin on the right, then place the CLAY in the basin.
- Move the clay from the basin to the wheel, then click to spin it into a JUG, adding it to your inventory.
- Make your way back to the Tower.
Tower
- Examine the box on the ledge on the left. Use the PLATE WITH SKULL on the slot on the top of the box to reveal a secret panel. Click on it to trigger a puzzle.
- Light all the crystals to open the chest. Click on the lines to light the crystals. Single crystals require one line going through it to become lit; double crystals require two lines. The solution is shown below.
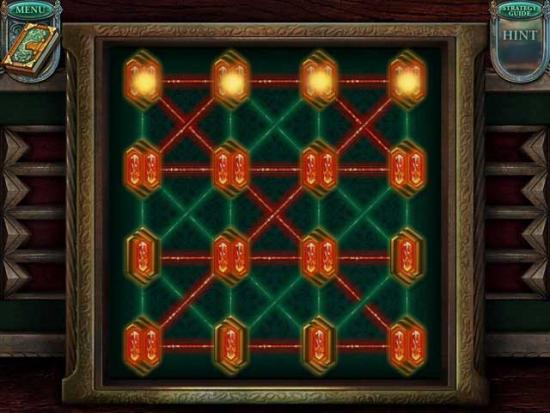
- Upon completing the puzzle, click on the Scroll and the MAGIC POWDER to collect them.
- Make your way down to the Torture Chamber.
Torture Chamber
- Use the MAGIC POWDER on the ghoul to turn it back into a skeleton.
- Click on the MAGIC GEM 6/10 to collect it.
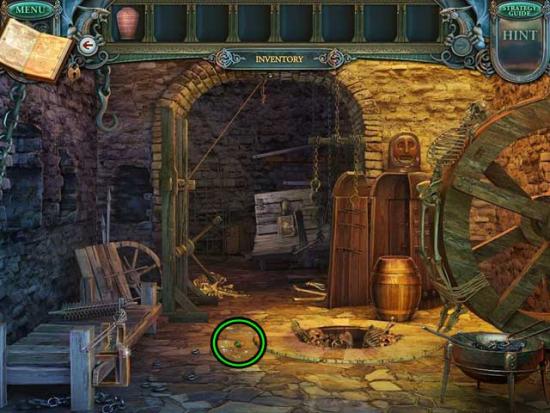
Chapter 4: The Spider and the Vines
Torture Chamber
- Use the LEVER on the vice grip on the lower left to loosen it, then click on the GREENHOUSE KEY to add it to your inventory.
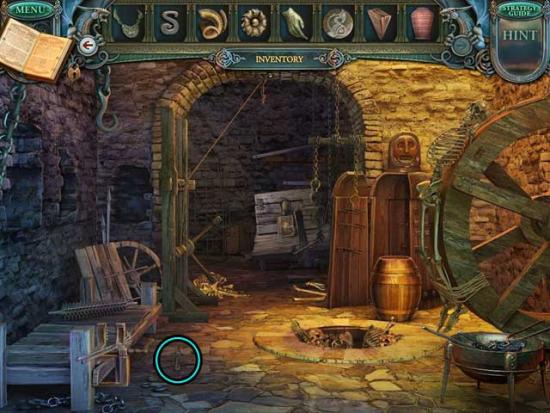
- Proceed to the Side Street.
Side Street
- Take a closer look at the doorway to the Greenhouse on the right.
- Use the GREENHOUSE KEY on the lock on the door on the right to open it, then proceed inside.
Greenhouse
- Click on the HACKSAW and the PAINT to add them to your inventory.
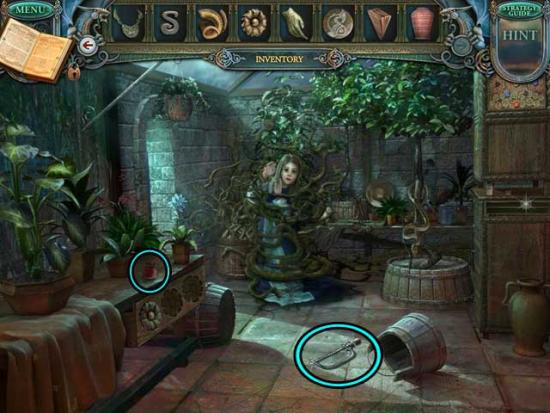
- Go to the Pottery Studio.
Pottery Studio
- Take a closer look at the painting wheel on the far right wall. Place the JUG and the PAINT in their respective locations to trigger a puzzle.
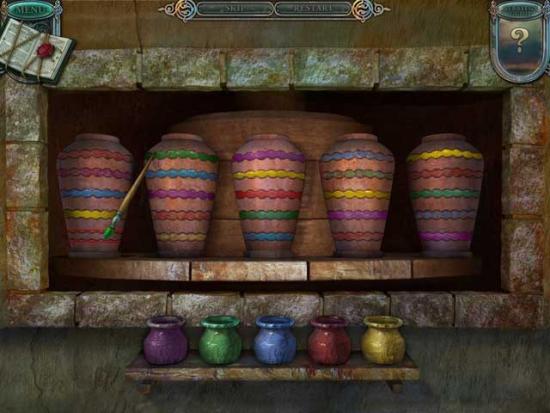
- Solve the puzzle to get a part of the statue. Pick up the brush and then click on any jar to choose the color you want to paint with. Paint the unpainted décor parts so that every column and every row of lines contain each of the colors only once. The solution is shown below.
- Upon completing the puzzle, click on the STATUE HEAD to add it to your inventory.
- Make your way back to the Town Hall Entrance.
Town Hall Entrance
- Examine the statue on the left. Place the STATUE HAND, the STATUE HEAD, and the METAL MEDALLION in their proper locations to restore the statue.
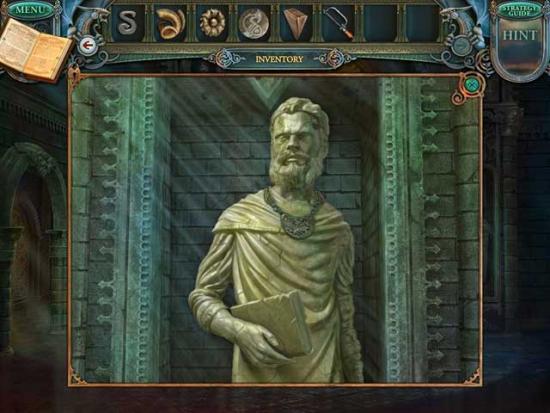
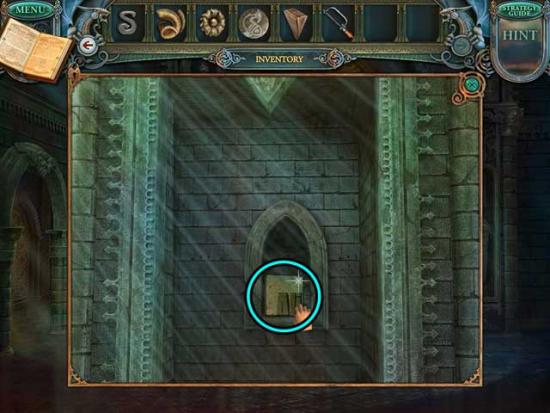
- Upon restoring the statue, click on the PART OF TABLET to add it to your inventory.
- Go to the Torture Chamber.
Torture Chamber
- Take a closer look at the rear portion of the room.
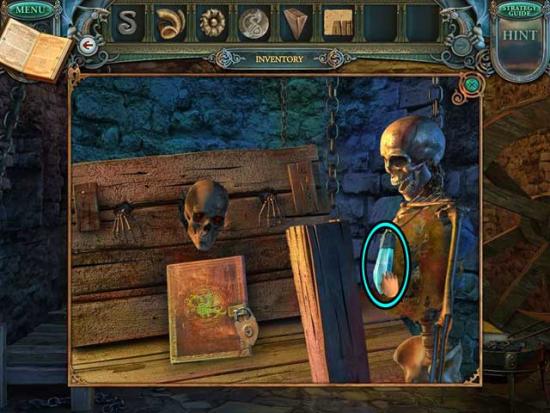
- Use the HACKSAW on the chains over the skeleton on the right, then click on the CRYSTAL to add it to your inventory.
- Exit to the Archives.
Archives
- Take a closer look at the picture frame lying on the floor towards the back of the room. Use the PART OF TABLET on the frame to trigger a puzzle.
- Solve the puzzle to get a clay tablet. Click on two tablet parts to swap them. The solution is shown below.
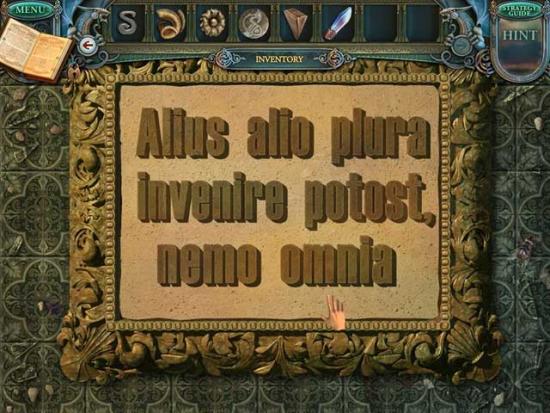
- Upon completing the puzzle, click on the completed CLAY TABLET to add it to your inventory.
- Go to the Tower.
Tower
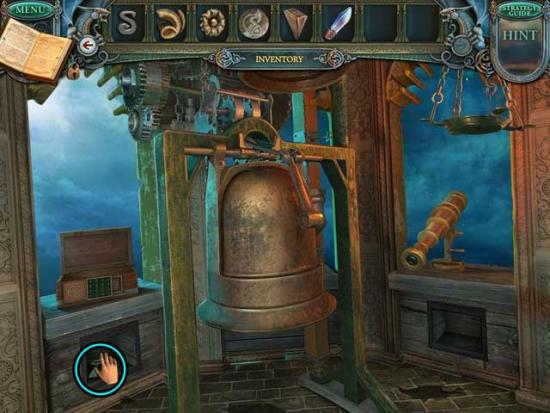
- Use the CLAY TABLET on the square groove on the lower left to restore it.
- Click on the TRIANGULAR KEY that’s revealed to add it to your inventory.
- Make your way to the Smithy.
Smithy
- Examine the shallow box beneath the window. Use the TRIANGULAR KEY on the slot to trigger a puzzle.
- Solve the puzzle to open a secret niche. Click on a highlighted cell to move. Remove all the monster-shaped tiles from the playing field by “jumping” over them with the magician-shaped tile. Click on the undo button on the left to undo a move if necessary. Move the tile to the numbered cells in the screenshot below, in order, to solve the puzzle.
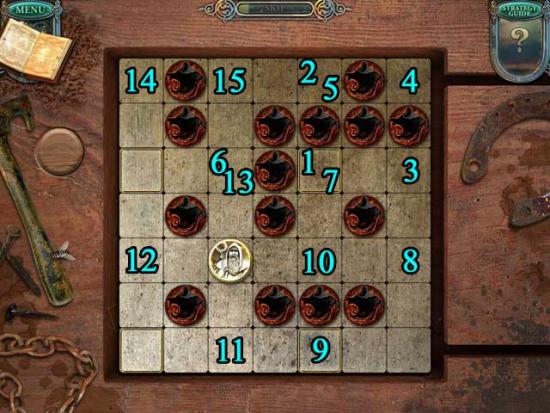
- Upon completing the puzzle, click on the WOODEN FLOWER (2) to add it to your inventory.
- Go back to the Greenhouse.
Greenhouse
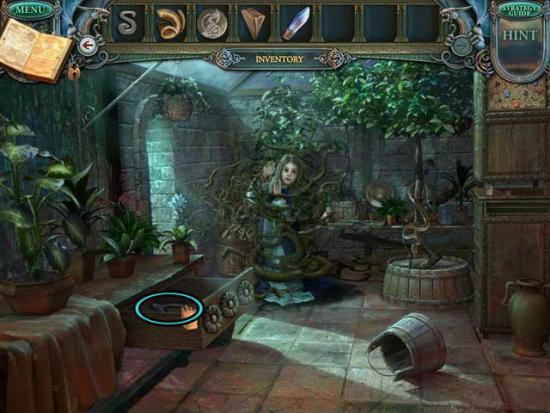
- Place the WOODEN FLOWERS (x2) into the slots in the drawer on the left, causing it to open.
- Click on the WIRE CUTTERS inside the drawer to add them to your inventory.
- Proceed to the Cottage.
Cottage
- Take a closer look at the small enclosure on the left side of the Cottage. Use the WIRE CUTTERS on the wire mesh, then click on the WOODEN BLOCKS to add them to your inventory.
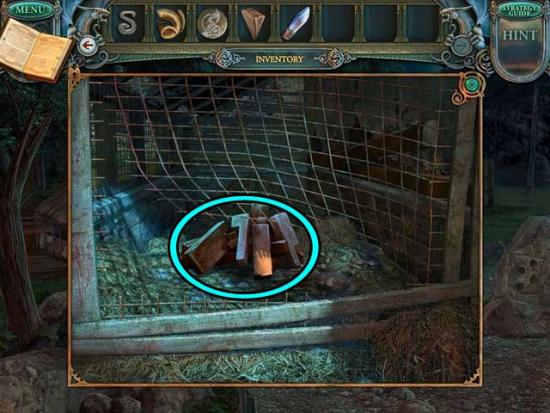
- Return to the Greenhouse.
Greenhouse
- Examine the lower/middle portion of the square cabinet on the right. Use the WOODEN BLOCKS on the close-up to trigger a puzzle.
- Solve the puzzle to make a cupboard leg. Click on the wooden parts to pick them up and then place them on the shadow of the cupboard leg. Make the cupboard leg by filling the space for it with proper wooden parts. The solution is shown below.
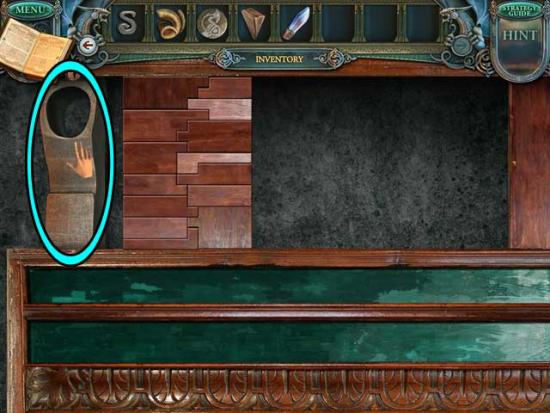
- Upon completing the puzzle, click on the AXE BILLET to add it to your inventory.
- Go to the Smithy.
Smithy
- Place the AXE BILLET in the oven on the left.
- Next, use the METAL TONGS to remove it from the oven, then use the HAMMER to shape it.
- Once shaped, place it inside the tray of water on the left to cool it, then click on the BLUNT AXE BLADE to add it to your inventory.
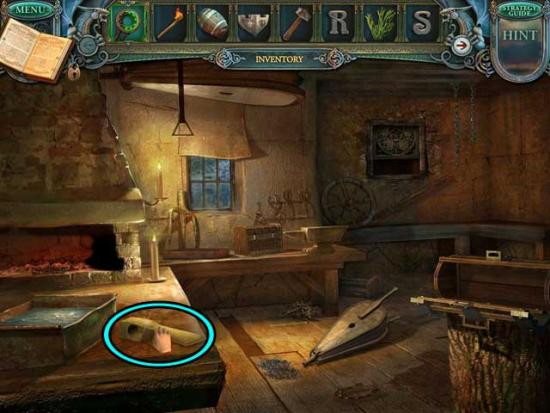
- Go to the Toy Shop.
Toy Shop
- Use the BLUNT AXE BLADE on the sharpening wheel on the left, then click on the SHARP AXE BLADE to add it to your inventory.
- Take a closer look at the vice grip on the table towards the left. Use the SHARP AXE BLADE on the wooden handle, then use the WOODEN WEDGE on the crevice at the top.
- Use the HAMMER to drive the wedge into the crevice, resulting in the AXE. Click on it to add it to your inventory.
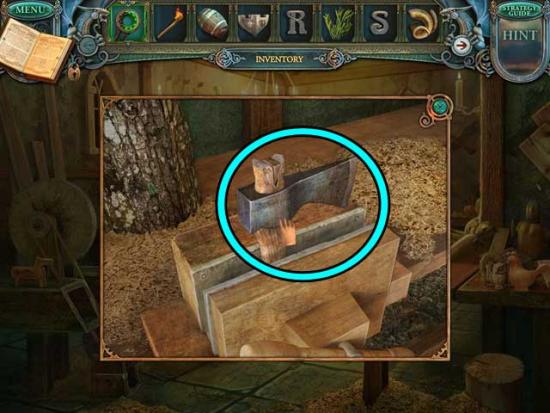
- Exit to the Well.
Well
- Use the AXE on the tree ahead to create a bridge.
- Proceed across to the next area.
Gully
- Click on the Scroll, the SMALL KEY, the METAL DAISY, and the MINERALS to collect them.
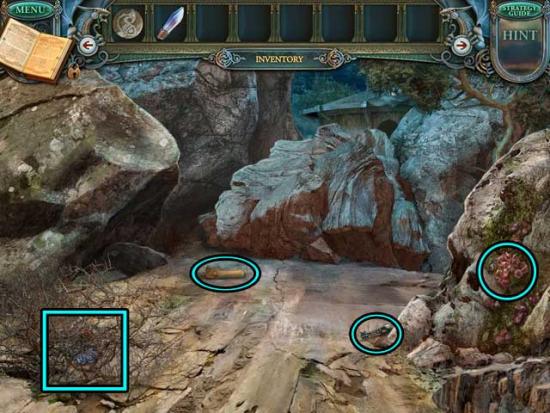
- Place the GUNPOWDER BARREL against the rocks ahead, then exit for now.
- Go back to the Clock Plaza.
Clock Plaza
- Click on the hidden object area over the second caravan on the left.
- Find the objects listed at the top of the screen. Items listed in red are outlined in red and require an additional action before they can be collected. The Key Item is circled in blue.
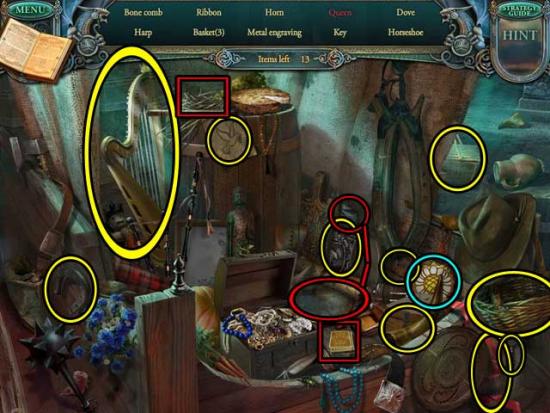
- Upon completing the area, the METAL SUNFLOWER will be added to your inventory.
- Return to the Torture Chamber.
Torture Chamber
- Examine the area at the back of the chamber. Use the SMALL KEY on the lock on the book to open it, then click on the METAL TULIP to add it to your inventory.
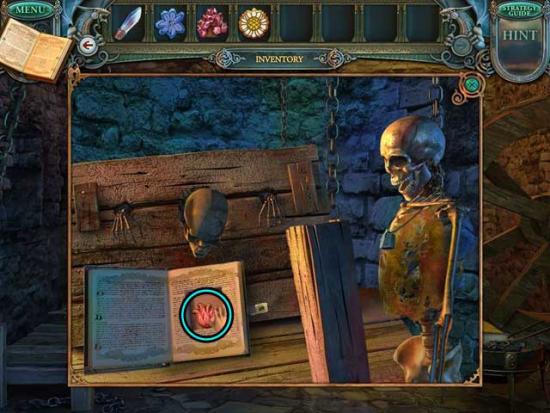
- Return to the Greenhouse.
Greenhouse
- Examine the upper right portion of the cabinets on the right. Use the METAL DAISY, the METAL SUNFLOWER, and the METAL TULIP on the panel to trigger a puzzle.
- Solve the puzzle to open the cupboard. Click on the arrows to rotate the rings with buttons. Locate all the buttons so that the images on them correspond to the background. Using the screenshot below as reference (and for the solution), click on the buttons in the following order: 3, 1, 3, 5, 5, 1, 4, 2.
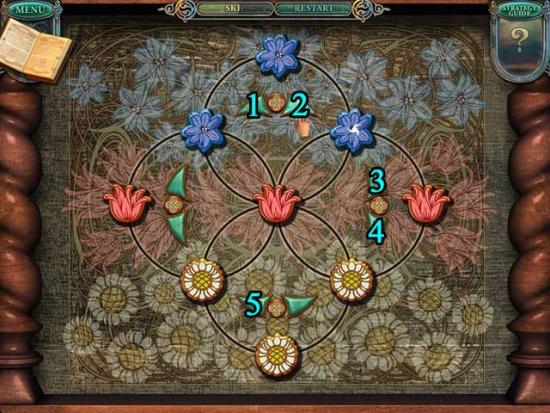
- Upon completing the puzzle, click on the PLATE WITH SPIDER that’s revealed to add it to your inventory.
- Go to the Pottery Studio.
Pottery Studio
- Examine the box on the floor beneath the cupboard. Use the PLATE WITH SPIDER on the slot at the top to reveal a secret panel in the side. Click on it to trigger a puzzle.
- Light all the crystals to open the chest. Click on the lines to light the crystals. Single crystals require one line going through it to become lit; double crystals require two lines. The solution is shown below.
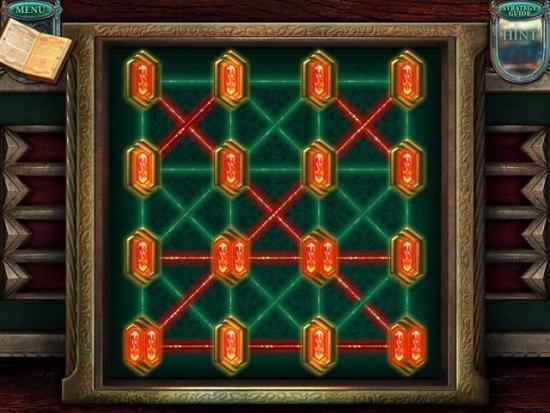
- Upon completing the puzzle, click on the Scroll and the MAGIC POWDER to collect them.
- Go to the Cottage.
Cottage
- Use the MAGIC POWDER on the Spider to make it disappear.
- Click on the MAGIC GEM 7/10 to collect it.
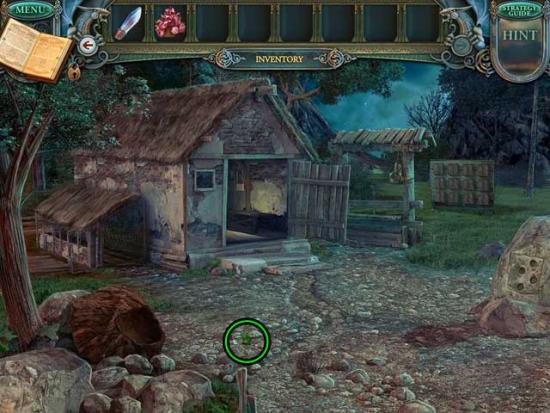
- Enter the Cottage.
Cottage Interior
- Click on the SCREWDRIVER and the FUSE to add them to your inventory.
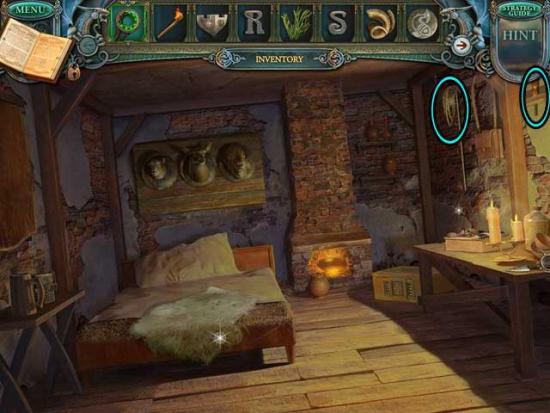
- Examine the other elements in the area before leaving.
- Go to the Brewery.
Brewery
- Click on the hidden object area beneath the right window.
- Find the objects listed at the top of the screen. Items listed in red are outlined in red and require an additional action before they can be collected. The Key Item is circled in blue.
- Upon completing the area, the SCALE will be added to your inventory.
- Examine the open cabinet on the far wall on the right. Use the SCREWDRIVER to remove the HOOK and add it to your inventory.
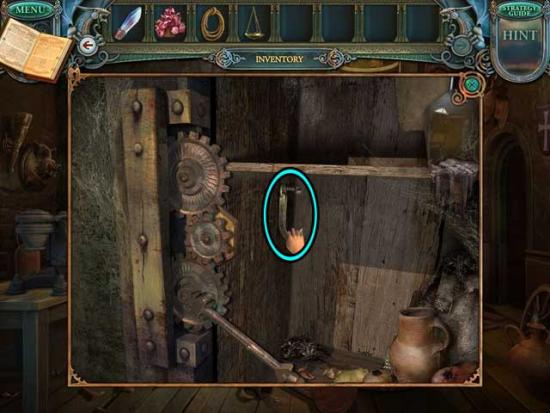
- Go to the Town Hall Entrance.
Town Hall Entrance
- Take a closer look at the statue on the right. Use the SCALE on the statue to restore it.
- Click on the STONE WITH BIRD IMAGE that’s revealed to add it to your inventory.
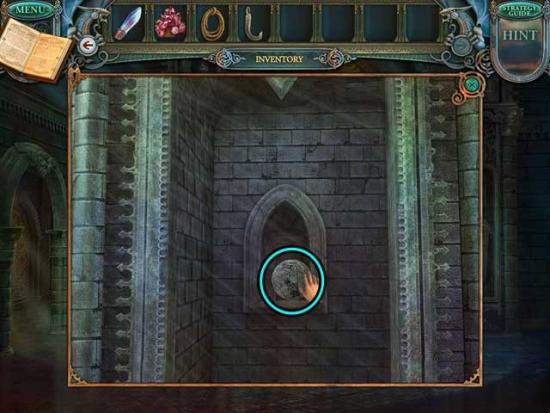
- Proceed to the Well.
Well
- Examine the well on the right.
- Use the HOOK on the end of the rope, then click on the well lever to retrieve the STONE WITH HOG IMAGE and add it to your inventory.
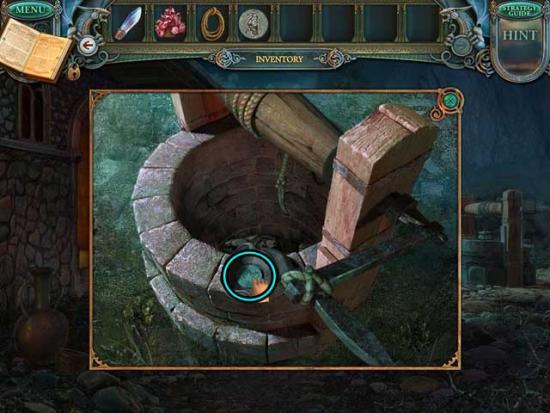
- Proceed forward to the Gully.
Gully
- Use the FUSE on the gunpowder barrel you placed ahead, then use the BURNING KINDLING to light the fuse.
- Once the rocks have been cleared, proceed forward to the next area.
Clearing
- Click on the hidden object area on the right.
- Find the objects listed at the top of the screen. Items listed in red are outlined in red and require an additional action before they can be collected. The Key Item is circled in blue.
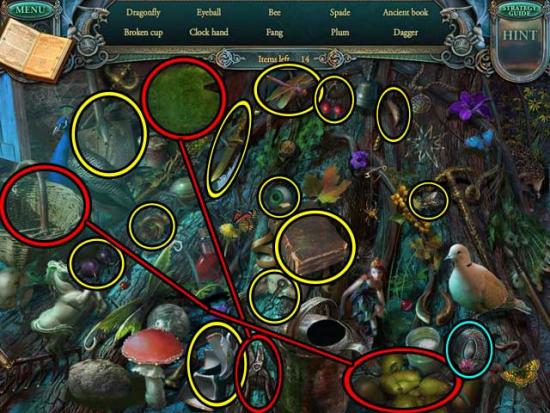
- Upon completing the area, the DECORATIVE PLATE will be added to your inventory.
- Back in the main area, click on the Scroll and the ANTLERS to collect them.
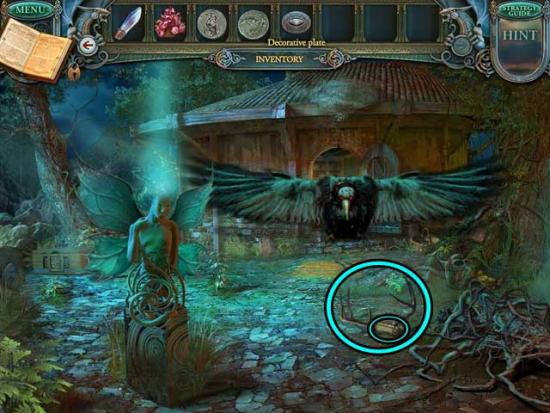
- Examine the other elements in the area, then return to the Pottery Studio.
Pottery Studio
- Take a closer look inside the open cupboard, then at the box on the lower left. Use the DECORATIVE PLATE on the box to trigger a puzzle.
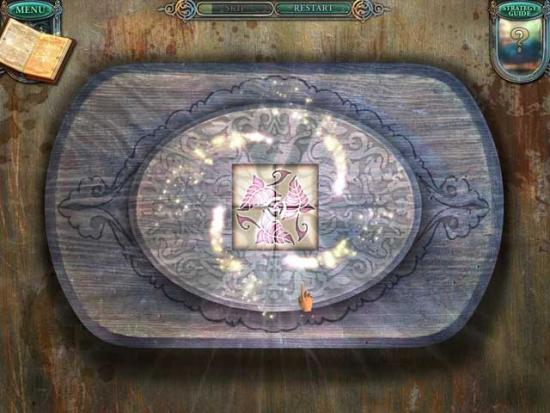
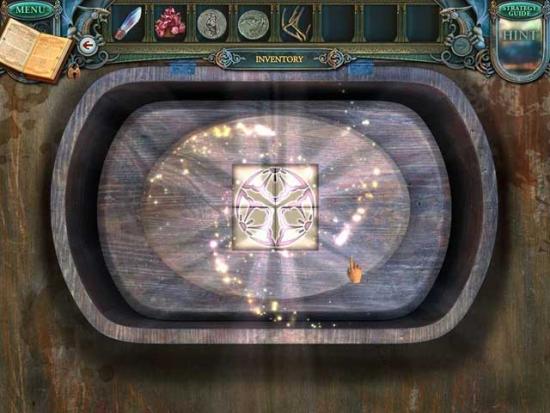
- Solve the puzzle to open the box. Click on two plates to swap them. Swap the patterns to create an integral pattern in the center of the cover. The solutions are shown below.
- Upon completing the puzzle, click on the LETTER E to add it to your inventory.
- Make your way back to the Town Hall.
Town Hall
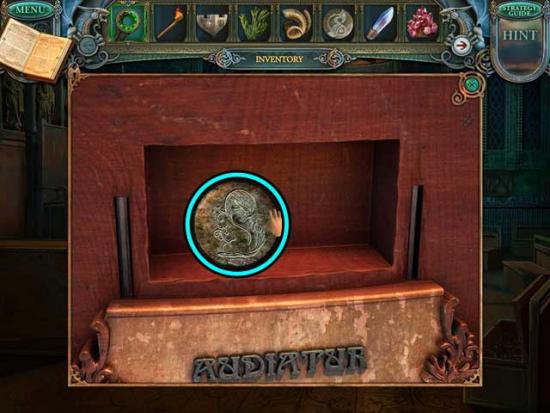
- Examine the plaque on the front of the box on the far side of the steps on the left.
- Use the LETTER E, the LETTER R, and the LETTER S on their correct locations to restore the plaque, then click on the STONE WITH SQUIRREL IMAGE to add it to your inventory.
- Return to the Cottage.
Cottage
- Examine the stone marker with the slots in it on the right. Place the STONE WITH FISH IMAGE, the STONE WITH BIRD IMAGE, the STONE WITH HOG IMAGE, and the STONE WITH SQUIRREL image in their proper locations (as shown below).
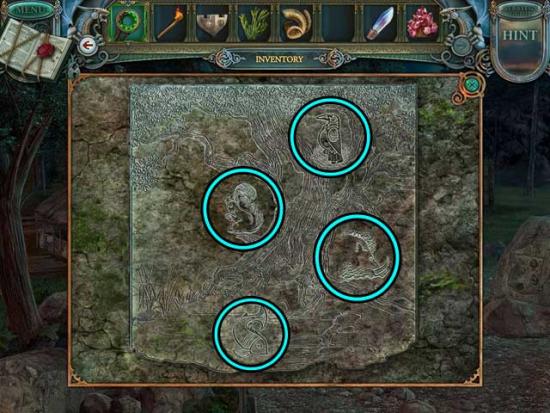
- Upon completing this task, click on the PLATE WITH LEAF that’s revealed to add it to your inventory.
- Enter the Cottage.
Cottage Interior
- Take a closer look at the box on the floor in the back right corner. Use the PLATE WITH LEAF on the slot at the top to reveal a secret panel. Click on it to trigger a puzzle.
- Light all the crystals to open the chest. Click on the lines to light the crystals. Single crystals require one line going through it to become lit; double crystals require two lines. The solution is shown below.
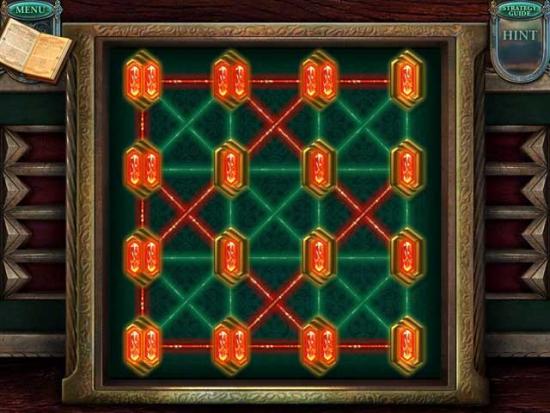
- Upon completing the puzzle, click on the Scroll and the MAGIC POWDER to collect them.
- Return to the Greenhouse.
Greenhouse
- Use the MAGIC POWDER on the vines restricting the young girl.
- Click on the MAGIC GEM 8/10 to collect it.
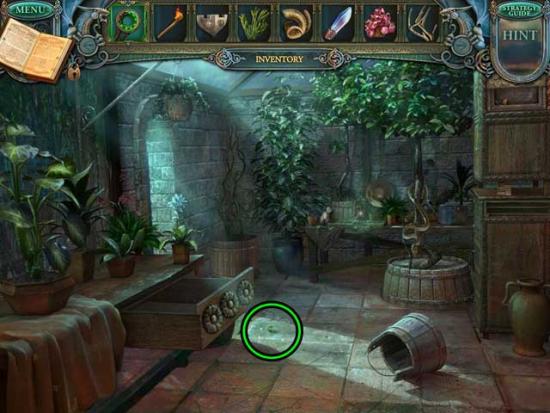
Chapter 5: The Eagle and the Chains
Greenhouse
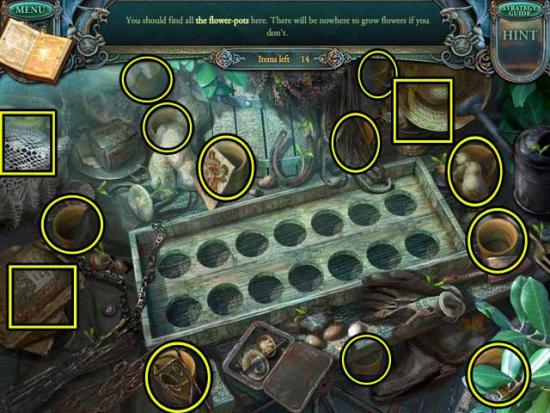
- Examine the table at the back of the room.
- Find all the flower pots here. Their locations are shown below.
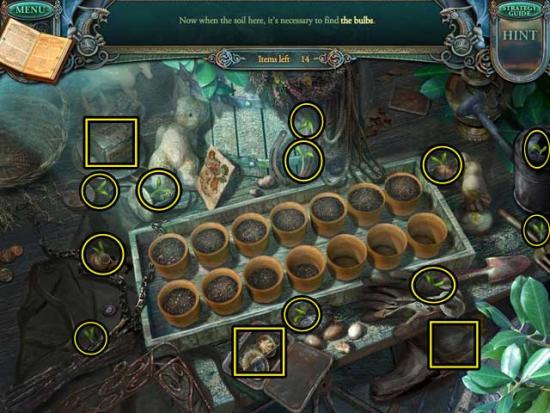
- Find all the bulbs here. Their locations are shown below.
- Exit back to the main area for now.
- Proceed through the now-accessible doorway on the left.
Garden
- Click on the SCISSORS to add them to your inventory.
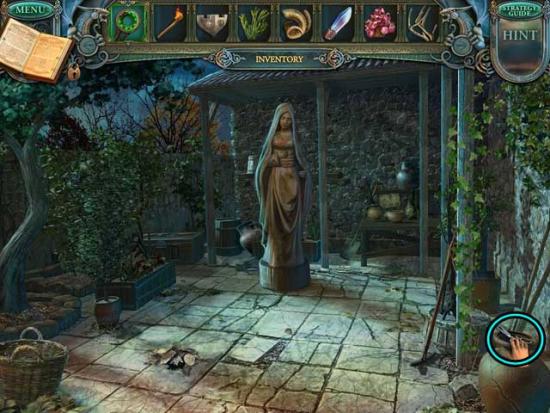
- Examine the other elements in the area, then exit for now.
- Go to the Cottage Interior.
Cottage Interior
- Use the SCISSORS on the FLEECE (fur) blanket on the bed to cut off a piece and add it to your inventory.
- Return to the Greenhouse.
Greenhouse
- Take a closer look at the tree in the barrel planter.
- Place the FLEECE beneath the snake, then use the BURNING KINDLING to light it.
- Once the snake is gone, click on the SAW to add it to your inventory.
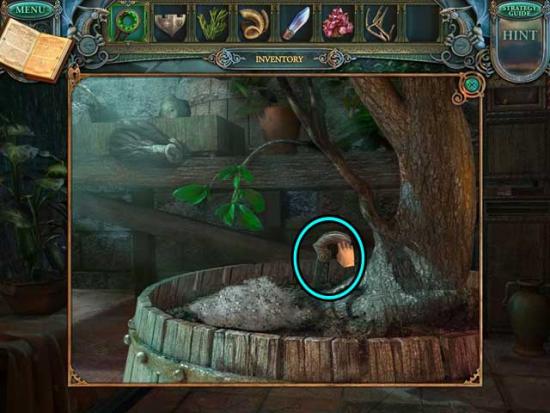
- Make your way to the Clearing.
Clearing
- Click on the hidden object area on the right.
- Find the objects listed at the top of the screen. Items listed in red are outlined in red and require an additional action before they can be collected. The Key Item is circled in blue.
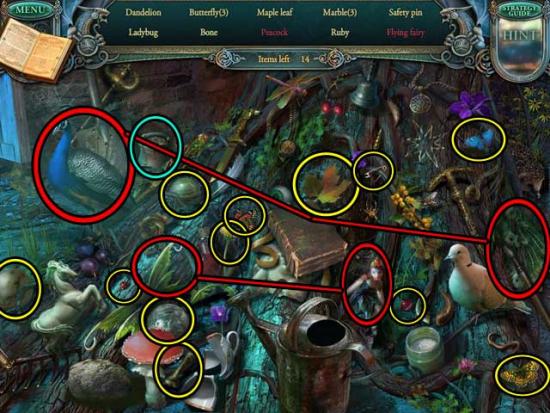
- Upon completing the area, the HONEY will be added to your inventory.
- Back in the main area, use the SAW on the pile of branches on the lower right. Then, click on the METAL ROSE to add it to your inventory.
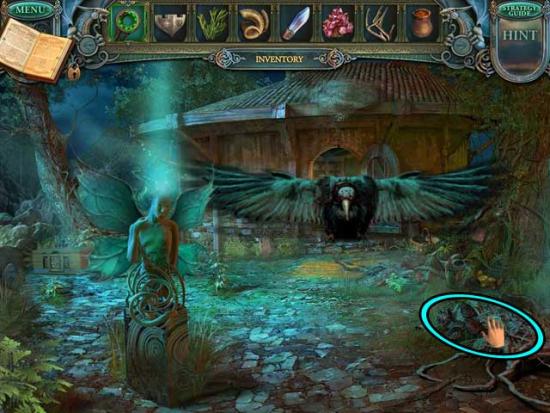
- Return to the Garden.
Garden
- Take a closer look at the statue. Place the METAL ROSE in the statue’s hand, then click on the QUADRANGULAR KEY to add it to your inventory.
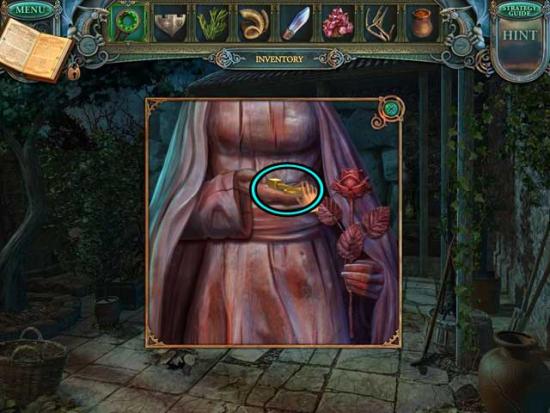
- Go to the Brewery.
Brewery
- Take a closer look at the hidden object area on the right.
- Take the misplaced items and put them in their proper places. The solution is shown below.
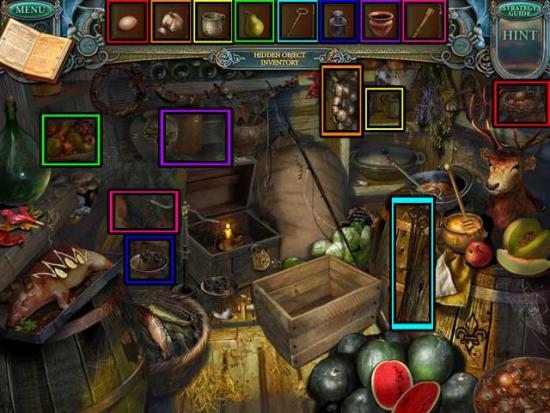
- Upon completing the area, the ALOE will be added to your inventory.
- Examine the box on the middle table at the back of the room. Use the QUADRANGULAR KEY on the lock to trigger a puzzle.
- Solve the puzzle to open a secret niche. Choose the tile you want to move with. Click on a highlighted cell to move. Remove all the monster-shaped tiles from the playing field by “jumping” over them with the magician-shaped tile. Click on the tiles and move them according to the numbered order in the screenshot below to solve the puzzle.
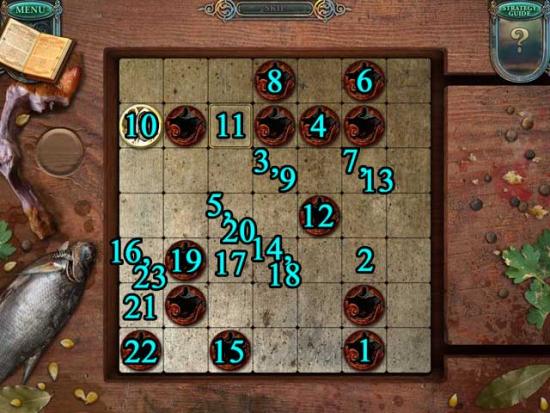
- Upon completing the puzzle, click on the CRYSTAL (2) to add it to your inventory.
- Go to the Garden.
Garden
- Take a closer look at the small table at the rear right of the Garden.
- Place the MINERALS, the WEED, and the ALOE into the mixing bowl, then use the Pestle to crush it.
- Use the HONEY on the bowl to complete the mixture, then click on the GROWTH ACCELERANT to add it to your inventory.
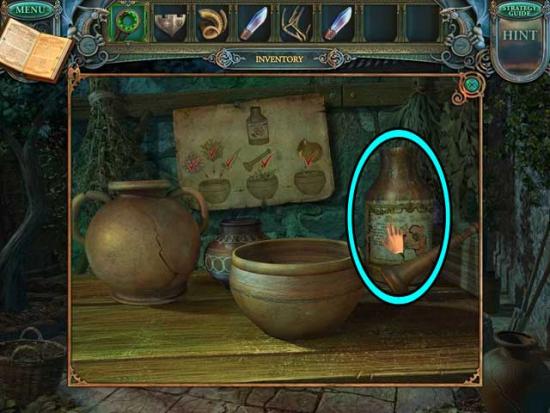
- Go back to the Greenhouse.
Greenhouse
- Take a closer look at the back table again. Use the GROWTH ACCELERANT on the potted plants, then click on the bouquet of LIVE FLOWERS to add them to your inventory.
- Go to the Clearing.
Clearing
- Use the LIVE FLOWERS on the fairy statue on the left, then click on the DECORATIVE PLATE to add it to your inventory.
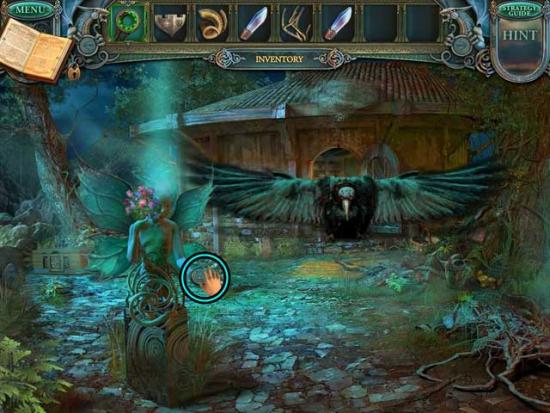
- Return to the Pottery Studio.
Pottery Studio
- Examine the open cabinet, and the box on the upper right inside. Use the DECORATIVE PLATE on the box to trigger a puzzle.
- Solve the puzzle to open the box. Click on the plate to rotate it. Create an integral pattern in the center of the cover by rotating the plates. The solutions are shown below.
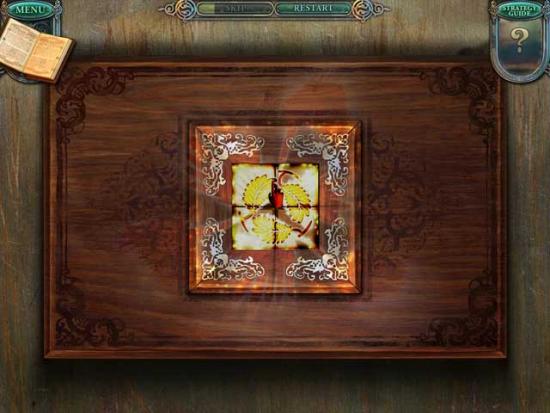
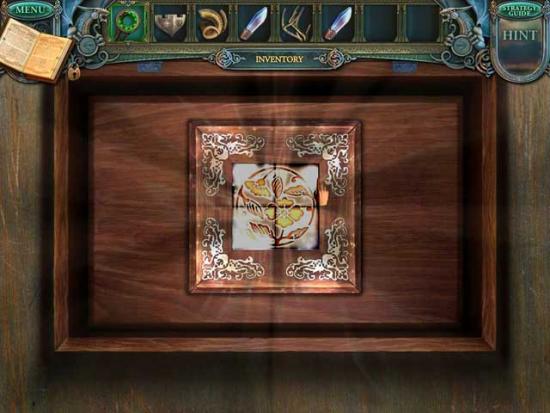
- Upon completing the puzzle, click on the PLATE WITH EAGLE to add it to your inventory.
- Go to the Garden.
Garden
- Examine the box in the upper left corner of the Garden, behind the statue. Use the PLATE WITH EAGLE on the slot at the top of the box. This will trigger a panel to open. Click on it to trigger a puzzle.
- Light all the crystals to open the chest. Click on the lines to light the crystals. Single crystals require one line going through it to become lit; double crystals require two lines. The solution is shown below.
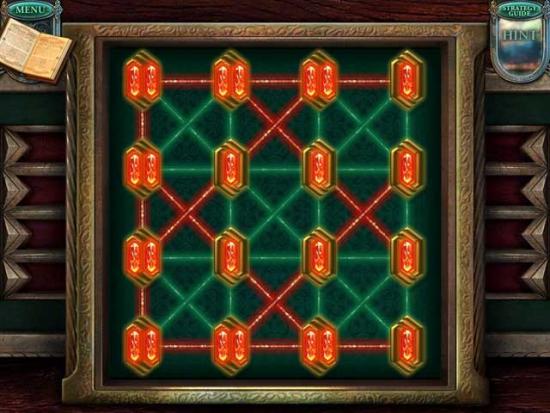
- Upon completing the puzzle, click on the Scroll and the MAGIC POWDER to collect them.
- Proceed to the Clearing.
Clearing
- Use the MAGIC POWDER on the Eagle.
- Click on the MAGIC GEM 9/10 to collect it.
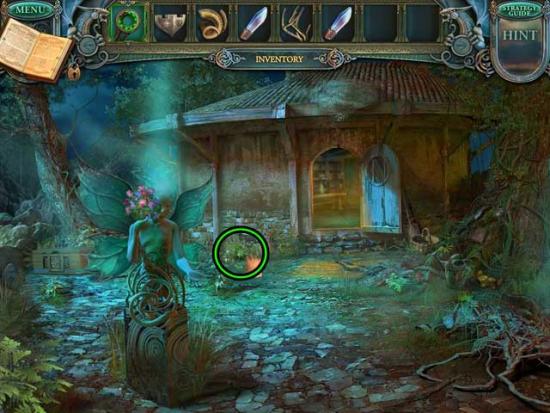
- Enter the now-accessible building.
Laboratory
- Click on the ROUND KEY to add it to your inventory.
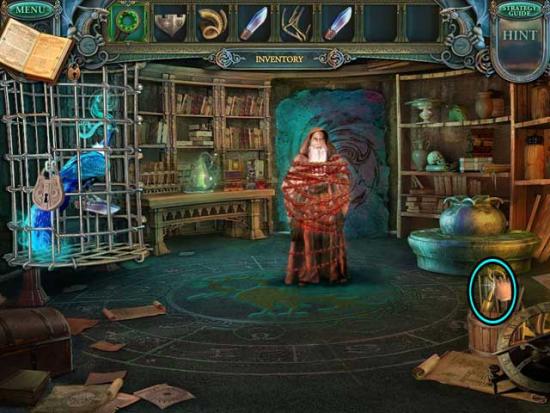
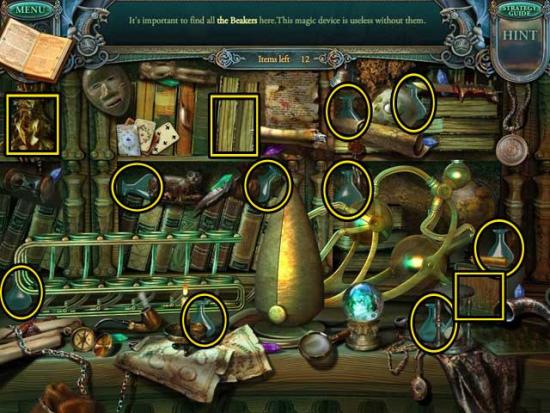
- Click on the desk in front of the bookshelf on the left.
- Find all the beakers here. Their locations are shown below.
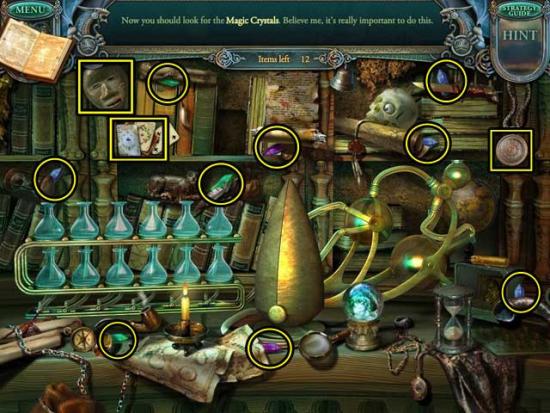
- Next, find all the magic crystals. Their locations are shown below.
- Backtrack to the Cottage Interior.
Cottage Interior
- Examine the box on the table on the right. Use the ROUND KEY on the lock to trigger a puzzle.
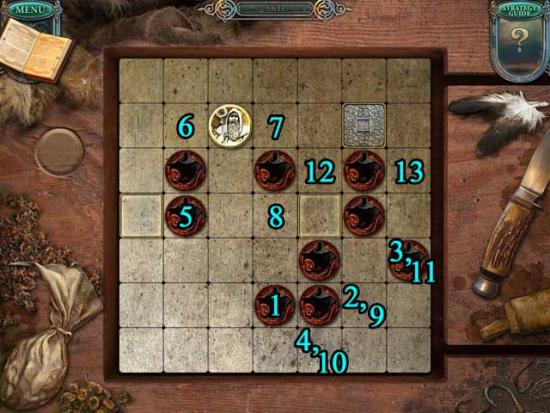
- Solve the puzzle to open a secret niche. Choose the tile you want to move with. Click on a highlighted cell to move. Remove all the monster-shaped tiles from the playing field by “jumping” over them with the magician-shaped tile. The place of the last tile left on the playing field is in the marked cell. Click on the tiles/cells in the order shown in the screenshot below to solve the puzzle.
- Upon completing the puzzle, click on the SHIELD PART (2) to add it to your inventory.
- Go to the Archives.
Archives
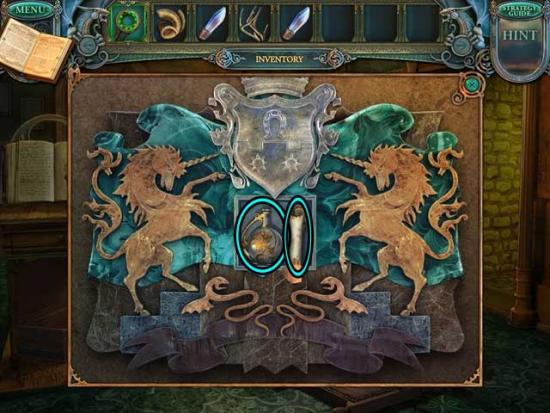
- Examine the coat of arms plaque on the back wall. Use the SHIELD PARTS (x2) to restore the coat of arms, then click on the Scroll and the MAGIC LIQUID to collect them.
- Return to the Clearing.
Clearing
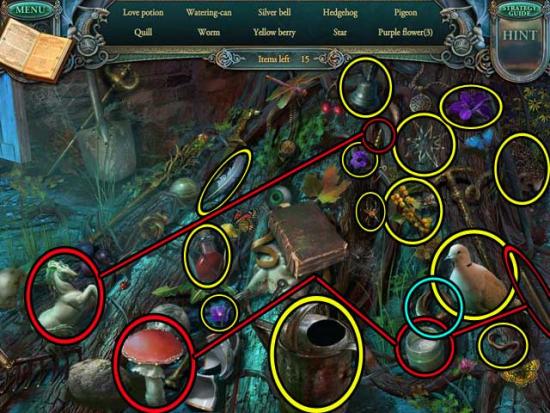
- Click on the hidden object area on the right.
- Find the objects listed at the top of the screen. Items listed in red are outlined in red and require an additional action before they can be collected. The Key Item is circled in blue.
- Upon completing the area, the BUFFALO HORNS will be added to your inventory.
- Return to the Cottage Interior.
Cottage Interior
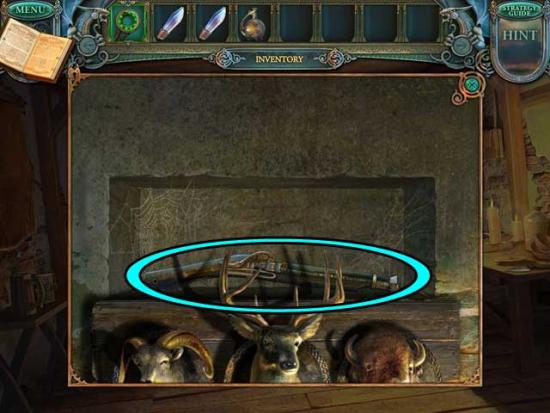
- Examine the trophy heads above the bed on the back wall. Place the RAM HORNS, the ANTLERS, and the BUFFALO HORNS on the animals respectively, then click on the RIFLE to add it to your inventory.
- Exit the Cottage Interior.
Cottage
- Take a closer look at the wooden rifle stand to the immediate right of the Cottage.
- Place the RIFLE on the rifle stand to trigger a puzzle.
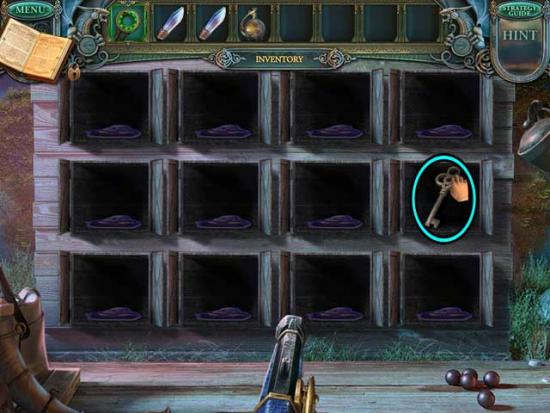
- Solve the puzzle to win a prize. Click an open window to shoot. Hit all the witches (blue/purple in color) that appear in open windows. Avoid hitting other characters, or you will have to start the game from the very beginning. You may have to wait for witches to cycle through windows.
- Upon completing the puzzle, click on the GOLDEN KEY to add it to your inventory.
- Return to the Laboratory.
Laboratory
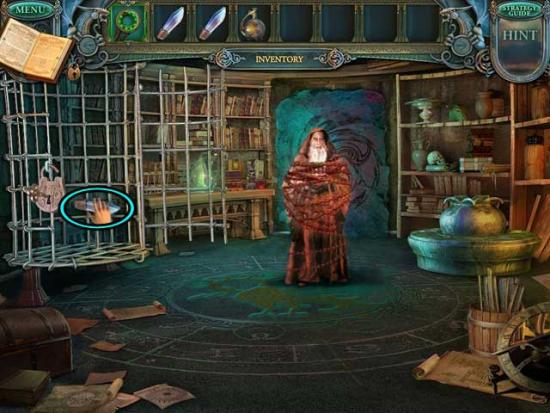
- Use the GOLDEN KEY on the lock on the cage on the left.
- Once the bird inside the cage flies out, click on the CRYSTAL (3) to add it to your inventory.
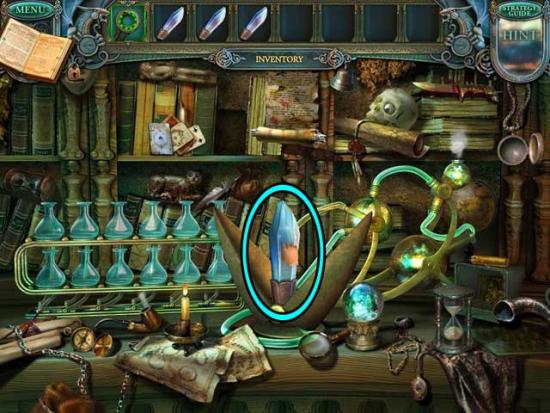
- Take a closer look at the table in front of the bookcase on the left again. Use the MAGIC LIQUID on the beakers full of crystals, then click on the resulting CRYSTAL (4) to collect it.
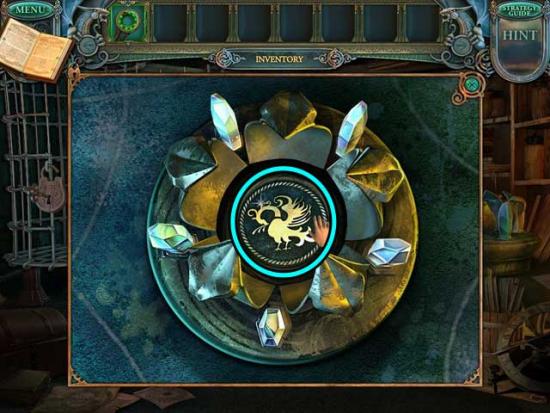
- Back in the main area, examine the fountain-like structure on the right. Use the CRYSTALS (x4) on the slots.
- Click on the PLATE WITH PHOENIX that appears to add it to your inventory.
- Go outside to the Clearing.
Clearing
- Examine the box beneath the tree on the left. Use the PLATE WITH PHOENIX on the slot at the top of the box to open a secret panel. Click on the panel to trigger a puzzle.
- Light all the crystals to open the chest. Click on the lines to light the crystals. Single crystals require one line going through it to become lit; double crystals require two lines. The solution is shown below.
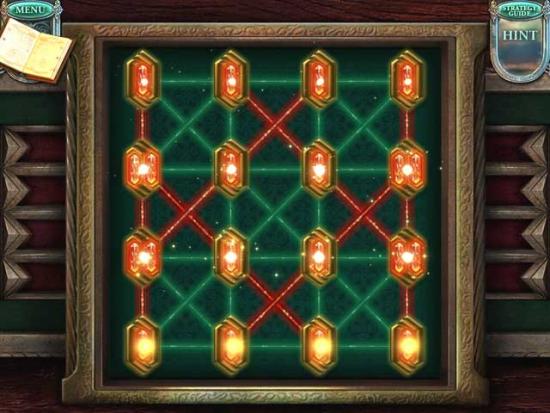
- Upon completing the puzzle, click on the Scroll and the MAGIC POWDER to collect them.
- Enter the Laboratory.
Laboratory
- Use the MAGIC POWDER on the chains holding the magician.
- Click on the MAGIC GEM 10/10 to collect it.
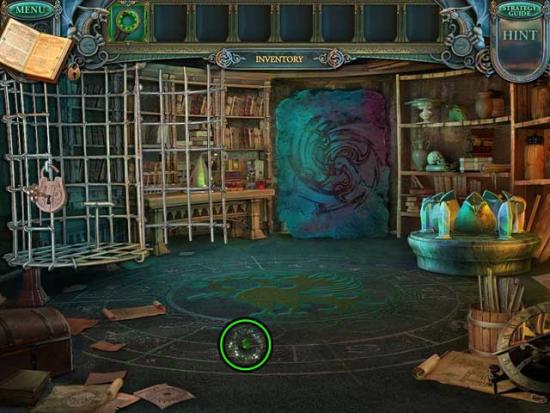
- Upon completing the staff, proceed forward through the doorway that appears.
Catacomb
- Upon entering the Catacomb, a puzzle will be triggered.
- Win the battle to defeat the witch. Click on the glowing balls with the magic staff to neutralize them. The balls should be clicked in the order they appear. The solution is shown below.
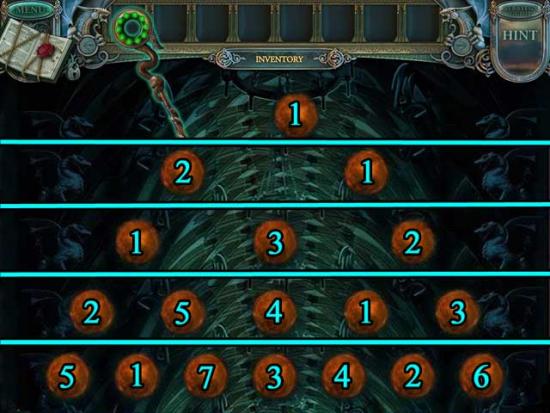
- Once the witch is defeated, use the MAGIC STAFF on the slot in the wall at the back of the room.
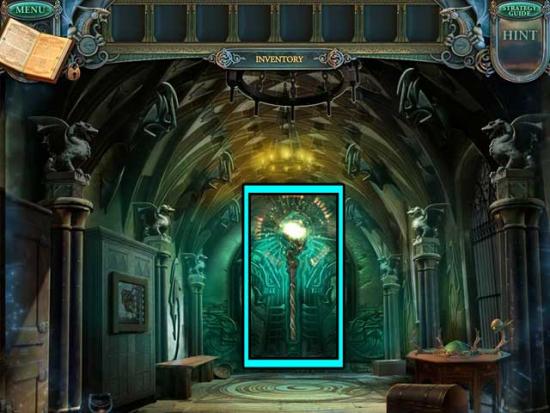
Congratulations! You’ve completed the main adventure, but your journey isn’t over yet! You can now access the Bonus Adventure via the Extras portion of the Main Menu, or choose to play it immediately from the end of the main adventure.
Bonus Adventure
Hallway
- Examine all the various elements in the area, then proceed forward to the next area.
Book Chamber
- Click on the hidden object area over the debris on the right.
- Find the objects listed at the top of the screen. Items listed in red are outlined in red and require an additional action before they can be collected. The Key Item is circled in blue.
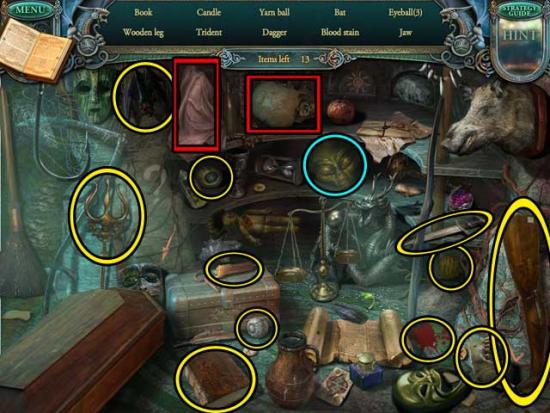
- Upon completing the area, MEDUSA’S FACE will be added to your inventory.
- Return to the Hallway.
Hallway
- Take a closer look at the second (grey-colored) cabinet on the left. Use MEDUSA’S FACE on the empty slot to trigger a puzzle.
- Solve the puzzle to open the cupboard. Click on the buttons to move the snake tongues. Make all the snakes hide their tongues. Click on the buttons in the order shown in the screenshot below to solve the puzzle.
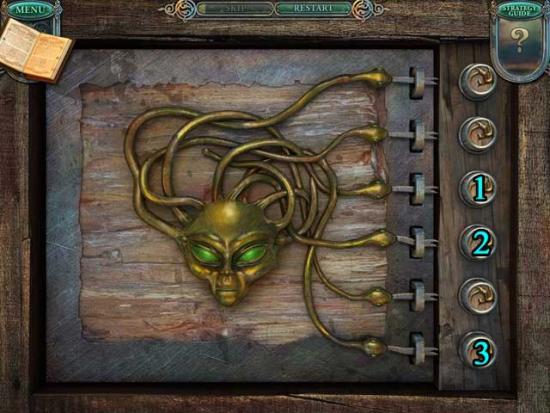
- Upon completing the puzzle, click on the MAGIC POTION on the lower right that Turns Bone to Dust to add it to your inventory.
- Proceed to the Book Chamber.
Book Chamber
- Use the MAGIC POTION on the pile of skeletons on the left.
- Proceed left to the next area.
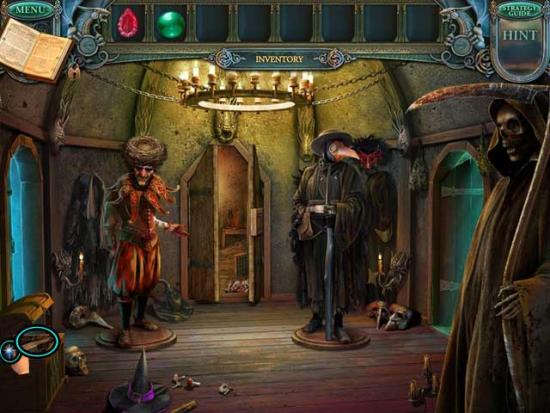
Mannequin Room
- After examining the area, proceed through the doorway on the left to the next area.
Field
- Click on the GARGOYLE to add it to your inventory.
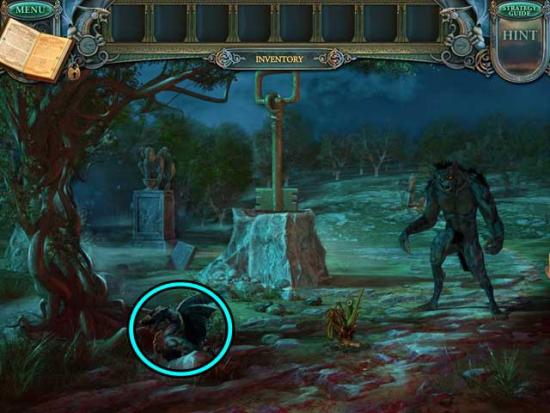
- Return to the Mannequin Room.
Mannequin Room
- Proceed through the doorway on the right.
Garden Room
- Click on the SKULL on the left to add it to your inventory.
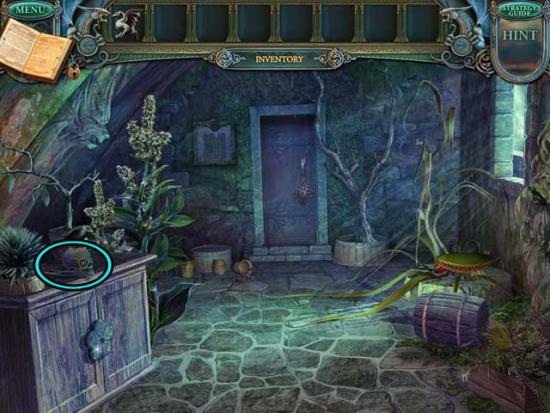
- Make your way back to the Hallway.
Hallway
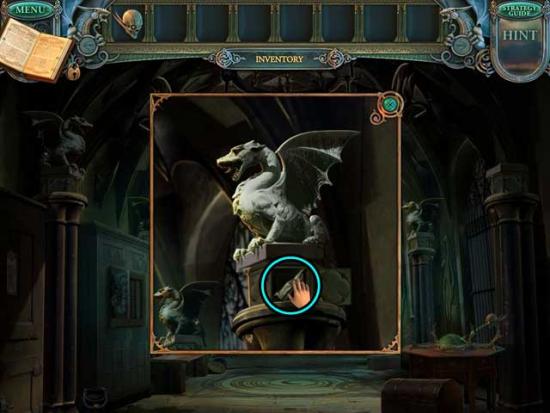
- Examine the top portion of the pillar on the far right. Place the GARGOYLE on top of the pillar, then click on the FINGER that appears to add it to your inventory.
- Enter the Book Chamber.
Book Chamber
- Click on the hidden object area on the right.
- Find the objects listed at the top of the screen. Items listed in red are outlined in red and require an additional action before they can be collected. The Key Item is circled in blue.
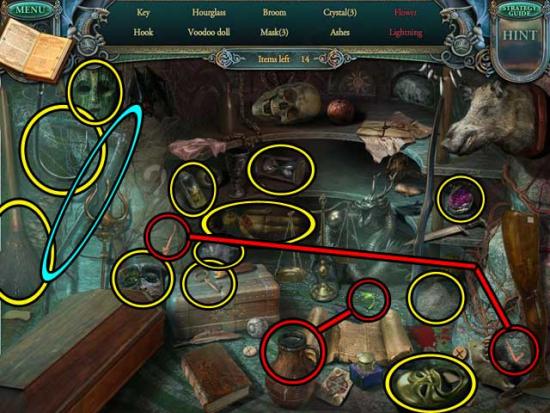
- Upon completing the area, the SCYTHE will be added to your inventory.
- Go to the Mannequin Room.
Mannequin Room
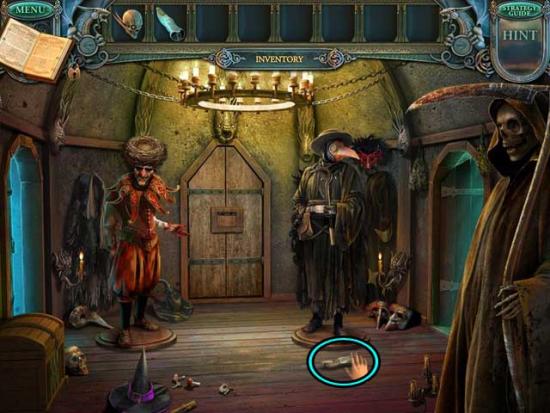
- Give the SCYTHE to the robed mannequin on the far right.
- Click on the FINGER (2) that the mannequin drops to add it to your inventory.
- Return to the Book Chamber.
Book Chamber
- Examine the typewriter table to the right of the red beams.
- Place the FINGERS (x2) on the table to restore them, then click on the LABEL that’s produced to add it to your inventory.
- Go to the Hallway.
Hallway
- Examine the potions cabinet on the left. Use the LABEL on the green potion on the upper right.
- Click on the MAGIC POTION Turns Big to Small to add it to your inventory.
- Make your way back to the Field.
Field
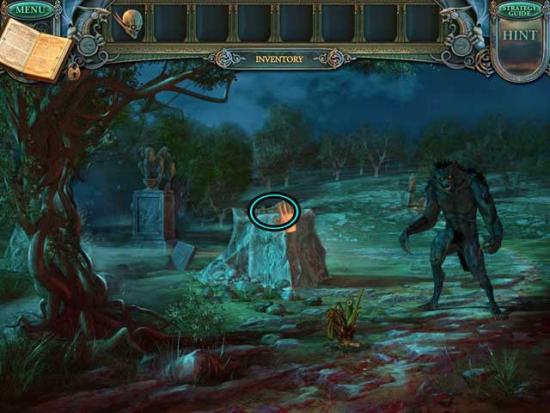
- Use the MAGIC POTION on the large key ahead, then click on the SMALL KEY to add it to your inventory.
- Go to the Garden Room.
Garden Room
- Take a closer look at the door at the back of the room. Use the SMALL KEY on the lock to open it, then proceed inside.
Pantry
- Click on the MOUSE TILE, the RED CRYSTAL, and the SKULL (2) to add them to your inventory.
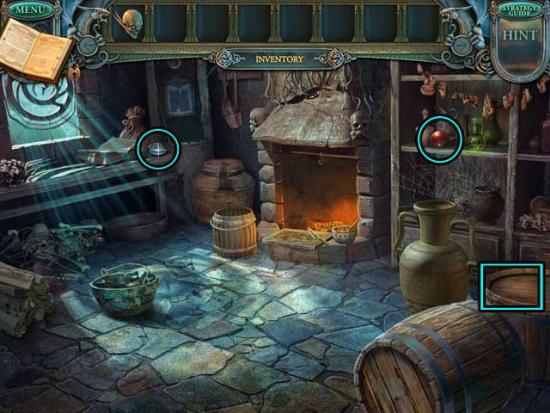
- Note the other elements in the area, then return to the Mannequin Room.
Mannequin Room
- Take a closer look at the door ahead, at the back of the room. Use the MOUSE TILE on the missing tile space to restore it, triggering a puzzle.
- Solve the puzzle to enter a new location. Click and drag the mice to move them. When you drag a mouse, the other mice will move in the same direction. If a mouse comes to a dead end or a blockage, it stops. Move the mice to the cells under the snakes in the upper part of the playing field. The solution is shown below (you can reach it by moving just one mouse).
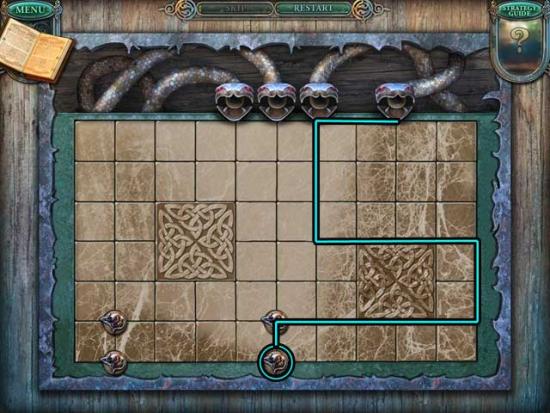
- Upon completing the puzzle, proceed through the open door to the next area.
Storage Room
- Click on the hidden object area over the dresser on the left.
- Find the objects listed at the top of the screen. Items listed in red are outlined in red and require an additional action before they can be collected. The Key Item is circled in blue.
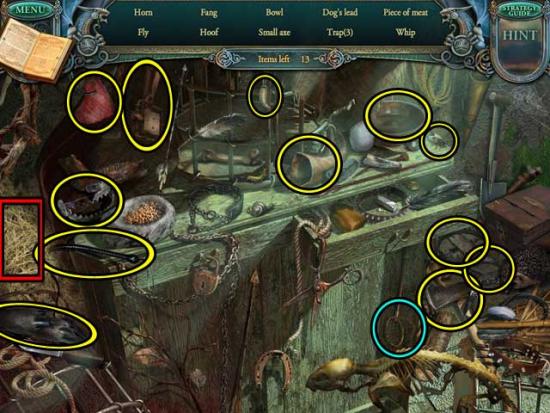
- Upon completing the area, the NET will be added to your inventory.
- Back in the main area, click on the CHICKEN FOOT and the HAM to add them to your inventory.
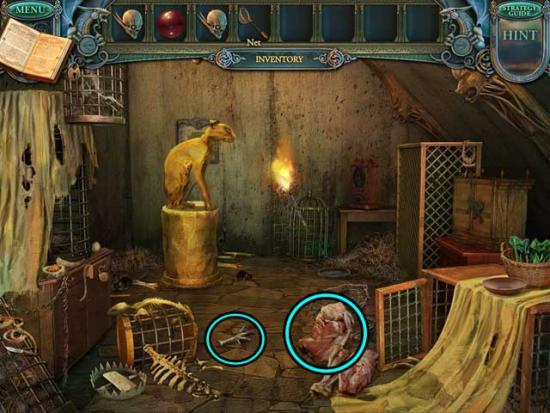
- Proceed to the Pantry.
Pantry
- Examine the large, gold-colored jar on the right. Use the NET to retrieve the FROG and add it to your inventory.
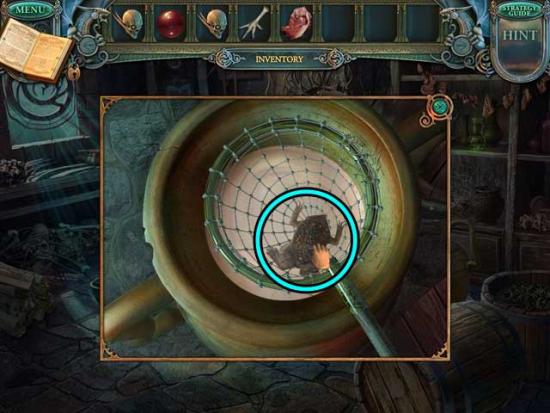
- Exit to the Garden Room.
Garden Room
- Give the FROG to the carnivorous plant on the right, then click on the TYPEWRITER BUTTON to add it to your inventory.
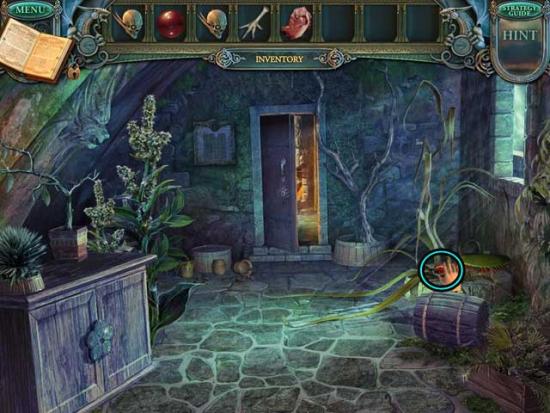
- Go to the Book Chamber.
Book Chamber
- Take a closer look at the typewriting machine to the right of the beams.
- Place the TYPEWRITER BUTTON in the bottom middle slot with the pink marking. Click on the LABEL that’s created to add it to your inventory.
- Go to the Hallway.
Hallway
- Take a closer look at the potions cabinet on the left. Use the LABEL on the purple-marked potion on the mid-bottom shelf, then click on the MAGIC POTION Turns Old to New to add it to your inventory.
- Go to the Pantry.
Pantry
- Use the MAGIC POTION on the old cauldron on the floor to restore it, then place it inside the fireplace.
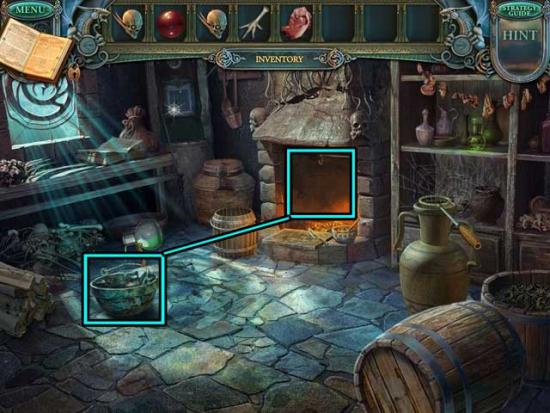
- Take a closer look at the fireplace with the cauldron. Click on the SKULL (3) to add it to your inventory.
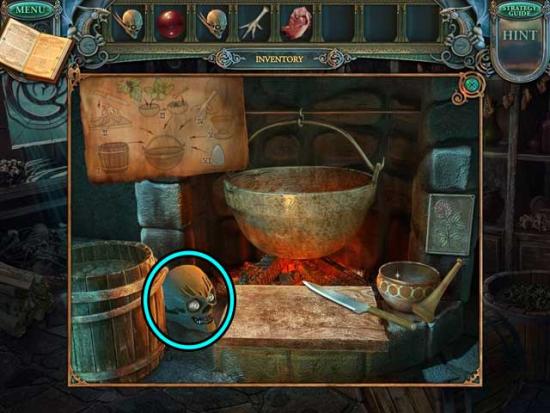
- Return to the Hallway.
Hallway
- Examine the round table on the lower right. Place the SKULLS (x3) on the stands to restore them, then click on the MOONSTONE to add it to your inventory.
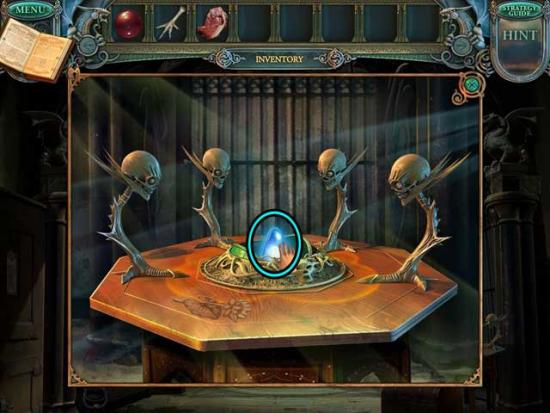
- Take a closer look at the brown cabinet on the far left. Place the RED CRYSTAL in the circular slot at the top of the screen to trigger a puzzle.
- Solve the puzzle to get a magic ruby. Click on a group of crystals to select it. Place all of the crystals on the playing field. The solution is shown below.
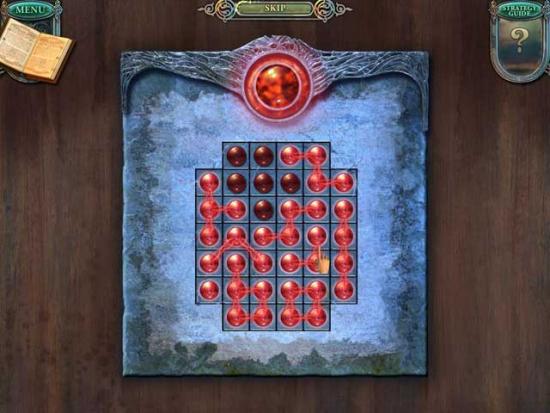
- Upon completing the puzzle, click on the RUBY to add it to your inventory.
- Go forward to the Book Chamber.
Book Chamber
- Click on the hidden object area on the right.
- Find the objects listed at the top of the screen. Items listed in red are outlined in red and require an additional action before they can be collected. The Key Item is circled in blue.
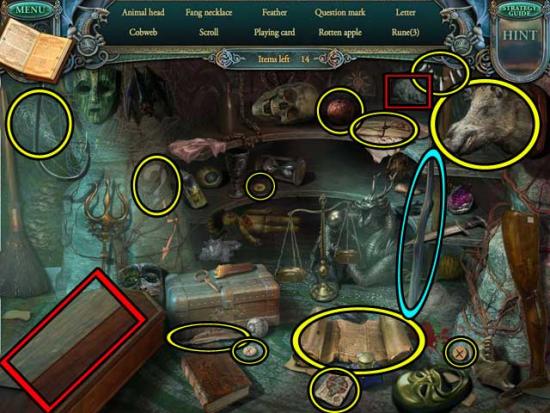
- Upon completing the area, the WALKING STICK will be added to your inventory.
- Enter the Mannequin Room.
Mannequin Room
- Give the WALKING STICK to the doctor, then click on the NAIL PULLER to add it to your inventory.
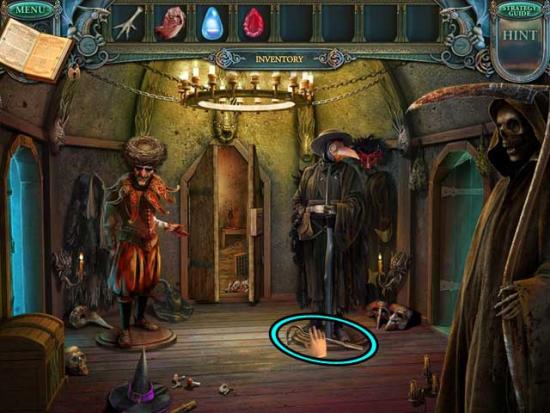
- Enter the Storage Room.
Storage Room
- Click on the hidden object area over the dresser on the left.
- Find the objects listed at the top of the screen. Items listed in red are outlined in red and require an additional action before they can be collected. The Key Item is circled in blue.
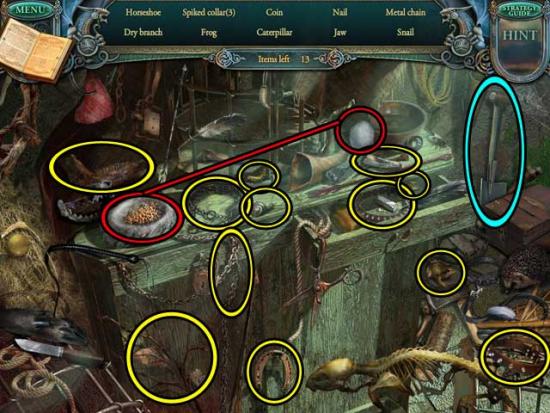
- Upon completing the area, the SPADE will be added to your inventory.
- Back in the main area, examine the small wooden cabinet on the right. Use the NAIL PULLER to remove the nail holding it shut.
- Click on the GARDENING SHEARS and the METAL FLOWER within the cabinet to add them to your inventory.
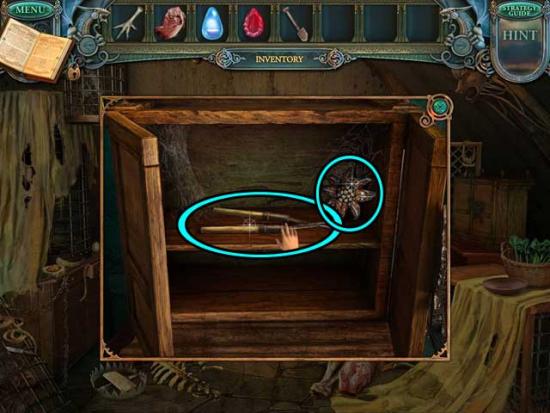
- Make your way to the Garden Room.
Garden Room
- Examine the cabinet on the lower left. Use the METAL FLOWER on the groove in the middle to trigger a puzzle.
- Choose the correct flower for every stem. The solution is shown below.
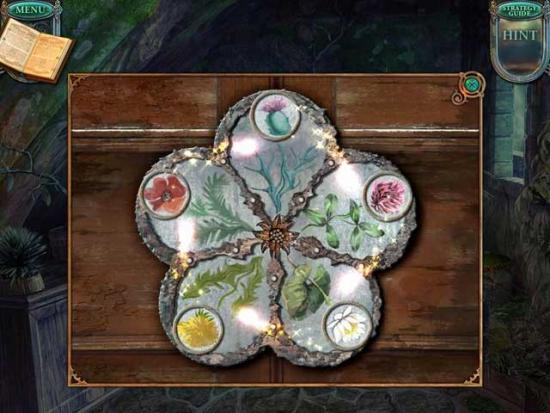
- Once the cabinet is open, click on the CURRANTS and the ONION inside to add them to your inventory. Before leaving, use the GARDENING SHEARS on the plant next to the cabinet to acquire the HELLEBORE.
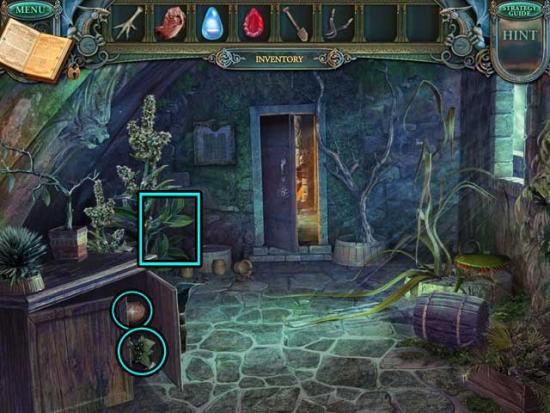
- Go to the Field.
Field
- Take a closer look at the crouching gargoyle-like statue in the distance towards the left. Use the ONION on the statue, then click on the resulting FLYING MAN’S TEARS to add them to your inventory.
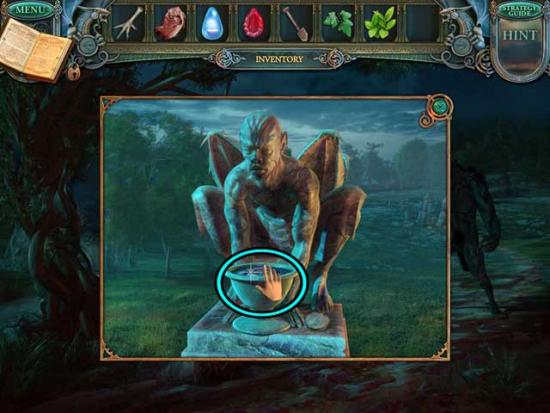
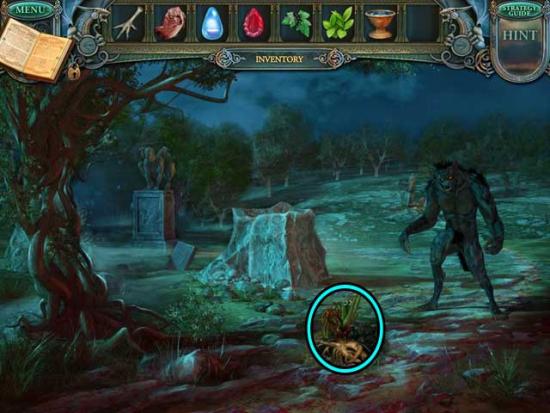
- Back in the main area, use the SPADE to dig up the VALERIAN ROOT and add it to your inventory.
- Return to the Pantry.
Pantry
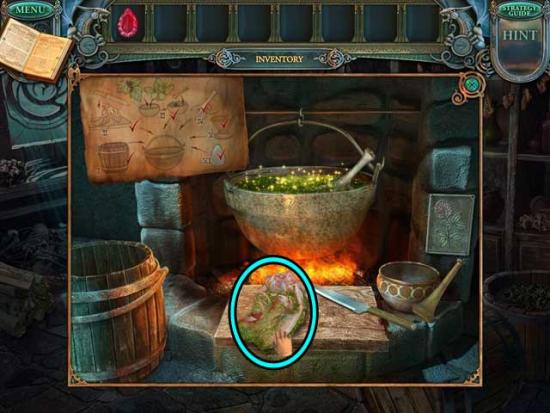
- Examine the cauldron in the fireplace. Follow these following steps, also shown on the scroll:
- 1) Pour the barrel of water into the cauldron.
- 2) Place the VALERIAN ROOT on the cutting board to chop it, and add it to the cauldron.
- 3) Place the CURRANTS and the HELLEBORE in the mortar towards the right, then use the pestle to crush it. Add it to the cauldron.
- 4) Add the CHICKEN FOOT to the cauldron.
- 5) Add the FLYING MAN’S TEARS to the cauldron.
- 6) Add the MOONSTONE to the cauldron.
- Once the potion is complete, dip the HAM into the cauldron, then add the HAM WITH SLEEPING POTION to your inventory.
- Go to the Field.
Field
- Use the HAM WITH SLEEPING POTION on the black werewolf on the right.
- Proceed forward to the next area.
Graveyard
- Click on the hidden object area on the ground on the left.
- Find the objects listed at the top of the screen. Items listed in red are outlined in red and require an additional action before they can be collected. The Key Item is circled in blue.
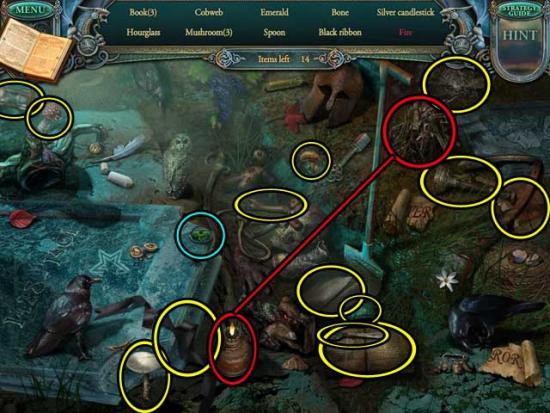
- Upon completing the area, the TYPEWRITER BUTTON will be added to your inventory.
- Make your way back to the Book Chamber.
Book Chamber
- Take a closer look at the typewriter on the right. Use the TYPEWRITER BUTTON on the upper left slot, then click on the LABEL to add it to your inventory.
- Go to the Hallway.
Hallway
- Examine the potions cabinet on the left. Use the LABEL on the remaining potion on the top shelf, then click on the MAGIC POTION Turns Dead to Living to add it to your inventory.
- Proceed to the Storage Room.
Storage Room
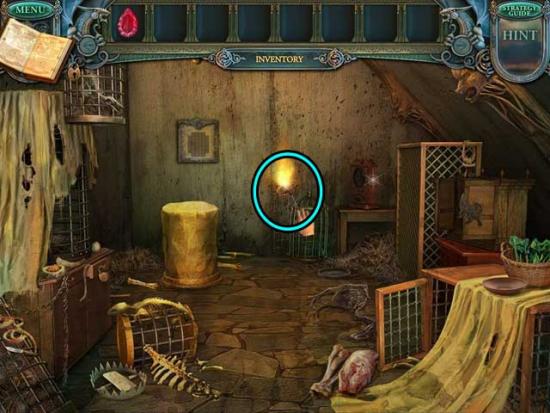
- Use the MAGIC POTION on the gold cat on top of the pedestal.
- Click on the BURNING TORCH to add it to your inventory.
- Return to the Graveyard.
Graveyard
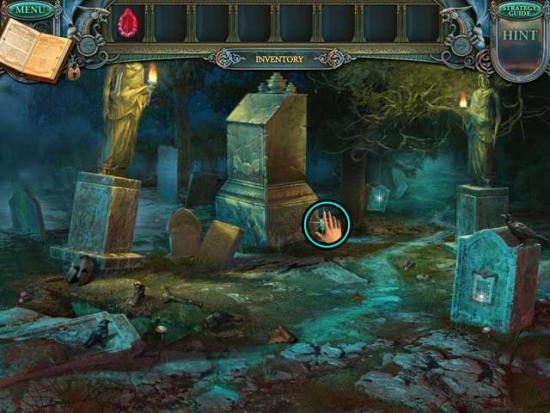
- Use the BURNING TORCH on the dark human statue on the right.
- Click on the GREEN CRYSTAL to add it to your inventory.
- Proceed up the path to the next area.
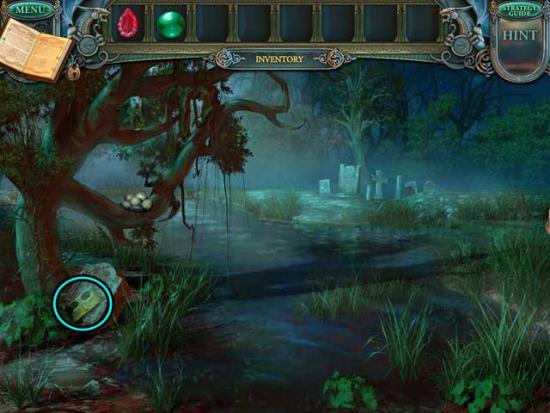
Swamp
- Click on the MASK to add it to your inventory.
- Return to the Mannequin Room.
Mannequin Room
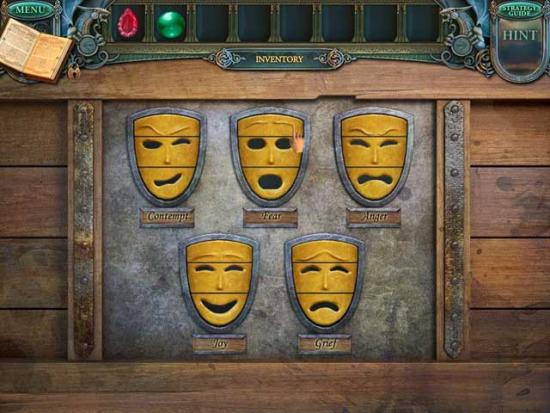
- Examine the chest in the lower left corner of the screen. Use the MASK on the empty slot to trigger a puzzle.
- Arrange the mask pieces into the corresponding emotions. Click two pieces to swap their positions. The solution is shown below.
- Once the chest is open, click on the BLUE CRYSTAL and the METAL BRUSH to add them to your inventory.
- Go to the Garden Room.
Garden Room
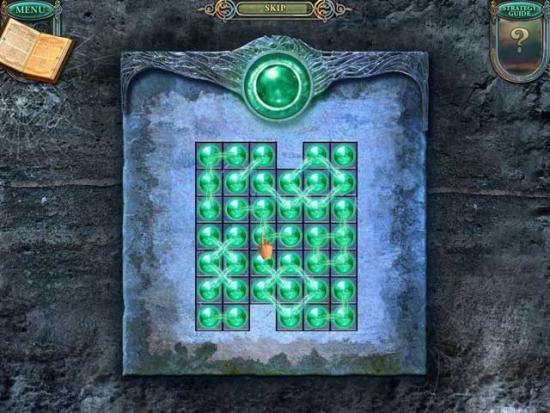
- Take a closer look at the puzzle panel to the left of the door. Use the GREEN CRYSTAL on the slot at the top to trigger a puzzle.
- Solve the puzzle to get a magic ruby. Click on a group of crystals to select it. Place all of the crystals on the playing field. The solution is shown below.
- Upon completing the puzzle, click on the RUBY (2) to add it to your inventory.
- Enter the Pantry.
Pantry
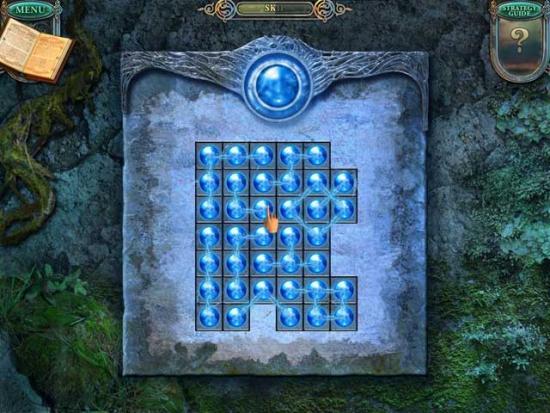
- Examine the puzzle panel in the rear left corner of the room. Use the BLUE CRYSTAL on the slot at the top to trigger a puzzle.
- Solve the puzzle to get a magic ruby. Click on a group of crystals to select it. Place all of the crystals on the playing field. The solution is shown below.
- Upon completing the area, click on the RUBY (3) to add it to your inventory.
- Go to the Graveyard.
Graveyard
- Take a closer look at the gravestone at the very back of the graveyard, to the left of the path leading to the Swamp.
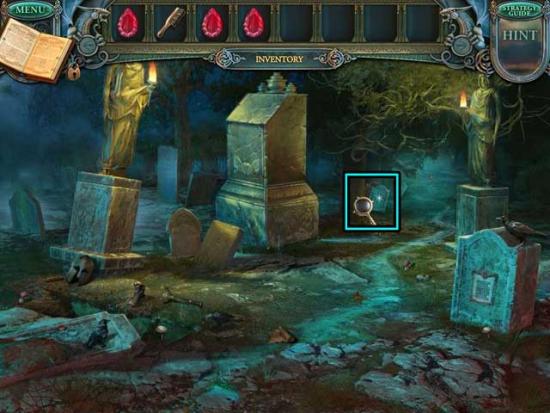
- Use the METAL BRUSH on the gravestone to remove the moss, then note the time “3.00” on the gravestone.
- Click on the hidden object area that appears on the ground.
- Find the objects listed at the top of the screen. Items listed in red are outlined in red and require an additional action before they can be collected. The Key Item is circled in blue.
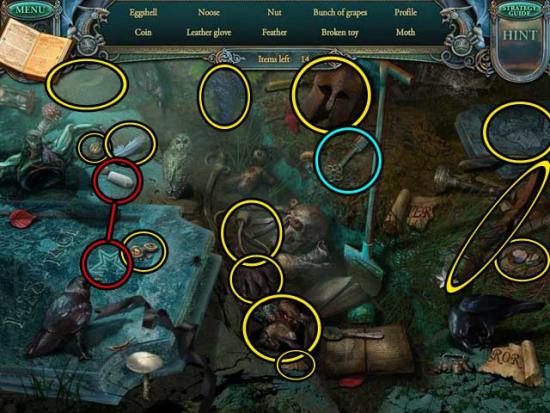
- Upon completing the area, the CLOCK KEY will be added to your inventory.
- Go to the Storage Room.
Storage Room
- Click on the hidden object area over the dresser on the left.
- Find the objects listed at the top of the screen. Items listed in red are outlined in red and require an additional action before they can be collected. The Key Item is circled in blue.
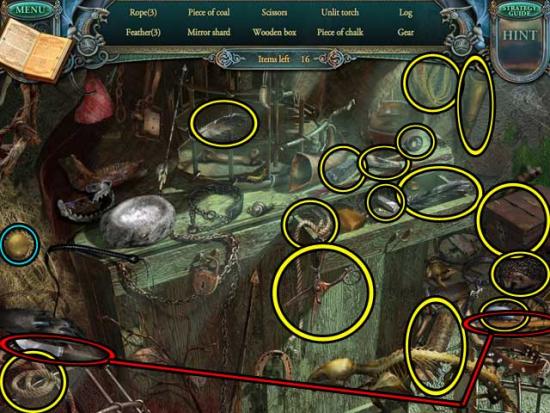
- Upon completing the area, the YELLOW CRYSTAL will be added to your inventory.
- Examine the clock sitting on top of the table at the back of the room. Use the CLOCK KEY on the clock to trigger a puzzle.
- Click on the holes under the clock face to move the clock hands. Each hole affects the clock hands differently. Solutions are randomized.
- Upon completing the puzzle, click on the TYPEWRITER BUTTON to add it to your inventory.
- Return to the Book Chamber.
Book Chamber
- Click on the typewriter for a closer view. Use the TYPEWRITER BUTTON on the final slot on the lower left, then click on the LABEL to add it to your inventory.
- Go to the Hallway.
Hallway
- Examine the potions cabinet on the left. Use the LABEL on the remaining MAGIC POTION Turns Liquid to Solid and click on it to add it to your inventory.
- Go to the Graveyard.
Graveyard
- Examine the short gravestone on the right. Use the YELLOW CRYSTAL on the slot at the top to trigger a puzzle.
- Solve the puzzle to get a magic ruby. Click on a group of crystals to select it. Place all of the crystals on the playing field. The solution is shown below.
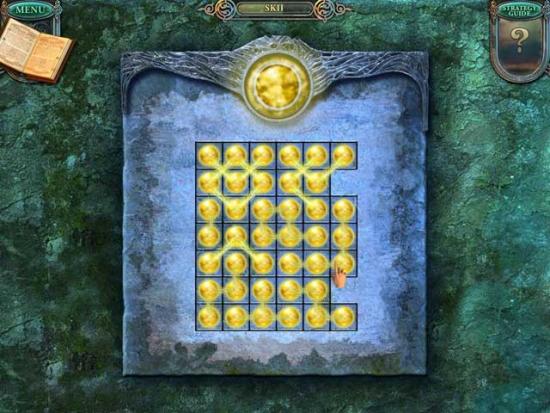
- Upon completing the puzzle, click on the RUBY (4) to add it to your inventory.
- Go forward to the Swamp.
Swamp
- Use the MAGIC POTION on the swamp water to turn it to a solid.
- Click on the PURPLE CRYSTAL to add it to your inventory.
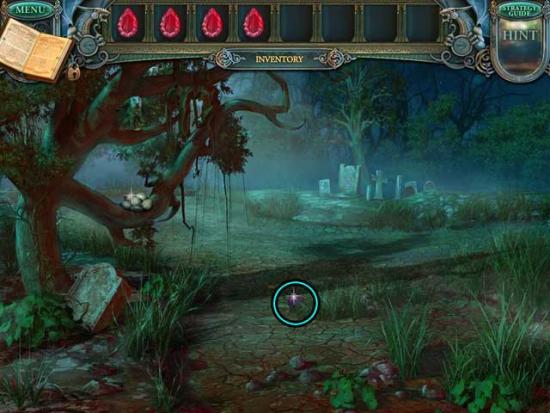
- Go back to the Graveyard.
Graveyard
- Click on the hidden object area on the ground on the left.
- Find the objects listed at the top of the screen. Items listed in red are outlined in red and require an additional action before they can be collected. The Key Item is circled in blue.
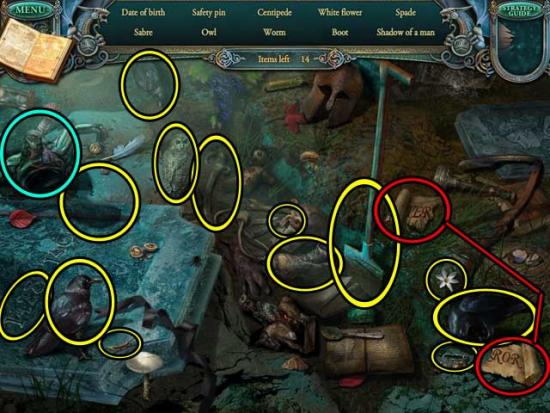
- Upon completing the area, the CLOWN HAT will be added to your inventory.
- Return to the Mannequin Room.
Mannequin Room
- Give the CLOWN HAT to the jester on the left, then click on the NEST to add it to your inventory.
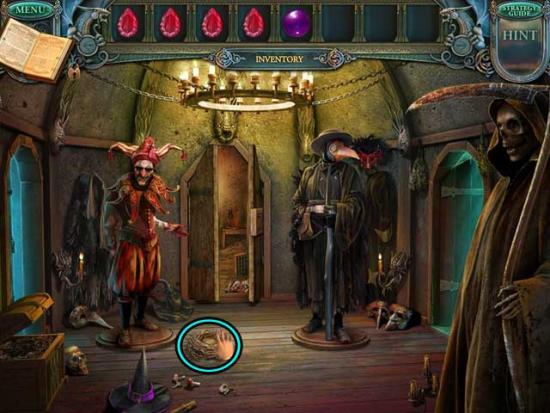
- Go back to the Swamp.
Swamp
- Use the NEST on the eggs sitting on the lower branch on the left, then click on the ORANGE CRYSTAL to add it to your inventory.
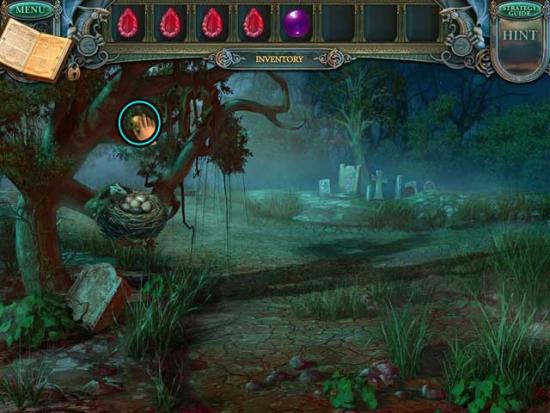
- Examine the gravestones in the distance. Use the ORANGE CRYSTAL on the slot at the top to trigger a puzzle.
- Solve the puzzle to get a magic ruby. Click on a group of crystals to select it. Place all of the crystals on the playing field. The solution is shown below.
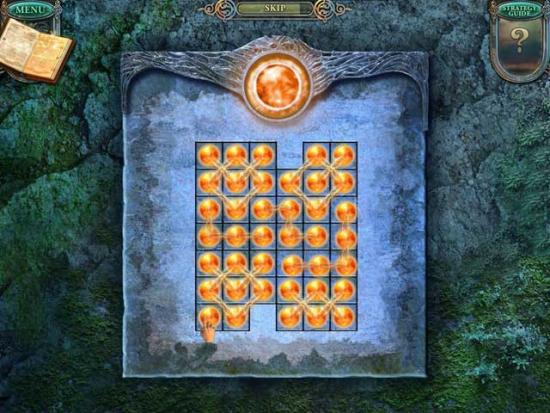
- Upon completing the area, click on the RUBY (5) to add it to your inventory.
- Return to the Storage Room.
Storage Room
- Examine the puzzle panel on the back wall towards the left. Use the PURPLE CRYSTAL on the slot at the top to trigger a puzzle.
- Solve the puzzle to get a magic ruby. Click on a group of crystals to select it. Place all of the crystals on the playing field. The solution is shown below.
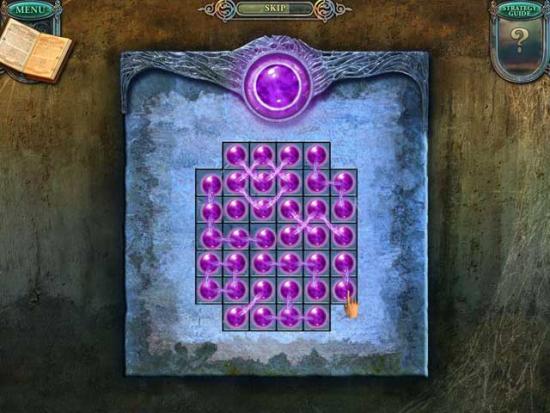
- Upon completing the area, click on the RUBY (6) to add it to your inventory.
- Go to the Book Chamber.
Book Chamber
- Examine each of the spiders hanging from the chains around the book stand. Use a RUBY on a spider to disable its beam. An example is shown below.
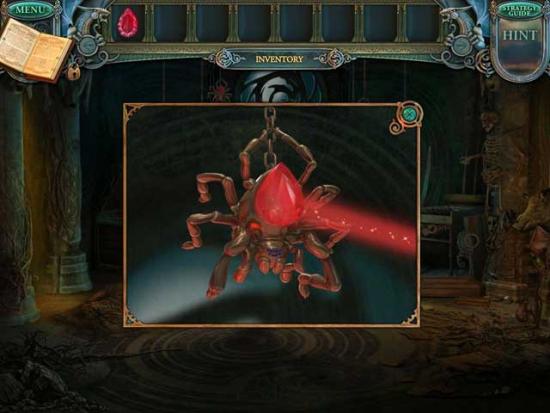
- Once you’ve placed the RUBIES (x6) in all the spiders and disabled the beams, watch the cutscene that follows.
Congratulations!
You have completed Gamezebo’s walkthrough for Echoes of the Past: The Revenge of the Witch. Be sure to check back often for game updates, staff and user reviews, user tips, forums comments and
much more here at Gamezebo!
More articles...
Monopoly GO! Free Rolls – Links For Free Dice
By Glen Fox
Wondering how to get Monopoly GO! free rolls? Well, you’ve come to the right place. In this guide, we provide you with a bunch of tips and tricks to get some free rolls for the hit new mobile game. We’ll …Best Roblox Horror Games to Play Right Now – Updated Weekly
By Adele Wilson
Our Best Roblox Horror Games guide features the scariest and most creative experiences to play right now on the platform!The BEST Roblox Games of The Week – Games You Need To Play!
By Sho Roberts
Our feature shares our pick for the Best Roblox Games of the week! With our feature, we guarantee you'll find something new to play!All Grades in Type Soul – Each Race Explained
By Adele Wilson
Our All Grades in Type Soul guide lists every grade in the game for all races, including how to increase your grade quickly!


