- Wondering how to get Monopoly GO! free rolls? Well, you’ve come to the right place. In this guide, we provide you with a bunch of tips and tricks to get some free rolls for the hit new mobile game. We’ll …
Best Roblox Horror Games to Play Right Now – Updated Weekly
By Adele Wilson
Our Best Roblox Horror Games guide features the scariest and most creative experiences to play right now on the platform!The BEST Roblox Games of The Week – Games You Need To Play!
By Sho Roberts
Our feature shares our pick for the Best Roblox Games of the week! With our feature, we guarantee you'll find something new to play!All Grades in Type Soul – Each Race Explained
By Adele Wilson
Our All Grades in Type Soul guide lists every grade in the game for all races, including how to increase your grade quickly!
Echoes of the Past: Royal House of Stone Walkthrough
Welcome to Gamezebo's walkthrough for Echoes of the Past: Royal House of Stone.General Tips The Menu crown at the top-left corner of the screen to displays the game menu. Help displays a list of icons and descriptions. Options allows you to change the music and sound volume, and also to toggle between full screen mode. High Scores displays the names of the players that have completed the game in the quickest times. Main menu exits the current game and displays the main menu. Resume exits th…
a:1:i:0;a:2:s:13:”section_title”;s:52:”Echoes of the Past: Royal House of Stone Walkthrough”;s:12:”section_body”;s:36588:”
Welcome to Gamezebo’s walkthrough for Echoes of the Past: Royal House of Stone.
General Tips
- The Menu crown at the top-left corner of the screen to displays the game menu. Help displays a list of icons and descriptions. Options allows you to change the music and sound volume, and also to toggle between full screen mode. High Scores displays the names of the players that have completed the game in the quickest times. Main menu exits the current game and displays the main menu. Resume exits the game menu and continues the game.
- Select the Magic Book below the Menu Crown to read notes and clues that are added as you play through the game.
- Move the mouse cursor to the top of the game window and the inventory window will drop down, which displays all of the items that are currently being held.
- The mirror at the top-right corner of the screen will display information and hints about locations in the game. In hidden object locations, the mirror will become a hint counter than can be clicked to identify hidden objects. Finding mirrors in the hidden object locations will increase the hint counter. Even if all hints have been used, wait one minute and an additional hint will be given.
- There are two types of hidden object locations. In locations which display a list of objects that need to be found, the names of the hidden objects and the order in which they appear are random each time. In locations where a set of items need to be found (feathers, rings, etc.), the order is not random.
- Clicking too many times in the wrong area on hidden object areas will cause the cursor to disappear for a few seconds.
- When red text appears in the hidden object locations, this means that a puzzle has to be solved before the item with red text can be found.
- There are various mini-games scattered throughout the main adventure. The Skip crown will become active at the top-right corner of the screen after 90 seconds have passed. Select this crown to skip the mini-game.
Walkthrough
Throne Room
The game starts in the throne room. Select the glowing book on the floor and it will be added to the slot at the top-left corner of the screen. Close the book and then select the glowing area at the right side of the room to enter the studio.
Studio
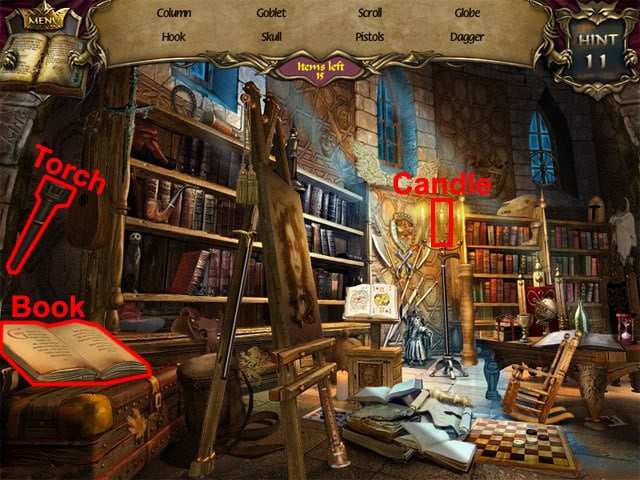
Select the mirror on the shelf and the Magic Mirror will be added to the slot at the top-right corner of the screen. Select the mirror in the window and a new hint will be added to the hint menu. Keep finding objects from the list and a message will mention that objects in red require a mini-puzzle to be solved.

Select the book twice and then select the letter W on the page. Find all of the hidden items. Take the candle and use it on the torch. Select the torch and it will be added to the inventory. Back out of the studio.
Throne Room
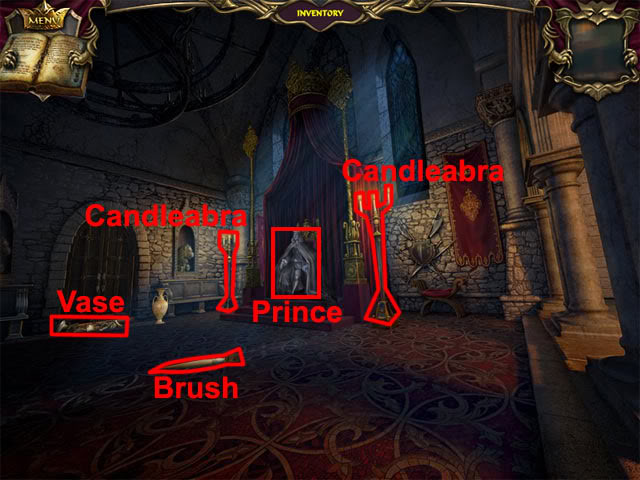
Use the torch on the candelabras at the sides of the throne. Examine the stone prince. Select the vase at the left side of the door and it will fall over, spilling a brush into the middle of the room. Take the brush. Examine the door and use the brush on the keyhole. Take the key that appears under the door and use it in the keyhole. Continue west through the doorway.
Hall
Move forward to the end of the hall:
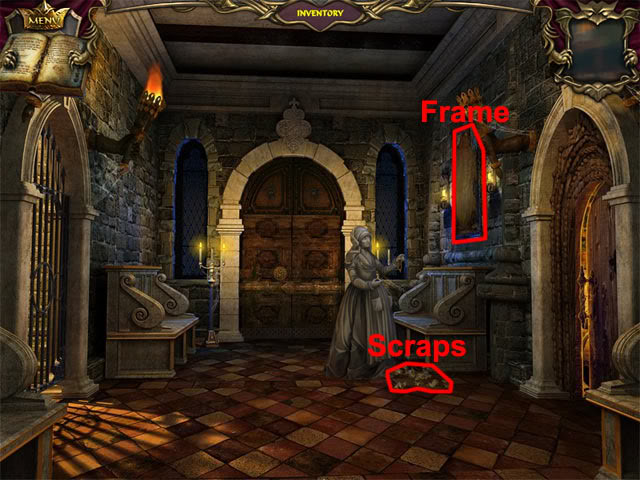
Take the portrait scraps on the floor at the right side of the petrified nanny. Examine the picture frame on the wall. Use the picture scraps on the picture frame and they will be added to the bottom of the screen. Select a picture scrap from the bottom of the screen, move it over the picture frame, wait a second for it to unfold, and then place the scrap in the correct place on the frame. The scrap can no longer be moved it has been placed correctly. The completed picture is shown below:
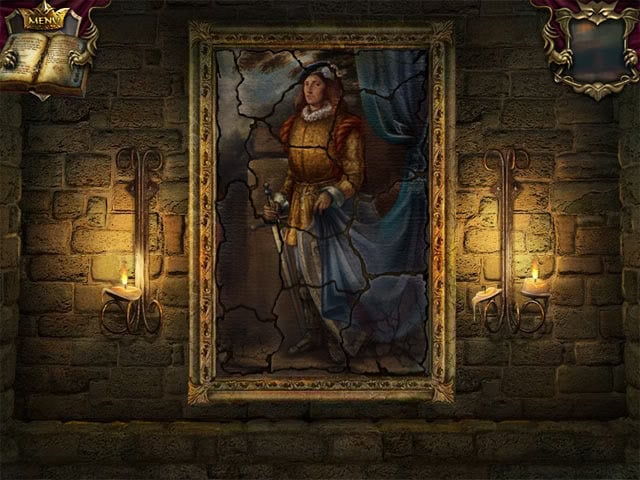
The seal of Orion will become visible on the prince’s shield. Back away from the picture. Move back twice and go through the doorway on the right.
Armory Room
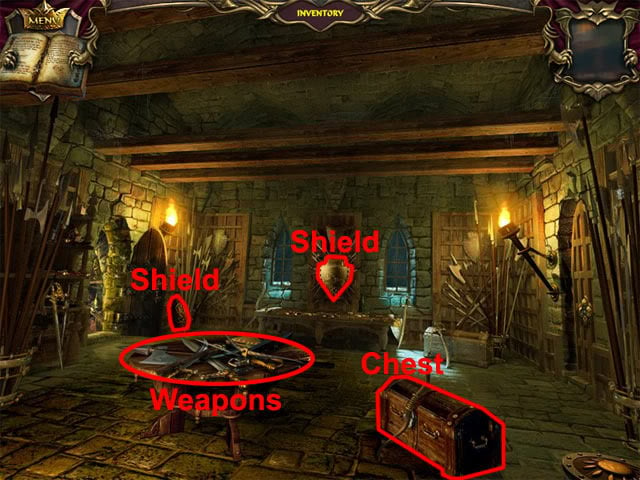
Select the five weapons on the table and they will all fall to the floor. Take the sword that remains on the table. Select the shield in the middle of the room to reveal a sign behind it. Examine the sign: Metal will cut the wood. Select the shield in the corner of the room near the left doorway and it will be added to the inventory. Go through the left doorway.
Stock Room
Find hidden objects until the heart with an arrow is listed as an item in red text:
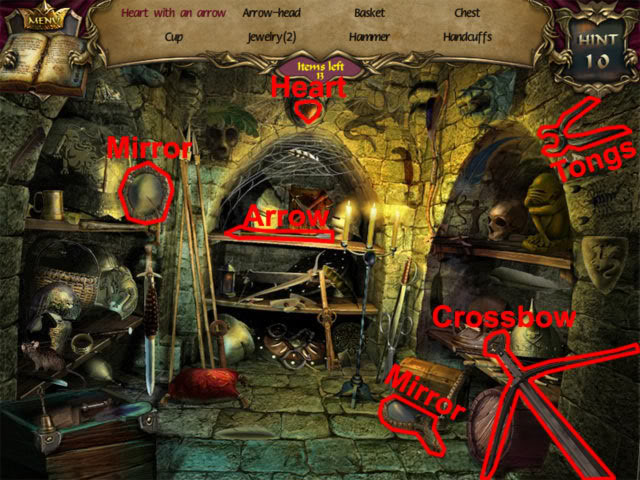
Take the arrow and use it on the crossbow to shoot an arrow at the heart. Select the heart with an arrow to find the hidden item. Select the two mirrors and then find the rest of the hidden objects in the room. After finding all of the listed hidden objects, a final object will need to be found. Take the tongs on the wall at the right side of the room. Move back twice to return to the hall.
Hall
Give the sword and shield to the knight standing by the left doorway. Take the green scroll:
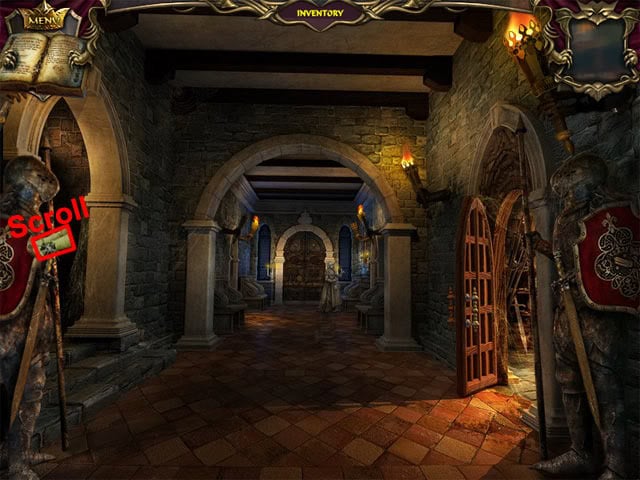
Move back and then right to return to the studio.
Studio
Another hidden object scene will begin after you enter the studio, and this time you will need to find all of the symbols of a King. Unlike the listed hidden items, the order is not random here so the exact locations for the symbols can be given. To find the checkers board symbol, select the white piece and then select the King piece. Select all of the symbols:
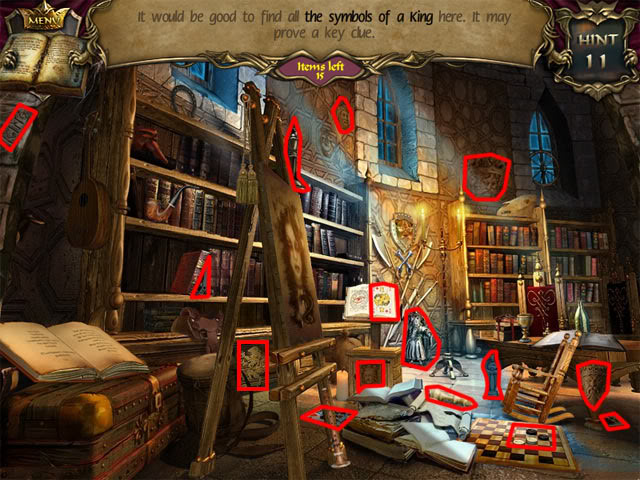
After all symbols have been found, you will next need to select matching pairs of Kings. Select a tile and then select a different tile. If the Kings are the same, the tiles will be removed. There is no time limit on this puzzle and you can take as long as you want, so just keep selecting the different tiles until all pairs of Kings are matched. Select the remaining tile and the bas-relief with King’s image will be added to the inventory. Move back and left twice to the hall.
Hall
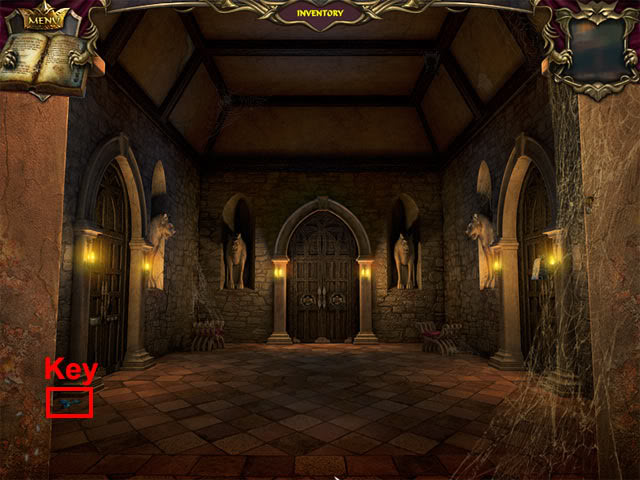
Select the diamond key at the bottom-left corner of the hall:
Examine the middle door to see the coat of arms. Select the magic book below the menu crown at the top-left corner of the screen and scroll back a few pages to see an image of the coat of arms. Exit the book. Select the sections on the shield and the symbols outside the shield to make it look the same as the image in the book:
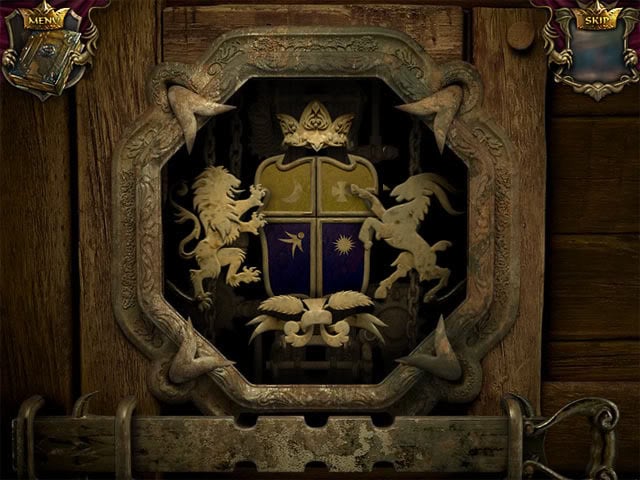
After solving the coat of arms puzzle, go through the middle door to enter the tailor’s room.
Tailor’s Room
This room will be explored in more detail later on. For now, go through the doorway at the left side of the room to enter the prince’s study.
Prince’s Study
Find hidden objects until the jug shadow is listed as an item in red text:
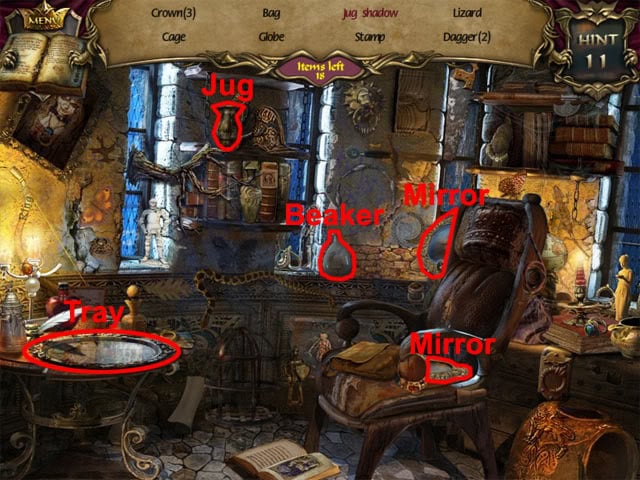
Take the jug and use it on the tray. Select the jug shadow on the tray. Select the two mirrors and then find the rest of the hidden objects in the room. After finding all of the listed hidden objects, a final object will need to be found. Select the empty beaker. Move back twice to return to the hall.
Hall
Examine the left door to see the lock. Use the tongs on the two screws:
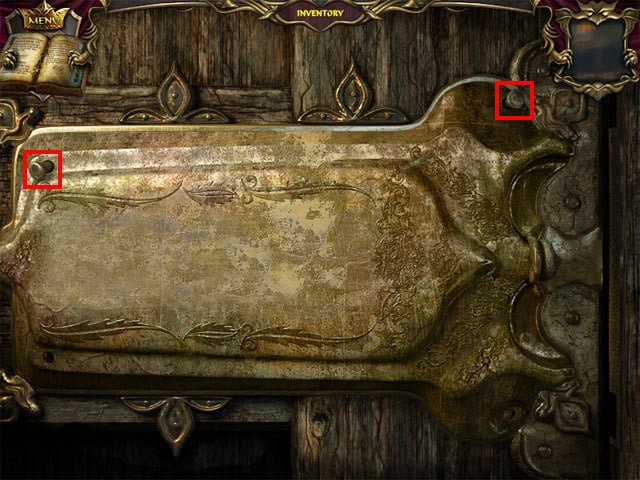
The aim now is place the wooden blocks in the correct places so that the key block can move freely across to the latch. Start by moving the top-left wooden block down to a location below the key block, and then move the bottom-left gear up to the peg at the top-left corner:
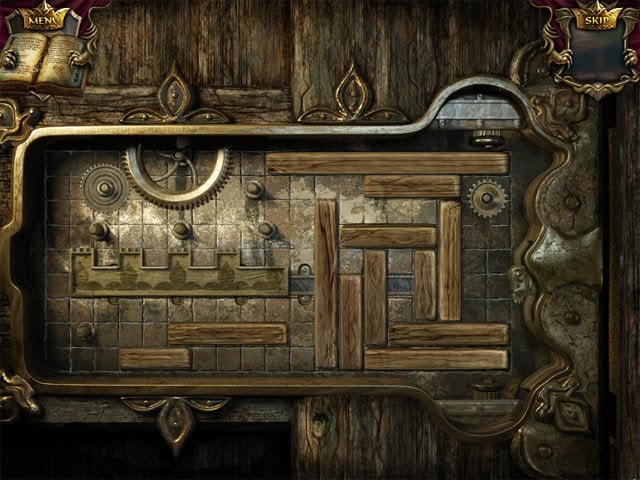
Next, position the wooden blocks in the correct places:
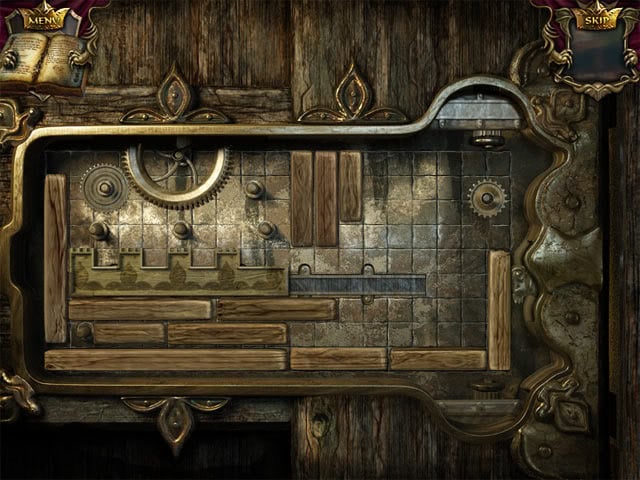
Move the small gear at the top-right corner of the lock over to the peg at the left side of the lock: This causes the the key lock to move one square to the right. Reposition the wooden blocks:

Move the big gear over to the top lock at the right side of the wheel and the small gear over to the bottom lock at the right side of the wheel:
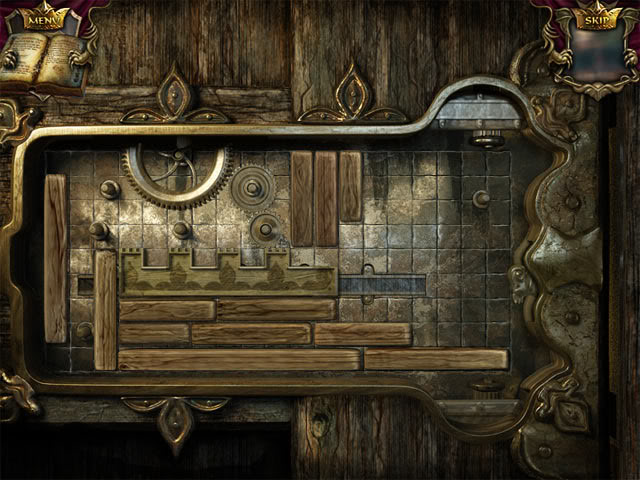
The key lock will move across to the latch and the door will open. Go through the left doorway to enter the princess’s room.
Princess’s room
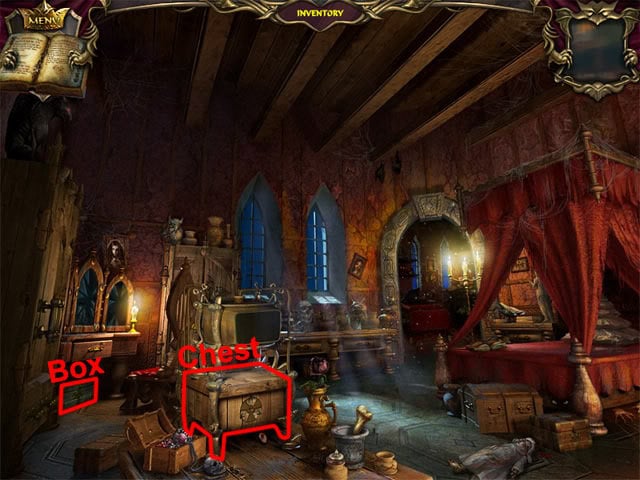
Open the box below the drawer at the left side of the room and take the paint. Use the green scroll on the chest in the middle of the room. Examine the chest to open it.
Use the empty beaker on the chest and elements of different colours will appear. Move the cursor over the elements to see that they become highlighted. Select only the green elements:
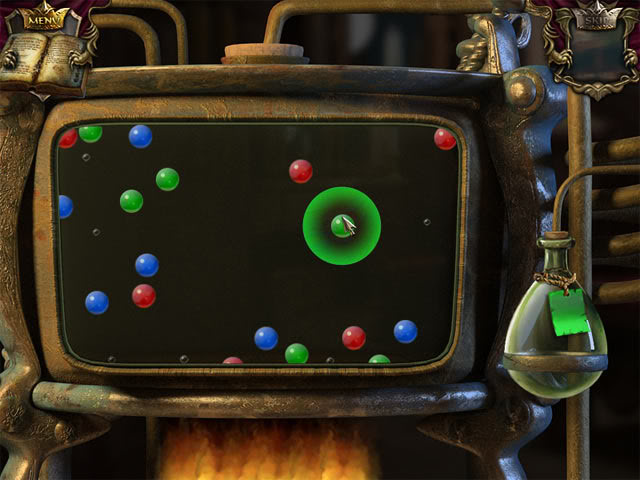
Keep selecting the green elements until the beaker is full. Take the beaker of magic liquid. Go through the doorway on the right to enter the hidden room.
Hidden room
Find hidden objects until the handprint is listed as an item in red text:
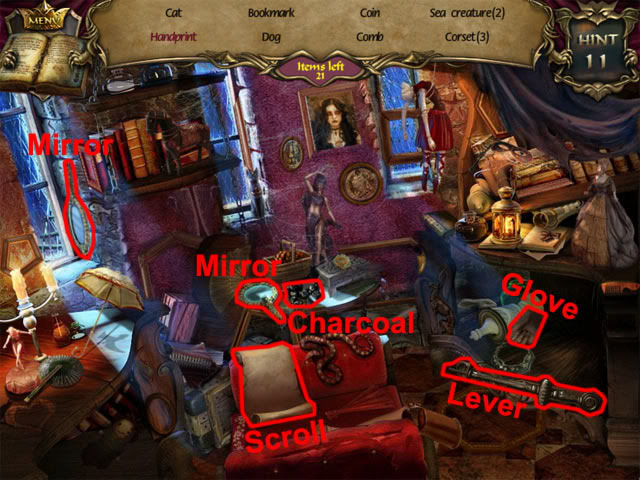
Select the glove and use it on the charcoal. Use the glove on the scroll. Select the handprint. Select the two mirrors and then find the rest of the hidden objects in the room. After finding all of the listed hidden objects, a final object will need to be found. Select the lever. Move back four times to the throne room.
Throne Room
Examine the prince. Use the diamond key on the chest and it will open. Take the medallion without a portrait from the chest. Move left twice to the hall.
Hall
Examine the door at the right side of the room to see a map. Use the paint on the scroll. The aim now is to paint the map, making sure that cells of the same colour do not touch:
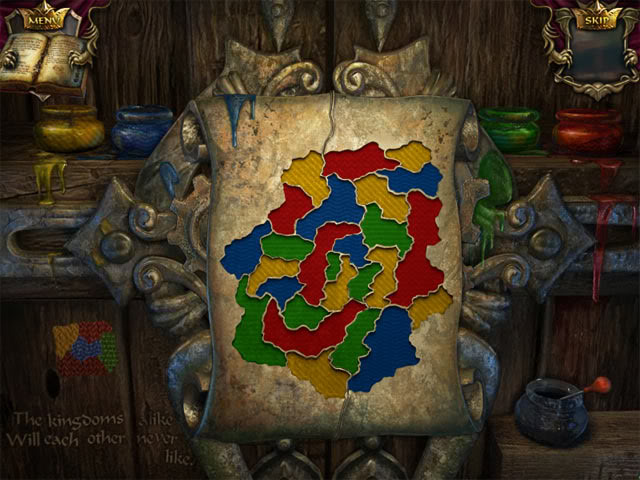
Go through the right doorway to enter the King’s room.
King’s Room
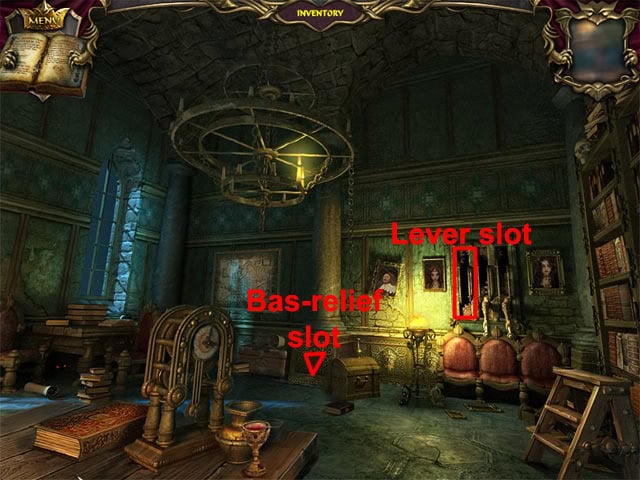
Use the bas-relief with King’s image on the slot below the pillar and a secret compartment will open. Take the portrait from the compartment and the medallion with portrait will automatically be made in the inventory. Use the lever on the lever slot to open a door in the hall. Move back twice and then move forward to the hall with the petrified nanny.
Hall
Give the medallion with a portrait to the petrified nanny: She explains that the prince went missing on the eve of his coronation, but as she went to search for him she was attacked with dark magic. She drops a handkerchief on the right bench and then leaves the hall. Take the handkerchief:
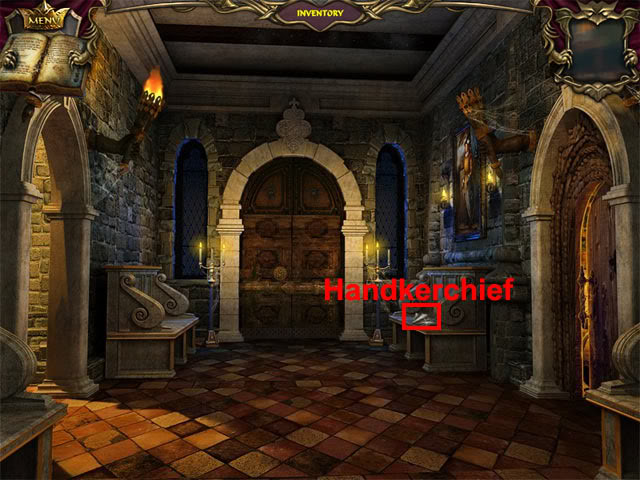
Go through the left doorway to enter the stairway.
Stairway
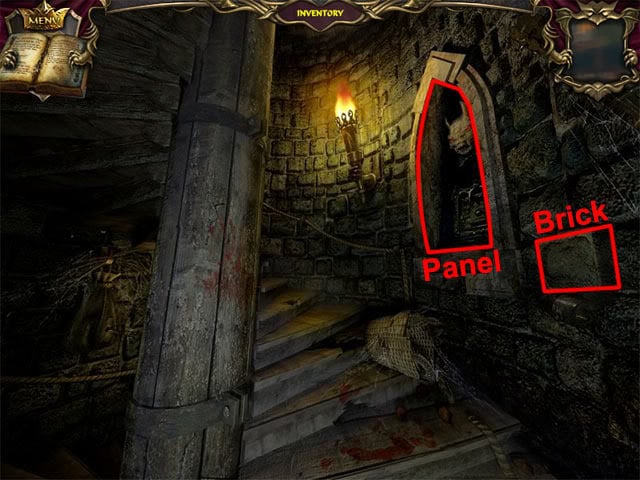
Select the brick twice and then take the key. Move upstairs to the tower.
Tower
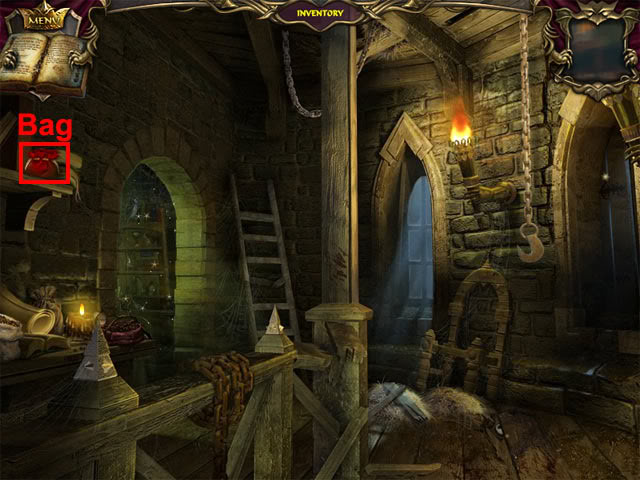
Take the empty red bag on the shelf. Go through the left doorway.
Alchemist’s Laboratory
Find hidden objects until the number 5 is listed as an item in red text:
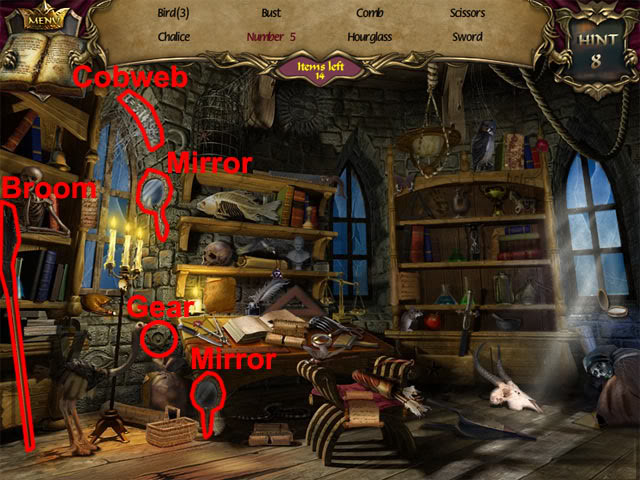
Take the broom and then select the cobweb on the arch to reveal numbers. Select the number 5. Select the two mirrors and then find the rest of the hidden objects in the room. After finding all of the listed hidden objects, a final object will need to be found. Take the gear. Move back twice to the stairway.
Stairway
Examine the panel on the wall. Use the gear on the panel. Put the weights on the correct platforms to open a door in the hall:
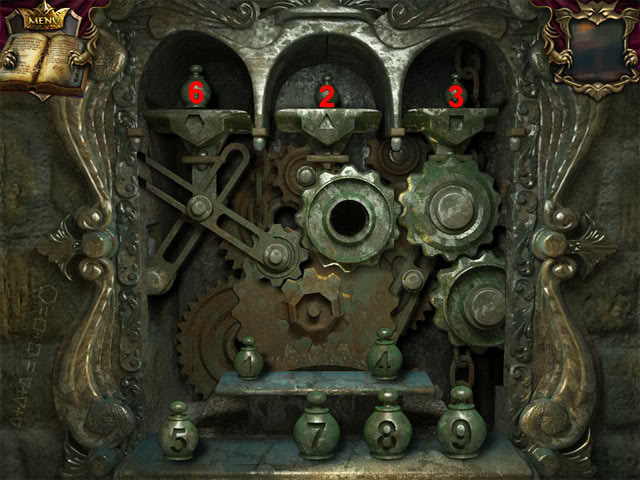
Move back twice and then go through the doorway on the right to the armory room.
Armory Room
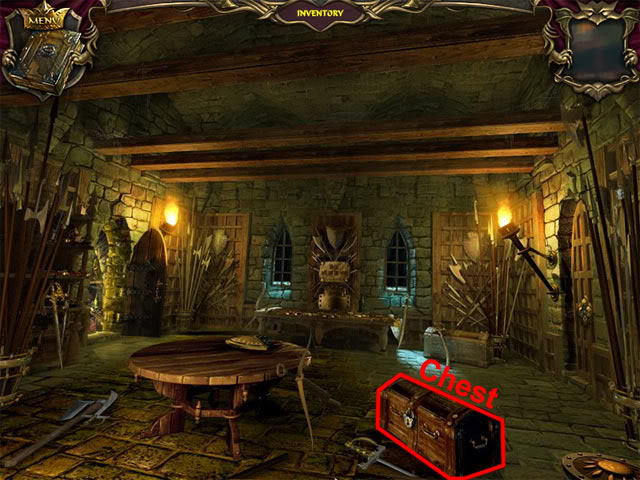
Select the chest to move the bow. Use the key on the chest to open it. Take the crowbar. Select the left doorway to enter the stock room.
Stock Room
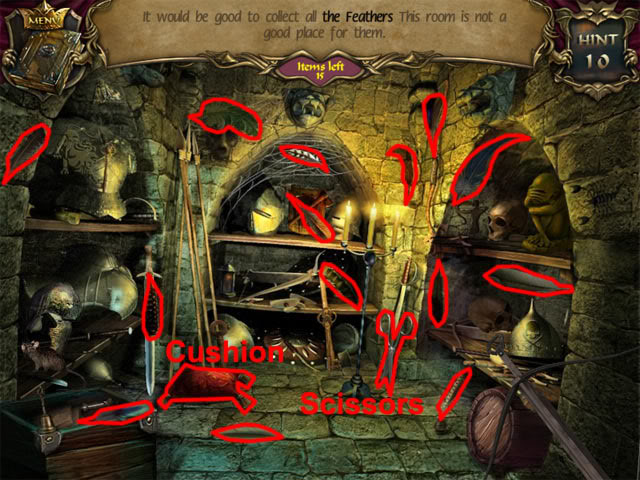
Find fourteen of the feathers. Take the scissors and use them on the red cushion to see the final feather. Take the feather. Select the matching pairs of feathers and take the remaining blue feather. Move back twice, left and forward to enter the tailor’s room.
Tailor’s Room
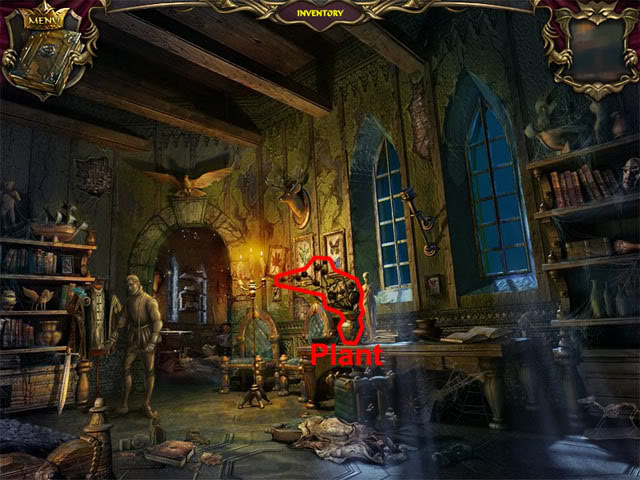
Examine the plant to see a closer view. Select the plant to shake it and seeds will fall onto the floor. Use the empty bag on the seeds and then take the bag. Select the doorway to enter the prince’s study.
Prince’s Study
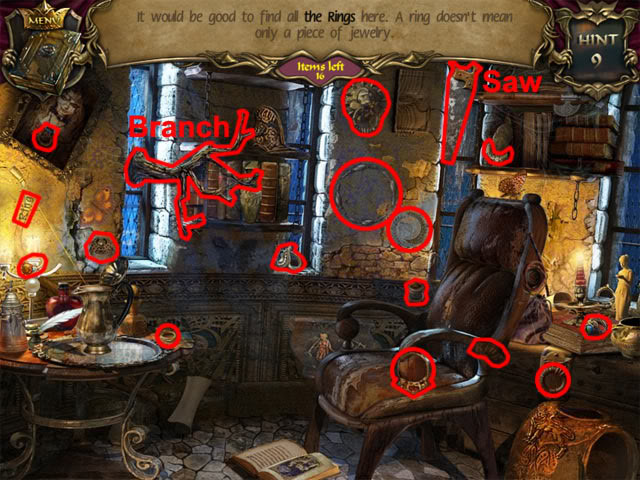
Find fifteen of the rings. Take the saw and use it on the branch to see the final ring. Take the ring. Match the pairs of rings on the tile game and then select the final tile to take the lion’s head. Move back three times, forward, left and up to the tower.
Tower
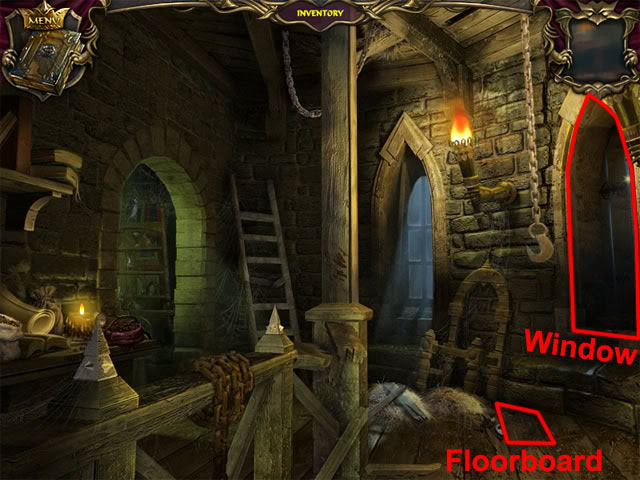
Use the crowbar on the floorboard. Take the knife from the hole. Examine the right window and use the crowbar on the lock. Take the ring. Move back twice to the hall.
Hall
Examine the door at the back of the hall. Use the lion’s head on the right slot. Select the right lion’s head. Use the ring on the left lion’s head. Select the left lion’s head to open the door. Move forward to go outside to the square.
Square
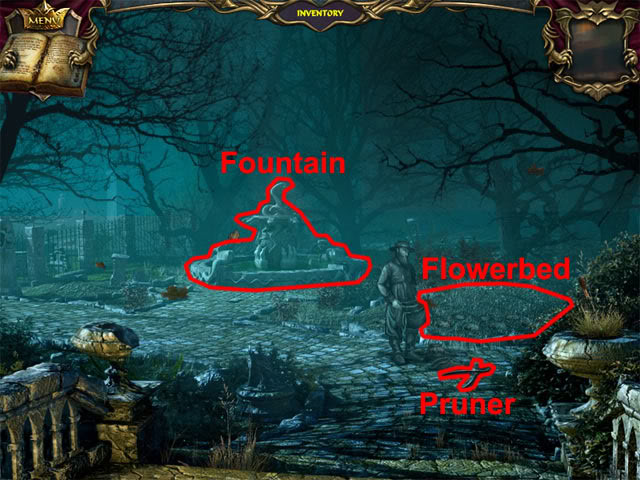
Take the garden pruner on the path. Use the bag with seeds on the flowerbed and the flowers will start to grow. Use the magic liquid on the flowers to free the gardener: He was working in the garden when the prince disappeared. Wait for the gardener to leave the square and then take the flavouring herbs on the ground. Examine the fountain.
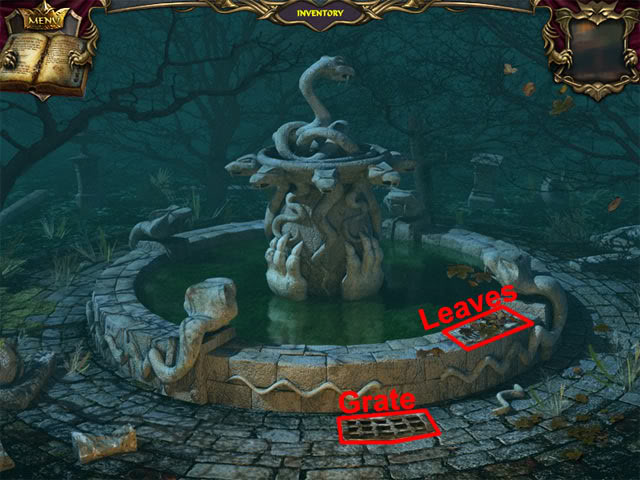
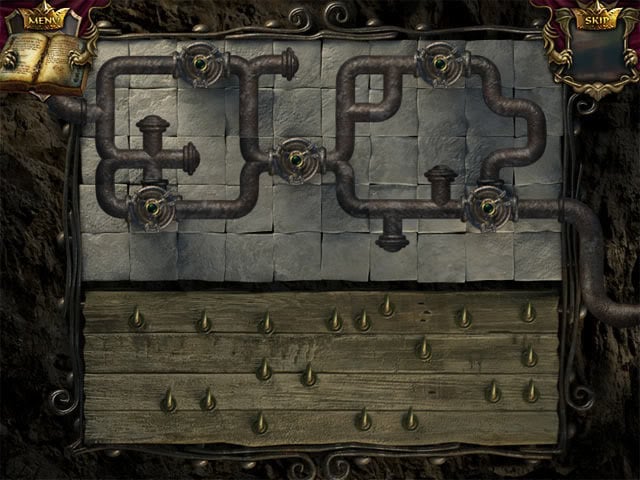
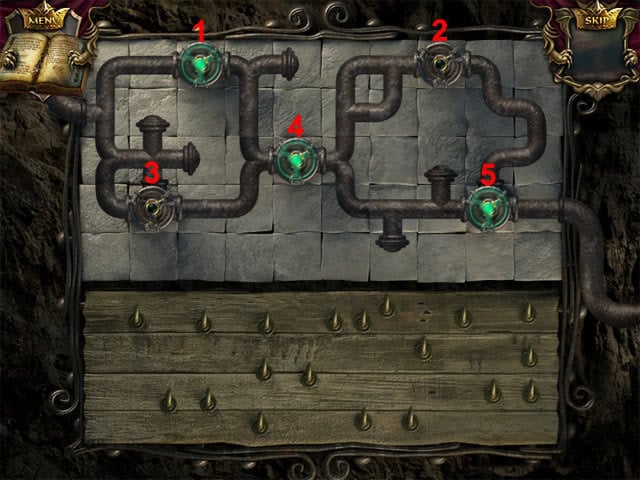
Select the leaves and then select the sign: Water defeats fire. Use the crowbar on the grate. Examine the grate. Put the pipes in the correct positions:
Press valve 5 and valve 2 to complete the puzzle:
Back away from the fountain and then move right to the backyard.
Backyard
Use the garden pruner on the bushes three times.
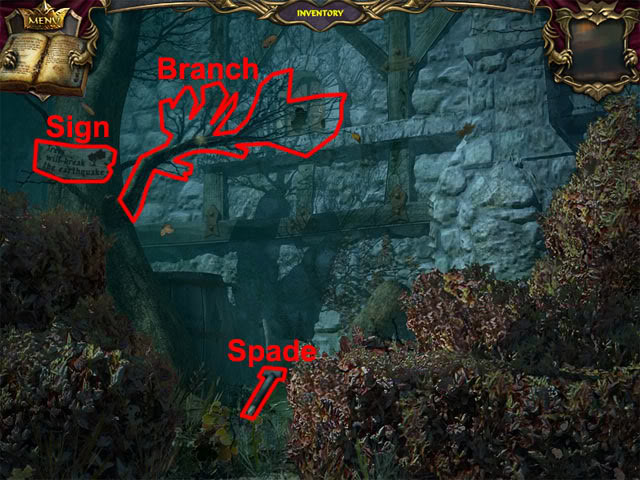
Select the spade twice and then take the spade. Select the sign to see another clue: Trees will break the earthquake. Move back and west to the alley.
Alley
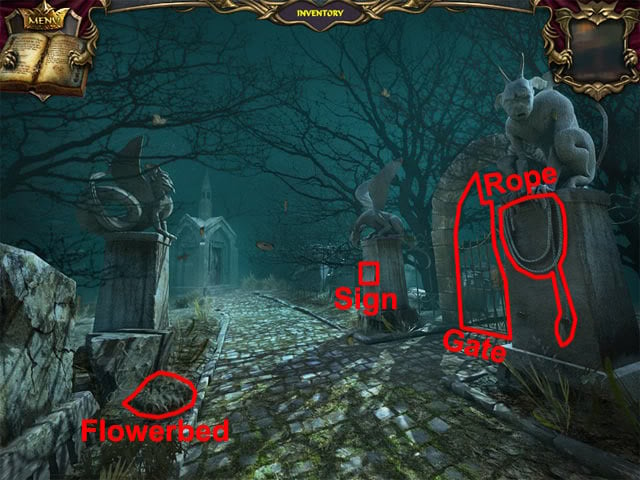
Use the spade on the flowerbed. Take the hook. Use the knife on the rope that is being held by the right gargoyle. Take the rope to make the climbing irons in the inventory. Examine the sign to see another clue: Earth will stop the water. Select the sign to move it. Take the key. Move back and right to the backyard.
Backyard
Use the climbing irons on the branch. Use the garden pruner on the branch. Use the climbing irons on the window. Select the window to enter the kitchen.
Kitchen
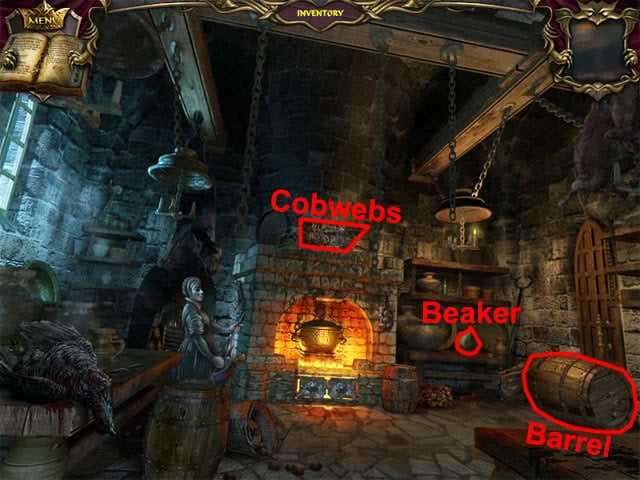
Select the cobwebs and then select the sign to see another clue: Fire destroys the metal. Take the empty beaker on the shelf. Keep clicking the barrel quickly until it rolls away from the door and stops by the smaller barrel. Move right, left, up and left to the alchemist’s laboratory.
Alchemist’s Laboratory
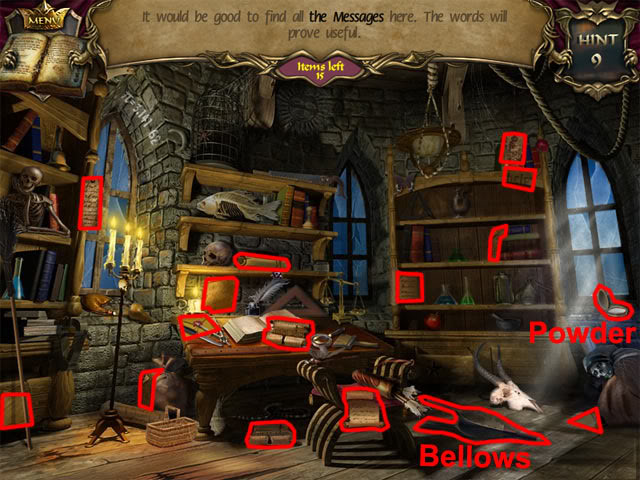
Find fourteen of the messages. Take the bellows and use them on the powder to see the final message appear on the window. Take the final message. Select all of the the matching pairs of letters and then select the remaining violet scroll. Move back four times and left twice to the princess’s room.
Princess’s Room
Use the violet scroll on the chest. Examine the chest and then use the empty beaker on the chest. Collect the red and blue elements at the same time:
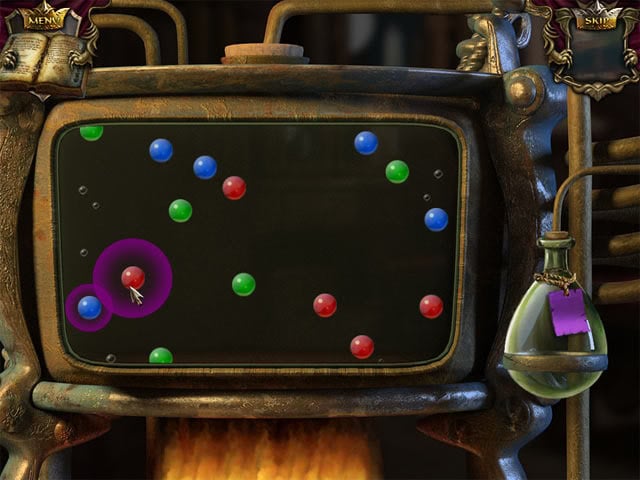
Keep collecting the red and blue elements until the beaker is full. Take the magic powder. Move back and then forward to enter the tailor’s room.
Tailor’s Room
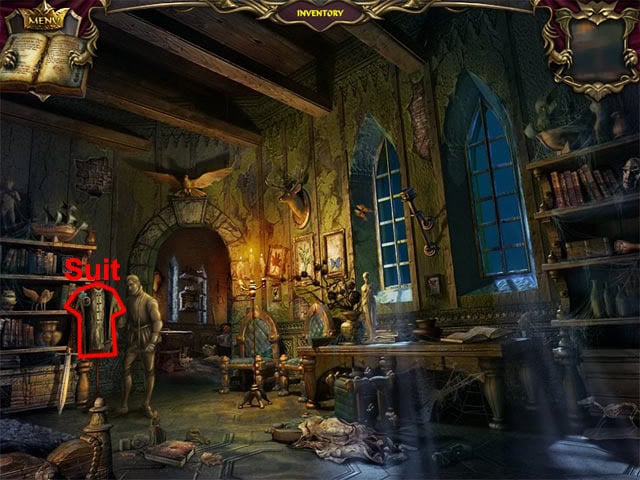
Use the feather on the court tailor’s suit. Use the magic powder on the court tailor to free him: He noticed someone behind the mirror when he entered the prince’s room. Take the mitten that the tailor left on the floor. Move back twice, forward and right to enter the kitchen.
Kitchen
Use the mitten on the cauldron. Use the flavouring herb on the cauldron to free the cook: She says that the King has a dark secret about the tower. Move forward to the wine cellar.
Wine Cellar
Find hidden objects until the glass of wine is listed as an item in red text:
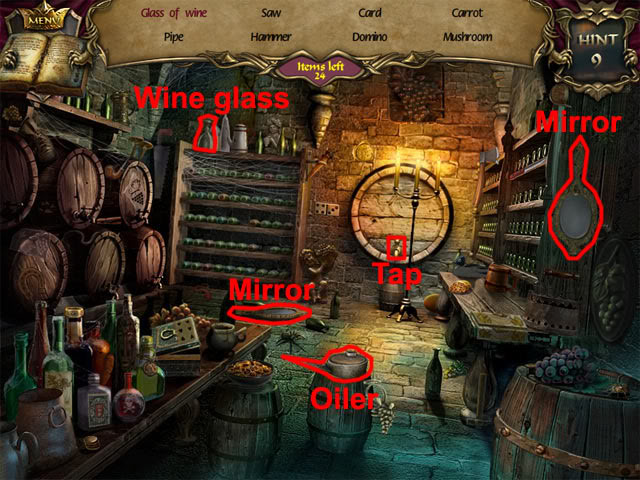
Take the wine glass and use it on the tap of the big barrel. Take the glass of wine. Select the two mirrors and then find the rest of the hidden objects in the room. After finding all of the listed hidden objects, a final object will need to be found. Take the empty oiler. Move back to the kitchen.
Kitchen
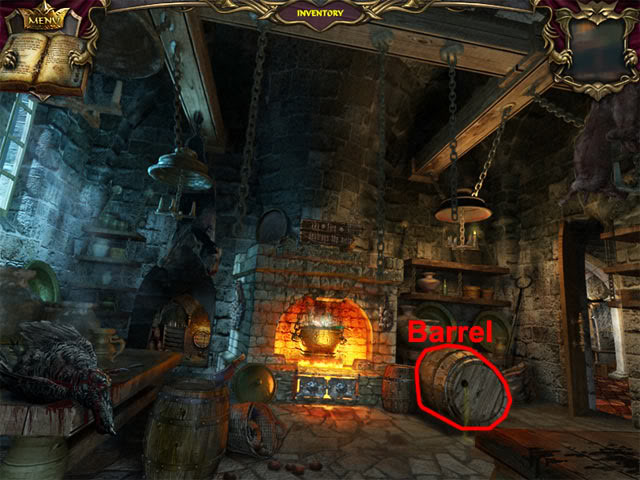
Use the empty oiler on the barrel to fill it with oil. Take the full oiler. Move right, forward and left to the alley.
Alley
Examine the gate:
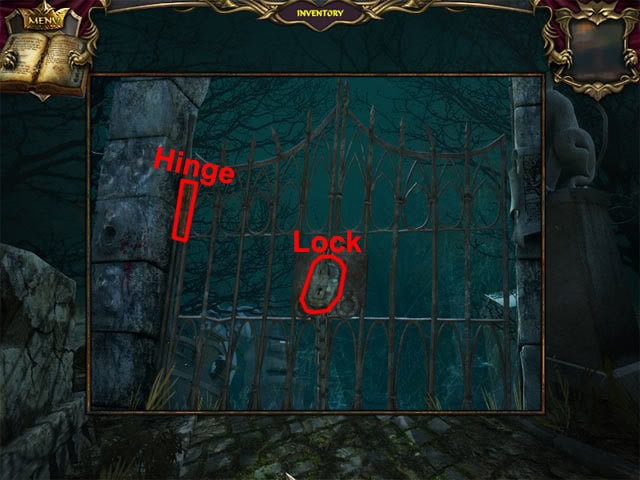
Use the gold key on the lock. Use the full oiler on the hinge to open the gate. Go right to the cemetery.
Cemetery
Find hidden objects until the smoke is listed as an item in red text:
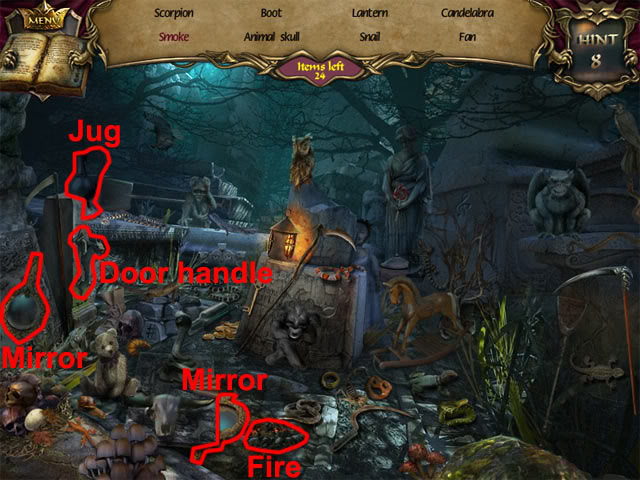
Take the water jug and use it on the fire. Select the smoke. Select the two mirrors and then find the rest of the hidden objects in the room. After finding all of the listed hidden objects, a final object will need to be found. Take the door handle. Move back twice to the square.
Square
Examine the fountain to see a symbol:
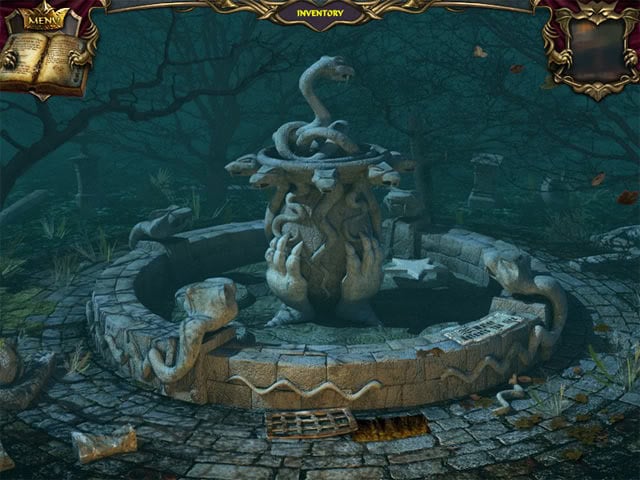
Move back twice, left and up to the tower.
Tower
Examine the right window to see three more symbols around the fountain:
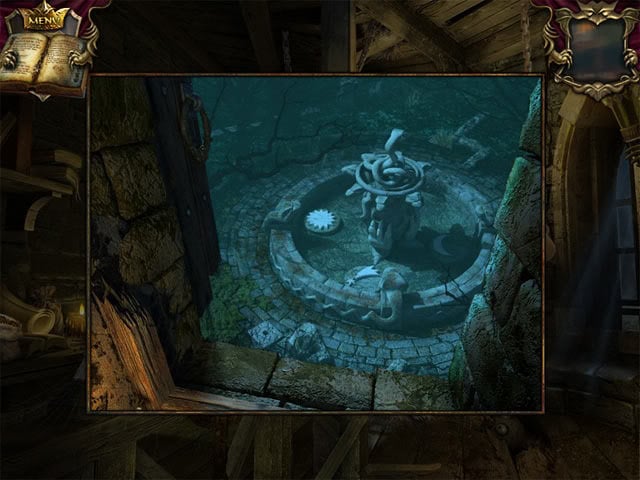
Exit the view of the window. Move back three times and right to enter the armory room.
Armory Room
Examine the door at the right side of the room. Position the symbols in the order that they were seen around the fountain:
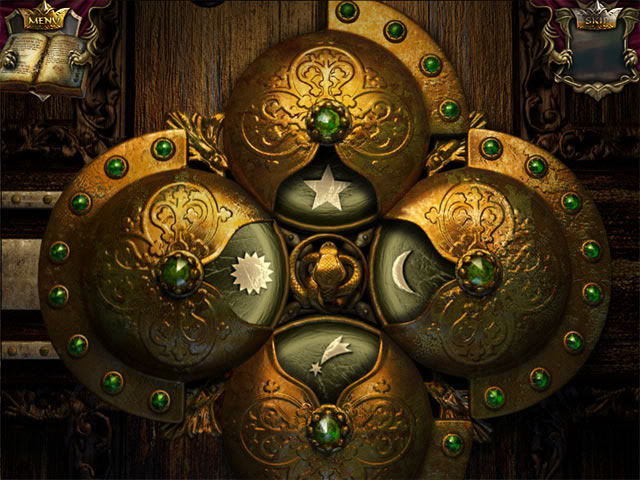
Select the right door to enter the treasure room.
Treasure Room
Find hidden objects until the letter is listed as an item in red text:
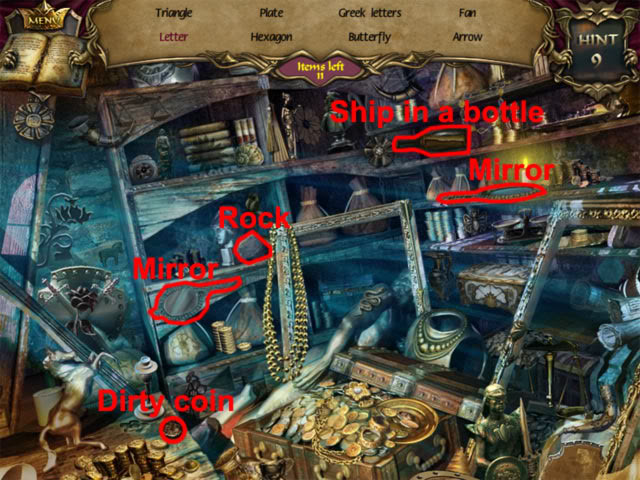
Take the stone and use it on the ship in a bottle. Take the letter from the broken bottle. Select the two mirrors and then find the rest of the hidden objects in the room. After finding all of the listed hidden objects, a final object will need to be found. Take the dirty coin and it will be automatically combined with the handkerchief in the inventory to make the clean coin. Move back twice, forward twice, left and forward to the crypt entrance.
Crypt Entrance
Use the handle on the door. Select the door and then move forward to enter the crypt.
Crypt
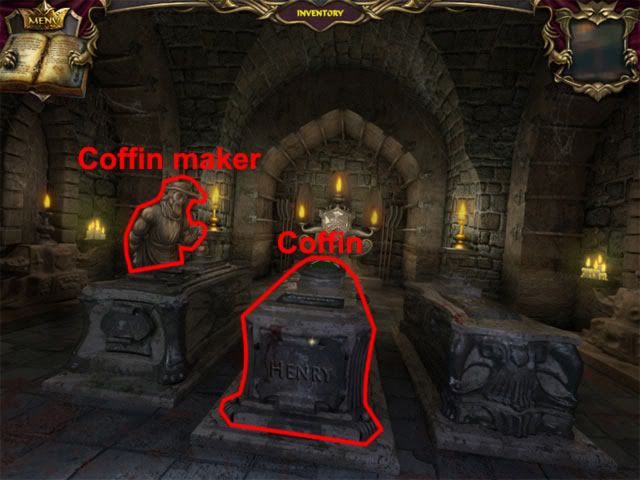
Use the clean coin on the coffin maker: He says that he followed the princess to the crypt, but when he arrived the crypt was empty except for a crystal ball. Take the crystal ball that the coffin maker leaves behind. Examine the middle coffin. Spell the name Henry by moving the letters:
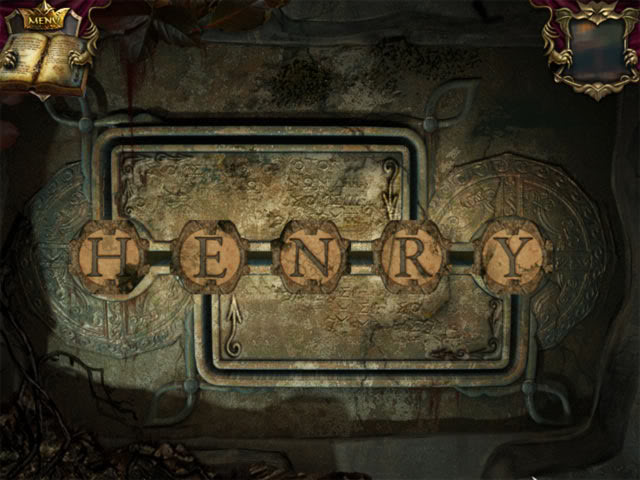
Select the coffin to go down the underground stairs.
Underground Stairway
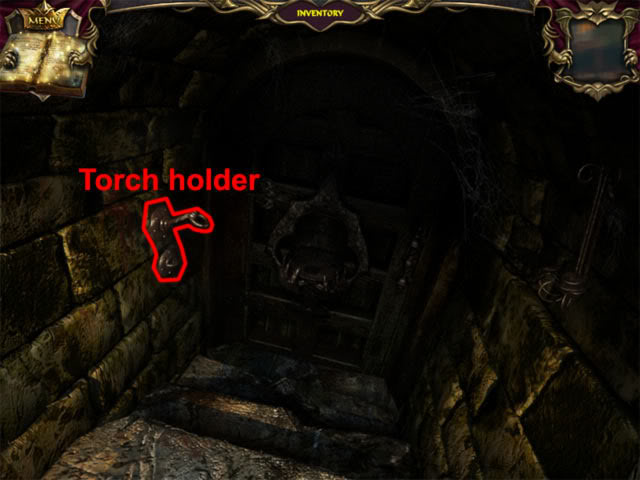
Use the torch on the torch holder. Move back three times and then go right.
Cemetery
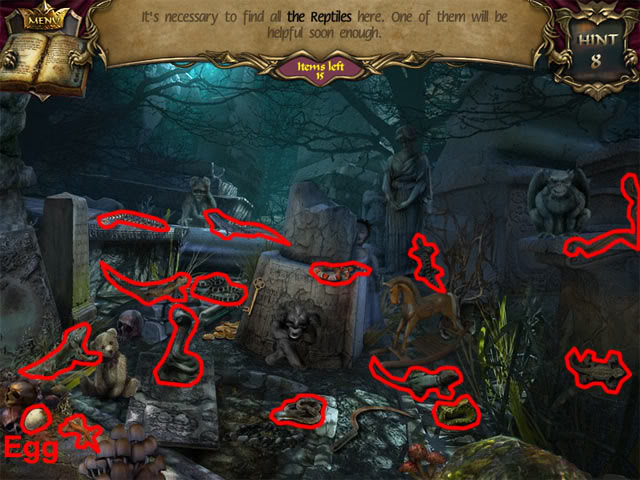
Find fourteen of the reptiles. Select the egg at the bottom-left corner of the screen three times and take the final reptile. In the matching game, you will now need to match the pairs by sound. Select a reptile to hear it hiss, and then find a reptile that makes a hiss that sounds the same. Select all of the matching pairs of reptiles and then select the remaining reptile to see the metal decoration. Take the first metal decoration. Move back three times, right and forward to the wine cellar.
Wine Cellar
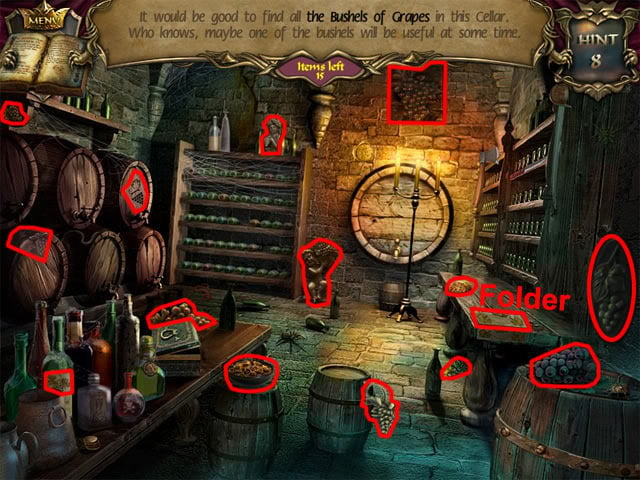
Find fourteen bushels of grapes. Select the folder on the table and take the final bushel of grapes. Select the pairs of objects that are similar to each other. Select the remaining object to take the second metal decoration. Move back, right, back and right twice to enter the treasure room.
Treasure Room
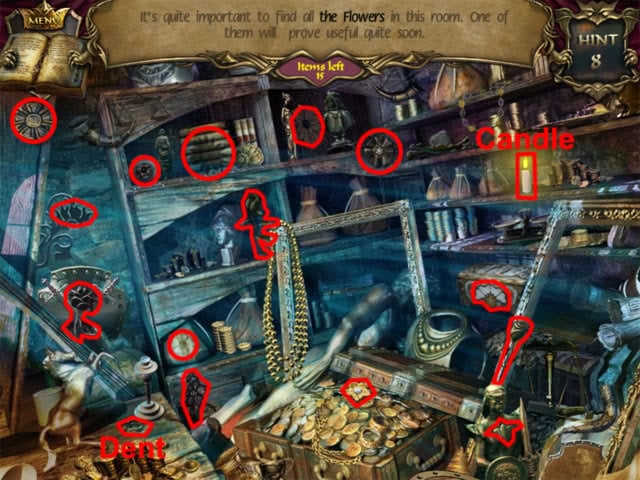
Find fourteen flowers. Select the candle and then select the flower-shaped dent on the table. Take the final flower. Select the matching pairs of flowers by listening to the sounds that they make. Select the remaining object to take the third metal decoration. Move back twice, left twice and forward to enter the princess’s room.
Princess’ room
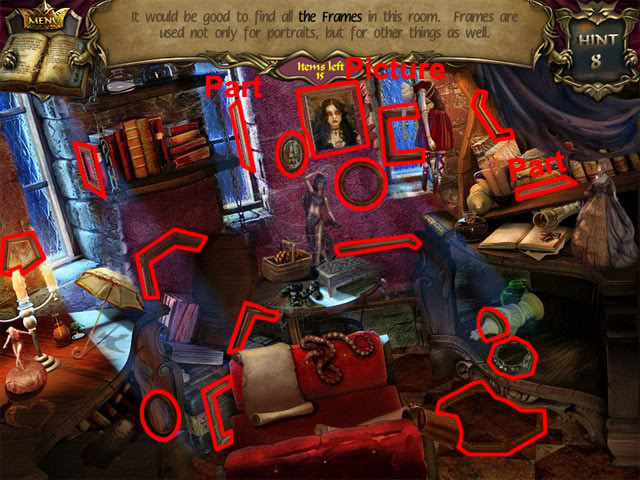
Find fourteen frames. Select the two parts of the frame and use them on the picture. Select the final frame. Select the similar pairs of frames and then select the remaining object to take the special frame. Move back three times, forward twice, left and forward twice to return to the crypt.
Crypt
Select the middle coffin to enter the underground stairway.
Underground Stairway
Use the three metal decorations on the door, special frame and crystal ball on the door. Move forward to enter the mysterious room.
Mysterious Room
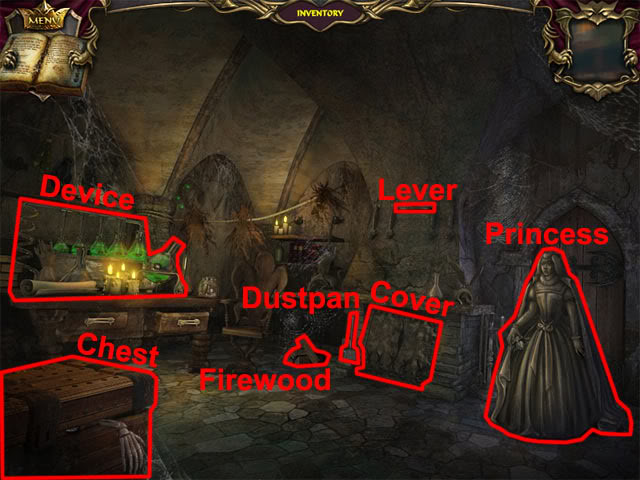
Open the chest and take the flint. Take the firewood and the dustpan. Remove the fireplace cover. Use the firewood and the flint on the fireplace. Move the lever above the fireplace. Wait for the fire to burn out, and then use the dustpan on the fireplace. Take the dustpan with coals. Examine the device on the table at the left side of the room. Use the dustpan with coals on the slot below the bottles. The aim now is to arrange the flowers in the bottles from lightest to heaviest. The correct order is shown below:
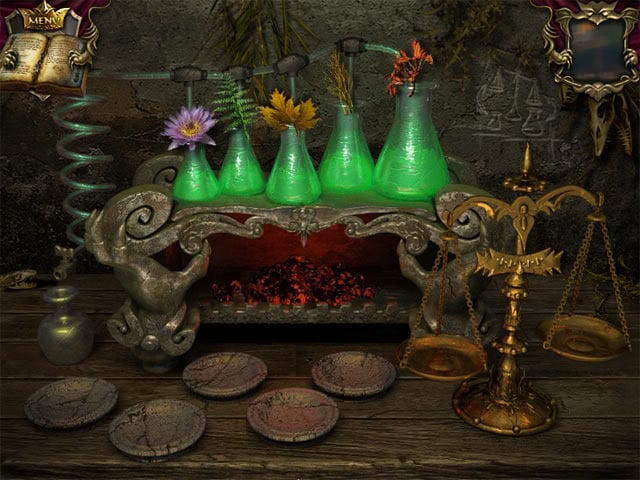
Take the bottle of magic potion. Use the magic potion on the princess: She says that her father’s second wife had not died, but was actually exposed as a witch. Take the amulet on the floor. Go through the doorway.
Gargoyle Room
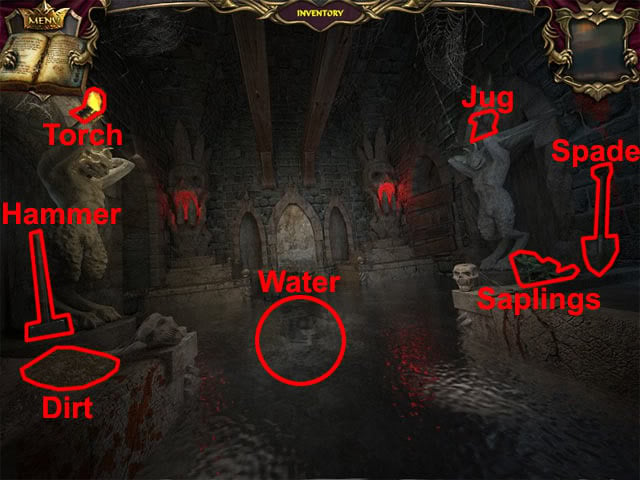
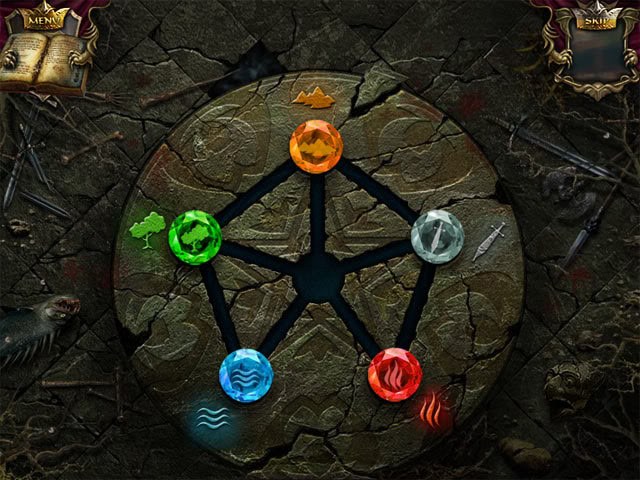
Take the hammer, torch, jug, saplings and spade. Use the spade on the dirt. Select the spade with the dirt on it and then use the spade on the the water. Take the blue gem held by the left gargoyle. Use the saplings on the dirt in the middle of the room and take the orange gem.
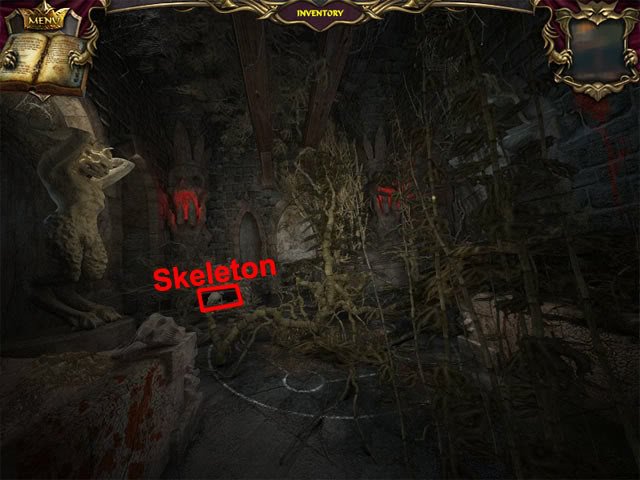
Use the hammer on the skeleton. Take the machete. Use the machete on the tree and then take the green gem. Use the burning torch on the room and then take the white gem. Use the jug on the barrel of water:
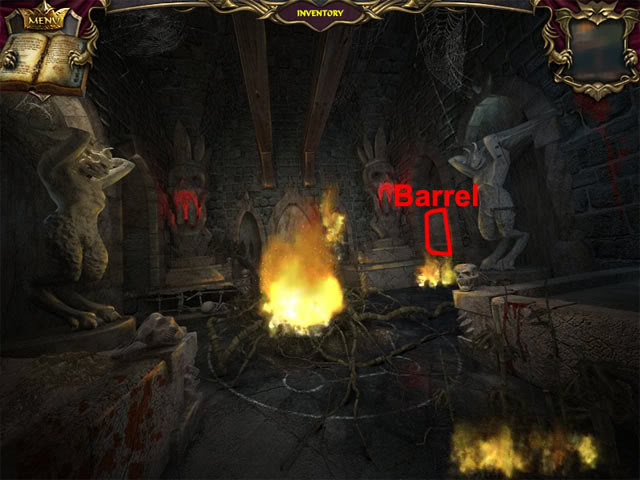
Take the red gem. Examine the floor and put all five gems on the slots in any order that you like. The aim now is to move the gems to the correct places, so the green gem will be next to the green tree symbol, the blue gem will be near the blue gem symbol, and so on. One way of completing the puzzle is shown below:
Examine the door. Use the amulet on the door to complete the game.
“;
More articles...
Monopoly GO! Free Rolls – Links For Free Dice
By Glen Fox
Wondering how to get Monopoly GO! free rolls? Well, you’ve come to the right place. In this guide, we provide you with a bunch of tips and tricks to get some free rolls for the hit new mobile game. We’ll …Best Roblox Horror Games to Play Right Now – Updated Weekly
By Adele Wilson
Our Best Roblox Horror Games guide features the scariest and most creative experiences to play right now on the platform!The BEST Roblox Games of The Week – Games You Need To Play!
By Sho Roberts
Our feature shares our pick for the Best Roblox Games of the week! With our feature, we guarantee you'll find something new to play!All Grades in Type Soul – Each Race Explained
By Adele Wilson
Our All Grades in Type Soul guide lists every grade in the game for all races, including how to increase your grade quickly!


