
Best Horror Games On Itch.io – July 2026
Across a bounty of subgenres.
Grow A Garden 2 Base Price List
What's the most valuable crop?![Evomon Best Starter [Leafbun, Blazpup, or Bubble?]](/wp-content/uploads/2026/06/evomon-best-starter.jpg "Evomon Best Starter [Leafbun, Blazpup, or Bubble?]")
Evomon Best Starter [Leafbun, Blazpup, or Bubble?]
Grass-type, Fire-type, or Water-type?
![[Roblox] Evomon Shiny Hunting Guide – Including Prismatic and Pris Shinies!](/wp-content/uploads/2026/06/evomon-shiny-hunting-guide.jpg "[Roblox] Evomon Shiny Hunting Guide – Including Prismatic and Pris Shinies!")
Echo: Secret of the Lost Cavern Tips Walkthrough
Check out our walkthrough for Echo: Secret of the Lost Cavern. CONTROLS When you scroll over something that you can pick up, the mouse cursor changes to a hand icon. When you scroll over an area that can be walked to, the mouse cursor changes to an arrow pointing forward and moving. When you scroll over an area that can be examined, the mouse cursor changes to a primitive-looking magnifying glass. When the icon changes to two stones rubbing together, it indicates that you can interact wit…


- Prefer Gamezebo on Google

a:1:i:0;a:2:s:13:”section_title”;s:36:”Echo: Secret of the Lost Cavern Tips”;s:12:”section_body”;s:71997:”Check out our walkthrough for Echo: Secret of the Lost Cavern.
CONTROLS
- When you scroll over something that you can pick up, the mouse cursor changes to a hand icon.
- When you scroll over an area that can be walked to, the mouse cursor changes to an arrow pointing forward and moving.
- When you scroll over an area that can be examined, the mouse cursor changes to a primitive-looking magnifying glass.
- When the icon changes to two stones rubbing together, it indicates that you can interact with that part of the environment in some way.
- If the icon shows two stones with a line through it, it means you can interact with the environment, but not at that particular time. Usually it means you need to have a certain inventory item selected before you click on it.
INVENTORY
- You can toggle the inventory menu on and off by clicking the right mouse button.
- You can’t always move if the inventory menu is open. If you seem stuck in one spot, remember to click the right mouse button to close the inventory so that you can move again.
- Sometimes you can use an item from your inventory simply by selecting it, then clicking on the object in the environment you want to interact with. Other times, when you click on an inventory object, it appears in the upper left corner of your screen. This means you’re holding it. You won’t be able to click on anything else until you de-select the item by right-clicking.
SAVING THE GAME
- To save the game, press the Escape (Esc) key to bring up the menu, then select "Save the game."
- You can create as many save games as you want, so remember to save often. It’s a good idea to save before attempting any of the puzzles, because there’s no way to reset the puzzle. If you want to take a fresh try at the puzzle from the beginning, it’s easier to just load your game from the beginning.
- To load a previous saved game, hit "Esc" and select the Load option.
THE DATABASE AND AROK’S DIARY
- You can access the database either through the Main Menu, or by opening up the inventory tab and clicking on the orange shell icon. The database contains all of the lore and techniques that Arok has learned so far, and you’ll find clues here about how to build various tools.
- Arok’s diary is accessed by clicking the hand icon in the inventory tab. If you’re not sure about what to do next, read it for guidance.
CRAFTING
- Throughout the game you’ll come across several large, flat slabs of rock with tools on them. These serve as workbenches for you to craft various items like spears and waterskins.
- To use the workbench, approach it, and place the materials you want to work with on it from your inventory. You can pick up the tools and use them on the materials, but the tools can’t actually be added to your inventory (you’ll have to put them back when you’re finished).
WALKTHROUGH
THE FIRST CAVE
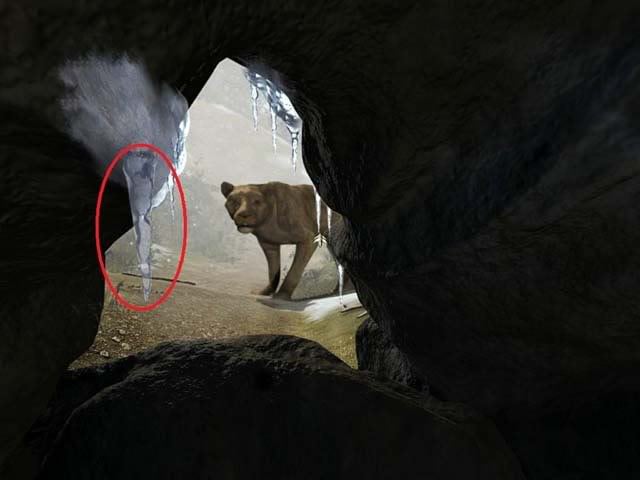
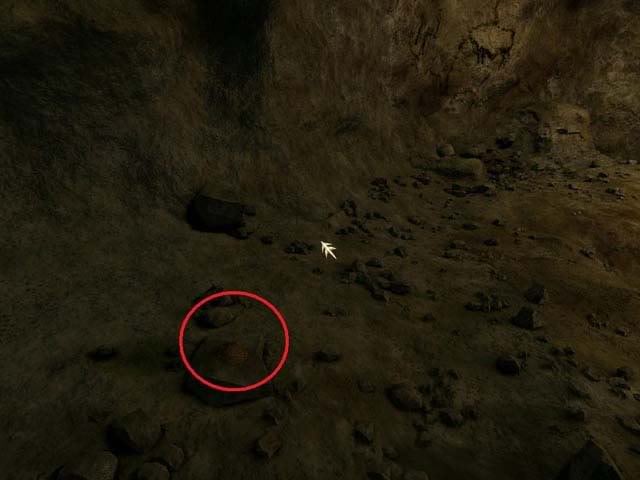
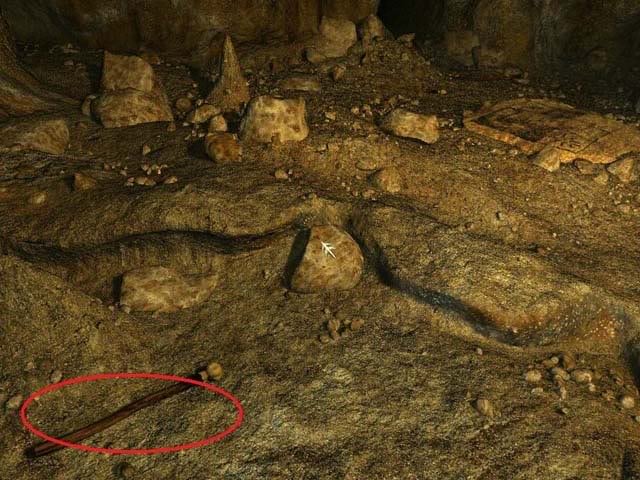
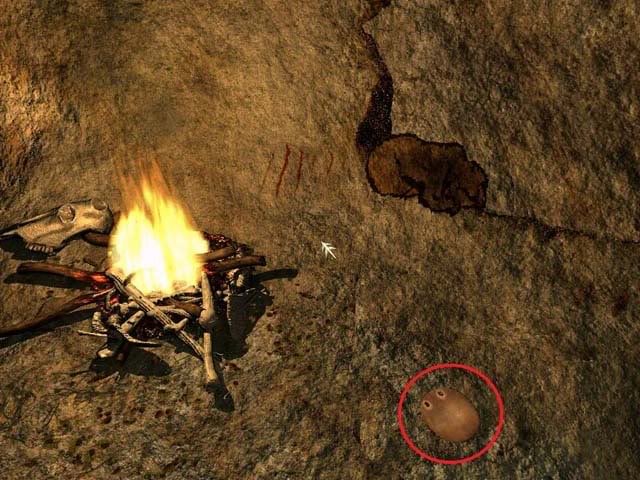
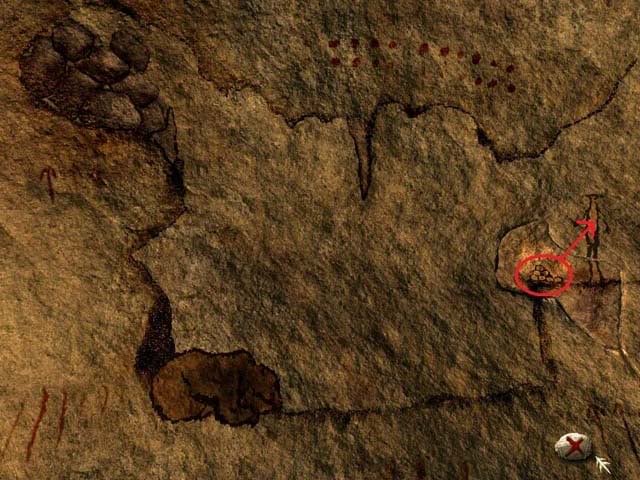
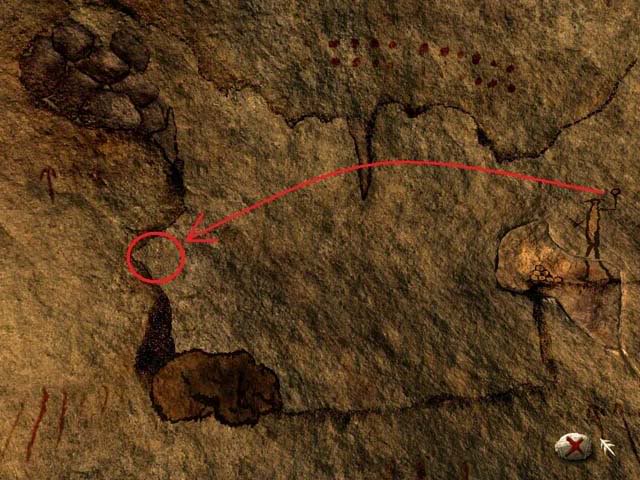
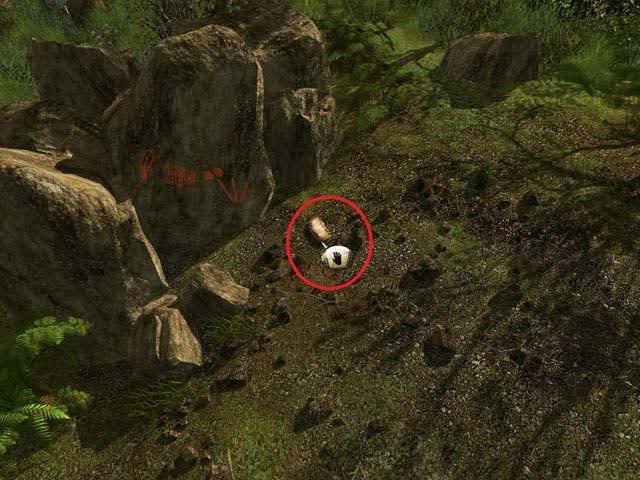
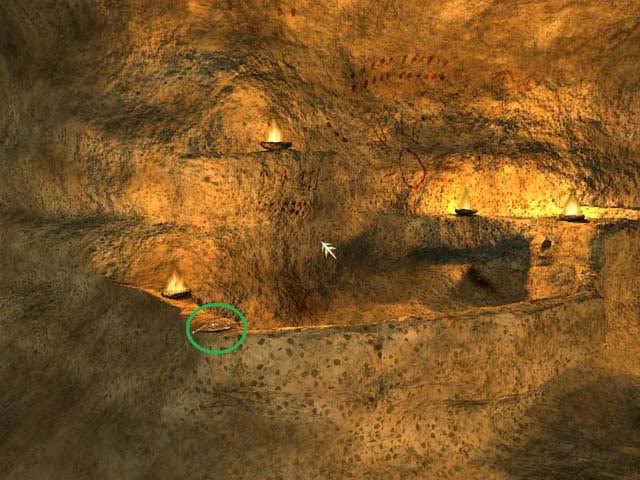
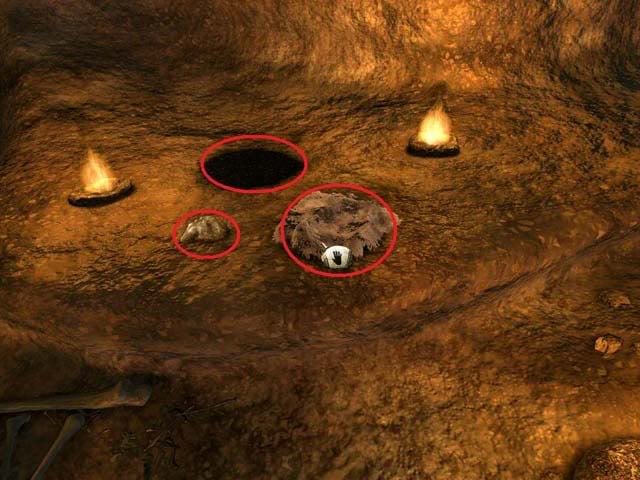
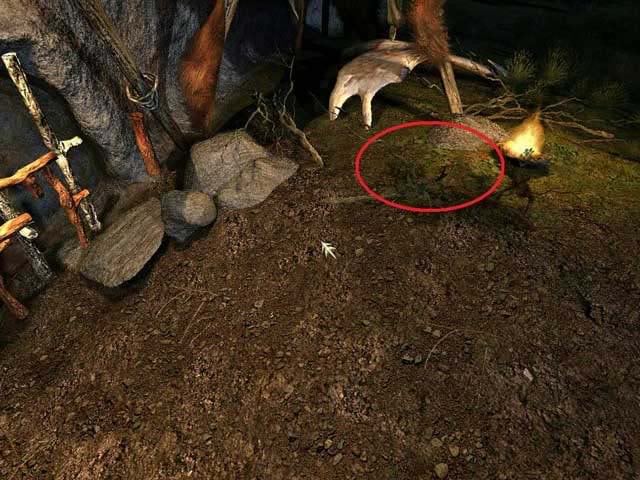
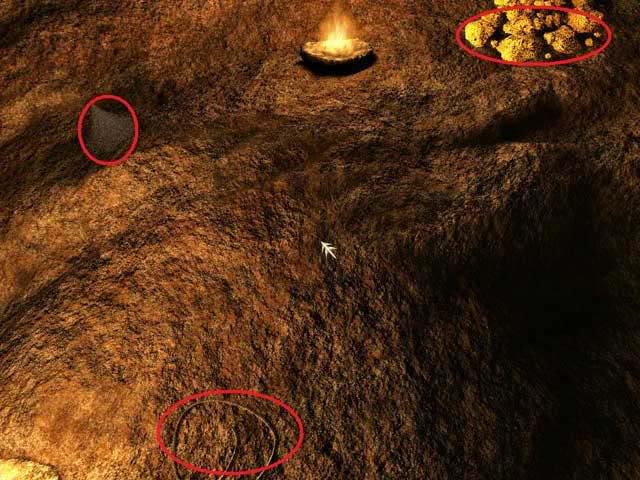
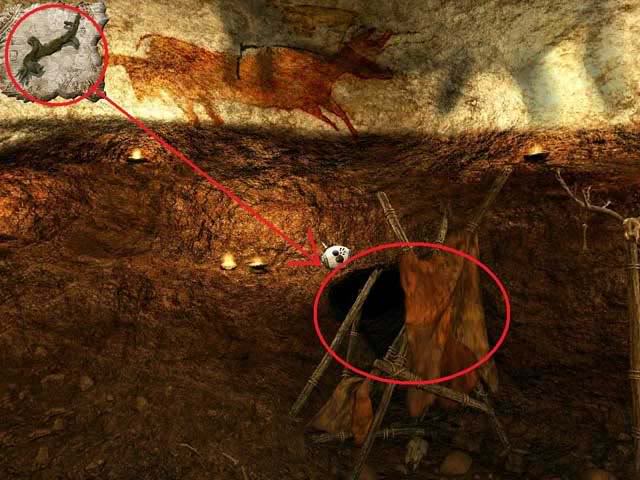
- After the opening cutscene has ended, you’ll find yourself in a cave. Look down from where you’re standing, and pick up the BUNDLE OF FIREWOOD from the ground.
- Swivel around and look back at the cave entrance. You’re not going anywhere until you can figure out a way to scare off the lion. Pick up the PIECE OF ICE.

- While facing the entrance, scroll down to the floor and pick up the PIECE OF HARDWOOD.
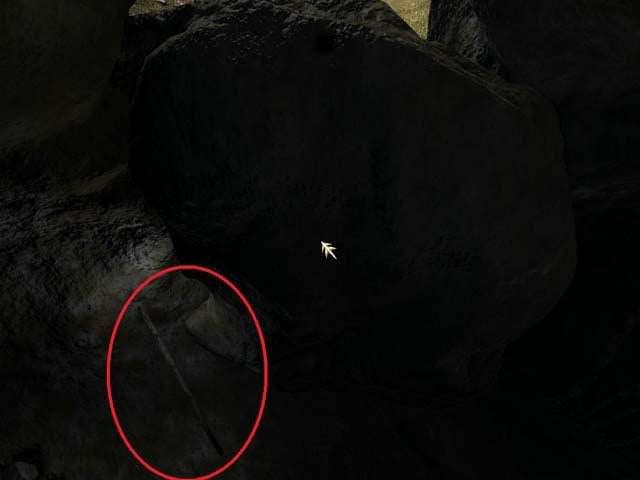
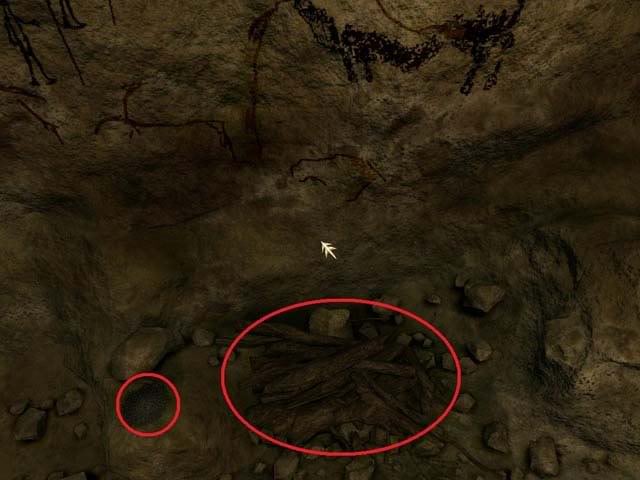
- Turn back around and take a step deeper into the cave, towards the firepit.
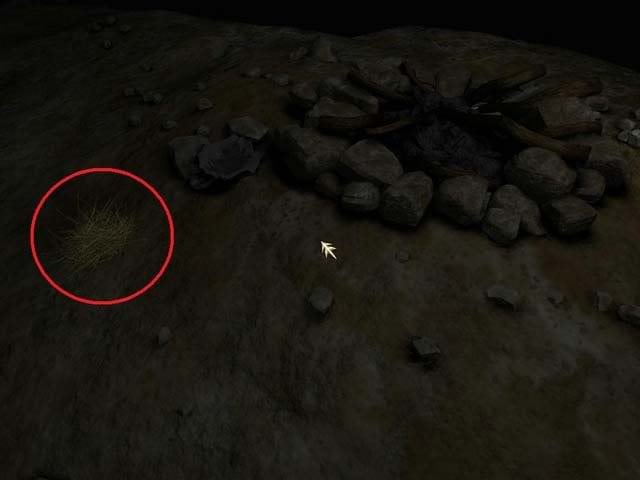
- Pick up the DRY GRASS near the firepit.
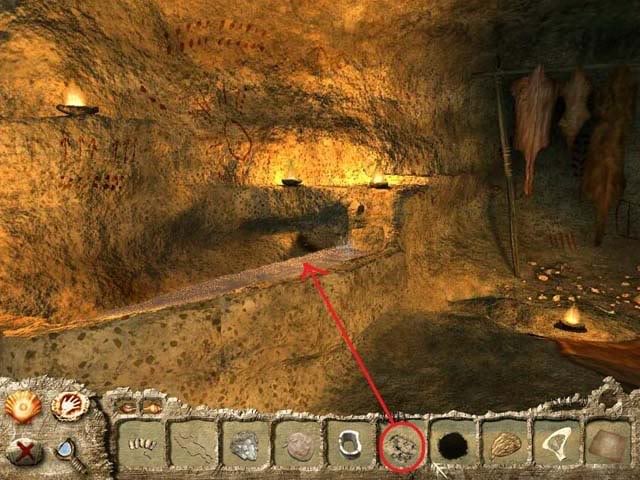
- Search the ground to the right of the firepit and pick up the PIECE OF SOFTWOOD.
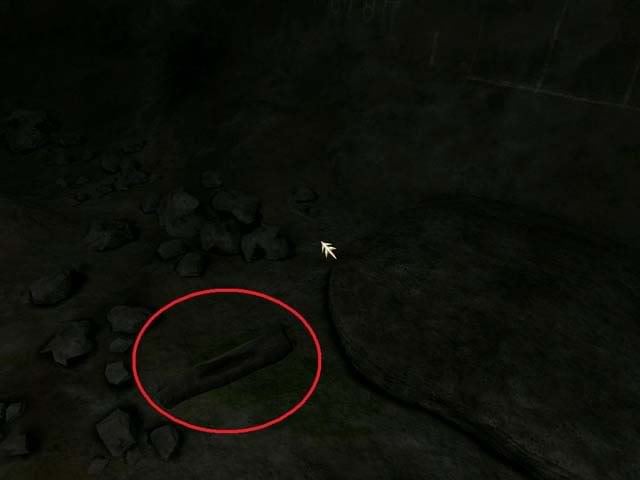
Making the fire:
- Put the DRY GRASS, BUNDLE OF FIREWOOD, PIECE OF HARDWOOD, and PIECE OF SOFTWOOD on the firepit and watch the cutscene as Arok starts a fire. That’s better!
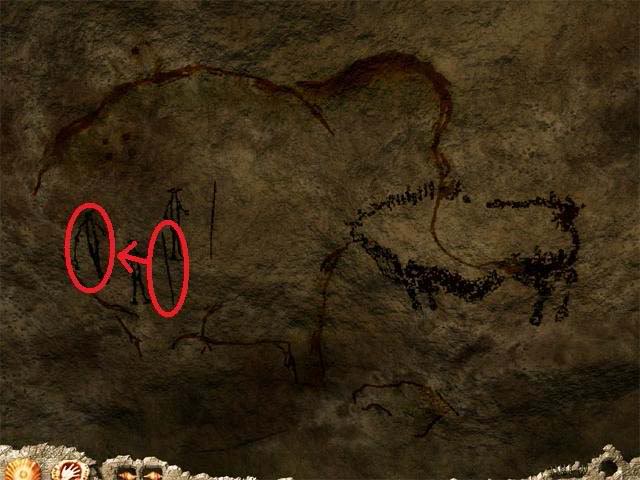
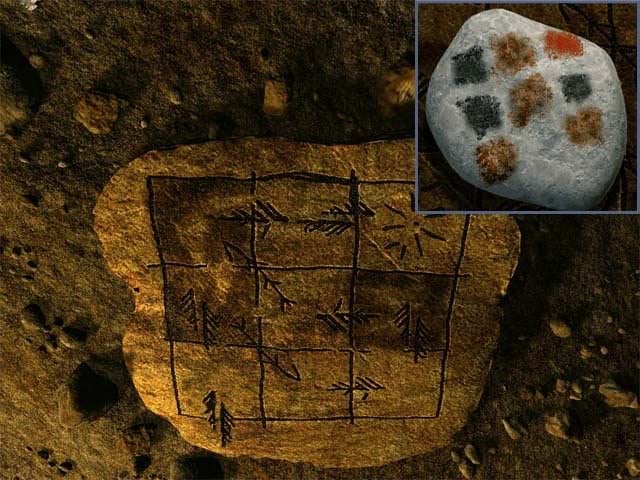
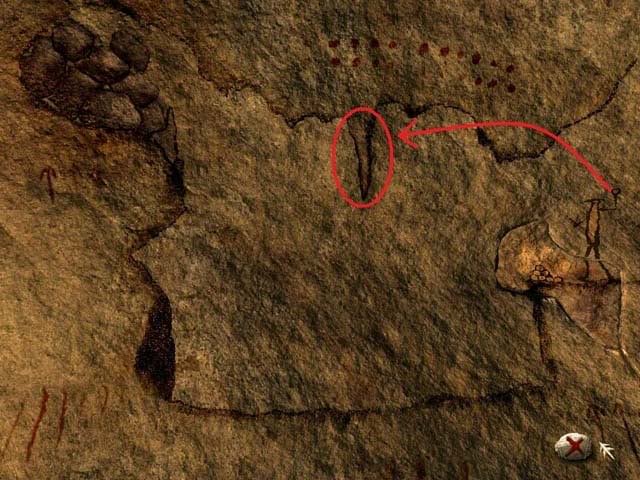
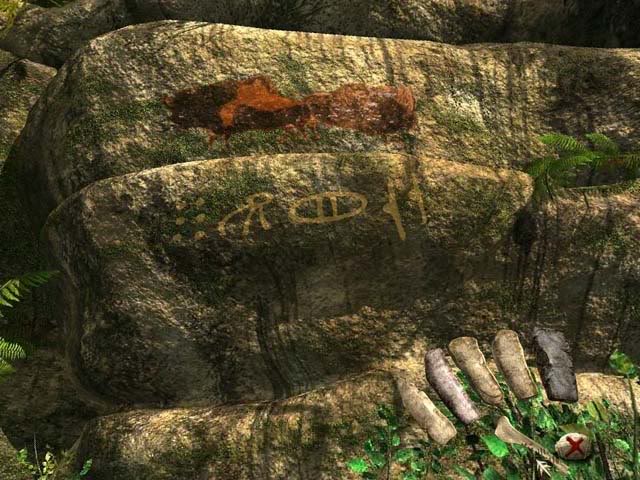
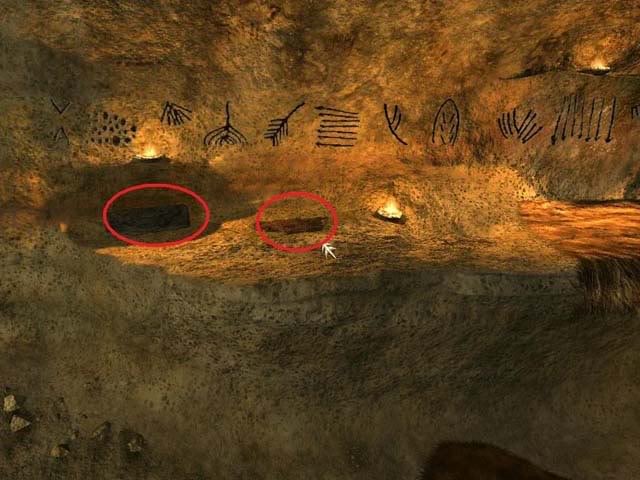
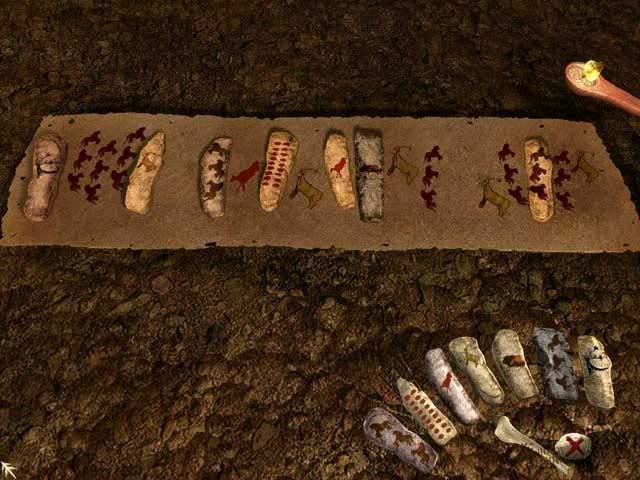
- Now that we have some light, look around at the paintings on the walls of the cave. When you reach a painting of colored squares, click on them when the cursor changes shape.
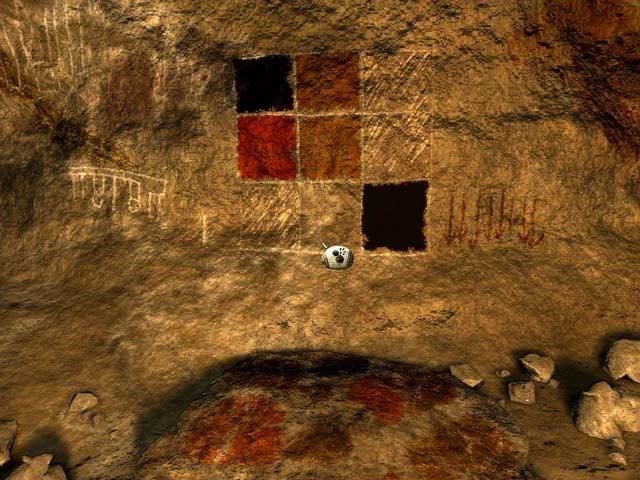
- After the cutscene, check your inventory to see that KLEM’S PAINTED STONE has been added.
Klem’s signature:
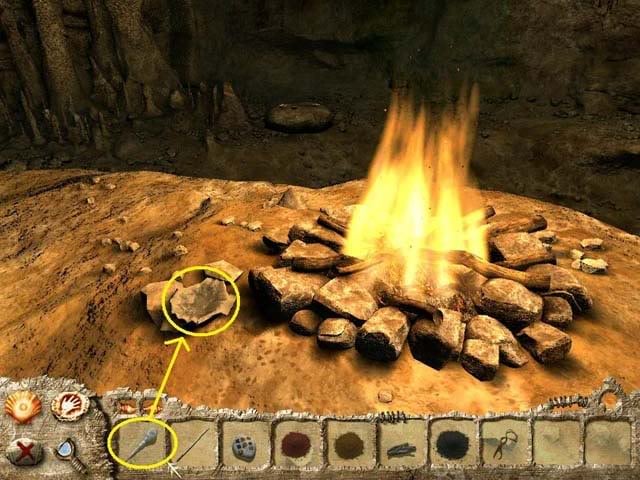
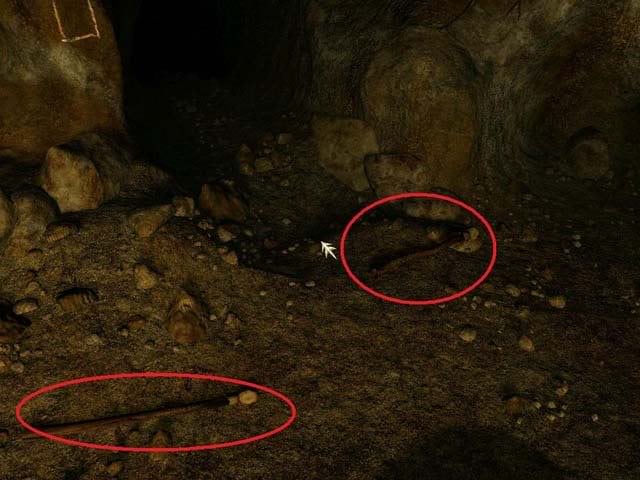
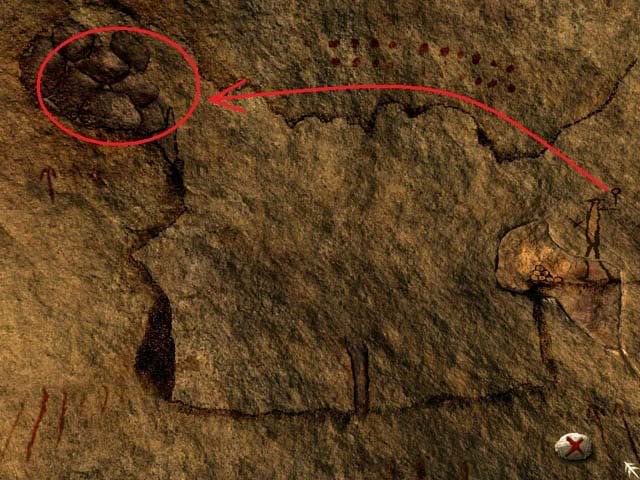
- Look at the floor to the right of Klem’s signature and pick up the RED PIGMENT.
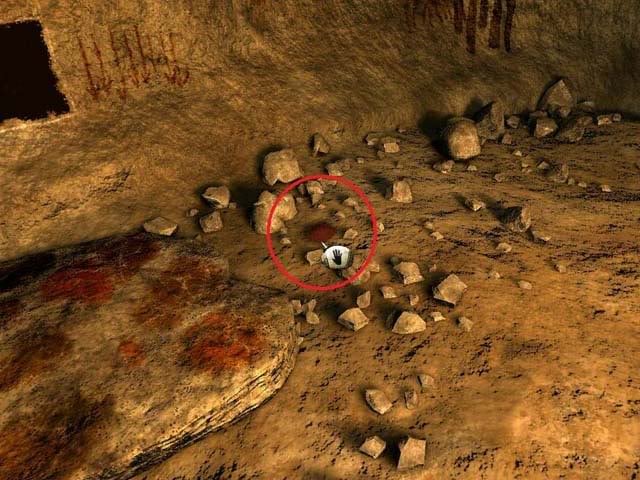
- Walk past the fire deeper into the cave and pick up the BROWN PIGMENT on the floor.
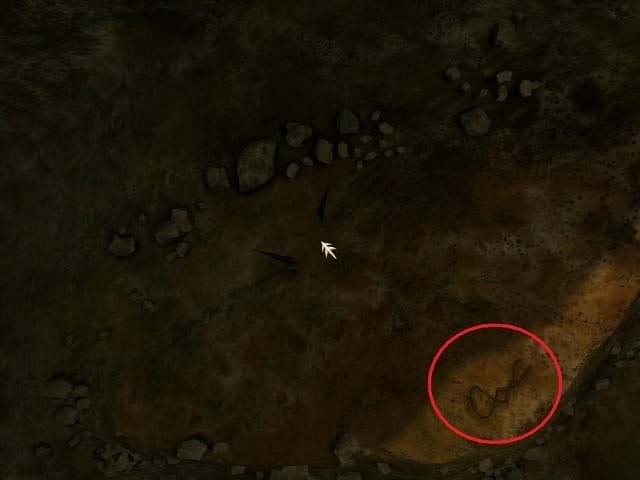
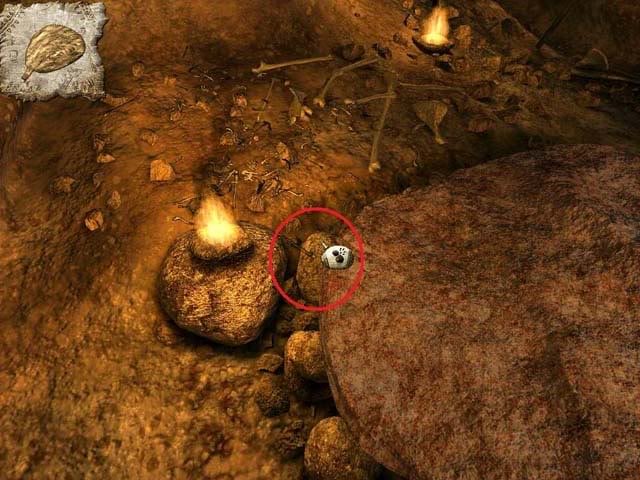
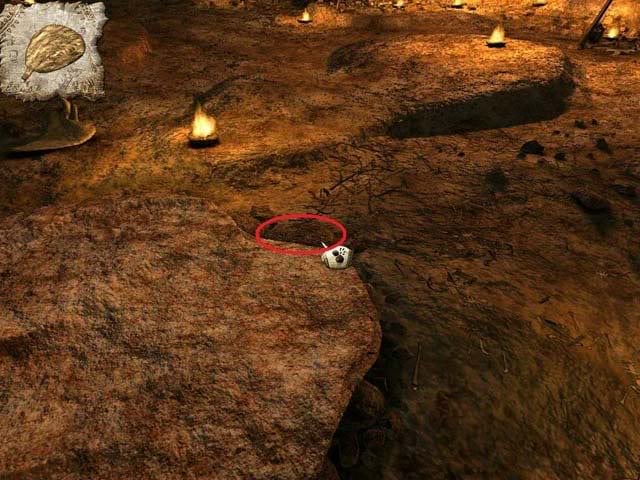
- Walk along the edge of the cave until you’re at the cave painting of the large brown beast with three hunters painted in black. On the floor in front of the painting you’ll see the BLACK PIGMENT and some BRANCHES. Take them.
- From the screen with the buffalo, take one step towards the fire, look down, and pick up the SMALL STRAP from the ground.

- Go back to the Klem’s colored squares painting, and place the three PIGMENTS on the palette below.
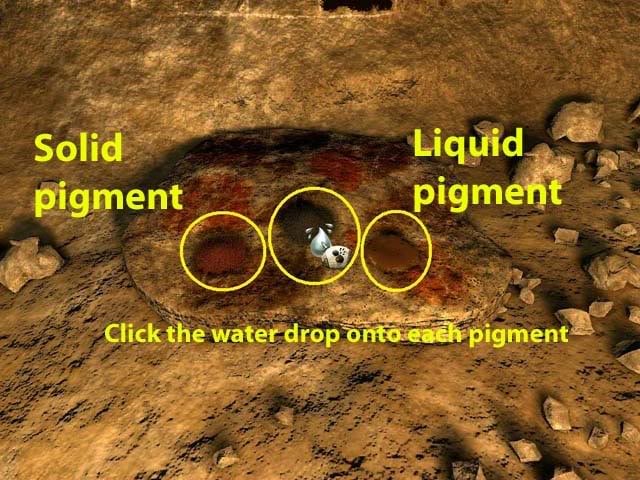
- Swivel around so you’re facing the fire, and use the PIECE OF ICE on the small dish left of the firepit to melt it.
- Touch the water to pick up a DROP OF WATER. Turn around to face the pigments, and click the drop of water on the pigment to turn it into liquid. Do this two more times until all three pigments are liquid.
- You have to paint the squares on the wall so that the colors match Klem’s painted stone. Use the screenshot below to compare the painting with the stone to see what you need to change.

Paint the squares in the following order:
- Top row, from left to right: Black, Brown, Red
- Middle row, from left to right: Black, Brown, Black
- Bottom row, from left to right: Brown, [leave blank], Brown
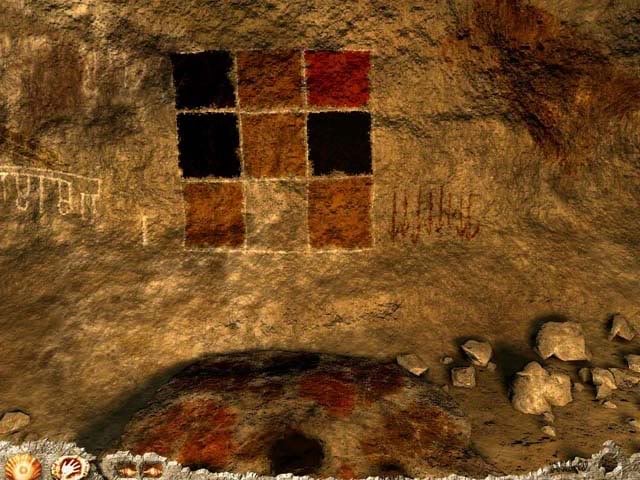
- Watch the cutscene.
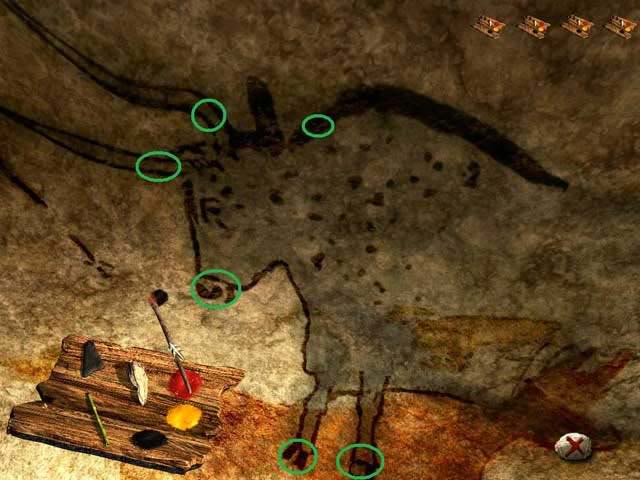
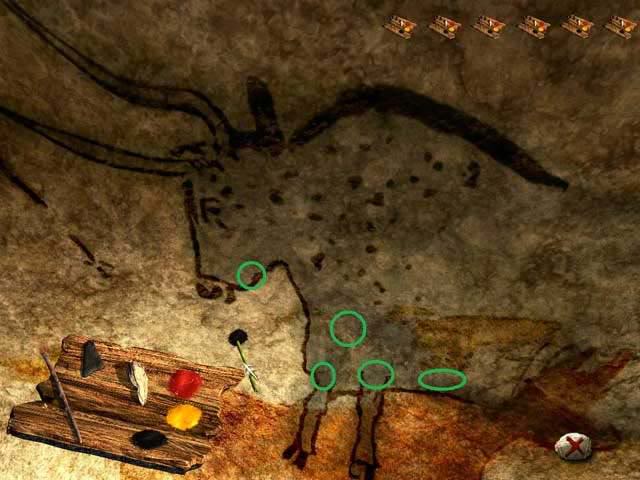
3 Hunters and buffalo painting:
- Go back to the panting with the buffalo and three hunters (where you found the Black pigment). Examine the painting closely. If you click on any of the hunters, or the buffalo, you’ll see an animation. You have to help the hunters kill the buffalo.
- Pick up one of the spears next to either of the two rightmost hunters, and give it to the hunter at the back (the one that looks like he’s holding a sling). Now click on the buffalo, and your spearthrower will take him down.
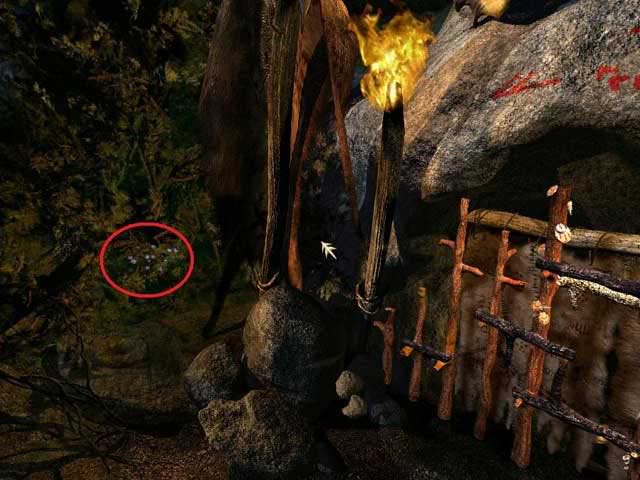
Scaring away the lion:
- Go back to the fire. Use the BRANCHES on the fire to light the branches on fire. An icon of burning branches will appear in the upper right corner of the screen.
- With the icon still active, walk back to the cave entrance and click on the lion to scare it away with the fire. Note: Do not open your inventory at this time, or the burning branches icon will disappear. If this happens, you’ll have to light the branch over again.
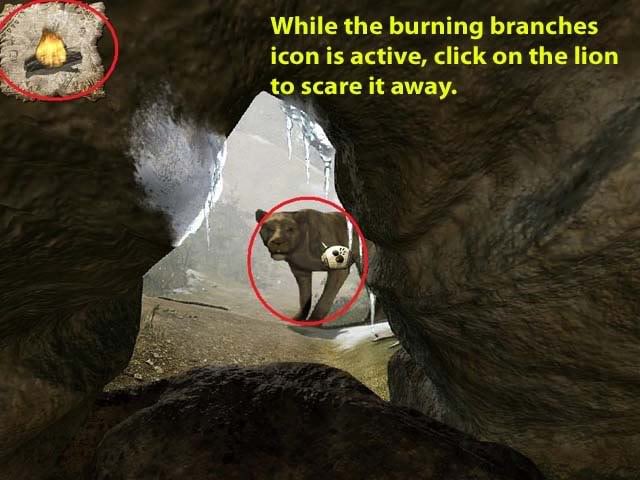
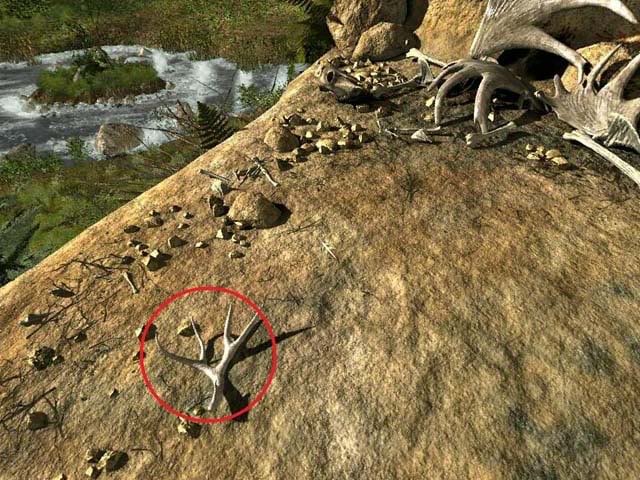
- After the lion runs away, go outside and take the ASSEGAI and DEER ANTLERS lying on the ground.

Making the spear:
- Go back inside the cave and approach the flat slab workbench at the back of the cave. You’ll see three tools sitting on it. Place the DEER ANTLERS on the workbench.
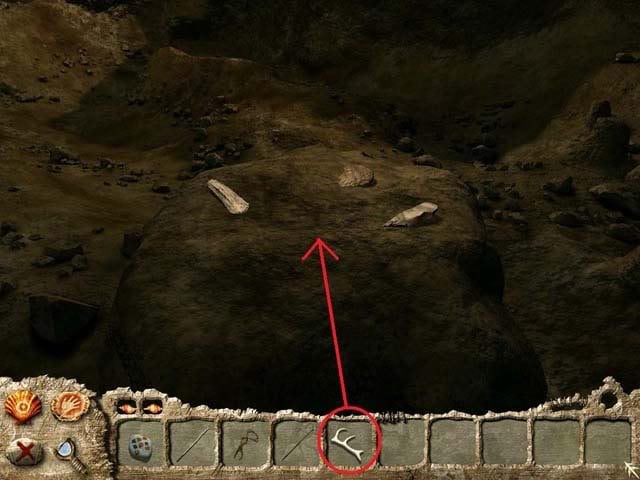
- You have to use the three tools to shape the deer antler. The bones in the upper right corner represent the number of times you can make a mistake before you have to start the puzzle over again.
- First, use the middle tool to break off the antler’s three points.
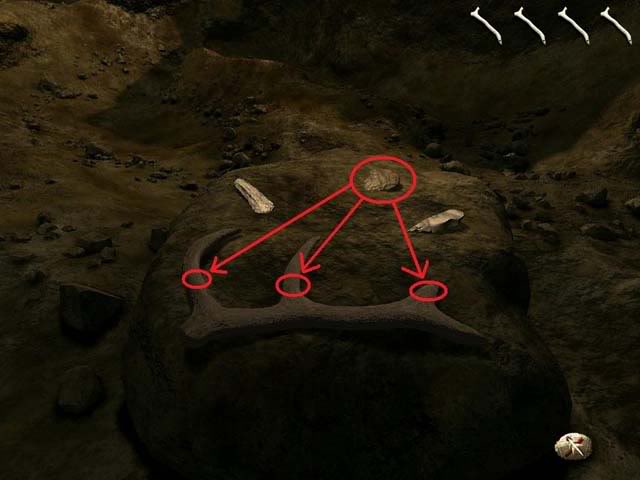
- Next, use the right tool to poke holes in either end of the antler.
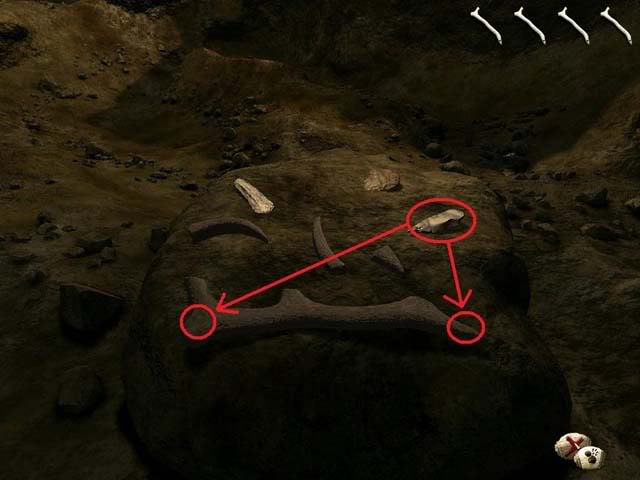
- Finally, use the left tool on the middle of the antler.
- Open your inventory and select the small strap so it appears in the upper left corner of the screen. Click on the right hole that you made in the antler to attach the strap.
- Click on the SPEARTHROWER WITH AN ASSEGAI i to add it to your inventory.
Scaring away the lion… permanently!
- You’ll find that as soon as you re-entered the cave, the fire outside goes out and the lion comes back. Go through the same steps you did to scare away the lion the first time: gather a new BRANCH, light the branch on fire, and click on the lion. When the lion runs away, exit the cave again.
- You’ll automatically watch a cutscene. The lion won’t be coming back any time soon.
THROUGH THE MOUNTAIN
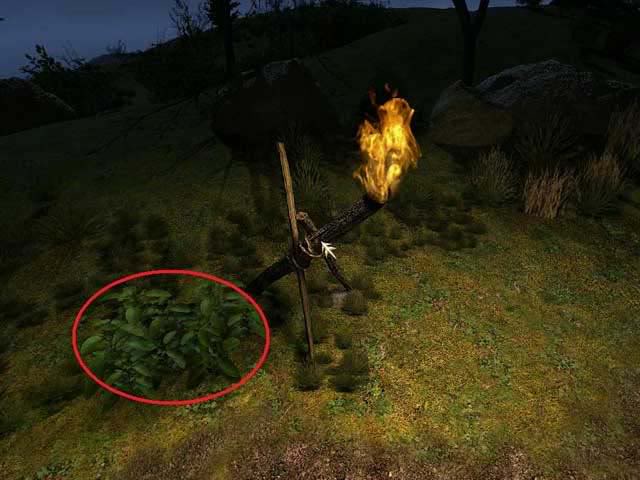
- Before you head off through the mountain, go back into the cave you started from, gather another BRANCH, and light it.
- Take the only path you can, the mountain path leading upwards. You’ll arrive at another cave entrance. Enter the cave.
- Look to your right and you’ll see an unlit firepit. Click on it to light it with your lit branch.
Mountain maze:
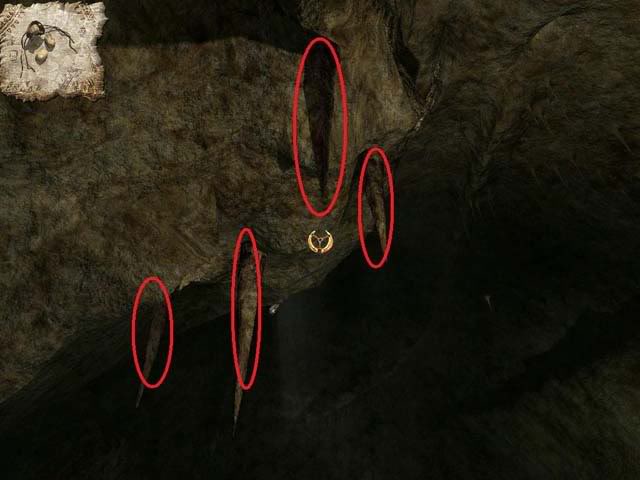
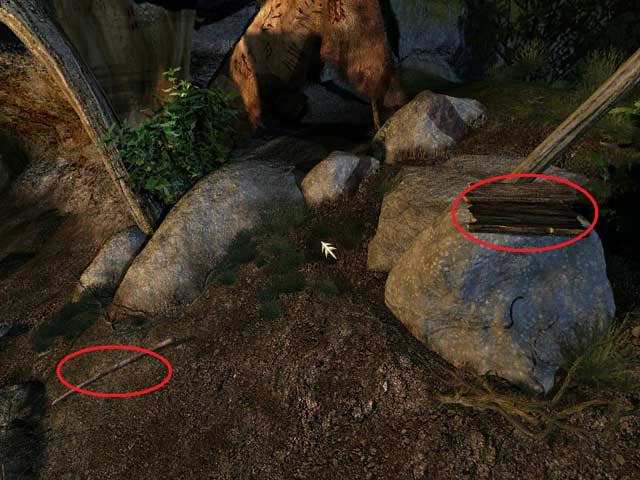
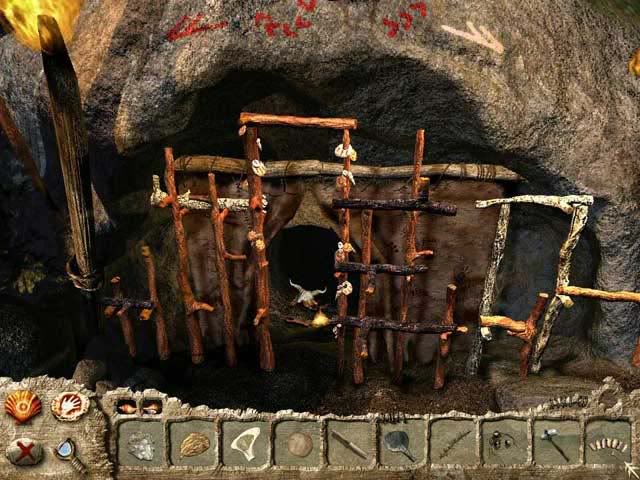
- If you try to enter any of the corridors, you’ll be told that it’s tOo dark. There are three TORCHES to be found on the cave floor. The first one is immediately to your left when you first enter the cave.
- The other two TORCHES are on the floor near the stone slab in the center of the room.
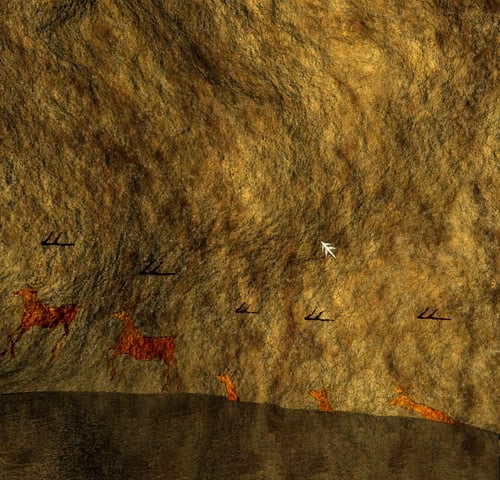
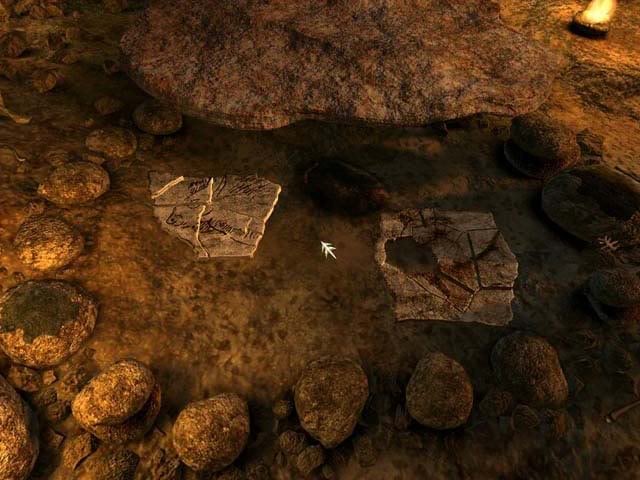
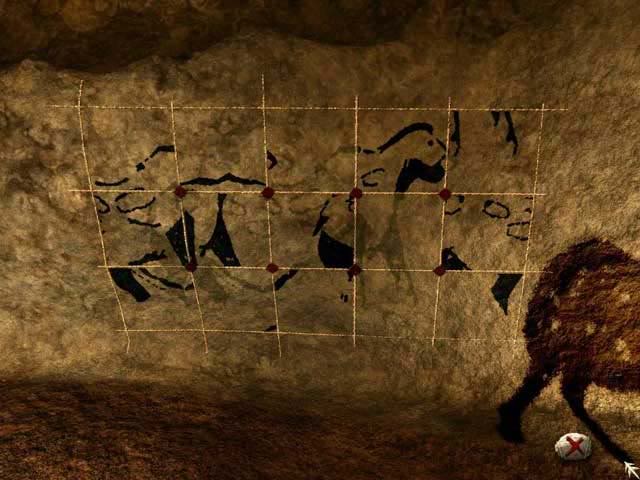
- Examine the slab on the floor in the center of the room. It’s a map about how to go through the maze. The compartments resemble the pattern on Kleb’s stone. (See the screenshot for a side-by-side comparison.)
- If you examine the passage openings, you’ll see that each one has a square of color next to it – from left to right: black, clear, brown and red. These correspond to the colors on Kleb’s stone. Compare the stone with the map to figure out the order in which you have to move through the passageway.
- Before you enter, though, go back to the fireplace, select a torch from your inventory, and click it on the fireplace to light it.
- The torch will go out after 8 steps. When you reach the seventh step, click on a new torch from your inventory and click it onto the still-lit torch to light the new one.
- Once your torch is lit, start with the brown cave and move through the series of caverns taking the following exits:
- Brown, Black, Clear, [light second torch], Brown, Black, Brown, Black, [light third torch], Brown, Red.
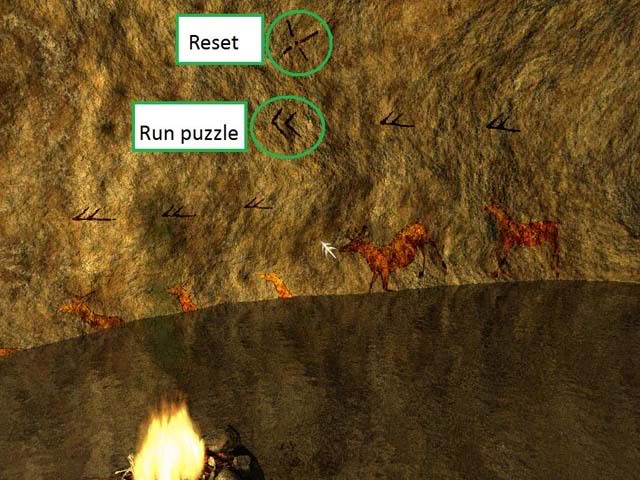
Climbing / hands puzzle:
- Walk to the far side of the cave and examine the hands painting on the wall. The goal is to touch the star symbols running along the bottom and right sides to rotate the hands so they light up and create a path leading up the wall.
- First, SAVE YOUR GAME before you attempt this puzzle, because there seems to be no way to reset it. If you get stuck and want to try again, you can simply load your game from that point and start fresh.
- Note: pressing the star symbol in the lower right takes you out of the puzzle so that you can move around and access your inventory, but does not actually reset the hands.
There are a few different ways to solve this puzzle; here is one solution.
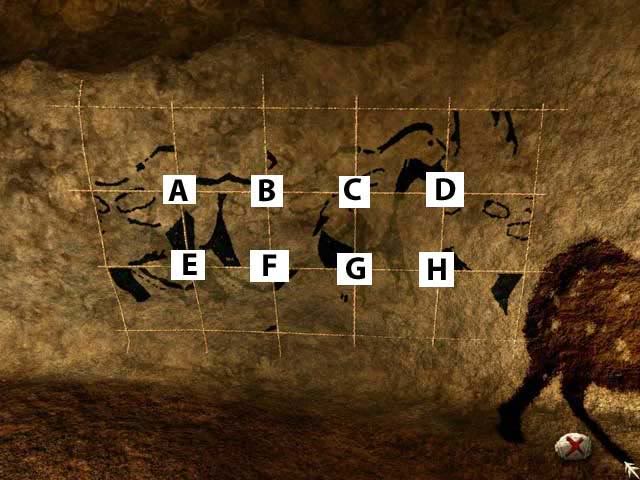
In the screenshot below, I’ve labelled the columns 1 to 5, and the rows A to H.
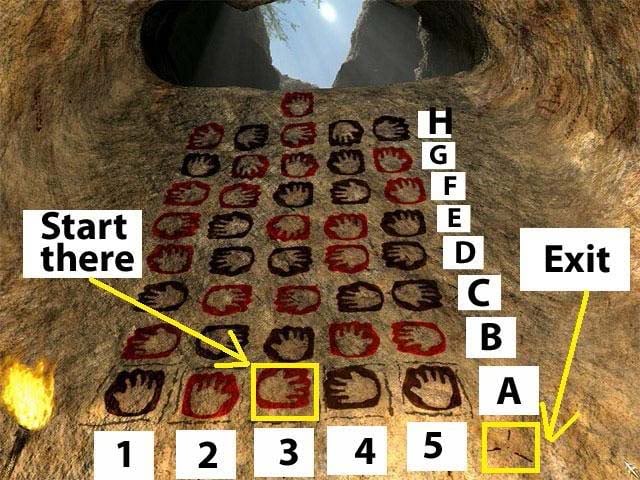
- Start by clicking on the red hand in the middle of the bottom row to select it as the starting point (a red arrow will appear underneath it.)
- Now, click the rest of the stars in the following order, using the screenshot as a guideline:
- Click "3" three times; click "B" three times; click "C" two times; click "E" three times; click "B" two times; click "2" two times, click "F" one time; click "H" one time.
- When lit up correctly, the puzzle should look like the screenshot below:

Bear cave:
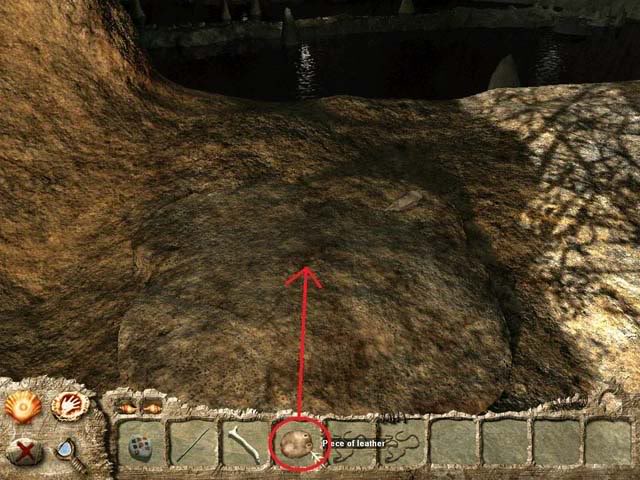
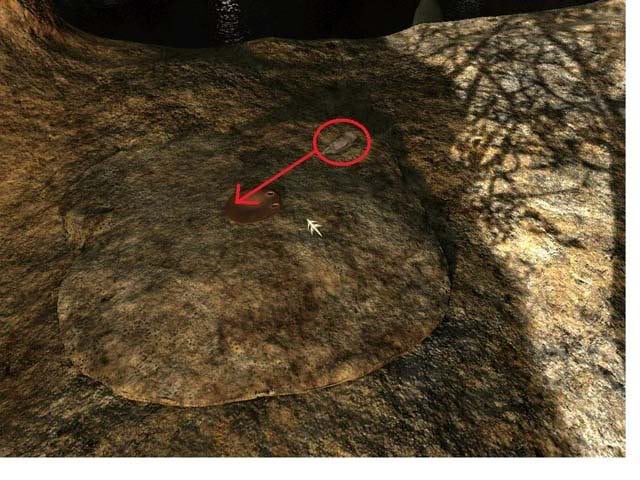
- You enter a new cave facing a lit fire. Look slightly down and to the right to see and pick up the PIECE OF LEATHER.
- Swivel around until you see a pile of grass up against the cave wall. Take a step towards the grass.
- If you turn around from the grass, you’ll see that there’s a ledge leading down into a lake. There’s a bear sleeping on the ledge. If you try to jump down, the bear will wake up and chase you back up.
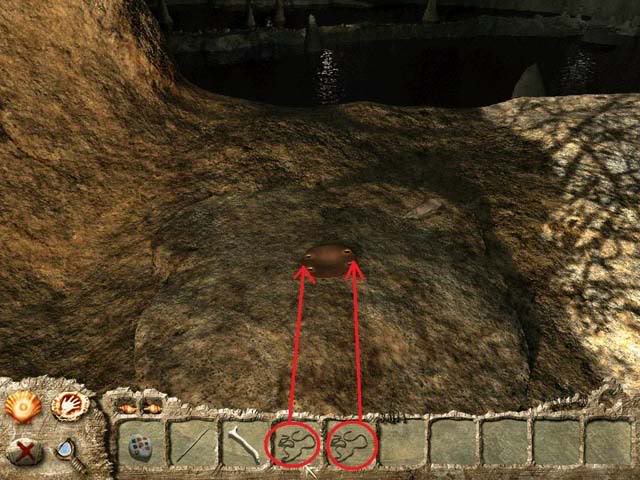
- Pick up a clump of GRASS and, while carrying it, turn around towards the ledge until you see the action icon (two stones rubbing together) appear. Click to drop the grass down onto the ledge.
- Pick up a second clump of GRASS and also drop it down onto the ledge.
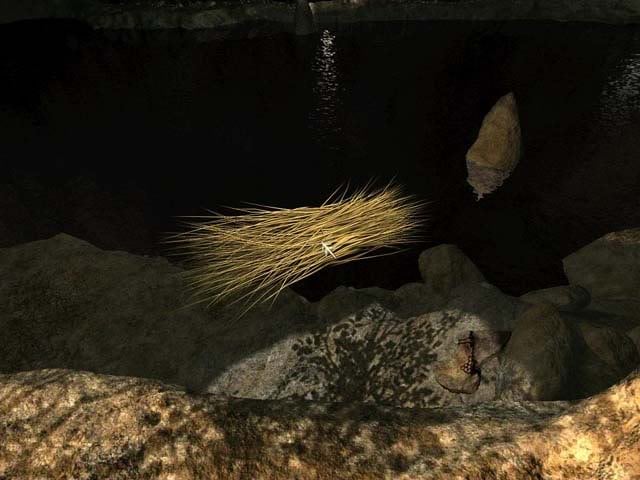
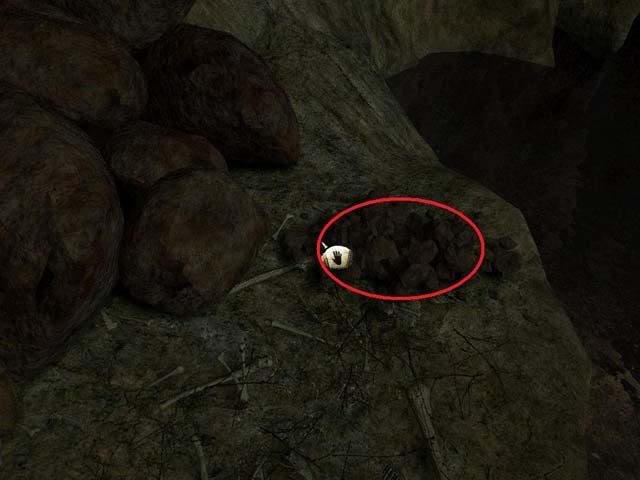
- In the spot where the grass used to be you’ll see a ROPE lying on the ground. Pick it up.
- Turn back to the ledge and click on the grass you’ve dropped. You’ll be able to jump down onto the ledge now since the grass muffles your jump so as not to wake up the bear.
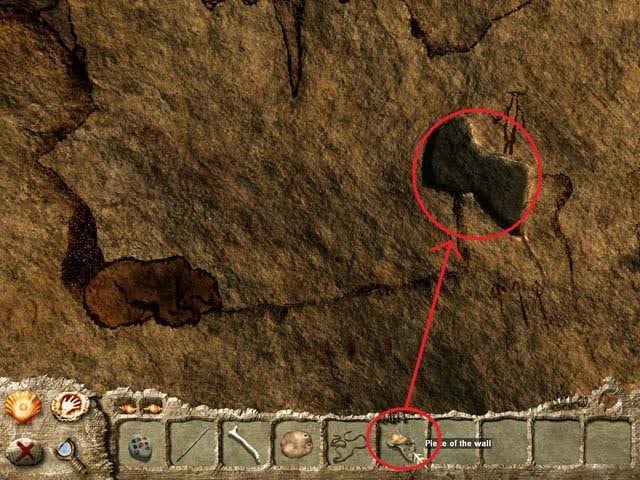
- Turn around and notice the PIECE OF THE WALL on the floor. Take it.
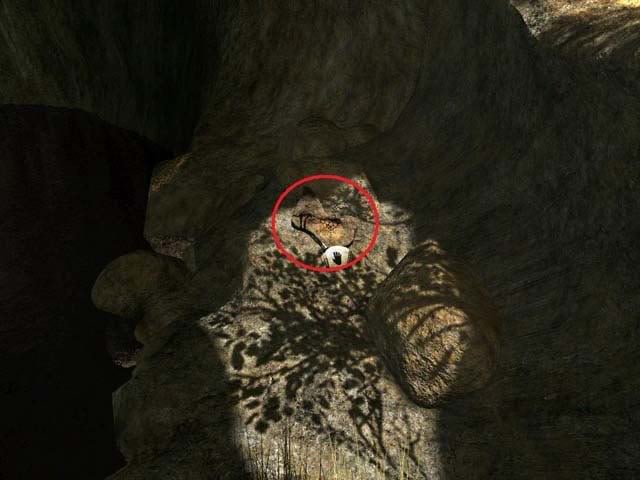
- You’re going to have to figure out how to get rid of that bear. Climb back up onto the ledge, and approach the cave painting near the fireplace.
- Click on it until you get a close-up of the painting.
- Open your inventory, select the PIECE OF THE WALL, and fit it into the hole in the wall to fill in the missing part of the painting.
- Like the previous painting, this painting features an animated situation. By interacting with the painting, you change what happens in the real world.
- Start by clicking on the pile of rocks and giving one to the man on the right.
- When the man is armed with a rock, click on the hole just above the bear’s head. The first time you do it, the bear will get up and look backwards. Quickly click on another rock to arm the man again, and click in the same place above the bear’s head to throw another rock. If you wait too long between throws, the bear will attack.
- After the second throw, the bear will run inside the cave. Throw a rock at the stalactite to knock it down.
- Finally, throw a rock at the pile of rocks to cause a landslide that will trap the bear inside the cave. Again, be quick or the bear will run back out and attack
- If you’ve done the sequence correctly, you’ll hear a rumbling sound. When you go and look back over the ledge, you’ll see that the bear has been trapped just like in the painting.
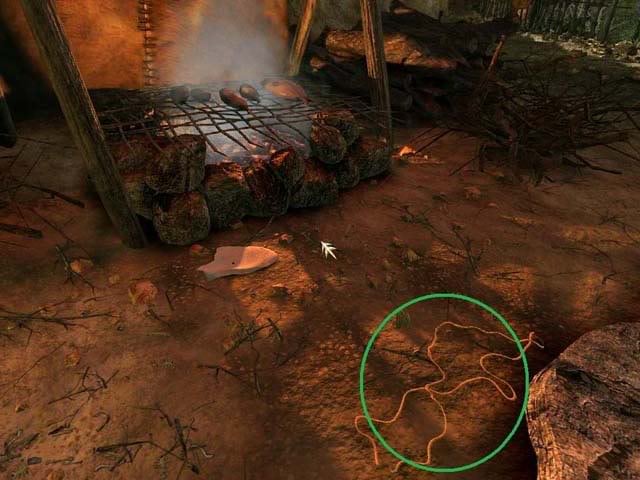
- Climb back down onto the ledge and walk to where the bear was. Look at the ground among all the bones to find a second ROPE. Pick it up.
Go back to the upper ledge. There’s another flat rock with a tool on it similar to the first cave. Approach the rock.
Making a slingshot:
- Place the PIECE OF LEATHER on the workbench.
- The leather already has two holes in it. Use the workbench tool on the other side to poke two more holes.
- Now, use both pieces of ROPE from your inventory on the PIECE OF LEATHER.
- Pick up the finished SLINGSHOT.
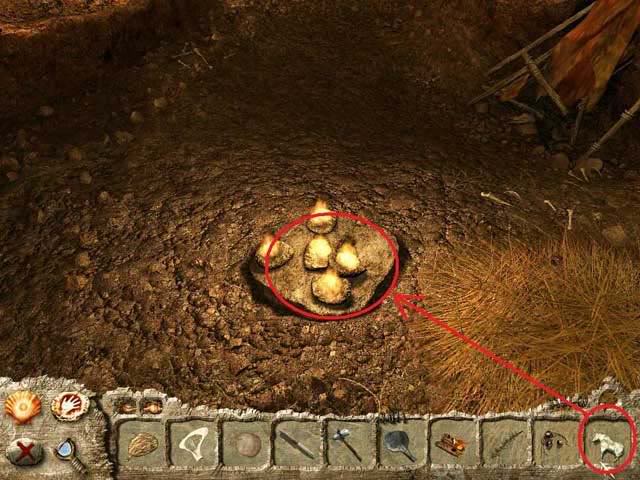
- Go back to the lower ledge to the rockslide where the bear used to be sleeping. There’s a smaller pile of rocks on the ground. Click on it to pick up three STONES and add them to the SLINGSHOT.
- Now, look out into the lake to see four stalactites hanging from the ceiling. Open your inventory and select the SLINGSHOT, and click on each Stalactite to shoot it and cause it to fall into the water. Note: You’ll have to go back to the rock pile to get a fourth rock after you shoot the first three stalactites.
- You can now cross the lake by stepping on the stalactite tops.
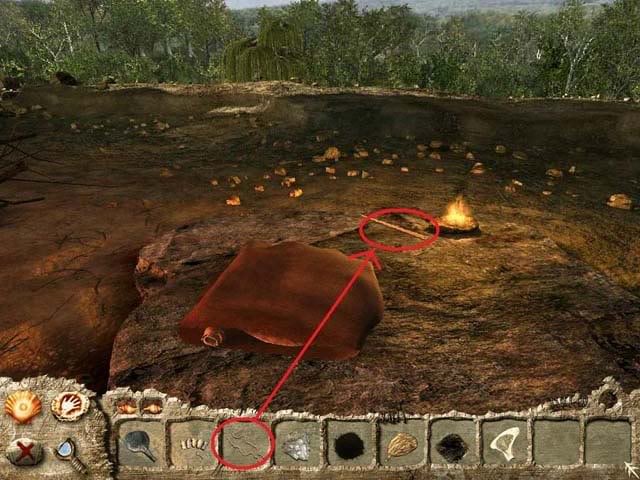
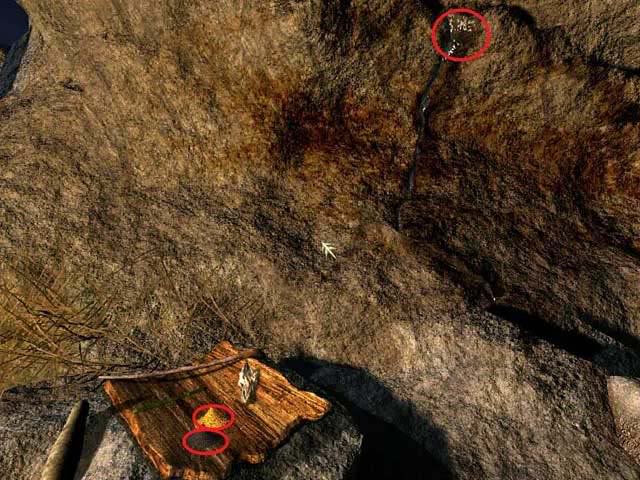
- Take a step forward, and pick up the AUROCHS HORN and LONG BRANCH along the path. There’s an unlit firepit along the path to the right.
- Walk back to the lit firepit where you started from, and click the AUROCHS HORN on it to receive AUROCHS HORN FILLED WITH EMBERS.
- Go back across the lake – uh oh, looks like you’re not going back across any time soon.
- Click the AUROCHS HORN FILLED WITH EMBERS onto the second firepit to light it. Take the long branch and click on the fire so you have a LIT BRANCH.
- Now turn towards the wall with the new cave painting.
Crossing the lake / Stag puzzle
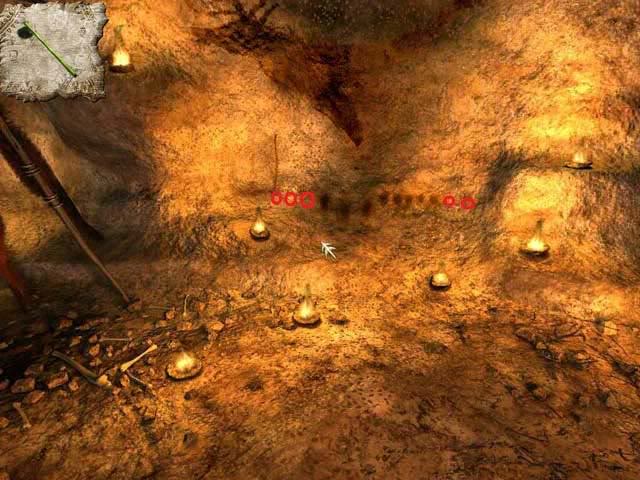
- SAVE YOUR GAME HERE since you aren’t able to reset the puzzle.
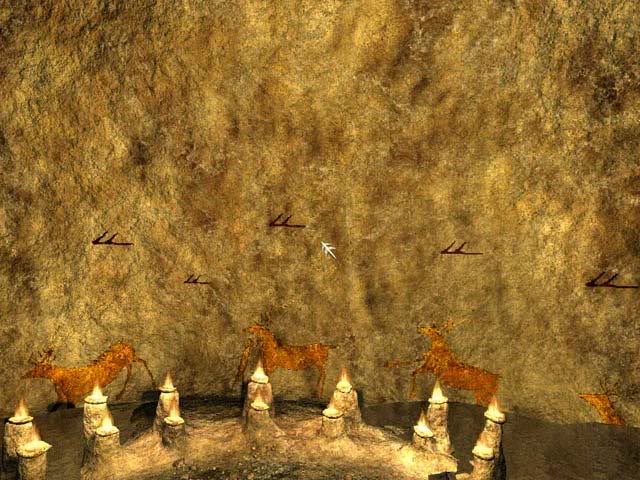
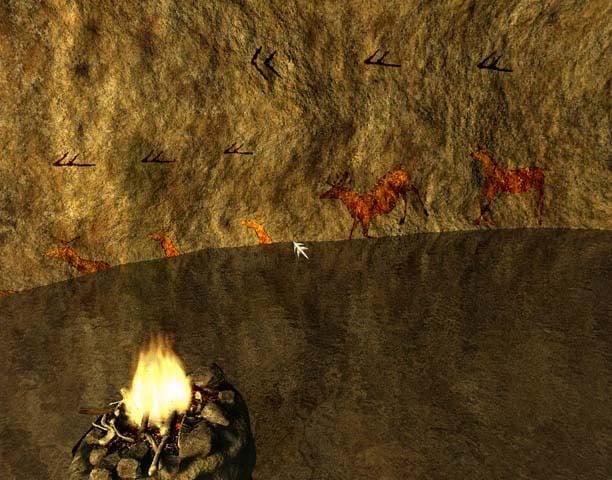
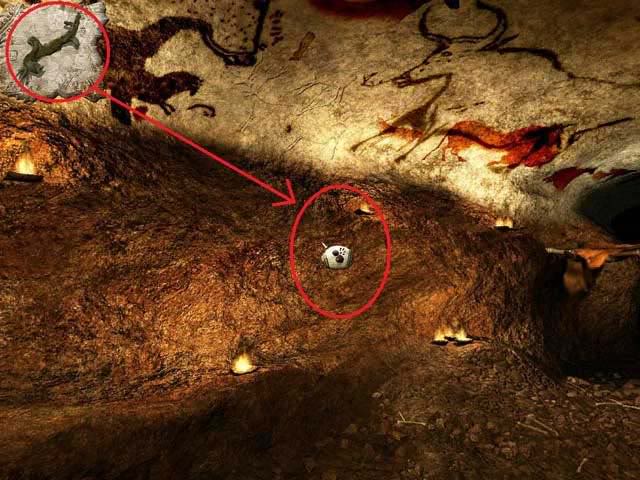
- The first goal is to light all the torches. With your lit branch selected, click on the torches in the following order based on the screenshot labelled below: N, E, J, A
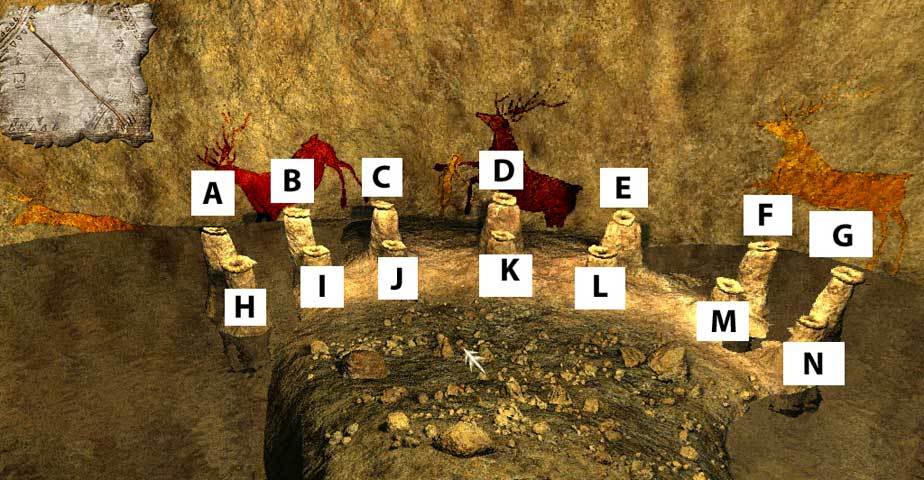
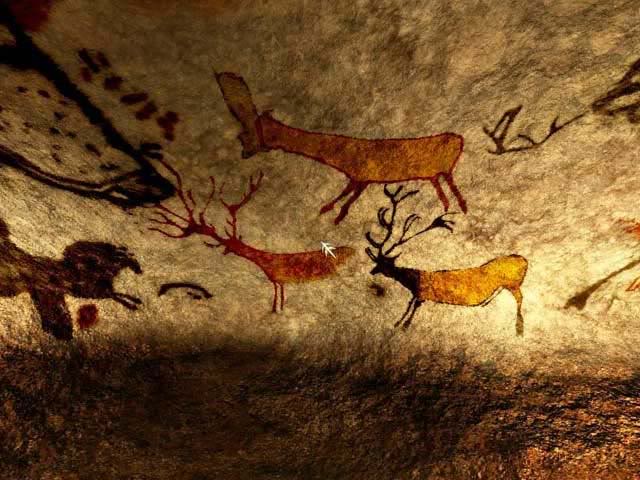
- Now you’ll be able to click on the stags. In his diary, Arok says that the stags should be able to help him cross the lake. You have to re-arrange the stags in the painting so that it shows a stag entering the water, swimming across, then getting out of the water, from right to left.
- Start by making the stags all the same color. They can be either red, brown, black or yellow. I chose yellow because I found it to be the easiest to see. Simply click on each stag until it turns yellow. Sometimes clicking on a stag will change the color of it along with another stag, so you’ll have to skip one in the sequence. Turn the man in the middle of the painting the same color as the stags.
- If you look on the right side, you’ll see two symbols. The "X" resets the puzzle. The double arrows runs through the stag animation. Clicking on the symbol above each stag changes its position.
- From right to left, the painting should show the stag jumping into the water, swimming, picking up the man in the middle, and emerging from the water at the other end. Look at the screenshots below to see what the painting should look like. Don’t forget to change the man’s position to show him climbing onto the stag’s back.
THE CLEARING
- See the screenshot below for a map of the area (click on it to enlarge the map). There are quite a few items you need to pick up here.
- Items you can pick up are noted in black. Items to interact with are marked in red. The REED, marked in green, is an item that you pick up later in the story. You can ignore it for the time being.
- Start by talking the left path, and pick up the WORKED STONE.
- Next, head right and pick up the CAMOMILE from the mauve-colored plant here.
- Head right again and pick up the BRANCHESbranches.
- Head right again and pick up the TINDER and the WORKED STONE.
- Head right again and pick up the KNAPPED FLINT.
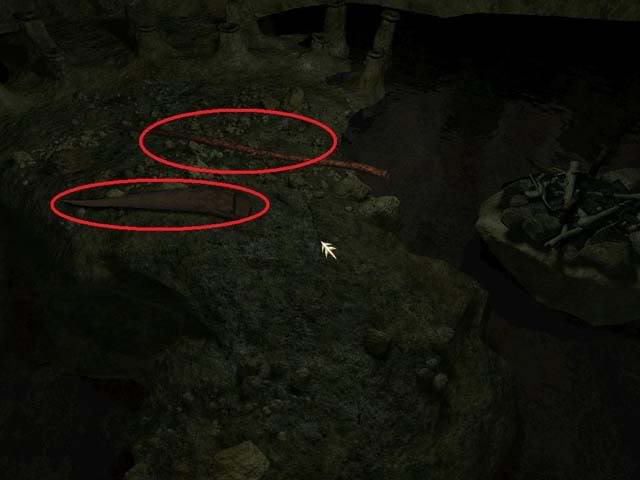
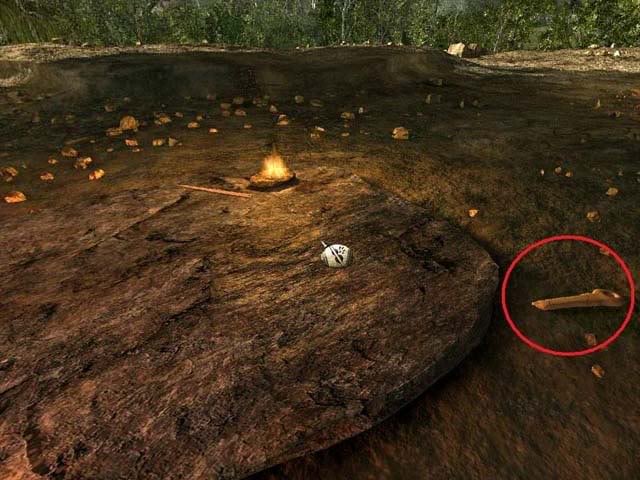
- Take the upper path that heads along the riverbank and pick up the SHAFT and the WORKED STONE.
- Head along the riverbank to the left (if you’re facing the river). On this screen you’ll see four stones that you can move but not pick up. There are also some salmon swimming in the stream. For now, pick up the HARPOON POINT on the ground.
- Take the second path from the left to find yourself in a clearing with a flat rock and a firepit. There’s also a STRAP on the ground – take it.
Making the harpoon:
Approach the flat rock. It’s time to make another tool.
Place the SHAFT on the flat rock. Place the HARPOON POINT on the shaft, and finally place the STRAP onto the shaft. Take the HARPOON.
Catching a salmon:
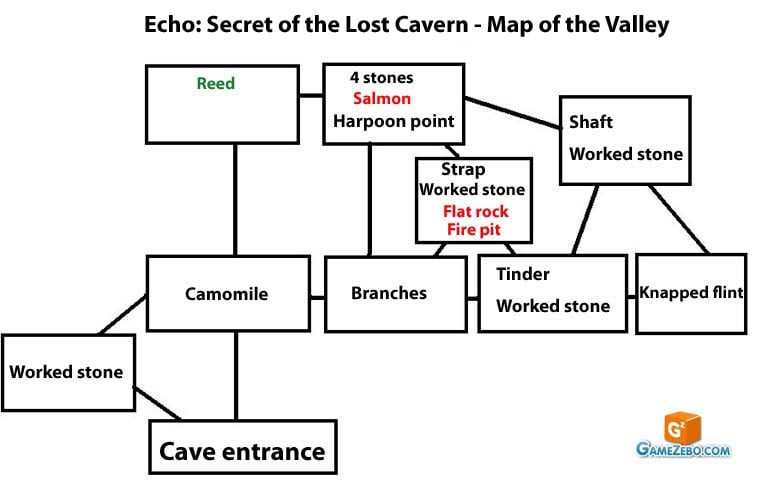
- Return to the river bank where you saw the salmon and the four rocks.
- You can try to spear a salmon, but they’re too fast for Arok to catch.
- You have to move the four rocks to block the opening in the stream to slow the salmon down.
- Start by picking up the large rock on the left and dropping it into the opening in the stream where the salmon are swimming through.
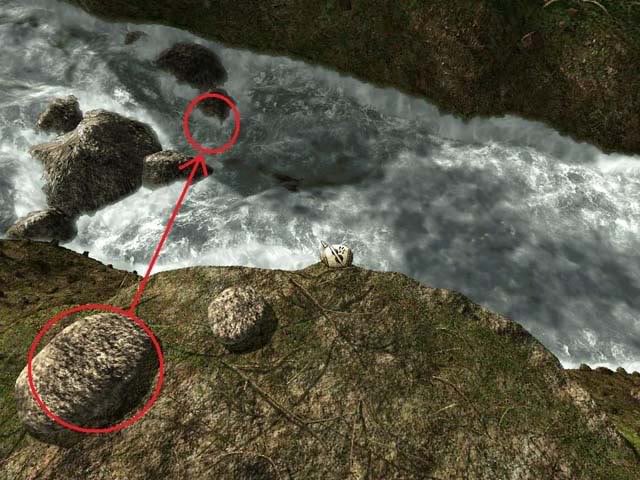
- For some reason, you have to skip the second rock for now, and pick up the third rock, and drop that in the opening as well. Do the same with the second and the fourth rocks.
- Now when a salmon swims up the rock, it will hesitate for a few seconds before leaping over. While the salmon is still, use the harpoon in your inventory to spear it.
- After you’ve CAUGHT the salmon, turn around so you’re facing the paths. You’ll notice that there’s now a man sitting in the area with the firepit. Walk towards him.
- Talk to Toar the carver about all three topics. He gives you MARCASITE and a WODDEN RECIPIENT, and asks you to grill the salmon and prepare some chamomile tea.
Making the tea:
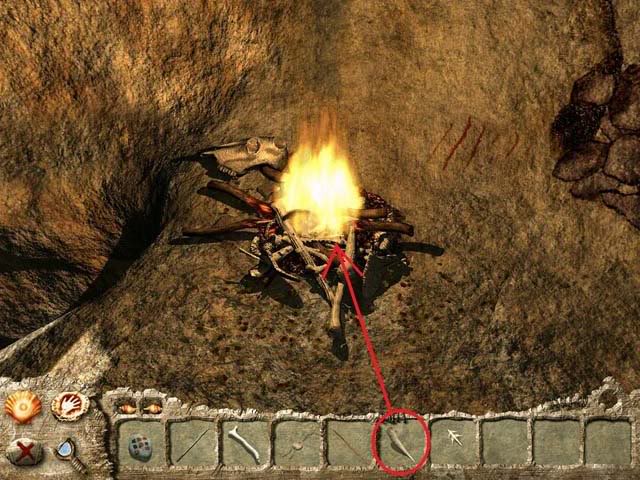
- Put the BRANCHES, MARCASITE and TINDER on the fire. Use the KNAPPED FLINT on the MARCASITE.
- Take note of the three rocks, the one large rock, and the branch near the firepit. Pick up each of the three rocks and place them into the fire to heat them up.

- Voila, you have fire! Take the path behind Toar to go back to the riverbank where the salmon are swimming. Use the WOODEN RECIPIENT on the stream to fill it with water. Return to the firepit, and place the RECIPIENT WITH WATER in front of Toar.
- Pick up the STICK near the firepit and touch each of the stones to remove them from the fire. Note: The mouse cursor has to touch the store, not the tip of the stick.
- Try to touch the hot stones, and Arok will burn himself. Toar automatically gives you the SPATULA.
- With the SPATULA selected, click on each of the stones and transfer them into the water recipient. After all three stones are inside and the water’s steaming, add the CAMOMILE. Watch Toar enjoy the tea.
Grilling the salmon:
- Use the stick on the large rock to add it to the firepit. Wait several seconds for the stone to get hot, then use the stick to take it off the fire again. Place the SALMON onto the rock. Again, wait several seconds. Click on the salmon to remove it. Click the salmon onto Toar to give it to him.
Making a flint:
- After you’ve prepared the tea and salmon, you can ask Toar about new topics, including the art of flint-making. Toar asks you to make him a flint and sets out his tools for your to work with.
- There are three tools here, and three stones. Use the rightmost tool (the large stone) on the lower middle stone three times. Then, use the leftmost tool (deer antler) on the middle stone two times. You’ll end up with a flint. Pick up the flint and show it to Toar.
- Talk to Toar again to receive the KNIFE and the MUSICAL STONES.
Finding the dwelling:
- Toar mentions that the paintings on the stones and cliff walls nearby offer clues about how to get to the dwelling.
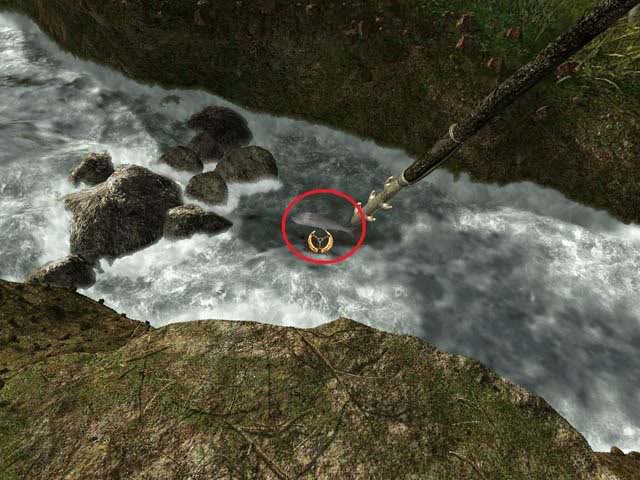
- First, turn around and examine the small red painting on the rocks near the firepit. There’s a fifth MUSICAL STONE on the ground. Take it and add it to your collection.
- Go back to the area where you picked up the tinder and the worked stone, and face the cliff wall to examine the painting. Select the MUSICAL STONES from your inventory, and click on the painting.
- This is a musical puzzle. Click on the bone mallet underneath the musical stones and use it to strike the stones in the correct sequence. When you’ve strike the stone correctly, the corresponding symbol on the painting will turn red. If it’s incorrect, the symbol will turn black.
- Strike the musical stones in the following order: 4, 2, 5, 1.
- Facing the cliff, take the path on your left to the spot where you picked up the knapped flint originally. A new entrance has opened up below the painting on the cliff. Click on it, and make your way up the cliff and along the ledge.
CLIFF DWELLING
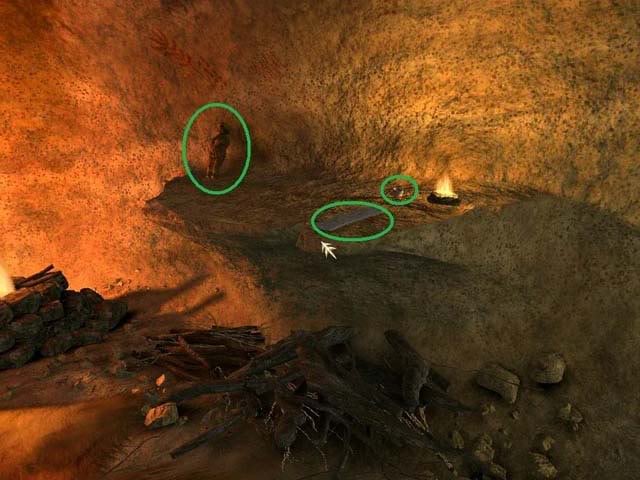
- Walk along the ledge a few paces until you notice a girl sitting on the left. Approach TIka and talk to her. She asks you to tell her the story of your life using objects from around the cave.
- Start by picking up the PEBBLE DECORATED WITH A HAND on Tika’s left.
- Walk back to the dwelling entrance where you came from, and pick up the STAG ANTLERS on the left near the edge of the cliff.
- Walk back into the cave and approach the ledge near the lit fire. Pick up the FIGURINE OF A WOMAN, BONE ENGRAVED WITH A LION, and VERTEBRA.
- Go into the next alcove farther into the cave and pick up the ANIMAL FAT in the near ledge.
- Approach the firepit with the cooking fish, and take the STRAP on the ground.
- Swivel around and take the STICK WITH HOLE ENGRAVED WITH A BEAR to the right of the large flat rock.
- Turn around and walk towards the railing on the edge of the cliff. Take the SKIN and the BLADDER.
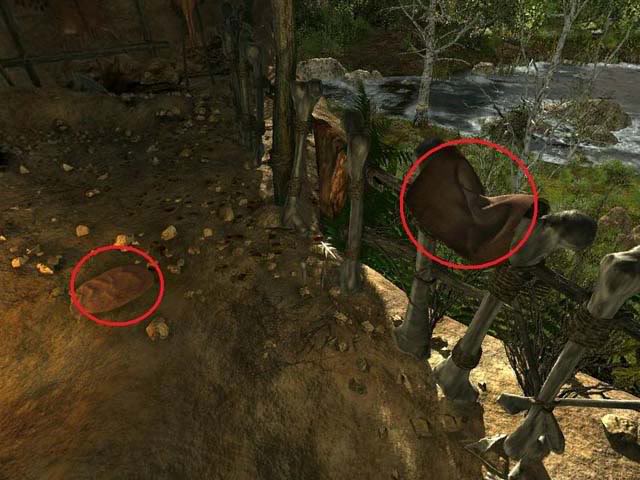
- Go back to Tika and approach the lit alcove. Take the ENGRAVING OF A STAG and the ENGRAVING OF A FISH.
Telling the story:
- Each of the black symbols here represent a part of Arok’s story. Click on a symbol to hear Arok read the story out loud. You have to put the symbols in order telling Arok’s story from the beginning to the end. Swap two symbols by clicking on one, then clicking again where you want it to go.
- If you don’t want to move a symbol, just click on it a second time.
- Once you’ve arranged the story in the right order, you’ll have to select a symbol to represent each part.
Arrange the story so it reads as follows:
1. "My trip began…" = Stag antlers
2. "Unfortunately, I was not the only…" = Bone engraved with a lion
3. "I took refuge in a cave…" = Klem’s painted stone
4. "To find him again…" = Spearthrower
5. "Free at last…" = Rock with hand painted on it
6. "When I got to the top…" = Stick with hole engraved with bear
7. "I just had to cross…" = Engraving of a stag
8. "Once in the valley…" = Harpoon
9. "Believe me, it isn’t easy…" = Engraving of a fish
10. "To thank me…" = Knife
11. "After following the signs…" = Figurine of a woman
After telling you story, talk to Tika again and ask her about Klem. You receive a new task, to fix the broken tablet.
Fix the broken tablet:
- Walk to the far end of the cave where you’ll see a large door whose entrance is blocked by two stag antlers. You can now click on each antler, then click again on the wall next to the door to move the antlers out of the way and enter.
- Inside the room, walk to the right and pick up the RESIN, POWDERED BLACK PIGMENT, and PIECE OF SKIN.
- Swivel around and look at the large stone slab that seems to be on top of some smaller stones.
- Use the ANIMAL FAT on either side of the slab, then right-click to de-select the animal fat and click on the slab itself to slide it out of the way.
- Underneath the slab are the broken tablet pieces. Think of this challenge like a jigsaw puzzle that you have to piece together. The two tablet pieces marked with a square in the screenshot below don’t move, so you should start with picking up pieces and seeing if they’ll fit to either of these pieces.
- The pieces circled in red are pieces you have to use on the stationary piece with the red square, and the ones in green should be used on the piece in the green square.
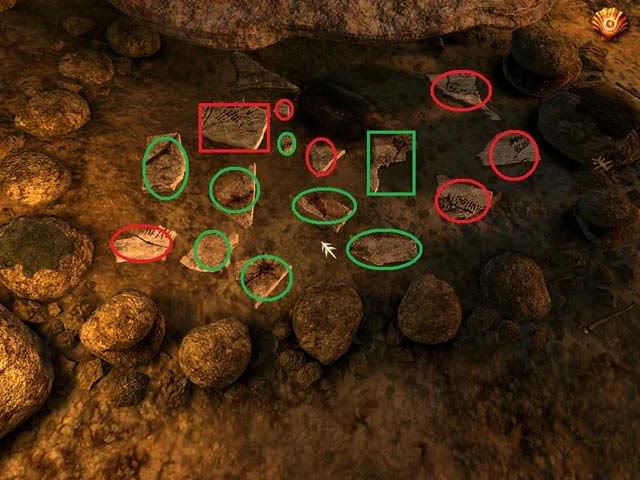
- When the tablets are finished, they’ll look like the screenshot below:
- You can’t pick up the tablet yet because the pieces still aren’t stuck together. Go back to the alcove with the fish cooking on a grate over the firepit.
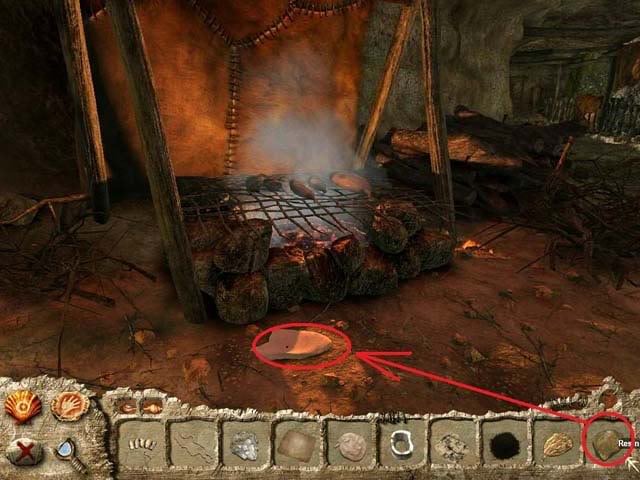
- Use the RESIN on the white plate in front of the firepit. Wait a second or two until it melts, then pick up the MELTED RESIN.
- Go back to the tablets, and use the MELTED RESIN on each now. Now, go back and talk to Tika about the tablets.
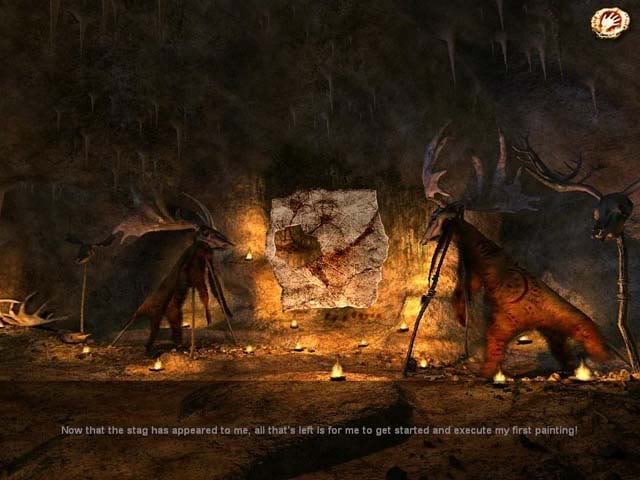
- Return to the tablets again, and pick up the one with the hole in it. Drag it across the cave wall between the two stylized stag statues until Arok "sees the stag."
- After the short cutscene, return to Tika and talk to her again. When you approach her the first time, she’ll automatically start talking. When she finishes, talk to her again and ask her about the three possible topics.
Restoring the fresco:
- According to Tika, the first thing you should do is clean the fresco wall since it’s covered with markings.
- Go to the second alcove (the one with the smoking fish and hides) and you’ll see that the ledge now contains running water.
- Use the PIECE OF SKIN on the water (not to be confused with the SKIN, which is also in your inventory) to receive a MOIST PIECE OF SKIN.
- Go back to the ceremonial cave and click the MOIST PIECE OF SKIN on the fresco area four times. Arok will tell you when it’s clean.

- Turn to your right and approach the slab of rock with the black pigment. Use the MOIST PIECE OF SKIN on the black pigment to receive a WAD OF HIDE DIPPED IN PAINT.
- Go back to the stag fresco and touch the wall three times with the WAD OF HIDE DIPPED IN PAINT to fill in more of the stag.
- Go back and talk to Tika, who tells you you need to bring her a reed.
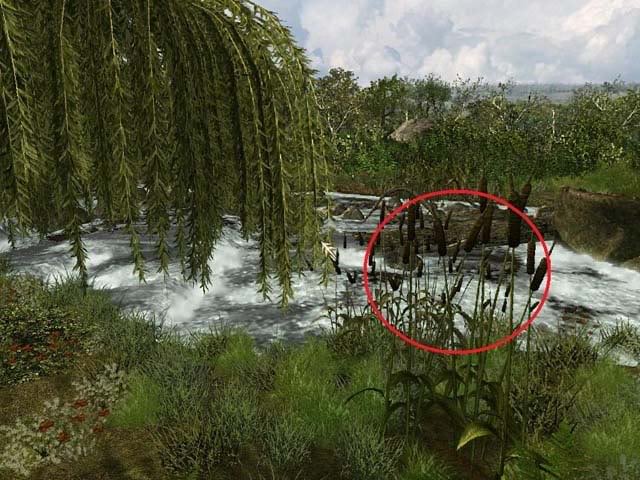
- Leave the cliff settlement and go back outside. Follow the path along the river towards the weeping willow tree. There’s a group of cattails growing by the river here. Click on it to pick a REED.
- Go to the middle alcove and approach the flat slab / workbench.
- Put the SKIN on the slab.
- Put the BLADDER on the skin, then put the VERTEBRA on top of the bladder.
- Use the STRAP on the needle tool that’s sitting on the slab, then use the strap and needle on the folded skin to sew it up. Take the finished WATERSKIN.
- Go back to the cave with the stag fresco. Tika will be there, and she’ll give you the BLOWPIPE.
- Use the BLOWPIPE on the fresco to fill in the line of dots in the lower right. Add two dots to the right of the row of dots, and three dots to the left. (See screenshot below.)
- You’ll talk to Tika again, and she gives you back your KNIFE.
- Use the KNIFE in the area to the left of the dots. Click twice to create a square shape. The stag will move, and you’ll end up outside with Tika.
NEXT STAGE
- You’ll find yourself standing outside in the clearing north of the cave entrance, where you originally picked up the WORKED STONE. You need to cut down the tree somehow, but your knife’s too small to do the job.
- Using the map, make your way back to Toar sitting by the fire, and talk to him. He gives you the AXE.
- Go back to where the tree is, and use the AXE on it to chop it down. You can now cross the river.
NIGHTFALL
- It’s nighttime. Tika asks you to bring her some mint leaves and juniper berries. There’s only one exit out of this clearing, so take it.
- Walk until you reach the cave entrance that’s blocked by twigs. To the right of the cave you can pick up the JUNIPER TWIGS
- To the left of the entrance, pick up the JUNIPER BERRIES.
- Walk one screen further, and pick up the SPEARMINT.
- Take a step further and you’ll find yourself at the entrance to the White Grotto. Pick up the LITTLE STICK and the PIECE OF BARK near the entrance.
- Enter the cave. Turn to the right, and take the STRAP, BLACK PIGMENT and BLOCK OF OCHRE PIGMENT.
- Take a step forward and you’ll automatically start to talk to Lahrik. Once you’re finished, talk to him again to learn more about how to make a palette. Take A TUFT OF HAIR, which is to the left of Lahrik.

Making a palette and brush:
- Step outside the cave, hugging the right wall, so that you approach the firepit. There are two flat rock slabs here, the right of which has a tool and indent that forms a rudimentary mortar and pestle.
- Start with the left slab. On it, place the LITTLE STICK, TUFT OF HAIR, and STRAP. Pick up the BRUSH.
- Next, pan right and place the BLOCK OF OCHRE PIGMENT on the mortar, then pick up the pestle and click on the ochre pigment to receive POWDERED YELLOW PIGMENT.
- To the right of the pestle, put down the PIECE OF BARK, then lay down the BRUSH, POWDERED YELLOW PIGMENT, POWDERED BLACK PIGMENT, BLOWGUN and PIECE OF SKIN on top.
- You’re not quite done. You can’t pick up the palette until the pigments are moist. Click on the tiny trickling stream to the right to get a DROP OF WATER, and click on one of the pigments. Do the same again to the other pigment. You can now pick up the PALETTE.
- Go back to Lahrik and show him your palette. He says you’re still missing a color, and gives you a hint on how to acquire it.
- Take another BLOCK OF OCHRE PIGMENT from the cave shelf, and go back to the fire. Use the BLOCK OF OCHRE PIGMENT on the fire so that it heats up and turns into red pigment. Use your WOODEN SPATULA on the red pigment to pick it up. Take it over to the flat slab and place it in the mortar. Use the pestle on the red pigment to get RED PIGMENT. Place your palette back on the rock and place the red pigment on it. Get another drop of water and moisten the red pigment like you did the other two, then pick up the palette.
- Show it to Lahrik again, and he permits you to enter the white grotto. Walk to the back, where you see Klem painting. Talk to Klem, then talk to Lahrik again, who asks you to find his missing bull-roarer.
- Exit the cave. Tika is now sitting by the fire. Talk to her thoroughly, and ask her about the bull-roarer. Give her the JUNIPER BERRIES and SPEARMINT.
Get the bull-roarer:
- Go back to the area that you started from, and some wolves will show up.
- You’ll have to find a way to climb the tree. Observe the slabs of stones below the tree. You have to stack the slabs from lowest to highest in the middle of the tree. You can only stack smaller slabs on top of larger ones. Move the slabs around to the left, right and center to stack them.
- SAVE YOUR GAME before the puzzle.
Solution (L = Left column, M = Middle column, R = right column):
- Take a rock from the left pile ("L") and place it in the middle ("M") pile.
- Take a rock from the right pile ("R" and place it in the left "L" pile.
- Middle to Left
- Right to Middle
- Left to Right
- Left to Middle
- Right to Middle
- Right to Left
- Middle to Left
- Middle to Right
- Left to Right
- Middle to Left
- Right to Middle
- Right to Left
- Middle to Left
- Right to Middle
- Left to Right
- Left to Middle
- Right to Middle
- Left to Right
- Middle to Left
- Middle to Right
- Left to Right
- Left to Middle
- Right to Middle
- Right to Left
- Middle to Left
- Right to Middle
- Left to Right
- Left to Middle
- Right to Middle
- Climb the tree, and take the BULL-ROARER and the PINECONES AND SLINGSHOT.

- Climb down the tree and turn to face the wolves. Arm your SLINGSHOT and fire at the wolves until until you automatically unequip the slingshot and can no longer aim in that direction, which means the wolves have gone away.
- Go back and talk to Tika to tell her that the wolves are gone. Visit Lahrik again and give him the BULL-ROARER. In exchange, he gives you the FIGURINE OF A BULL.
- Go back to the white grotto and place the FIGURINE OF A BULL on the small altar with candles on the floor.
- A bull painting will appear on the wall of the cave. Try to walk up to the bull painting, but you can’t reach it.
- Talk to Lahrik again, and he suggests that you find a dead tree to act as a ladder. Take one step back towards the clearing with the wolves, and you’ll see a dead tree on your left.
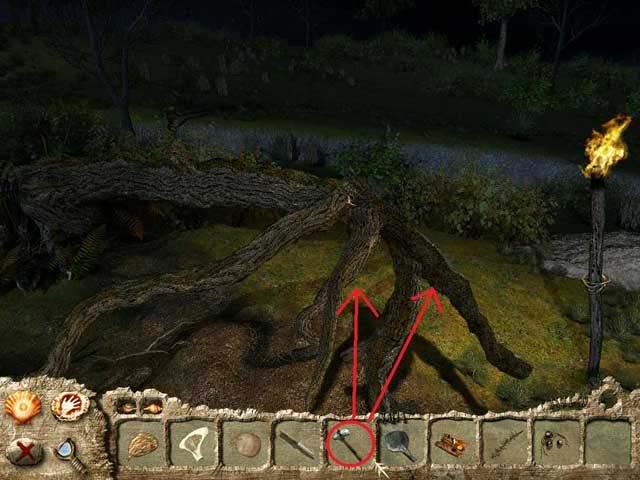
- Select the AXE and click three times on the dead tree. Right-click to deselect the axe, and click on A GNARLY TREE CUT ON A SLANT to pick it up.
- Return to the cave, and Klem will automatically explain a new painting technique to you.
- Use A GNARLY TREE CUT ON A SLANT below the bull painting.
- Climb up the tree and approach the painting.
Painting the bull:
- Click on your brush, then on the black pigment. Use the brush to fill in the outline of the bull by clicking on the right hoof, left hoof, nose, left horn, right horn, and back. When done correctly, it should look like the screenshot below. (I’ve also circled in green where you should click the cursor to paint.)
- Next, click on the blowpipe and then the black pigment, and click on the bull’s chest, stomach, jaw, and just above the left and right legs to fill more of it in.
- When you’ve done it correctly, you’ll see a cutscene.
- Go back to the bull painting and click on it to be given a musical stone puzzle.
First musical stone puzzle:
- Use the hammer on the stones in the following order from left to right: 1, 3, 2 and 5, 1.
- Climb back down and go to the area where you first saw Klem painting the ceiling (he isn’t there anymore.) Walk forward and pick up two MUSICAL STONES.
- (NOTE: It’s possible to pick up the musical stones first and then complete the first musical puzzle. In that case, you’ll have two extra musical stones – 5 instead of 7. In that case, the sequence is 2, 4, 3, 6, 2.
Second musical stone puzzle:
- If you haven’t done so already, go to the scaffold where you first saw Klem painting and grab the two extra MUSICAL STONES.
- Use the hammer on the stones in the following sequence: 1, 7, 5, 2, 1.
- Go back and talk to Klem.
- Swivel around and notice the painting on the stretched skin. Click above its upper left corner to zoom in on a slider puzzle.
Slider puzzle:
- SAVE YOUR GAME, then start by clicking the squares themselves until all squares are black – no red. It should look like the screenshot below:
- Notice the red dots. Clicking on one of these rotates the four squares around it clockwise once. Use this method to complete the slider puzzle. In the screenshot below, I’ve labaled the dots A through H.
Solution:
- C x 1, D x 1, A x 1, B x 1,
- E x 1, A x 3, E x 1, A x 1,
- H x 1, F x 2, G x 1, E x 1,
- F x 1, E x 1, H x 2, G x 1,
- H x 1, F x 1, G x 1, F x 1,
- H x 3, G x 3, H x 1
You’ll automatically talk to Klem again. There’s one more painting to finish.
Take the GNARLY TREE from where you placed it, and place it over on the other side of the cavern where you can see faint outlines of more stags.
Fill in the last painting:
- There are three stags that need to be colored in. The three bars of color next to each stag indicates the colors you should use.
Left stag:
- Use the brush + red pigment on the antlers and legs
- Use the reed + yellow pigment + red pigment (to make orange) on the body
Right stag:
- Use the black stone (or the brush + black pigment) on the antlers and legs
- Use the reed + yellow pigment on the body
Top stag:
- Use the brush + red pigment on the front leg and back leg
- Use the reed + red pigment + yellow pigment on the body
When finished, it should look like this:
- Talk to Klem again and he asks you to remove the sticks that are blocking the entrance to the other grotto and bring him back the things he needs for the ceremony.
- Go outside and approach the door to the other grotto.
Bars and posts puzzle:
- SAVE YOUR GAME HERE.
- You have to rotate the poles and bars so that you can slide the bars to the left and right and reveal the entrance to the cave.
- Along the top are four red symbols. When you’ve clicked on a bar or post to select it, use the four symbols to (from left to right), slide left, rotate clockwise, rotate counter-clockwise, and slide right.
- Take a look at the screenshot below. From left to right I’ve labaled the posts 1 through 12. I’ve also assigned a letter A through I to each of the bars.
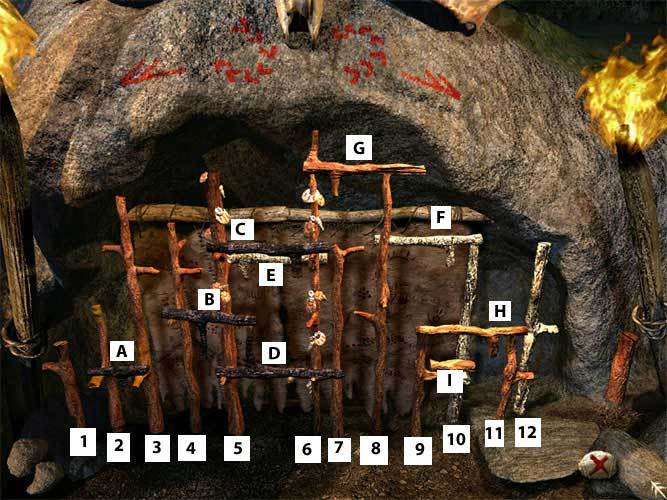
Solution:
- 1. Rotate Post#12 clockwise once. Rotate bar "H" clockwise once, then slide it right once.
- 2. Rotate post #1 counter-clockwise once. Rotate bar "A" clockwise once, then slide it left once.
- 3. Rotate post #11 clockwise twice. Slide bar "I" right once.
- 4. Rotate bar "F" clockwise once, then slide it right once.
- 5. Rotate bar "G" counter-clockwise once, then slide it left once.
- 6. Turn post #7 clockwise once. Turn post #8 counter-clockwise once. Turn post#9 clockwise once. Rotate bar "B" clockwise once, and slide it to the right twice. Rotate bar "D" counter-clockwise once. Slide it to right once.
- 7.Turn post #3 counter-clockwise once. Turn post #4 counter-clockwise twice. Turn bar "C" (the black one) clockwise, then slide it left twice. Finally, turn bar "E" (the white one) clockwise once, then slide it left once.
- When it’s finished, it will look like the screenshot below:
- The curtain should swing open. Take the SORCERER’S HEADDRESS and the OIL LAMP.
Final puzzle:
- Go back to the White Grotto, where you’ll see Klem, Lahrik and Tika sitting down. After a cutscene, place the sorcerer’s headdress and oil lamp in front of Klem.
- Klem asks you to light the oil lamp. Put the ANIMAL FAT and JUNIPER TWIGS from your inventory onto the lamp. Now turn around to face the lit candles. There’s a small twig beside them. Pick up the twig, then click on a candle to light the twig. SLOWLY turn back around, and click the lit twig on the oil lamp. If you move your mouse too quickly, the flame will go out.
- Klem tells you to taste the liquid concoction that Tika has made. Turn to your left and click on the steaming receptacle in front of her.
- The final puzzle is a musical stone puzzle. Klem has laid out a set of special spirit stones. Your musical stones appear in the lower right corner of the screen. Pick up your bone mallet, and strike each of the stones (spirit and musical). Figure out which of your musical stones make the same pitch as the spirit stones. When you hit two stones of the same pitch one after the other, the symbol from Kleb’s stone will be transferred to yours. Use the screenshot below as a guideline: When you’re finished, it will look like that:
- Once your musical stones are mapped out, you have to strike them in the order that the spirit stones appear in, from left to right.
- Use the bone mallet to strike your musical stones in the following order (numbered from left to right): 7, 6, 6, 6, 4, pause, 1, 3, 2, 4, 3, 5, 4, 6, pause, 4, 6, 6, 6, 4.
- The tones last for about 3 seconds each, and you have to overlap each tone into the next. To make a pause, simply wait until the previous tone has died away (or count to 5) then play the next tone.
Congratulations, you’ve just finished the game! Enjoy the final cutscene.
“;

More articles...
-
Best Horror Games On Itch.io – July 2026
Across a bounty of subgenres. -
Grow A Garden 2 Base Price List
What's the most valuable crop? -
Evomon Best Starter [Leafbun, Blazpup, or Bubble?]
Grass-type, Fire-type, or Water-type?