- Wondering how to get Monopoly GO! free rolls? Well, you’ve come to the right place. In this guide, we provide you with a bunch of tips and tricks to get some free rolls for the hit new mobile game. We’ll …
Best Roblox Horror Games to Play Right Now – Updated Weekly
By Adele Wilson
Our Best Roblox Horror Games guide features the scariest and most creative experiences to play right now on the platform!The BEST Roblox Games of The Week – Games You Need To Play!
By Sho Roberts
Our feature shares our pick for the Best Roblox Games of the week! With our feature, we guarantee you'll find something new to play!All Grades in Type Soul – Each Race Explained
By Adele Wilson
Our All Grades in Type Soul guide lists every grade in the game for all races, including how to increase your grade quickly!
Dying for Daylight, Chapter 1 Walkthrough
Dying for Daylight: Chapter 1 is an interactive, adventure Hidden Object game played on PC, created by Nikitova Games and I-play. This walkthrough includes tips and tricks, helpful hints, and a strategy guide for how to complete Dying for Daylight: Chapter 1.
Dying for Daylight: Chatper 1 – Game Introduction
Dying for Daylight: Chapter 1 is an interactive, adventure Hidden Object game played on PC, created by Nikitova Games and I-play. This walkthrough includes tips and tricks, helpful hints, and a strategy guide for how to complete Dying for Daylight: Chapter 1.
Copyright Information
This walkthrough was created by Lynne Basinet, for gamezebo.com, and is protected under US and International Copyright laws. Any unauthorized use, including re-publication, in whole or in part, without permission, is strictly prohibited.
General Information
- Main Menu
- Options: Adjust the Voice, Sound Effects and Music volumes and turn Full Screen and Wide Screen on and off.
- Profiles: Create up to 5 profiles with a maximum of 10 characters (letters and numbers only).
- Credits: View information about the development team.
- Game Screens
- Menu Button: Located at the lower right, click to access the Options and to exit to the Main Menu
- Hint Button: Located at the lower left (Bottle of Blood), click for succeeding hints in General Areas (click on each topic for the answer) and for a random item to be highlighted in Search Scenes. You’ll need to wait until the Hint Button recharges to use it again.
- Inventory: Located at the bottom, move your cursor to the bottom of the screen and it will open.
- Rare Items: Located at the lower right, just above the Menu Button, click to view all the Character Cards and Rare Items you’ve collected.
- Compass: Located just to the left of the Rare Items Button, click on it (once it’s available) to access new areas or return to previous ones. Check it often as there may be new tasks in previous areas.
- Diary: Located just above the Menu Button, click on it, when it’s glowing, to access new information. Refer to it often to view clues and information you’ve collected. Note the “?” (Question Mark) in the center of the Diary. Click on it to access an explanation of the Game Cursors.
- Gameplay consists of Object Searches, Interactive Tasks, Puzzles/Minigames, locating Inventory and Rare Items, speaking with Characters and navigating through different Areas, to progress through the game.
- Special Features include a Diary recapping the story, saved clues and your game progress; Rare Items and Character Cards to add to your Trophy Room collection and a Compass, which contains an interactive map.
- Search Scenes consist of a list of items to eliminate in the scene. In addition, some contain Interactive Items that require you to pick up items to use on another and some may contain a Puzzle/Minigame.
- There are 4 Episodes in Chapter 1. Once you complete an Episode, you’ll return to the Main Menu. Click on Play to continue to the next Episode.
Gameplay and Guide Tips
- This guide assumes you’ve read the General Information, used the in-game Tutorial and/or Help features or otherwise familiarized yourself with the gameplay.
- The Hint button recharges in 60 seconds and the Skip Button charges in 150 seconds.
- The game is fairly non-linear, although some areas aren’t available until after you complete other tasks. You may complete many areas and tasks in any order you choose.
- You may exit out of any Search Scene or Puzzle/Minigame by moving your cursor near the bottom of the screen and clicking. Don’t move it too far to the bottom or the Inventory will pop open and obscure the exit.
- Search Scene lists are random each time you play. Only Inventory Items, Interactive Items and Puzzles/Minigames (if applicable) will be indicated in this walkthrough.
- Many items can be clicked on only offer information. Not everything will be indicated in this walkthrough unless it’s necessary for game progression. Do click on them to add story elements to your Diary, see if there’s a Rare Item to collect and add to your overall experience.
- Some Tasks and Puzzles/Minigames are optional, but they may net you a Rare Item or Character Card to add to your collections in the Trophy Room. If you’d like to collect them all, make sure to investigate everything, thoroughly. Note that there are 10 Rare Items and 6 Character Cards to collect throughout Chapter 1’s 4 Episodes. They, and their locations, will be shown in this walkthrough and listed at the end.
- During dialogs, click the dialog box (it isn’t necessary to click the red arrow below it) to progress quickly. I don’t recommend you do this as the story is exciting, many dialogs are extremely humorous and it adds to your overall gaming experience.
- In many cases, you’ll need to close any open windows to proceed. It’s assumed you’ll know to do this and it won’t be mentioned in this walkthrough.
- After it’s available, you’ll use the Interactive Map to navigate to areas that are beyond the initial locations. Check the Compass when you see it blinking as new areas have become available or there are new tasks in previous areas. You’ll need to return to some areas to complete additional Search Scenes, so be sure to check the Compass, often.
- In this walkthrough, Inventory Items will be indicated in green, Interactive Items/Active Areas in yellow, Rare Items in blue and Puzzles/Minigames in red. Additional/Alternate colors, numbers and/or letters will be used where necessary and for clarification.
Walkthrough
Create your profile, adjust the Options, if you like, and then click Play to begin.
Episode 1: Vampire Wars
Vampire Quarter
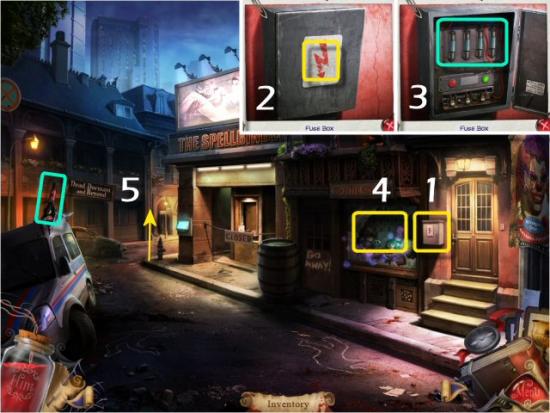
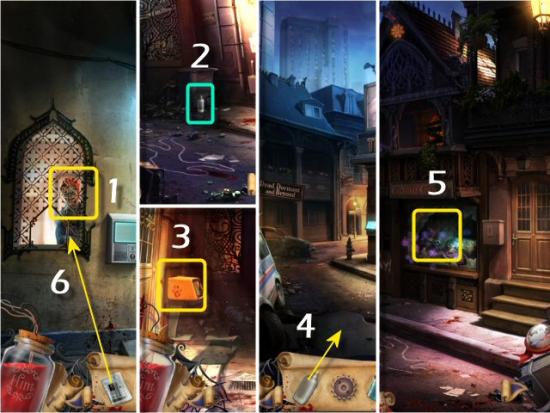
Collect the Rescue Jaws (click 3 times), click on the Fuse Box (1), click on the Cover (2), collect the Fuses (3 – click on each one to remove them) and then click on the GothiCandy Window (4). When complete, continue to The Archway (5).

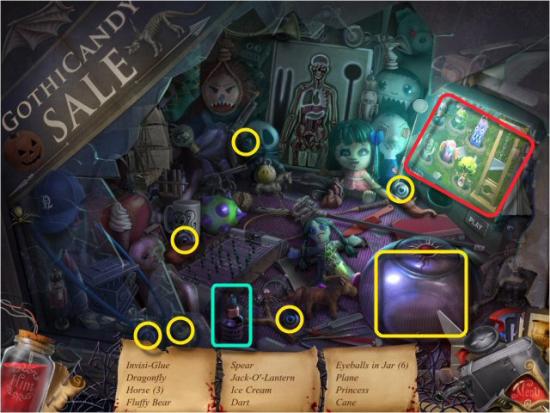
Find all the items in the list. Inventory Item: Invisi-Glue. Interactive Item: Eyeballs in a Jar (6). Click and drag the Eyeballs to the Jar (the front of the jar, not the top). When complete, click on the GothiCandy Window again to play the Happy Guillotine arcade game. Note that you may play the Happy Guillotine game at before you find the items in the list.
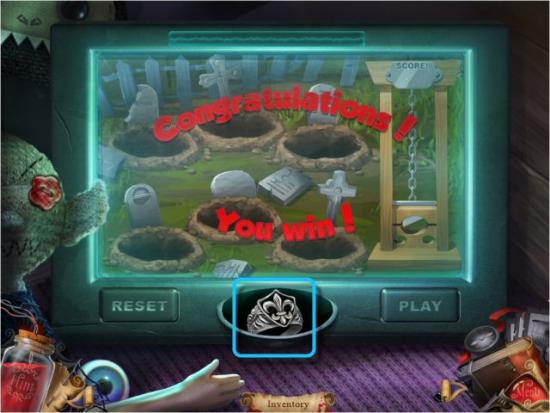
Happy Guillotine Minigame
The object of the game is to “Whack” the Enemy’s Friends when they pop up, score 10 points and eliminate the Enemy. Just before the game begins, a message on the screen will give you the instructions and then tell you what the Enemy’s Friends look like. This is different for each player, so pay attention and avoid clicking on anyone who doesn’t match the description, or you’ll lose points. Click on the following for a video example. Note that the message in my game showed the Enemy’s Friends were “Single-Eyed.” Your game will be different.
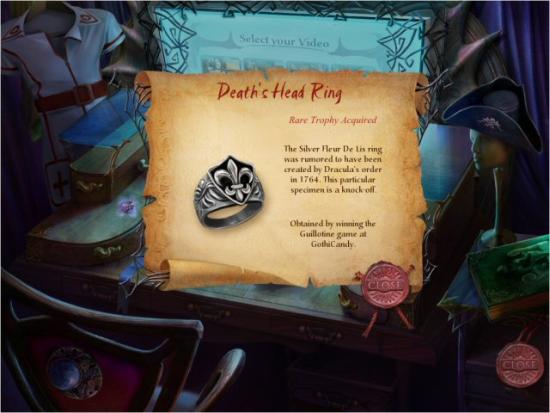
After completing it, collect the Death’s Head Ring (Rare Item #1), and then continue to The Archway.
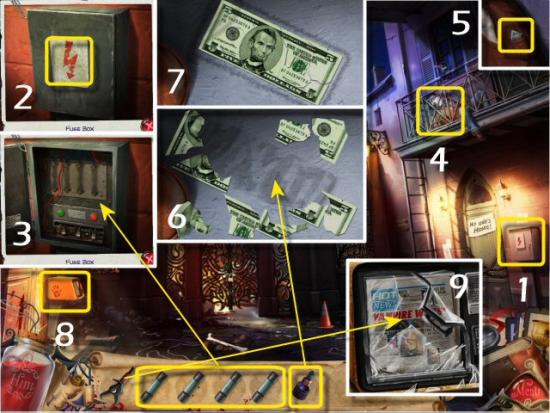
Click on the Electrical Box (1), click on the Cover (2), use the Fuses (3) and then click on the Balcony (4). Collect the 5 Dollar Bill (5 – click twice), use the Invisi-Glue (6) and then reconstruct the 5 Dollar Bill. Click and drag each piece to the correct locations. Right click to rotate the pieces into position and then collect the reconstructed 5 Dollar Bill (7). Click on the Newspaper Vending Machine (8), use the Rescue Jaws (9) and collect the Vampire Wars Newspaper (Character Card #1).
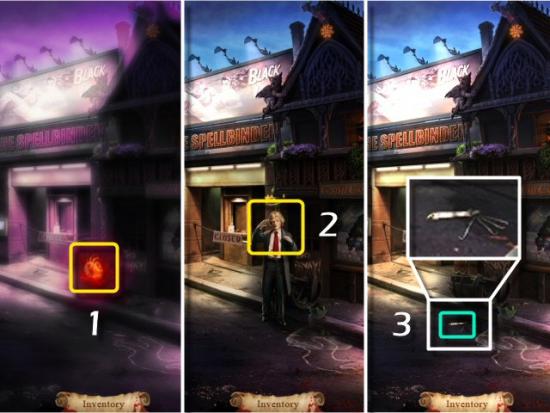
Return to GothiCandy (click back), click on the Pickle Barrel (1), speak to “The Tourist” (2), collect the Lockpick (3) and then return to the Archway (click forward).
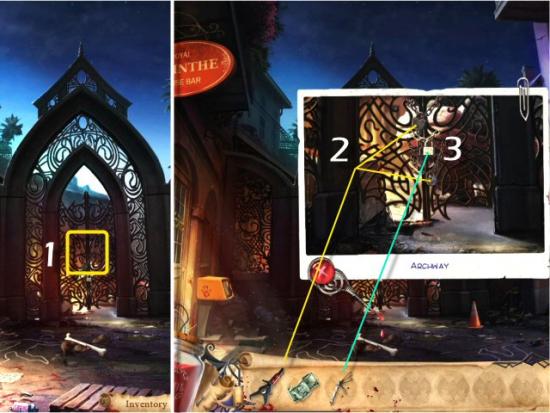
Click on the Gate (1), use the Rescue Jaws on the top and bottom Locks (2), use the Lockpick on the middle lock (3 – if you like, you can just use the Lockpick on all 3 Locks) and then return to GothiCandy (click back).
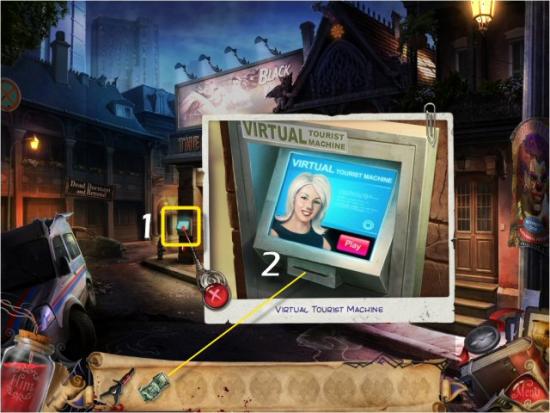
Click on the Virtual Tourist Machine (1), use the 5 Dollar Bill (2) and then head to The Cirque Terrible via the Compass.
Cirque Terrible
Collect the Cheese, click on the Sign Board (1), reconstruct the Message (2 – click and drag the Letters to the proper positions) and then click on the Ticket Booth (3). When complete, continue to Dead Hip Things (4).
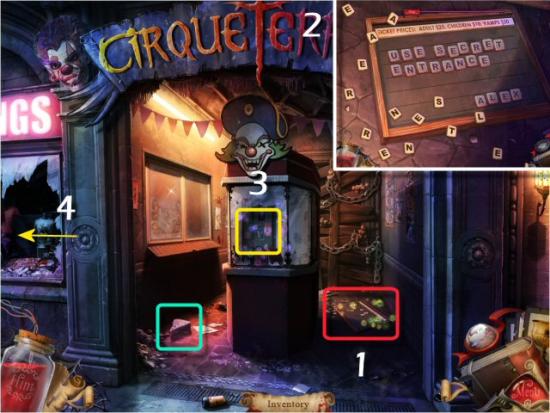
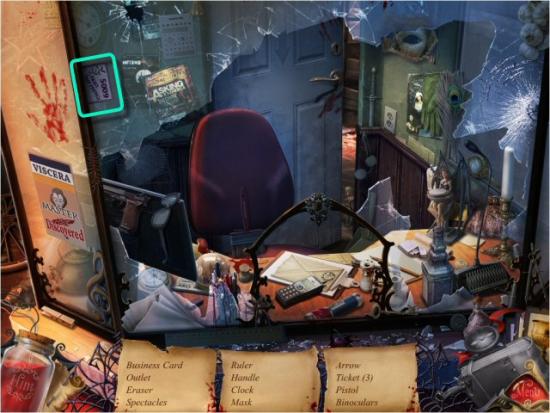
Find all the items in the list. Inventory Item: Business Card. Continue to Dead Hip Things.
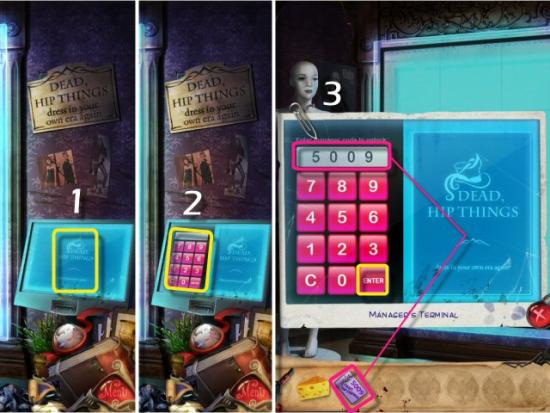
Click on the Terminal (1), click on the Keypad (2) and enter the Code (3 – from the Business Card).
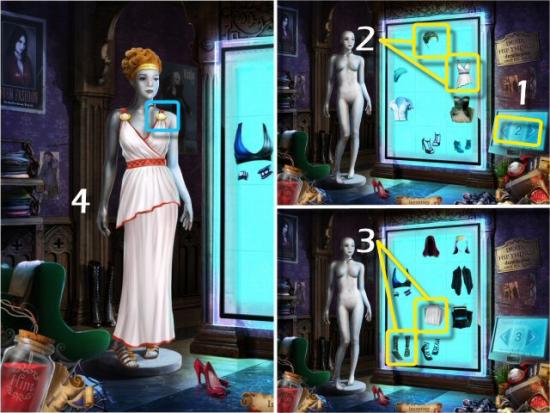
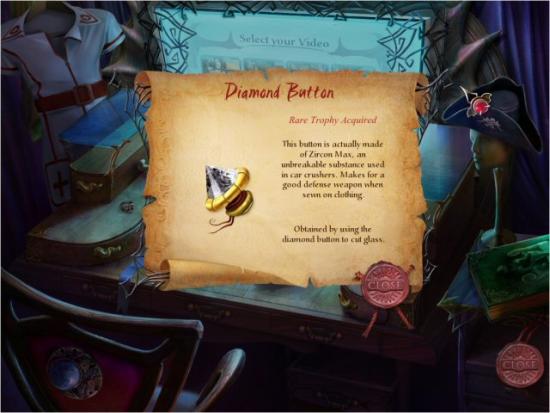
Use the Arrows on the Terminal (1) to scroll through the Choices. Click on the correct Options, which appear on the Screen (2 – screen 2 on the Terminal and 3 – screen 3 on the Terminal), to choose the Outfit (4) from Dahlia’s era (Greek) and then collect a Diamond Button (you can click on either one). Return to the Cirque Terrible (click back).
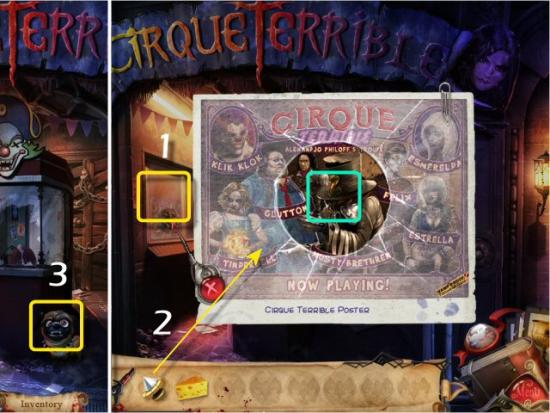
Click on the Theatre Window (1), use the Diamond Button on the Glass (2 – Rare Item #2) and collect the Poster (click on the Poster). Speak with Cinnamon (3) the Dog and then return to the Vampire Quarter via the Compass. Note that from this point on, it’s assumed you’ll know to click on the Compass to travel to the various locations.
Vampire Quarter
Continue to The Archway (1), use the Cheese on the Rats (2) and collect the Bone. Return to the Cirque Terrible and use the Bone on Cinnamon the Dog (3).
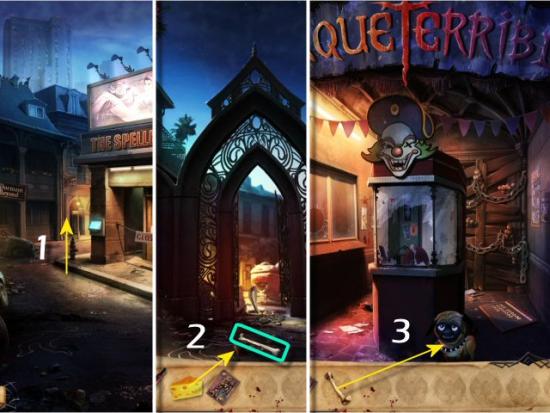
Follow Cinnamon Minigame
“Listen” to the sound of Cinnamon’s barking to figure out where she is and follow her to the location. Click anywhere beyond one of the 4 directions where Dahlia’s standing and she’ll walk to that location. If she’s getting close, Cinnamon’s bark will be “Loud.” If not, it will be “Faint.” Continue to follow her until you arrive at her location. For those that have the sound muted, or those who aren’t hearing-abled, watch the size of the text on the screen. The size of the text (large for “Loud” and smaller for “Faint”) will determine if you’re getting closer or farther away. Note that this minigame is random and the following is an example of my minigame. Yours will be different.
Blood Bank
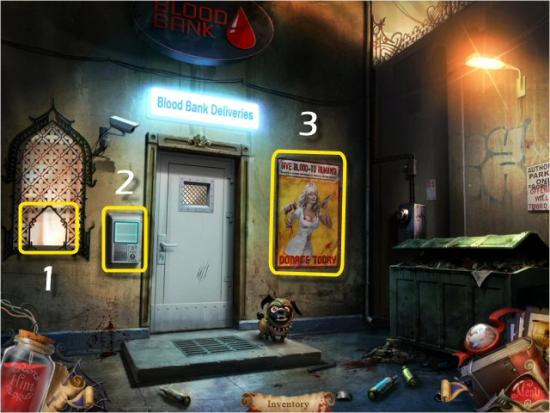
Click on the Window (1) and talk to Slick. Click on the Intercom (2), the Poster (3) and then return to Cirque Terrible via the Compass.
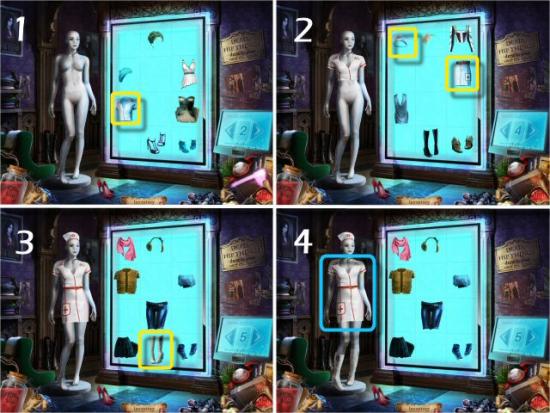
Cirque Terrible
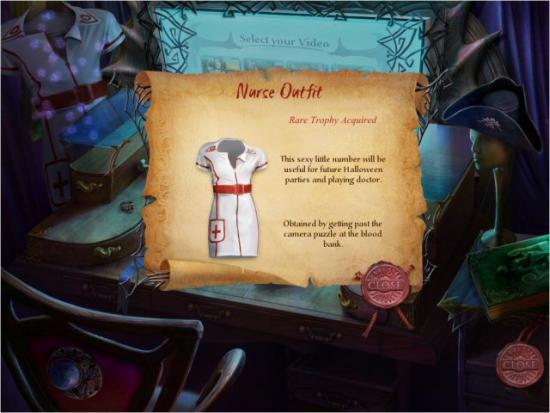
Continue to Hip Dead Things (click left) and use the Terminal Arrows to scroll through the Choices for an outfit that will get Slick to let Dahlia into the Blood Bank (1 – screen 2 on the Terminal, 2 – screen 4 on the Terminal and 3 – screen 5 on the Terminal). The Sexy Nurse Outfit will be perfect. Note that you can remove each item of her previous outfit, first, but it’s not necessary. Once Dahlia’s dressed, collect the Sexy Nurse Outfit (4) and then return to the Blood Bank via the Compass.
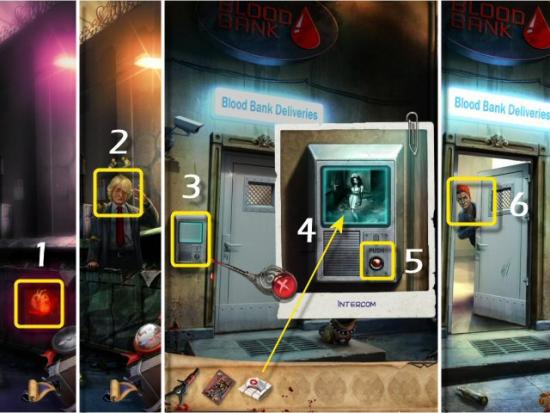
Blood Bank
Click on the Dumpster (1), talk to “The Tourist” (2) and then click on the Intercom (3). Use the Sexy Nurse Outfit on the Screen (4 – Rare Item #3), press the Red Intercom Button (5), talk to Slick (6) and then head to Restful Acres via the Compass.
Restful Acres
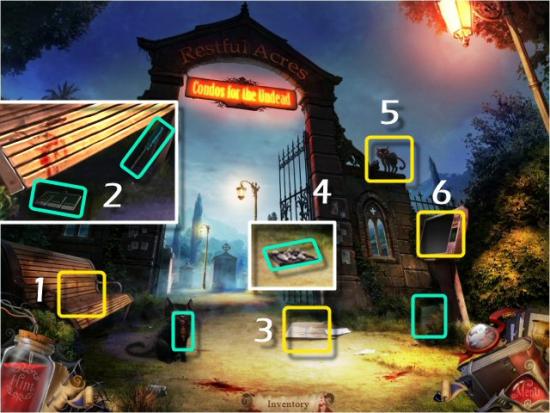
Click on the Bench (1) and collect the Resident Information Chip and Screwdriver (2). Click on the Newspaper (3) and collect the Button Panel (4). Collect the Screen Cover, click on the Cat (5), collect the Electronic Key and then click on the Terminal (6).
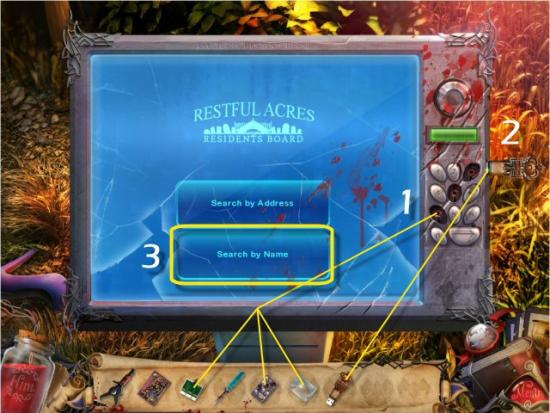
Use the Resident Information Chip, Button Panel, Screen Cover (1 – in that order) and Electronic Key (2) and then click on Search by Name (3).
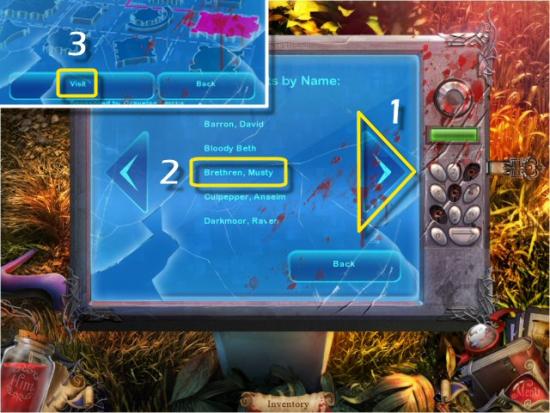
Click the Right Arrow (1 – click once), click on Brethren, Musty (2) and then click on Visit (3).
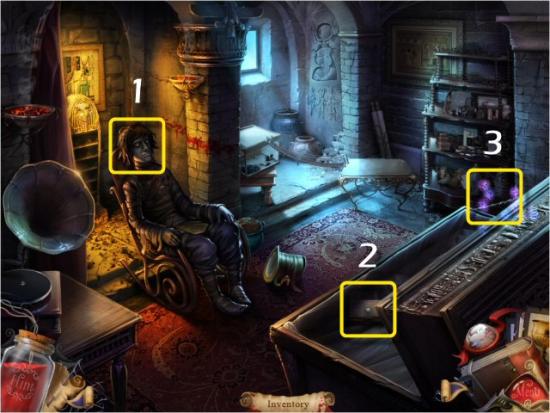
Click on Musty (1 – click twice), click on the Book (2 – click twice) and then click on the Shelves (3).
Find all the items in the list. Inventory (Interactive) Item: Scarab Circus. Click and drag each element (3 Elephants, Castle Tower, Toy Tricycle, Toy Car, Ferris Wheel and Elephant Performance Hoop) to the Circus Scene on the Coffin. Note that you don’t need to collect the Scarab Circus; it’s automatic once you finish the Search Scene. When complete, return to the Vampire Quarter via the Compass and click on the GothiCandy Window.
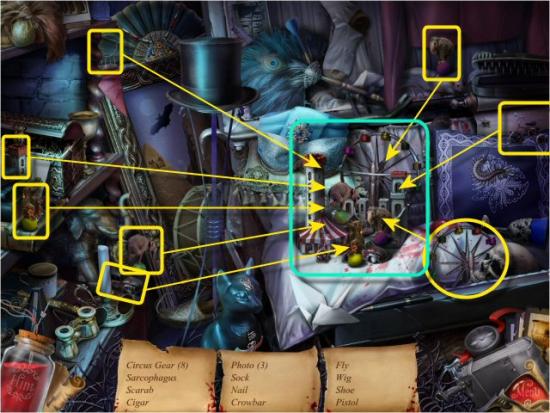
Vampire Quarter
Find all the items in the list. Inventory Items: Tweezers and Tongue Depressor. Interactive Item: Surgery Game. Click and drag each element (Stomach, Heart, Brain, Lung, Tweezers and Tongue Depressor) to the Surgery Game. When complete, return to the Cirque Terrible via the Compass and click on the Ticket Booth.
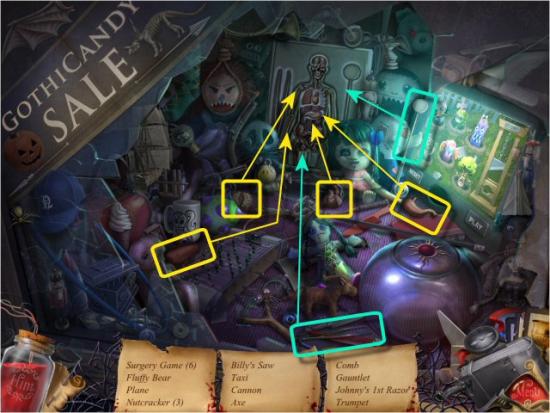
Cirque Terrible
Find all the items in the list. Inventory Item: Phonograph Record. When complete, return to Restful Acres via the Compass.
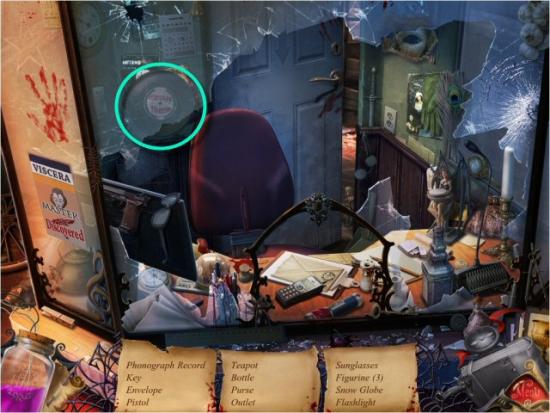
Restful Acres
Click on the Terminal (1), click on Search by Name (2), click on the Right Arrow (3 – click once), click on Brethren, Musty and then click on Visit (4).
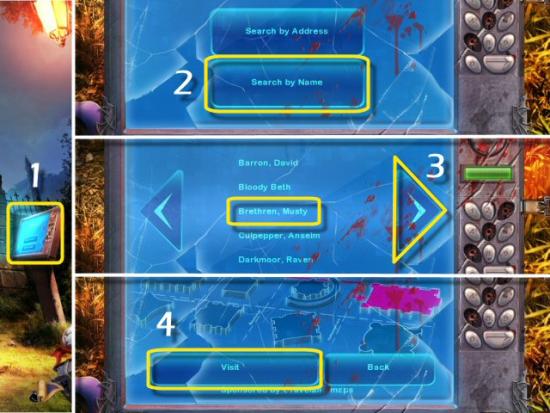
Click on Musty (1) and use the Tongue Depressor and Tweezers (2 – in that order. Character Card #2). Use the Scarab Circus on the Table (3), click on the Scarab Cage (4) and then click on the Latch (5). Use the Phonograph Record on the Gramophone (6) and then click the Gramophone Needle Arm (7). Click on the Scarab Cage, collect the Signet Ring (8) and then return to the Cirque Terrible via the Compass.
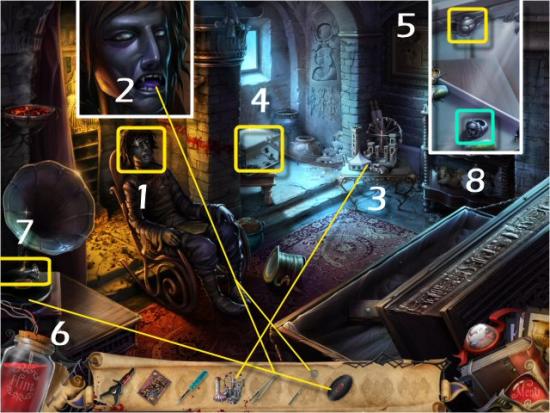
Cirque Terrible
Continue to Dead Hip Things (click left), click on the Sign (1), use the Signet Ring (2), collect the Skeleton Code (3) and then return to Restful Acres via the Compass.
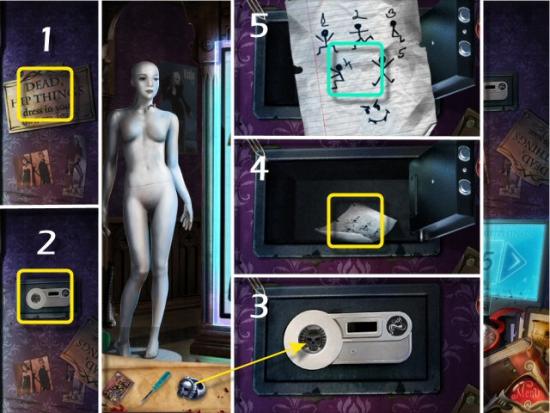
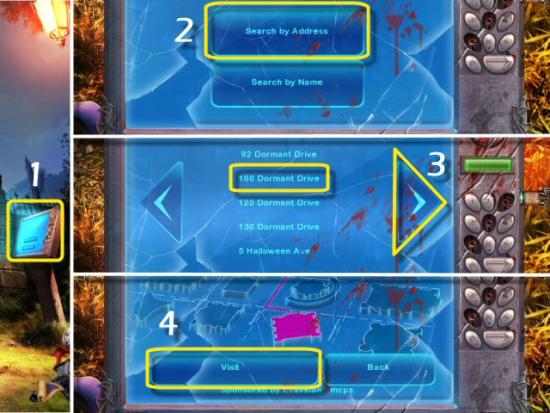
Restful Acres
Click on the Terminal (1), click on Search by Address (2), click on the Right Arrow (3 – click two times), click on 100 Dormant and then click on Visit (4).
Click and drag the Skeleton Tiles to the Spaces above the Door. They must in the same order as shown on the Skeleton Code. When complete, click on the Door (6) and then enter.
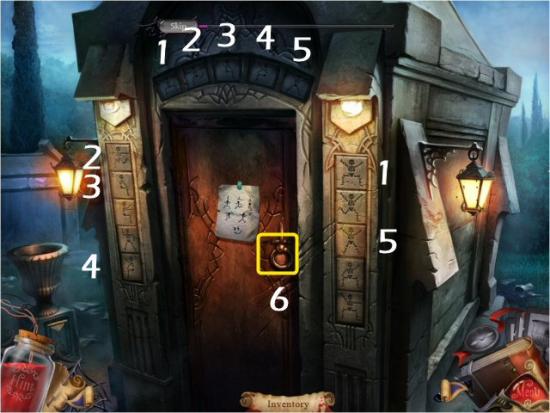
You’ve completed Episode 1: Vampire Wars.
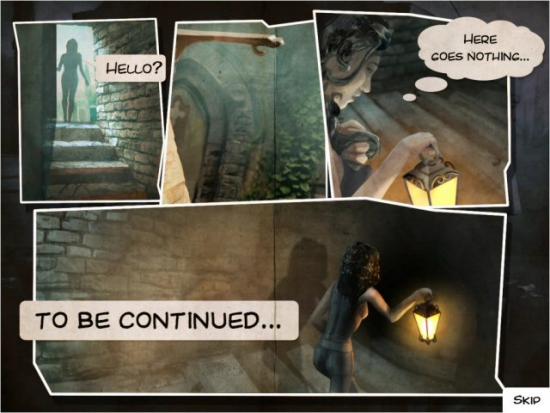
Episode 2: The Wizard in the Basement
Click on Play to continue with Episode 2.
Cirque Terrible Interior
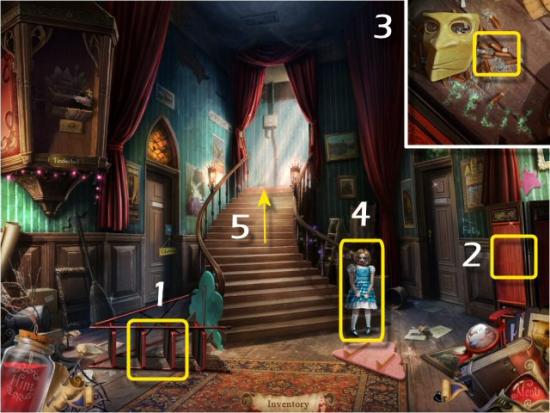
Click on the Step Ladder to right it (1), click on the Folding Screen (2) and then click on the Cigarette Butts (3 – click twice). Try to speak to Tinderbell (4 – Character Card #3) and then head upstairs (5).
Backstage
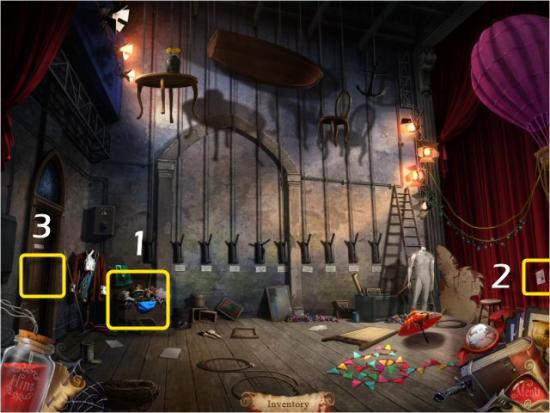
Click on the Trunk (1) and, when complete, click on the Note (2), click on the Door (3) and then enter Alex’s Office.
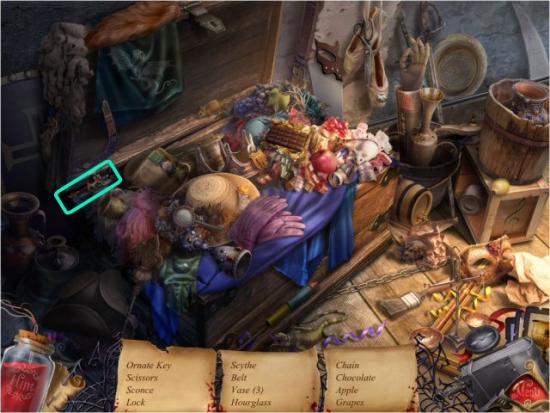
Find all the items in the list. Inventory Item: Ornate Key.
Alex’s Office
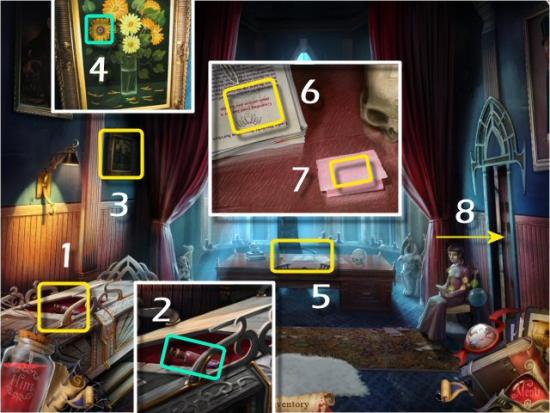
Click on Alex’s Coffin (1 – click twice), collect the Potion Vial (2), click on the Painting (3) and collect the Cog (4 – 1 of 6). Click on the Desk (5), click on the Report (6), click on the Note (7), exit the Office (8) and then return downstairs (click back).
Cirque Terrible Interior
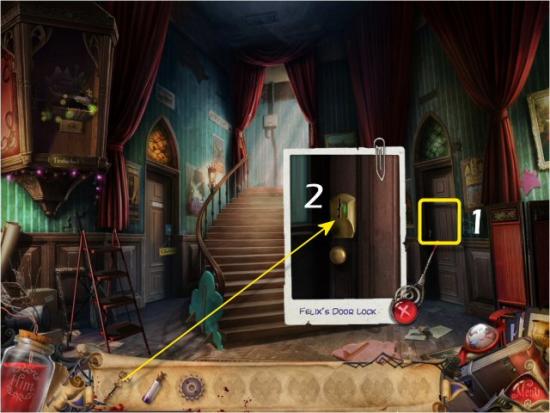
Click on Felix’s Door (1), use the Ornate Key (2) and then Enter Felix’s Room.
Felix’s Office
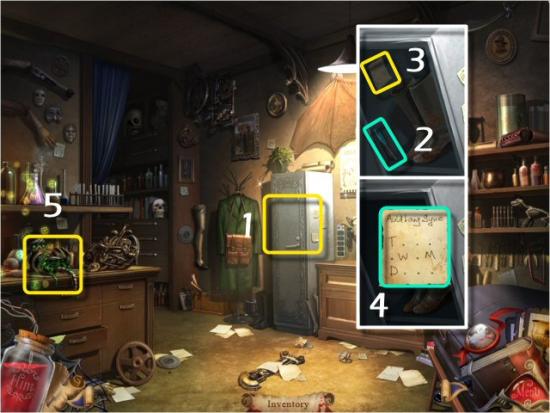
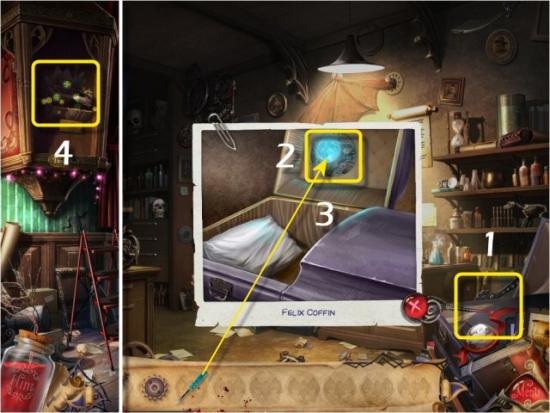
Click on Felix’s Locker (1), collect the Screwdriver (2), click on the Note (3), collect the Sketch (4) and then click on the Worktable (5).
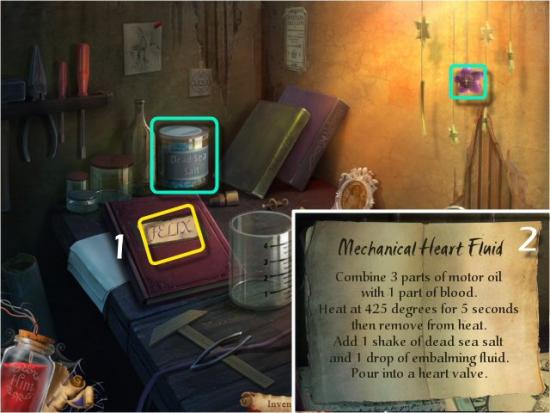
Collect the Dead Sea Salt and Cog (2 of 6), click on Felix’s Book (1 – click once on the book and again on the page) for a Recipe for Mechanical Heart Fluid (2) and then exit the scene (click back).
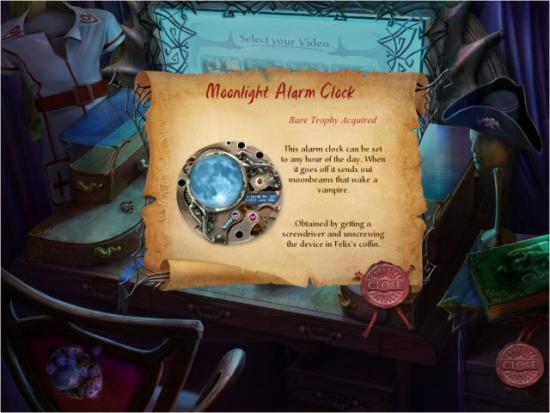
Click on Felix’s Coffin (1), click on the Moonlight Alarm Clock (2) and use the Screwdriver (3 – Rare Item #4) to collect it. Return to the Main Hall (click back) and click on Tinderbell’s Door (4).
Tinderbell’s Door Puzzle
Click and drag each of the Figures (1) onto the correct Posts (2). Use the Sketch (3 – T = Tree, W = Woman, M = Man and D = Dog) in your Diary for a clue on the proper placement of each Figure. Note that the solution to this puzzle is always the same. Click on the Drawer (4), collect the Key and then use it in the Lock (5) and click on the Key.
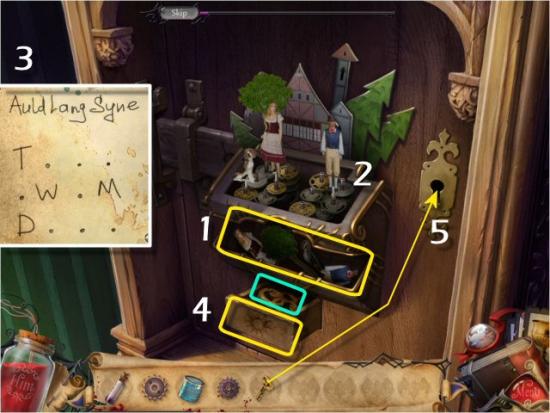
Click on the following for the video puzzle solution.
Tinderbell’s Room
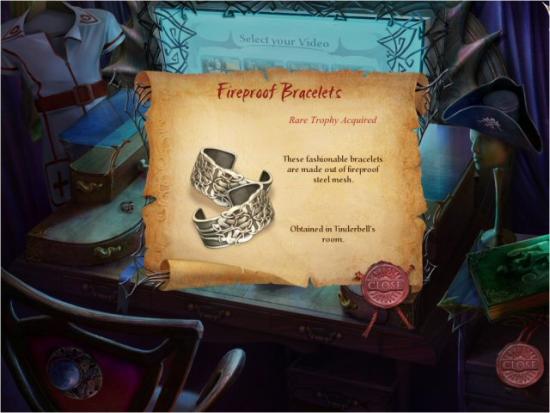
Click on the Tinderbell’s Coffin (1 – click twice), collect the Cog (3 of 6) and click on the Flower (2). Speak to Tinderbell (3), click on the White-Board (4), collect the Fireproof Bracelets (5 – Rare Item #5) and then click on the Shelves (6).
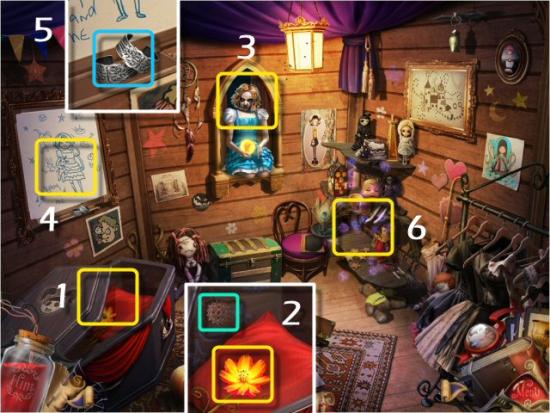
Find all the items in the list. Inventory Item: Cog (4 of 6). When complete, return to the Blood Bank via the Compass.
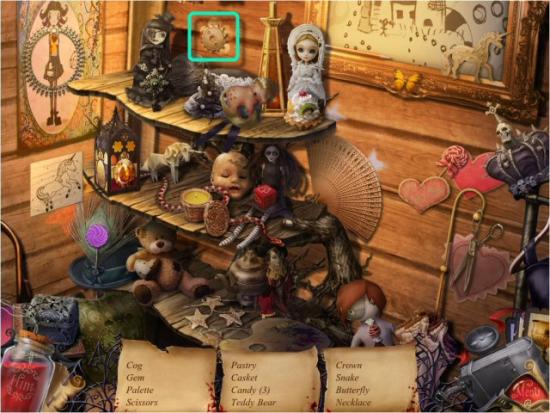
Blood Bank and Vampire Quarter
Click on the Window, speak to Slick (1), return to the Vampire Quarter via the Compass and continue to the Archway (click forward). Collect the Twist-cap Bottle (2), click on the Newspaper Vending Machine (3), collect the Newspaper and then return to GothiCandy (click back).
Use the Twist-cap Bottle on the Oil Spill (4) and then click on the GothiCandy Window (5). When complete (after you finish the Search Scene), return to the Blood Bank via the Compass and use the Newspaper on Slick (6 – you don’t need to click on the Window first, you can just use the Newspaper on the Window). Return to the Cirque Terrible Interior via the Compass and continue Backstage (click forward).
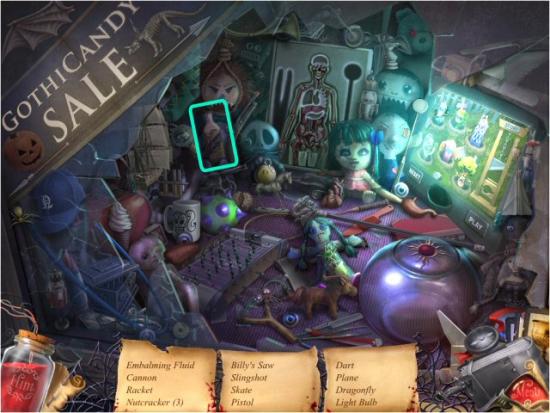
Find all the items in the list. Inventory Item: Embalming Fluid.
Backstage
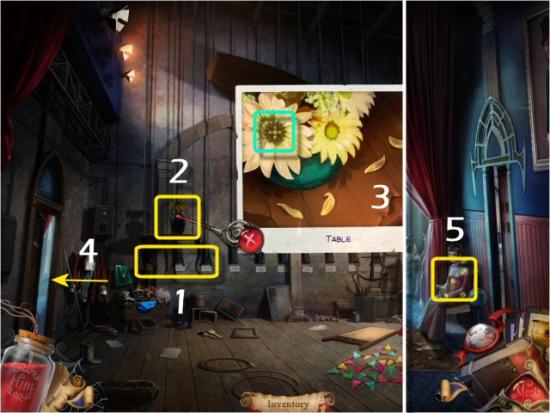
Click on the first three Scenery Control Levers (1) to lower the Table, click on the Table (2) and collect the Cog (3 – 5 of 6). Enter Alex’s Office (4) and click on the Mechanical Secretary (5).
Alex’s Office
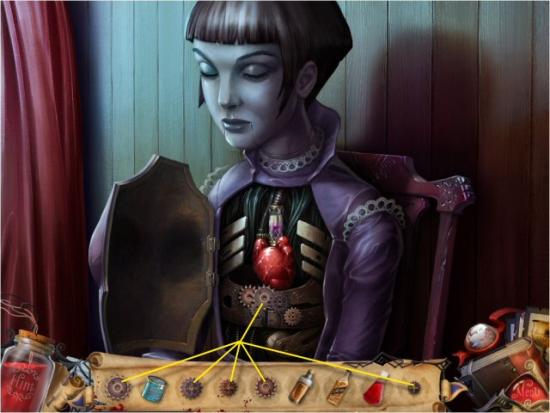
Click on the Mechanical Secretary’s Chest, use the Cogs, return to the Cirque Terrible via the Compass and then click on the Ticket Booth.
Cirque Terrible
Find all the items in the list. Inventory Item: Cog (6 of 6). When complete, return to the Cirque Terrible Interior via the Compass, continue to Alex’s Office (click forward and then left) and then click on the Mechanical Secretary.
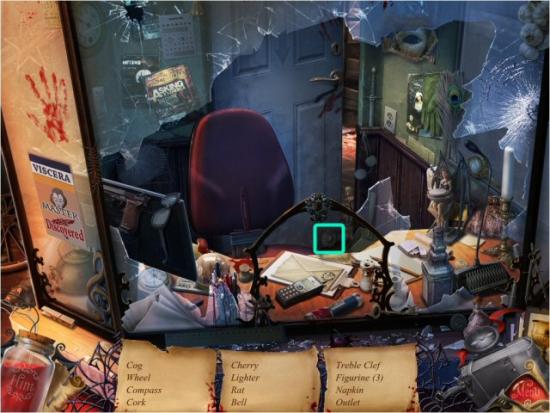
Alex’s Office
Use the Cog in the remaining Space, collect the Heart Valve and then return to Felix’s Room (click back, right, back and then right).
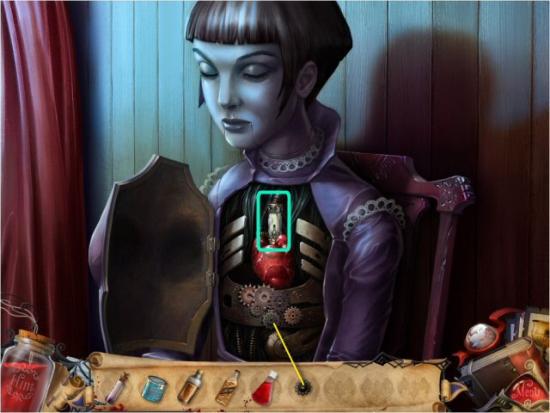
Felix’s Room
Click on the Sunlamp (1), use the Potion on the Lamp (2), press the Red Button (3) and then click on the Worktable (4).
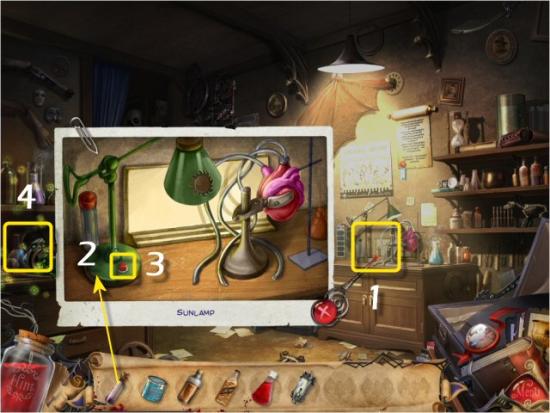
Use the Bottle of Oil (1 – you need 3 parts, so you’ll repeat this 2 more times) and Pint of Blood (2) on the Glass Measure. Set the Temperature to 425 (3 – click twice) and then click and drag the Glass Measure to the Burner (4 – it will be returned to the Table when complete). Use the Dead Sea Salt (5), Embalming Fluid (6) and finally the Empty Mechanical Heart Pump (7) on the Glass Measure. Return to Alex’s Office (click back twice, forward and then left) and click on the Mechanical Secretary.
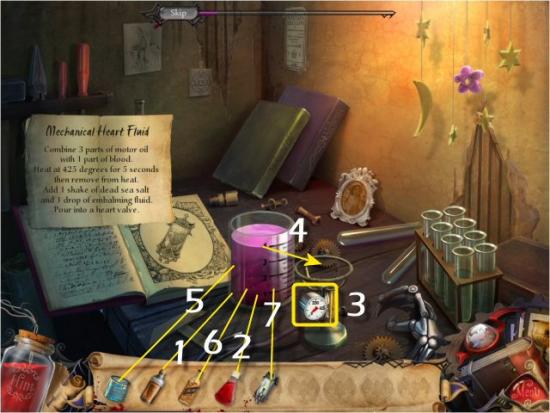
Alex’s Office
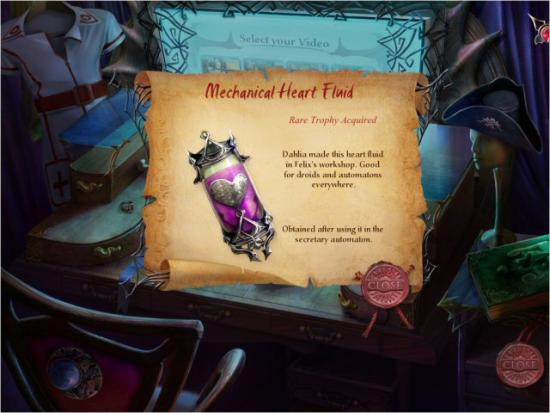
Use the Mechanical Heart Fluid (1), remove the Mechanical Heart Fluid (2 – Rare Item #6) and then click on the Mechanical Secretary (3 – click back to exit the scene, first) to collect the Spring. Return Backstage (click right).
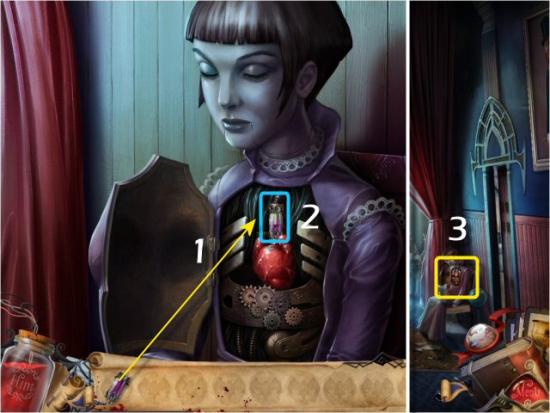
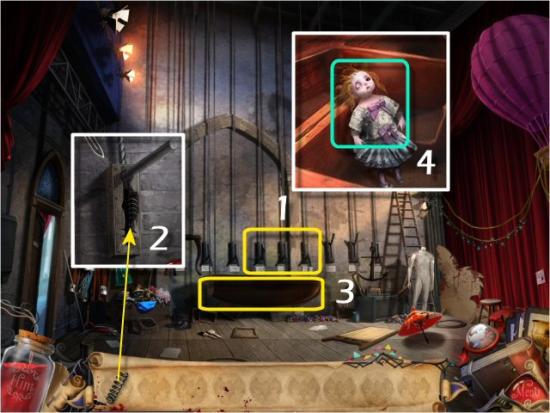
Backstage
Click on the Fifth Lever (1 – the middle lever of the 3 indicated) of the Scenery Controls, use the Spring (2), click on the remaining 2 levers (on either side of the Fifth Lever), click on the Boat (3) and collect Tinderbell’s “Baby” (4).
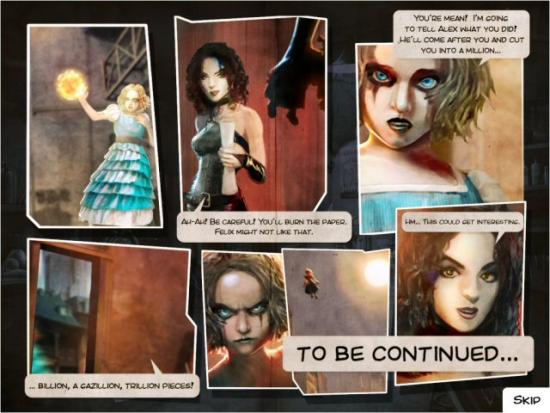
You’ve completed Episode 2: The Wizard in the Basement.
Episode 3: The Glutton of Gilborne
Click on Play to continue with Episode 3.
New Orleans – Backstage and Memphis – Hog Haven
Click on the Boat (1), click on the Newspaper (2) and then head to Memphis and Hog Haven via the Compass. Collect the Rake, click on the Compost (3), use the Rake (4) and collect the Rusty Key. Return to New Orleans and the Cirque Terrible Interior via the Compass, continue Backstage (click forward) and then click on the Trunk (5).
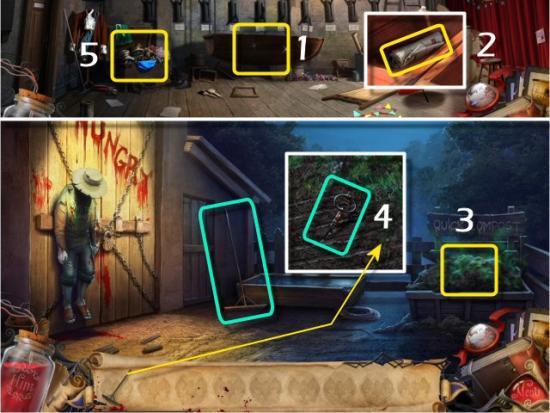
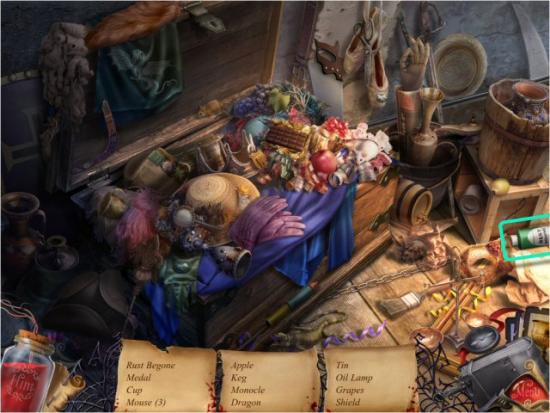
Find all the items in the list. Inventory Item: Rust Remover (the Rusty Key will automatically be cleaned). Return to Memphis and Hog Haven via the Compass.
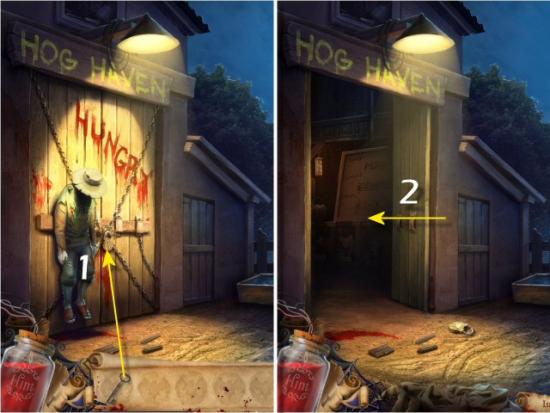
Use the Key on the Lock (1) and enter the Barn (2).
Pig Sing Minigame
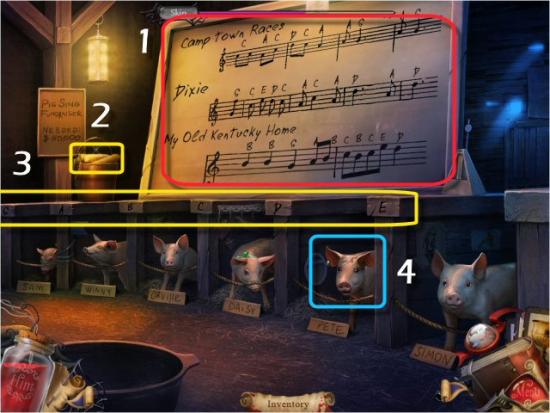
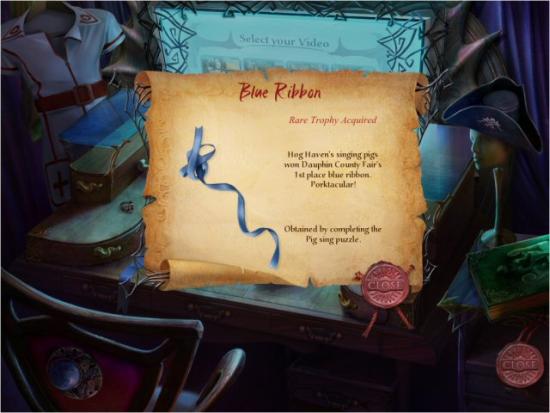
The object is to find out which of the Pigs is the Were-Pig. You’ll need to direct the Pigs in singing all 3 of the Songs on the Board (1). Click on an Ear of Corn (2) and then click on the Pigs, in succession, to play each song. The Notes that each Pig sings are shown at the upper left, above each of their pens (3). This is a tough minigame because you’ll also need to keep accurate tempo, according to the Musical Score. If necessary, you can just skip this minigame once the Skip Button has charged. When complete, you’ll speak to the Were-Pig, Pete (4) and receive the Blue Ribbon (Rare Item #7) and the Petite Pete card (Character Card #4). Note that you’ll receive these whether you successfully complete the minigame or simply skip it. When you’re finished, return to New Orleans and Restful Acres via the Compass.
New Orleans – Restful Acres
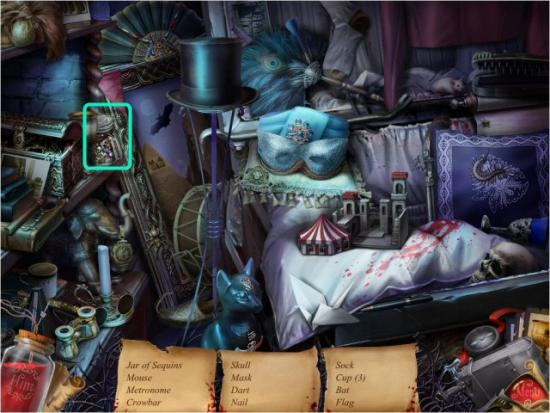
Note that you no longer need to use the Terminal. Click forward to Musty Brethen’s and click on the foot of Musty’s Coffin (on the right). Find all the items in the list. Inventory Item: Jar of Sequins. Return to Memphis and continue Downtown via the Compass.
Memphis – Downtown
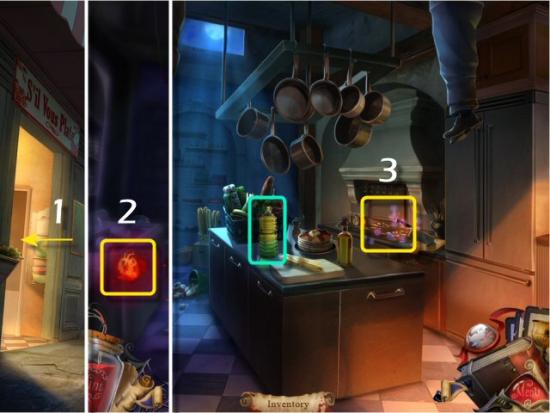
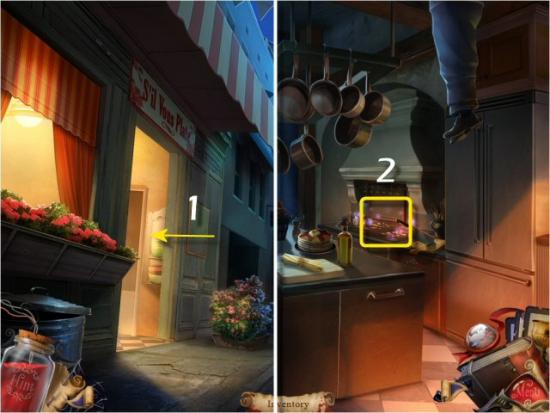
Enter the S’il Vous Plate (1), click on the Chef (2), collect the Cooking Oil and then click on the Stovetop (3).
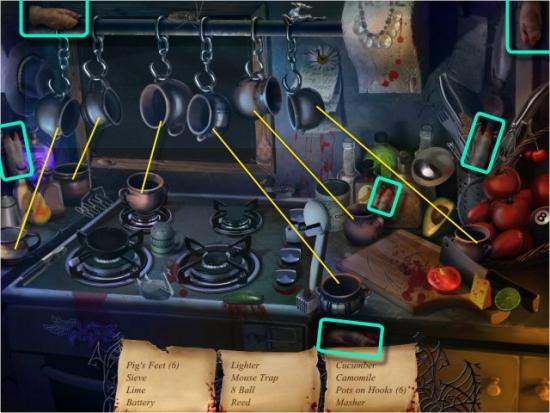
Find all the items in the list. Inventory Items: Pig’s Feet (6). Interactive Item: Pots on Hooks (6). Note that you can place the Pots anywhere on the row of hooks. Just click and drag each one and it will go into its assigned spot.
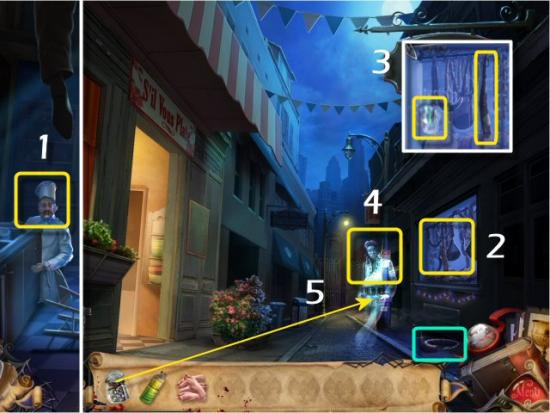
Speak to the Chef, Monsieur BoBo (1 – click on him after you finish speaking to him the first time), exit to the Street (click back) and click on Carnie’s Meat Shop Window (2). Click on the Oxtail and Handprint (3), speak to Melvis (4), use the Jar of Sequins on him (5) and then collect the Oxtail. Return to New Orleans and Restful Acres via the Compass and continue to Musty Brethren’s (click forward).
New Orleans – Musty Brethren’s and Memphis – Southern Grease
Collect the Clay (1), return to Memphis and continue to Southern Grease via the Compass and then click on the Book Rack (2).
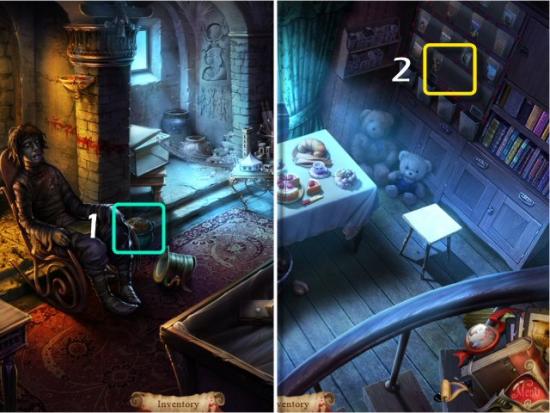
Cookbook Minigame
The object is to find the Cookbook that matches the description Melvis gave you (1) and then move the books until it appears above the active Dispensing Button (2). Click on the Arrows to shift the books around until you uncover the correct Cookbook (3) and then continue until it appears at the active Dispensing Slot (4). Note that each Slot can hold no more than 4 books. Click on the Dispense Button and then collect the Cookbook (5). Note that the solution is always the same.
Click on the following Arrows for the solution (R = right, L = left, U = up and D = down):
k – R | j – R | e – U | i – U | j – L | m – D | p – U | o – R | n – R |
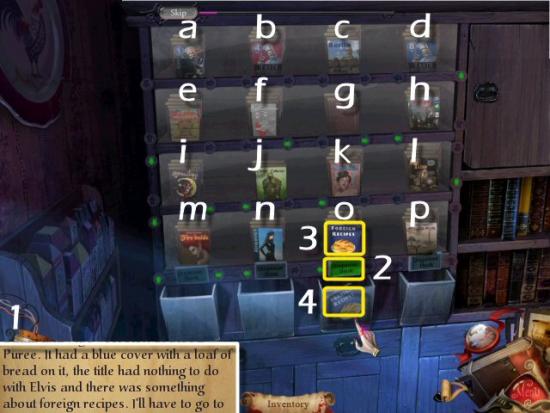
Click on the following for the video solution.
Memphis – Southern Grease and Hog Haven
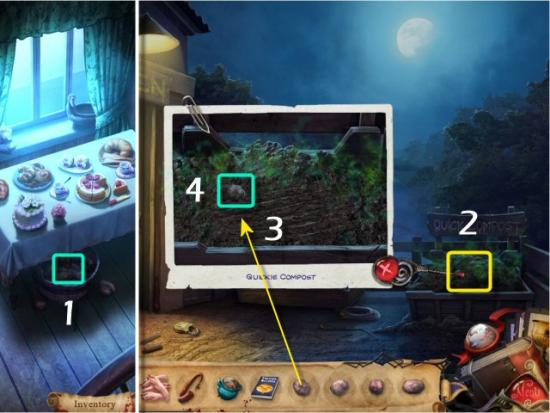
Collect 4 Potatoes (1 – click 4 times), return to Hog Haven via the Compass, click on the Compost (2), use one of the Potatoes in the Compost (3) and collect it as soon as it Rots (4). You’ll need to repeat this 3 more time. Note that if you put all 4 Potatoes in the Compost, they may rot away and you’ll have to return to Southern Grease to get more. Simply do them one at a time. Return to Downtown via the Compass.
Memphis – Downtown
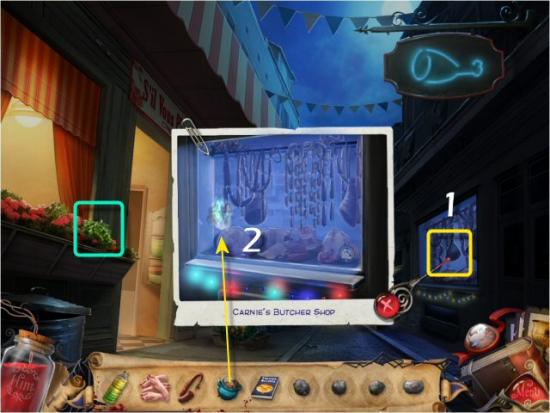
Collect the Parsley and click on Carnie’s Meat Shop Window (1). Use the Clay on the Handprint (2) and then return to New Orleans and the Cirque Terrible Interior via the Compass.
New Orleans – Cirque Terrible Interior
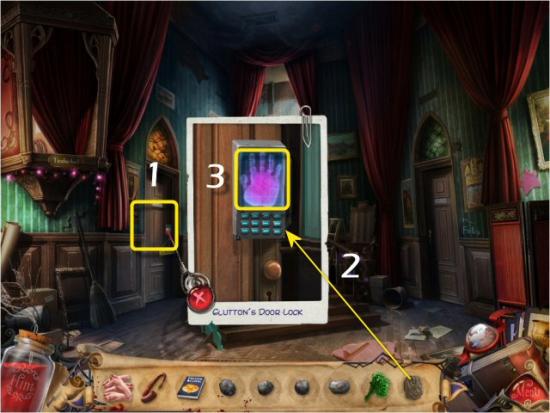
Click on the Glutton’s Door (1), use the Hand Print in the Lock (2), click on the Hand (3) and then enter Glutton’s Room.
New Orleans – Glutton’s Room
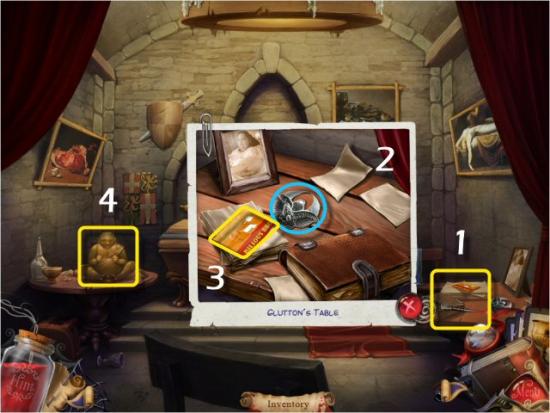
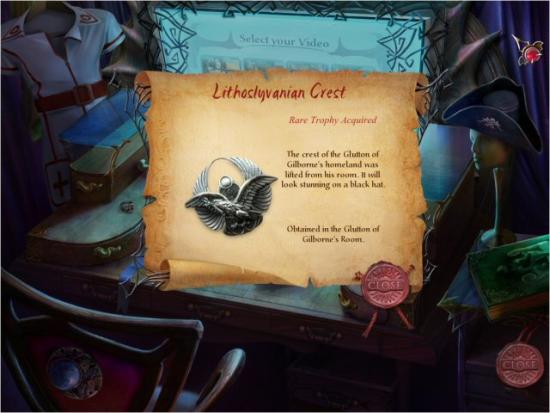
Click on the Table (1), collect the Lithoslyvanian Crest (2 – Rare Item #8), click on the Bilious BBQ Business Card (3) and then click on the Buddha (4).
Feed the Buddha Puzzle
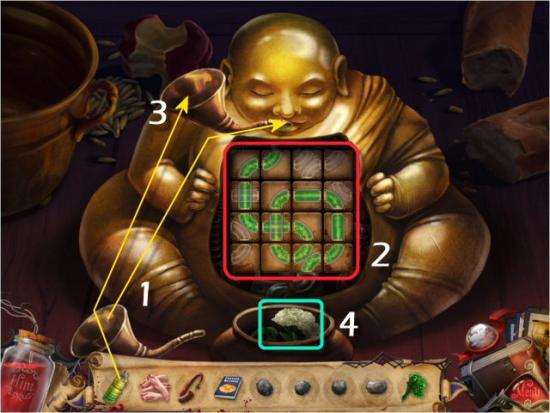
Click and drag the Funnel to the Buddha’s Mouth (1), click on the Tiles to rotate them so they form a continuous Path from the Buddha’s Mouth to the Bowl (2), use the Cooking Oil on the Funnel (3) and collect the Sambuka Herb (4). Return to the Blood Bank via the Compass.
New Orleans – Blood Bank and Memphis – Bilious BBQ
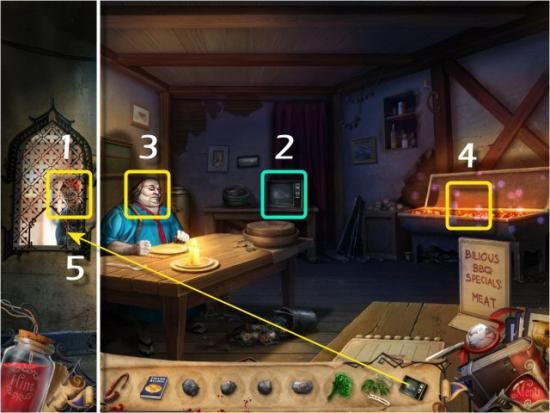
Click on the Window, speak to Slick (1), return to Memphis and continue to Bilious BBQ via the Compass. Collect the Television (3), speak to the Glutton (4) and then click on the Grill (5). When complete, return to New Orleans and the Blood Bank via the Compass and use the Television on the Window (6). Return to Memphis and Downtown via the Compass.
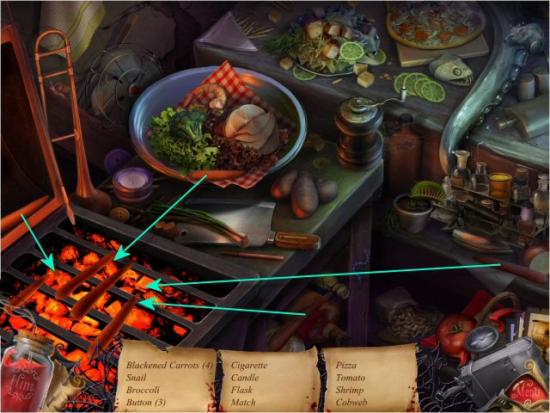
Find all the items in the list. Inventory (Interactive Item) Item: Blackened Carrots. Click and drag the Carrots to the Grill.
Memphis – S’il Vous Plate
Enter S’il Vous Plate (1) and then click on the Stovetop (2).
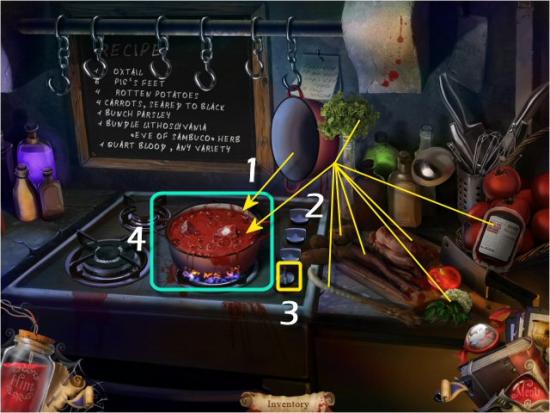
Click and drag the Pot to the Burner (1), add all the Ingredients (2 – click and drag each Ingredient to the Pot. Note that you may add them in any order you like), click on the Knob (3) and collect the Oxtail and Pig’s Feet Stew in Blood Puree (4). Return to Bilious BBQ via the Compass.
Memphis – Bilious BBQ
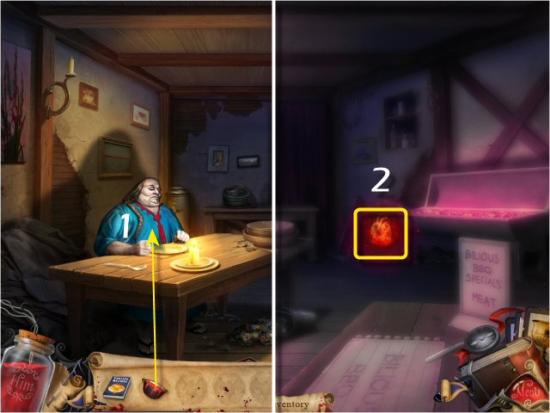
Use the Stew on the Glutton (1 – if you like, you can just click on him; he’ll automatically get the Stew) to receive the Glutton of Gilborne card (Character Card #5) and then click on the Crate (2).
You’ve completed Episode 3: The Glutton of Gilborne.
Episode 4: Inked
Click on Play to continue with Episode 4.
Memphis – Motel
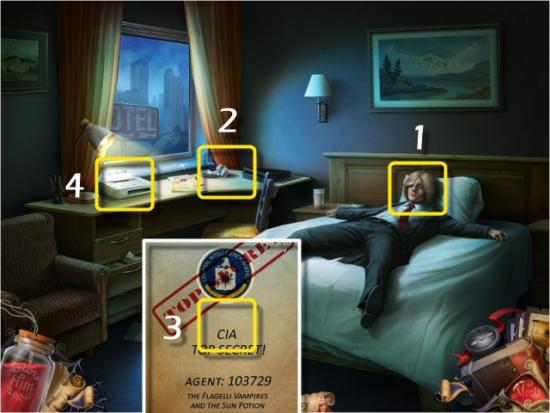
Click on Johnny (1 – click twice), click on the Desk (2), read the CIA Folder (3 – click 4 times) and then click on the Fax Machine (4).
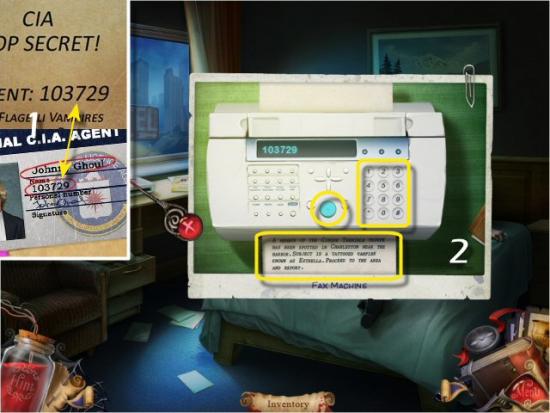
Enter the Code (1 – Either the number from Johnny’s ID in your Diary, or the number on the CIA Files, on the Desk) on the Keypad, press the Blue Button and then click on the Fax (2).
Charleston – Harbor
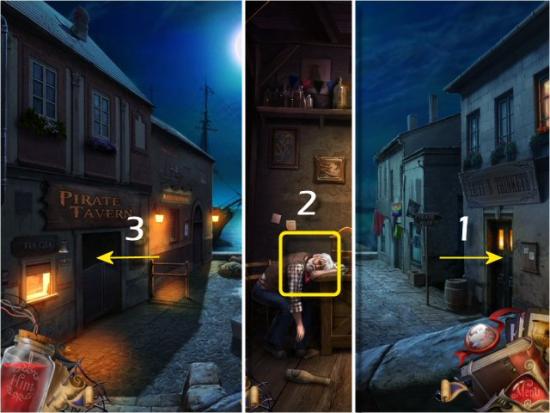
Enter the Tattoo Parlor (1), click on the Sleeping Man (2), return to the Street (click ) and then enter the Tavern (3).
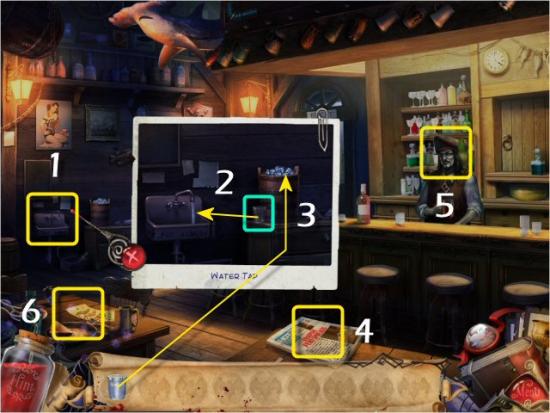
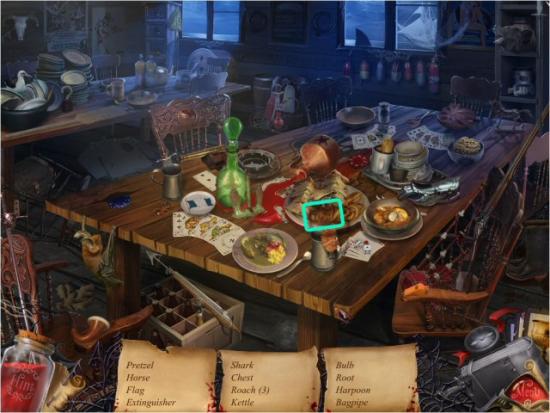
Click on the Sink (1), click on the Glass, drag it to the Tap (2) and then use the Glass of Water on the Bucket of Ice (3). Click on the Newspaper (4), speak to the Black Jack (5 – click on him twice) and then click on the Table (6).
Find all the items in the list. Inventory Item: Pretzel. When complete, return to the Street (click forward) and then enter the Tattoo Parlor (click right).
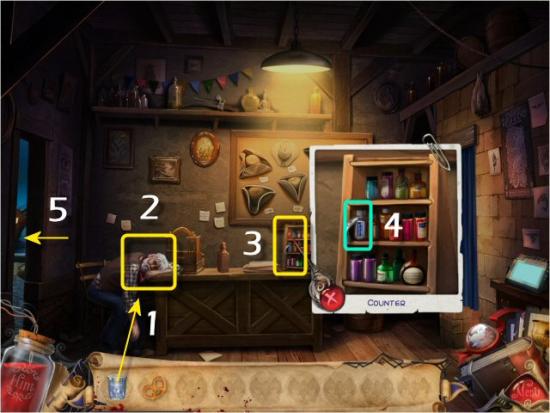
Use the Ice Water on Salty Sam (1), speak to him (click on him 3 times), click on the Ink Display (2), collect the Blood Thinner (3) and then return to the Street (4).
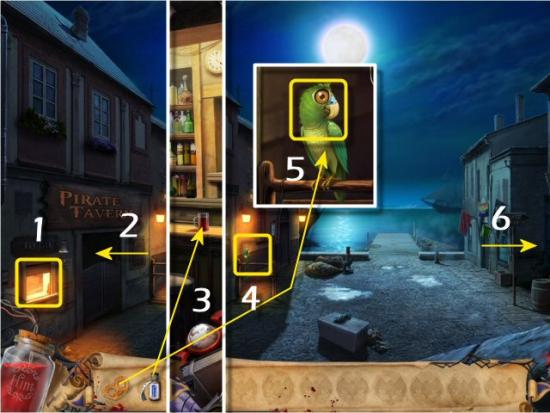
Click on the Take Out Window (1 – click twice), enter the Tavern (2), use the Blood Thinner on Black Jack’s Drink (3) and then return to the Street (click forward). Click on Polly (4), click on her again and use the Pretzel (5), click on her again and then continue to Pirate Alley (6).
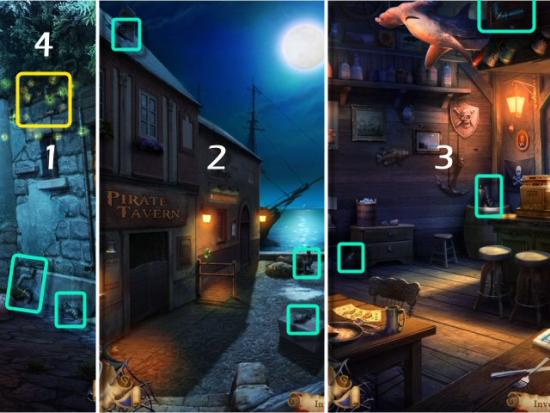
Collect 2 Pipes (1 – 2 of 8), return to the Street (click back) and collect 3 Pipes (2 – 5 of 8). Enter the Tavern (3), collect 2 Pipes (4 – 8 of 8), return to Pirate Alley (click forward and then right) and then click on the Broken Downspout (4).
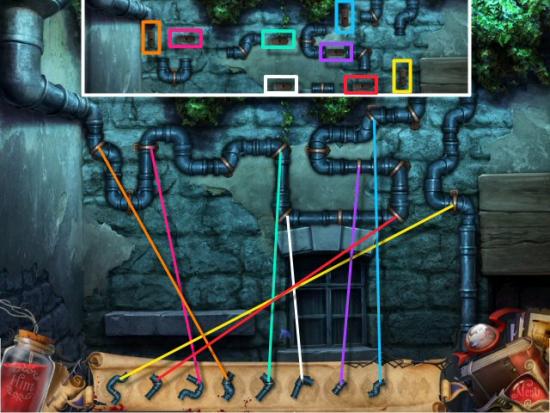
Pipe Puzzle
Use the Pipes to repair the Broken Downspout. Click and drag each Pipe and place it onto the Mounting. You can click and right click each piece but you really don’t need to. Once you place it onto its Mounting, it will lock in place. When complete, return to Memphis and Downtown via the Compass.
Memphis – Downtown
Collect the Coins (1), enter S’il Vous Plate (2) and then click on the Stovetop (3).
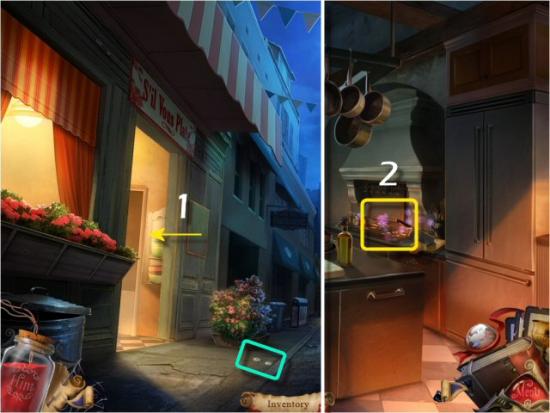
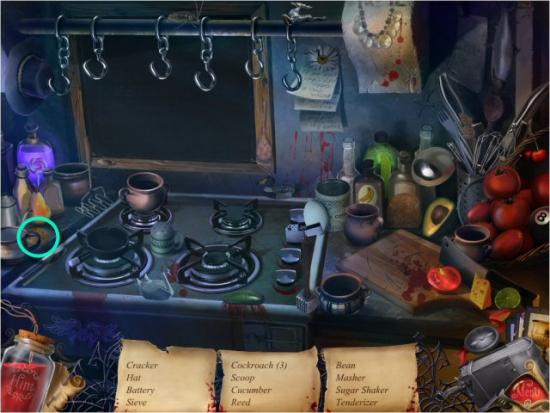
Find all the items in the list. Inventory Item: Cracker. When complete, return to Charleston and the Harbor via the Compass.
Charleston – Harbor
Click on Polly (1), use the Cracker on her and then speak to her (2). Return to the Pirate Alley (3), click and drag the Basket Ball (4) and Rock (5), in that order, onto the Board, collect the Peanut, click on the Rock to remove it from the Board and then return to the Street (click back). Click on Polly again, use the Peanut (6) and then speak to her again.
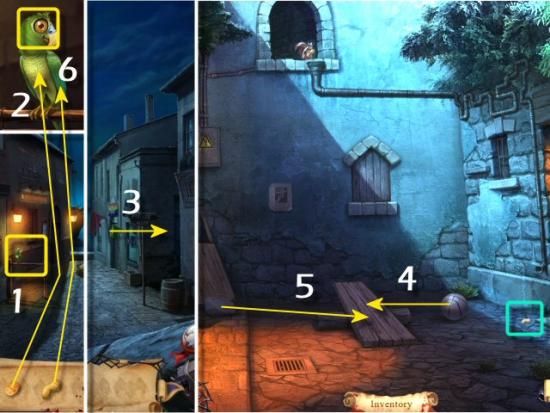
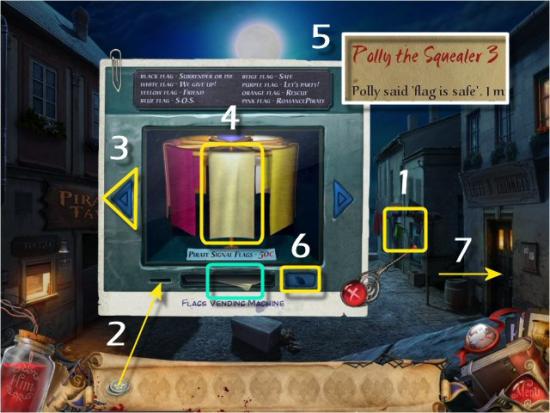
Click on the Flag Vending Machine (1), use the Coins in the Slot (2) and use the Left Arrow (3 – click twice) to choose the Beige Flag (4) that Polly said was Safe (5 – check your Diary). Click on the Vend Button (6), collect the Flag and then enter the Tattoo Parlor (7).
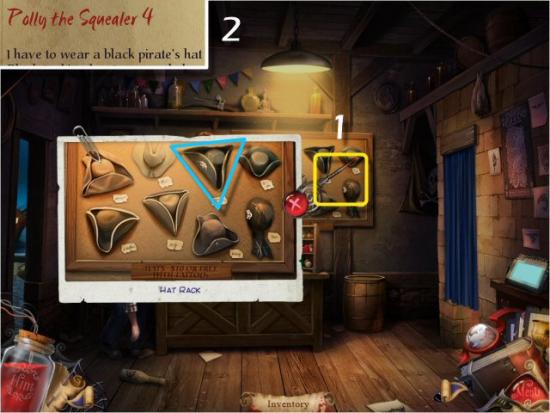
Click on the Hat Display (1), collect the Pirate Hat (Rare Item #9) that Polly said to wear (2 – check your Diary), return to New Orleans and the Cirque Terrible via the Compass and continue to Hip Dead Things (click right).
New Orleans – Cirque Terrible
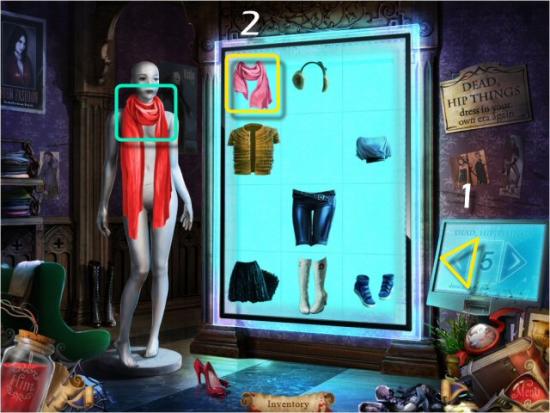
Click the Left Arrow once (1 – to get to Screen 5), click on the Red Scarf (2), collect it from the Mannequin and then return to Charleston and the Harbor via the Compass.
Charleston – Harbor
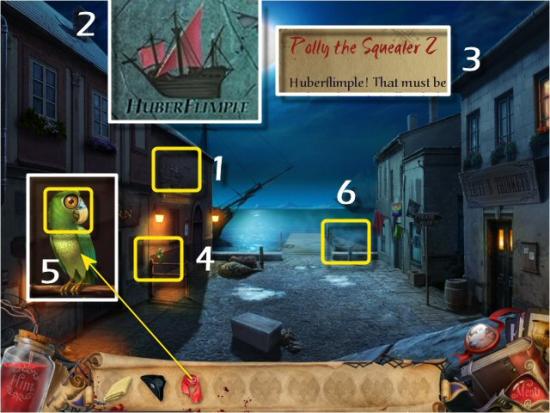
Click on the Ships Mural (1) and note the Ship with the Pink Sails (2) that Polly hinted was where Estrella was hiding (3). Click on Polly (4), use the Red Scarf on her and then speak to her (5). Click on the Dinghy (6) at the end of the Dock.
Charleston – The Huberflimple
Plot a course to reach the Huberflimple. Click anywhere in front of the Dinghy to start and then click again to change course so you avoid any obstacles.

Speak with Estrella (1 – click on her 2 more times) and then exit the Ship (2).
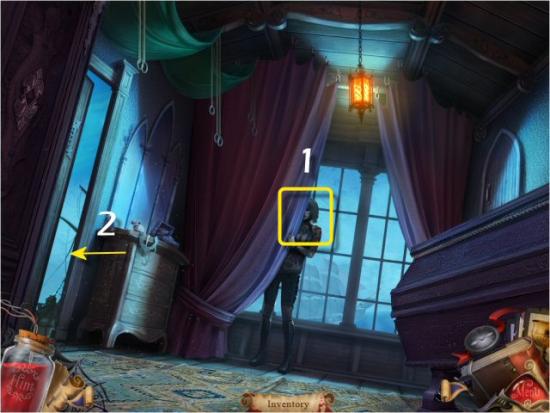
Plot a course back to the Dock. Click anywhere in front of the Dinghy to start, click to change course and avoid obstacles and then click on the Dock. Return to the New Orleans and the Cirque Terrible via the Compass and continue to Hip Dead Things (click right)

New Orleans – Cirque Terrible
Click on the Arrows to cycle through each of the 5 Screens. Click on the items that will create an outfit Estrella would normally wear. You’ll need an item from Screens 1, 3, 4 and 5 (1, 2, 3 and 4). Collect the Estrella Outfit, return to Charleston and the Harbor via the Compass and then enter the Tattoo Parlor (click right).
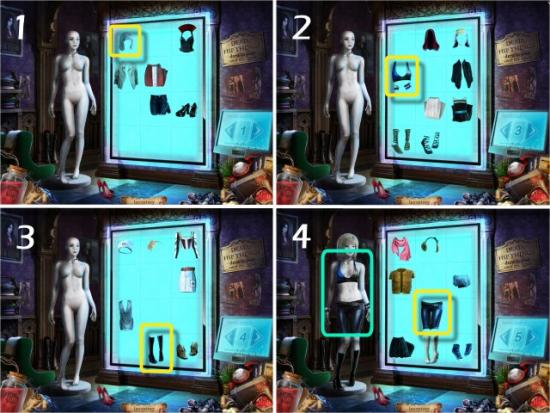
Charleston – Harbor
Click on the Tattoo Maker (1), click on Flowers (2) and click on the upper left Flower (3 – click the OK Button after you choose) that matches Estrella’s Tattoo. Click on each section of the Tattoo (4 and 5 – click the OK Button after you choose) until the colors match Estrella’s Tattoo (6 – Aqua and Orange-Red) and then click the Location (7 – Chest; click the OK Button after you choose). Return to the Street (click left) and click on the Dinghy, again.
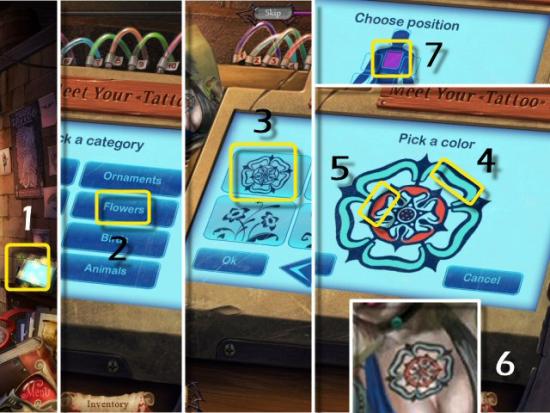
Charleston – Huberflimple
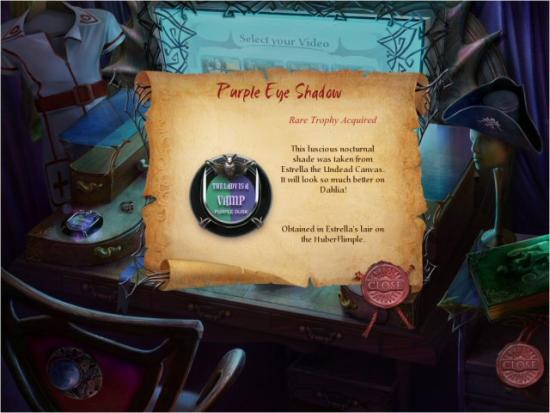
Plot a course to the Ship as before. Use the Estrella Outfit on Estrella (1) to receive the Estrella the Undead Canvas card (Character Card #6), click on the Cabinet (2 – click twice) and collect the Skinny Rat (3). Click on Estrella’s Dresser (4), collect the Purple Eyeshadow (5 – Rare Item #10) and then exit the Ship (6) and plot a return course to the Dock, as before.
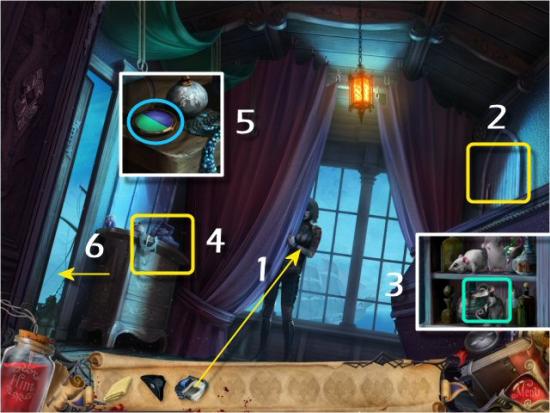
Charleston – Harbor
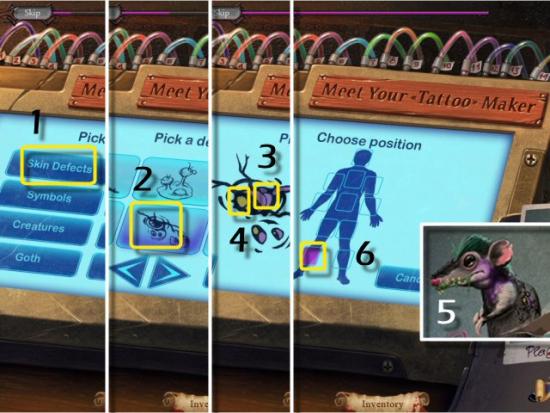
Enter the Tattoo Parlor (click right) and click on the Tattoo Maker (on the right). Click on Skin Defects (1) and then click on the bottom center Image (2 – click on the OK Button after you choose) that matches the Rat’s Image. Click on each section of the Tattoo (3 and 4 – click the OK Button after you choose) until the colors match the Rat’s Image (5 – Mustard Yellow and Dull Purple) and then click the Location (6 – lower left Leg; click the OK Button after you choose). Return to the Street (click left).
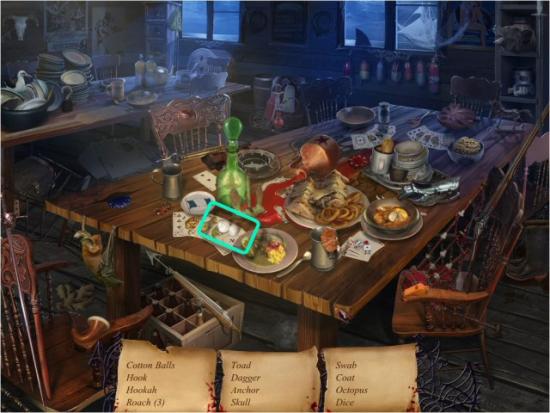
Enter the Tavern (click left) and click on the Table (on the left). Find all the items in the list. Inventory Item: Cotton Balls. Return to Memphis and Downtown via the Compass.
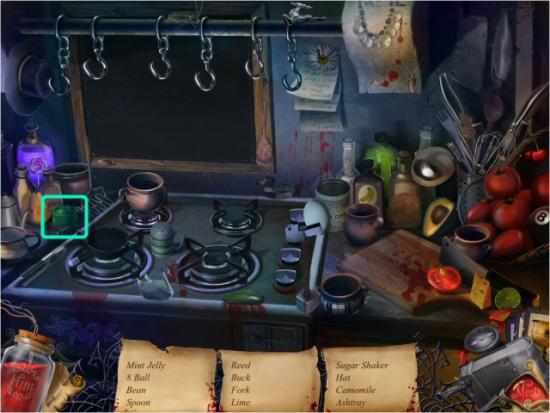
Enter S’il Vous Plate (click left) and click on the Stovetop (on the right). Find all the items in the list. Inventory Item: Mint Jelly. Return to Charleston and the Harbor via the Compass.
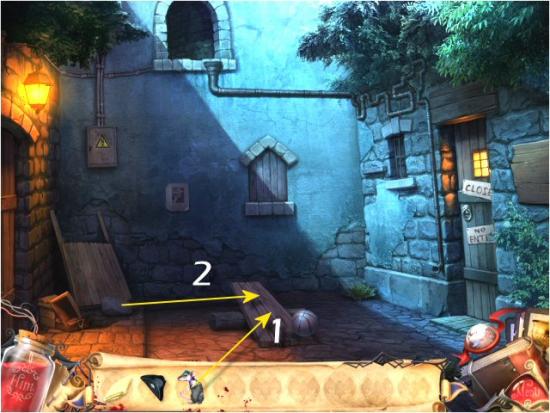
Enter Pirate’s Alley (click right), use the Plague Rat (1) and the Rock (2), in that order, on the Board.
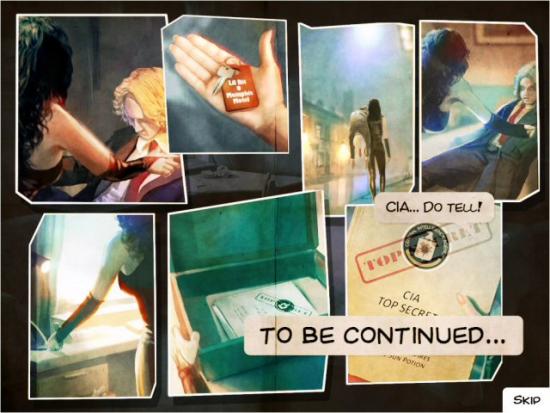
Watch the ending cutscenes and credits. Congratulations! You’ve completed Dying for Daylight: Chapter 1. Watch for Chapter 2, coming soon.
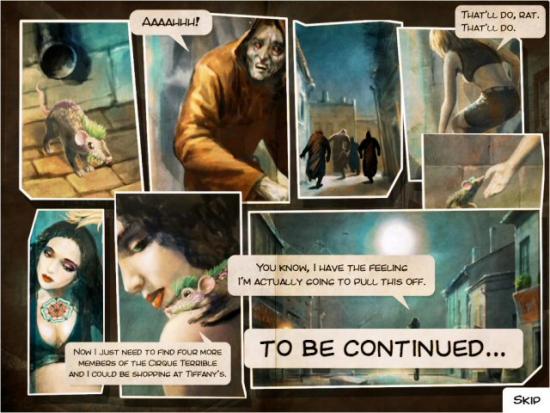
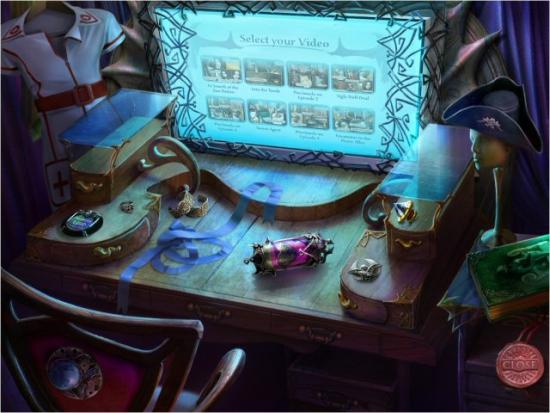
If you’d like to view your Trophies, click on Play and then Apply.
Trophy Room
Rare Items Death’s Head Ring
Diamond Button
Nurse Outfit
Moonlight Alarm Clock
Fireproof Bracelets
Mechanical Heart Fluid
Blue Ribbon
Lithoslyvanian Crest
Pirate Hat

Purple Eye Shadow
Character Cards Vampire Wars and Musty Brethren

Tinderbell and Petite Pete

The Glutton of Gilborne and Estrella the Undead Canvas

More articles...
Monopoly GO! Free Rolls – Links For Free Dice
By Glen Fox
Wondering how to get Monopoly GO! free rolls? Well, you’ve come to the right place. In this guide, we provide you with a bunch of tips and tricks to get some free rolls for the hit new mobile game. We’ll …Best Roblox Horror Games to Play Right Now – Updated Weekly
By Adele Wilson
Our Best Roblox Horror Games guide features the scariest and most creative experiences to play right now on the platform!The BEST Roblox Games of The Week – Games You Need To Play!
By Sho Roberts
Our feature shares our pick for the Best Roblox Games of the week! With our feature, we guarantee you'll find something new to play!All Grades in Type Soul – Each Race Explained
By Adele Wilson
Our All Grades in Type Soul guide lists every grade in the game for all races, including how to increase your grade quickly!


