- Wondering how to get Monopoly GO! free rolls? Well, you’ve come to the right place. In this guide, we provide you with a bunch of tips and tricks to get some free rolls for the hit new mobile game. We’ll …
Best Roblox Horror Games to Play Right Now – Updated Weekly
By Adele Wilson
Our Best Roblox Horror Games guide features the scariest and most creative experiences to play right now on the platform!The BEST Roblox Games of The Week – Games You Need To Play!
By Sho Roberts
Our feature shares our pick for the Best Roblox Games of the week! With our feature, we guarantee you'll find something new to play!Type Soul Clan Rarity Guide – All Legendary And Common Clans Listed!
By Nathan Ball
Wondering what your odds of rolling a particular Clan are? Wonder no more, with my handy Type Soul Clan Rarity guide.
Dreams from the Past Walkthrough
Dreams from the Past is a hidden object puzzle game created by Pixel Haze. You will move from location to location solving hidden object hunts, mini-puzzles and picking up items to use in order to proceed in the game. Gamezebo’s strategy guide will provide you with detailed images, tips, information, and hints on how to play your best game.
Dreams from the Past – Game Introduction
Dreams from the Past is a hidden object puzzle game created by Pixel Haze. You will move from location to location solving hidden object hunts, mini-puzzles and picking up items to use in order to proceed in the game. Gamezebo’s strategy guide will provide you with detailed images, tips, information, and hints on how to play your best game.
General Tips
- You need to click on items in order to trigger hidden object scenes and other actions to further the game. If this walkthrough tells you to click to start a hidden object scene but you don’t have one in your game, move backwards through the walkthrough to find what you need to click to trigger the hidden object hunt. Do not automatically assume the game has a glitch.
- Inventory objects will be written in CAPITALS and highlighted in yellow in the screenshots. The walkthrough will state, “Use the inventory item on the blah blah,” because it assumes you have the item. If you don’t have the item, on your keyboard, press CTRL+F (at the same time). In the text box, type the name of the item you are looking for and press ENTER. This will scan this page for the appearance of that word.
- The Menu button at the bottom left of the screen gives access to the options screen and can bring you back to the main menu.
- Items collected throughout the game go into your inventory, located at the bottom of your screen. You can keep the inventory displayed or hidden by clicking on the lock icon beside the Hint button. It seems to unlock after each hidden object hunt.
- When you click on an item that has spinning gears, small images appear. Place inventory items on these images.
Cursors
- The default cursor looks like an arrow.
- A magnifying glass indicates you can inspect the area more closely.
- Spinning gears indicate you need to perform an action. When you see the cursor turn into spinning gears, click on the area immediately as it will trigger hidden object hunts.
- A larger arrow indicates you can move in that direction.
- The cursor does not change into a grabbing hand when it is over something that can be picked up. Keep your eyes peeled for out of place items and try to take them.
Hidden Objects scenes (HOS)
- Hidden object scenes provide a list of items to find. These items will be highlighted in white.
- An item will be added to your inventory, it will be indicated by a yellow highlight in the screenshots.
- You cannot leave a hidden object scene or mini-puzzle. The workaround is to exit the game to the Main Menu, then return.
Starting and exiting the game
- When you start the game for the first time, you will watch a cutscene (it can be skipped).
- From the Main Menu, you can either press Play to start the game, or you can click on Profile and enter a name, then press Play to start the game. It doesn’t matter either way and is only really necessary if two separate people intend on playing the game or you wish to play two or more games simultaneously.
- When you want to leave the game, click the Menu button, then click Exit.
- When you restart the game, it will ask if you want to start a new game or continue playing your saved game. If you accidentally click Start a New Game, you will be asked if you want to overwrite your other game.
Hint and Skip
- The Hint button is located at the bottom right of the screen. After using a hint, the meter will recharge.
- Hints are only available in hidden object scenes.
- Hints used in hidden object scenes will point out an item to find.
- Skip allows you to skip mini-puzzles.
Walkthrough
- From the main menu, either click Profile and enter your name, or click Play.
- Click through the dialogue.

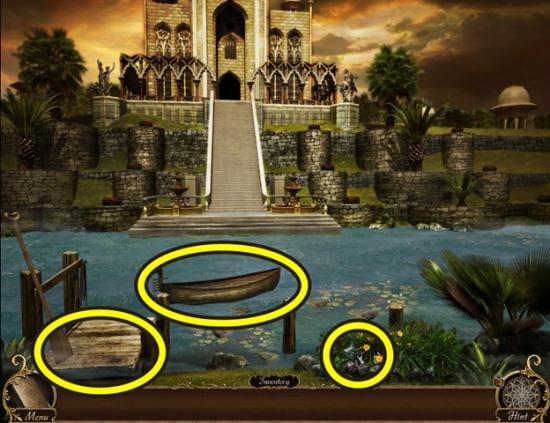
- Take the HOOK.
- Click on the boat to trigger a hidden object hunt.
- Click on the dock to start a hidden object hunt.
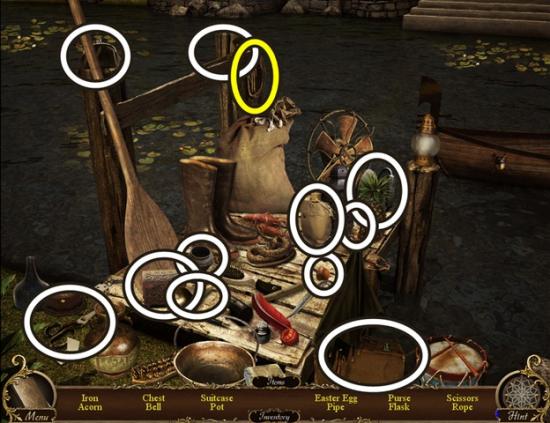
- Find all the objects. ROPE is added to your inventory.
- Click on the boat.
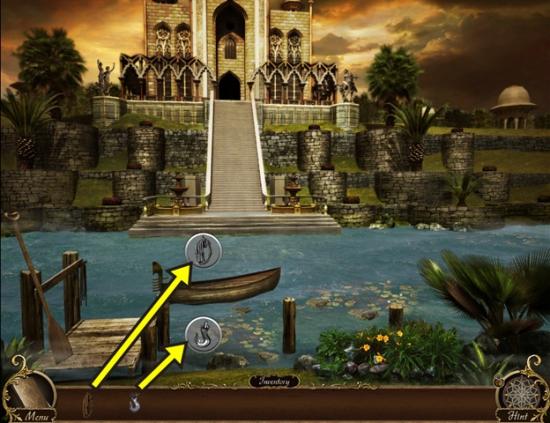
- Add the BOAT and HOOK.
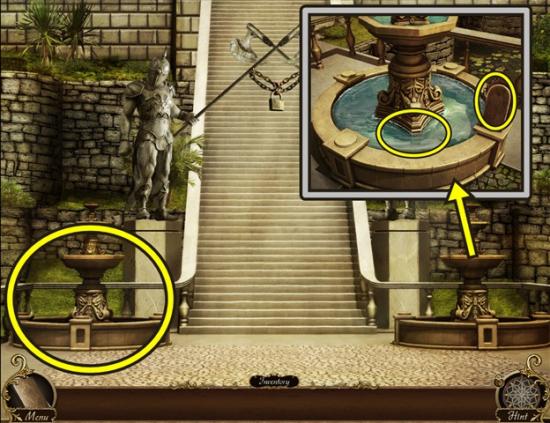
- Click on the right fountain.
- Click on the water, then on the winch with the missing handle.
- Move down.
- Click on the left fountain to start a hidden object hunt.
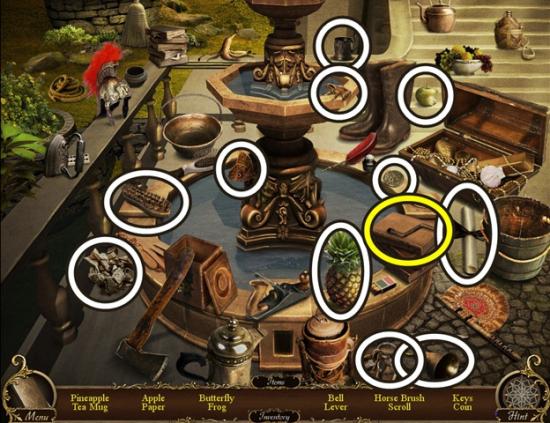
- Find all the objects. A LEVER is added to your inventory.
- Click on the right fountain.
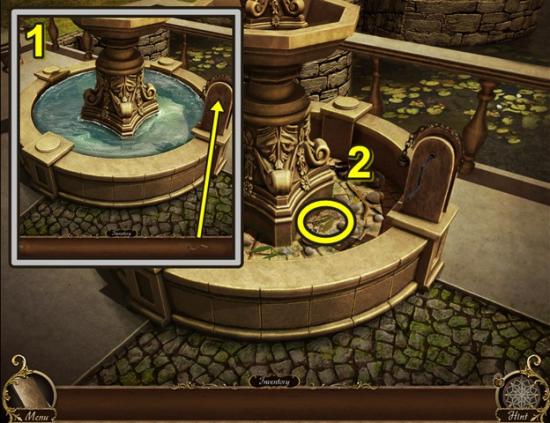
- Add the LEVER (1).
- After the water drains, take the KEY (2).
- Move down.
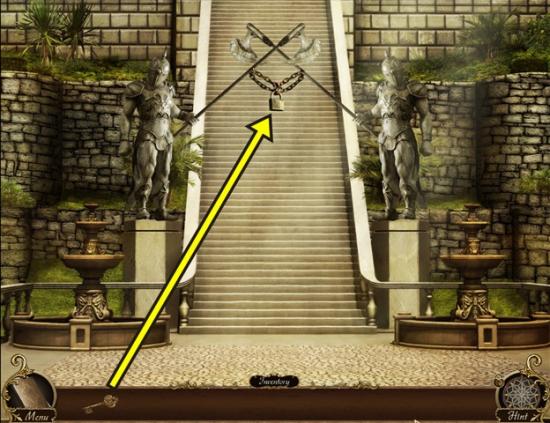
- Use the KEY in the lock.
- Go up the stairs.
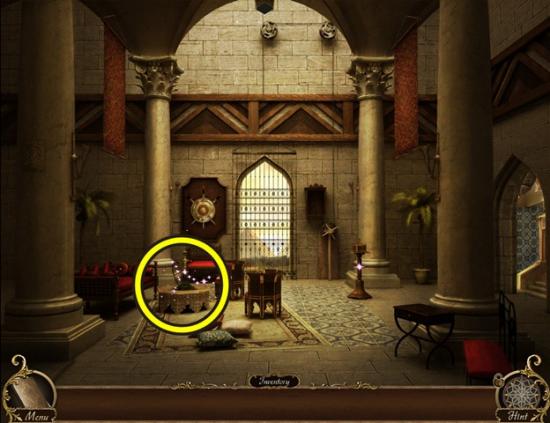
- Click on the coffee table to start a hidden object hunt.
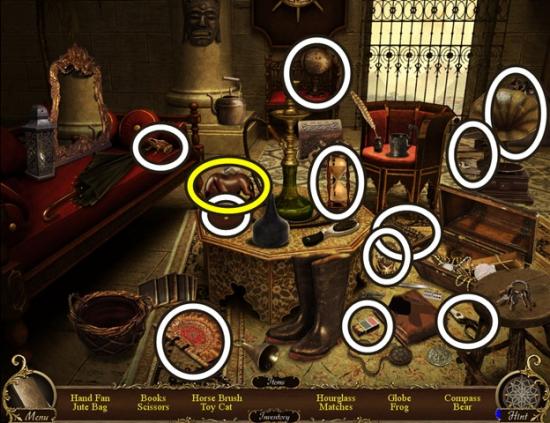
- Find all the objects. A BEAR is added to your inventory.
- Enter the room on the right.
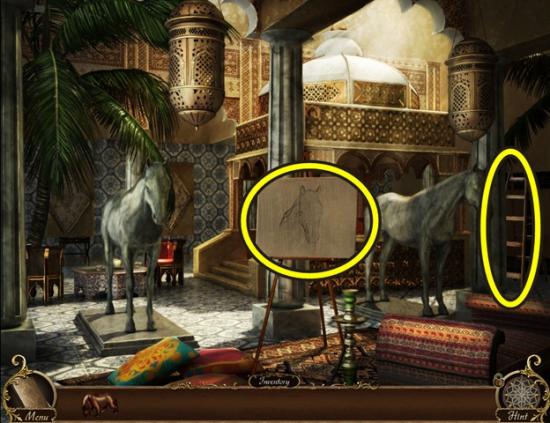
- Take the LADDER.
- Click on the easel.
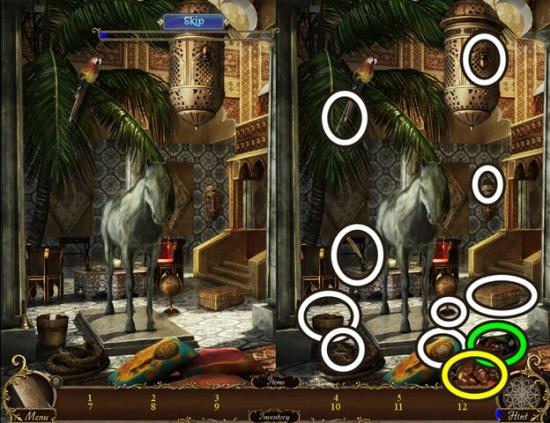
- Find the differences. On larger items, click on the area that is different from the other picture. For example, if there was a difference in the horse, click on the specific area of the horse. You can only click on the right picture.
- An ELEPHANT and a KEY is added to your inventory. The key is found on the pillow under the mask (green highlight).
- Move down.
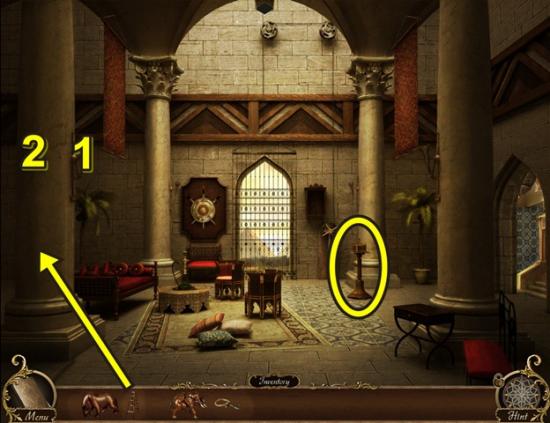
- Put the LADDER against the left column.
- Pull the sconce on the column (1).
- Click on the newly opened panel (2).
- Take the CAMEL.
- Click on the pedestal table.
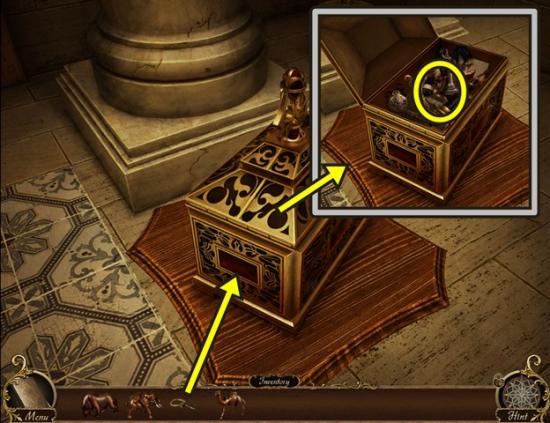
- Open the chest with the KEY.
- Take the HORSE.
- Move down.
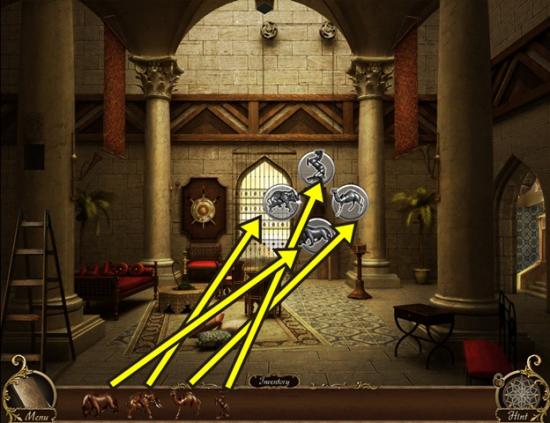
- Click on the wall cabinet beside the door.
- Add the HORSE, ELEPHANT, CAMEL and HORSE into their respective positions.
- Click on the wall cabinet again.
- A mini-puzzle starts. Place the animal statuettes on the scales so they line up. Each statuette is a different weight. To solve the puzzle, first determine the heaviness of each statuette. Pick a scale and weigh each statuette (click on a statuette to remove it from a scale). Note how much each statuette makes the scale fall.
- The horse is the lightest, the bear is the heaviest and the camel and elephant are in the middle and weigh about the same.
- Place the horse on the lowest hanging scale, place the bear on the highest hanging scale and put the elephant and camel on the two remaining scales.
- Solution:
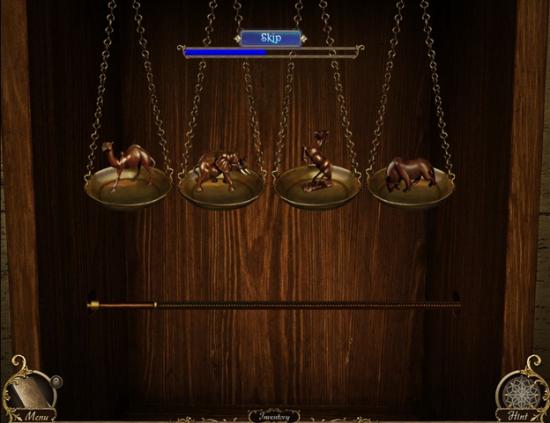
- From left to right, place the camel, elephant, horse and bear.
- Watch the cutscene. Click through the dialogue.
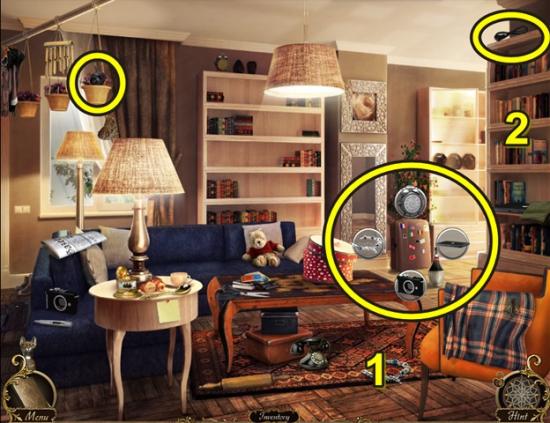
- Take the EXTENSION CORD and the LENS.
- Click on the suitcase to trigger items that need to be found.
- Click on the necklace (1) to trigger a hidden object hunt.
- Click on the bookshelf on the right (2) to start a hidden object hunt.
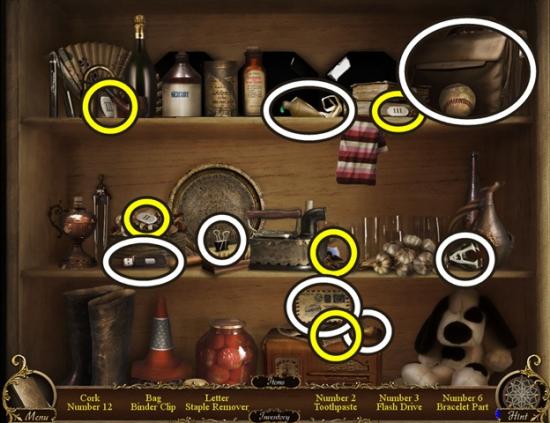
- Find all the objects. NUMBERED TILES and a BRACELET PART are added to your inventory.
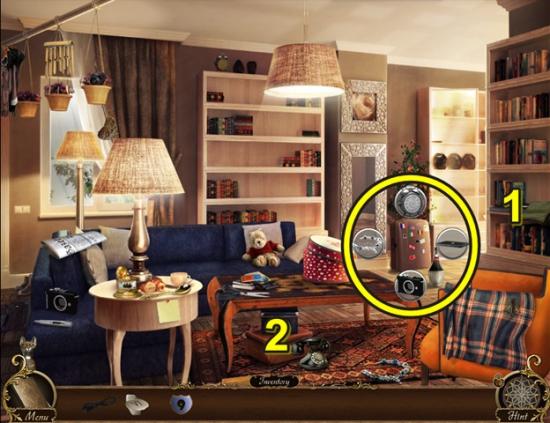
- Click on the suitcase again.
- Click on the laptop (1) to trigger a hidden object hunt.
- Click on the boxes under the coffee table (2) to start a hidden object hunt.
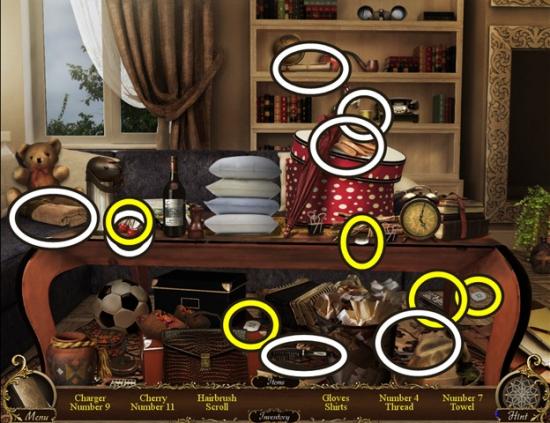
- Find all the objects. NUMBERED TILES and a CHARGER are added to your inventory.
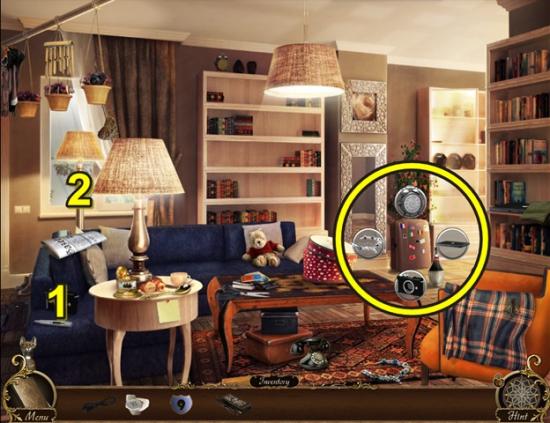
- Click on the suitcase again.
- Click on the camera (1) to trigger a hidden object hunt.
- Click on the table lamp under the coffee table (2) to start a hidden object hunt.
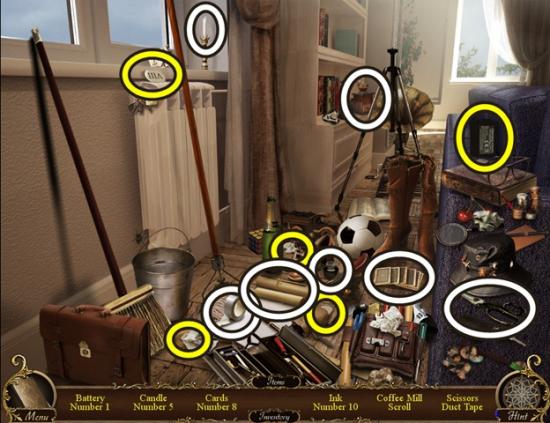
- Find all the objects. NUMBERED TILES and a BATTERY are added to your inventory.
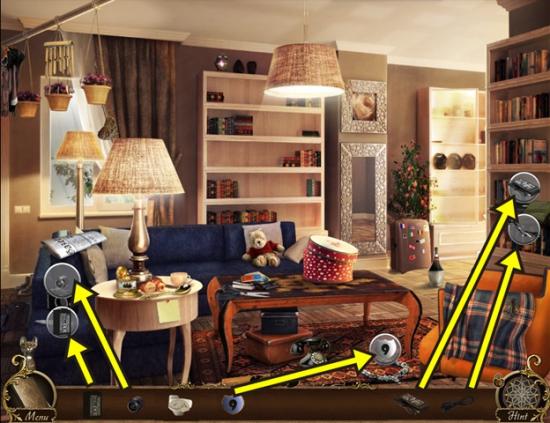
- Click on the camera.
- Add the LENS and BATTERY.
- Take the CAMERA.
- Click on the laptop.
- Add the EXTENSION CORD and CHARGER.
- Take the LAPTOP.
- Click on the bracelet.
- Add the BRACELET PART.
- Click on the bracelet.
- A mini-puzzle starts. Rearrange the numbers so each column and row equals 15. Click on two numbers to swap their positions.
- One possible solution appears below:
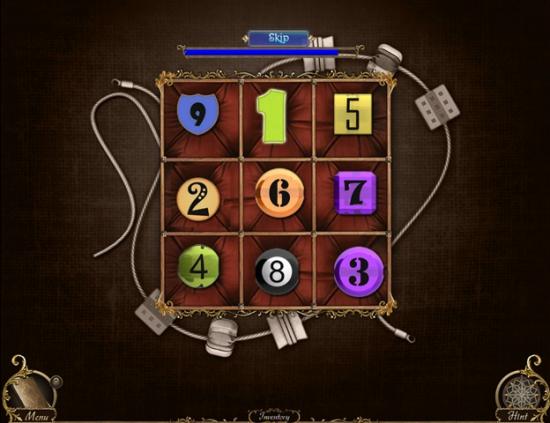
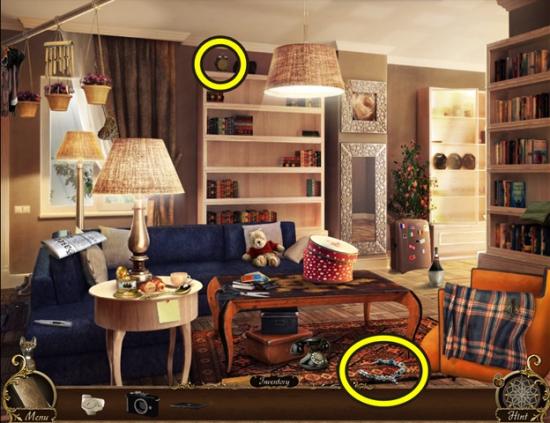
- Take the BRACELET.
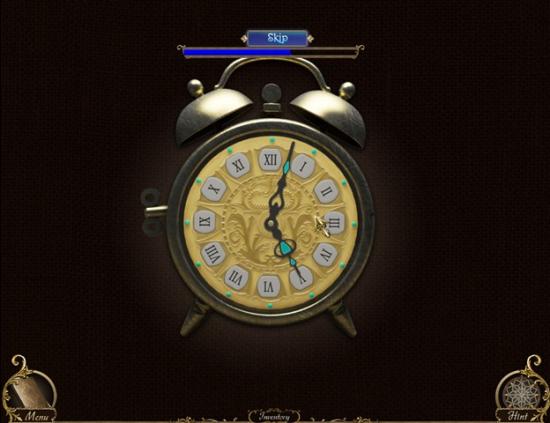
- Click on the alarm clock atop the bookshelf.
- A mini-puzzle starts. If the puzzle doesn’t start, it means you don’t have all the NUMBERED TILES. Place the numbered tiles in their appropriate slots on the clock. Pick up a tile and position it using the tip of the cursor’s finger. Some of the tiles are upside down. You can only place tiles in their appropriate slots.
- Solution:
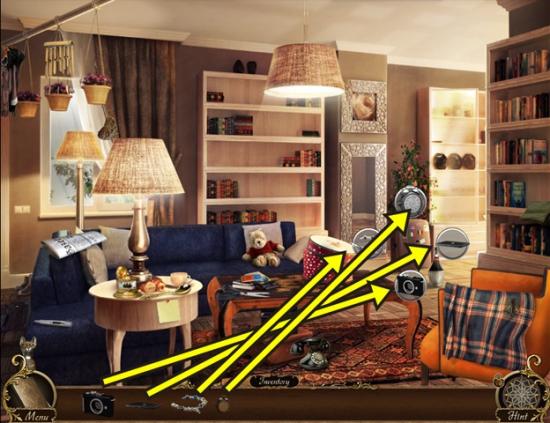
- Take the ALARM CLOCK.
- Click on the suitcase.
- Add the ALARM CLOCK, LAPTOP, CAMERA and BRACELET.
- Watch the cutscene. Click through the dialogue.
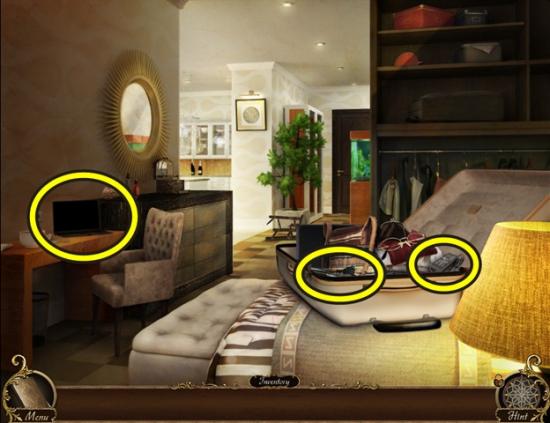
- Take the CHARGER and EXTENSION CORD from the suitcase.
- Click on the laptop.
- Add the CHARGER and EXTENSION CORD.
- Walk out the front door.
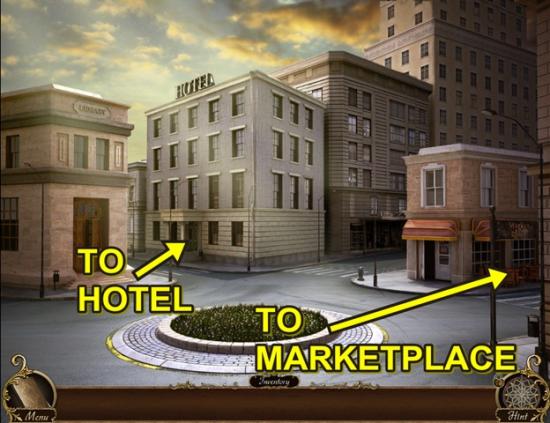
- Go right to the marketplace.
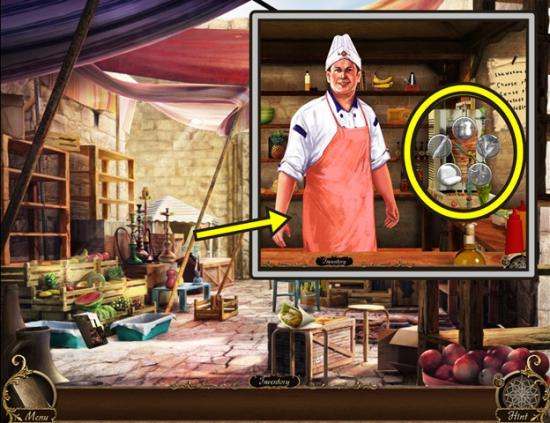
- Click on the covered awning.
- Click through the dialogue.
- Click on the shawarma meat.
- Move down.
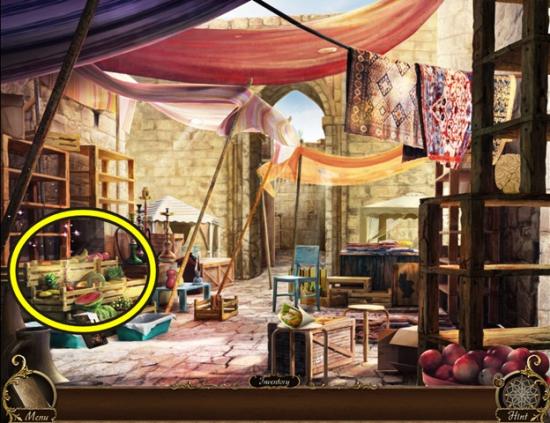
- Click on the crates to start a hidden object hunt.
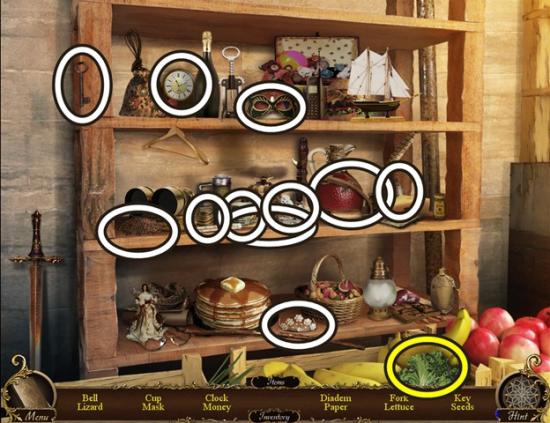
- Find all the objects. LETTUCE is added to your inventory.
- Move down and enter the hotel.
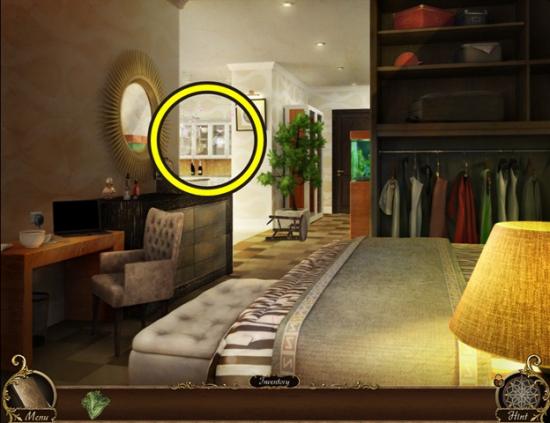
- Click on the kitchen cabinets to start a hidden object hunt.
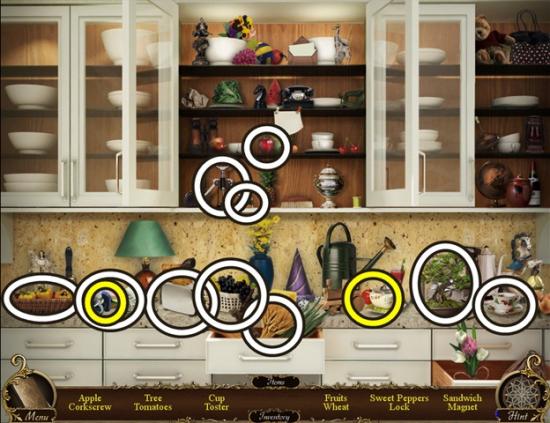
- Find all the objects. TOMATOES and a MAGNET are added to your inventory.
- Return to the marketplace.
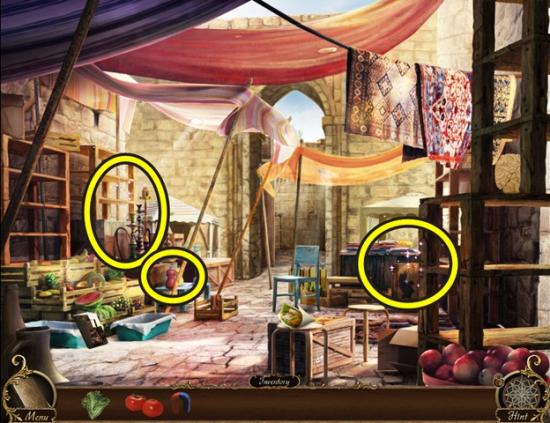
- Take the SALT AND PEPPER SHAKERS.
- Click on the left shelves to start a hidden object hunt.
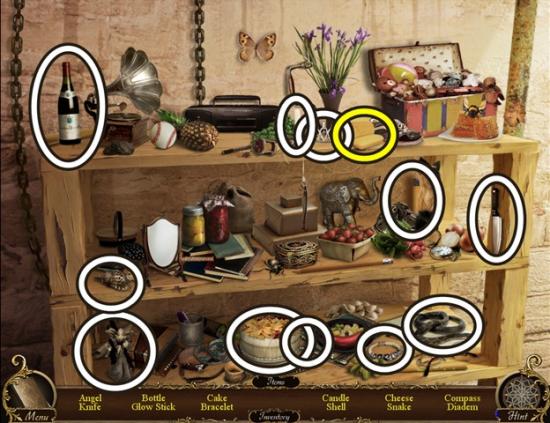
- Find all the objects. CHEESE is added to your inventory.
- Click on the right crates to start a hidden object hunt.
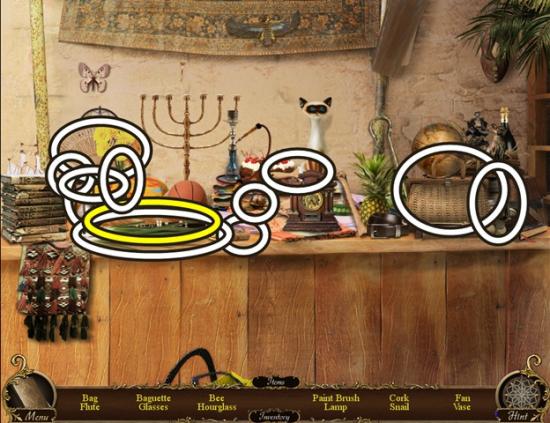
- Find all the objects. A BAGUETTE is added to your inventory.
- Click on the covered awning.
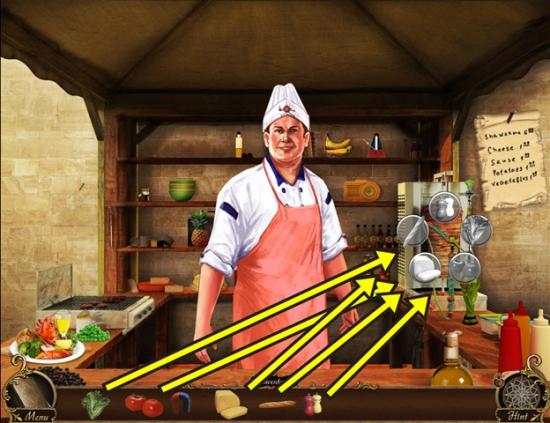
- Click on the shawarma.
- Add the SALT AND PEPPER SHAKERS, BAGUETTE, CHEESE, TOMATOES and LETTUCE.
- Click through the dialogue.
- A MEDALLION HALF is added to your inventory.
- Return to the hotel.
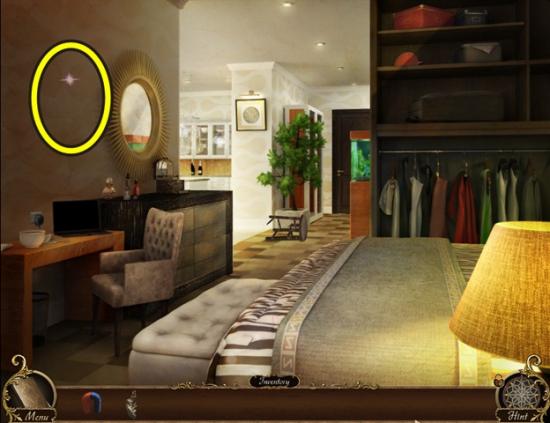
- Click on the wall.
- Return to the marketplace.
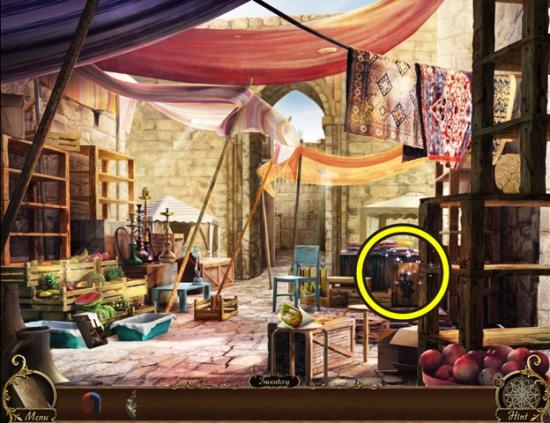
- Click on the right crates to start a hidden object hunt.
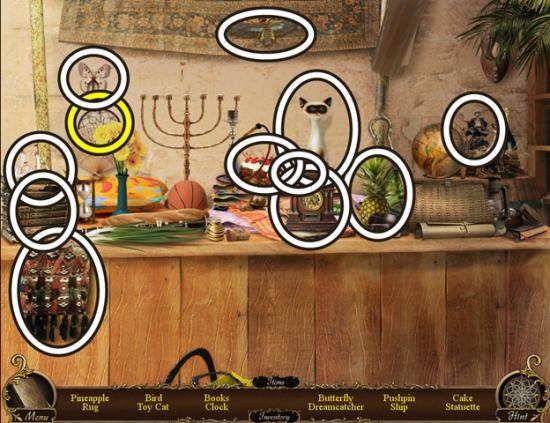
- Find all the objects. A DREAMCATCHER is added to your inventory.
- Return to the hotel.
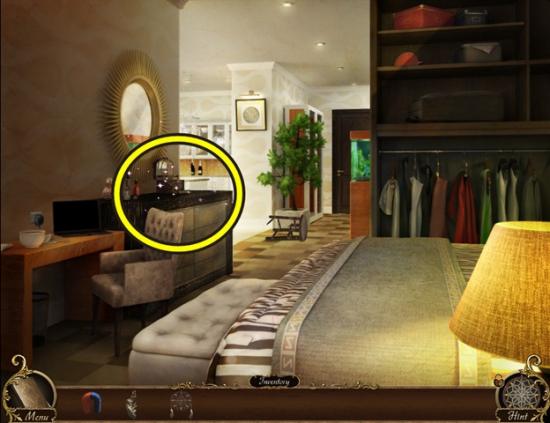
- Click on the dresser to start a hidden object hunt.
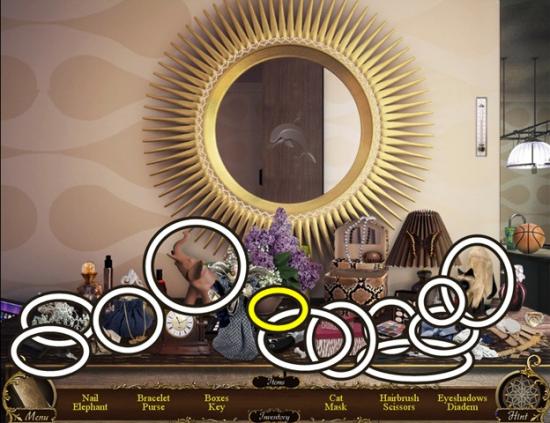
- Find all the objects. A NAIL is added to your inventory.
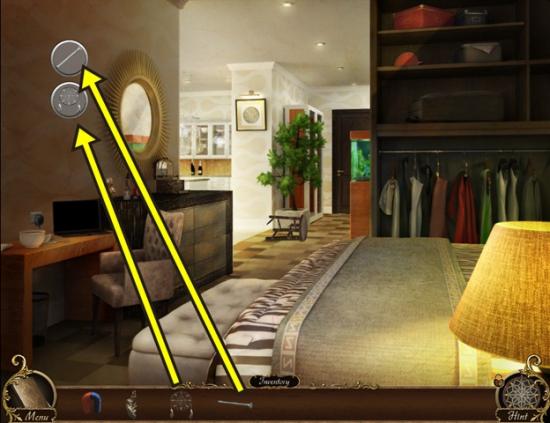
- Click on the wall.
- Add the DREAMCATCHER and NAIL.
- Watch the cutscene.
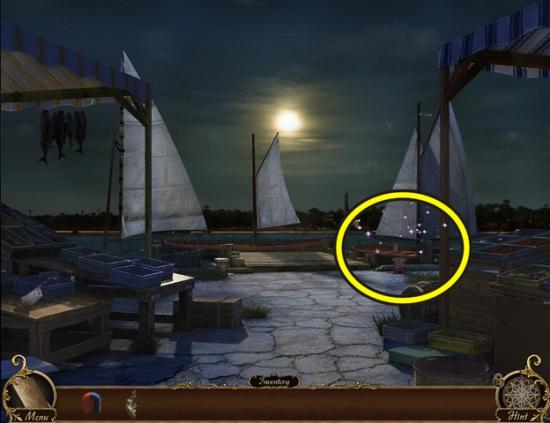
- Click on the right sailboat to start a hidden object hunt.
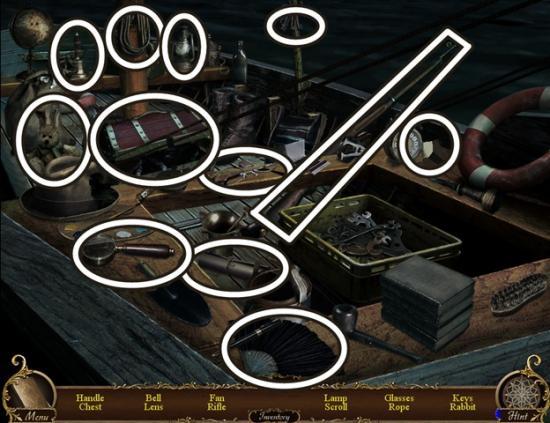
- Find all the objects.
- Move down.
- Click through the dialogue.
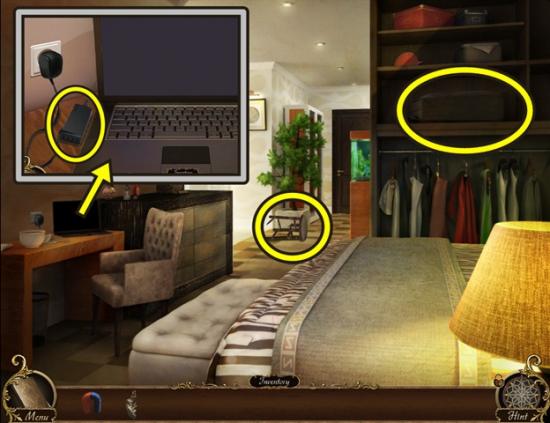
- Click on the laptop.
- Click on the charger.
- Move down.
- Click on the suitcase.
- Click on the stool.
- Return to the marketplace, then move forward.
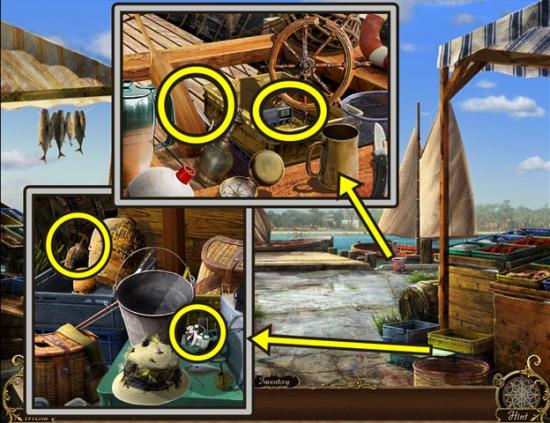
- Click on the baskets on the right.
- Take the LIGHTER and HAMMER.
- Move down.
- Click on the right sailboat.
- Take the SCISSORS and HANDLE.
- Return to the hotel.
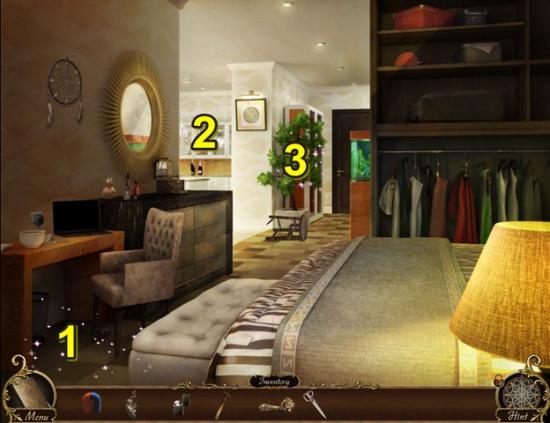
- There are three hidden object hunts to be done, under the desk (1), the kitchen cupboards (2) and the plant (3).
- Click under the desk to start a hidden object hunt.

- Find all the objects. DUCT TAPE is added to your inventory.
- Click on the kitchen cupboards to start a hidden object hunt.
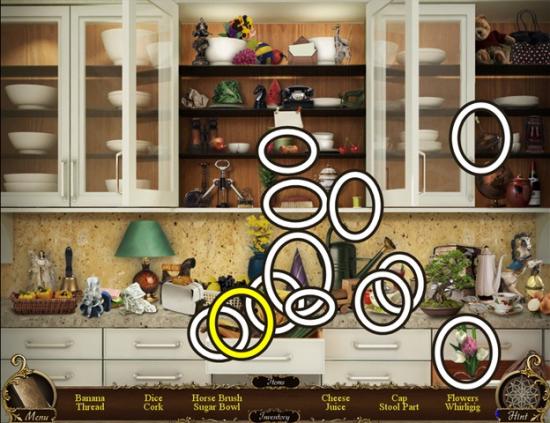
- Find all the objects. A STOOL PART is added to your inventory.
- Click on the plant to start a hidden object hunt.
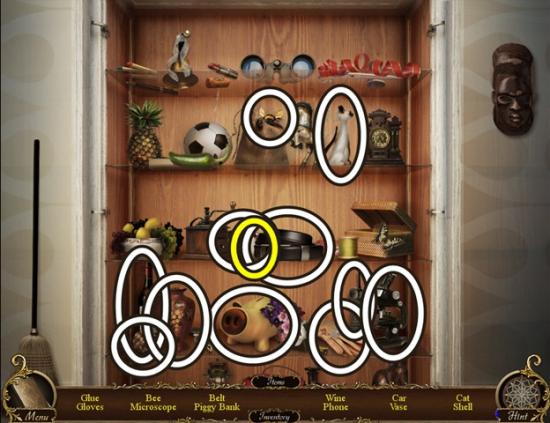
- Find all the objects. GLUE is added to your inventory.
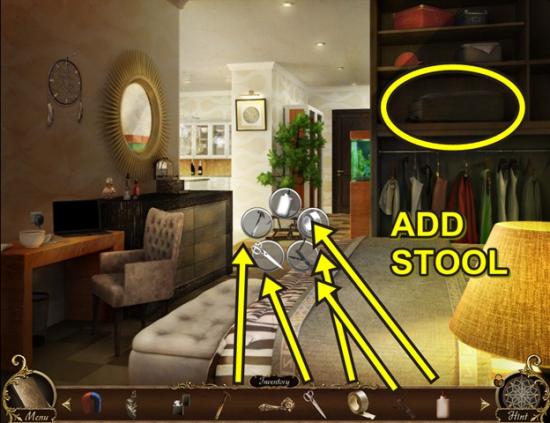
- Click on the stool.
- Add the HAMMER, STOOL PART, SCISSORS, GLUE and DUCT TAPE.
- The STOOL is added to your inventory.
- Click on the suitcase.
- Add the STOOL.
- Click on the suitcase.
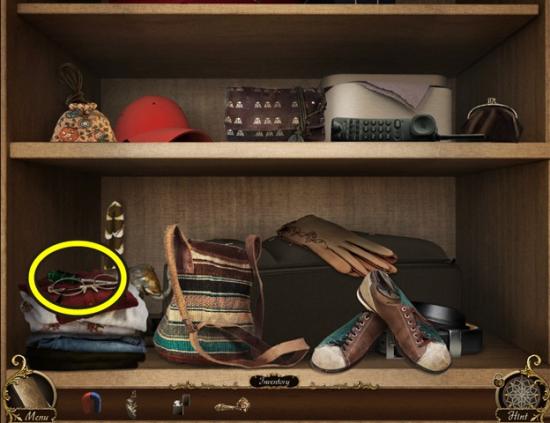
- Take the SCREWDRIVER.
- Click on the laptop.
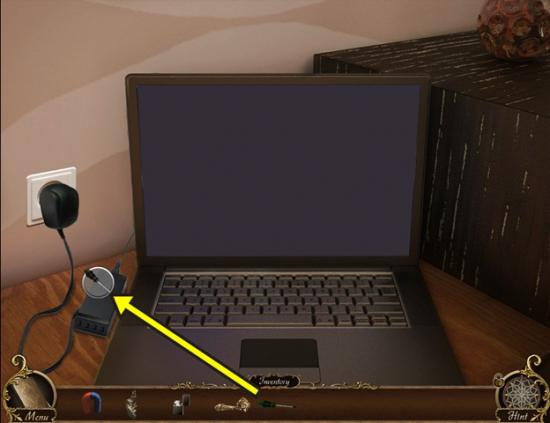
- Click on the charger.
- Add the SCREWDRIVER.
- Move down and leave the hotel.
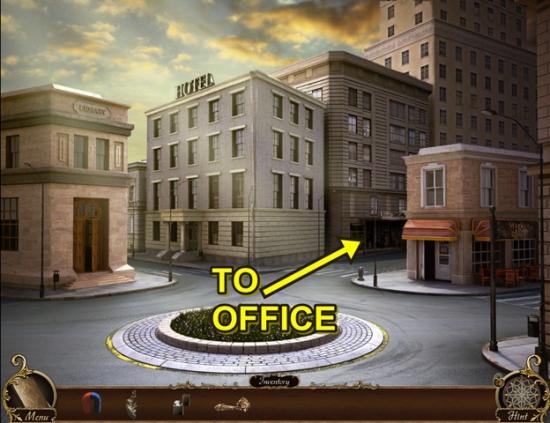
- Enter the building beside the hotel to go into the office.
- Click through the dialogue.
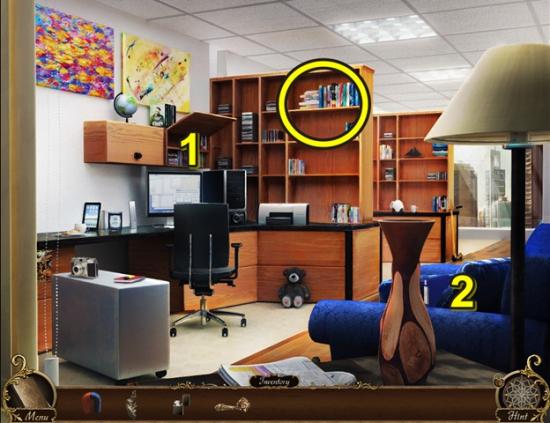
- Click on the top shelf to trigger two hidden object hunts, in the wall cabinet (1) and on the chair (2).
- Click on the wall cabinet to start a hidden object hunt.
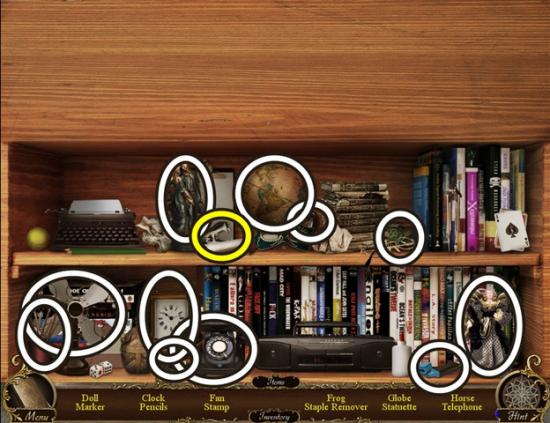
- Find all the objects. A STAPLE REMOVER is added to your inventory.
- Click on the chair to start a hidden object hunt.
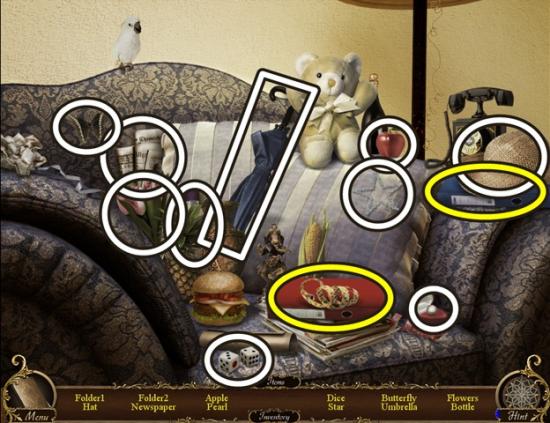
- Find all the objects. FOLDERS are added to your inventory.
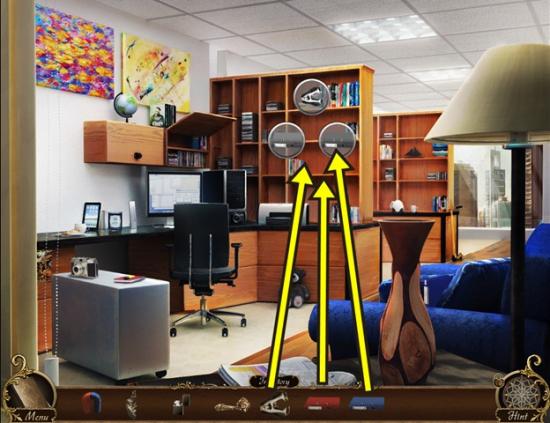
- Click on the top shelf. Add the STAPLE REMOVER and two FOLDERS.
- Click through the dialogue.
- Move down.
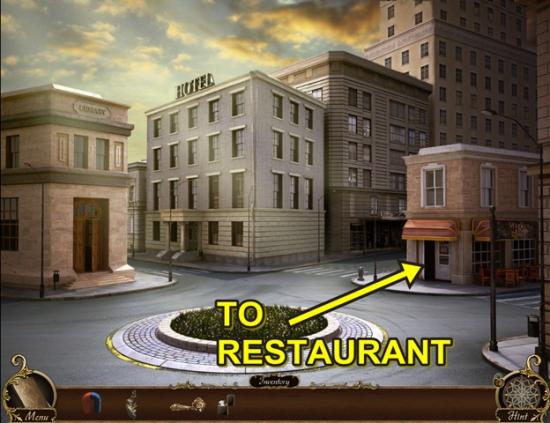
- Enter the restaurant.
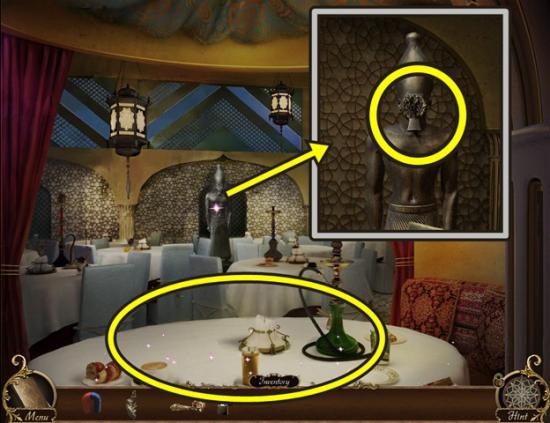
- Click through the dialogue.
- Click on the statue.
- Click on the statue’s face.
- Move down.
- Click on the table to start a hidden object hunt.
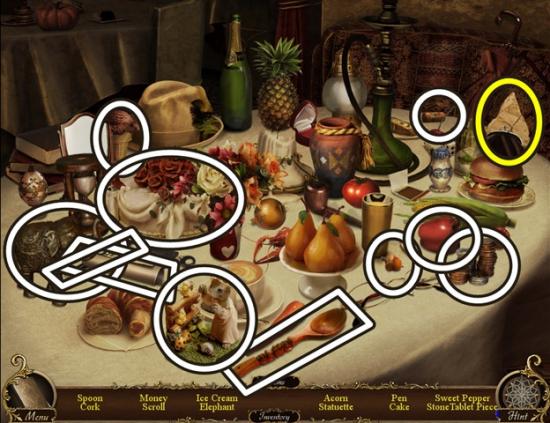
- Find all the objects. A STONE TABLET PIECE is added to your inventory.
- Move down.
- Return to the marketplace.

- Click on the shelves on the right.
- Add the STONE TABLET PIECE.
- A mini-puzzle starts. Adjust the rings so the grey rings surround the grey beetles and the blue rings surround the blue beetles. There are many possible solutions to this puzzle. To use the solution below, reset the puzzle by quitting the game. Click the Menu button and click Exit, then click Continue Saved Game. You will return to the mini-puzzle.
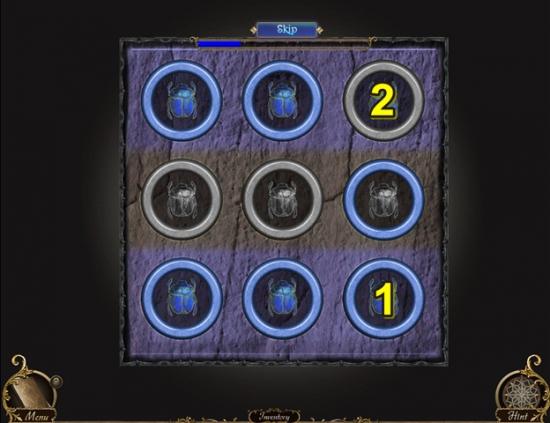
- Using the screenshot above as a guide, press the discs in the order shown.
- Solution:
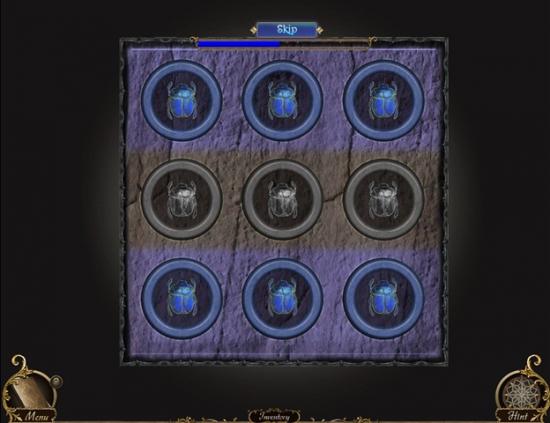
- A MEDALLION HALF is added to your inventory.
- Return to the office.
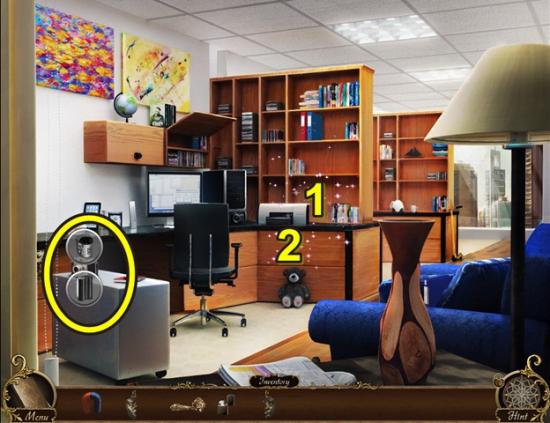
- Click on the camera to trigger two hidden object hunts, the desktop (1) and the top drawer (2). If the hidden object hunts aren’t triggered, go back to the restaurant, click on the statue and click on the statue’s face.
- Click on the desktop to start a hidden object hunt.
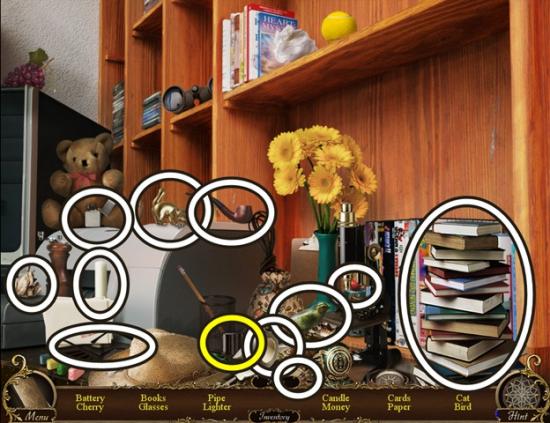
- Find all the objects. ABATTERYis added to your inventory.
- Click on the top drawer to start a hidden object hunt.
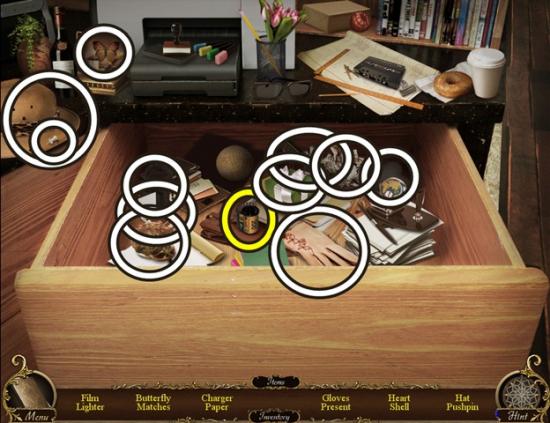
- Find all the objects. FILM is added to your inventory.
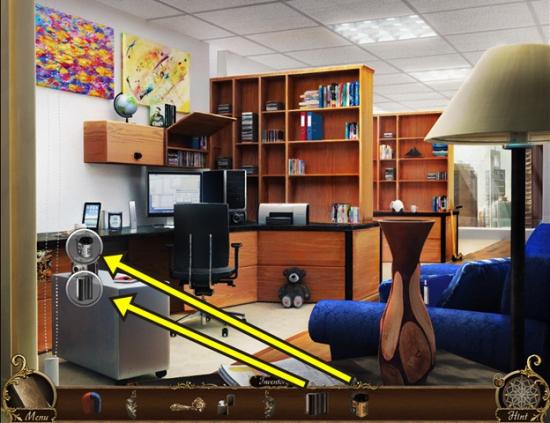
- Click on the camera.
- Add the BATTERY and FILM.
- Take the CAMERA.
- Return to the restaurant.
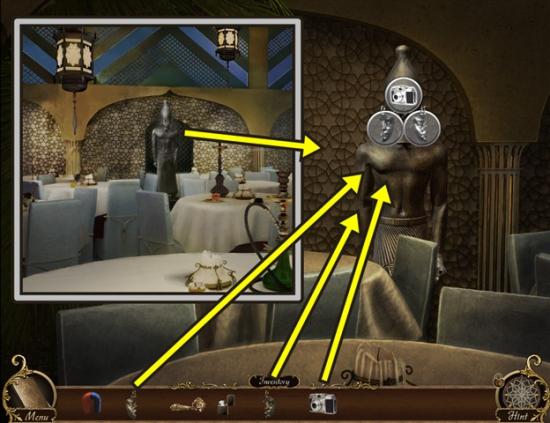
- Click on the statue.
- Click on the statue’s face.
- Add the two MEDALLION HALVES and the CAMERA.
- Move down two scenes.
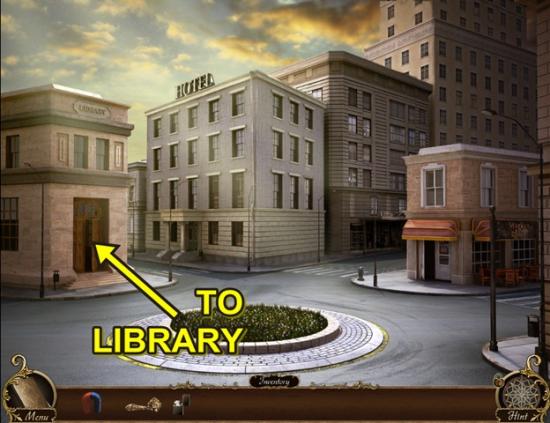
- Go to the library.
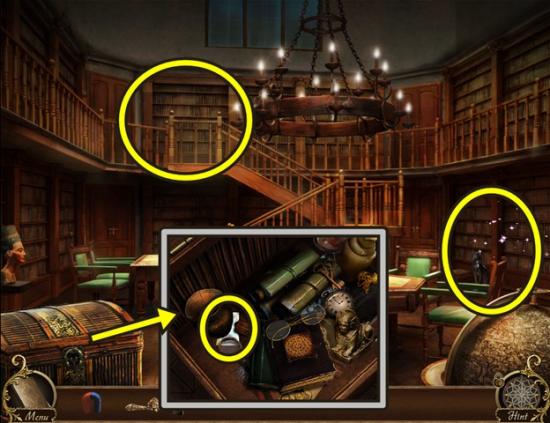
- Click on the chest.
- Take the MAP HALF.
- Move down.
- Click on the top bookshelf.
- A mini-puzzle starts. Jigsaw puzzle. Place the pieces in the inset. Once a piece is in its proper position, it locks and cannot be moved.
- Solution:
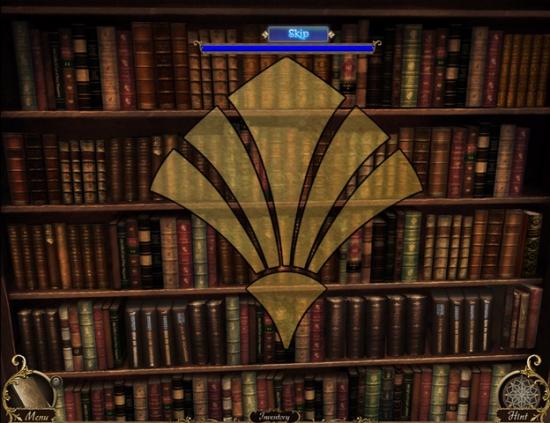
- Click on the top bookshelf again.
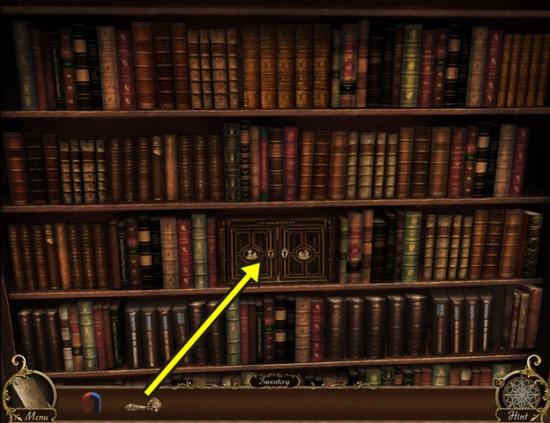
- Add the HANDLE to the left side of the cabinet.
- Open the cabinet and take the KEY.
- Click on the right bookshelf to start a hidden object hunt.
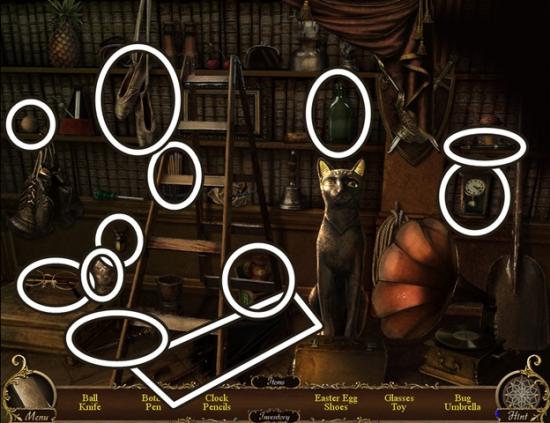
- Find all the objects. A MAP HALF is added to your inventory.
- Return to the marketplace.
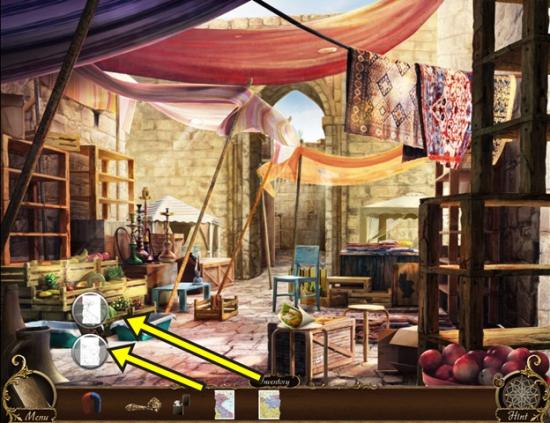
- Click on the map.
- Add the two MAP HALVES.
- A mini-puzzle starts. Using the arrows, guide the ball through the maze.
- Solution:
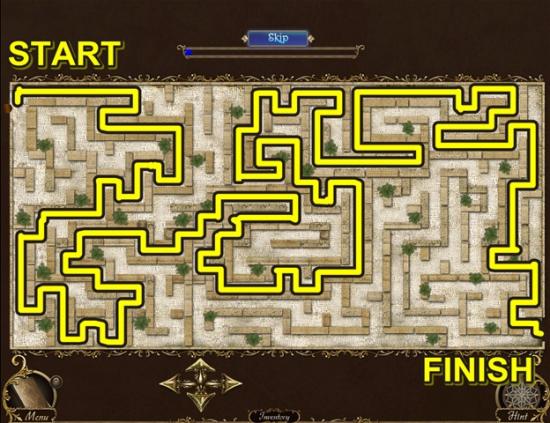
- Move forward to the sailboats.
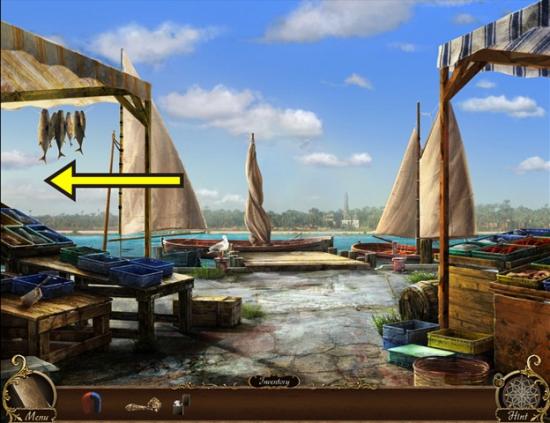
- Move left.
- Click through the dialogue.
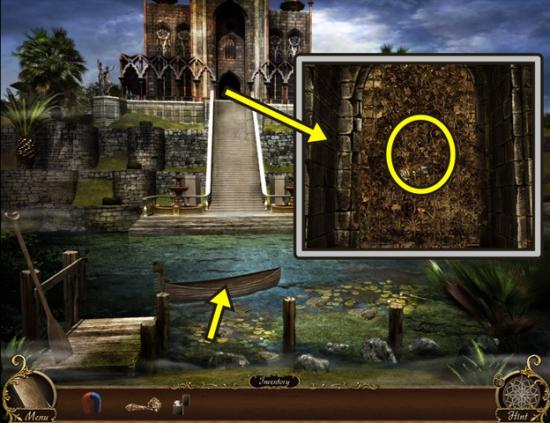
- Click on the boat.
- Click on the gate.
- Move down two scenes.
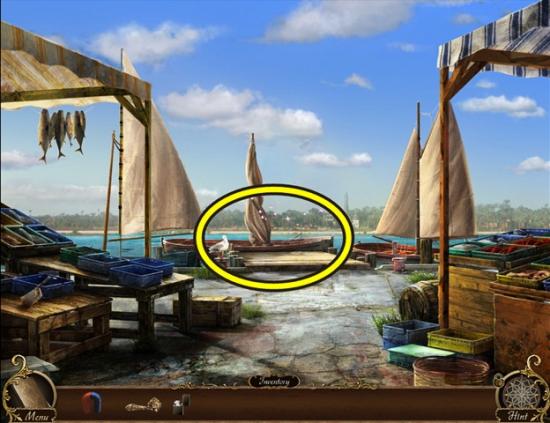
- Click on the middle sailboat to start a hidden object hunt.
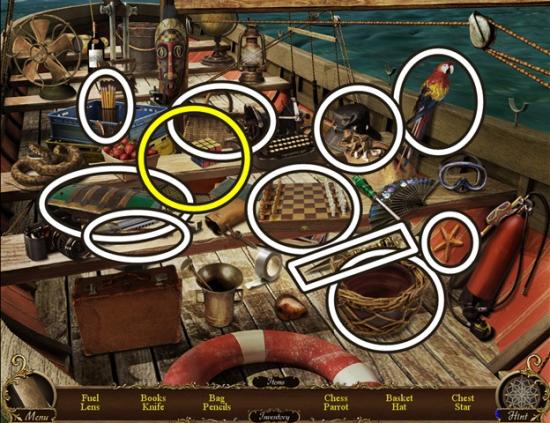
- Find all the objects. FUEL is added to your inventory.
- Move left, then take the boat to the other side.
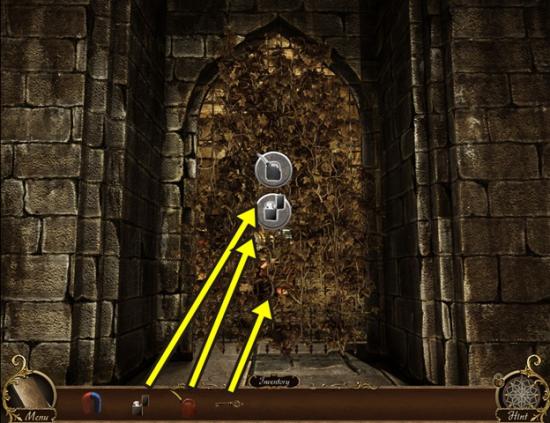
- Click on the gate.
- Use the LIGHTER and FUEL.
- Open the gate with the KEY.
- Go through the gate and continue forward into the next room.
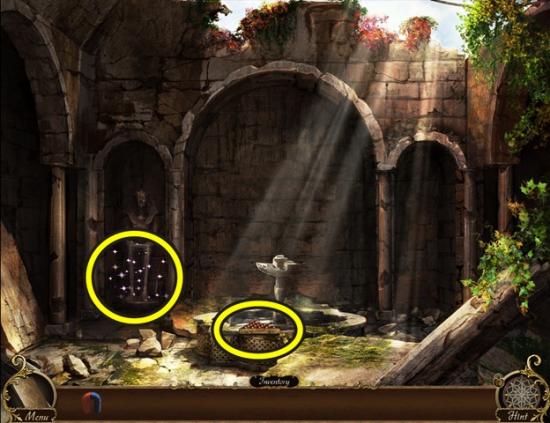
- Click on the fountain.
- Click on the statue to start a hidden object hunt.
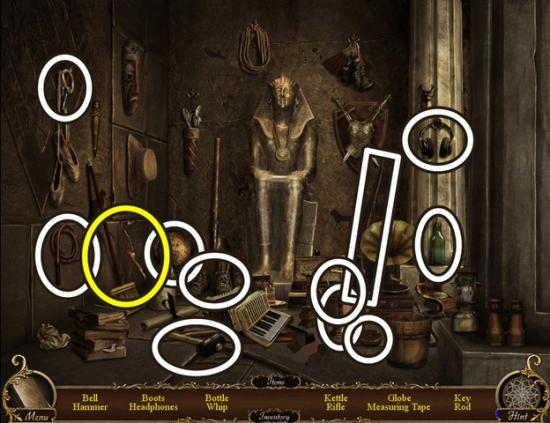
- Find all the objects. A ROD is added to your inventory.
- Move down and go into the room on the right.
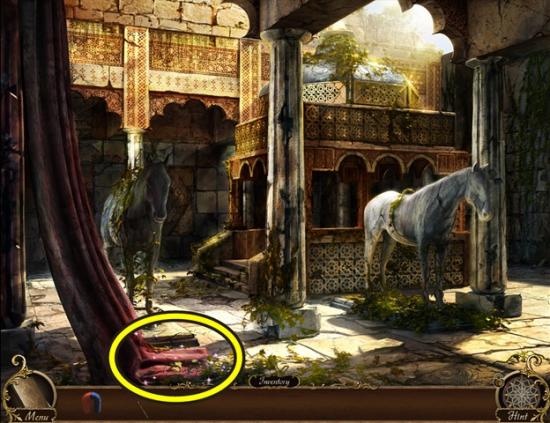
- Click on the ground in front of the left horse to start a hidden object hunt.
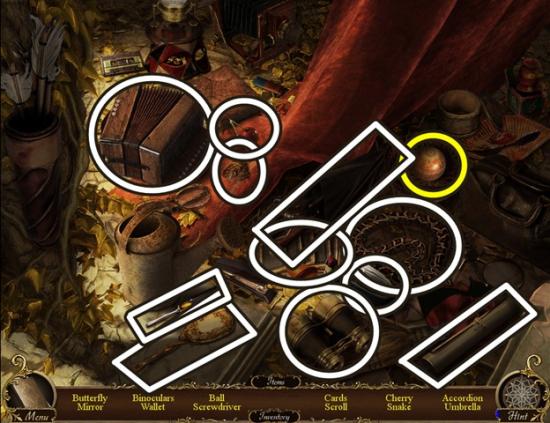
- Find all the objects. A BALL is added to your inventory.
- Move down three scenes.
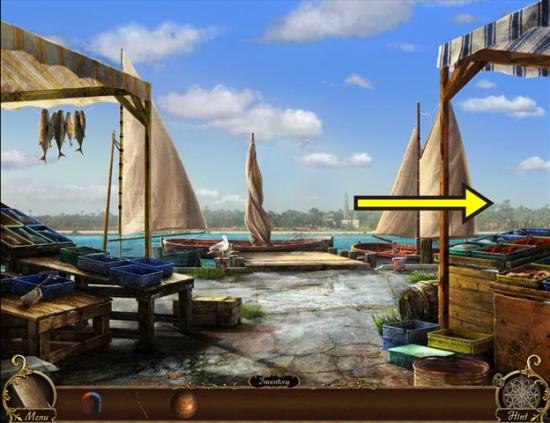
- Move right.
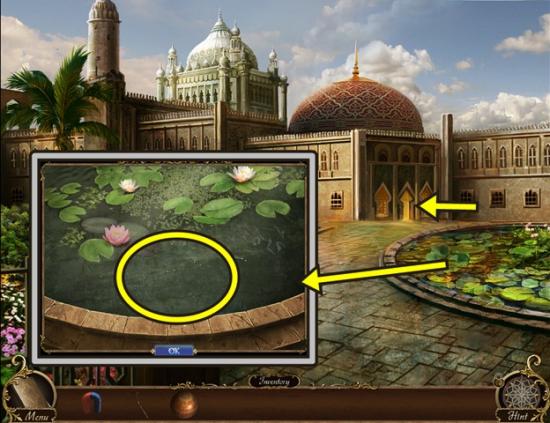
- Click on the pond.
- Click on the water.
- Click OK (the cursor must turn into a pointing hand and the fingertip is used on the OK button).
- Move forward into the house.
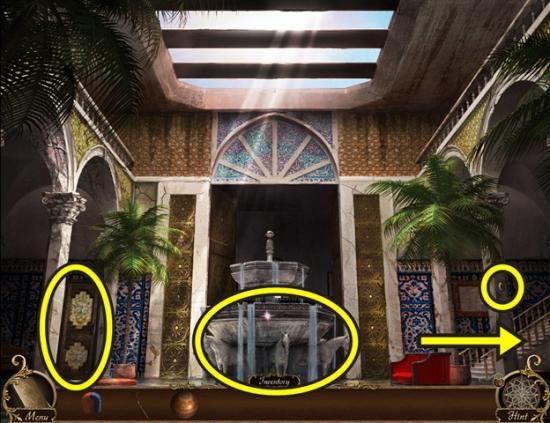
- Click on the door on the left.
- Click on the fountain.
- Click on the fountain again.
- Click on the pillar (when the magnifying glass appears, click to learn you need a lever).
- Move down.
- Move right.
- You don’t yet have the key. Click OK.
- Move down two scenes, then go left, move forward and enter the main room of the palace, then go left into the room with the horse statues.
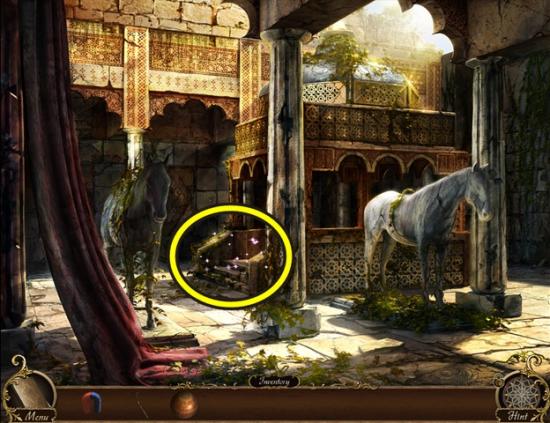
- Click on the steps to start a hidden object hunt.
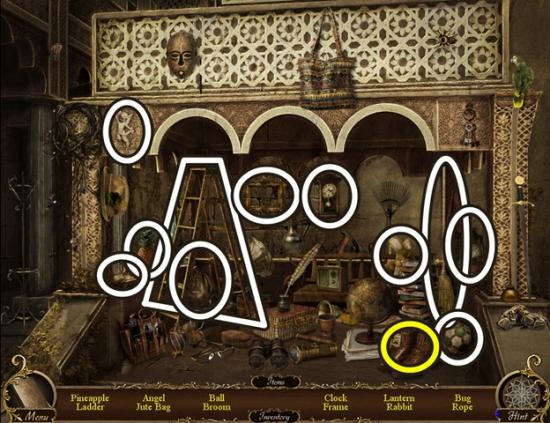
- Find all the objects. ROPE is added to your inventory.
- Return to the pond (move down three scenes, then move right).
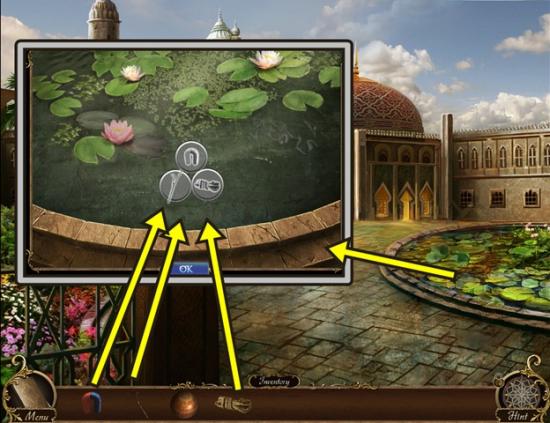
- Click on the pond.
- Click on the water.
- Add the ROD, MAGNET and ROPE.
- A KEY is added to your inventory.
- Click OK to close the window.
- Move forward into the house.
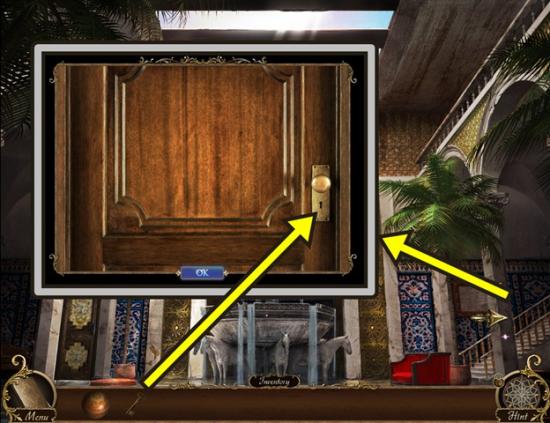
- Move right. Click when the arrow appears, not on the magnifying glass.
- Use the KEY to open the door.
- Enter the bedroom on the right.
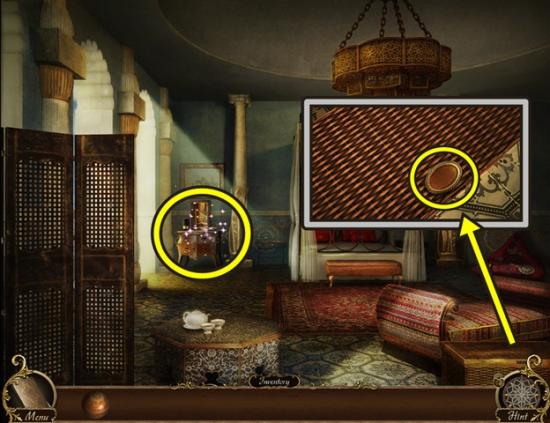
- Click on the basket.
- Click on the inset.
- Move down.
- Click on the dressing table to start a hidden object hunt.
- Find all the objects. A LEVER is added to your inventory.
- Move down.
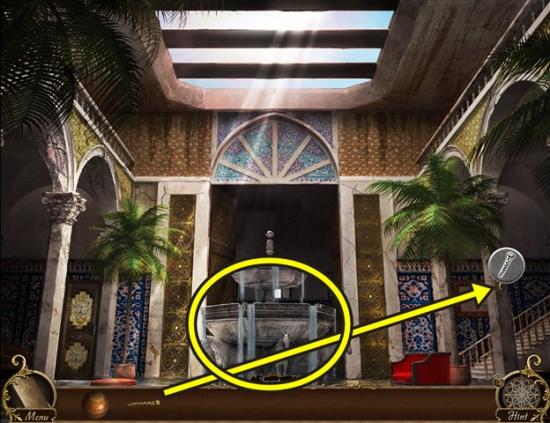
- Click on the pillar.
- Add the LEVER.
- Pull the lever down (click when you see the spinning gears).
- Click on the fountain.
- Click on the fountain again.
- A PUZZLE PIECE is added to your inventory.
- Move down two scenes.
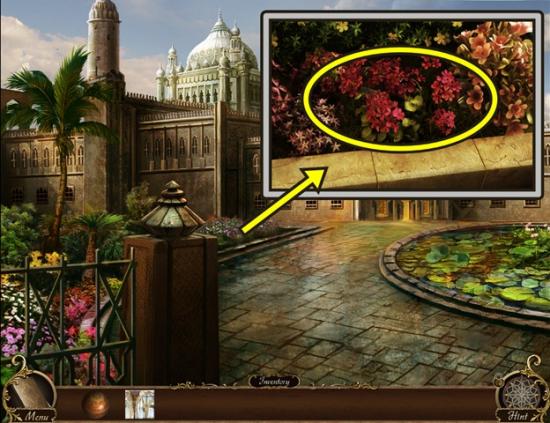
- Click on the garden at the left.
- Click on the flowers to learn you need a tool to trim the flowers.
- Move down two scenes, then go left, take the boat to the palace and enter the main room.
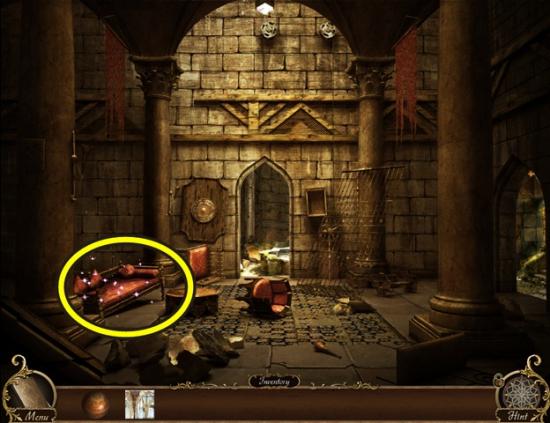
- Click on the broken couch to start a hidden object hunt.
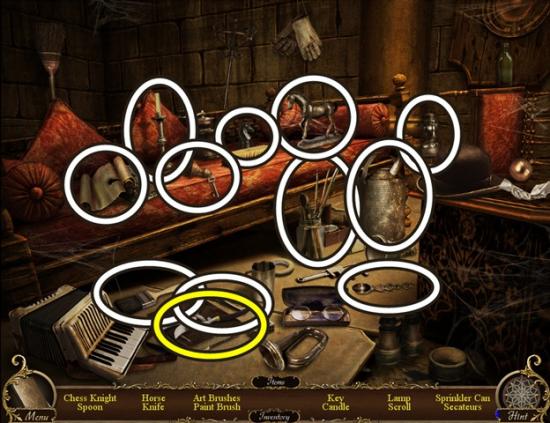
- Find all the objects. SECATEURS (CLIPPERS) are added to your inventory.
- Return to the garden.
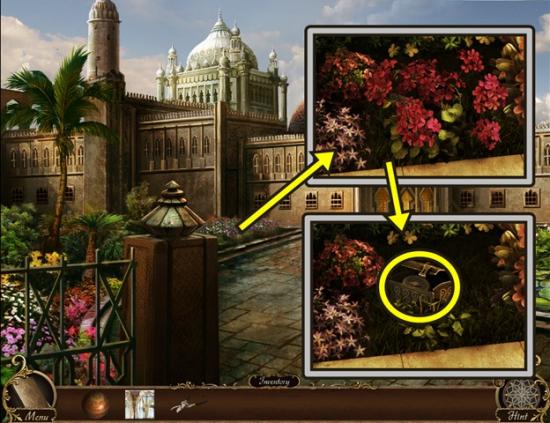
- Click on the garden.
- Use the SECATEURS (CLIPPERS) to cut the flowers.
- Take the AMULET.
- Move down and enter the house, then go into the bedroom on the right.
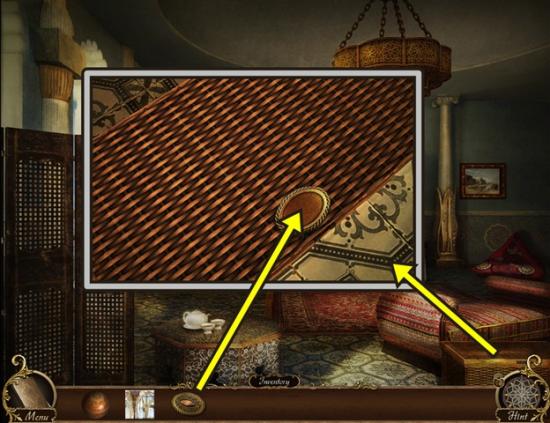
- Click on the basket.
- Add the AMULET.
- Open the basket and take the PUZZLE PIECE.
- Move down two scenes.
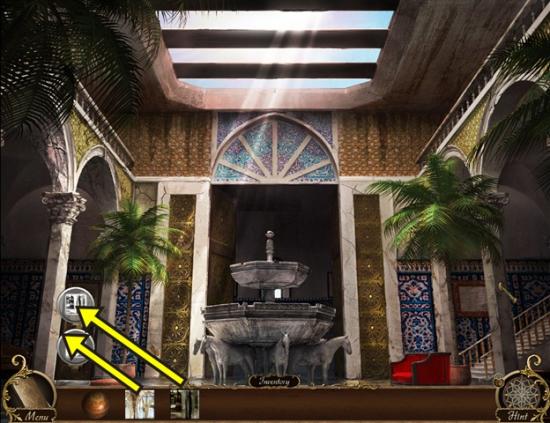
- Click on the door on the left.
- Add the two PUZZLE PIECES.
- A mini-puzzle starts. Slider puzzle. Slide the pieces to recreate the image. A piece can only be moved into an empty slot. There are many possible solutions to this puzzle.
- Solution:
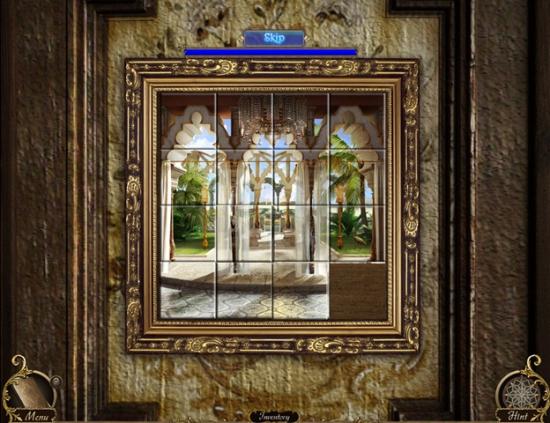
- Go through the door.
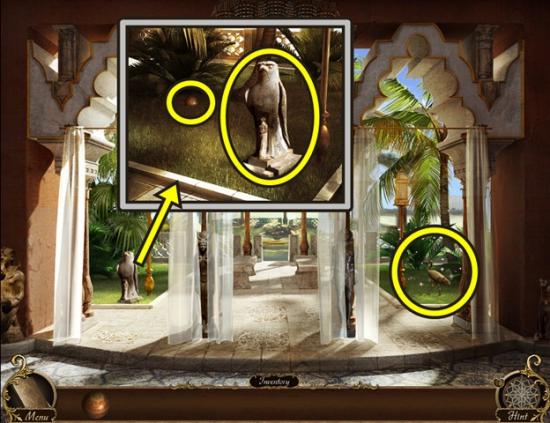
- Click on the eagle statue.
- Click on the eagle.
- Take the BALL.
- Click on the flamingo statue to start a hidden object hunt.
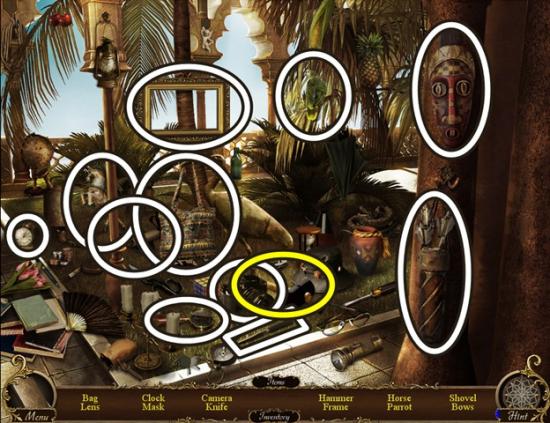
- Find all the objects. A HAMMER is added to your inventory.
- Return to the palace (move down three scenes, then go left, take the boat to the palace and go forward two scenes).
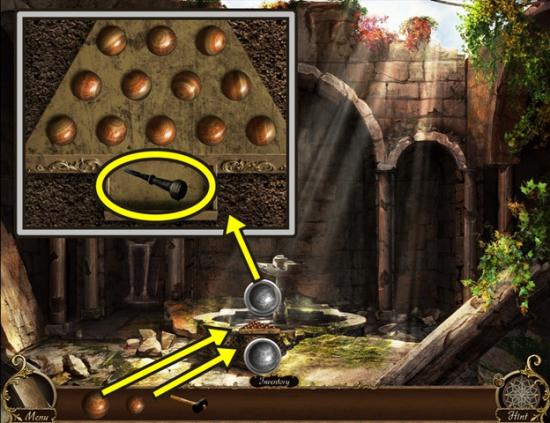
- Click on the fountain.
- Add the two BALLS.
- Click on the fountain.
- A mini-puzzle starts. Use a ball to jump over another to remove it from the board. A ball can move straight or diagonally. A ball can only move into an empty slot. There are many possible solutions for this puzzle.
- When you are finished, click on the fountain again.
- Take the CHISEL.
- Move down three scenes, go right, enter the house and go through the door on the left.
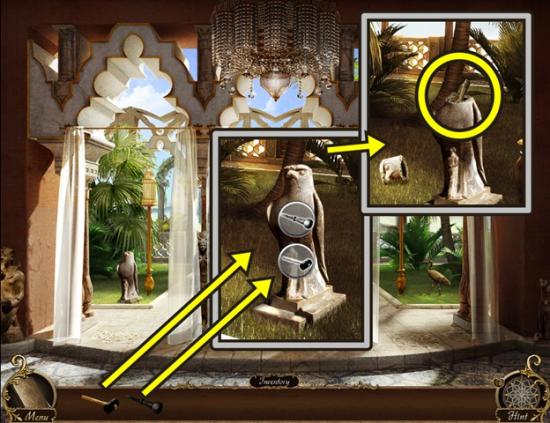
- Click on the eagle statue.
- Click on the eagle statue.
- Add the HAMMER and CHISEL.
- Take the HANDLE from the statue’s broken head.
- Return to the library.
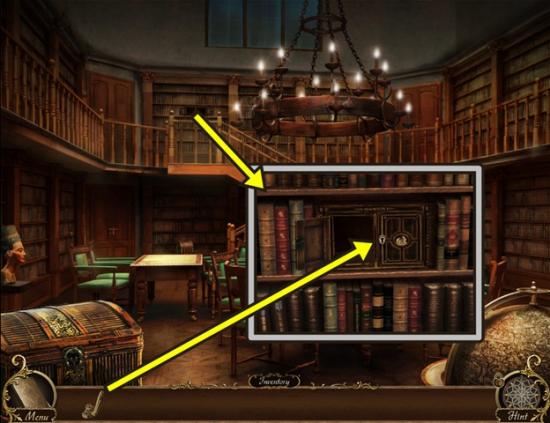
- Click on the top bookshelf.
- Add the HANDLE to the cabinet.
- Open the cabinet door.
- Take the KEY.
- Return to the scene with the eagle statue (leave the library, go to the marketplace and move forward to the sailboats, then go right and go into the house, then go through the door on the left) and move forward.
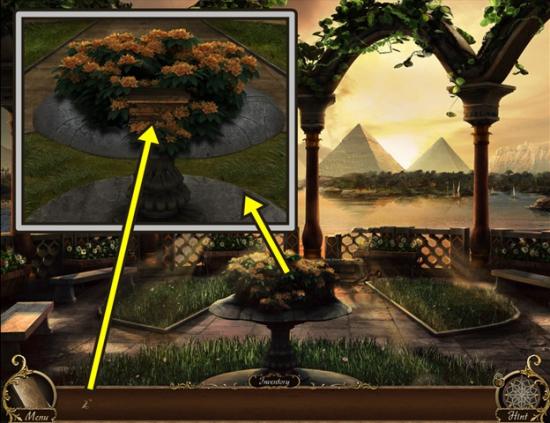
- Click through the dialogue.
- Click on the planter.
- Unlock the chest with the KEY.
- Click through the dialogue.
Congratulations! You have completed Gamezebo’s walkthrough for Dreams from the Past. Be sure to check back often for game updates, staff and user reviews, user tips, forums comments and much more here at Gamezebo!
More articles...
Monopoly GO! Free Rolls – Links For Free Dice
By Glen Fox
Wondering how to get Monopoly GO! free rolls? Well, you’ve come to the right place. In this guide, we provide you with a bunch of tips and tricks to get some free rolls for the hit new mobile game. We’ll …Best Roblox Horror Games to Play Right Now – Updated Weekly
By Adele Wilson
Our Best Roblox Horror Games guide features the scariest and most creative experiences to play right now on the platform!The BEST Roblox Games of The Week – Games You Need To Play!
By Sho Roberts
Our feature shares our pick for the Best Roblox Games of the week! With our feature, we guarantee you'll find something new to play!Type Soul Clan Rarity Guide – All Legendary And Common Clans Listed!
By Nathan Ball
Wondering what your odds of rolling a particular Clan are? Wonder no more, with my handy Type Soul Clan Rarity guide.


