- Wondering how to get Monopoly GO! free rolls? Well, you’ve come to the right place. In this guide, we provide you with a bunch of tips and tricks to get some free rolls for the hit new mobile game. We’ll …
Best Roblox Horror Games to Play Right Now – Updated Weekly
By Adele Wilson
Our Best Roblox Horror Games guide features the scariest and most creative experiences to play right now on the platform!The BEST Roblox Games of The Week – Games You Need To Play!
By Sho Roberts
Our feature shares our pick for the Best Roblox Games of the week! With our feature, we guarantee you'll find something new to play!All Grades in Type Soul – Each Race Explained
By Adele Wilson
Our All Grades in Type Soul guide lists every grade in the game for all races, including how to increase your grade quickly!
Dream Chronicles: The Book of Water Walkthrough
Welcome to the Dream Chronicles: The Book of Water walkthrough on Gamezebo. Dream Chronicles: The Book of Water is a hidden object adventure game played on the PC. This walkthrough includes tips and tricks, helpful hints, and a strategy guide for how to complete Dream Chronicles: The Book of Water.
Dream Chronicles: The Book of Water – Game Introduction
Welcome to the Dream Chronicles: The Book of Water walkthrough on Gamezebo. Dream Chronicles: The Book of Water is a hidden object adventure game played on the PC. This walkthrough includes tips and tricks, helpful hints, and a strategy guide for how to complete Dream Chronicles: The Book of Water.
General Tips
- This walkthrough covers Dream Chronicles: The Book of Water Collector’s Edition. As such, the “Bonus Adventure!” can be found at the bottom of this strategy guide. Please note the bonus adventure cannot be accessed until you’ve completed the main game.
- There are two kinds of Hints in this game: Text Hints, and Location Hints. Both buttons are located on the lower left corner of the screen, with Text Hints being marked by a “?” and Location Hints being marked by a Magnifying Glass. Both can be used without limit, however they will require a certain amount of time to recharge once they’ve been used. Text Hints will give you a list of objectives, or written hints, regarding what you should do next. Location Hints will illuminate the location of a hidden object (or say “There’s nothing to find here” if there’s nothing. In such cases, the button does not require time to recharge).
- Puzzles may be skipped after an allotted amount of time has passed.
- In the bottom right corner of the screen, you can find your Journal. This will give you access to your Journal (outlining important events and notes as they occur in the story), your Dreams, and a Map. Accessing the Map will shown your current location, as well as the total number of Dream Pieces you’ve collected and how far along you are in your game.
- Dream Pieces are circled in yellow in the walkthrough below. There are 70 in total, and they are all shown below.
- At the end of the game, you will receive a score based on your gameplay time, number of Dream Pieces found, number of hints used, etc.
- Inventory items are shown at the bottom of the screen. To drop an inventory item you’ve accidentally clicked but don’t want to use right away, simply click on its location on the inventory bar again to let go of the item.
- Throughout the game, you will discover Dream Jewels. These are magic spells that can be used to help you through the game, and are powered by Dream Pieces. The Illuminate spell will give light to a dark area, the Weld spell will repair a broken item, the Reveal spell will reveal secrets hidden in an area, and the Vision spell will allow you to briefly see other areas associated with the story. The Vision spell is not key to the main gameplay however, and thus is not outlined in the guide below.
- Please note: the bonus adventure does not have Dream Jewels, Dream Pieces, or Hint buttons.
- INVENTORY ITEMS are capitalized in the guide below and are circled in red in the screenshots.
- Chapters from the main quest, as shown below, are divided according to general region/location.
- You may access the Airship at any time during your game and use it to travel to a previously visited area in the event you’ve forgotten Dream Pieces.
Chapter 1: The Town of Wish
Airship
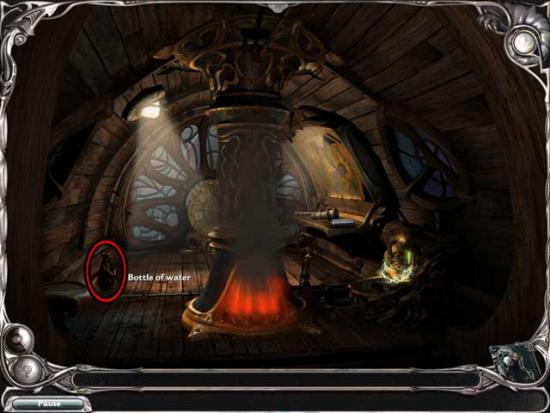
- A bolt of lightning has struck and caused a fire! Pick up the BOTTLE OF WATER on the left side of the ship and use it to put out the fire.

Gate of Wish
- Pick up the Note lying on the ground on the left to discover the town has been locked down. You’ll need to find a way inside.
- Pick up the 5 CARVED STONES strewn about the ground to add them to your inventory.
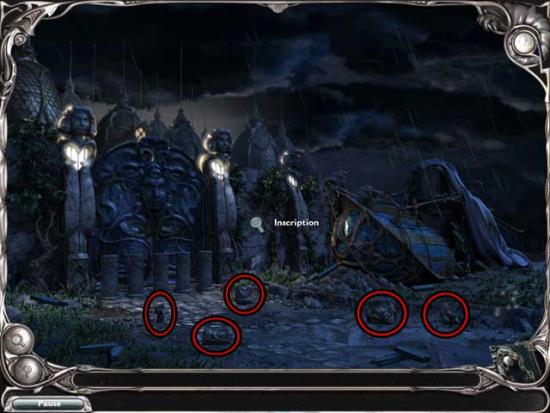
- Click on the Inscription on the wall to the right of the Town Gate. This will give you a clue on how to open it.
- Place the various CARVED STONES on the cylinders in front of the gate so that their lengths match those shown on the inscription. The solution is shown below.
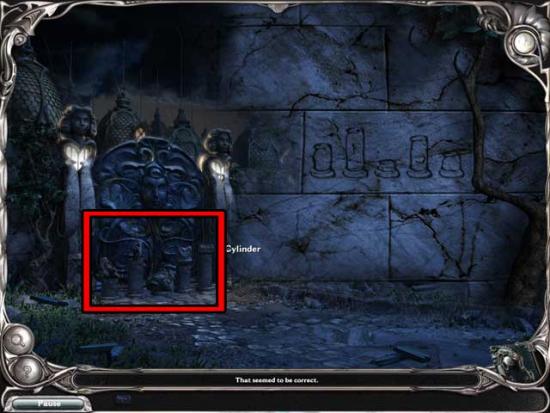
- Upon completing the puzzle, you will be able to enter Wish.
Wish Main Street
- There are Dream Pieces scattered here: their locations are shown below in yellow. Pick up the Metallic Object circled in red to discover the Dream Jewel of Illumination.
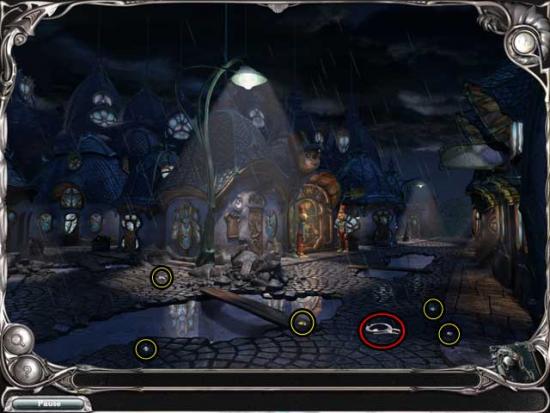
- Proceed to the left.
Statue
- Use the Dream Jewel of Illumination located on the left side of your screen to add light to the area.
- The Statue will move, and you can correct the position of the torso, but you won’t be able to solve this puzzle just yet. Pick up the Dream Pieces, then return to Wish Main Street.
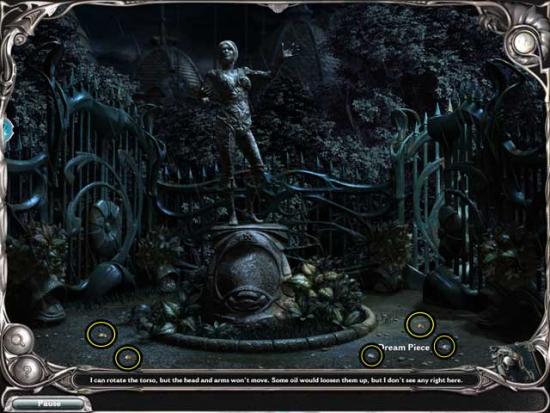
Wish Main Street
- Click on the Note lying in front of the Toy Shop to gather a hint on how to enter.
- Click on the Toy Soldiers on either side of the door in the following order: Left, Right, Right, Left, Right.
- Enter the Toy Shop.
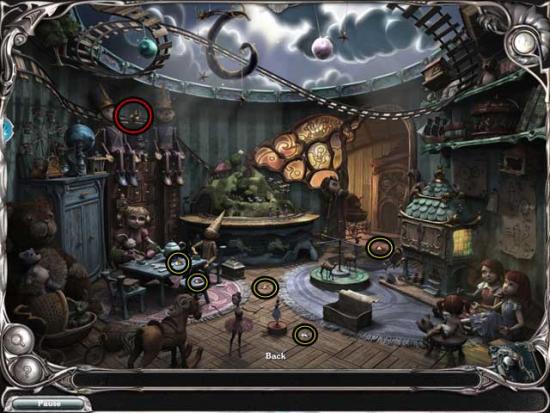
Toy Shop
- Pick up the Oil Container and the Dream Pieces, then return to the Statue.
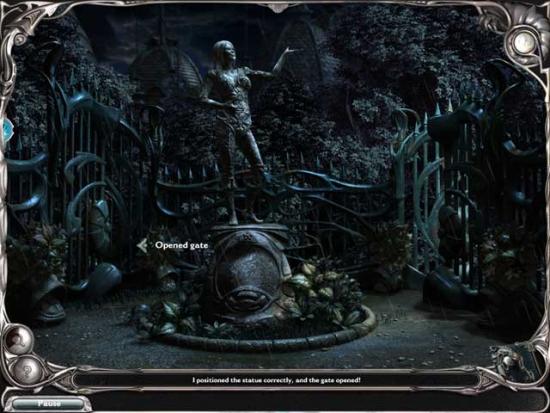
Statue
- Use the Oil Container on the Statue to restore it to moving order, then click on the arms and head to move them into the proper position. The solution is shown below.
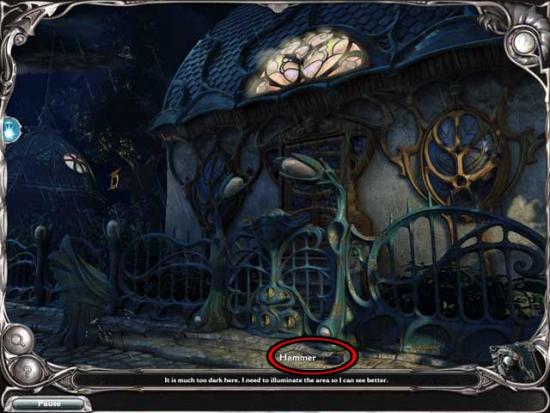
House Entrance
- Lighting will strike, knocking out the power and locking the Gate shut.
- Use the Dream Jewel of Illumination to light up the area.
- Pick up the HAMMER lying in front of the Gate, then use it on the Electricity Pole to open it.
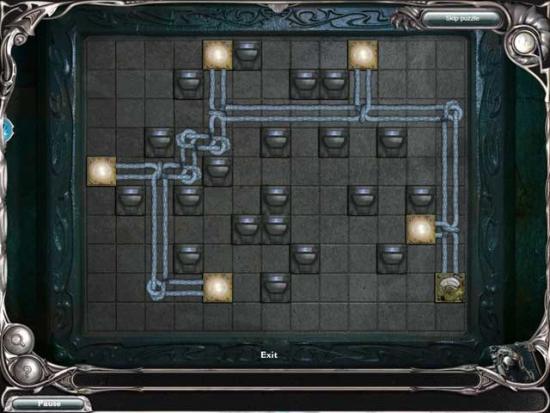
- Rearrange the pieces of cable so that all five electric nodes are connected again. The solution is shown below:
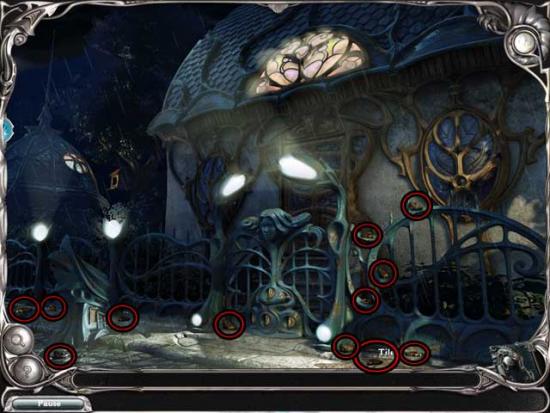
- Click on the Gate: the circle locking mechanisms will break into pieces and scatter throughout the area.
- Pick up all the TILES associated with the circle locking mechanisms. Their locations are shown below.
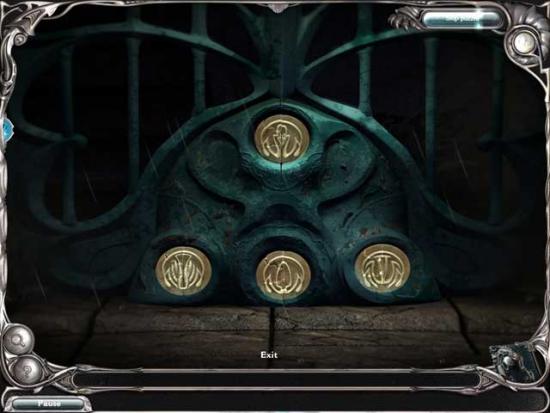
- Click on the Gate again for a closer view.
- Place the TILES in their correct locations on the circular locking mechanisms on the Gate, so that the locks/images are restored. The completed solution is shown below.
- Enter the House.
House
- Upon entering, use the Dream Jewel of Illumination to give light to the room.
- Read the Note lying on the floor: it will give you more details as to what exactly is going on and what you’ll need to do.
- Return to the Toy Shop.
Toy Shop
- Pick up the GREEN KEY and the PINK KEY to add them to your inventory, then use them on the dollhouse cabinet on the right.
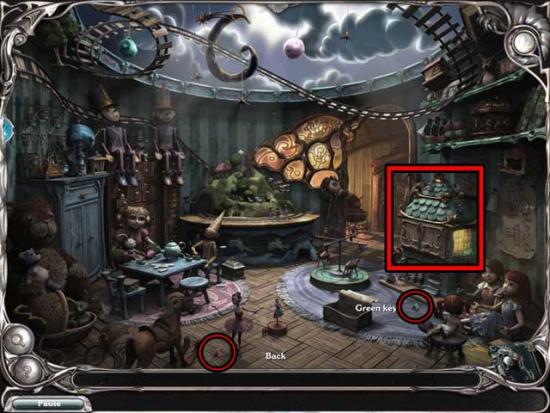
- Once open, check inside. You’ll need something to help you decipher the text.
- Click on the small gray box to open it and recover the MOONLIGHT TINT.
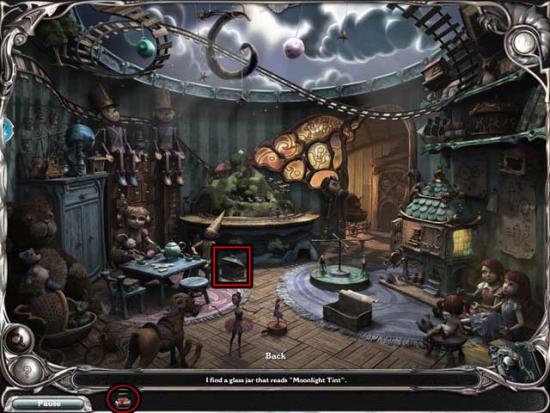
- Check inside the dollhouse again, this time using the MOONLIGHT TINT on the text.
- Find the scattered TRAIN PIECES. Their locations are shown below.
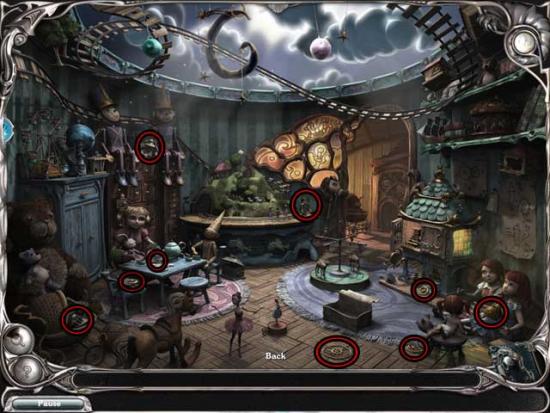
- Once you’ve found all the pieces, return to the dollhouse. Use the TRAIN PIECES on the page to trigger a puzzle.
- Place the pieces in their correct locations, referring to the sketches in the background for help. Some pieces will need to be placed before others. An encouraging chiming noise will sound if a piece is in the right location, while one placed in the right location in the wrong order (i.e., something should be beneath it before it’s set), will click, but will also turn gray. The completed solution is shown below.
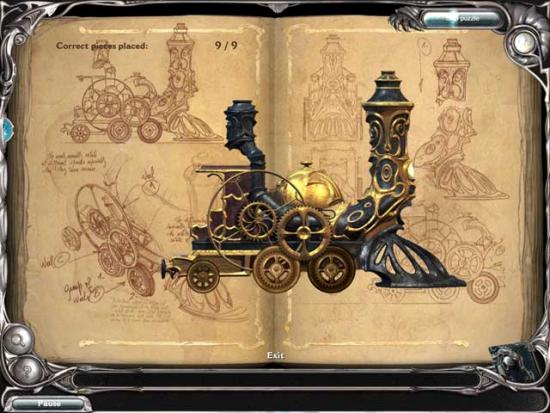
- Upon completing the assembly puzzle, the TRAIN will be added to your inventory.
- Click on the train play set near the back of the room.
- Use the TRAIN on the play set to set it in the station, but it seems some of the tracks are missing… Exit back to the main Toy Shop area.
- Find the missing pieces of RAILS. Their locations are shown below.
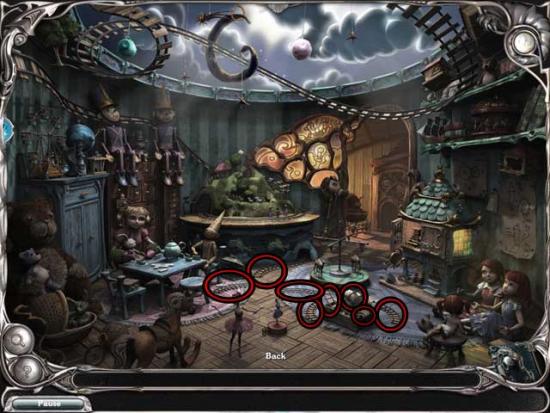
- Return to the train set
- Place the RAILS on the general area: they will all automatically snap into their proper positions. Now the train game is ready.
- Click the “Start” button at the train station to start the game. The goal is to switch the tracks according to the prompts shown in the upper left corner (i.e., I H K means you’ll want to connect the tracks so the train can go from point I to point H to point K etc.). You can adjust the speed of the train via the speed bar on the right. There are two major track layouts you will need to follow and switch part way through in order to complete the puzzle successfully. Both are shown below.
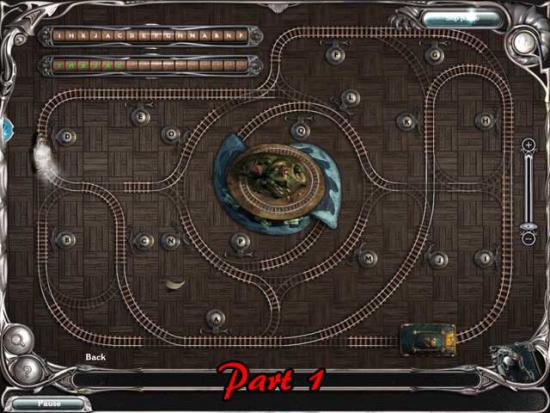
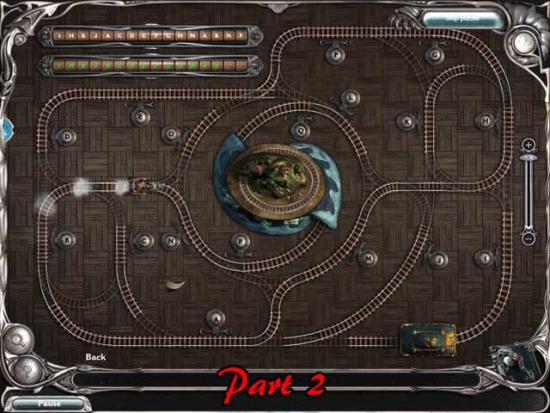
- Upon completing the puzzle, collect the Dream Jewel of Reconstruction that appears on “the other side of the mountain” to add it to the left portion of your screen along with the other Dream Jewel. You can now repair things!
- Return to the Gate of Wish.
Gate of Wish
- Examine the Airship on the right: there’s a large hole in the side that needs repairing. Before you exit the close-up though, collect the two Dream Pieces here.
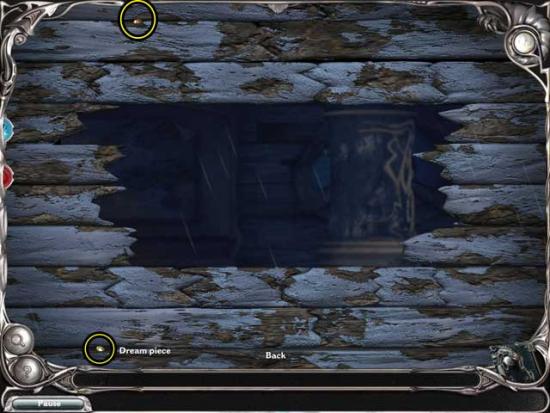
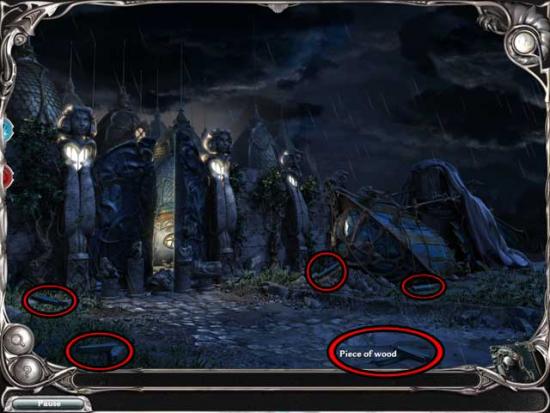
- Collect the WOOD BOARDS scattered throughout the area to add them to your inventory. Their locations are shown below.
- Take a closer look at the Airship again. This time, use the WOOD BOARDS on the hole to trigger a puzzle.
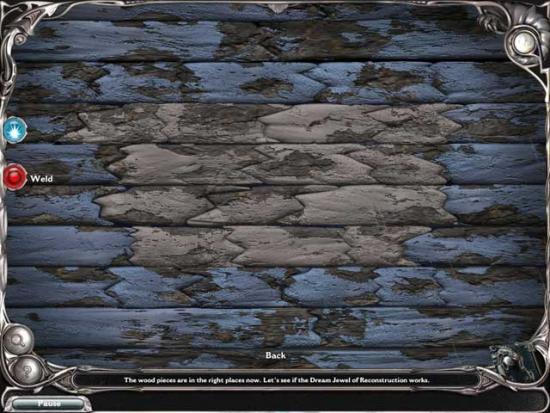
- Place the wooden pieces into their correct locations in order to repair the hull: the solution is shown below. Upon completing the puzzle, use the Dream Jewel of Reconstruction (aka Weld) to repair the hole for good.
Airship
- Collect the Dream Pieces lying throughout the Airship: their locations are shown below, then pick up the FUEL STONES to add them to your inventory.
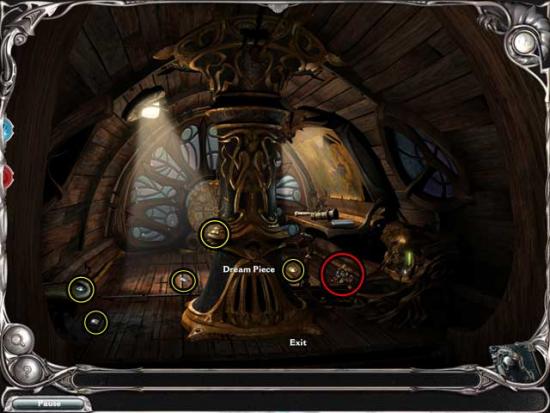
- Use Weld to repair the Fuel Device, then use the FUEL STONES on the Fuel Device to restore power to the Airship.
- Click on the Map to select your travel location. Select “The Herbalist” to continue on your way.
Chapter 2: The Herbalist
Front Yard
- Examine the lock on the front door: the eight numbers will disappear.
- Find the 8 NUMBERS and the PUMPKIN hidden in this area. Their locations are shown below.
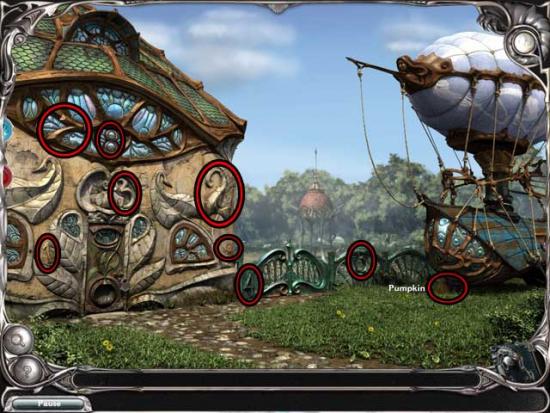
- Place the PUMPKIN back in the bottom of the door, then zoom in on the Magic Lock and place the NUMBERS on it.
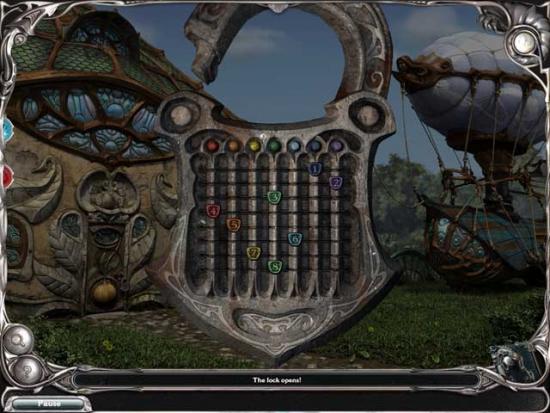
- Arrange the numbers so that the lock opens. The solution is shown below:
- Enter through the door.
Tree Lobby
- Enter the Kitchen.
Kitchen
- Click on the Book on the counter to open it, then click on it again for a closer look.
- Examine the contents of the Book, then exit back to the Kitchen area.
- Click on the Glass Container on the left to add it to your inventory: unfortunately, it breaks.
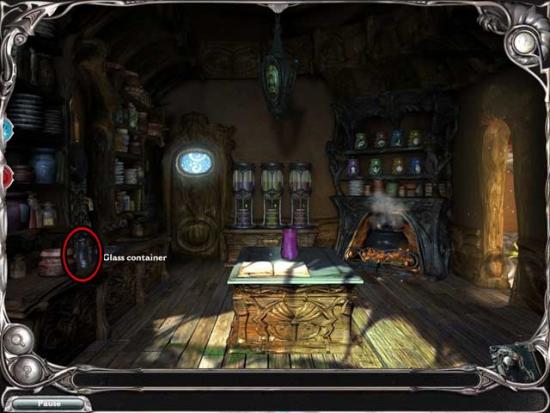
- Pick up the PIECES OF GLASS scattered around the room until you’ve obtained all the pieces in your inventory.
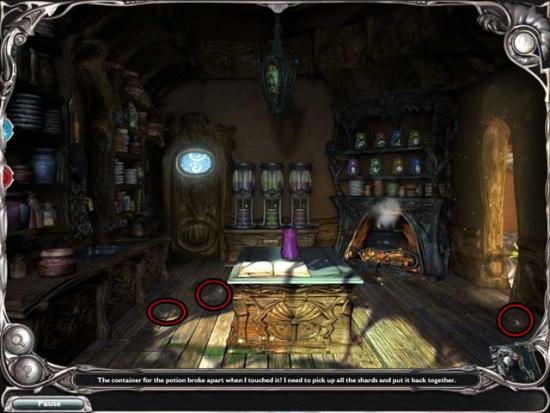
- Once you’ve collected all the glass, use the Weld spell to turn it into the EMPTY BOTTLE in your inventory.
- Use the EMPTY BOTTLE on the bubbling purple potion on the counter to obtain the HEALING POTION in your inventory.
- Return to the Airship and travel back to the town of Wish.
Gate of Wish
- Return to the House.
House
- Use the HEALING POTION on Fidget lying on the couch on the left.
- Return to the Airship and take it to Barge City.
Chapter 3: Barge City
Docks
- Pick up the two HAMMER PIECES lying on the docks to add them to your inventory, then use the Weld spell to turn them into the HAMMER.
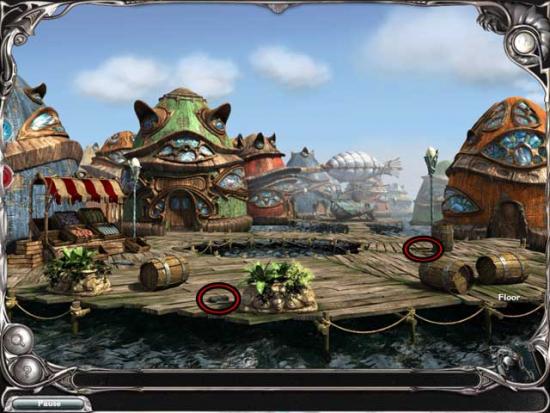
- Use the HAMMER on the barrel on the left to break it open, then click on the KEY to add it to your inventory.
- Use the KEY on the orange house on the right to open the door and proceed inside.
Port Office
- Click on the Dream Pieces to collect them, then click on the Dream Jewel of Reveal to add the magic to the left portion of your screen.
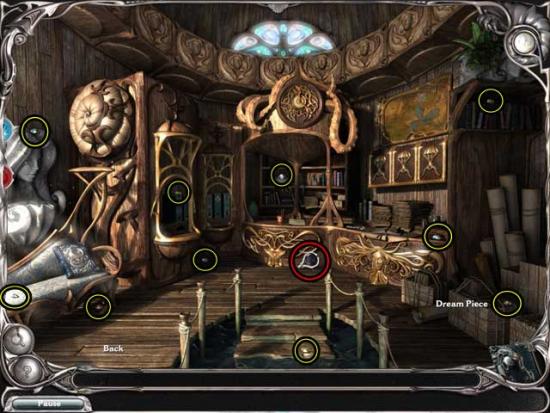
- Pick up the KEY lying on the counter to add it to your inventory, then click on the Note lying nearby to the left. Read it for a clue regarding another Key.
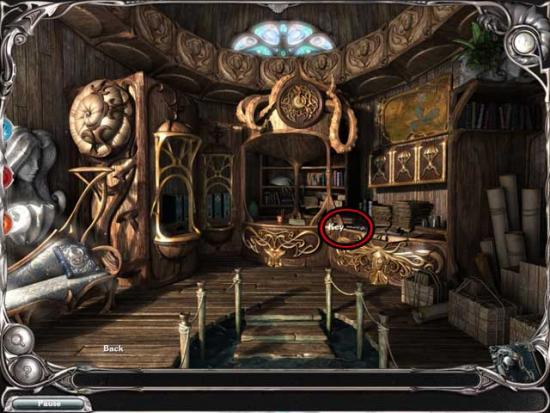
- Click on the blue book on the left to open it, revealing the Book of Water.
- Click on the Book of Water to examine the pages. Use Reveal on the pages to reveal the contents of the book.
- Click the “Check” button that appears at the bottom of the page: it appears the three lost figurines are no longer lost!
- Solve the Message Lock that appears on the right page. The solution is “You must stop them.” Unlocking the secret message will reveal the locations of the four figurines you need to find.
- Before leaving the Port Office, click on the Map in the upper right corner to add more Airship travel locations to your Airship Map.
- Exit to the Docks.
Docks
- Use the KEY on the red house in the background, behind the green house on the left, and enter.
Tackle Shop
- Pick up the Dream Pieces scattered throughout the shop, then collect the RING, GRIP, REEL, FISHING LINE, HOOK, CHISEL, and RIB to add them to your inventory. Their locations are shown below. Also don’t forget to open the second drawer from the left on the middle bookshelf to add the KEY to your inventory.
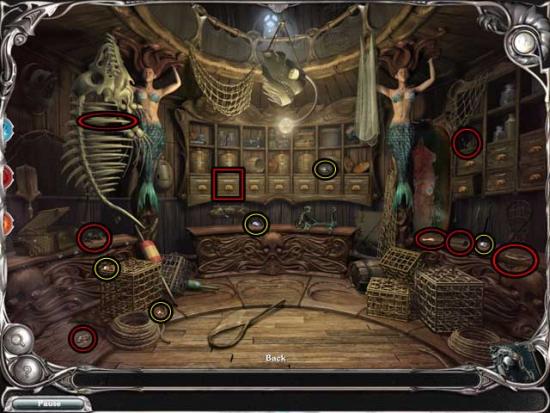
- Examine the clamp on the center table at the far end of the room.
- Place the RIB on the clamp, then use the CHISEL to shape it into a rod. Next, place the GRIP, REEL, RING, FISHING LINE, and HOOK on the rod (in that order). The fishing rod should appear as follows:
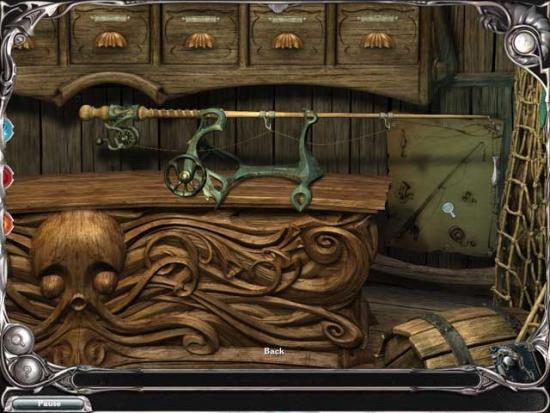
- For now, exit back to the Docks.
Docks
- Use the KEY on the green house on the left to unlock the door, then enter.
Art Studio
- Click on the Dream Pieces to collect them, then click on the Dream Jewel of Vision to add it to your magic on the left.
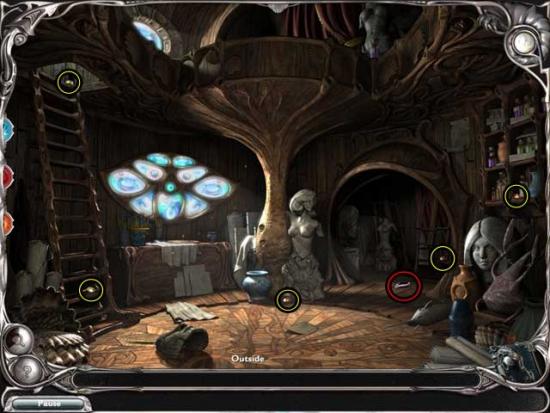
- Read the Note lying in the middle of the floor for a clue.
- Pick up the BRUSH lying on the floor to add it to your inventory, then examine the art table on the left.
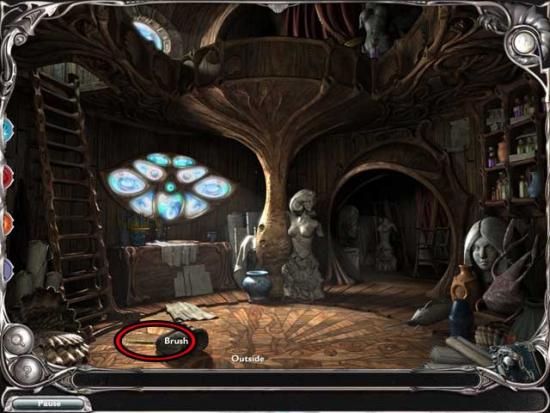
- Before you can complete the task here, you’ll need another clue. Exit the Art Studio and return to the Port Office.
Port Office
- Examine the Book of Magic Colors sitting on the desk on the right.
- Take note of the color mixing techniques listed on the left, then click on the Paper Reference/Note on the right to take it with you regarding the exact color.
- Return to the Art Studio.
Art Studio
- Click on the art desk on the left to enter the close-up again.
- The Note with the color reference will appear now, giving you a clue as to which colors to mix in order to obtain the right color. Click on the various colors (using black to darken and white to lighten as needed) until you obtain the correct color shade. The correct color shade is shown below.
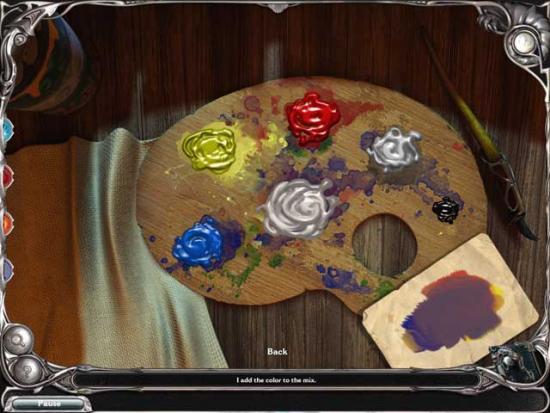
- Mixing the colors correctly will reward you with the PAINT in your inventory.
- Return to the Tackle Shop.
Tackle Shop
- Examine the clamp once again.
- Use the PAINT on the HOOK, then click on the FISHING POLE to add it to your inventory.
- Return to the Docks.
Docks
- Use the FISHING POLE on the Center of Barge City (aka the hole in the middle of the docks). You will be rewarded with the DOLPHIN FIGURINE, which will automatically be added to your inventory.
- Return to the Airship and select The Obelisk as your destination.
Chapter 4: The Obelisk
Obelisk
- Pick up the METALLIC OBJECT lying on the ground on the right and use it on the Mechanism next to the Obelisk.
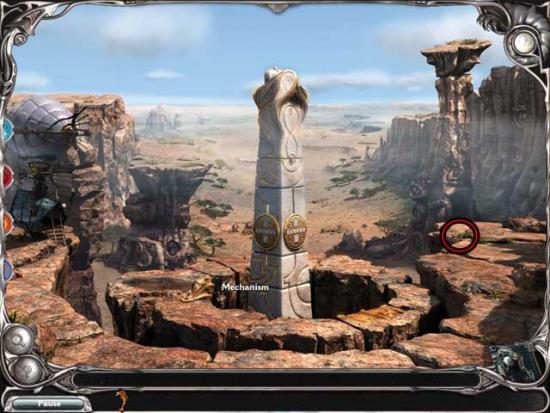
- Once the platform walkway has been extended, click on the Obelisk for a closer view.
- Click on the image pieces in the correct order to recreate the multi-colored picture at the top. You must do this four times total, choosing to look at the Obelisk again after each puzzle to trigger the next one. All four solutions are shown below:
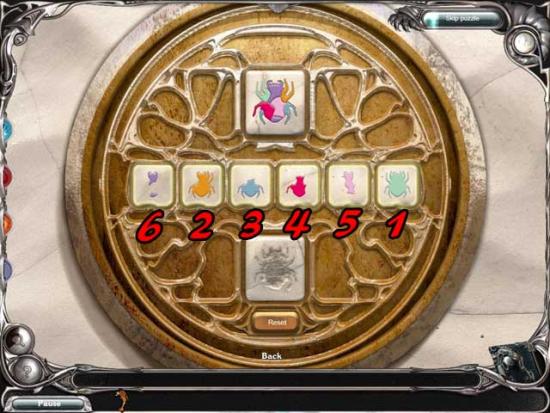
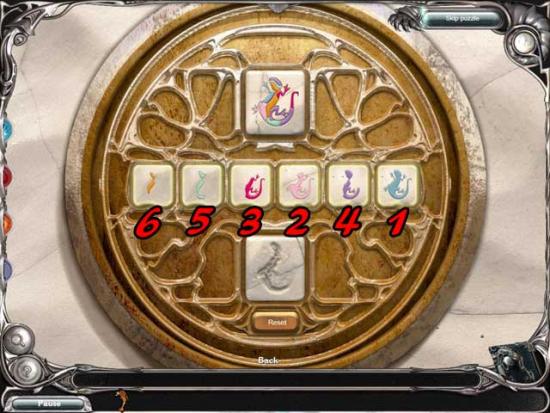
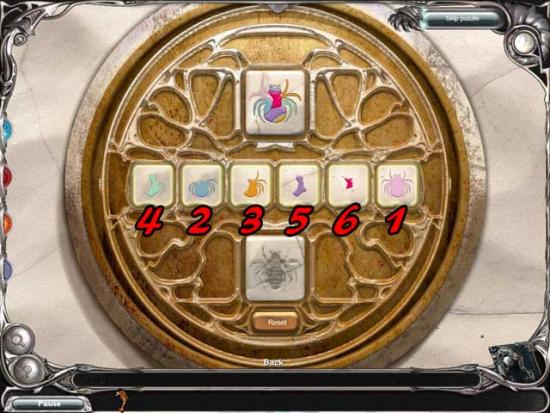
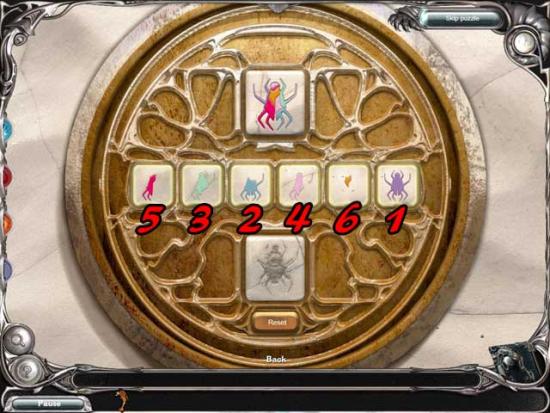
- Once you’ve completed all the puzzles, the Obelisk will sink into the ground, revealing the FAIRY FIGURINE. Click on it to add it to your inventory.
- Return to the Airship, this time selecting “Merrow” as the destination.
Chapter 5: Merrow’s House
Fountain
- Pick up the Dream Pieces and the KEY lying on the ground to add it to your inventory.
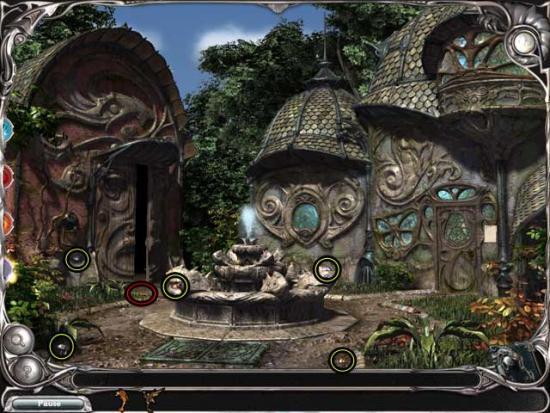
- Read the Note hanging next to the door on the right. It appears Merrow isn’t home.
- Enter the Hangar on the left.
Hangar
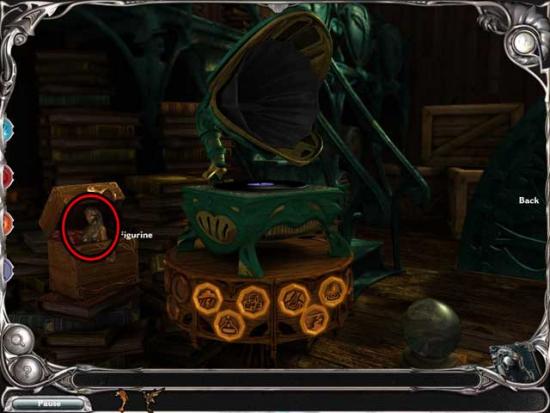
- Pick up the Dream Pieces scattered throughout the area, then pick up the KEY and GRAMOPHONE PARTS to add them to your inventory. Their locations are shown below.
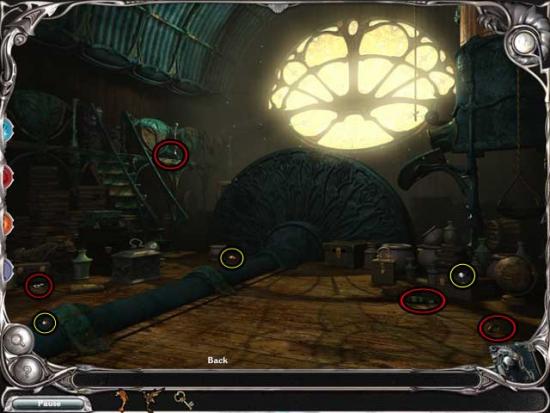
- Once you’ve collected all the parts, place the GRAMOPHONE back into its proper location, on the pedestal to the left of the stairs on the left side of the screen.
- Click on the Gramophone for a closer look once placed.
- Read the Note lying next to the Gramophone, then pick up the DISC PIECE and the WOOD TILE to add them to your inventory.
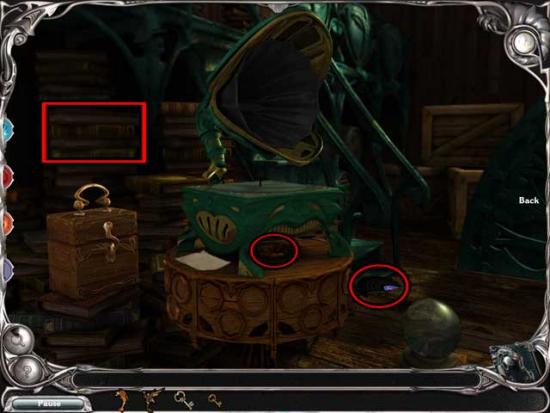
- Check the pile of books to the left of the Gramophone.
- Click on the three DISC PIECES within the Book to add them to your inventory, then use Weld to reconstruct the DISC.
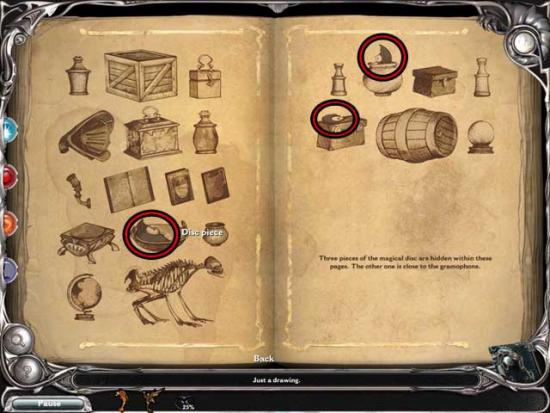
- For now, exit back to the Fountain.
Fountain
- Use the more silver KEY from your inventory on the door on the right to unlock it, then enter.
Merrow’s House
- Pick up the Dream Pieces and the WOOD TILES lying on the floor to add them to your inventory. Don’t forget to also pick up the KEY.
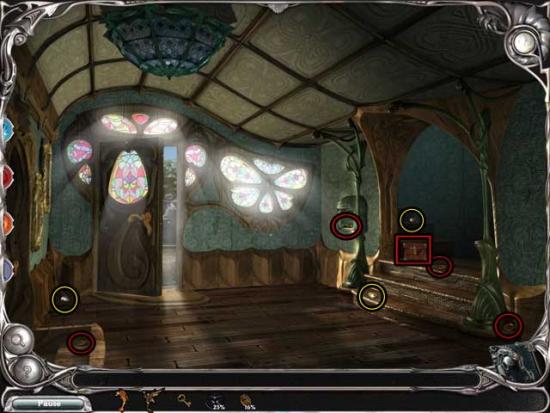
- Use the smaller KEY from your inventory (not the one you just picked up) on the Box on the right to open it, revealing an additional WOOD TILE.
- Return to the Hangar.
Hangar
- Use the remaining KEY on the locked Box just to the right of the large greenish mechanism in the middle of the screen. Opening the Box will reveal the final WOOD TILE.
- Examine the Gramophone again.
- Use the WOOD TILES on the base of the Gramophone and the DISC on the Gramophone itself to start a puzzle.
- Listen to the sounds the Gramophone plays and decide which Wood Tile it corresponds with. Once you’ve correctly identified a sound and clicked the right Tile, the Tile will illuminate and the sound won’t be played again. When you’ve completed this puzzle, the locked box on the left will open, revealing the MERMAID FIGURINE. Click on it to add it to your inventory.
- Return to the Airship, selecting the Clockmaker as your destination.
Chapter 6: The Clockmaker
Snow
- Enter through the rounded door at the bottom of the tower.
Clockmaker’s Residence
- Pick up the Dream Pieces scattered throughout the room. Their locations are shown below.
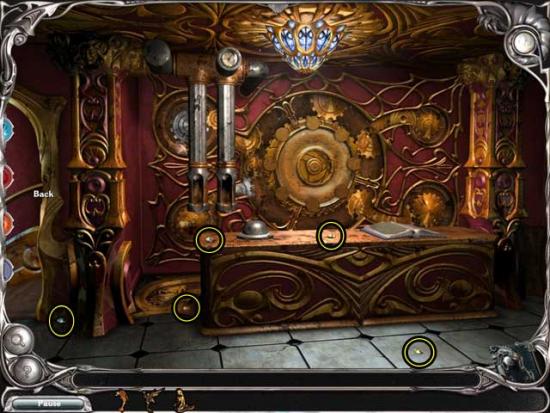
- Read the Note left inside the Book on the right.
- Ring the Bell on the left portion of the counter to summon the Clockmaker.
- Talk to the Clockmaker, selecting the responses that appear under his dialogue at the bottom of the screen. Do this until he reveals the location of the Unicorn Figurine.
- Return to the Airship and select the Herbalist as your destination.
Chapter 7: Backtracking and the Crater of Time
Front Yard
- Click on the Key Hole on the greenish Gate on the right. You’ll need a Key in order to open it.
- Collect the PIECES OF KEY around the area, then use Weld to repair it and thus obtain the KEY in your inventory.
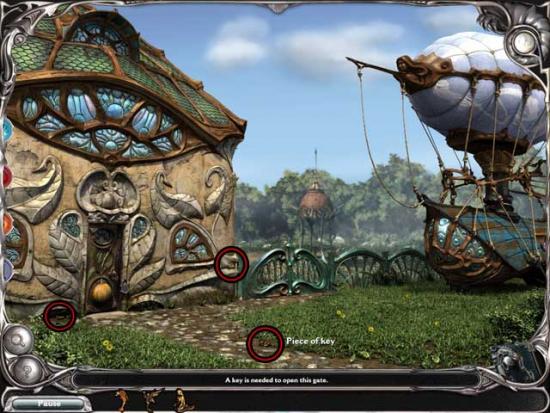
- Use the KEY on the Key Hole to open the Gate, then proceed into the Field.
Field
- Collect the Dream Pieces, the SHOVEL, and the PIECES OF PAPER scattered throughout the area to add them to your inventory.
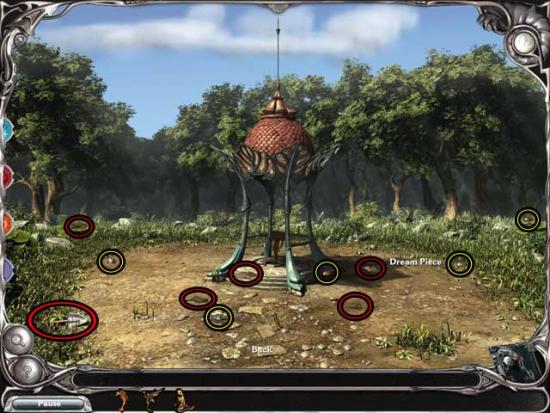
- Enter the Herbalist’s and proceed to the Kitchen.
Kitchen
- Click on the BOOK lying on the counter to add it to your inventory, then return to the Field.
Field
- Place the BOOK on the stand in the middle of the Pergola, then click for a closer view.
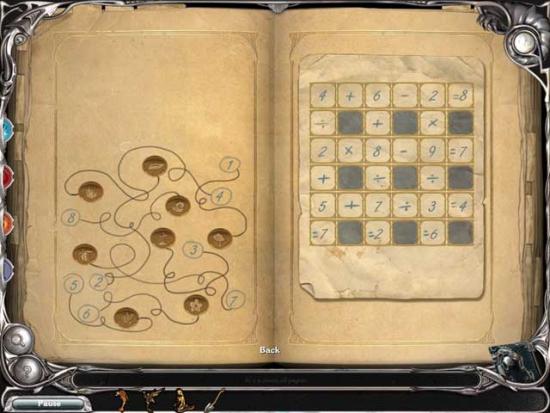
- Use the PIECES OF PAPER on the inside of the Book to trigger a puzzle. Place the Pieces in their proper locations to reveal the clue to the last Figurine. The solution is shown below. The numbers “274” will replace the puzzle once it’s finished. Take note of these numbers (and the symbols associated with them on the left).
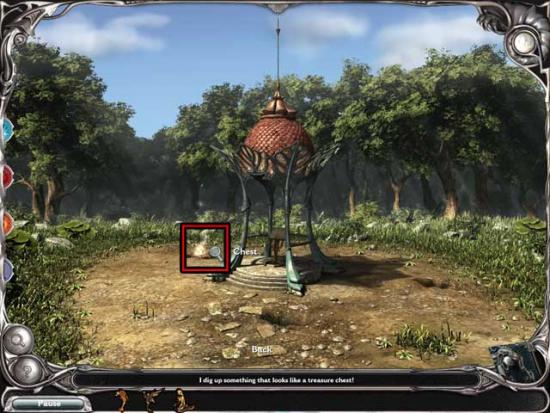
- Exit the Book, then use the Shovel to dig around the area until you find the Chest. It should be located to the left and a little behind the Pergola.
- Click on the Chest for a closer view. Arrange the circles so that they match the symbols matching the numbers “274” in the Book. The solution is shown below.
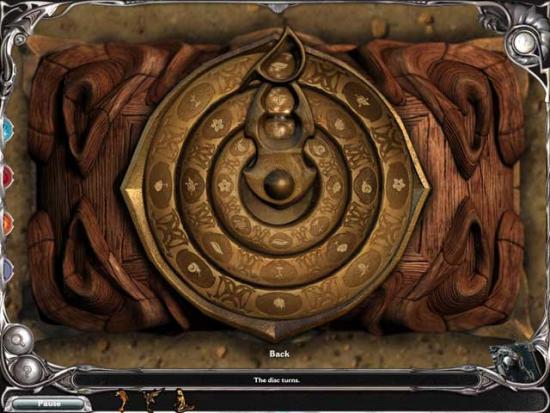
- The Chest will open, revealing the UNICORN FIGURINE. Click on it to add it to your inventory.
- Return to the Airship and select the area “Craters”.
Crater of Time
- The Crater of Time features seven doors. Some are already open, some will need to be opened by you. Their locations have been labeled and are shown below to make navigation for you easier.
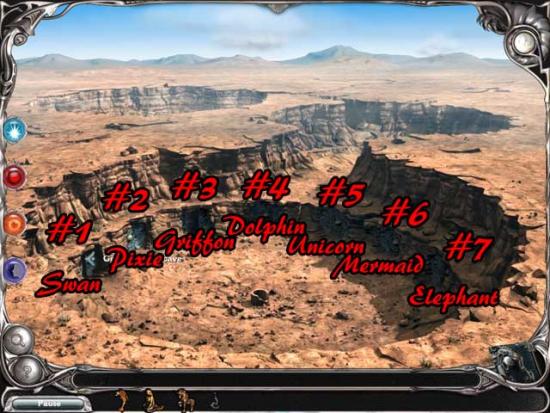
- Select the first Door.
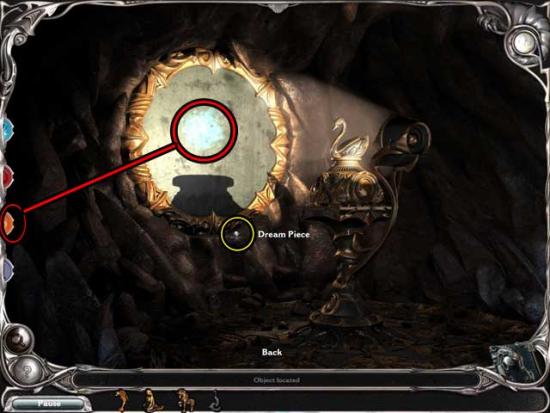
Door #1: The Swan
- Click on the Dream Piece to collect it, then use Reveal and collect the MAGIC SYMBOL 1/7 that appears.
- Return to the Crater of Time and click on Door #2.
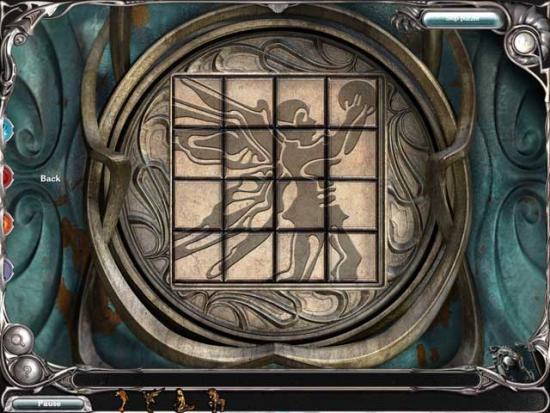
Door #2: The Pixie
- Click on the Door for a closer view, then open the mechanism. Arrange the pieces of the puzzle so that they form a Pixie. The solution is shown below.
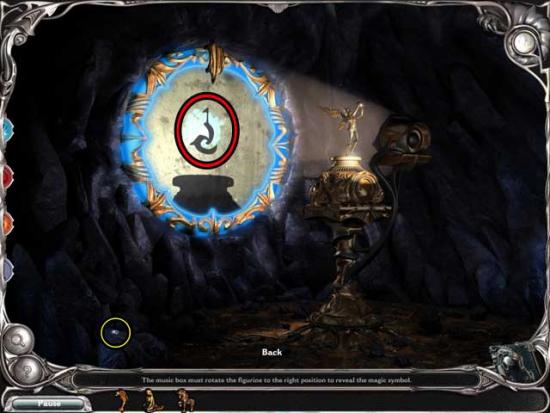
- Enter the Cave.
- Use the PIXIE FIGURINE from your inventory on the stand, then use the button on the right to rotate the Figurine until it’s in the correct position to make the MAGIC SYMBOL 2/7 appear. Don’t forget to collect the Dream Piece while you’re here. Their locations are all shown below.
- Exit the Cave, then proceed to Door #3.
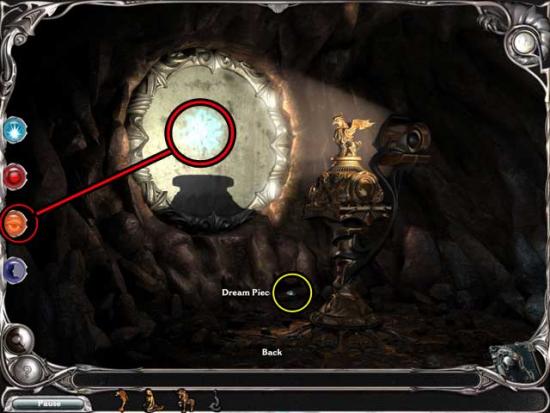
Door #3: The Griffin
- Collect the Dream Piece, then use Reveal to uncover the MAGIC SYMBOL 3/7 and add it to your inventory.
- Exit the Cave, then proceed to Door #4.
Door #4: The Dolphin
- Click on the Door for a closer view, then open the mechanism. Arrange the pieces of the puzzle so that they form a Dolphin. The solution is shown below.
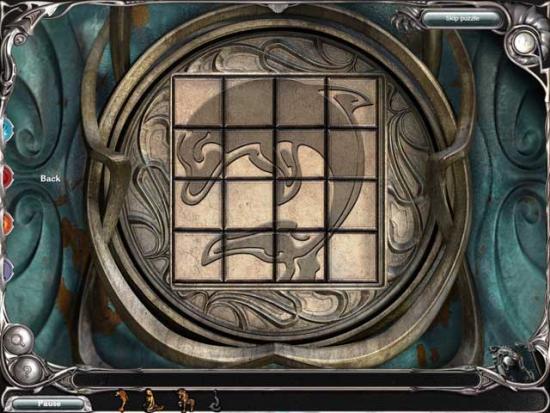
- Enter the Cave.
- Use the DOLPHIN FIGURINE from your inventory on the stand, then use the button on the right to rotate the Figurine until it’s in the correct position to make the MAGIC SYMBOL 4/7 appear. Don’t forget to collect the Dream Piece while you’re here. Their locations are all shown below.
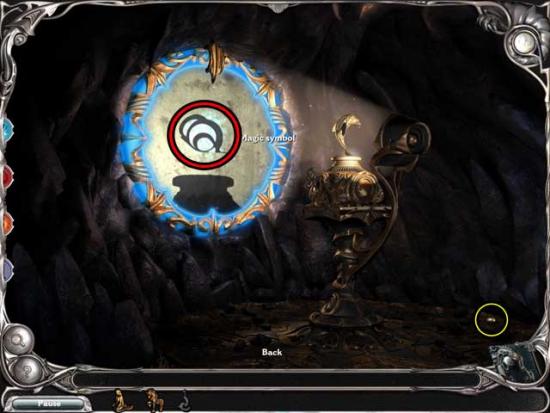
- Exit the Cave, then proceed to Door #5.
Door #5: The Unicorn
- Click on the Door for a closer view, then open the mechanism. Arrange the pieces of the puzzle so that they form a Unicorn. The solution is shown below.
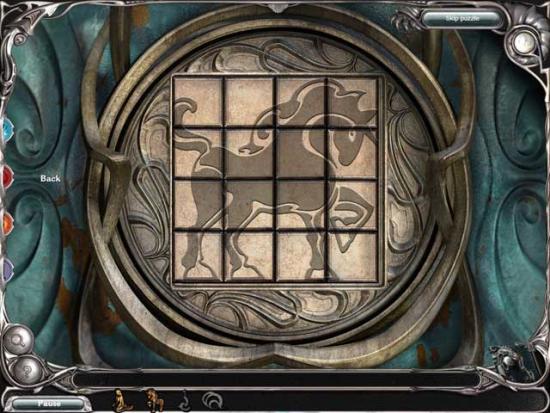
- Enter the Cave.
- Use the UNICORN FIGURINE from your inventory on the stand, then use the button on the right to rotate the Figurine until it’s in the correct position to make the MAGIC SYMBOL 5/7 appear. Don’t forget to collect the Dream Piece while you’re here. Their locations are all shown below.
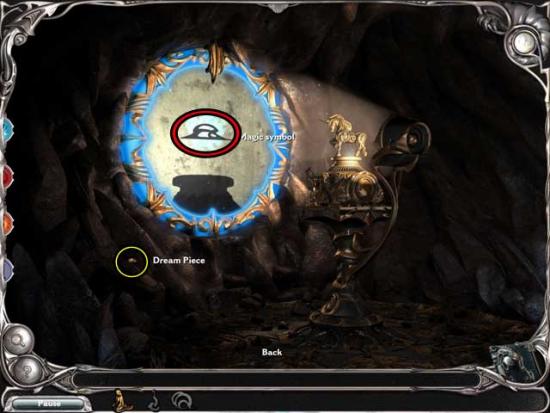
- Exit the Cave, then proceed to Door #6.
Door #6: The Mermaid
- Click on the Door for a closer view, then open the mechanism. Arrange the pieces of the puzzle so that they form a Mermaid. The solution is shown below.
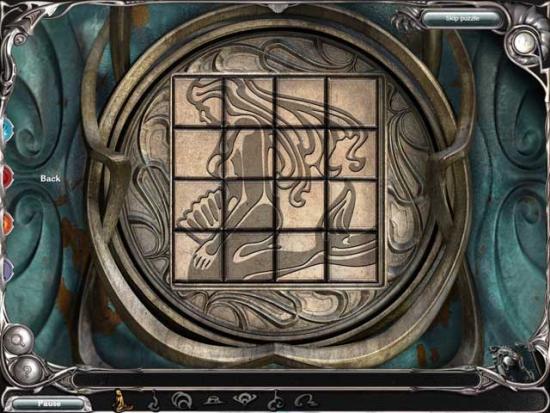
- Enter the Cave.
- Use the MERMAID FIGURINE from your inventory on the stand, then use the button on the right to rotate the Figurine until it’s in the correct position to make the MAGIC SYMBOL 6/7 appear. Don’t forget to collect the Dream Piece while you’re here. Their locations are all shown below.
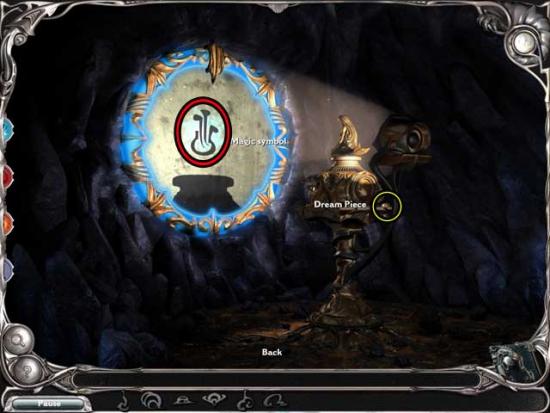
- Exit the Cave, then proceed to Door #7.
Door #7: The Elephant
- Collect the Dream Piece, then use Reveal to uncover the MAGIC SYMBOL 7/7 and add it to your inventory.
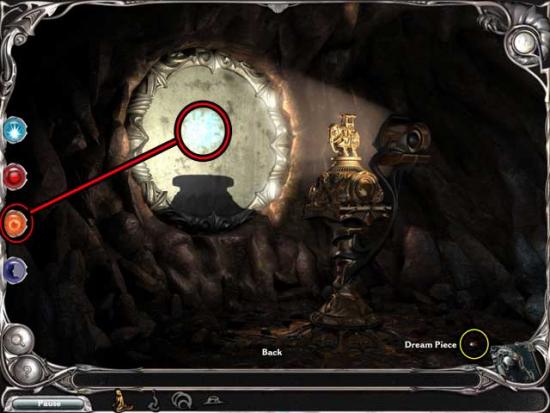
- By now, you should have not only collected all the MAGIC SYMBOLS, but also all the Dream Pieces (70 in total: you can check the “Map” portion of your journal to double-check your progress).
- Return to the Airship and select “Wish” as your destination. Once there, proceed to the Statue.
Statue
- Use all 7 MAGIC SYMBOLS on the area at the base of the Statue, then watch what happens…
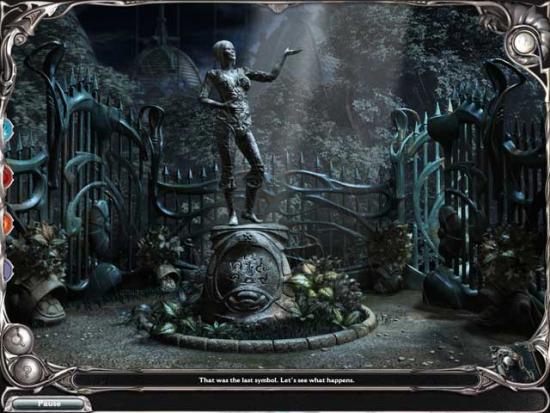
Congratulations! You’ve completed Dream Chronicles: The Book of Water!
Bonus Game: Faye’s Quest
If you purchased the Collector’s Edition of this game, you will be able to play this bonus adventure by selecting the “Bonus Game!” option located below the “Play” option in the Main Menu. You will have had to have completed the main Book of Water story/quest though before you can play. The following is a guide outlining how to complete “Bonus Game! Faye’s Quest”.
House
- Click on the Electrical Panel on the right for a closer view.
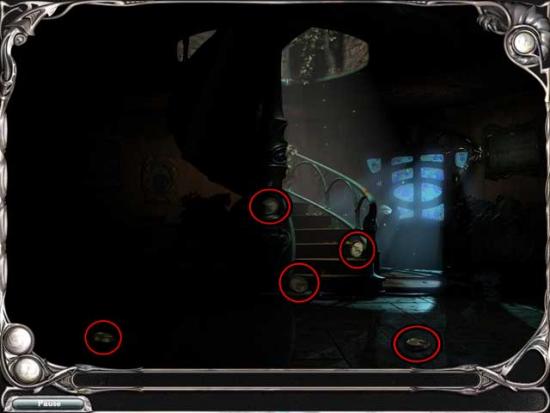
- Collect the CONNECTORS lying on the floor to add them to your inventory.
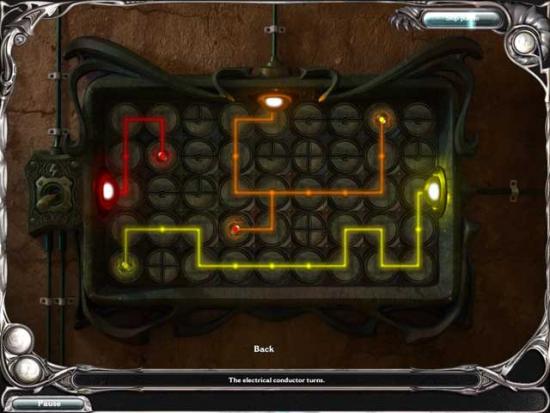
- Examine the Electrical Panel again. Use the ELECTRIC CIRCUIT on the Panel to trigger a puzzle.
- Rotate the various connectors so that electricity is restored with the proper colors to all of the colored circuits. The solution is shown below.
- Exit the House all the way back to the Gate of Wish, then proceed right to continue to the Herbalist.
Windmill
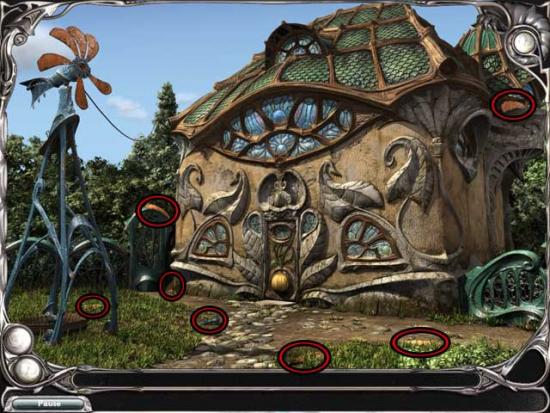
- Collect the BLADES and the SCREW strewn about the area to add them to your inventory, then use them on the Windmill to repair it.
- Enter the door to the Herbalist’s.
Tree Lobby
- Take note of the large Tree in the Lobby, which is almost dead, then continue to the Kitchen.
Kitchen
- Click on the Cookbook on the center counter to open it, then read the contents.
- 1)Light the Fire using the MATCH, then 2)add one unit of the tree liquid essences at the back of the room (simply by clicking on them to fill their glasses) to the large glass on the center counter.
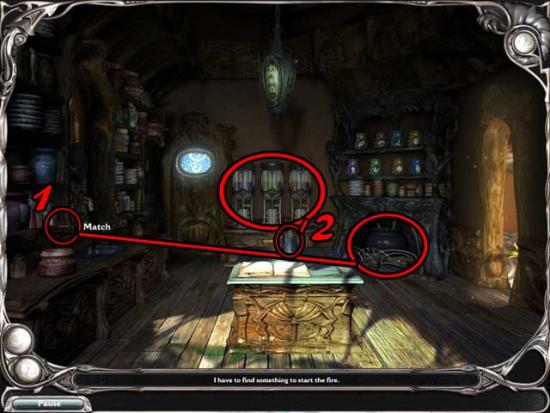
- 3)Take some ORANGE PEELS and crush them in the Mortar, then 4)heat the CRUSH ORANGE PEEL in the Cauldron. 5)Add the COOKED SPICE to the potion on the center counter.
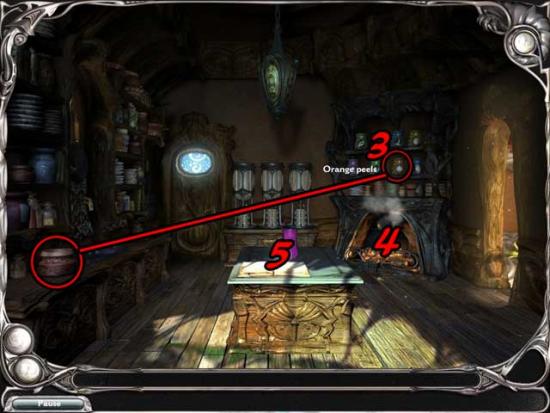
- Return to the Windmill to complete the final step.
Windmill
- Hang on, not all is at it seems. Aeval suggests you go to Barge City.
Docks
- Pick up the 3 KEYS scattered around the Docks to add them to your inventory.
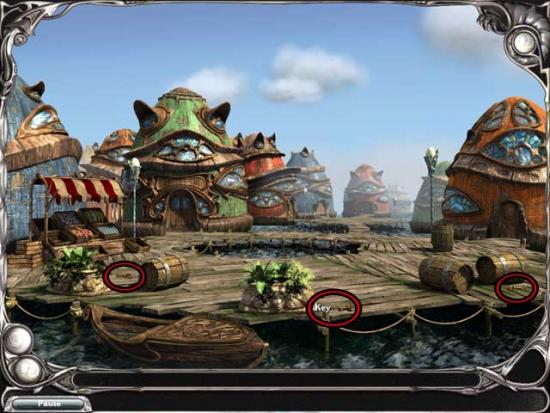
- Use the Silver KEY on the orange floating house on the right to open the door, then enter the Port Office.
Port Office
- Examine the Book of Water sitting on the couch on the left. Read the text: you’ll need to find a way to decipher it.
- Click on the Note lying on the floor to the right of the Book of Water: it’ll give you a clue as to a special color you may need.
- For now, exit back to the Docks.
Docks
- Use the Copper KEY on the green house on the left to open the door, then proceed inside to the Art Studio.
Art Studio
- Examine the art desk on the left: you’ll need a Brush and some Paints.
- Click on the GOLD NUGGET, BRUSH, LENS, and the 2 PIGMENTS to add them to your inventory.
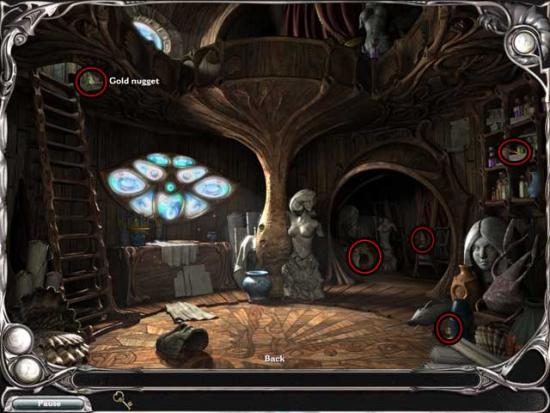
- Return to the Docks.
Docks
- Use the remaining KEY on the red house in the distance (behind the green Art Studio) to unlock the door, then proceed inside.
Tackle Shop
- Click on the GOLD, LENS, and the 2 PIGMENTS to add them to your inventory.
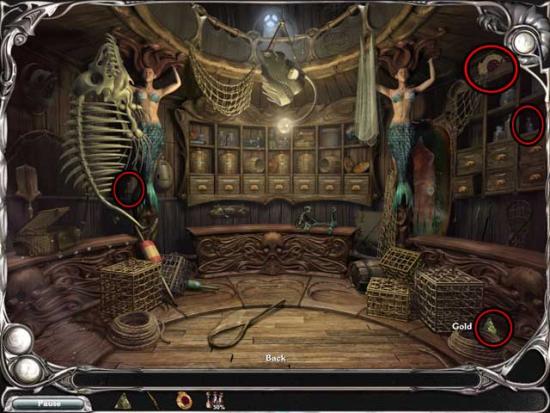
- Return to the Art Studio.
Art Studio
- Examine the art desk on the left again.
- Use the PAINT and the BRUSH on the palette to trigger a puzzle. Mix the correct paints until you achieve the proper color. Mixing YELLOW, RED, and WHITE x2 should give you the proper mixture (if not, just continue to mix as necessary until the proper color is achieved).
- Upon doing this successfully, the PAINT will be added to your inventory.
- Return to the Port Office.
Port Office
- Pick up the LENS (3/3) to add it to your inventory, then examine the Book of Water again.
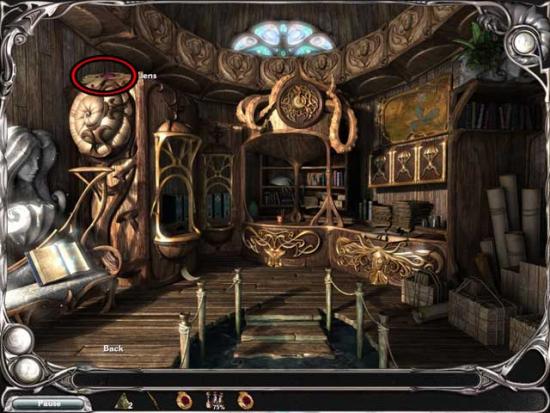
- Use the PAINT on the pages of the Book to reveal the contents. Once you’ve read them, exit the Book. You should find yourself back at the Herbalist.
Windmill
- Enter the house.
Tree Lobby
- Read the Note lying on the floor (in front of the door) on the right, then proceed to the Kitchen.
Kitchen
- Collect the TREE HEALING POTION sitting on the shelf to add it to your inventory, then return to the Tree Lobby.
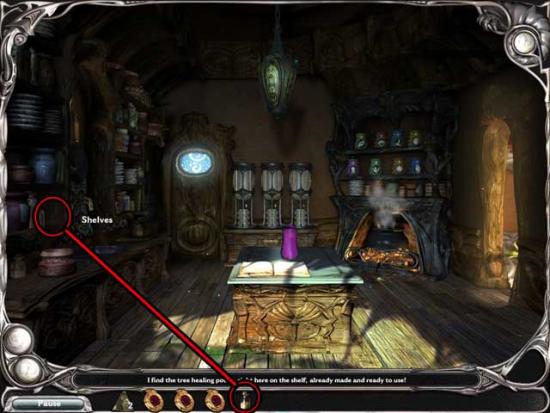
Tree Lobby
- Use the TREE HEALING POTION on the Tree to restore it back to life. This will trigger the door on the right to turn into a Portal. Click on it to enter.
Nexus
- Continue down the stairs at the bottom left corner of the screen to proceed to the next area.
Forge
- Collect the GOLD NUGGET (3/3) and the WOOD LOGS scattered around the area. Their locations are shown below.
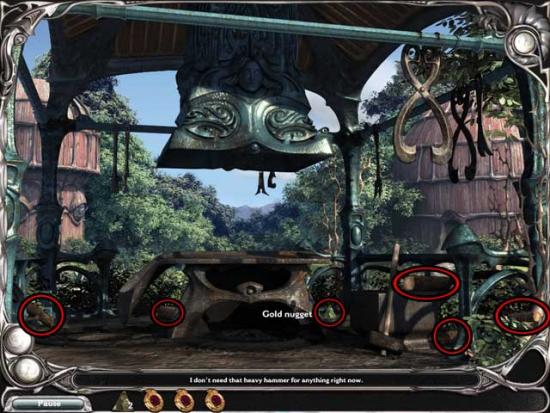
- Proceed to the left, to the Telescope.
Telescope
- Click on the Handle (just below the barely open shutter through which the light is coming, about mid-way down on the screen) to restore light to the room.
- Click on the Open Book on the left to read the contents regarding both the Telescope and the Forge.
- Click on the MAGNIFYING GLASS and the WOOD scattered throughout the room to add them to your inventory.
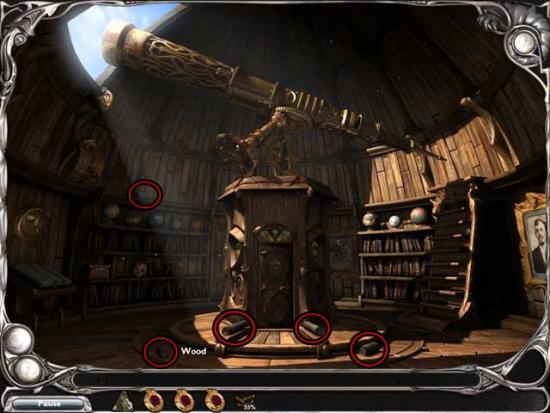
- Use the LENS on the Telescope (on the area about ¾ of the way towards the viewfinder for the person looking through) to trigger the night sky, then click on the Telescope again for a closer view. Use the Telescope to find the matching Constellation outline. Doing this correctly will reward you with a MOLD. Repeat this process for all three of the LENSES, until you have three MOLDS in your inventory. The locations of the three constellations are shown below.
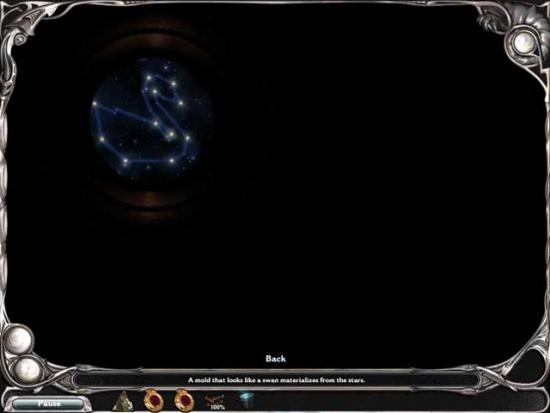
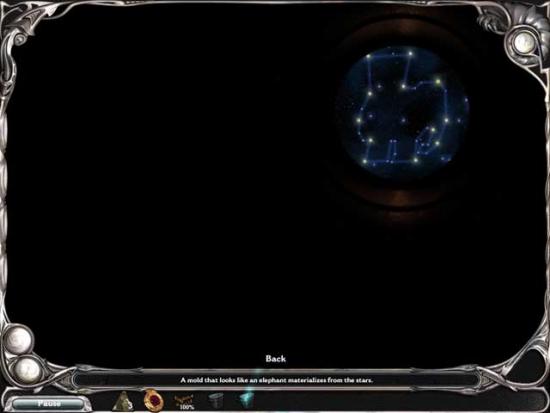
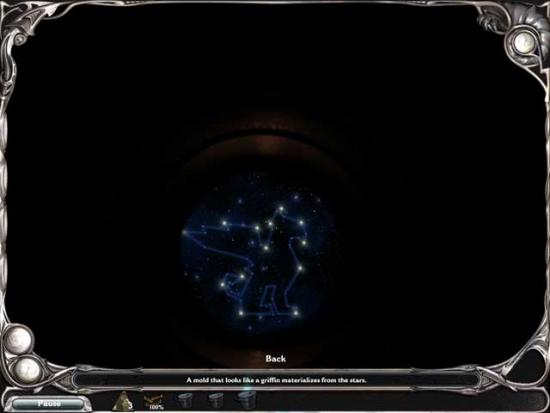
- Once you’ve obtained the 3 MOLDS, return to the Forge.
Forge
- Place a MOLD in the area on the ground to the left of the Forge, then use the WOOD on the fireplace. Use the MAGNIFYING GLASS to start the fire, then place a piece of GOLD on the Forge. It will melt and run into the Mold, rewarding you with a Figurine. Repeat this process three times to obtain the SWAN FIGURINE, the GRIFFIN FIGURINE, and the ELEPHANT FIGURINE for your inventory.
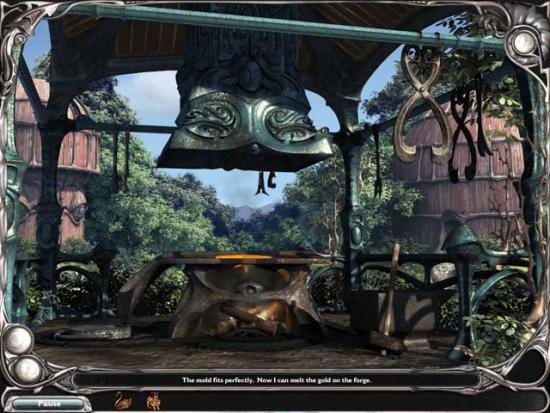
- Once you’ve done this, exit to the right to the Nexus, then enter the Portal. You should be transported after this to the Crater of Time.
Crater of Time
- Click on the first door on the left for a closer view.
Door #1: The Swan
- Click on the door for a closer view and remove the cover to trigger a puzzle. Rearrange the pieces so that they form a picture of a Swan. The solution is shown below. Once you’ve done this, enter through the door and into the Cave.
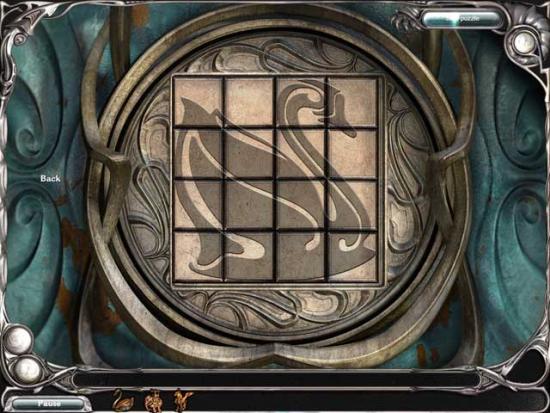
- Use the SWAN FIGURINE on the stand on the right, then click the button on the right to rotate the Figurine until it matches the solution shown below.
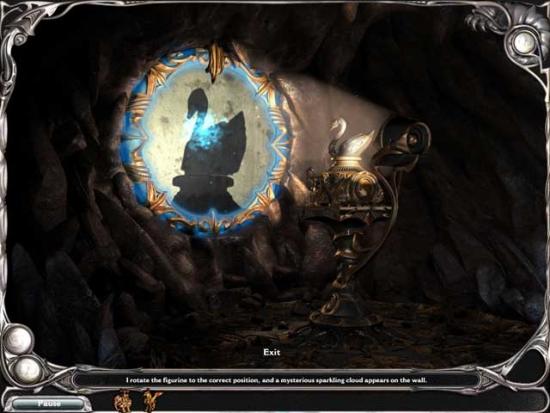
- Exit to the Crater of Time.
Crater of Time
- Click on the third door from the left for a closer view.
Door #3: The Griffin
- Click on the door for a closer view and remove the cover to trigger a puzzle. Rearrange the pieces so that they form a picture of a Griffin. The solution is shown below. Once you’ve done this, enter through the door and into the Cave.
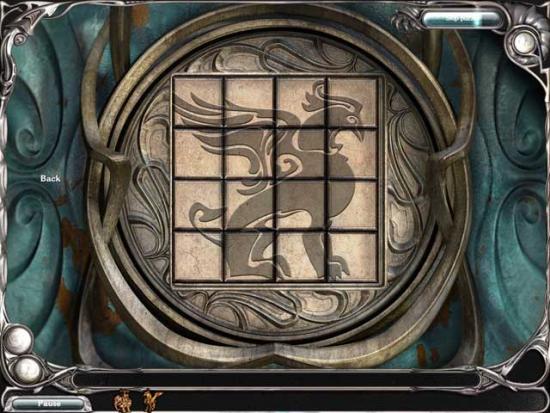
- Use the GRIFFIN FIGURINE on the stand on the right, then click the button on the right to rotate the Figurine until it matches the solution shown below.
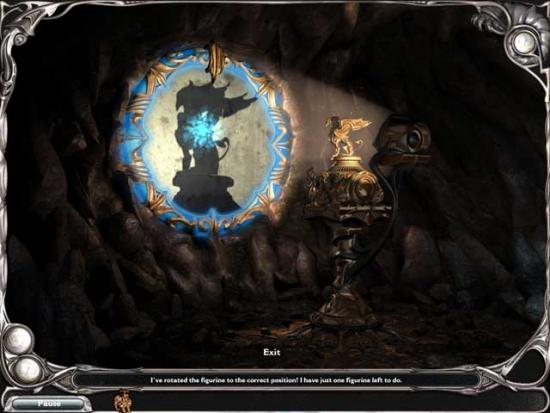
- Exit to the Crater of Time.
Crater of Time
- Click on the last door, or the first door on the right, for a closer view.
Door #7: The Elephant
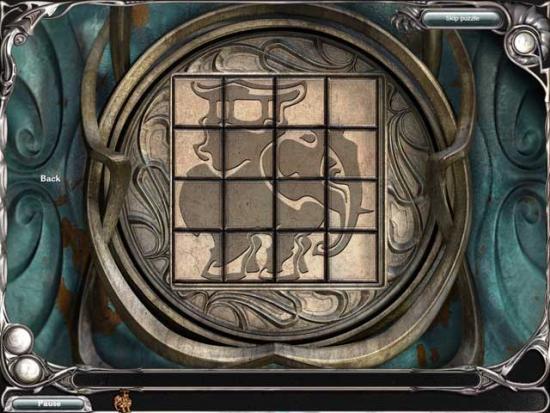
- Click on the door for a closer view and remove the cover to trigger a puzzle. Rearrange the pieces so that they form a picture of an Elephant. The solution is shown below. Once you’ve done this, enter through the door and into the Cave.
- Use the ELEPHANT FIGURINE on the stand on the right, then click the button on the right to rotate the Figurine until it matches the solution shown below.
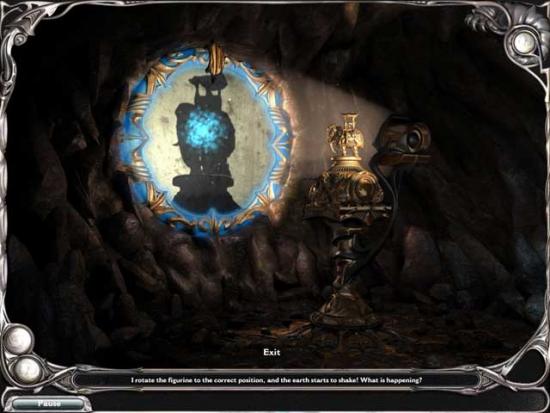
- Now just sit back and watch what unfolds…
Congratulations! You’ve completed Dream Chronicles: The Book of Water Collector’s Edition!
More articles...
Monopoly GO! Free Rolls – Links For Free Dice
By Glen Fox
Wondering how to get Monopoly GO! free rolls? Well, you’ve come to the right place. In this guide, we provide you with a bunch of tips and tricks to get some free rolls for the hit new mobile game. We’ll …Best Roblox Horror Games to Play Right Now – Updated Weekly
By Adele Wilson
Our Best Roblox Horror Games guide features the scariest and most creative experiences to play right now on the platform!The BEST Roblox Games of The Week – Games You Need To Play!
By Sho Roberts
Our feature shares our pick for the Best Roblox Games of the week! With our feature, we guarantee you'll find something new to play!All Grades in Type Soul – Each Race Explained
By Adele Wilson
Our All Grades in Type Soul guide lists every grade in the game for all races, including how to increase your grade quickly!


