
Best Horror Games On Itch.io – July 2026
Across a bounty of subgenres.![Haze Seas Accessories Tier List [Best Accessories to Equip]](/wp-content/uploads/2026/07/haze-seas-accessories-tier-list.jpg "Haze Seas Accessories Tier List [Best Accessories to Equip]")
Haze Seas Accessories Tier List [Best Accessories to Equip]
The accessories with the best stat buffs in Haze Seas.
![[Roblox] Evomon Shiny Hunting Guide – Including Prismatic and Pris Shinies!](/wp-content/uploads/2026/06/evomon-shiny-hunting-guide.jpg "[Roblox] Evomon Shiny Hunting Guide – Including Prismatic and Pris Shinies!")

Dream Chronicles: The Book of Air Walkthrough
Welcome to the walkthrough for Dream Chronicles: The Book of Air on Gamezebo. Dream Chronicles: The Book of Air is a hidden object game for the PC by PlayFirst. This walkthrough includes tips and tricks, helpful hints, and a strategy guide to complete Dream Chronicles: The Book of Air.


- Prefer Gamezebo on Google

Dream Chronicles: The Book of Air – Game Introduction
Welcome to the walkthrough for Dream Chronicles: The Book of Air on Gamezebo. Dream Chronicles: The Book of Air is a hidden object game for the PC by PlayFirst. This walkthrough includes tips and tricks, helpful hints, and a strategy guide to complete Dream Chronicles: The Book of Air.
General Information
- The game can be played in casual mode or challenge mode. Puzzles are more difficult on challenge mode and cannot be skipped. On casual mode, puzzles can be skipped after one minute has passed.
- Dream pieces are found in many areas of the game. Fill the dream jewel slots at the left side of the screen with enough dream pieces and a new spell will be learnt. Spells are required in the game to perform tasks such as deciphering text or lighting a room.
- The default mouse cursor in the game is the yellow arrow. Move the cursor around the screen and white text will appear over objects that can be examined more closely or picked up. The cursor will change to a white directional arrow when a new area can be accessed.
- Collectable items will be added to the inventory window at the bottom of the screen. Click on an item in the inventory window and then select an object in the playing area to use the inventory item.
- The dream journal shows a description of all the events that have happened in the game so far, as well as all of Tangle’s notes that have been found. The current goal to complete is displayed in red text. The journal also has a dream tab page which gives a description of each dream jewel.
- The collector’s edition of the game includes a bonus chapter, in-built walkthrough, a screensaver, six wallpapers and MP3 files from the game.
Walkthrough – Village of Wish
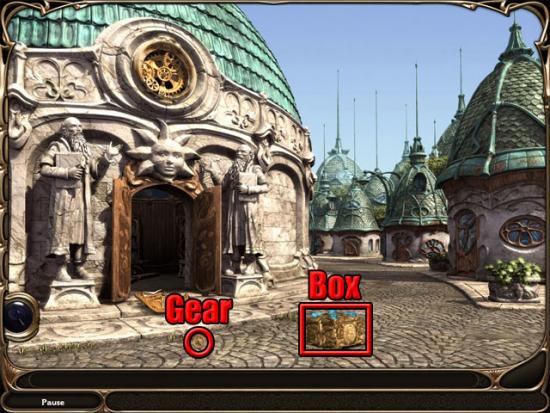
Wait for a few seconds and a box will fall to the floor. Take the clock gear and it will be added to the inventory. Select the clock gear from the inventory and use it on the box:
Select the box to look inside it. Take the book from the box and it will be added to the button at the bottom-right corner of the screen. There is also a note in the box from Tangle, Lyra’s grandfather. After the note has been put away, a lightning bolt will destroy one of the guardian statues outside the school. Find the nine pieces of the statue: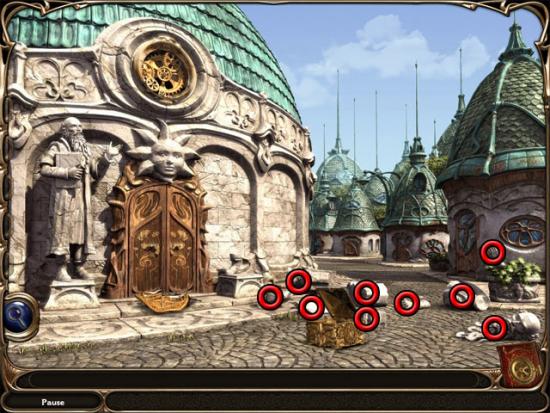
Put the pieces on the incomplete statue in the following order: Foot, three stone pieces, right side arm, book, left side arm, hand, head. Enter the school and click anywhere in the classroom. Find the eleven dream pieces: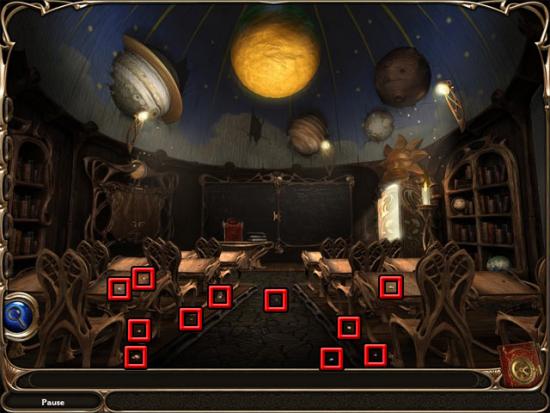
Examine the chalkboard at the back of the classroom. Find the two dream pieces: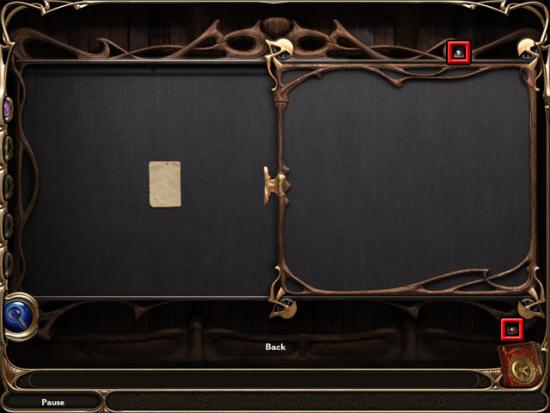
Examine the paper on the chalkboard to read another note from Tangle. Pull the handle in the middle of the chalkboard to reveal a strange message. Select the decipher spell at the left side of the screen: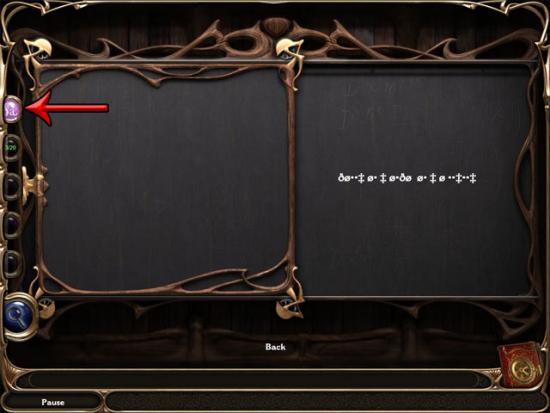
The message is translated and Lyra knows that she needs to find the map from the cabinet. Back away from the chalkboard. Three books can be found in the classroom. Select the three books to open them:
Examine the left book and find the four dream pieces. Cast the decipher spell to understand the writing in the book. Select the symbols from the left page of the book to change the symbols on the right page. Put the correct symbols in the spaces on the grid to make all of the boxes green.
Casual mode: Left book:
Casual mode: Middle book: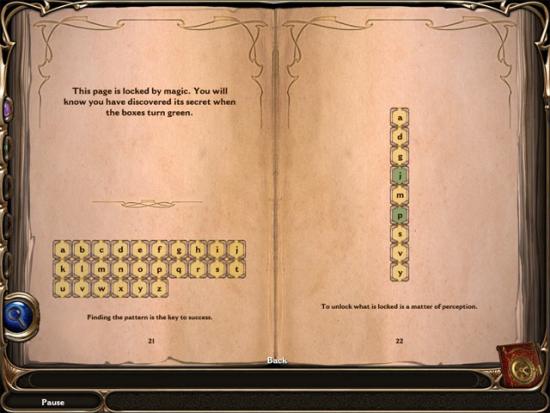
Casual mode: Right book: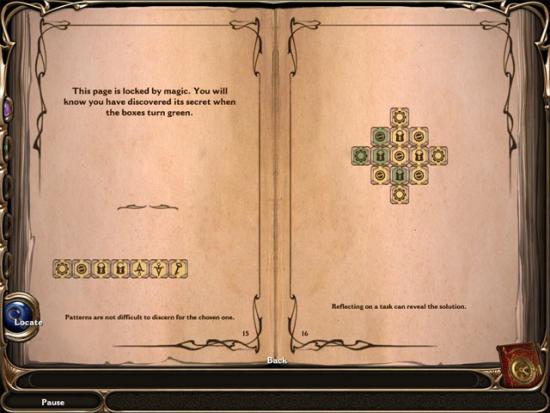
Challenge mode: Left book: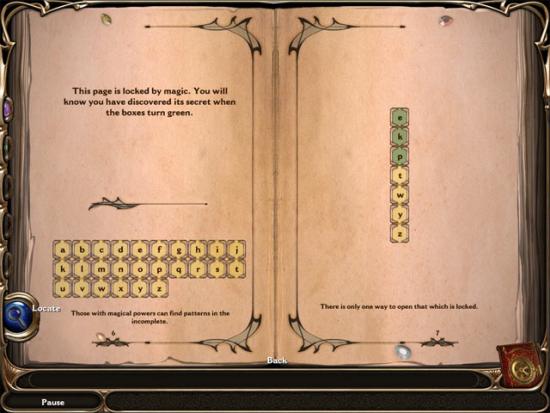
Challenge mode: Middle book: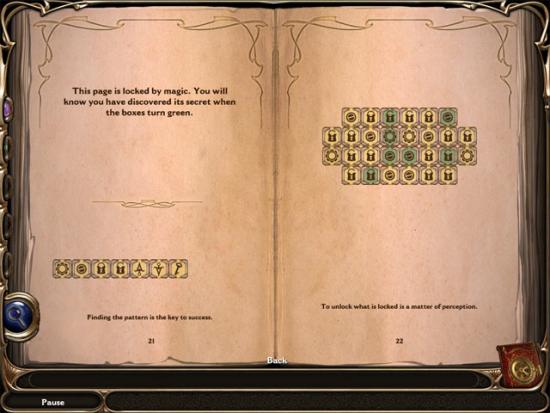
Challenge mode: Right book: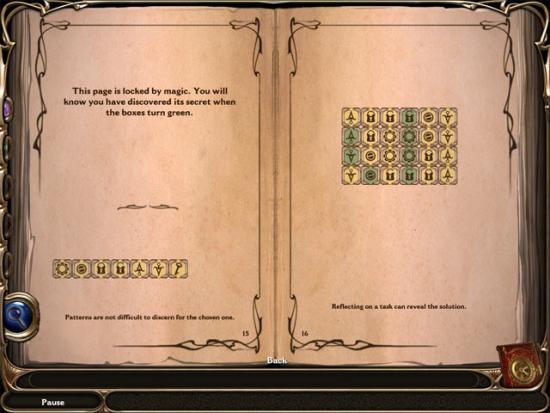
Examine the cabinet at the left side of the room. Select the paper: Tangle mentions that Lyra’s father may have hidden the combination to the cabinet in the classroom. Find the four jewel pieces: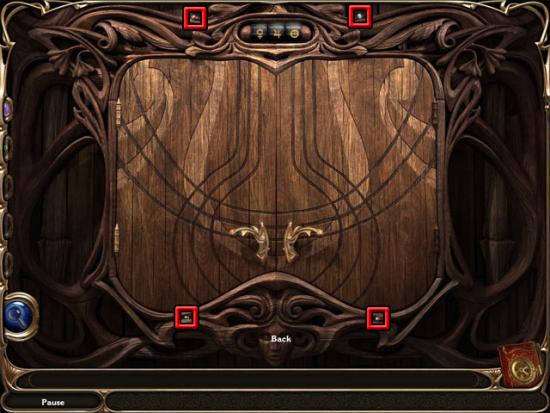
Select the dials at the top of the cabinet to change them to the ones shown in the books. The symbols are random with each new game. After the correct symbols have been entered, the map pieces will fly out of the cabinet and land in the classroom. Back away from the cabinet and find the six map pieces: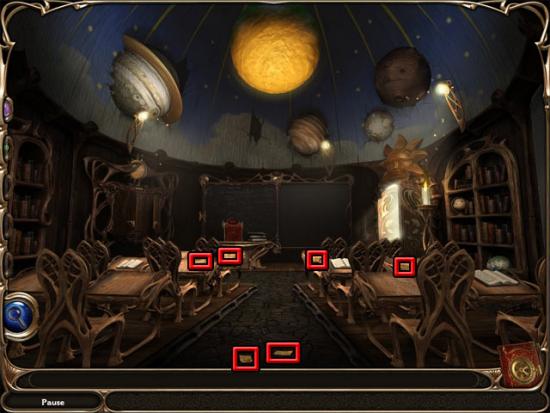
Examine the cabinet and use the map pieces on the light area. Select the pieces and place them in the correct positions in the cabinet: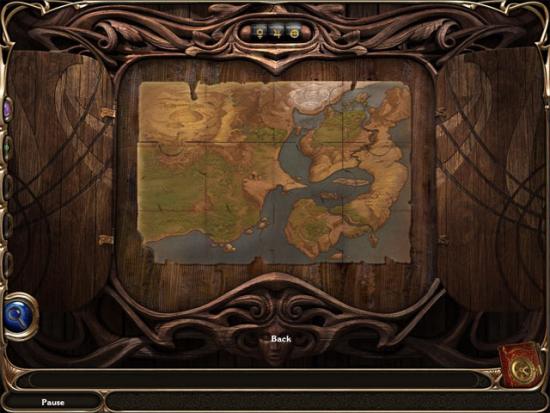
On challenge mode, there are twice as many puzzle pieces to use but the picture ends up looking the same. Examine the chalkboard and select the note from Tangle. Cast the decipher spell to translate the symbols on the chalkboard. Click the letters to spell out the names of the shapes shown on the left side of the chalkboard. The locations of the words are random with each new game.
Airship
Find the eight dream pieces, the large key and the colored stones: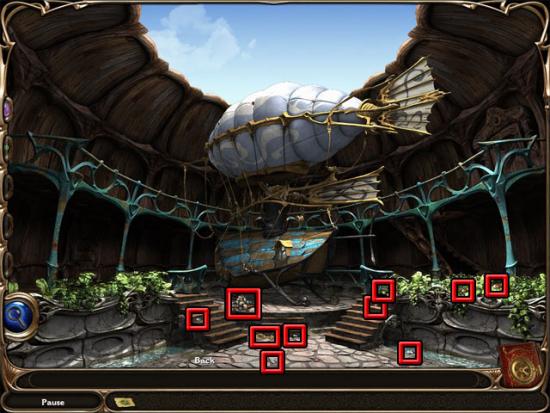
Use the large key on the closed door at the right side of the airship. Enter the airship and select the note on the floor. Find the six dream pieces: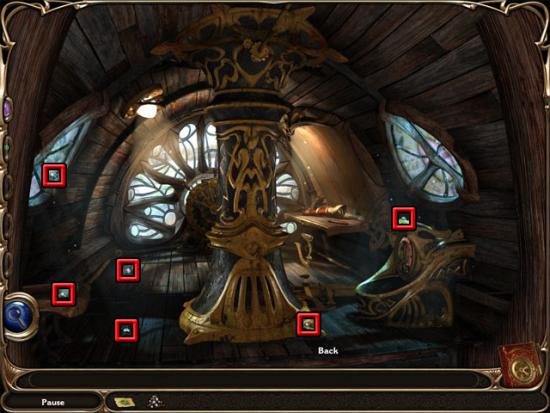
Use the map on the desk at the right side of the room. Examine the map and then cast the reveal spell to see the Crater of Time. Back away from the map and examine the control wheel near the large middle window. Set the course and heading bar to the settings for the Crater of Time that were shown on the map. The course and heading are random each time a new game is played. A noise will be heard after the course and heading have been set correctly. Back away from the control wheel and examine the device at the right side of the room. Use the colored stones on the hole at the bottom-right corner of the device panel. Select Tangle’s note at the bottom-left corner of the device to read about the fuel generator. Find the six dream pieces: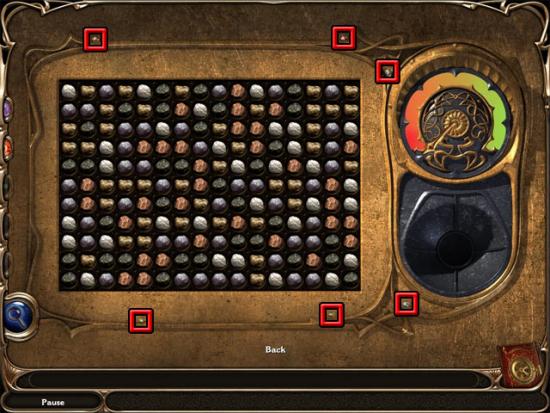
Aim to click stones when they are within groups of the same color. The larger the group of stones, the more fuel will be generated. The puzzle will be completed when the needle on the fuel gauge reaches its maximum level. Exit the airship and find the seven parts: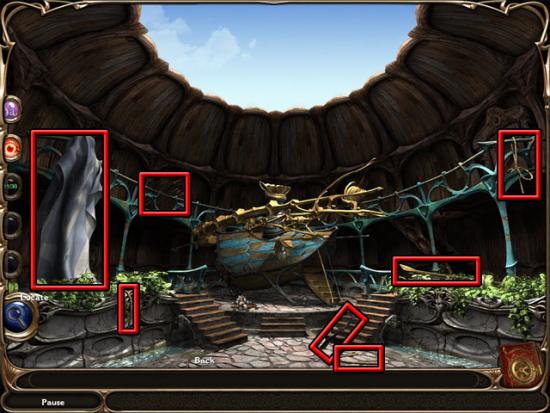
Use all of the parts on the airship, placing the balloon last. Enter the airship. Select the lever to take off for the Crater of Time: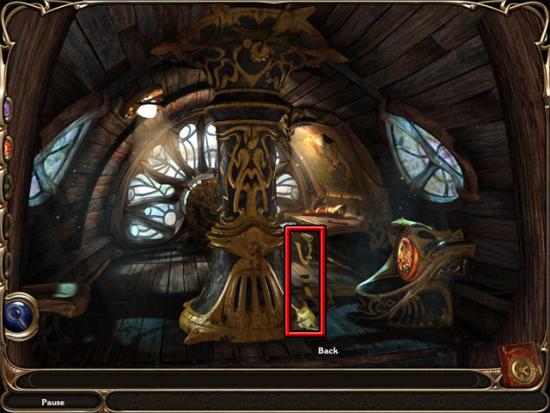
Crater of Time
Select Tangle’s note. Find the eight dream pieces: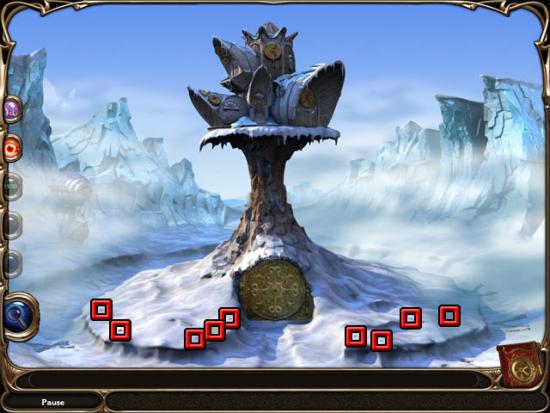
Examine the clock and find the five dream pieces: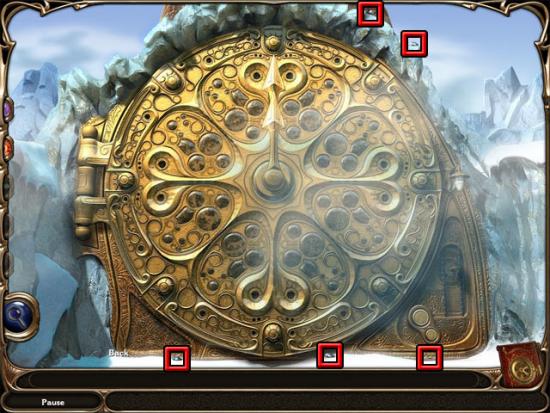
Press the small button on the clock and then press the small button again when the hour hand reaches VI. Go upstairs to arrive outside the wooden house. Take the note from Tangle and find the seven dream pieces: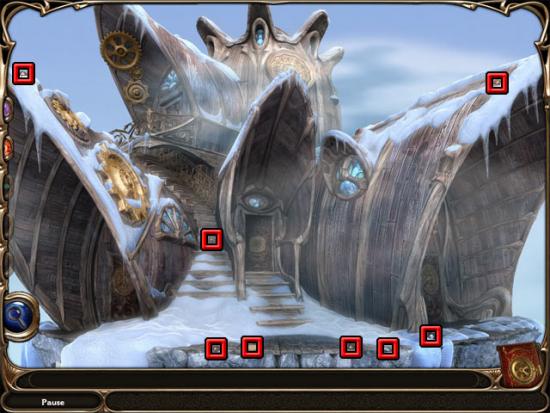
Examine the door at the left side of the area to see a mechanism. Exit the view of the mechanism and take the two small gears: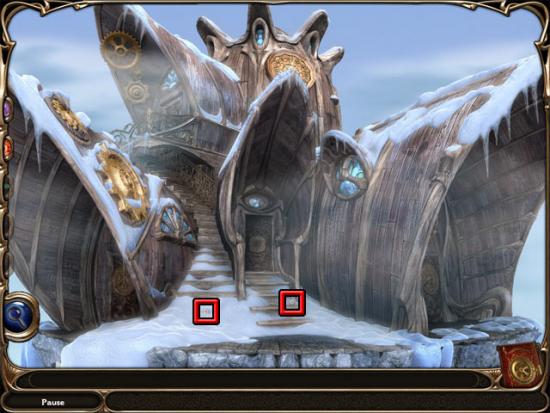
Examine the left door again to see the mechanism. Select the note from Tangle and the three dream pieces. Switch the tiles and the gears so that all of the gears rotate.
Casual mode: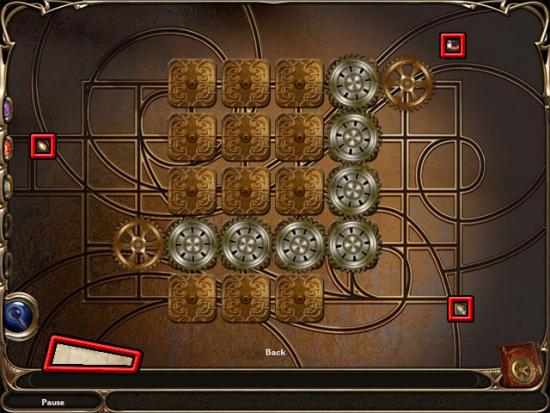
Challenge mode: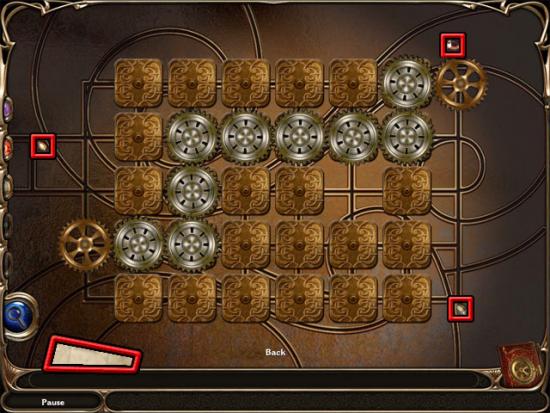
Take Tangle’s note, the metal bell and the pipe. Find the twelve dream pieces. Use the metal bell on the incomplete bell and the pipe on the incomplete pipe: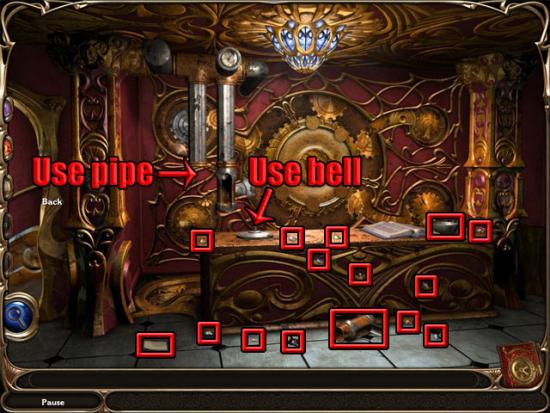
Examine the book on the counter. Cast the reveal spell to display the writing on the right page. Drag letters from the left page to the spaces on the right page to complete the words. Find the six dream pieces: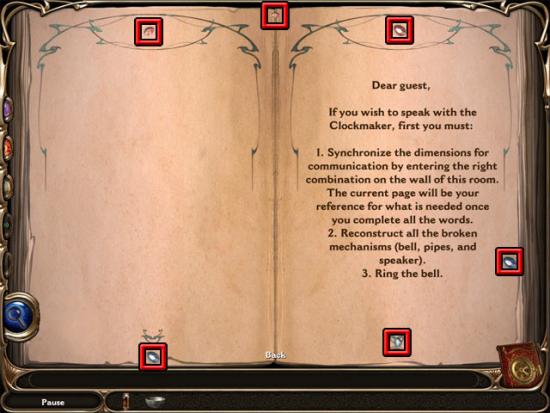
Back away from the book and examine the mechanism on the wall. Select the note from Tangle. Use the metal tile on the mechanism. Rotate the tiles so that they are in the same positions as the circles on the diagram shown in the book. Find the five dream pieces: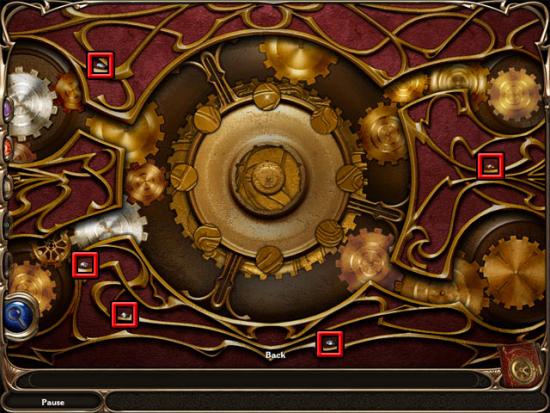
Back away from the book and select the bell on the counter to lower the pipes. Examine the pipes to speak to the clockmaker. Select the following answers to the clockmaker’s questions:
- “I’m trying to find my way home. I don’t belong here.”
- “Yes. I need to get back to my own dimension.”
- “Where are they?”
- “That sounds difficult, but I will do my best.”
- “Very well. I shall return.”
Move back and examine the door at the right side of the wooden house. Examine the note from Tangle and then cast the reveal spell to show the puzzle pieces. Find the three dream pieces. Place the puzzle pieces in the correct positions.
Casual mode:
Challenge mode: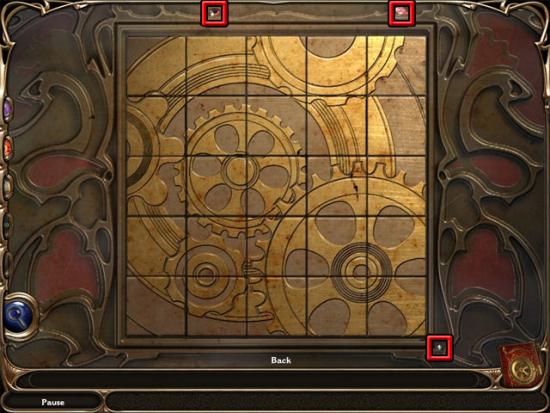
Select Tangle’s note. Find the ten dream pieces: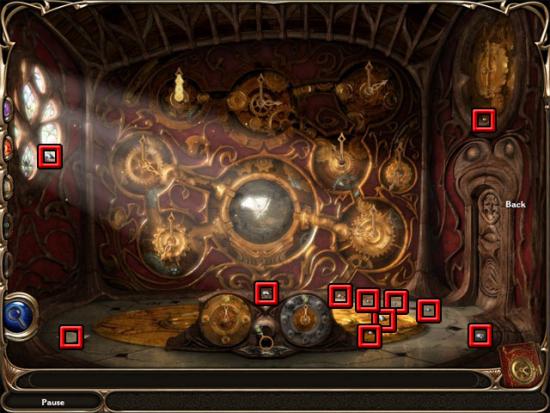
Examine the clock above the right door to see that the time is set to 6 o’ clock, the same as the sundial outside. The aim now is to use the two switches and the button to set all of the clocks on the wall to 6 o’ clock. The left switch changes the amount that each hour hand will move, the button between the two switches adjusts the hour hand on the currently selected clock, and the right switch changes the clock selection. After setting all of the clocks to 6 o’clock, take the colored stones from the doorway that opens. Move back to front of the wooden house and go through the middle doorway. Enter the airship.
Examine the device at the right side of the room. Use the colored stones on the hole and select the matching stones to create enough fuel. Move back and examine the map on the wall. Cast the reveal spell to show the location of the Treehouse Village. Exit the view of the map and examine the control wheel, then set the course and heading to the settings shown on the map for the Treehouse Village. Exit the view of the wheel and select the lever.
Treehouse Village
Take the note from tangle and find the twelve dream pieces. Also take the pile of sticks and some stones: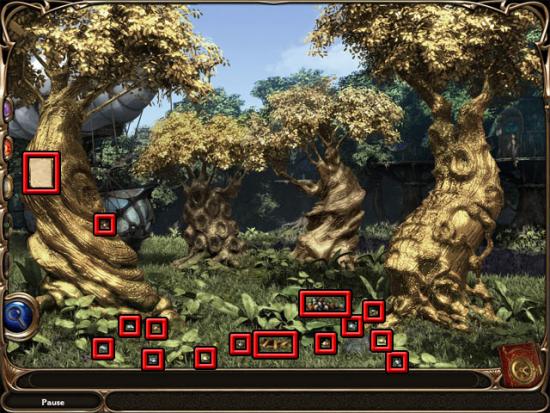
Cast the transmute spell. The four trees in the area can now be examined. Each tree has a puzzle that needs to be solved. The aim in each puzzle is to place the correct sticks on the pegs, and then press the button at the top of the screen so that the walnut falls into the hole.
Tree 1: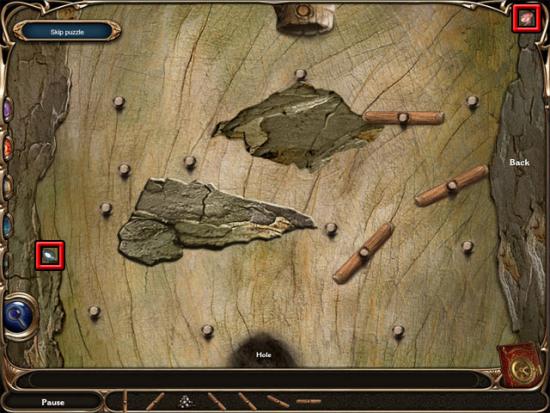
Tree 2: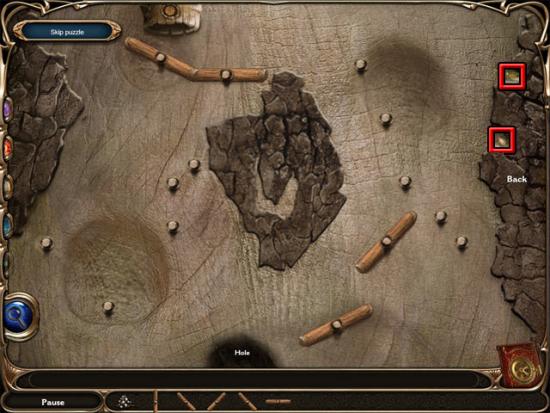
Tree 3: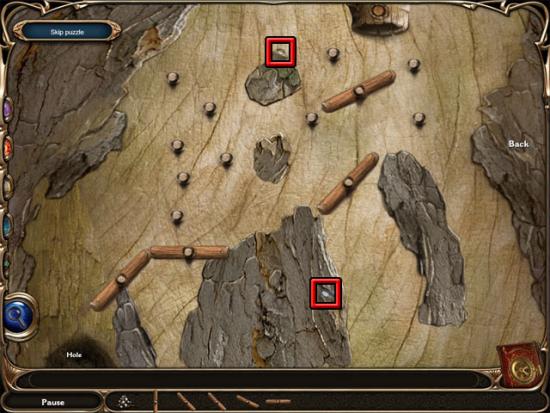
Tree 4: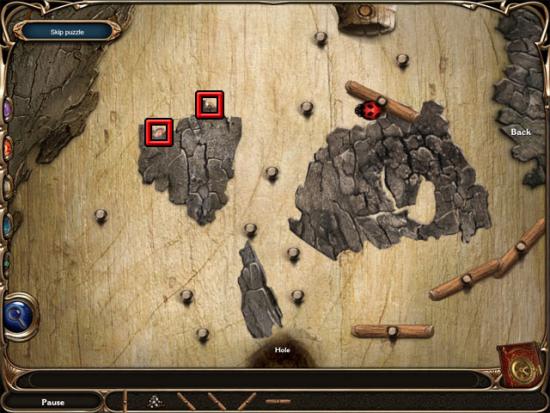
Take the ornate key that appears. Enter the airship and examine the device. Use the colored stones on the hole and select the matching stones to create enough fuel. Move back and examine the map on the wall. Cast the reveal spell to show the location of Wind Music Island. Exit the view of the map and examine the control wheel, then set the course and heading levers to the settings shown on the map for Wind Music Island. Exit the view of the wheel and select the lever.
Wind Music Island
Take the colored stones and the note from Tangle. Find the ten dream pieces: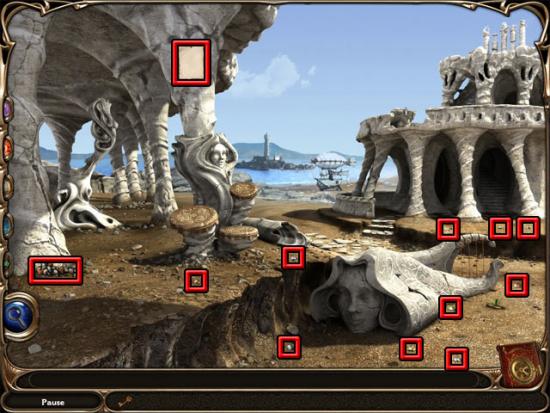
Go up to the columns at the top-right corner of the area. Take the note from Tangle and find the eight dream pieces: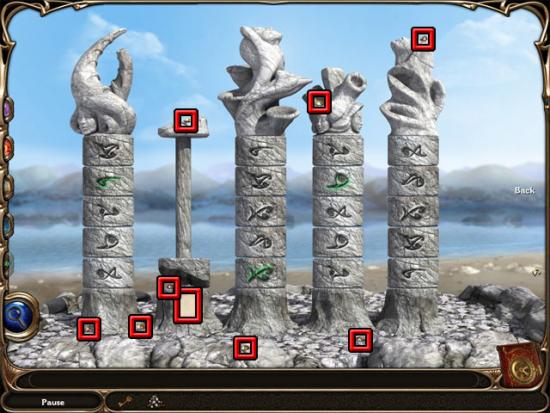
The aim here is to rotate the sections of the columns to make all of the symbols green. Rotate each section until the green symbol is shown in the following order:
Casual mode: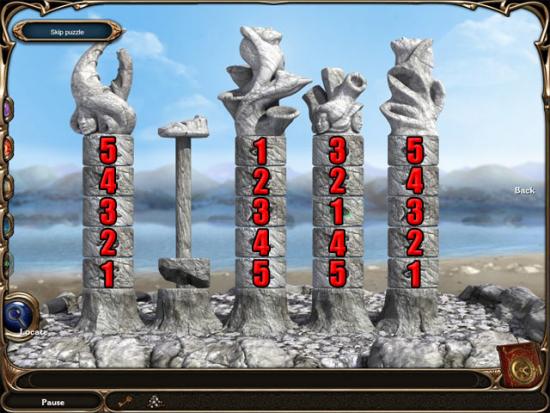
Challenge mode: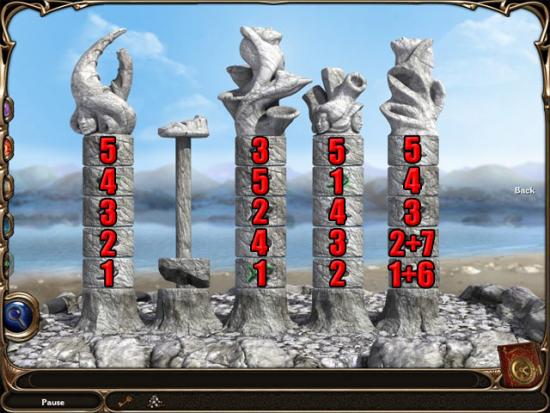
Back away from the columns and enter the cave. Cast the brilliance spell to illuminate the cave. Take the note from Tangle, the two metallic cylinders, the hammer and the eight dream pieces: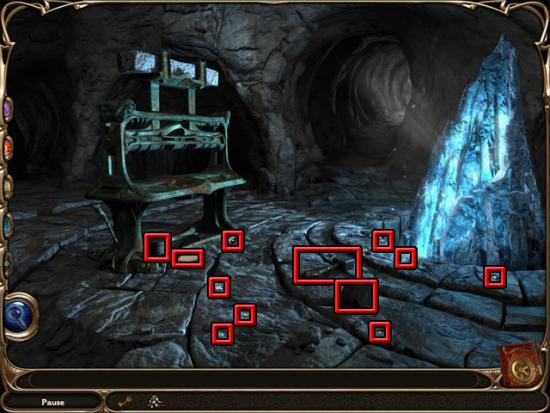
Use the hammer on the blue crystal four times to create four blank stones. Use the two metallic cylinders and one of the blank stones on the machine. The aim now is to make the same symbols on the blank stone that were visible on the columns. The symbols that need to be made on the four stones are shown below: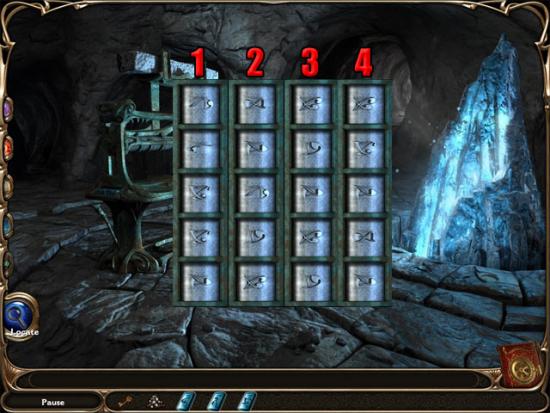
After one stone has been completed, back away from the view of the stone and then pull the handle to make the symbols. Exit the cave and examine the broken section of the building: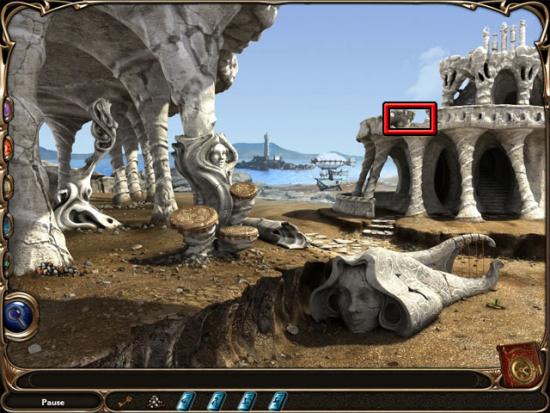
Read the note from Tangle. Use one of the blue stones on the left slot until a song is heard and the island will then shake. If one of the stones was printed incorrectly, it will become a blank stone again and can be reprinted back in the cave. Back away from the view of the stones and find the ten sculpture pieces: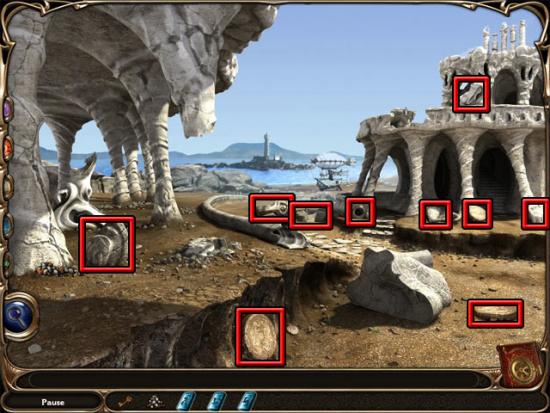
Place all of the sculpture pieces on the broken stones. The completed sculptures are shown below: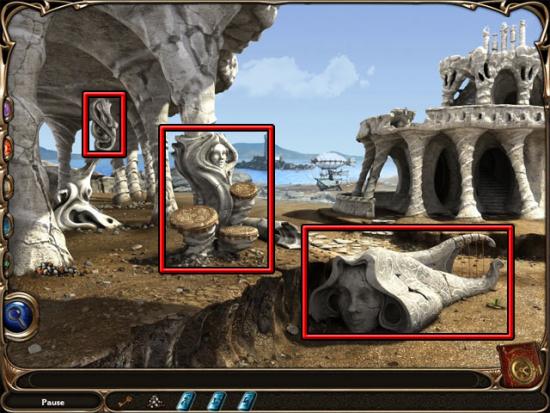
Inspect the broken section of the building and use the blue stones on the slots to play the song. Inspect the broken section of the building again and find the nine dream pieces: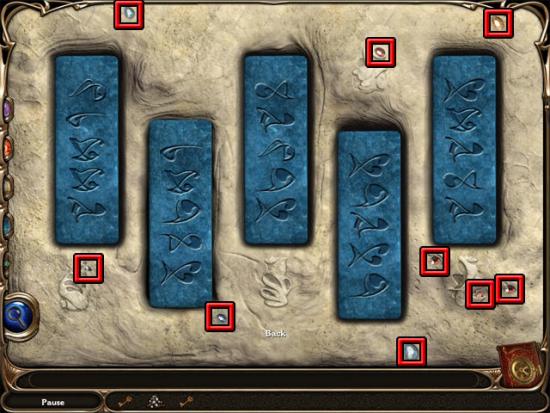
Back away from the view of the stones. Enter the airship and examine the device. Use the colored stones on the hole and select the matching stones to create enough fuel. Move back and examine the map on the wall. Cast the reveal spell to show the location of the Water Collector. Exit the view of the map and examine the control wheel, then set the course and heading levers to the settings shown on the map for the Water Collector. Exit the view of the wheel and select the lever.
Water Collector
Take the note from Tangle, the colored stones, the three pipe pieces, the small key and the thirteen dream pieces: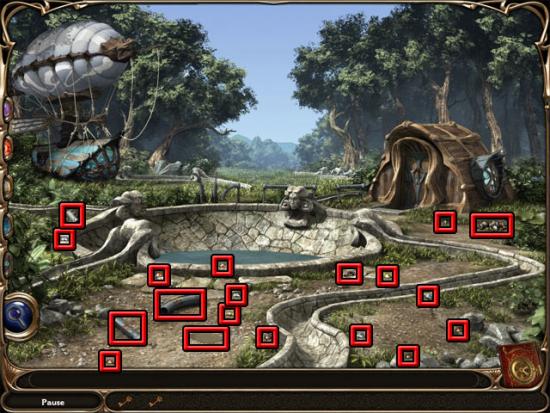
Cast the thunder spell to refill the pool. Use the three pipe pieces on the broken pipe behind the pool. Use the small key on the hut door. Enter the hut and cast the brilliance spell to illuminate the room. Take the note from Tangle, the six curved planks, the five containers and the ten dream pieces: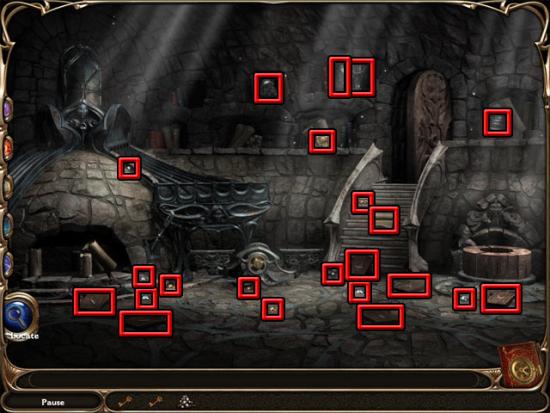
Examine the wheel at the right side of the room to see five markings. Back away from the view of the wheel. The aim now is to use a combination of different planks on the slots above the scale to make one of the markings on the wheel. Once the planks have been used to make the symbol, place a container on the right side of the scale and pull the lever at the left side of the slots. If the scales do not balance, keep trying different containers until the scales are balanced and a bell rings. Once this happens, take the container from the scale, examine the wheel and then place the container on the correct marking. Repeat this method of creating the markings with the planks, filling the correct container and placing it on the appropriate wheel marking with the remaining four containers. A third key will be received after the puzzle has been completed. Exit the hut.
Enter the airship and examine the device. Use the colored stones on the hole and select the matching stones to create enough fuel. Move back and examine the map on the wall. Move the mouse cursor over the Crater of Time to reveal the course and heading. Exit the view of the map and examine the control wheel, then set the course and heading levers to the settings shown on the map for the Crater of Time. Exit the view of the wheel and select the lever.
Crater of Time Revisited
Examine the front door and go upstairs to the front of the wooden house. Examine the door at the top of the house: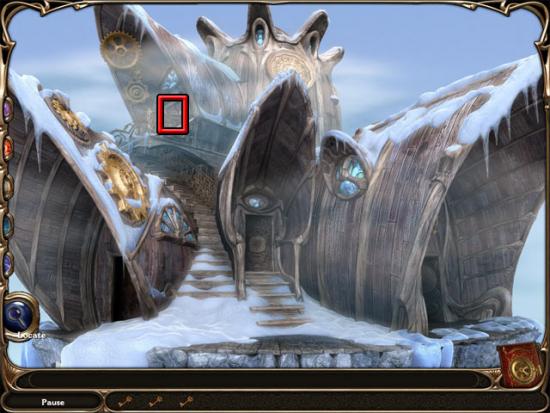
Back away from the mechanism view and find the three clock numbers: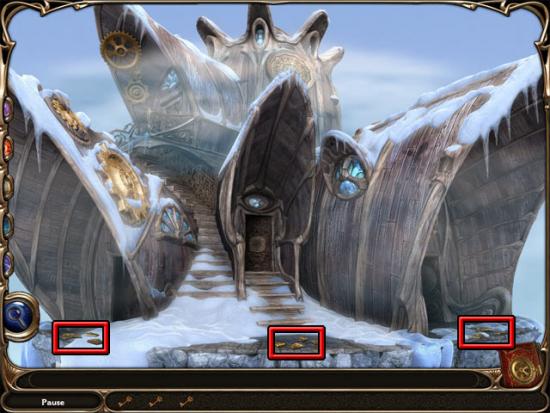
Examine the top door again and use the clock numbers on the mechanism. Take the three dream pieces: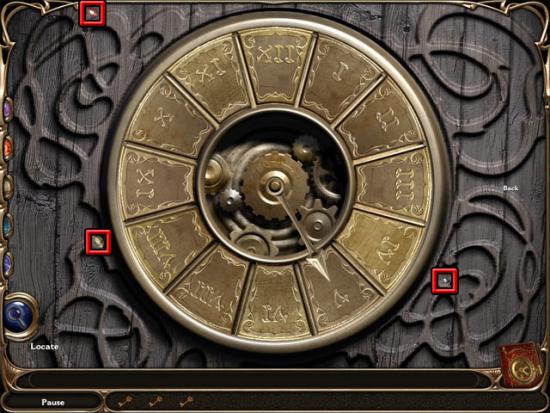
The aim now is to repeat the sequence of Roman Numerals that are indicated by the arrow. Cast the brilliance spell to illuminate the room. Take the five dream pieces and the iron key: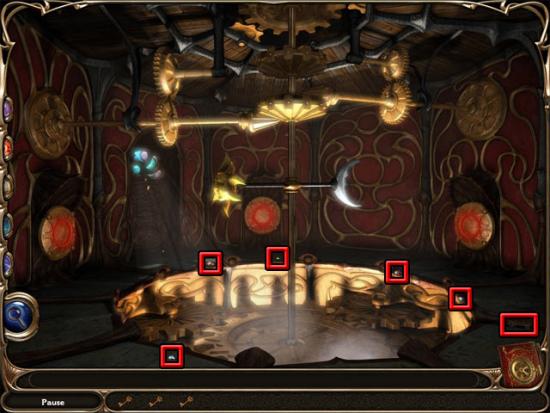
Use the three ornate keys on the locked covers. Examine the left cover and select the note from Tangle. Use the iron key on the locked gear. The aim now is to place the gears so that they all rotate when the machine is turned on. To remove an incorrectly placed gear, select it and then click the reset button. Put the gears in the correct positions, move the speed slider to the right and then press the on button: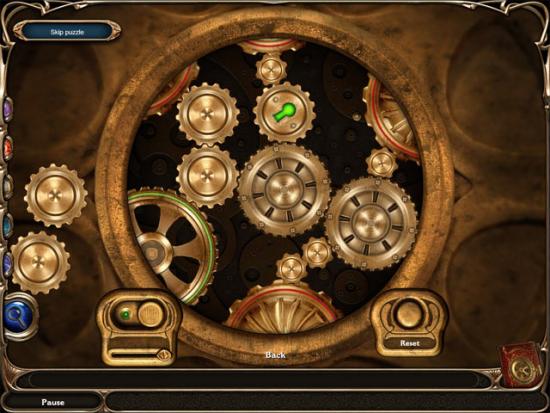
Examine the middle cover. Put the gears in the correct positions, move the speed slider to the right and then press the on button:
Examine the right cover. Put the gears in the correct positions, move the speed slider to the right and then press the on button: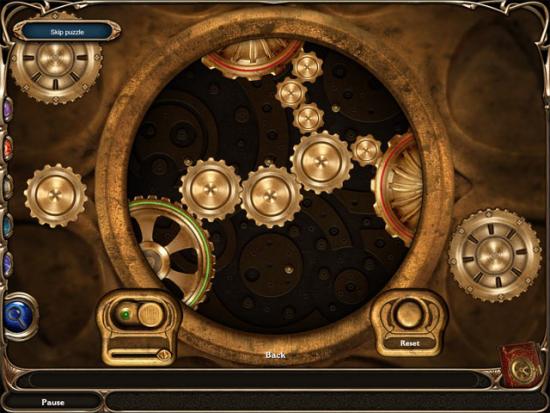
Exit the house and go through the right doorway. Take the colored stones from the hole in the wall: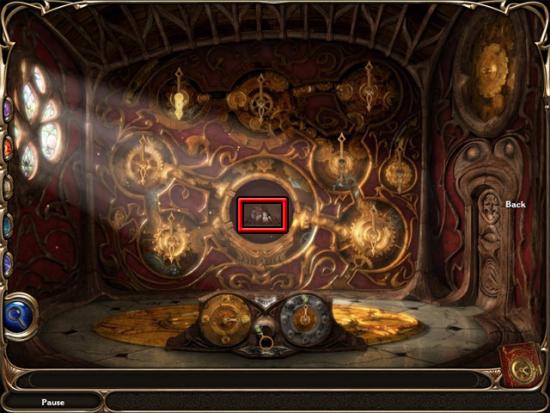
Exit the house and go through the middle doorway. Enter the airship and examine the device. Use the colored stones on the hole and select the matching stones to create enough fuel. Move back and examine the map on the wall. Move the mouse cursor over the village of Wish to reveal the course and heading. Exit the view of the map and examine the control wheel, then set the course and heading levers to the settings shown on the map for the village of Wish. Exit the view of the wheel and select the lever to complete the game.
Bonus Chapter
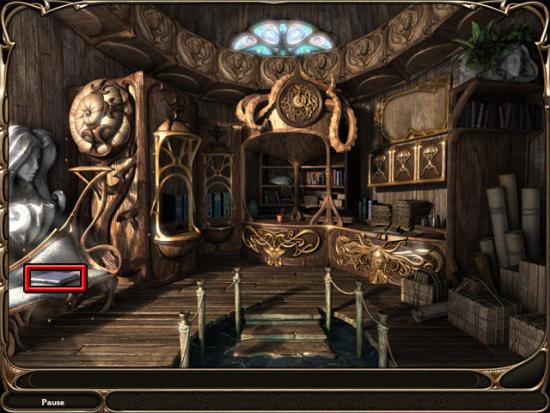
The bonus chapter is available in the collector’s edition of the game. Select the book on the sofa:
Examine the book and select the letters to fill in the spaces: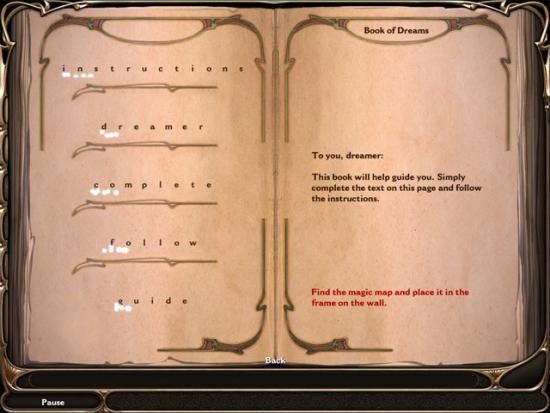
Take the vibrating roll and use it on the frame: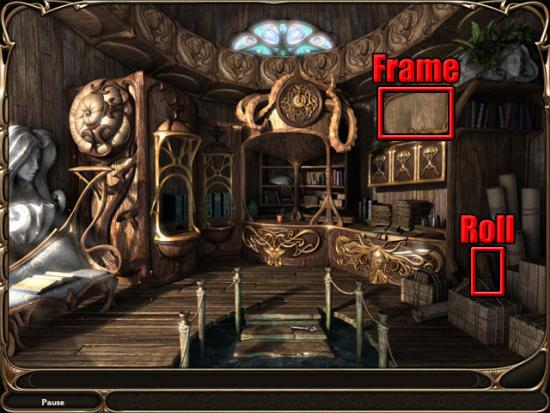
Take the first intricate key:
Examine the map and use the intricate key on the locked chest. Travel to Lilith’s mansion and complete the jigsaw puzzle: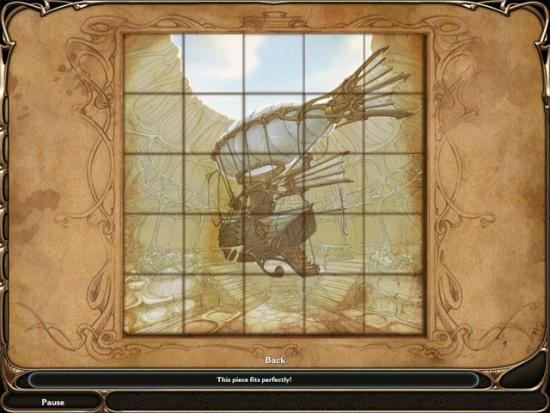
Back away from the map and take the second intricate key:
Examine the map and use the intricate key on the locked chest. Travel to the Tower of Dreams and fill in the missing words: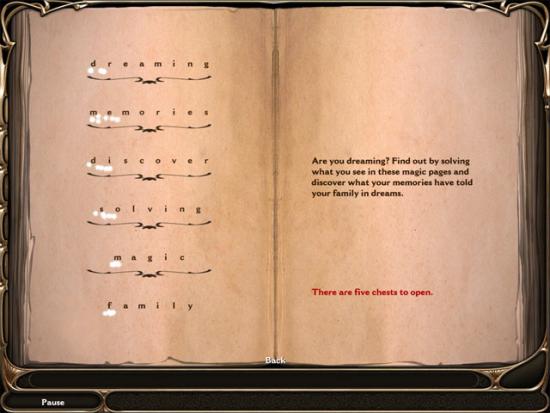
Back away from the map and take the third intricate key: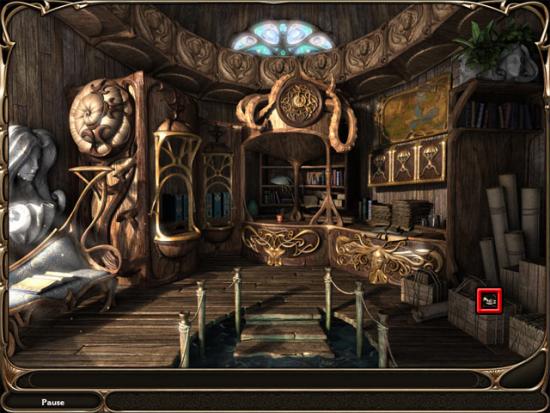
Examine the map and use the intricate key on the locked chest. Travel to the observatory and complete the jigsaw puzzle:
Back away from the map and take the fourth intricate key: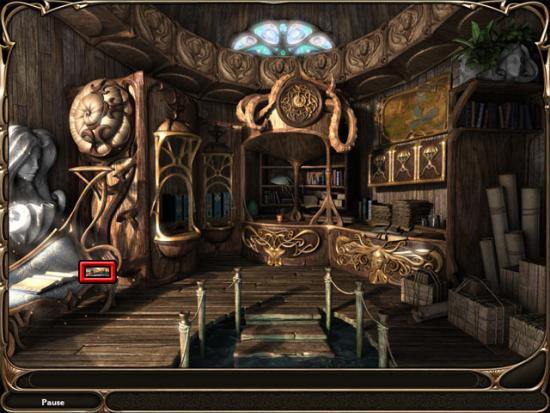
Examine the map and use the intricate key on the locked chest. Travel to Barge City and fill in the missing words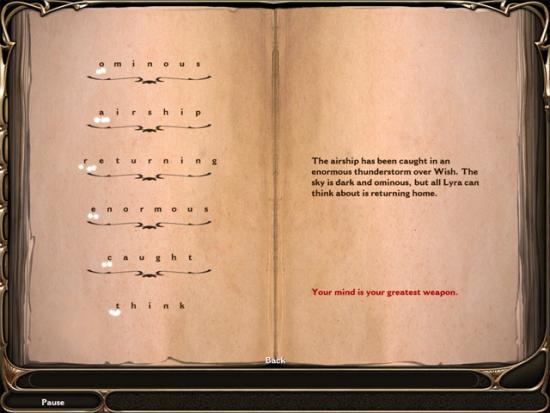
Back away from the map and take the fifth intricate key: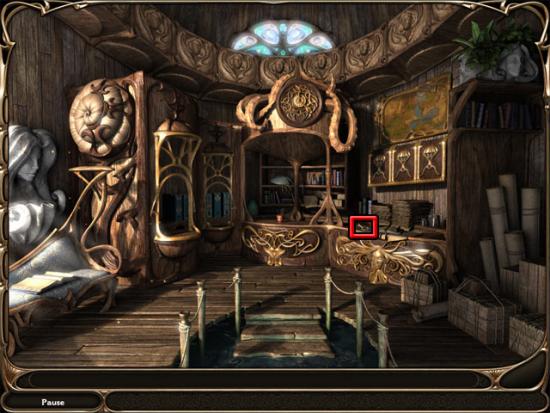
Examine the map and use the intricate key on the locked chest. Travel to the Desert of the Lost and complete the jigsaw puzzle:


More articles...
-
Best Horror Games On Itch.io – July 2026
Across a bounty of subgenres. -
Haze Seas Accessories Tier List [Best Accessories to Equip]
The accessories with the best stat buffs in Haze Seas.