
Best Horror Games On Itch.io – July 2026
Across a bounty of subgenres.![Haze Seas Accessories Tier List [Best Accessories to Equip]](/wp-content/uploads/2026/07/haze-seas-accessories-tier-list.jpg "Haze Seas Accessories Tier List [Best Accessories to Equip]")
Haze Seas Accessories Tier List [Best Accessories to Equip]
The accessories with the best stat buffs in Haze Seas.
![[Roblox] Evomon Shiny Hunting Guide – Including Prismatic and Pris Shinies!](/wp-content/uploads/2026/06/evomon-shiny-hunting-guide.jpg "[Roblox] Evomon Shiny Hunting Guide – Including Prismatic and Pris Shinies!")

Dream Chronicles 2: The Eternal Maze Tips & Tricks Walkthrough
Check out Gamezebo's walkthrough for Dream Chronicles 2: The Eternal Maze GENERAL TIPS For those people who played the original Dream Chronicles you will find some new variations and twists in this game. In Dream Chronicles 2: The Eternal Maze the objects that you find may be used in a scene other than the one you found it in. Objects will stay in inventory until you need to use them. If you're stuck in the game and don't know what to do the game will eventually throw a hint your wa…


- Prefer Gamezebo on Google


a:1:i:0;a:2:s:13:”section_title”;s:54:”Dream Chronicles 2: The Eternal Maze Tips & Tricks”;s:12:”section_body”;s:56958:”
Check out Gamezebo’s walkthrough for Dream Chronicles 2: The Eternal Maze
GENERAL TIPS
- For those people who played the original Dream Chronicles you will find some new variations and twists in this game. In Dream Chronicles 2: The Eternal Maze the objects that you find may be used in a scene other than the one you found it in. Objects will stay in inventory until you need to use them.
- If you’re stuck in the game and don’t know what to do the game will eventually throw a hint your way by way of a tiny twinkling light. Those lights will either symbolize an object that needs to be picked up or an area that you need to be in. In some rare instances the lights don’t mean anything but better safe than sorry, always check it out.
- There are several Dream Jewels that can be found throughout the game. These are separate from the Dream Pieces that you must also find.The Dream Pieces are what goes into the Dream Jewels. In order to activate the Dream Jewels you must find the Dream Pieces.
- Each Dream Jewel that you find will also come with a puzzle in which you must reconstruct a sentence. When you answer correctly you will be given some hints that can help you in certain levels of the game. When you are reconstructing a sentence look for the word(s) that begin with capital letters, they will always go at the beginning of a sentence, unless it’s a proper name then it can go either way.
- You don’t have to answer the Dream Jewel puzzles as they come along, you can always click on the book and answer them at a later time.
- High Scores will not be awarded until the very end of the game. When you replay the game focus on finding things faster and picking up all the Dream Pieces to earn a higher score. When you play again under the same name you will have new Dream puzzles to solve and some of the items will be in different locations. There are 15 Dream Jewels to find and over 135 Dream Pieces to find.
- You do not have to pick up Dream Pieces in order to complete the game. However, when you don’t it affects your score. You cannot go back and pick up Dream Pieces that you missed once you’ve completed a level. You will have to replay the game in order to do so. If you do want to get all the Dream Pieces I suggest that you pick them up before you start solving the puzzles. It can be easy to forget to pick them all up once you’re engrossed in the game.
- All objects that you are able to pick up will serve a purpose, whether they are used in that scene or not. A lot of times in this game the pieces you pick up may only be used as you get to the next scene.
- Some items may not become visible in a scene right away, you must perform other tasks first before they become visible. That’s why it’s important to go back and forth between scenes, you never know what you may have missed.
- In the puzzles where you have to click on tiles to place them in their correct order, look at the color of the tiles. If the tiles are red when you place them it means that they are in the wrong place. If the tiles remain creme then they are correct.
- If yu’re having difficulty with a level you can go back and reset the level. It will bring you back to the beginning of the level.
- You can right click an item to send it back to inventory or you can just click it back in place.
EXTREME SPOILER ALERT!!!
This part of the guide is a walkthrough for all the levels in the game, so please stop reading now if you don’t want the solutions to the puzzles in this game. Please realize that some of the objects move around and so these answers will not work for everyone but it will work for most. However, we have provided alternate locations in certain puzzles.
I provided answers to all the Dream Jewel puzzles that came along the first time I played the game. I placed the solutions in between the levels in the order that they appeared. When you play the game again, under the same name, you will get some new Jewels to solve. Here are the alternate Jewels that I found, the rest are in between the chapters.
DREAM JEWELS THE SECOND TIME AROUND
DREAM JEWEL OF MERY
What is the Dream Librarian’s most urgent task?
Answer: “The Dream Librarian seeks for someone to replace the Fairy Lord.”
DREAM JEWEL OF EBISU
Question: “What is the Eternal Maze?”
Answer: “It is an underground labyrinth that separates the ancient fairy world from the mortal world.”
DREAM JEWEL OF APOLLO
Question: “What do fairies do in the mortal world?”
Answer: “Fairies control natural forces but they must follow rules set by the Fairy Lord.”
DREAM JEWEL OF POSEIDON
Question: “How did Aeval know that I needed her help?
Answer: “Aeval has the power to communicate with plants and she received a message from them.”
DREAM JEWEL OF ILLAT
Question: “What was the purpose of the print machine.”
Answer: “Fairies used the machine to print the first volumes of history onto stone tablets.”
Clue: To enter and exit the labyrinth, save the north key for last.
DREAM JEWEL OF CHLORIS
Question: “Who would be able to replace the Fairy Lord?
Answer: “The new Fairy Lord must have a mix of both mortal and fairy blood.”
DREAM JEWEL OF IKWARA
Question: “Why have I seen no fairies living in the Ancient’s Place
Answer: ” All of the fairies left because one fairy saw three stars fall from the sky”
WALKTHROUGH
DREAM PRISON
CHAPTER 1 STONE CHAMBER No Dream Pieces
Click on the piece in the center of the screen and a stone chamber will appear.
Pick up the hammer that is on the bottom left side and click it on the glass to break it and take the book.
Click the flower on the wall on the right side to exit this scene.
DREAM PUZZLE #1/ DREAM JEWEL OF ABALONA
Question: “What lies beyond the walls of the dream prison where Lilith sent me?”
Solution: “Outside the prison walls lies the place where the fairies originated.
CHAPTER 2 TREE OF TRUTH – 5 Dream Pieces, 1 Dream Jewel

You must collect 5 animals that are scattered around the scene.
- Bird upper left side of the tree’s limb.
- Butterfly – Upper left side of the tree’s trunk
- Lizard – left side of the wall.
- Turtle – On the ground, at the base of the tree.
- Squirrel – Top right side of the tree branch.
- Once you’ve collected all the animals, place them on their corresponding carved part of the tree trunk.
- Once all the animals are placed correctly they will go back into inventory as pieces of bark.
- Place all 5 pieces on the trunk of the tree until all pieces are in place.
- Before you finish that pick up the 5 Dream Pieces.
- Also pick up the Dream Jewel that is located at the base of the tree.
- Exit on the right hand side.
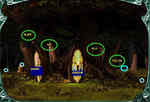
CHAPTER 3 WATER CHAMBER – 6 Dream Pieces and 1 Dream Jewel
- Your goal is to unlock the wall puzzles on the right and left of the scene in order to continue (see screenshot below)
- On the puzzle that is on the right side, you have to recreate a large imperfect circle.
- On the puzzle that is on the left, you must recreate 3 shapes. One on top and two at the bottom.
- The top one is shaped like a peanut. Bottom left shape is a diamond and on the bottom right is a square.
- If you place a tile incorrectly, it will turn red, if it’s correct it will turn creme.
ROCKS ON THE MAGICAL WATERS
- You must arrange the rocks in their correct order in order for you to get to the doors.
- You will be given 2 sets of rocks in the water and you must choose one. If it’s correct it will stay up.
- If you make a mistake and choose the wrong path you will have to start all over again until you get it right.
- Please look at the screenshots to see the correct placement of the stones.
MAGIC LOCK PUZZLE
- You have to recreate the puzzle that was quickly shown to you at the beginning of this round.
- All your tiles have to be creme in order to solve this puzzle.
- Click on the tiles one at a time, start at the bottom and work your way up.
- As a row is completely creme, move on to the next row. As the rows are completed, click on the rows above it so you don’t mess up the sequence too much.
- If you click on a tile and it changes the pattern to something you don’t want, click on it again to change it to it’s original pattern.
- Look at the screenshots for the solution.
DREAM PUZZLE # 2/ DREAM JEWEL OF CASSOPEA
Question: ” Why would a mortal like me be trapped in this Ancient’s Place?”
Answer: ” Fairies do not want the mortal world to know about their secret ways of life.”
ANCIENT’S PLACE
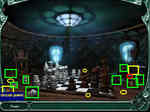
CHAPTER 4 STONEHENGE – 5 Dream Pieces
- Pick up all the round and square stones that you will find on the ground. Most of them are in the center of the scene.
- In the screenshot, the round stones are circled in blue, the square pieces are in purple and the Dream Pieces are in red.
- Look at the screenshots for the locations of all the rocks and tiles.
- You should have in inventory 4 imprinted square tiles, 4 round stones and 4 square tiles that are blank on top of each other. Plus one black tile which is called a mold.
- Place all 4 round stones on the ground, at the base of the large stone structures. You will see a round receptacle with a hole in the middle where they should go. (Look at the screenshot).
- Once you place all four stones, 3 symbols will light up around the walls, from left to right.
- The one farthest to the left will have a circle, place the four individual tiles in the 2 holes that are on each side. The tiles should form circles as you place them on the stone.
- The tiles will remain creme since they are in the correct position, red will mean that it is incorrect.
- Once all tiles have been placed correctly, the doors will open revealing your next location.
CHAPTER 5 PRINT STONE MACHINE – 5 Dream Pieces, 1 Dream Jewel
- You are in the section of the Print Stone Machine that is used to print symbols on stones.
- Pick up the 2 dented wheels that are on the left side of the screen.
- Pick up the handle that is on the left side of the grass.
- Attach the handle to the lower left side of the Print Stone Machine.
- Then place the 2 dented wheels on each side of the large stone section that is above the Print Stone Machine.
- Place a blank stone from your inventory into the bottom part of the machine.
- Then place the mold piece from inventory on the piece that is above that, the click on the handle.
- Once you see 2 blue lights (one top and one bottom) click on the blue light at the bottom to place the tile back into inventory.
- Repeat the same steps by placing the next 3 stones in the machine and click on the handle.
- Once all four stone shave been imprinted go back to the main scene.(STONEHENGE)
- Place the 4 printed tiles on the 4 holes that are located on the right side of the screen.
- The tiles have to form a square in order to progress and for the door to open. (you will go in there with 2 wooden boards in inventory.)
CHAPTER 6 CRYSTAL PRINT MACHINE – 5 Dream Pieces
- Click on the center of the machine and it will dismantle itself.
- Pick up a round piece called “something to hold a spherical object”, it is on the left side of the screen.
- Pick up the 3 metal pieces, also called molds around the scene.
- Pick up the hammer that is at the base of the machine and it will go into inventory as 6 pieces.
- Pick up the wooden bar that is on the bottom left side of the machine.
- Pick up another wooden piece on the right side of the screen in the bushes.
- Pick up a wooden circle that is on right side in the bushes.
- Pick up the crystal ball that is on the bottom left side of the machine.
- Place the 2 wooden bars on top of the machine and now you should have 4 bars on top.
- Place the wooden circle on top of the bars.
- Place the round piece that is marked “something to hold a spherical object” on the top right side of the machine and then place the crystal ball in that slot as well. It has to be in that order or it will not work.
- A handle will then appear on the lower left side of the screen, place it in the hole that is on the left side of the machine.
- Turn the handle until the crystal ball lights up.
- Take a mold from inventory and place it at the bottom of the machine and pull the handle.
- Once a blue light appears where you placed the stone, click on it to place it into inventory.
- Take the other 2 mold pieces from inventory and place them on the machine one at a time and repeat the same steps.
- Go back to the Stonehenge and take the hammer and break the 6 boards that are on the ground so that they form 12 stone squares or tiles.
- Once you’re finished go back to the Print Stone Machine (door on the left).
- Place a blank square stone into the machine at the bottom and at the top place a “mold with a curved line on top”
- Click on the handle to make the impression. Once it turns blue click the piece at the bottom so it can go into inventory. You can imprint 2 stones with this mold.
- Take the other mold marked curve, place it on top and take another blank stone and place it at the bottom. Follow the same procedures as above with 4 stones.
- Finally place the mold with the straight lines and do the same thing as above. You should be able to use this one twice.
- Once all 8 marked stones have been placed in inventory, go back to the main scene.
- Place the marked stones you’ve just made in the holes on each side of the wall.
- Duplicate the pattern on the wall with the stones to unlock it. (look at the screenshot)
- Enter that location once you’ve placed the stones correctly.
DREAM PUZZLE #3/ DREAM JEWEL OF OSIRIS
Question: “What should I know about Merrow?”
Answer: “Merrow is an inventor who left the fairy realm and so lost his powers.”
CHAPTER 7 THE WATERFALL – 5 Dream Pieces
- Pick up the 3 boards that are on the ground. One is on the far left side, one is on the left, close to the stone path. The last one is leaning against the right wall.
- Pick up the mold piece that is on the left side of the gate. (look at screenshot)
- Go back to the main scene (Stonehenge) and enter the door on the right.
- Place the mold on the Crystal Print Machine, turn the handle if the light is not shining on it. If the light is shining you do not have to do anything except place the mold and wait for it to turn blue.
- Go back to the main scene and enter the door on the left.
- Place the mold on the Print Stone Machine and then a tile underneath it.
- Click on the handle to make the impression, once it turns blue click it into inventory.
- You can repeat these steps until all 4 stones have been imprinted.
Click back and go to main scene and then enter the door in the middle.
- The clue at the beginning reads: “The water will stop if you place a diamond on the wall. Without that, the waters will not let you pass to the other side”
- Place the 4 imprinted stones on the spaces by the entrance of the waterfall. It should form a half a diamond shape on each side when placed correctly.
- Place the 5 boards you have in inventory where the pieces are missing on the bridge.
- Click on the door to get to the other side.
- At this point you must find 4 keys in order to advance.
CHAPTER 8 FIND THE KEYS – 1 Dream Jewel
- Pick up the Dream Jewel that is at the bottom of the door.
- Go back to the bridge and pick up the key that is on the lower right side of the screen. Close to to the small rock that is close to the large ones.
- Go back to the Stonehenge and pick up the key that is on the right side of the ground. It looks like a copper round piece.
- Go back to the Print Stone Machine and the key will be behind the base of the machine, on the right side.
- Go back to the Crystal Print Machine and pick up the key that is on the lower right side of the machine, on the grass.
- Go back to the bridge and go to the door and place all 4 keys in the holes on the door.
- The red keys mean that you need to click until until they all turn gold.
- There’s no solution to this except that you need to keep pressing different keys until they all turn gold.
- Once you solve it, enter through the door and you will encounter a maze.
THE MORTALS’ MAZE
CHAPTER 9 THE MAZE – 4 Dream Pieces
- As soon as you enter the maze click your cursor in the exact manner I describe below in order to get all 3 map pieces quickly.
- Click RIGHT 4 times, FORWARD once, pick up the piece of paper.
- LEFT once, FORWARD once, RIGHT and then FORWARD
- FORWARD RIGHT FORWARD and pick up the last piece of paper.
- Once the map to the maze is complete you can maneuver yourself around the maze by clicking the arrows.
- You need to maneuver the blue dot through ALL corners of the maze.
- To make the blue dot go in a straight line of the direction the arrow is pointing to, just place your cursor at the top and click it once it says step forward.
- Place your cursor left or right, when you need to go in either direction.
- You should then be on the left side of the maze, go to the lowest part of the left side and retrieve the key.
- Ignore any barrels you see for now, you can’t use them now.
- Maneuver yourself to the part of the maze that has a line through it, and you will stumble upon the door.
- Use the key to open the door so you can get to the other side and pick up the hammer.
- Maneuver your way around to the top right side and pick up the key that is on the floor.
- Go downwards and pick up the hammer at the end of that line.
- After you pick up the hammer go right 1 step and pick up the Dream Piece that is on the floor.
- Make one more step towards the right and pick up the gold key that is on the floor.
- Keep heading in the same direction and a barrel will be at the end. Break it with the hammer and a
- Dream Piece will go into inventory.
- Start heading left and do not go up in the first opening, go up the second one.
- As you go up you have to close in on the barrel and then hit it with the hammer, a gold key will be inside.
- Go up one and then heads towards your left 5 steps and hit the barrel, another key will be inside.
- Go down 3 steps and then right 3 steps and hit the barrel with a key, and a gold key will be inside.
- Go towards the lowest part of the right and the last barrel will be there, hit it with the hammer and
- a Dream Piece will be inside.
- Now that you’ve picked up all the pieces, head towards the door that is on the last corner of the upper right side.
- Right before you get to the door, pick up the last Dream Piece that is on the floor.
- Place all the keys on the door and click on them until all they stay gold.
MERROW’S COTTAGE
CHAPTER 10 COURTYARD 5 Dream Pieces
- You have to press the valves until you get the right combination to open them. The valves unlock the door to the Watermill.
- Pick up the crowbar that is on the ground of the water fountain, directly in front of the green metal piece on the ground.
- Place the crowbar on the metal grate.
- The screenshot will show you the numerical order in which you must press the valves.
- In order to get the correct combination you must press the valves one by one until they all stay down.
- Write down on a piece of paper the order in which they stay down so you can remember it easier.
- Once the valves have been entered correctly, the doors on the left will open up.
CHAPTER 11 WATERMILL – 4 Dream Pieces
- Your goal is to hold the cover open so that the water drops onto the wheel.
- Click on a round piece that is on the right side of the floor that is labeled “plate to hold something”
- Go back to the Courtyard and grab the heavy rock that is on the lower right side corner, in the grass. (The rock does not appear in the courtyard until after you’ve entered the watermill)
- Pick up the key that is behind the water fountain, on the ground.That key will open the door on the right.
- Go back to the watermill and place the plate on the right side of the water tank, at the end of the rope.
- Then place the rock on top of the plate and the water will start to flow.
- While you are in the Courtyard click the switch on that is on the left side of the wall, close to the left door.
- Go through the door on the right and you will enter the cottage.
DREAM PUZZLE # 4/ DREAM JEWEL OF NEREUS
Question: ” What does Lilith want with my husband.”
Answer: “If Fidget becomes her husband, Lilith will have total control over the dreams of mortals.”
CHAPTER 12 MERROW’S COTTAGE (FIRST FLOOR) 4 Dream Pieces
- Your goal is to complete the circuits so the watermill can bring electricity to the room.
- Pick up the key that is on the right side of the floor.
- Get the disc that is on the side of the picture that is highest on the wall.
- As you enter the main floor, you will see a green box that sits close to the steps, click on it and a puzzle will appear.
- You have to connect the lines so that one switches on for the upstairs light and the one works for the downstairs light.
- Both floors CANNOT be connected at the same time and all pipes will not be used.Once you finish with one side of the house you have to go back to this box and connect the other side.
- Please look at the screenshot, it is connected in a way that you only have to move one piece for it to switch between the upstairs and the downstairs light.
- The only piece you have to switch is the piece that is circled in yellow.
- Twist that piece until the connection switches over to the other side. There’s more than one way to make the connection but this one makes it easy to switch.
- Once you’ve connected the wires correctly, go to first floor and then go upstairs.
Switchbox Upstairs:
Main Floor:
Switchbox Downstairs:
CHAPTER 13 MERROW’S STUDIO (UPSTAIRS) – 3 Dream Pieces and 1 Dream Jewel
I would like to start off with the locations of the hexagon pieces, discs and keys. Some pieces will not be visible until after you’ve performed certain actions, go back and they will be there.
GRAMOPHONE ROOM
- 1 – Top right side, by the box.
- 2 – Left side, on the middle shelf, close to the base of the crystal ball.
- 3 – Bottom left corner, on the floor, under the cabinet where the handle is.
- 4 – Left side, bottom shelf of the bookcase on the left, you will not be able to get it until you’ve opened up that box with the key.
- DISC is located in the upper right side of the scene, on the second shelf.
- KEY is underneath the right side of the gramophone, on the table.
UPSTAIRS
- 1 – On the floor, right side, by the bookcase, in between the shadows.
- 2 – On the floor, left side, close to where the pile of books are.
- DISC is located on the bottom right side, leaning against the entrance, close to the steps.
- KEY is on the far left side, on top of the books where that sit under the window on the floor.
- KEY on the bottom left side, under table.
FIRST FLOOR
- 1 – Right side, by the left side of the steps, close to the switch box.
- 2 – Left corner, by the base of the door.
- DISC is on the left side of the scene, on the top left side of the picture that is highest on the wall.
- KEY is on the right side of the floor, not too far from the steps.
COURTYARD
- 1 – On the ground, right side of the water fountain.
- KEY is on the right side of the screen, close to the entrance of the door on the right.(This key is to open the door on the right side of the courtyard.)
GRAMOPHONE ROOM – 13 Dream Pieces (9 in the room and 3 in the locked boxes)
- Some pieces will not be visible until other things are in place.
- Pick up 4 small keys that are located downstairs, upstairs, in the gramophone room, the courtyard and the watermill.
- The keys will unlock the boxes that you see in the music room, some will have dream pieces inside and one of them will contain an hexagon piece.
- You need to place all 9 hexagon pieces at the bottom of the gramophone and put one record at a time to play. Once you hear a sound (thunder, rain an animal etc.) you must hit the correct item from one of the 9 hexagons at the bottom.
- Black Record – Frog/Thunder/Rain
- Yellow Record – Cat/Bird/Cow
- Red Record – Fire/Water/Horse
- Once you’ve identified all 9 sounds a key will appear in the cabinet that is located on the lower left hand side.
- Go downstairs to the switch box and connect your wires so that they are running electricity for downstairs.
- Go down to the first floor and open the door to the lab with it (left side door.)
DREAM PUZZLE #5 /DREAM JEWEL OF RHIANNON
Question: “What is the Tower of Dreams?”
Answer: “The tower is where the Fairy Lord watched over all, and where the Dream Librarian resides.”
CHAPTER 14 MERROW’S LAB (DOWNSTAIRS) – 10 Dream Pieces and 1 Dream Jewel. (Seven Dream Pieces in the lab and 3 Dream Pieces where Merrow is.)
- Merrow: ” I can’t see you properly, Come closer”
- Click on the talking plant and answer some questions.
ROUND ONE
- Merrow: “Hello! I’m Merrow”
- Correct Answer: ” You are the fairy I seek, yet you look like a plant
ROUND TWO
- Merrow: ” Who are you?
- Correct Answer: ” I’m Faye of Wish, proud wife of Fidget, who is the son of Aeval and Tangle.
ROUND THREE
- Merrow: ” I’m honored to meet you, Faye. But first, I’m freezing! Please light the fire.
- Correct Answer: ” I would, but first I’d need something with which to light the fire.”
ROUND FOUR
- Merrow: ” I can give you a match and tell you where to find some logs.
- Correct Answer: “Of course. Give me the match and I’ll tell you where to find some logs.”
- The Merrow says: “Here is the match you need. There are 4 wooden logs outside.”
- Pick up the match that is below Merrow. Pick up the dream pieces that are in the area before you leave.
- Once you’ve picked up the jewels and you can view the whole room. pick up some jewels and items for inventory.
- There is a candle that is on the top left part, above Merrow’s head, pick it up.
- There is a container on the lower right side marked “Something fireproof” pick it up as well.
- Get the bottle that is on the top right side of the screen. and there should also be about 5 Dream
- Pieces in that scene.
- Get out of that room and head back to the Courtyard to retrieve some logs.
- You should know be in the Courtyard again, you need to pick up four logs.
- There are 2 logs by the fountain, one is inside the fountain and the other is behind the left side of the fountain.
- The other two logs are each on the left and right side of the scene.
- Go back to the basement and place all 4 logs in the fireplace, then place the match in the fireplace as well.
- Once the fire is lit, take the candle by placing it in the fire so it can be lit.
- Go back to Merrow and he will ask you a few more questions.
ROUND FIVE
- Merrow: “That’s much better, though I’m still a bit dizzy. I haven’t been myself for a while.
Correct Answer: “Let me know what I can do for you, please.”
ROUND SIX
- Merrow: “My water is rank and I’m dying for a fresh chlorophyll cocktail. Will you make one for me?
- Correct Answer: ” Of course. Just tell me how”
ROUND SEVEN
- Merrow: “Pour the liquid from the “Liquid of Plant Life” into the flask. There is a bottle of it upstairs.
- Correct Answer: “I’ll go get it right away”
- Go back to where the gramophone is and pick up the blue bottle that is on the top left side of the shelf, it is labeled “Liquid of Plant Life”
- Once you retrieve the bottle go back to the basement and click that bottle onto the large flask that is on the right side.
- It will fill with yellow liquid, take the empty bottle ( top right side on the shelf) and place it on the flask to transfer the liquid. The liquid will change while it’s in the flask you have to press the bottle against it while it is yellow, otherwise it will not be correct.
- Place the metal container (burner base) and place it under the other flask that is close to the stairs.
- Take the yellow liquid and place it that same flask, and then place the candle under it to heat it.
- Once the liquid turns green take the empty bottle from inventory and place it on there.
- Go back to Merrow and place the bottle directly on his glass container
ROUND EIGHT
- Merrow: “That’s much better. Now tell me again: why do you need my help?”
- Correct Answer: “Lilith, the Fairy Queen of Dreams, took my husband and daughter. I must find them.
ROUND NINE
- Merrow: “Lilith must have them in the Tower of Dreams. The path is not easy, but reaching the Tower will be almost impossible for a mortal. Are you sure you want to go there?
- Correct Answer: ” Yes, even if I die trying”
ROUND TEN
- Merrow: “In that case, I’ll guide you. I, too, have business with Lilith.
- Correct Answer: “Then let’s go!
ROUND ELEVEN
- Merrow: “It won’t be an easy trip. You must follow my instructions precisely. I can communicate with plants, just as Aeval does. But you won’t receive any more messages from her.”
- Correct Answer: “I understand. Lets’ leave immediately OR
- “Wait. Before we leave I must gather some Dream Pieces I saw here” If you choose this answer, look for the dream pieces and then answer the question again with the first answer provided.
LAKE OF DREAMS
CHAPTER 15 THE BOAT – 5 Dream Pieces
- Pick up the harpoon that is on the left side and it will count as 3 pieces.
- Pick up the piece of wood that is on the bottom left side.
- Pick up the piece of wood that is on the right side of the barrel that is on the left.
- Pick up the oarlock that is on the dock.
- Pick up the oars that are on the top right side and it will count as 2 pieces.
- Pick up the piece of wood that is on the top of the barrel that is under the net.
- Pick up the brush that is in between the 2 barrels that are on the right side of the scene.
- Take the harpoon and click onto the 3 barrels that are on the right side.
- Take the brush and dip it into the blue paint that is on the lower right corner.
- Take the pieces of wood and place them on the boat.
- Place the oarlock in the right side of the boat where it says “a board is needed”
- Click the blue brush onto the boat and then click on the boat again so it can go in the water.
- Place the oars on the boat once it’s in the water and then click it again to move on to the next round.
TOWER OF DREAMS
CHAPTER 16 TOWER OF DREAMS – 10 Dream Pieces (5 in the main scene and 5 in the footpath)
- Pick up all the round pieces that are in the scene, there should be 7 round stones on the main page and 5 Dream Pieces.
- Go to the footpath that is on the right side of the screen and collect 2 round stones and 5 Dream Pieces
- Go to the door that is on the top of the hill.
DREAM PUZZLE # 6/ DREAM JEWEL OF FREY
- Question: Why isn’t the Fairy Lord stopping Lilith’s evil actions?”
- Answer: “The Fairy Lord went out on one of his quests, but never returned.”
- Clue: “One missing pipe leans against a pillar” This clue is for the organ room.
CHAPTER 17 THE DOOR – 5 Dream Pieces and 1 Dream Jewel
- Once you’re in the door you should pick up 4 round pieces, 3 Dream Pieces and 1 Dream Jewel, that is usually on the right side.
- Click on the 2 buttons that are on the railings leading to the door. Those 2 buttons will unlock 2 puzzles on each side of the door.
- You must place the round stones that you found in the correct order on both sides of the wall.
- If the stones turn red they are incorrect, if they turn blue they are correct. If they stay the same, that disc does not belong on that puzzle.
- Left side contains mostly pictures of trees and clouds.
- The right side puzzle consists mainly of plants.
- Place all the discs correctly and you will move on to the next round.
CHAPTER 18 ORGAN – 13 Dream Pieces (6 in the organ room and 7 on the close up of the piano)
- Pick up all the pipe pieces that are scattered around the room.
- Place all 7 pipes on the organ, once they are all in place, click on the organ to open it.
This is like a Simon Says game in which you have to duplicate the sequence in which the buttons light up. The sequence is always different so I cannot provide you with a solution.
- Each time you duplicate the sequence of the keys it will take you back to the main scene and you will see that some steps will be built for every correct answer.
- You have to duplicate 5 correct sequences in order to move upstairs.
- Once they are all correct, click upstairs so you can enter the library.
- The last 2 sequences are the most difficult to get, you make a diagram or print the screen and stop the game after each sequence.
- When you stop the screen you will be ale to see the whole playing field.
DREAM PUZZLE # 7 /DREAM JEWEL OF MONTU
- Question: “What does the Dream Librarian do?”
- Answer: “The Dream Librarian prints knowledge of fairy life into volumes of books.”
CHAPTER 19 THE LIBRARY – 5 Dream Pieces
- Click on the book that is on the large round table and read what it says.
- Pick up the book that is on the right side, under the window, close to the stairs.
- Pick up the book that is on the top left side of the large bookshelf.
- Place both both books on the 2 raised stands that are on the left side of the scene.
- Grab the crystal ball from the round table and place it on the stand that is in between the 2 books you just placed.
- Read the books and they will give you clues as to what you need to do next .One line speaks about that some of the titles have the opposite meaning on them. So the “Book of Myths” will go in the history section and so on.
- There are 10 books that you need to pick up 3 books marked “Fairy book”, One of each of the following: “Fairy Lord”/ “Book of Peace”/ “Book of Light”/ “Dark Magic Book”/”Book of Fire”/ “Book of
- Myths”/”Book of Night”
- Empty shelf in the middle, place the Fairy Lord book, 3 fairy books and the dark magic book.
- Book of fire, goes on top right shelf of the large bookcase. The case is called books about water.
- Book of myths goes in the history book section, top shelf, left side
- Book of light goes on the left side, middle shelf.
- Book of Peace goes on the left side, third shelf.
- Book of night goes on the right side of the bookcase, middle shelf.
- Once everything is in place, stairs will appear on your left.
CHAPTER 20 MUSIC ROOM – 5 Dream Pieces
- The screenshots we have provided show a detailed list of where the majority of the pieces are. We have also provided some alternate locations on the pictures for certain pieces since they do tend to move around.
- There are several ways to solve this puzzle, this is just one way but the end result will always be the same.
- You need to pick up bases, stands and pieces of paper so you can assemble the stands.
- After you’ve found 5 bases and 5 stands, go to the Music Room and place all the bases on the floor first, followed by the stands on top of that.
- Pick up all the pieces of paper (scores as they call it in the game), and place them on the music sheets on the stands.
- All these pieces can be in any of the 3 floors (organ room, library and the music room), check everywhere.
- As your inventory gets full go upstairs and start placing the papers on the stands.
You will know you have the correct pieces of paper when you click on them and they do not move.
- If a piece leaves the page you must switch it with another piece from another stand or with one from your inventory.
- You will know all the pieces are correct when all your stands turn blue.
- Your next step is to match the names of the instruments that are on your sheets of music with the actual instrument on the chair behind it.
- Go down to the library and click on the book that is on the left stand of the room. The crystal ball has to be on the table for you to open it.
- Click on all the musical instruments and place them in inventory.
- Place the correct pieces next to the correct descriptions on that page. (Look at the screenshot for the correct placements)
- This step could have been done in the previous chapter but I found it easier to do it now.I thought it was easier to find all the small pieces first without all those large instruments being in the way.
- When you go back upstairs you will see several instruments on the floor.
- You need to place those instruments on the correct chairs.
- You will actually pick up 7 instruments but you will only need five of them.Two of the instruments are there to stump you and will disappear once you’ve placed everything correctly.
- The instruments have to match the name of the instruments on each sheet of music.
- You can either go back to the book downstairs and figure out which instrument is which. You can also click the instruments onto the chair until they do not move anymore.
- The instruments will stay on the chair even if they are incorrect but they will go into inventory when you click them if they are not correct.
- Once all the correct instruments are on the right chairs each stand will turn play some music, head upstairs to the chess room.
DREAM PUZZLE # 8 /DREAM JEWEL OF ARACHNA
- Question: ” What does this all have to do with my family?”
- Answer: “Lyra could be the Chosen Child because she is the daughter of a mortal and a fairy”
- Clue given: According to the clock, starting at noon. The right order of colors is red, blue, yellow, green, purple, and black.” This is the solution for the wheel that you see in Chapter 25.
CHAPTER 21 CHESS ROOM – 5 Dream Pieces and 1 Dream Jewel
- You must first collect all the pieces that are scattered around the room you are in, the music room and the library.
- CHESS ROOM will have: 1 white knight, 2 white rooks, 1 white pawn, 1 black knight, black pawns and 2 black bishops.
- MUSIC ROOM will have: 1 black pawn behind the 4th chair (left to right) and 1 black queen, by the steps
- LIBRARY will have: 1 white pawn, on the left side of the floor and 1 white pawn under the round table.
- Place the tops on top of the broken chess pieces, if one piece does not fit place another piece over it, eventually you will get the right combination.
- Once the pieces are assembled, click on the board to begin the game.
- This is basically a Simon Says game in which you have to reproduce the light patterns in the order that they appear.
- If you do it correctly, your opponent’s pieces will begin to disappear. If you do it incorrectly you will lose some pieces.
- If you end up losing more pieces than your opponent you will have to start from the beginning.
- The sequences are random so I cannot provide a solution for this puzzle. However, you can print the screen and mark the board as you go along or make a diagram.
CHAPTER 22 THE KNIGHTS – 3 Dream Pieces
- You have to collect all the pieces of the armors that have fallen on the floor.
- There are so many pieces in that room that I did not provide a screenshot of where the pieces are, instead I provided a picture of what they should look like once they’ve been assembled.
- Here are the locations of some of the pieces in the other rooms.
Chess Room:
- Sword – against the right side of the wall.
Music room:
- Bottom of Armor – In between the fourth and fifth chair (from left to right)
- Armor Shoulder – Under the first chair.
- Sword – Right side, above the steps.
Library:
- Arm – Under the left side of the round table.
- Leg – Under the right side of the round table.
- Shoulder – Right side on the floor.
- Shoulder – On the last shelf of the bookcase that is on the right.
- To attach the legs you must click on the base of the statue to make sure that it sticks.
- The good thing about this section is that if a piece is incorrect it will not go back into inventory. It will just go elsewhere in that room, you will not have to go back and get it where you originally picked it up from.
- Some pieces can also be at the base of the armor and behind other things.
- Once you’ve completed all the pieces proceed upstairs. black and silver/all gold/gold and silver/rusty/silver and gold
CHAPTER 23 THE BEDROOM – 7 Dream Pieces to collect
- Collect all 7 Dream Pieces that are in the room.
- There are 4 on the left side of the bed (2 on the floor, one against the wall and one by the pillow).
- Two of them are at the bottom of the bed post and the last one is under the mirror.
- Click on the bed and a message will appear and once you exit out of the message, the window will open, click on it to exit.
CHAPTER 24 THE MAGIC TREE 5 Dream Pieces to find
- You have to repair all 6 windows so that all the colors match the largest design on top.
- Open a window and click on all the colors that do not match the large piece so you can place them in inventory.
- There are windows that are hidden behind the trees, you will identify them when you see the magnifying glass icon appear.
- Once all the pieces are completed, the entrance to the tree will appear on the right hand side, enter it.
CHAPTER 25 FINAL MAZE 7 Dream Pieces to find
- Collect all 7 Dream Pieces and then click on the left side of the wall and solve the puzzle.
- The hint for this puzzle came if you solved the Jewel of Arachna it says: “According to the clock, starting at noon, the right order of colors is red, blue, yellow, green, purple, and black.”
- Turn the little balls in the order stated above, you can also look at the screenshot.
FINAL MAZE
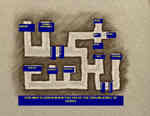
- You will now need to maneuver your way through the last maze by entering the door on the left.
- There’s a map provided about this last maze when you solve the Dream Jewel of Osiris early on in the game.
- It gives you a blank map of the maze but I marked the spots for you in which you can find the items you need.(look at the screenshot)
- There are 3 keys to find that open 3 different chests.
- You need to get the keys first so you can open all 3 chests.
- Each chest contains three colored stones that you must place on 3 different stone ornaments, they look like door knockers.
- Once you’ve acquired all 3 stones and placed them in the ornaments a key will automatically go into inventory.
- Take that key and use it on the door.Once you cross that door you will find a green bottle that contains the potion that you need to give Fidget, pick it up.
- You now have to make your way back to the tunnel where you first started and give Fidget the potion.
THE END
“;

More articles...
-
Best Horror Games On Itch.io – July 2026
Across a bounty of subgenres. -
Haze Seas Accessories Tier List [Best Accessories to Equip]
The accessories with the best stat buffs in Haze Seas.