- Wondering how to get Monopoly GO! free rolls? Well, you’ve come to the right place. In this guide, we provide you with a bunch of tips and tricks to get some free rolls for the hit new mobile game. We’ll …
Best Roblox Horror Games to Play Right Now – Updated Weekly
By Adele Wilson
Our Best Roblox Horror Games guide features the scariest and most creative experiences to play right now on the platform!The BEST Roblox Games of The Week – Games You Need To Play!
By Sho Roberts
Our feature shares our pick for the Best Roblox Games of the week! With our feature, we guarantee you'll find something new to play!All Grades in Type Soul – Each Race Explained
By Adele Wilson
Our All Grades in Type Soul guide lists every grade in the game for all races, including how to increase your grade quickly!
Drawn: The Painted Tower Walkthrough
Welcome to Gamezebo's walkthrough for Drawn: The Painted Tower.GENERAL TIPS Main menu Play: Starts the game as the currently selected player. Options: Configure music volume, sound effects volume, brightness. Toggle full screen, aspect ratio and custom cursor. Change player: Create, delete and choose player profiles. Select a profile by clicking it, and then press the OK star to return to the main menu. Credits: View the list of individuals involved in the creation of this gam…
a:1:i:0;a:2:s:13:”section_title”;s:36:”Drawn: The Painted Tower Walkthrough”;s:12:”section_body”;s:58799:”
Welcome to Gamezebo’s walkthrough for Drawn: The Painted Tower.
GENERAL TIPS
Main menu

Play: Starts the game as the currently selected player.
Options: Configure music volume, sound effects volume, brightness. Toggle full screen, aspect ratio and custom cursor.
Change player: Create, delete and choose player profiles. Select a profile by clicking it, and then press the OK star to return to the main menu.
Credits: View the list of individuals involved in the creation of this game. Press the Escape key to return to the main menu.
Extras: View the official bigfishgames Drawn: The Painted Tower forum and game companion.
Quit: Select the OK star to quit or select the Back scarf to return to the main menu.
Cursor and navigation icons
Move the mouse to control the cursor. White sparks will appear when the cursor hovers over an object that can be interacted with. The cursor will also change in appearance depending on the item or character it moves over. The cursor icons that are seen throughout the game are shown below.

Neutral: Standard icon displayed when no action can be performed.

Puzzle: An inventory icon must be used to interact with this area.

Hand: The object can be taken. Items that are taken are added to the inventory at the bottom of the screen.

Magnifying glass: Zoom into the area.

Speech bubble: Talk to a character.

Directional arrows: Move in the direction shown by the arrow.
![]()
![]()
Sparks and glints: Indicates interactive areas on the playing area.
Inventory

Items that are taken in the game are added to the inventory window at the bottom of the screen. Move the mouse cursor over an item in the inventory to see the item name and a larger image. Left click an item in the inventory to tag it onto the cursor and it can now be used on an item in the playing area. Some items can also be combined with another item in the inventory.
Mini-games
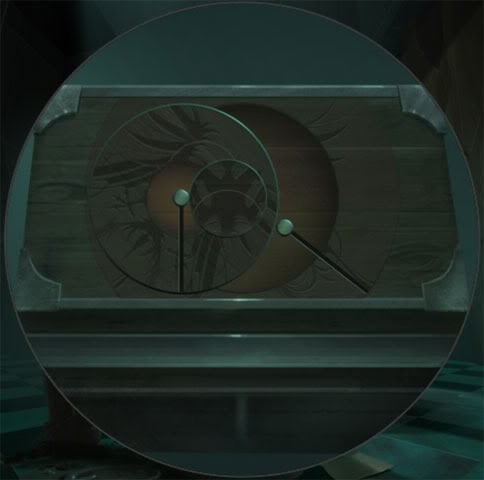
There are a variety of mini-games scattered throughout the main adventure, ranging from simple tile puzzles to more complex number dial puzzles. In each mini-game there is a Skip Puzzle bar at the top of the screen which gradually fills up as time passes. When the Skip Puzzle bar is full, select it to skip the mini-game.
Hint system

The hint system is available at the start of the game. Select Franklin’s portrait and then select the objective you need help with to see a hint. After a hint has been used, it will take a certain amount of time before the portrait bar becomes full again and another hint can be used. The amount of time the portrait bar takes to become full increases as you progress further into the game.
WALKTHROUGH
Part 1 – Outside the Tower
The tower steps
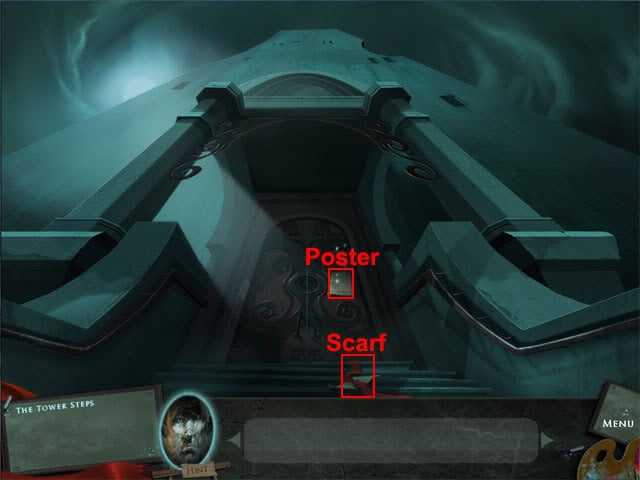
The game starts outside the tower. Read the poster on the door: A reward is offered for the safe return of the King’s daughter. Take the scarf on the steps to see a message from Iris: It mentions that she has drawn a way in to the tower. Notice that the current objective has changed in the window at the bottom-left corner of the screen.
Enter the tower
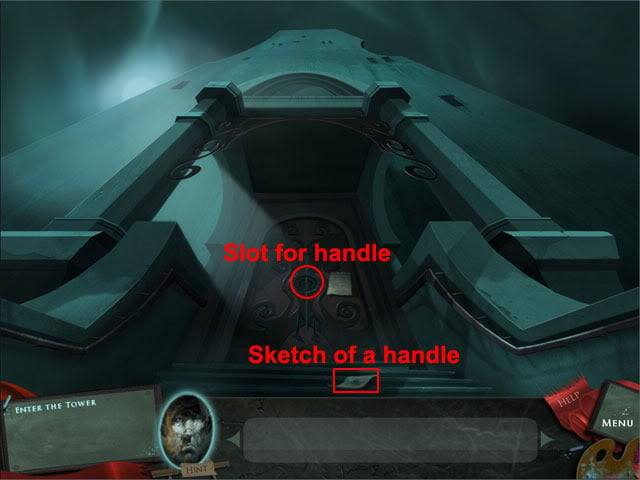
Take the sketch of a handle on the steps and it will be added to the inventory at the bottom of the screen. Use the sketch of the handle on the door of the tower. Open the door to enter the foyer of the tower.
Part 2 – The Foyer
The stone guardian
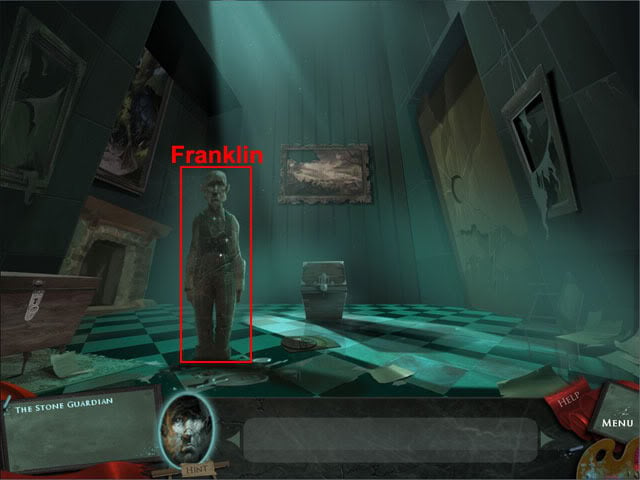
Talk to the stone guardian, Franklin: He says that the tower doors have all been locked with magic, and that Iris must be saved. Franklin’s portrait can be selected at any point through the game if hints are needed on an objective.
The floor chest
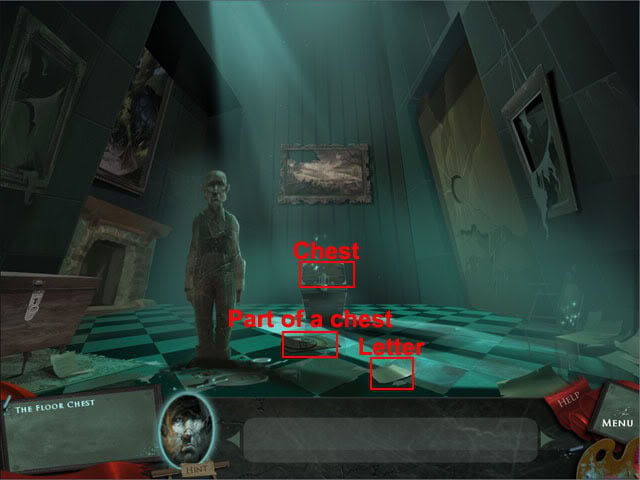
Look at the letter on the floor: The letter is written by Katherine, who thanks Franklin for keeping Iris safe from the King. Click anywhere outside of the note window to exit the view of the note. Take the part of a chest on the floor at the right side of Franklin. Look at the chest in the middle of the room. Use the part of the chest in the slot to see a puzzle.
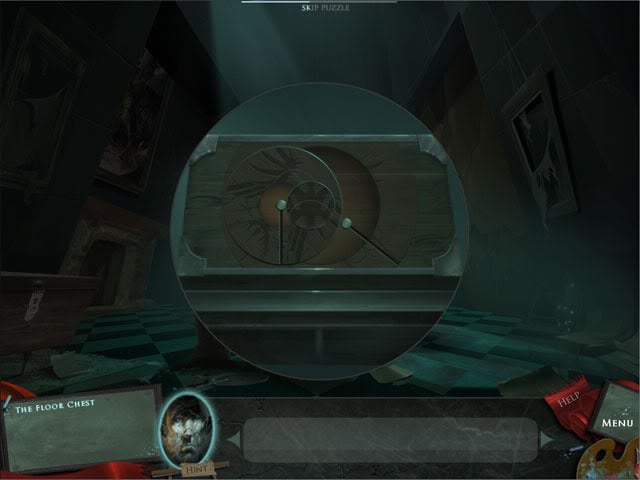
Move the left pin down as far as it will go. Move the small disc left to the middle of the large disc. Move the right pin down as far as it will go. Move the large disc right to the middle of the chest. Rotate the large disc so that the pattern on it matches the pattern outside the disc. Rotate the small disc so that the pattern matches the pattern on the large disc to open the chest. Drag the right side of the chest to the right. Take the canvas fragment to see a cutscene.
Restore a painting
Drag the left part of the chest to the left and take the small silver key. Exit the view of the chest. Read the letter below the chest at the left side of the room. Use the small silver key on the left chest. Look inside the chest and take the drawing of the rabbit and pumpkins. Exit the view of the chest. Move left to the fireplace.
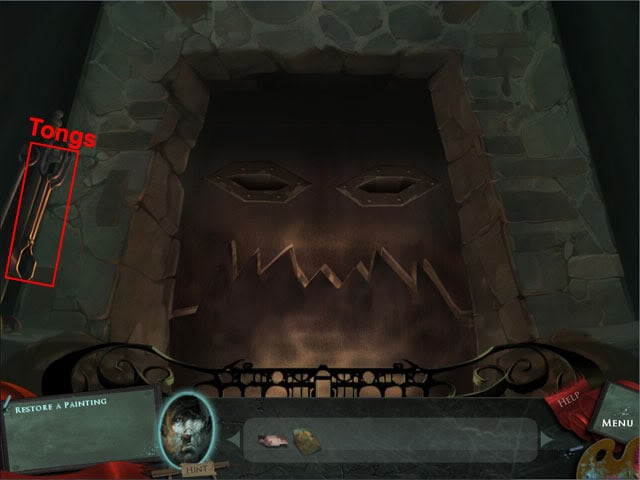
Take the tongs at the left side of the fireplace. Move back. Look at the sparkles at the right side of the room. Take the drawing of a squirrel on a stump and the glowing eye. Move forward to the painting on the wall. Use the canvas fragment on the top-left corner of the painting to go through the painting into the farm.
Speak with Scarecrow
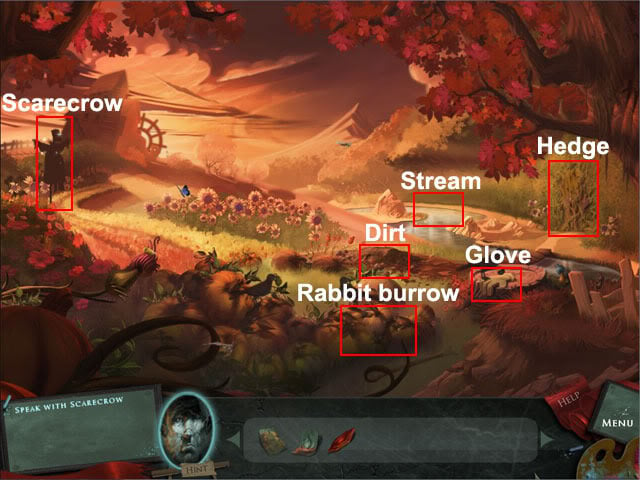
Look at the scarecrow at the left side of the screen. Talk to the scarecrow and he will ask for his glove.
Find Scarecrow’s glove
Use the drawing of the squirrel on a stump on the stump near the bottom-right corner of the screen. The crow will fly away from the stump, so you can now take the glove. Look at the scarecrow and use the glove on the end of his arm.
Find Scarecrow’s hat
The scarecrow adds the hedge clippers to the inventory and says that he wants his hat to be found. Use the hedge clippers on the hedge at the right side of the screen. Take the hat. Look at the scarecrow and use the hat on his head. Talk to the scarecrow to get a knife.
Find Scarecrow’s eyes
The scarecrow adds the carving knife to the inventory and says that he can’t watch the pumpkin patch without his eyes. Use the drawing of the rabbit and pumpkins on the rabbit burrow. Look at the rabbit burrow:
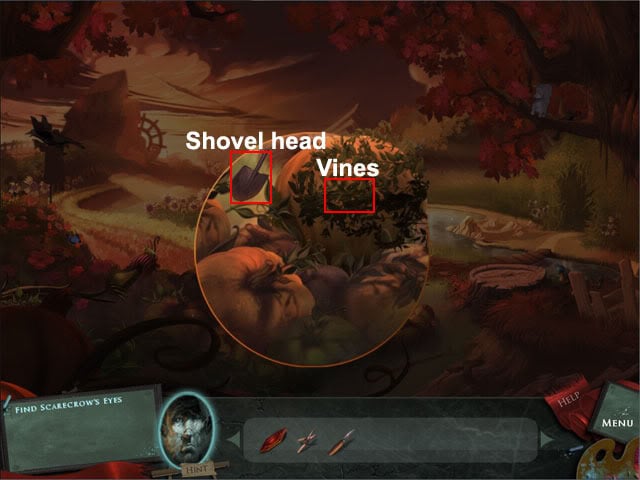
Take the shovel head at the left side of the pumpkin. Use the hedge clippers on the vines to reveal a pumpkin. Use the carving knife on the pumpkin. Take the button eyes from the mouth of the pumpkin. Look at the scarecrow and use the button eyes on his head.
Find Scarecrow’s belt
The scarecrow adds the shovel handle to the inventory and says that it should be combined with another item. Combine the shovel handle with the shovel head in the inventory to make a shovel. Use the shovel with the mound of dirt behind the rabbit burrow. Take the belt. Look at the scarecrow and give him the belt to receive the fishing line.
Find Scarecrow’s boot
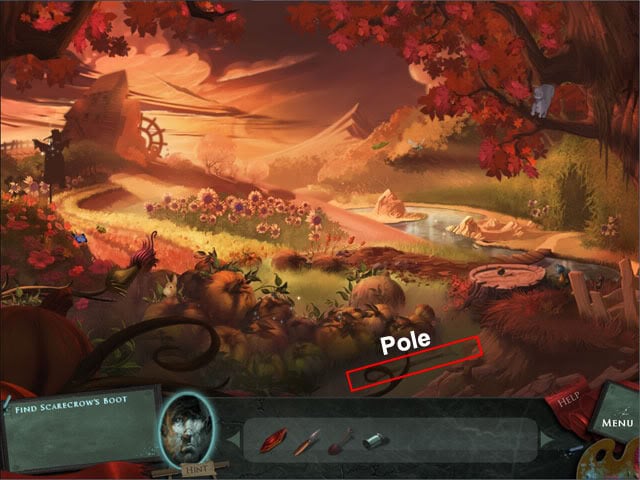
The scarecrow adds the fishing line to the inventory and says that you may be able to catch something with it. Take the pole on the ground below the pumpkin patch. Combine the fishing line with the pole to make a fishing pole. Use the fishing pole on the stream to recover a boot. Look at the scarecrow and use the boot on the end of his leg to receive the glowing eye.
Leave the painting
Exit the view of the scarecrow. Move the cursor to the bottom of the playing area to see the cursor change to an arrow with the words "exit painting" above it. Left click to leave the painting.
Deeper into the chest
Take the four scraps of paper around the edge of the picture frame:
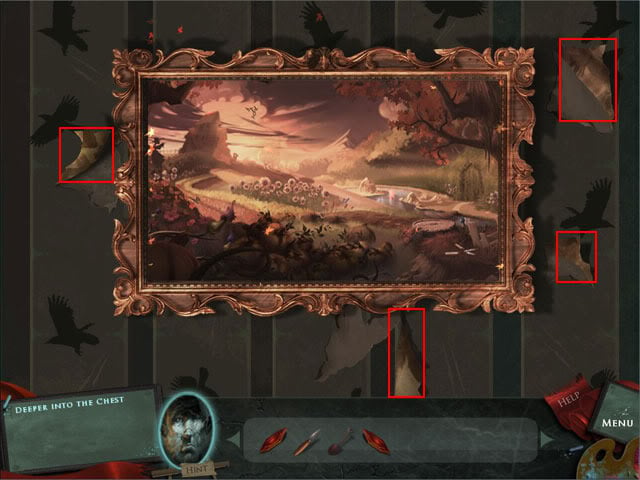
Look at the chest in the middle of the room and put the four scraps of paper in the correct place to see a tile puzzle. Move the tiles to the correct places to solve the tile puzzle:
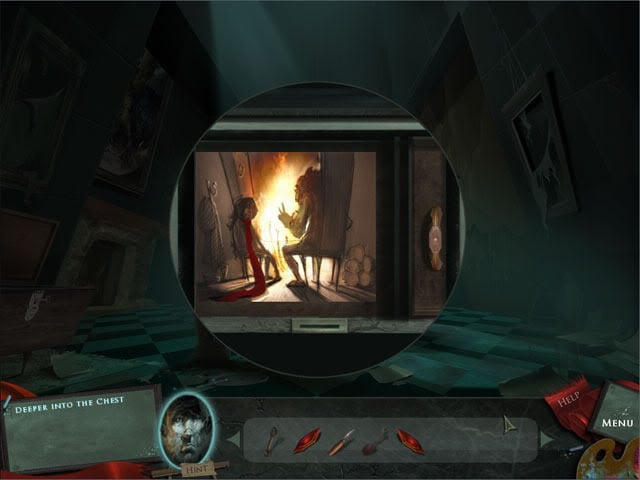
A panel will open after the tile puzzle has been solved. Take the cold iron sun.
The Sun and the rain
Exit the view of the chest. Move left to the fireplace and use both glowing eyes on the eye slots to start the fire. Use the cold iron sun from the chest on the fire. It is too hot to take out by hand, so use the tongs on the sun. Move back from the fireplace and move to the cloud door at the right side of the room.
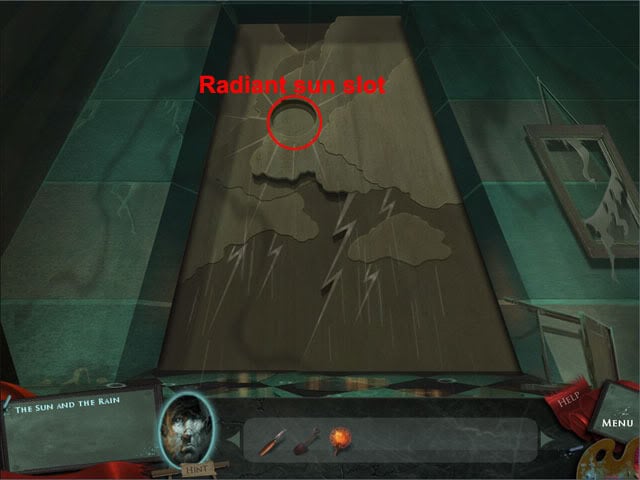
Use the radiant sun on the slot to open the door. Go upstairs to the window room.
Part 3 – The Window
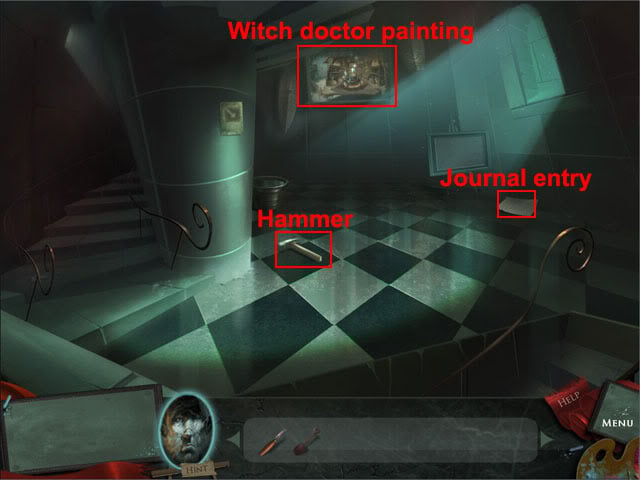
Look at the piece of paper on the floor to read Iris’ journal entry for the witch doctor painting. Take the hammer on the floor. Move forward and select the witch doctor painting to see it explode.
Restoration project
Use the hammer on hole in the wall and take the window shard. Exit the view of the painting to see that sand has poured out onto the floor.
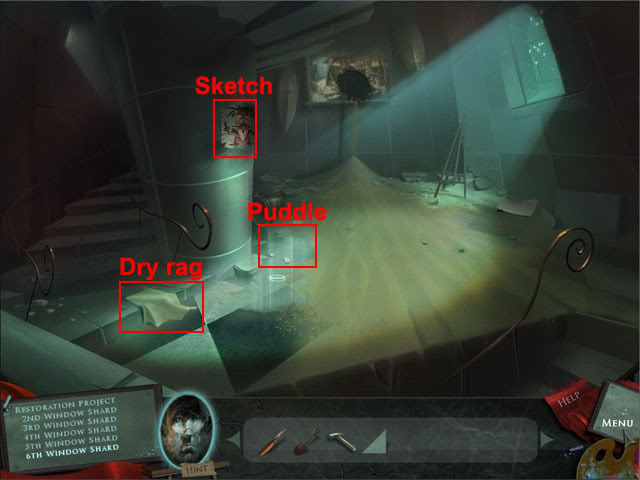
Take the sketch of the witch doctor on the pillar. Look at the drawing of the arrow in the frame on the pillar. Take the dry rag on the floor at the bottom of the stairs. Use the dry rag on the puddle to get the wet rag. Go upstairs.
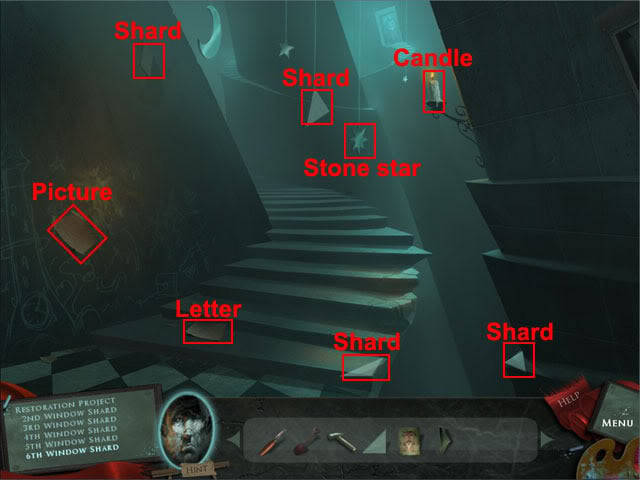
Read the letter from Iris on the floor. Look at the picture of Iris on the wall. Take the four window shards, the stone star and the flickering candle. Go upstairs. to see a picture of Iris on the door. Take the window shard above her hands.
The window’s pane
Use the stone star on the star at the top-left corner of the door to see a heart shaped recess appear on the Iris statue. Exit the view of the door. Go back one screen. Look at the window. Click the shards to rotate them. A shard will go grey and become unmovable when it has been put in the correct place. Put the shards in the correct places so that an arrow is formed:
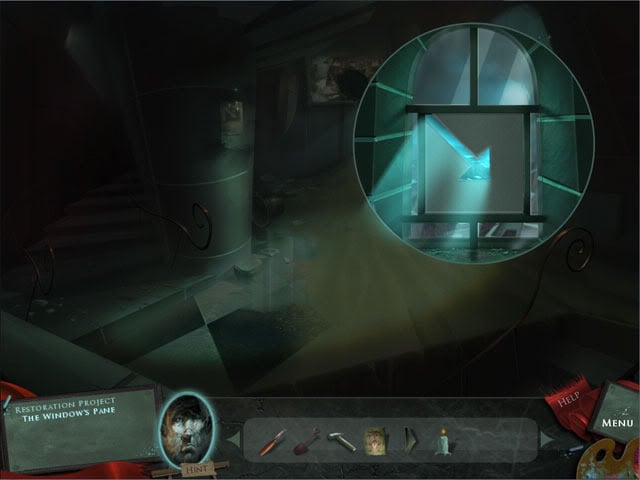
An arrow of light
Use the shovel on the arrow in the sand three times to dig a hole. Take the canvas fragment from the hole. Move forward to the witch doctor painting.
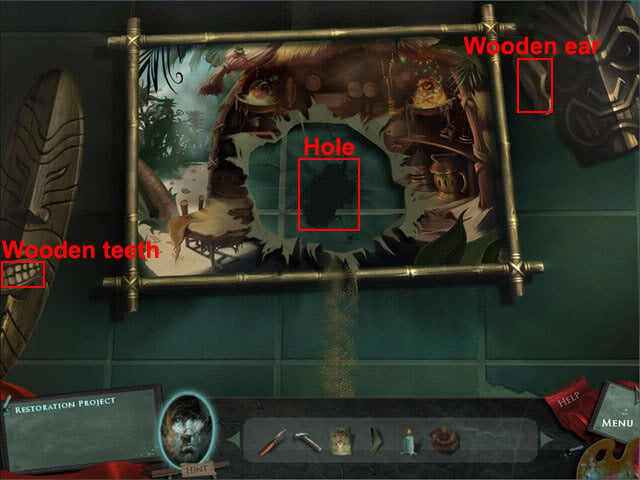
Use the canvas fragment on the hole. Take the wooden teeth at the left side of the painting and the wooden ear at the right side of the painting. Use the wet rag on the painting to enter the witch doctor’s house.
The doctor is in?
Use the sketch of the witch doctor anywhere in the house to make the witch doctor appear.
Cauldron of light
Use the flickering candle on the cauldron to light it.
Three pieces of a wand
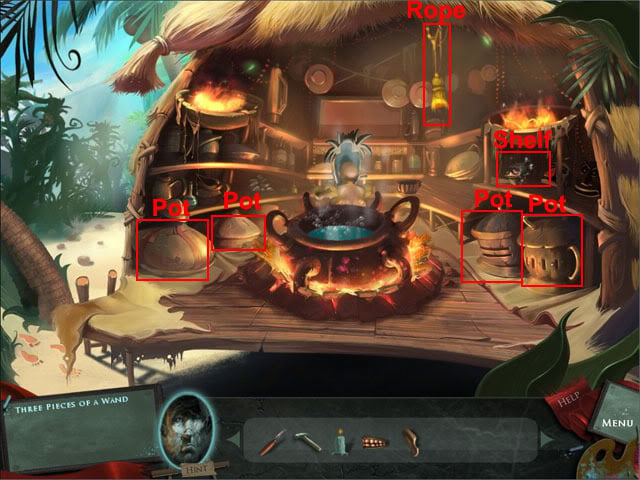
The witch doctor now wants his wand to use on the cauldron. Use the hammer to break the four stone pots. Take the netting from the first pot, shrunken heads from the second and third pot and the partial net from the fourth pot. Look at the right shelf. Use one of the shrunken heads on the left post.
Trouble ahead
Use the other shrunken head on the middle post. Use the wooden ear on the left shrunken head to receive a magic feather. Use the wooden teeth on the middle shrunken head to receive some magic beads. Exit the view of the heads. Pull the rope three times and take the magic staff that falls down.
Three pieces of a wand (continued)
Talk to the witch doctor and he will ask you to put three magic items for the wand in the stone circles. Put the magic feather, magic beads and magic staff in the spell circles. The witch doctor now wants six items to be found.
Bee, dragonfly, ½ sunflower, yellow maple leaf, blue butterfly, blue thistle
Exit the witch doctor painting. Go downstairs to the foyer and enter the farm painting.
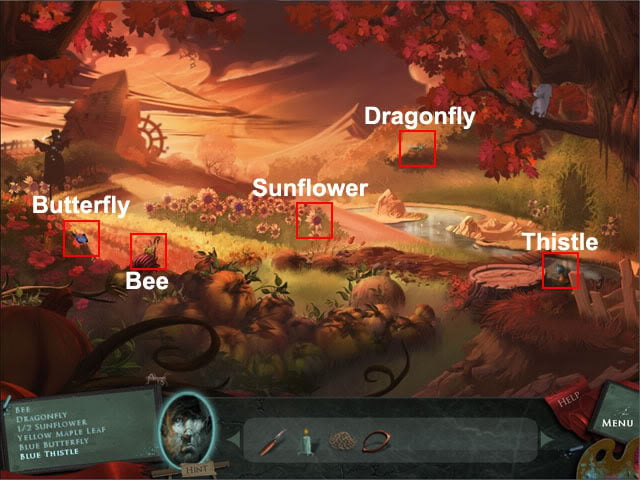
Combine the netting with the partial net to make the net. Use the net to catch the bee, dragonfly and blue butterfly. Take the maple leaf, blue thistle and half of a sunflower. The location of the maple leaf is now shown in the image above, but keep watching the screen and a yellow leaf will occasionally float down from the tree. After collecting all six of the items, exit the farm painting and go upstairs to return to the witch doctor painting.
Recipe for success
Give the witch doctor the bee, dragonfly and blue butterfly. Look at the bowls on the shelf at the left side of the room. Use the maple leaf on the top-left bowl. Use the carving knife on the maple leaf. Select the maple leaf to put the pieces in the bowl. Use the blue thistle on the mortar and pestle. Select the pestle to grind the blue thistle. Use half a sunflower on the bottom-left bowl. Take all of the petals from the sunflower. Select the blue thistle, green vial, maple leaf in the top-left bowl and sunflower in the bottom-left bowl. Give the prepared ingredients to the witch doctor to receive a stone heart.
Have a heart
Exit the witch doctor painting. Go upstairs twice to return to the statue of Iris. Use the stone heart on the heart recess. Take the needle and thread from the hands.
A stitch in time
Try to go forward across the bridge to see a large bell that drops down and destroys the bridge. Return to the foyer. Look at the painting above the fireplace. Take the cardinal sketch behind the small painting at the top-right corner of the screen:
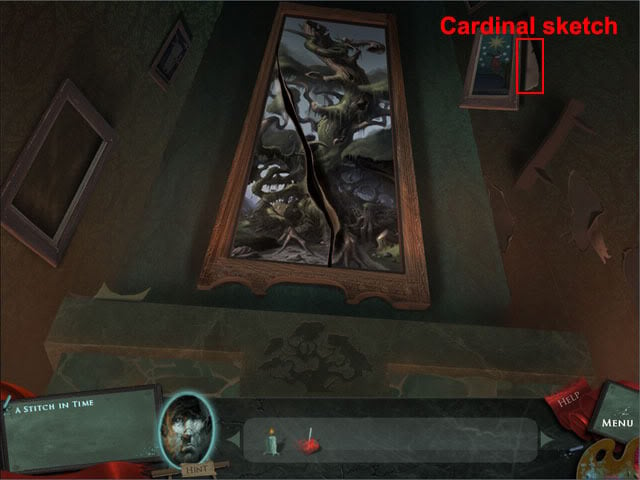
Use the needle and thread on the ripped painting to enter the giant tree painting.
The root of the problem
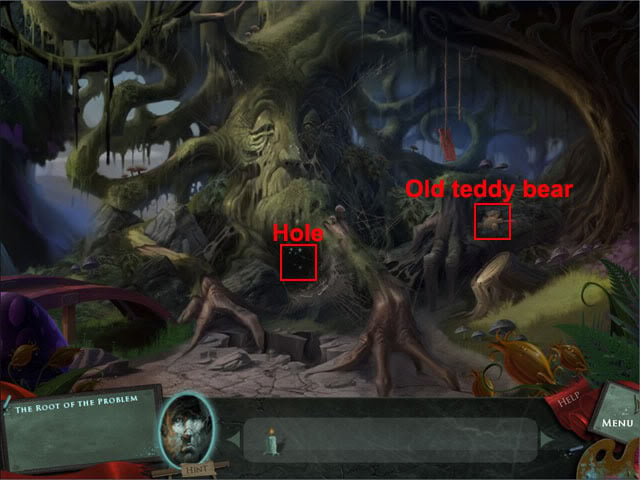
Take the old teddy bear at the right side of the screen. Look at the hole in the tree. Use the flickering candle on the hole to see a large spider. Look at the eyes of the spider. Select the correct eyes so that all of the eyes shut. The pincers can be selected to reset the eyes to their original positions. The correct order is shown below:
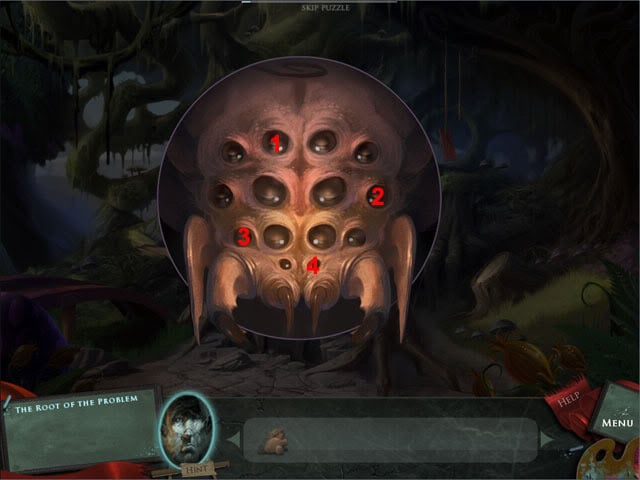
After all of the spider’s eyes have been closed, take the empty can and the hourglass.
One to grow on
Exit the big tree painting. Go back upstairs to the window room and return to the witch doctor’s painting. Use the empty can on the cauldron to fill it with growth potion. Exit the witch doctor painting and return to the large tree painting above the fireplace in the foyer. Use the can of potion on the root:
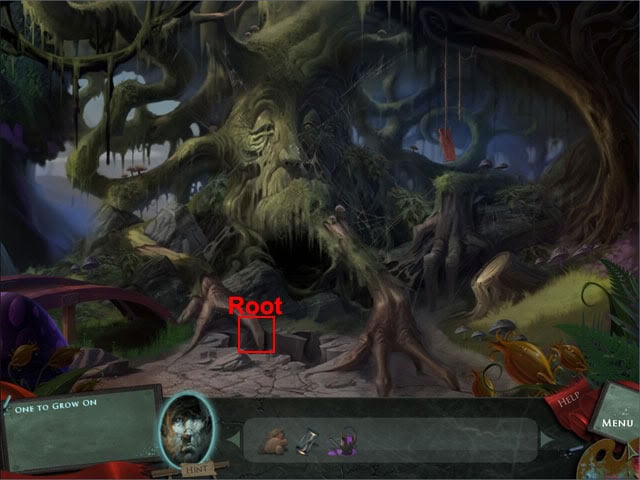
Bird’s eye view
Climb up to the top of the tree to see that bugs are crawling all over the branches. Use the cardinal sketch on the right branch of the tree and a bird will appear. Select the bird three times to remove all of the bugs.
Cleaning the treehouse
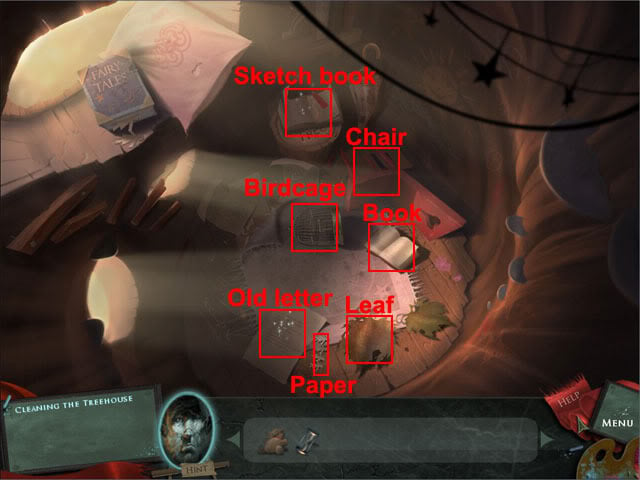
Go down the hole in the tree to see the treehouse. Look at the book on the table and the old letter on the floor: The old letter will be added to the inventory. Take the metal birdcage on the carpet. Move the chair, book, leaf and paper off the edge of the rug and then select the rug to move it. Look at the trapdoor below the rug to to see a puzzle. The aim is to rotate the dials by using the buttons so that the big shapes are placed on the correct colours on the outside and the small shapes are on the correct colours on the inside. Press the small buttons to rotate the inner circle and the big buttons to rotate the outer circle. The correct layout is shown below:
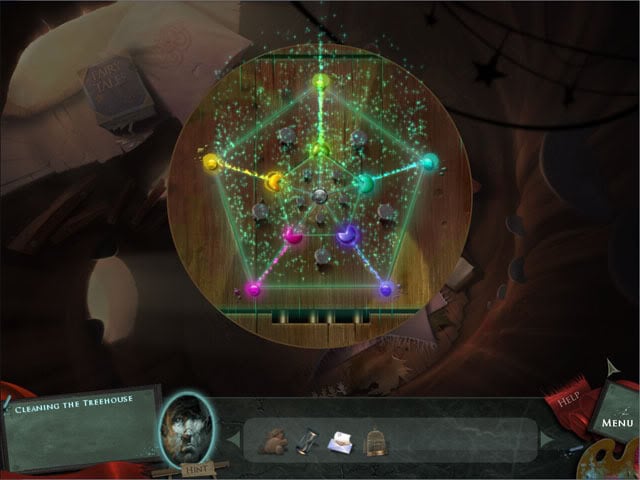
After solving the puzzle, take the white chalk from the trapdoor.
Chalk it up to the rain
Exit the treehouse. Use the white chalk to draw along the outlines of the three clouds in the direction the arrow is pointing. To draw, select the white chalk, hold the left mouse button down and then drag the mouse:
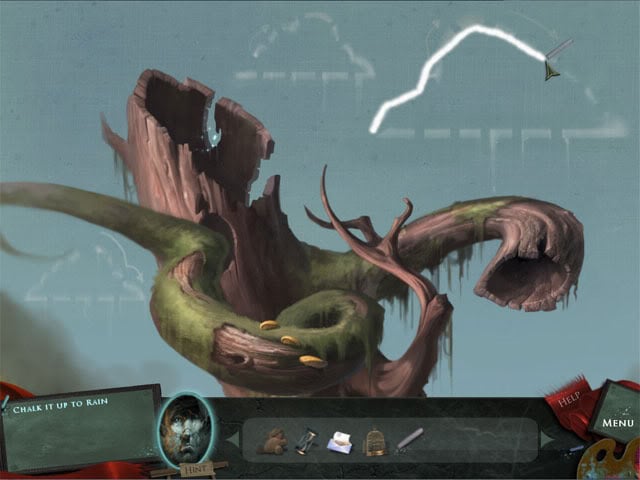
After successfully drawing over the outlines of the three clouds, enter the treehouse and take the wooden tree piece on the carpet. Exit the treehouse and climb down from the tree to see that the roots now have water.
Bridging the gap
Exit the big tree painting. Use the wooden tree on the wooden tree slot below the painting. Return to the broken bridge to see that a tree branch is now extending across the gap. Take the phoenix egg:
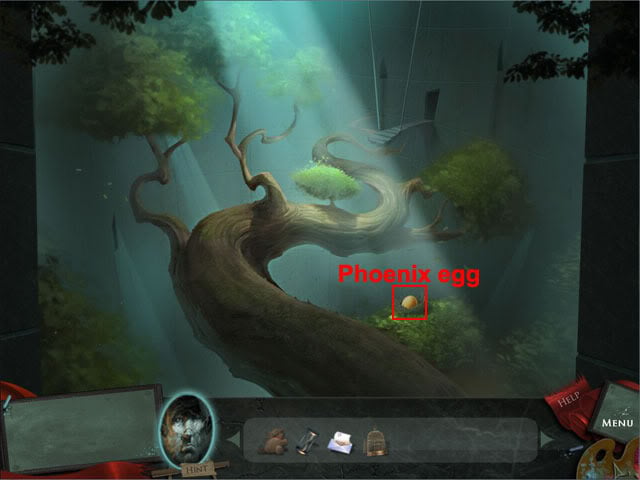
The birth of a phoenix
Return to the foyer. Look at the fireplace. Use the phoenix egg in the fire to release the phoenix. Use the metal bird cage on the phoenix. Return to the broken bridge and cross over the branch to enter the theater.
Part 4 – The Theater
The show must go on
Use the caged phoenix on the room to light the lanterns. Look at the table and take the sketch of a bell, sketch of a clock hand and the yellow chalk.
Setting the stage
Look at the chalkboard on the floor. Use the yellow chalk to drawn an outline around the sun to enter the clock tower painting:
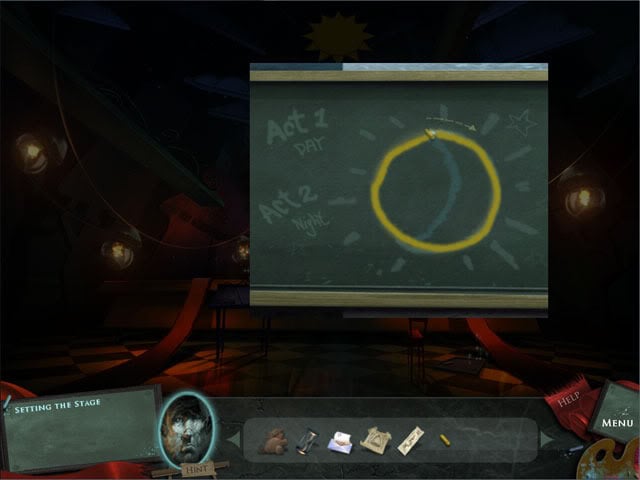
Time for rehearsal
Use the sketch of the clock hand on the big clock. Look at the sign outside the blue tent to see that the shop opens at 7:30. Select the hands of the clock to change the time to 7:30. Talk to the blue merchant that appears: He won’t open his shop until the clock starts running again. Go through the right doorway to enter the clock tower. Talk to the clock maker.
Cog in the machine
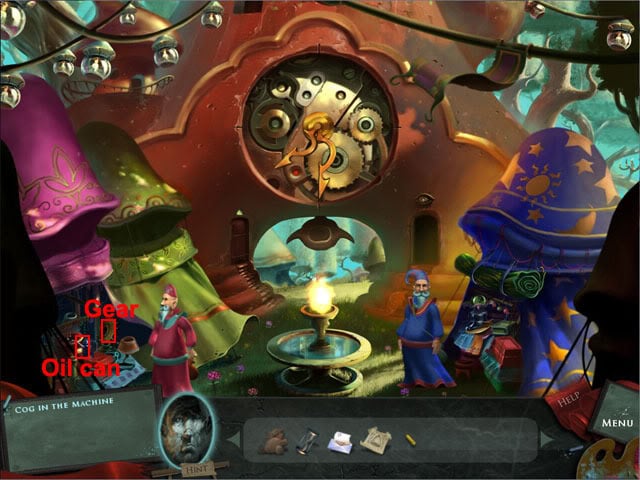
Exit the clock tower. Talk to the red merchant: He asks if anything catches your eye. Select the gold gear. The merchant wants something old and sentimental in return. Give the old teddy bear to the merchant. Take the gear. Return to the clocktower and use the gear on the blue gear slot. The clockmaker tries to work the clock, but says that the gear is rusted.
Oil fix it
Exit the clock tower. Try to take the oil can from the left table. The merchant says that he needs something black, white and read all over. Give the old letter to the merchant. Take the oil can. Return to the clock tower. Use the oil can on the rusty gear.
A show of color
Exit the clock tower and talk to the blue merchant. Solve the mini-game by adding colours to the board while making sure that none of the same colours touch each other. It helps to look at the four colours that are already on the board when you first start the puzzle. Look at the blank shape that touches the purple, green and blue shapes. As three colours touch the shape already, only the yellow should be used. With the yellow added to the shape, look for another blank shape that touches three colours and then add the remaining colour. Do this all the way around the board to end up with the following layout:
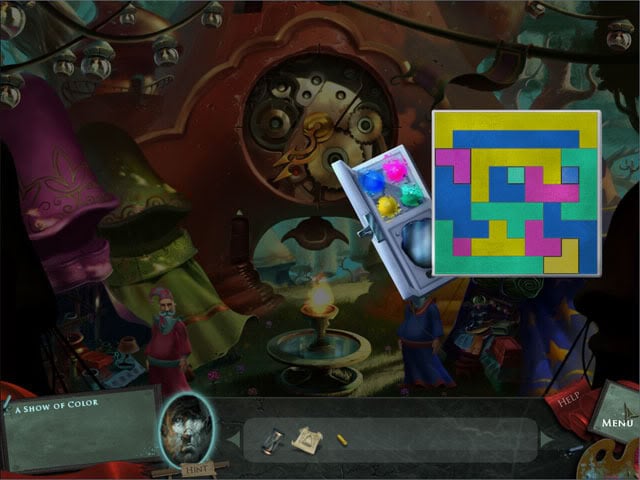
After solving the mini-game, the merchant will give you magic paints which he says can be used to help ring the bell. Enter the elevator to ascend to the roof of the clock tower. Use the magic paints on the picture.
Bats in the belfry
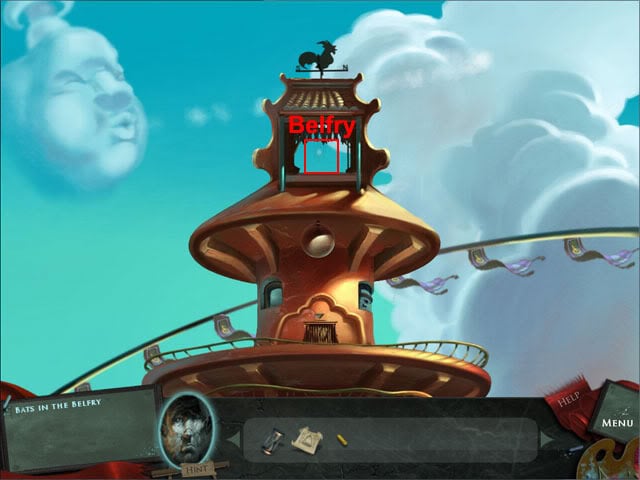
Use the sketch of a bell on the belfry to make the bats fly away.
The dress rehearsal
Go down to the base of the clock tower. Enter the clock tower and talk to the clockmaker to receive the dragon costume.
Let’s magic a deal
Exit the clock tower. Give the dragon costume to the blue merchant to receive blue chalk. Give the hourglass to the blue merchant and he will cast a spell on it that allows time to be slowed down. Exit the clock tower painting.
A star is born
Look at the chalkboard on the floor. Use the blue chalk to draw over the outline of the moon:
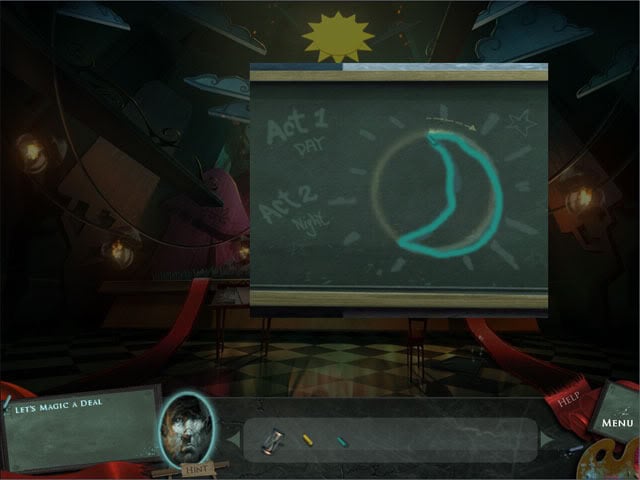
Return to the clock tower painting. Enter the elevator. Use the enchanted hourglass on the constellation in the sky to slow down time. When the shooting star flies into the circle created by the hourglass, take the constellation.
A magical trade
Go down and exit the clock tower painting. Look at the chalkboard on the floor and use the yellow chalk to draw over the outline of the sun. Enter the clock tower painting. Give the constellation to the blue merchant to receive a seed.
Flowers for the cast
Enter the clock tower. Go up the steps on the left. Put the seed in the soil near the bottom of the door. Select the eye below the left window and the eye below the right window to open the windows. The aim now is to move the mirrors so that the light hits the seed in the soil. The seed will grow four times, so reposition the mirrors to make the light keep hitting the when it grows to a new height. The four positions needed for the mirrors are shown below:

Position 2:
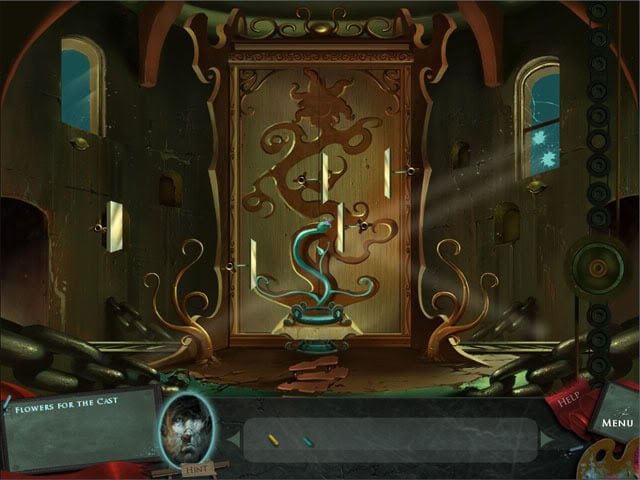
Position 3:
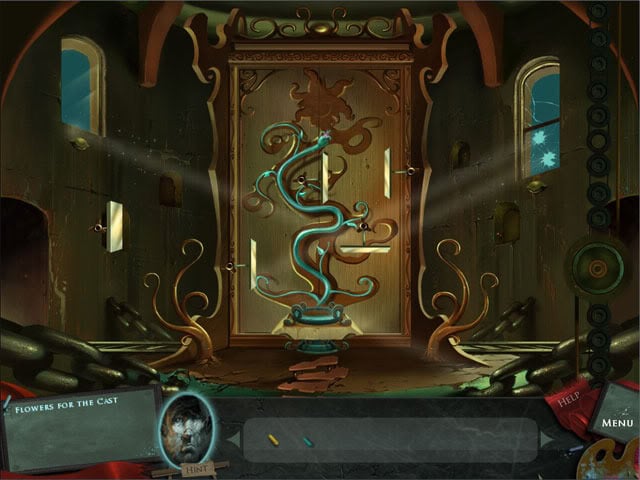
Position 4:
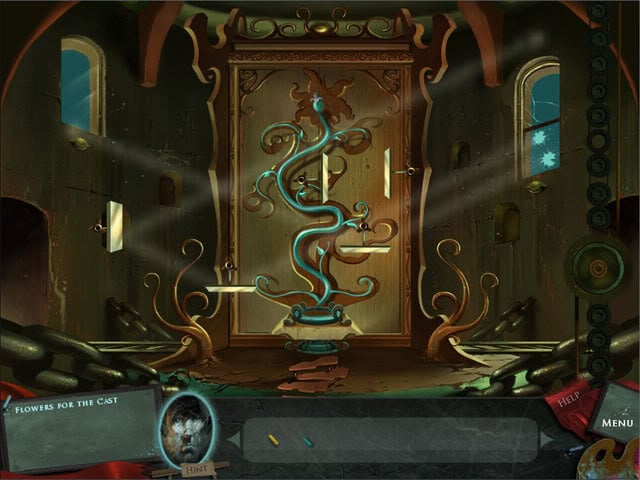
As flowers bloom
Exit the clock tower painting. Look at the chalkboard on the floor and use the blue chalk to draw an outline around the moon. Enter the clock tower painting and talk to the green merchant to play a mini-game. Solve the game by jumping over all of the red pieces and ending up with the blue piece in the middle of the board. The solution is shown in the picture below:
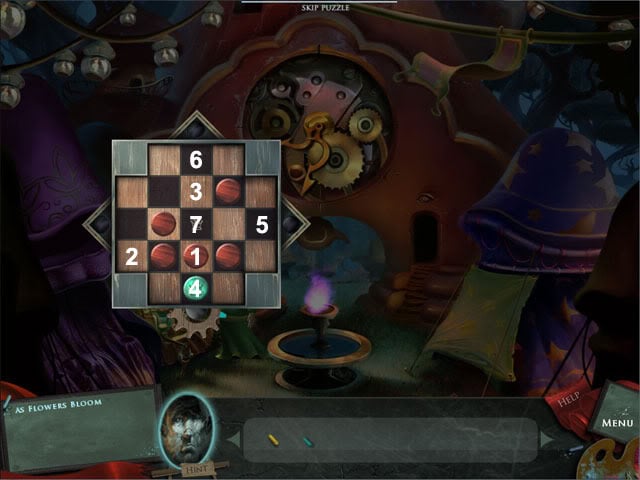
In the picture, the red piece (1) jumps west to the blank square (2). The red piece (2) jumps north-east to the blank square (3). The blue piece (4) jumps north-east to the blank square (5). The blue piece (5) jumps north-west to the blank square (6). The blue piece jumps south to the goal square (7).
Take the slingshot on the ground by the merchant. Enter the clock tower and go upstairs. Look at the left window to see that it has a small crack in it. Use the slingshot on the left window. Position the mirrors to hit the seed again and a flower will bloom:
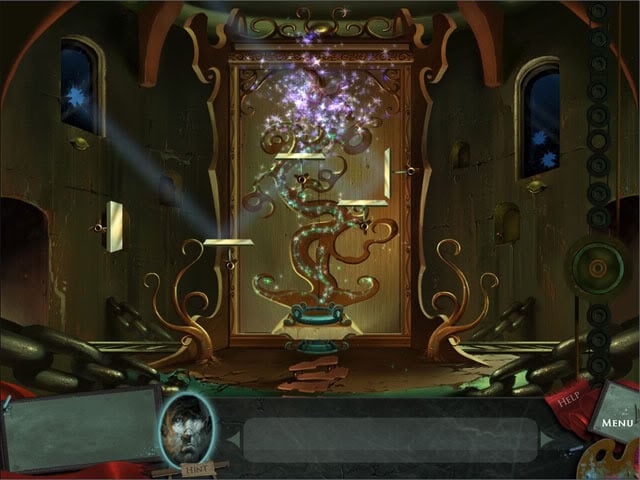
Ready for the closeup
Place the fourteen puzzle pieces in the correct positions in the outline on the board. You will know when a piece has been put in the correct position as it changes to a darker colour and can no longer be moved.
Breaking a leg
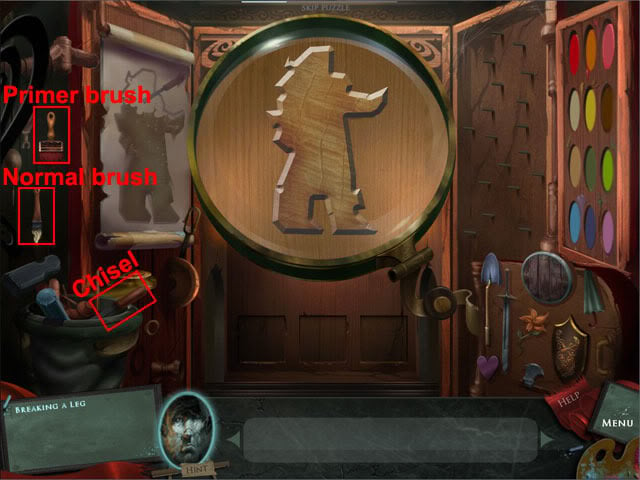
Select the chisel in the bucket at the left side of the screen and use it to chip away all of the wood from the board.
Priming the hero
Select the primer paintbrush at the left side of the of the picture on the door and use it to to paint the figure red.
A dash of color
Select the normal brush. The figure on the door must now be painted the same colours as the figure in the painting. For example, the picture on the wall shows the hair as being orange, so select the orange paint and use it on the hair of the figure. The complete figure is shown below:
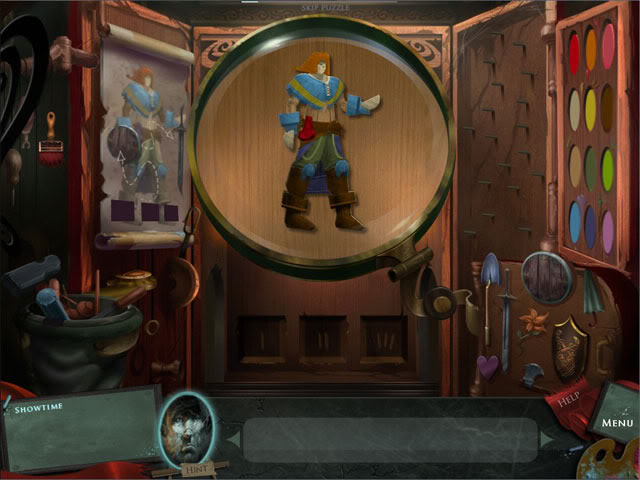
After painting the figure correctly, three slots will open at the bottom of the door.
Showtime
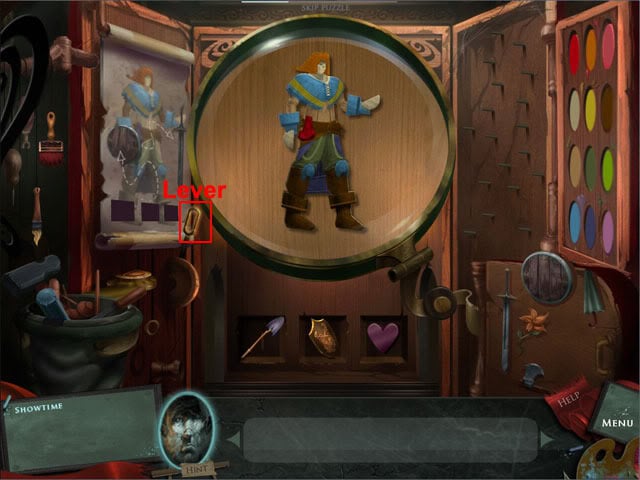
The aim now is to place the correct items in the three slots at the bottom of the door. Use the shovel on the left slot, the metal shield on the middle slot and the heart in the right slot. Pull the lever below the picture to start the show. After the show has finished, move the cursor to the top of the screen to see it change to an up arrow. Go up to the catwalk.
Part 5 – The Catwalk
Behind the scenes
Move forward to the store room.
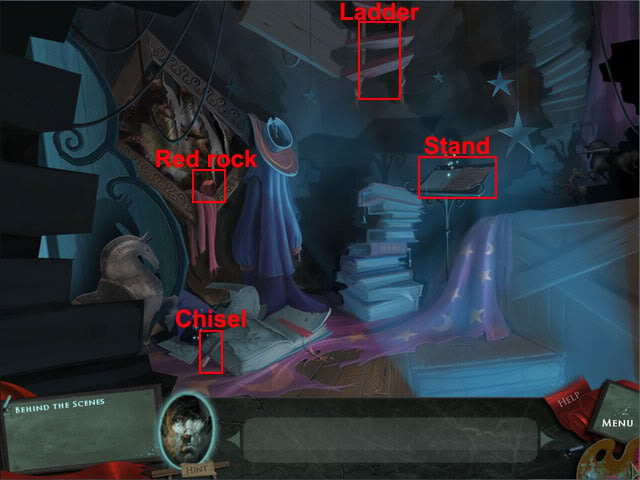
Take the red rock in the picture frame. Examine the area at the left side of the book on the floor and take the chisel. Look at the stand and take the griffon skeleton key and sheet of symbols. Exit the view of the book. Select the ladder at the top of the screen. Look at the hatch at the top of the ladder.
Stone circles
There are five moveable sections around the outside of the three discs. Select one of the sections and then select a different section to swap it. The aim is to make the numbers around the outside of the circle add up to the number in the middle of the circle. Numbers can only be added up when they are below a green light, and a green light is made by making sure that a number on one section of a disc is lined up next to the same number on a different section of the disc. The solution is shown below:
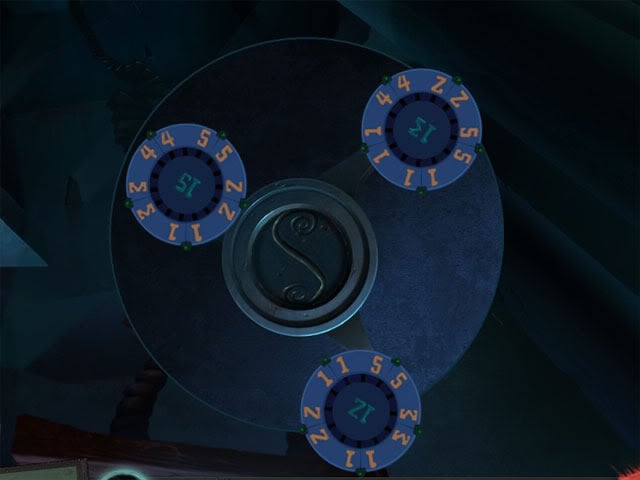
Complete the puzzle to open the hatch at the top of the ladder. Climb up the ladder to enter the hall of giants.
Part 6 – Hall of Giants
Hall of Giants
Try to go up the steps to see a boulder drop down and block the doorway. The force of the boulder dropping down causes a crack to appear in the large rock at the top of the screen. Use the chisel on the large rock to light the torch.
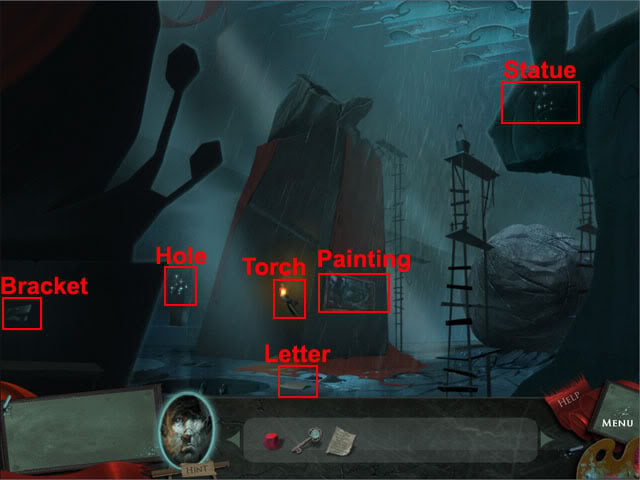
Read the letter on the ground. Look through the hole in the wall to see lights approaching the tower. Take the torch and use it on the bracket at the left side of the screen. The light from the torch illuminates a tile on the wall. Take the tile and the torch. Look at the rabbit head at the top-right corner of the screen. Take the yellow chalk from the scaffolding. Exit the view. Move forward to the painting.
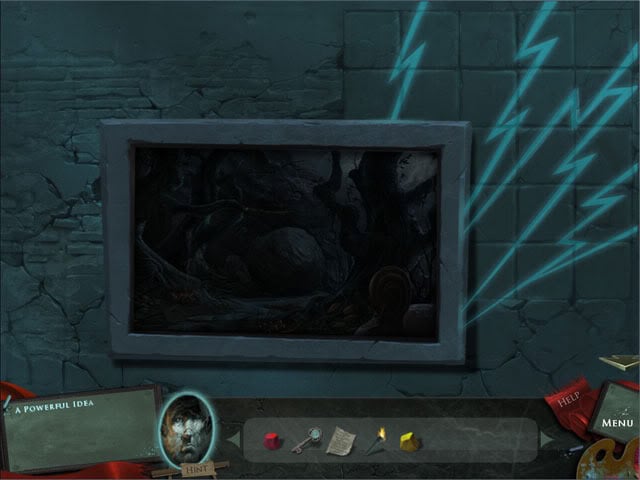
A powerful idea
Use the tile on the slot in the wall. Turn the tiles to the correct positions to enter the deep forest painting:
Cave of sorrow
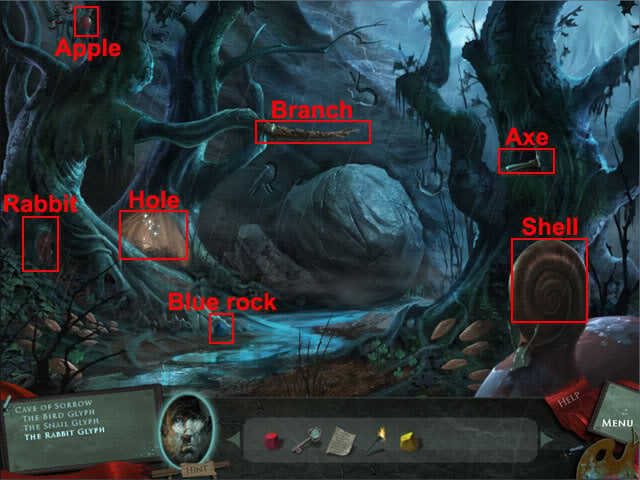
Try to take the axe in the tree and a bird will fly out of the hole. Take the axe. Use the axe on the branch that the bird lands on and a bird glyph will drop down to the ground. Take the bird glyph. Use the axe on the snail shell. Take the stone snail. Take the apple at the top-left corner of the screen and the blue rock above the puddle on the path. Look at the hole in the middle tree.
The color wheel
The aim now is to make six different colours for the palette. Use the yellow rock in the left bowl. Select the left bowl to grind the rock into powder. Select the left bowl again to pour the yellow powder into the middle bowl. Select the eggs and then select the middle bowl to add the yellow paint to the palette. Add the red rock and follow the same directions as above to make the red paint, then add the blue rock and make the blue paint in the same way.
To make the other colours, put a rock in the left bowl, stir it and add it to the middle bowl, then add another rock to the left bowl, stir it and add it to the middle bowl. With two powders in the middle bowl, add the egg and then select the bowl to add the mixed colour to the palette. The colours that should be made are orange (yellow powder + red powder), green (yellow powder + blue powder) and purple (red powder + blue powder). Take the palette.
See what can’t be seen
Back out of the cave and exit the deep forest painting. Back away from the painting. Look at the rabbit statue and use the palette of paints on the scaffolding. Select the paintbrush, select a colour and then select a section of the eye to apply the colour. Make the right eye the same colour as the left eye:
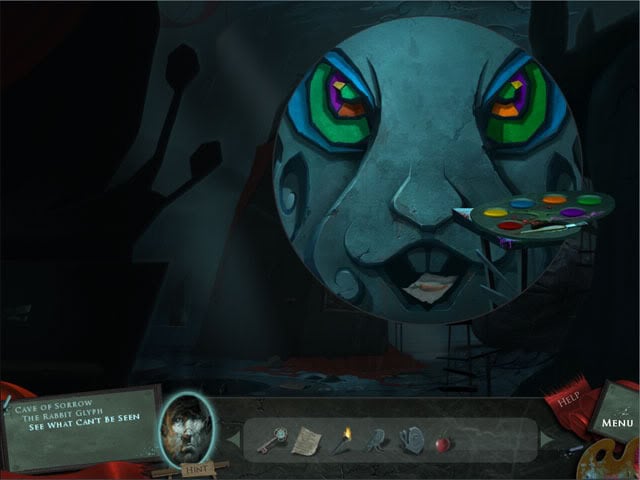
The mouth of the statue will open after the colours have been applied to the right eye. Take the sketch of the carrot. Return to the deep forest painting.
Cave of sorrow
Select the rabbit at the left side of the screen. Use the sketch of the carrot on the rabbit and the rabbit will move. Take the stone rabbit from the hole behind the rabbit. Use the stone rabbit, stone bird and stone snail in the correct indentations above the boulder. The boulder will then roll out of the way.
Once upon a time
Enter the cave of sorrows. Use the torch on the bracket at the left side of the screen. Use the sheet of symbols on the pieces of paper at the top-left corner. The aim is to place the symbols on the wall in the correct order as they are shown on the paper. For example, the top row on the piece of paper consists of five symbols.
There are two sets of symbols on the wall that consist of five symbols. Try changing one of these symbols on the wall to match the first row on the piece of paper. If the wrong symbols have been used, a drawing will appear but nothing will happen to the grey symbols on the wall. If the correct symbols have been used, a drawing will appear and one of the grey symbols on the wall will light up. The correct layout for the symbols on the wall is shown below:
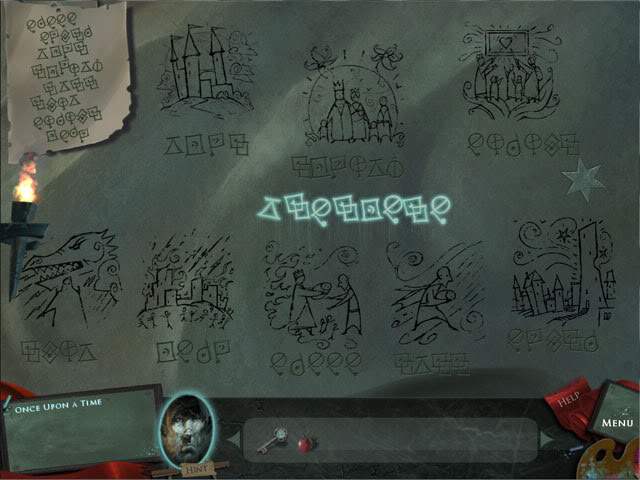
Take the star on the right side of the wall and the torch from the bracket at the left side of the wall. Go back one screen and exit the deep forest painting to see that a hole has been revealed behind the painting. Take the stone weight from the hole. Go back one screen and then go through the doorway.
Part 7 – Fire & Ice
Weighting on a change
Put the stone weight on the left rope. Pull the left rope twice and the right rope twice. Use the stone star on the slot and a griffon statue will appear.
A warm greeting
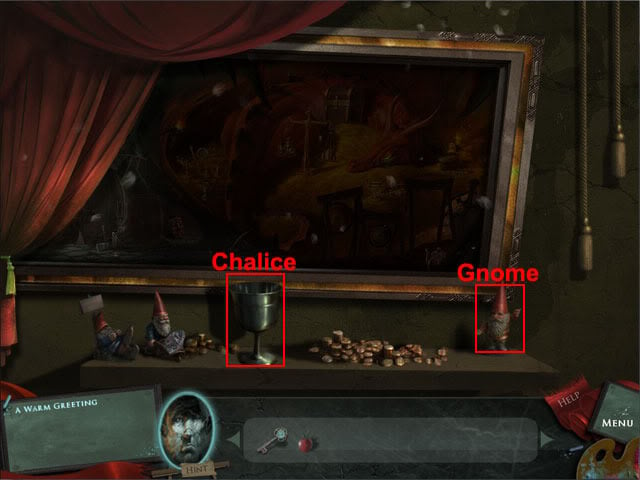
Look at the painting at the left side of the room. Take the chalice and the gnome on the shelf. Enter the dragon’s cave painting.
Dragon’s breath
Use the torch on the bracket to wake the dragon. The dragon says to prove your worth by balancing the scales.
Dragon’s scales
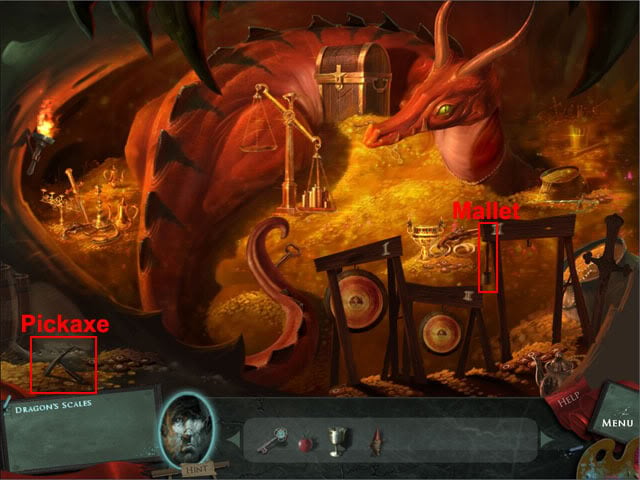
Take the pickaxe at the left side of the screen and the mallet hanging from the right gong frame. Move left one screen.
Take the bellows leaning against the wall. Use the bellows on the stove to start the fire. Notice the Roman numerals on the back wall (I, III, II, II, I). Look at the wall below the Roman numerals to see a skeleton. Use the pickaxe on the wall above the skeleton:
Take the gold ore from the hole in the wall.
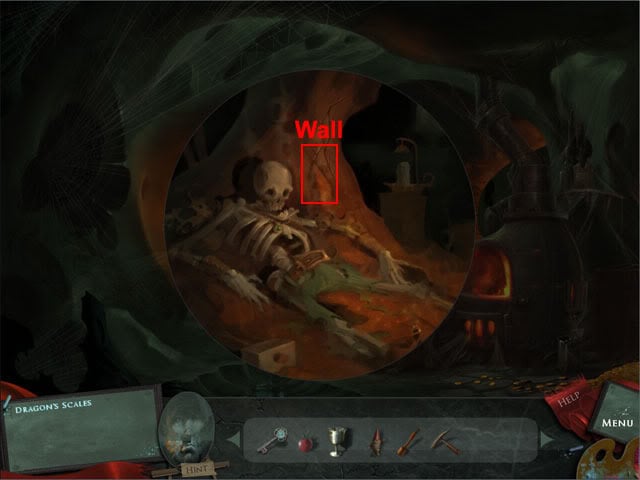
Silver ore gold
Exit the view of the skeleton. Use the gold ore on the stove and gold will pour into the cauldron. Use the chalice, gnome and apple in the cauldron to cover them in gold.
Dragon’s scales (continued)
Turn right to see the dragon. Use the three gold items on the left scale to balance the scales. The dragon shoots flames out of the picture and melts the ice.
Friend of foe
Look at the pedestal in the middle of the room and take the canvas. Look at the right painting. Use the canvas on the top-right corner of the painting to enter the ice castle painting.
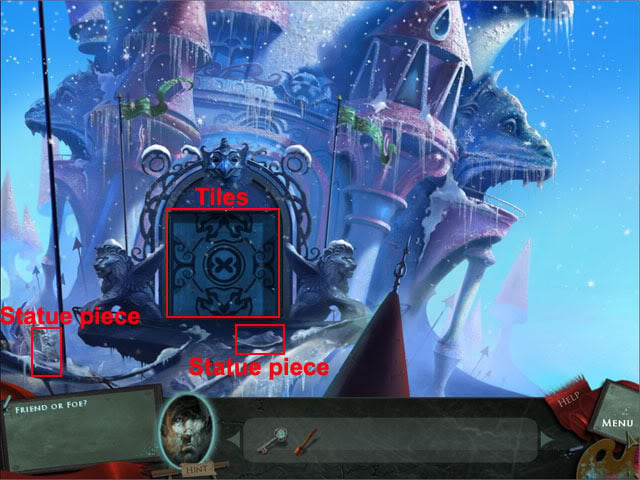
Rotate the four tiles on the door so that the X is formed in the middle. Arrange the tiles on the door correctly. Take the frozen statue piece above the left side of the path and the frozen statue piece on the path. Exit the ice castle painting.
Look at the left lion. Pull the whiskers three times each in the correct order shown below so that the teeth close:
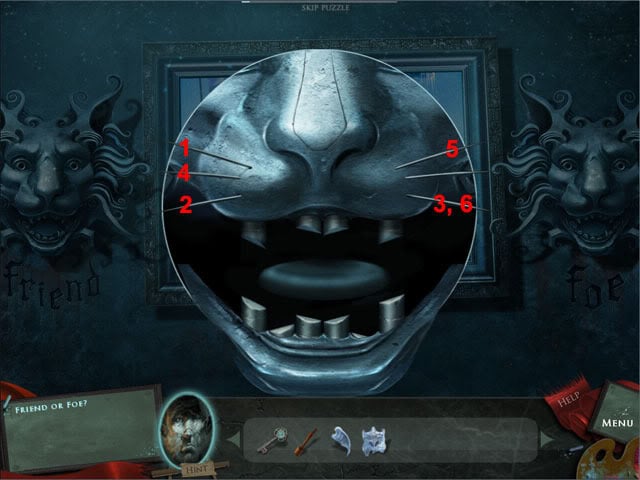
Exit the view of the statue. Enter the ice castle painting.
An uneasy piece
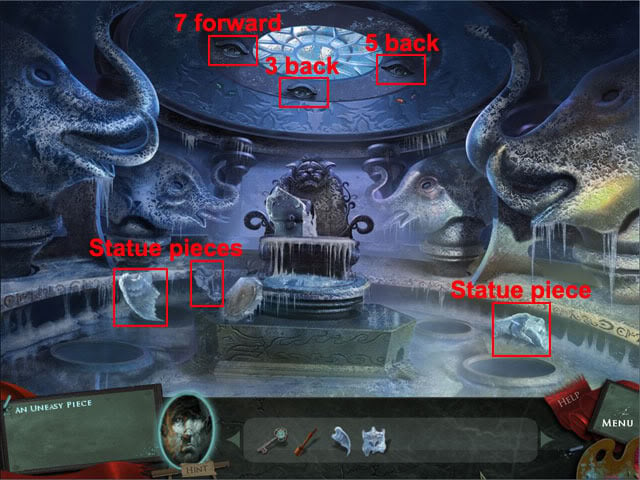
Go through the doorway. Take the three frozen statue pieces. Put the five frozen statue pieces on the statue in the middle of the room. The pieces will only fit together in a certain way, so if one piece doesn’t work just try the other one. Once the statue has been put together, select the eyes on the ceiling so that the green diamond is aligned with the green arrow. The left eye moves the diamond seven spaces forward, the bottom eye moves the diamond three spaces back and the right eye moves the diamond five spaces back.
Extinguishing the flame
Take the shield below the griffon. Back out of the room and exit the ice castle painting. Return to the dragon cave painting. Turn left. Use the shield in the cauldron to cover it in gold. Turn right. Use the gold shield below the right gong holder. Remembering the Roman numerals that were written on the wall, hit the gongs in the correct order using the mallet:
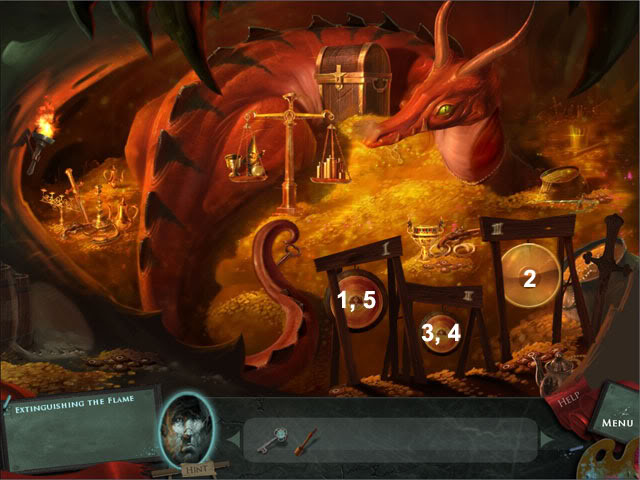
The dragon falls asleep after the gongs have been hit in the correct order. Take the key and use it to open the chest. Look in the chest.
The dragon’s chest
Move the rods out of the way by holding the left mouse button down on a rod and then dragging it. Drag the lower horizontal rod, right vertical rod, remaining horizontal rod and remaining vertical rod:
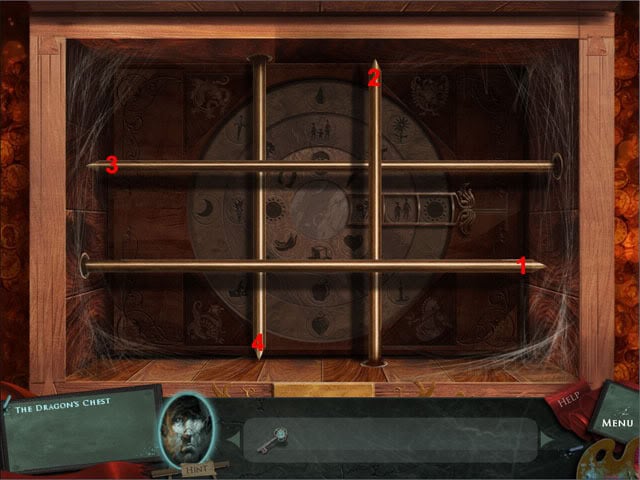
After moving the rods, the dial on the chest is illuminated. The aim now is to select one of the symbols at the the corners of the chest, and then match three of the symbols on the dials with pictures relates to that symbol.
The bottom-right symbol causes a magnet to be shown in the middle of the disc, so the three icons would need to magnetic. Magnetic items would be the horseshoe on the inner disc, anvil on the middle disc and sword on the right disc. Line these three icons up in the marker at the right side of the discs to solve the first part of the puzzle.
Select the top-left symbol to see fire in the middle of the disc. Move the inner disc to the sun, middle disc to the torch and the outer disc to the candle.
Select the top-right symbol to see a red circle in the middle of the disc. Move the inner disc to the heart, middle disc to the apple and the outer disc to the strawberry.
Select the bottom-left symbol to see waves in the middle of the disc. Move the inner disc to the floating box, middle disc to the snowflake and the outer disc to the raindrop.
After the images for all of the four symbols have been solved, the number 8 will appear in the middle of the disc. The aim now is to add items on the three discs to equal the number 8. Select the three flowers in the inner disc, the three people in the middle disc and the two rabbits in the outer disc.
Warming gaze
Take the gear of flame and the three red gems. Exit the dragon’s cave painting and return to the ice castle painting. Go through the doorway to the griffon room.

Take the red gem on the ceiling. Use the four red gems in the eyes of the elephant statues to start the memory mini-game. Watch the order that the platforms light up in and then press the platforms in the same order. Complete the three rounds of this random sequence puzzle.
Elemental gears
Look at the box held by the griffon and take the gear of ice. Back out of the room. Exit the ice castle painting. Back away from the painting. Look at the slot at the back of the room. Use the gears on the dial to open a doorway at the back of the room. Go through the doorway.
Part 8 – The Book
The power of pages
Look at the book to see a slot for a key. Use the griffon skeleton key on the book to open it. Select the top corners of the book to turn the pages. The aim is to find five sketches that can be placed on the pages of the book. Go downstairs. Look at the dragon cave painting and take the dragon’s sketch:
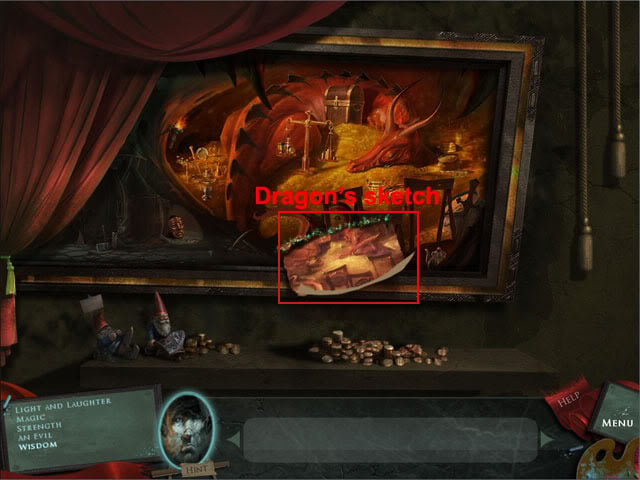
Back away from the painting. Look at the ice castle painting and take the griffon’s sketch:
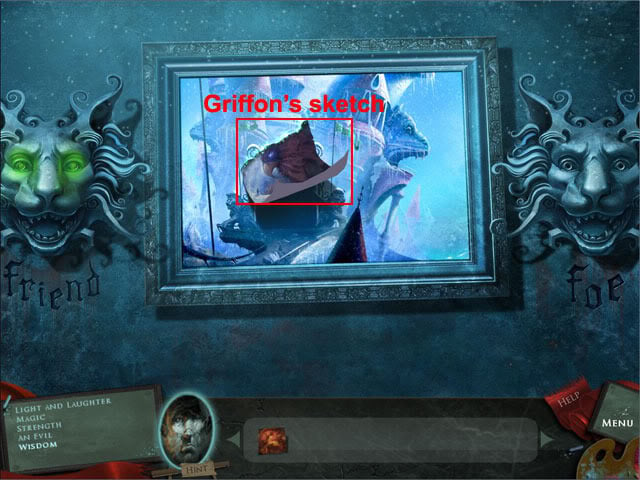
Back away from the painting. Return to the window room. Look at the witch doctor’s painting and take the doctor’s sketch:
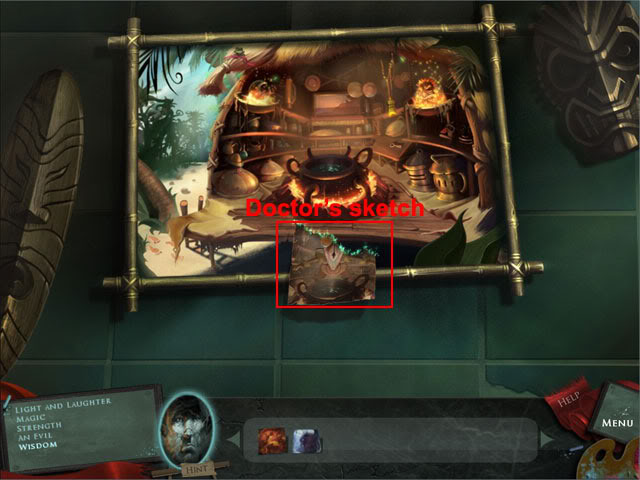
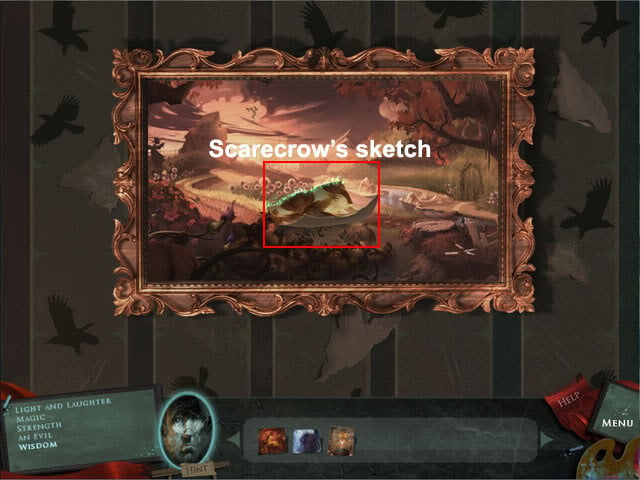
Return to the foyer. Look at the farm painting and take the scarecrow’s sketch:
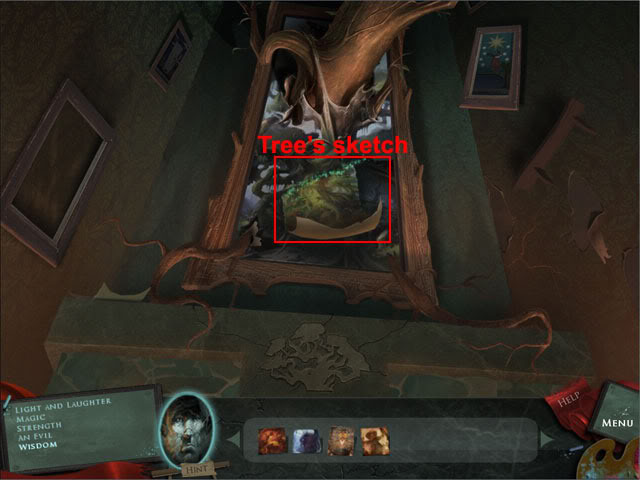
Look at the painting above the fireplace and take the tree’s sketch:
Return to the book. Look at the book and put the scarecrow sketch on the first page, the doctor’s sketch on the second page, the tree’s sketch on the third page, the dragon’s sketch on the fourth page and the griffon’s sketch on the fifth page.
Stairs to the stars
Exit the view of the book. Select the book to close it and then take the book to see a stairway appear.
Into the storm
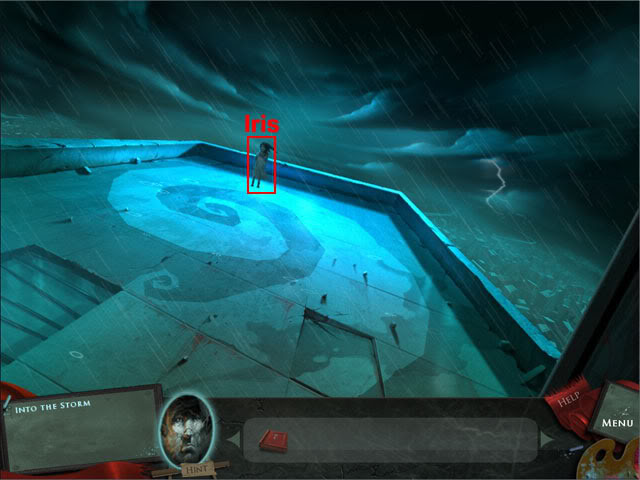
Go upstairs to the rooftop. Give the book to Iris to complete the game.
“;
More articles...
Monopoly GO! Free Rolls – Links For Free Dice
By Glen Fox
Wondering how to get Monopoly GO! free rolls? Well, you’ve come to the right place. In this guide, we provide you with a bunch of tips and tricks to get some free rolls for the hit new mobile game. We’ll …Best Roblox Horror Games to Play Right Now – Updated Weekly
By Adele Wilson
Our Best Roblox Horror Games guide features the scariest and most creative experiences to play right now on the platform!The BEST Roblox Games of The Week – Games You Need To Play!
By Sho Roberts
Our feature shares our pick for the Best Roblox Games of the week! With our feature, we guarantee you'll find something new to play!All Grades in Type Soul – Each Race Explained
By Adele Wilson
Our All Grades in Type Soul guide lists every grade in the game for all races, including how to increase your grade quickly!


