
Grow A Garden 2 Base Price List
What's the most valuable crop?![Evomon Best Starter [Leafbun, Blazpup, or Bubble?]](/wp-content/uploads/2026/06/evomon-best-starter.jpg "Evomon Best Starter [Leafbun, Blazpup, or Bubble?]")
Evomon Best Starter [Leafbun, Blazpup, or Bubble?]
Grass-type, Fire-type, or Water-type?![Evomon Tier List [META and BEST Evomon]](/wp-content/uploads/2026/06/evomon-tier-list.jpg "Evomon Tier List [META and BEST Evomon]")
Evomon Tier List [META and BEST Evomon]
The Evomon dream team.
![[Roblox] Evomon Shiny Hunting Guide – Including Prismatic and Pris Shinies!](/wp-content/uploads/2026/06/evomon-shiny-hunting-guide.jpg "[Roblox] Evomon Shiny Hunting Guide – Including Prismatic and Pris Shinies!")
Drawn: Dark Flight Walkthrough
Welcome to the Drawn: Dark Flight walkthrough on Gamezebo. Drawn: Dark Flight is an interactive, point-and-click adventure game played on PC, created by BigFish Games Studios and available at BigFish Games. This walkthrough includes tips and tricks, helpful hints, and a strategy guide for how to complete Drawn: Dark Flight.


- Prefer Gamezebo on Google

Drawn: Dark Flight – Game Introduction
Welcome to the Drawn: Dark Flight walkthrough on Gamezebo. Drawn: Dark Flight is an interactive, point-and-click adventure game played on PC, created by BigFish Games Studios and available at BigFish Games. This walkthrough includes tips and tricks, helpful hints, and a strategy guide for how to complete Drawn: Dark Flight.
General Information
- Click on Change Player (at the bottom of the screen) to create your profile. You can create a maximum of 6 profiles of up to 13 characters (letters and numbers, only) long. When you create your profile, you can choose either Casual (with a tutorial) or Experienced (without tutorial) modes. If you change your mind about which mode you want to play, you’ll need to delete your profile and create a new one.
- Click on Options to change the Music, Sound FX (effects) and Brightness levels. You can also turn Full Screen, Aspect Ratio and Custom Cursor on and off. Note: Full Screen may not be available (greyed out) if your screen resolution is higher than allowed. If you change your mind about the settings you chose, click on Restore Default.
- Click on Extras to access Credits, World of Drawn, Achievements, Concept Art, Wallpaper, Soundtrack and a link to the Forum.
- Click on Play to begin.
- After you start your game, click on Menu to access Resume, Options, Help, Main Menu and Quit.
- Click on Help for information about Cursors, Navigation and Tips, Hint System, Objective List, Inventory and Guide.
- The Lock icon, at the lower right, allows you to lock and unlock the taskbar (Inventory, Objective, Advice, Menu, Help and Hint features) so they’re always visible (locked) or only appear when you mouseover the bottom of the screen (unlocked).
- Click on Franklin’s portrait (Advice) for information about what objectives you need to complete and hints to complete them. They get progressively informative as you click on him. It’s always available.
- Click on Hint for an image of where to go or what to collect next. It’s always available.
- Click on the left or right arrows (bottom) to scroll through your inventory items.
- Mousing over your inventory items will show descriptive text with the object name.
- Within Messages, Sketches and some Puzzles, either click outside the area, or use the “Back” arrow, to return to the main screen.
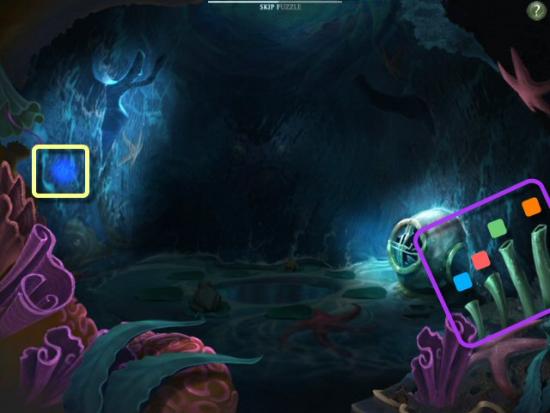
- You can skip some puzzles and minigames. It takes 45 seconds for the Skip bar to charge and it’s located at the upper middle of the screen.
- You can skip cutscenes (you’ll miss an Achievement, by the way) by pressing the Esc key on your keyboard.
Gameplay Tips
- For a truly immersive experience, choose Experienced mode and unlock the taskbar so it only appears when needed or when you mouseover.
- There are 15 Achievements to strive for, so look at the list (under Extras, on the Main Menu) to see if you want to attempt them on your first play through. You may want to wait and try it on a second play through, as some of them are quite tough. The body of the walkthrough won’t mention any of the Achievement areas.
- Move your cursor over the entire screen or you may miss needed information, items and new locations. Click everywhere and on everything. There is no mis-click penalty.
Walkthrough
Walkthrough Notes
- This walkthrough will only show objects and areas when they’re available to complete tasks or puzzles. In many cases, you’ll generally need to come back to those areas after performing certain tasks or collecting other items.
- In some areas, the walkthrough will show navigation with white arrows, however all directions won’t be shown, especially when returning to previous areas or clicking back/forward, several times. Long arrows indicate up or down; short arrows indicate forward (up) or back (down).
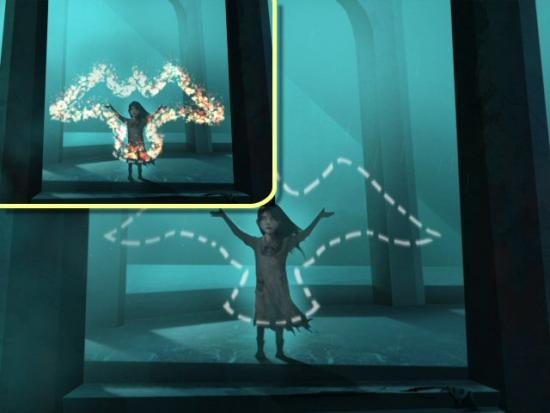
Click “Play” to start your adventure and watch the opening cutscene.
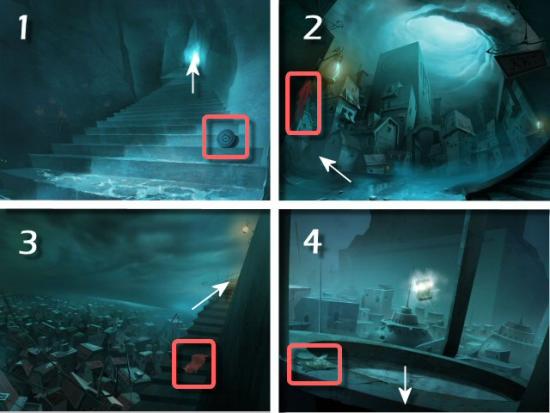
The Underground
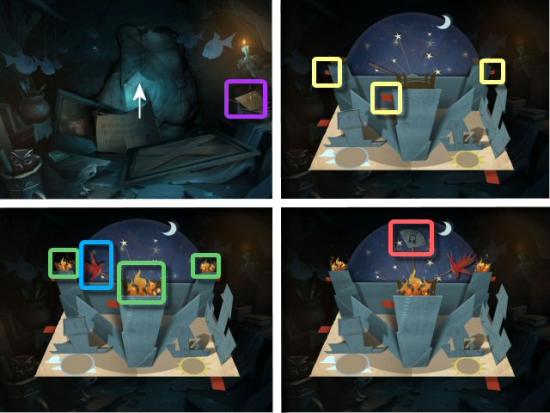
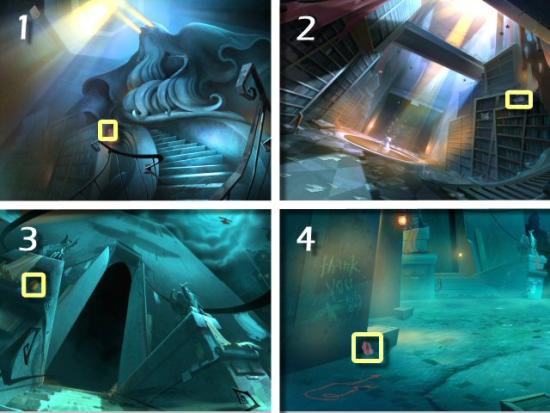
Click on the Message (green). Click on the Scarf (yellow) and collect the Silver Note (red). Collect the Rock and the Sketch of the Rope (red). Use the Sketch of the Rope on the Hook (purple). Click Up (white arrow).

Click on the Sketch (purple). Click on the Panel (yellow) and collect the Lever, Silver Note and Sketch of an Orange (red). Click Down, then Forward (white arrows).
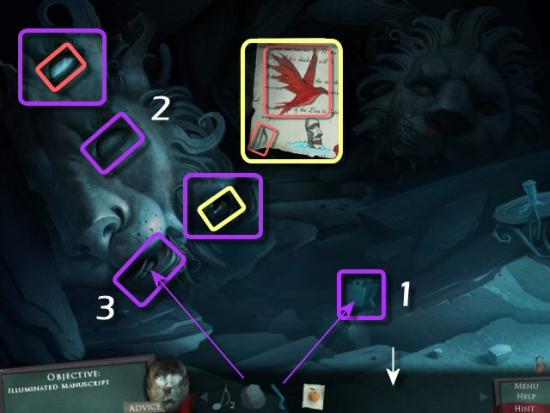
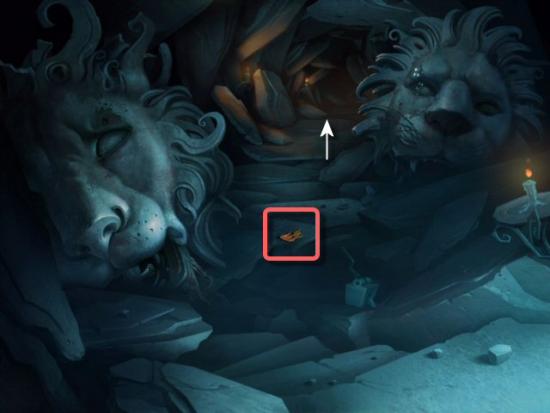
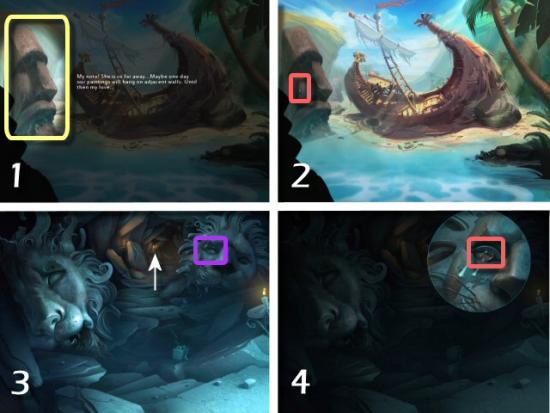
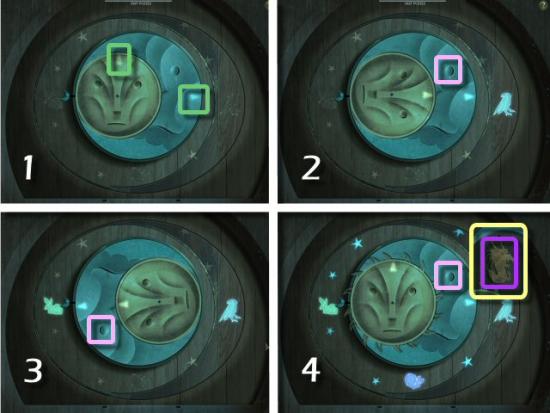
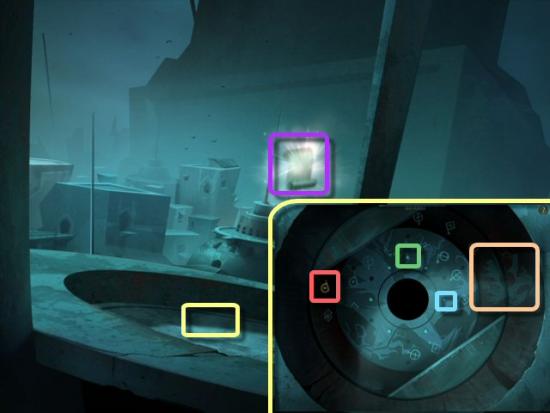
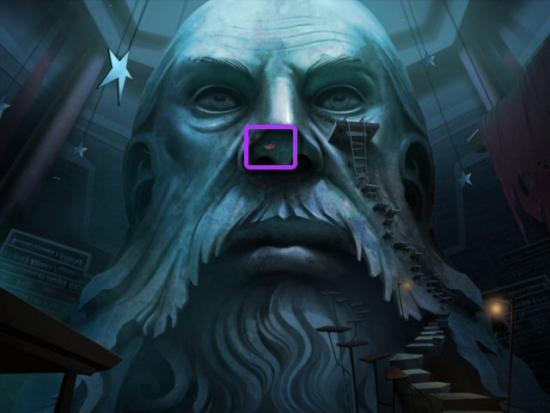
Use the Lever on the Control (1), click the Lever and quickly grab the Reflective Disk (red) from the Lion’s Eye (2). Click on the Lever again and quickly use the Large Rock (3) on the Lion’s Mouth. Click on the Message (yellow), collect the Silver Note, Paper Phoenix (red). Click Back (white arrow).
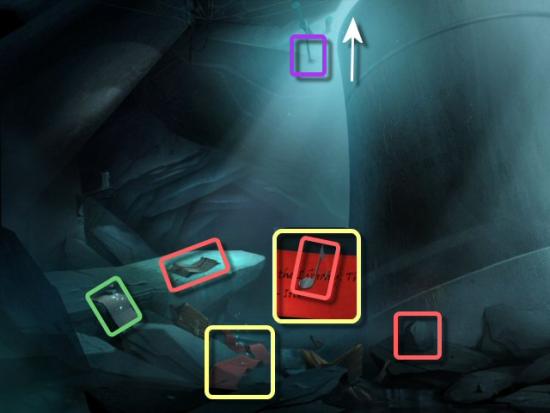
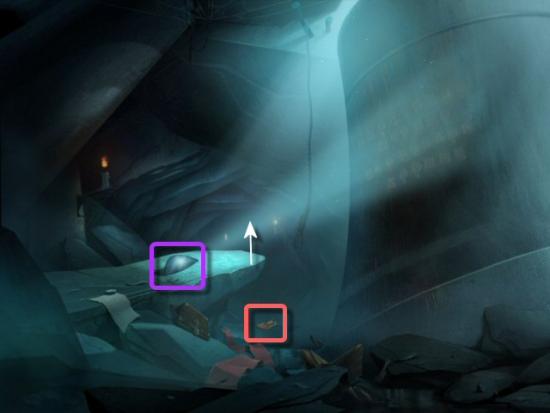
Use the Reflective Disk on the Ledge (purple). Collect the Paper Flame (red). Click Forward (white arrow).
Collect the Paper Flame (red). Click Forward (white arrow).
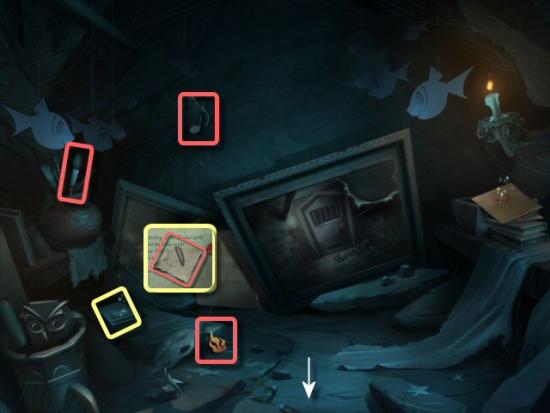
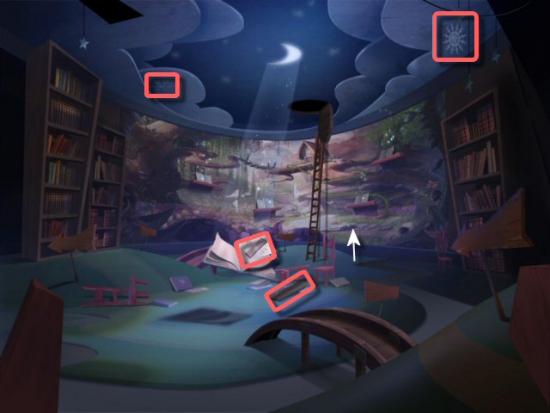
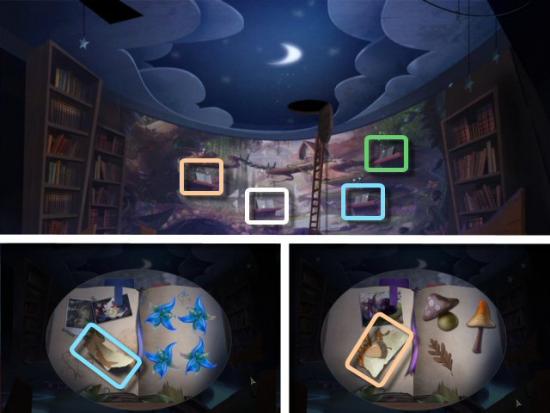
Collect the Paper Flame, Silver Note and Dry Brush (red). Click on the Book (yellow), collect the Paper Scrap (red) and read Franklin’s Messages (click on the red arrows at the sides). Click Back 3 times and then click Up.
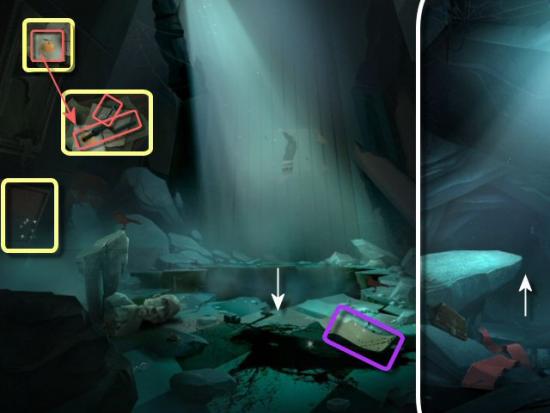
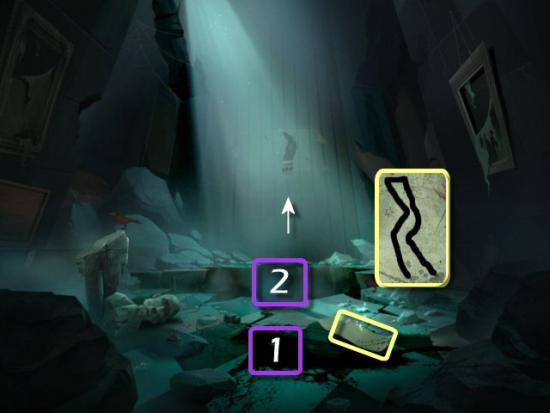
Use the Dry Brush on the Pool of Ink (1), click on the Sketch (yellow) and use the Inky Brush to trace the outline of the Bridge. Use the Sketch of the Bridge in the Hole (2). Click Forward (white arrow).
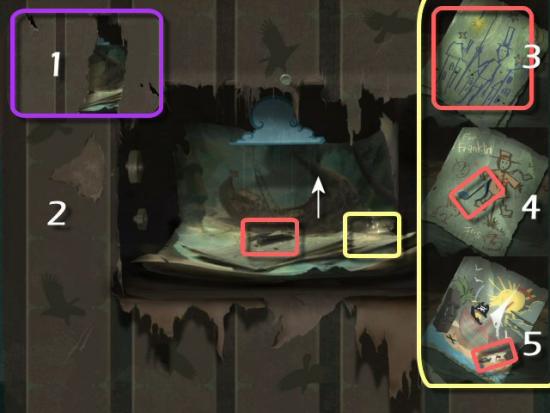
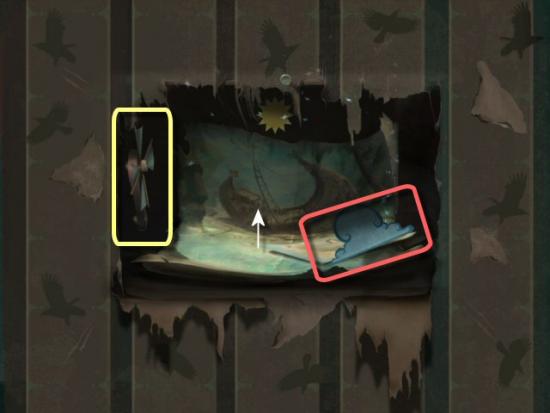
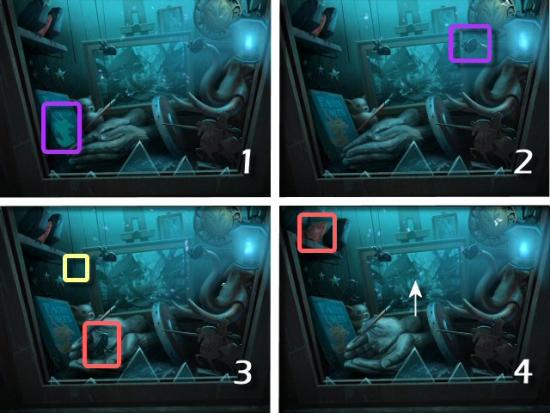
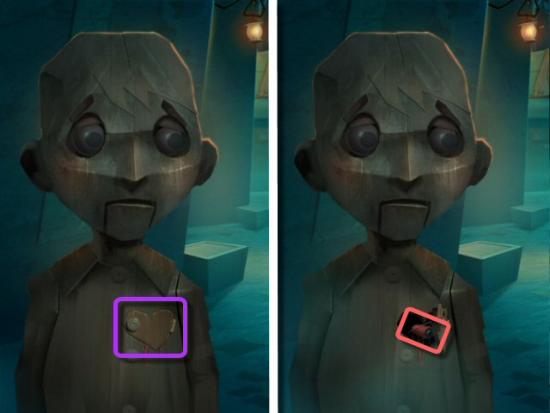
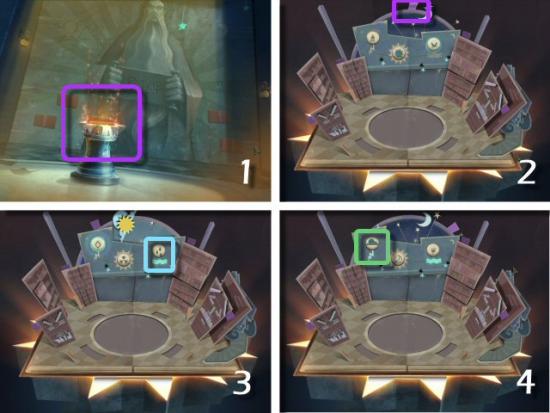
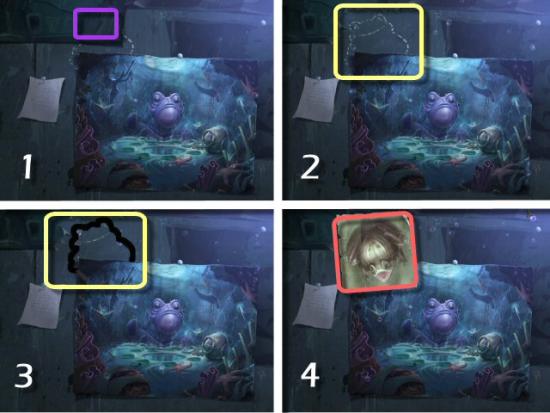
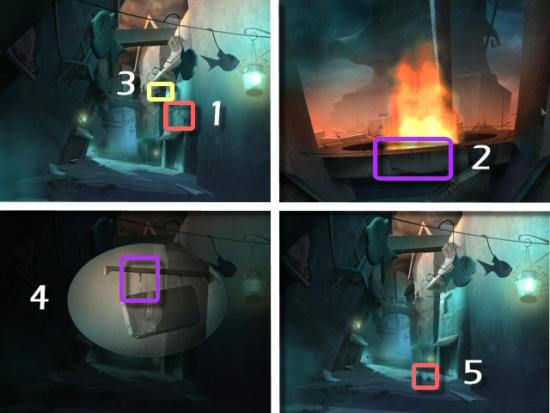
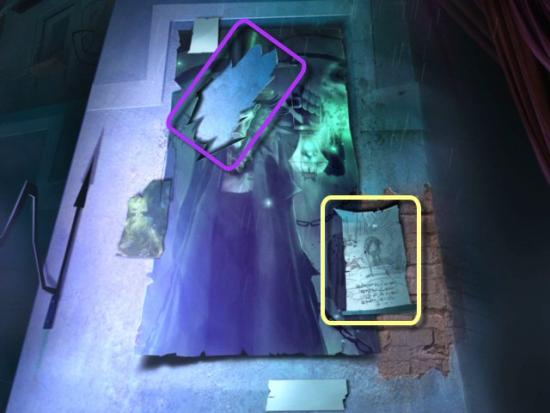
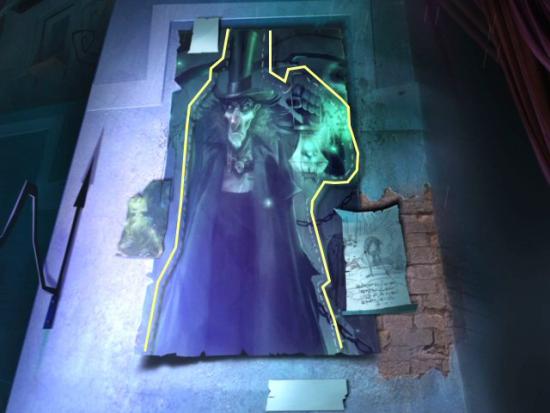
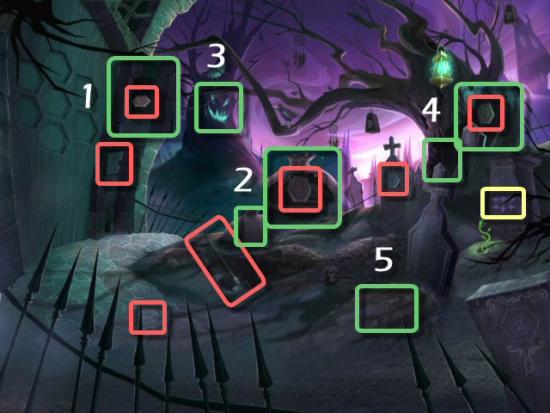
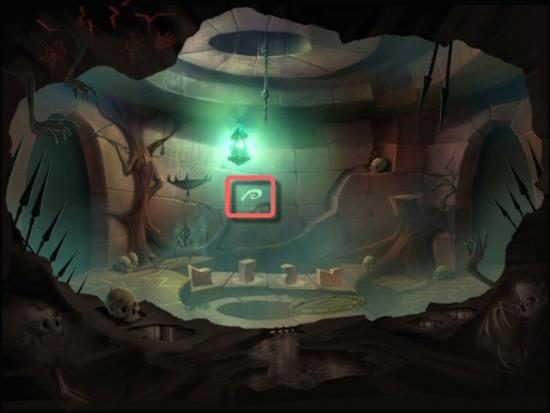
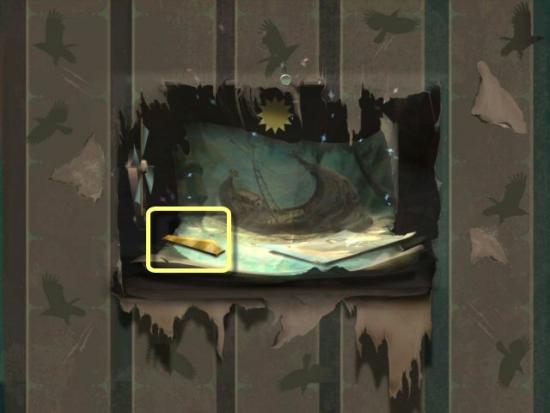
Click on the left and right sides of the Wallpaper (1), to reveal the Shipwreck Painting (2). Collect the Charcoal (red), click on the Sketches (yellow) and collect the Lamplighter Sketch (3), Silver Note (4), click on the next sketch to move it and collect the Shovel (5). Click Forward (white arrow).
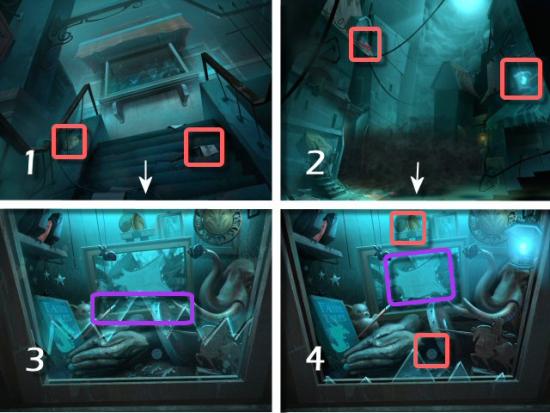
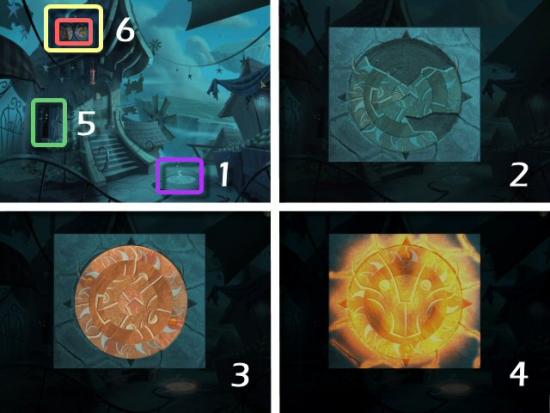
Click on the Sketch (yellow), use the Paper Scrap on the sketch, collect the Belt (red) and make note of the numbers: 5, SW, 3 and 6 with arrows above or below each one. Collect the Coconuts (red) and click on the Chest (purple). Lock Puzzle (1): use the information from the sketch and enter the code. Click and drag the pointer (yellow) to the appropriate number, following the code you found on the sketch and changing directions (clockwise/counter-clockwise) as also shown for each number. Rotate the indicator clockwise to 5 = V (1 – blue), counter-clockwise to SW = X (2 – green), clockwise to 3 = III (3 – pink) and counter-clockwise to 6 = VI (4 – dark yellow). Collect the Goblet, Anchor, Fan and Castle Wedge (red). Click Back.

Use the Belt and the Fan on the Gears (purple) and collect the Paper Cloud (red). Click Forward.
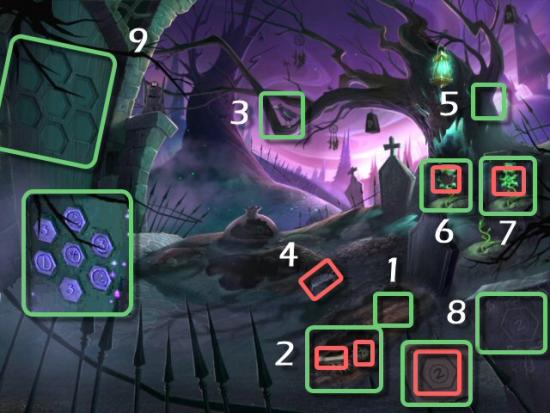
Use the Shovel on the “X” (1) and click 3 times, click on the Hole (2), collect the Cannon and the Glowing Stone (3). Click on the Bottle and click on the Sketch (4).
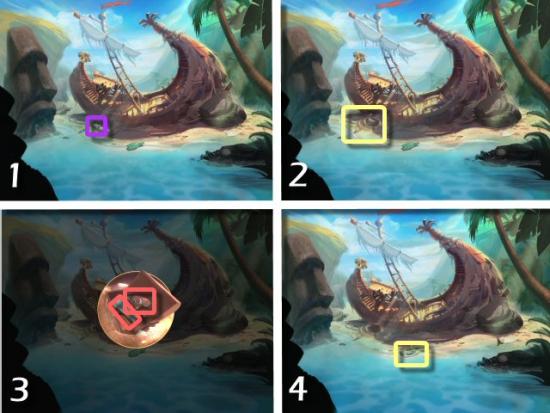
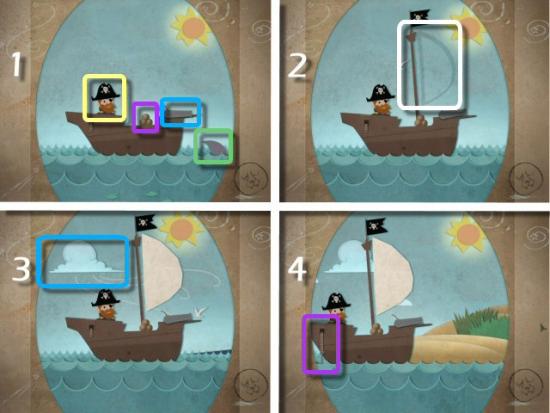
Use the Orange Sketch on the Pirate (yellow), use the Cannon (blue) and the Coconuts (purple) on the Ship. Shark minigame: click and drag the Cannon to aim towards a Shark (green), click on a Coconut to load the Cannon, and click on the Cannon to shoot. You’ll shoot 3 times (1). Use the Charcoal and draw the outline of the Sail (2). Use the Paper Cloud in the sky (3). Use the Anchor on the Chain (4).
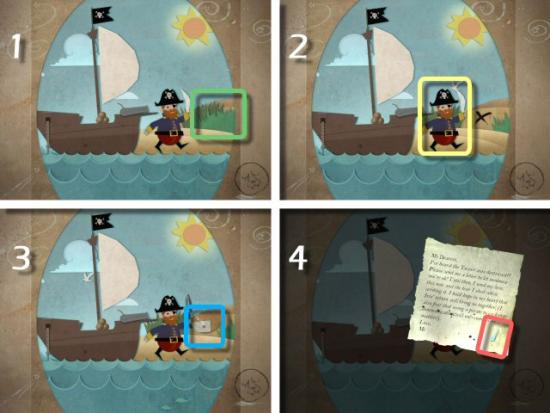
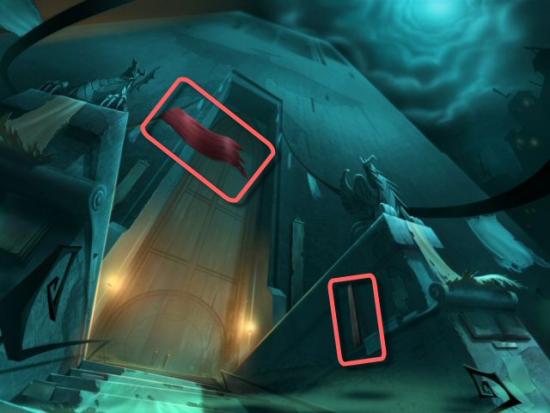
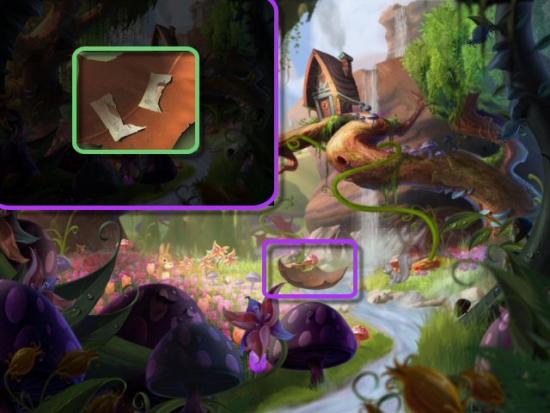
Click on the Bushes twice (1), use the Shovel on the Pirate (2), click on the Note (3) and collect the Tear (4). Click Back.
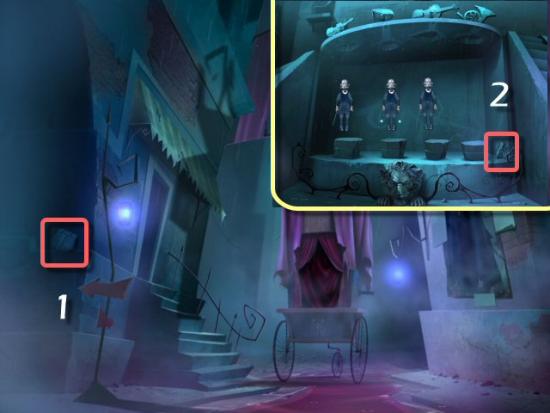
Use the Love Letter on the Statue (1); collect the Tear (2). Click Back twice, Down once and Forward once. Click on the Lion’s Eye (3), use the Tears in the spaces and then collect the Scrap of Canvas (4). Click Forward.
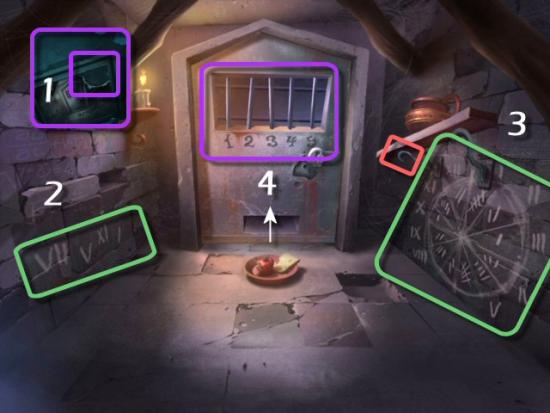
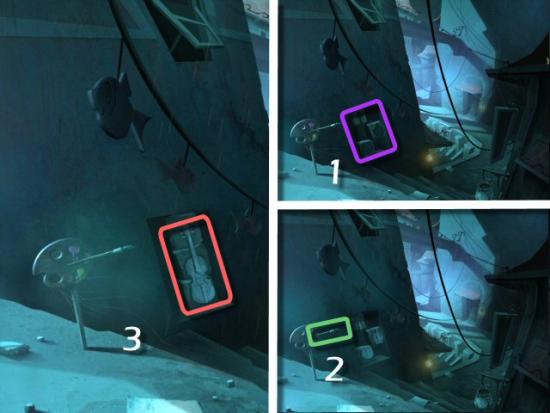
Use the Scrap of Canvas on the Painting (1). Note the Numbers scratched into the Wall on the left (2) and the Wheel of Numbers scratched into the Wall on the right (3). Collect the Metal Hook (red) from the Shelf. Use the Metal hook on the Bars, in the correct order, to unlock the Cell Door. VII = 2, V = 4, XI = 4 and I = 5. Click Forward.
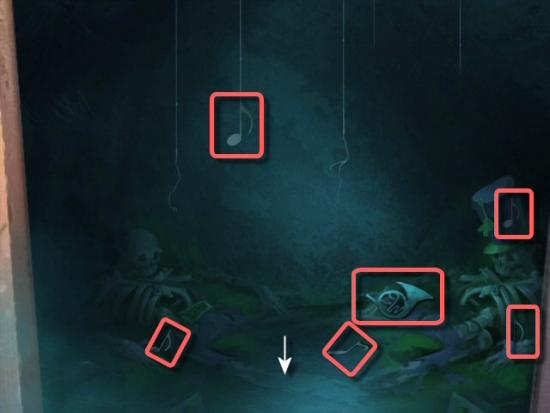
Collect the 5 Silver Notes and the Paper French Horn. Click Back twice.
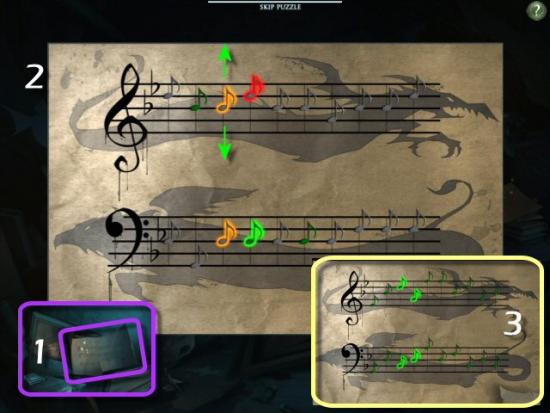
Click on the Sheet Music (1) and use the Silver Notes on each empty space in the Staff. Click and drag each Note, up or down (green arrows), to the correct position. Green notes are correct, Orange notes are 1 space from the correct position and Red notes are at least 2 spaces from the correct position. When all the notes are in the correct position, they’ll all turn Green and the Score will play with no discordant tones (3).
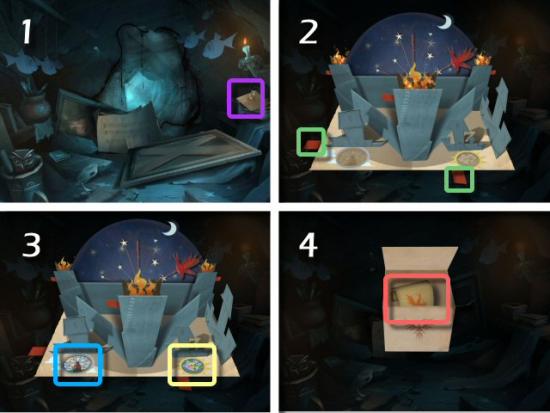
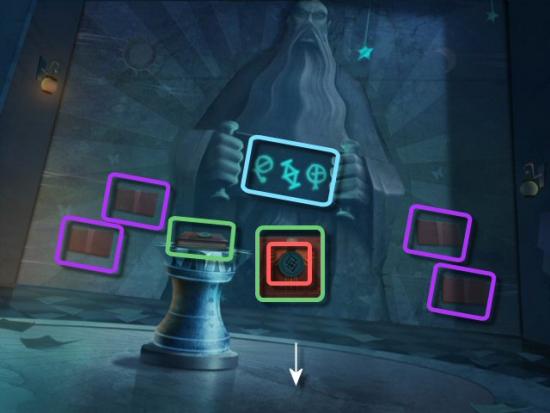
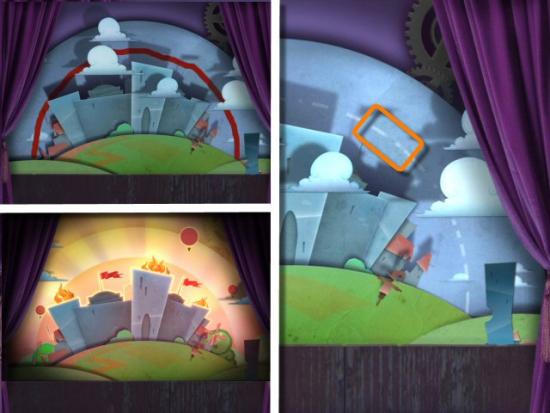
click on the Popup Book (1), click and drag the Red Tabs (yellow) to show the Beacons (2), use the 3 Paper Flames on the Beacons (green), use the Paper Phoenix (blue) on the Red Lever (3), click and drag the Phoenix across the night sky and collect the Queen Wedge (4). Click Forward twice.
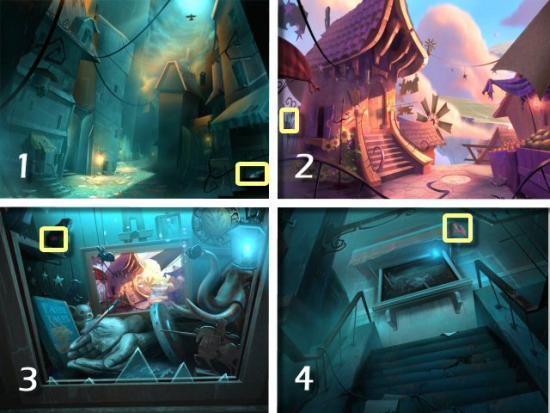
The Town
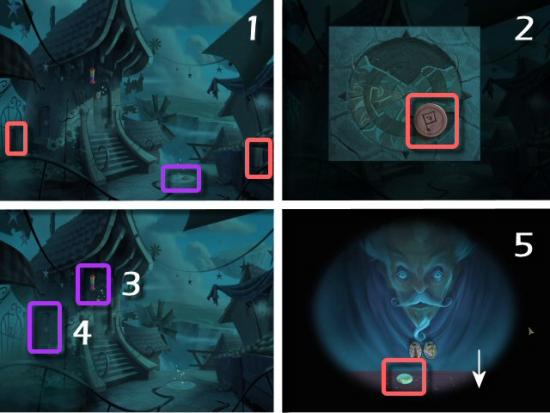
Click on the Pedestal (1). Collect Stone Disk 1 and the Chisel (2 – red), click on the Middle Column (purple) and collect Stone Disk 3 (3 – red). Click back.
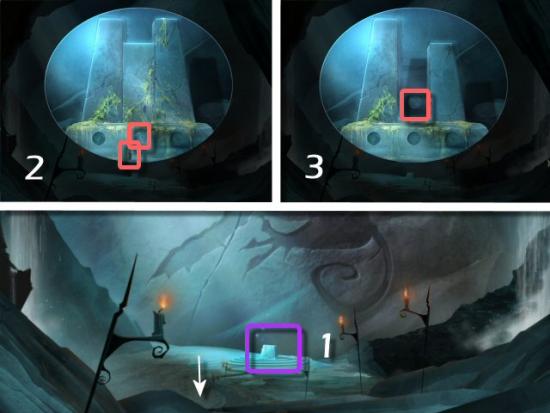
Click on the Carving on the left (1), use the Chisel and receive the Dragon Wedge (2). Click on the Circular Indentation on the right (3), use the Castle, Queen and Dragon Wedges and receive Stone Disk 2 (4). Click Forward.
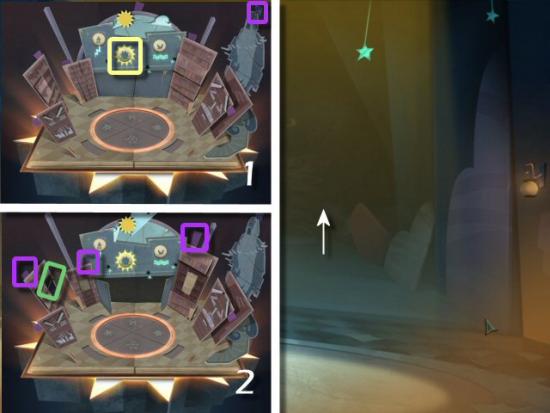
Click on the Pedestal (1). Use the 3 Stone Disks in the Indentations (2), in the correct order. Disk 1 goes in Column 1, Disk 2 in Column 2 and Disk 3 in Column 3. Creatures Puzzle (3): When you collected the 2 Disks, then placed them in order (1, 2 and 3) you moved the Columns 5 times. The simple solution is to click on the Columns in the following order, according to the letters in the screenshot: c, b, a, b, b, a, b, b. If you’ve moved the Columns, then you’ll need to look back at the first screenshot of the pedestal and try to recreate that image. Once they’re aligned, they will split apart. Click Forward.
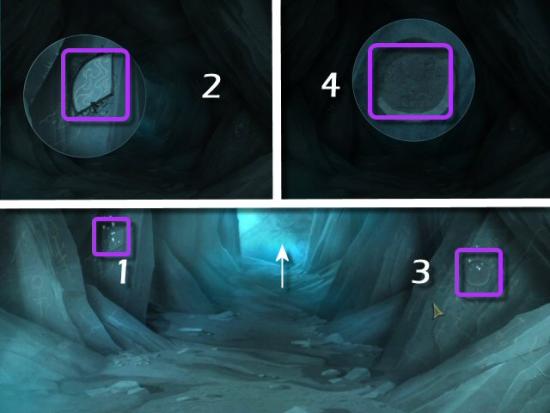
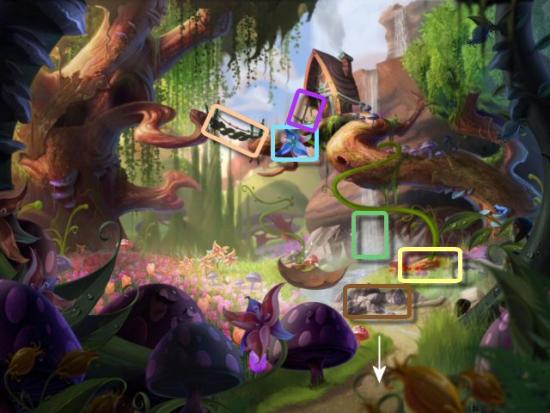
Collect the Stone Symbol (1). Click Forward. Collect the Red Fabric (2). Click Left twice. Collect the Red Fabric (3). Click Right. Collect the Piece of Poster (4). Click Back 3 times and then click Right.
Collect the Hummingbird Sketch and the Large Disc (1). Click Back then Forward. Collect the Red Fabric and Blue Lantern (2). Click Back, Right and then Forward. Use the Blue Lantern on the Glass (3 – purple), collect the Medium Disc, the Stone Symbol (red) and then use the Scrap of Poster on the Windmill Painting (4 – purple).
Collect the 2 pieces of Red Fabric (red), click on the Circle (1 – purple) and collect the Stone Symbol (2), use the Hummingbird Sketch on the Bird Feeder (purple), click on side door (3 – purple), collect the Small Disc and make note of the Constellations carved below the gardener (4). Click Back.
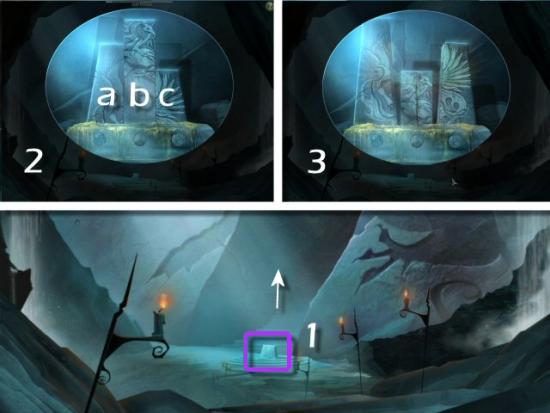
Click on Door (purple), click and rotate the Yellow Circle so there are 3 round spaces (1), use The Small, Medium and Large Discs in the spaces (2). Moon Puzzle: Click and rotate each Disc to form the picture (3). The Small Disc also rotates the Large Disc, the Large Disc also rotates the Small and Medium discs and the Medium Disc also rotates the Large Disc. The easiest solution is as follows:
Rotate the Small Disc until it is lined up, rotate the Medium Disc until it is lined up and rotate the Small Disc until it and the Large Disc are lined up (4).
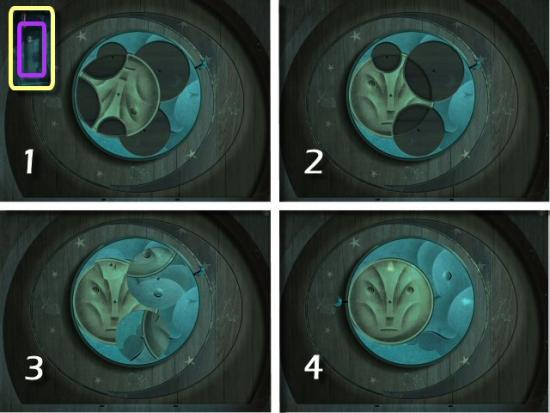
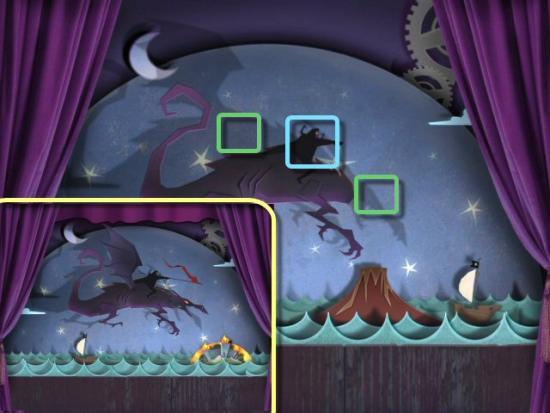
Click and rotate the Moon until the arrows (green) are lined up (1), click and drag the Handle (blue) clockwise to the Raven (2), counter-clockwise to the Rabbit (3) and then clockwise again to the Snail (4). Collect the Dragon. Click Back twice.
Use the Dragon on the Fairy Tale Book (1), click the Snail (2), collect the Heavy Stone Bird (red), use it on the Empty Wire (3 – yellow) and then collect the Glowing Stone (red). Click Forward.
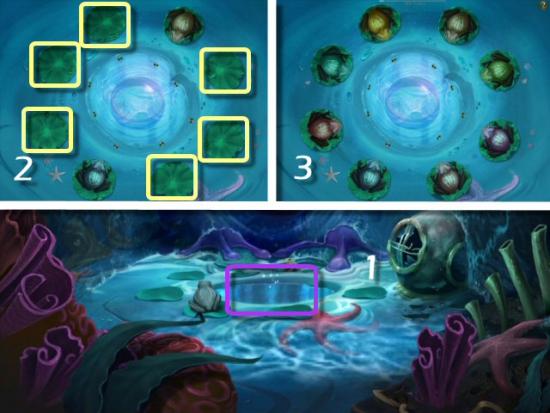
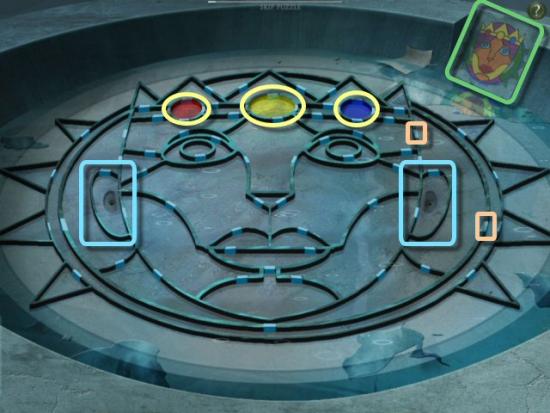
Click on the Circle (1), use the Glowing Stones (2), click and rotate each ring (they each move independently). When it’s in the correct position, it will lock in place (3). Rotate the rings so the image of the Sun appears (4). Click on the Side Door (5), collect the Paper Windmill and the Paper Hummingbird (6). Click Back 8 times
Click on the Popup Book (1), click and drag the red tabs to show the Windmill and Hummingbird (2), use the Paper Windmill (blue) on the Left Circle and the Paper Hummingbird (yellow) on the Right Circle (3). Collect the Magical Scroll (4). Click Forward 4 times, Left twice and Right once.
Use the Magical Scroll on the Ghostly Image (purple) and click on the Beacon (yellow). Beacon puzzle: Recreate the image on the right (orange) Click on the Blue Pivot Points (blue) to rotate each section. The sections rotate completely around in 2 clicks, except for the top Pivot Point (green) which rotates a small section in 3 clicks. There are 6 large sections and 1 small section. Once a piece is in the correct position, one of the Symbols (red) will light up. This puzzle is extremely challenging, and I only solved it after MANY clicks (over 70, and I missed the solution screenshot). If you find it too difficult, you can skip it. Once complete, click Back 3 times and Forward twice.
Click on the Heart (purple), collect the Needle and Thread (red) and then click Forward.
Collect the Piece of Wood and piece of Red Fabric and then click Back.
Click on the Kite (1), collect the Hammer and 3 Nails (2), use the Wood on the Kite, use the Nails on the Wood, use the Hammer on the Nails and click 3 times (3). Use the 6 pieces of Red Fabric and use the Needle and Thread on all 5 Seams (4). Click Forward twice.
The Library
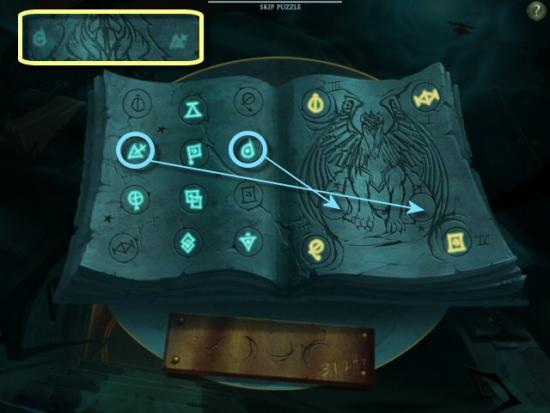
Book Puzzles: Click on the Right Book (1), look at the Symbols that appear during the electrical flashes. Place those symbols (yellow), from the left hand page, in the appropriate places; make note of them, especially the Numbers (blue) associated with them.
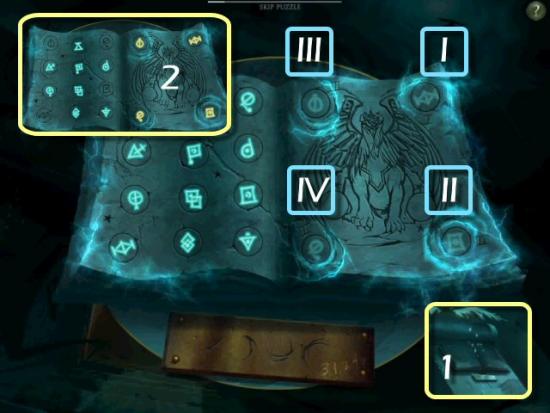
Click on the Left Book (1) and place the Symbols from the Right Book in the appropriate circles; remember the Numbers associated with each Symbol so you place the correct symbol in the correct place. Look at the other 2 Symbols that appear during the electrical flashes and make note of them.

Click on the Right Book, again, and place the 2 Symbols that appeared in the Left Book, in the correct circles. Click Forward.
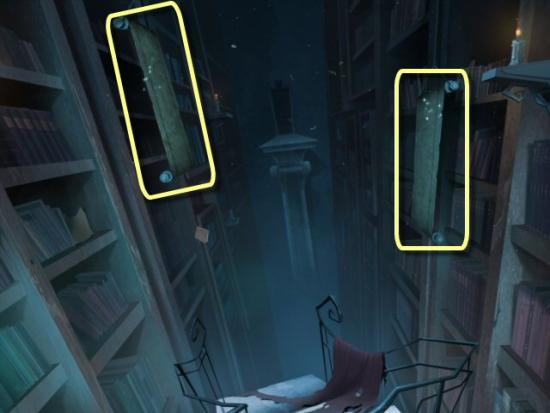
Click in front of the Chair (green) and collect the Net (red). Use the Net to collect the 2 flying Red Books (purple). Watch the pattern of how they fly around, move the Net there and wait for it to fly by again – much easier than trying to chase them. Click Right.
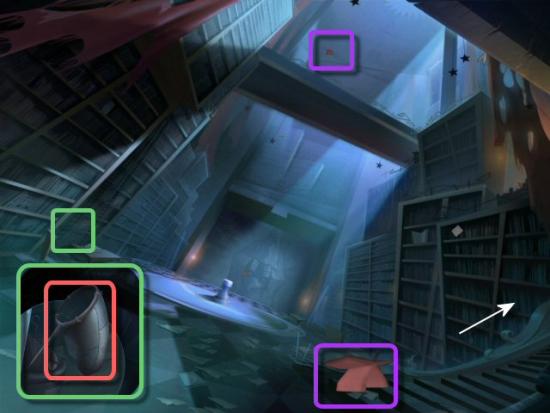
Use the Net to collect the third flying Red Book; it flies around 3 times in lower and lower positions, then repeats. Choose one position and wait for it to fly by and then click on it. Click Up.
Use the Net to collect the last, flying Red Book, this one also flies a pattern. Park the Net just under the tip of the nose and catch it when it flies by. Click Back twice, Forward once.
Use the Red Books in the spaces on the Wall (green) and make note of the Symbols that appear. Click on the Book, on the Pedestal (purple) and collect the Stone Symbol (red). Click Back, Right and then Up twice.
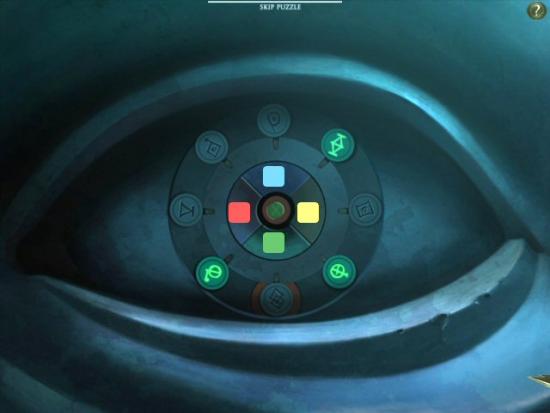
Eye Puzzle: Use the Stone Symbols in the empty spaces (green). The object is to light the Symbols that you saw in the room where you placed the 4 Red Books. Click on the red, blue, yellow and green quadrants to rotate the symbols so the ones from the scroll light up in the circle at the bottom. The different quadrants rotate in different directions and for different lengths. Blue (top) rotates counter-clockwise for 4 spaces, Red (left) rotates clockwise for 4 spaces, Green (bottom) rotates counter-clockwise for 3 spaces, Yellow (right) rotates clockwise for 3 spaces. You need to rotate the symbols back and forth until only the 3 that appeared on the scroll are lit. There is no, one solution; it’s different each time you play. I found it easiest to click the yellow button 8 times to light them all, and then work back and forth between the different quadrants to end up with the correct symbols lit. Click Forward.
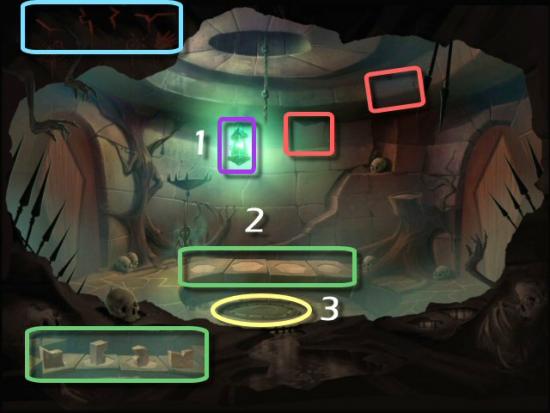
Click on the Mouth (1) to enter. Click on the Message (yellow), click on the Diagram (green) showing the solution for the Candle Puzzle (all the candles in the center square should be lit) and then click on the Red Curtains (2).

Candle Puzzle: You need to end up with only the Center Square (purple) of candles lit. Use the Brown Lever at the top (yellow) to rotate the one track of candles, and use the Red Lever (pink) to rotate the other. The Dragon (red) breathes fire and lights the candles in front of him, when you click on him, and the Griffin (blue) breathes cold air and blows out the candles in front of him. Click on the Ring (green) to reset the puzzle and start over.
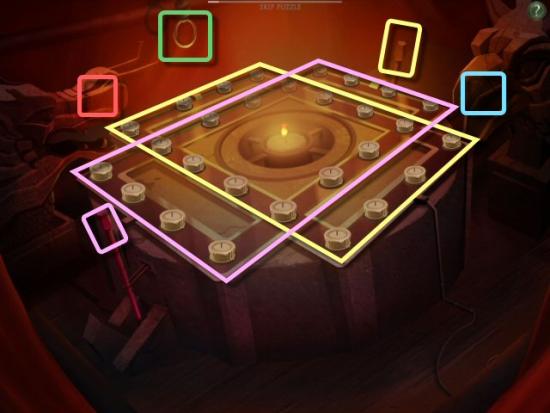
This puzzle requires quite a few moves (Thanks to JZ for the solution algorithm), so it’s not possible to show a screenshot. Click on the following for a video solution. When complete, click Forward.
Click on Book (1), rotate Purple tab, behind the backdrop (2), until 3 Drops of Water appear in the Right Circle (3). Rotate again until a Cloud appears in the Left Circle (4).
Rotate the Purple Tab, once more, until a Sun appears in the Center Circle(1). Click on the Purple Tab at right and drag until Stone Statue appears, click and drag the other two (purple) and then click on the Green Lever (2). Click Forward.
The Children’s Wing
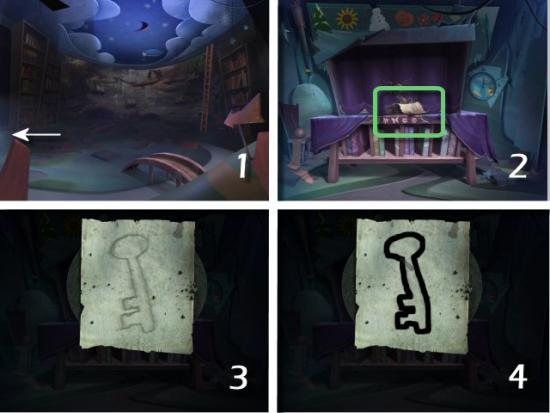
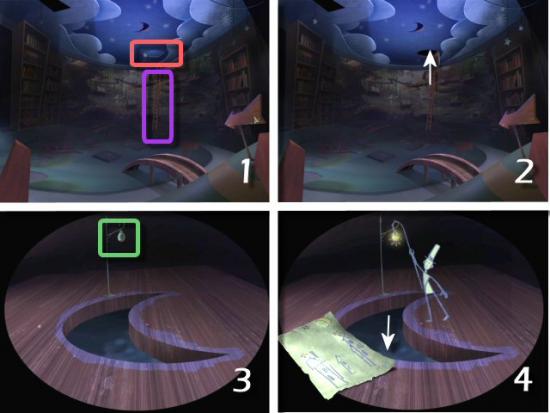
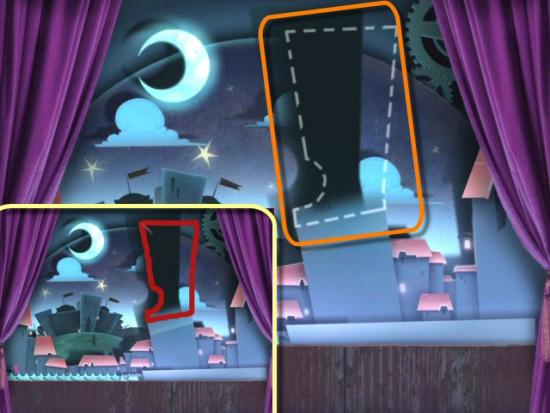
Click Left (1). Click on the Sketch (2), use the Charcoal to trace the shape of the Key (3) and receive the Key Sketch (4). Click Back.
Click on the Ladder (purple) twice, use the Key Sketch on the Hatch (1 – red). Click Up (2). Use the Lamplighter Sketch on the Lamp (3). Click Down (4).
Collect the 2 Snowflakes (red) from the ceiling and collect the Sketch of a Plank and the Plank on the Floor (red). Click Forward.
Collect the 3 Blue Flowers (blue) when they pop out, 2 Leaves (orange), a Frog (grey), 2 Mushrooms (lavender) and a Snowflake (red). Use the Net to catch the Grasshopper (green), Bee (yellow) and Butterfly (pink); watch their patterns and park the Net until they show up.

Use the Goblet on the Waterfall (green), use the Cup of Water on the Mound of Dirt (yellow) and collect the last Blue Flower (blue). Use the 2 Planks on the Bridge (orange), collect the Pickaxe (purple) and use the Pickaxe on the Rocks (brown). Click Back.
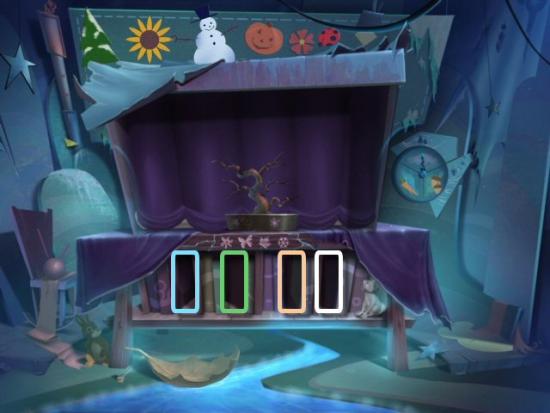
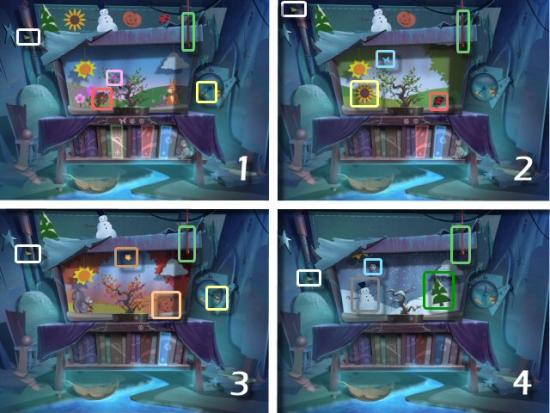
The Books, along the back wall are Fall (orange), Summer (green), Winter (white) and Spring (blue). Click on each Book and place the items. Use the 2 Leaves and 2 Mushrooms in the Book of Fall. Use the Frog, Butterfly, Grasshopper and Bee in the Book of Summer (2) and collect the partial Sketch of Acorns (orange). Use the 3 Snowflakes in the Book of Winter (3). Use the 4 Blue Flowers in the Book of Spring (4) and collect the partial Sketch of the Carrot (blue). Click Back then Forward.
Click on the Leaf Boat (purple) and use the Sketches on the Carrot and Acorns (green). Click back then Left.
Use Books of Spring, Summer, Fall and Winter, in that order, in the empty spaces in the bookshelf.
Click and drag the Indicator up to Mild (white), use the Flower (red), set the Dial (yellow) to point at the Carrot, use the Net to catch the floating Pink Flower (1 – pink) and click the Curtain Pull (green). Click and drag the Indicator up to Hot (white), use the Sunflower (yellow) and Lady Bug (red), use the Net to catch the floating Butterfly (2 – blue) and click the Curtain Pull (green). Click and drag the Indicator down to Cool (white), use the Pumpkin (orange), set the Dial (yellow) to point at the Acorns, use the Net to catch the floating Leaf (3 – brown). Click and drag the Indicator down to Cold (white), use the Fir Tree (dark green) and Snowman (grey), use the Net to catch the floating Snowflake (4 – blue). Click Back twice.
Click on the Popup Book, use the Flower, Butterfly, Leaf and Snowflake in the Center Circle. Click Down.
The Violin Door
Click on one of the Scrolls (purple) on either side; it doesn’t matter which.
Scroll Puzzle: The object is to light up the Symbols that appear at the top on the Left side of the Scroll. As symbols float down on the Right side of the Scroll, they will disappear if they are struck by lightning or run into the girl with the book. Click on the symbols to catch them (just above the book) and send them to the Left side, where they will float upwards. If they strike a bird, they will be eaten. If you already have any Symbols lit, they will go out, too. Click and hold the circle of birds, or click and drag left or right, where an opening appears, so the Symbol can pass through without being eaten by a bird. When a symbol you need reaches the top of the left scroll, click on it to light up that symbol. You will play 3 rounds to light up Write, Music and Art, on the Right side of the Scroll. The puzzle will be different for each player, so there isn’t a single solution. If you find it too difficult, you can click on the Skip bar at the top. When complete, click Forward.
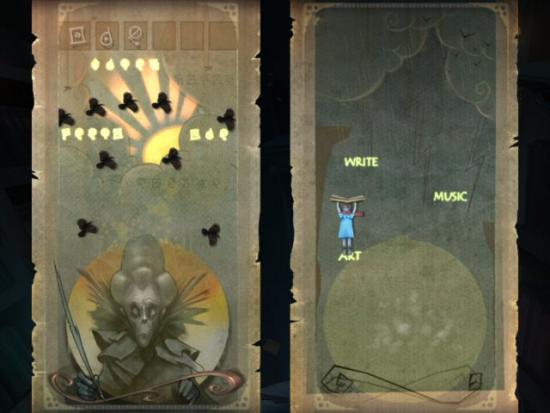
Click on the Floating Book (yellow) to collect the Metal Key. Click Forward 3 times.

Collect the Toad (red), click on the Stone Gate and use the Metal Key. Click Forward.
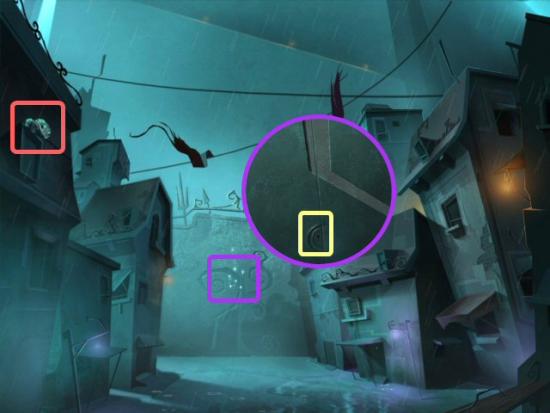
Collect the Sketch of a Frog (red) and click on the Beacon (purple), collect the Scrap of Poster (red) and click on the Message (yellow). Click Back 3 times then Click Left.
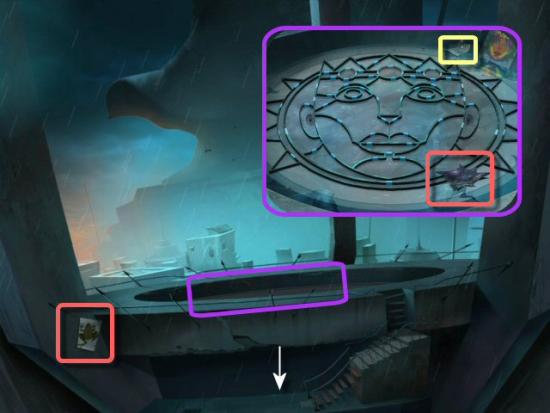
Click on the Message (yellow) and use the Scrap of Poster on the Painting (1), collect the Sharp Rock (red) and use it on the Helmet (2).
Light Puzzle: Click on the Tubers (purple) as the Colored Light (yellow) appears on the Left Wall. The colors in the Tubers are, from left to right, Blue, Red, Green and Orange. You’ll play several rounds, as follows:
Blue, Red, Green and Orange. Blue and Orange. Blue and Green. Red, Blue and Orange. Red and Green. Red and Green. Blue, Orange and Green. When complete, click back twice.
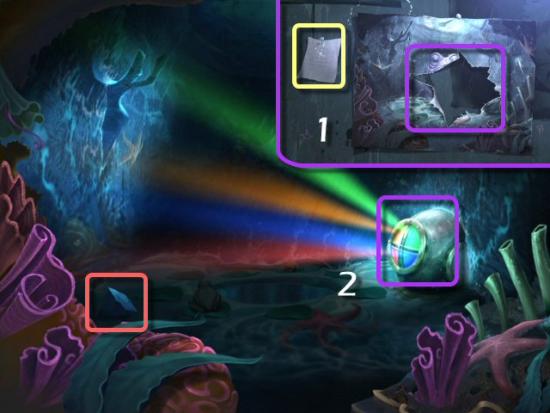
Click on the Right Corner (purple), above frog painting (1), to reveal the outline of a Frog (2). Use the Charcoal and draw the outline (3). Collect the Sketch of a Frog (4). Click Back then Right.
Click and drag the Paintbrush (1) down, collect the Frog (red), click on the Upper Window and collect the other Frog (red). Click Forward. Click on Blue Lantern (2) and quickly click on the Sketch of a Frog (red). Click Back twice, Left and then Forward.

Click on the Pool (1), use the 3 Frogs and 3 Sketches of Frogs on the empty Lily Pads (2) and you now have 8 Frogs in a circle, in the Pool (3).
Frog Puzzle: The object is to have the 8 Frogs eat all 8 Flies. Click on a Frog to have him eat a fly and the ring of Flies will rotate clockwise. If you click on a Frog, with a Fly in its mouth, he’ll release the Fly back in the ring, but only if there isn’t a Fly in front of him. You need to have a different Frog eat a Fly in order to rotate the Flies so there’s an empty space in front of the Frog you want to spit out his Fly. The key to solving this puzzle is to number the Frogs 1-8, beginning with the bottom left and working clockwise around to the bottom right. Work back and forth between the Frogs, having them eat and/or spit out Flies, in order to clear all the Flies. Click on the following for a video solution.
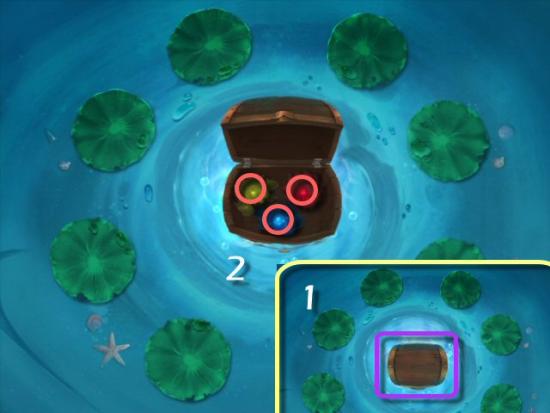
Click on the Chest and collect the Yellow, Red and Blue Dyes. Click Back 3 times, Forward twice and then click on the Beacon.
Beacon Puzzle 2: Use the Red ,Yellow and Blue Dyes in the Left, Middle and Right Circles (yellow), in that order. Opening and closing the Gates (orange – there are quite a few of them; only 2 are marked) will flood other sections of the puzzle. You will also need to combine Red and Yellow to make Orange, Red and Blue to make Purple and Blue and Yellow to make Green, in order to recreate the image (green) that appears at the right. Opening the Gates in the Ears (blue) will drain all the color from the areas that connect to them from open Gates. All the Gates, except for the original 3 colors, and the Ears, will remain open until you close them. The Gates for the original 3 colors and the Ears, close immediately after you click on them. This is a very challenging puzzle that requires a large number of moves to complete. A “Hint” suggests working from the outside to the inside. If you like, you can Skip this puzzle. I was forced to skip it, in order to complete this walkthrough on time. When complete, Click Back twice, Right and then Forward .
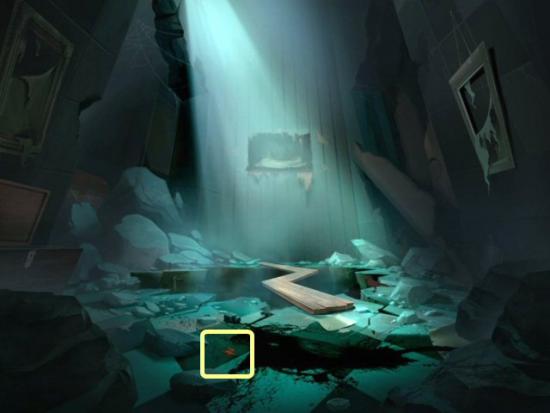
Collect the Unlit Torch (1), Click Back twice, Forward twice, use the Unlit Torch on the Beacon (2), click Back twice, Right and then Forward. Click on the Sign (3), use the Torch (4), collect the partial Stone Block (5), click Forward and then Left.
Collect the Partial Stone Block (1), click Left, collect the Partial Stone Block (2) and then click Back 4 times.
Use the 3 Partial Stone Blocks in the Mechanism (1), click and drag the Paintbrush (2) up, Collect the Violin (3). Click Forward twice and Left twice.
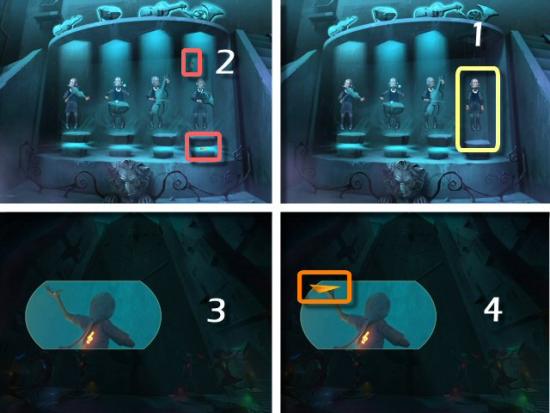
Use the Violin on the First Marionette (1), collect the Blue Paper Airplane and Blue Treble Clef (2). Click Back twice and then, Forward. Use the Blue Treble Clef on Blue Statue (3), collect the Timpani (4), use Blue Paper Airplane in Left Hand, click Back and then Left twice.
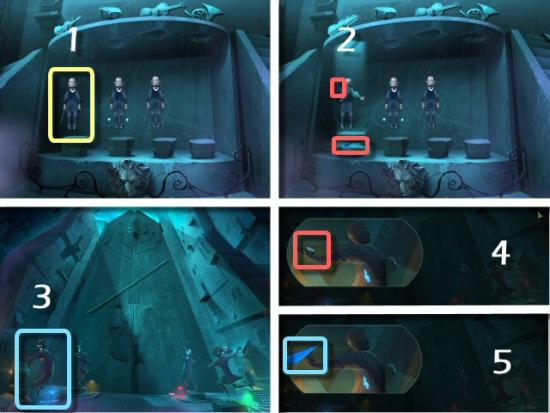
Use the Timpani on the Second Marionette (1), collect the Red Paper Airplane and Red Treble Clef, click Back twice and then Forward. Use the Red Treble Clef on the Red Statue (3), collect the Theatre Poster, use the Red Paper Airplane in the Right Hand and then click Back.
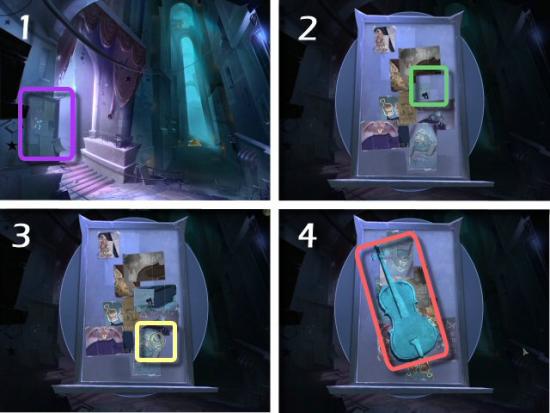
Click on Bulletin Board (1) and use Theatre Poster (2). Cello Puzzle: click to rotate (at the corner) each piece (3), and click and drag it to move it into position. Pieces will overlap. Collect the Cello (4). Click Left twice.
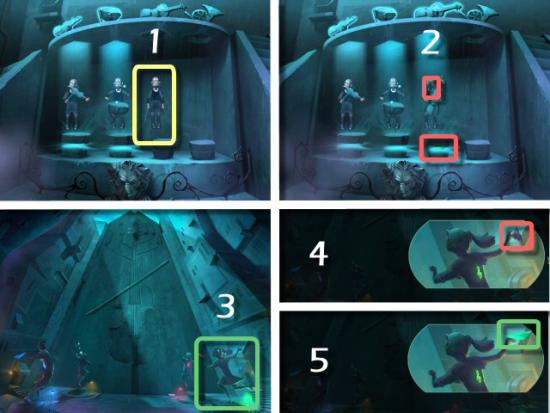
Use the Cello on the Third Marionette (1), collect the Green Paper Airplane and Green Treble Clef (2), click Back twice and then Forward. Use the Green Treble Clef on the Green Statue (3), collect the Scrap of Poster, use the Green Paper Airplane in the Right Hand (4), click Back, Left and then Right.
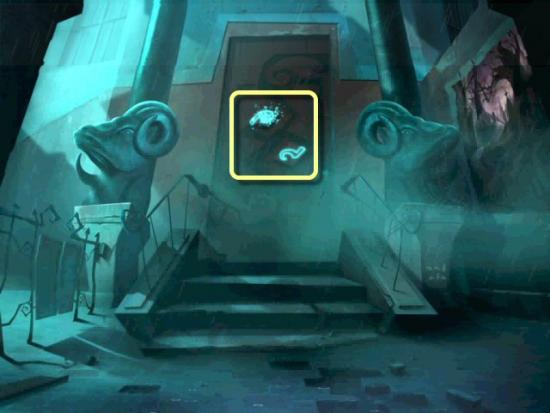
Click on the Message (yellow) and use the Scrap of Poster on the Painting (purple).
Collect 10 fireflies (green); wait for the green glow to locate them easier.
Use the Fireflies on the Lantern (yellow) and receive the Theatre Cart Key. Click Back twice.

Use the Theatre Cart Key on the Cart (1), click on the Door (2) and then collect the Paper Lance, Paper Dragon Wing, Paper Dragon Head, Knife and the Crayon (3). Click Right.
Use the Knife on the Artist and cut around his outline. Click Forward.
Use the Crayon on the dashed line of the semi-circle on the horizon
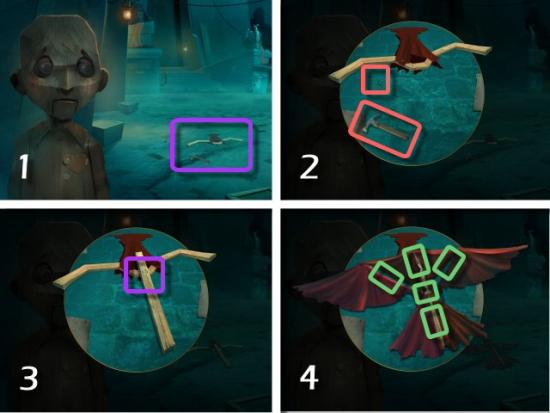
Use the Paper Dragon Head on the front of the Dragon, the Paper Dragon Wing on the top and the Paper Lance on the King (riding the dragon).
Click on the Dragon.
Use the Crayon to draw the Moon.
Use the Crayon to draw the Painted Tower.
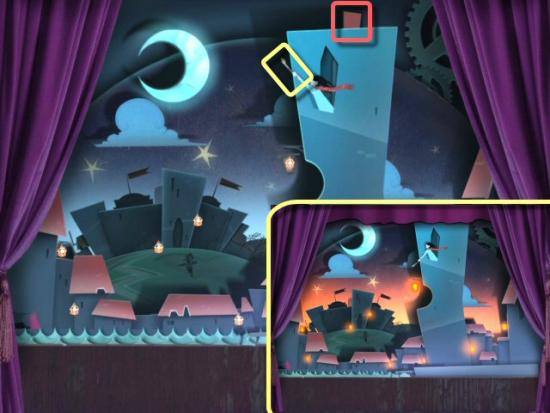
Click and drag the Red Tab (red) to bring Iris into the scene. Click and drag Iris’ arm (yellow) to aim towards a lantern then let go of your mouse button. Iris will shoot and light the lantern. Light all 9 lanterns.
Collect the Marionette (yellow). Click Back and then Left.
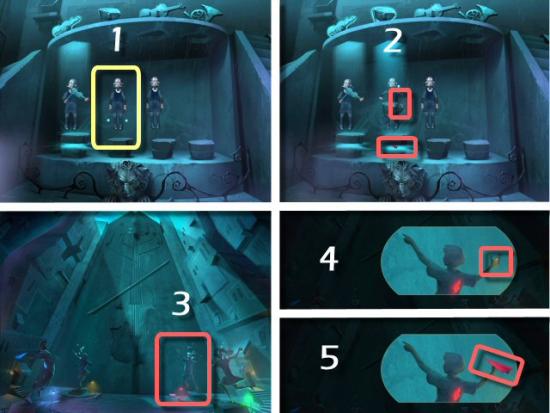
Use the Fourth Marionette in the empty space and use the French Horn on him (1), collect the Orange Paper Airplane and Orange Treble Clef (2), click Back twice and then Forward. Use the Orange Treble Clef on the Orange Statue (3), use the Orange Paper Airplane in the Left Hand (4). Click Forward.
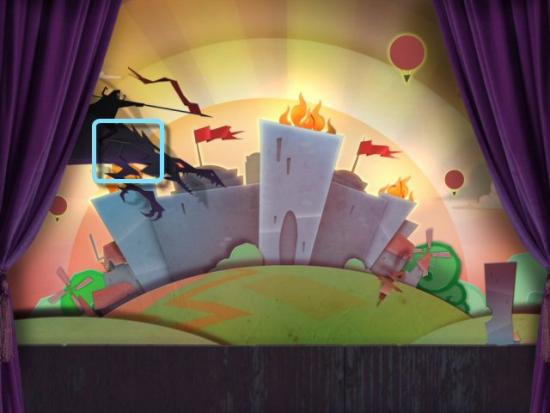
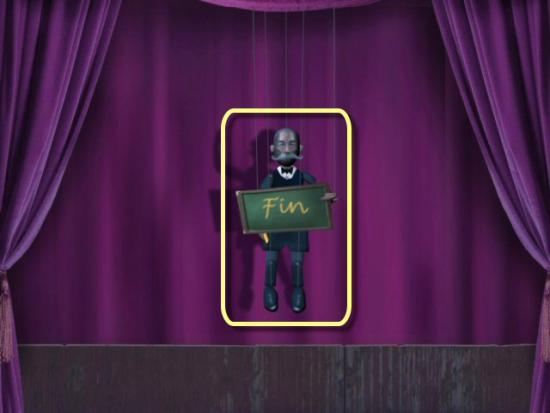
Click on Iris, use the Crayon on the outline of the Magical Phoenix…watch the ending movie and credits.
Congratulations! You’ve completed Drawn: Dark Flight.
Bonus Game (Collector’s Edition)
You’ve helped restore Iris to her rightful place on the throne, and now she asks for your help, one more time.
Saving Franklin
Click “Play Collector’s Edition” to begin the rest of your adventure, healing Franklin.
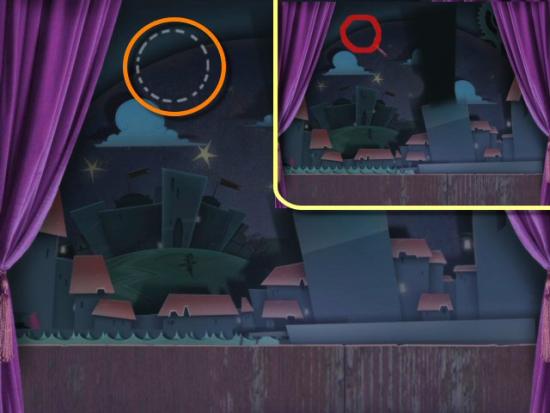
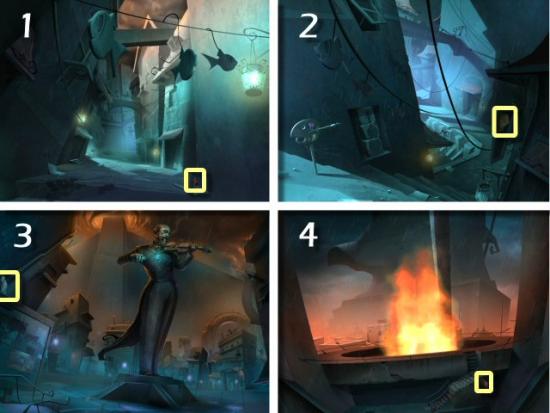
Click on the Message (yellow) and then click on the Royal Seal (1). Click Forward. Collect the Heavy Stone, the Crowbar and the Window Shard (red). Make note of the Arrows (green); you’ll need this information later. Click Right (2) and then Forward.

Collect the Hex Stones, the Shovel and the Heavy Stone (red). Collect the Hex Stone hiding behind the Heavy Stone (1), use the Knife on the Sack (green) and collect the Hex Stone from inside the Sack (2). Click on the Glowing Tree (3) and collect the Hex Stone below the Lantern (4). Use the Shovel (click 3 times) on the Fresh Dirt (5). Make note of the Arrows (yellow); you’ll need this information later.
Use the Crowbar on the Lid (1), and collect the Paper and the Worm (2). Use the Worm on the Raven (3) and collect the Feather (4). Use the Feather on the Tree (5) and collect the Hex Stone (6) and the Fire Flower (7). Use the Paper on the Gravestone, use the Crayon on the Paper and collect the last Hex Stone (8). Hex Stone Puzzle: Place the 6 Hex Stones, and 1 Sketch of a Hex Stone, in the Wall (9). Note that some have circles and some do not. The number denotes how many Hex Stones of that type can touch it. For example, the “1” doesn’t have a circle around it, so that means that you must place it so it only touches one other Hex Stone without a circle. The “4” does have a circle, so it can have four other Hex Stones with circles that can touch it. When they’re in the correct position, they’ll light up. When complete, click Left.
Use the Fire Flower in the Lantern (1), collect the Heavy Stones (red) and then use all 4 Heavy Stones on the Platforms (2). Note the Carvings (blue) in the upper left; these are a clue to which stone belongs where. Use the Crowbar on the Metal Plate (yellow).
Did you make note of the 2 sets of Arrow Symbols you saw? No? Well, you need them, now, as all the rooms look exactly alike. Not to worry, I will tell you (and so will the Hints in the game). Click Left, 4 times, click Down and then click Left. Collect the Symbol (red).
About now, you need the second set of Arrow Symbols, and I’ll help you with that, too. Click Right, two times, and then click Down, Left, Down and Right. Collect the Symbol (red) and then click Up to exit the Maze. Click Back twice.

Use the 2 Symbols in the Door and click Forward.
Now begins your great quest: to find all the Window Shards and Red Stars. Your quest will take you all the way back to the beginning of your journey, so you need to make a choice. Work your way back, then click all the way forward, or click all the back and work your way forward…there is a third option, and that is to work your way back and then work your way forward, so you don’t overlook anything. In addition, that is what I believe we should do. Let’s begin!
Click Back twice, Forward 3 times and collect a Window Shard (1). Click Back twice and collect a Window Shard (2). Click Left and collect a Window Shard (3). Click Left and collect a Window Shard (4).
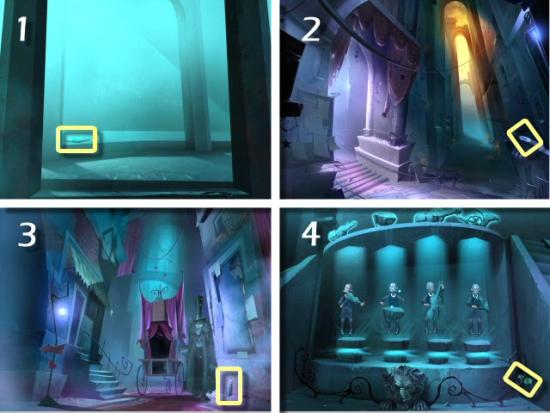
Click Back 3 times and collect a Red Star (1). Click Back and collect a Window Shard (2). Click Back and collect a Window Shard (3). Click Forward twice and collect a Window Shard (4).
Note: at step 3, do the following before continuing to step 4.
Click Left, Forward and collect a Red Star.
Click Back, collect a Window Shard, click Back and continue to step 4. After completing step 4, skip past this section to the one that follows.
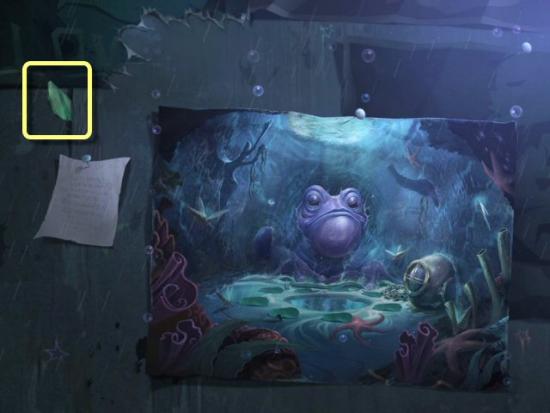
Click Back and collect a Window Shard (1). Click Back twice and collect a Window Shard (2). Click Back and collect a Window Shard (3). Click Back and collect a Window Shard (4).
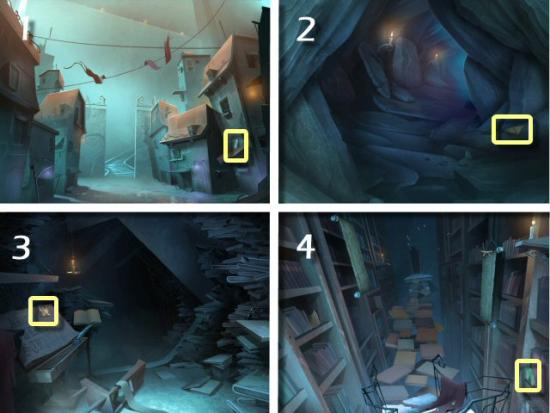
Click Back twice, Forward once and collect a Window Shard (1). Click Back and collect a Window Shard (2). Click Back, Left, Up, Forward and collect a Window Shard (3). Click Back and collect a Window Shard (4).
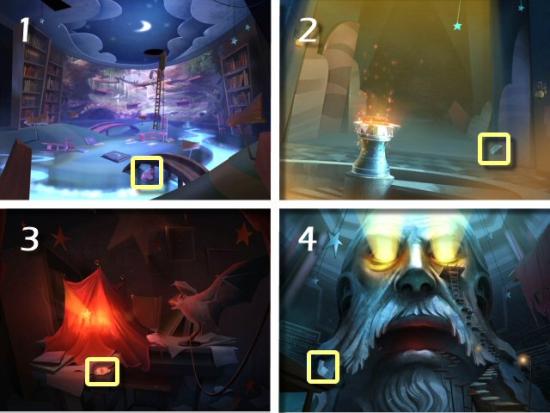
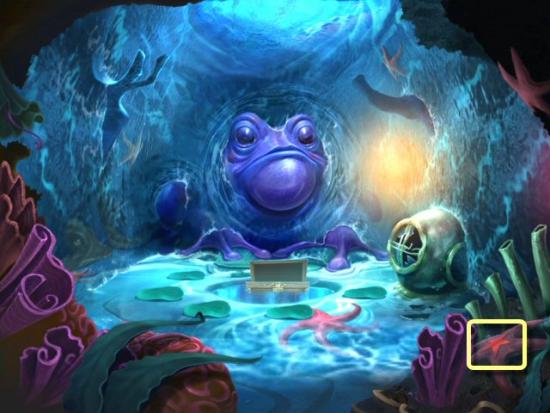
Click Back and collect a Red Star (1). Click Back and collect a Window Shard (2). Click Back and collect a Window Shard (3). Click Back and collect a Window Shard (4).
Click Back and collect a Window Shard (1). Click Back, Right, Forward twice and collect a Window Shard (2). Click Back and collect a Red Star (3). Click Back and collect a Window Shard (4).
Click Back, Left twice and collect a Red Star (1). Click Back twice and collect a Red Star (2). Click Back and collect a Window Shard (3). Click Back and collect a Window Shard (4).
Click Back and collect a Window Shard (1). Click Back and collect a Window Shard (2). Click Back and collect a Window Shard (3). Click Back, Up, Forward twice and collect a Window Shard (4).
Click Back and collect a Window Shard
Click Back and collect a Red Star (2).
You should now have 30 Window Shards and 7 Red Stars. If you are missing any, click on Advice (bottom left of your screen) and or Hint (bottom right of your screen) to see which ones you might have missed. Time to return to the Tomb.
Click Down, Forward 11 times, Down, Forward 4 times, Right, Forward, Left and Forward 3 Times.
Use the 7 Red Stars and 30 Window Shards in the Stained Glass Window.
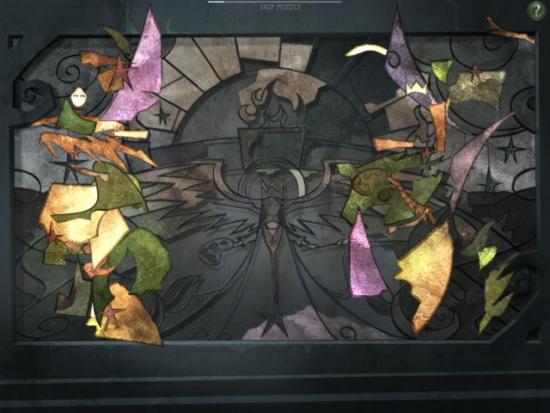
To make things easier, you may want to arrange your pieces by grouping all the Red Stars (red), identifiable shapes (blue) and separate the rest into 4 color groups (green, purple, yellow and orange). Click and drag (Hand cursor) a shape into position; click and rotate (Spiral cursor) to change a piece’s orientation. Note: there are no images of the cursors, as the game won’t show them in the screenshots.
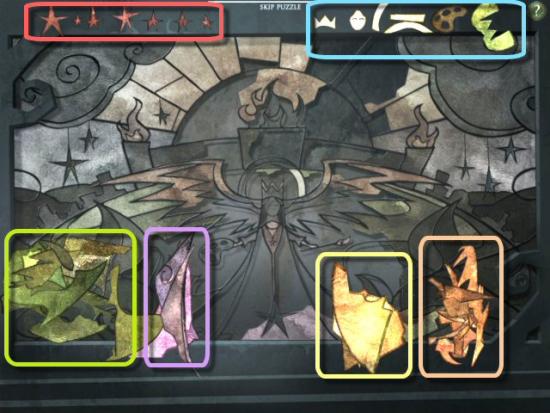
Place the Red Stars first.

Next, place the identifiable shapes.
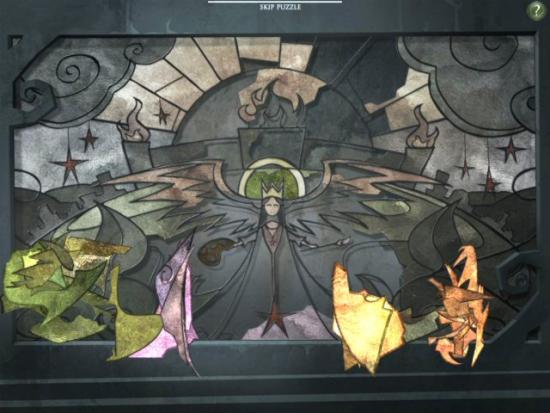
Begin placing pieces that you can tell where they belong, or that may have something drawn on them. Leave the smallest pieces for last, unless it’s obvious to you where they belong. You can’t rotate the smallest pieces; you’ll place them exactly as they appear.
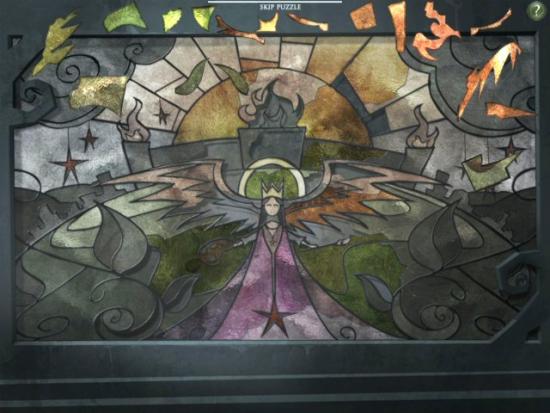
Place the last pieces.
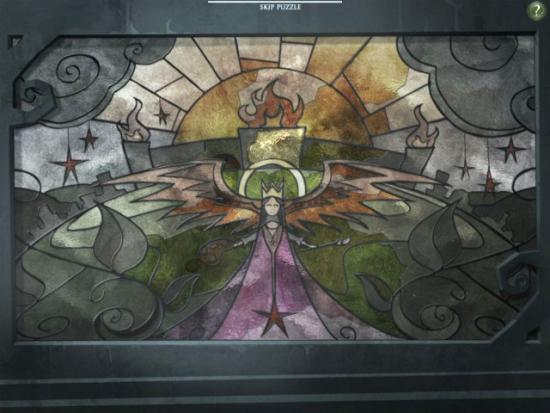
You’ve restored The Stained Glass Window.
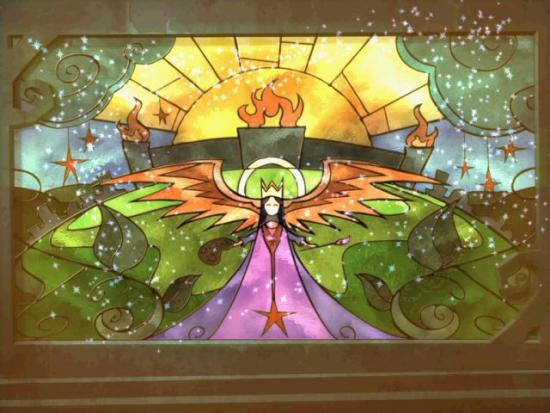
Watch the ending movie. Congratulations! You’ve healed Franklin.

More articles...
-
Grow A Garden 2 Base Price List
What's the most valuable crop? -
Evomon Best Starter [Leafbun, Blazpup, or Bubble?]
Grass-type, Fire-type, or Water-type? -
Evomon Tier List [META and BEST Evomon]
The Evomon dream team.