- Wondering how to get Monopoly GO! free rolls? Well, you’ve come to the right place. In this guide, we provide you with a bunch of tips and tricks to get some free rolls for the hit new mobile game. We’ll …
Best Roblox Horror Games to Play Right Now – Updated Weekly
By Adele Wilson
Our Best Roblox Horror Games guide features the scariest and most creative experiences to play right now on the platform!The BEST Roblox Games of The Week – Games You Need To Play!
By Sho Roberts
Our feature shares our pick for the Best Roblox Games of the week! With our feature, we guarantee you'll find something new to play!All Grades in Type Soul – Each Race Explained
By Adele Wilson
Our All Grades in Type Soul guide lists every grade in the game for all races, including how to increase your grade quickly!
Diamon Jones: Eye of the Dragon Walkthrough
Welcome to Gamezebo's walkthrough for Diamon Jones: Eye of the Dragon, the second title in this point and click adventure series. The game is divided into four long chapters. This guide is divided into two parts: General Tips (No Spoilers) Walkthrough GENERAL TIPS (NO SPOILERS) General Tips for Save and Load Games There is no autosave, but you will be asked if you want to save each time before you quit. Still, you may want to save your game more often, especially if you play…
a:1:i:0;a:2:s:13:”section_title”;s:43:”Diamon Jones: Eye of the Dragon Walkthrough”;s:12:”section_body”;s:104732:”
Welcome to Gamezebo’s walkthrough for Diamon Jones: Eye of the Dragon, the second title in this point and click adventure series. The game is divided into four long chapters.
This guide is divided into two parts:
GENERAL TIPS (NO SPOILERS)
General Tips for Save and Load Games
- There is no autosave, but you will be asked if you want to save each time before you quit. Still, you may want to save your game more often, especially if you play long sessions.
- Although your character can lose some of the mini-games, the game will automatically restart you at the beginning if you fail. So you don’t need to save before a mini-game. You may want to save after, especially if you found the mini-game difficult.
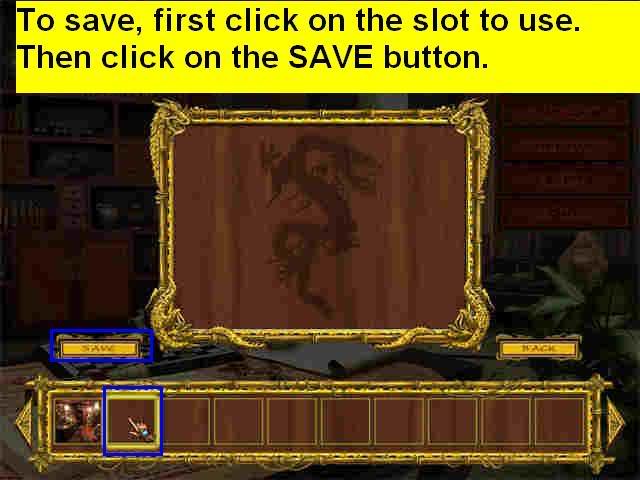
- To save the game, use ESC to return to the Main Menu. Click on the SAVE button. This will bring up the save screen.
- On the save screen, first click on the slot where you want to save the game. You can choose an empty slot or write over an existing save. Then click on the yellow SAVE button on the left. The game will save, and give you a "Game saved successfully" message. Click on the yellow BACK button on the right to return to the main menu.

- There are 25 save slots in total. This should be more than enough for most players.
- To continue from where you left off when you hit the ESC key, click on the RESUME button at the top of the Main Menu screen.
- When you restart the program, choose LOAD from the main menu to load a game. RESUME will not work unless you have a game already in progress.
General Tips for Navigation
- Jones will usually just walk to wherever you click.
- Double-click a spot to make Jones run there.
- To exit a scene, move the cursor around until a large gold arrow appears with a text label of the next location. Click there to exit.
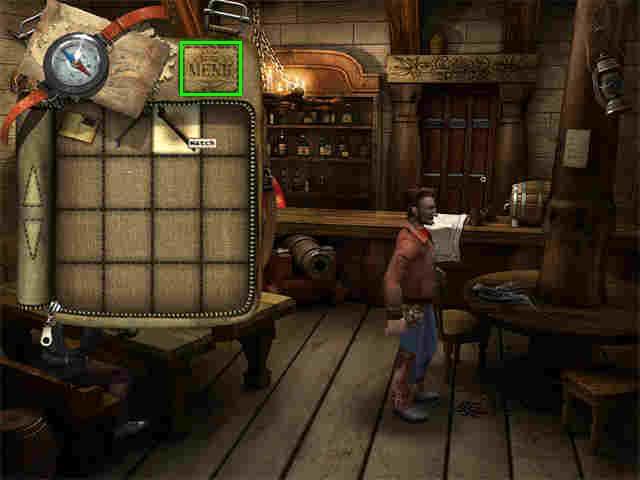
- You can get to the Main Menu by using the ESC key from the room view in any scene. There is also a MAIN MENU button on the top right of the open inventory tray.
- In several cases solving a riddle in one location will cause an action in another location, and nothing will happen in the location where you are except there is nothing more to do there. This can be quite frustrating to figure out if you’re not using a walkthrough. But if you’re going to do It all on your own, you may have to go back through each previous location to find where a door has opened or a gate has unlocked.
- Remember to save your game before you Exit-there is no autosave.
General Tips for the In-game Hint System
- A lot of the humor in the story is in the Guidebook, but the game is more challenging without it, so it’s a matter of choice whether you leave it turned on.
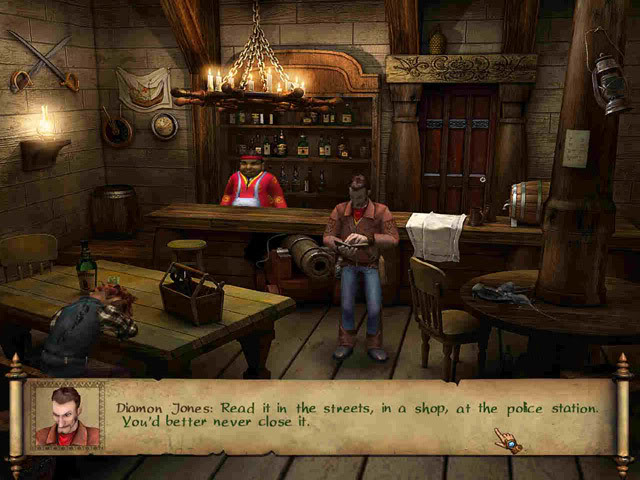
- If you are using the guidebook, you will get more hints, but then sometimes you have to ignore them anyway, or the game will not progress. For example, the guidebook tells you to never use a rickshaw, but there is one location in the game that can only be reached by rickshaw. I think this is just supposed to be funny.
- When you move the cursor around the scene, it will change. If it turns into a grabbing hand, there is something you can pick up there.
- If the jewel on the back of the cursor glows brightly, there may be something you can do there. Usually this means you need to use something from inventory.
- However, the jewel will also sometimes glow when you might use something there but you’re not supposed to, like if you have a lighter and you try to light yourself. In those cases Jones will make a text comment and not allow you to do it.
- If the cursor turns into a magnifying glass, click again to examine the area more closely. You may get a zoom scene or Jones may just make a text comment about what he sees.
- If the cursor turns to lips, you can talk to that character.
General Tips for Talking to Characters
- The dialog process in this game is unusual.
- If the cursor turns to a mouth when it is over a character, you can left-click to talk to them.
- In most cases, the initial dialog will be automatic, and will appear on a text scroll on the screen. You just have to read all of it.
- Then try clicking on the character again. The second time, a dialog topics box may open in the top right of the screen. If it does, you may select any topic in any order.
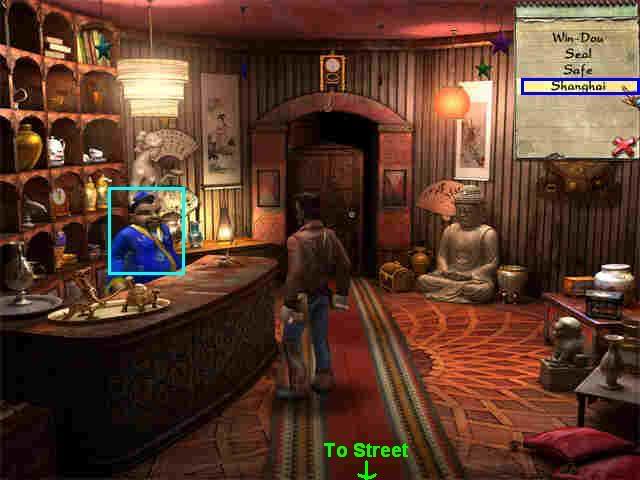
- It’s best to use all the topics so you don’t miss something.
- As you discuss a topic with a character, it will be removed from the dialog topics box.
- When you are done talking, click on the red X in the lower right of the dialog topics box to close it.
- If you come back and talk to the character again, you may find that a lot of old topics have reappeared on the list. Clicking on them may get you exactly the same information as the first time.
- However, sometimes there will be new information under the same topic title as a previous visit. For this reason, you do need to talk to all characters about all available topics each time, even if some of the topics are repeats.
- If a character asks you to tell them several things, you may need to click on them again to continue. For example, one character will ask you to sing three songs. You will need to click on them to open the Dialog Topics box, choose SONG as the topic, watch the dialog, and then repeat the whole process two more times.
General Tips for Using Inventory Items
- If Jones is standing in front of an object, you may not be able to use an inventory item there or collect it, even if you can see part of it. You need to move him to one side first.
- If a dialog scroll is on the screen, you will not be able to do anything with inventory until it finishes.
- To open the inventory tray, right-click.
- To use an item from inventory, right-click to open the inventory tray. Then left-click to pick up the item. Right-click again to close the tray, and the item will be attached to your cursor. Now position the cursor wherever you want to use it, make sure the jewel on the hand is glowing bright blue, and left-click.
- If you open the inventory tray and move the cursor across the objects, you will sometimes see the cursor change to a magnifying glass. If it does, you can left-click to examine that item more closely. Left-click again when you’re done.
- In a few cases when reading multipage documents you will have to ESC to close the document.
- The inventory tray holds Jones’ journal, which describes the current quest, a button to return to the Main Menu, and any inventory objects you’ve collected.
- Jones can also use inventory items on himself in some spots.
- In a few cases I could not get Jones to use an inventory object where I wanted him to, because when the cursor glowed blue he thought I was trying to get him to use the object on himself. In that situation I was able to resolve it by having him walk to another spot in the scene, open inventory and attach the inventory object to the cursor, and then click on the glowing blue spot back where I wanted him to use the object.
- In each chapter you will have access to many different locations. If you wait for a story cue to start looking for an object, it may be 4 or 6 locations away from where you are at that moment. I recommend that you pick up every item the game allows you to collect. You won’t run out of space in your inventory, and you’ll save yourself a lot of time later.
- Many of the inventory puzzles have to be solved with trial and error; they won’t really make sense in the context of the story until several scenes later. If the jewel on the back of the cursor hand glows blue, there is something you can do there. You may have to just try each item in your inventory until you find the right one.
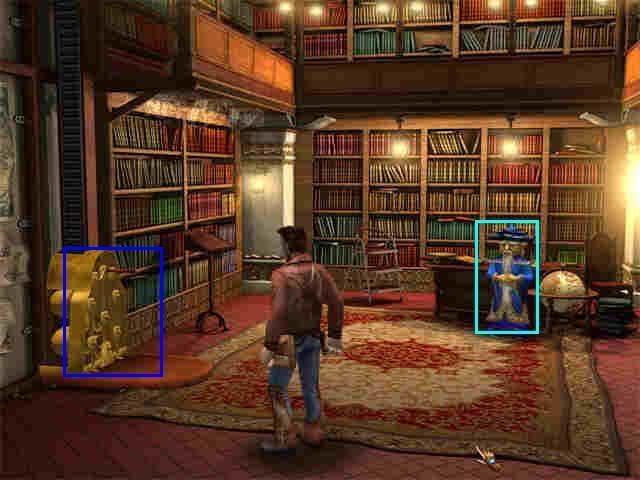
- Items to collect are marked in yellow.
- Places where you can interact with the scene are marked in blue.
Watch the opening movie. Two men are fighting over an object.
Shanghai, Scene 1, In the Tavern
This is a tutorial scene. The game will walk you step by step through the required actions.
- You start out feeling thirsty, but you have no money. Talk to the bartender, Win-doh. He won’t give you any more credit, but he offers you a quest.
- Try to talk to the sailor at the table. He won’t wake up.
- You need to fire the cannon. First you have to get rid of the rats inside.
- Collect the wrench. It will go into your inventory.
- Now make sure Jones is not blocking your full view of the cannon, or the next step won’t work. If necessary, move him to the side first.
- Right-click to open the inventory tray.
- Click on the wrench to pick it up.
- Right-click again to close the tray. The wrench will be attached to your cursor.
- Use the wrench on the cannon to drive away the rats.
- Now Jones will talk about his "guide." This is a guidebook he carries with tips. It will open and you see a horizontal text scroll. Click on it to turn the pages or close it on the last page.
- Look down. You will see matches off to the right. Collect them.
- Again, make sure Jones is not blocking your view of the cannon.
- Right-click to open your inventory.
- Take the match and use it on the cannon.
- The cannon will fire. Now talk to the man again. He will give you a plan of the brother’s pawnshop.
- Right-click to open inventory and examine the plan.
- Now it is up to you whether you want to leave the guidebook turned on for automatic hints or not.
- End of scene.
Shanghai, Scene 2, the Street In Front Of the Tavern
- Talk to the rickshaw driver, Da Shing. He will tell you a few things about characters and places. Eventually you will ask him to take you somewhere, but you won’t have the money, so you won’t go.
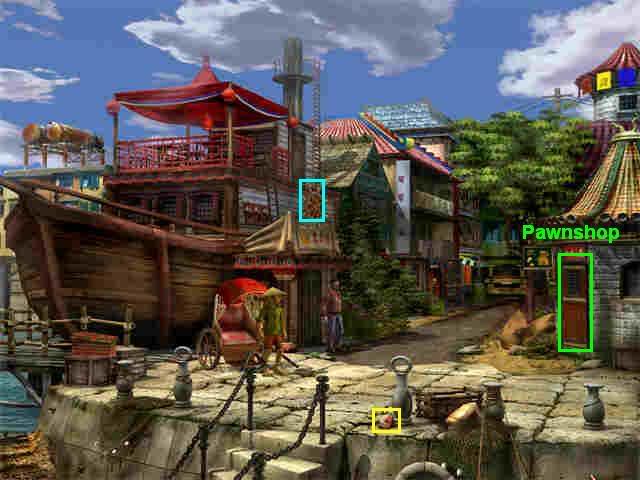
- Look around the scene. You will see a sign for the tavern you just came out of.
- Across the street, you see a sign for a pawnshop. Go in.
Shanghai, Scene 3: Inside the Pawnshop
- Look at the items on the shelves behind the counter. Nothing of interest.
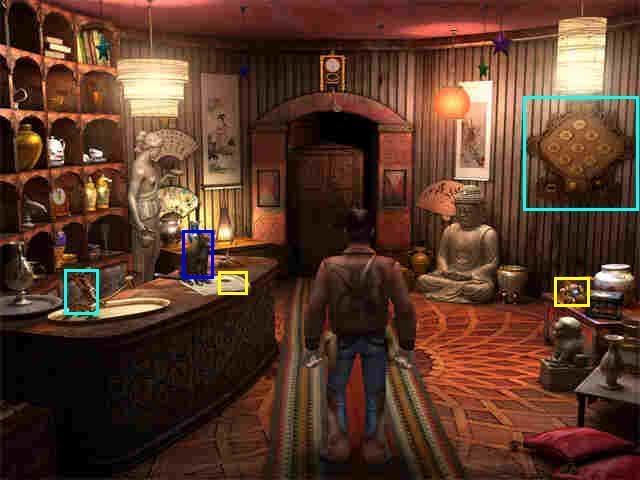
- Click on the cat, it will jump down.
- Pick up the newspaper. Left-click on it in inventory to read it all.
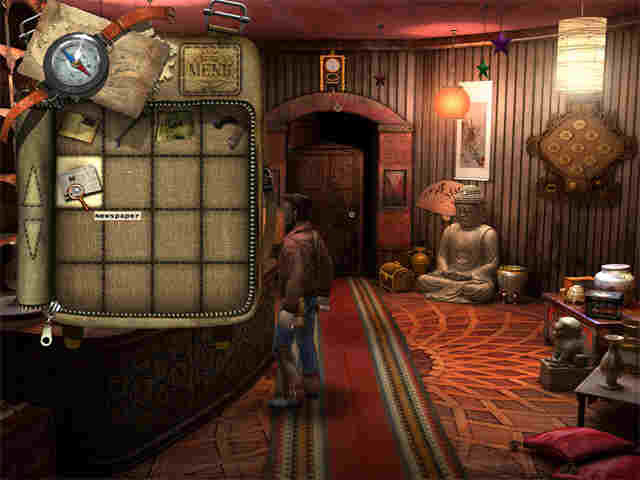
- The cat will jump back up on the counter.
- Look at the safe on the right wall, but you can’t do anything with it yet.
- Look on the low table on the right side and you will find a turtle. Take it.
- Take the turtle out of inventory and put it on the tray next to the dragon.
- Click on the dragon to ring the bell of the turtle’s shell.
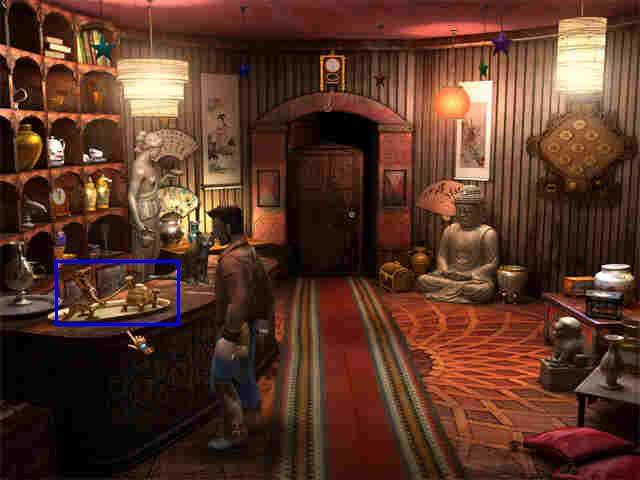
- The owner, Yung-Ix, will come out. Talk to him about everything. (In joke: the brothers are named Windows and UNIX.)
- When you are done talking, you can try to go through the door straight ahead of you, but the owner will tell you the door to the street is on the opposite side. Go downscene to exit back to the street.

Shanghai, Scene 4, courtyard behind pawnshop
- What to do next? Might as well see if there’s a back way into the pawnshop. Walk right, to the courtyard.
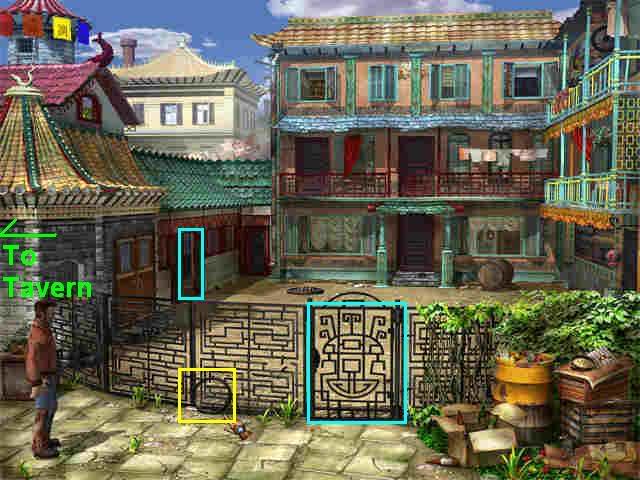
- The gate is locked, but there is a wheel leaning against the fence. On the theory that anything an adventure game lets you pick up is bound to come in useful later, collect it.
- Now back to the left to the street.
- Go downscene to the wharf.
Shanghai, Scene 5, the wharf
- There is a fisherman sitting on the wharf. Talk to him. You will find out that he is La, the fisherman mentioned in the newspaper article from the pawnshop, and that he has lost the token he needs for the pawnshop.
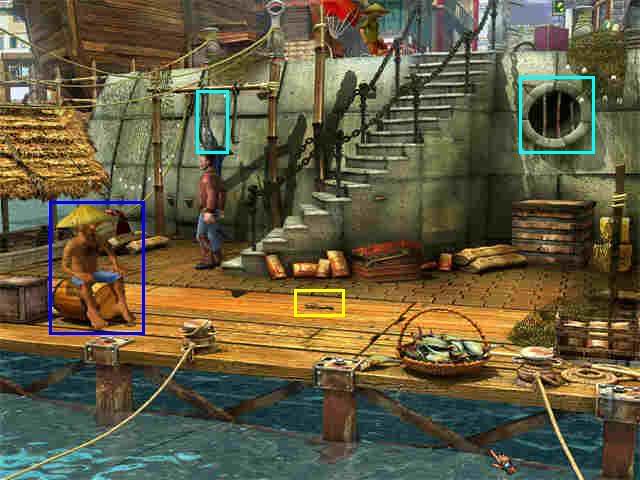
- Look around the wharf. Notice the swordfish.
- Notice the sewer entrance.
- Pick up the pocket watch.
- Go back up the stairs and back to the pawnshop.
Shanghai, Scene 6, inside the pawnshop
- Talk to Yung-Ix. He will tell you more about the token.
- Give him the pocket watch. He will give you a promissory note.
- Go back out to the street, and then into the tavern.
Shanghai, Scene 7, In the Tavern
- Give the promissory note to Win-doh, and he will give you a drink.
- Give the drink to the sailor, and he will give you the token.
- Go back to the street, then down the wharf again.
Shanghai, Scene 8, The Wharf
- Give the token to La.
- He will tell you he can’t leave the wharf, and ask you to go to the pawnshop for him.
- Go back upstairs and go into the pawnshop.
Shanghai, Scene 9, inside the pawnshop
- Give the token to Yung-Ix. He will tell you how to use it, and the combination to the safe.
- Click on the safe to open a zoom scene.
- Put the coin in the slot. Then click on the three tiles marked 1, 2, 3 in that order.
- Then pull the handle. The safe will open.
- Take the jar.
- If you get the combination wrong, the token will drop into the coin slot on the lower left and you can try again.
- Leave the pawnshop and go back down to the wharf.
Shanghai, Scene 10, the wharf
- Give the jar to the fisherman.
- He will give you part of the swordfish, which looks like a saw.
- Combine the saw handle with the part from the fish, and you will have a saw in inventory.
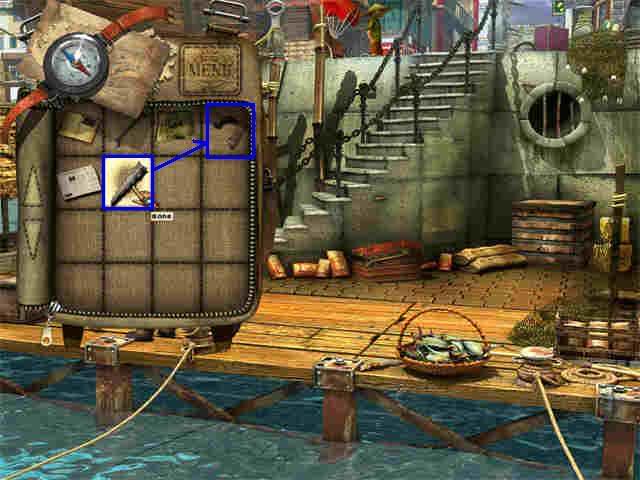
- Use the saw on the sewer entrance.
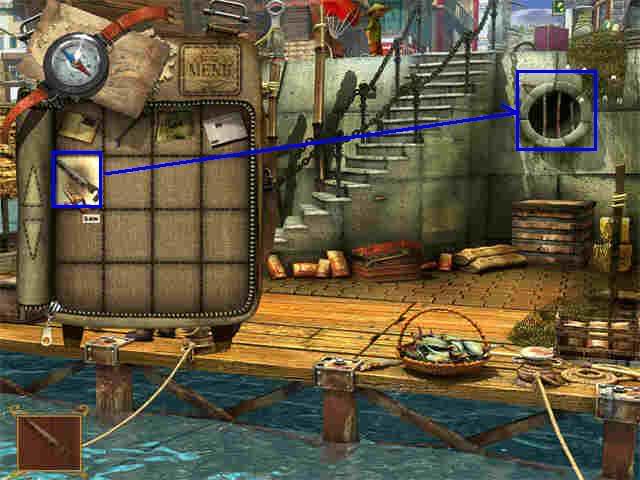
- Go in to the sewer.
Shanghai, Scene 11, Sewer Room 1
- Here you need to figure out that using the lever opens the gate, so pull the lever. But the gate closes before you can get to the gate.
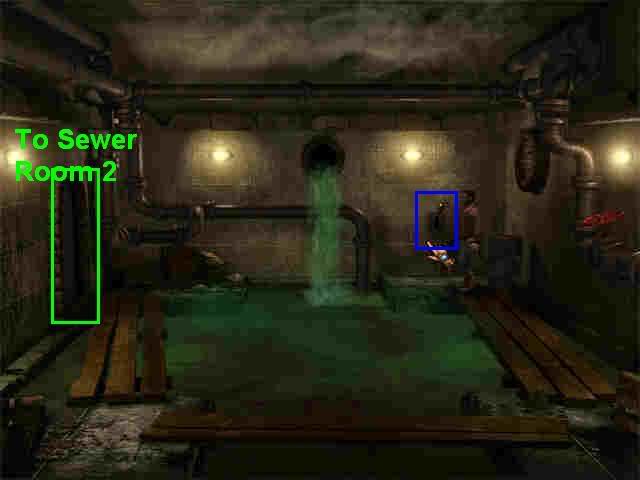
- Click on the tire in inventory and hang it on the lever. This will hold the gate open.
- Go through the gate into the next room.
Shanghai, Scene 12, Sewer Room 2
- The barrels in the water will go up and down. You can cross by jumping on a barrel when it is near the top, then jumping on to the next one before it sinks.
- I was able to get across with 5 left clicks in a row, but there are several different ways.
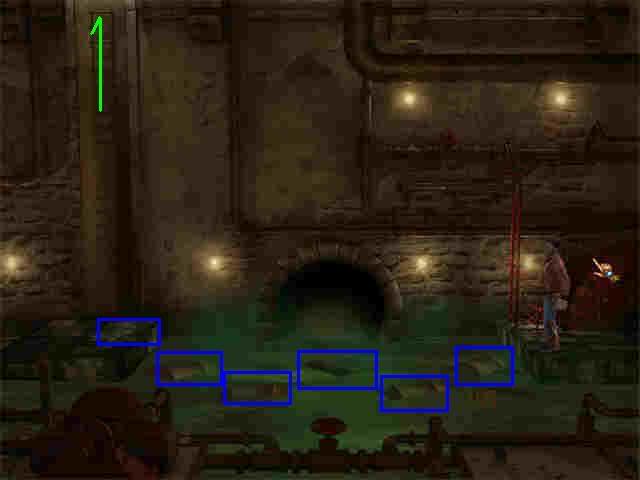
- Once you are across, climb the ladder.
Shanghai, Scene 12, Inside Courtyard
- Now you are in the courtyard, but inside the gated area. Look around. You will see a barrel on the right.
- Push the barrel, and eventually it will move, revealing a red fan on the ground. Collect it.
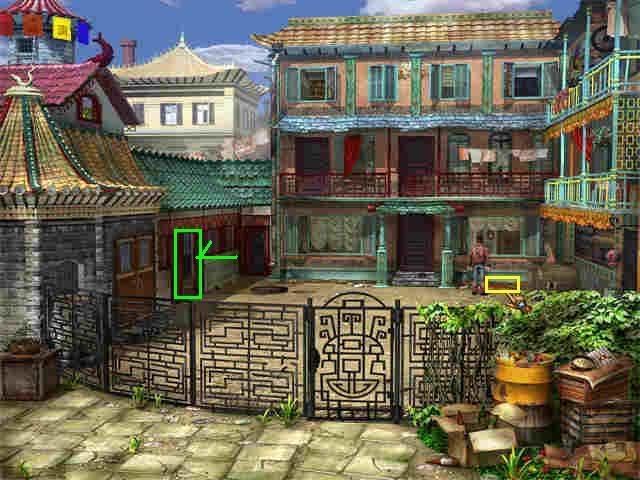
- Go through the doorway on the left into Ju-Ly’s bedroom.
Shanghai, Scene 13, Ju-Ly’s Room
- Talk to her. Give her the fan.
- Now you need to play a mah jong game. It’s just standard tile game, where you can remove any matching pair that is lit up. You get to the shadowed ones by clearing away surrounding tiles. At first this seemed like a really hard game, but it turns out the space bar will shuffle the tiles, so anytime you get stuck, just shuffle.
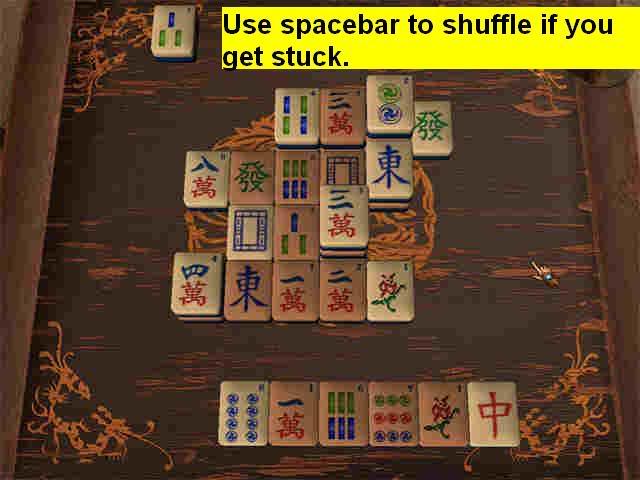
- When you are done, talk to Ju-ly again. She will eventually tell you that the seal is hidden behind the painting.
- Go to the painting and take the seal.
- Look under the mat by the doorway to the courtyard. You will find a key. Take it.
Shanghai, Scene 14, Courtyard
- Go out into the courtyard.
- Use the key from inventory to open the gate.
- Go left to the street in front of the tavern.
Shanghai, Scene 15: In the Tavern
- Go into the tavern.
- Give the seal to Win-doh.
- He will give you a lot of coins.
- Leave the tavern.
Shanghai, Scene 16: the street in front of the tavern
- Now, in spite of what the guidebook said, you need to give coins to the rickshaw driver, Da Shing, to get a ride to Flowers Street. There is no other way to get there.
Shanghai, Scene 17, Flowers Street
The rickshaw has hit a pedestrian! It is Mary Ocean, who was a character in the previous game. She is another archaeologist. Mary is knocked out on the ground.
- Look around. You will find a newspaper. Read it.
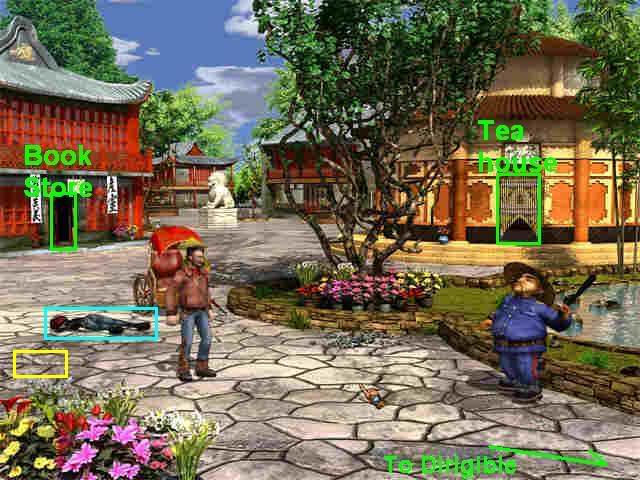
- Da Shing will tell you there is a pharmacy by the dirigible crash site, but the policeman won’t let you go there.
- You need to find a rickshaw hat. The only other place you can go is to the tea house, so go there.
Shanghai, Scene 18, Tea House
- Look on the floor on the far left. A rickshaw hat! Collect it.
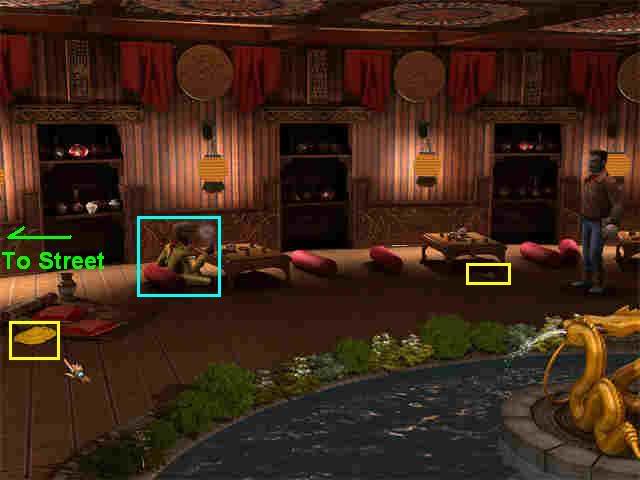
- Talk to the man at the center table. It is Fuffy, the dirigible pilot who was in the first game. He has become addicted to opium, but doesn’t realize it.
- Pick up the pipe on the ground on the far right.
- Go back to Flower Street.
Shanghai, Scene 19, Flowers Street
- Try to give the rickshaw hat to Da Shing. That doesn’t work.
- Instead, click it onto Jones, and he will wear it.
- Talk to Da Shing. He will let you borrow the rickshaw if he gets a ride.
- Talk to the policeman, he will eventually let you through.
Shanghai, Scene 20, Dirigible Crash Site
- Look around. Notice the dirigible.
- Pick up a stone by the entrance to the pharmacist.
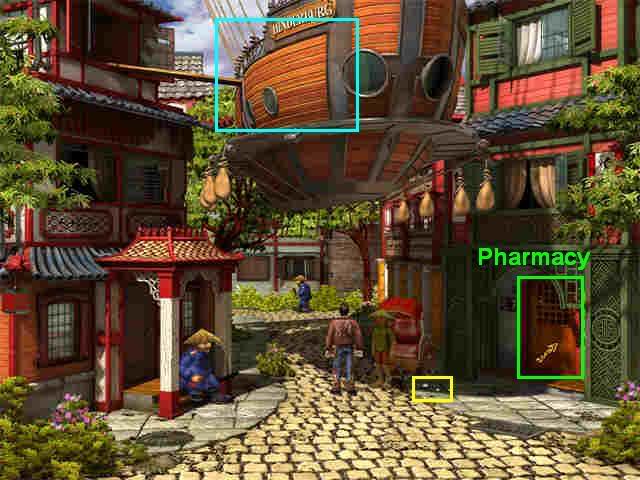
- Go into the pharmacy.
Shanghai, Scene 21, Inside the Pharmacy
- Talk to the doctor.
- Look along the top shelf on the left for ammonia. When you find it, take the stone from inventory and use it there.
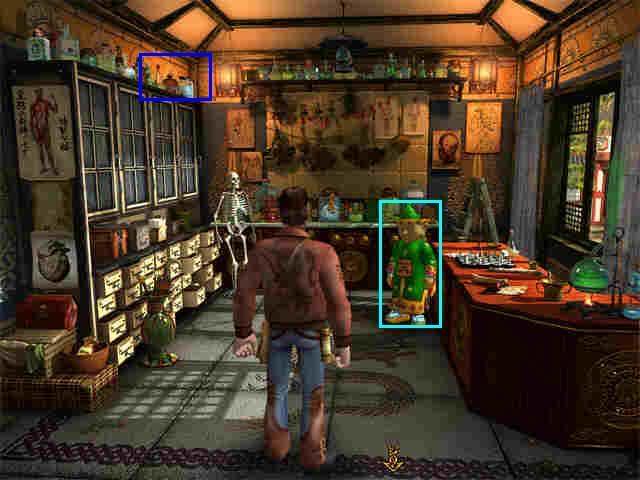
- The ammonia bottle will fall to the ground. It looks very different on the ground, just a tiny green speck. You need to pick it up.
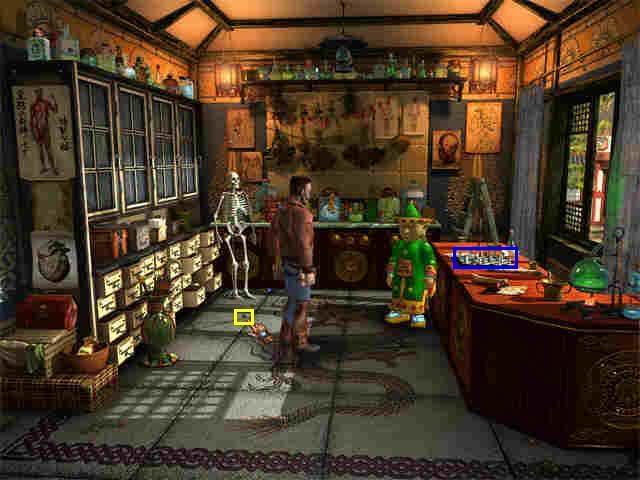
- Now talk to the doctor some more. He will tell you about a chess problem he is working on.
- Click on the chessboard. It is 9 x 9, but the unicorn piece moves like a regular chess Knight. You need to do a Knight’s Tour to clear the other pieces off the board. Note that you will always be alternating colors, going from black to white to black to white. There are several alternate solutions. The one I used is marked in the screenshot.
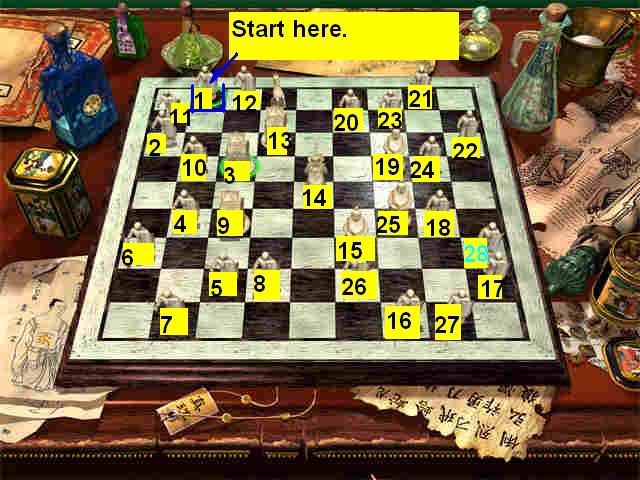
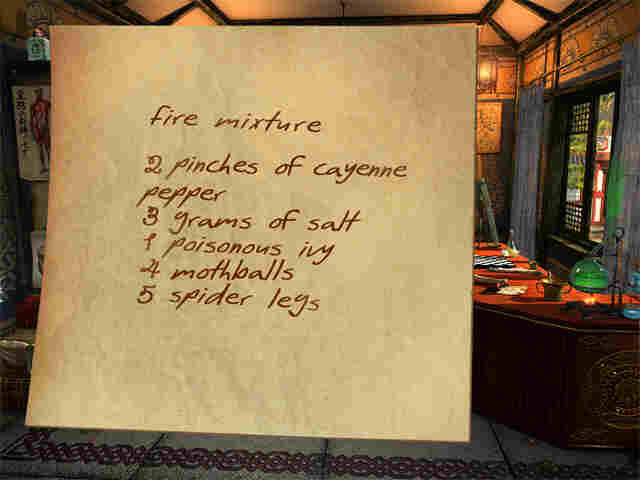
- After you solve the puzzle, the doctor will give you the recipe for an addiction cure.
- Now you need to look around the shop and collect everything you can. This includes a can of oil on the lower left, spider’s legs and ivy from two drawers at the back, and a chili pepper from the right counter.
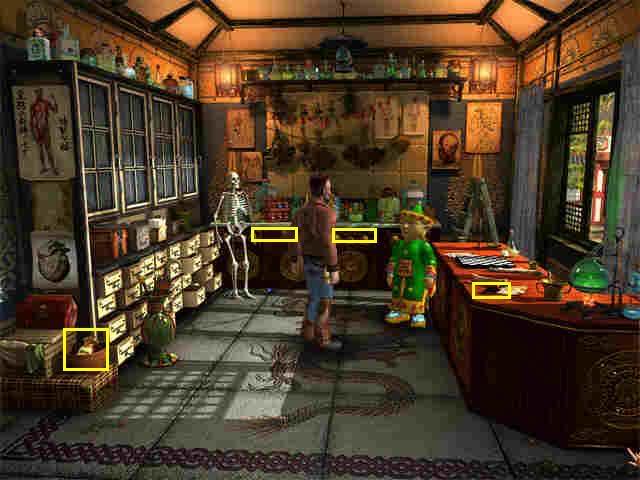
- Note: if you get to the pharmacy and you can get the ammonia but the doctor doesn’t tell you about an opium cure and "Pilot" is not one of your conversation topics, it means you didn’t talk to Fuffy in the teahouse for long enough. That’s OK. Just go back to Flowers Street, go into the tea house and talk to Fuffy, then walk back to the crash site and talk to the doctor again. The policeman will let you through without a problem the second time.
- Once you have collected everything, walk outside, then walk back to Flowers Street.
Shanghai, Scene 22, Flowers Street
- Give the ammonia to Mary Ocean.
- She will wake up, and you can talk about the Lost City.
- She will tell you about the Dragon Book. She was on her way to the bookstore to view their copy when she was in the accident.
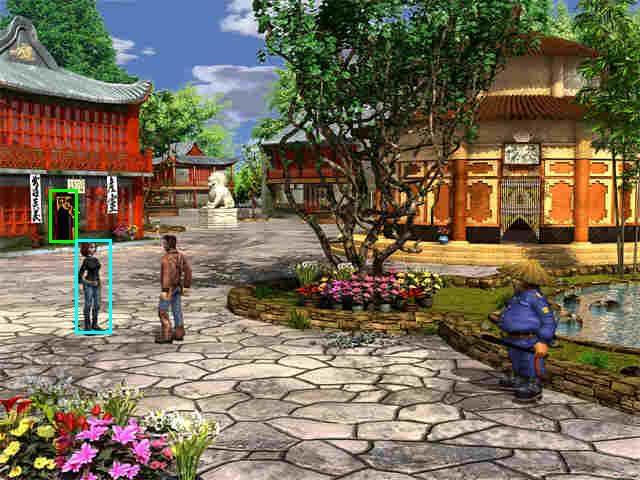
- Go to the bookstore (behind Mary).
Shanghai, Scene 23, Inside the Bookstore
- Talk to the owner. You need to go up to the second level.
- Use the oil on the lift mechanism.
- Now all you have to do to get the lift to go up is left-click your mouse once to start it. Then left-click again just before the two arrows line up. If they are lined up when they stop, you will go 1/3 of the way up. Repeat until you are all the way to the top.
- Anything within the sector marked by the straight lines will count. Both the positions in these screenshots will work.
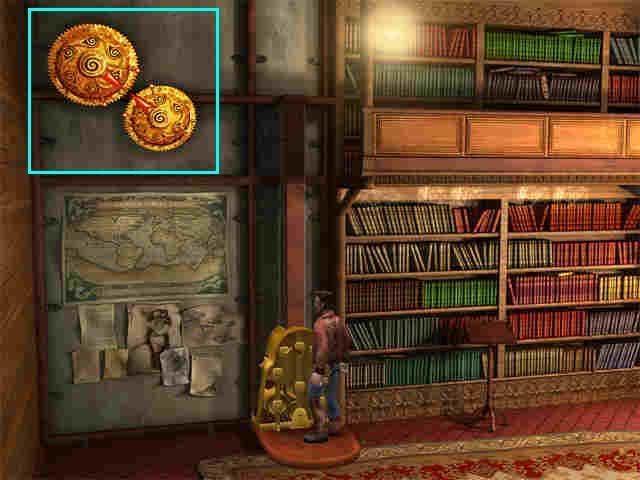
- Walk off the lift to the right and collect the Dragon Book.
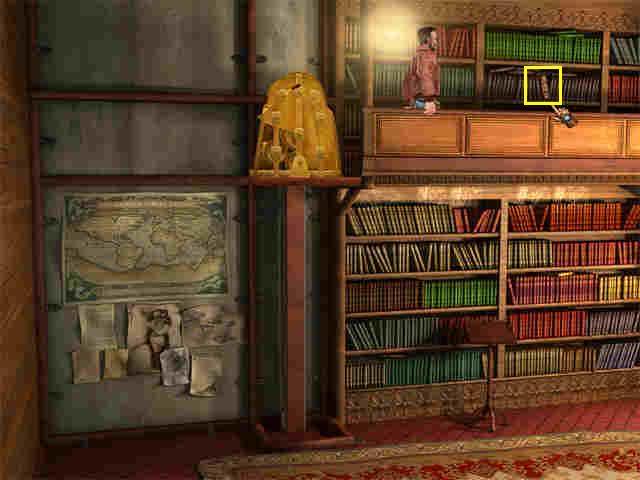
- Read it in inventory. To close the book, use the ESC key.
- Go back on the lift and click one more time to go down. You will fall all the way down and a piece of wire will pop out of the lift.
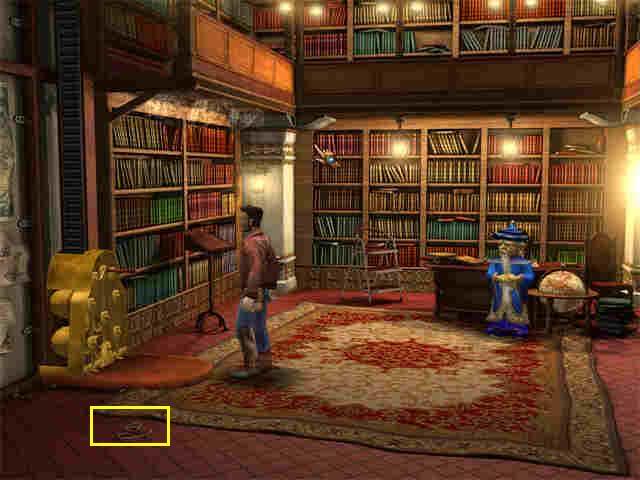
- Collect the wire.
- Go back out to the street
Shanghai, Scene 24, Flower Street
- Talk to Mary Ocean about the book again. She will tell you pages are missing.
- Go back into the bookstore and talk to the owner.
Shanghai, Scene 25, In the Bookstore
- The bookstore owner will tell you that the tavern owner, Win-dou, was also interested in the book.
- Go back out to Flowers Street.
- Walk back to the Dirigible Crash site. The policeman will let you through as needed for the rest of the game.
Shanghai, Scene 26, Dirigible Crash Site
- Talk to Da Shing, the Rickshaw driver.
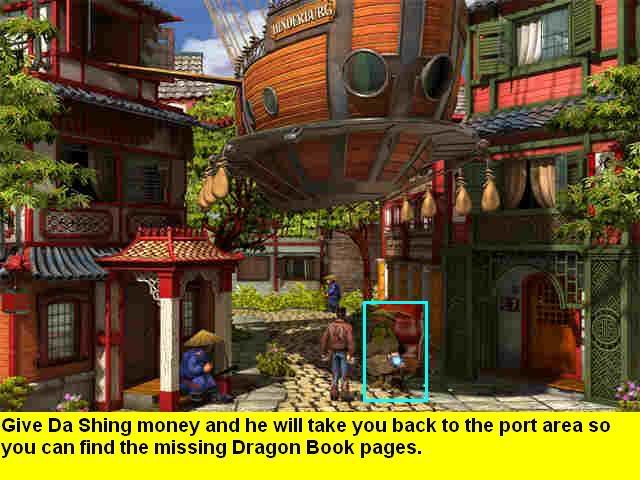
- Give him money from inventory and he will take you back to the port area.
Shanghai, Scene 27, Street in Front of the Tavern
- The two brothers are fighting about the seal.
- While they are busy, go inside the tavern.
- Go through the door at the back of the tavern into the kitchen.
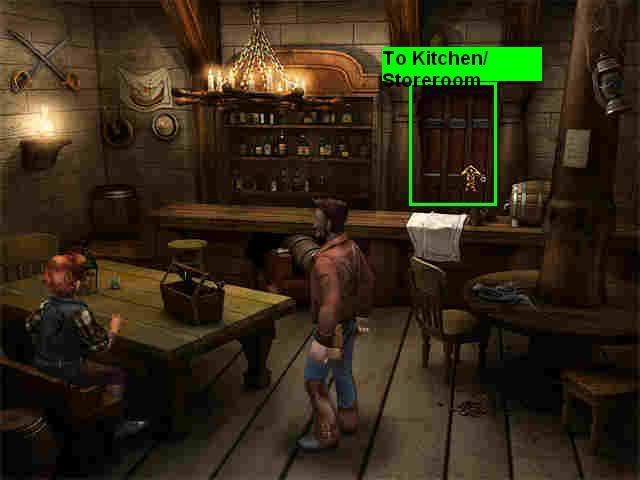
Shanghai, Scene 28, Tavern Kitchen/Storeroom
- Take the salt off the shelf.
- There is a chest on the left, but it is locked.
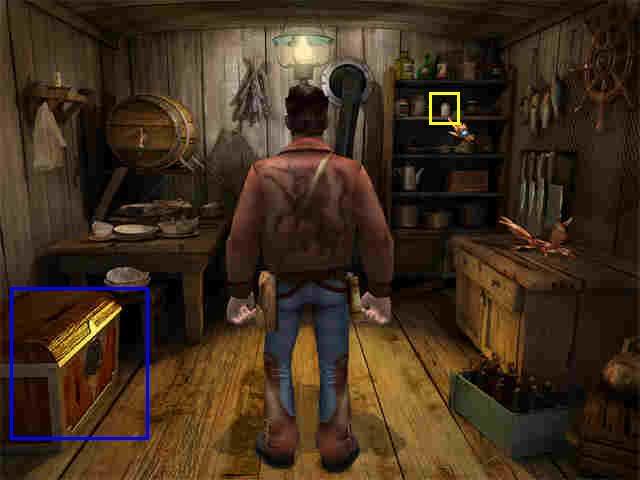
- Use the wire you picked up from the floor of the bookstore as a lockpick. This one is pretty simple. Just position the wire exactly under one of the tumblers. Click once, and the tumbler will start to rise. Click again when it gets to the top and it will stop there. Then move on to the next tumbler. When all 5 are in the top position, the chest will open.
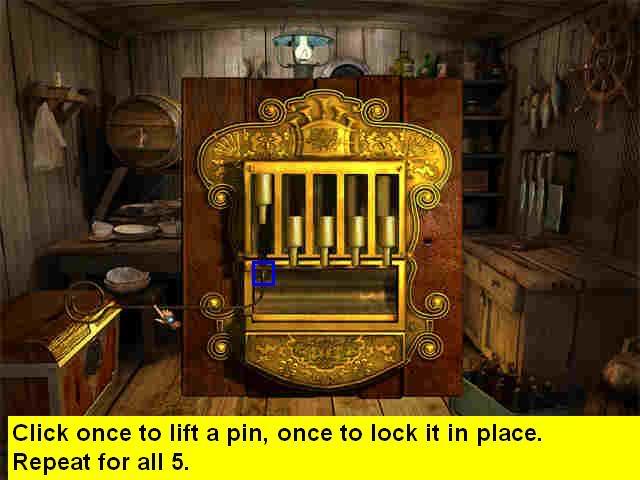
- Collect the Dragon Book pages from the chest.
- Go back out to the street in front of the tavern.
Shanghai, Scene 29, Street in front of the Tavern
- Give Da Shing more money and he will take you back to Flowers Street.
Shanghai, Scene 30, Flowers Street
- Give the pages to Mary Ocean.
- She will tell you to put the pages back in the book.
- Combine the loose pages and the book in inventory.
- Read the combined book by left-clicking on it in inventory. Use the ESC key to close it again.
- Time to go to the dirigible. You will be able to walk by the police officer.
Shanghai, Scene 31: Dirigible Crash Site
Mary will be standing by the door where you can go up to the dirigible, but the police officer won’t let you up because you don’t have a ticket.
- Talk to Mary. She will give you her ticket.
- Take the ticket from inventory and give it to the police officer. Now he will let you in.
Shanghai, Scene 32: Dirigible Deck
- You can handle this next part a lot of different ways, but the most logical is to go talk to the two guys standing at the front of the scene. These are Capone and Buffy. Capone will tell you that the dirigible can’t fly for three reasons: 1) the pilot is missing, 2) the gas bag won’t inflate, and 3) the police won’t let it leave.
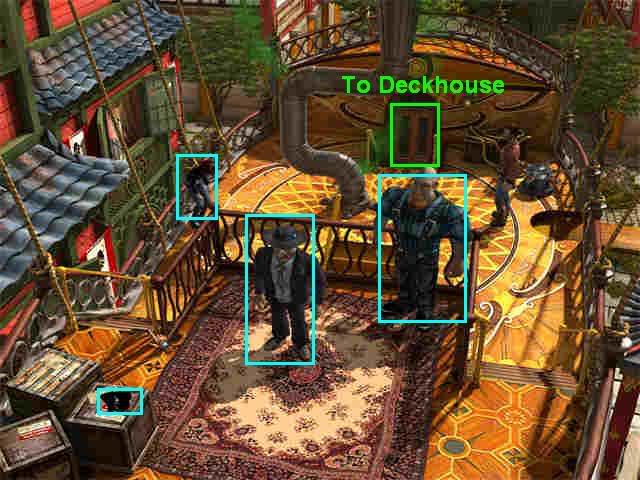
- Notice the tar at the front left of the scene, but you can’t do anything with it yet.
- Go into the deck house at the back of the scene.
Shanghai, Scene 33, Deckhouse
- There is a police captain here. Talk to him.
- Notice the telegraph on the table.
- Take the mothballs from under the sofa on the right. This is the last ingredient you need for the opium cure! At this point you could look around the dirigible more, but it makes more sense to hurry back and get Fuffy the pilot before something bad happens to him.
- Go down to the street, then walk to Flowers Street and enter the teahouse.
Shanghai, Scene 34, Teahouse
- Give Fuffy the empty pipe from inventory. This will start a mini-game. All you have to do is put the right number of ingredients into the pipe.
- The recipe for the cure is on the paper underneath the tally paper. Just click on the recipe to view it, then click on the tally sheet to go back to the pipe.
- Drag the ingredients from the bottom to the pipe. The tally sheet will tell you how many you’ve put in so far.
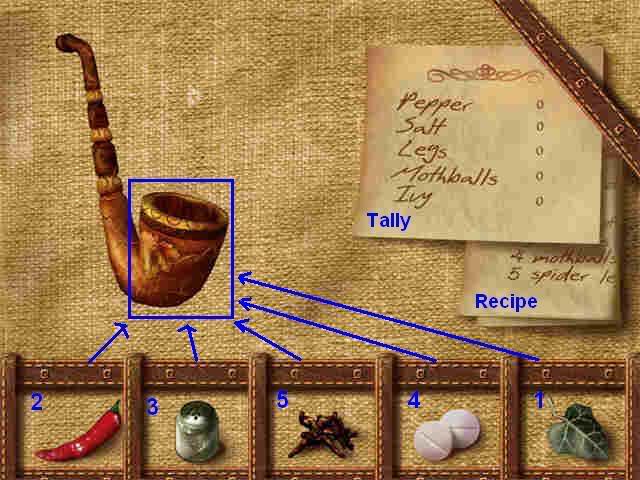
- Once you have made the recipe, go back to room view. Give the filled pipe to Fuffy. He will stumble around, then go back to the dirigible.
- Go back out to the street, then go back to the dirigible crash site. This time the police officer will let you in.
Shanghai, Scene 35, Dirigible Deck
- Talk to Capone again. Tell him the pilot is back.
- He will tell you the machine room is accessible through the deckhouse.
- Go into the deckhouse. Click on the trapdoor, then go down into the machine room.
Shanghai, Scene 36, Machine Room
- Look around. You will notice a stuck handle on the machine.
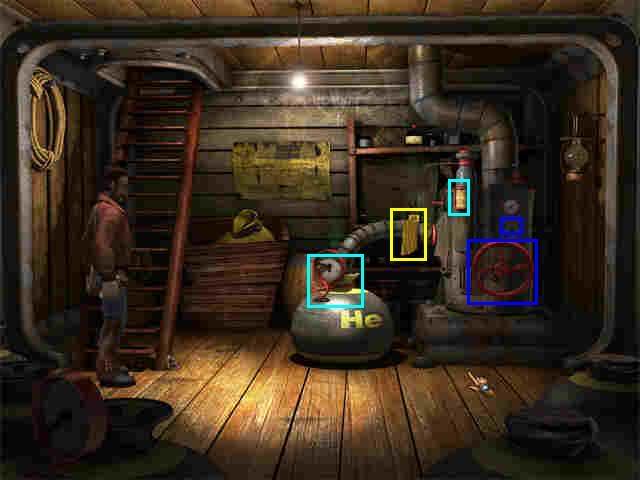
- Use the wrench from inventory on the stuck handle. You are not strong enough to turn it.
- Note that there are three hotspots close together on the right. One just gives you information about the machine. Jones will say it is a Frankenstein. One is a bolt where you can use the wrench. And one is a red wheel to turn. As you use inventory items in these areas, make sure you’re on the right hotspot or nothing will happen.
- Also, I had a problem with Jones refusing to move away from the machine after he found out he wasn’t strong enough to turn the wrench. You may need to click around the room to find something else he will look at or go to before you can get him to go back upstairs. This is why I recommend not picking up the cloth until after you’ve tried the wrench on the machine.
- Take the hanging cloth from the back of the scene.
- Go back upstairs.
- From the deck, go left.
Shanghai, Scene 37, Deck
- On the deck, go up to the area by Capone. Use the cloth on the tar.
- Talk to Capone and Buffy. Buffy will go with you to the machine room.
- Go back through the deckhouse into the machine room.
Shanghai, Scene 38, Machine Room
- Talk to Buffy, and he will turn the switch with the wrench. A part will fall off the machine.
- Collect the part. This will trigger a mini-game.
- This mini-game was really annoying, and there’s no skip. The tilt controls are slow to respond. I found several places where it was easier to go past a turn and then come back from the other side after I’d adjusted the tilt.
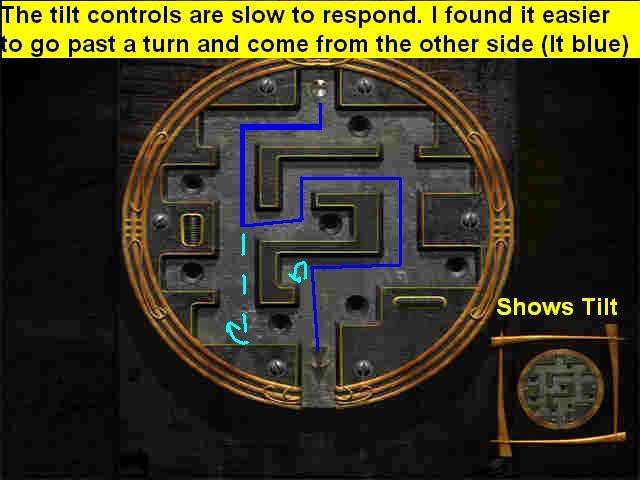
- Completing the mini-game repairs the part that fell on the floor. Put it back on the machine.
- Now you can turn the valve of the left tank. This will inflate the dirigible again.
- So that’s two of the three problems solved. You found the pilot and you reinflated the dirigible. Now you just need to get rid of the police commandant. He will yell at you as you go through the Deckhouse, but ignore him for the moment.
- Go back up to where Capone is.
Shanghai, Scene 39, Deck
- Talk to Capone and he will tell you he doesn’t want to get in trouble with the Chinese police.
- There is tar on the left side of the scene. Collect it on the rag.
- Now go down to the cabins below the Deck.
Shanghai, Scene 40, Dirigible Hallway
- Talk to Caruso. This is a long conversation, and doesn’t really give you much more information.
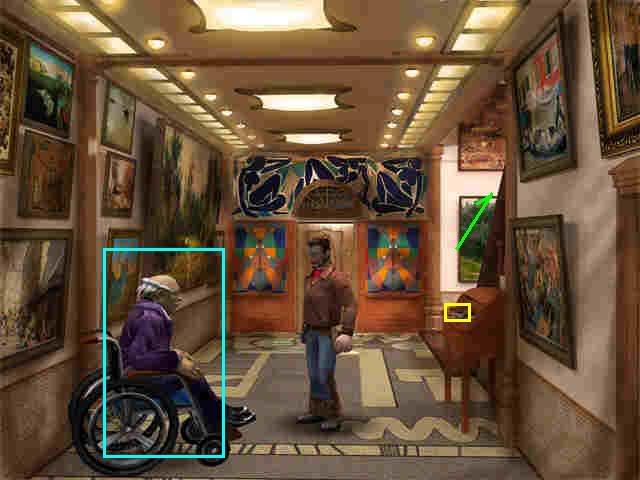
- On the desk, there is a lighter. Take it.
- Go back upstairs to the deck and go into the deckhouse.
Shanghai, Scene 41, Deckhouse
- The commandant is yelling out the window, telling his men below to tie down the dirigible so it can’t get away.
- Apply the rag with tar to the back of his pants, then light it with the lighter. He will jump out the window.
- Talk to Fuffy, and you will able to fly away.
- This ends the Chapter-you will no longer be able to access Shanghai locations.
In the Air, Scene 42, Deckhouse
- Talk to Fuffy. He has lost the map! It tore in 4 pieces and you will have to find them. Go back on deck to start the search.
In the Air, Scene 43, Deck
- The two brothers are on board. Talk to them. They haven’t seen the map.
- Go down to the cabins.
In the Air, Scene 44, Caruso’s Cabin
- Go into Caruso’s cabin, the first one at the bottom of the stairs.
- Talk to Caruso. He is despondent.
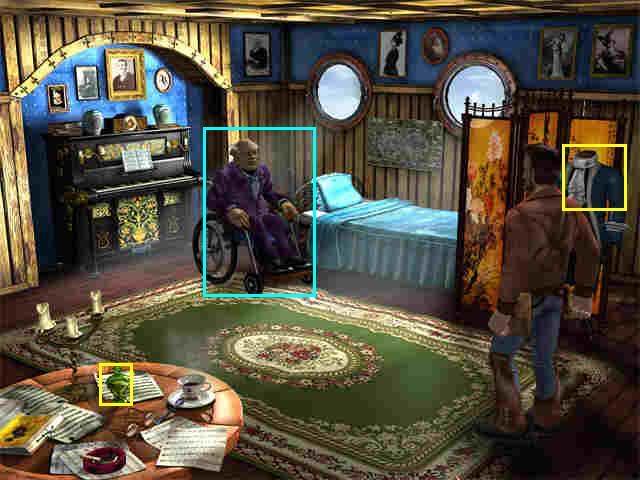
- Take the sedative from the table.
- Take the tailcoat from the stand by the door.
- Go back out to the hall.
- The first door on the left is Mary Ocean’s room.
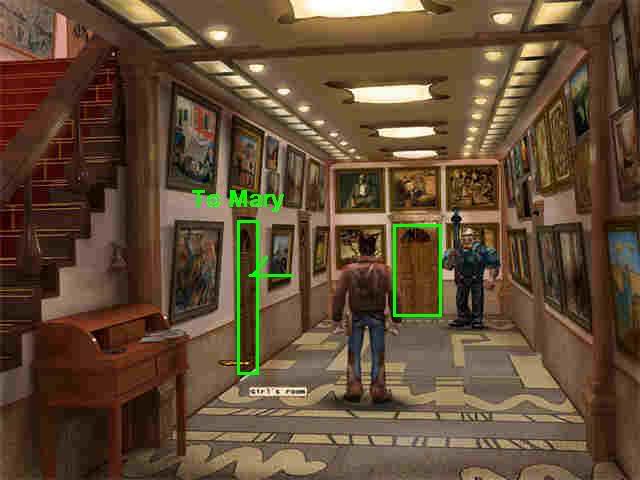
- Go into Mary’s room.
In the Air, Scene 45, Mary Ocean’s Cabin
- Talk to Mary. She will give you a piece of the map.
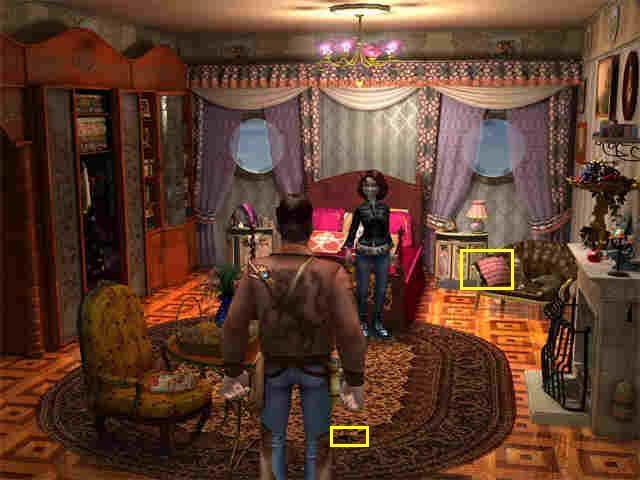
- Take the pillow from the cat.
- Take the pen from the floor.
- Go back out to the hallway.
- Go into Capone’s room at the end of the hall.
In the Air, Scene 46, Capone’s Cabin
- Talk to Capone. He has a piece of the map, but he will only give it to you if you send a telegraph message for him.
- While you’re here, you can try to look in his dresser, but he will tell you to leave it alone.
- Under the desk you will find a label with a skull on it. Take it.
- Combine the skull label with the sedative label in inventory, so the sedative looks like poison.
- Go back out to the hallway.
- Go back to Caruso’s room.
In the Air, Scene 47, Caruso’s Cabin
- Talk to Caruso.
- Give him the pen.
- Give him the sedative bottle with the skull on it. He will drink it, thinking it is poison.
- Go back out to the hallway,
In the Air, Scene 48, Hall
- Try to open the closed door next to Mary’s room. No luck.
- Return to Caruso’s cabin.
In the Air, Scene 49, Caruso’s Cabin
- Caruso is asleep. A piece of the map has fallen on the floor. Take it.
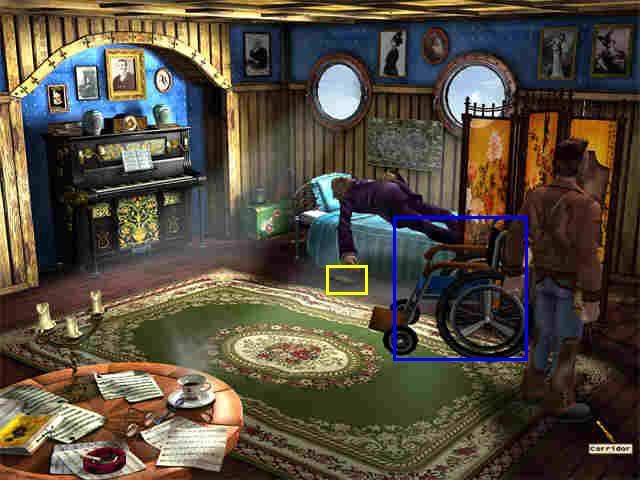
- Click on the wheelchair and Jones will get in it, then use it to go out to the hallway.
In the Air, Scene 50, Hall
- Click on the closed door next to Mary’s room one more time.
- Jones will automatically use the wheelchair to crash into the door and open it.
In the Air, Scene 51, extra cabin
- There is a bottle of gum arabic in the lower right. Take it.
- Examine the crate just behind the one with the gum arabic. You can’t move it.
- Start to look in the open crate on the left which has cheese cookies. Ninja Attack!
- This starts a mini-game. You have to fight off the ninja so that his energy level goes to zero before yours does.
- If you fail, you will immediately start over, so you don’t need to save before the fight, but you might want to save after.
- Once you defeat the ninja, take the cheese cookies out of the crate on the left.
- Go back out to the hall.
In the Air, Scene 52, Hall
- Talk to Buffy.
- Give him the cheese crackers, and he will agree to help you move the crate.
- Go back into the extra Cabin.
In the Air, Scene 53, Extra Cabin
- Talk to Buffy, and he will move the crate.
- There is a map piece under it. Pick it up. Now you have 3, and you just need to get Capone’s.
- Go out to the hall, up to the deck, and into the deckhouse.
In the Air, Scene 54, Deckhouse
- Click on the telegraph.
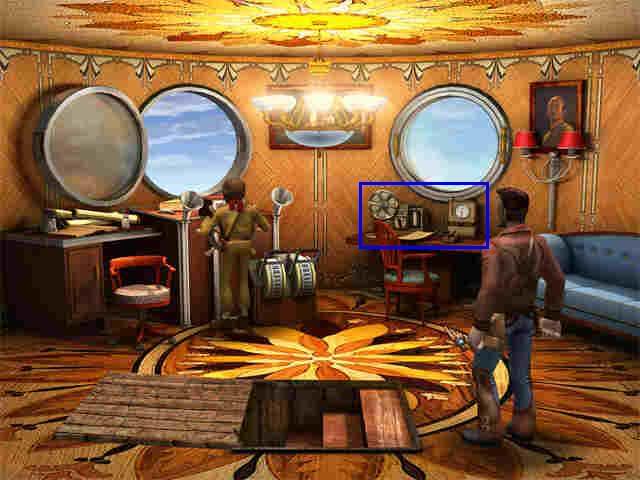
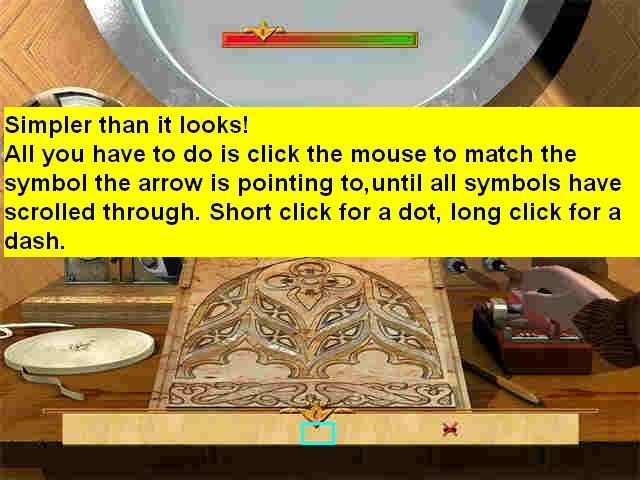
- This will start a mini-game. This one is much simpler than it looks at first. All you have to do is click to match the symbol that the center arrow is pointing to until all symbols have scrolled by. Use a short click for a dot and a long click for a dash.
- When you are done, leave the deckhouse, go back down to the Cabins, and go into Capone’s cabin.
In the Air, Scene 55, Capone’s Cabin
- Talk to Capone. He will give you the 4th piece of the map.
- The map pieces will combine automatically.
- Go back into the hall, up to the deck, and into the deckhouse.
In the Air, Scene 56, Deckhouse
- Give the map to Fuffy. Talk to him. Suddenly airplanes start to attack.
- This will start a new mini-game. You need to position your airplane so it is directly behind the enemy plane and click the spacebar to fire at it.
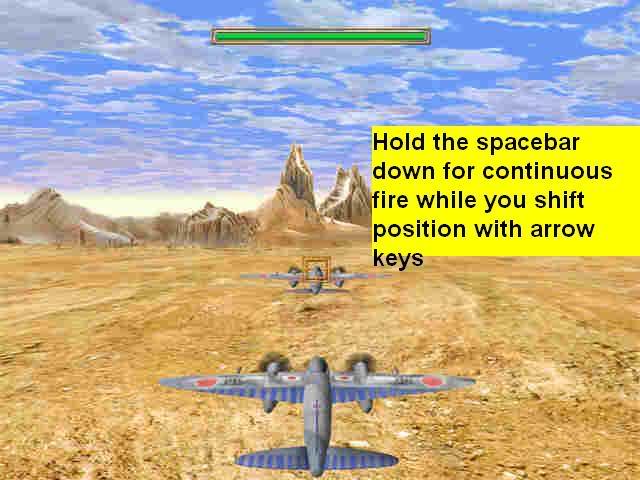
- You can hold down the spacebar while you’re moving with the arrows so you get in a few extra hits each time.
In the Air, Scene 57, Deck
- Back on Deck, talk to Capone. The dirigible is going down! You need to find stuff to patch the holes.
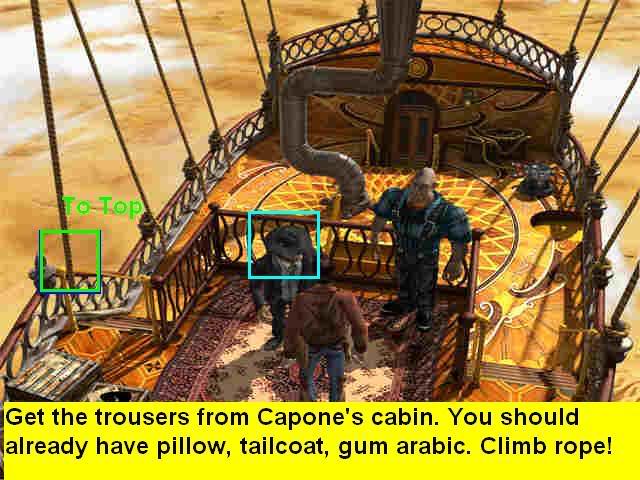
- If you’ve been collecting stuff as you move along, you already have a pillow, tailcoat, and a bottle of gum arabic. If not, you need to go back and get these things.
- You still need one more. Go down to the cabins
In the Air, Scene 58, Capone’s Cabin
- Go into Capone’s room
- Take a pair of trousers from the dresser drawers on the right.
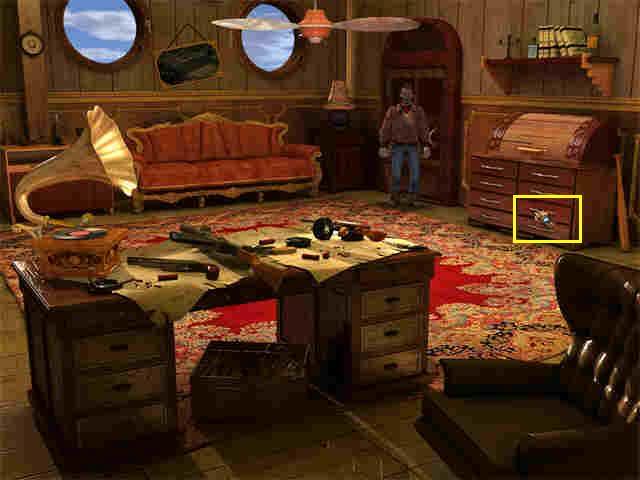
- Then go back up to the deck.
In the Air, Scene 59, Deck
- Climb the rope on the left hand side to get to the top of the dirigible.
In the Air, Scene 60, On top of Dirigible
- Talk to Mary.
- Patch the small holes with gum arabic.
- Patch the 3 large holes with the pillow, tailcoat, and trousers.
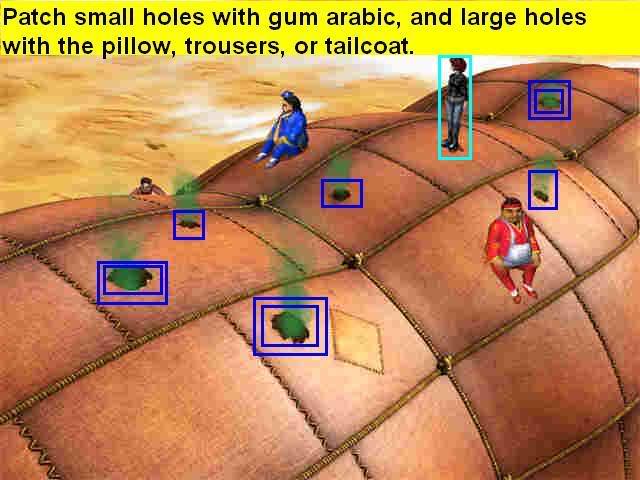
- Go back down to the deck at the same point you came up.
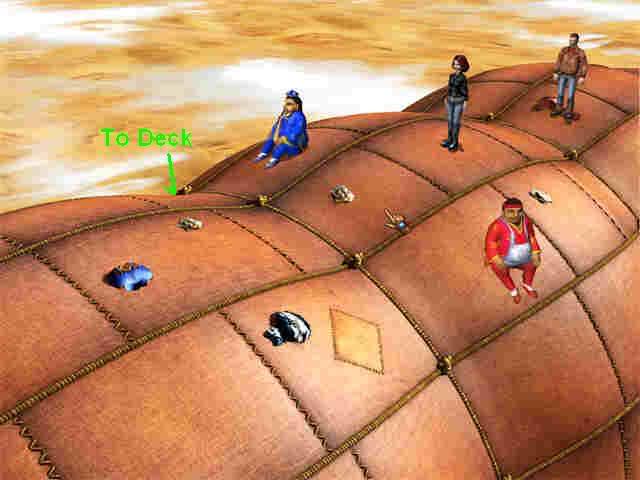
- Go into the deckhouse.
IN the Air, Scene 61, Deckhouse
- Talk to Fuffy. He says there are storms coming.
- This will start a mini-game. You have to steer the dirigible so it doesn’t hit the storms on the right or left.
- The meter on the lower right needs to stay in the green.
- If you fail, you will start over immediately.
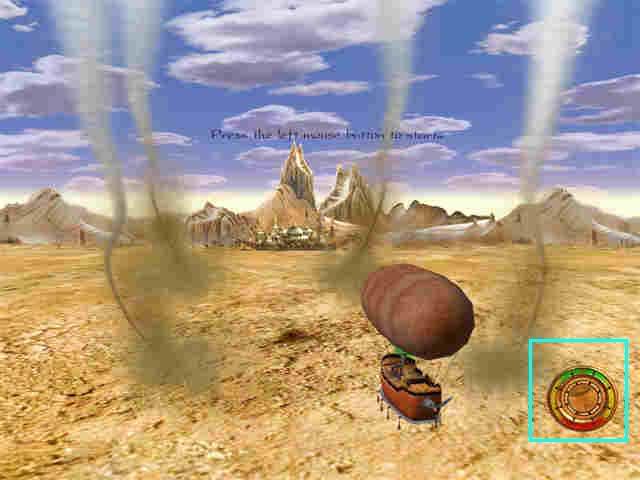
- Once you complete the mini-game, the dirigible will land in the Lost City.
- This ends the chapter-you will no longer have access to the rooms on the Dirigible.
The Lost City, Scene 62, Landing Site
- Lots of scorpions! Talk to Mary-she is trapped!
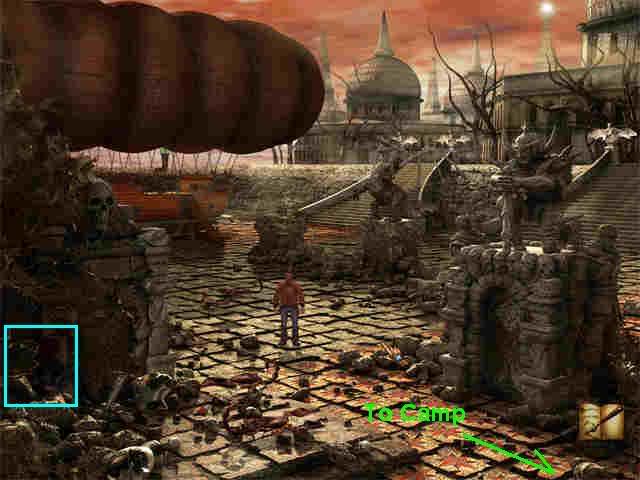
- Look around. You can click on the dungeon door to start a mini-game, but that’s not the next step in the story. Instead, go down the steps in front of the door to the archaeologists’ camp.
Lost City, scene 63, Archaeologists’ Camp
- Collect the pry bar.
- Talk to Capone.
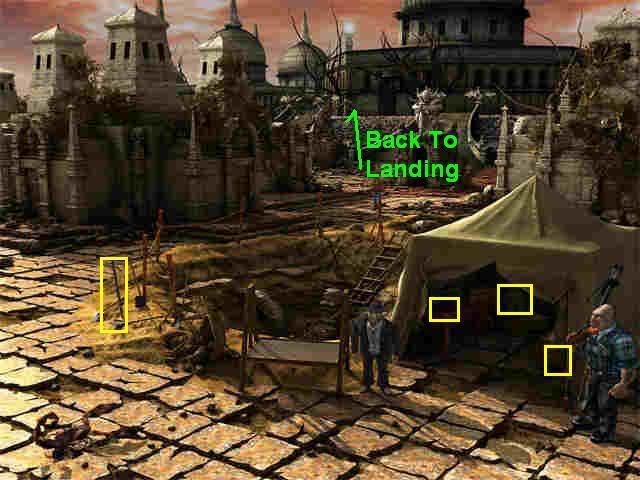
- Go into the tent and collect the diary, bug spray, and wire.
- Read the diary in inventory. At least that explains the planes.
- Go back up to the left to the Landing Area.
The Lost City, Scene 64, Landing Site
- Use the bug spray on the scorpions and they will run away, freeing Mary.
- Talk to her.
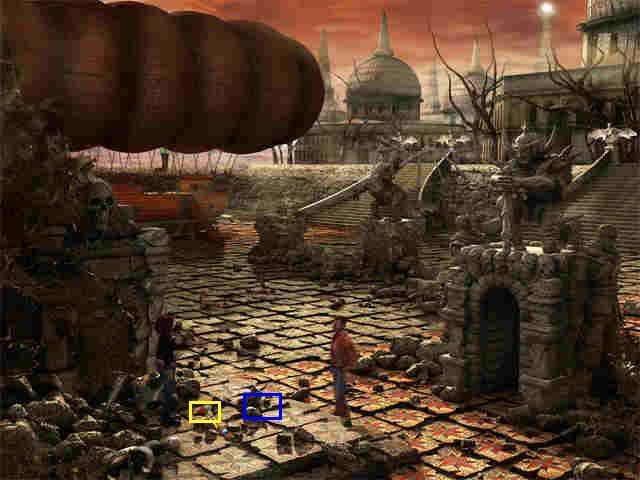
- Near her on the ground is a Detonator. Collect it.
- Now to search for the Emperor’s Tomb!
- Although there are a lot of large buildings around, none of them are the tomb. Go back to the archaeologists’ camp where Capone is, then go to the right.
The Lost City, Scene 65, In Front of the Temple
- You will come to a Temple and see the two brothers. Talk to them, but nothing important will happen.
- Look at the statue on the left, but you can’t get that door open.
- Go up at the back of the screen where the text label says To Statues. You will now be standing in front of the direct entrance to the Tomb.
- You can look around at everything, but you can’t do anything here.
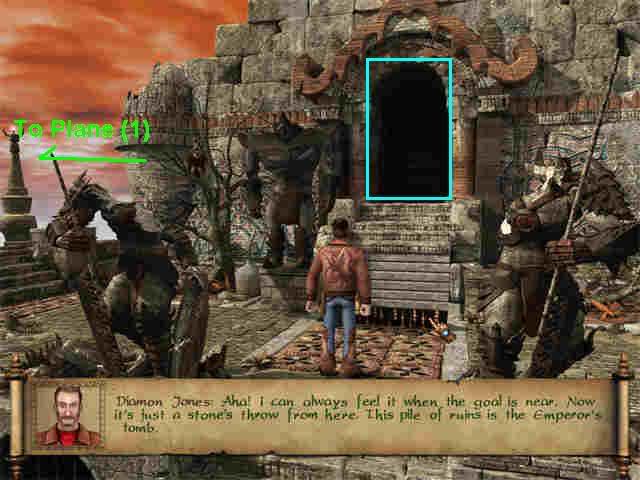
- Go up to the left, where the text says To Plane.
The Lost City, Scene 66, Plane from a Distance
- Now you will see the plane crash, but if you look carefully, you’ll see that Jones himself is on the other side of a divide and can’t get to the pilot this way. Pick up the gas can by Jones’ feet.
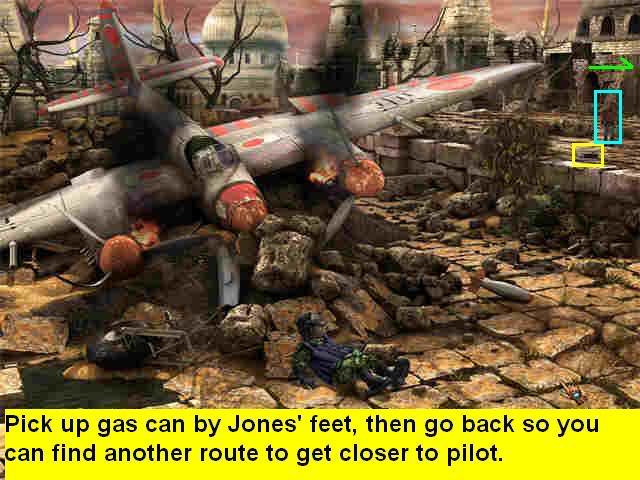
- Return to the Statues.
- Return to the Temple.
- Now position the cursor near the upper left and you will find another text label that says To Plane. Go that way, and you will come up to the front view of the plane.
The Lost City, Scene 67, Plane Crash Site
- Talk to the pilot. Eventually he will pass away.
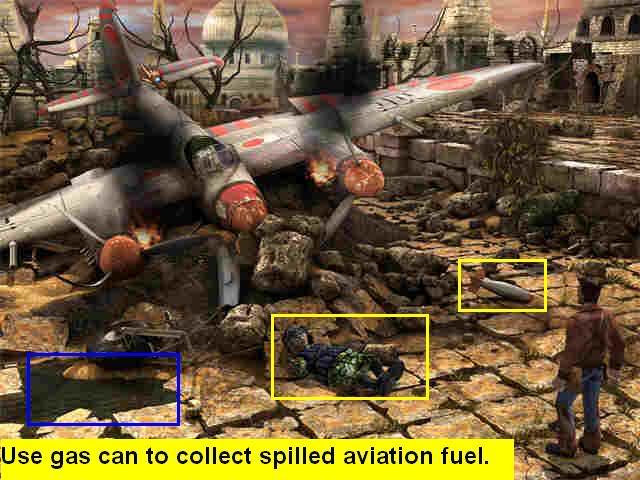
- Take the gas can and collect some of the aviation fuel to the left of the plane.
- Take the flag from the pilot’s pocket.
- Take the bomb from the right of the plane.
- Go back down to the Temple.
The Lost City, Scene 68, In Front of the Temple
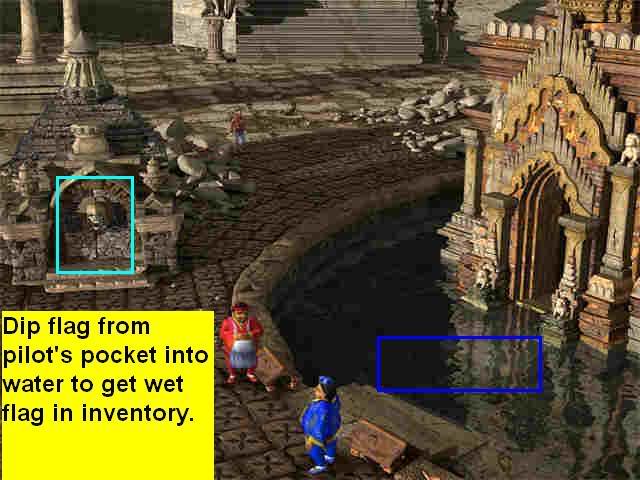
- Dip the flag in the water in front of the Temple. It will go back into your inventory. This isn’t logical yet, but you will need it later.
- Go back to the landing area.
The Lost City, Scene 69, Landing Site
Finally, it’s time to do the puzzle on the Dungeon door.
Dungeon Door puzzle
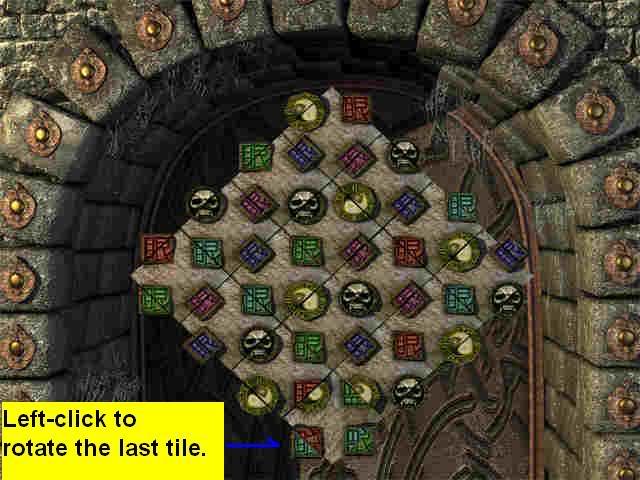
- Click on the door, and a mini-game will open.
- You must swap tiles until all the jewels are complete. There are many ways to do it, but the final picture is always the same. Note that the jewels will match exactly. If they are slightly off alignment, it’s the wrong tile.
- To move tiles, left-click once to pick it up. Then left-click on another tile to swap the two.
- If you want to rotate a tile, left-click once to pick it up. Then left click again to turn it a quarter-turn. When you are done rotating it, right-click to drop it back into place.
- Each tile can have jewels of any color, even two of the same color. The easiest way, I think, is to start with the corner tiles, since there you have two stones to match. Or you can just work from the solution screenshot.
- Once the door opens, go through.
The Lost City, Scene 70, Dungeon
- Go down into the Dungeon.
- You see heads on the wall like the heads in the diary you found in the tent.
- Put the aviation fuel from the gas can into the receptacle in the top center.
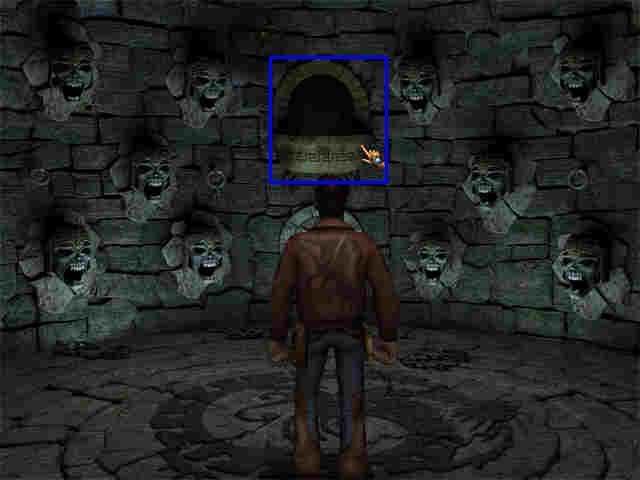
- Click on one of the heads, and Jones will say they are lamps.
- Light the lamps to match the pattern in the diary. If you make a mistake, you have to press the center circle and then start over.
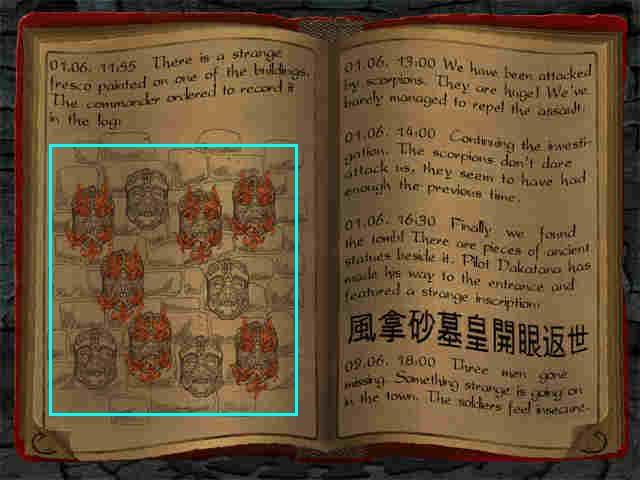
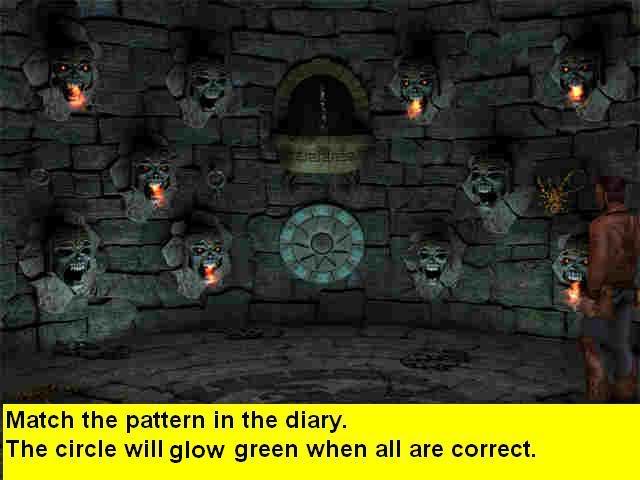
- Once you have the right pattern, the center green circle will glow green, but you can’t do anything more with it.
- Go back up to the landing area, then right to the camp, then right to the temple.
The Lost City, Scene 71, In Front of the Temple
- Remember that door you couldn’t open with the pry bar? It’s open now, and a lever has been revealed. Pull the lever.
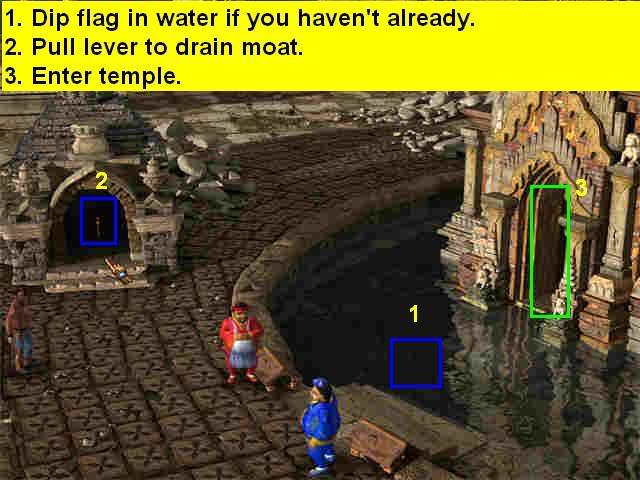
- The water in front of the Temple will go down. Walk into the Temple. The brothers will follow you.
The Lost City, Scene 72, Inside the Temple
- Talk to the brothers. They will talk about the seal getting hot. It will fall to the ground.
- Pick up the candlestick on the ground behind the brothers. This will also make it easier to see where the seal fell.
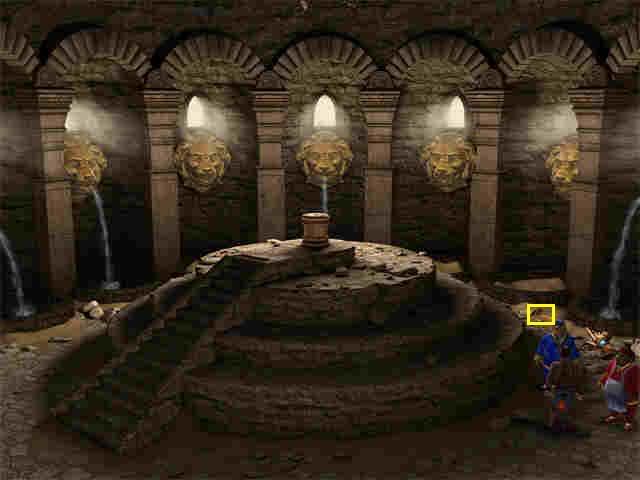
- Take the wet flag from inventory and use it to pick up the seal.
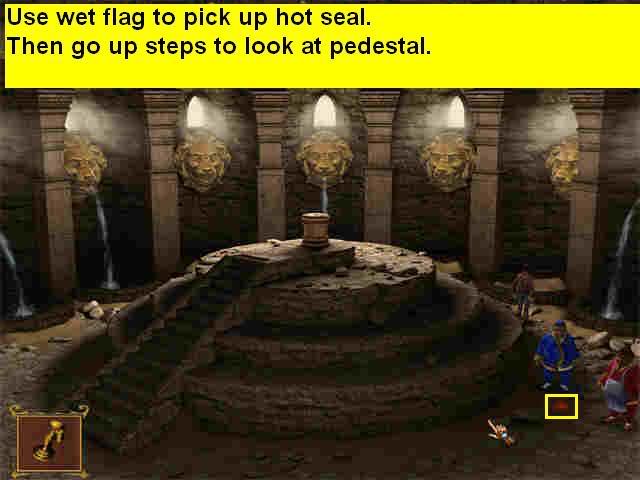
- Go up the steps to the pedestal in the center of the scene.
- Click on the pedestal, and you will see a zoom scene. There is a hole here that would fit the seal. However, you won’t be able to put it into place while you are in the zoom scene.
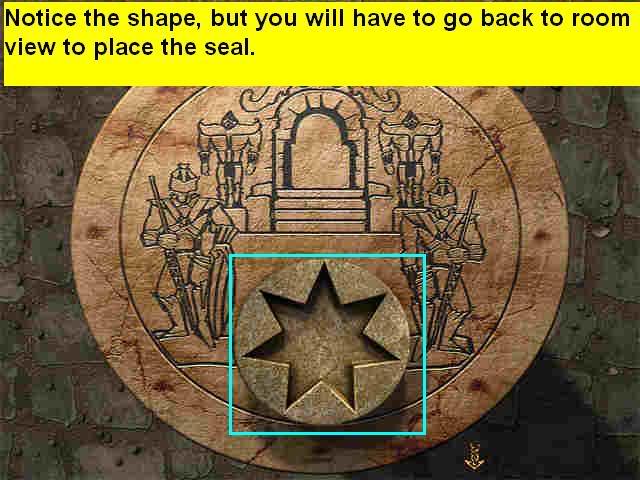
- Leave the zoom scene, then put the seal on the pedestal.
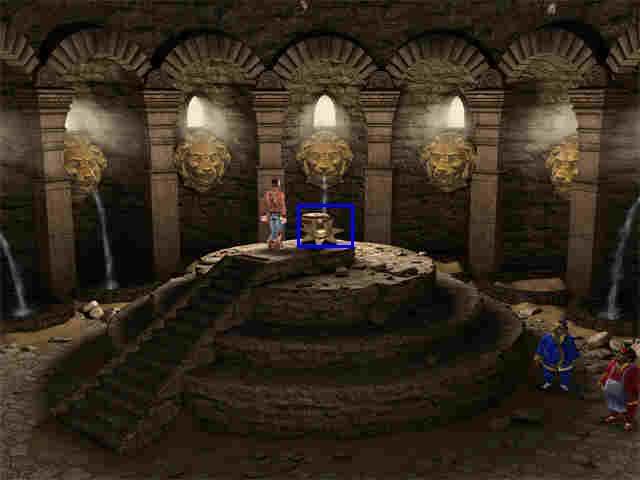
- This will activate a mini-game. You have to match the animals to the pictures around the edge. Again, this one is easier than it looks at first because there is one empty space. You can move any tile into the empty space without moving anything else, which makes it much easier to solve, so use the empty space often.
- When the mini-game is done, you will be back in room view.
- You hear a noise. There is nothing more to do here now.
- Go out of the temple, then up to the Statues on the left.
The Lost City, Scene 73, The Statues
One of the statues has come alive!
- In your inventory, combine the detonator and the bomb.
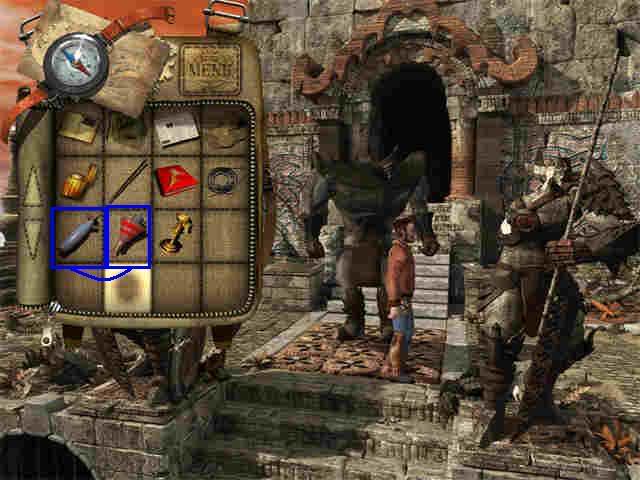
- Give the bomb to the statue. You will see a movie of the statue.
- When the way is clear, go through into the outer chamber of the Tomb..
The Lost City, Scene 74, Outer Chamber of the Tomb
- You will see that the bomb has shattered 3 stone heads that were on the wall. You have to put them back into place.
- Whenever you hover your cursor over the wall, you will see the shape of a piece. All you have to do is find that piece and click it into place.
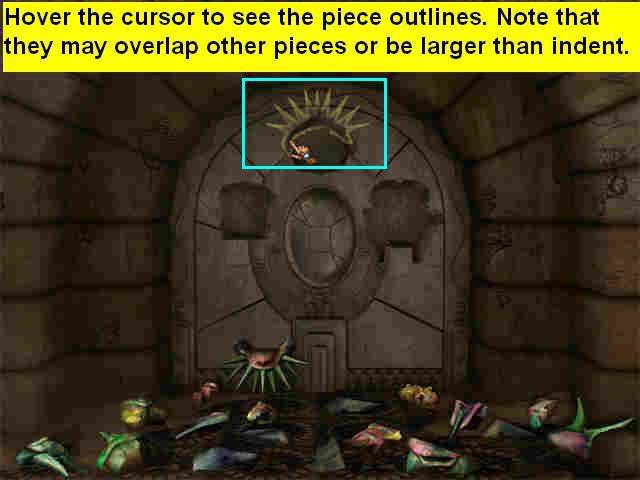
- It’s pretty easy. The only thing is that some pieces go on top of others, but there will always be a guideline to help you.
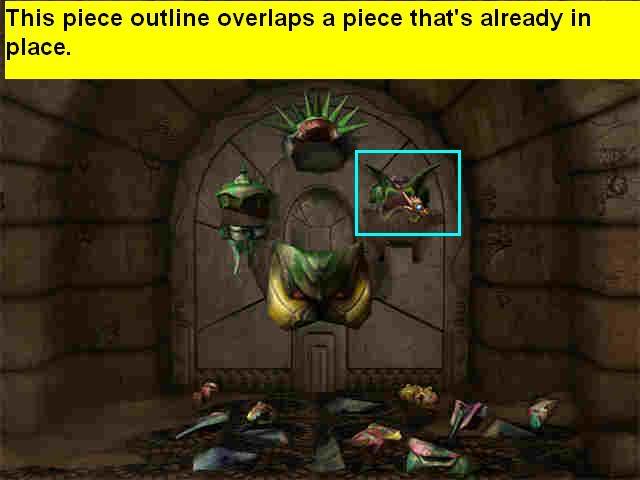
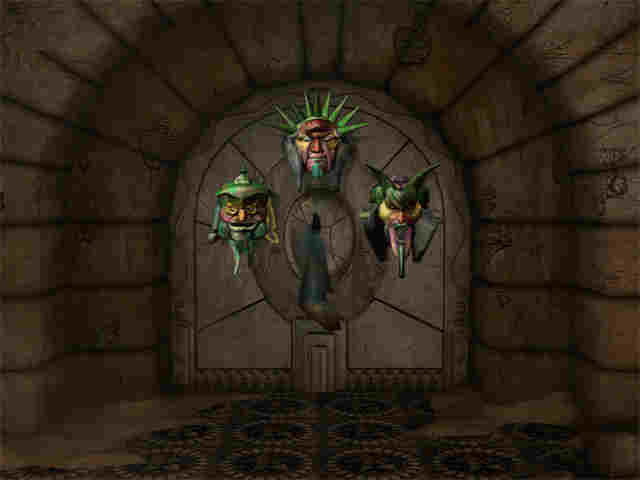
- Once the 3 heads are put together, talk to them one at a time. They will threaten to destroy you with a lightning bolt if you don’t know the secret word.
- Go ahead and look around the chamber, but all you’ll find is a rat. Pick it up.
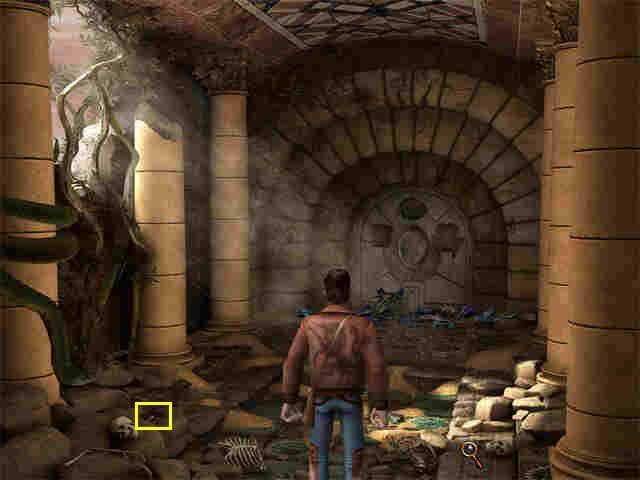
- Go back and talk to the heads. Talk to them in order left to right. However, you will find that they like to play tricks on you!
- The head on the right will try to incinerate you, but he has used up all his lightning charges on birds, so he can’t.
- A green emerald will fall to the ground. Pick it up.
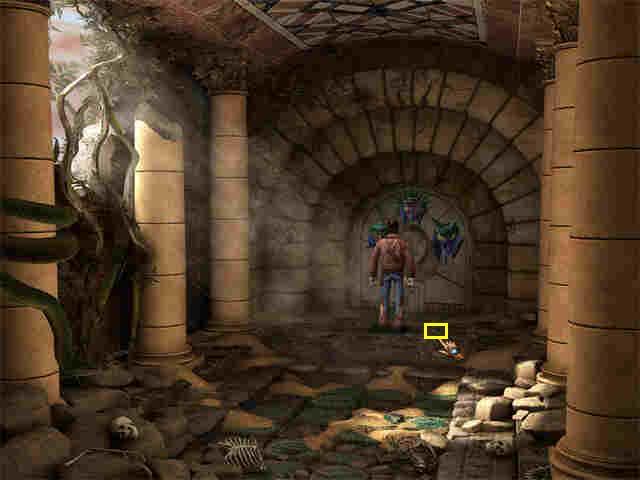
- Keep talking with the heads, left to right, until eventually they let you through.
- Go into the Gloomy Hall.
The Lost City, Scene 75, Gloomy Hall
- Mary, Capone, and Buffy are already there, but their passageway collapsed after they came through so they were trapped until you opened the main door.
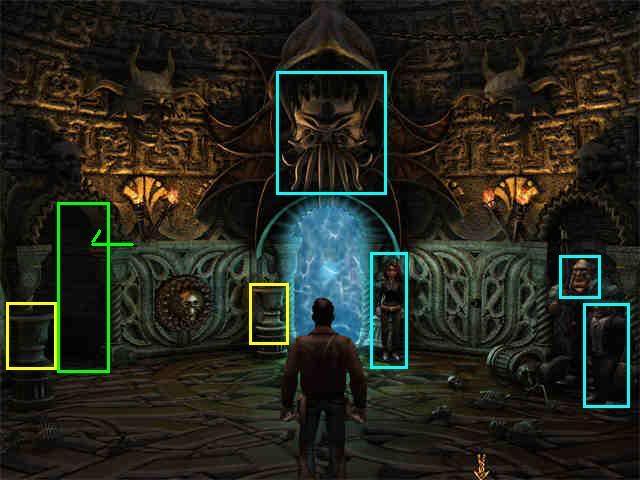
- Talk to Mary. She will say the head over the portal door looks like something from the Dragon book.
- Read the Dragon book in inventory. You will have to use ESC to close the book again.
- Talk to Capone. He will tell you that Buffy found a ruby.
- Talk to Buffy. If you sing him 3 songs, he will give you the ruby. You will now have to have many conversations with Buffy until he finally gives you the ruby.
- Look in the two urns in the scene. You will find another a topaz and a lever.
- Go through the doorway on the left.
The Lost City, Scene 76, Lever Chamber
- You will find Fuffy and Caruso. Fuffy is pulling on a lever on the wall but it doesn’t do anything.
- Look in the urn and you will find an opal.
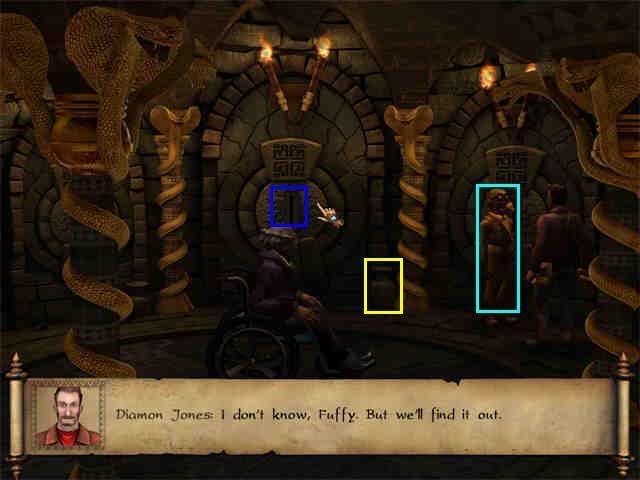
- Talk to Fuffy.
- Put your lever on the other slot on the wall.
- Pull the lever. It won’t do anything.
- Talk to Fuffy, and you agree to both pull your levers at the same time. A trap door will open, and Caruso will fall down.
- Climb down the ladder.
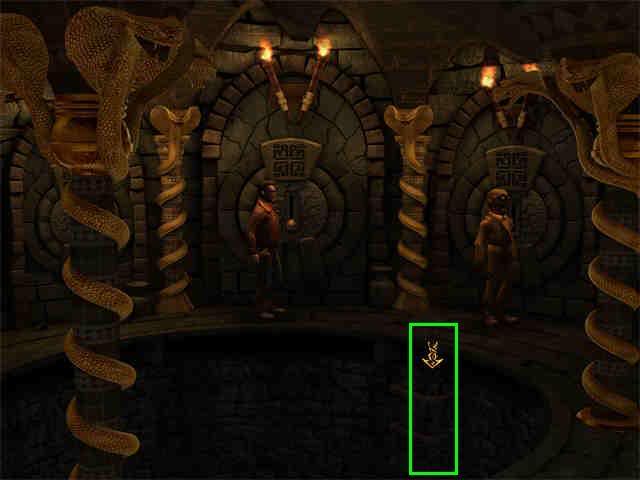
The Lost City, Scene 77, Dinosaur Chamber
- It is very dark. You will need to use your lighter. As you move it around the room, the blue jewel on the back of the cursor will glow. In the lower right is Caruso, don’t use it there. In the center is Jones, don’t use it there. Higher up on the wall is a torch. Use the lighter there.
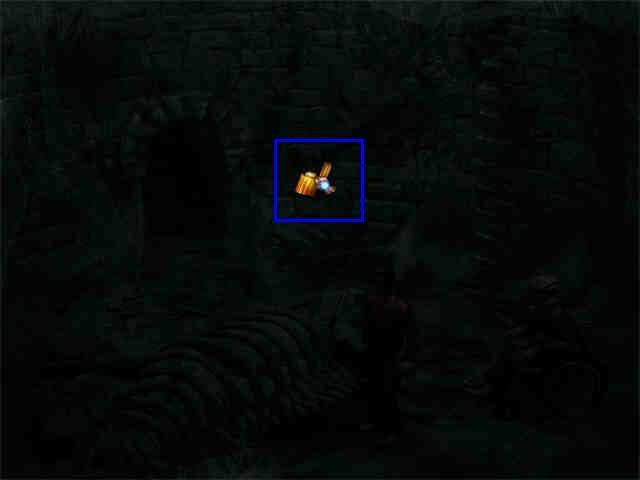
- Now you can see around the room. There is a jewel on the lower left. Collect it.
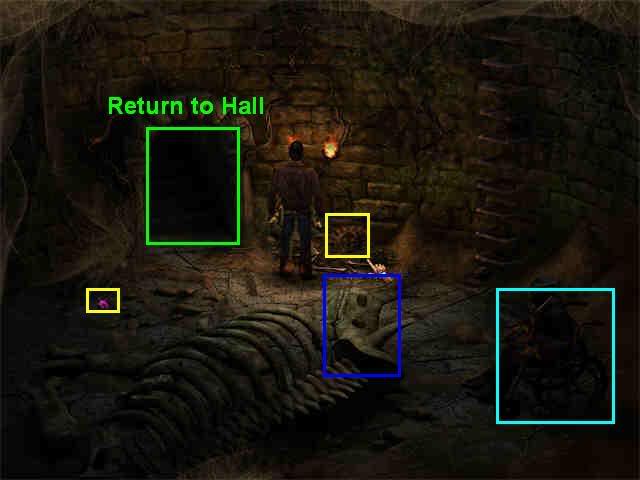
- Talk to Caruso. He is OK.
- Pick up the shield just below the torch.
- There is a dinosaur skeleton in the center. If you click on it, Jones will say he can see something in its mouth. Use the pry bar from inventory to open it and you will get a diamond.
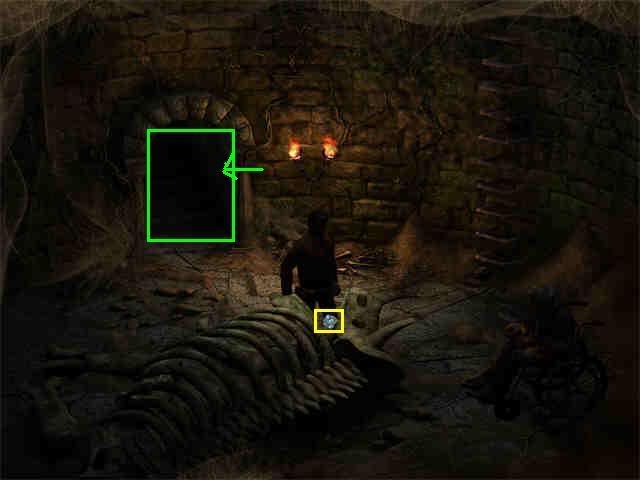
- Walk through the door on the left. This comes out into the Gloomy Chamber again, which makes no sense architecturally, but there you are.
The Lost City, Scene 78, Gloomy Hall
- If you haven’t already, talk to Mary about the Monster above the portal and she will remind you it was in the Dragon Book.
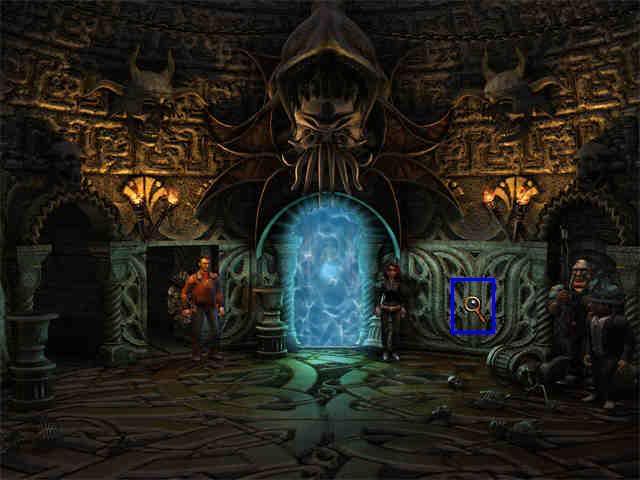
- Now hang the shield on the wall to the right of Mary, then click on it to turn it. A secret passage will open.
- Go into the secret passage.
The Lost City, Scene 79, Secret Room
- You will see a room with a skeleton on the left, a lot of scorpions, and some kind of altar in the back.
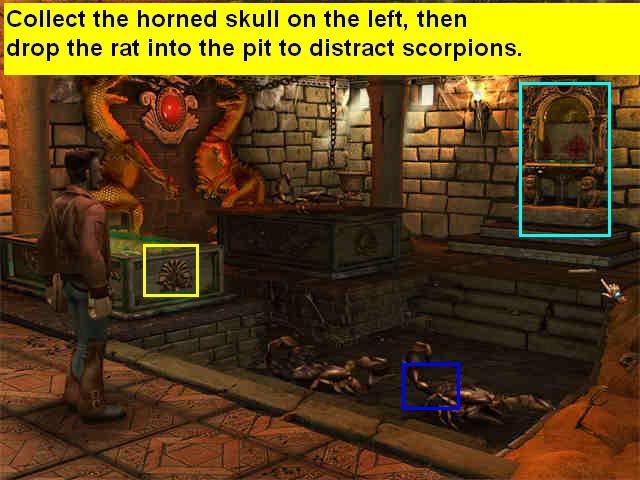
- Start by clicking on the skeleton. You will pick up a horned skull. Just click wherever the cursor on the back of the cursor turns blue.
- Open your inventory and combine the horned skull and the pry bar. You will receive the aquamarine jewel in inventory.
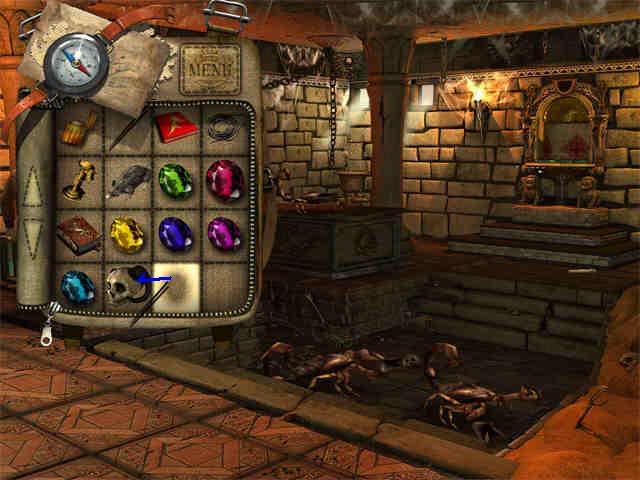
- Now you need to get over to the altar, but the scorpions are in the way. Throw the rat into the area. It will run away and the scorpions will chase it. Now you can just walk across.
- Click on the altar to do a mini-game.
- When you put your cursor on a tile, you can see its symbol in the lower right.
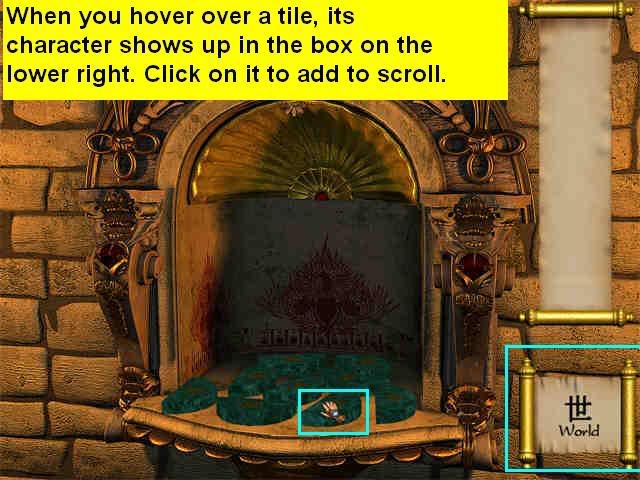
- Your task is to put all the symbols in the right order. They match the order in the diary.
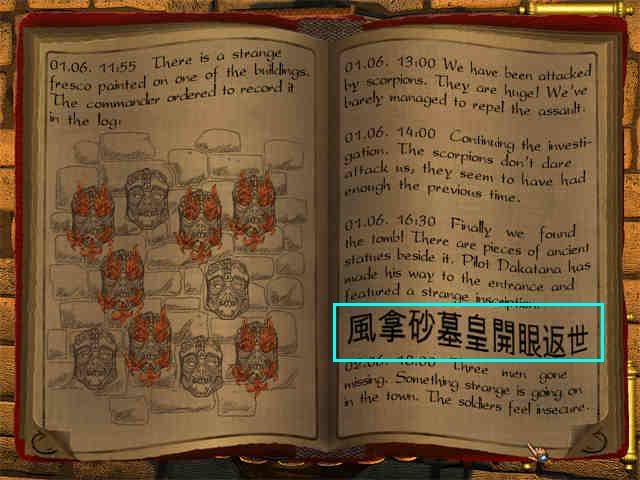
- You are building the phrase: Wind Take away Sand Tomb Emperor Open Eye Return World"
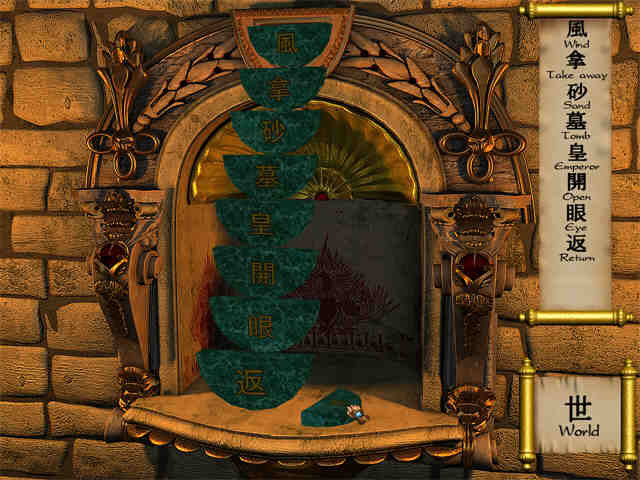
- If you get a tile out of order, they will all fall down and you will have to start over.
- Now you have to get back across the room. For some reason Jones won’t just jump from the platform on the left.
- Pick up the bone on the floor by the altar.
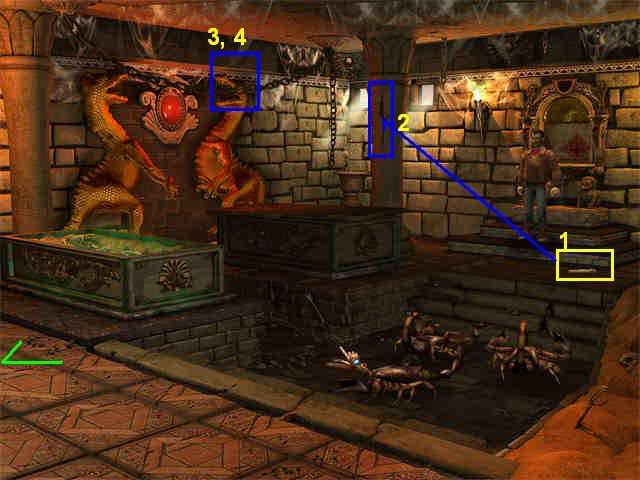
- Take the bone from inventory and put it in the crack on the column. This gives you a place to connect the chain.
- Grab the chain in the middle, just above the right dragon’s head. Jones will automatically attach it to the bone.
- Grab the chain again in the same spot, just above the right dragon’s head, and Jones will climb across. Return to the Gloomy Hall.
The Lost City, Scene 80, Gloomy Hall
- Putting together the tile phrase in the other room has created glowing steps in front of the portal.
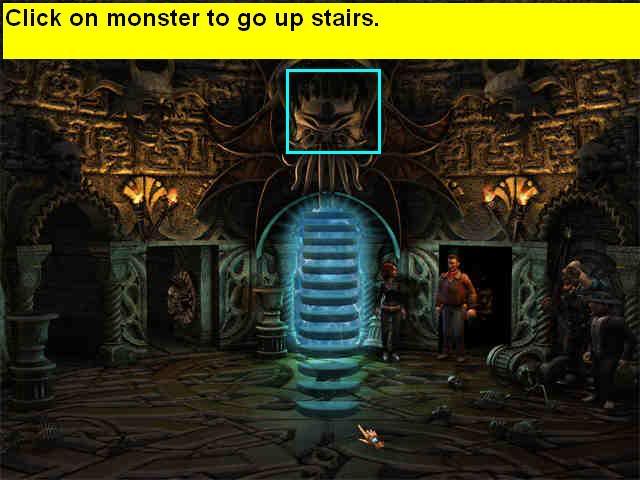
- To climb the stairs, position the cursor over the monster face until it turns into a grabbing hand, then click. Jones will climb up the stairs and you will get a zoom scene of the monster.
- Now you have to put the jewels in place to match the picture in the Dragon Book.
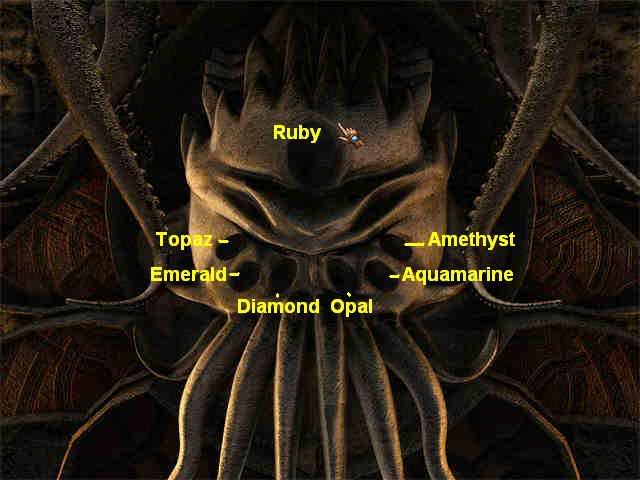
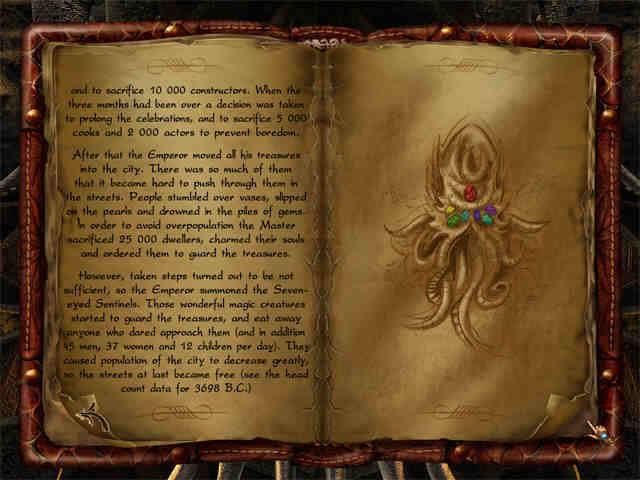
- The forcefield will go away and you can enter the tomb.
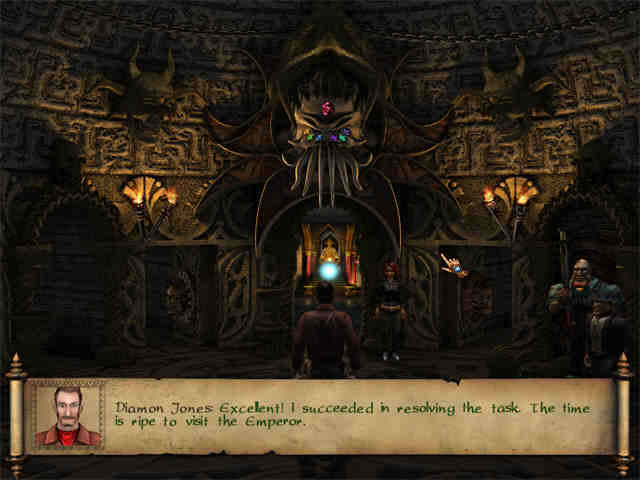
- Walk into the tomb.
The Lost City, Scene 81, Inner Chamber of the Tomb
- Mary will go with you. Notice the emperor. He is holding the Dragon’s Eye!
- To neutralize the ball lighting, combine the candlestick and the wire in inventory.
- Then click the candlestick on the lightning. It will fall down, with the wire hanging down.
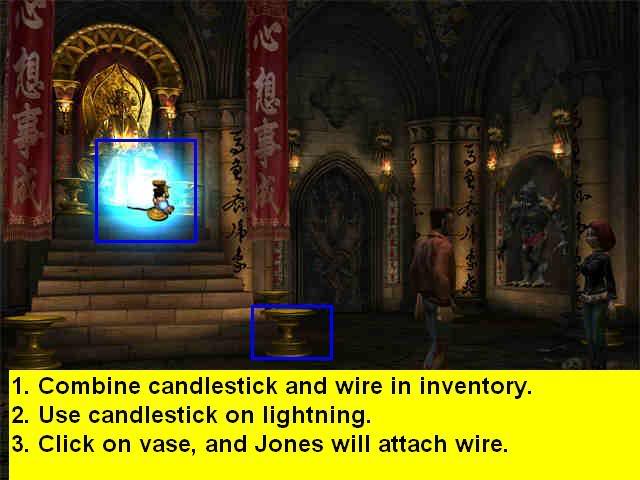
- Click on the vase on the right, and Jones will automatically attach the wire there. The lightning will be gone.
- Now take the Dragon’s Eye.
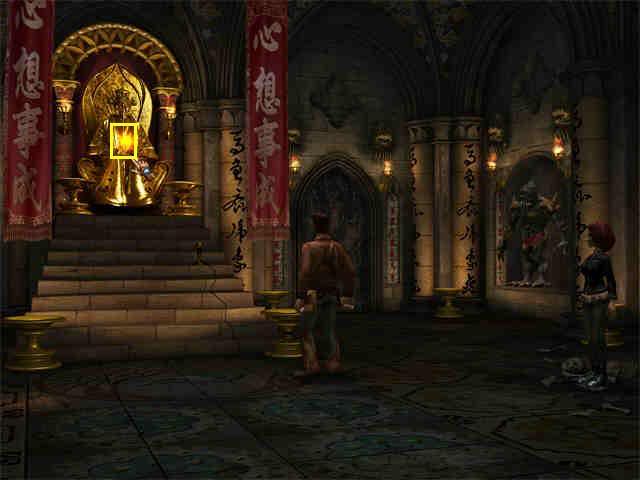
- As soon as you take the eye, the monster on the right will come to life and you will have to fight it.
- Use the left mouse key for attack and the right for defense. Your goal is weaken the monster’s health (green bar on the top right) before it weakens you (green bar on the top left).
- The bar on the bottom left shows the amount of charge left in the dragon’s eye.
- When the fight first starts, quickly hit the monster as many times as you can until it starts fighting back. This will probably be 4 or 5.
- Then use the right mouse key for defense a few times. Watch the monster carefully. When it stands fully straight is when you can attack it. If it is in a slight crouch, it is going to attack you.
- As soon as it is straight, hit it again, at least 2 times and more if you can.
- If you use this strategy, you should be able to win.
- Once you win, a movie will play. You will see Capone come into the room, take the Eye, and open a portal to Chicago.
- Diamon will be turned into a gold statue. Mary will jump through the portal after Capone to retrieve the Dragon’s Eye.
You are now playing as Mary Ocean.
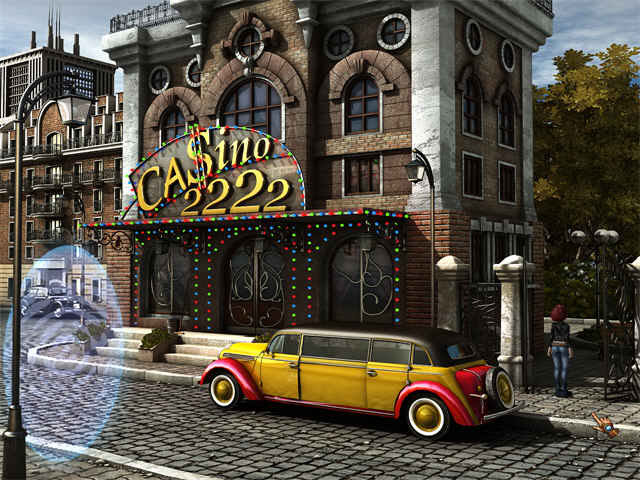
Chicago, Scene 82, Street in front of the Casino
- Talk to the man in front of the car, Shag-rock.
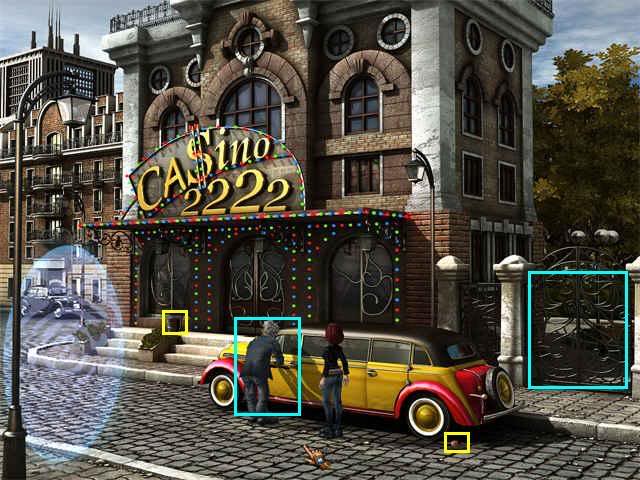
- Take the rubber pig from the front tire.
- Try to get in through the gate. It’s locked.
- Walk to the door of the Casino and collect the soap from the left side.
- Go into the Casino.
Chicago, Scene 83, Casino
- Talk to the banker under the table. He has lost his dentures.
- Pick up the dentures and hand them to the banker. They are missing two teeth.
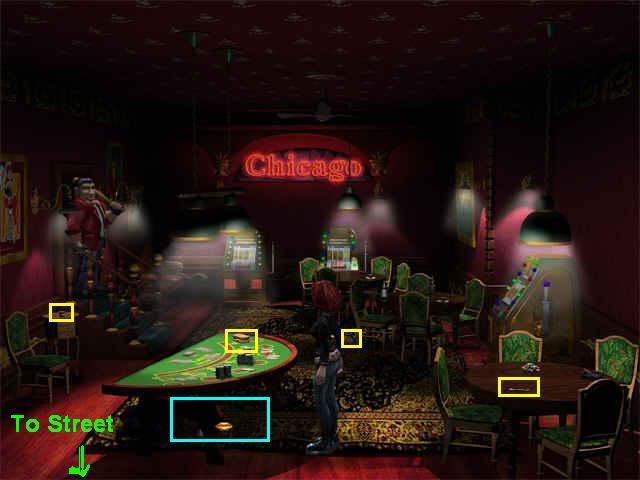
- Pick up the spoon and the tea. Combine them in inventory and discover a tooth.
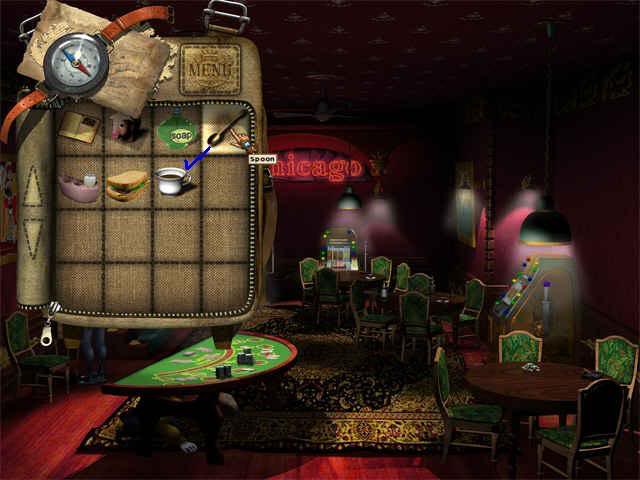
- Combine the tooth with the denture in inventory.
- Talk to the bouncer. He tells you no one can see Capone.
- Look around the room. Pick up the sandwich. Go back outside.
Chicago, Scene 84, Street in front of the Casino
- Give the sandwich to Shag-rock. He will find a tooth in it and give it to you.
- Combine the tooth with the denture.
- Go back inside.
Chicago, Scene 85, Casino
- Give the completed dentures to the banker.
- He will thank you, but decide you are too young to be in a Casino. He will give you a dollar.
- Go back outside
Chicago, Scene 86, Street in front of the Casino
- Give the dollar to Shag-rock. He will decide to go in the Casino to gamble it.
- Use the soap from inventory on the car door.
- Take the lockpick.
- Walk over to the gate. Use the picklock on the gate. I had a hard time finding just the right place to use the picklock. Finally I ended up having to walk over to the Casino, come back out, take the picklock out of inventory, and THEN click on the arrow to go into the park that appears on the gate. This caused Mary to use the picklock correctly.
- Go through the gate.
Chicago, Scene 87, Park in back of Casino
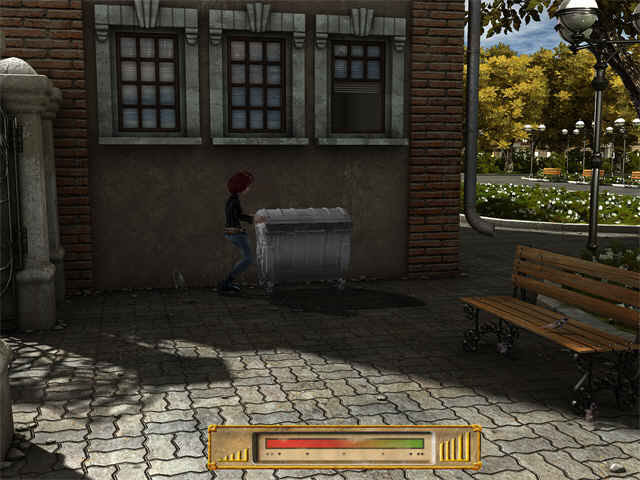
- You can see an open window up on the right, but it’s too high to reach.
- You’d like to move the bin under it, but the dog is in the way. Give the dog the rubber pig to play with, and he’ll run away to play.
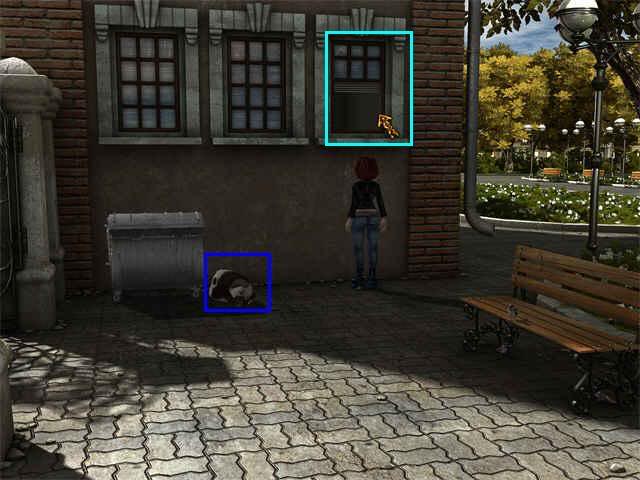
- Click on the bin to start a mini-game. There’s nothing much to it. Where you stop the arrow is how far the bin will move. If you go too far to the right, then Mary will pull it back to the left. It took me a couple of tries, but eventually I moved it in two shoves from the left.
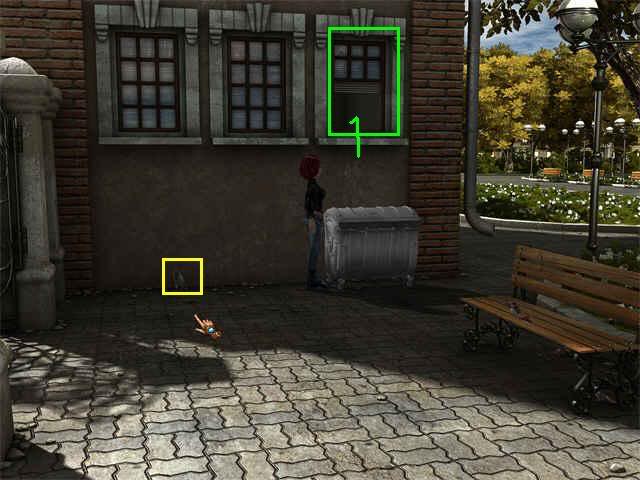
- After the bin moves, you will a glass fragment on the ground. Pick it up.
- Click on the open window, and Mary will climb up the bin and into the window.
Chicago, Scene 88, Casino Accounting Office
- Read the note on the chair. Although the note says you need to find 7 keys, there are actually only 6.
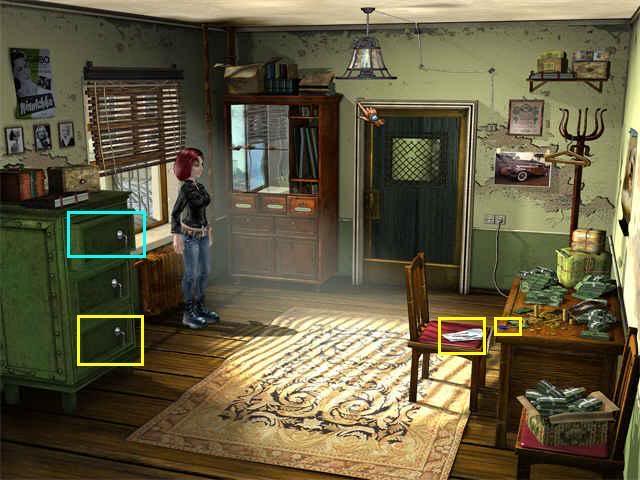
- The first key is dark blue, on the desk. Collect it.
- Now work the room from left to right. The next key is in the bottom drawer of the filing cabinet.
- Look in the top drawer of the filing cabinet. You can’t get it open, but if you click a couple of times Mary will say she sees something shiny.
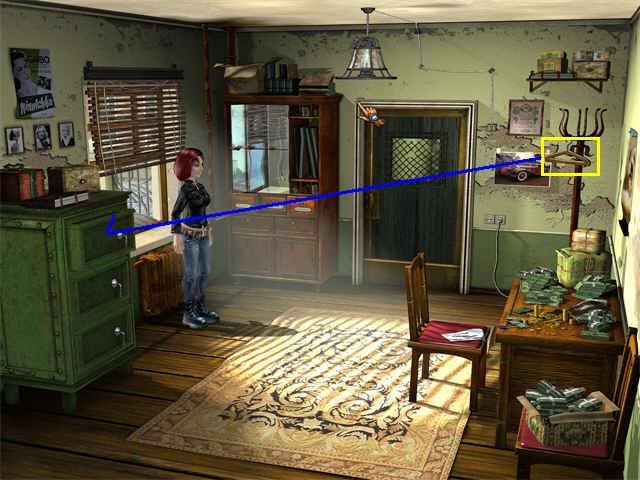
- Look around the room. There is a coat hanger on the coat rack in the back right. Go get it.
- Use the coat hanger on the top drawer of the filing cabinet to get the third key.
- Walk over to the wardrobe. There is one key in one of the top cubbies.
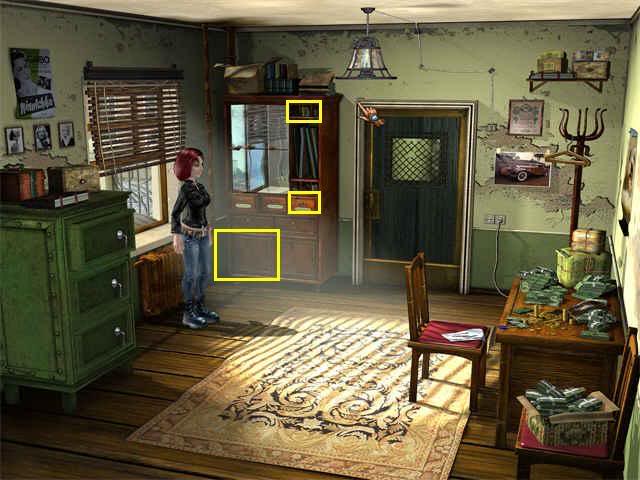
- One of the middle drawers opens. There is another key there.
- Now look at the bottom left door. I ended up actually clicking slightly to the left of the wardrobe. The door will open, and you will see a Gladstone bag.
- Take out the bag. It’s locked!
- Use the glass fragment from inventory on the bag and it will open, revealing the last key. All the keys will now jump together to form a keyring.
- You’re done in this room. Go back out the window into the park.
- Go through the park to the Street in front of the Casino.
- Go into the Casino.
Chicago, Scene 89, Casino
- Click on the left slot machine and Mary will notice it is broken.
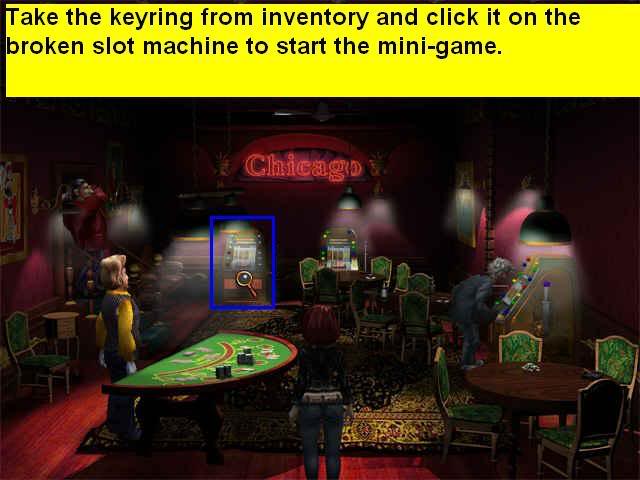
- Take the keys from inventory and click them on the slot machine and a mini-game will open.
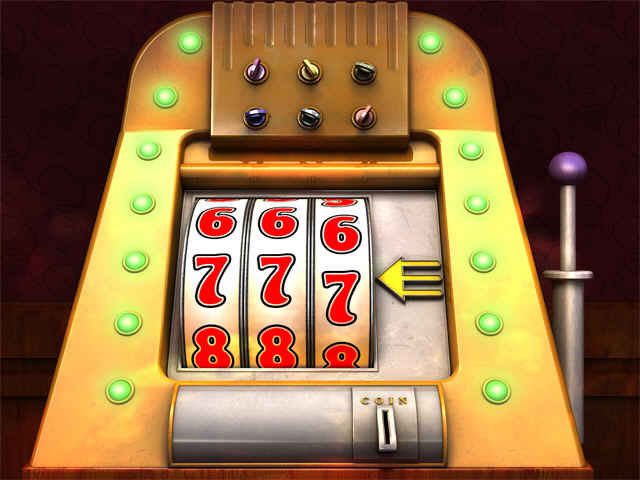
- Your task is to get 3 7’s in a row by the middle arrow. When you left-click the mouse once, the left-most ring will start rotating. Click it again to stop it. You can take as many tries as you need.
- Once you have the 7 in the right place (It won’t line up exactly, that’s OK), then your next left-click will start the 2nd ring rotating. Pay more attention now, because you are only allowed 5 clicks to get the 2nd 7 into position. If you take more than7, the whole machine will reset and you’ll have to start over.
- Once you have the 2nd 7 in position, your left clicks will control the 3rd ring. Again, you’ll get 5 tries to get it right.
- Once you have 3 7’s you will get a big jackpot.
- The bouncer will come over to examine the machine-he’s never seen a big payout before.
- Quickly run up the stairs while he’s busy with the machine.
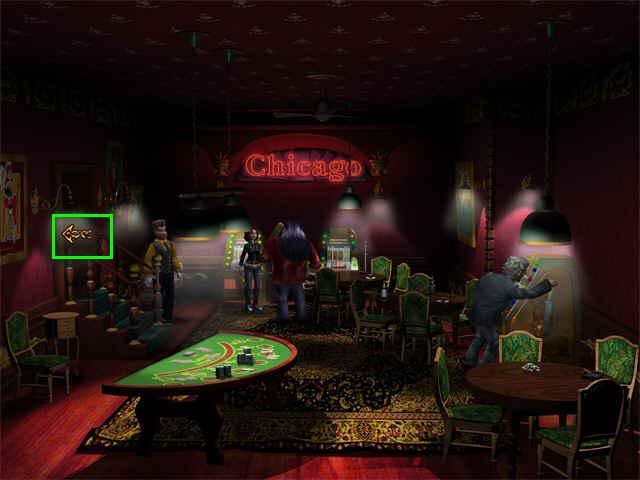
Chicago, Scene 90, Hallway
- You can see several doors. Buffy is on duty, but he is asleep.
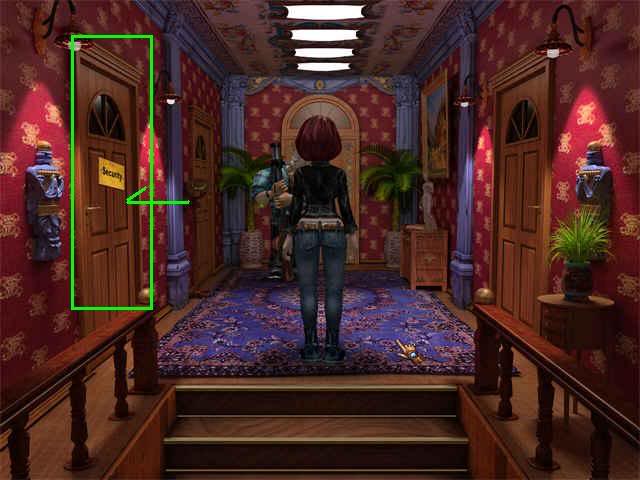
- Since I like to work a scene left to right, let’s start with the door marked Security.
Chicago, Scene 91, Security Room
- Start by clicking on the electrical box on the left. This will open a mini-game.
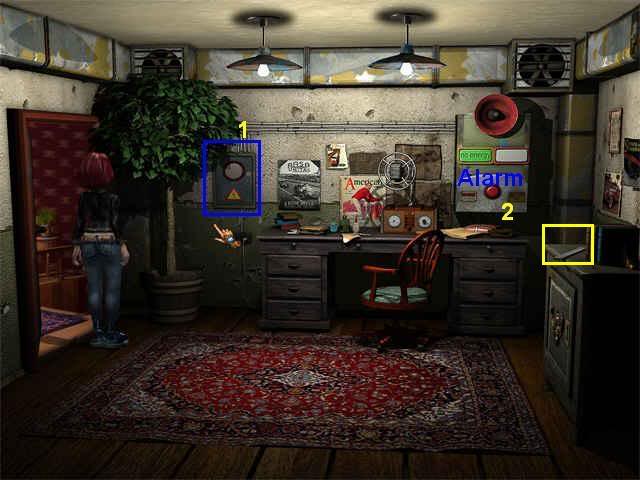
- In this game you must build a continuous wire connection from the left side to the ride. The initial arrangement of tiles is random, but the ending solution is always the same.
- You click once to start the game. I like to click outside the wires on the diagram on the left so I don’t get confused.
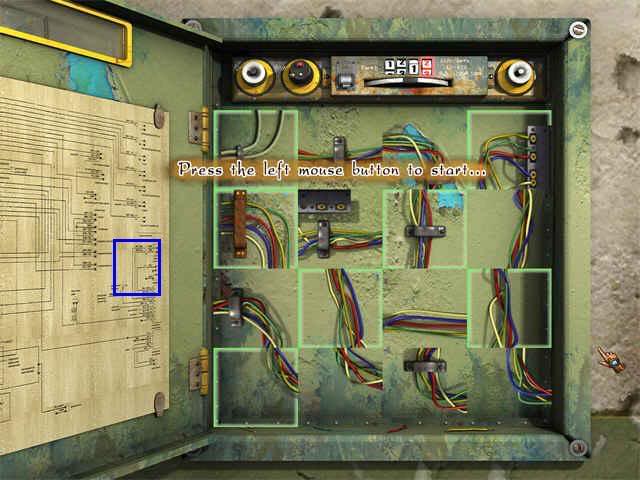
- After that, when you left click on a tile you can rotate it.
- Click on two tiles to swap them, but the game will not let you swap every pair of tiles.
- For me, there were a couple of key tips. First, the blue splotch on the right is background, it will not move even if you swap tiles in that spot.
- Second, look at the arrangement of the metal pieces. There are 3 horizontally across the middle, some vertical ones scattered around, and a big silver one for the far right. These were the most helpful to me in deciding which tiles to swap.
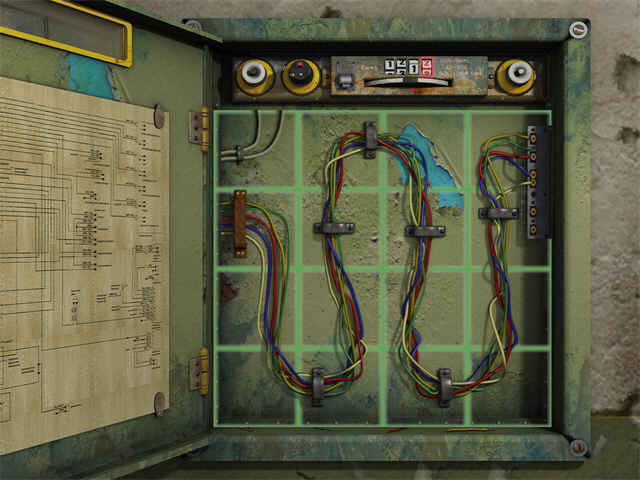
- If you don’t make it before time runs out, you’ll just start over, but the starting arrangement will be random.
- Once you complete the mini-game, you will be back in room view.
- Push the alarm button on the right. The siren will sound, and Buffy will run into the room. Mary will automatically hide.
- When Buffy is standing with his back to you, grab the ruler off the cabinet on the right and then exit back into the hallway.
- Now enter the fancy door at the end. This goes to the boardroom.
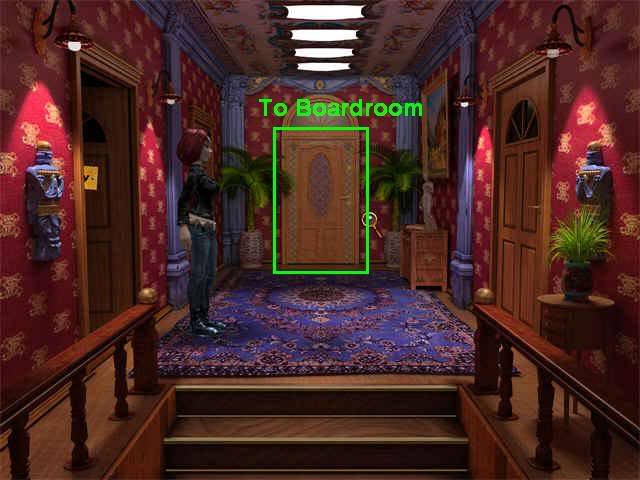
Chicago, Scene 92, Board Room
- The phone is ringing. Answer it. It is Capone, who thinks you are Buffy.
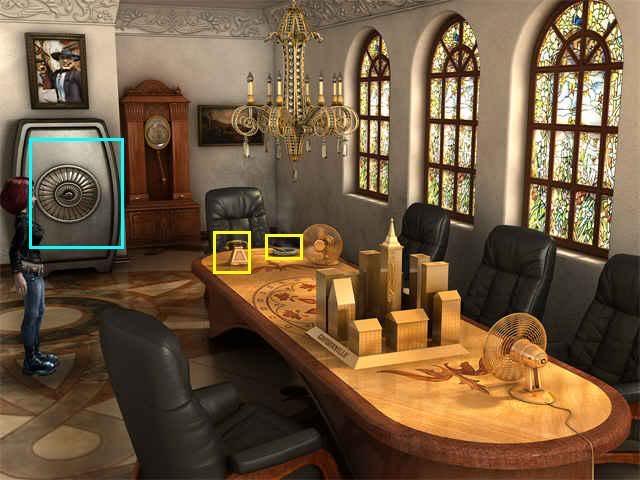
- Pick up the cigar from the table.
- Look around at everything.
- Back to the Hallway.
- Enter Ellie’s room (2nd door on the left).
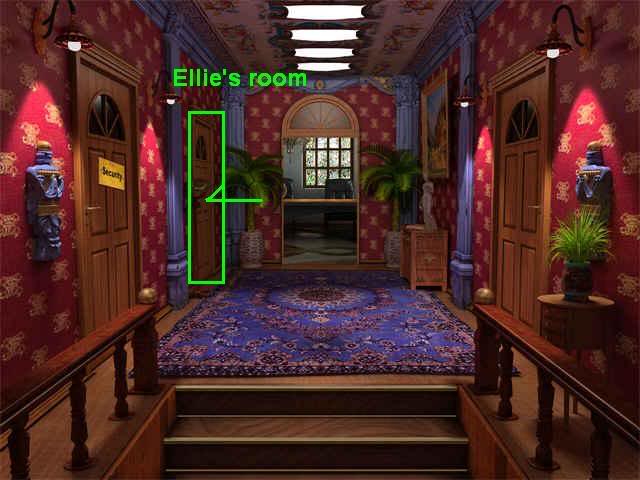
Chicago, Scene 93, Ellie’s Room
- Talk to the little girl, Ellie. She tells you it is her birthday.
- Pick up the candles from the dresser on the left.
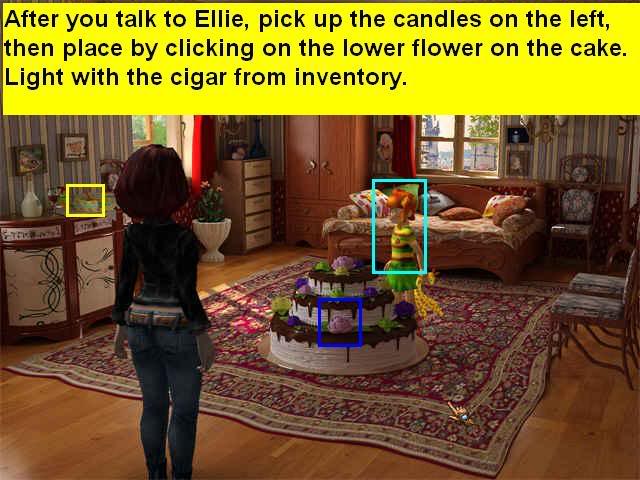
- Put the candles on the cake. This only worked for me when I positioned the candle in front of the large flower lower down on the cake.
- Light the candles with the cigar.
- Ellie will make a wish and blow them out.
- Talk to her again. You need to cut a piece of the cake.
- Use the ruler from inventory to cut the cake.
- Give the cake to Ellie.
- Talk to Ellie again. Eventually she will give you the key to the strongbox.
- Go back out to the hall, then into the Boardroom.
Chicago, Scene 94, Boardroom
- Use the key on the strongbox, which is actually an elevator.
- To go down, position the cursor until you get the gold down arrow, then click. Mary will step into the elevator.
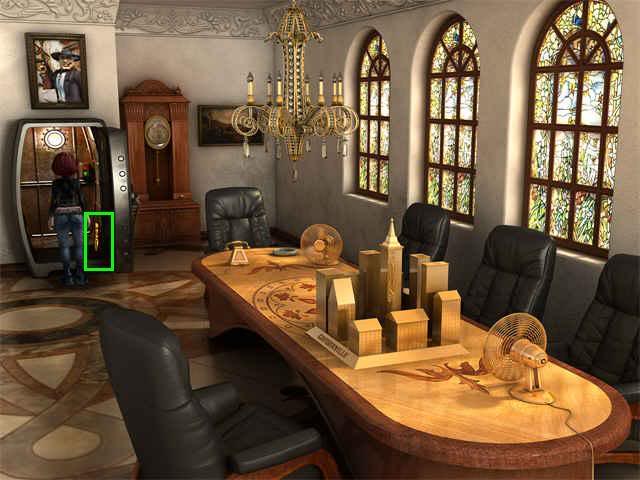
Chicago, Scene 95, Vault
- Talk to Capone. This will start a mini-game. Mary will automatically pick up the mirror. It’s pretty easy. Don’t bother to look at Capone at all-just look at Mary. If the energy bolt is near her body, use the left mouse button. If it’s near her head, use the right mouse button.
- Once Capone is defeated, he turns to gold and drops the Dragon’s Eye.
- Pick up the Dragon’s Eye from the floor and go back up the elevator.
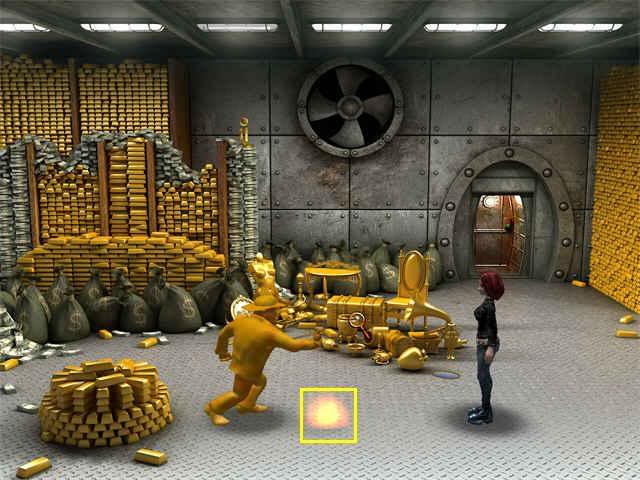
- Go through the Boardroom into the Hallway.
Chicago, Scene 96, Hallway
- The bouncer is there. Talk to him. He won’t let you through.
- Take the Dragon’s Eye from inventory and touch the Bouncer with it. He will turn to gold.
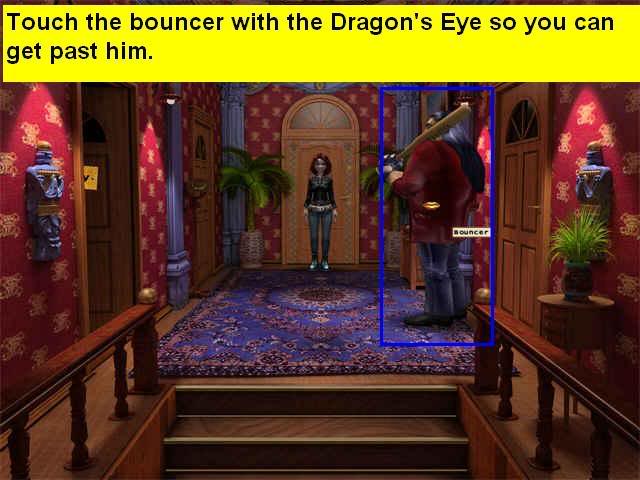
- Go down the stairs and out through the Casino to the street.
Chicago, Scene 97, Street in front of Casino
- Go through the magic portal.
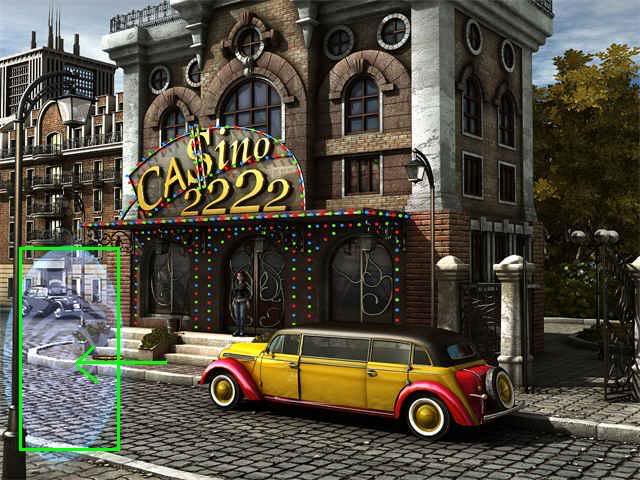
- This will take you back to the Lost City.
- Watch the ending movie.
“;
More articles...
Monopoly GO! Free Rolls – Links For Free Dice
By Glen Fox
Wondering how to get Monopoly GO! free rolls? Well, you’ve come to the right place. In this guide, we provide you with a bunch of tips and tricks to get some free rolls for the hit new mobile game. We’ll …Best Roblox Horror Games to Play Right Now – Updated Weekly
By Adele Wilson
Our Best Roblox Horror Games guide features the scariest and most creative experiences to play right now on the platform!The BEST Roblox Games of The Week – Games You Need To Play!
By Sho Roberts
Our feature shares our pick for the Best Roblox Games of the week! With our feature, we guarantee you'll find something new to play!All Grades in Type Soul – Each Race Explained
By Adele Wilson
Our All Grades in Type Soul guide lists every grade in the game for all races, including how to increase your grade quickly!


