- Wondering how to get Monopoly GO! free rolls? Well, you’ve come to the right place. In this guide, we provide you with a bunch of tips and tricks to get some free rolls for the hit new mobile game. We’ll …
Best Roblox Horror Games to Play Right Now – Updated Weekly
By Adele Wilson
Our Best Roblox Horror Games guide features the scariest and most creative experiences to play right now on the platform!The BEST Roblox Games of The Week – Games You Need To Play!
By Sho Roberts
Our feature shares our pick for the Best Roblox Games of the week! With our feature, we guarantee you'll find something new to play!Type Soul Clan Rarity Guide – All Legendary And Common Clans Listed!
By Nathan Ball
Wondering what your odds of rolling a particular Clan are? Wonder no more, with my handy Type Soul Clan Rarity guide.
Diamon Jones: Amulet of the World Tips Walkthrough
Check out our strategy guide for Diamon Jones: Amulet of the World. General Tips & Tricks To move Diamon, simply click on the area to which you'd like him to move. To make Diamon run instead of walk, double-click. This will prove to be a very helpful feature later. To access/hide the Inventory, press the “I” key To Save/Load/Pause the game, press the ESC key. If you'd like to keep playing, select continue. You can save at any time, and there are 10 slots available for savi…

a:1:i:0;a:2:s:13:”section_title”;s:38:”Diamon Jones: Amulet of the World Tips”;s:12:”section_body”;s:44329:”
Check out our strategy guide for Diamon Jones: Amulet of the World.
General Tips & Tricks
- To move Diamon, simply click on the area to which you’d like him to move. To make Diamon run instead of walk, double-click. This will prove to be a very helpful feature later.
- To access/hide the Inventory, press the “I” key
- To Save/Load/Pause the game, press the ESC key. If you’d like to keep playing, select continue. You can save at any time, and there are 10 slots available for saving. You may also save over previous files. Auto-save is not a feature in this game.
Walkthrough
Part I: Cairo
Tavern

- -Talk to Ahmed El Kashim, the Bartender, and he’ll inform you he doesn’t give out drinks on credit
- Go to the next screen and talk to John Milton. He’ll ramble about secrets, but won’t trust you unless you can get him a bottle of good wine.
- Give the Coin to the Bartender, and he’ll give you Rancid Oil
- Use Rancid Oil on Diamon Jones while near the bar, and he’ll rub it all over the floor. A pompous man will come by and slip on it, distracting the Bartender.
- Pick up the Wine on the shelf in the inner bar while he’s distracted
- Proceed to the next screen and give the Wine to John Milton. He’ll tell you more about his frightening ordeals before passing out cold.
- Try to exit the Tavern, and the plump aristocrat will inform you that you still need to pay up on some debts. He’ll be more forgiving if you steal a document from the museum for him. Jones agrees and exits.
- Street

- Outside, proceed to the right and talk to the Craftsman. He lost his tools. To find them, go down to the bottom of the screen (with the arrow) to arrive at the front of the Tavern again.
- Look in the Melon Cart and the Broken Barrel to the far right to find the Chisel and the Sledgehammer respectively
- Return/Give the items to the craftsman. He’ll thank you and not only will you be able to use his workshop and tools anytime, you’ll also receive a Ruby
- Pick up the Rope by looking at the box near the shop.
- Proceed to the top of the screen, towards the museum. Walk through the courtyard and enter.
- Museum
- The guard’s asleep. Look in the bottom leftmost case to find a very useful tool. The guard will wake up and chase you out of the museum.

- Back in the courtyard, proceed to the left, near the museum wall. Look at the flagpole and the open window to find the only way inside. Move back to the right to enter the full courtyard screen again.
- Look in the brush on the left side of the screen, and pick up the Crowbar
- Use the Crowbar on the cracked masonry near the front corner of the museum to get Rocks
- Exit the museum area and return to the street
- Street
- Enter the Craftsman’s Shop (get close to where he was standing)
- Pick up the Sledgehammer and Chisel
- Place the Rocks in your inventory into the large metal tray
- Use Sledgehammer & Chisel on the Rocks to get Rocks with holes
- Pick up the Rocks with holes. In your inventory, combine them with the Rope.
Museum
- Proceed up the street to return to the museum again, and this time go back to the area with the flagpole and the window
- Use Device (Ropes with rocks) on the flagpole
- A small minigame will ensue when you click on the Rope to climb. When the left arrow icon appears, press the left mouse button. When the right appears, click the right button.

- You’ll find yourself in an office. Look at the Painting on the right, and you’ll notice it has hinges. Click on it again to open it and find a safe. But you don’t know the combination… Press ESC to leave the puzzle area.
- Look at the Trashcan to pick up fragments of a note. Assemble them to find out the safes combination: 6>4<9>7<3>2<
- Click on the safe. Right click 6 times, left click 4, right click 9, left click 7, right click 3, and left click 2 to open the safe. Look inside and pick up the Key and the Map (the Map is sitting on top of the pile of books at the top)
- Walk to the left and into the next room: pick up the Hammer on the floor.
- Return to the office and use the Hammer on the flimsy desk lock to recover your Gun
- Go back to the storage area where you picked up the hammer and use the Key on the door (you may have to look at the door first)
Tavern
- A small cutscene will ensue. The plump businessman is assigning two hooligans to plot against Diamon. The game will assign you to control Billy Smith.
- Exit the tavern and proceed towards the museum.
Museum
- Once there, talk to Andy Rain
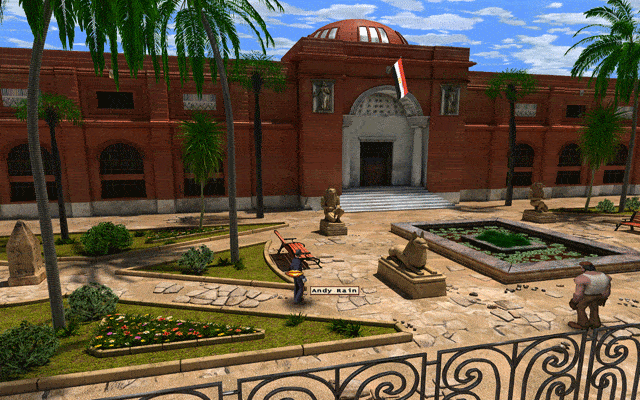
- There’s a shootout, and now you’re in control of Diamon again.
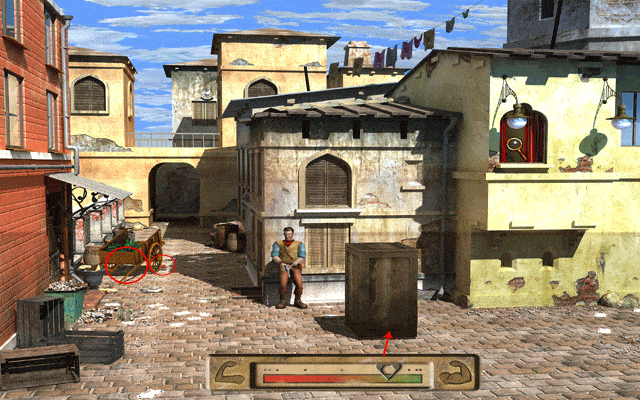
- Move the Watermelon Cart, but it doesn’t move! Look at the wheel and find there’s a stone holding it up. Click on the stone so the cart will move, and knock Billy Smith out for the count.
- Look at the window, and then click on the Crate. A minigame will begin. Select/aim for the yellow area of the strength bar to push the crate into the exact right spot to access the window. If you mess up the first time though, you can still push the box into position. The red area is a weak push, and the green is a strong one. Remember, you want to position the box under the window.
Bedroom
- Inside, you’ll find a girl named Fatima, who is locked up and unhappy at her circumstances, being forced to marry an old and ugly banker. Diamon offers to take her away with him, and they’ll fly away together.
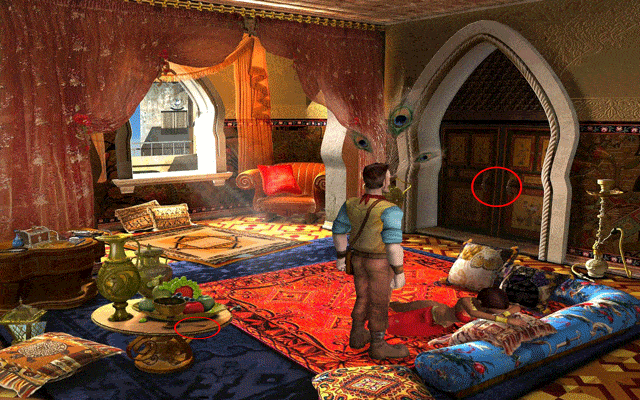
- Look at the table and pick up the Hairpin
- Use the Hairpin on the door, and a minigame will ensue.
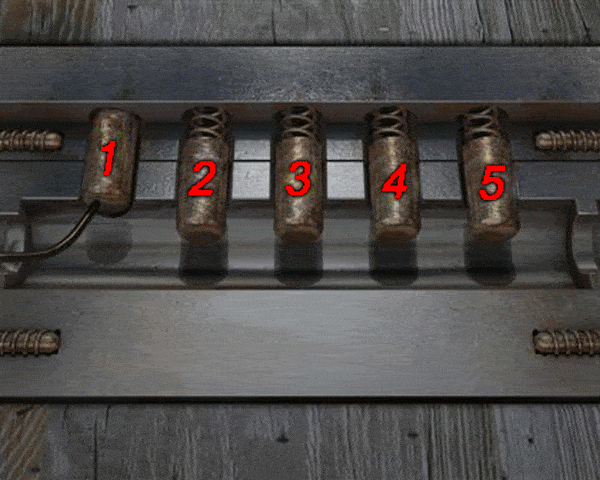
- There are 5 tumblers in the lock. Numbered 15 from left to right for your convenience, click the following sequence: 1,3,2,5,4. The two will escape.
- Hangar
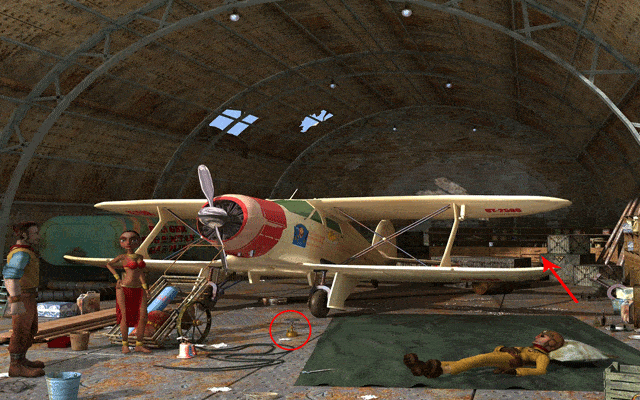
- Unfortunately, Diamon’s pilot friend, Fuffy Wilson, is drunk on the floor. Walk to the back of the hangar and examine all the drawers, picking up Coffee, Coffeepot, Sugar, Ammonia, and Matches. Also pick up Cup of Water, which is on the third shelf down in the middle, and return to the front of the hangar.
- Use Ammonia on Fuffy. Well that didn’t work…
- Use/Place the Coffeepot on the burner, which is at the left end of the blanket Fuffy’s laying on. Use Sugar with Cup of Water and use it on the burner. Use Matches on the burner, and Diamon will automatically add Hot Coffee to his inventory. (Note: be patient: you may have to experiment a little bit or move Diamon away from the burner several times to get this to work, since when he does something with the burner, he stands in front of it, so if you try to add another item to the burner, often the game thinks you’re trying to apply it to Diamon himself).
- Use Hot Coffee with Coffee Cup, and then use it on Fuffy. Even worse, now Fuffy falls fast asleep. Frustrated, Diamon flies off himself, leaving Fatima behind.
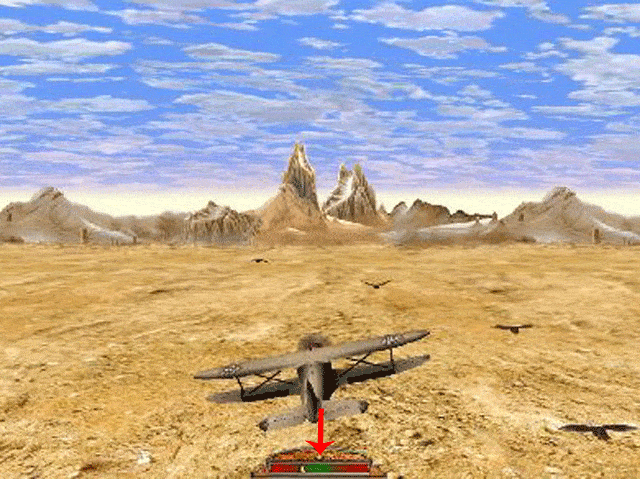
- While in the plane, you’ll play a little minigame. You’ll have a bar at the bottom of the screen, and the goal is to keep the plane level and in the green area. If the plane is tilting right, use the left mouse click (and hold it until it reaches the green area). If the plane is tilting left, use the right mouse click to even it out. Successful, Diamon will parachute to the next location. (What happens to the plane…?)
Part II: The Pyramids
Outside the Pyramid

- You’ll find Diamon’s standing next to an open tent, with lots of trinkets and supplies inside. Pick up the Flask, Bottle of Kerosene, Screwdriver, Lighter, and the Rod.
- Take a look at the Suitcase, and a minigame will begin. Press the buttons in the proper sequence for unlock it. (Important Note: This is a randomized sequence. For us, the solution was 4,5,2,1,3. Another possible solution is 1,4,2,5,3, however there may be more.) If the correct button is pressed, it will stay down and not pop back up.
- Click inside the suitcase three times to pick up the Rope and two Emeralds
- Look in the knapsack sitting in the back of the tent and pick up the two Clay Tablets
- Exit to the left and you’ll find yourself in front of a tomb.
- Use the Rod on the hole in the panel on the left. Once inserted, click on it again to move it and reveal a hidden tablet puzzle in the stone in front. Looking at it closer, some pieces are missing.
- Use the Emeralds with each of the Clay Tablets in the inventory.
- Use the Screwdriver on the eyes of the Sphinx above the tomb door to collect two Sapphires. (You may have to look at it a few times first)
- Use the Sapphires with each of the Clay Tablets in the inventory.
- Use the Ruby the Craftsman gave you earlier on the Clay Tablet that still has one gap in it.
- Use each of the Clay Tablets on the tablet stone puzzle on the ground. The panels/tablets need to be put together in a certain order. This is the order:
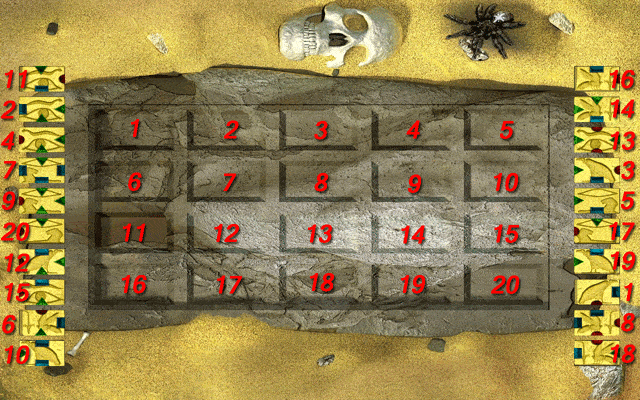
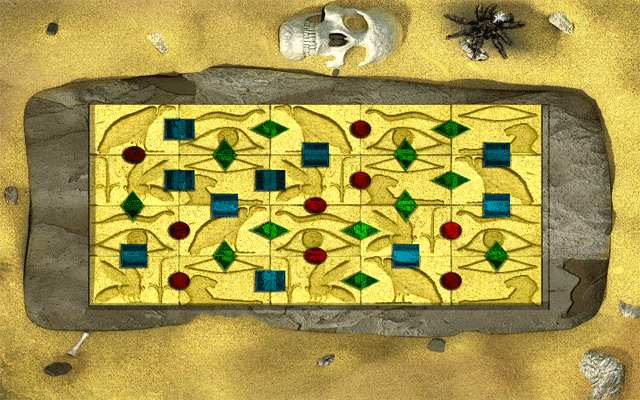
Entrance
- The door opens. Enter to find a woman named Mary Ocean, who’s been trapped inside the tomb for two days. Look at the torches.
- Pull/Select the middle torch, the left one, and then lastly the right one. A light will appear, shining on the floor with a Ruby
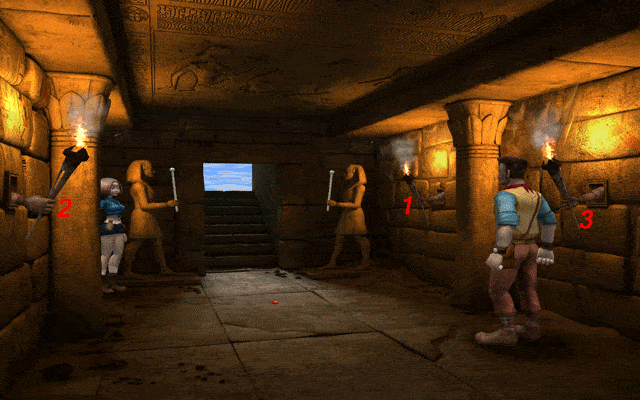
- Pick up the Ruby, and look at the guards standing on either side of the doorway with the metal rods in their hands
- First Room
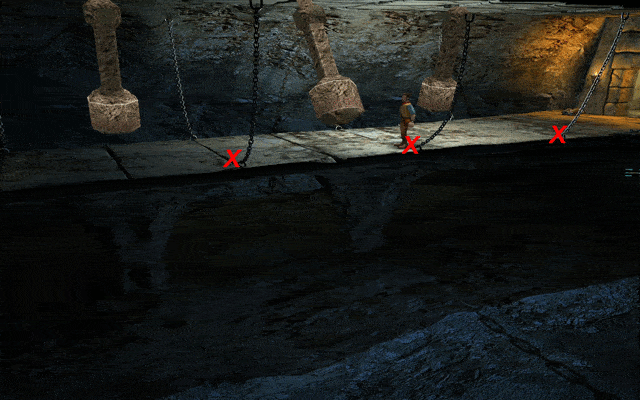
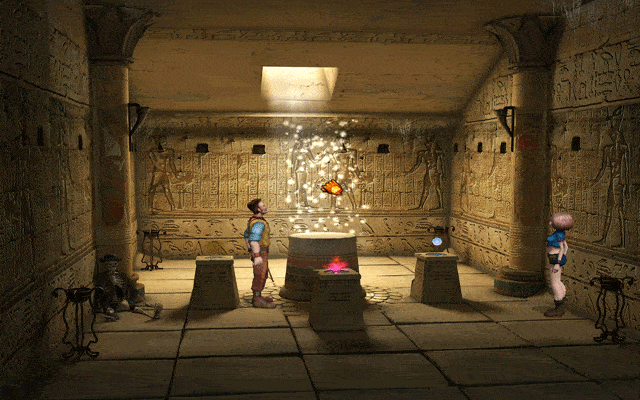
- Proceed to the next room. Uhoh, you may remember this place from the opening scene of the game. We’ll have to get past them. Doubleclick to make Diamon run.
- Use the chains hanging on either side of the bridge (marked by an X) as a reference for your start and stop points, and run when the pendulum has reached its highest point on one side, and is about to swing back.
- Tip: Don’t run down the middle! Stay to the far end of one side of the walkway. This will buy you more time.
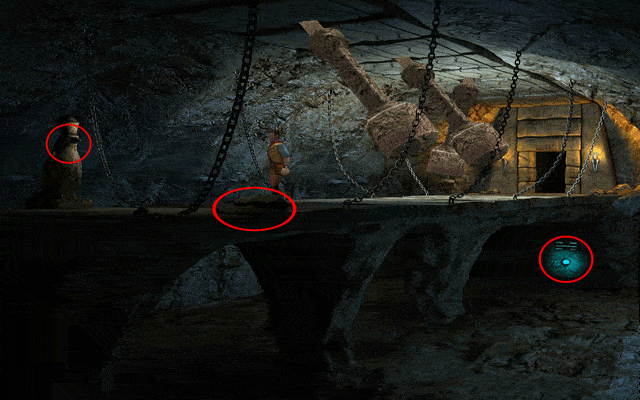
- Look at the bird statue. You may have to do this a few times before Diamon realizes there’s a switch in the eye, and presses it to stop the pendulums.
- Directly across from the bird statue, another statue once stood, but is gone. Use the Rope on the little of what’s left.
- Climb down and pick up the Sapphire shining brightly near where you entered.
- Use Flask on the fresh Spring Water that flows when you remove the Sapphire
- Climb back up to the bridge and continue left to the Second Room
Second Room
- The Second Room has an elaborate mechanism with missing levers. Pull the right and then the left torch respectively.
- Return to the tomb entrance and pick up the Lever that each statue guard is holding. Proceed back to the Second Room
- Use the Levers on the mechanism. Click on the panel to open a minigame.
- In this minigame, you have a series of 7 buttons. Left or right clicking on them causes Diamon to either pull or push the lever respectively. Using the letter and number system for the buttons provided below (AC and 14), use the following strategy:
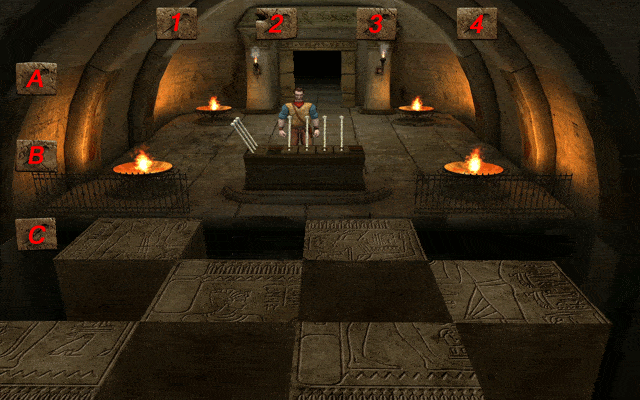
- Left click 1, 2, and C
- Right click B, B, 3, 1, and B
- Left click B. The bridge is now complete. Pick up the Topaz in the middle and continue to the Third Room
Third Room
- Use the Sapphire on the rightmost pedestal, and then use the Flask of Water (you may need to look at the various pedestals a few times before Diamon will set the stones)
- Use the Ruby on the middle/front pedestal, and then use Kerosene. Use the Lighter on the Kerosene.
- Use the Topaz on the leftmost pedestal.
- Go back to the tomb entrance and outside. Pick up Sand, which you’ll find on the left side of the tomb entrance.
- Go back into the tomb. Mary’s moved. Proceed to the final room.
- Use Sand on the leftmost pedestal with the Topaz, and an Amulet will appear. Click on the Amulet to pick it up. A cutscene ensues…
Part III: London
Pub
- Well this is familiar. You’re playing the part of Billy Smith again. Pick up the Dice on the left side of the bar.
- Note: Save now! You will need it if you lose the upcoming minigame!
- Talk to the Sea Dog, who’s sitting at the first table. After a brief confrontation, use the Dice to challenge him to a match.
- This minigame is all about rolling the dice, and getting as close to a total of 30 points as possible without going over. If you go over, you lose. Once you feel comfortable with your point total of rolling (i.e. 26 points), select “Pass” and the Sea Dog will roll. If he gets more points than you without surpassing 30, he wins. If he goes over, you win. If you lose to the Sea Dog the once, you’ll be even. Twice, he takes your gun. Three times, your ammunition. See? You don’t want to lose all that, you need it, which is why it’s important to save with the ability to reload without having lost your entire inventory! Once you win Money from the Sea Dog (equal to winning the first time), you don’t have to play him again.
Main Street
- Leave the Bar. Outside, talk with the Constable, who knows Diamon’s whereabouts. Give him the Money you won from the Sea Dog as a bribe to get more information.
- Talk to Andy Rain
- Walk down towards the Hotel and try to open the door, only to find it locked.
Inside the Hotel
- Take control of Diamon shortly before. Walk to the left to have a conversation with Mary: she’s taking the amulet to Tibet to restore order to the world and leaves.
- Look on the bureau by the door to find a note Mary left, urging you to join her and apologizing.
- Walk back to the bedroom, and look out the window. Billy Smith is approaching. Go back to the living room and leave through the same door as Mary to enter the corridor.
- Take a look at the door. Mary took the key with her. Walk back to the living room and pick up the Candlestick, which is sitting on the dining table.
- Walk back to the corridor and use the Candlestick on the door
- Enter the bedroom and look at the large Trunk. Diamon’s gun is inside, but Mary left a load of artifacts on top. Click on them to open a minigame:
- The goal is to move all the boxes with the artifacts onto the floor. You can put them on the bench, but not for long/not many, or they’ll fall and break. You can’t put a bigger box on top of a smaller box for the same reason. Labelling the bench A, the trunk B, and the floor C, as well as the boxes top to bottom 16, make the following moves: 1A, 2C, 1C, 3A, 1B, 2A, 1A, 4C, 1C, 2B, 1B, 3C, 1A, 2C, 1C, 5A, 1B, 2A, 1A. 3B, 1C, 2B, 1B, 4A, 1A, 2C, 1C, 3A, 1B, 2A, 1A, 6C, 1C, 2B, 1B, 3C, 1A, 2C, 1C, 4B, 1B, 2A, 1A, 3B, 1C, 2B, 1B, 5C, 1A, 2C, 1C, 3A, 1B, 2A, 1A, 4C, 1C, 2B, 1B, 3C, 1A, 2C, 1C
- Pick up the Gun fron the trunk
- Look at the window: it’s the only way out, but it’s too high
- Go to the living room and pick up the Table Cloth
- Return to the bedroom and pick up Bed Sheets. Combine Bed Sheets and Table Cloth in the inventory, and use Rope on the bedpost. (bottom righthand corner of the bed). Click on the rope to climb out.
Hotel
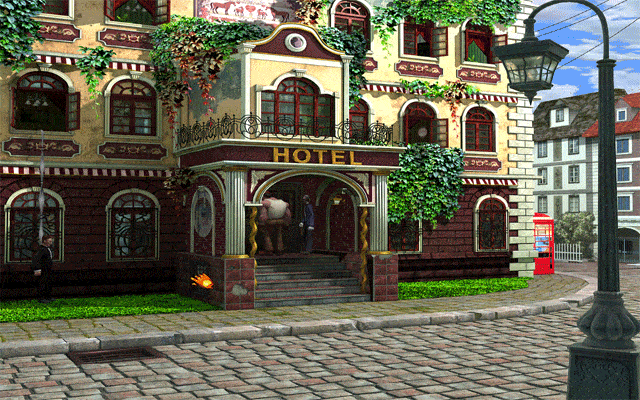
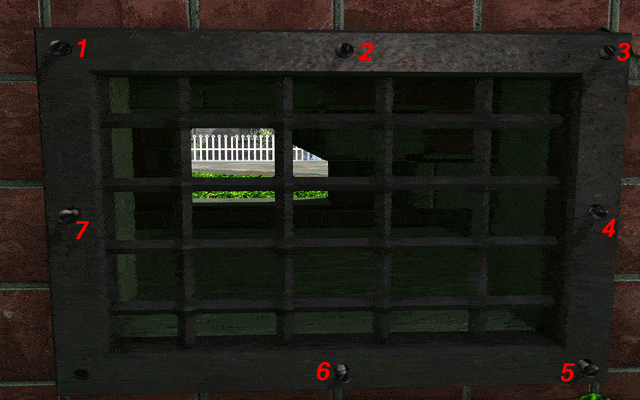
- Outside, click on the grating on the frontside of the Hotel. A minigame will begin. Remove the screws in the proper order to open the grate. If you click on a screw and red lights appear, put it back and try a combination until you don’t get the red lights. The sequence is randomized, but our proper sequence was 7, 2, 4, 5, 3, 6, 1 according to the diagram below:
Pub
- Head toward the Main Street. You’ll encounter Mary, who missed the last boat. Diamon has agreed to find a schooner. Enter the Pub.
- Talk to Fuffy Wilson. He’s still angry with Diamon for what happened to his plane.
- Talk to the Sea Dog. You may have to talk to him a few times to trigger the Shooting Gallery minigame.
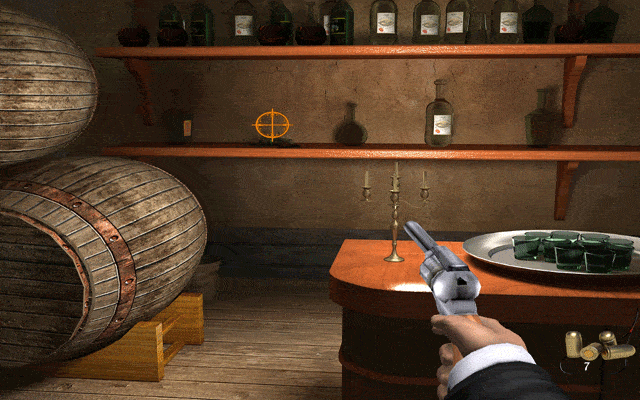
- Aim with the mouse and shoot. You goal is to shoot the bottles on the bottom shelf. There are 5 bottles and 8 bullets for each round, with each progressive round becoming more difficult. Win all five to win the captain’s services. If you lose, challenge him again.
Landing Place
- Outside, walk up to the Landing Place
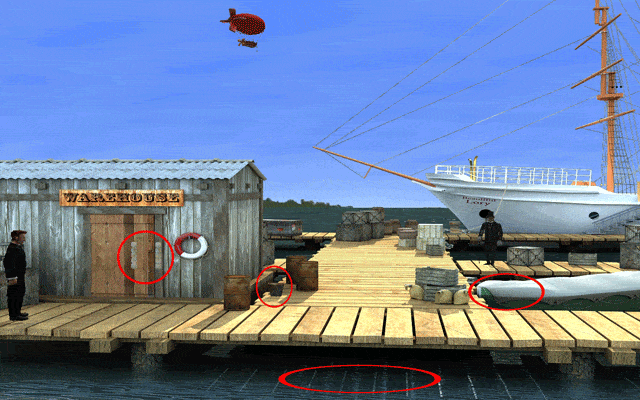
- Look at the covered boat, and also under the tarpaulin. You’ll find the Boat Hook
- Talk to the Gentleman, and he’ll inform you that he’s lost his wallet. Also walk up to the boat and talk with the Sailor. He’s not feeling too well.
- Look at the boxes in the foreground to find the Gentleman’s Wallet. Diamon will try to get it, but his hands are too big. Use the Boat Hook on the boxed to retrieve the wallet.
- Return to the main landing area and give the Wallet to the Gentleman and he’ll give you his prized Silver Razor
- Pick up the Bucket and combine it with the Boat Hook. Use the combined items on the sea water at the bottom of the screen. Go back to the Schooner area and use the water on the Sailor.
- You’re not leaving yet! Go back to the main landing area and enter the Warehouse. Use the Boat Hook on the boxes inside to start another minigame.
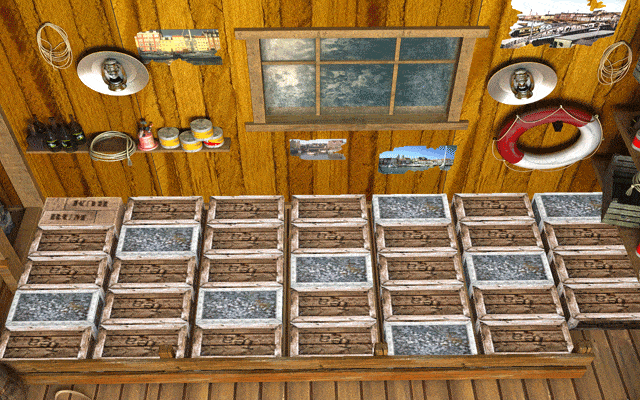
- Slide the box from one end to the other. Grey boxes are concrete, so you can’t move them. When you’re finished, pick it up and return to the Sailor.
- Give the box of Rum to the Sailor. But you’re still not leaving!
- Use the Silver Razor on the coil of rope holding the ship to the dock and talk to the Sailor again.
- Return to the Pub and talk to the Captain, then go outside and talk to Mary. The two of you are finally on your way!
Part IV: Tibet, the Village and Mountains
Village Entrance
- Talk to the Guide out front. He won’t take anyone into the mountains until his girlfriend agrees to marry him. Enter the house and talk to the Tibetan Girl.
- Take the Rusty Scissors from the center of the table
- Go outside and talk to the Guide again.
Side Street
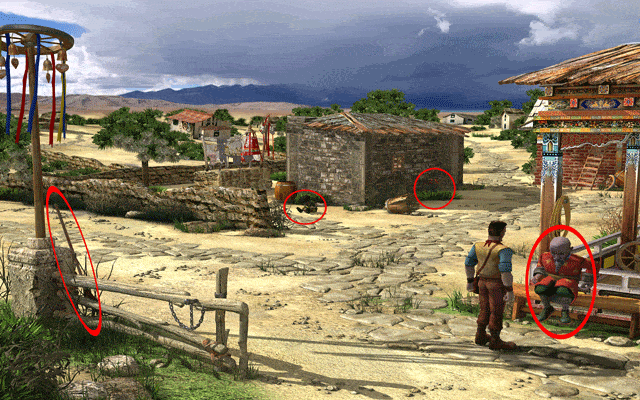
- Proceed left to the side street, and talk to the Village Man. He used to be a craftsman. Give him the Rusty Scissors and he’ll sharpen them for you.
- Pick up the Broom which is located beneath the prayer wheel with the colorful ribbons.
- Look at the flowers near the building in the center of the screen. Use the Scissors to cut them and add them to your inventory.
- Continue forward (up) to the next screen and the area with the Merchant’s Shop. Look at the suit and try to take it. Talk to the Merchant, but it’s not for sale. Go back to the side street.
- Talk to the small boy near where you got the flowers. He’ll agree to take the suit while you distract the Merchant.
- Go back and talk with the Merchant. Once the boy has taken the suit, return to the side street and talk to the boy to get the Suit
Village Entrance
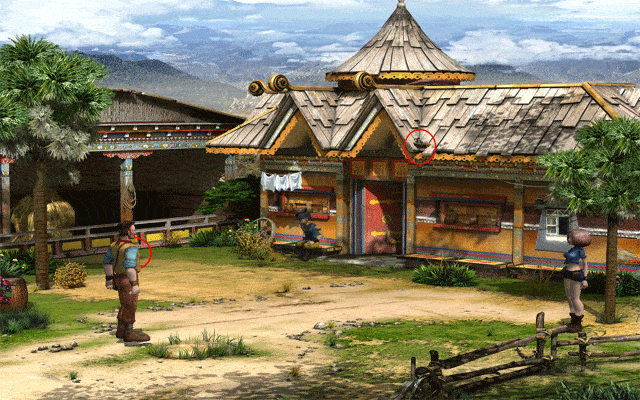
- Return to the village entrance. Notice the Bird’s Nest on top of the roof.
- Take the bag of Grain in front of the far fence, and use it on Diamon to set grain for the bird.
- Use Broom on the bird’s nest to cause it to fly towards the grain and drop the Ring you need.
- Give the Ring, Suit, and Flowers to the Guide, and he’ll agree to take you to the temple.
- In the next area, talk to the Guide. He’ll go no further, being superstitious and fearing evil spirits. The bridge is gone and boulders block the path.
Mountain Path
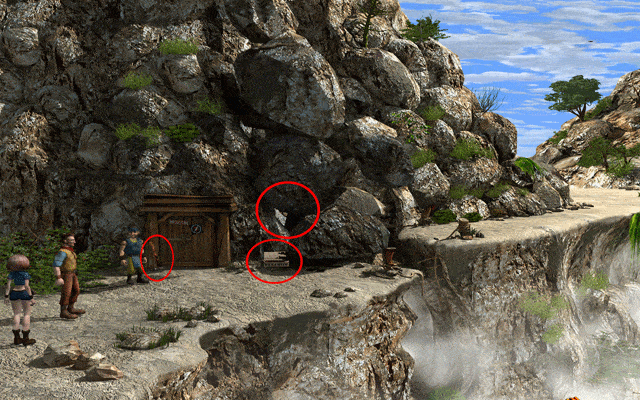
- Pick up a stick of Dynamite and combine it with the Lighter
- Throw the Lit Dynamite at the boulders. If you’re not fast enough, he’ll throw it into the ravine instead. If this happens, just repeat the process until done correctly.
- Pick up the Hammer to the left of the mine doorway, and the Guide will leave.
- Cross the newlycreated bridge and continue along the path.
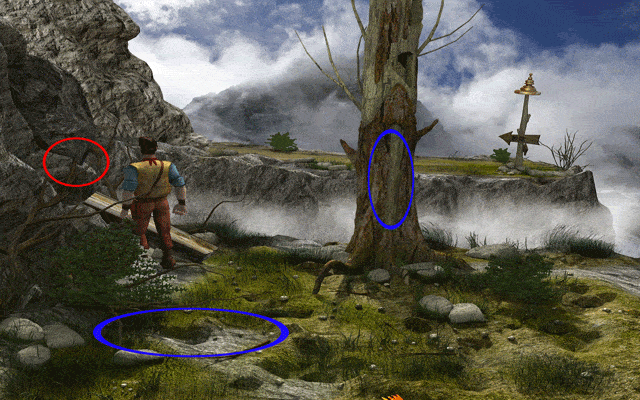
- In the next area, you’ll see a Log. Look at it and then pick it up.
- Attempt to pick up the dried tree, but it’s not going anywhere. Pick up the Wedge on the tree.
- Look at the loose stones on the left. Use the Log under the unstable rocks, and then use Wedge under the unstable rock as well. Use the Hammer on the Wedge to knock over the dried tree.
- Click on the fallen tree to cross the gap in a minigame. Use the right and left mouseclicks to keep Diamon balanced. The exact same principle as the airplane minigame earlier in the game applies here. Once you’ve crossed the gap (likely after several attempts) successfully, you’ll find yourself in a new area.
Part V: Jungle and the Monastery
Jungle Ruins
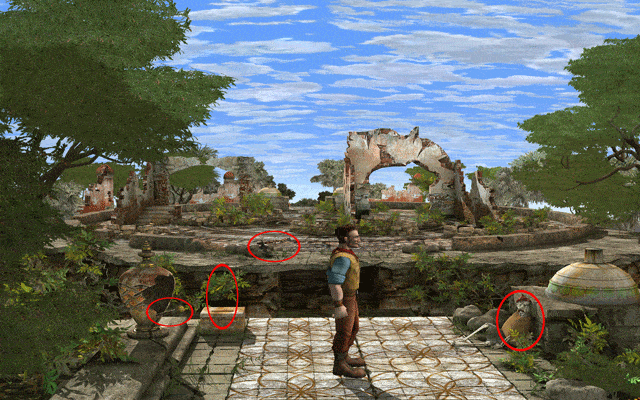
- Look at the broken vase, and pick up the Lever lying nearby. Use the Lever on the pedestal hole, and click on it to start a new minigame.
- Use the left and right mouse clicks to steer the bridge. The goal is to align it perfectly so you can get across. This may take several attempts before done right, but remembers, it’s like the other balancing minigames.
- Once the bridge is extended, pick up the Lever again. Walk across the bridge and pick up the Axe, taking note of the skeleton near the entrance, and continue into the jungle.
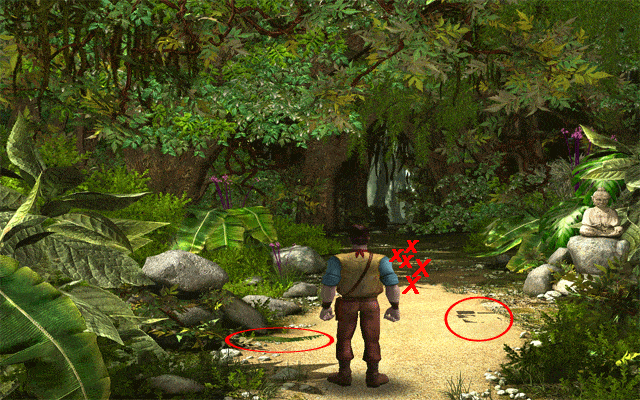
- Take a look at the sandy road: there’s something buried underneath. Pick up the Palm Frond lying on the ground, and use it to sweep away the sand.
- Pick up the Tiles. Consequently, throw each one onto the path ahead (marked by an X). They will activate traps, and by doing so, allow you to proceed safely.
Monastery Gate
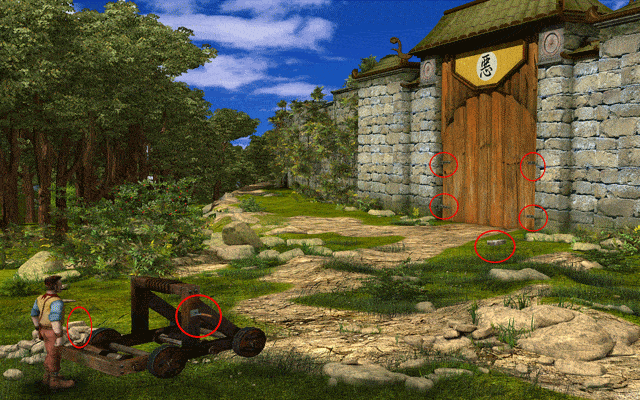
- Look at the catapult: parts of it are missing. There’s a Knife holding a Note attached to the catapult. Look at and pick up both.
Mountains
- The note needs translating, so backtrack all the way until you encounter Mary again (she should still be loitering around the mine entrance). She’ll tell you what you need for the catapult.
- On the way back to the Monastery, at the precipice with the fallen dried tree, use the Axe to dig up and carve the log you used beneath the loose rocks into a piece for the catapult.
- Jungle Ruins
- Continue to the ruins. Use the Silver Razor on the skeleton’s bonds to pick up the Rope.
Monastery Gate
- Go back to the area with the catapult. Use the Spoon, Rope, and Lever on the catapult.
- Pick up the flat stone/brick in front of the gate, and use it on the catapult to keep it steady.
- Pick up a rock from the pile nearby to begin a new minigame.
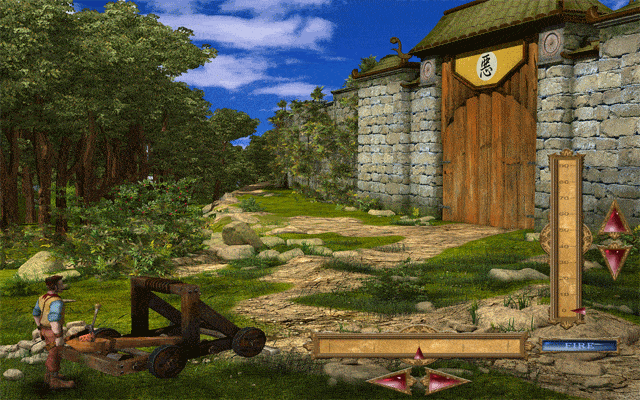
- Adjust the catapult to take out the hinges on the gate before knocking the gate itself down. The following angles are what you’ll need:
- Hinge 1: Horizontal 34 clicks left of center mark, Vertical 40 degrees
- Hinge 2: Horizontal 34 clicks left of center mark, Vertical just under 30 degrees
- Hinge 3: Horizontal 9 clicks right of center mark, Vertical just under 30 degrees
- Hinge 4: Horizontal 9 clicks right of center mark, Vertical 40 degrees
- You have unlimited ammo, so don’t worry if you mess up. Put the horizontal scale back on the center mark to knock down the gate. Give the gate all you’ve got once the hinges have been taken care of. Once the gate is knocked down, enter the monastery. (Note: you may have to adjust in any given direction just slightly since people click their mouses at different speeds)
Monastery Gardens
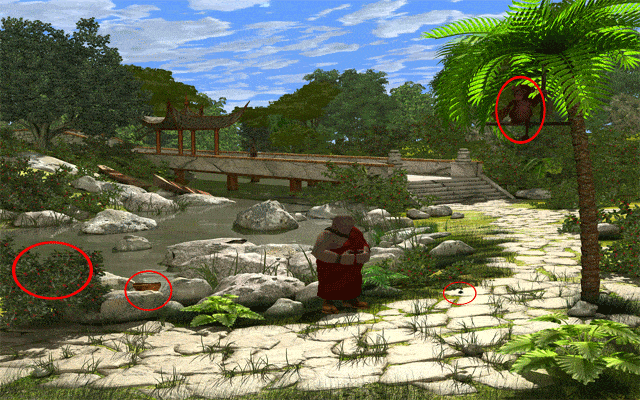
- Talk to the Fat Monk. He’ll inform you the mechanism that opens the way into the monastery has been broken, and monkeys have scattered the pieces. He’ll give you a Banana
- Proceed across the bridge to the water mechanism
- Pick up the Gutter Piece and the Water Step, and return to the Fat Monk
- Pick up the Small Stone lying to the right of the Fat Monk. Throw it at the monkey. He’ll get angry and throw the Water Step at you. Pick it up.
- Pick up a Twig from the bush on the left. Use it to access the third Water Step at the edge of the pond, and return to the water mechanism.
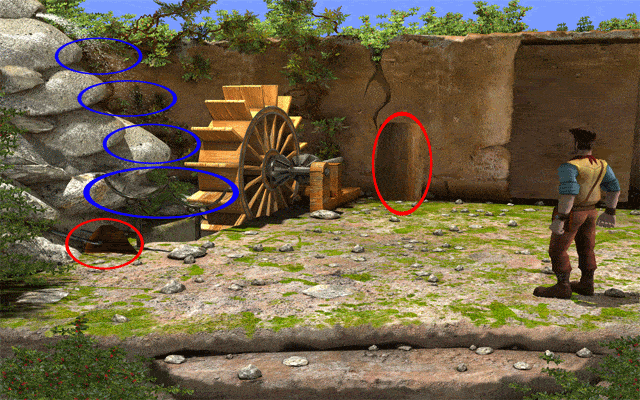
- Place the Gutter Piece into the metal brackets, and use the Water Steps on the slots in the stone beneath the water (small container on top, average in the middle, and large on the bottom). This will fix the mechanism and open the monastery gates.
- Inner Monastery
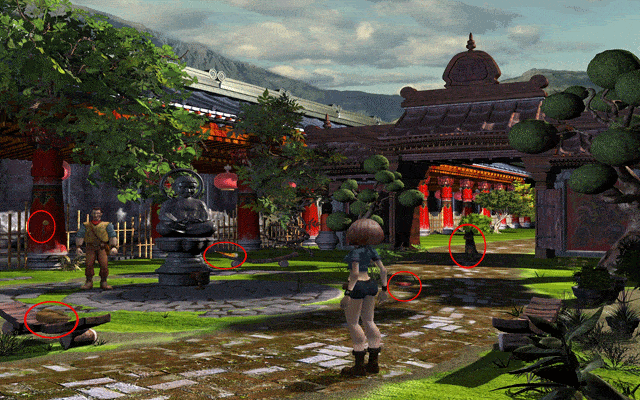
- Once inside the monastery, Mary will join you again. Note there’s a gear embedded in the nearby column.
- Pick up the Meat and use it on the dog. That didn’t work… Pick up the Horn sitting on the bench near the Buddha statue.
- Use the Horn on the cat. The loud noise will make it run away, and the dog will run after it. Proceed right, into the monastery yard.
Temple Grounds
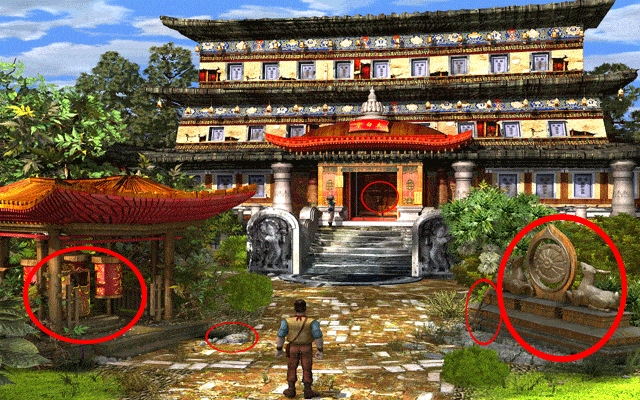
- Look at the temple door. Mary will translate for you. Proceed right to the temple premises (arrow appears to the right of the main steps)
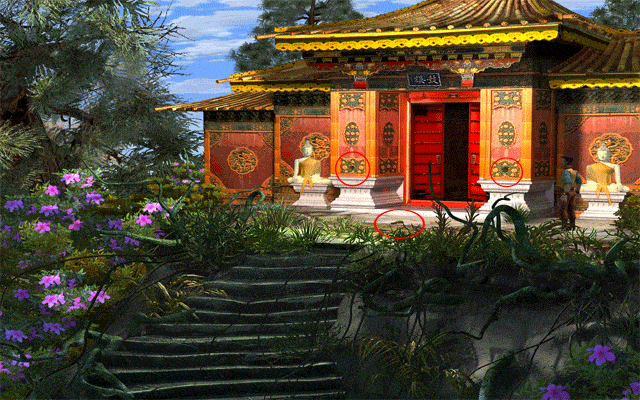
- Pick up the Tibetan Phurba Knife, and use it on the two Gears embedded in the columns.
- Backtrack to the courtyard, and again use the Knife on the Gear trapped in the column mentioned earlier.
- Return to the temple. Pick up the Crank from among the rocks, and enter the gazebo with the prayer wheels inside. Use the Gears and the Crank on the mechanism inside. Turn the crank, and make a note of the tune it plays.
- Leave the gazebo, and pick up the Gong Hammer, and walk close to the gong.
- There are 7 bubbled areas around the gong. The goal is to use the Gong Hammer and play the same tune that the prayer wheels in the gazebo did.
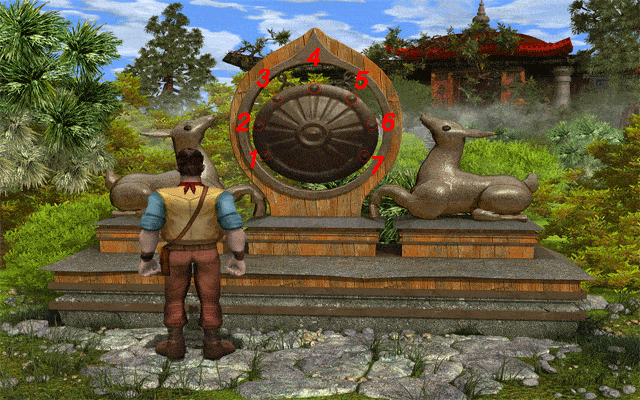
- Hit them in the following order: 2, 4, 3, 5. The ground will quake. Return to the Buddha statue in the area with the cat and dog, and pick up the Key that’s been revealed.
- Return to the temple grounds area and use the Key on the temple doors.
Part VI: The Temple Mazes
Temple Maze
- Inside the Temple doors lies the maze. It’s five rooms by five rooms in size, and scattered throughout are 4 map pieces and 10 pieces of gold. When you’ve collected the 4 map pieces, you can see your location on the map, which is marked by a red dot. Use the map below to navigate the rooms. The map piece locations are randomized, but the gold is marked with a “G”:
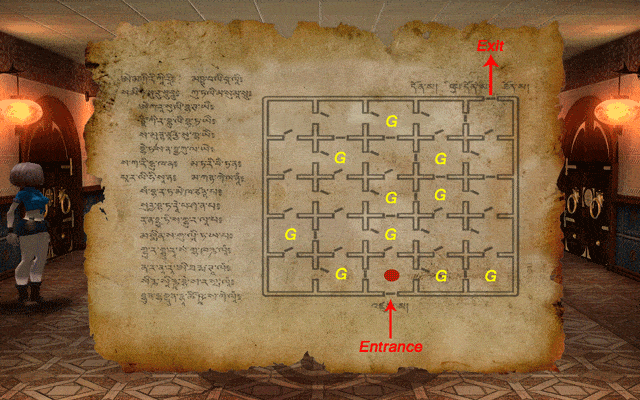
- The upper righthand corner of the maze is the exit.
- Once you’ve gathered the 10 gold pieces, head to the upper righthand corner of the maze. The room resembles the entrance in design, and a puzzle is on the wall. You must combine the gold pieces you gathered with the puzzle. The goal is to assemble a dragon.
- Here’s how the puzzle starts out and what it should look like when you’re finished:
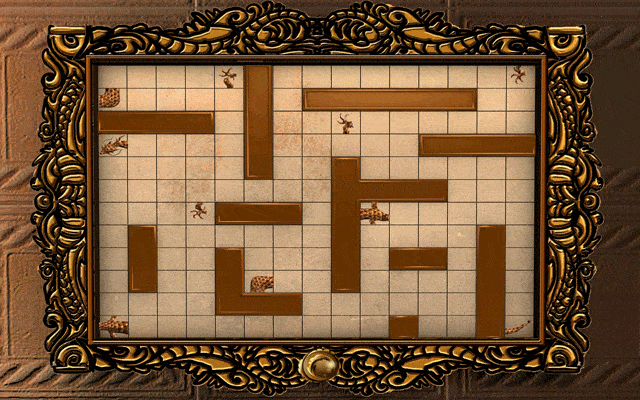
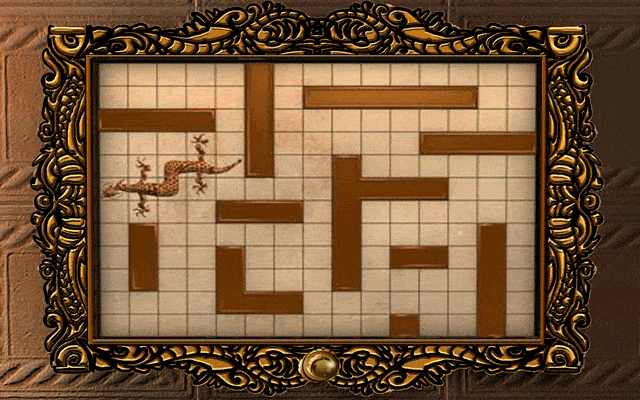
- Completed successfully, the door unlocks. Diamon and Mary proceed into the next room.
Reflection Room
- Talk with Mary until she has nothing new to say. Pick up the gold Bowl and use it on the snake sculpture. The tiles on the floor will light up. Cross them in the following numbered order:
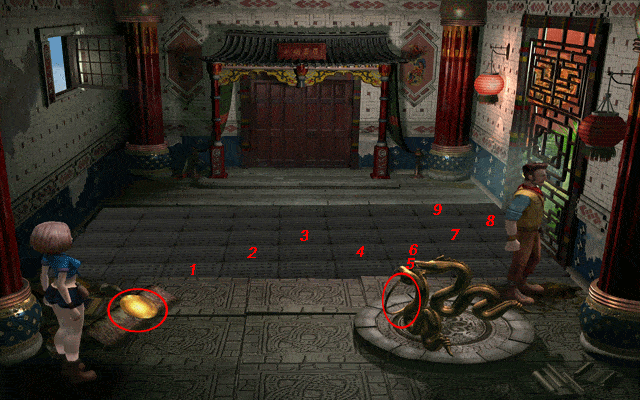
- Across safely, you enter the next room, but uhoh, it’s Samuel Johnson! All goes black.
Dried Up Well
- Diamon and Mary find themselves tied up and hanging in a dried well. Talk to Mary to invert the screen.
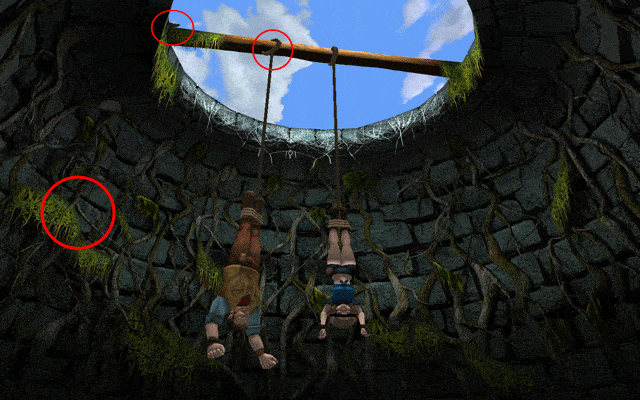
- Look at the bough on the left. Use the Belt on the bough, but it’s just out of reach. Talk to Mary, asking her for her belt. Combine the belts in your inventory and use them on the bough.
- Look up at the rat. Use Meat on the knots of Diamon’s ropes above, and the rat will chew through. Diamon climbs down…
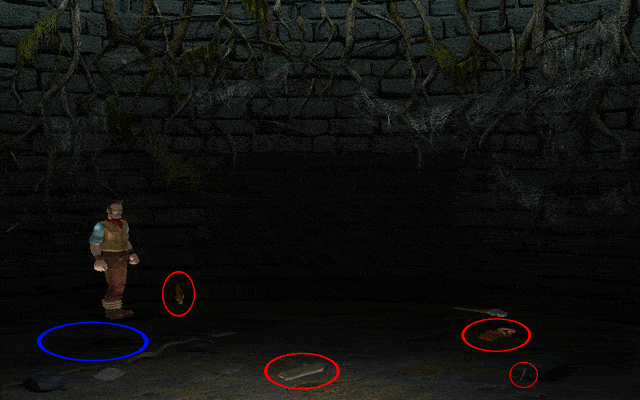
- Pick up the Bag to retrieve the Razor. Use the Razor on Diamon’s ropes.
- Pick up Dry Stick, Dry Log, and Rotten Wood. Combine the three in your inventory.
- Use the Wood on the fireplace area, and Diamon will start a fire, illuminating the wall. Click on the wall to begin a minigame.
- This is a matching game. Using the screenshot below, match the numbers to each other to successfully complete the puzzle (Note: numbers have been added since recognizing Kanji is difficult for many):
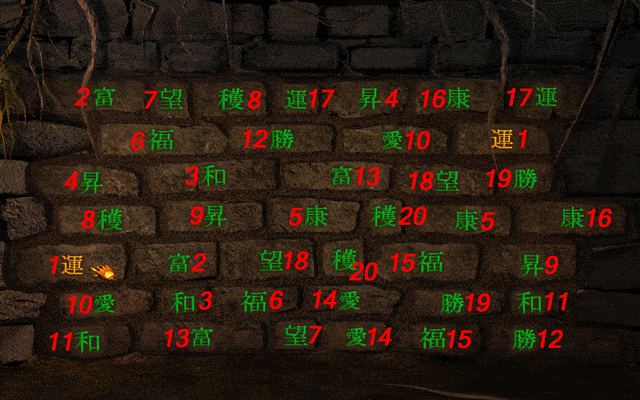
- The wall will fall away once the puzzle is complete. Click on the lever in the dark gap (righthand side) to lower Mary down. Use the Razor to cut her ropes.
- Look at the dark gap where the wall once stood. Pick up the Torch and use it on the fire to get a proper light, and proceed into the dark tunnel.
Dark Sand Maze
- The next area is a large 4screen maze that’s covered in darkness. To better aid your sense of navigation, following the map below:
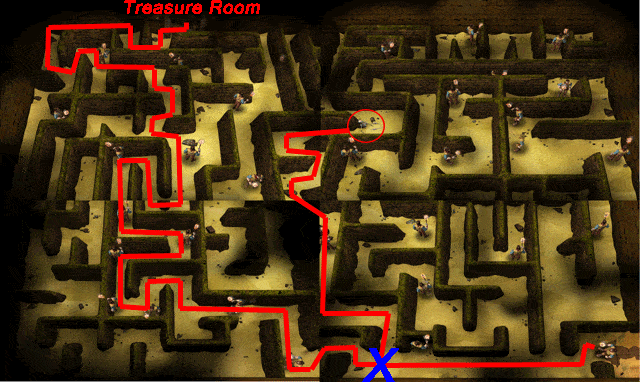
- Follow the red path until you encounter the giant blue X, and go up. Follow the path until you reach the (circled) skeleton. Look at the skeleton, and then pick up the Golden Snake in its hand. Return to the blue X, and this time proceed to the left. Follow the path to the treasure room.
Treasure Room
- Look at the skeleton, and pick up the adventurer’s bag next to it. Inside is a journal.
- Select the Journal in your inventory, and click on Diamon with it to read through it. It’s 26 pages long, belonged to the late Johan Forster, whom discovered the secret of the clocklike lock on the door before he died.
- Pick up the Bird Hourhand from in front of the grey treasure chest.
- Use the Bird Hourhand and Snake Minutehand on the clocklike lock on the door. Set the clock to 6am to open the door. Mary will arrive when you solve the puzzle.
Lava Room
- The next room is filled with lava, and the bridge has been destroyed. Jump from rock to rock to get to the other side. Not all rocks are steady though. If you jump on an unsteady rock, Diamon will fall into the lava. Jump onto the following stones to get across (marked by an X):
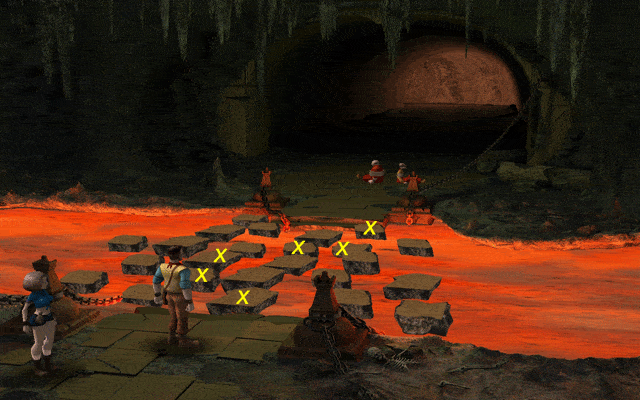
- Once across, untie the Monks using the Razor. They will give you part of a sacred scroll in thanks. Proceed forward out of the lava cave.
Border of the World Gate
- In the next room, Andy Rain is standing guard at the door. Pick up the Small Chest. Use Coins on Andy (tossing them) to distract him.
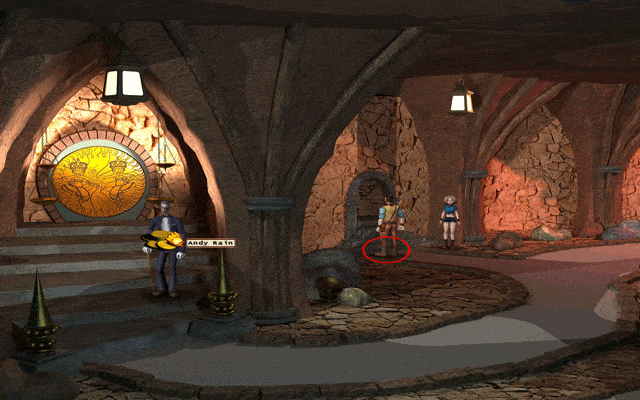
- While he’s distracted, use the Small Chest on him to hit him over the head and knock him out cold.
- Pick up Andy’s Gun and proceed to the border of the world.
Border of the World
- Samuel Johnson is planning on taking over the world, and a fight ensues. He will shoot blue fireballs at you, which you’ll have to dodge (by clicking on the floor in various places to walk/run). If you wait just before he fires a fireball to run, the chances of you getting hit are much slimmer.
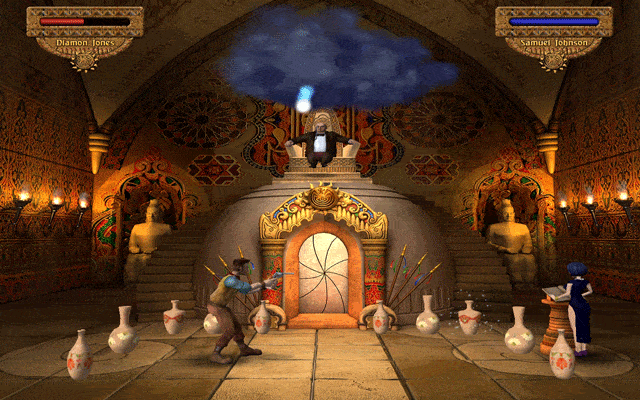
- After firing three blue fireballs at you, one of the fireballs will land in one of the vases. Click on it to shoot and shatter it. Repeat this process, avoiding fireballs and shooting the vases when they sparkle, until Samuel Johnson has no more health.
- Avoid his fireballs and click around the vases until you find the second half of the Sacred Scroll. Finding it will trigger the final cutscene and the game ending.
Congratulations! You’ve finished the game!
“;
More articles...
Monopoly GO! Free Rolls – Links For Free Dice
By Glen Fox
Wondering how to get Monopoly GO! free rolls? Well, you’ve come to the right place. In this guide, we provide you with a bunch of tips and tricks to get some free rolls for the hit new mobile game. We’ll …Best Roblox Horror Games to Play Right Now – Updated Weekly
By Adele Wilson
Our Best Roblox Horror Games guide features the scariest and most creative experiences to play right now on the platform!The BEST Roblox Games of The Week – Games You Need To Play!
By Sho Roberts
Our feature shares our pick for the Best Roblox Games of the week! With our feature, we guarantee you'll find something new to play!Type Soul Clan Rarity Guide – All Legendary And Common Clans Listed!
By Nathan Ball
Wondering what your odds of rolling a particular Clan are? Wonder no more, with my handy Type Soul Clan Rarity guide.


