
Best Horror Games On Itch.io – July 2026
Across a bounty of subgenres.![Haze Seas Accessories Tier List [Best Accessories to Equip]](/wp-content/uploads/2026/07/haze-seas-accessories-tier-list.jpg "Haze Seas Accessories Tier List [Best Accessories to Equip]")
Haze Seas Accessories Tier List [Best Accessories to Equip]
The accessories with the best stat buffs in Haze Seas.
![[Roblox] Evomon Shiny Hunting Guide – Including Prismatic and Pris Shinies!](/wp-content/uploads/2026/06/evomon-shiny-hunting-guide.jpg "[Roblox] Evomon Shiny Hunting Guide – Including Prismatic and Pris Shinies!")

Detective Quest: The Crystal Slipper Walkthrough
Detective Quest: The Crystal Slipper is a hidden object game created by Elephant Games. You are the sleuth chasing the girl who lost her crystal slipper at the prince’s ball around a magical kingdom where you’ll meet fairy godmothers, witches, ogres and a lot of other storybook characters. Gamezebo’s quick start strategy guide will provide you with detailed images, tips, information, and hints on how to play your best game.


- Prefer Gamezebo on Google

Detective Quest: The Crystal Slipper – Game Introduction
Detective Quest: The Crystal Slipper is a hidden object game created by Elephant Games. You are the sleuth chasing the girl who lost her crystal slipper at the prince’s ball around a magical kingdom where you’ll meet fairy godmothers, witches, ogres and a lot of other storybook characters. Gamezebo’s quick start strategy guide will provide you with detailed images, tips, information, and hints on how to play your best game.
General Tips
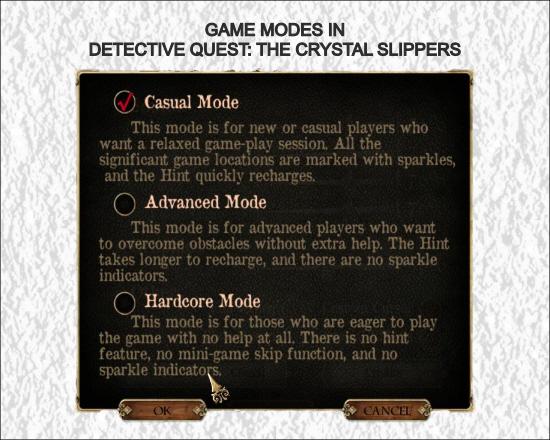
Difficulty Levels
- You can play in Casual, Advanced or Hardcore mode.
- In Casual Mode all significant locations are marked with sparkles and hint and skip buttons recharge quickly.
- In Advanced Mode there are no sparkle indicators and hints recharge more slowly.
- In Hardcore Mode there are no sparkle indicators, no hints and mini games can’t be skipped.
- You can change to a different difficulty mode at any point in the game by clicking on “menu” in the bottom left of the screen and then selecting “options”.

Cursors
- The default cursor looks like an ornate arrow. It can change into the following icons:
- A magnifying glass indicates areas you can inspect more closely.
- A grabbing hand indicates items you can pick up for your inventory
- A hand with pointed finger indicates objects that you can do something with.
- A hand with pointed finger + gears indicates a place where you need to use an object from your inventory – note that if you click an object repeatedly (2-3 times) with this cursor you may get additional hints as to what you are supposed to do.
- Smaller directional arrows indicates places where you can move to the next scene.
- A camera shows where you should select your camera from the inventory and take a picture of the storybook creature you have encountered.
- Note 1: you have to select the camera yourself, the icon in itself does not mean you have selected the camera.
- Note 2: The map in the image below is not a cursor, but an icon in the lower right corner of the screen (se below under Screen elements).

Hidden Object Scenes
- Hidden Object scenes (HOS) in this game are not the usual list of items to find – instead you get a number of items to return into the scene at the appropriate spot or items that you can use with objects in the scene. An example of the first is a doll head in your inventory, which is to be placed on the headless doll in the scene. An example of the second is a box of matches that you use for lighting a candle in the scene. These items are the same each time you play the game, so they are all shown in the images in this walkthrough.
- Some items need to be placed in a scene in a certain order, for example you would first have to put a candle in the candlestick, and then light the candle.
- Cursor icons in HOS are the same as in the rest of the game.
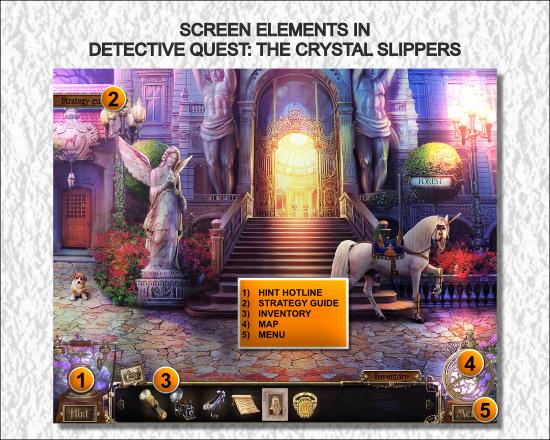
Screen elements
- At the bottom left of the screen is your Hint hotline (the telephone).
- During normal gameplay you can use the Hint system to get specific tips about what you could do now if you are stuck and can’t figure out what to do next. During hidden object scenes (HOS) you get help to place an item in its proper place.
- At the top left there’s a button to display the Strategy Guide – which is instructions sort of like this, though less nice and eloquent.
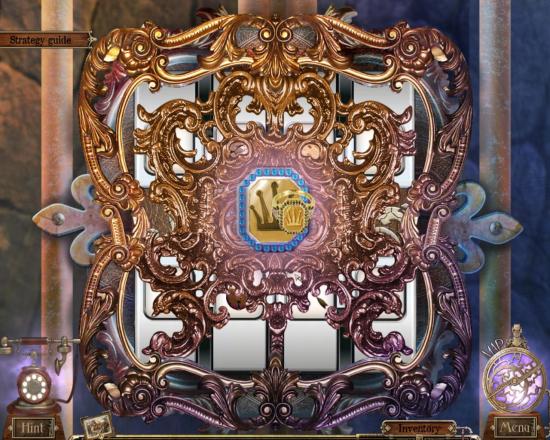
- In the middle you have your inventory – you have to hover with the cursor over the Inventory label to display it. Attached to the top left part of the inventory pane is your photo album.
- To the right you have the map, with the Menu button underneath. The map shows all locations you have visited so far. Your current location is shown by your current mount – in the beginning a unicorn, later on a gryphon. Move your cursor over the locations to see screenshots of these locations and a list of tasks for each of them. You can also click on the buildings to display floor plans and tasks for each room. You can use the map to quickly jump from one location to another without having to walk all the way yourself – including specific rooms in the buildings. However, the game is divided in several different sections that have their own maps, so if you want to jump to another section you have to scroll the map first.
- Clicking on the Menu button displays the Options dialog, where you can change game mode and various video and audio options. In that dialog there’s also another menu button which brings you to the main menu.
Chapter 1 – Where You Meet a Troubled Young Prince
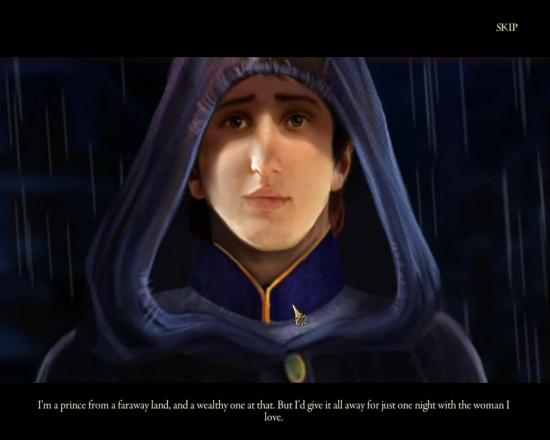
- The story begins when a handsome young man comes to your office and asks you to find his dream girl – she danced all night with him at the castle ball, but suddenly disappeared, leaving only her crystal slipper behind. You accept the job and is soon sitting on a train on your way to his fairy kingdom to find the girl.
- When you arrive you are greeted by the courtier, standing on the palace steps, holding a tray with some items for you. A dialog box is displayed where you can select whether you want some interactive help or not. If you have played a few of these HO games before, the help doesn’t add anything vital for this particular game, but if you are new to this type of game I suggest you click YES here.
- Click on the courtier to listen to what he has to say. He explains that the prince is unavailable at the moment, but has left a few items for you. He also warns you – the forests have of lately become rather dangerous in the kingdom.
- After listening to the courtier, click him again to see what’s on his tray.
- Pick up THE ROYAL LETTER from the prince, the PICTURE CLUE of the missing girl and a signet RING.
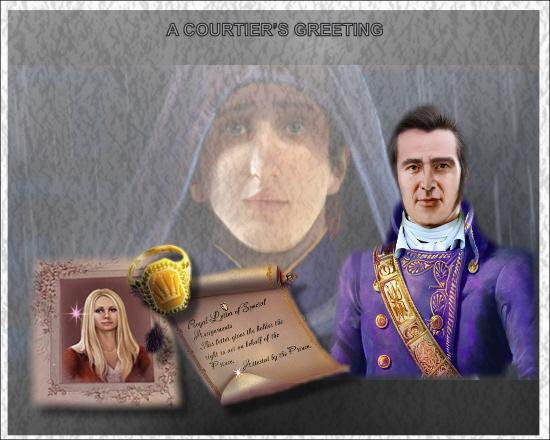
- Apart from those three items you also have a FLASHLIGHT, a CRYSTAL SLIPPER and a CAMERA in your inventory.
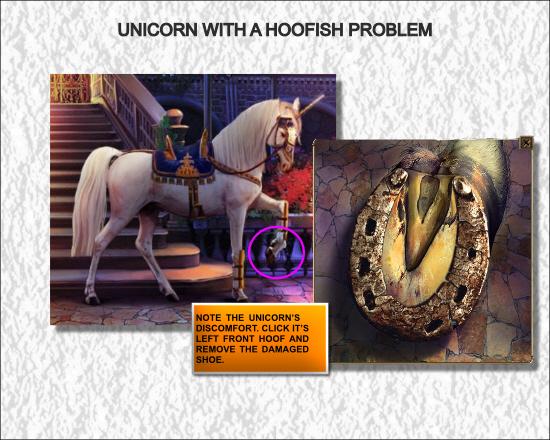
- When you hover your cursor over the unicorn, note that it changes into a camera – that means you should select the camera from your inventory and snap a photo of the unicorn. This is a bonus quest, and you should take 30 pictures of storybook creatures during the game to fill your photo album.
- Zoom in on the unicorn.
- You see that his shoe is broken, so take it off by clicking on the hoof.
- Then click on the palace door to enter.
- You are now in the palace hall – you can look around for a bit, but there’s not much else to do at the moment except to click on the rightmost door, the door to the minor treasury.
- Unlock the gate by using the prince’s ring on the lock:
- The first minigame is launched.
- There’s no automatic instructions displayed in this game, but if you can’t figure out what to do, click the INFO button to the left. Sometimes you then can figure out what to do, but at least once during this game I must admit I stumbled and fell.
- This minigame is however quite simple, you just click the images that belong together – the game has three rounds.
- Note: As soon as you’ve made a matching pair, the remaining items are moved around.
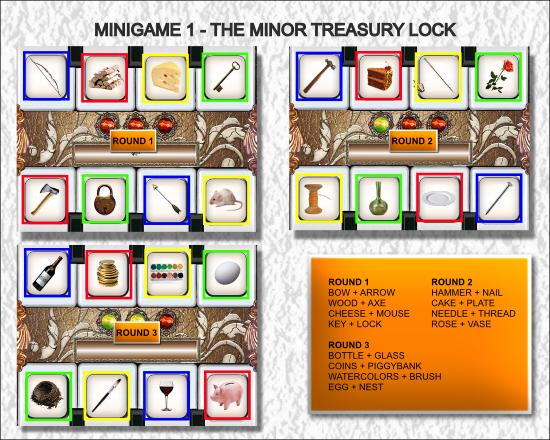
- Now the gates to the minor treasury opens, so enter it.
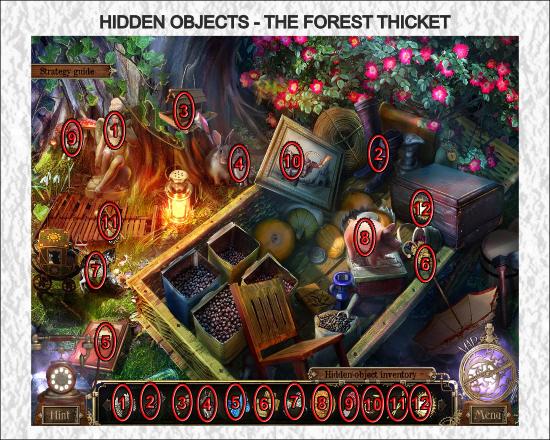
- To the right you have a hidden object scene (with sparkles, if you have selected that type of game mode).
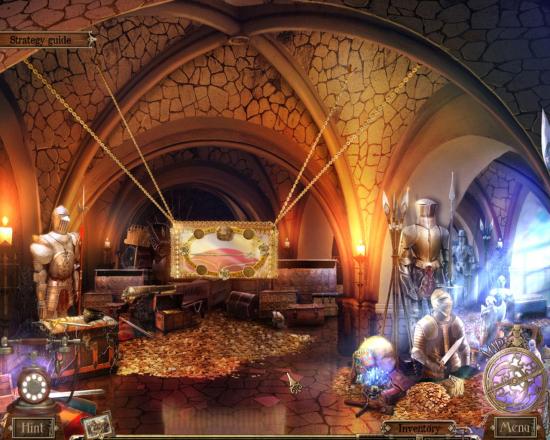
- Start the hidden object scene – the HOS.
- Here you have to return items to the scene, instead of finding objects. This is the only type of HOS in this game.
- Note 1: the image below is slightly manipulated to be able to show all items in the inventory simultaneously – you have to scroll the inventory with the appropriate arrows to see all objects you have to work with.
- Note 2: If you hover with the cursor over an object in your inventory you will see a label describing what it is, which is sometimes difficult to determine – which is a good clue as to where it should go.
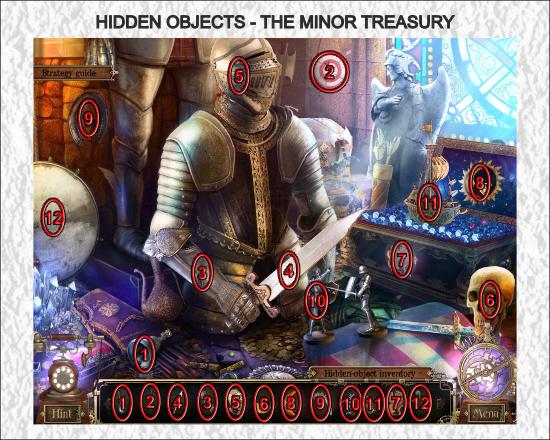
- Remember to do some things in the proper order – put the glove on the armor, then the sword in the glove. First put the key in the chest, then place the ship and the moon inside.
- The numbers in the image shows which order you need to put (some) items back in.
- From this scene you get a HORSESHOE.
- Next zoom in on the chest to the left.
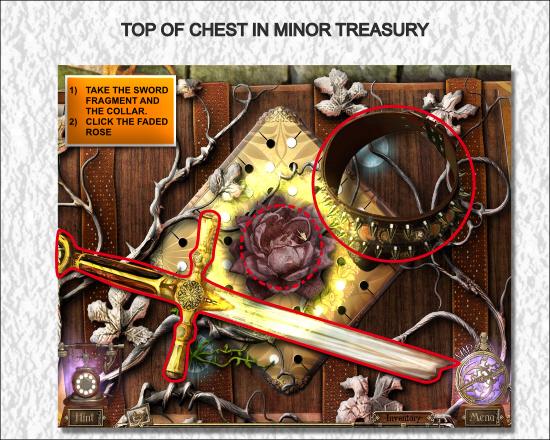
- Take the SWORD FRAGMENT and the COLLAR.
- Click on the black flower in the center to reveal a prettier picture and read the clue on the top of the screen.
- Go back out to the unicorn, and click on it.
- Put the HORSESHOE on the hoof.
- As soon as you have done that, you set off into the forest – but you are immediately attacked by harpies and get knocked off your mount.
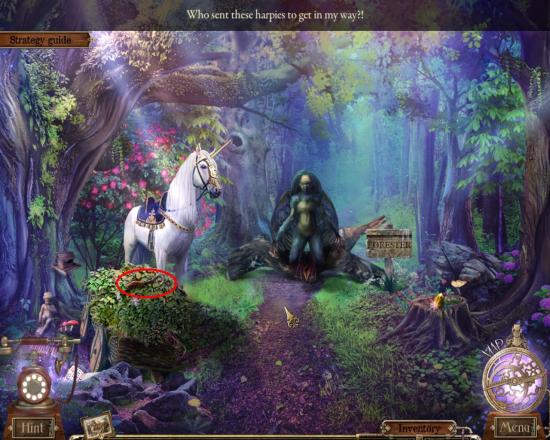
- Hover your cursor over the harpy – note that it changes into a camera.
- Select your camera from the inventory and snap a picture of the harpy (2/30).
- Zoom in on the cart to the left and take the HOOK. Note the cute little bunny and its shivering little nose :o)
- As I said before, you can get quite a lot of hints by clicking on items where the cursor is a pointing hand with gears on – if you now click on the harpy you can read the tip “I wish I’d thought to bring the hunting dogs. They can scare off a bear!” Off to get some dogs, then!
- Go back to the palace entrance.
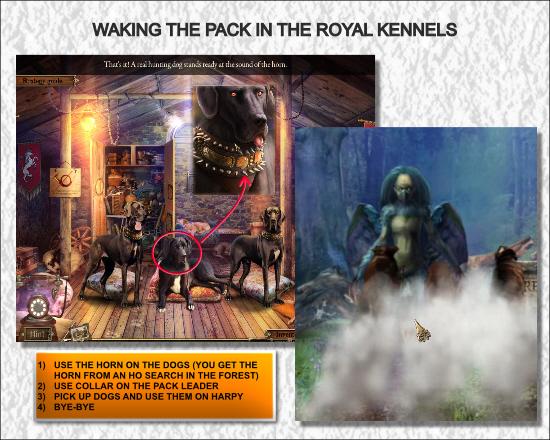
- The door to the left leads to the royal kennels. Click on that door.
- Here it’s not the case of letting sleeping dogs lie – it’s a case of rise and shine! To accomplish that you obviously need a hunting horn, according to the sign on the left:
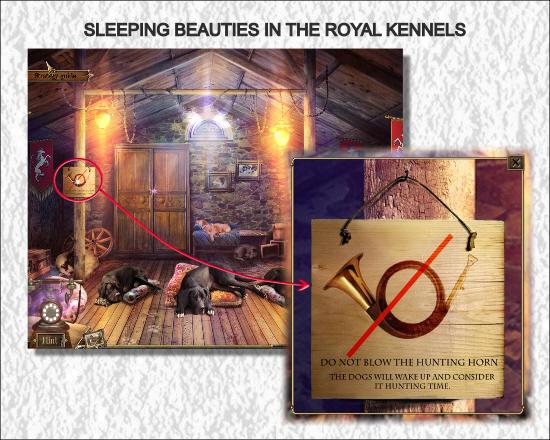
- Click on the cabinet to zoom the lock in.
- Use the HOOK in your inventory to lift the latch off.
- The cabinet is now open, but first take the RAKE leaning by the left cabinet door.
- Click the cabinet.
- The inside is very dark, so take your FLASHLIGHT and use it on the cabinet.
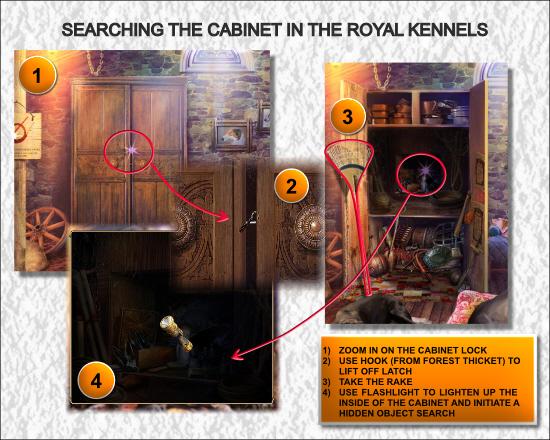
- Another HOS is revealed – click the cabinet once more:
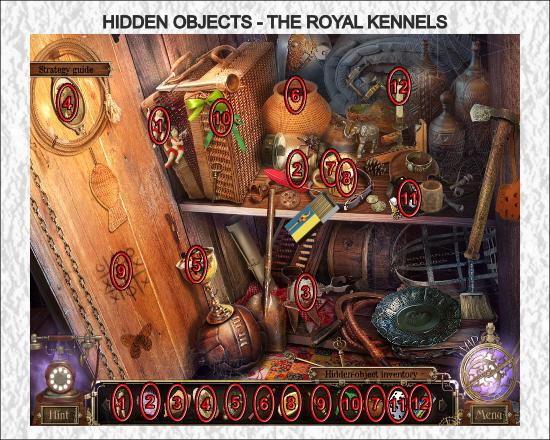
- Note that you have to take the lid off the basket before using the flute on the snake, and pour tea from the kettle into the mug before you put the lemon slice in.
- From this search you get the GOBLET.
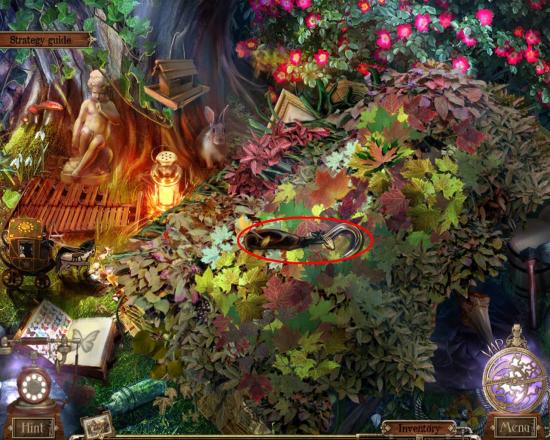
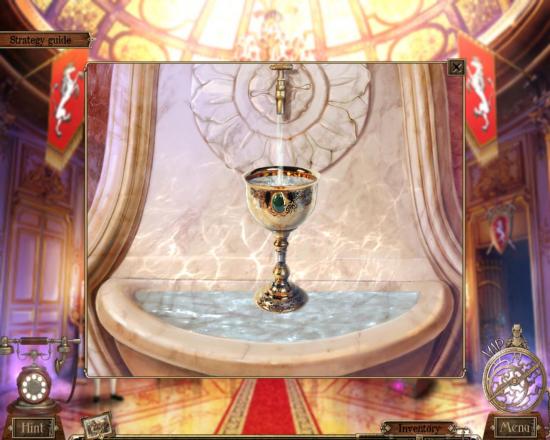
- Go back to the palace hall and zoom in the fountain (on the right).
- Use the GOBLET on the fountain to fill it with water.
- Go back to the forest thicket (with the harpy).
- Zoom in the tree stump with the yellow flower (right).
- Use the GOBLET to pour water on the flower.
- It blooms, and you can now pick the FLOWER.
- Next zoom in on the cart again.
- Use the RAKE twice to remove all the leaves.
- Next use the SWORD FRAGMENT to cut the vines.
- DQCS_018
- A HOS is revealed:
- From this HOS you get the HUNTING HORN.
- Return to the palace and enter the minor treasury again.
- Zoom in on the chest to the left (again).
- Put the yellow flower in the center – over the existing yellow flower image.
- A gameboard is revealed.
- Your goal is to lead “your” green vines from the bottom left side of the board to the top right side. Your opponent will try (but not very diligently) to block your progress with purple vines.
- You play the white circles, and your opponent the black circles.
- Click on your starting circle and an adjacent, white circle to make your move.
- There are several solutions, and here’s one:
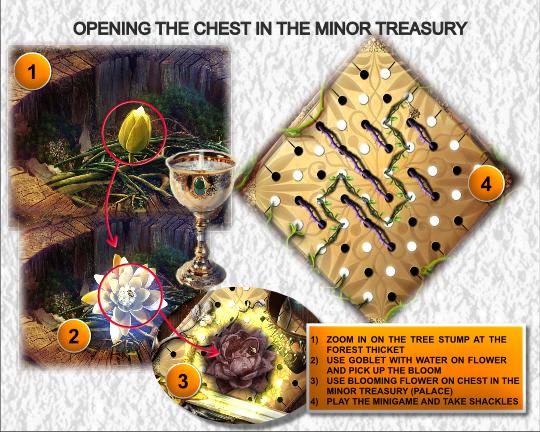
- The chest opens, and you see a small box and shackles. You can do nothing with the box at the moment, but you should take the SHACKLES.
- Go back to the royal kennels.
- Use the HUNTING HORN.
- The dogs wake up and stand – except the leader of the pack.
- Take the COLLAR from your inventory and put it on the lead dog.
- Pick up the dogs and put them in your inventory (jeez, wish I could do that some days with my labs).
- Go to the forest thicket and sick the dogs on the harpies. They disappear quite quickly:
- You can now continue your journey.
- Next you arrive at the forester’s cottage.
- You have to click to get a little cutscene started, and then again to start playing again.
- Your PHOTO CLUE automatically disappears from your inventory at this point since you have found the girl.
- Zoom in on the double-headed snake.
- Grab your camera and take a snapshot of the snake (3/30).
- Then pick up the CRYSTAL SLIPPER.
- The cobra is hovering over a book of some sort, but it’s not possible to grab that at this moment.
- Zoom out from the cobra and instead zoom in on the well to the right.
- Use the SHACKLES on the hook.
- The chain rolls up by the weight, and you get a LIZARD.
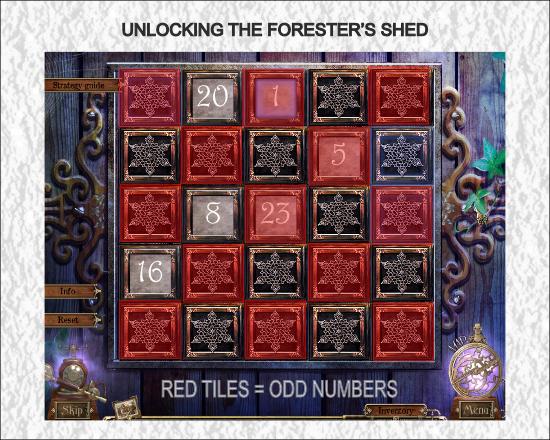
- Next, zoom in the shed doors to the left.
- Put the lizard into the lock:
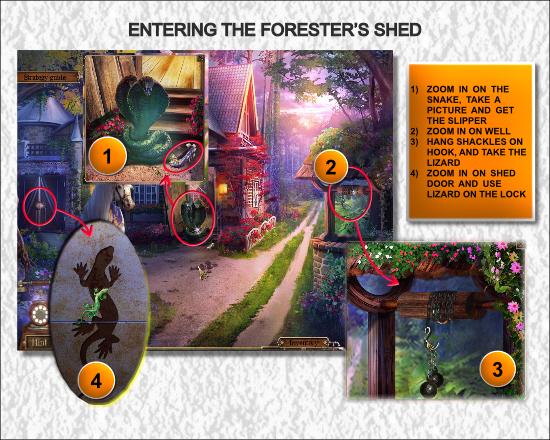
- A minigame starts.
- You are to click the tiles in ascending numerical order – that is: 1, 2, 3 and so on.
- If you click the wrong tile, you have to start over.
- The trick to the game is realizing that the numbers are arranged like on a chess board.
- On this game board all the red tiles hide odd numbers.
- Just think of it just like a chess board. If you need an odd number, click on one of the red tiles. If you need an even number, click on a non-red tile.
- In this image the pattern is quite obvious:
Chapter 2 – The Forester Bears a Curse
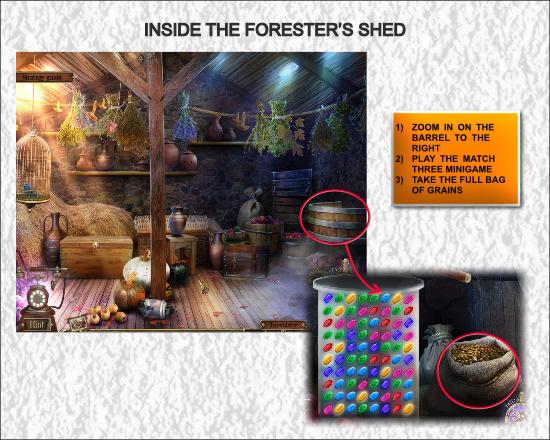
- Enter the shed.
- Click on the barrel to the right to start a match three minigame.
- Focus on matching the grains (yellow).
- The matching is pretty easy and straight forward – a dozen clicks or so does it.
- When you’re done, take the now full BAG OF GRAINS.
- Exit the shed, and continue down the forest path to a clearing.
- First read the sign that’s hanging from the tree branch.
- You get some info about ermines.
- Then zoom in on the foot of the tree – you have now found yourself an ermine, but you have to lure it out.
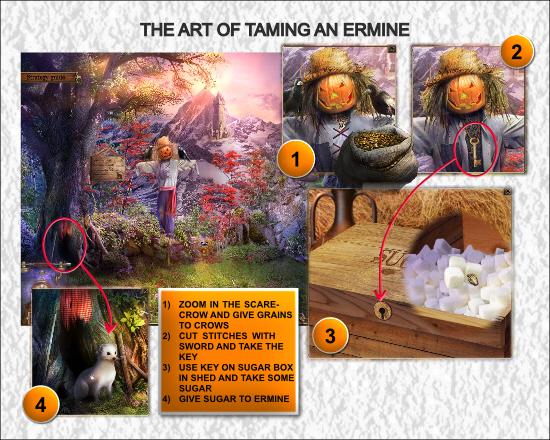
- Zoom in on the scarecrow.
- Use the BAG OF GRAINS on the crows.
- Then use the SWORD FRAGMENT on the stitches on the scarecrow’s shirt.
- Take the KEY that appears, hanging in a string around the scarecrow’s neck.
- Go back to the forester’s shed.
- Zoom in on the wooden box to the left – it’s a sugar box.
- Use the KEY on the box.
- Take the SUGAR.
- Return to the clearing.
- Zoom in on the burrow.
- Give the sugar to the ermine.
- The ermine comes out from it’s hiding place.
- Take the ERMINE.
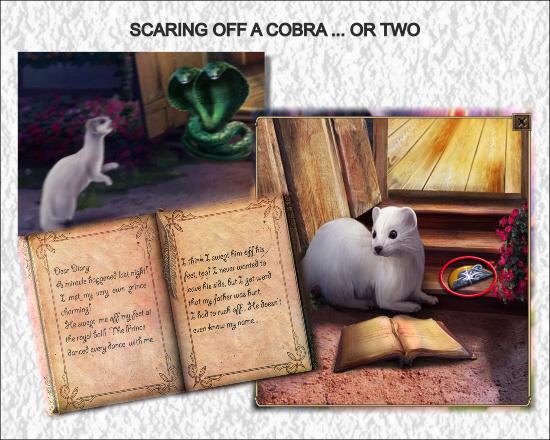
- Go back to the forester’s house.
- Zoom in on the cobra.
- Sick the ERMINE on the cobra.
- Take the CAMEO “BEAR”.
- Click on the book to read the girl’s diary and view a short cutscene.
- Don’t forget to pick up the ermine – you’ll need him again!
- Enter the forester’s hut.
- You come into the kitchen, where there – for the moment – is nothing to do.
- Continue upstairs.
- Now you get to meet Isabella, the forester’s daughter.
- Give her the LETTER from the prince to make her tell you what has happened since the night of the palace ball.
- Isabella tells you that her father was attacked that night, and turned into a bear. She asks you to help her.
- Zoom in on the mirror and take the KEYS.
- When you do, the mirror explodes!
- Zoom in on Isabella’s father on the bed to take a picture (4/30).
- Go downstairs and zoom in on the door to the right.
- Use the KEYS on the lock to start a minigame.
- Here you have to use the proper key on the proper lock – not much of a challenge here:
- There are five keyholes, but six keys, so there’s one key that you don’t need.
- The only thing worth considering here is that once you pick up a key it’ll look mirrored, compared to what it looks like lying in it’s little cubbyhole.
- The easiest way is to pick up the key and then look for the proper keyhole.
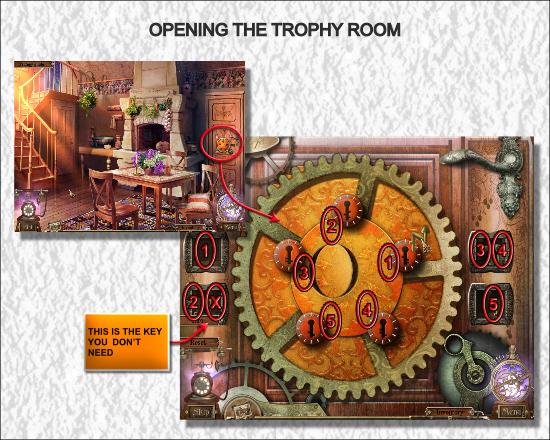
- Now you can enter the trophy room
- First zoom in on the table and read the letter.
- Then scratch the cat on the tummy – totally pointless but nice.
- Now click on the HOS by the desk.
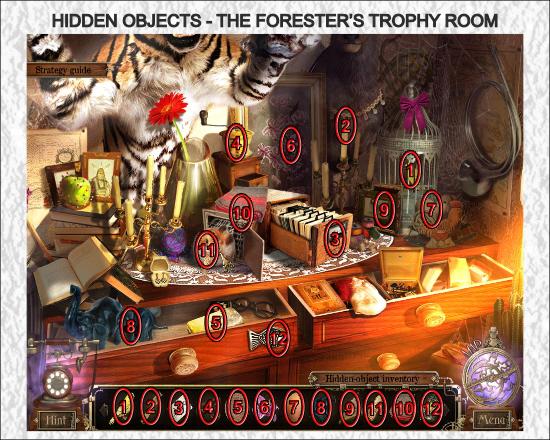
- The only notable issue here is the cloth (10) which you have to use before the peanut (11).
- From this you get a SNARE – which sort of looks like a net to me, but it will soon serve its purpose anyway.
- Return to Isabella upstairs.
- Click on the window to zoom it in.
- Click on the curtains to pull them aside.
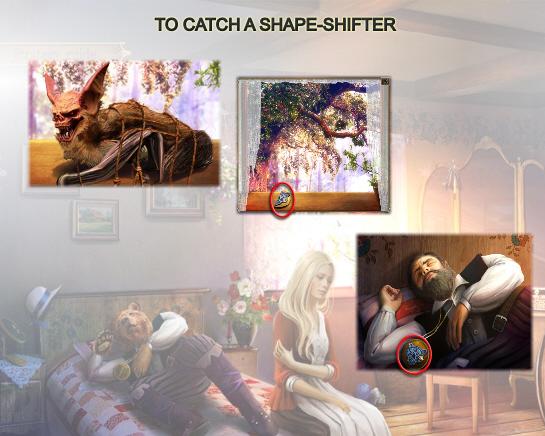
- Take out your camera to snap a picture of the bat, hanging outside the window (photo op 5/30).
- Use the SNARE on the spying bat.
- You catch the bat – which turns out to be a shape-shifter that soon disappears.
- It leaves the other half of the cameo on the window sill.
- Take the CAMEO “FORESTER”.
- Zoom in on the forester/bear lying on the bed.
- Put the two halves of the CAMEO in the medallion hanging around his neck.
- The bear disappears, and the forester is back.
- Take the CAMEO – the forester doesn’t need it anymore.
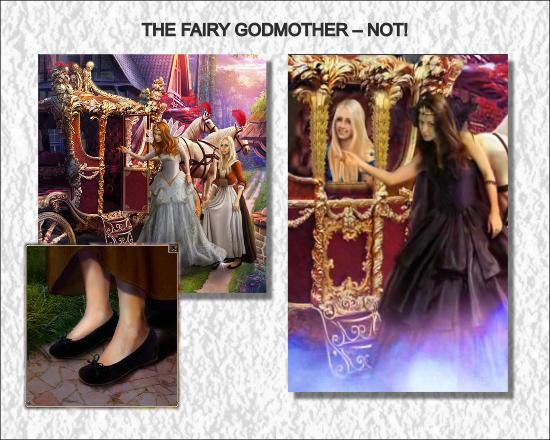
- Out of nowhere appears Isabella’s fairy godmother, saying that the prince has sent for Isabella.
- They prepare to rush off in the magical fairy carriage, but standing there in front of the forester’s hut there’s yet one thing left for you to do.
- Zoom in on Isabella’s feet.
- Use the CRYSTAL SLIPPERS (called the glass slippers in the inventory – but who’s going to notice?).
- Isabella steps in to the carriage – and gets whisked away. Not by her fairy godmother, but some evil creature that not only takes the prince’s love to her faraway castle, but also wreaks havoc on this fair land and fills it with black magic.
- You follow as far as the clearing with the scarecrow – but since you cannot fly (yet) there’s nothing you can do for Isabella right now.
TO BE CONTINUED…
Gamezebo’s walkthrough for Detective Quest: The Crystal Slipper is currently a work in progress, or as we like to call it, a “Living Walkthrough.” Living Walkthroughs are updated regularly, until every last secret of a game has been revealed. Be sure to check back every day to see what new content we add to our walkthrough next!

More articles...
-
Best Horror Games On Itch.io – July 2026
Across a bounty of subgenres. -
Haze Seas Accessories Tier List [Best Accessories to Equip]
The accessories with the best stat buffs in Haze Seas.