
Best Horror Games On Itch.io – July 2026
Across a bounty of subgenres.
Grow A Garden 2 Base Price List
What's the most valuable crop?![Evomon Best Starter [Leafbun, Blazpup, or Bubble?]](/wp-content/uploads/2026/06/evomon-best-starter.jpg "Evomon Best Starter [Leafbun, Blazpup, or Bubble?]")
Evomon Best Starter [Leafbun, Blazpup, or Bubble?]
Grass-type, Fire-type, or Water-type?
![[Roblox] Evomon Shiny Hunting Guide – Including Prismatic and Pris Shinies!](/wp-content/uploads/2026/06/evomon-shiny-hunting-guide.jpg "[Roblox] Evomon Shiny Hunting Guide – Including Prismatic and Pris Shinies!")
Department 42: The Mystery of the Nine Walkthrough
Welcome to the Gamezebo Strategy Guide for Department 42 from Frogwares Studios. In this Hidden Object/Adventure game, you play as Alice Wright, an investigator for a government agency that fights against black magic. There are 9 investigations in the game. This Strategy Guide is divided into two sections: General Tips (no spoilers)Walkthroughs General Tips If an area of a scene sparkles, click on it to open a zoom scene there. These are usually Hidden Object scenes.The Find Li…


- Prefer Gamezebo on Google

a:1:i:0;a:2:s:13:”section_title”;s:50:”Department 42: The Mystery of the Nine Walkthrough”;s:12:”section_body”;s:105177:”
Welcome to the Gamezebo Strategy Guide for Department 42 from Frogwares Studios. In this Hidden Object/Adventure game, you play as Alice Wright, an investigator for a government agency that fights against black magic. There are 9 investigations in the game.
This Strategy Guide is divided into two sections:
- If an area of a scene sparkles, click on it to open a zoom scene there. These are usually Hidden Object scenes.
- The Find List for the Hidden Object scenes can vary, but each scene contains a Key Object that will be needed by all players. When you click on a Key Object, it will go into inventory.
- If you have printed material in your inventory like a book or letter, you can right click on it to read it.
- To use the hint device that looks like a cell phone next to your inventory, just wait until all the green bars are lit, then click on it. It will illuminate one object from the Find List.
- New locations on the map will appear as you uncover clues in the main scenes.
- If you feel stuck, the first thing to do is to check the scene for new sparkles to see if there is a new Hidden Object scene. At least twice in the game sparkles appear again almost immediately after you’ve completed a Hidden Object scene in that same location, so you may think you’ve done it without realizing it’s a new one.
- If you’re still stuck, go back and check other locations on the map to see if there is a new task there. The game does this a lot, and it seems to be the most common reason why people feel lost in the game. The new tasks will be clearly identified, but you have to go to the other locations to see them.
- The game can sometimes be very picky about exactly where you click on an object in the Hidden Object scenes. For example, in one scene where there is a corkscrew, only clicking on the handle counts, not the metal spike. In another where there is a pen, only clicking on the center band around the pen will count. This doesn’t happen often, and where it does I noted it in the walkthrough, but it’s something to be aware of.
- The cursor has a long skinny pointing finger. For some items, you must position the tip of the finger to count as a click.
- When a mini-game screen first opens, click on the ? in the upper right corner to get the directions for it.
- You can skip or rest any mini-game, a nice feature.
- Most of the mini-games are not timed.
- In most cases if you lose a mini-game, you’ll get an option to try again. Or you can just skip it at that point.
- You can also access the mini-games from the Main Menu just for fun.
- Objects you can put into inventory are marked in yellow.
- Places where you can interact with the scene are marked in dark blue.
- Things you can look at in the scene are marked in light blue.
- There are 9 different investigations. Most have 3 locations and 6 or 7 "scenes," but it varies.
- Investigation 1: The Packleader’s Fang
- Investigation 2: Dreamcatcher
- Investigation 3: Sleepsand
- Investigation 4: The Stopwatch
- Investigation 5: Rabbit’s Paw
- Investigation 6: Sphere of Life
- Investigation 7: Flaming Rose
- Investigation 8: Mirror of Dreams
- Investigation 9: Evil Eye
Investigation 1: The Packleader’s Fang
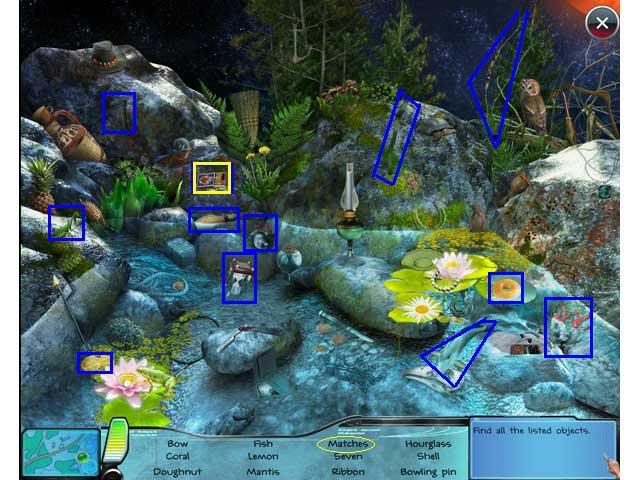
Fang, Scene 1: The creek
- Pick up the crowbar.
- Click on the crowbar in inventory, then click on the rocks on the left of the scene until you have cleared them.
- Click on the sparkly area below where the rocks were to open a hidden object scene.
- Your Find List may be different than mine. The matches are the Key Object.

Fang, Scene 2: The bar
- Click on the bar’s location on the map to go there.
- Look at the refrigerator. It is missing a handle.
- Pick up the ice pick from the bar.
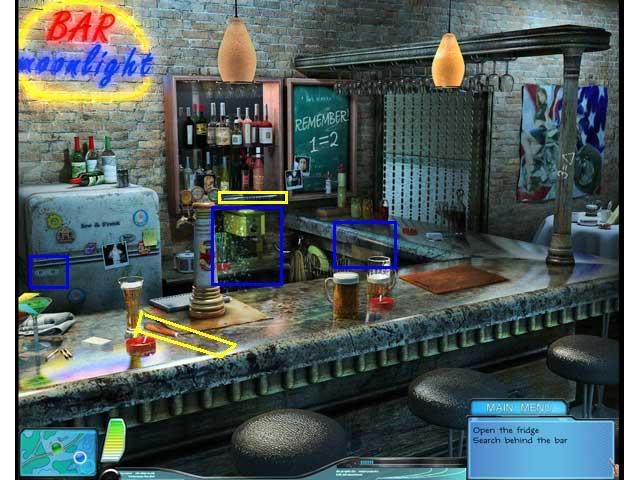
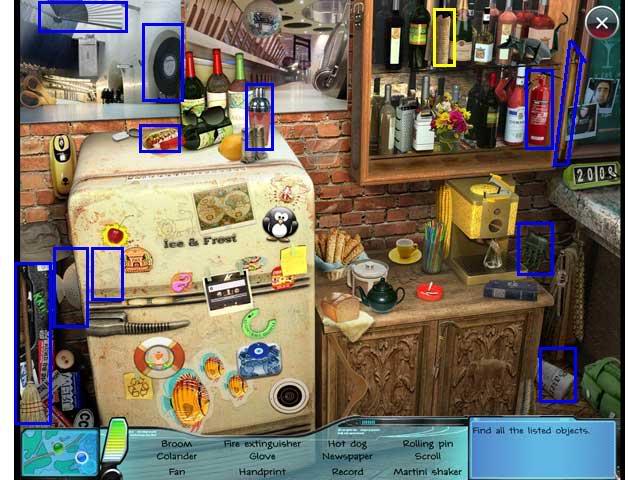
- Click on the sparkly area behind the bar. This will open a Hidden object scene.
- Your Find List may be a different than mine. The scroll is the Key Object.
- Pick up the refrigerator handle on the shelf above the sparkly area you just searched.
- Click on the refrigerator handle in inventory, then on the refrigerator door. The door will open.
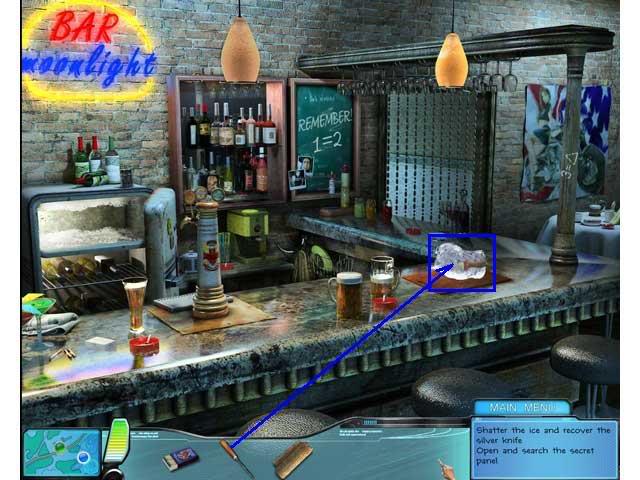
- Pick up the ice block from the freezer compartment. It will go into inventory.
- Click on the ice block in inventory and put it on the chopping block on the bar.
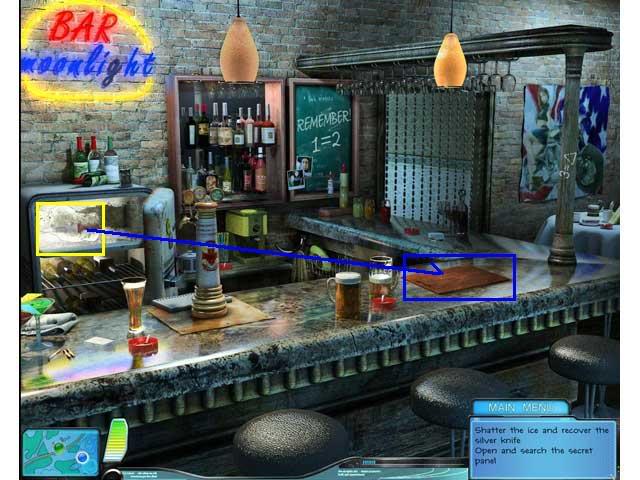
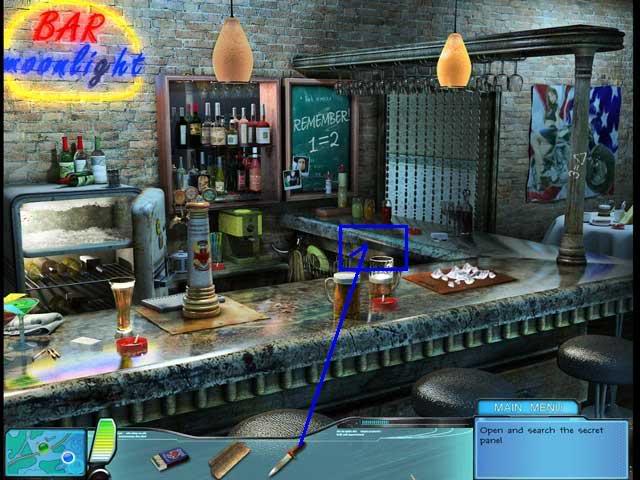
- Pick up the ice pick from inventory and use it on the ice block. You will reveal a silver knife. Pick it up.
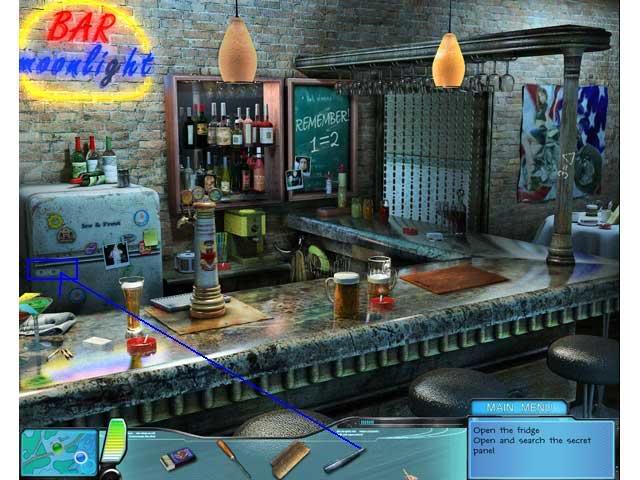
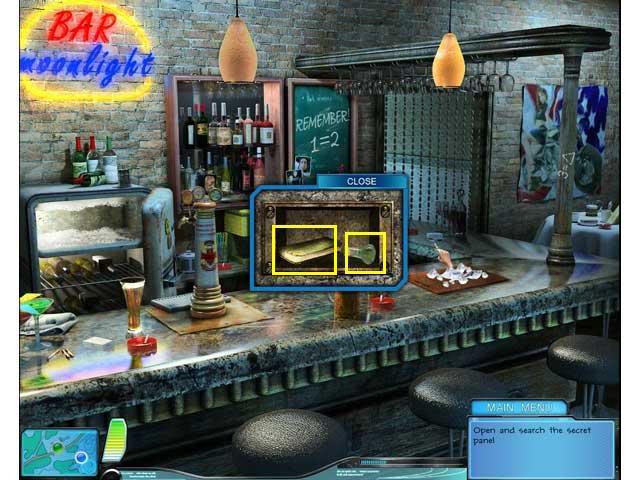
- Click on the secret panel on the inner right side of the bar. A zoom scene will open showing 4 rusty screws
- Click on the silver knife in inventory and use it on each of the 4 screws.
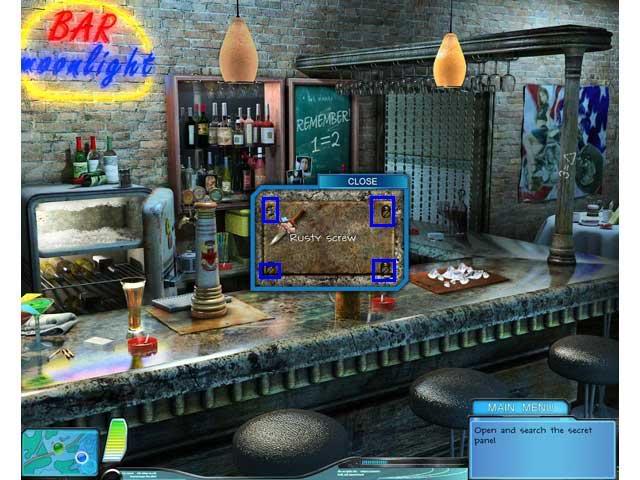
- The panel will open, revealing two objects: a diary and a sample of werewolf saliva. Collect both.
- A new location will be revealed on the map: the werewolf’s lair. Go there.
Fang, Scene 3: The Werewolf’s Lair.
- First let’s get some light. Collect the oil from the scene.
- Click on the oil in inventory and put it in the lamp.
- Click on the matches in inventory and light the lamp.
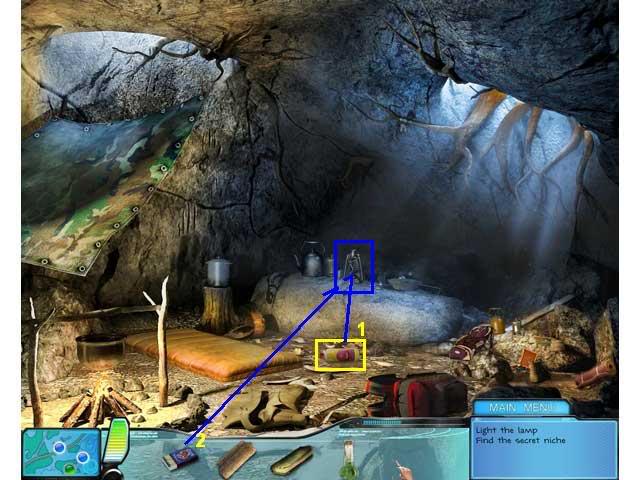
- Put the matches back in inventory.
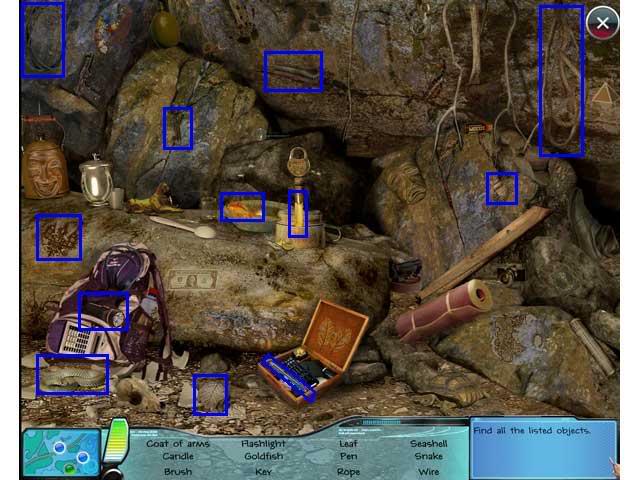
- Click on the sparkly area to the right of the lamp and reveal a hidden object scene.

- Your Find List may be different from mine. The rope is the Key Object.
- Look along the roof of the lair. You will find a sturdy root in the upper left.
- Click on the rope in inventory and attach it to the sturdy root. It will connect to the tent flap that is hanging down.
- Pick up the kettle.
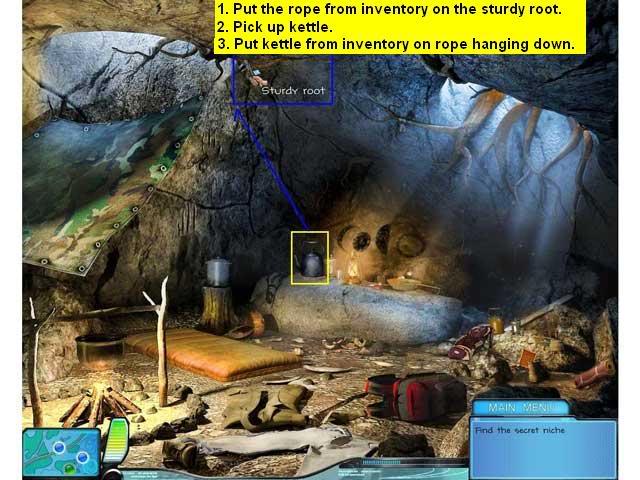
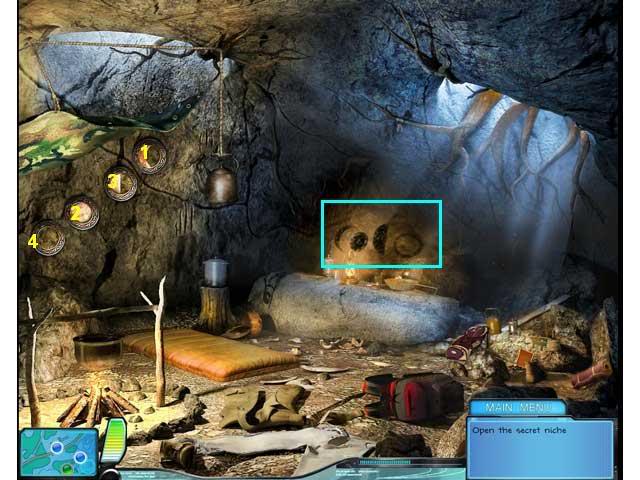
- Click on the kettle in inventory and attach it to the rope you put on the sturdy root. Its weight will pull the tent flap aside revealing a set of 4 brass plates with moon symbols.
- Notice that the brass plate symbols match the painted moon symbols on the wall behind the lamp, but in a different order.
- It’s a little hard to tell, but the fully filled in painted moon in the second position is the fully bright moon, not the fully dark moon.
- Click on the brass plates in the order of the symbols on the wall behind the lamp to reveal the hidden niche.
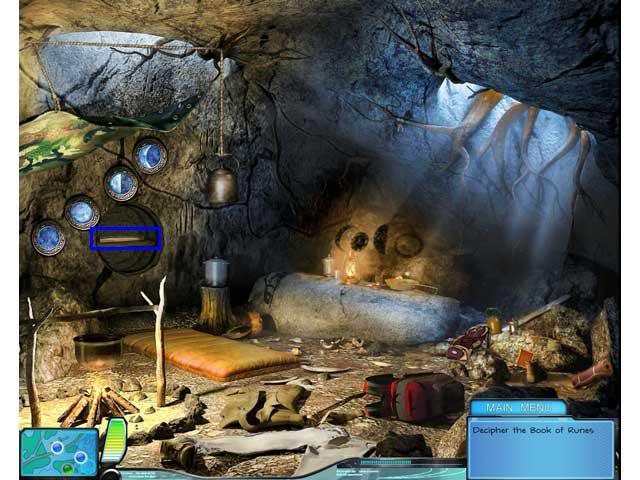
- Get the rune scroll from inventory and put it on the rune book in the niche. This will open a zoom screen where you can work the rune puzzle.
- Click on a letter in the alphabet, and a rune book will open. Click on the rune that you believe matches that letter.
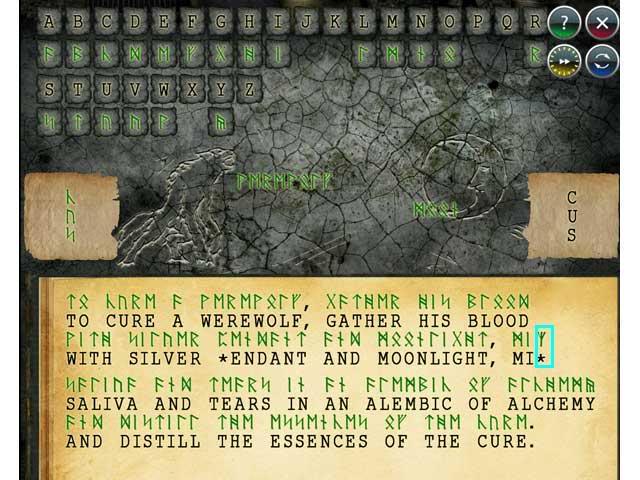
- The phrase should read:
To cure a werewolf, gather his blood with silver pendant and moonlight, mix saliva and tears in an alembic of alchemy, and distill the essence of the cure.
- This will reveal the full instructions:
With the three essences united, kindle your fi4e and boil the potion, and give it to the beast, thus lifting the curse of shifting shapes.
- The werewolf will appear and ask you to help him.
- Go to the bar to mix the cure.
Fang, Scene 4: Moonlight Bar.
- Start by clicking on the sparkly area behind the bar. This will reveal a hidden object scene.
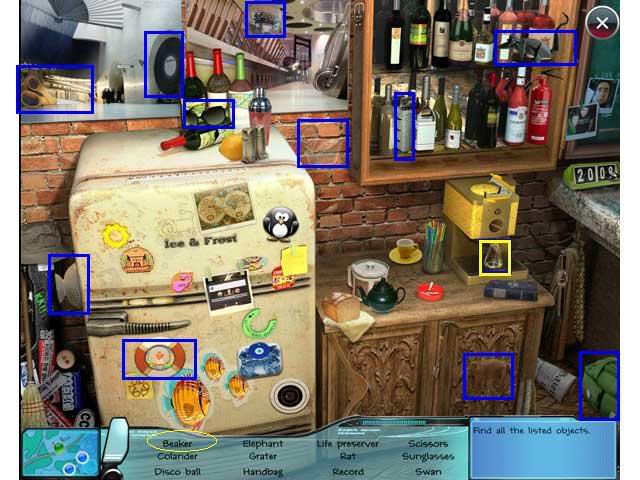
- Your Find List may be different than mine. The key object is the beaker.
- Now click on the mirrored shelves behind the bar twice. The shelves will swing away revealing three skulls.
- Collect the lightbulb and the tripod leg.
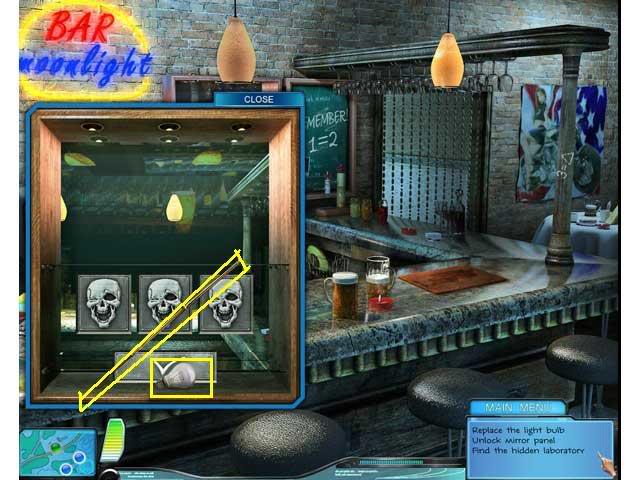
- Close the mirror.
- Take the lightbulb from inventory and use it in the burned out lamp.

Hmmm-that revealed a formula. Look around the bar and you will see two more. And there are three skulls in the mirror case.
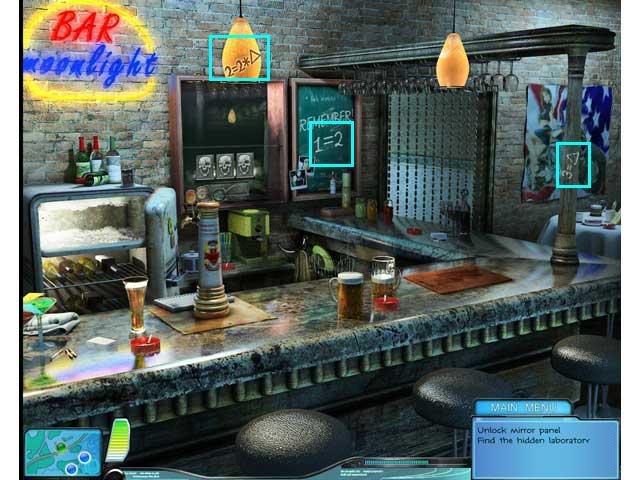
The three formulas are:
1 = 2
2 = 2 * triangle
3 = triangle
The solution is to set the skulls to
2
6
3
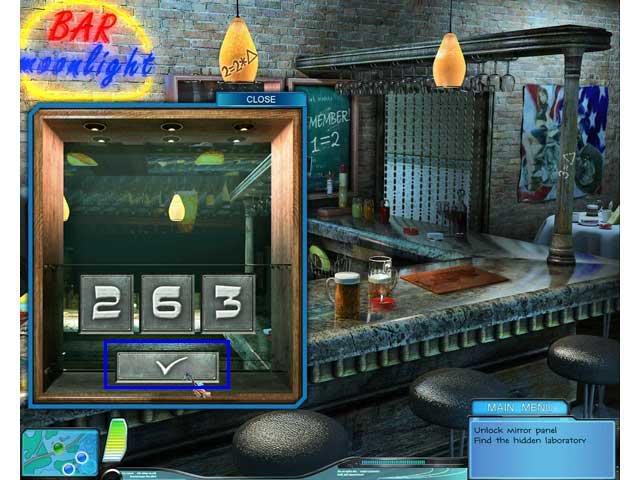
Then click on the checkmark button to submit your answer.
- The skulls will disappear, revealing the alchemy lab.
- Look closely and you will see that there is already a vial of werewolf tears in place.
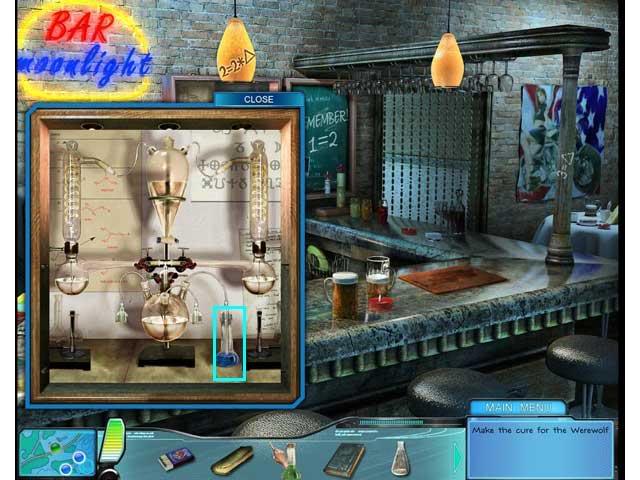
- You have saliva in inventory. Put it in the lab.
- Now you need the blood. At first I thought we were supposed to find the silver knife we’d used the first time, but that’s not it.
- Go back to the Crime Scene by the creek.
Fang, Scene 5: Creek
- Click on the tripod leg in inventory, and attach it to the broken tripod center scene.
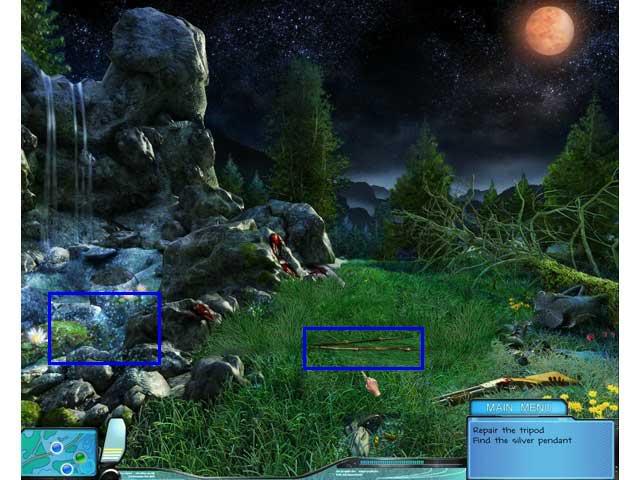
- Now click on the sparkly area on the left. A Hidden Object scene will open up.
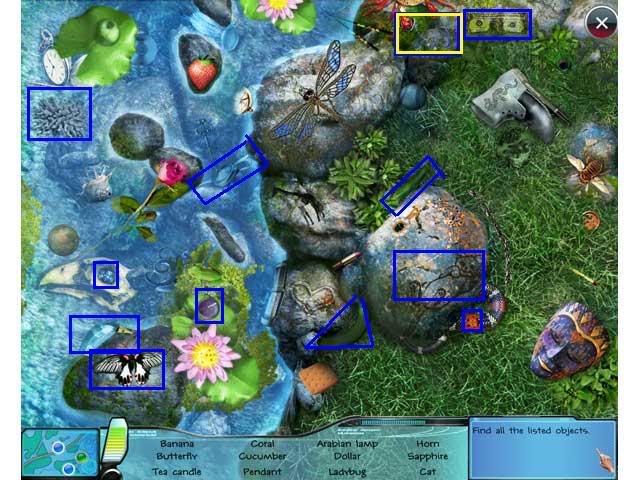
- Your Find List may be different than mine. The Key Object is the red pendant up near the top right. However, the game is very picky about where you click to collect it. I finally got it by clicking on the chain where it overlaps itself.
- Now click on the pendant in inventory and hang in on the tripod. It will shine a light on where the werewolf blood is.
- Click on the empty beaker in inventory and click it on the bloodstain to collect the blood.
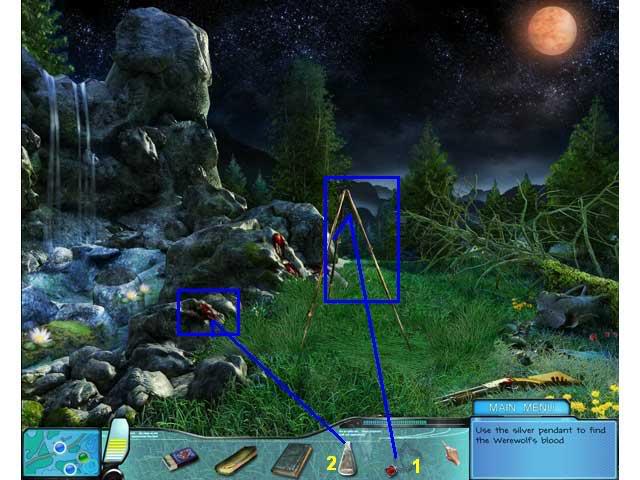
- Click on the beaker one more time to put it back into inventory.
- Go back to the bar.
Fang, Scene 6: Moonlight Bar
- Click on the mirror to open the Alchemy Lab.
- Click on the beaker of blood in inventory and put it in the lab.

- Now you have all 3 ingredients. You will have to mix them 3 times.
- Look at the color of the beaker at the top. You have to match that by trying different combinations of your 3 ingredients. You will hear a ding when you get it right, and the color will change in the top beaker.
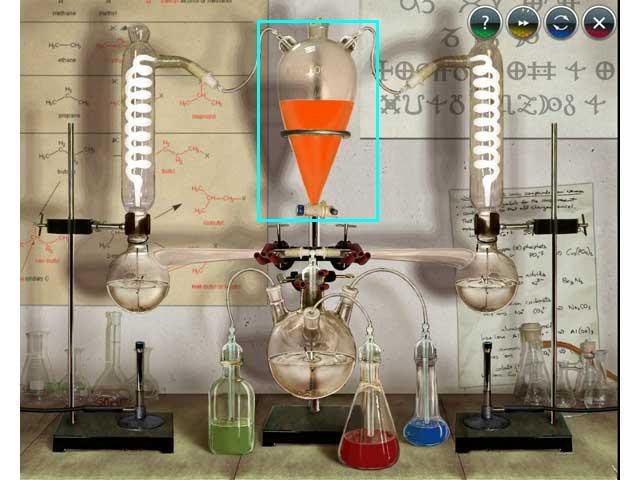
Solution:
1st Mix: 1 click green, 4 clicks red
2nd Mix: 3 clicks green, 4 clicks red, 1 click blue
3rd Mix: 4 clicks green, 4 clicks red, 1 click blue
- Finally you end up with the purple cure.
- Collect it and it will go into inventory.
- Back to see the werewolf.
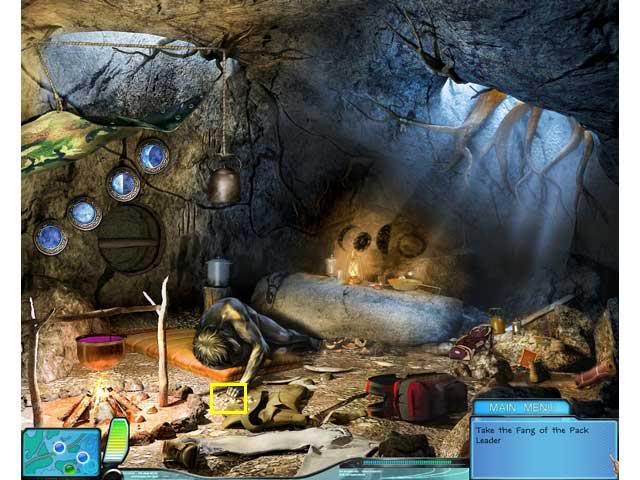
Fang, Scene 7: Werewolf Lair
- Pick up the metal pot that is center scene.
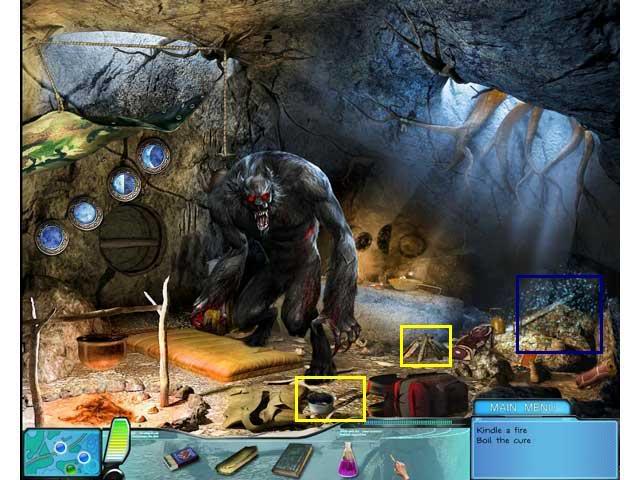
- Click on the sparkly area to the right. A Hidden Object scene will open.
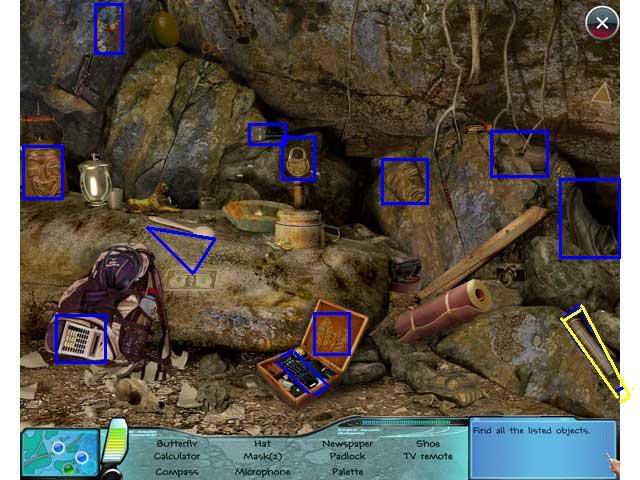
- Your Find List may be different than mine. The key object is the rolled up newspaper.
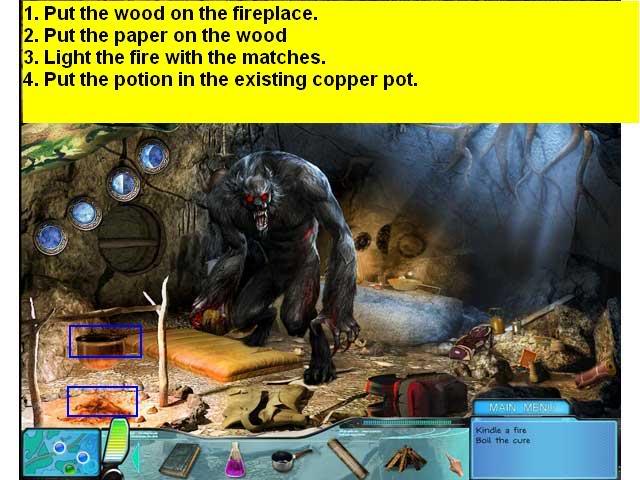
- To boil the cure, you must do the following in order:
- Put the fresh wood in the fireplace.
- Put the old paper from inventory on the fresh wood.
- Use the matches to light the fire.
- Put the purple cure into the metal pot that is already hanging in the fireplace.
- Now use the metal pot you picked up like a ladle to get a serving of the cure for the werewolf.
- Take the pot from inventory again and give it to the werewolf. You need to position it so the text label for the werewolf pops up, or it won’t count.
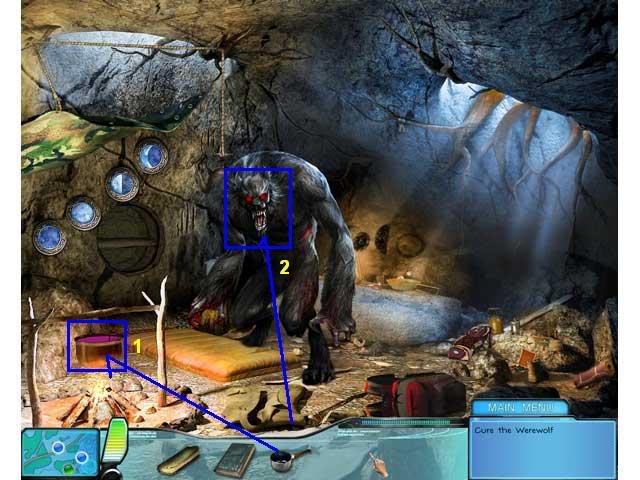
- He’s cured! Pick up the necklace in his hand. This will end this assignment.
Assignment 2: The Dreamcatcher
Dreamcatcher, Scene 1: Crime Scene/Trailer Home
- First look around. You will see that the trailer door is locked.
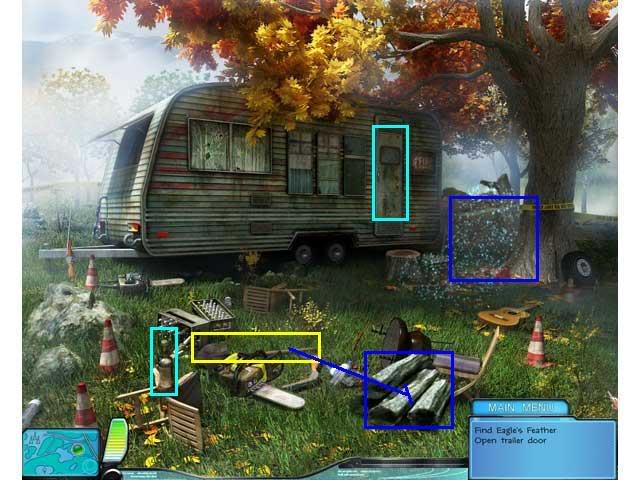
- There is a sparkly area by the tree. Click on it, and a Hidden Object scene will open.
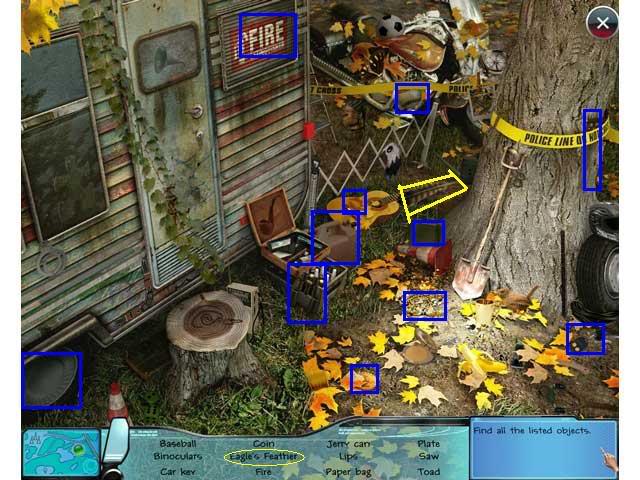
- Your Find List may be different than mine. The Key Object is the Eagle Feather.
- Now look around some more. You will see a bottle with something in it, but you can’t get into it.
- You will find a shovel. Put it in inventory.
- There are some heavy logs in a stack. Use the shovel from inventory to move them, revealing a cache.

- There is a lunchbox. Click on it once to open it. Take the corkscrew.
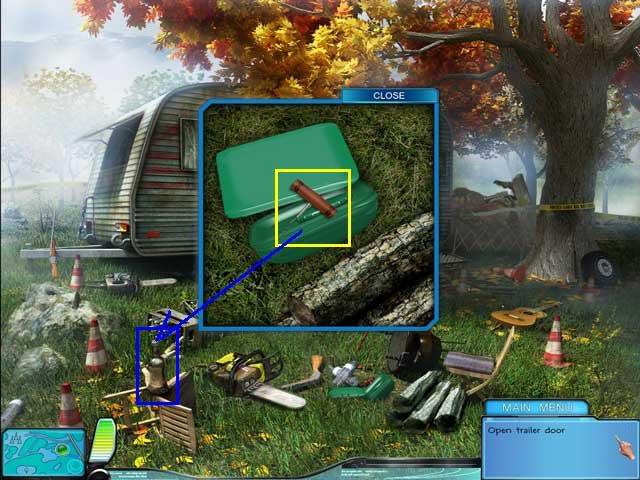
- Use the corkscrew on the bottle.
- The bottle will tip over and a key will fall out.
- Pick up the key and use it on the locked door.
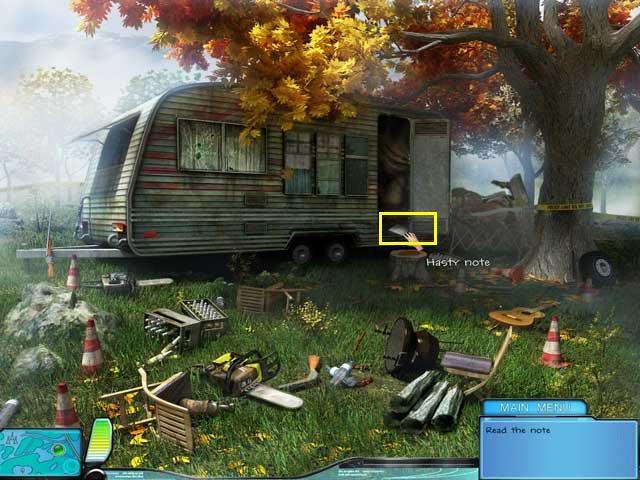
- Pick up the note.
- Go to the reservation
Dreamcatcher, Scene 2: Reservation
- Look around. Collect the flint and iron, wood, peace pipe, and the torn wampum on the floor.
- Put the wood in the stove.
- Use the flint to light the wood.
- Give the pipe to the Shaman.
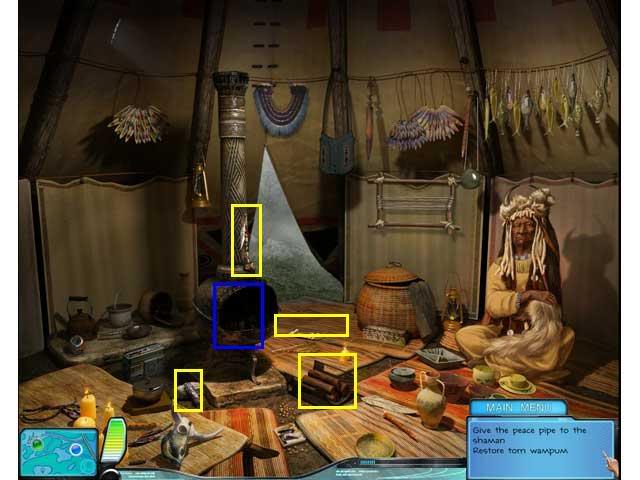
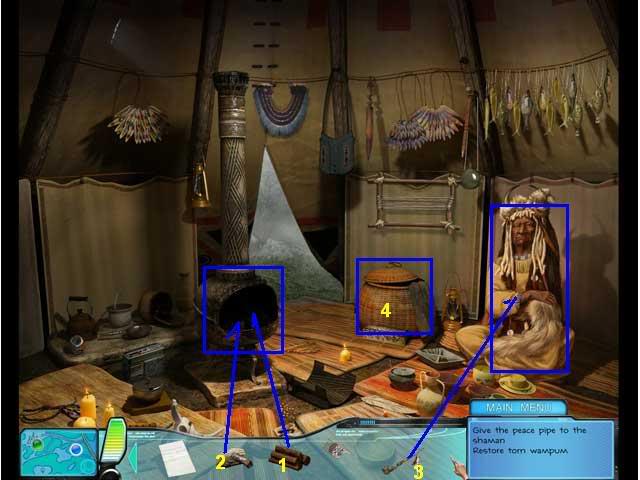
- Click on the wicker basket. The top will come off.
- Click on the basket again and you will get a zoom scene.
- Collect the tobacco and the other piece of torn wampum.
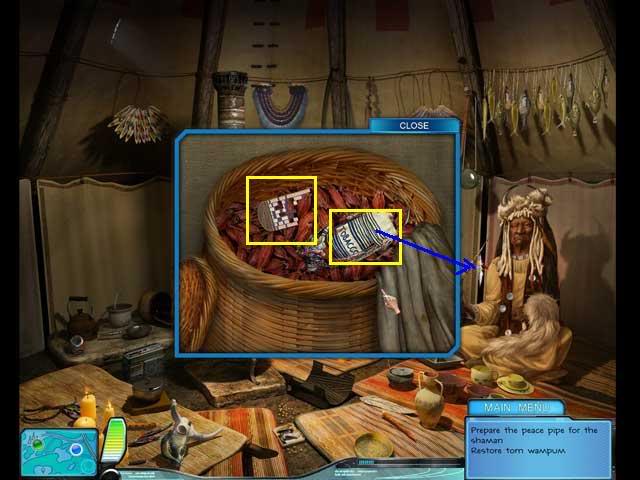
- Put some tobacco in the pipe.
- Get a glowing ember from the stove and use it light the pipe.
- The shaman will thank you. A new piece of wampum will appear on the floor.
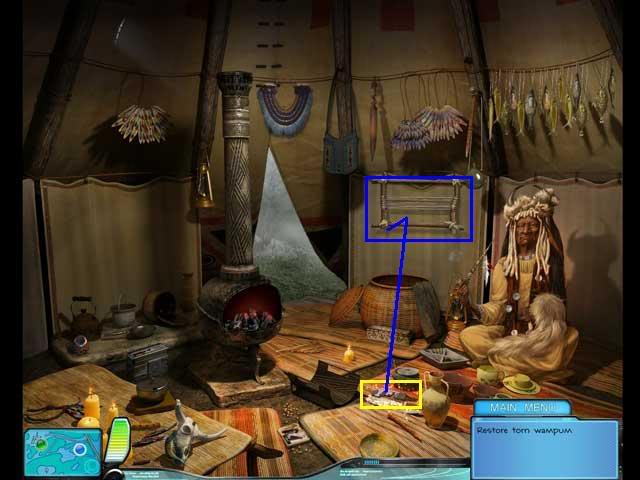
- Pick up the pieces of wampum in inventory and click 3 times on the frame on the wall.
- A zoom scene will open up with a mini-game.
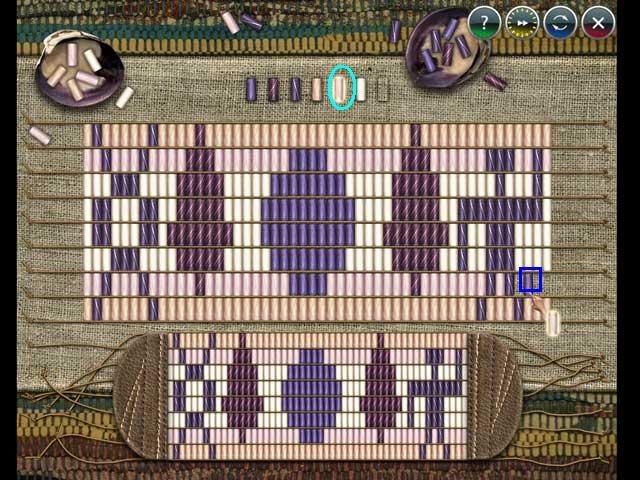
- This one is simple. Just click on a bead of the correct color from the row at the top, then click where you want to put it so you are matching the pattern at the bottom.
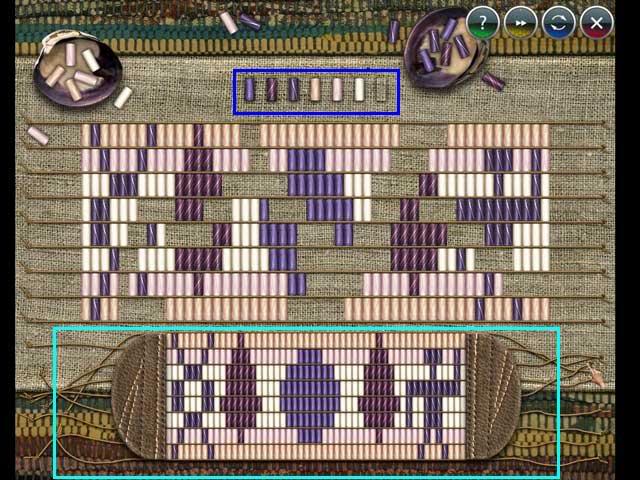
- If you make a mistake, just click on the right color bead and put it over the top of the wrong one.
- Go to the Sacred Grove
Dreamcatcher, Scene 3: Sacred Grove
- First pick up all the cans lying around.
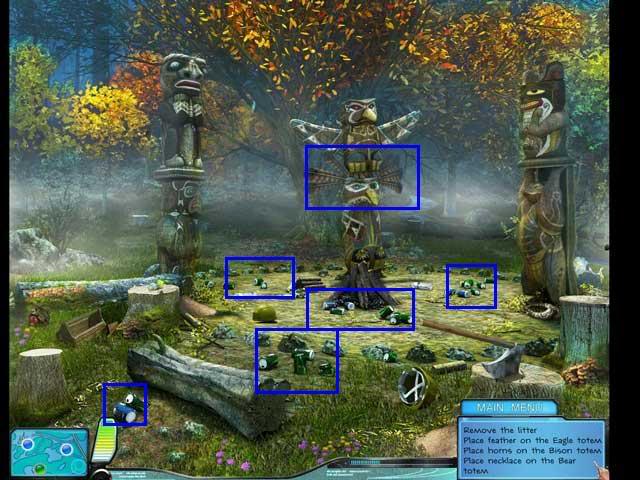
- Now take the eagle feather from inventory and place it on the headdress of the central Eagle Totem. It will only stick when you get the pop up text.
- Pick up the horns near the base of the bear totem. Put them on the head of the Bison totem.
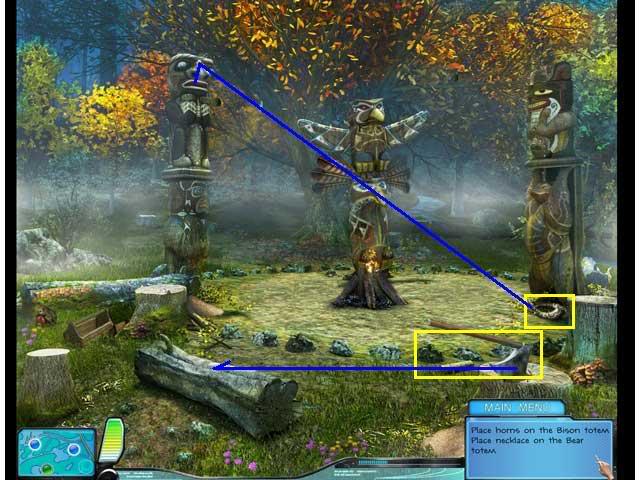
- Now take the axe from the tree stump in the lower right. Use it on the "recently cut tree" on the left until you see the amulet. But that’s only part of the necklace.
- Now you have to go back to the Reservation for your next task.
Dreamcatcher: Scene 4: Reservation
- When you return to the Reservation, you will see a new task: Find Bear’s Necklace, and a new sparkly area to the left.
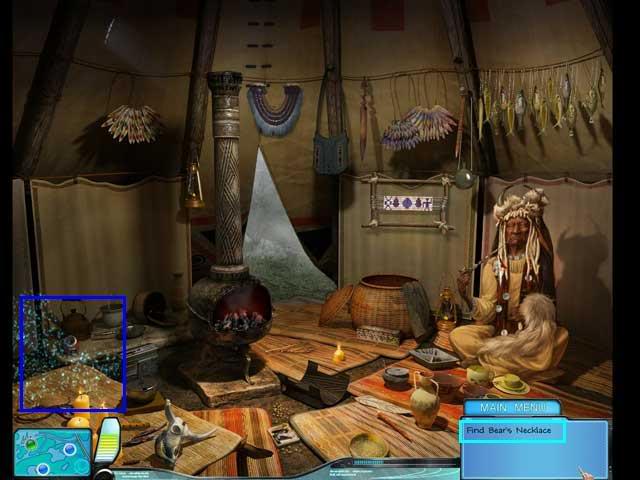
- Click on it and a Hidden Object scene will open up.
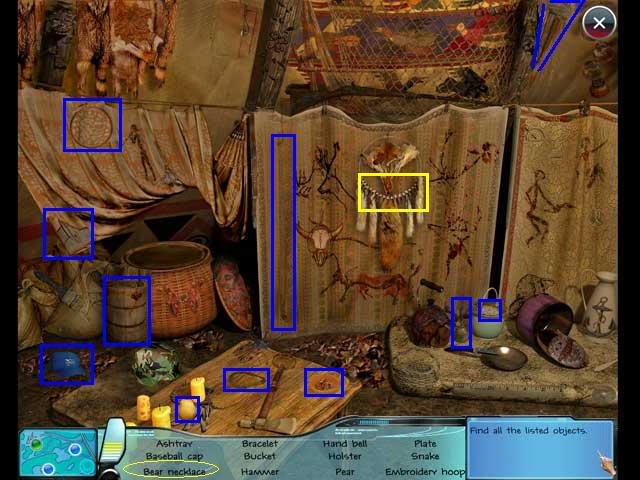
- Your Find List may be different than mine. The Key Object is Bear’s Necklace.
- The bracelet was very picky-I had to click on the chain part, not the ID part.
- Go back to the Sacred Grove.
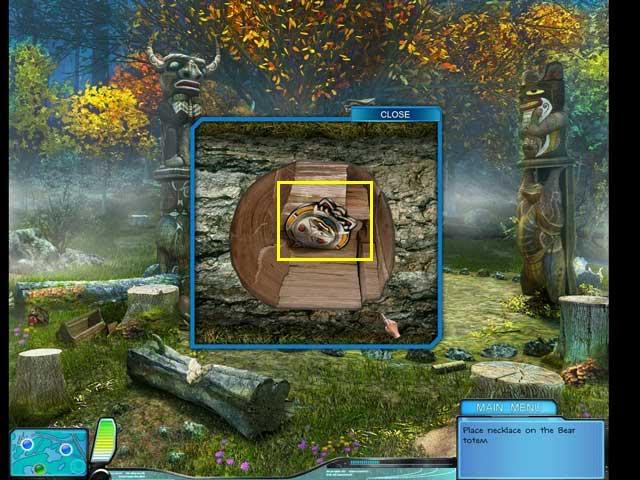
Dreamcatcher, Scene 5: Sacred Grove
- Put the bear necklace on the Bear Totem.
- The Moon Lady will appear.
- Give her the moon amulet.
- Click on the sparkly area on the left of the scene, and a hidden object scene will appear.
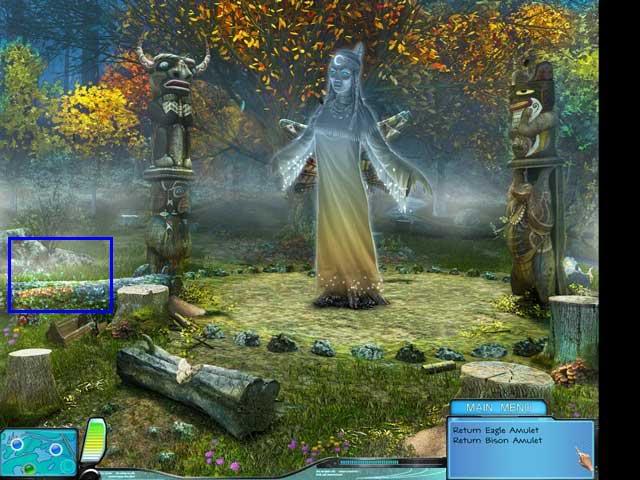
- Your Find List may be different than mine. The key object is the Eagle Wings.
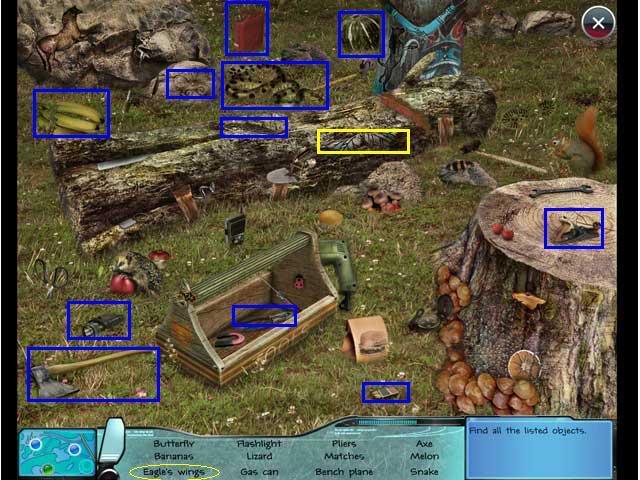
- The Moon Lady will not take it yet, because this is only part of the Eagle Amulet. You have to go find the rest of it and put it back together.
- Go back to see the Shaman.
Dreamcatcher: Scene 6: Reservation
- There will be a sparkly area on the left. Click it, and a new hidden object scene will appear.
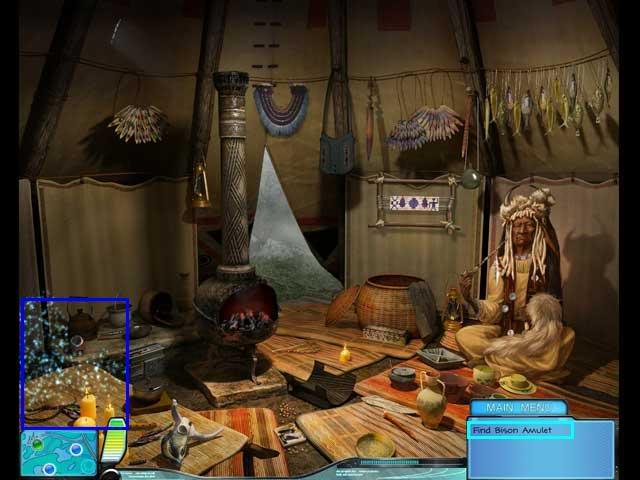
- Your Find List may be different than mine. The key item is the Bison amulet.
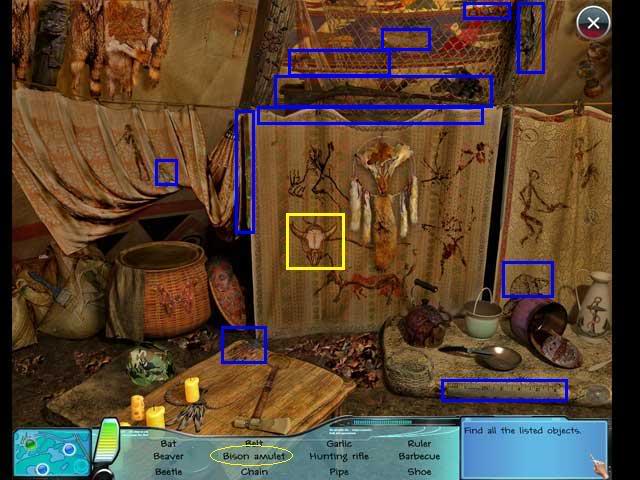
- Then back to the grove.
Dreamcatcher: Scene 7: Sacred Grove
- Give the Bison Amulet to the Moon lady.
- Now you still have to find the rest of the Eagle amulet. You only have the wings so far.
- Go back to the Crime Scene at the Trailer Home
Dreamcatcher: Scene 8: Crime Scene/Trailer Home
- Click on the sparkly area on the right. A Hidden Object scene will open.
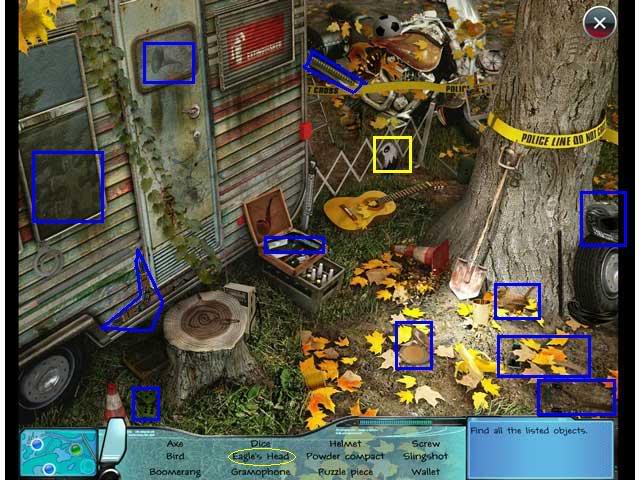
- Your Find List may be different than mine. The Key Item is the Eagle’s Head.
- Now you have a new task:
- Look for a stump near the trailer home and click on it.
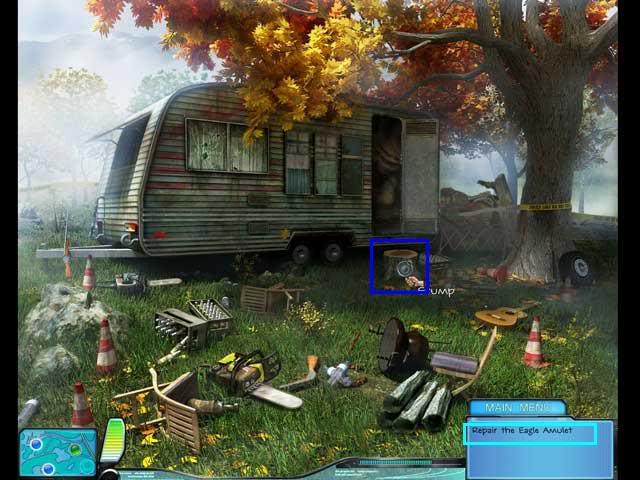
- A zoom scene will open up.
- Click on the pieces in inventory and then click on the eagle cutout, and the mini-game will start.
- You need to move the brown pieces on the left so they form the eagle.
- Right click on a piece to rotate it.
Solution:
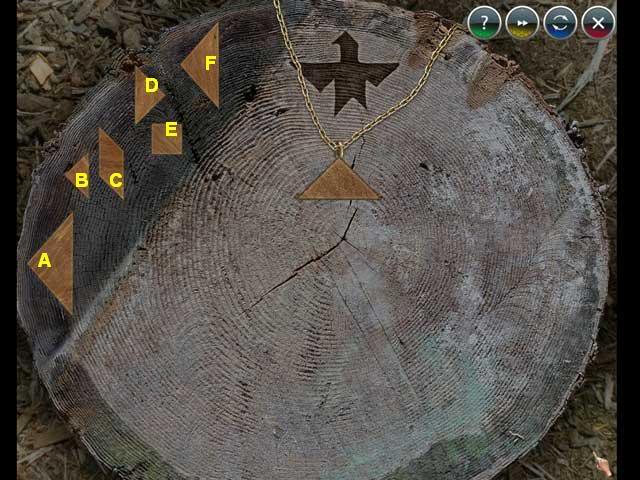
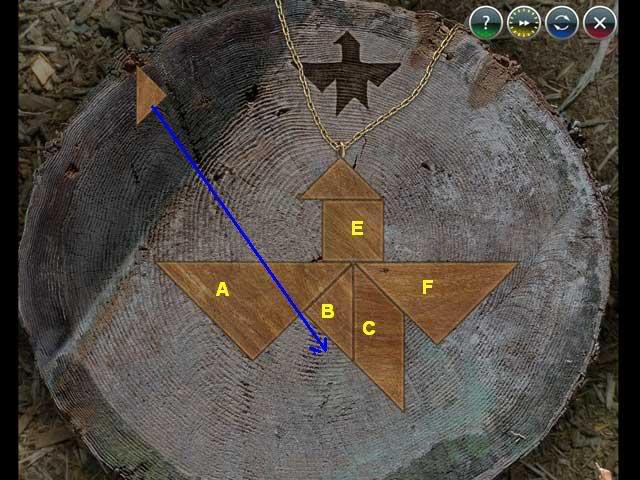
- Now back to the grove.
Dreamcatcher, Scene 9: Sacred Grove
- Give the eagle amulet to the Moon lady.
- She will give you the Tambourine of the Spirits.
- Take it to the Shaman.
Dreamcatcher, Scene 10: Reservation
- Give the tambourine to the Shaman. He will challenge you to a dice game.
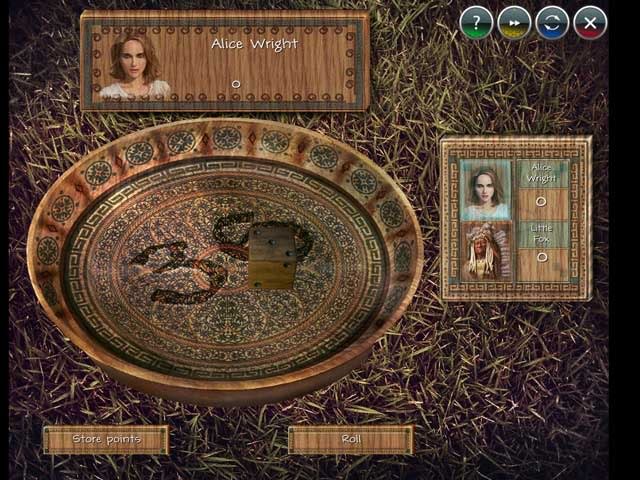
- This is just a game of chance, and if you don’t win you get to continue playing until you do, so there’s not that much to it.
- If you want to get into the strategy, you have to decide when to keep rolling, but risk getting a skull and losing all your points for the turn, or stop rolling and store your points.
- I just rolled 4 times each turn and then stored my points and I won on the second play.
- After you win, the Dreamcatcher will be sparkling to the left of the Shaman. Collect it.
- That ends this investigation.
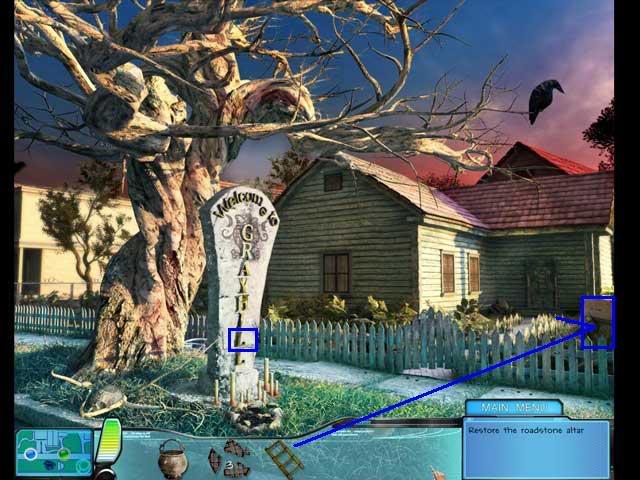
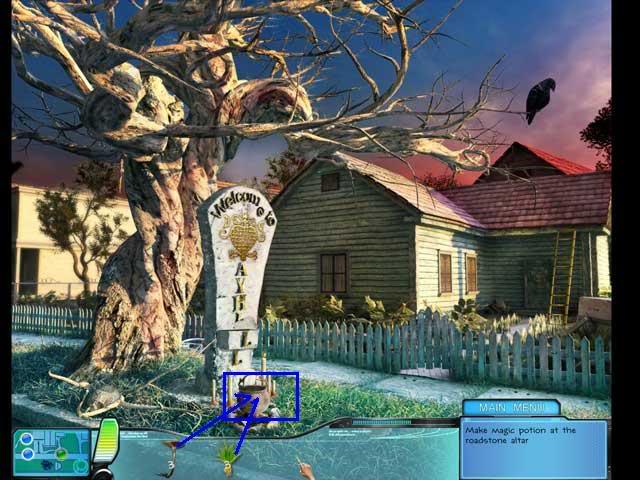
Sleepsand, Scene 1: Crossroads
- Click on the sparkly area on the right to reveal a hidden object scene.
- Your Find List may be different than mine. The key object is the brass L.
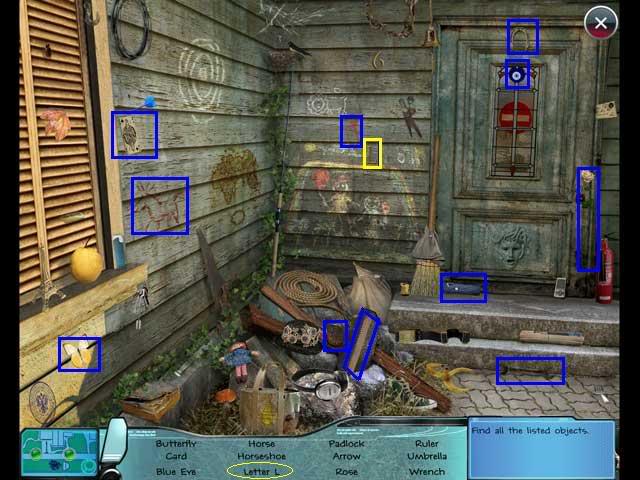
- Notice the place for a ladder on the right.
- Put the L back on the sign.
- Pick up the old pot.
- Go to the 2nd location, Grayhill Road.
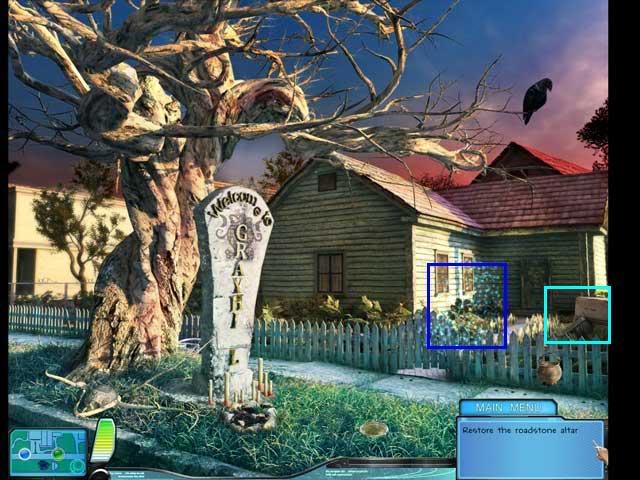
Sleepsand, Scene 2: Grayhill Road
- Collect the 3 pieces of the magic symbol.
- Collect the ladder.
- Notice the voodoo doll.
- Notice the garage is locked.
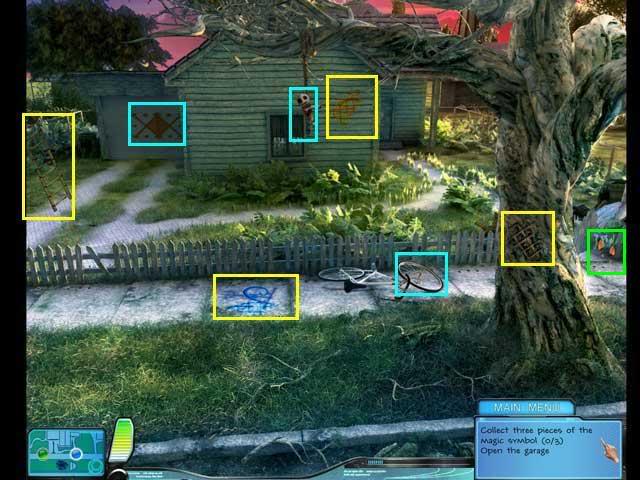
- Go back to the crossroads.
Sleepsand, Scene 3: Crossroads
- Put the ladder in place on the right.
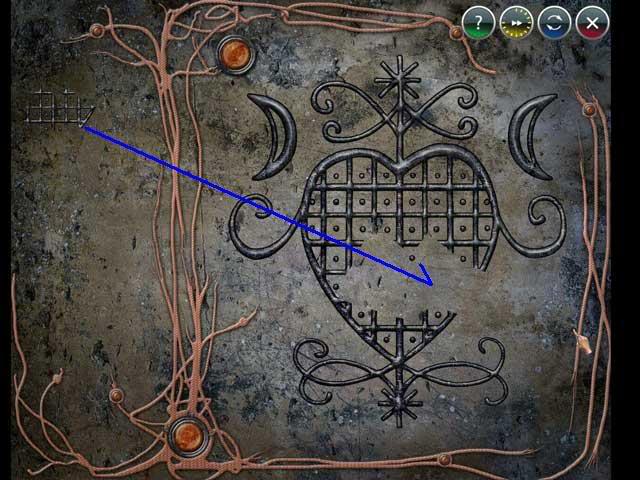
- Click on the broken magic symbol pieces in inventory, then click on the roadside altar.
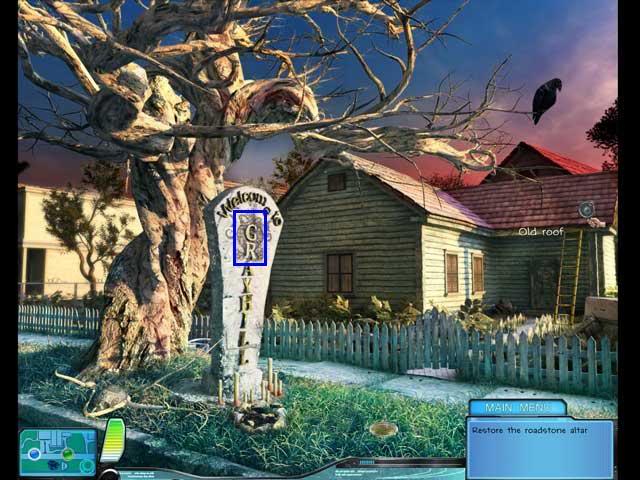
- This will open a mini-game.
- Put together the shape. It’s a heart with a lot of curlicues.
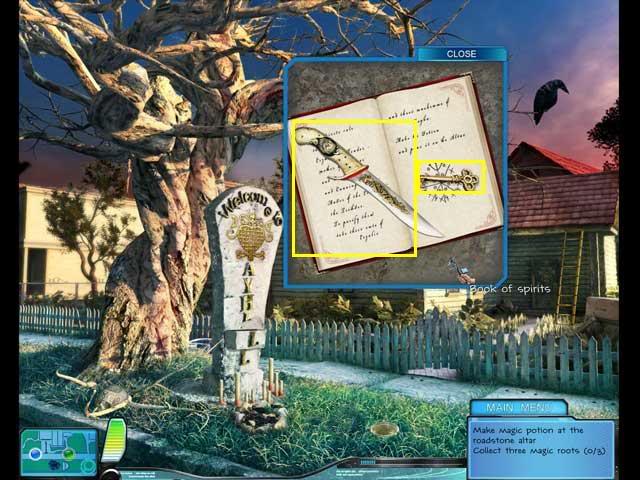
- Now the L you put back into place will move and reveal the Book of Spirits. Click on it.
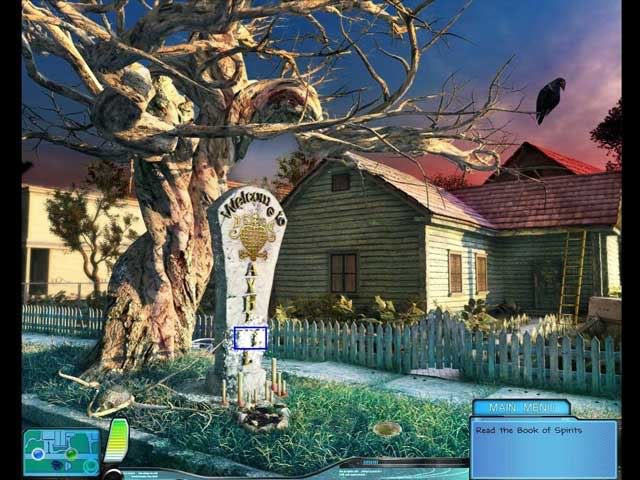
- Read the message. You will need 3 herbs and 3 mushrooms.
- Look at the book again. A dagger and a key have appeared. Collect them.
- Go back to Grayhill Road.
Sleepsand, Scene 4: Grayhill Road
- Use the key on the Garage door and it will open.
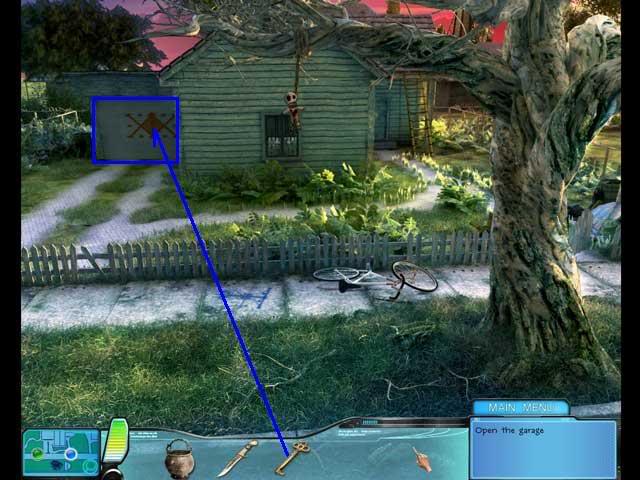
- Go in, to the Secret Altar of Legba.
Sleepsand, Scene 5: Secret Altar of Legba.
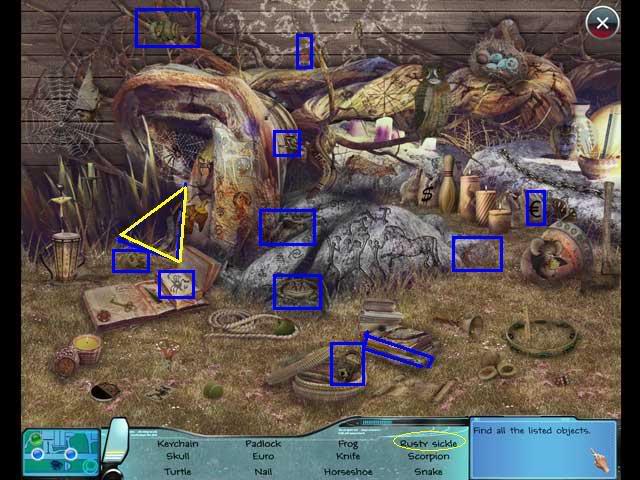
- There is a sparkly section on the right. Click on it and a Hidden Object scene will open.
- Your Find List may be different than mine. The Key Object is the Rusty Sickle, which becomes the "Blessed Sickle" in inventory.
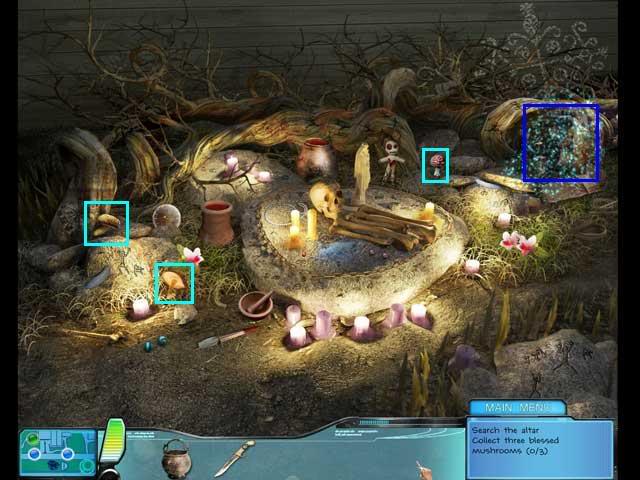
- Back at the shrine, cut the 3 mushrooms with the Sickle.
- Go back to the Crossroads.
Sleepsand, Scene 6: Crossroads
- You can see a new hidden object scene on the right, but first go up the ladder to the roof and cut the 3 herbs with the Magic Knife.
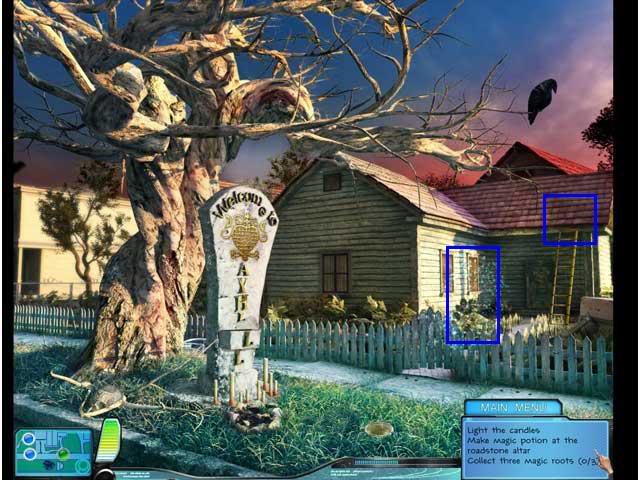
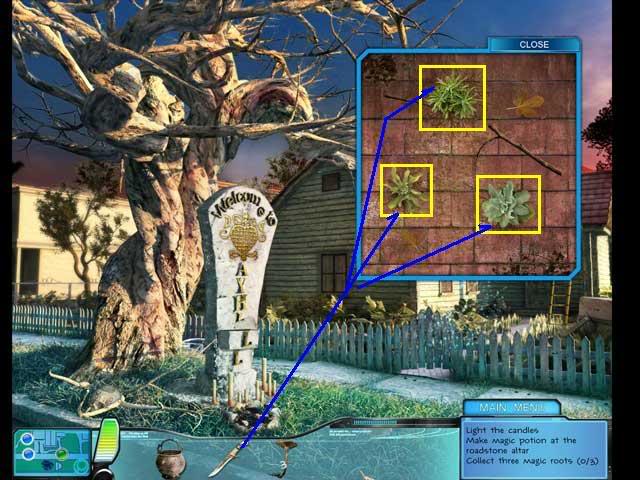
- Now do the hidden object scene.
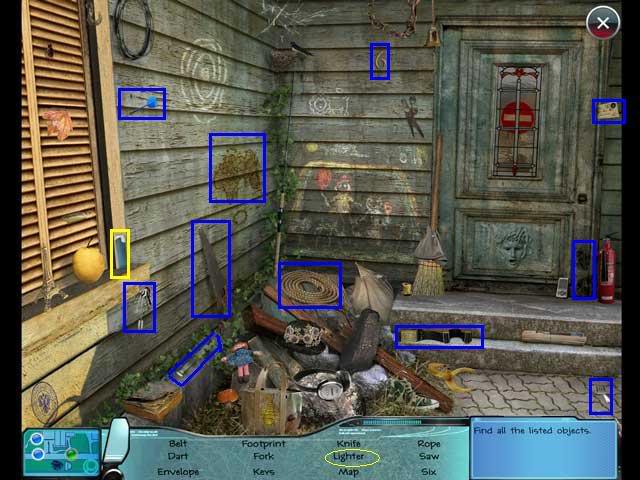
- Your Find List may be different than mine. The Key Object is the Lighter.
- Use the lighter from inventory to light the candles.
- Put the Old Pot from inventory on the fireplace.
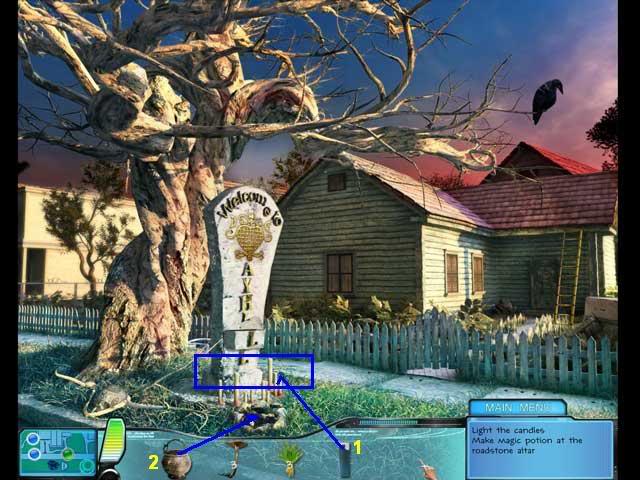
- Put the mushrooms and the herbs into the Old Pot.
- The potion is prepared. Click on it again to put it back in inventory.
- Now go back to the Secret Shrine.
Sleepsand, Scene 7: Secret Shrine
- First complete the Hidden Object scene on the right side.
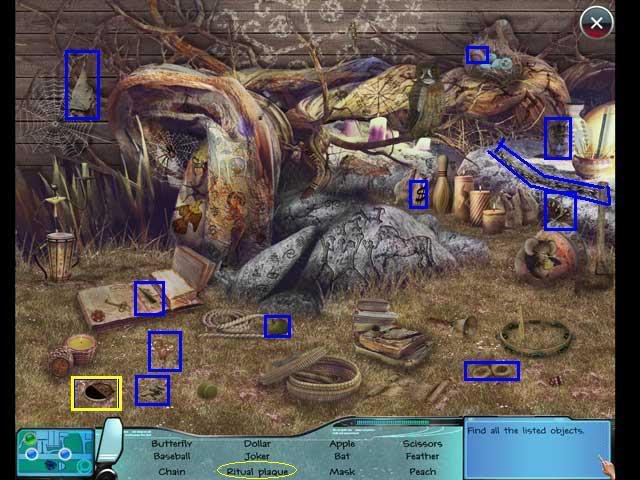
- Your Find List may be different than mine. The Key Object is the Ritual Plaque.
- When you return to the Shrine view, click on the potion in inventory and pour it on the altar in the center.
- Legba will appear.
- Give him the ritual plaque.
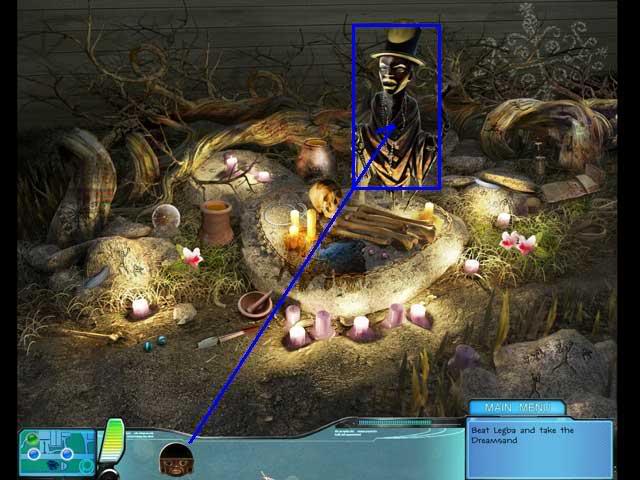
- This will start a new mini-game. This is an Otello-like game.The most important thing is to take control of the corners whenever possible.
- If you lose, you get to keep playing until you win.
- When you win, the dreamsand will appear just to the left of the god. Take it.
- This ends investigation 3.
Stopwatch, Scene 1: Car Crash
- Pick up the empty bucket.
- Put the bucket on the snow.
- Take the bucket of snow from inventory and put it on top of the flames on the car. This will melt the snow so you have a bucket of water.
- Take the bucket of water and use it to put out the flames.
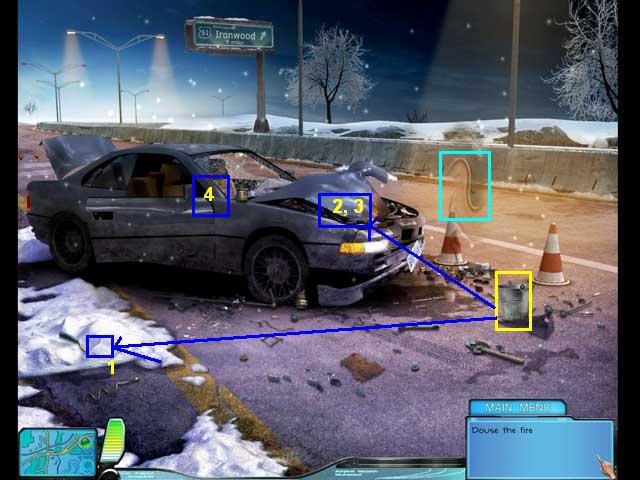
- Try clicking on the car to look in the glove box. It’s locked!
- Sparkles will appear just to the right of the car. Click there and a Hidden Object scene will be revealed.
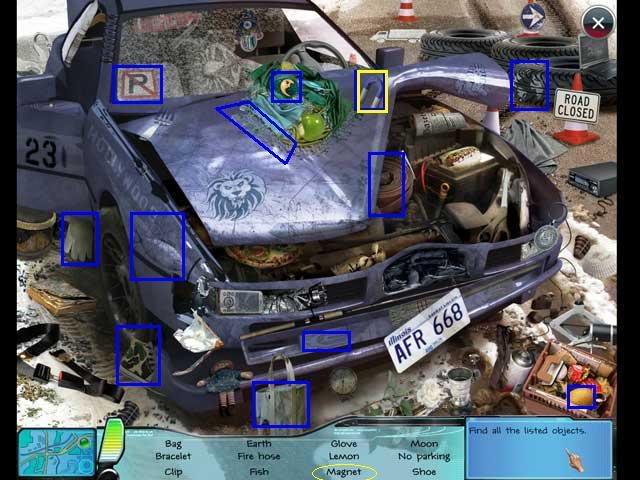
- Your Find List may be different than mine. The Key Object is the Magnet.
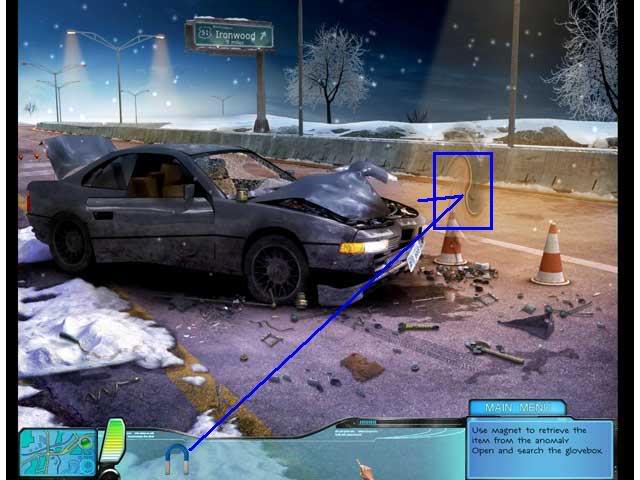
- Take the magnet from inventory and use it on the anomaly.
- This will open a mini-game. Untangle the lines between the magnets.
My solution:
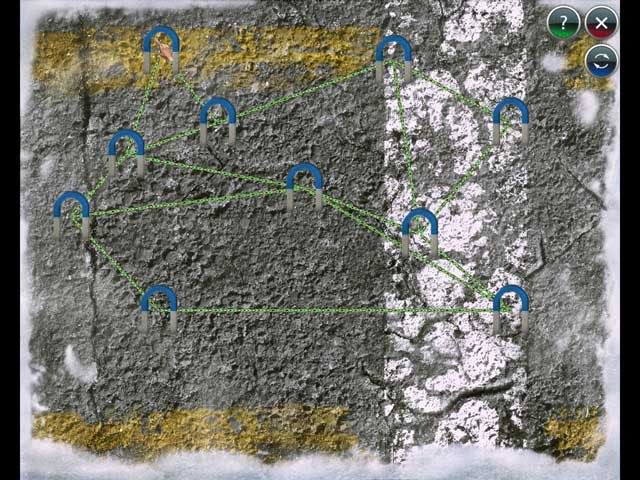
- You will retrieve the key.
- Take the key and use it to open the glovebox.
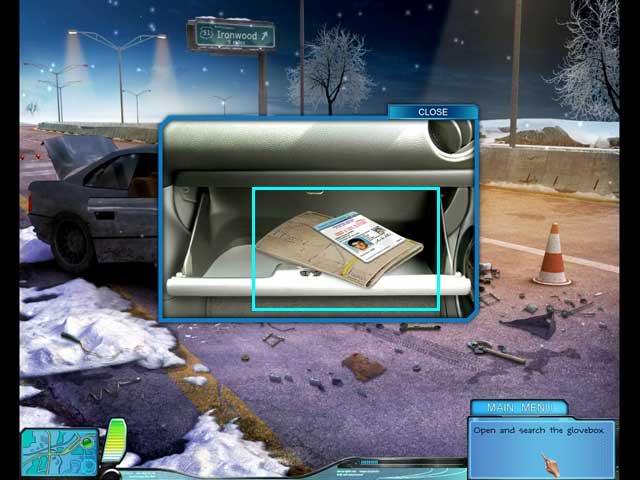
- Examine the documents and two new locations will open on the map.
- Go to the Car Dump/Junkyard.
Stopwatch, Scene 2: Car Dump
- Collect the gas can.
- Collect the discharged battery.
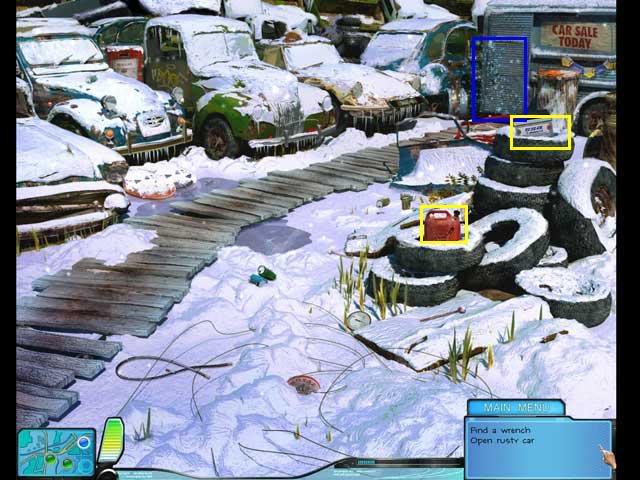
- Click on the sparkle area to open a Hidden Object scene.
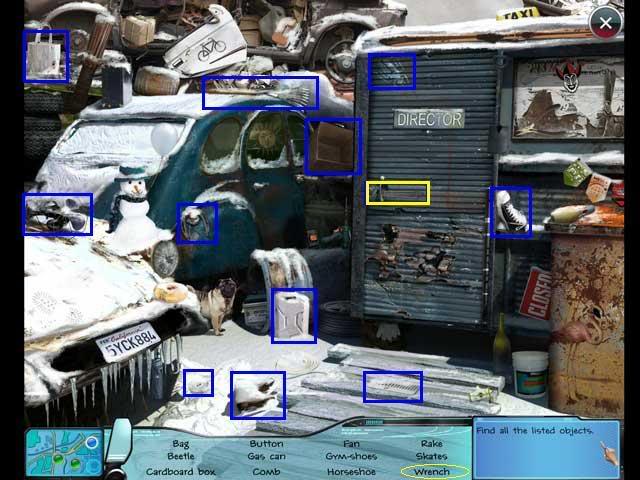
- Your Find List may be different than mine. The key object is the wrench.
- Use the wrench on the Rusty Car. It will open.
- Look inside. There is some kind of fancy light system, but it needs energy.
- Notice that there are blue sparkles again in the scene, so you need to reopen the Hidden Object scene.
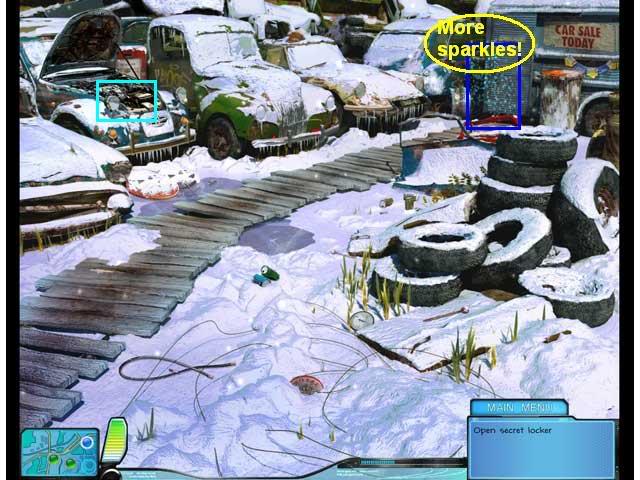
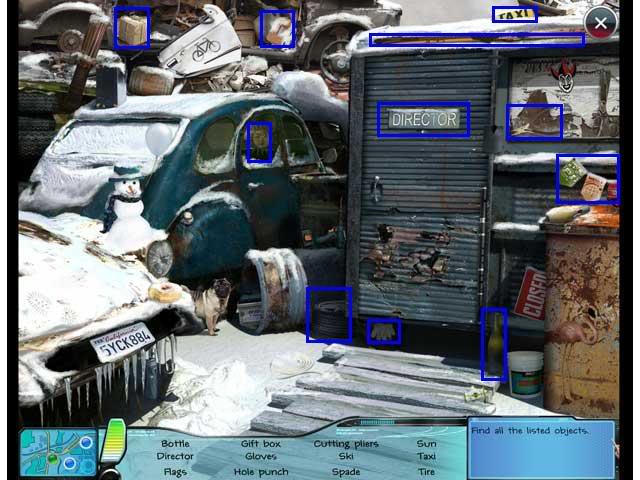
- Your Find List may be different than mine. This time the Key Object is Cutting Pliers (wire cutters).
- Go to the tool shed.
Stopwatch, Scene 3, Tool Shed
- Click on the gas can in inventory and pour it in the generator.
- Click on the discharged battery in inventory and put it on the charging platform where the text says "charging slot."
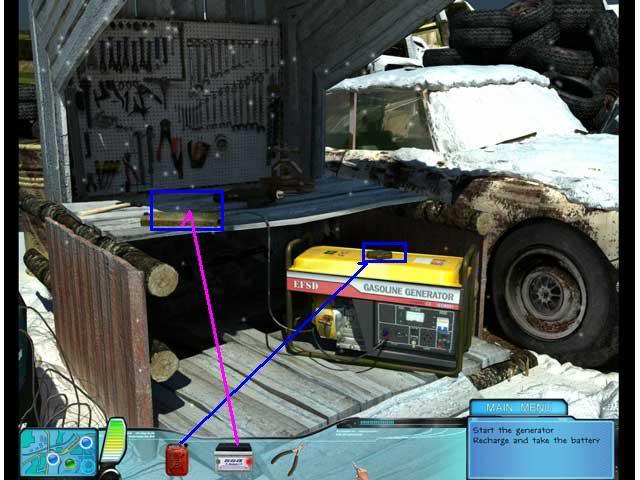
- Use the wire cutter to cut the extra wire on the lower left part of the screen.
- Take the wire from inventory and put it on the generator-it will automatically attach to the battery, which will start charging.
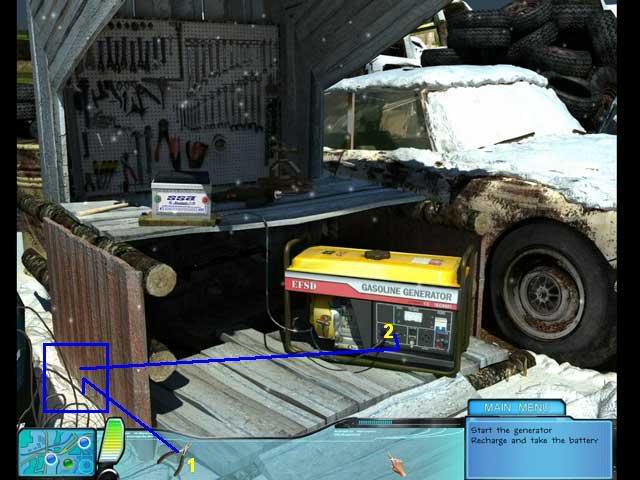
- When the lights are green, take the battery.
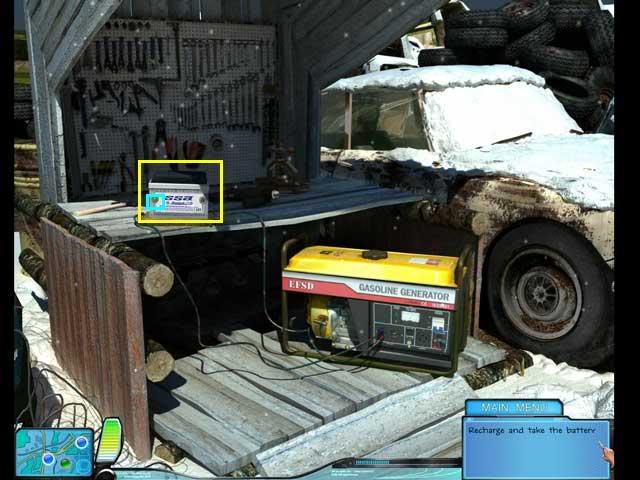
- Back to the car dump.
Stopwatch, scene 4: Pollock’s Car Dump
- Click on the rusty car to see the lights array.
- Attach the charged car battery.
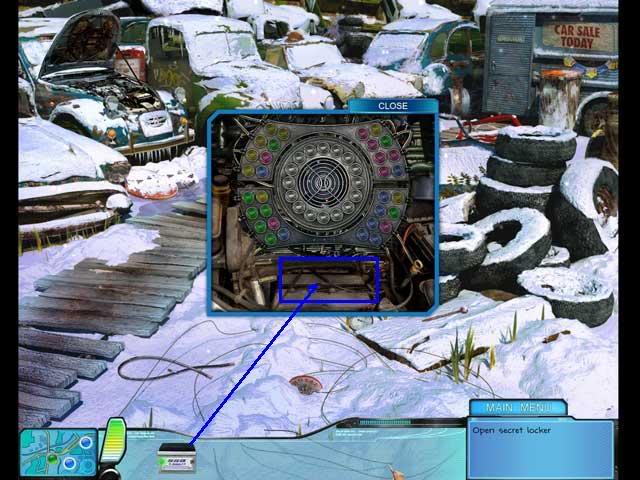
- This will open a mini-game.
- Clicking each inner button changes its color. You just keep clicking to change to a different color.
- As the inner lights change, they are counted in pairs (each light with the one next to it). These pairs light up pairs of similar color in the outer ring.
- There are many solutions for this. Here’s mine.
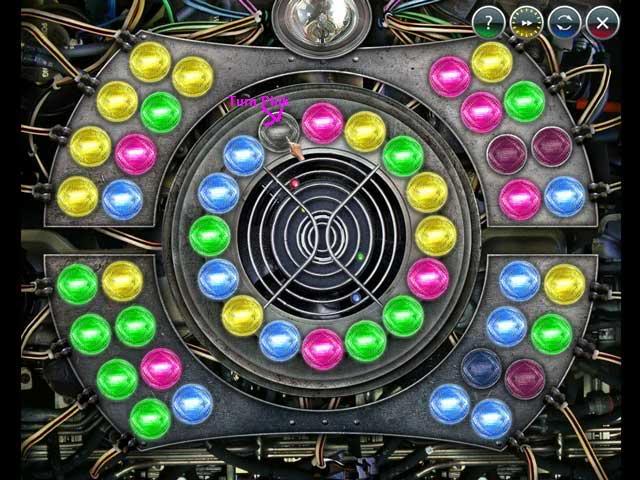
- Turn the last button pink and you’ve got it.
- This will reveal James’ diary. Click it to read it.
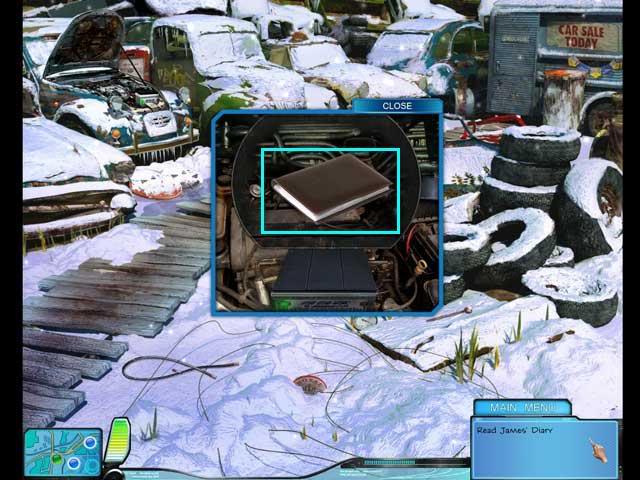
- Return to the crash scene.
Stopwatch, scene 5: Crash Scene
- Click on the sparkles to the right of the car to reveal a Hidden Object scene.
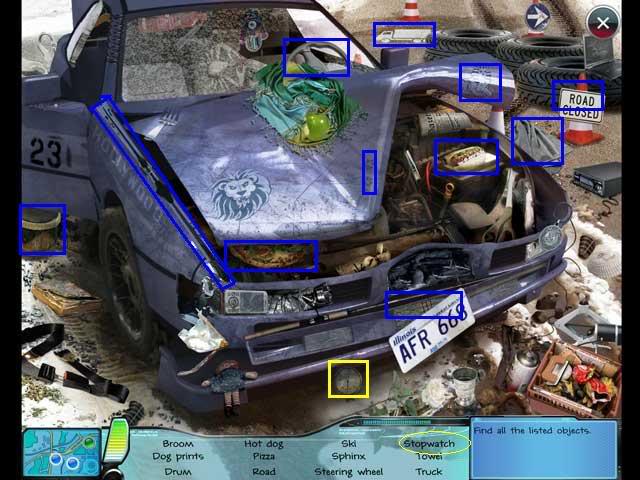
- Your Find List may be different than mine. The key object is The Stopwatch.
- Now it’s time to try to save Pollack.
- Click on the stopwatch in inventory, then apply it to the anomaly.
- A mini-game will open up.
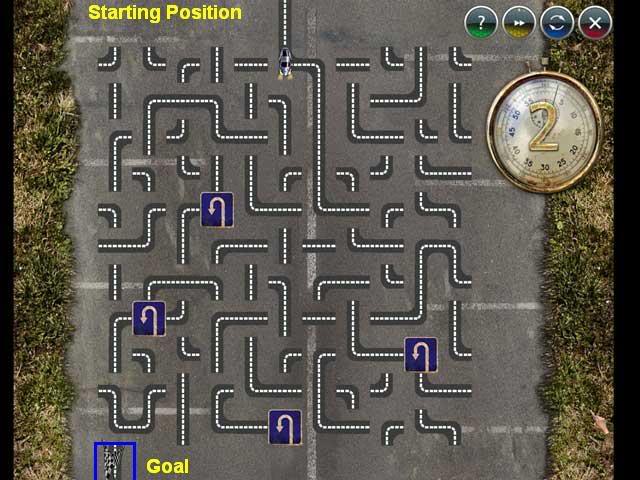
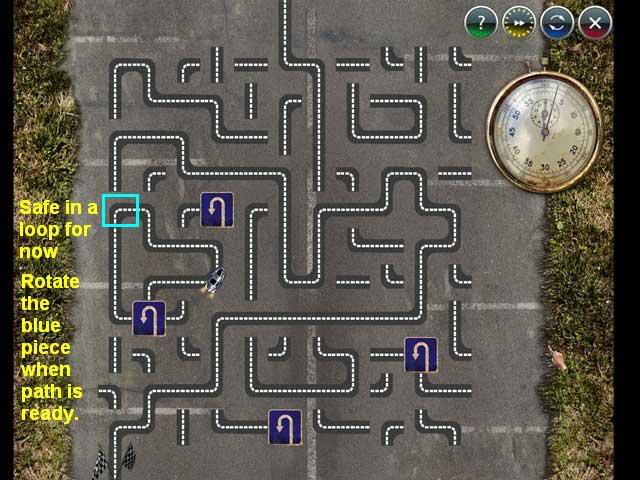
- If the car runs out of road it will crash. Your job is to design a road that will get it safely to the checkered flag.
- The key to this is to understand that you can switch road segments more than once, as long as the car never crashes.
- What I did was first trap the car in a safe loop where it could go around and around while I built the rest of the road.
- Then I built the path to the finish, and finally switched one segment of the loop to connect it back to the new road to the destination.
- Here’s my solution, there are many others:

- After you finish, the stopwatch will be on the hood of the car. Collect it.
- This completes investigation 4.
Rabbit’s Paw, Scene 1: Hotel Room
- Pick up the microcassette on the bed.
- Notice that the cellphone on the bed needs to be charged.
- Notice the safe.
- Notice the desk phone on the nightstand.
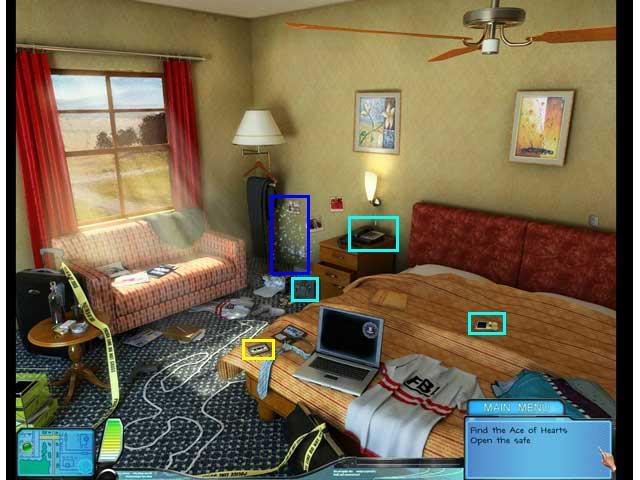
- Click on the sparkles by the safe. A Hidden Object scene will open.
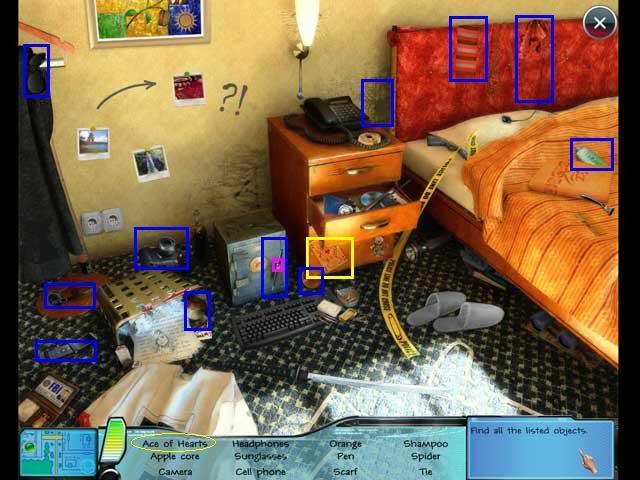
- Your Find List may be different than mine. The key object is the Ace of Hearts.
- By the way, the Pen was on my Find List and the game was extremely picky about where you clicked I was only able to collect it when I clicked right on its center band, marked in pink on the screen shot.
- Now what?
- Click on the desk phone on the nightstand. A zoom scene will open. Ah ha! It has a tape player for the answering machine.
- Put the microcassette into the desk phone.
- Click on the zoom scene two more times, once to close the lid and once to play the cassette.
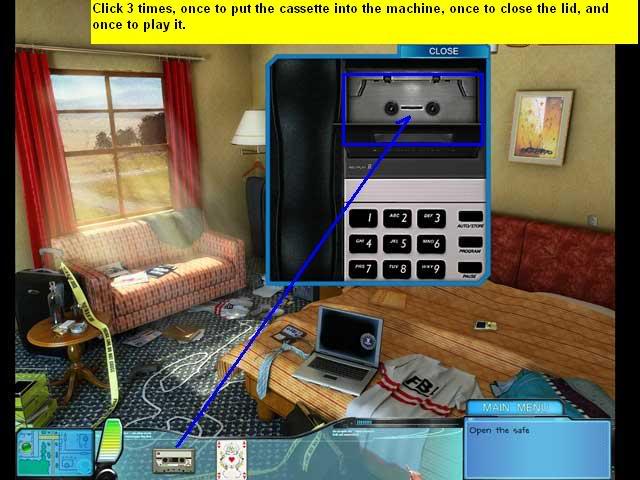
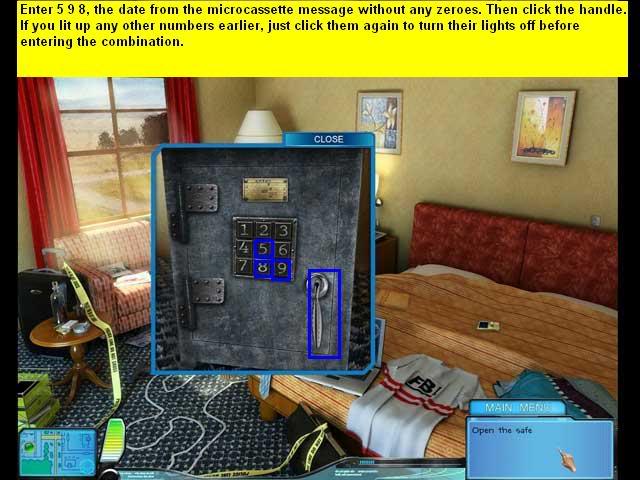
- You will get a message: "Attention all agents! Remember to change your code and password daily. Today is 05/09/08"
- Click on the safe. If you previously lit up any numbers, click click on them again to turn their lights off, so start with all lights off.
- There are no zeroes on the safe, so use 5 9 8 as the code.
- Click on the handle. The safe will open.
- Collect the flash drive inside.
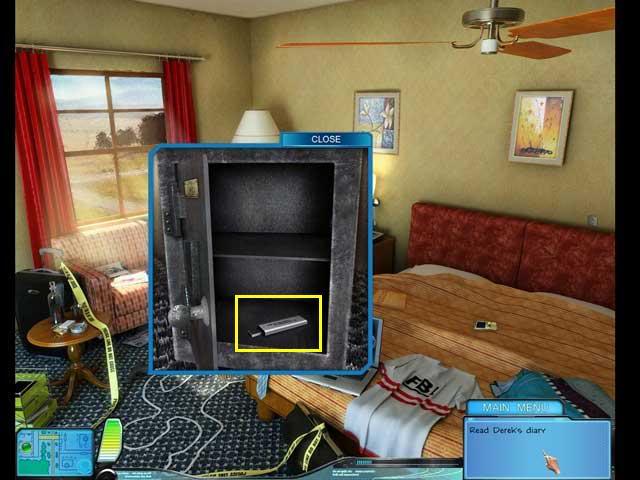
- Take the flash drive from inventory and use it on the laptop on the bed.
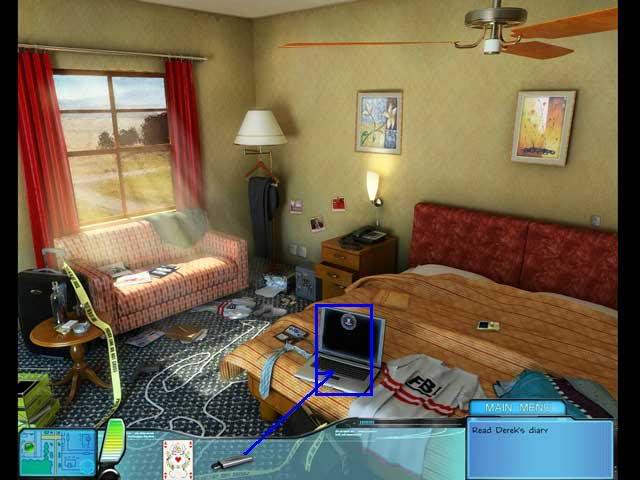
- Read the diary.
- Two new locations will open on the map.
- Go to the Roulette.
Rabbit’s Paw, Scene 2: Casino Roulette
- Collect the Ace of Diamonds card from the table.
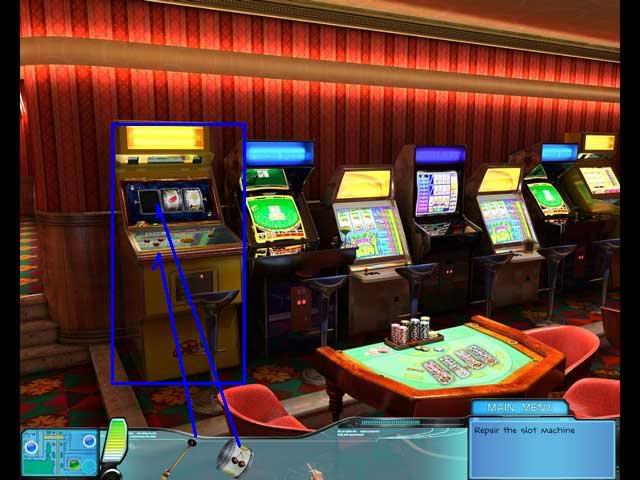
- Collect the slot machine reel from the chair to the left of the table.
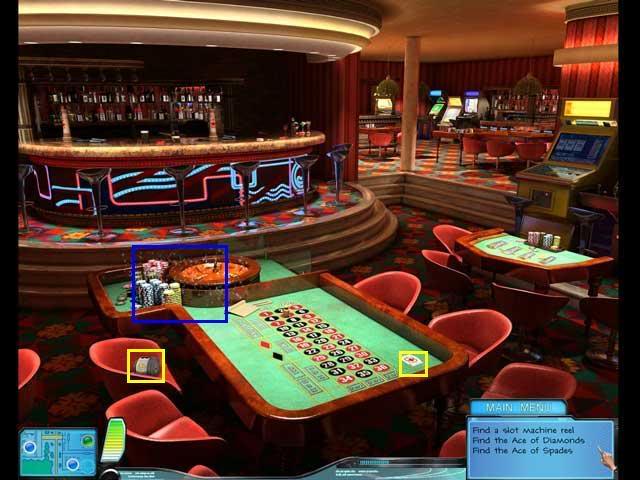
- Click on the sparkles to open the Hidden Object scene.
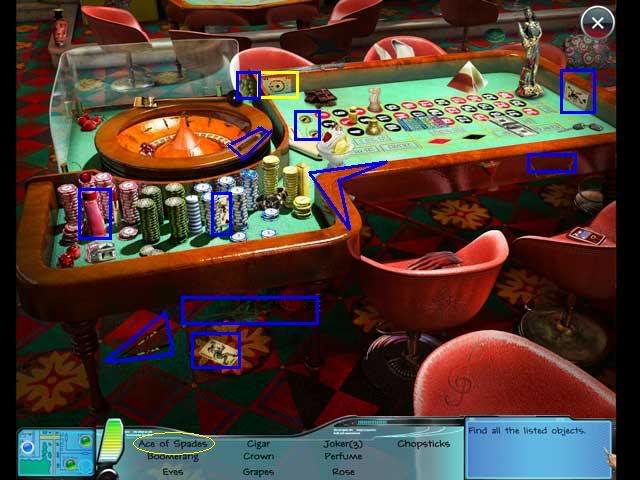
- Your Find List may be different than mine. The key object is the Ace of Spades.
- Go to the Casino Slots.
Rabbit’s Paw, Scene 3: Casino Slots
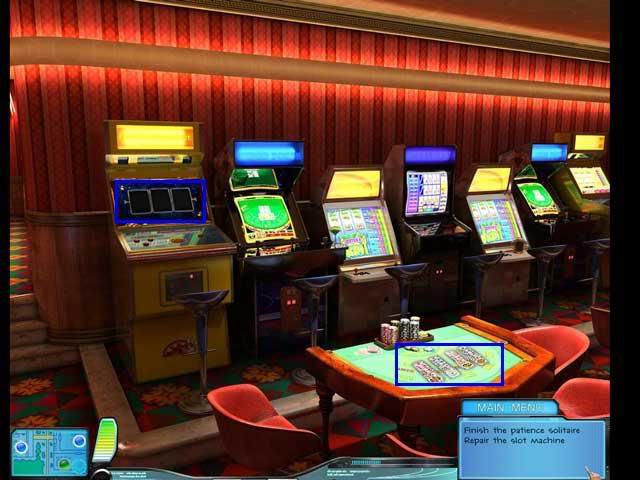
- Click on the card table on the right. A zoom scene will open.
- Complete the Patience game by taking the Aces from your inventory and putting them on the right stacks.
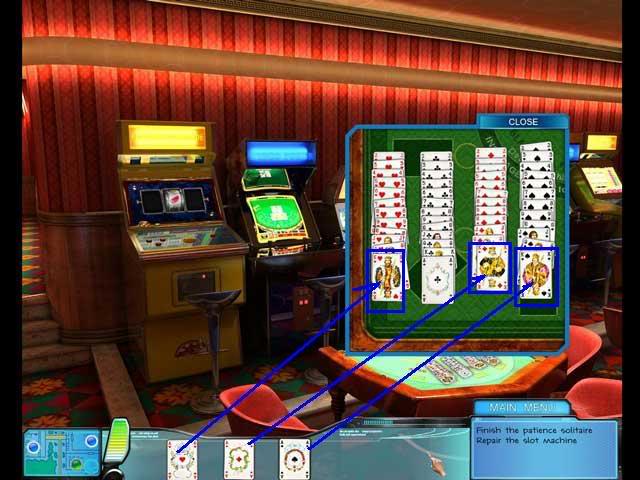
- A slot machine reel will appear at the bottom of the cards. Collect it.
- Take the slot machine reels from inventory and put them in the broken slot machine.
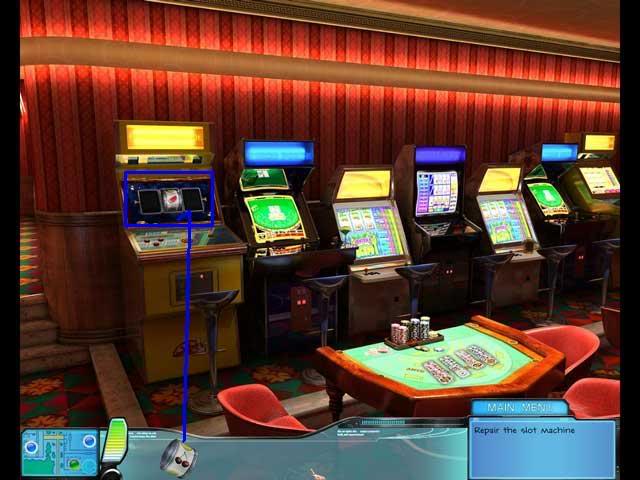
- You still need one more reel.
- Go back to Casino Roulette and look there.
Rabbit’s Paw, Scene 4: Casino Roulette
- Click on the sparkles to open a Hidden Objet scene.
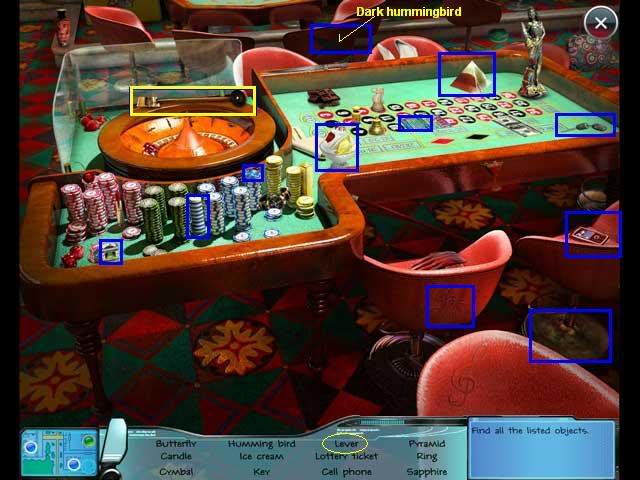
- Your Find List may be different than mine. The key object is the slot machine lever. I guess that machine was more broken than we thought!
- Back to the hotel room.
Rabbit’s Paw, Scene 5: Hotel Room
- You have a new task, to open the suitcase.
- Start by clicking on the sparkles and opening the Hidden Object Scene.
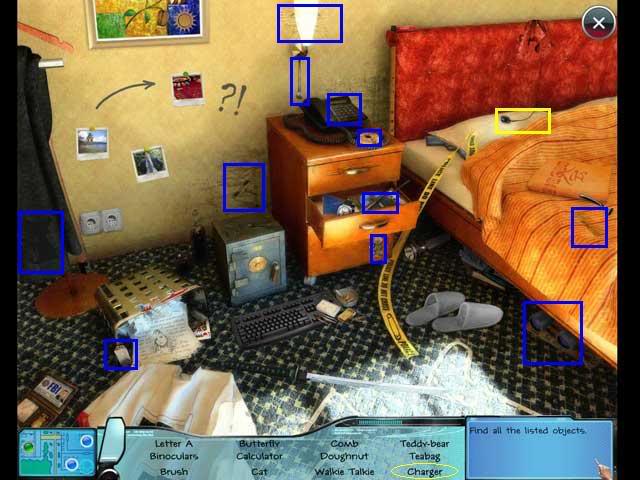
- Your Find List may be different than mine. The key object is the cellphone charger.
- Now we have a cellphone charger and there’s a dead cellphone on the bed. Let’s put them together.
- Click on the charger in inventory, then on the phone on the bed. It will connect itself to the wall plug and charge.
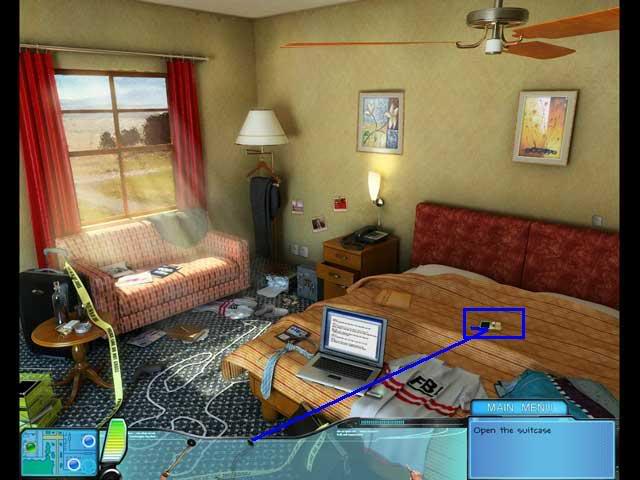
- Click on the cellphone again. You will see a note:

"Remember S. Holmes, Baker Str
221b"
- Click on the suitcase. You will get a zoom scene.
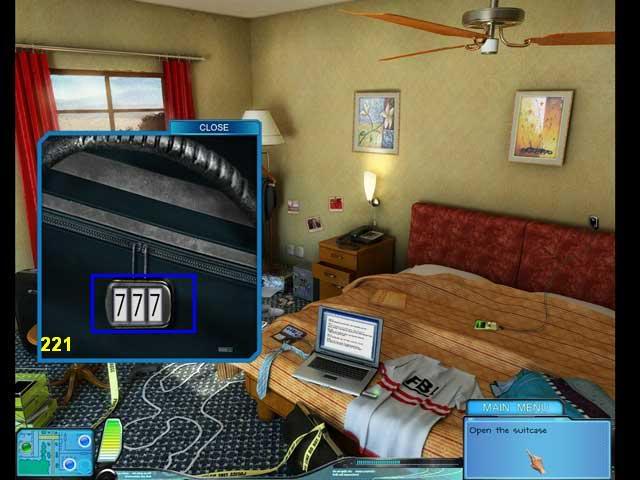
- Enter 221 for the code.
- The suitcase will open and you will see the 3rd slot machine reel. Collect it.
- Go back to the Casino Slots.
Rabbit’s Paw, Scene 6: Casino Slots
- Put the 3rd reel and the lever on the machine.
- Click on the machine one more time to open a mini-game.
- This is just a game of chance. I bet 3 coins each time. If you don’t win, you get another chance to play until you do.
- You can bet from 1 to 5 coins each time. Just click on a coin to move it to the betting row.
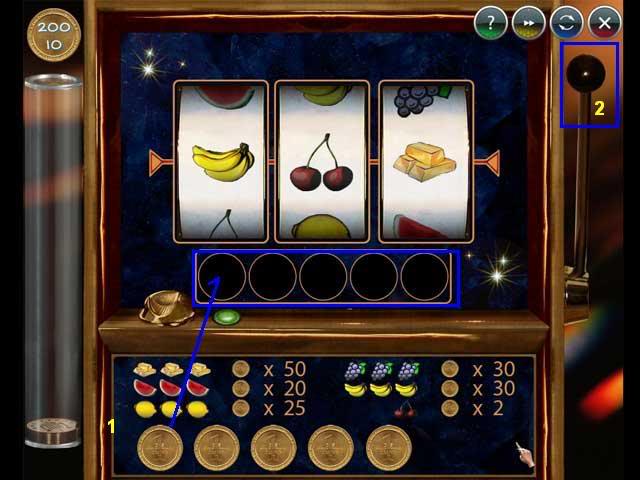
- When you’ve moved all the coins you want to, click on the handle to play.
- Once you have enough coins to end the game, go to Casino Roulette.
Rabbit’s Paw, Scene 7, Casino Roulette
- Talk to Derek’s ghost.
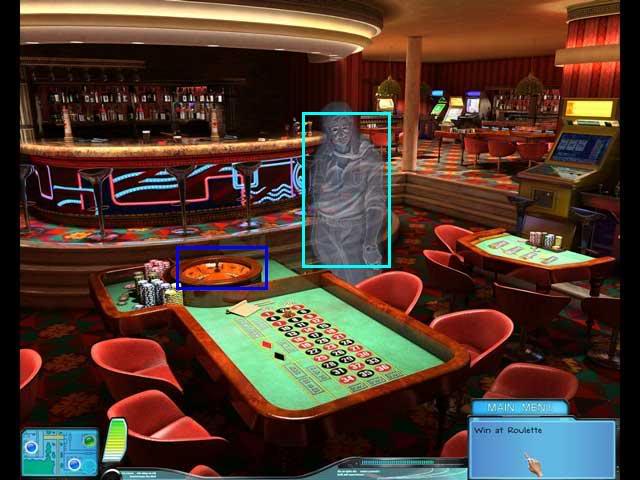
- Click on the coins in inventory, then the roulette wheel to play.
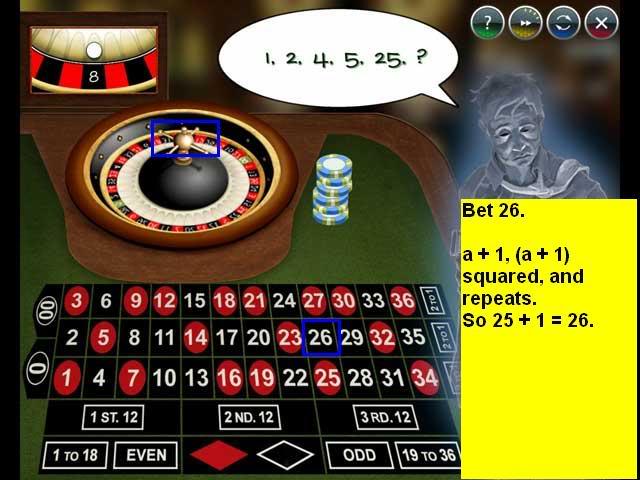
- This is a sequence puzzle.
- Once you know what number you want to bet, click on that number, then click on the roulette wheel to spin.
- I don’t know if these are random, but here are the three I got.
- The first number is 8. (a + 4, – 2, + 4, etc)
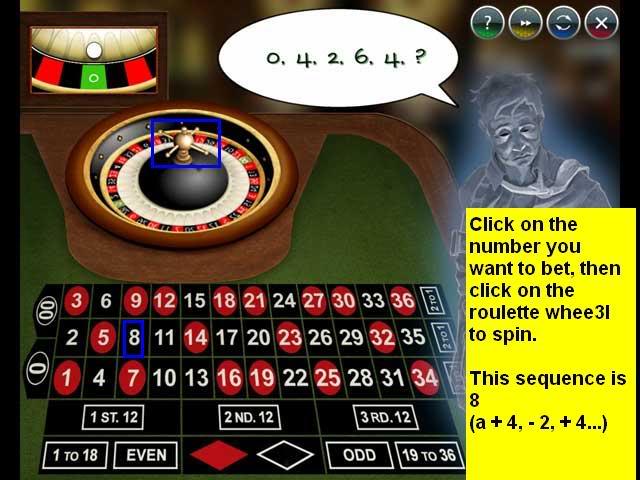
- The next number to bet is 26. The sequence is a + 1, (a + 1) squared, repeats. 25 + 1 = 26.
- The third sequence is just standard prime numbers: 2, 3, 5, 7, 11, 13. The next number is 17.
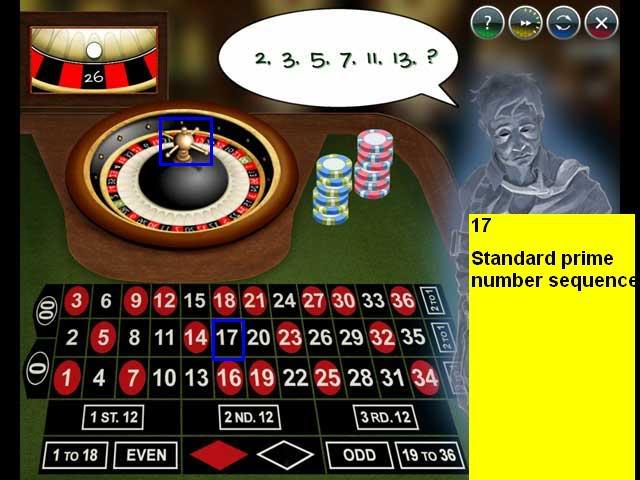
- Once you have won 3 times, Derek’s ghost will be freed.
- Click on the rabbit’s paw next to him to collect it.
- This completes this investigation.
Investigation 6: The Sphere of Life
Opening the Kabbalist’s Safe Puzzle
Sphere of Life, Scene 1: Study
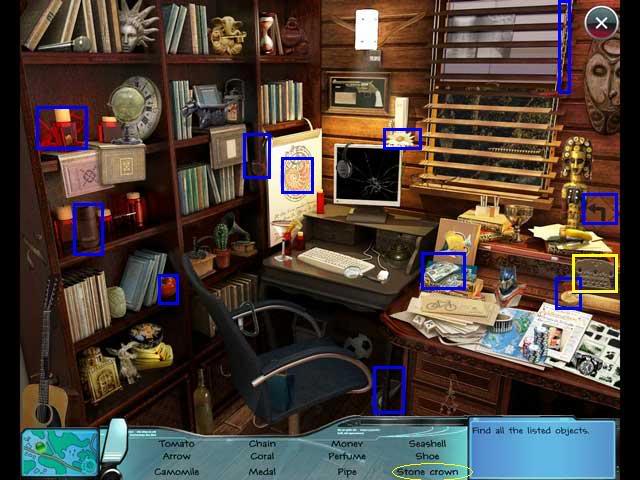
- There are a lot of things to look at here, but let’s start by clicking on the sparkles and doing the Hidden Object scene.
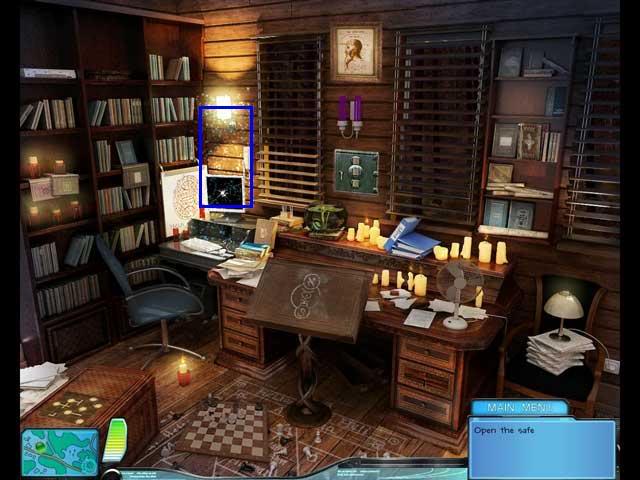
- Your Find List may be different than mine. The key object is the stone crown.
- Now see the 3 symbols on the easel in the center of the scene?
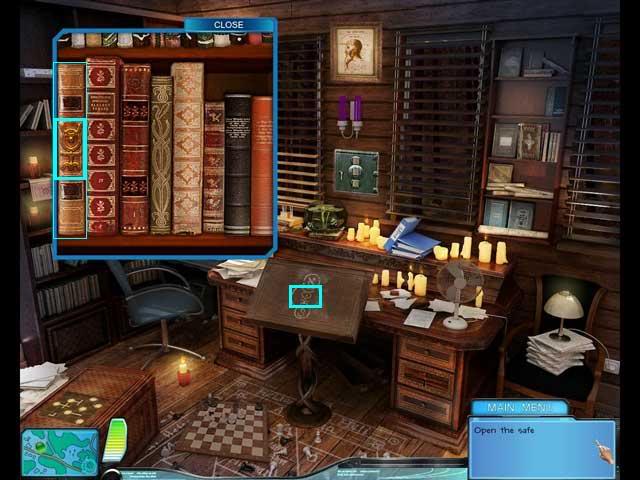
- You need to look around the room to find 3 sets of books that match them. The S symbol stands for Shakespeare.

- Each shelf that will open has several books. You need to find one with a symbol that exactly matches one of the symbols on the easel. When you find that book, click on it to open it. You will see a bunch of numbers on the pages, and one of them is circled.
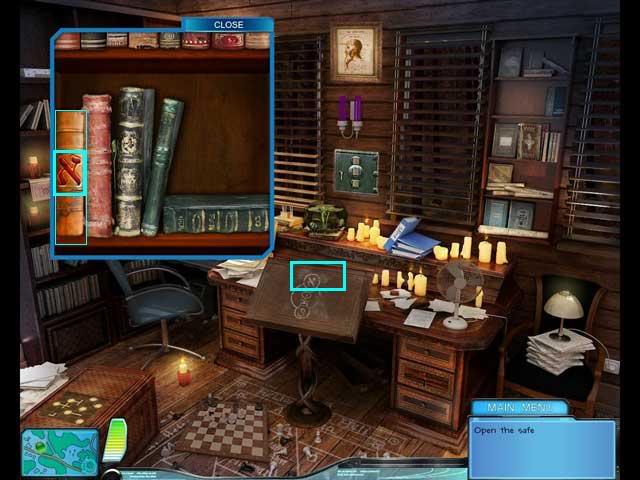
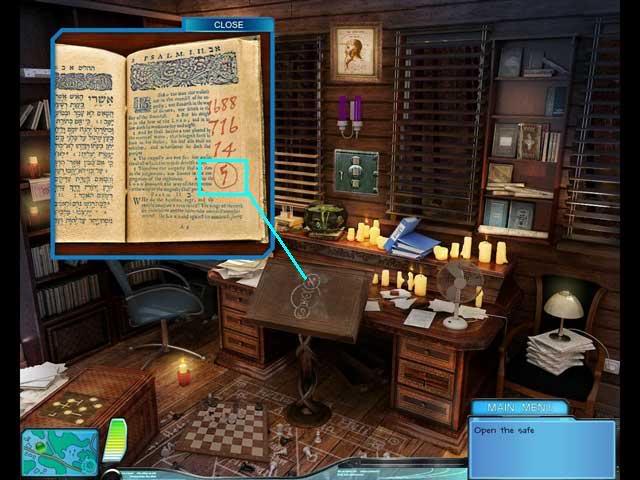
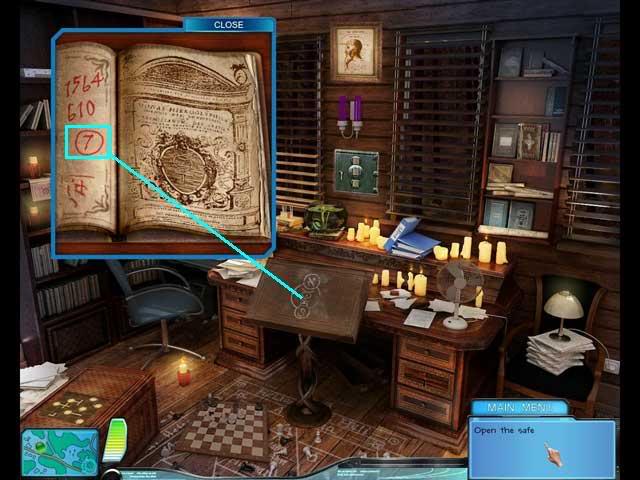
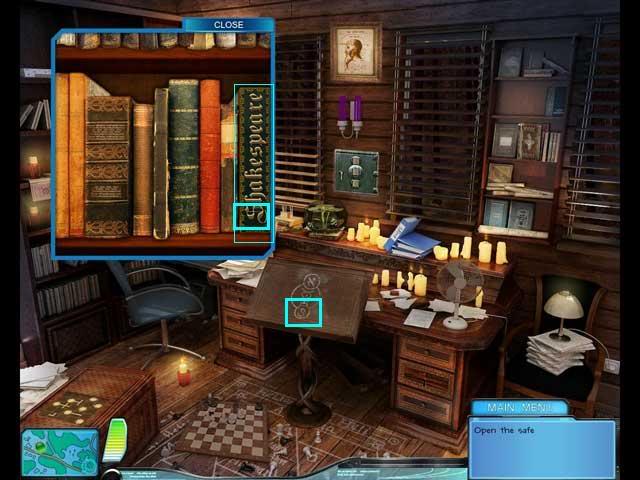
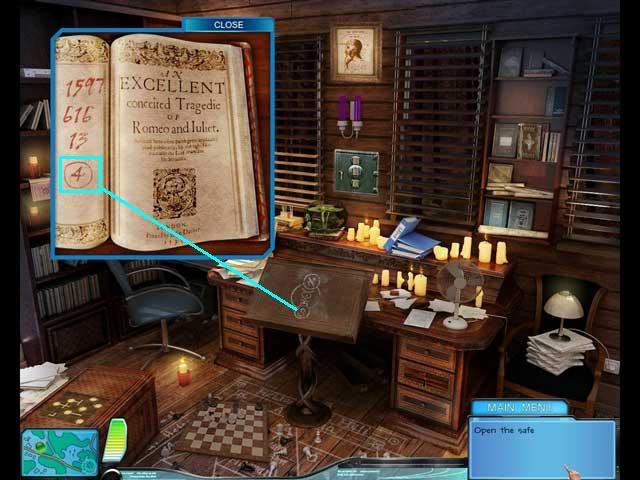
This is the safe combination, in the order of the symbols on the easel.
5 7 4
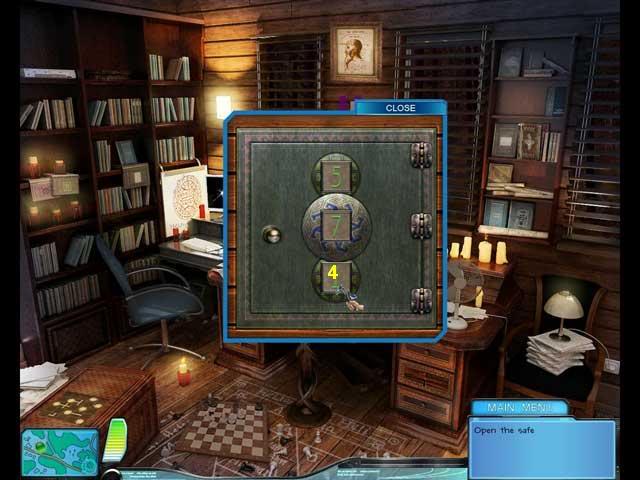
- The safe will open.
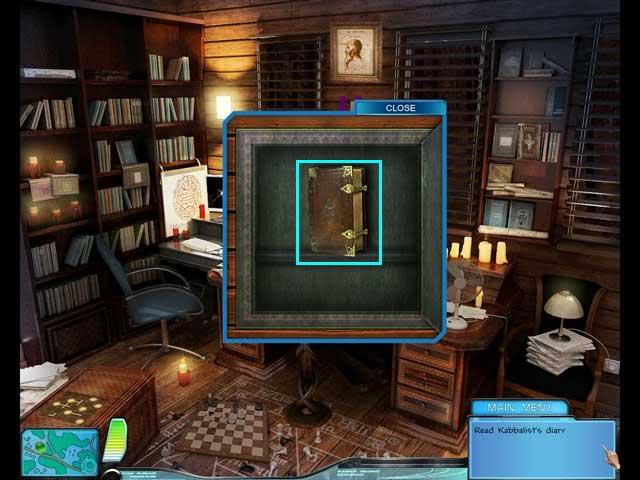
- Read the diary. It says with the help of three letters, Aleph, Mem, and Thav, he brought the golem to life and put the sphere inside of it.
- The Old Cemetery will appear on the map. Go there.
Sphere of Life, Scene 2: Old Cemetary
- Click on the sparkles to open a Hidden Object Scene.
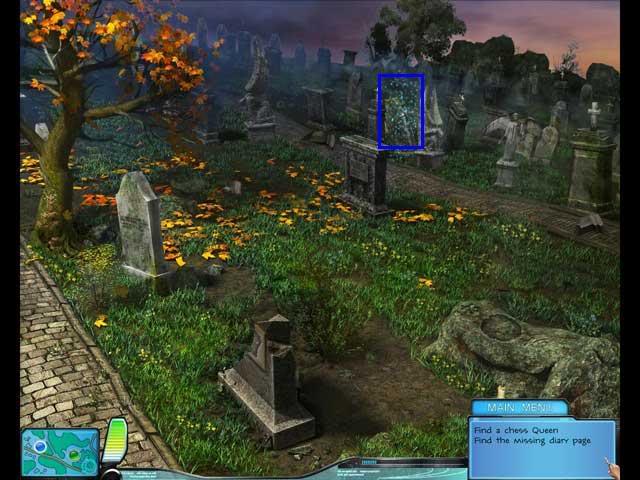
- Your Find List may be different than mind. The Key Object is the diary page.
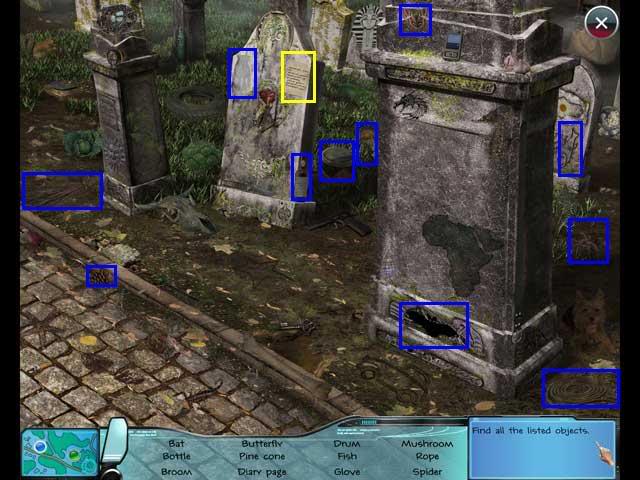
- Once the diary page is in inventory, you can right click to read it.
- Now you are back in the cemetery.
- Look around, and you will find 3 pieces of a gravestone.
- Put them on the "broken gravestone" in the front.
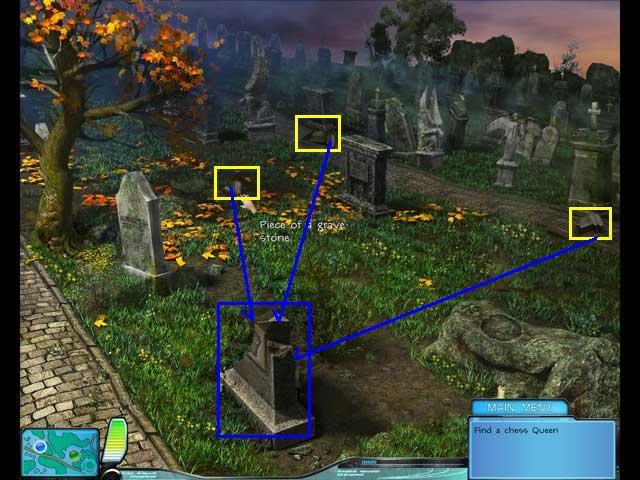
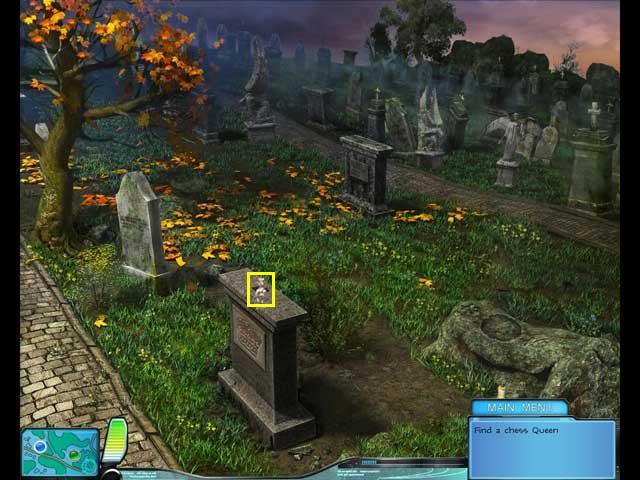
- When they are all put together, click on the stone crown in inventory and put it on the front of the gravestone.
- Collect the chess queen that will appear on top of it.
- Now back to the study.
Sphere of Life, Scene 3: Study
- We have a chess queen and there’s a chessboard on the floor. Click on the chessboard.
- A zoom scene will open.
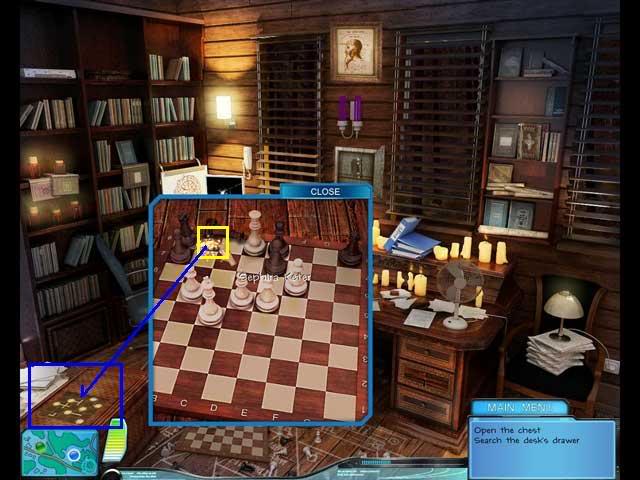
- Click on the White Queen in inventory, then on the zoom scene.
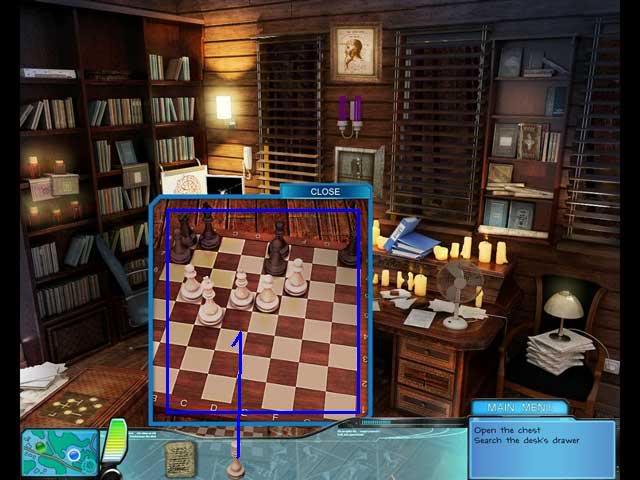
- A glowing object will be revealed. Collect it. It will be a gold coin.
- Click on the coin in inventory, then on the chest on the floor next to the chessboard.
- A mini-game will open up. You need to connect all the coins to the central coin.
- Click on each coin to rotate it.
Solution:
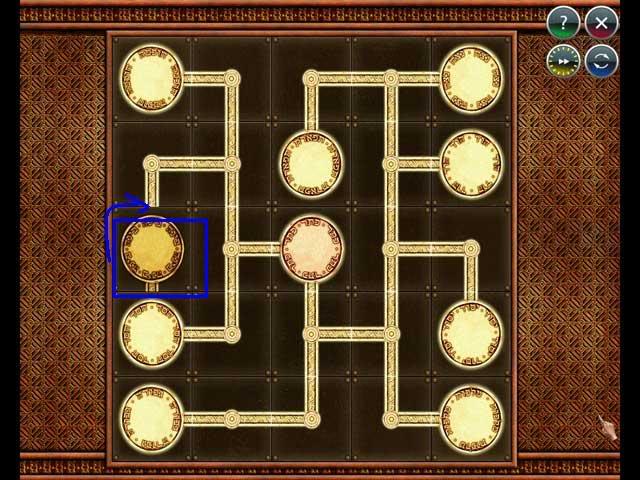
- The chest will open.
- Collect two objects from the chest, the Golem’s Seal and the Letter Mem.
- Back to the Old Cemetery.
Sphere of Life, Scene 4: Old Cemetery
- Start by clicking on the sparkles to open a Hidden Object scene.
- Your Find List may be different than mine. The key object is a small key.
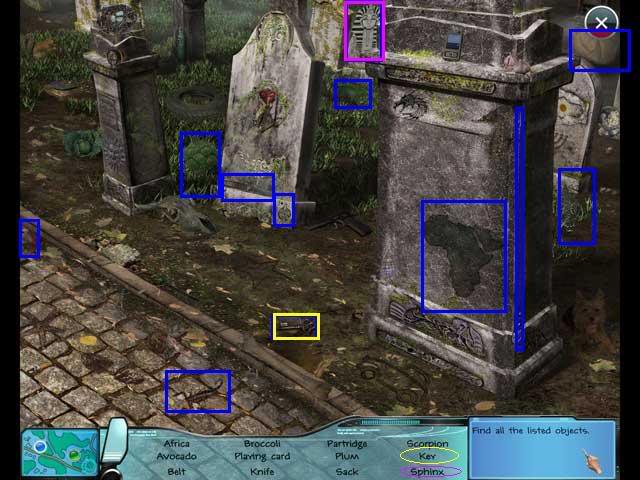
- On my Find List, there was a "sphinx," but it just looked like a regular pharaoh to me. I’ve marked that one in pink.
- Back to the Study. I don’t want to call up the Golem until I know I’ve got everything I might need.
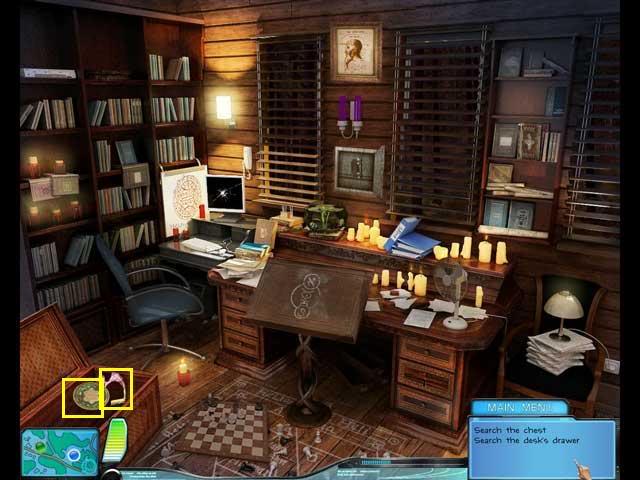
Sphere of Life, Scene 5, Study
- Click on the small key in inventory, then on the desk drawer.
- The drawer will open. Collect the two objects there, another letter and part of a spear.
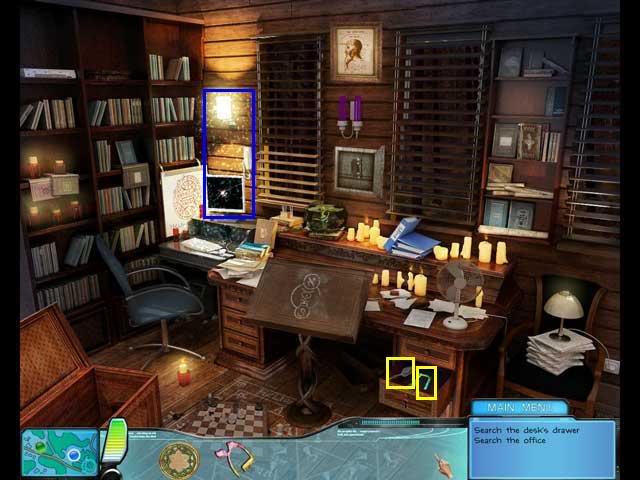
- Now notice there are new sparkles in the left of the scene.
- Click on the sparkles to open a Hidden Object scene.
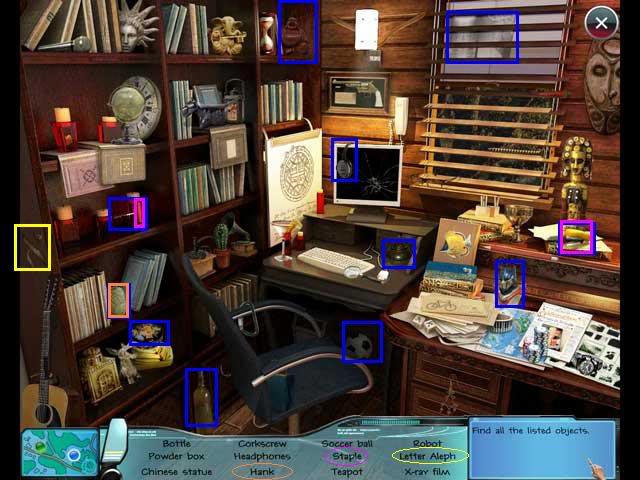
- Your Find List may be different than mine. The key object is the letter Aleph.
- I think the translator must have been tired for this scene, because there were a couple of confusing objects. On my list, the "staple" was really a yellow stapler. And the "Hank" was a skein of yarn. I’ve marked them on the screenshot.
- Also, the corkscrew was really picky, it would only work if I clicked on the handle.
- Back to the cemetery
Sphere of Life, Scene 6, Old Cemetary.
- Now we’re ready. Put the golem’s seal on the ritual area on the right.
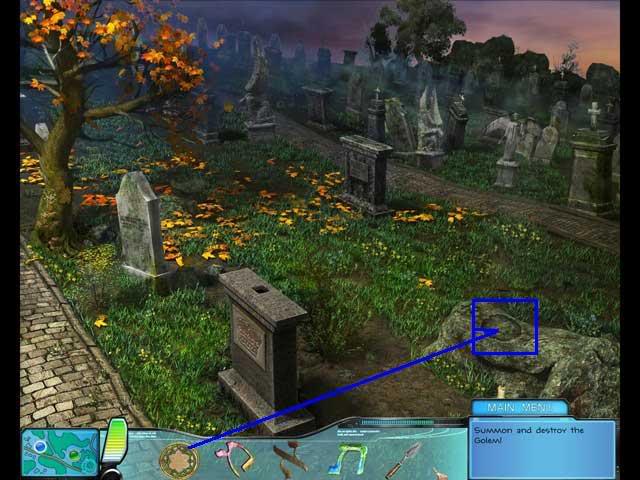
- The seal will move to the left, but the golem will be only partially formed.
- Put each of the 3 letters from inventory onto the seal, and a mini-game will open up.
Sphere of Life, Golem’s Name Puzzle
- The instructions for this one weren’t too clear, but it’s easy once you figure it out. It’s just a matching game.
- You start out with a whole plateful of gold letters. Take any gold letter that matches one of the green letters in the outermost ring and click on it, then click on the green letter it matches. This will remove it.
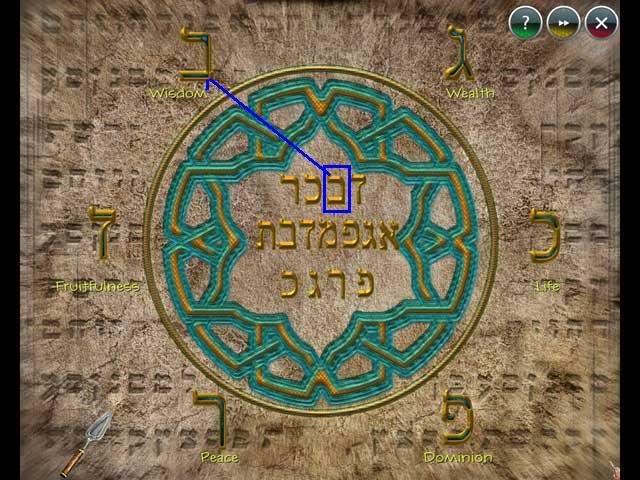
- Eventually you will be left with just 3 gold letters, which happen to be the same as the three letters you started out with inventory. This spells the golem’s true name.
- Now take the magic spear from the lower left corner and cross out one the letter on the far right, changing Truth to Dead.
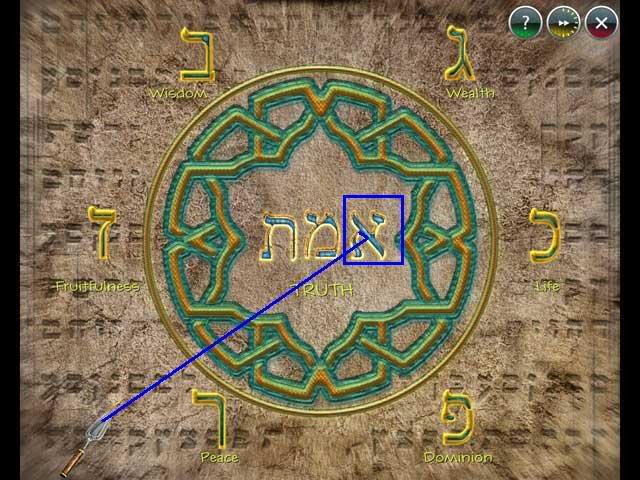
- The Golem will disappear, leaving the Sphere of Life. Click on it to collect it.
- This ends this investigation.
Flaming Rose, Scene 1: Ground Floor
- Collect the fire extinguisher.
- Click it on each of the flames you see.
- Collect the chisel on the ground to the left of the chair.
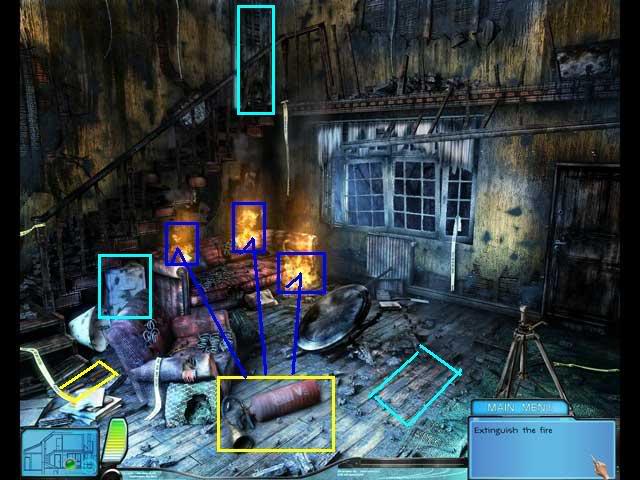
- Sparkles will appear on the left side of the couch. Click there to open a Hidden Object scene.
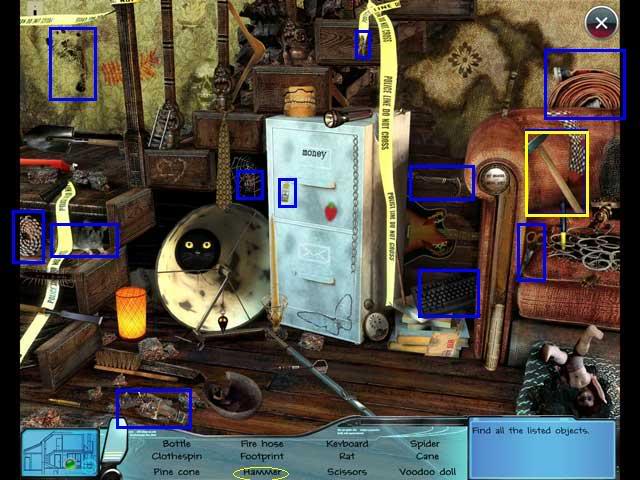
- Your Find List may be different than mine. The key object is a hammer.
- Put the chisel on the strongbox behind the chair.
- Put the hammer on the chisel.
- The strongbox will open, revealing a key. Collect the key.
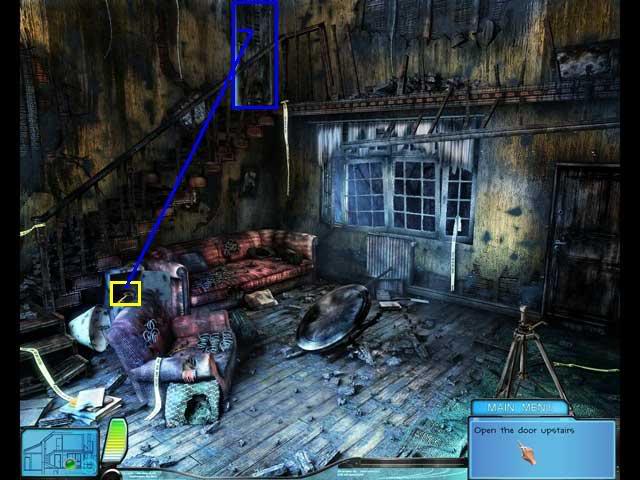
- Use the key on the locked door to upstairs. It will open.
- Go upstairs, either through the door or with the map.
Flaming Rose, Scene 2: 1st Floor
- Pull back the blankets on the bed, revealing the crowbar. Collect it.
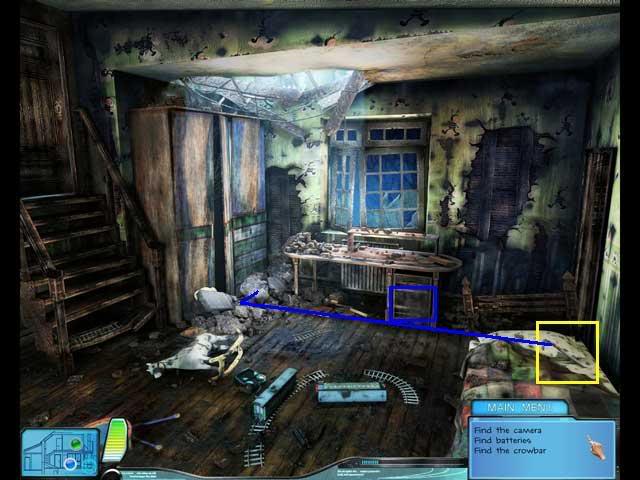
- Open the drawer in the dresser and collect the camera.
- Click on the crowbar in inventory and use it on the wreckage in front of the closet door.
- This will reveal a teddy bear and sparkles.

- Click on the sparks to reveal a Hidden Object Game.

- Your Find List may be different than mine. The key object is batteries.
- Go back downstairs using the map.
Flaming Rose, Scene 3: Ground Floor
- Click on the crowbar in inventory, then click on the squeaky floorboard by the tripod. It will open.
- Collect the photopaper from the floorboard.
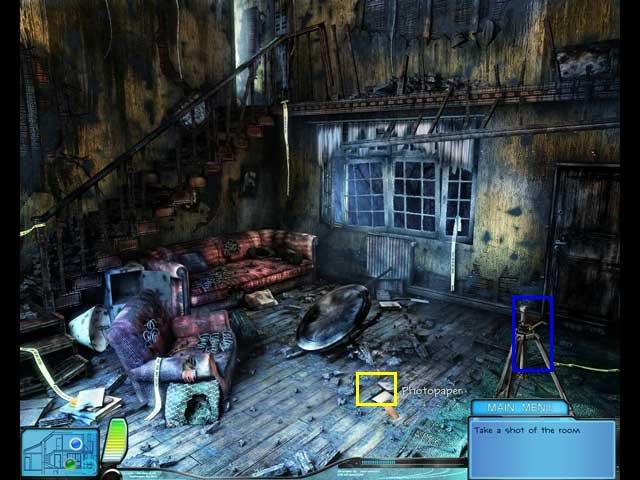
- Take the camera from inventory and put it on the tripod.
- Take the batteries from inventory and put them on the camera.
- Take the photopaper from inventory and put it on the camera.
- Click the camera one more time to take the picture.
Find The Differences Photo Puzzle
- This will open a mini-game.
- This is a find the differences game. Note that the pictures are taken at different times of day, so difference in color and shadow don’t count. All the differences are real objects that are present or missing or broken.
Solution:
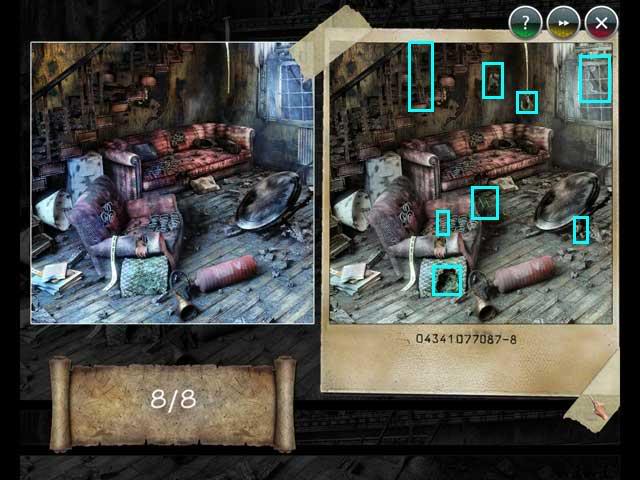
- When you find all 8, a ghost will appear.
- Click on her to talk to her.
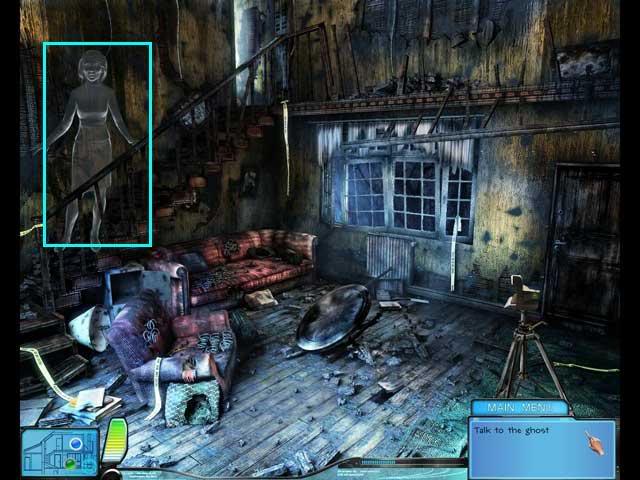
- After you talk to her, sparkles will appear on the couch again.
- Click on the sparkles to open a Hidden Object scene.
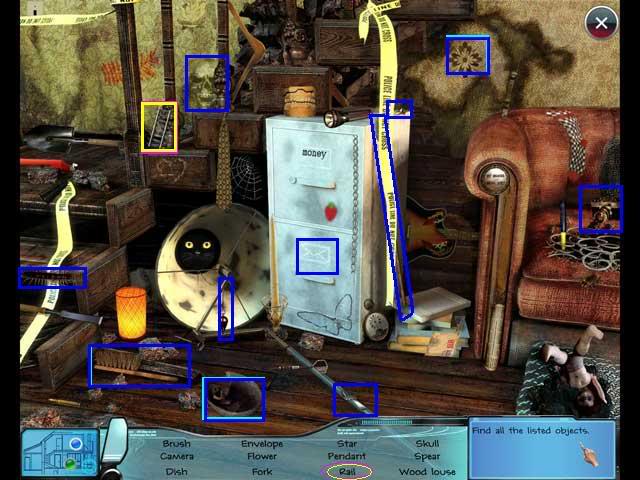
- Your Find List may be different than mine. The key object is the "rail," a toy train track.
- Go upstairs to the first floor.
Flaming Rose, Scene 4, 1st Floor
- Start by clicking on the sparkles by the closet door. This will open a Hidden Object scene.
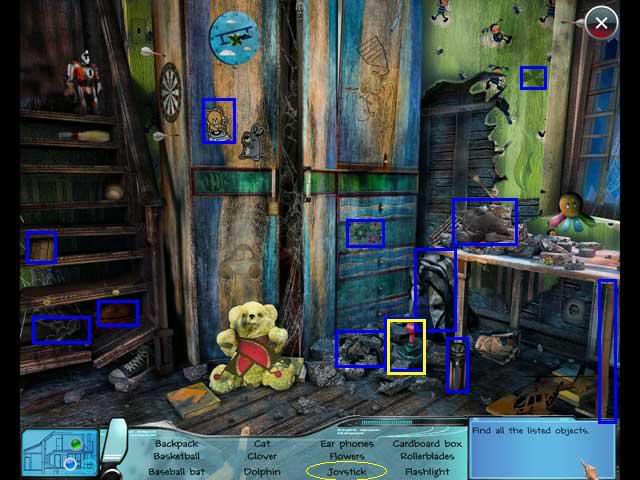
- Your Find List may be different than mine. The key object is a joystick.
- Now you have a joystick and toy rail and you need to repair the toy train. Put both items from inventory onto the toy train. The joystick goes on the electronic controller next to the track.

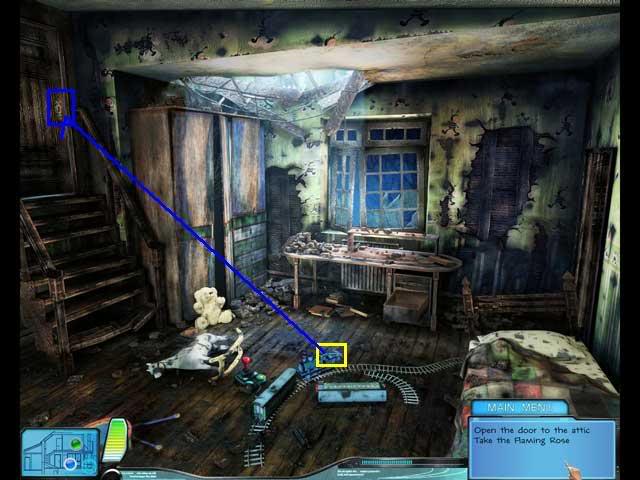
- Now look around the room and find more rail.
- Add more pieces to the track and a toy train will come out from behind the bed. It has a key on it. Collect the key.
- Use the key to unlock the door to the attic.
- This will reveal a mini-game.
- This is a sequence puzzle.
- There are several ways to do this.
- This screenshot shows the sequence I used.
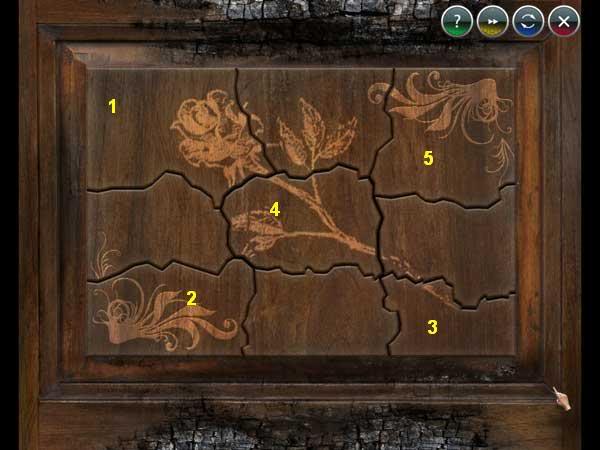
Top left, bottom left, bottom right, center, top right.
- Once you complete the mini-game, the flaming rose will appear in the attic doorway. Collect it.
- Now go downstairs again.
Flaming Rose, Scene 5, Ground Floor
- Click on the Flaming Rose In inventory and give it to the ghost.
- This is the end of this investigation.
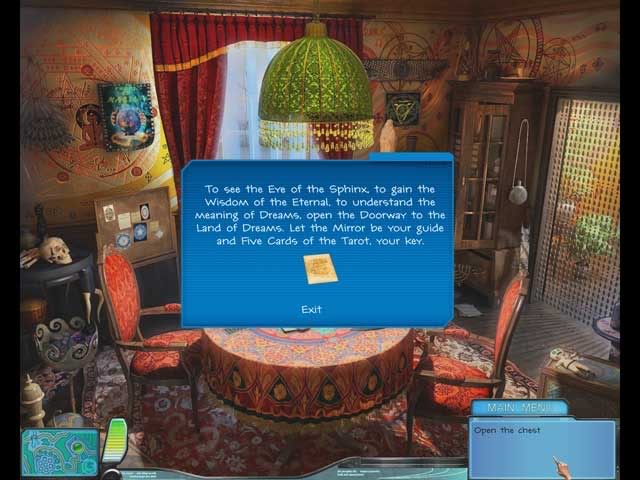
Investigation 8, Mirror of Dreams
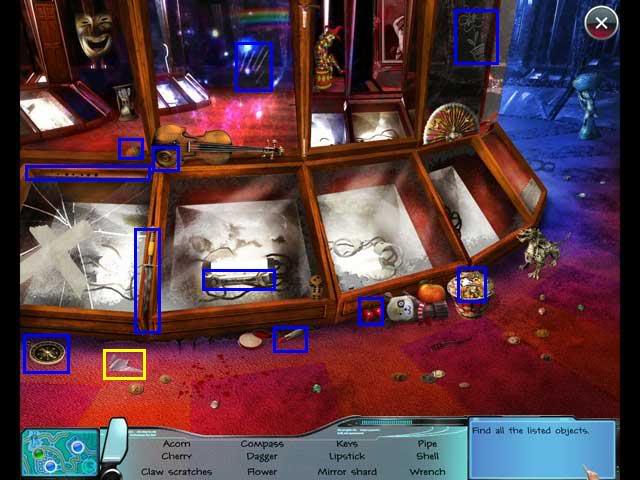
Mirror of Dreams, Scene 1: Fortune Teller
- Collect the Tarot Card from the tablecloth.
- Collect the Tarot Card from the bulletin board.
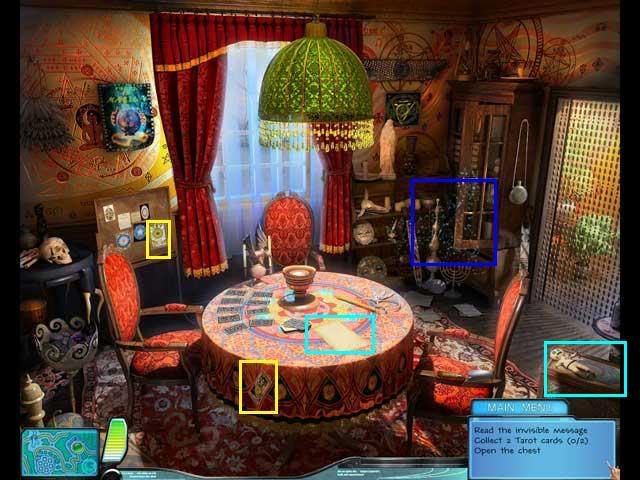
- Click on the sparkles. This will open a Hidden Object scene.
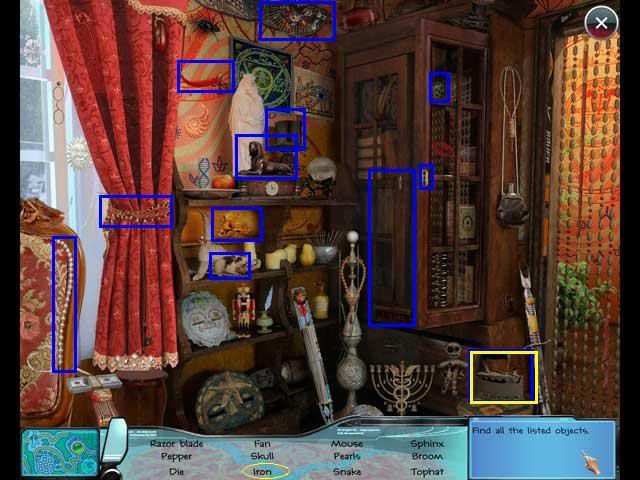
- Your Find List may be different than mine. The Key Object is the iron.
- Did you notice the Invisible Message on the table yet?
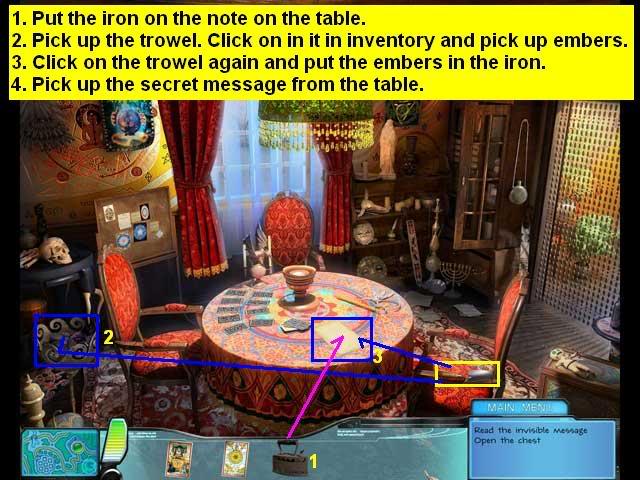
- Click on the iron in inventory and set it on the message on the table.
- Pick up the trowel from the chair. Click on it in inventory and use it to pick up some hot embers.
- Click on the trowel with embers in inventory and put the embers in the iron.
- The message will appear on the paper. Click to pick up the paper and read the message.
- Two new locations will appear on the map, the Mirror Room and the Great Mirror.
- Since I always like to work a game left to right, let’s start with the Mirror Room.
Mirror of Dreams, Scene 2: Mirror Room
- You can see the crescents, but they are in glass cases and you can’t pick them up.
- Look around the scene and you will find a counterweight. Collect it.
- Click on the counterweight in inventory and put it on the chain to the right of the front crescent. The case will open and you can collect the crescent.
- Click on the counterweight again to put it back into inventory.
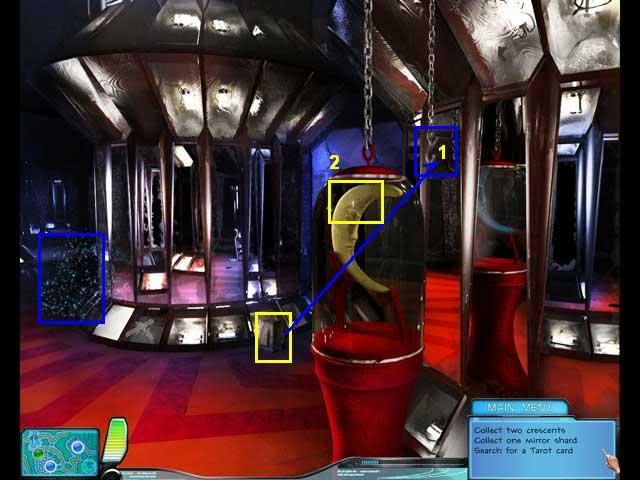
- There is a sparkly area on the left. Click on it, and a Hidden Object scene will open.
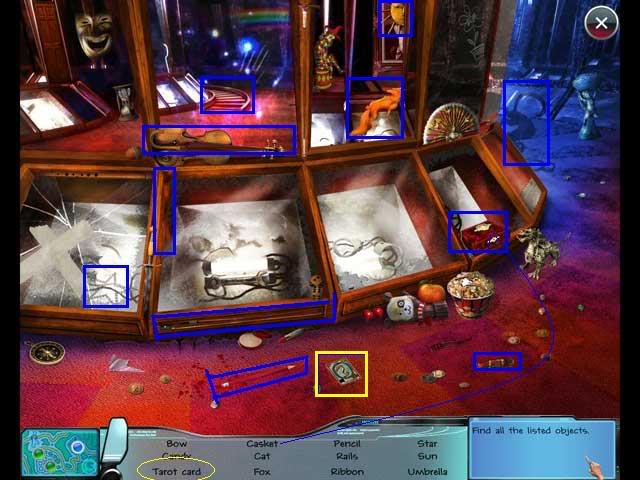
- Your Find List may be different than mine. The key object is the Tarot Card, the World.
- Note that "the casket" is a jewelry box.
- This next step is strange. Click on the counterweight that you put back into inventory, and this time hook it to the reflection of the chain. It will work, and open the case for the silver crescent.
- Collect the silver crescent.
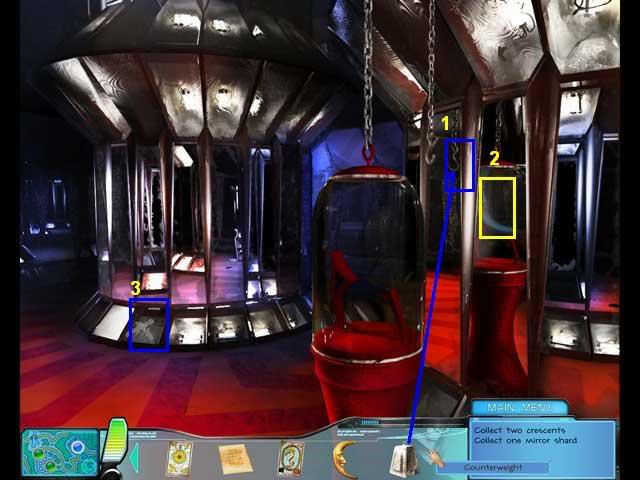
- There is a broken mirror on the base of the big case towards the back.
- Click on it, and a zoom scene will open up.
- Click on the white tape in the center of the broken mirror, and the tape will fold back, revealing a mirror shard.
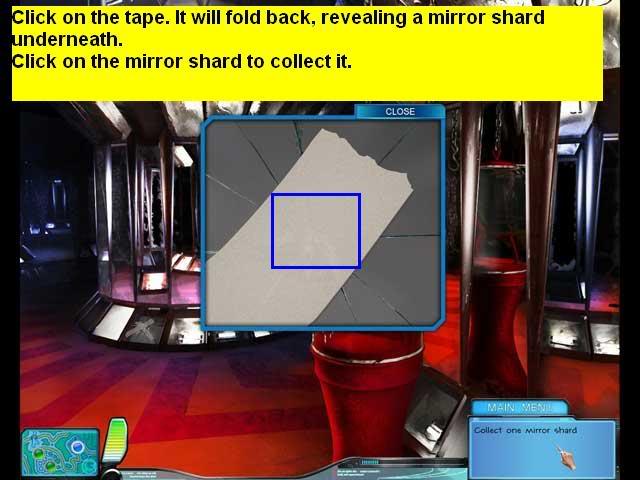
- Click on the mirror shard to collect it.
- Go to the Great Mirror. You can use the button on the map or the footprints to the right of the scene.
Mirror of Dreams, Scene 2, Great Mirror
- Collect the Tarot Card, the Fool.
- Collect the mirror shard from the left.
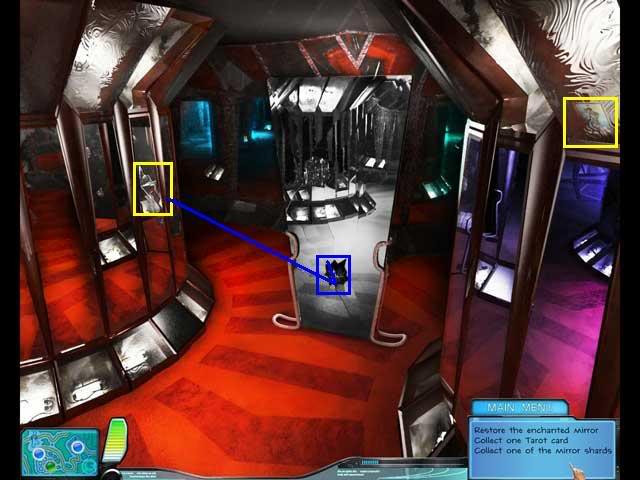
- Go ahead and put both mirror shards from inventory onto the broken mirror.
- Back to the Fortune Teller’s.
Mirror of Dreams, Scene 3, Fortune Teller’s
- There are new sparkles on the right. Click on them to reveal a Hidden Object scene.

- Your Find List may be different than mind. The key object is the brass sun.
- Back in the room, click on the Ornate Chest on the right. A zoom scene will open.
- Fit the sun and the two crescent moons from inventory into the zoom scene.
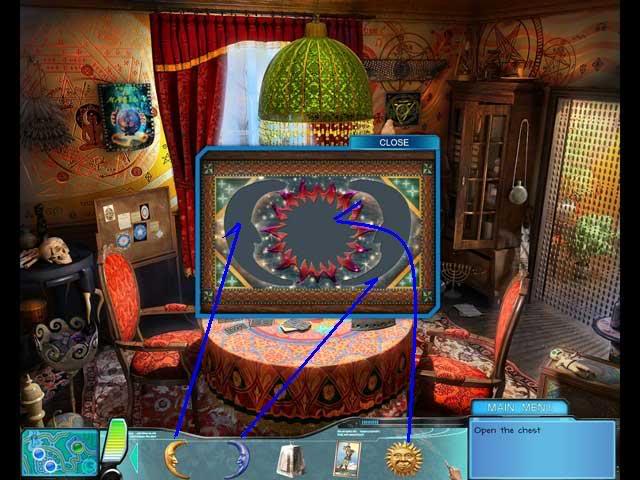
- The chest will open revealing a crystal ball. Click on it to collect it.
- Back in the room, click on the crystal ball in inventory and put it on the crystal ball stand on the table.
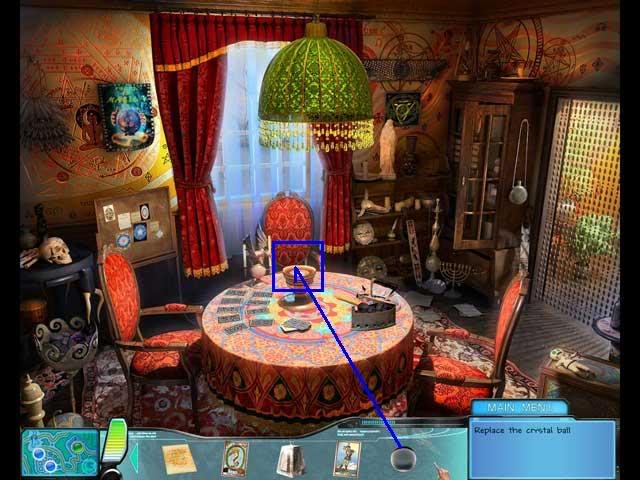
- Click on the crystal ball, and a mini-game will open up.
- All you have to do is click on the cards that match the pattern in the crystal ball. However, after the first one, the crystal ball will go black pretty quickly, so you have to work from memory. The designs are random, but there are only 6 or7 cards each time and you’re allowed 3 misses per layout.
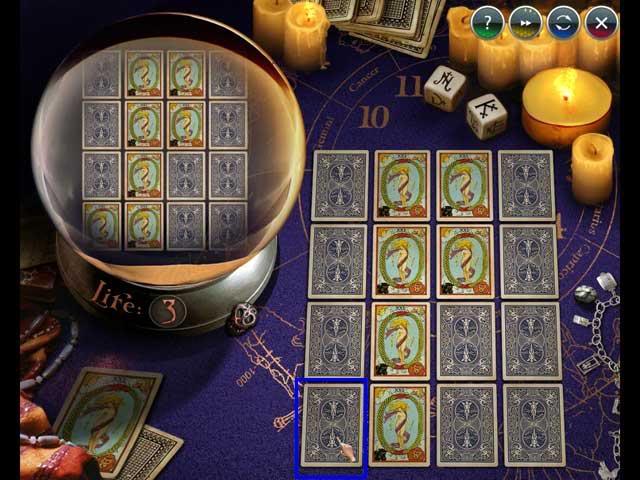
- When you complete it, you will get the Mage tarot card.
- Go to the Mirror room again.
Mirror of Dreams, Scene 4, Mirror Room
- More sparkles on the left. Click on them, and a Hidden Object scene will open.
- Your Find List may be different than mine. The key object is the mirror shard.
- Go back to the Great Mirror.
Mirror of Dreams, Scene 5, Great Mirror
- Click on the mirror shard in inventory and put it on the broken mirror. If you have any other mirror shards still in inventory, put them back, too.
- Once you have repaired the mirror, stick the 5 tarot cards on it.
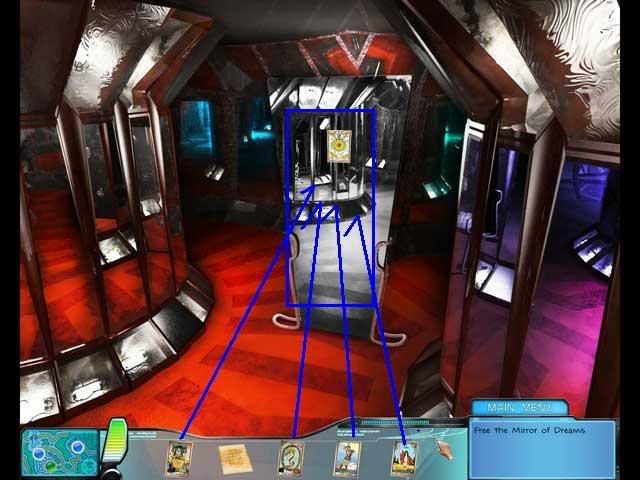
- Click on the spot that says Mirror Portal, and a minigame will open up.
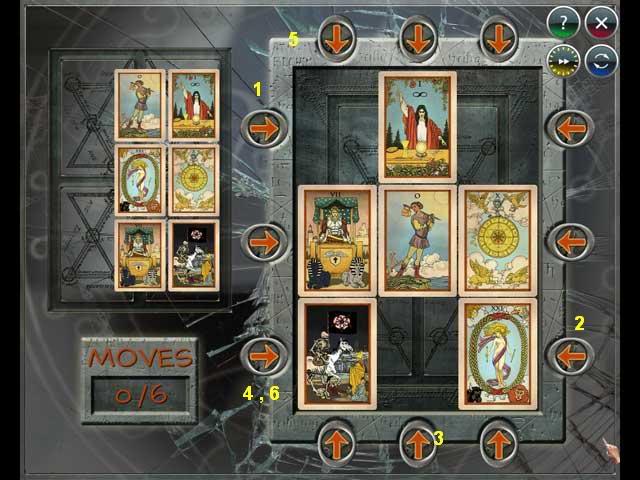
Tarot Card Mirror Portal Puzzle
- The arrows on the side will shift an entire row or an entire column, so a lot of the strategy is deciding what you need to block so it won’t move at all.
- The layouts are random so yours may be different than mine, but here are the ones I had so you can see some examples.
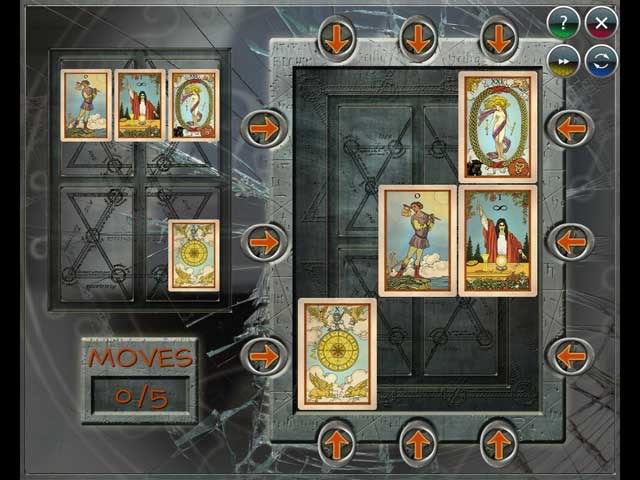
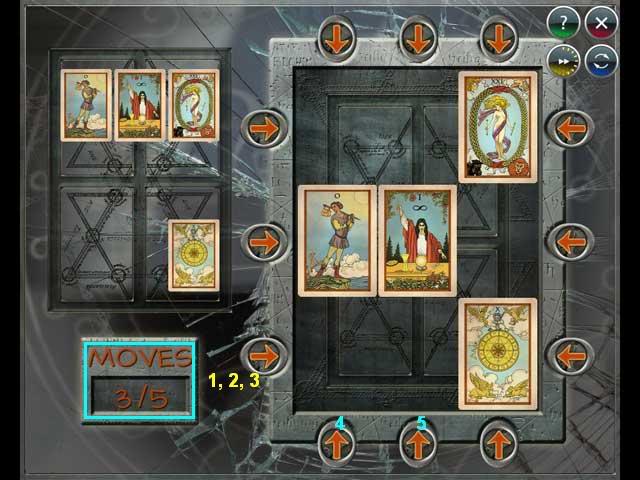
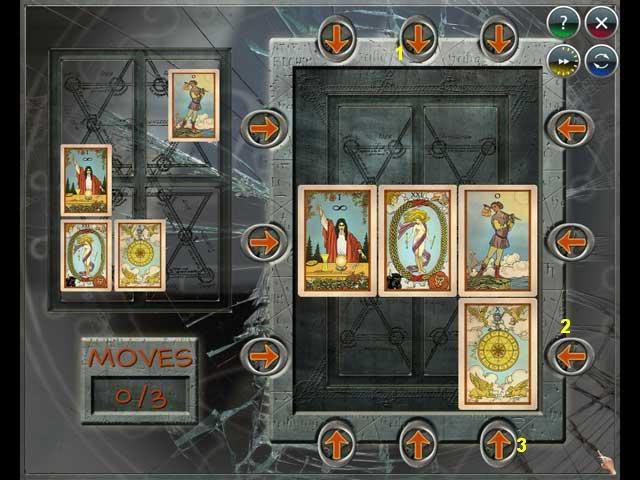
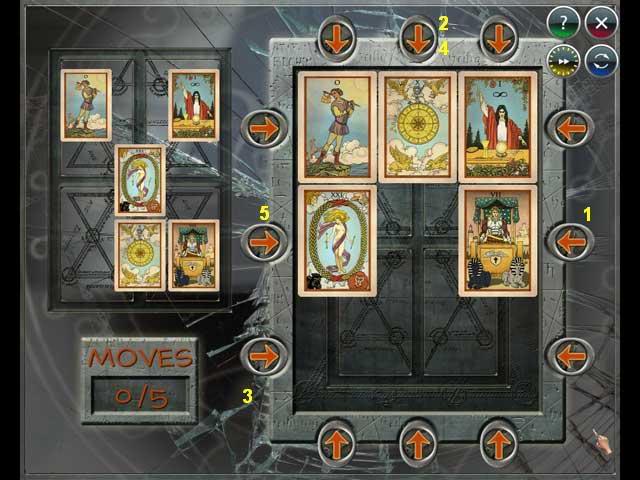
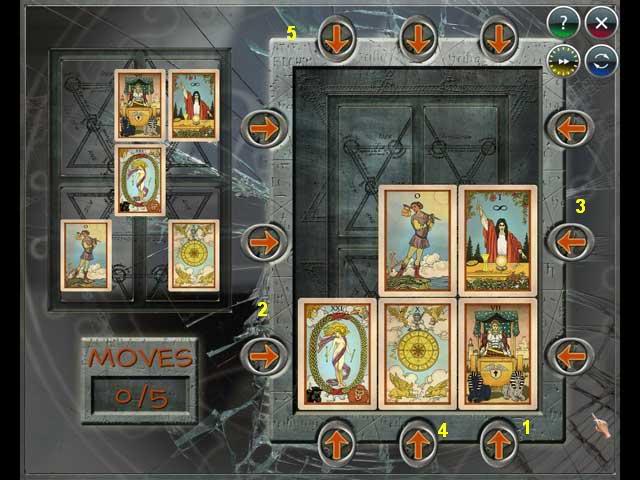
- When you finish, you will be back facing the Great Mirror.
- Click on the face in the mirror and you will free the fortune teller.
- Click one more time on the enchanted mirror to collect the Mirror of Dreams.
- This ends investigation 8.
Investigation 9, The Eye of Evil
Eye of Evil, Scene 1: Grimstone Mansion
- The first thing to do is notice that your inventory already contains the 8 magical objects from your previous investigations
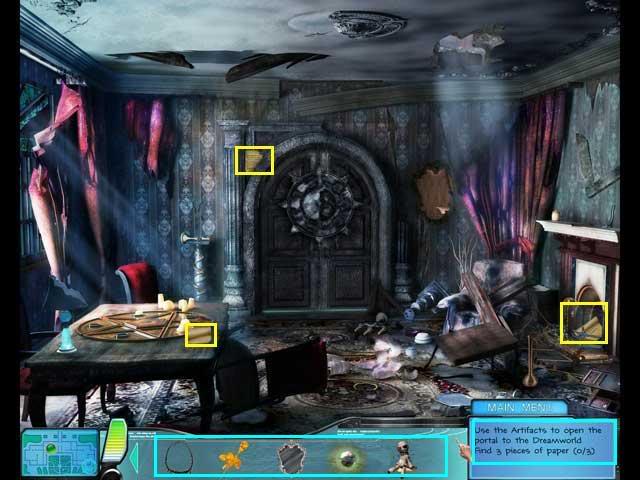
- Collect the 3 pieces of paper. Rightclick on the paper in inventory to read it.
- Click on the flaming rose in inventory and put it in the Sooty Vase on the right side of the scene. You may have to use the arrows on the right and left side of the Inventory bar to find it.
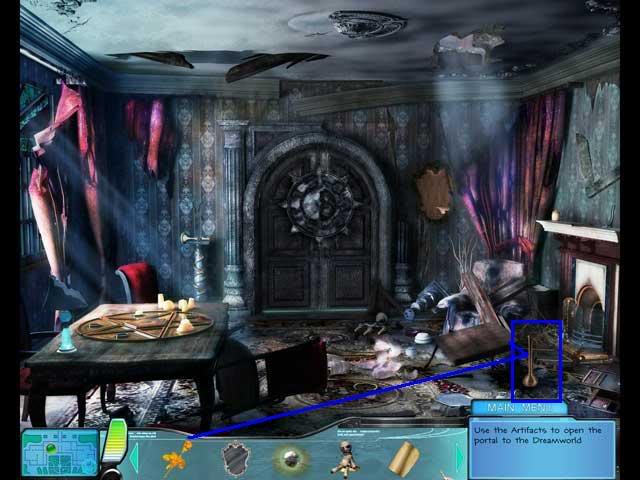
- Click on another piece of paper in inventory and read about the pentagram.
- You need to put the Sphere of Life and the Dreamsand there.
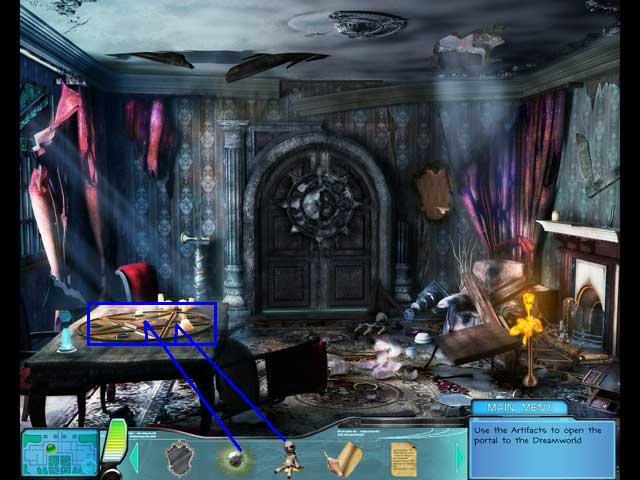
- The last paper tells you you must enter through the Mirror of Dreams.
- Look on the back wall to the left of the door for a crack. Put the Mirror of Dreams there.
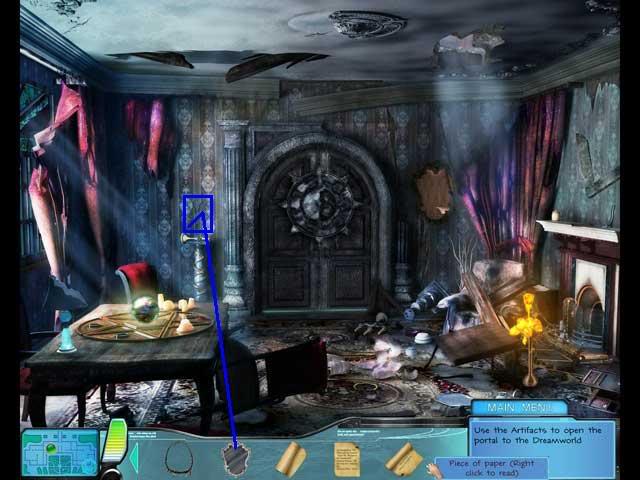
- Click on the Mirror Portal to enter into the world of dreams.
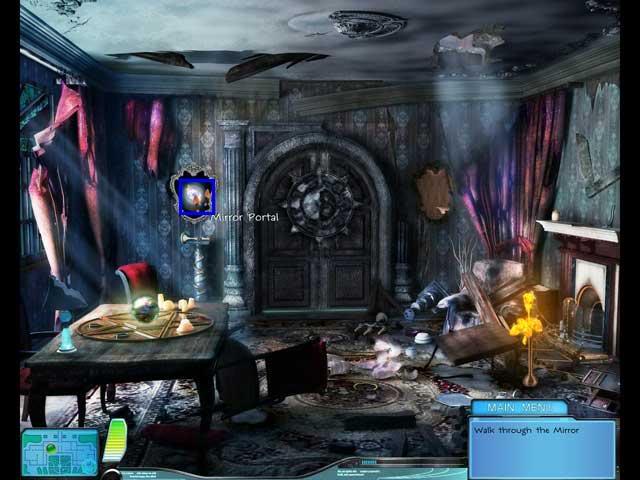
Eye of Evil, Scene 2: Grimstone Mansion in the world of dreams
- Start by clicking on the sparkles on the right. This will open a Hidden Object scene.
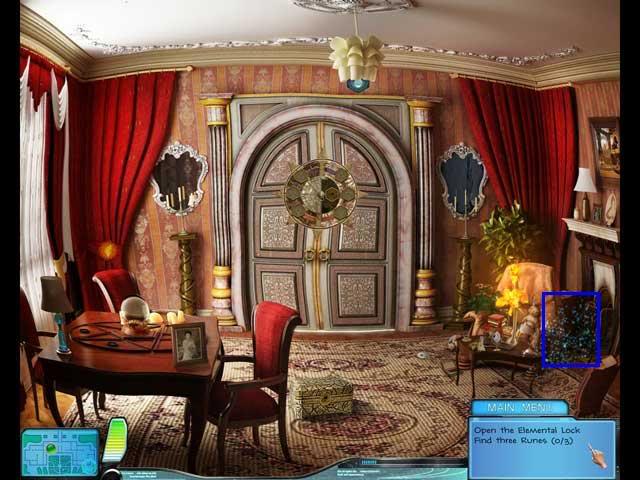
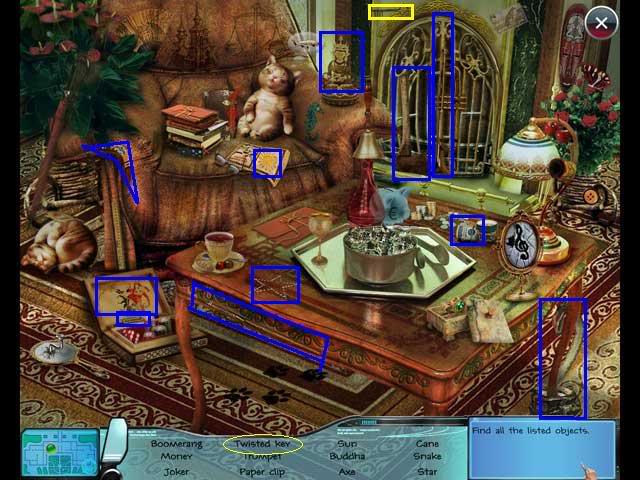
- Your Find List may be different than mine. The key object is a Twisted Key.
- Collect the water amulet from above the door.
- Collect the fire amulet from the red curtains on the left of the door.
- Click on the Twisted Key in inventory and use it on the Twisted Lock.
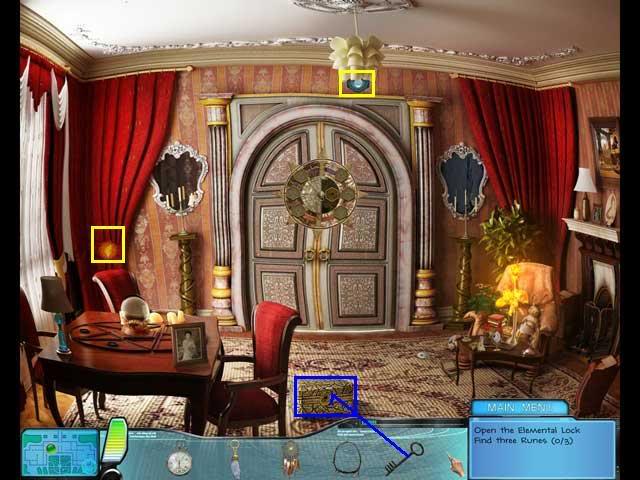
- Click on the box to open it. It will reveal the Stone amulet. Click on it to collect it.
- Now put all 3 amulets on the elemental lock.

- Click on the lock again.
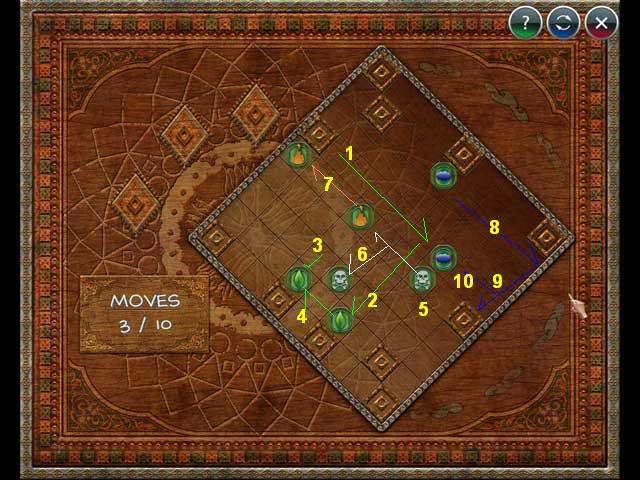
- This will reveal a mini-game. It works like the old fox/chicken/corn puzzle.
- You have to transfer the amulets form one side to the other, but you can never leave fire and water together, or water and stone together. But you can leave all 3 together.
- Start with all 3 on the right.
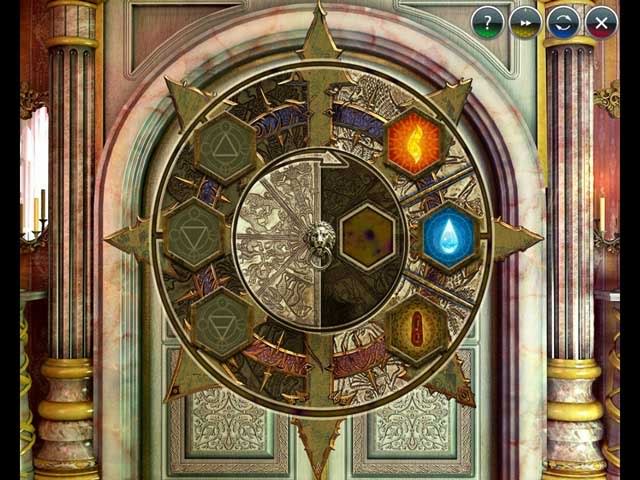
- Click on the water, then click on the rotation arrows to move it to the other side. Click on the water again to leave it on the left.
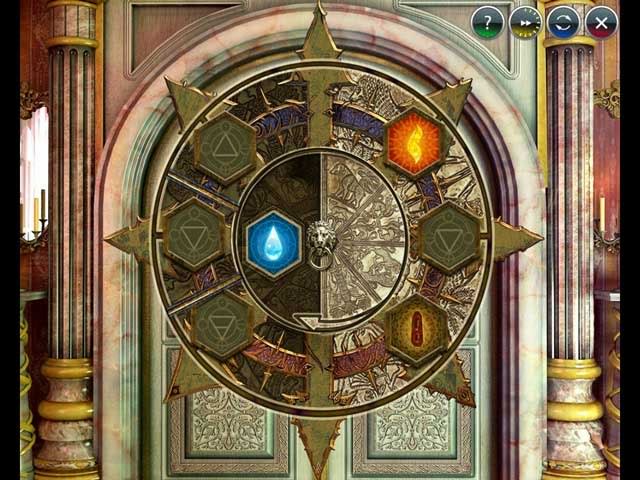
- Use the rotation arrows to move the empty space back to the right.
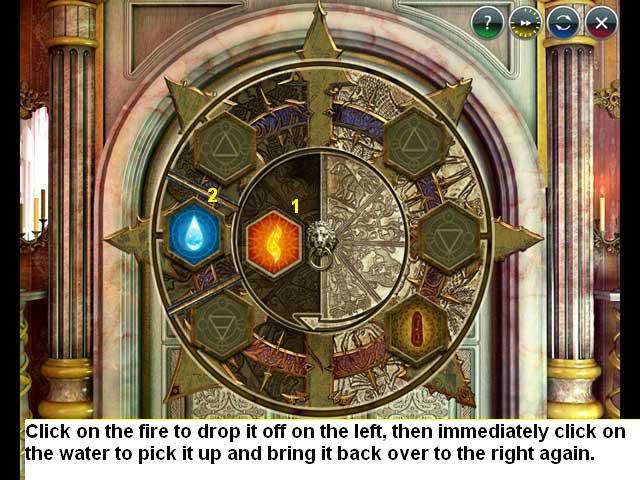
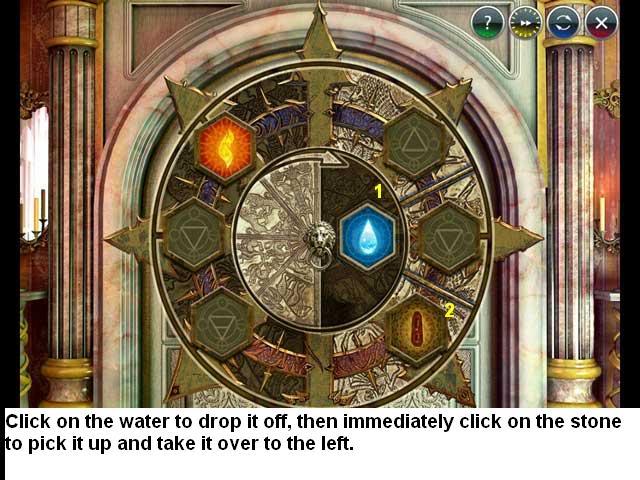
- Click on the fire. Click on the rotation arrows to bring it to the other side. Click on the fire to drop it off and immediately click on the water to pick it up again.
- Use the rotation arrows to move the empty space back to the right.
- Click on the rotation arrows to take the water back to the right. Click on the water to drop it off and immediately pick up the stone.
- Click on the rotation arrows to take the stone to the left and drop it off.
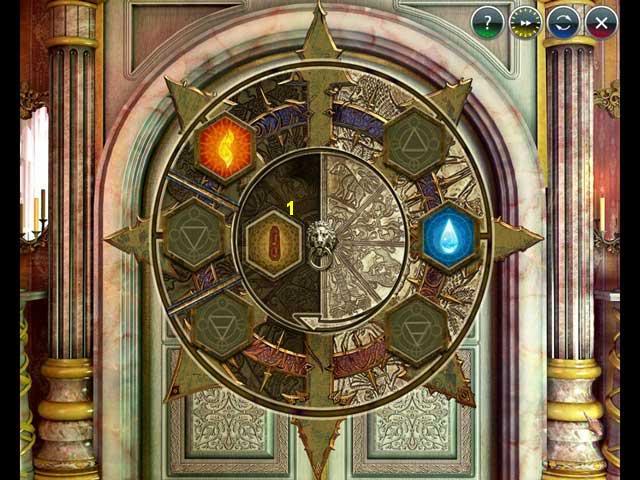
- Click on the rotation arrows to go pick up the water.
- Click on the water, then click on the rotation arrows, then click on the water to drop it off.
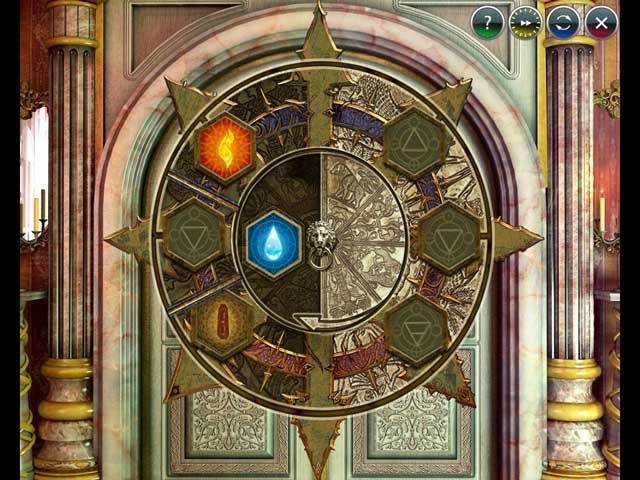
- Done!
- A new location has appeared on the map. You can also go there by clicking on the door. Don’t go there yet, though.
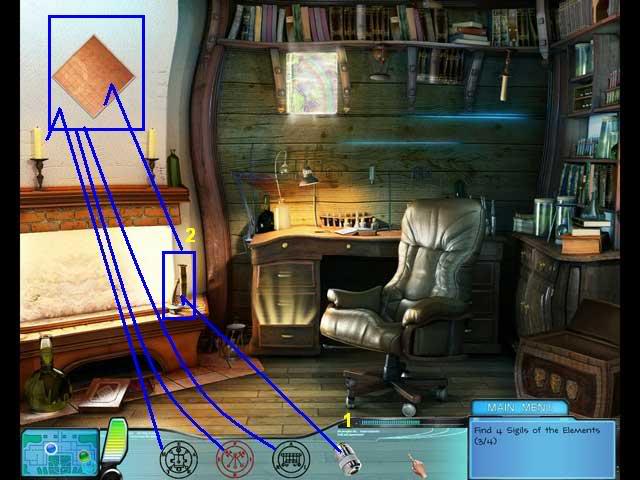
- You still need to find 3 runes.
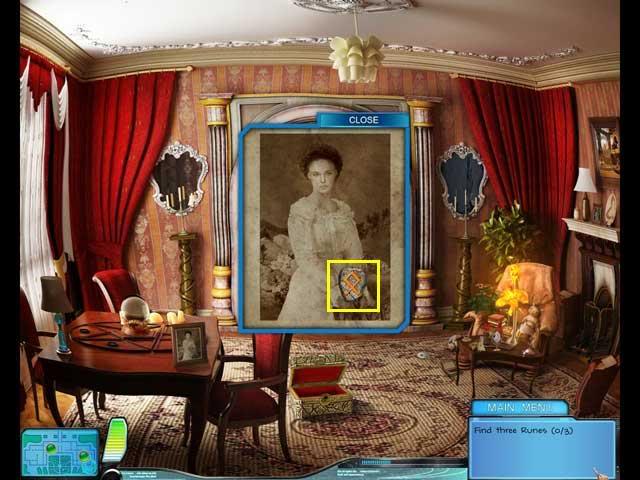
- Click on the woman’s picture on the table. Looks like this has something to do with time.
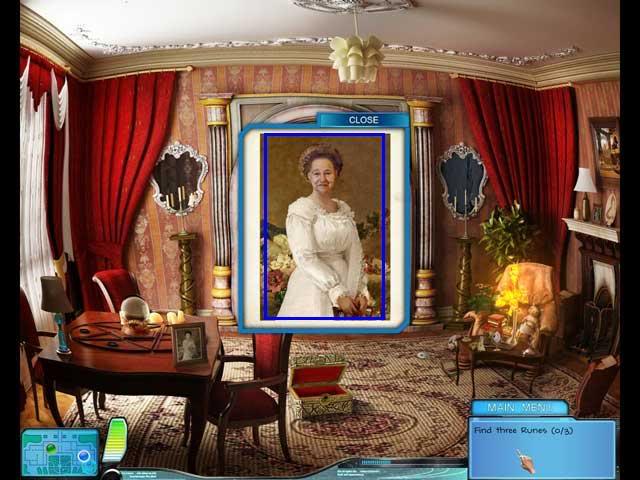
- Click on the stopwatch in inventory and click it on the picture.
- A rune will appear. Click on it to collect it.
- Now let’s go to the study.
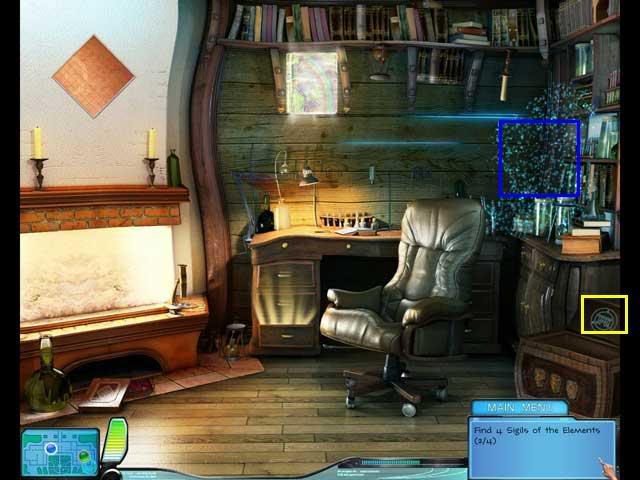
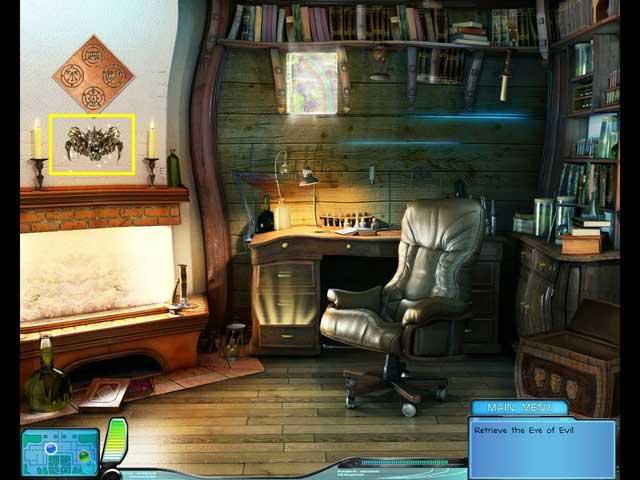
Eye of Evil, Scene 3: Study
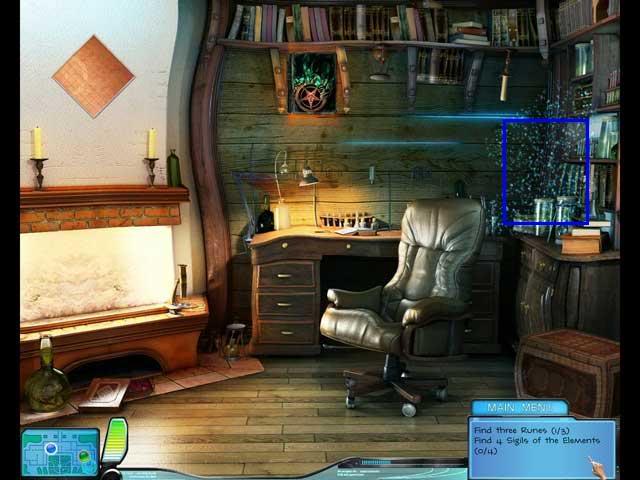
- First click on the sparkles on the right. A Hidden Object scene will open.
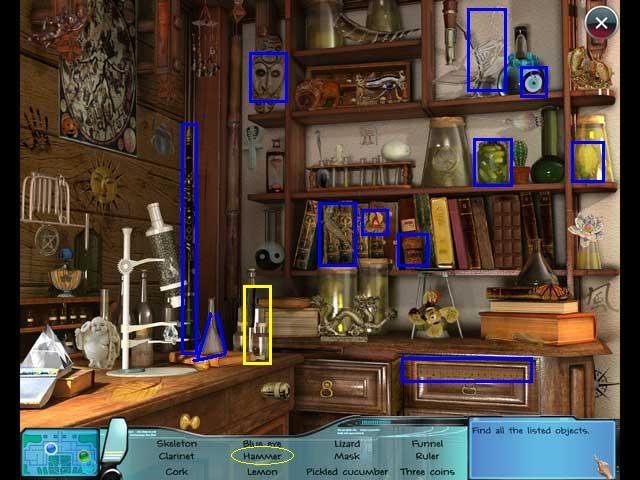
- Your Find List may be different than mine. The key object is the hammer.
- Use the hammer on the "big retort"/big green bottle on the left to crack it.
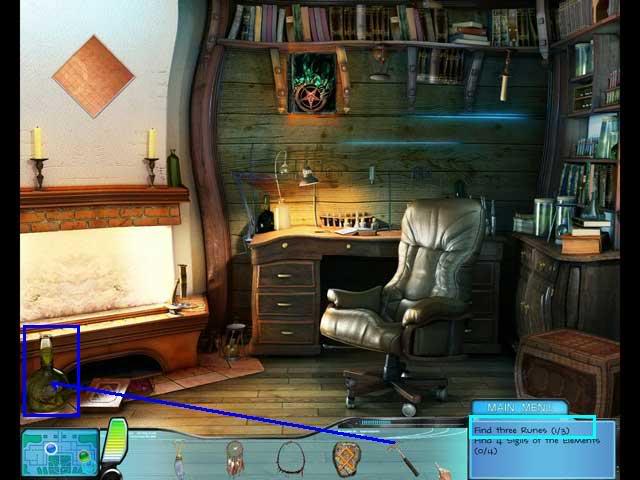
- A rune stone will fall out on top of the book. Click on it to collect it.
- Try the drawer of the desk. You need more strength to open it.
- Click on the Fang of the Packleader necklace I inventory and click it on the drawer. I guess it’s not too bad if you only dream about turning into a werewolf!
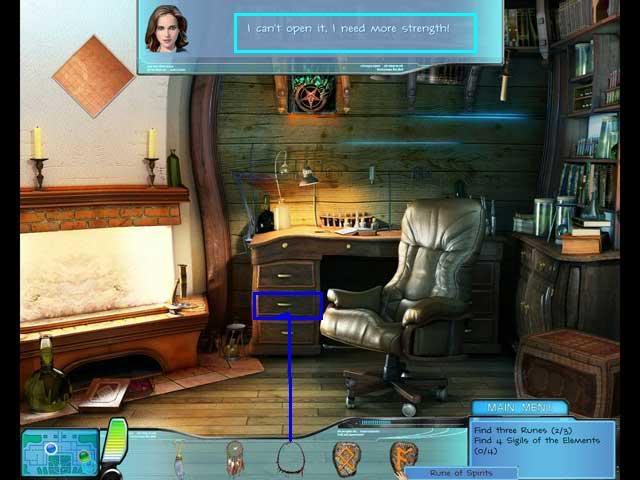
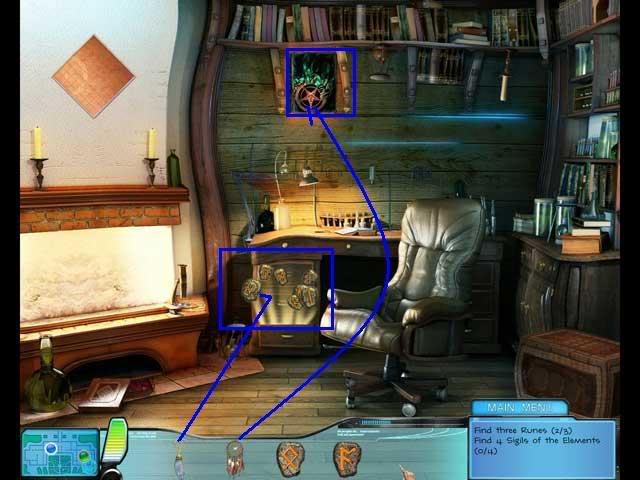
- It will open and a bunch of runes will start floating above it.
- You don’t know which one to take. I think we need a lucky guess.
- Click on the rabbit’s paw in inventory, and click it on the runes. Just one will be left.
- Collect the rune.
- Click on the dreamcatcher in inventory. Put it on the book of nightmares on the wall and it will turn into the book of dreams.
- Click on the book of dreams and it will open, revealing a pair of tongs. Collect them.
- Notice that there is a Runic Chest in the lower right.
- Put the 3 runes from inventory on it.
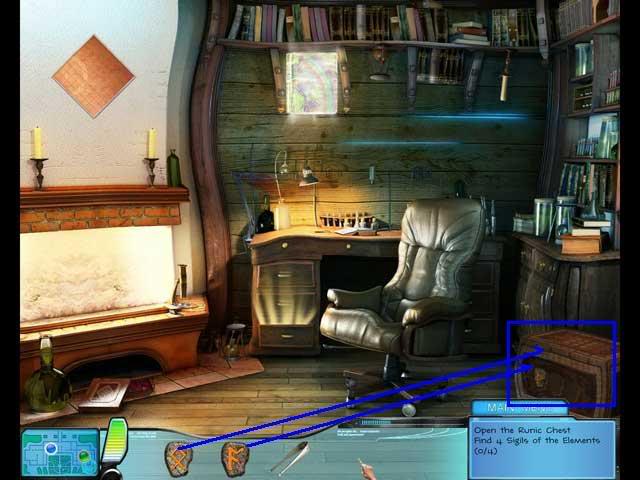
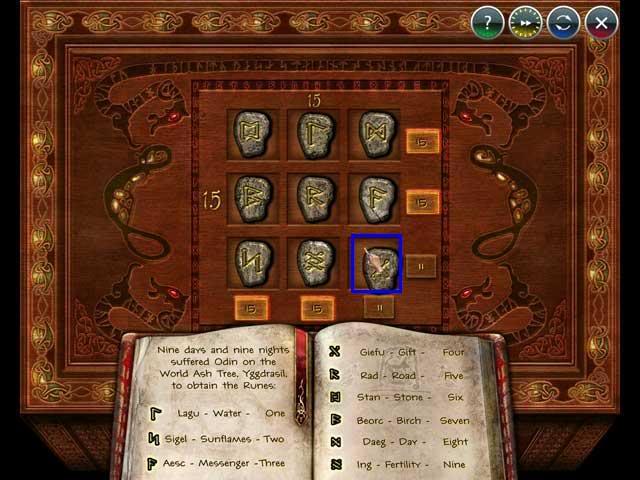
- It will open, revealing a mini-game. This is a magic square puzzle where the rows and columns have to add up to 15. Put the 5 in the center.
Here’s my solution:
- Time to go back to the other room.
Eye of Evil, Scene 4: Dreamworld Mansion
- There are sparkles on the right. Click on them and a Hidden Object scene will open.
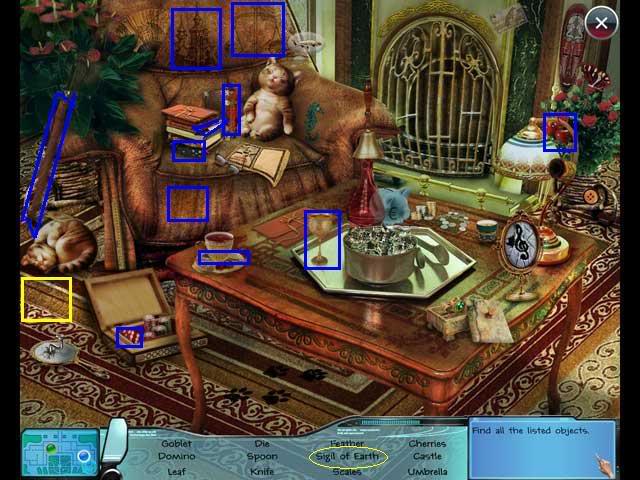
- Your Find List may be different than mine. The Key Object is the sigil of earth.
- Use the tongs to pick up the Flaming Rose.
- Click on the picture on the right of the Temple of Fire. A Zoom Scene will open.
- Click on the Flaming Rose in inventory and put it in the picture.
- Collect the Sigil of Fire from the picture.
- The Flaming Rose will go back to the vase, but that doesn’t matter.
- Go back to the study.
Eye of Evil, Scene 5, Study
- If you didn’t get it already, collect the Sigil of Air from the Run Chest on the right.
- There will be sparkles on the right side. Click on them and a Hidden Object scene will open.
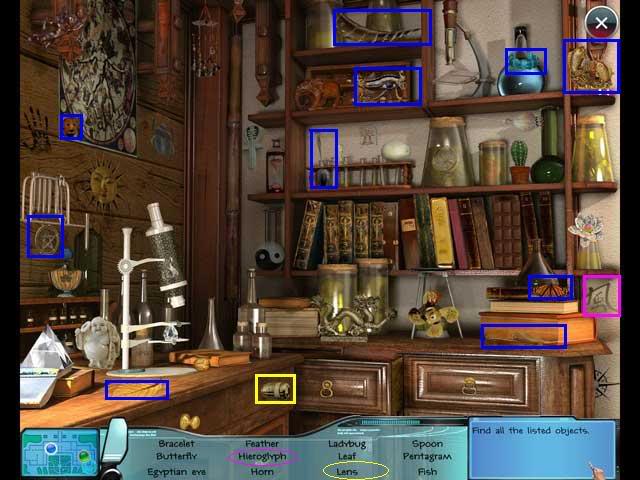
- Your Find List may be different than mine. The key object is the microscope lens.
- On mine, the Find List said "hieroglyph," but it was actually a Chinese letter.
- Click on the lens in inventory, then on the microscope.
- Click on the microscope again to look through it.
- Collect the Sigil of Water.
- Place all 4 Sigils on the Sigil shield on the wall.
- A mini-game will open up.
- You have to remove sigils in pairs by bringing matching pairs together. They have to match in both color and symbol.
- Once you complete the game you are back in the study.
- Collect the Eye of Evil from the wall below the Shield of Sigils.
- This completes the 9th investigation.
Watch the ending!
“;

More articles...
-
Best Horror Games On Itch.io – July 2026
Across a bounty of subgenres. -
Grow A Garden 2 Base Price List
What's the most valuable crop? -
Evomon Best Starter [Leafbun, Blazpup, or Bubble?]
Grass-type, Fire-type, or Water-type?