
Best Horror Games On Itch.io – July 2026
Across a bounty of subgenres.![Haze Seas Accessories Tier List [Best Accessories to Equip]](/wp-content/uploads/2026/07/haze-seas-accessories-tier-list.jpg "Haze Seas Accessories Tier List [Best Accessories to Equip]")
Haze Seas Accessories Tier List [Best Accessories to Equip]
The accessories with the best stat buffs in Haze Seas.
![[Roblox] Evomon Shiny Hunting Guide – Including Prismatic and Pris Shinies!](/wp-content/uploads/2026/06/evomon-shiny-hunting-guide.jpg "[Roblox] Evomon Shiny Hunting Guide – Including Prismatic and Pris Shinies!")

Delicious – Emily’s Taste of Fame Tips Walkthrough
Delicious: Emily’s Taste of Fame Walkthrough


- Prefer Gamezebo on Google


a:1:i:0;a:2:s:13:”section_title”;s:38:”Delicious – Emily’s Taste of Fame Tips”;s:12:”section_body”;s:90868:”
Delicious: Emily’s Taste of Fame Walkthrough
Delicious: Emily’s Taste of Fame is a time management title, boasting 50 levels and numerous challenges, with a unique task assigned to each individual day. This guide will be divided according to each day and area. Remember, if the going gets tough, there is an adjustable difficulty level for this game! (Note: if you need to access a certain part of the guide quickly, use Ctrl+F to search for a keyword, such as "easter eggs").
Guide Overview
I. General Tips
II. Betty’s Drive Thru
III. Mo’s Farm
IV. Charles’ Candy Shop
V. The TV Studio
VI. Snuggford Fair
VII. Hidden Mice
VIII. GameHouse Easter Eggs
IX. Trophies/Fireworks
I. Delicious: General Tips (Apply to All Days)
- Keep your food stocked and filled! If you have any items that can be picked/refilled during any of the days, pick or refill them every spare second you’ve got where you’re not serving a customer. This will keep your necessary ingredients and foods filled when you get waves of customers and are unable to refill. Refilling at a busy time can make customers angry with their wait and backlog you very quickly.
- Keep those tables clean! Some days, you will have someone to help do this for you. Just click on the table (it doesn’t matter if Emily is busy with something else) to have them clean it. If there isn’t a cleaner to help you, you’ll have to do it manually by clicking on the table. Remember, cleaning tables takes a short while, so don’t do it if a customer has already ordered and is waiting for their food.
- Use the Entertainer! You won’t have this on all days, but you will have it in about half of them. The entertainer in each of the five locations is unique. Click on the entertainer and then the table/customer of your choice (one without a heart next to them) to have them entertained. Entertaining customers keeps them happy and/or makes them happier. You can entertain a specific table or customer more than once: until they’ve got a heart next to them, if you’d like. Note, entertainers cannot entertain people who are standing, but they can entertain a table of people if they are waiting for one of them to pay: this will also cheer up the person in line.
- Double is better! If you check out two people (or more) at a time at a register, you will get a combination bonus. It’s important to know though, that it’s better to check out two happy customers separately than to keep one waiting for a combo: two customers with a heart checked out separately results in a higher score than 1 with and 1 without in a combo. If someone’s waiting to pay and another customer next to them wants something that doesn’t require preparation, or you think you can make it fast enough, you can keep them waiting and check them out together for bonus points.
- Know your customers! It’s important to realize that different customers have different levels of patience: you’ll always want to pay special attention to the most impatient ones, as they are less forgiving. The least patient customers are children and the Posh customers (woman in the red coat, man with the purple suit). The most patient customers are the Elderly.
- Listen for the squeak! Every day on every level, there is a mouse hiding somewhere. Catching/clicking it when it pops up will result in 100 bonus points, and you’ll get a special reward at the end of the game if you catch all the mice. Keep an eye out for the mouse hole on the various levels. It won’t be visible on all days though, which is why it’s important to listen for the squeak. If you miss it the first time, it’ll pop up again. Each mouse should pop up 3-4 times a day in case you missed it.
- Shop ’til you drop! There is a feature in Delicious called "Shop", which you can access from the Calendar menu. Earn money to spend in the shop by reaching the expert score/level in a day. Each item in the shop has a feature that will help you, such as pulling in a bonus customer or increasing the patience or tips of your customers.
- Take a neutral stance! It’s important to always be at the optimal ready position to help customers. So, when you’re not doing anything or have completed your tasks, always click on the cash register. This is a great place for Emily to start from when something else comes up, and minimizes the time taken running around!
- Serve takeout customers first! If it’s a busy day and you’ve got people waiting in line for food, serve them before the tables. You can always use an entertainer on the tables to improve their moods, but not so for takeout customers. Just make sure if the customers start to get angry (red face) that you get to them quickly!
- Emily will catch up! The key to playing this game successfully is learning how to line up a series of tasks at once. Say, a table customer wants chips, a takeout customer wants soda, and another customer wants to pay all at once. Click chips, soda, takeout customer (who wanted soda), table customer, and then register. Emily may still be running around, but she’ll complete the tasks you set ahead for her, and you can keep adding more. An object/customer will blink softly if it’s been selected for Emily to interact with, so you’ll know if you missed something or where she’s headed next. Keep lining up tasks in this way to more effectively manage your time. Take a pause if you need to.
- Remember, there’s adjustable difficulty! If completing a level gets too hard or easy for you at a certain difficulty, you can access the menu at any time to make it easier or harder.
- The customer comes first! Each day will introduce a unique task, often which demand your time. The unique tasks should be treated like refilling/restocking, and done whenever you have a spare moment. These tasks are most often only for bonus points and don’t necessarily have to be completed, but you should certainly try!
- The end of the day is the end of the day! If the restaurant is about to close, don’t bother cleaning any more tables. Once a place has closed, you definitely no longer need to. You don’t need to refill, bake, or stock either: so long as you’ve got enough for the last customer, and even then, if there’s only one left, they won’t mind waiting too much.
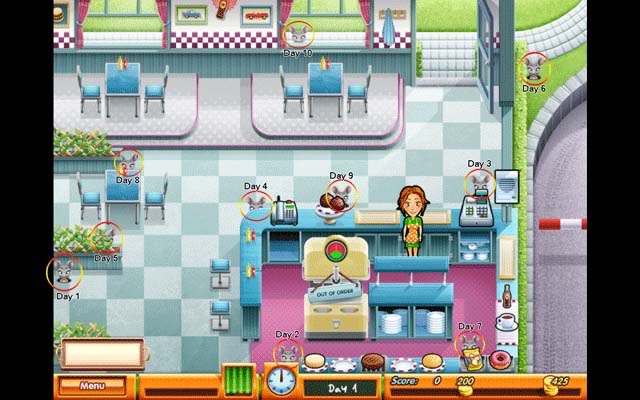
II. Betty’s Drive Thru – Day 1
One month ago… There’s a car wreck out front. Emily and Francois enter a little diner called Betty’s Drive Thru. They’ll need to have their car towed and fixed, but they don’t have any money! Taking pity on them, Betty, the owner, decides Emily can work at the diner to earn the money she’ll need to have her car fixed. Begin Day 1!
Available Menu: Soda, Coffee, Donut, Chips, Hamburger (without toppings)
Special Task: None
- Tutorial- If you haven’t played Delicious before, I highly suggest you use the tutorial offered at the beginning when Betty asks "Do you want me to help you get started?" by selecting "Yes". She’ll show you exactly how everything works. And don’t worry! You’ll get the hang of things eventually. I suggest starting on Normal difficulty (default) with the Hints on (also default). You can change both settings at any time by pressing the Menu/Settings button if things get too difficult.
- Clean the Tables- It’s important to remember to clean the tables once the customers there have left. A red "!" will appear when a table needs to be cleaned. Cleaning tables takes a little longer than the other tasks, so if you have a customer in line that’s already decided what they want or is waiting to pay, I suggest waiting to clean the table until after you’ve taken care of them.
- Make a Hamburger- This takes a little more time, because it takes three clicks instead of one to pick up the item. Select the bottom bun (far left), the patty, and then the top to complete a hamburger.
- The Drive-Thru- The game will explain this for you, but once your drive-thru customer has paid, don’t forget to click on the money/register to collect the payment! Payment will lose its value the longer you leave it. If you manage to prepare and set down the meal for the drive thru customer before they reach the window, you’ll receive a very nice bonus of 50.
- The Mouse- The mouse for today will pop up in front of the middle planter on the left. Click on it to get bonus points.
Betty’s Drive Thru – Day 2
Francois is expecting some packages today, so keep an eye out for them!
Available Menu: Soda, Coffee, Donut, Chips, Hamburger (with Lettuce and Cheese toppings)
Special Task: Pick up Francois’ packages (8 in total)
- Custom Burgers- Today the toppings of cheese and lettuce have been added to the hamburgers. But this is where you have to be careful: pay very close attention to the little hamburger icon in the customer’s request bubble. Some will want just lettuce or just cheese, some will want all the toppings, and some will want none at all! If you mess up, you can click on the burger on your serving tray (bottom left) to get rid of it. You will not lose any points or money for wasting food. Remember to put topping on in order as they’re laid out from left to right: bottom bun, lettuce, patty, cheese, and top bun. If a customer doesn’t want, say, lettuce, then follow the same order, skipping lettuce.
- Special Task: Francois’ Packages- The Postman will show up with each of Francois’ packages throughout the day. A little jingle will sound whenever he shows up, in case you’re busy with customers and don’t notice him walk in. Click on him to automatically collect the package. There are 8 in total.
- The Mouse- The mouse for today will pop up right above your special task box (with the little green curtain) at the bottom of the screen.
Bonus: Betty’s Drive Thru: Catalogue
Collecting all of Francois’ packages will allow the Shop option in the Calendar menu to be unlocked. The following are items up for purchase:
- Authentic Chair –Price 400- Increase patience of customers
- Classical Lamp –Price 100- Increases tips
- Shiny Kitchen -Price 400- Allows Emily to prepare food faster
- Hurricane Fan -Price 200- Keeps customers from getting too angry
- 60’s Jukebox -Price 600- Keeps customers happy
- Commercial Sign -Price 300- Increase in Drive-thru tips
Every day you reach the expert score, you will earn 200 in decoration money. You don’t have to buy items: in fact, I’d recommend you as little as needed for this restaurant unless you really need it. Saving your decoration money for the future restaurants will aid you much more when it gets more difficult, or allow you to immediately upgrade when you reach them instead of having to sit and work for that illusive, much-needed certain item to give you a break or a boost!
Betty’s Drive Thru – Day 3
Betty’s back today, and has offered to help clean tables for you. Great, that will be a big help!
Available Menu: Soda, Coffee, Donut, Chips, Hamburger (with Lettuce and Cheese toppings), Waffles (with chocolate topping)
Special Task: Find the Missing Pearls
- Making Waffles- You’ll start with 2 waffles. To make more, click on the bowl of batter. You can cook two at a time. When they’re finished (ding!), click on them to add them to the Waffle plate. Now you have 4. I suggest cooking more waffles whenever you have a free moment: you can have a maximum of 8 prepared at one time. A nifty trick is, when you’re about to carry a plate of food to an ordering table, click the batter bowl two times on your way over. By the time you come back from the table, the waffles will be done! To add chocolate syrup to a waffle, click the waffle and then the chocolate syrup. No one will ever order a plain waffle, so it should become routine to follow clicking on the waffle by clicking on the syrup.
- Find the Missing Pearls- A woman runs in worried. Her necklace has broken and she’s lost all her pearls! There are 8 missing in total. Seven are in plain sight, but the last is cleverly hidden under Betty. When a table needs to be cleaned, click on it. Betty will move and you can collect the last pearl.

- The Mouse- The mouse for today is hiding behind the register. Most likely you will have to move Emily (by clicking on food or an empty table) to be able to see this mouse enough to catch it.
Betty’s Drive Thru – Day 4
Available Menu: Soda, Coffee, Donut, Chips, Hamburger (with Lettuce and Cheese toppings), Waffles (with chocolate topping), Banana Shake
Special Task: Test by Phone
- Making Banana Shakes- Click on the banana icon on the shake machine. A little gauge meter will appear: click when the needle lands on the green area. Ta-da! Fresh banana shake!
- Test by Phone- An angry studio manager calls you, saying you were supposed to be there days earlier and haven’t been tested yet, so now you have to be tested during your shift! Little order bubbles will appear over the phone. Make the products that appear, and instead of delivering them to customers, deliver them to the Postman (via clicking on the phone works, too). At times, you may have 10 items lined up at once, but don’t panic! Take your time as you need. You have 2 1/2 minutes to complete the task of making the 20 items, but be sure not to keep your customers waiting too long!
- GameHouse Easter Egg- If you look closely, you’ll notice a little picture of a man inside the bottom cabinet that’s open on the left of the cooking area. Click on it to discover one of the hidden GameHouse easter eggs in this game. This one is Emily’s Uncle Antonio from Delicious 2.
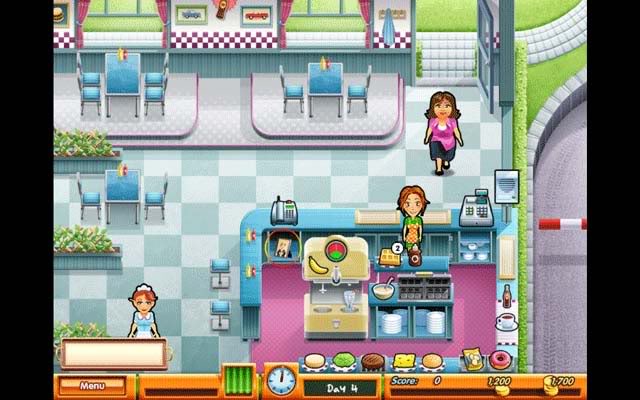
- -The Mouse- The mouse for today is hidden at the upper lefthand corner of the counter. You can’t see the mouse hole, so keep a sharp eye out for this one!
Betty’s Drive Thru – Day 5
Uh-oh, Betty and Emily enter in the morning to see there’s been a break-in, and one of the tables has been broken. We’ll have to fix it today.
Available Menu: Soda, Coffee, Donut, Chips, Hamburger (with Lettuce and Cheese toppings), Waffles (with chocolate and whipped cream topping), Banana Shake
Special Task: Fix the Broken Table
- Whipped Cream Topping- There’s a new topping available for the waffles: whipped cream. You don’t have to do anything special for this one: just click on it like you do with the chocolate syrup.
- Fix the Broken Table- Since the table’s broken, we’ll have to fix it. Every spare moment you have (especially when customers are thinking of what to order "…") click on the table. Emily will automatically work on fixing it. Since you’re short a table now, it’s important to make sure you keep Betty on top of keeping them clean. Fixing the table gives you a bonus of 300.
- The Mouse- The mouse for today is hiding behind the right corner of the middle planter on the left. He’s a little hard to see, so it may take a couple tries to catch him.
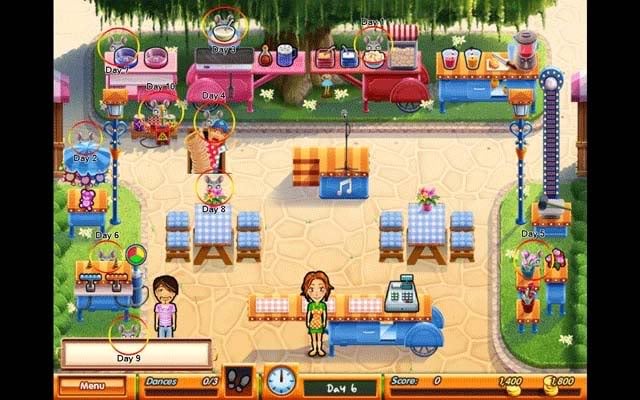
Betty’s Drive Thru – Day 6
Francois comes in, telling Emily oh no, she has to have proper media training before she goes on her new TV show!
Available Menu: Soda, Coffee, Donut, Chips, Hamburger (with Lettuce and Cheese toppings), Waffles (with chocolate and whipped cream topping), Banana Shake, Strawberry Shake
Special Task: Media Training
- Strawberry Shakes- The strawberry shake is the new addition to the menu today. It works exactly like the banana shake. Remember to watch the needle on the gauge and make sure it lands in the green! The timing is always the same, so you don’t have to worry about the needle speeding up or slowing down.
- Media Training- Francois is holding a camera, and will dash to certain areas of the diner. When you see him stop and holding the camera, click on him, and Emily will pose. You’ll have to do this a total of 8 times. Treat Francois as your most important priority though, because if you keep him waiting very long, you’ll fail the task.
- The Mouse- The mouse for today is an easy one. You’ll see the mouse hole in the upper right-hand corner of the screen, outside on the lawn.
Betty’s Drive Thru – Day 7
Well look who’s entered the building, it’s the best Elvis impersonator in the world, and he’s here to entertain your guests, of course!
Available Menu: Soda, Coffee, Donut, Chips, Hamburger (with Lettuce and Cheese toppings), Waffles (with chocolate and whipped cream topping), Banana Shake, Strawberry Shake
Special Task: Betty Whoops
- Betty Whoops- Betty is so beside herself at how handsome the Elvis impersonator is, she’ll keep dropping her cleaning cloth! If she drops it, she can’t clean the table, so be sure to click on the cloth, which will be lying on the ground somewhere between her and the table, and click on the table again so she’ll clean it. It’s possible she’ll drop it numerous times in one trip. Whenever she drops it, there’s a little chime sound to inform you.
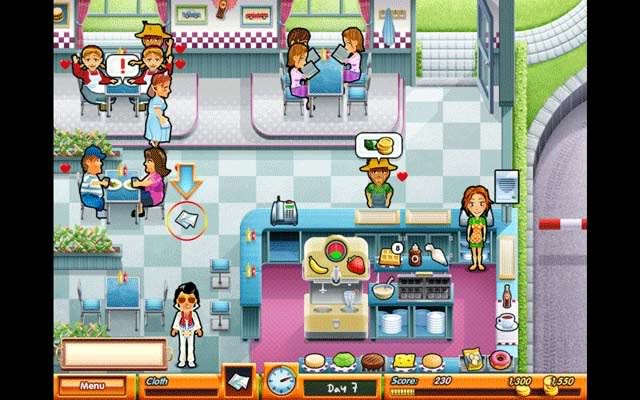
- Elvis the Entertainer- Using an entertainer is easy: in this case, click on Elvis, and then on the table you’d like him to entertain. If the people at the table are optimally happy (hearts around them), you don’t need to use the entertainer. Using an entertainer on a table that’s not optimally happy will improve their moods. You can do it as many times as you like/need to bring their moods up all the way!
- GameHouse Easter Egg- Up on the wall, where there was a picture of a car the previous days, there’s a plaque with various insects on it. Click on it to add yet another easter egg find to your list: uh-oh, they’re bugs! Hopefully the only ones in the game.
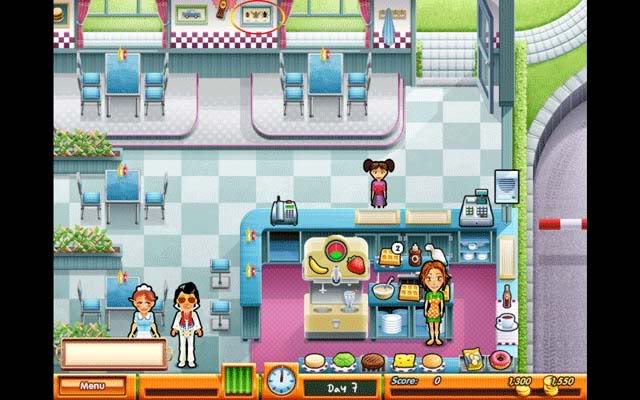
- The Mouse- The mouse for today will pop up just above/behind the bag of chips on the counter.
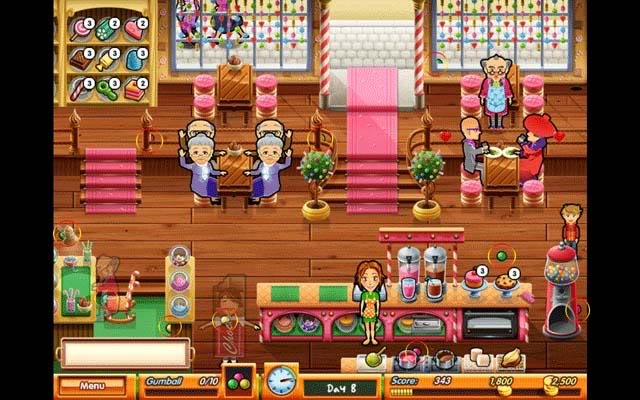
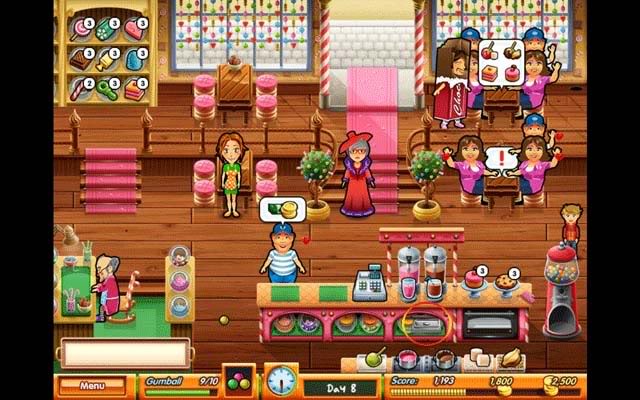
Betty’s Drive Thru – Day 8
The Postman walks in with a contract for Emily to sign. Emily will fix him a waffle at his request, but then he starts choking!
Available Menu: Soda, Coffee, Donut, Chips, Hamburger (with Lettuce and Cheese toppings), Waffles (with chocolate and whipped cream topping), Banana Shake, Strawberry Shake
Special Task: Save the Postman
- Save the Postman- Click on the choking postman, and a meter will appear with a green zone on it below. When the white line moving back and forth lands in the green zone, click on the postman. You will need to do this six times in order to save him. Clicking out of the green zone results in the number toggling back one, so if you were at 4 to go and click wrong, you’re back at 5. It’s a good idea to save the Postman first, before addressing your customers, since you’ll get a 400 bonus as reward.

- The Mouse- The mouse for today is hiding behind the topmost two-seater table on the left. He may even pop up in the middle while two people are eating there!
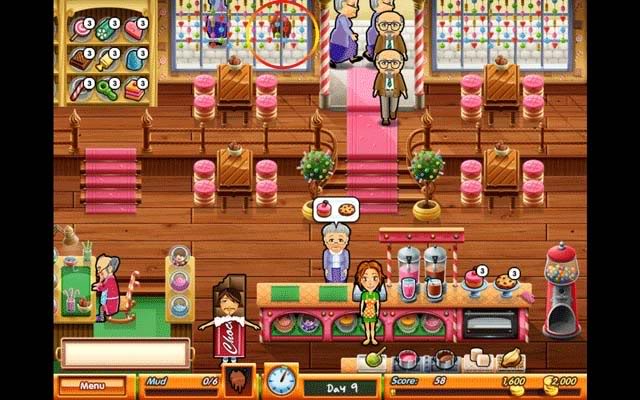
Betty’s Drive Thru – Day 9
Emily comes in, but she’s much much slower today due to a lack of sleep. Betty notices and offers her some chocolates, from a local candy store that’s soon to close. The chocolates give Emily the boost she needs to get back up to speed.
Available Menu: Soda, Coffee, Donut, Chips, Hamburger (with Lettuce and Cheese toppings), Waffles (with chocolate and whipped cream topping), Banana Shake, Strawberry Shake
Special Task: Staying Awake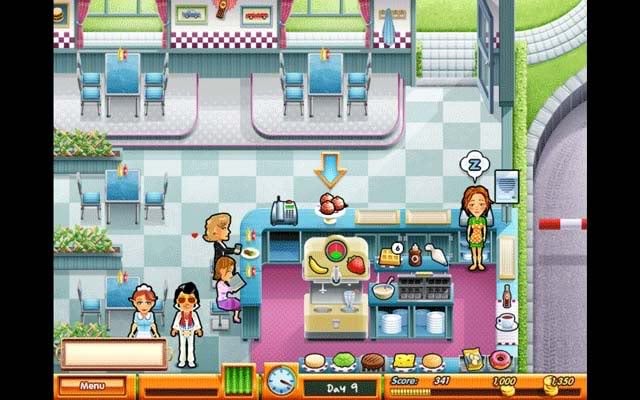
- Staying Awake- If Emily slows up and gets tired again, click on the little plate of chocolates on the counter to wake her back up. There are three chocolates on the plate, but you don’t need to worry about saving them: if you eat a chocolate immediately every time Emily gets tired, you’ll still have what it takes to get through the day. You don’t need to worry about running out.
- The Mouse- Today’s mouse is hiding near/behind the plate of chocolates on the main floor area. You should see the hole in the floor when the day begins.
Betty’s Drive Thru – Day 10
Good news for Emily! Betty’s cousin, Mo, has offered to fix their car and take care of them on his farm. Today’s the last day she’ll need to work at the diner.
Available Menu: Soda, Coffee, Donut, Chips, Hamburger (with Lettuce and Cheese toppings), Waffles (with chocolate and whipped cream topping), Banana Shake, Strawberry Shake
Special Task: Fixing the Car
- Fixing the Car- This task has a couple aspects to it. Every time Mo enters or leaves the diner, he’ll get mud and oil all over the welcome mat. Click on it to have Betty clean it. If you don’t clean it, people will become upset and lose their appetites, and that’s not good for business. Mo, once inside, will ask for a specific tool. The tools are scattered throughout the screen. You’ll need to find it and click on it in order for Mo to use it and come back. Don’t forget to clean the mat!
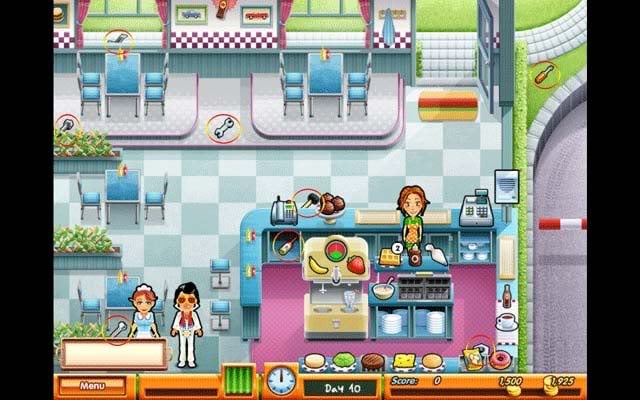
- The Chocolates- The chocolates Betty gave you from yesterday have made a return to the diner today. Eat one to temporarily become super-fast!
- The Mouse- The mouse for today will pop up behind the window sill of the middle window (next to the picture of the red car).
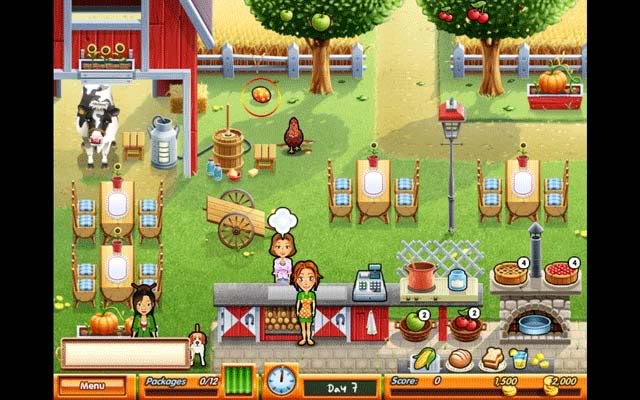
Admittedly, Mo’s not much of a farmer, and he asks for Emily’s help getting the farm back up and running. A woman who lives in the area notices the farm is back open for business and promises to spread the word.
Available Menu: Corn, Bread Loaf, Sliced Bread, Lemonade, Dairy Products (Milk, Porridge, Cheese)
Special Task: None
- The Dairy Products- When someone asks for Milk, Porridge, or Cheese, click on the churn to the right of the milk tank. Doing so will result in those products appearing in that order. Click when you see what you need to pick it up. Each product takes up 1 portion of the milk tank nearby: the tank has 4 portions total. To refill the milk tank, click on the cow. Emily will milk the cow to replenish the tank. It’s a good idea to click on the cow every spare moment you have so your tank is always full before going back to the register.
- Cleaning Tables- Remember, this is a new area, so there’s no waitress to clean tables for you! You’ll have to do it yourself, don’t forget!
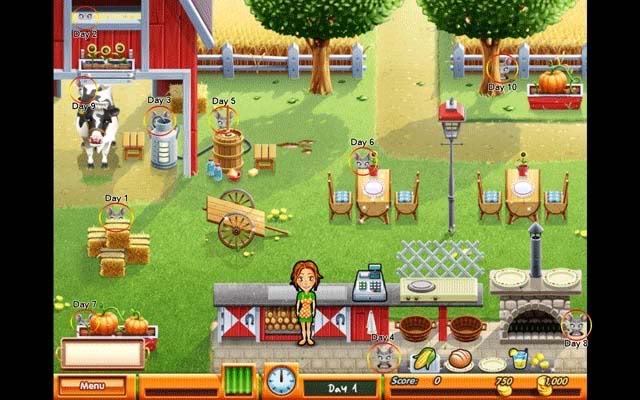
- The Mouse- The mouse for today will appear behind the stack of hay bales on the left side of the screen.
Bonus: Mo’s Farm: Shop
Upon reaching Mo’s Farm, you can actually immediately access the shop to purchase various items for the farm. The following are available:
- Sunflowers –Price 300- Decreases the time taken to milk the cow
- Lantern -Price 400- Brings in 1 extra customer after closing
- Kitchen -Price 600- Decreases food preparation time
- Wooden Wagon -Price 200- Increases tips from line customers
- Tables and Chairs -Price 300- Increases patience of sitting customers
- Grand Pumpkins -Price 200- Decreases amount of time taken to grow fruit
The beSt first upgrade to buy is probably the Sunflowers, since the dairy products are very popular on the farm and milking the cow can eat up valuable time.
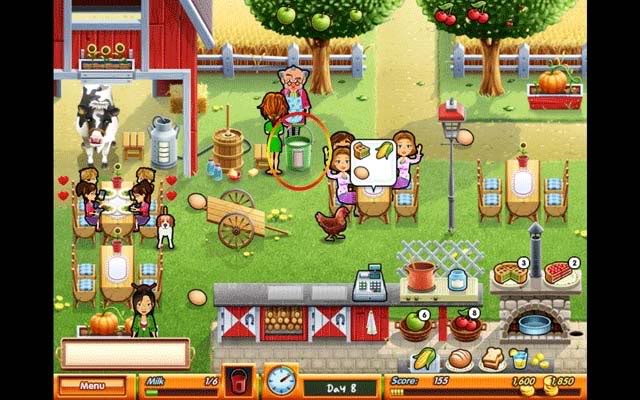
Mo’s Farm – Day 2
Emily arrives at the farm the next morning to find that the cow’s been spooked terribly, and won’t be able to give any milk until she calms down.
Available Menu: Corn, Bread Loaf, Sliced Bread, Lemonade, Dairy Products (Milk, Porridge, Cheese), Eggs
Special Task: Calm the Cow
- The Chicken- The chicken is the latest addition to the farm. It will walk around and lay eggs at random. When a customer orders an egg, click on one of the eggs laying on the ground to pick it up and give it to the customer. You don’t have to do anything more than that!
- Calm the Cow- The cow’s been spooked, and won’t give any milk until she calms down. Luckily for you, none of the customers will order dairy products in the meantime. To calm the cow, simply click on her. Emily will pat her. Given enough time and filling up the green meter completely, the cow will calm down and you can sell dairy products again. It’s a good idea to try and calm the cow every spare moment you have, even (especially) while customers are thinking of what to order.
- The Mouse- Today’s mouse will pop up in the loft of the barn, up above the cow.
Mo’s Farm – Day 3
Upon opening, a young woman will wander into the farm, named Tashi. She’s looking for Mo. Emily suggests she stick around and help out a bit.
Available Menu: Corn, Bread Loaf, Sliced Bread, Lemonade, Dairy Products (Milk, Porridge, Cheese), Eggs, Apples
Special Task: Blueberries for Mo
- Apples- The newest product available on the farm, apples grow on the left tree in the background. The tree will hold three ripe apples at most. There is a basket below the counter where Emily keeps the harvested apples: you can hold 12 at a time. To harvest more apples, click on the tree and Emily will collect them. When a customer asks for an apple, though, pick it up from the basket below the counter.
- Blueberries for Mo- Tashi will ask Emily if she can help her find some blueberries for Mo: ten should do. 10 blueberries are scattered throughout the farm. Find them to earn a nice bonus! The fact that they’re blue makes them pretty easy to find.
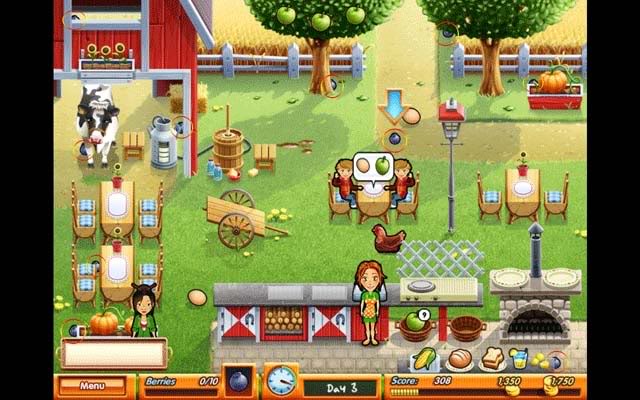
- The Mouse- The mouse of today is hiding behind the milk canister. You’ll barely be able to see this one, just the ears sticking out!
Mo’s Farm – Day 4
Today a woman will appear with a large group of kids, and they’ve decided to have a birthday party at the farm.
Available Menu: Corn, Bread Loaf, Sliced Bread, Lemonade, Dairy Products (Milk, Porridge, Cheese), Eggs, Apples, Apple Jam
Special Task: Birthday Party
- Apple Jam- A new item available at the farm, this one’s pretty simple. First, click on the empty jar, and then on the basket of apples to make jam. Making jam requires two apples, so make sure you keep harvesting apples from the tree!
- Birthday Party- A large group of kids will arrive and all begin to order at once. This is similar to the studio call in the Diner where you had to give items to the Postman. You have 2 1/2 minutes to get all the items they want, which is more time than it seems. A green bar ticks down with the time below their tables. Get all their orders on time and you’ll have a nice bonus.
- The Mouse- Day 4’s mouse is a very easy one. The hole is at the bottom of the screen below the register. If you’re at the register when it shows up, it will be right near Emily’s feet.
Mo’s Farm – Day 5
Today, a mysterious visitor will enter the farm, tail wagging.
Available Menu: Corn, Bread Loaf, Sliced Bread, Lemonade, Dairy Products (Milk, Porridge, Cheese), Eggs, Apples, Apple Jam, Apple Pie
Special Task: Feed the Dog
- Apple Pie- Apple pie can be found above the oven. Click on the pie and then on the customer that wants it to give them a slice. There are four slices in a pie. If you run out completely, it will take 4 apples to bake a new one. Click on the pie dish in the oven, and then on the apples in the basket to bake a new pie. Make sure to watch it and pick it up before it burns! Since it requires so many apples, again it’s a good idea to keep harvesting from the tree.
- GameHouse Easter Egg- Take a close look at the counter cupboard on the left side. There’s a few slashes, and a hook stuck in the wood. Click on it to discover another easter egg. This is the mysterious hook man’s hook from Campfire Legends. Hope he’s not around anymore!
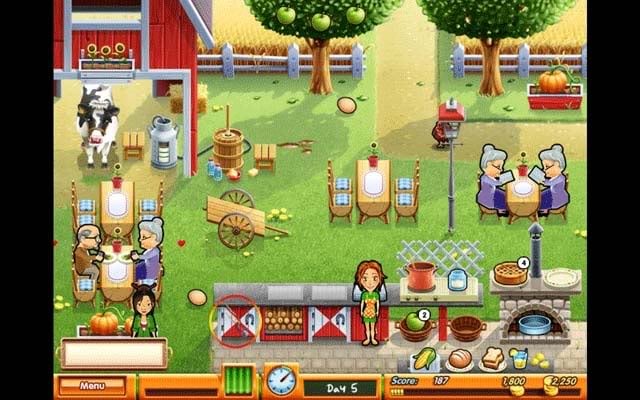
- Feed the Dog- An unknown dog will show up on the farm. Emily and Tashi decide to feed him scraps. This is similar to the minigame with Francois and the camera at the diner. Follow the dog, and click on him whenever he stops to feed him. Don’t waste too much time, or you’ll fail the task. Complete it successfully to meet your new entertainer! To use the dog an as entertainer, click on it and then on the table you want it to entertain. Same rules apply as with the Diner.
- The Mouse- The mouse for today will pop up behind the dairy churn, so keep an eye out!
Mo’s Farm – Day 6
Wow! A chicken just laid a really shiny egg! They’re considered good luck.
Available Menu: Corn, Bread Loaf, Sliced Bread, Lemonade, Dairy Products (Milk, Porridge, Cheese), Eggs, Fruit (Apples or Cherries), Jam (Apple or Cherry), Pie (Apple or Cherry)
Special Task: The Golden Eggs
- Cherries- Cherries are now available at the farm! They work just like the apples: you can give them to customers as they are, as jam, or as pie per their request. Baking pie and making jam, the same rules apply. The only difference is that the tree that grows cherries is located on the right, and instead of three, four cherries grow on the tree at a time. Make sure to keep picking them: you can hold twelve in the basket at once.
- The Golden Eggs- Throughout the day, the chicken will be laying golden/shiny eggs (a little chime sound will clue you in if you’re not paying attention).
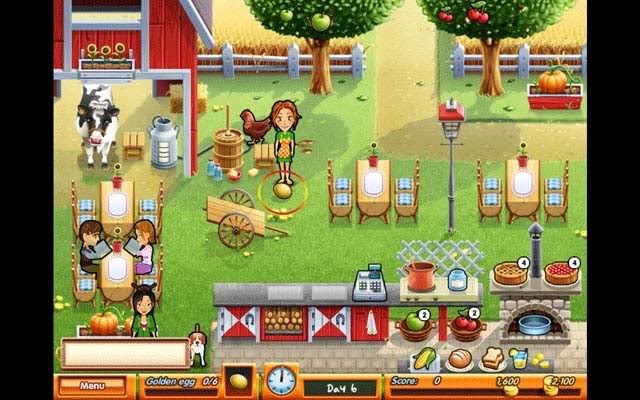
Pick them up as soon as they’re laid (in fact, there’s an extra spot on your carrying tray now just so you can hold on to these). When a customer orders an egg, give them the shiny one instead of one of the normal ones to receive a nice tip of 25 each! If you do not have a gold egg when a customer orders an egg, do not wait for one to show up, and instead give them a normal one. There are six gold eggs in all.
- The Mouse- Today’s mouse will pop up behind the centermost eating table, customers or not! Be sure to keep watching.
Mo’s Farm – Day 7
Mo loves how the farm is coming along, and the good news is the parts to repair Emily’s car are coming in today! Emily will need to pick up the packages.
Available Menu: Corn, Bread Loaf, Sliced Bread, Lemonade, Dairy Products (Milk, Porridge, Cheese), Eggs, Fruit (Apples or Cherries), Jam (Apple or Cherry), Pie (Apple or Cherry)
Special Task: Pick up the Packages
- Pick up the Packages- You know the drill! When the mailman arrives, click on him to pick up the package. A little chime should go off every time he shows up. There are twelve packages in total with a nice bonus attached.
- GameHouse Easter Egg- The first egg the chicken lays today will be orange with white spots. Click on it to reveal yet another GameHouse easter egg, which by complete coincidence, is also an easter egg.
- The Mouse- The mouse of today will be hiding behind the pumpkin planter, at the bottom lefthand corner of the screen. He’s well-hidden, so you’ll need to look especially hard for this one.
Mo’s Farm – Day 8
The day begins with a very angry, selfish man demanding a pale of milk…
Available Menu: Corn, Bread Loaf, Sliced Bread, Lemonade, Dairy Products (Milk, Porridge, Cheese), Eggs, Fruit (Apples or Cherries), Jam (Apple or Cherry), Pie (Apple or Cherry)
Special Task: Pleasing the Customer
- Pleasing the Customer- Charles, the Candy Shop owner, has some to pick up some buckets of milk. He’s brought his own and is adamant you don’t cheat him or let the bucket overflow. Since he’s such a demanding customer, take care of him as soon as he arrives at the farm. Click on him/the bucket to fill it. When it turns green, click again.
He will show up and leave six times without a thank you, but at least you’ll get a bonus.
- The Mouse- Today’s mouse is an easy one. The hole is in plain sight located next to the oven. Make sure you keep an ear out though, because it’s likely you’ll be too caught up with Charles to pay any attention to the mouse hole.
Mo’s Farm – Day 9
Francois shows up with the angry TV Producer Ludwig on the phone, who says if Emily’s not at the studio in two weeks, the job is gone. Francois decides to reminisce around the farm for the day.
Available Menu: Corn, Bread Loaf, Sliced Bread, Lemonade, Dairy Products (Milk, Porridge, Cheese), Eggs, Fruit (Apples or Cherries), Jam (Apple or Cherry), Pie (Apple or Cherry)
Special Task: Do you recall?
- Do you recall?- Francois will stroll around, thinking deeply. When he thinks of a memory he wants to share with you, a red "!" will pop over his head with a chime. Click on him to get bonus points and unlock some easter-egg style memories. There are five in total.
- GameHouse Easter Egg- Take a look behind the apple tree, and you’ll notice a sign that says Emily’s Tea Garden. This is an easter egg and reference to the previous game in which Emily started her own Tea Garden in Delicious: Emily’s Tea Garden.
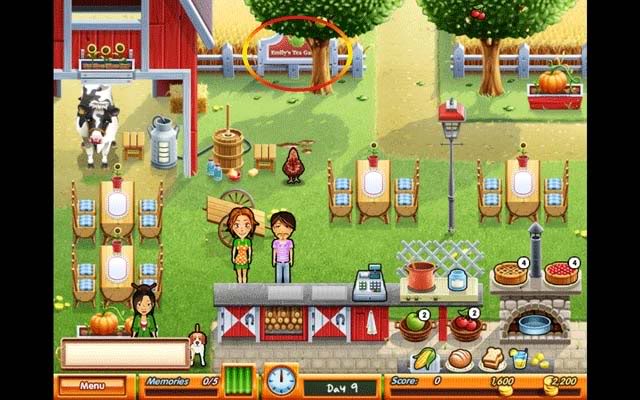
- The Mouse- The mouse of today will sneakily pop up behind the cow on the upper lefthand side. This is one you’ll have to look hard for.
Mo’s Farm – Day 10
It’s the final day at the farm, and Emily’s agreed to help teach Tashi how to run the farm in her stead. The closing Candy Shop is on the mind…
Available Menu: Corn, Bread Loaf, Sliced Bread, Lemonade, Dairy Products (Milk, Porridge, Cheese), Eggs, Fruit (Apples or Cherries), Jam (Apple or Cherry), Pie (Apple or Cherry)
Special Task: Teaching Tashi the Ropes
- Teaching Tashi the Ropes- Tashi will ask Emily to teach her how to do various things. To teach Tashi, all you have to do is the action of what she’s asking about. She’ll asking you (in order) how to pick up an egg, how to milk the cow, how to prepare jam, how to bake a pie, how to entertain people (the dog), how to pick apples, and how to handle the register. You know how to do all these as per described above. You will have to do these tasks immediately upon her asking though, otherwise she’ll forget the previous one. Once you teach her all seven tasks, you can relax as you finish your day at the farm.
- The Mouse- The last mouse at the farm can be found just to the right of the cherry tree trunk. The hole is visible, so it’s not to hard to catch this one.
IV. Charles’ Candy Shop – Day 1
Emily convinces Charles to let her work at the Candy Shop temporarily while trying to think of a solution to save it. An underenthusiastic candy maker agrees.
Available Menu: Shelf Candy (9 varieties), Pink Soda Pop, Gumballs
Special Task: None
- The Candy Shelf- There are nine different kinds of candy on the shelf, and a quantity of three of each to a jar. When a jar runs low or is empty, click on Charles and he’ll refill them. However, it’s important to note that you cannot pick candy from out of a row of jars while Charles is in the way refilling them.
- The Gumball Machine- When people order gumballs, they will want an exact amount 1-3. Pay close attention to what they ask for. Click on the gumball machine once for however many gumballs they want (i.e., 3x for 3 gumballs), and most importantly, don’t forget to pick up the bag at the bottom once you’re done. This throws a lot of people off.
- Drinks and Cleaning- Drinks are easy! Just click on them to pick them up and they’re instantly ready for the customer. Remember, Emily will also, once again, be responsible for cleaning the tables on her own, so plan accordingly. You will also be introduced to the Posh customer for the first time (woman in red, man in purple with classes). These guys pay well, but are more impatient than other customers.
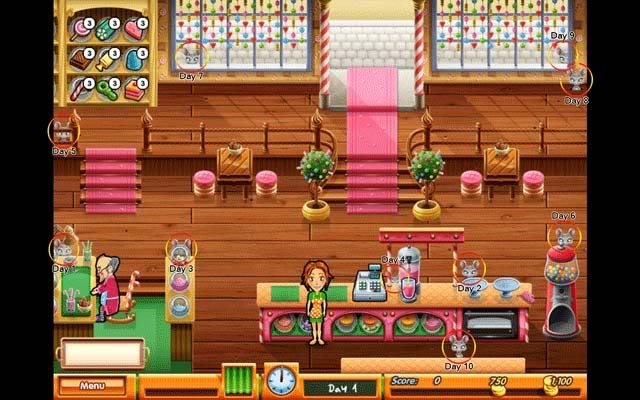
- The Mouse- Of course we couldn’t forget the mouse! He’s hiding behind Charles’ candy-making station when he pops up.
Bonus: Charles’ Candy Shop: Shop
Again, this can actually be accessed from the first day if you’ve got some extra money to spend! The following are available to sprucen up the Candy Shop:
- Candy Trees -Price 200- Increases tips from line customers
- Rocking Chair -Price 400- Increases Charles’ speed
- Kitchen -Price 300- Decreases workload/time taken in the kitchen area
- Tables and Chairs -Price 300- Increases patience of sitting customers
- Candy Curtains -Price 200- Brings in 1 extra customer after closing
- Carpet -Price 600- Allows Emily to move faster
Seeing as how Emily will be moving around a lot over a wide area in the candy shop, the best investment you could make would be the carpet which allows her to move faster.
Charles’ Candy Shop – Day 2
Two little girls walk into the candy shop and ask for sour drops, only to have their mother run in and desperately try to stop you before they run wild, uh-oh…
Available Menu: Shelf Candy (9 varieties), Pink Soda Pop, Gumballs, Candy Apple w/Marshmallows
Special Task: Catch the Twins
- Candy Apples- New dessert today, candy apples! To make a candy apple, click on the apple on a stick, then the dipping sauce (candy: red), and finally the marshmallows for topping. These are popular with the customers, so you’ll be making these a lot.
- Catch the Twins- A set of twins will walk in and ask for blue sour drops. Emily gives it to the children, only to have their mother run in moments later and tell her not to give them anything blue. Too late! The two begin running around the shop excitedly. When they stop and are jumping in place, click on them so Emily will momentarily grab them. Do this until the green meter at the bottom is filled, you’ll get big bonus points. You need to be relatively quick though, otherwise they’ll dash somewhere else.
- The Mouse- Today’s mouse will pop up behind the empty cake plates on the counter.
Charles’ Candy Shop – Day 3
Francois and Emily declare how delicious the new cakes are. Charles, the cynic, tells Emily she could lose some weight…
Available Menu: Shelf Candy (9 varieties), Pink Soda Pop, Chocolate Milk, Gumballs, Candy Apple w/Marshmallows, Cherry Cake
Special Task: Walking 1,000 Steps
- New Items- Chocolate Milk and Cherry Cake are the latest additions to the menu. Chocolate Milk is easy, all you need to do is click on it and it’s ready. With the Cherry Cake, there’s room for 3 on the plate. When you get low on cake or run out, click on the oven to bake more. Once it chimes, it’s ready to be taken out, much like the pie at Mo’s Farm
- Walking 1,000 Steps- The easiest way to rack up steps is to click on one table, and then another when you’re not doing another task. Emily will go back and forth between the tables as often as you click between them. This is the best way to get more steps, besides doing the normal service.
- The Mouse- The mouse for today will pop up behind the multi-colored candy jar on the bar behind Charles.
Charles’ Candy Shop – Day 4
Charles has decided to help you clean tables today, so you don’t have a heart attack. The Postman arrives with a package for Matthew, but Charles tells him to go away. Emily agrees to take the packages from the Postman.
Available Menu: Shelf Candy (9 varieties), Pink Soda Pop, Chocolate Milk, Gumballs, Apple (Candy or Chocolate dip) w/Marshmallows, Cherry Cake
Special Task: Special Delivery
- New Apple Dip: Chocolate- There’s a new dip available for the apples today, so be sure to pay close attention to what the customers are ordering. The chocolate dip is the darker of the two, and also the new one.
- Special Delivery- The Postman will bring by twelve packages throughout the course of the day. Be sure to pick these up and don’t keep him waiting too long! Even the Postman can get upset if you keep him waiting. Click on him to collect the package. A little chime sound will go off whenever he’s got another package for you.
- The Mouse- Day 4’s mouse will appear between the Pink Soda Pop and the Candy Cane pole next to it. It’s a hard one to spot, even when looking directly at it, so be especially vigilant with this one.
Charles’ Candy Shop – Day 5
Emily gets a call in the morning from Ludwig. He’s sending a reporter to interview Emily today.
Available Menu: Shelf Candy (9 varieties), Pink Soda Pop, Chocolate Milk, Gumballs, Apple (Candy or Chocolate dip) w/Marshmallows, Cherry Cake, Cookies
Special Task: Interview
- Cookies- The new specialty, these are a popular item, just like the cakes. No preparation is necessary for the cookies, though if you run low, like with the cakes, you can click on the oven to bake more. Whenever you choose to bake more of either, cake or cookies, both will be fully replenished.
- Interview- A man will come by to interview Emily, but obviously she’s still got work to do! He’ll sit at one of the tables and order food, asking the occasional question. Treat him as your highest priority customer with the food. Reply as such with the following questions:
-"I hear you learned how to run a restaurant from your Uncle Antonio" –Yes
-"You’re stranded here because your car broke down, right?" –No
-"Your friend Francois usually travels with you, right? Is it true you’ve decorated 10 restaurants together?" –No
After answering the final question, you’ll receive your final bonus and the interviewer will leave to write a good story.
- GameHouse Easter Egg- Below the counter bar behind Charles, look near the floor. There’s a coconut: an easter egg from the game Marooned.
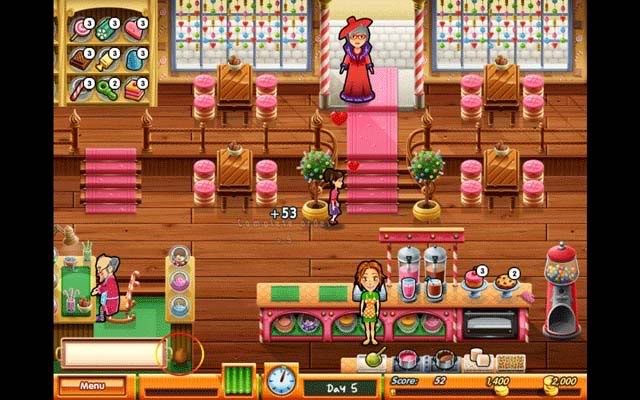
- The Mouse- Today’s mouse will appear on the upper left part of the screen, next to the stairs.
Charles’ Candy Shop – Day 6
Francois will be joining you as the Shop entertainer from this day forward in the Candy Shop. Unfortunately, some kids broke in last night and broke two of the tables: you know what to do!
Available Menu: Shelf Candy (9 varieties), Pink Soda Pop, Chocolate Milk, Gumballs, Apple (Candy or Chocolate dip) w/Marshmallows or Nuts, Cherry Cake, Cookies
Special Task: Fix the Tables
- Nutty Topping- Nuts have been added as a topping for the apple desserts. Topping them is just as easy as the marshmallows, but make sure to pay attention to the change in peoples orders!
- Fix the Tables- Two tables are broken today. Use every spare moment you have, even and especially while the customer is thinking of what to order, to fix the tables. It’s also smartest to only work on one at a time. Once the first is fixed, move onto the second where the same rule applies.
- The Entertainer- Same rules apply as before: click on Francois and then the table that needs entertaining to improve their moods!
- The Mouse- The mouse for today will pop up at the top of the gumball machine.
Charles’ Candy Shop – Day 7
The Postman’s back today to deliver six packages of gumballs to the Candy Shop!
Available Menu: Shelf Candy (9 varieties), Pink Soda Pop, Chocolate Milk, Gumballs, Apple (Candy or Chocolate dip) w/Marshmallows or Nuts, Cherry Cake, Cookies
Special Task: Stack the Packages
- Stack the Packages- Charles will ask you to stack the packages the Postman has brought by. Click on the packages, and a meter will open much like in the minigame where you saved the Postman. When the little sliding bar lands in the green zone, click on the packages again. You will need to do this successfully six times in a row to stack all the packages. Missing the green zone will result in one package falling off the stack. You’ll get a 300 bonus at the end for stacking them all successfully.
- The Mouse- The mouse for today will pop up in the left window near the bottom left corner. If you get caught up with stacking the packages, don’t worry: the mouse will pop up again later.
Charles’ Candy Shop – Day 8
A boy comes into the candy shop to get some gumballs, but more than one come rolling out!
Available Menu: Shelf Candy (9 varieties), Pink Soda Pop, Chocolate Milk, Gumballs, Apple (Candy or Chocolate dip) w/Marshmallows or Nuts, Cherry Cake, Cookies
Special Task: Find the Gumballs
- Find the Gumballs- A boy will come in to get candy from the gumball machine, but unfortunately, more than one come rolling from the slot! Emily agrees to help him find them. There are ten scattered throughout the Candy Shop. The hardest ones to find are behind/underneath both Charles and Francois, so you’ll need to move them and then grab the gumball while they’re moved. Move Charles by refilling the candy jars or cleaning a table, and move Francois by making him entertain a table.
- GameHouse Easter Egg- Take a good look under the counter where Emily is working. On the left side in front of the bottom-most decorative candy jars, there’s an old typewriter hidden away. Click on it to reveal yet another easter egg: this was the old typewriter Emily used in her very first game Delicious.
- Extended Tray- You can carry more at one time today! Your serving tray has been extended by one.
- The Mouse- Today’s mouse is hidden in the most upper righthand corner of the shop on the wooden floor, next to the top right table. The hole is in plain sight, so this one’s not too hard to nab.
Charles’ Candy Shop – Day 9
Charles has found out who the trouble-maker was who broke the tables, and now they’re back to wreak more havoc!
Available Menu: Shelf Candy (9 varieties), Pink Soda Pop, Chocolate Milk, Gumballs, Apple (Candy or Chocolate dip) w/Marshmallows or Nuts, Cherry Cake, Cookies
Special Task: Clean the Windows
- Clean the Windows- The troublesome child will come by with a laugh and throw mud at the windows. Click on the mud which has been thrown onto the window, and Charles will run outside to clean it. It’s important to do this as soon as he throws the mud so that Charles will be available to clean tables and refill candy jars when you need him!
- The Mouse- Today’s mouse will pop up in the right window, in the far bottom right corner. If customers are sitting at the top right table or walking towards/away from it, it can be almost impossible to see, so be fore-warned.
Charles’ Candy Shop – Day 10
It’s the last day the Candy Shop will be open…
Available Menu: Shelf Candy (9 varieties), Pink Soda Pop, Chocolate Milk, Gumballs, Apple (Candy or Chocolate dip) w/Marshmallows or Nuts, Cherry Cake, Cookies
Special Task: So Much Candy!
- So Much Candy!- A little boy will walk into the shop part way through the day and ask for a lot of candy. You have 2 1/2 minutes to gather everything he asks for. Be sure not to ignore your other customers, but most importantly make sure Charles keeps restocking the candy jars! Done properly, 2 1/2 minutes should be plenty to gather all the candy he wants. Remember you can keep the table customers waiting and occupied with Francois as entertainer. Gathering all the candy will make Charles want to reconcile with his son at the end of the day. The Candy Shop isn’t closing afterall!
- The Mouse- Today’s mouse will pop up right next to/behind the chocolate dip for the apples. Keep a sharp ear out, since most likely you’ll be occupied with getting the candy for the little boy.
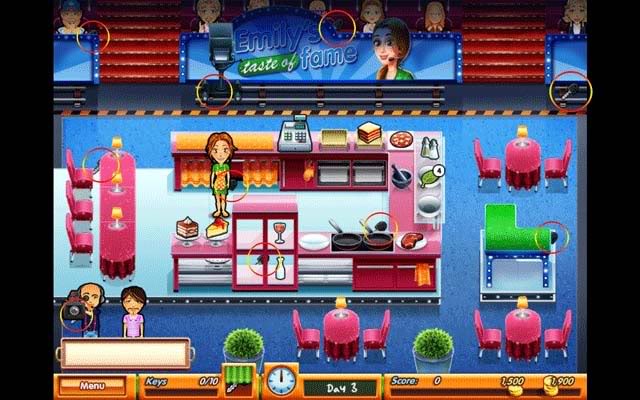
It’s Emily’s first day at the TV Studio, and uh-oh, we’re live in 3, 2, 1…
Available Menu: Meat Delicacy (w/ salt and pepper), Cake, Pie, Wine
Special Task: None
- New Menu- The meat delicacy is prepared by clicking on the meat, and then the salt and pepper before it’s ready to serve. All the other items on the menu require no preparation and can be served immediately.
- Promoting Products- There is a feature here that’s unique to any of the levels. There is a table near the bottom left part of the screen where the cameraman will move to sometimes. When he moves over there, click on the table to advertise/promote a product. You will get very valuable bonus points for doing this.
- GameHouse Easter Egg- In the upper lefthand corner of the studio, across from the camera, there’s a roll of film. Click on it to reveal an easter egg: it’s a stolen roll of film from Sunset Studio 2.
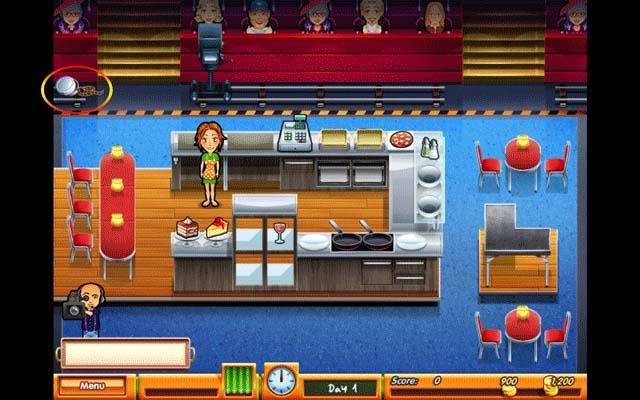
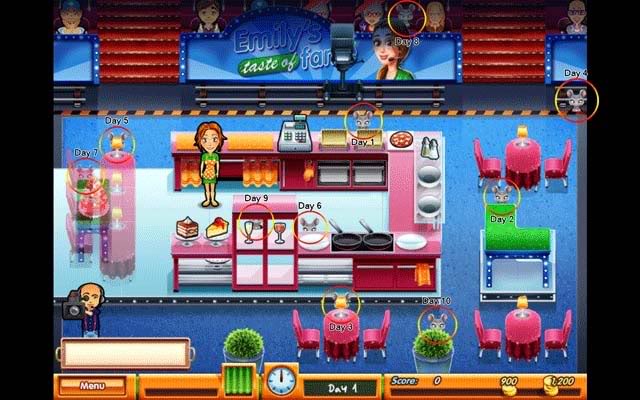
- The Mouse- The mouse will pop up behind the rightmost tray at the front of the counter. If you look closely, you can see part of the hole.
Bonus: The TV Studio: Shop
Once again, you can access the shop before the first level if you exit to the calendar on the first day. The following upgrades are available for the TV Studio:
- Plants -Price 200- Increases tips from table customers
- Tables and Chairs -Price 400- Increases patience of table customers
- Kitchen -Price 300- Decreases kitchen preparation time
- Boarding -Price 500- Increases Emily’s speed
- Presenting Table -Price 400- Increases amount of money earned from presenting
- Stairs -Price 200- Gives one bonus customer after closing
Upgrades that increase patience and tips are the best investments for this level to concentrate on getting first.
The TV Studio – Day 2
It’s Day 2, and Emily already has fans who want her autograph!
Available Menu: Meat Delicacy (w/ salt and pepper), Steak (w/salt and pepper), Cake, Pie, Wine, Sparkling Water
Special Task: Signing Autographs
- Steak and Sparkling Water- Sparkling water is a non-preparation item, so you really don’t need to worry about that as an addition. The steak however, is something different. Click on the steak to throw it into the pan. You will have to wait until it’s cooked (ding!) before you can pick it up from the pan. Once you pick it up, click on the salt and pepper seasoning to finish preparing it for the customer. Don’t wait too long to pick up the steak though, or it will burn and you’ll have to cook another.
- Signing Autographs- Emily will need to sign six autographs while cooking on her show. A little chime will notify you when a new fan wants an autograph signed: they will always stand in the upper part of the screen between the camera and the counter. Click on them to sign the autograph.
- The Mouse- The mouse will pop up on the right side of the screen, Just above/behind the advertising and promotional table area.
The TV Studio – Day 3
Francois is in the studio today, and he’ll be cleaning tables for you. Click on the table that needs cleaning to make Francois go to work! Today the studio is doing a promotion for the audience: with every car key Emily finds, an audience member wins a new car!
Available Menu: Meat Delicacy (w/spices, spinach), Lasagna (w/spices, spinach), Steak (w/spices, spinach), Cake, Pie, Wine, Sparkling Water
Special Task: Finding the Car Keys
- Lasagna and Spinach- Spinach has been added as a topping, so make sure to pay extra close attention to customers orders which involve a topping or spice! There is a quantity on the spinach: a maximum of 4. Every spare moment you get, or when you run low, click on the stone mashing bowl in front of the spinach to prepare more.
Lasagna is another dish that requires more time to prepare than most dishes: first click the lasagna, then the topping and Emily will put it in the oven. Once it’s ready, the oven will beep and open. You can then click on the cooked lasagna and give it to the customer who ordered it.
- Finding the Car Keys- Car keys are hidden throughout the studio: find and click on all ten of them. The two most difficult keys to find are behind the cameraman (it might be best to pick that one up when he goes to the promotional table), and underneath the camera on the left side. When the camera follows Emily to the right, click on the key before the camera moves back. You can do this as many times as you need to since the camera is almost constantly moving to follow Emily.
- The Mouse- Today’s mouse will pop up behind the light on the bottom center table. It’s easy to click on the table instead of the mouse, so be especially careful not to miss this one.
The TV Studio – Day 4
Today a phone has been added to the studio. People will be calling in special orders for Emily to make in addition to her normal wave of customers.
Available Menu: Meat Delicacy (w/spices, spinach), Lasagna (w/spices, spinach), Steak or Fish (w/spices, spinach), Cake, Pie, Wine, Sparkling Water, Champagne
Special Task: Call-in Orders
- Fish and Champagne- Champagne requires no preparation. Fish works like steak: you click on it to cook it, and once it’s done, click on it and then the correct topping to prepare it for the customer. You can cook a maximum of 2 fish, 2 steaks, or one of each at a time.
- Call-in Orders- When the phone rings, answer it. Orders will be called in, much like the previous phone minigames. You have 2 minutes and 20 seconds to prepare everything requested by the callers. Callers should take priority whenever and wherever possible, since you don’t want items that need cooking, such as steak or lasagna, getting too backlogged since they take a decent amount of time to prepare. If you need to, slow down a little. It’s best to take care of the items that need preparation before something simple, like say pie or wine.
- The Mouse- The mouse for today will pop up in the upper righthand corner of the screen, in front of the studio audience and the camera track. The hole is in plain sight, so this one shouldn’t be too hard.
The TV Studio – Day 5
A very enthusiastic fan comes on stage to let Emily know how much he loves her, but an angry Ludwig insists he must be kicked off, now!
Available Menu: Meat Delicacy or Mushroom (w/spices, spinach, chives), Lasagna (w/spices, spinach, chives), Steak or Fish (w/spices, spinach, chives), Cake, Pie, Wine, Sparkling Water, Champagne
Special Task: Stop the Crazed Fan
- Chives and Mushroom- Chives are a topping, much like the spinach. You can hold a quantity of five at a time. Whenever you’re not busy with something else or waiting for a customer to order, click on the cutting board in front of the chives (as well as the spinach crushing bowl) to refill your toppings. Mushroom is like lasagna, and must be prepared with a topping and then cooked before it can be served to the customer.
- Stop the Crazed Fan- A man with an "I love you Emily" sign has run onstage, and Emily has to chase him off. To chase him, click on him when he’s standing still. Everytime you click on him while he’s standing still, you’ll earn a bonus of 25. When you finally catch him after chasing him ten times, he’ll leave the stage and you’ll get an extra bonus of 50.
- The Mouse- Today’s mouse will pop up at the top of the single-seater tables on the left. This one is hiding behind a lamp, too, so you’ll have to look a little harder to find it.
The TV Studio – Day 6
Today Emily’s been introduced to her new co-host, the reporter, Ted Dorton. Ted will act as your entertainer in this level. Click on him and then the table you’d like to entertain to make him go to work! At the end of the show, Emily will be shooting a commercial.
Available Menu: Meat Delicacy or Mushroom (w/spices, spinach, chives), Lasagna (w/spices, spinach, chives), Steak or Fish (w/spices, spinach, chives), Cake, Pie, Wine, Sparkling Water, Champagne, Orange Juice
Special Task: The Commercial
- Orange Juice- Orange juice is your last new cooking item addition to the kitchen. It requires no preparation, just like all the other drinks.
- The Commercial- The commercial will be shot at the end of the show. Emily will say something, and you will have to click on the correct icon of three following that statement to promote the product. This is the solution:
1. "I’m here to show you Emily’s Pasta Light" -orange box icon
2. "It tastes delicious" -spoon icon
3. "It’s very light" -scale icon
4. "Delicious Emily’s Pasta Light" -orange box icon
5. "I love it and I have my own cooking show" -smile icon
- The Mouse- Today’s mouse is going to pop up right above the uncooked fish.
The TV Studio – Day 7
Emily’s duty today is to create a mystery dessert for the audience!
Available Menu: Meat Delicacy or Mushroom (w/spices, spinach, chives), Lasagna (w/spices, spinach, chives), Steak or Fish (w/spices, spinach, chives), Cake, Pie, Wine, Sparkling Water, Champagne, Orange Juice
Special Task: Mystery Dessert
- Mystery Dessert- To work on the mystery dessert, click on the sparkly red curtain on the left. Every spare moment you have (make sure your topping don’t get too low), click on the curtain to have Emily work on the dessert. She will need to fill up a meter going up to 100 before it’s finished.
- The Mouse- If you want to catch the mouse for today, you’ll need to finish the mystery dessert ASAP, because the mouse will pop up behind the top of the table that has the mystery dessert on it: you won’t be able to see it at all if the curtain’s down.
The TV Studio – Day 8
Ted, the co-host, was so tired coming into the studio today, he fell down the stairs on his way in…
Available Menu: Meat Delicacy or Mushroom (w/spices, spinach, chives), Lasagna (w/spices, spinach, chives), Steak or Fish (w/spices, spinach, chives), Cake, Pie, Wine, Sparkling Water, Champagne, Orange Juice
Special Task: Dizzy Dining
- Dizzy Dining- Since Ted fell down the stairs on his way in and the show must go on, he’s not going to be in tip-top shape. In fact, whenever he entertains a table, it’s most likely on the way back he’s going to drop his microphone somewhere (between his normal standing spot and the table he was entertaining). If he does this, a little chime will notify you. Click on his dropped mike to have him pick it up again. If you are an expert at the game and/or don’t use the entertainer, you wouldn’t have to worry about this.
- The Mouse- Today’s mouse is hidden in the audience, up behind Emily’s head on the sign in front of the stage. Note: if you haven’t bought the sign for the stage, the mouse will pop up to the left of the red-headed girl in the audience.
The TV Studio – Day 9
Ludwig’s signed a contract with the shoe brand PANDAS. What could this entail for Emily today…?
Available Menu: Meat Delicacy or Mushroom (w/spices, spinach, chives), Lasagna (w/spices, spinach, chives), Steak or Fish (w/spices, spinach, chives), Cake, Pie, Wine, Sparkling Water, Champagne, Orange Juice
Special Task: 2000 Yard Dash
- 2000 Yard Dash- Emily will need to walk a total of 2000 yards today. The best way to rack up distance is to, whenever you’re not serving a customer, click between two distanced objects, such as the bottom righthand corner table and the cash register. Going back and forth between these when you’re not doing anything, while it looks silly, will help to give you more steps than you would by normally cooking and waiting. You’ll get a bonus of 100 at the end. Make sure you’re at at least 1000 yards by the time the clock is at the halfway mark (6 o’clock position), if not, better get walking!
- The Mouse- The mouse for today will pop up in the middle of the kitchen behind the champagne. Be careful to listen for it though, because if Emily’s getting drinks when it pops up, it’s impossible to see or click on it. It’s also easy to accidentally click on the champagne instead of the mouse, so try to click on the upper right side of it, even if it’s behind the purple shelf.
The TV Studio – Day 10
Emily decides to leave the show and let Ted Dorton take over in her stead, but she’ll have to sneak out before Ludwig finds out.
Available Menu: Meat Delicacy or Mushroom (w/spices, spinach, chives), Lasagna (w/spices, spinach, chives), Steak or Fish (w/spices, spinach, chives), Cake, Pie, Wine, Sparkling Water, Champagne, Orange Juice
Special Task: Time to Pack
- Time to Pack- Francois will show up with their suitcase, but uh-oh! The clothes are scattered all over the place. Find all five articles of clothing. Once the clothes have been found, Emily will need to pack the suitcase. There’s a scale of 100 she will have to fill, and sometimes the customers will be really relentless, so use every moment of spare time, even if it’s just a fraction of a second, to pack. Every little bit counts!

- The Mouse- The last TV studio mouse will pop up behind the right plant at the bottom of the screen.
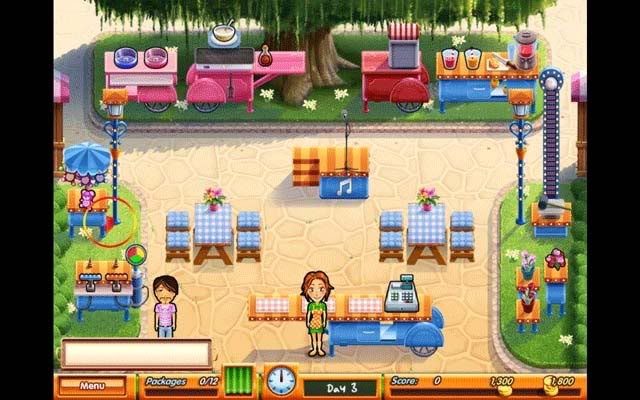
Emily and Francois arrive at the fair, but no one’s there! Maggie, the mayor, shows up and tells Emily because of cutbacks, no one could be hired to operate the stands. Emily volunteers.
Available Menu: Pink Cotton Candy, Pink Lemonade, Orange Juice, Teddy Bear, Flowers
Special Task: None
- The Fair- The fair is very different from the various shops and restaurants! In addition to food, customers can order items as well, such as teddy bears or flowers. Cotton Candy is a popular item with a little secret: every single one can give you a bonus! Simply click when the cotton candy is at its largest (second growth). Taking that little extra time to make a larger snack is the key to getting high scores with ease on this level.
- Your Cleaner- Since Francois is with you, you already have an instant help when it comes to cleaning tables! Emily won’t have to clean them herself.
- Mystery Ding- This is a special trophy you can unlock if you’ve purchased the Hit-the-Pole mentioned just below. Click on it until Emily scores the highest, and you’ll earn your mysterious trophy.
- Three Times the Charm- You can now ring out customers in a combo of three if you time things right!
- -The Mouse- The mouse will be hiding behind the middle empty cart in the background just to the right of the tree.
Bonus: Snuggford Fair: Shop
There are six available upgrades for the Snuggford Fairgrounds; they’re as follows:
- Flowers -Price 200- Increases patience of line customers
- Tables and Chairs -Price 300- Increases patience of table customers
- Themed Carts -Price 400- Decreases preparation time
- Lantern -Price 400- One extra customers shows up after closing
- Hit-the-Pole -Price 200- Bonus pay: customers will pay to hit it
- Classic Carts -Price 500- Decreases preparation time
The first upgrade you should purchase is Hit-the-Pole, which will bring in a lot of bonus cash. After that, buy items that decrease your preparation time.
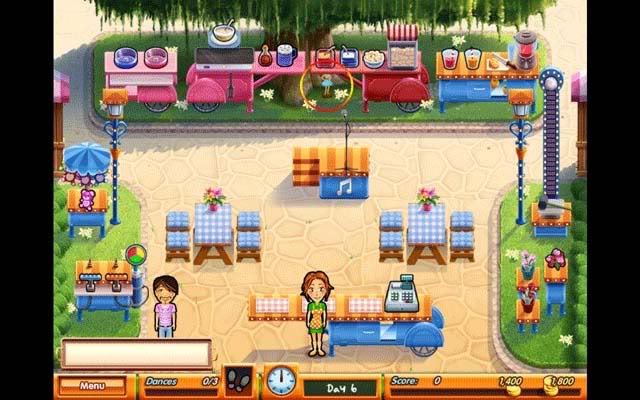
Snuggford Fair – Day 2
The fair’s been going really well: too well! Emily’s going to have to figure out a way to raise more money so the fair can keep going!
Available Menu: Pink or Blue Cotton Candy, Pink Lemonade, Orange Juice, Teddy Bear, Flowers, Blue Heart Balloon
Special Task: Fundraiser Singing
- Blue Cotton Candy and Heart Balloons- There’s now an option for blue cotton candy in addition to pink: remember, bigger is better! There are also blue heart balloons available now. Click on the lever and watch the gauge. When the needle lands on the green, click again to get a balloon for the customer!
- Fundraiser Singing- Emily’s going to have to sing to earn more money to keep the fair going. Every spare moment you’ve got, click on the center stage, and Emily will sing. The goal is 1500. Reaching it will result in the fair being able to stay open until next week, so it’s important to reach your goal! The progress towards the goal increases in intervals of 25.
- The Mouse- Today’s mouse will pop up at the top of the blue umbrella at the teddy bear cart stand.
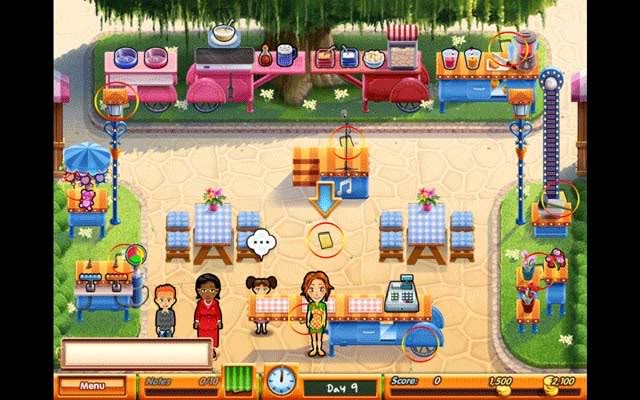
Snuggford Fair – Day 3
The fair’s going to have fireworks! Emily will be accepting the packages today.
Available Menu: Pink or Blue Cotton Candy, Pancakes w/syrup, Pink Lemonade, Orange Juice, Teddy Bear, Flowers, Blue Heart Balloon, Orange Flower Balloon
Special Task: Picking up Fireworks
- Pancakes- The newest edible item on the menu. To make a pancake, click on the batter. Once the pancake is done cooking, you’ll hear a "ding!" sound. Click on the finished pancake and then on the syrup topping to finish it for the customer! If something else has been ordered with the pancake, say a pink lemonade, click on the pancake batter and then get the pink lemonade while the pancake is cooking: you will be back in time before it burns. Apply this strategy to make better use of your time.
- Orange Flower Balloon- This is just like the blue heart balloon: click on the orange lever this time, and when the needle on the gauge lands on the green, click again and you’ve got yourself a balloon!
- Open Stage- The stage Emily sang on the day before is now open to the public: this is your form of entertaining customers for this level. When someone sings, customers moods won’t get any worse and will improve as a result. To have someone sing, just click on the podium. It’s a good idea to click on this often so that everyone always stays happy!
- Picking up Fireworks- The Postman will arrived to deliver packages of fireworks to you. Everytime he arrives, you’ll hear a little chime. Click on the Postman to collect the package: there are 12 total with a bonus of 25 for each package and an extra 100 at the very end when you collect them all.
- GameHouse Easter Egg- Look at the foot of the teddy bear stand, and you’ll notice something red. It’s a Super Collapse Block! It’s not just any Super Collapse block though, this one belongs to Super Collapse 4.
- The Mouse- The mouse for today will pop up behind the bowl of pancake batter. Be warned, it’s easily to accidentally click on the bowl of batter instead of the mouse, so don’t be too careless, or you’ll miss it!
Snuggford Fair – Day 4
There’s an eating contest at the fair today, and Betty and Elvis have come back as participants!
Available Menu: Pink or Blue Cotton Candy, Pancakes w/syrup or sugar, Popcorn w/sour cream (blue), Pink Lemonade, Orange Juice, Teddy Bear, Flowers, Blue Heart Balloon, Orange Flower Balloon
Special Task: Eating Contest
- Popcorn and Sugar Topping- Powdered sugar has been added as another topping for the pancakes now. Also being introduced to the fair is popcorn, a popular item! Click on the bowl of popcorn, and then the topping. This time, sour cream is in a blue container. When people order, they’ll order a blue box of popcorn, which means you should top it with the topping in the blue container. Popcorn is tricky though: there’s a large container of it next to the bowl that decreases with every popcorn served. Be sure to refill it when it gets empty or close to it by clicking on it, you wouldn’t want to run out of popcorn in a rush!
- Eating Contest- In order for the eating contest to progress, you’ll need to keep feeding them what they order when they order it! You will need to make all the items the contestants order (all sitting at one table) over the course of 5 1/2 minutes.
- The Mouse- The mouse for today will pop up at the top righthand corner of the eating contest sign.
Snuggford Far – Day 5
Ted has shown up in Snuggford with his cameraman, looking to tell Emily’s story.
Available Menu: Pink or Blue Cotton Candy, Pancakes w/syrup or sugar, Popcorn w/sour cream (blue) or butter (red), Pink Lemonade, Orange Juice, Teddy Bear, Flowers, Blue Heart Balloon, Orange Flower Balloon
Special Task: Emily’s Story
- Butter Topping- Now when people order a red popcorn, it means they want a butter topping. Click on the red container after clicking on the bowl of popcorn to make it. Don’t forget to keep the popcorn machine full!
- Emily’s Story- Emily agrees to point out various people she knows in Snuggford for Ted to interview. They are Mo and Tashi (+25), the Postman and Maggie (+25), and Charles and Matthew (+25 and final bonus). A chime will sound whenever one of these pairs enters the screen. They will move if you take too much time, so be sure not to miss them!
- The Mouse- Snuggford’s mouse of the day is hiding behind the top left table of flowers (pink tulips) in the bottom righthand corner of the screen.
Snuggford Fair – Day 6
It’s going to be a slow day at the fair today since most other people will be attending various other shows around town, so Francois had agreed to teach Emily this dance she’s been wanting to learn.
Available Menu: Pink or Blue Cotton Candy, Pancakes w/syrup or sugar, Popcorn w/sour cream (blue) or butter (red), Pink Lemonade, Orange Juice, Teddy Bear, Flowers, Blue Heart Balloon, Orange Flower Balloon
Special Task: Learn to Dance
- Learn to Dance- When things slow down a bit, Francois will take you aside to teach you a little dance. He will do this a total of three times. The actual dance step sequences are randomized and will be different for every gamer. There are three "step icons" you can click: purple, green, and blue. Remember the sequence in which they light up/move and repeat that sequence in clicks to earn 25 bonus points for each round. At the end, you’ll earn 100 extra big ones if you do it right!
- GameHouse Easter Egg- Look underneath the container of butter on the popcorn cart: there’s a little hula girl. Click on her to reveal the last of the GameHouse Easter Eggs: she’s a souvenir from Getaway Islands.
The Mouse- The mouse of today will pop up at the top of the balloon cart (no pun intended).
Snuggford Fair – Day 7
Francois brought a box of fireworks with him today. Emily tells him to set them by the lantern.
Available Menu: Pink or Blue Cotton Candy, Pancakes w/syrup or sugar, Popcorn w/sour cream (blue) or butter (red), Pink Lemonade, Orange Juice, Teddy Bear, Flowers, Blue Heart Balloon, Orange Flower Balloon
Special Task: Save Francois
- Save Francois- This task won’t happen until after you’ve served your last customer. A troublesome kid will light the fireworks, and they’ll blow up in Francois’ face. Emily will have to try and resuscitate him. You’ll need to do this six times: when the needle lands in the green, click. Do this until the meter is down to zero.
- The Mouse- The mouse for today is hiding behind the corner of the blue cotton candy maker.
Snuggford Fair – Day 8
With Francois in the hospital, who’s going to clean the tables now…?
Available Menu: Pink or Blue Cotton Candy, Pancakes w/syrup or sugar, Popcorn w/sour cream (blue) or butter (red), Pink Lemonade, Orange Juice, Teddy Bear, Flowers, Blue Heart Balloon, Orange Flower Balloon
Special Task: Confront the Troublemaker
- Confront the Troublemaker- The kid who set off the fireworks will walk into the fair and ask if you’re angry with him. If you say "yes", you’ll have to chase him down numerous times. If you say "no", you get an instant bonus of 500. Either way, once you’re done talking with him/chasing him, he’ll apologize and offer to help clean tables. No need to panic about Francois being gone now!
- The Mouse- Today’s mouse will pop up behind the decorative flowers on the table on the left.
Snuggford Fair – Day 9
The Mayor has accidentally dropped all her notes, and she has a speech to give at the end of the day!
Available Menu: Pink or Blue Cotton Candy, Pancakes w/syrup or sugar, Popcorn w/sour cream (blue) or butter (red), Pink Lemonade, Orange Juice, Teddy Bear, Flowers, Blue Heart Balloon, Orange Flower Balloon
Special Task: Find the Notes
- Find the Notes- The mayor’s notes are scattered everywhere! This is a very hard batch to find, because people standing in line can completely obscure your view! Here’s the location of all 10 notes. If you miss a few though, don’t worry, the day will progress and you won’t have to replay it.
- The Mouse- The mouse of today is going to pop up at the top of your tray where items are held. It’s not a hard one to spot.
Snuggford Fair – Day 10
It’s the day of the fireworks! The mayor asks Emily if she’ll set them up.
Available Menu: Pink or Blue Cotton Candy, Pancakes w/syrup or sugar, Popcorn w/sour cream (blue) or butter (red), Pink Lemonade, Orange Juice, Teddy Bear, Flowers, Blue Heart Balloon, Orange Flower Balloon
Special Task: Set up the Fireworks
- Set up the Fireworks- There are four stands of fireworks. Immediately click on one to have Emily set it up: if you do this immediately upon opening, one stand will already be completely finished by the time your first customer orders. Throughout the day, whenever you have a spare moment, work on the 4 batches of fireworks. You’ll get a 100 bonus at the end for your hard work.
- The Mouse- The final mouse of the game will pop up behind the second batch of fireworks from the left. People walking by may obscure him, so look carefully. If you’ve gotten every other mouse up until this point, you’ll have unlocked the Rat Pack firework!
At the end of the day are the fireworks, boasting all your achievements! At the end, Francois suggests it’s about time that Emily found herself a man. To be continued…
There is a hidden mouse for each day of every level, making a total of 50 hidden mice. For those of you who need a visual on where exactly the mice are hidden, you can find it here:
1. Betty’s Drive Thru (Days 1-10)
2. Mo’s Farm (Days 1-10)
3. Charles’ Candy Shop (Days 1-10)
4. The TV Studio (Days 1-10)
5. Snuggford Fair (Days 1-10)
In Delicious: Emily’s Taste of Fame there are a total of 10 GameHouse easter eggs hidden. The following is a list of what they are, what game they’re from, and on what day in what restaurant they can be found. Refer to the guide above for screenshots of the specific item on the specific day mentioned.
1. Betty’s Drive Thru, Day 4: Uncle Antonio, Delicious 2
2. Betty’s Drive Thru, Day 7: Bugs (humorous)
3. Mo’s Farm, Day 5: Hookman’s Hook, Campfire Legends
4. Mo’s Farm, Day 7: Easter Egg (humorous)
5. Mo’s Farm, Day 9: Emily’s Tea Garden Sign, Delicious: Emily’s Tea Garden
6. Charles’ Candy Shop, Day 5: Coconut, Marooned
7. Charles’ Candy Shop, Day 8: Old Typewriter, Delicious
8. The TV Studio, Day 1: Film Roll, Sunset Studio 2
9. Snuggford Fair, Day 3: Super Collapse Block, Super Collapse 4
10. Snuggford Fair, Day 6: Hula Girl Souvenir, Getaway Islands
There are approximately 18 unlockable fireworks/trophies in the game. The following is a list of what they are and what you must do to unlock them. Acquired trophies can be viewed as fireworks at the end of the game or anytime following in the Trophies menu.
1. Closure Rocket: finish the entire game
2. Pretty Missile: buy all decorations for one restaurant
3. The Rat Pack: collect all 50 mice
4. The Happy Pill: handle the payment of 500 ecstatic customers
5. The Star: reach the TV studio
6. Break-an-Egg: pick up every egg in a single day
7. Preferred People Popper: serve 4 of the same customer types in a row
8. Bang-For-Your-Buck: make a total of 100,000 bucks
9. Show-Biz Burner: use your entertainer on every table customer during one day
10. The Chef’s Toolkit: make all the products of a restaurant in one day
11. Mystery Ding: wasted time by testing Emily’s strength and ringing the bell
12. Triple Cash Combo Blast: use the register to handle the payment of 3 customers at the same time
13. The Perfectionist: reach the expert score for every level
14. Get-Your-Hands-Dirty-BOMB: make a total of 2,500 products
15. The GameHouse Bang: find all 10 GameHouse objects
16. Rocket of Respect: watch the entire credits without skipping (after finishing the game)
17. The Panda: Burn those shoes and walk 150 miles
18. The Fat Lady: Get all 17 other pieces of firework
“;

More articles...
-
Best Horror Games On Itch.io – July 2026
Across a bounty of subgenres. -
Haze Seas Accessories Tier List [Best Accessories to Equip]
The accessories with the best stat buffs in Haze Seas.