- Wondering how to get Monopoly GO! free rolls? Well, you’ve come to the right place. In this guide, we provide you with a bunch of tips and tricks to get some free rolls for the hit new mobile game. We’ll …
Best Roblox Horror Games to Play Right Now – Updated Weekly
By Adele Wilson
Our Best Roblox Horror Games guide features the scariest and most creative experiences to play right now on the platform!The BEST Roblox Games of The Week – Games You Need To Play!
By Sho Roberts
Our feature shares our pick for the Best Roblox Games of the week! With our feature, we guarantee you'll find something new to play!All Grades in Type Soul – Each Race Explained
By Adele Wilson
Our All Grades in Type Soul guide lists every grade in the game for all races, including how to increase your grade quickly!
Delaware St. John: The Town with No Name Walkthrough
Welcome to Gamezebo's walkthrough for Delaware St. John: The Town With No Name. Before starting the game, you can play through the tutorial to get a better understanding of how the game works if it is your first time playing. The tutorial mostly explains how to use the VIC, or the Voice Imagery Communicator. Throughout the game, Delaware will experience various types of paranormal activity and may be required to record strange sounds or take pictures to be sent back to his partner Kelly…
a:1:i:0;a:2:s:13:”section_title”;s:52:”Delaware St. John: The Town with No Name Walkthrough”;s:12:”section_body”;s:28374:”
Welcome to Gamezebo’s walkthrough for Delaware St. John: The Town With No Name.
Before starting the game, you can play through the tutorial to get a better understanding of how the game works if it is your first time playing. The tutorial mostly explains how to use the VIC, or the Voice Imagery Communicator. Throughout the game, Delaware will experience various types of paranormal activity and may be required to record strange sounds or take pictures to be sent back to his partner Kelly for further analysis.
After completing the tutorial, launch a new game and let’s start with the first story, The Big Picture.
Story 1: The Big Picture
While working at the book store, Delaware happens across an old atlas that he’s seemingly drawn to after it had fallen off a shelf. A mysterious map appears on one of the pages, but it doesn’t seem to be on any regular map. Delaware sets out to its location to find himself in the middle of the woods.
He finds an abandoned road that has slowly being taken over by nature and upon further investigation, the road leads him to an abandoned town.
From where Delaware enters the town, follow the street down until you reach the movie theater. Lurking in the shadows nearby, something is keeping its eye on Delaware as he tries to find a way into the theater.
Walk up to the ticket booth and Delaware will experience a vision of a skeleton usher handing him a ticket. As the apparition vanishes, the ticket is left behind. Pick up the ticket and let’s try to find a way inside.
The front doors are locked, so let’s head around the side of the building and try the side exit. That door is locked too and the only other option is the fire escape that’s just out of reach. Walk out of the alley to see a dumpster across the street, maybe that will have something we can use.
When you open the dumpster, you will find a broken umbrella sitting inside. Pick it up and then go back to use it to pull down the ladder on the fire escape. Climb up the ladder to the second floor of the theater and open the window to head inside.
You’ll see a desk with a name card that says ‘Charles Epps’ on it. When you open the drawer, you’ll find a termination notice for an employee named Josh Martin. Apparently he was fired for having been displaying some erratic behavior. As you attempt to leave, the flashlight goes dead and Delaware will see the ghost of Charles Epps appear seated at his desk. Charles rants on about kids on how everything with them is about sex and drugs.
As Delaware reports to Kelly, she suggests that there is a theory that when ghosts manifest, they do so by drawing energy from any nearby sources, including Delaware’s flashlight and that’s why it goes out every time a ghost appears.
Exit through the door and you’ll realize that the only other accessible room on this floor is a storage room around the corner. As Delaware approaches it, the door slams shut and he’ll overhear an argument between Josh Martin and Charles Epps.
Head back the way you came and walk past the office door to the stairwell. Follow the stairs down to enter the main floor. As Delaware explores his surroundings, he’ll be interrupted by Kelly on the VIC. It turns out their friend Simon is now with her and he’s willing to help out with Delaware’s investigation.
When Delaware tries to open the door leading into the service room, he’ll hear a woman crying from inside the room. The door is locked, so we’ll have to try to find the key for it. As Delaware walks towards the concession stand, he’ll see a ghostly conversation between Josh and a girl he’s interested in, Jenny. Look at the note posted to the side of the register to learn that the key for the service room is in the register, and that the door is not to be opened unless absolutely necessary.
Look at the note on the refrigerator to learn how to open the register. Look at the register and you’ll see several keys. To open the drawer, turn the crank once and then turn the B & D keys near the lower left corner once before turning the crank again. Once successful, the drawer will pop open and Delaware can take the key hidden inside.
Use the key to unlock the door to the service room to find a couple of lockers. When Delaware opens the first locker, there is nothing to be found inside. However, when he closes the door, the flashlight goes out and the ghost of Jenny appears inside. You can ask her whatever you want, but if you ask her for her name, Kelly will be able to do some research and speed things up a bit.
After the ghost has disappeared, open up the other locker and take the rubber glove found sitting on the top shelf. Return to the concession area and walk up the stairs on the other side of the room to reach the second floor where the restrooms are located.
Enter the men’s room in front of you and walk over to the stalls. Open the door and you’ll spot a key floating in the bowl. The water it’s sitting in is filthy, so Delaware won’t go anywhere near it. Use the rubber glove on it to pick it up and then leave the restroom.
Use the key to unlock the door to the women’s room and you’ll spot a badge sitting near the edge of the sink. Take it and go back downstairs to the first floor.
Walk over to the large double doors that lead into the seating area and use the badge to jimmy the lock. Open the door and as you enter, you’ll see Charles’ ghost appear to quiet an unseen audience.
Attempt to open the emergency exit to the right of the movie screen to find that it won’t open. As Delaware heads back out of the room, the sounds of the audience are heard and you’ll spot a ghost sitting up in the balcony.
NOTE: As you wander around in the seating area, you may hear a sound that sounds like a bug flying too close to your ear. I tried to record it to have Kelly tell me what it was, with no success. If the sound is able to be identified by Kelly and someone has more success than I did at recording it, please let me know.
Before Delaware can head up to see who it is, the VIC cuts in with Kelly and Simon explaining more about the town, including the fact that its name is Winter Haven. They explain that a police report was filed for two missing teenagers, Josh Martin and Jenny Miller. According to the testimony of one Charles Epps, he said that Josh was becoming aggressive and thought that he harmed Jenny. Delaware doesn’t believe that is the case, but we’ll have to continue on with the investigation to find out for sure.
Return upstairs and continue past the restrooms to find the door leading to the balcony. As Delaware attempts to open the door, the ghost of a woman named Barbara appears and tells him that no one is allowed on the balcony. She then reappears at her podium, trying to figure out a crossword puzzle. Delaware offers to help her in exchange for access to the balcony, to which Barbara agrees.
Look at the podium to see the crossword puzzle she’s working on and you’ll notice that she’s having trouble figuring out a couple of clues. The first clue is "1 Across: When you don’t want to be recognized". The answer is Costume, so punch in the missing letters using the alphabet that has appeared across the top of the screen.
The second clue is "2 Down: Unsubstantiated gossip", to which the answer is Rumor. Punch in the missing letters and Barbara will allow Delaware to go out onto the balcony.
Turn left and walk down the aisle to see the ghost of a nun appear. Her name is Mother Helena and she’s upset with what has happened to Winter Haven. Apparently Charles Epps set out to create a "godly" village until the degenerates decided to move in. They were warned that the Cleansing would be coming, but apparently none of them listened to her. Delaware’s next on the list, and to prove the point, you’ll hear the sound of a growl coming from somewhere.
Time is of the essence, so you’ll have to hightail it back to Charles Epps’ office before the Hunter appears and kills Delaware. If you fail to make it back in time, the screen blackens and you’ll have to start over from where Delaware was finishing up his conversation with Mother Helena.
I’ve never played the first game, so I don’t know what happened there, but after Delaware makes it back to the office Kelly comes over the VIC and Delaware tells her that the Hunter didn’t fall for the protected room trick as it did in the last game.
The Hunter is gone for now, so leave the office and return to the theater balcony. When Delaware arrives, the projector will turn on by itself and display the message "knock knock knock". Rather than stand around and ponder what it means, it means that in order to gain access to the storage room that had the door close on Delaware, he has to knock three times to be let into the room. Before leaving, turn left and look at the seat near where Delaware is standing to find a quarter that he should pick up.
NOTE: As you wander around by the balcony doors, you may spot the shadow of a female body on the wall just before you round the corner to the balcony door. I missed out on taking a photo of it, but I thought you should be aware of it in case you run across it too.
Go to the storage room near Charles Epps’ office and knock on the door three times. The door will open, allowing Delaware to check out what’s inside. As you look down the rows of projection reels, the ghost of Josh will appear slumped against the wall. His only concern at the moment is Jenny’s well-being, so we’ll have to find a way to assure him that she’s okay.
Return to where Jenny is staying in the utility room and Delaware will ask to record her voice to reassure Josh. Press the Record button on the VIC and Jenny will record a message. Go back to play it for Josh and he’ll feel better knowing that she is okay. As you turn around to leave, Josh will appear at the door to the projection room and unlock it.
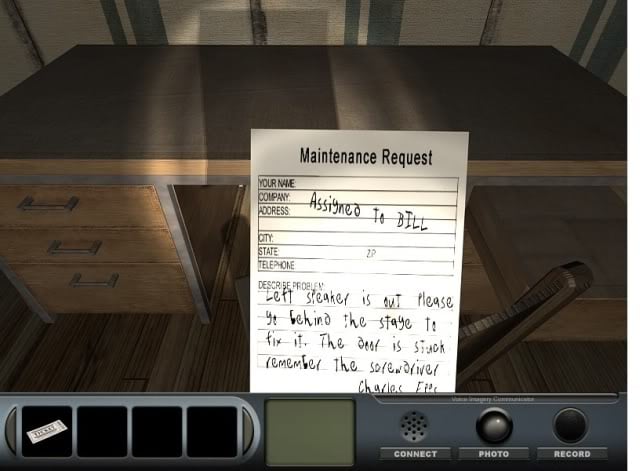
Enter the newly unlocked projection room and rummage through the desk to the left of the door. In the top right drawer, you’ll find a maintenance request.

The left speaker appears to be out and there’s a stuck door that requires the use of a screwdriver to open. You can find the screwdriver in the bottom left drawer of the desk. Before leaving, look at the projector to see a shovel leaning against the wall near it and take it along for the ride.
Head downstairs to the theater and look at the arcade machine next to the doors leading to the seating area. The machine will suddenly come alive, but you’ll have to use the quarter to play the game.
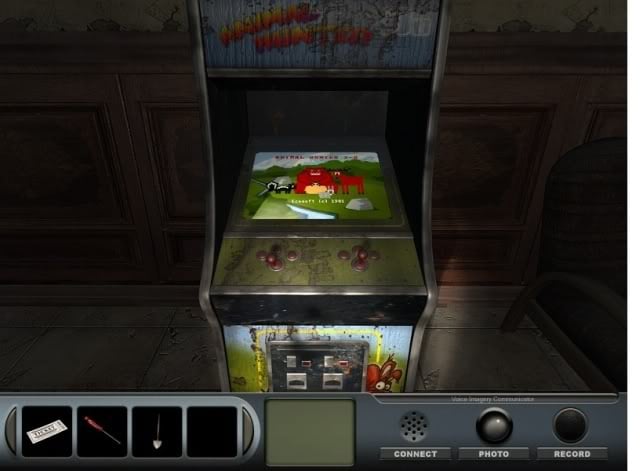
As explained by the game, the goal is to shoot the highest valued animal on the screen and the more there are of one animal, the better the value. Here’s how the animals are scored:
Deer – 100 points
Rabbit – 50 points
Skunk – 20 points
Bear – 10 points
Be sure to add up the total value for each animal that appears on the screen before shooting it. For example, if there’s a deer and a skunk on the screen, you’ll want to shoot the deer because it’s worth more than the skunk. However, if there were two deer and six skunk, you’ll want to shoot the skunk instead.
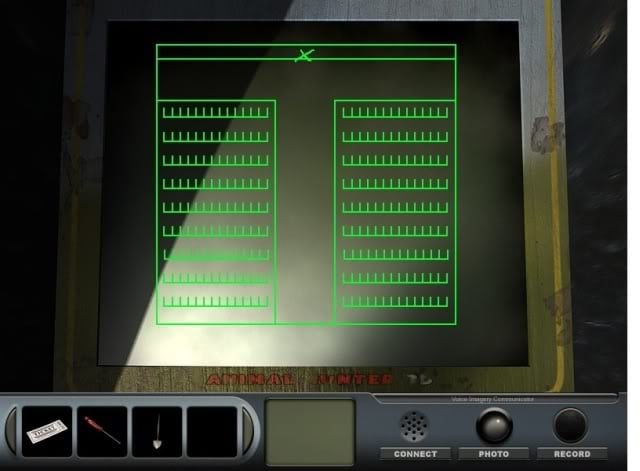
Once you’ve won the game, you’ll be treated to a view of the map of the theater. Click on the X near the center to hear Delaware’s comments before heading into the seating area once again.
Walk down to the center of the stage and look at the panel in front of you to see that it’s loose. Use the screwdriver to pry it open and Delaware will uncover a hidden passage.
As Delaware enters the passage, the ghost of Charles Epps will appear and it will start ranting about children and their moral ethics again. It’ll then turn around and focus its attention on Delaware. Since Delaware isn’t technically a trespasser, the ghost asks for his ticket instead. Give him the ticket and the ghost will eventually disappear. Walk over to the spot where the ghost initially appeared and use the shovel to dig up the dirt to uncover a couple of skeletons. They belong to Josh and Jenny, so take a picture of them before turning around to leave.
Josh and Jenny will appear and thank Delaware for his help in allowing them to finally rest. Jenny tells Delaware to go to the emergency exit, which he should do after they disappear. You’ll find that the door is unlocked and once opened, Barbara’s ghost appears and tells him what happened. Apparently Barbara was killed after she witnessed Charles killing Josh and Jenny.
Continue up the stairs and head out of the alley to find yourself in front of an orphanage. Delaware tells Kelly that he feels like he’s been there before, but that story is better saved for another time.
Start a new game and let’s continue on with:
Story 2: Home of the Damned
You’ll find Delaware where we left him at the conclusion of the first story, standing in front of the orphanage that he believes he’s been to before. Let’s not stand around any longer and let’s head inside to check the place out.
As soon as Delaware enters the orphanage, the door slams shut behind him as Mother Helena’s cackling echoes throughout the building. Head into the main room and enter the first door to the left to find Mother Helena’s bedroom.
Look on her desk to find a letter addressed to her from Charles Epps. Read it and pick up the key lying next to it. As you continue to look around the room, you’ll see a dresser near the door with its bottom drawer partially opened. Open it all the way to find a diary. Read the few entries that it contains and then leave the room. Mother Helena will appear in the middle of the doorway and threatens Delaware before vanishing.
Take the stairs to the right of the door up to the second floor and walk down the hallway until you reach one that connects the two second floor corridors. Turn right and use the key from Mother Helena’s room to unlock the double doors and enter the art room.
The flashlight will go out as you walk around the corner to the back of the room. The ghost of a boy named Tommy Jarvis will appear and say that he was made to sit in a corner until he decides to color with the rest of the kids. Delaware will agree to help him and now you’ll have to find the five crayons needed to color in his picture.
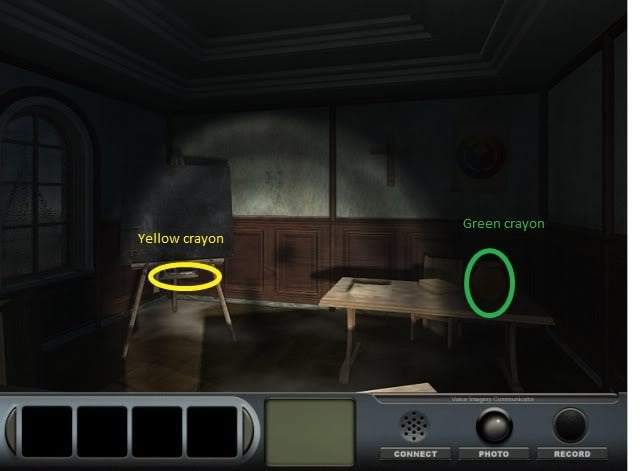
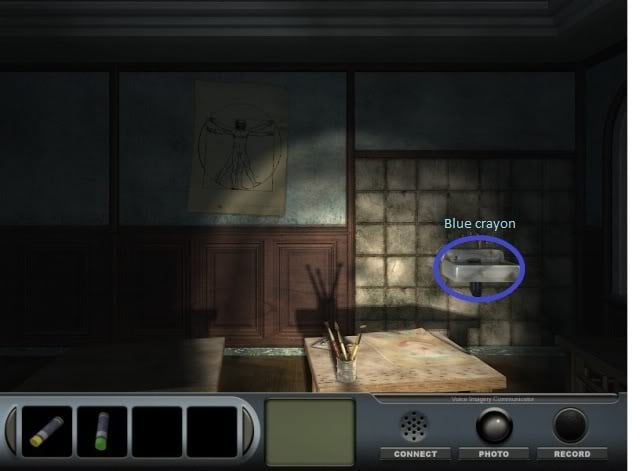
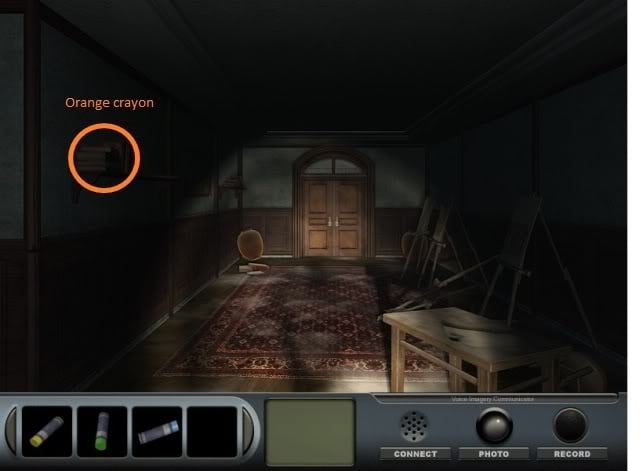
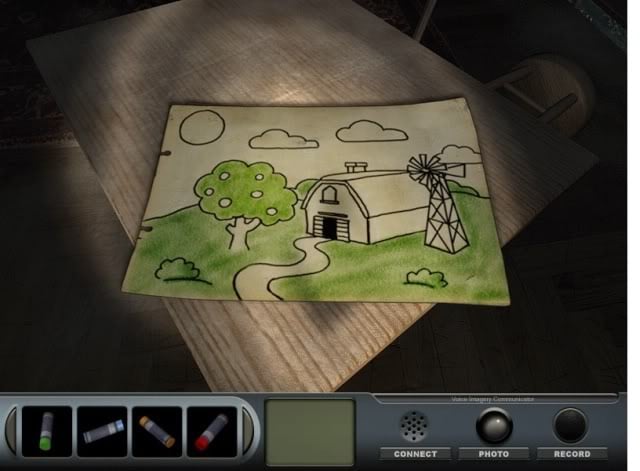
The uncolored picture is sitting atop one of the desks near the front of the room. When you look at it, it depicts a barnyard setting. The crayons can be found in the following locations:
Yellow crayon – in the tray at the bottom of the easel near Tommy’s table
Green crayon – hiding behind the vase on Tommy’s table
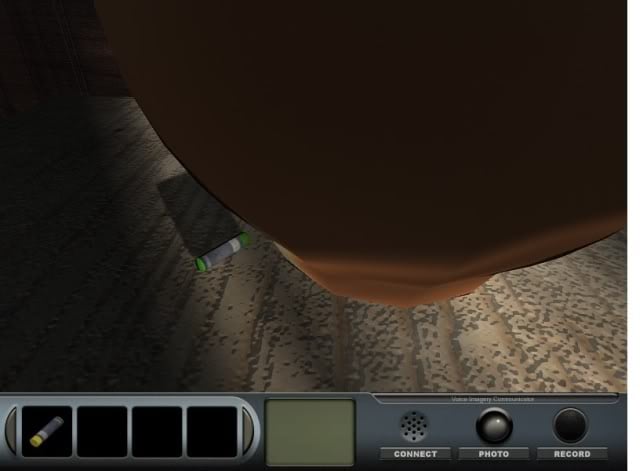
Blue crayon – in the sink behind you
Orange crayon – on the shelf opposite the uncolored drawing
Red crayon – on the shelf to the left of the door
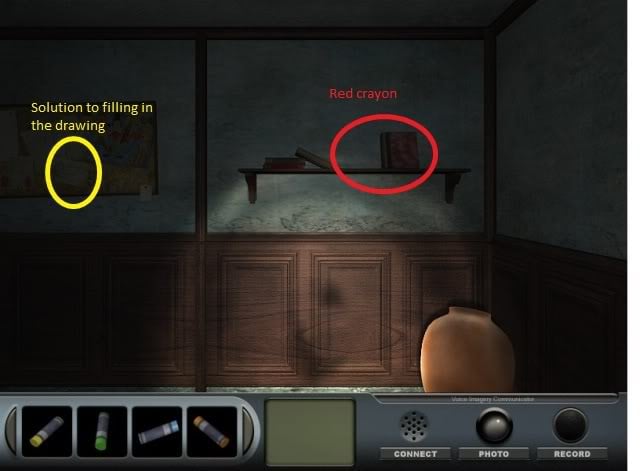
Once you have picked up all the crayons, you can find the instructions to filling in the drawing on the bulletin board near the shelf that hid the red crayon.
"A foundation of Green then anything Blue
Enough Red to color an apple or two
Finish it off with a big Yellow sun
Add a splash of Orange and your drawing is done!"
Use the green crayon on the tree or grass to fill them in.
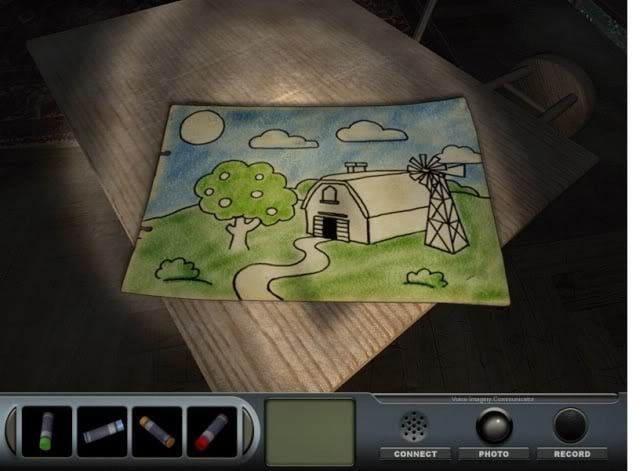
Use the blue crayon to fill in the color of the sky.
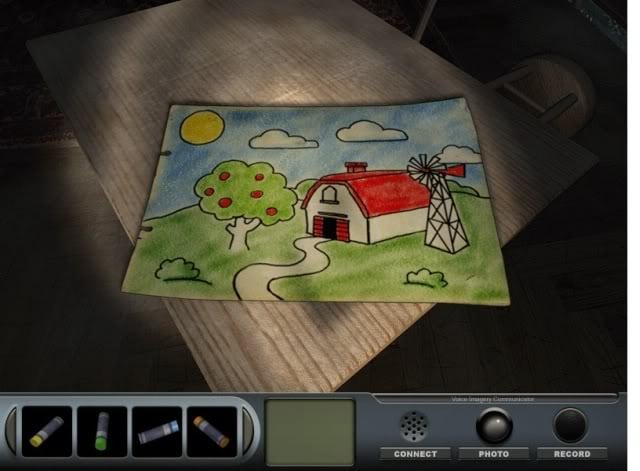
Use the red crayon on the barn to fill in a couple of apples on the tree as well as the roof of the barn.

Use the yellow crayon to color in the sun.
Lastly, use the orange crayon to fill in the barn itself. Once you’re finished and Tommy is pleased with Delaware’s work, he rewards him with a map of the first floor with an X marked on one of the rooms.
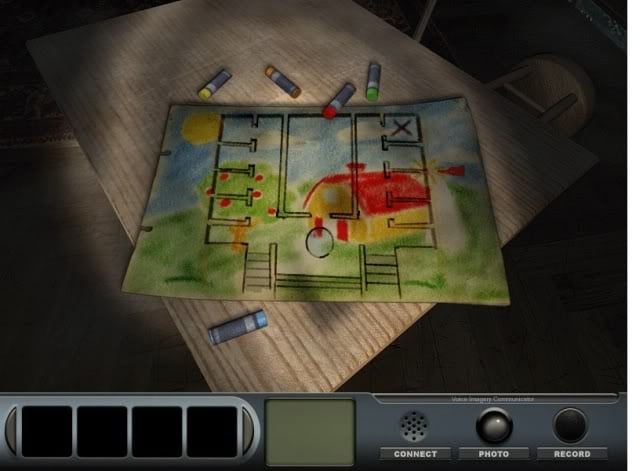
Proceed to the room that was marked on the map to see that the door leading into it is rotting. The door is locked, but the door can be bashed open by using the Hit icon when it appears.
When you enter the room, there’s nothing of interest other than the diary lying underneath the bed. Read it to gain another clue for Delaware’s investigation, meaning he now has to check out the second floor to see how bad of a shape it’s really in.
Head up to the second floor using the stairs at the beginning of the hallway and as you walk along the right side of the second floor hall, you’ll see that there is a hole in the floor with no way to cross to the other side. Head back to the stairs and walk up to the third floor and you’ll see the same thing in the same location. However, open the door just before the hole and walk inside. You’ll see that the door leading into the bathroom can be knocked off its hinges. Take the door and head back down to the second floor.
Use the door to create a bridge over the hole and walk over it to enter the bedroom. When you open the closet, a ghost of a little girl named Nancy Thompson appears and tells Delaware that she was made to be in the closet by Mother Helena. While Delaware offers her some light, she would prefer to have her lantern working again, which simply needs new batteries to make it work again.
Head back downstairs to the first floor and enter the kitchen, which can be found by heading down the hallway behind the statue in the middle of the room and through the last door on the left.
As Delaware enters the kitchen, the phone sitting on the nearby counter will begin to ring. As he answers it, he hears nothing but the sound of someone coughing. After he hangs up, rummage through the cupboard next to the door to find a couple of batteries in one of the drawers.
Take the batteries up to Nancy’s room and put them in her lantern. She’ll reappear and thank Delaware for the assistance. As you leave the room and head back toward the stairs, you’ll hear the sound of someone walking on the floor above and closing a door.
Follow the sound up to the third floor and walk down to the connecting hallway. Open the double doors to the library to realize that whoever was here previously unlocked them for you.
As you look through the shelves in the back of the room on the right side, you’ll find a page from a diary suspecting that Mother Helena is a part of some sinister plot. When you look at the books on the table behind you, Tommy will reappear and tell Delaware that Mother Helena wants to sort the books into two groups after he was caught looking at one of Helena’s books without permission. Kids’ books go into a pile on the left side of the table, while adult books go on the right.
Pick up the first book and click on the appropriate side of the table to place it in the pile. Here’s a list to help you out:
Adult Books:
– Punishment Made Easy
– Global Warming: Why Should You Care?
– Schizophrenia and You
– Get Rich Yesterday: A Do-It-Yourself Guide to Becoming a Millionaire
– Inherent Evil: The Novel
– It Was the Maid! – A Murder Mystery
– Spells, Occult, and Rituals: Second Edition
Kids Books:
– Let’s Talk About the Alphabet
– The Kids’ Guide to Churning Your Own Butter!
– The Safety Book For Kids
– Let’s Count to 11!
– My First Book of Diseases – Children’s Edition
When you come across the spell book at the bottom of the pile, open it to read more about the Hunter and now Delaware will have to find the spell room where the Hunter was initially summoned.
It’s after Delaware finishes reading the book that Kelly comes over the VIC to share the same information that he just learned. After they’re done discussing the next step in the investigation, leave the library only to take a peek over the balcony and see the ghost of a nun walking down one of the hallways on the first floor.
Return to the first floor and walk down the hallway where Mother Helena’s room is located. Instead of entering her room, go into the room two doors down on the left. You’ll hear a ghost calling Delaware’s name, but ignore it for now. You’ll see the covers on the bed pulled back and something sticking out from underneath the pillow.
Pick it up to see it is a letter addressed to a Sister Hazel from a Sister Grace. It explains the feeling that Delaware had of having been at the orphanage before, it’s because he has been at the orphanage before. He is being used for some sort of ritual that involves his death. Take a picture of the letter to send it to Kelly and then she along with Simon will attempt to persuade Delaware to leave while he still can, but Delaware wants to put an end to Mother Helena’s shenanigans. As they talk, Mother Helena cuts off the transmission and threatens Delaware some more before the signal returns with Kelly wondering if Delaware is still there.
Once that’s done, return to the kitchen to hear the sound of a girl coughing. The phone will ring with a girl looking for her mom on the other end. Walk into the pantry and follow it down until you reach the end. It is here a ghost named Kirsty Cotten will appear. Talk to her for a bit and then you’ll hear that familiar, menacing growl again.
The Hunter is after Delaware once more so you’ll have to follow Kirsty to the nearest safe room. Quickly turn around and follow her out to the main area. Turn right at the statue and run up the stairs to the second floor. You’ll see her enter one of the rooms near the connecting hallway, but when Delaware attempts to open the door, he finds that it’s locked.
The Hunter will catch up to Delaware at this point, so now you’ll have to follow Kirsty up to the third floor. Turn around and run down the connecting hallway and run up the stairs to the third floor.
You’ll see Kirsty enter a room with a rotting door on the right. Dive through the door and the Hunter will disappear. Delaware tries to find out from Kirsty where the secret room is located, but she has no clue. Just then, she introduces him to a ghost named Ashley, who claims to know the location of the secret room. However, he’s too afraid to leave due to the Hunter lurking around, and he’ll only go out if Delaware can find his stuffed dinosaur, Rex.
Leave the room and go to Mother Helena’s room. You can find the stuffed dinosaur lying in a corner on the other side of the bed. Take it and return it to its rightful owner. When Ashley leaves to show Delaware to the secret room, follow him down to the first floor and enter the middle hallway where the kitchen is located. The secret room is on the right side and when you open the door, you’ll see that it leads into a washroom.
After you enter the room, turn around and move the painting near the door to find the spell that had given life to the Hunter. Take a picture of it and Simon tells Delaware that he has to destroy it without removing the plate it’s resting on.
Return to the kitchen pantry and go back to where Kirsty first appeared. Kirsty tells Delaware that a book of matches can be found lying under the bag of flour on the shelf to the left of where he’s standing.
Pick up the matches and go back to burn the spell. As you leave the room, however, Mother Helena appears wielding a nasty hatchet. Your path will also be blocked by the Hunter and Charles Epps, leaving the front door as your only means of escape. When you try the front door, however, all three ghosts appear and they’re ready to finish what they started 20 years ago. Before they can off Delaware, the ghosts that he’s helped appear and drive them off for good.
Leave the orphanage and Delaware, Kelly, and Simon will reflect on what has happened. The game closes when Delaware asks Kelly to find out what happened to his parents.
Congratulations! You’ve finished the Town With No Name!
“;
More articles...
Monopoly GO! Free Rolls – Links For Free Dice
By Glen Fox
Wondering how to get Monopoly GO! free rolls? Well, you’ve come to the right place. In this guide, we provide you with a bunch of tips and tricks to get some free rolls for the hit new mobile game. We’ll …Best Roblox Horror Games to Play Right Now – Updated Weekly
By Adele Wilson
Our Best Roblox Horror Games guide features the scariest and most creative experiences to play right now on the platform!The BEST Roblox Games of The Week – Games You Need To Play!
By Sho Roberts
Our feature shares our pick for the Best Roblox Games of the week! With our feature, we guarantee you'll find something new to play!All Grades in Type Soul – Each Race Explained
By Adele Wilson
Our All Grades in Type Soul guide lists every grade in the game for all races, including how to increase your grade quickly!


