- Wondering how to get Monopoly GO! free rolls? Well, you’ve come to the right place. In this guide, we provide you with a bunch of tips and tricks to get some free rolls for the hit new mobile game. We’ll …
Best Roblox Horror Games to Play Right Now – Updated Weekly
By Adele Wilson
Our Best Roblox Horror Games guide features the scariest and most creative experiences to play right now on the platform!The BEST Roblox Games of The Week – Games You Need To Play!
By Sho Roberts
Our feature shares our pick for the Best Roblox Games of the week! With our feature, we guarantee you'll find something new to play!All Grades in Type Soul – Each Race Explained
By Adele Wilson
Our All Grades in Type Soul guide lists every grade in the game for all races, including how to increase your grade quickly!
Death Under Tuscan Skies: A Dana Knightstone Novel Walkthrough
Welcome to the Death Under Tuscan Skies: A Dana Knightstone Novel walkthrough on Gamezebo. Death Under Tuscan Skies: A Dana Knightstone Novel is a hidden object/adventure game played on the PC created by Boomzap. This walkthrough includes tips and tricks, helpful hints, and a strategy guide to how to complete Death Under Tuscan Skies: A Dana Knightstone Novel.
Death Under Tuscan Skies: A Dana Knightstone Novel – Game Introduction
Welcome to the Death Under Tuscan Skies: A Dana Knightstone Novel walkthrough on Gamezebo. Death Under Tuscan Skies: A Dana Knightstone Novel is a hidden object/adventure game played on the PC created by Boomzap. This walkthrough includes tips and tricks, helpful hints, and a strategy guide to how to complete Death Under Tuscan Skies: A Dana Knightstone Novel.
How to Use this Walkthrough (Please read)
- This walkthrough is meant to be used as a guide to assist in solving mini-puzzles and acquiring all items in order to complete the game. You may explore locations in the order you wish, this walkthrough is written to take the most direct route to the game’s finish.
- Inventory objects will be written in bold. The walkthrough will state, “Use the inventory item on the blah blah,” because it assumes you have the item. If you don’t have the item, on your keyboard, press CTRL+F (at the same time). In the text box, type the name of the item you are looking for and press ENTER. This will scan this page for the appearance of that word.
Gameplay and Tips
- This is a hidden object adventure game. You will move from location to location solving hidden object hunts, mini-puzzles and picking up items to use in order to proceed in the game.
- There are two difficulty settings.
- Casual mode allows the Hint and Skip puzzles meters to fill faster and guidance is given.
- Advanced mode has a longer filling Hint and Skip meters no guidance is given.
- Move your cursor over every aspect of a scene to find everything.
- Achievements – From the main screen, click Achievements to see the achievements you can earn in the game.
- The Menu button at the bottom left of the screen will bring you back to the main screen.
- Items collected throughout the game go into your inventory, located at the bottom of your screen.
- Closing a window – To close the zoom-in windows, click anywhere outside of the window. Tip: If you can zoom in on the area again, you likely haven’t found everything you needed to find.
- Mini-puzzles can be skipped once the Skip button fills.
- In most cases, clicking Back in a mini-puzzle and returning to it will reset the puzzle.
- Hint system – Hints are available in the bottom right-hand of the screen.
- Hints used in the hidden object scenes will point out an object to be found.
- Hints used during the adventure mode will tell you what you should do next.
- Hidden object hunts provide either a list of items to find. The list will either be written or will provide images or silhouettes of what you need to find.
- Hidden object scenes are different each time you play. Hidden objects screenshots will only highlight (yellow circles) the items added to your inventory.
- Naming convention: When you hover your mouse over an area, its name will appear either above the cursor or the name of the object or action will appear at the top of the screen. This walkthrough will use that naming convention.
- Within the game, click Menu, then click How to Play for explanation on the game’s elements.
Chapter 1
- From the main screen, you may change the profile name or keep “Dana” (the default), then click Start Game to begin playing.
- Select the level of difficulty (explained above).
- Watch the cutscene.
- You are asked if you want to play the tutorial. It is highly recommended you play the tutorial, even if you are a veteran of these types of games. This way you know about all elements.

- Talk to Professor Romano. Click through the dialogue.
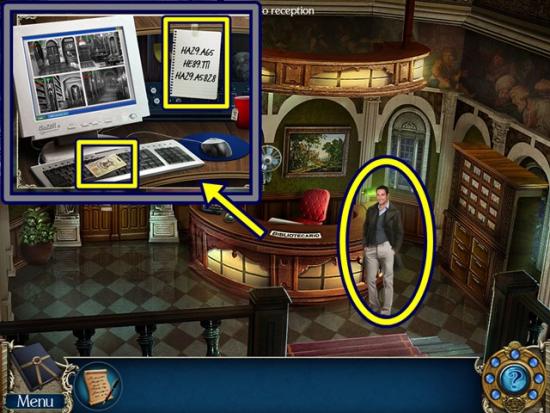
- Click on the desk. Take the list and the keycard. Click anywhere outside the window to close it.
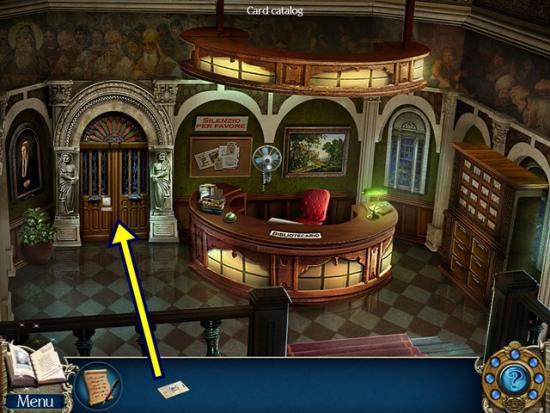
- Click on the door to the library balcony. Use the keycard, then take it back and go through the doorway.
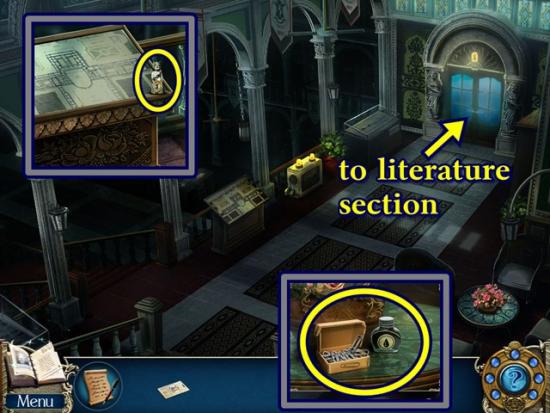
- Click on the table. Take the paper clip and the ink bottle. Click on the map. Take the human figurine (1/3). Click on the map to learn more. Click anywhere outside the window to close it.
- Click on the door to the literature section. Turn the handle, then go through the doorway.
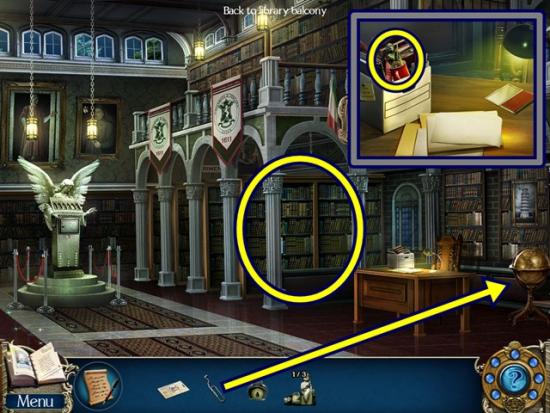
- Click on the globe. Pick the lock with the paper clip and take the human figurine (2/3). Click on the desk. Take the human figurine (3/3). Click on the bookshelf.
- Select the three books from the list you took from the reception desk. To find the list, click on your journal (bottom left corner). Click the left arrow to go back one page. Either take note of the three sets of numbers or memorize the first set, click anywhere outside the window to close the journal, select the book, then reopen the journal, memorize the next number, etc. Any books you’ve selected remain selected.
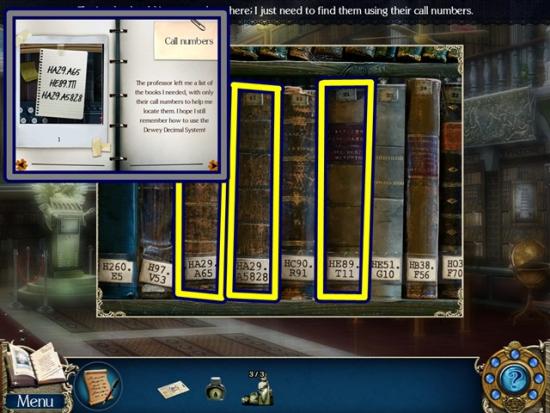
- Once you’ve selected the correct three books, take the handkerchief.
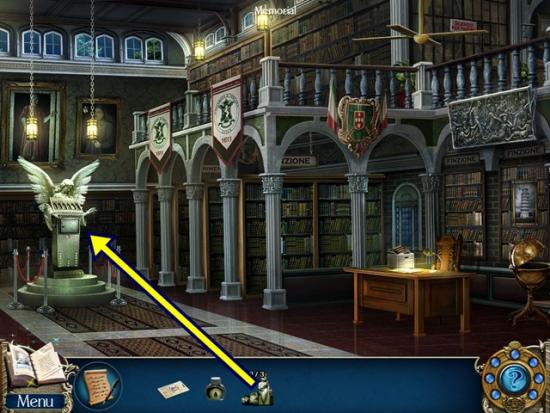
- Click on the memorial. Add the three human figurines. A mini-puzzle starts. Change each symbol on the shield so it matches the symbol above its figurine’s crown, then match the crown’s colour to the flower symbol below. Click on the shield to change its symbol and click on a crown to change its colour.
- Solution:
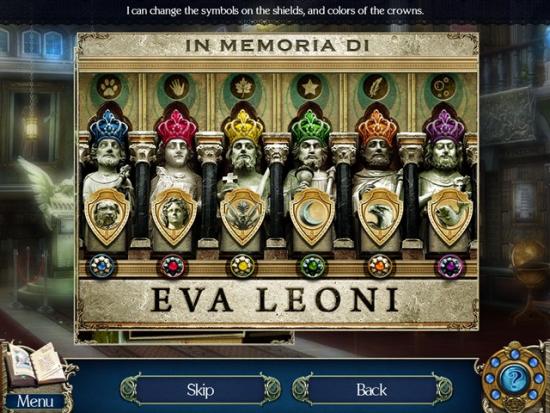
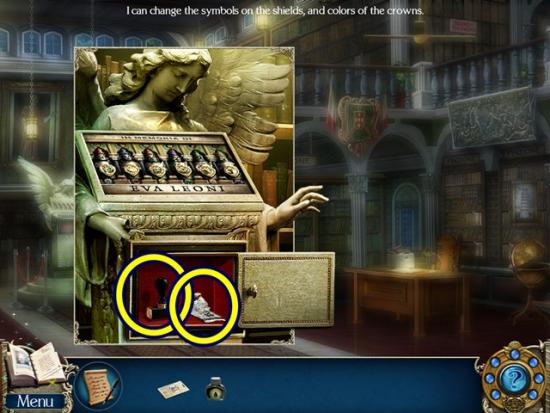
- When the panel opens, take the wooden stamp and the torn newspaper (1/3).
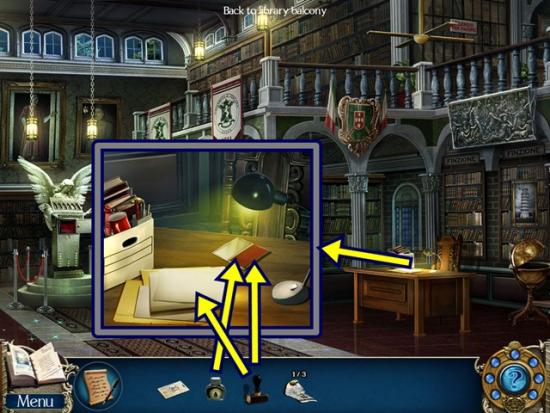
- Click on the desk. Pour the ink bottle on the ink pad. Press the wooden stamp onto the ink pad, then when it’s full of ink, use the wooden stamp with ink on the blank paper. Pick up the paper, then click on it. Professor Romano appears. Click through the dialogue. Return to the reception area.
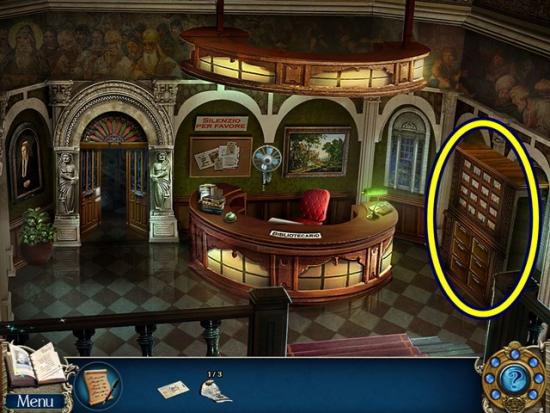
- Click on the card catalogue. A mini-puzzle starts. Rearrange the labels so they match the coloured tape already on the drawers.
- Solution:
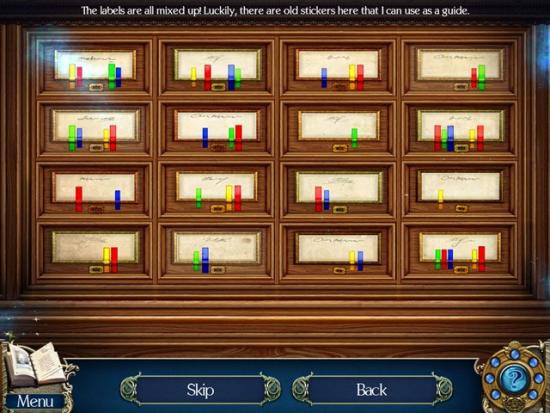
- When the drawer opens, click on the open drawer, then click on the card. Take the letter opener and take note of the book number (the information is added to your journal). Return to the library balcony.
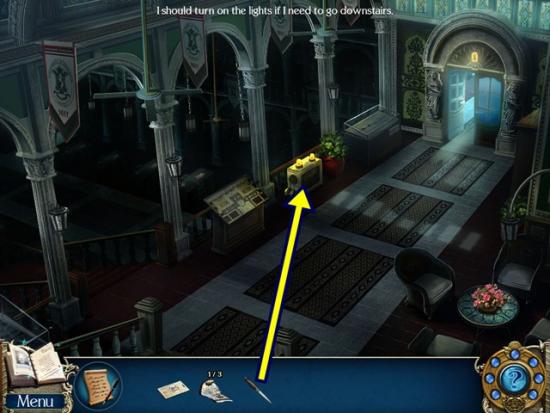
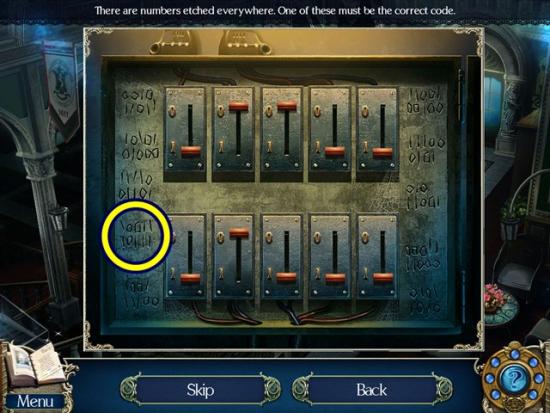
- Click on the circuit breaker. Pry open the panel with the letter opener. A mini-puzzle starts. Arrange the levers in the proper sequence to turn on the lights. The proper sequence is one of the codes scratched onto the wood. Use trial and error to determine which sequence is correct. For the levers, the up position is 0 and the down position is I. Click and drag the levers to adjust their positions.
- Solution:
- Go towards the main library (to the left).
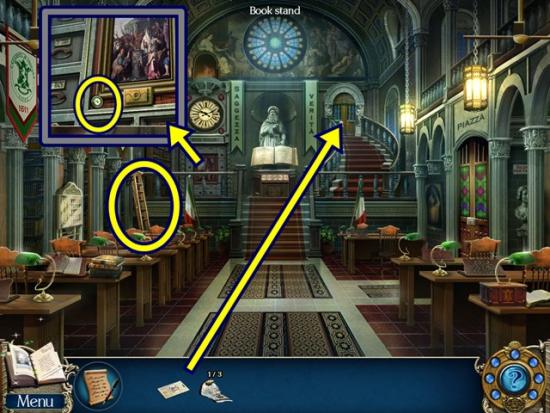
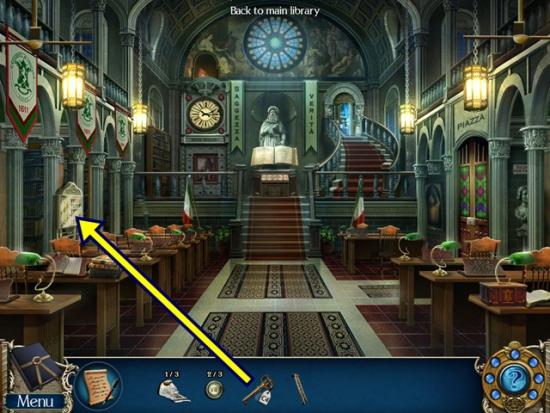
- Take the ladder. Click on the painting. Take the numbered knob (1/3). Click anywhere outside the window to close it. Click on the door to the medical section. Use the keycard. Enter.
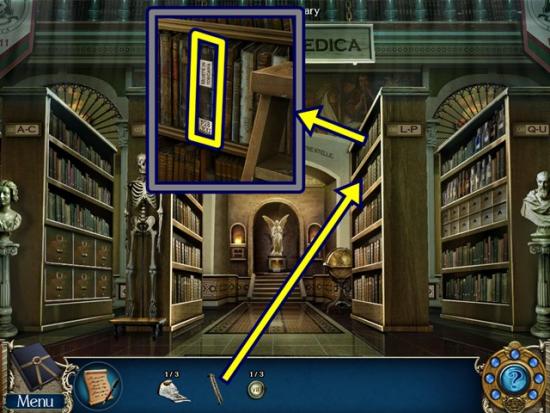
- Put the ladder on the L-P shelf. Click on the shelf. Take the book called Morte in Toscana. Open it.
- A hidden object puzzle starts. Note the image fragments at the bottom of the scene and find where they are in the book. Solution:
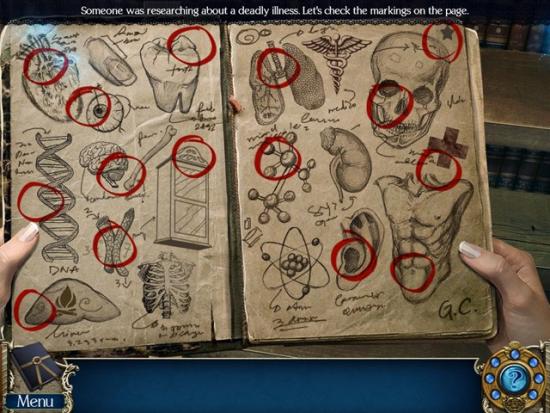
- Take the small iron key. Take the ladder. Return to the main library.
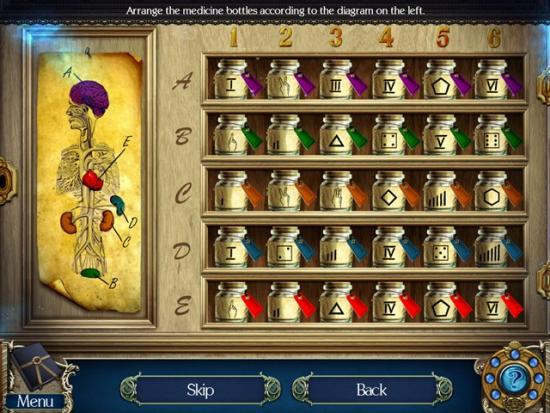
- Click on the medicine cabinet. Unlock it with the small iron key. A mini-puzzle starts. Rearrange the bottles so they correspond with the diagram on the left. Note the coloured areas of the diagram correspond to a letter. A = purple, B = green, C = orange, D = blue and E = red. Each shelf is labelled A – E. Each bottle has a coloured tag. Rearrange the bottles so each is on its correct shelf according to the colour of its tag. Note each bottle has a symbol on its label that represents a number. Once you’ve arranged each bottle by colour, arrange the bottles from 1 – 5 (from left to right).
- Solution:
- Click on the bottle and take the glass eye. Click anywhere outside the window to close it.
- Return to the medical section.
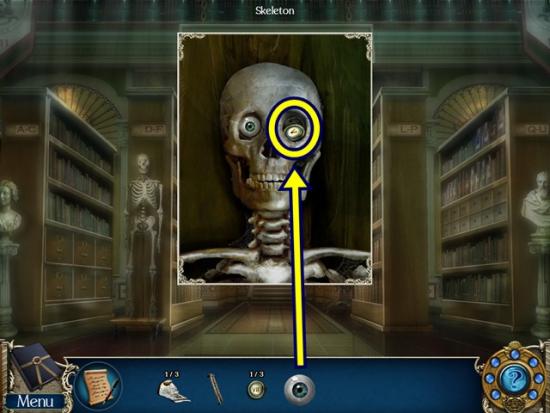
- Click on the skeleton. Take the numbered knob (2/3) and add the glass eye to the empty socket. Take the scroll that appears in its mouth. Read the letter.
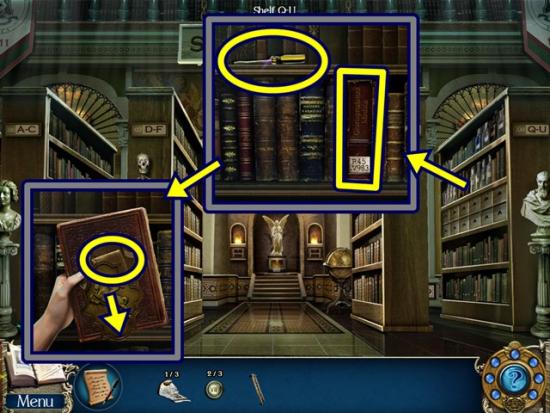
- Click on the Q-U shelf. Take the screwdriver and the book titled Giurisprudenza Medica. Click and drag the metal engraving downward and take the note that appears. Open the note (three clicks) and read it. Return to the main library.
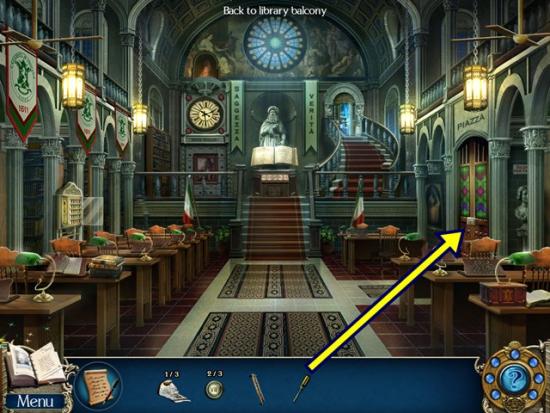
- Click on the hallway to the plaza door. Remove the door release panel with the screwdriver. A mini-puzzle starts. Click on the circuit tiles to rearrange them so a complete path is formed from each switch to its corresponding button.
- Solution:
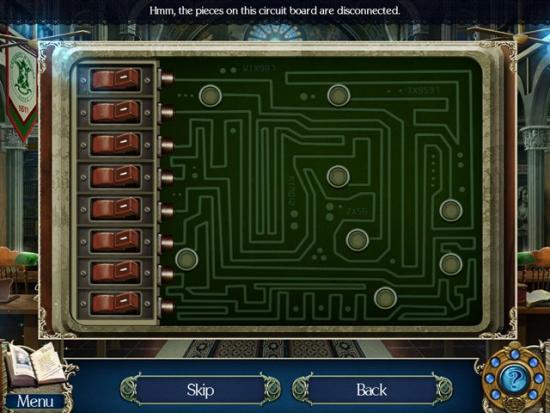
- Once you are finished, turn on a switch and then click on its corresponding button (or vice versa). Use your finger or cursor to follow each path. If you don’t want to do that, do trial and error. Click on a switch, then click a button. If it’s not correct, click the switch again and click another button and continue until you find the correct button.
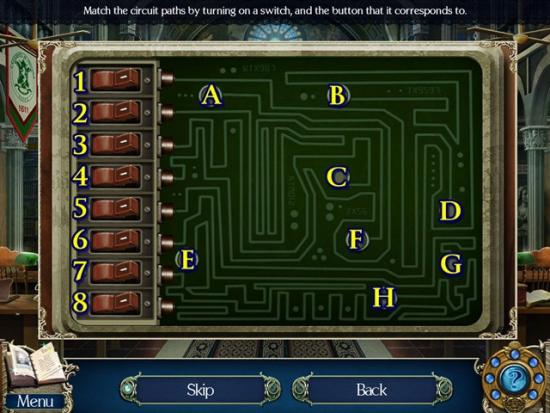
- Assuming the switches are numbered 1-8 and the buttons are lettered A-H (screenshot above), match them up in this order: 1-D, 2-F, 3-C, 4-A, 5-B, 6-G, 7-E and 8-H.
- Go through the doorway.
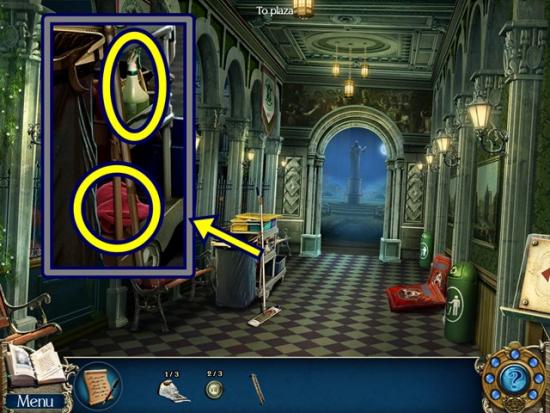
- Click on the cleaning trolley. Take the cleaning rag and the glass cleaning solution. Go into the plaza.
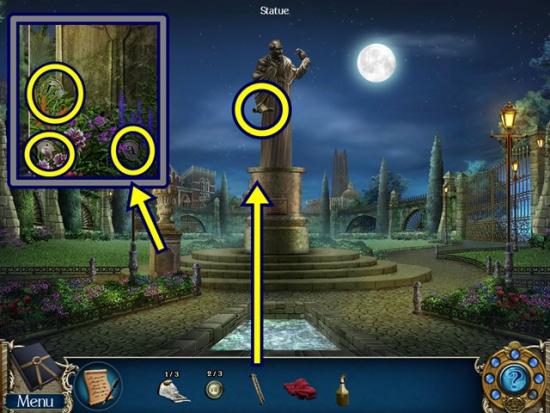
- Click on the base of the urn. Take the three stone letters (3/7). Put the ladder against the statue. Click on the statue’s right hand. Click on the spyglass. A mini-puzzle starts. Drag the rings’ tabs to focus the image. You can see a faint outline of the image in each ring, position them so they line up properly.
- Solution:
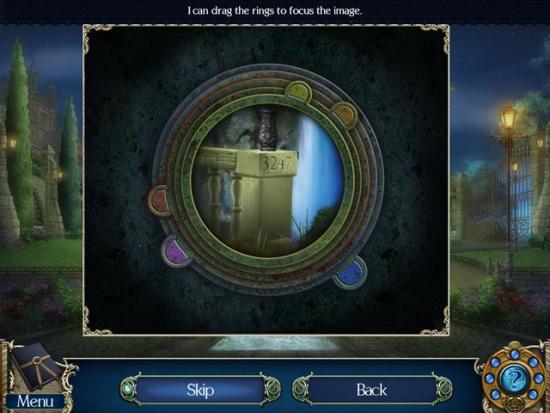
- Take note of the number (it’s added to your journal). Click anywhere outside the window to close it. Return to the main library.
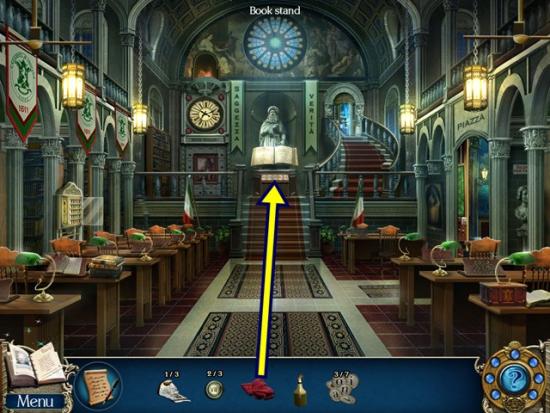
- Click on the book stand. Clean it with the cleaning rag. A mini-puzzle starts. Look at the cubes to determine their meaning and order of events. Then press the button under each cube in that order. If you can’t figure out the meaning of the cubes, use trial and error. Press each button until one remains yellow. Then press another button. If it is incorrect, you have to restart. If it stays yellow, continue in that fashion until all the buttons are yellow.
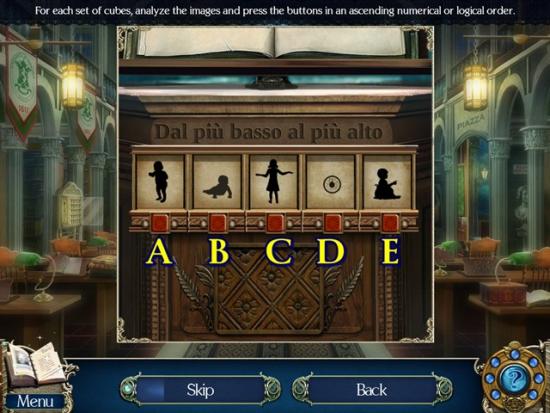
- Assume that the buttons are named A-E (screenshot above).
- Set one: stages of growth. In this order, press buttons D, B, A, E, C.
- Set two: number of legs. In this order, press buttons C, D, B, A, E.
- Set three: starting from 1, create a path to finish at 2. In this order, press buttons C, B, A, E, D.
- When the panel opens, take the numbered knob (3/7). Return to the plaza.
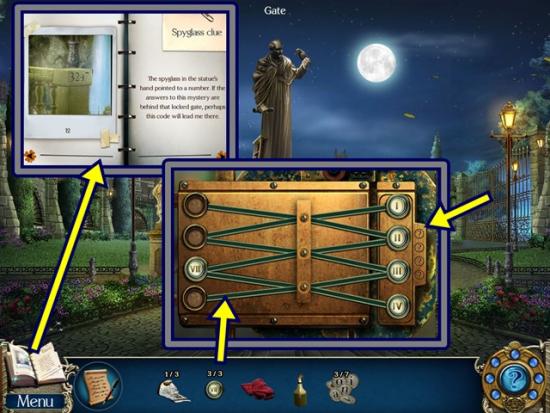
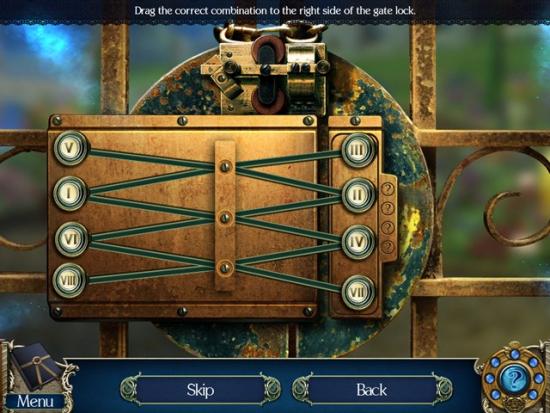
- Click on the gate. Add the three numbered knobs. A mini-puzzle starts. Rearrange the numbered knobs so the column on the right is the same as the combination you saw in the looking glass, 3247 (it’s in your journal).
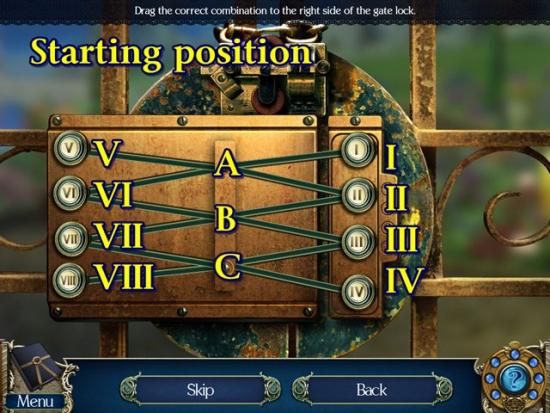
- Click and drag the knobs to move them. A knob can only move into an empty position. The puzzle starts with three empty spaces down the centre (labelled A-C in screenshot above). To solve the puzzle, follow these instructions:
- Move knob III to B, then move IV to C, then to III’s original position. Move VII to IV’s original position.
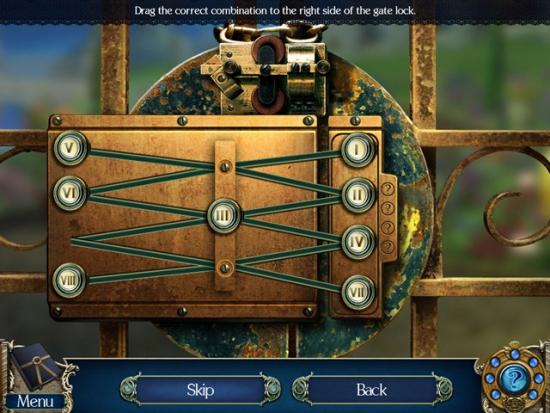
- Move II to A and III to II’s original position.

- Move VI to VII’s original position (via B). The move II to B (via VI’s original position).
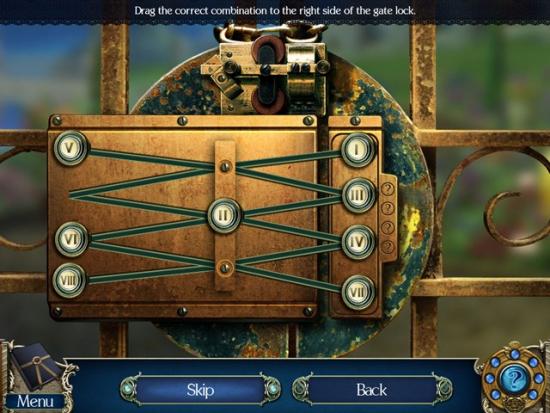
- Move I to VI’s original position (via A). Move III to I’s original position, then move II into its original position.
- Solution:
- Go through the gate.
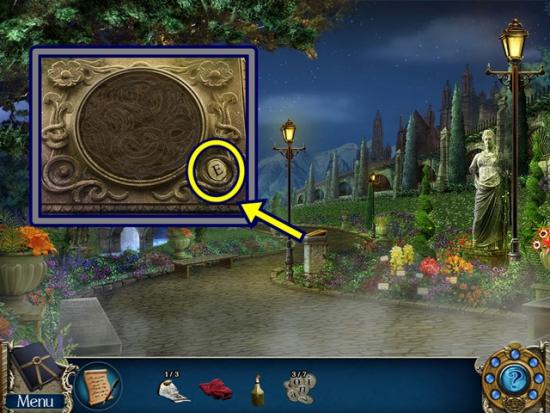
- Click on the plaque. Take the stone letter (4/7). Click anywhere outside the window to close it. Go towards the bridge.
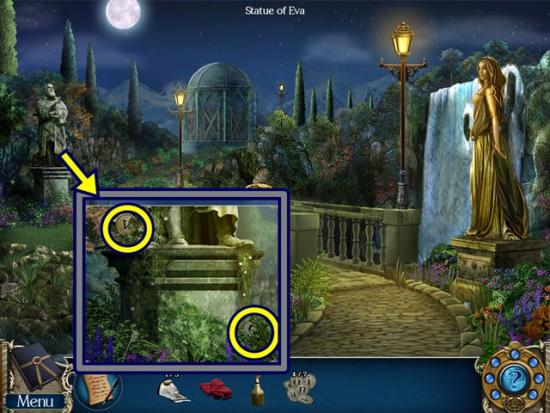
- Click on the statue (left). Take the two stone letters (6/7). Go to the outside of the domed building.
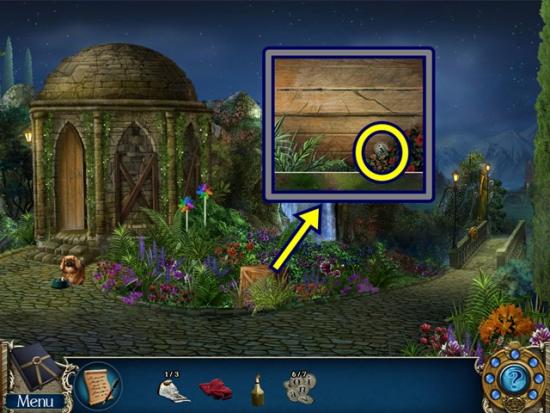
- Click on the wooden crate. Take the stone letter (7/7). Click anywhere outside the window to close it. Return to the bridge.
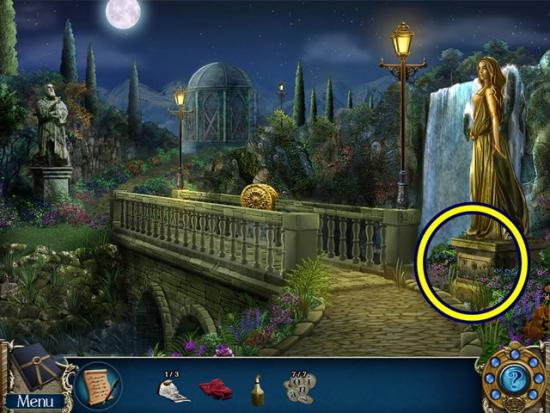
- Click on the Statue of Eva. Add the seven stone letters. A mini-puzzle starts. You have to press the letters in the right order to spell something. To get the answer, open your journal and go back through the pages to the Memorial page. The answer is Eva Leoni.
- Solution:
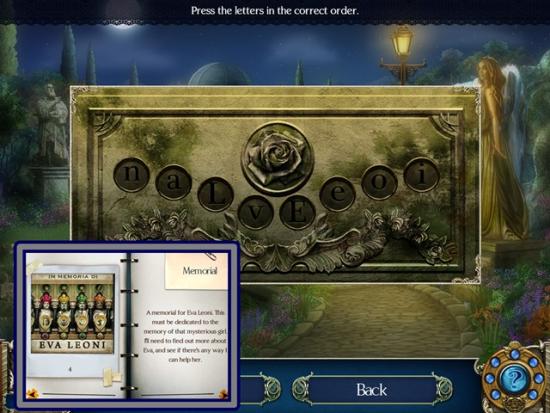
- When the panel opens, take the letter. Click on the letter to add the information to your journal.
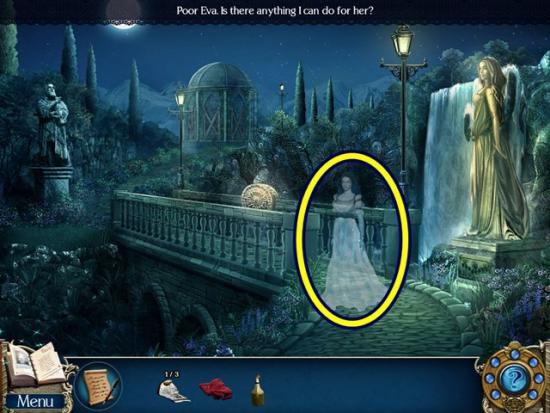
- Click on Eva’s ghost.
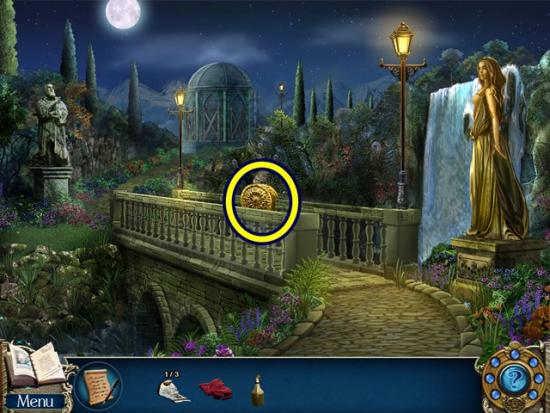
- Click on the motif on the bridge. A mini-puzzle starts. Find 20 snakes.
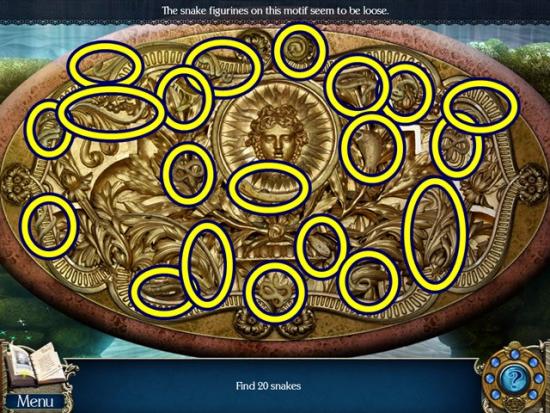
- Snake figurines are added to your inventory.
- Return to the botanical garden.
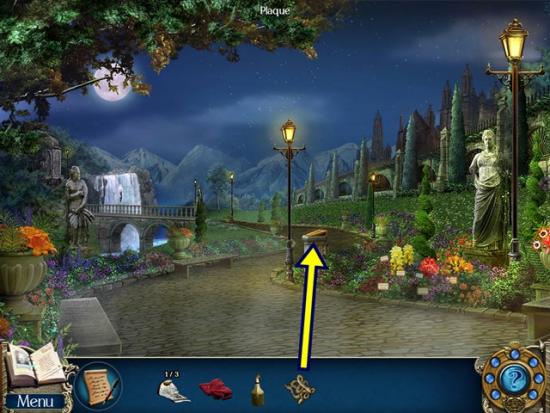
- Click on the plaque. Add the snake figurines. A mini-puzzle starts. Select five snakes that aren’t touching each other.
- One possible solution:
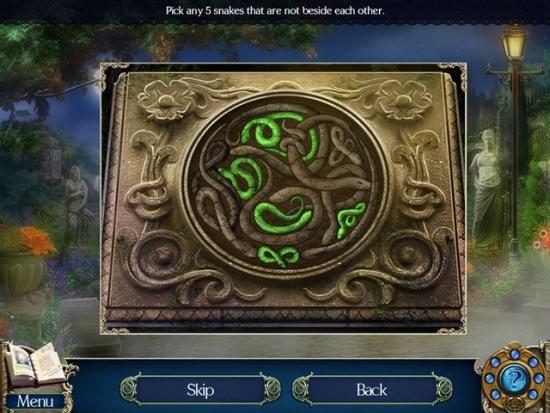
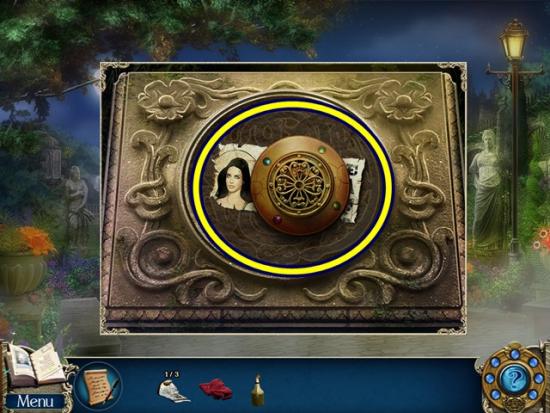
- Take the copper disk and the torn newspaper (2/3). Return to the medical section of the library (south three scenes, then up the stairs).
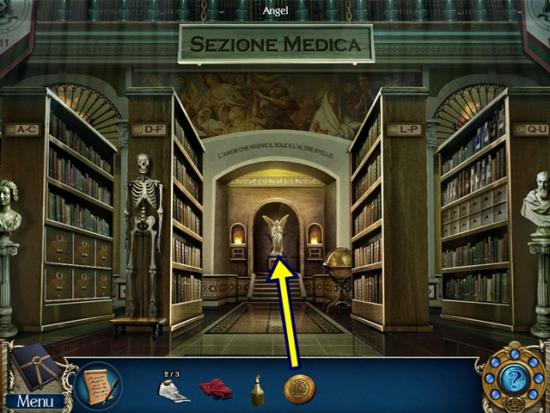
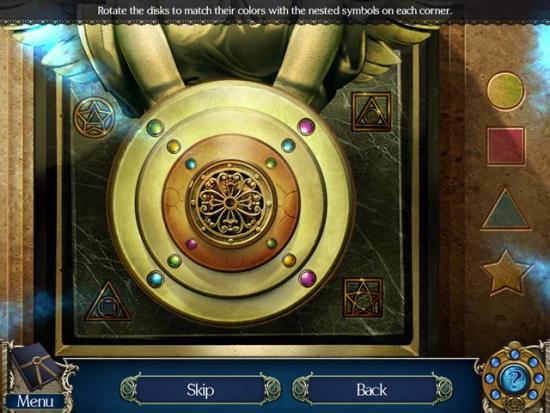
- Click on the angel. Add the copper disk. A mini-puzzle starts. Rotate the rings so each row of buttons matches the colours of the nested symbols in each “corner” of the disk. The diagram at the right shows the colours of each symbol: circle = green, square = purple, triangle = blue and star = yellow.
- Solution:
- Enter the secret chamber.
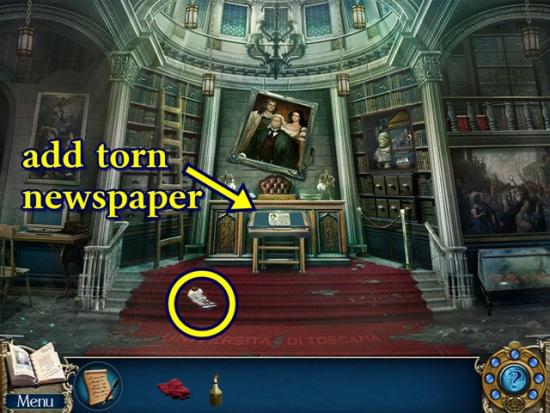
- Take the torn newspaper (3/3). Click on the newspaper display. Add the three torn newspaper pieces. A mini-puzzle starts. Rearrange the pieces to reassemble the newspaper article. Place your mouse over a piece and click to rotate, click and drag to move the piece.
- Solution:
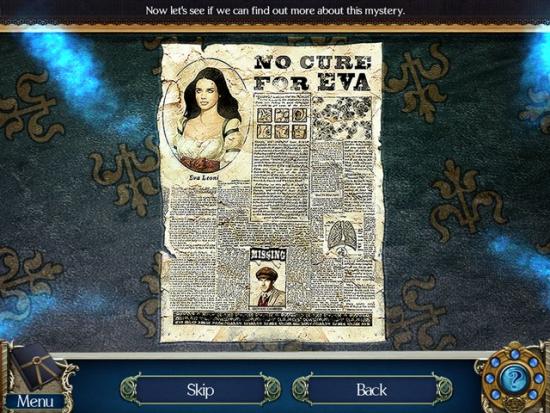
- Click on the newspaper article to add the information to your journal. Click anywhere outside the window to close it.
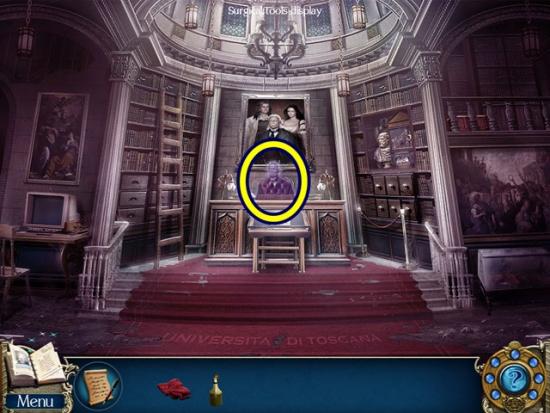
- Click on the ghost behind the desk.
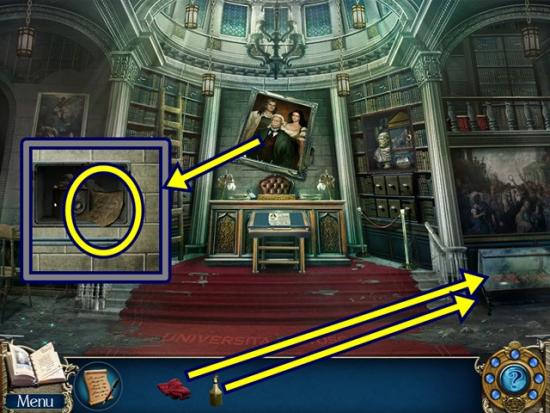
- Click on the family portrait. Knock it down. Read the note, then take the undeveloped film.
- Click on the surgical tools display. Clean it with the glass cleaning solution, then use the cleaning rag. Open the case and take the silver key. Click anywhere outside the window to close it. Return to the main library.
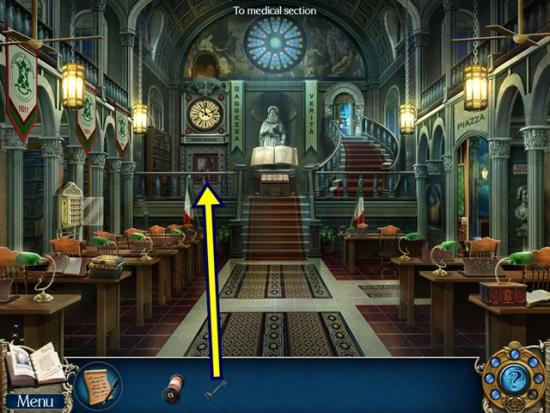
- Click on the painting. Unlock it with the silver key. A hidden object hunt starts.
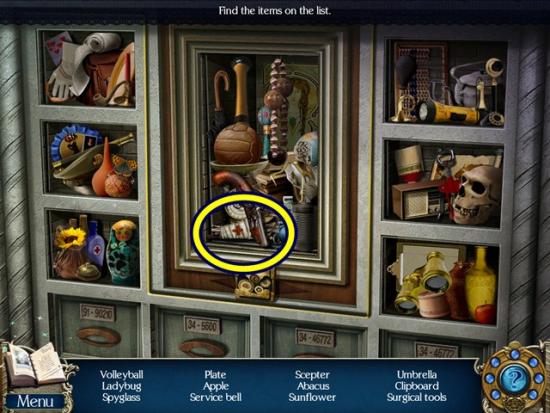
- Find all the objects. Surgical tools are added to your inventory. Return to the secret chamber.
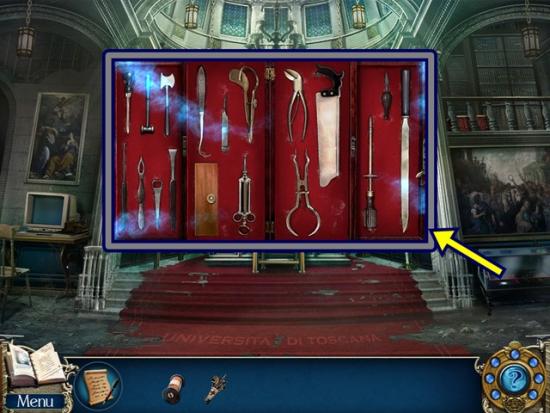
- Click on the surgical tools display. Add the surgical tools. A mini-puzzle starts. Place the items at the bottom in their proper position. Solution is in the screenshot above. Scissors are added to your inventory.
- Return to the hallway to the plaza.
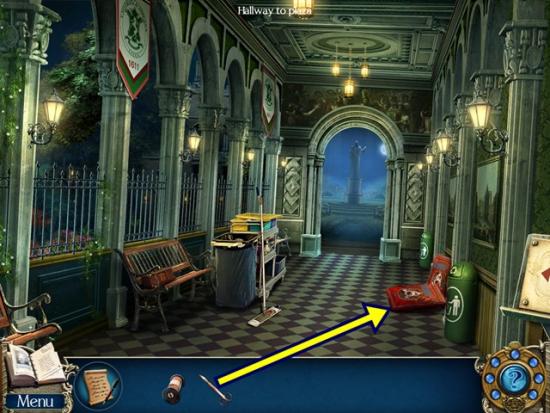
- Click on the dog biscuits. Use the scissors on the bag. The scissors get attached to your cursor. To open the bag, click and drag the scissors across the dotted line (it doesn’t have to be perfect). Take the dog biscuits.
- Return to the outside of the domed building.
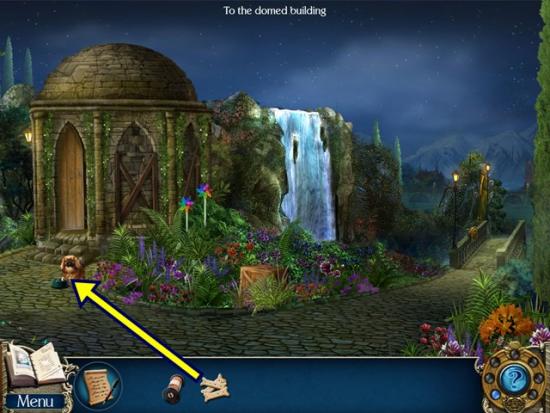
- Click on the dog. Give him the dog biscuits. Click anywhere outside the window to close it. Enter the domed building.
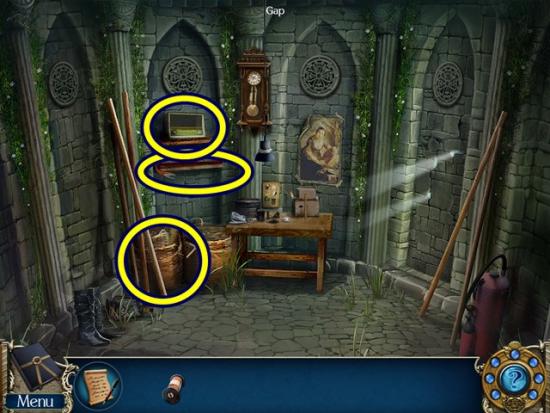
- Take the crowbar. Click on the basket. Take the wooden cube (1/3). Click on the radio. Take the wooden cube (2/3). Leave the domed building.
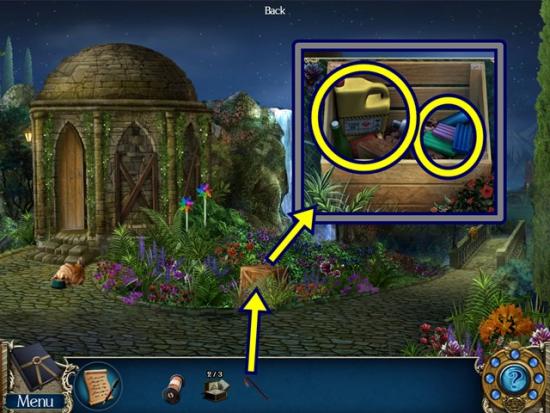
- Click on the wooden crate. Pry open the top with the crowbar. Take the modeling clay and the film developing chemicals. Go back into the domed building.
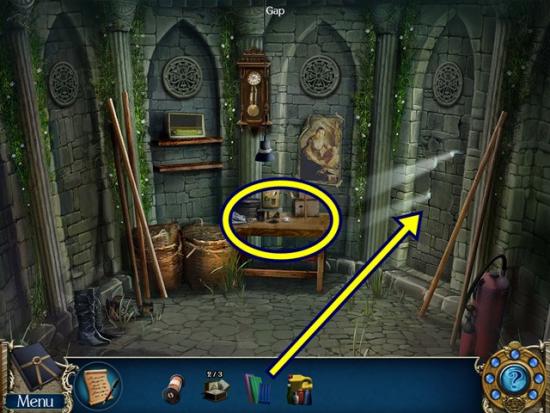
- Click on the gap. Plug the three holes with the modeling clay.
- Click on the table.
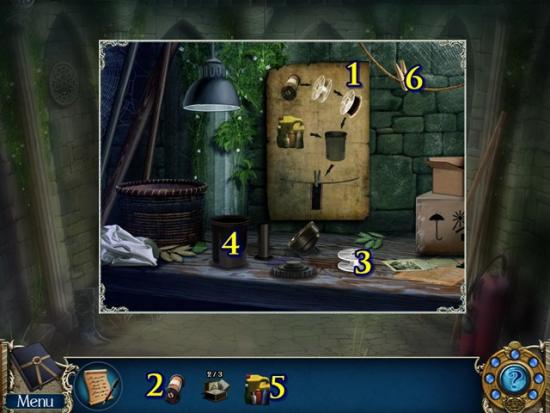
- Look at the instructions (1). Put the undeveloped film (2) on the empty reel (3) to get a loaded reel. Place the loaded reel into the film developing tank (4), then add the film developing chemicals (5). You are given wet film. Attach the wet film to the line using the peg (6). Click on the wet film. Watch the cutscene.
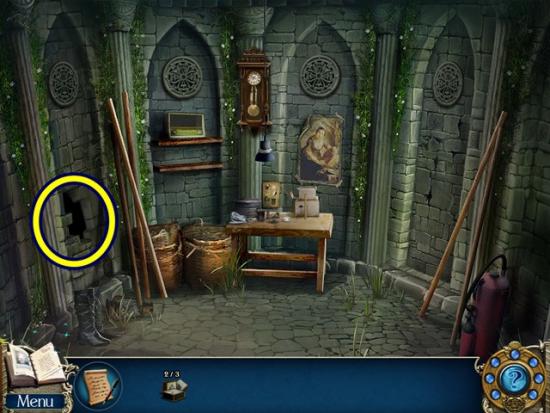
- Click on the hole in the wall. Click on the box. A mini-puzzle starts. Click on all the cubes that have the same shapes as the ones etched at the bottom of the box. The shapes appear multiple times. It doesn’t matter in what order you click the cubes.
- Solution:
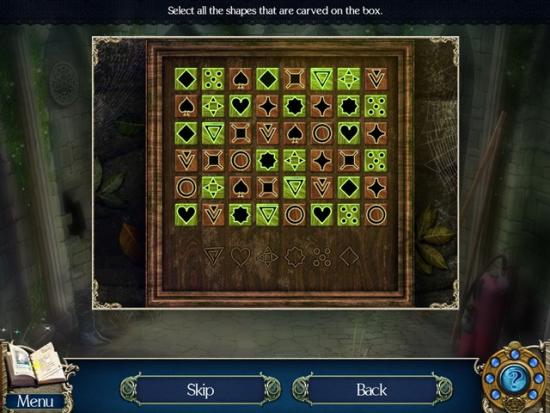
- From the open box, take the wooden cube (3/3). Return to the secret chamber.
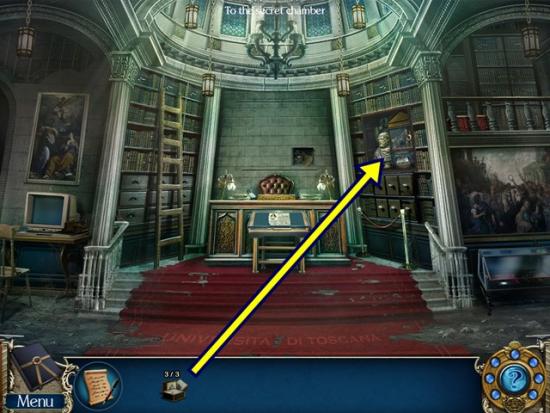
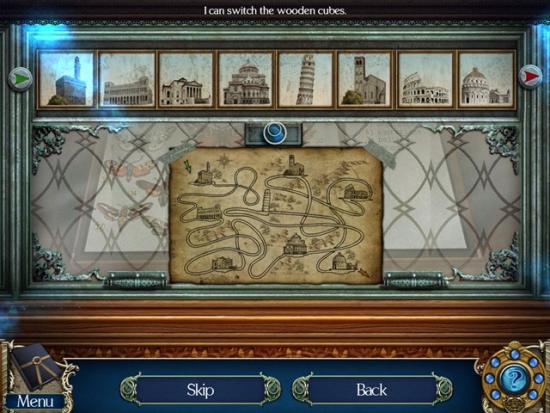
- Click on the collection display. Add the three wooden cubes. A mini-puzzle starts. Adjust the cubes so the images on each are in the order they appear on the map below, from start to finish.
- Solution:
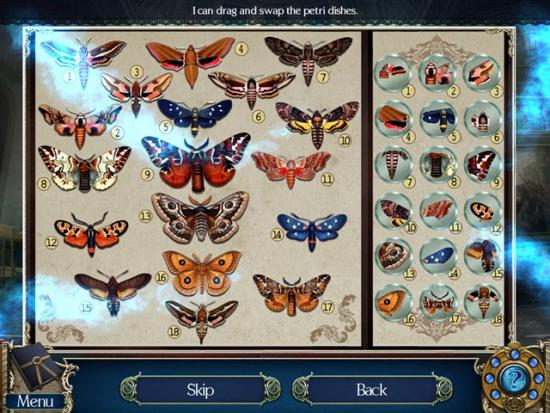
- Click on the moth display. A mini-puzzle starts. Rearrange the Petri dishes on the right so each dish is in the same number as its matching moth on the left.
- Solution:
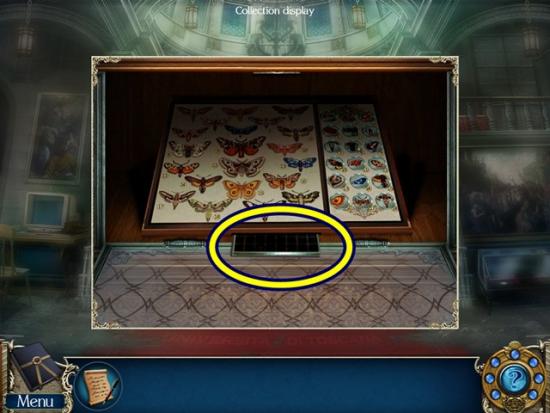
- Take the microfiche.
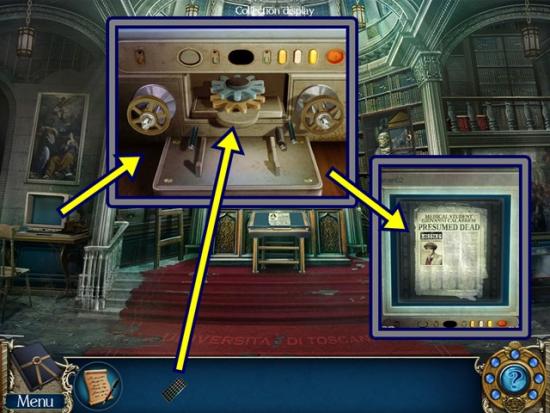
- Click on the microfiche scanner. Add the microfiche. Click on the article. Watch the cutscene.
Chapter 2
- Talk to Professor Romano. Click through the dialogue. A mini-puzzle starts. Rearrange the flags so their colours match the uniforms.
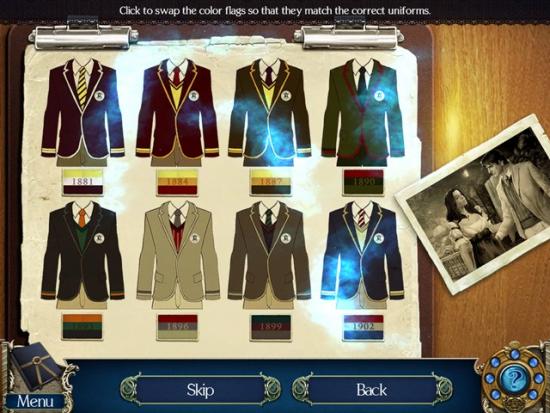
- Take the Professor Romano again. Click through the dialogue. Go out the door to the hall of fame.
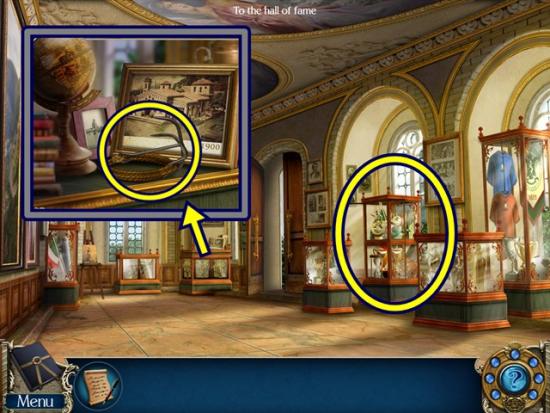
- Click on the display case. Take the grappling hook. Click on the trophy case to start a hidden object hunt.
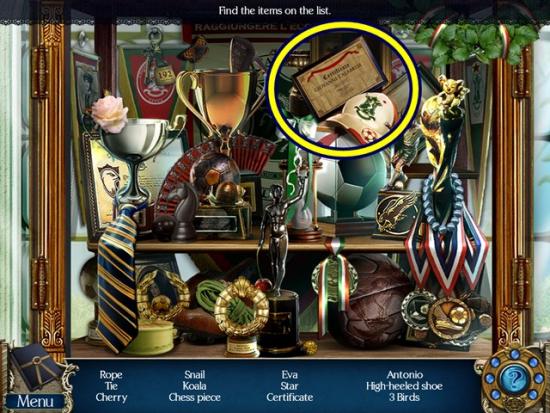
- Find all the objects. Giovanni’s certificate is added to your inventory. Return to the records office.
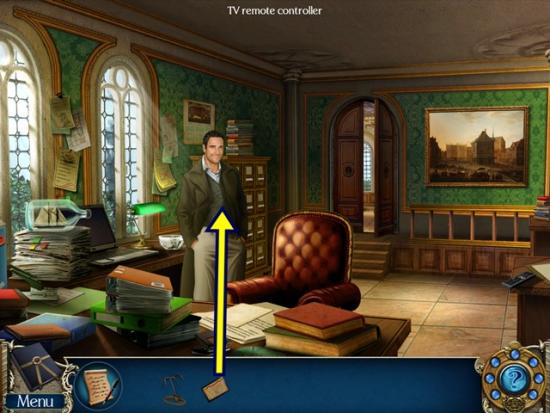
- Give Giovanni’s certificate to Professor Romano. Click through the dialogue.
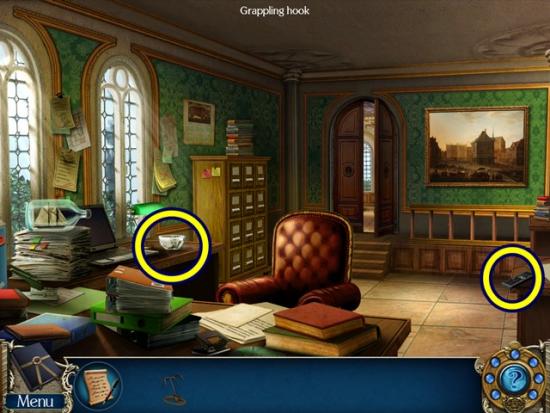
- Click on the tv remote controller. Pick it up, slide the cover down and take the batteries. Click on the glass bowl. A mini-puzzle starts. Remove the cards by clicking two matching cards. Continue until all the cards are gone, then click on the two boxes of matches. Matches are added to your inventory. Return to the hall of fame and go outside the admin office.
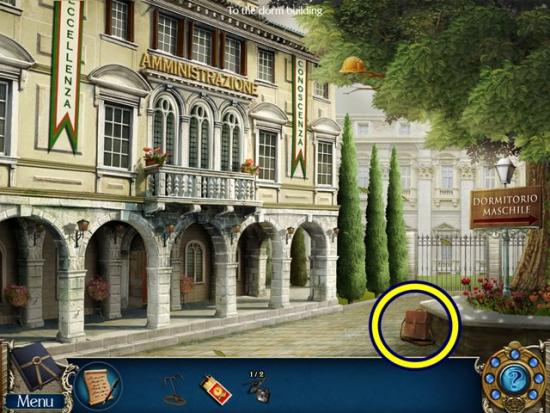
- Click on the student’s bag. Open it and take the wire cutters and the tweezers. Return to the hall of fame.
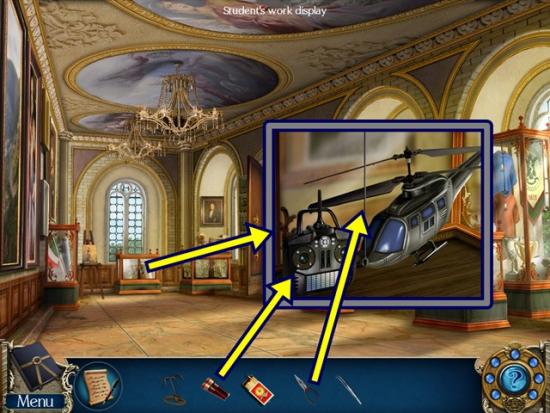
- Click on the student’s word display. Put the batteries in the remote control and take it. Cut the wire holding onto the helicopter with the wire cutters then take it. The remote controlled helicopter is added to your inventory. Return to the records office.
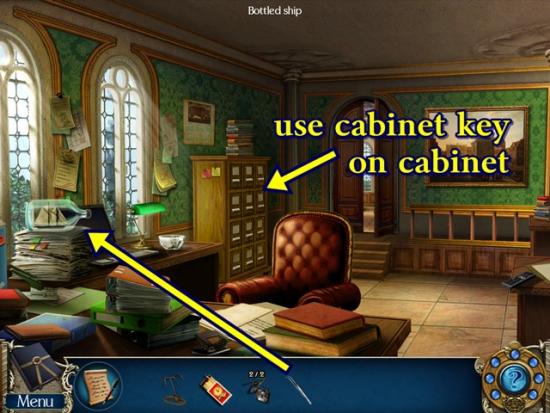
- Click on the bottled ship. Use the tweezers to get the cabinet key. Unlock the cabinet with the cabinet key. Click on the card, then click on the file.
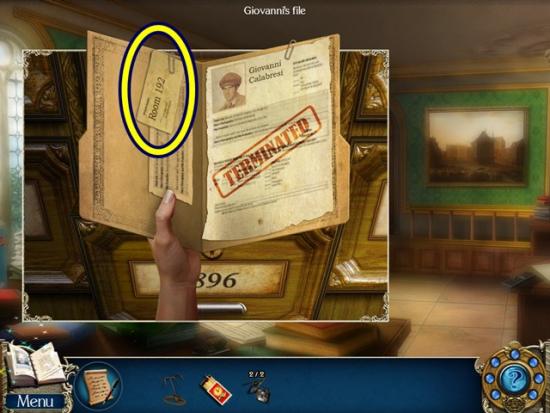
- Take the dorm address and read the file. Click anywhere outside the window to close it. Return to outside the admin office.
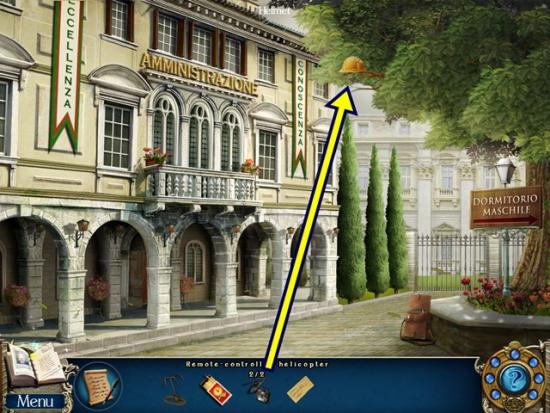
- Use the remote controlled helicopter to get the helmet out of the tree. A mini-puzzle starts. Starting from the green arrow, click on the arrows to form a continuous path to the red arrow.
- Solution:
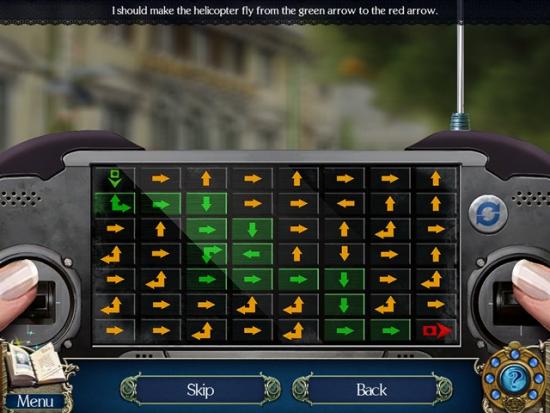
- Take the helmet from where it fell. Go right to outside the dorm.
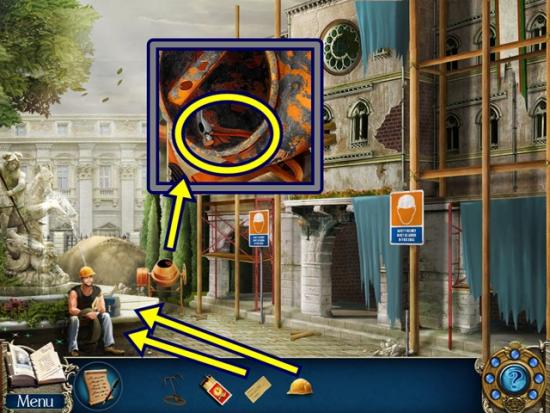
- Talk to the construction worker. Click through the dialogue. Click on the cement mixer. Take the hammer. Try to enter the dorm lobby. Give the construction worker the dorm address and helmet. Enter the dorm lobby.
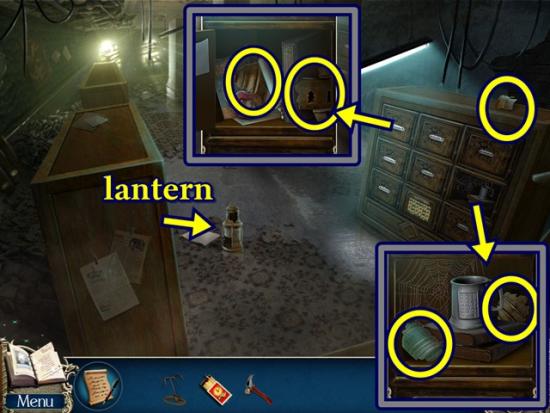
- Take the broken glass (1/5). Click on the open locker. Take the two pieces of broken glass (3/5). Click on the closed locker. Open it and take the two pieces of broken glass (5/5).
- Click on the lantern. Add the five broken glass pieces. A mini-puzzle starts. Fix the broken lantern by adding the broken glass pieces. Use the arrows to turn the lantern. Hover your mouse over a piece and click to rotate it or click and drag it to place it. Once you are finished, click anywhere outside the window to close it.
- Go back outside the dorm.
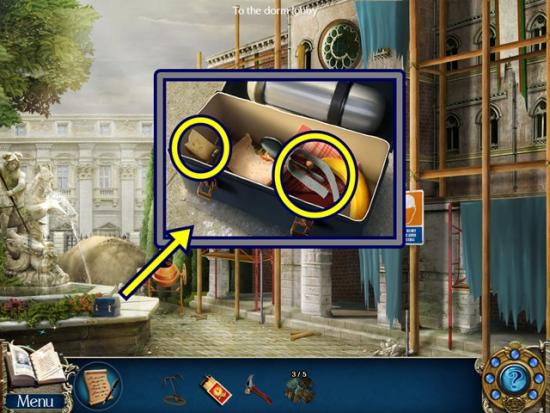
- Click on the lunchbox. Take the wick and the cheese. Go back into the dorm hallway.
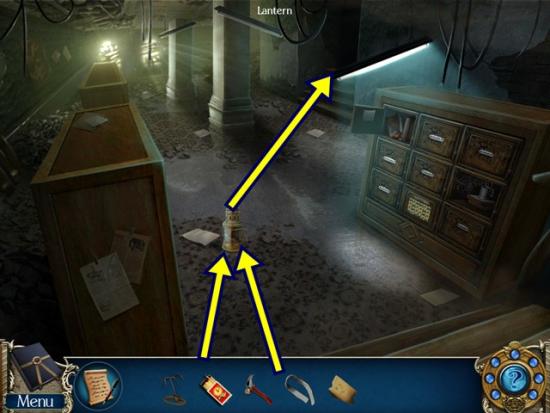
- Click on the lantern. Add the wick, then light it with the matches. Take the lantern. Use the lantern on the dorm hallway.
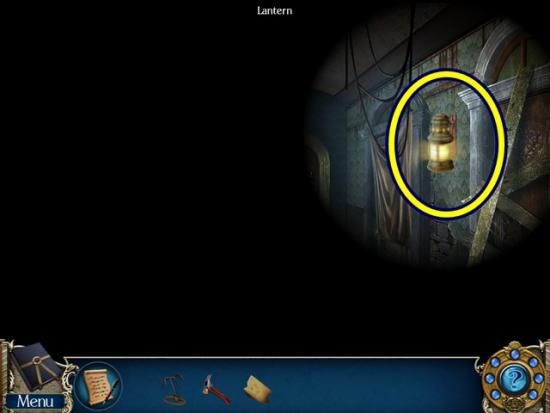
- Hang the lantern on the wall mount.
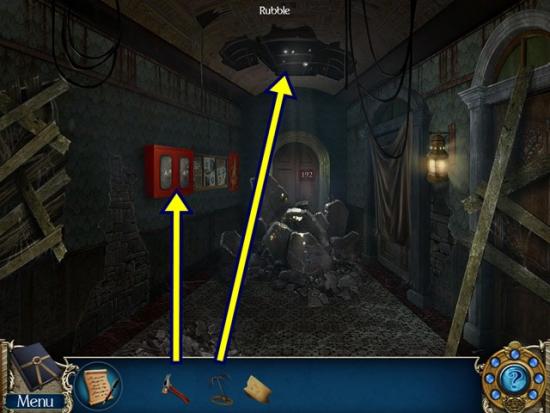
- Click on the emergency case. Break the glass with the hammer and take the fire axe. Use the grappling hook on the railings on the ceiling. Move towards door to #192.
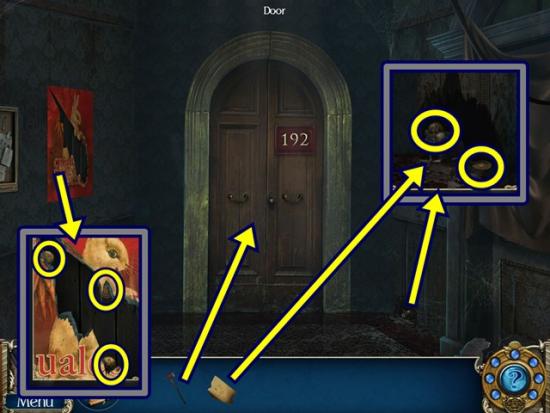
- Click on the ripped poster on the wall. Take the three brass coins (3/5). Click on the mouse hole. Give the cheese to the mouse and take the two brass coins (5/5).
- Click on the door. Break it open with the fire axe (three clicks). Enter room #192.
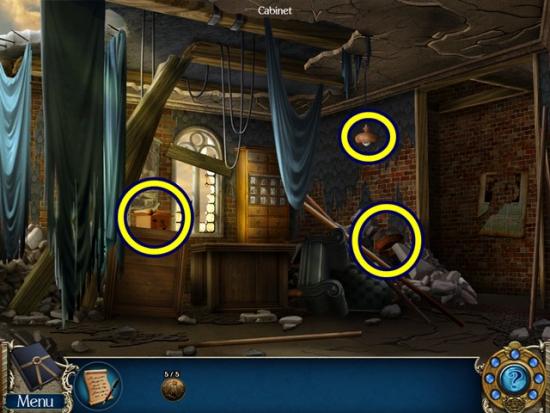
- Click on the box and take the two plastic organs (2/8). Click on the basket and take the two plastic organs (4/8). Click on the lamp and take the light bulb. Return to the dorm lobby.
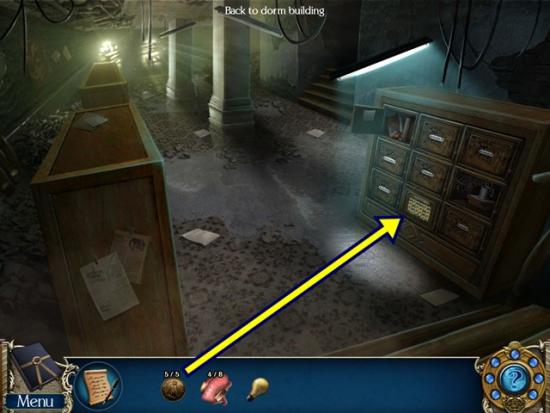
- Click on the locker. Add the five brass coins. A mini-puzzle starts. Click on the coins so they all turn bronze. Clicking on a coin will change the colour of it and its surrounding coins.
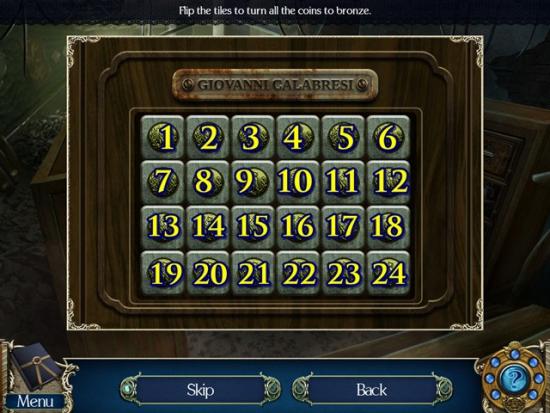
- Assuming the coins are labelled 1-24, to solve the puzzle, click coins 1, 19, 6, 24, 9, 15, 10 and 16.
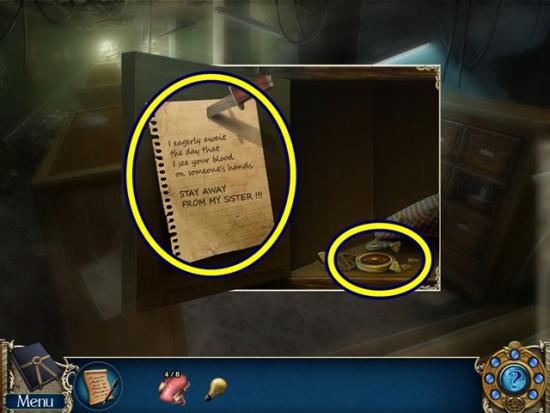
- Take the note. Click on the locket. A mini-puzzle starts. Put the locket back together again. Hover your mouse over a piece and click to rotate or click and drag to move it. Once it’s in its proper position, it locks.
- Solution:
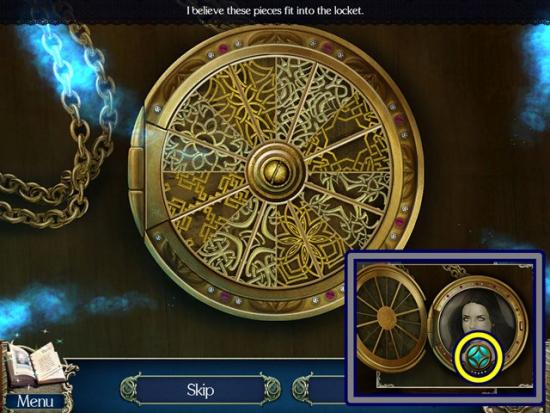
- Take the gem. Return to room #192.
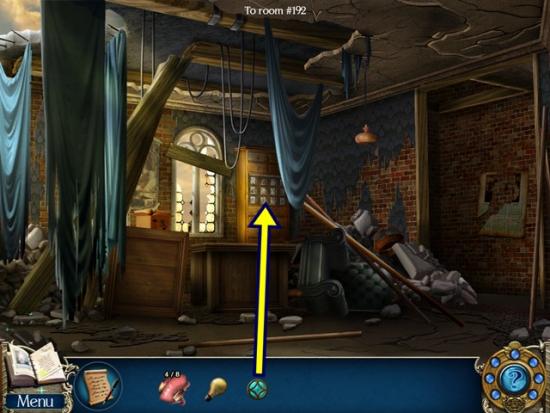
- Click on the cabinet. Add the gem. A mini-puzzle starts. Select the images with a common theme.
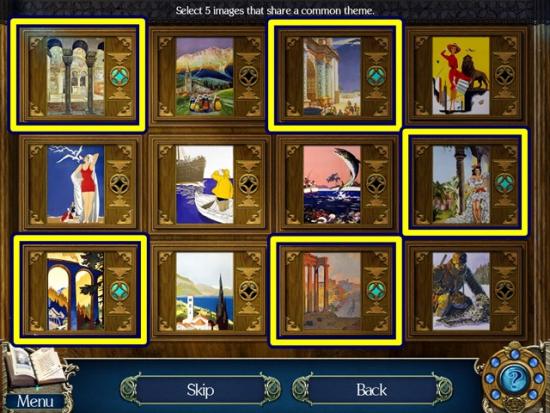
- For the first set, select five images showing archways (solution above).
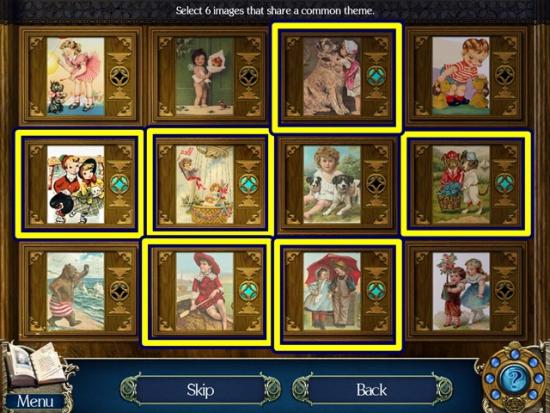
- For the second set, select six images of children or animals wearing hats (solution above).
- Press the red button that appears.
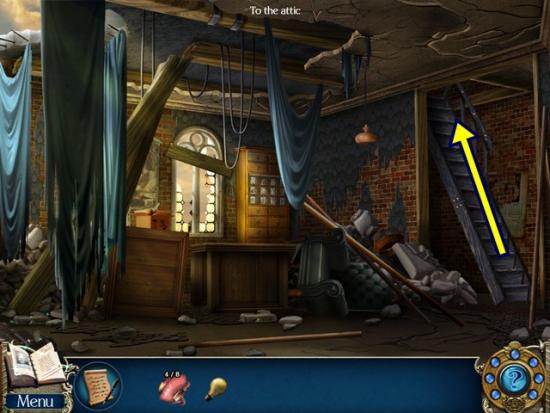
- Go up the newly revealed stairs to the secret attic.
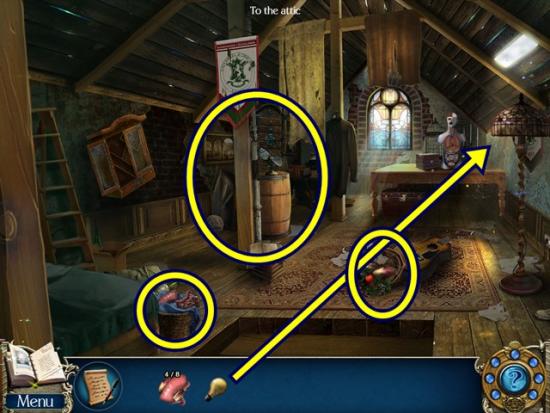
- Click on the basket and take the plastic organs (6/8). Click on the wreath and take the plastic organs (8/8). Click on the lamp and add the light bulb. Take note of the four digit code (it’s added to your journal). Click anywhere outside the window to close it.
- Click on the corner to start a hidden object hunt.
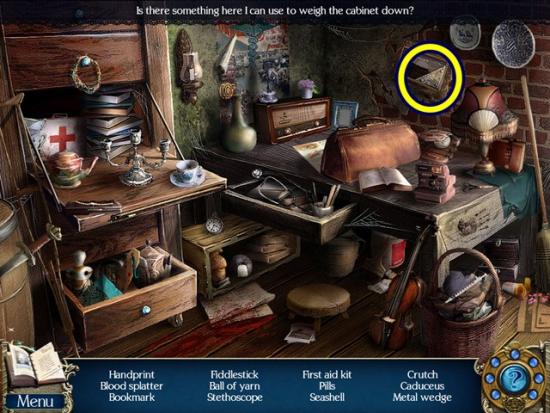
- Find all the objects. Heave blocks are added to your inventory.
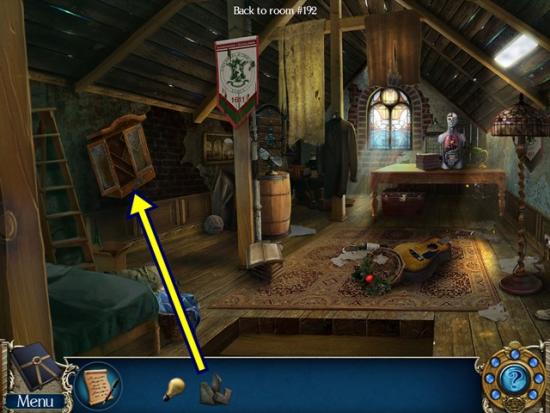
- Click on the cabinet. Add the heavy blocks. A mini-puzzle starts. Place the heavy blocks in the cabinet so they all fit. The block pieces cannot be rotated. Note the outline in the cabinet, it helps in placing the blocks.
- Solution:
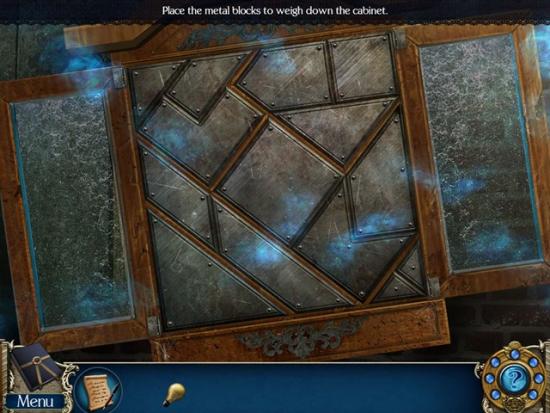
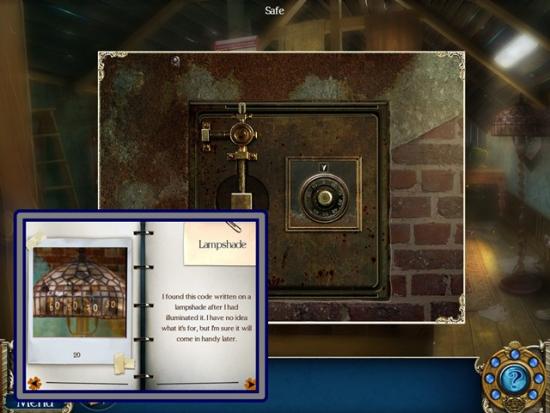
- When the cabinet falls, a wall safe appears. If you haven’t done so already, click anywhere outside the window to close it and put the light bulb in the lamp. If you’ve already put the light bulb in the lamp, you have the four digit combination to the safe. Click on the safe dial. A mini-puzzle starts. Open the safe using the four digit code you saw on the lamp. Follow the instructions by turning (click and drag) the dial clockwise and stop at 60. MAKE SURE YOU STOP AT THE NUMBER! Then turn the dial counter-clockwise and stop at 50, then turn the dial clockwise and stop at 70, then turn the dial counter-clockwise and stop at 30.
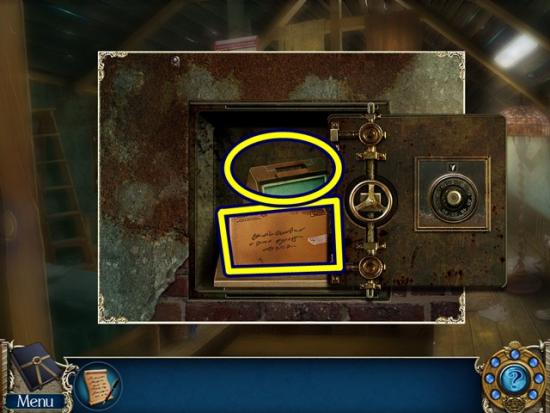
- Take the envelope, then take the letter to get Doctor Ferro’s address and then the portable microfiche viewer.
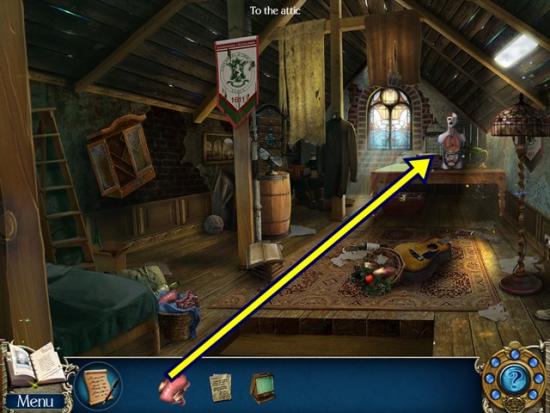
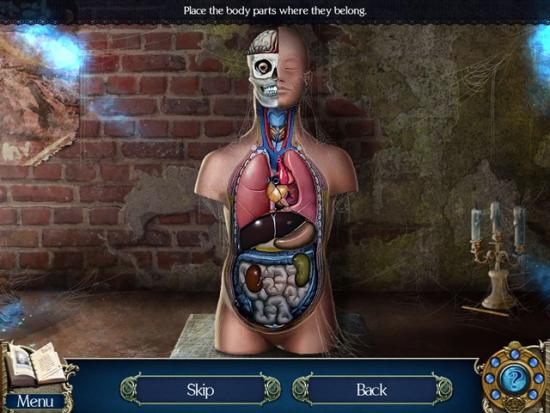
- Add the eight plastic organ pieces to the human anatomy model. A mini-puzzle starts. Fit all the plastic organs into the model. Hover your mouse over a piece and click to rotate and click and drag to move.
- Solution:
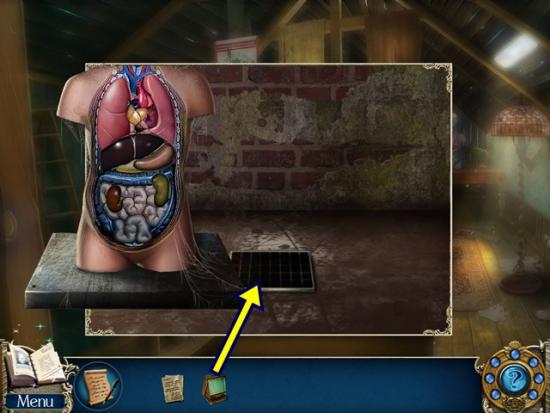
- Place the portable microfiche viewer on the microfiche. Watch the cutscene.
Chapter 3
- Talk to the woman. Click through the dialogue.
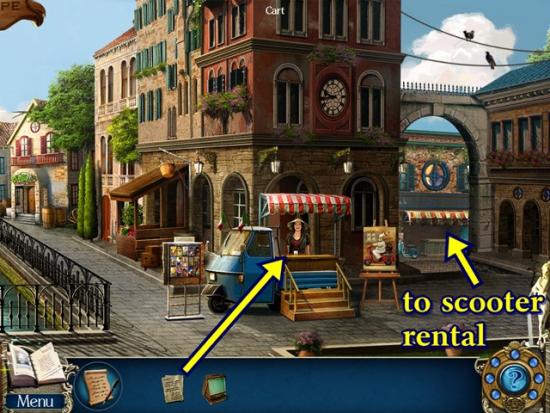
- Give Doctor Ferro’s address to the woman. Click through the dialogue. Go through the archway to the scooter rental.
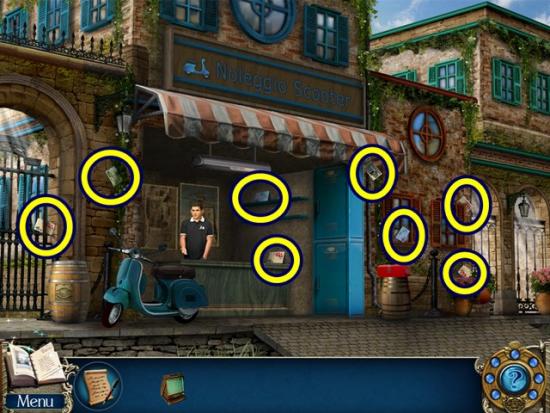
- Take the eight postcards (8/8). Return to the town centre.
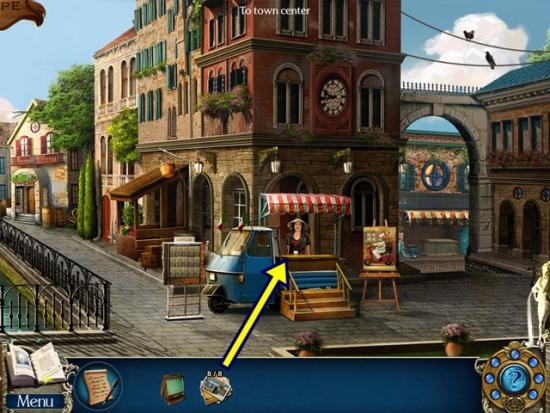
- Give the postcards to the woman. Click through the dialogue. A mini-puzzle starts. Move the postcards to their appropriate positions on the rack. Click and drag to move postcards. Click and drag a postcard to reveal an image on a rack. The image indicates which postcard belongs on that rack.
- Solution:
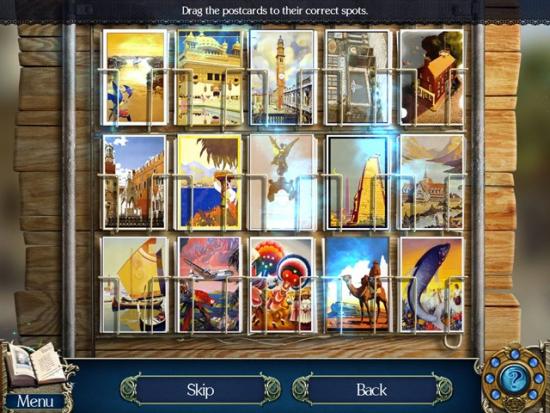
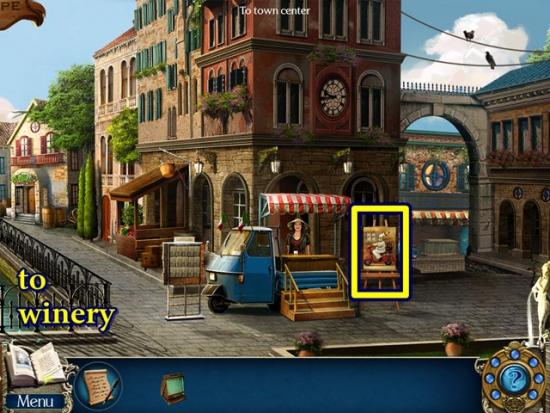
- Click on the scooter rental poster. Click through the dialogue. Click anywhere outside the window to close it. Go to outside the winery.
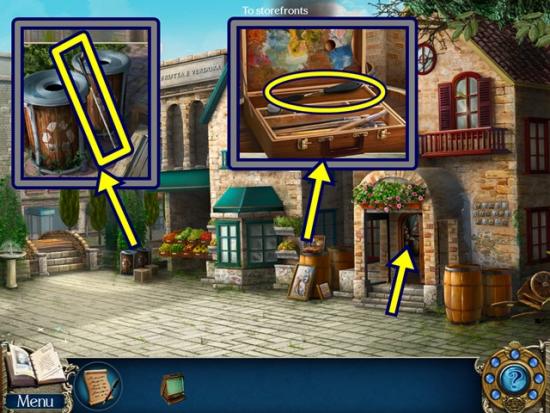
- Click on the painting supplies. Take the palette knife. Click on the trash bin. Take the litter picker. Enter the wine store.
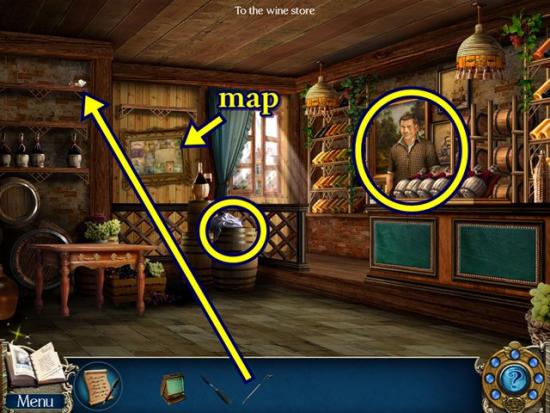
- Talk to the wine store owner. Take the rag. Click through the dialogue. Click on the shelf. Use the litter picker to take the map piece. Click on the map. Add the map piece. A mini-puzzle starts. Recreate the map. Hover your mouse over a map piece and click to rotate or click and drag to move it. Rotate the pieces to they are aligned properly (i.e., the house is lined up accordingly) and then match the pieces against the faint outline on the board.
- Solution:
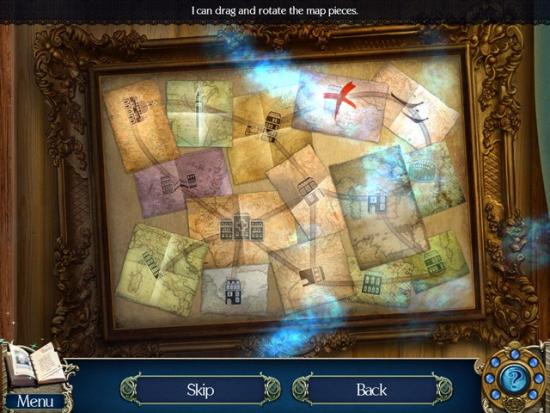
- Click through the dialogue. Leave the winery and go through the archway to the toy shop, then enter the toy shop.
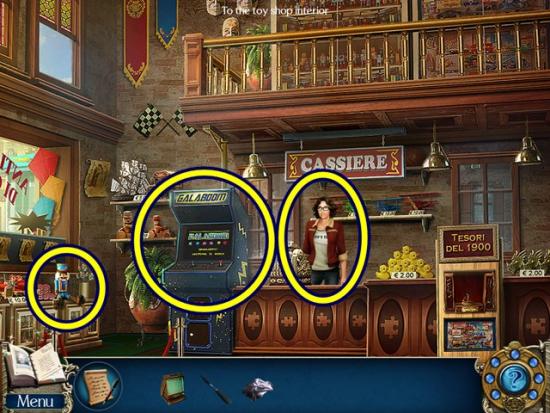
- Talk to the toy shop owner. Click through the dialogue. Click on the arcade game and let the animation play. A mini-puzzle starts. It’s a match three game. Click and drag the images to match three or more of the same image. Matching three or more will break the tiles behind each image. Clear the board of all tiles. When you are finished, a plastic egg is added to your inventory.
- Click on the nutcracker. Slide its mouth down, then add the plastic egg. Take the token. Go outside.
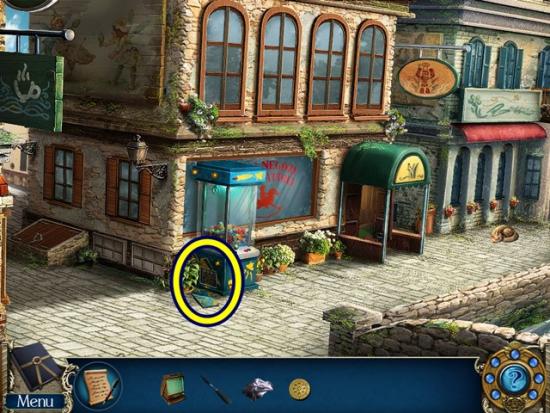
- Click on UFO Catcher (arcade game). Click on the power supply. A mini-puzzle starts. Swap and rotate the tiles.
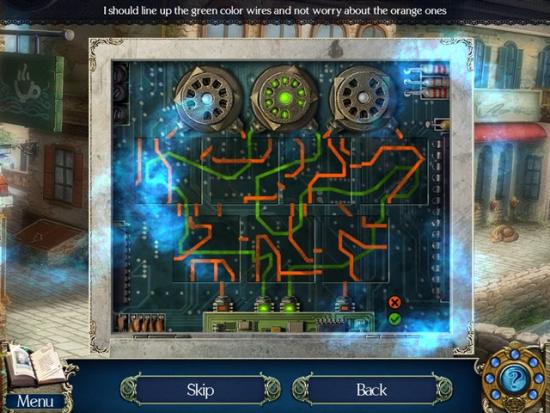
- For the first puzzle, line up the green wires (solution above).
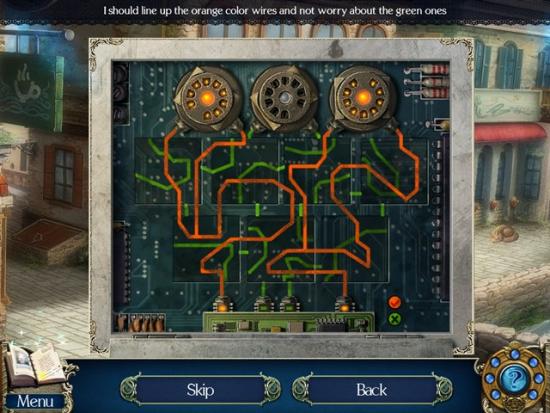
- For the second puzzle, line up the orange wires (solution above).
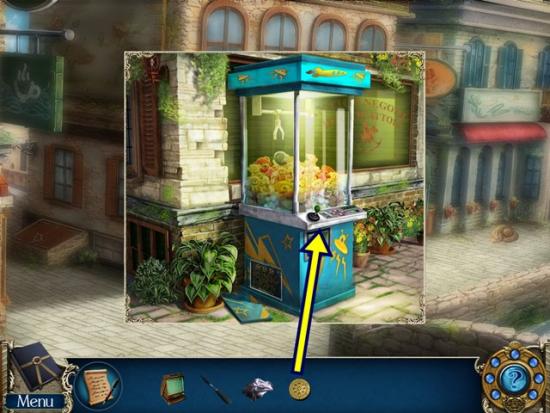
- Click on the game control panel. Add the token. A mini-puzzle starts. Determine the proper sequence to press the directional buttons. After pressing five buttons, press the checkmark to learn how many arrows are correctly and incorrectly positioned.
- To start, press the same directional arrow five times, then press the checkmark. If you get a message reading, “1 right input; 4 wrong input” means that arrow appears once in the correct sequence. “2 right input; 3 wrong input” means that arrow appears twice in the correct sequence. Do this for all four arrows to determine how many of each arrow appears in the correct sequence.
- Once you’ve determined the correct arrows, properly positioning them comes down to trial and error and I suggest you get a pen and paper and keep track of your guesses. Assuming the solution is correct for each game, press right, up, left, up, down.
- Take the mechanical pigeon parts (1/3) that appear in the drawer. Return to the scooter rental (south twice, then through the archway).
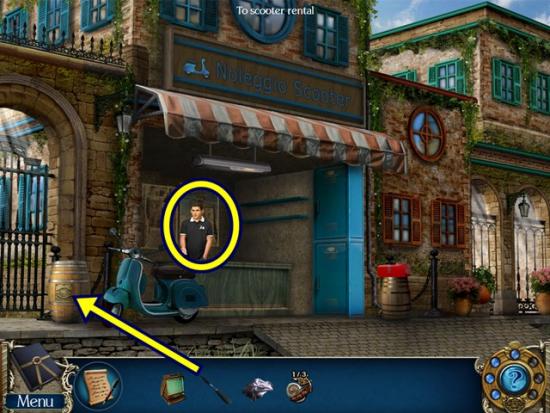
- Talk to the scooter rental owner. Click through the dialogue. Click on the barrel. Pry the emblem off with the palette knife. Return to the outside of the winery.
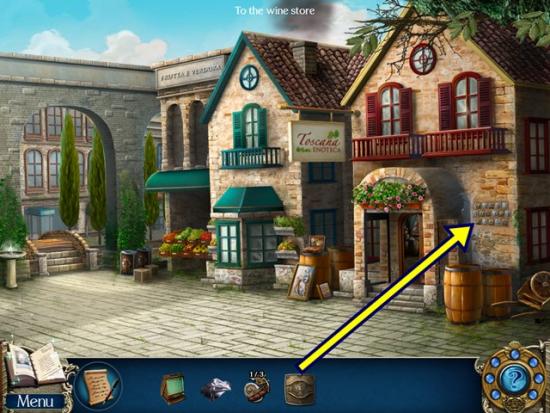
- Click on the wall. Add the emblem. A mini-puzzle starts. Similar to the postcard puzzle. Rearrange the emblems according to the symbols scratched into the wall behind them.
- Solution:
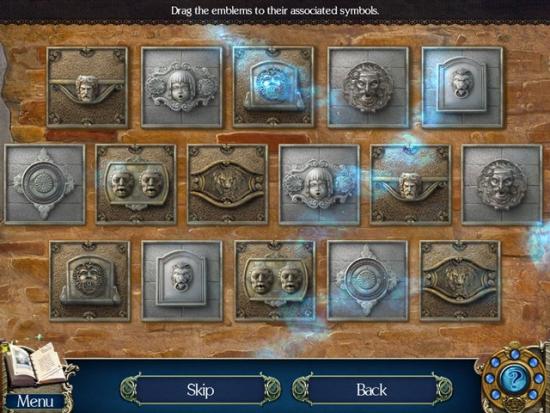
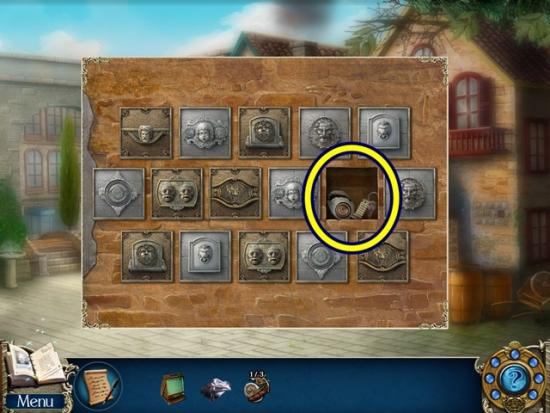
- When emblem falls, take the mechanical pigeon parts (2/3) and the locker key. Return to the scooter rental.
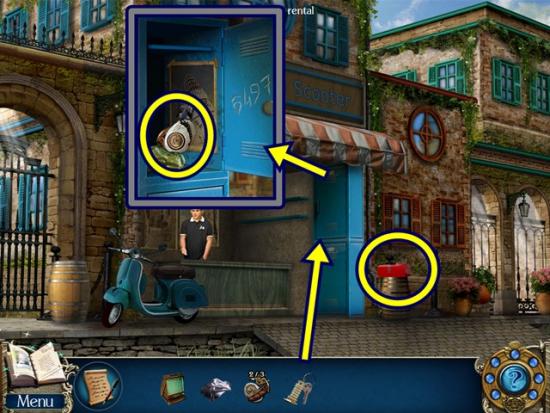
- Click on the locker. Unlock it with the locker key. Take note of the combination scratched into the locker door. Take the mechanical pigeon parts (3/3). Click anywhere outside the window to close it. Click on the toolbox. Unlock it with the combination seen scratched into the locker door (also in your journal). Press the small buttons to change the numbers. A hidden object hunt starts.
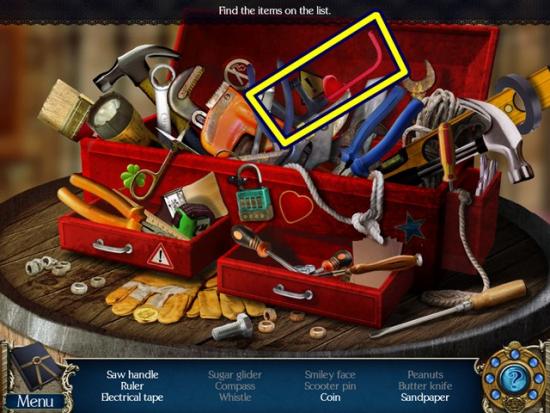
- Find all the items. Open the two small drawers to find more items. A saw handle is added to your inventory. Return to the toy shop.
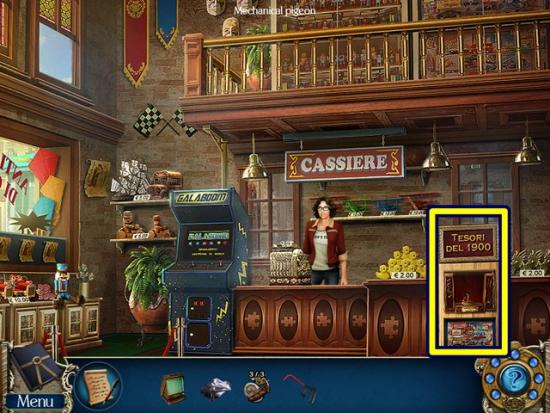
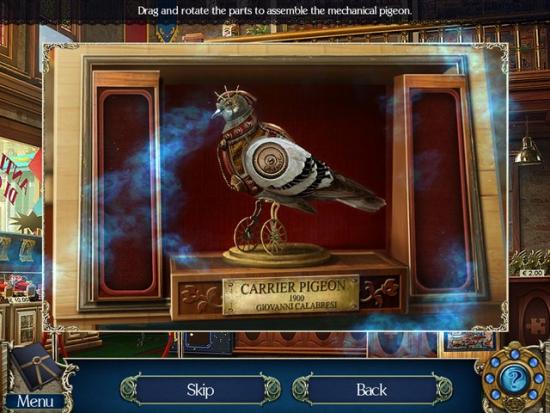
- Click on the mechanical pigeon. Add the mechanical pigeon parts. A mini-puzzle starts. Reassemble the pigeon.
- Solution:
- Click through the dialogue. Leave the toy shop.
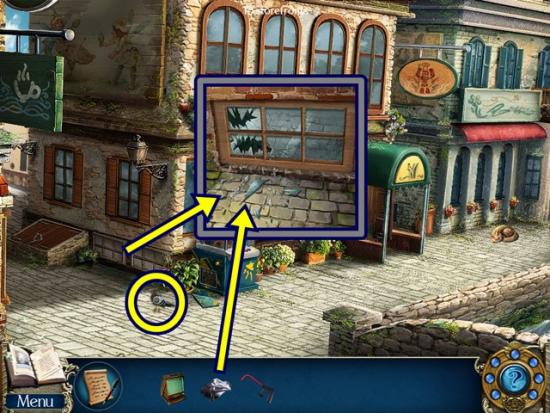
- Click on the mechanical pigeon. Click on the window the pigeon broke. Use the rag to pick up the glass shard. Return to the town centre.
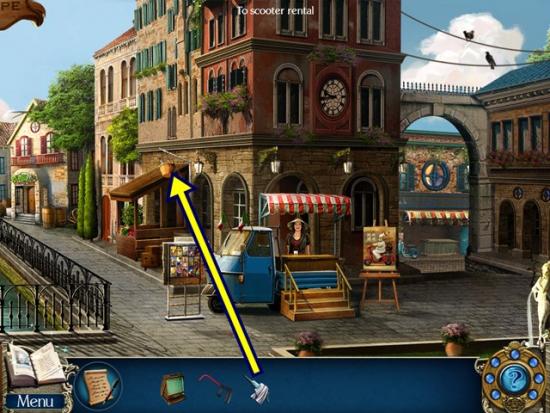
- Click on the basket. Cut the rope with the glass shard, then take the fish. Return to the outside of the toy shop.
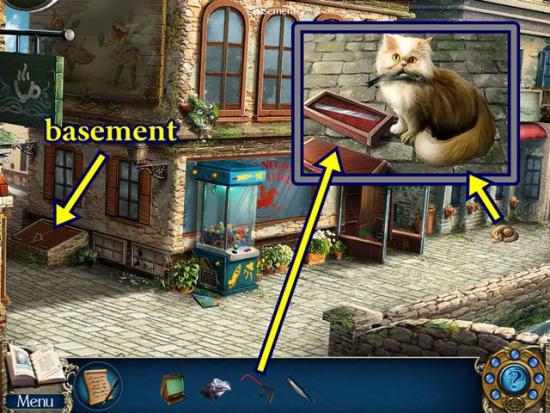
- Click on the cat. Give the fish to the cat. Click on the box the cat was sleeping on. Add the saw handle to get the hand saw. Click on the basement door. Cut the chains with the hand saw. Enter the basement.
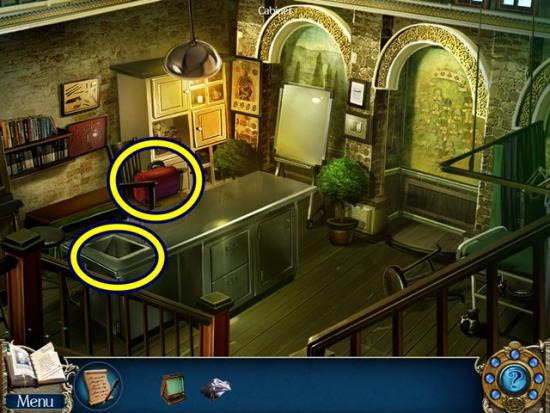
- Click on the sink. Take the rings (1/3). Click on the cupboard to start a hidden object hunt.
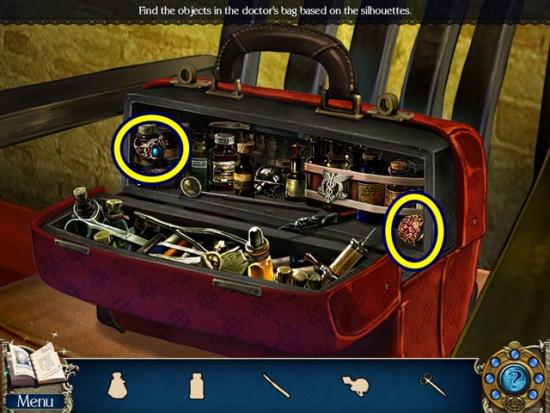
- Find all the objects based on the silhouettes at the bottom. Two rings (3/3) are added to your inventory.
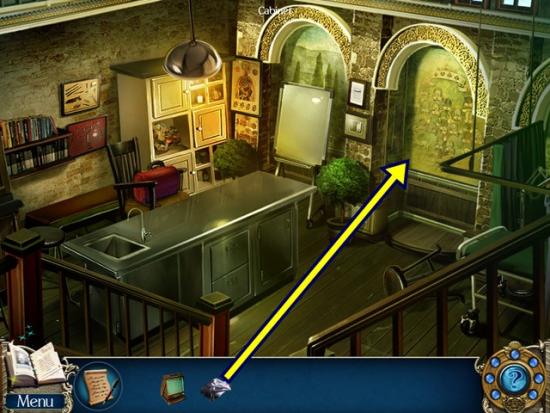
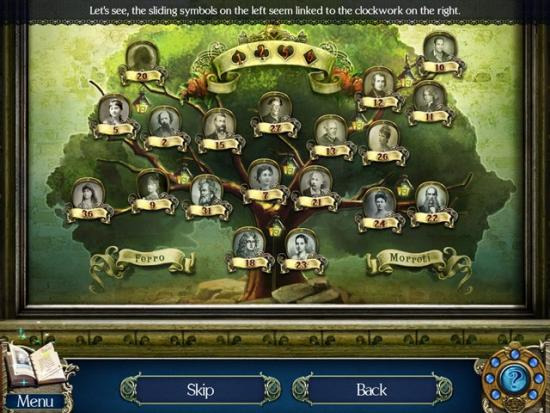
- Clean the dusty wall with the rag. Click on the family tree. A mini-puzzle starts. Rearrange the portraits. Each portrait has a number on it. Behind each portrait are symbols. Each symbol represents a number. Spade = 1, club = 2, heart = 5, diamond = 6. For each group of symbols, determine the numbers they represent, then add them together. The sum equals the picture that must appear in that position. Once a portrait is properly placed, it lights up and is locked.
- Solution:
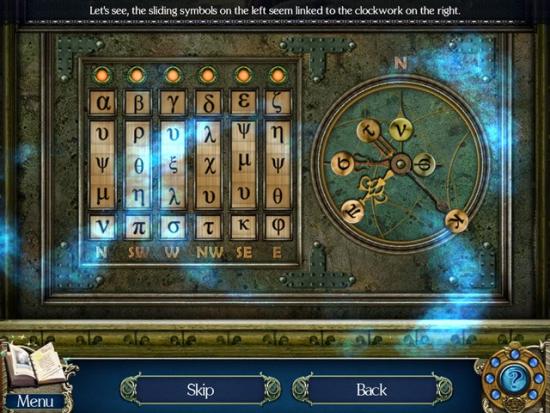
- Another mini-puzzle starts. On the left, drag the strips so the first six letters of the Greek alphabet appear in the top portion. At the bottom of each strip is a direction. On the right, adjust the hands so they proper symbol is pointing to its proper direction.
- Solution:
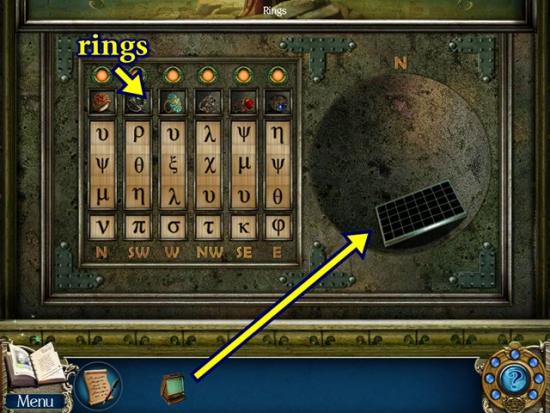
- Once you are finished, the panel opens. Add the rings.
- When the panel opens, put the portable microfiche viewer on the microfiche. Watch the cutscene. Take the cabinet key.
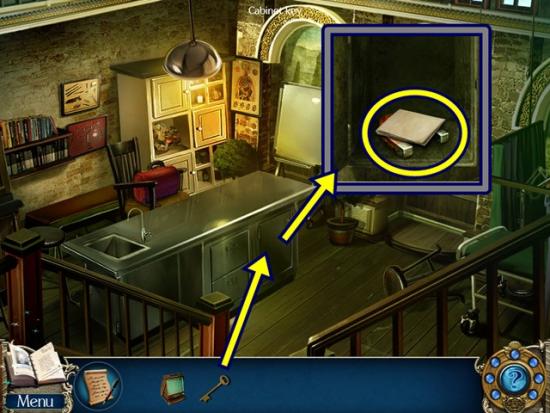
- Click on the cabinet. Unlock it with the cabinet key. Take Giovanni’s formula and the magnet. Return to the winery.
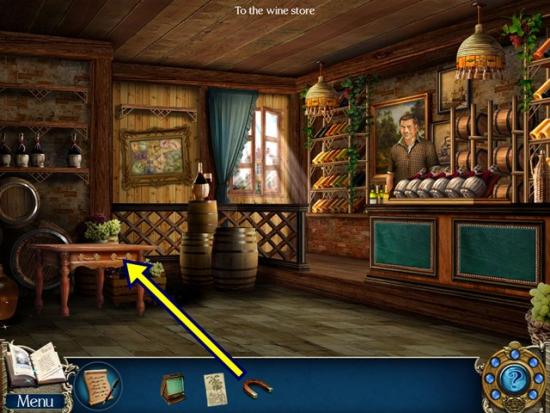
- Click on the wine rack. Click through the dialogue. Use the magnet. A mini-puzzle starts. Move the bottles horizontally or vertically, depending on the direction of the bottles, to clear a path to allow the pink bottle to exit.
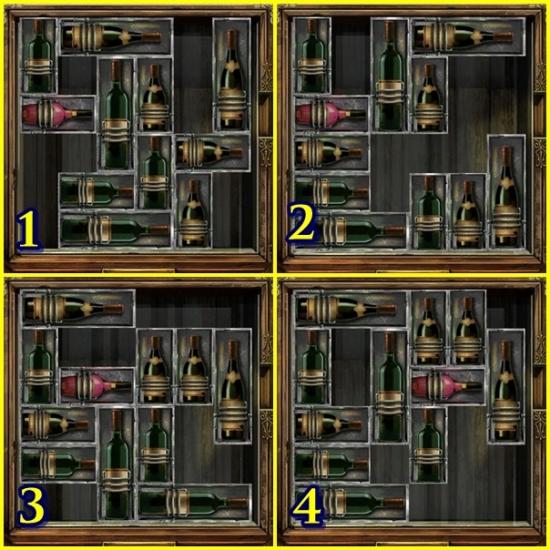
- Solution:
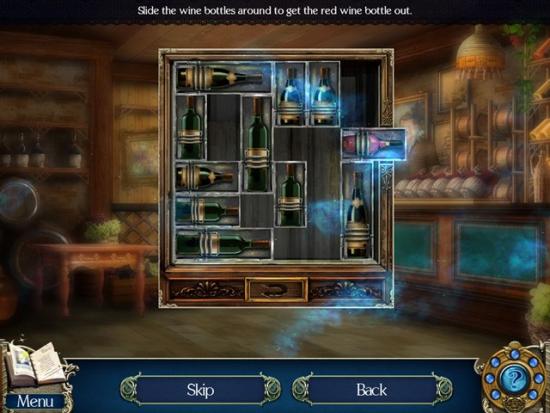
- Take the wine. Return to the town centre.

- Give the wine to the woman. Click through the dialogue. A mini-puzzle starts. Find the ingredients for the three recipes given. To find the ingredients, look for the ingredients in the recipe book. All the items are labelled.
- The first recipe is prosciutto pizza, the second for brasato al Chianti, the third for spaghetti alla Puttanesca. The screenshot below shows the three recipes.
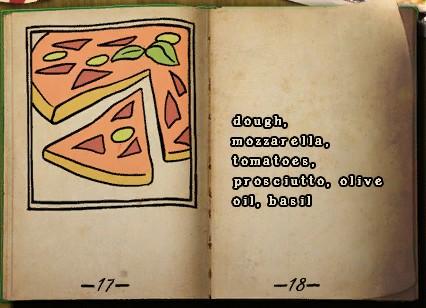
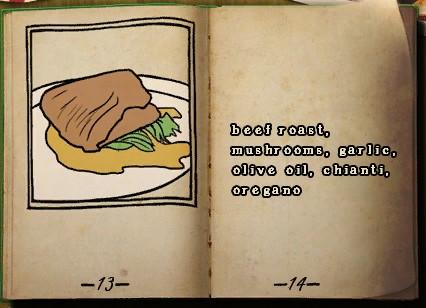
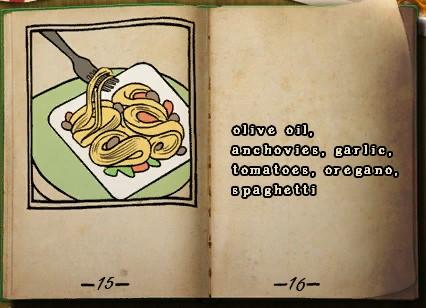
- When you are finished, you are given a scooter voucher. Go to the scooter rental.
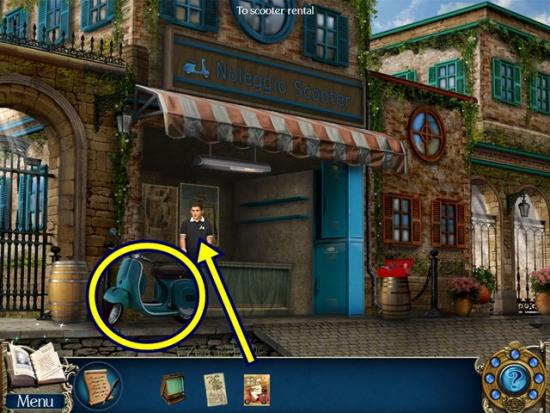
- Give the scooter voucher to the scooter rental owner. Click on the scooter.
Chapter 4
- Talk to the monk. Click through the dialogue.
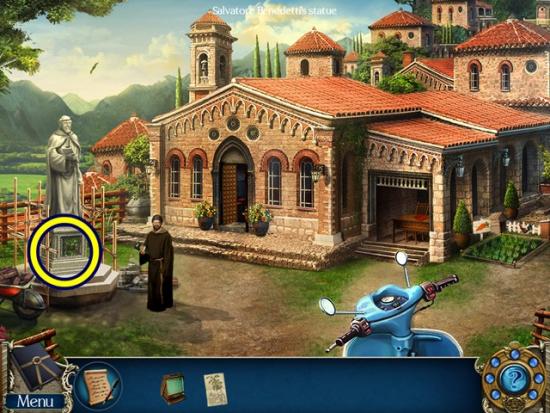
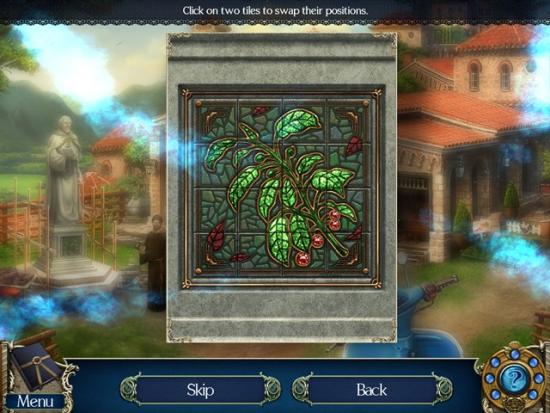
- Click on the statue. Click on the plaque. A mini-puzzle starts. Swap the tiles to recreate the image.
- Solution:
- Enter the courtyard.
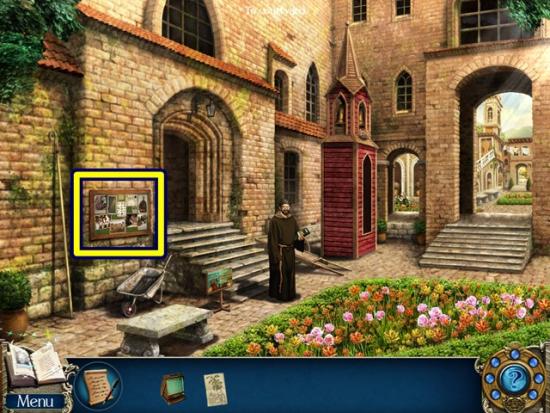
- Click through the dialogue. Click on the bulletin board to start a hidden object hunt.
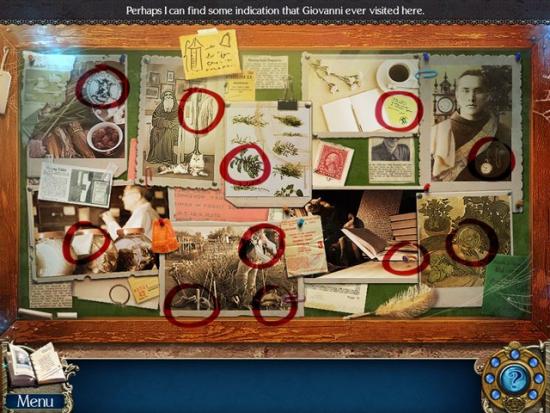
- Find all the objects based on the images. Click through the dialogue.
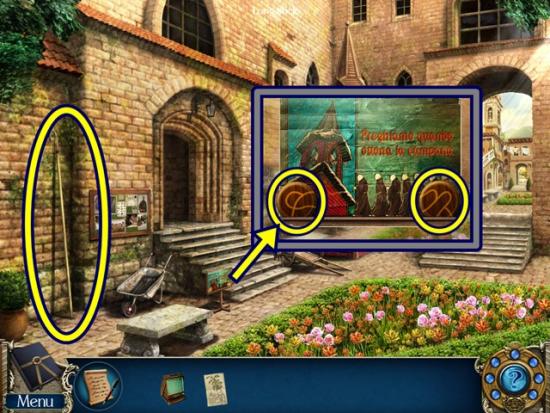
- Take the long stick. Click on the prayer schedule. Take the two wooden tiles (2/8). Read the sign. Click anywhere outside the window to close it. Return to outside the monastery.
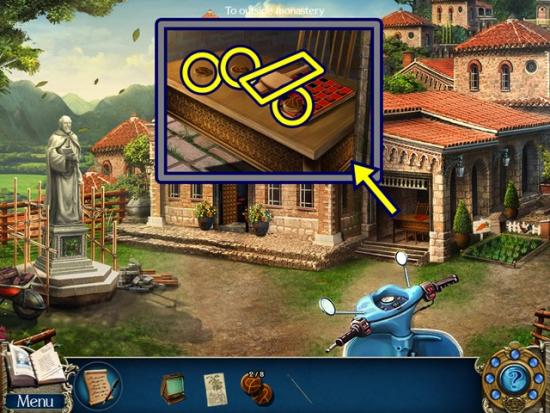
- Click on the porch. Take the three wooden tiles (5/8) and the mallet. Return to the courtyard and go to outside the tower.
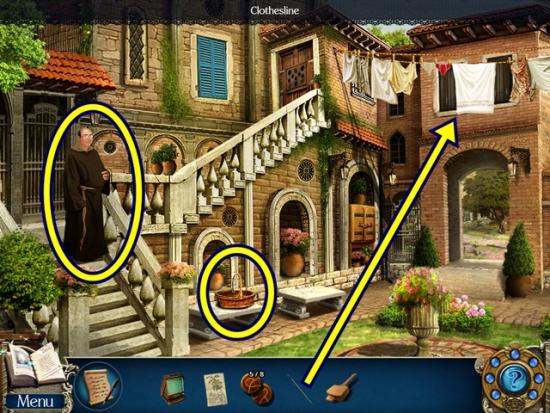
- Talk to the monk. Click through the dialogue. Take the basket. Click on the clothesline. Use the long stick to take the blanket. Return to the courtyard.
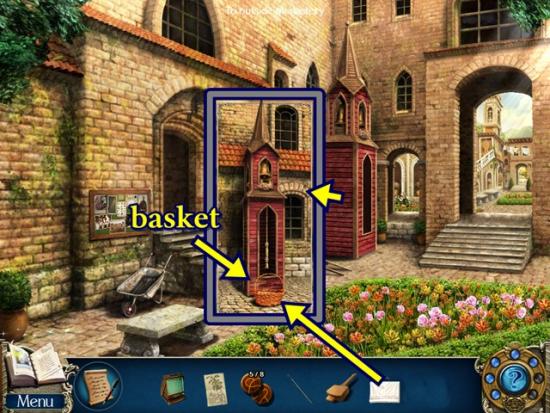
- Click on the prayer bell. Put the basket in front of the prayer bell, then add the blanket. Click on the prayer bell to put the baby birds in the basket. Ring the bell.
- Enter the herb garden.
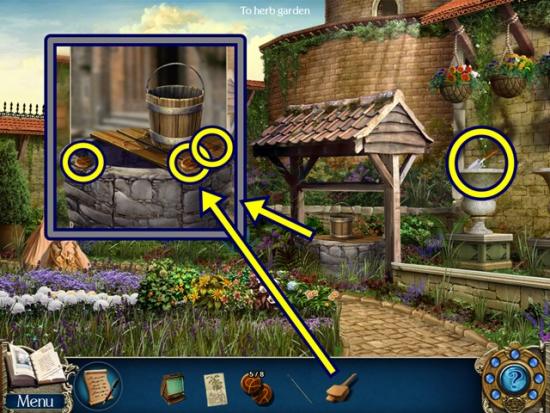
- Take the trowel. Click on the well. Take the three wooden tiles (8/8). Smash the boards with the mallet to get the bucket of water.
- Return to the outside of the tower.
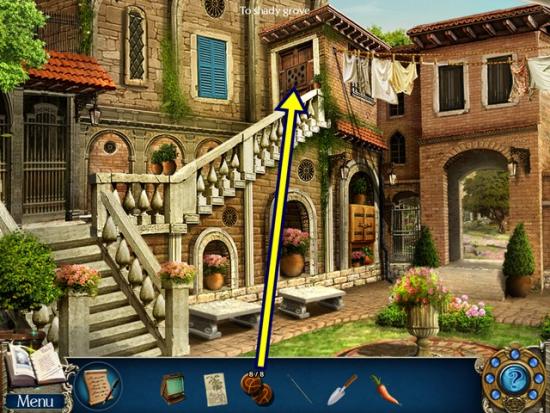
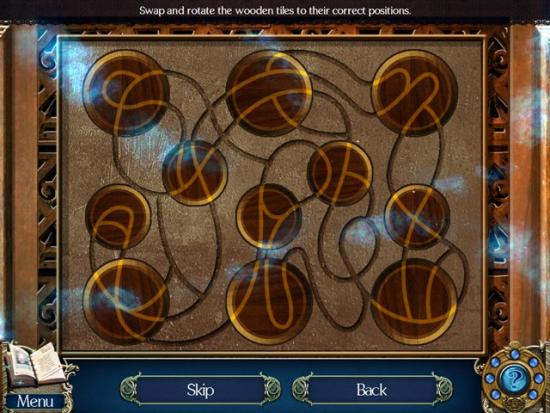
- Click on the big oak door. Add the eight wooden tiles. A mini-puzzle starts. Swap and rotate the tiles to complete the image.
- Solution:
- Enter the tower.
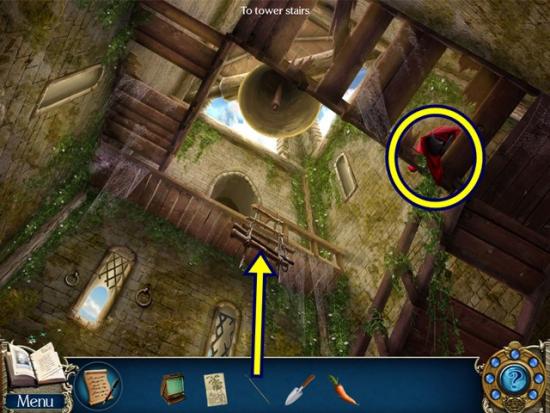
- Click on the cloth. Take the three mosaic parts (3/6). Use the long stick to untangle the rope ladder. Climb up to the abbot’s room.
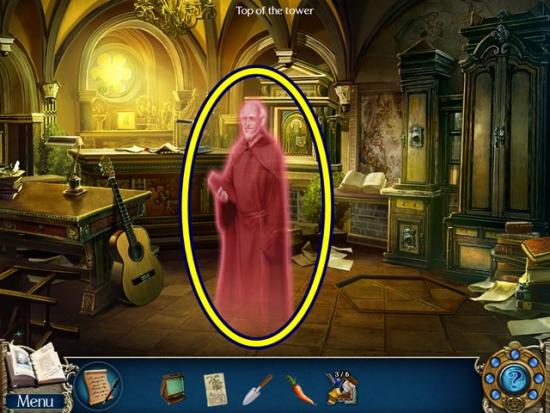
- Click on the abbot’s ghost.
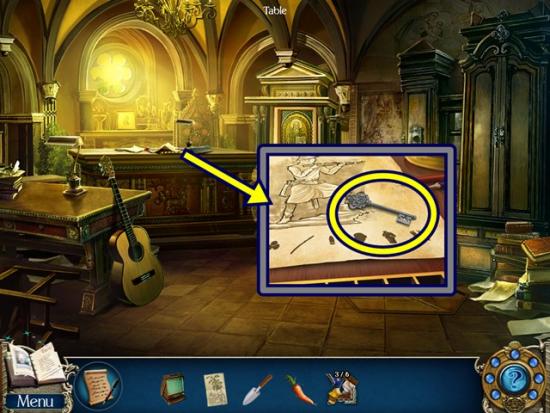
- Click on the table. Take the supply key. Click anywhere outside the window to close it. Return to the outside of the tower.
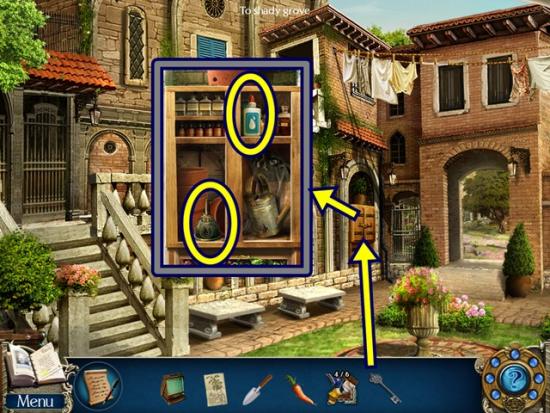
- Click on the supply cabinet. Open with the supply key. Take the oil and the glue. Return to the to herb garden.
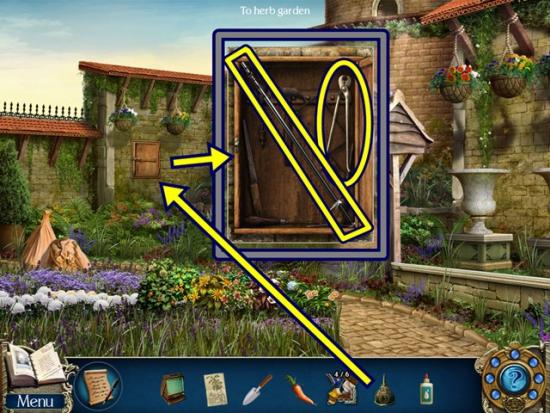
- Click on the tool cabinet. Use the oil on the lock. Take the wooden pole and the nail puller.
- Return to the outside of the tower and go to the shady grove.
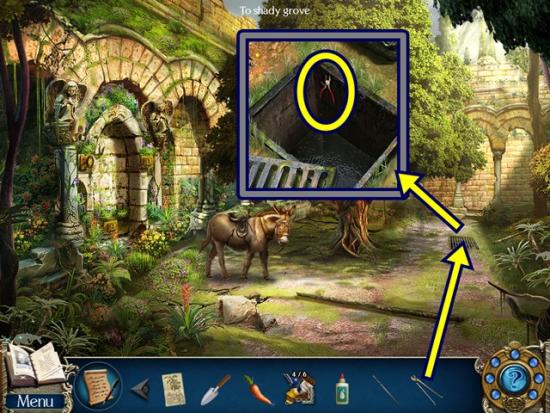
- Click on the drain. Remove the cover with the nail puller and take the wire cutters. Return to the tower.
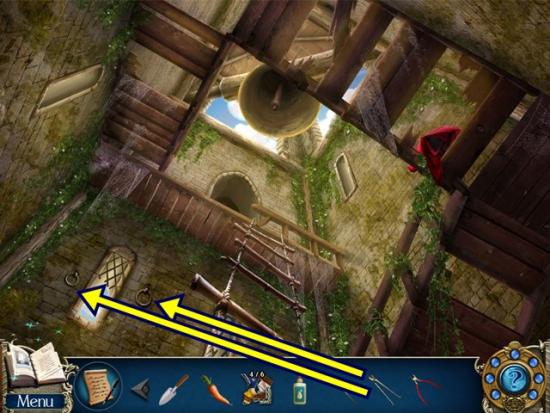
- Click on the tower wall. Use the nail puller to remove the two metal rings (2/2). Return to the abbot’s room.
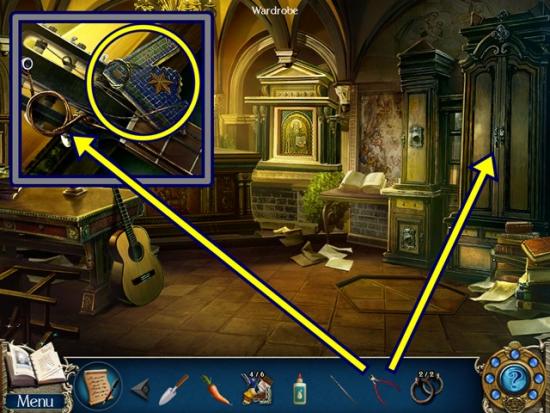
- Click on the guitar. Take the mosaic part (4/6). Cut the guitar string with the wire cutters to get the pole with string.
- Click on the wardrobe. Cut the wire with the wire cutters and open both cabinets.
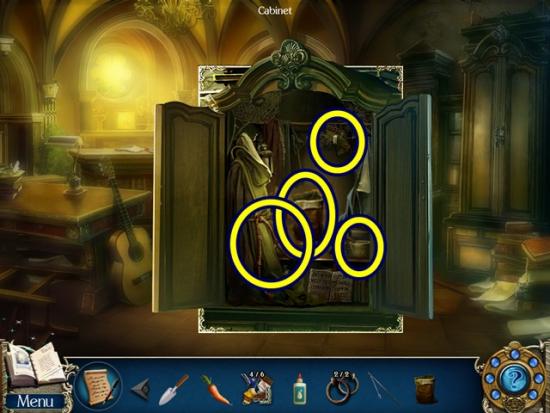
- Take the sack, the two mosaic parts (6/6) and the rope belt.
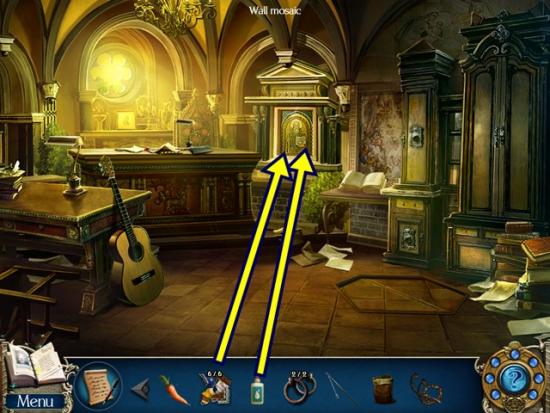
- Click on the wall mosaic. Add the glue and the six mosaic parts. A mini-puzzle starts. Recreate the mosaic.
- Solution:
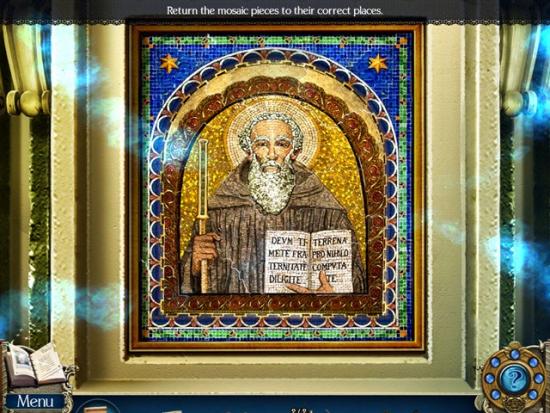
- Add Giovanni’s formula. A mini-puzzle starts. Find the differences.
- Solution:
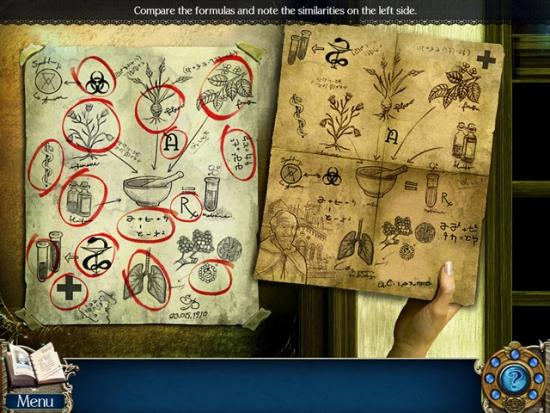
- Take the forged formula.
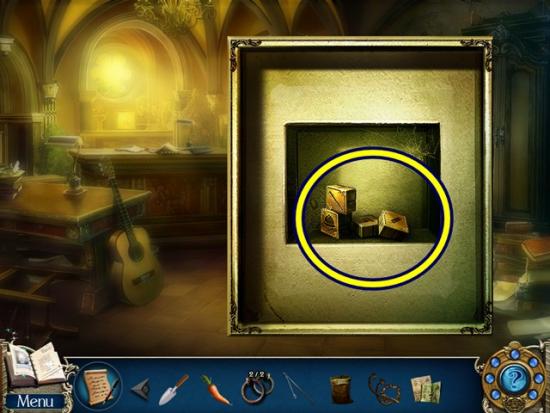
- Take the golden cubes.
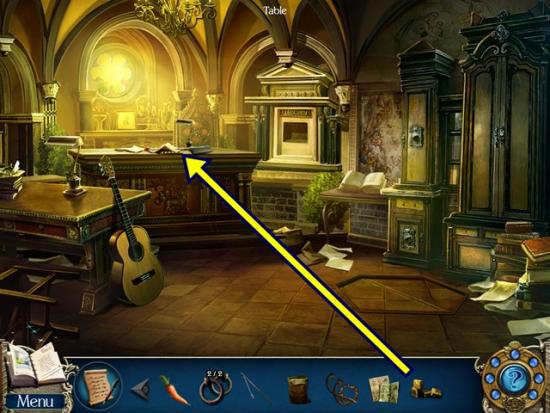
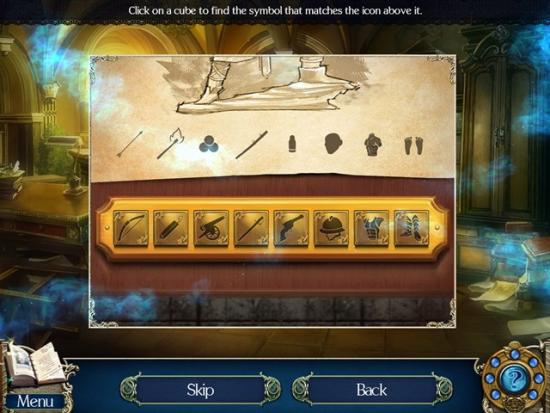
- Click on the table. Add the golden cubes. A mini-puzzle starts. Adjust the cubes so they match the symbol above it.
- Solution:
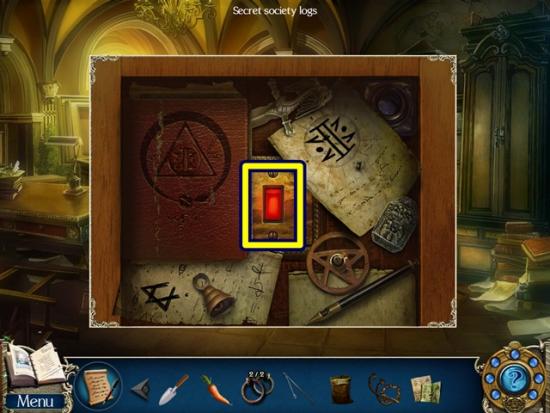
- Move the items (click and drag) to reveal the switch. Click the switch.
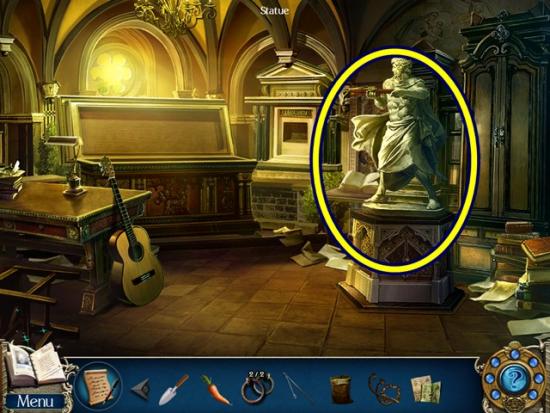
- Click on the statue. A mini-puzzle starts. Press the buttons in the proper sequence so all buttons are lit up. Solve this puzzle using trial and error. To begin, press all the buttons until one remains lit. That is your starting point. With the first button selected, press another button. If the first button is no longer lit, press it again, then press another button. Continue until the second button (and the first) remain lit. Continue until all the buttons are lit.
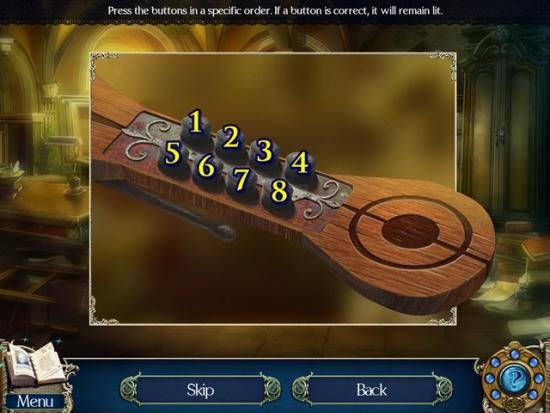
- Assuming the buttons are labelled 1-8, in the following order, press buttons 3, 6, 5, 1, 4, 8, 7, 2.
- Return to the shady grove.
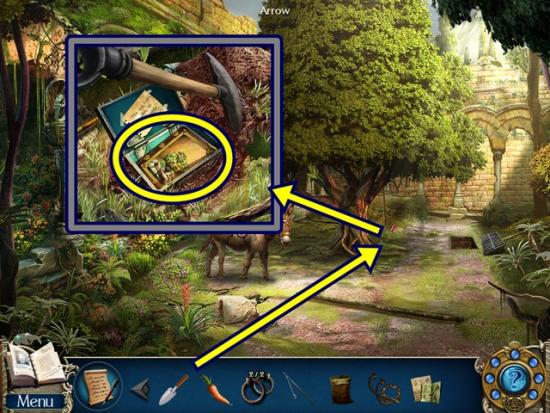
- Click on the arrow. Dig up the soil with the trowel (three clicks). Open the box and take the book of herbs. Read about ant killers (added to your journal). Click anywhere outside the window to close it.
- Return to outside of the monastery.
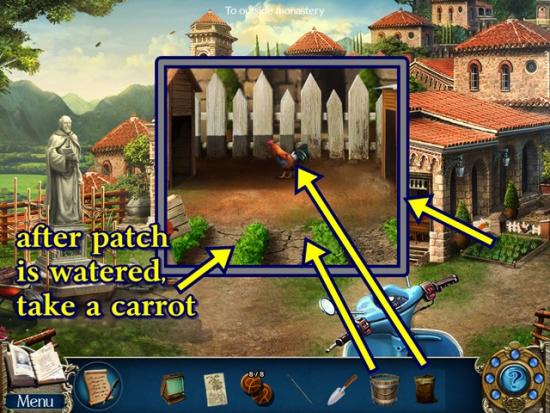
- Click on the carrot patch. Pour the bucket of water on the dry carrot patch, then take a carrot. Use the sack to catch the rooster. The rooster in a sack is added to your inventory.
- Return to the herb garden.
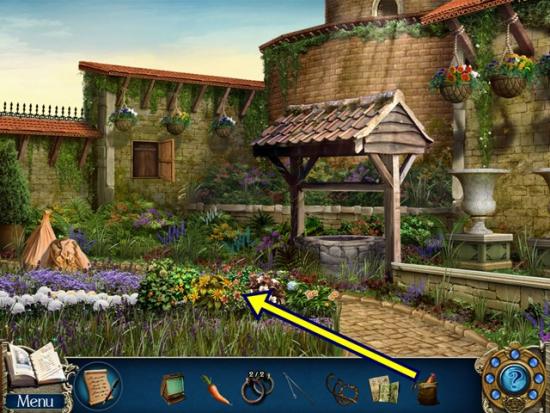
- Click on the herb patch. Use the rooster in a sack to eat the worms. Click on the herb patch to start a hidden object hunt. Find all the objects based on the images at the bottom. You will take a flower from each bunch. The natural ant killer is added to your inventory. Return to the shady grove.
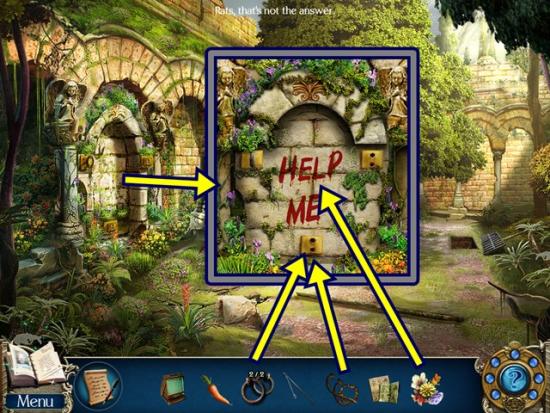
- Click on the wall. Add the natural ant killer to kill the ants, then add the metal rings. Finally, add the rope belt.
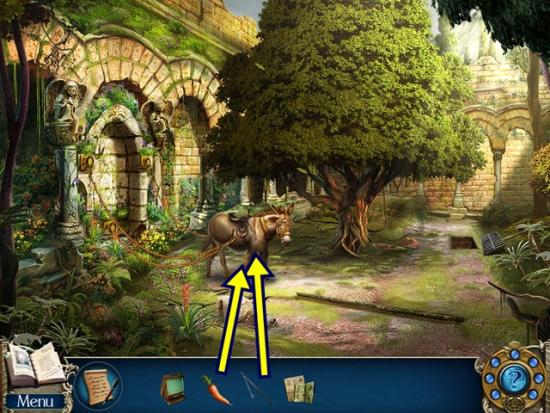
- Click on the donkey. Add the pole with string, then add the carrot.
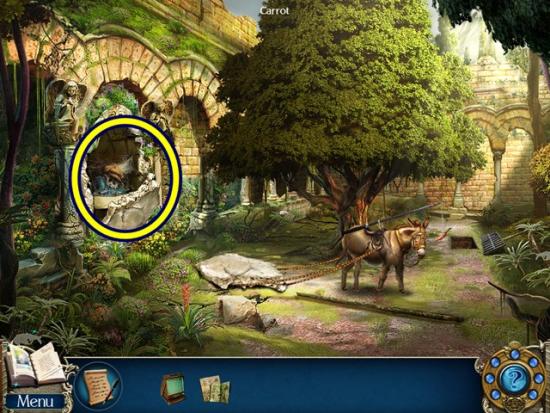
- Click on the crypt wall to start a hidden object hunt. Find all the objects based on the images at the bottom. You are given a microfiche and evidence is added to your inventory.
- Watch the cutcscene.
Chapter 5
- Talk to the Professor Romano. Click through the dialogue.
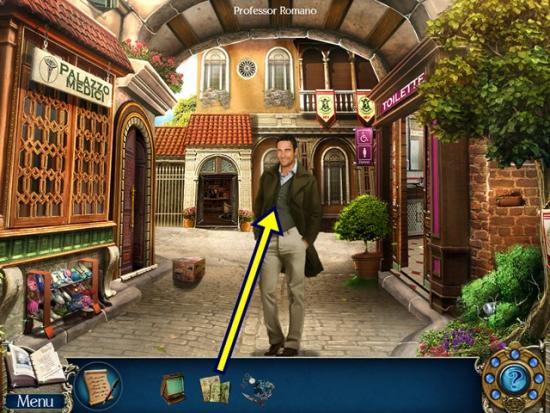
- Give the forged formula to the Professor. Click through the dialogue.
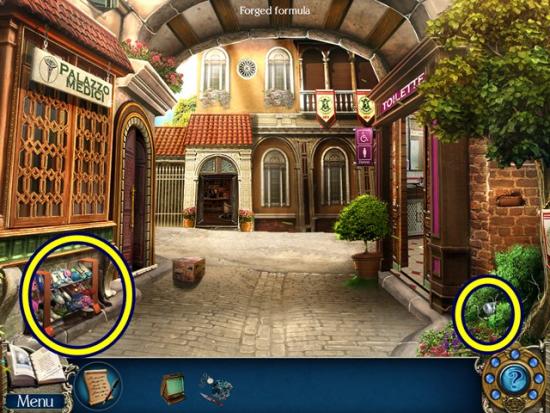
- Click on the bush and take the cotton. Click on the shoe rack to start a hidden object hunt.
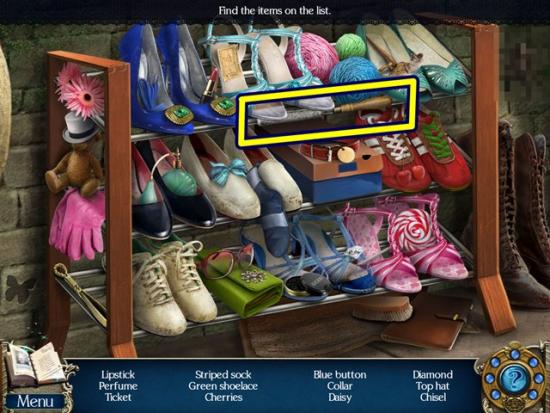
- Find all the objects. A chisel is added to your inventory.
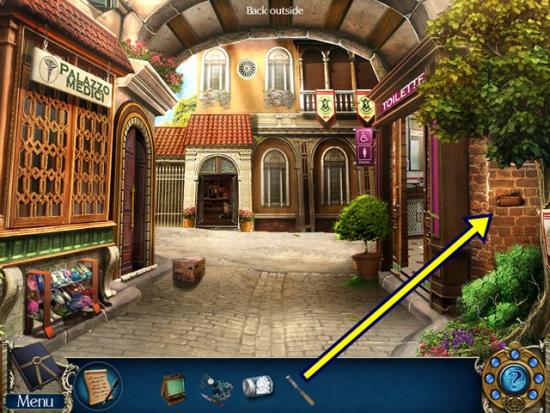
- Click on the wall. Use the chisel on the loose brick to get the brick. Enter the medical building hallway and continue to the laboratory.
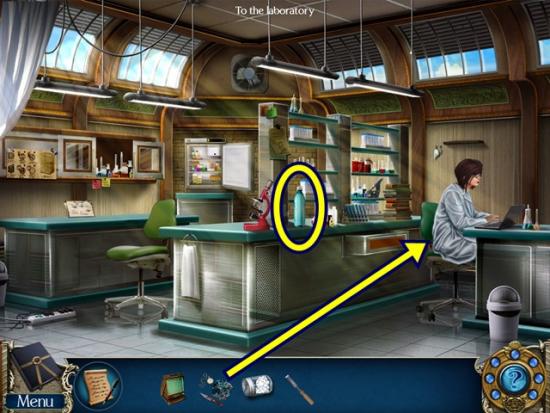
- Talk to the lab assistant. Click through the dialogue. Give the evidence to her. Click through the dialogue. Take the empty bottle.
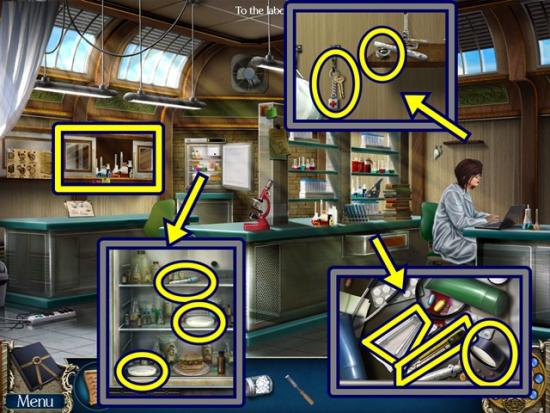
- Click on the drawer. Move the items around and take the microscope parts (1/3), cutter and tongs. Click on the refrigerator. Take the dropper and two Petri dishes to get the dirty lab equipment (3/3). Click on the shelf. Take the microscope parts (2/3) and the keys.
- Click on the cabinet to start a hidden object hunt.
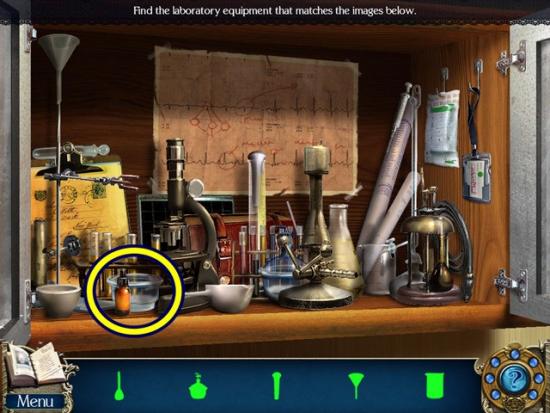
- Find all the objects. Bowls are added to your inventory. Return to the medical building hallway.
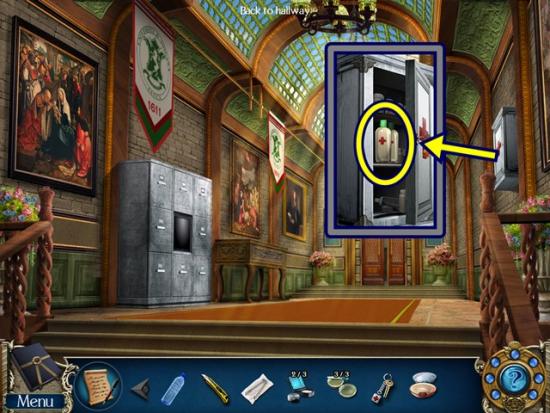
- Click on the first aid kit. Unlock it with the keys. Take the alcohol. Return to outside the university buildings.
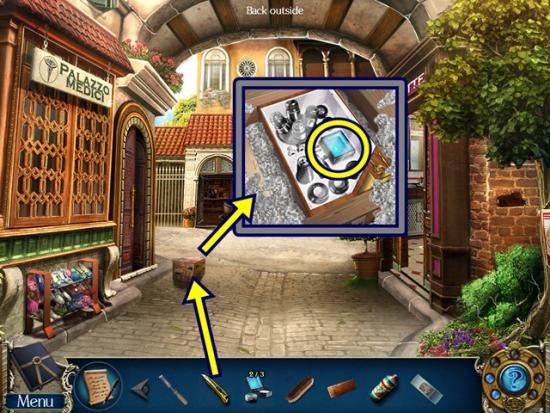
- Click on the box. Use the cutter to cut open the box. Draw a line along the middle of the box (where you would cut to open it), from one end to the other. Move the packing peanuts and take the microscope parts (3/3). Enter the girl’s restroom (right).
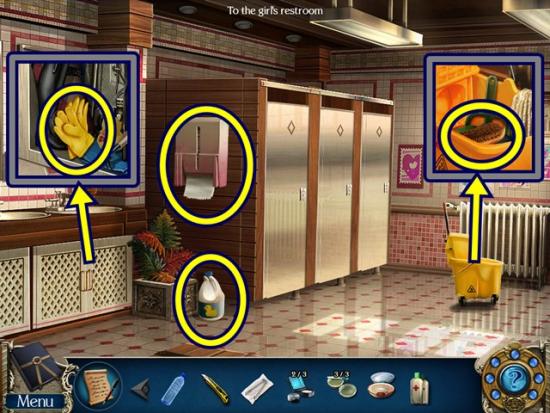
- Take the bleach. Click on the tissue paper dispenser and take three pieces of tissue paper (3/3). Click on the trolley and take the brush. Click on the cabinet doors below the sink (both door). Take the rubber gloves.
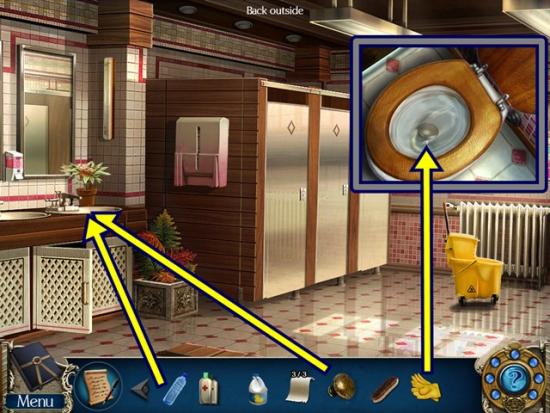
- Click on the middle cubicle (stall) door. Use the rubber gloves to take the dirty knob. Click on the sink. Fill the empty bottle with water to get the bottle of water. Add the dirty knob to get the clean knob. Return to the medical building hallway.
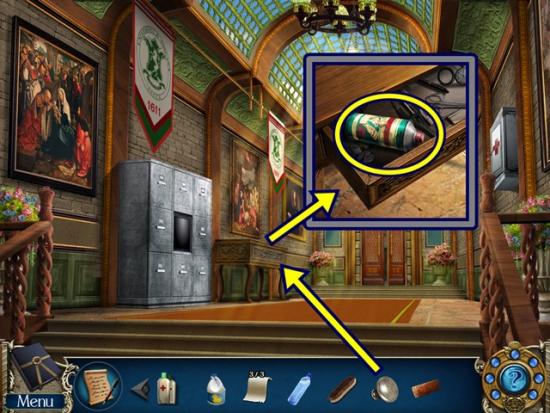
- Click on the desk. Add the clean knob. Take the thinner. Enter the laboratory.
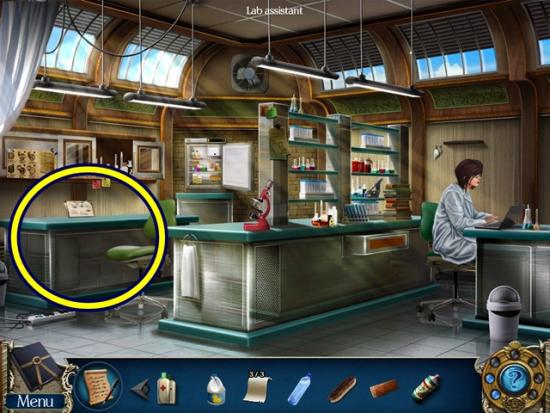
- Click on the counter.
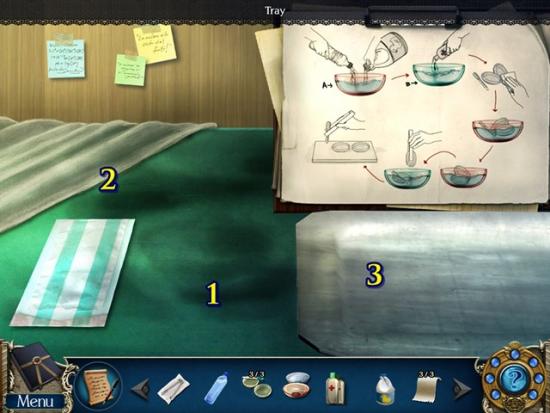
- Put the bowls on the counter (1). Fill the red bowl with the bottle of water and the bleach. Fill the blue bowl with alcohol. Put the dirty lab equipment (3/3) on the counter (2) and wipe with the tissue paper, then take the unsterilized equipment. Add the unsterilized equipment to the red bowl, then pick it up with the tongs and add to the blue bowl, then (still using the tongs), put the equipment on the tray (3) and take the tray with clean equipment.
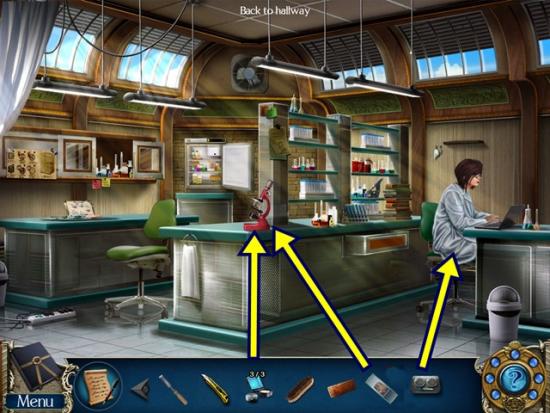
- Give the tray with clean equipment to the lab assistant and receive the cloth specimen. Click on the microscope. Add the microscope parts (3/3), then the cloth specimen. A mini-puzzle starts. Rotate the rings to bring the microscope lens into focus. Be mindful of which ring you are rotating. Use the faint outline to adjust the rings.
- Solution:
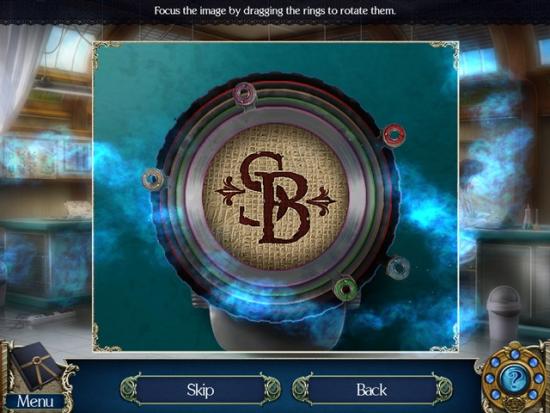
- Click through the dialogue. The pocket watch is added to your inventory. Return to the medical building hallway.
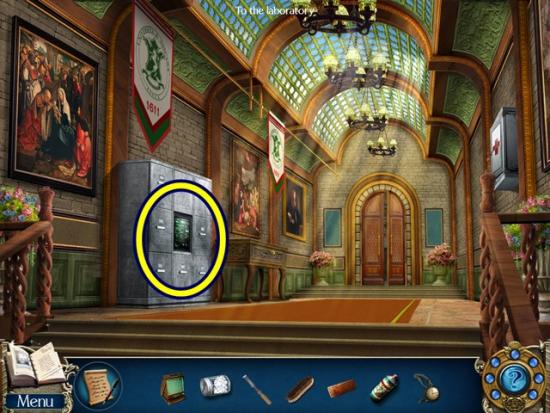
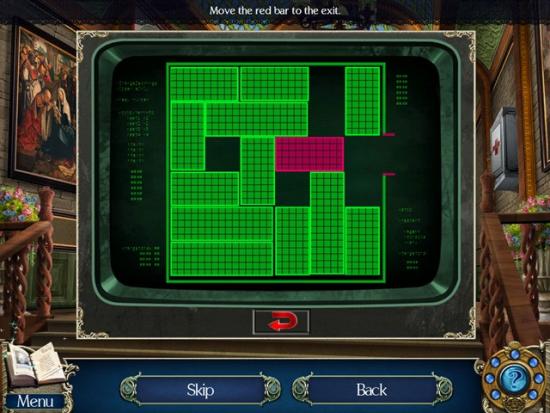
- Click on the records cabinet, then click on the computer terminal. A mini-puzzle starts. Slide the green blocks horizontally or vertically (depending on their direction) to clear a path to slide the red block out the exit.
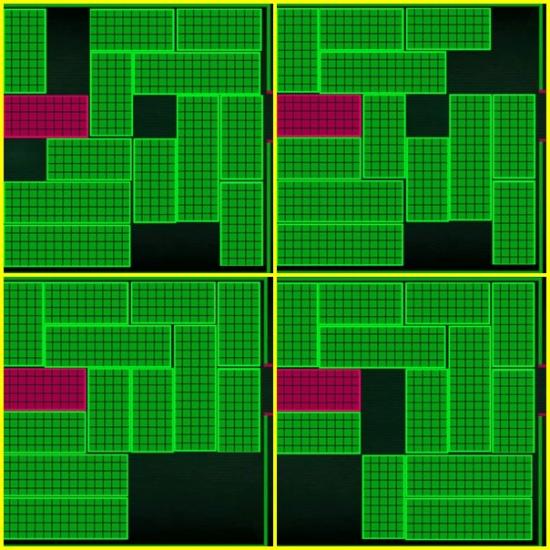
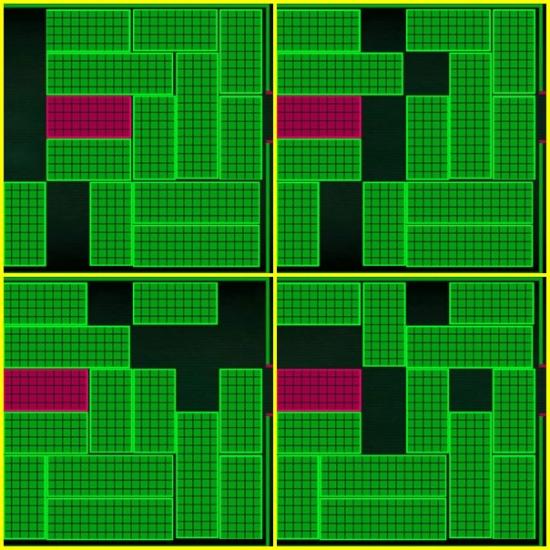
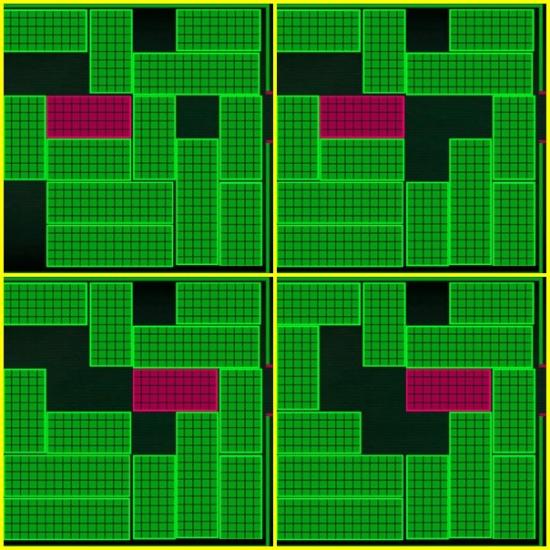
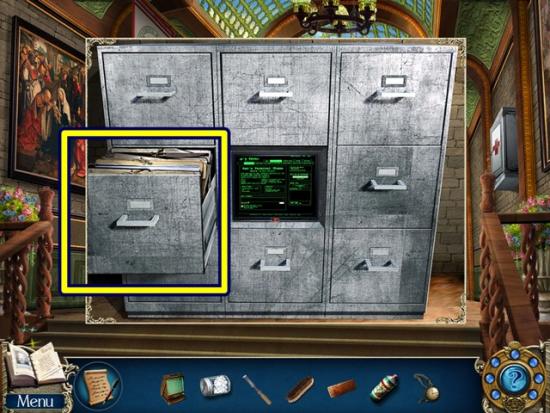
- Click on the open drawer. Click to search the records. Click on the list of medical directors. Click anywhere outside the window to close it.
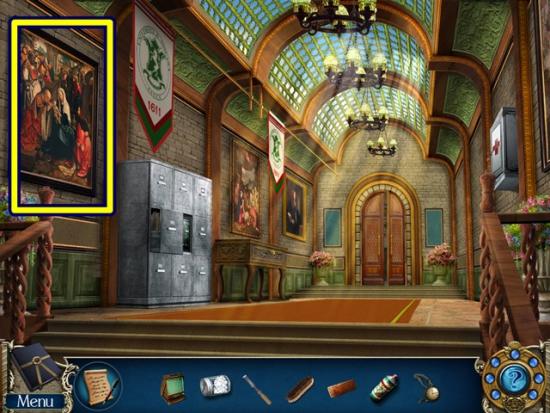
- Click on the painting. Knock the painting down to reveal a safe. Click on the painting again.
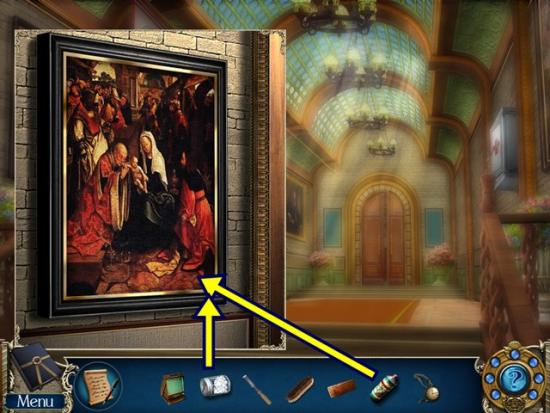
- Add the thinner to the bottom corner of the painting, then wipe it with the cotton (three clicks) to reveal a code (added to your journal). Click anywhere outside the window to close it.
- Click on the safe. A mini-puzzle starts. Open the safe using the code revealed in the painting.
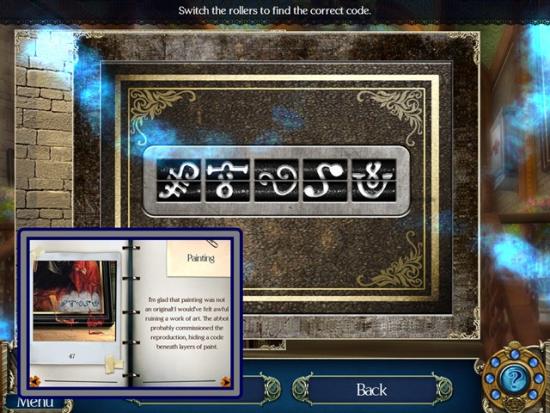
- Take the envelope, open it and read the confession letter.
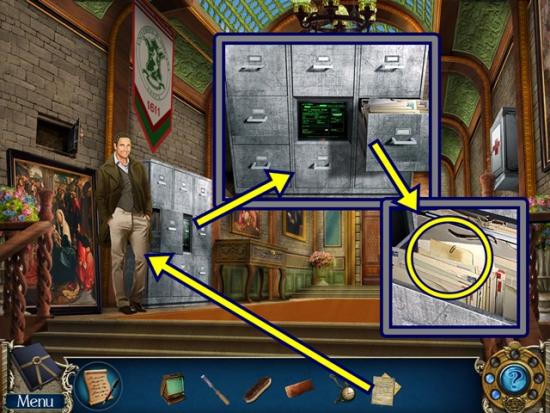
- Talk to Professor Romano. Click through the dialogue. Give him the confession letter. When he leaves, click on the records cabinet. Click on the open drawer (on the right) and click to search the records. Read the letter for Eva, then take Eva’s address.
- Return to outside the university buildings, then enter the girl’s dorm.
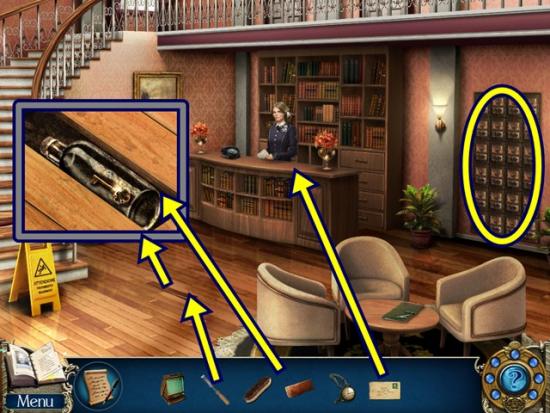
- Talk to the student representative. Click through the dialogue. Give her Eva’s address. Click through the dialogue. Click on the floorboard. Remove it with the chisel. Smash the bottle with the brick and take the post box key. Click on the post box. Open the box with the post box key.
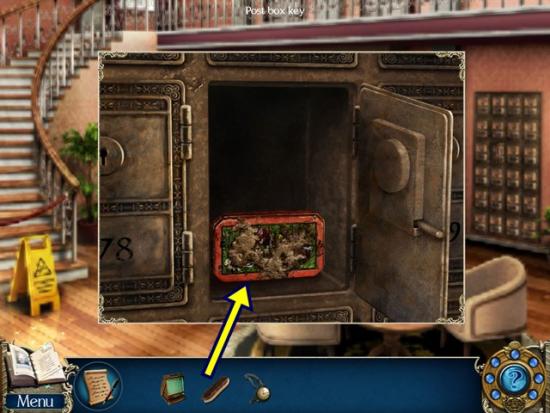
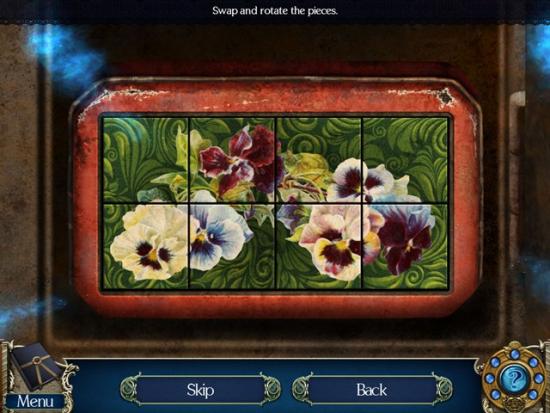
- Clean the tin can with the brush. Click on the tin can. A mini-puzzle starts. Swap and rotate the tiles to complete the image.
- Solution:
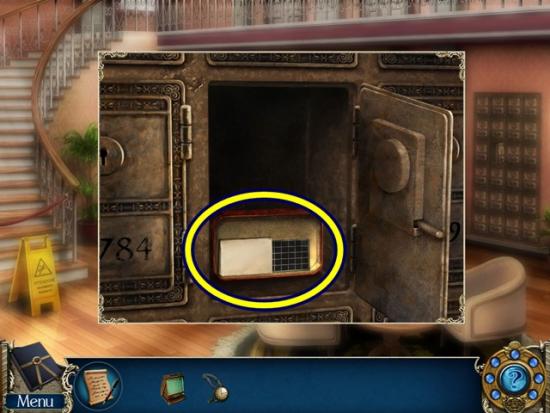
- Click on the folded note and read it. Add the portable microfiche viewer to the microfiche. Watch the cutscene.
Chapter 6
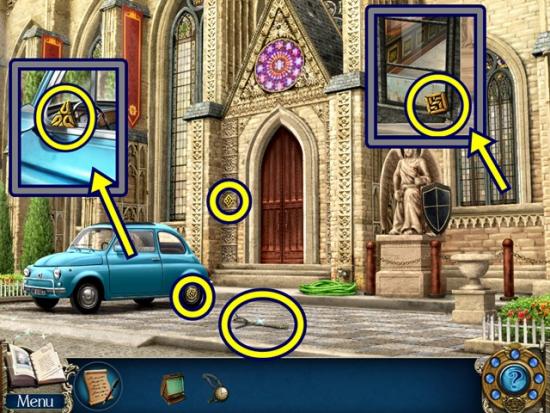
- Take the branch, the diamond badge and the round badge. Click on the car door. Take the triangle badge. Click on the window. Take the square badge.
- Click on the statue.
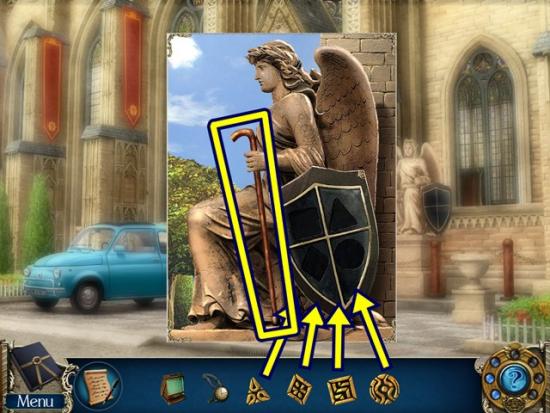
- Add the four badges. Take the staff.
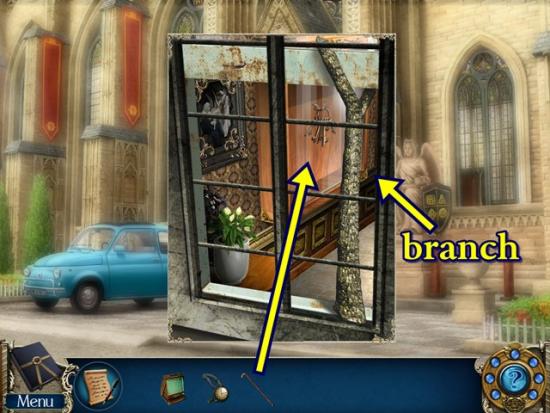
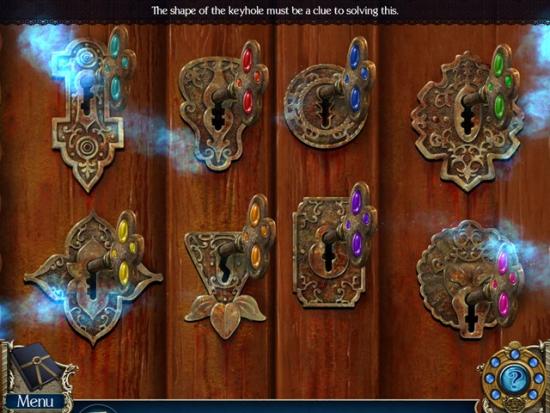
- Click on the window. Prop it open with the branch. Use the staff to get the keys. Use the keys on the cathedral door. A mini-puzzle starts. Open each lock with the correct key. Select a key and match its shape to the proper keyhole.
- Solution:
- Enter the cathedral.
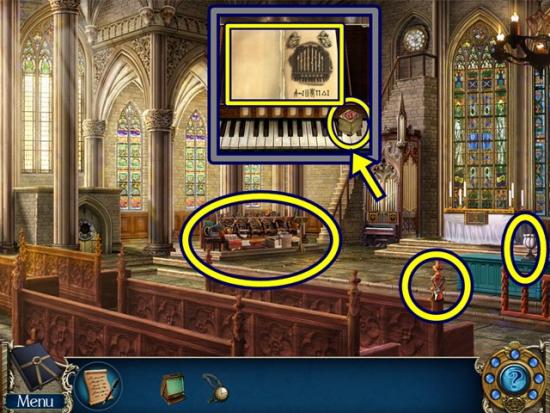
- Take the vase. Click on the bench. Take the car key. Click on the pipe organ. Take the cube (1/2) and the code page (added to your journal). Click anywhere outside the window to close it. Click on the choir area to start a hidden object hunt.
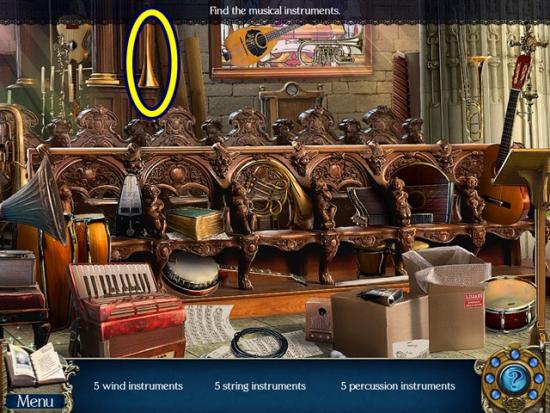
- Find all the objects. A trumpet is added to your inventory. Return to the outside of the cathedral.
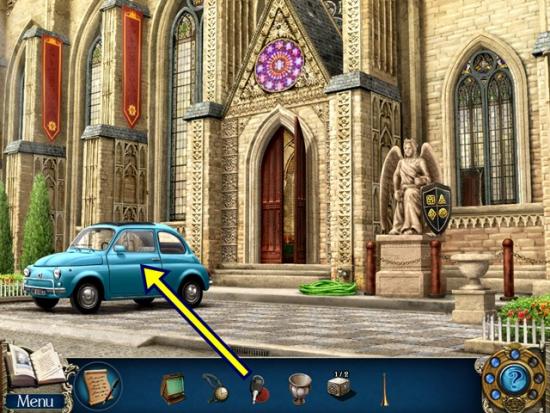
- Click on the car door. Unlock it with the car key.
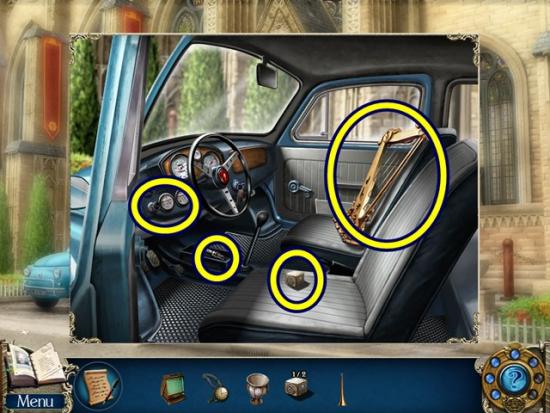
- Take the harp, spark plug and the cube (3/3). Click on the dashboard and press the hood release button. Return to the cathedral.
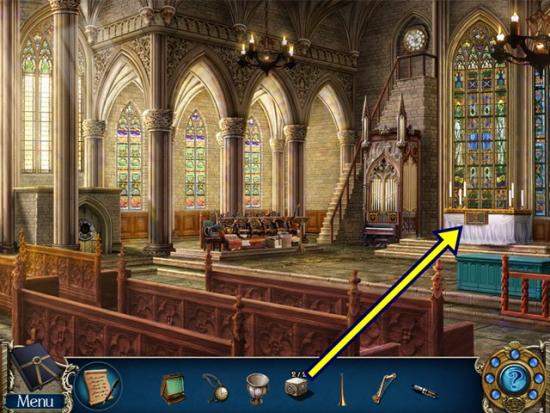
- Click on the altar. Add the two cubes. A mini-puzzle starts. Click on the cubes so they all change colours. Clicking on a cube will change the colour of it and its surrounding cubes. On the left, make the cubes turn green and the cubes on the right need to turn red.
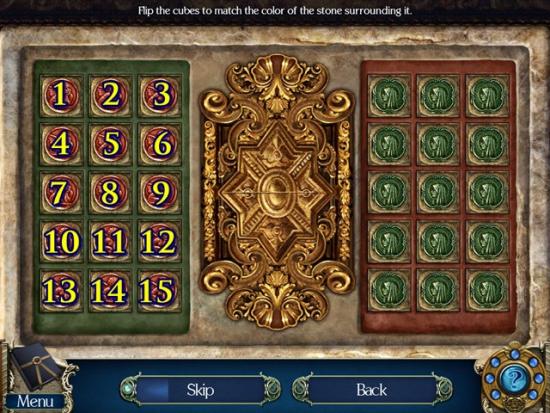
- Assuming the cubes are labelled 1-24 (screenshot above), for each set, click the cubes in the following order: 5, 1, 3, 7, 9, 14.
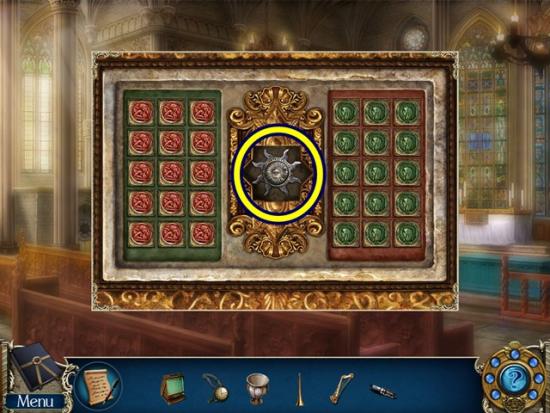
- Take the sun disk.
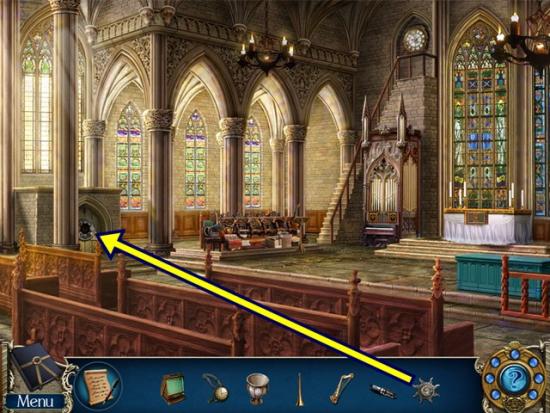
- Click on the door to tunnels. Add the sun disk. Enter the tunnels.
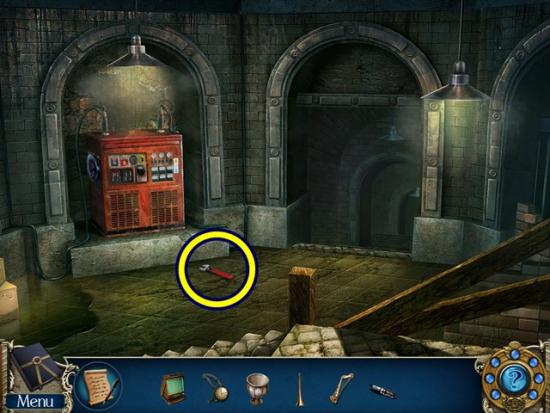
- Take the wrench. Return to the outside of the cathedral.
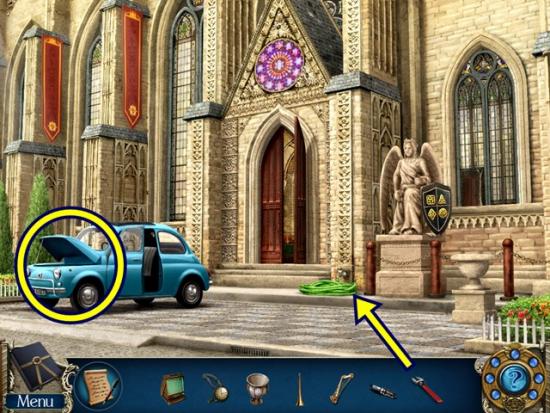
- Click on the faucet. Remove the hose with the wrench. Click on the car hood.
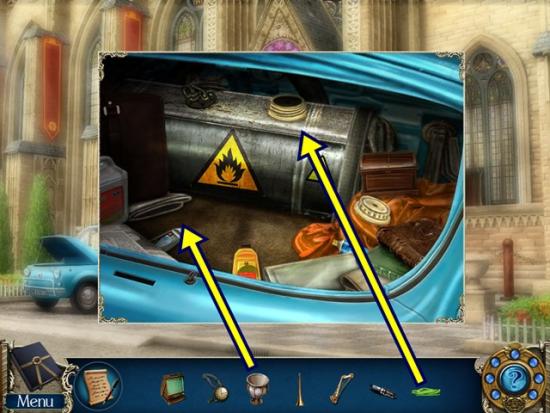
- Remove the fuel tank cover. Add the hose to the fuel tank. Add the vase to the other end of the hose. Take the vase with fuel. Return to the tunnel.
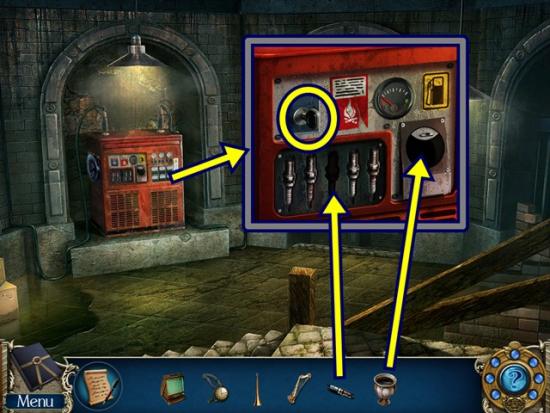
- Click on the generator. Add the spark plug and pour the vase with fuel into the fuel hole. Flip the switch. Enter the catacombs.
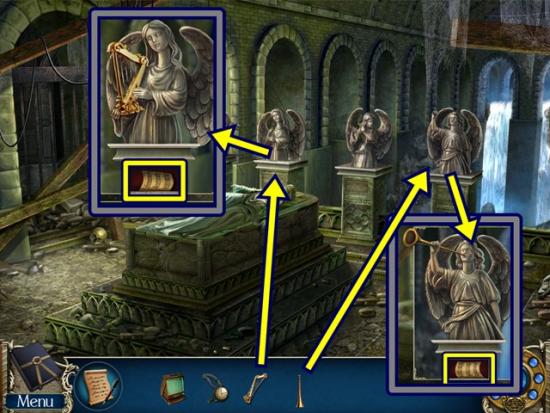
- Click on the second from the left statue. Put the harp on the statue and take the music sheet (1/2). Click on the fourth from the left statue. Put the trumpet on the statue and take the music sheet (2/2). Return to the cathedral.
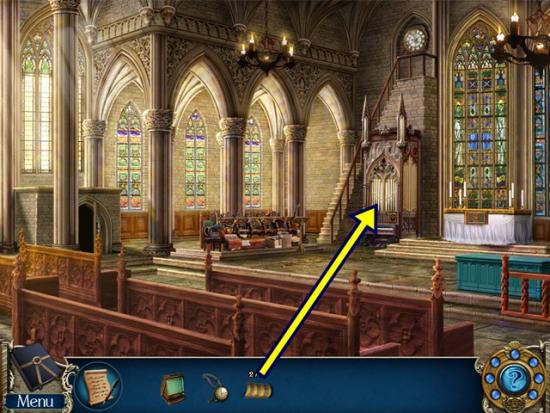
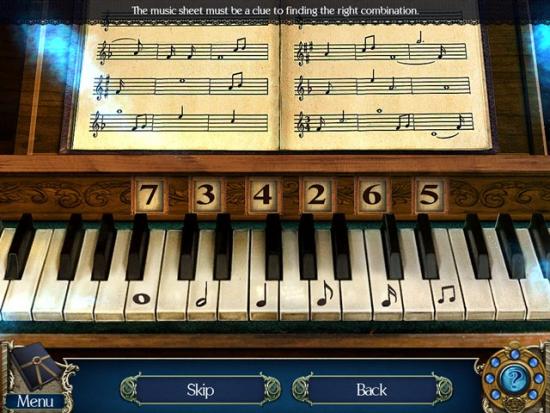
- Click on the pipe organ. Add the two music sheets. A mini-puzzle starts. From the sheet music, count how many instances each note appears. Then press each note’s corresponding key until it displays the amount of times its note appears.
- Solution:
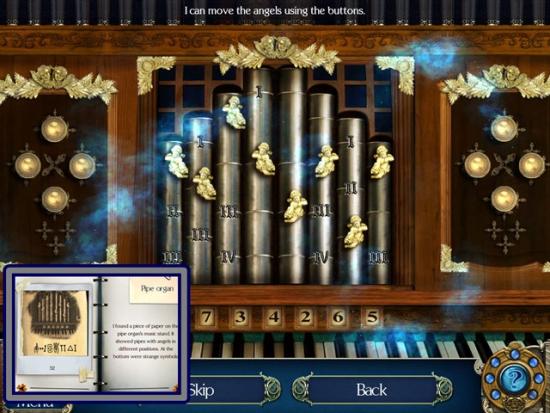
- A mini-puzzle starts. Arrange the angels so they match the code you found on the pipe organ (it’s in your journal). Each pipe has three or four marks. Each button moves an angel. Adjust each angel so it’s on the appropriate marker. Translating the symbols of the code, it reads: 1-2-1-2-3-2-3-1.
- Solution:
- Take the flute that appears. Return to the catacombs.
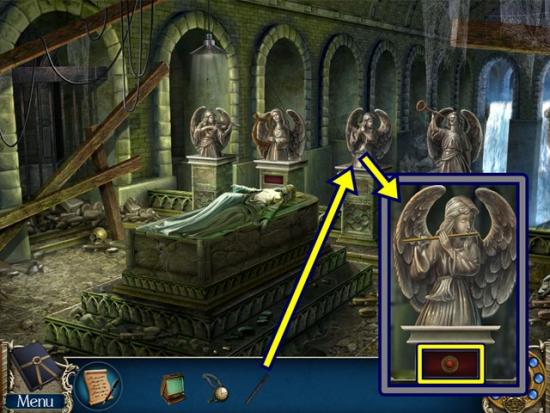
- Click on the third from the left statue. Add the flute. Press the hidden switch that appears.
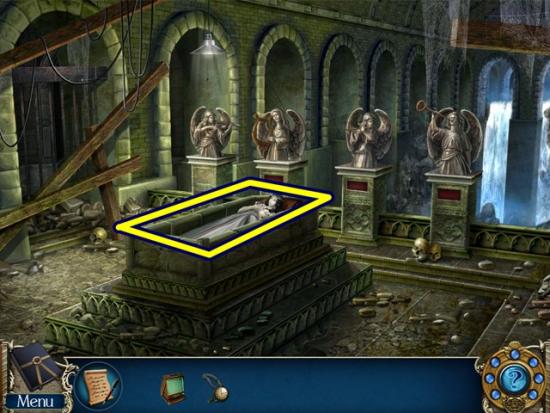
- Click on the Eva’s incorrupt body.
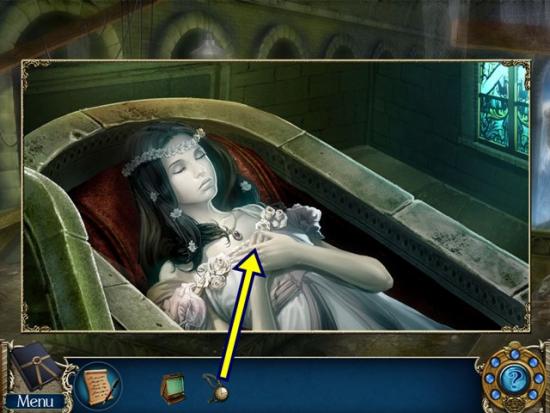
- Give her the pocket watch.
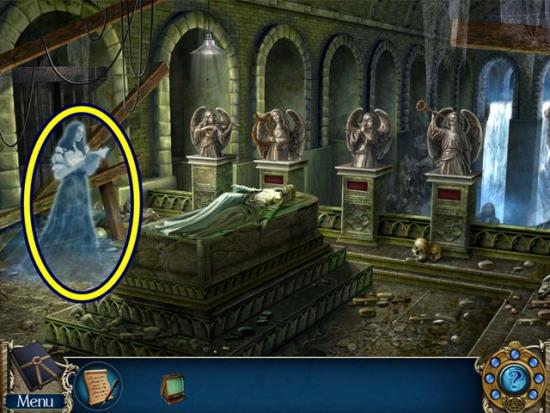
- Click on Eva’s spirit.
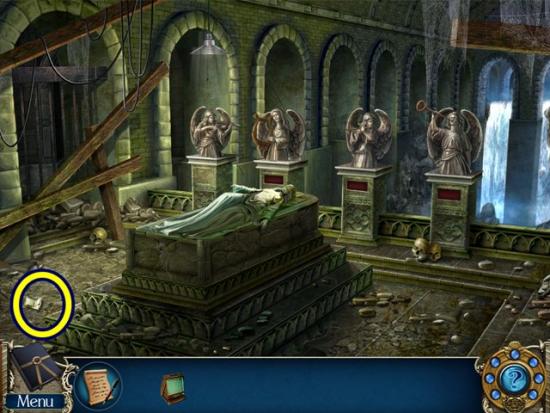
- Take the note she drops. Read the note (it’s important to click on the note). Note the time, 7:15. Click anywhere outside the window to close it. Return to the cathedral.
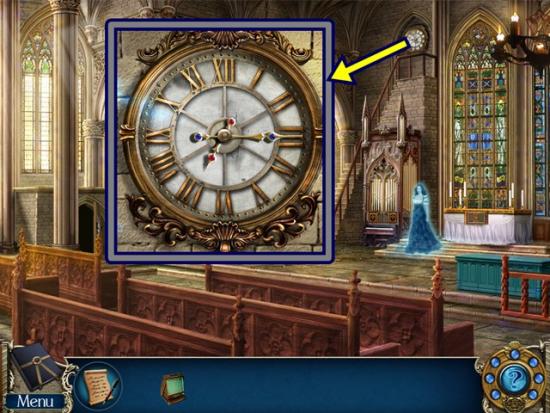
- Click on the clock. A mini-puzzle starts. Set the time to 7:15.
- Watch the cutscene.
The end!
If you are playing the Collector’s Edition, click Epilogue from the main page to play the bonus chapter.
Epilogue (Collector’s Edition Only)
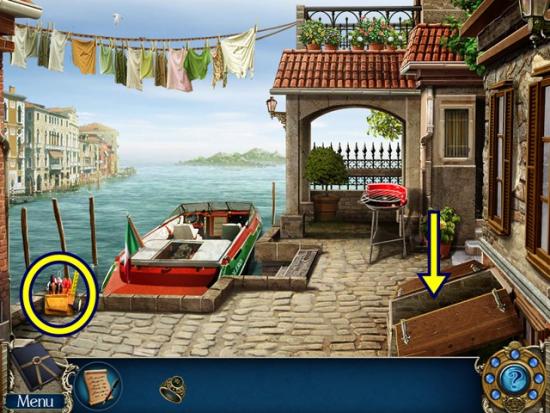
- Take the tool pouch. Enter the doctor’s office.
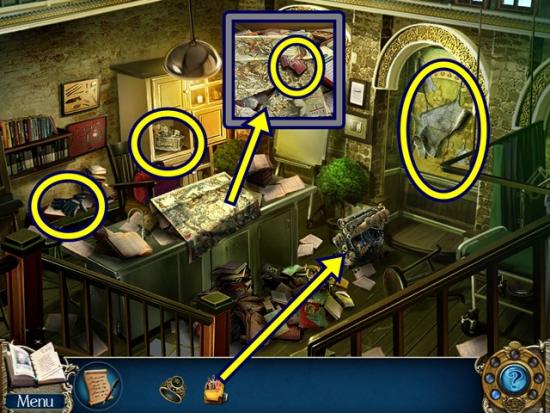
- Take the wax idol and gloves. Use the tool pouch on the old engine to get the engine parts. Click on the table. Take the lighter. Click on the family tree. Tear away Paolo’s portrait.
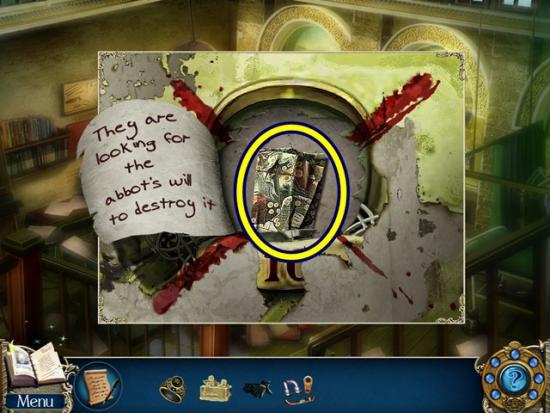
- Read the note. Take the map piece (1/2). Click anywhere outside the window to close it. Return to the back alley.
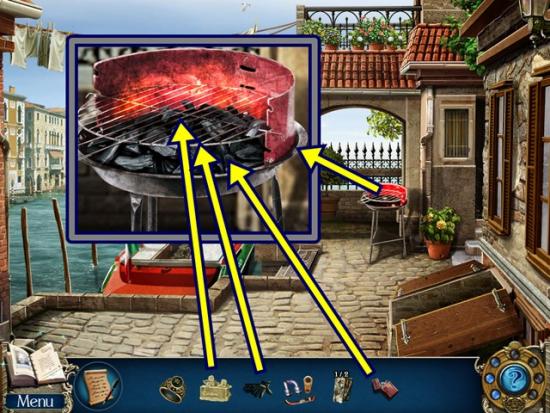
- Click on the barbecue grill. Light the coals with the lighter. Add the wax idol. After it melts, use the gloves to open the tin can. Take the map piece (2/2). Return to the doctor’s office.
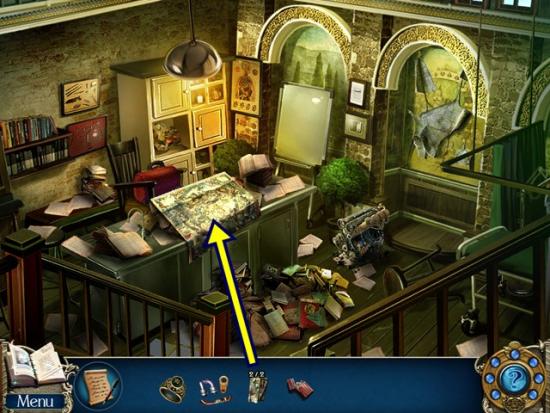
- Click on the table. Add the two map pieces. A mini-puzzle starts. Find the areas on the map indicated by the images below.
- Solution:
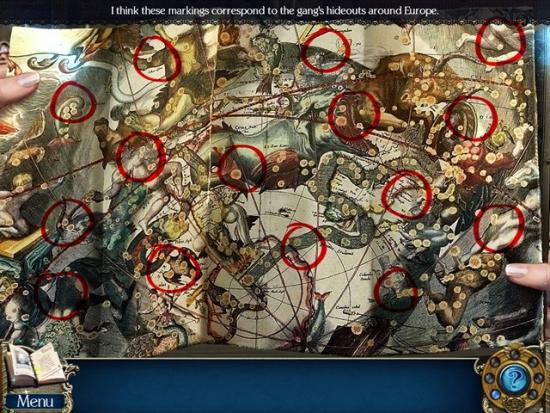
- The fixed map is added to your inventory. Return to the back alley.
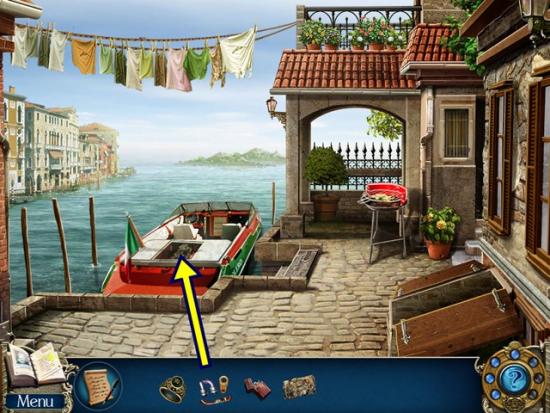
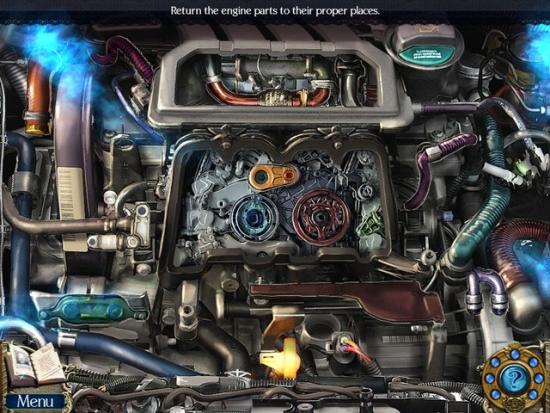
- Click on the engine. Add the engine parts. A mini-puzzle starts. Replace the engine parts.
- Solution:
- Click on the dashboard of the boat.
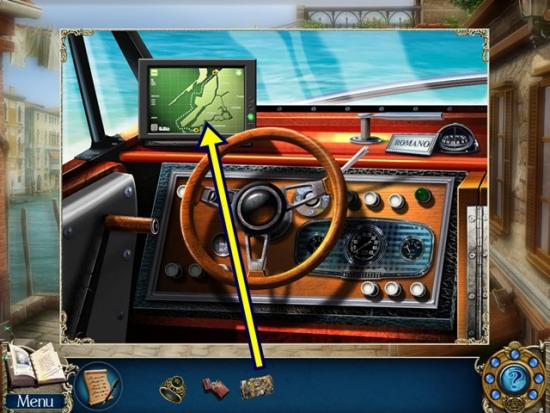
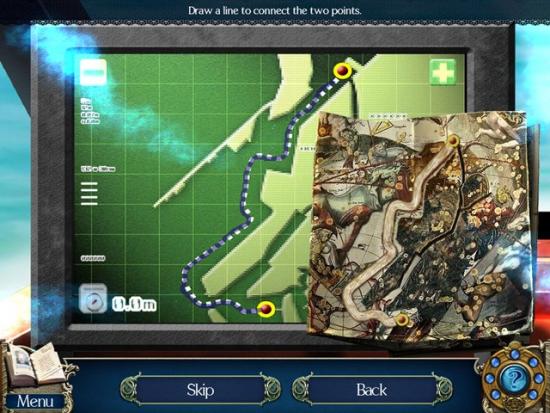
- Put the fixed map on the GPS. A mini-puzzle starts. Draw (click and drag) a line from the top point to the bottom point by following the dotted line.
- Solution:
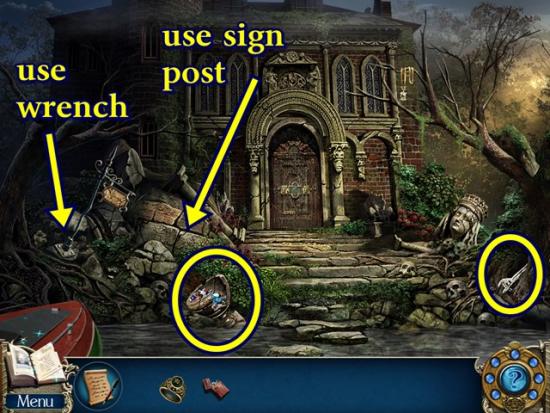
- Take the wrench. Click on the old sign post. Remove the bolts with the wrench to get the sign post. Click on the rubble. Remove the two pieces of rubble with the sign post to get the green key. Click on the jar. A mini-puzzle starts. Determine the number each stone represents using the diagram. Then remove matching pairs of stones, starting from the lowest number (1) to highest number (10).
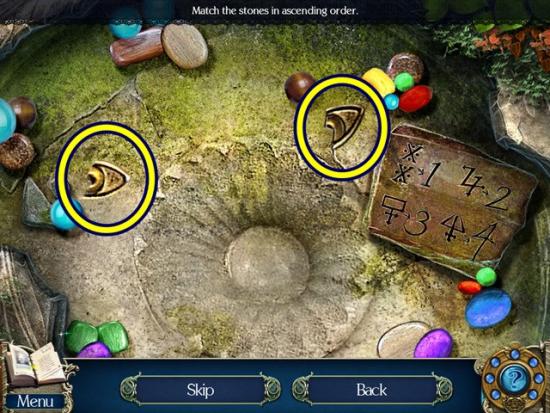
- When you are finished, match up the two broken pieces to get the gold eye.
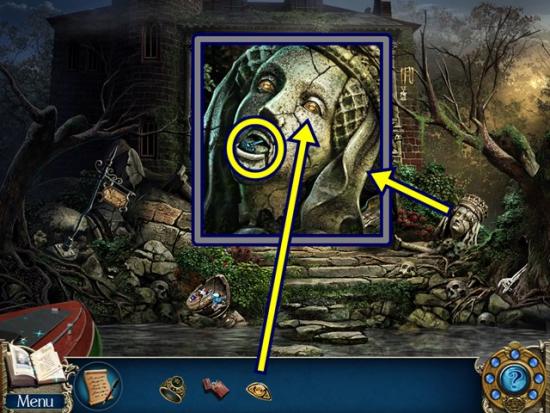
- Click on the statue. Add the gold eye. When the mouth opens, take the blue key. Click on the door to the secret lair.
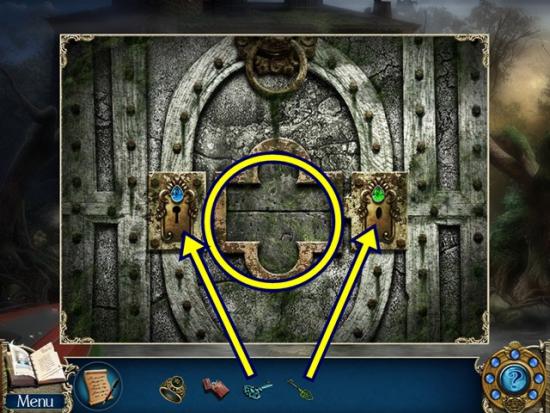
- Add the green key and the blue key to the appropriate lock. Then click the door lock (centre area). A mini-puzzle starts. Click each tile so the dots all appear in the centre line.
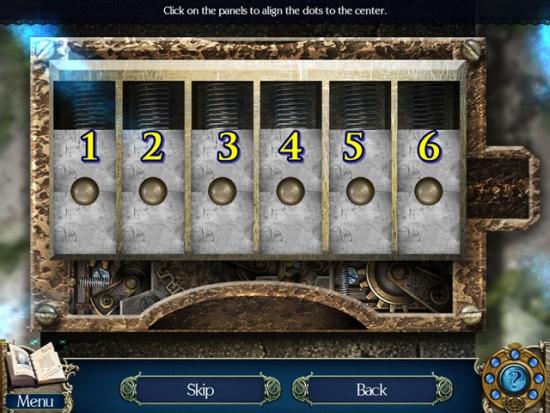
- Assume the tiles are labelled 1-6 from left to right. Then set the dots in the centre of the tiles in the following order: 6, 2, 5, 3, 1, 4.
- Enter the secret lair.
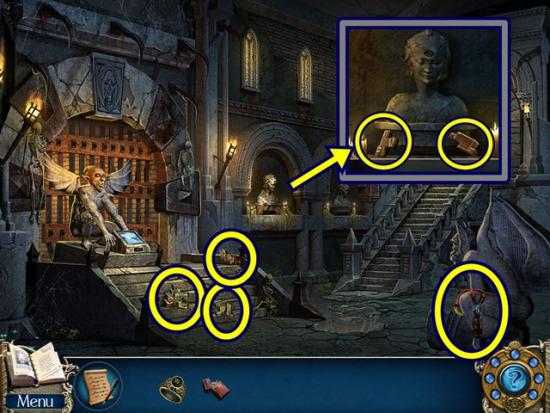
- Take the slingshot and three wooden blocks (3/20). Click on the bust. Take the two wooden blocks (5/20). Click anywhere outside the window to close it. Return to the secret lair entrance.
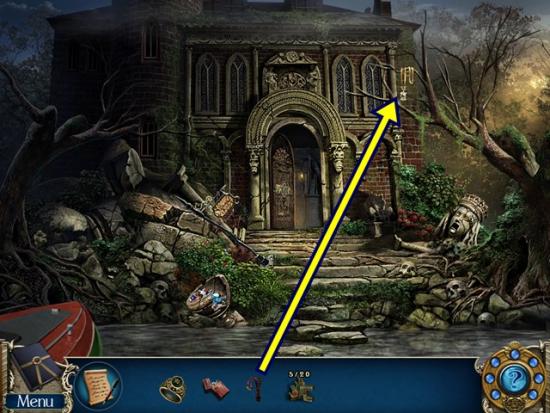
- Use the slingshot to get the locket. Return to the secret lair.
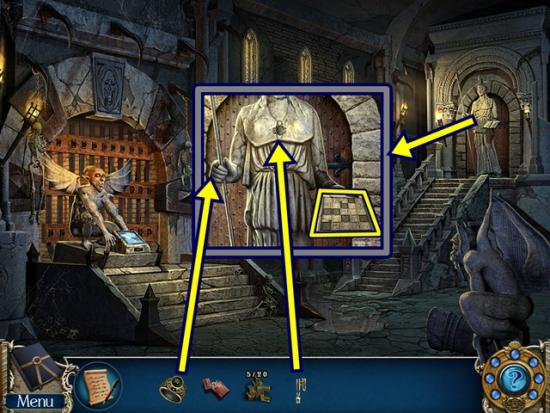
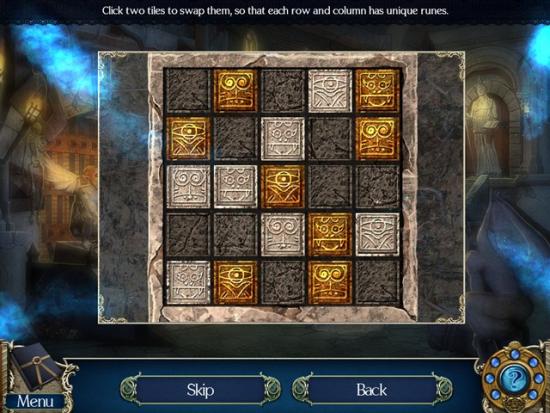
- Click on the statue in front of the control room. Put the locket and the ring on the statue. Click on the tablet. A mini-puzzle starts. Rearrange the tiles so no duplicates appear in any row or column.
- Solution:
- Enter the control room.
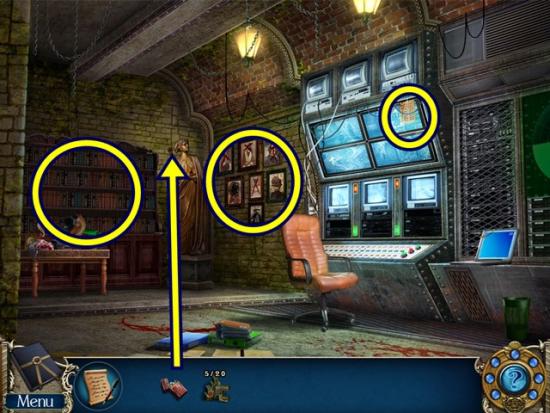
- Click on the portraits. Click again. Click anywhere outside the window to close it. Click on the video monitors. Take the clue. Click anywhere outside the window to close it.
- Click on the shelf. It’s too dark so click anywhere outside the window to close it. Light the statue’s torch with the lighter.
- Click on the shelf.
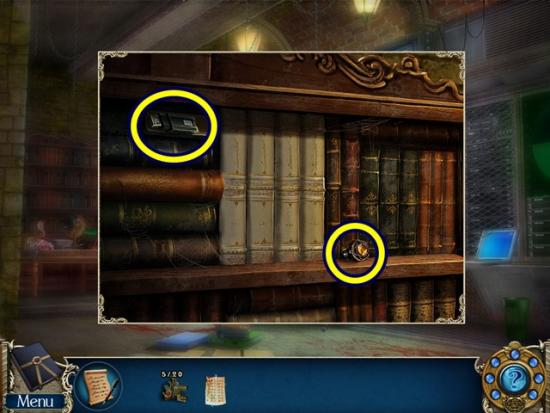
- Take the flash drive and the knob.
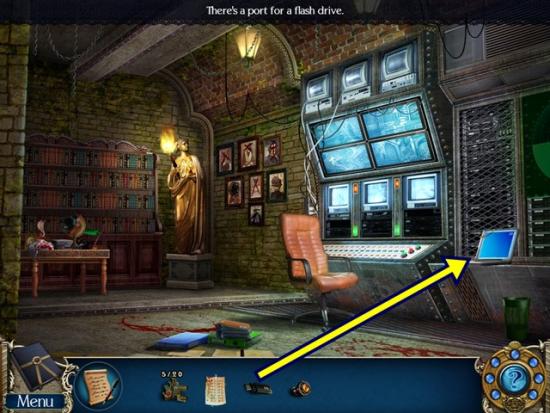
- Click on the computer terminal. Add the flash drive. A mini-puzzle starts. Adjust the symbols in the grid according to the code/clue.
- Solution:
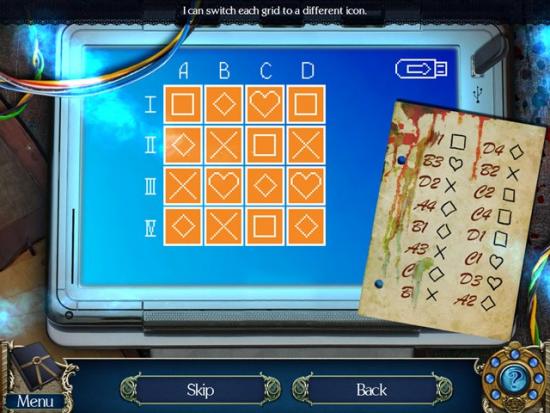
- The flash drive with data is added to your inventory. Return to the lobby.
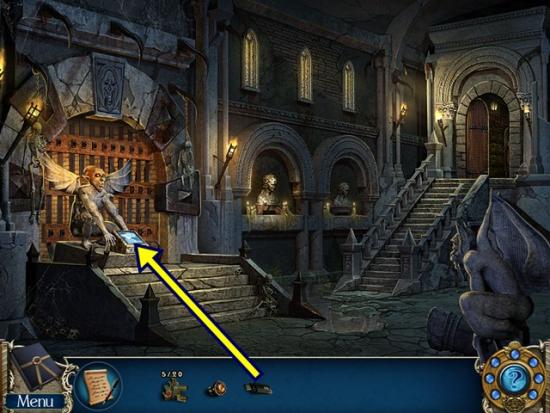
- Click on the prison hallway. Add the flash drive with data. A mini-puzzle starts. Adjust the items at the bottom so their symbols match what is displayed at the top.
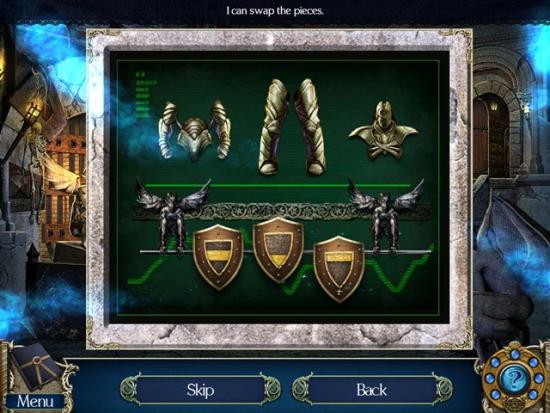
- Adjust the shields so they represent the top, middle and bottom of a suit of armour. Solution above.
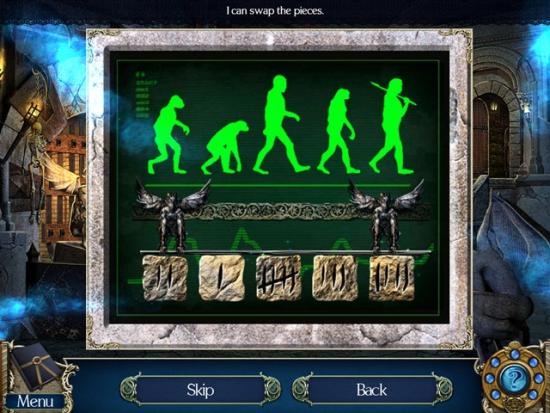
- Swap the pieces to show the order of evolution. Solution above.
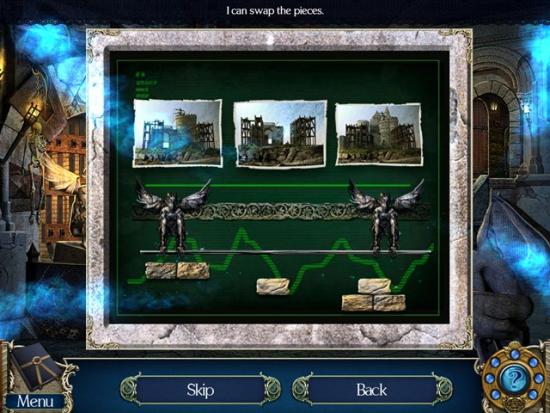
- Swap the pieces to show the building’s progression. Solution above.
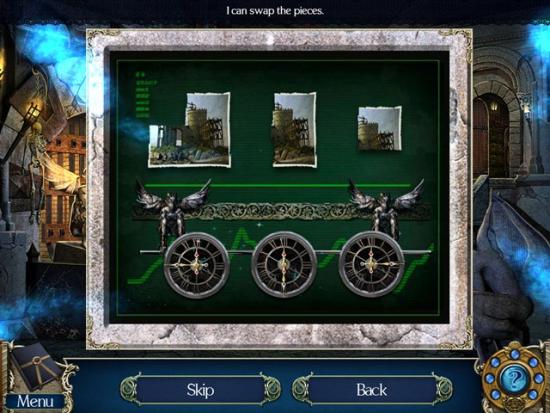
- Swap the pieces to show the amount of picture shown. Solution above.
- Enter the prison hallway.
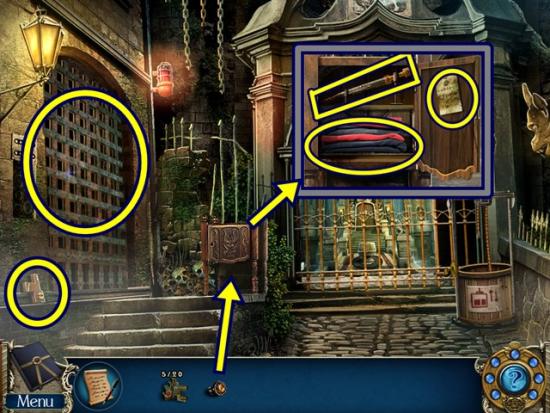
- Take the wooden block (6/20). Click on the prison wall. Click through the dialogue. Click on the cabinet. Add the knob. Open the cabinet. Click to read the note (added to your journal). Take the blunt dagger and the robes. Return to the control room.
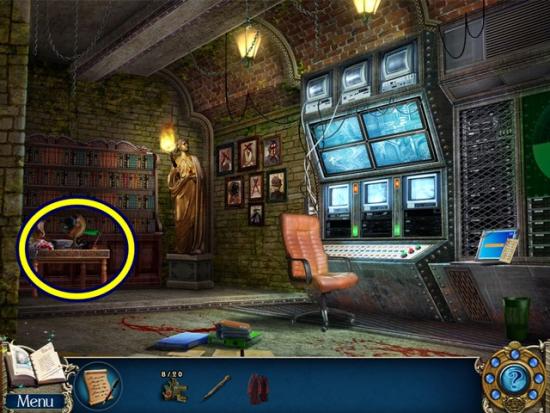
- Click on the table to start a hidden object hunt.
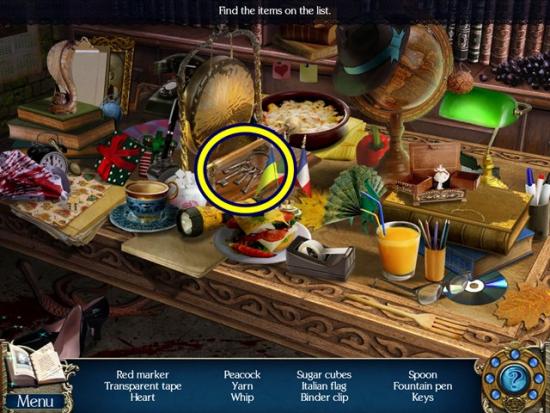
- Find all the objects. Prison keys are added to your inventory. Return to the prison hallway.
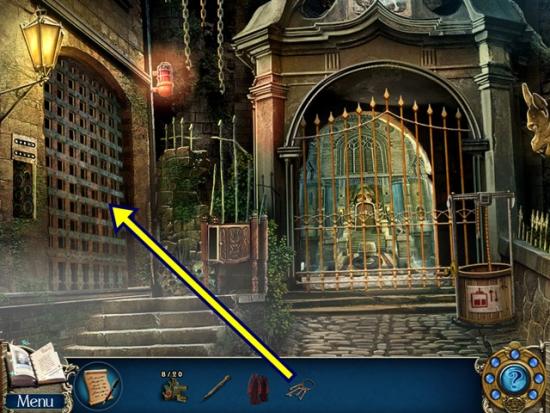
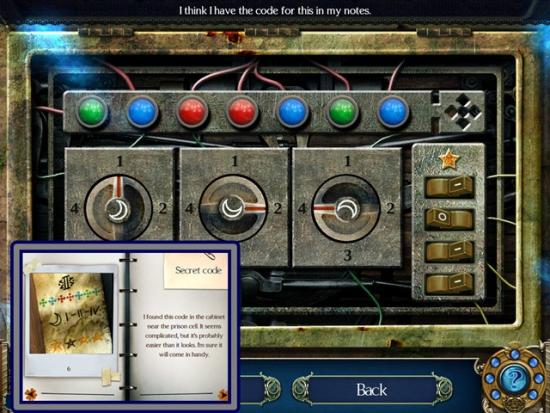
- Click on the prison cell. Unlock with prison keys. Click on the switches. A mini-puzzle starts. Adjust the dials, buttons and switches to match the code you found in the cabinet (it’s in your journal).
- Solution:
- Enter the prison cell.
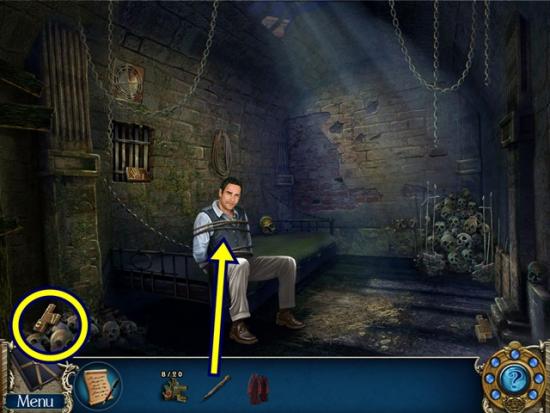
- Talk to Professor Romano. Click through the dialogue. Take the three wooden blocks (9/20). Try to use the blunt dagger to free him. Return to the secret lair entrance.
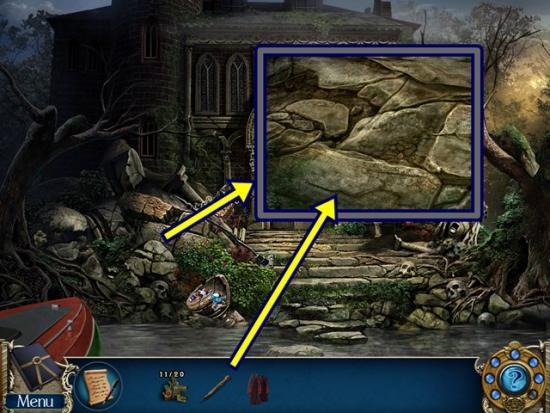
- Click on the rubble. Sharpen the blunt dagger on the rough stone to get the sharp dagger. Return to the prison cell.
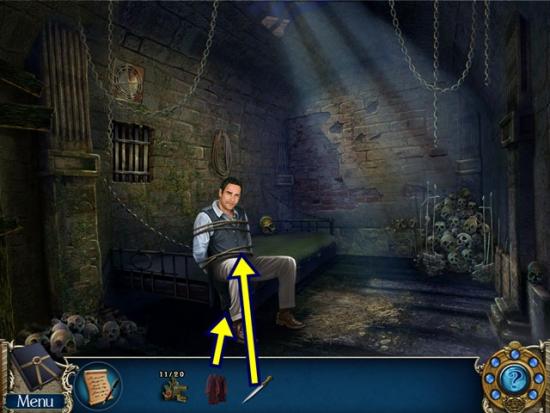
- Use the sharp dagger to free the Professor. Click through the dialogue. Give him the robes. Talk to him again. Click through the dialogue.
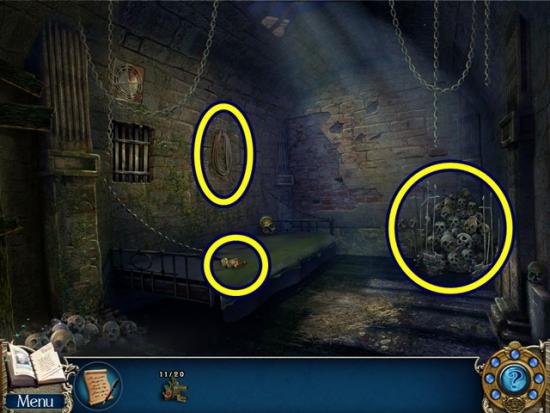
- Take the wooden block (10/20) and the rope. Click on the pile of bones. A mini-puzzle starts. Match the symbols on the skulls to clear them. Skulls are added to your inventory. Return to the prison hallway.
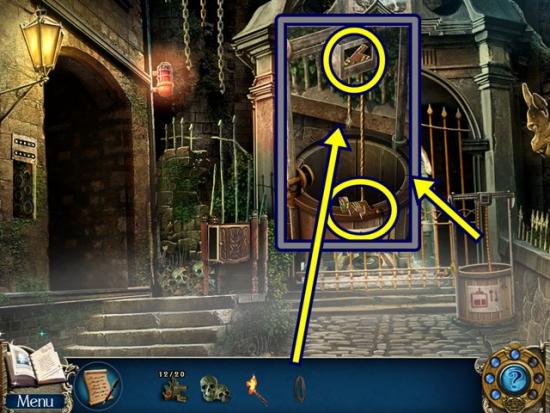
- Click on the dumbwaiter. Take the two wooden blocks (12/20). Add the rope. Pull the rope. Click on the lock. A mini-puzzle starts. Determine the proper sequence to press the coloured buttons. After pressing five buttons, press the green button to learn how many colours are correctly and incorrectly positioned.
- To start, press the same coloured button five times, then press the green button. If you get a message reading, “1 right input; 4 wrong input,” that colour appears once in the correct sequence. “2 right input; 3 wrong input” means that colour appears twice in the correct sequence. Do this for all four coloured buttons to determine how many of each colour appears in the correct sequence.
- Once you’ve determined the correct amount of colours, properly positioning them comes down to trial and error and I suggest you get a pen and paper and keep track of your guesses. Assuming the solution is correct for each game, press purple, red, blue, yellow, purple.
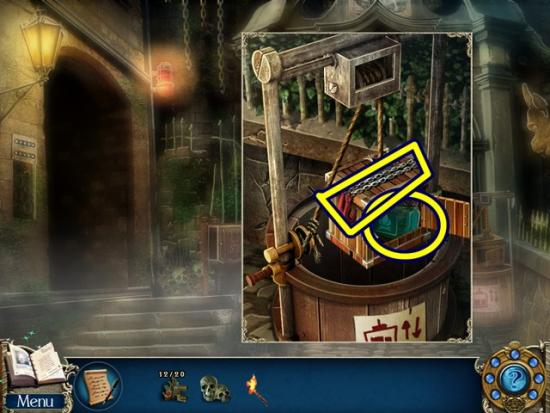
- Take the hooks and the gasoline. Return to the control room.
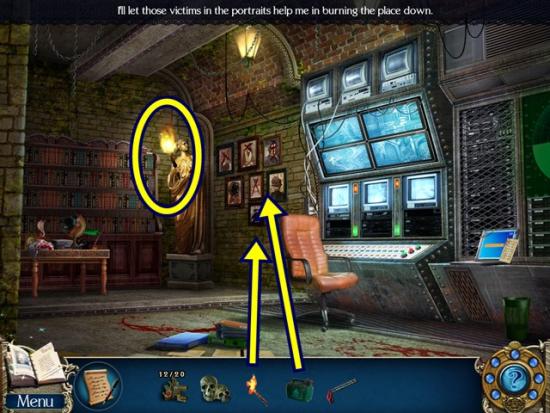
- Click on the portraits. Take the torch. Click on the portraits. Pour gasoline on the portraits (two clicks) and light with the torch. Watch the cutscene.
- Return to the prison cell.
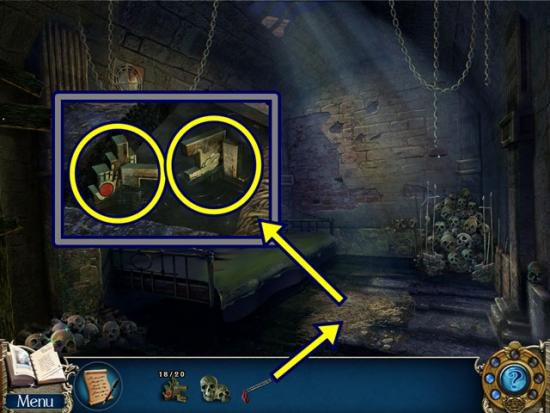
- Click on the hay. Clear away the hay. Use the hooks on the grate. Lift the grate. Take the two wooden blocks (14/20). Return to the prison hallway and enter the meeting room entrance.
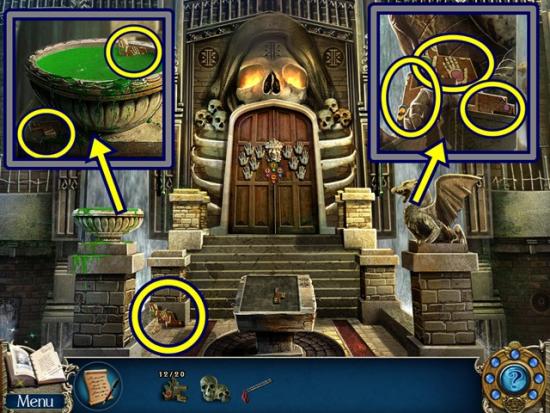
- Take the wooden block (15/20). Click on the bowl. Take the two wooden blocks (17/20). Click anywhere outside the window to close it. Click on the dragon statue. Take the three wooden blocks (20/20).
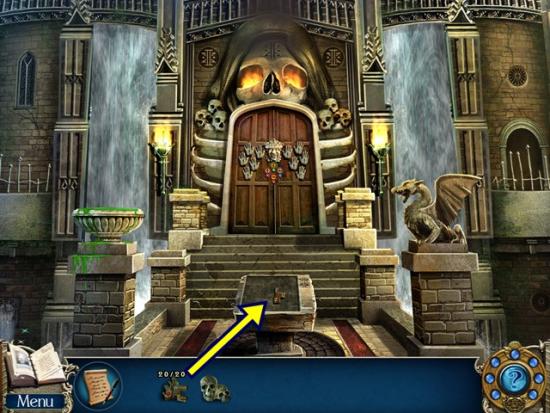
- Put the 20 wooden blocks on the stone table. A mini-puzzle starts. Fit all the blocks into the table.
- Solution:
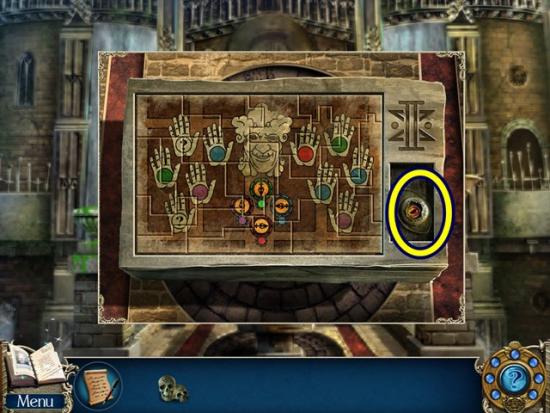
- Take the eye. Return to the lobby.
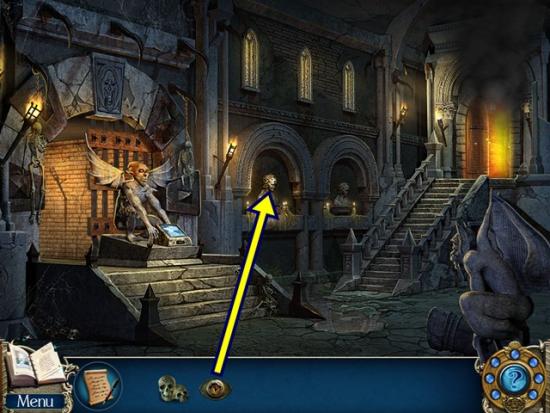
- Click on the bust. Add the eye. Take the gem. Return to outside of the meeting room.
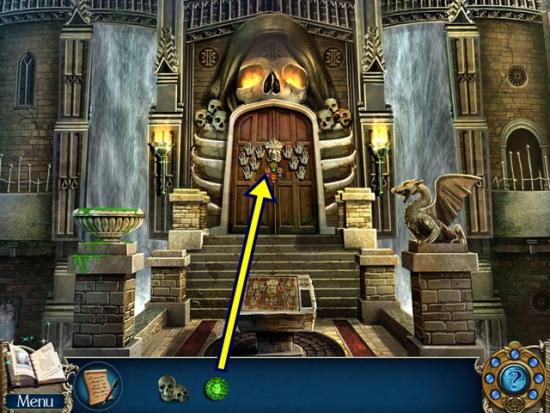
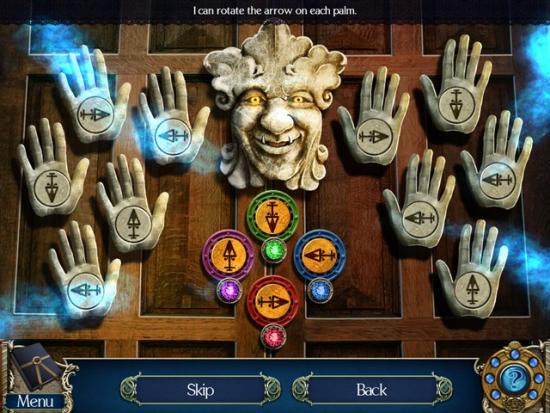
- Click on the door to the meeting room. Add the gem. A mini-puzzle starts. Rotate the palm arrows to match the image from the stone table puzzle (it’s in your journal). Use trial and error to determine which arrows are represented by the question mark symbols.
- Solution:
- Enter the meeting room.
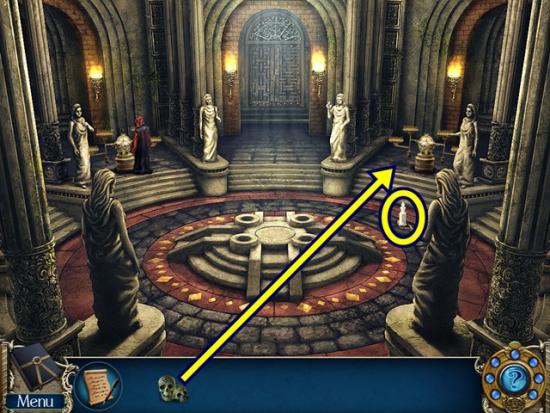
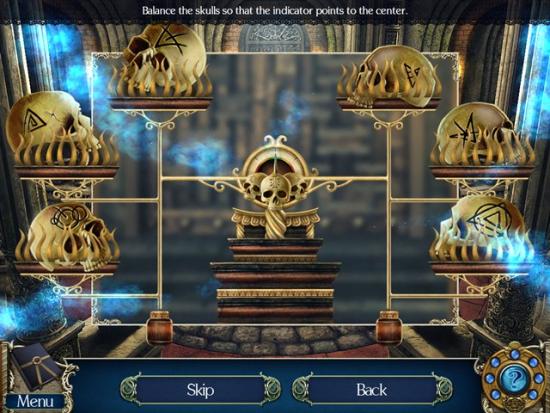
- Click through the dialogue. Take the empty vial. Click on the scales. Add the skulls. A mini-puzzle starts. Rearrange the skulls on the scales so both sides are of equal weight and the centre dial points to the middle.
- Solution:
- Click through the dialogue. Return to the outside of the meeting room.
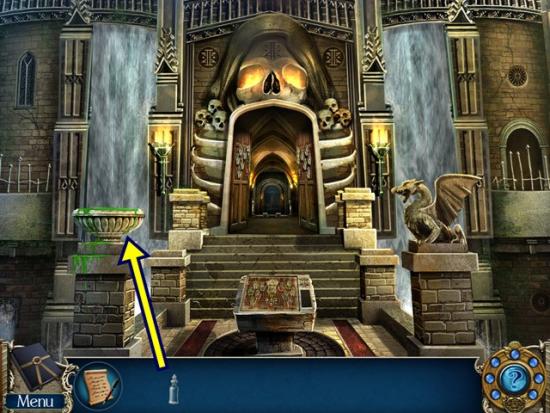
- Click on the bowl. Fill the empty vial with green liquid. Return to the meeting room.
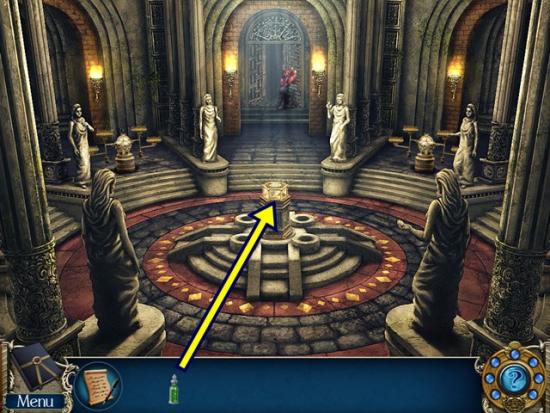
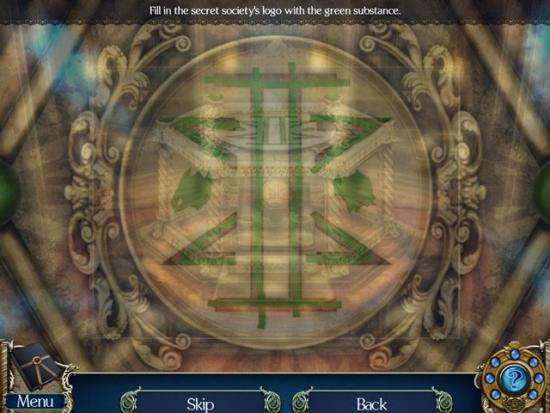
- Click on the platform. Pour the green liquid on the logo. A mini-puzzle starts. Use your cursor to fill in the logo. Click and drag a line from one end to another. You can let go of the mouse. When you continue drawing, ensure there’s no break in the line.
- Solution:
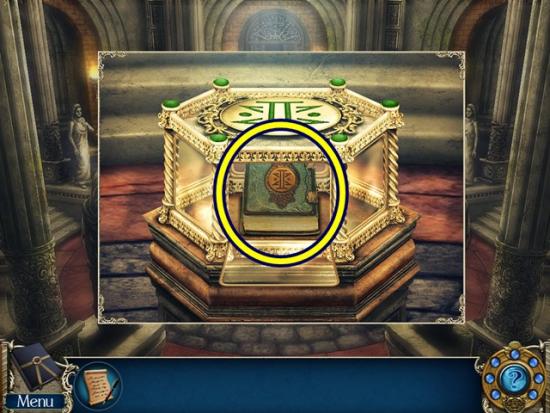
- Take the records book.
The end!
More articles...
Monopoly GO! Free Rolls – Links For Free Dice
By Glen Fox
Wondering how to get Monopoly GO! free rolls? Well, you’ve come to the right place. In this guide, we provide you with a bunch of tips and tricks to get some free rolls for the hit new mobile game. We’ll …Best Roblox Horror Games to Play Right Now – Updated Weekly
By Adele Wilson
Our Best Roblox Horror Games guide features the scariest and most creative experiences to play right now on the platform!The BEST Roblox Games of The Week – Games You Need To Play!
By Sho Roberts
Our feature shares our pick for the Best Roblox Games of the week! With our feature, we guarantee you'll find something new to play!All Grades in Type Soul – Each Race Explained
By Adele Wilson
Our All Grades in Type Soul guide lists every grade in the game for all races, including how to increase your grade quickly!


