- Wondering how to get Monopoly GO! free rolls? Well, you’ve come to the right place. In this guide, we provide you with a bunch of tips and tricks to get some free rolls for the hit new mobile game. We’ll …
Best Roblox Horror Games to Play Right Now – Updated Weekly
By Adele Wilson
Our Best Roblox Horror Games guide features the scariest and most creative experiences to play right now on the platform!The BEST Roblox Games of The Week – Games You Need To Play!
By Sho Roberts
Our feature shares our pick for the Best Roblox Games of the week! With our feature, we guarantee you'll find something new to play!All Grades in Type Soul – Each Race Explained
By Adele Wilson
Our All Grades in Type Soul guide lists every grade in the game for all races, including how to increase your grade quickly!
Deadly Sin 2: Shining Faith Walkthrough
Welcome the Deadly Sin 2: Shining Faith walkthrough on Gamezebo. Deadly Sin 2: Shining Faith is an RPG played on PC created by Deadly Sin Studios. This walkthrough includes tips and tricks, helpful hints, and a strategy guide on how to complete Deadly Sin 2: Shining Faith.
Deadly Sin 2 – Game Introduction
Welcome the Deadly Sin 2: Shining Faith walkthrough on Gamezebo. Deadly Sin 2: Shining Faith is an RPG played on PC created by Deadly Sin Studios. This walkthrough includes tips and tricks, helpful hints, and a strategy guide on how to complete Deadly Sin 2: Shining Faith.
Some of the maps were kindly provided by Deadly Sin Studios.
General Gameplay
Controls
To play the game, you can either use your mouse or the keyboard. When using your mouse, click on people, doors and items to interact with them. When you’re using the keyboard you can interact with the aforementioned by walking up to them and hitting your space bar.
To make your character walk faster, hold down your shift key. You can also increase walking speed permanently by switching on Automatic Dash in the System Menu under esc.
Quest Menu
The game is divided into 5 chapters, each with a specific set of main quests and side quests. Your main quest instructions will usually be received after you complete a previous main quest or after cut scenes. Side quests can be obtained from characters scattered throughout the game that are marked with a red exclamation mark above their heads.
Main quests will guide you through the chapters, but side quests can only be completed in the chapter in which you received them. Leave any side quests uncompleted before you go to the next chapter and you won’t be able to complete them. It is therefore a good idea to first complete any side quests you may have before going on to your main quests.
You can find out the details of your quests in your Quest Menu, which you can access by hitting the esc key and scrolling down to the quest menu. The quest menu is subdivided into all quests, active quests, completed quests and quest you failed to complete before the end of the chapter. Main quests are indicated with a red symbol, side quests with pale blue one.
Character Skills
Each character has a set of 9 active and 3 passive skills to choose from, which you can access in the Skills Menu. Active skills can be selectively used in battle (though healing skills can also be used out of battle by accessing the Magic Menu). Passive skills are continually active throughout your battles.
Each skill has a maximum of 5 levels and can be “bought” with skill points. Higher level skills cost more skill points. Skill points can be gained through increasing levels, completing quests and by allocating Monster Node Shards (see below).
A great feature of this game is that you can choose to reset your skill points if you don’t like the set of skills you’ve chosen. You can do this in all the inns in the game, as well as in Lureska Resort (see below).
Equipment, Augments and Accessories
As in every RPG, it is essential that you always equip your characters with the best armor and weapons possible. Each city you will go to will have a weapons shop and an armor shop with a new, superior collection of equipment. Although the “buy” menu in the shops will show you some character statistics that will be improved or decreased by equipping this item, you can’t see all stats changes. So, in your Equipment Menu carefully look at all the changes in stats the new equipment will bring to decide if this is the right gear for your character.
Other than general armor and weapons, your characters can each also equip 2 accessories, which will also affect their stats. Carefully select which accessories will be right for your characters.
Another great feature that is specific to this game is the augments system. Augments are items that can be used to alter the properties of your weapons and armor (accessories cannot be augmented). These aren’t simply cute, frivolous trinkets, but they can actually change the effectiveness of your characters in battle. You can use augments to improve a character’s defense against magic or melee attacks, or imbue weapons with a specific kind of magic or a debuff (which is an affliction like poison, stun, confusion etc.).
You can augment your items in your Augments Menu. Note that equipment needs to be unequipped before you can augment it. Equipment can only have one augment at a time, and adding a new augment will destroy any previous ones. Most augments can be bought in augment shops in your cities, but some unique ones can be found in chests across the game. Don’t use the special ones lightly as you can’t get them back if you allocate them wrong!
Battle
Battles in this game are predominantly random, meaning that you can’t see your attackers before you are attacked. However, the attacks are nicely spaced and you can do quite a bit of exploring in between them.
Each dungeon has a pink Monster Node crystal near the end of the dungeon. Touch the Monster Node to switch off the battles in that dungeon. Touching it again will switch them back on. The first time you deactivate a Monster Node you will receive a Monster Node Shard, which you can give to your characters to give them an additional skill point.
Battles are turn based, meaning you can select an action for a character when it’s their time to strike. You can simply choose “attack” to make your character hit with whatever weapon they have equipped. You can also choose to use one of the character’s skills, such as a magic spell or a spell to heal one of your own during battle. Finally, you can choose to use an item from your inventory to cure a debuff or improve health.
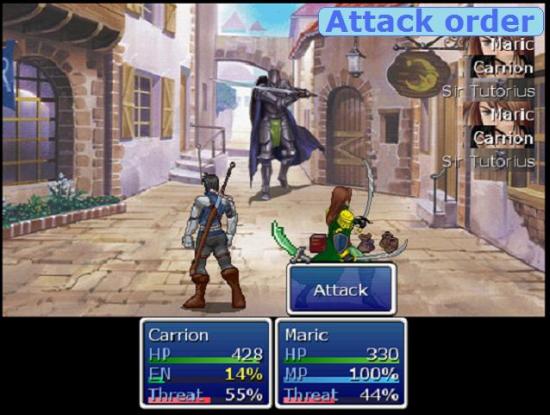
Underneath your characters you will see a HP, and MP or EN and a Threat bar. HP stands for Health Points and shows how much life your character has left. Each time they’re hit, HP will decrease. MP are Magic Points, which decrease when skills are used. Your skills menu will show how many MP each skill will cost. Carrion doesn’t have MP but EN or energy points. He will start off with 0 at the beginning of the battle and gain EN with every successful hit. “Threat” indicates which character your enemies deem to be their greatest threat. The character with the highest threat will be attacked in the next single target attack.

Finally, your battle menu will have an attack order on the right hand side of the screen. The attack order is determined by each participant’s speed. Some attacks take time to charge, meaning that after you’ve selected that specific attack, the character will drop a few places in the attack order until the attack has charged. Other attacks will decrease the speed of the target, also making them drop places.
Make sure that you heal your characters after each fight, before you continue on your way. You can use items from your Items Menu or use Maric and Teresa’s healing skills out of battle from their Magic Menus. At higher levels, their individual healing spells will also cure debuffs and revive fallen characters. Only the poison debuff will remain after battles, the others will be automatically cured. Poisoning will decrease that character’s HP with every step. You will know you are walking around with a poisoned character when your screen is flashing red.
At key places in the game you will find Rest Points, which look like white glowing hexagons on the floor. If you have any tents in your items menu, you can completely heal and cure your entire party at a rest point.
Character Stats
There are many statistics that determine the effectiveness of your characters. These stats are affected by their level, the equipment they’re using and the augments on that equipment. The stats are:
- HP – the total amount of health points
- MP+ – the amount of MP that is regenerated per battle turn
- STR – strength. Determines hitting power and the effectiveness of blocking
- DEF – defense. Determines the damage done by attacks
- INT – intelligence. Determines the effectiveness of magic and debuffs
- AGI – agility. Increases chance of landing critical blows and dodging attacks
- SPD – speed. Determines battle order
- GRD – guard.
- BLK – block. Blocking physical attacks. The chance is determined by the equipped weapon, effectiveness is determined by STR
- CRI – critical hits (2x hitting power). Chance to land a critical hit is determined by AGI
- EVA – evasion. Chance to dodge physical attacks. Is determined by AGI
- WGH – the weight of the equipment. If weight exceeds a character’s build, their speed goes down
Strategy
Deadly Sin 2 isn’t a game for the novice RPG player. This is one of the few RPGs in which strategy really affects your success in battle. The way you choose to develop your characters has a strong influence on their effectiveness in fights. So it is essential to develop your characters, with the armor, skills, weapons, augments and accessories you choose, to suit your personal battle style.
For example, for me Maric is by far my most important player. He is both strong and a powerful healer. I therefore want to make as much use of him as possible, so I try and give him items that increase his speed and strength. This may come at a cost of his HP and defense, so I chose Teresa to be my “decoy” by giving her very high HP and defense and a one-handed weapon and a shield to increase her threat. This way, most attacks will be focused on her. Ruby’s strength relies on magic, so I give her items that increase her intelligence. Carrion is more of an all-rounder for me. I keep his defense and attack powers at medium level and his intelligence low (poor kid… but he just doesn’t need it).
After a few battles you will start to see a pattern of how you are using each individual character. Once you know your style you can start to develop your characters to suit your style.
Lureska Resort
Lureska Resort is an interesting place, as it is the only place you can access during all chapters of the game. You can sleep in the inn there, reset your skill points, do a spot of gambling and, most importantly, there is a battle arena. Go back to the arena regularly to fight more battles, as they give you experience and a gold reward if you win. There is no penalty for losing battles, so just keep going on to the next one until you can’t win anymore and then come back later when you’re stronger.
The Deck of Hearts
Inside Lureska Resort, in the southwest, you will find Castellino, who will tell you about a powerful deck of cards. Find all cards to gain a big bonus for the final battle. This quest will not be listed in your quest book. I will tell you where to find the cards throughout the walkthrough, but for quick reference, here is a full list:
- Two of Hearts – Ruins of Telaria
- Three of Hearts – Veridia Lighthouse
- Four of Hearts – Death’s Gauntlet
- Five of Hearts – Lake Felnamia, unfrozen part
- Six of Hearts – Silver door, Rimorgue Inn
- Seven of Hearts – 5th Legion Airbase, left tower
- Eight of Hearts – Desert of Death
- Nine of Hearts – Lake Felnamia, unfrozen part
- Ten of Hearts – World’s End Cove, before switching on the waterfall
- Jack of Hearts – Ruins of Telaria
- Queen of Hearts – Silver door, lower level of Rimorgue Mineral Reserves
- King of Hearts – Battle of Rimorgue, chest in southwest
- Ace of Hearts – Kill Tinny at Barah Treden
Walkthrough
Prologue
You’re dropped right in the middle of the action. Walk down to the soldier and talk to him. When the soldier walks off, follow him. Talk to the green haired man. After the cut scene of the attack, talk to the people who just walked up.
Walk up to the skeleton and fight him. He’s really easy to beat at this stage. Just keep hitting him – you will get a battle tutorial later on. After the fight walk west and go through the door. You’ll have to fight again – Teresa’s Zealous Strike and Carrion’s Adept Slash work well here (in fact, they almost always work well).
When the rest of the party walks off again, fight another skeleton with Carrion. Use his Adept Slash again. Go north and west and through the door. After the cut scene go west and north. You’re now in the City of Rimorgue. You’ll have a lot of time exploring the city later, right now just make your way to the northwest corner and walk up the wooden pier.
You next get a window where you supposedly should be able to give your main character, who looks uncannily like Adam Lambert (seriously, stick some glitter on him and they’re indistinguishable), a name – but this window doesn’t work at all for me. So, in this walkthrough you’re the default Carrion. Use your arrows or mouse to click “ok”.
Watch the cut scene, which highlights the beginning of Maric’s girl trouble, and OK Maric’s name (after several minutes of playing around with this window I got stuck with “Marickkd”, but we’ll just call him Maric, shall we?).
Watch the scene with Prince Siegfried in the Imperial Palace. The story in this game is really good. It’s well written, quite deep and quite gritty at times! So I definitely recommend reading everything.
Chapter 1 – Fighting Fate
Siegfried wants you to go find his half sister, Ruby, who was last seen in Hibernus Cove, to the southwest of Veridia. The description for this quest is below.
Explore the Palace, if you like, but there isn’t much to do here right now. Just go south through the door, empty the red chests there and go south again. The west wing of the Palace goes to the chapel on the roof and to a portal to Lureska Resort.
Outside the Palace, Carrion will be approached by a girl he seems to know really well. We’ll meet her again later. Keep going south until you’re in the main area of Veridia. Talk to the green haired guy, who invites you to go into the building behind him, which is Veridia University. I strongly recommend doing this, as inside you will find tutorials on the most important aspects of the game.
When you’re satisfied you’ve learned all you can learn in the University, exit and explore Veridia. There are shops that sell weapons and armor, health items and accessories and augments. Spend your money on some better equipment and health items now, if you like.
There are two more maps to the city – one to the east and one to the west. On each map there are several side quests to find, which will be described below. When you’re done exploring, exit Veridia on the south side and you’ll be on the world map.
Side Quest: I Left my Heart in Herald
Side Quest: Legitimate Business
Your first two side quests can be completed at the same time.
To the right of the stairs to the Palace, under a tree is Corwynn. She wants you to light the lighthouse southwest of Veridia as it reminds her of her former lover, Jared.
Gerald, who hangs out in the southeast of Veridia, by the barrels south of the items shop, wants you to go find his missing record book, also in the lighthouse.
Exit Veridia and walk south across the bridge. Then make your way west to the lighthouse. To light the lighthouse and find out what happened to Jared, go west from the entrance and make your way to the top via the outside of the lighthouse. At the top, pick up the note and pull the lever on the wall to light the lighthouse.
If you go west from the entrance and take the path through the middle of the lighthouse you will find a gray chest with the Three of Hearts inside it.
To find Gerald’s notebook, go east from the entrance and then take the route that takes you to the center of the lighthouse. The notebook is on the top floor in one of the red chests. There is also a better sword for Maric there – don’t forget to equip it.
Don’t forget to take the monster node shards from the crystals. If you like, switch the crystals back on to do some more fighting and gain some more experience.
When you’re done, go back to Corwynn in Veridia and she will give you her diamond ring, which you can equip as an accessory. Take the notebook back to Gerald and receive a Hoplite Helmet for your troubles.
Side Quest: Happiness in a Bottle
Go to the east screen of Veridia, enter the building, which is Veridia Airport, and talk to Sullivan by the table in the southeast corner of the airport. He wants you to get him some Varna Vintage Reserve wine.
The wine can be bought on the west map of Veridia. You can find the merchant north of the Temple, just walk north along the west side of the temple and go east at the top. The wine costs 150 gold, so do this when you have money to spare. Bring it back to Sullivan to complete the quest. No reward here, other than a skill point bonus for completing the quest.
Side Quest: Holy Disciple
Go to the west map of Veridia and enter the Conclave Temple. Elder Ewing wants Carrion to become a Holy Disciple of the Conclave. This quest has several steps, the first three of which you can complete in any order. You need to donate 100 gold to the woman standing next to the Elder. You can do this now or later, when you have more money.
I recommend you go to Granheim Temple to get a copy of Saint Durai, Genesis before the Religious Cleansing main quest is initiated, or you won’t be able to complete this quest. Leave Veridia, cross the bridge to the north and then walk west. Inside the temple, take the door to the right and find the bookcase that’s sparkling to find the book.
Do the third part of this quest, which is to visit the Shrine of Cyrene, during your Wayward Princess main quest.
Finally, when you have done all of the above, go back to the Palace in Veridia, take the west door and then make your way to the chapel on the roof from there. Stand on the glowing white hexagram to complete the quest and receive a new weapon for Carrion.
Main Quest: Wayward Princess
On to the main quest. We need to find Ruby. She’s in Hibernus Cove, which is right below Veridia on the world map. It’s not a very large place, so I’m not posting a full map. Just keep going west until you get to a T crossing. The Shrine of Cyrene is off to the right, across the bridge. When you’re there, step on the glowing hexagram on the floor to complete this part of the quest. Then go back to the T crossing and go west, past the signpost with nothing on it.
On level 2 is a large area with a lever on the wall on either side of the room. Maric will stay at the right lever while you take Carrion around to the left lever. The idea is that Maric and Carrion pull both levers at the same time. To do this, Maric has devised the plan to pull his lever every 4 seconds and a convenient ticking sound accompanies Carrion to the other side of the room. However, I didn’t know if Maric was pulling his lever on 1 or on 4 (or on 2 or 3 for that matter) so you can just ignore the whole spiel and just keep pulling the lever until it works. Go back to Maric on the other side and go through the door in the center.
You’re in a weird sort of bar/night club. First talk to the bunny girl in the center and then to the bouncer on the right. Neither of them is very forthcoming with information so Maric suggests they just sit down and watch the show. Do so on the stool to the left of the bunny girl.
During the show, the performing girl, “Firefly”, hands you a note. It says to talk to the bouncer again and meet her backstage. Talk to the bouncer, then go up the stairs and through the door. Look behind the curtain on the other side of the door and meet… Ruby!
Ruby tells you she’s been investigating an organization that’s been hoarding a huge storage of Nervestim (the fuel to the country’s air ships). This quest won’t show up in your quest book. Carrion agrees to help Ruby and she will join your team. Don’t forget to award her her skill points and to see if you have any better equipment for her.
Leave through the door in the north of the room. The next area looks more complex than it is. The two curtains on the first lower floor come out at the curtains diagonally down from them. Push the red button when you’re in the southwest and make your way all the way back up to go through the door on the right. Go down the stairs.
Find the blue and yellow button in the next area and go through the door in the center. It’s not a big place. Then go down the stairs.
You’ve found the stock of Nervestim and Carrion gets a bit nervous and wants to get out of there. Go south, heal up with a tent at the rest point, go east and prepare for a big fight. When you’re ready to make the first assault, the lovely woman you met earlier is catching up with you. She’s now in full armor and her name is Teresa. Award her her skill points and she’ll help you fight.
Attack the Karmagh. Magic doesn’t do much to him so have Maric and Ruby hit him and use Teresa’s Zealous Strike and Carrion’s Adept Slash. After the fight, Teresa will leave again. Quest complete.
Side Quest: Gone Fishin’
Follow Teresa up the stairs and talk to the orphan boy at the top, who wants you to go find his father. To do this, first go to the main area of Veridia and buy a grilled salmon from the items shop (if you don’t have one in your inventory already). Then go back to the Temple and walk past it to go to the boats by the dock. Pay 10 gold to the ferryman to go to West Island.
Talk to the man in the house in the north of the island. Then talk to him again to give him the fish. He will give you a ferry ticket for his son. Go back to the Temple and give the boy the ticket. As a reward you get 2 skill points.
Main Quest: Terrorists, Your Game is Through
After you return from the Cove with Ruby, go back to the palace. The Regent will talk to you. You have to go see Siegfried first and then the Regent will have a mission for you. Go through the right door and then to the door at the top to talk to Siegfried. You will get a long cut scene with a lot of back story and in which relationships are developed. After that you will be taken back to the Regent who will ask you to find out what is causing the lake to melt in the east.
While you’re in the palace, don’t forget to complete the Holy Disciple quest. Also go back through the portal to Lureska Resort to do some more fighting. When you’re done in the palace, go spend your money on some better equipment. Also play around with some of the augments. Then leave the city and make your way straight east. Enter the cave by the lake.
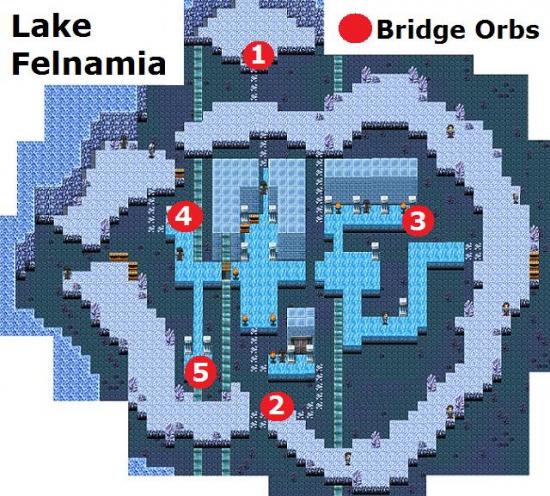
This dungeon isn’t very big. On the first level, make your way north via the west side and go down the stairs. On the second level go east and then south to find the exit. The next level is trickier, as you have to find light orbs that you need to activate to open up new paths. Refer to the map below if you get stuck.
When you walk south on the next level, the floor behind you will cave in and you won’t be able to go back up. Walk south, down the stairs, and go down the stairs at exit A (don’t forget to pick up the Five of Hearts card on your way – circled). The next level isn’t very large: pick up the Nine of Hearts card from the chest in the south and touch the orb in the southeast to extinguish the fires. Then exit in the northwest, behind the now extinguished fires. This will take you back to the top part of the previous map (exit B), and you can now take the exit behind the fires (exit C).
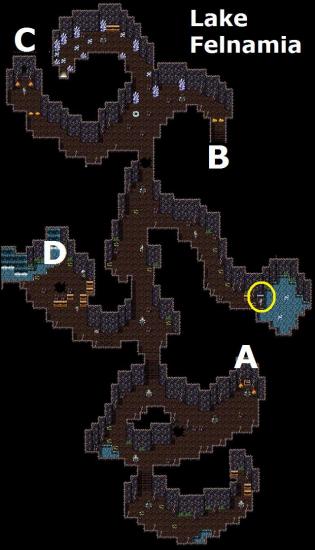
On the next map, go west as far as you can, then go south. At the end of that path is a broken bridge. Walk onto it and you will be dropped back on the previous map, by the chests behind the spikes at point D. You can now pull the lever to lower the spikes. Go back through exit A, go northwest on the next map to come back out at B and exit to C to continue with your quest.
Go west again and then go north past the monster node. Then cross the bridge east to exit in the south. Heal up at the rest point if necessary and go down the stairs, where you’ll have your next boss fight. It shouldn’t be too hard. First take out the two priests (second from left and right), as they cast healing spells on the party. Also use Maric’s Regenerative Aura to keep healing your party.
After the fight, you’re transported back to the world map. Go back to Veridia Palace and talk to the Regent. Quest complete.
Main Quest: Religious Cleansing
Leave the Palace and you’ll be encountered by a man who tells you something terrible is about to happen in Granheim Temple. Before you go there, make sure you have some fire and water power – upgrade Maric and Ruby’s skills that have to do with fire and water and augment your weapons with fire and water elements too. Finish all remaining side quests and do whatever else you want to do here as you won’t be able to come back from the moment you enter Granheim Temple.
Go back to Granheim Temple and go in. Talk to Doma and Carrion and Ruby will go into the room on the right to find Teresa again. The three of them fight a bunch of knights. When you’re done, heal up and attack the guard blocking the door on the left. Then go through the door and down the stairs and fight your way to the bridge. There you will be rejoined by Maric.
Go up the rope ladder and prepare for your biggest fight yet. Make sure everyone has their skill points used (don’t forget to award the monster node shards too) and augment your equipment with water and fire power. I also like to have one of Maric’s sword augmented with amethyst, to stun. Heal up fully and talk to Doma again.
When you’re fighting Doma, first attack on his two crystal buddies. The blue crystal is sensitive to fire power, the red one to water power. After they’ve been taken out, focus on Doma. Also cast Maric’s Regenerative Aura spell on your party. For Doma himself simple melee attacks work best. You should be around level 10 at this point, and with these tips it is quite doable.
When you’re done, walk onto the airship and enter it down the stairs on the right. Then watch your party take off and leave Chapter 1!
Chapter 2 – March of the Dominion
After the long cut scene, get up the rope ladder and leave the airship to enter your new home for the next chapter: Rimorgue.
Explore the main square. There is an inn on your left, which has a locked silver door – remember this. By the weapons shop is Daphne, who has a side quest for you – below.
When you’re done in the main square, leave the square on the south side and go through the door at the end of the walkway. On the other side, keep going east until you’re in Rimorgue Keep. Inside you will get instructions for your next main quest and side quests. Inside the Keep also is the portal back to Lureska Resort in case you want to have a couple more arena fights.
Side Quest: Green Invasion
Daphne, by the weapons shop in Rimorgue, wants you to clear the Mineral Reserves in the southwest of goblins. Do this after you’ve collected your other side quests and main quest in Rimorgue Keep. When you’re done in Rimorgue Keep, leave the building and go south and south again to get to the world map. Do this quest first, not only because it’s relatively easy, but you will get a great reward that will help you in the upcoming quests.
Enter the cave just southeast of Rimorgue and explore. There will be no random encounters in here, only small groups of goblins and ogres that are clearly visible. There are 7 on this level – fight and defeat them all. Then make your way to the southwest corner of the mine and go down the stairs.
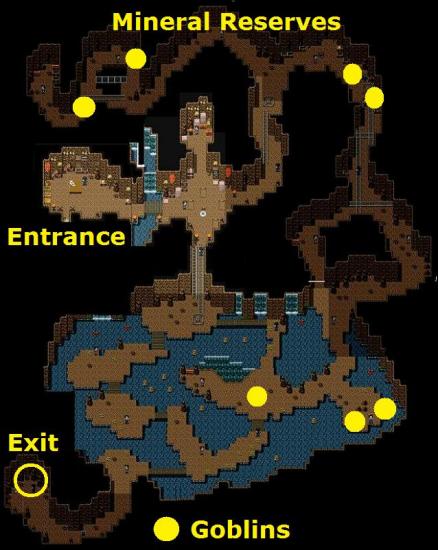
Downstairs, in the northwest, there are 3 more groups of goblins. There is also another locked, silver door. Remember this for later. When you’re done, go back to Rimorgue, make your way to the west side of the city and talk to Daphne again. She will give you a whopping big sum of gold, which you can use to buy some better gear right now.
Side Quest: Deceptively Dangerous
Talk to Officer Harold, on the right side of the table in Rimorgue Keep. He wants you to go deal with a dangerous bloodthirsty faerie in the Ruins of Talaria to the east. Upgrade all your gear with the money Daphne gave you and leave Rimorgue again. Go northwest to the Ruins of Talaria.
You will meet Tinny, the faerie, for the first time right across the bridge. Fight her – she’s very weak. She will be annoying and take all your gold. But then, what can a faerie be if not annoying.
Go in the first door, northwest of the entrance and find another locked silver door to remember. You will come in at entrance A. The southwest part of the dungeon can be explored from here. When you’re done, go back out through door A and go east and north.
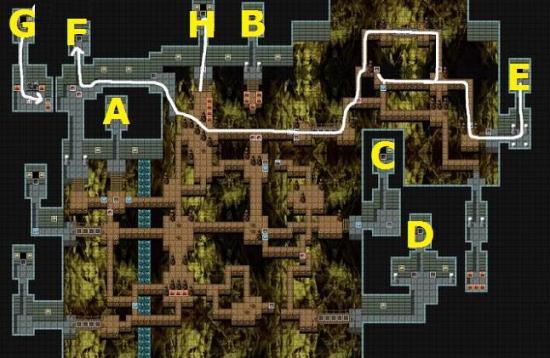
Go in the second door you come across, the one in the north, as it leads to a bunch of chests (entrance B). Then cross the bridge and fight Tinny for a second time. This time, she steals all but 1 HP. So make sure to heal up after the fight (there is a rest point nearby, fortunately).
Go south and enter the door (don’t forget to check the chests to the left of the door). You’ll enter at point C. You’ll find the Jack of Hearts card in a gray chest close to the entrance. Flick the switch to your left and go south past the red button. Exit the underground area again at exit D. Meet Tinny again outside, who will steal your food.
Go down the stairs, entering at point E, flick the switch and make your way through to the other side of the dungeon. The switches are fairly self-explanatory. Exit at the only door you can exit (F) and enter again on the other side (G) to get to the monster node crystal and the last switch.
Make your way back in through the doors G and F and go east and then north to find another monster node crystal and the Two of Hearts card in a chest. Exit at H. Go down the stairs, heal up and fight Tinny for the last time. She’s much stronger than earlier, when she was just toying with you! But she shouldn’t be too much of a problem.
Get your gold back from the chest behind her and exit. Go back to Rimorgue and east to Rimorgue Keep and talk to Officer Harold again for your reward.
Main Quest: Relics of a Legend
Side Quest: The Best Defense…
When you first enter Rimorgue Keep you will meet Consul Justinian. He needs you to retrieve a special sword, Lightfury, from Death’s Gauntlet in the northeast. When you’re going to Death’s Gauntlet to find Lightfury, also deal with a deadly Necromancer who resides there.
Leave Rimorgue and go into the cave in the northeast. First go southwest and pull the lever at the end. Then go back to the start and go east. Don’t forget to pick up the Four of Hearts card from the gray chest. Take the bridge south to find the monster node crystal. Pull the lever and cross the bridge, then go northeast and exit.
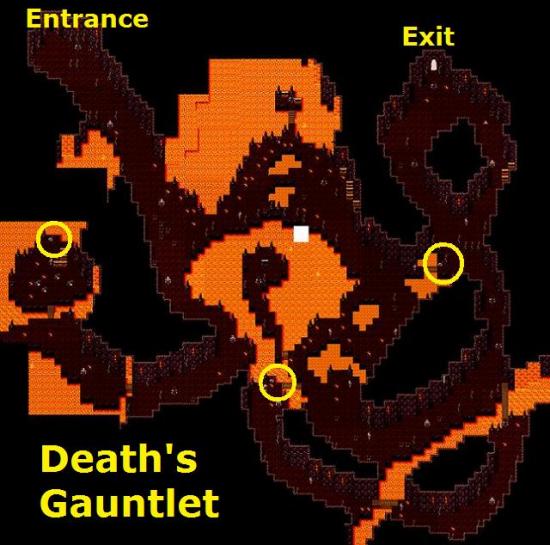
For the second part of the map, go up the stairs, clear out the chests to your right and then go west (path indicated by yellow line). There’s another chest to the south and then go north to pull another lever. This opens a bridge in the south that gives access to more chests.
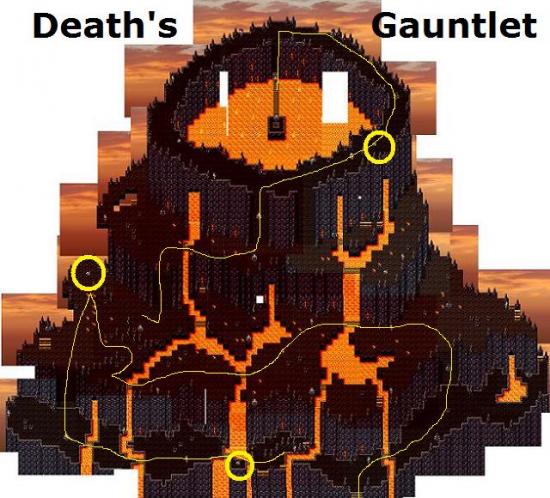
Go back to the lever, go east and go up one of the two stairs. The area at the top is circular, but the monster node crystal is to your right. Also pull the lever, which gives access to chests at the bottom of the stairs.
At the top is the Necromancer you have to dispose of. Use your own strategy, but I found that having Ruby’s whip augmented with amethyst really helped. When you’ve defeated him, first report back to Consul Justinian at Rimorgue Keep for your reward. Don’t forget to talk to Advisor Reeves, to the right of the Consul, as he will tell you to ask Officer Harold to give you the key to the silver doors. Remember there was one in the inn, one on the lower level of the mineral mines and one behind the first door in the Ruins of Telaria. There is also one right here in the Keep.
When you’re done, go back to the place where you fought the Necromancer and go down the stairs. Make your way through the second and third levels and fight the guardian at the end, who is fairly sensitive to water power. Go down the stairs. You don’t need to fight again, just have a little chat with a fella named Rowdain. Then you can go and take the sword.
After you’ve taken the sword, you get another cut scene. This time we meet Siegfried and Ruby’s mother. Then you’re transported back to the world map, so go back to Rimorgue and report back to Consul Justinian.
Main Quest: Long Time No Siege
This quest is unusual and kinda fun. Make sure you do everything you want to do in Rimorgue before you start it, though! Buy gear and augments, find those silver doors, fight in the Resort – whatever it is you still need to do, do it now.
When you’re all done, talk to the Consul again. He will take you to the battlefields south of Rimorgue, where you will be split up in 3 groups, led by Maric, Teresa and Ruby. Carrion will join one of these groups of your choice (I like playing with Maric, but everyone has their own favorite) and each group will get 2 soldiers. You then have 10 minutes to keep the army away from the Consul.
You can hit A on your keyboard to change groups, and when any of your groups is under attack, you will automatically be taken to the battle. You can use the clay pots scattered around to heal everyone in an entire group.
There are many strategies you can employ here, but my best run was with Carrion and Teresa guarding the bottom of the bridge, Ruby being backup at the top of the bridge and Maric running through the maze collecting the contents of the chests. I’ve never managed to clear out all the chests in the field, but make sure to make your way to the southwest (sort of just west of the middle) as there is a chest with the King of Hearts card in it.
After the siege, Siegfried joins you with some bad news. Rimorgue needs to be evacuated as soon as possible. After the cut scene and another fight, you’re left with Carrion in a repeat of the battle scene in the prologue. Make your way back to the northwest of Rimorgue and watch the end of the chapter unfold.
Chapter 3 – Revolution
You find yourself in a new town: Varna. After the dramatic events in Rimorgue your party has been scattered and only Teresa is still willing to fight. Her mission is to find the other three party members and convince them to join her for battle once more. Description of this quest below.
Explore the town to find all the shops and the inn etc. Note and remember the gold door in the inn.
Side Quest: Quick Rebound
On the east side of Varna you will meet Corwynn again, who is ready to date again after losing her previous lover. There are 3 men that she’s shortlisted as candidates: Sebastian the bard, Leonardo the merchant and Humberto the soldier. You need to convince them to ask her out on a date and then ask her for a date report the next day.
You can go find all of them and get her to go out with each one of them, which is quite entertaining so recommended, but she will want to end up with Humberto the soldier, who hangs out by the town entrance, no matter what you do. Just out of interest, Sebastian hangs out in the library of the east wing of the amphitheater in the northwest and Leonardo is the guy with the turban in Varna tavern, on the west side of town.
Main Quest: Reunion
To reunite your party, start with looking around Varna. You will find Ruby behind the bar in Varna Tavern on the west side of town. She’s reluctant to join and thinks you should find Maric first, who probably hangs out in Lureska Resort. Lureska Resort is actually on the Varna world map, so to find him, leave town.
Make your way to the southwest. The resort is in a nice location on the beach. Go in and talk to Maric, who is sitting at the bar. He takes little persuasion to join you. Then go back and talk to Ruby again. This time she will join.
Time to go to Belladorne Jungle, even though you haven’t found Carrion yet, for your next main quest and a couple of side quests, which can all be done in one trip to the jungle.
Main Quest: Jungle Fever
Side Quests: Breath of Fresh Air/Performance Enhancement
You need to disrupt the Consulate’s hold over the Belladorne Jungle. This involves several things: you need to free the slaves that are held there, defeat the Consulate garrison at their storehouse and liberate Tomei the rebel leader, who is held somewhere in the jungle.
In the northwest of Varna, outside the amphitheater, you’ll find Chaska, who plays the harp in Varna orchestra. A precious harp was sent to her by ship, but it sank. She asks you to find the Eternal Air Pocket in Belladorne Jungle, which can be used to dive to the sunken ship and find the harp.
In the tavern on the west side of Varna you will find Mayu, who is a bit sensitive about his short stature. He wants to make a vitality potion, for which he needs 8 Belladorne Jasmine flowers, which grow in Belladorne Jungle.
When you’ve collected all quests for this trip, use whatever money you have to buy better gear for your party and leave town. Walk east through the trees and cross the bridge to enter the jungle. There are 3 exits from the main map.
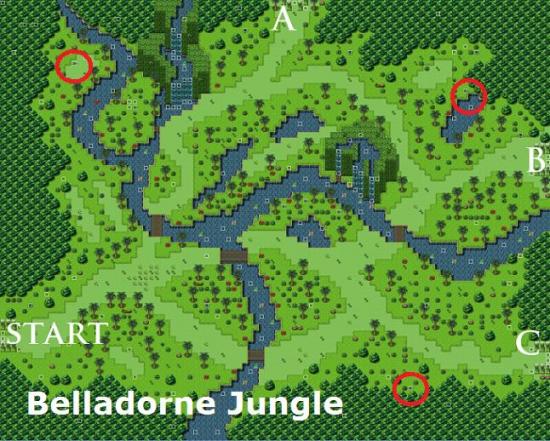
Go through exit A and make your way all the way to the north. Fight the guard outside the door. Don’t forget to loot the warehouse behind him.
Go through exit B to find the Eternal Air Pocket. It is actually in the chest that’s right by the entrance, but you will have to walk all the way around to access the chest. Walk further to find the monster node crystal. Enter the cave by the crystal and make your way to the end to find Tomei. He will come with you when you’re going back to Varna.
Go through exit C and explore the area. You will find several groups of slaves with a guard. Attack and defeat the guards to collect keys to release each slave.
When you’re done in Belladorne Jungle, go back to Varna and report back to the various people who gave you the quest. Don’t drink Mayu’s potion, though! I think it needs a bit more tweaking before it’s safe. You can find Justinian in the west room of the amphitheater.
Side Quest: Shipwreck of Much Loot
When you’ve brought the Eternal Air Pocket to Chaska, she asks you to find the harp for her in World’s Edge Cove. Still without Carrion, once again leave town and this time enter the cave just southeast of Varna.
Before you flick any switches, first make your way to the lower level (go southwest as much as you can and exit through the door) as there is a chest there with the Ten of Hearts in it, which you can’t access after you’ve switched on the waterfall. Then go back up, find the red, blue and yellow switches and then pull the lever in front of the three buttons to switch on the waterfall.
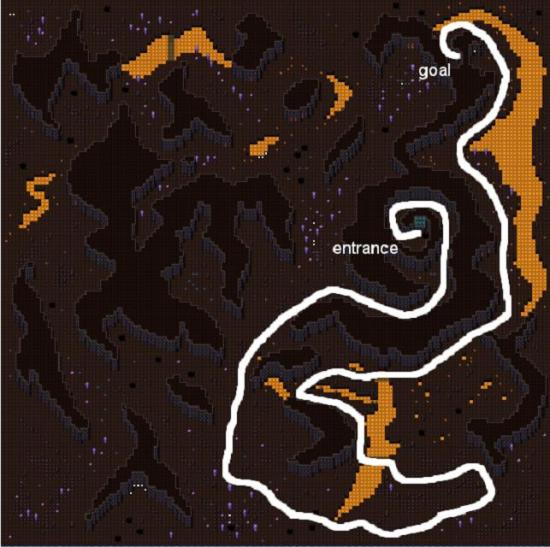
Go back to the lower level and jump down the waterfall. The underwater area is an “endless” map – meaning it just goes round and round. The image below shows the fastest route to your destination, but do wander around a bit as there are some chests with nice goodies. Then go to the Valoren Schooner and empty the chests inside. Then leave through the back exit to come out on the world map again.
Return the harp to Chaska and receive a whopping great amount of gold, for which you can get your party entirely kitted out with the best gear around.
Main Quest: Grand Theft Airship
When you return to Consul Justinian after the Belladorne Jungle quest he gives you your new quest. You have to go to the Imperial 5th Legion Base to hijack the airships. Leave town, go back east and this time take the second bridge north. Keep going north until you’re inside the Legion Base.
As soon as you’re in the base, you’re arrested and thrown into jail by Doma. Never fear, however, as Carrion is back! Use him to first free Maric, then Ruby, then Teresa. Then go back to the control room and pull all four levers.
If you like, you can leave to go buy new equipment for Carrion or do some fighting elsewhere.
Go into one of the doors on the upper level (outside) and go to the center. You will be split into two groups. Carrion and Teresa will take the left tower, Maric and Ruby the right. You first get 10 minutes to take Carrion and Teresa to the top of their tower, then another 10 minutes to take Maric and Ruby to the top of theirs. You have ample time, so make sure you empty the chests on the way – one contains the Seven of Hearts card.
Main Quest: Epic Battle is Epic
When you’ve completed the Grand Theft Airship quest, you’re taken back to Justinian in Varna Amphitheater. He gives you time to get ready for your next mission. It is of the greatest importance to get a nice set of augments. Augment Ruby’s whip with arcane residue and one of Maric’s swords with amethyst. When you’re all set, talk to Justinian again.
You will board one of the airships and take to the skies. Your mission is to find the 3 Imperial Dreadnoughts in the fleet and board them. They’re the largest ships in the fleet. Use your arrow keys to move your ship around the fleet.
On the first ship you first have to fight a bunch of Imperial generals and destroyers. Nothing you haven’t done before. When you’re done, go inside the ship and fight the person behind the controls. He’ll take shape of two Imperial Commanders. They’re a bit tougher, but very doable.
Back on the Ichival, go find the second Dreadnought. On this one you first have to fight some more destroyers. Then go inside and fight two Magi Commanders.
Now find the third Dreadnought and get ready for a big fight. You first have to fight the spirits of wind, air, fire and water. After the fight, heal and save up, make sure Ruby’s whip has arcane powder and someone has the ability to stun. Also remember that the higher Ruby and Maric’s intelligence levels are, the more likely their debuffs stick.
Then go inside and fight Doma again. This time he is flanked by two Magi Destroyers and two Magi Clerics. The Clerics will keep healing the whole party, unless they’re silenced. This is where Ruby’s whip comes in. Doma can actually revive his party and he won’t be silenced, but he can quite easily be stunned.
After the fight the party gets ready to fight the Regent but it’s Siegfried to the rescue! He’s alive! He seems different somehow, though. But he brought back Lightfury. The airship your party is on took some heavy damage. It crashes in the desert and we find ourselves in…
Chapter 4 – Looking for a Savior
Main Quest: The Desert of *What*?
After you crash in the desert, you find yourself in a little place called Gondwana Oasis. The Queen of Silesia needs you to come and talk to her. She lives in Novas Kedah, a city inside a giant tree, for which you need to cross the Desert of Death. Yikes.
There isn’t that much to do in the Oasis, so buy any items you think you need and exit. The Desert of Death consists of several maps. The first is quite easy to navigate, just exit at the south end. The second is another “endless” map that just goes round and round. Everything looks kind of the same, so pay close attention to any landmarks. Also, it is quite hard to see which sand you can and which you cannot walk on.
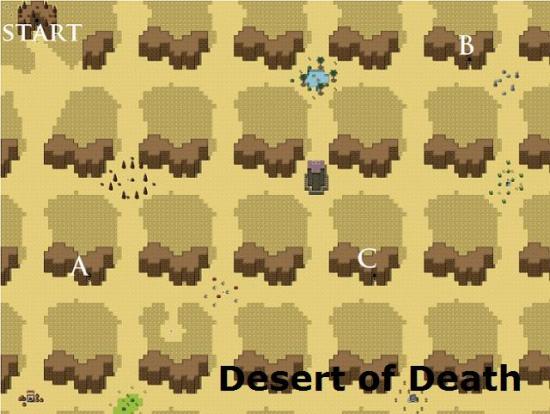
I find the easiest way to navigate this map is to move horizontally, then when I’m back at a point I recognize, I move down to the next level. Inside cave A you’ll find the Eight of Hearts. Eventually, you will have to find cave C and enter.
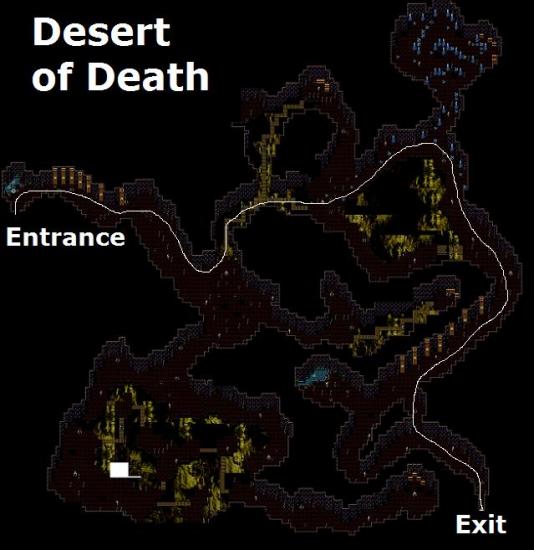
Make your way through the cave, exit on the other end and fight the Garuda on the bridge. I didn’t really find a good strategy for this, but lowering his water resistance with Maric’s Aqua Sabre and then having Ruby freeze him seemed to work ok.
In the next scene, walk Siegfried through the Lucid Dawn Temple and watch the rather disturbing events unfold. Use Siegfried to talk to all the Acolytes and then talk to Reinhardt again.
When you’re back with Carrion, exit the Desert of Death, cross the bridge and walk into the great tree in the middle to arrive at Novas Kedah. The city has several levels, but for now you must simply make your way all the way to the top, to the Silisian Keep to talk to Queen Boudica. Note that there is another golden door in the Keep.
Side Quest: Easier to Kill than Pronounce!
When you’re with the Queen also talk to Brenya, her assistant, who has a side quest for you. She asks you to kindly dispose of the insect lord Zrysix, who lives in his lair in the northeast. You can do this before or after the next main quest. It’s up to you. In any case, spend your money on some better gear if you can, and exit the city. Cross the bridge to the north and enter Zrysix’s Lair.
Then leave town, cross the bridge to the north and enter Zrysix’s Lair in the northeast. As soon as you switch on the light in the center of the room, you will be attacked by Zrysix. You will get 3 consecutive fights, so make sure you heal up during the fight as there will be no in between fights.
First you get 6 demon spiders, followed by 5 wasps. They’re not that hard. Your last fight will be 3 demon spiders, 2 wasps and Zrysix himself. Focus on the little guys first, but make sure you keep healing your people as you go. Zrysix himself is sensitive to quite a few things – both melee and magic attacks. Just experiment a bit with the different options you have. He’s tough, but not impossible. When you’re done, go back to Novas Kedah and talk to Brenya again. She will give you the golden key – woohoo!
Main Quest: War… What is it good for?
Queen Boudica will have a mission for you tomorrow. For now you just need to go to the inn and relax. Your easiest quest yet! If you have any money, go and buy some new gear before you go to bed. You never know when you may need it. Then go to the inn and talk to the innkeeper. She will give you a room.
Carrion will wake up in the middle of the night, noticing that Teresa is gone. Go downstairs and talk to the innkeeper. Teresa has been taken and is held in a temple in the south. Carrion wants to go and rescue her, but Maric has some reservations, leading to my favorite line of dialogue in the game: “You’re welcome to wuss out and stay here.” Of course Ruby is all gung-ho, so off you go.
You arrive by boat on an island. Walk to the building there and enter the Valoren Catacombs. You can’t do anything in the catacombs until you find Teresa, so look for her and talk to her.
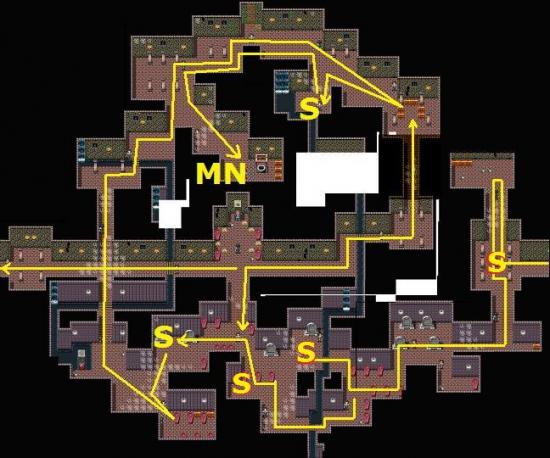
I stupidly made my map before talking to Teresa, so none of the fires and switches are on it. But it’s not hard to navigate. Walk west as far as you can go, clear out the chests in the north and flick the switch. Then go south, empty the chest and go west. Flick the switch by the north bridge, cross the south bridge and flick the switch on the other side. Go north, flick the switch and go north to be back at where you found Teresa. Now you can go east and clear out the chests there.
Go back to where you found Teresa, go south, flick the switch, clear out the chests in the south and go west. Push the red button. Now make your way all the way north, ignoring one switch on your way. Walk past the exit, clear the chests in the east flick the switch and walk back to the well to take the monster node shard. Then exit.
When you’re out, you can go back to your boat and go straight to your next destination, or you can go back to Novas Kedah to spend your money. More excitingly, you can also go back to Varna and Lureska Resort. Remember there was a golden door in the inn in Varna? Go open it now.
When you’re ready to continue, sail west to the Vadii Shipyards. Enter, talk to the Lucid Dawn Acolyte and continue in.
The main areas of the shipyards are two large, circular rooms with lots of ladders and switches. On level 1 go up ladder A and come out at A on level 2. Make your way around the west side to ladder B and go down it. Clear out the area around B on level 1, push the yellow button and go up ladder C.
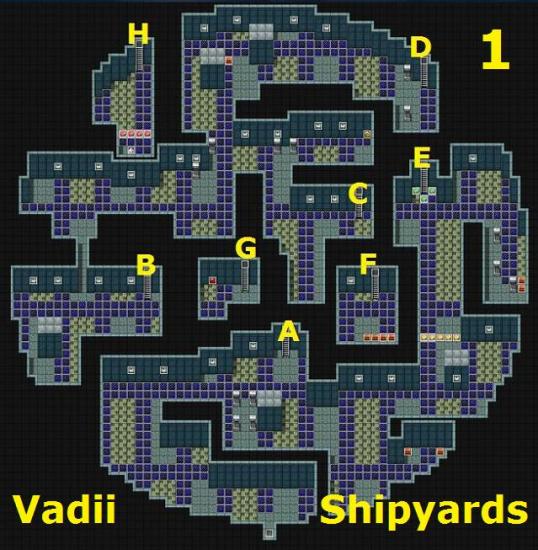
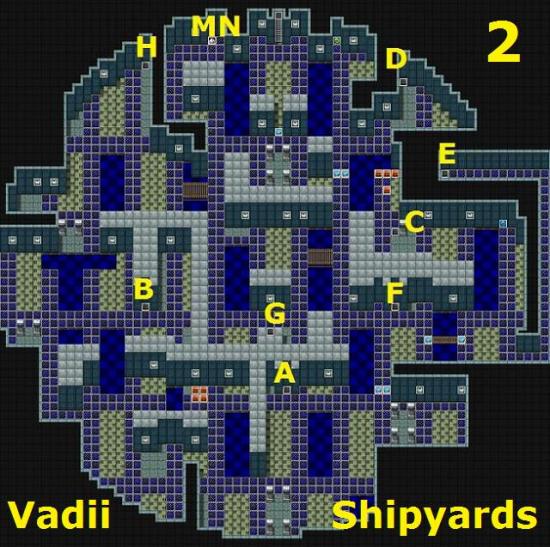
When you’ve cleared out at the top of ladder C, go back down it and go on to ladder D to push the green button. Then make your way all the way back to the start and this time go east. You can now go up ladder E to push the blue button.
Stay on level 2 and cross the bridge with the blue buttons to go down ladder F to empty the chest, and then down ladder G to push the red button. You can then go all the way north on level 2 to switch off the monster node. Also go down ladder H to switch off the monster node on level 1. Finally, exit at the north end of level 2.
When you’re on the docks, just make your way north (there is a monster node crystal you shouldn’t forget) until you meet Siegfried. Follow him in and watch the scene unfold. At one point Siegfried blows up a bridge, leaving Ruby hanging from a precipice, desperately clinging on to Maric’s hand, making them go go all Sawyer and Juliet on us with Maric telling her “I gotcha!” This is followed by quite a funny battle scene in which Maric and Ruby shout spells from a distance. Quite rudely, Siegfried walks out halfway through the battle.
Watch the most dramatic cut scene yet, in which Siegfried rises to power. Even his avatar changes! And then we’re ready for…
Chapter 5 – Shining Faith
Congratulations! You’re now the proud owner of an airship! To pilot the airship and move around the world, simply sit down at the helm. While you’re flying, you can go back inside the ship with your menu button. Land the ship with your space bar – look for the shadow of the ship on the ground, it has to be on a landable spot.
First explore the inside of the ship. In the west wing is a blacksmith who will forge you some amazing armor if you bring him Imbued Iridium. There are also shops of every kind and in the east wing you can reset your skill points and heal up. Ask around for side quests before you go on with your main quest.
Side Quest: Vindication
Talk to Officer Harold, who stands right next to the helm. He wants you to go to the crater where Kallenberg used to be and retrieve Lightfury from the ruins.
Go into the crater, pull out the sword and go into Carrions hallucination. In the hallucination, make your way up to Veridia Palace and go on to the chapel on the roof. Step into the hexagram.
Make your way across the airships until you find Lightfury again. Fight the mysterious creature, watch the scene and decide which sword you want. Then go back to the airship and talk to Officer Harold again to complete the mission.
Side Quest: Insatiable
Talk to Queen Boudica and she will send you on a mission to find out what’s happening at a place called Barah Treden. Barah Treden is just northwest of Nova Kedah. Enter the village. Everyone there is dead and there is nothing to do, so leave again. When you leave, you’re encountered by an old “friend”. She’s quite a bit harder to beat this time, but you can do it! As a reward you get the Ace of Hearts card – the last one of your set! To complete the quest, go back to Boudica on the airship.
Don’t forget to take all cards back to Lureska resort. He will tell you that you will find something very special at the top of Heaven’s Aegis.
Side Quest: Revisionist History
Sentinel Bors, on the south side of the airship, wants you to go investigate the Temple of Zanatus, in the far northeast and rescue a group of missing sentinels.
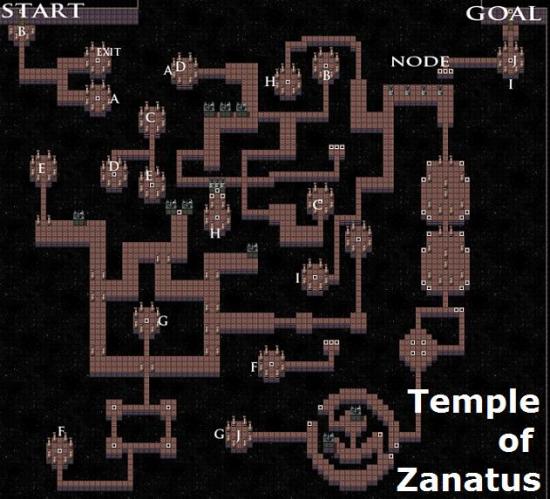
Go to the far northeast and go into the temple. The only way you can go is down the stairs. This is a great place to do some leveling up! The fights are quite doable at this stage and you get heaps of experience. To make your way through, go through the following portals: A, C, E, F, back through F, C, E, G, H, push button, back through H, I, switch off monster node and exit.
Go through the door behind the blue button on the upper level. Take the book and fight the acolyte on your way out. Exit and go back to Sentinel Bors to complete the quest.
Side Quest: Sliver of Hope
In the east wing of the airship is a nurse who tells you that Siegfried’s mother has appeared at Novas Kedah with severe neveroot poisoning. Go back to Veridia and ask Gerard if he knows what to do about this. So fly to Veridia, land your ship and enter the city. Gerard is the shifty fella by the items shop in the southeast. He will tell you you need to go to Vedessa Cove on an island west of where Kallenberg used to be, and find Kallenroot.
Sail due west and find the island in the middle. Make your way through the first 2 levels and eventually try and pick the Kallenroot flowers, but they will fight you for it! They’re tough little critters who can stun and poison and are resistant to magic. This is one of the few dungeons that you have to physically walk back out of, so when you’re done, trudge on back. I hope you switched off those monster nodes!
Board your airship, fly to Novas Kedah and go to the inn. Give the Kallenroot to the woman in the bed upstairs, Hilda. You will get some of Ruby and Siegfried’s back story and your quest is complete – no need to go back to the nurse on the airship.
Main Quest: Apocalypse
This leaves you with only one more thing to do and that is to enter Heaven’s Aegis and put Siegfried out of his misery. However, Heaven’s Aegis is a big place with several wings that you need to clear out first.
To enter Heaven’s Aegis, talk to the guy with the eye patch next to your airship’s controls. He will sneak you on board the Aegis. At any time during your next mission(s) you can come back here and talk to the guy again to be taken back to the airship, so you won’t have to do the whole Aegis in one go.
When you enter the Aegis you will come to a room with several portals to different wings. At the north end of the room is a bridge blocked by crystals. You need to kill the demons in each wing to destroy the crystals one by one and make your way through.
First go to the ice wing, on the left side of the room. This is another room where you have to touch glowing orbs to open up new bridges.
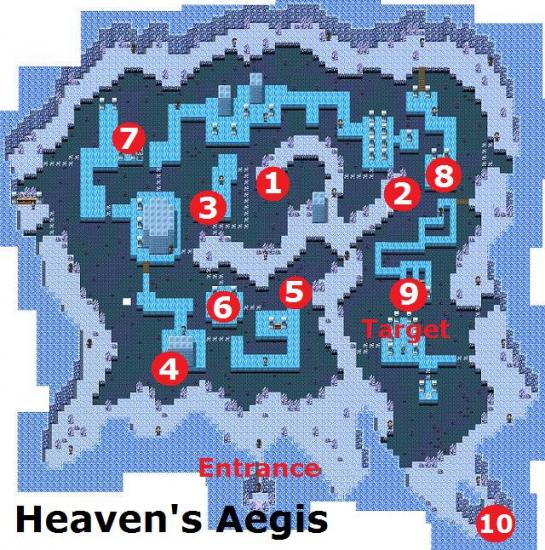
When you’re at the end of the room you will encounter Absolute Zero. This is quite a tough fight, but still doable. Keep healing with Maric and use your best melee attacks. When you’ve defeated Absolute Zero you will get your first lot of Imbued Iridium. Go back to your airship and talk to the blacksmith in the west wing to pick some nice armor for whoever needs it the most.
Then go back to the Aegis and go into the fire wing in the north. This is a linear map – just follow the path. At the end you need to fight Trailblazer. Another tough fight that you should be able to do by now. Go back to the airship to get your party ready for the next stage.
Now go to the purple wing on the east side of the room. This is a complex, circular room. To get to the end, first follow the green lines in the image below to find a nice new weapon for Teresa. Then go back to the start and follow the red lines.
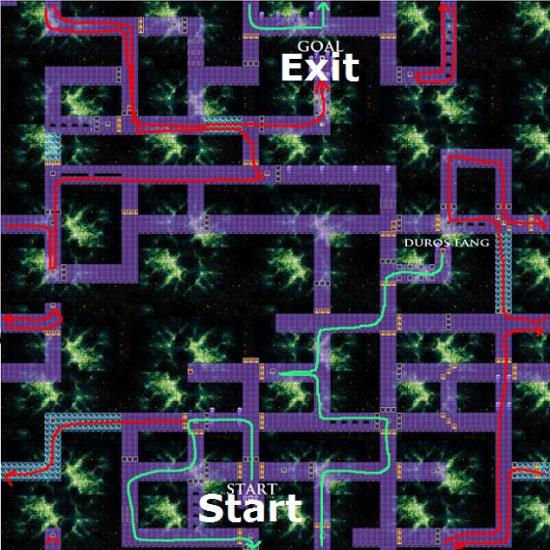
Fight the Maelstrom at the end and get more Imbued Iridium. Exit through the portal behind the Maelstrom and go back to your airship.
If you had little trouble with the enemies you encountered in the purple wing of the Aegis now is the time to go back to Lureska Resort and fight your quarter final battle. I went back to do the semi final battle after the next Aegis wing, which was tricky, but doable. You have to be quite clever with healing your allies etc. As Maric is such a useful fighter and healer, I made sure his speed was as high as I could make it (use your time keeper accessory). Your rewards for the quarter and semi finals are some really nice accessories.
Now go into the center room of the Aegis. You need to fight all the blue flames at the top of the stairs. They shouldn’t be a problem by now. When you’ve defeated them all, a red flame will have appeared at the top of the center stairs. This flame represents death itself. With my party at level 48 on average, I expected this fight to be harder. Get another Imbued Iridium as a reward.
Now go back into the Aegis and cross the bridge. You’re in a stunning sky garden that looks like a labyrinth. Spend some time here to level up. Make your way all the way around and through the tunnels at the top (go in at A, come out at B, in at C etc.). Then go into the door at the very top.
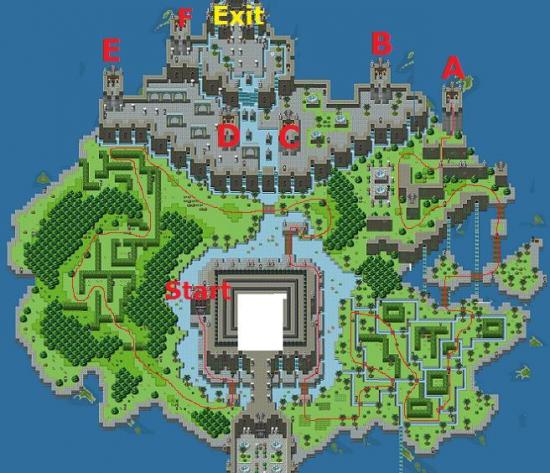
If you gave the full Deck of Hearts to Castellino in Lureska Resort, an Astral Maiden will wait for you right on the other side of the door. Fight her to get your reward, which are TWO lots of Imbued Iridium and a quite sensational augment. So dash back down to your airship to get more gear from the blacksmith! At this time also try to do the final battle at Lureska Resort. This is a tough one! I could only just manage at level 65.
Finally, make your way back to where you fought the Astral Maiden and continue onwards until you’re in the heart of Heaven’s Aegis and ready to battle Siegfried. This battle is very hard. General tips are:
- Make sure everyone is wearing their best armor and weapons.
- Augment to the max! Augment your weapons with as many debuffs as possible, so you have the best chance of inflicting Siegfried with something nasty.
- Don’t leave any skill points unused. Make sure you also allocate your Monster Node Shards to whoever need them.
- Ignore the orbs and focus on Siegfried himself.
- Pay attention to what shape Siegfried is in. When he is a warrior, attack him with magic. When he’s a mage, attack him with melee attacks.
- Use Teresa’s Absorb Magic skill at level 5 (provided she has the highest threat).
- Use Maric’s Regenerative Aura at level 5.
- Use Ruby’s level 5 Blood Tap.
Good luck and have fun!
More articles...
Monopoly GO! Free Rolls – Links For Free Dice
By Glen Fox
Wondering how to get Monopoly GO! free rolls? Well, you’ve come to the right place. In this guide, we provide you with a bunch of tips and tricks to get some free rolls for the hit new mobile game. We’ll …Best Roblox Horror Games to Play Right Now – Updated Weekly
By Adele Wilson
Our Best Roblox Horror Games guide features the scariest and most creative experiences to play right now on the platform!The BEST Roblox Games of The Week – Games You Need To Play!
By Sho Roberts
Our feature shares our pick for the Best Roblox Games of the week! With our feature, we guarantee you'll find something new to play!All Grades in Type Soul – Each Race Explained
By Adele Wilson
Our All Grades in Type Soul guide lists every grade in the game for all races, including how to increase your grade quickly!


