- Wondering how to get Monopoly GO! free rolls? Well, you’ve come to the right place. In this guide, we provide you with a bunch of tips and tricks to get some free rolls for the hit new mobile game. We’ll …
Best Roblox Horror Games to Play Right Now – Updated Weekly
By Adele Wilson
Our Best Roblox Horror Games guide features the scariest and most creative experiences to play right now on the platform!The BEST Roblox Games of The Week – Games You Need To Play!
By Sho Roberts
Our feature shares our pick for the Best Roblox Games of the week! With our feature, we guarantee you'll find something new to play!All Grades in Type Soul – Each Race Explained
By Adele Wilson
Our All Grades in Type Soul guide lists every grade in the game for all races, including how to increase your grade quickly!
Dawn’s Light Walkthrough
Welcome to our walkthrough for Dawn’s Light.
a:1:i:0;a:2:s:13:”section_title”;s:24:”Dawn’s Light Walkthrough”;s:12:”section_body”;s:120683:”
Welcome to our walkthrough for Dawn’s Light.
Introduction
As with most RPG’s, this game is non-linear. It has many side quests that can be played at any time and in any order. Sometimes you won’t be able to finish a quest until long after you received it and quite often you will need to complete several other quests first. So if someone asks you for an item and you can’t find it straight away, just keep playing, you might find it later! If you follow the three basic rules of RPGs (1: Explore everything! 2: Talk to everyone! 3: Fight all monsters!) and pay close attention to the information you’re given, you should be able to finish all quests without too much trouble.
In this game there are no random encounters and enemies do not respawn. So once you kill all monsters in a dungeon, you will be able to walk through it freely next time you’re there. You will also get extra rewards for killing all monsters in a dungeon. Don’t panic if you get to the treasure room at the end of the dungeon and you can’t get all the goodies because you missed a few monsters along the way – you will always be able to kill the monsters later and go back to the trophy room when you’re done.
The bosses get increasingly hard to fight throughout the game, so always try and buy new, better equipment whenever you can, and don’t forget to equip your characters with the best equipment you have! Also don’t forget to check all the barrels, vases, statues and chests scattered throughout the game for useful items and new skills. This walkthrough will indicate where to find important quest items and collectables such as letters, artifacts, fish etc.
If with your best weapons and skills the bosses are still too hard to fight, go away and do a couple of side quests to gain more gold and experience before trying again. This walkthrough attempts to wrap up as many side quests as possible in between closing a demon portal and going on to the next dungeon so you’ll be well prepared before going on to the next stage. Note that you can only reach level 50 maximum! After this you will not gain more experience.
There are 100 quests in total, but there are a few Mail Delivery and Lone Wolves quests for which you don’t get a notification if you have received or completed it. But all 100 are numbered in this guide.
The game begins with a flashback. You, a young boy named Harvey, are told to go inside and hide. Once inside, walk to the top floor of the house. There you will walk to the window and watch a masked man, Mordecai, abduct Victor, your brother. Granddad tries to stop him, but fails. Granddad takes you to an orphanage on Autumn Island to keep you safe. He also tells you he is not your real grandfather. Then he leaves.
Fast forward seven years. You are now a young man. Walk north to leave the little park. Tracey, one of the nuns in the orphanage, calls you back. You tell her you’re still worried about Victor. She gives you a journal in which you can write your game progress. You’re looking for a quest to write down. Tracey suggests talking to Jeremy.
1. Frog Wrangler
Your first quest! Jeremy has lost his frogs and you offer to find them for him. The first frog is in the little park at Point Lookout, where you started the game. Interact with him and bring him back to Jeremy. Now go west and find a blue frog outside the orphanage. Take the frog back to Jeremy. Walk north and get cut scene with John.
The magubbins have stolen his sheep and taken them to the cave. But he doesn’t want you to go look for them. There is a green frog inside his house. Take it to Jeremy. Walk north past John’s house to the crossroads. Go east and enter the house. There is a brown frog by the boat landing on the beach to the east. Bring it to Jeremy. Go back to the crossroads and enter the house on the west. Find the last frog and return it to Jeremy. Quest complete. Receive Harvey’s Wrangler Outfit as a reward.
- Woolly rescue.
After you’ve returned the frogs, you realize you want to do another quest. You want to go rescue John’s sheep, but you need to go to Hecktor to get a weapon first. Hecktor lives in the house west of the junction. You ask for a battle axe but Hecktor gives you a Training Stick in stead.
Now go north at the junction, into the forest and inspect the statue. Harvey learns Tactical Strike. Go into the cave and talk to and fight the magubbin. You can’t jump to the blue chest in the water just yet. The next area has two more magubbins. Go north. Fight the magubbin and open the green chest to find Spring Boots. Go back south and jump across the stones west. Jump across the water to fight another magubbin.
Go north. Fight the magubbin and receive a ruby gem. You have some trouble getting the sheep, Gordon and Trevor, to leave, but an explosion chases them away. Quest complete. Walk back out of the mountains and open the blue chest on your way out to find a Rusted Mail Armor.
It is now raining and you realize something is not right. Go back to town and watch two people disappear through a portal at the junction. John tells you that “he” was looking for you. When you weren’t there, he killed everyone on the island. Before he dies, John gives you his ship and tells him he needs to go talk to granddad.
- I Want the Truth!
Take the ship and go to granddad’s island. Go into the house. Quest complete.
- The Journey Begins
You tell granddad what happened. Granddad tells him “his” name is Mordecai and he killed your parents and took granddad’s family. Granddad then took you back to his island. You swear revenge and granddad tells you to start looking in Twilight Village in the East Seas. To go to the East Seas he needs to find Oddwolf in Trade Town and use the teleportation crystals.
Granddad marks Trade Town on Harvey’s map and gives him a Communication Stone, Decrepit Battleaxe and Worn Wooden Shield. Take the boat and go to trade town. Go into the shack on the beach and talk to Joseph. He gives you a starter rod, a fishing line and a tiny fish lure.
Go into the back for the fishing tutorial. Joseph tells you about the fishing competition. Go back out onto the dock and north into town. Go into the house straight ahead. Talk to James, behind the table. He tells you that there have been kidnappings and that therefore all visitors need a visitor’s pass. Tell him you’re there on a social visit and he will give you a visitor’s pass.
Go back out and into town. The guard will ask for your pass and tell you you can only enter the business district. Ignore the doors on the left for now and go into the door with the hexagram on the right. Talk to Jonas Gumby behind the table. He is also known as Oddwolf. Quest complete.
Jonas tells you that the gems for the power crystals were stolen a long time ago, and the crystals have been out of action since. You give him the ruby gem. He tells you to follow him. Go downstairs and talk to Jonas again. He activates the red crystal for you and you’re teleported out. You land in Twilight Village and granddad talks to you through the communication stone. He tells you to find the leader of the island and get information on Mordecai.
The Mansion – Portal #1
- Take Me to Your Leader
The mansion door is locked. Don’t forget to fish in the pond in the village center! All the other houses are locked too, except for the house in the northwest. Go in and talk to Andre behind the table. He will tell you that Cuthoro Mannington has not let anyone into the mansion in ages and he communicates through his sons. His youngest son, Joss, used to be best friends with Andre’s daughter Vera.
Vera gets upset and you leave. She follows you out and tells you that when Joss stopped talking to her, all the people in the village locked their doors, too. She tells you someone needs to kill the demon inside the mansion, and that she knows a secret entrance through the forest.
Sleep in the inn if you need to, and stock up on food and potions, then go west into the forest. Fish the river. Walk north and see a white cat run away. Follow it. In the clearing there is a crate containing a map to Snowball Island.
Go back out into Twilight Forest. Fish the river by the bridge to catch a Spotted Sweetfish for Joseph. Go north and west across the bridge. You can’t go into the secret hideout in the southwest just now. Go north.
Go east. Both doors are locked but you can climb through the window. Keep going through the rooms until you run into Cuthoro and his sons David and Josh. He denies all involvement with wizards and throws you out. Quest complete.
As you walk away, a bush follows you and talks to you. It tells you to follow the red flowers and meet him in the secret hideout in the forest.
- A Secret Meeting
Go back to the forest, cross the bridges to go west and then go south. Joss is waiting for you and tells you to get inside. Quest complete.
- Into the Mansion
Josh tells you his dad has been very secretive and tells you to search the mansion. Joss joins the party. Vera arrives. There is some arguing during which everyone keeps leaving and joining the party. Finally everyone decides to all go together.
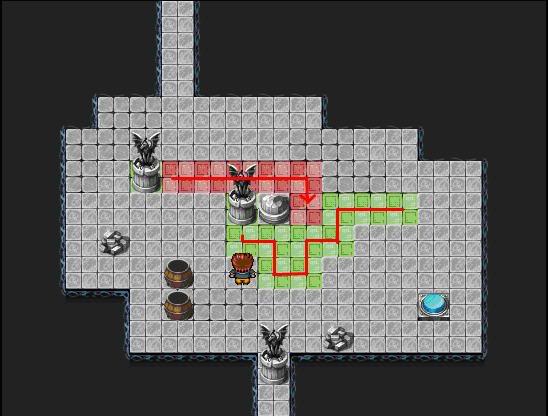
Go back to the mansion through the kitchen window. Josh will open a shortcut. Go in. The blue chest contains a Knight’s Chestpiece. Go to the next room. You can only enter the doors with the yellow tiles right now. Go through the door to the right of the stairs. Go into the next room and down the ladder. Jump across the stones and go into the next room. Jump across the rocks. Touch the statue and Vera learns Double Stab. Go into the next room and jump through the hole. Go up the ladder. On the table is encrypted letter #1. Go back down the ladder and the hole and go south. Solve the puzzle as in the image below:

Go into the next room and then the next. The red box contains the wolf key. You can now open the green doors. Go back up and go through the green door west. This gets you back to the central hallway. Go through the green door on the left. The blue chest contains the Crown of Royal Blood. Go back to the hall and up the stairs. Go through the green door on the right then through the hole in the wall. Go down the rope and into the next room. Go south into the next room. Solve the puzzle as below:
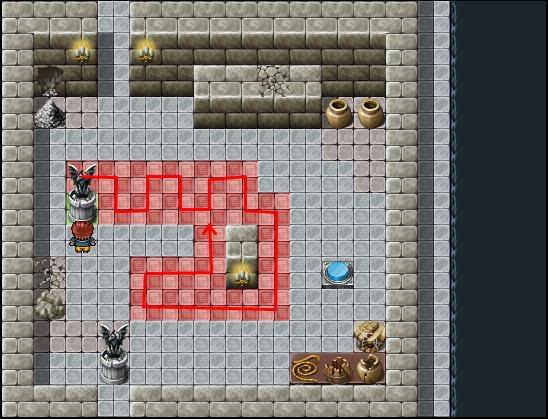
Go into the next room. It has secret door by the shadow on the right hand wall.
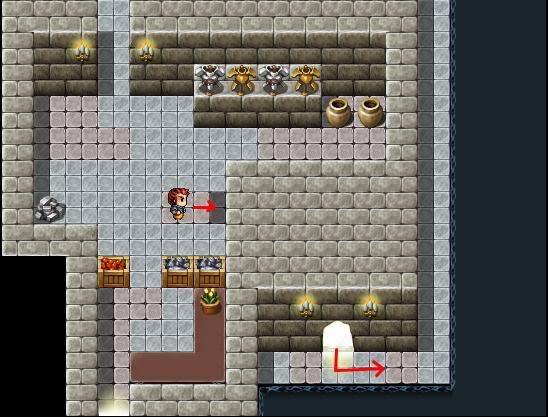
Walk all the way around until you find a red chest with the Prisoner’s Shank. Go back to the room with the secret door and then south into the next room. To solve the shadow puzzle, make the shadows into a cross on the floor:
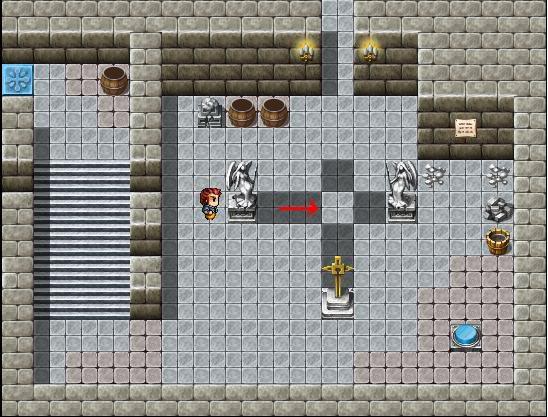
The red chest you get as a reward contains the Eagle Key. This will open the blue doors. Leave through the blue door and get back to the landing. Go through the blue door straight ahead of you. The blue chest contains a Knight’s Helm. Leave through the other door and then go into the blue door on your left. Go into the next room and jump down the hole. Jump across the water and go east. Go east again and then north through the blue door. Get the sheet music from the table, interact with the organ and watch Harvey do his thing! This reveals a hole in the wall – go through it. The statue will teach Vera Back Stab. Go into the next room and solve the puzzle as below:
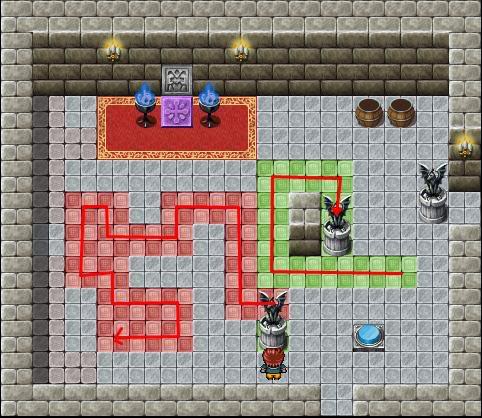
Go east. Hop along the rocks and find a red chest containing the Viper Key, which opens the purple doors. Go back to the previous room and through the purple door. Go up the stairs. Go north and then east. This gets you back to the landing in the main hallway. Go through the purple door north of the stairs. The door on the right is locked, so go west. The party will witness a scene with Mordecai, Victor and Cuthoro through a vent in the floor. They talk about opening a demon portal. Quest complete.
- The Demon Portal
You decide to go and find Cuthoro. Go back to the locked door. Watch a scene between Cuthoro and Joss. He kills Joss and his brother David joins the team in the fight against Cuthoro to avenge Joss’s death. When you defeat Cuthoro you will receive the Skeleton Key.
Go through the locked door. The statue in the next room will teach Harvey Strategic Strike. Go down the ladder and hop straight south across the tiles. The red chest in the next room holds a Spectral Blade.
Make sure your party has full stats and the best weapons and armor equipped, then go back north and walk onto the demon portal. You will encounter the King of Blades. With your best skills, using Harvey’s Strategic Strike when the demon charges up to use Helicopter Spin (make sure you have enough mana left!), he shouldn’t be too hard to beat. You will receive a glowing shard. Quest complete.
Then watch a flashback cut scene where a little boy (Marcus) and girl witness their father (Graham) being abusive to their mother (Mary). You are then taken to a treasure room! If you have been diligently defeating all the monsters in the mansion, you will find lots of great goodies, such as a green chest with a sapphire gem and two blue chests containing a Magician’s Robe and a Crest of Truth.
Leave the treasure room through the portal and David will leave your party. Go back to the main hallway of the mansion. If you like, you now can go east through the red door and talk to Trevor, the rather peculiar gardener. Remember this guy for later! Now leave the mansion.
Vera tells Harvey she wants to join him in his mission to destroy the other demon portals. After some objections he lets Vera join. She walks off to say goodbye to her father. Walk away and granddad will talk to you again. He tells you to go to the tournament arena in the West Seas to recruit a warrior to accompany you on your quest (receive tournament quest – quest #13.
You can now explore the village and buy some better weapons and armor for both Harvey and Vera. However, only the Darksteel Buckler shield is better than the items you have found in the Mansion.
The old man in the magic shop, Bernard, will give you a side quest to find him 5 burning embers in exchange for a tuxedo, one of the collectable outfits (quest #44). I will get back to this later. There is also a treasure hunting game where you have to collect red tickets to exchange for prizes. There is one barrel on the right hand side of the playing field in the treasure hunting game that holds 10 tickets each time. You can come back to this game any time you like, and you will need to collect 100 tickets to get the Bunny Outfit for Vera.
When you’re done, go west into Twilight Forest and meet Vera again. Then go back into the teleporter and take the green crystal to Trade Town. Jonas will then activate the blue crystal for you.
This is where the game becomes less linear, so you’re welcome to do the quests in your own preferred order. But I think it’s time to do some side quests!
- Side Quest: The Snow Monster
Go into your items menu and activate the map to Snowball Island. Go out of the teleporter and go south to the dock. Give your special fish to Joseph, if you like. Take the boat and go east to Snowball Island.
Talk to Chloe by the fence. She collapses from the cold. You take her inside and her parents tell you about a Snow Monster in the mountain. You’re told you need to go and see Derek. Go outside. Go into the house on the left and talk to Derek. The only useful information he has for you is to tell Marco that Suzie, his cat, is in danger so he will get out of your way. Talk to the guy by the north fence. He will get out of the way and jump down the well.
Now exit to the north. Go all the way north and exit east. Go up the steps, keep going west and enter the cave. There is a fish in the stream you can’t catch just yet (it’s the Lone Shark). Go north into the next room. Talk to the Snow Monster. Quest complete. The monster turns out to be a boy named Henry who left town to become a baker in Trade Town, but chickened out. He’s been hiding in the cave in embarrassment ever since. Bring him back and receive a Travel Outfit for Harvey. On your way out, talk to Marco inside the well for a bit of fun. Go back to your boat and back to Trade Town.
- Side Quest: Mail Delivery to “Anybody”
In trade town, go into the middle door (with the bag symbol). This is the post office. Give encrypted letter #1 to the lady behind the desk and she will decrypt it for you. Quest complete.
- Side Quest: A Simple Request
You receive a side quest. The letter contains a map to Bluewood Island. Go into your items menu and activate the map. Bluewood Island is in the East Seas. Go back to the teleporter and use the red crystal to go to the east seas. Go into the village, down to the boat and then to Bluewood island in the east. Go in.
The door to Bluewood Manor is locked. Go into the shed and talk to Augustus. Quest complete.
- Side Quest: 100 Spiders
Augustus has been living in the shed because his house is infested with 100 spiders. He will give you Bluewood Manor Key and a spider jar. Go into the manor and collect the spiders.
Entrance hall and west:
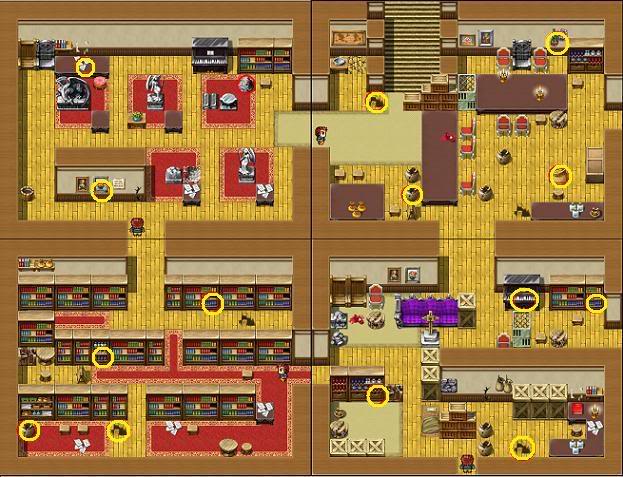
Upstairs:
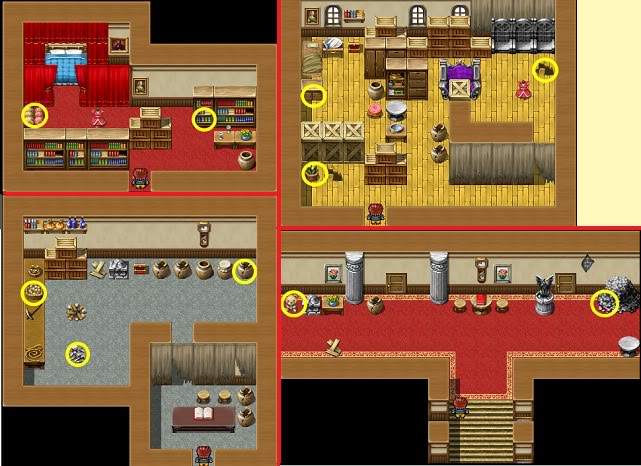
Upstairs exit west, walk all the way around the balcony and go into the hidden room at the end (which is indicated by a dark shadow on the floor):
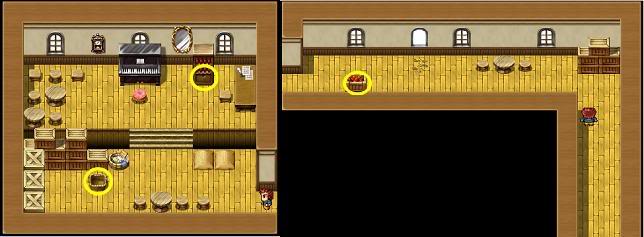
East of the entrance, kitchen and basements:
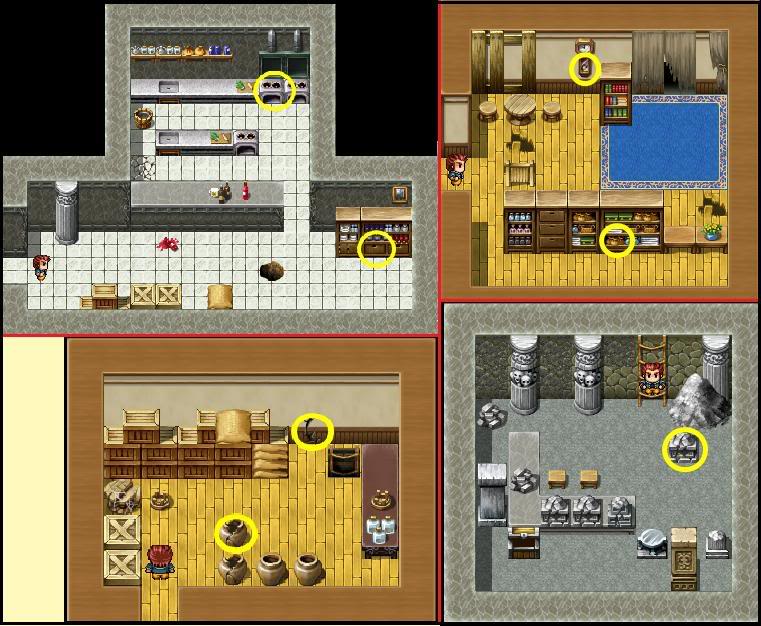
When you’re done, return to Augustus. If you haven’t found all the spiders yet, he will tell you. If you’ve found all the spiders Augustus will reward you with an Arachnid Pendant (trinket), Lunar Artifact and some gold. Quest complete.
Back to the main quest. Go back to Twilight Village and use the blue crystal to go to Saltwater Bay in the West Seas. Exit the portal. Cherry, the bunny girl, will mark Arena Island on your map. Go into Saltwater Bay and explore. The items shop on the left sells a Hero Outfit for Vera that you’ll be able to afford later (7600g). There is also a map shop that sells treasure maps. The first map, to Bonechill Island, costs 1000g. This treasure hunt can be done at any time and doesn’t rely on level (quest #40).
In the southwest there is a man, Broderick, who will give you a side quest to find him a pirate hat (quest #17).
On the island way in the north there is another treasure hunt game, but it is still locked. Go back to the dock and get in your boat to go to Arena Island. Go in, talk to everyone and pick up encrypted letter #2 from the table. Go further in and the bunny girl at the table will tell you that sign-ups are to the left. Go to the sign-up desk and watch another funny cut scene. Quest complete. Pick your team name.
- The Arena
Go buy some supplies now if you need as you won’t be able to leave the tournament until you’ve won the first three rounds. I also recommend getting the Champion’s Barricade shield and the Cloak of Deception from the shops.
Talk to the guard to the right of the registration desk and he will take you to your prep room. Go through the portal for the fights. You need to fight, in order, Team Jones, Hip Hop and The Dragons. The third fight is pretty tough, even though there is only one opponent. However, you should now be level 12 and with some of the armor from the shops in Saltwater Bay you should be quite able to win it. Quest complete.
You receive the Champion’s Ring (trinket). You can now enter the champions’ area on the right. If you like, you can go straight on and fight the first two battles against the King and Captain (quest #91) and the Rot Augen Kinder (quest #92).
Pirate Mines – Portal #2
- The Pirate Mines
When you leave the arena, Tyson, the guy from the third battle, and his fast fingered friend Kain catch up with you. Tyson says he has a treasure map and wants to join your party. After some discussion, Kain marks the Pirate Mines in the West Seas on your map. Tyson will join your party for good, so you can start giving him some better equipment if you like.
Go out, get into your boat and sail west to the pirate mines. Go in. The statue gives you Call of Protection for Harvey. Go into the east room to get the Unbreakable Head Gear from the blue chest and the other goodies from the barrels. Now go west.
In the next room you will get a cut scene where you find lots of treasure but need to flee a group of skeletons before you can get to it. What follows is an absolutely hilarious mine cart chase. Fight Nusku, get out of the cart, take encrypted letter #3 from the table and follow Kain into the next room.
Next is a series of mine cart games. You have to flick the switches in a certain order to make the tracks go the right way. These can only be done if you have dash mode on. To use dash mode hold down shift while walking or go into your options menu and select automatic dash.
The first one is easy – get the cart rolling with the red switch and then flick the blue one before the cart gets there.
The game in the next room is a bit harder and you have to be fast. Run to the yellow switch, then straight up to the blue one, then back down, off to the right and hop over the two tracks to get the purple one.
The third puzzle (in the next room) is the trickiest as you have to flick some switches more than once. Get the cart started with the red switch, then run over to the green one on the right and flick it, and then instantly run to the rope ladder on the right and go up.
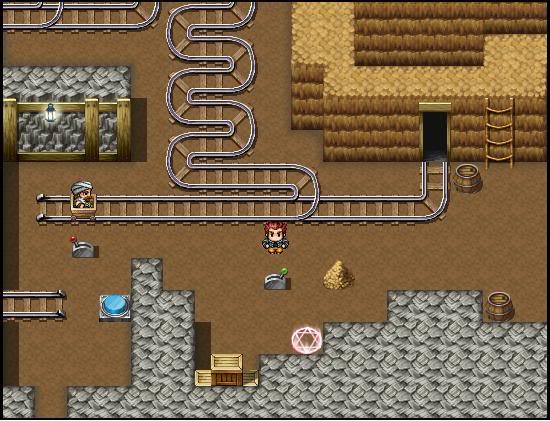
Go left and up and hop over to the blue switch on the left. You have to flick this one three times. Once as soon as you get there and before the cart gets to the bottom left junction (1), then again as soon as the cart is in between the bottom two junctions (2), and when it is between the top two junctions (3). Then run over to the purple switch on the right, which you need to flick twice. Once before the cart gets to the left junction (4) and then again when it is in between the two (5):
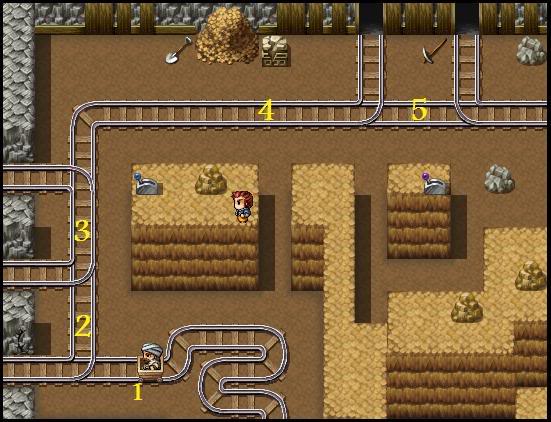
Then hop back to the left, run down and go back down the rope ladder to flick the orange switch on the right.
When Kain gets to the green button on the other side of the water, a bridge will appear for you. Get the pirate hat from the green chest.
Go north and fight Anguta. Go to the next room. For the first shadow puzzle slide the top pillar 4 down and 2 right, then the left pillar 2 right:
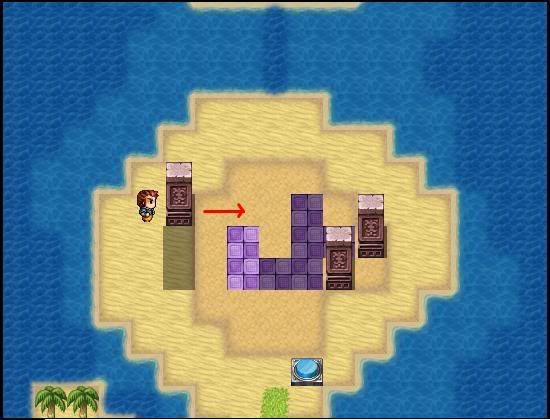
For the second puzzle, move the left pillar 2 down and 1 right. Move the top pillar 2 down and 2 right and then move the right pillar two left:
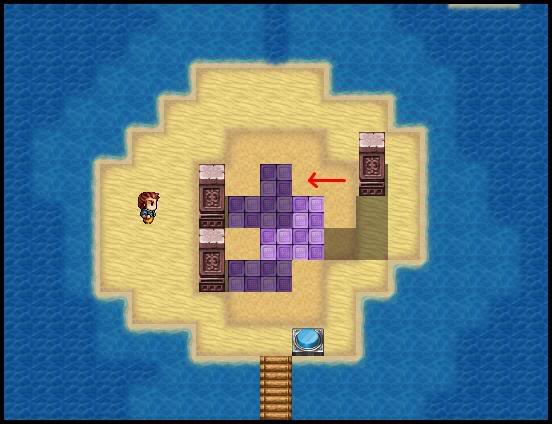
Do the next puzzle and move on to the next screen. Try the switch. You’re told it’s jammed and you have to clear the tracks. Go up the steps and up the rope ladder. Go down the next rope ladder and enter the cave. Move the stool off the tracks. Go out, back up, right and down two rope ladders. Enter the cave on the beach. Get the pickaxe off the tracks. Go back out, up the rope ladder and enter the next cave. Move the teddy bear off the tracks. Go through to the next cave. The statue teaches Tyson Light Feet. The red chest contains a Bloody Fang. Move the flowers and helmet off the tracks. Leave the two caves and go up the ladder. Then move the rock to the right and jump down the hole. Enter the next cave. Move the flowers and helmet off the tracks. Go back to the start, flick the switch and watch the action.
Fight Nyiko. First go south and get a Cross Stitched Hood from the blue chest. Go back in and down the ladder. The statue teaches Vera Contagious Stab. There is also a secret room in this area!
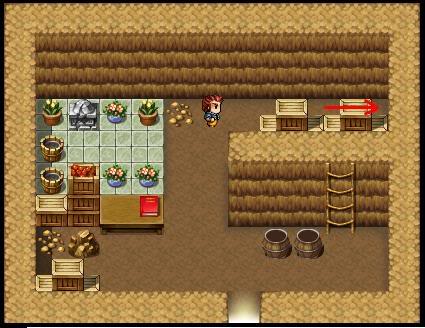
Exit this room and go south and south again. Watch the action and fight Captain Helheim. Quest complete.
- The Pirate Demon
Go into the room on the right, go into the portal and fight Dionysis. Quest complete.
You receive a glowing shard. Watch another flashback. This time Marcus, the little boy, takes a leaf out of his father’s book and treats his sister like his father treated his mother. You’re then taken to another treasure room with Mage’s Vestments in a blue chest, a Hammerhead Mace in a red chest and lots more great stuff.
Leave the trophy room. Go back into the previous room and find that Kain has disappeared with the treasure. Go south, flick the switch, cross the bridge and go west. Remember the room west of the entrance had lots of treasure, which you can now go and collect. The blue chest has a Chestplate of Power. Also fish for the Axehead Fish (you may have to give it a few tries). Leave and granddad will speak to you again. He asks you to come see him.
- Side Quest: Collection of Goods #1.
Get in your boat and go to Saltwater Bay. Return to Broderick’s house in the south west and give the pirate hat to Broderick. He will give you a Pirate’s Outfit in return. Quest complete.
The Haunted Farm – Portal #3
- Hi Granddad
Take the green crystal back to the South Seas, get into your boat and go to granddad’s island. Talk to granddad. Quest complete.
Granddad tells you he thinks he’s found another demon portal on a farm. He used to get supplies from them but deliveries have stopped. He marks the island on your map.
- Sneaky Sheep
Go back to your boat and go to the haunted farm. Walk along the beach to the east to get a Helm of the Fallen Champion from a blue chest. The only path you can take right now is the top left one. Go to the next screen and the next. Go into the hut. Read the book on the table, it gives you a to do list. Then pick up the rope from the table and go back out. Pick up the log on the left and the log by the trees in the south. Go back to the previous screen and pick up the log there. Go back west and then go north. Fix the bridge and get the spectral goggles from the green chest. Fight Skoll. Cross the bridge again. Talk to Nick. Quest complete.
- Ghostly Helper
Go help out the other spirits on the farm so they can pass over. Go back to the farmhouse. Also inspect the doghouse for more goodies! Now take the east path to help Gordon with his sheep. The statue teaches Tyson Whirlwind. Talk to Gordon again and he will move out of the way. Go into the shed and out the other door. Go west.
Talk to Gordon again and he will give you a Cow Outfit. You need to chase the sheep back to Gordon one by one. The red chest has a Shining Star. Chase the sheep north through the fence. Then go up the steps, cross the bridge, jump the gap and go back down the other steps. Chase this sheep back the way you came, too. Go back to the last barrel and go south, east and then north, hopping across the stream when necessary. Go up the mountain and chase the third sheep all the way back. Talk to Gordon again and go back to the farmhouse.
Now take the northeast path. You need to help Frieda retrieve her chickens. To do this, bring each chicken to the pen with the same color. Go one field north and one east and find a blue chest with a Champion’s Breastplate. Return all the chickens to their pens, fight the demons that are released, talk to Frieda again and go back to the farmhouse.
Now go west to help Morgan find his cows. The statue teaches Harvey Call of Purity. Go west again. Morgan will tell you to kill the monsters so the cows can go home. The left paddock has a blue chest with the Hood of Repressed Memories. Kill the flowers in each of the fields and the cows will go inside. (Just for some fun, click on the top right cow once they’re in the shed, and he will whinny like a horse! Now, isn’t that interesting…) Talk to Morgan again and go back to the farm house and talk to Georgia on the steps. Quest complete.
- Demon at the Farm.
Now go into the farmhouse. Step onto the demon portal and watch a hilarious scene between Harvey and Thanathos/Death. Fighting Death is tricky, as he will kill you in one blow when your health drops below 40%, so you need to keep your HP up. Other than that it’s pretty straightforward. You receive a glowing shard. Quest complete.
In the next flashback mom punishes Marcus for being rude to his sister and leaves him alone with dad. The treasure room contains a Demonic Scythe in a red chest and Fanatical Attire in a blue chest. Leave the treasure room and be approached by Rolando. He works for a secret organization of assassins called the Lone Wolves (quest #24). He will mark their headquarters in the East Seas on your map. While you are talking he sets the place on fire and floods the sink, just for fun. You can sleep in the bed to regain your strength.
It is now time to do some more side quests!
- Side Quest – Mail Delivery to James
Go back to trade town and have the two encrypted letters decoded in the post office. Encrypted letter #2 is for James, the mayor’s assistant, in the visitor’s office. Go to the visitor’s office and give the letter to James. He will give you a map to Slime Island in the West Seas. Activate it in your items menu. Quest complete.
- Side Quest – Mail Delivery to Handyman
Encrypted letter #3 is for handyman Rick in Saltwater Bay. Take the blue crystal to Saltwater Bay. Rick lives in the house on the middle south island. He will now activate the treasure hunting game in the north. Quest complete.
Get 100 tickets in this treasure hunting game and you’ll be able to get Harvey’s Moonwalker Outfit. You are now also advanced enough to fight Sugar and Spice (quest #93) and the Wranglers in the Arena (quest #94).
The Crypt – Portal #4
- The Lone Wolves
Go back to Saltwater Bay and take the red crystal to the East Seas. Go to your boat and sail to the Lone Wolves HQ in the southwest. Go in through the fenced door on the right. Talk to Rolando. Quest complete.
- Mansion Baddie, and
- Side Quest – Lone Wolves Mission Alpha
Rolando tells you you can join their organization after you complete a couple of tasks. First you need to find a demon in Twilight Village. Go back to the Mansion in Twilight Village and talk to David. He tells you to check out the odd gardener in the northeast room. The odd gardener is indeed a trickster demon. Fight him. Quest(s) complete.
- Lone Wolf Return
Go back to Lone Wolf HQ and talk to Rolando. Quest complete.
- Return to Magubbins Cave, and
- Side Quest – L one Wolves Mission Beta
Your next mission for the Lone Wolves is to find a trickster in the Magubbins Cave on Autumn Island. Take the green crystal to the South Seas and go back to Autumn Island. Go back north into the cave and talk to the magubbins until you find the trickster. Also go back north to the green chest in which you found your spring boots. It now contains a lamb cutlet (thanks Finnius!). Quest(s) complete.
- Lone Wolf Return
Go back to Lone Wolf HQ and talk to Rolando. Quest complete. You can now follow Rolando inside.
- To Trade Town
Talk to Rolando again. He will tell you about a group called the Fanatics in Trade Town, who have kidnapped some priests and are using them to open another demon portal (quest #38). You need to go to Trade Town and find the baker’s apprentice. You are given a Lone Wolves badge and a Trade Town resident’s badge.
While you’re still there, talk to the guy on the right and he will give you an exclusive membership pass. Then go in through the door. Talk to Normando on the left and he will give you another side quest. He wants you to find him some golden thread, and in return he will give you a Ninja’s outfit (quest #41).
Leave and take the green crystal back to Trade Town. Go east. The weapon shop in the square has some nice but expensive armor and weapons. Talk to the girl in the magic shop and she will reveal that there is a hidden passageway behind the bookshelf. Push the shelf aside and go in. Go out on the balcony and in the other door and into the next room. Go out on the second balcony and find Tyson’s Hero Outfit. Leave the shop.
The next house north is locked. Go into the house by the barrels (the bakery) and talk to Fernando behind the counter. You show him your lone wolves badge. Quest complete.
- Secret Meeting
Fernando tells you to meet him in the park later. Leave the shop and exit west. Fernando is hiding in the northeast corner. Talk to him. Quest complete.
- Collection
Fernando tells you the Fanatics are having a secret meeting tonight that he wants to infiltrate. He has a cunning plan, and for the plan he needs you to find a pound of flour, two eggs, a gallon of milk, five berries and a big wooden box. Two berries are in the park, one near the north wall and one near the south wall.
There is also a girl, Olivia, with a large wooden box. Talk to her. She is hiding behind the box from the creepy guy on the left. Talk to the guy. The guy, Brody, is an undercover cop who is watching for an assassin to make his move. He can’t leave until the assassin attacks. Talk to Ginsu, the assassin, but he doesn’t dare move while the guy to his right, whom he believes to be a cop, is around. Talk to the guy, Riley, but he won’t leave until the lady to his right leaves, as he doesn’t want to give her his seat. Talk to the lady, Eva, and Vera threatens her into leaving. Watch the scene unfold and go back to Olivia, who will give you her oversized box.
Now go west. You will find another berry. Go into the first house and talk to Aidan, who has chickens in his house. He has just sold all his eggs to Gerald, who is in the Inn. Go back out. The next door is locked. Go south. The next house has nothing interesting. Talk to the owner of the shop in the square and look at all his merchandise. You will need all of this at some point, so remember what you see! Buy his milk. Also buy his fishing line.
The house in the northeast belongs to Marvin, the cartographer. Buy his map to Butterfly Island. Exit east. There is another berry by the inn. Go into the inn and talk to the green haired guy by the table on the right. It’s Gerald. He needs you to go talk to the girl, Madeline, on the left. She says she likes Gerald. Go back to Gerald. He wants to propose to her but needs a blue feather to do so. Go back to the vendor in the pervious screen and buy his blue feather. Give it to Gerald and he will give you two eggs.
Leave the inn and go west back to the bakery in the shopping district. Talk to Lucien. He won’t sell you flour. Leave. Harvey suggests Vera and Tyson distract the baker while he slips into the back room. But you need a bag for the flour. Go back to the house in the southwest of the shopping district. Try and steal the bag off the table. Vera tells you she wants to ask the owner first. Talk to the owner. He won’t give you the bag. You leave and Vera will just grab it off the table.
Go back to the bakery and talk to Lucien again. They distract Lucien and Harvey will get the bag of flour. Leave the bakery and go north to find the last berry. You will have to come back to this area later, but while you’re here (and before you get to quest #35) go into the church and walk all the way north to the table by the piano. You can either donate money or take money from it. Donating money will simply make you a good person. When you take all money you will get stricken as if attacked by a demon, but no real damage will be done. (Note: if you “take some money” first and then “take all money”, you will first receive 50g and then another 500g while if you go straight for all the money you will only get 500g. Thanks Finnius!) Go south and west and talk to Fernando again. Quest complete.
- Infiltration
Fernando tells you to meet him by the locked door in the crooked district. Go west and talk to him again. He will give you the alley key. Go through the door on your left and talk to Fernando again. Quest complete.
- Church Distraction
Fernando will lure the Fanatics outside with his cake and, oddly enough, a pony. You overpower them and take their clothes. You go inside and hear that they have captured the priests and are holding them in the crypt under the church. Fernando tells you you need to get the people from the church so you can sneak in. Meet him by the church in 10 minutes. Go back east to the park, then north and east again. Ignore the house on your right for now, we will need to go there later. Go into the church. Quest complete.
- Rescue the Priests
Fernando has found 4 dogs and painted them red to resemble the hounds of the apocalypse (with some imagination). The people run off. Fernando joins your party. Go down the steps on the right. There is nothing on the left. Push the book shelves in the top right aside and go into the crypt. One of the priests talk to you and tells you you need to find the keys to their cells.
Step onto the latticed platform and move north. Exit west, exit north and go west again. Talk to the ghost knights. They will each tell you something about themselves. Pay close attention to any number they mention. Remember this number and the color of the banner on the wall behind them. In the northeast there is a blue chest with a Breastplate of Honor. To open the door, pull the levers in the order the guards told you. The correct order is 1 – red, 2 – purple, 3 – green, 4 – blue. Go in. The statue gives you Wicked Strike for Harvey. Get cell key 2A from the chest at the top of the steps. Go back to the entrance.
The cell in the northwest is cell 2A. Open it. Go into the cell and north. The door in the next room is locked, but you can go through the wall. Step on the platform to move north. Hop to the next island and find a statue with Primitive Mind for Tyson. Move onto the next latticed platform moving west to get a Crimson Helm from the blue. Move east again and then move back onto the same platform going north. Go west into the next room, which has a chest with cell key 2B. Go back to the entrance.
Cell 2B is in the northeast. Unlock the cell. The red chest inside has a Blessed Warhammer. Go to the cross shaped platform and go east. Go into the next room and then into the room in the southwest. The chest has a blue lever. Go back to the previous room, put the lever in the switch and pull it. Get Gasher for Tyson from the statue. Go north. Go left and go into the west room. Go south to the enclosed pond and get a grey lever from the crate. Go up the steps at the north end of the room and activate the grey switch. Jump to the right (put your hands on your hips, and bring your knees in tight…) and get the green lever from the crate. Go to the southwest corner of the room and activate the green switch. Hop south and get the purple lever from the crate. Go to the northwest, activate the purple switch and get the yellow lever from the crate. Go to the center of the room, activate the yellow switch and get the red lever from the crate. Before you leave, go to the north wall and go into the hole in the wall hidden with vines. Use the platform to go north, west, south and west and get the golden thread from the crate in the next room.
Go back three rooms. Activate the red switch by the stairs. Go east and get cell key 1B from the crate. Go one room back and quickly hop into the hole in the wall. In there you can fish for a dark trout, delicious eel and a fish you can’t catch yet. Go back to the entrance.
Cell 1B is in the southeast. Unlock the cell. Go into the next room south. Pull the red lever. Go around to the blue switch and pull it. Go back up to the main platform and pull the green lever. Go back to the blue lever and pull it again. Go south and go up to the gold switch. Pull it. Go back to the main platform to get a Battlesilk Cowl from the blue chest.
Exit south and first flick the green switch, then the purple switch, the orange switch and the gold switch in that order. Exit east
In the next room follow the following steps:
1. Go south
2. Flick the switch
3. Go east
4. Flick the switch
5. Go further east and north
6. Flick the switch
7. Walk to the north side of the switch and flick it again
8. Hop to the northwest corner
9. Flick the switch
10. Go south and east to the gold switch in the middle
11. Flick the switch
Don’t forget to go to the statue in the northeast to get Shadows for Vera. Then exit north. The next room is easy. Flick the blue switch and then the gold one. Get cell key 1A from the crate. Exit east to get Aegis of the Damned from a blue crate. Go back to the entrance. Cell 1A is in the southwest. Quest complete.
- Demon Crypt
The four rescued priests have opened up a new bridge for you from the centre platform. Go there and exit north. Walk onto the demon portal. Fight Rahu. You receive a glowing shard. Quest complete.
In the flashback, the demon Syn gives an angry and upset Marcus a special mask that gives him power. The treasure room gives you a Fang of Rahu from the red chest and the Red Robe of Beauty from the blue chest.
- Side Quest – Lone Wolves Mission Gamma
Replenish your stats before you leave as you will have to fight again instantly. Leave the treasure room, watch a funny scene in which Fernando reveals in a rather clumsy way that the captured priests are actually four tricksters. Fight the tricksters. Quest complete.
- Save the Village
Fernando leaves the party. Exit the crypt and the church. Mordecai speaks to you through granddad’s communication stone. The party splits up: Vera and Tyson go to Twilight village as Mordecai hinted there was trouble there, and Harvey goes to see granddad. Go into granddad’s house. Victor is there. He hints that Vera and Tyson are dead.
The scene cuts to Vera and Tyson in Twilight Village. They’re talking to David. He tells them the village is overrun with monsters from the mountain. Use the three of them to kill all the monsters in the village. Quest complete.
Cut back to Harvey and Victor. Beat Victor and he leaves. Granddad tells Harvey he feels guilty for not being able to protect him and Victor. Then you cut to Twilight Village to reunite your party. David tells you he thinks there is another demon portal in the volcano (quest #43). He marks it on your map. David joins your party.
This is probably a good moment to do some more side quests!!
- Side Quest – Treasure hunting #1:
As you are in the East Seas, get in your boat and go to Bonechill Island. Get 5g from the well, 5g from the haystack north of the well and 5g from the shrub on the right. Talk to the robot and do the time challenge. Make sure you are in dash mode again as you have to run fast. The robots inside the game have a fixed route, so you can watch them and judge how much time you have to run past them. It will probably take a few tries, but if you get it right, it is doable with several seconds to spare. There are several routes you can take, and below I will show my preferred one.
Wait until robot 1 is left of the entrance, then dash right. When robot 2 is moving up, go up and dash left. When robot 3 is going up and 4 is going right, go up, right and up into the enclosure.
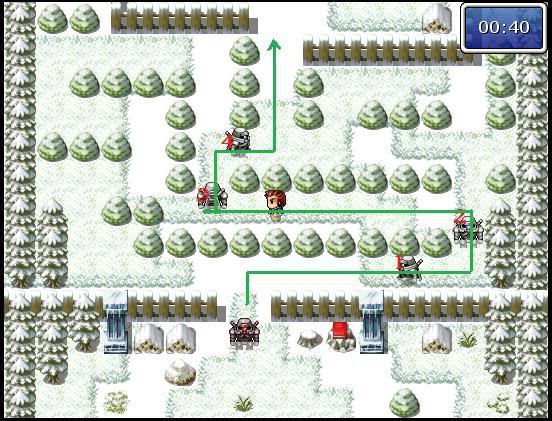
The robots in the enclosure start in a different spot each game and will move towards you. Run past them as fast as you can. Follow the route below without any robot interference. Before moving north, wait until robot 5 is moving north ahead of you, then pop into the spot on the right marked with a red X.
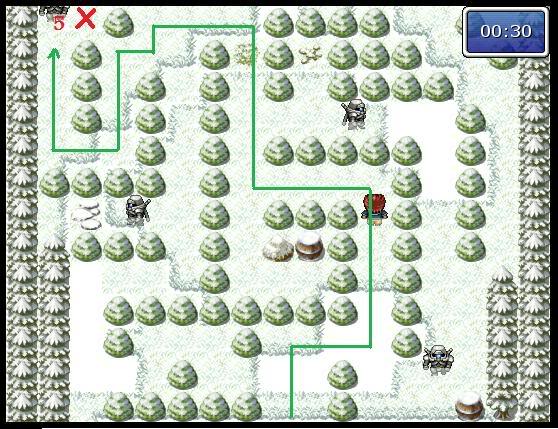
Wait until robot 5 is moving down again. Then wait until robot 6 is moving up, then dash up and hop off to the spot marked with a red X below. When robot 6 is south of that spot, run up and follow the route around. When robot 7 is approximately where it is in the image, stand in the spot marked with the blue X until he is north of you. Then your way is clear to collect your treasure.
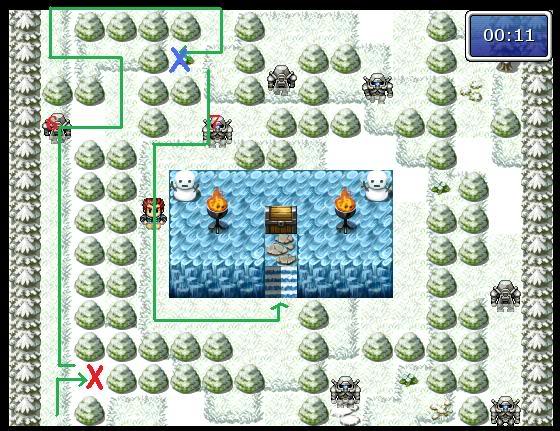
Win an icy thread and proof of treasuremanship#1. Check the three barrels in the game field on your way out as they hold 100g each. Also check the woodpiles in the central area for another 2x5g (thanks, Finnius!).
- Side Quest – Collection of Goods #2
Go back to Lone Wolves HQ and give the golden thread to Norman. He will award you with a Ninja’s Outfit for Tyson.
- Side Quest – Lone Wolves Mission Delta
Talk to Rolando again. He will give you a reward for killing the tricksters in the crypt. Talk to him again and he will tell you about a demon on the Haunted Farm, disguised as a cow. Take the green crystal back to the South Seas and go back to the Haunted Farm. Go west and “talk to” all the cows. One of them (top right) is a trickster. Fight it.
While you’re in the South Seas, activate the map to Butterfly Island and go there. Find a green chest with a Butterfly Pendant (trinket) and some other goodies.
You’re now also leveled up enough to do another couple of fights in the Arena. Take the blue crystal to the West Seas. If you’ve finished the time challenge on Bonechill Island, go back to the map seller in Saltwater Bay. Treasure hunting #1 quest complete. She has a new map for you, but it costs 3000g, so you may want to go buy it later. Get in your boat and go to the Arena to fight the Followers (quest #95) and Grandma and Chris (quest #96). Make sure you use Harvey’s Call of Purity when fighting the latter.
Now go back to the East Seas (red crystal). Go back to Lone Wolves HQ. Rolando will give you a reward for dealing with the tricksters on the farm. While you’re there you can get the next Lone Wolves quest. The baker in Trade Town is suspected to be a trickster (quest #45).
The Volcano – Portal #5
- Volcano
Now go back to the main quest. Get in your boat and sail to Mt Blaze. Go in. You can’t access the hot areas (like where the red chest is) just yet, but you will be able soon. In the volcano there are many puzzles where you have to roll boulders into the lava so you can cross. The boulders will slide as far as they can until they hit something.
The first puzzle is simple. Slide the top boulder south and the bottom boulder north, and both of them west. Go into the next room. Right now you can only keep going west into the next room. One of the vases contains a burning ember (remember Bernard in Twilight Village?). The statue has Mocking Strike for Harvey.
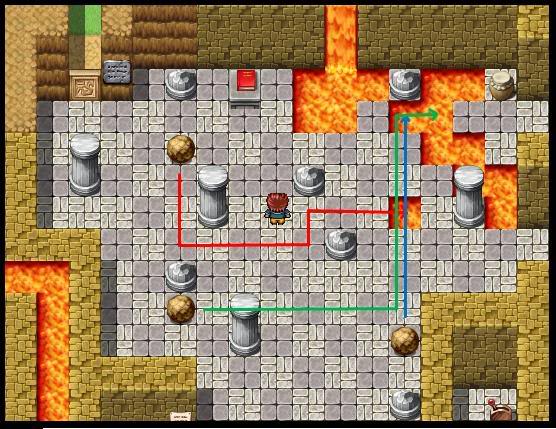
For the next lava puzzle, move the boulders as below, following the red path first, then the blue, then the green.
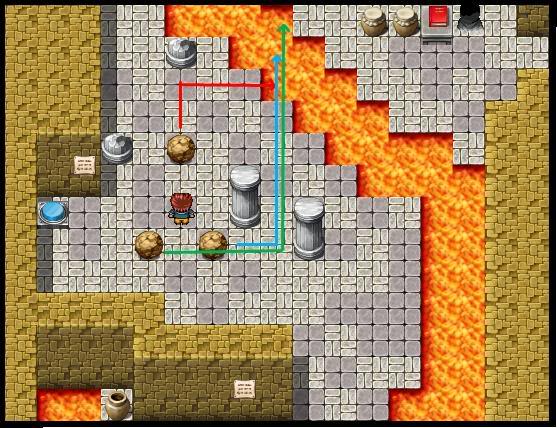
Cross the boulders and go into the next room. Flick the switch and the first flame by the demon portal is lit. Hop across the tiles into the next room. The vase contains another burning ember.
For this puzzle, move the pillar 5 squares west to where it is in the image below (red line). Roll the left boulder up against it, and then roll it north into the lava (blue line). Move the pillar 2 more squares west (green line), roll the right boulder up against it and then roll it north (orange line).
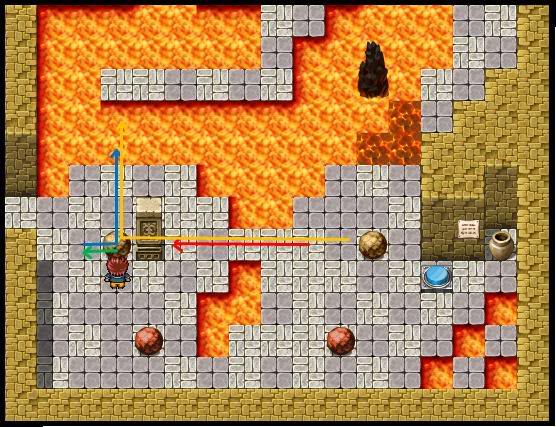
Go north, and as you can’t reach any of the other goodies yet, go west into the next room. The blue chest has Headgear of Promises. Go down the steps and exit west.
For the next puzzle, move the bottom boulder up and then east up against the other boulder. Then roll it north, west and north again (red path). Roll the other boulder north, west and north (blue path).
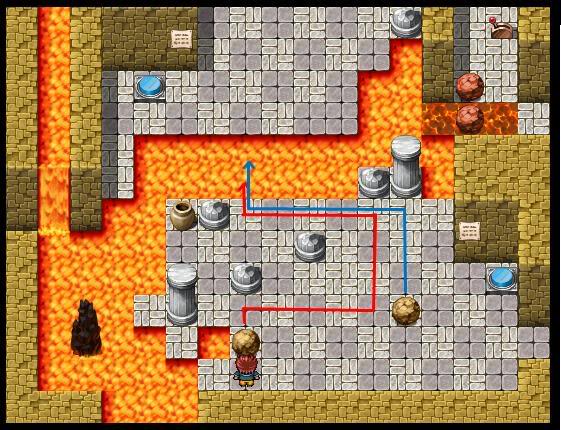
Go north. On the right there is a path to the next room. Go there first. Flick the switch and light the second flame. Hop over to the right. The statue teaches Vera Exploit Weakness.
Now go back to the previous room and do the next puzzle. Roll the top boulder south, east, north and east into the square of lava (red path). Then roll the bottom right boulder north (blue path), followed by the last boulder east, north and east again (green path).
Exit east. Hop across the tiles east and north. One of the barrels contains a burning ember. Try to open the green chest and Hestia will talk to you. You will have to fight her before she allows you to continue and destroy the demon in the portal. The chest contains a heat shield, which will allow you to now walk across the lava tiles and touch red boulders.
Now go down the right path and exit east. Hop over the tiles and go west to light the third fire. Then go back and go east. The chest has a Battlesilk Robe. Make your way south and around. Tyson will learn Berserk from the statue. The bottom left vase has another burning ember. Exit west. Hop west to the vase with the spiced bread, and encrypted letter #5 on the table. Then exit east.
Go south and you’re back at a puzzle you’ve done earlier. There is a second part you can now complete to get to the final switch, as you can now touch the red boulders. Move the pillar until it is straight north of the left red boulder (as in picture). Roll the boulder up against it (red path). Then move the pillar two west and one south (blue path). Roll the boulder west against it and then north (green path). It should cross the original two boulders and roll into the next lava pit. Then move the pillar to position A, and roll the other boulder up against it (orange path). Finally, move the pillar to where Harvey is in the picture and roll the boulder against it and then north (purple path).
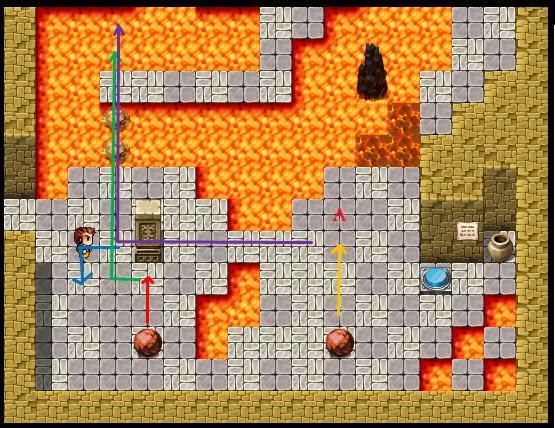
Cross the boulders and go west to flick the final switch. Go back into the previous room and exit southwest. Go north along the lava path, hop across the lava west and just before the exit go north up the other lava path. Exit west and flick the switch to open a locked door. Roll the red boulders into the lava, cross them and go through the opened door. There is a fish for the fishing quest (the Magma Phantom) that you can’t catch yet. The vase contains the final burning ember. The blue chest has a Heatforged Barricade.
Exit the room, leave the next room via the southeast exit, hop across the lava and make your way to the red chest to get the Molten Rock Sledgemace. Go south and quickly pop back to the entrance through the first path east. Get the Solidified Magma Blade from the red chest.
Go back to the previous room. Make sure all your stats are refilled, save and step into the demon portal to fight Gerra. I recommend using Harvey’s Call of Protection and David’s skill that causes attack up for the whole team. Gerra will take away some of your max HP every few turns, but once his own HP is below 15%, you will be replenished and you can finish him off. Receive a glowing shard. Quest complete.
In the flashback, the newly empowered Marcus attacks his father to avenge his mother. The trophy room has a blue chest with the Cowl of Wisdom, a red chest with a Blade of Courage and a green chest with an Amethyst Gem, as well as the usual goodies. Exit the trophy room and David will leave your party.
- Side Quest – Collection of Goods #3
Leave the volcano and Granddad will talk to you again. He will tell you to go back to Oddwolf in Trade Town to get access to the North Seas. Go back to twilight Village, bring the burning embers to Bernard in the southwest house and receive a Tuxedo outfit for Harvey. Quest Complete.
Take the green crystal back to Trade Town. As soon as you get back, Oddwolf will activate the purple crystal for you. He also tells you to get a total of 7 glowing shards to activate the last crystal behind the door on the bottom right. You only have 5 so far.
While you’re in Trade Town, do a few more side quests.
- Side Quest – Lone Wolves Mission Epsilon
Go back to the bakery in the shopping district and speak to Fernando. He wants you to meet him in the park again. Meet him there – he is in the southeast this time. When you talk to him the little white dog walks past again. You wait till night time, then follow Fernando back to the bakery, watch the baker go home and follow him into his house. You confront the baker. It turns out he was the little white dog all along and has been listening in on their conversations. Fight and kill the trickster.
Before you go back to the East Seas to report back to Rolando, go back to the cartographer in the Crooked District (west) and buy the map to Adrian’s Island. Activate it in your items menu – it’s in the East Seas. Take the red crystal back to the East Seas and go to Adrian’s Island for lots of goodies. You can try and catch Adrian, who is running around in a mouse costume chased by his cat, but he has nothing much interesting to say.
Now go back to Rolando and he will give you a Red Bandit Mask (trinket) as a reward. Quest complete. Talk to him for the next quest (quest #49).
- Side Quest – Mail Delivery to the Mayor of Trade Town
Take the green crystal back to Trade Town. Go back to the post office and have encrypted letter #5 decoded. It’s for the Mayor of Trade Town. Leave the post office, go northwest to the park, then north to the church district. The Mayor lives in the house on the north side. Go in and hand him the letter. Quest Complete.
- Side Quest – My Dear Robot
The Major gives you a map to Spencer’s Island and commands you to go to see Spencer to inquire what is holding up the delivery of his robot. Activate the map in your items menu. Spencer’s Island is in the West Seas. Take the blue crystal back to the West Seas and go to Spencer’s Island. Talk to all the robots for a bit of fun. One robot will sell you a Gizmotronic Fishing Rod for 2000g. Talk to Spencer. Quest complete.
- Side Quest – Sprocket to Me!
He tells you he need a time displacement sprocket to finish the robot. Now who do we know that sells one? Also talk to the robots in the back room before you leave. While you’re in the West Seas, you might as well go back to the map seller and buy that other map now. You should have enough gold for it now. She will sell you Treasure Map #2. Also go to the arena and fight Corporate Pain (quest #97). Take the green crystal back to Trade Town and go west to the vendor in the Crooked District. Buy his time displacement sprocket. Take it back to Spencer. Quest complete. He will also give you a Strange Gizmo (trinket).
- Side Quest – Lone Wolves Mission Zeta
Now go back to Trade Town and find Jenny for Rolando. Rolando told you that Jenny believes her husband has run off with a succubus and you need to go and investigate. Jenny lives in the Church District. Go east and north and enter the house east of the church. She gives you the map to Esther’s Island. Activate it – it is in the East Seas. Take the red crystal to the East Seas and find Esther’s Island. Talk to Trent and then to Esther. She works her magic on Harvey and he no longer wants to fight her. Vera suggests getting some holy water to reveal that Esther is a succubus. Go back to Trade Town. Go to the church and ask the priest for some holy water. Then take it from the table and go back to Esther to fight her. Go back to Rolando for your reward. Quest complete.
- Side Quest – Lone Wolves Mission Eta
Rolando’s next quest involves one of Spencer’s robots. He’s become self-aware and dangerous. Go back to Spencer in the West Seas and into the back room. After another zany interaction, the trickster reveals himself to you. Kill it and go back to Rolando for your reward. Quest complete. Get the next mission while you’re here (quest #59), but we’ll come back to that later.
The Vault – Portal #6
- Journey to Infinity
Time to go back to our main mission. Take the purple crystal to the North Seas. Quest complete.
- Find a Way into Twinkle Town
As soon as you get there, you’re addressed by Christoph, who is a bit defensive. You trick him into telling you the way to Twinkle Town. Quest complete. (Aren’t quests like this great!)
- Breaking In
Arabella tells you there is a demon in the Vault. A local hero is just about to go and deal with it and is looking for a team to go with him. He lives in a house with a red roof in the west of the village. But first explore the village. Go east to the inn and then south. The house there has another treasure hunting game where you can get Harvey’s Wizard Outfit for 100 tickets. The Magic shop has Virgil’s Brown Outfit. Buy some new gear for Vera there too. Go west to find another crystal teleporter. Go west again. Buy some gear for Harvey and Tyson. Go west again and north. The girl there will sell you a map to the Forest of Illusion for 200g – it’s in the North Seas. Go north. In the house there you will find encrypted letter #8. Go east and go into the house with the red roof. Watch the scene. At the end you have to fight Lord Adolin. Quest complete.
- Investigate the Vault
Lord Adolin joins your party. Go east and north. Archibald there will ask you to find a stone tablet for him (quest #56). Go north and into the Vault. Go north and read the sign on the wall and pull the levers in that order (2-1-3, or red-green-blue). Go in. Right now you can only go straight north. Go north and north again. You briefly meet Virgil, but he runs off. Go north. There you will find the first ice puzzle.
In these puzzles you need to press the blue button and then slide yourself or objects across the ice to make a path. You will keep sliding until you hit a tile or an object. The first one is simple: go north, west, north, east, north. Go into the next room.
For the next puzzle go north and west and stand below the pillar (red path). Push the pillar one square up. Then follow the blue line east, north and west so you’re to the right of the pillar. Push it west (green line). Then go west and north (yellow line).
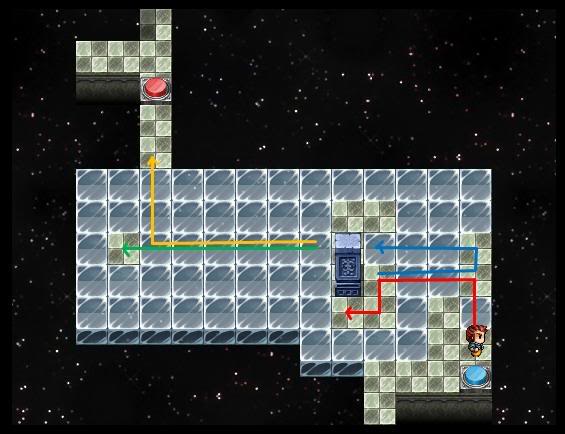
Go into the next room and jump on the red button. Then jump on the blue one and slide across to get a Hunter’s Faceguard from the red chest. Exit east. For the next puzzle just start sliding.
Exit west. The door of Varsillia the Wind Spirit’s door has opened. Go in to get the goodies from the barrels. Varsillia is not there. Go out and back south. Varsillia will catch up with you. Fight her and go south. The route to the west will now open.
Exit west and go west again. You will see Virgil again – he’s solving the first pillar puzzle. Get Sea of Flames for Vera from the statue and go west. Virgil has solved another puzzle. Adolin attacks him but his spell backfires. He realizes he’s in too deep and swiftly leaves your team to go home. Go west for the next ice puzzle. Follow the route in the image below.
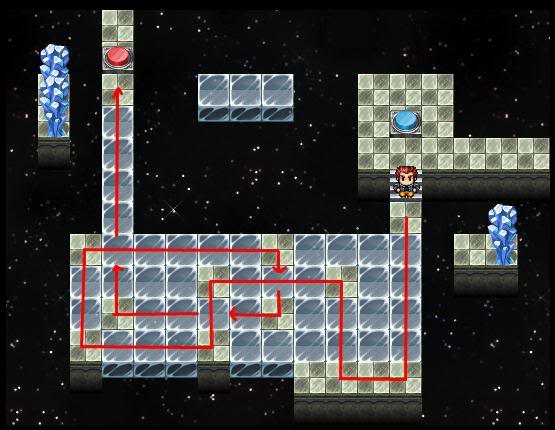
Go into the next room. For the next puzzle, slide up behind the lower pillar and push it west (red line). Then go east, south and west yourself (blue line) so you can push the pillar north (green line). Slide after it and go east (yellow line). Push the second pillar east (purple line). Slide after it and go north (black line).
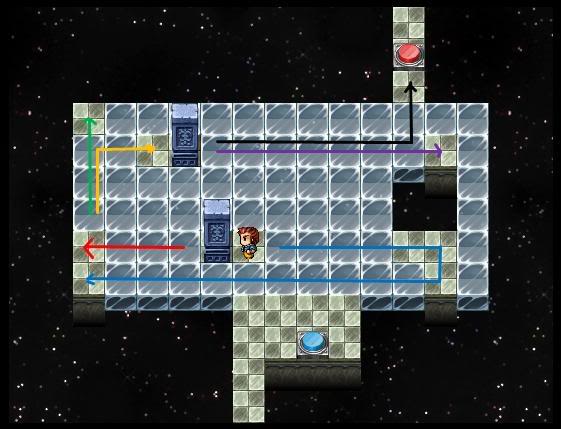
Go to the next room. For the next puzzle, move each of the pillars south of the ice path one by one and slide them north. Follow them and go east. Find a red chest with a Prince’s Warhelm. There is a blue button that will explode the blue crystals hidden behind the row of crystals – you can stand on it. Exit south. This puzzle is another slide-and-go. Just go for it! When you go south you will see that the door of the King of Flames’s prison is opened. Go in and get some more goodies. Go out and east. You will be ambushed by the King of Flames. Kill him and go east.
The east path is now open. Go in. Touch the statue and get Call of Battle for Harvey. If you look carefully, you will see that a shadow by the northwest wall is darker than the others (see image). Walk into the wall there to find a hidden room with encrypted letter #7 on a table.
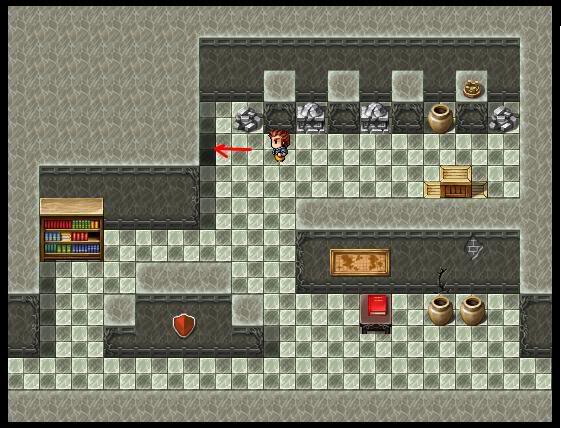
Go out and east. You will find your way blocked and you can’t reach the pillar puzzle to open it. However, Virgil solves the puzzle for you. Go east. This time, Virgil is blocked in, and you have to solve a rock puzzle as in the image below: Move the top right rock 2 squares west. Then move the rock north of the red tile 2 south. Walk around to get west of the pillar and move the pillar 2 squares east. Walk around until you are north of the pillar and push it south onto the square.
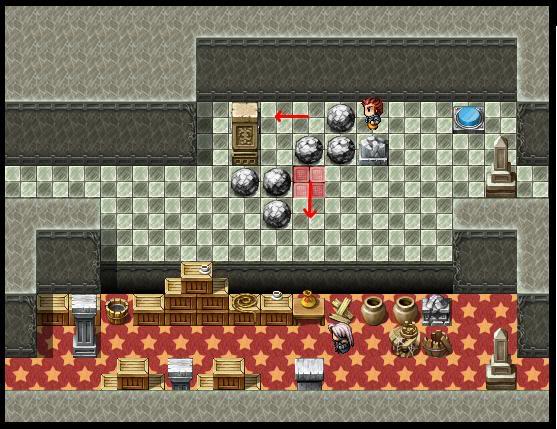
Exit east. Watch Virgil solve the next one and go east again. Move the rocks according to the colored lines below to clear the path for the pillar.
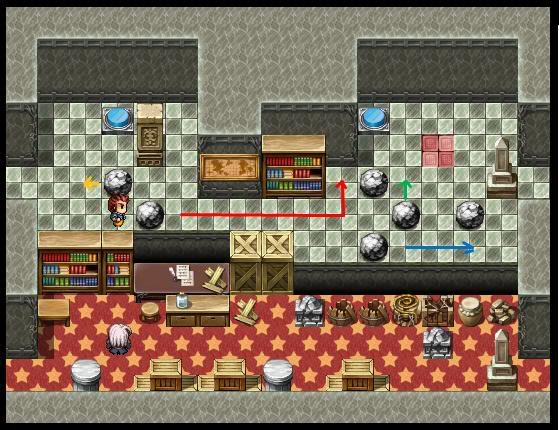
Exit east. It’s Virgil’s turn again. However, he can only clear the path for you while he is still stuck. Go east. You will find you’re blocked in and have to go back to pull the switch. Go back east and watch Virgil clear out all the treasure (2x health potion and a Victory Magnum) while you’re still stuck. Serves you right for not helping him right away! He will let you through after he’s finished pillaging. Quest complete.
- Destroy the Vault Portal
Virgil joins your party (and you actually get his health potions, too). Exit east. Then first go south and south again. Get Terrorize for Virgil from the statue. Go east for another ice puzzle. First get behind the leftmost pillar and push it north (red). Go back south and slide the bottom pillar east (blue). Then go north to push the third pillar north. Go south yourself, one tile east and north so you’re in between the two top pillars. Push the pillar to your right east (green). Go south and slide east, north and east (yellow). Exit east.
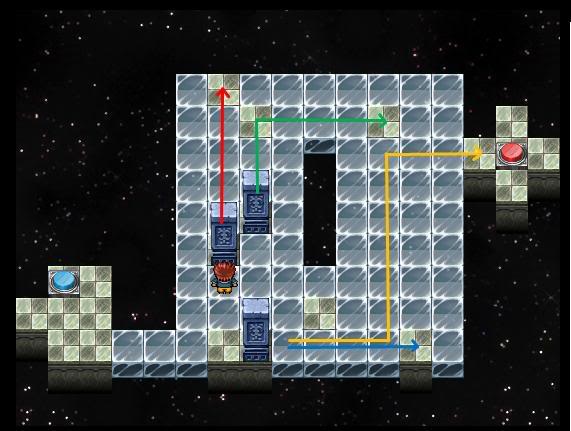
For the next puzzle, slide east (red) and push the pillar south (blue). Follow the pillar, move to the right of it and push it west (blue). Follow it again and push it one more west. Go back all the way east and one north, then go west, south and east so you’re south of the pillar (green). Push the pillar north (yellow). Then go north, east and south (purple).
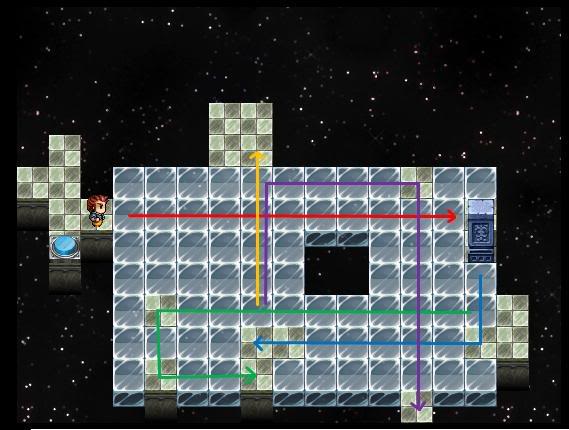
Exit south. For the next ice puzzle there is only one route to go. Go all the way east and then spiral around until you reach the green button. Retrace your steps to the blue chest to get a Conjurer’s Hood. Now go back east and exit north. The next one is slide and go – wheeeeeeeee! Exit north. You will be ambushed by Prince Terra. After you defeat him, get Smash for Tyson from the statue. Exit west.
Time to find some missed goodies before you go through the new door to fight the demon. Exit south twice to go back to Terra’s prison. The blue chest has a Green Tunic of Balance. Inside Terra’s prison you find two barrels and a crate with a stone tablet. Go out and twice north again.
Now exit west and then go through the lower west door. Keep going back and find a Timeworn Chestplate in a green chest. Then go south to the entrance and get a Blade of Despair from the red chest. Retrace your steps to the room before the one in which you fought Terra. Exit north. Walk up and watch an amazing slide-fest!
Step into the demon portal to fight the Avatar of Evil. He hits pretty hard but other than that it’s a straightforward fight. You receive a glowing shard. Quest complete.
In the flashback, Marcus, now Mordecai, takes over and kills off the people on the Haunted Farm. The treasure room has two red chests containing a Brutal Powersword and a Titan Longsword.
When you leave the room, Virgil tells you of another portal (quest #67). He marks Twin Castle Island in the North Seas on your map. Exit east, then south and make your way back west to the leave the crypt.
But first… it’s side quest time again!!
- Side Quest – Collection of Goods #4.
Give the stone tablet to Archibald outside the crypt entrance and receive a Wizard Outfit for Vera. Quest complete.
- Side Quest – The Forest of Illusion
Go south to the Twinkle Town portal. Go through the portal and go south to your boat. (Isn’t it convenient you have a boat in all of the seas!) Go east to the Forest of Illusion. To solve this quest you need to inspect everything to find objects you can use to access new areas. While you walk around the island you will keep getting visions.
Let’s call the area you’re in right now the entrance. First inspect the little round bush to find a knife. Then exit west. You briefly see two people by the fire. You can’t touch the fire right now. To the right of the barrels is a hidden room obscured by vines. Go in and use the pocket knife on the teddy bear to get the water shed key. Also take the rope and exit. Exit south. You can’t dig up the dirt yet. Exit east. Pick up the lumberjack’s axe. Catch the Bloody Trout. You also can’t jump across the rocks to the green chest.
Go back to the entrance, then go north. Check the crate by the door to find a lantern. You can’t enter the shed or clear the rubble on the west side of the cabin. Back to the entrance. Use the axe you just picked up on the log blocking the east exit and then exit east. You see people crying by a grave. You can’t yet cross the bridge. Go east and then north. Talk to the guy there. His name is Warren and he begs you not to hurt him, then vanishes. Get the bucket of water and go back to the entrance.
Now go west again and use the water on the fire. Get the graveyard key. Go back east to where you found the water and open the gate to the graveyard. There is only one way you can walk through the graveyard and that is from moss covered pillar to moss covered pillar.
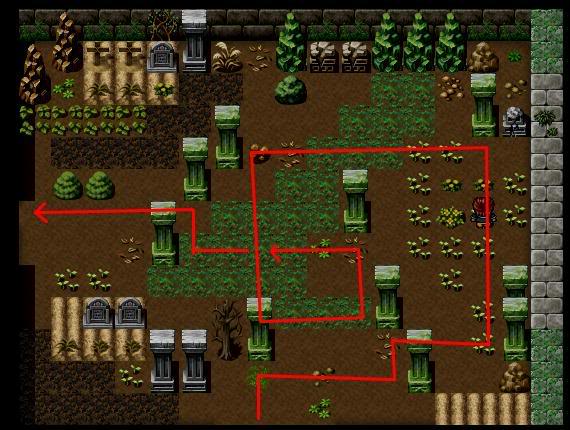
By the water shed you see another illusion in which Charlotte tells Warren they can be together forever. First use the lantern and then the rope on the well. Go down the well and get a pick. Go back out. Use the water shed key on the door of the shed. Go in and see that you need to find a lever.
Go back to the entrance. Go north and use the pick on the rubble beside the shed to find a hidden entrance. Go in. Inspect the wood on the floor and get a wooden log. Back to the entrance and go east. Use the wooden log on the bridge and pick up the shovel.Go back to the entrance and go west again and south. Use the shovel on the dirt and find a red box with a shed key.
Go back to the shed north of the entrance and open the door with the key you just found. Go in and find the lever in the fireplace. There is also a room hidden behind the middle book case – just walk straight through it. Go back to the entrance, go east and make your way all the way around to the water shed. Use the lever on the switch and pull the switch. Go down the steps and keep going south until you reach the green chest. It contains a Mirror of Illusion (trinket).
Go back to the entrance. You see Warren and Charlotte again. Follow them west. Charlotte promises Warren they will be together forever. She wants to show him something. You fear Charlotte is going to be killed. Follow them back east and east again. Warren and Charlotte are by the grave. I won’t tell you what happens here. Just watch the scene! Follow them east again. Talk to Charlotte then go north and talk to Warren. Cross the graveyard again and go to the shed. Watch the scene and go back to the entrance. Quest complete. Warren rewards you with a Cosmic Artifact.
- Side Quest – Treasure Hunting #2
Take the boat to Crystal Bay island. For these puzzles you need to clear all the colored blocks by pushing two or more blocks of the same color against each other. Note that if there are three blocks of the same color you have to make all three of them touch at the same time!
Puzzle 1
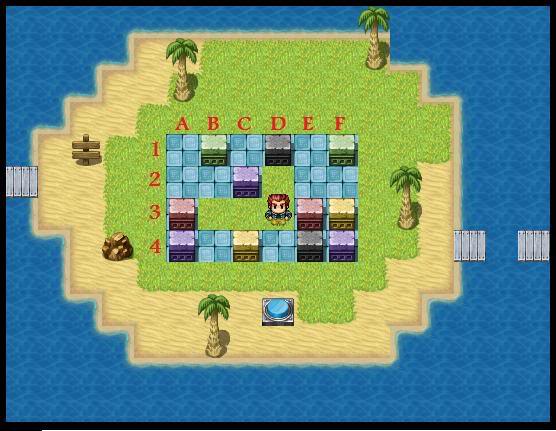
a) Green block in B1 to B2
b) Black block in D1 to A1
c) Green block in F1 to B1
d) Purple block in A4 to B4
e) Red block in A3 to B2
f) Black block in A1 to A2
g) Red block in B2 to E2
h) Black block in E4 to A1
i) Yellow block in F3 to E4
j) Purple block in F4 to F3
k) Yellow block in E4 to D4
l) Purple block in F3 to F4
m) Purple block in B4 to D4
n) Purple block in C2 to E4
Puzzle 2
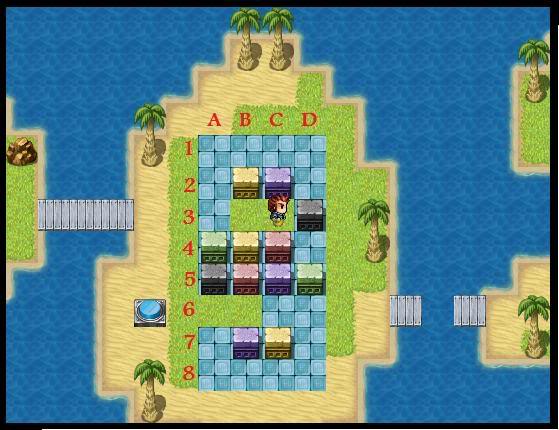
a) Green in D5 to C6
b) Black in D3 to D8
c) Green in C6 to A3
d) Black in D8 to A4
e) Purple in C2 to D4
f) Purple in B7 to D6 (don’t cross C6!)
g) Red in C4 to C5
h) Yellow in C7 to C5
i) Yellow in B2 to C4
Puzzle 3
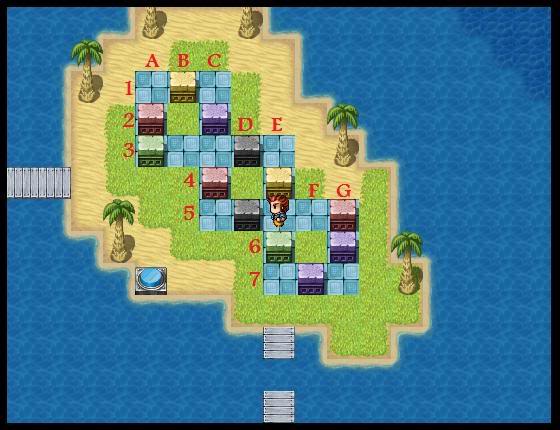
Push a lot of the blocks aside one square until it looks like the image. From there, do the following moves:
a) Black in D5 to C5
b) Yellow in E4 to F5
c) Black in C5 to E5
d) Black in D3 to E4
e) Green in E6 to B3
f) Red in C4 to D5
g) Purple in C2 to C4
h) Yellow in B1 to E5
i) Red in G5 to F5
j) Red in A2 to E5
k) Purple in C4 to D5
l) Purple in G6 to F5
m) Purple in F7 to E5
Find a chest with proof of treasuremanship #2 and Vera’s Knight Outfit. Take the boat back to Twinkle Town and then take the blue crystal to Saltwater Bay. Talk to the map seller. Quest complete. While you’re there, buy the next map for 5000g. It goes to Trial Isle in the South Seas. Also go and fight Los Mysterioso in the Arena (quest #98).
- Side Quest – Lone Wolves Mission Theta
Now take the boat to Slime Island in the southwest of the East Seas. This island has another ticket hunting quest: you need to fight various colored slimes to collect tickets with which you can buy items. Note: fighting slimes does not increase your experience! Rolando’s quest was to find a trickster disguised as very tall man in the east of Slime City. In order to get to Slime City, you need to get 5 slime hunter’s tickets to unlock the next zone. The crate in the first area contains 5x slime hunter’s tickets. Go into the next area, fight some more slimes and exit southwest to find the entrance to Slime City. Go in and north and explore the city. Fish the pond for a Toxic Stonefish.
- I Need Coffee!
The top right house has a slime who gives you a side quest. You need to get him coffee. Get it off the table, give it back to him and receive 25 slime hunter’s tickets. Quest complete. Back to the other quest.
Go back to the main square and exit east. Go into the house and talk to the very tall man. He’s a trickster. Fight him. Go back to the main square and go north into the castle. Talk to the king. He will give you a new quest (quest #77). He wants 25 slime residues of each type of slime. Do as much of that as you like now, it’s quite a lot of work and you may want to take it in stages. Then go back to Rolando in the East Seas for your reward. Quest complete. Get the next mission while you’re there (quest #66).
- Side Quest – Mail Delivery to Granddad
Take the green crystal to Trade Town and go to the post office to decrypt two more letters. Encrypted letter #8 is a letter for someone named Graham. Harvey reveals that granddad’s name is Graham… remember anyone else named Graham? You get a silver feather (trinket) as a reward for decrypting five letters.
Encrypted letter #7 contains a letter for someone named Will with and has a picture of an island on the back. You have to ask the cartographer where it is. Go to the cartographer in the Crooked District and he will sell you a map to Golding Island for 200g. It’s in the North Seas. This will be quest #63.
Go to your boat and go see granddad. Give him the letter. It’s from his wife, who tells him she has cancer. Unfortunately, the letter is two years old and she has since died. Granddad regrets never having had the chance to tell her he’s sorry. Quest complete. (Note: when you go through Trade Town give your collected special fish to Joseph for some cool rewards.)
- Side Quest – Treasure Hunting #3
Now take your boat to Trial Isle. Trial Isle is a bit like the Forest of Illusion in that you have to find objects to access new areas. First go inside. Get a Dirty Mudfish from the water. Go up the steps and pull the green switch. Go out and east.
You have to slide all the blocks onto the red squares at the same time. The blocks will all move in unison unless there’s something obstructing them. For the first puzzle push the bottom left block two right, one down, one right and one up. You get a chest with a rope in a jar.
Go back west and use the rope on the rope hanging from the wall. Go up and in. Pull the blue lever. Go back out and in through the lower entrance. For the second block puzzle move the blocks in the following directions:
- One up
- One left
- Two down
- One right
- One down
- One left
- One up
- One left
- One down
- Two up
- One right
- Two up
- One left
- One down
- Two right
- Two down
You get a chest with fire in a jar. Go out and east and use the fire on the snowball. Roll the rock aside and go in. This puzzle is a bit different in that the blocks move in opposite directions rather than unison. Do the following moves:
- Purple block 4 up, 1 down, one left
- Yellow block 1 up, 1 right, 1 up, 1 left, 1 down, 5 right
Receive rain in a jar. Go out and west and use the rain on the fire. Go west and in.
- Right block: 2 down, 5 right
- Left block: 1 up
- Right rock: right and up
- Left rock: down, right and up
- Right block: 1 left, 5 up, 5 right, 1 down, 3 left, 1 up, 1 left
- Left block: 2 down
- Right block: 1 right, 1 up, 1 left
You get a lever in a jar. Go out, east and in, and use the lever on the switch. Pull the switch. Step on the platform and find the treasure room! Items of interest are a Dragon’s Tooth (trinket), and a chest with a Solar Artifact. Quest complete.
Now go deliver your other letter. Take the purple crystal to Twinkle Town and go to Golding Island.
- Side Quest – Battle of the Tribes
Two boys, Jack and Ralph, are arguing about whether or not to kill a “beast” and about who is the leader. They have split into two tribes (anyone recognize this story? It’s one of the most awesome books in the world). You want to settle the fight. Talk to Ralph, on the far left. Ralph tells you there are no adults on the island but there is a beast in the forest. But you can’t go to the forest as Jack has put landmines in the way and only he knows the codes.
Go east and up the ladders to speak to Jack. Jack is a bit aggressive and unhelpful so go back to Ralph. He says Jack never listens to him. Go back to Jack. He says Ralph never listens either. You need to find something that will allow them all to speak in turn, uninterrupted (if you’ve read the book you may know what you’re looking for!).
Go to the street vendor in the Crooked District of Trade Town and buy his conch for 2000g. While you’re there, also buy Virgil’s Purple Outfit, if you’re collecting those. Go back to Golding Island and talk to Ralph. Eventually, the conch idea works. Quest complete.
- Side Quest – The Beast Within (the Cave)
Jack has deactivated the land mines, and you can now go north. Go into the cave and get attacked by the Beast. Kill it. Quest complete.
Move the pillar aside and go into the secret room. The green chest has a Bunny Hood (trinket). Give the letter to Will to Will. He will give you your reward. Quest complete.
- Side Quest – Lone Wolves Mission Iota
Now it’s time to go find the trickster in Twinkle Town for Rolando. Leave the Lord of the Flies and go to Twinkle Town. The demon is in the house in the southwest. Fight it and go back to Rolando for your reward. Quest complete. Get your final assignment while you’re there (quest #69). I, however, am now ready to go back to our main quest!
The Twin Castles – Portal #7
- The Ninth Portal
Go to the North Seas and sail to the Twin Castles island. Meet Josephine. Her cats have been trapped and she wants you to rescue them. Virgil isn’t interested so you decline. Slide the book case to the right and reveal a secret room. Go in and roll the rock onto the moving platform. Remember this place for later. Go out and fight Kurk Hama.
Go north. Talk to Josephine again. She will only remove the magic barrier if you rescue her cat. Exit east. The statue teaches Tyson Wild Swing. Exit east. Pull the levers in the order of the banners on the wall (blue, red, green). Get the cat and take it back to Josephine.
Now quickly go west. Roll the rock right, up and left. Go out and through the gate. Go into the hole on the left. Jump out the window. You can now access the red chest, which has a Paradox Correcter.
Go back to where you met Josephine and go up the stairs. Exit east. The statue in the next room teaches Harvey Healing Strike. Exit east. Step on the arrow and click space or enter. You will jump to the other castle. Exit east.
The next room has another hidden room: behind the bookcase is a switch that opens a hole in the floor. Go in. Get the Panic skill for Virgil from the statue. Go up the rope at the other end and exit south. Get the Darkthread Cap from the blue chest and a Poison Axe from the red chest.
Retrace your steps and talk to Sophia. She wants you to go find her three cats for her before she’ll let you continue. Go east. This room has several exits. Take the north one first. There os a fish for the fishing contest there (the Enchanted Loach), but you can’t catch it yet. Go out and take the south exit. Get encrypted letter #6 from the table. Flick the switch and the first kitty will come a-floating. Take her to Sophia and go back to the room with the multiple exits.
Now hop east and go through the door. The blue chest in the garden area has a Conjurer’s Tunic. Cross the bridge, go down the steps and go north. Go through the door and flick the switch. The kitty will float outside. Pick him up there and take him to Sophia.
Now go back to the garden area and exit south. I couldn’t find the exit from here at first, but you have to go west, south and then east and then you can exit east.
In this room you alternatively need to do some actions yourself and some actions when you control the next kitty, Gavin. Basically, you solve a simple pillar puzzle and then touch the purple orb. Then Gavin needs to walk onto the yellow button and then go back and touch the orb. Repeat this a few times. Make sure Gavin also fights the monsters in his area, or else you won’t get your complete reward in the trophy room at the end of this dungeon. He will be able to use your potions to replenish his HP and MP. In the last puzzle area get a Warlord’s Plate Armor from the chest.
Walk Gavin through the hole in the wall and go get him. Take him back to Sophia. Gavin isn’t hers, but Josephine’s. You have to take him to her. Sophia will open the bridge north for you. Go up the steps. Exit west and jump to the other castle. Go west again and west again. The switch will give you a quicker exit once you’re done here. Josephine will remove the next barrier for you for returning Gavin to her. Now go up the stairs.
Yup, you guessed it: you have to rescue another kitty for Josephine. Exit east. The red chest has an Ancient Keyblade, the blue chest has the Helm of Great Sin and the statue has Destroyer for Vera. You can reach the kitty by going south via the middle path. Take him back to Josephine. This is actually Sophia’s cat, and you have to take him back to her.
Go up the stairs and exit north. You will meet Josephine again. You have to help her “tune” her kitty choir by repeating the pattern in which they sing. Exit east once you’re done.
You need to find one more cat before you can get to the demon portal. Hop east to the next castle. Give the cat back to Sophia and exit south. The blue chest has a Light Etched Barricade. Flick the switch and find the last kitty. Take him to Sophia. Quest complete.
- Twin Castles Portal
Heal up, save and go into the portal. Daarvika will sometimes summon a group of his children, which provide him with new energy. You can wipe these out in one blow with either Harvey’s Wicked Strike or Tyson’s Whirlwind. You receive the final glowing shard. Quest complete.
In the flashback a woman, Victoria, pleads with Mordecai for the safety of her child. He kills the woman’s husband. Graham/granddad comes in and tries to stop him. Mordecai decides to save Victoria’s life in exchange for her child. The treasure room has three blue chests with a Sunlit Breastplate, Blade of Redemption and the Crown of Dignity.
Leave the treasure room and be confronted by Mordecai himself. He refuses to fight you, even though all his portals have now been destroyed. Go west and Josephine will give you encrypted letter #9 to give to her sister. She also gives you the map to the Rare Witch Forest. She will teleport you to the exit of the castle.
Now let’s do some more side quests!
- Side Quest – Lone Wolves Mission Kappa
Go to Trade Town and go directly north to the park to find the travelling band of three tricksters for Rolando. In the park is a guy who looks just like Harvey. Talk to him and find out the tricksters are pretending to be our team of heroes and pretending to be looking for a band of tricksters themselves. You can fight them easily, though. Next time you’re in the East Seas go back to Rolando. He will award you an Earthly Artifact. Quest complete.
Now go to the post office to have your next two letters decrypted.
- Side Quest – Mail Delivery to Lorelei
Letter #9 contains a letter for Lorelei. Go to Rare Witch Island and give the letter to Lorelei. Quest complete.
- Tears in a Phial
Lorelei’s sister invited her to come see the cat choir but she can’t go because she accidentally turned her husband into a monster. You need to find ingredients for a potion so she can turn him back. You need 6 spotted mushrooms, 2 thornroot weeds, pixie dust and black frog saliva. Go out and east. Let the black frog lick Vera’s hand and get black frog saliva. Go north and east. The crate has a thornroot weed. Go back to the black frog and go east. The crate there has a Red Outfit for Virgil. In the top right is a spotted mushroom. Go north and pick the second spotted mushroom. Go south and east and pick another spotted mushroom.
Go into the cave. Talk to the troll. It’s actually Jordan, Lorelei’s husband. He will sell you some pixie dust for 2000g. Buy it. Go northwest and get another thornroot weed from the crate. Go northeast and pick another spotted mushroom. Fish for a Violet Piranha. Exit south and pick another spotted mushroom. Exit north for the last spotted mushroom and Draining Shot for Virgil from the statue. Go back to Lorelei and give her the items. Quest complete. Take Lorelei to her husband and get your 2000g back. You also receive an Enchanted Mushroom (trinket).
- Side Quest – Mail Delivery to Lord Adolin
Have letter #6 decrypted and receive a letter for Lord Adolin in Twinkle Town. Go see him and give him the letter. Quest complete.
- Side Quest – Quiz Castle
Lord Adolin’s letter was from Quiz Castle. He’s not interested in doing their quiz, but gives you the map to Quiz Castle. Go to Quiz Castle in the southeast of the North Seas. Talk to the witches at the desk. Quest complete.
- Side Quest – Quiz Round 1
You have to do three challenges. The first one is set by Kamwyna. Look into the orb of illusion and watch the scene carefully. She will then ask you 5 questions of which you need to answer 3 correctly to go on. The answers are:
1) Butterfly
2) 7
3) Cryer of Tears
4) Red
5) 53d
For the second challenge, set by Aisha, you need to read all the papers and books on the table and again answer 5 questions. The answers are:
1) Destroy it
2) Increasing strength
3) Stay at max range
4) Fire
5) Flamestrike
The third challenge is set by Abigail. You need to answer 10 questions posed by Godwin, the Mayor of Trade Town. The questions are all about Trade Town and you need to answer 7 correctly. The answers are:
1) Blacksmith
2) Crooked District
3) Church District
4) Cartographer
5) Green
6) Dog
7) Magic Shop
8) Jordan
9) Crooked District
10) Disguised Trickster
Go back to the lobby and receive the Quiz Master’s Cape (trinket). Quest complete.
- Side Quest – Quiz Round 2
The idea for round 2 is the same as round 1. For round 1 you now need 4/5 questions correct. These are the answers:
1) The Dancemaster
2) Adrian
3) Diamond
4) 2:1
5) 10
Round 2. Again you need 4/5.
1) Cat
2) Mix it up a bit
3) Warrior, rogue, barbarian
4) Staff
5) The Incinerator
Round 3. The quizmaster is Lord Adolin, and he will be asking questions on the dungeons you’ve been in.
1) Tiger
2) Two
3) 5
4) Barrels
5) 28
6) 4
7) Gavin
8) Armor
9) The Crypt
10) The Volcano
Go back to the lobby and receive Harvey’s Super outfit. Quest complete.
- Side Quest – Quiz Round 3
Same as before in rounds 1 and 2 you now need 5/5 correct. Round 1:
1) Chicken
2) Scrumptious
3) David and Richard
4) A dozen per week
5) Tomato Assassin
Round 2:
1) Two
2) Deep inside a volcano
3) Short-term power
4) 3-5
5) Magic staff
Round 3. The quiz master is… Edward Donkey? Oh no! It’s Zoroaster, the guy from Quiz Castle Lobby. His topic is “extremely vague and general”:
1) Rocky
2) Tyson
3) The Farm
4) 0
5) Come to do some damage!
6) Kurk Hama
7) King of Blades
8) Trinket
9) The Green Twins
10) 9842
Collect your trophy, a Cosmic Artifact, in the lobby. Quest complete.
You can now also do your final two battles in the Arena now (quests #99 and #100). As a reward you get a Lunar Artifact.
- Side Quest – Residual Damage
If you haven’t done this already, go back to Slime City to find 25 slime residues of each type of slime for the king. It’s a big job but when you unlock new areas you will find some more side quests. The slimes available are olive slimes, autumn slimes, lava slimes, grass slimes, dirty slimes and ruins slimes. In the bottom right corner of the area with the grass slimes is a vine covered exit. Go in to find encrypted letter #4.
Give the slimes to the king to complete the quest. He will give you 150x slime hunter’s tickets as a reward. Don’t forget to buy the slime lure for 35 tickets, so you can catch those last few fish, the Earthly Artifact for 750 tickets, the Tube of Slime trinket for 200 tickets and the Slime Outfit for 2000 tickets. If you go back to slime island wearing the slime outfit, you’ll get a nice giggle.
- Side Quest – The Earth Elder
When you’ve finished the slime residue quest, the Slime King will give you some more quests. You may want to wait until later for these, as the slime elders are quite hard to beat and later on you will get some better weapons and armor. But you can beat them now, with some persistence. First you need to go beat the Earth Elder, on top of Slimeball mountain. The path has been cleared for you. Go back to the mountain (west of the castle), jump down the hole and then up the rope ladder in the northeast. Defeat the elder and go back to the king. Quest complete. You will get 150x slime hunter’s tickets as a reward.
- Side Quest – Slimy Rescue
The technician who was sent to open the path in the ruin was ambushed by angry slimes, and you have to go rescue him. Go back to the ruins (south of the castle) and find the technician. He’s the blue slime to the west of the stairs. He will join you and you have to take him to the king. Quest complete. Get 150x slime hunter’s tickets.
- Side Quest – The Ruins Elder
Now go back to the ruins and up the stairs to defeat the Ruins Elder. He hits very hard! Come back to this later, if you like. You will receive 500x slime hunter’s tickets from the king for defeating him. Quest complete. You will also receive Harvey’s King Outfit for completing all the king’s quests.
- Side Quest – Mail Delivery to Richard
Encrypted letter #4 is a letter for Richard, who lives in the northeast house in Twilight Village. Take it to him. Quest complete.
- Side Quest – The Root of All Evil
Richard’s brother has some trouble with his plants, but Richard can’t really explain what it is. He gives you a map to Percy’s Island, which is in the West Seas. Go there and you’re confronted by a very aggressive rose. Go into the cabin and talk to Percy. Quest complete.
- Side Quest – The Plant Gauntlet
You need to fight all the plants on the island in a gauntlet so they will stop being so aggressive. Talk to the plant blocking the way. Go north. Read the sign and the battle begins. You have to fight, in order, Lilly, Violet, Aloe, Snapdragon and Rose. Beat them all and receive a Petrified Rose (trinket). Quest complete.
- Into the Abyss
Back to the main quest! You need to go see Oddwolf again. He is in the little room off the side of the crystal room in Trade Town. Give him the 7 glowing shards and he activates a new crystal for you. Use it to go to the Dark/Dead Seas. In the room to the north you can exchange the artifacts you’ve collected for some awesome equipment. There should be one selection for each artifact, though you have not collected all of them yet. Get as many as you can right now. Your options are the Protector’s Blade and Battleshield, Protectors Faceguard, Protector’s Chestguard (Solar), Blade of the Moon, Robe of the Moon, Crown of the Moon (Lunar), Gladiator’s Battleaxe, Gladiator’s Warhelm, Gladiator’s Warplate (Earthly), Redemption, Attire of the Redeemed and Hood of the Redeemed (Cosmic). Exit south twice and sail to the tower. Quest complete.
- Get Past Illusions
Mordecai’s tower contains mini versions of all the previous dungeons. You have to do them all and fight all the demons again, too! The green chest has a Cosmic Artifact (go exchange it now if you like). Go into the first dungeon, which is a mini Mansion. Solve the puzzle as below:
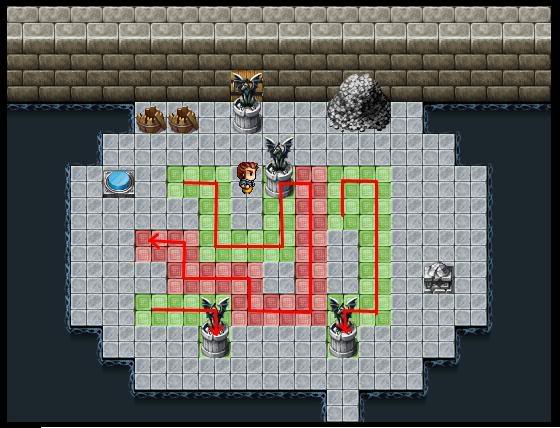
Go into the next room. The blue chest has a Sun Drenched Robe. Go into the next room and fight the King of Blades again.
Go into the next dungeon, which is a mini version of the Pirate Mines. The blue chest has a Rune Etched Breastplate. Go into the next room and fight Dionysus again.
In the mini Enchanted Farm you have to chase the sheep into the barn. Then go north. Get Piercing Shot for Virgil from the statue and get Uchigatana from the red chest. Go north to fight Thanatos/Death again. This time he shouldn’t be a problem.
Next up is the Crypt. For the switch puzzle flick the red switch and go north, east and south. Get a Commander’s Face Shield from the blue chest. Hop north on the left side of the barrel to flick the blue switch. Go back to the red switch and flick it again, then go north to flick the yellow switch. You can now activate the purple switch. Flick the red one again and go east to flick the green switch. Then flick, in order, the red, the yellow, the red and the blue (from the south side) and you can go to the golden switch and move north to fight Rahu.
The next dungeon is the Volcano. For the lava puzzle slide the three lower rocks in turn up against the west wall and then north. Then on the north end slide the rocks up against the north wall and then east. The blue chest has a Dextrous Warguard. Go north and fight Gerra.
The next dungeon is the Vault. Get Blizzard for Virgil from the statue on your way in. The pillar in the ice puzzle needs to follow the path as in the image below (you will have to circle around it a few times to get behind it, but you should be quite adept at these puzzles by now!):
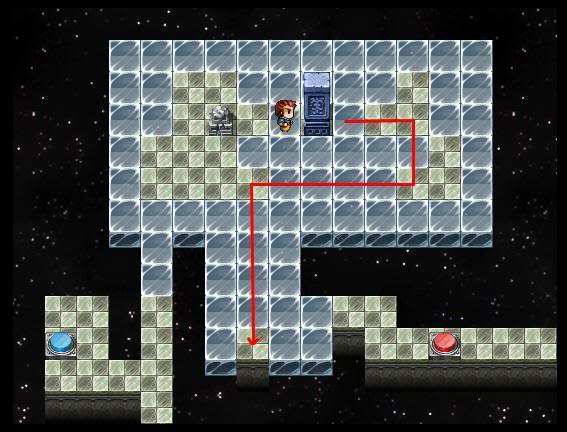
On the table in the next room is encrypted letter #10. The blue chest has the Hood of Icy Wrath. Go into the next room to fight the Avatar of Evil.
Next up is the Twin Castles. Get a Double Barrel Revolver from the red chest and go in. I’m sure you can do the next pillar puzzle on your own. Go through the gate. Hop to the other side and get a Forgotten Turmoil from the red chest. Meet Daarvika again in the next room. After defeating Daarvika go through the doors on the right in the front hall. Quest complete.
- Blood Bond
You now have to face Victor. Go north and talk to him. After a brief discussion on whether or not they should kill Harvey’s brother they decide to attack him. Defeat him. Quest complete.
- Dawn of Redemption
Victor is now free of the demon that possessed him and he dies in peace. Harvey now really wants to avenge his brother and fight Mordecai. Get a Solar Artifact from the green chest. Exit through the west door. In the flashback, Victoria is on her death bed, asking Graham/granddad to look after her sons.
You are now outside. Get the Blessed Sunblade from the red chest and go up the stairs. Granddad speaks to you again through the communication stone. He wants you to tell his son that he is sorry. Go east. Quest complete.
You now encounter Mordecai. He is impressed that you killed your own brother and wonders if he should have taken you rather than Victor as a child. He offers you to join him, but you decline. Mordecai attacks. He regularly drains your whole party of MP, and Blessed Shield cannot prevent this. I try to get Harvey’s tactical strike, Tyson’s Gasher and Vera’s Exploit Weakness in before my MP is drained and then just hit hard with melee attacks. After you defeat him, Mordecai tries to appeal to your sense of pity. You push him off the tower. Quest complete.
THE END
Or is it? Syn, the demon who gave Mordecai his mask, appears. She says she enjoys toying with human feelings, and will now go and find someone else to give the mask to. She marks her castle on your map, in case you want to come and get the mask from her.
- Side Quest – Mail Delivery to David
Go back to the post office in Trade Town to get encrypted letter #10 decrypted. It is a letter for David. As a reward for returning all 10 letters you receive a Solar Artifact. Go to Twilight Village and go into the Mansion. Give the letter to David. It is from Joss, telling him that he believes their father has been involved with demons and dark magic. David is sorry he never believed Joss and gives Vera Joss’s Lunar Artifact as a reward. Quest complete.
- Prepare to Face Syn
Before facing Syn, you should finish all of your side quests and get all the artifacts, fish and trinkets. So it’s now time to tie up some loose ends.
Go back to find the remaining special fish. In the Volcano, in the garden room in the northwest, you will now be able to find a Magma Phantom. In the cave on Snowball Island you will find the Lone Shark. In the Crypt under the church in Trade Town (go east and north from the central hall and then through the hole in the wall by the stairs) you will find the Darksteel Fish. In the east castle of the Twin Castles (northwest exit of the room with the many exits where we had to find the 3 kitties) find the Enchanted Loach. Bring 6 fish to Joseph and he will give you a Refined Fishing Device. For 9 fish he will award you Tyson’s Fisherman Outfit. Once you’ve returned all 10 fish, you will receive an Earthly Artifact.
Finish any ticket collecting quest you haven’t done and check you have done everything in your journal except for 2 final quests (98/100 quests). Stock up on huge potions at the market in Saltwater Bay, though you will get some good ones in Syn’s Lair itself. Now go back to the Dark Seas and exchange all the artifacts for weapons and armor. Then go to Syn’s Lair and go in.
You enter a room with three altars that can contain a red, green or blue gem to give access to a new area. Whenever there is more than one altar, you will only need one of the gems to access the new area. So you will have to run back and forth to swap gems around. Take the ruby from the altar and go west twice. Place the ruby in the stone there and cross the bridge. Go north and cross the bridge. Now push the pillar south, go back across the bridge and push the pillar aside. Now take the sapphire from the altar, go south, get the ruby and go back to the main room with the three stones.
Go north, place the ruby in the altar and cross the bridge east. Flick the switch to get a second bridge. Get the ruby again, go back south, place the ruby in the altar, get the sapphire and go north. Now exit east. Place the sapphire in the altar and go north through the gate that just opened. Get the emerald from the altar and go south. Get the Sapphire again and go east. Place the sapphire into the altar and go east.
Exit east. Place the emerald in the single altar on the right and cross the bridge. Exit south and pull the lever. Go south and east to collect the ruby from the first room then retrace your steps and go back north to where you left the emerald. Put the ruby into the altar and the doors will open. Quest complete.
- Defeat Syn
You will meet Syn in the next room. You tell her you’ve come to rid the world of evil, but she taunts you that without evil you wouldn’t be a demon hunter and you would be nothing. The fight that follows is very hard, but it can be won. Syn’s biggest attach is impale, which reduces all your party members to 1 HP. However, she needs a turn to recharge from this attack, a time you can use to heal up too. Once you’ve defeated her, your party simultaneously deals her one last blow and she disappears. Watch what happens to the game’s most prominent characters (definitely worth a watch!!!).
THE END
(For real this time!)
Arena Quests
1. King and Captain
2. Rot Augen Kinder – level 10
3. Sugar and Spice – level 15
4. The Wranglers – level 20
5. The Followers – level 25
6. Grandma and Chris – level 30
7. Corporate Pain – level 35
8. Los Mysterioso – level 40
9. The Fanatics – level 45
10. The Green Twins – level 50
Letter Locations
#1 – Secret room in Mansion, underground
#2 – Arena entrance
#3 – Pirate Mines, after mine cart chase
#4 – In Slime Garden on Slime Island
#5 – Volcano
#6 – Twin castles, east castle
#7 – Secret room in the Vault
#8 – In a house in Twinkle Town
#9 – Receive from Josephine in Twin Castles after defeating demon
#10 – Vault Illusion in Mordecai’s Tower
Special Fish Locations
1. Spotted Sweetfish – Twilight Forest
2. Axehead Fish – Pirate Mines
3. Toxic Stonefish – Slime City
4. Magma Phantom – Volcano
5. Lone Shark – Snowball Island
6. Enchanted Loach – Twin Castles
7. Darksteel Fish – Crypt
8. Bloody Trout – Forest of Illusions
9. Violet Piranha – Rare Witch Forest
10. Dirty Mudfish – Trial Isle
Artifact Locations Solar Artifacts
- Trade Town post office after you deliver all of the mail
- Complete all treasure maps
- In a chest in Victor’s room in Mordecai’s tower
Lunar Artifacts
- Get from David after delivering Joss’s letter
- Defeat every team in the arena tournament
- Complete spider hunting side quest
Cosmic Artifacts
- Complete Quiz Castle
- Complete Forest of Illusion
- In a chest in first room in Mordecai’s tower
Earthly Artifacts
- Compete all Lone Wolves missions
- Purchase from Slime Island shop
- Get from Joseph after you catch all of the rare fish
Trinket Locations
1. Tube of Slime – Buy from Slime Island shop
2. Red Bandit Mask – Complete 4 lone wolves missions
3. Bunny Hood – Chest on Golding Island
4. Petrified Rose – Complete the plant gauntlet on Percy’s Island
5. Dragon’s Tooth – Complete Trial Isle
6. Enchanted Mushroom – Complete Rare Witch Island
7. Strange Gizmo – Complete Sprocket to Me! quest on Spencer’s Island
8. Butterfly Pendant – In chest on Butterfly Island
9. Silver Feather – Have 5 letters decrypted
10. Quiz Master’s Cape – Complete round 1 on Quiz Island
11. Arachnid Pendant – Find all 100 spiders on Bluewood Island
12. Champion’s Ring – Complete the three initial rounds in the Arena
13. Mirror of Illusion – Complete the Forest of Illusion
Outfits
Harvey
- Wrangler – Reward for returning Jeremy’s frogs
- Tuxedeo – Collect burning embers for Bernard in Twilight Town
- Super – Defeat Quiz Castle
- King – Complete all Slime City quests
- Travel – Snowball Island
- Moonwalker – Saltwater Bay mini game
- Cow – Given to you on the Haunted Farm
- Slime – Purchase for 2000 tickets on Slime Island
- Wizard – Mini game in Twinkle Town
Vera
- Bunny – Twilight Village mini game
- Wizard – Find the stone tablet for Archibald in Twinkle Town
- Knight – Crystal Bay treasure map
- Hero – Purchase in Saltwater Bay
Tyson
- Captain – Retrieve the pirate hat for Broderick in Saltwater Bay
- Ninja – Collect the special thread for Normando at the Lone Wolves HQ
- Fisherman – Catch 9 special fish
- Hero – Secret room in magic shop in Trade Town shopping district
Virgil
- Purple – Outdoor vendor in Trade Town crooked district
- Brown – Magic shop in Twinkle Town
- Red – Chest on Rare Witch Island
Skill Statues
Harvey
- Call of Protection – Pirate Mines, entrance
- Call of Purity – Haunted farm, west
- Call of Battle – The Vault, east
- Strategic Strike – Mansion, upper level, before the demon portal
- Mocking Strike – Volcano, east of entrance
- Tactical Strike – Forest of Autumn Island
- Healing Strike – Twin Castles, west castle, upstairs
- Wicked Strike – The Crypt, where the ghost knights are
Vera
- Quick Stab
- Back Stab – Mansion, behind the organ
- Contagious Stab – Pirate Mines, after blocked track cart ride
- Sea of Flames – The Crypt, outside King of Flames’s cell
- Shadows – The Crypt, blue switches puzzle south
- Exploit Weakness – Volcano, room east of fishing area
- Destroyer – Twin Castles, west castle, south of kitty choir
- Double Stab – Mansion, basement level
Tyson
- Cleave
- Light Feet (Frenzy) – Pirate mines, blocked track puzzle
- Berserk (Frenzy) – Volcano
- Primitive Mind (Frenzy) – The Crypt, north of cell 2A
- Whirlwind – Haunted Farm, east
- Wild Swing – Twin Castles, east of where Josephine blocked stairs
- Smash – The Vault, after last ice puzzle outside Terra’s cell
- Gasher – The Crypt, east
Virgil
- Blast Shot
- Demon Form
- Piercing Shot – Mordecai’s Tower, Enchanted Farm Illusion
- Terrorize – The Vault, outside Terra’s cell
- Draining Shot – Rare Witch Island, cave
- Panic – Twin Castles, hidden room in east castle
- Blizzard – Mordecai’s Tower, Vault Illusion
World Maps
South Seas
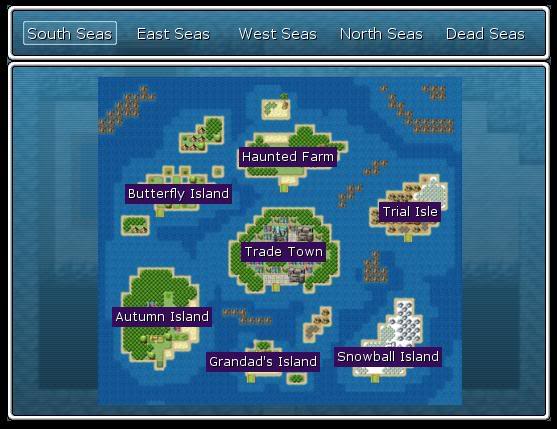
East Seas
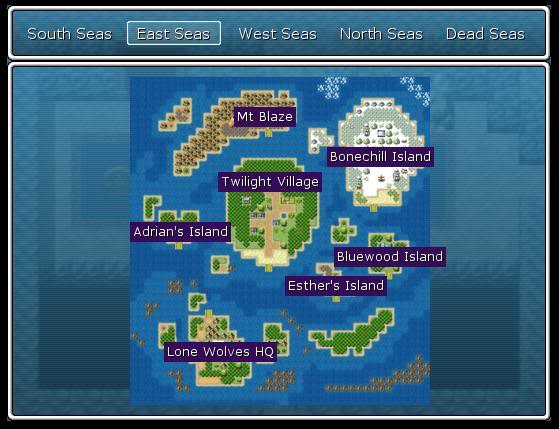
West Seas
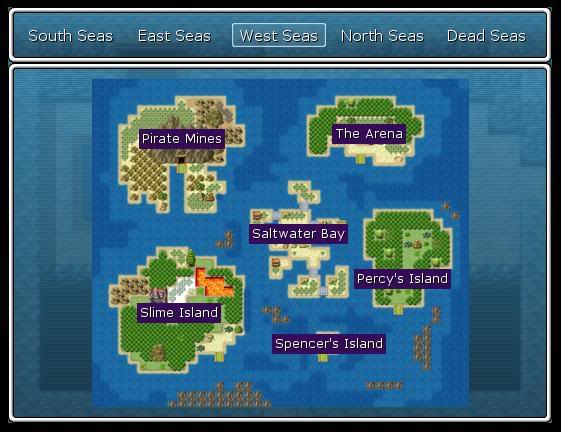
North Seas
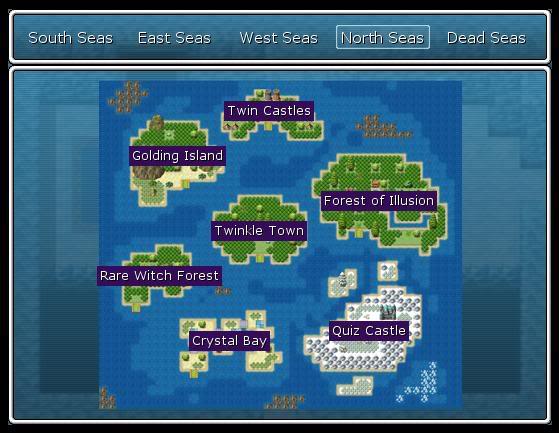
Dark/Dead Seas
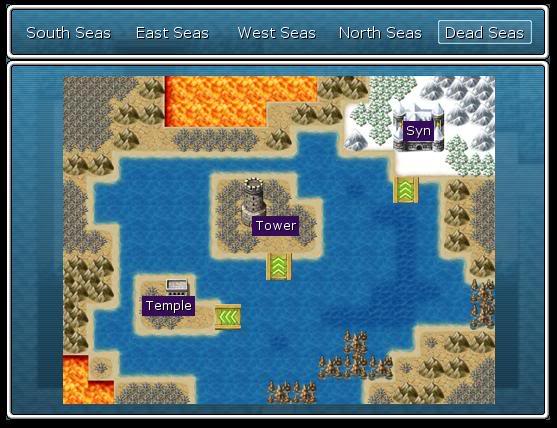
“;
More articles...
Monopoly GO! Free Rolls – Links For Free Dice
By Glen Fox
Wondering how to get Monopoly GO! free rolls? Well, you’ve come to the right place. In this guide, we provide you with a bunch of tips and tricks to get some free rolls for the hit new mobile game. We’ll …Best Roblox Horror Games to Play Right Now – Updated Weekly
By Adele Wilson
Our Best Roblox Horror Games guide features the scariest and most creative experiences to play right now on the platform!The BEST Roblox Games of The Week – Games You Need To Play!
By Sho Roberts
Our feature shares our pick for the Best Roblox Games of the week! With our feature, we guarantee you'll find something new to play!All Grades in Type Soul – Each Race Explained
By Adele Wilson
Our All Grades in Type Soul guide lists every grade in the game for all races, including how to increase your grade quickly!


