- Wondering how to get Monopoly GO! free rolls? Well, you’ve come to the right place. In this guide, we provide you with a bunch of tips and tricks to get some free rolls for the hit new mobile game. We’ll …
Best Roblox Horror Games to Play Right Now – Updated Weekly
By Adele Wilson
Our Best Roblox Horror Games guide features the scariest and most creative experiences to play right now on the platform!The BEST Roblox Games of The Week – Games You Need To Play!
By Sho Roberts
Our feature shares our pick for the Best Roblox Games of the week! With our feature, we guarantee you'll find something new to play!Type Soul Clan Rarity Guide – All Legendary And Common Clans Listed!
By Nathan Ball
Wondering what your odds of rolling a particular Clan are? Wonder no more, with my handy Type Soul Clan Rarity guide.
Dark Tales: Edgar Allan Poe’s The Masque of the Red Death Walkthrough
Welcome to the Dark Tales: Edgar Allen Poe’s The Masque of the Red Death walkthrough on Gamezebo. Dark Tales: Edgar Allen Poe’s The Masque of the Red Death is an adventure game with puzzles and hidden object scenes created by ERS Game Studios. This walkthrough includes tips and helpful hints and is a strategy guide on how best to complete the game.
Game Introduction – Dark Tales: Edgar Allen Poe’s The Masque of the Red Death
Welcome to the Dark Tales: Edgar Allen Poe’s The Masque of the Red Death walkthrough on Gamezebo. Dark Tales: Edgar Allen Poe’s The Masque of the Red Death is an adventure game with puzzles and hidden object scenes created by ERS Game Studios. This walkthrough includes tips and helpful hints and is a strategy guide on how best to complete the game.
General Tips
- Play is linear with few options for the order in which to explore locations, complete tasks and find inventory items.
- This guide completes tasks in the most efficient way possible. Not all inventory items are picked up when first encountered; tasks are completed when all required items have been assembled.
- To make it easier to find where this guide may differ from your own play, collected inventory items are CAPITALIZED and highlighted in white with a blue border in the screenshots.
- If you don’t have an item referenced in this guide, press and hold the “Ctrl” key while pressing the “F” key. This opens a Find area in your web browser. Type in the name of the object as it appears in this guide. Press the “Enter” key to find references to the item.
- Consult the game diary for story information, playing hints and tips to solve puzzles.
Options
- Adjust the music, effects and voice volumes.
- Toggle the custom cursor, full- or wide-screen on or off.
- Change the playing difficulty mode.
Difficulty Modes
- There are three playing modes: Casual, Advanced or Hard.
- Casual mode offers the most assistance during play. Interactive locations are highlighted with sparkles; hint and skip buttons recharge quickly.
- Advanced mode increases the challenge. Interactive locations are not indicated; hint and skip buttons recharge more slowly.
- Hard mode offers the most challenging way to play. Interactive areas are not indicated; hint and skip buttons recharge very slowly; black-bar tips are disabled.
- The playing mode may be changed at any time from the Options menu.
- This guide was written using casual mode of the Collector’s Edition.
Cursors
- The default custom cursor is an arrow. It can change into the following icons:
- An eye indicates a character or an area requiring interaction.
- A hand means an item may be opened or collected for inventory.
Hidden Object Scenes
- There are two types of hidden object scenes: list and silhouette.
- Items listed in light blue require interacting with the scene to reveal or create the item.
- Cursor icons in these scenes are the same as in the rest of the game.
- Each hidden object scene is played twice.
- With the exception of the interactive objects, list items are randomly generated. Only interactive and inventory items are highlighted in this guide.
Hint and Skip Buttons
- The hint button is in the lower right corner of the screen.
- How much assistance the hint provides depends on the play mode selected.
- The hint button can also be used in a hidden object scene to locate an item.
- Puzzles may be skipped once the skip button has charged.
Diary and Map
- The diary icon is in the lower left of the screen.
- The diary section is updated regularly with story information and hints for solving puzzles.
- The interactive map is included in the diary.
- Pictures of locations on the map are added as they are discovered.
Camera
- Note: This may be an option only available in the Collector’s Edition.
- The camera may be used to take a picture of the current scene.
- Pictures may be viewed in the photo album in the office. Click the “Save” tab in the album to save the image to the My Pictures folder on your Windows-based computer.
- You do NOT need to take a picture of a scene for it to appear on the map. Images appear when a location is opened.
Chapter 1: Opening the Gate

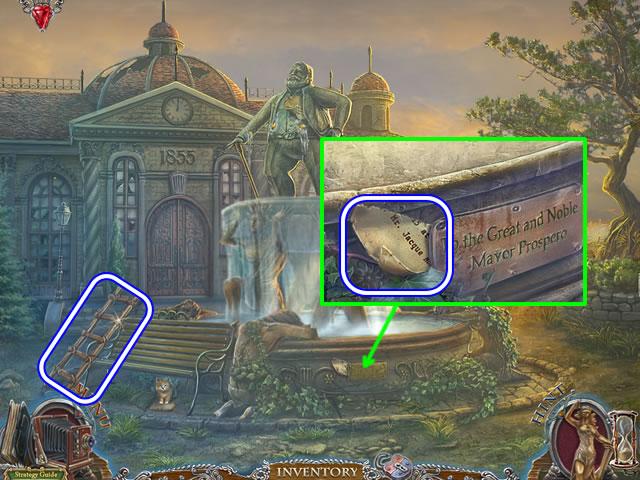
- Pick up the LADDER.
- Examine the plaque on the fountain base; take the ANNOUNCEMENT PIECE (1/2).
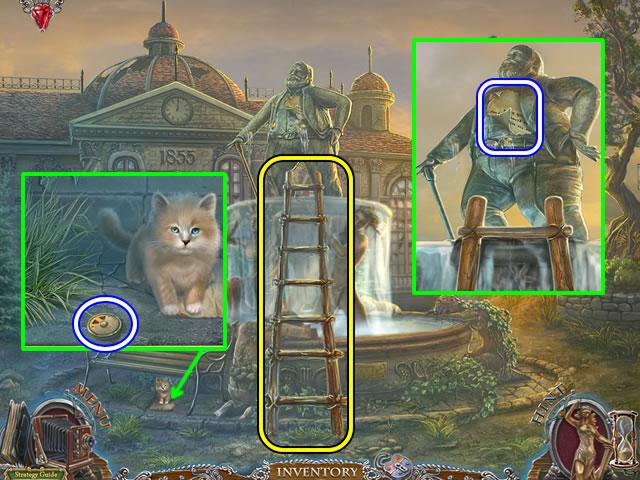
- Look closer at the cat; pick up the WHEEL (1/2).
- Drag the LADDER from inventory and place it against the fountain.
- Climb up and take the ANNOUNCEMENT PIECE (2/2).
- Take the road on the right and enter the watch house.
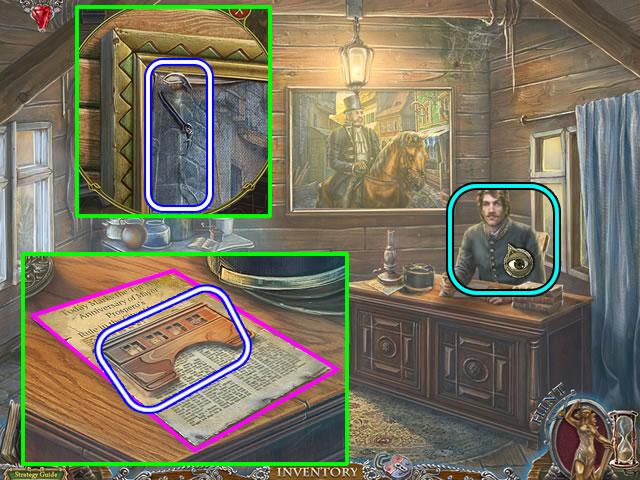
- Speak to the desk sergeant to acquire story information and activate the scene.
- Examine the painting.
- Take the FISHING LINE AND HOOK.
- Look at the desk corner.
- Take the TRAIN CARRIAGE; pick up the newspaper article.
- Play the hidden object scene on the woodstove.
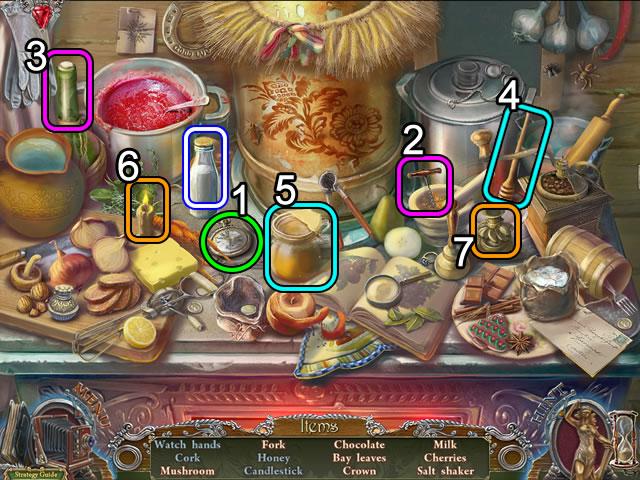
- Pick up the watch (1) and remove the Watch hands.
- Use the corkscrew (2) to remove the Cork from the bottle (3).
- Take the honey dipper (4) and put it in the jar (5) to get the Honey.
- Put the candle (6) in the candleholder (7) to create the Candlestick.
- Find the rest of the listed items. Your list may not match that in the screenshot.
- Receive the bottle of MILK for inventory.
- Exit the cabin; go right.
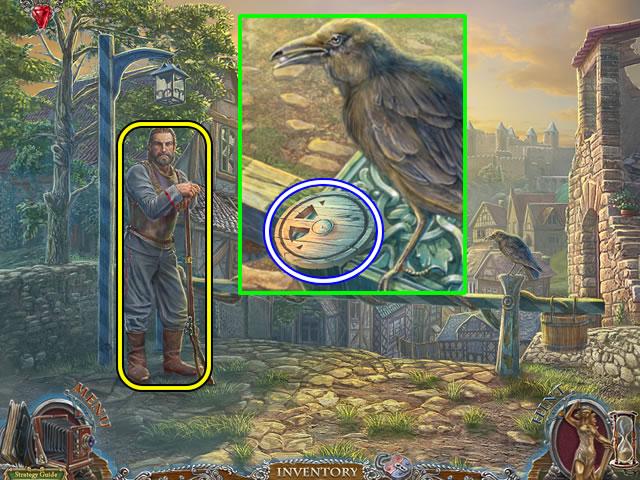
- Speak to the guard.
- Examine the crow; take the WHEEL (2/2).
- Go down two times to return to the station.
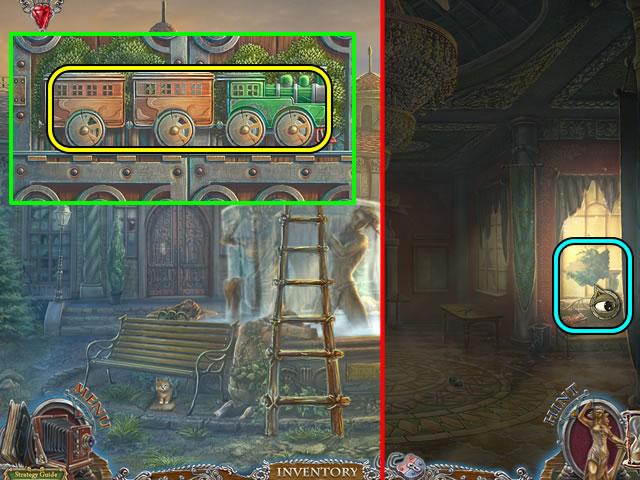
- Zoom in on the door.
- Insert the two WHEELS and the TRAIN CARRIAGE in the slots to activate the door lock.
- Enter the station.
- Look closer at the window to activate the scene.
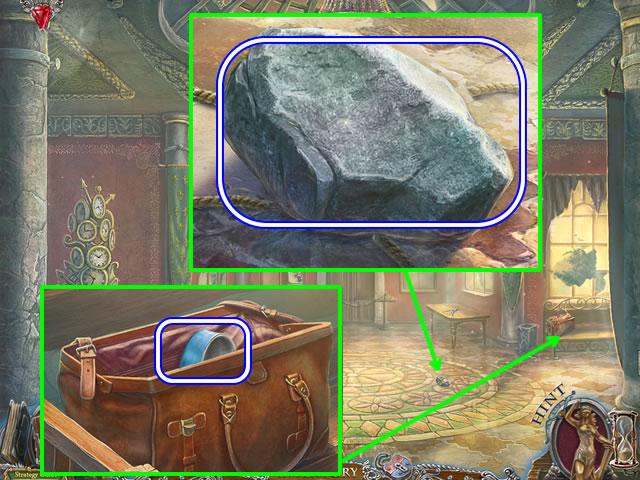
- Remove the ropes and note from the STONE on the floor.
- Open the bag on the bench; take the BOWL.
- Exit the building.
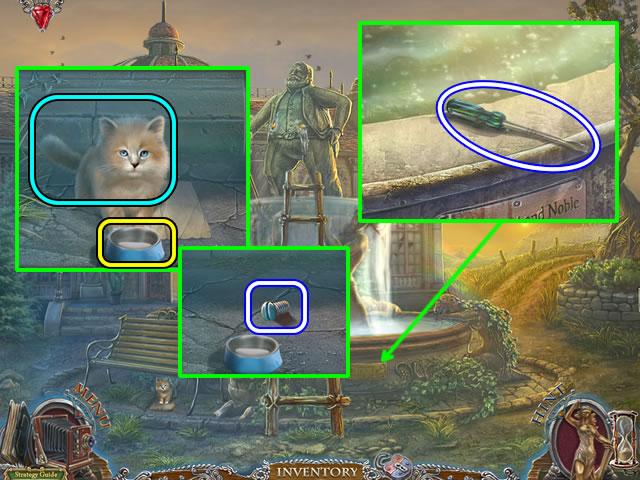
- Look at the plaque on the fountain.
- Use the FISHING LINE AND HOOK to retrieve the SCREWDRIVER from the fountain.
- Look at the cat under the bench.
- Put the BOWL in front of the cat; fill the bowl with the MILK.
- Pick up the cat to add it to the private office area (note: this feature may only be available in the Collector’s Edition of this game).
- Read the note the cat was sitting on.
- Pick up the SCREW that was under the note.
- Go forward and enter the building.
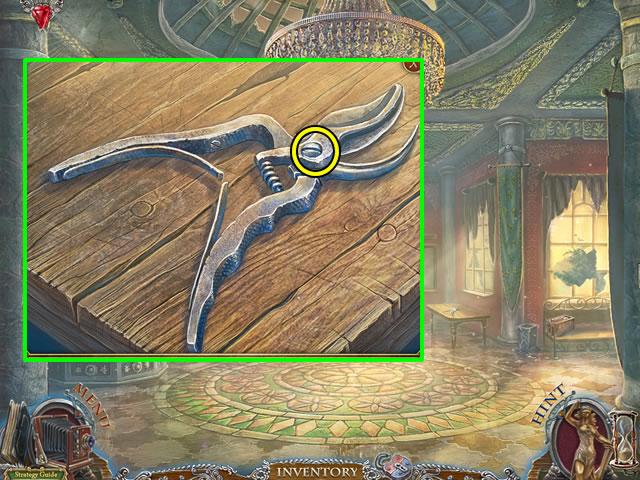
- Zoom in on the table.
- Insert the SCREW and secure it with the SCREWDRIVER.
- Take the repaired PRUNERS.
- Exit the building; go right.
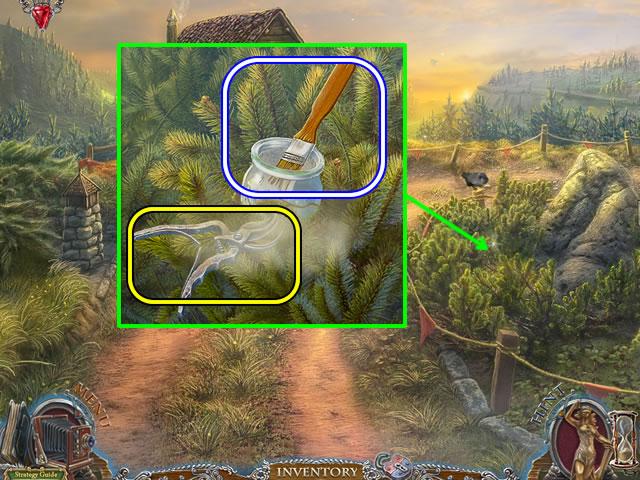
- Look closer at the bushes.
- Use the PRUNERS to free the pot of GLUE.
- Go down once and enter the building.
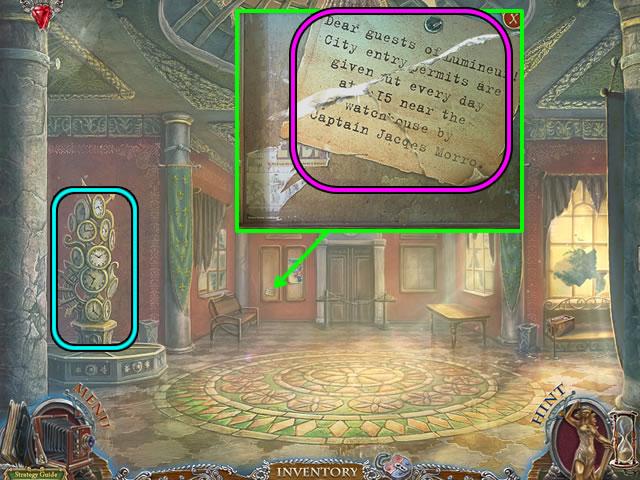
- Zoom in on the notice board on the back wall.
- Remove the top notice.
- Spread the GLUE on the torn notice; attach the two ANNOUNCEMENT PIECES.
- The repaired announcement is automatically added to the diary.
- Look at the clock stand to open a puzzle.
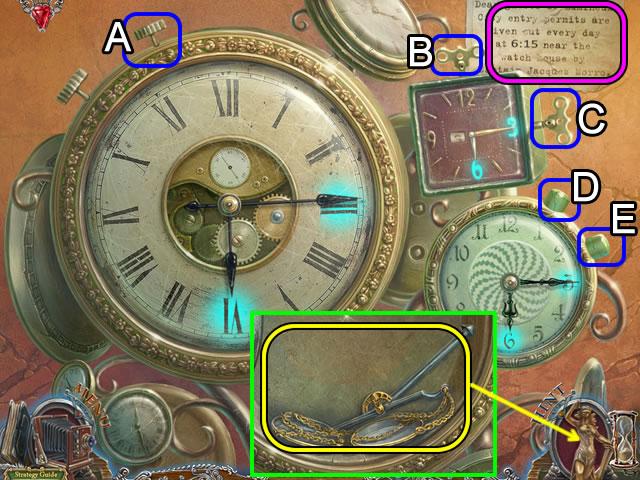
- The announcement information is pasted in the upper right corner.
- The goal is to each of the three clocks to 6:15.
- Solution: Click the hand movement mechanisms in this order: A, A; B, B, C, C; E, E, D, D and E.
- Pick up the Scales of Justice from the center clock compartment. Receive a brief tutorial about the use of this item.
- Exit the building. Go right.
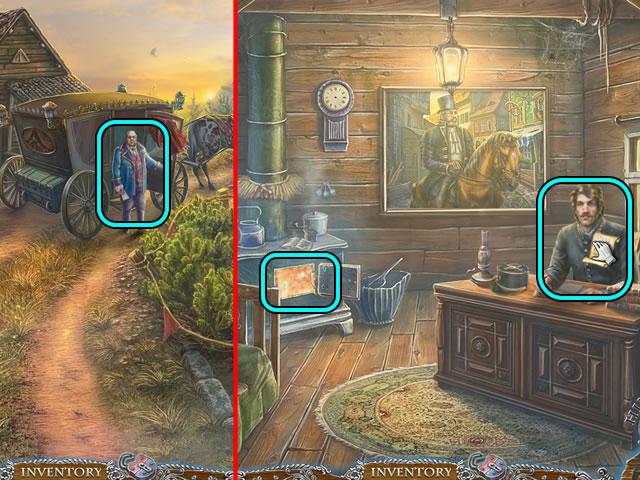
- Speak to Captain Morrow; receive a BLANK PERMIT.
- Enter the watch house.
- Give the BLANK PERMIT to the desk sergeant; receive a NOTARIZED PERMIT.
- Play the hidden object scene on the wood stove.
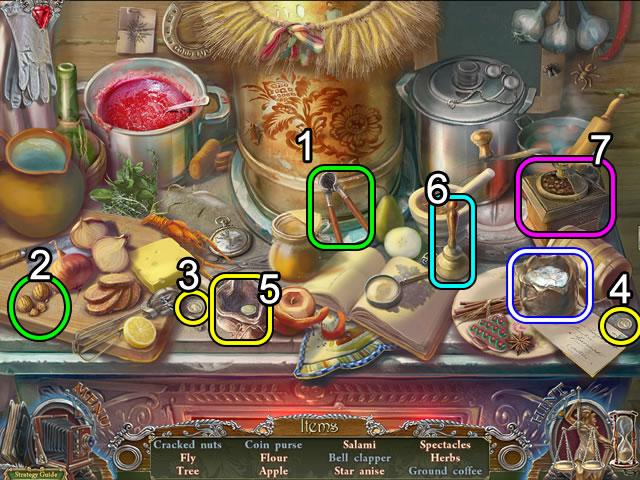
- Use the nutcracker (1) on the nuts (2); pick up the Cracked nuts.
- Put coin (3) and coin (4) in the purse (5); take the Coin purse.
- Lift the bell (6); take out the Bell clapper.
- Click the coffee grinder (7) to open a drawer containing Ground coffee.
- Find the rest of the items on your list; receive FLOUR for inventory.
- Exit the building.
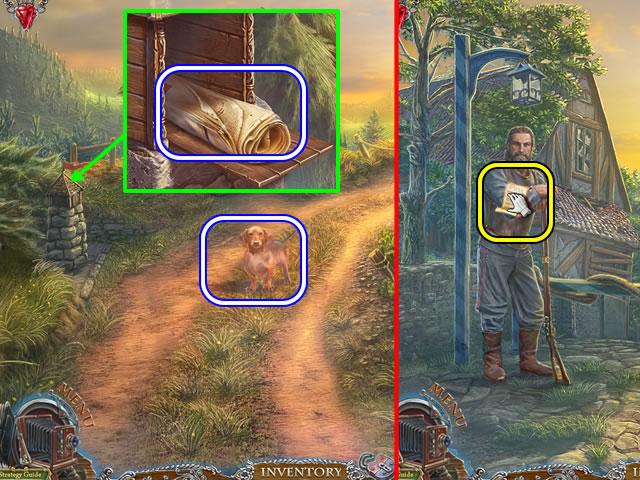
- Open the mailbox on the stone pedestal; take the NEWSPAPER.
- Pick up the DACHSHUND.
- Go right.
- Give the NOTARIZED PERMIT to the guard to open the gates.
Chapter 2: The Bakery and Carriage
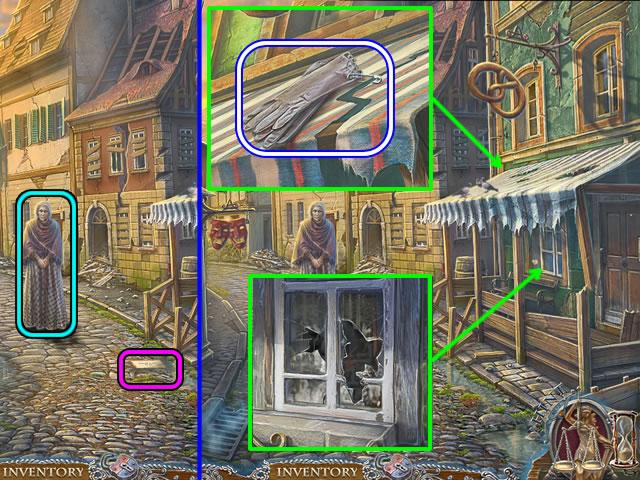
- Speak with the woman to activate the scene.
- Pick up the paper on the cobblestones.
- Look at the top of the awing.
- Click twice to open the safety pin and get the GLOVE; take the PIN.
- Examine the shop entrance.
- Use the STONE to break the window.
- Look closer at the broken window; use the GLOVE to open the latch.
- Enter the bakery.
- Play the hidden object scene on the worktable.
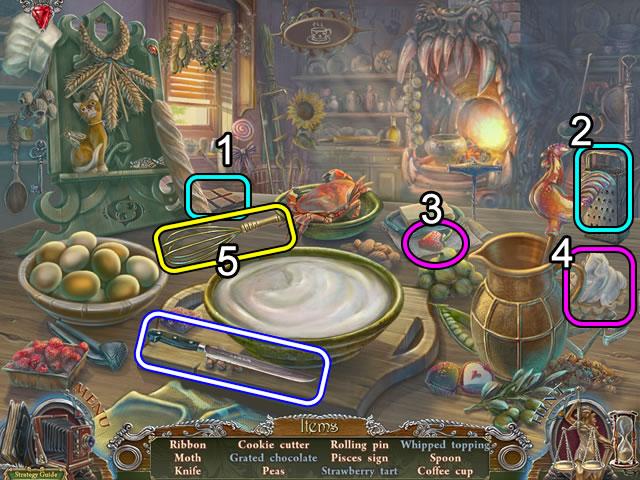
- Put the chocolate (1) on the grater (2); take the Grated chocolate.
- Place the strawberry (3) on the pastry (4) to create the Strawberry tart.
- Use the whisk in the bowl (5) to get Whipped topping.
- Find the items on your list; receive the KNIFE for inventory.
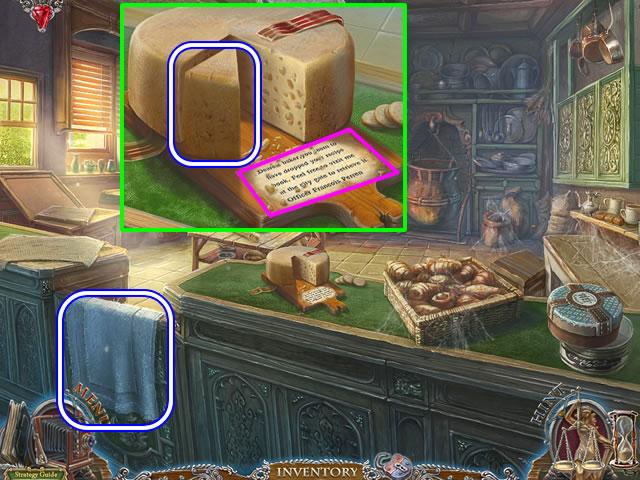
- Pick up the TOWEL.
- Use the KNIFE to slice off a wedge of CHEESE.
- Pick up the note on the cutting board.
- Exit the shop. Go down.
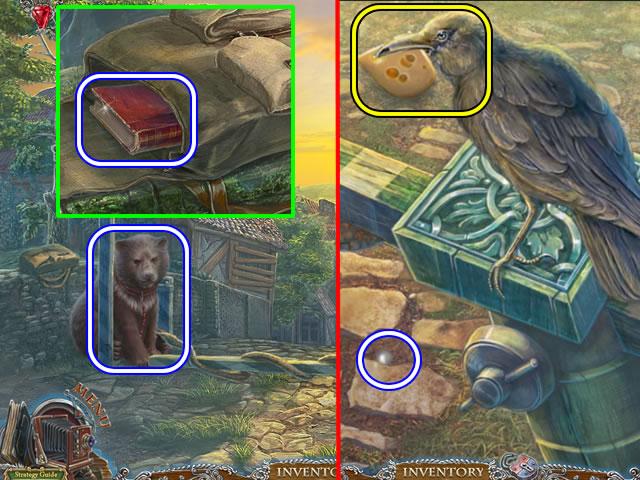
- Pick up the BEAR.
- Open the satchel; take the RECIPE BOOK.
- Look closer at the crow.
- Put the CHEESE on the crow; pick up the dropped MARBLE.
- Go forward and enter the bakery.
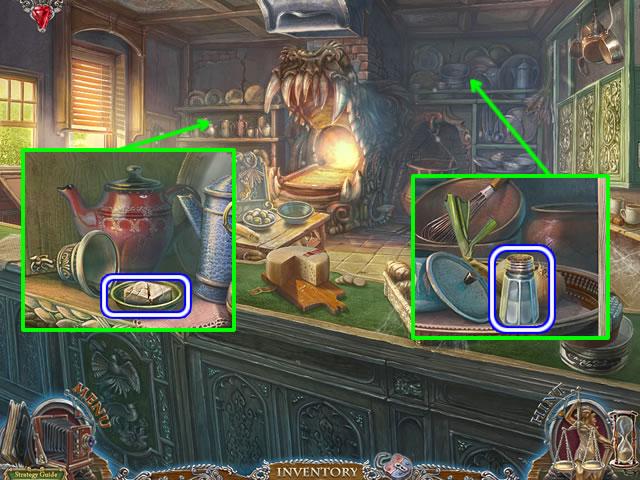
- Look at the shelves on the left.
- Pick up the YEAST.
- Look at the shelves on the right.
- Get the SALT.
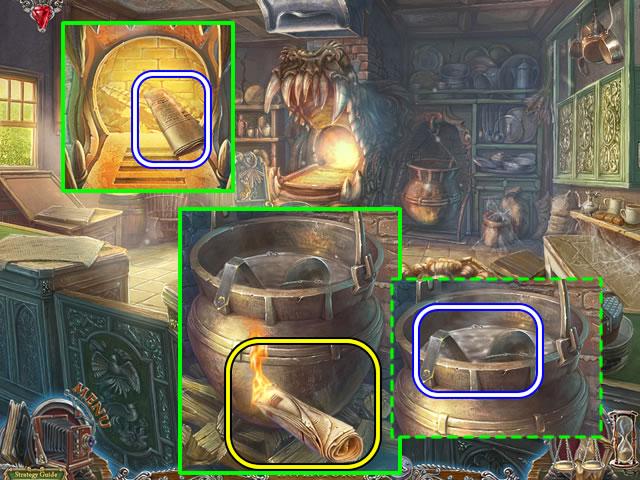
- Put the NEWSPAPER in the open-hearth oven to get a BURNING NEWSPAPER.
- Look closer at the caldron.
- Use the BURNING NEWSPAPER to light the firewood.
- Take a ladle full of BOILED WATER.
- Zoom in on the worktable.
- Put the RECIPE BOOK, YEAST, SALT, FLOUR and BOILED WATER on the table to open a puzzle.
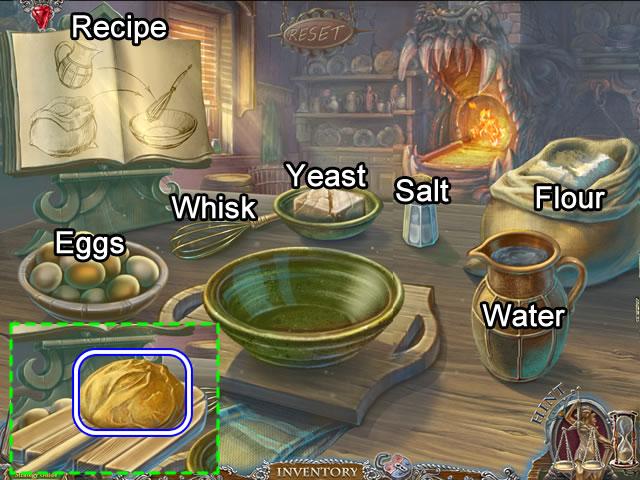
- The goal is to follow the steps in the recipe book to create a loaf of bread.
- Solution: (1) Click the water and flour to add them to the bowl. Click the whisk to mix the ingredients. (2) Turn the book page. (3) Add an egg and yeast; mix the ingredients with the whisk. (4) Turn the book page. (5) Add water and salt. Use the whisk. (6) Click the bowl of ingredients to knead the dough. The dough automatically moves from the bowl to the baking board and enters the oven.
- Take the baked BREAD and exit the bakery.
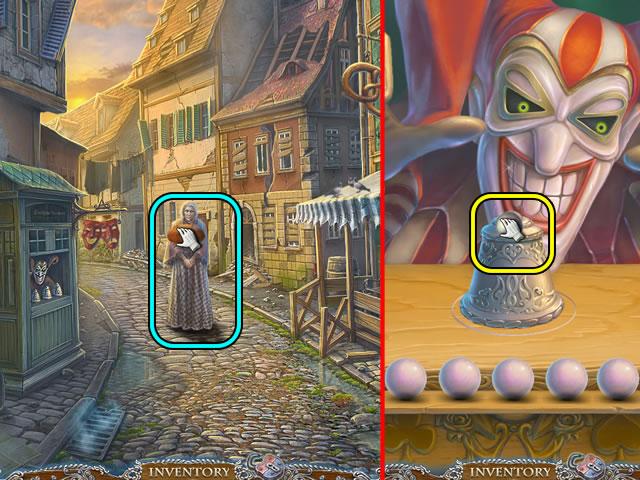
- Give the BREAD to the woman; receive the first Sphere of Guilt and a quick tutorial on their use.
- Zoom in on the clown.
- Put the MARBLE on the scene to open a puzzle.
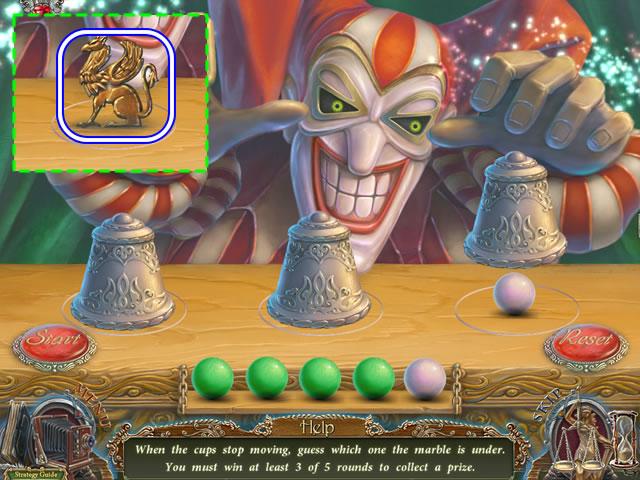
- The goal is to guess the cup hiding the marble. There are five rounds. Three correct guesses are required to win.
- The solution is random.
- Receive the GRYPHON FIGURINE for solving the puzzle.
- Go forward two times to inspect the wrecked carriage.
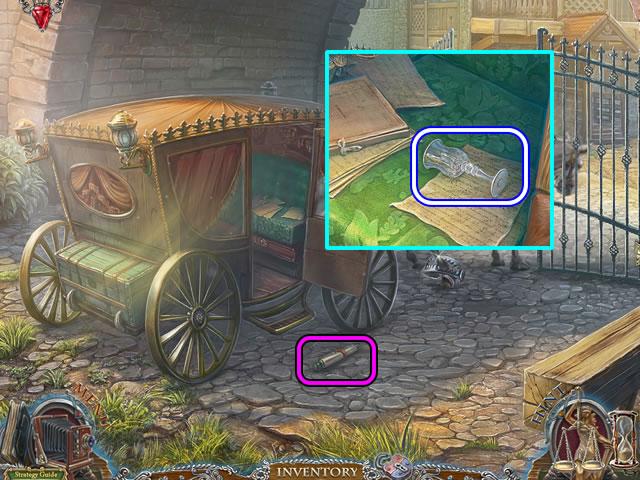
- Pick up the scroll for diary information.
- Look inside the carriage.
- Pick up the CRYSTAL GLASS.
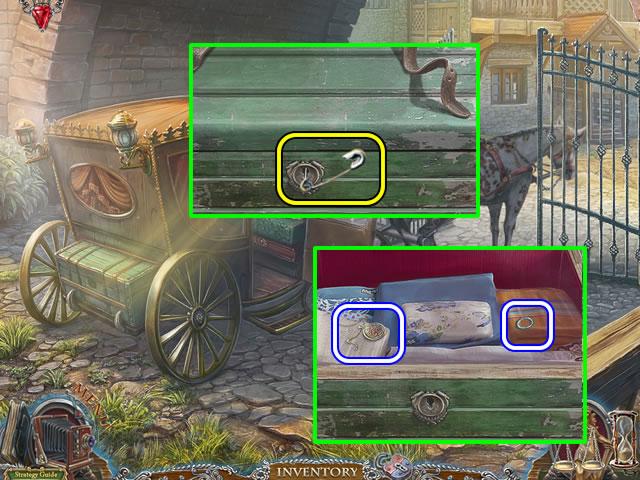
- Look closer at the luggage chest on the back of the carriage.
- Use the KNIFE to cut the straps; pick the lock with the PIN.
- Take the MEDALLION and EYELID.
- Go down once.
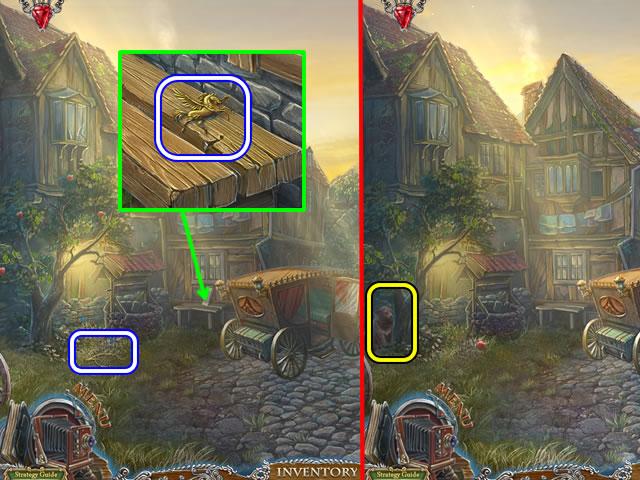
- Pick up the BRANCH by the tree.
- Zoom in on the bench; remove the cat toy if necessary to uncover the PEGASUS FIGURINE.
- Use the BEAR to knock down an apple from the tree.
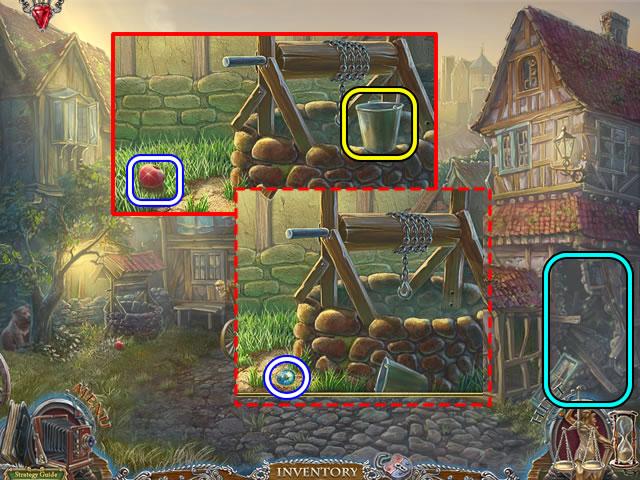
- Look closer at the well.
- Pick up the APPLE.
- Knock over the pail; pick up the EYE.
- Play the hidden object scene on the side of the building (note: the actions at the carriage must be complete to trigger this scene).
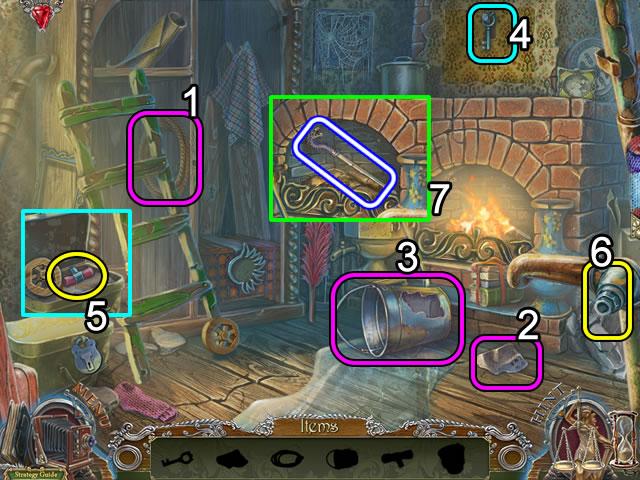
- Pick up the rope (1) and scrap iron (2).
- Put the scrap iron on the bucket (3) hole. Secure the scrap with the rope. Take the empty bucket.
- Use the key (4) padlock on the box (5); take the valve from the box.
- Affix the value to the pipe (6). Hang the empty bucket on the spigot; turn the valve to get a bucket of water.
- Pour the bucket of water on the flames (7); take the SWORD CANE.
- Go forward to the carriage.
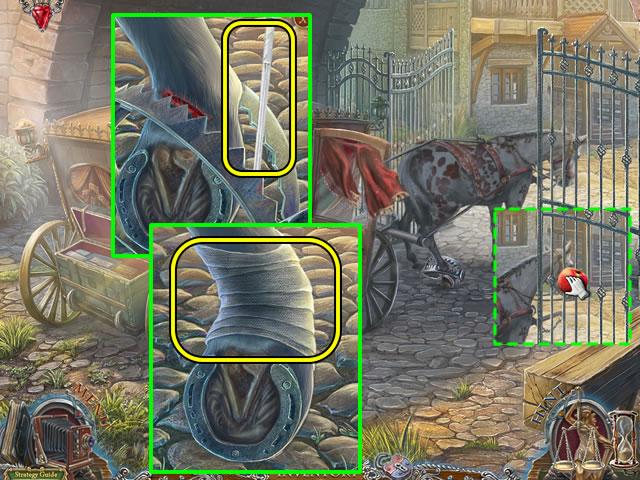
- Pry open the trap on the horse’s hoof with the SWORD CANE.
- Use the TOWEL to bind the wound.
- Feed the APPLE to the horse to release it from the harness and clear the gate.
Chapter 3: The Mayor’s House
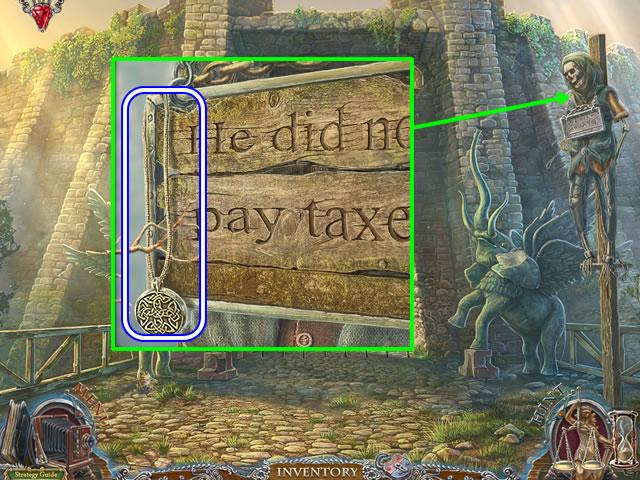
- Zoom in on the skeleton with the sign.
- Use the BRANCH to snag a second MEDALLION.
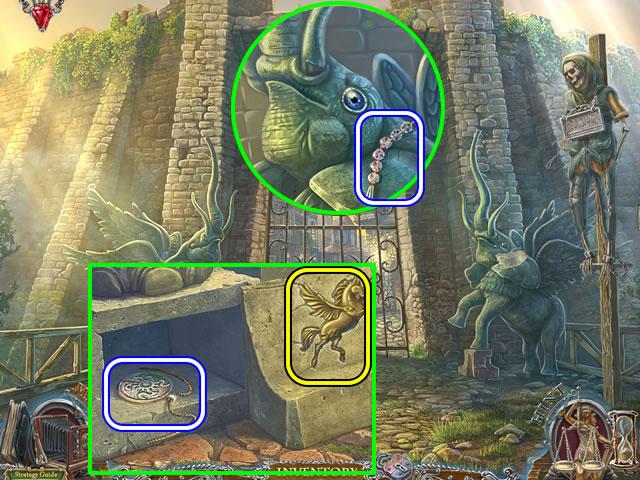
- Look at the head of the elephant on the right.
- Remove the paper for diary information; take the CRYSTAL CLUSTER.
- Look at the stand supporting the elephant’s foot.
- Insert the PEGASUS FIGURINE in the slot to open a compartment.
- Take the third MEDALLION.
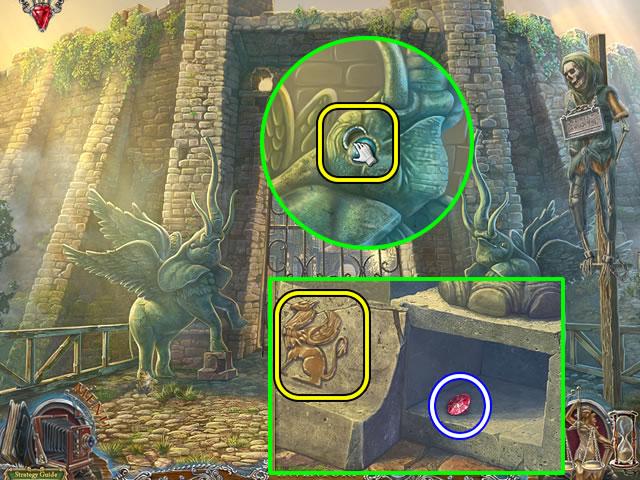
- Place the EYELID and EYE in head of the elephant on the left.
- Look at the stand supporting the elephant’s foot.
- Insert the GRYPHON FIGURINE in the slot; take the RUBY from the compartment.
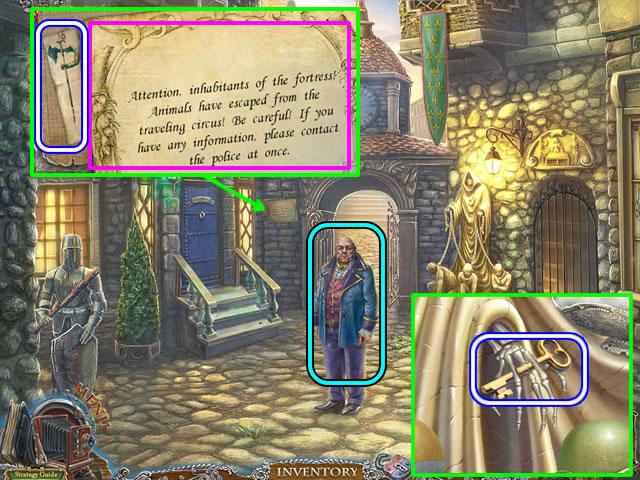
- Speak to the captain to receive the second Sphere of Guilt for the scales of justice.
- Read the warning on the back wall; take the KNIGHT PICTURE (1/2) fragment from behind the notice.
- Look closer at the chained figures statues.
- Take the KEY from the hand.
- Insert the three MEDALLIONS in the figures to open a puzzle.
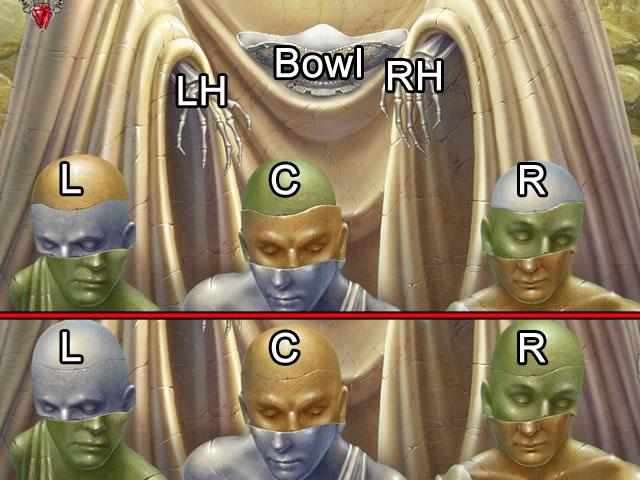
- The goal is to swap the eyes and skulls until they match their same colored body.
- The left hand (LH) can pick up a part from the left and center figures. The right hand (RH) can pick up parts from the center and right figures. Use the bowl to hold pieces. Eyes cannot be picked up until their matching skull has been added. Once a skull and eyes are matched they can be picked up as one piece. Click a hand to activate it and then pick up a piece or put an existing piece in the bowl.
- There is no reset button and exiting the puzzle does not reset it. The following solution is based on the original arrangement.
- Solution: RH-R skull. RH-Bowl. RH-C skull. RH-R eyes. LH-L skull; LH-C eyes. LH-Bowl for blue skull. LH-skull to L eyes. The result of these moves in shown in the bottom portion of the above screenshot. Follow the next set of moves to complete the puzzle. RH-R skull and eyes. RH-Bowl. RH-C skull and eyes. RH-R statue complete. LH-L skull and eyes. LH-C statue complete. LH-Bowl. LH-L statue complete.
- Solving the puzzle opens the gates to the cells.
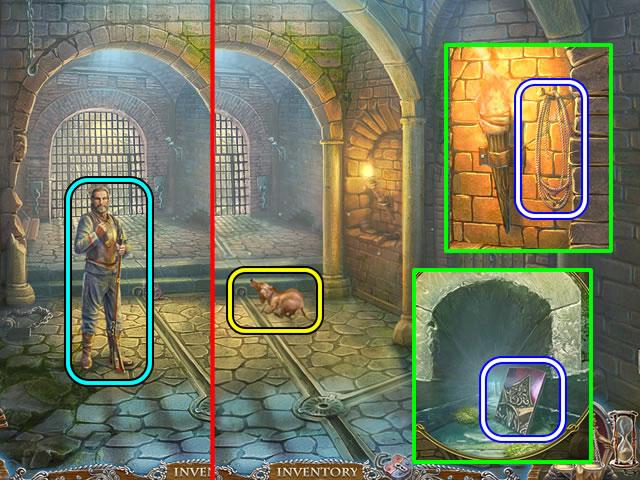
- Speak with the guard to activate the scene.
- Use the DACHSHUND to scare away the rat.
- Look into the rat hole; take the PUZZLE PIECE (1/3).
- Inspect the niche with the torch; take the ROPE.
- Zoom in on the locked gates. Put the KEY on the lock to open a puzzle.
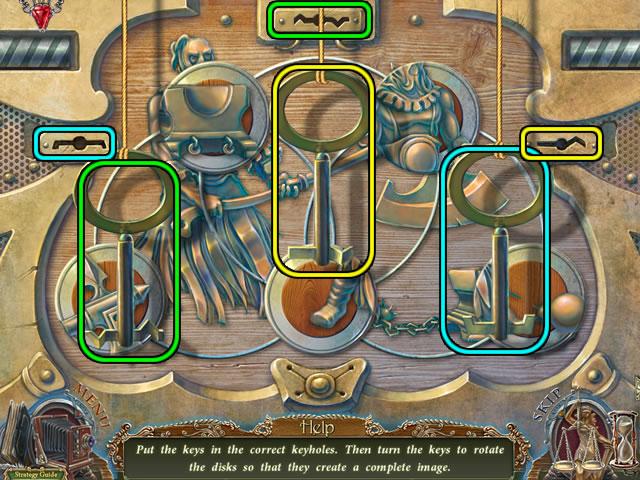
- Insert each key in the keyhole matching its lock pattern.
- The goal is to use the keys to rotate the disks to complete the image.
- The solution is shown in the next screenshot.
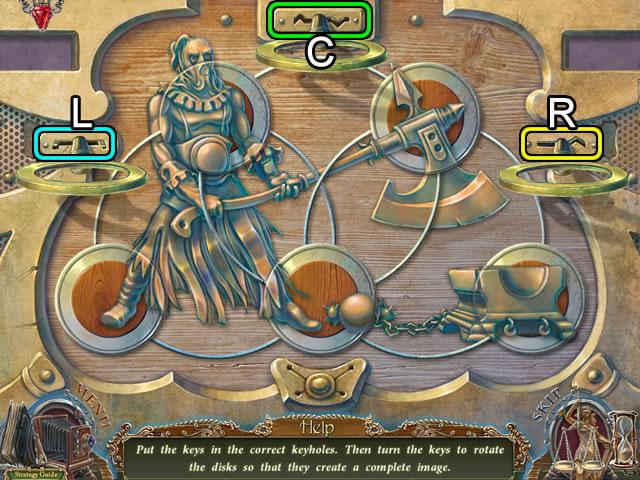
- There is no reset button and exiting the puzzle does not reset it.
- Beginning from the original positions, press the keys in this order: L, R and C.
- The completed picture is shown above.
- Play the hidden object scene in the cell.
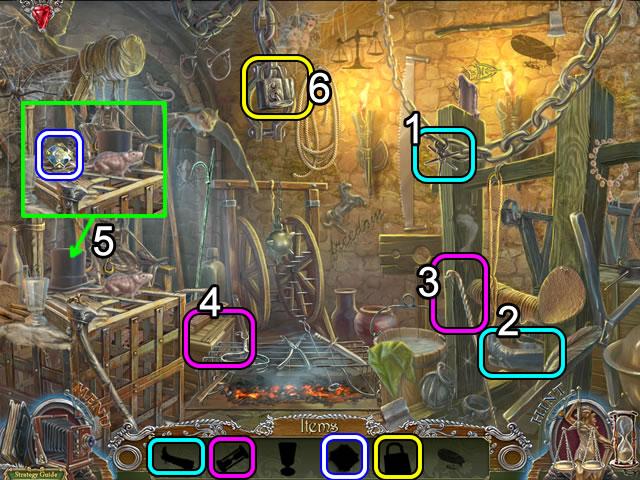
- Use the spur (1) to complete the Boot (2).
- Use the lever (3) to pry open the chest (4) and find the Hourglass.
- Move the top hat (5) to uncover the DOOR ORNAMENT.
- Click the key two times (6) and take the unlocked Padlock.
- Find the rest of the items on your list.
- Exit the cells.
- Zoom in on the door to the mayor’s house.
- Insert the DOOR ORNAMENT in the knocker. Click the knocker to open the door.
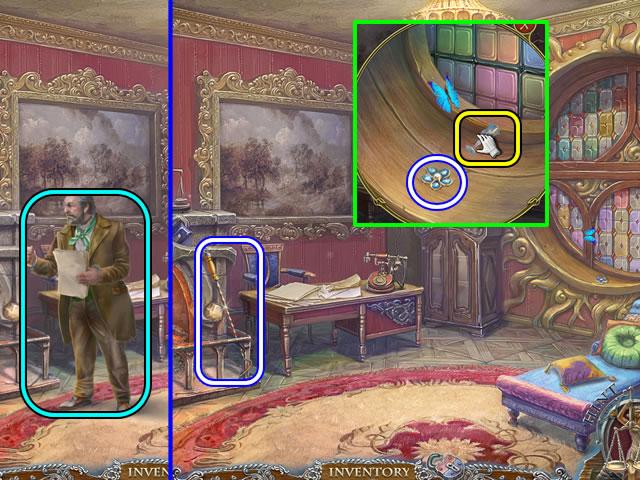
- Speak with the mayor.
- Pick up the POKER.
- Look at the window.
- Pick up the FLOWER (1/3).
- Put the CRYSTAL GLASS toward the back of the window ledge and click. The glass disappears and the captured BUTTERFLY is available for inventory.
- Go down two times to the elephant gates.
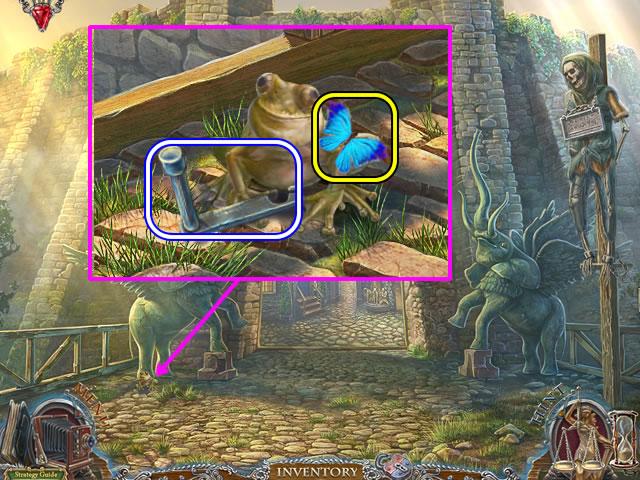
- Zoom in on the frog.
- Use the BUTTERFLY to distract the frog; pick up the HANDLE.
- Go down two times to the well area.
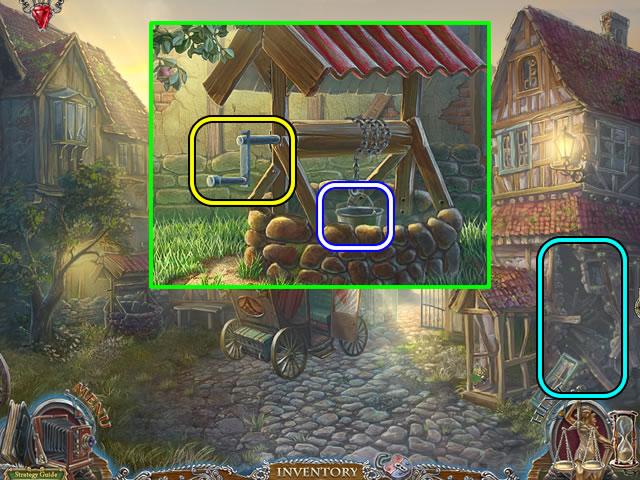
- Zoom in on the well.
- Attach the HANDLE to the crank and put the bucket on the chain hook.
- Click the handle to retrieve a BUCKET OF WATER.
- Play the hidden object scene on the side of the building.
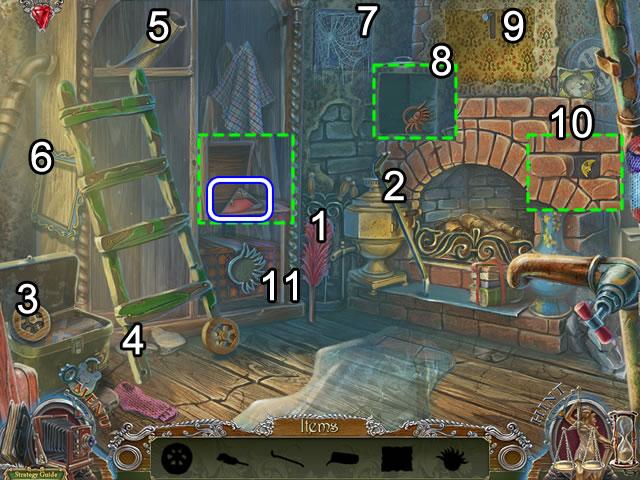
- Pick up the Brush (1), Crowbar (2) and Wheel (3).
- Put the wheel on the bottom of the ladder (4) to retrieve the Canvas (5).
- Add the canvas to the frame (6) to get a Picture.
- Click the ladder to move it to the right.
- Use the brush to clear the cobwebs (7) from the grate and the crowbar to pry it off.
- Take the Sun (8) from the nook.
- Hang the picture on the wall (9) to open a hidden compartment on the fireplace (10); take the Moon.
- Insert the sun and moon in the trunk lock (11). Take the PUZZLE PIECE (2/3).
- Go forward three times to return to the outside of the mayor’s house.
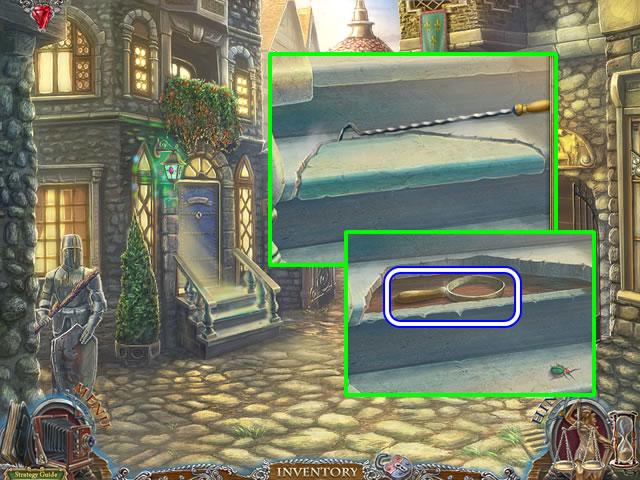
- Use the POKER to pry out the loose step.
- Take the MAGNIFIER HANDLE.
- Enter the house.
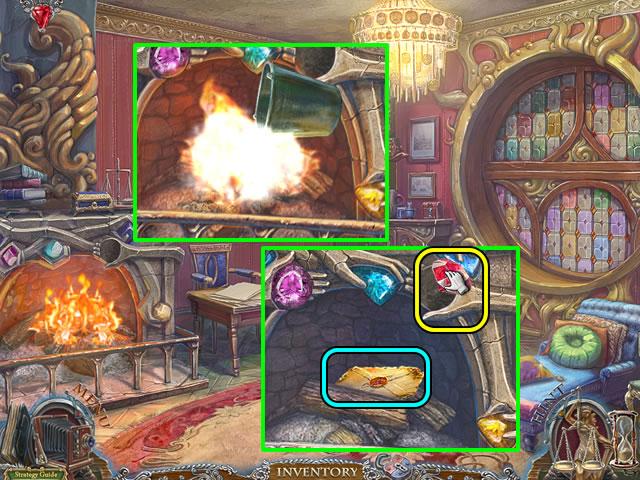
- Pour the BUCKET OF WATER on the flames.
- Pick up the envelope; remove the seal and read the note.
- Insert the RUBY in the slot to open a puzzle.
- The goal is to unclench all of the hands.
- The solution is shown in the next screenshot.
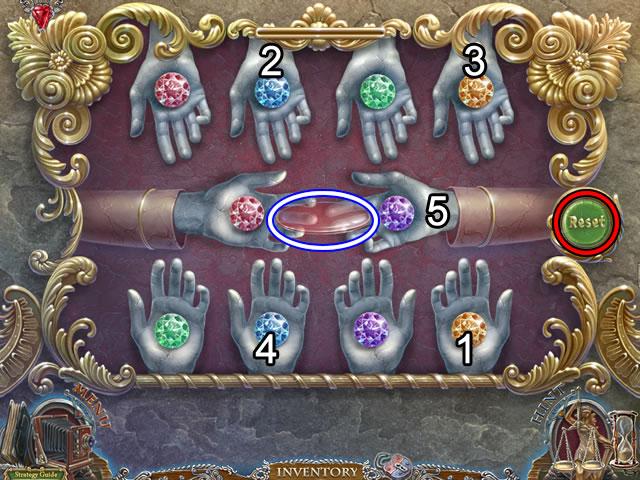
- Press the Reset button if necessary.
- Open the hands in the order shown.
- Take the RED LENS that drifts down.
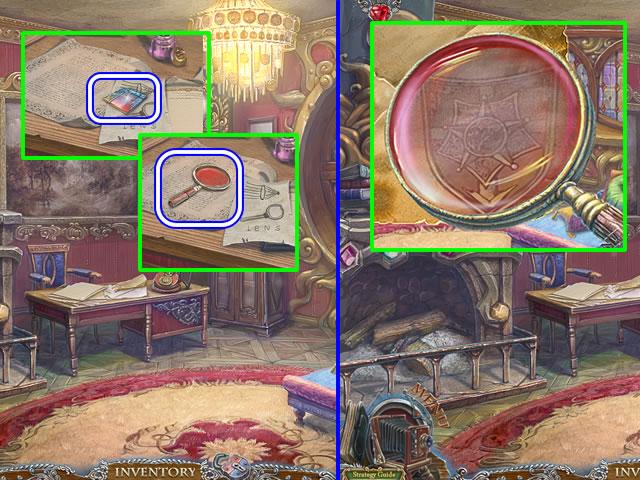
- Look at the desk.
- Pick up the PUZZLE PIECE (3/3)
- Put the MAGNIFIER HANDLE on the desk; add the RED LENS.
- Take the INFRARED LENS.
- Zoom in on the fireplace and pick up the envelope.
- Use the INFRARED LENS to view the coat of arms. A copy is saved in the diary.
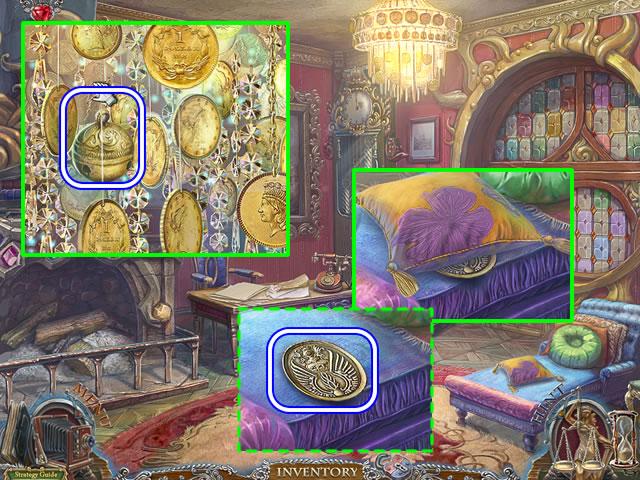
- Examine the chandelier.
- Exchange the CRYSTAL CLUSTER for the BELL (1/3).
- Remove the pillow on the lounge; take the EMBLEM.
- Exit the house and go forward through the clock tower arch.
Chapter 4: Police Headquarters
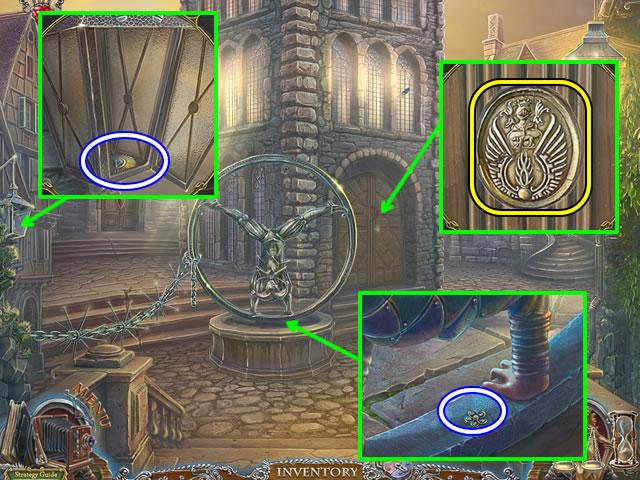
- Look at the lantern on the left.
- Open the lens; take the COCKADE.
- Examine the base of the sculpture.
- Pick up the FLOWER (2/3).
- Put the EMBLEM in the inset in the doors to trigger a hidden object scene.
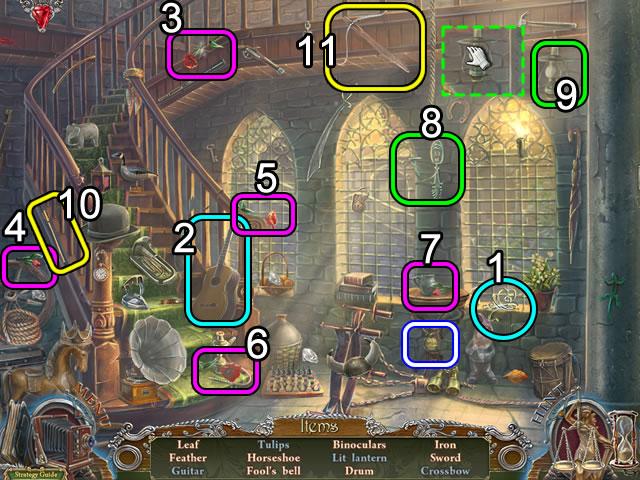
- Use the strings (1) to fix the Guitar (2).
- Pick up flowers (3), (4), (5) and (6) and put them in the vase (7).
- Put the cursor over the candleholder (8) and drag it up to the lantern (9) to light the lantern. In the release used to write this guide, the candle moves out of the scene. The dashed green inset shows how the cursor is on the lantern and not the candle.
- Add the arrow (10) to the bow (11) to get the Crossbow.
- Find the rest of the listed objects. The Fool’s bell goes to inventory as BELL (2/3).
- Zoom in on the door of the building on the right.
- Put PUZZLE PIECE (3/3) on the lock to open a puzzle.
- The goal is to recreate the coat of arms found on the envelope in the mayor’s house. Refer to the diary for an image if necessary.
- The next screenshot shows the solution.
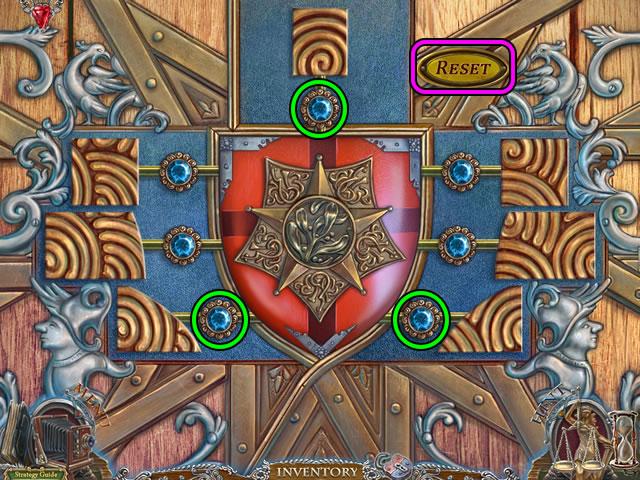
- Press the Reset button if necessary.
- Click the three green-circled gems in any order to create the pattern.
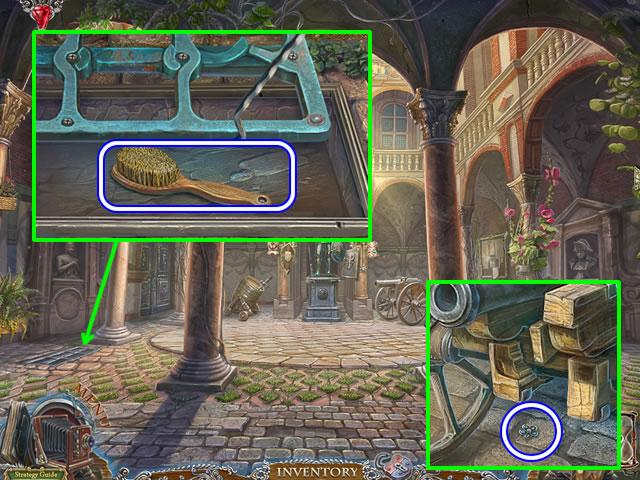
- Look at the area below the bust on the left.
- Use the POKER to pry off the grate; take the BRUSH.
- Look at the cannon.
- Remove the box, if necessary, and find the FLOWER (3/3).
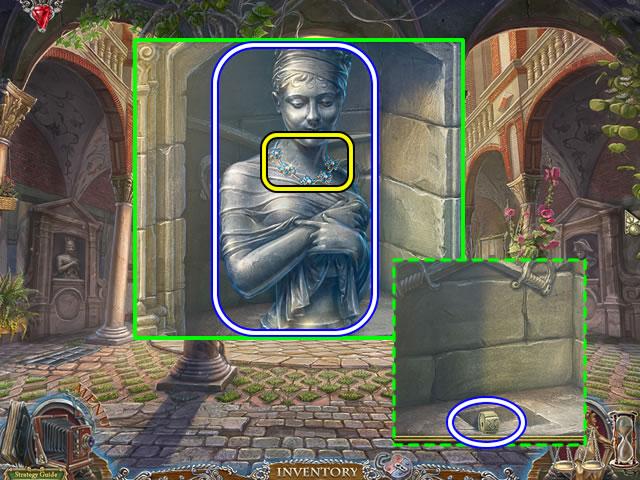
- Zoom in on the statue recess on the left.
- Add the FLOWERS (3/3) and pick up the bust of JOSEPHINE.
- Grab the LOCK PART (1/2) that was hidden beneath the bust.
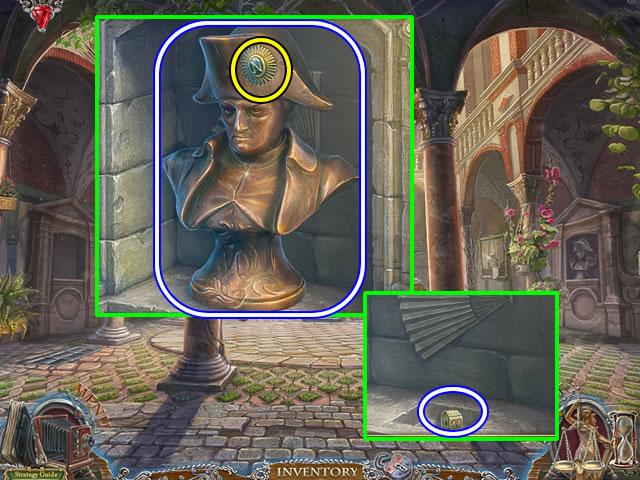
- Zoom in on the statue in the recess on the right.
- Add the COCKADE to the hat to pick up the bust of NAPOLEON.
- Take the LOCK PART (2/2) that was hidden beneath the bust.
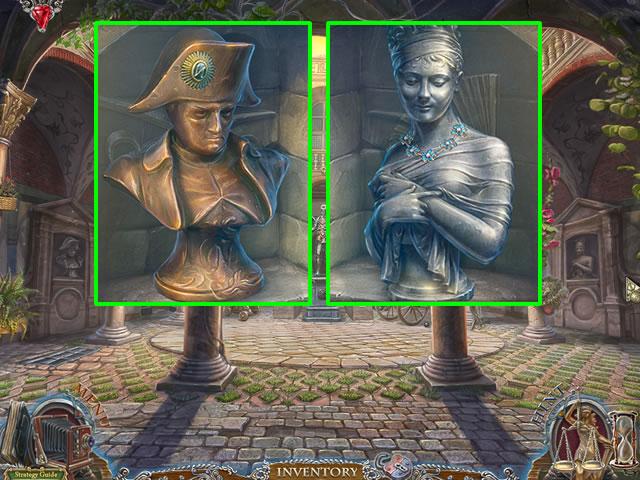
- Put the bust of NAPOLEON in the left recess and JOSEPHINE in the right to open the door on the left rear wall.
- Enter the office to view a cutscene and receive the third Sphere of Guilt.
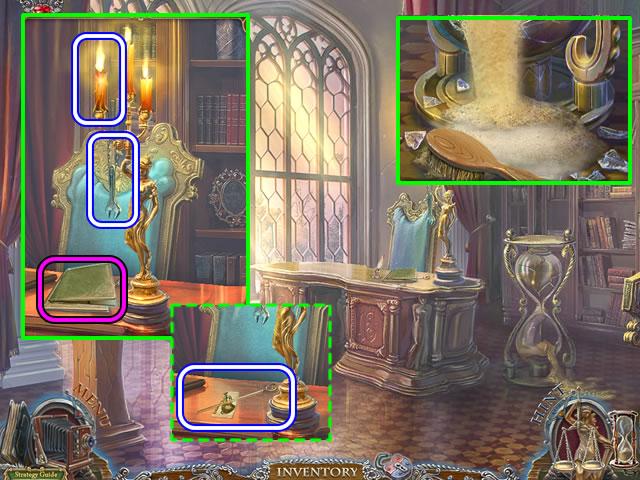
- Look at the desk.
- Take the CANDLE and WRENCH for inventory.
- Read the two interrogation documents; the information is added to the Scales of Justice.
- Take the HAT PIN and KNIGHT PICTURE (2/2) that from under the documents.
- Examine the base of the hourglass.
- Use the BRUSH to clear the sand; the uncovered ORNAMENT PIECE quickly goes to inventory.
- Exit the office.
- Zoom in on the knight at the end of the courtyard.
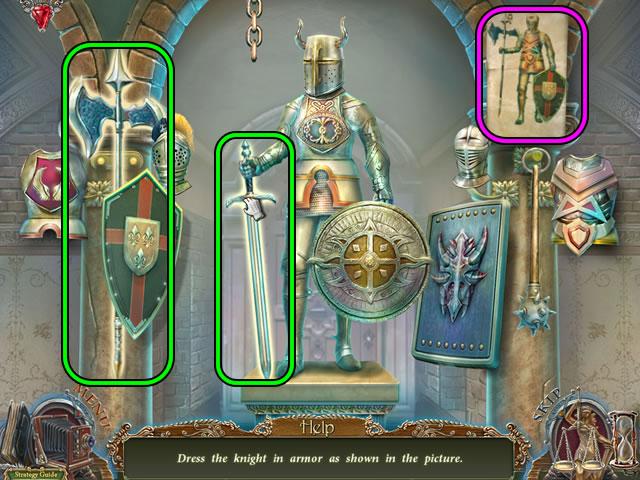
- Put the KNIGHT PIECES (2/2) on the knight to activate a puzzle.
- The goal is to swap the armor pieces until the knight resembles the picture.
- The next screenshot shows the pieces to swap.
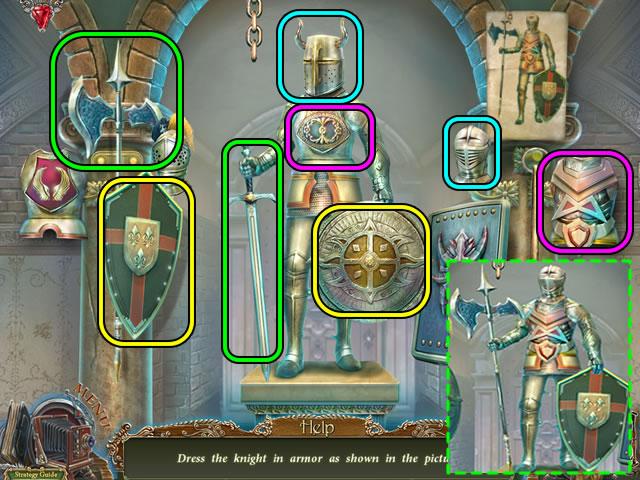
- Match the color-coded armor pieces with the same colored pieces on the knight.
- The dashed inset shows the completed knight.
- Correctly dressing the knight opens the office door.
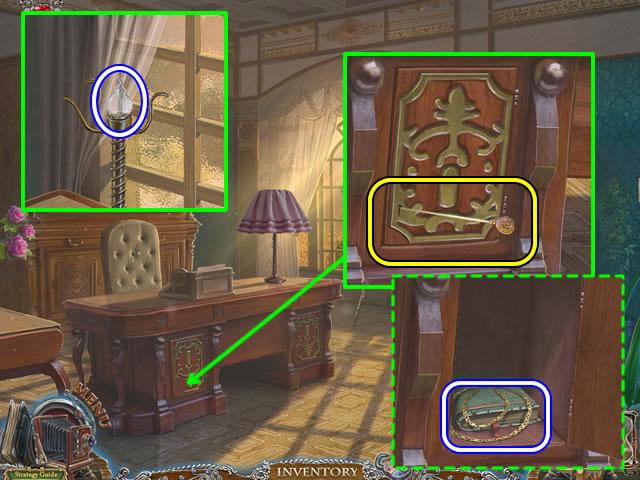
- Look at the desk lamp.
- Remove the light shade; take the LIGHT BULB.
- Examine the left panel on the desk.
- Attach the ORNAMENT PIECES to the lower left corner.
- Use the HAT PIN to pick the lock.
- Take the GOLD CHAIN and diary information from the compartment.
- Go down once and left.
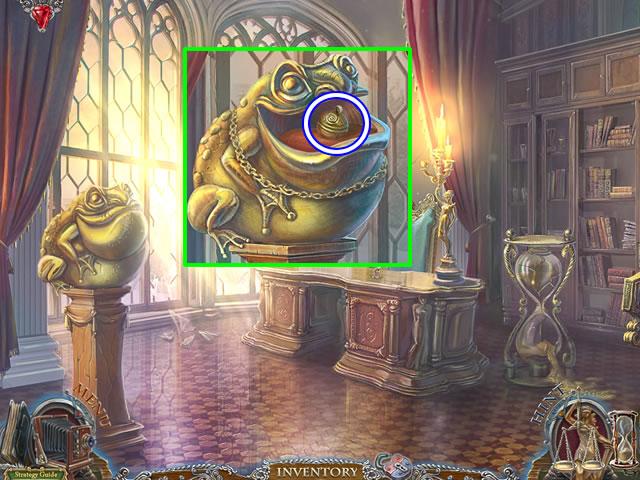
- Put the GOLD CHAIN around the frog’s neck.
- Take the BELL (3/3) from the open mouth.
- Go down twice.
Chapter 5: The Girl’s House
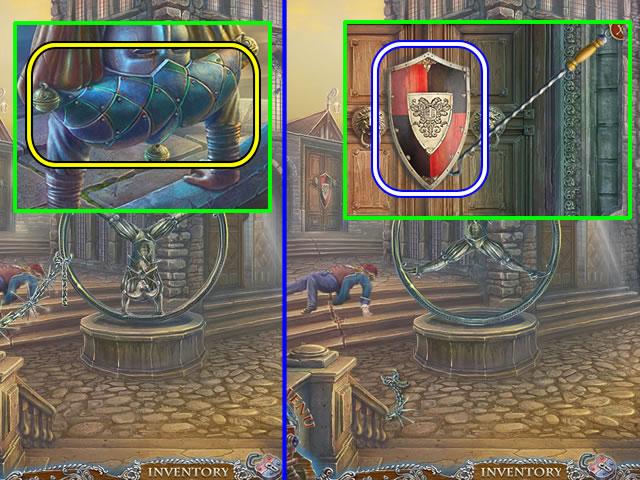
- Zoom in on the statue.
- Attach the BELLS (3/3) to the hat to spin the statue and open a new area.
- Look at the door behind the statue.
- Use the POKER to pry off the SHIELD.
- Enter the house and play the hidden object scene on the piano.

- Strike a match from the book of matches (1); use it to light the candles (2) and illuminate a Piano key (3).
- Use the wind-up key (4) to open the box (5) and find a Piano key (6).
- Collect the other eight keys (green) to receive a PIANO KEY (Note: This inventory item will not be needed for a very long time.)
- Go forward and right.
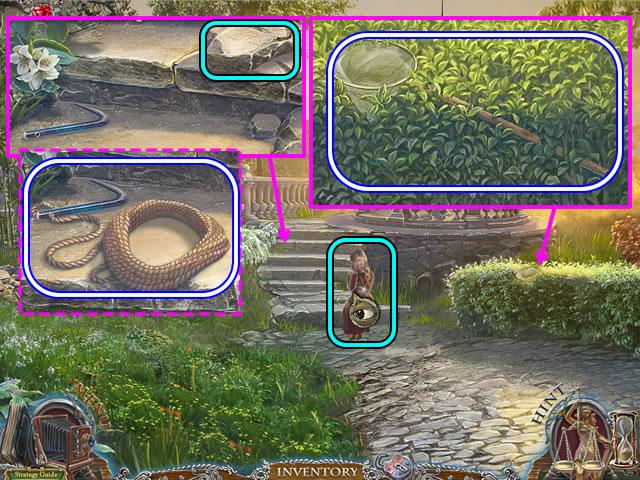
- Speak with the girl; receive the fourth Sphere of Guilt.
- Examine the steps.
- Move the loose stone to uncover a hook.
- Put the ROPE on the hook; take the ROPE WITH A HOOK.
- Take the NET from the hedge.
- Play the hidden object scene in the pond.
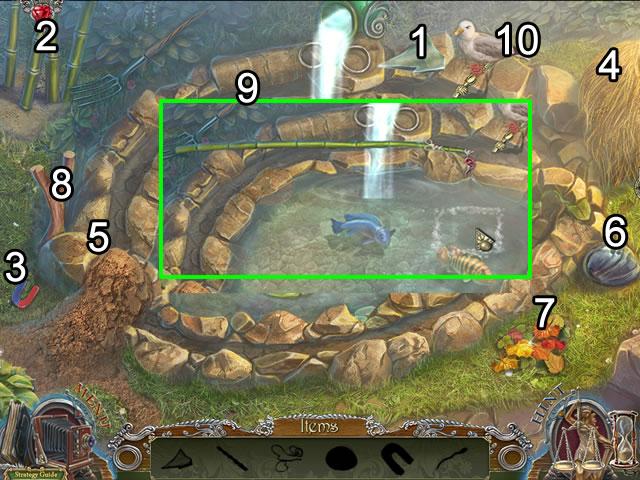
- Pick up the Glass (1) to cut the Bamboo (2) stalk.
- Use the Magnet (3) to retrieve the Needle from the hay pile (4).
- Put the Needle on the flat rock (5).
- Use the Rock (6) to pound the needle into a Hook.
- Move the leaves (7) to uncover Fishing line.
- Put the Bamboo in the holder (8). Attach the Fishing line. Add the Hook and Worm to the end of the line to open a mini-game (9).
- The goal is to catch the two Fish by anticipating their movements. Place the baited hook in the square where they will be. Their movements are random.
- Feed a Fish to the gull (10) to get the TYPEWRITER HANDLE.
- Go down four times.
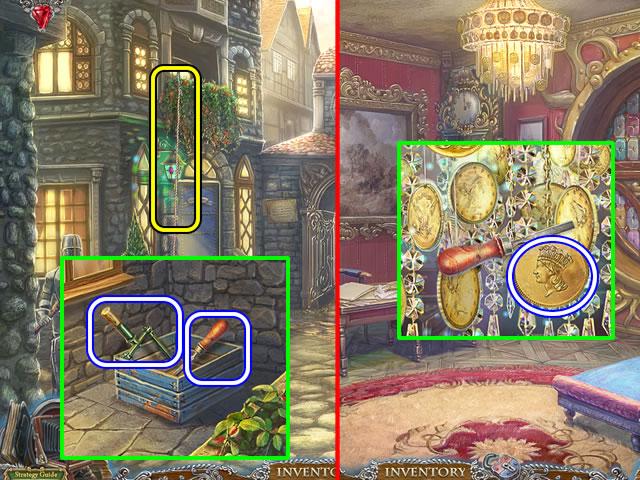
- Attach the ROPE WITH A HOOK to the balcony.
- Take the SWITCH and FILE from the balcony.
- Enter the house.
- Use the FILE to get a COIN from the chandelier.
- Exit the house. Go forward.
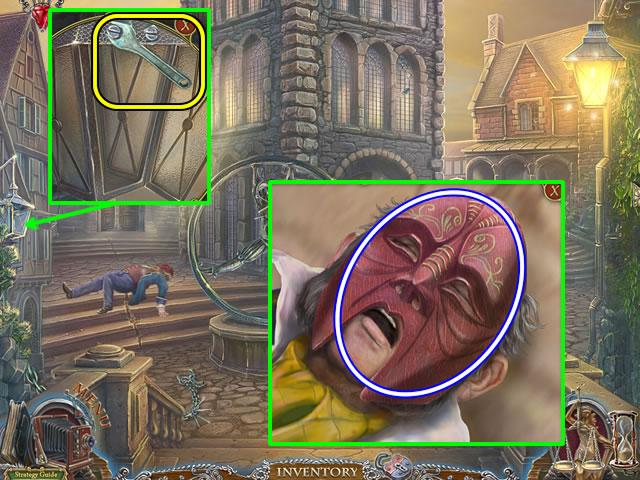
- Zoom in on the lamp.
- Use the WRENCH to remove the two BOLTS.
- Look at the body; take the MASK (1/2) and trigger a hidden object scene in the door of the center building.
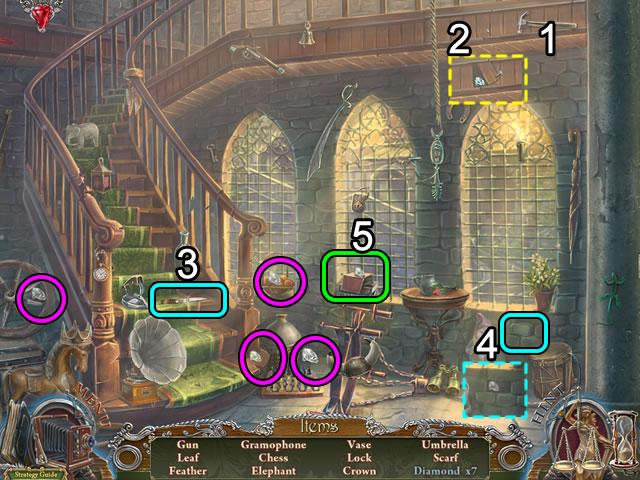
- Use the hammer (1) to loosen the board (2) and find a Diamond.
- Use the knife (3) to pry out the brick (4) and find a Diamond.
- Open the book (5) to find another Diamond.
- The remaining four Diamonds are highlighted.
- Find the items on your list to add the DIAMONDS to inventory.
- Go right and forward.
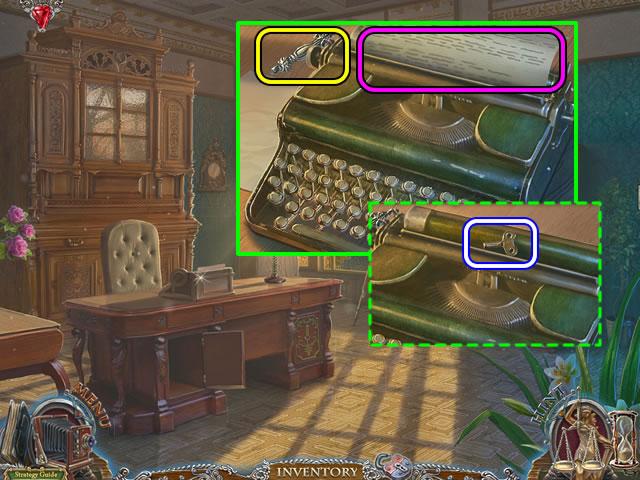
- Zoom in on the typewriter.
- Attach the TYPEWRITER HANDLE; click the handle to remove the note from the typewriter.
- Pick up the TOY KEY.
- Go down twice to exit the building.
- Go forward twice and right.
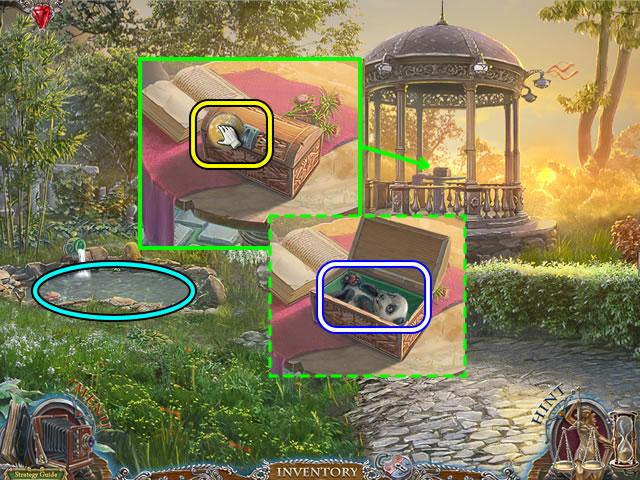
- Zoom in on the box in the gazebo.
- Insert the COIN in the lid; take the BABY PANDA.
- Play the hidden object scene in the pond.
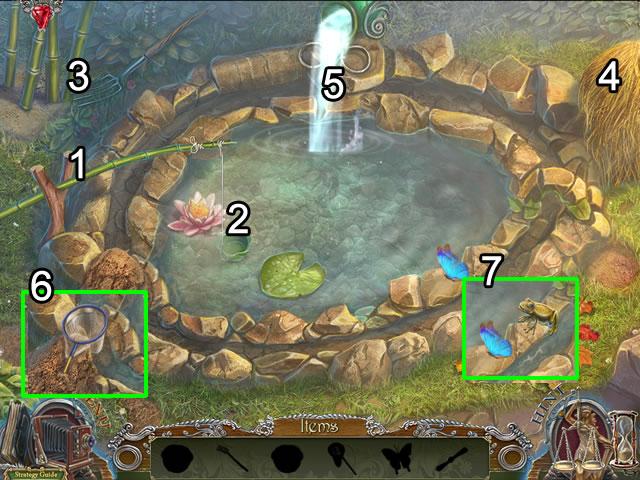
- Click the fishing pole (1) to retrieve a Cup (2).
- Use the Fork (3) to move the hay (4) and find the second Cup.
- Put the two cups in the rings (5) to fill the outer pond ring with water and uncover a Net (6) and a frog. Use the net to capture the blue Butterfly.
- Feed the butterfly to the frog (7) to open a mini-game in the middle of the pond.
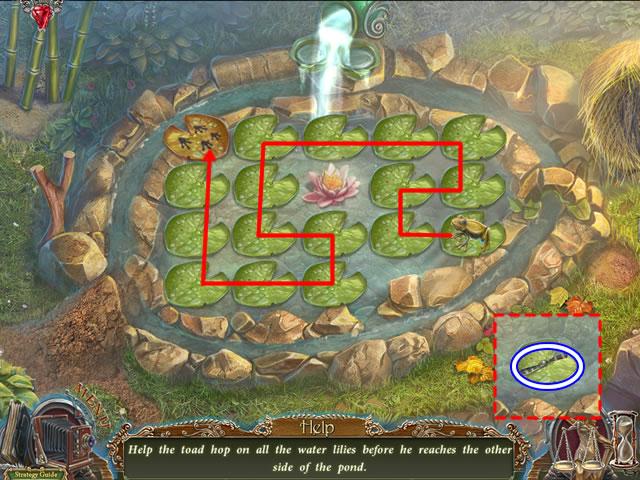
- Guide the frog through all of the lily pads to the brown pad.
- The path is shown above.
- Completing the game produces a PROPELLER.
- Go down.
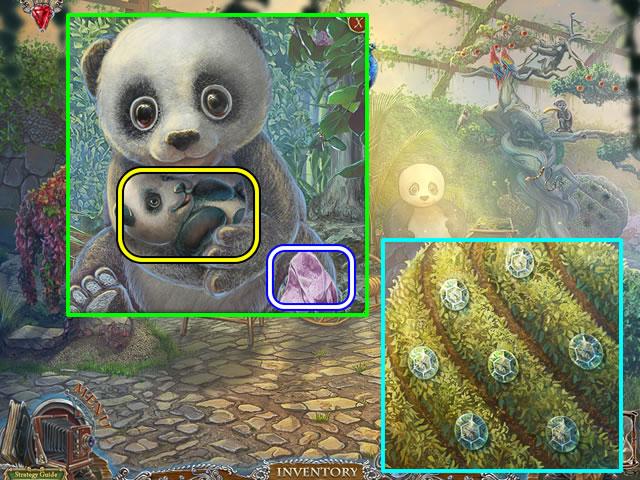
- Put the BABY PANDA in the panda’s arms.
- Take the HANDKERCHIEF.
- Add the DIAMONDS to the snail.
- Go down once.
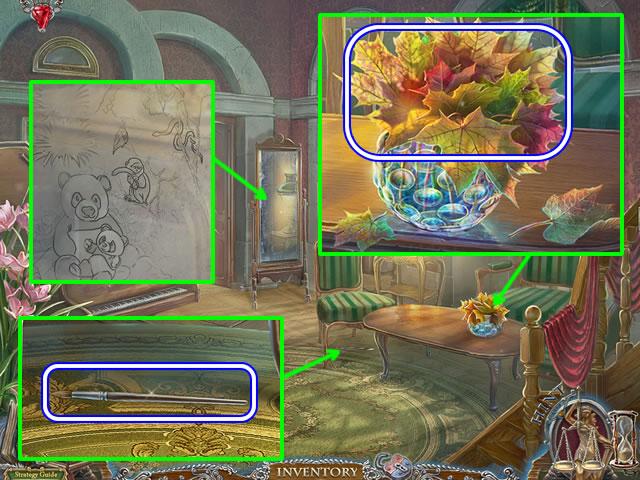
- Take the DRIED LEAVES from the vase on the table.
- Dip the HANDKERCHIEF in the vase of water; receive a WET HANDKERCHIEF.
- Zoom in on the mirror.
- Use the WET HANDKERCHIEF to clean the mirror. Click the jungle scene to add the information to the diary.
- Look under the chair.
- Pick up the PAINTBRUSH.
- Go forward.
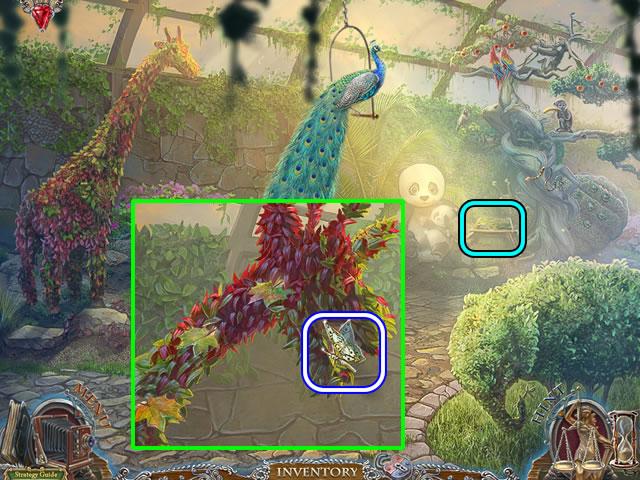
- Put the DRIED LEAVES on the giraffe; take the MECHANICAL BUTTERFLY (1/3).
- Open the easel and put the PAINTBRUSH in the tray to start a spot-the-difference puzzle.
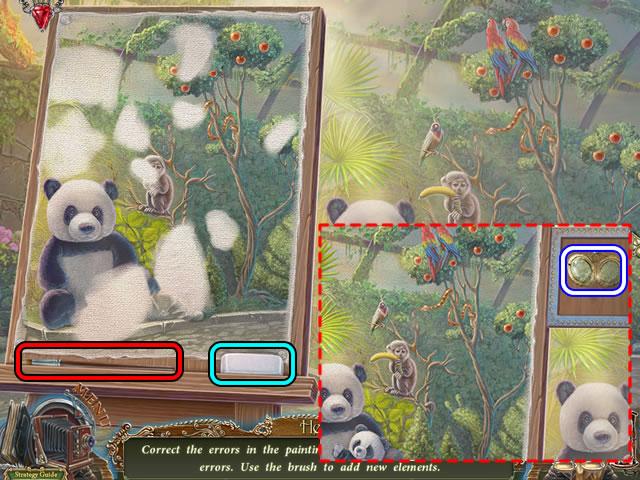
- Use the eraser to remove the difference between the two scenes.
- Put the paintbrush on each of the erased areas to restore them.
- Pick up the MEDALLION that pops out on the side of the easel.
- Go right.
- Give the MEDALLION to the girl; take the GEM she offers.
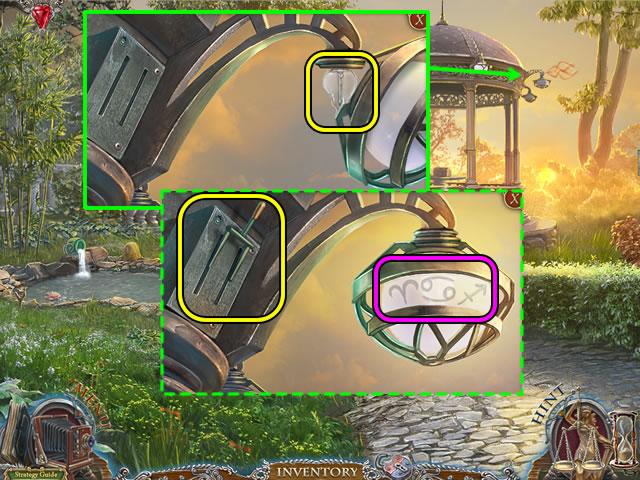
- Look at the light.
- Open the cover; insert the LIGHT BULB; close the cover.
- Attach the SWITCH to the switch plate.
- Throw the switch to power the light. The symbols are added to the diary.
- Go down twice.
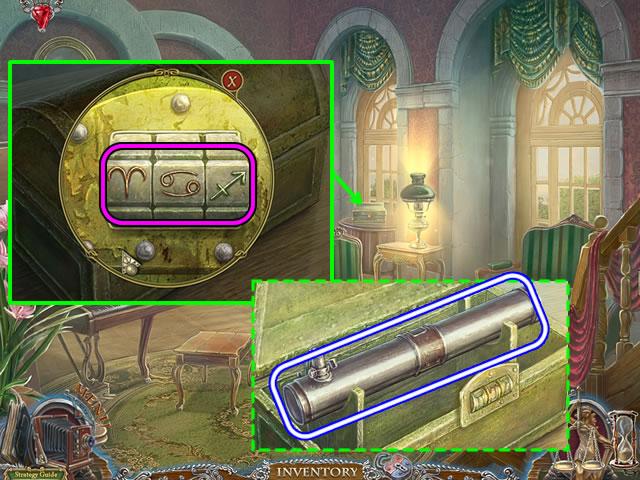
- Look at the box on the table.
- Put each LOCK PIECE (2/2) in an empty slot.
- Click the lock symbols until they match the pattern from the gazebo light (shown in the inset).
- Take the TELESCOPE from the box.
- Play the hidden object scene on the piano.
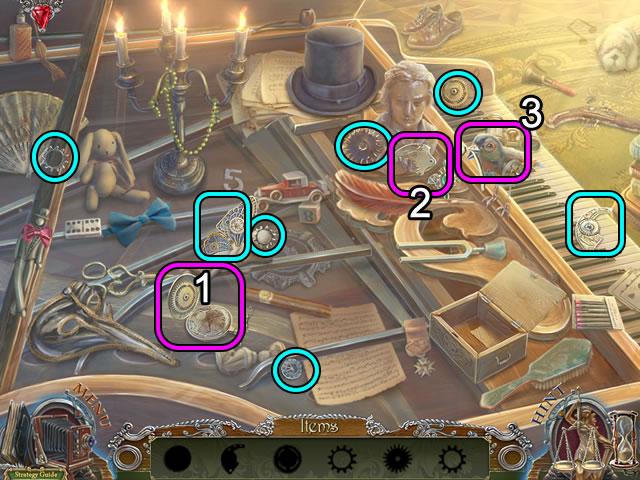
- Open the watch (1) to find a Gear.
- Move the broach on the bust (2) to find a Mechanical part.
- Click the bird (3) to release the Mechanical part in its beak.
- Pick up the rest of the parts for the MECHANICAL BIRD (2/3).
- Go down once; go right.
Chapter 6: Opening the Way to the Park
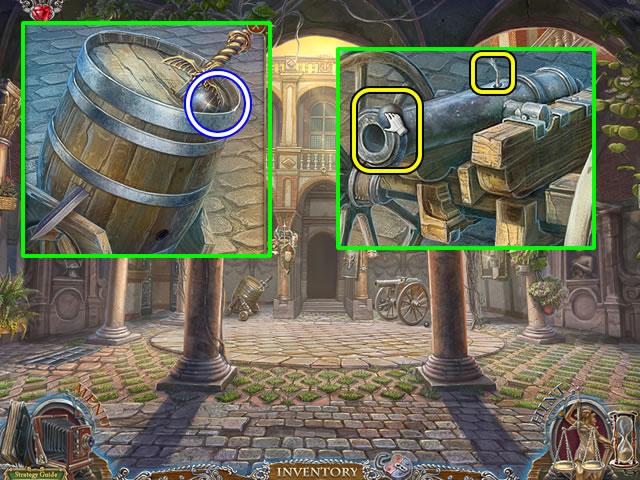
- Look at the barrel; pick up the CANNONBALL.
- Zoom in on the cannon.
- Drop the CANNONBALL into the barrel; use the CANDLE to light the fuse.
- Zoom in on the blasted barrel; take the SWORD (1/2).
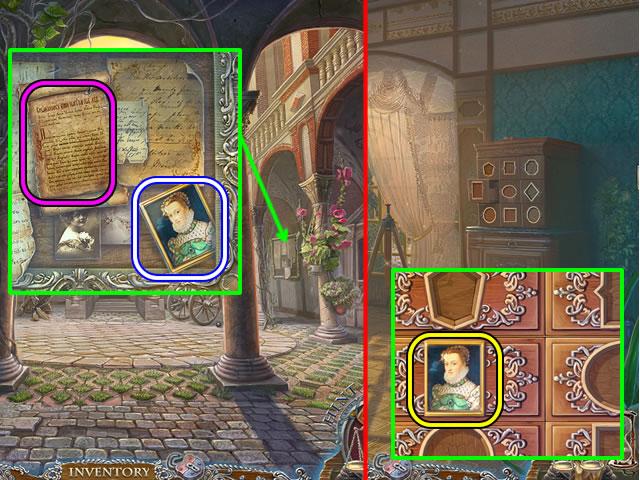
- Examine the notice board.
- Read the announcement; take the PORTRAIT.
- Go forward.
- Put the PORTRAIT on the cabinet to open a puzzle.
- The goal is to open every compartment and place each portrait.
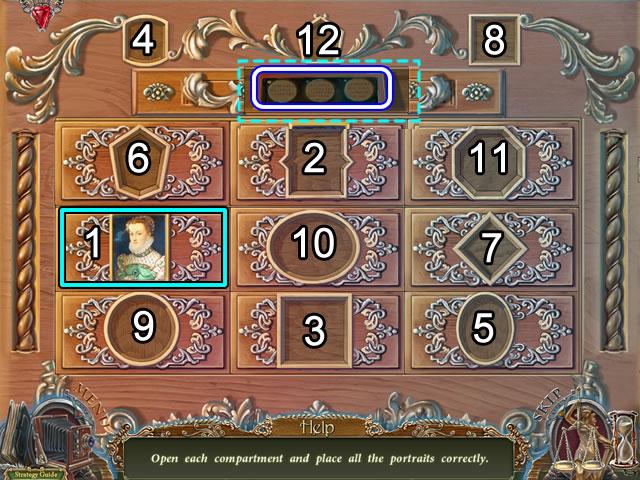
- Solution. Open compartment (1). Put the portrait in inset (2); open compartment (2) and take the portrait for compartment (3). Open compartment (3). Put the first portrait in slot (4), use the second portrait to open compartment (5); take the portrait for compartment (6). Open compartment (6) to get the portrait for compartment (7). Open compartment (7) to find the portrait for inset (8).
- Open compartment (3) and take the weight. Open compartment (7) and hang the weight on the hook; take the portrait that drops down and put it in compartment (9).
- Open compartment (5) and take the key. Open compartment (9) and use the key in the lock. Take the portrait and put it on compartment (10). Open the compartment to find the portrait for compartment (11).
- Open compartment (6). Light a match. Open compartment (11) and light the candle. Take the portrait that drops down and put it inset (12) to complete the puzzle.
- Take the PHOTO SLIDE from the compartment that opens.
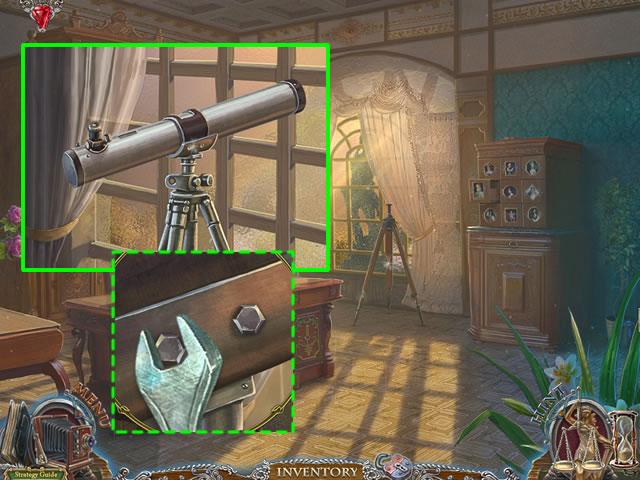
- Zoom in on the tripod.
- Put the TELESCOPE on the stand.
- Add the BOLTS to the mount; tighten them with the WRENCH.
- Look through the telescope for a clue to for another location.
- Go down three times.
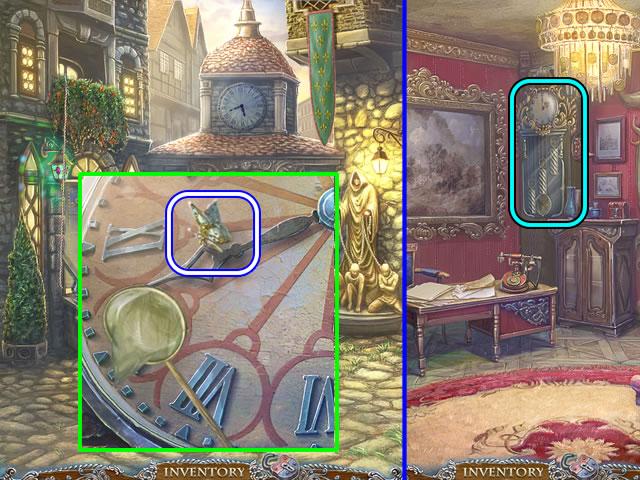
- Use the NET to capture the MECHANICAL BUTTERFLY (3/3) on the clock hands.
- Go left.
- Look closer at the clock in the corner.
- Put the MECHANICAL BUTTERFLIES on the clock to open a puzzle.
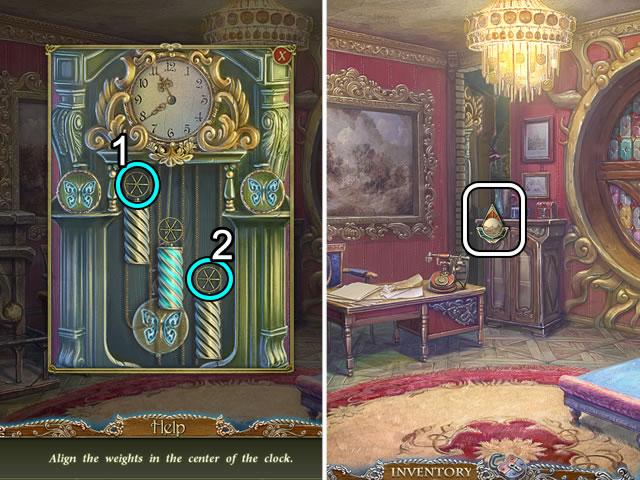
- Click wheels (1) and (2) to align the three weights in the center.
- Go through the entrance to the secret room.
- Put the SHIELD anywhere on the scene to stop the swinging axe.
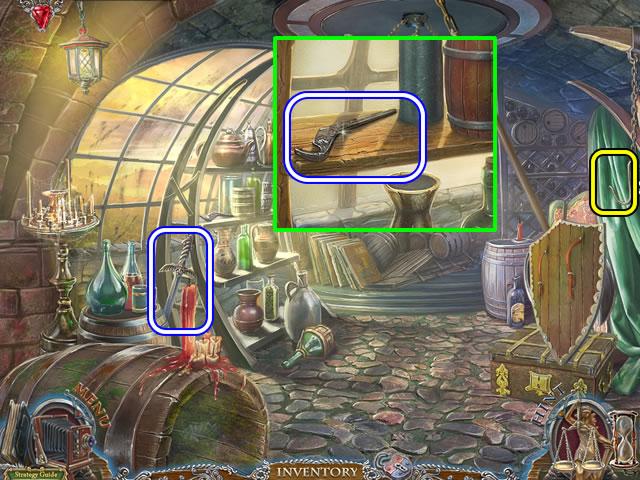
- Pick up the SWORD (2/2).
- Look at the shelves; pick up the HALF OF A NIPPER.
- Click the hook to raise the shield.
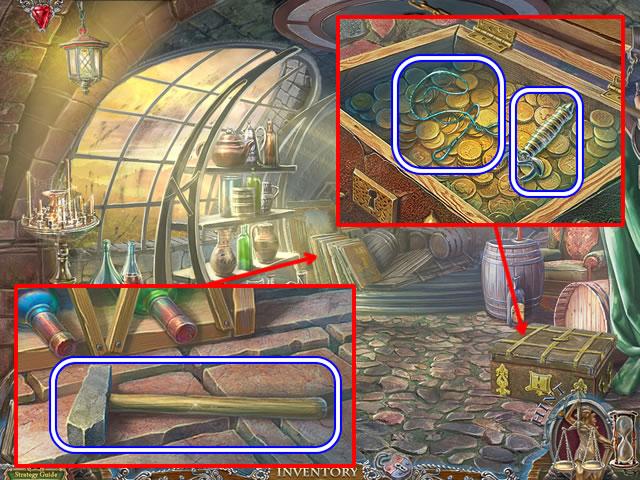
- Open the chest; take the BOW STRING and DAGGER HANDLE.
- Zoom in on the paintings.
- Remove all the paintings to find a HAMMER.
- Go down twice.
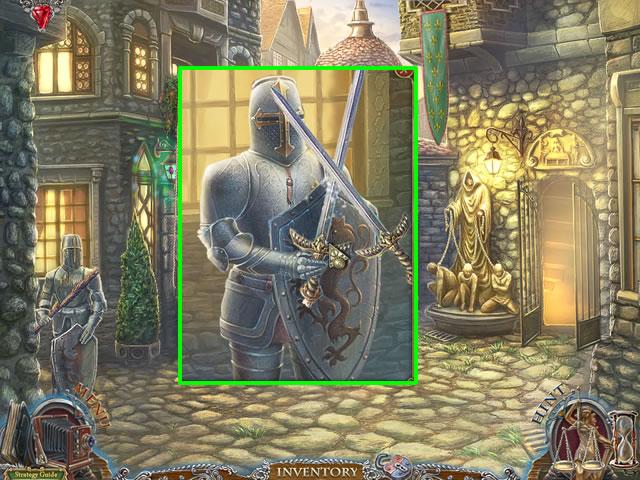
- Zoom in on knight.
- Put the SWORD (2/2) on the knight.
- Click the knight three times to chase him off and open the passage.
- Go left two times.
Chapter 7: Getting inside the Cabin
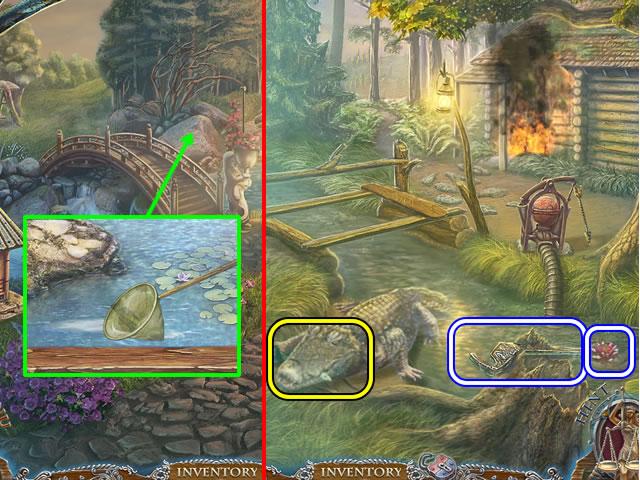
- Zoom in on the large rock to access the stream.
- Use the NET to scoop up a FISH.
- Go down and forward.
- View a cutscene and receive the fifth Sphere of Guilt.
- Feed the FISH to the crocodile to activate the scene.
- Put the HALF OF A NIPPER on the other nipper part on the stump; receive a NIPPER.
- Pick the LILY from the stream
- Play the spot-the-difference scene by the crashed hot-air balloon.
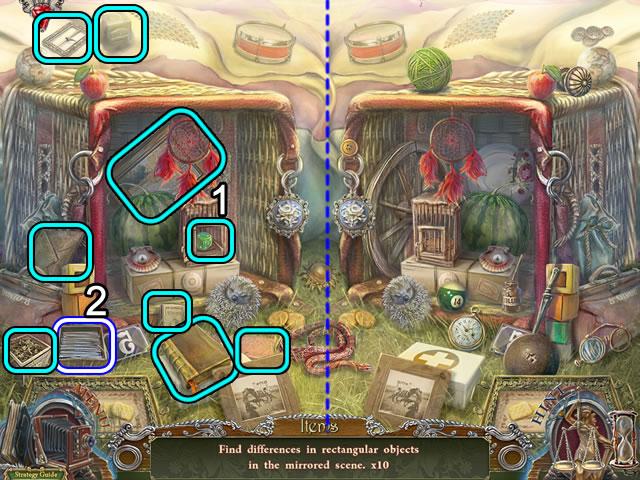
- Select the rectangular items on the left side of the screen that do not appear on the right.
- Open the cage door (1) to find a die.
- Remove a bag to find a rectangle of nails (2).
- Remove the rest of the differences; receive the BOX OF NAILS for inventory.
- Go down and left.
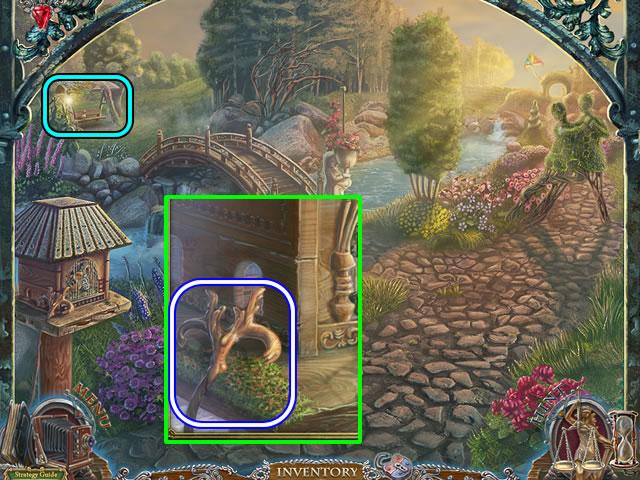
- Pick up the WOODEN STAFF leaning against the birdcage.
- Open the swing area.
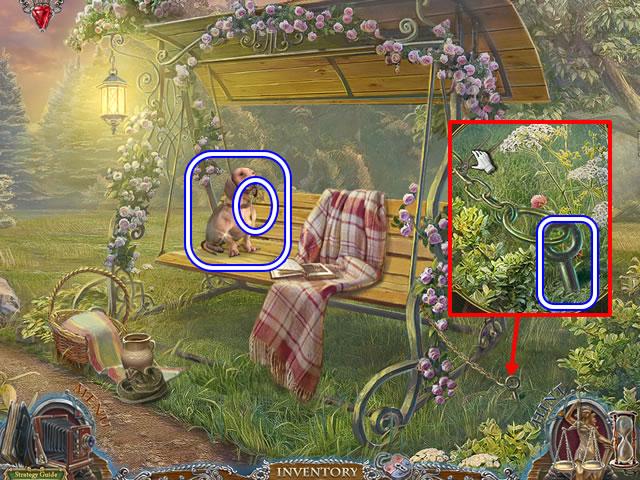
- Take the KEY ON A CHAIN from the dog’s mouth.
- Pick up the DACHSHUND.
- Look closer at the peg securing the swing.
- Cut the CHAIN with the NIPPER.
- Use the WOODEN STAFF to pry out the METAL PIN.
- Go down.
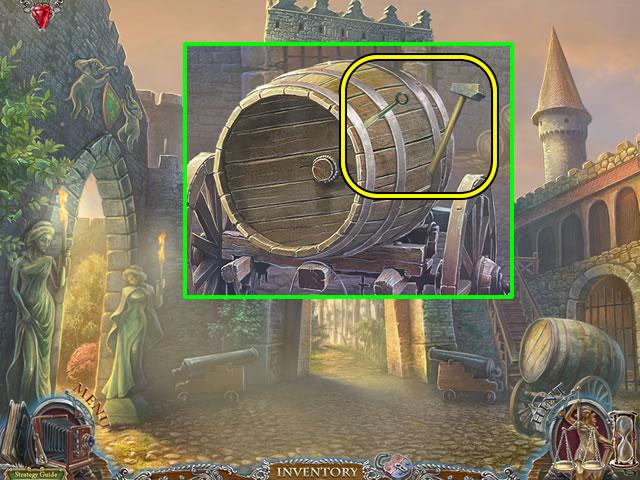
- Zoom in on the barrel.
- Put the METAL PIN on the barrel.
- Use the HAMMER to collect the PLANKS.
- Go forward.
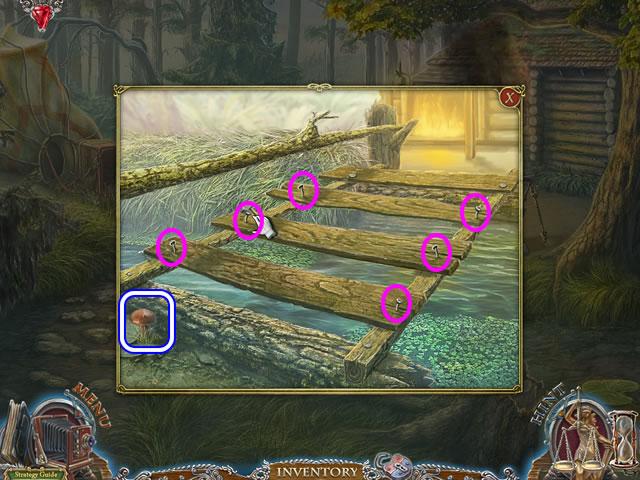
- Zoom in on the bridge.
- Pick the MUSHROOM.
- Put the PLANKS on the frame.
- Place the BOX OF NAILS on the planks; secure the six nails with the HAMMER.
- Go forward.
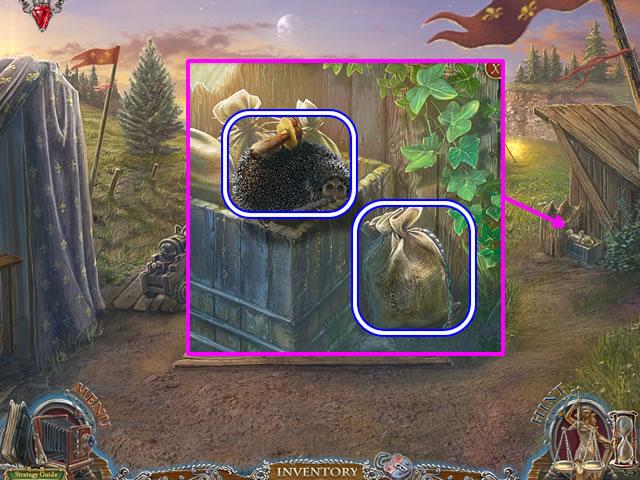
- Look at the sacks on the side of the shed.
- Put the MUSHROOM on the HEDGEHOG.
- Pick up the sack of GUNPOWDER.
- Go down twice.
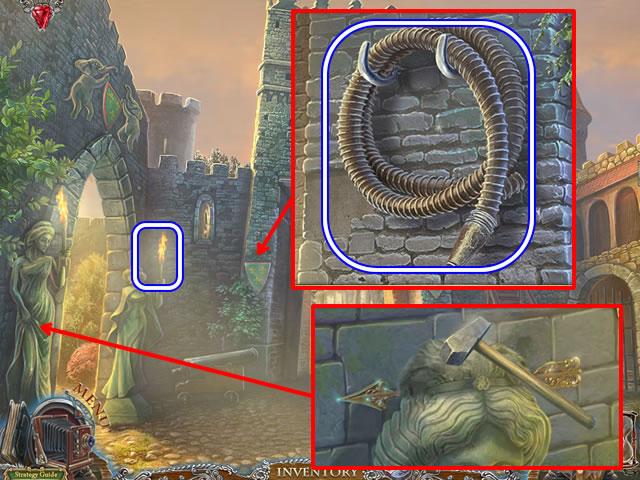
- Take the TORCH from the far statue.
- Zoom in on the shield; take the HOSE.
- Look at the first statue.
- Use the HAMMER to free the ARROW (1/3).
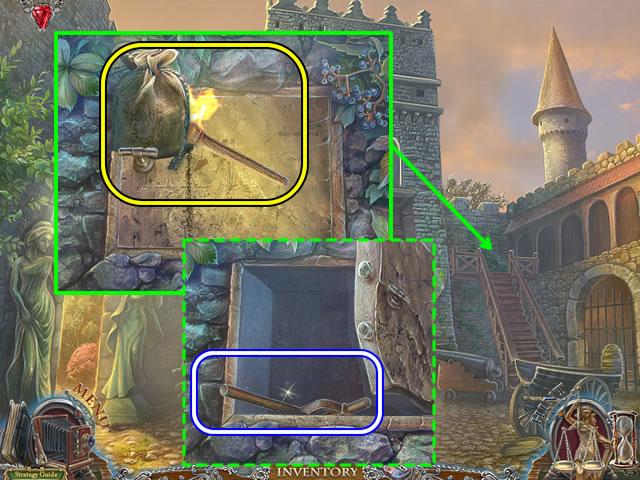
- Inspect the area at the top of the stairs.
- Put the bag of GUNPOWDER on the metal door.
- Light the powder with the TORCH.
- Look again at the area.
- Take the PUMP HANDLE from to compartment.
- Go forward.
- Play the spot-the-difference puzzle by the crashed hot-air balloon.
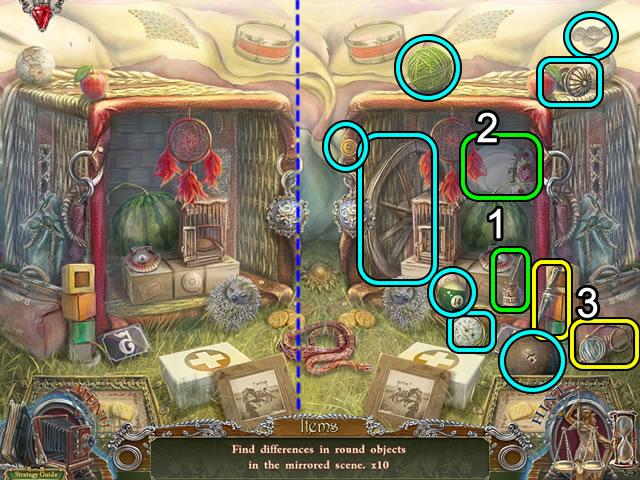
- Find the round objects on the right side of the image that do not appear on the left.
- Use the glue (1) to repair the Plate (2).
- Use the knife to pry out the Lens on the glasses (3).
- Remove the rest of the items. Receive a CANNONBALL.
- Go forward.
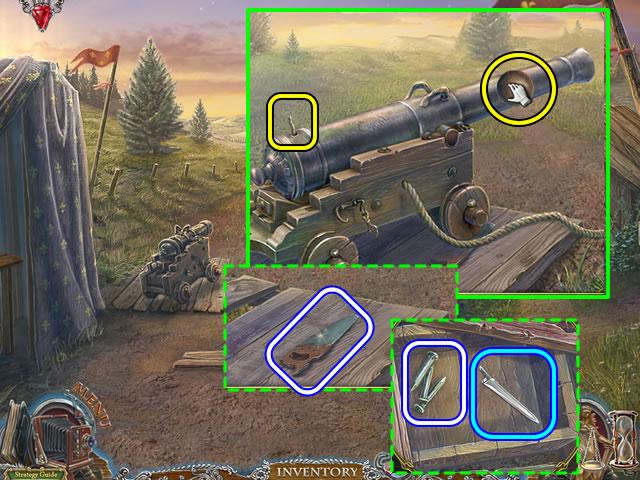
- Inspect the cannon.
- Put the CANNONBALL in the barrel; use the TORCH to light the fuse.
- Pick up the SAW from the platform.
- Lift the platform boards.
- Take the FIXING PINS.
- Attach the DAGGER HANDLE to the blade; take the DAGGER.
- Go down.
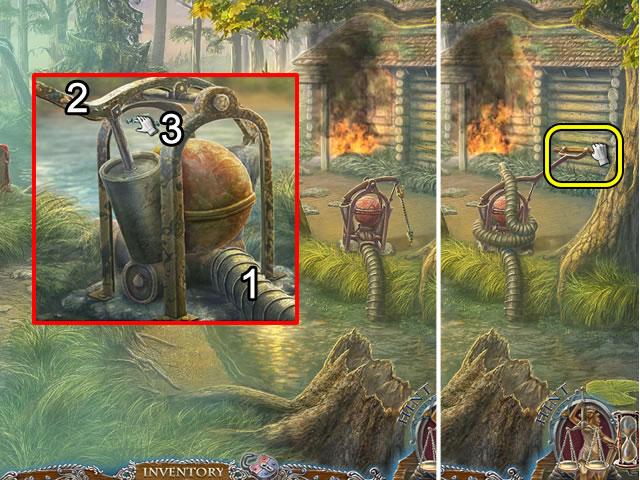
- Zoom in on the pump.
- Attach the HOSE (1) and HANDLE (2).
- Secure the handle with the FIXING PINS (3).
- Pump the handle three times to extinguish the flames.
- Enter the cabin.
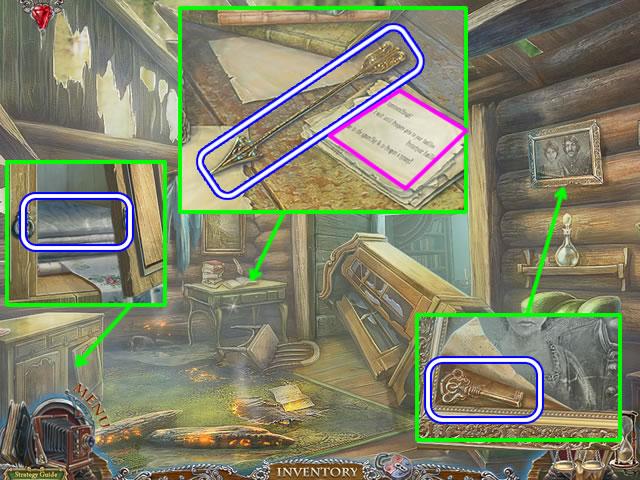
- Open the cupboard door; take the CLOTH.
- Look at the desktop.
- Pick up the ARROW (3/3).
- Move the mouse; pick up the notice for diary information.
- Examine the framed photograph.
- Lift the edge of the photo; take the KEY.
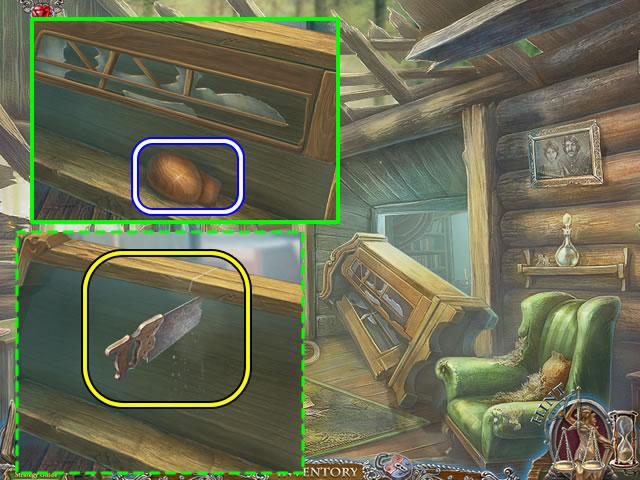
- Zoom in on the fallen cabinet.
- Remove the lower door; take the WOODEN HEAD.
- Remove the upper door; use the SAW to cut the cabinet in half.
- Move both cabinet sections to clear the way to the bedroom.
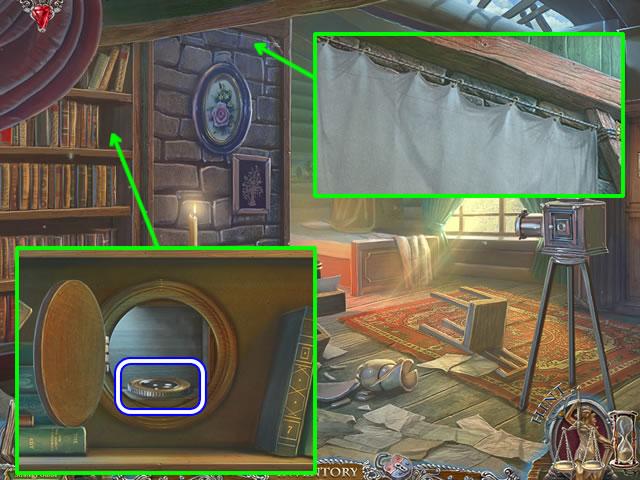
- Look closer at the bookshelves.
- Move a book to find the safe.
- Insert the KEY in the safe lock; take the LENS.
- Hang the CLOTH from the line stretched across the wall.
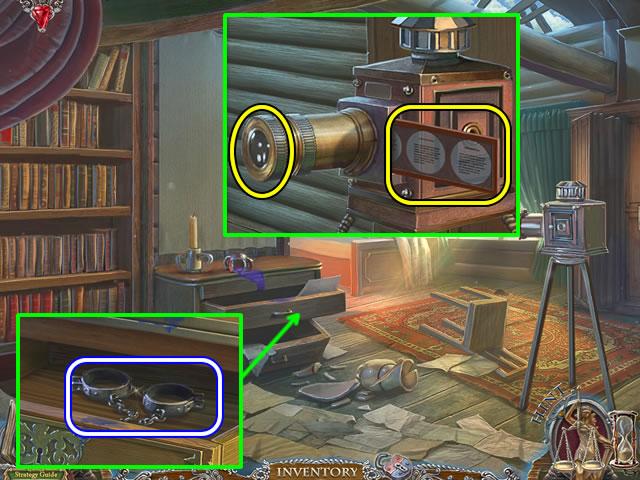
- Examine the camera.
- Attach the LEN; insert the PHOTO SLIDE in the side slot.
- Click the camera to view the slide show; a slide summery is added to the diary.
- Look in the top dresser drawer.
- Remove the paper; take the HANDCUFFS.
- Go down twice. Go forward.
Chapter 8: Opening the path to the Castle
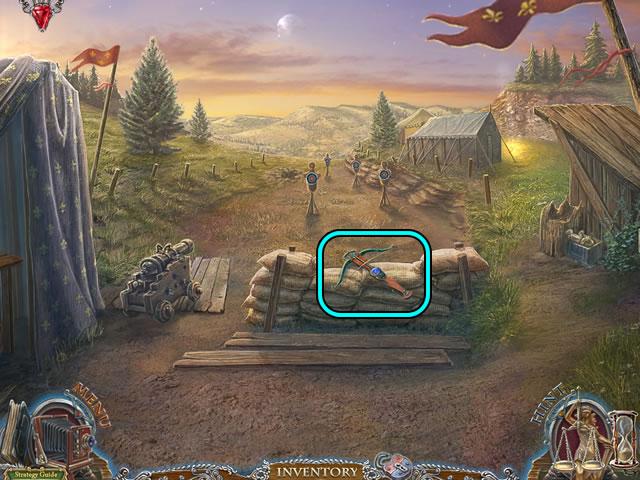
- Zoom in on the bow.
- Attach the BOW STRING and load the ARROWS (3/3) to open a puzzle.
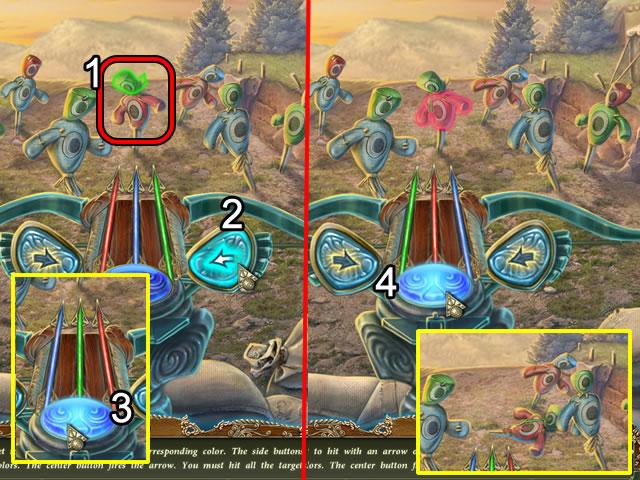
- Select a head or body target on a practice dummy (1).
- Use the left or right arrow button (2) to rotate a same colored arrow to the center slot (2).
- Click the center button (3) to fire the arrow.
- Repeat the process for the second target on the dummy (4) to knock over the dummy.
- Continue firing arrows until all dummies are knocked down.
- Take the RAMROD that pops up on the right side of the bow.
- Go down three times; go right.
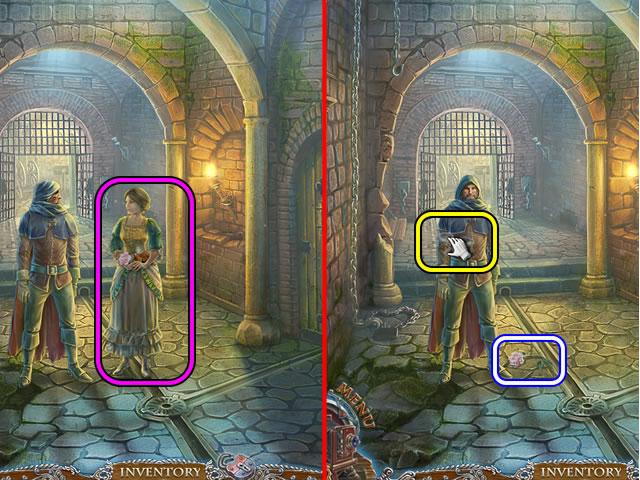
- Speak to the woman.
- Put the HANDCUFFS on the man; receive the sixth Sphere of Guilt.
- Pick up the ROSE the woman dropped.
- Play the hidden object scene in the open cell doors.
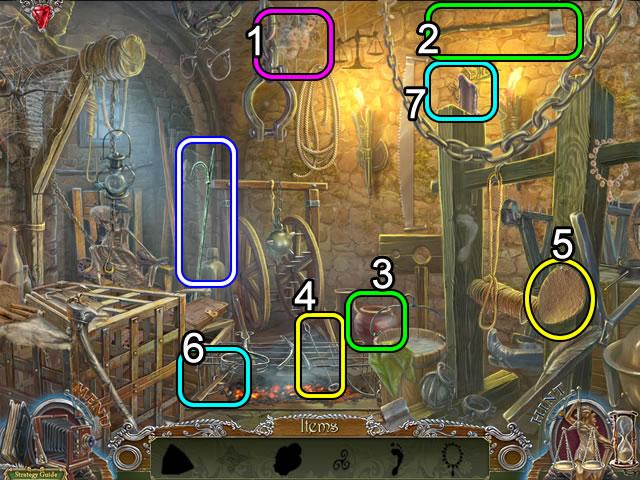
- Click the cobweb (1) to access the Angel.
- Use the axe (2) to smash the jar (3) to get the Gem.
- Put the branding iron (4) on the patch (5) to make a Brand.
- Use the stick (6) to complete the Design (7).
- Find the rest of the items on your list. Receive the HOOK for inventory.
- Go down once and forward.
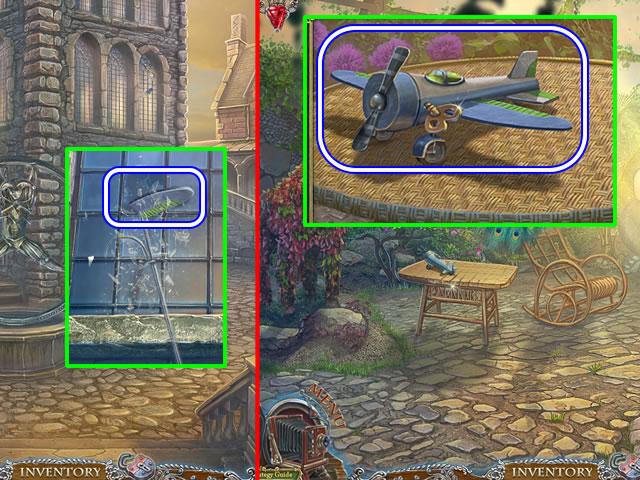
- Look closer at the window.
- Use the HOOK to retrieve the WINGS.
- Go forward twice.
- Look at the table.
- Attach the WINGS, PROPELLER and TOY KEY. Take the TOY AIRPLANE.
- Go down three times, go left through the door and forward to enter the secret room.
- Zoom in on the back wall.
- Add the GEM and DAGGER to the design to open a puzzle.
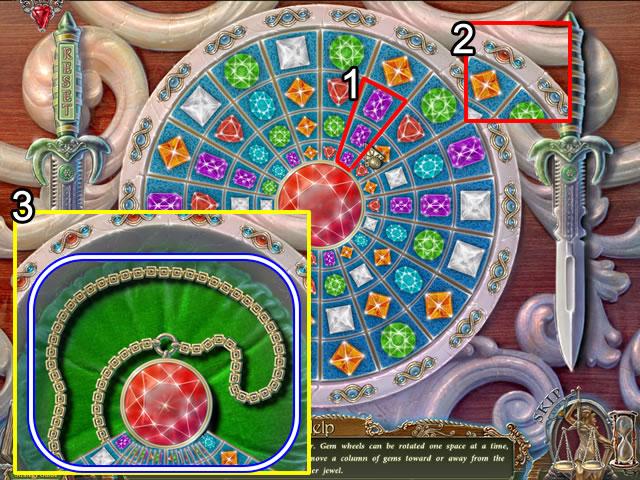
- Drag the rings to create matches of three or more gems (1). The rings can be moved once space left or right. A column of gems can also be moved up or down.
- Making matches turns the blue gem on the border red (2).
- Turn all the border gems red to open the design; take the PENDANT (3).
- Go down twice and left twice.
- Zoom in on the swing area.
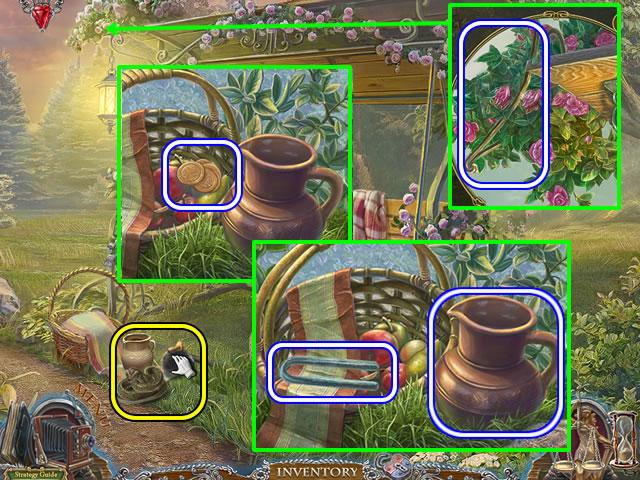
- Use the HEDGEHOG to chase away the snake.
- Look in the basket.
- Pick up the COOKIES.
- Shake the FOUNTAIN FRAME out of the jug.
- Take the EMPTY PITCHER.
- Look at the top of the swing.
- Move the flowers; take the LEFT PLANTER FRAME.
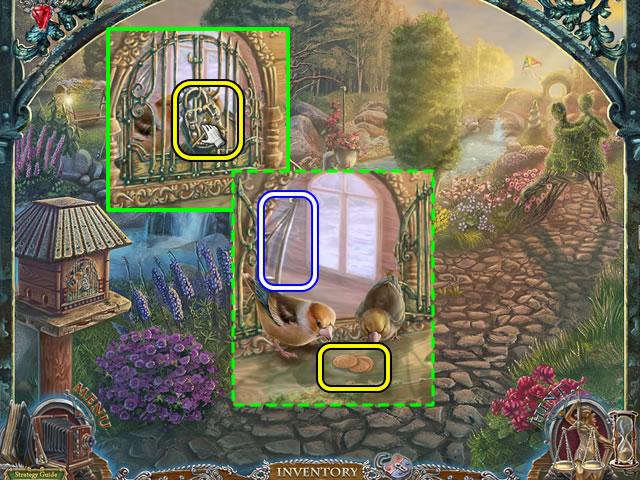
- Inspect the birdcage.
- Use the KEY ON A CHAIN to open the padlock.
- Put the COOKIES on the shelf to lure the bird out of the cage.
- Take the RIGHT PLANTER FRAME from the inside of the cage.
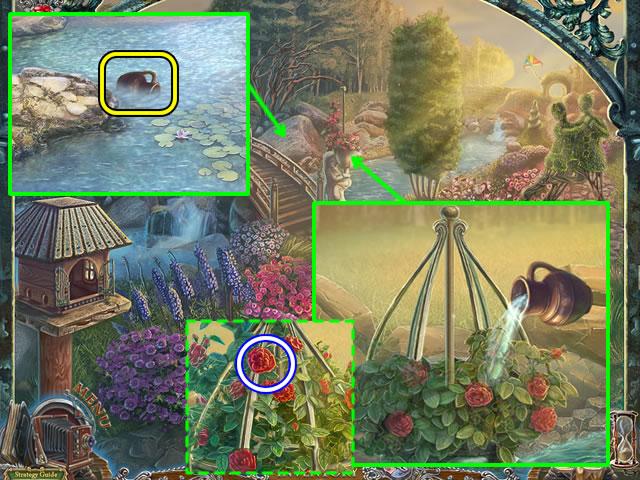
- Click the large rock to access the stream.
- Dip the EMPTY PITCHER in the water; pick up the FULL PITCHER.
- Zoom in on the planter hanging on the end of the bridge.
- Raise the back frame; add the LEFT PLANTER FRAME and RIGHT PLANTER FRAME.
- Pour the FULL PITCHER on the planter; pluck a ROSE.
- Look at the dancing figures on the right.
- Put the ROSE, LILLY and ROSE anywhere on the scene to open a puzzle.
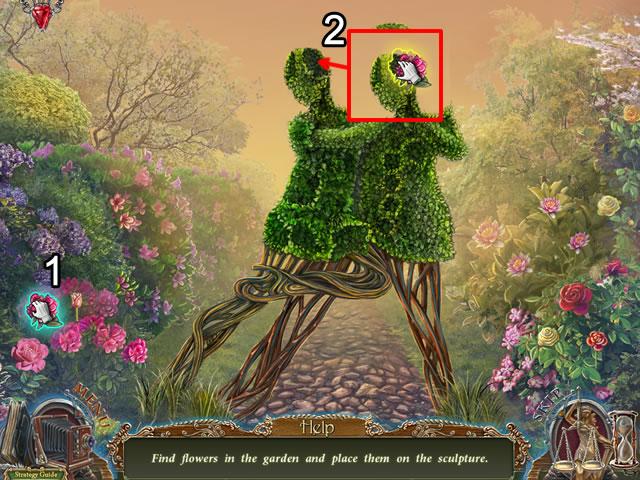
- The goal is to find the flowers in the scene that fit in the insets in the sculpture.
- Drag the mouse over the scene until a flower is highlighted (1). Click to pick it up.
- Drag the flower around the sculpture until area glows (2). Click to place the flower.
- The next screenshot shows the solution.
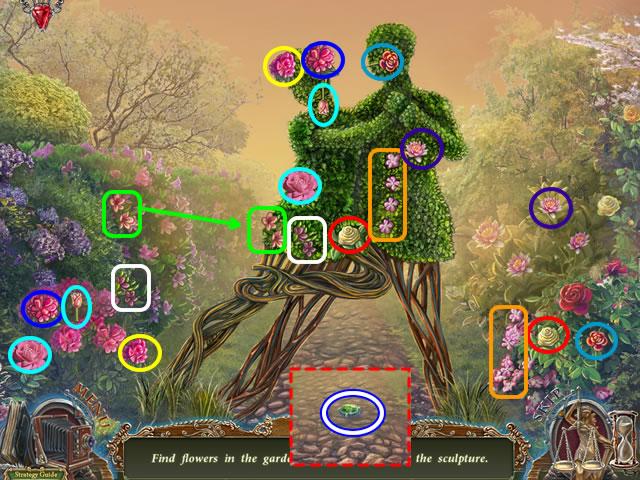
- Match the flower highlight color with the same colored location on the topiary for placement.
- Correctly placing all the flowers opens the pathway.
- Pick up the FOUNTAIN ELEMENT.
- Go forward twice to the rear of the castle.
Chapter 9: The Castle
DT115
- Look at the worktable.
- Pick up the OAKUM CAULK and WEDGE (1/2).
- Inspect the bunch of grass.
- Pick up the STATUE HAND.
- Play the hidden object scene on the side of the building.
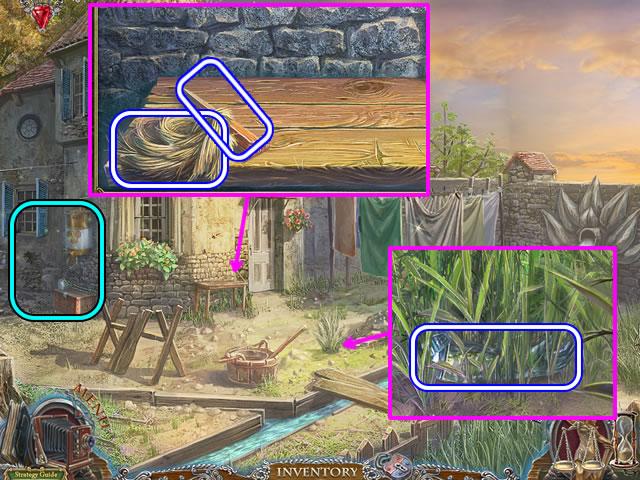
- Pick up the Box part (1).
- Slide the bar (2) to open the shutter and reveal a box. Put the Box part on the box (3); take the Thread.
- Mend the hole in the bellows (4) with the thread. Press the bellows handle (5).
- Pick up the Clamp (6).
- Open the oven door (7). Reach into the oven with the clamp; take the Clamp with embers.
- Open the top of the smoker (8). Put the Clamp with embers on the smoker; take the Smoker.
- Put the Smoker on the bees (9) to clear the way to the hive.
- Pick up the Mallet (10). Use the Mallet to remove the pegs securing the doors on the hive; take the Honeycomb.
- Open the door on the honey extractor (11); insert the Honeycomb.
- Pick up the Jar (12) and put it in the holder (13).
- Pick up the Handle (14) and attach it to the top of the extractor (15). Click the handle.
- Take the JAR OF HONEY.
- Go down.
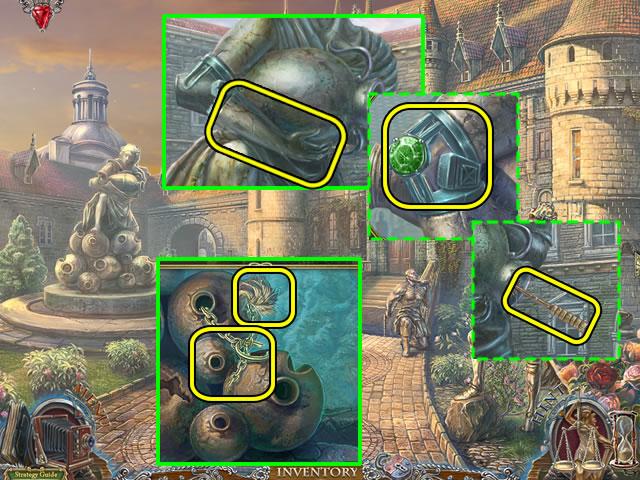
- Zoom in on the bottom of the fountain.
- Insert the OAKUM CAULK in the jar; secure it with the CHAIN.
- Look at the top of the fountain.
- Attach the STATUE HAND.
- Add the FOUNTAIN FRAME and FOUNTAIN ELEMENT to attach the arm to the statue.
- Put the RAMROD in the end of the vase to clear the obstruction.
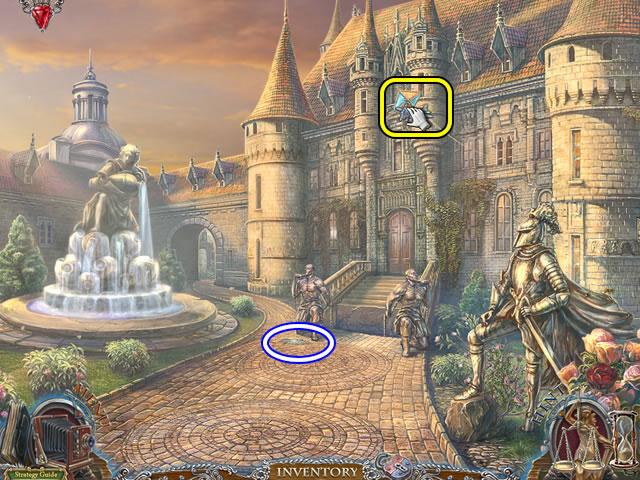
- Pick up the SHARPENER that was ejected from the vase.
- Use the TOY AIRPLANE to crash the kite.
- Zoom in on the statues at the base of the stairs.
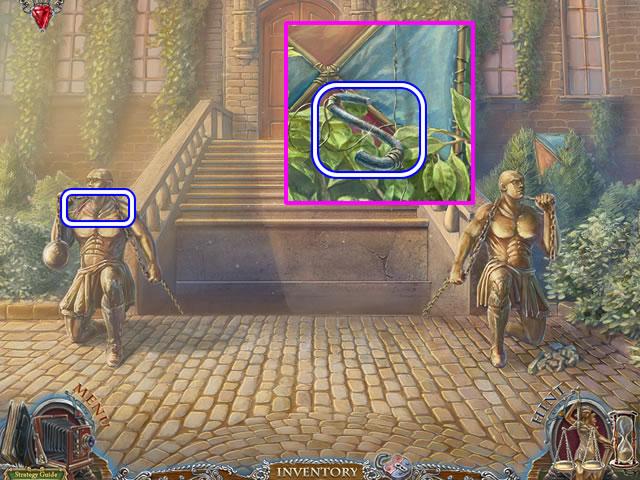
- Take the dull SICKLE from the neck of the statue on the left.
- Look at the crashed kite.
- Take the HOOK.
- Exit the scene. Go forward.
- Put the SICKLE on the worktable.
- Use the SHARPENER on the sickle; take the SHARP SICKLE.
- Look at the clothesline.
- Use the SHARP SICKLE to slash the sheet; take the PIECE OF FABRIC.
- Take the ROPE that was hidden behind the fabric.
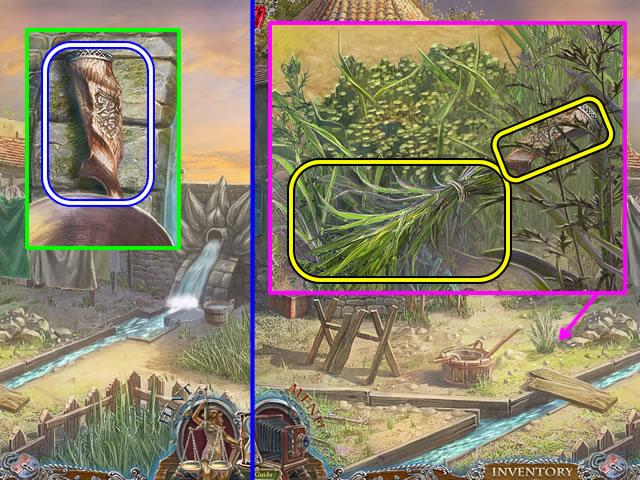
- Zoom in the on the flowing water.
- Pick up the RIFLE STOCK
- Inspect the clump of grass.
- Use the SHARP SICKLE to cut the grass.
- Use the ROPE to bundle the grass; attach the RIFLE STOCK to the bundle.
- Take the BROOM.
- Go down.
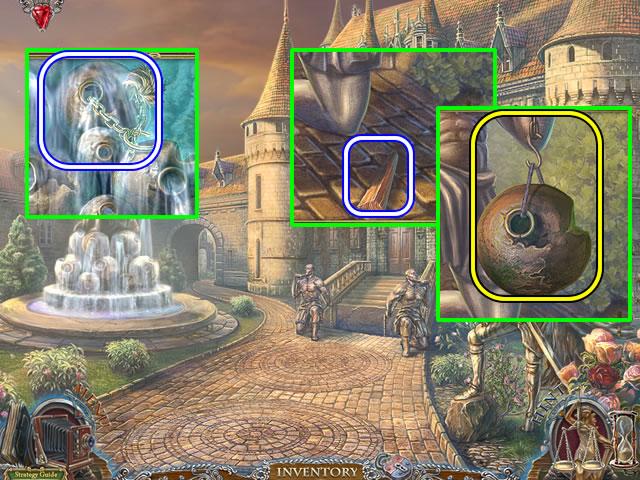
- Stop at the fountain.
- Pick up the COUNTERWEIGHT from the top of the pile of jugs.
- Look closer at the statues at the base of the stairs.
- Use the BROOM to sweep away the debris; take the WEDGE (1/2).
- Attach the HOOK to the end of the chain; add the COUNTERWEIGHT.
- Pick up the CANNONBALL on the stairs and enter the castle.
- Receive the last Sphere of Guilt.
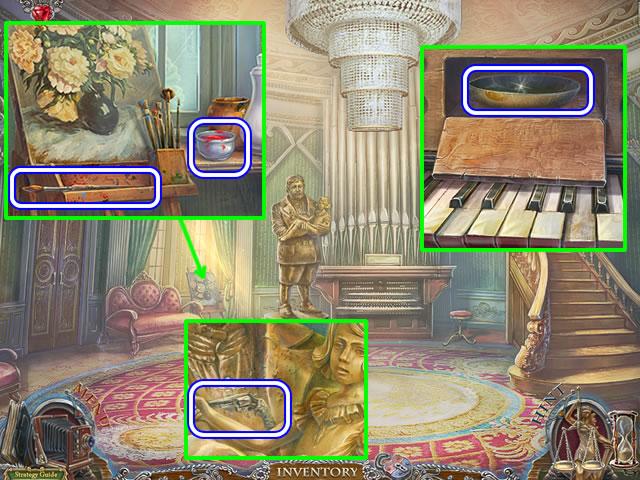
- Look at the easel.
- Take the PAINTBRUSH and BOWL OF PAINT.
- Look at the statue; take the GUN-SHAPED KEY.
- Zoom in on the organ; insert the PIANO KEY in the keyboard; take the SCALE PAN from the compartment.
- Go down and forward.
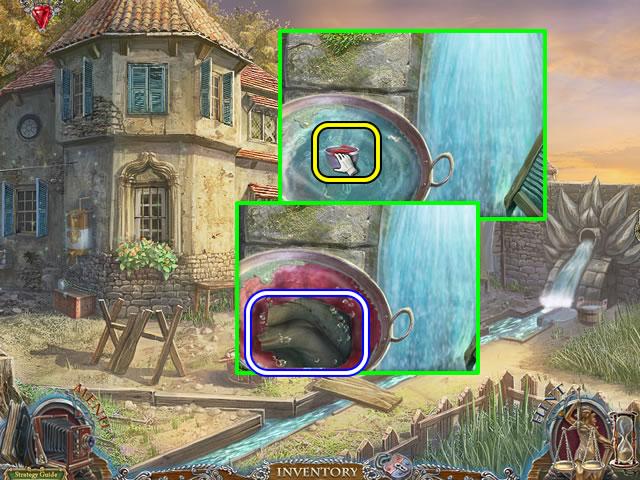
- Zoom in on the water flow.
- Fill the pan with water; add the BOWL OF PAINT.
- Put the PIECE OF FABRIC in the red water; take the RED FABRIC.
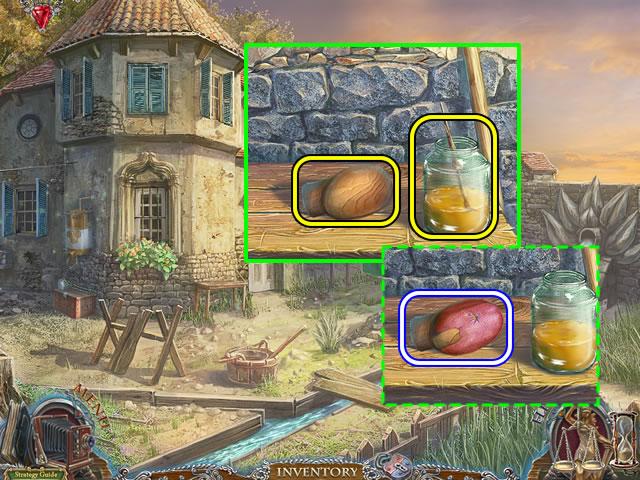
- Zoom in on the worktable.
- Put the WOODEN HEAD and JAR OF HONEY on the worktop. Put the PAINTBRUSH in the honey jar.
- Click the paintbrush to spread honey on the wooden head.
- Put the RED FABRIC on the sticky head; take the RED MASK (2/2).
- Play the hidden object scene on the side of the building.
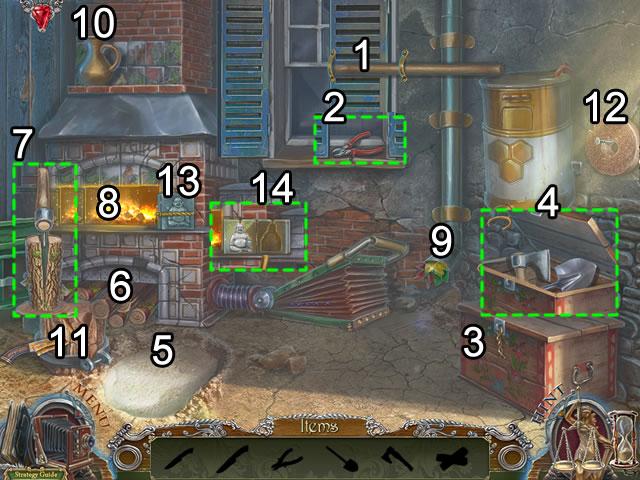
- Side the bar (1) over; open the right shutter and take the Pliers (2).
- Use the Pliers to remove the wire (3) on the box; open the box (4) and take the Axe and Shovel.
- Use the Shovel to dig (5) up a ball of Gypsum.
- Pick up a Log (6) and put it on the stump. Put the Axe on the log to start a mini-game (7). Click the axe three times when it is centered over the log. Pick up the Firewood and add it to the oven (8).
- Remove the leaves (9) from the spout.
- Pick up the Pot (10); put it under the spout; take the Pot of water.
- Pick up the Rusty knife (11) and put it on the stone (12) to get a Sharpened knife.
- Use the Sharpened knife to cut the cord on the form (13).
- Open the form and add the Gypsum. Pour the Pot of Water on the form.
- Put the form in the oven. Remove the form; take the BUDDHA FIGURINE.
- Go down, enter the castle and go through the door on the left.
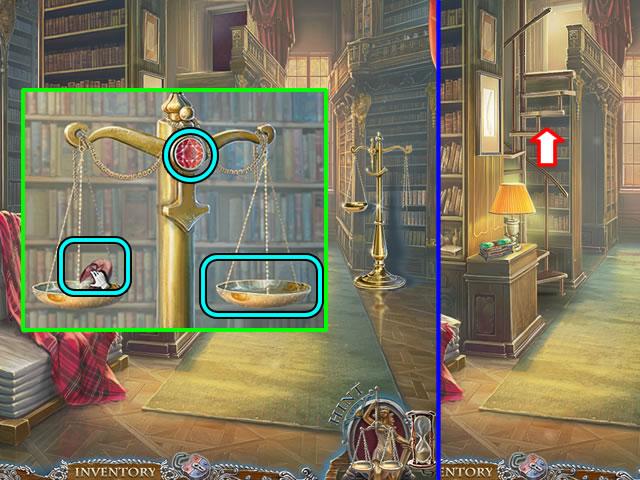
- Zoom in on the broken scale.
- Attach the SCALE PAN to the chain; insert the PENDENT in the center slot.
- Put the RED MASK (2/2) in one of the scale pans.
- Go up the stairs.
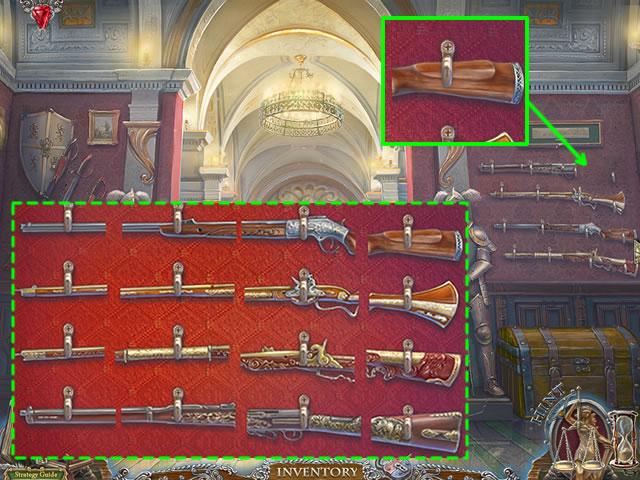
- Examine the rifles on the right wall.
- Add the RIFLE STOCK to open a puzzle.
- Match the parts to the stocks. Swap within sections and match patterns.
- The above inset shows the solution.
- Receive a BAG OF COINS in inventory.
- Go down and right.
- Zoom in on the top of the stairs.
- Add the BAG OF COINS and BUDDHA FIGURINE to open a puzzle.

- Swap the weights to rotate the maze and move the ball to the outside ring.
- Solution. From the starting position, swap the weight pairs as follows: B-C; C-A; C-B and B-C.
- Go right through the doorway.
- Use the DACHSHUND to chase away the animal.
- Go left.
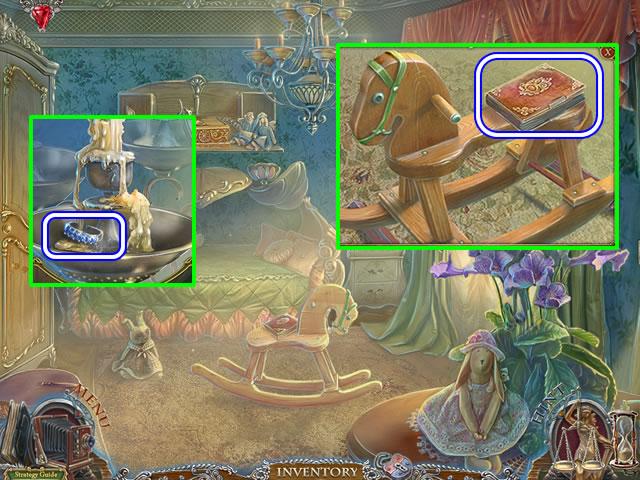
- Look at the rocking horse.
- Pick up the BOOK.
- Put the WEDGES (2/2) under the rockers.
- Peer into the chandelier.
- Pick up RING (1/3).
- Look at the bed.
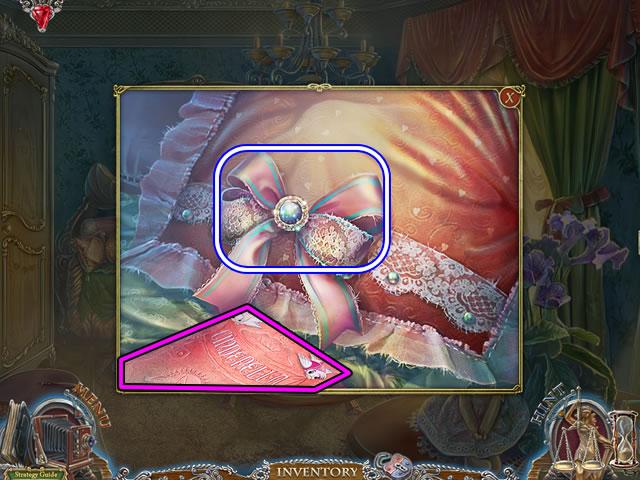
- Read the diary for story information.
- Take the RIBBON.
- Go down twice; go left.
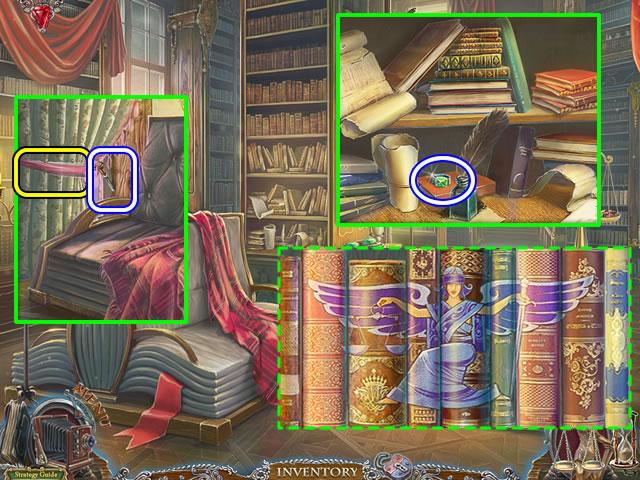
- Look at the sofa.
- Use the RIBBON to tie back the curtains; take the CHISEL.
- Look at the bookshelves.
- Pick up the RING (1/3).
- Look closer at the books.
- Put the BOOK in the empty slot to open a puzzle.
- Swap the books to form the image (dashed inset).
- Take the DOVE PENDANT.
- Go down and right.
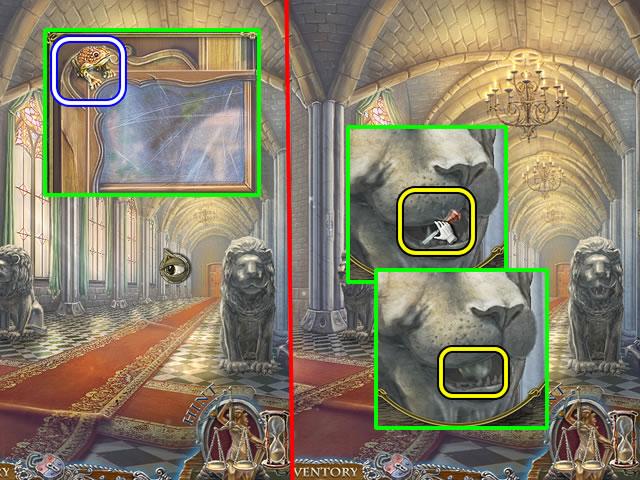
- Zoom in on the door lock at the end of the right hallway.
- Pick up the FROG (1/2).
- Examine the mouth of the lion on the right.
- Use the CHISEL to remove its FANG.
- Insert the CANNONBALL in the mouth to free the tracks on the door lock.
- Hint: If you have problems getting the cannonball in the mouth make sure you have removed the frog from the door lock mechanism. If you have taken the frog and the thought bar along the top of the screen still says the mechanism is jammed, try exiting and entering the scene again. The thought bar along the top of the screen must say “What an unusual slot in the lion’s mouth…” to get the cannonball to fit in the mouth. Good luck.
- Go left.
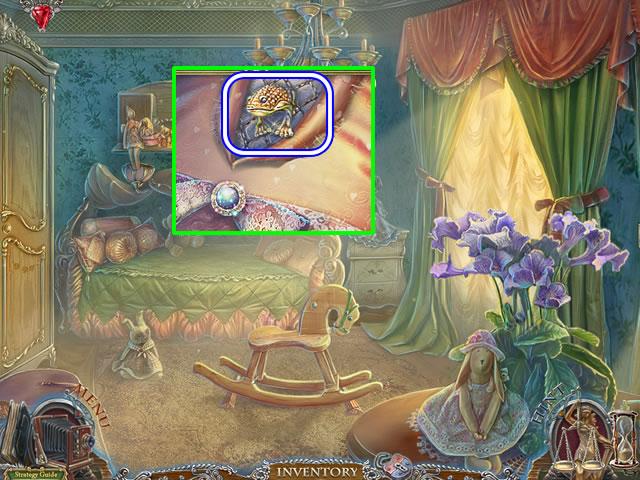
- Look at the bed.
- Use the FANG to rip the pillow.
- Take the FROG (2/2).
- Go down twice and left.
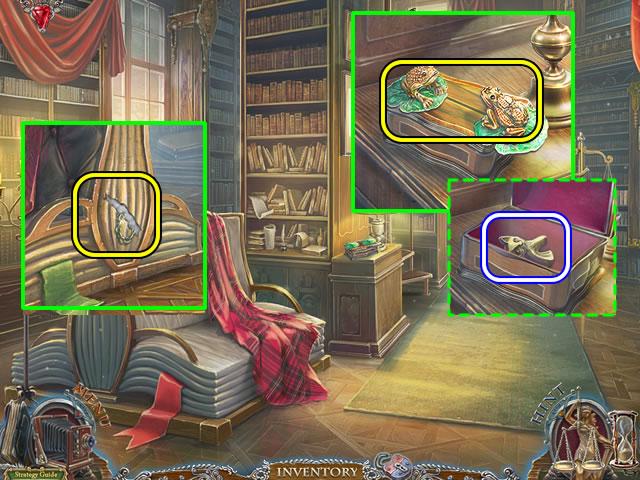
- Look at the sofa.
- Use the FANG to rip the threads; take the BULLET-SHAPED KEY.
- Look at the end table.
- Put the FROGS (2/2) on the pads on the box.
- Take the CAT RING HOLDER from the box.
- Go forward up the stairs.
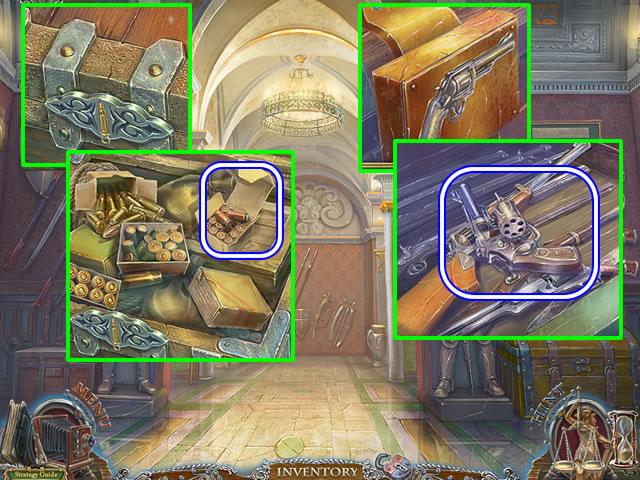
- Use the BULLET-SHAPED KEY to open the chest on the left.
- Take the box of BULLETS.
- Use the GUN-SHAPED KEY to open the chest on the right.
- Take the GUN.
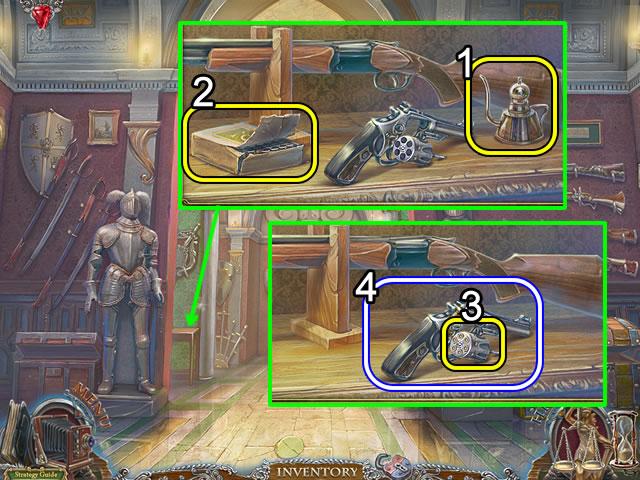
- Look at the worktable.
- Put the GUN and box of BULLETS on the table.
- Pour the container of oil (1) on the gun.
- Load the gun with the BULLETS (2).
- Close the cylinder (3); take the LOADED GUN.
- Go down twice; go right.
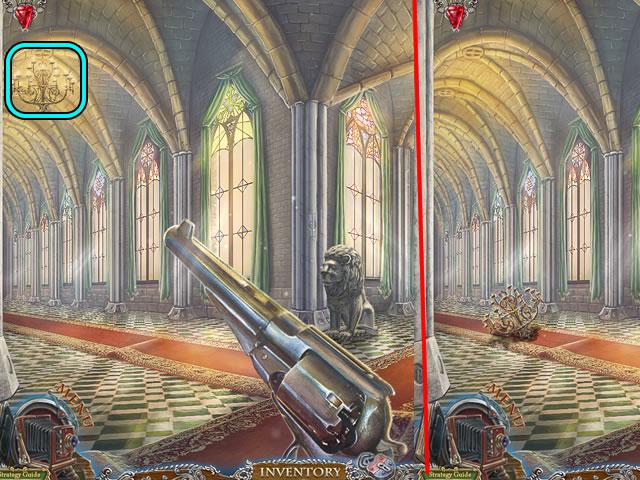
- Place the LOADED GUN on the chandelier to see the chandelier shot from the ceiling.
- Play the hidden object scene on the fallen chandelier.
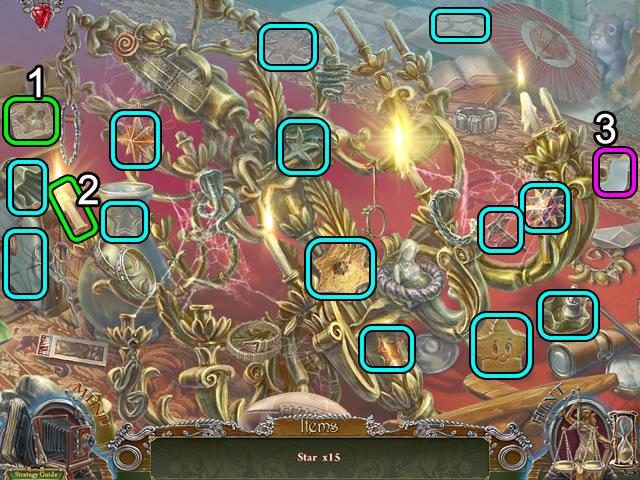
- Drag the mold (1) to the burning candle (2) to create a Star.
- Click the paper (3) twice to create a Star.
- Pick up the rest of the stars. Receive a STAR.
- Go left.
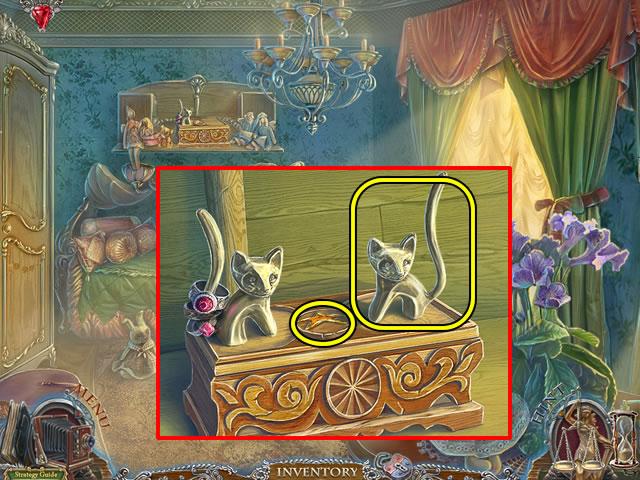
- Zoom in on the shelf.
- Add the CAT RING HOLDER and insert the STAR in the box lid.
- Go down.
- Play the hidden object scene in the chandelier.
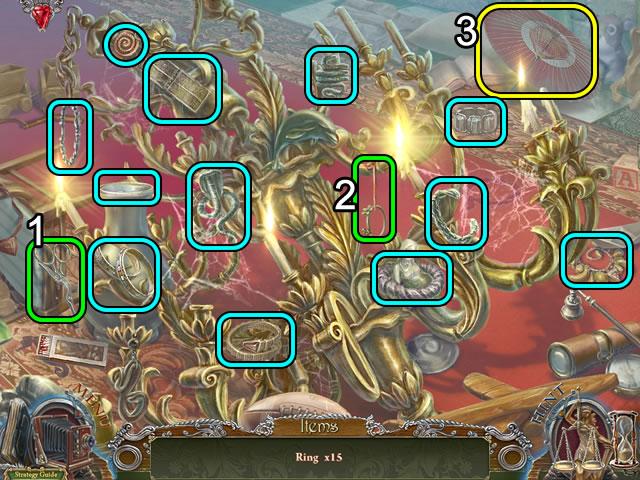
- Use the scissors (1) to snip the string (2) securing a Ring.
- Collapse the umbrella (3) to find a Ring.
- Collect the rest of the Rings. Receive a RING (3/3).
- Go left.
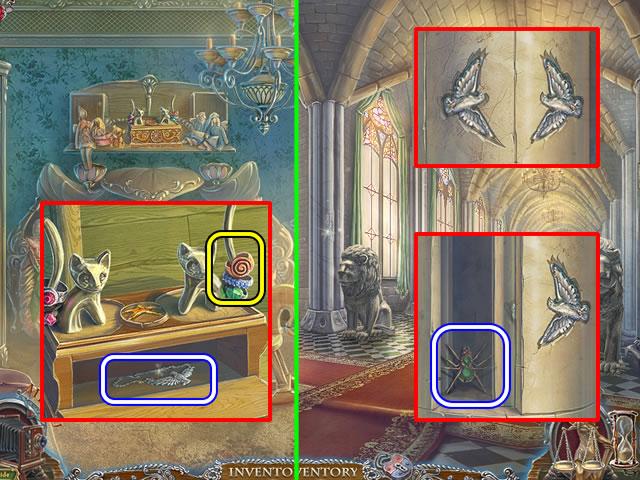
- Zoom in on the shelf.
- Put the RINGS (3/3) on the holder; take the DOVE MEDALLION from the compartment.
- Go right.
- Look at the column beside the left lion.
- Insert the DOVE PENDANT and DOVE MEDALLION in the insets.
- Open the left side; take the GOLDEN SPIDER.
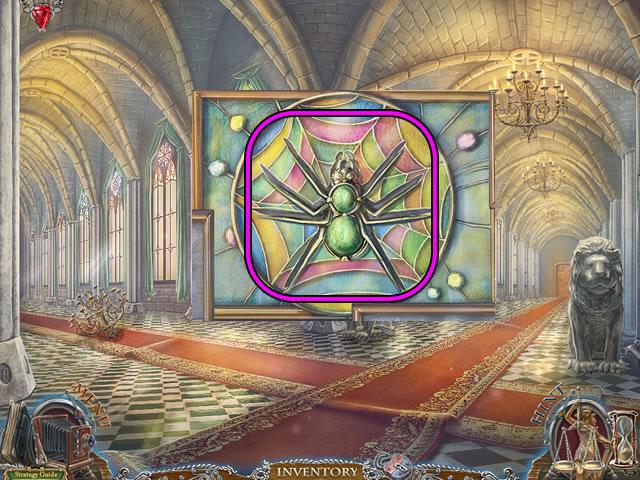
- Look at the door at the end of the right hallway.
- Insert the GOLDEN SPIDER in the slot. Click to open the door.
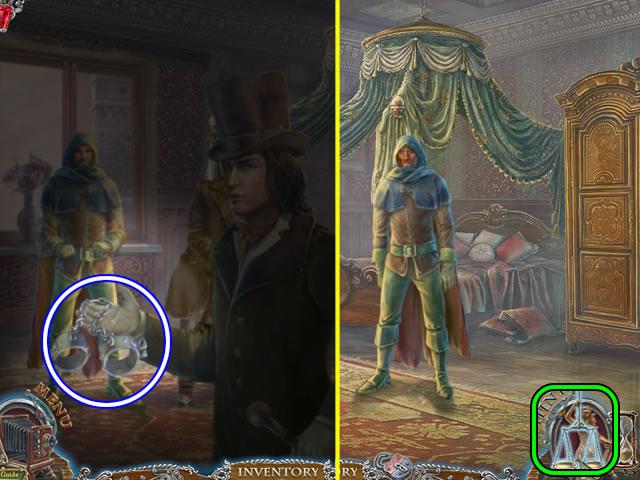
- Take the HANDCUFFS.
- Click the scales to open the Scales of Justice and decide who is guilty.
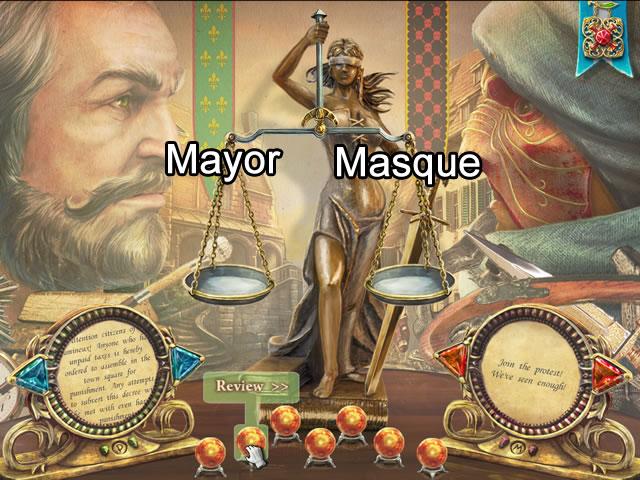
- Review the evidence by scrolling the document windows or clicking the Spheres of Guilt to watch cutscenes.
- Put the majority of spheres in left pan to convict the mayor or the right to convict the red masque.
- Close the scales and place the HANDCUFFS on the person you decided was guilty for the final cutscene.
Congratulations!
You have completed playing Dark Tales: Edgar Allen Poe’s The Masque of the Red Death. Be sure to check back often for game updates, staff and user reviews, user tips, forums comments and much more here at Gamezebo.
More articles...
Monopoly GO! Free Rolls – Links For Free Dice
By Glen Fox
Wondering how to get Monopoly GO! free rolls? Well, you’ve come to the right place. In this guide, we provide you with a bunch of tips and tricks to get some free rolls for the hit new mobile game. We’ll …Best Roblox Horror Games to Play Right Now – Updated Weekly
By Adele Wilson
Our Best Roblox Horror Games guide features the scariest and most creative experiences to play right now on the platform!The BEST Roblox Games of The Week – Games You Need To Play!
By Sho Roberts
Our feature shares our pick for the Best Roblox Games of the week! With our feature, we guarantee you'll find something new to play!Type Soul Clan Rarity Guide – All Legendary And Common Clans Listed!
By Nathan Ball
Wondering what your odds of rolling a particular Clan are? Wonder no more, with my handy Type Soul Clan Rarity guide.


