
Best Horror Games On Itch.io – July 2026
Across a bounty of subgenres.![Haze Seas Accessories Tier List [Best Accessories to Equip]](/wp-content/uploads/2026/07/haze-seas-accessories-tier-list.jpg "Haze Seas Accessories Tier List [Best Accessories to Equip]")
Haze Seas Accessories Tier List [Best Accessories to Equip]
The accessories with the best stat buffs in Haze Seas.
![[Roblox] Evomon Shiny Hunting Guide – Including Prismatic and Pris Shinies!](/wp-content/uploads/2026/06/evomon-shiny-hunting-guide.jpg "[Roblox] Evomon Shiny Hunting Guide – Including Prismatic and Pris Shinies!")

Dark Tales: Edgar Allan Poe Murders in the Rue Morgue Walkthrough
Welcome to Gamezebo's walkthrough for Dark Tales: Edgar Allan Poe Murders in the Rue Morgue. General Tips Main Menu The left button displays the name of the current player. To change players, select the left button to display the profile selection. The profile selection allows you to add new players and delete current players. Select New to add a new player to the list, OK to select a player and Delete to remove a player from the list. The Play button displays the playing mode window…


- Prefer Gamezebo on Google

a:1:i:0;a:2:s:13:”section_title”;s:65:”Dark Tales: Edgar Allan Poe Murders in the Rue Morgue Walkthrough”;s:12:”section_body”;s:85480:”
Welcome to Gamezebo’s walkthrough for Dark Tales: Edgar Allan Poe Murders in the Rue Morgue.
General Tips
Main Menu

- The left button displays the name of the current player. To change players, select the left button to display the profile selection.
- The profile selection allows you to add new players and delete current players. Select New to add a new player to the list, OK to select a player and Delete to remove a player from the list.
- The Play button displays the playing mode window, where regular or expert mode can be selected. Regular mode has shorter recharge times for the hint and skip buttons, and active areas are shown with sparkles. Expert mode has a longer recharge time for the hint and skip buttons, and there are no sparkles shown over active areas.
- The Options button displays a window where music and sound volume can be changed, and there are toggles for full screen mode and a custom mouse cursor.
- The Quit button exits the game if Yes is selected or returns to the main menu if No is selected.
- Extras displays options for extra content which can be accessed after the bonus section of the game has been completed, a strategy guide can be accessed and there is also a button that links to the forum for this game on the Big Fish Games website.
- Credits displays a list of the people that were involved in making this game.
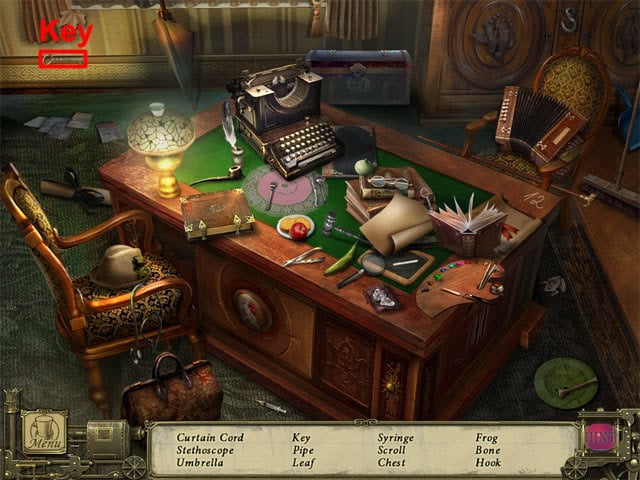
Normal Locations
- Normal locations allow access to other normal, hidden object and mini-game locations in the game. Objects can be examined, moved or taken depending on the icon displayed by the mouse cursor.
- Move the cursor around the normal locations until it changes. A grasping hand icon means that an object can be moved or taken, an eye icon means that an object or area can be examined more closely, and a pointing red arrow means that you can move to a new location.
- The menu button can be selected at the bottom-left corner of the screen to display the game menu, which has very similar options to the main menu. Continue returns to the game, Options displays music, sound, full screen and custom cursor options, Help displays general tips on controls and types of locations, Credits displays the list of people involved in making the game, and Quit returns to the main menu.
- The notebook can be selected at the bottom-right corner of the screen to display notes and images that are collected as you progress through the game.
- Items that are found in the normal locations are added to the inventory, which is displayed at the left side of the notebook.
Hidden Object Locations
- The aim in the hidden object locations is to find all of the items that are displayed in the list window. It is not possible to give the exact locations of all of the hidden objects as many objects on the list are random each time that the is played.
- An item will be added to the inventory when all objects have been found in a hidden object location.
- Some hidden objects will require an action to take place (such as opening a drawer or moving an item) before they can be found.
- Some hidden objects on the list are not random and occur each time the game is played, so these objects will be shown with a red border on the images in this guide.
- Clicking five times in the wrong area will cause the cursor to move uncontrollably for two seconds.
- The hint button can be selected at at the bottom-right corner of the screen to highlight a hidden object, although after using a hint it takes 90 seconds (regular mode) or 3 minutes (expert mode) before another hint can be used.
Mini-Game Locations
- There are various mini-games scattered throughout the main adventure which must be solved in order to make further progress.
- Completing a mini-game causes a new object or exit to appear in the location where the mini-game was solved.
- The skip button becomes active 90 seconds (regular mode) or 3 minutes (expert mode) after the mini-game starts, and when active it can be selected to pass the puzzle.
Walkthrough
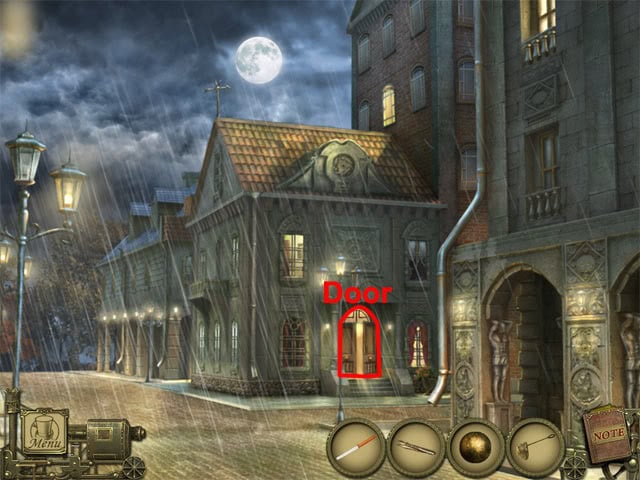
Outside Dupin’s House
The game starts outside the house, Select the newspaper on the grass to see that the murders in the Rue Morgue have already been reported:
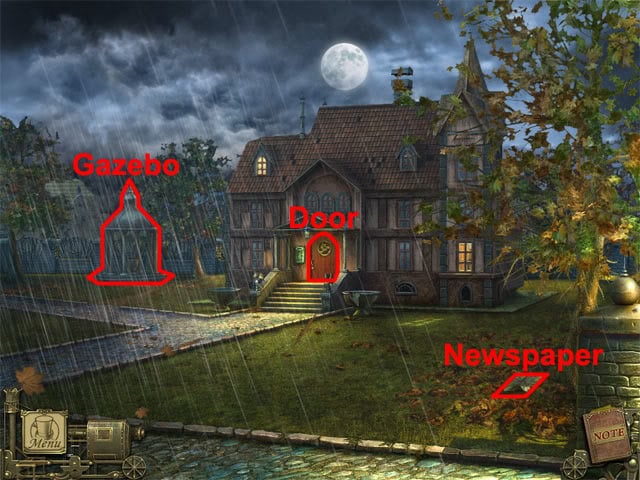
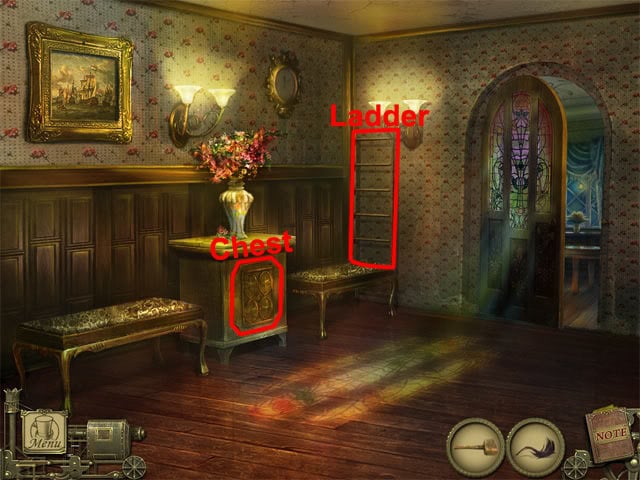
The notebook can now be selected at the bottom-right corner of the screen, which displays two images and a description of what has happened so far in the game. It is useful to refer to the notebook frequently, as descriptions, images and new clues are added as you progress through the game. Select the door to move to the porch.
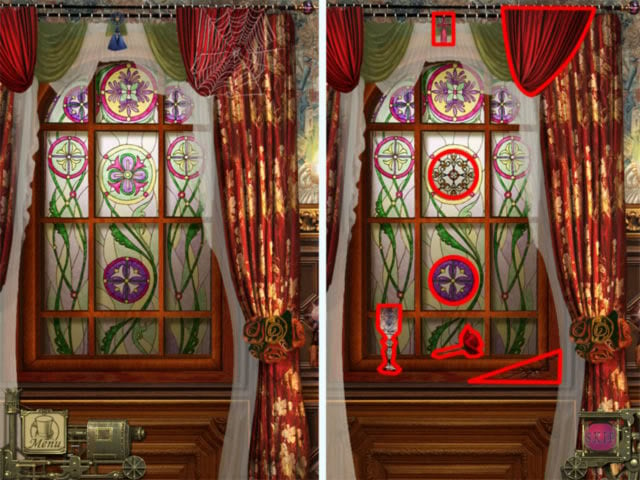
Dupin’s House Porch
Examine the left gargoyle:
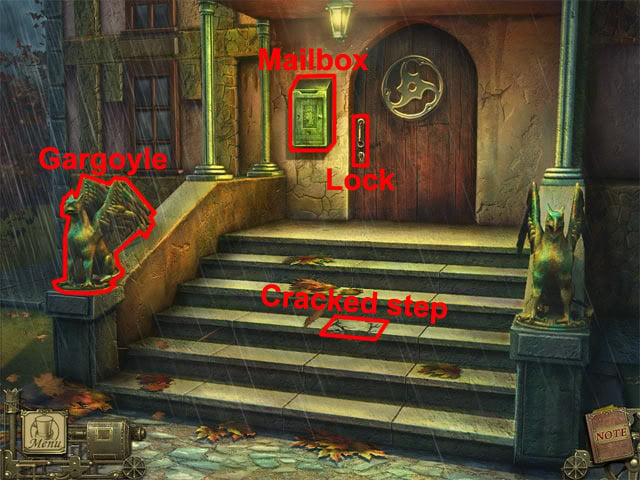
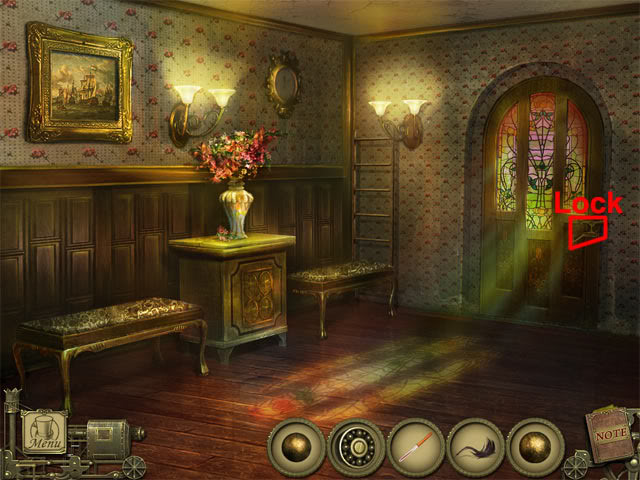
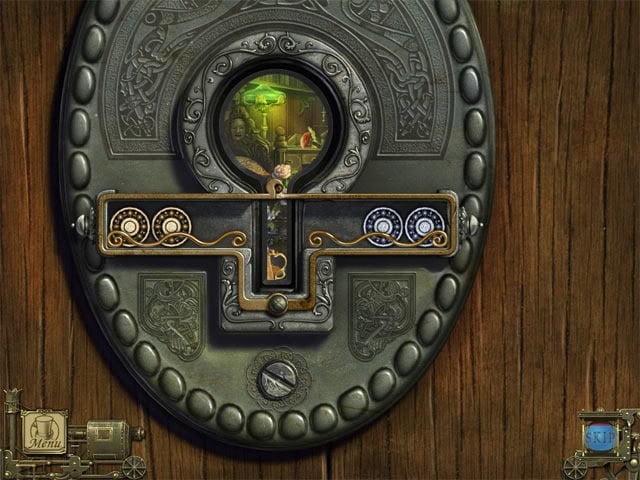
Select the gargoyle’s head and its mouth will open. Take the key from the gargoyle’s mouth and it will be added to the inventory at the left side of the notebook. Select the cracked step to move it. Examine the step and then take part of the lock. Examine the mailbox at the left side of the door. Open the mailbox and take the newspaper. Examine the mailbox again and take the glue. Examine the lock on the door. Use the glue, the part of the lock and then the key on the lock. Select the key three times and the door will open. Move through the doorway to enter Dupin’s foyer.
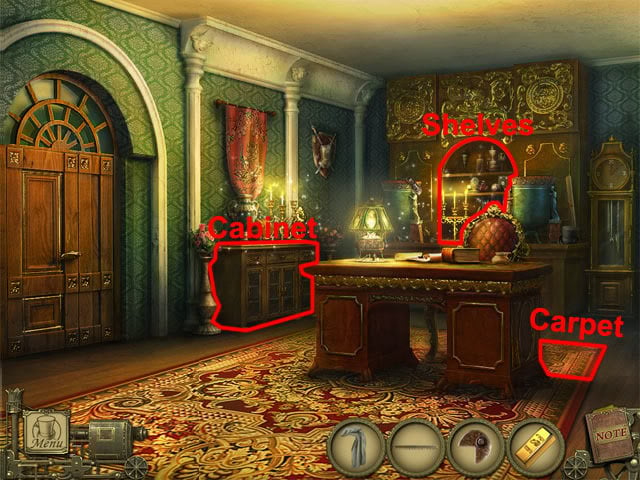
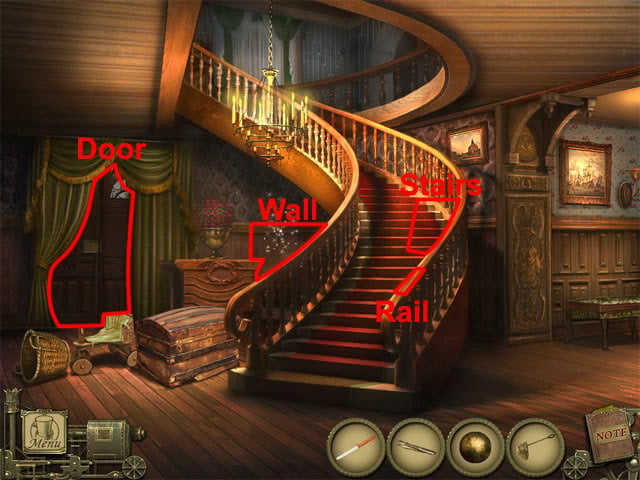
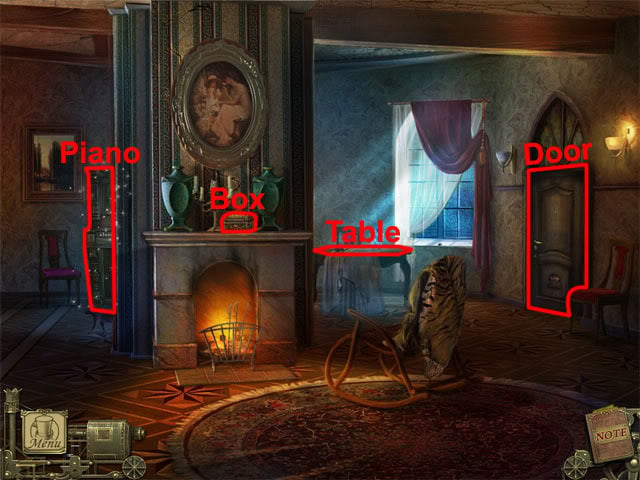
Dupin’s House Foyer
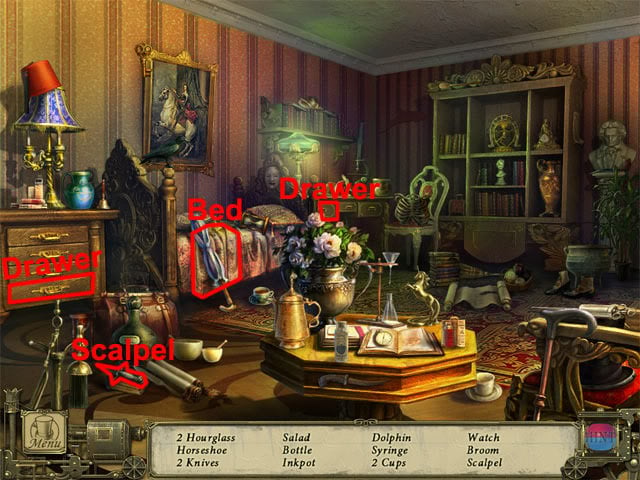
Examine the book on the table:
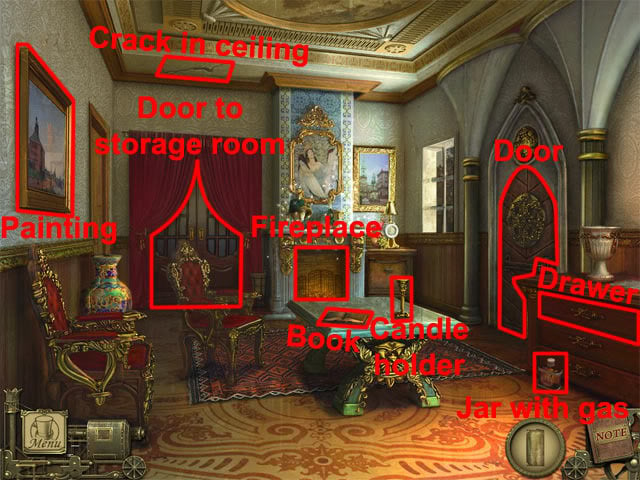
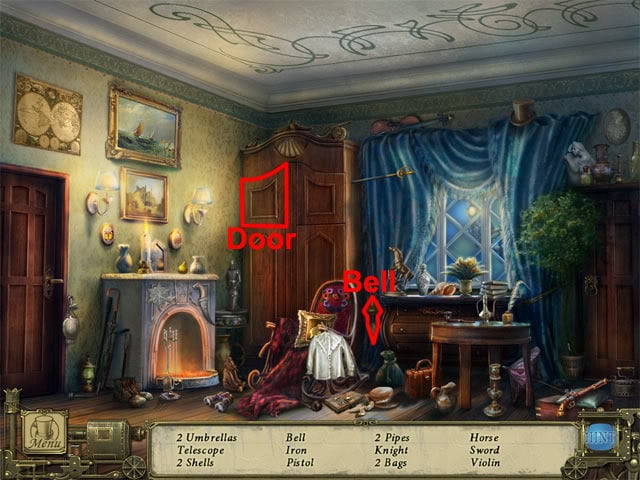
A diagram of a scorpion is shown in the book. Exit the view of the book. Take the jar with gas on the floor at the right side of the room. Examine the drawer at the right side of the room. Open the top drawer and take the lighter parts. Examine the fireplace to enter the first hidden object location. Open the drawer:
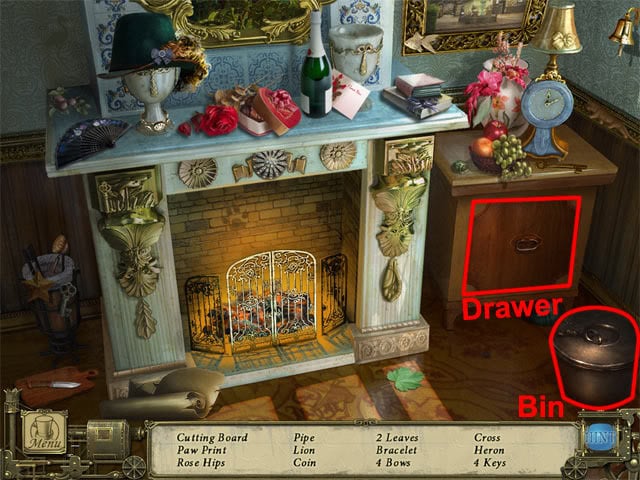
Select the coin in the drawer. Open the bin. Find the remaining hidden objects to receive the coin. Open the door with the red curtains above it. Go through the open doorway to enter the storage room.
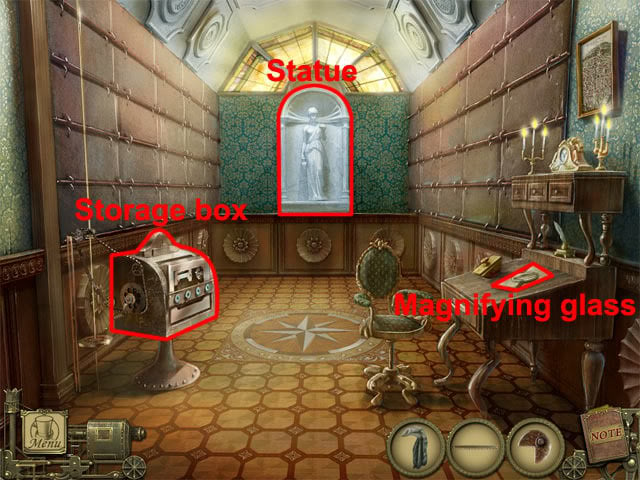
Dupin’s House Storage Room
Select the silhouette at the window:
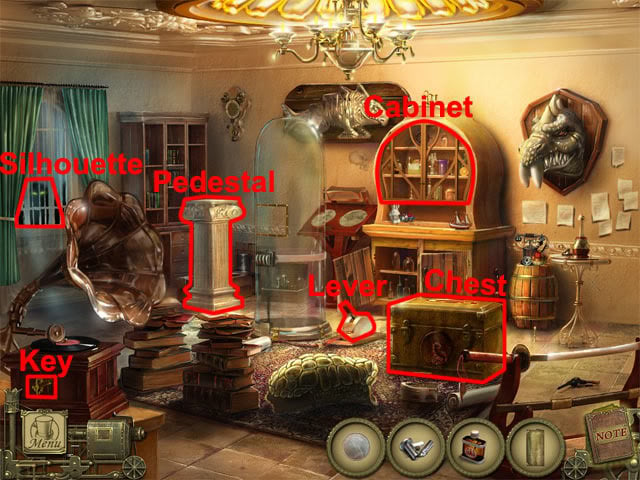
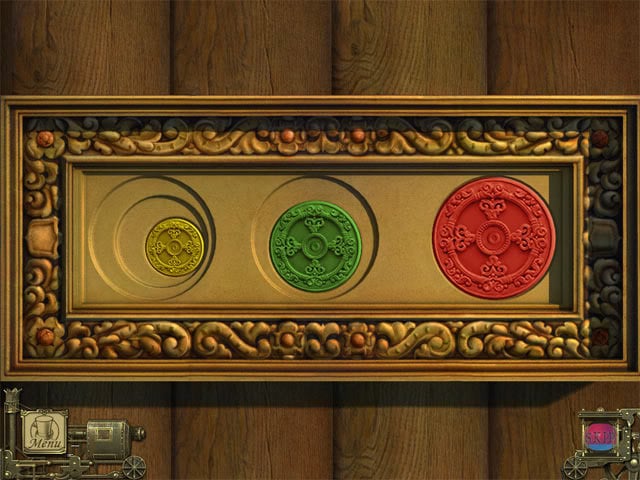
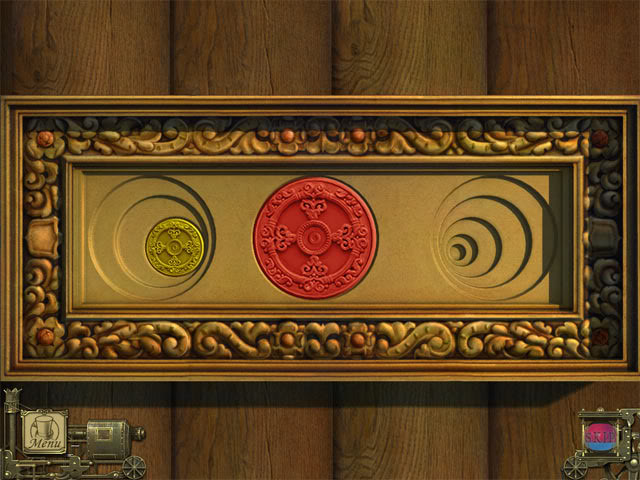
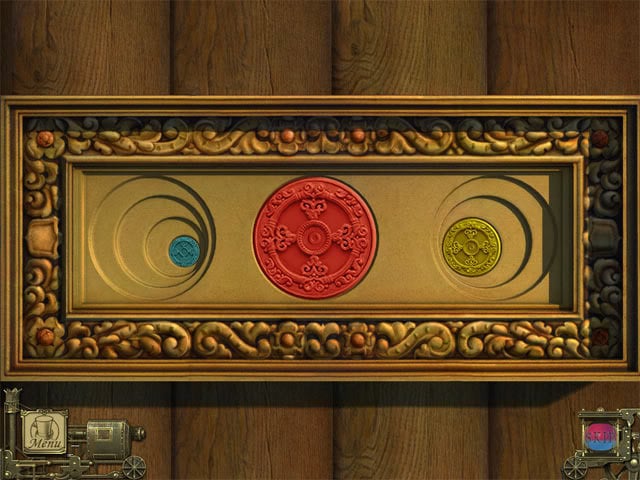
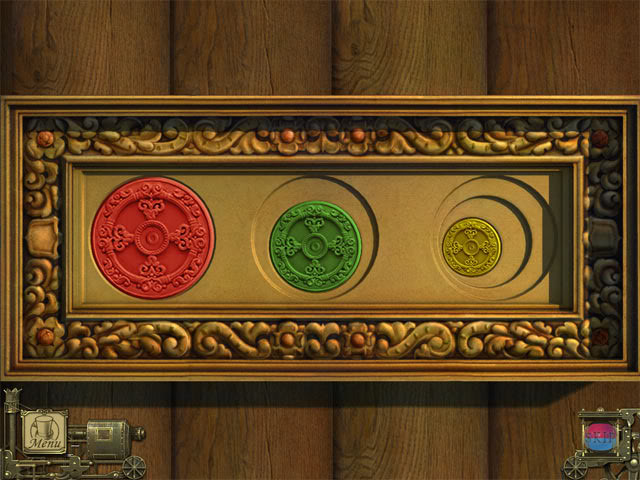
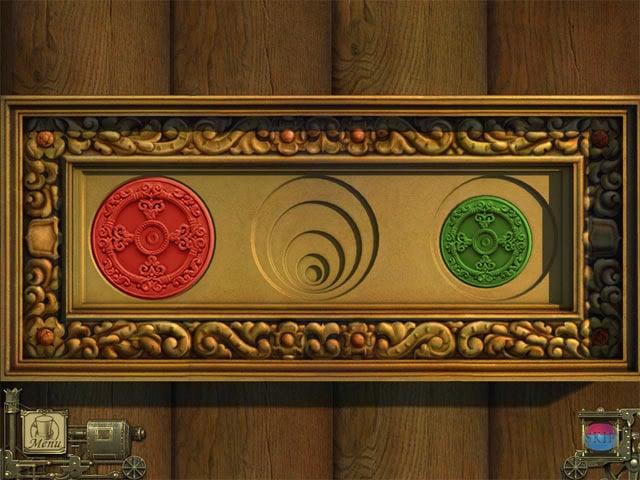
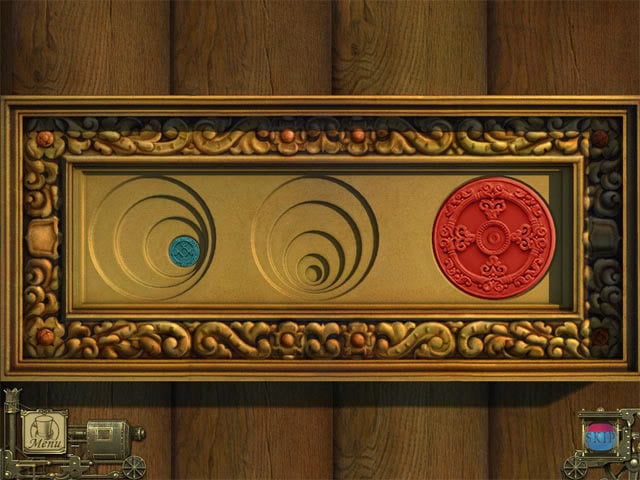
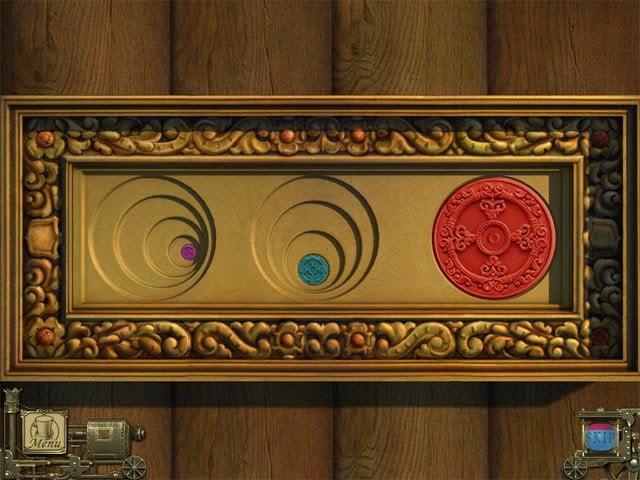
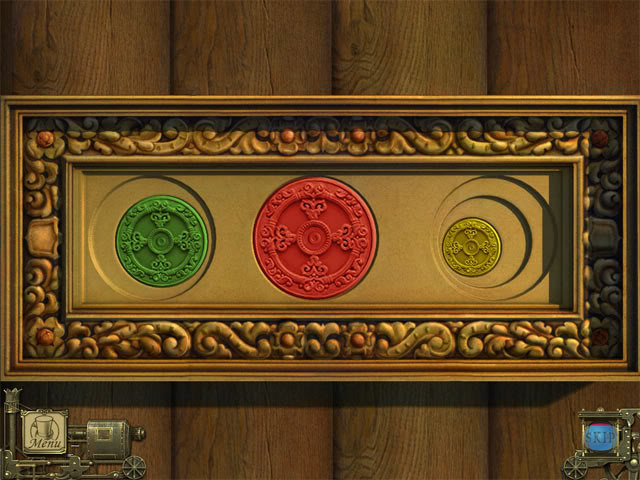
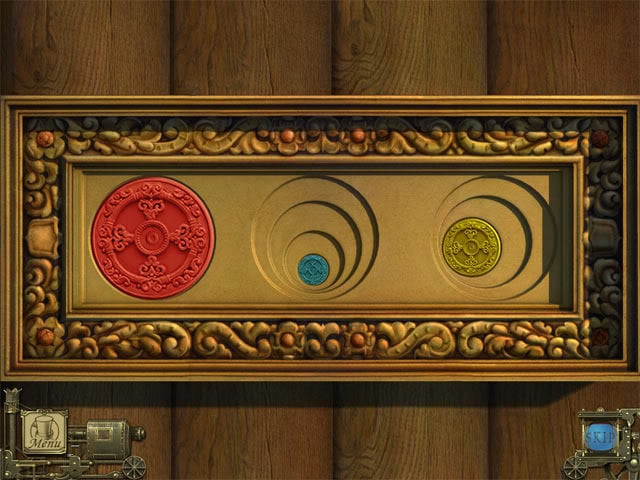
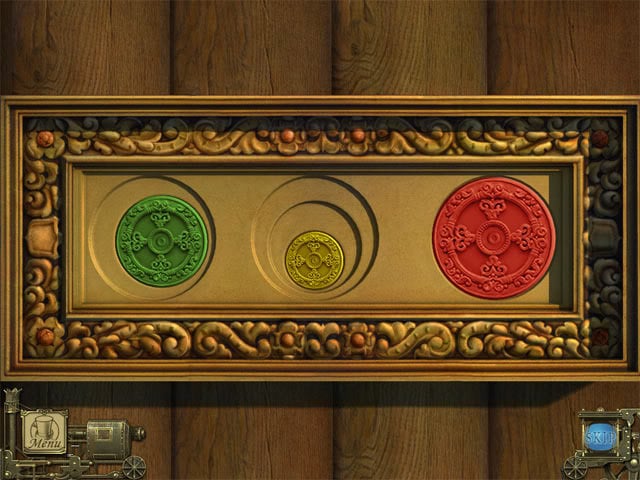
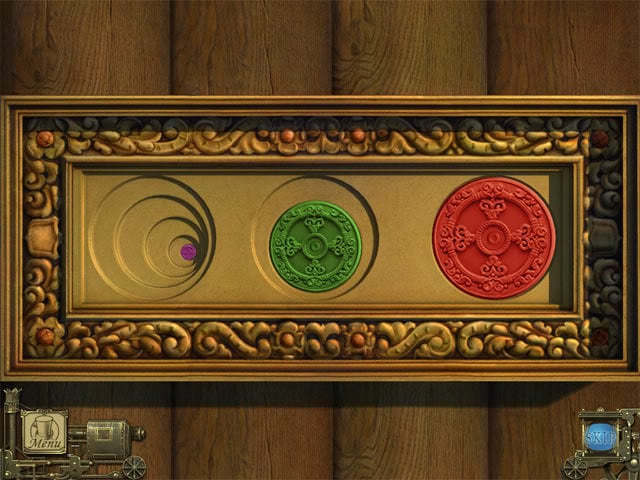
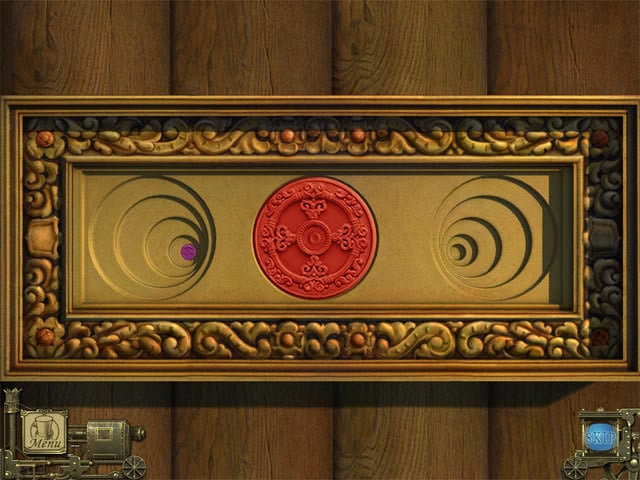
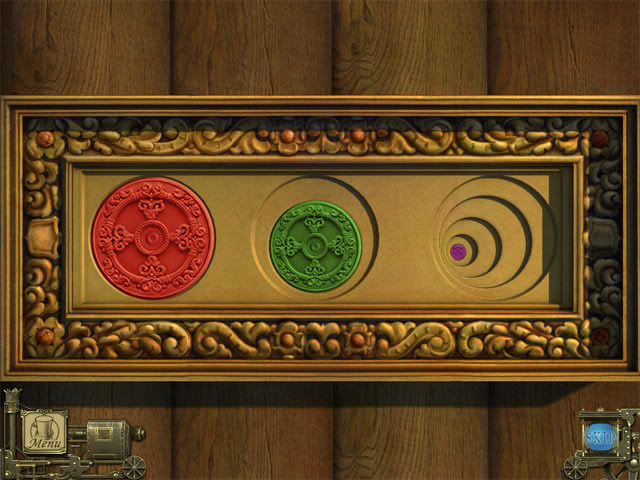
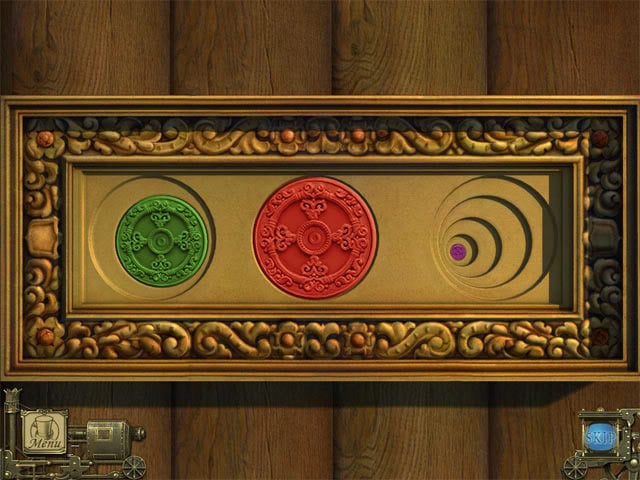
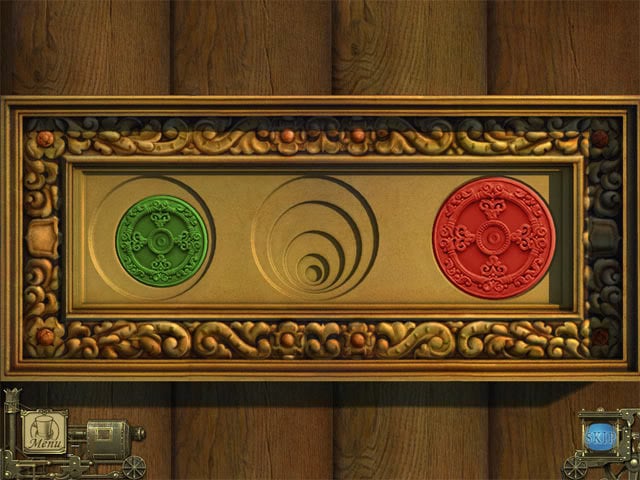
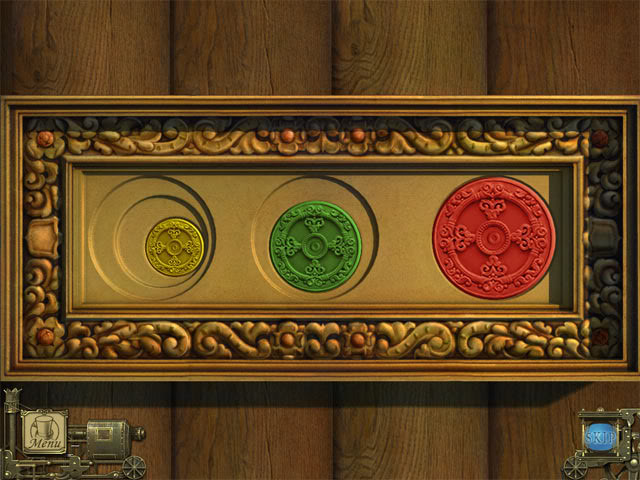
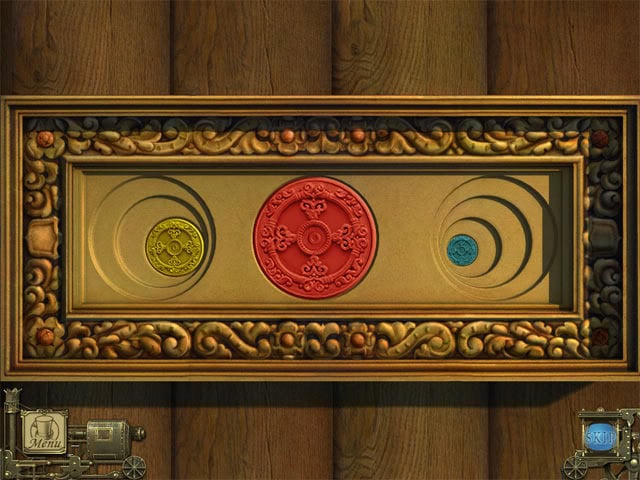
The silhouette will move away after it has been selected. Select the key in the gramophone to turn it. Examine the chest to see a scorpion. Each of the five pink spheres on the scorpion moves a different section of the tail. Select the following sections of the tail:
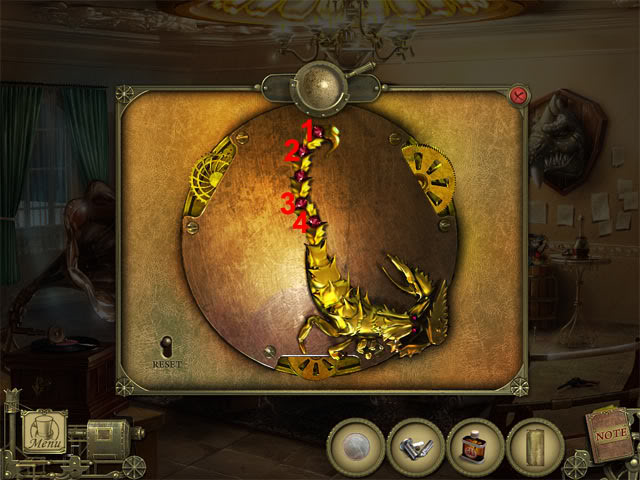
The chest will open after the correct sections of the scorpion have been pressed. Examine the chest to see a wooden plank with the numbers 0412. Exit the view of the chest. Examine the pedestal. Open the top drawer:
Open the bottom drawer and select the part of shears. Find the remaining hidden objects to receive the garden shears half. Open the cabinet and then examine the cabinet. Select the candle:
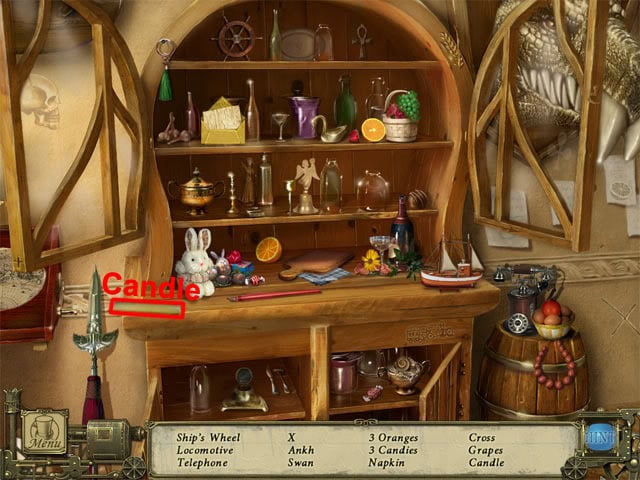
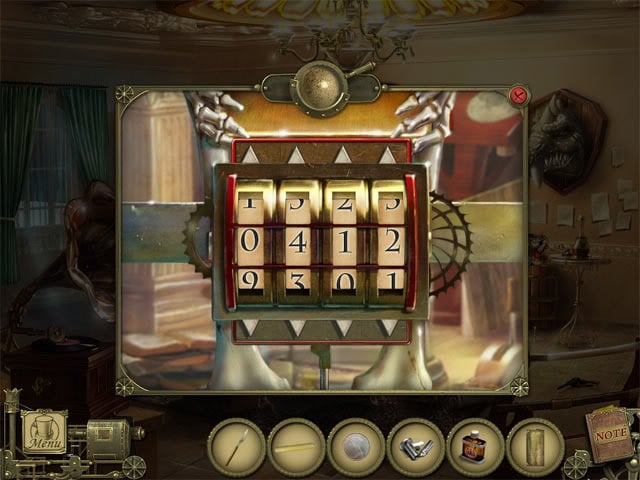
Find the remaining hidden objects to receive the candle. Examine the lever on the floor. Select the lever and a skeleton will appear in a glass container. Examine the combination lock on the front of the container:

The number seen on the wooden plank inside the chest was 0412, so enter the number 0412 on the combination lock:
The skeleton will move his hands after the correct combination has been entered. Select the gold bar in the skeleton’s hands and it will be added to the inventory. Move back to the foyer.
Dupin’s House Foyer
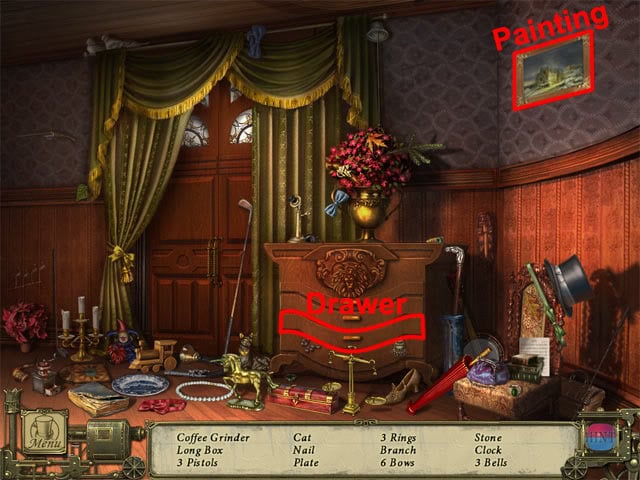
Wait a few seconds after returning to the foyer and a rock will smash the vase at the left side of the room. Examine the broken vase:
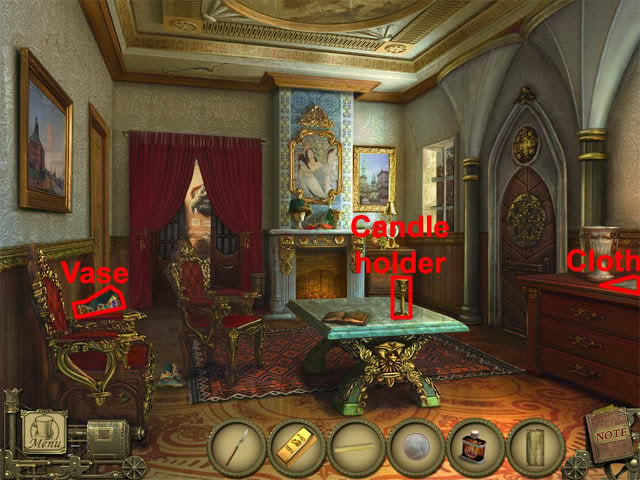
A rock with scratches can be seen near the broken vase. Back away from the view of the vase. Examine the cloth on top of the dresser at the right side of the room. Use the lighter parts on the cloth. Use the jar with gas on the cloth. All parts needed to build the lighter have now been used on the cloth:
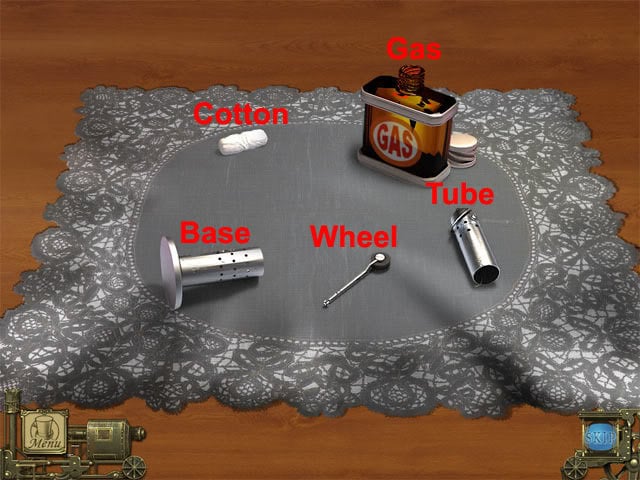
Use the cotton on the gas. Use the cotton on the tube. Use the tube on the base. Use the wheel on the base. Take the lighter to add it to the inventory.
Examine the candle holder on the table. Use the candle on the candle holder. Use the lighter on the top of the candle. Wait for a few seconds and Dupin will ask for the newspaper. Give the newspaper to Dupin to read about the murders in the Rue Morgue. Exit the view of the newspaper and Dupin will open the right door. Go through the right doorway to see the coach.
Outside the Stagecoach
Select the stagecoach and the coachman will ask for payment. Give the coin to the coachman. Open the stagecoach door and then enter the stagecoach.
Inside the Stagecoach
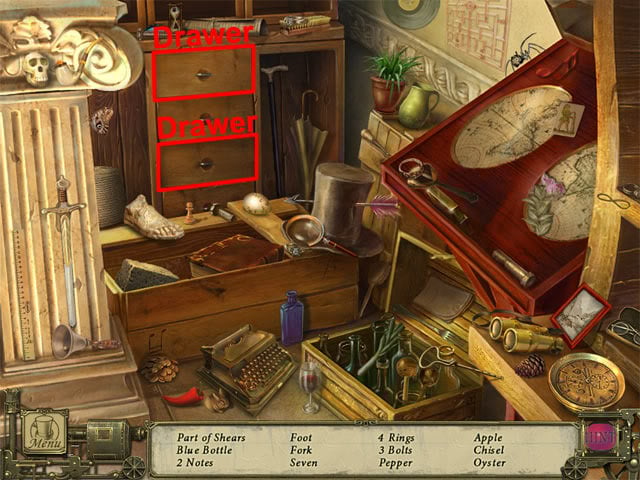
Select the drawer to open it. Find the twelve map pieces:
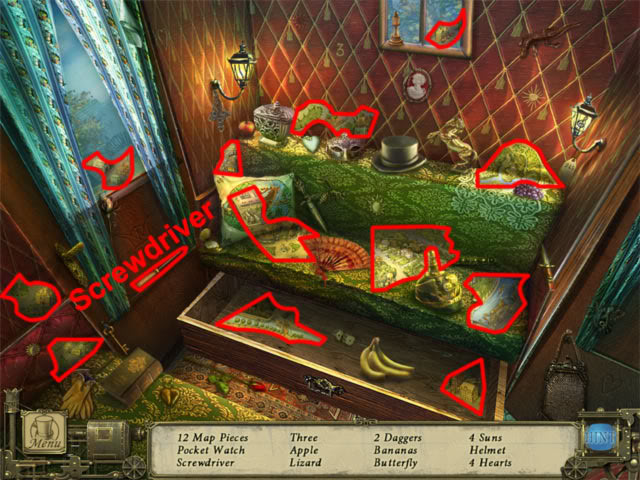
Select the screwdriver. Find the remaining hidden objects to receive the screwdriver.
Outside the Stagecoach
Select the map below the door of the stagecoach to start the map mini-game. The aim in the mini-game is to drag the pieces to the correct locations on the canvas so that they become fixed in place. Hold the left mouse button to drag a piece, and click the right mouse button to rotate a piece. The completed map is shown below:
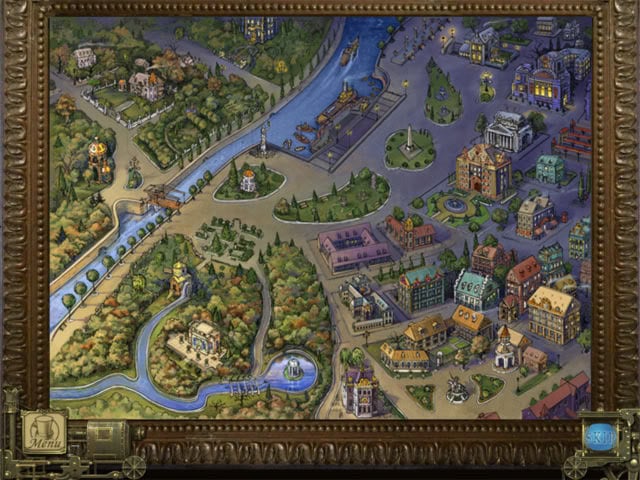
With the map complete, you can now hold down the left mouse button and drag the mouse to view different areas of the map. There is only one active area available at the moment, which is represented by a spinning sphere. Select the spinning sphere to travel to the bridge.
Bridge
Examine the left barrel:
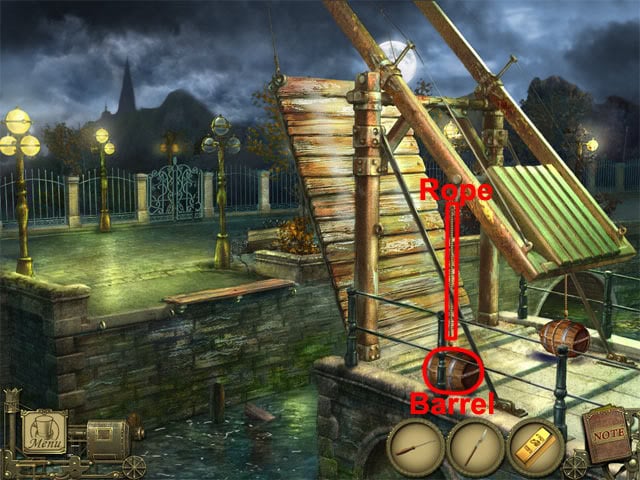
The other half of the garden shears can be seen after examining the left barrel. Use the garden shears half from the inventory with the garden shears half on the ground, then use the screwdriver on the screw. Take the garden shears. Use the garden shears on the rope above the left barrel and the right barrel will be raised. Use the garden shears on the rope above the right barrel to lower the bridge. Go through the gate on the other side of the bridge.
Path
Take the pickaxe from the bin:
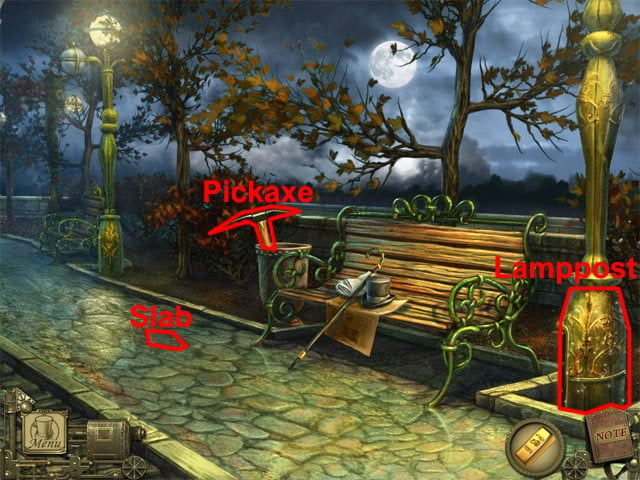
Use the pickaxe on the slab. Examine the slab and take the part of the unusual lock. Examine the base of the right lamppost. Select the saw blade:
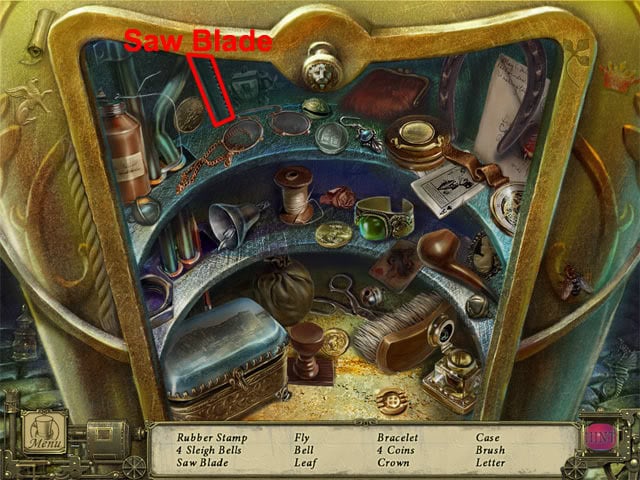
Find the remaining hidden objects to receive the fretsaw. Examine the objects on the bench to see the banker’s business card. Exit the view of the business card to return to the map. Select the spinning sphere on the map to travel to the bank.
Bank Hall
Take the rag on the shelf at the left side of the hall:
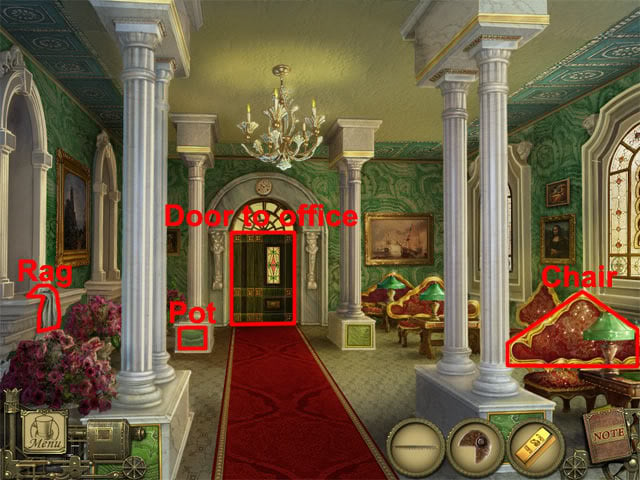
Examine the right chair to see a hidden object location. Select the door handle:
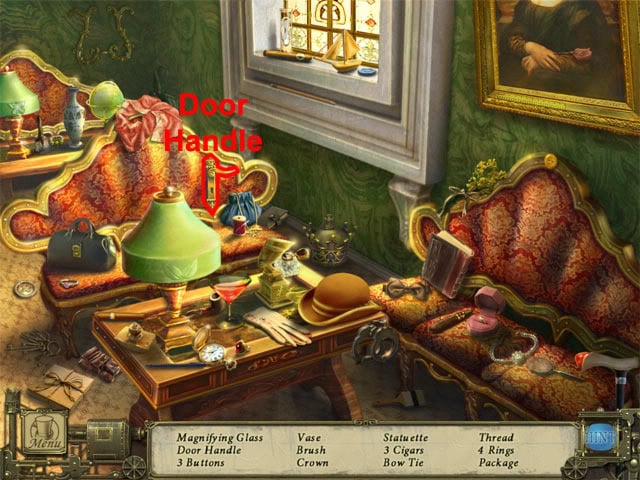
Find the remaining hidden objects to receive the door handle. Move forward to the door. Use the door handle on the door:
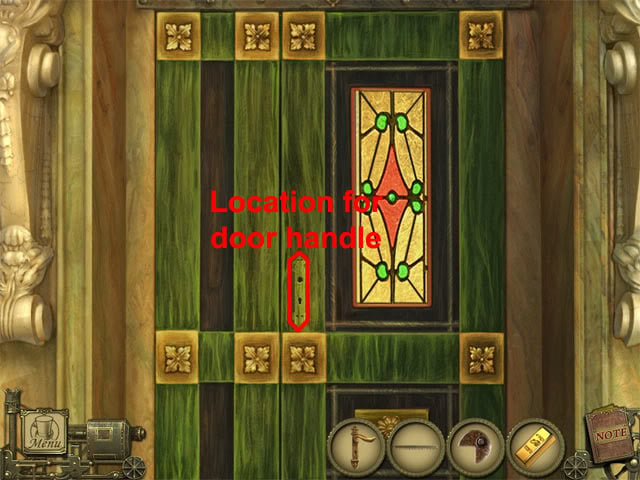
Select the door handle to open the door. Go through the doorway to enter the office.
Bank Office
Examine the shelves:
Select the no. 5 button:
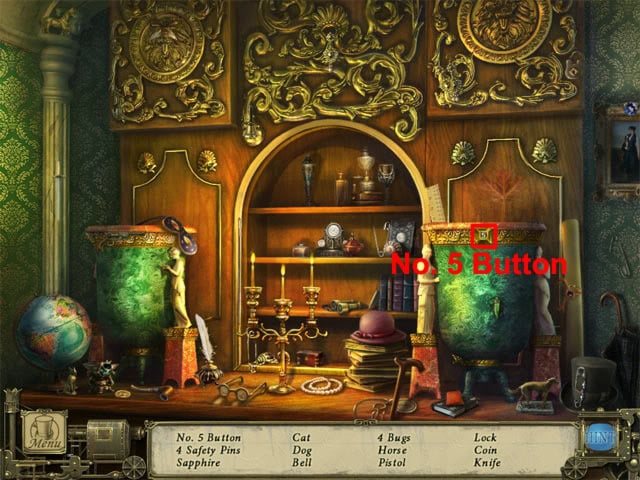
Find the remaining hidden objects to receive the numbered button. Examine the cabinet at the left side of the room to see another hidden object location. Open the chest, the two drawers, the cabinet door and the curtains:
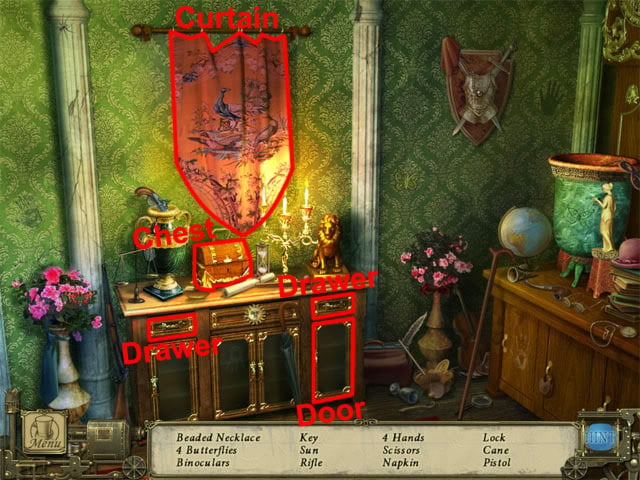
Find all of the hidden objects on the list except the key. Examine the panel on the wall that was revealed when the curtains were opened. Use the numbered button on the panel. The aim is to switch the buttons on the panel so that they are displayed in the correct order:
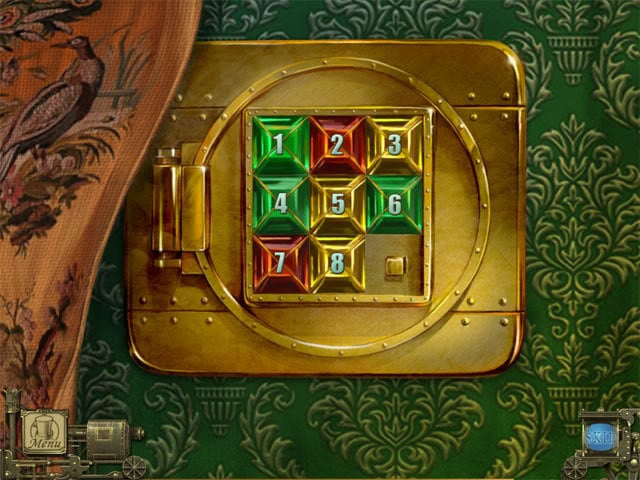
Take the key that is revealed when the panel opens. Examine the top-right corner of the carpet and take the lever that is revealed. Move back to the hall.
Bank Hall
Examine the base of the top-left pillar to see a pot. Use the lever on the tap above the pot. Select the lever to fill the pot with water. Use the rag on the pot of water to receive the wet duster. Go through the doorway to return to the office.
Bank Office
Open the door at the left side of the office. Go through the left doorway.
Bank Storage Box Room
Examine the lock on the gate. Use the key on the lock and then select the key to unlock the gate. Give the golden bar to Mignaud and he will allow you to explore the room. Examine the magnifying glass on the desk:
Use the wet duster on the magnifying glass three times to reveal the number 2232. Examine the storage box at the left side of the room and set the dials to 2232 to see a compartment open in the wall. Examine the compartment and take the picture of Eric L’Espanaye. Exit the view of the picture to return to the map. Select the spinning sphere on the map to travel to the police station.
Police Station Office
Open the bottom safe:
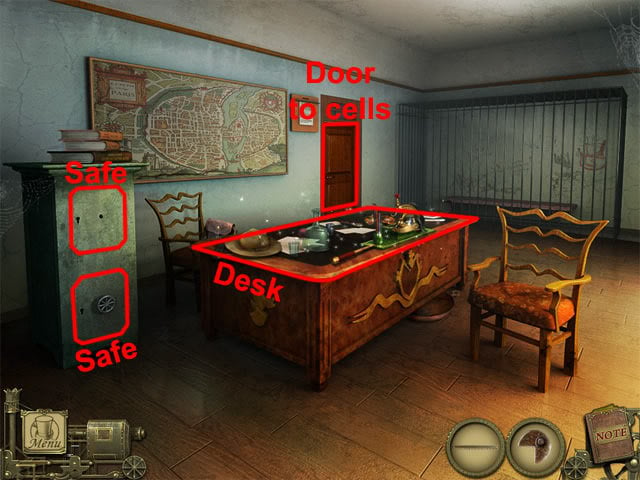
Take the empty matchbox from the bottom safe. Examine the top of the desk. Select the safe valve:
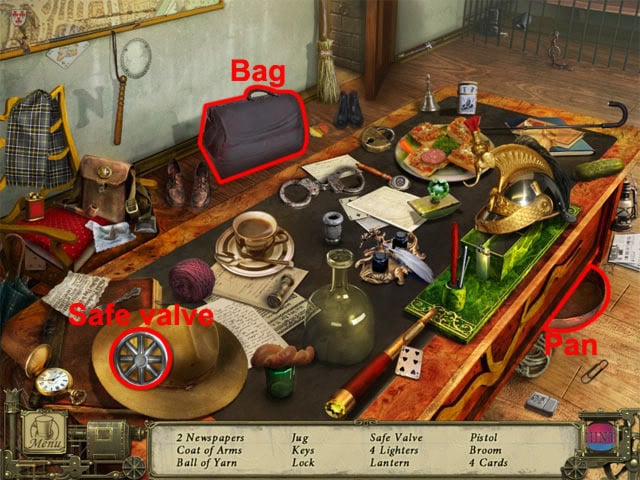
Select the bag and the pan. Find the remaining hidden objects to receive the safe valve. Examine the top safe. Use the safe valve in the hole on the middle of the safe and then turn the valve to open the safe. Take the second part of the unusual lock from the safe. Open the door and go through the doorway to see the cells.
Police Station Cells
Go through the left doorway to enter the cell. Examine the jug:
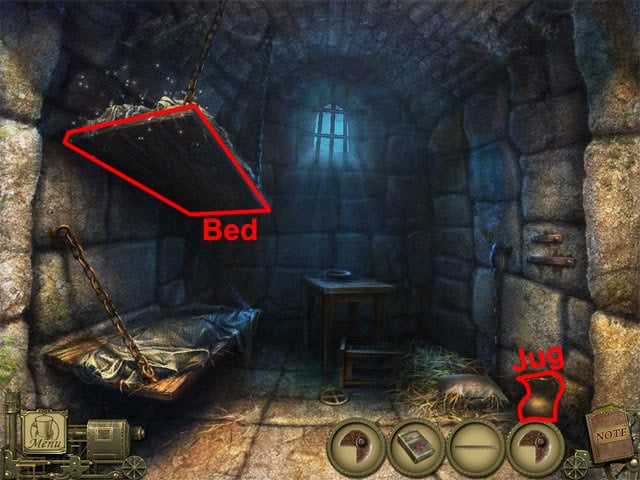
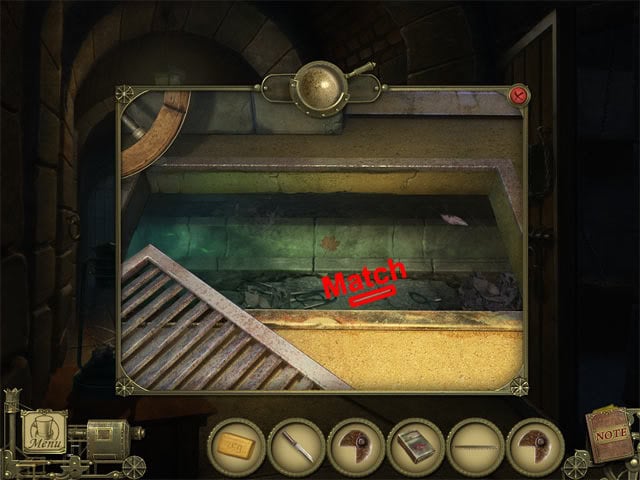
Take the knife from the jug. Examine the top bed. Select the stone to move it:
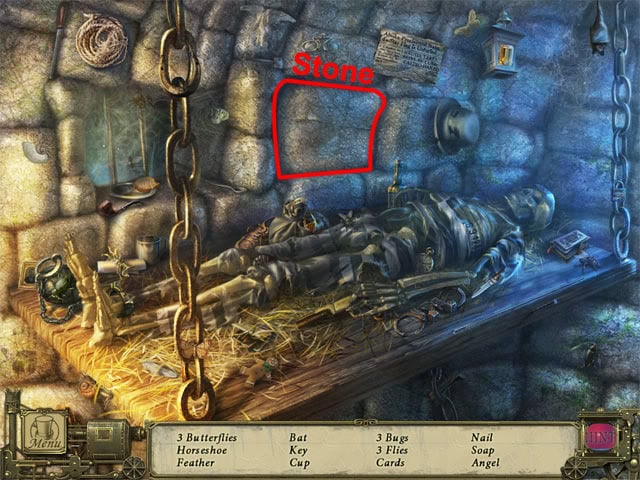
Select the soap that is revealed behind the stone. Find the remaining hidden objects to receive the soap. Back out of the cell. Select the grate on the floor:
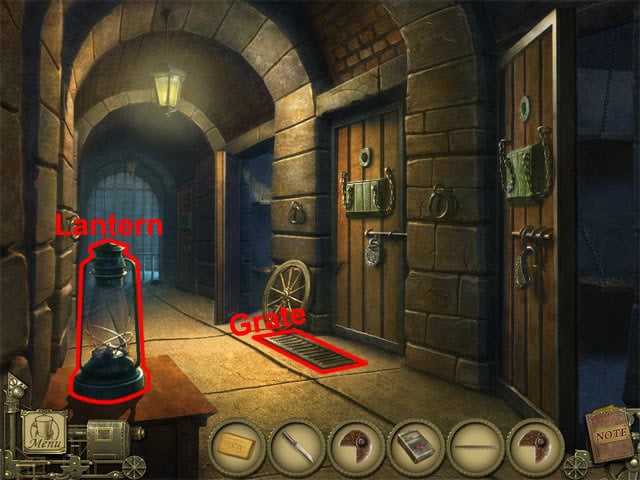
Examine the grate and then take the match:
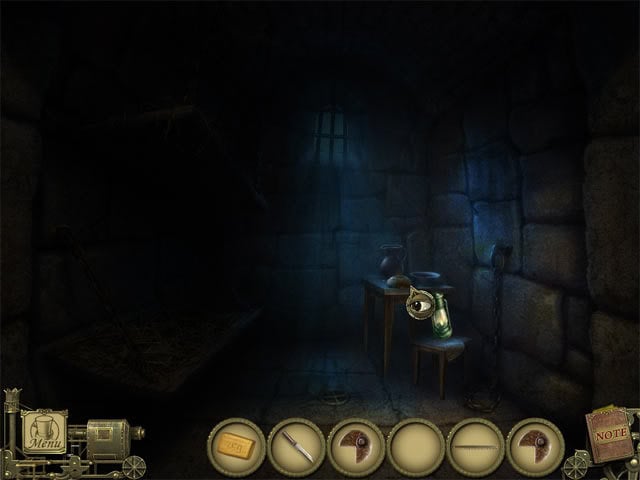
Examine the lantern. Use the match and the empty matchbox on the table. Use the match on the matchbox to light it. Use the lit match on the lantern. Take the lit lantern. Go through the doorway into the right cell and the lantern will automatically light the cell depending on where you move the mouse cursor. Move the lantern to the table at the right side of the cell:
Examine the table. Use the knife on the bread to cut it in half. Take the message tube from the bread. Examine the police report on the small table. Back out of the cell.
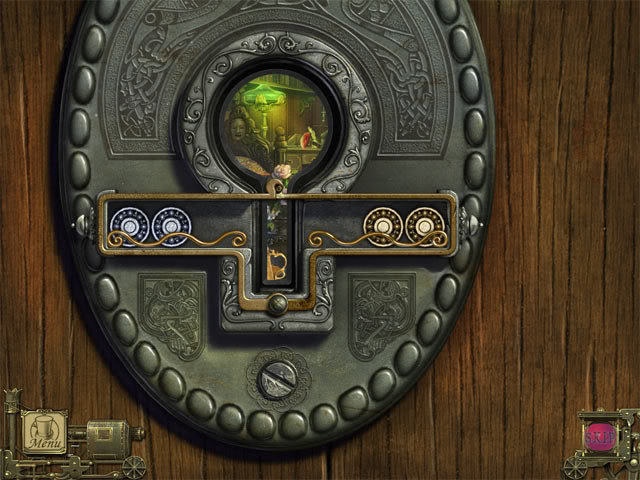
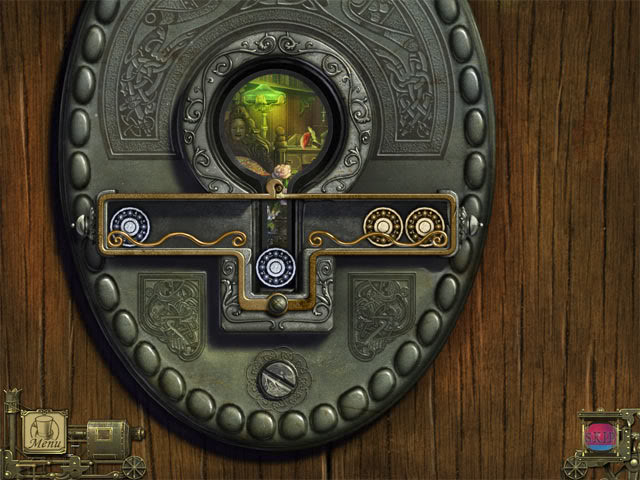
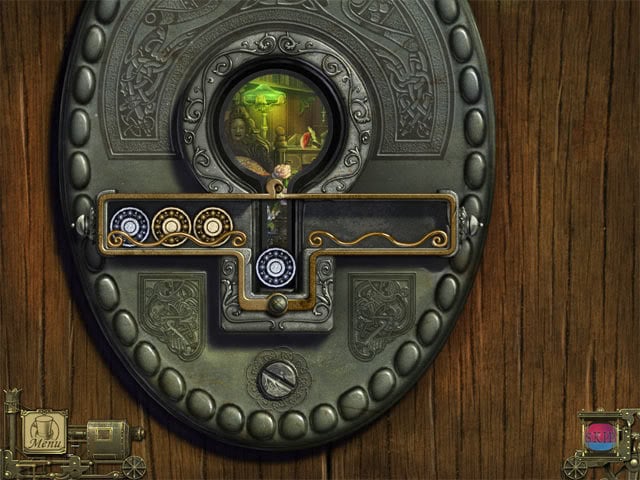
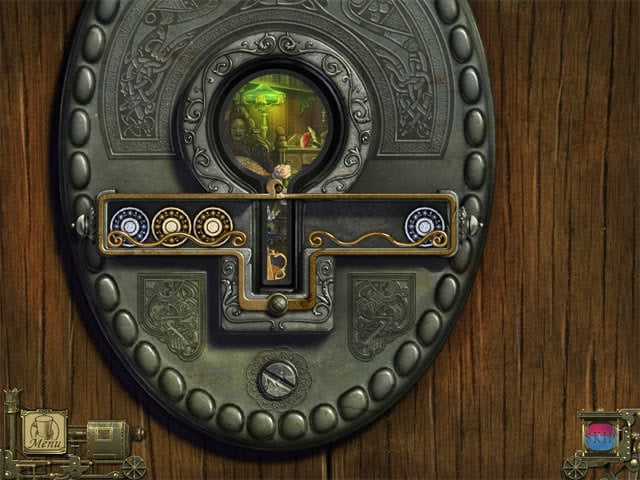
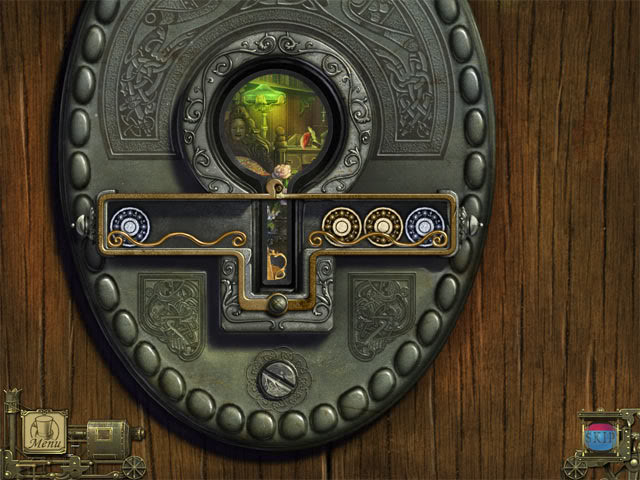
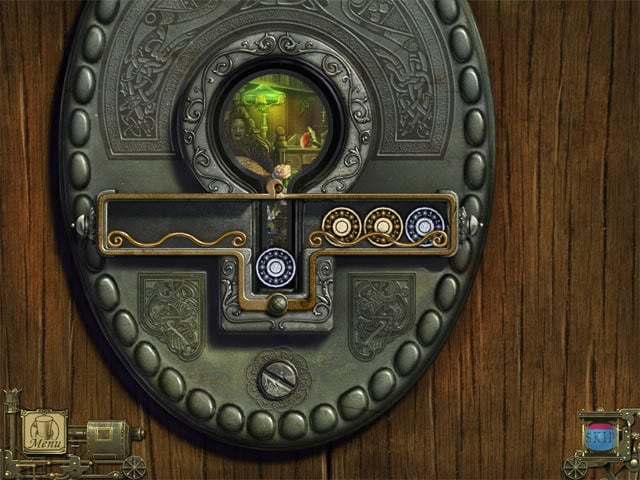
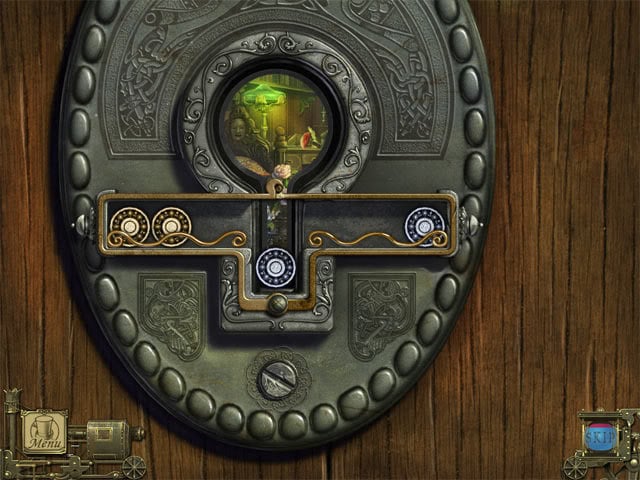
Examine the lock on the middle door. Use the two parts of the unusual lock from the inventory on the door lock. Click and drag each part of the lock to rotate them all into the position shown below:
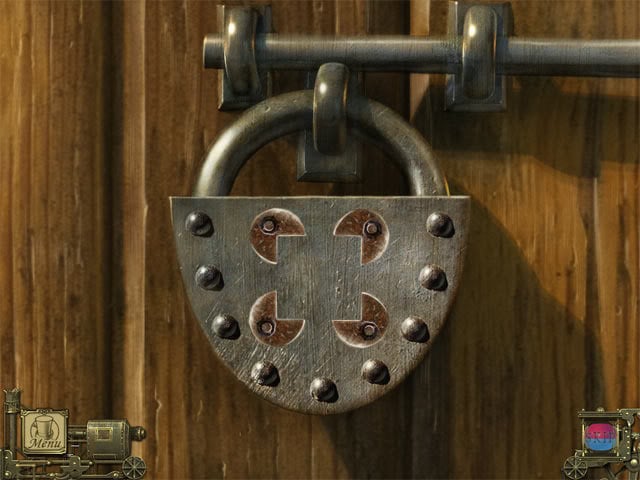
Go through the middle doorway. Examine the vice grip at the left side of the cell:
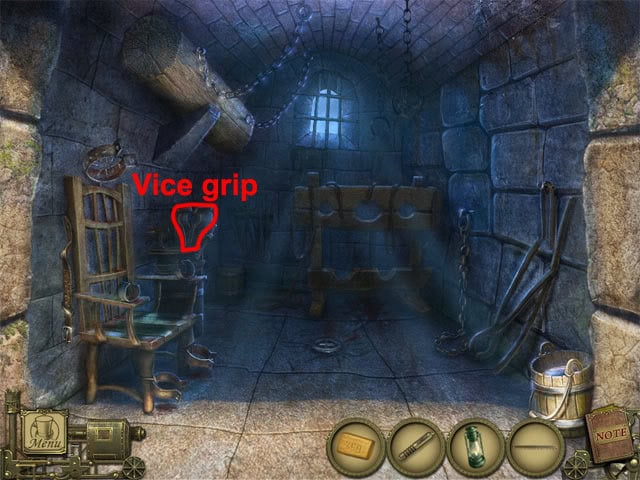
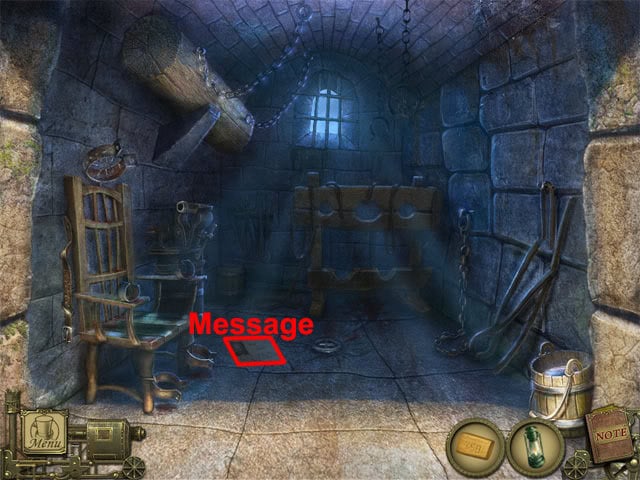
Use the message tube on the vice grip. Select the handle to tighten the vice. Use the fretsaw on the message tube and a message will fall to the floor. Examine the message:
Exit the view of the message to return to the map. Select the spinning sphere on the map to travel to the restaurant.
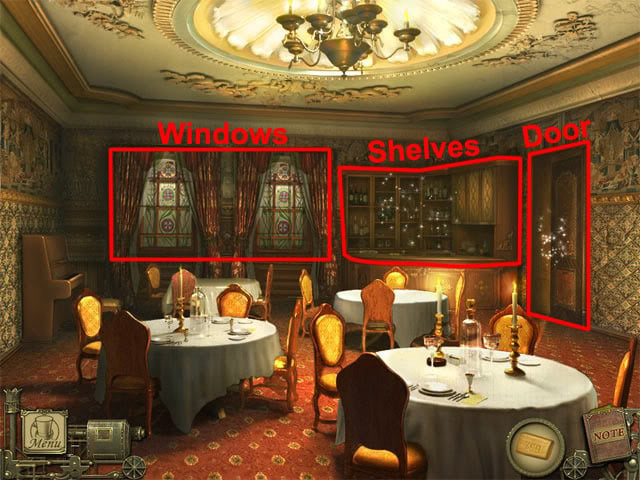
Restaurant Dining Area
Examine the windows:
Select the seven differences to receive the wine glass:
Examine the shelves. Select the eight bottles:
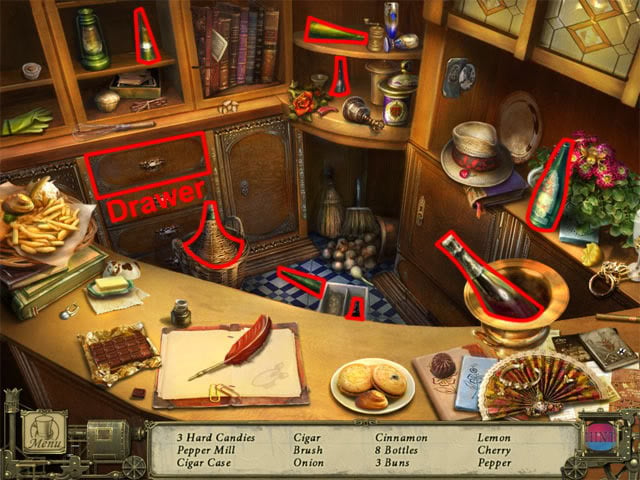
Open the top drawer. Find the remaining hidden objects to receive the bottle of wine. Go through the doorway to enter the kitchen.
Restaurant Kitchen
Open the cabinet.
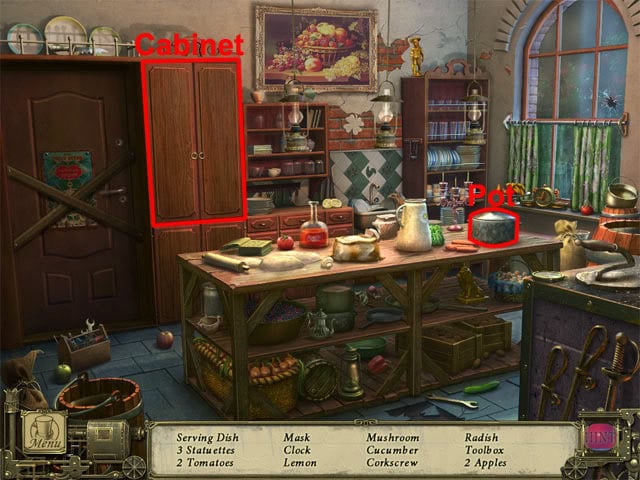
Select the pot to remove the lid. Examine the pot and select the corkscrew. Find the remaining hidden objects to receive the corkscrew.
Restaurant Dining Area
Examine the top-right table. Use the bottle of wine, the corkscrew and the empty wine glass on the table. Use the corkscrew on the cork in the bottle of wine. Use the bottle of wine on the empty wine glass. Take the glass of wine. Give the glass of wine to Odenheimer to return to the map. Select the spinning sphere to travel to the laundrette.
Laundrette Reception
Give the soap to the laundry lady. Open the left door:
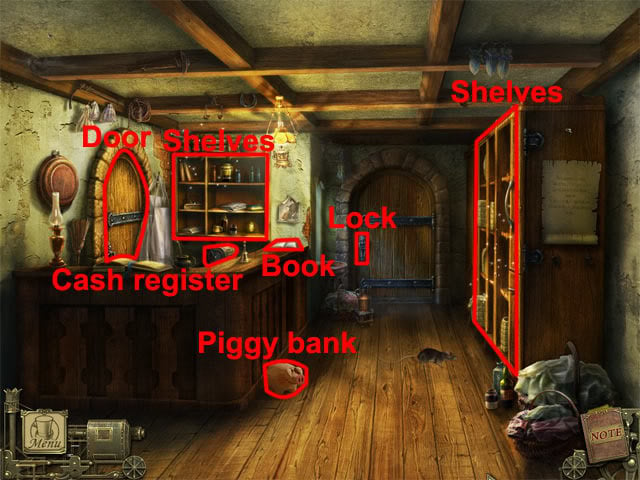
Go through the left doorway. Select the fish net:
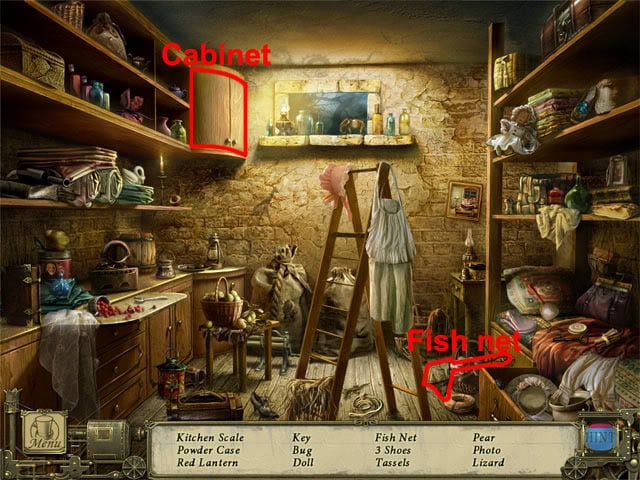
Open the cabinet. Find the remaining hidden objects to receive the fish net. Examine the left shelves. Select the no. 3 button:
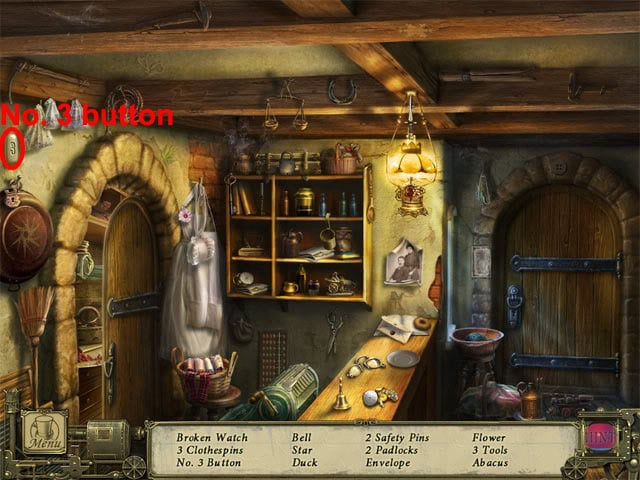
Find the remaining hidden objects to receive the no. 3 button. Examine the right shelves. Examine the owl:
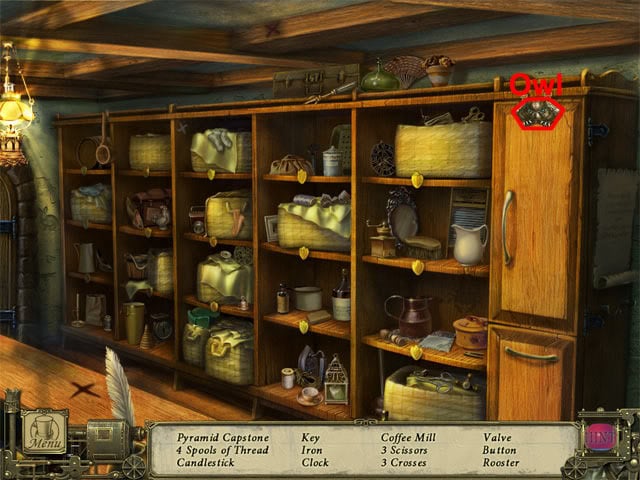
Select the owl to reveal a device. Use the no. 3 button on the right slot. Select button 1, button 3 and then button 2 to open the cabinet door. Select the blue button from the cabinet. Find the remaining hidden objects to receive the blue button. Examine the book on the counter to see the cash register code:

Exit the view of the book. Examine the cash register. Select the buttons shown below:
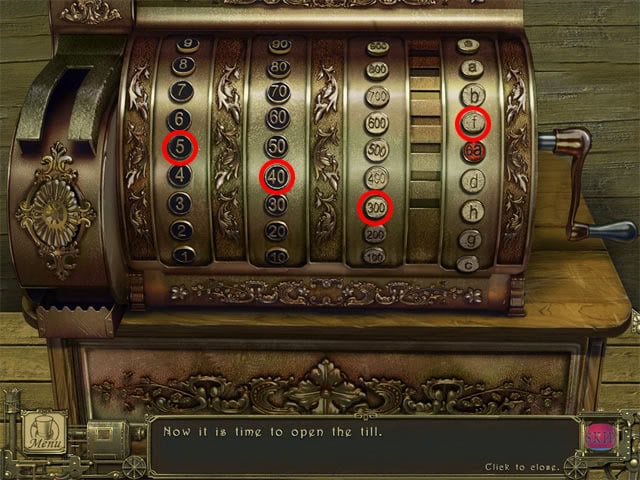
Take the key from the cash register drawer. Examine the lock on the right door. Use the key on the lock and then select the key to open the door. Go through the doorway to enter the back room.
Laundrette Back Room
Examine the barrel at the left side of the room:
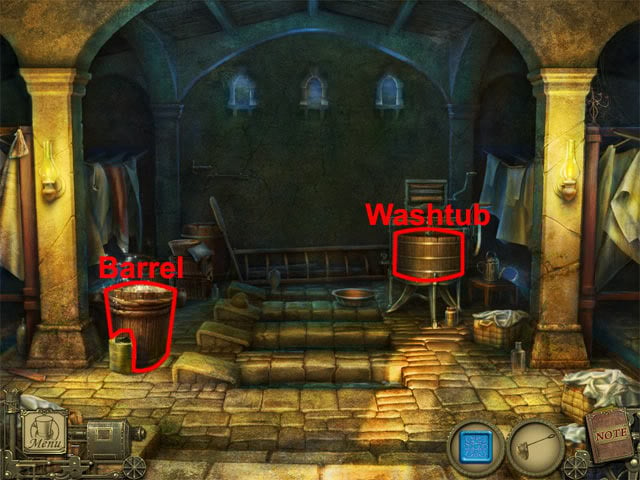
Select the hammer:
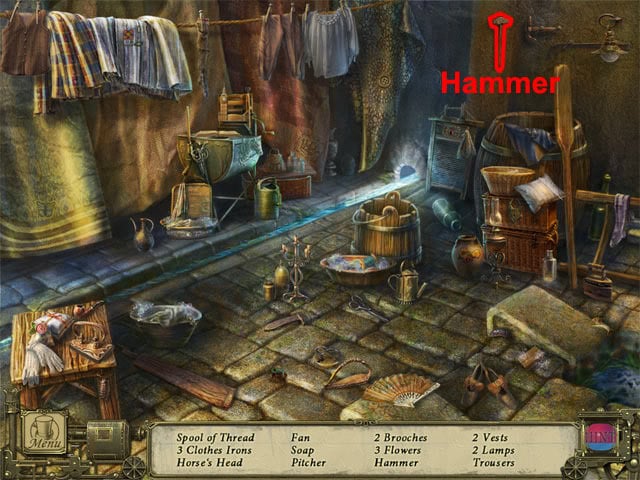
Find the remaining hidden objects to receive the hammer. Move back to the reception area.
Laundrette Reception
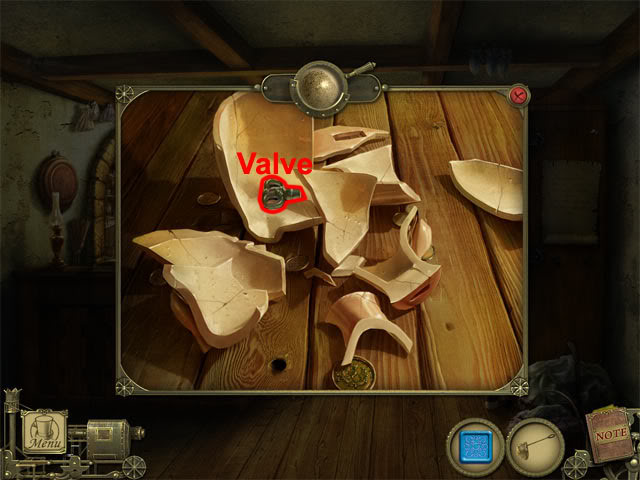
Use the hammer on the piggy bank. Examine the broken piggy bank and take the valve handle:
Go through the doorway to return to the back room.
Laundrette Back Room
Examine the washtub at the right side of the room. Examine the slot for the valve:
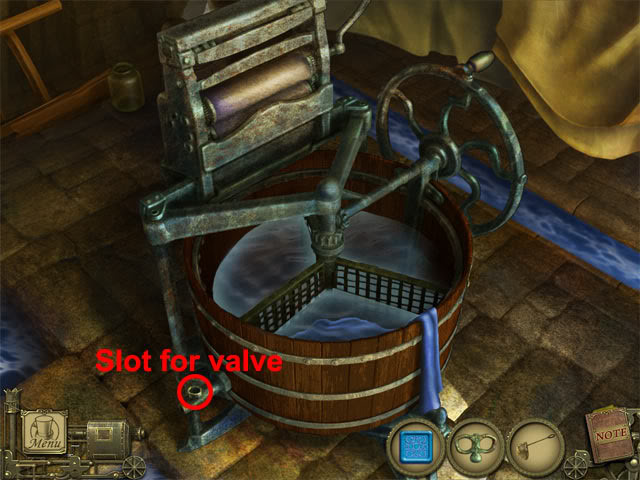
Use the valve handle on the slot for the valve. Select the valve to drain the water from the washtub. Take the ball from the washtub to return to the map. Select the spinning sphere on the map to travel to the boutique.
Boutique
Open the top drawer at the left side of the room:
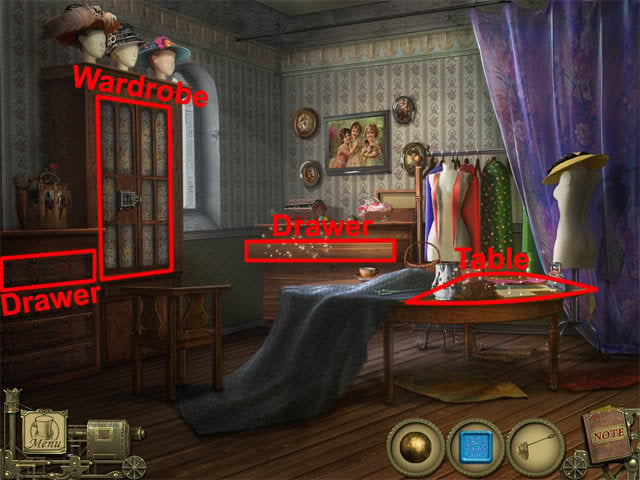
Examine the drawer and take the green button. Examine the drawer in the middle of the room. Select the tweezers:
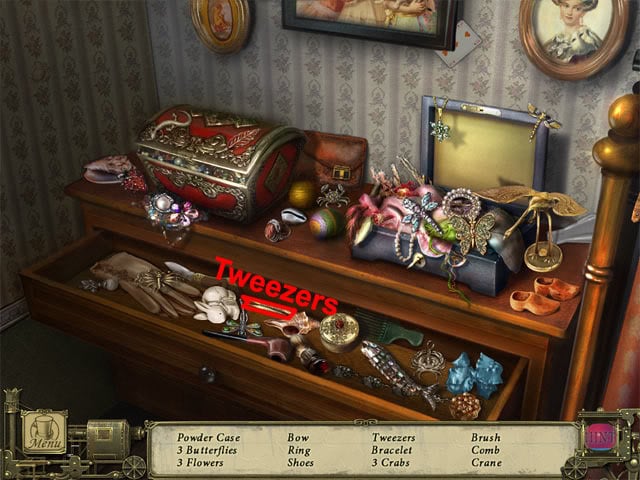
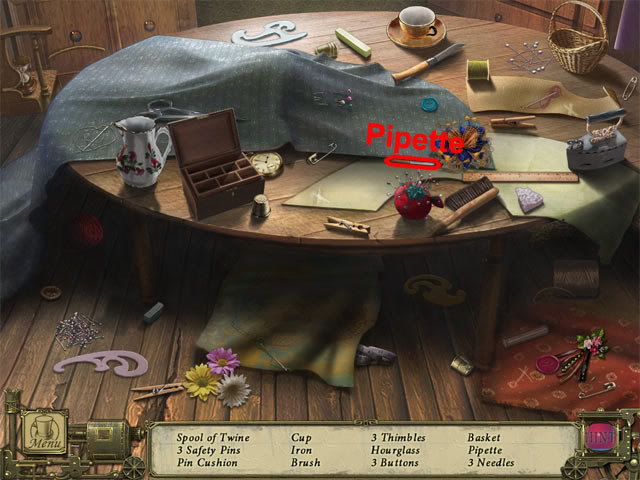
Find the remaining hidden objects to receive the tweezers. Examine the table. Select the pipette:
Find the remaining hidden objects to receive the pipette. Examine the lock on the wardrobe. Use the green button and the blue button on the lock. The aim now is to place five buttons of the same color in a line, which will cause the line to disappear. An example is shown below:
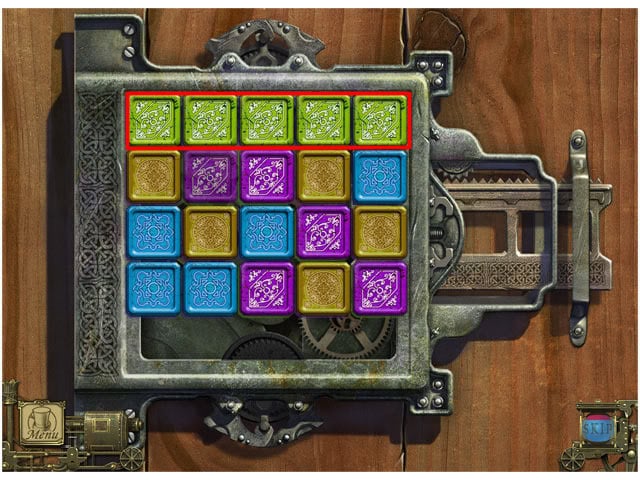
Keep creating lines that have buttons of the same color to complete the mini-game. Open the wardrobe door and then select the wardrobe to go outside.
Outside Rue Morgue
Select the door to enter the Rue Morgue:
Rue Morgue Stairway
Examine the wall at the left side of the stairway:
Open the middle drawer:
Examine the drawer and select the stone. Move the painting. Find the remaining hidden objects to receive the stone. Examine the stairway rail and use the pipette on the blood. Examine the stairs and use the tweezers on the lock of hair. Go upstairs.
Rue Morgue Upstairs Hall
Examine the window at the back of the hall:
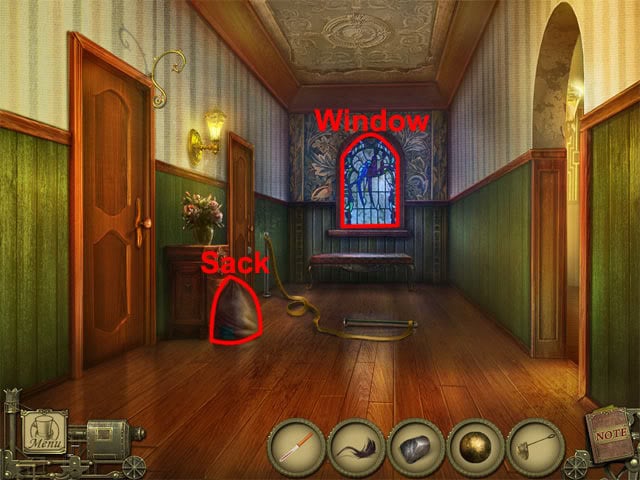
Take the scissors:
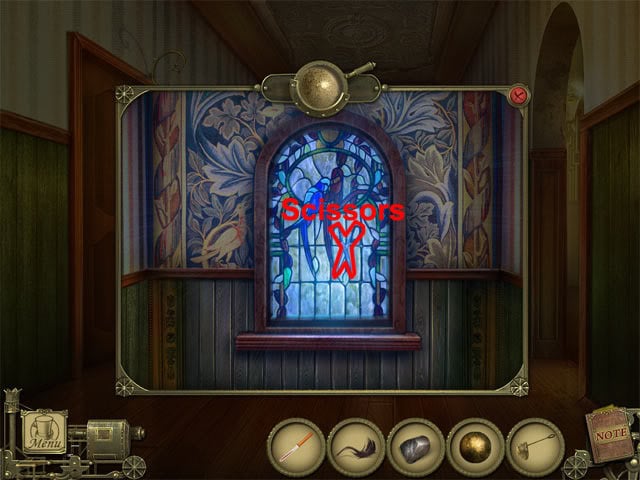
Use the scissors on the sack and sand will pour out. Examine the drawer that was behind the sack and take the button:
Move east through the doorway to the painting room.
Rue Morgue Painting Room
Examine the goldfish bowl at the right side of the room:
Use the fish net on the bowl to take the ball bearing. Move back twice to the stairway.
Rue Morgue Stairway
Examine the door below the green curtains at the left side of the room to see a panel. Use the button that was found in the upstairs hall on the panel. The panel has many different types of buttons on it, and the aim here is to press the matching pairs of buttons. The door will open after all of the buttons have been correctly matched. Go through the doorway to enter the study.
Rue Morgue Study
Examine the bench:
Select the wrench:
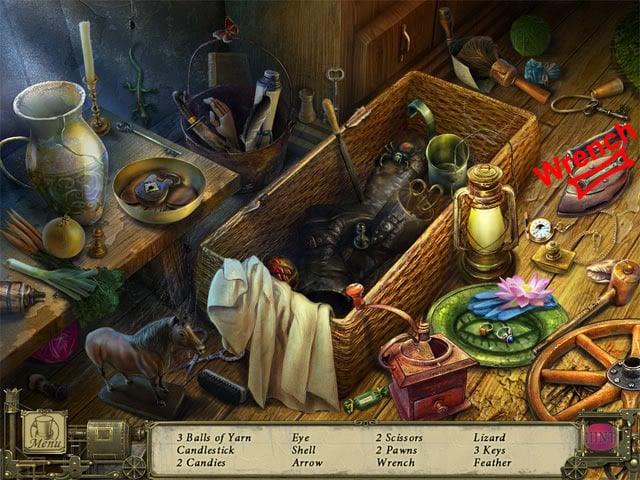
Find the remaining hidden objects to receive the wrench. Examine the shelves. Select the screwdriver:
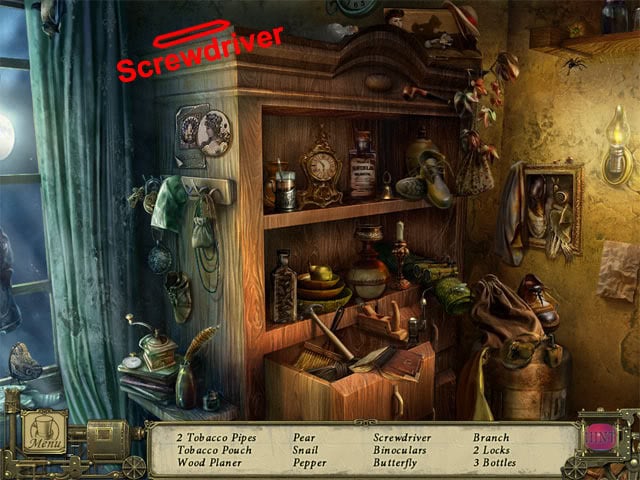
Find the remaining hidden objects to receive the screwdriver. Examine the panel at the top-left corner of the study. Use the screwdriver on the screw at the bottom-right corner of the panel. Use the wrench on the remaining three bolts at the corners of the panel. Use the stone on the panel twice to break the glass. Select the acid:
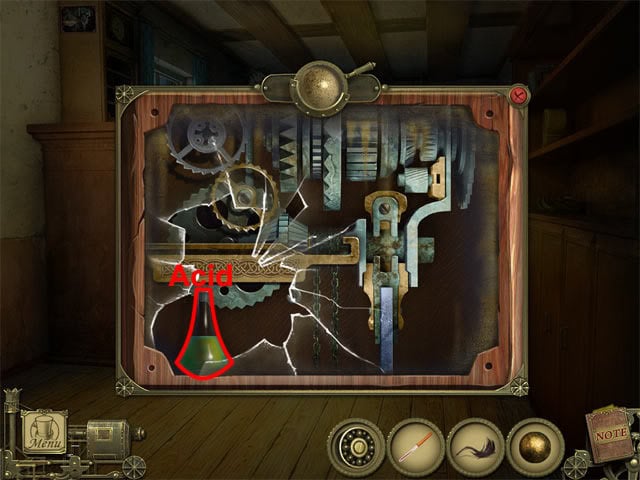
Examine the door at the back of the study. Use the acid on the lock:

Go through the doorway. Select the ball:
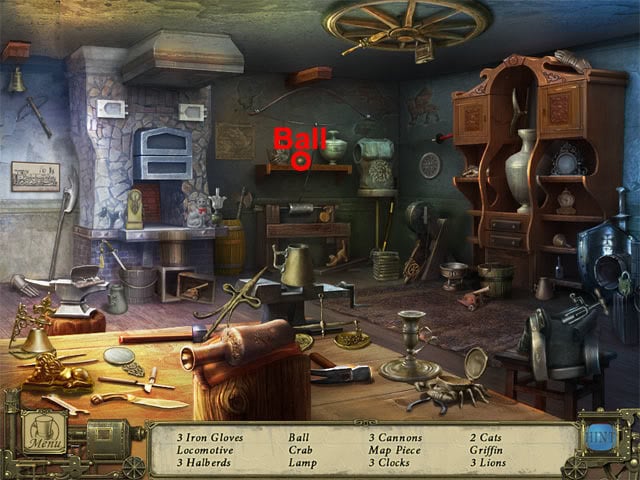
Find the remaining hidden objects to receive the second ball. Move back to the stairway and east to the stained glass door.
Rue Morgue Stained Glass Door
Examine the lock on the door:
Use the two balls on the bottom of the lock to open the door. Go through the doorway. Select the bell:
Open the wardrobe door. Find the remaining hidden objects to receive the bell. Move back and go upstairs to return to the upstairs hall.
Rue Morgue Upstairs Hall
Examine the hook at the top-right corner of the left door:
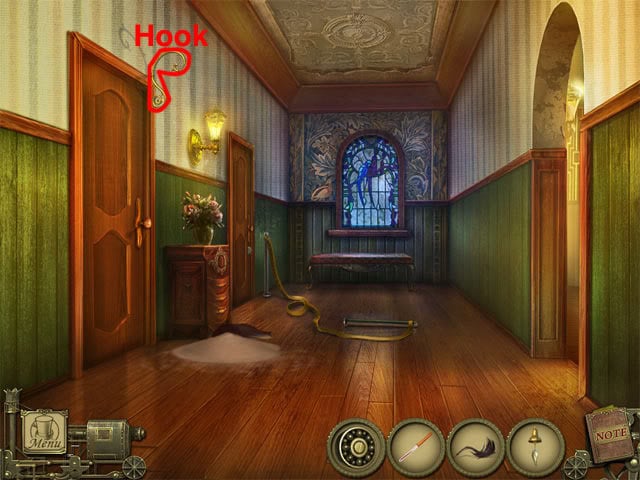
Use the bell on the hook. Select the bell and the door will open. Go through the left doorway to enter the doctor’s apartment.
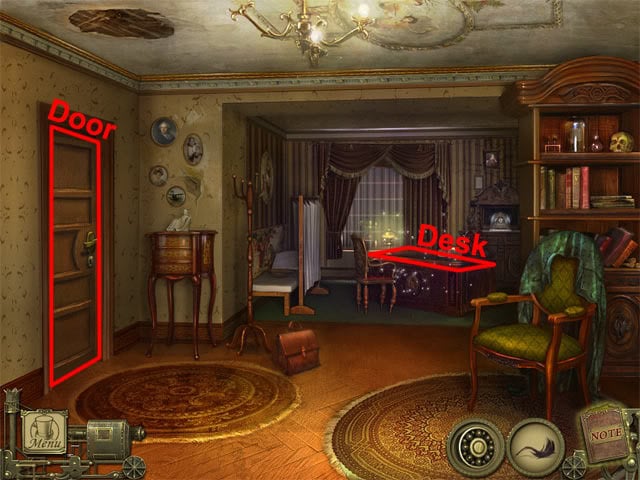
Rue Morgue Doctor’s Apartment
Give the pipette with blood to the doctor. Examine the desk:
Select the key:
Find the remaining hidden objects to receive the key. Examine the door at the left side of the room. Use the ball bearing on the right side of the lock:
The aim now is to switch the positions of the bearings so that the silver bearings are on the right side of the lock and the gold bearings are on the left side of the lock. Move the right silver bearing into the slot:
Move both gold bearings to the left side of the lock:
Move the silver bearing in the slot to the right side of the lock:
Move both gold bearings to the right side of the lock:
Move the left silver bearing into the slot:
Move both gold bearings to the left side of the lock:
Move the silver bearing in the slot to the right side of the lock:
Use the key on the keyhole and then select the key to open the door. Go through the doorway. Select the two drawers, the bed and the scalpel:
Examine the drawers and the bed to find items. Find the remaining hidden objects to receive the scalpel. Move back to the upstairs hall and east through the doorway to the picture room.
Rue Morgue Picture Room
Use the scalpel on the middle of the carpet to reveal a trapdoor. Open the trapdoor and take the mallet. Move back twice and east to the stained glass door.
Rue Morgue Stained Glass Door
Use the mallet on the chest:
Take the glove from the chest. Use the glove on the ladder to take the ladder. Move back, up and east to return to the picture room.
Rue Morgue Picture Room
Use the ladder on the wardrobe. Examine the top of the wardrobe to see a brush. Take the brush. Examine the goldfish bowl. Use the brush in the goldfish bowl to receive the wet brush. Use the wet brush on the picture in the middle of the room five times to see a wolf’s eye. Select the wolf’s eye to take it. Move back to the upstairs hallway.
Rue Morgue Upstairs Hallway
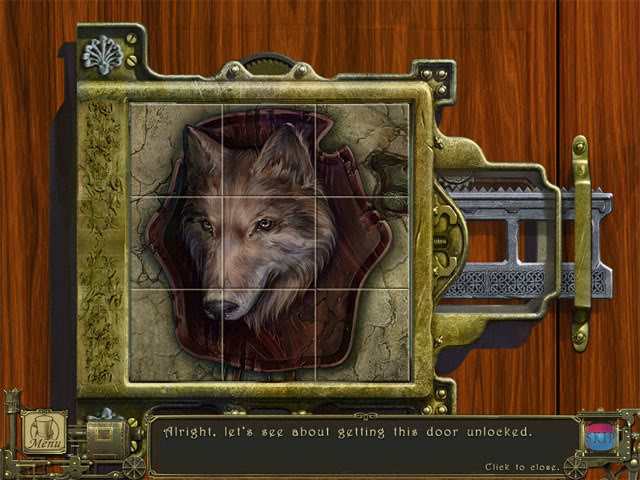
Examine the door at the top-left corner of the hall to see a tile puzzle. Use the wolf’s eye on the tile puzzle. The aim now is to keep moving the mouse cursor over one of the tiles until it changes to the correct section of the picture. Keep changing the tiles to make the picture shown below:
Go through the top-left doorway to enter the bedroom.
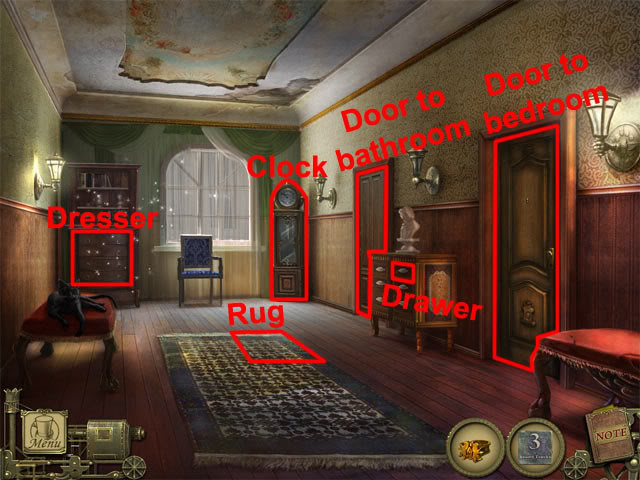
Rue Morgue Bedroom
Examine the fireplace:
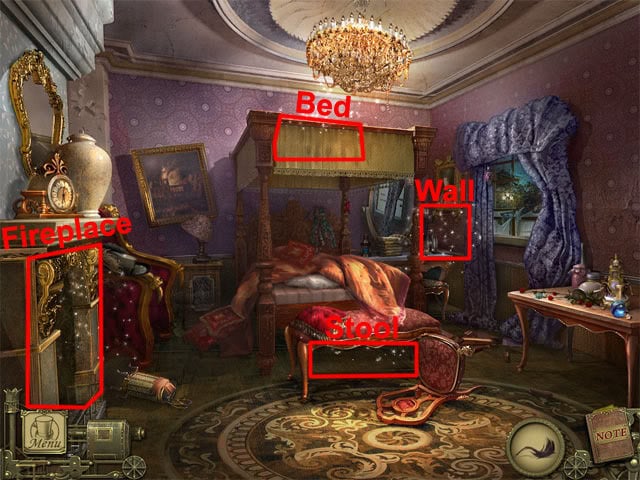
Select the microscope:

Find the remaining hidden objects to receive the microscope. Examine the top of the bed. Select the glass:
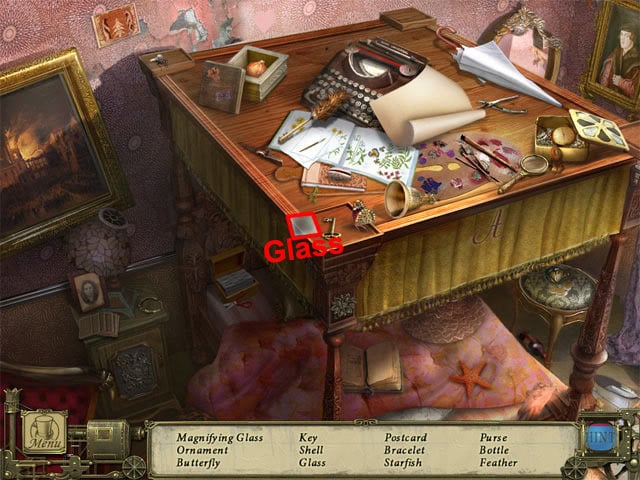
Select the glass. Find the remaining hidden objects to receive the glass. Examine the stool. Select the shell:
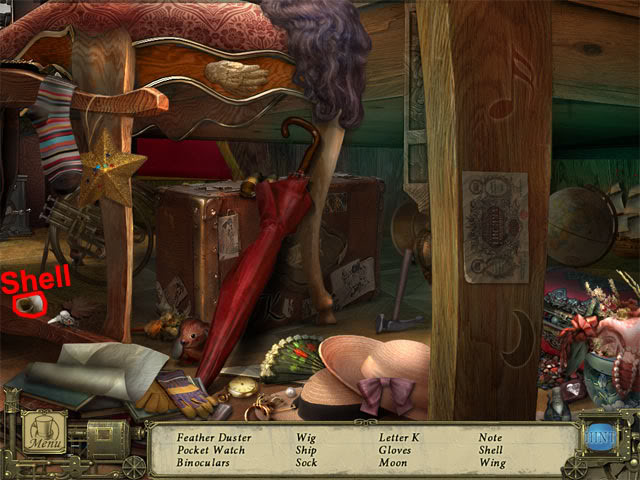
Find the remaining hidden objects to receive the seashell. Examine the wall at the right side of the bed. Select the pipette:
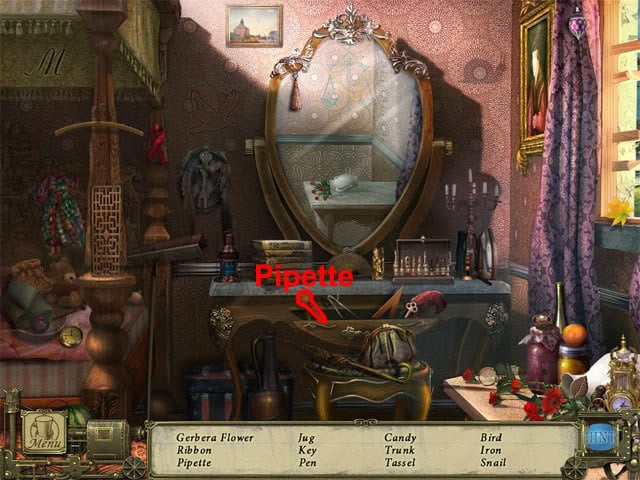
Find the remaining hidden objects to receive the pipette. Examine the table at the right side of the room. Use the seashell, pipette, microscope and glass on the table. Use the shell on the vial of blue liquid and the liquid will turn pink. Use the pipette on the vial of pink liquid. Use the glass on the microscope. Use the pipette of pink liquid on the glass to return to the map. Select the spinning circle to travel to the Bois de Boulogne.
Outside Windmill
Examine the note:
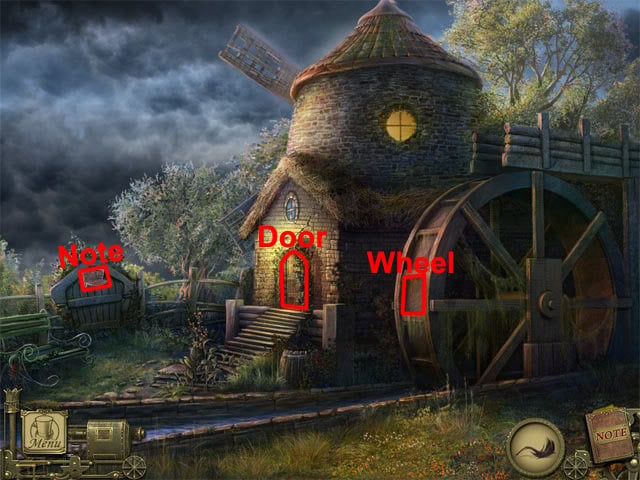
Examine the wheel and take the button. Open the door and go through the doorway to enter the windmill living room.
Windmill Living Room
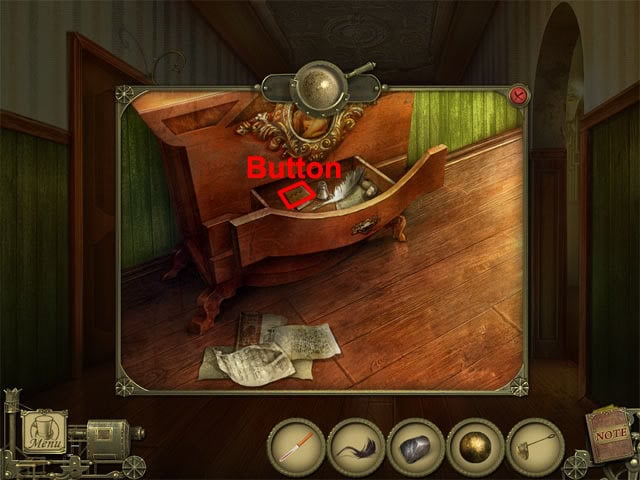
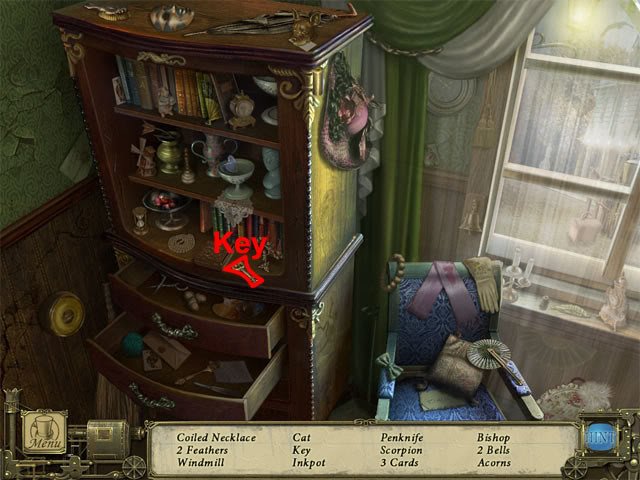
Examine the dresser:
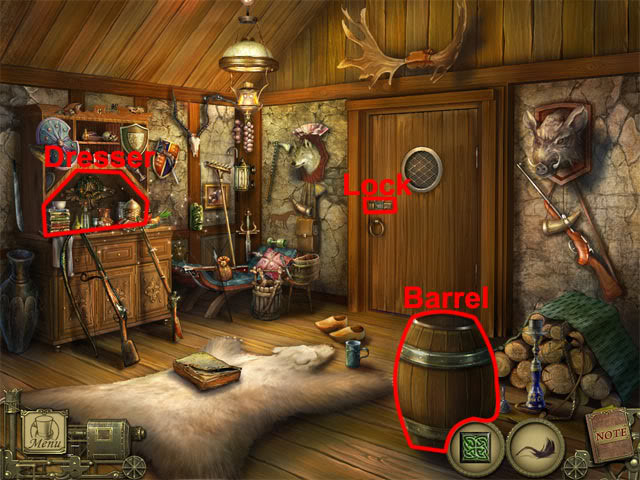
Open the middle drawer:
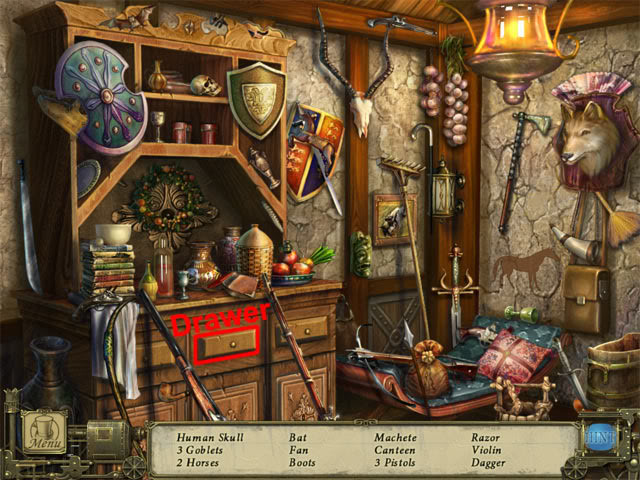
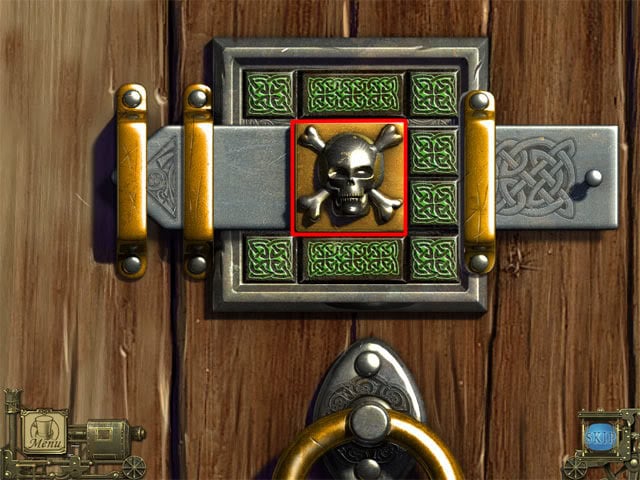
Examine the middle drawer and select the razor. Find the remaining hidden objects to receive the razor. Examine the barrel and take the wide button. Examine the door lock. Use the wide button and the button on the lock. The aim is to move the buttons so that the skull can be moved toward the right side of the lock. Start by moving the two middle buttons one space to the right:
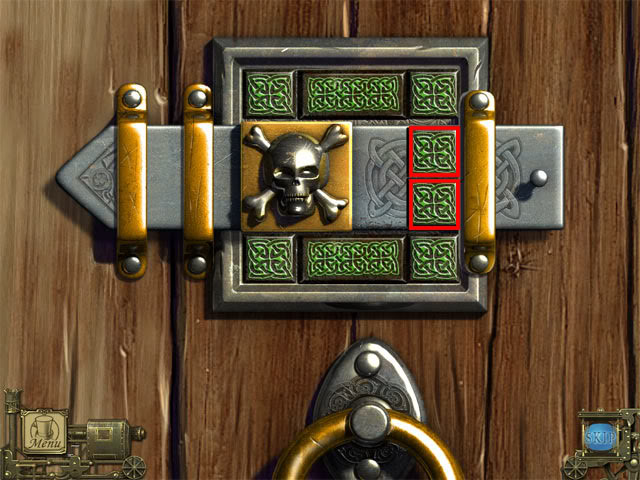
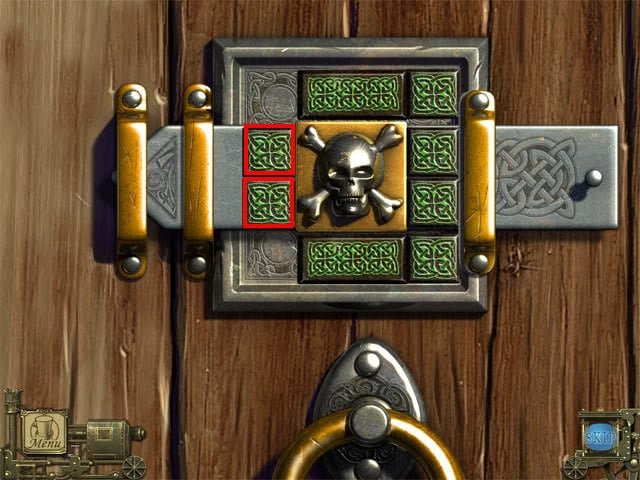
Move the lock one space to the right:
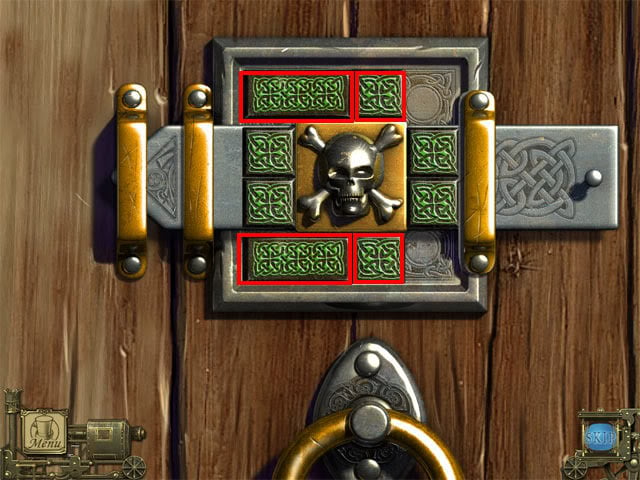
Move the top-left button one space down and the bottom-left button one space up:
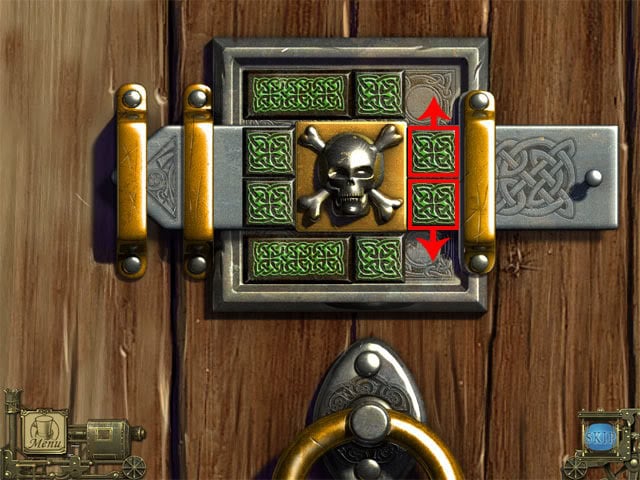
Move the two wide buttons and the top-right and bottom-right buttons one space to the left:
Move the two buttons at the right side of the lock to the top-right and bottom-right corners:
After the last two buttons have been moved, the lock will automatically slide to the right and the door will open. Go through the doorway to enter the windmill gear room.
Windmill Gear Room
Take the comb in the bucket:
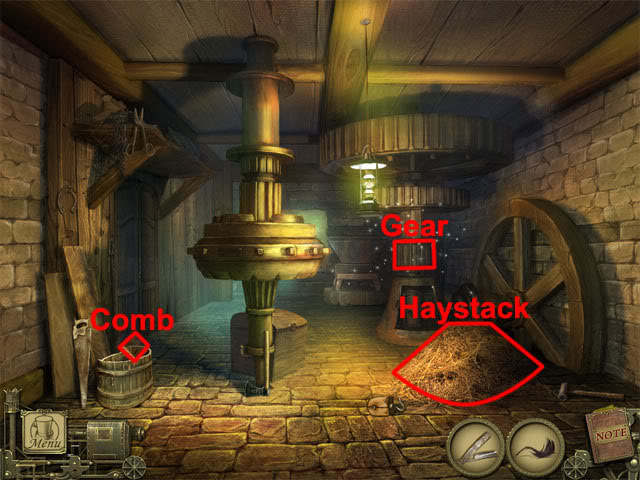
Examine the gear. Select the pitchfork:
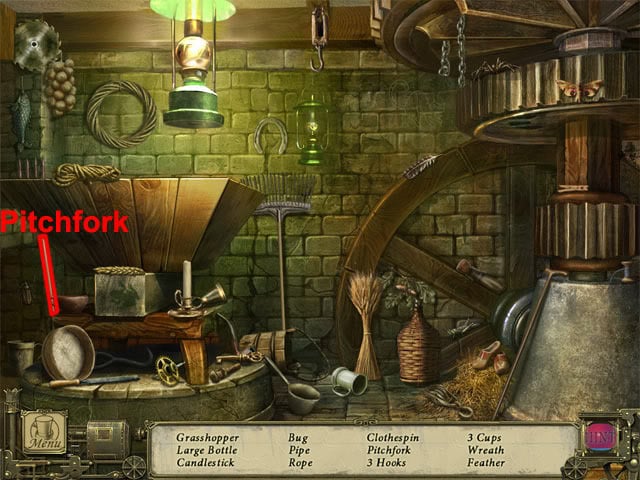
Find the remaining hidden objects to receive the pitchfork. Use the pitchfork on the haystack to reveal a kettle. Examine the kettle and then take it. Move back to the living room.
Windmill Living Room
Examine the wolf:
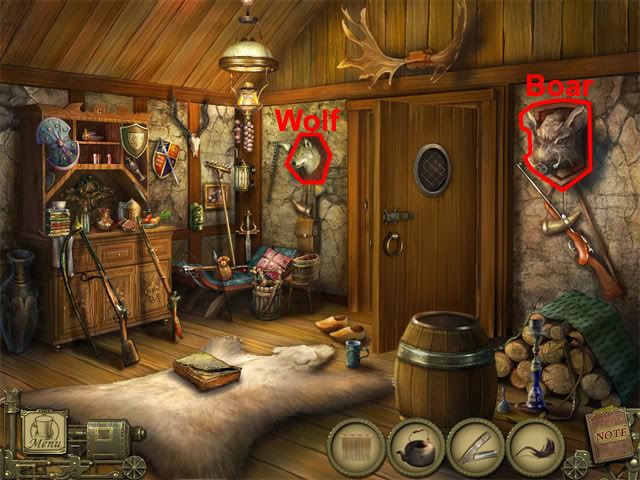
Use the comb on the wolf to take the wolf fur. Examine the boar. Use the comb on the boar to take the boar hair. Select the spinning sphere on the map to travel to the docks.
Docks
Move toward the ship and then board the ship.
Outside Ship
Open the door:
Go through the doorway to enter the cage room of the ship.
Ship Cage Room
Move to the cage:
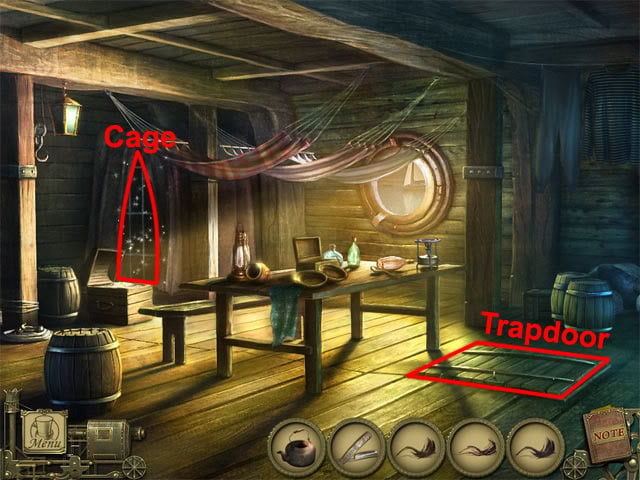
Examine the bottom-left corner of the cage and select the circular handle:
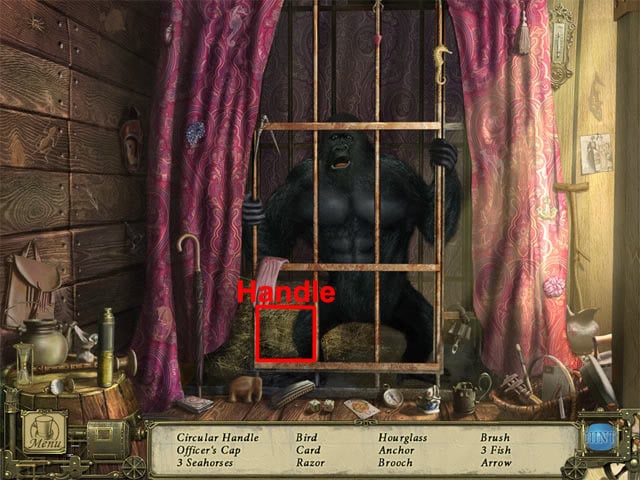
Find the remaining hidden objects to receive the circular handle. Use the circular handle on the trapdoor. Select the circular handle twice to open the trapdoor. Go down the trapdoor to enter the hold.
Ship Hold
Examine the barrels:

Select the pliers:
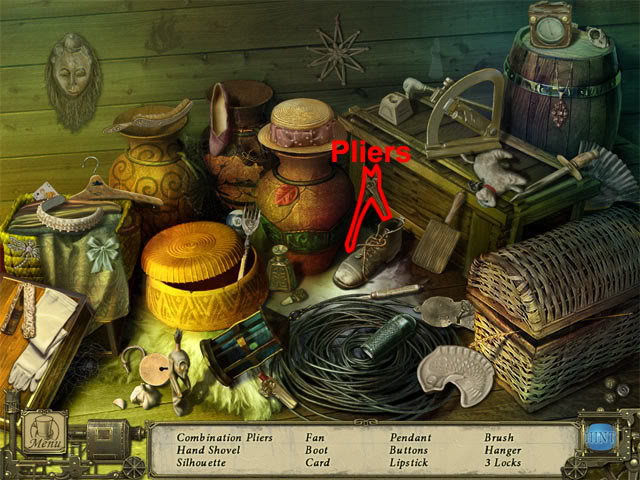
Find the remaining hidden objects to receive the combination pliers. Examine the base of the ladder. Select the crowbar:

Find the remaining hidden objects to receive the crowbar. Use the combination pliers on the plank to remove the nail. Use the crowbar on the plank to reveal an axe. Examine the plank and take the axe. Go upstairs to the cage room.
Ship Cage Room
Use the axe on the barrel twice. Examine the hole in the barrel and take the wrench. Move back to exit the ship.
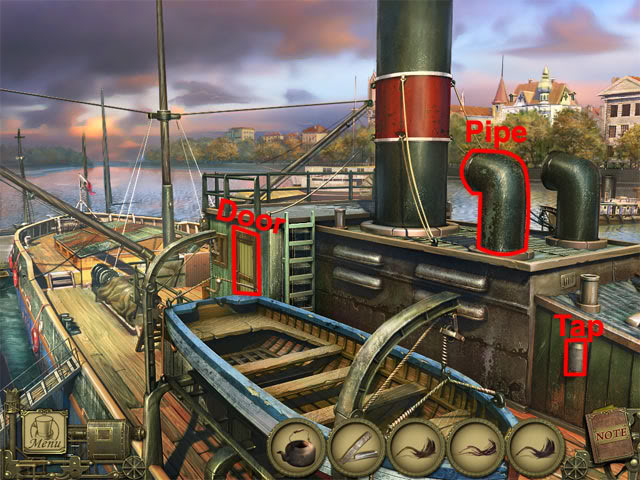
Outside Ship
Examine the tap at the right side of the ship. Use the kettle on the tap. Turn the tap to fill the kettle with water. Take the full kettle. Examine the left pipe. Use the wrench on the bolt at the top of the pipe to remove the grate. Take the monkey picture. Go back through the doorway to return to the cage room.
Ship Cage Room
Examine the Bunsen burner on the right side of the table:
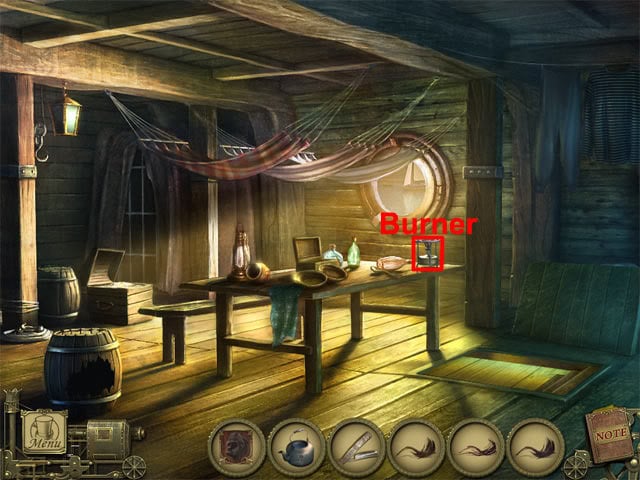
Select the switch on the base of the burner. Use the full kettle on the flame. Move back to exit the ship.
Outside Ship
Examine the back of the boat at the bottom of the screen:
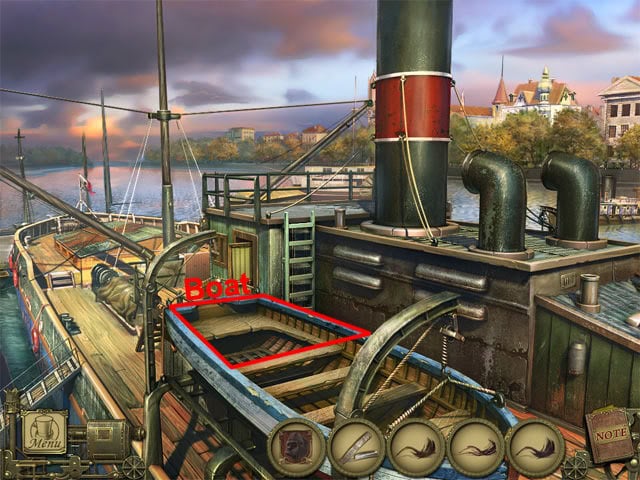
Take the butterfly nut from the boat. Go back through the doorway to enter the ship.
Ship Cage Room
Examine the box on the table:
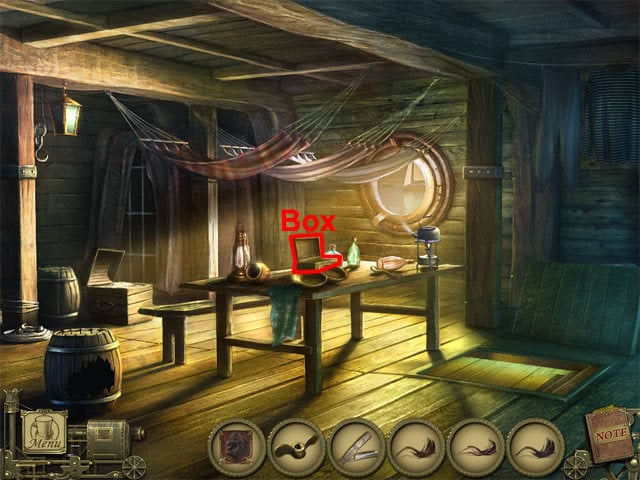
Use the butterfly nut at the bottom-left corner of the box. Turn both butterfly nuts to open the box. Use the monkey picture on the middle picture slot. Use the wolf fur, boar hair and lock of hair on the following slots:
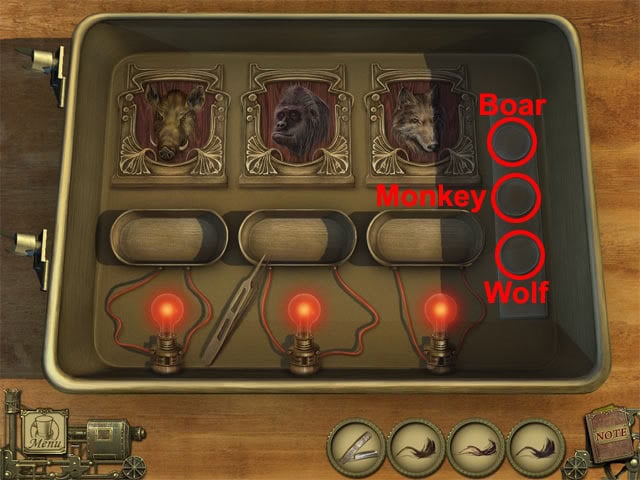
The aim now is to drag the hair from the circles to the slots below the animals. After this has been done, give the razor to the sailor to complete the game.
Bonus – Outside
The bonus section is only available on the collector’s edition of the game. After completing the game, select the extras doorway on the main menu screen. Move the box four times:
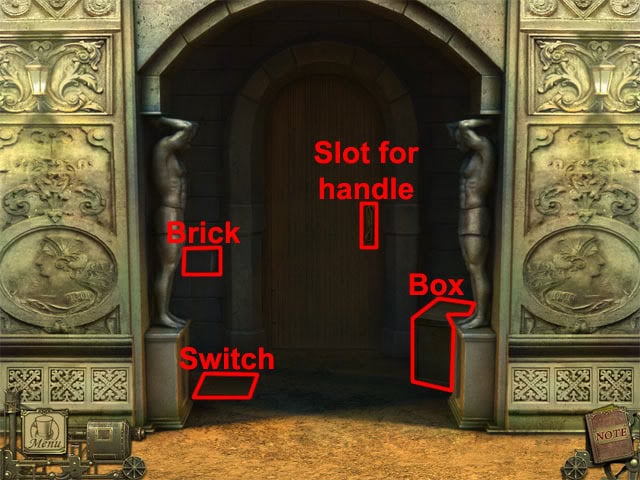
The box will trigger the floor switch and the brick will move. Examine the gap in the wall where the brick moved to take the door handle. Use the door handle on the slot for the handle on the door. Select the handle. Go through the doorway to enter the living room.
Bonus – Living Room
Examine the piano:
Select the signet ring:
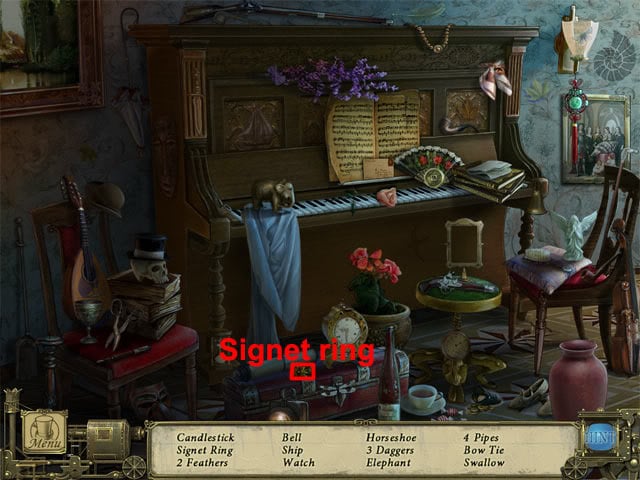
Find the remaining hidden objects to receive the signet ring. Examine the table. Select the clip:
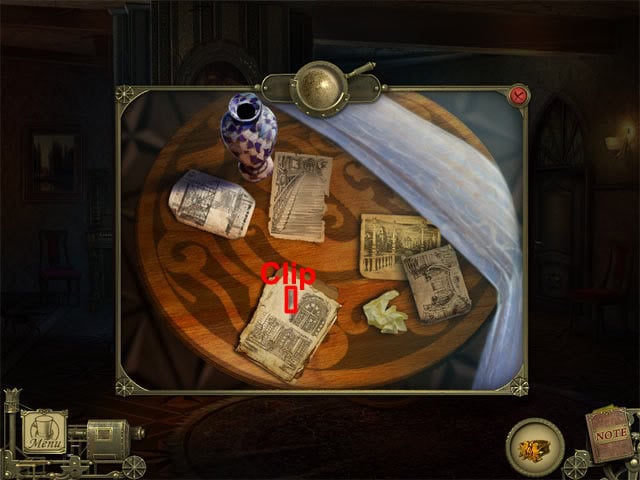
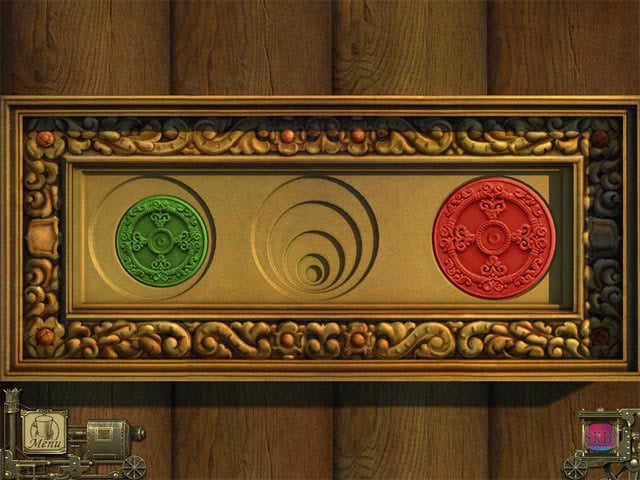
Examine the box on top of the fireplace. Use the clip on the lock to unlock the box. Take tile no. 3. Examine the box again and press the yellow button to make the picture above the fireplace turn around. Examine the door at the right side of the room to see a disk mini-game. The aim is to move the discs from the left hole to the right hole, with the rule that larger disks can only be placed on top of smaller disks. Move the red disk to the right hole:
Move the green disk to the middle hole:
Move the red disk to the middle hole:
Move the yellow disk to the right hole:
Move the red disk to the left hole:
Move the green disk to the right hole:
Move the red disk to the right hole:
Move the blue disk to the middle hole:
Move the red disk to the middle hole:

Move the green disk to the left hole:
Move the red disk to the left hole:
Move the yellow disk to the middle hole:

Move the red disk to the right hole:
Move the green disk to the middle hole:
Move the red disk to the middle hole:
Move the purple disk to the right hole:

Move the red disk to the left hole:
Move the green disk to the right hole:

Move the red disk to the right hole:
Move the yellow disk to the left hole:
Move the red disk to the middle hole:
Move the green disk to the left hole:
Move the red disk to the left hole:

Move the blue disk to the right hole:

Move the red disk to the right hole:
Move the green disk to the middle hole:
Move the red disk to the middle hole:
Move the yellow disk to the right hole:
Move the red disk to the left hole:

Move the green disk to the right hole:

Move the red disk to the right hole to complete the puzzle:

The door will open after the disk puzzle has been completed. Go through the doorway to the hall.
Bonus – Hall
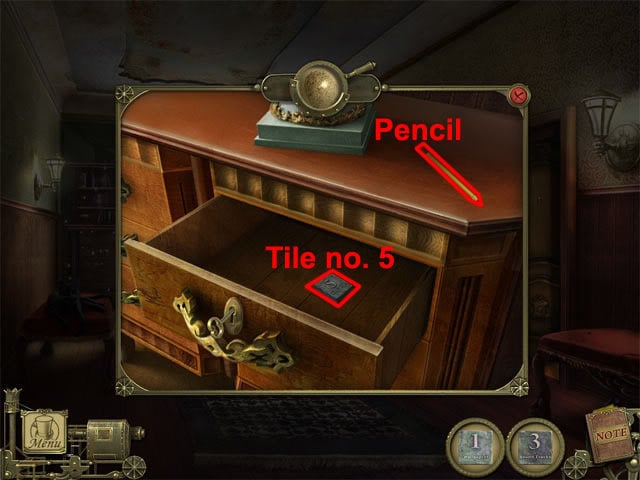
Examine the dresser:
Select the key:
Find the remaining hidden objects to receive the key. Select the top-right corner of the rug and take tile no. 1. Examine the drawer. Use the key in the drawer and then turn the key four times to open the drawer. Take tile no. 5 from the drawer and the pencil on the desk:
Examine the dresser again. Select the weight:
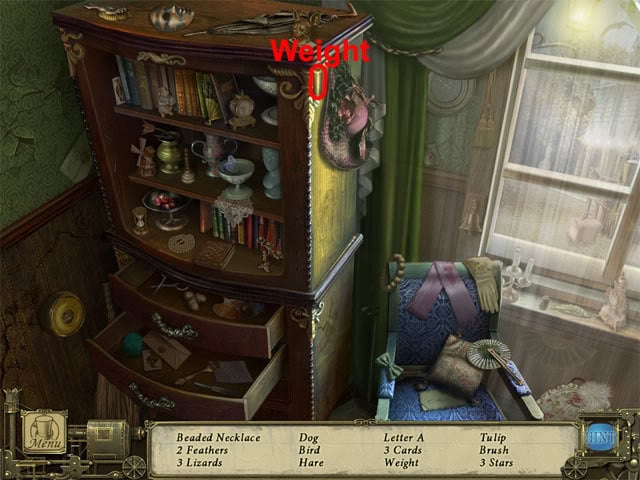
Examine the clock. Open the clock and use the weight on the right chain. Examine the right door and use the signet ring in the slot. Select the signet ring twice to open the door. Go through the right doorway to enter the bedroom.
Bonus – Bedroom
Examine the curtain above the bed:
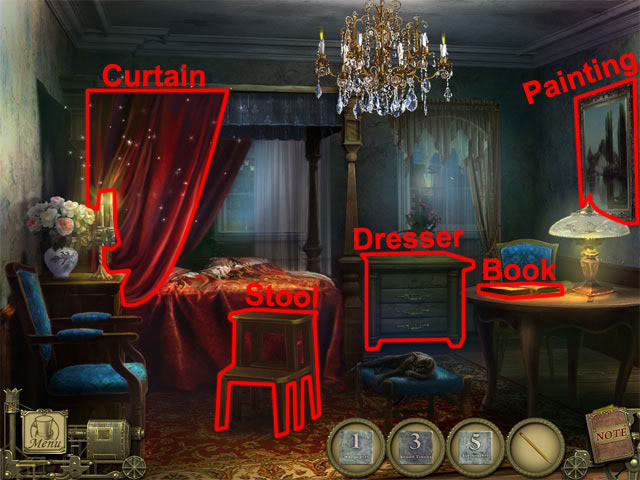
Select the magnet:
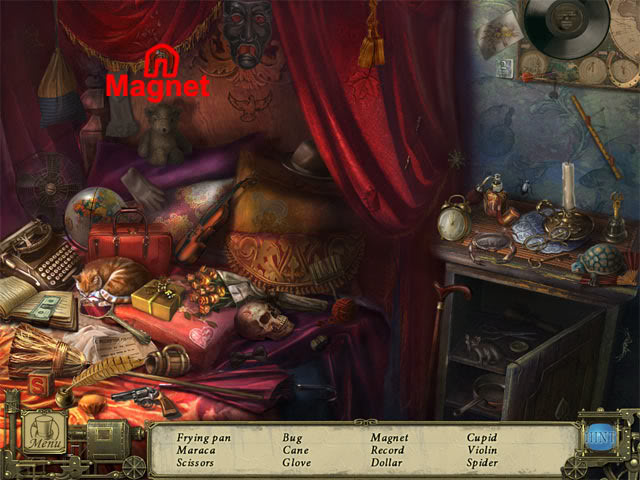
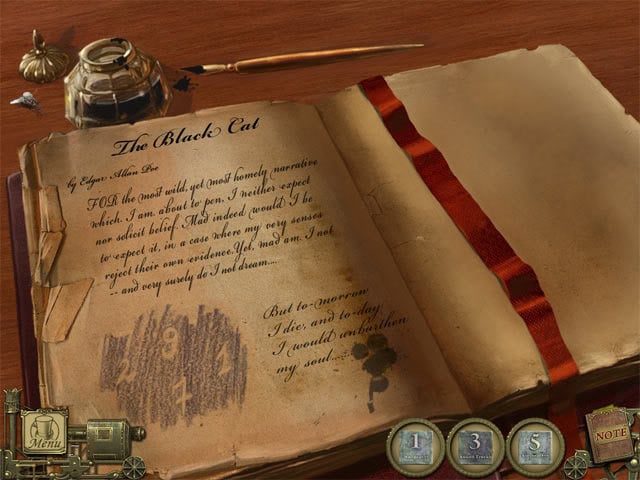
Find the remaining hidden objects to receive the magnet. Examine the book on the table to read about the black cat:
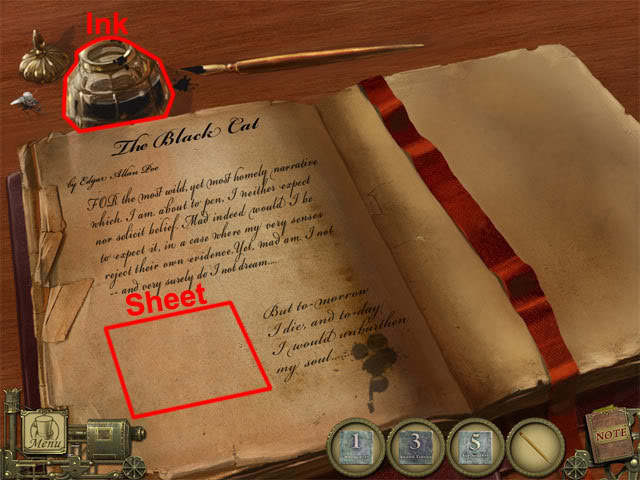
Use the pencil on the sheet twice to reveal numbers:
Use the magnet on the ink to retrieve a dirty tile. Back away from the view of the book and examine the curtain above the bed again. Select tile no. 2:
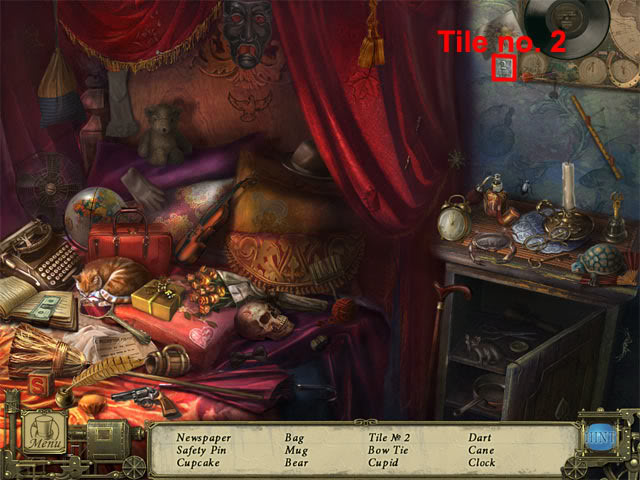
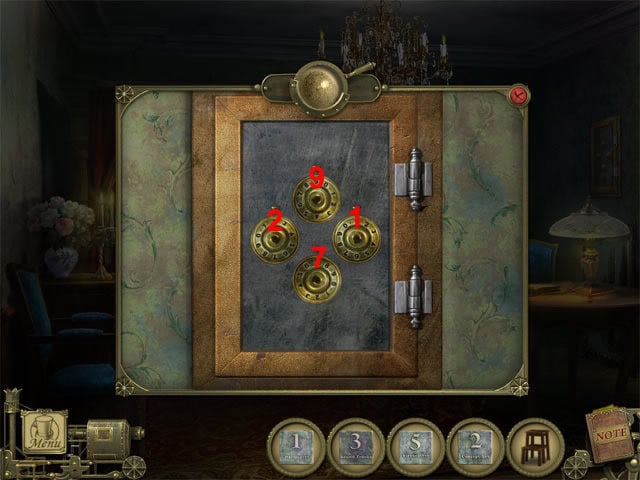
Find the remaining hidden objects to receive tile no. 2. Select the picture at the right side of the wall to reveal a safe. Examine the safe. Remembering the numbers seen on the book, set the dials of the safe:
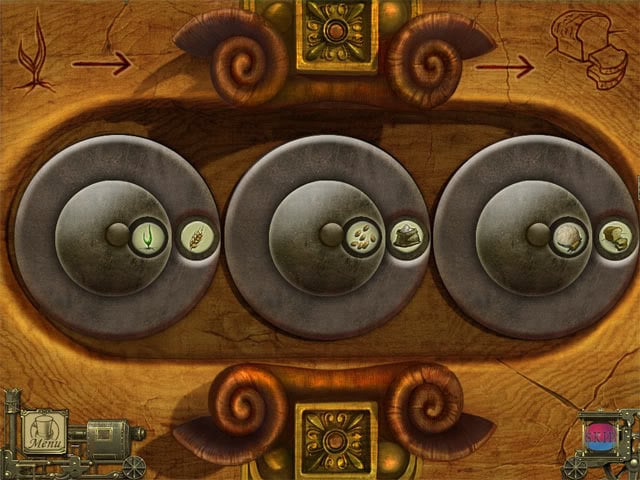
Take the statue from the safe. Examine the drawers and select the top drawer to see a disk puzzle. The aim is to rotate the discs so that the symbols form a row of steps to making bread:
After solving the puzzle, examine the drawer and take tile no. 8. Back out of the bedroom, open the left door and go through the left doorway to enter the bathroom.
Bonus – Bathroom
Use the stool on the section of the wall below the chain:
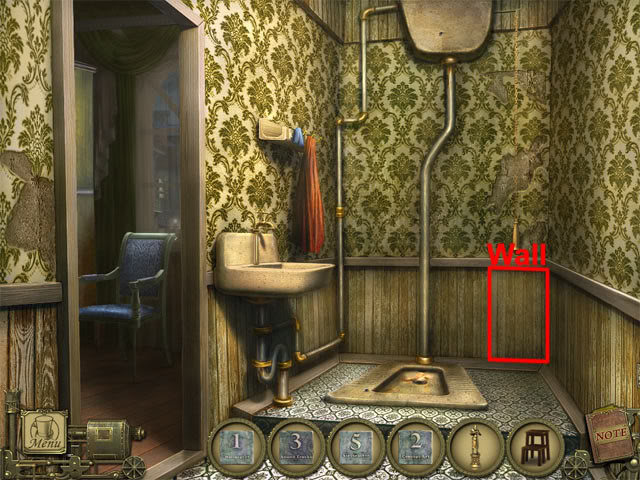
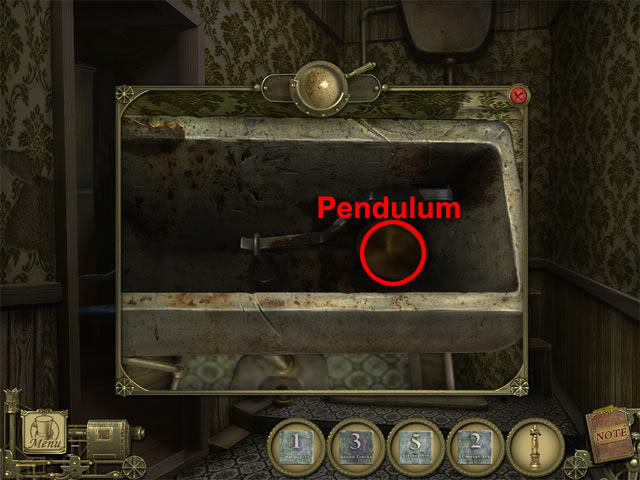
Pull the chain and then examine the toilet tank. Take the pendulum:
Exit the bathroom.
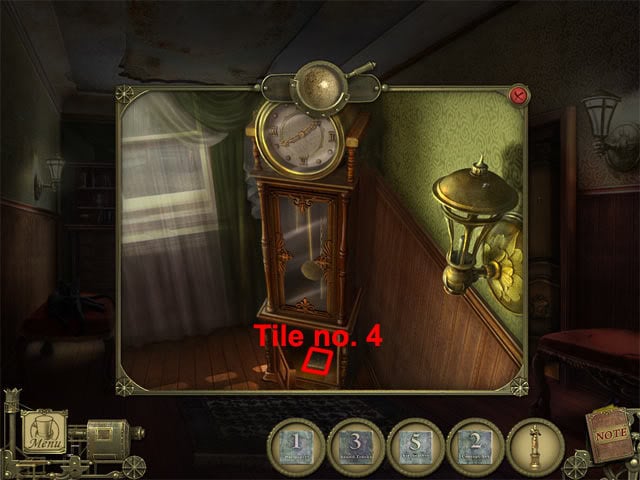
Bonus – Hall
Examine the clock. Use the pendulum on the clock. Close the clock and a compartment will open at the bottom of the clock. Take tile no. 4 from the compartment:
Move back to the living room.
Bonus – Living Room
Examine the frame above the fireplace. Use all of the numbered tiles on the board. Examine the piano and select the dustrag:
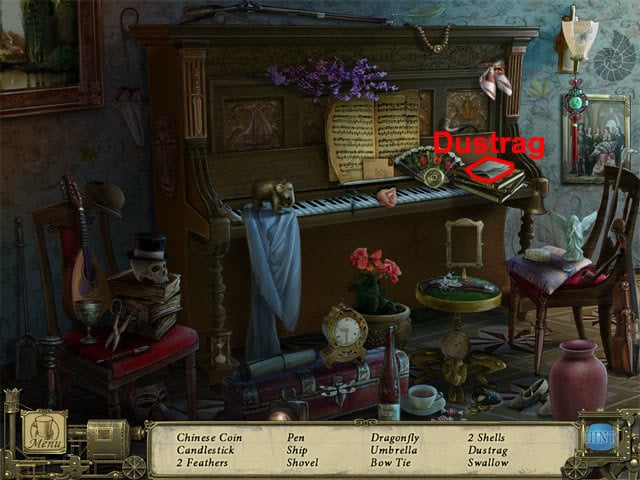
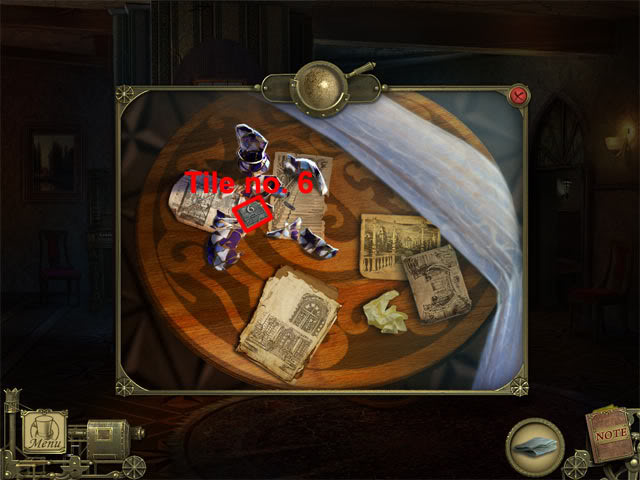
Find the remaining hidden objects to receive the dustrag. Examine the table and use the statue on the vase. Take tile no. 6 from the remains of the vase:
Move east to the hall and go through the right doorway to return to the bedroom.
Bonus – Bedroom
Examine the book on the table and use the dustrag on the dirty tile to clean it. Take tile no. 7. Return to the living room.
Bonus – Living Room
Examine the frame above the fireplace and put the remaining two tiles on the frame. Move the tiles to the position shown below:
Extra content will now be unlocked, and this can be accessed by selecting the extras sign above the left arch from the main menu.
“;

More articles...
-
Best Horror Games On Itch.io – July 2026
Across a bounty of subgenres. -
Haze Seas Accessories Tier List [Best Accessories to Equip]
The accessories with the best stat buffs in Haze Seas.