
Best Horror Games On Itch.io – July 2026
Across a bounty of subgenres.
Grow A Garden 2 Base Price List
What's the most valuable crop?![Evomon Types Guide [Strengths, Weaknesses, Resistance]](/wp-content/uploads/2026/06/evomon-types.jpg "Evomon Types Guide [Strengths, Weaknesses, Resistance]")
Evomon Types Guide [Strengths, Weaknesses, Resistance]
Your companion guide during battles.
![[Roblox] Evomon Shiny Hunting Guide – Including Prismatic and Pris Shinies!](/wp-content/uploads/2026/06/evomon-shiny-hunting-guide.jpg "[Roblox] Evomon Shiny Hunting Guide – Including Prismatic and Pris Shinies!")
Dark Strokes: Sins of the Fathers Walkthrough
Welcome to the Dark Strokes: Sins of the Fathers walkthrough on Gamezebo. Dark Strokes: Sins of the Fathers is a Hidden Object Game created by Alawar Friday’s Games. This walkthrough includes tips and tricks, helpful hints and a strategy guide on how to complete Dark Strokes: Sins of the Fathers.


- Prefer Gamezebo on Google

Game Introduction – Dark Strokes: Sins of the Fathers
Welcome to the Dark Strokes: Sins of the Fathers walkthrough on Gamezebo. Dark Strokes: Sins of the Fathers is a Hidden Object Game created by Alawar Friday’s Games. This walkthrough includes tips and tricks, helpful hints and a strategy guide on how to complete. Dark Strokes: Sins of the Fathers.
General Tips
This hidden object game requires visiting several locations and using inventory items to advance play.
Play is mostly linear although there are some options for the order in which to explore locations.
Begin play by selecting a difficulty mode:
Casual – Hint and Skip button recharge faster. Active zones are highlighted by sparkles.
Expert – Hint and Skip buttons recharge slower. Active zones are not indicated.
Change play mode by creating a new profile.
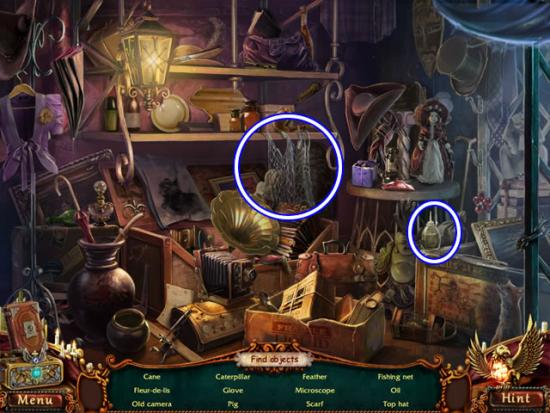
Hidden object scenes contain items listed in white lettering. These items require an extra step to find.
The Journal accumulates story information and reference material to help solve puzzles. There is also a Map section showing areas visited and the position of unexplored locations. It shows your current location but doesn’t say what that location is, nor is any other location identified. The map cannot be used to switch locations.
Always move the cursor around a scene. Watch the cursor to see if it changes into a hand or magnifying glass.
Walkthrough Tips
CAPITALIZED inventory items are meant to make it easier to find where this guide may differ from your own play. Inventory items are highlighted in blue with a white border in the screenshots.
If you don’t have an item referenced in this guide, click and hold the “Ctrl” key and then press the “F” key. This opens a Find area in your web browser. Type in the name of the object as it appears in this guide to find where else it’s referenced.
To minimize back and forth moves, most available inventory items in a scene are picked up when first encountered.
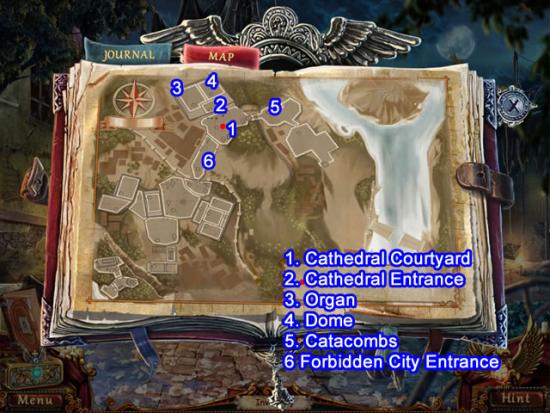
An annotated map, beginning with chapter 2, starts each chapter. This should help navigate the locations mentioned in that chapter.
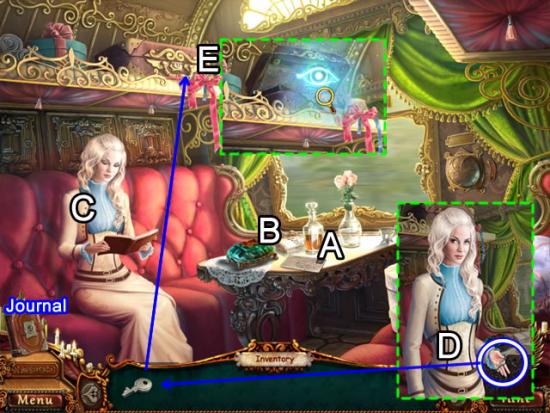
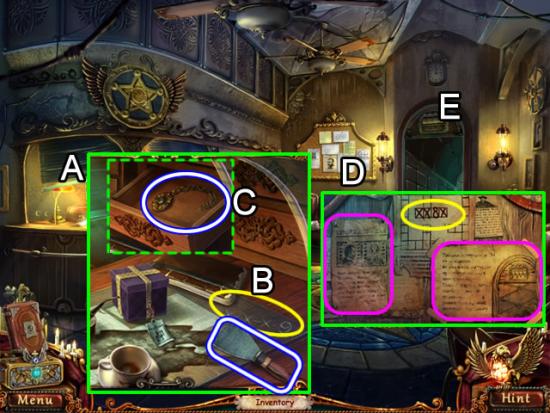
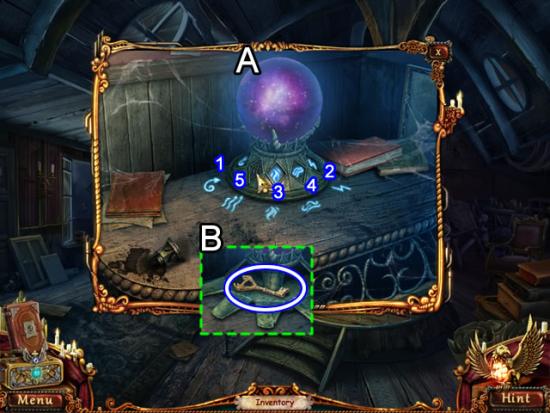
Chapter 1: The Accident

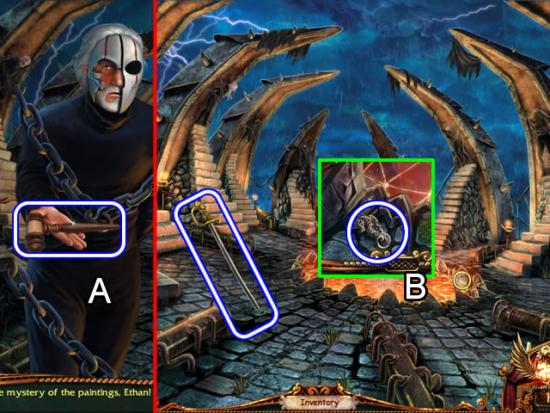
Train Car
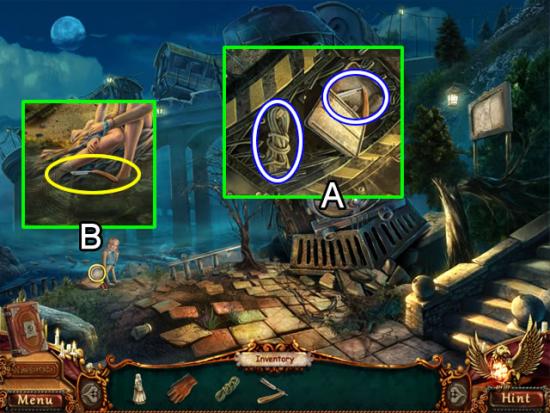
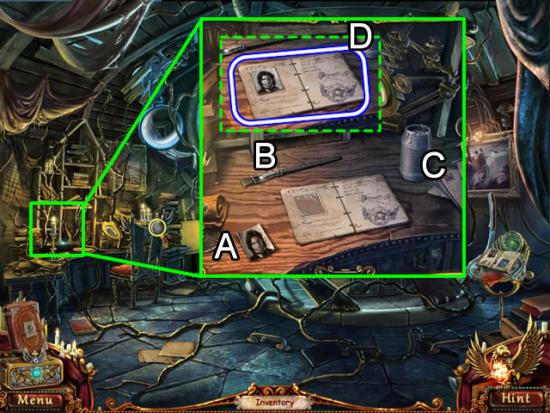
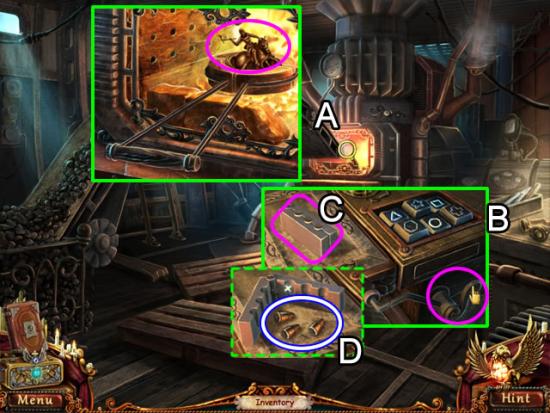
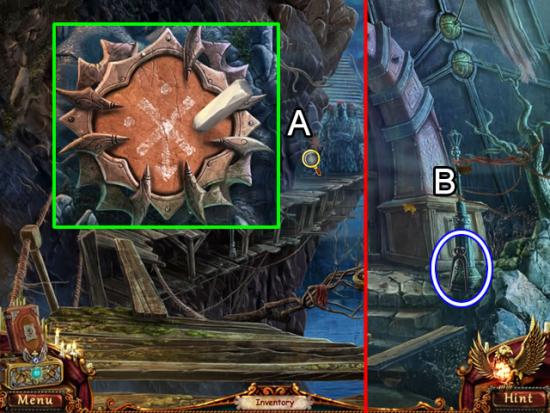
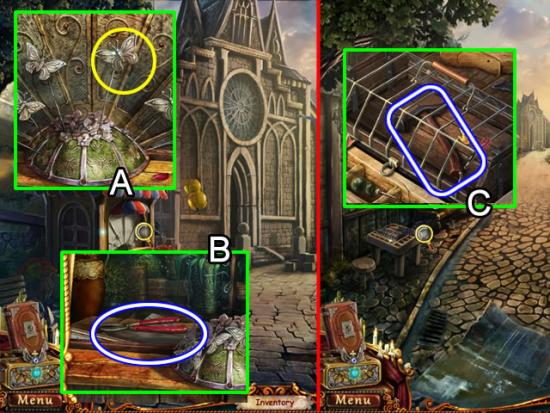
Read the letter (A). Information is added to the journal.
Inspect the turtle box (B).
Speak to Clair (C).
Take the KEY from Claire for inventory (D).
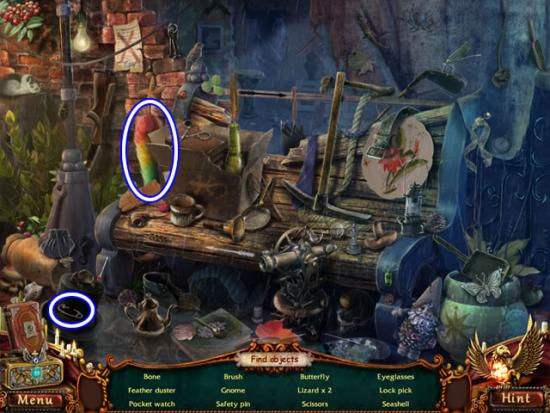
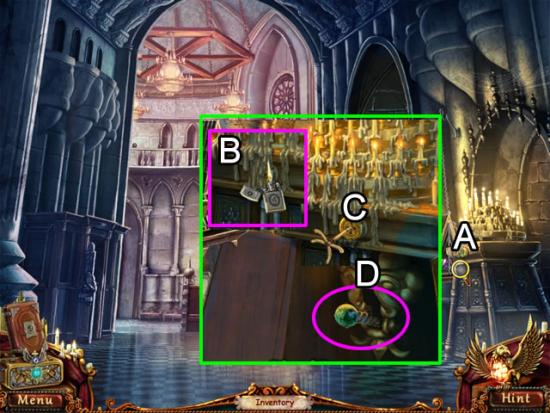
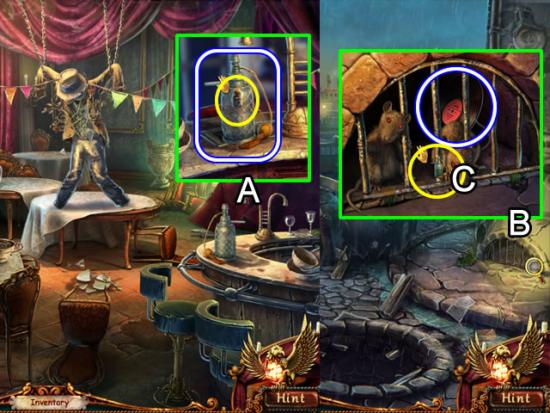
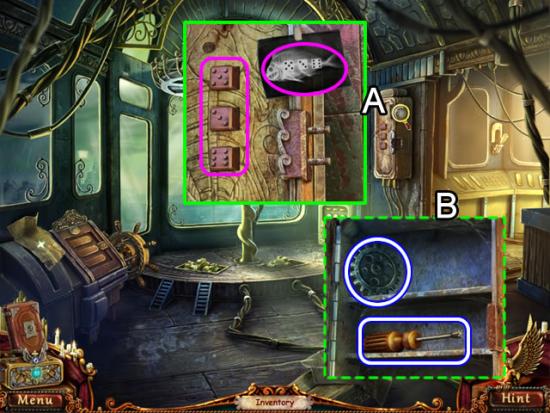
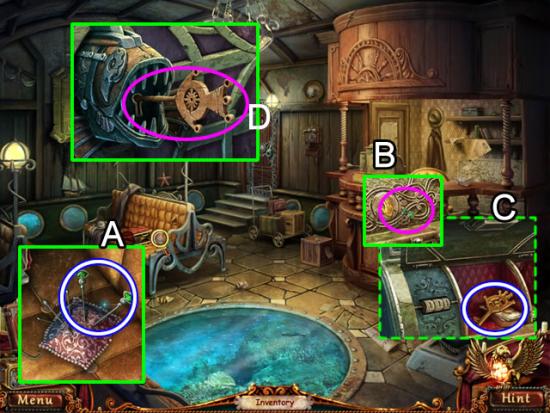
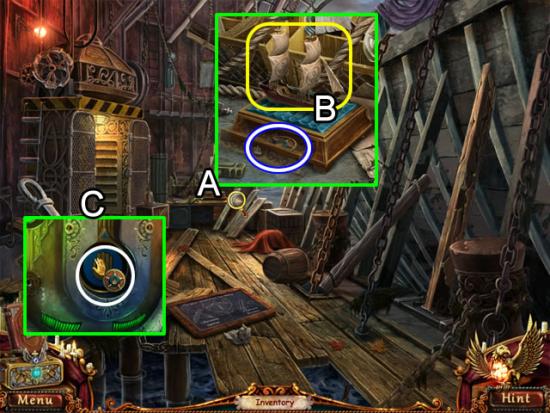
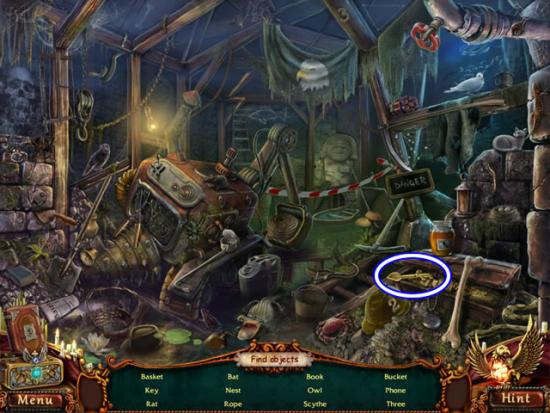
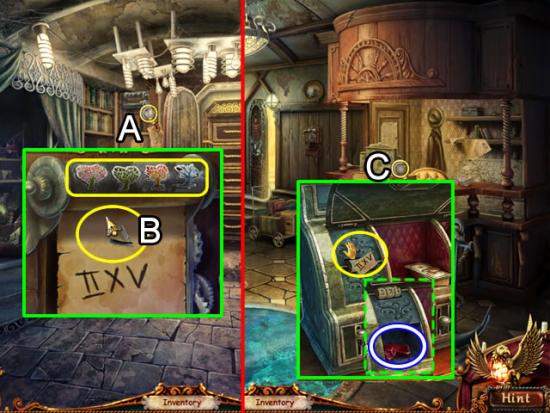
Examine the suitcase on the shelf. Insert the KEY in the lock. Click the key twice to open the suitcase and unlock a hidden object scene (E).
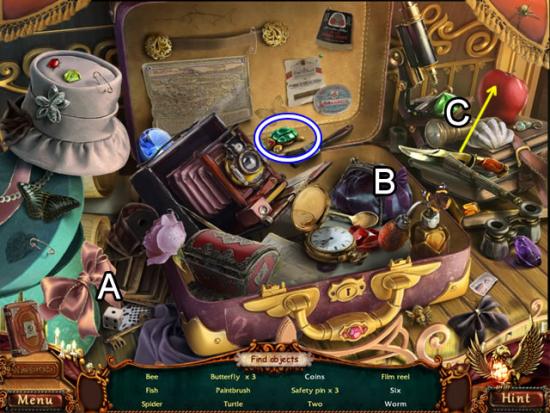
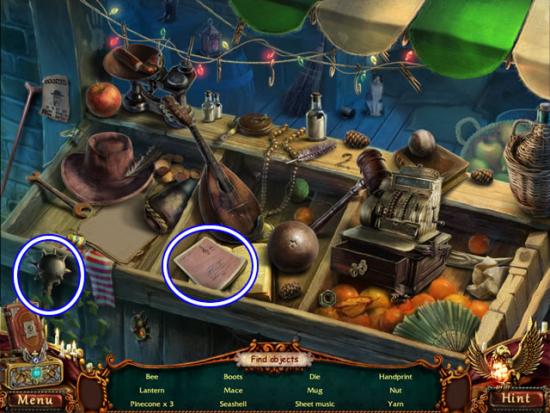
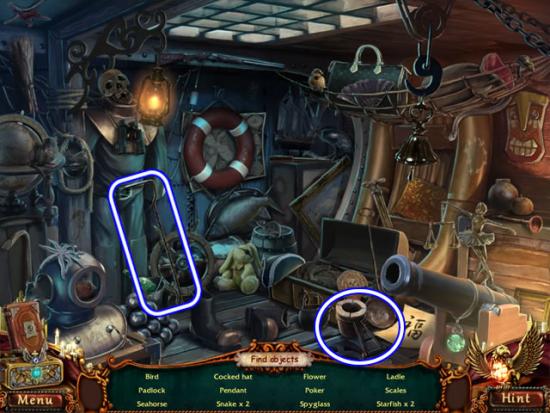
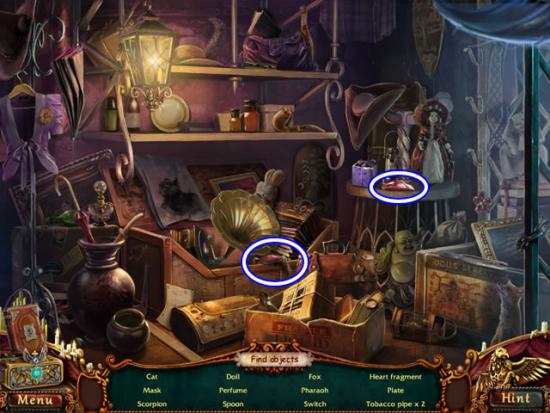
Click the die twice to get a Six (A). Open the coin purse and take the Coins (B). Use the knife to slice open the apple (C) and find a Worm.
Find the rest of the listed objects. The TURTLE goes to inventory.
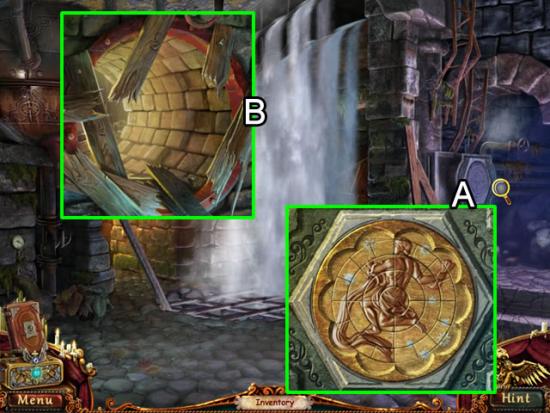
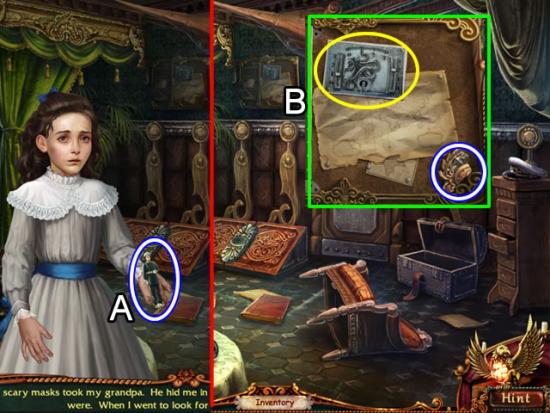
Look at the turtle box again. Put the TURTLE in the slot on the back. Click the head that comes out to open the box. Take the CLAIR FIGURINE.
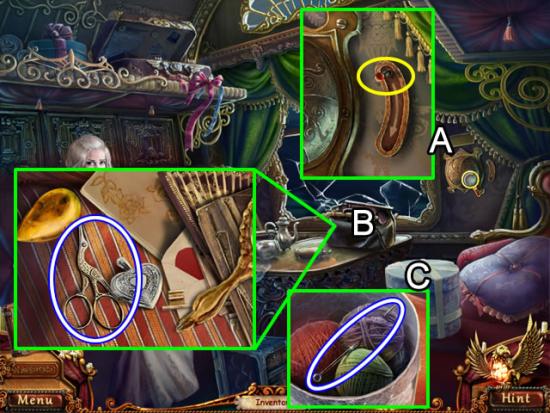
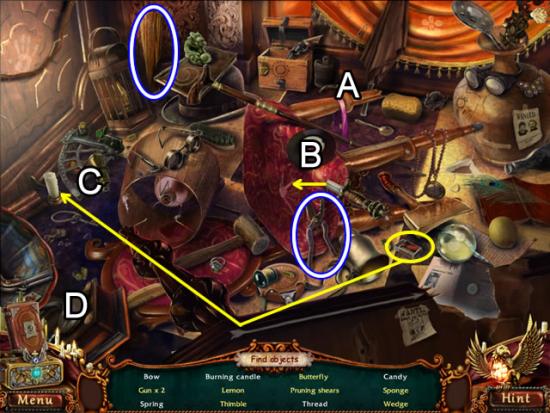
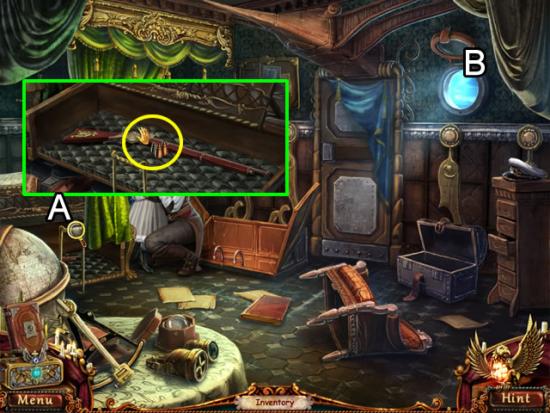
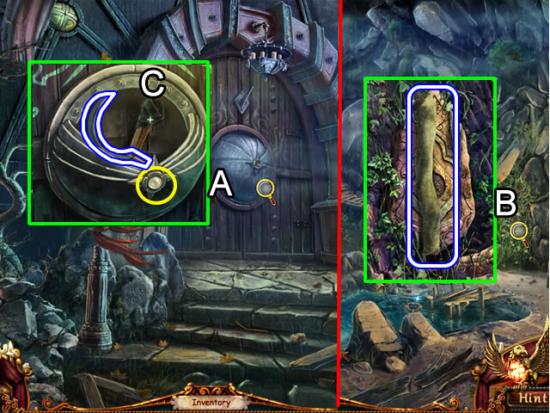
Zoom in on the emergency call system (A). Pull the red lever.
Look inside the bag (B). Move the objects around to find a pair of SCISSORS.
Use the SCISSORS to remove the strapping tape on the hatbox (C). Take the KNITTING NEEDLE.
Insert the KNITTING NEEDLE in the slot on the call system and pull.

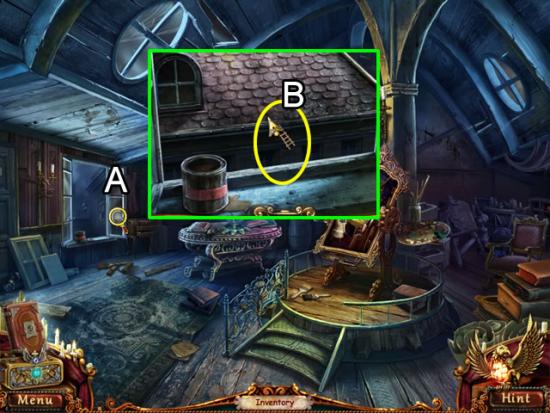
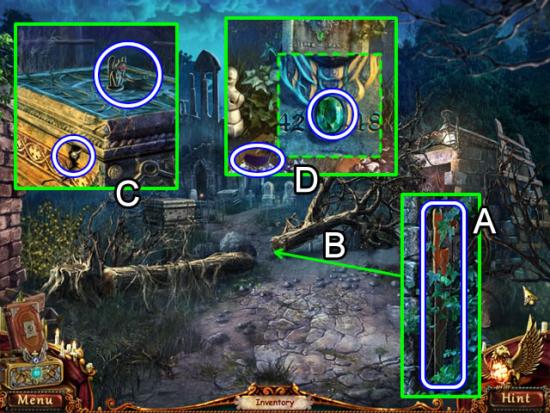
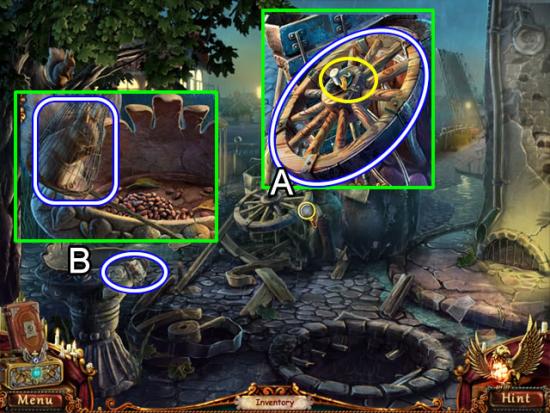
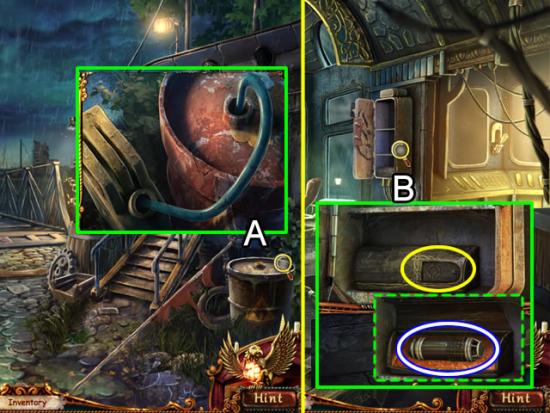
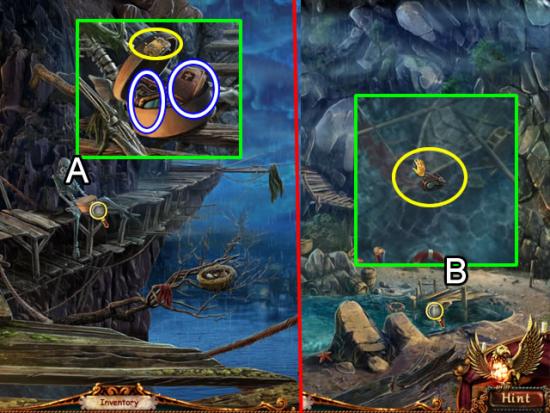
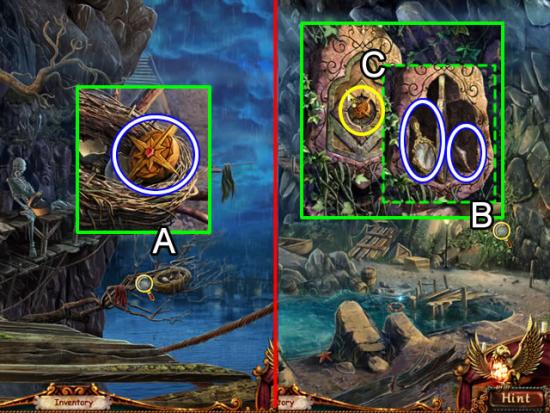
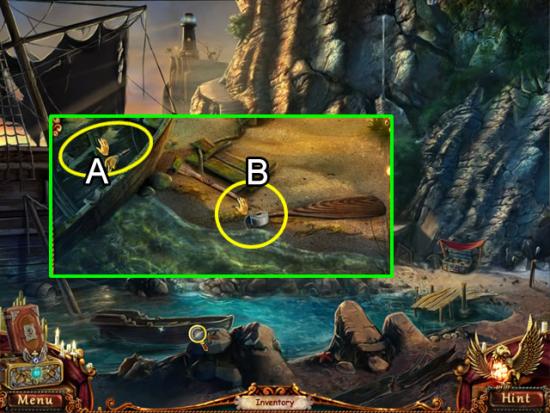
Train Wreck Site
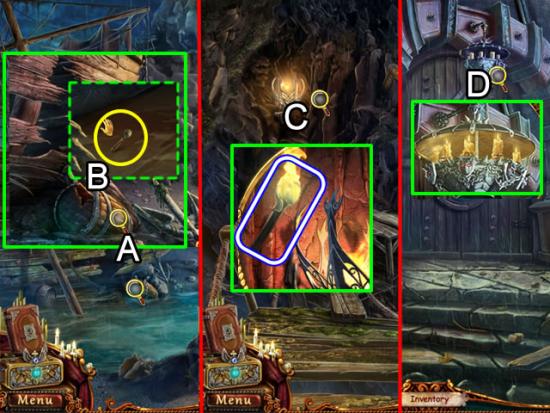
Go up the stairs (A).
Inspect the dry fountain on the left (B). Take the EMPTY BUCKET.
Go back down the stairs.
Zoom in on Clair (C). Dip the EMPTY BUCKET in the water.
Use the BUCKET OF WATER to put out the flames (D).
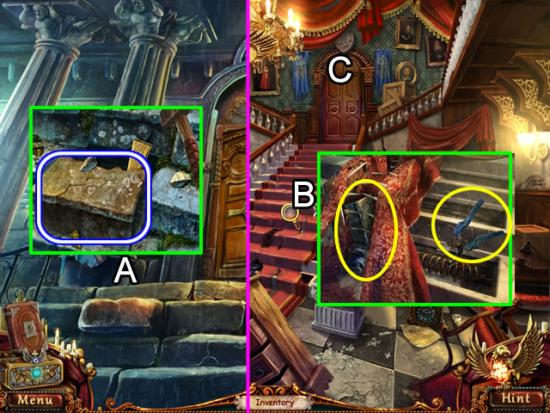
Examine the engine (E). Take the PICKAXE and POSTER FRAGMENT (E).
Pick up the POSTER FRAGMENT on the stones (F).
Go back up the stairs.
Use the PICKAXE to break the lock on the door of the building to the right.
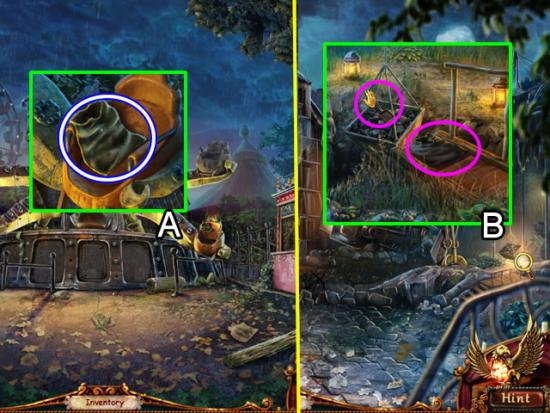
Play the hidden object scene
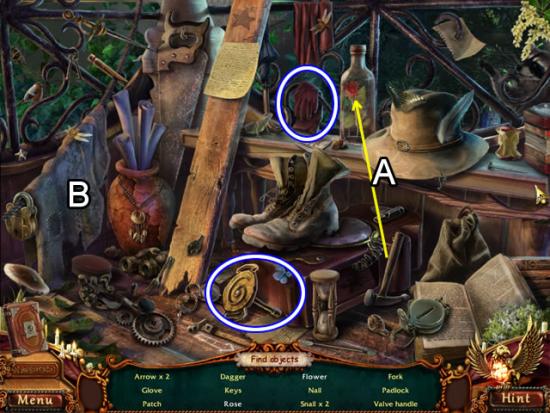
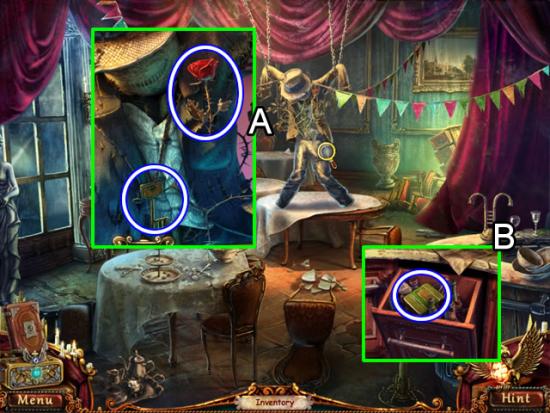
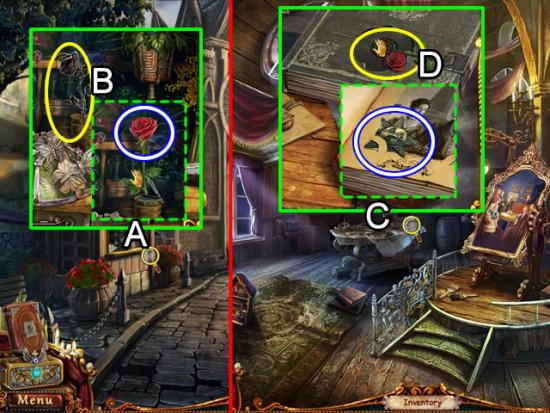
Use the hammer to smash the bottle and take the Rose (A). Lift the rag (B) to find a drawing of a Flower.
Find the rest of the listed objects. The VALVE HANDLE and GLOVE go to inventory.
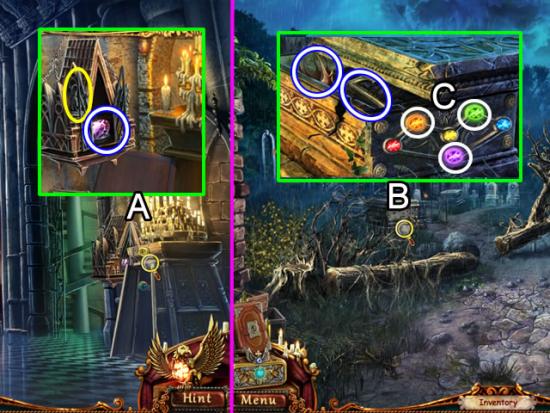
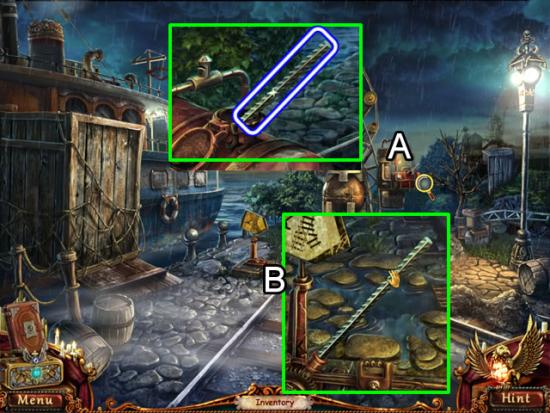
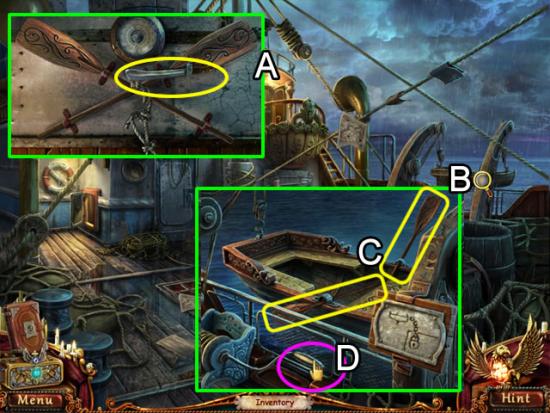
Stairs
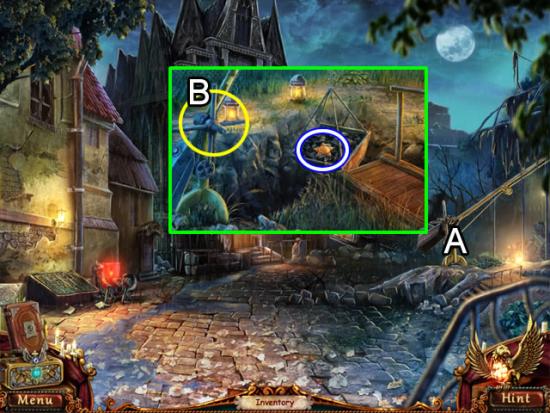
Look again at the dry fountain (A). Insert the VALVE HANDLE (yellow) to turn on the water. Take the POSTER FRAGMENT and SHIP WING.
Go down the steps.
Train Wreck Site
Zoom in on the sign.
Place the three POSTER FRAGMENTS in the torn out area (pink) to see the pattern (B). The information is recorded in the journal.
Go back up the steps.
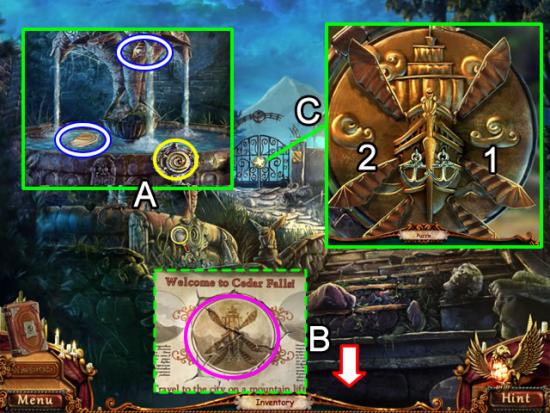
Stairs
Inspect the lock on the gate at the top of the steps.
Attach the missing SHIP WING. The goal is to click the wings until they match that from the poster (C).
Solution. Click the two middle wings (1) and (2) to get the correct pattern.
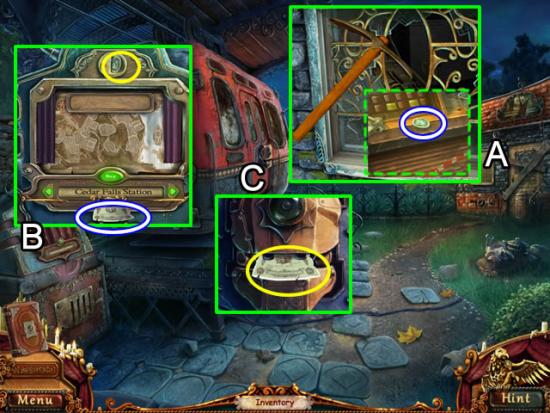
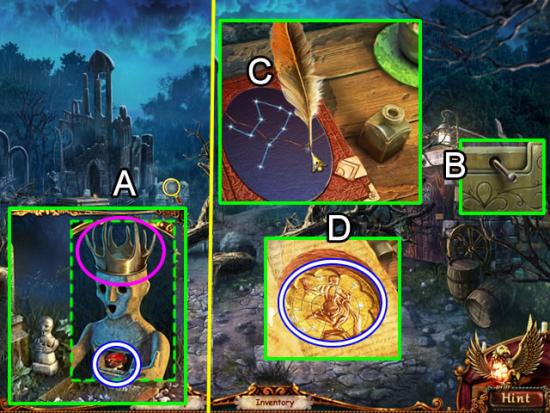
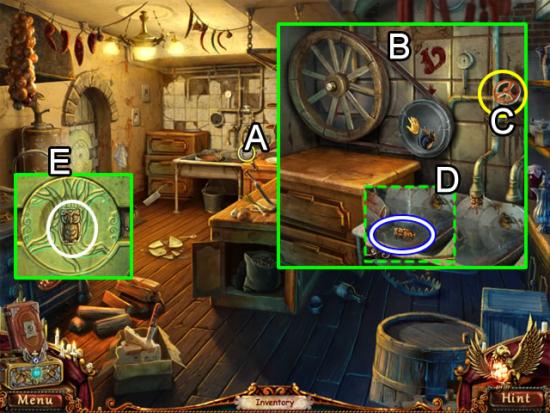
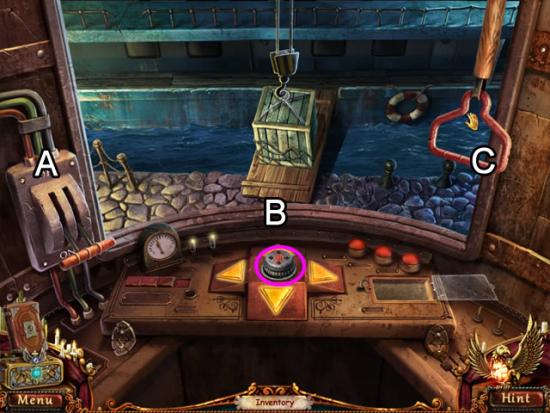
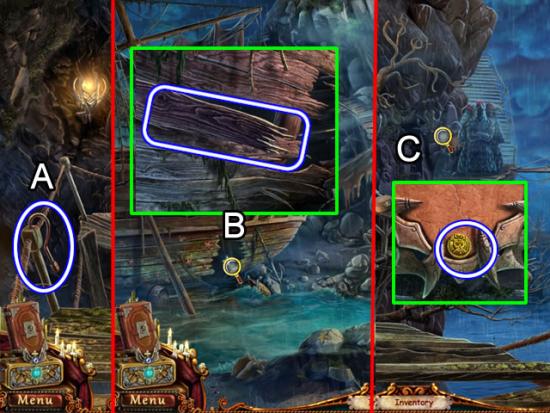
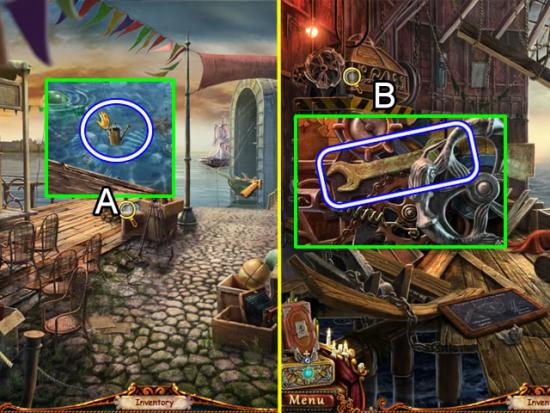
Mountain Lift Station
Use the PICKAXE to smash the glass window in the building (A). Look inside. Take the TOKEN from the ledge of the mechanism.
Examine the ticket dispenser (B). Insert the TOKEN. Click the right or left arrow to scroll through the destinations. Click the “Buy” button for the available station. Take the TICKET.
Look closer at the door to the tram (C). Insert the TICKET to open the doors.
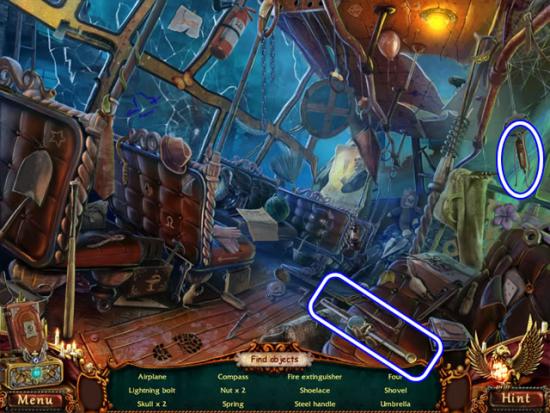
Enter the tram. Take the SHOVEL leaning next to the controls.
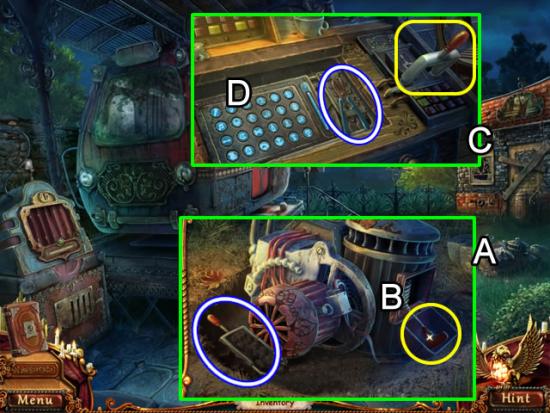
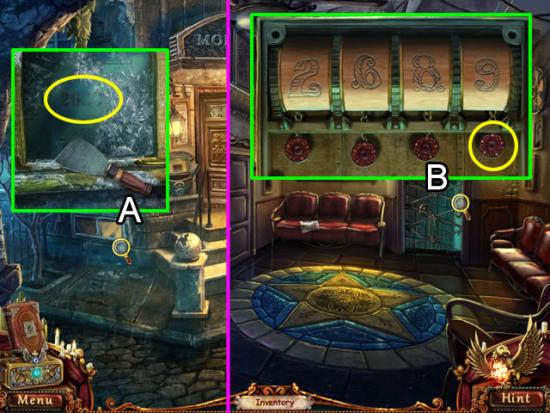
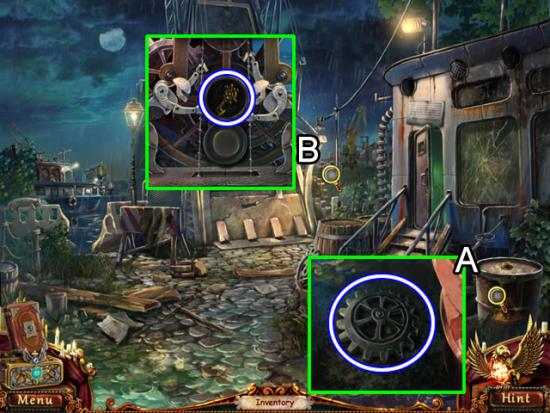
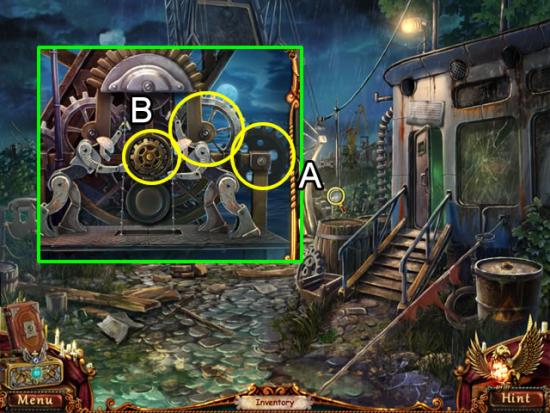
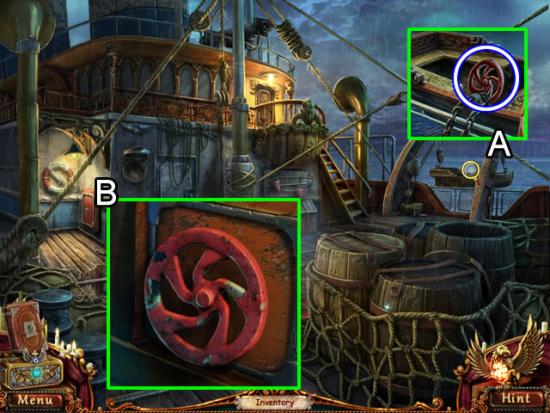
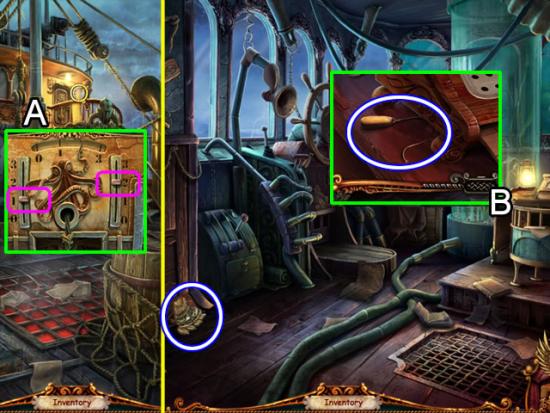
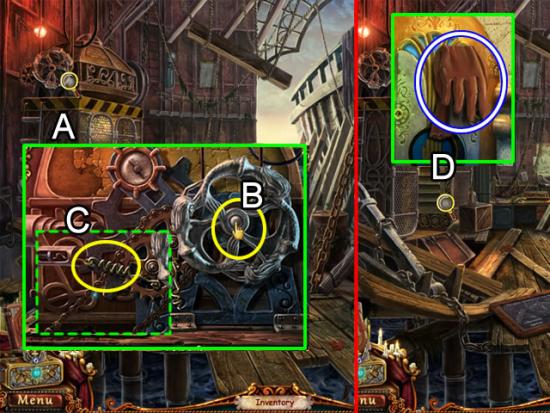
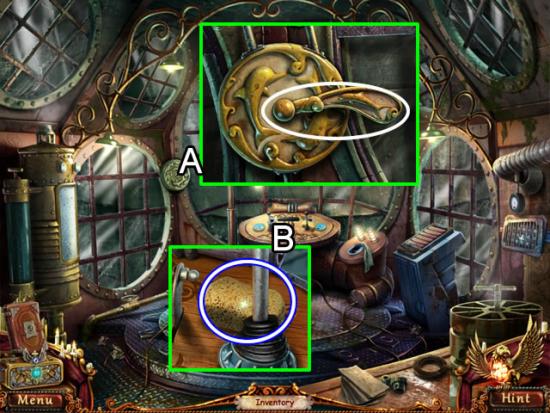
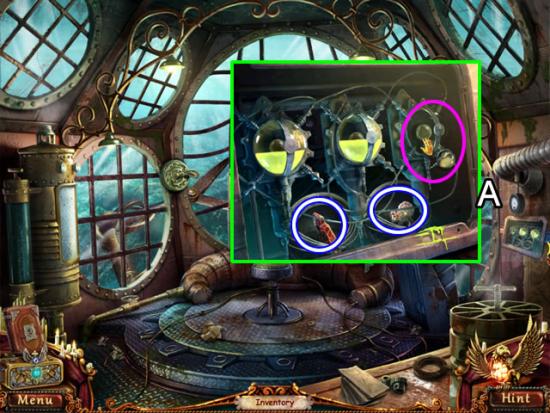
Use the SHOVEL to dig up the generator (A). Open the compartment on the side (B). Pull the cord in an attempt to start the generator. Pick up the SWITCH.
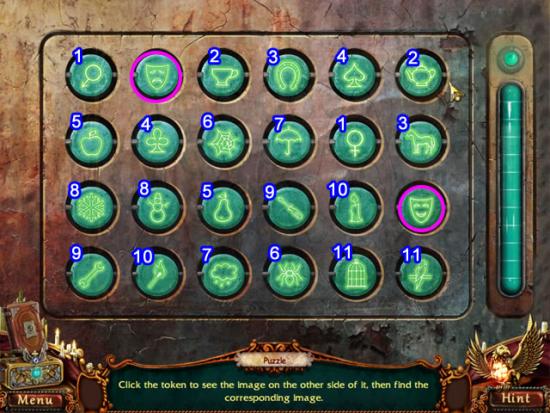
Zoom in on the broken window (C). Insert the SWITCH in the slot. Pull the switch to open the panel. Take the WIRE CUTTERS. Click the blue lights to open a puzzle.
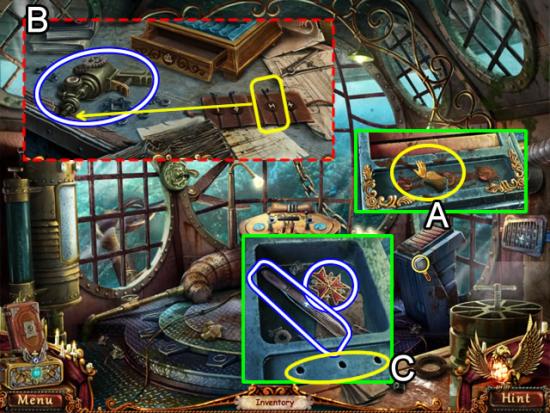
The goal is to find all of the related pairs. See the next screenshot for the solution.
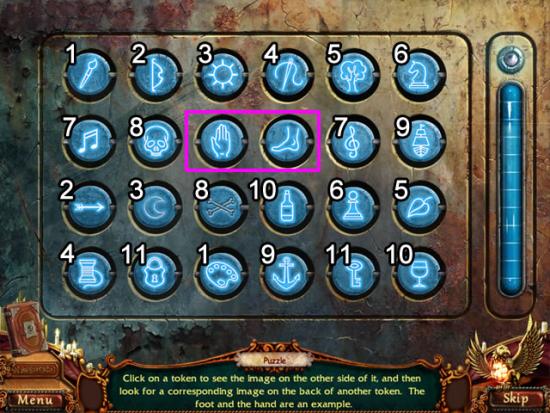
The hand and foot (pink) are already given as an example.
Match the numbers to find the related pairs.
The gate barrier for the tram lifts.
Train Wreck Site
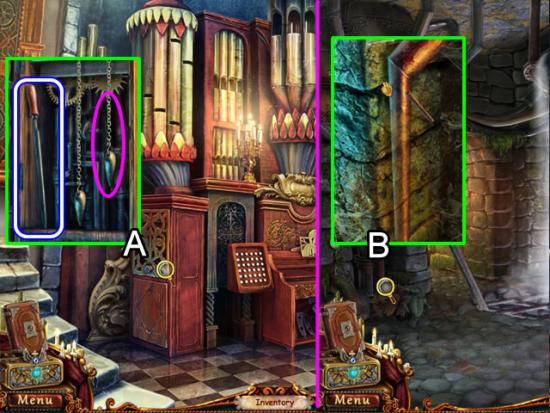
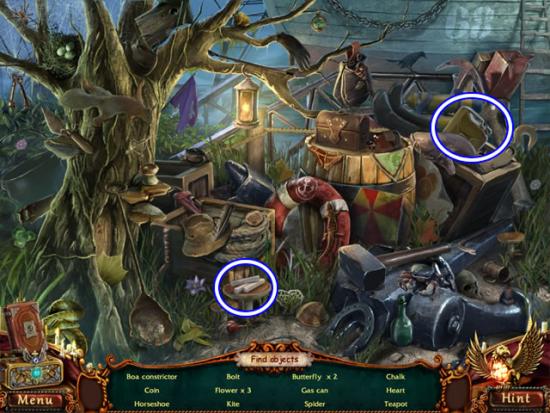
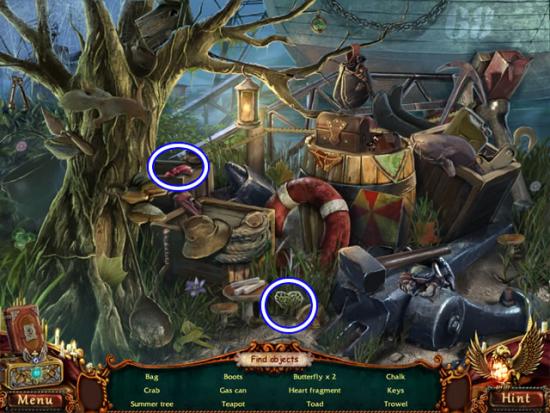
Use the WIRE CUTTERS to remove the grate holding the needed items (A). Take the ROPE. Open the small compartment and take the RAZOR.
Go to Clair (B). Use the RAZOR to free her from the net.
Mountain Lift Station
Replace the ROPE on the generator. Pull the cord to start it.
Enter the tram.
Pull the switch to head off.
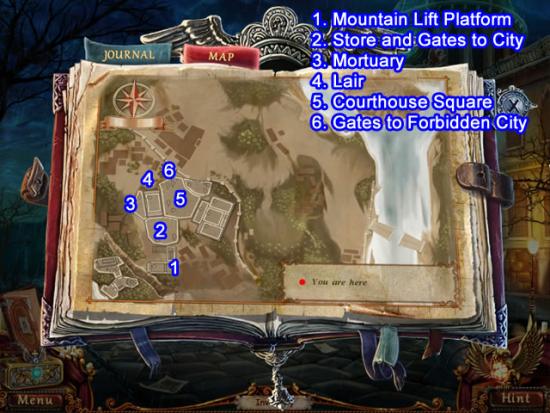
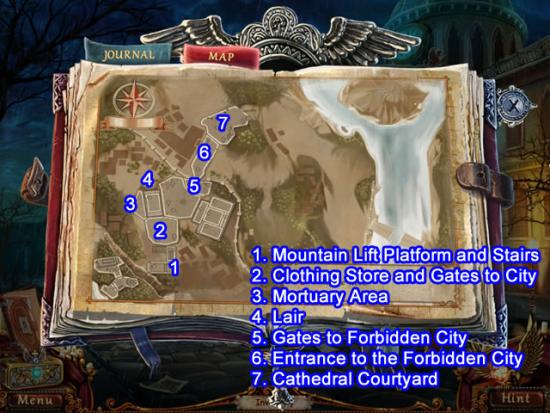
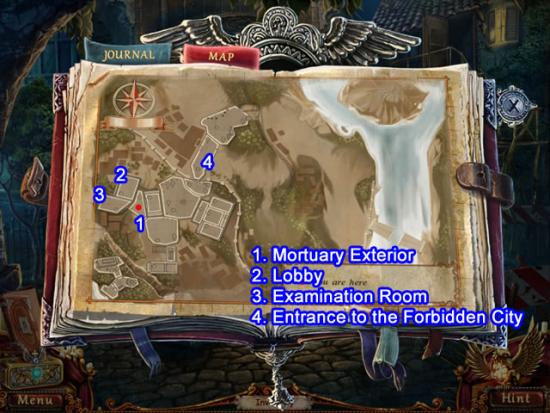
Chapter 2: Getting Inside the City Gates
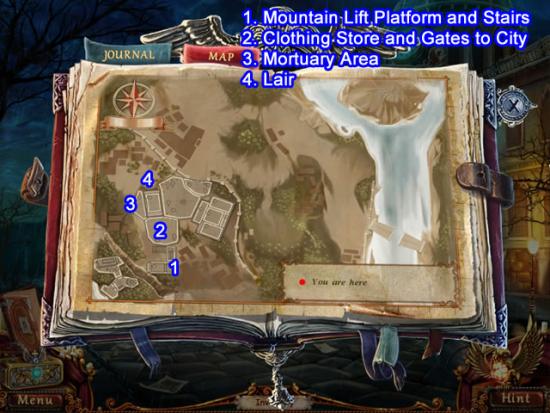
Refer to this map as needed to locate sites mentioned in this chapter.

Mountain Lift Platform
Go down the steps.
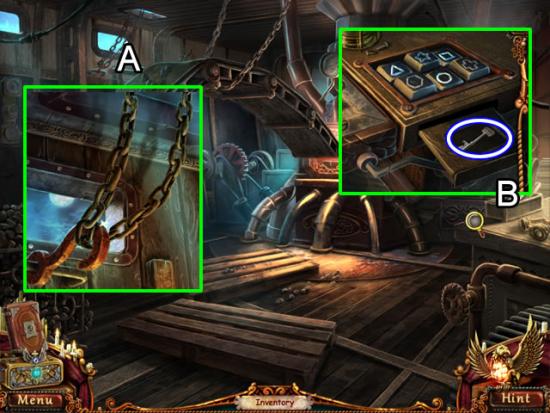
Examine the lock on the gate at the bottom (A). Take the WIRE.
Look closer at the bench (B). Read the paper. Use the WIRE to fish out the KEY in the crack.
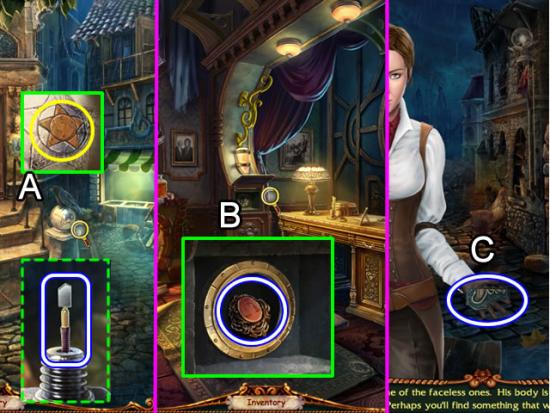
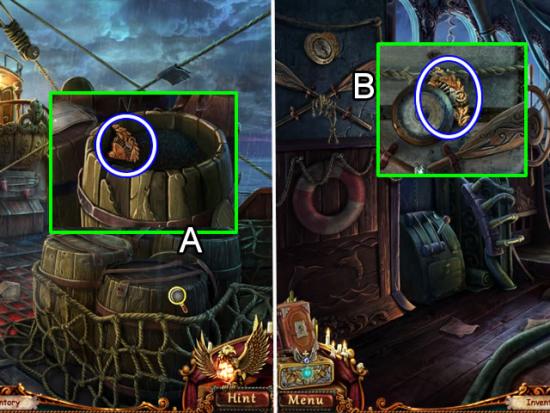
Read the notices on the bulletin board (C). Take the TILE.
Look in the overturned garbage container (D). Take the COIN (1/5).
Go down the steps.
Use the KEY to unlock the gate.
View the cut scene at the bottom of the stairs.
Go left.
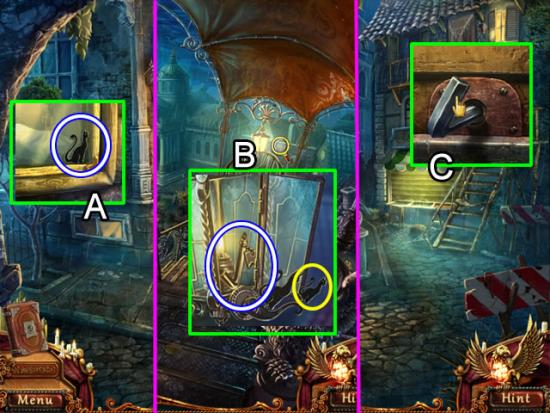
Mortuary
Look closer at the window (A). Take the CAT.
Return to the base of the stairs.
Stairs
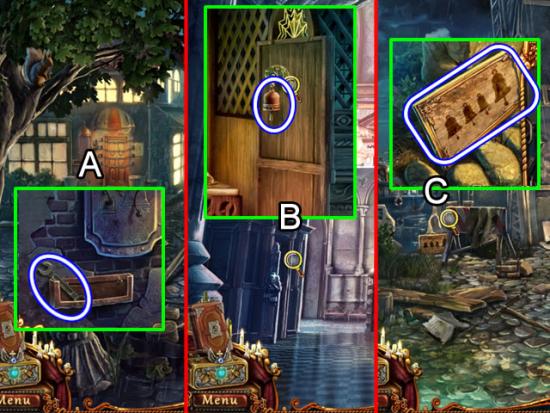
Examine the lamp next to the gate (B). Place the CAT on the empty slot to open the glass. Take the HEX KEY.
Return to the mortuary area.
Store Front
Zoom in on the shuttered window across the street (C) from the mortuary.
Insert the HEX KEY to open the shutter.
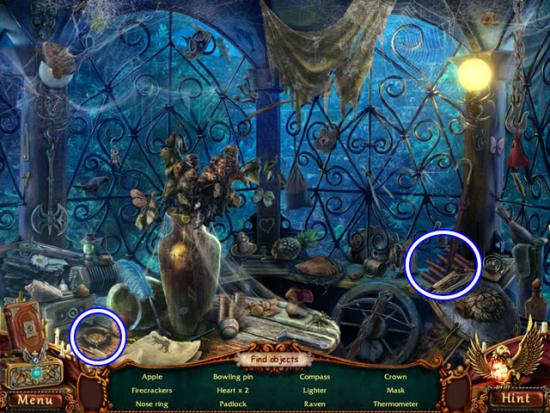
Play the hidden object scene.
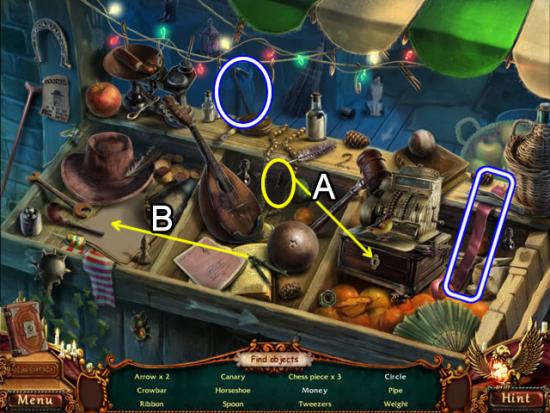
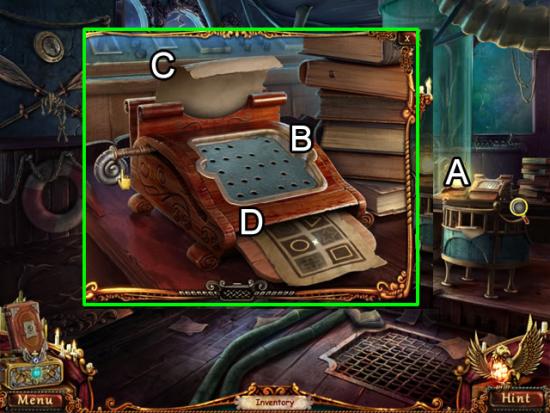
Place the key in the cash register slot (A) to get the Money. Use the compass to draw a Circle on the paper (B).
Find the rest of the listed objects. The CROWBAR and RIBBON go to inventory.
Return to the lift platform.
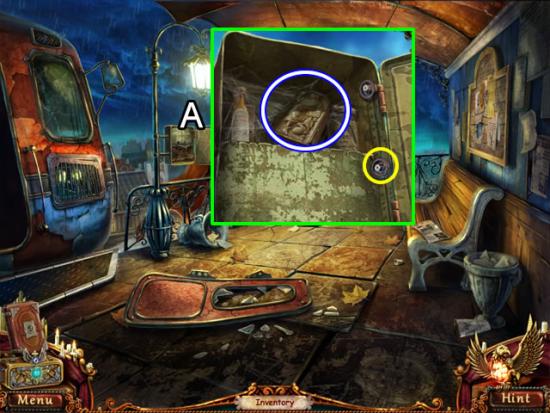
Mountain Lift Platform
Pry open the first-aid box with the CROWBAR (A). Take the GAUZE and COIN (3/5).
Clothing Store
Give the GAUZE to the wounded man (B). He returns the kindness with PUZZLE PIECES (C).
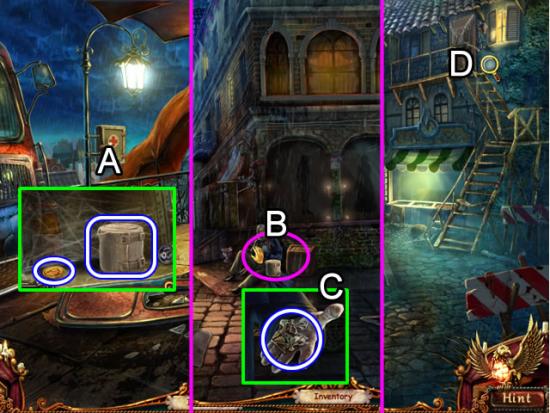
Store Front – Second Floor
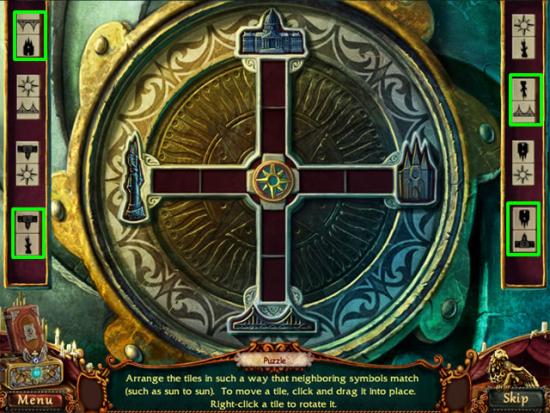
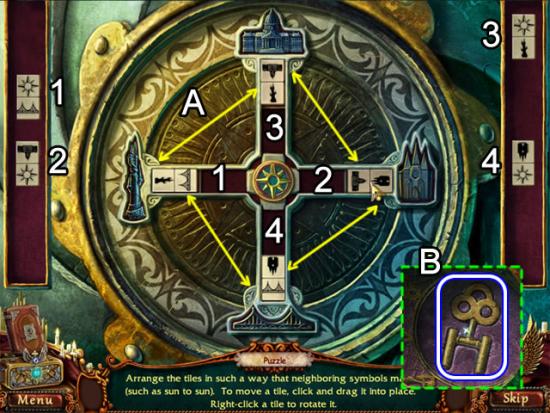
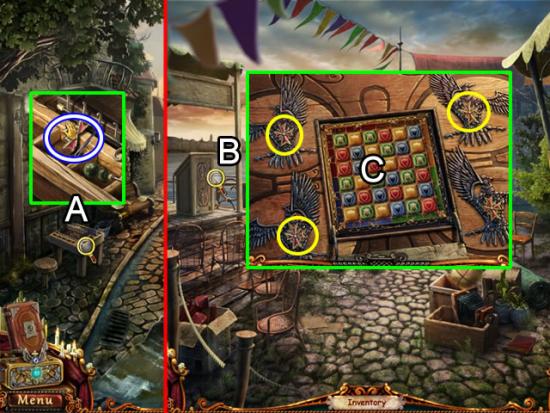
Zoom in on the triangular door lock (D). Place the PUZZLE PIECES on the lock to start a puzzle.
The goal is to places the pieces in such a way as to conform to the triangle frame and to form a picture. See the next screenshot for the solution.
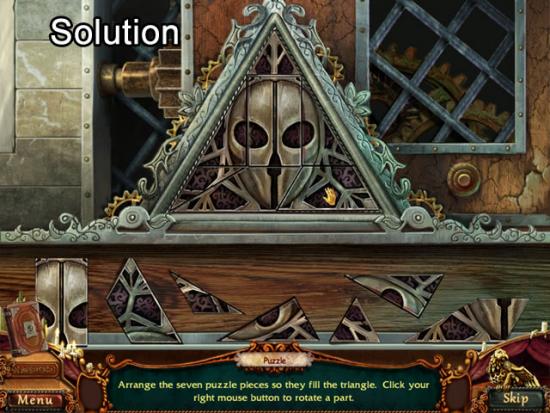
Right-click to rotate the pieces.
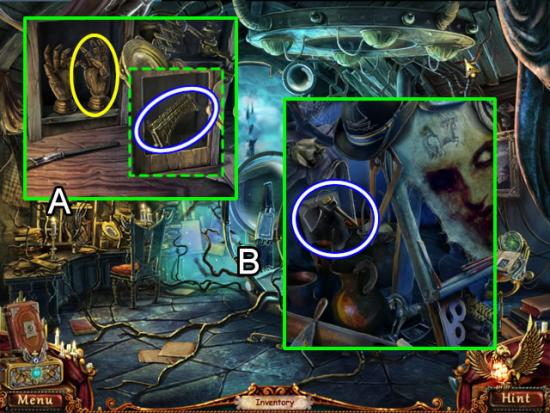
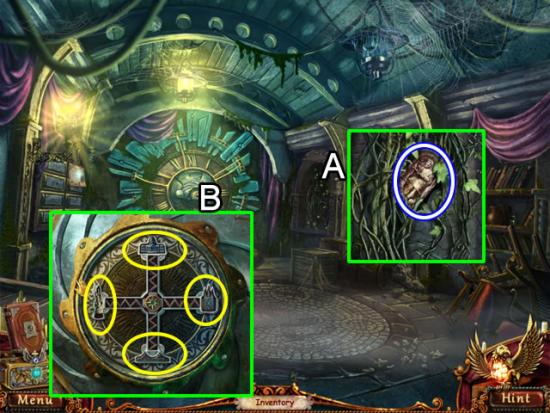
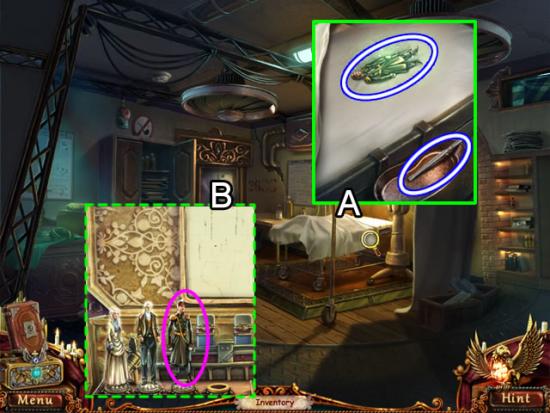
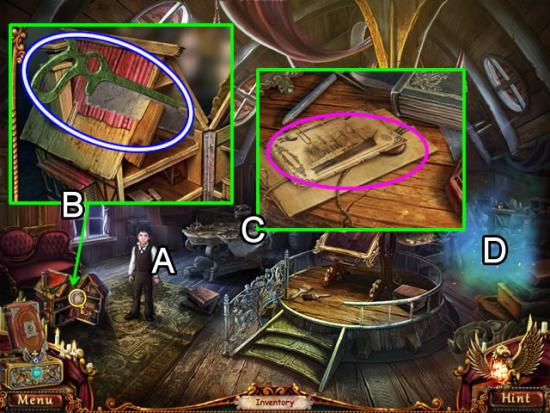
Enter the lair.

The Lair
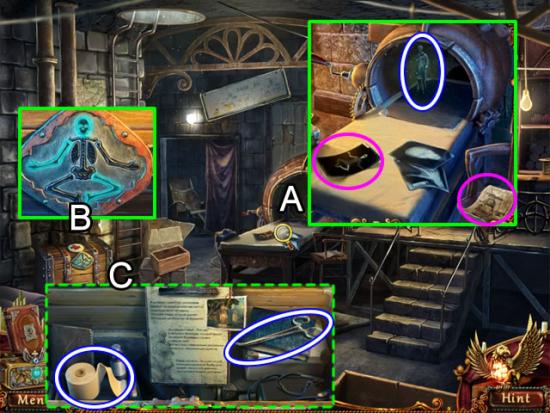
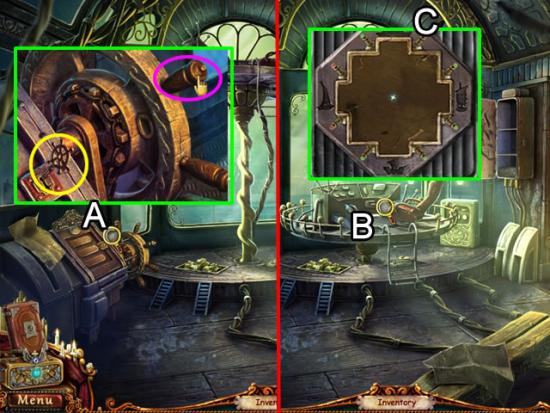
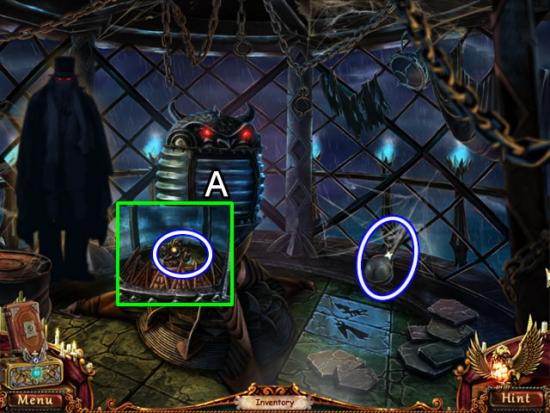
Examine the mechanism (A).
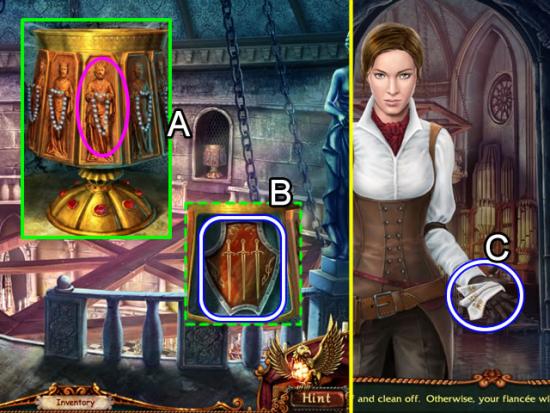
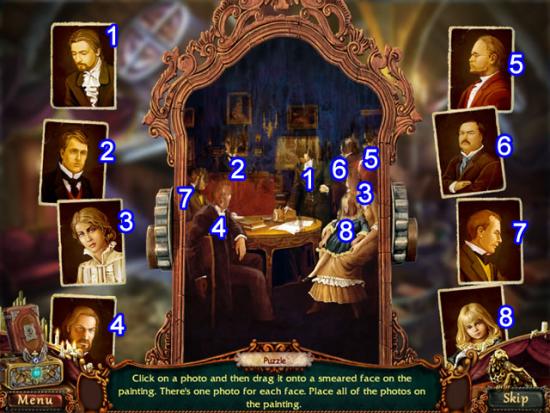
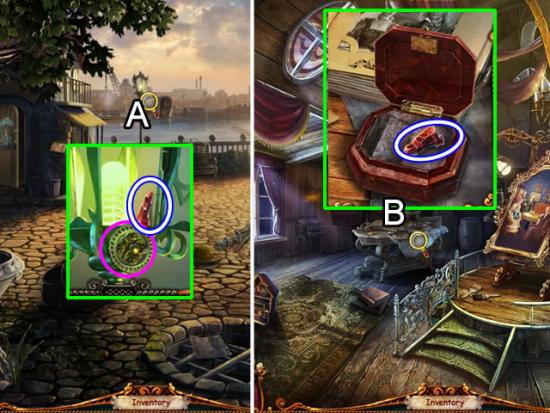
Take the DAGGER and look closer at the photo (B). Open the box (C). Place the CLAIR FIGURINE on the first pedestal (pink) and watch the cut scene.
Look closer at both paintings (D).
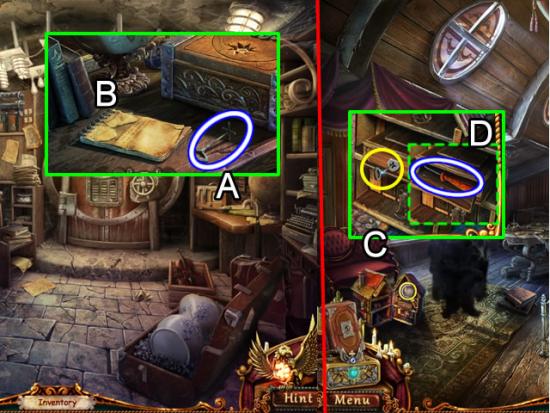
Inspect the journal (E). Read the entry. Take the PAINTBRUSH.
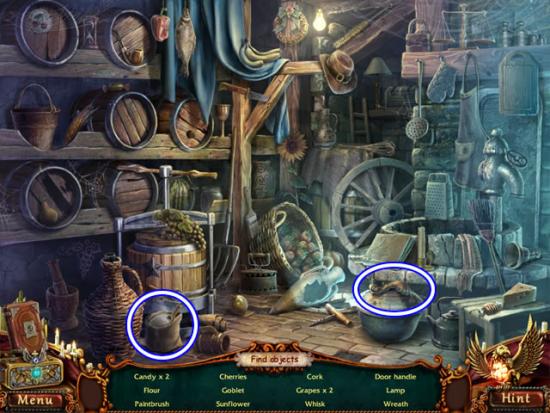
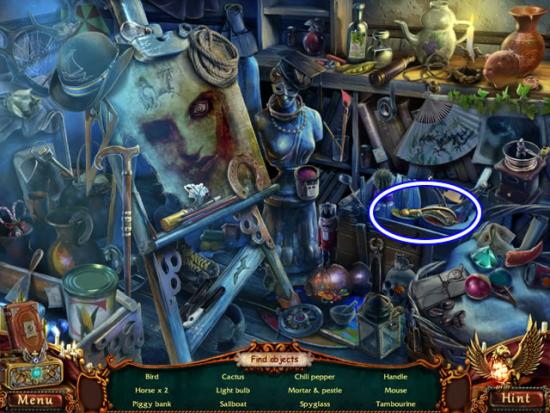
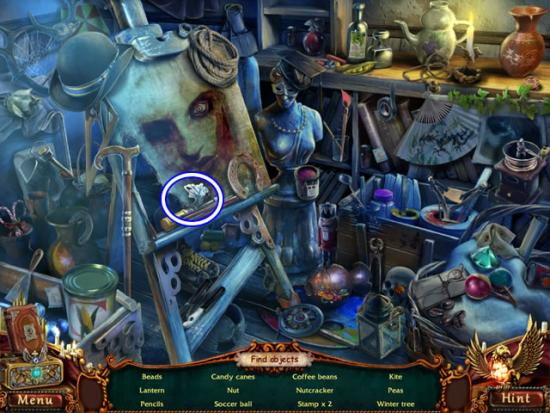
Play the hidden object scene.
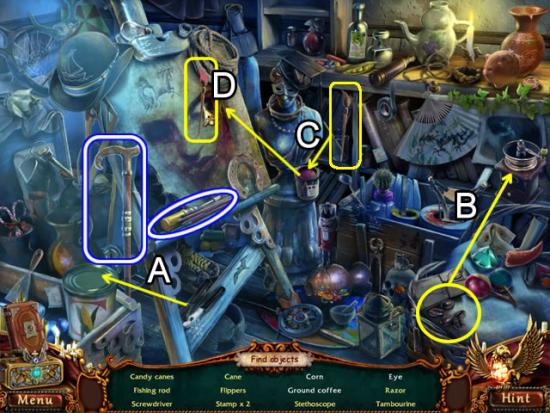
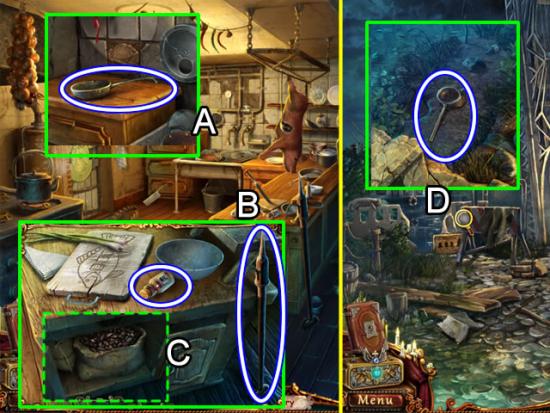
Open the can of Corn with the can opener (A). Put the coffee beans into the grinder (B). Take the Ground Coffee. Dip the paintbrush into the can of paint (C). Place the paintbrush across the eye as shown above (D) to draw the Eye.
Find the rest of the listed objects. The CANE and SCREWDRIVER go to inventory.
Exit the lair. Go down once to return to the clothing store.
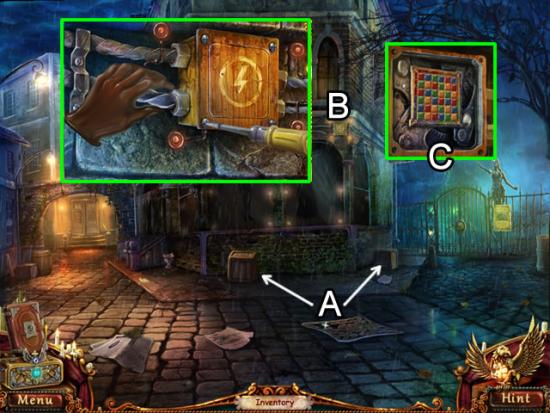
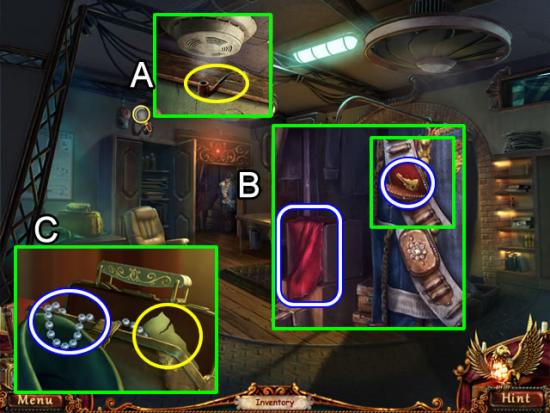
Clothing Store
Stack the empty crates (A) to reach the power box (B). Put the GLOVE on to reattach the live wire. Use the SCREWDRIVER to remove the cover plate.
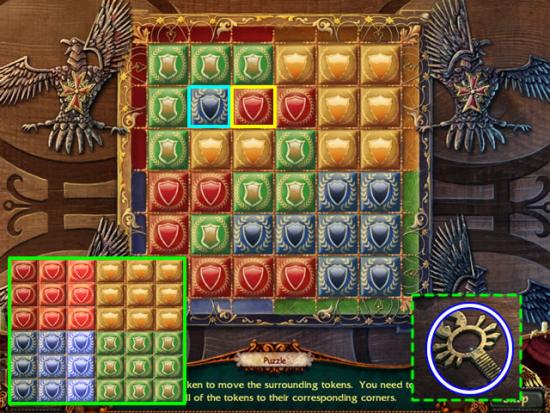
Click the colored panel (C) to start a puzzle.
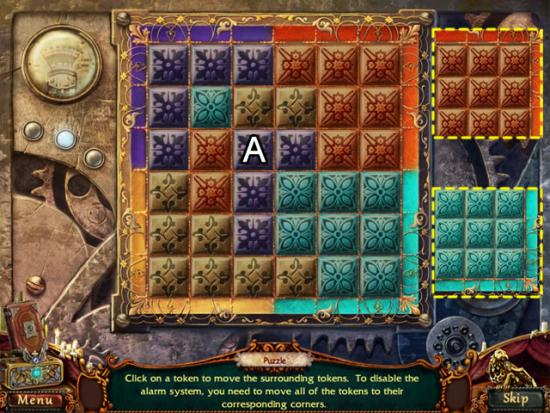
The goal is to match the colored tiles to the colors on the outside border.
This puzzle does not have a reset button. Exiting and reentering the puzzle is also not an option. The only way to reset the puzzle is to open the Menu tab, return to the Main Menu, and then click Play.
The best strategy for solving this puzzle is to complete the orange and aqua squares first.
Solve the orange squares by click the purple tile (A) four times. Next rotate the aqua tile down the board. Try to arrange the tiles into groups of three and then rotate them into place.
View the video to see one possible solution.
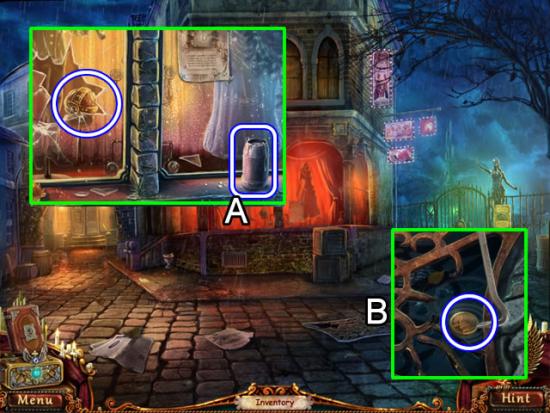
Use the CROWBAR to smash the window (A). Take the ORB and GLUE container.
Zoom in on the drain (B). Pry apart the grate with the CROWBAR. Retrieve the COIN (3/5).
Go down once to return to the stairs.
irs
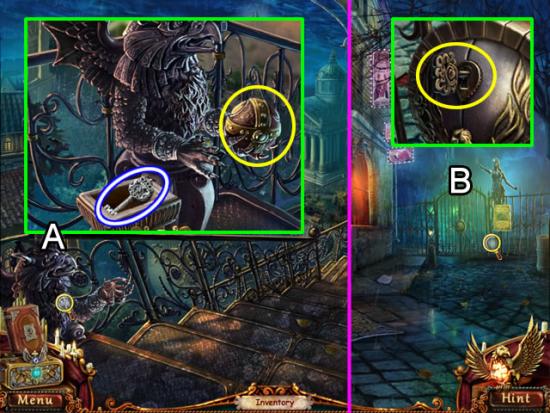
Look at the griffin on the left (A). Place the ORB in its hand (yellow). Lift the lid on the box and take the KEY TO THE CITY.
City Gates
Insert the KEY TO THE CITY in the lock (B) to open the gates.
Chapter 3: Gaining Entrance to the Courthouse
Refer to this map as needed to locate sites mentioned in this chapter.
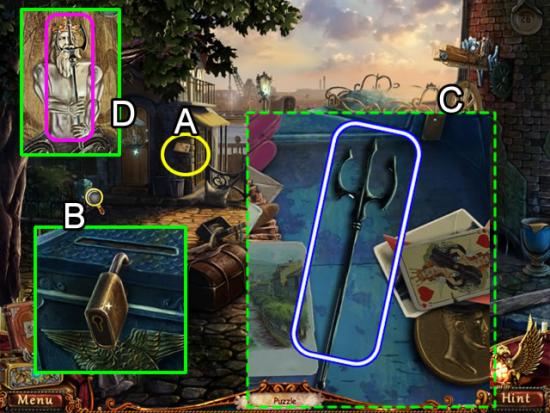
Courthouse Square
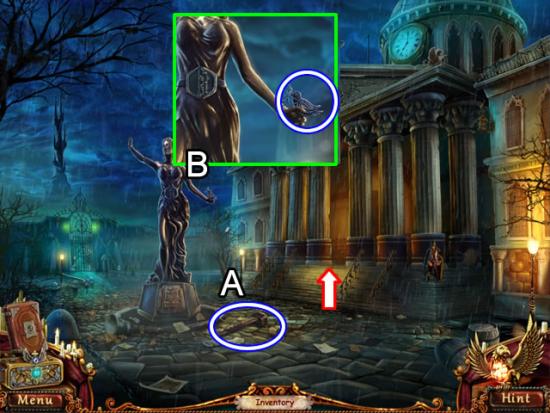
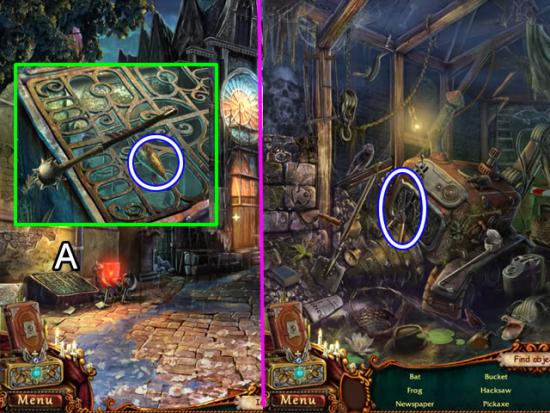
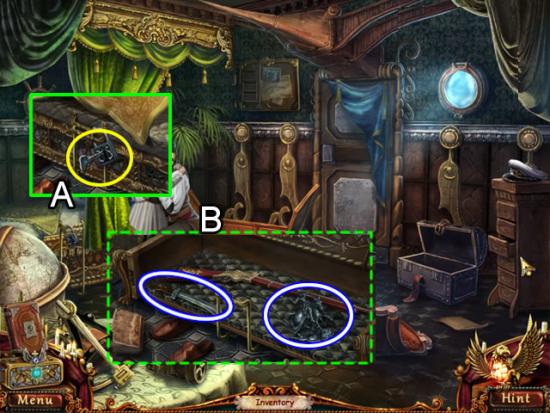
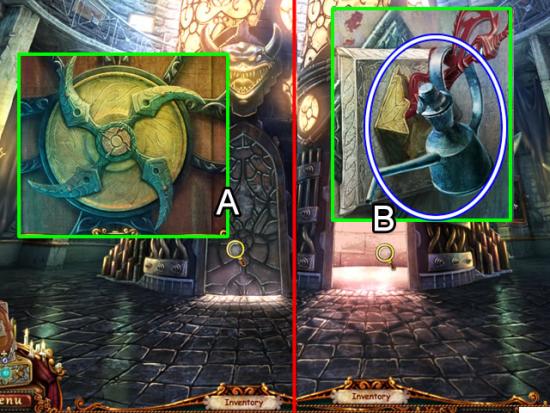
Pick up the SLEDGEHAMMER near the statue (A).
Examine the statue (B). Take the BIRD from her hand.
Approach the stairs to the courthouse.
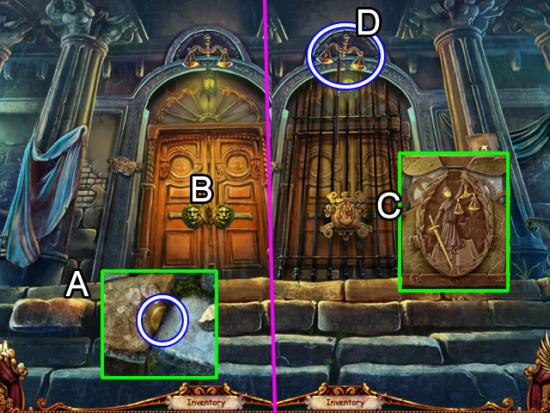
Courthouse Stairs
Examine the loose stone (A). Pry out the COIN (4/5) with the DAGGER.
Approach the doors (B).
Examine the lock on the bars (C) to see what needs to be added to the statue.
Use the CANE to retrieve the SCALES above the door (D).
Return to the mortuary.
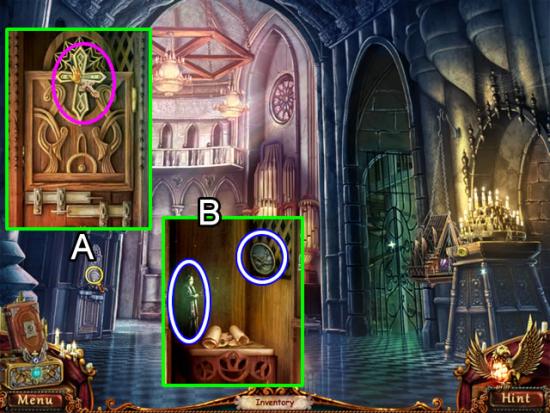
Mortuary
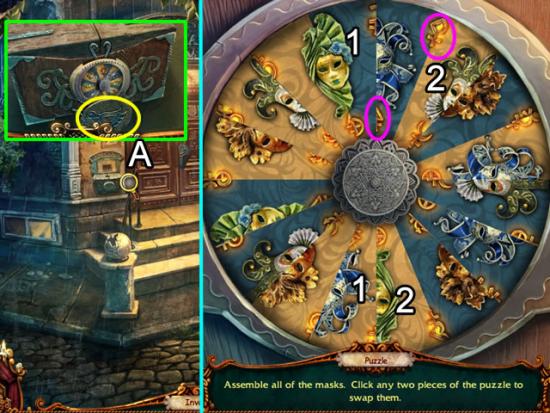
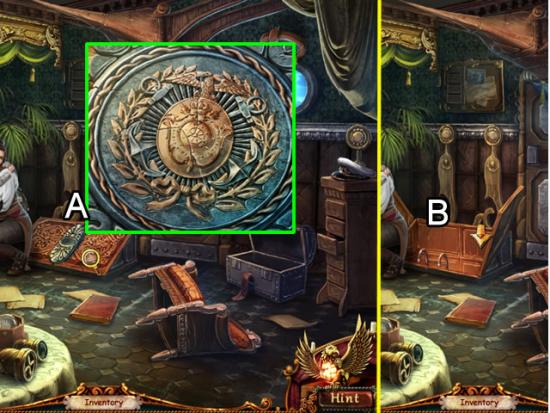
Zoom in on the collection box (A). Insert the BIRD in the outline.
Click the circle to open a puzzle.
The goal is to complete the masks by swapping mask pieces.
Each mask is half brown and half blue. This pattern repeats around the circle.
Use the symbols at the bottom or top (pink) of a segment to find its matching half. The first two swaps are shown above.
See the next screenshot for the solution.
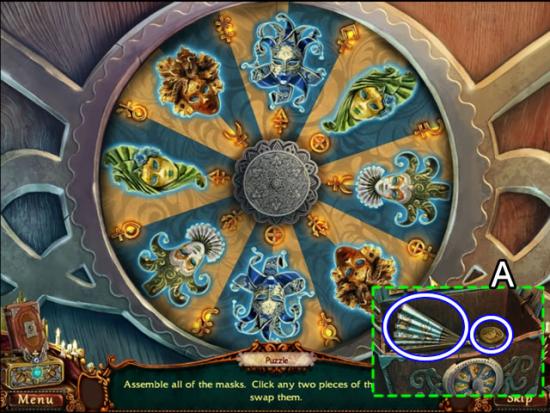
Take the FAN and COIN (5/5) from the box (A).
Return to the courthouse square.
Courthouse Square
Give the man with the camera the five COINS.
Receive a PHOTO.
Return to the lair (top floor across from the mortuary).
The Lair
Zoom in on the desk.
Place the PHOTO, PAINTBRUSH and GLUE in the dark outlines on the desk.
Dip the paintbrush (B) in the glue (C). Dab the brush on the document. Press the photo (A) in the glued outline.
Take the FAKE ID (D).
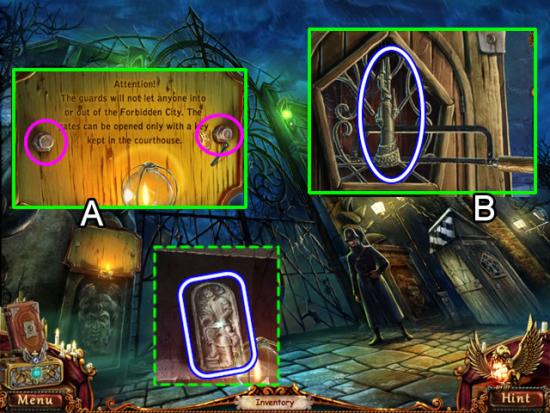
Return to the courthouse square. Go forward to the gates to the Forbidden City.
Gates to Forbidden City
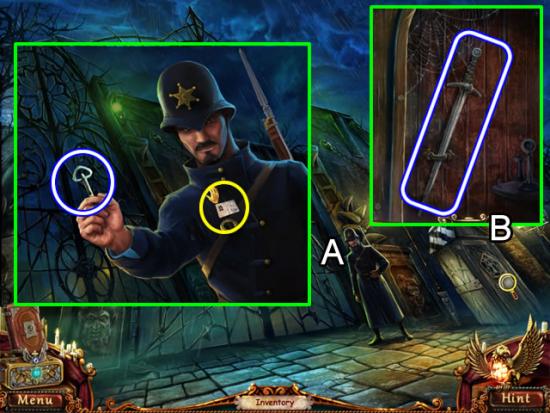
Give the guard (A) the FAKE ID. Take the POLICE SHED KEY.
Use the POLICE SHED KEY to open the door on the shed (B). Take the SWORD.
Return to the statue in the courtyard square.
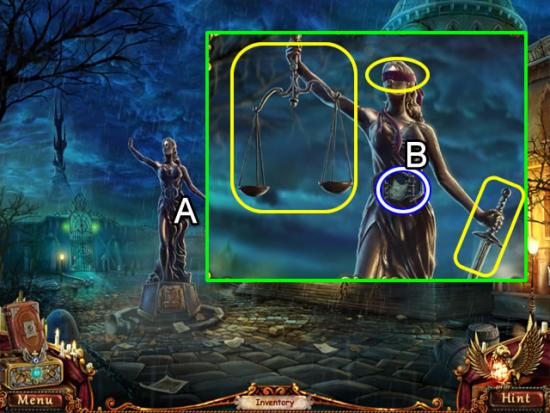
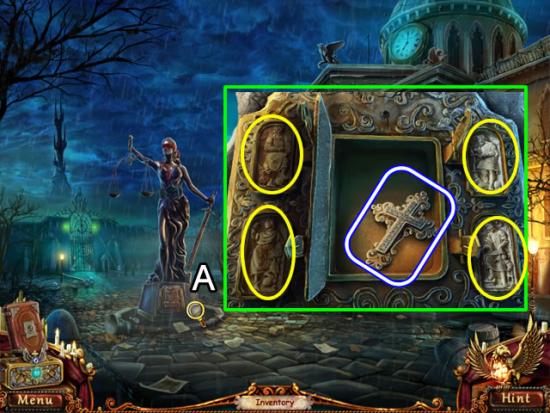
Courtyard Square
Zoom in on the statue (A). Place the RIBBON, SCALES and SWORD as indicated.
Take the PUNCH CARD from her belt (B).
Courthouse Stairs
Insert the PUNCH CARD in the slot in the door to enter the courthouse.
Chapter 4: The Courthouse and its Secrets
- Refer to this map as needed to locate sites mentioned in this chapter.
Courthouse Lobby
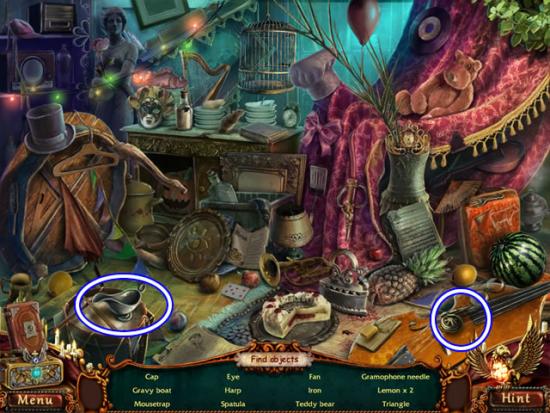
- Play the hidden object scene
- Click the ribbon (B) to form a Bow. Use the dagger (B) on the bulge in the chair to find the Spring. Use the matches to light a Burning Candle. Open the drawer in the gramophone (D) to find the Candy and Thread.
- Find the rest of the listed objects. The PRUNING SHEARS and WEDGE go to inventory.
- Attempt to go up the stairs.
Courthouse Stairs
- Insert the WEDGE behind the large stone. Use the SLEDGEHAMMER to free the STONE.
Courthouse Lobby
- Zoom in on the trap on the stairs (B).
- Spring the trap with the STONE. Use the PRUNING SHEARS to cut the spring.
- Enter the doors at the top of the stairs (C).
Judge’s Office
- Speak to the judge. Take the RING.
Courthouse Lobby
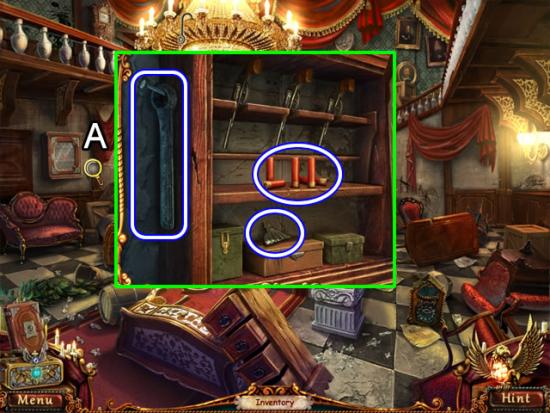
- Inspect the cabinet on the left wall (A).
- Use the RING to unlock the cabinet door.
- Take the BULLETS and DOME FIGURINE. Pluck the WRENCH from the side of the cabinet.
Judge’s Office
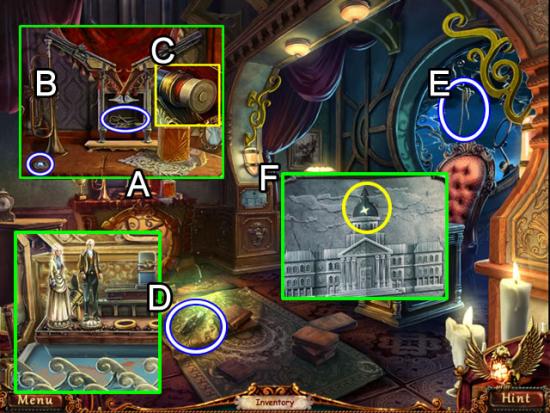
- Examine the contents on the mantel (A). Pick up the bugle (B). Take the WHEEL that falls out.
- Look closer at the right pistol (C). Insert a BULLET in the chamber to open a secret compartment. Take the LOCK PICK from the compartment.
- Pick up the JUDGE FIGURINE from the floor (D). This triggers the movie box. Place the figurine on the second space to see more of the story.
- Take the ROPE hanging by the window (E)
- Zoom in on the etching of the courthouse (F). Place the DOME FIGURINE on top to start a series of spot-the-difference puzzles.
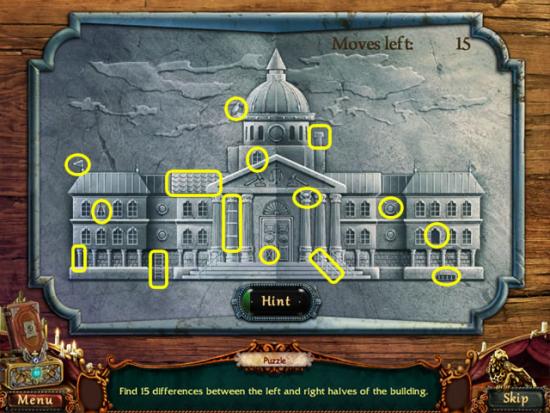
- Puzzle 1. The differences are shown.
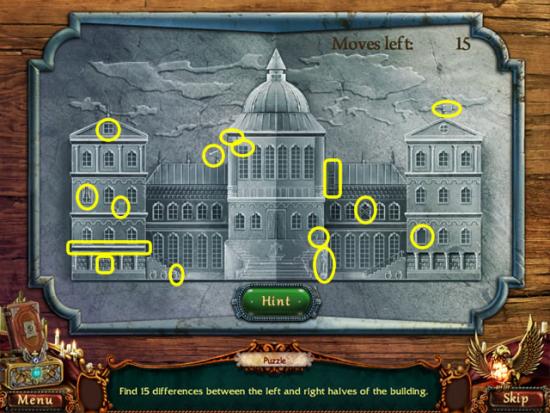
- Puzzle 2. The differences are shown.
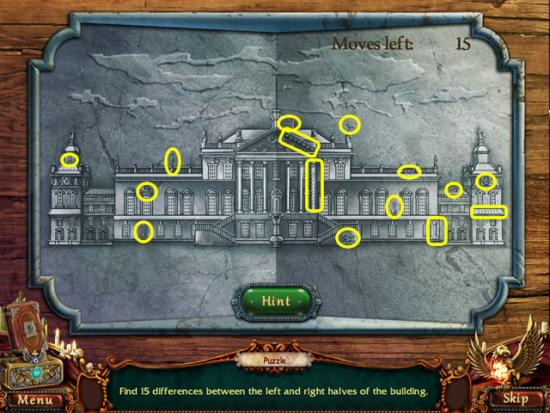
- Puzzle 3. The differences are shown.
- Take the COURTHOUSE REPLICA from the hidden cache.
Courthouse Lobby
- Throw the ROPE to the hook hanging from the chandelier (A). Take the ROPE WITH HOOK.
Judge’s Office
- Look out the window (B). Use the ROPE WITH HOOK to retrieve the SAFE KEY.
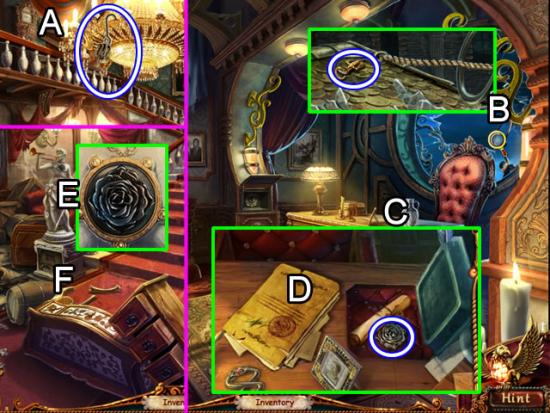
- Examine the desk (C).
- Read the documents in the folder (D). Remove the safe cover. Insert the SAFE KEY in the safe lock. Take the BLACK ROSE. Read the document.
Courthouse Lobby
- Zoom in on the statue on the left (E). Position the BLACK ROSE in the necklace inset.
- Examine the base of the statue to open a puzzle.
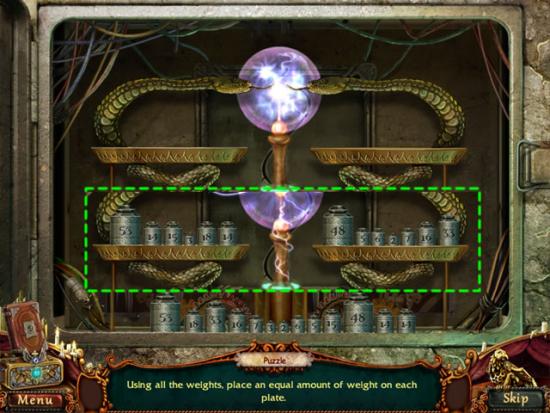
- The goal is to distribute all of the weights on the two scale pans to balance the scale.
- The best strategy is to place the two largest weights on opposite pans. Add weights to each pan to try and keep them even until all weights are used.
- Adding together all the weights totals 234. Divided by 2 equals 117 on each pan. Keep that goal in mind as moving the weights to the pans. The weights will shift positions on the pans once they are placed.
- The solution is shown in the dashed inset above. Left pan: 53, 14, 15, 3, 18, 14. Right pan: 48, 5, 6, 2, 7, 16, 33.
- Enter the secret passage.
Archive Hallway
- Read the plaques beneath each portrait for more story information.
The Archive
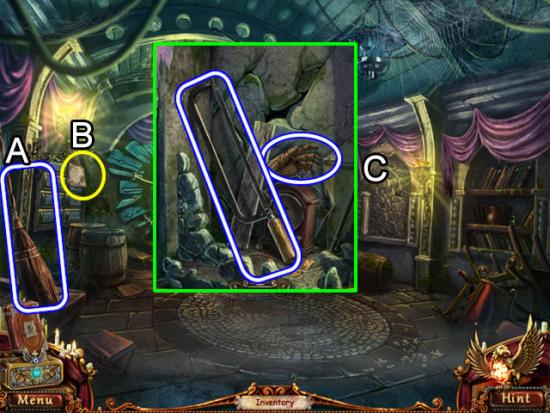
- Take the BROOM (A).
- Read the document (B). The information is not stored in the journal.
- Use the SLEDGEHAMMER to punch through the rocks covering the alcove (C). Take the HACKSAW and WOODEN HAND.
Archive Hallway
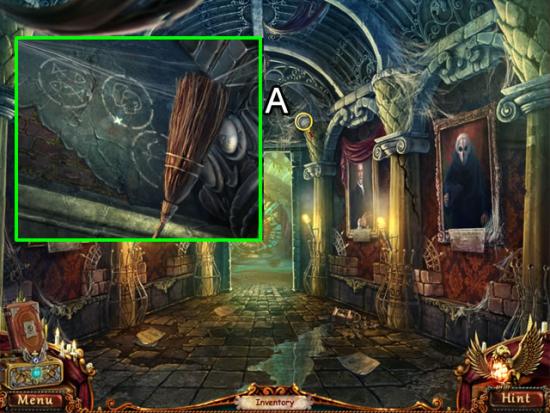
- Use the BROOM to sweep away the cobwebs (A).
- Note the three Zodiac signs as this information is not added to the journal.
Judge’s Office
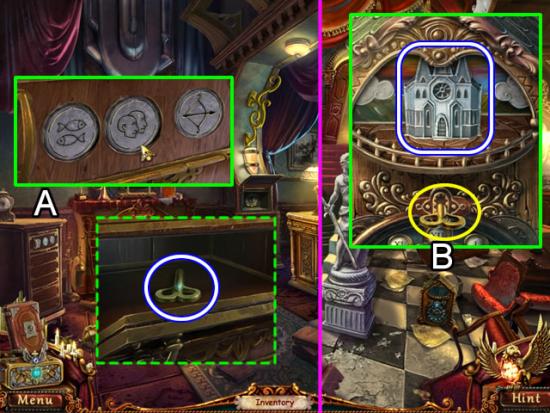
- Zoom in on the small cabinet on the left (A).
- Flip through the Zodiac signs until they match the sequence that was uncovered in the hallway:
- Solution. Pisces (fish), Gemini (twins) and Sagittarius (bow).
- Take the WINDUP KEY from the compartment.
Courthouse Lobby
- Inspect the clock (B). Insert the WINDUP KEY. Take the CATHEDRAL REPLICA when it appears.
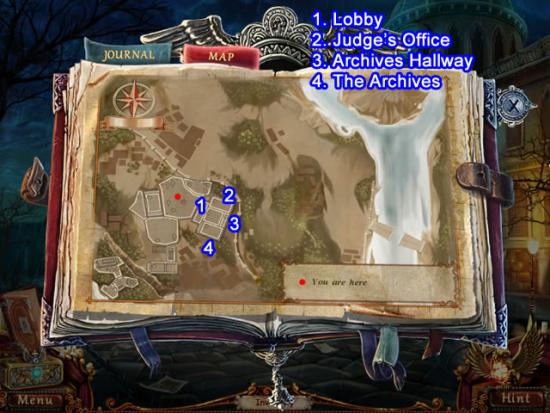
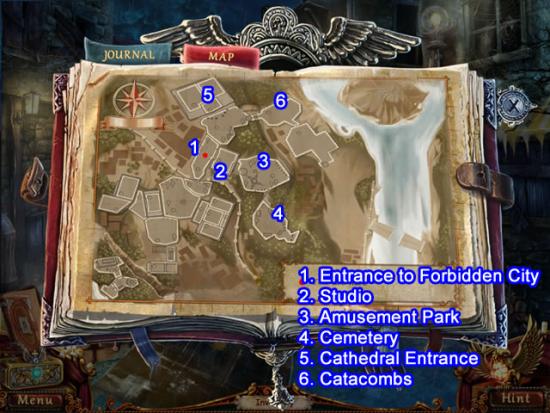
Chapter 5: Finding the Key to the Gates
- Refer to this map as needed to locate sites mentioned in this chapter.
Mountain Lift Platform
- Examine the first-aid box (A).
- Replace the missing WHEEL (yellow) to open the compartment.
- Take the TILE.
The Lair
- Look at the desktop (A). Place the WOODEN HAND on the stand (yellow). Take the BRIDGE REPLICA from the nook.
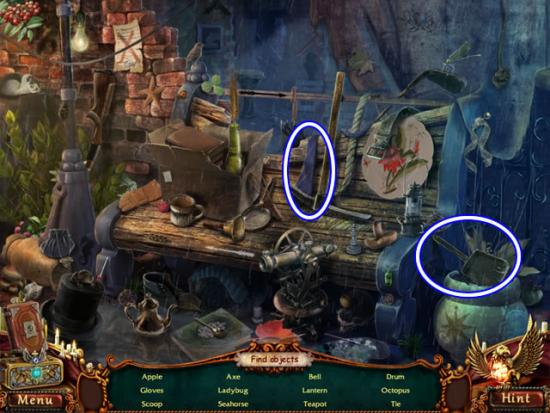
- Play the hidden object scene (B).
- Find the listed objects. The SHARP HOE goes to inventory.
Gates to Forbidden City
- Inspect the sign (A).
- Use the WRENCH to remove the bolts. Take the TILE hidden in the nook.
- Look at the door of the guard shack (B).
- Use the HACKSAW to cut the metal holding the TOWER REPLICA.
The Archives
- Examine the ivy-covered alcove (A).
- Use the SHARP HOE to free the TILE from the ivy.
- Zoom in on the compartment lock on the back wall (B).
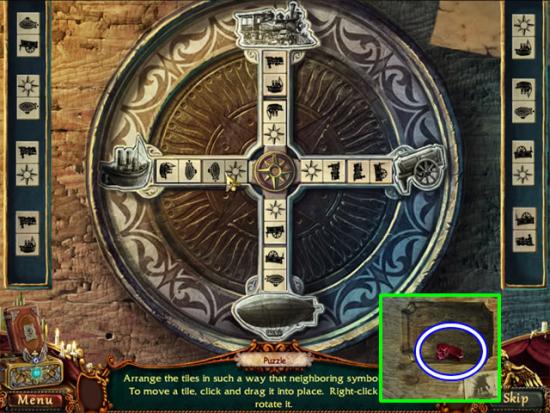
- Place the BRIDGE, TOWER, COURTHOUSE and CATHEDRAL REPLICAS on the lock to open a puzzle.
- The goal is to arrange the tiles in the grid so symbols and their associated structures match.
- Place the initial tiles, those with two replica symbols (tower/bridge) on them. Match the tile symbol (i.e. tower) with the replica on the ring (tower). Right-click to rotate a tile.
- Match the tiles with the suns on them to the sun in the center and the structure on the tile below it.
- See the next screenshot for the solution.
- The initial four tile positions are shown above (A). Place the remaining four so the same symbols match (i.e. tower to tower).
- Take the FORBIDDEN GATES KEY from the nook.
Courthouse Square
- Zoom in on the base of the statue (A).
- Insert the four TILES in the empty slots. Take the CRUCIFIX.
Gates to Forbidden City
- Insert the FORBIDDEN GATES KEY into the lock on the gates.
Forbidden City Entrance
- Play the hidden object scene.
- Find the listed objects. The FEATHER DUSTER and SAFETY PIN go to inventory.
- Continue up the street.
Cathedral Courtyard
- Examine the mechanism on the right (A).
- Turn the crank (B) to raise the coal container. Use the FEATHER DUSTER to clean off the STAR.
Mortuary
- Zoom in on the post on the right (A). Put the STAR in the inset. Take the GLASS CUTTER.
Judge’s Office
- Inspect the cabinet (B). Use the GLASS CUTTER to obtain the MEDAL.
Forbidden City Entrance
- Give the MEDAL to the woman. Receive the MORTUARY KEY.
Chapter 6: The Mortuary
- Refer to this map as needed to locate sites mentioned in this chapter.
Mortuary
- Approach the door. Place the MORTUARY KEY in the outline.
Mortuary Lobby
- Inspect the reception desk (A).
- Pick up the PUTTY KNIFE. Read the document in the brown folder (B) and make a note of the code clue (yellow) scratched on the desk.
- Use the LOCK PICK to open the drawer (C). Take the PENDANT.
- Look at the bulletin board (C). Note another code clue (yellow). Read the two posters (pink).
- Attempt to go down the steps (E).
- Exit the building
Mortuary
- Peer in the window (A).
- Use the PUTTY KNIFE to scrape off the ice and view the code clue (yellow).
Mortuary Lobby
- Zoom in on the gate lock (B). Attach the PENDANT to the empty slot. Use the code clues to determine the code. Pull the pendants to enter the code in the correct sequence (see above inset).
Examination Room
- Move the curtain and look closer at the gurney (A). Take the SCALPEL. Pick up the OFFICER FIGURINE to open the movie box.
- Place the OFFICER FIGURINE on the next empty pedestal (B) to see more of the story.
Mortuary Lobby
- Look again at the reception desk.
- Use the SCALPEL to open the box. Use the LIGHTER to light the TOBACCO PIPE. Take the smoking pipe.
Examination Room
- Zoom in on the fire alarm (A). Place the TOBACCO PIPE under the smoke detector to trigger the alarm and open the door to the storage room (B).
- Take the FLAG. Use the SAFETY PIN as a zipper tab on the ammunition belt compartment. Take the BRIEF CASE KEY.
- Examine the items on the desktop (C). Use the BRIEF CASE KEY to open the case. Read the document (yellow). Take the ROSARY BEADS.
- Exit the mortuary.
- Play the hidden object scene in the storefront.
- Find the listed objects. The SHEET MUSIC and MACE go to inventory.
Chapter 7: The Cathedral
- Refer to this map as needed to locate sites mentioned in this chapter.
Cathedral Courtyard
- Use the MACE to break up the cement clogging the steam pipe (A). Open the grate by taking the WEIGHT.
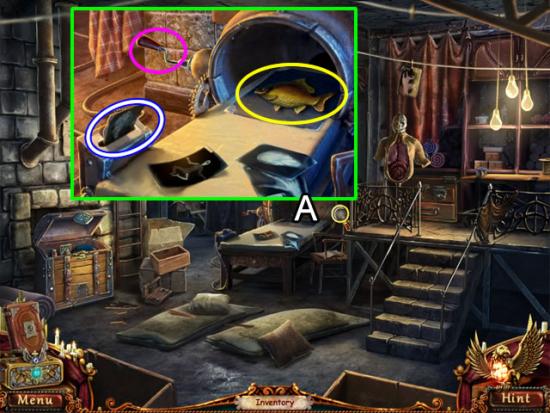
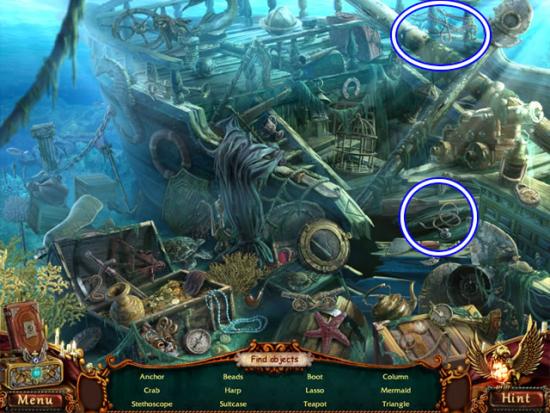
- Enter the catacombs and play the hidden object scene.
Catacombs
- Find the listed objects. The PRUNING SHEARS go to inventory.
Cathedral
- Use the PRUNING SHEARS to remove the netting on the door.
Cathedral Entrance
- Use the CRUCIFIX to unlock the confessional (A).
- Take the LOCKET. Read the document. Pick up the PRIEST FIGURINE to open the box. Place the figurine on the next open pedestal to view more of the story.
- Go forward.
Organ
- Look at the keyboard. Take the BATON.
- Exit the cathedral.
Cathedral Courtyard
- Zoom in on the old bus.
- Use the BATON to slip the latch on the doors.
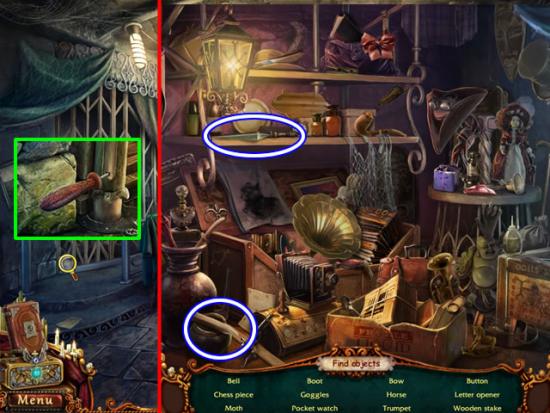
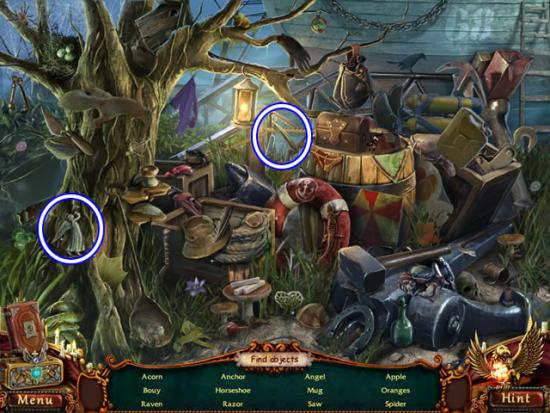
- Play the hidden object scene.
- Find the listed objects. The STEEL HANDLE and (shoe) LACE go to inventory.
Organ
- Use the STEEL HANDLE to open the side compartment on the organ (A).
- Take the FILE. Place the WEIGHT on the empty chain. The balanced weights open the keyboard cover.
Catacombs
- Zoom in on the pipes (B).
- Use the FILE to remove a section of PIPE.
Organ
- Open the pipe cover (A). Replace the twisted pipe with the new PIPE.
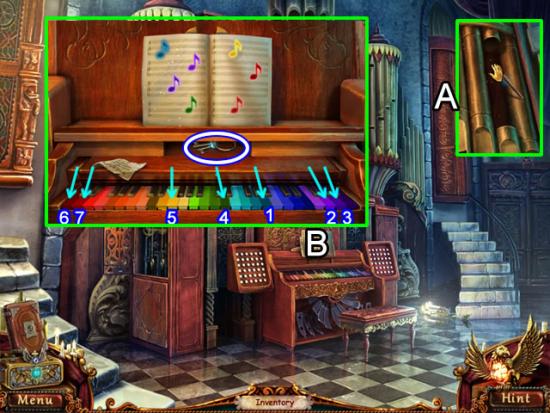
- Look at the keyboard (B). Place the SHEET MUSIC on the stand to open a puzzle.
- The goal is to find the colored key that matches the note. The note lights up when a correct key is struck. Striking an incorrect key resets the puzzle.
- The keys and the order they are struck is shown above. Click the center compartment to get the BUNCH OF KEYS.
Cathedral Entrance
- Use the BUNCH OF KEYS to open the gated door on the right.
Dome
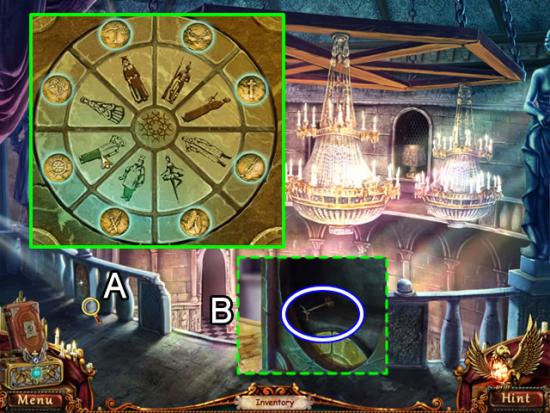
- Inspect the railing support (A). Insert the LOCKET to start a puzzle.
- The goal is to swap neighboring symbols until the correct symbol matches the person depicted.
- Take the CATHEDRAL KEY from the nook (B).
Cathedral Entrance
- Zoom in on the candles (A).
- Use the LIGHTER (B) to melt the wax covering the keyhole.
- Insert the CATHEDRAL KEY (C) to open the cabinet doors.
- Pull the lever (D) to lower the chandelier.
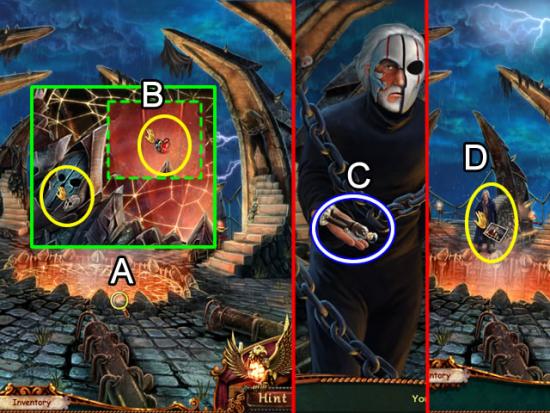
Dome
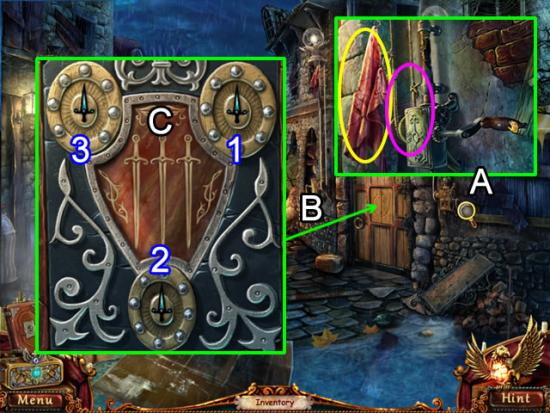
- Cross the planking to the goblet (A). Place the ROSARY BEADS on the goblet (pink). Take the SHIELD (B).
- Speak to the officer. Take the HANDKERCHIEF (C).
Forbidden City Entrance
- Play the hidden object scene in the street.
- Find the listed objects. The TIE and SCOOP go to inventory.
Chapter 8: What the Cemetery Holds
- Refer to this map as needed to locate sites mentioned in this chapter.
The Door
- Zoom in on the mechanism on the right of the door (A). Attach the FLAG to the line. Use the LACE to repair the rope (pink). Pull the lever to raise the flag and open the door panel.
- Inspect the panel (B). Place the SHIELD in the center (C) to start a puzzle.
- The goal is to rotate the swords until all are pointing down. The order to click the symbols is shown above.
Studio
- Look closer at the window (A). Remove the lid from the solvent. Dip the HANDKERCHIEF in the solvent. The HANDKERCHIEF WITH SOLVENT is returned to inventory.
- Examine the painting (B). Remove the paint layer with the HANDKERCHIEF WITH SOLVENT. Open the locket (C) to view a cut scene.
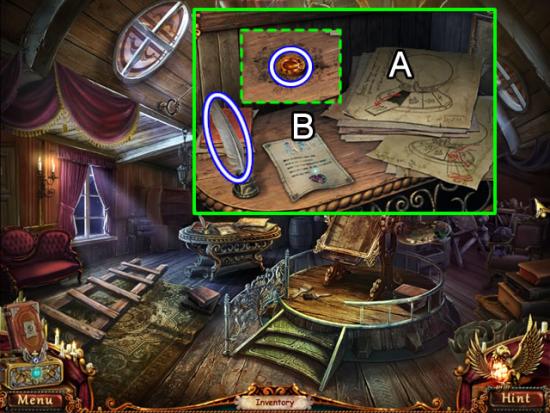
- Examine the contents on the table.
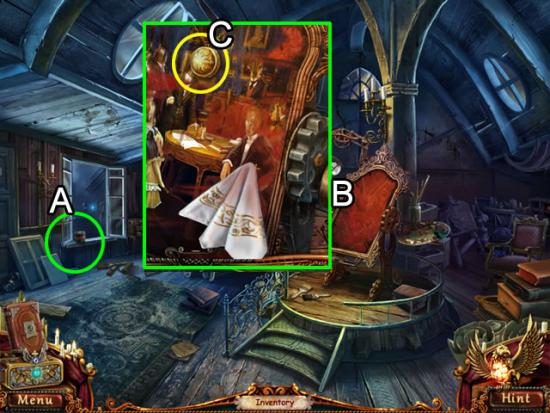
- Look at the directions for opening a secret compartment (A). Read the note (B). Take the ORANGE CRYSTAL after the note burns. Pick up the FEATHER.
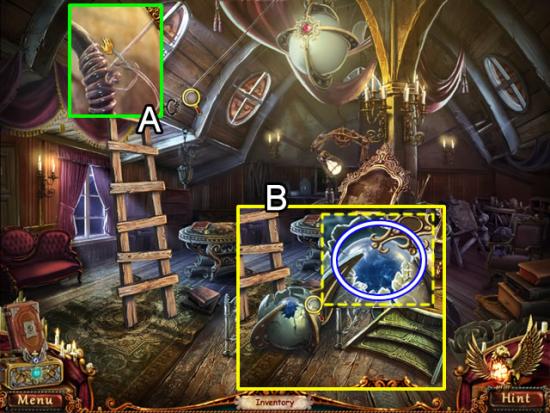
- Prop the ladder against the wall (A) to reach the wall anchor. Cut the wire supporting the orb with the SCALPEL.
- Look closer at the broken orb (B). Take the CRYSTAL BALL.
- Take the LADDER for inventory.
- Return to the table. Put the CRYSTAL BALL in the stand (A) to open a puzzle.
- Click the diamond inset matching the symbol that flashes on the table. This isn’t a repeat-the-sequence puzzle; the diamonds must be clicked while the symbol is illuminated. The order is shown above.
- Take the BONE KEY from the compartment (B).
- Look out the window (A).
- Use the LADDER to span the gap between the buildings. Be sure to place the ladder in the gap and not on the far roof.
Amusement Park
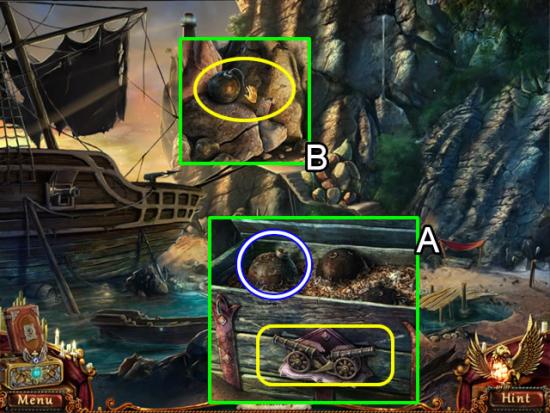
- Look at the seat at the end of the tentacle on the octopus ride (A). Take the EMPTY BAG.
Cathedral Courtyard
- Go over to the coal pit (B). Lay the EMPTY BAG on the wooden structure. Use the SCOOP to fill a BAG OF COAL.

Amusement Park
- Examine the coal furnace on the ride (A). Remove the CHAIN and open the furnace doors.
- Dump the BAG OF COAL in the furnace. Light the coals with the LIGHTER. FAN the coals to get them hot.
- Attach the CHAIN to the ride seat (B).
- Attach the other end to the grill on the booth (C).
- Pull the lever (D) to start the ride.
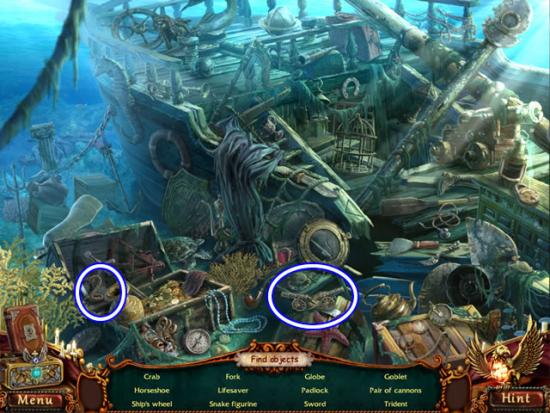
- Play the hidden object scene in the booth.
- Find the listed objects. The FIREWORKS and NOSE RING go to inventory.
- Look at the cemetery gates to the left of the ride.
- Attach the NOSE RING to the lock creature. Insert the BONE KEY in the keyhole to open the gates.
Cemetery
- Look closer at the guardhouse (A). Remove the ivy from the SAW.
- Clear away the tree (B) with the SAW.
- Examine the tomb (C). Take the GARGOYLE and TACK.
- Inspect the headstones (D). Pick up the BOOK COVER FRAGMENT. Zoom in on the headstone. Take the GREEN CRYSTAL.
Cathedral Entrance
- Zoom in on the candles (A). Place the GARGOYLE on the empty pedestal. Take the VIOLET CRYSTAL.
Cemetery
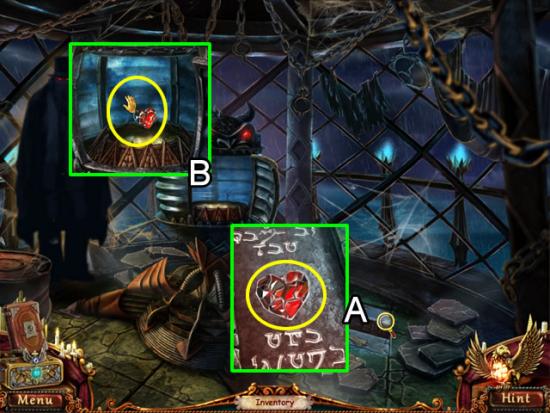
- Examine the tomb (B). Place the ORANGE, VIOLET and GREEN CRYSTALS in the slots. Swap the three crystals to find the right combination to open the tomb (see above inset). Take the CROWN and AXE from the tomb.
- Look at the headstones again (A). Zoom in on the small figure. Place the CROWN on its head. Take the HEART from its chest.
- Use the TACK to open the door to the guardhouse (B).
- Examine the desk. Put the BOOK COVER FRAGMENT on the book (C). Dip the FEATHER in the ink to begin a connect-the-dots puzzle.
- Take the AQUARIUS disk (D).
Catacombs
- Play the hidden object scene.
- Find the listed objects. The HONEY and BELL go to inventory.
- Put the AQUARIUS disk in the bas-relief (A) to start a puzzle. Swap the pieces within a ring to form a picture. Pieces can only be swapped with a neighboring piece.
- The best strategy is to work from the outside ring to the center. Match the patterns on the outside and the stars in each ring.
- The solution is shown above. Solving the puzzle turns off the water.
- Use the AXE to cut through the boards covering the passageway (B).
Chapter 9: On the Waterfront

Refer to this map as needed to locate sites mentioned in this chapter.
Medical Room
Zoom in on the x-ray machine (A). Note the bones that are lit up in the skeleton x-ray (pink). Read the document on the right. Pick up the DOCTOR FIGURINE for more of the story.
Examine the trunk (B). Light up the same bones as seen in the x-ray to open the trunk (C).
Take the GAUZE and MEDICAL CLAMPS. Read the document on the clipboard.

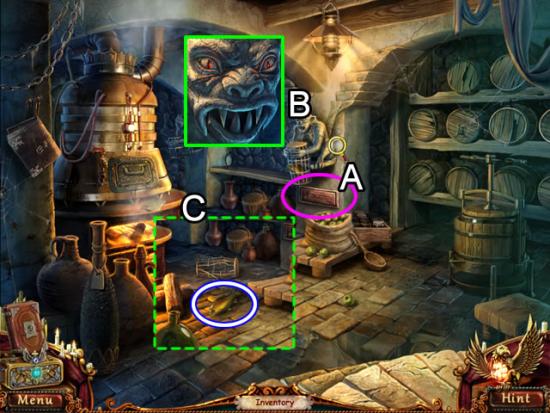
Look at the worktable (A). Place the SCALPEL, FIREWORKS and GAUZE in their shadow spots. Snip a length of fuse from the spool with the scalpel. Use the gauze to bundle the fireworks. Attach the fuse. Take the BOMB.
Examine the grate at the top of the ladder (B). Put the BOMB on the grate and TIE it to the bars. Light the fuse with the LIGHTER.
River Road
Examine the building across the street (A). Take the WRENCH.
Cathedral Entrance
Enter the Confessional. Use the WRENCH to remove the BIG BELL
Return to the river road. Go right.
Bridge Entrance
Look at the warning barrier (C). Take the TILE.
River Road
Look at the building again.
Place the BIG BELL and BELL on their hooks.
Place the TILE in the slot. Pull the bells in the order and number indicated on the tile to open the door.
Kitchen
Look at the sink (A). Take the SCOOP.
Examine the work surface (B). Take the HOOK and bottle of POISON. Open the cabinet doors (C). Open the bag. Use the SCOOP to get a SCOOP OF NUTS.
Bridge Entrance
Return to the barrier (D). Use the HOOK to retrieve the BUTTERFLY NET.
River Road
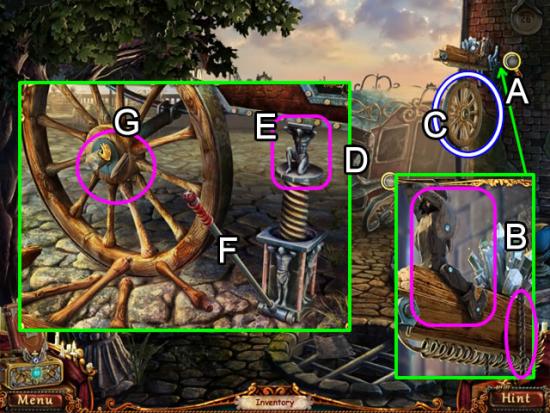
Look at the wrecked carriage (A). Use the MEDICAL CLAMPS to remove the hub pin (yellow). Take the WHEEL.
Zoom in on the empty birdbath (B). Take the BELT. Put the SCOOP OF NUTS in the basin to lure the squirrel. Capture the SQUIRREL with the BUTTERFLY NET.
Kitchen
Zoom in on the sink (A). Place the WHEEL on the wall. Attach the BELT to the wheel and squirrel cage. Put the SQUIRREL in the wheel cage.
Turn the valve (C). Take the OWL floating in the water (D).
Look at the door (E). Insert the OWL in the slot to open the door.
Wine Vault
Play the hidden object scene.
Find the listed objects. The FLOUR and DOOR HANDLE go to inventory.
Inspect the journal hanging on the left wall. Take the CHEF FIGURINE. Place him on the empty pedestal to see more of the story.
Kitchen
Put the DOOR HANDLE on the green doors to the right.
Dining Room
Play the hidden object scene.
Find the listed objects. The GRAMOPHONE NEEDLE and GRAVY BOAT go to inventory.
Look at the bar area (A). Pour the POISON in the spray bottle. Take the BOTTLE OF POISON.
River Road
Zoom in on the grate at the base of the building across from the restaurant (B).
Spray the rats from the BOTTLE OF POISON. Remove the grate. Take the RECORD.
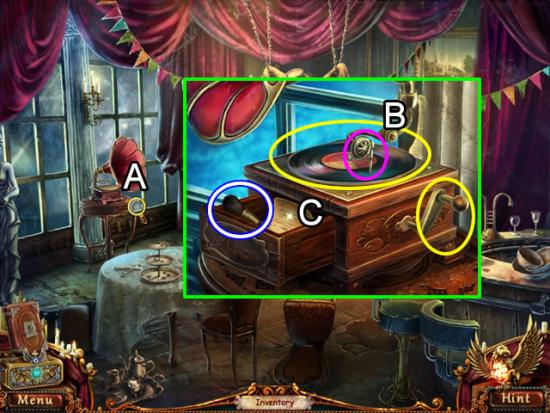
Dining Room
Inspect the gramophone (A).
Place the RECORD on the turntable. Attach the GRAMOPHONE NEEDLE to the arm. Crank the gramophone.
Read the note in the compartment (C). Take the BRUSH.
dge Entrance
Zoom in on the control room door (A). Dust the buttons with FLOUR. Use the BRUSH to reveal fingerprints.
Press the three keys with flour on them (B).
Control Room
Play the hidden object scene.
Find the listed objects. The OVEN GLOVE and HOSE go to inventory.
Dining Room
Zoom in on the dummy (A). Use the OVEN GLOVE to remove the thorns. Take the ROSE and BAR KEY.
Look behind the bar area (B). Insert the BAR KEY in the drawer lock. Take the WINE SATCHEL PART.
River Road
Look again at the carriage wreck.
Zoom in on the wine case. Place the WINE SATCHEL PART in the space. Take the bottle of WINE.
Wine Vault
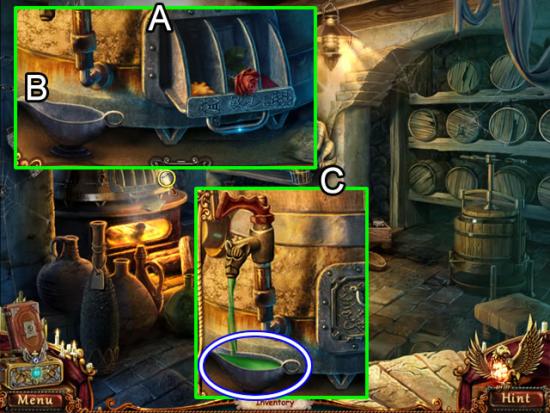
Zoom in on the mechanism. Open the compartment (A). Place the following items in each slot in this order: HONEY, ROSE and WINE. Put the GRAVY BOAT under the spigot (B).
Close the compartment door.
Open the spigot to fill the gravy boat with POTION.
Read the plaque on the wall (A).
Put the POTION in the chimera’s mouth (B).
Take the FISH that falls on the floor (C).
Medical Room
Look closer at the x-ray machine (A).
Put the FISH as shown above (yellow). Pull the crank (pink). Take the X-RAY.
Control Room
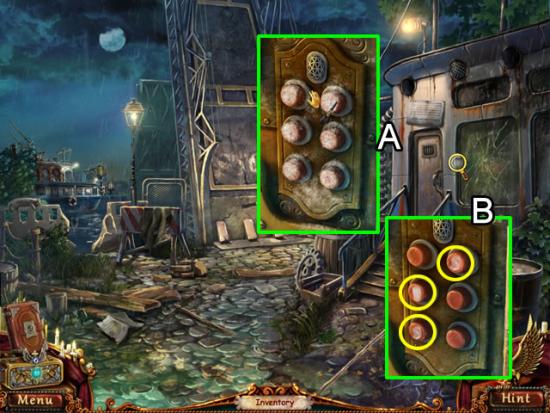
Look at the locked cabinet (A). Place the X-RAY on top of the existing x-ray. Click each die until the numbers match those shown on the x-ray.
Take the GEAR and STAR-SHAPED SCREWDRIVER from the cabinet (B).
Bridge Entrance
Look at the barrel next to the control room (A). Take the GEAR.
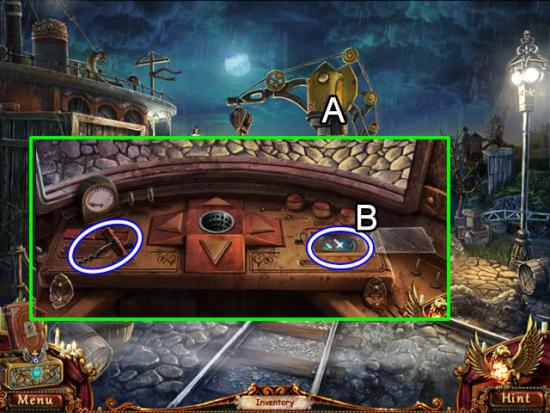
Examine the bridge mechanism (B). Use the STAR-SHAPED SCREWDRIVER to open the center panel. Take the KEY.
Control Room
Use the KEY to unlock the mechanism (A). Turn the wheel (pink) to lower the command center.
Look closer at the command center (B). Click the panel (C) to open a slider puzzle.
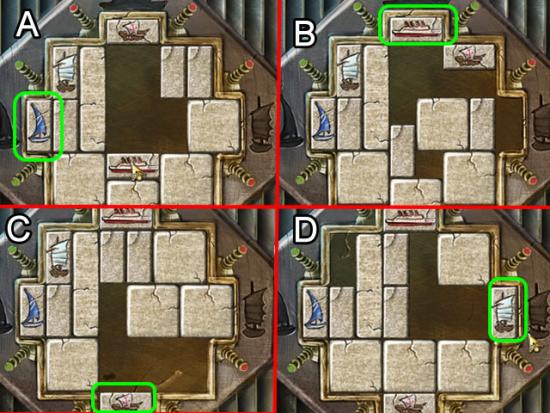
All tiles can slide horizontally or vertically.
See the above screen shots showing the position of the tiles as each ship is placed.
Take the CENTRAL GEAR.
Bridge Entrance
Examine the bridge mechanism again (A).
Place the CENTRAL GEAR in the middle and the other two GEARS on the right side as shown above.
Cross the bridge
Chapter 10: Across the River
Refer to this map as needed to locate sites mentioned in this chapter.
Wharf
Play the hidden object scene.
Find the listed objects. The CHALK and EMPTY GAS CAN go to inventory.
Enter the crane cab (A).
Lift the plastic cover (B) to get the WORKER’S BADGE. Take the CORKSCREW.
Bridge Entrance
Examine the barrel (A). Remove the top with the CORKSCREW. Place the EMPTY GAS CAN on the ground. Insert the HOSE in the barrel. Take the CAN OF GAS.
Bridge Control Room
Zoom in on the cabinet (B). Place the WORKER’S BADGE in the box lock. Take the CRANE KEY.
Wharf
Look at the gas tank for the crane (A). Take the RAILWAY LEVER. Pour the CAN OF GAS into the tank.
Examine the switch (B). Insert the RAILWAY LEVER and pull to switch the tracks.
Crane Cab
Pull the switch (A) to reposition the crane.
Insert the CRANE KEY in the slot (pink). Use the yellow direction arrows (B) to position the hook. Lower the hook with the handle. Remove the crate.
Board the ship.
Deck
Look in the lifeboat (A). Take the VALVE HANDLE.
Put the VALVE HANDLE on the hatch (B) and give it a spin.
Captain’s Cabin
Take the CAPTAIN FIGURINE from the girl. Place it on the empty pedestal to watch more of the story.
Look at the bulletin board (B). Take the PUZZLE FRAGMENT. Note the position of the sidebars on the octopus drawing (yellow).
Deck
Zoom in on the door on the upper deck (A). Move the bars on each side of the octopus to the same position as seen on the bulletin board.
Bridge
Pick up the PUZZLE FRAGMENT.
Look at the desk (B) Take the PULL ROPE.
Captain’s Cabin
Look again at the bulletin board.
Attach the PULL ROPE to the pulley next to the box. Give it a tug. Take the PLIERS and SHEET OF PAPER.
Deck
Examine the barrels (A). Use the PLIERS to remove the straps. Take off the lid to find the PUZZLE FRAGMENT.
Bridge
Look closer at the oars (B). Use the PLIERS to get the PUZZLE FRAGMENT.
Captain’s Cabin
Inspect the panel on the hatch cover (A). Place the four PUZZLE FRAGMENTS in the groove.
Enter the hold (B).
Hold
Play the hidden object scene.
Find the listed objects. The POKER and (Ladle) CRUCIBLE go to inventory.
Look at the table on the right. Take the CODE plate.
Bridge
Zoom in on the code machine (A).
Insert the CODE plate in the machine (B). Add the PAPER (C). Turn the handle. Examine the code sheet that is produced.
Hold
Look at the hook and chain (A). Use the POKER to remove the chain from the hook and free the lifeboat.
Go to the table (B). Press the buttons matching the code. Take the BED KEY.
Captain’s Cabin
Zoom in on the bed (A). Use the BED KEY to unlock the padlock.
Take the MACHETE and FIGURINE (B).
Hold
Go to the furnace (A). Place the CRUCIBLE in the flames. Add the FIGURINE (pink). Take the MELTED METAL to the table (B).
Pour the melted metal into the mold (C). Turn the handle to dip the mold in the water. Take the BULLETS (D).
Captain’s Cabin
Put the BULLETS in the RIFLE (A).
Open the porthole (B). Aim the RIFLE at the barrels of gunpowder.
Bridge
Use the MACHETE to cut the rope holding the OARS (A).
Deck
Zoom in on the lifeboat (B).
Put the OARS in the boat (C). Turn the crank (D) to lower the boat.
Chapter 11: The Tower
Beach
Go forward up the wooden path.
Wooden Path
Take the HOOK hanging on the rope guideline (A).
Beach
Zoom in on the broken hull in the ship (B). Use the HOOK to pry off the PLANK.
Wooden Path
Place the PLANK across the gap in the path.
Look in the rock face next to the eagle-headed guards (C). Take the SEAL.

Beach
Inspect the ivy-covered rocks (A).
Take the VALVE. Place the SEAL on the scroll (B). Look at the scroll.
Wooden Path
Zoom in on the tile next to the guards (A). Place the CHALK on the tile. It will automatically draw the magic symbol. The guards move aside.
Tower Entrance
Pick up the TONGS leaning against the pole.
Lace up your running shoes.
Wooden Path
Look at the skeleton.
Examine its eye. Use the TONGS to extract the PEARL.
Tower Entrance
Examine the door mechanism (A). Insert the PEARL in the center. Take the SICKLE from the compartment.
Beach
Look at the ivy-covered rocks again (B).
Use the SICKLE to remove the ivy. Take the CLOTH.
Tower Entrance
Wrap the CLOTH around the old torch (C). Take the TORCH.
Beach
Zoom in on the ship’s hull again (A). Look in the barrel (B). Place the TORCH in the oil. Take the OIL-SOAKED TORCH.
Wooden Path
Stop at the rock-embedded torch (C). Dip the OIL-SOAKED TORCH in the flame. Take the BURNING TORCH.
Tower Entrance
Use the BURNING TORCH to light the lamp (D) above the door.
Tower Hall
Look closer at the elevator door (A). Put the VALVE HANDLE in the slot. Turn the handle to open the elevator.
Enter the elevator (B). Take the OILER from the rusty lever.
Beach
Go back to the ship’s hull. Dip the OILER in the barrel of oil. Take the FULL OILER.
Tower Hall
Pour the contents of the FULL OILER over the rusty lever.
Press the lever.
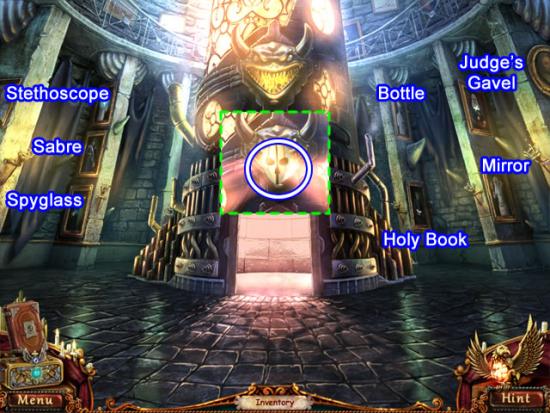
Tower Roof
Take the JUDGE’S GAVEL (A).
Pick up the SABRE. Look in the lava pit (B). Take the SEAHORSE.
Wooden Path
Zoom in on the skeleton (A). Place the SEAHORSE in the lock on the box. Take the GOGGLES and HOLY BOOK.
Beach
Look at the water by the pier (B). Place the GOGGLES on the water to see the sunken ship.
Play the hidden object scene
Find the listed objects. The LASSO and STETHOSCOPE go to inventory.
Wooden Path
Use the LASSO to retrieve the COMPASS from the bird nest (A).
Beach
Look at the ivy wall (B). Insert the COMPASS in the bas-relief (C). Take the MIRROR and CLAW.

Wooden Path
Look again at the tile with the magic symbols on it (A.
Place the CLAW on the outside ring (yellow). Take the SPYGLASS and BOTTLE.
Tower Hall
Examine each of the paintings. Pair the person with an inventory item. The above screenshot shows the placement.
Take the MASK from above the elevator.
Tower Roof
Look into the pit (A). Place the MASK over the mask on the side of the pit. Attempt to throw the HEART into the abyss (B).
Take the BOY FIGURINE (C). Place it in the last spot in the box. Receive a PHOTO.
Give the PHOTO to Leonard (D). Watch the final cutscenes
Congratulations! You have finished playing Dark Strokes: Sins of the Fathers Collector’s Edition.
The Bonus Chapter is now available from the main menu.
Collector’s Edition Bonus Chapter
Leonard’s Street
Attempt to climb the ladder to the window.
Play the hidden object scene in the street.
Find the listed objects. The MINER’S FIGURINE goes to inventory.
Go forward.
Cathedral Square
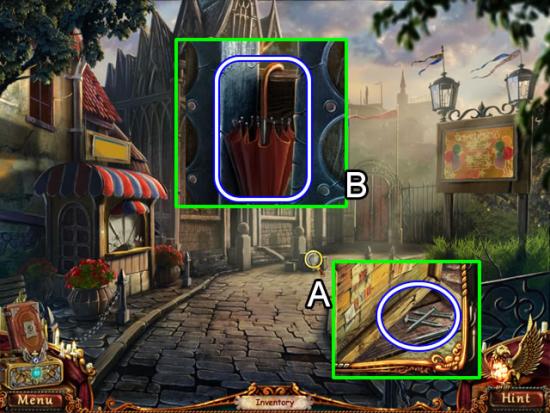
Look closer at the stack of boxes (A). Take the NAILS.
Examine the gates (B). Pick up the UMBRELLA.
Leonard’s Street
Use the UMBRELLA to snag the BUTTERFLY at top of the ladder.
Cathedral Square
Zoom in on the shuttered window (A). Attach the missing BUTTERFLY to raise the shutters.
Take the PRUNING SHEARS (B).
Leonard’s Street
Look at the bench across the street from Leonard’s house.
Use the PRUNING SHEARS to cut the wire enclosing the HAMMER (C).
Use the NAILS and HAMMER to repair the ladder.
Studio
Click the boy (A) and watch the cut scene.
Examine the toy house (B). Take the SAW.
Look at the contents on the table (C). Read the document.
Play the hidden object area (D).
Find the listed objects. The HANDLE goes to inventory.
Cathedral Square
Zoom in on the gates. Use the SAW to cut through the board holding the gates closed.
Ticket Office Street
Read the note on the side of the building (A).
Inspect the mailbox (B). Use the HAMMER to break the lock and open a puzzle.
Move the objects around to uncover a TRIDENT (C).
Zoom in on the door (D). Place the TRIDENT in Poseidon’s hands.
Ticket Office
Look at the seat (A). Take the PINS.
Inspect the cash register (B). Pick the lock with the PINS.
Take the ARCHIVE KEY from the cash drawer (C).
Insert the ARCHIVE KEY in the keyhole (D).
Archive Room
Examine the contents on the table (A).
Read the notebook (B). Take the CROSS-SHAPED KEY.
Studio
Look again at the toy house (C). Insert the CROSS-SHAPED KEY in the box. Take the AWL.
Archive Room
Use the AWL to open the lock on the gated room.
Play the hidden object scene.
Find the listed objects. The LETTER OPENER and STAKE go to inventory.
Ticket Office
Look at the bulletin board.
Use the LETTER OPENER to cut the cord on the MAGNIFYING GLASS.
ive Room
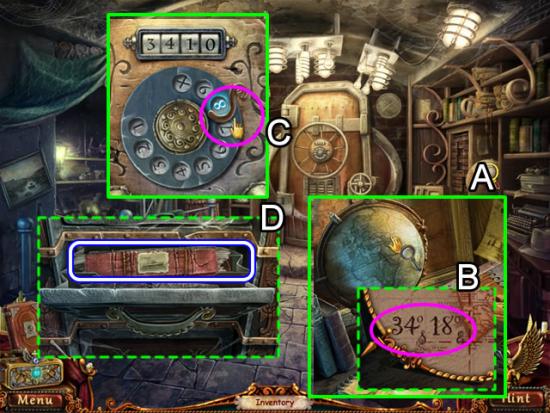
Zoom in on the desk (A).
Use the MAGNIFYING GLASS to find the numbers on the globe (B).
Look at the vault (C). Input the numbers (3418) as though dialing a rotary telephone.
Open the center drawer in the vault (D). Take the PASSENGER MANIFEST.
Studio
Look closer at the easel.
Place the PASSENGER MANIFEST on the blurry painting to open a puzzle.
The goal is to match the pictures to those in the painting. The solution is shown above.
Take the ATLAS figure from the dark shape.
Ticket Office Street
Examine the sign on the side of the building (A).
Place the MINER FIGURINE on the empty position (B). After both miners have chipped away the crystal, the rope holding the wheel (pink) breaks. The WHEEL falls off the sign and automatically to inventory.
Inspect the broken carriage (D).
Put the ATLAS figure on the top of the jack (E). Click the handle (F) to raise the carriage. Replace the broken wheel with the new WHEEL and secure it with the WOODEN STAKE (G).
Follow the carriage to the pier. Play the hidden object scene.
Pier
Find the listed objects. The RAZOR and ANGEL go to inventory.
Leonard’s Street
Play the hidden object scene.
Find the listed objects. The WATERING CAN goes to inventory.
Pier
Look closer at the water (A).
Dip the WATERING CAN in the water to get a FULL WATERING CAN.
Continue to the end of the street.
Dry Dock
Look above the freight elevator (B). Take the WRENCH.
Ticket Office Street
Look at the sign with the miners again.
Use the WRENCH to remove the bolt securing the SPRING.
Cathedral Square
Look into the flower shop.
Pour the contents of the FULL WATERING CAN on the dead rose.
Use the RAZOR to cut the ROSE.
Studio
Inspect the table (C).
Place the ROSE in the center of the album (B). Take the SUN.
Archive Room
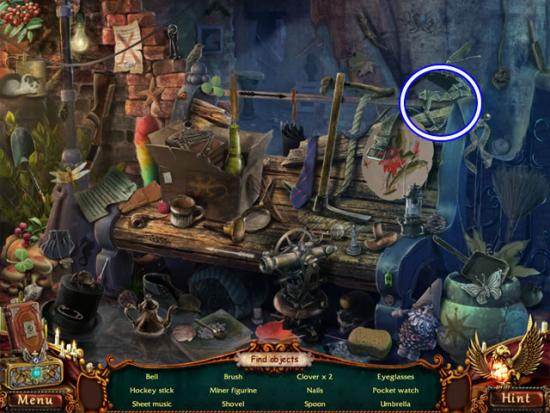
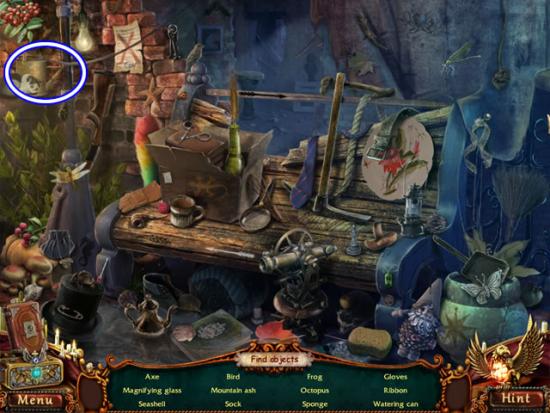
Play the hidden object scene.
Find the listed objects. The FISHING NET and OIL go to inventory.
Look at the desk.
Place the SUN in the outline on the box. Take the MEDALLION.
Dry Dock
Look at the top of the elevator again (A).
Turn the wheel (B). Replace the SPRING (C). Turn the wheel again.
Look inside the open elevator door (D). Take the GLOVE.
Pier
Look at the water again.
Use the FISHING NET to retrieve the bottle.
Take the SHIP out of the bottle with the GLOVE.
Dry Dock
Look at the desk (A).
Place the SHIP on the stand (B). Take the TOKEN.
Enter the elevator (C). Place the TOKEN in the slot.
Reenter the elevator.
Underwater Room
Zoom in on the mechanism (A).
Attach the HANDLE. Pull the handle to open the window covers.
Look at the control panel (B). Take the SPONGE.
Pier
Look at the water again.
Place the SPONGE in the water. Take the WET SPONGE.
Underwater Room
Inspect the storage area (A).
Use the WET SPONGE to wipe off the grime. Uncover the “H” looking screws.
Dry Dock
Look at the desk (B).
Drag the “H” drill bit to the MECHANICAL SCREWDRIVER.
Underwater Room
Use the MECHANICAL SCREWDRIVER to remove the screws on the storage bin (C).
Take the MEDALLION and TWEEZERS.
Leonard’s Street
Zoom in on the cobbler’s table (A).
Use the TWEEZERS to remove the MEDALLION.
Pier
Go to the podium (B).
Place the three MEDALLIONS in the slots.
Click the center of the colored cubes (C) to open a puzzle.
This puzzle is similar to the one in the main game. Rotate the tiles to form colored squares according to the outside frame colors.
The best strategy is to solve the yellow square first (press the blue tile outlined in aqua five times and then press the red tile outlined in yellow twice).
Next solve the red. This leaves the lower panel of blue and green to solve simultaneously. The solution is shown in the inset.
Take the CONTROL PANEL KEY.
Play the hidden object scene.

Find the listed objects. The CROWBAR and SCUBA GEAR go to inventory.
Cathedral Square
Zoom in on the crates.
Use the CROWBAR to pry off the nails.
Remove the lid and take the SLEDGEHAMMER.

Underwater Room
Go to the control panel (A).
Insert the CONTROL PANEL KEY in the slot (B) and pull the lever to cut the chains holding the ship.
Dry Dock
Look at the support beam (C).
Use the SLEDGEHAMMER to break the beam.

Beach
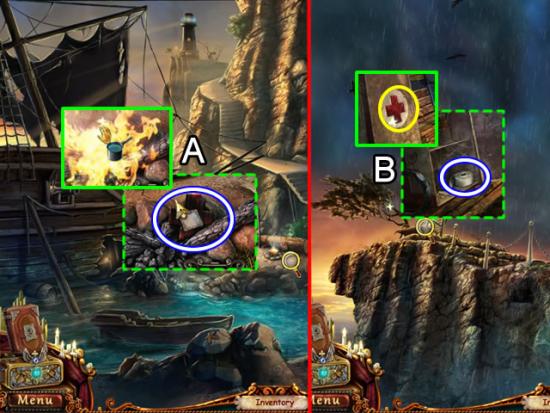
Zoom in on the campfire (A).
Use the RAZOR to cut the strap on the satchel. Take the MATCHES and read the document. Note the figure on the piece of wood.
Look at the rock pile (B). Take the SHOVEL.
Go to the water (C). Place the SCUBA GEAR on the water to open a hidden object scene.
Find the listed objects. The SNAKE FIGURINE and PAIR OF CANNONS go to inventory.
Look at the chest under the canopy (A).
Use the SHOVEL to dig out the chest.
Place the PAIR OF CANNONS in the outline and open the chest. Take the BOMB
Look at the rock pile again (B).
Place the BOMB on the rocks. Light the fuse with the MATCHES.
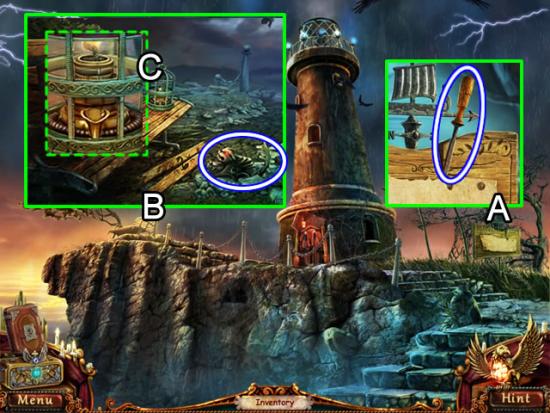
Lighthouse
Inspect the sign (A). Take the CHISEL.
Look closer at the bench (B).
Use the CHISEL to get the CAT FIGURINE.
Look at the lamp (C). Add OIL and light it with the MATCHES. Take the OIL LAMP. Note the figures on the piece of wood.
Beach
Look at the hole in the ship’s hull.
Place the OIL LAMP in the hole.
Take the FISHING ROD.

Lighthouse
Look over the side of the cliff (A).
Use the FISHING ROD to retrieve the RAVEN FIGURINE. Pick up the ANCHOR.
Look at the lighthouse door (B)
Place the CAT, RAVEN and SNAKE FIGURINES in the slots according to their position in the two pieces of wood seen at the campfire and bench.
Open the door and take the PICKAXE HANDLE.
Beach
Look at the chest again.
Place the PICKAXE HANDLE on the pickaxe head. Take the PICKAXE.
Lighthouse
Play the hidden object scene on the side of the cliff
Find the listed objects. The Key goes to inventory as a CASE KEY.
Look at the lighthouse door.
Use the PICKAXE to smash the brick wall.
Top of Lighthouse
Open the light (A).
Take the LOCKET.
Pick up the POT.
Beach
Look in the old rowboat.
Use the POT to bail out the water. A POT OF WATER goes to inventory.
Pick up the DEMON in the bottom of the boat.
Top of Lighthouse
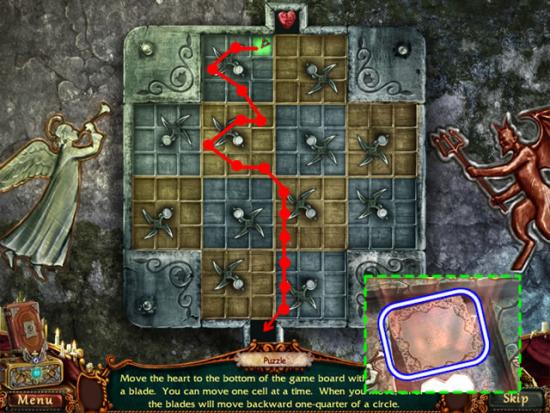
Place the ANGEL and DEMON in the tiles on the floor to start a puzzle.
The goal is to move the heart from the top to the bottom while avoiding the blades.
The heart can move horizontally, vertically or diagonally once square at a time.
The next screenshot shows the solution
Take the HANDKERCHIEF from the compartment.
Beach
Zoom in on the campfire.
Use the POT OF WATER to extinguish the flames.
Rub the grime off the cross with the HANDKERCHIEF.
Take the RED CROSS.
Lighthouse
Look at the bench again.
Insert the RED CROSS on the box.
Take the GAUZE.
Beach
Play the hidden object scene.
Find the listed objects. The PUTTY KNIFE goes to inventory.
Lighthouse
Look at the tree.
Use the PUTTY KNIFE to scrape off some SAP.
Beach
Zoom in on the rowboat.
Use the SAP to repair the hole in the side (A).
Wrap the GAUZE around the oar pieces.
Click the oar to place it in the boat.
Click down to return to the dry dock.
Ticket Office Street
Look closer at the lamppost (A).
Insert the LOCKET in the slot to open the lantern.
Take the HEART FRAGMENT (1/7)
Studio
Look at the desk.
Insert the CASE KEY in the box (B).
Take the HEART FRAGMENT (2/7).
Play the hidden object scene.
Find the listed objects.
The WINTER TREE goes to inventory.
Ticket Office
Look at the bulletin board.
Place the ANCHOR in the anchor inset to open a puzzle.
Drag the tiles into the grid to match symbol-to-symbol.
See the next screenshot for the solution.
Take the HEART FRAGMENT (3/7) from the niche.
Archive Room
Play the hidden object scene.
The HEART FRAGMENT (4/7) and SWITCH go to inventory.
Leonard’s Street
Look at the mechanism on the side of the building.
Attach the SWITCH.
Take the FUSE.
Underwater Room
Look at the grate on the right side of the wall.
Remove the covering to start a puzzle.
The goal is to match the symbols related symbols
See the next screenshot for the solution.
The symbols circled in pink were given.
Completing the puzzle opens the panel.
Insert the FUSE in the empty slot (pink).
Retrieve the HEART FRAGMENT (5/7) and the AUTUMN TREE.
Pier
Play the hidden object scene.
Find the listed objects. The HEART FRAGMENT (6/7) and SUMMER TREE go to inventory.
Archive Room
Zoom in on the mechanism on the back wall (A).
Insert the SUMMER, WINTER and AUTUMN TREES in the empty slots.
Click the scroll container to see the scroll (B).
Use the RAZOR to cut out the CODE.
Ticket Office
Look at the cash register (C).
Place the CODE on the number rollers (yellow) to open a compartment.
Take the HEART FRAGMENT (7/7) from the compartment.
Dry Dock
Point toward the ocean to return to the island.
Top of Lighthouse
Zoom in on the floor tile (A).
Place the HEART FRAGMENTS in the heart outline (yellow).
The MAGNETICALLY-CHARGED HEART goes to inventory.
Inspect the lantern (B).
Place the MAGNETICALLY-CHARGED HEART in the lantern.
Watch the final cutscenes.
Congratulations! You have finished the Bonus Chapter of Dark Strokes: Sins of the Fathers Collector’s Edition. Additional bonus content is now available from the main menu.

More articles...
-
Best Horror Games On Itch.io – July 2026
Across a bounty of subgenres. -
Grow A Garden 2 Base Price List
What's the most valuable crop? -
Evomon Types Guide [Strengths, Weaknesses, Resistance]
Your companion guide during battles.