Dark Ritual Walkthrough

Welcome to the Dark Ritual walkthrough on Gamezebo. Dark Ritual is a hidden object Game played on the PC created by VOGAT Interactive. This walkthrough includes tips and tricks, helpful hints and a strategy guide on how to complete Dark Ritual.

By
Share this
  • Share this on Facebook
  • Share this on Twitter

Dark Ritual – Game Introduction

Welcome to the Dark Ritual walkthrough on Gamezebo. Dark Ritual is a hidden object Game played on the PC created by VOGAT Interactive. This walkthrough includes tips and tricks, helpful hints and a strategy guide on how to complete Dark Ritual.

General Tips

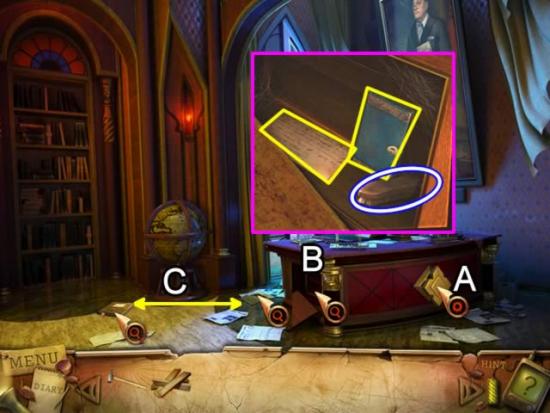
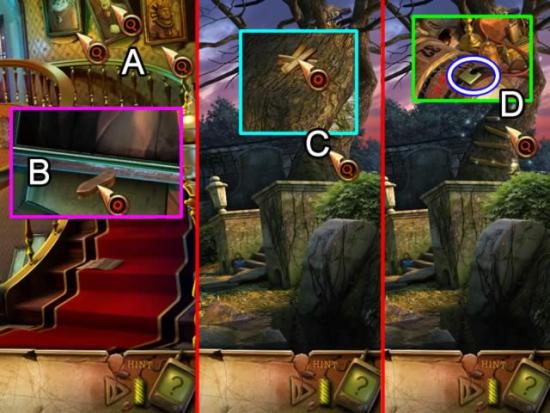
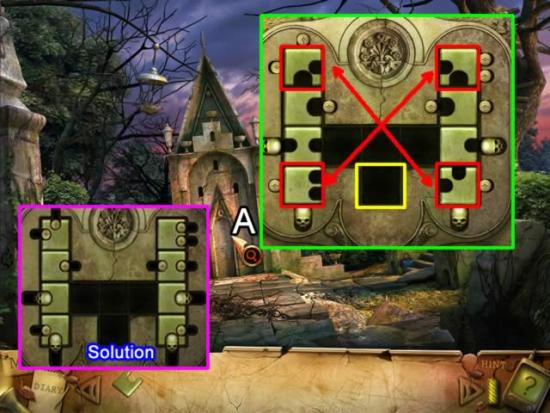
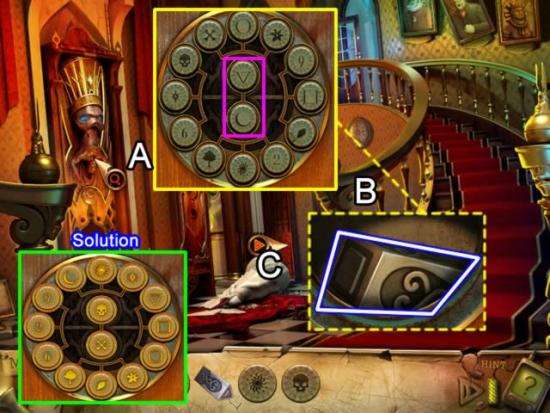
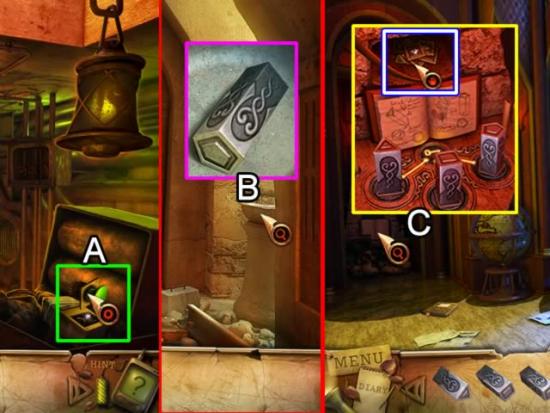
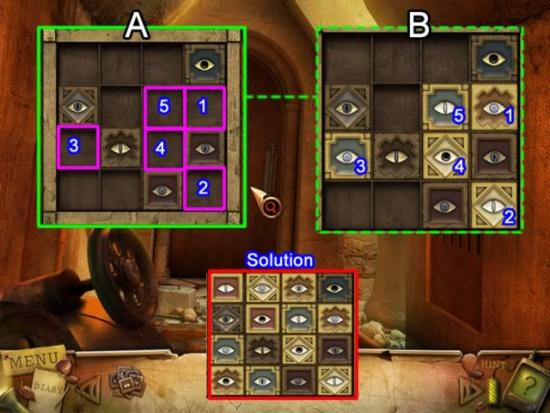
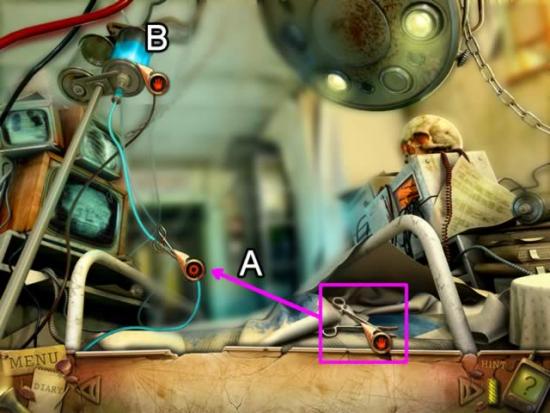
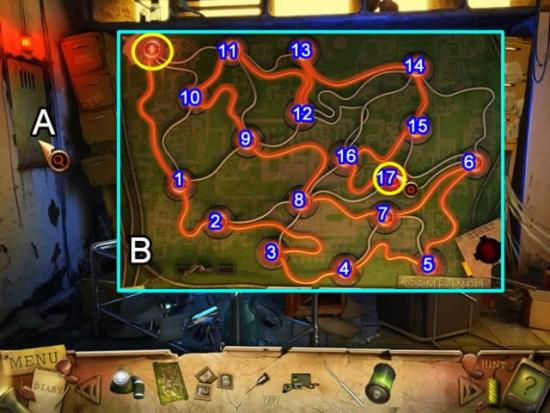
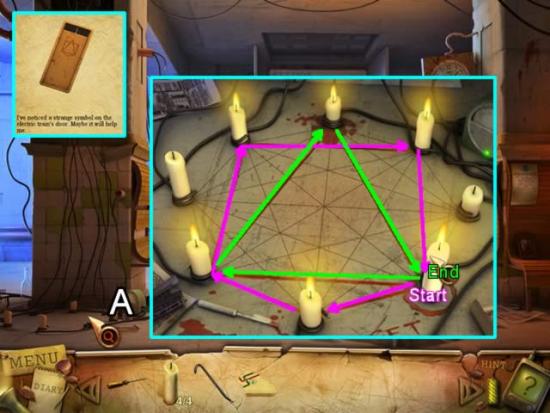
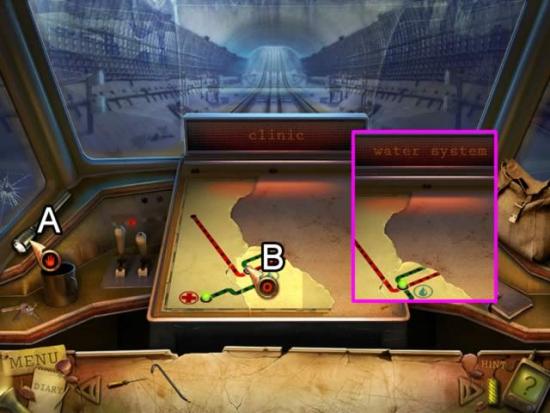
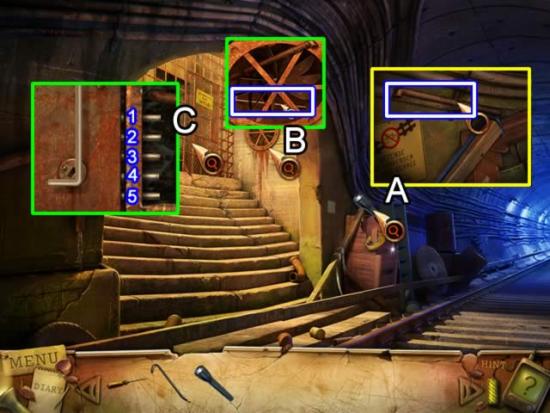
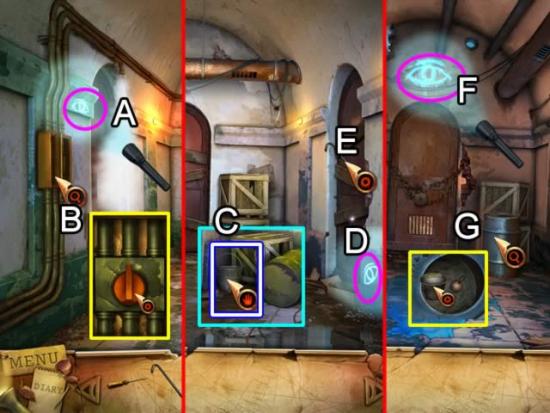
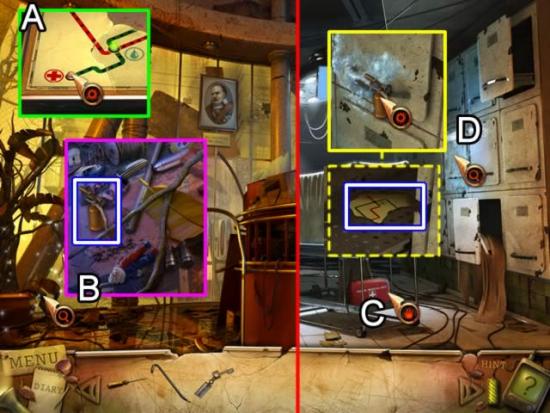
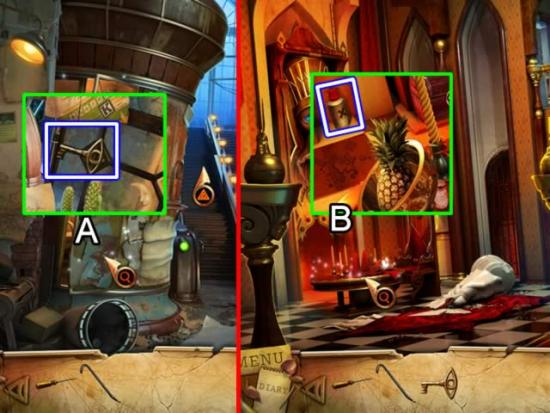
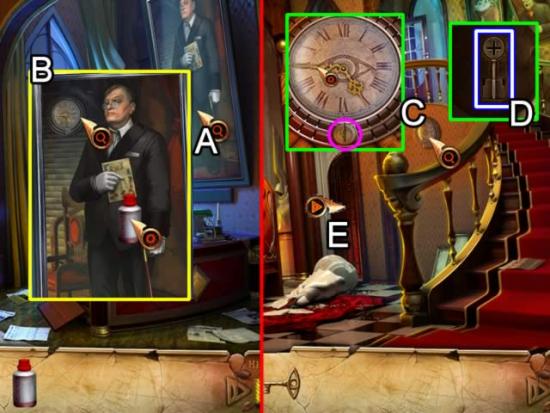
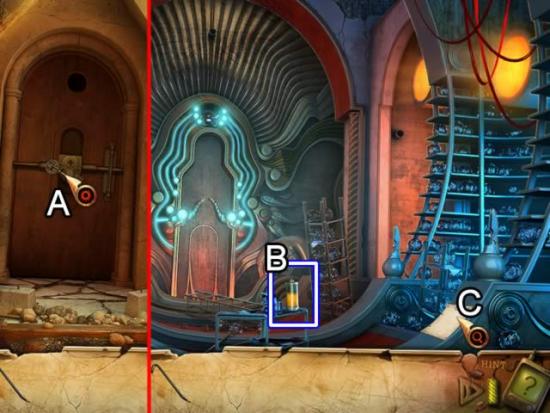
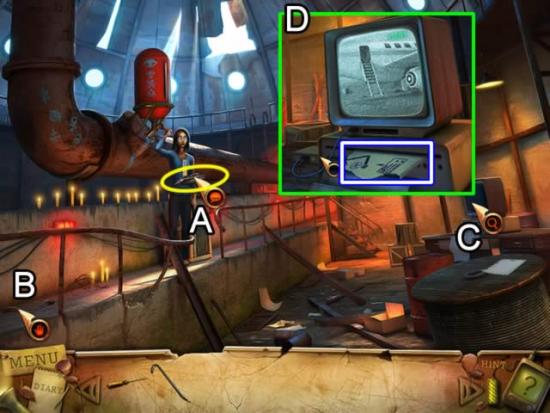
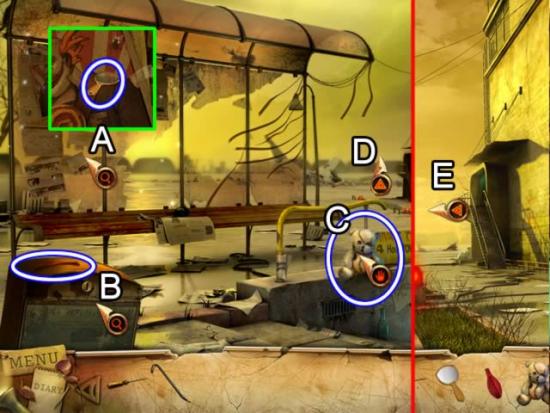
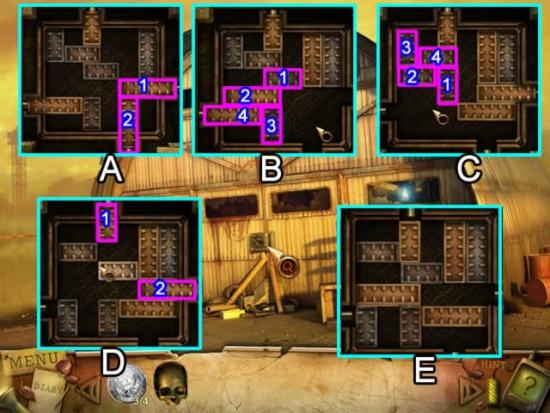
This hidden object game requires visiting several locations and using inventory items to advance play.

  • Play is mostly linear although there are a few options in some scenes.
  • CAPITALIZED inventory items are meant to make it easier to find where this guide may differ from your own play.
  • There are no penalties for multiple clicks in a scene.
  • Always move the cursor around a scene. Watch the cursor to see if it changes into a hand or magnifying glass.

Main Menu:

  • Play – Begin or resume a game. The first time you play you must select a difficulty level:
    • Casual – Provides game tutorial, helpful sparkles and faster hint and skip recharge. Advanced – Provides minor sparkles and slower hint and skip recharge.
  • Options – Change music and sound effects volume. You may select or deselect full screen or wide screen and a custom cursor.
  • Play More – Contains links to the developer’s other games on the Big Fish Games website.
  • Exit – Quite the game.
  • Profiles – Click the “Click here if this is not you” link to create, delete or switch player profiles.
  • Strategy Guide – Links you to the purchase option on the Big Fish Games website.

Screen Navigation:

  • Menu – Change your options, resume the game or return to the main menu.
  • Hint/Skip Bar – Clicking will show a random item from an itemized list. Hints are not limited and the bar refills quickly. The bar turns into a Skip bar for puzzles.
  • Diary – Clicking an object can add clues or tasks to complete. The diary flashes when new information is added.
  • Inventory/Item List – A scrollable list of icons showing available items or a list of hidden items to be collected.

Symbol Meanings:

  • Magnifying Glass – Zoom in on interactive area.
  • Gear – Interact with an object: pick up an item, open a door or move an object.
  • Sparkles – Hidden object areas.

Walkthrough

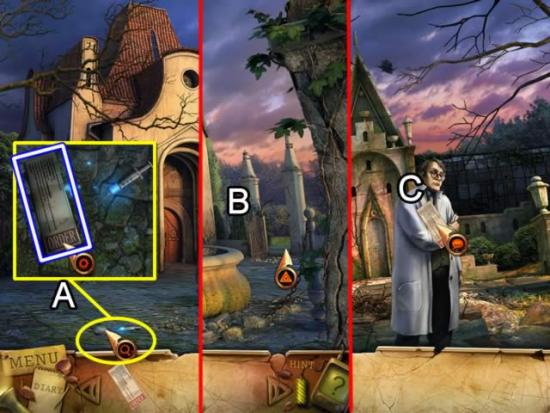
A short clip explains the background and introduces the story line for play.

If you are not familiar with hidden object games, click “Yes” when asked if you would like a tutorial. This will show you how to interact with objects and characters.

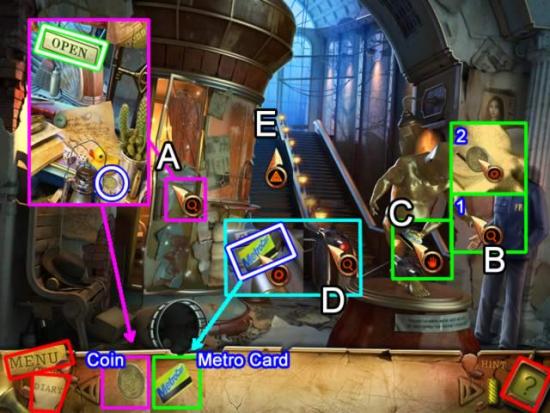
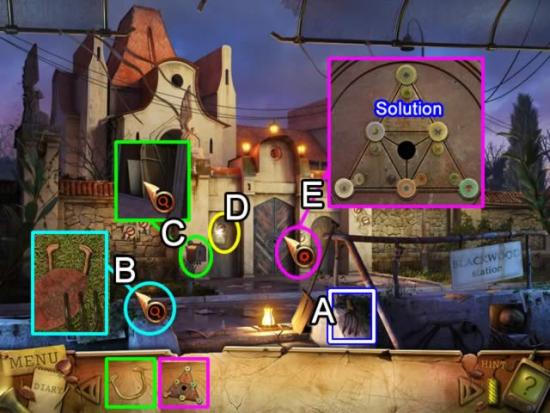
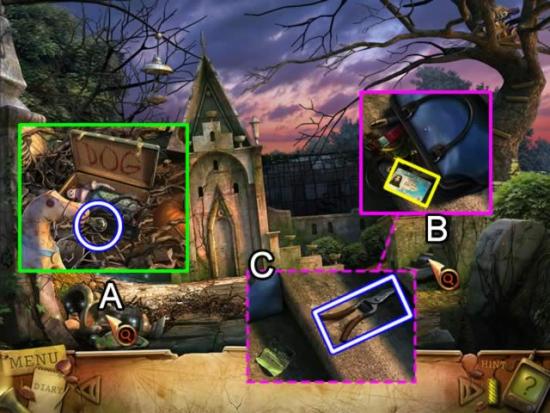
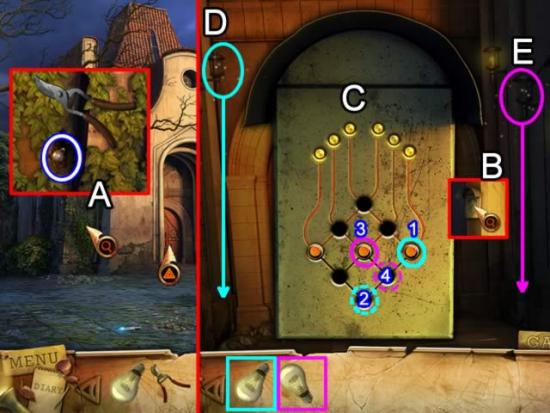
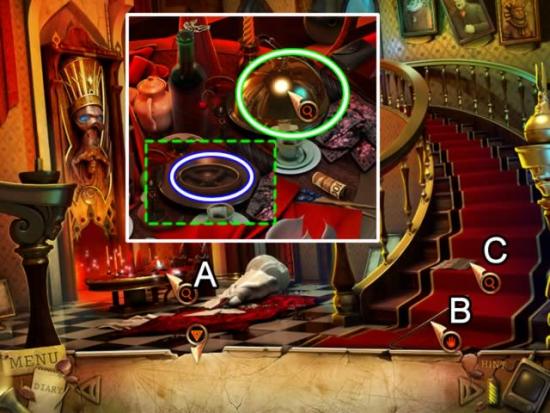
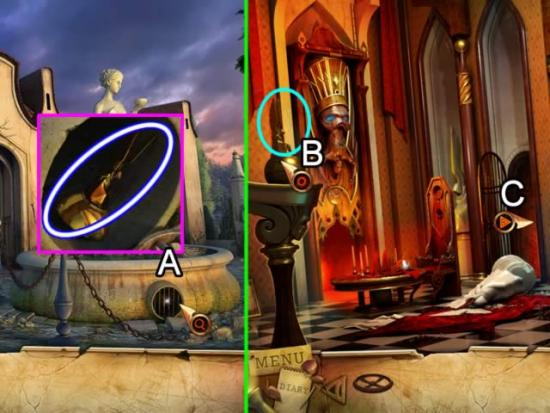
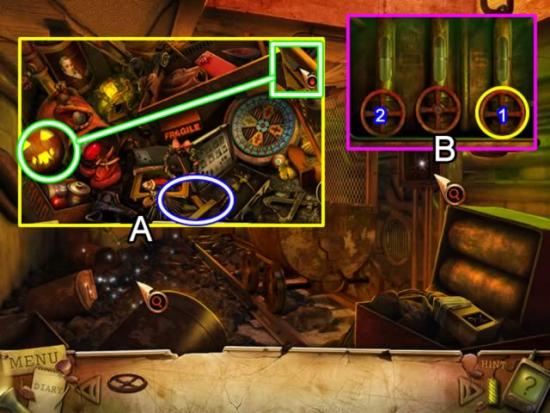
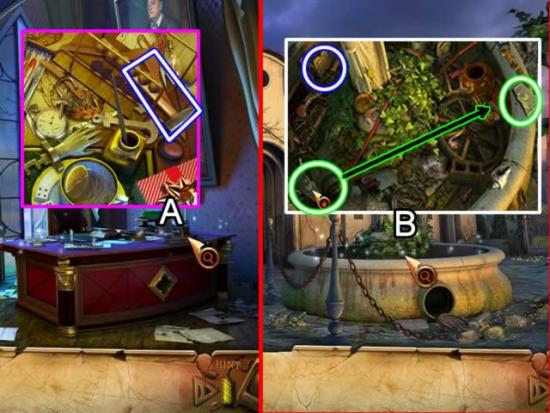
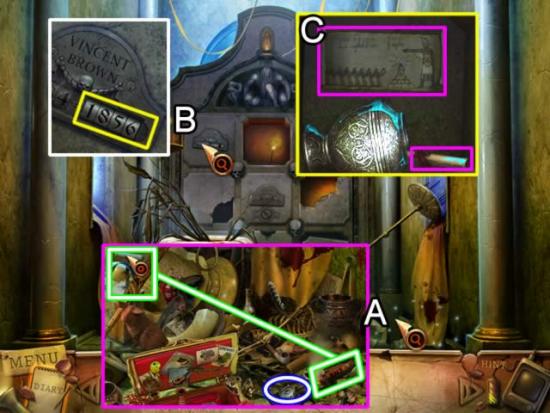
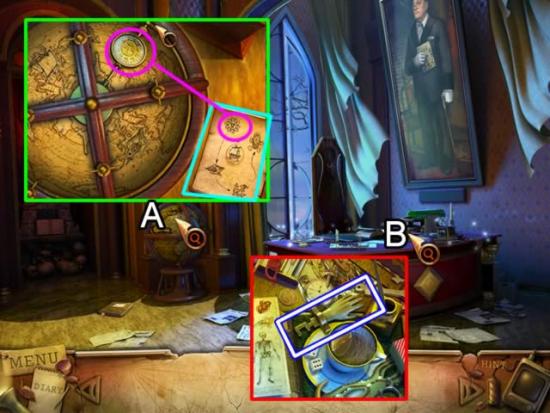
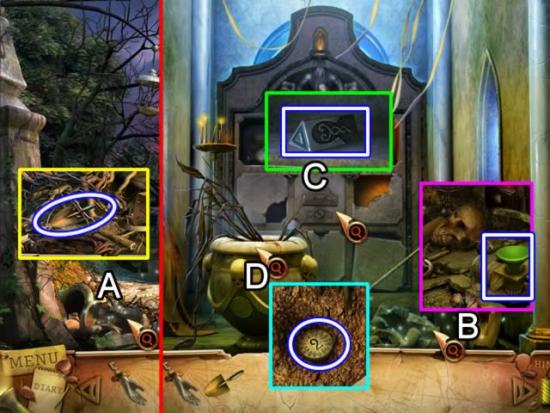
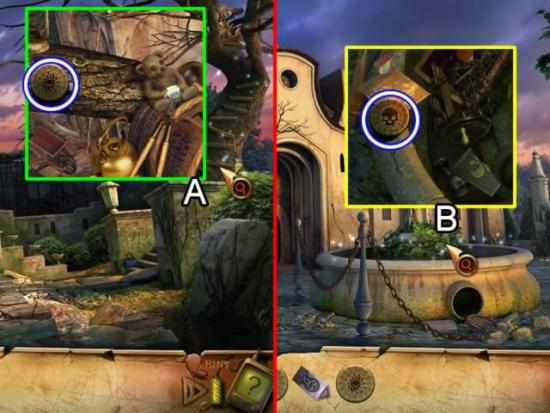
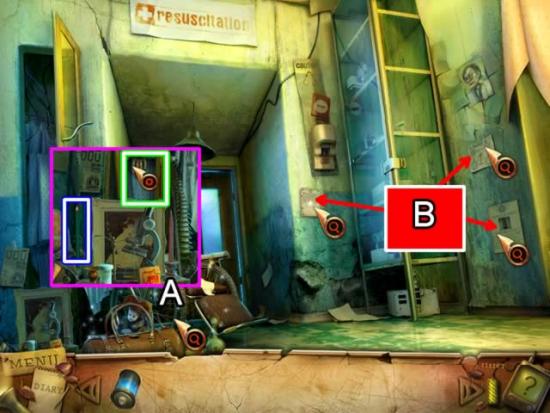
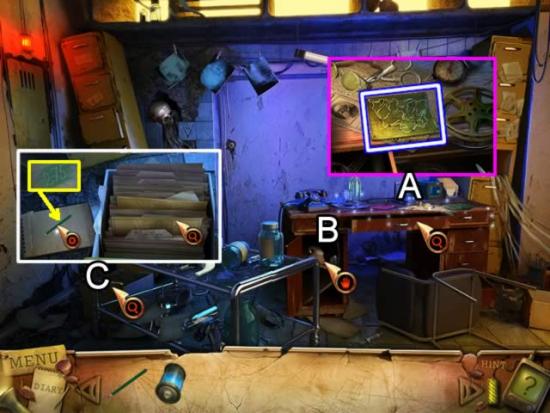
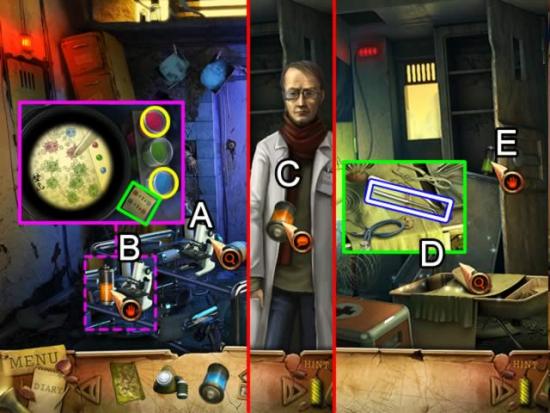
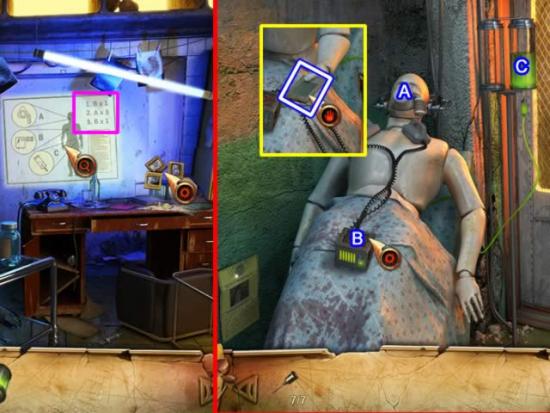
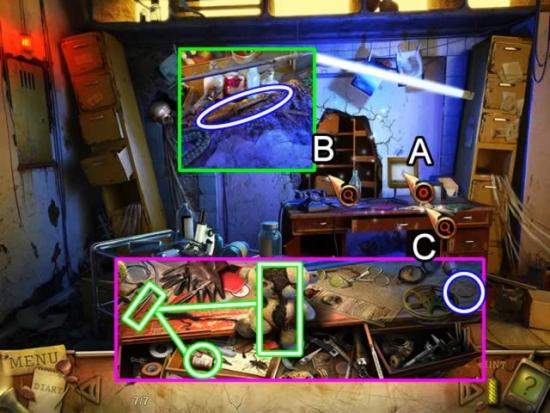
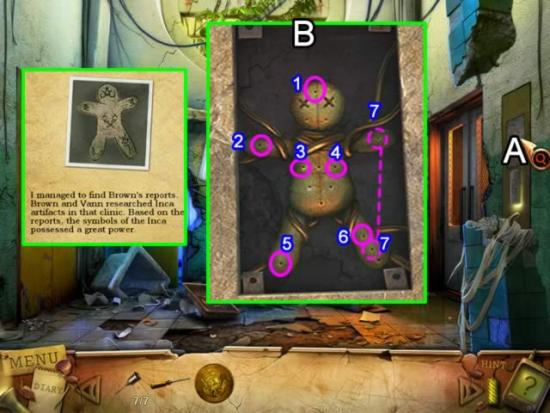
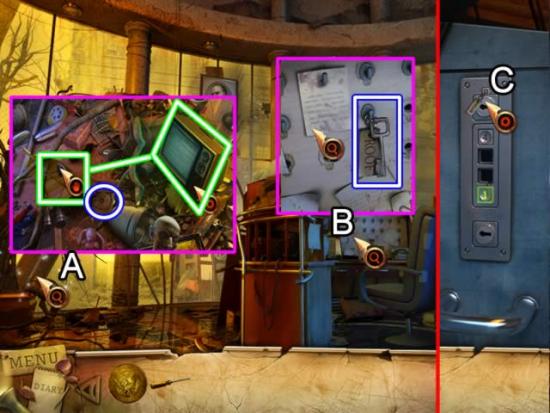
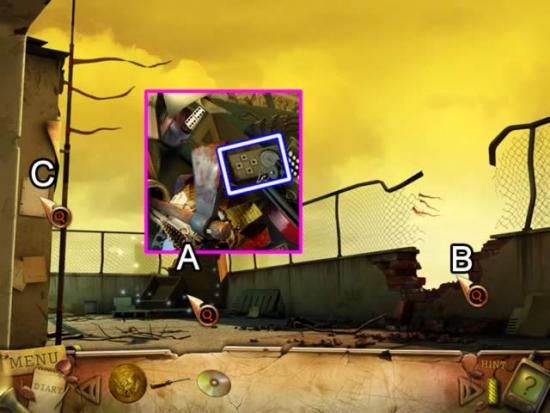
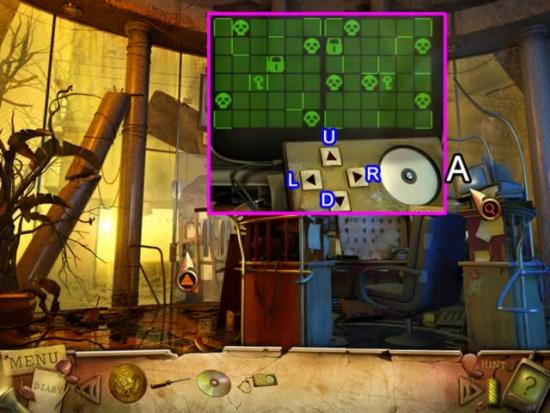
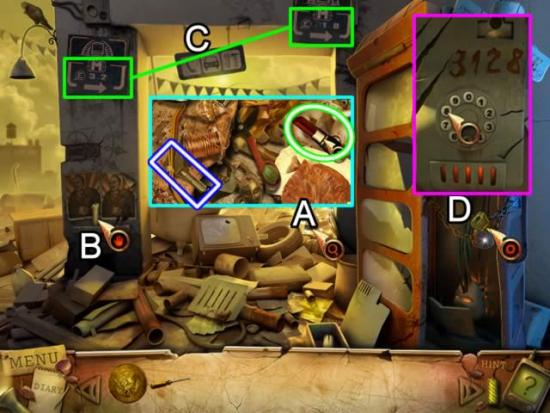
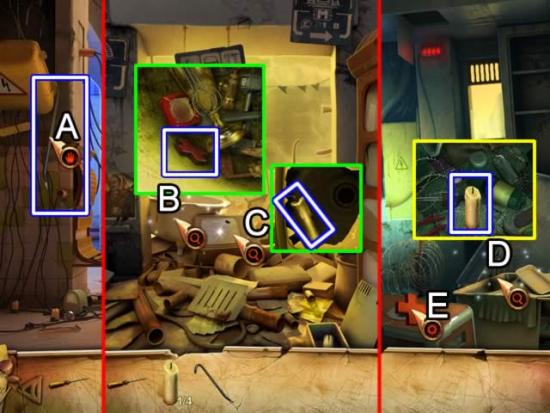
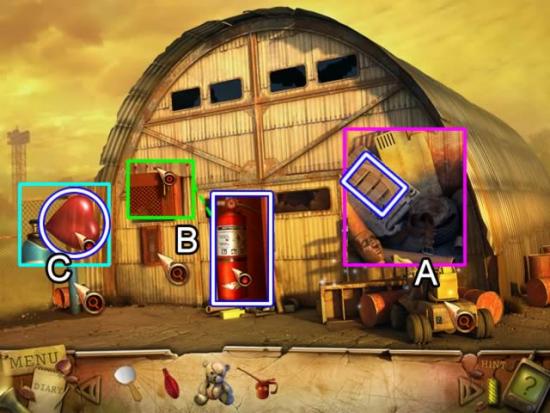
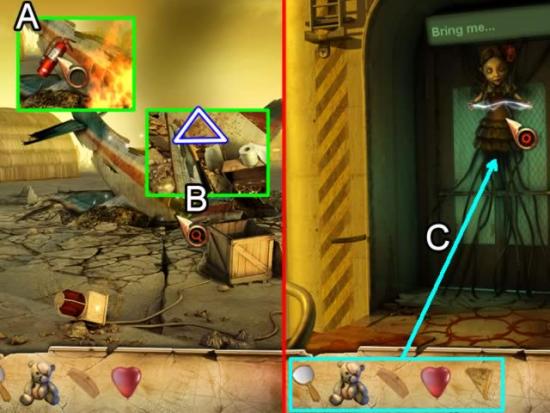
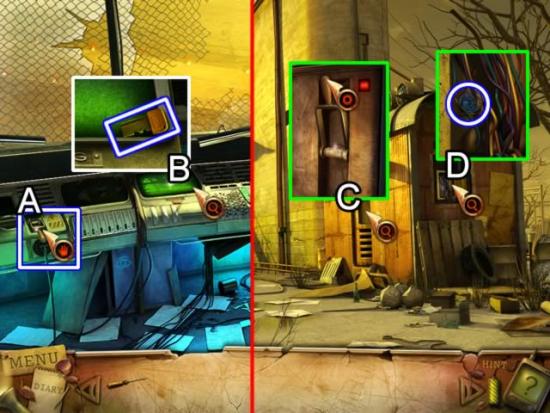
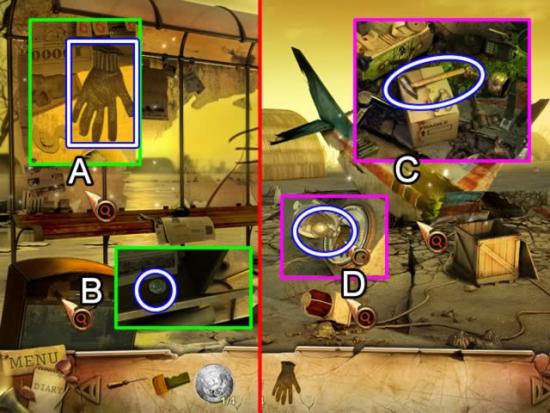
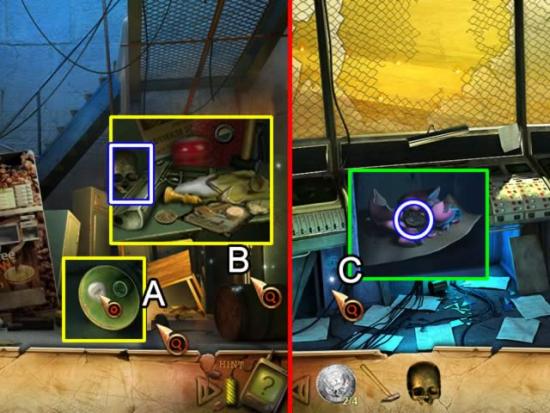
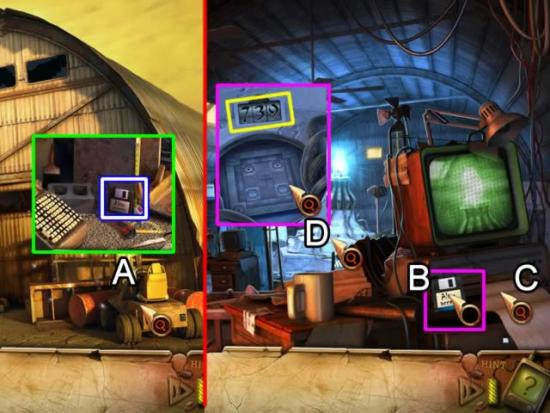
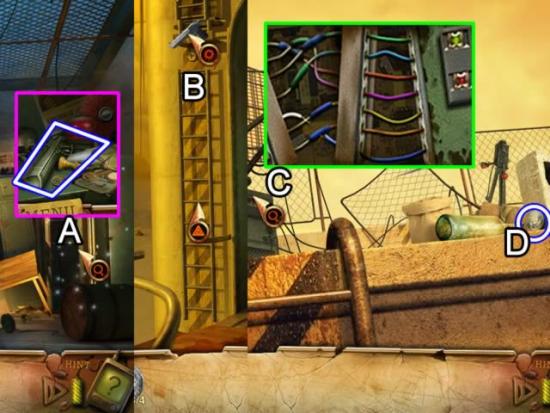
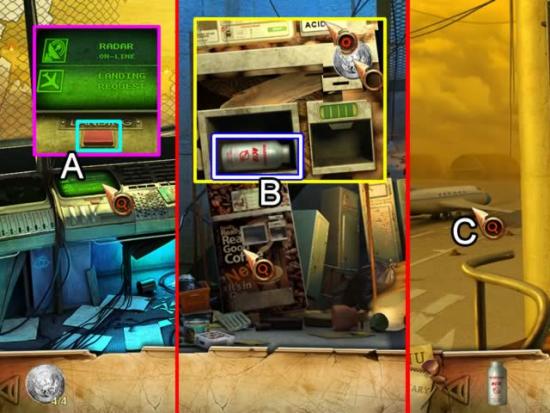
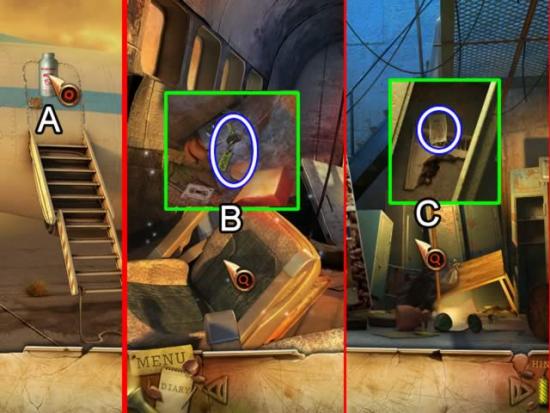
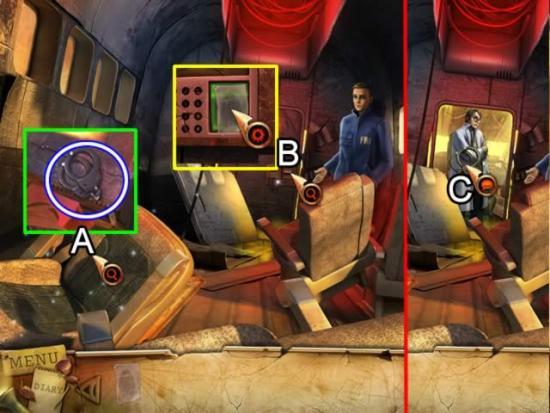
The objects for hidden object scenes are randomly generated. That is why only inventory items are shown. They are highlighted in white with a blue border. Objects written in green lettering indicate you must interact with that item in scene. Move your cursor around until the cursor turns into a hand to figure out how to obtain the object.

With the exception of a hidden object area, most inventory items are not collected from a scene until they are needed.

Assumptions:

  • You know to click through the conversations with characters.
  • After you have gone back and forth between locations more than once, you know how many times to go up or down.
  • Just as in the movies, you will always enter a darkened door, open window or secret room.

Chapter 1: Exploring Dr. Brown’s Mansion

Dark Ritual
  • Click the magnifying glass cursor icon to open the hidden object scene by the ticket booth (A). The list of items to find contains the word “Open” written in green lettering. Click the “OPEN” sign (highlighted above). It flips over to “Closed”. In the list of items, the word “Open” has been replaced with the word “Closed” and the letter coloring has changed. Click the “Closed” sign to collect this item. Find the rest of the objects. The COIN is added to inventory.
  • Note the gold statue (B). Look closely at its hand (1). Click the COIN in inventory and place it in the slot in the open palm (2). The statue rotates. Take the METRO CARD from the other hand of the statue (C).
  • Zoom in on turnstile (D). Take the METRO CARD from inventory and place it on the validation mechanism. The turnstile light turns green and the gate opens. Follow the up arrow (E) to exit the metro station (E).
Dark Ritual
  • Pick up the RAKE (A) in the foreground.
  • Zoom in on the grassy area on the left (B). Use the RAKE to drag the leaves away. Uncover the MAILBOX HANDLE. Access the mailbox and place the MAILBOX HANDLE. Click to open the mailbox (C). Inspect the contents. The DOOR LOCK ASSEMBLY goes to inventory. The content of the letter is added to the diary.
  • Look closer at one of the protest documents (D) to gain more insight into Dr. Brown’s activities.
  • Place the DOOR LOCK ASSEMBLY in the empty slot in the door (E) to activate a slider puzzle. Use the blank circle in the center as a holding slot to arrange the circles to match their corresponding symbols on the plate. Click a circle to move it. One approach is to arrange the star, moon and water drop in the proper sequence and then the last three. The solution is shown above.
Dark Ritual
  • Click the interactive area by the fountain (A). Collect the SEARCH WARRANT.
  • Go through the gate on the far right (B).
  • Have a conversation with Dr. Brown (C) and give him the SEARCH WARRANT. He glides away.
Dark Ritual
  • Play the hidden object scene (A). The LIGHT BULB goes to inventory.
  • Zoom in on the purse lying on the steps (B). Inspect the driver’s license (yellow). After you awaken, click the license again to discard it. GARDEN SHEARS appear on the steps. Look at the green job offer on the step below the shears. Click outside of the interactive box to close it.
  • Go back through the gate to the courtyard.
  • Use the GARDEN SHEARS to remove the ivy (A). Get the second LIGHT BULB.
  • Go to the door of the house.
  • Access the control panel (B) to open the fuse box (C). Replace the broken light bulbs to open the door. You cannot replace a light bulb while a lantern is raised. Move the fuses in the box to raise and lower the lanterns. To replace the bulb in the left lantern (D), move the fuse labeled (1) to position 2. Click the LIGHT BULB and drag it to the lantern. The bulb is replaced. Click the fuse box again. To replace the bulb in the right lantern (E), move the fuse labeled 3 to position 4. Click the remaining LIGHT BULB and drag it to the lantern. The bulb is replaced. Access the fuse box again. Place the fuses back in their original positions to raise the lit lanterns. The door opens.
Dark Ritual
  • Access the hidden object scene (A). Lift the serving tray lid to uncover the green-lettered wheel. Pick up the WHEEL for inventory.
  • Collect the POKER (B). Read the notice from the government (C).
  • Exit the house and return to the courtyard.
Dark Ritual
  • Zoom in on the side of the fountain (A). Use the POKER to pry off the grate. Collect the STATUE from inside. Return to the house.
  • Place the STATUE on the stand (B). Click to rotate it and open the door on the right (C).
Dark Ritual
  • Play the hidden object scene (A). Create the jack-o-‘lantern by picking up the knife and placing it on the pumpkin. It will carve the face. The BOARDS WITH NAILS go to inventory.
  • Look at the water gauges (B). Place the WHEEL on the third column to trigger a puzzle. The goal is to have the liquid in all three columns on the white line. Do this by clicking the last wheel (1) once and then the first wheel (2). Water pours into the empty cart.
  • Exit the room and go upstairs to the office.
Dark Ritual
  • Open the hidden object scene (A). Collect all the objects. The HAMMER goes to inventory.
  • Exit the house to the courtyard.
  • Access the hidden object scene (B). Create the fleur de lis by combining a piece on the left with the one one the right. A GOLD DIAMOND is added to inventory.
  • Return to the office.
Dark Ritual
  • Place the GOLD DIAMOND in the slot in the front of the desk (A). A panel falls off the end of the desk revealing a secret compartment (B). Pick up the BRUSH and read the two documents. Also read the two documents on the floor (C).
  • Exit the room.
Dark Ritual
  • Click each portrait lining the wall above the staircase (A). Use the BRUSH on each plaque (B) to remove the grime and reveal the details.
  • Exit the house. Go to the side yard.
  • Zoom in on the large tree (C). Place the BOARDS WITH NAILS on the trunk. Use the HAMMER to secure the planks to the tree.
  • The tree turns into a hidden object area (D). Collect the PUZZLE PIECE.
Dark Ritual
  • Access the door to the mausoleum (A). Place the PUZZLE PIECE in the empty slot to start the puzzle. The goal is to move the pieces so each locks into place according to the cutouts. Larger cutouts match skulls, smaller match dots. Note that the four corner pieces are exactly opposite from where they need to be. Use the empty yellow square as a holding area while sliding pieces. The best way to solve this puzzle is to pick one of the corner pieces and work it into place. Next place the other corner piece in the same column. Solve one column at a time. Place the tiles with only a skull cutout last. See the solution in the inset.
Dark Ritual
  • Play the hidden object scene (A). Get the dynamite by depressing the handle of the detonator (upper left corner). The scene shakes and the dynamite falls down. The NUMBER WHEEL goes to inventory.
  • Access the burial chamber in the upper left corner (B). Place the NUMBER WHEEL in the missing slot. Based on the portrait plaque, spin the end date to 1856. The front plate falls away. Inspect the two documents inside the chamber. The scroll document contains puzzle instructions.
  • Return to the office.
Dark Ritual
  • Zoom in on the globe (A). The directions from the burial chamber appear on the left. Rotate the globe until a symbol is centered under the magnifying glass. The symbol turns gold. Place them under the glass in the same order indicated on the paper: sun, fish, anchor, pirate and ship. The book case on the back wall slides back revealing a hidden room.
  • Solving the puzzle triggers a hidden object area on the desk (B). Collect all the items. The hand turns into a KEY in inventory.
  • Return to the side of the mansion.
Dark Ritual
  • Inspect the debris pile (A). Find all the objects in the list. The trowel becomes a SCOOP in inventory.
  • Enter the mausoleum.
  • Play the hidden object scene on the right (B). The green button becomes a BUTTON in inventory.
  • Look at Arthur Brown’s burial chamber (C). Insert the KEY to open it. Collect the ALTAR ELEMENT (1/3).
  • Zoom in on the urn (D). Use the SCOOP to uncover a MEDALLION.
  • Exit the mausoleum.
Dark Ritual
  • Access the hidden object scene by the tree (A). Collect the items. The sun becomes a MEDALLION in inventory.
  • Exit to the courtyard.
  • Zoom in on the hidden object area (B). Collect the items. The skull becomes a MEDALLION in inventory.
  • Enter the house.
Dark Ritual
  • Access the interactive area by the mask (A). Place the three MEDALLIONS to trigger a puzzle. Place the four groups of three related medallions along the outside of the ring. There are two pieces that do not belong to any group; place them in the center. The solution is shown in the inset.
  • Solving the puzzle opens a compartment (B). Collect the the ALTAR ELEMENT (2/3) inside the compartment.
  • Enter the door to the right (C).
Dark Ritual
  • Place the BUTTON in the remote control (A). Press the button to activate the cart. The cart goes forward and dumps the water on to the flames. The next doorway is now open.
  • Look at the font (B). Pick up the last ALTAR ELEMENT (3/3).
  • Return to the office.
  • Zoom in on the recessed altar on the back wall (C). Place the three ALTAR ELEMENTS in the slots according to shape. The bars on the back retract revealing the ANCIENT TILES. Grab them and retrace your steps to the new room (B).
Dark Ritual
  • Zoom in on the door lock. Place the ANCIENT TILES on the lock to activate a puzzle. Each tile contains an eye with either a different iris or frame. Place the tiles so each row and column contains a unique set of eyes/frames. The dark brown tiles are set. Use these set tiles to guide you.
  • Here is how to start. Begin with square 1 in inset (A). The column has two set squares and the row has one set square. The column has a full eye in a cross and a blue iris with a black pupil. The row has the same blue iris with a black pupil but with a diamond background. The only background pattern remaining that will fit in this square is a star. There are three star tiles available, but only one of whose eye pattern is not yet represented: a solid blue iris. By process of elimination, the only tile that can fit in square 2 is a diamond pattern with an eye with a solid blue pupil.
  • Continue the above logic to complete the pattern. The first five tiles are shown (B) and the final solution. Successfully completing the puzzle opens a door.

Chapter 2: Escaping the Hospital

Dark Ritual
  • You wake up in a hospital room. Take the FORCEPS and place them on the tube to free yourself (A). Pick up the BLUE INGREDIENT (B).
  • Go forward to exit the room.
Dark Ritual
  • Play the hidden object scene (A). Click the hand to extend it to get the wrist watch. Pick up the PENCIL for inventory.
  • Read the three documents on the wall (B). Some of the information is stored in the diary for future reference.
  • Go through the door under the resuscitation sign. Continue through the door at the back of the room.
Dark Ritual
  • Play the hidden object scene over the desk (A). Pick up a CIRCUIT BOARD.
  • Access the desk door (B). Pick up a MASK.
  • Zoom in on the box on the floor (C). Read the two files in the box. Use the PENCIL on the paper to reveal the numbers 2-7-5.
  • Exit and return to the resuscitation room. Return to the hallway.
Dark Ritual
  • After the room quits shaking, click the voodoo doll to solve a puzzle (A). The goal is to position the symbol circles over the matching symbol on the board. Symbols can “jump” over another symbol only if there is an empty circle. The solution is shown above.
  • Solving the puzzle triggers a hidden object area (B). Pick up the SLIDES.
Dark Ritual
  • Access the lock on the cabinet (A). Set the code to 2-7-5. Pick up the DEAD DEFIBRILLATOR and ACCESS CARD.
  • Return to the resuscitation room. Use the ACCESS CARD to gain entry to the door on the left (B). Have a conversation with Dr. Vann. He gives you the ANTIDOTE RECIPE.
  • Open the electrical cabinet (C). Place the DEAD DEFIBRILLATOR in the slot to recharge. Pick up the seven NEEDLES on top of the first-aid kit (D). Grab the RED INGREDIENT (E).
  • Return to the lab.
Dark Ritual
  • Zoom in on the microscope (A). Place the BLUE and RED INGREDIENTS in the empty jars. Drag the ANTIDOTE RECIPE onto the table. Move your cursor over the slide area. It turns into a dropper. Click the dropper on the dot of color you want and then click a bacterium to color it. The recipe calls for twice as many red bacterium as blue and three times as many green than red. Since there are only eight bacterium the solution is one blue, two red and six green.
  • Completing the puzzle produces the ANTIDOTE (B). Take it and give it to Dr. Vann to administer. Have a conversation. He disappears and a hidden object scene appears (D). The dental pick on the list turns into a TOOL in inventory. Pick up the DRIP BOTTLE (E) from the back shelf.
  • Return to the lab.
Dark Ritual
  • Access the electrical panel on the left wall (A). Use the DENTAL PICK to pick the lock. Place the CIRCUIT BOARD inside and solve the puzzle (B). Starting from the lit diode trace a path along the wires to light all of the diodes. Do not cross an existing lit path or try to go through a diode that is already illuminated. One solution is shown above. The numbers indicate the sequence the diodes were lit. The red lines show the path through the circuit board.
  • Completing the puzzle turns the power on in the lab.
Dark Ritual
  • Place the SLIDES in the projector. A couple of x-rays appear then the directions for the training mannequin. Click this slide to add the information to the diary.
  • Return to the resuscitation room.
  • Zoom in on the training mannequin. Place the MASK and CHARGED DEFIBRILLATOR (If you didn’t charge it, return to Dr. Vann’s room. The charger is on the back wall). Hang the DRIP BOTTLE.
  • Follow the directions from the slide: click the defibrillator (B) once; the mask (A) three times; the defibrillator once more. The mannequin revives and hands you a MYSTERY SLIDE.
  • Return to the lab.
Dark Ritual
  • Place the MYSTERY SLIDE in the slide projector (A). A mysterious sign appears on the wall before the wall breaks apart.
  • Play the hidden object scene in the wall recess (B). Pick up a SCREWDRIVER.
  • Completing the first hidden object scene prompts a new scene to appear on the desk (C). Complete the “sewn bear” by dragging the thread to the needle on the desk. They form a needle and thread. Select the item and place it on the rip in the bear. Collect the sewn bear. Also pick up the COIN for inventory.
  • Return to the resuscitation room.
Dark Ritual
  • Access the elevator control panel on the wall (A). Click on each of the four screws with the SCREWDRIVER to remove them. Discover a voodoo doll (B).
  • Flip back through the diary to find the pattern (or view the insert above). Place the NEEDLES in the holes to create the design. The above screenshot shows which holes to use. The pattern requires eight needles to create but you only have seven. After inserting the seventh needle, take it out (the pattern stays on the doll) and replace it in the last hole.
Dark Ritual
  • Enter the elevator. Access the control panel and press “1”.
  • Click the the hidden object scene in the reception area (A). Get the “weather forecast” by placing the antenna on the television set. Pick up the DISC for inventory.
  • Look in the key area (B). Take the ROOF KEY. Read the notice on the board.
  • Get back on the elevator. Place the ROOF KEY in the slot (C).
Dark Ritual
  • Find the REMOTE CONTROL from the list of items in the hidden object scene (A).
  • Look over the edge of the building (B) to view the chaos below.
  • Read the notice (C).
  • Enter the elevator and return to the reception area.
Dark Ritual
  • Access the computer (A). Place the DISC and REMOTE CONTROL on the computer to open a game.
  • The goal is to put both keys in their locks. Avoid skulls or going off the grid or the game will reset. Use the barriers to your advantage to try and coordinate the lock movements. Here is the combination for one solution: D-R-U(2x)-L-U-L(3x)-R(2x)-D-R(2x)-D-U-L(2x).
  • Exit the building.
Dark Ritual
  • Access the hidden object scene (A). Drag the lipstick to the lips on the mask to get “red lips”. Get the KEY for inventory.
  • Pick up the CANDLE (1/4) located below the poster (B).
  • Note the number on the two metro signs. The sign on the left is 3_2_. The second is _1_8. The underscores represent missing numbers. Inserting the numbers from the second sign into the blanks on the first, the four-digit number is: 3-1-2-8.
  • Use the KEY to unlock the padlock on the telephone booth (C). Place the COIN in the slot. Click the numbers 3-1-2-8. The entrance to the secret station is opened.
Dark Ritual
  • Go down to the secret station. Grab the CROWBAR hanging from the electrical box (A) and return to the exterior of the hospital.
  • Play the hidden object scene (B). Get the MEDICAL CROSS. Click the broken television (C). Use the CROWBAR to smash the screen. Take the CANDLE (2/4).
  • Enter the elevator and press the button for the fourth floor.
  • Enter Dr. Vann’s room. Play the hidden object scene (D). Get the CANDLE (3/4) for inventory. Place the MEDICAL CROSS in the slot in the first-aid kit (E). Take the CANDLE (4/4) and a MAP piece.
  • Return to secret station.
Dark Ritual
  • Zoom in on the candle area (A). Place the four CANDLES in the empty slots to trigger a puzzle.
  • The goal is to recreate the symbol on the door of the train. Click the candles to form a continuous line without retracing the path. The best approach is to draw the box first. The above solution starts at the right lower corner of the box. The box outline and path is shown in pink above. When the box is drawn, you’ll be back at the candle where you started. Click the three candles that form the triangle (green). You will start and end at the same candle.
  • Successfully completing the puzzle powers the train.

Chapter 3: The Water System

Dark Ritual
  • Board the train. Pick up the FLASHLIGHT (A). Fit the MAP piece on the board (B). Click the white button on the map. The train moves. The light turns green and the display changes to “Water System” upon arrival.
  • Click down to exit the train.
Dark Ritual
  • Use the FLASHLIGHT to search the hidden object area (A). The RUSTY PIPE is near the top left of the scene.
  • Zoom in on the wall fan (B). Put the RUSTY PIPE in the fan blades to stop them. Collect the LOCK PICK.
  • Access the door (C) to activate a puzzle. Use the pick tool to depress the latches. The goal is to depress the latches in the correct order so that all stay depressed. The order for my solution was: 3-1-4-2-5.
  • Enter and speak with Dr. Vann. Take the first door on the right.
Dark Ritual
  • Use the LED mode on the FLASHLIGHT to spot that the door on the left is marked (A). Access the steam valve on the wall (B). Click the knob twice to cut off the steam.
  • In the next room pick up the EMPTY BUCKET (C) by the door on the left. Find the marking next to the door on the right (D). Use the CROWBAR (E) to remove the planks.
  • Spot the symbol in the next room above the center door.(F). Examine the barrel (G). You cannot reach the contents.
  • Retrace your steps by clicking down four times until you are outside of the building. Fill the bucket from the flowing water pipe on the left side of the building. Return to the locked door room with your FULL BUCKET.
  • Pour the water into the barrel. The water floats the KEY within reach. Use it to open the door. Watch the cut scene. Receive the MORGUE KEY.
  • Return to the train.
Dark Ritual
  • Click the red cross to return to the hospital (A).
  • Return to the reception area. Play the hidden object scene (B). Collect the BLOWTORCH.
  • Enter the elevator. Place the MORGUE KEY in the bottom key slot.
  • Pick up the FIRST AID KIT (C). Inspect the frozen locker (D). Use the BLOWTORCH to melt the ice. Take the MAP piece from the locker drawer.
  • Return to the train. Click the water drop symbol to return to the water system.
  • Give the FIRST-AID KIT to Dr. Vann. He instructs you to return to the secret lab in Dr. Brown’s mansion.
Dark Ritual
  • Enter the train. Place the new MAP piece on the board. Click the house icon.
  • Play the hidden object scene (A) at the metro station. Collect the CLOCK KEY. Exit the station via the escalator.
  • Enter the mansion.
  • Play the hidden object scene in the entryway (B). Pick up the PAINT REMOVER.
  • Go upstairs to the office.
Dark Ritual
  • Zoom in on the painting above the desk (A). Use the PAINT REMOVER on the upper left corner of the painting (B). A clock showing the time as 5:45 appears.
  • Return to the entryway.
  • Access the clock on the wall (C). Insert the CLOCK KEY in the slot at the base. Drag the hands to set them at 5:45. The clocks face moves away to reveal a compartment (D). Pick up the KEY.
  • Enter the doorway under the stairs (E). Go forward to the secret lab.
Dark Ritual
  • Use the KEY to gain entry to the secret lab (A).
  • Pick up the ANTIDOTE (B). Read the document (C).
  • Continue to click down until you return to the metro station. Board the train.
  • Click the water drop symbol on the train map to return to the water system.
  • Dr. Vann greets you. Give the ANTIDOTE to Dr. Vann and receive an antidote filled SYRINGE GUN. Make your way through the maze of doors to the back room.
Dark Ritual
  • Place the SYRINGE GUN on your sister (A). She revives and goes to find help.
  • Pick up the CORD (B).
  • Click the computer (C). Place the CORD on the computer to hook it to the modem. A remote camera shows Dr. Brown boarding a plane. Take the MAP piece that slides out of the computer.
  • Exit the water system building.
  • Enter the train. Place the MAP piece on the board. Click the airplane icon.

Chapter 4: The Airport

Dark Ritual
  • Play the hidden object scene (A). Collect a MIRROR.
  • Zoom in on the newspaper vending machine (B). Get the BALLOON. Pick up the TEDDY BEAR (C) sitting by the railing. Head toward the control tower (D).
  • There is nothing that can be done at the control tower yet. Head left (E).
  • Stop at the crash site. Use the CROWBAR on the crate. Get the OIL CAN.
  • Continue to the hangar.
Dark Ritual
  • Access the hidden object scene. Collect all the objects. The COMB goes to inventory.
  • Click the fire extinguisher cage (B). Use the OIL CAN on the pin at the top. Click the pin to open the grate. Pick up the FIRE EXTINGUISHER.
  • Zoom in on the helium tank (C). Attach the balloon to the valve. Click the knob to get a HEART-shaped balloon.
  • Click down to return to the crash site.
Dark Ritual
  • Use your industrial-strength FIRE EXTINGUISHER to put out the flames (A).
  • A hidden object scene appears (B). Collect all of the objects. The FAN goes to inventory.
  • Click right to return to the control tower. Go up the stairs.
  • Give the MIRROR, TEDDY BEAR, COMB, HEART and FAN to the creepy doll.
  • There is nothing to do yet in the locker room. Continue up the stairs to the flight control center.
Dark Ritual
  • Pick up the KNIFE SWITCH (A). Click the radar screen (B). Pick up the KEY in the corner.
  • Exit the control tower. Go right to the electrical hut.
  • Open the control door (C). Place the KNIFE SWITCH in the power switch. Click to turn off the power.
  • Access the electrical wires (D). Get the COIN (1/4).
  • Go down once to return to the entrance.
Dark Ritual
  • Open the hidden object area (A). Collect the GLOVE for inventory.
  • Click the newspaper vending machine (B). Use the KEY to open it. Collect the COIN (2/4) at the bottom.
  • Return to the crash site.
  • Play the hidden object scene (C). Get the HAMMER.
  • Use the SCREW DRIVER to take off the cover of the landing light (D). Use the GLOVE to unscrew the hot LIGHT BULB.
  • Return to the control tower and enter the locker room.
Dark Ritual
  • Click the lamp lying on the floor (A). Place the LIGHT BULB inside. Light fills the room.
  • A hidden object scene appears on the right (B). Access it and collect the SKULL.
  • Go up stairs to the flight control center.
  • Open the door with the eye symbol (C). Smash the piggy bank inside the cabinet with the HAMMER. Collect the COIN (3/4)
  • Return to the hangar.
Dark Ritual
  • Access the lock on the hangar. Place the missing SKULL in the lock to trigger a slider puzzle.
  • The goal is to slide the bars so all four pins are extended. The above sequence shows one way to acomplish this. In the following explanation, always slide the bar as far as possible in the direction indicated. The results of the moves is shown in the next lettered sequence.
    1. Slide bar 1 left and bar 2 up.
    2. Slide bar 1 left, bar 2 right, bar 3 up and bar 4 right.
    3. Slide bar 1 down, bar 2 right, bar 3 down and bar 4 left.
    4. Slide bar 1 down and bar 2 left.
  • Inset E shows the solution.
  • Enter the hangar. There is nothing you can do here yet (other than talk to Dr. Vann), but you needed to enter to trigger a hidden object scene when you exit.
  • Exit the hangar.
Dark Ritual
  • Play the hidden object scene (A). Pick up the floppy DISKETTE.
  • Enter the hangar.
  • Place the DISKETTE in the computer drive (B). Paper spews out (C). The number 739 appears on the paper.
  • Inspect the altar (D). Change the tumblers to 739 to open the area and access a puzzle.
  • The goal of the puzzle is to match the eye color of the tiles with those on the board. Tiles may be moved in a one-to-three pattern: one space vertically and three horizontally or vice-versa. Clicking a tile will show the available moves. A correctly solved puzzle with have the blue eyes on top and the brown at the bottom. View the video to see the moves.
Dark Ritual
  • Access the hidden object area (A). Collect the GUN for inventory.
  • Exit the locker room. Place the GUN on the lock on the ladder (B). The lock is shot off. Go up to the roof.
  • Zoom in on the wire puzzle. The goal is to connect the correctly colored wire from the left to the one on the right. Since the colors fade quickly, it is easier to just click on a colored wire on the right and a wire on the left. If a guess is correct, the green light goes off and the wires are taped together. The solution is shown above.
  • Pick up the last COIN (4/4).
  • Descend the ladder.
Dark Ritual
  • Return to the flight control center. Access the radar screen (A). Click the Landing button.
  • Descend to the locker room. Zoom in on the vending machine (B). Insert the four COINS in the slot. Click the “Acid” selection. Retrieve the BOTTLE OF ACID from the machine.
  • Exit the control tower. Head to the plane (C).
Dark Ritual
  • Use the BOTTLE OF ACID to open the door (A).
  • Access the hidden object scene inside the plane (B). Collect a KEY.
  • Return to the locker room. Use the KEY to open Dr. Brown’s locker (C). Take the FINGER PRINT on the tape.
  • Return to the plane.
Dark Ritual
  • Access the hidden object scene (A). Collect the HAND CUFFS.
  • Click the flight deck door lock (B). Place the FINGER PRINT on the scanner.
  • Place the HAND CUFFS on Dr. Brown and watch the ending cut scene.

Congratulations! You have finished playing Dark Ritual.