- Wondering how to get Monopoly GO! free rolls? Well, you’ve come to the right place. In this guide, we provide you with a bunch of tips and tricks to get some free rolls for the hit new mobile game. We’ll …
Best Roblox Horror Games to Play Right Now – Updated Weekly
By Adele Wilson
Our Best Roblox Horror Games guide features the scariest and most creative experiences to play right now on the platform!The BEST Roblox Games of The Week – Games You Need To Play!
By Sho Roberts
Our feature shares our pick for the Best Roblox Games of the week! With our feature, we guarantee you'll find something new to play!All Grades in Type Soul – Each Race Explained
By Adele Wilson
Our All Grades in Type Soul guide lists every grade in the game for all races, including how to increase your grade quickly!
Dark Parables: Rise of the Snow Queen Walkthrough
Welcome to the Dark Parables: Rise of the Snow Queen Collector’s Edition walkthrough on Gamezebo. Dark Parables: Rise of the Snow Queen is a hidden object adventure game played on the PC created by Blue Tea Games. This walkthrough includes tips and tricks, helpful hints, and a strategy guide for how to complete Dark Parables: Rise of the Snow Queen Collector’s Edition.
Dark Parables: Rise of the Snow Queen – Game Introduction
Welcome to the Dark Parables: Rise of the Snow Queen Collector’s Edition walkthrough on Gamezebo. Dark Parables: Rise of the Snow Queen is a hidden object adventure game played on the PC created by Blue Tea Games. This walkthrough includes tips and tricks, helpful hints, and a strategy guide for how to complete Dark Parables: Rise of the Snow Queen Collector’s Edition.
General Tips
- When starting your game for the first time, you can choose between three difficulty levels: Casual, Normal, and Hard. Casual features quicker hint recharges, sparkles illuminating items and areas of interest, and puzzles being skippable. Normal features the same, only scarcer and longer. Hard disables the hint button, features no sparkles, and no ability to skip puzzles.
- In the bottom left corner of the screen (while playing), the hint button is located. Hints are unlimited but require time to recharge.
- Puzzles may be skipped after a certain amount of time has passed. Skipping a puzzle will disable the hint button for five minutes.
- Throughout the game are hidden Cursed Objects. These objects are outlined with blue squares in the guide below, and can be identified by their morphing behavior. There are twenty in total, and collecting them will result in upgrades to your Hint button and meter, allowing it to charge faster.
- Throughout the game are also hidden Parable Gems. These are outlined with blue circles in the guide below. Collect these to unlock stories pertaining to the characters and events in the game.
- Parables, once unlocked, can be accessed via the button beneath the Hint button and meter.
- Options and the game’s main menu can be accessed via the button in the lower right corner.
- Key Items are identified with CAPS in the guide below and are identified with red circles in the screenshots below. Hidden object areas are composed of several items which must be found in order to assemble the Key Item to be added to your inventory.
- Excessive clicking will result in cursor penalties.
- After completing the main story, you can access the Bonus Story of Hansel and Gretel from the main menu.
Chapter 1
Village Pass
- Take a closer look at the pile of supplies lying on the ground towards the bottom of the screen. Click on the DYNAMITE to add it to your inventory.
- Speak with the guide for more information regarding what’s happening.
- Next, use the DYNAMITE on the area straight ahead to blast a new path. Continue forward to the next area.
Caravan Wreck
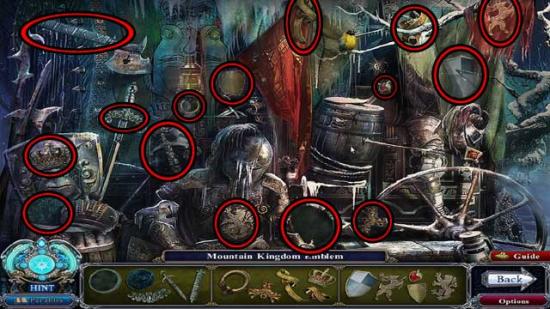
- Take a closer look at the beast-like figure in the distance. A hidden object scene will trigger.
- Find the items shown at the bottom of the screen. Their locations are shown below.

- Upon completing the area, the MOUNTAIN KINGDOM EMBLEM will be added to your inventory.
- Take a closer look at the scattered objects on the right. Click on the blue-framed medallion to collect the *Rise of the Snow Queen 1/6* Parable Gem.
- Return to the Village Pass.
Village Pass
- Take a closer look at the doorway on the right. Use the MOUNTAIN KINGDOM EMBLEM on the slot in the door to open it.
- Before leaving, the guide will give you PICTURE OF THE GUIDE’S SON, KAI to be added to your inventory.
- Continue forward into the next area.
Royal Statues
- Take a closer look at the cross beneath the King’s statue, on the right.
- Match the animals to their preferred habitat. The solution is shown below.
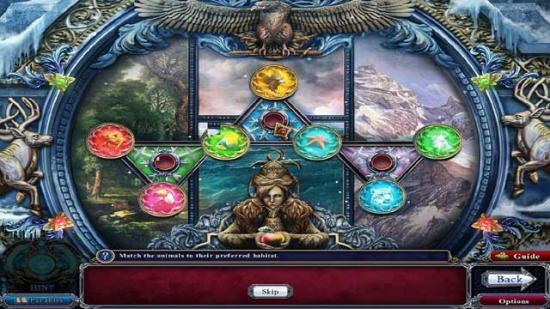
- Upon completing the puzzle, click on the STAR INSIGNIA to add it to your inventory.
- Proceed forward into the next area.
Yard
- Click on the young girl in front of the statue straight ahead.
- Click on the hidden object area that appears under the knight statue.
- Find the items shown at the bottom of the screen. Their locations are shown below.
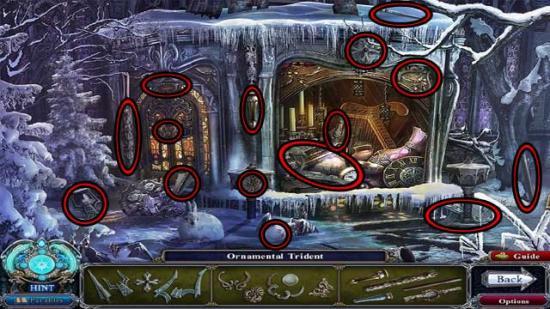
- Upon completing the area, the ORNAMENTAL TRIDENT will be added to your inventory.
- Back in the main area, click on the *The Mountain Beast 1/3* Parable Gem to collect it, then click on the -Cursed Object #1- (the knight’s sword/torch).
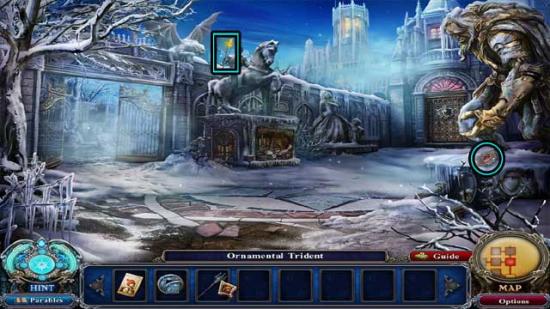
- Continue forward/right towards the palace between the two statues.
Palace Entrance
- Click on the red glowing buzzard towards the upper left corner, then click on the Snow Queen as she appears on the balcony.
- Click on the statue on the right for a puzzle.
- Create a path to the other side using the correct number of colored tokens shown above. The solution is shown below.
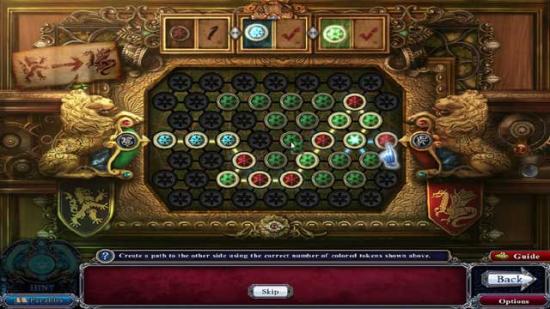
- Upon completing the puzzle, click on the SNOW QUEEN’S WAND to add it to your inventory.
- Return to the Yard.
Yard
- Proceed forward through the open gates.
Church (Outside)
- Take a closer look at the angel/cherub statue sitting on the pedestal on the far right. Click on the ARMORY KEY to add it to your inventory.
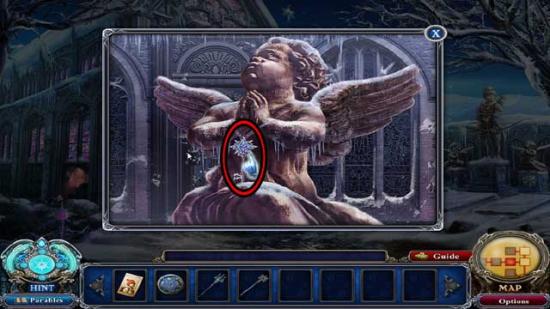
- Examine the small lit building in the corner to discover two children locked up.
- Take a closer look at the door of the church. Two glaring eyes will meet yours before disappearing.
- Return to the Palace Entrance.
Palace Entrance
- Take a closer look at the door on the left. Use the ARMORY KEY on the lock to open the door, then proceed inside.
Armory
- Click on the hidden object area on the left.
- Find the items shown at the bottom of the screen. Their locations are shown below.
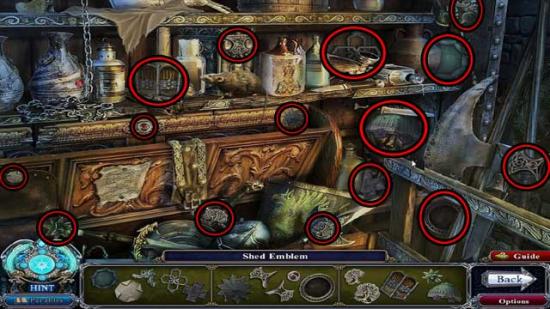
- Upon completing the area, the SHED EMBLEM will be added to your inventory.
- Click on the -Cursed Object #2- (the skull/helmet) on the upper left corner of the shelf, then take a closer look at the desk on the right to collect the *Rise of the Snow Queen 2/6*.
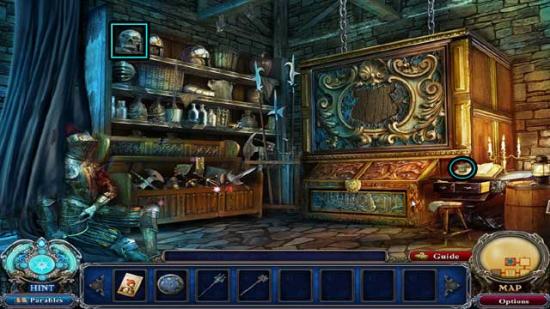
- Read the book entry, then exit for now.
- Return to the Church (Outside).
Church (Outside)
- Take a closer look at the locked-up children. Use the SHED EMBLEM on the slot to free the children– they will give you the HERALDIC SHIELD PIECE in return.
- Return to the Palace Entrance.
Palace Entrance
- Watch the cutscene that occurs.
- Next, examine the fallen gargoyle on the left. Click on the APPLE KEY and the *The Mountain Beast 2/3* Parable Gem to collect them.
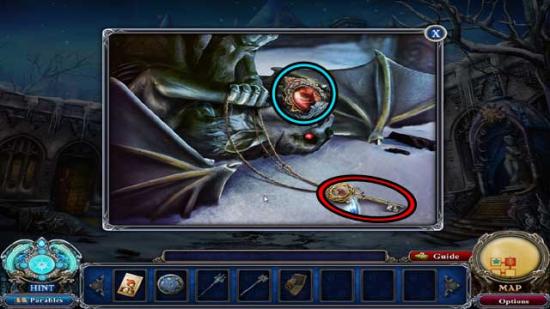
- Return to the Church (Outside).
Church (Outside)
- Take a closer look at the left support pillar of the church. Use the APPLE KEY on the key slot, then click on the SNOW QUEEN’S ORB to add it to your inventory.
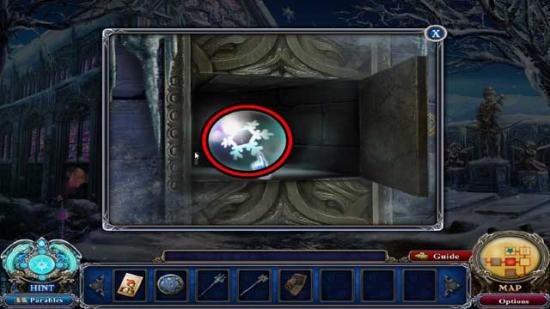
- Return to the Royal Statues.
Royal Statues
- Use the SNOW QUEEN’S ORB and the SNOW QUEEN’S WAND on the Queen statue’s empty hands. The statue will crumble, revealing a new path. Enter.
Hidden Cove
- Click on the hidden object area over the fountain straight ahead.
- Find the items shown at the bottom of the screen. Their locations are shown below.
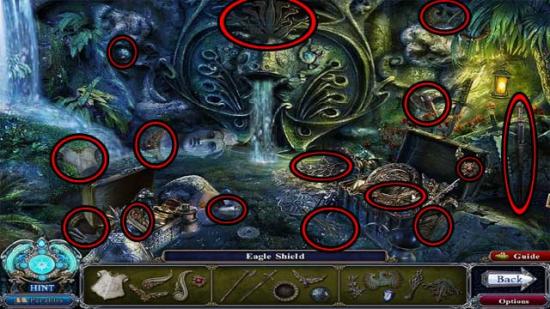
- Upon completing the area, the EAGLE SHIELD will be added to your inventory.
- Click on the halberd lodged in the rocks on the left to break it in half. Click on the METAL PRYING ROD floating in the water to add it to your inventory.
- Take a closer look at the stone tablet on the left. Click on the *Tale of Two Mirrors 1/4* Parable Gem to collect it.
- Return to the Church (Outside).
Church (Outside)
- Use the METAL PRYING ROD on the boards covering the door to the church to remove them. Take a closer look at the door and then enter inside.
Church (Inside)
- Click on the -Cursed Object #3- on the far left (the stained glass window).
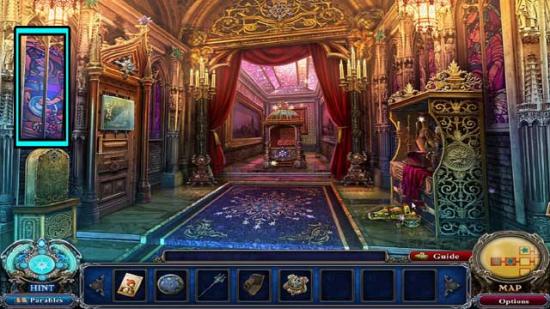
- Click on the hidden object area on the right.
- Find the items shown at the bottom of the screen. Their locations are shown below.
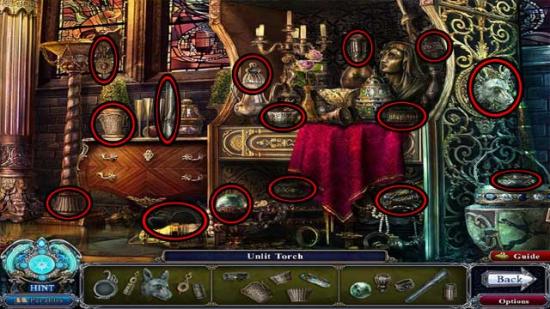
- Upon completing the area, the UNLIT TORCH will be added to your inventory.
- Read the memorial tablet on the left before exiting.
- Return to the Hidden Cove.
Hidden Cove
- Use the UNLIT TORCH on the burning basin on the left to obtain the BURNING TORCH.
- Return to the Palace Entrance.
Palace Entrance
- Use the BURNING TORCH on the white wolf. You will obtain the FROST STONE.
- Take a closer look at the front gate: it’s still locked.
- Enter the Armory on the left.
Armory
- Click on the hidden object area on the left.
- Find the items shown at the bottom of the screen. Their locations are shown below.
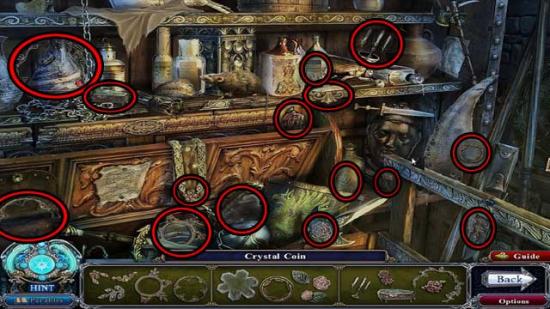
- Upon completing the area, the CRYSTAL COIN will be added to your inventory.
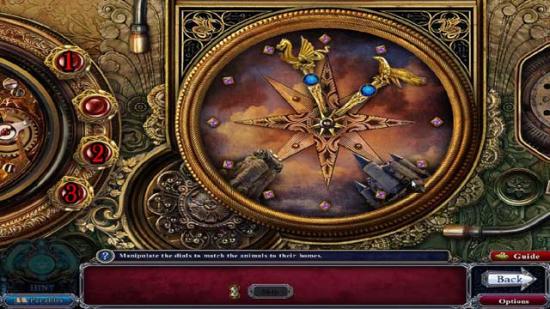
- Back in the main area, use the EAGLE SHIELD on the slot in the large cabinet to trigger a puzzle.
- Manipulate the dials to match the animals to their homes. Referring to the screenshot below, the solution is as follows: 3- press four times, 2- press once, 1-press eight times. The eagle should be over the nest and the dragon should be over the castle.
- Manipulate the dials to match the weapons to their users. Referring to the screenshot below, the solution is as follows: 3- press three times, 2- press three times, 4- press three times, 1- press three times.
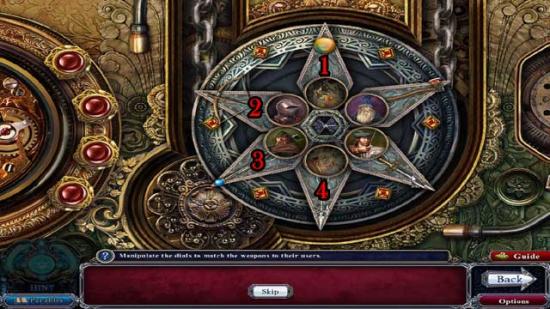
- Upon completing the puzzle, the portcullis blocking the door outside will lift.
- Exit to the Palace Entrance.
Palace Entrance
- Take a closer look at the front door. Use the HERALDIC SHIELD PIECE on the missing portion of the crest to restore it.
- The front door will open. Proceed inside.
Chapter 2
Foyer
- Click on the door on the right to open it. Before proceeding inside, click on the -Cursed Object #4- (the flower bouquet) next to the door.
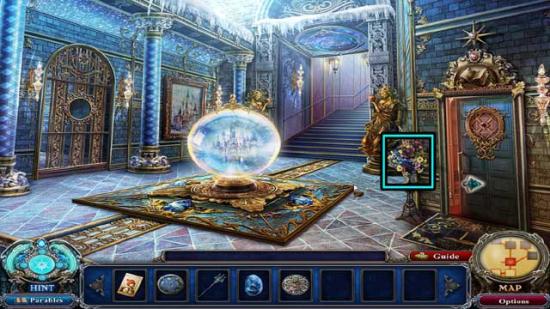
- Enter through the door on the right.
Library
- Examine the statue. Use the ORNAMENTAL TRIDENT on the statue’s hand to trigger a puzzle (click to trigger).
- Match each token to its appropriate slot. The solutions are as follows: Lion= meat, Cat= fish, Dog= bones, Monkey= banana, Rat= cheese, Bunny= carrot, Spider= fly, Fish= worm.
- Upon completing the puzzle, click on the button to finish. Once back in the main area, click on the *The Mountain Beast 3/3* Parable Gem that appears in the statue’s hand to collect it.
- The story of The Mountain Beast is now available to read.
- Take a closer look at the ornate wall panel on the left. Use the STAR INSIGNIA on the upper slot, then exit for now.
- Return to the Foyer.
Foyer
- Proceed up the stairs to the next area.
Hall
- Take a closer look at the Snow Queen and the child at the far end of the hall. A wall will spring up, blocking you from reaching them.
- Examine the hidden object area to the left of the wall.
- Find the items shown at the bottom of the screen. Their locations are shown below.
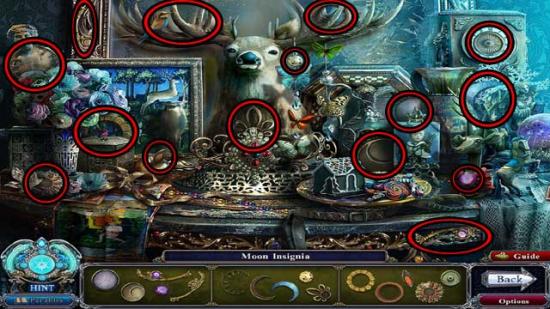
- Upon completing the area, the MOON INSIGNIA will be added to your inventory.
- Take a closer look at the small box on the small table towards the right. Click on the GOBLET COLLECTION 1/6 inside to add it to your inventory.
- Examine the immediate right wall. Click on the *Rise of the Snow Queen 3/6* Parable Gem to collect it.
- Enter the doorway on the left.
Throne Overlook
- Click on the little girl standing in front of the door for an objective update. She will give you the GOLDEN COMPASS.
- Click on the GOBLET COLLECTION 2/6 on the right to add it to your inventory.
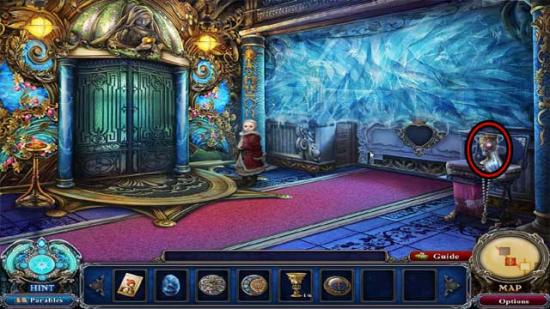
- Return to the Library.
Library
- Take a closer look at the ornate wall panel on the left again. Use the MOON INSIGNIA on the second slot to complete the panel, revealing an opening to a new room.
Observatory
- Click on the -Cursed Object #5- (the second hanging planet from the left).
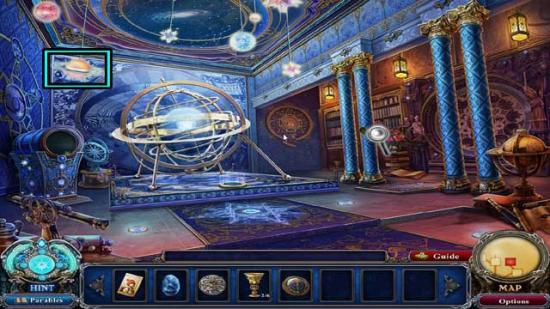
- Take a closer look at the second pillar from the back of the room on the right. Insert the GOLDEN COMPASS into the slot to trigger a hidden object area.
- Find the items shown at the bottom of the screen. Their locations are shown below.
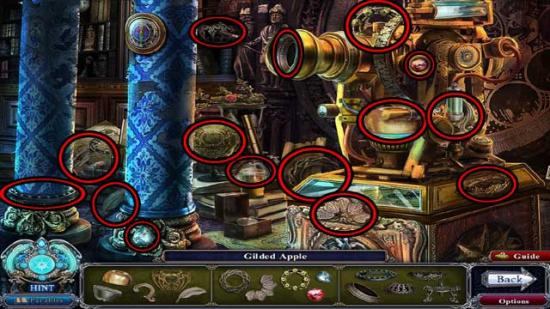
- Upon completing the area, the GILDED APPLE will be added to your inventory.
- Take a closer look at the gold-colored globe on the far right side of the screen. Click on the WORKSHOP KEY to add it to your inventory.
- Return to the Hall.
Hall
- Notice the Mountain Beast watching you through the ice. Proceed via the door on the left to the Throne Overlook.
Throne Overlook
- Take a closer look at the pedestal next to the door on the far left. Use the GILDED APPLE on the stand.
- Before you can complete the action, watch the cutscene. Once finished, zoom in on the pedestal again and place the GILDED APPLE on the stand.
- The doors will open. Proceed through to the next area.
Garden
- Click on the hidden object area on the right.
- Find the items shown at the bottom of the screen. Their locations are shown below.
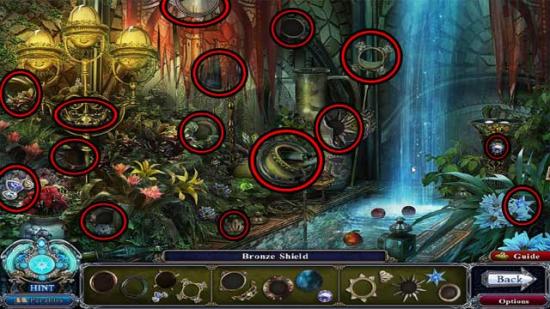
- Upon completing the area, the BRONZE SHIELD will be added to your inventory.
- Click on the -Cursed Object #6- (the stained-glass window), then click on the *Rise of the Snow Queen 4/6* and the *The Golden Child 1/3* Parable Gems to collect them.
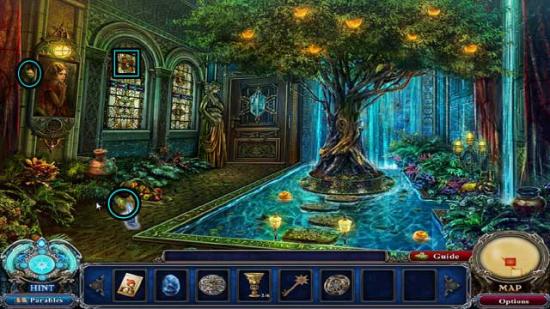
- Take a closer look at the door at the far end of the room, only to have vines bar the way.
- Return to the Foyer.
Foyer
- Take a closer look at the barred doorway on the left. Use the BRONZE SHIELD on the groove to open the door, then proceed through to the next area.
Courtyard
- Take a closer look at the doorway on the right. Use the WORKSHOP KEY on the lock to open it, then go inside.
Workshop
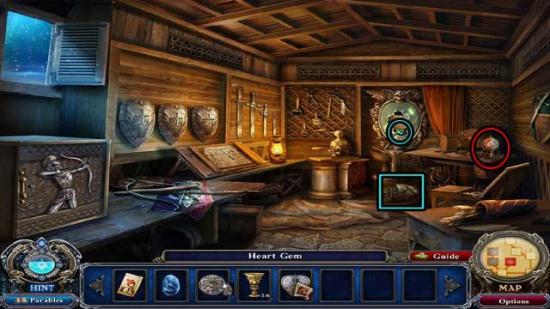
- Take a closer look at the scroll laid out on the left for an objective update. This will also trigger a hidden object area to appear.
- Find the items shown at the bottom of the screen. Their locations are shown below.
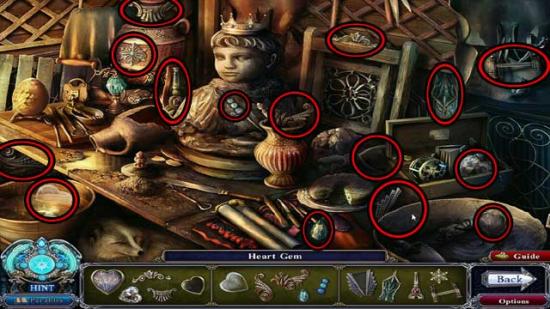
- Upon completing the area, the HEART GEM will be added to your inventory.
- Back in the main area, click on the -Cursed Object #7- (the helmet/vase lying on the floor) and take a closer look at the broken mirror on the back wall to collect the *Tale of Two Mirrors 2/4* Parable Gem. Also, click on the GLOBE COLLECTION 1/5 sitting on the desk in the right corner to add it to your inventory.
- Exit to the Courtyard.
Courtyard
- Take a closer look at the statue of the King, specifically his shield. Click on the *Rise of the Snow Queen 5/6* Parable Gem to collect it.
- There’s nothing more you can do here at the moment, so return to the Throne Overlook.
Throne Overlook
- Take a closer look at the heart-shaped groove on the right. Use the HEART GEM on the groove to melt the ice on the balcony, then click for a closer view into the Throne Room.
Chapter 3
Prison
- Take a closer look at the wizard’s skeleton on the left for a hidden object area.
- Find the items shown at the bottom of the screen. Their locations are shown below.
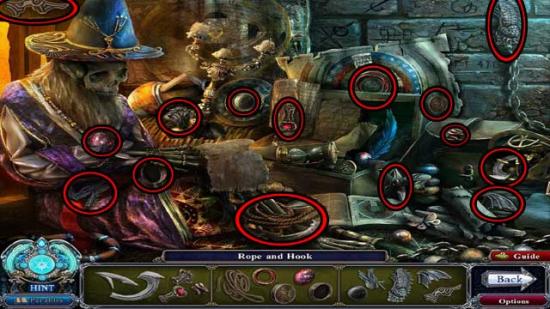
- Upon completing the area, the ROPE AND HOOK will be added to your inventory.
- Click on the -Cursed Object #8- (the etchings on the wall next to the skeleton), then take a closer look at the scroll and book as circled below to collect the *The Snow Queen Tale 1/6* and *Rise of the Snow Queen 6/6* Parable Gems. Also click to open the drawer, revealing the SILVER ARROW.
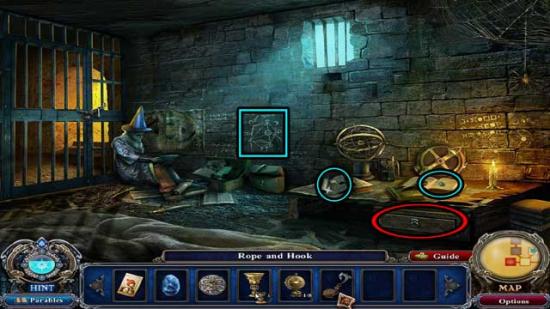
- The *Rise of the Snow Queen* Parable is now complete and can be read.
- Click on the large blanket on the floor towards the lower left corner to move it, then click for a closer view. Click on the WATER VIAL to add it to your inventory and take note of the alchemist formula left behind.
- Examine the barred window. Use the FROST STONE on the indentation in the wall, then use the WATER VIAL on the stone to blow a hole in the wall.
- Use the ROPE AND HOOK on the opening to escape.
Courtyard
- Enter the Workshop again.
Workshop
- Click on the hidden object area.
- Find the items shown at the bottom of the screen. Their locations are shown below.
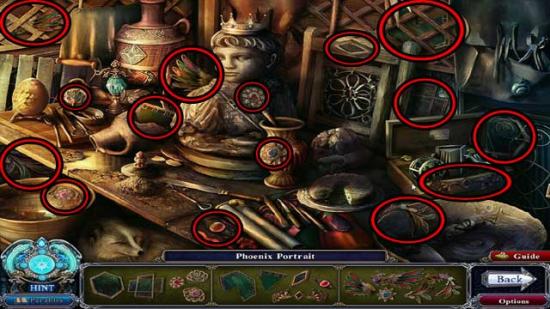
- Upon completing the area, the PHOENIX PORTRAIT will be added to your inventory.
- Examine the safe on the left. Use the SILVER ARROW on the archer design to open the safe. Click on the GOBLET COLLECTION 3/6 to add it to your inventory.
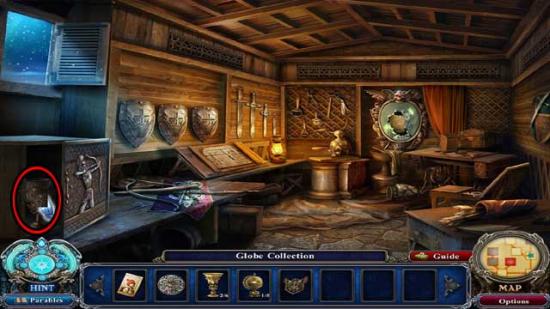
- Backtrack to the Hall.
Hall
- Upon entering the area, you’ll notice all the ice has melted away. Your objective will be updated.
- Click on the -Cursed Object #9- (the banner hanging on the right) to identify it.
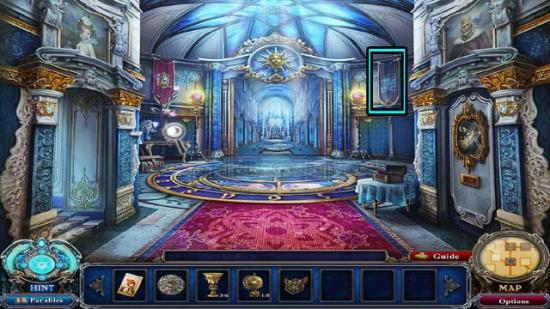
- Click on the hidden object area that has appeared on the left.
- Find the items shown at the bottom of the screen. Their locations are shown below.
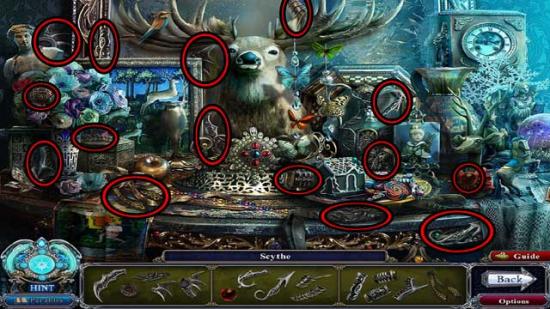
- Upon completing the area, the SCYTHE will be added to your inventory.
- Continue forward into the next room.
Throne Room
- Take a closer look at the throne for a puzzle.
- Match each token to its appropriate slot. The solution is as follows (going clockwise): Demon= horns, Gentleman= top hat, Man= knight’s helmet, Wizard= wizard’s cap, Saint= snake, Queen= curved crown, King= crown w/cross, Cherub= halo.
- Upon completing the puzzle, click on the button that appears in the middle to trigger the door on the right to open.
- Enter through the doorway on the right.
Holding Room
- Talk with the children being held in this room. You’ll receive the GOBLET COLLECTION 4/6.
- Next, use the SCYTHE on the statue of the grim reaper to open a secret doorway on the right.
- Click on the -Cursed Object #10- (the painting on the left) and the *The Golden Child 2/3* Parable Gem hanging on the right to collect them.
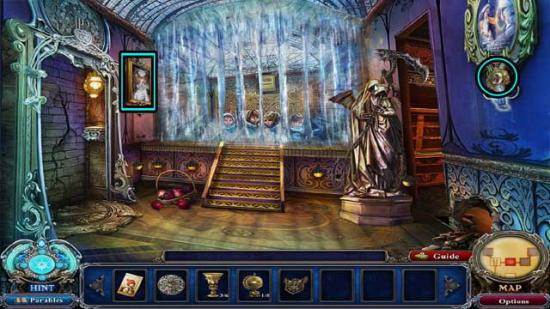
- Enter through the doorway on the right.
Chapter 4
Safe
- Take a closer look at the safe door for a puzzle.
- Create a path to the other side using the correct number of colored tokens shown above. The solution is shown below.
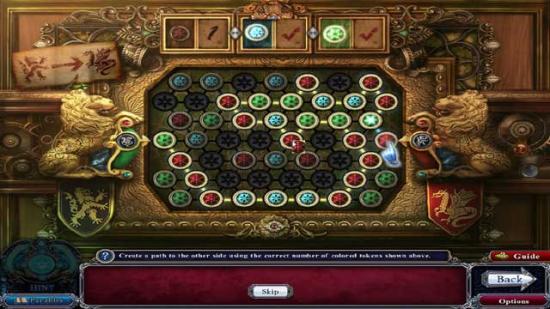
- Upon completing the puzzle, the safe door will open. Before proceeding into the next room though, take a closer look at the shelves on the left for a hidden object area.
- Find the items shown at the bottom of the screen. Their locations are shown below.
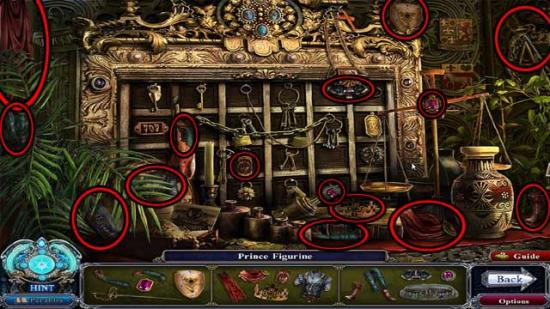
- Upon completing the area, the PRINCE FIGURINE will be added to your inventory.
- Proceed through the large door into the next room.
Treasury
- Upon entering the room, click on the -Cursed Object #11- (the emblem above the door on the left, near the ceiling) to identify it. Take a closer look at the glass case in the middle of the room and click on the *Tale of Two Mirrors 3/4* Parable Gem to collect it. Back in the main area, click on the GOBLET COLLECTION 5/6 to add it to your inventory.
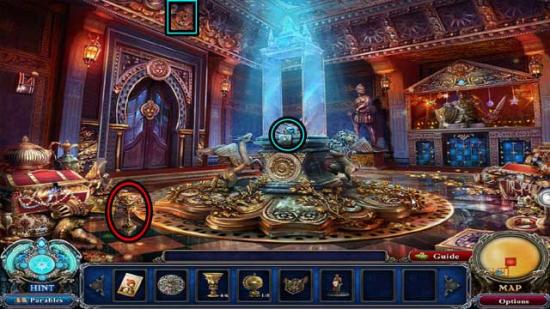
- Before leaving, click on the lever on the wall on the far right to trigger something in the next room.
- Exit back to the Safe.
Safe
- Take a closer look at the puzzle on the right.
- Light up the four rose panels by solving each interactive puzzle. The solutions are as follows:
- Move the wolf tails into the positions shown below, then click on the button that appears on the right.
- Click on the tiles towards the top of the puzzle to form the picture of a rose, shown below.
- Click on the buttons to light the blue flowers– the solution is shown below and is as follows: Push button A, then B, then C.
- Use the buttons to move the rose marker to the center line. The solution is shown below and is as follows: Press Z x5, Y x5, Z x4.
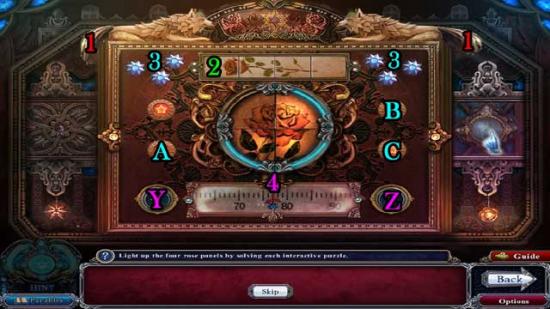
- Upon completing the puzzle, click on the button that appears in the center once all the panels have been lit. A portal will appear.
- Give the PICTURE OF THE GUIDE’S SON, KAI to the boy to trigger a cutscene.
- Enter through the portal.
Hidden Cove
- Click on the hidden object area over the fountain at the back of the cove.
- Find the items shown at the bottom of the screen. Their locations are shown below.
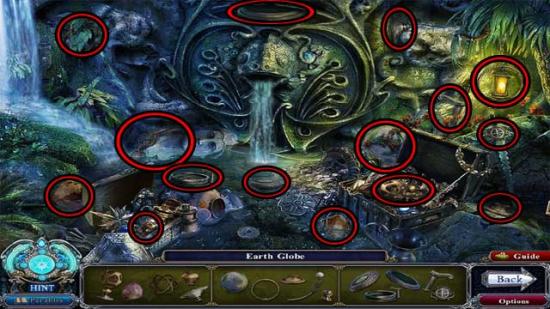
- Upon completing the area, the EARTH GLOBE (GLOBE COLLECTION 2/5) will be added to your inventory.
- Exit the Hidden Cove.
Royal Statues
- Click on the -Cursed Object #12- (the flowers/chest) outside of the cave entrance on the left to identify it.
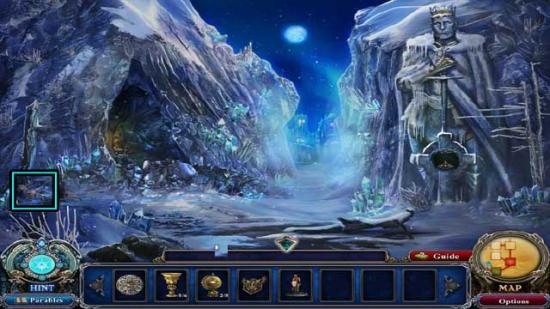
- Return to the Village Pass.
Village Pass
- Watch the cutscene that ensues. Kai will give you the SILVER PENDANT.
Chapter 5
- Proceed forward to the Yard.
Yard
- Click on the statue of the knight riding the horse for a hidden object area.
- Find the items shown at the bottom of the screen. Their locations are shown below.
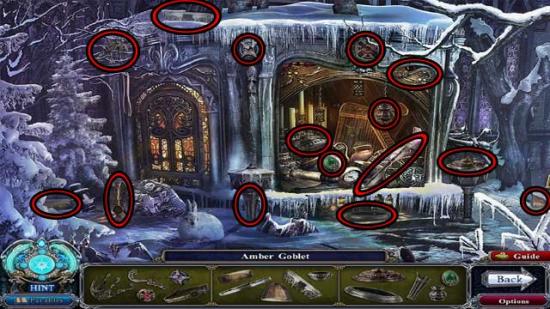
- Upon completing the area, the AMBER GOBLET/GOBLET COLLECTION 6/6 will be added to your inventory.
- Proceed to the Church (Outside).
Church (Outside)
- Click on the -Cursed Object #13- (the star/angel) over the shed to collect it.
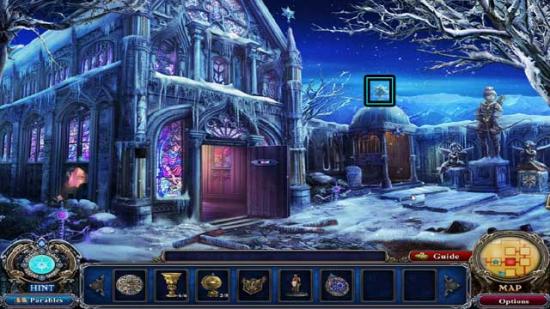
- Enter the Church.
Church (Inside)
- Click on the hidden object area on the right.
- Find the items shown at the bottom of the screen. Their locations are shown below.
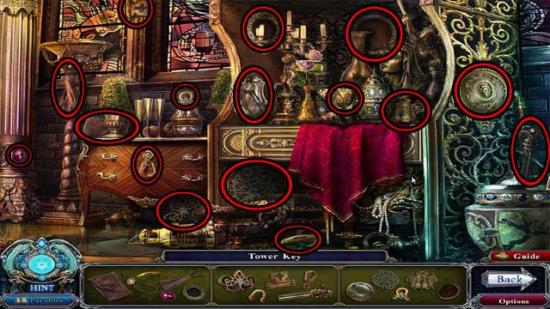
- Upon completing the area, the TOWER KEY will be added to your inventory.
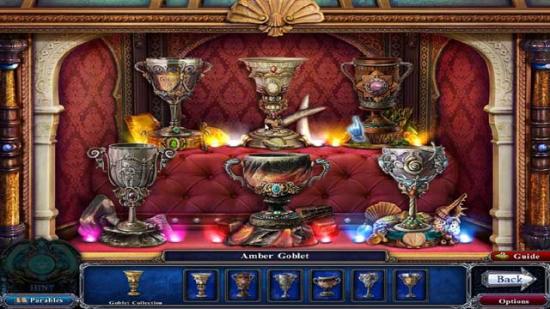
- Take a closer look at the display at the back of the Church. Place the Goblets (GOBLET COLLECTION 6/6) into their correct locations. The solution is shown below.
- Take a closer look at the door on the left for a puzzle.
- Create a path to the other side using the correct number of colored tokens shown above. The solution is shown below.
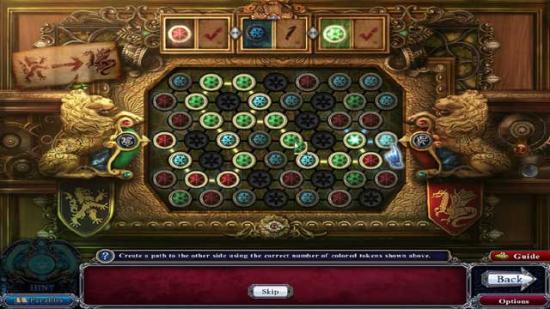
- Upon completing the puzzle, the door will open. Proceed inside.
Shrine
- Take a closer look at the portrait on the back wall. Click on the *The Golden Child 3/3* Parable Gem to collect it.
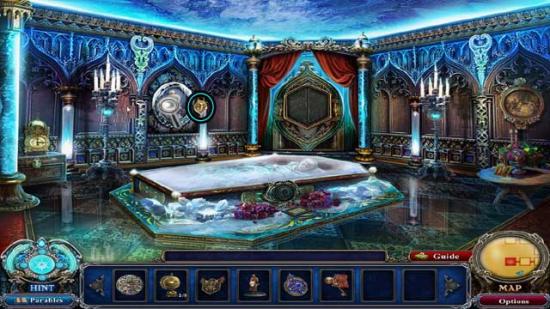
- You have now completed and can read the story of The Golden Child.
- Take a closer look at the base of the coffin in the middle of the room. Use the CRYSTAL COIN on the slot, then click on the same area again to trigger a puzzle.
- Match each token to its appropriate slot. Match the correct tail type to each of the animals. Upon completing the puzzle, click on the button that appears to trigger the opening of the coffin.
- Take a closer look at the body within the coffin. Place the SILVER PENDANT within the hand, then read the text inside.
- Back in the main area, click on the -Cursed Object #14- (the portrait) on the far right.
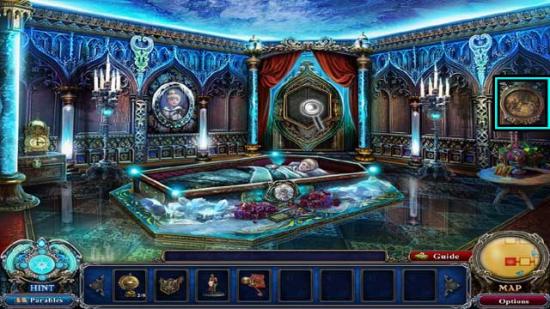
- Examine the groove on the back wall. Use the PHOENIX PORTRAIT on it to open a secret compartment. Inside, click on the JEWEL COLLECTION 1/4 to add it to your inventory.
- Exit the Church.
Church (Outside)
- The guide is waiting for you outside. Talk with him to update your objective.
- Proceed to the Palace Entrance.
Palace Entrance
- Take a closer look at the statue on the right for a hidden object area.
- Find the items shown at the bottom of the screen. Their locations are shown below.
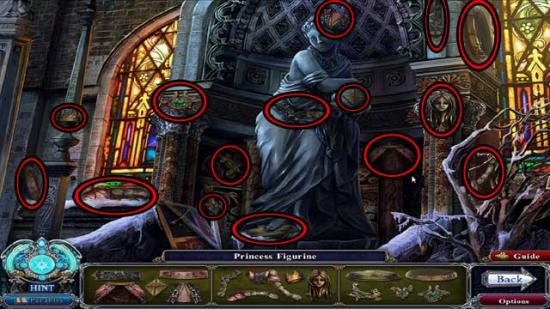
- Upon completing the area, the PRINCESS FIGURINE will be added to your inventory.
- Go to the Courtyard.
Courtyard
- Take a closer look at the closed door across the Courtyard. Use the TOWER KEY on the lock to open it, then proceed inside.
Tower Stairs
- Click on the hidden object area on the right.
- Find the items shown at the bottom of the screen. Their locations are shown below.
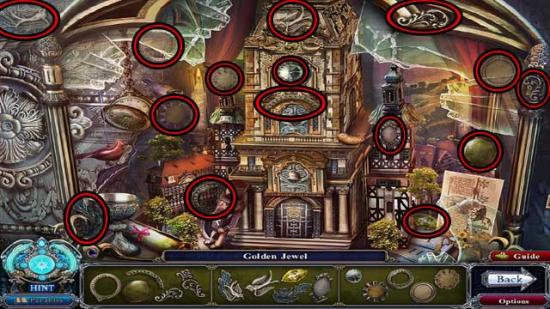
- Upon completing the area, the GOLDEN JEWEL/JEWEL COLLECTION 2/4 will be added to your inventory.
- Take a closer look at the compartment that opens to the left of the hidden object area. Click on the lever to open the door up the steps and proceed through.
Tower Top
- Take a closer look at the control panel towards the right for a puzzle.
- Light up the center portrait by searching for all unique paths. The unique path combinations are as follows (refer to the screenshot below as reference): 1-5-2, 1-5-3, 1-15-12, 1-16-6, 1-16-8, 11-14-7, 11-14-9, 11-18-4, 11-10-13, and 11-10-17.
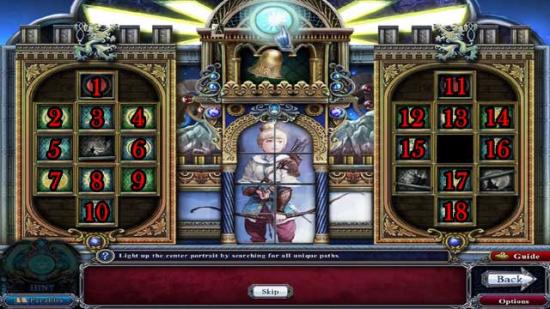
- Upon completing the puzzle, click on the button at the top and watch the cutscene that follows.
Chapter 6
Tower Top
- The tower light is now on, and your objective has been updated.
- Take a closer look at the edge of the platform on the ground, just to the left of the bell. Click on the FALSE MIRROR SHARD and the *The Snow Queen Tale 2/6* Parable Gem to collect them.
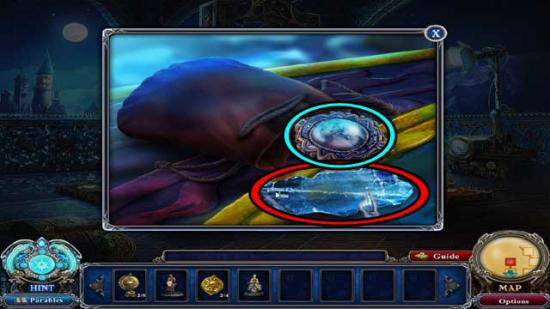
- Take a closer look at the light/over the railing and notice the guide waiting for you down below.
- Go back down to the Tower Stairs.
Tower Stairs
- Click on the hidden object area on the right.
- Find the items shown at the bottom of the screen. Their locations are shown below.
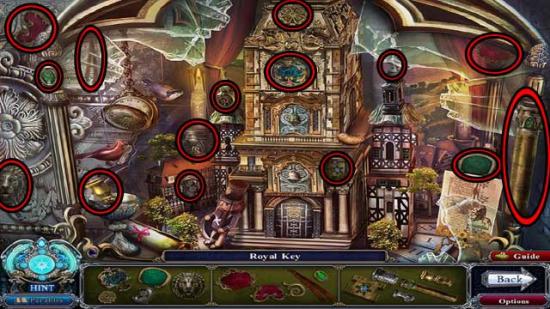
- Upon completing the area, the ROYAL KEY will be added to your inventory.
- Click on the -Cursed Object #15- (the jewelry box) on the small table on the left.
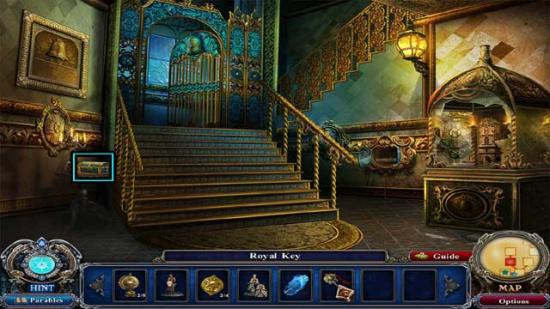
- Exit to the Courtyard.
Courtyard
- Click on the *Tale of Two Mirrors 4/4* Parable Gem to collect it.
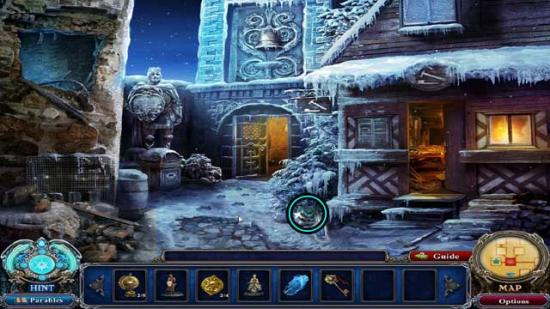
- The Tale of Two Mirrors parable is now complete and can be read.
- Enter the Prison via the hole on the left.
Prison
- Click on the hidden object area near the skeleton.
- Find the items shown at the bottom of the screen. Their locations are shown below.
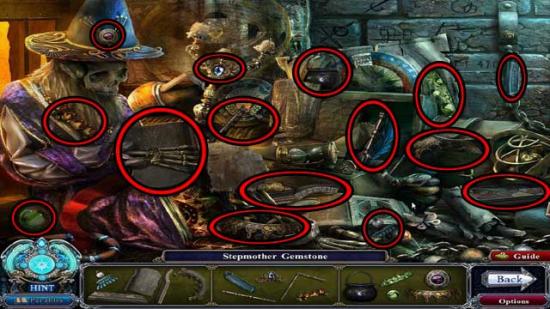
- Upon completing the area, the STEPMOTHER GEMSTONE will be added to your inventory.
- Exit to the Foyer.
Foyer
- Click on the -Cursed Object #16- (the gem on the floor) beneath the magical sphere.
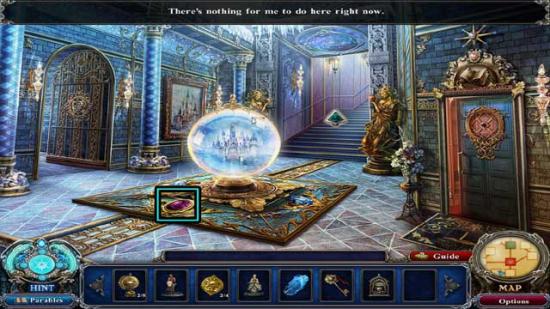
- Continue to the Throne Room.
Throne Room
- Take a closer look at the door on the far left. Use the ROYAL KEY on the lock to open it and proceed inside.
Bedroom
- Click on the hidden object area over the foot of the bed.
- Find the items shown at the bottom of the screen. Their locations are shown below.
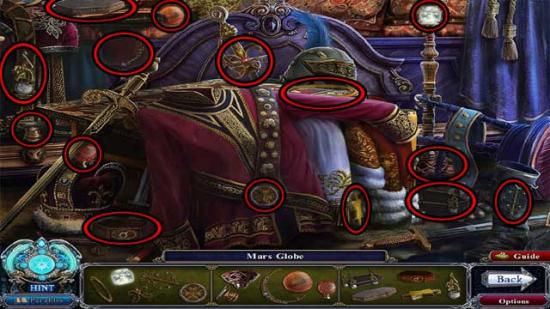
- Upon completing the area, the MARS GLOBE/GLOBE COLLECTION 3/5 will be added to your inventory.
- Click on the -Cursed Object #17- (the clock) on top of the wardrobe and the *The Snow Queen Tale 3/6* Parable Gem to collect them.
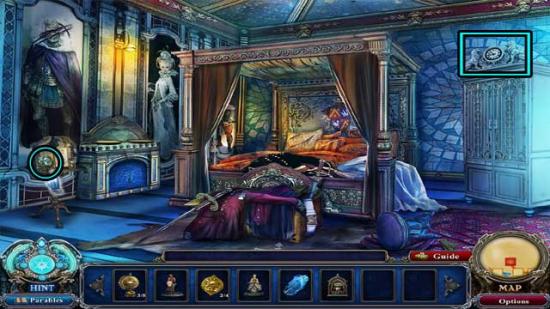
- Take note of the cabinet on the left wall. Place the PRINCE FIGURINE and PRINCESS FIGURINE on top of the cabinet. A secret panel will open– click on the lever inside.
- Backtrack all the way back to the Caravan Wreck.
Caravan Wreck
- Click on the -Cursed Object #18- (the frog symbol/shield) on the side of the caravan.
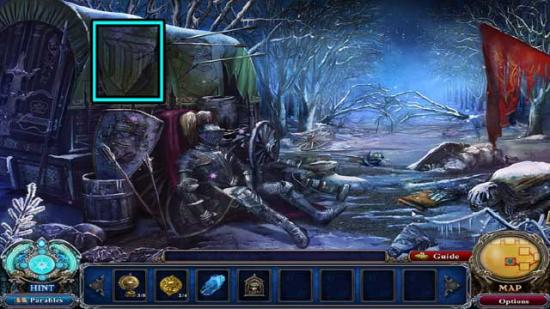
- Click on the hidden object area.
- Find the items shown at the bottom of the screen. Their locations are shown below.
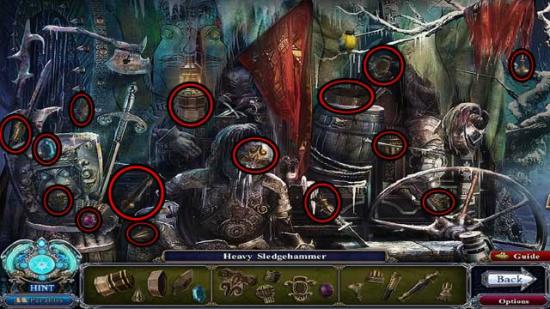
- Upon completing the area, the HEAVY SLEDGEHAMMER will be added to your inventory.
- Return to the Holding Room.
Holding Room
- Use the HEAVY SLEDGEHAMMER on the cracked wall on the left to break it open.
- Talk with the guide. After a brief cutscene, you will receive the MAGICAL AX.
- Backtrack to the Garden.
Garden
- Click on the hidden object area on the right.
- Find the items shown at the bottom of the screen. Their locations are shown below.
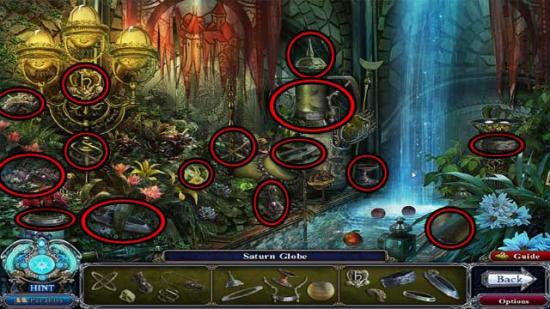
- Upon completing the area, the SATURN GLOBE/GLOBE COLLECTION 4/5 will be added to your inventory.
- Use the MAGICAL AX on the vines covering the door at the back of the room to clear them. Click on the door to open it and proceed into the next area.
Secret Hideaway
- Click on the plaque on the right for a puzzle.
- Create a path to the other side using the correct number of colored tokens shown above. The solution is shown below.
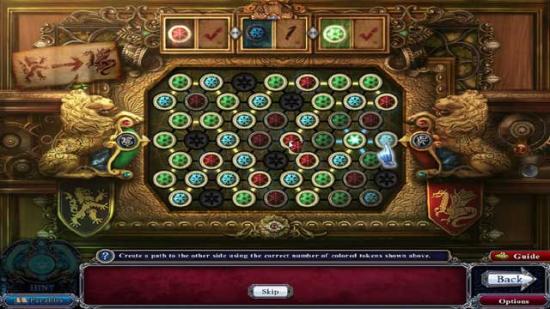
- Upon completing the puzzle, click on the ICE SCEPTER to add it to your inventory.
- Back in the main area, click on the GOLDEN CROWN lying in the water to add it to your inventory.
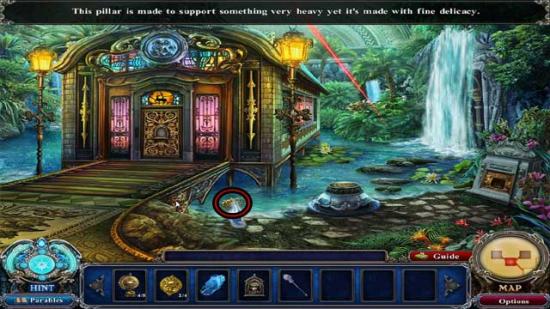
- Take a closer look at the doorway on the left. Use the STEPMOTHER GEMSTONE on the groove to open the door, then proceed inside.
Stepmother’s Lab
- Click on the -Cursed Object #19- (the bottle) on the right and zoom in on the shelf on the left to collect the *The Snow Queen Tale 4/6* Parable Gem.
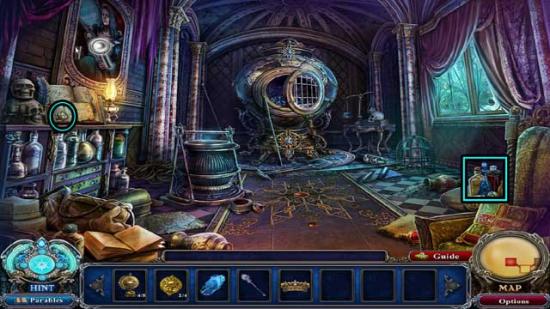
- Exit and go all the way back to the Courtyard.
Courtyard
- Take a closer look at the base of the statue of the king. Use the GOLDEN CROWN on the indentation to trigger a puzzle.
- Complete the puzzle by solving each interactive area. The solutions are numbered and shown below.
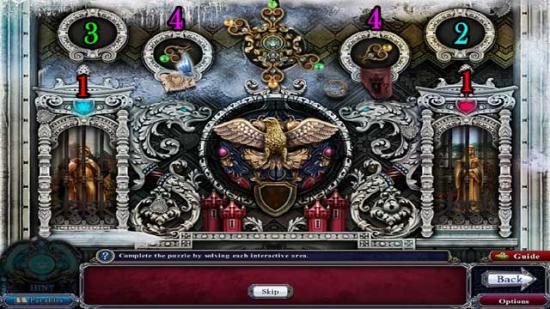
- Click on the figures to switch them out until you have the King on the left and the Queen on the right. Completing this will award you with the left wing: use it on the eagle.
- Click on the panel to open it, revealing the right wing. Use it on the eagle.
- Click on the panel to open it, revealing a gem. Use it on the crest above the eagle.
- Count the number of hearts (solution= V) and castle turrets (solution= IV) and input those numbers onto the two panels, revealing two more gems. Use them on the crest above the eagle, then once it moves aside, use the shield on the groove beneath the eagle to complete the puzzle.
- Once the puzzle is complete, click on the KNIGHT’S SHIELD to add it to your inventory.
- Return to the Throne Room.
Throne Room
- Use the KNIGHT’S SHIELD on the suit of armor on the right, then click for a closer view. Read the note to update your objective.
- Return to the Stepmother’s Lab.
Stepmother’s Lab
- Click on the hidden object area at the back of the room.
- Find the items shown at the bottom of the screen. Their locations are shown below.
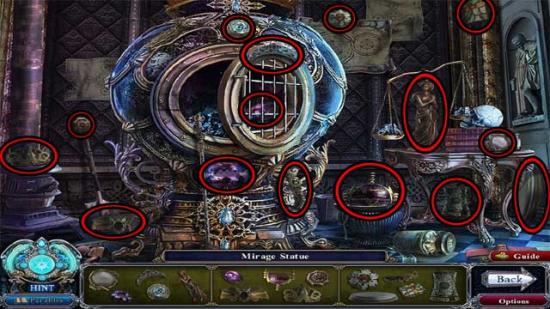
- Upon completing the area, the MIRAGE STATUE will be added to your inventory.
- Exit outside.
Secret Hideaway
- Use the MIRAGE STATUE on the base on the shore to open a doorway in the waterfall.
- Enter the new area.
Mirage Room
- Click on the hidden object area over the table on the left.
- Find the items shown at the bottom of the screen. Their locations are shown below.
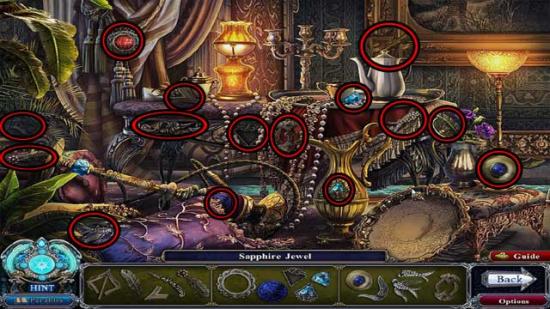
- Upon completing the area, the SAPPHIRE JEWEL/JEWEL COLLECTION 3/4 will be added to your inventory.
- Click on the *The Snow Queen Tale 5/6* Parable Gem to collect it.
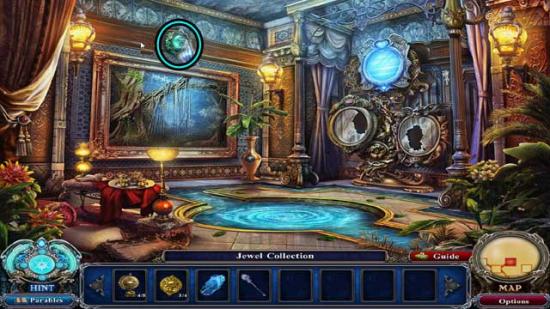
- Use the FALSE MIRROR SHARD on the broken mirror on the lower right to restore it, then click on the mirror.
Chapter 7
Mirage Room (Alternate)
- Click on the hidden object area on the left.
- Find the items shown at the bottom of the screen. Their locations are shown below.
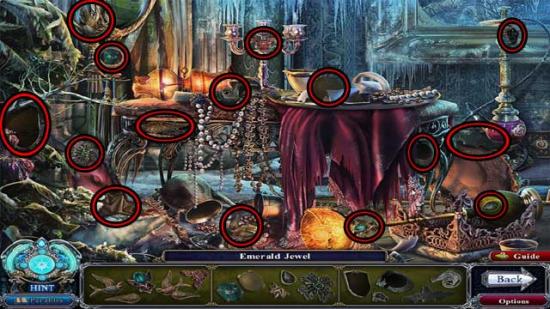
- Upon completing the area, the EMERALD JEWEL/JEWEL COLLECTION 4/4 will be added to your inventory.
- Click on the final -Cursed Object #20- (the panel in the upper corner).
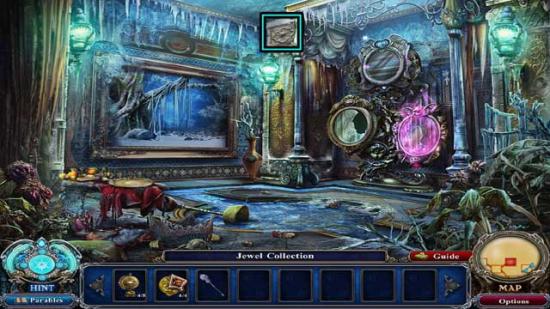
- Return to the Safe.
Safe
- Click on the shelves on the left for a hidden object area.
- Find the items shown at the bottom of the screen. Their locations are shown below.
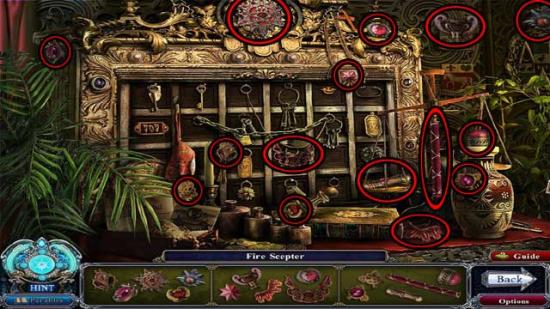
- Upon completing the area, the FIRE SCEPTER will be added to your inventory.
- Enter the Treasury.
Treasury
- Take a closer look at the display in the back right corner of the room.
- Swap the jewels so that they’re all in their correct locations. The solution is shown below.
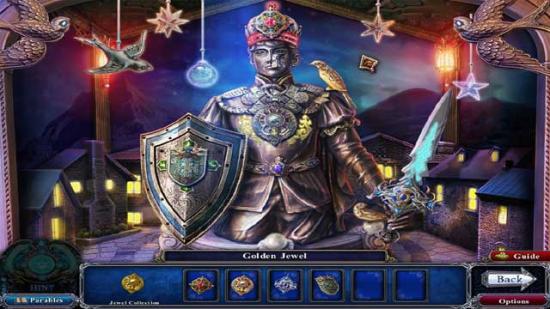
- Once all the jewels have been set in their correct locations, take a closer look at the puzzle that appears beneath the display.
- Create a path to the other side using the correct number of colored tokens shown above. The solution is shown below.
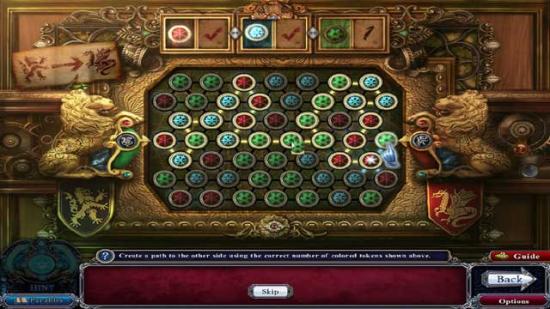
- Upon completing the puzzle, take a closer look at the location of the former puzzle. Click on the ANCIENT GLOBE to add it to your inventory, then examine the scroll to update your objective.
- Return to the Library.
Library
- Take a closer look at the table on the far left holding the book. Click on the *The Snow Queen Tale 6/6* Parable Gem to collect it.
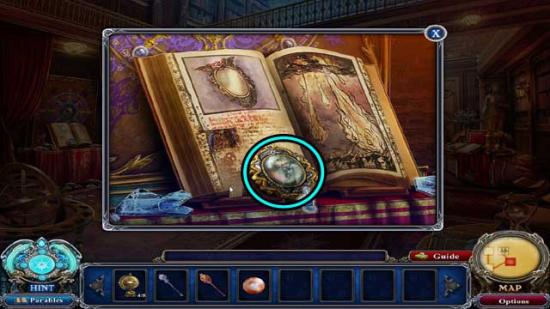
- You can now read the parable of The Snow Queen Tale.
- Enter the Observatory.
Observatory
- Click on the hidden object area on the right.
- Find the items shown at the bottom of the screen. Their locations are shown below.
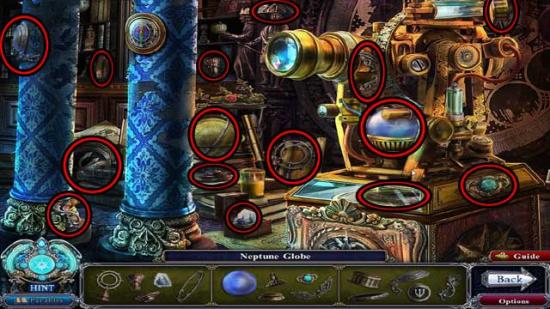
- Upon completing the area, the NEPTUNE GLOBE/GLOBE COLLECTION 5/5 will be added to your inventory.
- Take a closer look at the display on the far left. Arrange the globes so that they’re all in their proper locations. The solution is shown below.
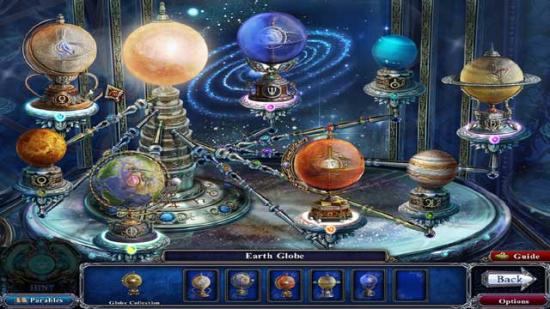
- Take a closer look at the device that rises out of the floor in front of the large solar display. Use the ANCIENT GLOBE on the stand to trigger the appearance of a portal.
- Enter through the portal.
Chapter 8
Magic Realm
- Use the ICE SCEPTER on the blue statue on the left and the FIRE SCEPTER on the red statue on the right.
- Climb up the stairs that appear to the next area.
Altar
- Take a closer look at the mirror, the girl, and the queen.
- There’s nothing more to do here at the moment, so go back.
Magic Realm
- Talk with the King to update your objective.
- Return through the portal and proceed to the Palace Entrance.
Palace Entrance
- Take a closer look at the hidden object area over the statue on the right.
- Find the items shown at the bottom of the screen. Their locations are shown below.
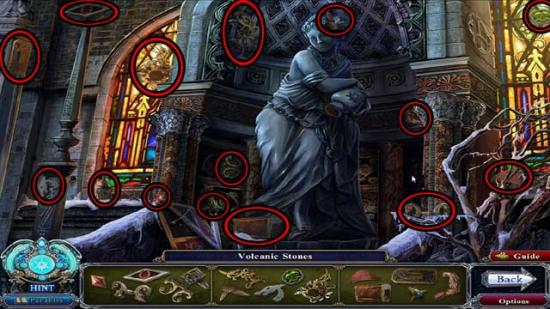
- Upon completing the area, the VOLCANIC STONES will be added to your inventory.
- Enter the Armory.
Armory
- Click on the hidden object area over the shelves on the left.
- Find the items shown at the bottom of the screen. Their locations are shown below.
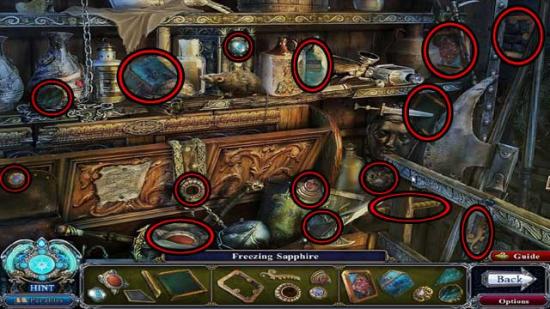
- Upon completing the area, the FREEZING SAPPHIRE will be added to your inventory.
- Return to the Palace and enter the Bedroom.
Bedroom
- Click on the hidden object area at the foot of the bed.
- Find the items shown at the bottom of the screen. Their locations are shown below.
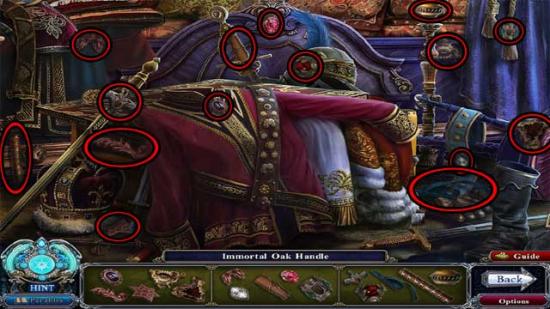
- Upon completing the area, the IMMORTAL OAK HANDLE will be added to your inventory.
- Return to the Stepmother’s Lab.
Stepmother’s Lab
- Take a closer look at the hidden object area at the back of the room.
- Find the items shown at the bottom of the screen. Their locations are shown below.
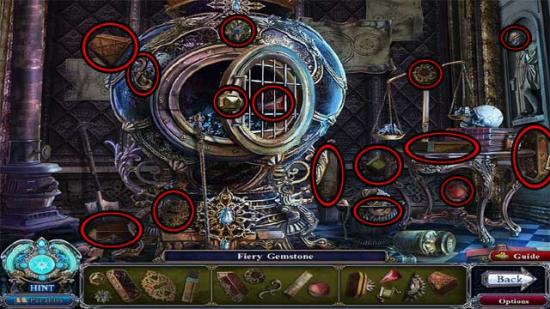
- Upon completing the area, the FIERY GEMSTONE will be added to your inventory.
- Return to the Mirage Room.
Mirage Room (Alternate)
- Click on the hidden object area on the left.
- Find the items shown at the bottom of the screen. Their locations are shown below.
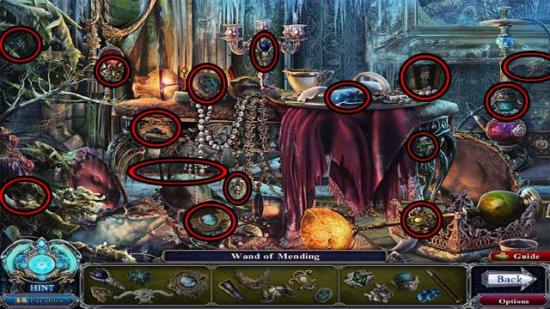
- Upon completing the area, the WAND OF MENDING will be added to your inventory.
- Return to the Observatory and enter through the portal.
Magic Realm
- Give all of the items to the King (VOLCANIC STONES, FREEZING SAPPHIRE, IMMORTAL OAK HANDLE, FIERY GEMSTONE, WAND OF MENDING). Upon giving him the last item, click on the SACRED BLACKSMITH MALLET in his hands to add it to your inventory.
- Proceed up the steps.
Altar
- Use the SACRED BLACKSMITH MALLET on the mirror on the left until it breaks, then watch the ensuing cutscene.
Congratulations! You’ve completed Dark Parables: Rise of the Snow Queen!
Collector’s Edition Bonus Game: Hansel and Gretel
Upon completing the main story, you can choose this bonus game from the main menu. Click play to start!
Campsite
- Click on the hidden object area over the tent.
- Find the items shown at the bottom of the screen. Their locations are shown below.
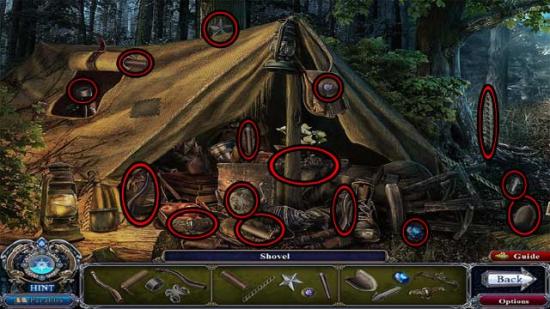
- Upon completing the area, the SHOVEL will be added to your inventory.
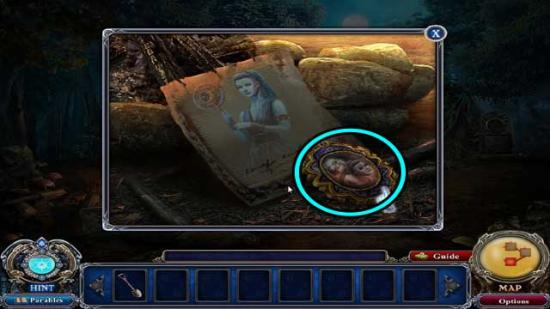
- Take a closer look at the rocks surrounding the campfire (not lit) towards the bottom of the screen. Click on the *The Witch and the Goddess 1/6* Parable Gem to collect it, then examine the drawing.
- Click on the signpost towards the bottom left corner to update your objective.
- Enter through the hollow to the right of Gretel.
Cave
- Click on the hidden object area in the bottom left corner.
- Find the items shown at the bottom of the screen. Their locations are shown below.
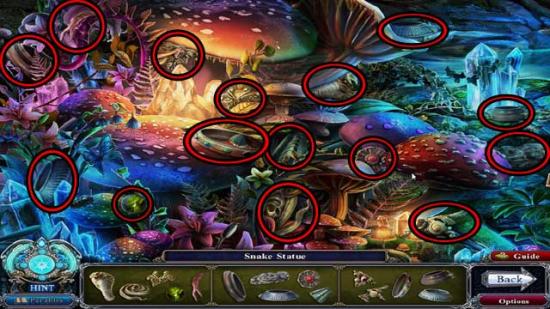
- Upon completing the area, the SNAKE STATUE will be added to your inventory.
- Examine the areas around the cave, then return to the Campsite.
Campsite
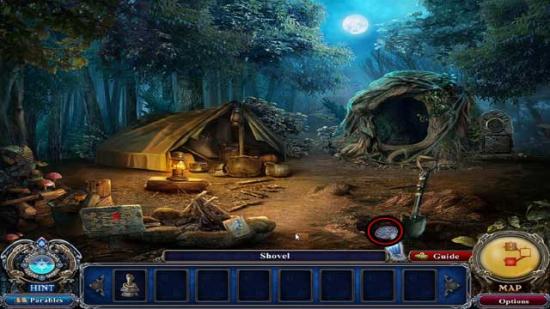
- Take a closer look at the faint dirt pile towards the bottom right corner of the screen. Use the SHOVEL on it to uncover the ORNAMENTAL STAR and add it to your inventory.
- Take a closer look at the stone tablet on the right, next to the cave entrance. Use the ORNAMENTAL STAR on the circular groove to trigger the appearance of a puzzle. Click on it.
- Align all the birds to one direction so they follow the wind. Click on the birds in the order shown below to solve the puzzle.
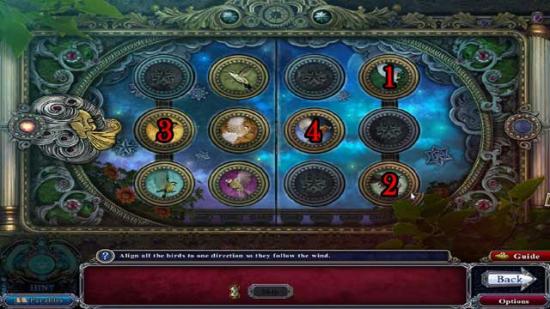
- Upon completing the puzzle, you will be rewarded with the SKULL RING.
- Return to the Cave.
Cave
- Take a closer look at the tunnel in the upper left corner. Use the SKULL RING on the skeleton’s glowing finger to open a doorway to the next area.
- Proceed forward.
Gingerbread House
- Examine the locked front door to update your objective.
- After examining the area, return to the Cave.
Cave
- Upon entering, you should hear a loud scream in the direction of the forest. Return to the Campsite.
Campsite
- Watch the falling trees, then proceed forward (around the back of the tent).
Forest
- Talk with the Ogre, then click on the *The Witch and the Goddess 2/6* Parable Gem to collect it.
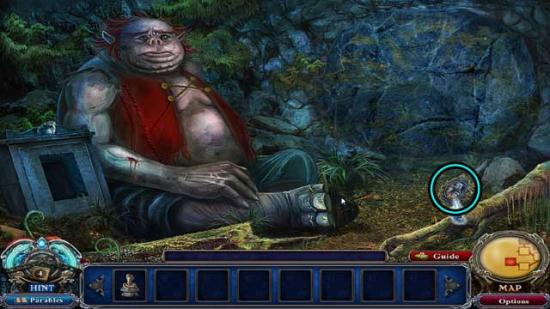
- Use the SNAKE STATUE on the box on the left to reveal a hidden alcove, then take a closer look. Click on the SPIDER CROWN to add it to your inventory, and take note of the bone before leaving.
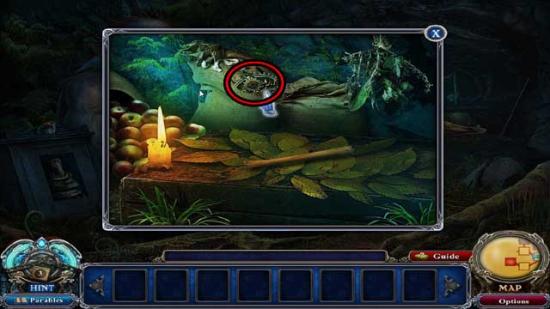
- Return to the Cave.
Cave
- Take a closer look at the door with the spider design. Use the SPIDER CROWN on the groove in the door to open it and gain access into the next area.
Spider Lair
- Click on *The Witch and the Goddess 3/6* Parable Gem to collect it.
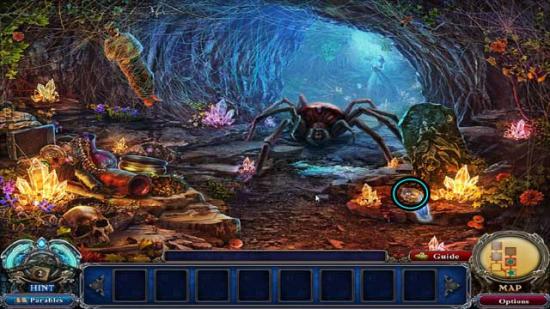
- Click on the hidden object area in the lower left corner.
- Find the items shown at the bottom of the screen. Their locations are shown below.
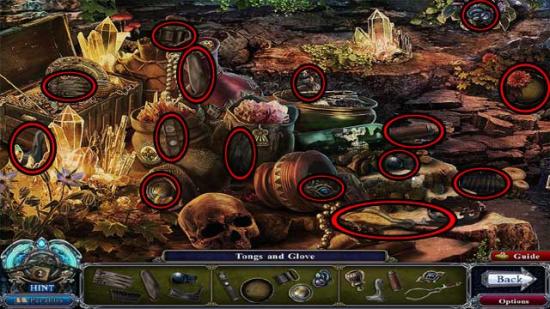
- Upon completing the area, the TONGS AND GLOVE will be added to your inventory.
- Return to the Cave.
Cave
- Click on the hidden object area in the lower left corner.
- Find the items shown at the bottom of the screen. Their locations are shown below.
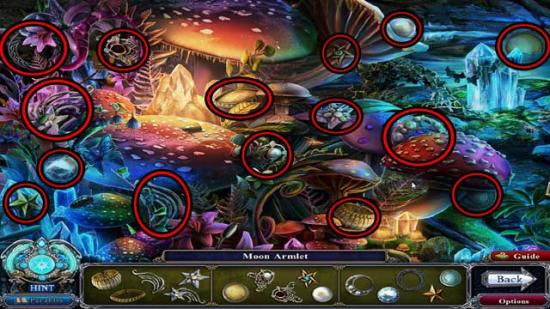
- Upon completing the area, the MOON ARMLET will be added to your inventory.
- Return to the Forest.
Forest
- Use the TONGS AND GLOVE on the thorn in the Ogre’s foot: he will reward you with the LOLLIPOP KEY.
- Return to the Gingerbread House.
Gingerbread House
- Take a closer look at the front door. Use the LOLLIPOP KEY on the lock to open the door, then proceed inside.
Living Room
- Speak with the imp butler.
- Click on *The Witch and the Goddess 4/6* Parable Gem to collect it.
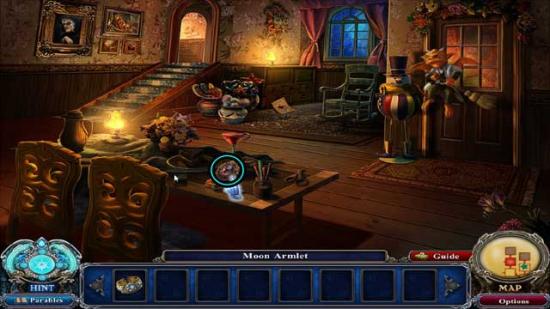
- Examine the paper and portrait in the room, then head up the stairs to the next area.
Bedroom
- Click on the chest next to the cage to trigger a puzzle.
- Create a path to the other side using the correct number of colored tokens shown above. The solution is shown below.
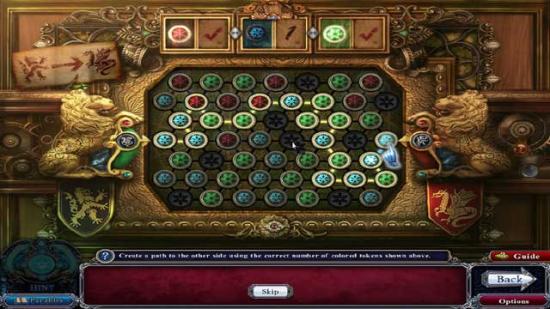
- Upon completing the puzzle, the chest will open. Click on the SMALL HAMMER and the *The Witch and the Goddess 5/6* Parable Gem to collect them.
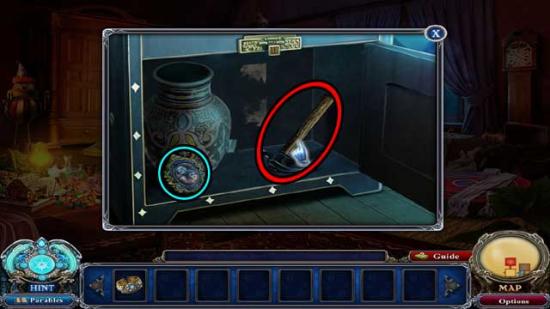
- Take a look around the room before leaving for the Spider Lair again.
Spider Lair
- Click on the hidden object area in the lower left corner.
- Find the items shown at the bottom of the screen. Their locations are shown below.
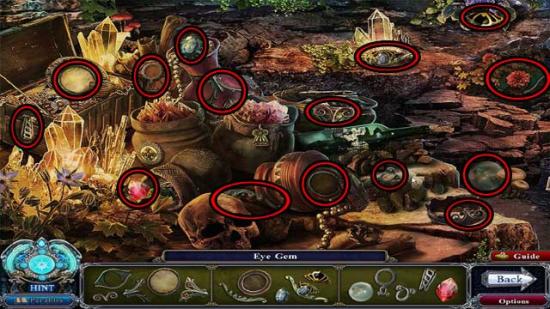
- Upon completing the area, the EYE GEM will be added to your inventory.
- Return to the Living Room.
Living Room
- Take a closer look at the witch portrait on the far left wall. Use the EYE GEM on the slot in the upper portion of the frame to trigger a puzzle. Click for a closer view.
- Match each token to its appropriate slot. The solutions are as follows (clockwise): Ear= earrings, Eye= monocle, Wrist= watch, Neck= necklace, Feet= boots, Back of neck/Head= wig, Fingers/Hand= ring, Body= robe.
- Upon completing the puzzle, click on the button to open a hidden safe. Click on the SLEEPING FLUTE inside to add it to your inventory.
- Return to the Spider Lair.
Spider Lair
- Use the SLEEPING FLUTE on the large spider to put it to sleep, then continue forward to the back of the cavern.
Goddess
- Use the MOON ARMLET on the upper arm of the Goddess.
- Examine the area, then exit back to the Forest for now.
Forest
- Take a closer look at the alcove. Use the SMALL HAMMER on the bone to obtain the SHARP BONE. Click on it to add it to your inventory.
- Return to the Spider Lair.
Spider Lair
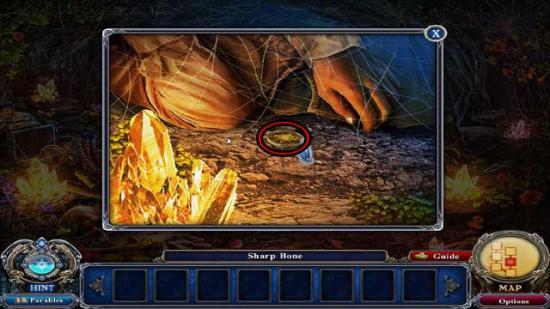
- Take a closer look at the body tangled up in the web. Use the SHARP BONE on the web to cut it– the body will fall to the ground.
- Take a closer look at the fallen body. Click on the GOLD COIN to add it to your inventory.
- Return to the Living Room.
Living Room
- Give the GOLD COIN to the imp butler, then speak with him to update your objective.
- Enter the Bedroom.
Bedroom
- Take a closer look at the hidden object area in front of the window.
- Find the items shown at the bottom of the screen. Their locations are shown below.
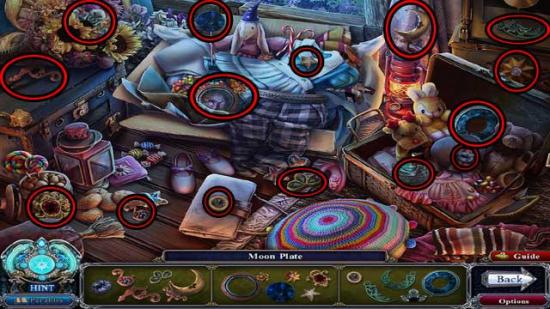
- Upon completing the area, the MOON PLATE will be added to your inventory.
- Return to the Goddess.
Goddess
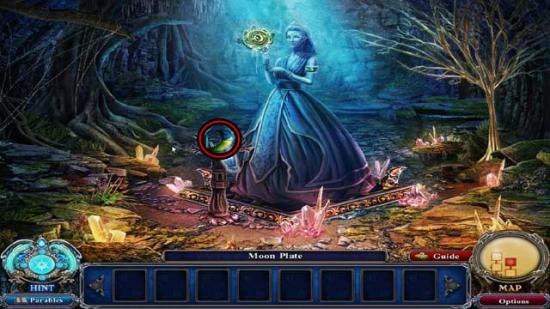
- Use the MOON PLATE on the top of the Goddess’ staff. The nearby sphere will break open, revealing the MOON ESSENCE. Click on it to add it to your inventory.
- Return to the Living Room.
Living Room
- Give the MOON ESSENCE to the imp butler. Speak with him, then enter the Kitchen.
Kitchen
- Take a closer look at the pantry cabinet (shelves) on the right. Click on the SMALL JAR to add it to your inventory.
- Take a closer look at the open oven on the left side of the room. Click on the GINGERBREAD MAN KEY inside to add it to your inventory.
- Return to the outside of the Gingerbread House.
Gingerbread House
- Take a closer look at the striped gate in the background. Use the GINGERBREAD MAN KEY on the lock to open the gate.
- Proceed through to the next area.
Lake
- Take a look around– there’s nothing to do here at the immediate moment, but take note of the various features.
- Return to the Spider Lair.
Spider Lair
- Click on the hidden object area in the lower left corner.
- Find the items shown at the bottom of the screen. Their locations are shown below.
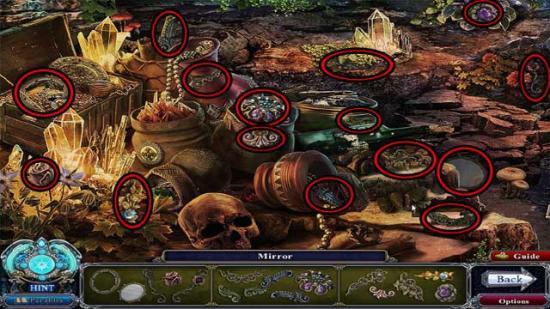
- Upon completing the area, the MIRROR will be added to your inventory.
- Return to the Campsite.
Campsite
- Click on the hidden object area over the tent.
- Find the items shown at the bottom of the screen. Their locations are shown below.
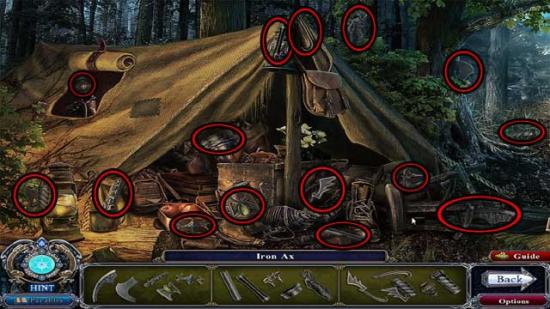
- Upon completing the area, the IRON AX will be added to your inventory.
- Return to the Cave.
Cave
- Use the MIRROR on the end of the log on the right– the reflection will cause the Moon Flower to bloom. Use the SMALL JAR on the delicate purple flower to add the MOON FLOWER to your inventory.
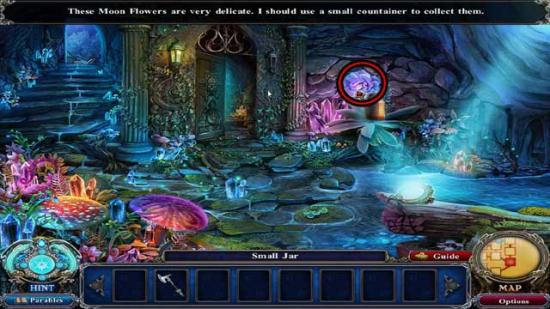
- Return to the Lake.
Lake
- Use the IRON AX on the open hand of the statue, then take a closer look at the glowing sphere for a puzzle.
- Flip the die and swap the symbols so each equation is correct. The solution is shown below.
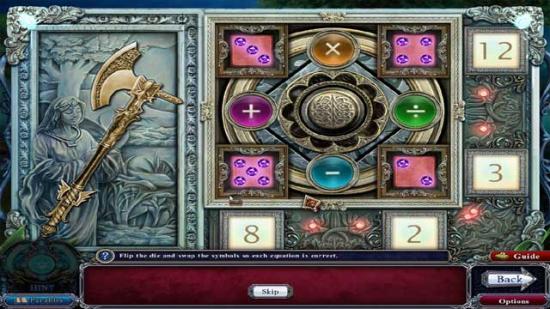
- Upon completing the puzzle, click on the GOLDEN AX in the statue’s hand to add it to your inventory.
- Return to the Goddess.
Goddess
- Use the GOLDEN AX on the golden tree on the right. Click on the GOLDEN BRANCH that falls to the ground to add it to your inventory.
- Return to the Bedroom.
Bedroom
- Click on the hidden object area in front of the window.
- Find the items shown at the bottom of the screen. Their locations are shown below.
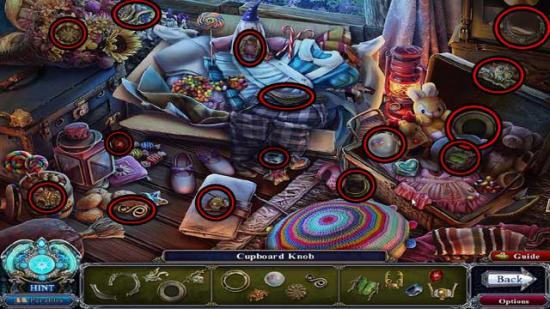
- Upon completing the area, the CUPBOARD KNOB will be added to your inventory.
- Return to the Kitchen.
Kitchen
- Take a closer look at the pantry on the right (the drawers). Use the CUPBOARD KNOB on the circular groove in the drawer to restore it, then click on the BOTTLE WITH STRANGE FLUID inside to add it to your inventory.
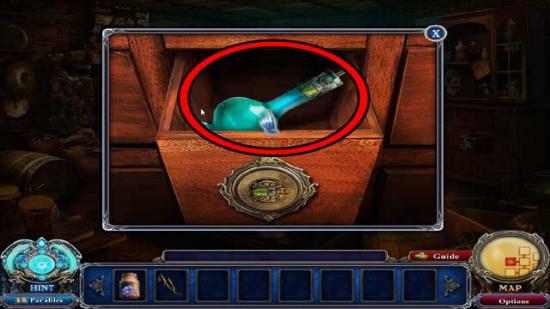
- Return to the Lake.
Lake
- Take a closer look at the panel on the right. Use the BOTTLE WITH STRANGE FLUID on the beetle design to open the panel, revealing the *The Witch and the Goddess 6/6* Parable Gem and the LODESTONE. Click to collect them.
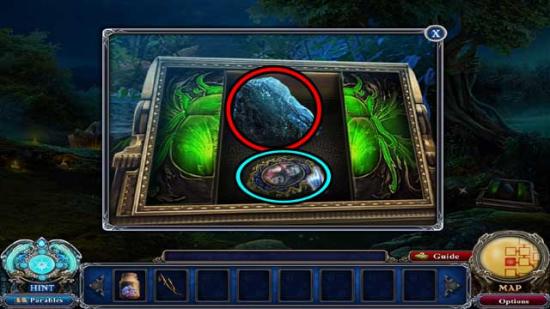
- The parable of The Witch and the Goddess is now complete and can be read.
- Return to the Spider Lair.
Spider Lair
- Take a closer look at the puddle immediately in front of the sleeping spider. Use the LODESTONE on the liquid, then click on it again to collect the SILVER WEB.
- Return to the Kitchen.
Kitchen
- Take a closer look at the large table in the center of the room. Read the recipe lying on the table to update your objective.
- Take a closer look at the mortar and pestle towards the left. Put the SILVER WEB, the GOLDEN BRANCH, and the MOON FLOWER inside to crush them together, then click on the ETERNAL SLEEPING POWDER to add it to your inventory.
- Return to the Bedroom.
Bedroom
- Take a closer look at the table on the left. Use the ETERNAL SLEEPING POWDER on the square wine bottle.
- Click on the wardrobe towards the back of the room to open it, then enter.
Congratulations! You’ve completed Dark Parables: Rise of the Snow Queen Collector’s Edition!
More articles...
Monopoly GO! Free Rolls – Links For Free Dice
By Glen Fox
Wondering how to get Monopoly GO! free rolls? Well, you’ve come to the right place. In this guide, we provide you with a bunch of tips and tricks to get some free rolls for the hit new mobile game. We’ll …Best Roblox Horror Games to Play Right Now – Updated Weekly
By Adele Wilson
Our Best Roblox Horror Games guide features the scariest and most creative experiences to play right now on the platform!The BEST Roblox Games of The Week – Games You Need To Play!
By Sho Roberts
Our feature shares our pick for the Best Roblox Games of the week! With our feature, we guarantee you'll find something new to play!All Grades in Type Soul – Each Race Explained
By Adele Wilson
Our All Grades in Type Soul guide lists every grade in the game for all races, including how to increase your grade quickly!


