![All VV Ultimatum Titles [How to Get]](/wp-content/uploads/2026/06/vv-ultimatum-titles.jpg "All VV Ultimatum Titles [How to Get]")
All VV Ultimatum Titles [How to Get]
Do titles provide buffs?


Welcome to the Dark Dimensions: City of Fog walkthrough on Gamezebo. Dark Dimensions: City of Fog is an interactive, hidden object game played on PC, created by Daily Magic Productions. This walkthrough includes tips and tricks, helpful hints, and a strategy guide for how to complete Dark Dimensions: City of Fog.
Welcome to the Dark Dimensions: City of Fog walkthrough on Gamezebo. Dark Dimensions: City of Fog is an interactive, hidden object game played on PC, created by Daily Magic Productions. This walkthrough includes tips and tricks, helpful hints, and a strategy guide for how to complete Dark Dimensions: City of Fog.
Copyright Information
This walkthrough was created by Lynne Basinet, for gamezebo.com, and is protected under US and International Copyright laws. Any unauthorized use, including re-publication, in whole or in part, without permission, is strictly prohibited.
Enter your desired Profile name, adjust the Options, if desired and then click on Play to begin the game.
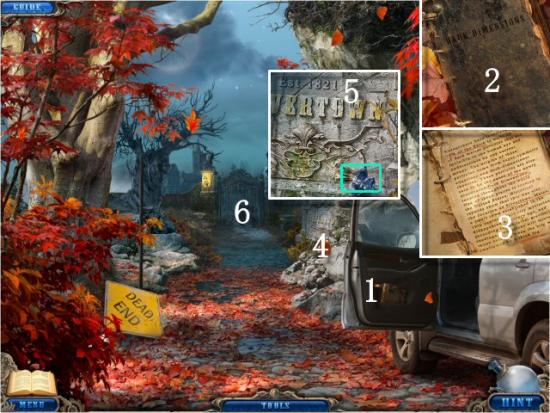
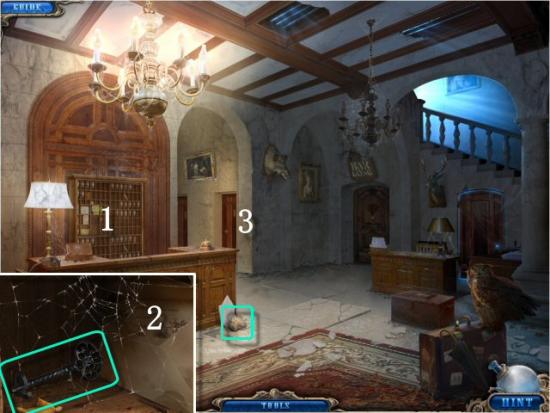
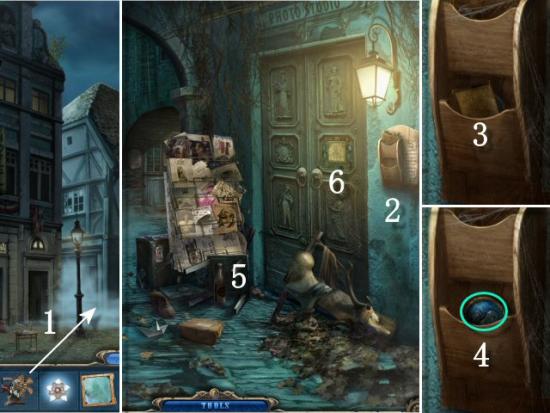
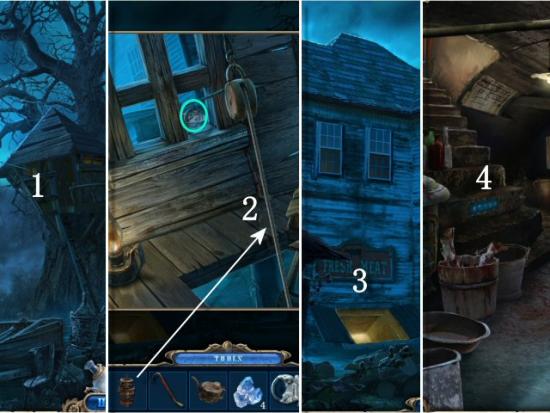
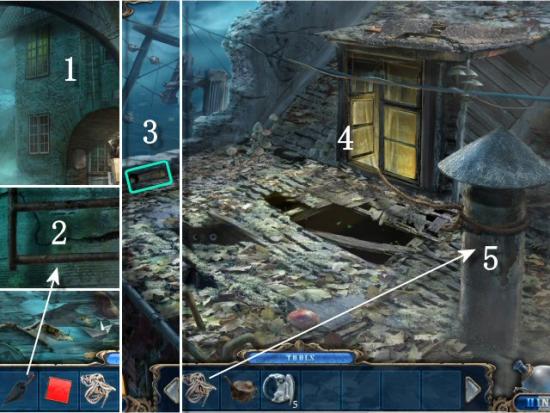
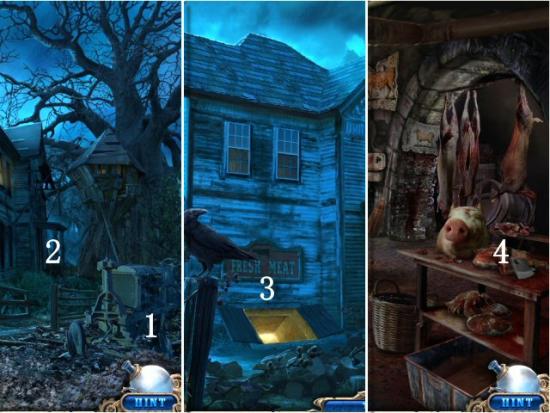
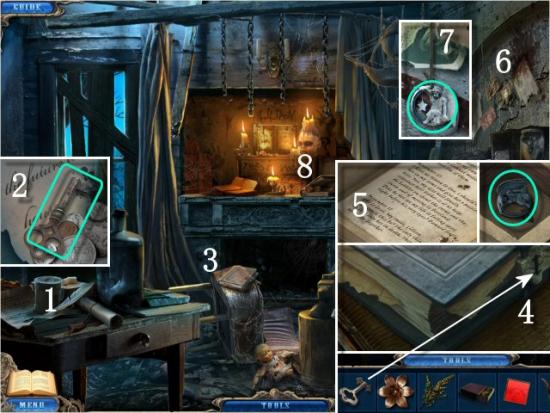
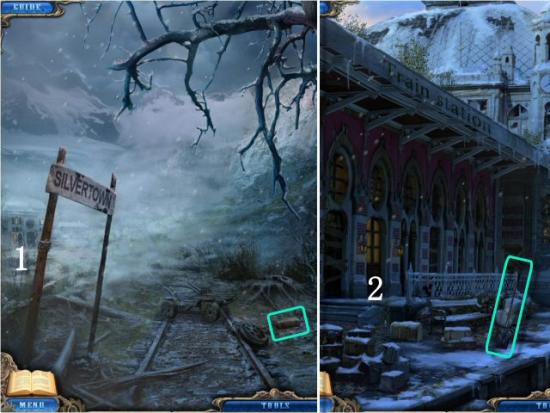
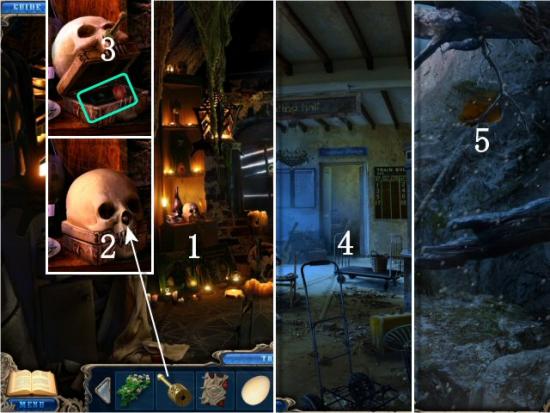
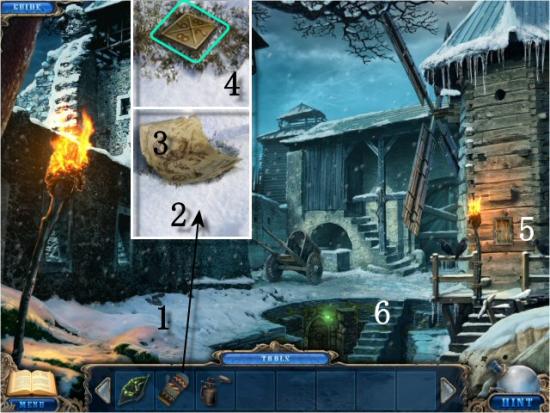
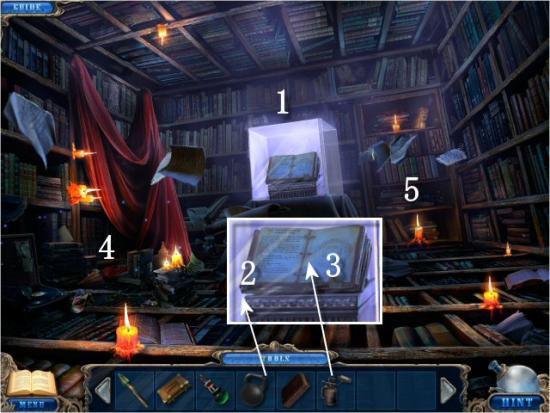
Click on the Car Door (1), click on the Dark Dimensions Book (2) and collect the Journal Entry (3). Click on the Town Marker (4), collect the Gem (#1 of 5), click on the Year (5) and then continue forward toward the Gate (6).

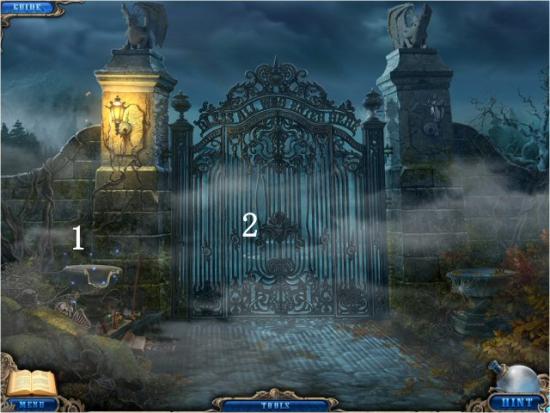
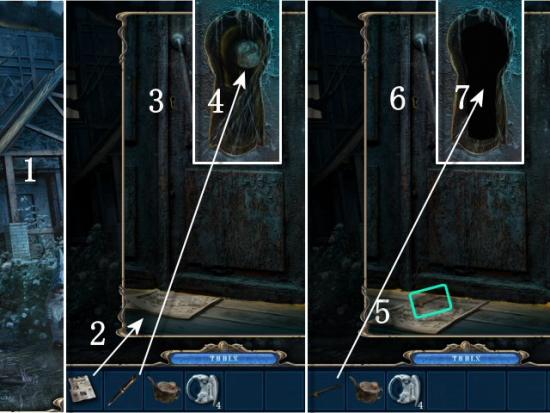
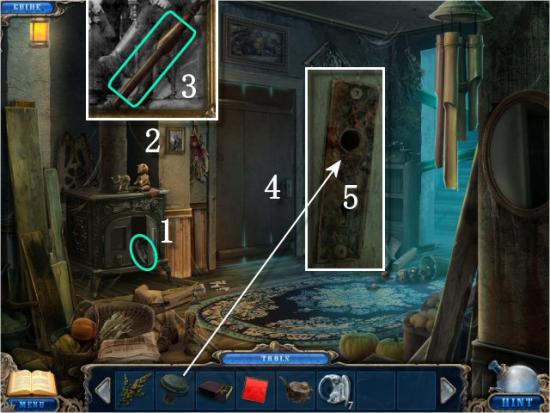
Click on the Broken Planter (1). When complete, click on the Gate Lock (2).
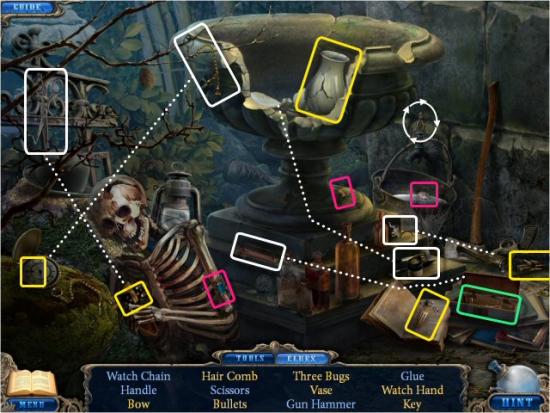
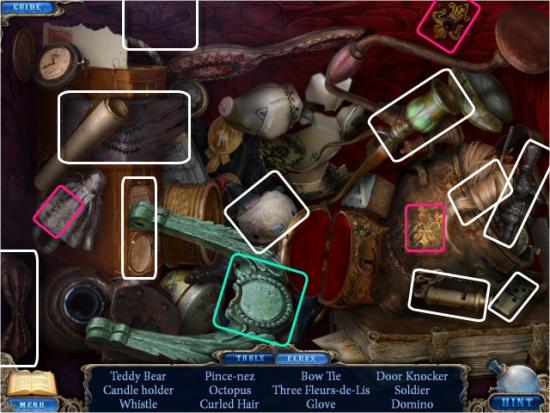
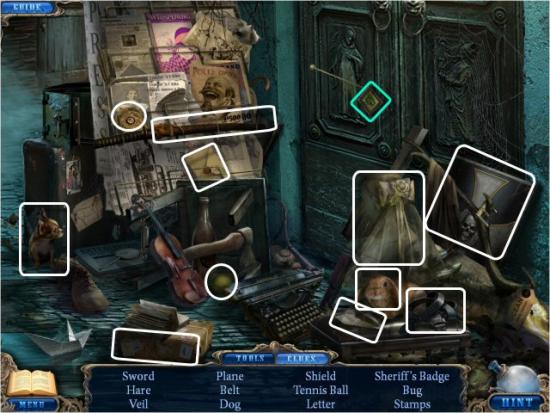
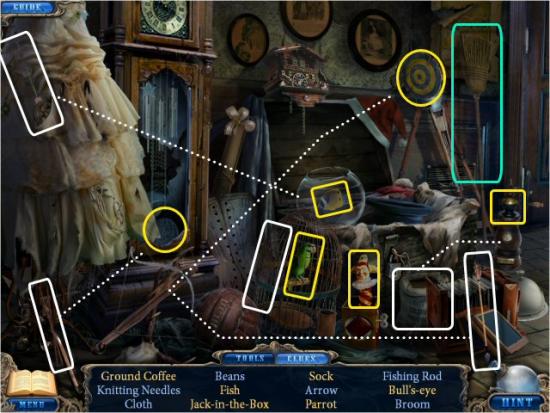
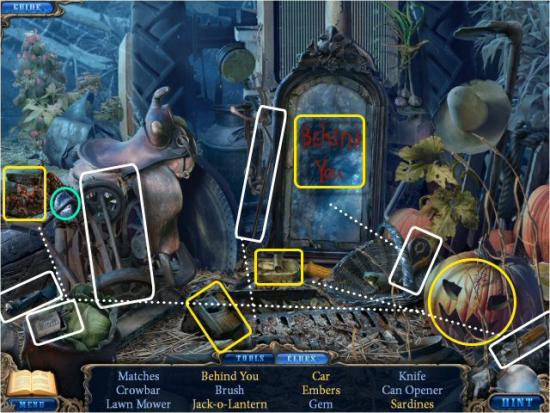
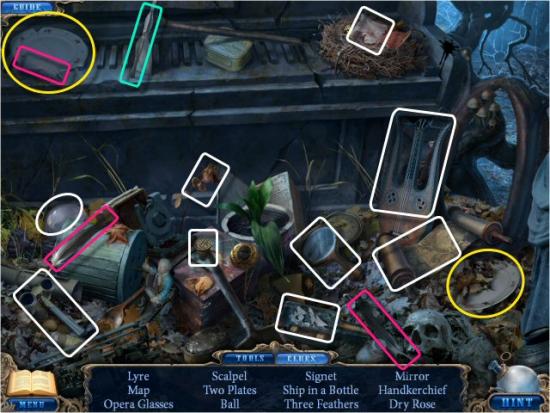
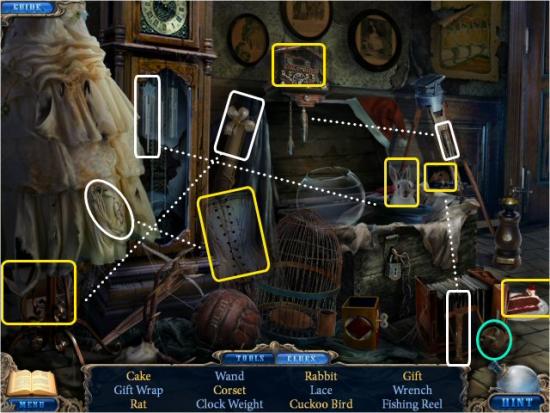
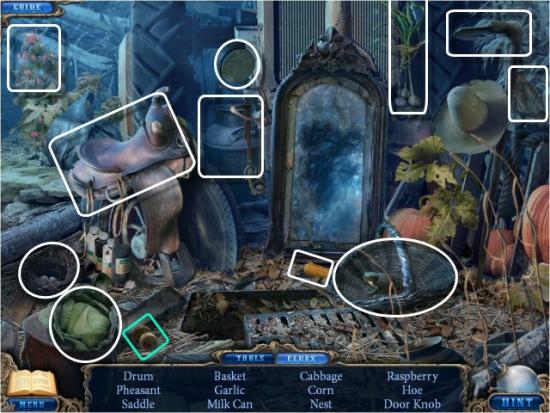
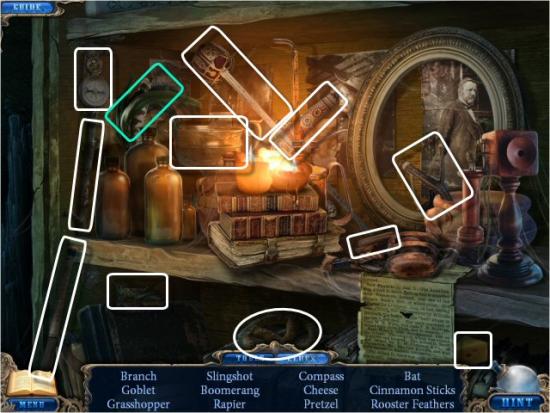
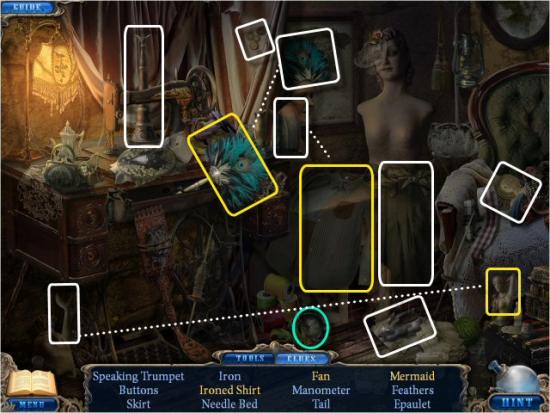
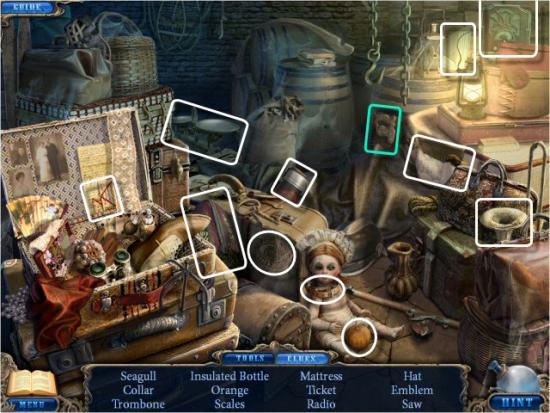
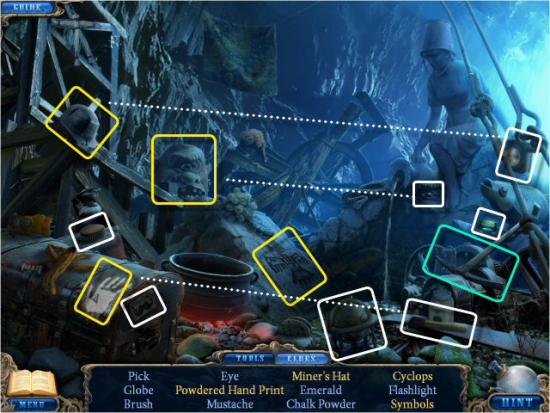
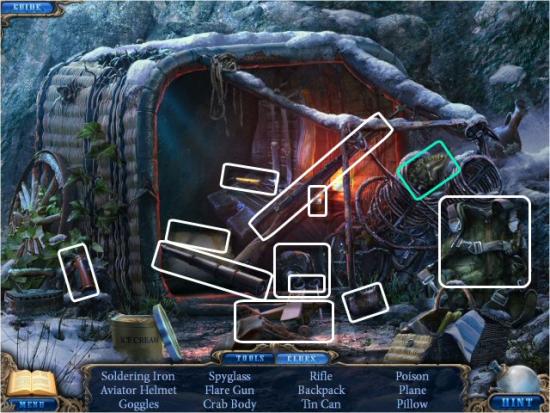
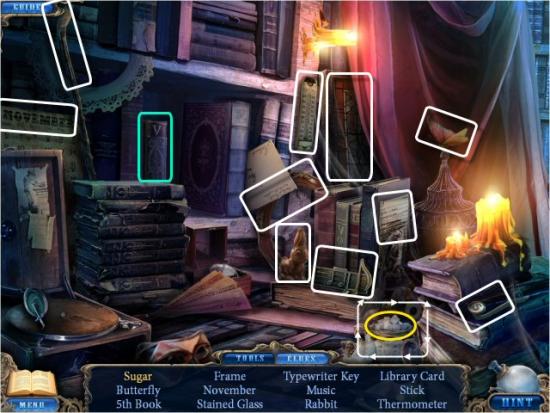
Find all the items in the list. Items in yellow require you to combine another item in the list with an object in the scene or to manipulate an object in the scene to reveal the item. Tool: Key, Multiple Items: 3 Bugs, Interactive Items:
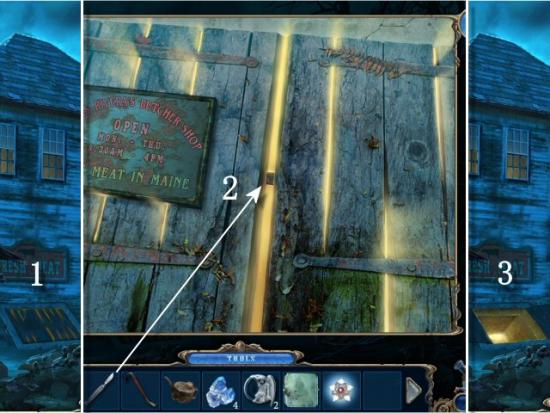
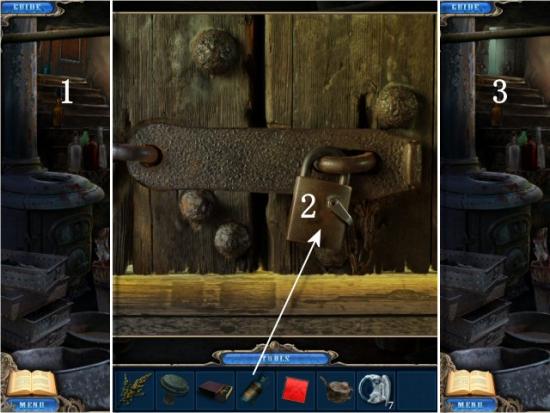
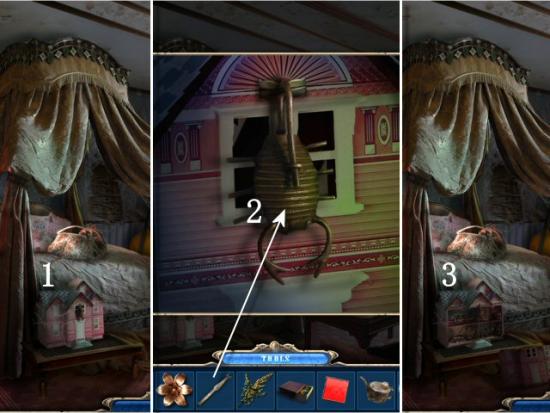
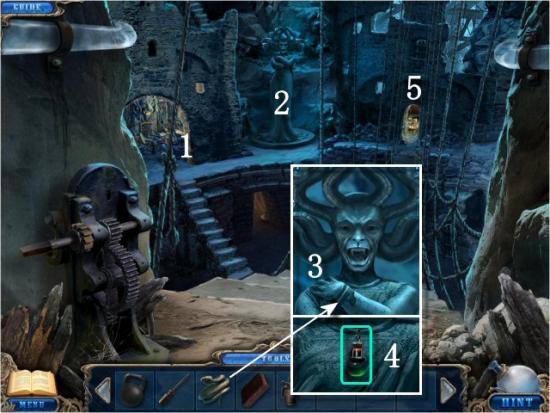
The object is to change the Snakes’ Eyes from red to blue. Click on the correct Snakes’ Eyes until they’ve all been changed to blue, to reveal the Keyhole.
The only numbers that will change the Snakes’ Eyes to blue, without changing any back to red, are 1, 7 and 8. You may click on them in any order. Use the Key on the Keyhole, click on the Key and then continue forward to the Square.

Click on the following for the video solution.
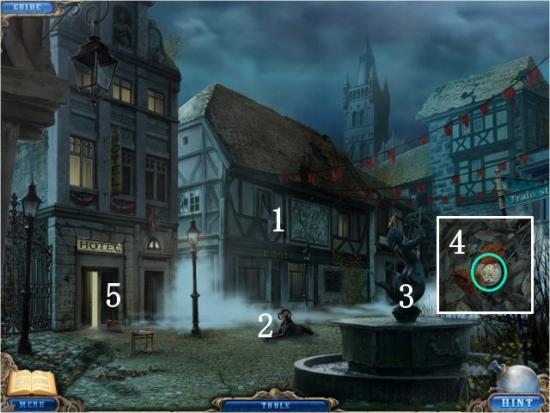
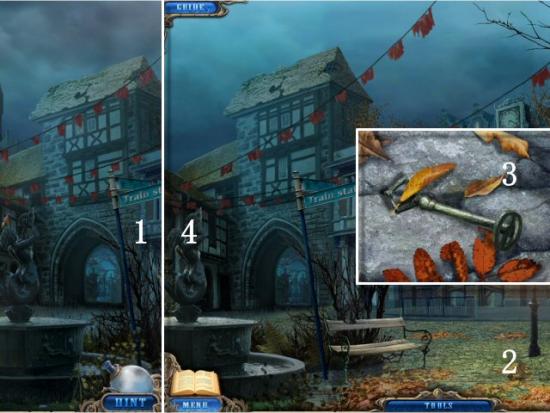
Click on the Town Map (1), click on the Dog (2) and then click on the Fountain (3). Click on the Leaves (4 – you don’t need to remove all the Leaves; click until enough of the coin is revealed to collect it), collect the 25 Cents (#1 of 3) and then enter the Hotel (5).
Collect the Stone, click on the Cubbyholes (1), collect the Journal Entry and Spiral Key (2) and then enter the Hotel Room (3).
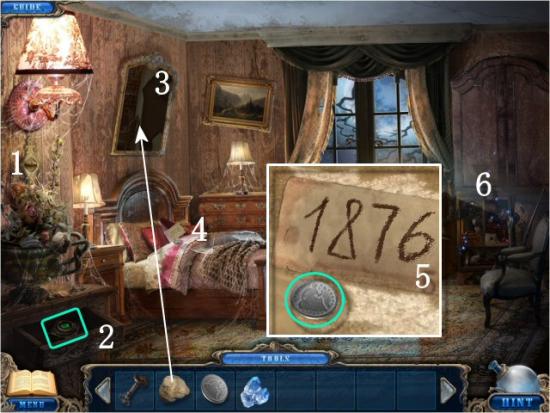
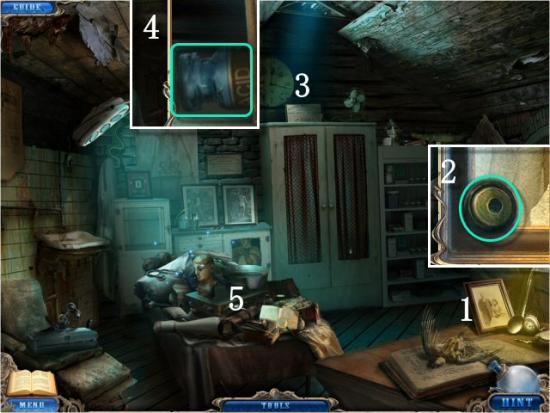
Click on the Light Switch (1), click on the Drawer (2) and collect the Puzzle Piece. Use the Stone on the Mirror (3), click on the Bed (4), collect the Journal Entry and the 25 Cents (5 – #2 of 3) and then click on the Armoire (6).
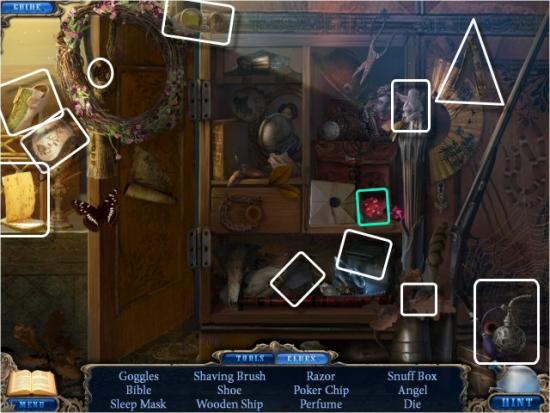
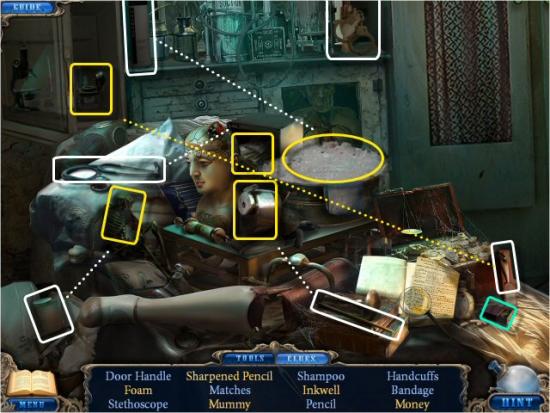
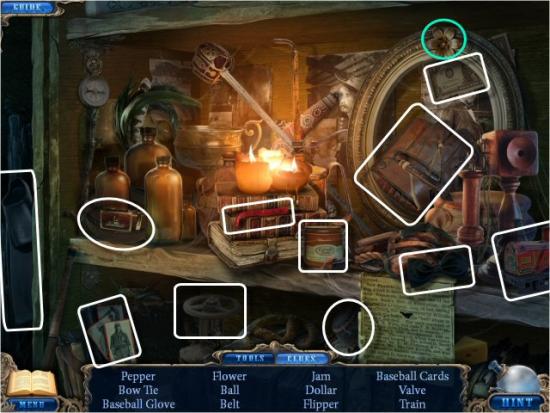
Find all the items in the list. Tool: Die
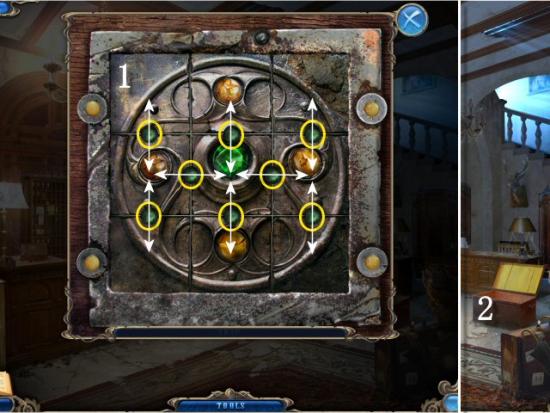
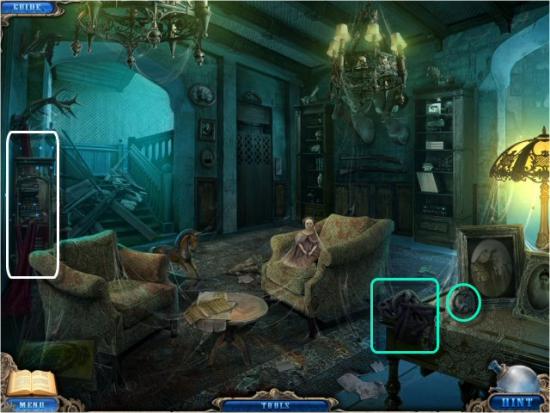
Return to the Lobby (click back), click on the Trunk (1) and use the Puzzle Piece in center of the Lock (2).

The object is to restore the image to unlock the Trunk. Click on one of the Green Buttons (1) to switch the place of the 2 Tiles connected to it. Note that the buttons in the top and bottom rows will only switch the Tiles vertically; the 2 buttons, on either side of the center Tile will only switch the connected Tiles horizontally. The initial configuration is different for each player, so the solution steps are random. A good strategy would be to complete the bottom row, then the middle row (or top then middle) and then switch between the middle and top (or middle and bottom) rows to complete them. When complete, click on the Open Trunk (2).
Click on the following for a video of my solution. Note that this solution will only work for you if your initial configuration is the same as mine. If you like, you can try to get your Tiles into the configuration shown at the beginning of the video and then follow along for a direct solution.
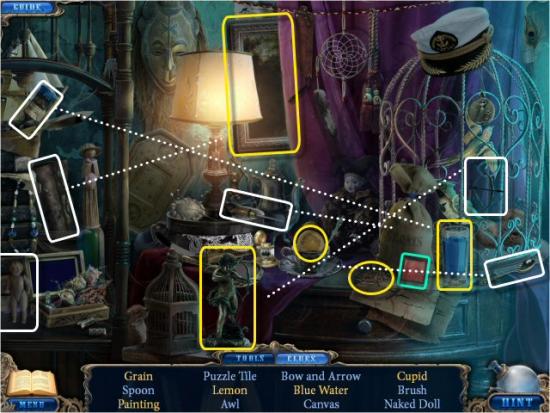
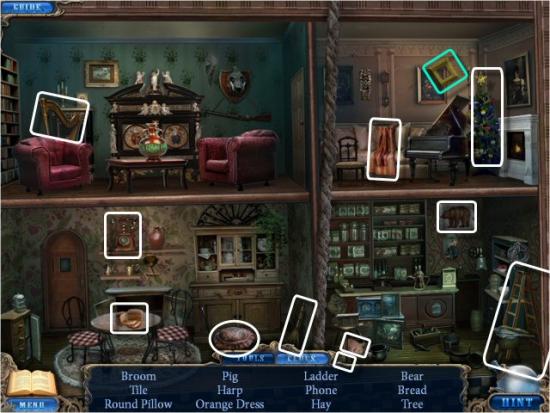
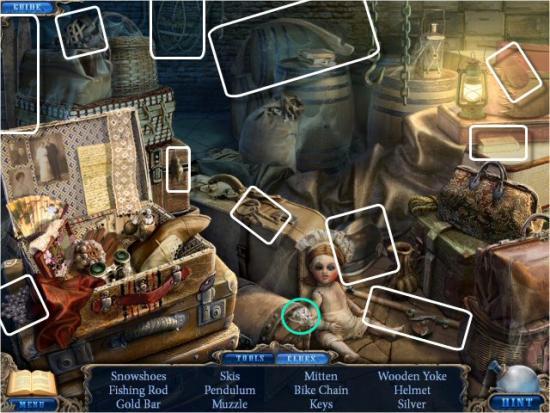
Find all the items in the list. Items in yellow require you to combine another item in the list with an object in the scene or to manipulate an object in the scene to reveal the item. Tool: 25 Cents (#3 of 3), Multiple Items: 3 Coins, Interactive Items:
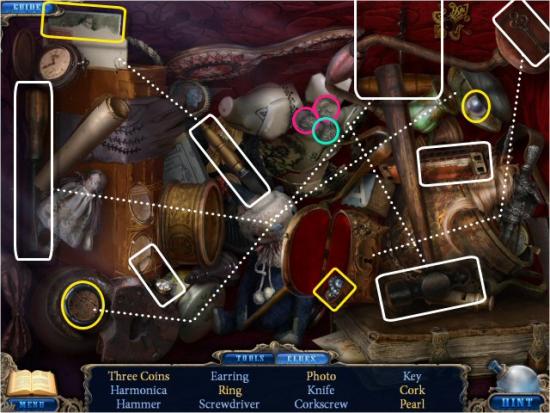
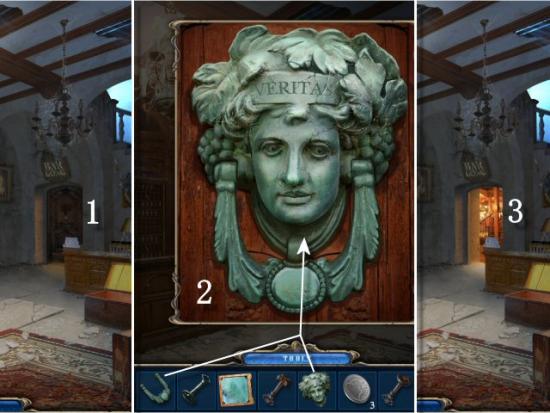
Exit the Hotel (click back) and continue through the Arch (1). Click on the Pile of Leaves (2), collect the Lever (3) and then click on the Tree (4). When complete, continue up the Stairs (5 – click right).
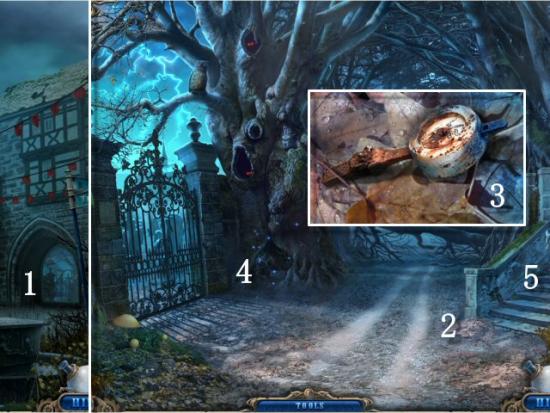
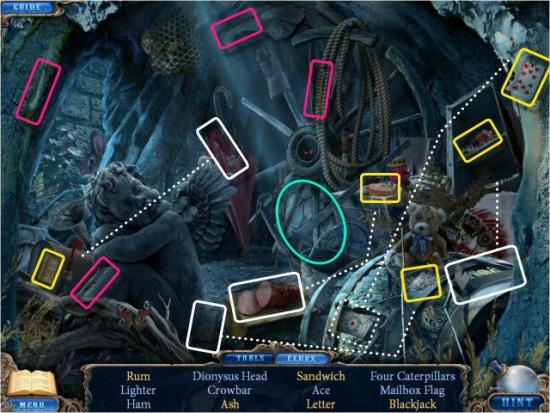
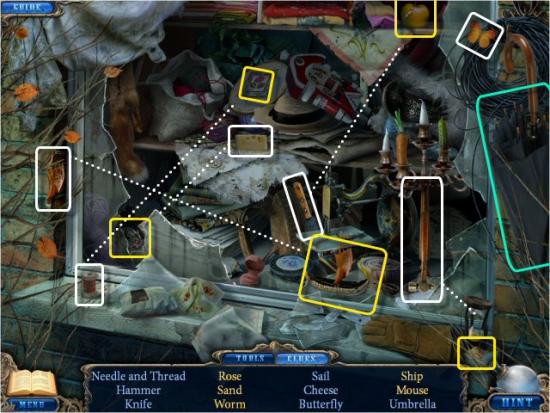
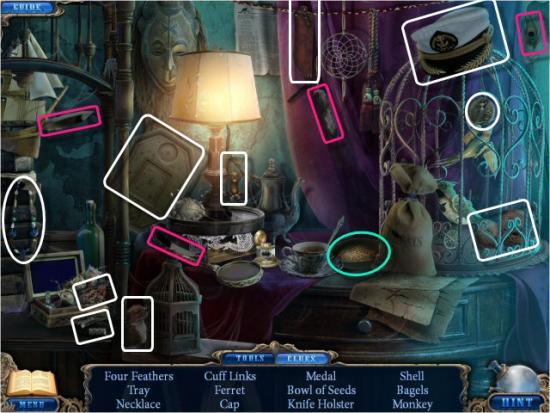
Find all the items in the list. Items in yellow require you to combine another item in the list with an object in the scene, or manipulate an object in the scene, to reveal the item. Tool: Dionysus Head, Multiple Items: 4 Caterpillars, Interactive Items:
Click on the Step (1). When complete, click on the Red Stone Circle (2), collect the Cross Key (3) and then click on the Right Pedestal (4).
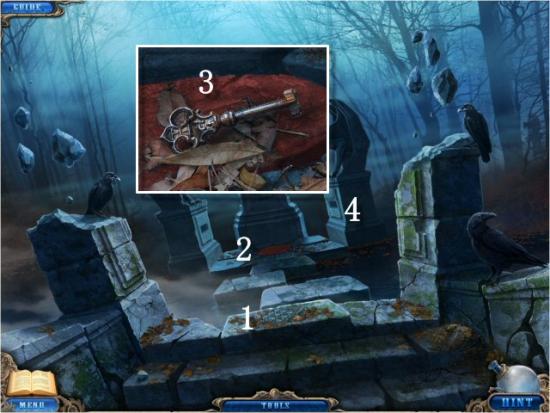
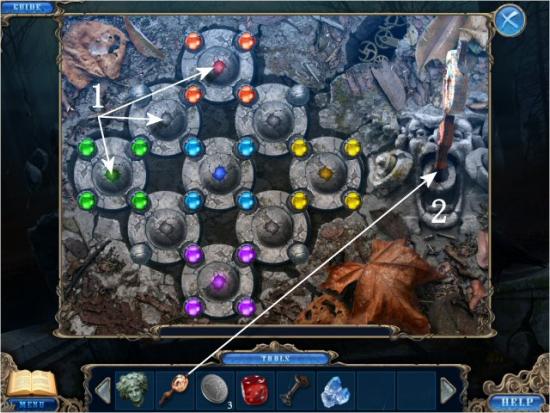
The object is to rotate the Stone Circles and move the Colored Gems into their matching, colored Stone Circles. Click on the center of any Stone Circle (1) to rotate it clockwise. You may also right click; however, the circle won’t rotate in the opposite direction. Work back and forth, switching between the Stone Circles, to move the Gems to the correct locations. A good strategy would be to concentrate on grouping the Gems near their Stone Circles before beginning to complete them. If you complete each color, one at a time, you may end up with 4 of them complete and one of them with a Gem that’s difficult to get into the final position. The beginning configuration is different for each player so there isn’t a single solution to this puzzle. When complete, use the Lever on the Slot (2) and then click on the Lever.
Use the Die in the Empty Space (1). The object is to switch the places of the Green and Red Dice, keeping them in the same numerical order they began. Click and drag a Die to any open position, moving other Dice out of the way so that you have a free space to move a Die into position on the opposite side. Use the Space at the center top as a placeholder to leave room to move the Dice. When complete (2), collect the Photographic Plate (3).
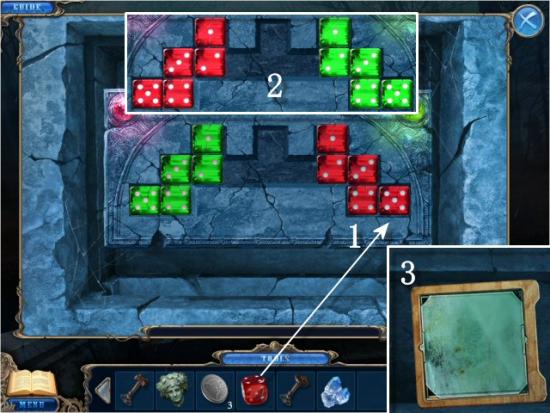
There are 2 solutions, depending on whether you begin with a Red Die or a Green Die. Both solutions take 80 moves. Click on the following video for the solution for starting with a Red Die. The solution for starting with a Green Die would be the same, except that you would mirror the moves on the opposite side.
Return to the Square (click back twice) and then continue to the Train Station (1 – click right). Click on the Pile of Leaves (2), collect the Circle Key (3), return to the Hotel (4 – click left and then forward into the Hotel) and then click on the Open Trunk.
Find all the items in the list. Tool: Door Knocker.
Click on the Door to the Bar (1), use the Dionysus Head and Door Knocker (2), click on the Door Knocker and then enter the Bar (3).
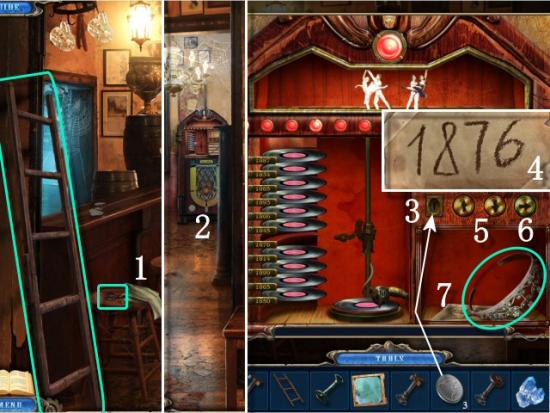
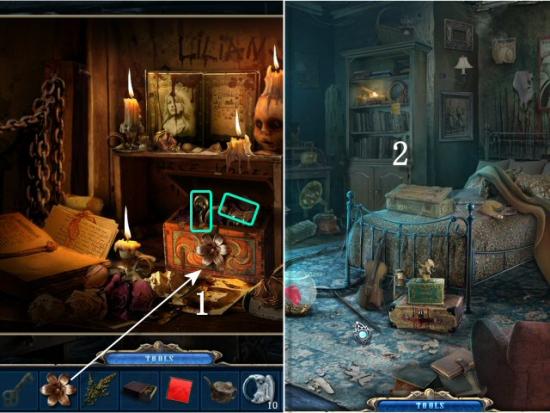
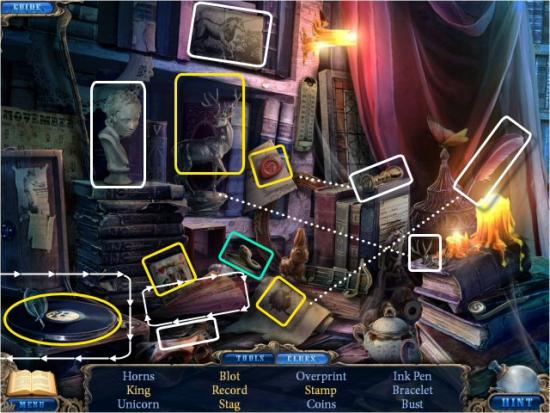
Collect the Ladder, click on the Cloth (1), collect the Zig Zag Key and then click on the Jukebox (2). Use the 3 Quarters in the Coin Slot (3 – you’ll need to add them one at a time) and then select a Record, using the Up and Down Arrows. Use the clue you found in the Hotel Room (4). Note that you’ll need to click on the Up and Down Arrows (5) several times, as the selector moves more than one space, and it will move in both directions. The selector begins at 1845 and the quickest solution is Down, Up twice, Down, Up and then Down. Click on the Play Button (6), collect the Tiara and the Journal Entries (7 – click on the Drawings and then click 3 times) and then return to the Cemetery Gate (click back twice and then forward through the Arch).
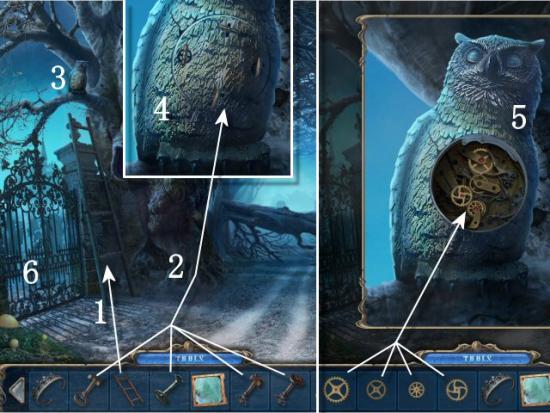
Use the Ladder on the Column (1) and then click on the Tree (2). When complete, click on the Owl (3), use the 4 Keys in the Keyholes (4 – click anywhere; they’ll automatically go where they belong) and then click on each Key. Use the 4 Gears in the Mechanism (5), collect the Ladder and then enter the Cemetery (6).
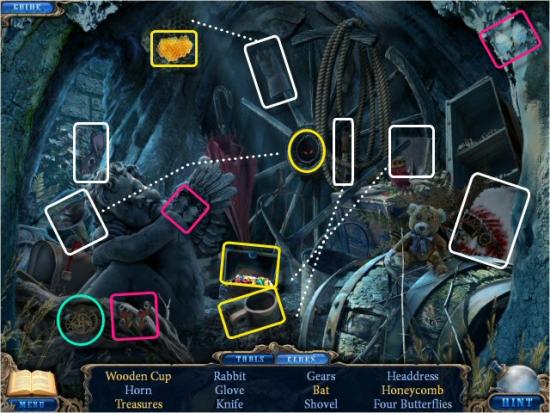
Find all the items in the list. Items in yellow require you to combine another item in the list with an object in the scene, or manipulate an object in the scene, to reveal the item. Tool: Gears, Multiple Items: 4 Butterflies, Interactive Items:
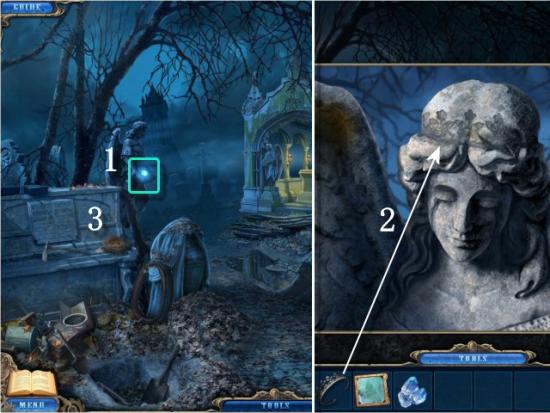
Click on the Angel Statue (1), use the Tiara (2), collect the Star and then click on the Stone Piano (3).
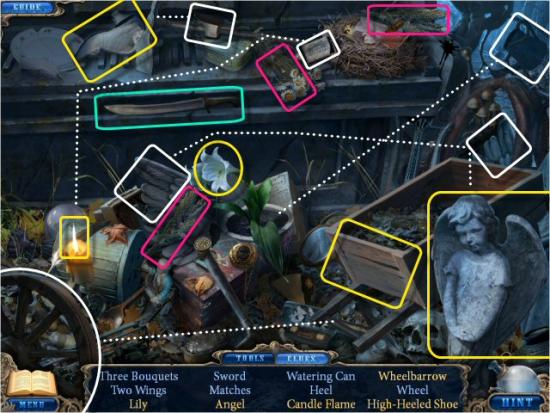
Find all the items in the list. Items in yellow require you to combine another item in the list with an object in the scene, or manipulate an object in the scene, to reveal the item. Tool: Knife (Sword), Multiple Items: 3 Bouquets, Interactive Items:
Return to the Train Station (click back twice and then click right), use the Knife on the Vines (1) and then click on the Shop Window (2). When complete, return to the Statue Park (3 – click forward through the Arch and then click right) and then click on the Left Pedestal (4).

Find all the items in the list. Items in yellow require you to combine another item in the list with an object in the scene, or manipulate an object in the scene, to reveal the item. Tool: Arrow Button, Interactive Items:
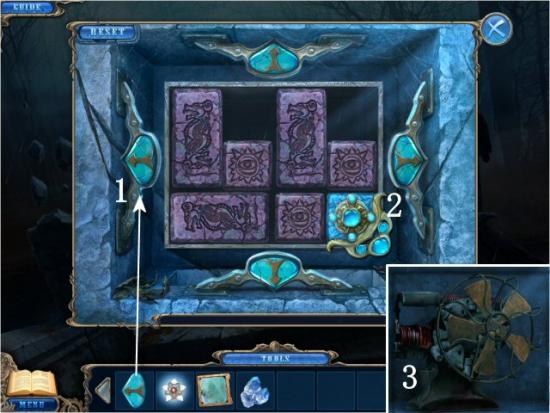
Use the Arrow Button in the Empty Slot (1). The object is to move the Blue Tile (2) to the Lower Right Corner. Click on the Left, Right, Up and Down Arrow Buttons to move the Tiles. Note that when you click on one of the Arrows, all the Tiles that have a direct path in the direction you chose will move. You’ll continue to move Tiles as a group unless one of them is blocked by another Tile. When complete, collect the Fan (3).
Click on the following for a video solution.
Return to the Square (click back twice and then click left), use the Fan on the Ground (1) and then enter the Alley (click forward). Click on the Drop Box (2), collect the Journal Entry (3), collect the Button (4) and then click on the Newsstand (5). When complete, click on the Door (6).
Find all the items in the list. Tool: Gnome Tile (Bug).
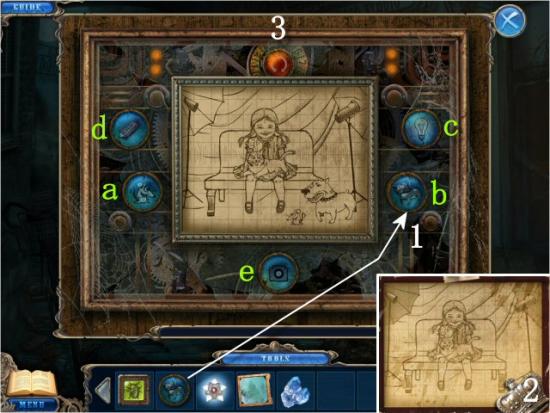
Use the Button in the Empty Space (1). The object is to recreate the image of the girl in the Journal Entry (2). Click on the Buttons to change the image so that it matches the one in the Journal entry. The instructions mention that the girl is smiling, with the cat on her lap and that she does not like bright lights. The only order that will work is Mouse (a), Dog (b), Light (c), Candy (d) and Camera (e). If you make a mistake, click on the Reset Button (3). When complete, enter the Photo Studio.
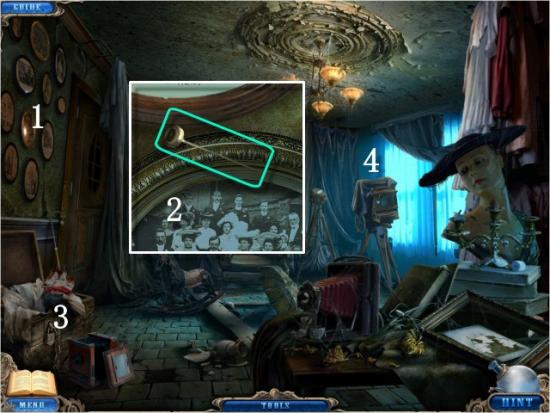
Click on the Pictures (1), collect the Photography Knob (2) and then click on the Trunk (3). When complete, click on the Camera (4).
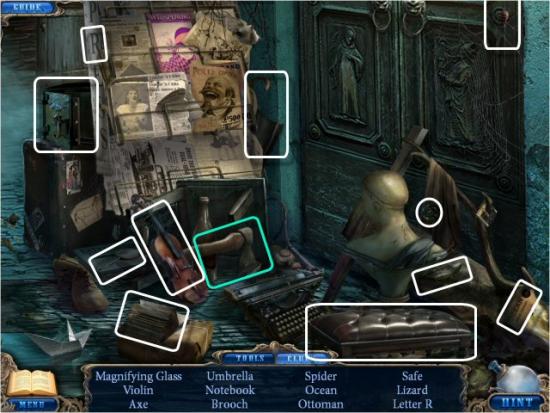
Find all the items in the list. Items in yellow require you to combine another item in the list with an object in the scene, or manipulate an object in the scene, to reveal the item. Tool: Broom, Interactive Items:
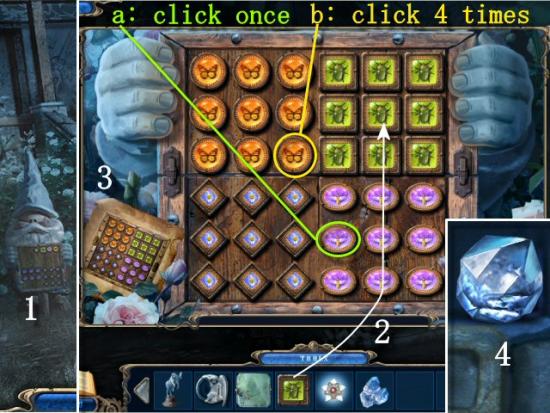
Use the Photo Knob on the Camera (1), adjust the Sliders (2 – click the Right Slider once and the Left Slider 4 times) until the image focuses, use the Photo Plate (3) and you’ll automatically receive the Negative (4).
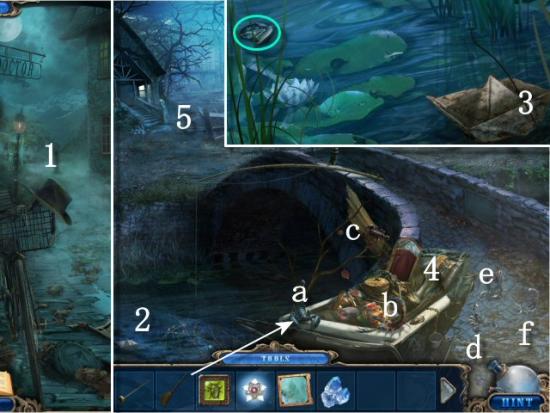
Exit the Photo Studio (click back) and then continue forward to the Bridge (1). Use the Broom on the Scorpions (a, b, c, d, e and f), click on the Paper Boat (2), collect the Angel (#1 of 12) and the Journal Entry (3 – click twice) and then click on the Baby Carriage (4). When complete, continue to the Lillian’s House (5).
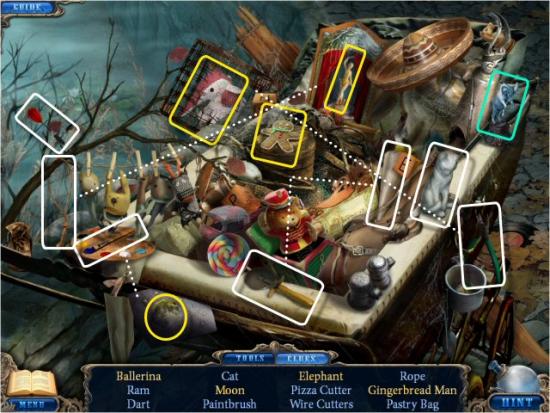
Find all the items in the list. Items in yellow require you to combine another item in the list with an object in the scene, or manipulate an object in the scene, to reveal the item. Tool: Ram, Interactive Items:
Click on the Gnome (1) and use the Gnome Tile on the Board (2). The object is to rearrange all the Tiles so they match the image at the lower left (3). Click on a Tile to rotate the others surrounding it. You may click on any Tile except the ones around the perimeter. The quickest solution is shown in the following image. When complete, collect the Gem (4 – #2 of 5).
Click on the following for the video solution.
Return to the Alley (click back twice) and click on the Newsstand. Find all the items in the list. Tool: Axe.
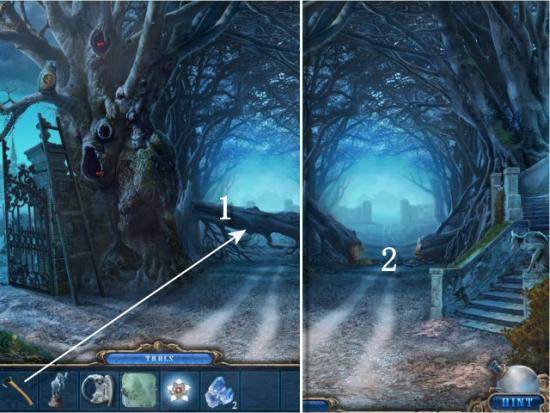
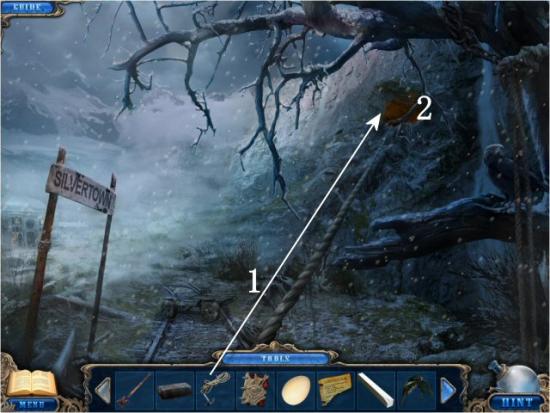
Return to the Cemetery Gate (click back once and then click forward through the Arch), use the Axe on the Fallen Tree (1 – click 4 times) and then continue forward to the Farm House (2).
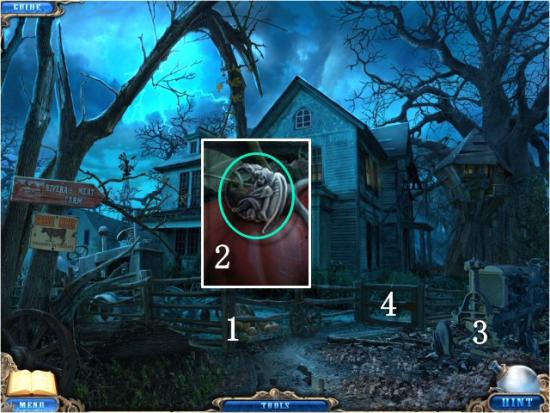
Click on the Pumpkin Patch (1), collect the Angel (2 – #2 of 12) and then click on the Rusted Tractor (3). When complete, click on the Gate (4).
Find all the items in the list. Items in yellow require you to combine another item in the list with an object in the scene, or manipulate an object in the scene, to reveal the item. Tool: Gem (#3 of 5), Interactive Items:
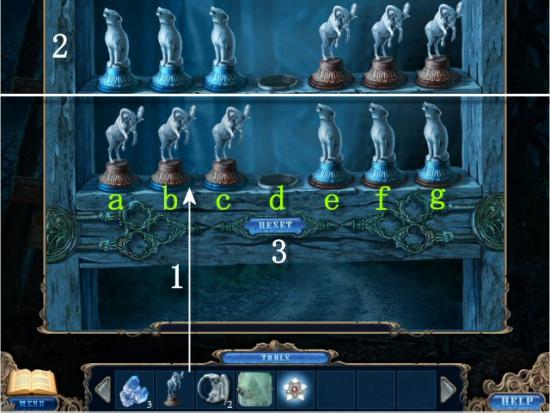
Use the Ram in the Empty Spot (1). The object is to switch the places of the Rams and Wolves (2). Click on a figure to move it to the next empty spot. You may only move a figure one space or jump over one figure to that space; you may not jump over more than one figure. The key to solving this type of puzzle, quickly, is to make sure you do not place 2 like figures next to each other until the end of the puzzle. There are 2 solutions – one beginning with a Ram, and one beginning with a Wolf. In the image, click on the spot indicated in the solution steps (a, b, c, d, e, f and g). Click on the Reset Button (3) to restart the puzzle. When complete, continue forward to the Farm House.
Click on the following for a video solution. This solution begins with a Ram. To begin with a Wolf, simply mirror the moves on the opposite side.
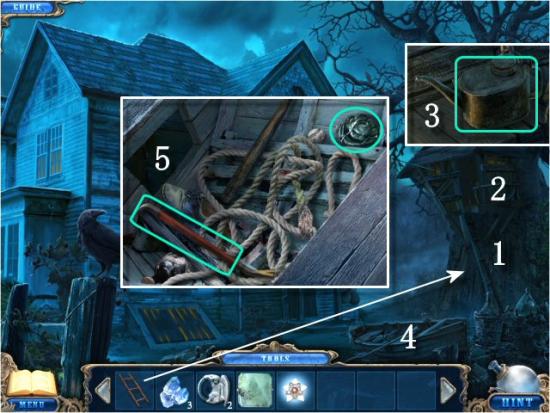
Use the Ladder on the Tree (1 – if you forgot to retrieve it, it’s sitting against the right column of the Gate to the Cemetery – click back twice to get it and then return here.), click on the Tree House (2) and collect the Kerosene (3). Click on the Boat (4), collect the Crowbar and the Rose (5) and then return to the Cemetery (click back twice and then click left).
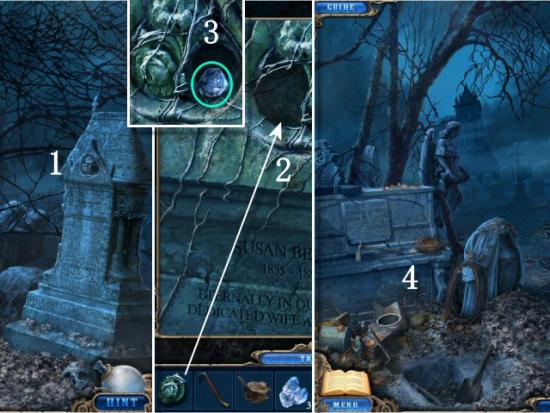
Click on the Monument (1), use the Rose (2), collect the Gem (3 – #4 of 5) and then click on the Stone Piano (4).
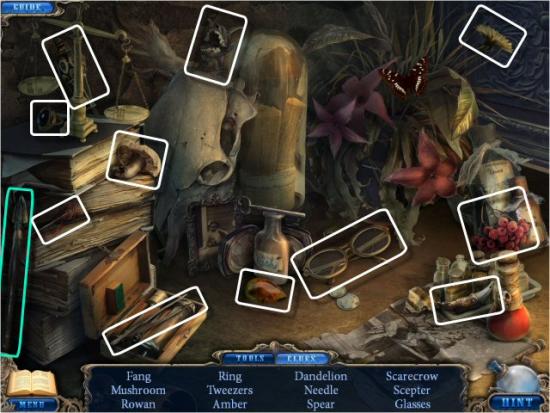
Find all the items in the list. Tool: Scalpel, Multiple Items: 3 Feathers (pink), 2 Plates (yellow).
Return to the Farmhouse (click back once and then click forward twice), click on the Basement Doors (1), use the Scalpel (2) and then enter the Basement (3).
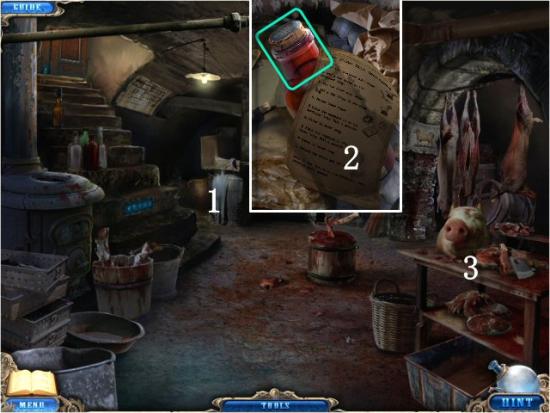
Click on the Barrel (1), collect the Journal Entry (2 – click twice) and the Developer and then click on the Butchering Table (4).
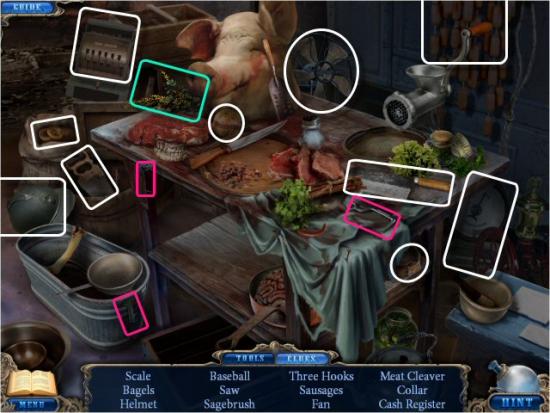
Find all the items in the list. Items in yellow require you to combine another item in the list with an object in the scene, or manipulate an object in the scene, to reveal the item. Tool: Pull Chain, Interactive Items:

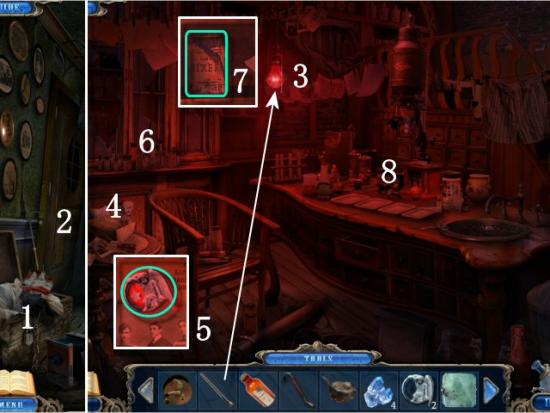
Return to the Photo Studio (click back 4 times, click forward into the Alley and then click forward into the Photo Studio) and click on the Trunk (1). When complete, enter the Developing Lab (2). Use the Pull Chain on the Bulb (3), click on the Table (4), click on the Yearbook and collect the Angel (5 – #3 of 12). Click on the Cabinet (6), collect the Fixer (7) and then click on the Developing Table (8).
Find all the items in the list. Items in yellow require you to combine another item in the list with an object in the scene, or manipulate an object in the scene, to reveal the item. Tool: Fishing Reel, Interactive Items:
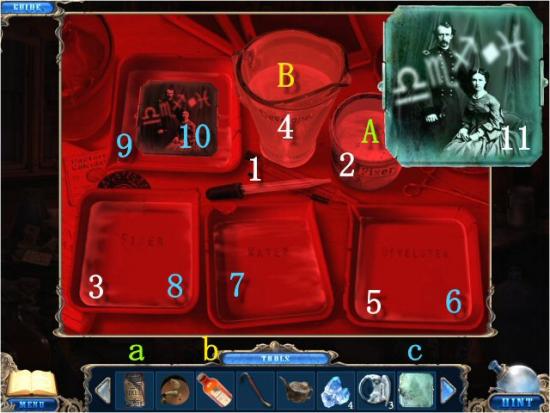
Use the Fixer (a) on the Ceramic Jar (A) and use the Developer (b) on the Glass Pitcher (B). Click and Drag the Dropper (1), use it on the Ceramic Jar (2) and then on the Fixer Tray (3). Drag the Dropper and use it on the Glass Pitcher (4) and then Developer Tray (5). Note that you only need to pick up the Dropper once.
Use the Negative (c) on the Developer Tray (6), then use the Photo on the first Water Tray (7), the Fixer Tray (8) and then the second Water Tray (9). Click on it each time to pick it up. Click on the Developed Photo (10) and then click on the Journal Entry (11).
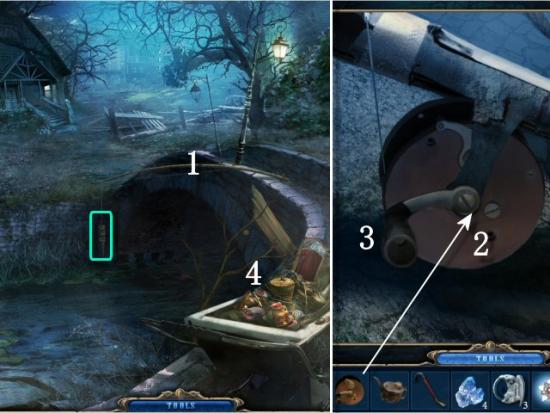
Return to the Bridge (click back twice and then click forward), click on the Fishing Pole (1), use the Fishing Reel (2), click on the Handle (3) collect the Counterweight and then click on the Baby Carriage (4).
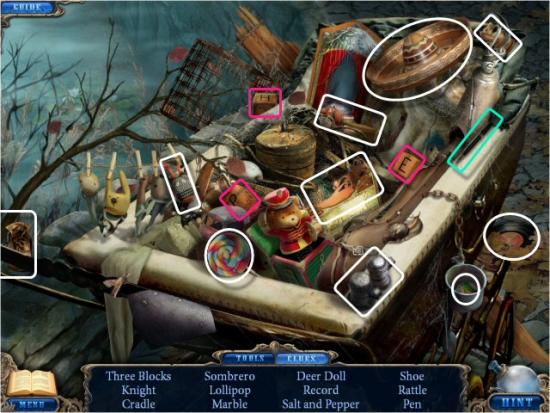
Find all the items in the list. Tool: Pen, Multiple Items: 3 Blocks.
Return to the Farmhouse (click back twice, click forward through the Arch and then click forward twice) and click on the Tree House (1). Use the Counterweight on the Rope (2), collect the Angel (#4 of 12), enter the Cellar (3) and click on the Symbols (4).
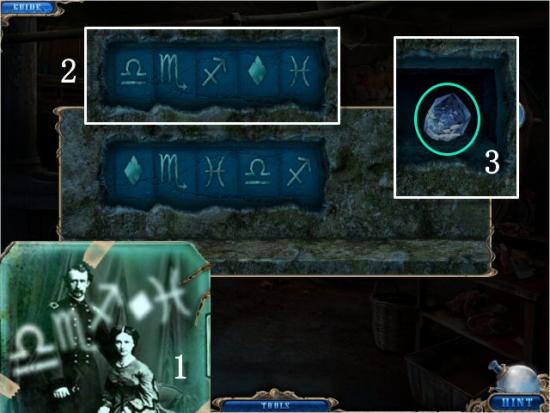
Change the Symbols to match those on the Developed Photo from your Journal (1). Click on each Symbol until the Symbols match the Photo (2) and collect the Gem (3 – #5 of 5).
Return to the Cemetery (click back 3 times and then click left), click on the Mausoleum (1), use the Shining Star in the Center (2) and use the Gems in the Points of the Star (3 – click anywhere). The object is to light a continuous line connecting the Points of the Star and the Center Pentagon. There are at least 2 solutions, and they depend on which side of the Star you begin (there are more than 2, but I didn’t feel like standing sideways, or upside down, to figure them out). Click on each point and intersection without retracing any lines. When complete, click on the Casket (4).
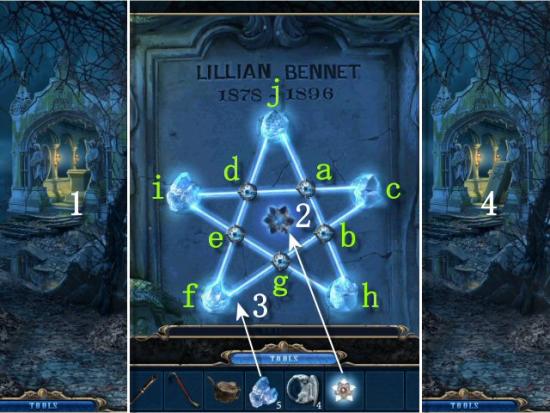
Click on the following for a video solution. Solution 1 is shown.
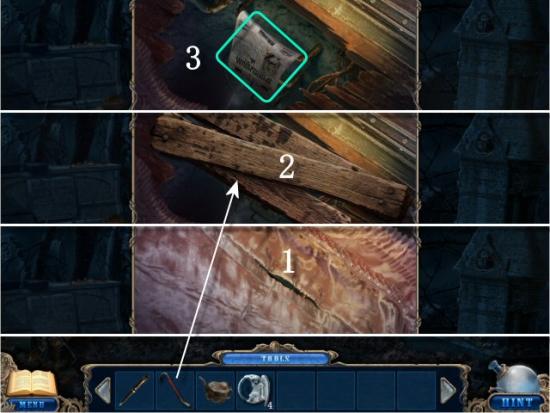
Click on the Loose Stitches (1), use the Crowbar to remove the Boards (2 – click on each Board) and then collect the Newspaper (3).
Return to Lillian’s House (click back twice, click forward into the Alley and then click forward twice), click on the Door (1), use the Newspaper underneath the Door (2) and click on the Keyhole (3). Use the Pen on the Key (4), click on the Newspaper (5) and collect the Key. Click on the Keyhole (6), use the Key (7) and then enter the House.
Collect the Rope and the Angel (#5 of 12) and then click on the Étagère.
Find all the items in the list. Items in yellow require you to combine another item in the list with an object in the scene, or manipulate an object in the scene, to reveal the item. Tool: Puzzle Tile, Interactive Items:
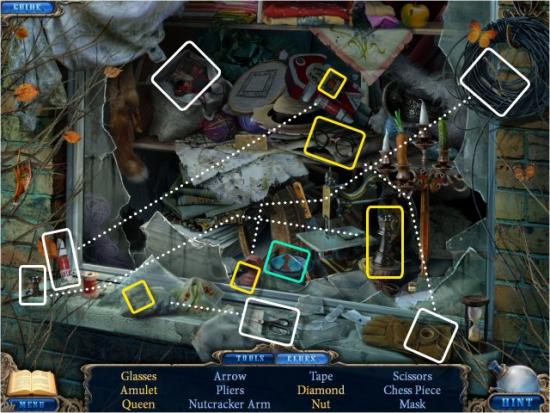
Return to the Train Station (click back 4 times and then click right) and click on the Shop Window (on the right). Find all the items in the list. Items in yellow require you to combine another item in the list with an object in the scene, or manipulate an object in the scene, to reveal the item. Tool: Umbrella, Interactive Items:
Return to the Alley (click left and then click forward into the Alley), click on the Fire Escape Ladder (1), use the Umbrella (2) and then continue up to the Roof. Collect the Elevator Handle (3), click on the Window (4), use the Rope on the Smokestack (5) and then enter the Doctor’s Office through the Window.
Click on the Photograph (1), collect the Elevator Button (2), click on the Top of the Cabinet (3), collect the Acid (4) and then click on the Surgery Table (5).
Find all the items in the list. Items in yellow require you to combine another item in the list with an object in the scene, or manipulate an object in the scene, to reveal the item. Tool: Matches, Interactive Items:
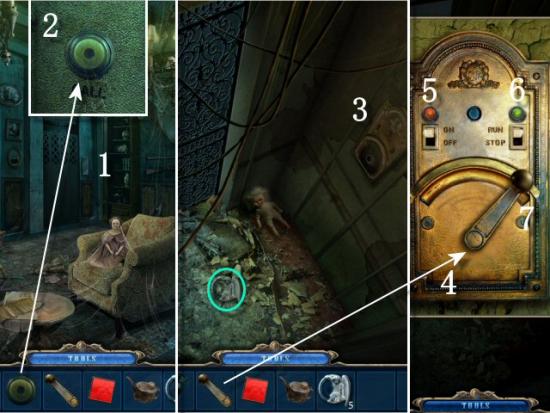
Return to Lillian’s House (click back twice and then click forward 3 times), click on the Elevator (1), use the Elevator Button (2) and then click on it. Collect the Angel (#6 of 12), click on the Controls (3) and use the Handle (4). Click the Left Switch (5) to turn the Elevator “On,” click the Right Switch (6) to put it in “Run” mode and the click the Handle (7) to move it to the right.
Enter Lillian’s Bedroom (1 – click forward), collect the Journal Entry (2), click on the Vanity (3) and collect the Angel (4 – #7 of 12). Return to the Elevator (click back), click on the Controls, click the Handle to move it to the left and then return to the Farm (click back 5 times, click forward through the Arch and then click forward).
Click on the Rusted Tractor (1). When complete, click forward (2), enter the Basement (3) and then click on the Butchering Table (4).
Find all the items in the list. Items in yellow require you to combine another item in the list with an object in the scene, or manipulate an object in the scene, to reveal the item. Tool: Door Knob.
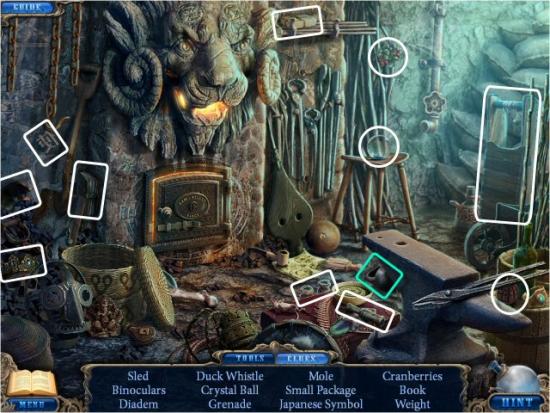
Find all the items in the list. Items in yellow require you to combine another item in the list with an object in the scene, or manipulate an object in the scene, to reveal the item. Tool: Sagebrush, Multiple Items: 3 Hooks.
Click on the Door (1), use the Acid on the Lock (2) and then enter the Hall (3).
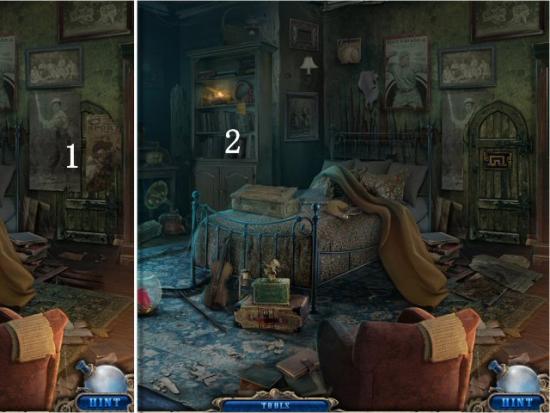
Click on the Right Door (1) of the Woodstove and collect the Angel (#8 of 12), click on the Photo (2) and collect the Dollhouse Key (3). Click on the Door (4), use the Door Knob (5) and then enter the Bedroom.
Click on the Posters (1) and then click on the Bookshelf (2).
Find all the items in the list. Tool: Flower.
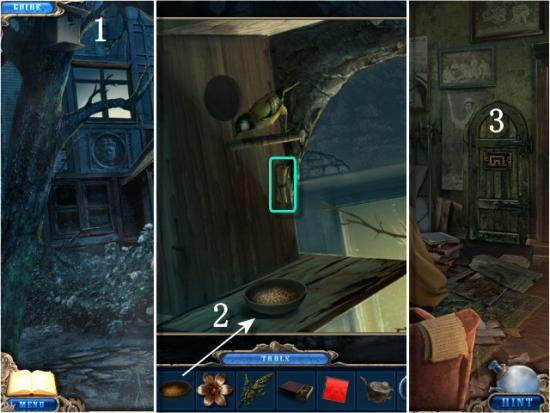
Return to Lillian’s House (click back 6 times, click forward into the Alley and then click forward 3 times), click on the Étagère on the Left. Find all the items in the list. Tool: Bowl of Seeds, Multiple Items: 4 Feathers.
Continue to Lillian’s Bedroom (enter the Elevator, click the Controls, click the Handle and then click forward to exit the Elevator), click on the Dollhouse (1), use the Key (2) and then click on the Open Dollhouse (3).
Find all the items in the list. Tool: Yellow Tile.
Return to the Yard (click back, click on the Controls, click the Handle and then click back twice), click on the Bird House (1), use the Bowl of Seeds (2) and collect the Diary Key wrapped in the Note. Return to the Bedroom at the Farmhouse (click back 3 times, click forward through the Arch, click forward twice, enter the Basement, enter the Door into the Hall and then enter the Bedroom) and click on the Door (3).
Use the Tile Frame on the Empty Spot. The object is to move the Frames to their matching-colored Squares. Click and drag a frame in the direction you want it to go. It will move until it comes to a dead end or an obstacle (another Frame). There are 2 solutions, depending on if you begin with the Blue and Yellow Frames or the Green and Purple Frames. Both solutions take 65 moves.
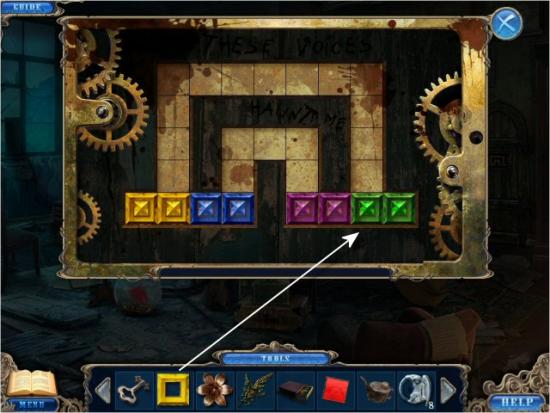
Click on the following video for the solution for starting with Blue and Yellow Frames. The solution for starting with Green and Purple Frames would be the same, except that you would mirror the moves on the opposite side.
Enter the Studio, click on the Desk (1), collect the Key (2) and then click on the Diary (3). Use the Diary Key (4), collect Journal Entry (5) and the Angel (#9 of 12), click on the Pictures (6), collect the Angel (7 – #10 of 12) and then click on the Shrine (8).
Use the Flower (1) on the Box, collect the Handle and Lillian’s Curl, return to the Bedroom (click back) and then click on the Shelves (2).
Find all the items in the list. Tool: Feathers (Rooster Feathers).
Return to the Train Station (click back 6 times and then click right), click on the Shop Door (1) and use the Puzzle Tile in the Empty Space (2). The object is to arrange the Tiles so each row contains the same color Tiles as the Arrows in each row. From top to bottom, they are Cyan (Blue), Red, Green, Magenta (Purple) and Yellow. Click and drag a Column (up or down) or Row (left or right) to move the Tiles around. This puzzle is completely random and there is no specific strategy for solving it. Just continue to move the Rows and Columns until all the Tiles are in the correct positions. When complete, use the Key in the Lock (3), click on the Key and then enter the Dressmaker’s Shop.

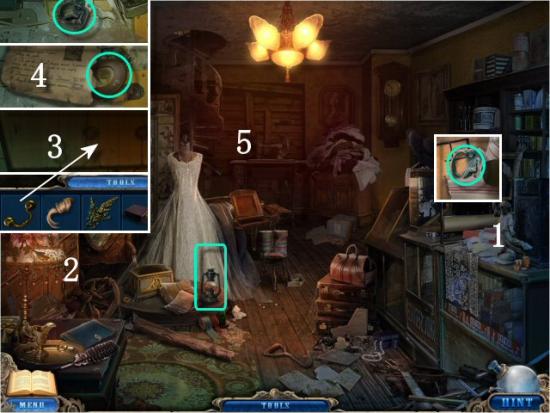
Click on the Counter (1), collect the Angel (#11 of 12), click on the Drawer (2) and use the Handle (3). Collect the Journal Entry (4), the Telescope Lens and the Angel (underneath the Journal Entry – #12 of 12), collect the Kerosene Lantern and then click on the Sewing Machine (5).
Find all the items in the list. Items in yellow require you to combine another item in the list with an object in the scene, or manipulate an object in the scene, to reveal the item. Note: the “Needle Bed” is a Rabbit Pincushion. Tool: Manometer (Pressure Gauge), Interactive Items:
Return to the Statue Park (click back, click forward through the Arch and then click right), click on the Center Pedestal (1) and use the Angels on the Board (2 – you’ll need to add each one separately; click anywhere to place them). The object is to place all the Angels on the board and avoid letting them be eaten by a Demon. If you place an Angel and a Demon can jump over it in one move, it will be eaten. If the Demons eat 6 Angels, they win. If the Angels block the Demons, they win.
Angels can move to any space connected by an open path; Demons can only move 1 space. A good strategy would be to begin placing the Angels in the corners and around the perimeter. As the Demons move toward the center, block them off by placing your Angels behind them. Be aware that the Demons move every time an Angel moves, so you may have to readjust your plan as the game progresses. There are many solutions; you only need to make sure fewer than 6 Angels are eaten by the Demons in order to win. If you lose, you’ll play again. See the following for one solution.

Click on the following for a video solution. Note that this is not the only solution.
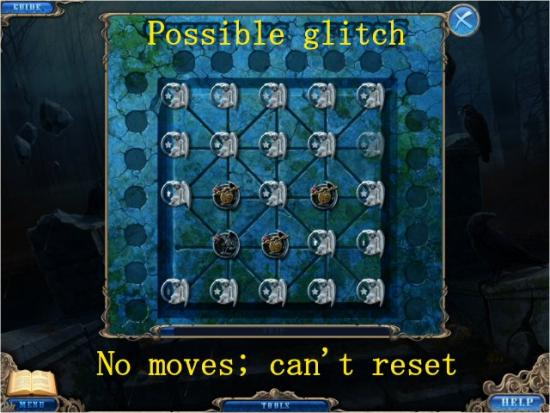
Note that there may be a glitch, or random bug, in the game, where it’s your turn but you have no moves left. A Demon has a space to move to, but can’t until you do. This happened to me, but the remaining Demon wasn’t blocked, so my entire game was effectively over and I had to start over with a new profile. See the following for the final screenshot and try to avoid this. It’s possible this is just a random bug.
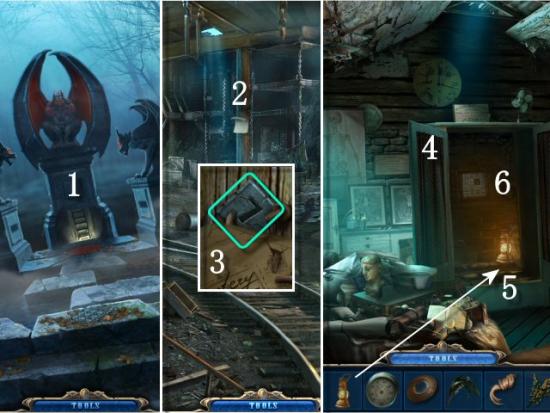
Click forward into the Mine (1), click on the Map (2), collect the Number 7 Tile (3) and then return to the Doctor’s Office (click back 3 times, click left, click forward into the Alley, click on the Fire Escape Ladder and then click forward through the Window). Click on the Cabinet (4), use the Kerosene Lantern (5) and then click on the Wall of the Cabinet (6).
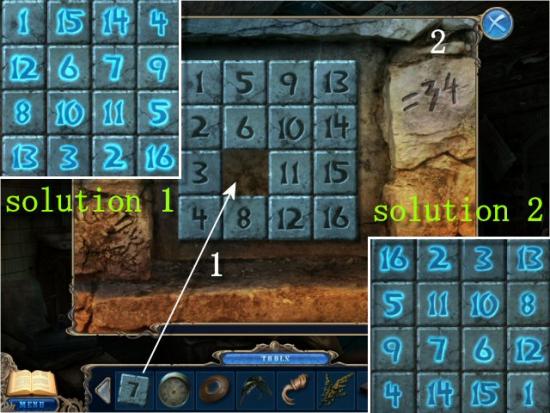
Use the Number Tile in the Empty Space (1). The object is to rearrange the numbers so that each horizontal Row and vertical Column adds up to 34 (2). Click on a Tile and then click on any other Tile to switch their places until all the numbers are in the correct positions. I’ve shown 2 solutions; note that each quadrant of 4 squares also adds up to 34, although this isn’t a requirement in the puzzle instructions.
This type of puzzle is a standard Magic Square and they’re quite easy to solve once you know a few tricks. Instead of explaining them, click on the following link for a nice, detailed explanation and for how to solve them. It even includes instructions for creating a solution spreadsheet in Excel. Create a Magic Square for Any Number:
http://www.mrexcel.com/tip069.shtml
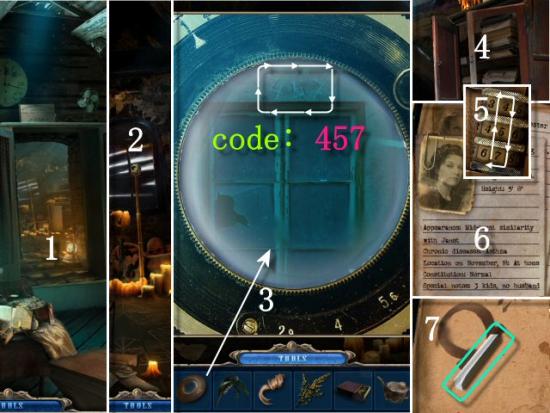
Enter the Secret Room (1), click on the Telescope (2) and use the Telescope Lens (3). Click on the Cabinet (4), click on each number on the Lock Dial to enter the Code seen in the Telescope: 4 5 7 (5) and collect the Journal Entry (6 – click 3 times) and the Chalk (7 – underneath the Journal Entry).
Click on the Skull (1), collect the Grappling Hook (2) and then click on the Book (3). Collect the Egg, click through the Pages (click 3 times), collect the Torn Page (4) and then collect the Book from the floor. Return to the Doctor’s Office (click back) and click on the Surgery Table.
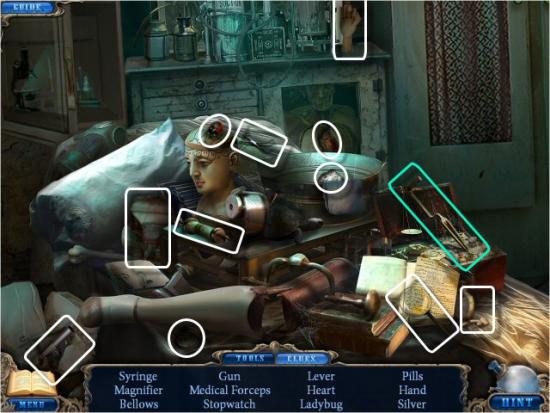
Find all the items in the list. Tool: Lever
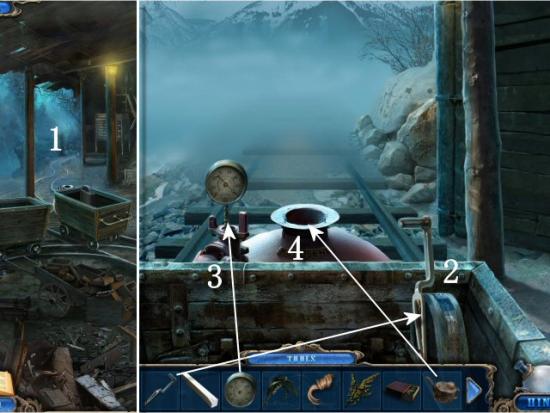
Return to the Mine (click back 3 times, click forward through the Arch, click right and then click on the Ladder to the Mine) and continue down the Track (1). Use the Lever on the Controls (2), use the Manometer on the Pressure Coupling (3) and then use the Kerosene in the Fuel Tank (4).
Collect the Brick, continue to the Train Platform (1), collect the Spade and then click on the Door (2).
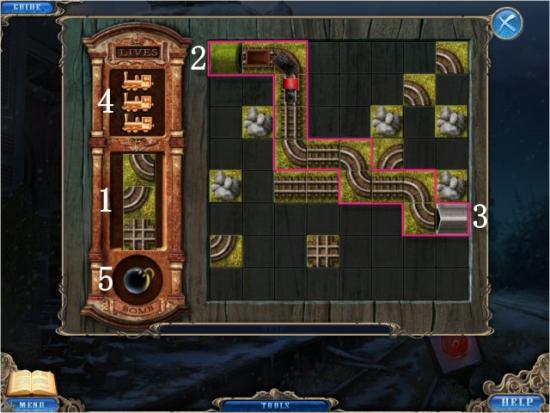
The object is to construct a Track for the Train, with the pieces that appear in the Selection Window (1), so the Train can get from the First Tunnel (2) to the Second Tunnel (3). You have 15 seconds to click, drag and place your first piece or the train will crash and you’ll lose one of your 3 lives (4). The initial layout and the pieces offered are completely random, so your solution will probably be different from the one shown. Use a Bomb (5) to remove a piece from the grid that’s in the way. If you can’t use the piece in the Selection Window, place it somewhere on the grid, to get your next piece. Continue placing pieces until you have a completed Track and the Train has made it to the Tunnel. If you lose all 3 lives, the puzzle will start again from the beginning. When complete, return to the Mine Cart (click back).
Use the Grappling Hook on the Cave Entrance (1) and then enter the Cave (2).
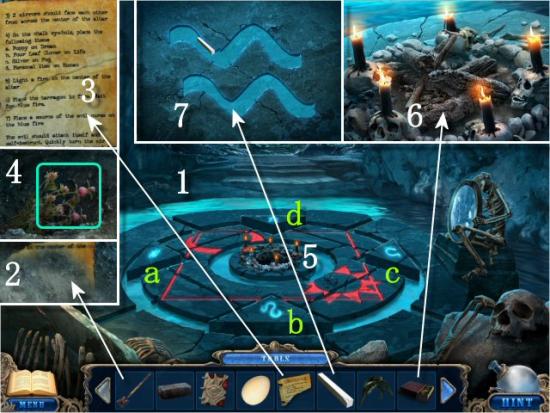
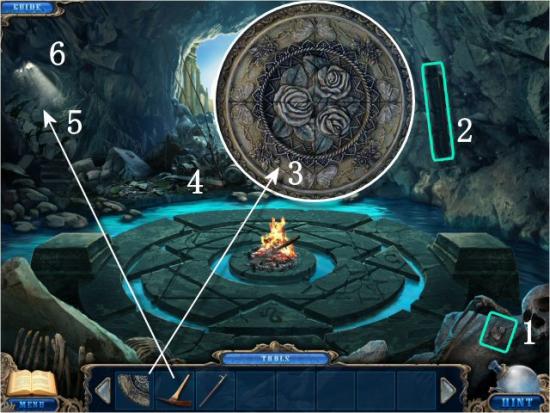
Click on the Skeleton (1), use the Spade on the Dirt (2), use the Torn Page on the Ritual (3), collect the Journal Entry and then collect the Clover (4 – underneath the Journal Entry). Click on the Fire Pit (5) and use the Matches on each of the Candles (6). Click on each of the Symbols (a, b, c and d) and use the Chalk on each Symbol to fill them in (7). Return to the Train Platform and enter the now open Door (click forward twice and then enter the Open Door).
Click on the Ticketing Window (1), collect the Key (2) and then click on the Door to the Luggage Room (3 – click twice). When complete, use the Saw on the Boards (4) use the Brick on the Glass (5), exit through the Open Window (6) and then return to the Secret Room in the Doctor’s Office (click left, click forward into the Alley, click on the Fire Escape Ladder, click forward through the Window and then click forward into the Secret Room).

Find all the items in the list. Tool: Saw.
Click on the Skull (1), use the Key (2) and collect the Poppy (3). Return to the Waiting Room in the Train Station (click back 4 times, click right and then click forward through the Window at the Train Station) and click on the Luggage Room Door (4). When complete, return to the Cave (5 – click back twice).
Find all the items in the list. Tool: Silver.
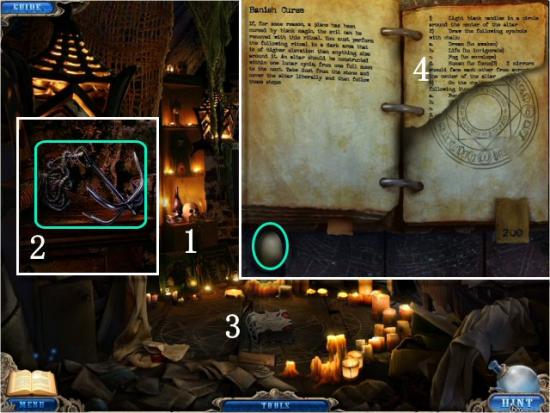
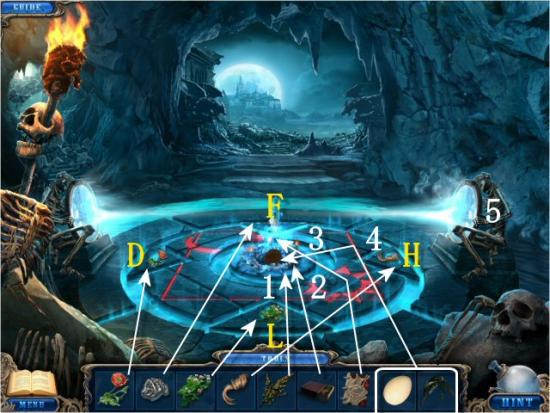
Place the Poppy on the Dream Symbol (D), place the Silver on the Fog Symbol (F), place the Clover on the Life Symbol (L) and then place Lillian’s Curl on the Human Symbol (H). Place the Sagebrush on the Fire Pit (1) and use the Matches (2). When the Flame turn blue, place the Book on the Fire (3). Place the Egg and the Feathers (4 – in either order) on the Fire and then click on the Right Mirror (5).
The Curse has been lifted! Speak with Lillian and then watch the Credits. Congratulations! You’ve completed Dark Dimensions: City of Fog.
If you are playing the Collector’s Edition, you now have access to all the Extras: Wallpapers, Music Tracks, Concept Art and the Bonus Chapter. If you’re playing the Bonus Chapter immediately, just click on Yes. If you decide to wait, click on Extras, click on Bonus Gameplay and then click on Play.
Click on the Skull (1), collect the Puzzle Piece, click on the Niche in the Wall (2) and then use the Puzzle Piece in the Empty Spot (3). The object is to restore the image. Click on each Piece until it rotates into the correct position. You’ll only need to click on each one 2 or 3 times. Collect the Hook and click on the Debris (4). When complete, use the Pick on the Rocks (5) and then exit through the Opening to the Ledge (6).
Find all the items in the list. Items in yellow require you to combine another item in the list with an object in the scene, or manipulate an object in the scene, to reveal the item. Tool: Pick, Interactive Items:
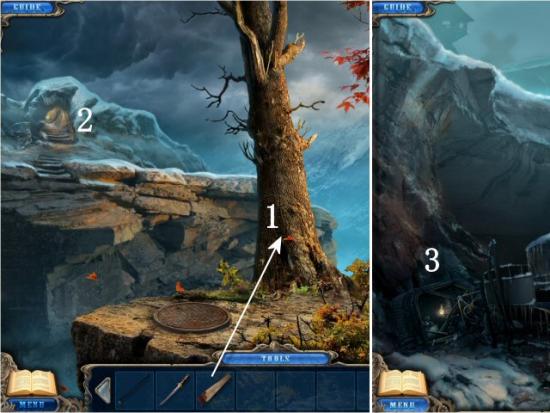
Use the Hook to collect the Saw (1), collect the Bucket and then return to the Cave (click back). Use the Bucket on the Fire (2), collect the Sword and then click on the Debris (3). When complete, return to the Ledge (click forward through the Opening).
Find all the items in the list. Items in yellow require you to combine another item in the list with an object in the scene, or manipulate an object in the scene, to reveal the item. Tool: Crowbar, Interactive Item:

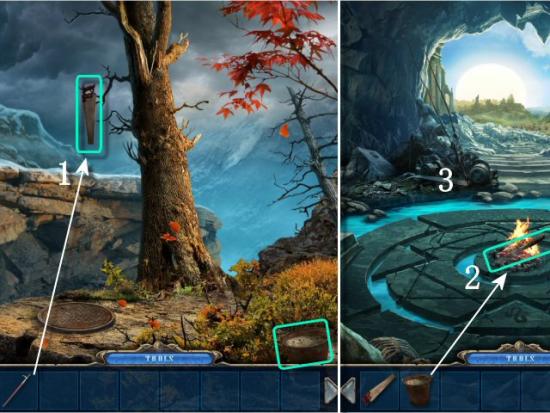
Use the Saw on the Tree (1), continue to the Ice Passage (2) and then click on the Balloon Gondola (3).
Find all the items in the list. Items in yellow require you to combine another item in the list with an object in the scene, or manipulate an object in the scene, to reveal the item. Tool: Blowtorch, Interactive Items:
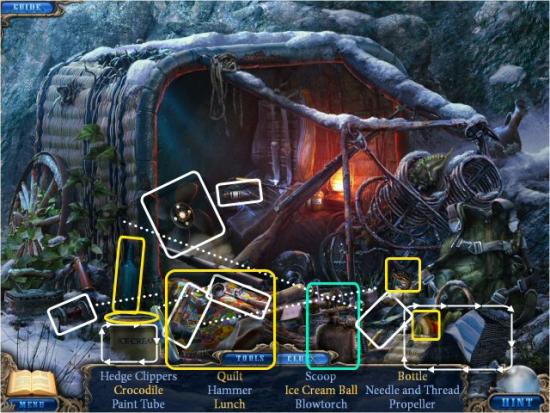
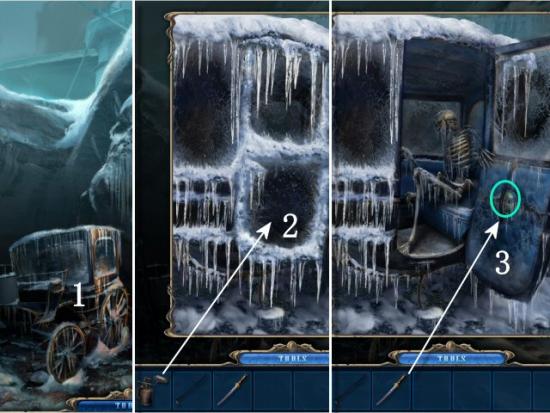
Click on the Carriage (1), use the Blowtorch (2 – move the Blowtorch around until all the ice melts and the door opens; you don’t need to click), use the Sword (3 – click twice), collect the Helicopter and then return to the Ledge (click back).
Use the Crowbar on the Manhole Cover (1), click on the Hole and use the Helicopter on the Empty Space (2 – click anywhere). The object is to move the Helicopters to their matching-colored Pads. Click on a Helicopter and it will move to Empty Pad. You can only move a Helicopter that is on a direct path to the Empty Pad. The solution is click on c, d, a, b, f, a and then d. When complete, collect the Glasses and the return to the Ice Passage (3).

Click on the following for a video solution.
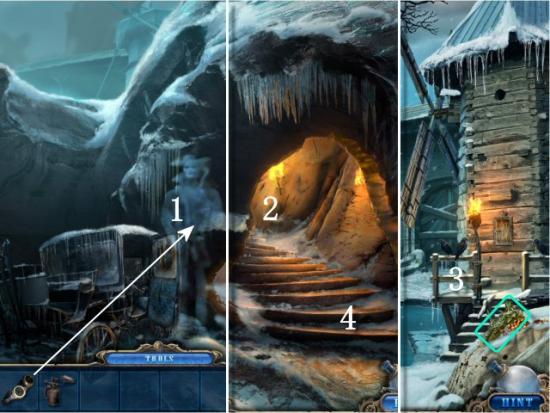
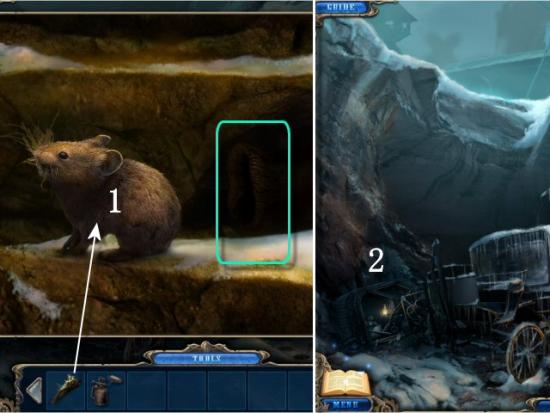
Speak to the Ghost, use the Glasses (1) and then continue to the Village (2). Collect the Grass (3), return to the Ice Passage (click back) and then click on the Mouse Hole (4).
Use the Grass (1), collect the Mitten and then click on the Balloon Gondola (2).
Find all the items in the list. Tool: Crab Body.
Return to the Village (click forward), click on the Snow (1) and use the Mitten (2 – click 3 times). Collect the Journal Entry (3), collect the Puzzle Tile (4 – underneath the Journal Entry) and then click on the Door in the Windmill (5). When complete, click on the Stairs (6).
Use the Puzzle Tile in the Empty Space (1). The object is to place the Tiles so that all Numbers are matched (2). Click on a Tile and then click on the Grid to place it. To remove a Tile, click on it and then click below the Grid.

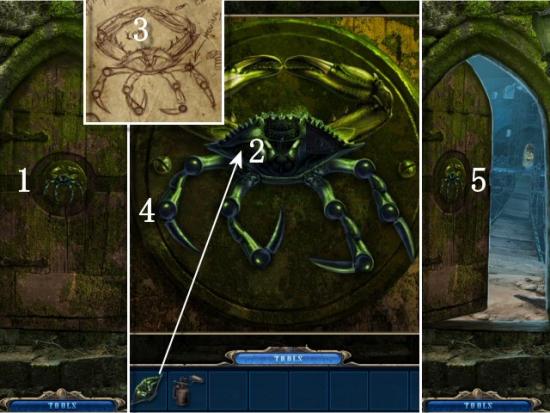
Click on the Door (1) and use the Crab Body (2). The object is to arrange the Crab’s Legs as they appeared in the Journal Entry (3). Click on the Joints (4) to move each section of the Crab’s Legs. When complete, enter the Open Door (5).
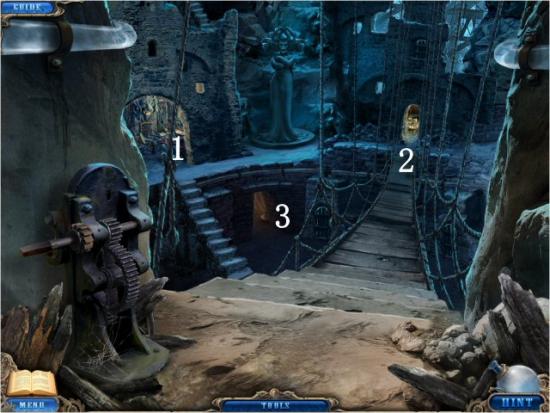
Click on the Alcove (1). When complete, cross the Bridge and enter the Doctor’s Room (2). When complete, return here and then click on the Lower Doorway (3).
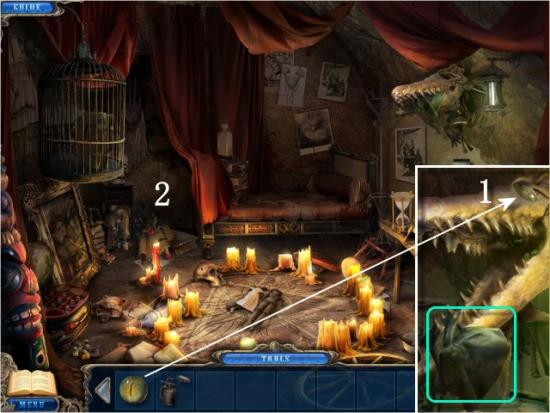
Find all the items in the list. Items in yellow require you to combine another item in the list with an object in the scene, or manipulate an object in the scene, to reveal the item. Tool: Alligator’s Eye, Interactive Items:
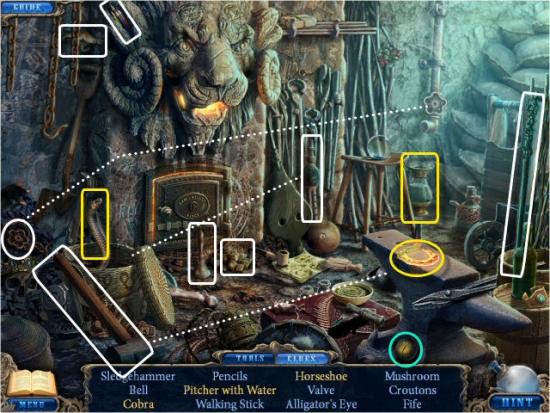
Click on the Alligator (1), use the Eye (2), collect the Rag and then click on the Corner (3).
Find all the items in the list. Items in yellow require you to combine another item in the list with an object in the scene, or manipulate an object in the scene, to reveal the item. Tool: 6th Book, Interactive Items:
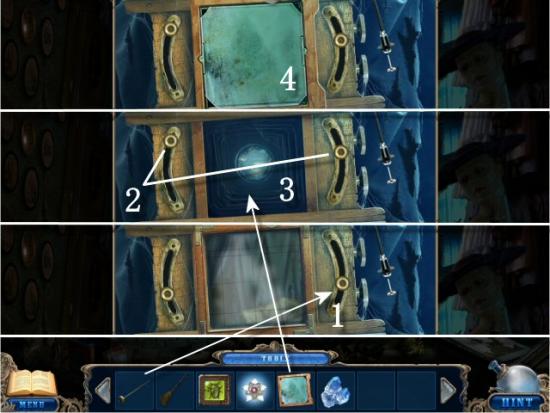
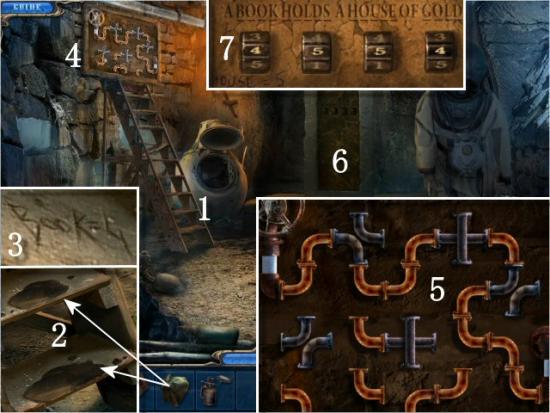
Click on the Ladder (1), use the Rag on the Spills (2 – click on each Spill; click on the bottom Spill first) to reveal a Clue (3 – “Book = 4”). Click on the Pipes (4). The object is to rotate the Pipes so that the water will flow from the Inlet to the Outlet. Click on the sections of Copper Pipe to rotate them. When complete, click on the Door (6) to find another Clue (7 – “House = 5”). The Clues refer to the number of letters in each of the underlined words. Click on the Dials to enter the correct number (“4 5 5 4”) and then enter the Open Door.
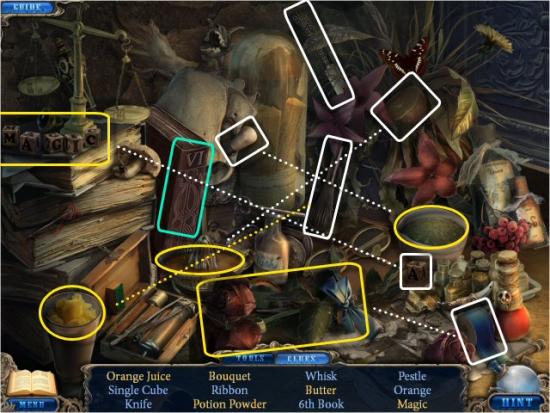
Collect the Screwdriver and then click on the Stack of Books.

Find all the items in the list. Items in yellow require you to combine another item in the list with an object in the scene, or manipulate an object in the scene, to reveal the item. Tool: Bracelet, Interactive Items:
Return to the Rope Bridge (click back twice) and click on the Alcove (1). When complete, Click on the Medusa (2), use the Bracelet (3), collect the Poison (4) and then return to the Doctor’s Room (5).
Find all the items in the list. Tool: Weight.
Click on the Cage (1), use the Screwdriver (2 – click on each of the 3 Screws), collect Book XI and then click on the Corner (3).

Find all the items in the list. Tool: Spear.
the Library (click back, click forward into the Lower Doorway and then forward into the Library), click on the Glass Case (1), use the Weight on the Glass (2), use the Blowtorch on the Book (3 – click once) and then click on the Stack of Books (4). When complete, click on the Bookcase (5).
Use the Books on the Shelf (1 – click anywhere). The object is to rearrange the Books in ascending order, from I to IX. Click and drag the Books into the Upper Slots (2) to get them out of the way so you can slide Books into the proper position. When complete, click forward into the Lab (3).
Click on the following for a video solution.
Use the Poison on the Snake (1), collect the Forceps and click on the Port Hole (2). Click on the Latches (3), click on the Control Panel (4), use the Spear (5) and then use the Forceps on the Valve (6). Return to the Rope Bridge (click back 3 times), use the Valve on the Mechanical Drive (7) and then watch the final cutscene.
Congratulations! You’ve completed the Bonus Chapter of Dark Dimensions: City of Fog.