- Wondering how to get Monopoly GO! free rolls? Well, you’ve come to the right place. In this guide, we provide you with a bunch of tips and tricks to get some free rolls for the hit new mobile game. We’ll …
Best Roblox Horror Games to Play Right Now – Updated Weekly
By Adele Wilson
Our Best Roblox Horror Games guide features the scariest and most creative experiences to play right now on the platform!The BEST Roblox Games of The Week – Games You Need To Play!
By Sho Roberts
Our feature shares our pick for the Best Roblox Games of the week! With our feature, we guarantee you'll find something new to play!All Grades in Type Soul – Each Race Explained
By Adele Wilson
Our All Grades in Type Soul guide lists every grade in the game for all races, including how to increase your grade quickly!
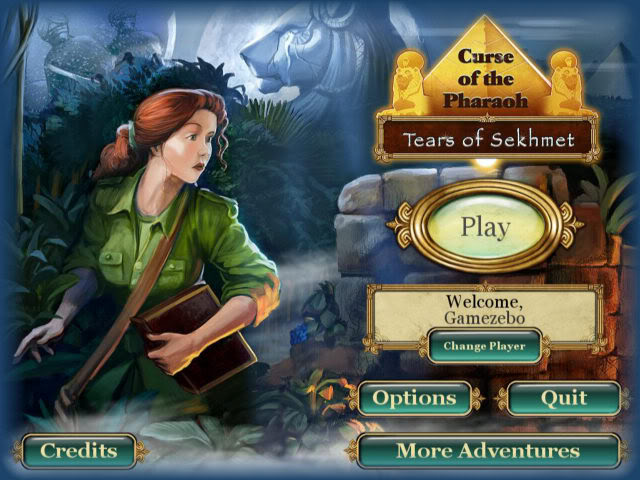
Curse of the Pharaoh: Tears of Sekhmet Walkthrough
Welcome to Gamezebo's walkthrough for Curse of the Pharaoh: Tears of Sekhmet. General Game Information Hidden Object Game with 9 Chapters and 8 mini games that can be played in casual mode only. You are playing as "Anna," who must, along with the Professor, locate the "7 Tears of Sekhmet" before her estranged step-brother "Will," who has recently become overwhelmed with Greed. There is no score or points awarded. The game is played for story complet…
a:1:i:0;a:2:s:13:”section_title”;s:50:”Curse of the Pharaoh: Tears of Sekhmet Walkthrough”;s:12:”section_body”;s:103103:”
Welcome to Gamezebo’s walkthrough for Curse of the Pharaoh: Tears of Sekhmet.

General Game Information
- Hidden Object Game with 9 Chapters and 8 mini games that can be played in casual mode only.
- You are playing as "Anna," who must, along with the Professor, locate the "7 Tears of Sekhmet" before her estranged step-brother "Will," who has recently become overwhelmed with Greed.
- There is no score or points awarded. The game is played for story completion only.
- The game has a tutorial mode that can be turned on and off by clicking on the "options" button on the main screen. You have the option of keeping game hints or a full tutorial in the game. Simply click the check mark off the box if you wish to turn these off.
- The game can be played in full screen or windowed mode by clicking on the "options" button in the main menu screen.
- If you choose the tutorial mode you will be taken through one hidden object screen tutorial before you begin the storyline. This screen walks you through all the features of the game.
- You play the game in list mode and the items will be crossed off as you locate them.
- There are 3 coins that must be located at each location before you can proceed.
- You can find pieces of a mask at each location. Once you complete the mask you will win more coins to spend in the store or win extra hints.
- The game has a store in which you can purchase upgrades that will help you to win the game.
- At any time in the game you can access the store by clicking on the "store" button at the lower right hand side of the screen.
- There are a few challenge modes in the game. In "Water Mode" water will start to rise from the bottom of the screen and you must purchase an oxygen tank from the store to deal with this. Drag the tank to the water line and click and the water will go back down. This happens every few minutes and the period becomes shorter in the higher levels.
- You will need 15 coins to buy an oxygen tank. Make sure you have these held aside for World 7 as this is when you will meet your first "water level."
- There is a "Mirror Mode" which is only during the find the difference screens and first seen during "World 8" of the game. Purchase a mirror for 15 coins and look in the "puzzle" storage area of your menu. Drag the mirror to the scene and the picture will change to the correct format. Without the mirror you will be seeing the mirror image of the scene instead of a copy of it and it is much more difficult to find the differences.
- The hammer can be purchased to smash away any mini game puzzle you find is too difficult. You can purchase the hammer in the store for 12 coins. During the game you want to skip just click on the skip button to redeem your hammer.
- While in the hidden object screens you will see text in blue and red. The red and blue items are items that can be used somewhere else in the scene or in another scene within a world. When you find these items they will move into the inventory area at the bottom of the screen.
- The game gives you 3 hints for free and then you can earn more hints by clicking on "Wipi" the little black cartoon character that appears at random times on any side of your screen. You must click him fast as he only stays a few seconds. It is wise to save your hints for the later chapters if you can.
- To activate a hint click on the hint button at the lower right and "Wipi" will run onto the scene and highlight the first item in your list that has not been found yet.
- You may purchase hints for 3 coins in the store if you get stuck. Use this wisely. Make sure you have coins set aside for the oxygen tank and mirror by chapters 7 and 8 of the game.
Game Elements
Sample Hidden Object Scene
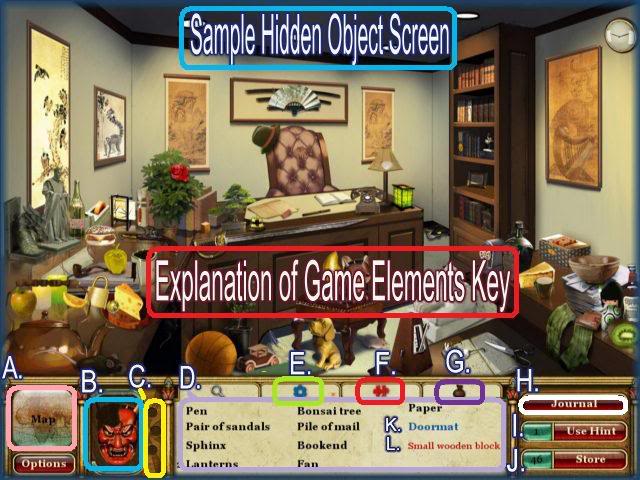
- A. Map Button -Click on this button to move to the map area of the game. Here you can move to any unlocked location that is highlighted in green. The order is not critical as you must visit all locations to win the game.
- B. Mask – Here you will see your progress as you find map pieces. There is one map piece in each location. Once you complete a map you will win more hints, or more coins to spend in the store.
- C. Coins Inventory – This is where the coins go when you find them in a scene. Each scene has 3 coins you must locate. Many times you must completely solve an area before the coins appear and in some they are there right away. Make it a habit to scan for coins each time you start a new screen.
- D. List – Here is the list of items you must find in the scene. As you locate an item it will cross off in your list.
- E. Gear – This blue gear tab when clicked on takes you to the inventory of items that will act upon other items in the scene. Mouse over the scene and you will see blue gears and text appear anywhere you can use this.
- F. Puzzle – Here is the puzzle inventory area. Clicking on this tab will show you which items you have located that can be used to solve a puzzle in the game.
- G. Puzzle Inventory – Here you will store the items that you have purchased from the store and will need to use in "Water and Mirror" modes of the game.
- H. Journal – The main character "Anna" keeps a journal and you can access it at any time by clicking on this button.
- I. Hint Button – When you need to use a hint this is where you click. Wipi will run out and show you the first uncrossed off item on your inventory list.
- J. Store – Click on this button to access the store where you can purchase upgrade items in the store.
- K. Blue Text – Items in blue text will be stored in the gear area of the game and must be used on another item in the game to work.
- L. Red Text – Items in red text will be stored in the puzzle piece area of the game and must be used to solve a puzzle in the game.
Sample find the differences Scene 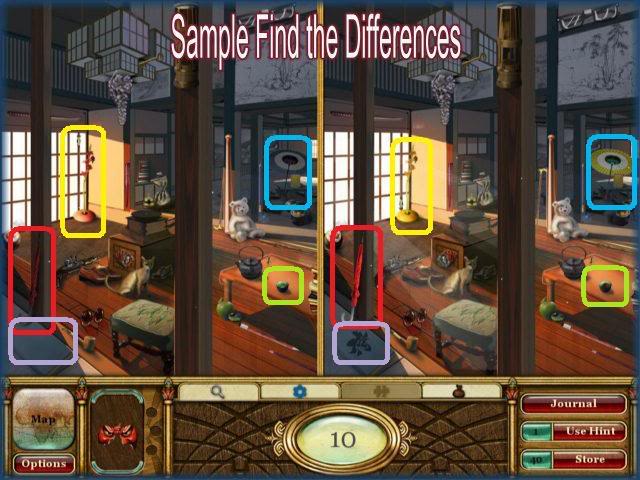
- In scenes as this you will need to compare both sides for any differences.
- In this walkthrough I have color coded the items to help ease identification.
Using the Hint Button
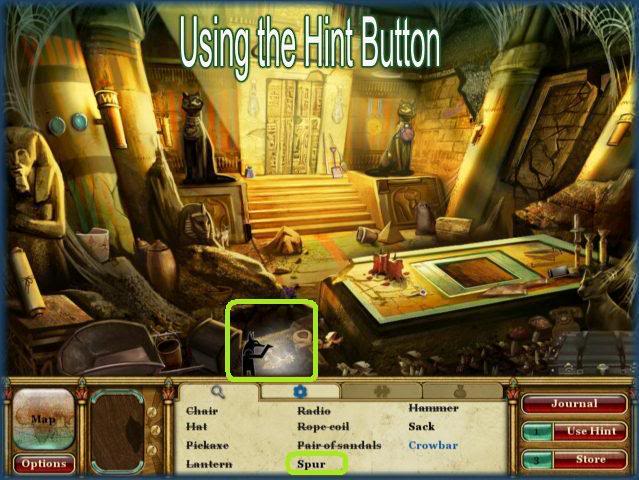
- Click on the hint button at the bottom right of the screen for help finding an object.
- "Wipi" will run onto the scene and highlight the first item that is not crossed off on your list.
- He only stays a few seconds to be sure to watch after you push the button.
- The hints do not recharge after use. As long as you can afford them you can use as many hints in a level as you wish without penalty.
Earning Extra Hints
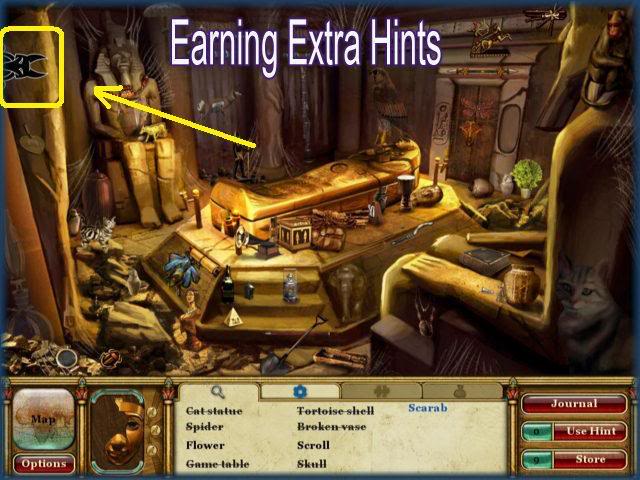
- You have multiple chances to earn extra hints throughout the game.
- "Wipi" will appear along the edges of the screen periodically and you must click on him as fast as possible.
- If you are successful you will earn another hint to use when you wish.
- There is no warning tone when Wipi arrives so be at the ready if you need more hints.
- Remember you can also purchase hints for 3 coins in the store if you get stuck.
Penalty – Too much fast and random Clicking.
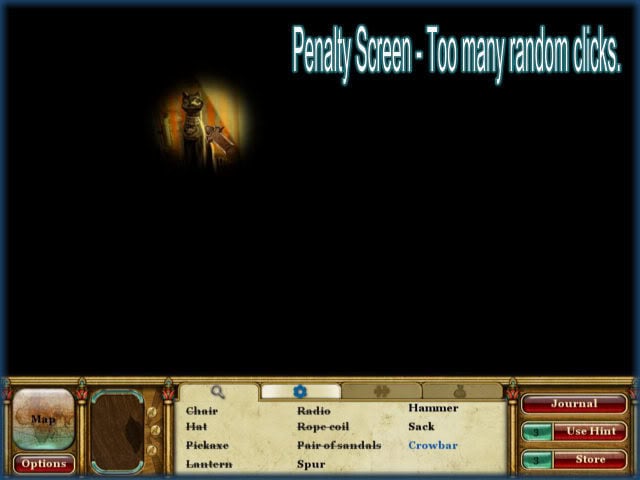
- If you click too fast or too many times randomly the screen will become dark as shown except for one very small area of light.
- You can keep searching when the screen is like this but it will prolong the dark screen if you do.
- The best thing to do is to hold still a few moments and eventually it will go back to normal.
Game Store
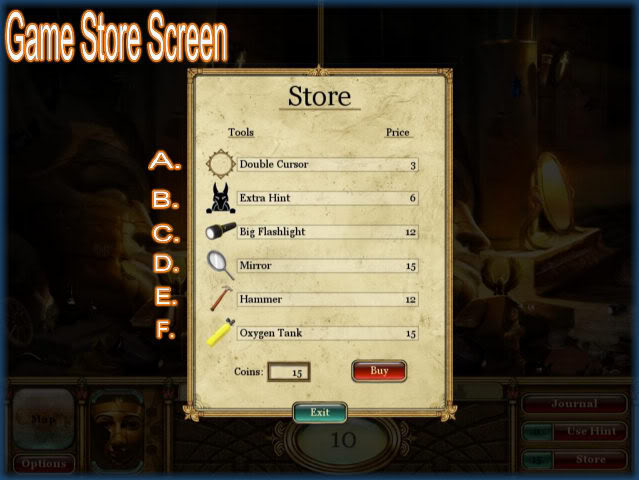
- Here is the screen you will see if you click on the "store" button at the lower right of your search screen.
- Simply click on the item you wish to purchase and then click on the "buy" button at the bottom.
- You can access this at any time during the game from the very start.
Puzzle Items in Store

- These are the items you can purchase in the store.
- "Mirror Image" This mirror is 15 coins and will cause the find the difference scene to revert back to normal. TIP – You will not need this upgrade until World 8 of the game.
- This hammer can be purchase to smash away any mini game puzzle in the game. Use it by clicking on the "skip" button while in the screen of the puzzle you wish to skip.
- The hammer costs 12 coins and can be purchased at any time in the game.
- Oxygen tank – The oxygen tank costs 15 coins and is used in water levels where the water begins to rise from the bottom very fast. If the water reaches the top you will have to start over the level again. Purchase the tank and it will go into the inventory area with the small brown bag. Drag the tank to the water line as it is rising and it will go back down. It may come back several times in a scene so be ready for it.
Water Levels
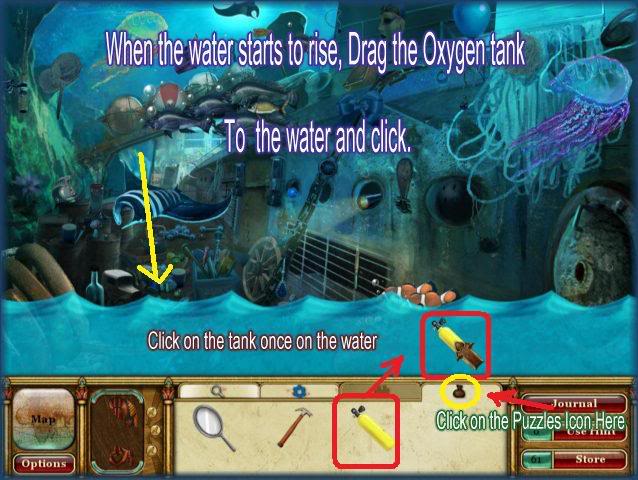
- This shows you the water level and the water rising from bottom of the screen.
- Take the tank from the inventory as shown and place it in the water and click.
- This happens several times in a level and the further along you play the game the more frequently this can happen.
- TIP – You do not need the Oxygen tank until World 7 of the game.
Location Maps/Key
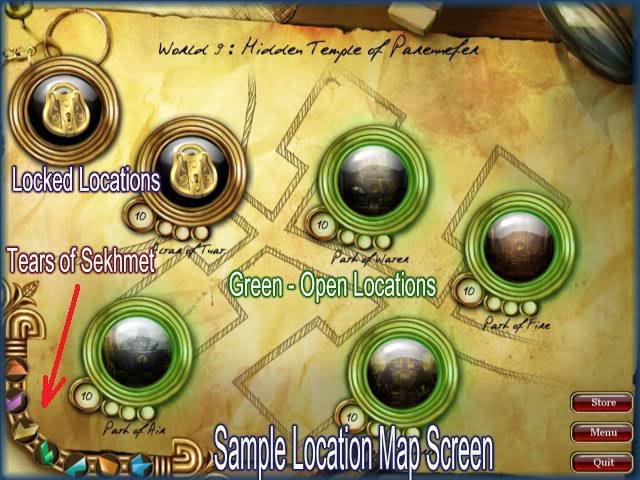
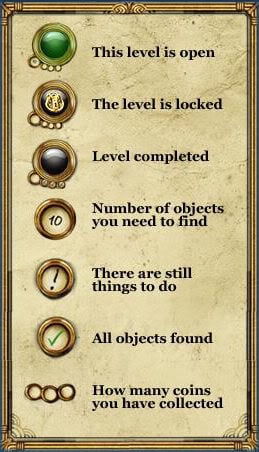
- Here is a sample of the location map you will see at the beginning of each World.
- Note the key in the image.
- If the circle is green you can access that area.
- It also shows you how many items need to be found for that location.
- You can leave an area and go to another if you get stuck as long as there is one open.
- TIP – If you get stuck and all other locations are locked, buy a hint and proceed from there.
Gear Items
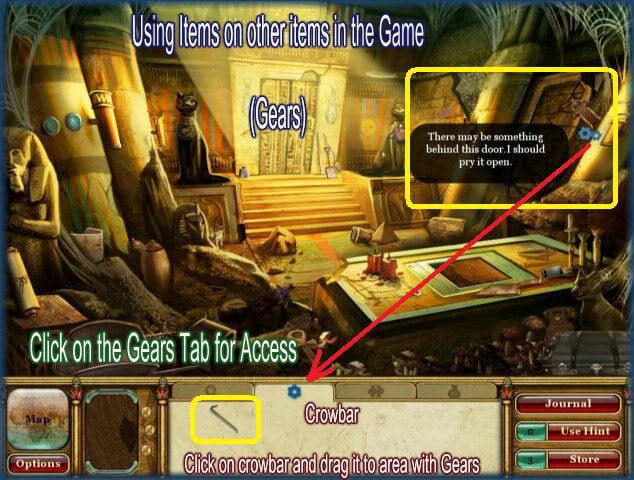
- While in the game screens you will notice areas your mouse hits that have text and blue gears.
- These items need another item dragged to them and they must interact for you to proceed in the game.
- When you find items in blue text they will move into the gear inventory item marked by the blue gear tab at the bottom center of the screen.
- When you locate the areas you need to use these items click on the gear tap then drag the item to the desired location.
- Note that finding an item in one scene doesn’t mean you will use it in that scene. You may find items to be used in later locked scenes so don’t get stuck looking for something to use an item on. It will let you know if you need to use it to proceed or not.
Walkthrough
- In this walkthrough all the coins are in the same locations and all of the items you must use on other items are the same.
- The only difference is you may have different items on your list to find in a hidden object scene than the ones I did, but I have circled mine in case we have any in common to help you.
- The mini games may also have different solutions than the ones I have listed here but the instructions should help you figure out any issues you are having.
Tutorial – Sanctum
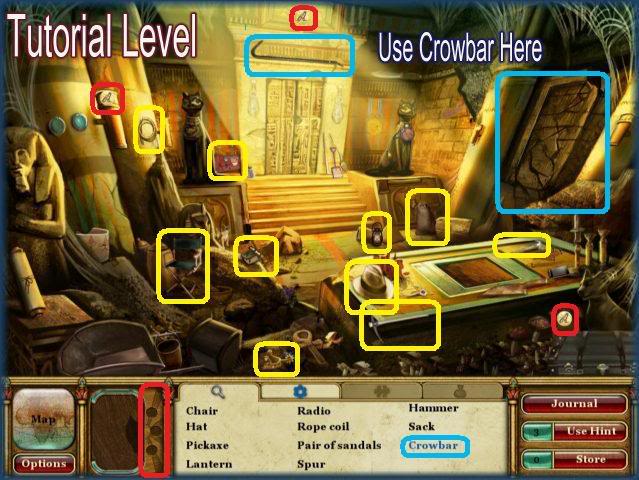
- In this screen the coins are circled in red but on all others the coins will be circled in yellow.
- Finding the crowbar will place it in your inventory.
- Find the 10 hidden objects in this scene.
Tutorial continued
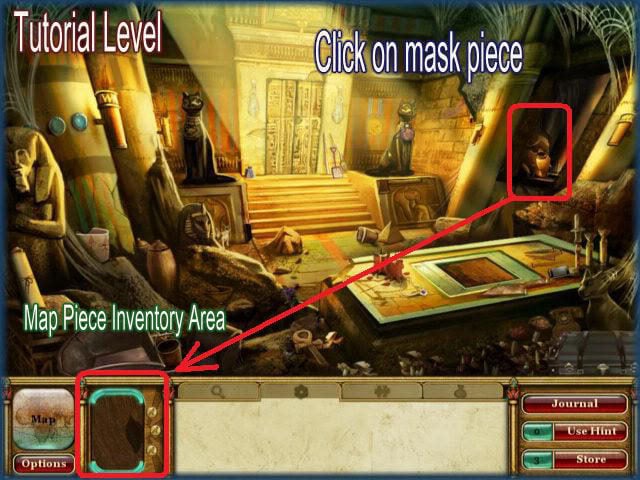
- Once you have found all 10 hidden objects, click on the gear tab and drag the crowbar to the door at the far right.
- Once it opens click on the mask piece and note it has gone into your inventory at the bottom left center of screen.
WORLD 1: HIDDEN TEMPLE OF PARENNEFER
Location Map -Hidden Temple of Parennefer
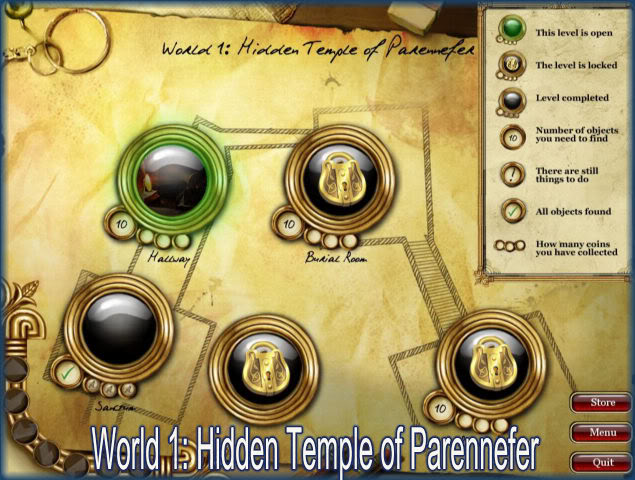
- This is the location map for World 1.
- Click on any open green ring to begin.
- Click on Hallway to begin.
Hallway
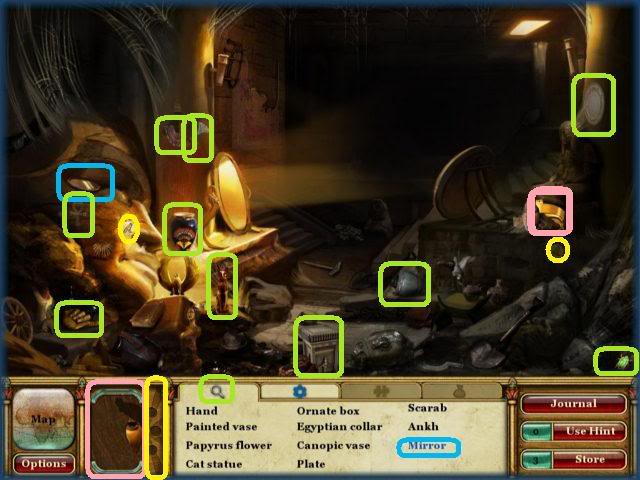
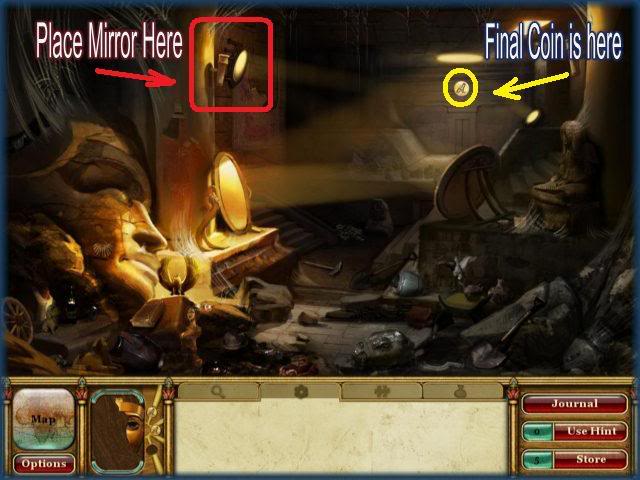
- Locate the 10 hidden objects in the scene.
- Locate the 2 hidden coins circled in yellow.
- Locate the item in blue text.
- Place mirror in the location indicated.
- When the light is reflected you can click on your final coin.
Burial Room
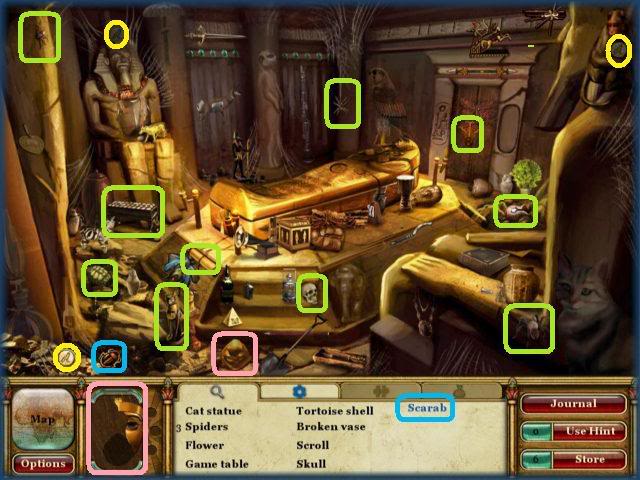
- Locate the 10 hidden objects in the scene.
- Locate the 3 coins circled in yellow.
- Locate the item in blue text.
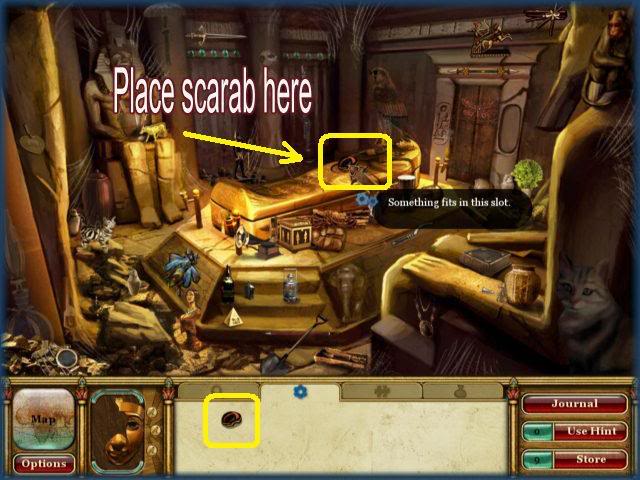
- Place the scarab in the area indicated on Sarcophagus.
Ritual Room
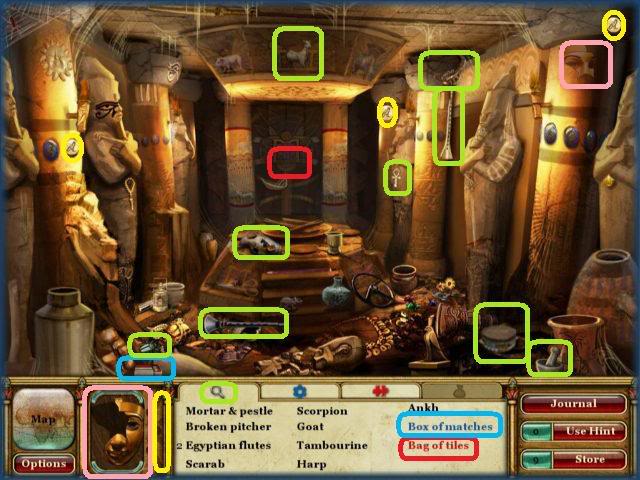
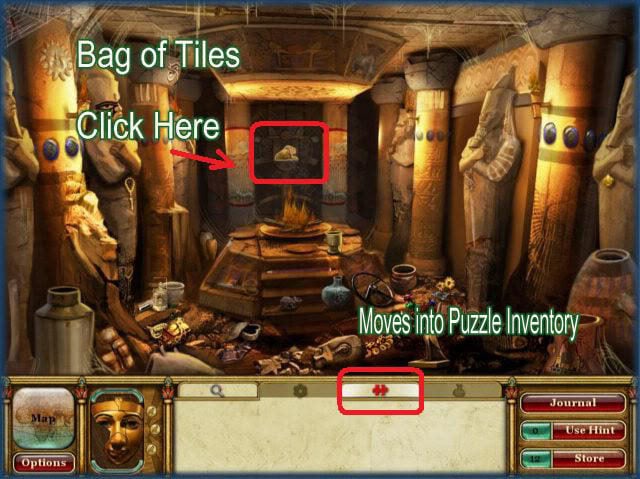
- Locate the 10 hidden objects in the scene.
- Locate the 3 coins circled in yellow.
- Locate the items in red and blue text.
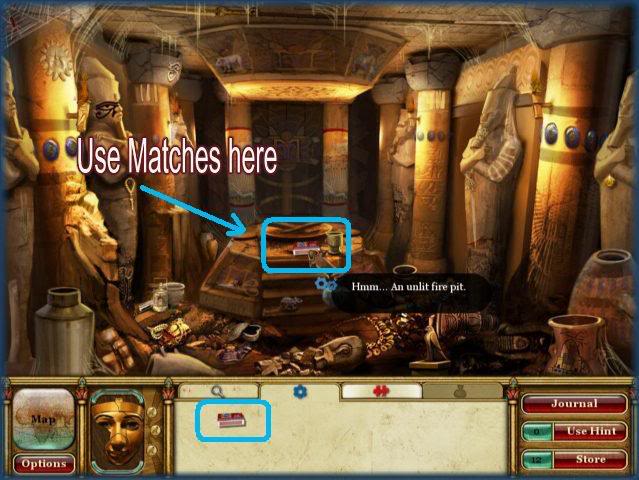
- Use the matches where indicated.
- Click on the bag of tiles once it is in sight.
Now you can move in any order you wish on the map. For walkthrough purposes we will move left to right. Proceed to the Sanctum 2.
Sanctum 2
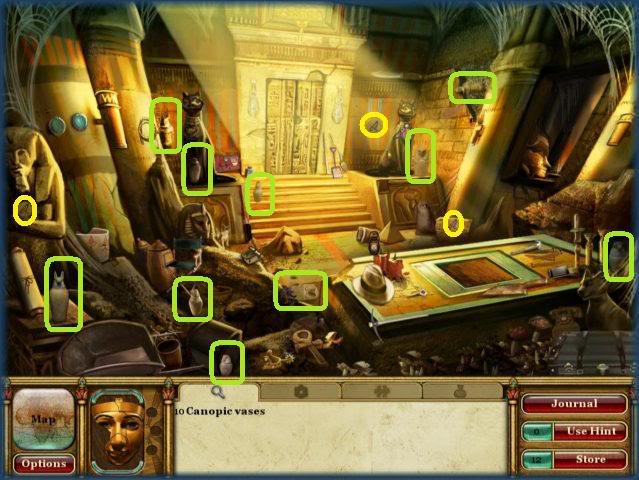
- Locate the 10 canopic vases circled above.
- Locate the 3 coins circled in yellow above.
- No mask piece in this screen.
Now you need to go into the store and purchase the "Double Cursor" for your first find the difference screen.
Hallway 2
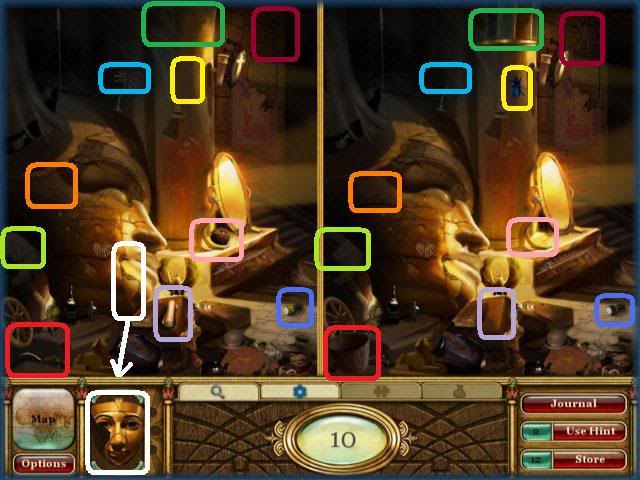
- Using your new double cursor locate the 10 differences between the scenes.
- The differences have been color coded for ease.
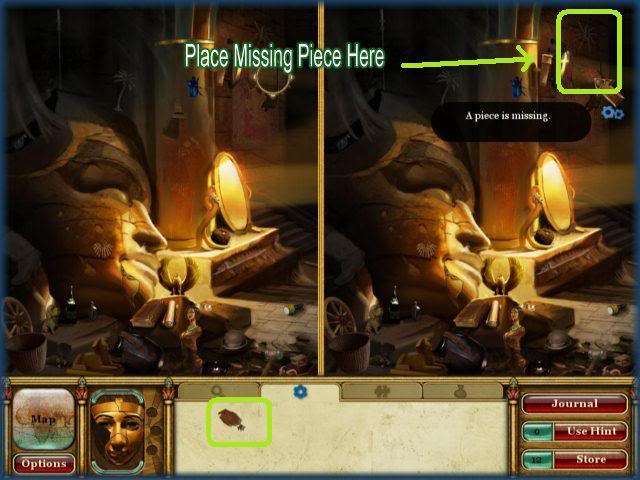
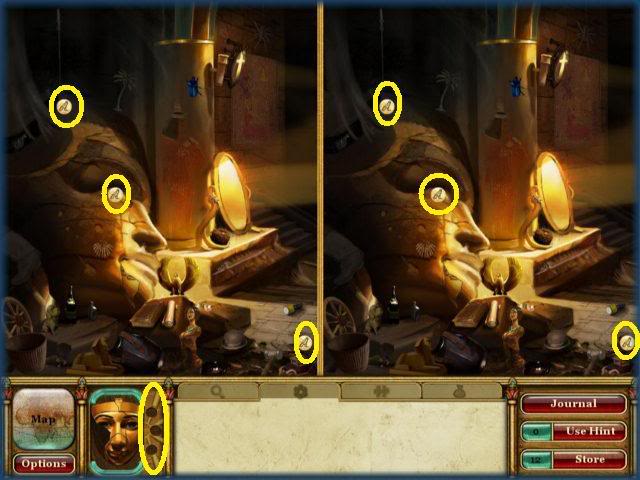
- Place the missing piece as indicated.
- After the mirror is placed you will be able to see the 3 coins which are circled in yellow above.
Burial Room 2
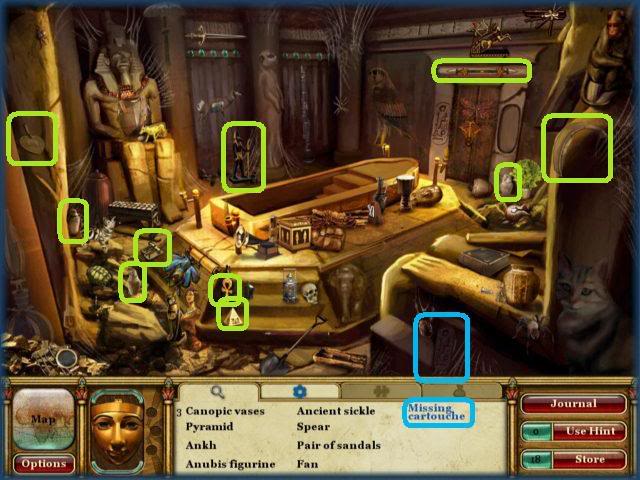
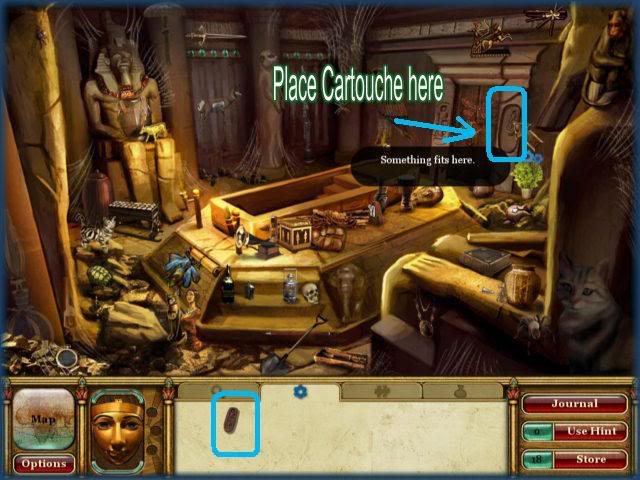
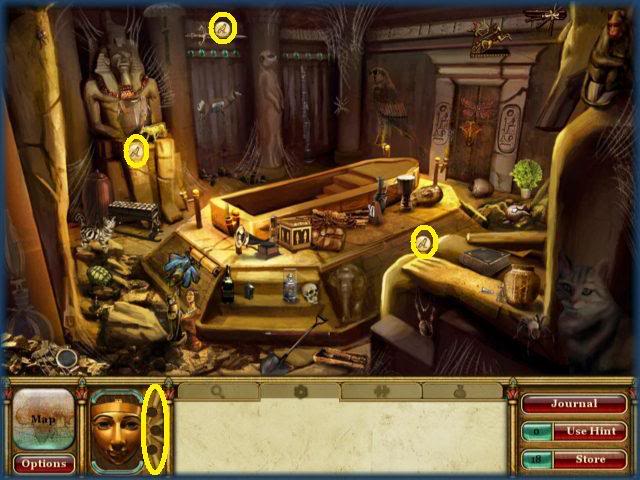
- Locate the 10 hidden objects and the object in blue text
- Place the missing cartouche in the correct location.
- Locate the 3 coins circled in yellow above.
Mini Game – Swapping Tile Puzzle
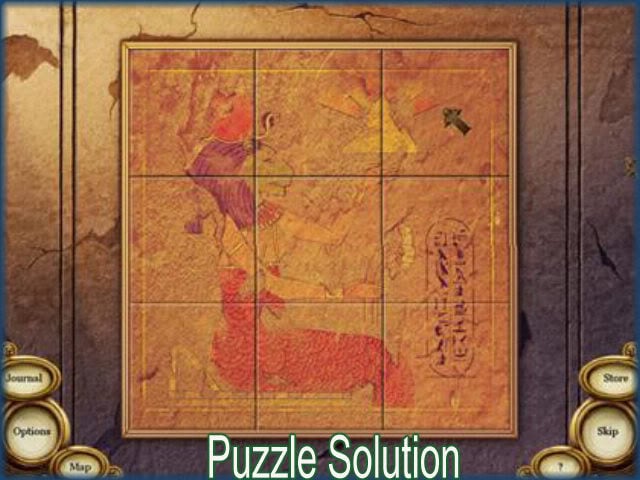
- In this puzzle you click on a tile and a tile next to it to swap places until you complete the image seen above.
WORLD 2: British Museum
Location Map – British Museum
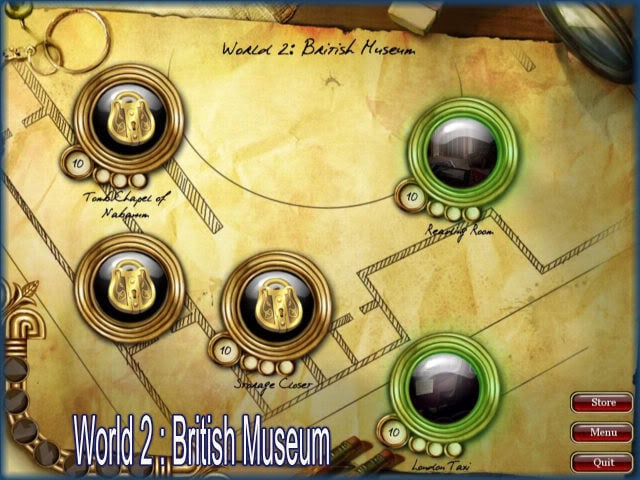
- For walkthrough purposes begin with the "Reading Room"
Reading Room
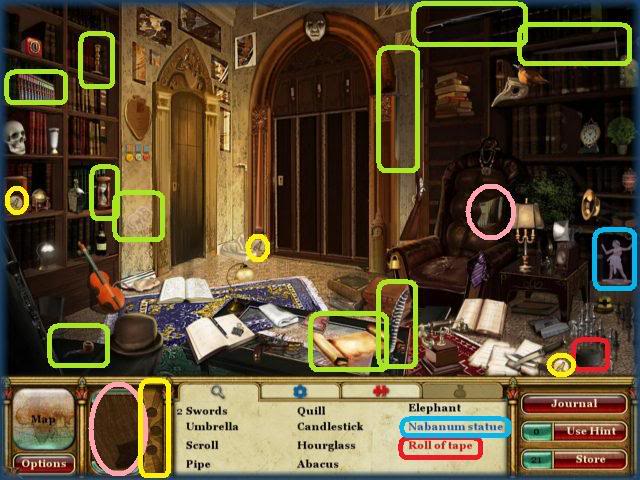
- Locate the 10 missing items and the items in red and blue text.
- Locate the 3 coins circled in yellow.
- Locate the mask piece circled in pink.
London Taxi
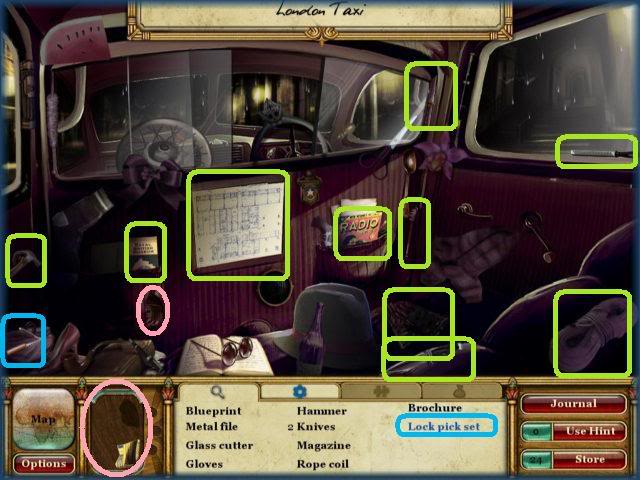
- Locate the 10 hidden objects and object in blue text.
- Locate the mask piece circled in pink.
Back to the Reading Room
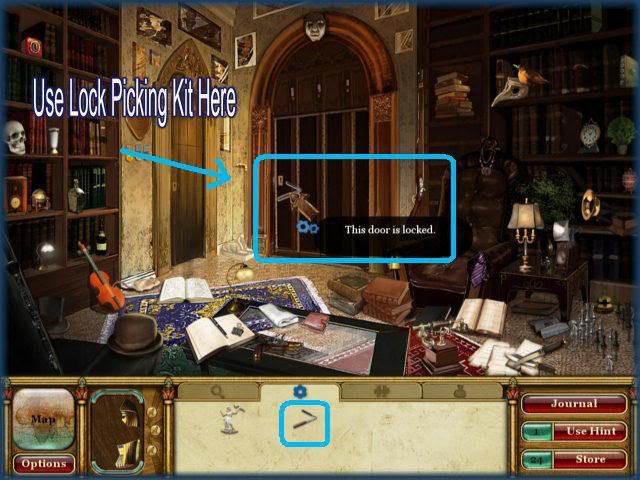
- Use the lock picking kit here.
Tomb Chapel of Nabanum
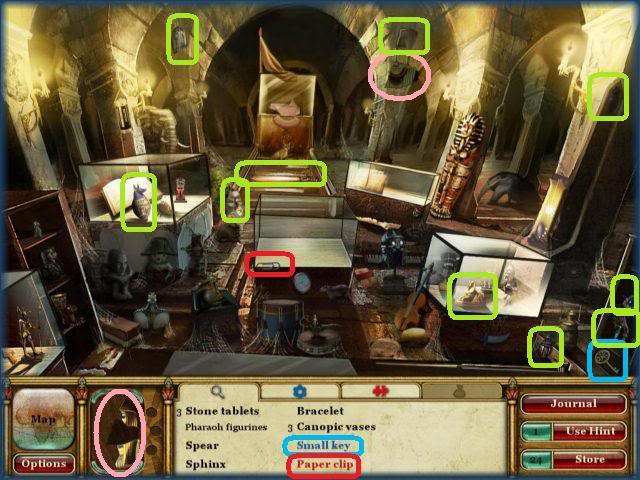
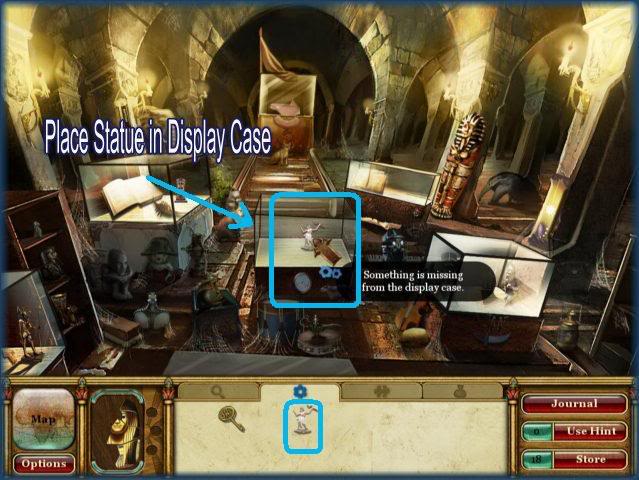
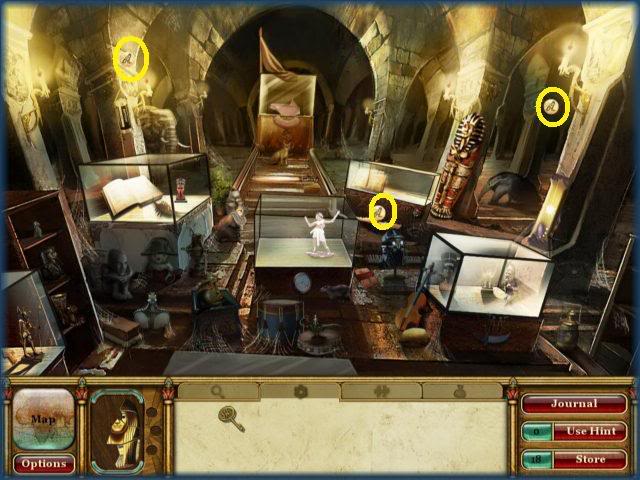
- Locate the 10 hidden items and items in red and blue text.
- Locate the mask piece circled in pink.
- Place the statue into the case.
- Locate the 3 coins circled in yellow above.
Display Case
Mini Game – Repair the Display Case
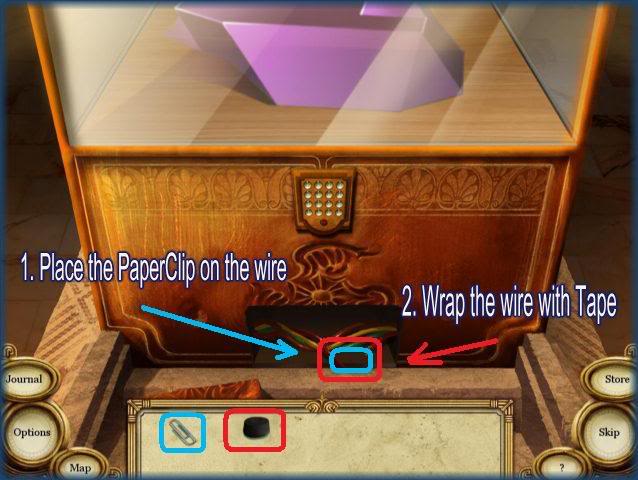
- Place the paperclip on the wire.
- Cover the wire with tape.
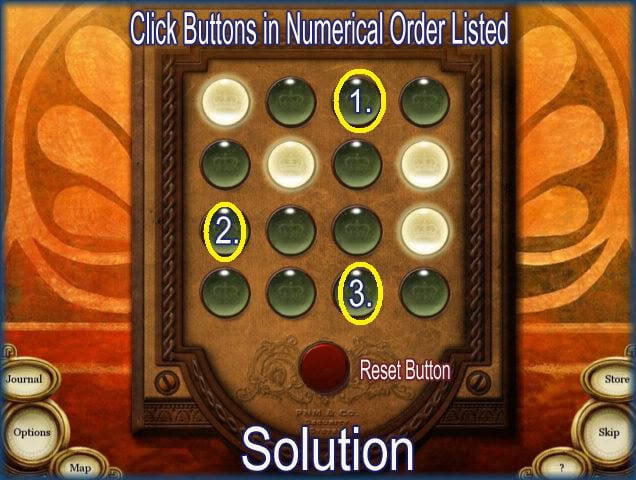
- In this puzzle you must light the entire panel of lights by clicking them in the correct order as one button causes others to light up.
- The solution is in the image above. Click on the 3 buttons as shown. If you mess up there is a reset button at the bottom you can use without penalty. If you get stuck you can purchase a hammer for 12 coins to skip this puzzle if you wish.
Display Case 2
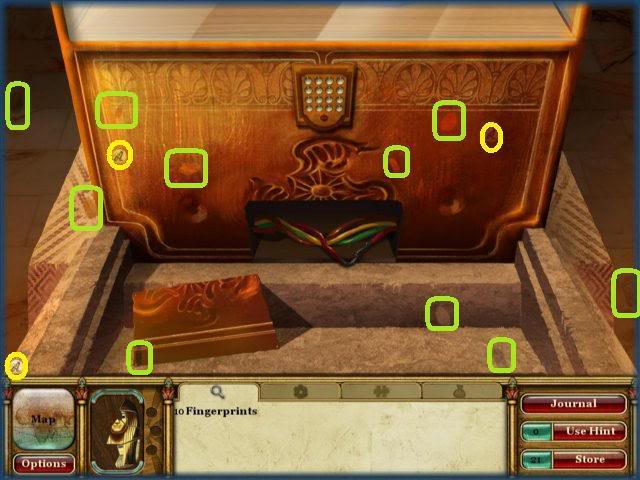
- Locate the 10 fingerprints in the scene.
Tomb Chapel of Nabanum 2
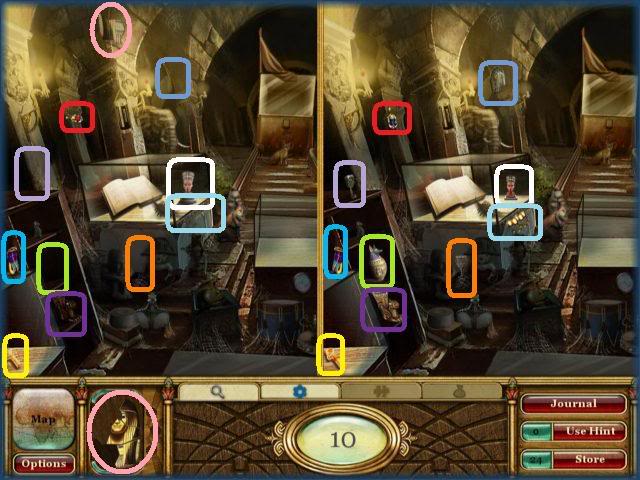
- Find the 10 differences between the 2 scenes.
- Click on the mask piece circled in pink.
- Click on the tape.
- You will have to return to this scene later.
Reading room 2 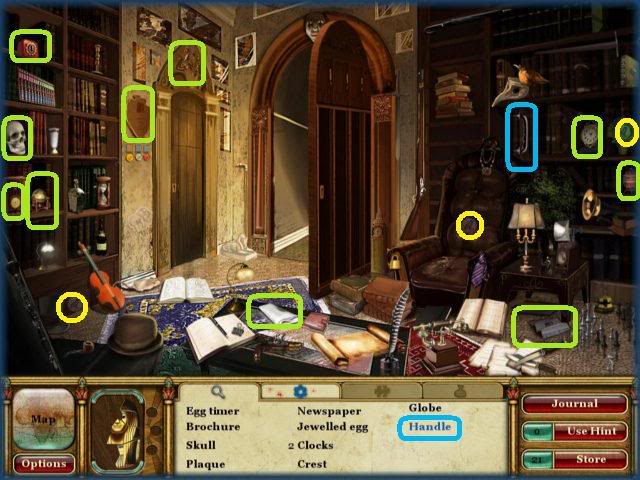
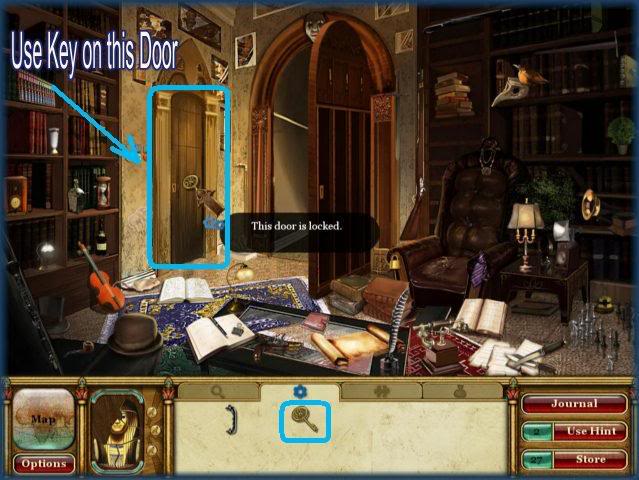
- Locate the 10 hidden items in the scene and blue text item circled in blue.
- Locate the 3 coins circled in yellow.
- Use Key on the door as shown.
London Taxi 2
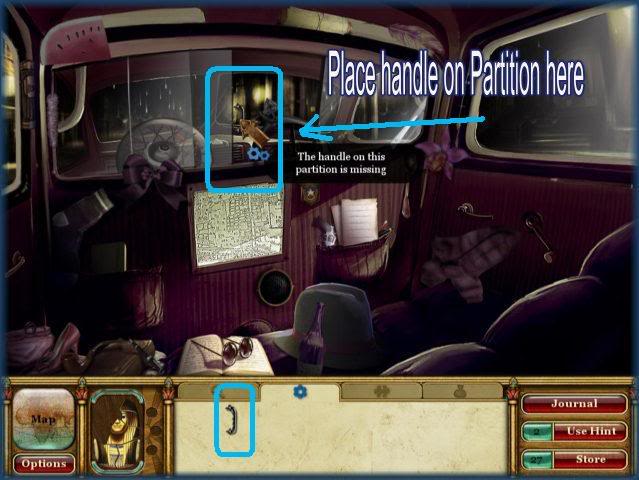
- Place handle on the partition as shown.
Storage Closet
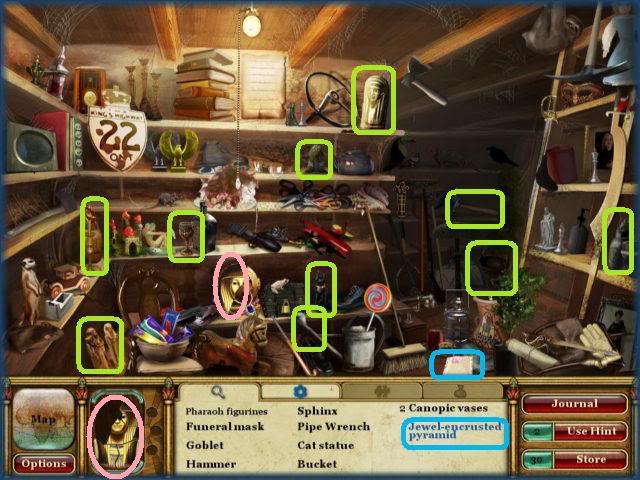
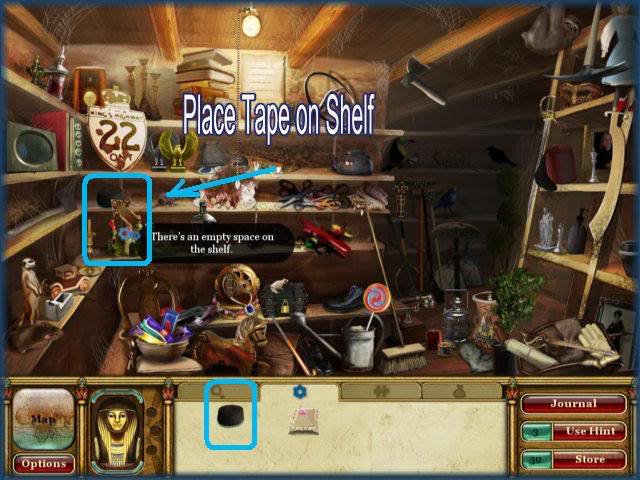
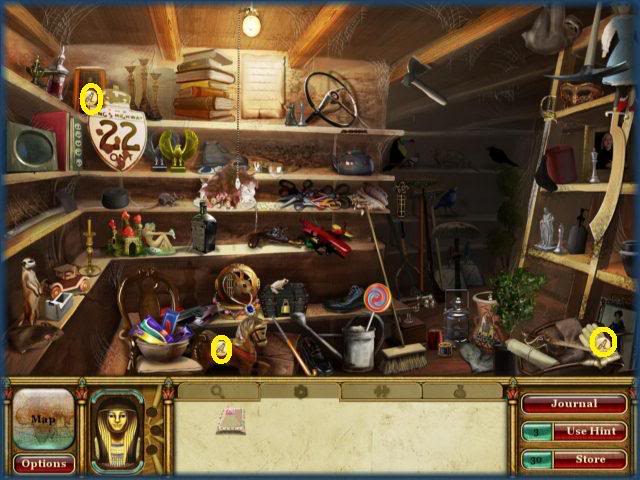
- Locate the 10 hidden objects and blue text item circled in blue.
- Locate the mask piece circled in pink.
- Place the tape on the shelf as indicated.
- Locate the 3 coins circled in yellow.
Tomb Chapel of Nabanum 2
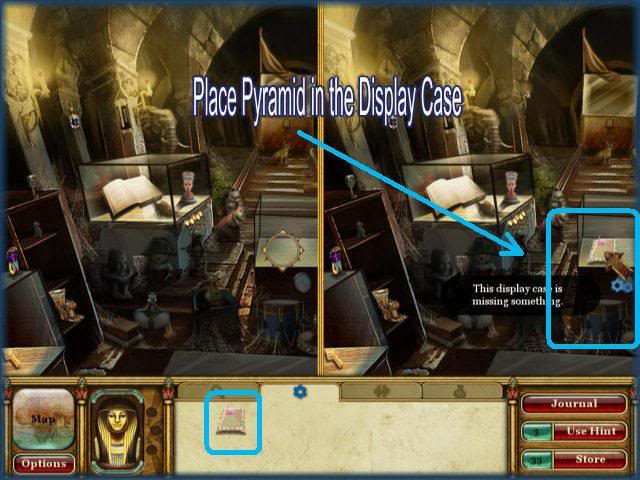
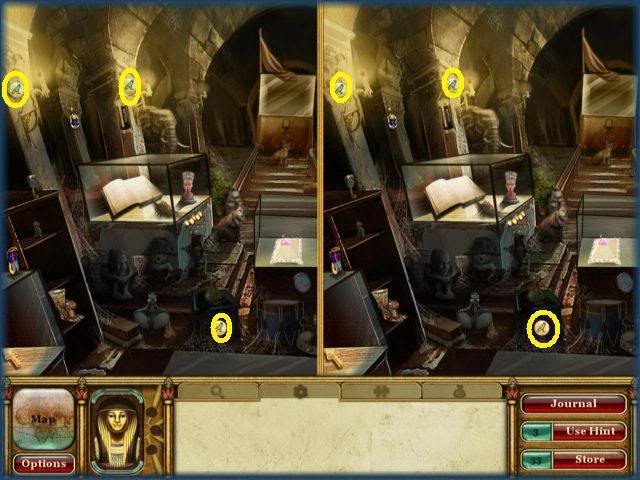
- Place the pyramid in the display case as indicated.
- Locate the 3 coins circled in yellow.
You have found the "Tear of Knowledge"
WORLD 3: PARIS
Location Map – Paris
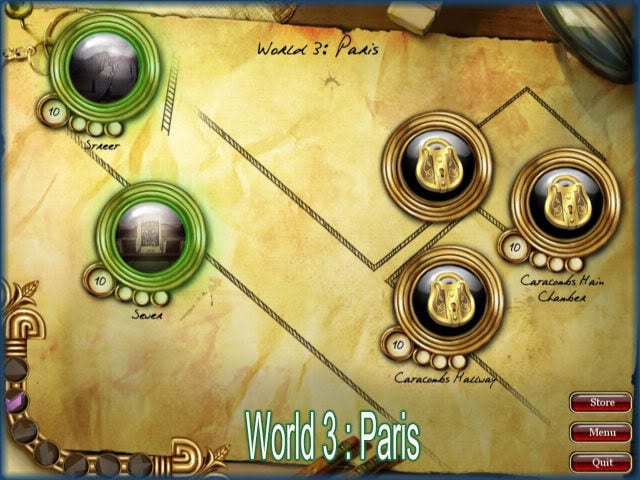
- Begin with the "Street" location.
Street
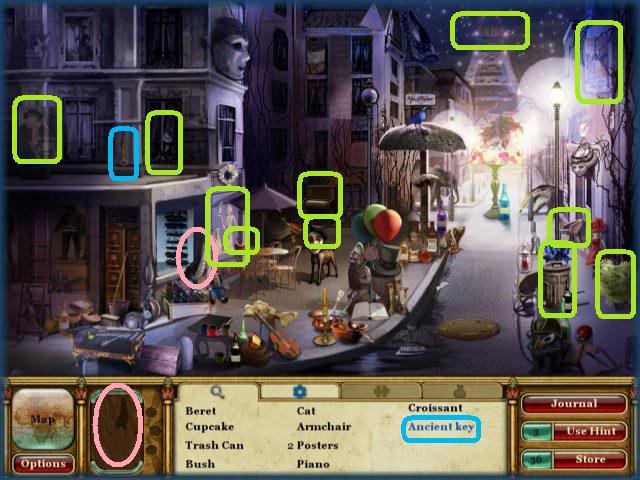
- Locate the 10 hidden objects and the blue text item circled in blue.
- Locate the mask piece circled in pink.
- Return to this location later.
Sewer
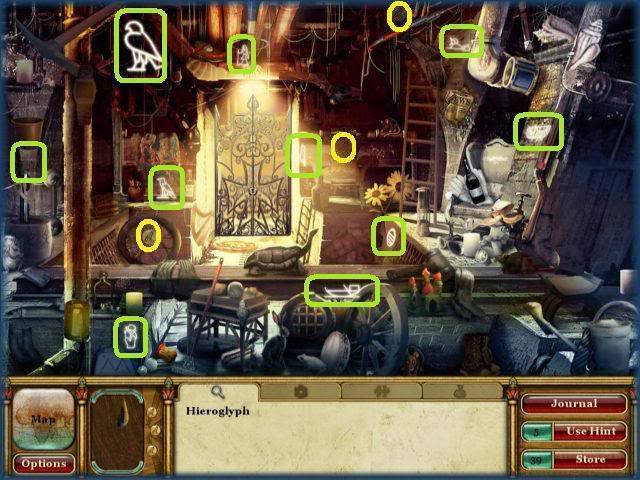
- Locate the 10 Hieroglyphs in the scene.
- Locate the 3 coins circled in yellow.
Sewer 2
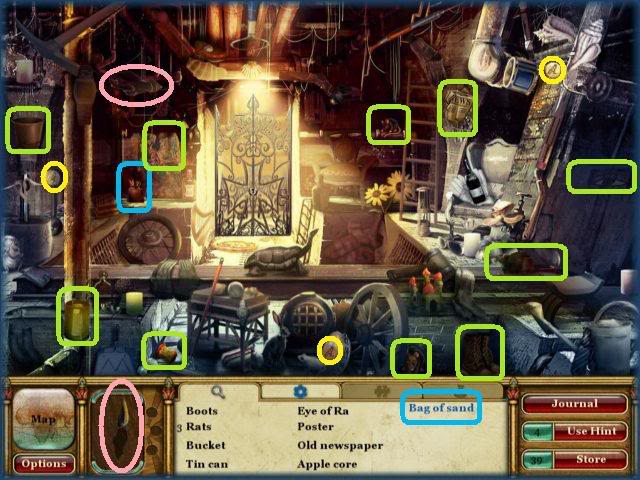
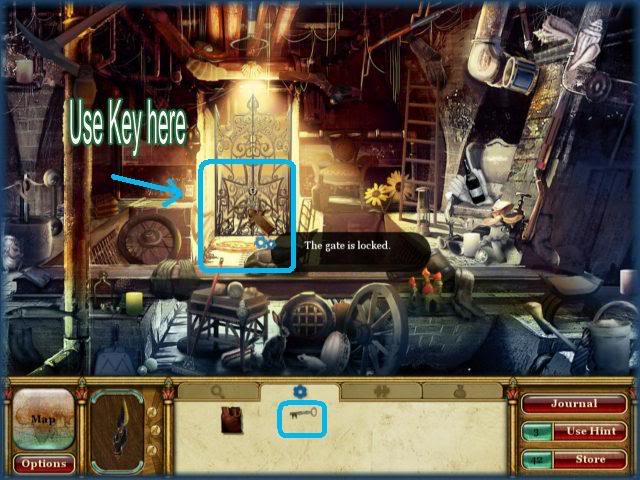
- Locate the 10 hidden items in scene and the blue text item circled in blue.
- Locate the mask piece circled in pink.
- Locate the 3 coins circled in yellow.
- Use the key in the gate as indicated.
Catacomb’s Hallway
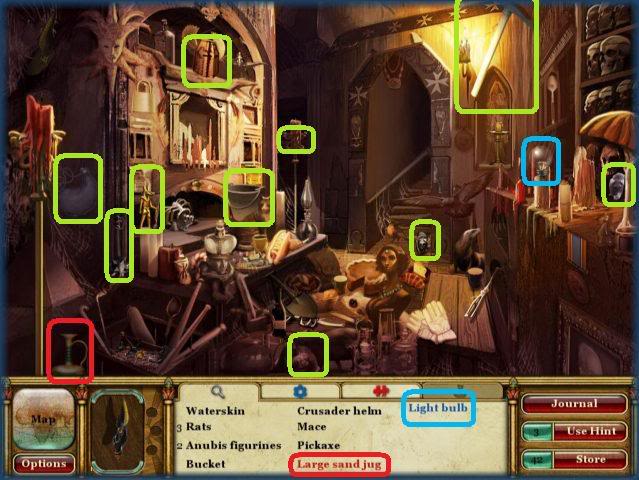
- Locate the 10 hidden objects as well as the red and blue text items circled in red and blue.
- Return to this location later.
Catacomb’s Main Chamber
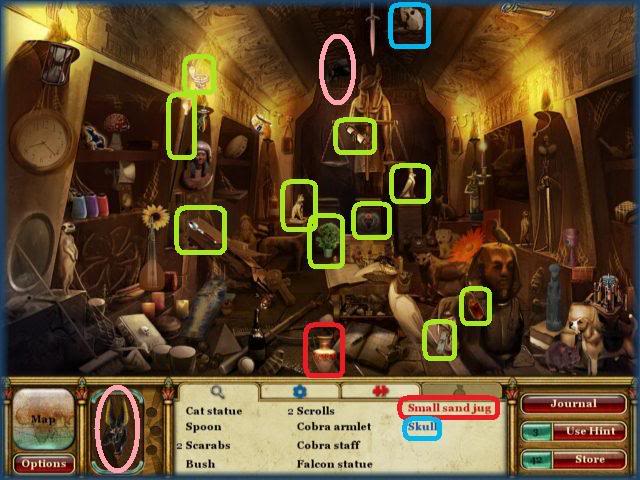
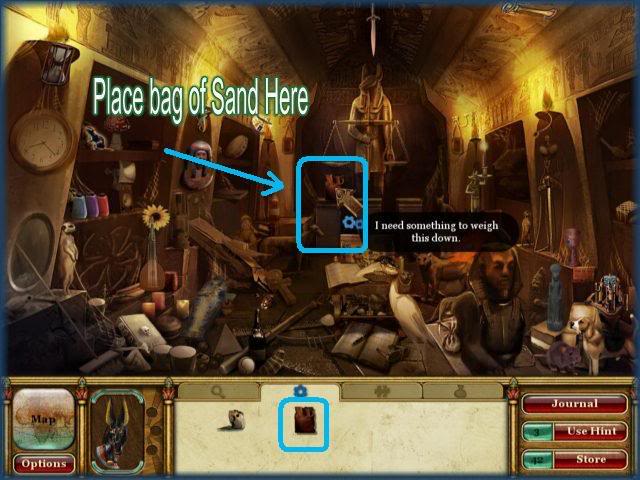
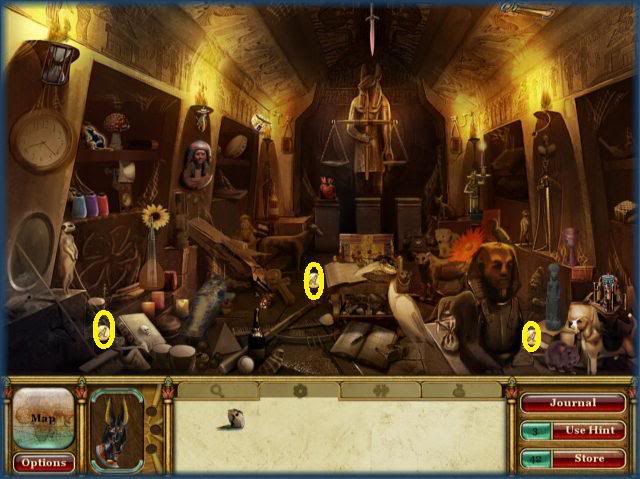
- Locate the 10 hidden objects as well as the blue and red text items circled in blue and red.
- Locate the mask piece circled in pink.
- Place the bag of sand where indicated.
- Locate the 3 coins circled in yellow.
Catacomb’s Main Chamber 2
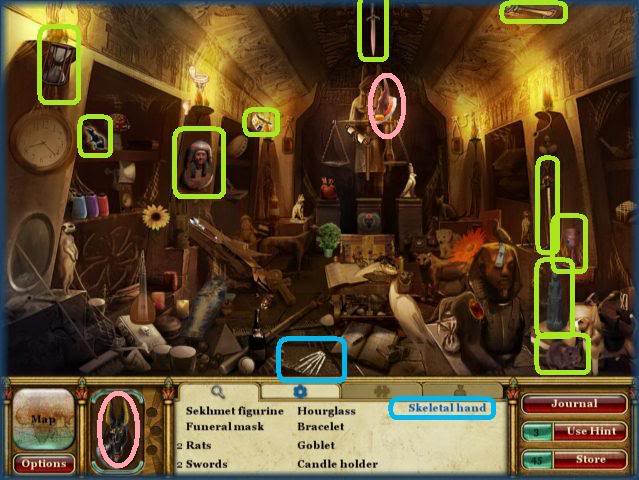
- Locate the 10 hidden objects and blue text item circled in blue.
- Locate the mask piece circled in pink. **You have completed a mask and won 6 Coins!**
- Return to this location later.
Return to the "Street"
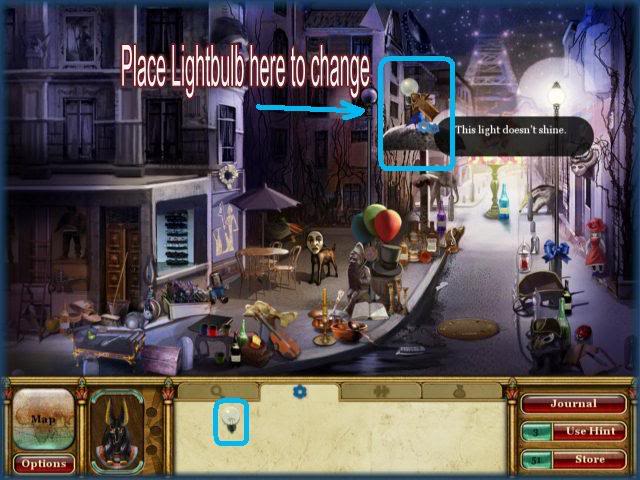
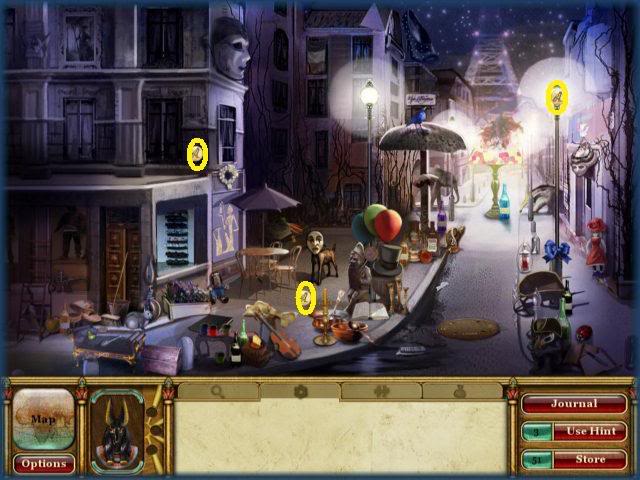
- Place light bulb where indicated.
- Locate the 3 coins circled in yellow.
Return to Catacomb’s Hallway 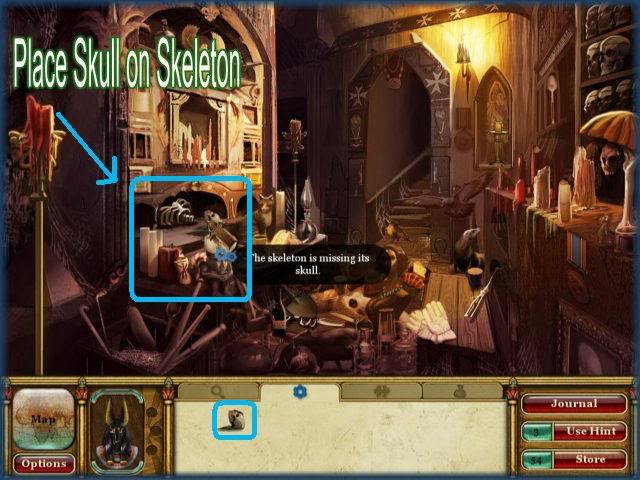
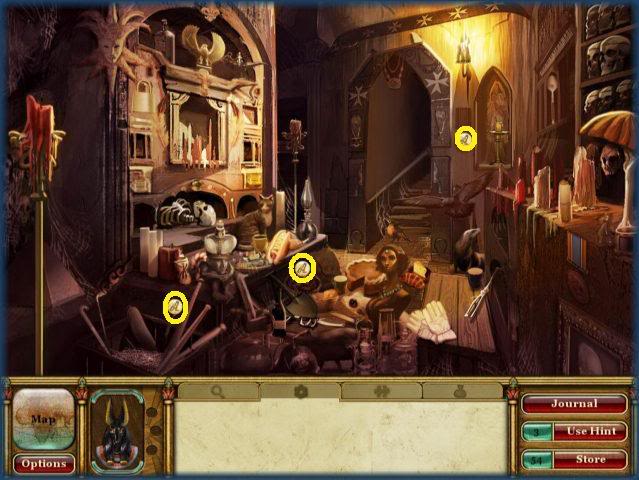
- Place the skull on skeleton’s body as indicated.
- Locate the 3 coins circled in yellow.
Catacomb’s Hallway 2
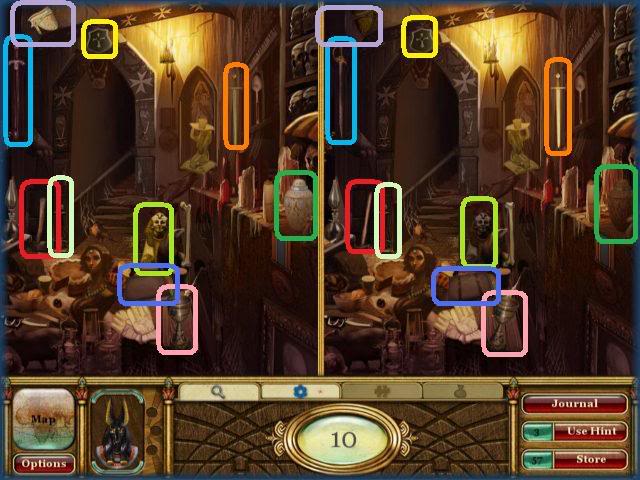
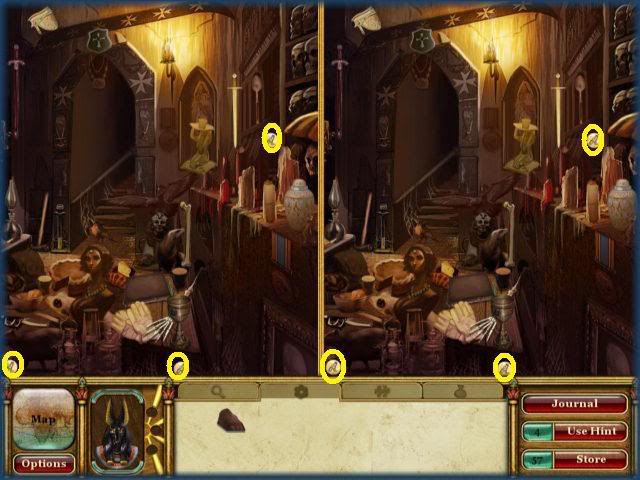
- Locate the 10 differences between the scenes.
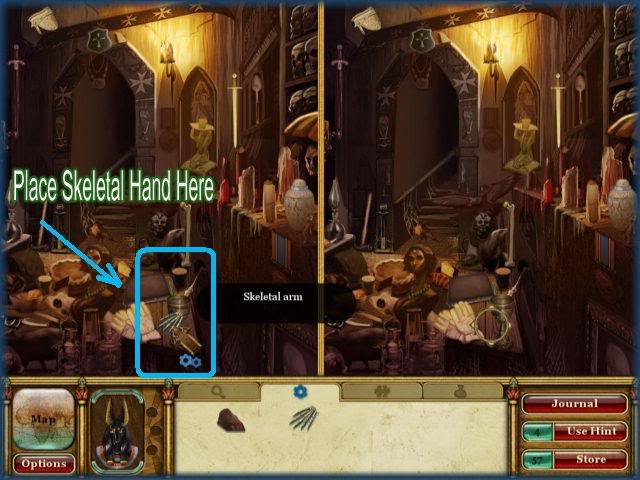
- Place the skeletal hand where indicated.
- Locate the 3 coins circled in yellow.
Return to Catacomb’s Main Chamber 2
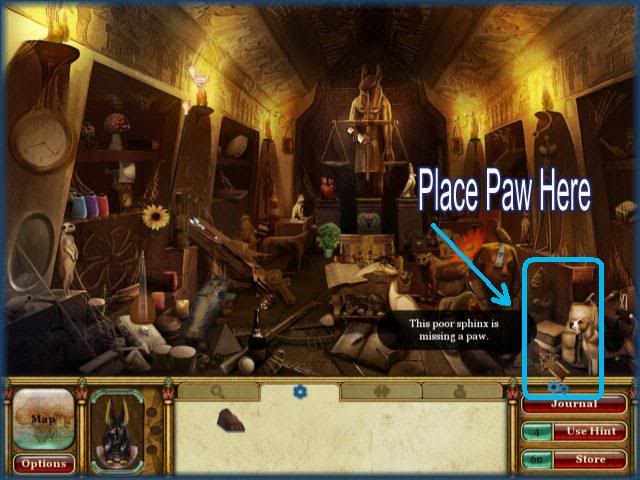
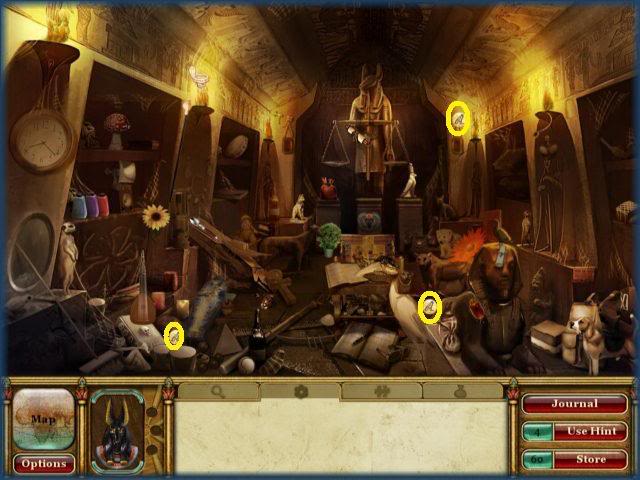
- Place the paw as indicated above.
- Locate the 3 coins circled in yellow.
Mini Game – Sand Pouring
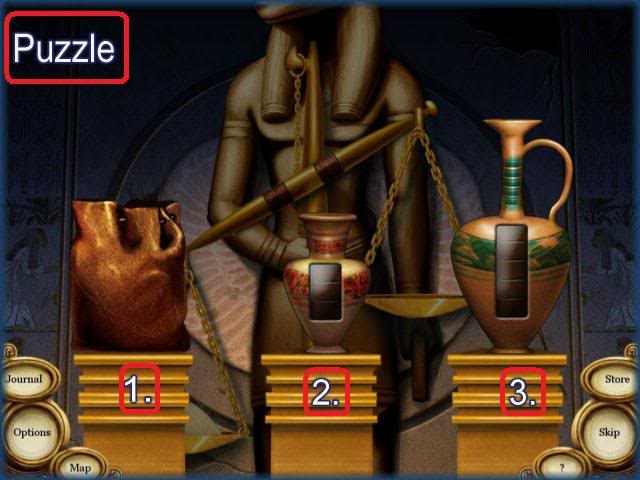
- In this game you need the same amount of sand in all of the jugs.
- Click on the jugs so they will move up into their correct locations.
- I have labeled the jugs 1, 2 and 3 from right to left.
- Click on a jug then on the one you wish to pour into next.
- Follow this formula to solve this puzzle.
- 1 into 2, 2 into 3, 1 into 2, 2 into 3, 3 into 1, 2 into 3, 1 into 2 and 2 into 3.
WORLD 4: ANTARCTIC TEMPLE
Location Map – Antarctic Temple
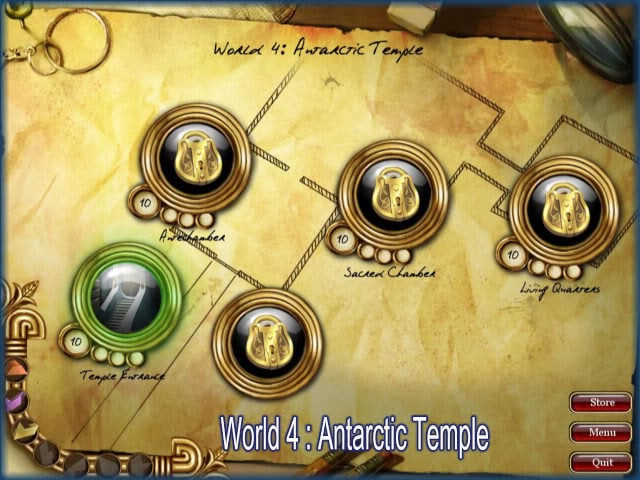
- Begin by clicking on the "Temple Entrance"
Temple Entrance
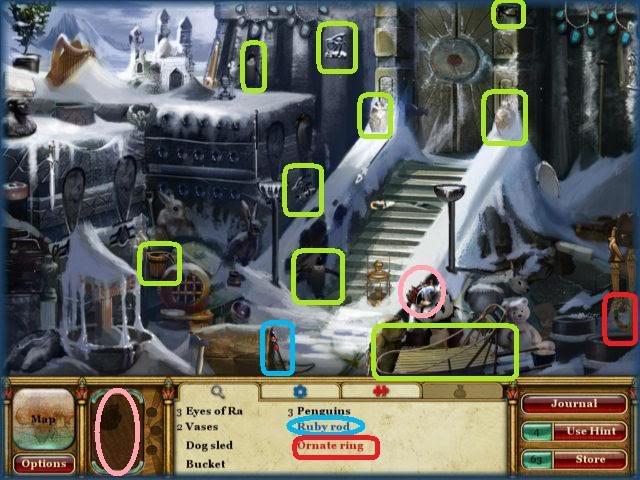
- Locate the 10 hidden items and the red and blue text items circled in red and blue.
- Locate the map piece circled in pink.
- You will need to return to this location later.
Mini Game – Rotating Rings Puzzle.
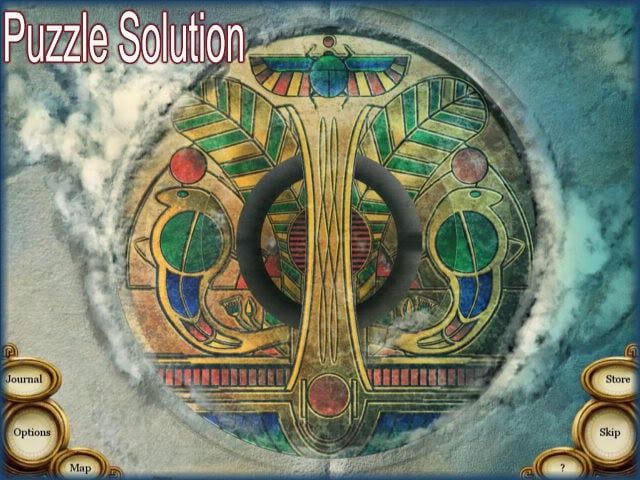
- Here you must rotate the rings until you complete the image above.
- Click on the rings and they will move into position.
- Clicking on some rings moves others so you will need to play around with this first.
- The solution is shown above.
- You may skip this puzzle if you wish by purchasing the hammer and clicking on skip in the mini game menu.
Antechamber
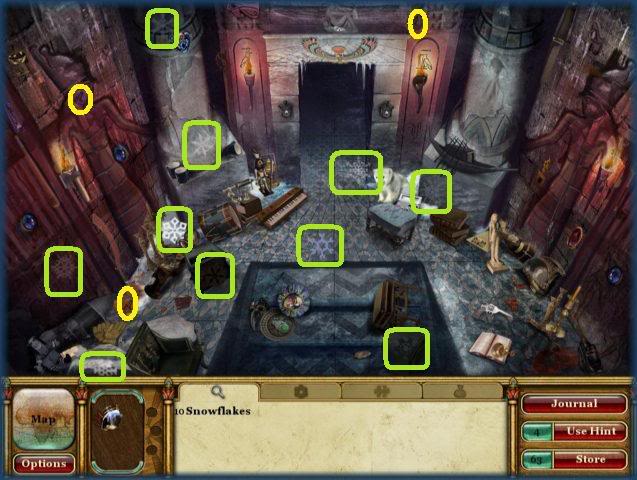
- Locate 10 snowflakes in the scene shown above.
- Locate the 3 coins circled in yellow.
Antechamber 2
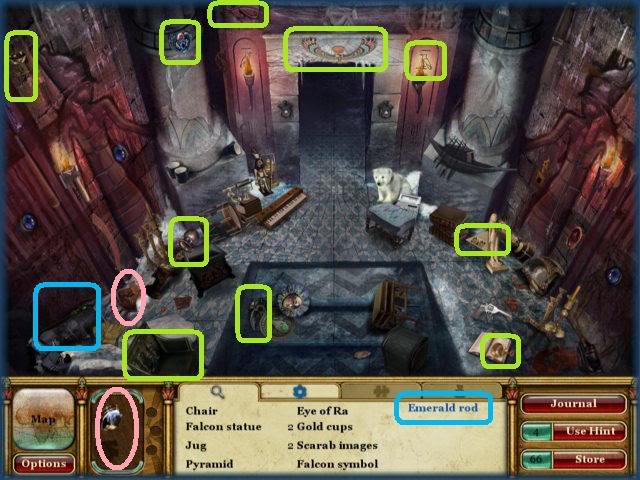
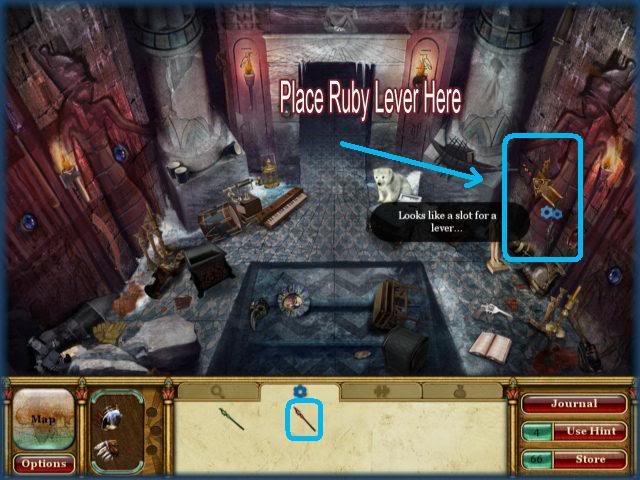
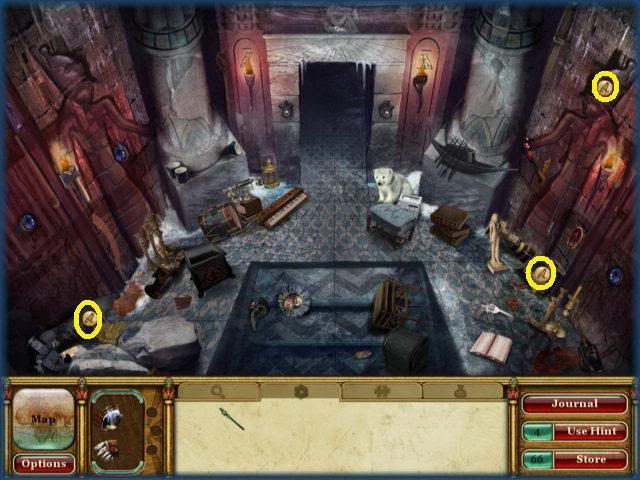
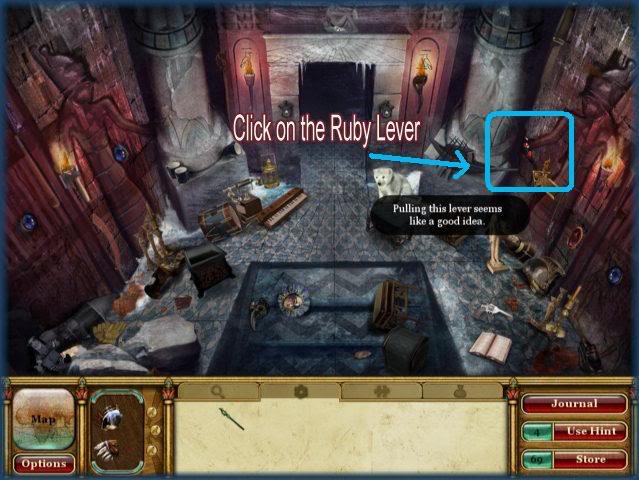
- Locate the 10 hidden objects and blue text item circled in blue.
- Locate the map piece circled in pink
- Place the ruby lever where indicated.
- Locate the 3 coins circled in yellow.
- Pull the lever and proceed.
Sacred Chamber
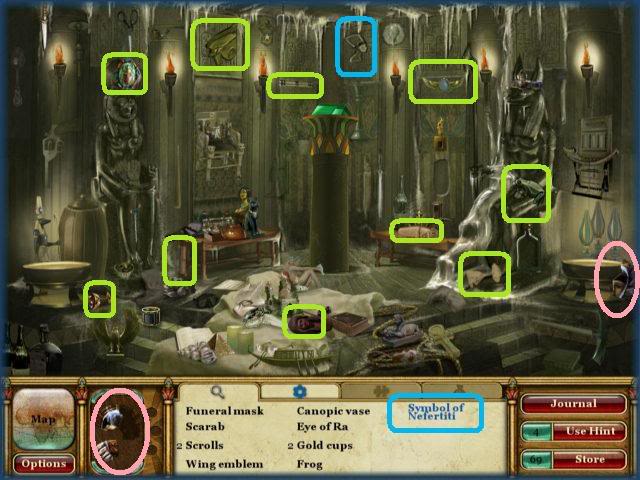
- Locate the 10 hidden objects in the scene and the blue text item circled in blue.
- Locate the mask piece circled in pink.
- Return to this location later.
Living Quarters
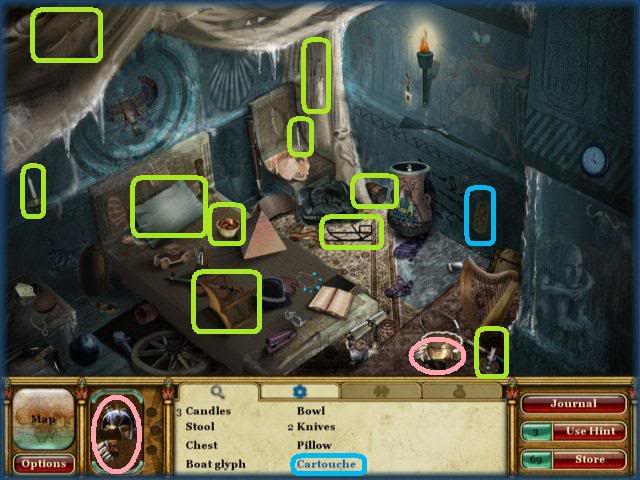
- Locate the 10 hidden objects and blue text item circled in blue.
- Locate the mask piece circled in pink.
Return to Temple Entrance
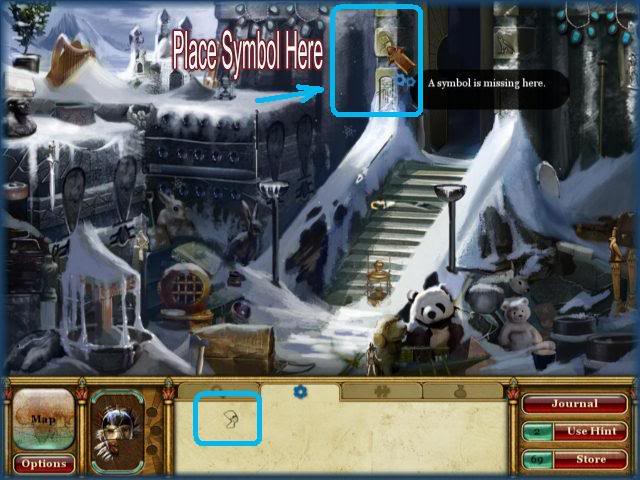
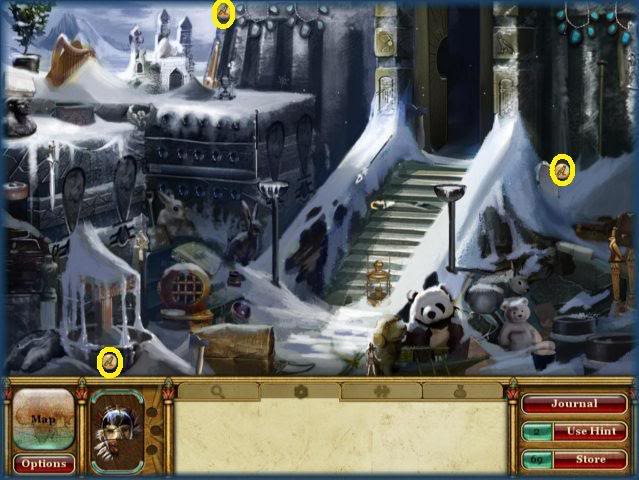
- Place the symbol where indicated.
- Locate the 3 coins circled in yellow.
Temple Entrance 2
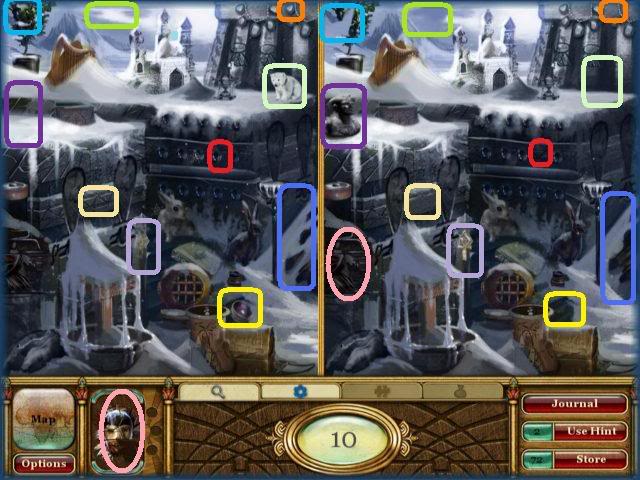
- Find the 10 differences between the 2 scenes.
- Locate the mask piece circled in pink.
- Return to this location later.
Return to Sacred Chamber
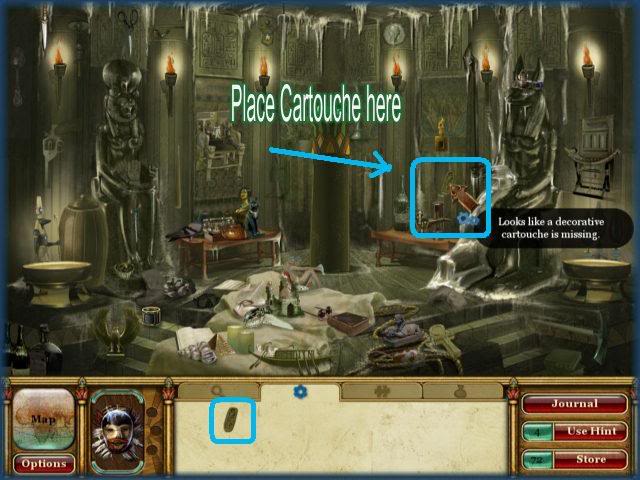
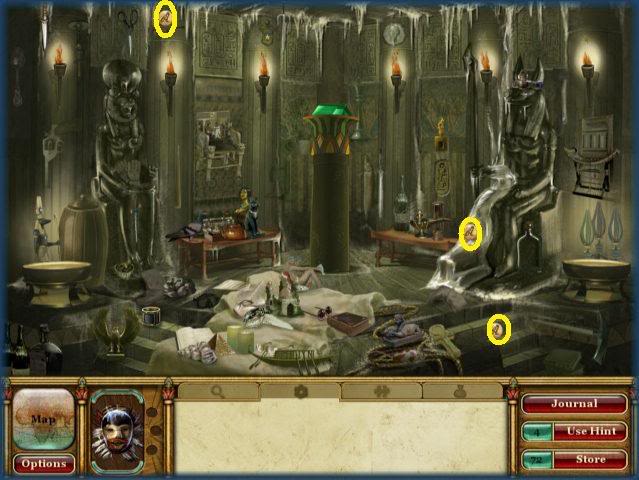
- Place the Cartouche where indicated.
- Locate the 3 coins circled in yellow.
Sacred Chamber 2
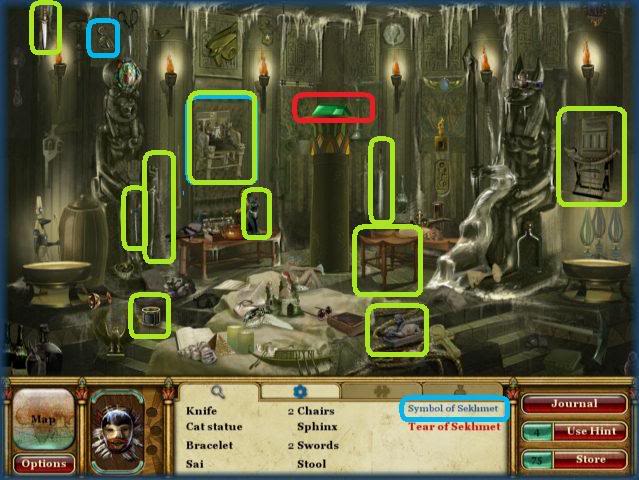
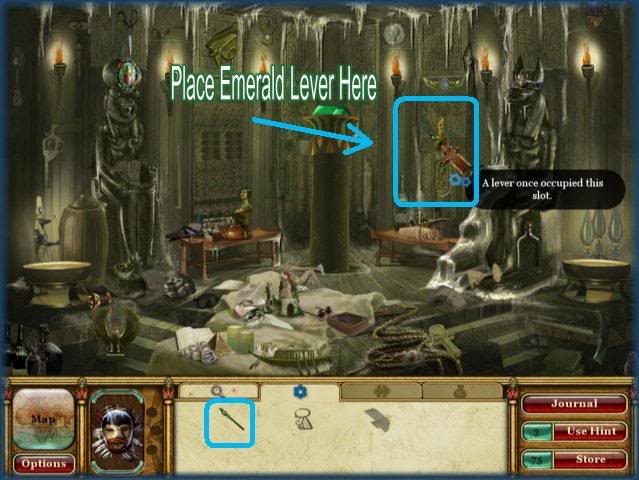
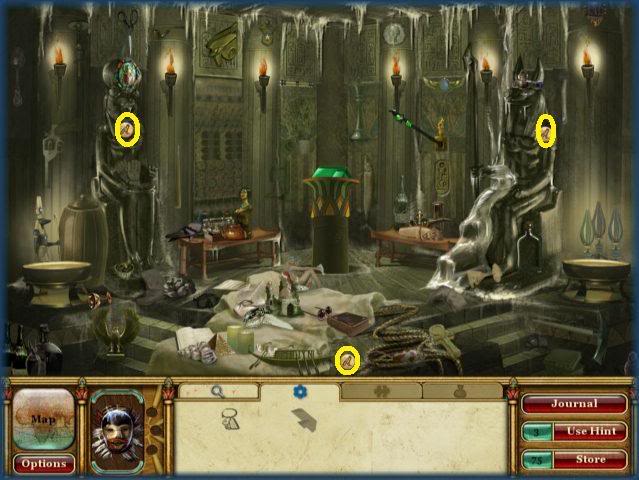
- Locate the 10 hidden objects and blue and red text items circled in blue and red.
- Place Emerald Lever as indicated and the tear will lower.
- Locate the 3 coins circled in yellow.
- You will return to this location later.
Return to Living Quarters
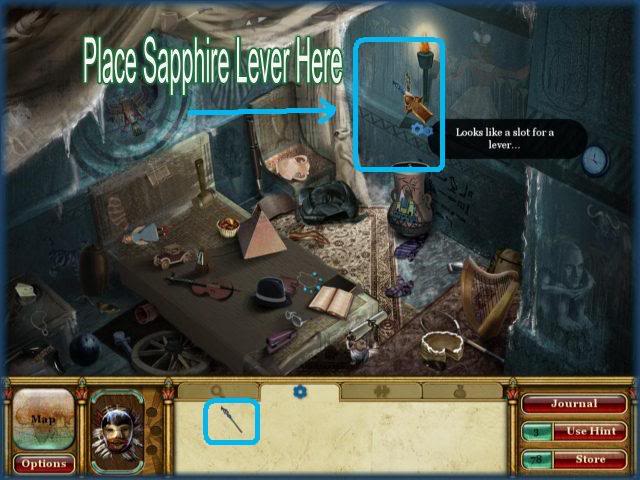
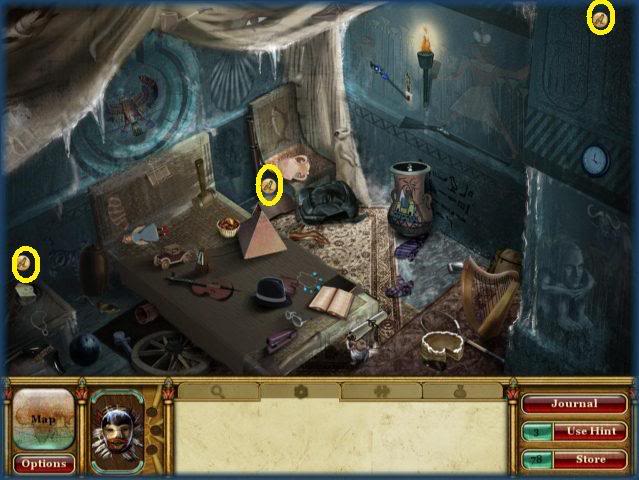
- Place the Sapphire lever as indicated.
- Locate the 3 coins circled in yellow.
Temple Entrance 2
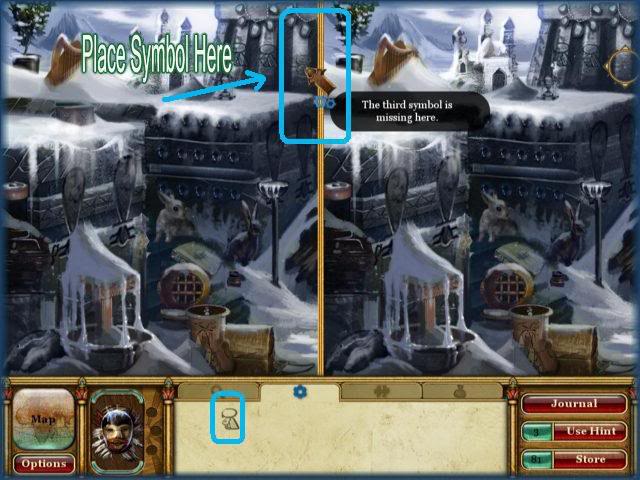
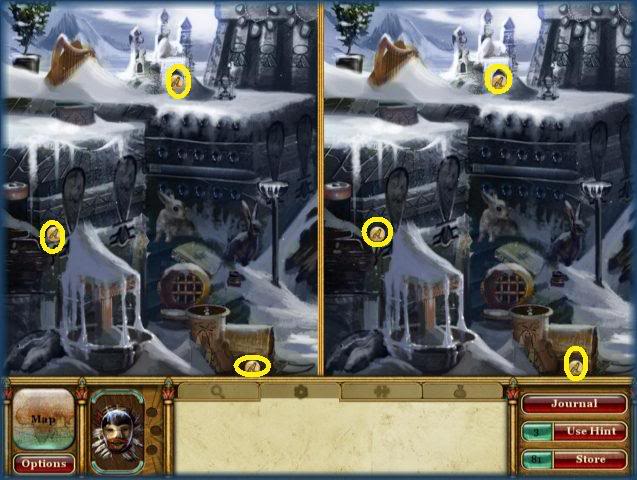
- Place the symbol as indicated.
- Locate the 3 coins circled in yellow.
Sacred Chamber 2
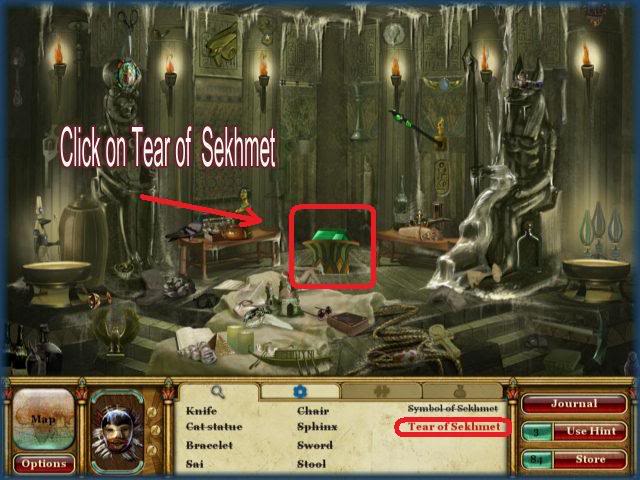
- Click on the tear of Sekhmet.
You have found the "Tear of Courage"
WORLD 5: SOUTH AMERICAN JUNGLE
Location Map – South American Jungle
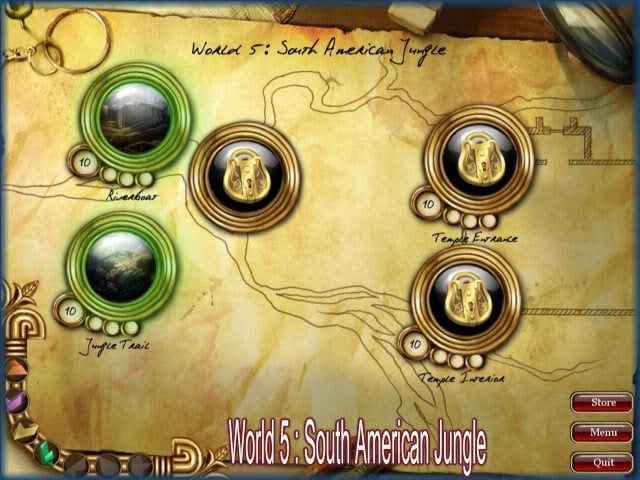
- Begin in the "Riverboat" location.
Riverboat
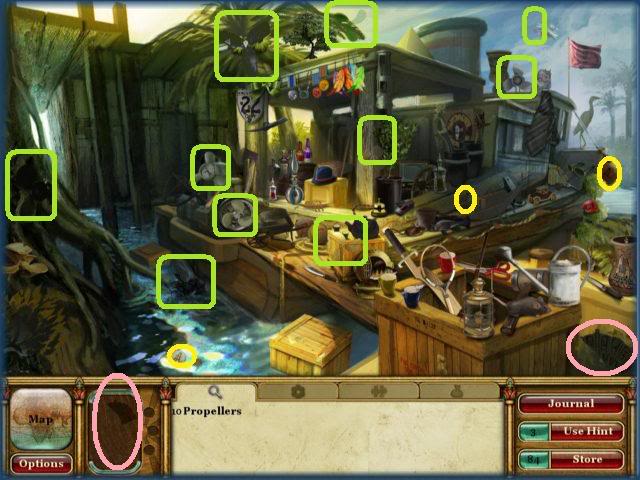
- Locate the 10 propellers circled above.
- Locate the mask piece circled in pink.
- Locate the 3 coins circled in yellow.
Riverboat 2
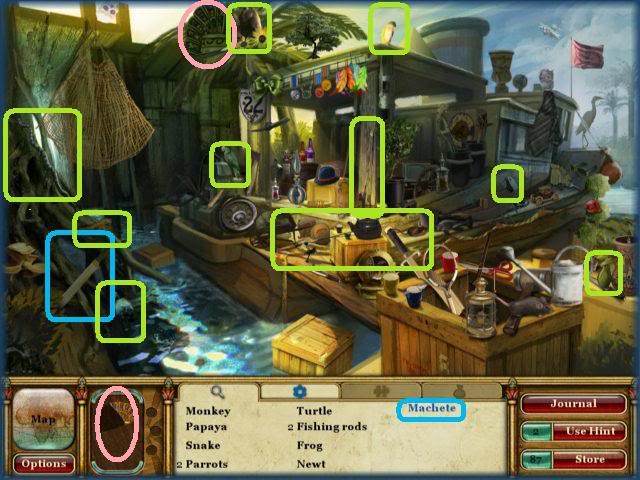
- Locate the 10 hidden objects and the blue text item circled in blue.
- Locate the mask piece circled in pink.
- Return to this location later.
Jungle Trail
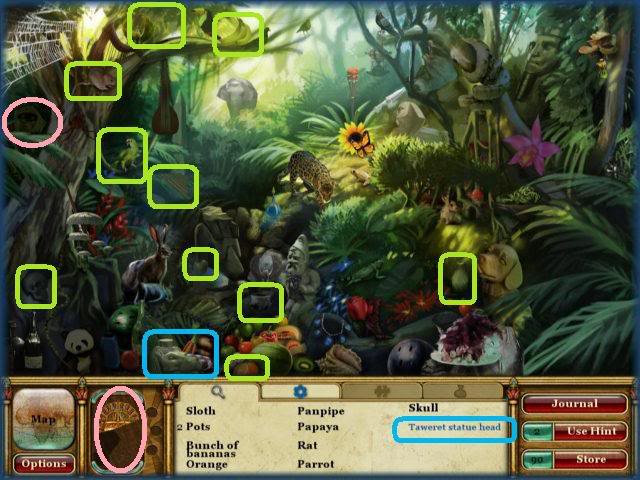
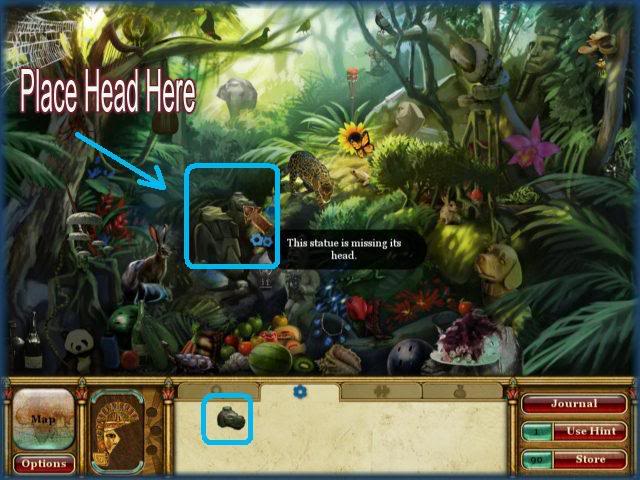
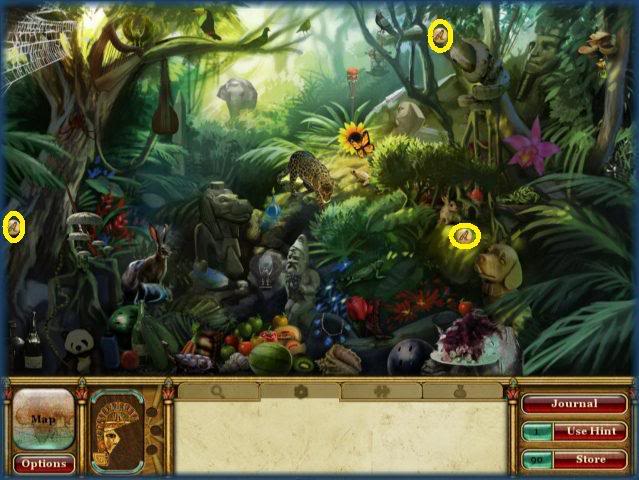
- Locate the 10 hidden objects and blue text object circled in blue.
- Locate the map piece circled in pink.
- Place the head on the statue as indicated.
- Locate the 3 coins circled in yellow.
Jungle Trail 2
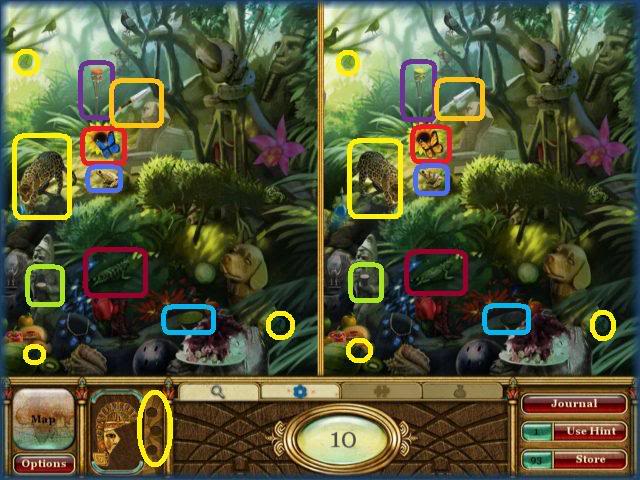
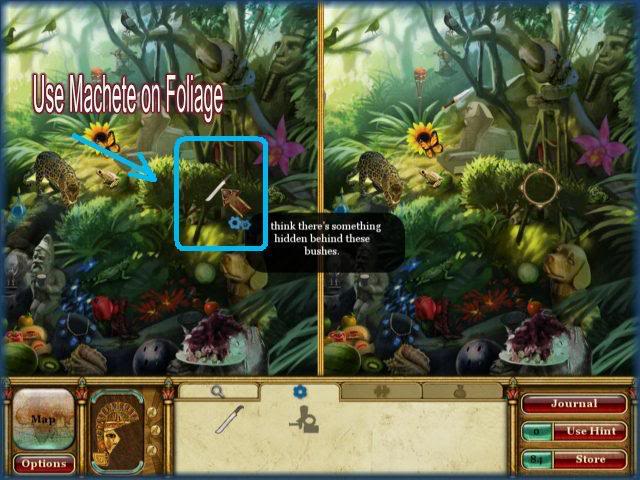
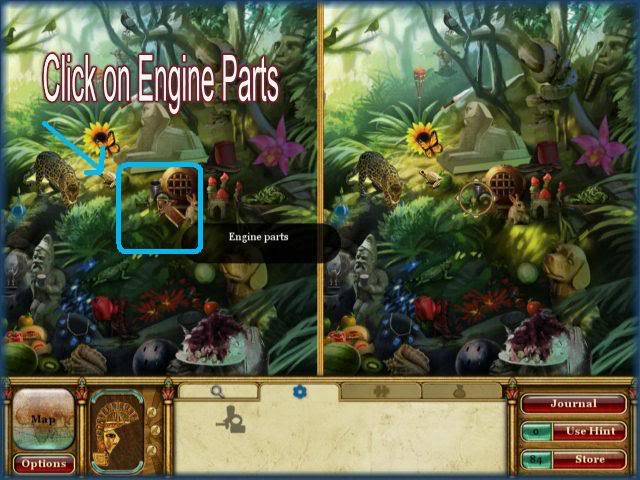
- Locate the 10 differences between the 2 scenes.
- Locate the 3 coins circled in yellow.
- Use the machete on the foliage as indicated.
- Click on the engine parts.
- Return to this location later.
Riverboat 2
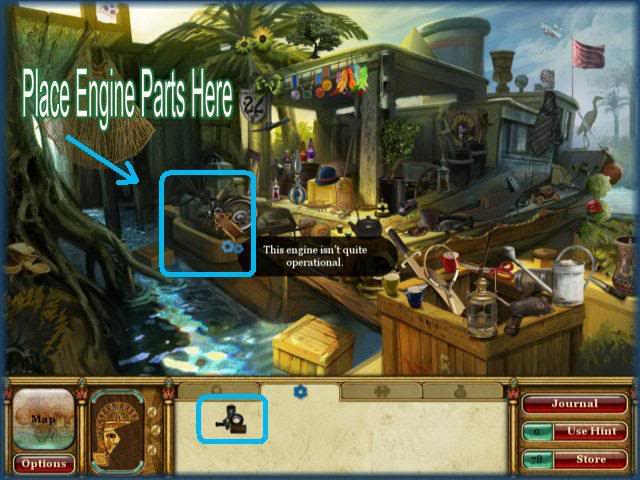
- Place the engine parts as indicated which triggers a mini game.
Mini Game – Drive the Riverboat
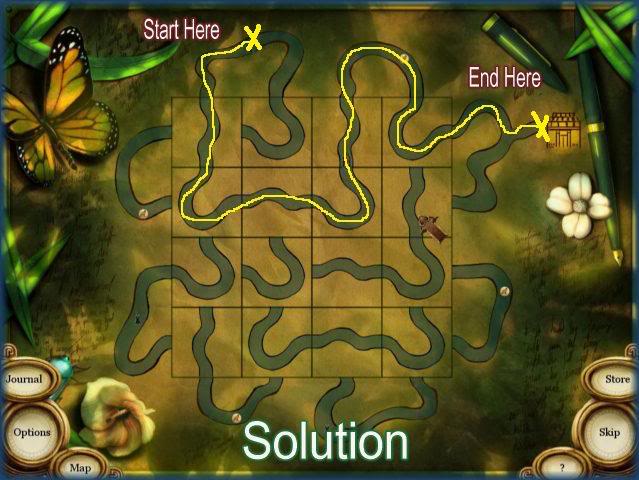
- In this game you are to get the mini boat from one side to the other as indicated in the image above.
- Click on the tiles to turn them before the boat touches or it will go back to the start.
- The image above is one possible solution as there are many for this game.
- If you choose you can obtain extra hints and coins by driving over them in this game.
- You may skip this puzzle with the hammer if you wish.
Temple Entrance
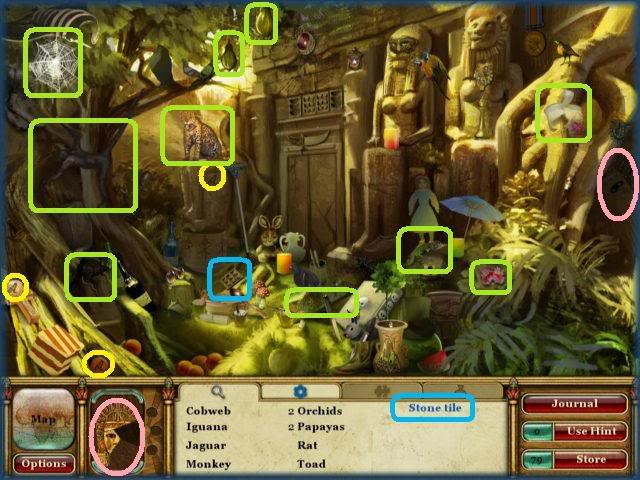
- Locate the 10 hidden objects and blue text item circled in blue.
- Locate the mask piece circled in pink.
- Locate the 3 coins circled in yellow.
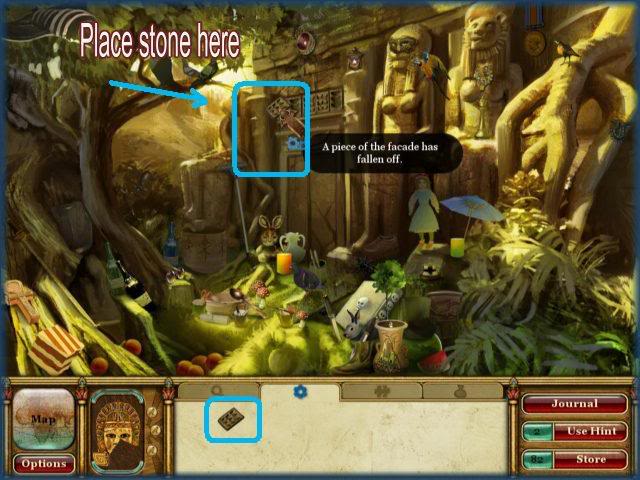
- Place the stone above door as indicated above.
Temple Entrance 2
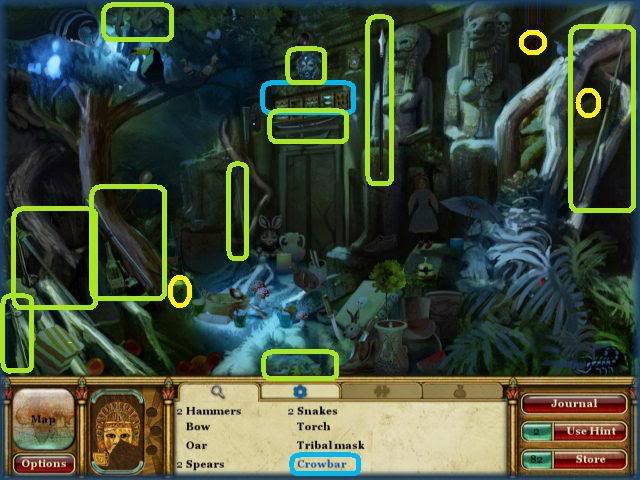
- Locate the 10 hidden objects and blue text item circled in blue.
- Locate the 3 coins circled in yellow.
- Press the 3 glowing stones from left to right to open the Temple’s interior.
Temple Interior
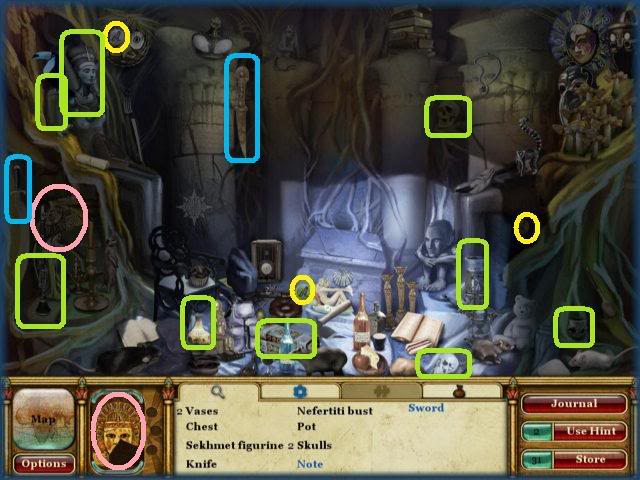
- Locate the 10 hidden objects and the blue text item "Sword" circled in blue.
- Locate the mask piece circled in pink.
- Locate the 3 coins circled in yellow.
- Go back outside of Temple.
Return to Temple Entrance 2
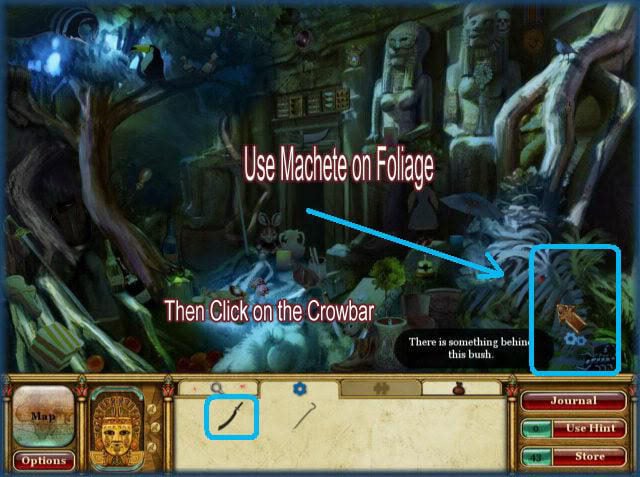
- Use the machete to cut away foliage and click on the crowbar to enter into inventory.
Return to Temple Interior
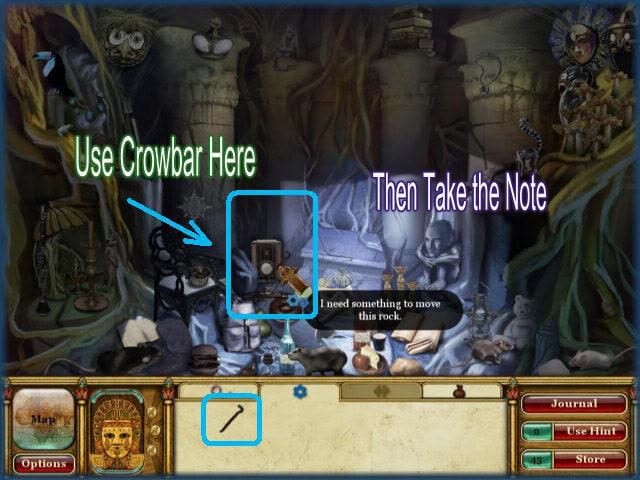
- Use the crowbar as indicated and take the note.
- Read the storyline and proceed.
WORLD 6: JAPANESE PALACE
Location Map – Japanese Palace
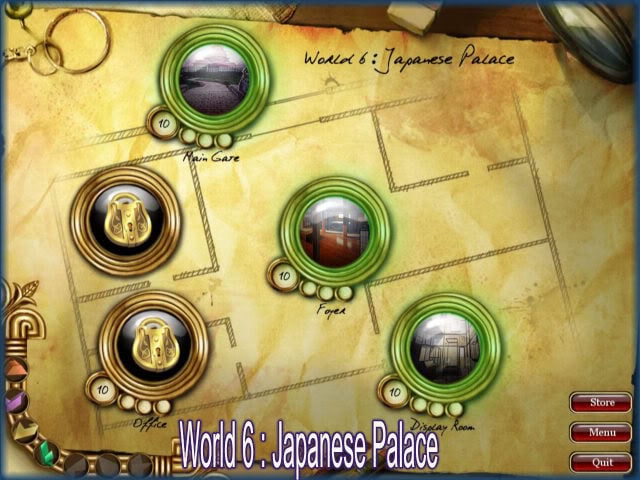
- Begin with the "Main Gate" location.
Main Gate
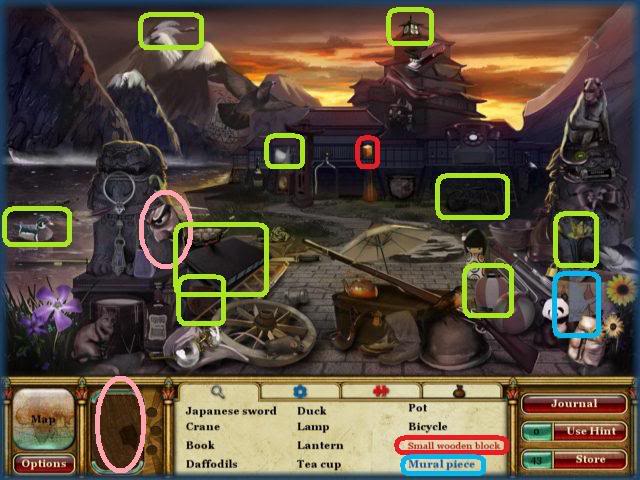
- Locate the 10 hidden objects and the red and blue text items circled in red and blue.
- Locate the mask piece circled in pink.
- Return to this location later.
Foyer
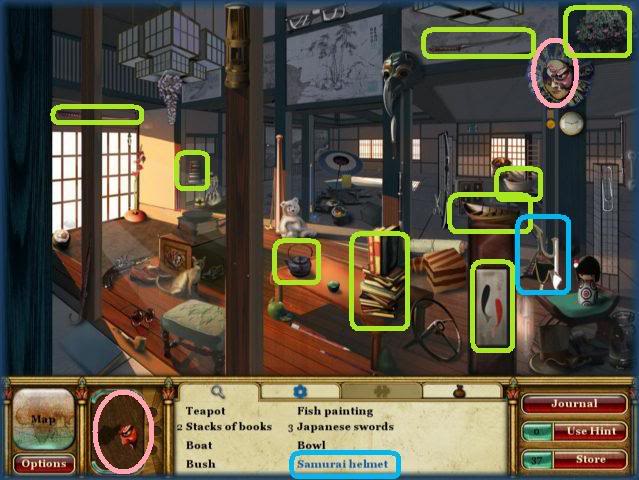
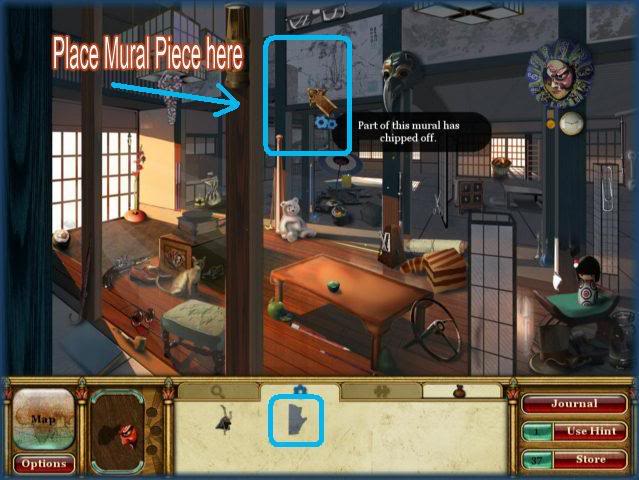
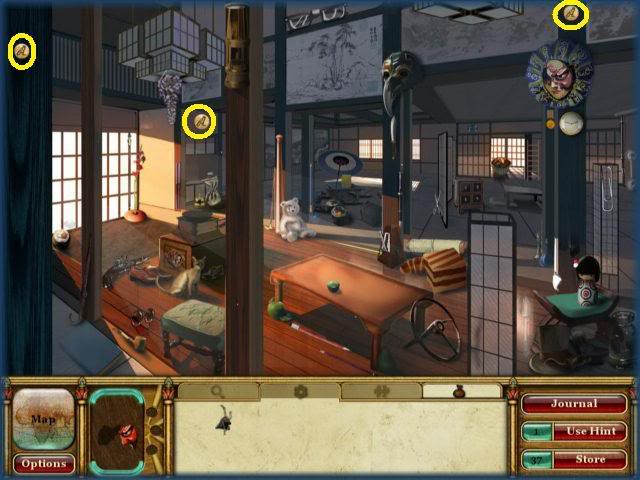
- Locate the 10 hidden objects and blue text item circled in blue.
- Place the mural piece as indicated.
- Locate the 3 coins circled in yellow.
Foyer 2 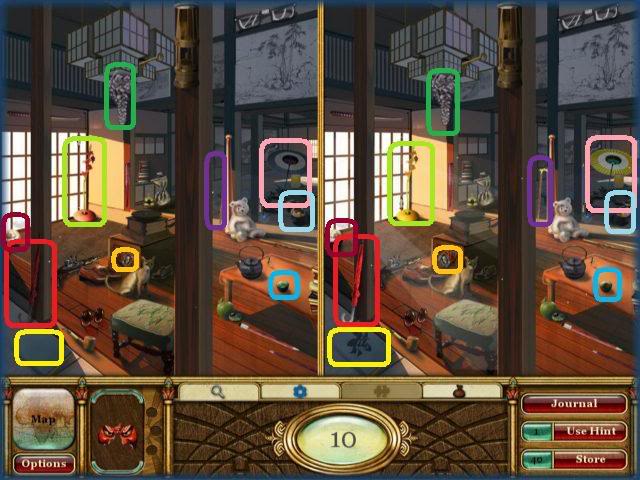
- Locate the 10 differences between the scenes.
- Return to this location later.
Display Room 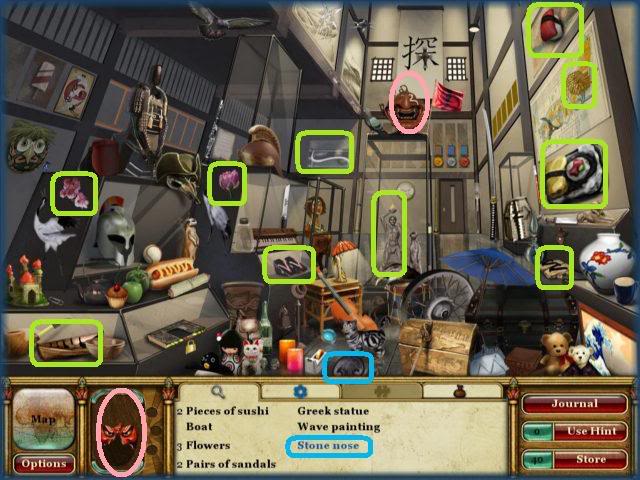
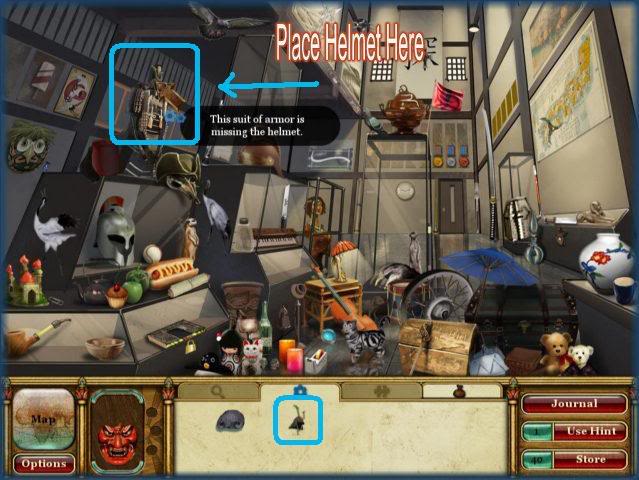
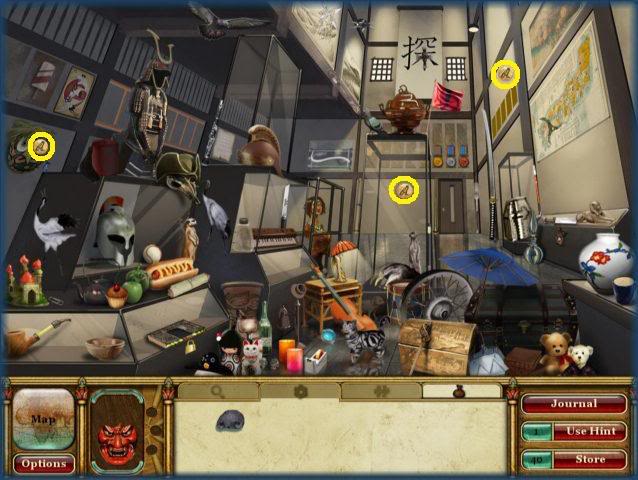
- Locate 10 hidden objects and blue text item circled in blue.
- Locate the mask piece circled in pink.
- Place the helmet at the top of the suit of armor as indicated above.
- Locate the 3 coins circled in yellow.
Display Room 2 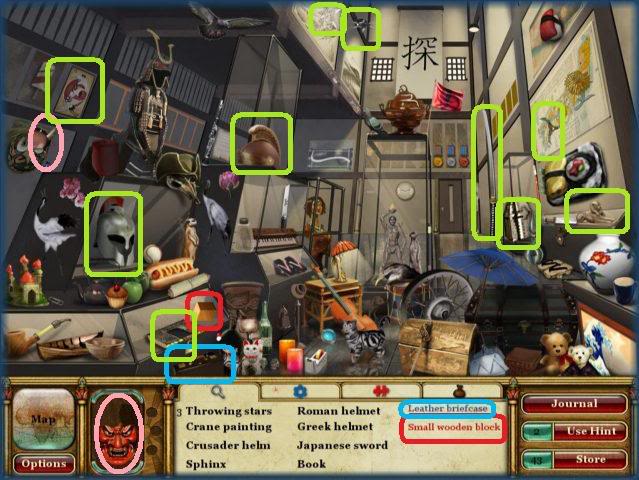
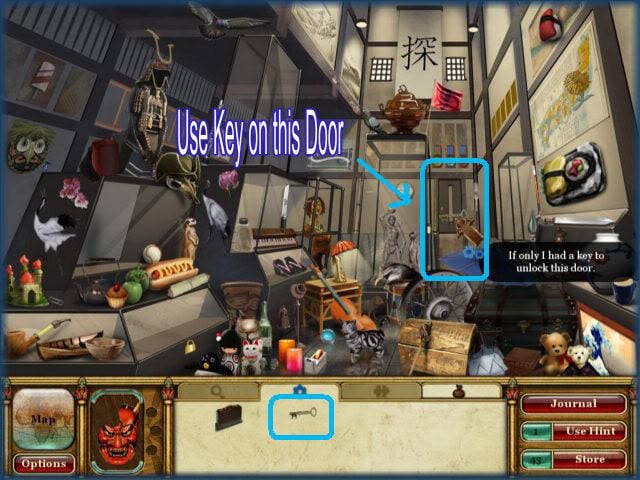
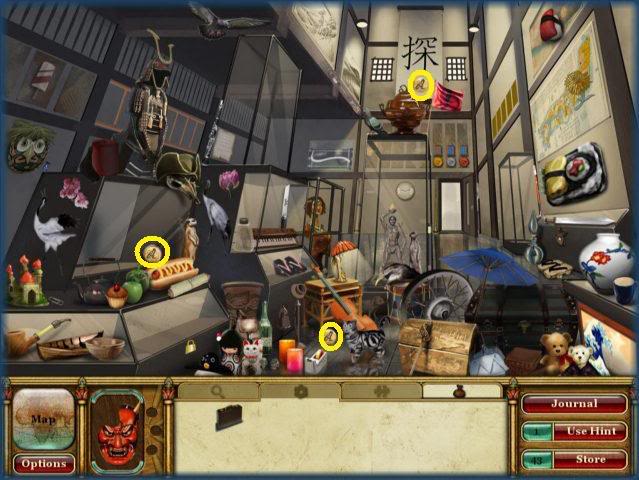
- Locate the 10 hidden objects and the blue and red text items circled in blue and red.
- Locate the mask piece circled in pink.
- Use the key on the door as indicated.
- Locate the 3 coins circled in yellow.
Office
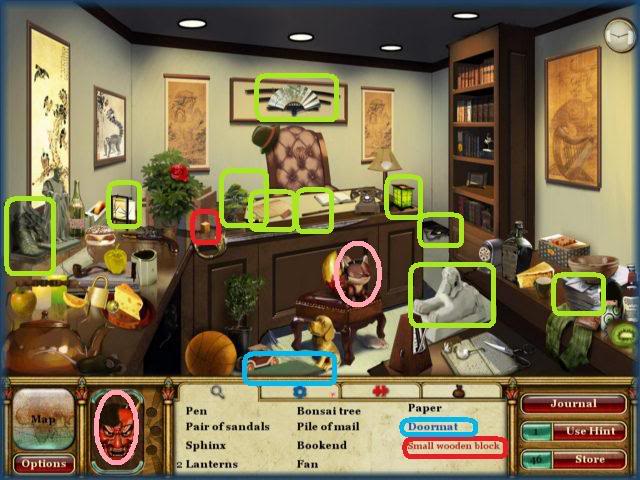
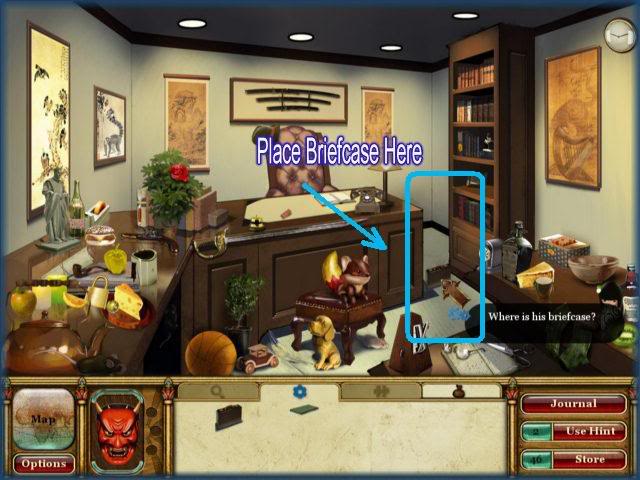
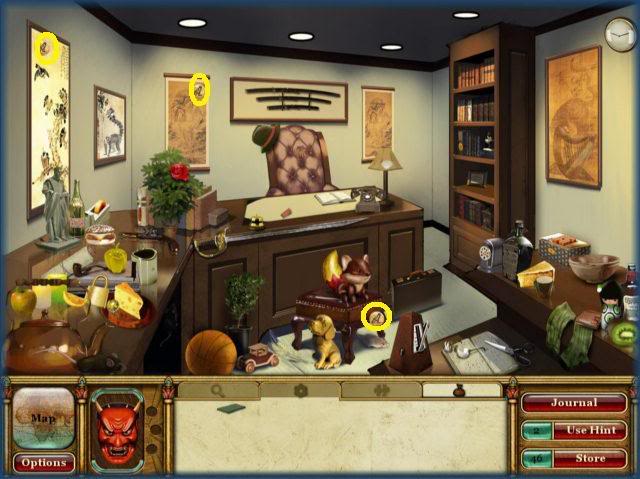
- Locate the 10 hidden objects and the blue and red text items circled in blue and red.
- Locate the mask piece circled in pink.
- Place the briefcase as indicated above.
- Locate the 3 coins circled in yellow.
Return to Foyer 2
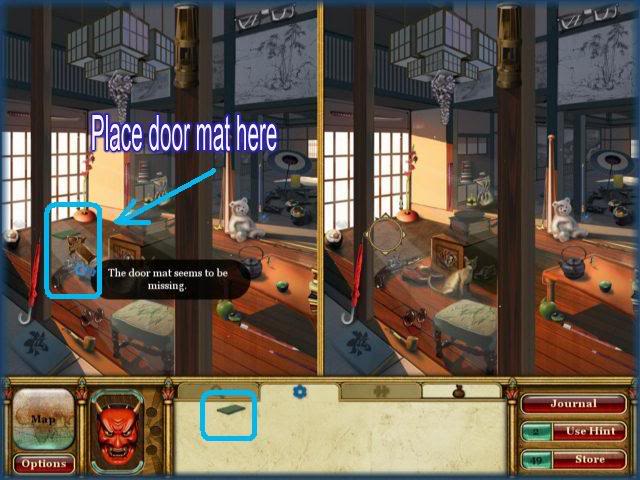
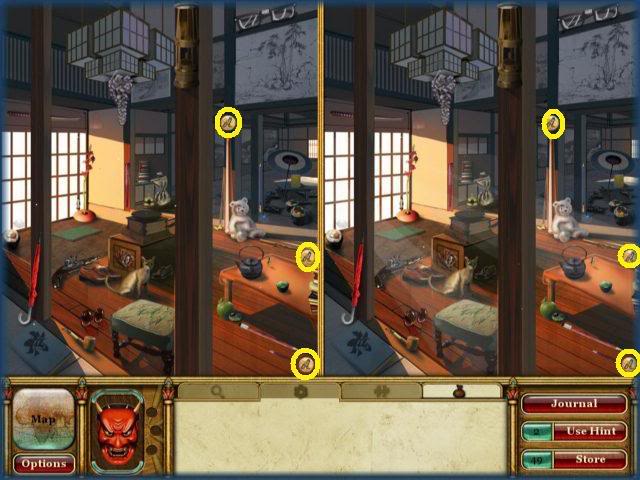
- Place the doormat as indicated above.
- Locate the 3 coins circled in yellow.
Return to Main Gate
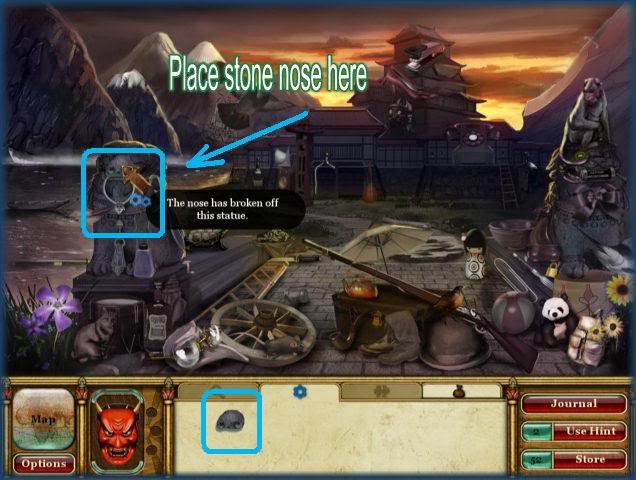
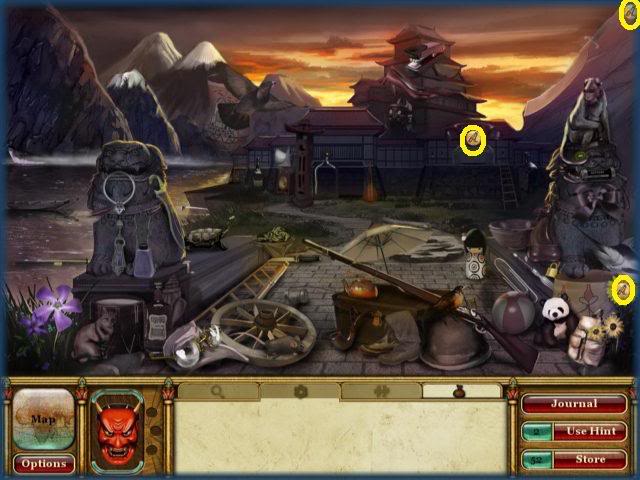
- Place the stone nose on statue as indicated.
- Locate the 3 coins circled in yellow.
Mini Game – Light Up the Panels
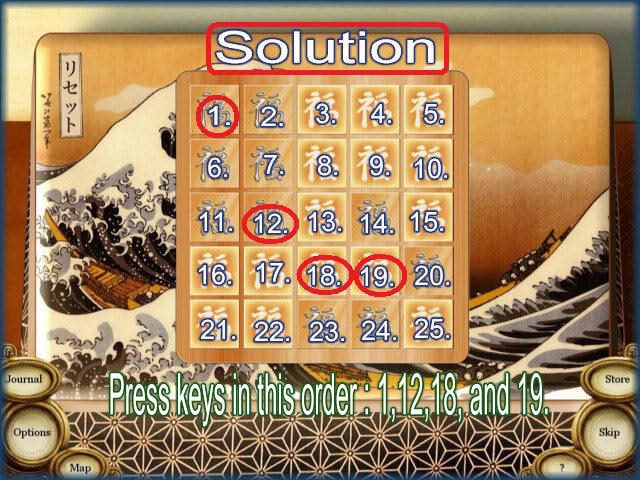
- Click on the panels at the bottom and they will go up into the grid.
- Once the grid changes you will click on the correct keys to get them all the same.
- Click on the following numbers using the image above as a guide: 1,12, 18 and 19.
Office 2 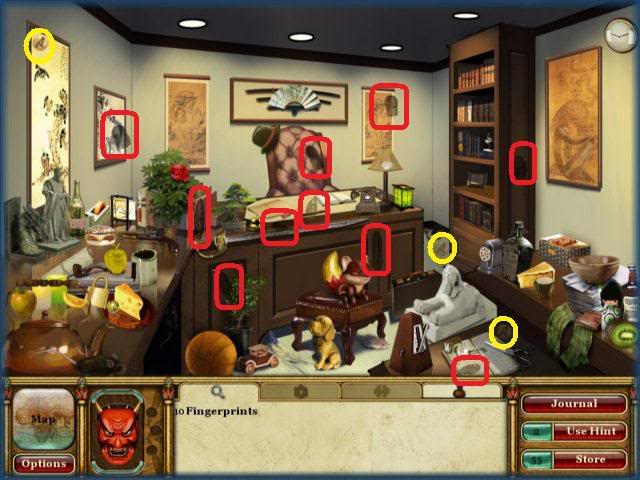
- Locate the 10 fingerprints circled in red above.
- Locate the 3 coins circled in yellow.
WORLD 7: AFRICAN COAST SHIPWRECK
Location Map- African Coast Shipwreck
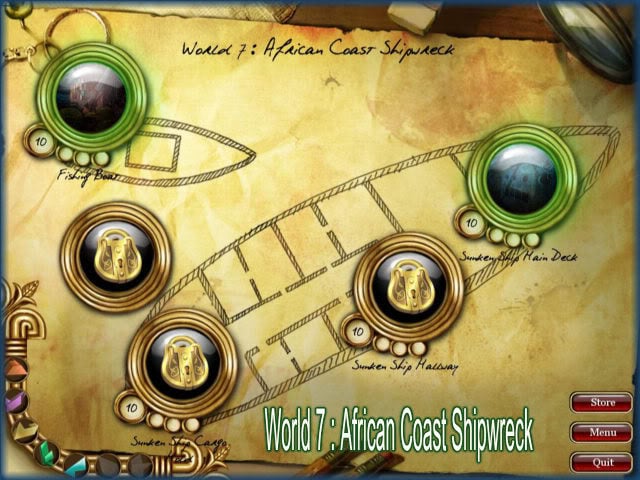
- Begin with the "Fishing Boat" location.
Fishing Boat
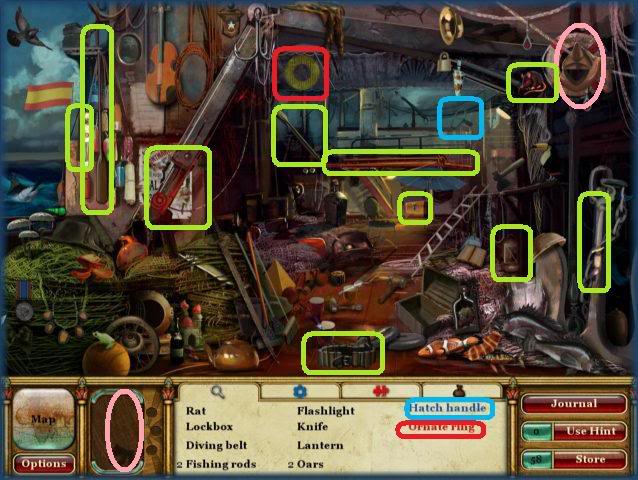
- Locate the 10 hidden objects and the blue and red text items circled in red and blue.
- Locate the mask piece circled in pink.
Sunken Ship Main Deck
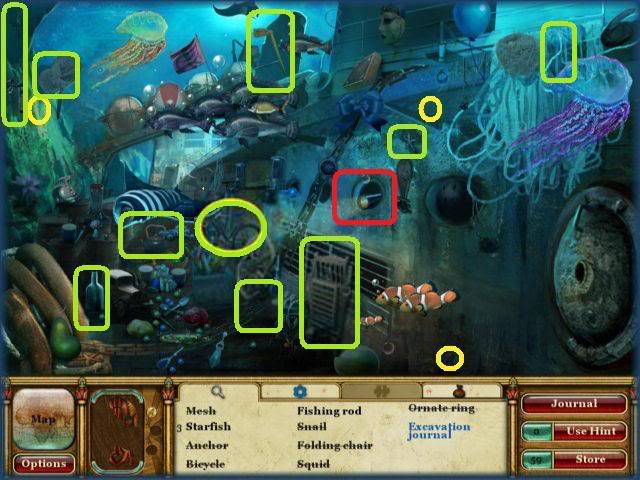
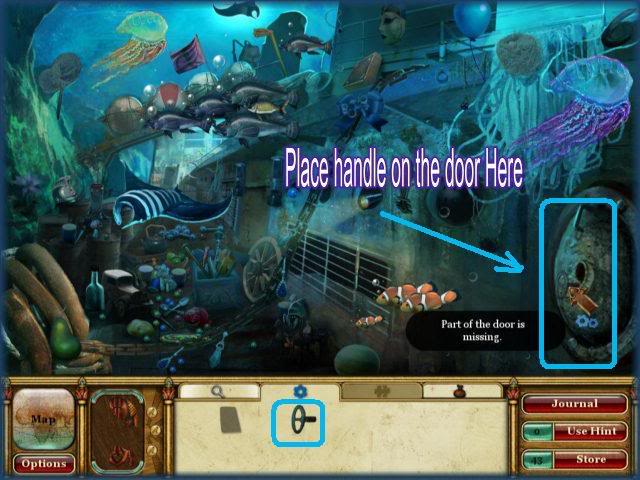
- Locate the 10 hidden objects and red text item circled in red.
- Locate the 3 coins circled in gold above.
- Place the handle on the door as indicated.
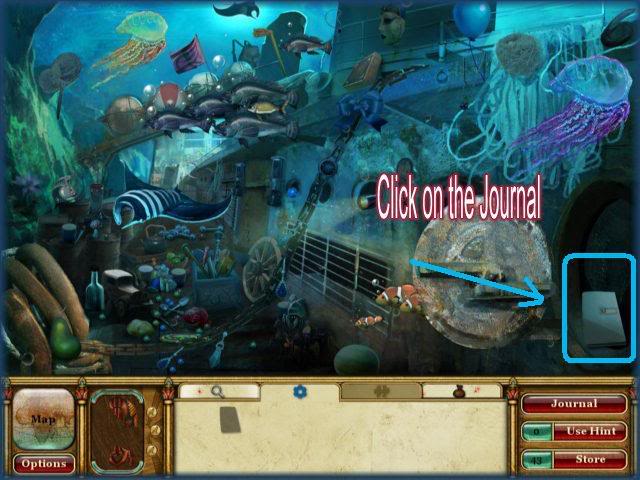
- Click on the journal.
Return to Fishing Boat
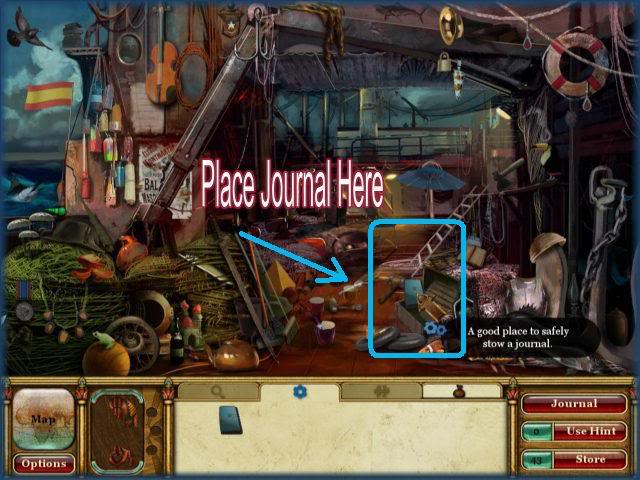
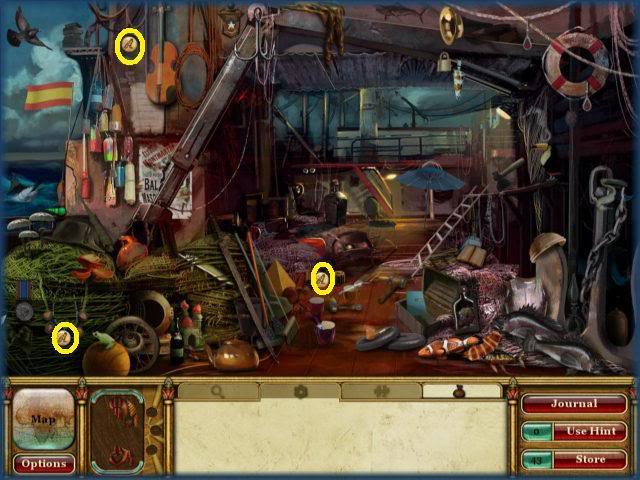
- Place the journal in the box as indicated.
- Locate the 3 coins circled in yellow.
**The next level is your first Underwater Level. You will need to go to the store and purchase the oxygen tank before you begin.
Sunken Ship Cargo Hold
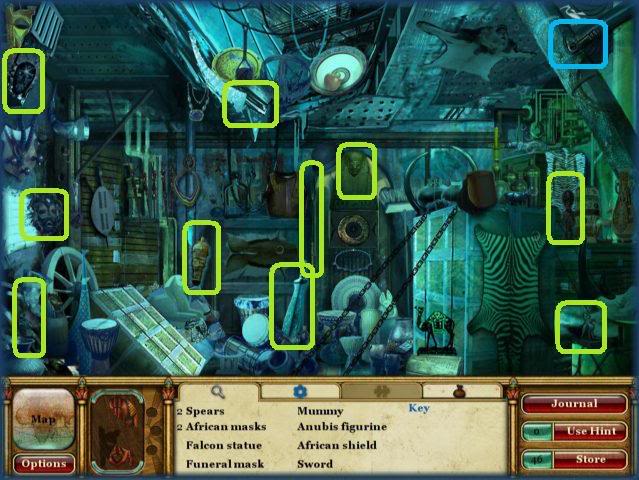
- Locate the 10 hidden objects and blue text item circled in blue.
- Return to this location later.
Sunken Ship Hallway
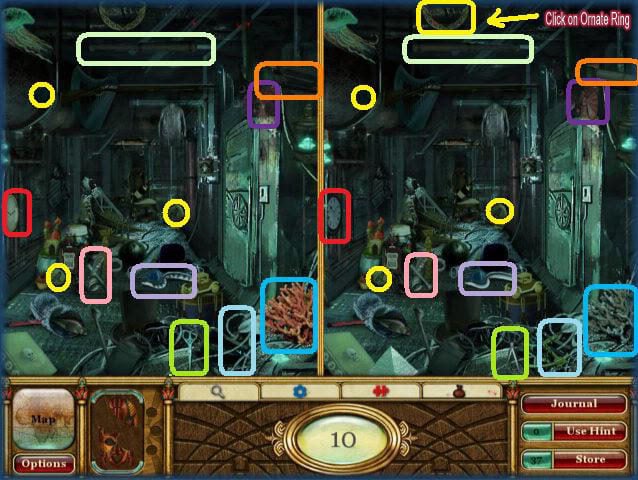
- Find the 10 differences between the 2 scenes.
- Locate the 3 coins circled in yellow.
- Click on the "Ornate Ring" at the top of the page labeled.
Sunken Ship Hallway 2
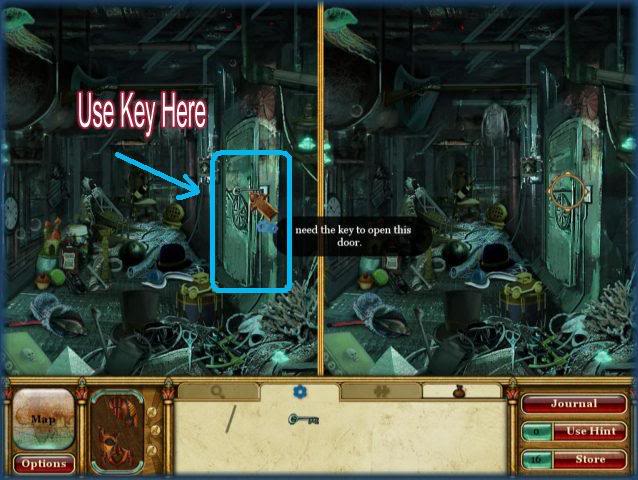
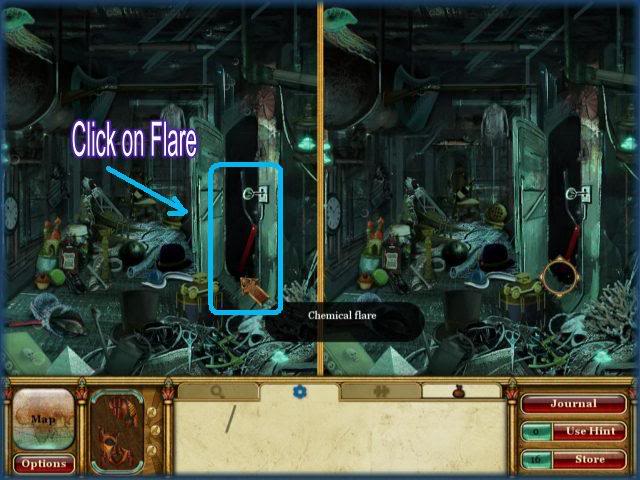
- Use the key on the door as indicated
- Click on the chemical flare when door opened.
Fishing Boat 2
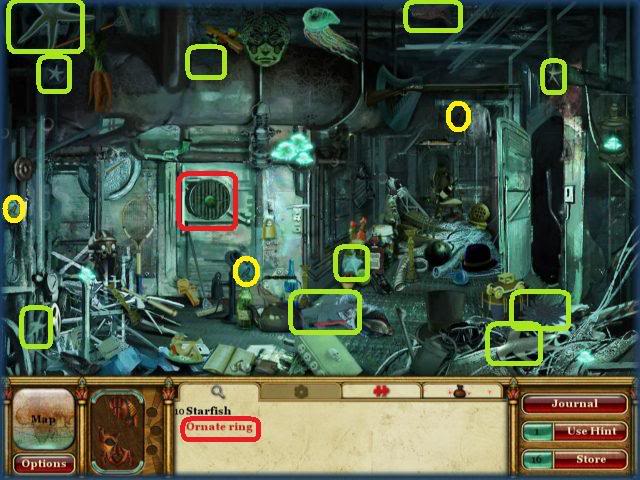
- Locate 10 starfish and click on the ornate ring.
Return to Sunken Ship Cargo Hold
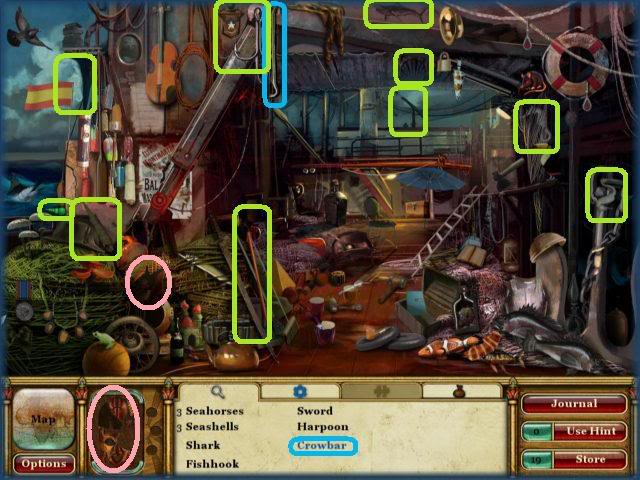
- Locate the 10 hidden objects and blue text item circled in blue.
Sunken Ship Cargo Hold 2
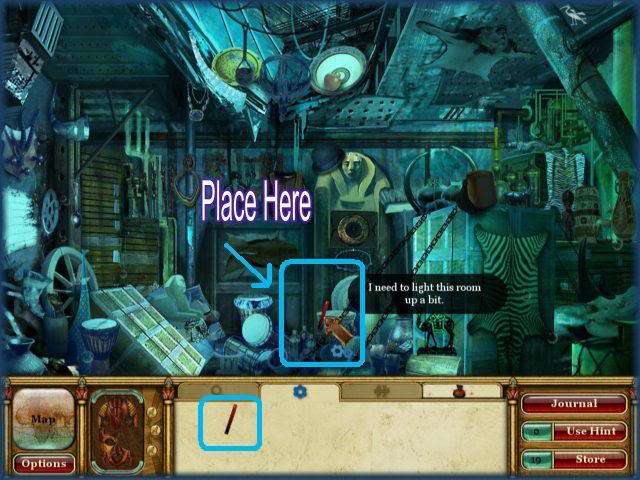
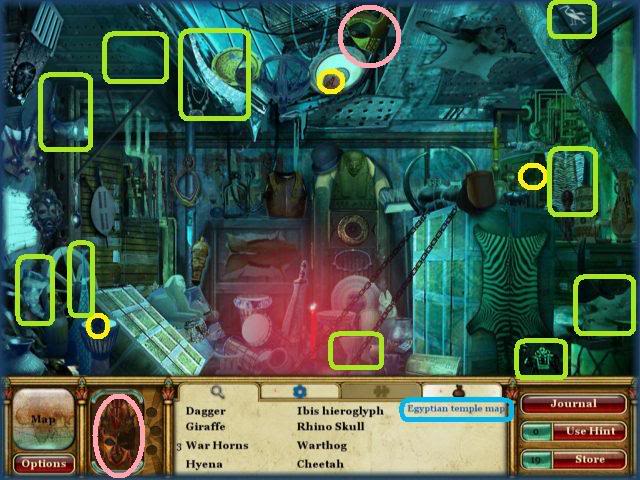
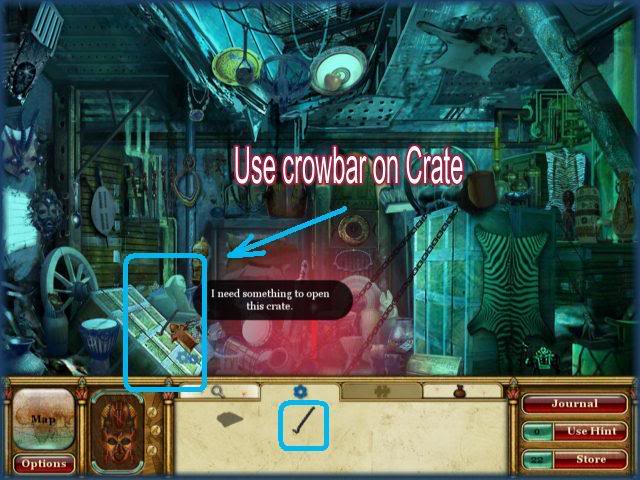
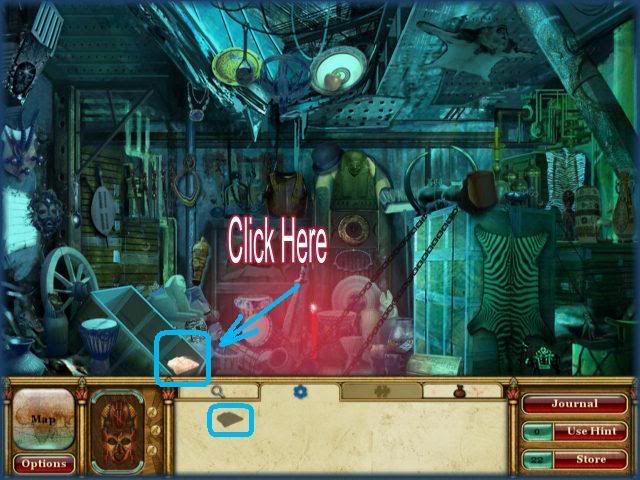
- Place the flare as indicated
- Locate 10 hidden objects and blue text item circled in blue.
- Locate the 3 coins circled in yellow.
- Locate the mask piece circled in pink.
- Use the crowbar as indicated.
- Click on the note.
Return to Fishing Boat 2
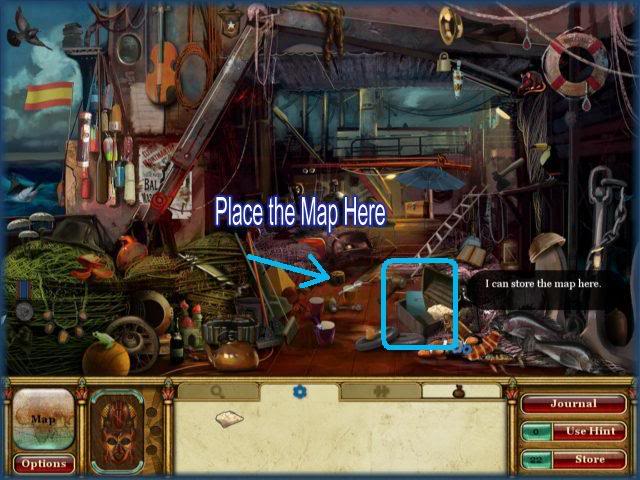
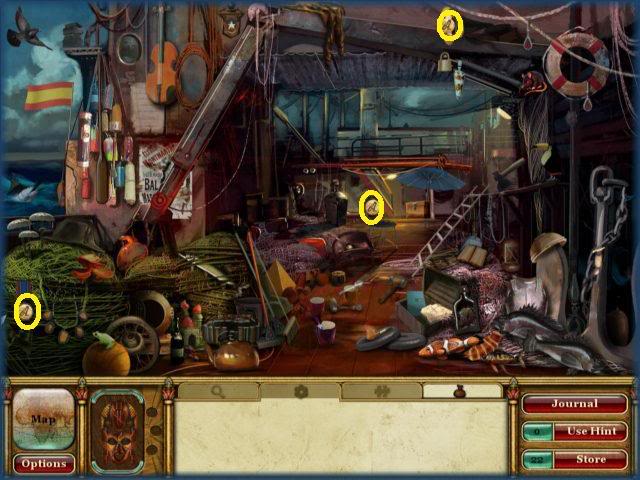
- Place the map in the box as indicated.
- Click on the 3 coins circled in yellow.
Mini Game – Ring Puzzle
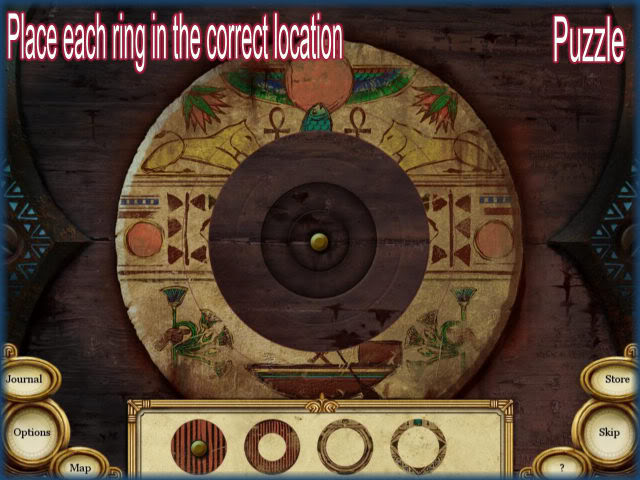
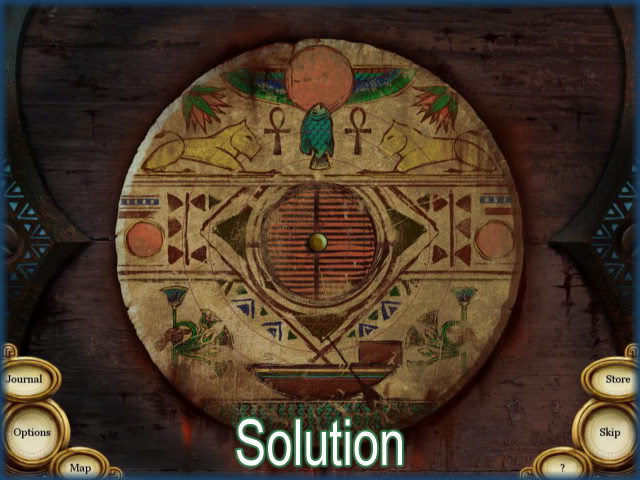
- Click on the rings and they will move into place.
- Rotate the rings until you see the image solution above.
- Some rings move others and there are several solutions to this puzzle.
- You may skip this puzzle if you wish.
WORLD 8: FORT CARTER RUINS
Location Map – Fort Carter Ruins
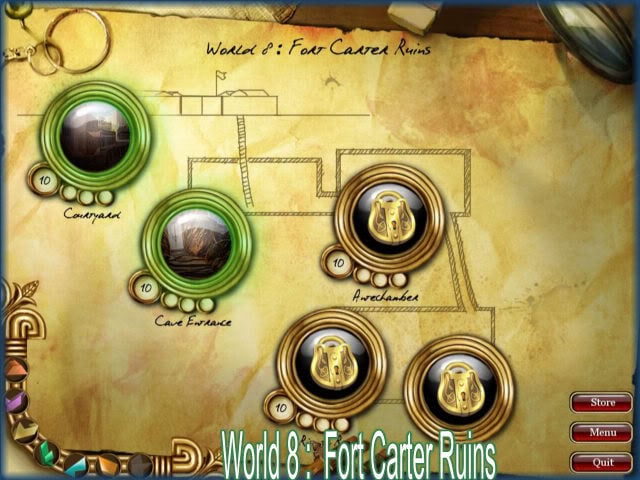
- Begin with the "Courtyard"
Courtyard
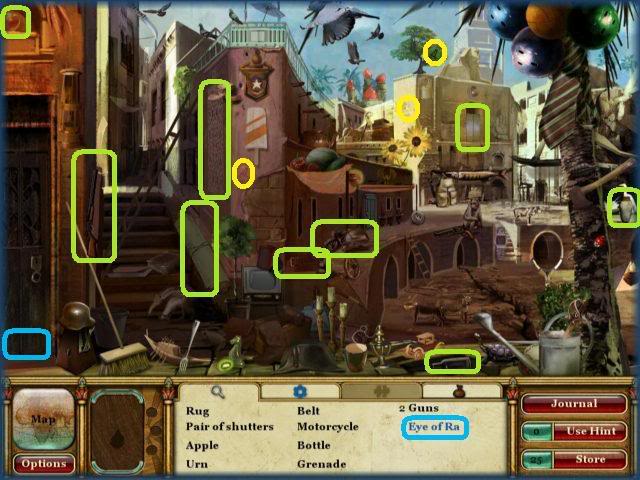
- Locate the 10 hidden objects and blue text item circled in blue.
- Locate the 3 coins circled in yellow.
Cave Entrance
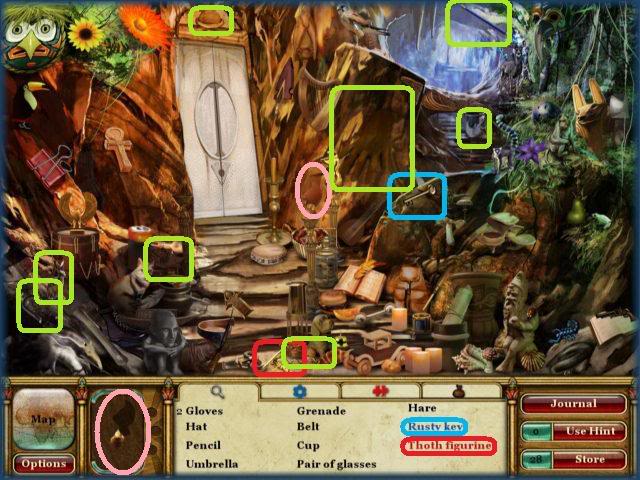
- Locate the 10 hidden objects and blue and red text items circled in blue and red.
- Locate the mask piece circled in pink.
Return to the Courtyard
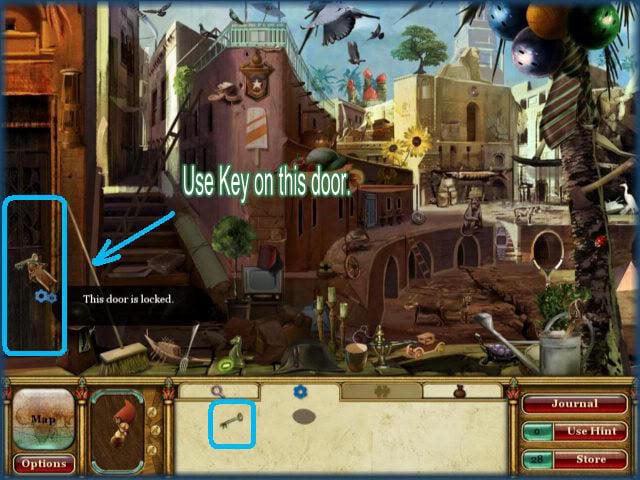
- Use the key on the door as indicated.
**You are about to have your first Mirror Level. Go to the store and purchase the mirror if you have not done so yet.
Courtyard 2
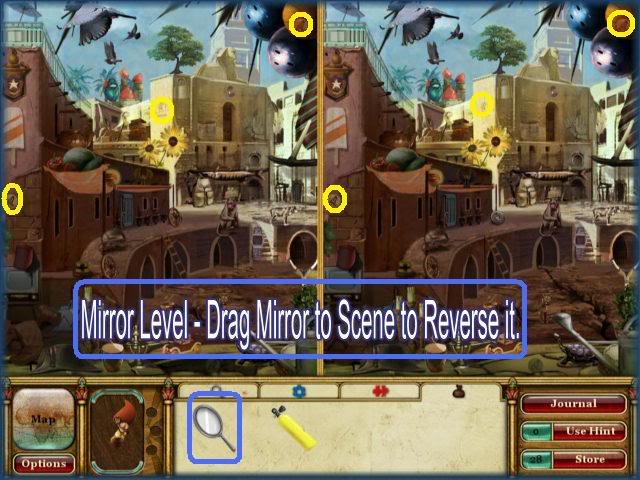
- Drag the mirror to the scene and click anywhere on it to reverse it.
- Locate the 10 differences between scenes.
- Locate the 3 coins circled in yellow.
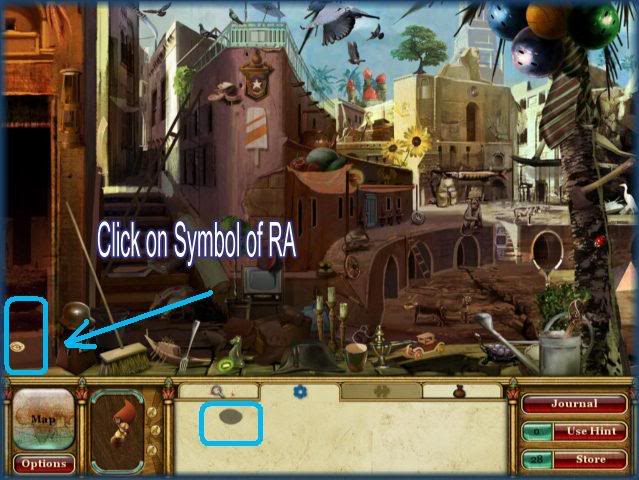
- Locate the Symbol of Ra and click on it.
Return to Cave Entrance
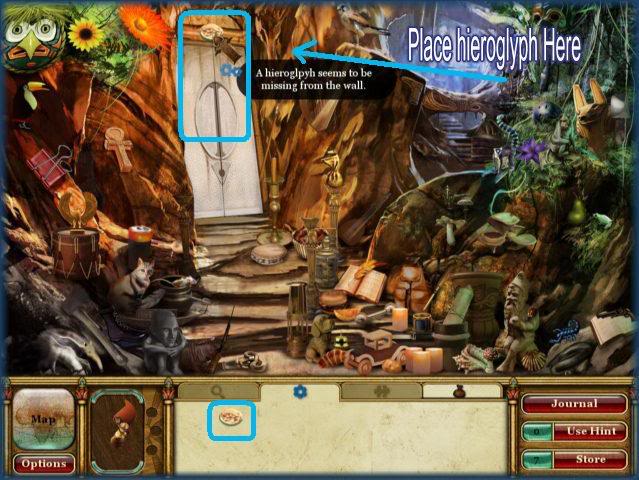
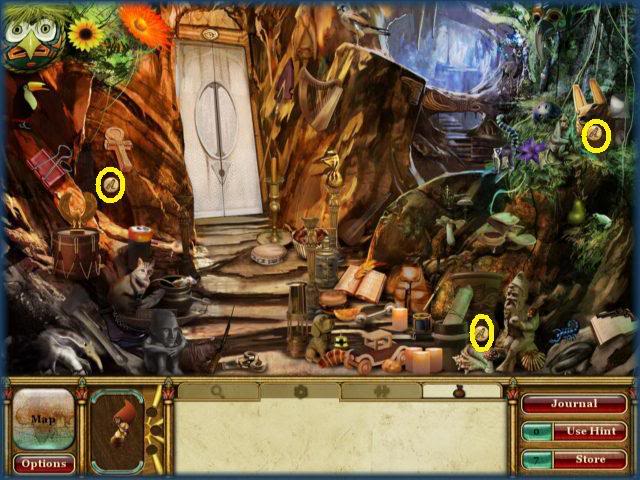
- Place Hieroglyphic above door as indicated.
- Locate 3 coins circled in yellow.
Cave Entrance 2
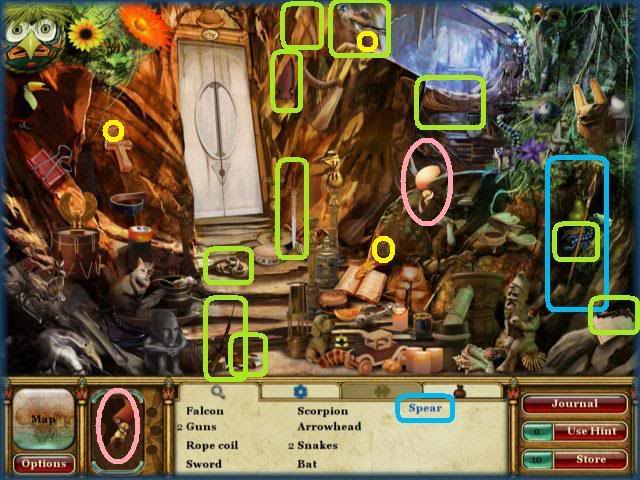
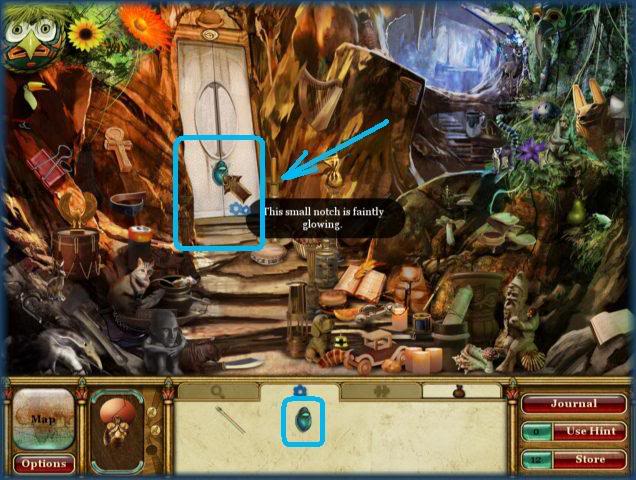
- Locate the 10 hidden objects and blue text item circled in blue.
- Locate 3 coins circled in yellow.
- Locate the mask piece circled in pink.
- Place the scarab sigil in the door.
Return to Courtyard 2
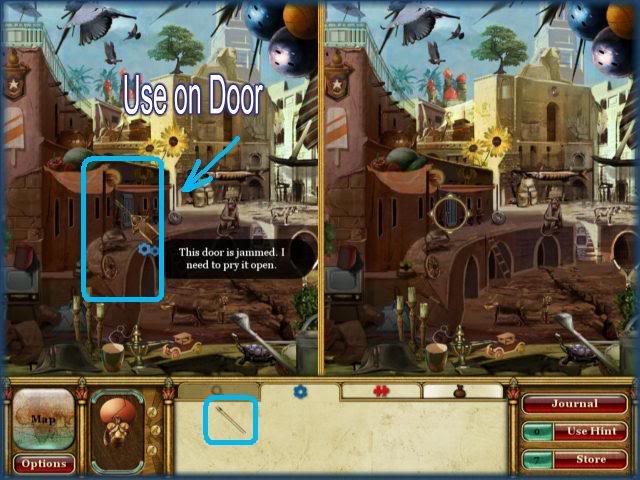
- Pry the door open as indicated.
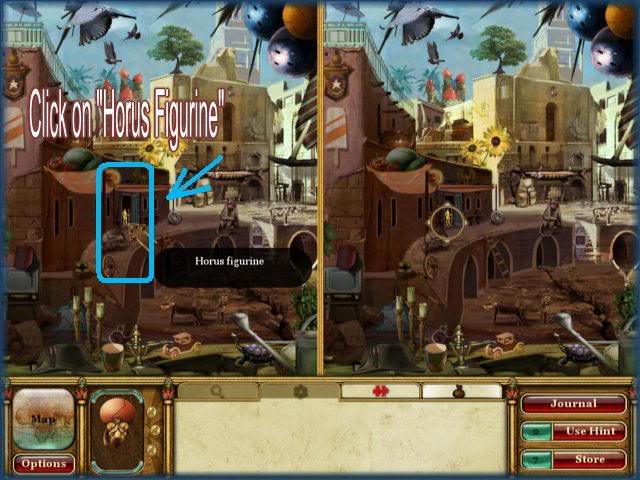
- Click on the "Horus Figurine" as indicated.
Antechamber
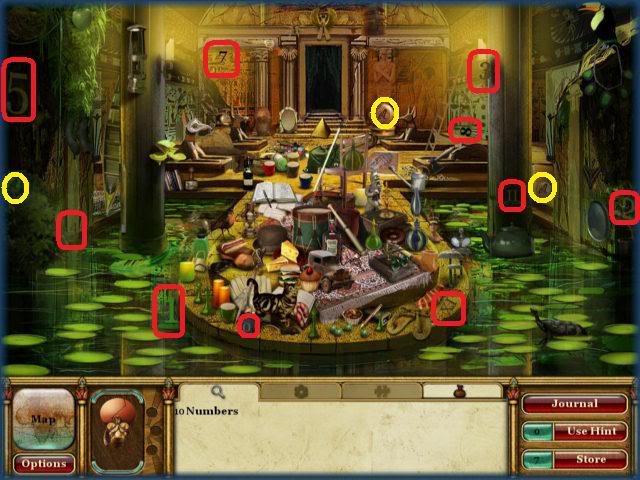
- Locate 10 numbers circled in red.
- Locate the 3 coins circled in yellow.
Antechamber 2
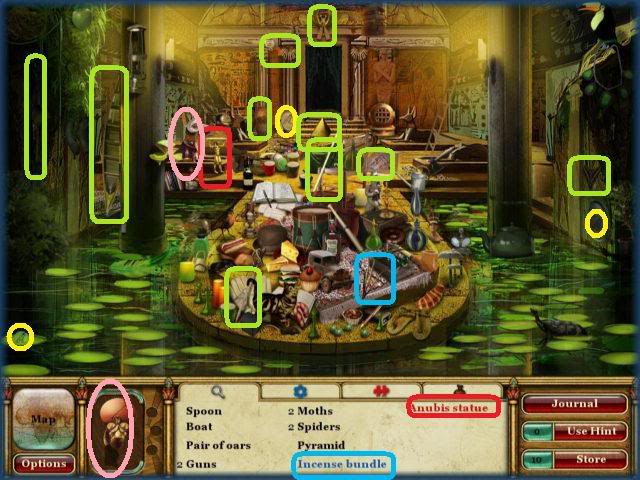
- Locate the 10 hidden objects and red and blue text items circled in red and blue.
- Locate the mask piece circled in pink.
- Locate the 3 coins circled in yellow.
Ritual Room
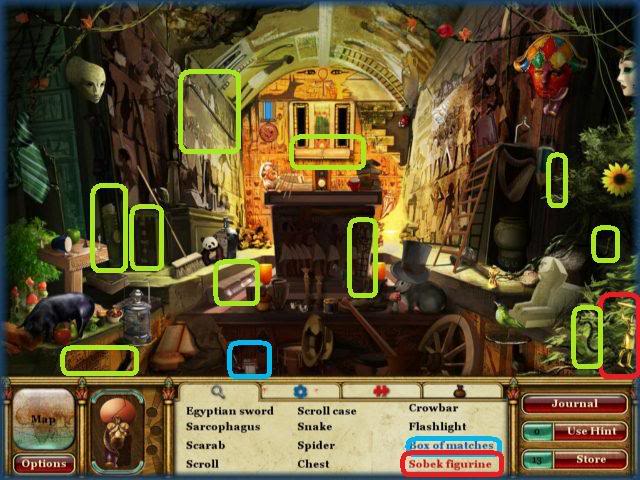
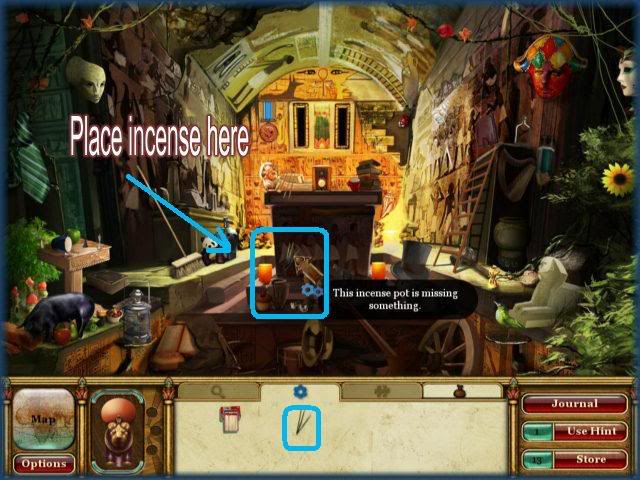
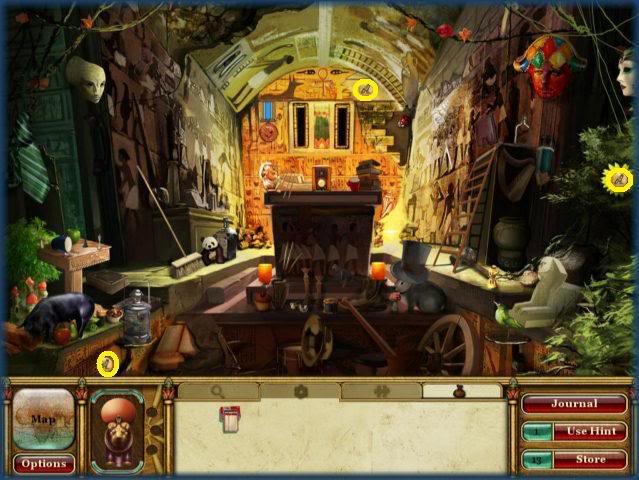
- Locate the 10 hidden objects and red and blue text items circled in red and blue.
- Place the incense where indicated.
- Locate the 3 coins circled in yellow.
Antechamber 2
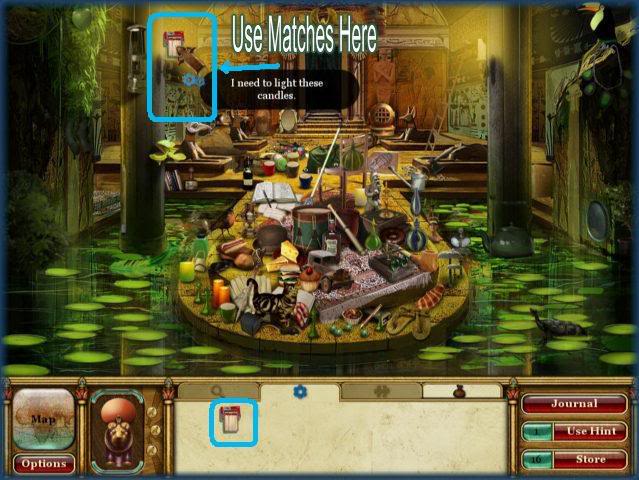
- Use matches as indicated.
Mini Game – Place the statues.
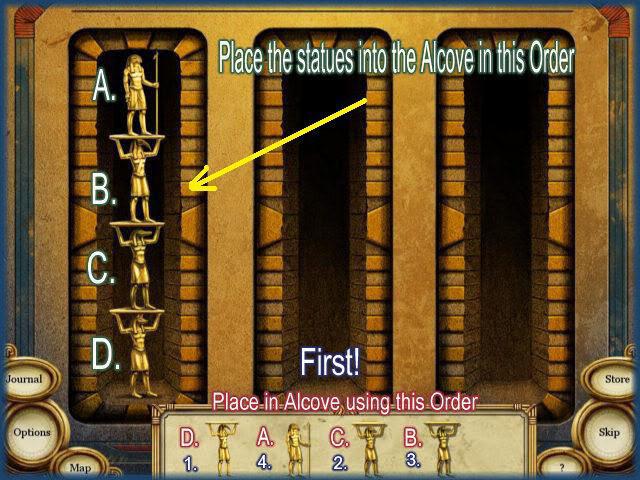
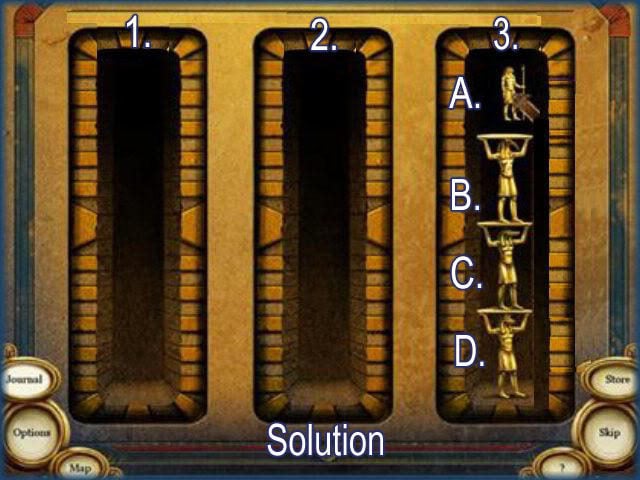
- Place the statues in the left column in the order shown above. Statues are labeled A through D.
- Place D, C, B then A.
- After place the middle column opens.
- You can only place them in the order shown. You can not place anyone higher than what is below them.
- The statues are labeled A through D and the columns are labeled 1, 2 and 3 from left to right.
- Use this pattern to solve puzzle: A-2,B-3,A-3,C-2,A-1,B-2,D-3,A-3,B-1,A-1,C-3,A-2,B-3,and A-3.
**You have found the "Tear of Nobility"
WORLD 9: HIDDEN TEMPLE OF PARENNEFER
Location Map- Hidden Temple of Parennefer
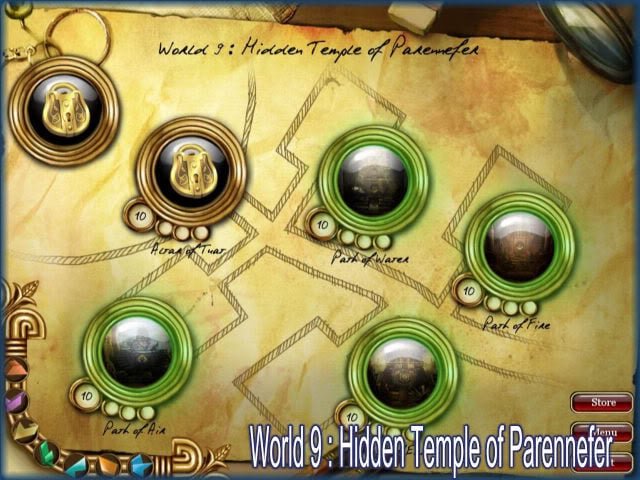
- Begin with "Path of water"
Path of Water
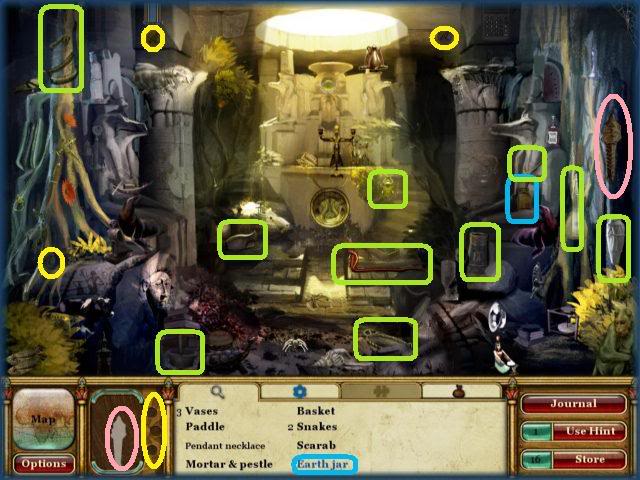
- Locate the 10 hidden objects and blue text item circled in blue.
- Locate the mask piece circled in pink.
- Locate the 3 coins circled in yellow.
- Return to this location later.
Path of Fire
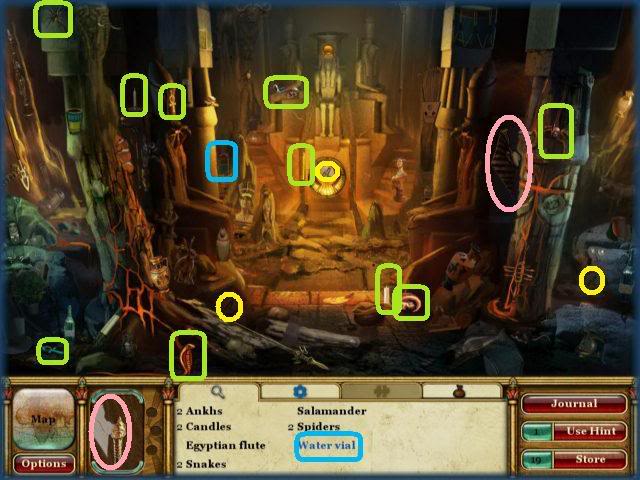
- Locate the 10 hidden objects and blue text item circled in blue.
- Locate the mask piece circled in pink.
- Locate the 3 coins circled in yellow.
- Return to this location later.
Path of Air
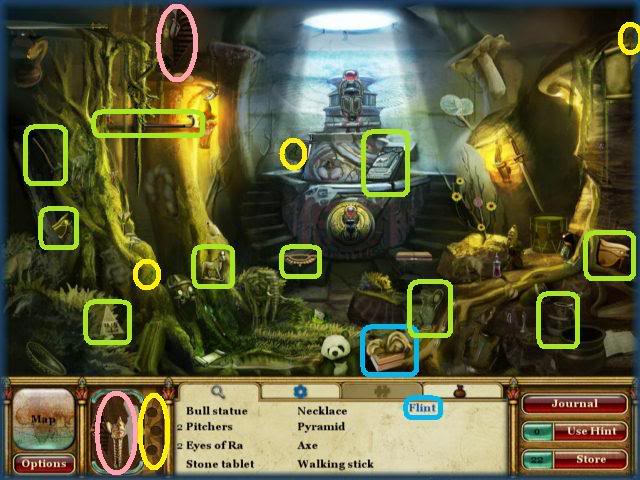
- Locate the 10 hidden objects and blue text item circled in blue.
- Locate the mask piece circled in pink.
- Locate the 3 coins circled in yellow.
- Return to this location later.
Path of Earth
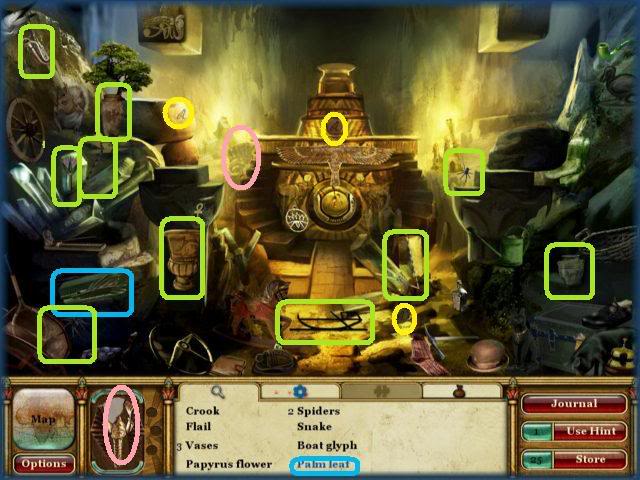
- Locate the 10 hidden objects and blue text item circled in blue.
- Locate the mask piece circled in pink.
- Locate the 3 coins circled in yellow.
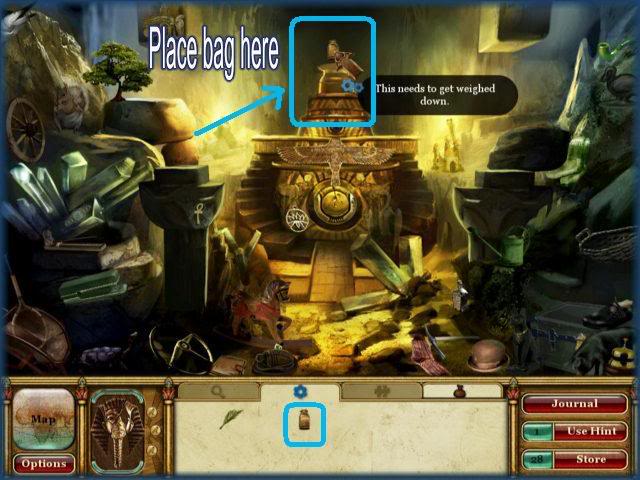
- Place bag as indicated.
Path of Earth 2
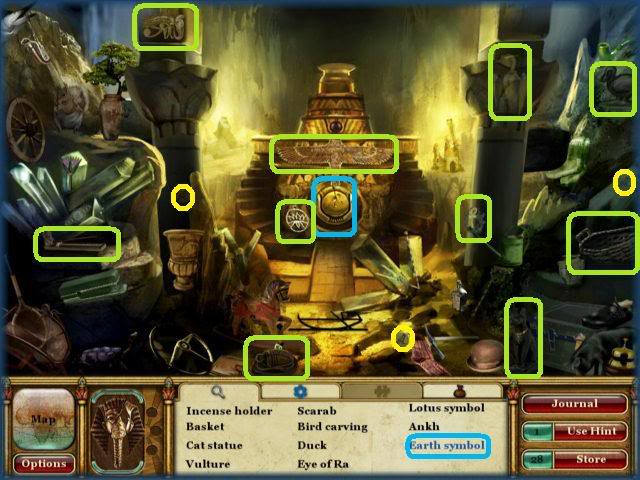
- Locate the 10 hidden objects and blue text item circled in blue.
- Locate the 3 coins circled in yellow.
Return to Path of Water
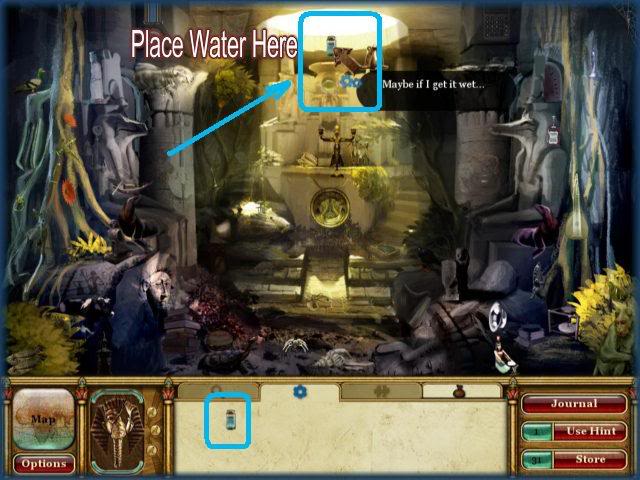
- Place water here as indicated.
Path of Water 2
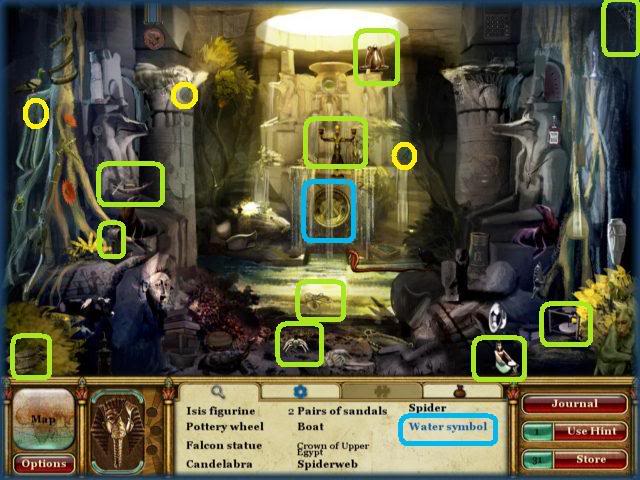
- Locate the 10 hidden objects and blue text item circled in blue.
- Locate the 3 coins circled in yellow.
Return to the Path of Fire
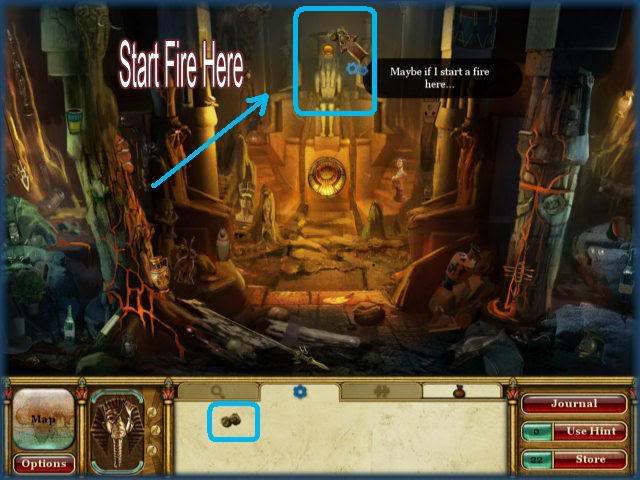
- Start fire as indicated above.
Path of Fire 2
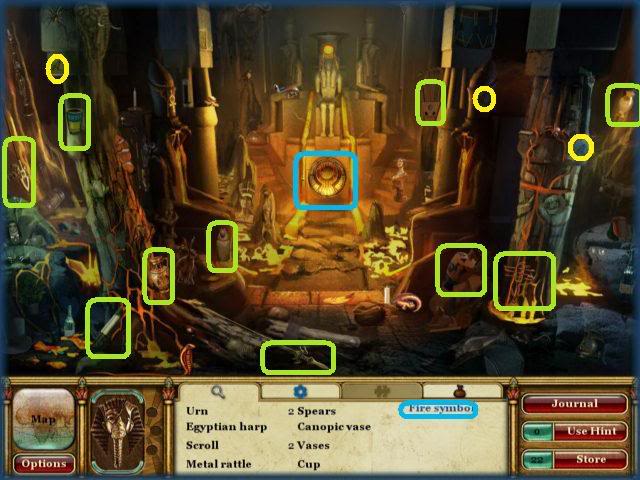
- Locate the 10 hidden objects and blue text item circled in blue.
- Locate the 3 coins circled in yellow.
Return to the Path of Air
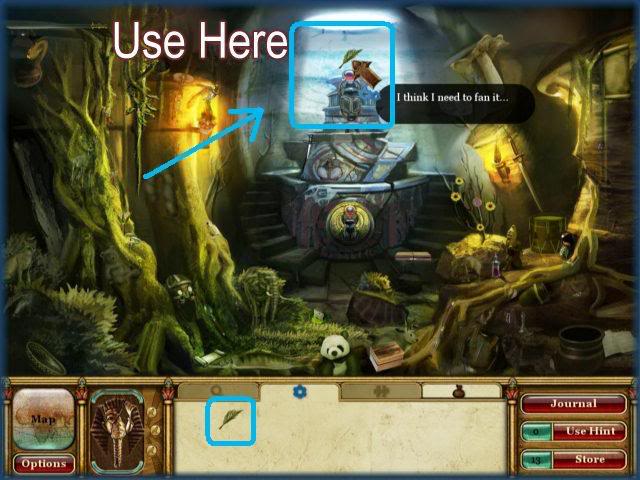
- Use Fan as indicated above.
Path of Air 2
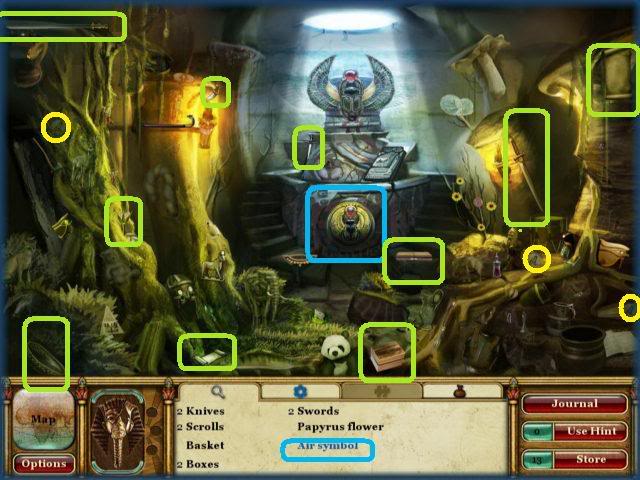
- Locate the 10 hidden objects and blue text item circled in blue.
- Locate the 3 coins circled in yellow.
Altar of Tuat
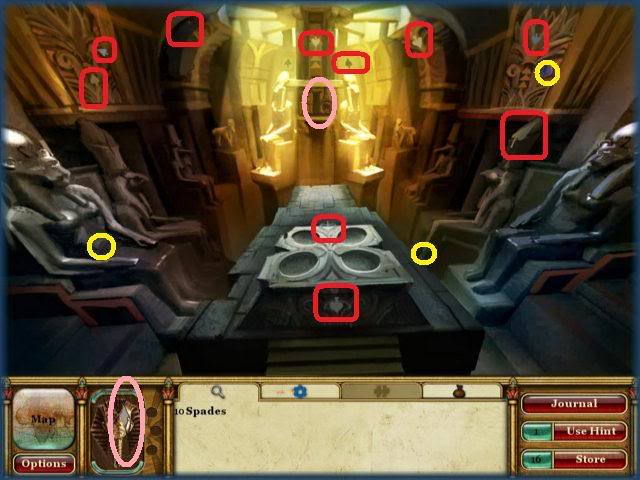
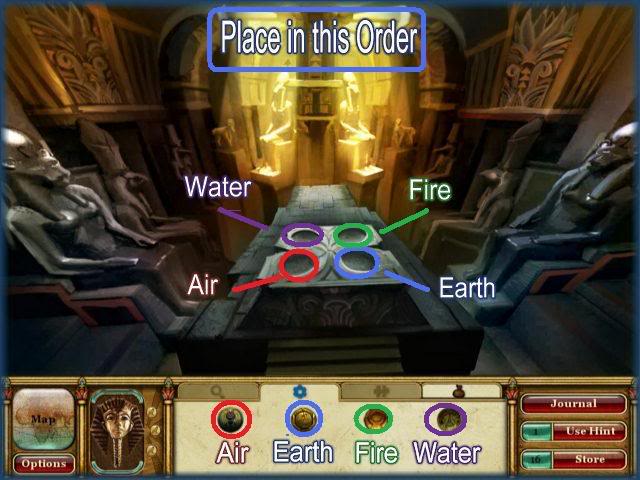
- Locate 10 spades circled in red above.
- Locate 3 coins circled in yellow.
- Locate mask piece circled in pink.
- Place the Orbs as indicated in image above.
- Top left to right Water and Fire
- Bottom left to right Air and Earth.
Mini Game – Sliding Tile Puzzle/Building Pyramid with Tears
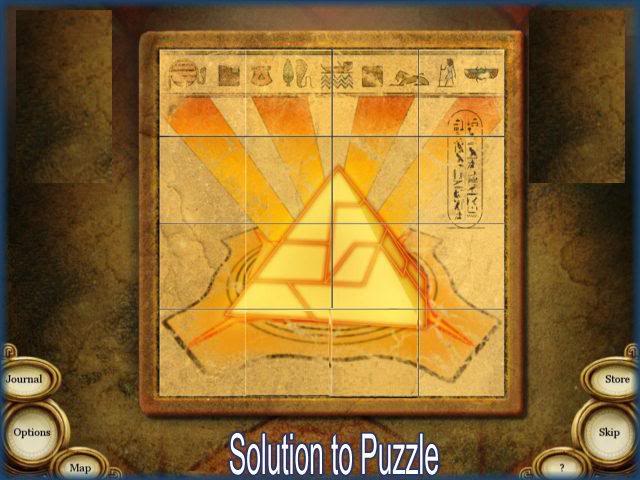
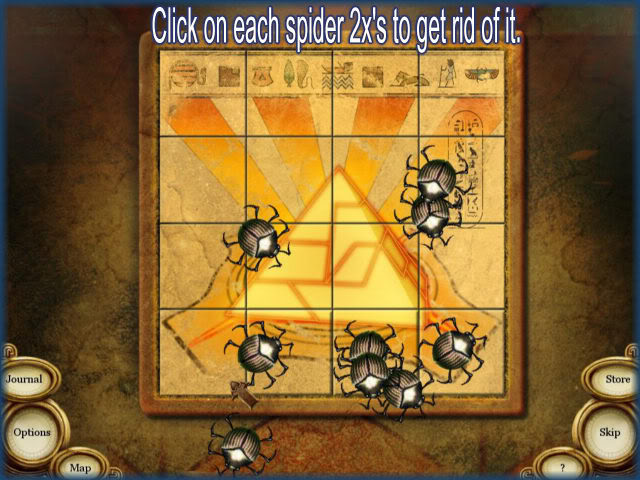
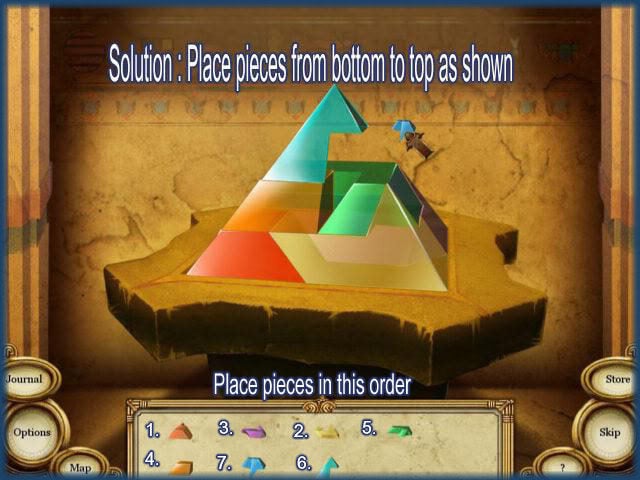
- This puzzle has multiple parts.
- Solve the first puzzle by clicking on tiles and trading with the ones next to them. See solution above. Use the edges as a guide.
- The second part spiders will rush along the puzzle click on each one twice until they disappear.
- Finally place the tears together in the format shown above to finish the game.
CONGRATULATIONS!
- Congratulations, you have finished the game!
“;
More articles...
Monopoly GO! Free Rolls – Links For Free Dice
By Glen Fox
Wondering how to get Monopoly GO! free rolls? Well, you’ve come to the right place. In this guide, we provide you with a bunch of tips and tricks to get some free rolls for the hit new mobile game. We’ll …Best Roblox Horror Games to Play Right Now – Updated Weekly
By Adele Wilson
Our Best Roblox Horror Games guide features the scariest and most creative experiences to play right now on the platform!The BEST Roblox Games of The Week – Games You Need To Play!
By Sho Roberts
Our feature shares our pick for the Best Roblox Games of the week! With our feature, we guarantee you'll find something new to play!All Grades in Type Soul – Each Race Explained
By Adele Wilson
Our All Grades in Type Soul guide lists every grade in the game for all races, including how to increase your grade quickly!


