
Best Horror Games On Itch.io – July 2026
Across a bounty of subgenres.![Haze Seas Accessories Tier List [Best Accessories to Equip]](/wp-content/uploads/2026/07/haze-seas-accessories-tier-list.jpg "Haze Seas Accessories Tier List [Best Accessories to Equip]")
Haze Seas Accessories Tier List [Best Accessories to Equip]
The accessories with the best stat buffs in Haze Seas.
![[Roblox] Evomon Shiny Hunting Guide – Including Prismatic and Pris Shinies!](/wp-content/uploads/2026/06/evomon-shiny-hunting-guide.jpg "[Roblox] Evomon Shiny Hunting Guide – Including Prismatic and Pris Shinies!")

Criminal Minds Walkthrough
Welcome the Criminal Minds walkthrough on Gamezebo. Criminal Minds is a hidden object adventure game created by Legacy Games. This walkthrough includes tips and tricks, helpful hints, and a strategy guide on how to complete Criminal Minds.


- Prefer Gamezebo on Google

Game Introduction – Criminal Minds
Welcome the Criminal Minds walkthrough on Gamezebo. Criminal Minds is a hidden object adventure game created by Legacy Games. This walkthrough includes tips and tricks, helpful hints, and a strategy guide on how to complete Criminal Minds.
General Tips
- When starting a case, you can choose between one of two difficulties: Casual or Expert. Casual features hint and skip buttons recharging faster, and active areas being highlighted with sparkles. Expert features slower hint and skip recharges, and active areas won’t be highlighted.
- At the top right corner of the inventory bar is the FBI Handbook. You can open this to read more about the task force and the various members of it.
- In the lower left corner is the Menu (a monitor that says “Criminal Minds”), the Hint button (in the shape of a badge), and the Tasks notepad. Hints are unlimited, but require time to recharge. Click on the Tasks notepad to see what tasks you have yet to complete. When you use the Hint button outside of a hidden object area, you will have the option to view a Hint related to a specific task.
- Inventory items are identified with CAPS in the guide below and are circled in red.
- In hidden object areas, Inventory items and Question marks will be circled. Question marks are circled in blue. Finding these will cause jumbled words to unscramble.
- There are two main story Cases to play. Completing the first will unlock the second.
Case One, Chapter 1: A Dying Art
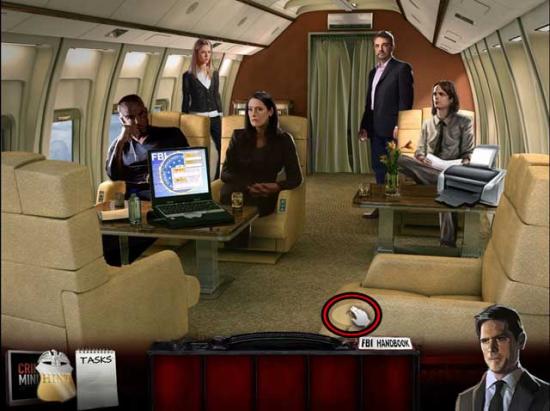
Plane
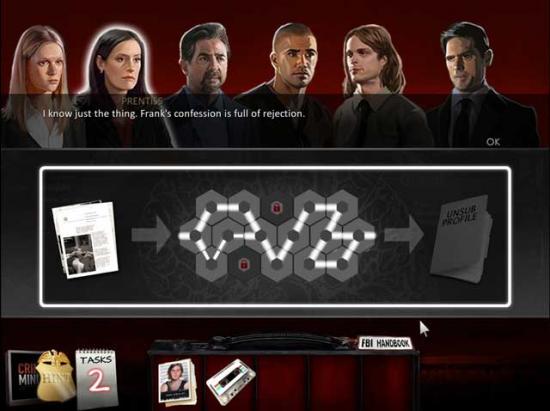
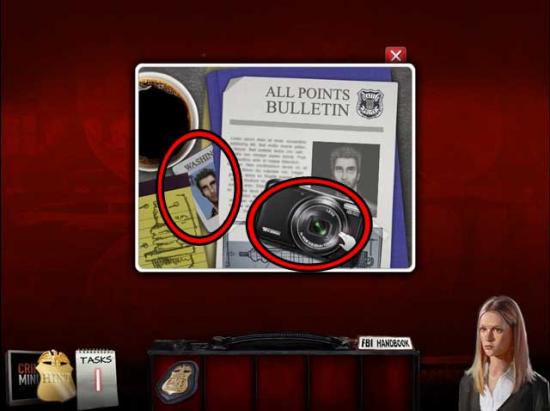
- Click on Prentiss, the woman with the long black hair, to talk with her and hear a briefing.
- Click on the CD to add it to your inventory.

- Take a closer look at the computer. Use the CD on the disc drive, triggering a document to print.
- Click on the PRINTOUT that comes out of the printer on the table on the right to add it to your inventory.
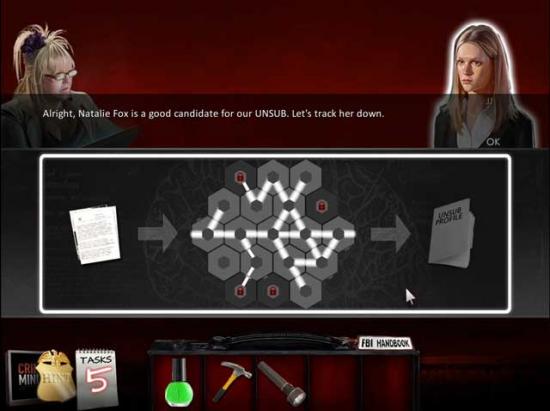
- Give the PRINTOUT to Prentiss, triggering a puzzle.
- Click on a tile to select it, then click on another to switch their places. Tiles with a lock cannot be moved. The solution is shown below.
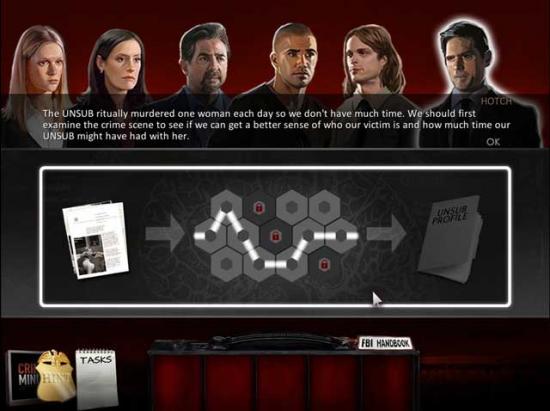
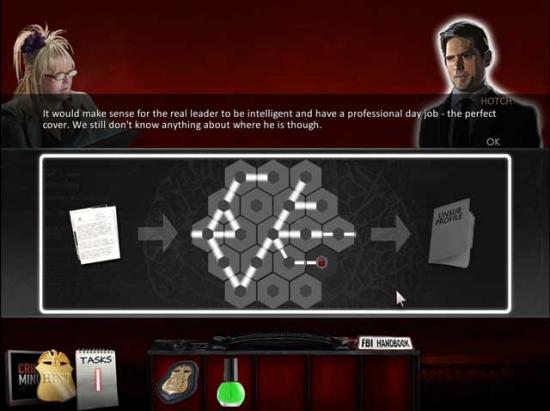
- Upon completing the puzzle, you will acquire the UNSUB PROFILE.
- Watch the cutscene that follows.
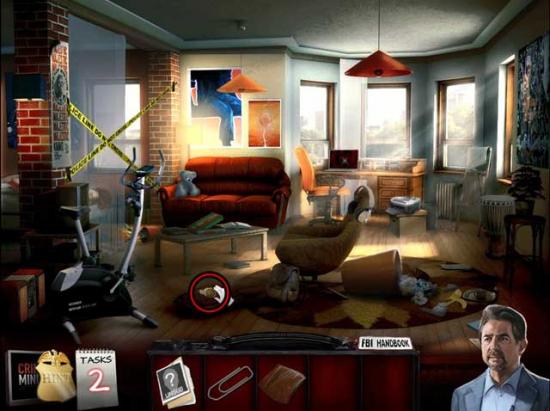
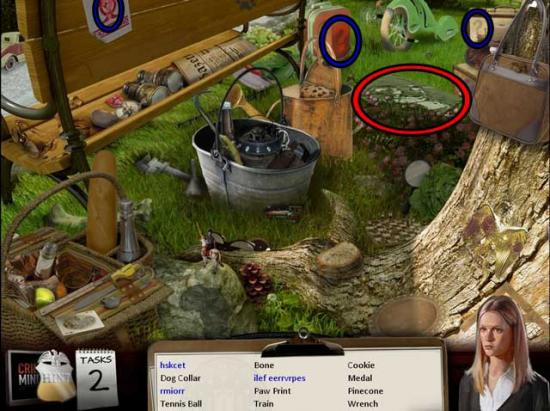
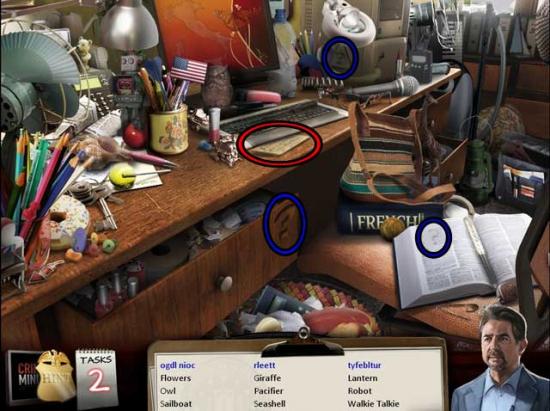
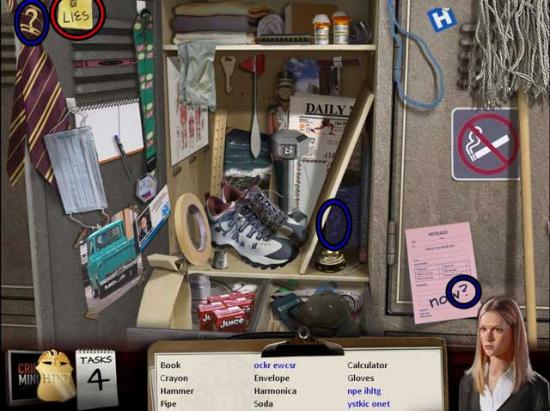
Apartment
- Talk with the man standing near the window. Click on the nearby HANDCUFFS to add them to your inventory, then use them on the man.
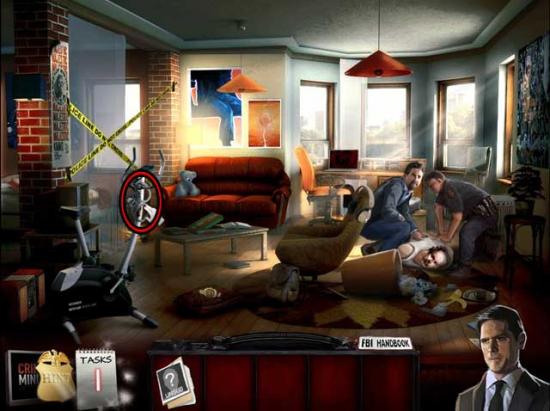
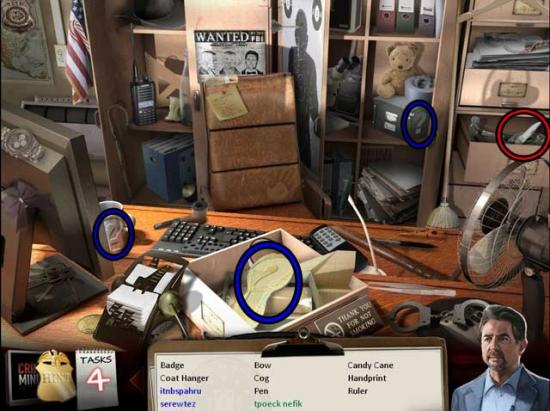
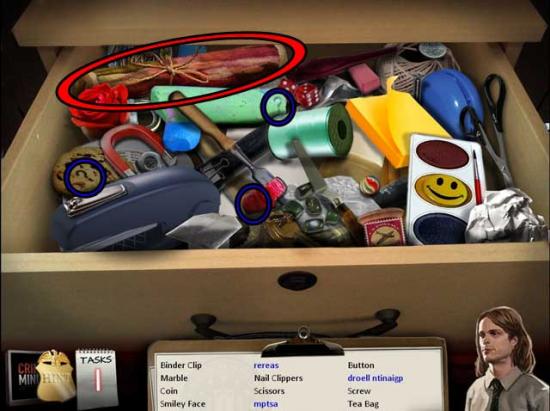
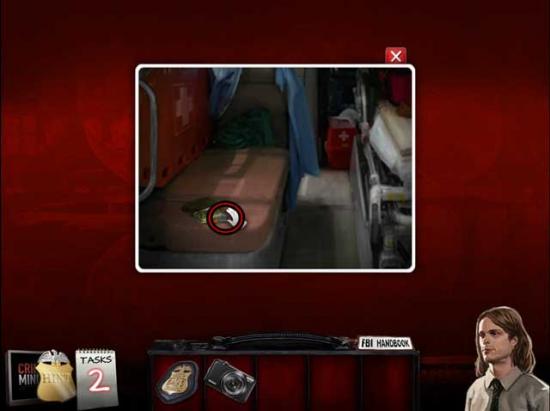
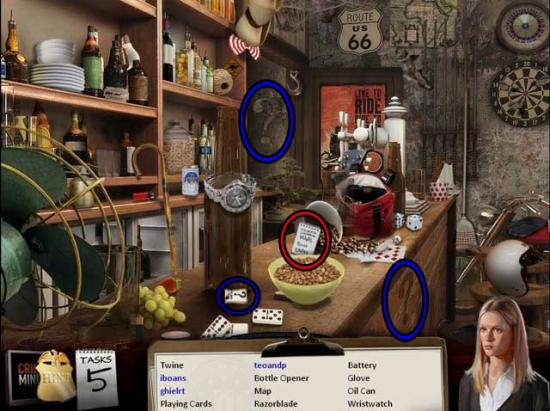
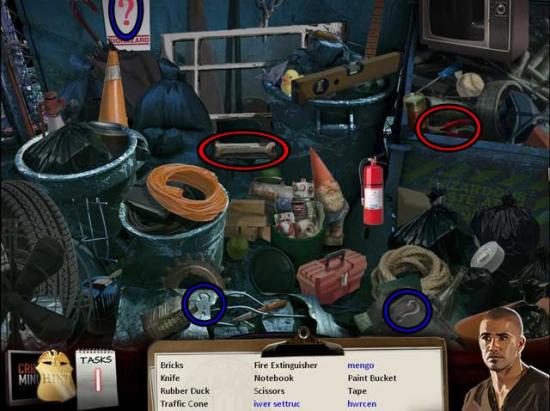
- Once the man has been taken away, take a closer look at the printer sitting on top of the small cardboard box, in front of the desk on the right, to enter a hidden object area.
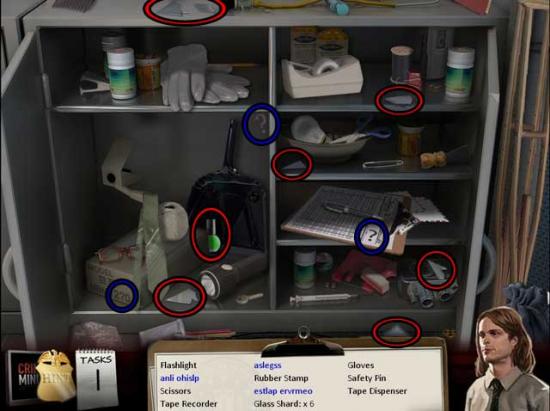
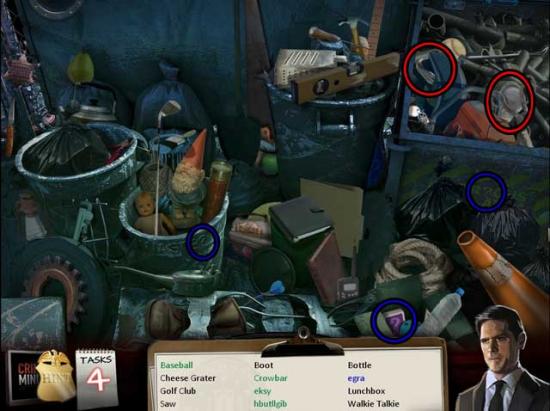
- Find the objects listed at the bottom of the screen. Inventory Items are circled in red, and ? marks are circled in blue.
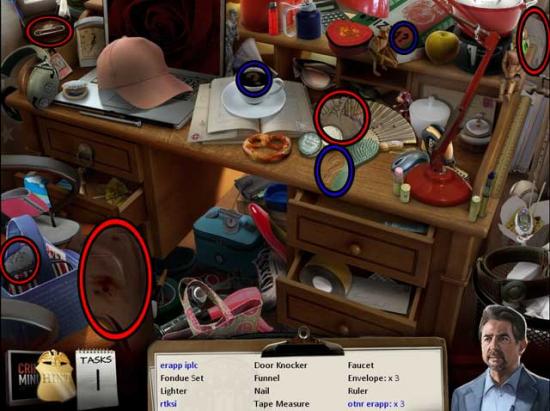
- Upon completing the area, the PAPERCLIP, the SKIRT, and the TORN PAPERS will be added to your inventory.
- Take a closer look at the spilled trashcan on the floor. Use the TORN PAPERS on the close-up, then exit for now.
- Click on the WRISTWATCH to add it to your inventory.
- Take a closer look at the body on the left. Place the SKIRT and the WRISTWATCH back into their correct locations on the body, then exit for now.
- Exit the Apartment.
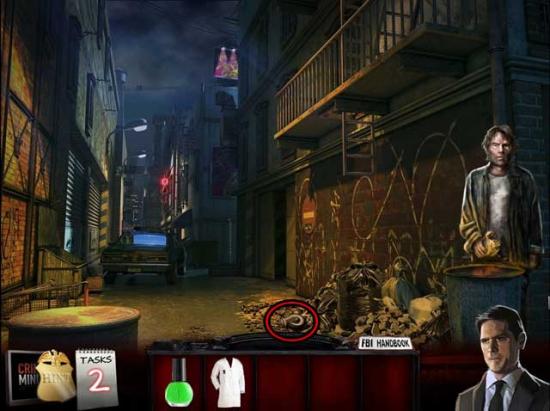
Street
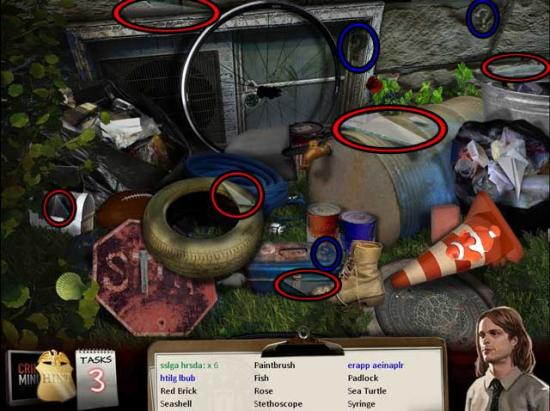
- Take a closer look at the trash can to the left of the Apartment entrance to enter a hidden object area.
- Find the objects listed at the bottom of the screen. Inventory Items are circled in red, and ? marks are circled in blue. Click on the lid of the trashcan to open it, revealing the items listed in green.
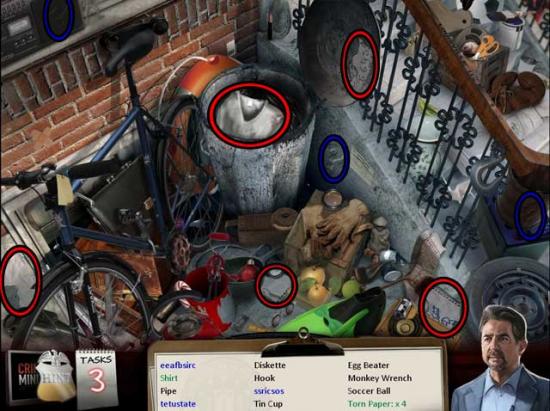
- Upon completing the area, the SHIRT and the TORN PAPERS will be added to your inventory.
- Click on the SCISSORS to add them to your inventory.

- Enter the Apartment again.
Apartment
- Examine the spilled contents of the trash can again. Use the TORN PAPERS on the contents to trigger a puzzle.
- Reassemble the note by dragging the torn pieces back into their correct locations. Right-click to rotate a piece. The solution is shown below.
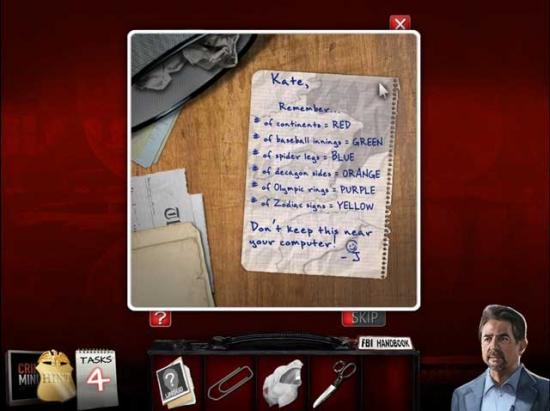
- Upon completing the puzzle, the CODE will be added to your inventory.
- Examine the computer at the far end of the room, sitting on the desk in front of the windows. Use the CODE on the computer to trigger a puzzle.
- Fill in the numbered areas with the corresponding color: the solution is shown below.
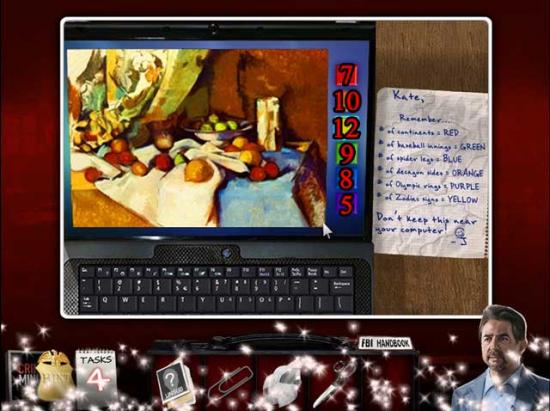
- Upon completing the puzzle, the computer will unlock. Once you’re done looking at it, click on the FLYER that comes out of the printer to add it to your inventory.
- Exit the Apartment again.
Street
- Enter the black car to be taken to the Police Station.
Lobby
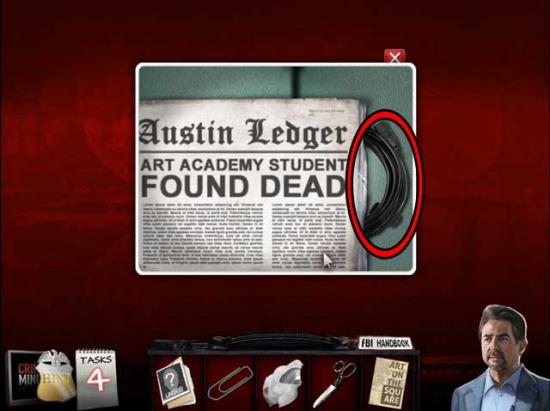
- Take a closer look at the newspaper sitting on the chairs. Click on the POWER CORD to add it to your inventory.
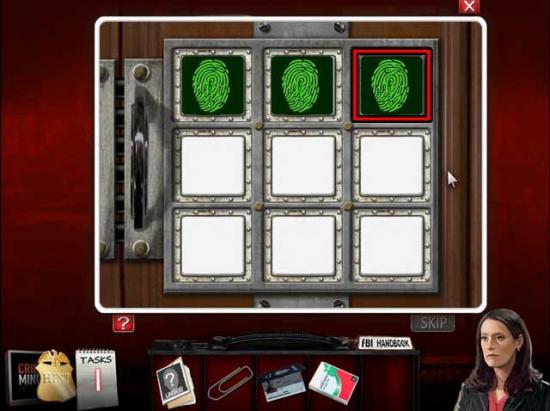
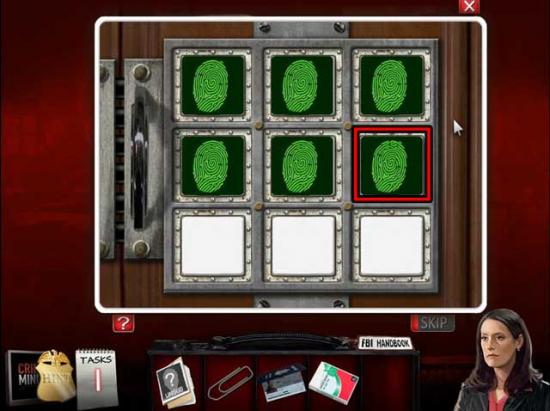
- Take a closer look at the cabinet towards the right, with the green panels on top, to trigger a puzzle.
- Click on the fingerprint that doesn’t match the rest out of the bunch. The solutions are shown below.
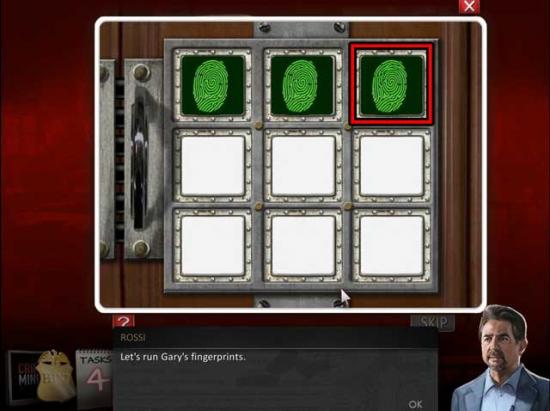
- Upon completing the puzzle, click on the CAUTION TAPE and the INK CARTRIDGE in the cabinet to add them to your inventory.
- Enter through the door on the left.
Assessment Room
- Use the SCISSORS to cut the tie on the evidence box on the right, then click on it for a closer view.
- Match the items inside the box with their corresponding items, such as the medicine bottle with the pills and the cigarettes with the lighter. Do this for all the items until you find the LANDLORD I.D. at the bottom of the box, then click on it to add it to your inventory.
- Once the puzzle is done, use the POWER CORD on the computer.
- Show the LANDLORD I.D. to Garcia via the computer.
- Next, use the INK CARTRIDGE on the phone and fax machine to the left of the computer. Click on the LANDLORD PROFILE that’s faxed through to add it to your inventory.
- Return to the Lobby.
Lobby
- Click on the hidden object area over the desk on the right.
- Find the objects listed at the bottom of the screen. Inventory Items are circled in red, and ? marks are circled in blue. Click on the middle drawer on the right to open it and reveal the item in green.
- Upon completing the puzzle, the POCKET KNIFE will be added to your inventory.
- Enter the Interrogation Room via the door on the upper left.
Interrogation Room
- Speak with the Landlord, then show him the LANDLORD PROFILE. This will trigger a puzzle.
- Match pairs of free tiles. A tile is free if: 1) It is not covered. 2) Either the left or right side is free. Match all pairs of green tiles to complete the interrogation. An example is shown below.
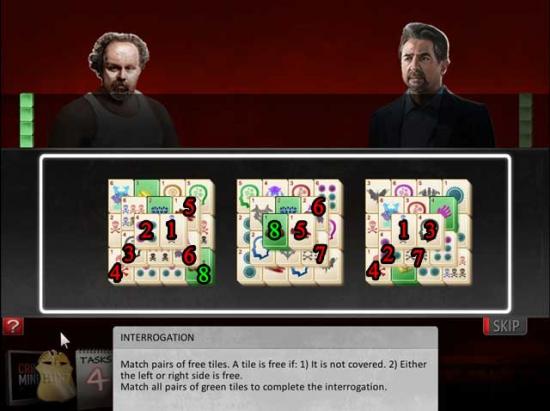
- Once all the green tiles have been matched, the interrogation will be complete.
- Exit the station and return to the Street outside the Apartment.
Street
- Examine the sign “Art On The Squ” on the far right. Click on the NECKLACE underneath it to add it to your inventory.
- Enter the Apartment.
Apartment
- Take a closer look at the body on the left again. Place the SHIRT and the NECKLACE back on their proper locations on the body.
- Exit the Apartment back out to the Street.
Street
- Give the CAUTION TAPE to the Groundskeeper standing in front of the path to the yellow building in the background.
- Next, proceed down that path now that the Groundskeeper has moved.
Square
- Give the FLYER to Morgan, standing on the left, to assume his role.
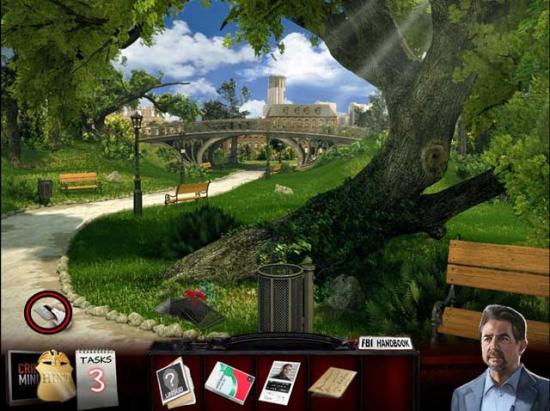
- Speak with the Groundskeeper, then proceed down the path on the right, into the Park.
Park
- Click on the UMBRELLA to add it to your inventory.
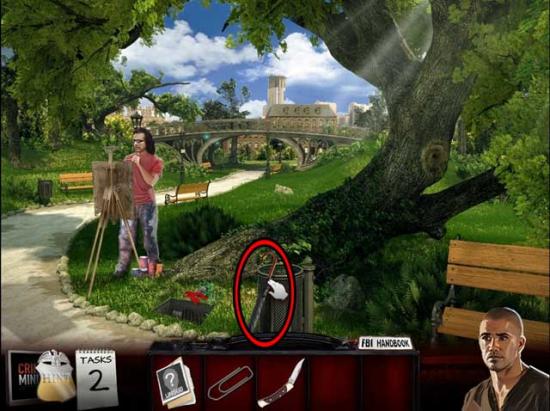
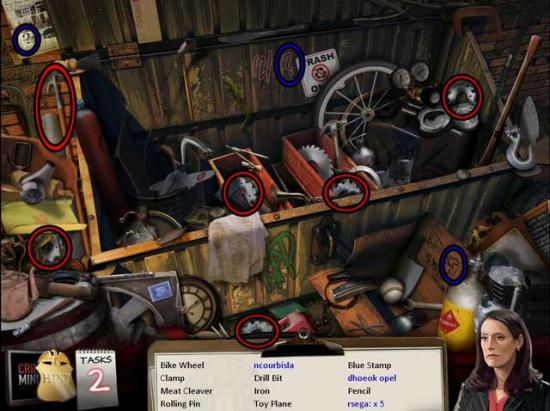
- Click on the hidden object area over the bridge in the distance.
- Find the objects listed at the bottom of the screen. Inventory Items are circled in red, and ? marks are circled in blue.
- Upon completing the area, the CROWBAR will be added to your inventory.
- Return to the Square.
Square
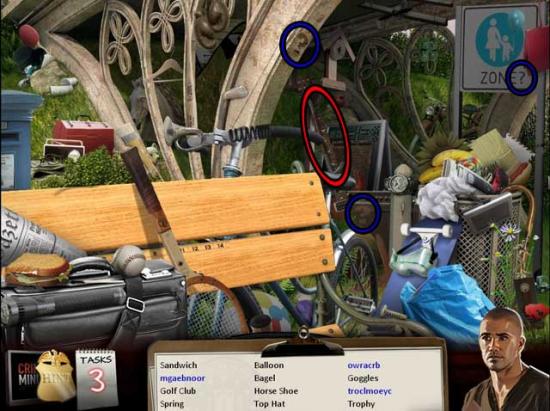
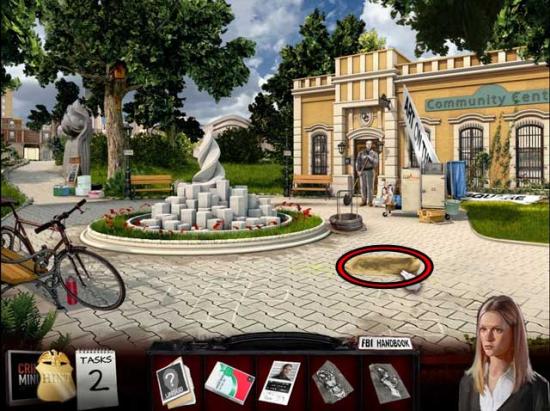
- Take a closer look at the cart to the right of the community center door. Use the CROWBAR to pry it open, then click on the hidden object area that appears there.
- Find the objects listed at the bottom of the screen. Inventory Items are circled in red, and ? marks are circled in blue. Click on the box on the right and the drawer on the left of the cart to open them, revealing the objects listed in green.

- Upon completing the area, the VAN KEYS will be added to your inventory.
- Return to the Park.
Park
- Proceed down the path to the Academy.
Academy
- Speak with the girl on the right, then take a closer look at the bulletin board to her left.
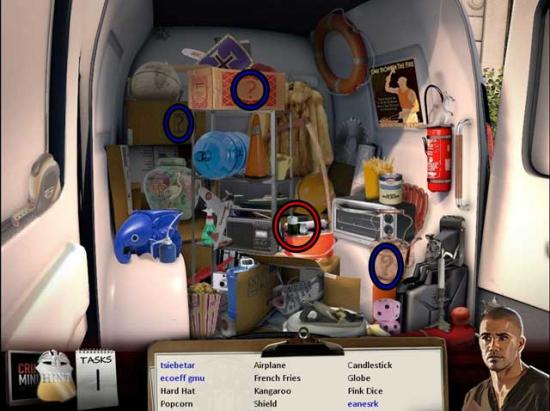
- Examine the top of the van on the left. Use the POCKET KNIFE to cut the ropes holding the LADDER, then click on it to add it to your inventory.
- Examine the back of the van. Use the VAN KEYS to unlock the back doors, revealing a hidden object area.
- Find the objects listed at the bottom of the screen. Inventory Items are circled in red, and ? marks are circled in blue.
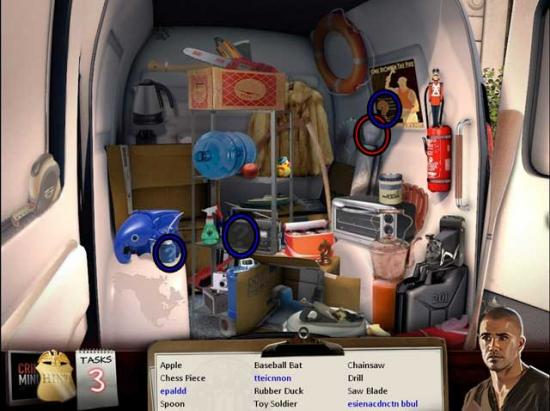
- Upon completing the area, the INCANDESCENT BULB will be added to your inventory.
- Return to the Square.
Square
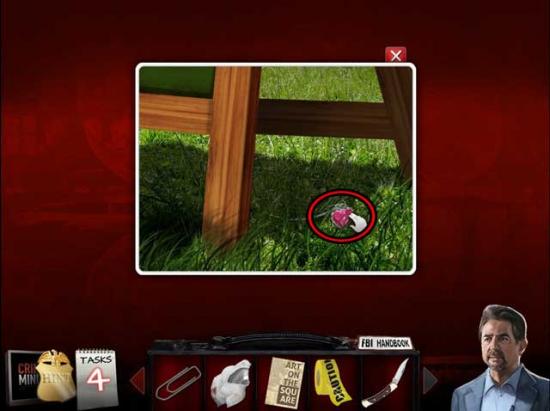
- Use the LADDER on the tree on the left, then use the UMBRELLA to reach the purse caught in the tree, triggering a puzzle.
- Left-click on the tumblers to align them into a connecting image to open the lock. The solution is shown below.
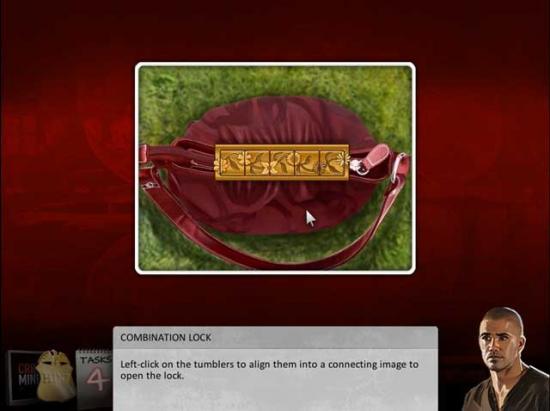
- Upon completing the puzzle, click on the LETTER and the HANDKERCHIEF inside the purse to add them to your inventory.
- Return to the Academy.
Academy
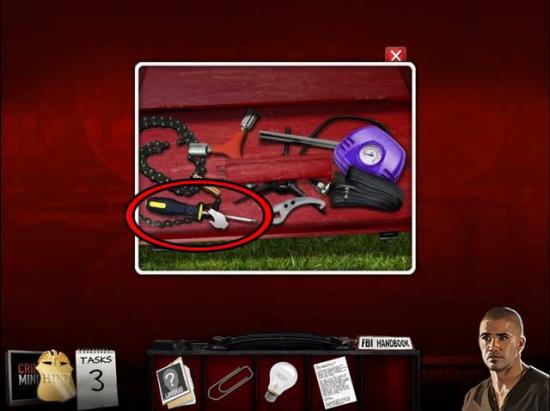
- Give the HANDKERCHIEF to the girl on the right. Once she’s gone, take a closer look at the red toolbox on the ground where she was previously standing for a closer view. Click on the SCREWDRIVER inside to add it to your inventory.
- Return to the Park.
Park
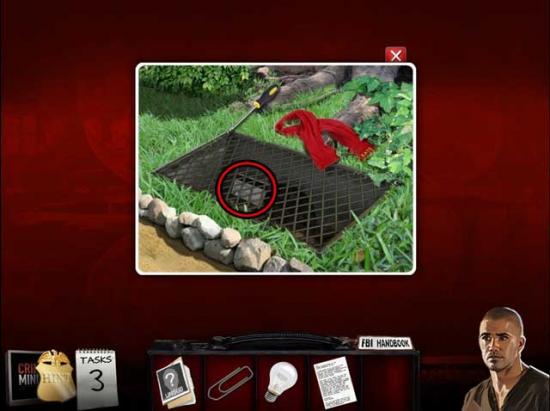
- Take a closer look at the grate on the ground in front of the tree. Use the SCREWDRIVER and click on each of the screws in the four corners to remove them. Once the grate is removed, click on the STUDENT ID to add it to your inventory.
- Return to the Academy.
Academy
- Speak with Reid.
- Next, take a closer look at the card panel to the left of the Academy doors. Use the STUDENT ID on the swipe to open the door and assume the role of Reid.
- Enter the Academy.
Classroom
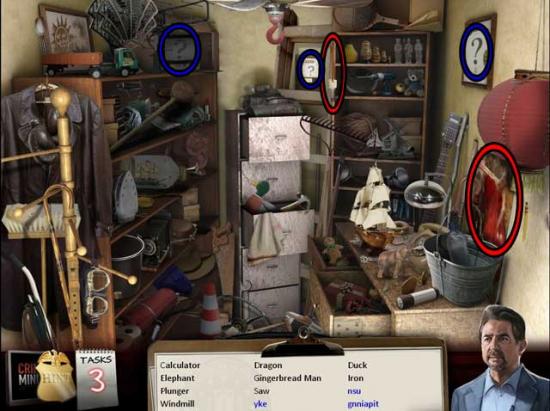
- Click on the hidden object area over the shelves in the corner.
- Find the objects listed at the bottom of the screen. Inventory Items are circled in red, and ? marks are circled in blue.
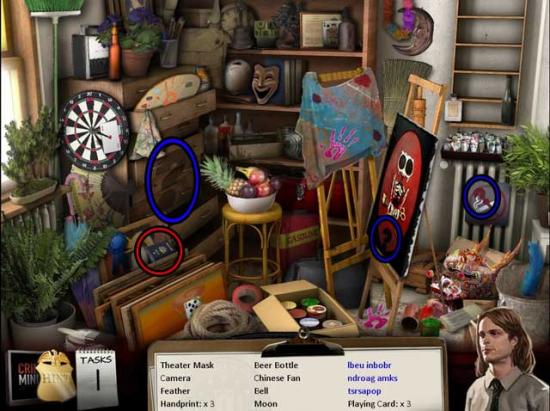
- Upon completing the area, the GARNET PASSPORT will be added to your inventory.
- Click on the OFFICE KEY on the left to add it to your inventory.
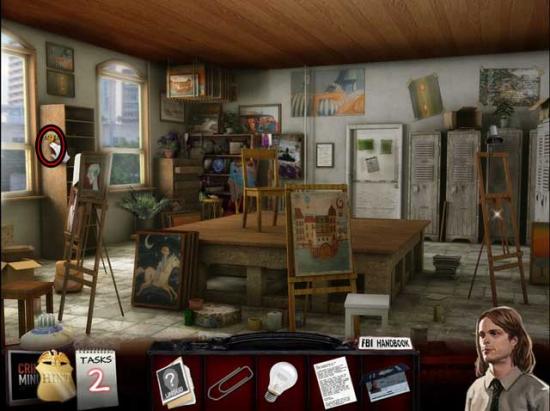
- Use the OFFICE KEY on the door at the back of the room to open it, then proceed inside.
Garnet’s Office
- Speak with Garnet, who’s sitting behind the desk. He will attempt to get away. After he’s apprehended, show him the LETTER.
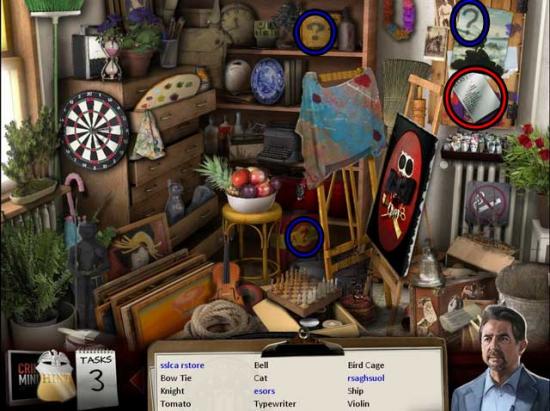
- Click on the hidden object area over the small dresser at the far end of the room.
- Find the objects listed at the bottom of the screen. Inventory Items are circled in red, and ? marks are circled in blue.
- Upon completing the area, the MURDER PAINTING will be added to your inventory.
- Go back out to the Classroom.
Classroom
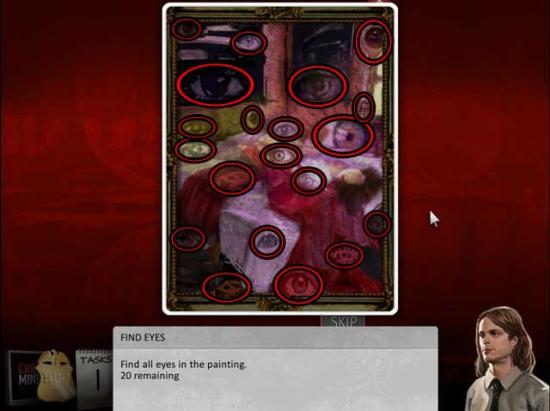
- Use the MURDER PAINTING on the empty easel on the right. Use the INCANDESCENT BULB on the light at the top of the easel to repair it, then click on the painting for a closer view.
- Find all eyes in the painting. There are 20 in total, and their locations are shown below.
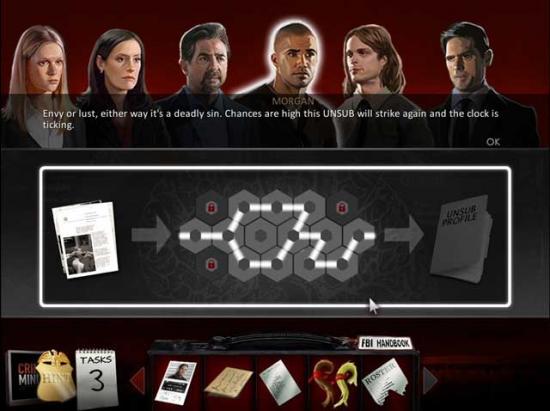
- Upon completing the puzzle, another puzzle will be triggered. Click on the tiles to swap them until they form a complete circuit. Tiles with a lock cannot be moved. The solution is shown below.
- After a brief cutscene, you will find yourself back at the Police Station.
Lobby
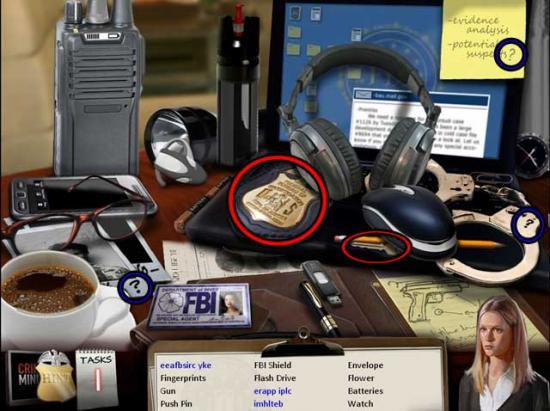
- Once you’ve assumed the role of Prentiss, click on the desk on the right to enter a hidden object area.
- Find the objects listed at the bottom of the screen. Inventory Items are circled in red, and ? marks are circled in blue.

- Upon completing the area, the CASSETTES and the REAM OF PAPER will be added to your inventory.
- Examine the box on top of the white copier to the right of the entry doors. Use the CASSETTES on the box, then exit for now.
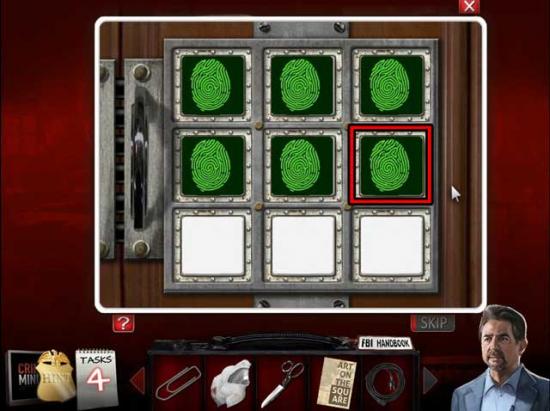
- Examine the cabinet to the right of the copier, with the green panels on the front, to trigger another puzzle.
- Click on the fingerprint that doesn’t match the others. The solutions are shown below.
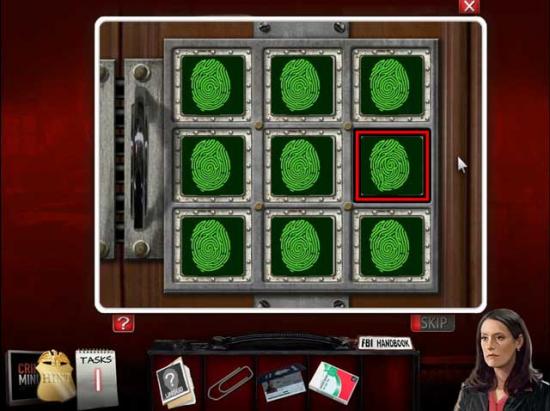
- Upon completing the puzzle, click on the CASSETTE inside the cabinet to add it to your inventory.
- Examine the box on top of the copier again. Use the CASSETTE on the box to trigger a puzzle.
- Arrange the cassettes in the box so that none of the cassettes overlap each other and all fit within the box. Afterward, select the blank cassette. A possible solution is shown below.
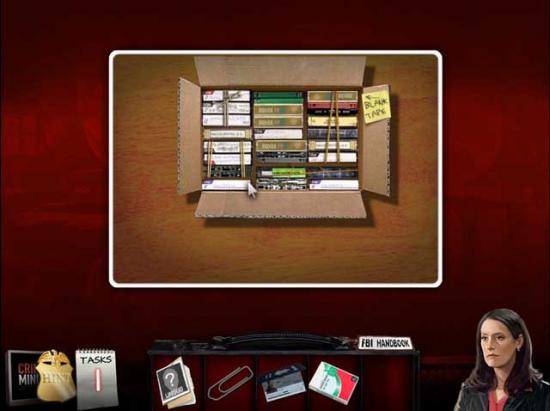
- Upon completing the puzzle, click on the blank CASSETTE in the upper right corner to add it to your inventory.
- Enter the Assessment Room on the left.
Assessment Room
- Take a closer look at the tape recorder on the shelf in the corner of the room. Use the CASSETTE on the recorder, then click on the red recording button.
- Speak with Garcia via the computer and show her the GARNET PASSPORT. She will send you the GARNET PROFILE via the fax machine.
- Return to the Lobby.
Lobby
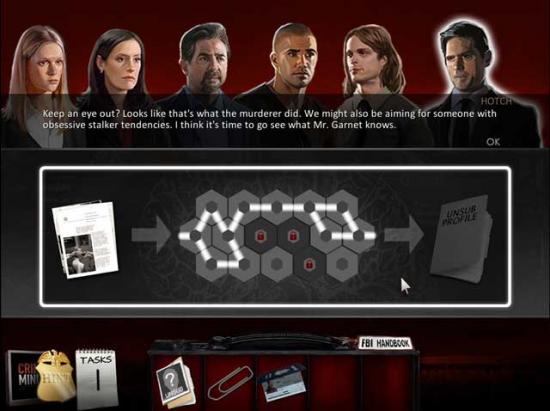
- Speak with Hotch to learn another murder has occurred.
Case One, Chapter 2: The Second Murder
Street Corner
- Click on AUGUST’S SKETCH (1) lying in the street on the left to add it to your inventory.
- Enter the building.
Second Apartment
- Click on the hidden object area over the open closet at the far end of the room.
- Find the objects listed at the bottom of the screen. Inventory Items are circled in red, and ? marks are circled in blue.
- Upon completing the area, the BROKEN PICTURE will be added to your inventory.
- Examine the counter on the left. Note the briefcase requires a key.
- Take a closer look at the TV. Use the PAPERCLIP to open the locked cabinet on the lower left, then click on the TROPHY and the PAPER SCRAP to add them to your inventory.
- Take a closer look at the toppled trashcan near the first pillar. Use the PAPER SCRAP on the close-up to trigger a puzzle.
- Swap the pieces to reassemble the document. The solution is shown below.
- Upon completing the puzzle, the DIPLOMA will be added to your inventory.
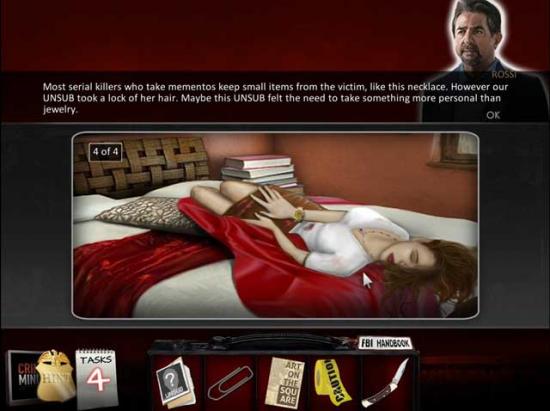
- Examine the victim’s body on the left. Place the TROPHY, the DIPLOMA, and the BROKEN PICTURE back into their proper locations. The solution is shown below.
- Exit the Second Apartment.
Street Corner
- Click on the hidden object area over the bench at the entrance to the park.
- Find the objects listed at the bottom of the screen. Inventory Items are circled in red, and ? marks are circled in blue.
- Upon completing the area, AUGUST’S SKETCH (2) will be added to your inventory.
- Enter the park area.
Square
- Click on AUGUST’S SKETCH (3) lying on the ground to add it to your inventory.
- Proceed into the Park.
Park
- Talk with August. Once finished, give him the three AUGUST’S SKETCHES. This will trigger a puzzle.
- Match pairs of free tiles. A tile is free if: 1) It is not covered. 2) Either the left or right side is free. Match all pairs of green tiles to complete the interview.
- Upon completing the puzzle, you will acquire the BRIEFCASE KEY.
- Return to the Second Apartment.
Second Apartment
- Take a closer look at the counter on the right again. Use the BRIEFCASE KEY on the briefcase to open it, then click on the CLASS SCHEDULE inside to add it to your inventory.
- Exit the Second Apartment.
Street Corner
- Speak with the detectives outside. You will assume the role of Rossi.
- Proceed towards the Square.
Square
- Click on the hidden object area over the cart to the right of the Community Center entrance.
- Find the objects listed at the bottom of the screen. Inventory Items are circled in red, and ? marks are circled in blue.
- Upon completing the area, the GLASS CUTTER and the LED LIGHT will be added to your inventory.
- Take a closer look at the door to the Community Center. Use the LED LIGHT on the socket with the wires hanging out to repair it, triggering a puzzle.
- Select the switches to turn them on (green) and off (red) by using the clues on the left. The lights will turn on once all switches are in the “on” position. The solution is shown below.
- Upon completing the puzzle, enter the Community Center.
Community Center
- Give the CLASS SCHEDULE to the Director.
- Once the Director leaves, take a closer look at the door on the right. Use the GLASS CUTTER on the glass to cut a hole, unlocking the door. Proceed inside.
Office
- Click on the hidden object area over the desk.
- Find the objects listed at the bottom of the screen. Inventory Items are circled in red, and ? marks are circled in blue.
- Upon completing the area, the LETTER will be added to your inventory.
- Examine the copy machine towards the right. Click to open the top, and note the torn piece of paper inside.
- Exit for now, making your way to the Park.
Park
- Click on the PASSCARD lying on the ground to add it to your inventory.
- Return to the Community Center.
Community Center
- Use the PASSCARD on the far door, through the archway, to open it and proceed inside.
Closet
- Find the objects listed at the bottom of the screen. Inventory Items are circled in red, and ? marks are circled in blue.
- Upon completing the area, the MURDER PAINTING and the LOCKER KEY will be added to your inventory.
- Make your way back to the Academy, and inside to the Classroom.
Classroom
- Click on the hidden object area in the far left corner.
- Find the objects listed at the bottom of the screen. Inventory Items are circled in red, and ? marks are circled in blue.
- Upon completing the area, the ART SCHOOL ROSTER will be added to your inventory.
- Take a closer look at the lockers on the right. Use the LOCKER KEY on the middle locker to open it, then click on the HAIR and the COMMUNITY CENTER ROSTER PIECE inside to add them to your inventory.

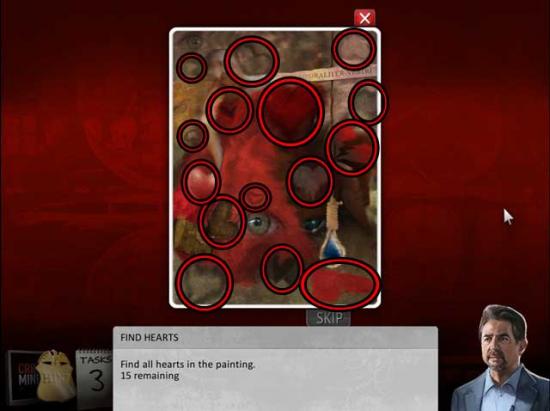
- Back in the main area, place the MURDER PAINTING on the empty easel on the right, then click on it to trigger a puzzle.
- Find all hearts in the painting. There are 15 in total, and their locations are shown below.
- Upon completing the puzzle, another will be triggered. Swap the tiles to complete the circuit. Tiles with a lock cannot be moved. The solution is shown below.
- Make your way back to the Office in the Community Center.
Office
- Take a closer look at the copy machine towards the right. Use the COMMUNITY CENTER ROSTER PIECE on the copier, then the REAM OF PAPER. Click on the resulting COMMUNITY CENTER ROSTER to add it to your inventory.
- Return to the Street Corner.
Street Corner
- Enter the car to make your way back to the Police Station.
Lobby
- Upon arriving, you will assume the role of Prentiss.
- Enter the Assessment Room.
Assessment Room
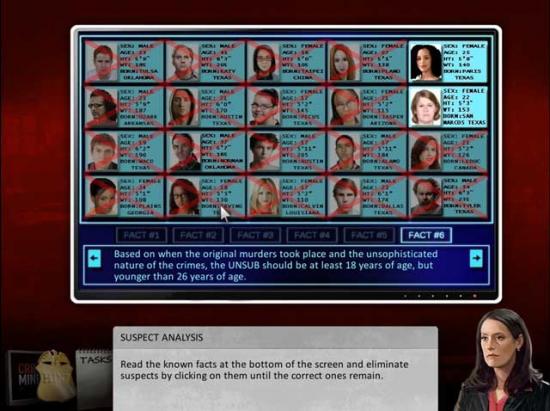
- Show the COMMUNITY CENTER ROSTER and the ART SCHOOL ROSTER to Garcia via the computer. A puzzle will be triggered.
- Read the known facts at the bottom of the screen and eliminate suspects by clicking on them until the correct ones remain. The solution is shown below.
- Exit the Assessment Room and enter the Interrogation Room.
Interrogation Room
- Speak with Garnet. Show him the GARNET PROFILE, the LETTER, and the HAIR. This will trigger a puzzle.
- Match pairs of free tiles. A tile is free if: 1) It is not covered. 2) Either the left or right side is free. Match all pairs of green tiles to complete the interrogation.
- Once you’ve completed the puzzle, the JEN PROFILE will be added to your inventory.
- Go back to the Assessment Room.
Assessment Room
- Take a closer look at the recording device up on the shelf. Click on it to acquire the CASSETTE.
- Exit the Police Station and make your way back to the Classroom.
Classroom
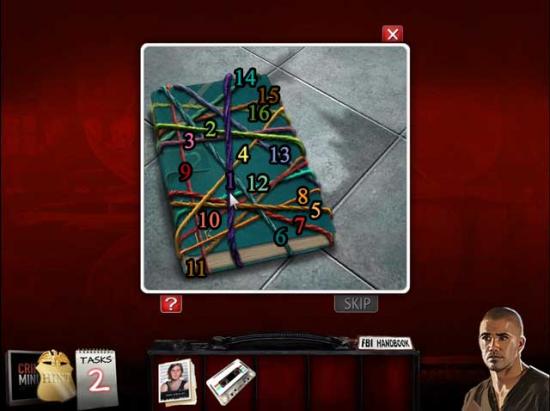
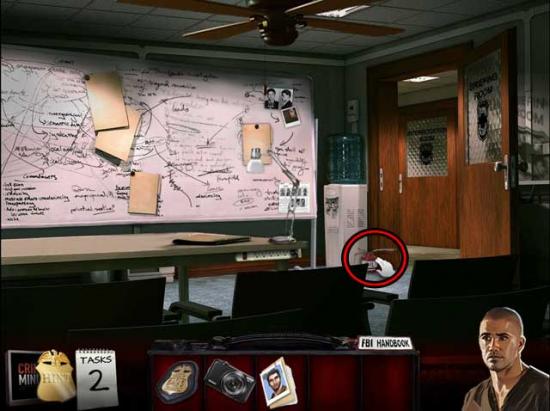
- Click on Jen’s Diary lying on the ground on the lower right, next to the empty easel, to trigger a puzzle.
- Click on the strings to remove them, starting with the top and working your way down. The solution is shown below.
- Upon opening the diary, another puzzle will be triggered.
- Swap the tiles so that they’re all in their correct locations. Tiles with a lock symbol cannot be moved. The solution is shown below.
- You will now assume the role of Morgan. Go outside to the Academy.
Academy
- Click on the back of the van to trigger a puzzle.
- Find the objects listed at the bottom of the screen. Inventory Items are circled in red, and ? marks are circled in blue.
- Upon completing the area, the BATTERIES will be added to your inventory.
- Enter the Classroom again.
Classroom
- Take a closer look at the radio stand to the right of the agents, in front of the left locker. Use the BATTERIES, then the CASSETTE on the radio to trigger a puzzle.
- Match pairs of free tiles. A tile is free if: 1) It is not covered. 2) Either the left or right side is free. Match all pairs of green tiles to complete the interview.
- Upon completing the puzzle, watch the cutscene that follows.
Congratulations! You’ve completed Case One: A Dying Art! Case Two is now unlocked.
Case Two, Chapter 1: No Spark
Plane
- Take a closer look at the briefcase on the chair on the right. Note it’s locked.
- Click on the computer to access a hidden object area.
- Find the objects listed at the bottom of the screen. Inventory Items are circled in red, and ? marks are circled in blue.
- Upon completing the area, the BRIEFCASE KEY and the FBI SHIELD will be added to your inventory.
- Take a closer look at the briefcase again. Use the BRIEFCASE KEY to open it, then click on the INFO FOLDER inside to add it to your inventory.
- Give the INFO FOLDER to Hotch to trigger another puzzle.
- Click on the tiles to swap their positions. Tiles with a lock icon cannot be moved. The solution is shown below.
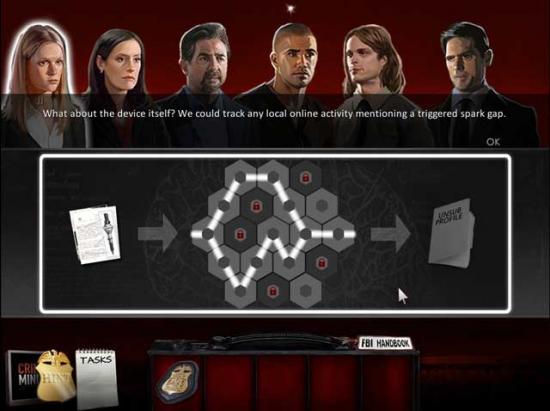
- Upon completing the puzzle, you will obtain the DEVICE DESCRIPTION.
- Talk to Garcia via the monitor at the back of the plane. Show her the DEVICE DESCRIPTION.
Station
- Upon arriving at the station, you will assume the role of JJ.
- Take a closer look at the papers sitting on the table on the left. Click on the CAMERA and the MILITIA LEADER ID to add them to your inventory.
- Upon finding the ID, you will assume the role of Morgan.
- Show the MILITIA LEADER ID to Garcia via the computer. Click on the print-out that appears to obtain the MILITIA LEADER PROFILE.
- Proceed through the double doors ahead.
Briefing Room
- Click on the OIL CAN to add it to your inventory.
- Proceed through the door on the right to the next area.
Interrogation Room
- Talk with the man sitting at the desk, then show him the MILITIA LEADER PROFILE.
- Return to the Briefing Room.
Briefing Room
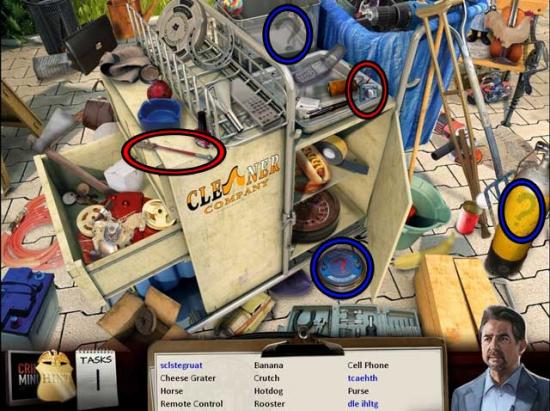
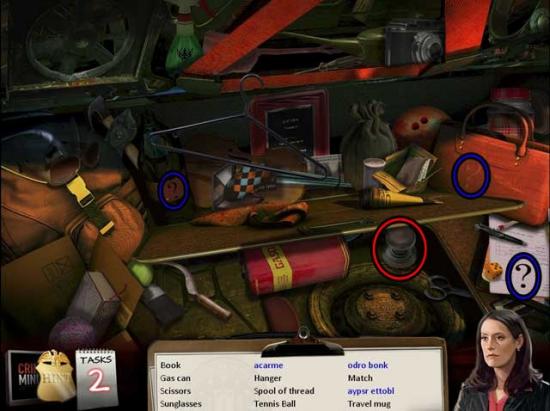
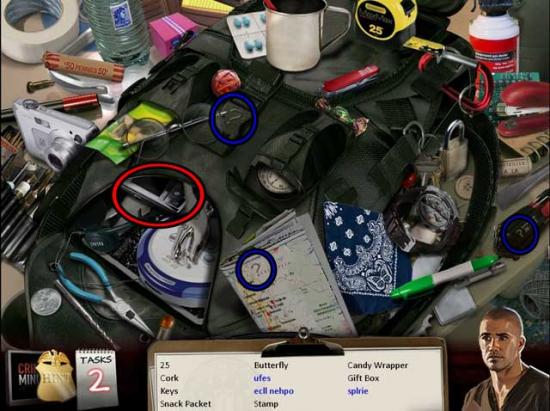
- Click on the backpack on the table to access a hidden object area.
- Find the objects listed at the bottom of the screen. Inventory Items are circled in red, and ? marks are circled in blue.
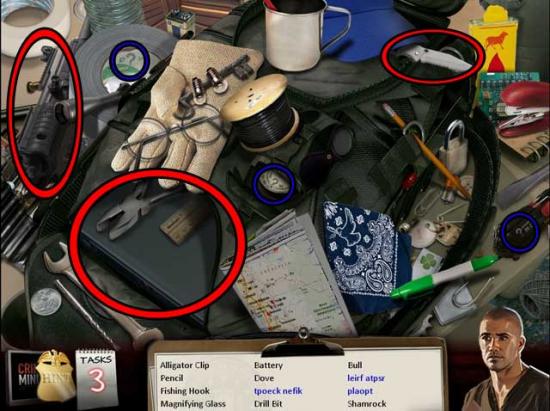
- Upon completing the area, the LAPTOP, the POCKET KNIFE, and the RIFLE PARTS will be added to your inventory.
- Return to the Station.
Station
- Take a closer look at the box marked “storage” beneath the bulletin boards on the right. Use the OIL CAN on the lock to open the box and trigger a puzzle.
- Select the top-most cable that is not covered by other cables. Continue this process until all are removed. The order is as follows: Aqua, Grey, Orange, Red, Green, Dark Grey, Yellow, Blue Grey, Blue, Light Grey.
- Upon completing the puzzle, click on the POWER CORD to add it to your inventory.
- Return to the Briefing Room.
Briefing Room
- Use the LAPTOP on top of the notebook on the table, then use the POWER CORD on the laptop.
- Return to the Interrogation Room.
Interrogation Room
- Speak with the man again, this time showing him the RIFLE PARTS to trigger a puzzle.
- Match pairs of free tiles. A tile is free if: 1) It is not covered. 2) Either the left or right side is free. Match all pairs of green tiles to complete the interview.
- Upon completing the interview, return to the Briefing Room.
Briefing Room
- Click on the brown jacket on the far left for a closer view. Use the POCKET KNIFE to cut it open, then click on the FLASH DRIVE inside to add it to your inventory.
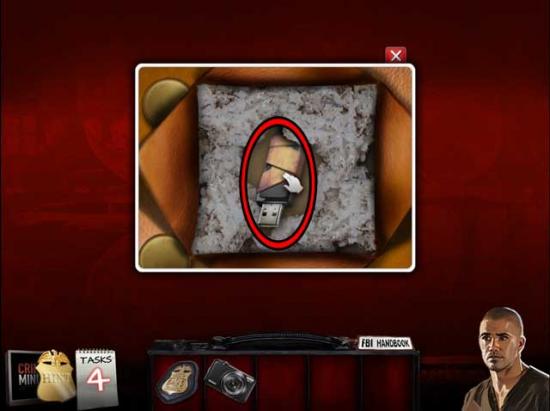
- Use the FLASH DRIVE on the computer to trigger a puzzle.
- Read the clues and use them to decipher which files should be eliminated. Click on files that you’d like to cross off. Reveal the true file to complete the puzzle. The solution is shown below.

- Upon completing the puzzle, read the message that appears on the computer and click “Print” in the bottom right corner of the window.
- Go to the Station.
Station
- Click on the EMAIL PRINTOUT to add it to your inventory.
- Return to the Interrogation Room.
Interrogation Room
- Show the EMAIL PRINTOUT to the man at the desk. You will obtain the BRIEFING FOLDER.
- Return to the Station.
Station
- Give the BRIEFING FOLDER to the police officer, then exit via the doors on the left.
Street
- Speak with Reid, who’s standing in front of the Hospital. You will assume his role.
- Take a closer look at the back of the ambulance. Click on the QUARTER to add it to your inventory.
- Enter the Hospital on the right.
Hospital
- Speak with the Chief of Staff, then speak with the Nurse.
- Exit the Hospital for now.
Street
- Proceed up to the next area.
Bar Entrance
- Click on the bush on the right to enter a hidden object area.
- Find the objects listed at the bottom of the screen. Inventory Items are circled in red, and ? marks are circled in blue. Click on the white lunchbox on the left to reveal the item listed in green.
- Upon completing the area, the GLASS SHARDS will be added to your inventory.
- Proceed forward to enter the Bar.
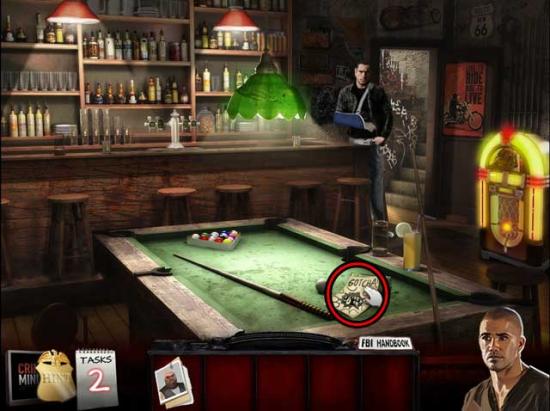
Bar
- Speak with the Bartender and the Injured Biker.
- Examine the jukebox on the right. Use the QUARTER on the coin slot, then exit for now.
- Use the CAMERA on the Injured Biker and the Bartender to obtain the PHOTO OF BIKER and PHOTO OF BARTENDER.
- Exit for now and return to the Hospital.
Hospital
- Show the PHOTO OF BIKER and PHOTO OF BARTENDER to the Nurse. You will acquire the SURVEILLANCE PHOTOS.
- Return to the Bar.
Bar
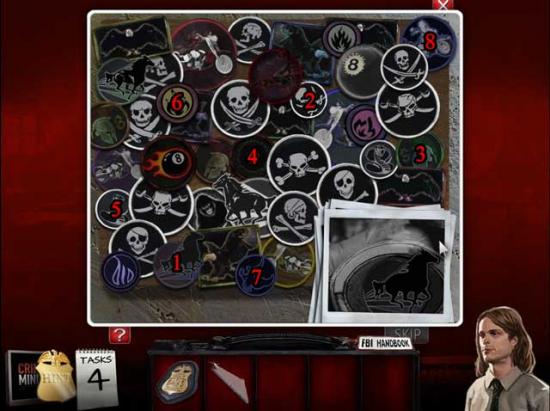
- Take a closer look at the back wall to the left of the Injured Biker. Use the SURVEILLANCE PHOTOS on the close-up to trigger a puzzle.
- Find the matching patch that corresponds to each photo. The solution is shown below.
- Upon completing the puzzle, click on the hidden object area that appears over the bar.
- Find the objects listed at the bottom of the screen. Inventory Items are circled in red, and ? marks are circled in blue.
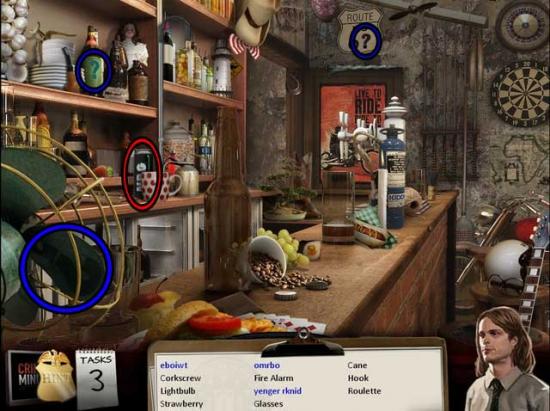
- Upon completing the area, the ENERGY DRINK will be added to your inventory.
- Give the ENERGY DRINK to the Bartender.
- Examine the Jukebox on the right again. Input the song numbers according to the clue left by the Bartender. The solution is D4, C1, B3.
- Upon completing the puzzle, you will obtain the CODE CARD.
- Go outside.
Bar Entrance
- Examine the back of the bike on the left. Use the CODE CARD on the lock to trigger a puzzle, then input the code “D4, C1, B3”.
- Upon completing the puzzle, click on the MEDICINE BAG inside to add it to your inventory.
- Return to the Hospital.
Hospital
- Give the MEDICINE BAG to the Chief of Staff.
- Take a closer look at the medicine bag, which is now sitting on the left side of the desk.
- Investigate the doctor’s bag by selecting pairs of items associated with each other. An example is Corkscrew with Cork, or Ping Pong Ball with Ping Pong Paddle. Repeat this process until you reach the bottom of the bag, then click on the ID CARD to add it to your inventory.
- Examine the door behind the Chief of Staff. Use the ID CARD on the swipe to gain access to the next area.
Hallway
- Enter through the doors on the left.
Lithotripsy
- Click on the hidden object area over the open cabinet on the lower left.
- Find the objects listed at the bottom of the screen. Inventory Items are circled in red, and ? marks are circled in blue.
- Upon completing the area, the NAIL POLISH and the SMALL GLASS SHARDS will be added to your inventory.
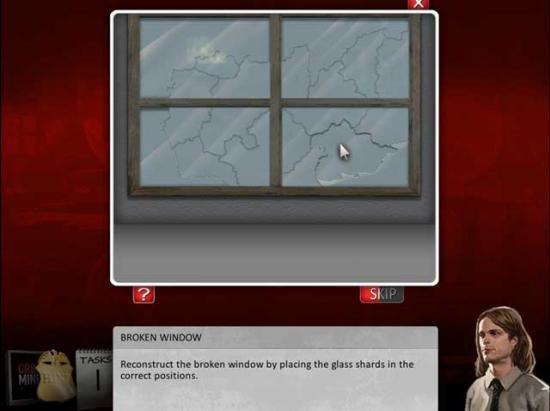
- Examine the broken window on the left. Use the GLASS SHARDS and the SMALL GLASS SHARDS on the window to trigger a puzzle.
- Reconstruct the broken window by placing the glass shards in the correct positions. The solution is shown below.
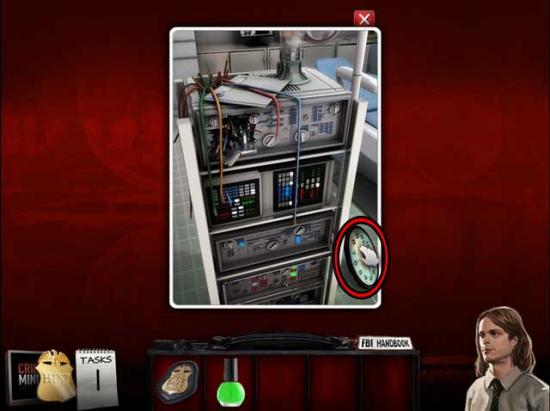
- Examine the machine to the left of the chair. Note the mess, then click on the BROKEN CLOCK to add it to your inventory.
- Return to the Hospital.
Hospital
- Show the BROKEN CLOCK to the Nurse at the front desk. You will obtain the RESIDENT’S RECORD.
- Go outside.
Street
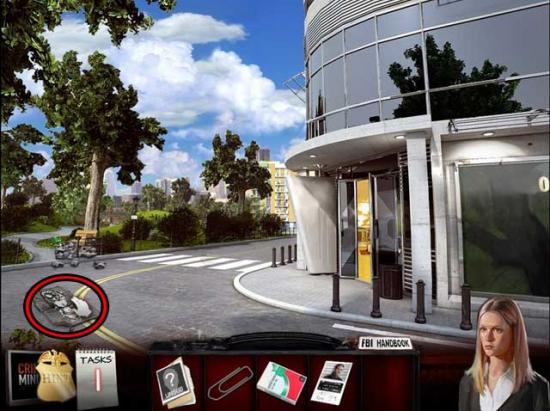
- Click down, or on the police car on the left, to return to the Station.
Station
- Upon arriving at the station, you will assume the role of Hotch.
- Show the RESIDENT’S RECORD to Garcia via the computer. A puzzle will be triggered.
- Swap the tiles so that they’re all in their correct locations. Tile with a lock cannot be moved. The solution is shown below.
- Exit the Station back to the Street.
Street
- Speak with the man standing on the left. Show him the FBI SHIELD, then you will obtain the RESIDENT COAT.
- Enter the Alley on the left.
Alley
- Click on the WHEEL lying on the ground to add it to your inventory.
- Make your way back to the Hallway of the Hospital.
Hallway
- Use the WHEEL on the broken machine at the back of the hallway to move it out of the way.
- Once moved, click on the INHALER lying on the floor to add it to your inventory.

- Enter the Locker Room.
Locker Room
- Click on the hidden object area over the sink.
- Find the objects listed at the bottom of the screen. Inventory Items are circled in red, and ? marks are circled in blue.
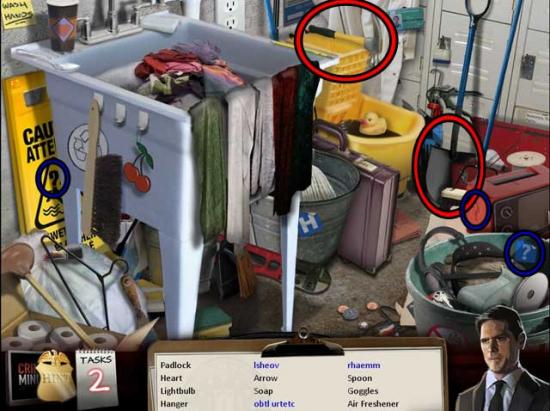
- Upon completing the area, the HAMMER and the SHOVEL will be added to your inventory.
- Examine the lockers. Note you’ll need to find the combination.
- Make your way back to the Alley.
Alley
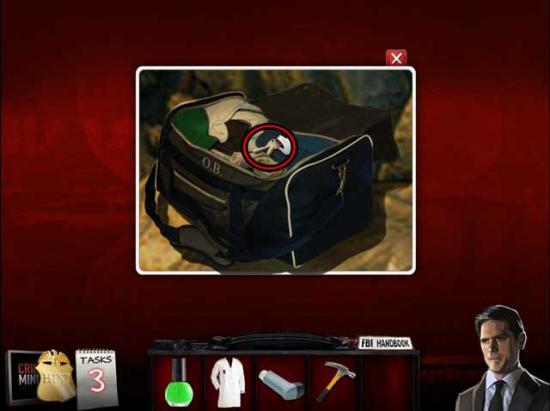
- Use the SHOVEL on the pile of garbage to the left of the homeless man. Click on the bag that’s revealed for a closer view.
- Click on the top of the resident’s bag to open it, then click on the RESIDENT’S APARTMENT KEY inside the bag to add it to your inventory.
- Speak with the homeless man on the right to trigger a puzzle.
- Match pairs of free tiles. A tile is free if: 1) It is not covered. 2) Either the left or right side is free. Match all pairs of green tiles to complete the interview.
- Return to the Bar.
Bar
- Speak with the Injured Biker. Give him the INHALER. A puzzle will be triggered.
- Match pairs of free tiles. A tile is free if: 1) It is not covered. 2) Either the left or right side is free. Match all pairs of green tiles to complete the interview.
- Upon completing the puzzle, the door behind Edward will open. Proceed through to the next area.
Corridor
- Use the RESIDENT’S APARTMENT KEY on the door on the far left to open it, then proceed inside.
Burn’s Apartment
- Examine the broken TV on the floor, then take a closer look at the open closet on the left. Use the RESIDENT COAT on the hanger to place it back where it belongs.
- Click on the hidden object area that appears over the dresser in the corner.
- Find the objects listed at the bottom of the screen. Inventory Items are circled in red, and ? marks are circled in blue.
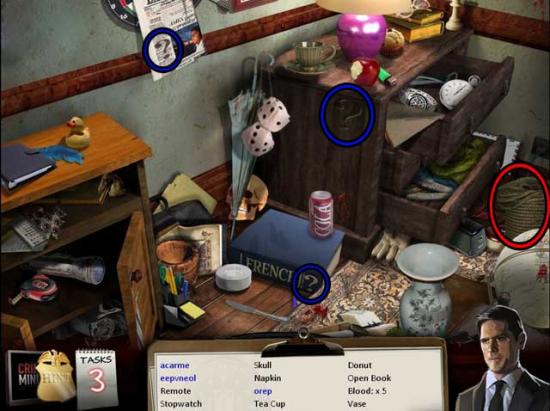
- Upon completing the area, the ROPE will be added to your inventory.
- Examine the window on the right for a closer view. Use the ROPE on the heater, then exit the close-up.
- Proceed out the window via the rope.
Construction Site
- Click on the hidden object area in the upper right corner.
- Find the objects listed at the bottom of the screen. Inventory Items are circled in red, and ? marks are circled in blue. Click on the dumpster lid on the right to reveal the objects listed in green.
- Upon completing the area, the CROWBAR and the INCANDESCENT BULB will be added to your inventory.
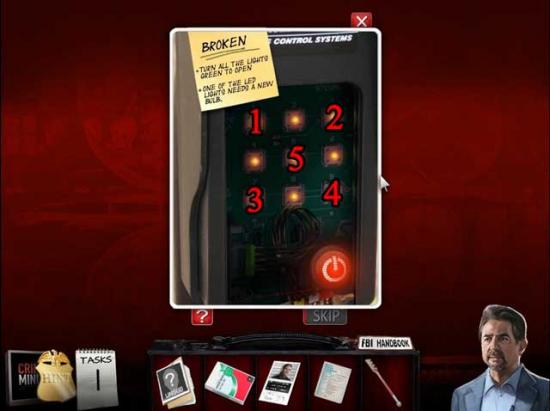
- Examine the power panel on the left. Use the CROWBAR to pry it open, triggering a puzzle.
- Select the switches to turn them on (green) and off (red) by using the clues on the left. The lights will turn on once all the switches are in the “on” position. Click on the switches in the following order: A, B, C, E.
- Upon completing the puzzle, the lights will turn on, revealing a body. Examine the left hand for a closer view.
- Click on the red box to open it, revealing a RING. Click on it to add it to your inventory.
Case Two, Chapter 2: The Missing Link
Station
- Give the RING to the police officer. This will trigger a puzzle.
- Click on tiles to rotate them to complete the map. The solution is shown below.
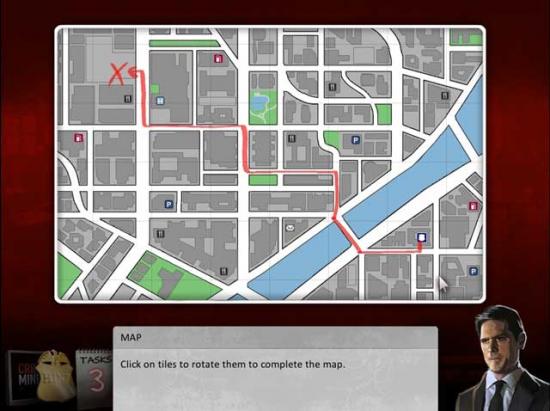
- Upon completing the puzzle, you will obtain the PHOTO OF RING. You will also now assume the role of Rossi.
- Make your way back to the Bar.
Bar
- Show the PHOTO OF RING to Edward.
- Make your way back to the Hospital.
Hospital
- Examine the clipboard on the desk, next to the fan and the water bottle. You will obtain the HOSPITAL SIGN-IN.
- Return to the Bar.
Bar
- Show the HOSPITAL SIGN-IN to Edward.
- Enter the door behind him.
Corridor
- Speak with JJ, then use the INCANDESCENT BULB on the broken light in the upper left corner.
- Examine the welcome mat on the floor. The corner will be lifted, triggering a puzzle.
- Select matching pairs of identical keys until only one key remains. The solution is shown below.
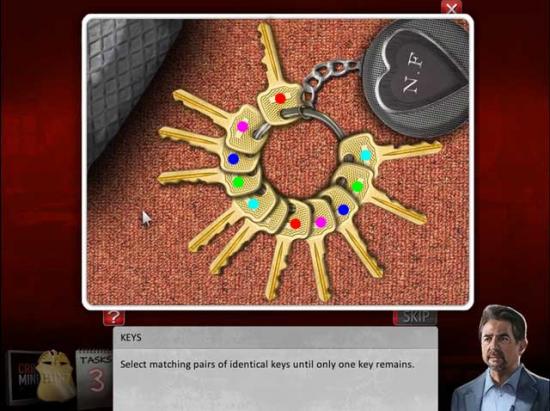
- Upon completing the puzzle, click on the WAITRESS’ APARTMENT KEY to add it to your inventory.
- You will now assume the role of JJ.
- Use the WAITRESS’ APARTMENT KEY on the door on the immediate left to open it and proceed inside.
Waitress’ Apartment
- Click on the hidden object area over the desk.
- Find the objects listed at the bottom of the screen. Inventory Items are circled in red, and ? marks are circled in blue.
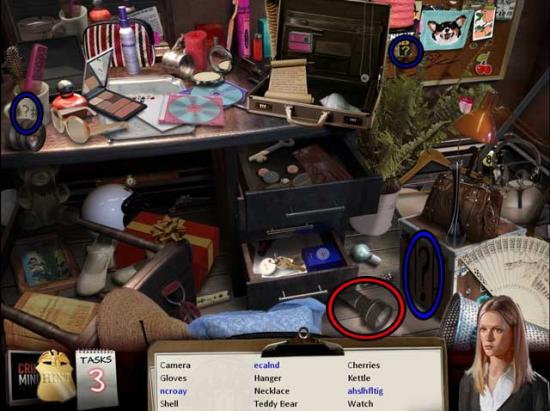
- Upon completing the area, the FLASHLIGHT will be added to your inventory.
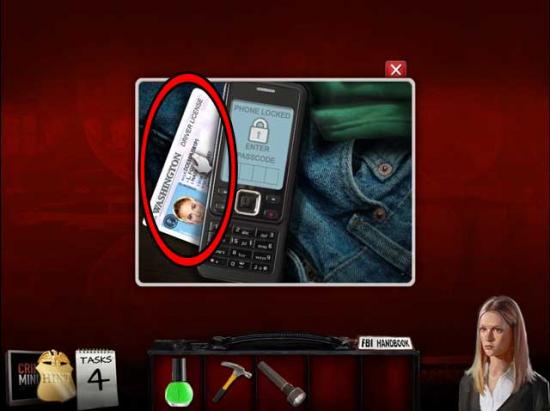
- Examine the phone lying on the ground on the lower right. Note you’ll need a password, then click on the WAITRESS ID to add it to your inventory.
- Note the nurse uniform on the right, then exit back to the Station for now.
Station
- Show the WAITRESS ID to Garcia via the computer. This will trigger a puzzle.
- Swap the tiles so that they’re all in their proper locations. Tiles with a lock cannot be moved. The solution is shown below.
- Upon completing the puzzle, you will obtain the WAITRESS PROFILE.
- Return to the Bar.
Bar
- Show the WAITRESS PROFILE to the Bartender.
- Click on the hidden object area that appears over the bar.
- Find the objects listed at the bottom of the screen. Inventory Items are circled in red, and ? marks are circled in blue.
- Upon completing the area, the LOCKER COMBINATION will be added to your inventory.
- Make your way back to the Hospital Locker Room.
Locker Room
- Examine the small lockers in the corner. Use the LOCKER COMBINATION on the close-up to trigger a puzzle.
- Turn the tumblers on the padlock to the corresponding symbols on the code. The solution is shown below.
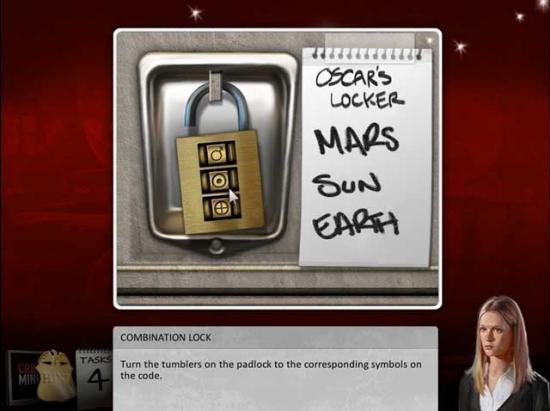
- Upon completing the puzzle, the locker will open and a hidden object area will appear.
- Find the objects listed at the bottom of the screen. Inventory Items are circled in red, and ? marks are circled in blue.
- Upon completing the area, the CELL PHONE PASSWORD will be added to your inventory.
- Make your way back to the Waitress’ Apartment.
Waitress’ Apartment
- Examine the phone lying on the floor on the lower right. Use the CELL PHONE PASSWORD on the phone to trigger a puzzle.
- Select the number buttons to enter the correct passcode. Notice that the cellphone symbol on the note is upside-down, so the code is as well. The real solution is 5317.
- Upon completing the puzzle, click on the CELL PHONE to add it to your inventory.
- Exit the Waitress’ Apartment.
Corridor
- Speak with Prentiss. You will assume her role.
- Make your way back to the Station.
Station
- Show the CELL PHONE to Garcia via the computer.
- Exit the Station and make your way back to the Alley.
Alley
- Click on the hidden object area over the dumpster on the left.
- Find the objects listed at the bottom of the screen. Inventory Items are circled in red, and ? marks are circled in blue.
- Upon completing the area, the HOOKED POLE and the SMALL GEARS will be added to your inventory.
- Back in the main area, use the HOOKED POLE on the ladder towards the right to bring it down, then click on it to climb up.
Balcony
- Take a closer look at the boarded-up window next to the ladder. Use the HAMMER to remove the boards, then enter the building.
Abandoned Building
- Click on the camera on the tripod for a closer view. Click on the letter on the sill to read it, then click on the LARGE GEARS to add them to your inventory.
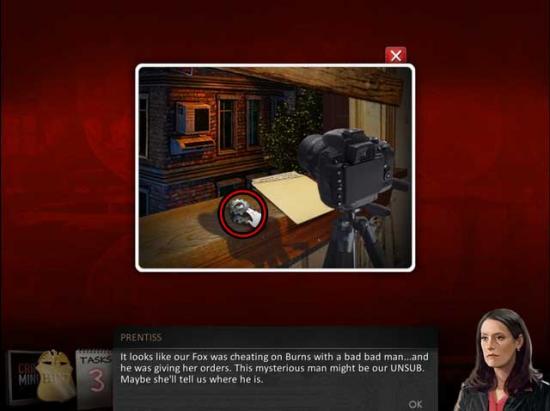
- Exit the close-up.
- Back in the main area, click on the hidden object area over the sleeping bag.
- Find the objects listed at the bottom of the screen. Inventory Items are circled in red, and ? marks are circled in blue.
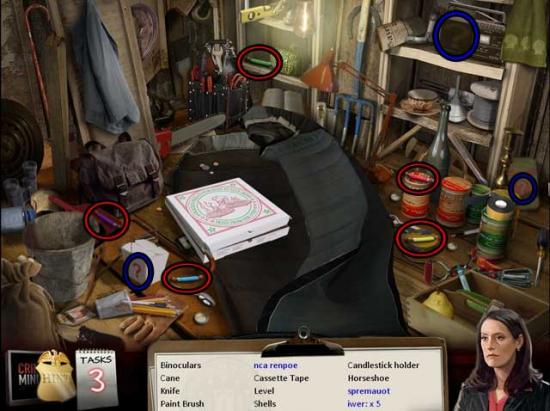
- Upon completing the area, the COLORED WIRES will be added to your inventory.
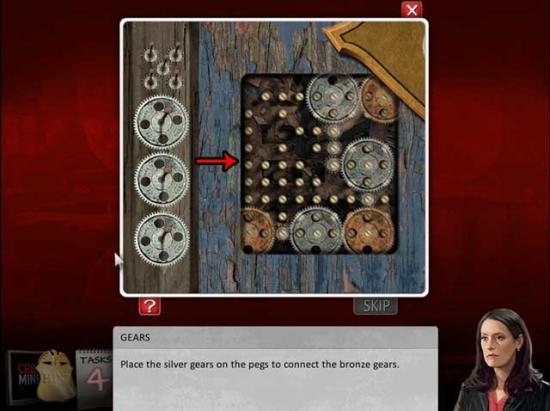
- Click on the elevator panel on the right for a closer view. Use the SMALL GEARS and the LARGE GEARS on the panel to trigger a puzzle.
- Place the silver gears on the pegs to connect the bronze gears. The solution is shown below.
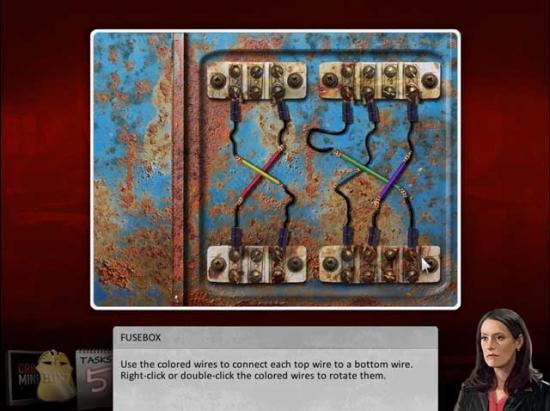
- Upon completing the puzzle, take a closer look at the open elevator. Use the FLASHLIGHT on the dark shaft to light it, then take a closer look at the fuse box at the back of the shaft. Use the COLORED WIRED on the fuse box to trigger a puzzle.
- Use the colored wired to connect each top wire to a bottom wire. Right-click or double-click the colored wires to rotate them. The solution is shown below.
- Examine the body that appears once the elevator arrives, then take a closer look at her hand. Use the NAIL POLISH on the hand to cause it to open, then click on the CAR KEYS to add them to your inventory.

- Exit the building to the Alley.
Alley
- Proceed forward towards the car.
Car
- Take a closer look at the trunk. Use the CAR KEYS to unlock and open it, then click on the hidden object area inside.
- Find the objects listed at the bottom of the screen. Inventory Items are circled in red, and ? marks are circled in blue.
- Upon completing the area, the DOOR HANDLE will be added to your inventory.
- Return to the Abandoned Building.
Abandoned Building
- Examine the door on the left. Use the DOOR HANDLE on the door to open it, then click on the IMPORTED COFFEE inside to add it to your inventory.
- Return to the Station.
Station
- Show the IMPORTED COFFEE to Garcia via the computer. This will trigger a puzzle.
- Swap the tiles so that they’re all in their correct positions. Tiles with a lock cannot be moved. The solution is shown below.

- Upon completing the puzzle, you will obtain the ERROL CASH PROFILE.
- Return to the Bar.
Bar
- Upon entering the Bar, you will assume the role of Morgan.
- Speak with Edward, then show him the ERROL CASH PROFILE.
- Click on the NOTE lying on the pool table to add it to your inventory.
- Exit the Bar.
Bar Entrance
- Give the NOTE to the police officer.
- Make your way all the way back to the Interrogation Room of the Police Station.
Interrogation Room
- Show the ERROL CASH PROFILE to the man.
- Return to the Briefing Room.
Briefing Room
- Click on the backpack to enter a hidden object area.
- Find the objects listed at the bottom of the screen. Inventory Items are circled in red, and ? marks are circled in blue.
- Upon completing the area, the CELL PHONE will be added to your inventory.
- Enter the Interrogation Room.
Interrogation Room
- Give the CELL PHONE to the man. Afterward, the CELL PHONE will be added to your inventory again.
- Go to the Station.
Station
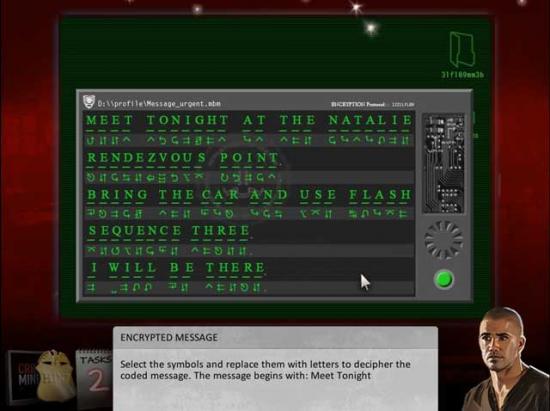
- Show the CELL PHONE to Garcia via the computer. This will trigger a puzzle.
- Select the symbols and replace them with letters to decipher the coded message. The message begins with: Meet Tonight. The solution is shown below.
- Return to the Interrogation Room.
Interrogation Room
- Speak with the man, then make your way back to the Alley.
Alley
- Click on the hidden object area over the dumpster on the left.
- Find the objects listed at the bottom of the screen. Inventory Items are circled in red, and ? marks are circled in blue.
- Upon completing the area, the MITTENS will be added to your inventory.
- Proceed forward towards the Car.
Car
- Enter the Car.
Car Interior
- Take a closer look at the wired box device sitting on the dashboard. Note it’s missing half of the paper sequence.
- Return to the Alley.
Alley
- Speak with the homeless man on the right. Give him the MITTENS, and you will receive the SEQUENCE 3 SCRAP.
- Return to the Car Interior.
Car Interior
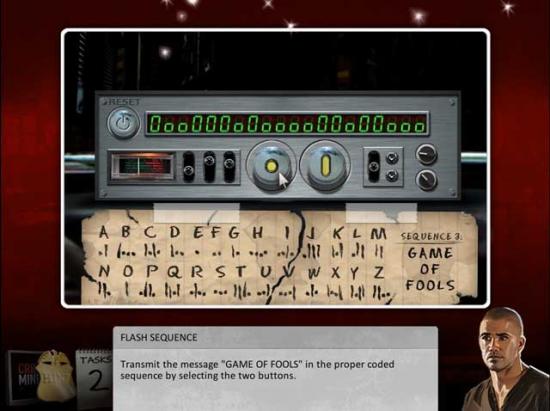
- Take a closer look at the device on the dashboard again. Use the SEQUENCE 3 SCRAP on the torn half of paper to restore it, triggering a puzzle.
- Transmit the message “GAME OF FOOLS” in the proper coded sequence by selecting the two buttons. The solution is shown below.
- Upon completing the puzzle, you will find yourself back in the Alley.
Alley
- Talk with Errol to trigger a puzzle.
- Match pairs of free tiles. A tile is free if: 1) It is not covered. 2) Either the left or right side is free. Match all pairs of green tiles to complete the interview.
- Upon completing the puzzle, you will be sent on a hot-and-cold mission to find the bomb.
- Make your way to the Construction Site via the window in Burn’s Apartment.
Construction Site
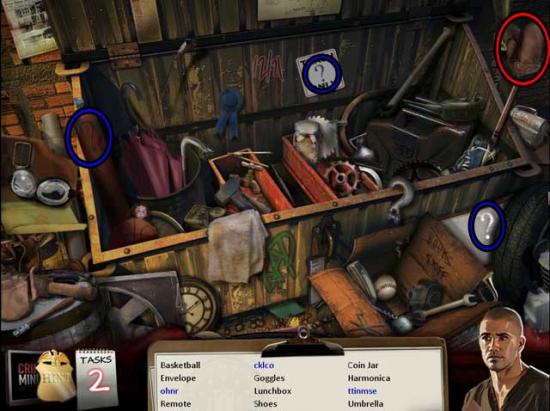
- Click on the hidden object area in the upper right corner.
- Find the objects listed at the bottom of the screen. Inventory Items are circled in red, and ? marks are circled in blue.
- Upon completing the area, the WIRE CUTTERS and the WRENCH will be added to your inventory.
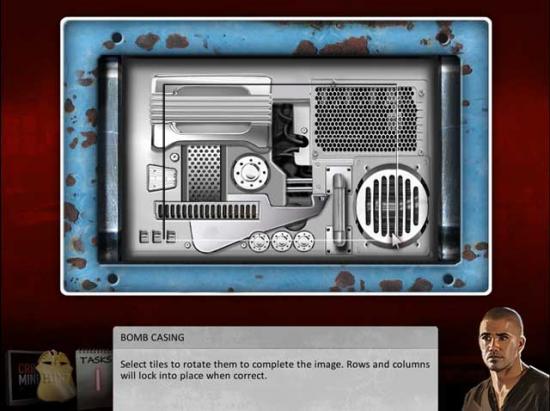
- Examine the construction vehicle in the upper left corner of the screen for a closer view. Once inside, examine the panel on the left. Use the WRENCH by clicking on each of the bolts with the tip to remove them. Once the panel is removed, a puzzle will trigger.
- Select tiles to rotate them to complete the image. Rows and columns will lock into place when correct. The solution is shown below.
- Upon completing this puzzle, another will be revealed. Use the WIRE CUTTERS to trigger it.
- Cut the exposed portion of each wire on the left and right side to remove them. Once all wires are gone, remove the stolen spark device to disarm the bomb. The solution is shown below.

- Upon completing the puzzle, click on the spark device to recover it.
Congratulations! You’ve completed Case Two of Criminal Minds!

More articles...
-
Best Horror Games On Itch.io – July 2026
Across a bounty of subgenres. -
Haze Seas Accessories Tier List [Best Accessories to Equip]
The accessories with the best stat buffs in Haze Seas.