![Digimon UP Tier List [Supports, Buddies, and Partners]](/wp-content/uploads/2026/07/digimon-up-tier-list.jpg "Digimon UP Tier List [Supports, Buddies, and Partners]")
Digimon UP Tier List [Supports, Buddies, and Partners]
These Digimon will get you UP the leaderboard.

![Haze Seas Boss Drops [Chances, Locations, and How to Spawn]](/wp-content/uploads/2026/07/haze-seas-boss-drops.jpg "Haze Seas Boss Drops [Chances, Locations, and How to Spawn]")

Check out our strategy guide for Cleopatra: Riddle of the Tomb. GAME OVERVIEW Cleopatra's Apartments Before starting a new game, you can explore Cleopatra's apartments. Look around by using the mouse and move forward by left clicking when the beetle cursor is pointing forward. From the apartments, you can quit the game, view the credits and the gallery, adjust options or start a new game. The game can be saved by selecting the scroll at the left side of the new game door. Whe…
a:1:i:0;a:2:s:13:”section_title”;s:34:”Cleopatra: Riddle of the Tomb Tips”;s:12:”section_body”;s:48323:”
Check out our strategy guide for Cleopatra: Riddle of the Tomb.
GAME OVERVIEW
Cleopatra’s Apartments
Before starting a new game, you can explore Cleopatra’s apartments. Look around by using the mouse and move forward by left clicking when the beetle cursor is pointing forward. From the apartments, you can quit the game, view the credits and the gallery, adjust options or start a new game.
The game can be saved by selecting the scroll at the left side of the new game door. When a game has been saved, game scrolls that can be loaded will appear in the cabinet below the profile characters.
Starting a new game
When you begin a new game, you will be asked to select a profile character as well as an astrological symbol. It doesn’t matter what profile character you choose, but certain events will change in the game depending on which astrological symbol you choose.
As you progress through the game, you will either have good luck or bad luck at various points depending on your symbol. Good luck means that some events are easier and quicker to complete, whereas bad luck means that there are harder puzzles that often take longer to complete.
After the game has been completed once, you will be rewarded with two more astrological symbols: One which gives all good luck and one which gives all bad luck.
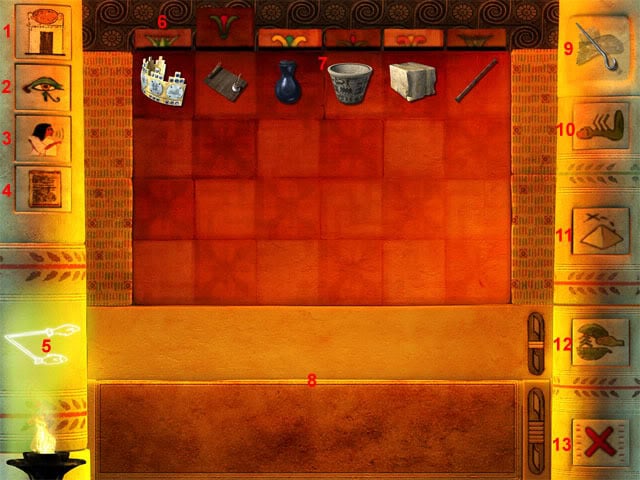
Game Menu
The game menu is accessed by right clicking the mouse.

1: Return to Cleopatra’s apartments.
2: Notebook – Contains information on past events in the game.
3: Dialogue history – Contains all of the character conversations.
4: Documents – Displays all of the documents that have been found.
5: Astrological sign – This changes throughout the game, and can be either good or bad.
6: Inventory tabs – Switch between different pages in the inventory.
7: Storage zone – All items that are found in the game are stored here.
8: Item information – Displays descriptions of items.
9: Transit zone – Items can be placed here so that they can then be organized in the storage zone.
10: Automatic storage – Press this button to place all items from the transit zone to the storage zone.
11: Map of Alexandria – Displays all locations so far opened in Alexandria.
12: Disassemble/Empty – Takes apart or empties certain objects.
13: Return to the game.
WALKTHROUGH
Observatory Garden
The game starts in the garden of the observatory. Turn slightly right and take the strip of papyrus on top of the urn. Turn slightly left and move forward one screen. Quarter turn right and take the papyrus stalk on the ground (bad luck only). Quarter turn left and move forward one screen to the side of the pyramid facing the sun.
Look down to the base of the pyramid and take Iris’s writing case and half of a broken stick. Turn slightly left and move forward one screen to the bridge. Quarter turn left, look down and take the papyrus stalk (bad luck only). Half turn right and move forward to see a statue of Eros without an arrow. Quarter turn right and move forward to the wall. Quarter turn left and take Akkad’s half crown in the leaves. Quarter turn left and take part of a theatrical mask on the ground. Quarter turn left and move forward two screens to see the mausoleum.
Turn slightly right and move forward two screens to the bridge. Turn slightly right, look down and take the other half of the broken stick on the ground. Cross over the bridge to the hippopotamus fountains. Quarter turn right and take the precious bracelet on the ground. Move forward over the bridge to see the statue of Eros holding an arrow. Quarter turn left, look down and take the metal hook, pot of bitumen and the strip of leather on the bricks, (bad luck only). Cross back over the two bridges and then move forward two screens. Quarter turn left and look down to see two hippopotamus statue heads.
Right click to open the menu and then press the automatic storage of objects button (second button from top on right side of menu screen) to place all items collected so far into the storage window. Select the metal hook, right click to exit the menu and then use the metal hook on the left hippopotamus head: The grass with the papyrus will float away.
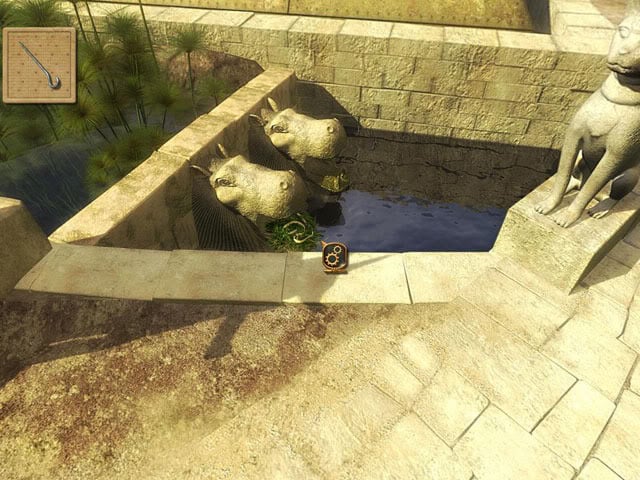
Quarter turn right and cross over the bridge. Quarter turn right and look down to see the grass. With good luck, you can just take the water damaged papyrus. With bad luck, combine the two papyrus stalks with the strip of leather to create the pole and then use the pole on the piece of grass in the water to get the water damaged papyrus.
Half turn left and move forward one screen to the side of the pyramid. Quarter turn left and move forward one screen. Quarter turn left and move forward again to return to the side of the pyramid facing the sun. Quarter turn left and use the water damaged papyrus on one of the astrological symbols on the pyramid to dry it. Take the dried papyrus.
Open the inventory and combine the two halves of the broken stick with the pot of bitumen to make the mended stick. Combine the mended stick with the strip of papyrus to read the papyrus: Iris warns Thomas that her father is in danger. Combine the dried papyrus with Iris’s writing kit to make the legible papyrus. Combine the mended stick with the legible papyrus to read the papyrus: Thomas needs to correctly name the arrow constellation as well as two of the constellations it points to.
Quarter turn left and move forward twice to the celestial sphere. Rotate the sphere left slightly to see the arrow constellation. Position the mouse cursor over the arrow constellation to see the correct letters.
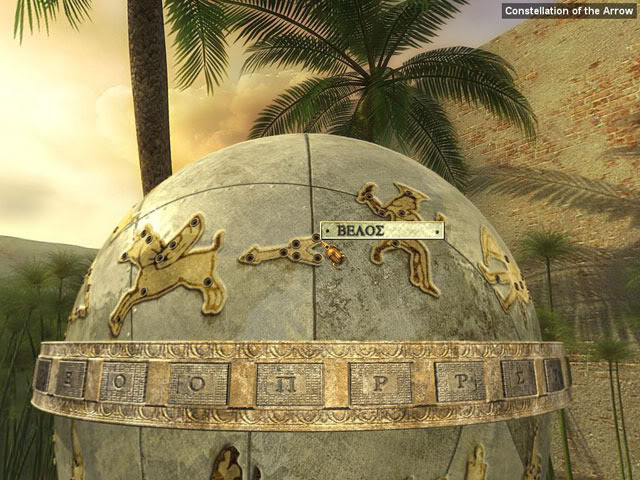
The arrow is pointing to the constellations of Pegasus and Pisces so we will need to name those as well. Enter the following letters: Beta (B), Epsilon (E), Lambda (?), Omicron (O) and Sigma (?) to light the arrow constellation. Enter the following letters: Pi (?), Eta (H), Gamma (?) and Alpha (A) to light the Pegasus constellation. Enter the following letters: Iota with the tonos (?), Khi (X), Theta (?) and Upsilon (Y) to light the Pisces constellation.
With the celestial sphere puzzle completed, the statue of Eros will move his arm back. Half turn right and move forward one screen. Turn slightly right and move forward two screens to the mausoleum entrance. Quarter turn right and move forward twice to the hippopotamus fountains. Quarter turn right and move forward one screen to the statue of Eros with the arrow: A short cutscene will be shown where Thomas is nearly hit by an arrow.
Take the broken arrow (bad luck) or Cretan arrow (good luck). Return to the statue of Eros without the arrow near the pyramid. Operate the bow and the Sagittarius icon on the pyramid will extend. If the arrow is broken (bad luck only), open the inventory, disassemble the broken arrow and then combine the arrow tip, arrow feathers, mended stick and pot of bitumen to assemble the arrow. Use the arrow on the bow. Operate the bow once and it will move down to the middle position.
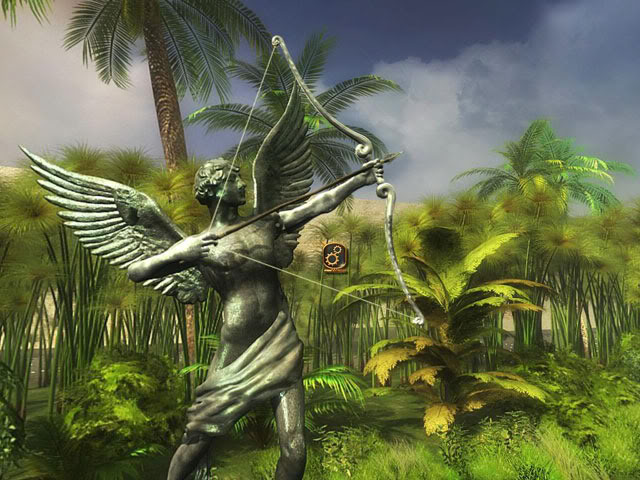
Half turn and push the sign of Sagittarius on the pyramid to make Eros shoot the arrow: It hits a point on the wall and opens a secret door. Move forward one screen. Examine the door and then move forward one screen to Akkad’s workshop.
Akkad’s Workshop
Turn slightly left, look up and take Akkad’s notes on the shelf. Half turn right and move forward. Open the cupboard and take the story of Enuma Anu Enlil. Turn slightly right and take the letter from the librarian on the rack. Quarter turn right and move forward. Take the letter to Iris, small pliers and small board (bad luck only) on the table. Turn slightly right, look up and take the notched rod on the shelf. Half turn left and take the papyrus with months on the chair. Half turn left and move forward.
Take the heliolab document and tablet mold. Don’t take any clay for now, as we will be returning here later to take some. Half turn left, look down and take the lighter on the small stool. Quarter turn right and move the sheet covering the doorway. Move forward through the doorway. Quarter turn left and go upstairs to the observatory terrace.
Observatory Terrace
Take the ancient rod for tags from the heliolab. Quarter turn left and look down to see a chest. Open the chest and take the papyrus containing codes. Turn slightly right and move forward to the other side of the terrace. Look down and take the clepsydra. Quarter turn right and move forward. Go back downstairs and return to the workshop.
Akkad’s Workshop
Quarter turn right and move forward to the table. Quarter turn right, look down and use the notched rod on the slot in the table. With bad luck, take the small tassette in the bowl, open the inventory and combine the small board, small pliers and small tassette to make the pile of tags and then put the pile of tags in the empty bowl.
The code papyrus from the chest on the observatory terrace lists the correct order that tags have to be placed into the notched rod. Insert the following tags into the notched rod from left to right: Small, large, small, large, small, large, large and small.
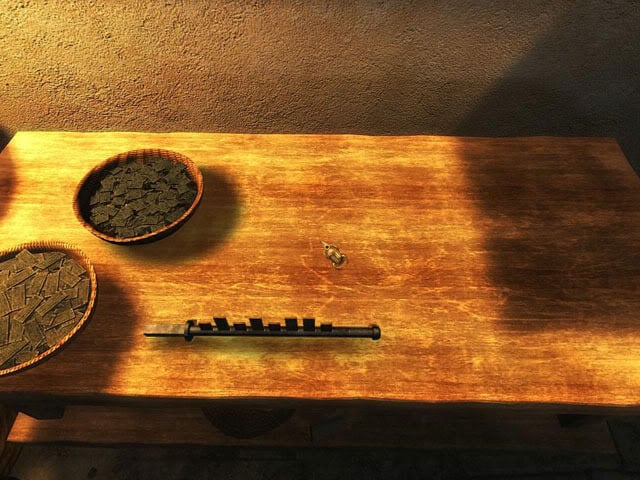
This leaves one blank slot at the right side of the rod. Take the rod with tags from the slot. Return to the observatory terrace.
Observatory Terrace
Quarter turn right and use the rod with tags on the heliolab. Move the small plate on top of the heliolab to lower it. Use the handle at the right side of the heliolab to wind the spring. Move the small plate again on the heliolab to raise it: A cutscene will be shown where Thomas visits the palace.
Observatory Garden
There is nothing else to do here for now, so half turn and move forward to travel to the garden library.
Garden of the Great Library of Alexandria
Turn slightly left and take the crushed necklace (bad luck only) or broken necklace (good luck only) on the ground near the crocodile. Quarter turn right and move forward to the right side of the swimming pool. With bad luck, look down and take the stone at the side of the swimming pool, then combine the stone with the necklace to find the papyrus. With good luck, there will be no stone at the side of the swimming pool, so just disassemble the broken necklace in the inventory to find the papyrus.
Move forward one screen. Examine the statue of the crocodile and one of Sobek’s guardians will appear. Talk about the crocodile: He wants one more (good luck) or two more (bad luck) ushabti figurines. Despite what the guardian says, with bad luck you actually need to create three more ushabti figurines. Quit the dialogue. Take the first ushabti figurine on top of the table. Open the menu and select the map.
Akkad’s Workshop
Half turn left and move forward to the corner of the room. Quarter turn right, look down and take a piece of clay. Combine the tablet mold, clay and ushabti figurine to make the unbaked ushabti half mold (front). Take another piece of clay. Combine the tablet mold, clay and the ushabti figurine again to make the unbaked ushabti half mold (back). Quarter turn right and move forward to the fireplace.
Take the dry leaves from the floor and put them in the fireplace. Use the lighter on the dry leaves. Put three handfuls of charcoal on the fire. Use one of the unbaked ushabti half molds on the fire and then wait a few seconds for it to bake. Take the kiln tongs and use them to take the baked half mold. Start the fire again using the dry leaves, lighter and charcoal. Use the other unbaked half mold on the fire and again wait a few seconds for it to bake. Take the kiln tongs and use them to take the second baked half mold.
Half turn left and move forward to the corner of the room. Quarter turn right, look down and take one piece of clay (good luck) or three pieces of clay (bad luck). Quarter turn right and move forward to the fireplace. Combine the two baked ushabti half molds with the clay to make an unbaked ushabti figurine. With bad luck, do this twice more to create two more unbaked ushabti figurines. Start a fire using the dry leaves, lighter and charcoal. Use the unbaked ushabti figurine on the fire and wait a few seconds for it to bake.
Take the kiln tongs and use them to take the baked ushabti figurine. With bad luck, repeat this method twice more to create two other baked ushabti figurines. You should now have a total of two (good luck) or four (bad luck) ushabti figurines in the inventory. Half turn left from the fireplace and move forward one screen. Before leaving, take one piece of clay (good luck) or two pieces of clay (bad luck). Open the menu and select the map.
Garden of the Great Library of Alexandria
Put the ushabti figurines on the table at the left side of the guardian. You will need to place two (good luck) or four (bad luck) figurines before Thomas mentions that was the last ushabti. Talk to the guardian about the ushabti: He wants statuettes of four gods to be placed correctly on the casket. Quit the dialogue. Select the map.
Observatory Garden
Quarter turn right, move forward one screen, quarter turn right and move forward two screens to the hippopotamus statues. Disassemble the clepsydra to get the lower half of the clepsydra. Use the lower half of the clepsydra in the water coming out of either statue’s mouth and fill the clepsydra to the 9 hour mark.
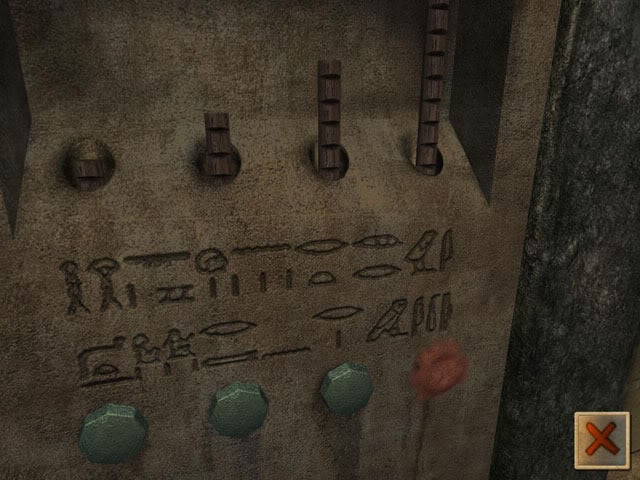
Quarter turn left and go back across the bridge. Turn slightly right and move forward to the door of the mausoleum. Examine the hieroglyphics to read the riddle: “I was born at one; at three already a man I was; at five I was aged, past my prime; when nine shall chime the hour, the tomb gates shall open.”
Select the lower half of the clepsydra. Fill the left hole once, the second hole from left three times and the third hole from left five times. By now the clepsydra will have run out of water, so return to the hippopotamus statues and fill it to the 9 hour mark (good luck) or 10 hour mark (bad luck).
Return to the door of the mausoleum. Use a piece of clay in the bottom-right hole. Fill the right hole nine times to open the door to the mausoleum. With bad luck, water will start to pour out of the bottom-left hole so use a piece of clay in it, then fill the left hole to the 1 hour mark again and the right hole to the 9 hour mark to open the door to the mausoleum.
Enter the mausoleum.
Akkad’s Mausoleum
Look down and use the lighter on the small bowl to light the room. Move forward to the three urns. Take the tops off the three urns to see three statuettes. Get the statuette of Isis, the statuette of Thoth and the statuette of Anubis. Look down and move the top of the right statue head to reveal a fourth statuette.
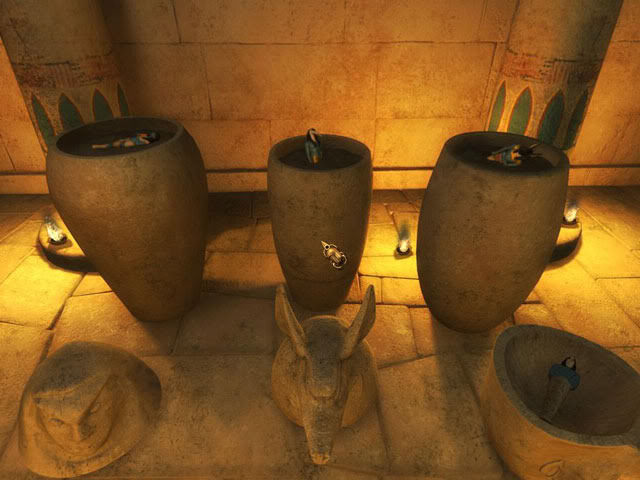
Take the statuette of Horus. Quarter turn left and move forward one screen. Quarter turn left and move forward again to see a depiction of the soul weighing ceremony. From left to right the characters are Isis, Thoth, Anubis and Horus. Return to the library garden.
Garden of the Great Library of Alexandria
Turn slightly right to see the casket. Use the statuette of Isis on the left black square, the statuette of Thoth on the second black square from the left, the statuette of Anubis on the second black square from the right and the statuette of Horus on the right black square.

The guardian will move the crocodile. Move forward into the great library.
Great Library of Alexandria
Half turn right and take the grappling hook just outside the entrance to the library. Quarter turn right and move forward to the corner of the library. Look down to the right and take the digging bar on the floor. Look up and move forward. Quarter turn left and move forward to see a crocodile near a rope. Take the rope. Quarter turn right and move forward one screen. Turn slightly right and move forward twice to meet Kordax. Quit the dialogue. Move forward into the storage room.
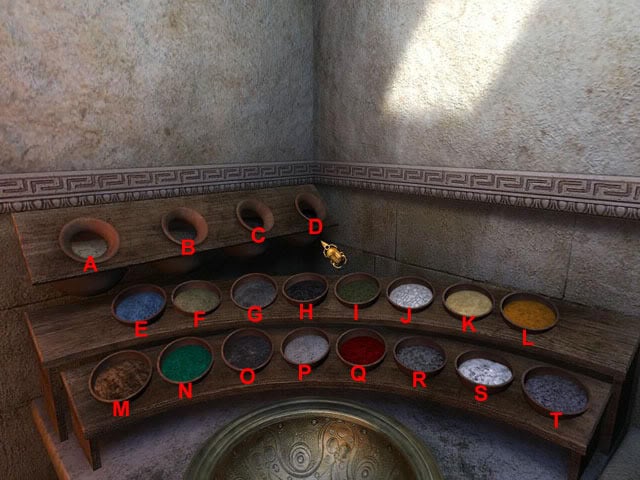
Quarter turn right and take the inventory of ingredients. Look down and take the four piles of 4 bowls. The aim now is to collect all of the ingredients using the bowls. Start by collecting the powders on the floor: Collect the green powder, black powder, white powder and gray powder. Use another pile of bowls to collect the red powder, orange powder, another white powder and yellow powder. Use another pile of bowls to collect the ochre powder.
Look up to the shelf and collect the Melukhkha bone, Uruku root and Canaan thorns. Use another pile of bowls to collect the white nugget. Half turn and collect the gray nugget (good luck only), Lullubi flower and Makkan seed. Quarter turn left and move forward through the doorway to the laboratory.
Quarter turn right and take the empty decanter on the shelf. Half turn left and take the Diomedes reactions on the wall, Prusias properties on the table and the Zoilos reactions papyrus on the plank. Use one of the bowls on a hole on the shelf to put all of the bowls on there. The ingredients in the bowls are currently listed as follows:

A: Mitanni gum
B: Kerma powder
C: Arsawa powder
D: Pitassa gum
E: Lullibi flower
F: Makkan seed
G: Melukhkha bone
H: Uruku root
I: Canaan thorns
J: White nugget
K: Yellow powder
L: Orange powder
M: Ochre powder
N: Green powder
O: Black powder
P: White powder
Q: Red powder
R: Gray nugget (Good luck only)
S: White powder
T: Gray powder
Take the large empty bowl, use it on the water at the right side of the table and then put the bowl back in the big hole. The note written by Aristion mentions the ingredients that are required for the solvent. There are no Amath leaves, but the Prusias properties document mentions that Amath leaves and Canaan thorns have the same properties.
Put the following ingredients in the bowl: One handful of Lullibi flowers, two handfuls of Makkan seeds, two handfuls of Uruku roots and one handful of Canaan thorns to create the solvent. Use the empty decanter on the big bowl to get the solvent.
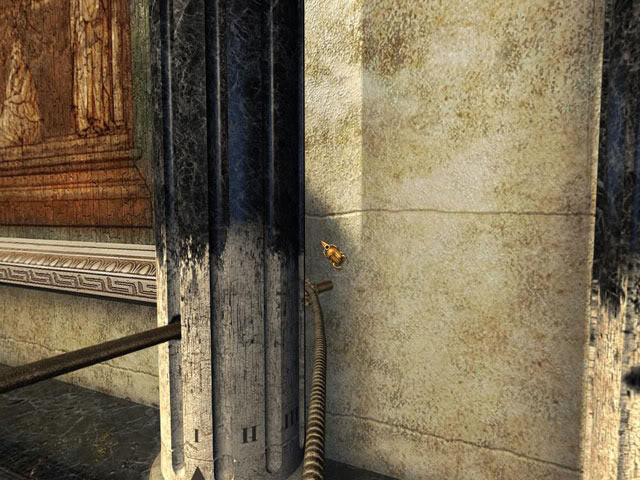
Half turn left and move forward twice to the library hall. Turn slightly right and move forward one see Souchous the crocodile. Turn slightly left and move forward one screen to the pillars. Quarter turn left and move forward one screen. Examine the paint at the base of the left pillar. Use the solvent on the base of the pillar to reveal Roman numerals.
Examine the next pillar on the right and use the solvent on it as well. Quarter turn right and move forward one screen. Use the solvent on the base of the other two pillars. Quarter turn left and move forward one screen. Use the digging bar on the hole in the left pillar. Move forward one screen and then quarter turn left to see Souchous.
Combine the rope with the grappling hook to make the rope and grappling hook. Use the rope with grappling hook on the collar of Souchous. Turn slightly left and move forward to the pillar with the digging bar in the hole. Look down to the right. Take the rope with grappling hook from the floor and use it on the right side of the digging bar.
Return to Souchous and select his head: The guardian will mention that Souchous needs a stick. Move forward twice to go outside.
Garden of the Great Library of Alexandria
Half turn left and take Sobek’s staff next to the table with the ushabti figurines. Return to the library.
Great Library of Alexandria
The note written by Aristion mentions a clue which will help in this section: “The first four prime numbers will open the door.” Move forward one screen and use Sobek’s staff on Souchous to turn the first pillar to II. Approach the pillar. Take the rope and grappling hook and digging bar. Use the digging bar on the hole in the second pillar and then attach the rope and grappling hook to the right side of the digging bar. Use Sobek’s staff on Souchous to turn the second pillar to III. Repeat the method of removing the rope and digging bar and then attach the digging bar and the rope to the hole in the third pillar.
Use Sobek’s staff on Souchous three times to turn the third pillar to V. Repeat the method of removing the rope and digging bar and then attach the digging bar and rope to the hole in the fourth pillar. Use Sobek’s staff on Souchous three times to turn the fourth pillar to VII: A secret chamber will open.
Move north twice to enter the secret chamber. Take the tablets on the chair. After the cutscene, talk to Kordax and ask where Sobek’s guardian has gone: He headed for the secret room. Talk about the house of the crocodile: He mentions a powerful sleeping draft. Quit the dialogue. Look down and open Kordax’s basket. Take the formula for the Morpheus draft and fillets of dried fish. Look up and move forward twice to return to the laboratory.
Take the big bowl of mixed water and use it on the urn on the left to empty it. Use the empty bowl on the fresh water at the right side of the table and then put the bowl back in the hole. According to the formula for the Morpheus draft, the ingredients required are Melukhkha bone, Ashod resin, Canaan thorns and Tjekker flowers.
The Melukhkha bone and Canaan thorns are currently identified but the Ashod resin and Tjekker flowers are not, so these have to be identified first before starting to make the sleeping balm. The Diomedes reactions document explains how to identify the Ashod resin and the Tjekker flowers. With bad luck, you will need to make the Ataniya root ingredient instead of the Ashod resin.
Add the following ingredients to make the Ashod resin (good luck only): one handful of Mitanni gum, two handfuls of Arsawa powder, two handfuls of Pitasa gum and one handful of grey nuggets. Take the bowl of mixed water and use it on the urn on the left to empty it. Use the empty bowl on the fresh water and then put the bowl back in the hole.
Add the following ingredients to make the Ataniya roots (bad luck only): One handful of Kerma powder, two handfuls of Arsawa powder, two handfuls of Pitassa gum and one handful of gray powder to identify the gray powder as Ataniya roots. Take the bowl of mixed water and use it on the urn on the left to empty it. Use the empty bowl on the fresh water and then put the bowl back in the hole.
Add the following ingredients to make the Tjekker flowers: One handful of Mitanni gum, two handfuls of Arsawa powder and one handful of white powder that is in the fourth from left bowl on the bottom row to identify the white powder as Tjekker flowers. Take the bowl of mixed water and use it on the urn on the left to empty it. Use the empty bowl on the fresh water and then put the bowl back in the hole.
Add the following ingredients to make the sleeping draft: Two handfuls of Melukhkha bone, two handfuls of Ashod resin (good luck) or two handfuls of Ataniya roots (bad luck), two handfuls of Canaan thorns and two handfuls of Tjekker flowers to complete the sleeping draft.
With the sleeping draft complete, use the fillets of dried fish on the bowl to get the soporific fish. Half turn and move forward twice. Use the soporific fish on the crocodile. Thomas visits Cleopatra and is told that Iris and Akkad are known to be on the Isle of Pharos.
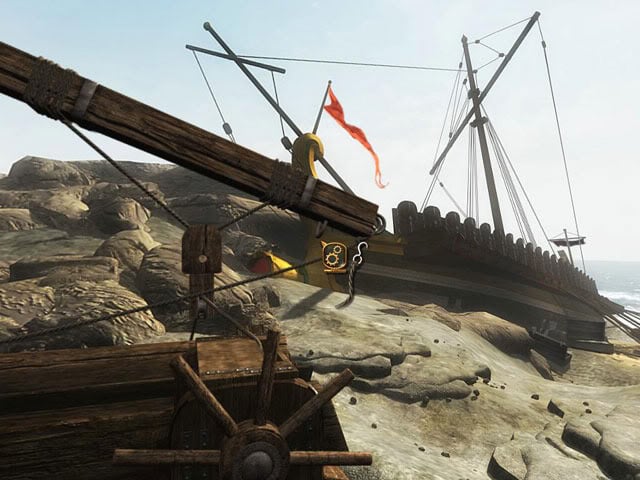
Isle of Pharos – Outside Lighthouse
Quarter turn right and move forward toward the ship. Quarter turn left, look down and open the chest. Take the hammer and chisel. Turn slightly right and then use the chisel on the beam to get a piece of wood. Quarter turn right and open the chest. Take the needle of reel and thread. Take the fraying instrument. Use the fraying instrument on the sails in the chest to get a large section of sail. Half turn left and move forward one screen to the catapult.
Quarter turn right, look down and take the broken peg on the ground. Combine the broken peg, chisel, hammer and piece of wood to make a new peg.
Quarter turn left and move forward one screen to look up at the lighthouse. Quarter turn left, look down and take the wooden frame and the ball of stone. Quarter turn left to see some sandbags. Take a sandbag from the ground and use it on the catapult counterweight. Use the other two sandbags on the counterweight as well. Quarter turn left and move forward twice to the wall of the lighthouse. Combine the fraying instrument with the large piece of sail to make three small strips of sail.
Combine the needle and thread with all three of the small strips of sail to make three open bags. Look down and use the three open bags on the sand near the wall to fill them. Quarter turn right and move forward twice to the catapult. Quarter turn left and use the three sandbags on the counterweight.
Quarter turn right and move forward one screen. Quarter turn right and take the ladder. Quarter turn right and use it on the catapult. Take the winch cable loop near the base of the ladder. Climb up the ladder, turn slightly right and use the winch cable loop on the wooden block. Climb back down the ladder, half turn and move the peg at the base of the wheel. Climb back up the ladder and use the new peg on the wooden block. The new peg will either stay in the wooden block (good luck) or break (bad luck).
With good luck, climb down the ladder. With bad luck, climb down the ladder, turn slightly right and move forward to the boat, use the chisel on the beam to get another piece of wood, combine the broken peg, chisel, hammer and piece of wood to make a new peg, quarter turn left, move forward to the catapult and climb up the ladder, use the new peg in the wooden block and then climb back down the ladder.
Quarter turn right and take the ladder. Quarter turn left and put the ladder on the rocks. Half turn right and use the wheel to lower the catapult. Take the catapult sling and use it on the section of the catapult near the left side of the wheel. Use the stone ball in the sling. Take the hook attached to catapult sling on the ground and use it on the hook below the beam at the right side of the catapult.
Use the hammer on the peg above the wheel to fire the ball at the wall.
Quarter turn right, look down and take the new peg on the ground. Quarter turn left and move forward three screens to the wall. Quarter turn left, look down and take the ball of stone. Quarter turn left and move forward three screens to the catapult. Quarter turn right and take the ladder, then quarter turn right and put the ladder on the ground at the base of the catapult. Quarter turn right and move the peg below the wheel. Take the winch cable loop to automatically set the catapult up to fire again. Use the hammer on the peg above the wheel to fire the ball at the wall again.
With good luck, the ball will make a hole in the wall. With bad luck, move forward three screens toward the wall, look up and use the metal hook to take rubble from the wall, combine the wooden frame, chisel, hammer and rubble to make a stone missile, half turn and move forward three screens, take the ladder and put it against the catapult, take the winch cable loop to attach it to the catapult and then use the hammer on the peg above the wheel to fire the stone missile at the wall.
Now that a hole has been made in the lighthouse wall, move forward three times to the wall. Take one of the plaque segments on the floor and put it on the block below the main section of the plaque. Do the same thing for the other two small pieces of the plaque.
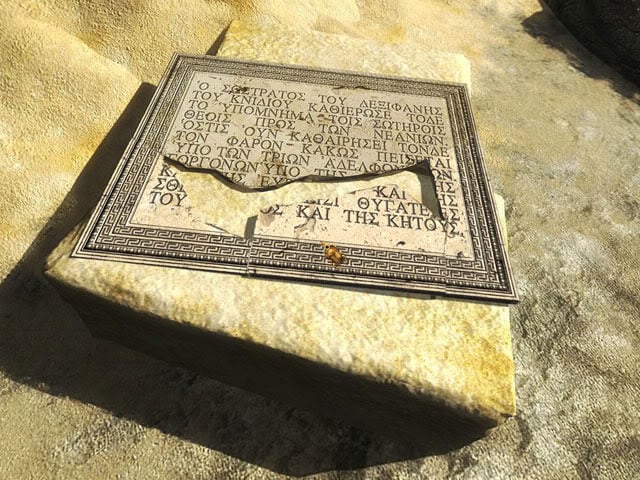
Read the plaque: The lighthouse was built by Sostrotos. Quarter turn left and move forward through the hole in the wall to enter the lighthouse.
Isle of Pharos – Inside Lighthouse
Quarter turn left and take the chain mail on the ground. Quarter turn left and move forward to exit the lighthouse.
Isle of Pharos – Outside Lighthouse
Quarter turn left to face the plaque. Combine the chain mail, wooden frame and reel of thread to make a sieve. Use the sieve on the sand to find some more pieces of the plaque. Keep searching through the sand until Thomas says that he can’t find any more pieces.
Return to the catapult counterweight and take one sandbag (good luck) or four sandbags (bad luck). Return to the plaque. Use a sandbag on the sand near the plaque and then use the sieve two more times to find the final pieces. Put all of the pieces in the plaque to read the names of the three Gorgons: Medusa, Euryale and Stheno.

Enter the lighthouse.
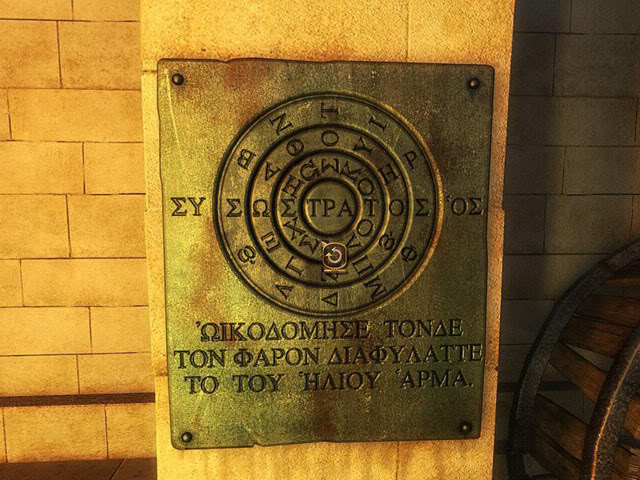
Isle of Pharos – Inside Lighthouse
Move forward one screen to face the green door. Quarter turn left and move forward one screen to the panel. Try moving one of the wheels on the panel. With good luck, the panel will be straight. With bad luck, use the hammer on the outside and inner wheel on the panel to fix them. The aim now is to use the wheels to spell the name Sostrotos, the builder of the lighthouse mentioned in the plaque outside. Align the wheels so that the letters from left to right are: Sigma (?), Omega (?), Sigma (?), Tau (T), Rho (P), Alpha (A), Tau (T), Omicron (O) and Sigma (?).
Use the middle of the panel to open it. Take the letter. Move the lever to lower the counterweight.
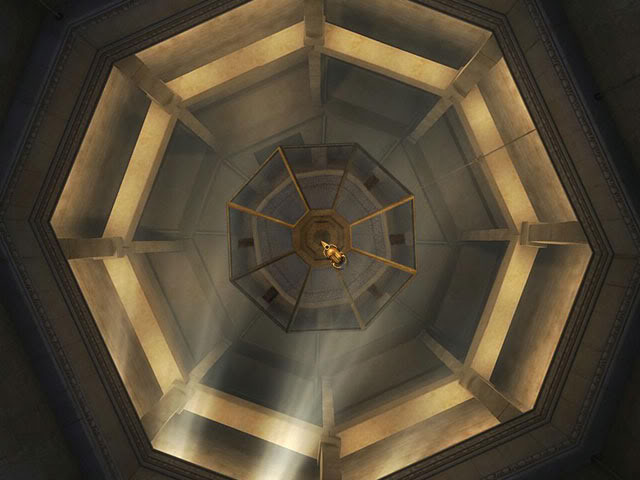
Half turn right and move forward one screen, then quarter turn left to face the counterweight. Take all of the weights from the counterweight and put them on the block on the left: The chariot will drop down now as it is heavier than the counterweight. The aim now is to even the balance by putting weights on the chariot. With good luck, put eleven weights on the chariot. With bad luck, put three sandbags and six weights on the chariot.
Turn slightly right and pull the rope to lower the counterweight. Put the remaining weights on the counterweight. Use the rope again to lower the chariot. Enter the chariot. Take weights (good and bad luck) and sandbags (bad luck only) out of the chariot until Thomas says that the weight and counterweight seem to weigh the same. Take the final weight out of the chariot to ascend to the top floor of the lighthouse.
Move forward two screens to talk to Iris in the hydra chamber. Quit the dialogue. Look down to the dial on the floor and enter the following letters to spell Medusa: Mu (M), Epsilon (E), Delta (?), Omicron (O), Upsilon (Y), Sigma (?) and Eta (H). Enter the following letters to spell Euryale: Epsilon with the tonos (?), Rho (P), Alpha (A), Lambda (?). Enter the following letters to spell Stheno: Theta (?) and Nu (N).
Move forward one screen and use the winch to raise the prism. Half turn and move forward to the middle of the room. Look up at the prism. Some sections of the prism have brown rectangles (traps) or are blank (safe).
Examine one of the safe panels, look down and then pull the rope to raise one of the panels. Examine the other two safe panels and then pull the ropes to lower Iris. Talk to Iris if you like or say “Let’s go now!” to leave the isle of Pharos.
Observatory
Half turn left, move forward one screen and go downstairs. Kordax will call you, but ignore him for now. Quarter turn left and take the part of a mask from the stairs. Combine the two parts of the mask in the inventory. Go upstairs and talk to Iris about the theatrical mask: She thinks that Kordax is the murderer. Go back downstairs, quarter turn left and move forward to enter Kordax’s room.
Talk to Kordax about speaking from the heart: He admits to killing Iris’s father and says that he wants a divination. Ask him what he wants: He wants a divination. Return to the terrace and talk to Iris about Kordax’s confession. Ask about stalling Kordax: She suggests poisoning Kordax. Ask about her plan: She tells Thomas to poison the water in Kordax’s washbowl. Return to Kordax’s room and talk to Kordax about the washbowl. Quit the dialogue. Take the dirty washbowl. Half turn right and take the fragrance formula on the table. Open the menu and select the map.
Garden of the Great Library of Alexandria
Take Sobek’s staff and use it on the crocodile to make it move. Move forward into the library.
Great Library of Alexandria
Quarter turn right and move forward three screens to the laboratory. To poison Kordax, the ingredients for Kordax’s soothing balm must be combined with the ingredients for the fragrance formula. Many of the bowls of powder are unidentified at the moment, so they must be identified first before the poison can be made. To start with, take the big bowl, empty it in the urn, fill it with water and then put the bowl back in the hole. Create the following constituents, remembering after identifying each one to empty the big bowl and fill it with clean water.
Ekron leaves: One handful of Kerma powder, two handfuls of Arsawa powder, one handful of Pitassa gum and one handful of white powder from the right side of the bottom shelf.
Ataniya roots (Good luck only): One handful of Kerma powder, two handfuls of Pitasa gum and one handful of gray powder.
Askelon leaves: One handful of Mitanni gum, one handful of Kerma powder, two handfuls of Pitassa gum and one handful of red powder.
Nuzi leaf: One handful of Mitanni gum and one handful of yellow powder.
Ashur seed: One handful of Mitanni gum, two handfuls of Pitassa gum and one handful of orange powder.
Kassite bark: One handful of Kerma powder and one handful of ochre powder.
Masa thorns: One handful of Kerma powder, one handful of Arsawa powder and one handful of green powder.
Teresh roots: One handful of Kerma powder, one handful of Arsawa powder, one handful of Pitassa gum and one handful of black powder.
All of the ingredients are now identified as follows:
A: Mitanni gum
B: Kerma powder
C: Arsawa powder
D: Pitassa gum
E: Lullibi flower
F: Makkan seed
G: Melukhkha bone
H: Uruku root
I: Cannan thorns
J: White nugget
K: Nuzi leaf
L: Ashur seed
M: Kassite bark
N: Masa thorn
O: Teresh roots
P: Tjekker flower
Q: Askelon seeds
R: Ashod resin (Good luck only)
S: Ekron leaf
T: Ataniya roots
To create the fragrance, use two handfuls of Nuzi leaves, one handful of Ashur seeds, two handfuls of Kassite bark, two handfuls of Masa thorns and one handful of Teresh roots. Leave the mixed water in the bowl.
To create the soporific, use two handfuls of Melukhka bone, two handfuls of Ataniya roots, two handfuls of Canaan thorns and two handfuls of Tjekker flowers.
Use Kordax’s dirty washbowl on the urn to empty it. Use Kordax’s empty washbowl on the perfumed sleeping potion to get the poisoned and fragranced washbowl. Select the map.
Observatory
Enter Kordax’s room and put the poisoned and fragranced washbowl on the small table: He will taste the liquid and fall asleep (good luck) or say that he is immune to the poison (bad luck). With bad luck, take Kordax’s poisoned and fragranced washbowl, go to the observatory terrace and talk to Iris about Kordax’s immunity: She will mention dipping a bracelet in Melukhkha bone. Travel to the laboratory in the great library, empty the bowl of mixed water, fill the bowl with fresh water and put it back in the hole, put one handful of Melukhkha bone in the bowl, put the precious bracelet in the bowl, use Kordax’s washbowl on the urn to empty it, use Kordax’s empty washbowl on the big bowl, return to Kordax’s room in the observatory and then use the bowl on the table next to Kordax to make him fall asleep.
Take the horn of Kordax to blow it. Open the bag by Kordax’s feet and take the rod with tags and half the crown of Akkad. Exit Kordax’s room and go upstairs to the roof of the observatory. Talk to Iris and tell her that the poison worked. Open the menu and select the map.
Akkad’s Mausoleum
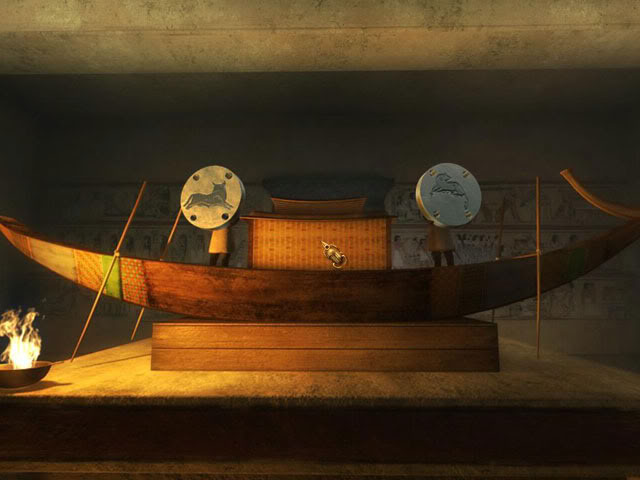
Combine the two halves of the crown to get two zodiac medallions. Use the small pliers on the crown to remove the other ten zodiac medallions. Look down at the picture on the tomb to see Taurus on the left and Aries on the right. Move forward twice to the other side of the mausoleum, then half turn to see the boat. Use the Taurus medallion on the left figure and the Aries medallion on the right figure to hear a stone moving.
Move forward twice to see that a dial has been revealed. You may have noticed that there are frescos on the side of the tomb with Gemini, Cancer and Scorpio on one side and Sagittarius, Capricorn and Aquarius on the other side. The first aim is to make all six of these astrological symbols appear on the dial. To do this, rotate the sun to the 12 o’clock position and the moon to the 7 o’clock position.

Now put the medallions in the correct places on the dial (Gemini medallion on the Gemini slot, and so on). The next aim is to put rods in the correct places on the medallions. Each fresco at the side of the tomb has a number of demons around it. The rods must be put in the correct positions on a medallion according to the positions of the demons around each of the frescos on the tomb. Take rods from the bottom-left corner of the disc and put them in the following locations:
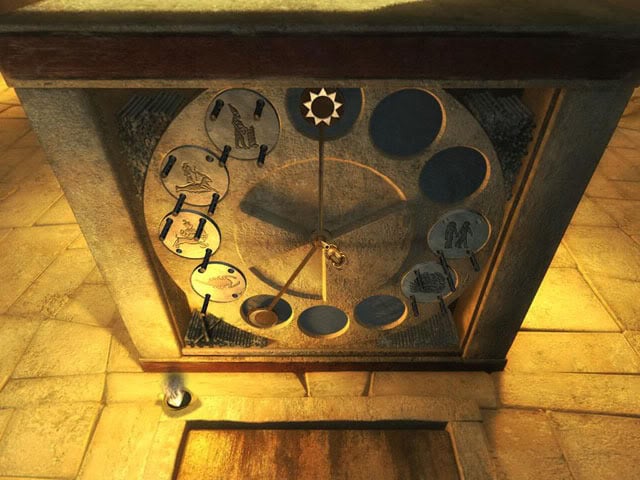
Gemini: A rod in the bottom-left and bottom-right corner.
Cancer: A rod in all four corners.
Scorpio: A rod in the bottom-left corner.
Sagittarius: A rod in the top-left, top-right and bottom-right corner.
Capricorn: A rod in the top-left, bottom-right and bottom-left corner.
Aquarius: A rod in all four corners.
When all the rods have been put in the correct positions, the door to the secret observatory will be opened. Go to the other side of the observatory. Use the lighter on the small hole at the left side of the stairs. Go down the stairs into the secret observatory.
Secret Observatory
Quarter turn right and use the Libra medallion on the slot on top of the casket. Open the chest and take the moldboard tube and letter from Heron of Alexandria. Turn slightly right. Open the small box on the shelf and take Akkad’s last will and testament. Half turn left and move forward one screen. Look up slightly and pull the handle on each side of the walkway. Open both of the furnace doors. Use the lighter on both furnaces sections to create two fires. Turn slightly right and use the Pisces medallion in the pillar.
Quarter turn left and walk forward to the bottom of the stairs. Quarter turn right and take the gangway on the ground. Half turn left and use the Leo medallion on the slot on top of the casket. Open the casket, which will contain three discs with good luck or will be empty with bad luck. With good luck, take the water disc, air disc and fire disc and then half turn to face the disc. With bad luck, quarter turn right and go upstairs, quarter turn left and take the beam, quarter turn left and go downstairs, then quarter turn left to see the disc. Use the Virgo medallion in the slot. Exit the secret observatory and the mausoleum to return to the garden.
Observatory Garden
Move forward from the mausoleum entrance to see steam escaping from the chimneys. Remove the cover from the left chimney. Move forward one screen and remove the cover from the right chimney. Move forward three screens to hippopotamus statues. Quarter turn right and move forward to the statue of Eros holding an arrow. Quarter turn right and use the gangplank on the water between the statue of the four hippos. Move forward over the gangplank. With good luck, open the small gate to let the water in. With bad luck, use the beam on the trapdoor twice to break it and then open the small gate. Return to the secret observatory.
Secret Observatory
With good luck, a crocodile will slide into the water. With bad luck, use Sobek’s staff on the crocodile. Move forward one screen. Quarter turn right and press the moon button on the pillar to fill the container with water. Use the moldboard tube on the tube at the right side of the pillar to connect it to the container. Examine the valve on the container and then use the valve to drain the water. Half turn left and take the empty spade on the ground. Use the spade on the heliolites and then use the heliolites on the right fire until Thomas says that the firebox is full. Now do the same thing for the left fire until that firebox is full as well.
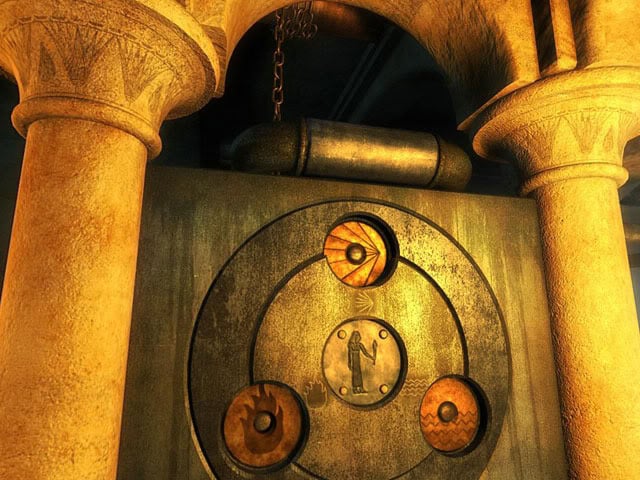
With bad luck, take the three stone discs that are revealed by digging in the heliolites. When both fireboxes are full, steam will begin to escape from the pipe. Move forward one screen and quarter turn right to see three slots. Put the wind disc in the top slot, the water disc in the bottom-right slot and the fire disc in the bottom-left slot to complete the game.
Congratulations, you’ve just finished Cleopatra: Riddle of the Tomb!
“;
