
Best Horror Games On Itch.io – July 2026
Across a bounty of subgenres.
Grow A Garden 2 Base Price List
What's the most valuable crop?![Evomon Types Guide [Strengths, Weaknesses, Resistance]](/wp-content/uploads/2026/06/evomon-types.jpg "Evomon Types Guide [Strengths, Weaknesses, Resistance]")
Evomon Types Guide [Strengths, Weaknesses, Resistance]
Your companion guide during battles.
![[Roblox] Evomon Shiny Hunting Guide – Including Prismatic and Pris Shinies!](/wp-content/uploads/2026/06/evomon-shiny-hunting-guide.jpg "[Roblox] Evomon Shiny Hunting Guide – Including Prismatic and Pris Shinies!")
Casebook, Episode III – Snake in the Grass Walkthrough
Welcome to Gamezebo's walkthrough for Casebook Episode 3: Snake in the Grass. Tips & Tricks Before embarking on this new mystery adventure, there are a few tips and tricks I'd like to point out. 1. When in doubt, use the "i" key. If you ever get stuck, don't know where to go next, or just can't seem to find a particular piece of evidence, pressing the i key will make a magic eye appear that directs you straight to whatever you're looking for. 2. W…


- Prefer Gamezebo on Google

a:1:i:0;a:2:s:13:”section_title”;s:54:”Casebook, Episode III – Snake in the Grass Walkthrough”;s:12:”section_body”;s:27601:”
Welcome to Gamezebo’s walkthrough for Casebook Episode 3: Snake in the Grass.
Tips & Tricks
Before embarking on this new mystery adventure, there are a few tips and tricks I’d like to point out.
1. When in doubt, use the "i" key. If you ever get stuck, don’t know where to go next, or just can’t seem to find a particular piece of evidence, pressing the i key will make a magic eye appear that directs you straight to whatever you’re looking for.
2. What’s the objective? Unfortunately Casebook isn’t very clear on what exact items will help you clear which objectives. Sometimes some objectives may only appear once you’ve achieved them, and other times, they’ll never appear at all. But as long as you gather all the evidence, it doesn’t matter.
3. I can’t find the part of the guide that I need. There’s a simple shortcut you can use. Press Ctrl+F, and a search bar will open in your window. Type in whatever keyword you’re looking for (i.e., Mirror), and the function will direct you directly to that word within the guide.
4. Link your evidence! Whenever you see a red chain link on top of a photo of a piece of evidence, it’s important to link it to the other evidence. You’ll only be able to see the ending of the game once you link all the evidence together. When evidence has been successfully linked, a blue chain link icon will appear on the photo. However, if the red chain link is still there, that means the evidence still needs to be linked to something else. If you follow this guide, you won’t have to worry about missing anything.
Puzzle Guide
The following is a guide to help you understand, recognize, and execute puzzles successfully. If you forget how to do something though, don’t worry: the game will toggle hints and instructions at the top of the screen.
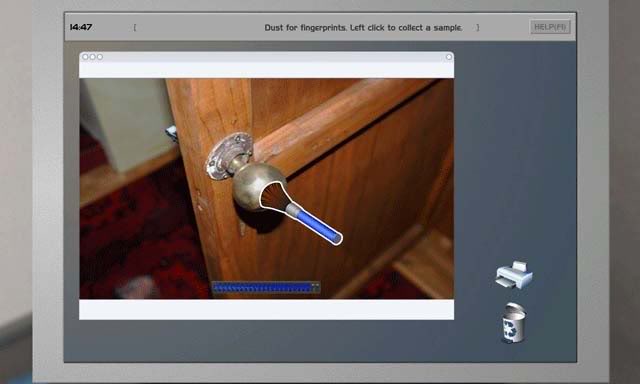
1. Dusting for Prints–
Move the mouse cursor, which has turned into a brush, over the evidence you’re dusting. Doing so will cause the evidence to be dusted. If you find the print, you can also click on it. Once the blue bar is filled at the bottom of the screen, you’ll automatically be moved to the next area.

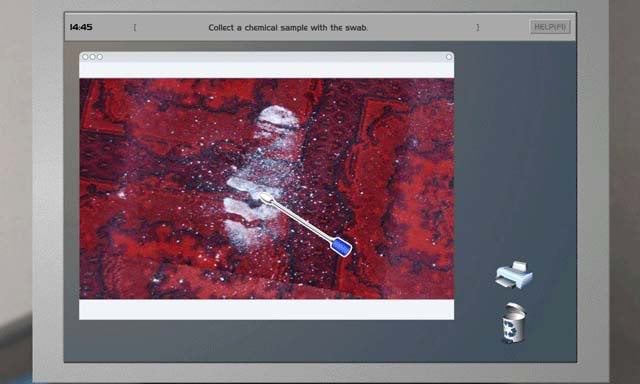
2. Swabbing for a Sample-
This is probably the easiest of all the puzzles. Simply click on the area or object you’d like to take a sample from. Doing so correctly results in the next puzzle.
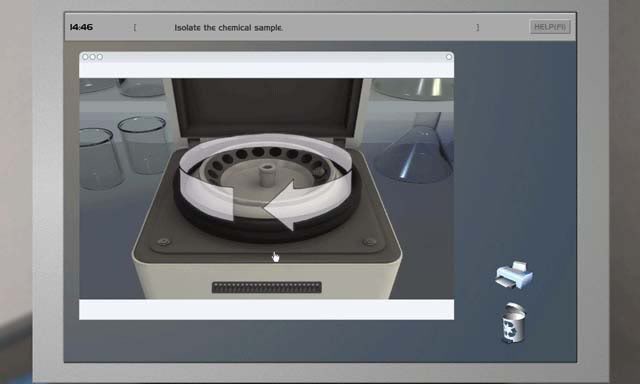
3. Using the Centrifuge-
Spin the mouse counter-clockwise around the apparatus until the blue bar at the bottom of the screen is filled.
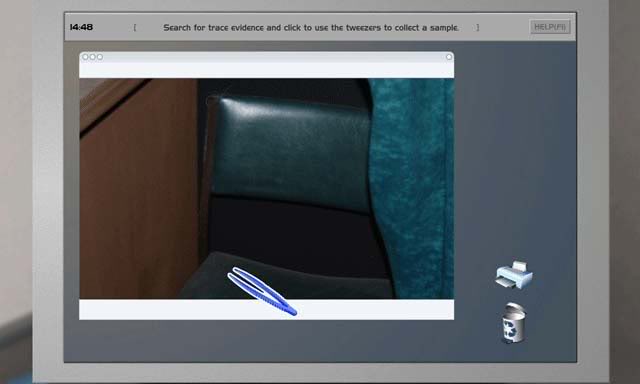
4. Using the Tweezers-
The mouse cursor will turn into a pair of tweezers. Click on whatever object you’d like to examine or extract.
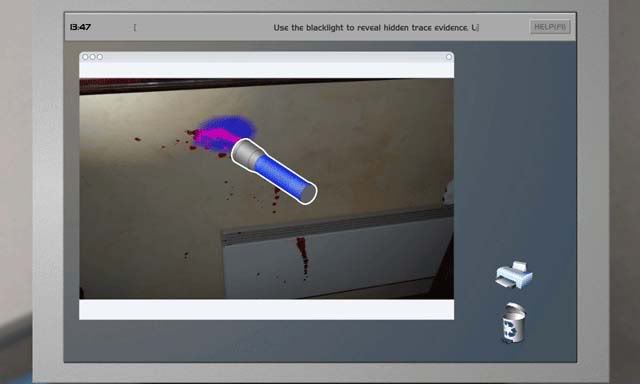
5. Using the Black Light-
Use the mouse to move the Black Light over an object: click on the area that glows brightly, or differently from the normal purple light.
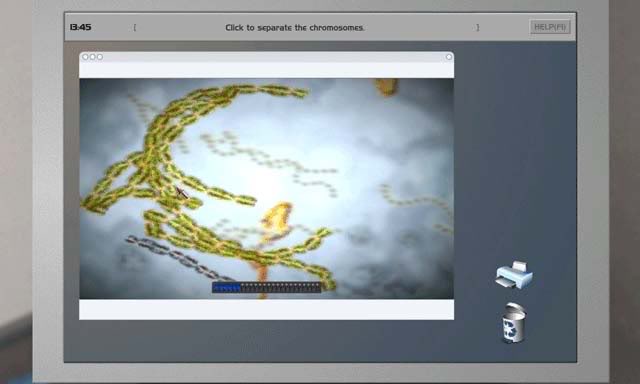
6. Separating Chromosomes-
The chromosomes will be a greenish color when you begin. Click around the petri dish to move the chromosomes around and away from each other: the goal is to make all of them turn grey. Holding down a mouse click results in stronger movement of the chromosomes.
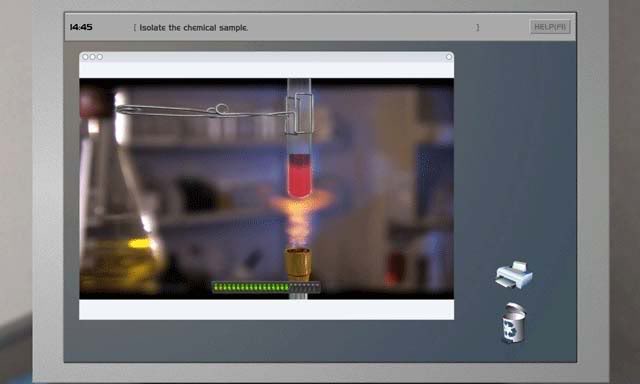
7. Using the Bunson Burner-
Use the mouse to move the test tube over the burner: you want to fill the bar at the bottom of the screen, and you want it to be a green color. Here’s an example:
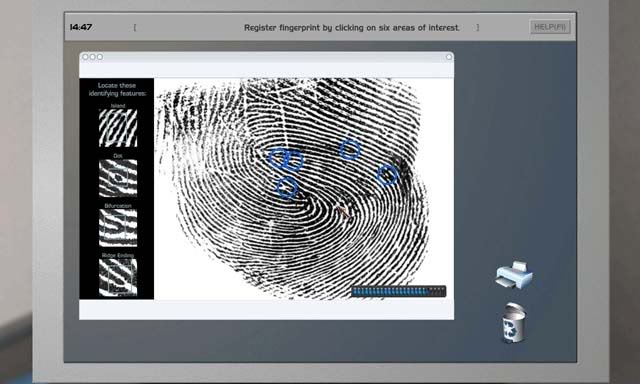
8. Identifying Prints
Click on various points in the image to identify prints according to the examples on the left. Here’s an example:
Note: These are the common puzzles in the game which occur multiple times. One time/specific puzzles will be addressed accordingly in the guide.
Walkthrough
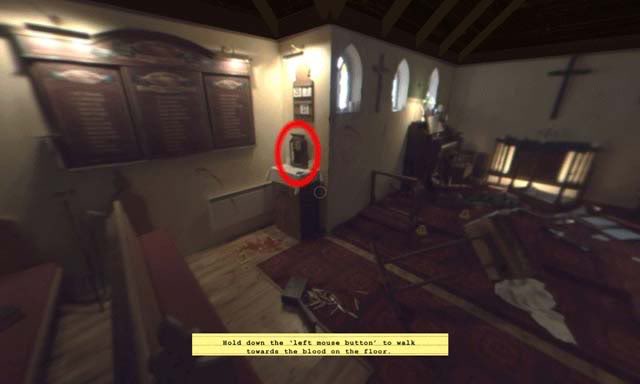
Crime Scene Location 1: Chapel
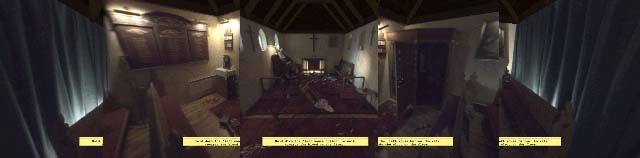
Objective: Photograph the Blood for Analysis
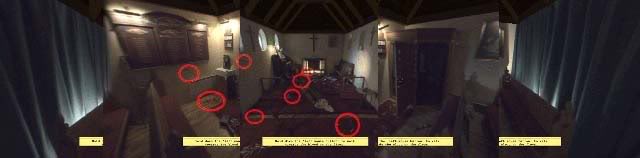
Chapel
Find and take pictures of the following evidence (locations circled in the screenshot above). Remember you can use the "i" key to locate each item exactly.
1. Candlestick
2. Candelabra
3. Bloody Vase
4. Blood Spatter
5. Blood Spatter (2)
Note: it’s during this moment you should encounter the cutscene Meeting the Sheriff. Coroner’s Report will be added to your evidence.
6. Blood Stain
7. Blood Stain (2)
8. Blood Stain (3)
Crime Van
Process the following evidence:
1. Candlestick: Dust for fingerprints, then click on 6 areas of interest on the discovered fingerprint. Use the black light to find hidden trace evidence, and then seperate the chromosomes to process it to the evidence folder.
2. Candelabra: Click on it to process it directly to your evidence folder.
3. Bloody Vase: Use the black light to find hidden trace evidence, then click on it to process it to your evidence folder.
4. Blood Spatter: Use the black light to find hidden trace evidence, then click on it to process it to your evidence folder.
5. Blood Spatter (2): Use the black light to find hidden trace evidence, then seperate the chromosomes to process it to your evidence folder.
6. Coroner’s Report: Click to process directly to evidence.
7. Blood Stain: Use the black light to find hidden trace evidence, then seperate the chromosomes to process to the evidence folder.
Note: Objective "Photograph the Blood for Analysis" will now be completed.
8. Blood Stain (2): Use the black light to find hidden trace evidence, then seperate the chromosomes to add to your evidence folder.
9. Blood Stain (3): Use the black light to find hidden trace evidence, then seperate the chromosomes to add to your evidence folder.
Evidence Folder- Link the following:
1. Candlestick to Coroner’s Report
Objective: Identify the Murder Weapon

Find and take pictures of the following evidence (locations circled in the screenshot above). Remember you can use the "i" key to locate each item exactly.
1.Bootprint
2.Shoeprint
3.Muddy footprint
4.Flowers
5.Door
6.Digging tools
7.Chair
8.Candlestick
Crime Van
Process the following evidence:
1. Bootprint: Collect a chemical sample with the swab, then isolate the chemical sample with the bunson burner to add the evidence to your folder.
2. Shoeprint: Click to transfer directly to evidence folder
3. Muddy footprint: Collect a chemical sample with the swab, then isolate the chemical sample via the centrifuge to add it to your evidence folder.
4. Flowers: Click to transfer directly to evidence folder
5. Door: Dust for fingerprints, then identify six areas of interest to transfer to evidence folder
6. Digging tools: Dust for fingerprints to then add to your evidence folder
7. Chair: Use the teezers to collect a sample of Hair. Click on the Hair and seperate the chromosomes to process to evidence folder
8. Candlestick: Use the black light to find hidden trace evidence, then seperate the chromozomes to process to evidence folder.
Note: It’s during this time you’ll experience the movie scene Interview with Daniel White and Photograph will be added to your inventory. Dust for prints and then seperate the chromosomes to process to evidence folder.
Evidence Folder- Link the following:
1. Bootprint to Flowers
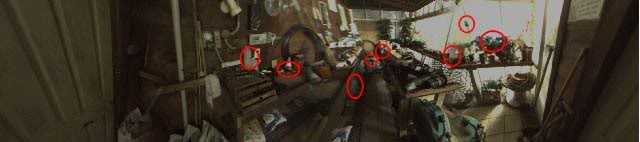
Crime Scene Location 2: Hapman’s Garden Shed
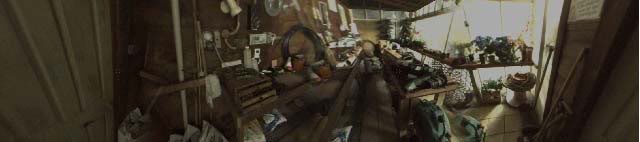
Objective: Connect the Garden Shed to the Chapel
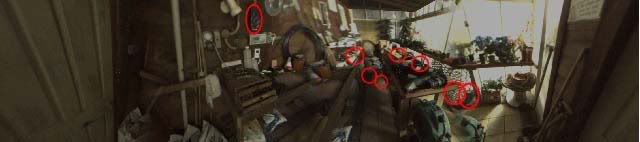
Find and take pictures of the following evidence (locations circled in the screenshot above). Remember you can use the "i" key to locate each item exactly.
1.Trowel
2.Handprint
3.Gloves
4.Footprint
5.Fertilizer print
6.Boots
7.Black box
8.Bench
Note: Priest’s Tea Cup and Priest’s Shoes will be added to your evidence upon entering the Crime Van. Click both to process them directly to your evidence folder.
Crime Van
Process the following evidence:
1. Trowel: Click to process directly to evidence folder
2. Handprint: Dust for fingerprints, then click to process to evidence folder
3. Gloves: Use the black light to find trace evidence, then seperate the chromosomes and click to add to evidence folder.
4. Footprint: Swab for a chemical sample, then use the centrifuge to isolate it and add it to your evidence folder.
5. Fertilizer print: Swab for a chemical sample, then use the bunson burner and process to the evidence folder.
6. Boots: Use the black light, then seperate the chromosomes to process to the evidence folder.
7. Black box: While this is technically an essential piece of evidence, it won’t be processed to your evidence folder.
8. Bench: Dust for fingerprints, then process to your evidence folder.
9. Priest’s Tea Cup: Dust for prints, then then identify six areas of interest on the fingerprint. Use the black light to find hidden trace evidence, then seperate the chromosomes and process it to your evidence folder.
10. Priest’s Shoes: Click to add directly to your evidence folder.
Evidence Folder- Link the following:
1. Priest’s Shoes to Shoeprint
2. Footprint to Bootprint
3. Boots to Footprint
4. Fertilizer Print to Muddy footprint
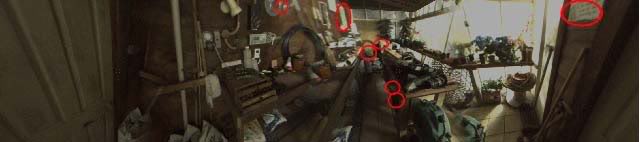
Objective: Find out what Hapman has been doing
Find and take pictures of the following evidence (locations circled in the screenshot above). Remember you can use the "i" key to locate each item exactly.
1.Zimmer
2.Watering equipment
3.Gloves
4.Hydrangea
5.Fertilizer
6.Chemicals
7.Chemicals (2)
8.Chemicals (3)
Crime Van
Process the following evidence:
1. Zimmer: Dust the photograph for fingerprints before adding it to your evidence folder.
2. Watering equipment: Dust to collect a sample, then process to the evidence folder.
3. Gloves: Use the black light to find trace evidence, then seperate the chromosomes and add to your evidence folder.
4. Hydrangea: Collect a chemical sample with the swab, then use the centrifuge to isolate it and process it to your evidence folder.
5. Fertilizer: Collect a chemical sample with the swab, then isolate it via the centrifuge and process to the evidence folder.
6. Chemicals: Swab for a sample then use the centrifuge to isolate it and process to your evidence folder.
7. Chemicals (2): Swab for a sample, then use the bunson burner to isolate it and process to your evidence folder.
8. Chemicals (3): Swab for a sample, then use the centrifuge to isolate it and process to your evidence folder.
Evidence Folder- Link the following:
1. Fertilizer to Fertilizer print
2. Footprint to Bootprint
3. Hydrangea to Flowers
4. Hydrangea to Bootprint
Objective: Find out what Hapman has been doing (part 2)
Find and take pictures of the following evidence (locations circled in the screenshot above). Remember you can use the "i" key to locate each item exactly.
1.Water supply map
2.Trash
3.Quote
4.List
5.Dynamite
6.Diagrams
7.Cog
Crime Van
Process the following evidence:
1. Water supply map: Click to transfer directly to evidence folder.
2. Trash: Use the tweezers to search for trace evidence and discover the Chemical notes. These will be added as an eigth item to examine.
3. Quote: While this won’t be transfered to the evidence folder, it could offer insight…
4. List: Use the ESDA wand to search for hidden text, then transfer to your evidence folder.
5. Dynamite: Click to process directly to evidence folder.
6. Diagrams: Click to process directly to evidence folder.
7. Cog: Click to process directly to evidence folder.
8. Chemical notes: Click to process directly to evidence folder.
Evidence Folder- Link the following:
1. Chemical notes to List
Objective: Photograph the Clock in the Chapel
Find and take pictures of the following evidence (locations circled in the screenshot above). Remember you can use the "i" key to locate each item exactly.
1.Clock
Crime Van
Process the following evidence:
1. Clock: Click to process directly to evidence folder.
Evidence Folder- Link the following:
1. Clock to Cog
Objective: Examine the Clock
- Deconstruct the clock and place the pieces onto the blueprint on the right. Some parts may block others when disassembling the clock, so be sure to do it in the correct order. The screenshot below shows the solution, with the start being on the left and the pieces being placed in their proper positions on the right.
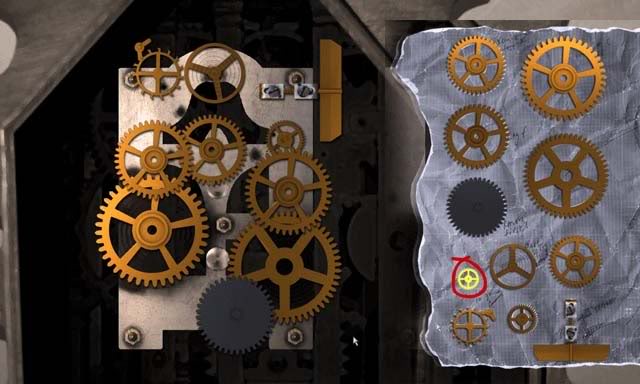
Note: The cutscenes Hassling Hapman and Flavin will take place now.
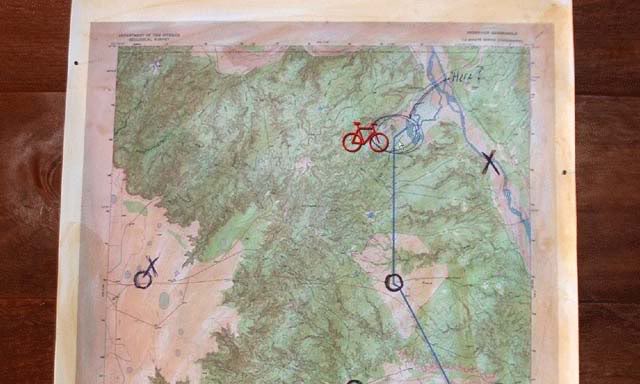
- Click on the area of the map to which Burton should travel. The solution is shown below.
- After the next scenes, the "Strange Device" will be added to your crime computer. Click to process it directly to your evidence folder.
- Link "Strange device" to "Watering equipment" and select "Reconstruct the Strange Device" on the note on the right.
Objective: Reconstruct the Strange Device
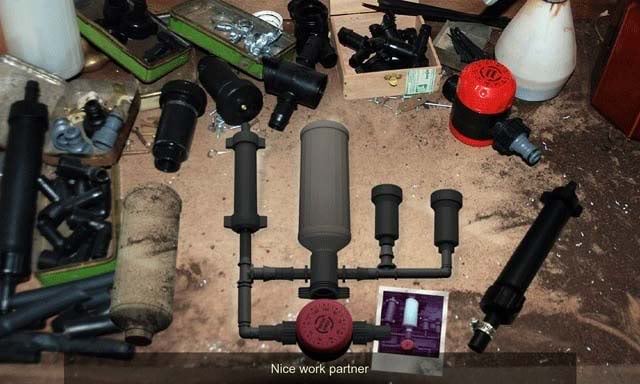
- Build a device similar to the one shown in the photograph by using pieces of watering equipment in the screen. Drag highlighted pieces to their correct areas. You can right-click to rotate. The solution is shown below:
Note: The cutscene Confronting the Sheriff will take place now.
- The "Floorplans" will be added to your inventory. Click on them to process directly to your evidence folder.
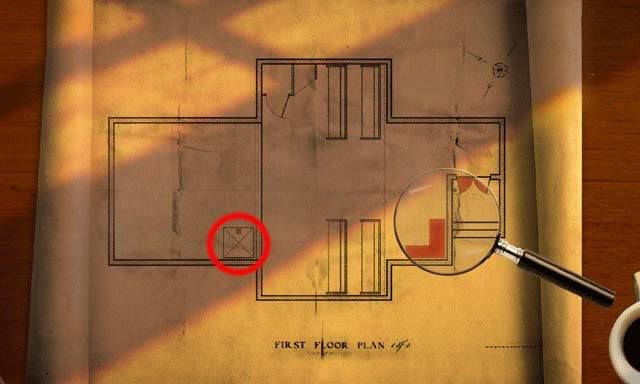
- Once placed in the evidence folder, click on the yellow sticky on the right called "Examine the Chapel Plans"
- Use the magnifying lens to look over the picture and find any secrets hidden in the Floorplans. The secret area is circled below.
Crime Scene Location 3: Laboratory

Objective: Find the Chemicals

Find and take pictures of the following evidence (locations circled in the screenshot above). Remember you can use the "i" key to locate each item exactly.
1.Chemicals
2.Chemicals (2)
3.Chemicals (3)
4.Chemicals (4)
5.Bible
6.Apparatus
7.Apparatus (2)
8.Apparatus (3)
Crime Van
Process the following evidence:
1. Chemicals: Collect a chemical sample with the swab, then isolate with the bunson burner and process to the evidence folder.
2. Chemicals (2): Use the swab to collect a chemical sample, then isolate with the centrifuge to process to the evidence folder.
3. Chemicals (3): Collect a chemical sample with the swab, then isolate via the bunson burner to process to the evidence folder.
4. Chemicals (4): Swab for a sample then isolate the sample via the bunson burner to process to the evidence folder.
5. Bible: Dust for fingerprints, then process to the evidence folder.
6. Apparatus: Click to process directly to evidence folder.
7. Apparatus (2): Click to process directly to evidence folder.
8. Apparatus (3): Swab for a sample, then isolate with the centrifuge to process to evidence folder.
Evidence Folder- Link the following:
1. Apparatus (3) to Strange Device
2. Chemicals to Chemicals
3. Chemicals to Chemicals
Objective: Find Evidence that Hapman’s been in the Lab

Find and take pictures of the following evidence (locations circled in the screenshot above). Remember you can use the "i" key to locate each item exactly.
1.Chemicals
2.Lampshade
3.Jar
4.Glass thing
5.Footprint
6.Chemicals (2)
7.Chemicals (3)
8.Chemicals (4)
Crime Van
Process the following evidence:
1. Chemicals: Swab for a sample, then use the centrifuge to isolate the sample and process to evidence folder.
2. Lampshade: Dust for prints before processing to the evidence folder.
3. Jar: Click to process directly to evidence folder.
4. Glass thing: Click to process directly to evidence folder.
5. Footprint: Swab for a sample, then use the centrifuge to isolate the sample and process to the evidence folder.
6. Chemicals (2): Click to process directly to evidence folder.
7. Chemicals (3): Click to process directly to evidence folder.
8. Chemicals (4): Swab for a sample, then use the bunson burner to isolate it and process to evidence folder.
Evidence Folder- Link the following:
1. Footprint to Fertilizer print
2. Chemicals to Chemical notes
Objective: Document the Apparatus

Find and take pictures of the following evidence (locations circled in the screenshot above). Remember you can use the "i" key to locate each item exactly.
1.White powder
2.White crystals
3.Rag
4.Chemicals
Crime Van
Process the following evidence:
1. White powder: Swab for a chemical sample, then use the bunson burner to isolate it and process to the evidence folder.
2. White crystals: Swab for a chemical sample, then use the bunson burner to isolate it and process to the evidence folder.
3. Rag: Swab for a chemical sample, then use the bunson burner to isolate it. Use the black light to reveal hidde trace evidence and seperate the chromosomes to process to the evidence folder.
4. Chemicals: Swab for a chemical sample, then use the centrifuge to isolate it and process to the evidence folder.
Evidence Folder- Link the following:
1. Chemicals to Rag
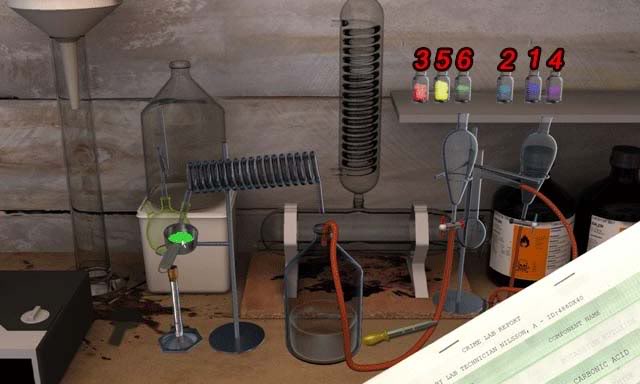
Objective: Recreate Hapman’s Drug
- The powders and liquids need to be added in the correct order to recreate the drug. Jars on the left side of the shelf are to be used with the round flask on the left while jars on the right side of the shelf are to be used on the apparatus on the right. The order is as follows:
1.Blue
2.Light Blue
3.Red
4.Purple
5.Yellow
6.Green
- Now enjoy watching the final scenes unfold! When you’re being interviewed later on, you can nod or shake your head by moving the mouse up and down vertically or side to side horizontally. Go with your instinct and you can’t lose.
Congratulations, you’ve completed the game!
“;

More articles...
-
Best Horror Games On Itch.io – July 2026
Across a bounty of subgenres. -
Grow A Garden 2 Base Price List
What's the most valuable crop? -
Evomon Types Guide [Strengths, Weaknesses, Resistance]
Your companion guide during battles.