- Wondering how to get Monopoly GO! free rolls? Well, you’ve come to the right place. In this guide, we provide you with a bunch of tips and tricks to get some free rolls for the hit new mobile game. We’ll …
Best Roblox Horror Games to Play Right Now – Updated Weekly
By Adele Wilson
Our Best Roblox Horror Games guide features the scariest and most creative experiences to play right now on the platform!The BEST Roblox Games of The Week – Games You Need To Play!
By Sho Roberts
Our feature shares our pick for the Best Roblox Games of the week! With our feature, we guarantee you'll find something new to play!Type Soul Clan Rarity Guide – All Legendary And Common Clans Listed!
By Nathan Ball
Wondering what your odds of rolling a particular Clan are? Wonder no more, with my handy Type Soul Clan Rarity guide.
Casebook, Episode II – The Watcher Tips Walkthrough
Check out our walkthrough for Casebook, Episode II: The Watcher. The sequel to “Casebook Episode 1: Kidnapped”, the second episode of the series delves into the mysterious murder/suicide of a man named Salt. Join Detective Burton as his “Partner” to uncover the mystery and solve the crime of just what exactly happened. Tips & Tricks Before embarking on this new mystery adventure, there are a few tips and tricks I'd like to point out. 1. When in doubt, use the “i” key. If you ev…
a:1:i:0;a:2:s:13:”section_title”;s:39:”Casebook, Episode II – The Watcher Tips”;s:12:”section_body”;s:35451:”
Check out our walkthrough for Casebook, Episode II: The Watcher.
The sequel to “Casebook Episode 1: Kidnapped”, the second episode of the series delves into the mysterious murder/suicide of a man named Salt. Join Detective Burton as his “Partner” to uncover the mystery and solve the crime of just what exactly happened.
Tips & Tricks
Before embarking on this new mystery adventure, there are a few tips and tricks I’d like to point out.
1. When in doubt, use the “i” key. If you ever get stuck, don’t know where to go next, or just can’t seem to find a particular piece of evidence, pressing the i key will make a magic eye appear that directs you straight to whatever you’re looking for.
2. What’s the objective? Unfortunately the game isn’t very clear on what exact items will help you clear which objectives. Sometimes some objectives may only appear once you’ve achieved them, and other times, they’ll never appear at all. But as long as you gather all the evidence, it doesn’t matter.
3. I can’t find the part of the guide that I need. There’s a simple shortcut you can use. Press Ctrl+F, and a search bar will open in your window. Type in whatever keyword you’re looking for (i.e., Mirror), and the function will direct you directly to that word within the guide.
4. Link your evidence! Whenever you see a red chain link on top of a photo of a piece of evidence, it’s important to link it to the other evidence. You’ll only be able to see the ending of the game once you link all the evidence together. When evidence has been successfully linked, a blue chain link icon will appear on the photo. However, if the red chain link is still there, that means the evidence still needs to be linked to something else. If you follow this guide, you won’t have to worry about missing anything.
Puzzle Guide
The following is a guide to help you understand, recognize, and execute puzzles successfully. If you forget how to do something though, don’t worry: the game will toggle hints and instructions at the top of the screen.
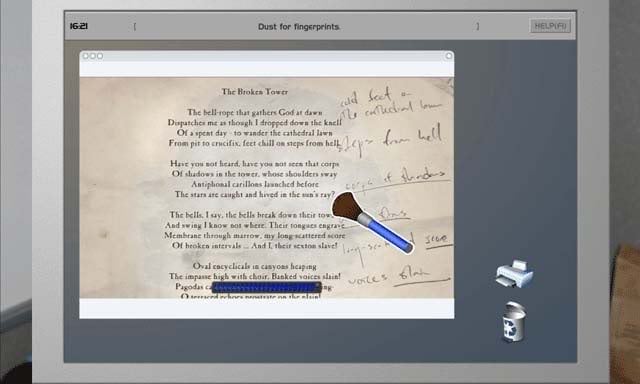
1. Dusting for Prints-
Move the mouse cursor, which has turned into a brush, over the evidence you’re dusting. Doing so will cause the evidence to be dusted. If you find the print, you can also click on it. Once the blue bar is filled at the bottom of the screen, you’ll automatically be moved to the next area.

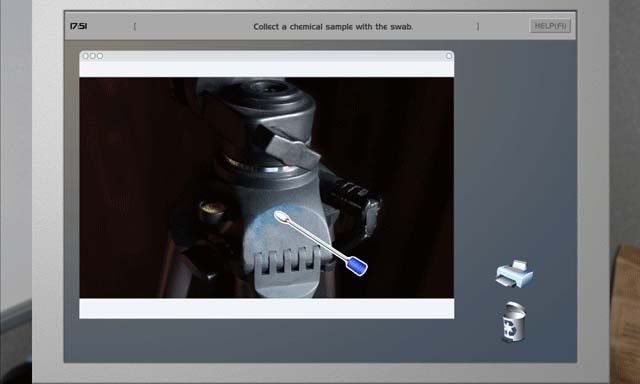
2. Swabbing for a Sample-
This is probably the easiest of all the puzzles. Simply click on the area or object you’d like to take a sample from. Doing so correctly results in the next puzzle.
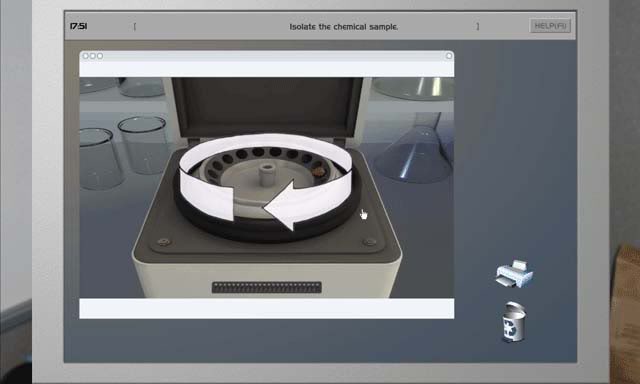
3. Using the Centrifuge-
Spin the mouse counter-clockwise around the apparatus until the blue bar at the bottom of the screen is filled.
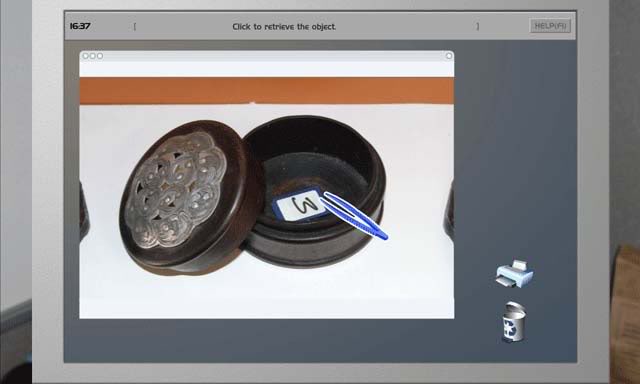
4. Using the Tweezers-
The mouse cursor will turn into a pair of tweezers. Click on whatever object you’d like to examine or extract.
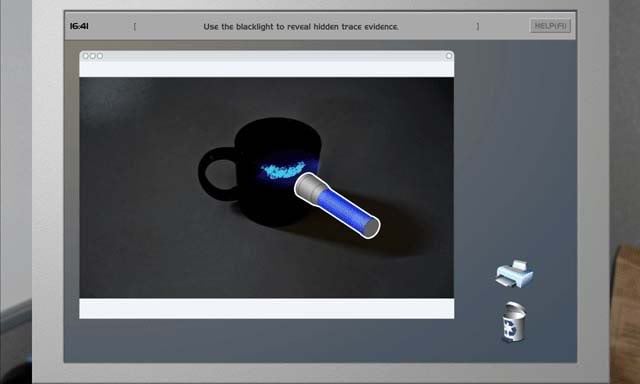
5. Using the Black Light-
Use the mouse to move the Black Light over an object: click on the area that glows brightly, or differently from the normal purple light.
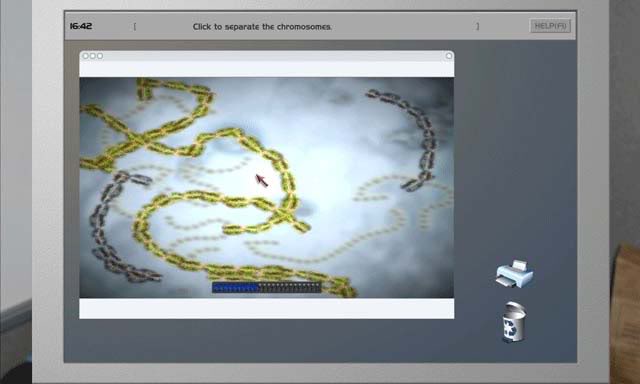
6. Separating Chromosomes-
The chromosomes will be a greenish color when you begin. Click around the petri dish to move the chromosomes around and away from each other: the goal is to make all of them turn grey. Holding down a mouse click results in stronger movement of the chromosomes.
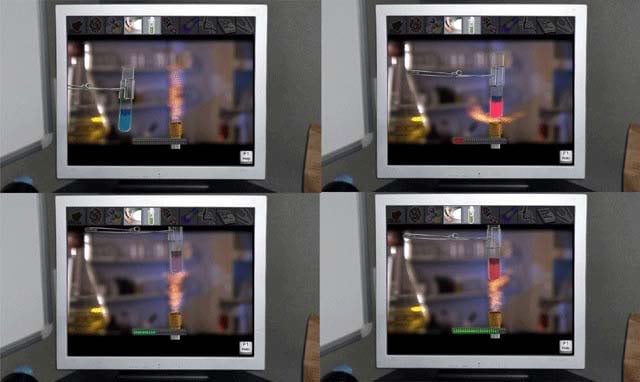
7. Using the Bunson Burner-
Use the mouse to move the test tube over the burner: you want to fill the bar at the bottom of the screen, and you want it to be a green color. Here’s an example:
8. Fixing and Adjusting Video Feed-
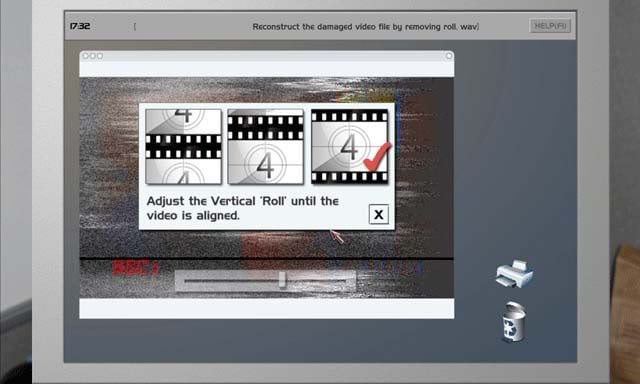
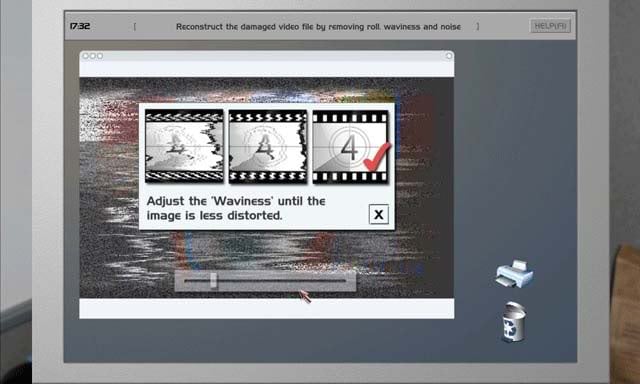
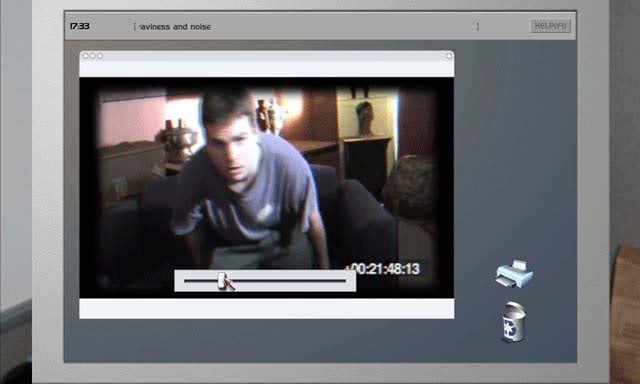
You will need to adjust roll, waviness, and noise. You can toggle a dial along a bar to adjust things properly. Remember:
Roll: You want to move the black bar off the screen and make sure it’s no longer moving.
Waviness: Adjust the dial so that the picture isn’t spiky from side to side.
Noise: Toggle along the bar until the picture is crystal clear
9. Using the Microscope-
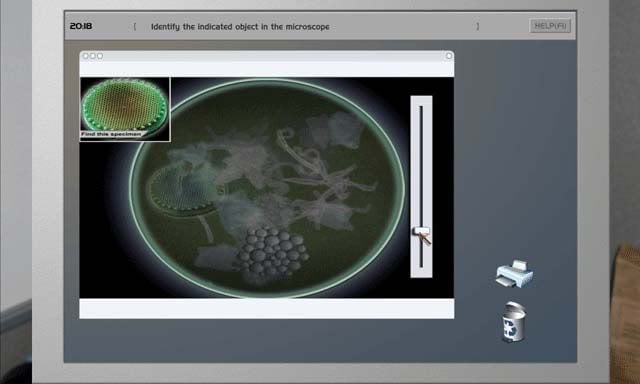
The point of the microscope is to toggle the dial up and down (slowly) until you see the matching algae sample to that which is on the left side of your screen. Once you see it, release the mouse click to move onward.
Note: These are the common puzzles in the game which occur multiple times. One time/specific puzzles will be addressed accordingly in the guide.
Walkthrough
Crime Scene 1: The Victim’s Room
![]()
Objective: Canvas the Room (Tutorial)
The first objective is a simple one, as it will act as a starting tutorial for the game. If you’ve played Casebook before, the process will be familiar to you, with a few select changes.
Victim’s Room
- Walk over to the Pills on the floor by using the left click
- Pull out your camera with the right click, take a picture of the Pills by left-clicking, and then put the camera away

- Detective Burton has informed you that you’ll need to compare these Pills to the Coroner’s Report, which he left in the Crime Van
- Proceed towards the door to return to the Crime Van
Crime Van
Upon entering the Crime Van, you will encounter Pete, who will offer his remarks in regards to the incident and encourage you to connect your camera to process evidence.
- Upload evidence by clicking on the computer monitor
- Select Coroner’s Report to process to the Evidence Folder
- Select Pills, swab for a chemical sample by clicking on the Pills, then isolate the sample in the centrifuge by spinning the mouse clockwise around the apparatus. When the bar at the bottom is completely blue, the sample will be isolated, revealing Clonazepam. Burton will then urge you to proceed to the Evidence Folder.
- In the Evidence Folder, link Pills to Coroner’s Report by moving one piece of evidence atop the other and clicking. If done right, a small blue chain link icon will appear. The objective “Match the Drugs” is now complete.
Note: You may be wondering where the objective “Match the Drugs” came from since it wasn’t the first objective in your Notebook, and wasn’t listed at all in the beginning. Occasionally, an objective will appear and subsequently disappear by linking or finding one piece of evidence. In this case, the objective was revealed when it was completed.
Objective: Canvas the Room (Part I)
![]()
Now that we’ve processed our first evidence and completed the “Match the Drugs” objective, it’s time to give the room a second sweep for evidence. Once you leave the van, a cutscene will take place, and then once it’s over, you’ll be back in the room. Take pictures of the following objects:
1. Camcorder (next to window)
2. Container (pots on the wall above the sofa, on bottom left shelf)
Cutscene: Interviewing the Inhabitants. A cutscene will ensue showing Burton interviewing the Groundskeeper, among many other people who dwell in the immediate complex area. Once the cutscene is complete, Burton will have acquired Poetry, which you can access in the Crime Van later.
3. Cup (mug on kitchen counter)
4. Pill Bottles (on kitchen counter)
5. Dish (on stand nearby screen in bedroom)
6. Floor Markings (on the wall between the kitchen counter and the bedroom)
Crime Van
Process the following evidence:
1. Poetry: You will find this has been delivered as evidence to the computer via Burton’s interview with one of the residents. Click on it to process it. Dust for fingerprints to find a fingerprint linking the Poetry to one Marlon Hampton.
2. Camcorder: Click on the photo to process to the Evidence Folder. Burton will mention that this Camcorder uses SD Cards.
3. Container: Click on the Container to open it and find an SD Card (with #3 on it). Click on the SD Card to continue. A video file will show a woman yelling on her phone, and another resident dancing in his apartment. Once the video is finished, the SD Card will be processed to the Evidence Folder.
4. Cup: Use the Black light to find saliva on the edge of the cup, then separate the chromosomes to discover unknown DNA and process it to the Evidence Folder. Burton will explain what Exemplars are, and new evidence will arrive: Grib’s DNA, Hapman’s DNA, Mueller’s DNA, Shure’s DNA, and Zimmer’s DNA. Select each to process them directly to the Evidence Folder.
5. Pill Bottles: Select the Pill Bottles to process them directly to the Evidence Folder.
6. Dish: Select the Dish, and use the tweezers to select the Earring inside. A new objective will be revealed: Find the Earring’s Owner. Select the Earring, and use the Black light to find trace evidence. Separate the chromosomes to discover it belongs to Zimmer: process to Evidence Folder. Once all evidence has been processed, the objective Find the Earring’s Owner will be complete.
7. Floor Markings: Select to process directly to the Evidence Folder.
Evidence Folder- link the following:
1.Pills to Pill Bottles
Objective: Canvas the Room (Part II)
![]()
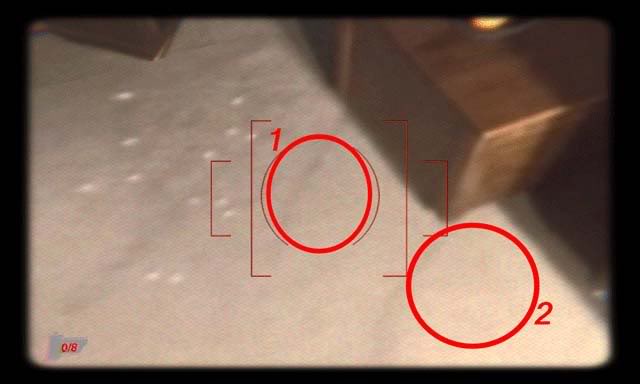
It’s time to finish canvasing the room. Take pictures of the following objects:
1. Floor Markings (by dropped Pills)
2. Floor Markings (by Pills and coffee table)
3. Glass (beside picture on the kitchen counter)
4. Mirror (in bedroom)
5. Damaged SD Card (on shelf above TV)
6. Locks (on door)
7. Slime Mould (between kitchen counter and door, high up on wall)
8. Window (in front of Camcorder)
Crime Van
Process the following evidence:
1. Floor Markings: Select photo to process directly to Evidence Folder
2. Floor Markings (2): Select to process directly to Evidence Folder
3. Glass: Select Glass, use tweezers to extract SD Card. Select SD Card to watch video clip of a man lifting a mannequin, and a woman acting out a script in her underwear. After the clip is finished, the SD Card will be processed to the Evidence Folder.
4. Mirror: Select the Mirror, and use the Black light to find a residue. Separate the chromosomes to find the DNA of Cat’s Blood. Evidence will be processed to the Evidence Folder.
5. Damaged SD Card: Select the Damaged SD Card, and Pete will take it and turn it into SD Card. Select SD Card. You will then have to adjust the roll, waviness, and noise so the result is a clean picture. Below are the proper solution locations:
After watching the video clip, it will be processed to the Evidence Folder and a cutscene will ensue.
Cutscene: Interviewing Zimmer. Burton will have a conversation with Zimmer, where it’s revealed that she feels responsible for Salt’s jump and owns one of Hampton’s paintings.
6. Locks: Select Locks to dust for prints: no prints are found, evidence is processed to the Evidence Folder
7. Slime Mould: Select photo to process directly to the Evidence Folder.
8. Window: Select photo to process directly to the Evidence Folder.
Objective: Canvas the Room (Part III)
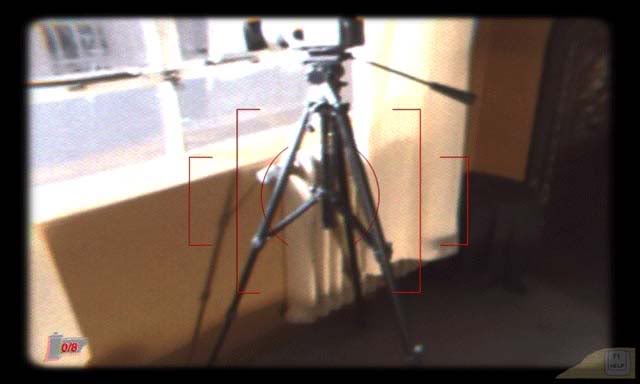
This objective is short. There’s just one piece of evidence you need to take a picture of:
1. Tripod (holds up Camcorder)
Crime Van
Process the following evidence:
1. Tripod: Select, then use the swab to collect a chemical sample. Isolate the sample by spinning the mouse clockwise around the centrifuge. The result is Potassium Carbonate: evidence is sent to Evidence Folder.
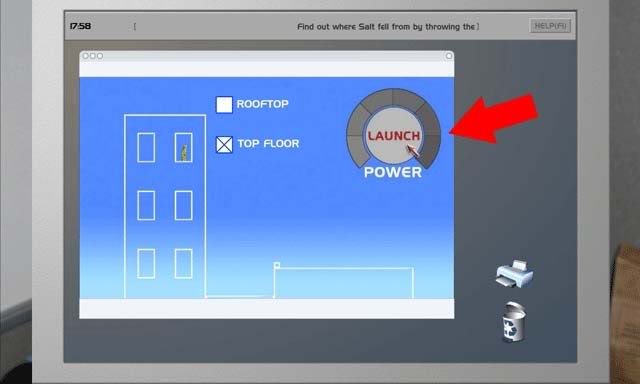
Cutscene: Was Humpty Dumpty Pushed? The crime scene is done being processed, but Pete’s got a new toy up his sleeve! You will need to find out how Salt fell: if he jumped or was pushed. Select “Top Floor” and let the launch meter fill up fully to section 5 of 6 as indicated by the red arrow in the picture. Then press launch to solve the puzzle.
Cutscene: Fire Burton will go home after a long day at the crime scene, only to return and find the place has been burned to the ground. This is the introduction to the next crime scene.
Crime Scene 2: The Burned Room

Objective: Who did this?

What was previously the Victim’s Room is now a burned shell of the original crime scene. Take pictures of the following objects:
1. Hairpin (on floor in middle of living room)
Cutscene: Where was Zimmer last night?
2. Mouldy SD Card (on floor near Hairpin)
3. Runes (on floor under bed in bedroom)
4. Blood Stain (next to Writing, under bed)
5. Burned Pages (at separation wall between rooms)
6. Broken Vase (on bedroom floor)
Cutscene: Where was Hampton last night?
7. Gold Vase (beside sofa, under shelves in the living room)
8. Match Smear (on kitchen counter, near door)
Crime Van
Upload and process the following evidence:
1. Hairpin: Select and use the Black light to reveal hidden trace evidence. Separate the chromosomes to discover Hairpin belonged to Zimmer. Processed to Evidence Folder.
2. Mouldy SD Card: Select to view a video clip of Salt becoming more and more irritable. Process directly to Evidence Folder when finished.
Cutscene: What if…?
3. Runes: Select to process directly to Evidence Folder
4. Blood Stain: Select and use the Black light to find trace evidence: separate the chromosomes to discover the blood is consistent with Cat DNA
5. Burned Pages: Select to process directly to Evidence Folder
6. Broken Vase: Select to process directly to Evidence Folder
7. Gold Vase: Select to process directly to Evidence Folder
8. Match Smear: Select and adjust the microscope to find the matching sample. Discover the specific algae, process to Evidence Folder.
Evidence Folder- link the following:
1. Blood Stain to Mirror
2. Mouldy SD Card to Slime Mould: no match
Objective: Find the Accelerant
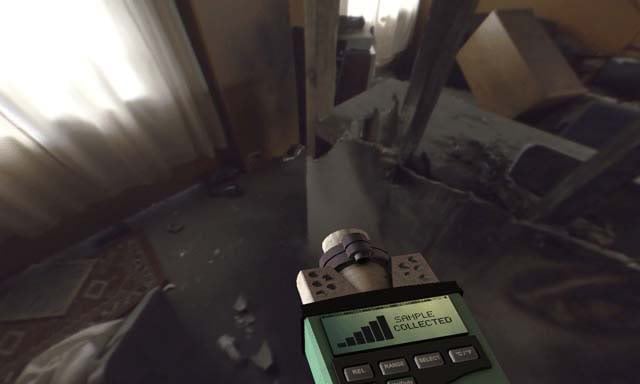
Burton will hand you a devise he refers to as the “Sniffer”. Use it to find the possible accelerant that the arsonist used. The sample you will need is located in the bedroom, at the foot of the bed facing the kitchen counter.
Crime Van
Back at the Crime Van, compare the Hyrdocarbon Sample to the other available samples. When you find one that looks similar, select “Test”. Click the upper arrow scroll 4 times to find the matching sample. The conclusion is that lighter fluid from out of town was used. We’re looking for an arson with exotic tastes. Evidence is processed to the Evidence Folder.
Objective: What were they looking for?

It’s time to try and find out what the arsonist was looking for. Take pictures of the following objects:
1. Empty Space (on broken shelf, on wall above sofa)
2. Ornament (on sofa by wall)
3. Ornament (2) (on floor below window in living room)
4. Plate (on floor in living room below window)
5. Statuette (on top of the TV)
6. Vase (on sofa by the wall)
7. Broken Metal (on carpet to the right of the mid-room sofa, near the door)
Crime Van
Upload and process the following evidence:
1. Empty Space: Select to process directly to Evidence Folder
2. Ornament: Select to process directly to Evidence Folder
3. Ornament (2): Select to process directly to Evidence Folder
4. Plate: Select to process directly to Evidence Folder
5. Statuette: Select to process directly to Evidence Folder
6. Vase: Select to process directly to Evidence Folder
7. Broken Metal: Select to process directly to Evidence Folder
Evidence Folder- link the following:
1. Empty Space to Gold Vase: no match
2. Empty Space to Plate: no match
3. Empty Space to Vase: no match
4. Empty Space to Ornament: no match
5. Empty Space to Ornament (2): no match
6. Empty Space to Statuette: no match
Burton and Pete conclude it’s similar to the Statuette, and the statues come in pairs. Meanwhile, Pete’s got the Fixed SD Card for us, so let’s check it out. Once again you’ll have to fix and adjust roll, waviness, and noise. The video clip will reveal a strange spook really is tormenting the place. Burton will get old blueprints for you so you can find out where he’s hiding. The blueprints look like this at the beginning, and should appear like this when correctly aligned (note: you can look at the dial locations on the zoom and rotate to see exactly how to align the picture):
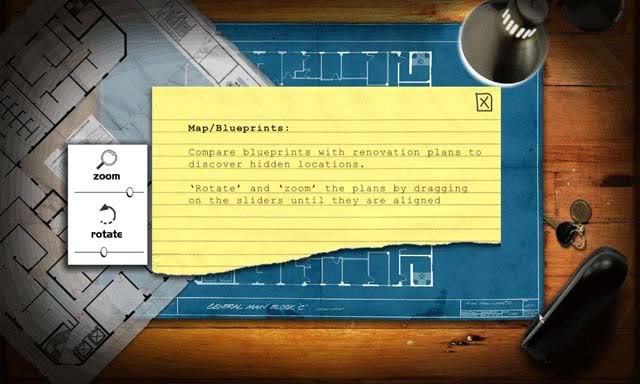
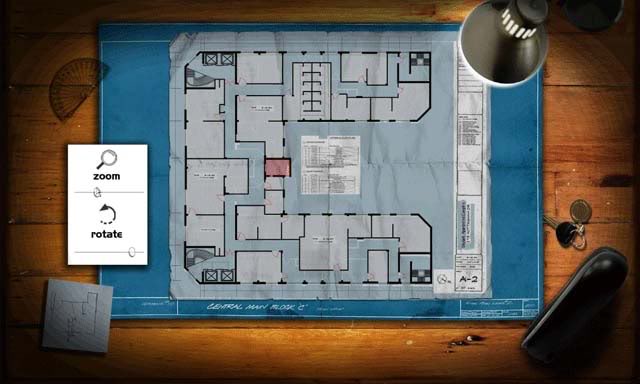
Finding this secret space, a cutscene ensues, where another body and Crime Scene 3 is revealed.
Crime Scene 3: The Recluse Room

Objective: Link Recluse to Salt

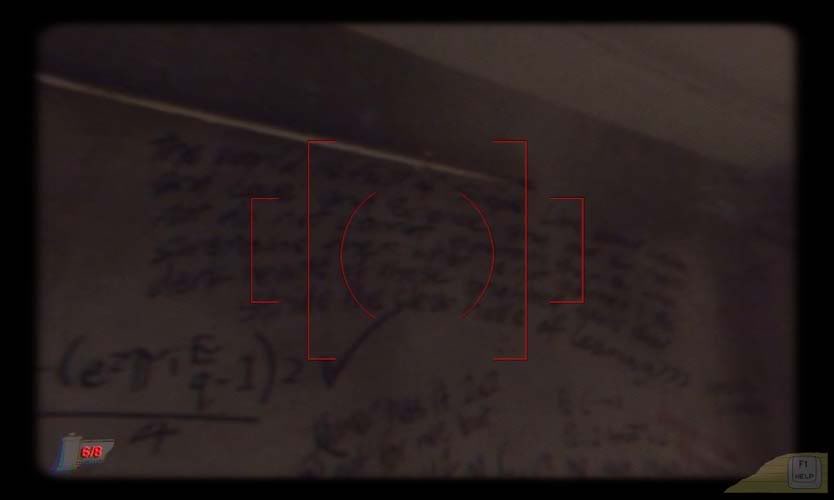
Take pictures of the following objects:
1. Footprint (on floor)
2. Lighter Fluid (on floor)
3. Match Box (on a plate near the pipe on the right wall)
4. SD Card (in left wall panel)
5. SD Card (2)(on pipe above the left side of the mattress)
6. Belt (hanging on pipe)
7. “Simple Lies” (writing on top right wall)(second screenshot)
8. “The Salted Earth” (located above plate with matches)
Crime Van
Pete will show up on the computer when you enter, and inform you that the victim’s name was Hercules Welt. Cause of death: strangulation, but something doesn’t seem quite right… After the discussion, you will obtain Welt Coroner’s Report. Upload and process the following evidence:
1. Welt Coroner’s Report: Select to process directly to Evidence Folder
2. Footprint: Select and use the tweezers to collect Shards. Select Shards to process directly to Evidence Folder.
3. Lighter Fluid: Collect a sample with the swab, then isolate the sample over the Bunson burner. The results reveal it’s not local lighter fluid: process directly to Evidence Folder.
4. Match Box: Use the tweezers to collect Match. Select Match and toggle on the microscope until you find the matching specimen. Results processed to Evidence Folder.
5. SD Card: Select and adjust the roll, waviness, and noise. The video reveals Salt feeling very hopeless before being processed to the Evidence Folder.
6. SD Card (2): Select to view a video of Salt being knocked out by an unknown attacker. The video is then processed to the Evidence Folder.
7. Belt: Select and swab for a sample. Use the Bunson burner to isolate the sample and reveal oil paint.
8. “Simple Lies”: Select to process directly to Evidence Folder
9. “The Salted Earth”: Select and swab for a sample, then use the centrifuge to isolate it and reveal paint. Results are processed to the Evidence Folder.
Evidence Folder- link the following:
Note: by linking the following successfully, you won’t have to return to the Recluse Room to gather any additional evidence:
1. The Salted Earth to Poetry Book
Cutscene: Warrant for Hapman
2. The Salted Earth to Belt: no match
3. The Salted Earth to Simple Lies: no match
4. Simple Lies to Poetry Book: no match
5. Belt to Tripod
6. Shards to Broken Vase
7. Match to Match Smear
8. Lighter Fluid to Hydrocarbon Sample
Cutscene: Warrant Served
Crime Scene 4: Hapman’s Room
![]()
Objective: Who is Hapman?
![]()
Well that was easy, wasn’t it? By linking all the evidence above, we’re able to move straight on to Hapman’s Room. Take pictures of the following objects:
1. Painting (against wall to the right of the door when facing it)
2. Painting (2)(above the bed) Note: You may have to take the picture from the left side.
3. Painting (3)(to the right of the bookcase, up on the wall)
4. Painting (4)(laying against wall, next to the door)
5. Art (on Hapman’s bed)
6. Jacket (to the left of the door)
7. Bloodstain (on floor at the corner of the kitchen counter)
Crime Van
Upload and process the following evidence:
1. Painting: Swab for a chemical sample, then use the centrifuge to isolate it. Result is unknown substance.
2. Painting (2): Swab for sample, use the Bunson burner to isolate the sample and find unknown substance.
3. Painting (3): Swab for sample, use the Bunson burner to isolate the sample and find unknown substance.
4. Painting (4): Swab for sample, use the centrifuge to isolate the sample and discover an unknown substance.
5. Art: Select to process directly to Evidence Folder
6. Jacket: Select and use the Black Light to find trace evidence. Separate the chromosomes to discover Hapman’s DNA.
7. Bloodstain: Use the Black Light to find trace evidence, then separate the chromosomes to reveal it’s Cat’s Blood.
Evidence Folder- link the following:
1. Bloodstain to Blood Stain and Mirror
Objective: Find out what Hapman Reads

Take pictures of the following objects:
1. Forensics Book (on bookcase, to the right of the window)
2. The Catcher in the Rye (on laundry basket in the bedroom)
3. Psychic Book (on sofa arm)
4. Book of Runes (to the right of the bookcase)
Cutscene: Pete identifies the unknown blood
Cutscene: Confronting Hapman about the blood
Crime Van
Upload and process the following evidence:
1. Forensics Book: Select to process directly to Evidence Folder
2. The Catcher in the Rye: Select to process directly to Evidence Folder
3. Psychic Book: Select to process directly to Evidence Folder
4. Book of Runes: Select to process directly to Evidence Folder
Evidence Folder – link the following:
1. Book of Runes to Runes
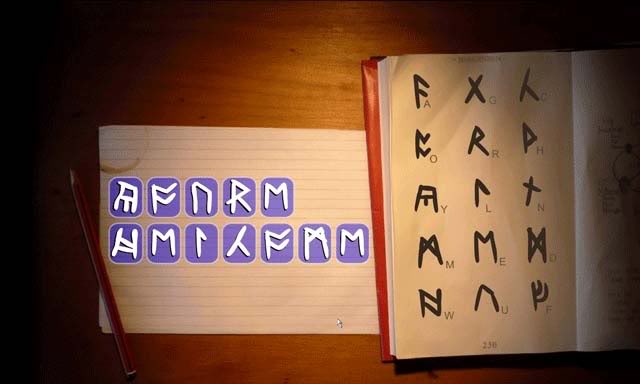
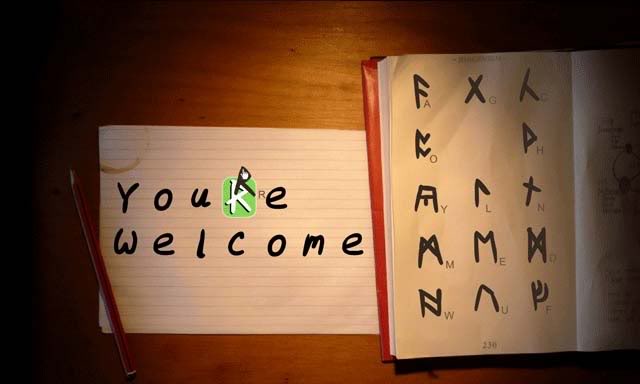
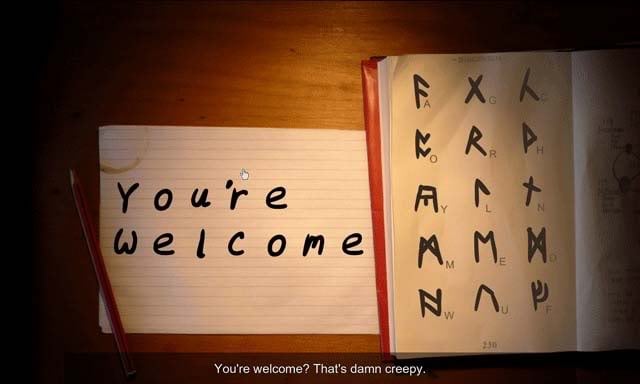
Once you link these two, a yellow Post-It will appear in the bottom right-hand corner of the screen, saying “Find out what the weird message says”. You will then be directed to a simple rune puzzle, in which you’ll need to drag the matching rune from those on the message over their corresponding match. It’s a relatively simple puzzle. Dragging the wrong rune over another, the bottom rune will turn red. Likewise, if it’s correct, it will turn green. The message says “You’re Welcome”. Here’s what the puzzle will look like:
Objective: Link Hapman to Salt
![]()
Take pictures of the following objects:
1. Computer (on table across from counter)
2. Cup (O’Malley’s Mug, on top shelf in kitchen)
3. Blood Stain (inside fridge in kitchen)
4. Lockpicks (on table beside the bed)
5. Statuette (above speaker, on same wall as the door)
6. Lighter (on table near couch)
7. Ashtray (on table near couch)
8. Mould (on wall above computer)
Crime Van
Upload and process the following evidence:
1. Computer: Select and use the tweezers to extract SD Card. Select SD Card to view a chilling video of Hapman looking directly at Salt’s camera.
Cutscene: Confronting Hapman about the SD Card
2. Cup: Select to process directly to Evidence Folder.
3. Blood Stain: Select and separate the chromosomes to discover unknown humans blood. Pete points out it’s not Hapman’s or Salt’s. Burton will notify you shortly afterwards that Pete discovered something in the Paint: human blood, but no two samples are alike. The plot thickens…
4. Lockpicks: Select to process directly to Evidence Folder
5. Statuette: Select to process directly to Evidence Folder
6. Lighter: Select and swab for a chemical sample, use the Bunson burner to isolate it. Conclusion is that the lighter fluid isn’t local.
7. Ashtray: Select and use the tweezers to extract a Match. Select Match, and use the toggle on the microscope to find the proper algae. Process evidence to Evidence Folder.
8. Mould: Select to process directly to evidence folder
Evidence Folder – link the following:
1. Painting to Blood Stain: no match
2. Painting (2) to Blood Stain: no match
3. Cup to Matchbox
4. Match to Match Smear and Match
5. Lighter to Lighter Fluid and Hydrocarbon Sample
6. Lockpicks to Broken Metal
Cutscene: Confronting Hapman about the Lockpick
7. Blood Stain to Painting (4): no match
8. Mould to Mouldy SD Card
9. Statuette to Empty Space
Objective: Did Hapman kill Welt?
This is a quick and easy objective. Take a picture of:
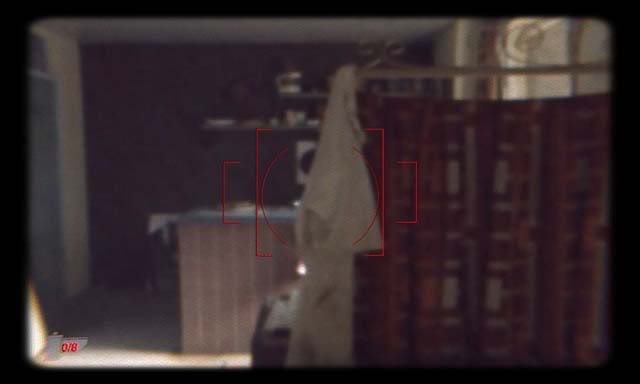
1. Overalls (hanging on room divider near computer)
Crime Van
Upload and process the following evidence:
1. Overalls: Select and use the swab to collect a chemical sample. Use the centrifuge to isolate it and discover Potassium Carbonate. Evidence is processed to the Evidence Folder.
Evidence folder – link the following:
1. Overalls to Tripod
2. Overalls to Belt
After linking all the evidence, a yellow Post-It will appear, saying “Interrogate Hapman”.
Cutscene: How it happened
Cutscene: The Interrogation (for this part, Burton will ask you to make a choice. You can either nod by moving the mouse up and down to encourage Burton to attack Hapman’s pride, or you can shake the mouse from side to side to have Burton challenge Hapman’s lies. Either way results in the same conclusion.)
This is the final part of the game! Enjoy your final cutscenes to see how the end of the mystery plays out, and for a teaser of the upcoming Casebook, Episode III: Snake in the Grass.
“;
More articles...
Monopoly GO! Free Rolls – Links For Free Dice
By Glen Fox
Wondering how to get Monopoly GO! free rolls? Well, you’ve come to the right place. In this guide, we provide you with a bunch of tips and tricks to get some free rolls for the hit new mobile game. We’ll …Best Roblox Horror Games to Play Right Now – Updated Weekly
By Adele Wilson
Our Best Roblox Horror Games guide features the scariest and most creative experiences to play right now on the platform!The BEST Roblox Games of The Week – Games You Need To Play!
By Sho Roberts
Our feature shares our pick for the Best Roblox Games of the week! With our feature, we guarantee you'll find something new to play!Type Soul Clan Rarity Guide – All Legendary And Common Clans Listed!
By Nathan Ball
Wondering what your odds of rolling a particular Clan are? Wonder no more, with my handy Type Soul Clan Rarity guide.


