- Wondering how to get Monopoly GO! free rolls? Well, you’ve come to the right place. In this guide, we provide you with a bunch of tips and tricks to get some free rolls for the hit new mobile game. We’ll …
Best Roblox Horror Games to Play Right Now – Updated Weekly
By Adele Wilson
Our Best Roblox Horror Games guide features the scariest and most creative experiences to play right now on the platform!The BEST Roblox Games of The Week – Games You Need To Play!
By Sho Roberts
Our feature shares our pick for the Best Roblox Games of the week! With our feature, we guarantee you'll find something new to play!All Grades in Type Soul – Each Race Explained
By Adele Wilson
Our All Grades in Type Soul guide lists every grade in the game for all races, including how to increase your grade quickly!
Casebook, Episode I Tips Walkthrough
Casebook is a game based around mystery, investigation, and forensics. The goal of the game is to help in the recovery of a family's kidnapped children. You will be playing the role of Detective Burton's “Partner”. This game requires a vast amount of patience, for the answers and the evidence aren't always very obvious! Your search and seek abilities and your ability to connect one piece of evidence to another will present a challenge only a few will be able to finish on their own….
a:1:i:0;a:2:s:13:”section_title”;s:24:”Casebook, Episode I Tips”;s:12:”section_body”;s:41251:”
Casebook is a game based around mystery, investigation, and forensics. The goal of the game is to help in the recovery of a family’s kidnapped children. You will be playing the role of Detective Burton’s “Partner”. This game requires a vast amount of patience, for the answers and the evidence aren’t always very obvious! Your search and seek abilities and your ability to connect one piece of evidence to another will present a challenge only a few will be able to finish on their own. For everyone else, there’s this walkthrough.
Things to Know about the Game & Walkthrough Before Playing:
The walkthrough begins easy and very detailed, and gets simpler after the initial tutorial section of the game.
The walkthrough is divided into Objectives, which are goals that are set up for each Crime Scene. An important thing to note about this game is that it will not always name the objectives you need to move onto until you’re halfway through an actual objective, or it may never name it at all. If you complete an objective and the game doesn’t give you your next objective, you can continue to follow the walkthrough with complete ease: the game will eventually catch up to you.
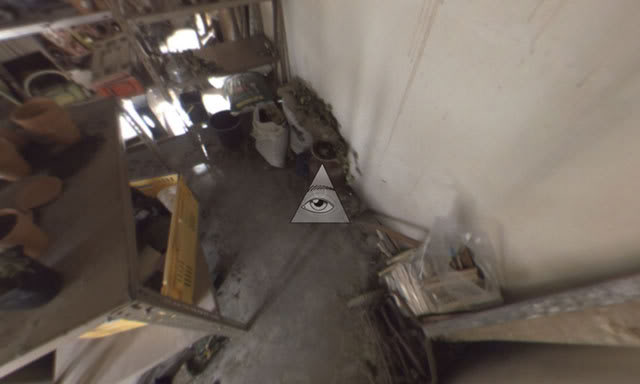
Some items can be very difficult to find, and could result in the gamer becoming stuck. A very useful trick is to simply press the “i” key on your keyboard. If you missed an item you needed or can’t find one you’re looking for, a triangular eye icon will appear and direct you towards the item.

Do you know where you are in the game, but not in correspondence with the walkthrough? Use the Ctrl+f command and type in a keyword (i.e. Fibres, Champagne) to find what you’re looking for.
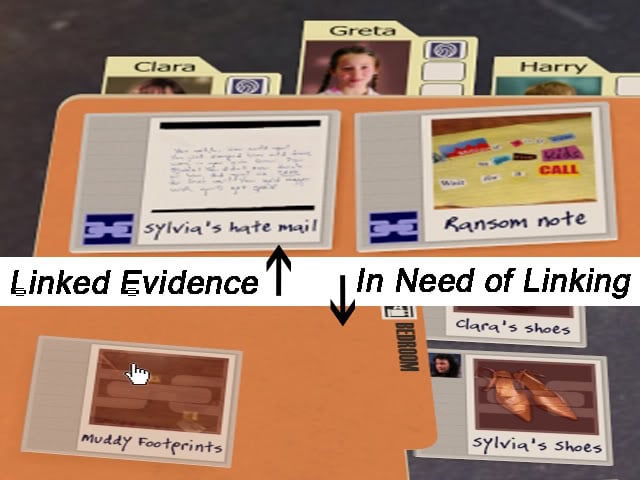
Make sure you link evidence to each other! If evidence needs to be linked, a red chain link will appear over the photo. Once it’s linked, a blue chain link icon will appear. If you’ve reached the end of the game but haven’t linked all the evidence together, you won’t get to see the ending! If you follow this guide though, you won’t have that problem.
Cutscenes will appear on and off throughout the gameplay. These cutscenes have more to do with the story than the actual gameplay, though a few will give you items of evidence at the end.
If at any point you forget how to use or perform a certain function, you can press the F1 key for help and a basic tutorial and explanation will appear.
GENERAL TIPS
Camera:
The camera can be taken out using the right click of your mouse. To take a snapshot, click with the left mouse button. To zoom in and out, use the toggle reel in between the right and left buttons on your mouse (note: if you’re using a laptop mouse, you can use the up and down arrow keys on your keyboard instead). To put the camera away, simply click the right mouse button (or esc on the keyboard). You can also use the arrow keys to walk.
Uploading Pictures:
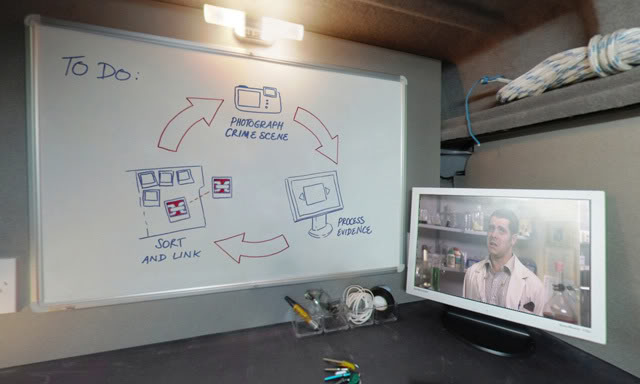
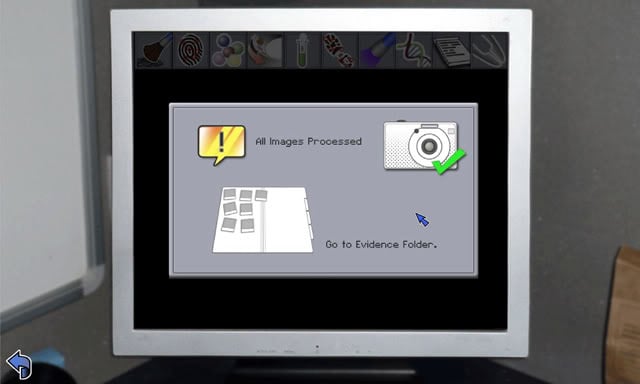
Your camera can only hold 8 pictures at a time. To upload the pictures you’ve taken and to examine them as evidence, return to the crime van and simply click on the computer to upload photos. Once you’re done uploading and examining the evidence, by default you’ll be taken back to the evidence folder.
Linking Photos/Evidence:
To link photos or pieces of evidence to each other, click on the photo you’d like to connect and drag it over top the photo you’d like to connect it to. If the connection is successful, a blue chain link icon will appear on each photo. If a photo requires a link still, a red chain link icon will be visible over the picture.
Dusting for Prints:
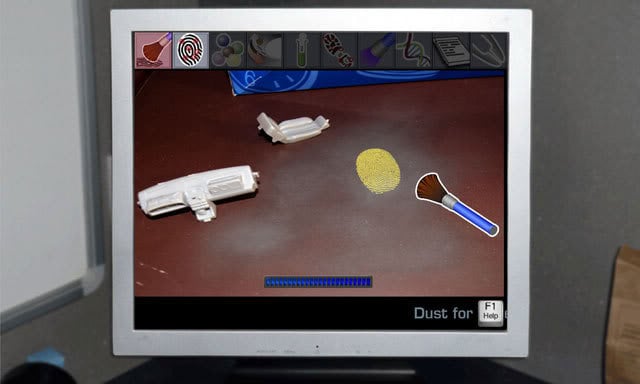
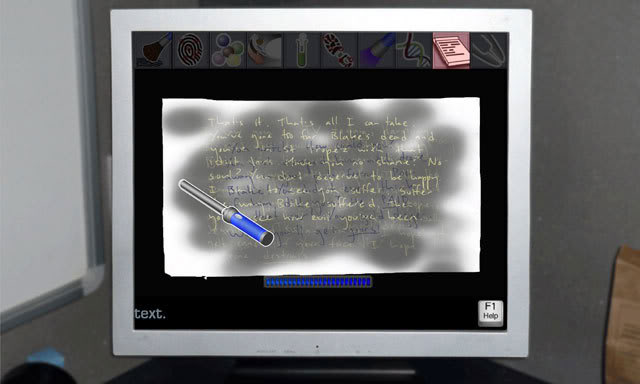
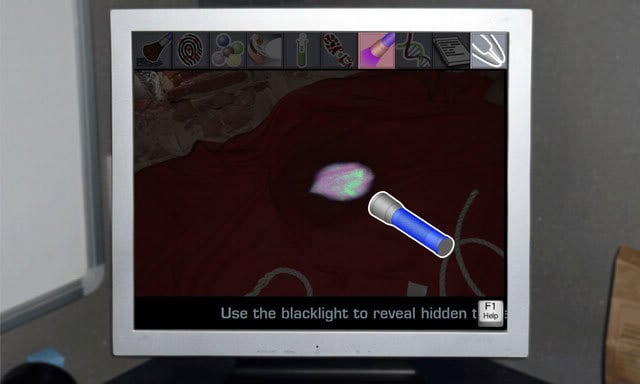
When dusting for prints, the mouse cursor will turn into a dusting brush. Move the mouse back and forth, and all around the object or area to dust. Once you identify a print, you can click on it to move onto the next step, or just dust until the blue bar is completely filled. The exact same principle applies to the ESDA Wand and the Blacklight.
Separating Chromosomes:
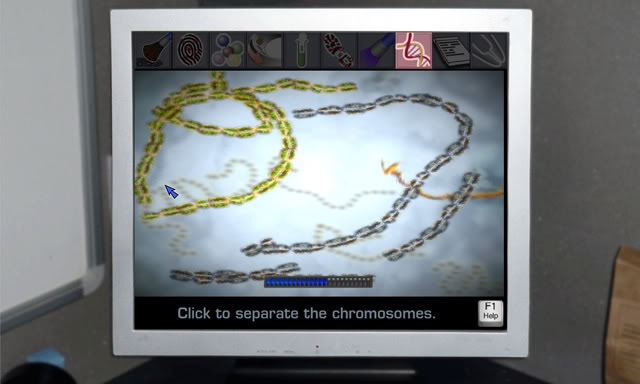
The chromosomes will be greenish in color when you begin, which means they need to be separated. Once a chromosome turns grey, it’s been separated and no longer needs attention. To move chromosomes, you can click next to them with your mouse. You can also move them faster or strong by holding down the click of the mouse button. When all of them are grey, you will move on to the next step.
Swabbing & Taking Samples:
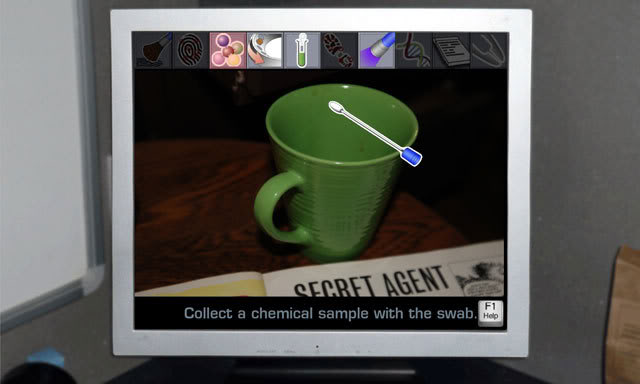
This is just like dusting, only way easier. Just click on the area that needs to be swabbed or tested (i.e. Mud smudge, whiskey spill, etc).
Using the Tweezers:
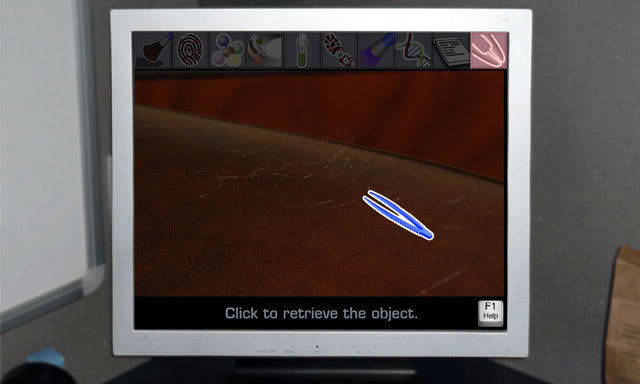
Probably the easiest thing to do, when you use these your cursor will become a set of tweezers. Click on the object that needs to be examined closer.
Using the Bunsen Burner:
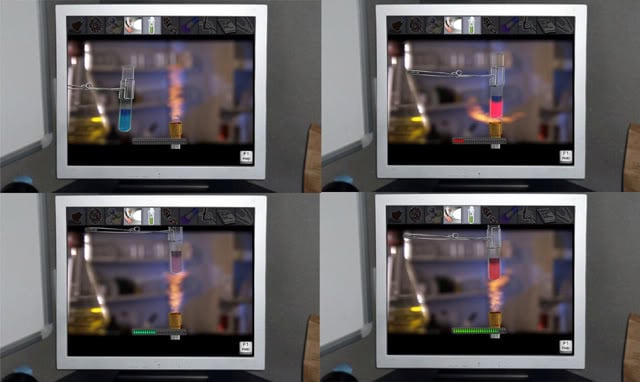
When isolating chemicals with the Bunsen Burner, you will need to heat the sample just right. You can control where it is placed, how low or how high, with the mouse. Watch the bar at the bottom of the screen for clues as to what you need to do: you will want the bar to be green. If the bar is blue, the sample is too cold and should be lowered on the flame. If the bar is yellow or red, you will need to lift the sample so it can cool.
Using the Centrifuge:
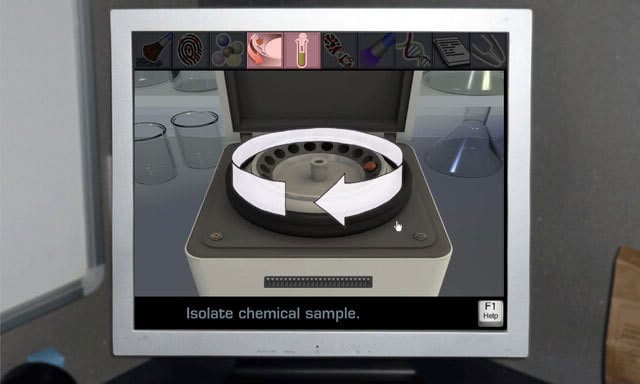
This one’s simple: rotate the mouse in a clockwise circle around the machine to spin it. Once the blue bar at the bottom is filled, you’re done!
Fingerprints & Shoe Prints: Finding Key Points of Interest:
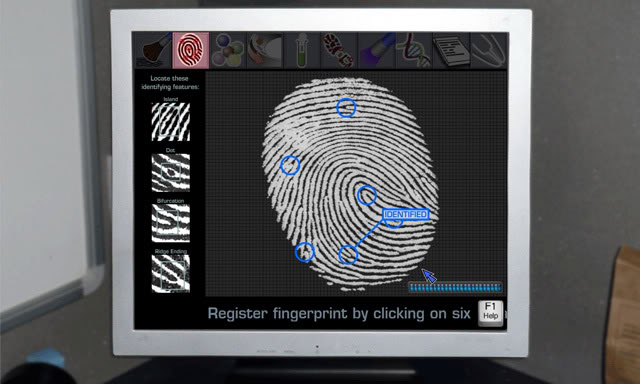
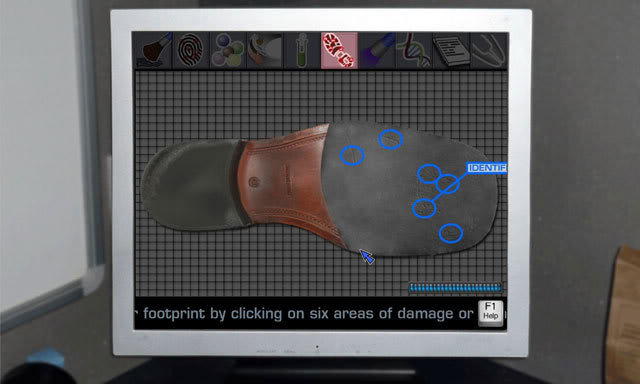
When you’re faced with identifying a fingerprint or a shoe print, you’ll be asked to identify six points of interest. For fingerprints, this includes islands, dots, bifurcations, and ridge endings. For shoe prints, it includes primarily flaws or worn grooves in the shoe (that are not part of the original tread). There’s more than six points of interest for each you’ll encounter, so chances are you’ll be able to figure it out relatively easily.
WALKTHROUGH
Crime Scene 1: The Bedroom

Objective: Match Footprints
- The Bedroom area is pretty selfexplanatory as the game will use it as a tutorial for you to learn how to investigate a crime scene. You will be directed to the bedroom window.
- Look down at footprints on the floor
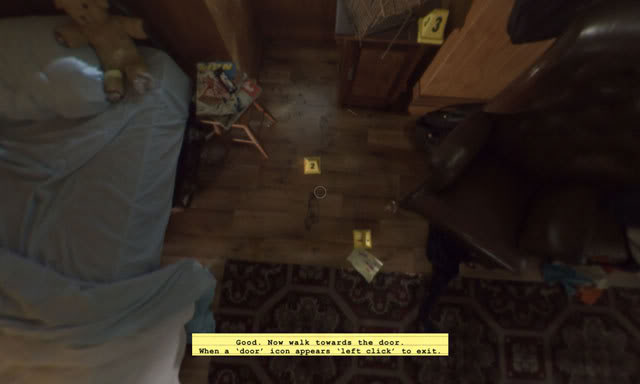
- Take out camera with right click: make sure you are close enough (if a red X appears, you need to zoom in or out according to what the camera says) over the footprint you want to take a picture of
- Left click to take picture
- Right click to put away camera
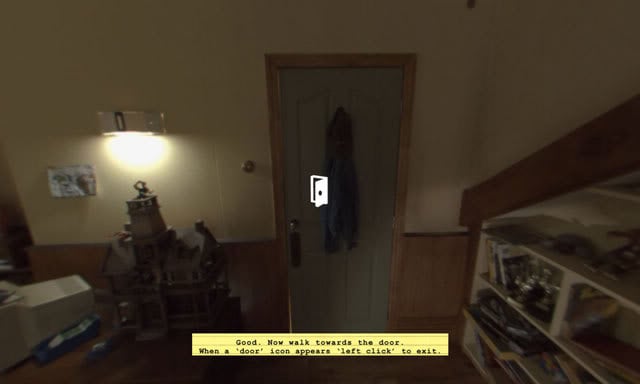
- Walk towards the door, when the door icon appears, click to leave the bedroom
Crime Van
- A zoom icon will appear, click on the computer to upload your photo of the Muddy Footprints
- Select the Muddy Footprints photograph
- Use the swab cursor to click on the mud left by the footprints
- After collecting the sample, spin the mouse clockwise in a circle around the machine to isolate Phosphoric Acid, then click on it
- Photos of a few pairs of shoes will appear: click on it once to examine, and click on it again to add it to the database. Do this for each pair of shoes (Clara’s shoes, Sylvia’s Shoes, Larson’s Shoes)
- Drag the photos of the shoes into the exemplar folder, and the muddy footprints into the Bedroom Folder)
- Click on the Muddy Footprints photo, and the photos of the 3 pairs of shoes will appear on the righthand side. Drag the Muddy Footprints over each pair of shoes.
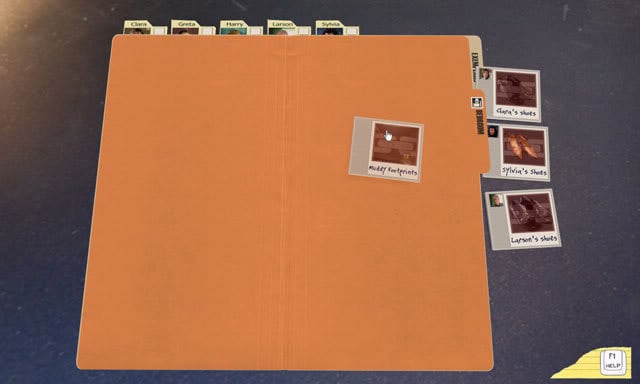
- After comparing all the shoes to the footprints, the detective concludes none of them match. It’s time to go back to the bedroom to try and gather more evidence.
Objective: Track the Kidnapper
Bedroom
Take pictures of the following objects:
1. Ransom Note (on floor, crime marker #1)
2. Smashed Birdcage (near window)
3. Windowsill
4. Fibres (located on the blue bed sheet)
5. Fibres (located on the pink bed sheet)
6. Joystick (on the floor below the computer monitor)
7. Rocking Horse
8. Window Pane
9. Stain on Floor (beside Harry’s blue bed)
Note: Your camera can only hold 8 pictures at a time, so you will have to take multiple trips.

Crime Van
- Click on computer to upload photos
1. Ransom Note
- Select “ransom note”
- Dust the ransom note for prints by moving mouse cursor over paper
- No prints are found, use wand to examine further and find “junky” written in the top left corner: computer concludes kidnapper is lefthanded
2. Smashed Birdcage
- Select Smashed birdcage
- Use tweezers to find fabric snag, click photo to examine further. The conclusion is it’s nylon.
3. Windowsill
- Select Windowsill, evidence will process
4. Fibres (Harry’s Bed)
- Select Fibres, computer concludes they’re from a rope
5. Fibres (Greta’s Bed)
- Select other Fibres, and computer will once again conclude the rope
- In evidence folder, link to other Fibres
6. Joystick
- Select Joystick
- Dust the Joystick to find unknown prints
7. Rocking Horse
- Select Rocking Horse
- Dust Rocking Horse to find Larson’s prints
8. Window Pane
- Select Window (Pane)
- Dust for prints, discover print of Clara
- Cutscene: Interviewing Clara
9. Stain
- Select Stain
- Test/swab the liquid to find it’s whiskey
- Cutscene: Interview with Parents
- Note: Viewing cutscene will give you “Sylvia’s Hate Mail”. Once back in Crime Van, dust for prints and use ESDA wand to discover underlying writing. Link hate mail to ransom note in evidence.
Objective: Find Evidence from Family
Bedroom
Take pictures of the following objects:
1. Brown Chair (specifically armrest, between window and Greta’s bed)
2. Top of Brown Chair (same chair as armrest)
3. Bedhead (Head Railing of Greta’s Bed)
4. Cat Basket (Foot of Greta’s Bed)
5. Left side of Desk (right side of the room from the door)

Crime Van
Upload and Process the following evidence:
1. Chair
- Select Chair
- Dust armrest for prints, discover print of Sylvia
2. Chair (top)
- Select photo, select hair, discover it’s Clara’s
- Note: It’s possible to discover both the fingerprint and the hair from one photo.
3. Bedhead (Greta’s Bed)
- Select Bedhead
- Dust bars for prints, find Sylvia’s print
- In evidence folder, link to Chair
4. Cat Basket
- Select Cat Basket, will be added to evidence folder
5. Desk
- Select Desk
- Dust for prints, result is discovery of unknown prints
Objective: Find Exemplars
Bedroom
Take pictures of the following objects:
1. Cup (on side table beside Greta’s Bed)
2. Pillow (Greta’s Bed)
3. Picture (on wall, next to door and above dollhouse)
4. Pillow (Harry’s Bed)
5. Jacket (hanging on door)

Crime Van
Upload and process the following evidence:
1. Cup
- Select Cup
- Dust for fingerprints, find print on handle
- Swab for sample
- Isolate sample by spinning mouse clockwise: discover cocoa
- Use Blacklight to find hidden trace evidence
- Discover DNA sample from Greta
2. Pillow (Greta’s Bed)
- Select Pillow
- Discover hair: Greta’s hair
3. Picture
- Select Picture
- Dust for prints, discover Greta’s prints
4. Pillow (Harry’s Bed)
- Select Pillow
- Discover hair: Harry’s hair
5. Jacket
- Select Jacket
- Use Blacklight to reveal hidden evidence
- Separate chromosomes to find Harry’s DNA
- In evidence folder, link to Hair (Harry’s)
Cutscene: Greta Returns Home
Note: After cutscene, you will obtain “Greta’s rope marks,” “Greta’s blood,” and “Greta’s clothes.”
Greta’s Rope Marks
- Select photo to process evidence
- In evidence folder, link to fibres 1 and 2
Greta’s Clothes
- Select photo, swab clothes for sample
- Isolate chemical sample by spinning mouse clockwise, discover phosphoric acid
- In evidence folder, link Greta’s Clothes to Muddy Footprints
Greta’s Blood
- Select photo, isolate sample to discover Benzodiazepine
- In evidence folder, link Greta’s Blood to Hair, Cup, and Picture
After processing and linking all the evidence, you should notice a yellow Post-it in the bottom right hand corner of the screen. Click on it to search for Harry’s location.
Searching for Harry’s Location:
1. In the map screen where you are asked to select a tower, select “Tower 3”.
2. Narrow your search by choosing “Heavy Industry” next
3. Finally, choose the “South” option.
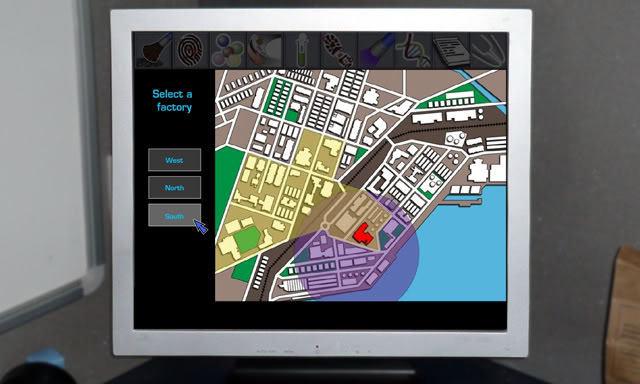
Your findings will lead you to a Sugar Factory. Congratulations, a new crime scene has been unlocked!
Crime Scene 2: The Refinery

Objective: Prove the Children have been here
Refinery
After a cutscene in which the detective expresses his mistrust of the family, take pictures of the following objects:
1. Blanket (red, in far right corner)
2. Rope (on red blanket)
3. Tape (use camera to zoom, on red blanket)
4. Fluidstain (on red blanket)
5. Sugar (in right corner past oil drum)
6. Soda Bottle (between table and red blanket)
7. Noodles (on table in middle of room)
8. Vent (in upper left corner of room)

Crime Van
Upload and Process the following evidence:
1. Blanket
- Select Blanket
- Use Blacklight to discover DNA, separate chromosomes to find it’s Harry’s DNA
- Find hair sample, collect it to find it’s Greta’s
- In evidence folder, link Blanket to Jacket and Harry’s Hair
2. Rope
- Select Rope, added to evidence folder
- In evidence folder, link to Greta’s Rope Marks and Fibres
3. Tape
- Select Tape, discover it’s duct tape
4. FluidStain
5. Sugar
- Select Sugar
- Isolate chemicals over the burner, discover glucose and fructose
- Link Sugar to Greta’s Clothes in the evidence folder
6. Soda Bottle
- Select Soda
- Dust for prints: no prints found
- Swab for chemical sample, separate in spinner to discover Benzodiazapine
7. Noodles
- Select Noodles
- Swab for chemical sample, and then isolate over burner: contains Benzodiazapine
- In evidence folder, link Noodles to Soda, Greta’s Blood, Hair and DNA
8. Vent
- Select Vent
- Dust for prints: discover Greta’s prints: she escaped.
Objective: Prove the Kidnapper was at the Refinery
Refinery
Take pictures of the following objects:
1. Oily Footprint (near oil drum and Fluid by entrance door)
2. Fluid (below oil drum to immediate right of door upon entry)
3. Hair in Oil (right next to/in fluid near door)
4. Burger Bag (on edge of table near door)
5. Pipe (on opposite side of room, between red Blanket and Vent)
6. Candy Wrapper (On floor in front of Vent)
7. Tweezers (on table right next to Burger Bag)

Crime Van
Upload and process the following evidence:
1. Oily Footprint
- Select Oily Footprint to add to evidence folder
2. Fluid
- Select Fluid
- Swab for sample, then isolate in the spinner: contains Phosphoric Acid
- in evidence folder, link to Oily Footprint and Muddy Footprint
3. Hair in Oil
- Select Hair in Oil to add to evidence folder
4. Burger Bag
- Select Burger Bag
- Dust for prints: none found. Use tweezers to extract Receipt.
- Receipt found, select Receipt to add to evidence folder
5. Pipe
- Select Pipe
- Dust for prints: identify 6 points of interest: discover unknown fingerprint
- In evidence folder, link to Candy Wrapper
6. Candy Wrapper
- Select Candy Wrapper
- Dust for prints, unknown print discovered
- Use Blacklight to find trace evidence: separate chromosomes to discover unknown person’s trace
7. Tweezers
- Select Tweezers
- Dust for prints: none found, pick up small object above tweezers with tweezer cursor
- Discover Splinter
- Select Splinter, use Blacklight to discover trace evidence. Separate chromosomes to discover unknown person’s blood.
- In evidence folder, link to Smashed Birdcage
- After processing and linking all the evidence, (or maybe even before), a cutscene will occur. It’s time to track down the kidnapper. A new crime scene has also been unlocked.
Crime Scene 3: The Junkyard

Objective: Prove that Lionel is the Kidnapper
House
Take pictures of the following objects:
1. Jacket (on chair near door)
2. Sneakers (on floor under small table to left of counter)
3. Tape (on side table beside bed)
4. Rope (at foot of bed)
5. Bloodstain (on floor below file cabinet near rope)
6. Note (on top of file cabinet)
7. Notepad (on top of TV)
8. Door Handle (on entrance door)
9. Blond Hair (on farthest chair upon entry)
10. Shoes (under bed)
Note: Your camera can only hold 8 pictures at a time, so you will have to make multiple trips to gather all the evidence.

Crime Van
Upload and process the following evidence:
1. Jacket
- Select Jacket
- Swab for chemical sample: use burner to isolate chemical: Phosphoric Acid
- In evidence folder, link to Fabric Snag, Greta’s Clothes and Fluid
2. Sneakers
- Select Sneakers
- Identify six flaws in the shoe print, print linked to unknown person
- In evidence folder, link to Muddy Footprint and Oily Footprint
3. Tape
- Select Tape to transfer directly to evidence folder
- In evidence folder, link to refinery tape
4. Rope
- Select Rope to transfer directly to evidence folder
- In evidence folder, link to
5. Blood Stain
- Select Bloodstain
- Use Blacklight to find trace evidence, separate chromosomes to discover blood belongs to Lionel Rivert
6. Note
- Select Note to transfer directly to evidence folder
- In evidence folder, link to Ransom Note and Sylvia’s Hate Mail
7. Notepad
- Select Notepad to transfer directly to evidence folder
- In evidence folder, link to Ransom Note and Sylvia’s Hate Mail
8. Door Handle
- Select Door Handle
- Dust for prints: discover print that belongs to Lionel
9. Blond Hair
- Select Blond Hair
- Separate chromosomes to discover hair is from a cheap wig
10. Shoes
- Select Shoes
- Identify six points of interest: unknown person’s shoes discovered
Note: You may not be able to take a picture of “Note” until after you’ve analyzed “Notepad” in your evidence. It might be a good idea to save “Note” for your second trip.
Objective: Establish that Harry was here
House
Take pictures of the following objects:
1. Tape (on white rug near bed)
2. Hair (on pillow on bed)
3. Cup (located on stove)

Crime Van
Upload and process the following evidence:
1. Tape
- Select Tape to transfer directly to evidence folder
- In evidence folder, link to Tape from Refinery
2. Hair
- Select Hair
- Separate chromosomes to discover it’s Harry’s hair
- In evidence folder, link to Hair, Jacket, and Blanket
3. Cup
- Select Cup
- Use Blacklight to find trace evidence, separate chromosomes to find Harry’s trace
- Use swab to take trace sample, use burner to isolate chemicals: discover Benzodiazapine
- In evidence folder, link to Soda, Greta’s Blood, and Noodles
Objective: Find out how Lionel was Killed
House
Take pictures of the following objects:
1. Champagne (Bottle) (on floor near kitchen counter)
2. Spill (in front of champagne bottle)
3. Cork (next to magazine, in front of Champagne Bottle)
4. Smashed Glass (beside Champagne Bottle)
5. Pills (behind Champagne Bottle)

Crime Van
Upload and process the following evidence:
1. Champagne
- Select Champagne
- Dust the bottle for prints, discover Clara’s print
- Swab bottle for sample, isolate chemicals via spinner: discover Pollen and Prussic Acid
2. Spill
- Select Spill
- Swab Spill for chemical sample, isolate chemicals via spinner: discover Prussic Acid
- In evidence folder, link to Champagne
3. Cork
- Select Cork
- Use tweezers to extract object: discover Syringe Needle
- select Syringe Needle
- Use swab to collect chemical sample, then isolate chemicals over the burner: discover Prussic Acid
4. Smashed Glass
- Select Smashed Glass to transfer directly to evidence folder
5. Pills
- Select Pills
- Use swab to collect chemical sample, isolate chemicals via the burner: discover Benzodiazapine
- In evidence folder, link to Soda, Greta’s Blood, and Noodles
Objective: Deduce the Size of the Kidnapper’s Group
House
Take pictures of the following objects:
1. Wine Glass 1 (on table near door)
2. Wine Glass 2 (on table near door)
3. Ashtray (on table above playing cards)
4. Playing Cards (on main table)
5. Photograph (above bed)
6. Footprint (on doormat)
7. Closet (to immediate right upon entry, next to fridge)

Crime Van
Upload and process the following evidence:
1. Wine Glass (1)
- Select Wine Glass
- Dust for fingerprints: none found. Use swab to collect chemical sample.
- isolate chemical sample with the burner, discover Pollen and Phosphoric Acid
2. Wine Glass (2)
- Select Wine Glass
- Dust for fingerprints: none found. Use swab to collect chemical sample.
- isolate chemical sample via the spinner, discover Pollen and Phosphoric Acid
- in evidence folder, link to first Wine Glass
3. Ashtray
- Select Ashtray to transfer directly to evidence folder
4. Playing Cards
- Select Playing Cards
- Dust for prints, none found. Conclusion: scene was setup. Cards not transferred to evidence folder.
- Note: Instead of the Playing Cards, you can also take a picture of/test the Dice, with the exact same result.
5. Photograph
- Select Photograph to transfer directly to evidence folder, points directly to Sylvia.
6. Footprint
- Select Footprint
- Swab for chemical sample, isolate chemicals in the spinner: result is Iron Oxide and Carbolic Acid.
7. Closet
- Select Closet: evidence is processed and Closet will be revisited later
After linking all the evidence in the evidence folder, you will see a Postit in the bottom left hand corner that suggest you check the Crime Van computer. Check it to discover Jacket, Tabloid (1) and Tabloid (2). Click on each to gather more information: afterwards, the two tabloids will be thrown out and the Jacket will be moved to the evidence folder, where it links with Photograph.
Cutscene: The Interrogation: During this cutscene, you will be asked to do one of two things: nod to encourage a strongarmed approach (move mouse up and down) or shake your head to encourage a psychological approach (move mouse side to side). The choice itself doesn’t matter, since either one will have the same outcome.
Crime Scene 4: The Bunker

Objective: Find the Person, Find the Killer
Bunker
Take pictures of the following objects:
1. Shears (on corner of shelf near door on the entrance side)
2. Boots (on shelf near door)
3. Blood Spots (on floor below shears)
4. Gloves (on floor by back wall)
5. Wig (on chair at back wall)

Crime Van
Upload and analyze the following evidence:
1. Shears
- Select Shears
- Use Blacklight to find trace evidence, separate the chromosomes: leads to Sylvia
2. Boots
- Select Boots
- Identify six points of interest to find Boots lead to unknown person
3. Blood Spots
- Select Blood Spots
- Use Blacklight to find trace evidence, separate the chromosomes: leads to Sylvia
4. Gloves
- Select Gloves
- Use swab to collect chemical sample, then isolate it with the burner: result is Prussic Acid
- Use Blacklight to find trace evidence, then separate the chromosomes: result leads to Sylvia
5. Wig
- Select Wig
- Separate the chromosomes to find trace of unknown person
- use tweezers to pick up Hair Inside Wig, then select
- Separate the chromosomes to find hair belongs to Sylvia
- in evidence folder, link to Shears, Gloves, and Blood Spots
Objective: Look for Trace Evidence connecting the Killer to Lionel’s Junkyard
Bunker
Take pictures of the following objects:
1. Poison (on shelf to right of starting position)
2. Syringe (next to Rat Poison/on opposite side of shelf, can also be accessed from chair area)
3. Glasses (on shelf in box below Rat Poison)
4. Blade (on shelf to the right of starting position, 1 over from Rat Poison)
5. Champagne (at far back wall on top of wine rack, near chair)
6. Orchid (in front of/beside Champagne)
7. Boots (located beside chair)

Crime Van
Upload and analyze the following evidence:
1. Rat Poison
- Select Rat Poison
- Use swab to collect chemical sample, isolate chemicals with the burner: result is Prussic Acid
- In evidence folder, link to Champagne, Spill, and Cork
2. Syringe
- Select Syringe
- Use swab to collect chemical sample, isolate chemicals via the spinner: result is Prussic Acid
- In evidence folder, link to Syringe in Cork, and Gloves
3. Glasses
- Select Glasses
- Use swab to collect sample, isolate chemicals with the burner: result is Pollen
- in evidence folder, link to Wine Glass(es) and Smashed Glass from the Junkyard
4. Blade
- Select Blade
- Use tweezers to extract Fabric Snag
- Select Fabric Snag, evidence goes straight to evidence folder
5. Champagne
- Select Champagne
- Use swab to collect sample, isolate chemicals via the spinner: result is Pollen
- in evidence folder, link to Champagne from the Junkyard
6. Orchid
- Select Orchid
- Use swab to collect sample, isolate chemicals with the burner: result is Pollen
- in evidence folder, link to Champagne and both Wine Glass(es) from the Junkyard
7. Boots
- Select Boots
- Use swab to collect chemical sample, then isolate chemicals via the spinner: result is Iron Oxide and Carbolic Acid
- Lastly, register footprint by identifying size points of interest: leads to unknown person
- In evidence folder, link to Footprints/Mat at Junkyard
Objective: Find the Tape Fragments
Bunker
Take pictures of the following objects:
1. Tape Fragment (1) (located near door on the table with the dried plants)
2. Tape Fragment (2) (in front of table with dried plants, located on floor by metal pot)
3. Tape Fragment (3) (on shelf to the left of the knife with the fabric snag)
4. Tape Fragment (4) (on shelf below the knife with the fabric snag)
5. Tape Fragment (5) (on floor below the knife with the fabric snag)
Note: If you’re having a difficult time finding the tape fragments, now is a good time to use the “i” function on the keyboard.

Crime Van
Upload and analyze the following evidence:
1. Tape Fragment (1)
- Select to send straight to evidence folder
2. Tape Fragment (2)
- Select to send straight to evidence folder
3. Tape Fragment (3)
- Select to send straight to evidence folder
4. Tape Fragment (4)
- Select to send straight to evidence folder
5. Tape Fragment (5)
- Select to send straight to evidence folder
After assembling all the Tape Fragments in the evidence folder, a yellow Postit will appear that says “Reconstruct Audio Tape”. There are 6 broken tape segments on the top audio bar, and the beginning of the tape on the second bar.
Here’s the how to solve the puzzle:
- You will have two columns to work with: the first holds the fragments and the second plays the tape.
- You can drag and combine various pieces of tape. To test if it sounds right/makes sense, press the “Play” button on the right hand side of the column.
- The order in which the tape fragments should connect is 0,6,1,4,2,3,5
- When connected correctly, all tape pieces should show green and a message will play revealing who the killer is and who was behind the plot all along.
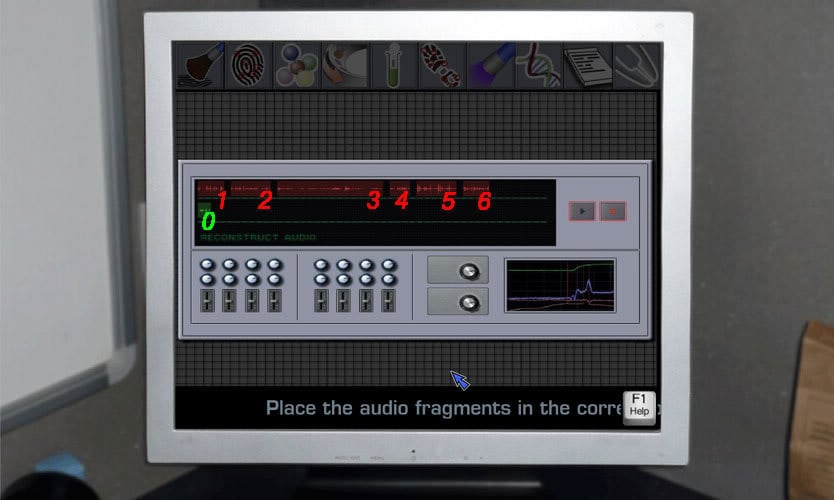
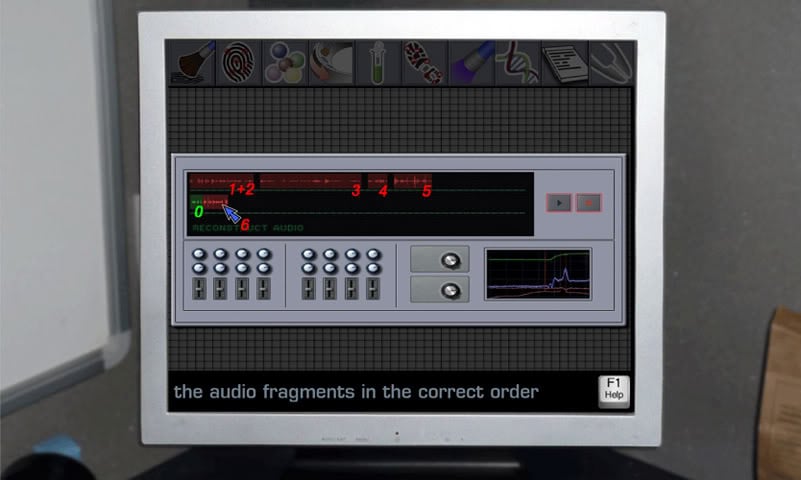
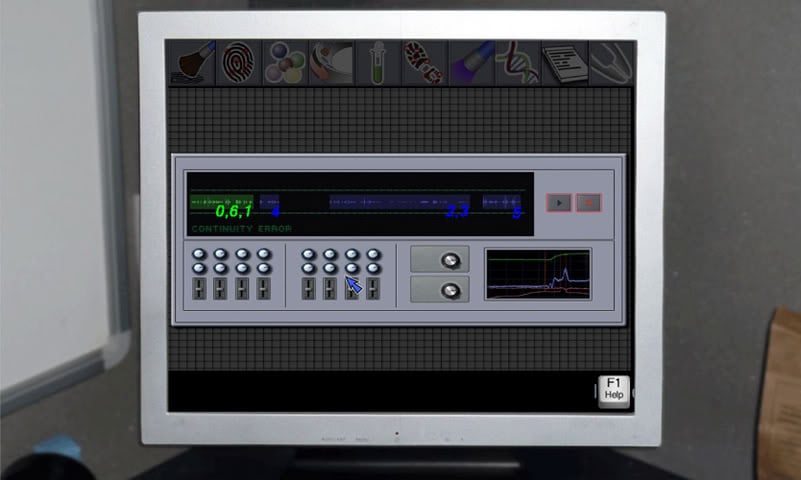
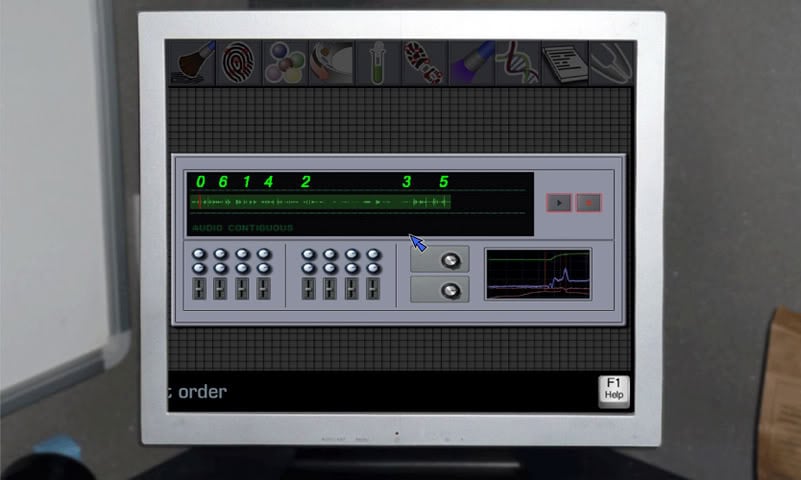
- Once the tape is assembled and you hear the recording, a cutscene will occur.
Cutscene: Convicting a Killer
At one point during the interrogation, you will be asked by Burton if he should take a strong approach or a psychological approach. Whichever your decision, the same result occurs.
Congratulations, you’ve beaten the game! Enjoy your final cutscenes!
“;
More articles...
Monopoly GO! Free Rolls – Links For Free Dice
By Glen Fox
Wondering how to get Monopoly GO! free rolls? Well, you’ve come to the right place. In this guide, we provide you with a bunch of tips and tricks to get some free rolls for the hit new mobile game. We’ll …Best Roblox Horror Games to Play Right Now – Updated Weekly
By Adele Wilson
Our Best Roblox Horror Games guide features the scariest and most creative experiences to play right now on the platform!The BEST Roblox Games of The Week – Games You Need To Play!
By Sho Roberts
Our feature shares our pick for the Best Roblox Games of the week! With our feature, we guarantee you'll find something new to play!All Grades in Type Soul – Each Race Explained
By Adele Wilson
Our All Grades in Type Soul guide lists every grade in the game for all races, including how to increase your grade quickly!


