
Best Horror Games On Itch.io – July 2026
Across a bounty of subgenres.![Haze Seas Accessories Tier List [Best Accessories to Equip]](/wp-content/uploads/2026/07/haze-seas-accessories-tier-list.jpg "Haze Seas Accessories Tier List [Best Accessories to Equip]")
Haze Seas Accessories Tier List [Best Accessories to Equip]
The accessories with the best stat buffs in Haze Seas.
![[Roblox] Evomon Shiny Hunting Guide – Including Prismatic and Pris Shinies!](/wp-content/uploads/2026/06/evomon-shiny-hunting-guide.jpg "[Roblox] Evomon Shiny Hunting Guide – Including Prismatic and Pris Shinies!")

Campfire Legends: The Last Act Walkthrough
Welcome to the Campfire Legends: The Last Act walkthrough on Gamezebo. Campfire Legends: The Last Act is a Hidden Object Game played on the PC created by Absolutist for GameHouse Studios. This walkthrough includes tips and tricks, helpful hints and a strategy guide on how to complete Campfire Legends: The Last Act.


- Prefer Gamezebo on Google

Campfire Legends: The Last Act – Game Introduction
Welcome to the Campfire Legends: The Last Act walkthrough on Gamezebo. Campfire Legends: The Last Act is a Hidden Object Game played on the PC created by Absolutist for GameHouse Studios. This walkthrough includes tips and tricks, helpful hints and a strategy guide on how to complete Campfire Legends: The Last Act.
General Tips
This hidden object game requires visiting several locations and using inventory items to advance play.
- Play is linear. The story dictates game play, items to find and locations to visit. The thoughts of the main character are frequently displayed to provide game direction.
- The Help system is excellent. Collect up to five fireflies at a time. Use them to be led to a needed item or speed up the Skip bar in puzzles.
- Always click on interactive objects to add items to the list of items to find.
- Read the diary each time pages are added.
Main Menu:
- Play – Begin or resume a game. Be careful when resuming a game: there is a choice to resume play or restart from the beginning.
- Project Stillwater – This is bonus spot-the-difference play that is available after completing the game. There are 14 scenes to play. Completing them unlocks a 15th scene.
- Extras – A screensaver, concept art, cutscenes and a strategy guide are available at any time. The cutscenes show only those scenes already viewed.
- Settings – Change music and sound effects volume. You may select or deselect full screen and game tips.
- Help – Describes how to interact with the game.
- Exit – Quit the game.
- Profiles – Follow the “CLICK HERE to Change Name” link to create, delete or switch player profiles.
Screen Navigation:
- Menu – Change your settings, see the game help, resume the game or return to the main menu.
- Items – Icons showing available items for use. Objects with a “+” sign need to be combined with other items.
- Find – A list of current objects to locate.
- Goals – Shows the current goal and the next required move.
- Hint/Skip Bugs – Find and store up to five fireflies to obtain help in locating objects or speed up use of the Skip bar in puzzles.
- Diary – Finding diary pages adds clues or information. The diary glows when new information is added.
Symbol Meanings:
- Magnifying Glass – Zoom in on interactive area.
- Hand – Interact with an object: pick up an item, open a door or move an object.
- Gears – Use an inventory item in an interactive area.
Walkthrough
A short clip explains the background and introduces the story line for play.
Advanced players will want to deselect the “Tips” option under settings.
Firefly locations are random and appear in scenes throughout the game. Only five may be stored at any one time.
Chapter 1: Finding Ashley

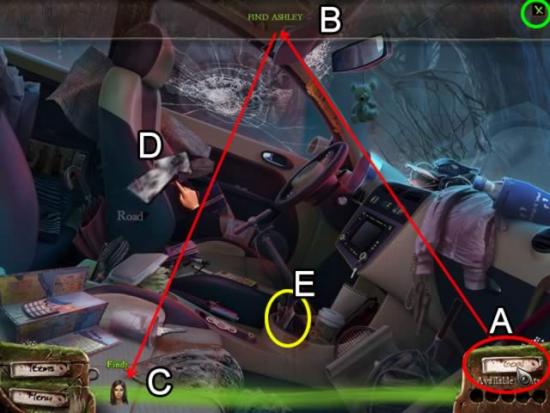
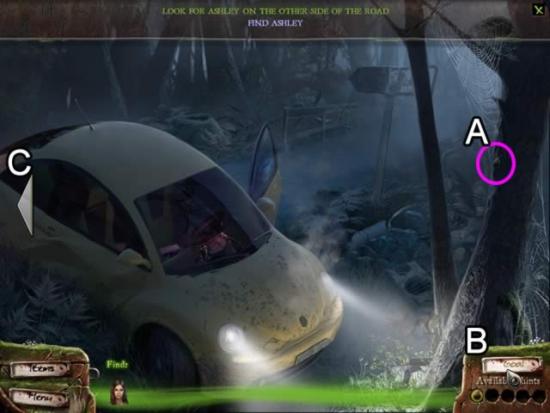
- Click the “Goals” tab (A) for help finding what needs to be done. The goal appears along the top of the screen (B). New goals are added to the list if another step needs to be completed first. Click the “X” to close the list.
- Icons indicating what needs to be found (in this case, Ashley) appear in the green mist section (C).
- Attempt to exit the car (D).
- The airbag deploys and a GLASS SHARD appears in the find list.
- Pick up the GLASS SHARD on the console (E). A SCARF appears in the find list.
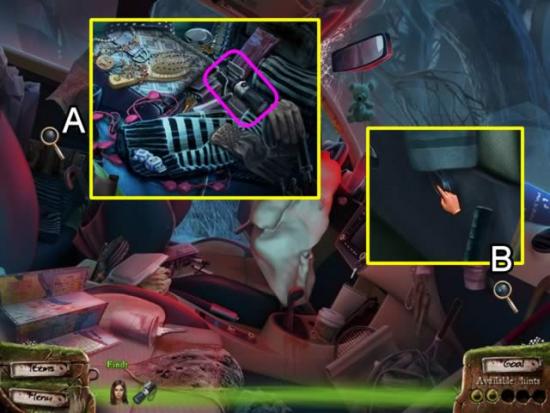
- Zoom in on the back seat.
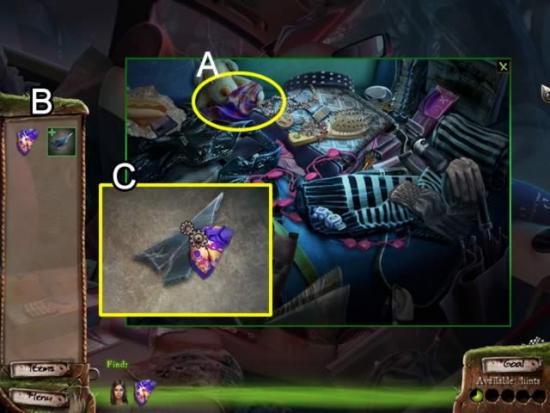
- Find the SCARF (A). It is added to the Items list (B).
- Note the GLASS SHARD has a plus sign indicating it can be combined with another object.
- Click the GLASS SHARD to open the combine window (C). Drag the SCARF to the shard to get a new item: GLASS KNIFE.
- Use the GLASS KNIFE to cut the airbag.
- Exit the car.
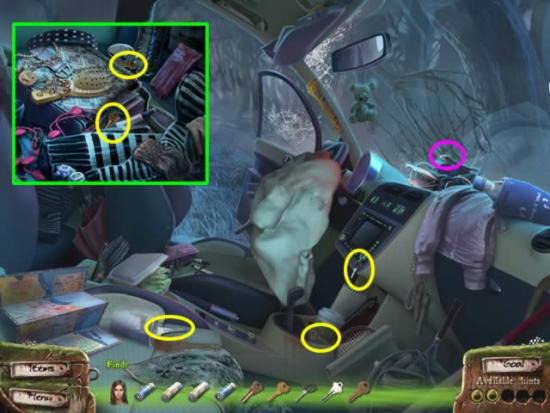
- Enter the car again to find the phone parts.
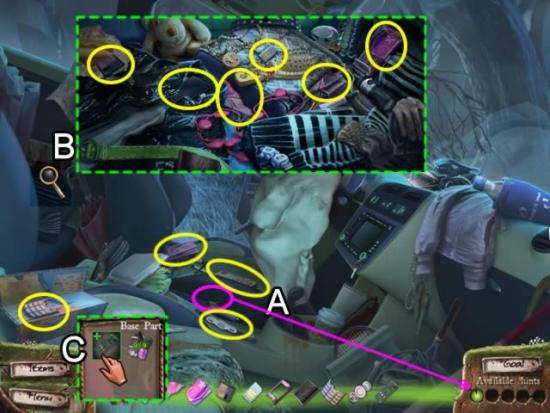
- Collect the firefly (A). It is added to the Available Hints bar for use in finding listed objects or filling the skip bar on puzzles faster.
- Pick up the phone base and parts (yellow).
- Inspect the back seat (B). Collect the rest of the phone parts.
- If necessary, open the Items tab (C). Click the BASE PART to open a combine window. Drag the nine PHONE PARTS to the window to begin a phone repair puzzle.
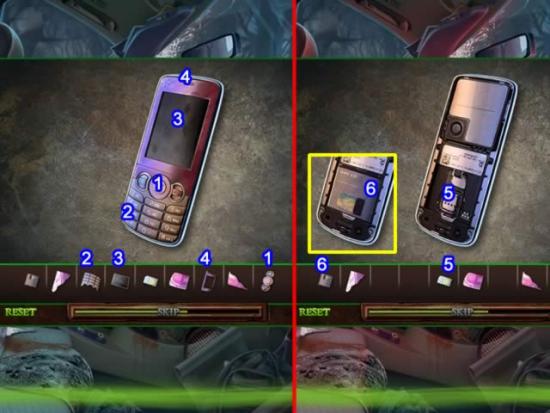
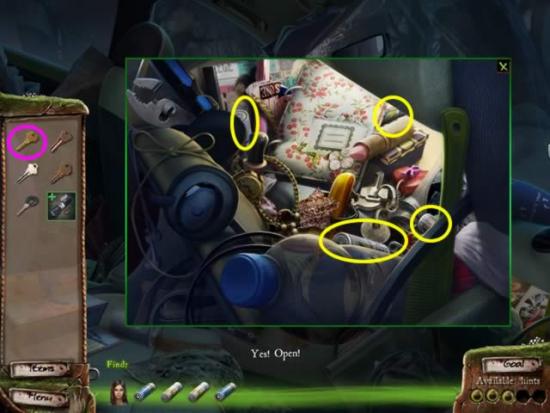
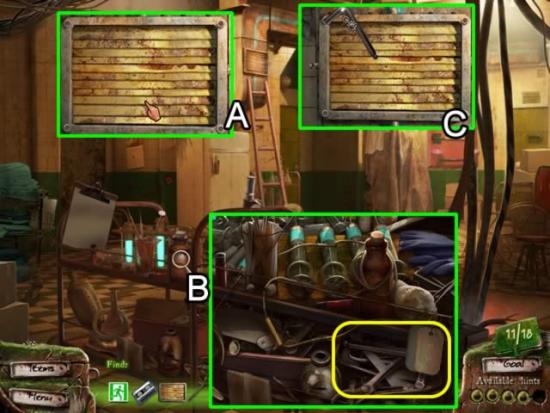
- Select a part. Click the rotate button or right-click the mouse button to rotate the part.
- Place the numbered parts in their corresponding numbered position as shown above.
- The phone flips over. Put the small blue part (5) in the slot. The larger part (6) fits over it (see the yellow inset). Place the three pink cover parts to complete the phone.
- After the cut scene, check to see if there is a firefly on the tree (A).
- Click the Goals tab to see the next step (B).
- Click the arrow on the side to scroll the scene (C).
- Approach the mansion door. Ring the doorbell located to the right of the door.
- Enter the foyer.
- Return to the car to retrieve a flashlight (click down twice and then right).
- Pick up the FLASHLIGHT from the backseat (A).
- Four BATTERIES are added to the find list.
- Zoom in on the glove compartment (B). Press the lock. KEYS are added to the find list.
- Pick up the three keys in the front seat.
- Get the other two from the back seat (inset).
- Check to see if there is a firefly on top of the dashboard (pink).
- Open the glove compartment area. Use the KEY (pink) to open the lock.
- Collect the four BATTERIES.
- Combine the batteries with the flashlight.
- Return to the mansion foyer.
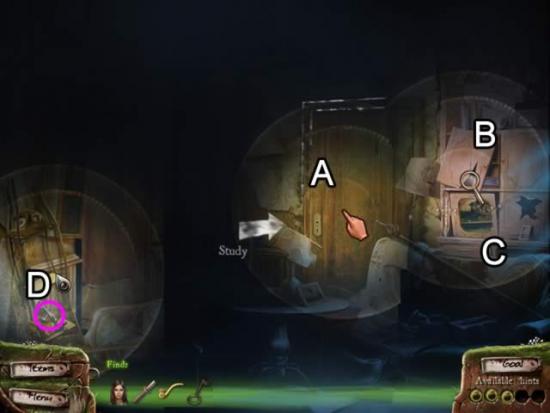
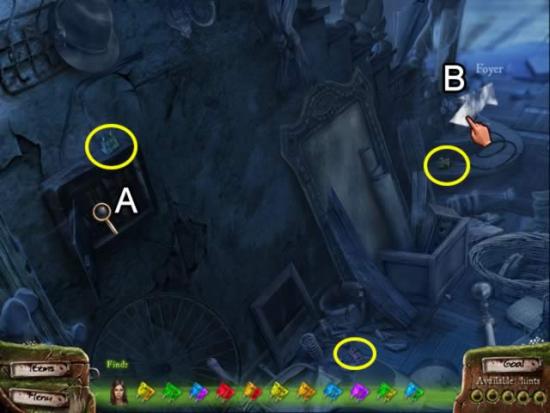
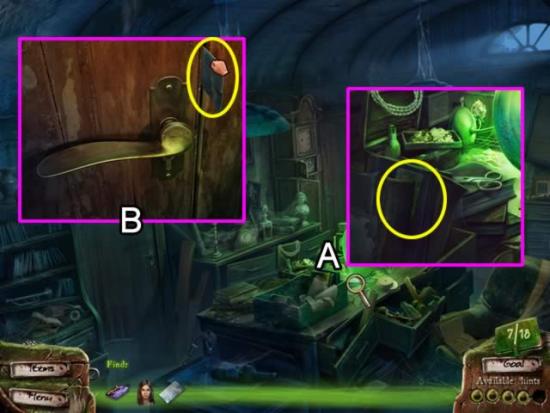
- Attempt to open the door to the study (A). A DOOR HANDLE and PEG are added to the find list.
- Inspect the cabinet on the right.
- Click the upper door (B) to spill the contents. Try to open the drawer (C). A KEY is added to the list of items to find.
- Shine the flashlight on the far left (D) to find the KEY.
- Shine the flashlight on the couch (A) to find the DOOR HANDLE.
- Use the KEY to open the cabinet drawer (B). Take the PEG from the back of the drawer (yellow inset).
- Combine the DOOR HANDLE and PEG and put the handle on the study door.
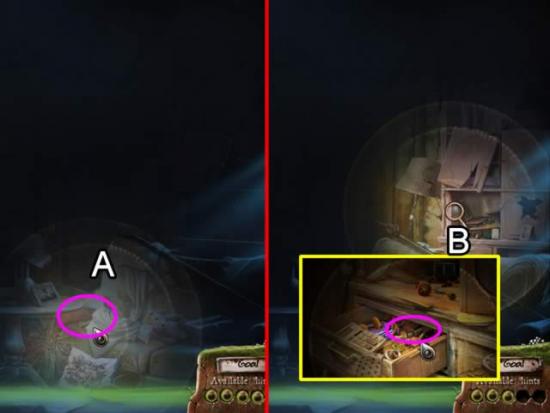
- Examine the easel at the back of the study (A). Look at the base to add the missing WHEELS to the find list.
- Look at the corner of the desk (B) to find two of the WHEELS. The third is on the seat of the chair (C).
- Exit the mansion.
- Inspect the boarded up window on the right. Click a nail to need PLIERS.
- Return to the car.
- Look in the glove compartment to find the PLIERS.
- Use the PLIERS to remove all of the nails from the boards. Click each board to remove it from the window.
- Reenter the mansion.
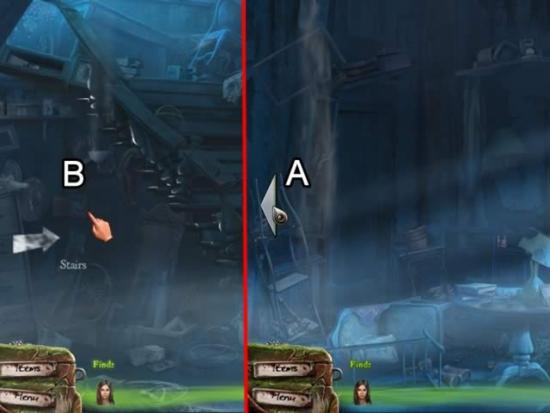
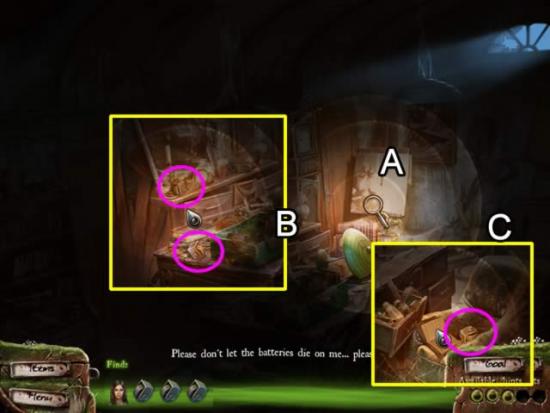
- Click the left arrow on the left side of the foyer (A).
- Zoom in on the area under the stairs (B).
- Zoom in on the fuse box (A). FUSES are needed.
- Pick up the three fuses (yellow).
- Go toward the foyer (B).
- Pick up the three fuses in the stair area.
- Scroll right (A).
- Get the two fuses in the foyer.
- Examine the cabinet (B). Pick up the last three fuses.
- Return to the fuse box.
- Place the fuses on the box to open a puzzle.
- The goal is to insert the fuses to form a continuous link of like colored fuses.
- The best strategy is to work from both ends. Right click to rotate a fuse. Use the two-colored transition fuses to change colors. See the next screen shot for the solution.
- Return to the study.
- Zoom in on the easel. Place the three WHEELS on the bottom of the easel. Click the easel to move it out of the way.
- Enter the library.
Chapter 2: Finding the Hidden Rooms
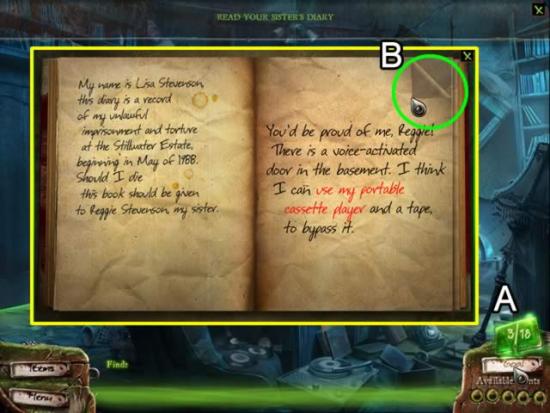
- The diary is now available (A). Use the diary to supplement information and obtain clues for using inventory items. The numbers on the cover indicate how many pages the diary contains (three of eighteen).
- Click the page corners (B) to view the information.
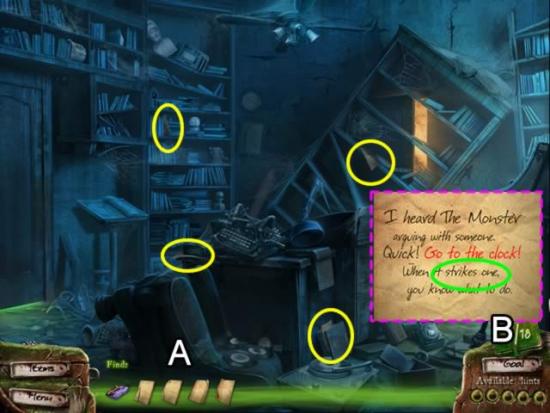
- Pick up four of the missing pages (A) circled above.
- Read the diary again. A new goal is added. Note the information about the time on the clock.
- Return to the study.
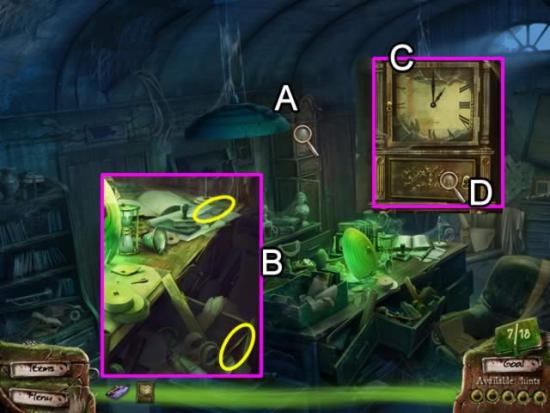
- Examine the grandfather clock (A). It is missing the CLOCK HANDS.
- Look closer at the desk (B). Pick up the two missing CLOCK HANDS.
- Go back to the clock.
- Place the hands on the clock face. Drag each hand to position them at 1:00 as the diary instructed (C).
- Open the lower compartment (D). The clock needs GEARS to run.
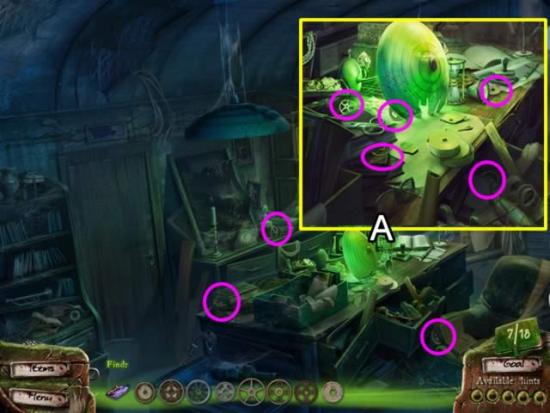
- Pick up the three gears in the room (pink).
- Inspect the desk (A). Take the five GEARS.
- Return to the clock.
- Place the GEARS on the clock to start a puzzle.
- The goal is to place the gears on the pegs to connect the bottom gear to the top. Not all gears need to be used. One solution is shown in the following screen shot.
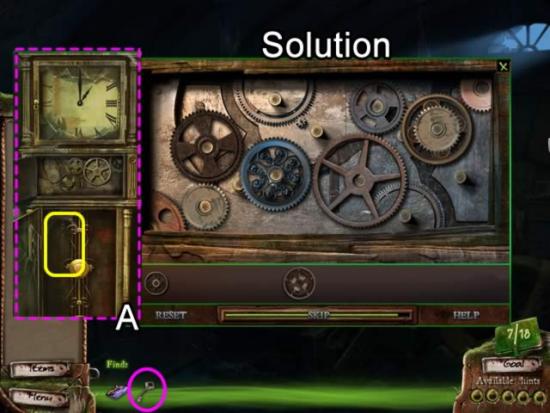
- Once all the gears are turning, a KEY is added to the find list.
- Look closer at the lower part of the clock to find the KEY (yellow).
- Attempt to return to the foyer.
- Return to the desk (A). Take the PLASTIC CARD.
- Examine the door handle (B). Insert the PLASTIC CARD between the door and the door jamb. Drag it up and then down to open the door.
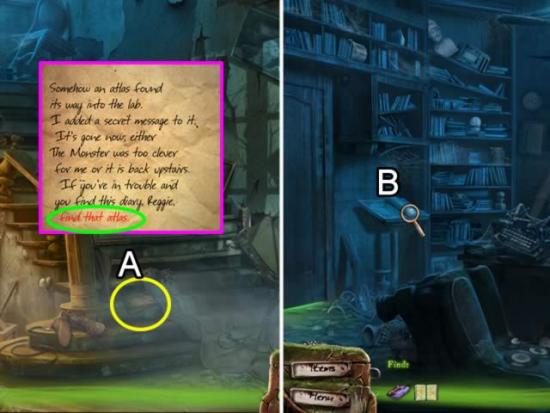
- Pick up the DIARY PAGE on the stairs (A).
- Examine the page for a clue for the next step.
- Return to the study.
- Inspect the ATLAS on the book stand (B).
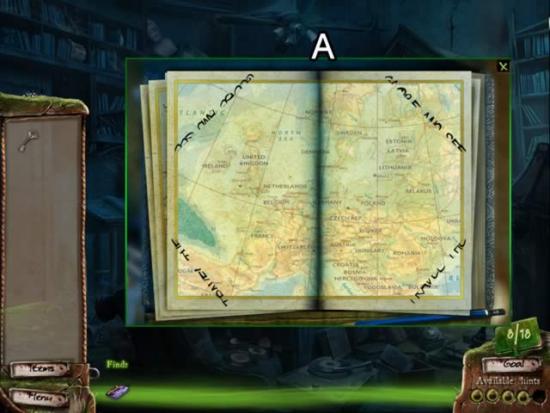
- Note the writing on the four corners of the pages (A).
- Go forward one page.
- Click the bottom of the page and pull it back until the two text notations match (A).
- Repeat the process with the upper left corner (B).
- Go forward one page.
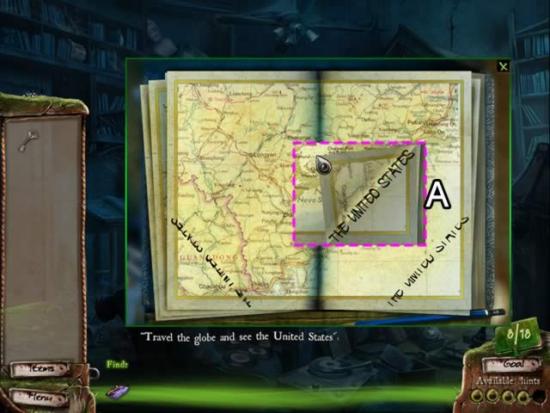
- Note the text on the two pages.
- Go back one page.
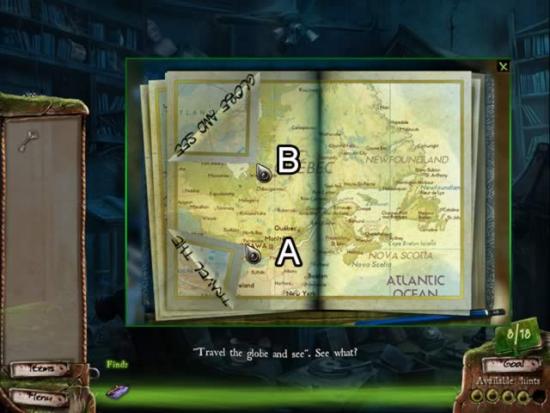
- Drag the lower right corner back to reveal the last part of the message (A).
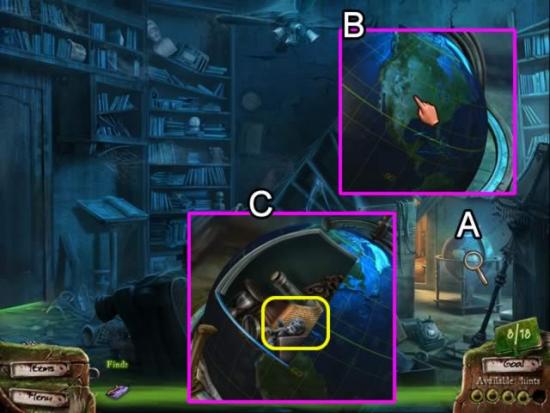
- Examine the globe (A).
- Rotate the globe until the United States is positioned on the left side (B). A secret compartment opens.
- Take and read the DIARY PAGE for the next instruction (C).
- The information about the SECRET DOOR is added to the find list.
- Return to the foyer.
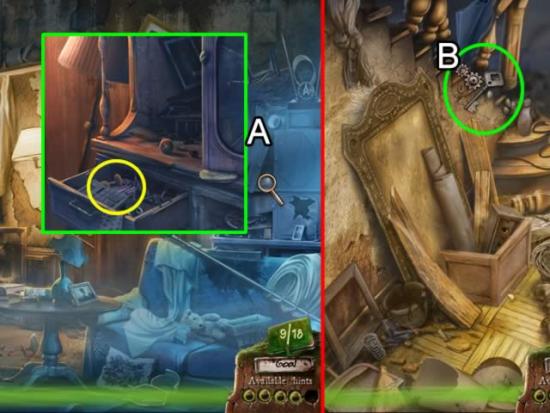
- Examine the cabinet again (A). Take the WALKMAN from the drawer.
- Scroll the scene left.
- Enter the area under the stairs.
- Insert the KEY in the keyhole on the right (B) to open the secret door.
- After the cut scene, zoom in on the door at the bottom of the stairs.
- Examine the lock. Click the cover to remove it and open a slider puzzle.
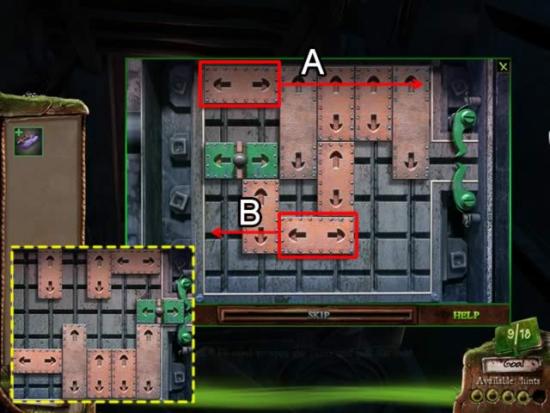
- The goal is to clear a path for the green lock piece to slide to the exit.
- The pieces can only slide horizontally or vertically along their tracks.
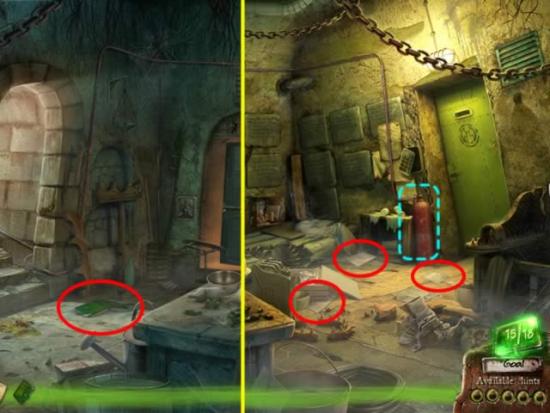
- The best strategy is to move the two pink horizontal pieces to the far right (A) and far left (B). Clear a path for the top piece (A) first. Next reposition the pieces as needed to move the bottom piece (B) to the far left. Once they are both in place slide the vertical pieces to clear the way.
- The final placement of the pieces is shown in the dashed inset.
Chapter 3: Exploring the Hidden Rooms

- Click the button to slowly retract the gate (A).
- As the gate is retracting, the elevator comes down. Inspect the elevator. A WOODEN PLANK is needed to keep the doors open.
- When the gate is fully retracted, take the WOODEN PLANK (B).
- Zoom in on the elevator (C).
- Use the WOODEN PLANK to wedge the doors open.
- Take the DIARY PAGE (pink) to see a map of the sanatorium.
- Enter the door on the right to the big hall.
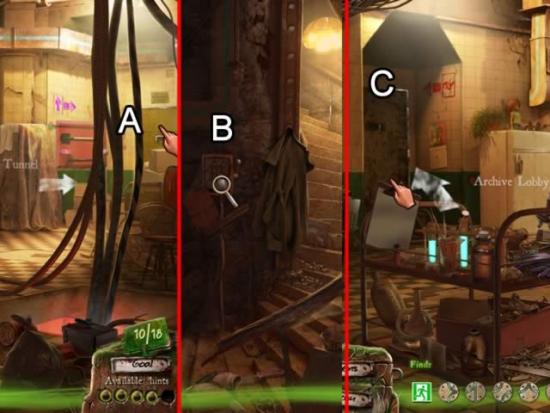
- Take the door on the far right to the tunnel (A).
- Zoom in on the the circuit box (B). Circuit plugs are added to the find list.
- Go up the stairs on the right to return to the hall.
- Take the first door on the left (C) to return to the archive lobby.
- Zoom in on the elevator. Inspect the red toolbox in the elevator.
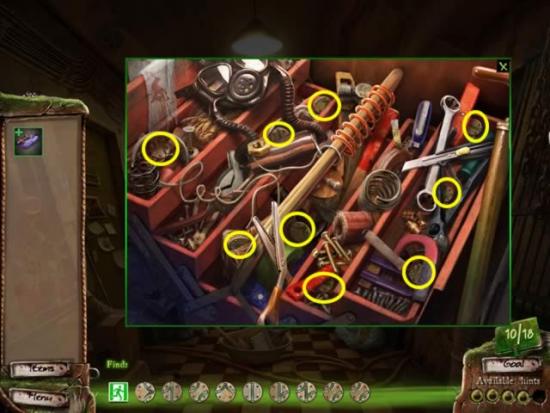
- Pick up the nine circuit plug WIRES from the toolbox.
- Return to the tunnel.
- Place the nine WIRES on the circuit box to open a puzzle.
- The goal is to place the wires on the circuit board so the current flows through each of the connections in numerical order.
- The best strategy is to work through the connections in numerical order. Place a wire on the board. Right click to rotate it. Watch the current flow and adjust the circuits as needed. Not every wire needs to connect to another to complete the circuit.
- The following screen shot shows the solution.
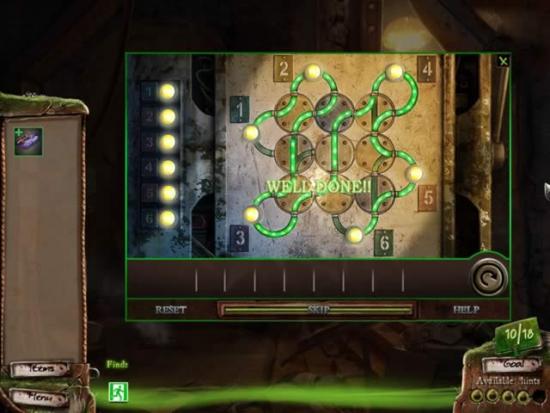
- There may be other wiring solutions to this puzzle.
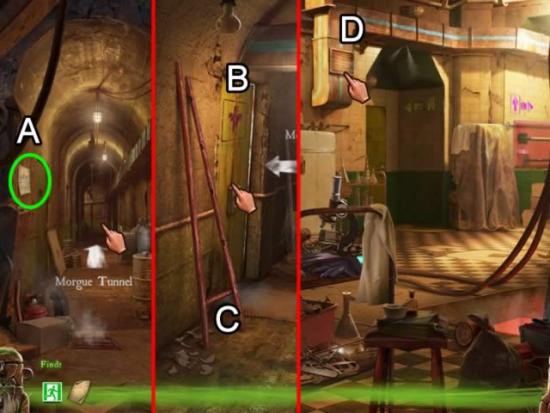
- When the lights come on, take the DIARY PAGE from the tunnel wall (A).
- Read the diary. Find out there is an AUDIO CASSETTE somewhere in the basement.
- Go forward to the end of the hall. Note the blue line near the ceiling on the right side of the tunnel. It denotes the air conditioning ducts.
- Enter the first door on the left to enter the morgue (B). A VENTILATION grate is needed to shut down the air conditioning. Click right to exit the morgue. Note the partial ladder leaning against the wall next to the morgue entrance (C).
- Return to the hall.
- Click the vent on the air conditioning duct (D). A LADDER is added to the find list.
- Return to the morgue. Pick up the broken LADDER in the hall.

- The LADDER is missing four STEPS.
- Pick up the first STEP by the corner to the tunnel (A).
- Zoom in on the door at the end of the hallway (B). Find two more STEPS among the debris.
- The last STEP is on the left of the tunnel entrance (C) by the circuit box.
- Combine the LADDER and STEPS to get a fixed ladder.
- Return to the hall.
- Place the LADDER against the wall to access the ventilation grate (A). Click the grate to discover a HEX KEY is needed to remove the grate.
- Inspect the supply cart (B). Take the HEX KEY.
- Use the HEX KEY to remove the four bolts.
- Five OLD RAGS are needed to block the ventilation system.

- Pick up the first two OLD RAGS in the hall (A).
- Get the third one from the elevator (B).
- Inspect the rubbish pile at the end of the morgue hallway (C) to get the fourth.
- Enter the morgue. Take the fifth OLD RAG from the table (D).
- Return to the hall.
- Stuff the five OLD RAGS in the ventilation shaft.
- Return to the morgue.
- Inspect the control panel next to the panel of doors on the left.
- Zoom in and click the panel to get the KEY pad squares added to the find list.
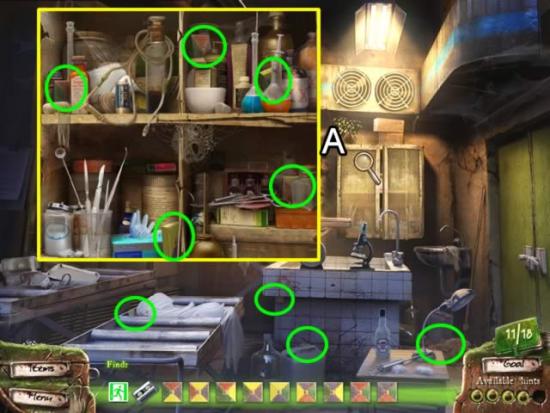
- Look closer at the cabinet (A). Click the doors to open them.
- Take the five KEYS from the cabinet.
- The locations of the remaining four KEYS are circled in green.
- Zoom in on the control panel again.
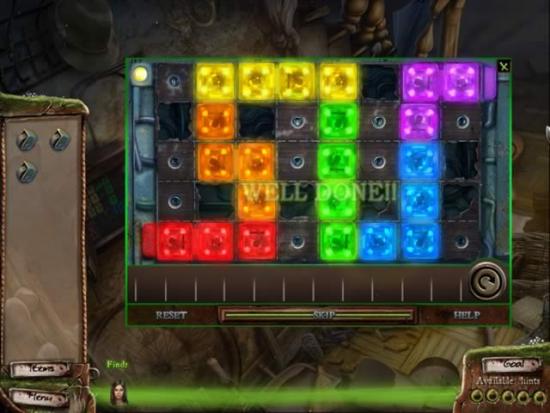
- Place the KEYS on the pad to open a puzzle.
- The goal is to place the squares in the pad so each is bordering a similarly colored square.
- The best strategy is to work with the corner pieces where two colors are given. Right-click to rotate the squares.
- The next screen shot includes the solution.
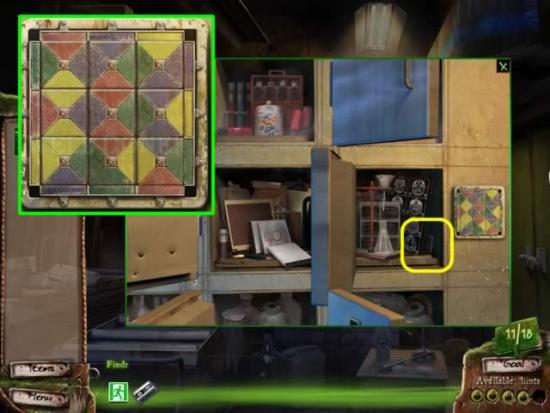
- See the inset above for the panel solution.
- Take the AUDIO TAPE from the middle right cabinet.
- Combine the WALKMAN and the AUDIO TAPE.
- Return to the archive hallway.
- Zoom in on the voice activation panel on the archive door.
- Place the WALKMAN on the panel. Press the top right button on the Walkman to play the tape.
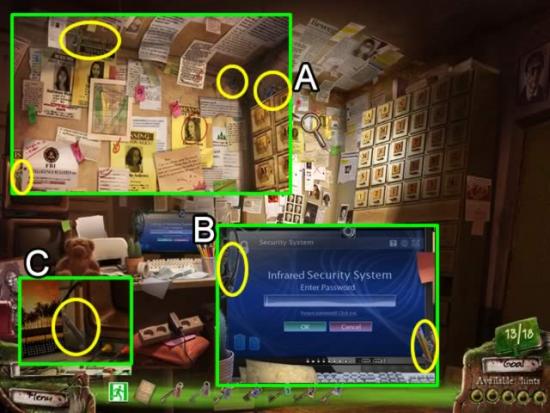
Chapter 4: The Archives
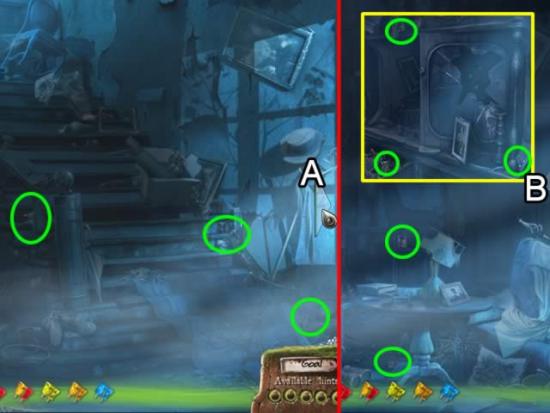
- Click the drawers on the right (A) to get DIARY PAGES added to the find list.
- Zoom in on the lower monitor (B). Touch the monitor control pad to add another DIARY PAGE.
- Look at the computer (C). Take the DIARY PAGES.
- Read the new entries in the diary.
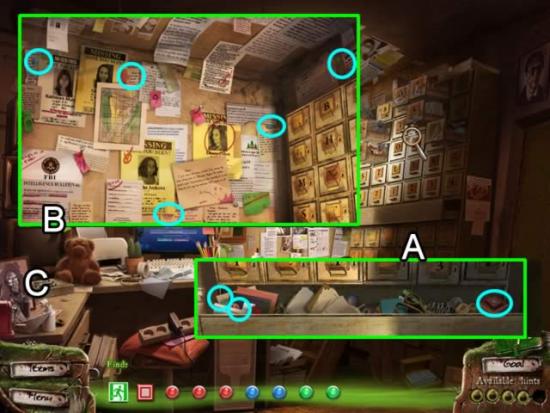
- Seven KEYS are added to the list.
- Examine the posters on the wall (A).
- Pick up four KEYS.
- Look at the computer monitor (B). Take the KEY by the lizzard and the one in the pencil holder.
- Examine the camera control area (C). Find the last KEY next to the picture.
- Zoom in on the file cabinet drawers.
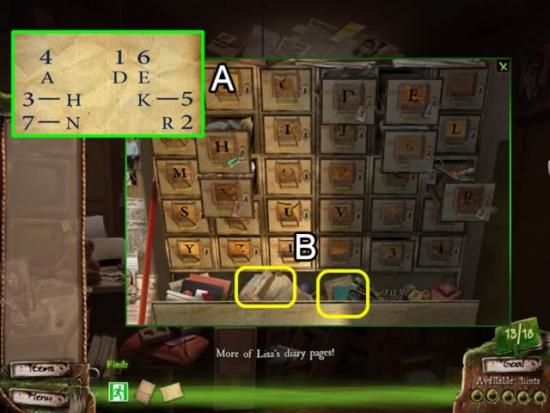
- Use the information from the diary to find the code to open the drawers (A).
- Insert the keys in order from 1 – 7 in the lettered boxes. The order is 1-D, 2-R, 3-H, 4-A, 5-K, 6-E, 7-N.
- Take the two DIARY PAGES from bottom drawer (B).
- Read the diary entries.
- Go back to the camera control area by the bear.
- Look closer at the camera control pad. Touch it to add BUTTONS to the find list.
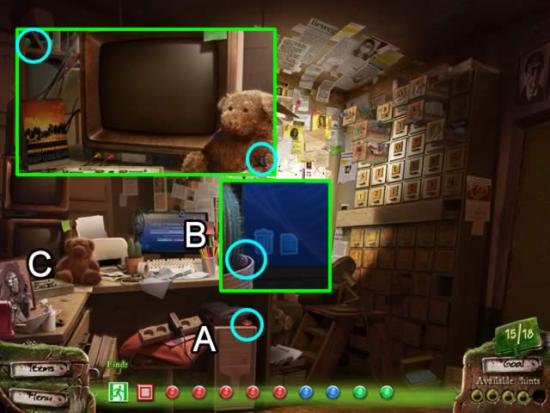
- Pick up the first BUTTON from the top of the computer case (A).
- Look at the computer monitor (B). Take the BUTTON in the cactus pot.
- Look again at the camera control area (C). Take the BUTTON from the shelf and the one on the bear.
- Look in the bottom area of the filing drawers. Take the three BUTTONS.
- Examine the posters on the wall. Get the remaining five BUTTONS.
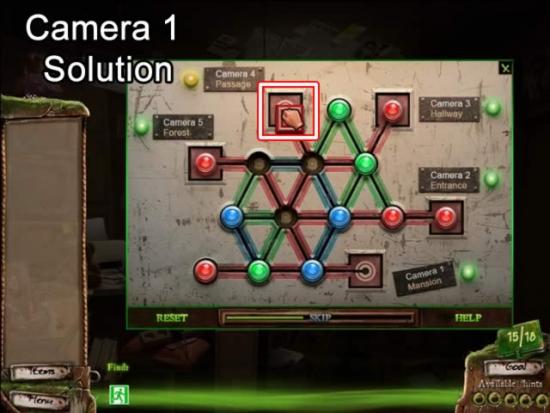
- Zoom in on the camera control area (C). Place the buttons and transfer plug on the pad to open a puzzle.
- The goal is to move the transfer plug to a camera to activate it.
- The control dial buttons can only move on their color coded paths. The control plug can only move on a red colored path.
- The best strategy is to clear the slot where the control plug needs to go first.
- View the following screen shots for the ending positions of the buttons for each camera.
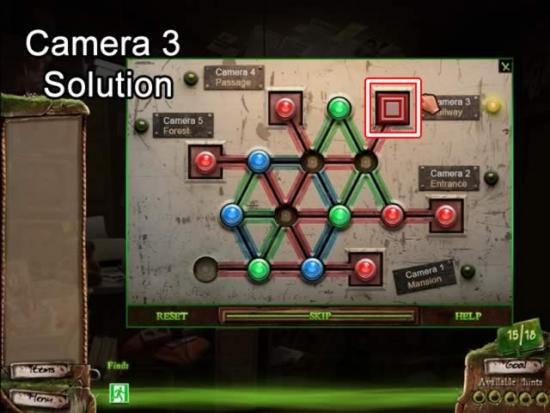
- Watch the cut scene on camera 3.
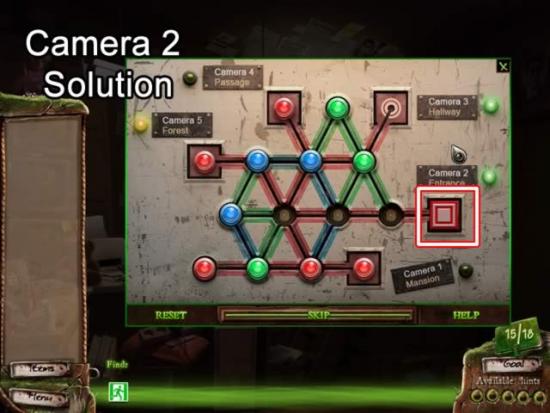
- Watch the cut scene on camera 2.
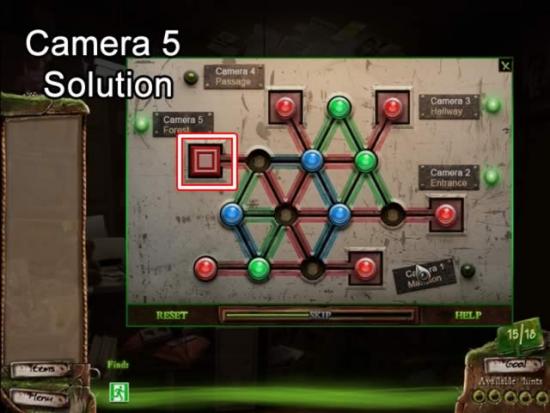
- Watch the cut scene on camera 5.
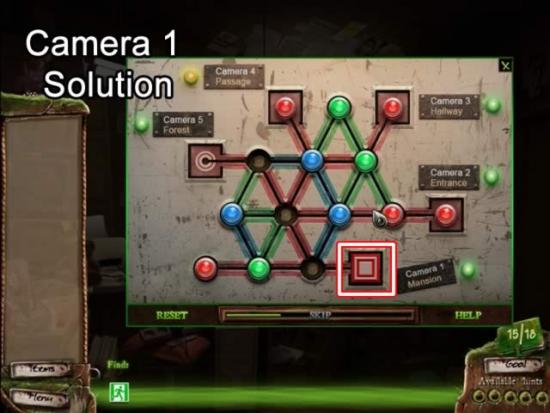
- Watch the cut scene on camera 1.
- Watch the cut scene on camera 4.
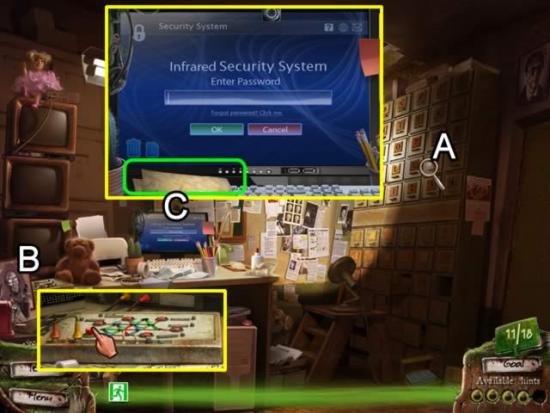
- Return to the computer monitor.
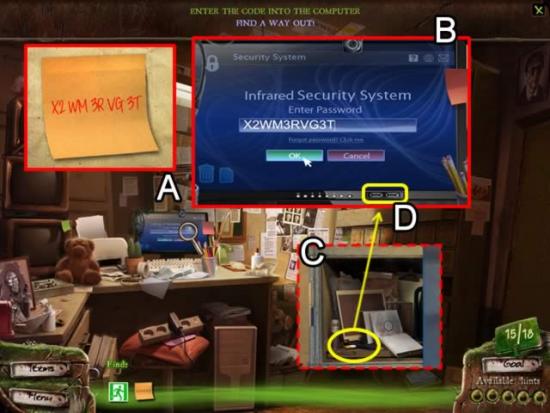
- The system requires a password. Each cut scene viewed on the security camera monitors contained part of the password. They were recorded in the diary.
- Find the password in the diary (A) and type it in as shown above (B). Click “OK”.
- A USB drive is needed.
- Return to the morgue.
- Look in the middle left cabinet (C). Take the USB DRIVE.
- Return to the archives.
- Insert the USB DRIVE in one of the drive slots (D) to open a puzzle.
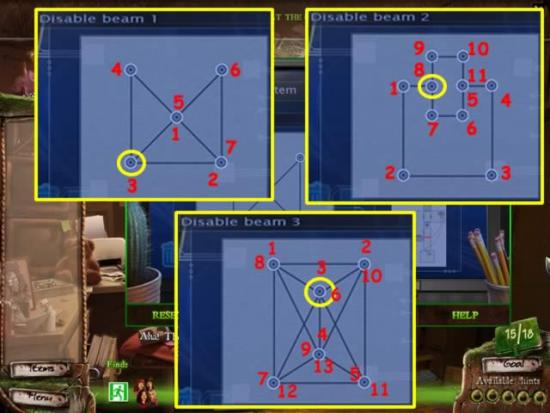
- The goal is to connect the dots without retracing a path.
- Clicking a dot highlights possible routes. A dot can be clicked more than once as a connector to different paths.
- In the above screen shots, the yellow circle indicates the beginning point. The numbers show the sequence the dots were clicked.
- Once the beams have been disabled, return to the hall. Take the middle door to the cabin passage.
- Go forward to the basement door.
- Examine the lock mechanism. It is missing a green piece.
- Return to the hall. Go past the morgue and inspect the debris pile.
- Look at the door lock. Take the green piece.
- Return to the basement door.
- Put the lock piece on the lock to open a slider puzzle.
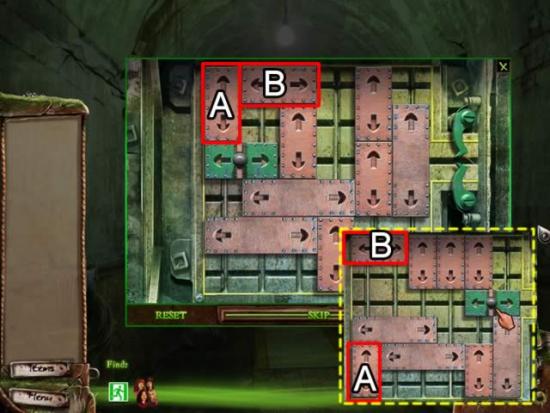
- This is similar to the earlier slider puzzle.
- Correctly placing the key pieces (A) and (B) will allow the path to be cleared. Look at the solution (dashed yellow) to see the final piece placement.
Chapter 5: Finding the Girls
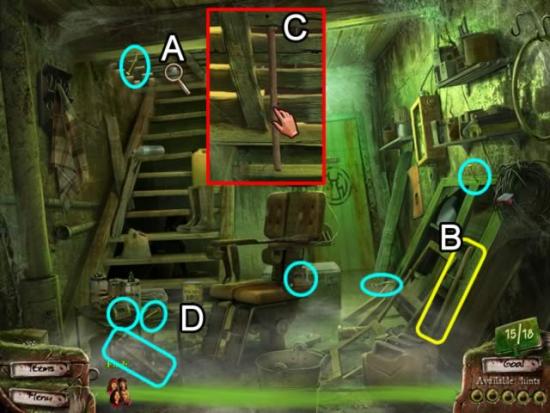
- Attempt to open the hatch door at the top of the stairs (A).
- Pick up the THIN BEAM (B). Insert it between the slats in the hatch (C) to try and move the chair. More items are needed.
- Pick up the NAILS, HAMMER and METAL CLIPS outlined in aqua above.
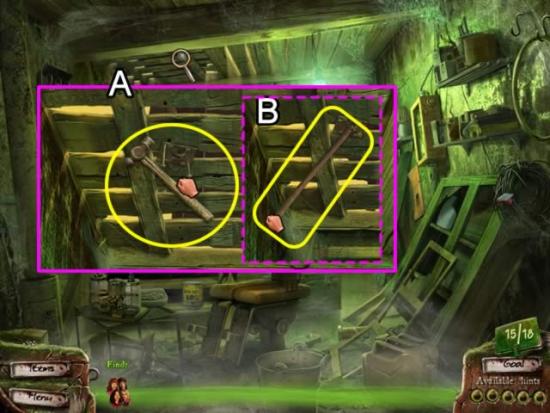
- Move the first METAL CLIP around on the hatch until the cursor turns to gears. Affix the clip with two NAILS. Use the HAMMER to pound in the nails (A). Positioning the hammer can be tricky. Be sure it is over a nail and the cursor has changed to gears.
- Place the THIN BEAM in the metal brace and drag it to the left (B) to move the chair.
- Repeat the above process with the second clip, nails, hammer and beam.
- Click the hatch to enter the living room.
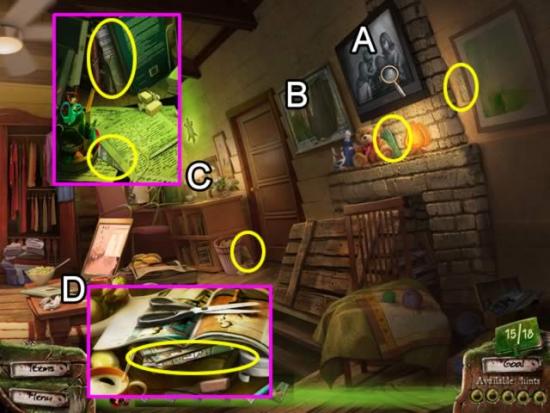
- Look at the monitor (A).
- Examine the frame (B). MAP PIECES are added to the find list.
- Pick up the three pieces in the room (yellow).
- Examine the desk (C). Take the two pieces.
- Look at the table (D). Find the last piece.
- Place the pieces inside the frame to open a jig-saw puzzle.
- Select a piece. Right-click to rotate it and place in on the map. A correctly placed piece locks into position. The solution is shown in the next screen shot.
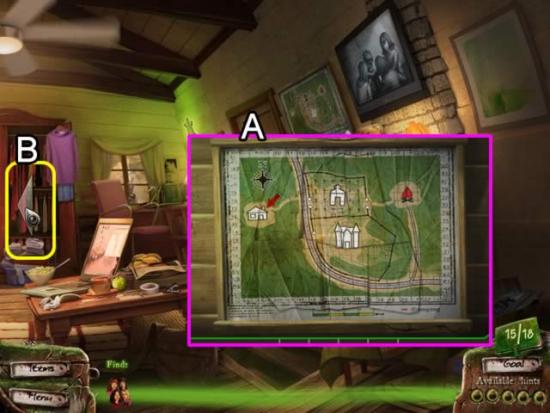
- Examine the completed map (A) for clues on where to go next.
- Scroll the scene left (B) to find the front door.
- Go to the front porch and on to the cemetery.
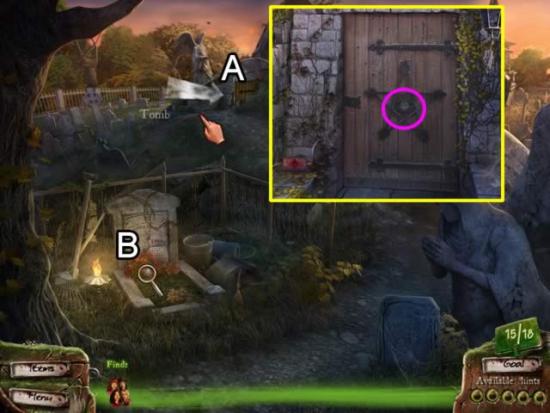
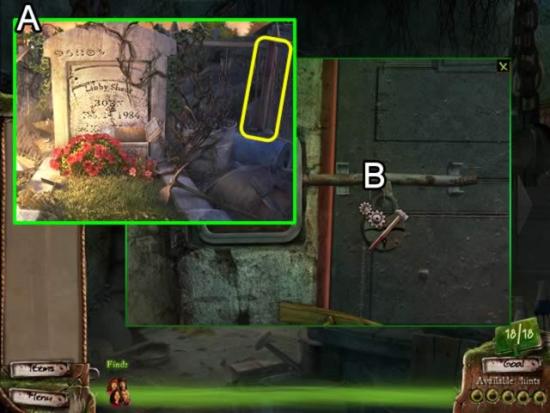
- Zoom in on the tomb entrance (A). Look closer at the door. Click the center of the star to add an AMULET and TOMB DOOR BUTTONS to the find list.
- Look closer at the grave (B).
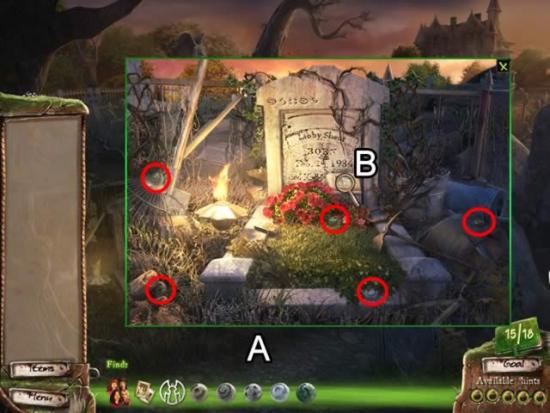
- DIARY PAGES are added.
- Pick up the five TOMB DOOR BUTTONS (A) circled in red.
- Return to the house. Scroll right to view the living room.
- Zoom in on the desk on the back right. Pick up the picture in the brief case. Read the new diary entries.
- Return to the grave.
- Inspect the metal box by the head stone (B). A RAG, STEEL BRUSH and ANTI RUST LIQUID are added to the find list.
- Return to the house porch.
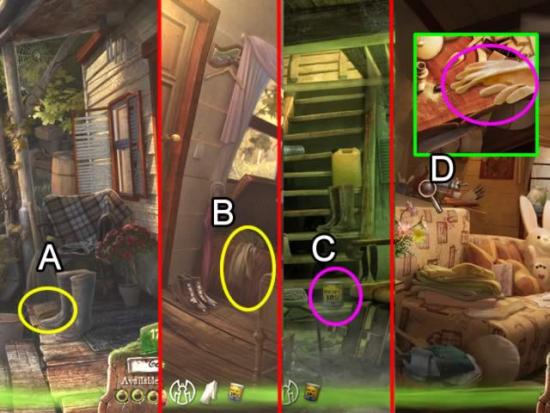
- Pick up the STEEL BRUSH next to the boots in front of the door (A).
- Get the RAG draped over the side of the chest (B) just inside the door.
- Return to the basement. Pick up the ANTI RUST LIQUID (C). Now protective GLOVES are needed.
- Return to the living room. Scroll the scene left.
- Zoom in on the sink area (D). Pick up the GLOVES. Now more items are needed.
- Return to the basement.

- Pick up the SCREWDRIVER, SPRAY BOTTLE and SPRAY TOP.
- Combine the ANTI RUST LIQUID with the SCREWDRIVER to pry off the lid.
- Combine the SPRAY BOTTLE with the ANTI RUST LIQUID to add the liquid to the bottle.
- Combine the SPRAY BOTTLE with the SPRAY TOP to cap the liquid.
- Return to the grave.
- Zoom in on the metal box.
- Spray the box with the liquid in the SPRAY BOTTLE.
- Use the METAL BRUSH to remove the rust.
- Wipe the box clean with the RAG.
- Examine the box to play a puzzle.
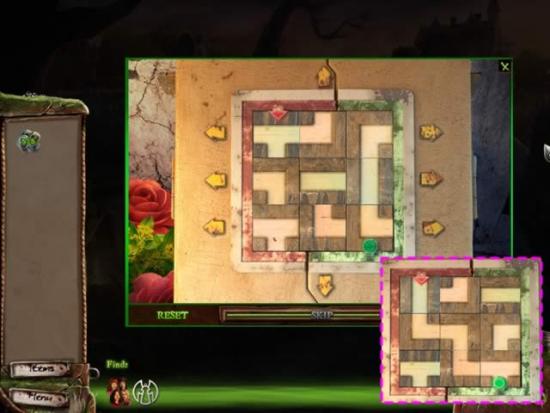
- The goal is to create a path from the red arrow at the top to the green button at the bottom.
- Use the arrows on the right and left to scroll the pieces. Move pieces to the center column and use the arrows to change their rows. The placement of the initial pieces is random.
- The solution is shown in the inset.
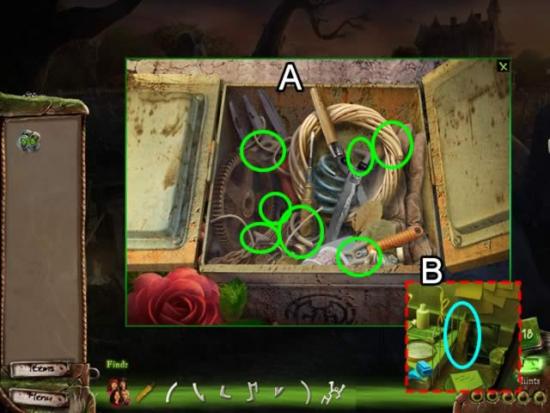
- Find the AMULET PIECES in the box (A).
- Return to the house.
- Look on the back right desk to find the GLUE (B).
- Refer to the diary or look at the rock below the metal box to see the shape of the amulet.
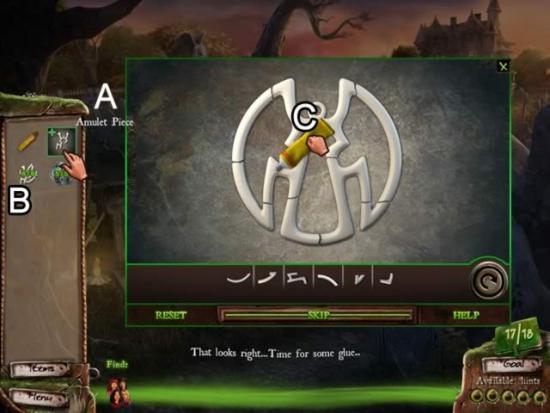
- Click the AMULET PIECE (A) to open a combine window.
- Drag the six AMULET PIECES (B) to the combine window to open a puzzle.
- Select a piece from the bottom to recreate the amulet. Right-click to rotate a piece. A correctly positioned piece locks into place.
- When the amulet is complete, apply the GLUE to each of the breaks to get a whole AMULET.
- Return to the tomb.
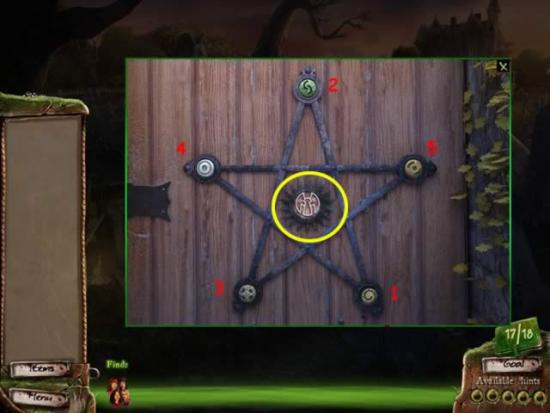
- Place the AMULET in the center of the star.
- Drag the five TOMB DOOR BUTTONS to the door.
- Refer to the diary for the order to click the buttons. The order is indicated above.
- Zoom in on the door (A).
- Examine the lock. Six MARBLES are added to the find list.
- Pick up the first two MARBLES (pink).
- Scroll to the right side of the scene (B).
- Pick up two more MARBLES.
- Inspect compartment on the rear wall (C).
- Take the last two MARBLES and the last DIARY PAGE.
- Read the diary.
- Scroll left.
- Place the six MARBLES in the door lock to open a puzzle.
- The goal is to place the colored marbles in their similarly colored rows.
- Click a marble to move it into the empty slot at the bottom of the row. Click the center circle to rotate the marbles.
- The best strategy is to work one color at a time. The solution is in the inset.
- Click the padlock on the door. A SLEDGEHAMMER is required.
- Return to the grave (A).
- Take the SLEDGEHAMMER leaning against the right post.
- Use the hammer to break the lock (B).
- Watch the cut scene.
- Pick up the DIARY.
- Scroll right.
- Pick up the three DIARY PAGES.
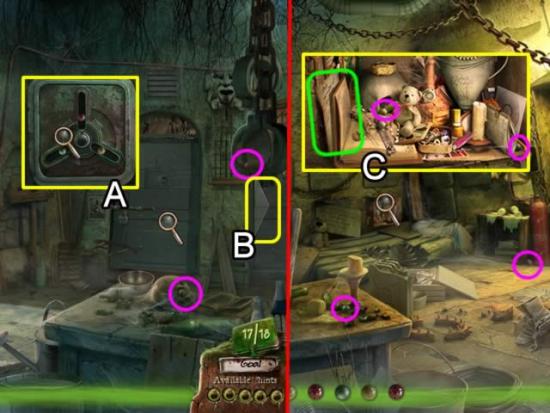
- Zoom in on the gas cylinder by the door (dashed aqua). Click the top of the cylinder for the next items to find.
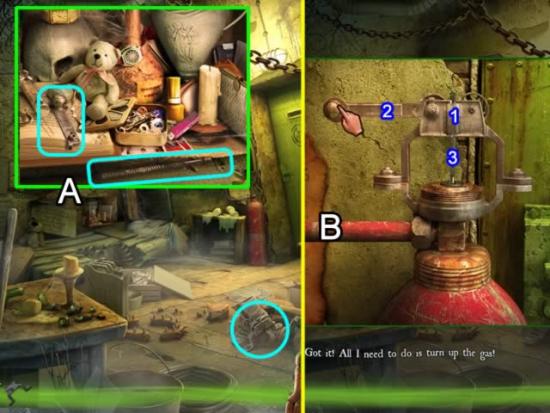
- Pick up the part on the floor.
- Inspect the compartment (A). Pick up the last two parts.
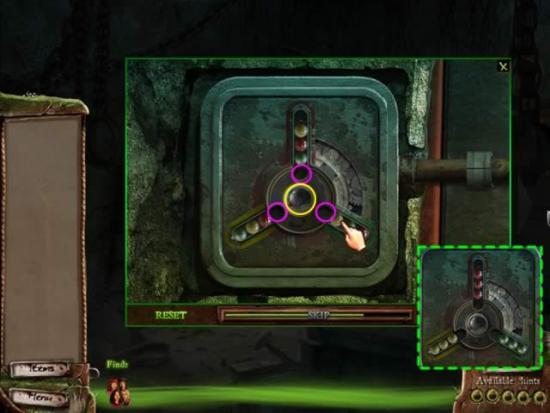
- Zoom in on the gas cylinder (B).
- Affix the parts as shown above.
- Click the lever and watch the final cut scene.
Congratulations! You have finished playing Campfire Legends: The Last Act. Select the Project Stillwater tab on the main menu to play the spot-the-difference games with various scenes.

More articles...
-
Best Horror Games On Itch.io – July 2026
Across a bounty of subgenres. -
Haze Seas Accessories Tier List [Best Accessories to Equip]
The accessories with the best stat buffs in Haze Seas.