
Best Horror Games On Itch.io – July 2026
Across a bounty of subgenres.![Haze Seas Accessories Tier List [Best Accessories to Equip]](/wp-content/uploads/2026/07/haze-seas-accessories-tier-list.jpg "Haze Seas Accessories Tier List [Best Accessories to Equip]")
Haze Seas Accessories Tier List [Best Accessories to Equip]
The accessories with the best stat buffs in Haze Seas.
![[Roblox] Evomon Shiny Hunting Guide – Including Prismatic and Pris Shinies!](/wp-content/uploads/2026/06/evomon-shiny-hunting-guide.jpg "[Roblox] Evomon Shiny Hunting Guide – Including Prismatic and Pris Shinies!")

Campfire Legends: The Babysitter Walkthrough
Welcome the Campfire Legends: The Babysitter walkthrough on Gamezebo. Campfire Legends: The Babysitter is a hidden object adventure game played on the PC created by GameHouse Studios. This walkthrough includes tips and tricks, helpful hints, and a strategy guide for how to complete Campfire Legends: The Babysitter.


- Prefer Gamezebo on Google


Campfire Legends: The Babysitter – Game Introduction
Welcome the Campfire Legends: The Babysitter walkthrough on Gamezebo. Campfire Legends: The Babysitter is a hidden object adventure game played on the PC created by GameHouse Studios. This walkthrough includes tips and tricks, helpful hints, and a strategy guide for how to complete Campfire Legends: The Babysitter.
General Tips
- Hints in Campfire Legends come in the form of Fireflies. Fireflies will appear at random throughout most of the areas in the game, and will replenish themselves overtime. Because of this, Fireflies are not circled in the guide below. Often Fireflies won’t appear in the same place back-to-back, however when you run out of hints you can count on more appearing in your vicinity. You can store up to five hints at a time.
Note: for items of the same type you need to find that are located throughout several rooms, i.e. lizards, do NOT use hints on these! They will be wasted repeating the goal.
Hints will not be wasted if there’s nothing to do in a specific area.
- Puzzles may be skipped, however it will cost three hints in order for you to do so. Each hint will move you closer to the goal before giving you the option to skip the puzzle entirely. Many puzzles can also be reset.
- The current Goal in the game can be turned on and off from the button on the bottom right corner of the screen.
- The Items button on the bottom left of the screen will keep track of items in your inventory: items you still need to find will be shown at the bottom of the screen.
- The main Menu can be accessed via the Menu button at the bottom left corner of the screen: the game will automatically save when exited to the main Menu.
- When resuming a game, you will be given to option to take off from where you left off, or start your game over.
- Completing the main story mode of the game will unlock Haken’s Journal Mode, accessible from the main Menu.
- Haken’s Journal Mode: this is a bonus unlockable mode which allows you more insight into the story through the eyes of Haken himself. Complete each hidden object location to move on to the next area and unlock more of Haken’s Journal. Items listed at the bottom of the screen are randomized, and areas are timed. If you do not complete an area within the given time limit, you will have the option to restart. About half the items on the list will be re-randomized while half will remain the same as the previous attempt in hopes of giving you better odds to complete the area.
- Objects throughout the game have a chance of being randomized: however, the guide below still circles item locations, as they may very well be the same in your personal playthrough.
Walkthrough – Part I: The Twins
Front Gate
- Click on the intercom located on the left.

- Pick up your stuff and put it back in your purse. The locations of the various objects are shown below:
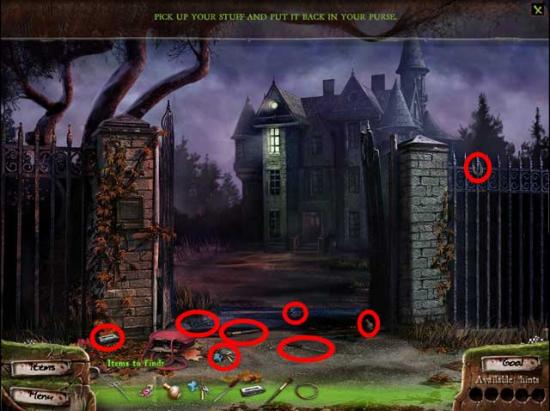
- Once you’ve collected everything, click on the purse for a closer view, then place the objects back inside.
- Proceed to the Mansion.
Hallway
- Continue into the living room.
Living Room
- Take a closer look at the table in the center of the room. Click on the remote on the left for another close-up.
- Click the Power Button, A/B Button, and (channel) 7 respectively.
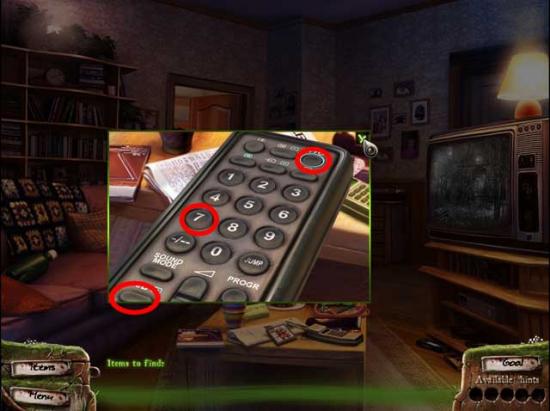
- After a cutscene, go into the kitchen.
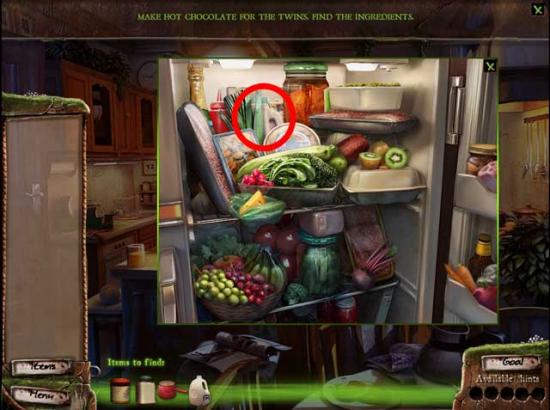
Kitchen
- Find the family recipe for homemade cocoa. It’s lying on the counter island. Click on it for a closer view.
- Click on the recipe, and a list of necessary ingredients will appear.
- Click on the fridge for a closer view: pick up the Milk and add it to your inventory.
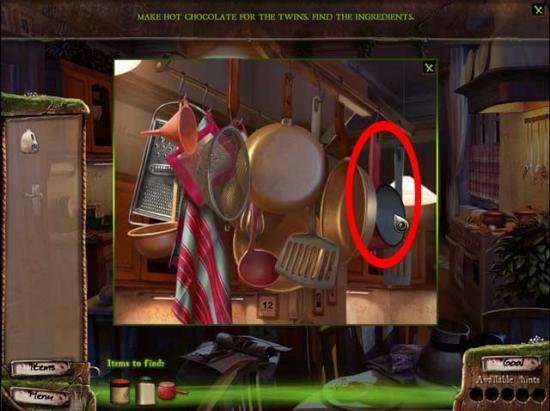
- Take a look at the pan rack hanging over the center counter island for a closer view. Pick up the Saucepan to add it to your inventory.
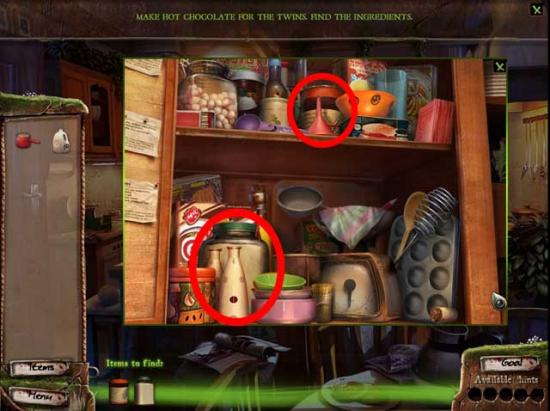
- Take a closer look at the cupboard on the left. Pick up the Sugar and the Cocoa to add it to your inventory.
- You’ve now got all the ingredients to make the cocoa. Click on the stove on the right to prepare it.
- Place the Saucepan on the bottom right burner, then add all the ingredients from your inventory. Click the knob to boil and prepare the cocoa.
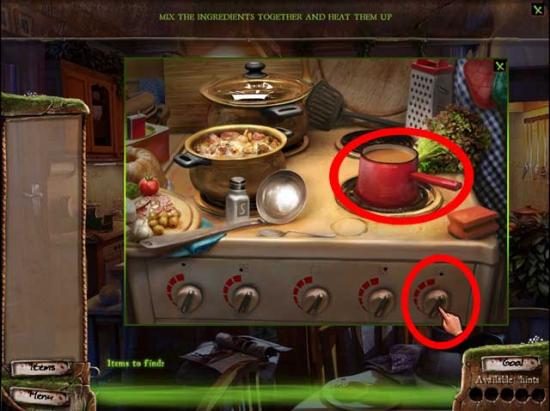
- Click the cocoa once it’s done warming to add it to your inventory.
- Time to find spoons for the cocoa mugs. Click on the kitchen drawer sticking out on the right side of the center island for a closer view.
- Click on the two spoons hidden inside the drawer to add them to your inventory.
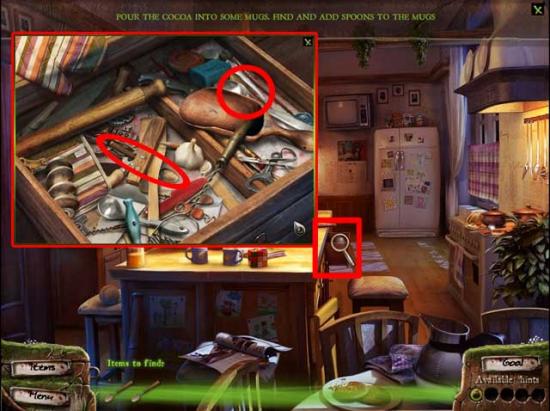
- Click on the center island for another close-up view. Pour the cocoa into each of the blue mugs, then place a spoon inside each. Vióla, fresh homemade cocoa!
- Exit the kitchen back into the living room.
Living Room
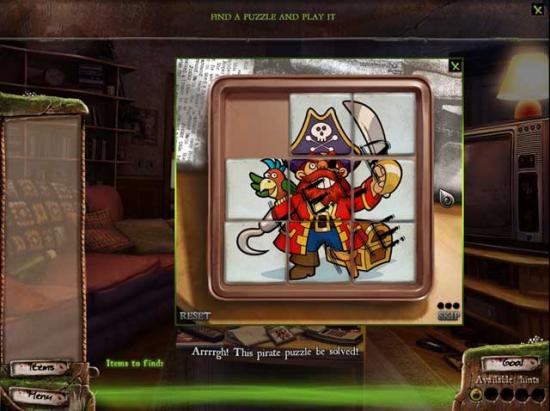
- Click on the center table for a closer view.
- Click on the pirate-themed slide puzzle next to the phone and below the newspaper to begin.
- Click the puzzle pieces to move them around and reassemble the picture. The solution is as follows:
- Time to check on the twins. Proceed into the Hallway…
Hallway
- After a slightly harrowing cutscene, pick up all the marbles that have fallen down the stairs. Their locations are shown below:
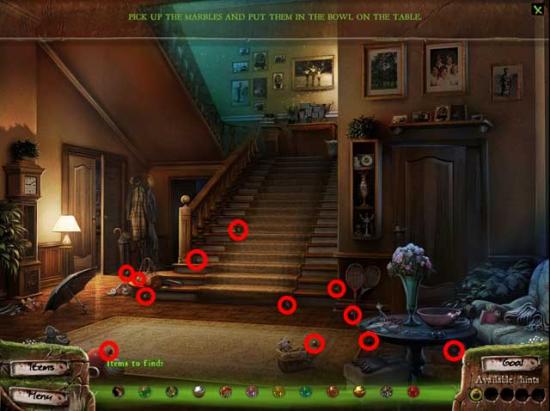
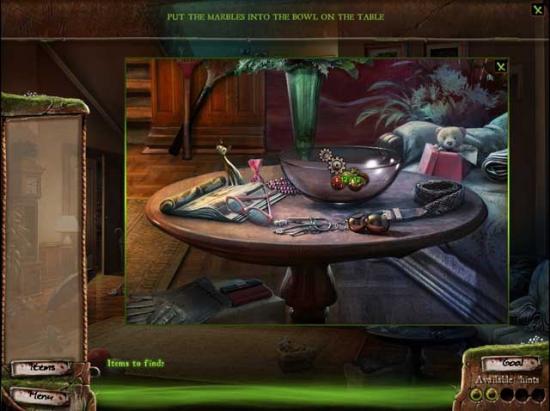
- Click on the bowl on the table on the right for a closer view. Place the marbles from your inventory inside the bowl.
- Time to resume the check on the twins. Go Upstairs.
Upstairs
- Take a closer look at the door of the Twin’s Room. Click on the handle to discover it’s been locked. You’ll have to find a way to retrieve the key from the keyhole, so go back downstairs into the Living Room.
Living Room
- Take a closer look at the table in the center of the room.
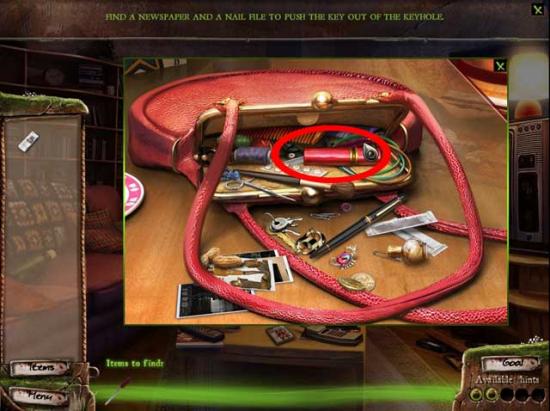
- Pick up the Newspaper lying on the table, then take a closer look at the purse in the corner.
- Pick up the Nail File inside the purse to add it to your inventory, then go back upstairs.
Upstairs
- Take a closer look at the Twins’ Door again. Place the Newspaper under the door, then use the Nail File on the lock to knock out the key. Click on the Newspaper again, then collect the Key to add it to your inventory.
- Use the Key on the door lock to unlock it.
- A Mirror? That’s right, but before you can pick it up and add it to your inventory, click on it to discover the objects you need in order to clean it.
- Click on the left arrow, then enter the Bathroom.
Bathroom
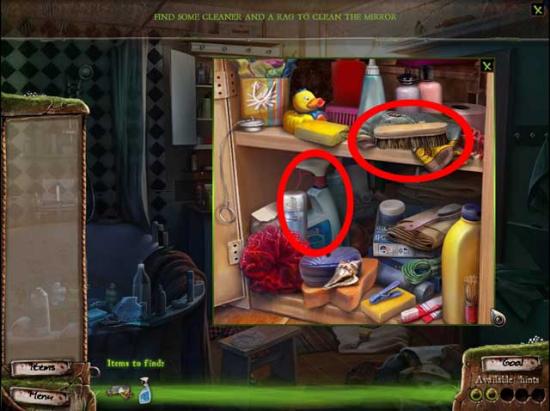
- Click on the cabinet under the sink for a closer view.
- Pick up the Cleaner and the Rag to add them to your inventory.
- Go back to the Mirror in the Upstairs/Twins’ Room.
Upstairs
- Use the Cleaner, spraying it over all of “Go Away” until it vanishes. Then, use the Rag to wipe it all clean.
- Click on the Mirror to add it to your inventory.
- Go to the second part of the Upstairs Hallway, then click on the Parents’ Room to enter.
Parents’ Room
- Take a closer look at the blank space of wall on the left.
- Try and place the mirror on the wall, however the nail is too bent. You’ll have to find a replacement Nail and Hammer to boot. Proceed back downstairs to the hallway.
Hallway
- Enter the Closet. It’s located on the left just around the corner of the stairs.
Closet
- Take a closer look at the box on the right near the door. Pick up the Hammer inside to add it to your inventory.
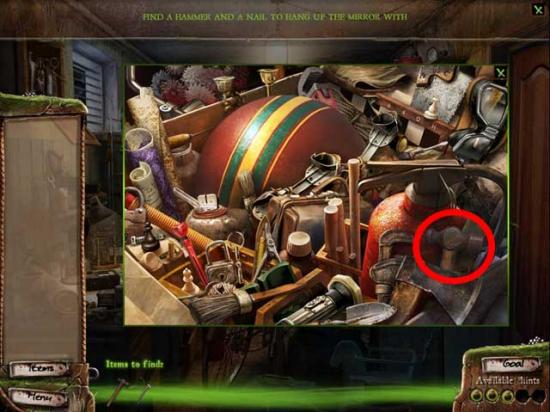
- Take a closer look at the workspace on the left. Click on the Nail to add it to your inventory.
- Go back upstairs to the Parents’ Room.
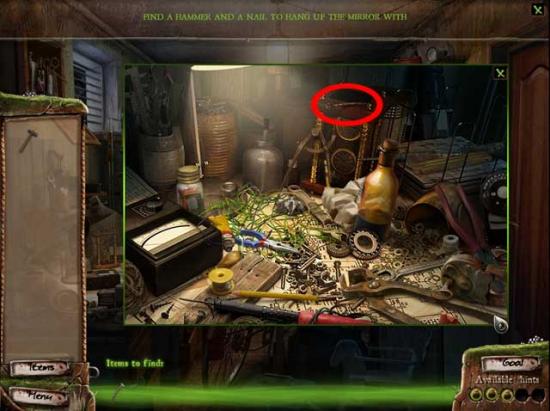
Parents’ Room
- Take a closer look at the blank wall again. Use the Nail, followed by the Hammer to replace the bent nail.
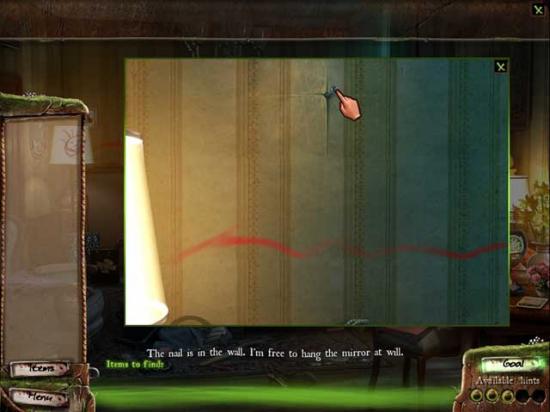
- Click on the mirror, now sitting below the blank wall space, for a closer look.
- The cord behind the mirror broke! You’ll have to fix it with some First Aid Tape. Return to the Bathroom.
Bathroom
- Take a closer look at the medicine cabinet to the left of the door. Pick up the First Aid Tape inside to add it to your inventory.
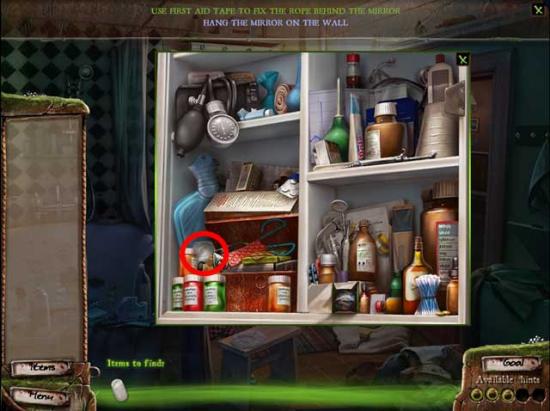
- Return to the Parents’ Room.
Parents’ Room
- Click on the mirror for a closer view.
- Use the First Aid Tape on the back of the mirror to repair the cord. The mirror will then be added to your inventory again.
- Take a closer look at the blank space of wall where you hung the new nail. Place the mirror on the nail to return it to its rightful place.
- Exit the room back into the Upstairs hallway.
Upstairs
- Take a closer look to the right of the Parents’ Room door: there’s remnants of a broken plate.
- Find the missing plate pieces. Their locations are all in the Upstairs are and are shown below:
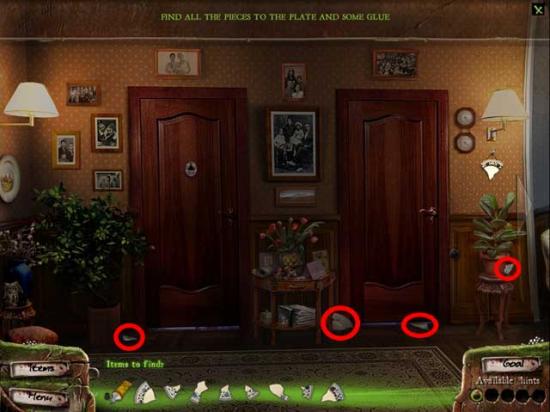
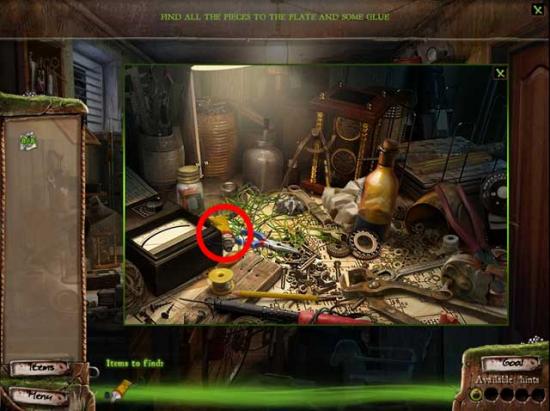
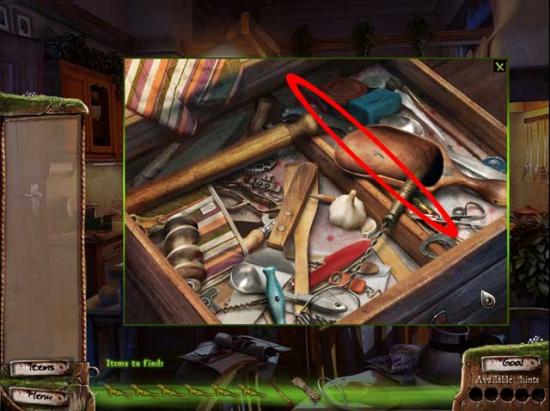
- You’re going to need Glue in order to fix the plate, too, so proceed downstairs into the Closet.
Closet
- Take a closer look at the workspace on the left. Pick up the Glue and add it to your inventory.
- Return to the Upstairs, outside the Parents’ Room door.
Upstairs
- Take a closer look at the broken plate to the right of the Parents’ Room door again.
- Reassemble the pieces of broken plate. Right-click to rotate pieces. Once you’ve assembled it, drag the Glue over the cracks to mend them. The solution and an example is shown below:

- Enter the Parents’ Room.
Parents’ Room
- Take a closer look at the drawer on the right: it’s next to the bed and slightly behind the table.
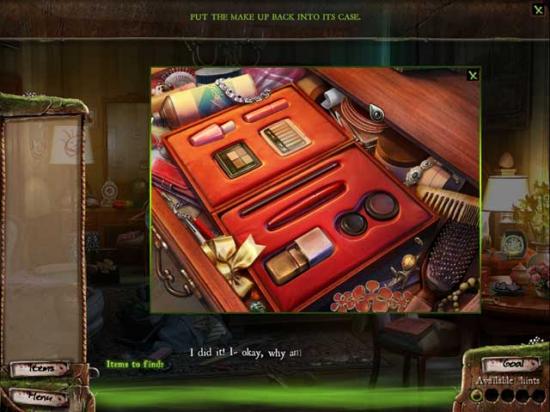
- It appears all of the mother’s make up is missing. Exit the close-up.
- Find the missing make up. Their locations are shown below:
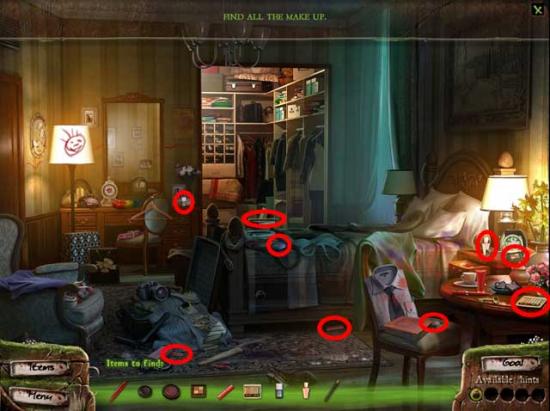
- Return to the close-up of the make up case. Place the items back in their correct locations. The solution is shown below:
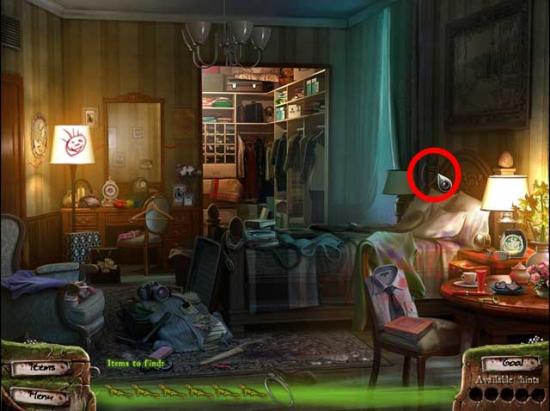
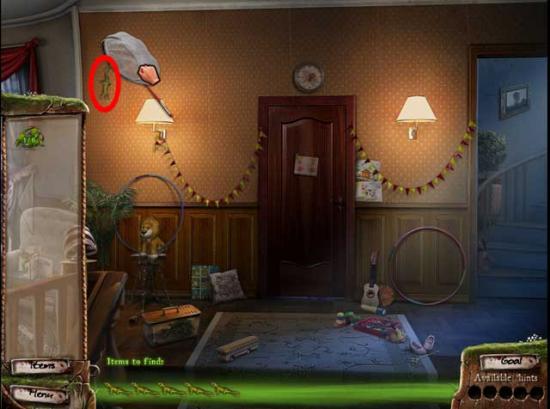
- It’s probably best to check on the twins again. Exit to the Upstairs hallway, then click on the Twins’ Room for a cutscene.
Upstairs
- Catch the lizards and put them back in their terrarium. You’ll need some sort of a net first, though.
- Enter the Bathroom.
Bathroom
- Take a closer look at the wooden stool at the bottom of the screen, next to the bathtub.
- Click on the lizard: you can’t catch it yet, but the hairnet looks promising. Three additional items you’ll need to make it function as a net will appear at the bottom of the screen. Time to find them!
- Proceed down to the Kitchen.
Kitchen
- Take a closer look at the drawer sticking out on the right side of the center counter island. Find the Chopstick inside and add it to your inventory.
- Enter the Closet.
Closet
- Take a closer look at the box on the right. Pick up the String inside to add it to your inventory.

- Go Upstairs to the Parents’ Room.
Parents’ Room
- Click on the Hairband hanging off the corner of the bed to add it to your inventory.
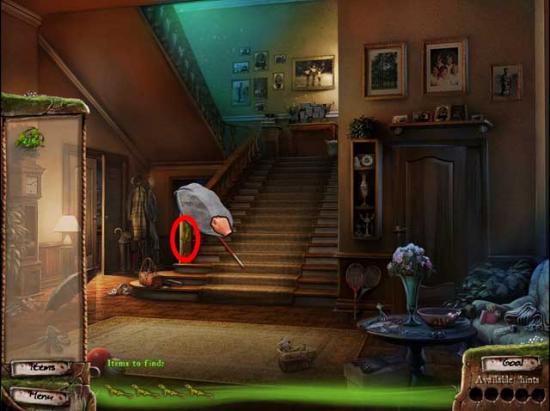
- Now you can finally assemble a net! Return to the Bathroom.
Bathroom
- Take a closer look at the wooden stool near the bottom of the screen again. Use the Hairband and Chopstick, and lastly the String to assemble a Net and add it to your inventory.
- Use the Net on the lizard to catch it. That’s 1 of 6.
Upstairs
- Outside the Twins’ Room is another lizard. Its location is shown below:
- That’s 2 of 6. On to the (downstairs) Hallway.
Hallway
- The locations of the lizard here is shown below:
- That’s 3 of 6. On to the Living Room…
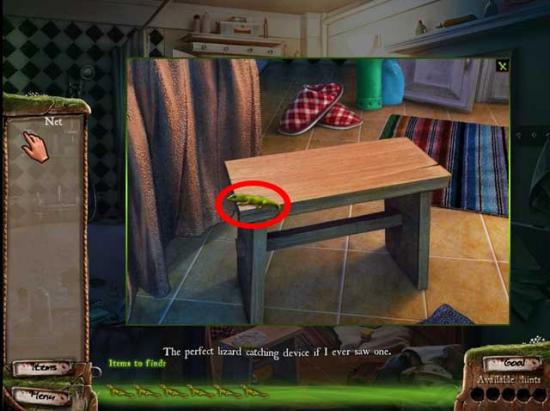
Living Room
- There’s two lizards here. Their locations are shown below. You’ll have to take a closer look at the table to catch the one hiding there.
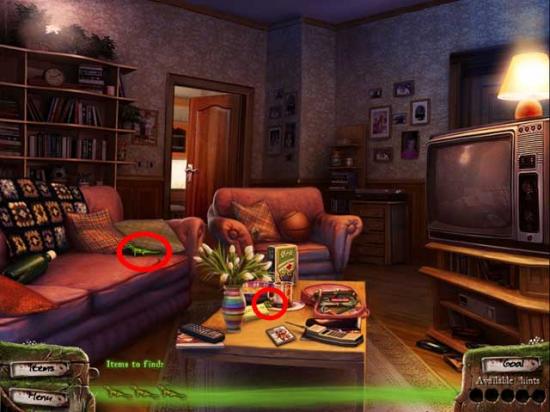
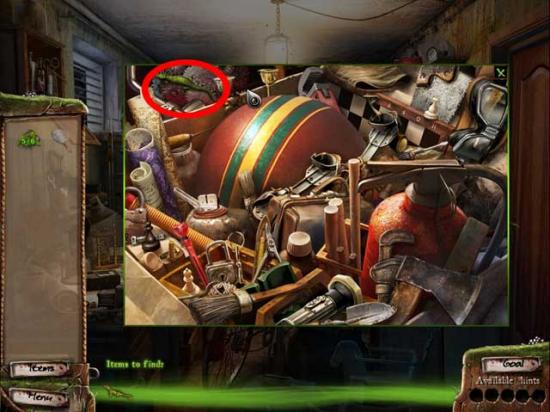
- That’s 5 of 6. The last one is hiding in the Closet.
Closet
- Click on the box on the right for a closer view. Catch the lizard hiding inside to finally retrieve 6 of 6.
- Return to the Upstairs, outside the Twins’ Room.
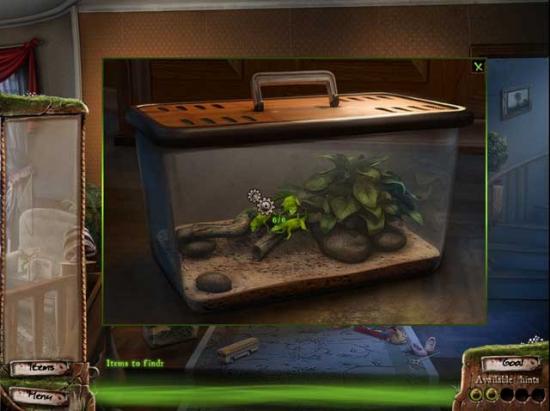
Upstairs
- Take a closer look at the terrarium on the floor: it’s slightly to the left. Click on it for a closer view.
- Place the 6 lizards inside to complete the task at hand.
- Enter the Twins’ Room.
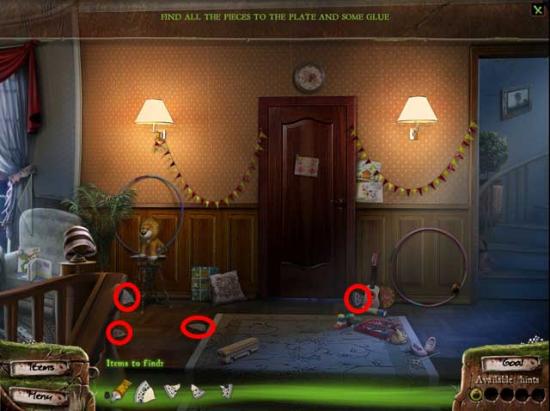
Twins’ Room
- The twins seem to have gone missing. Go back downstairs to the Living Room to find the emergency number to contact their parents.
Living Room
- The power will momentarily go out, revealing a creepy image on the TV before the lights flick back on.
- Click on the table in the center of the room: the emergency number is gone! Exit the close-up and find the pieces of torn note strewn throughout the room: their locations are shown below:
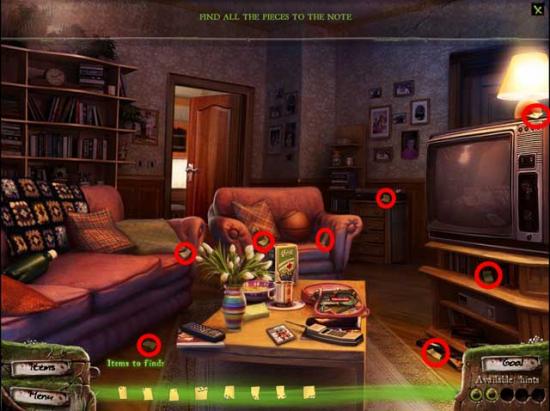
- Return to the close-up of the table. Use the torn note pieces on the table to enter a puzzle.
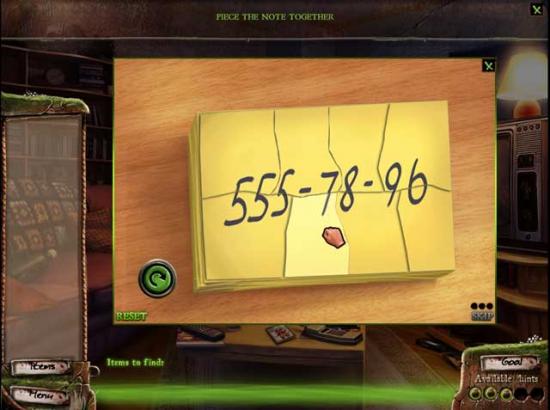
- Reassemble the torn note: you can rotate pieces by right-clicking. The solution is shown below:
- Once reassembled, pick up the phone on the right and dial the number as it appears on the note.
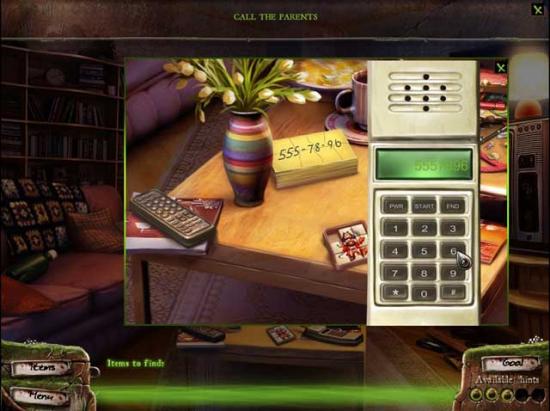
- Something’s odd. Return to the Hallway.
Hallway
- Muddy footprints all over the floor! They lead towards the right, into the Library…
Library
- There seems to be something awful funny about the bookcase in this room. Find the House Plans.
- Click on the painting on the right to remove it and reveal a hidden safe. Click on it for a closer view.
- You’ll need a Key and a Passcode to open the safe: these items have now been added to your to-find list.
- Take a closer look at the open drawer in the desk in the middle of the room.
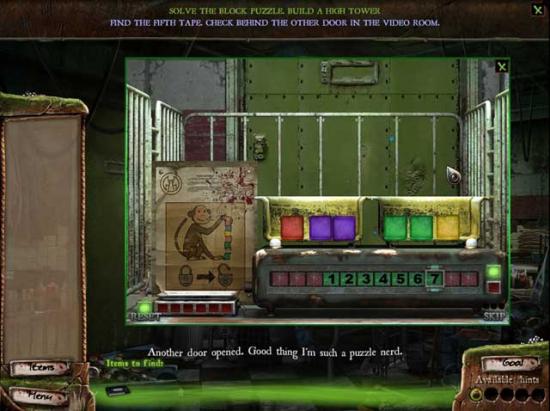
- Click on the colorful box inside to enter a puzzle.
- Reassemble the pieces of the box into their proper locations to complete the pattern and unlock the box, using the left mouse click to rotate clockwise and the right click to rotate counter-clockwise. The solution is shown below:
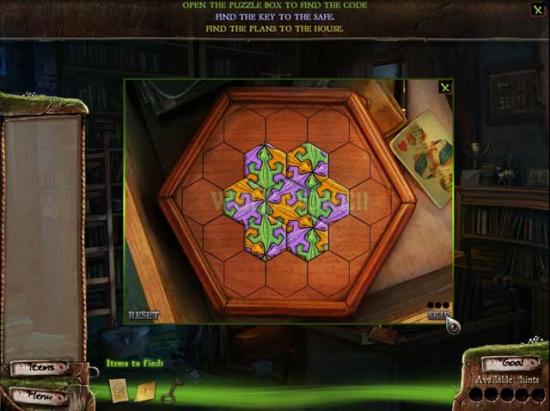
- Pick up the Passcode revealed inside the open box to add it to your inventory.
- Take a close look at the panel on the left side of the bookcase: it controls the library ladder. Move the lever into the far right and up position to extend the ladder within reach of the box on the top right corner of the bookshelf.
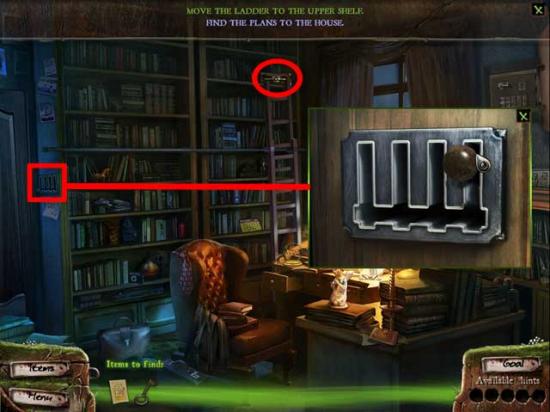
- Click on the box on the shelf for a closer view until you enter a puzzle.
- Click all the buttons that need to be clicked: the solution is shown below:

- The box will open and reveal a key. Click on the Key to add it to your inventory.
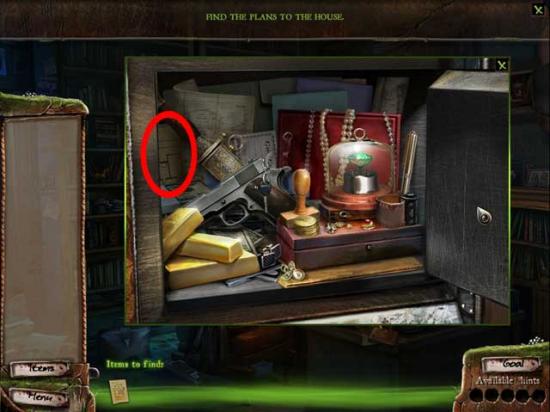
- Take a closer look at the safe on the right wall again.
- Place the Passcode note on the safe, then use the Key on the lock to activate the panel. Click in the Passcode 1-9-5-3-7-2 to open the safe and gain access to the contents within.
- Click on the Plans for the House to strike them from your list.
- Go back upstairs to the Twins’ Room.
Twins’ Room
- Click on the panel on the back wall: the portion of the wall covered in numbers, to reveal a hidden elevator. Click once more for a closer view and to discover that the Elevator Key is missing.
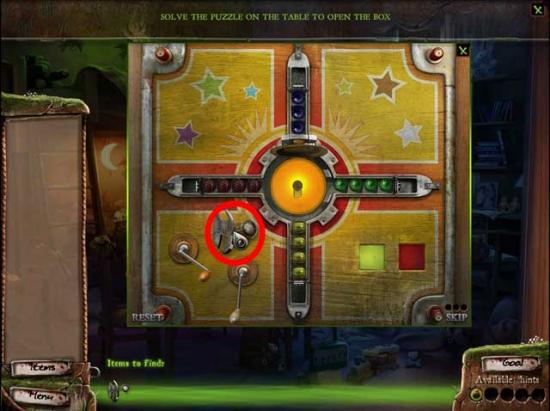
- Click on the box in the center of the table in the middle of the room for a closer view.
- Several beads are missing from the box. Find them to activate the puzzle: their locations are shown below:
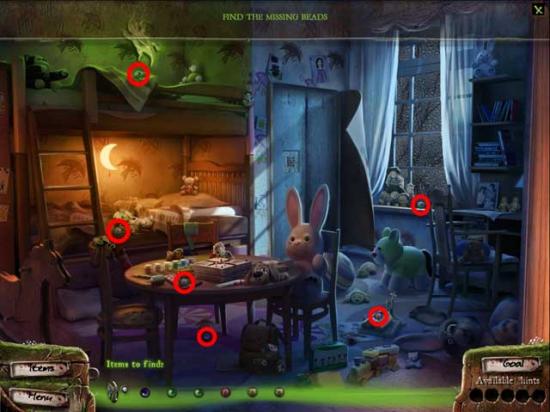
- Click on the box once again for a closer look, then place the beads you’ve found onto it to activate the puzzle.
- Use the left and right mouse buttons to move the dial clockwise and counter-clockwise. The goal is to place all the beads of a certain color together in one slot. Upon completing the puzzle, click the Elevator Key that appears. The solution is shown below:
- Use the Key on the Elevator lock to open it and gain access to…
Part II: The Secret Laboratory
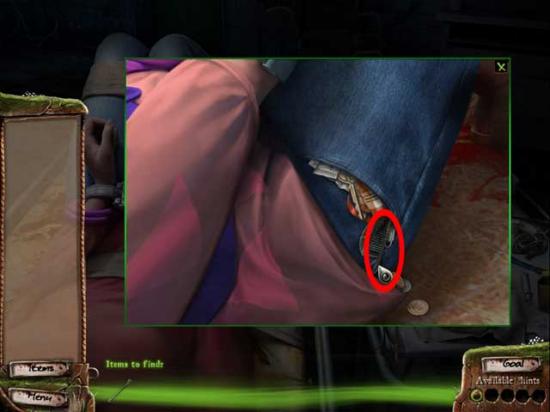
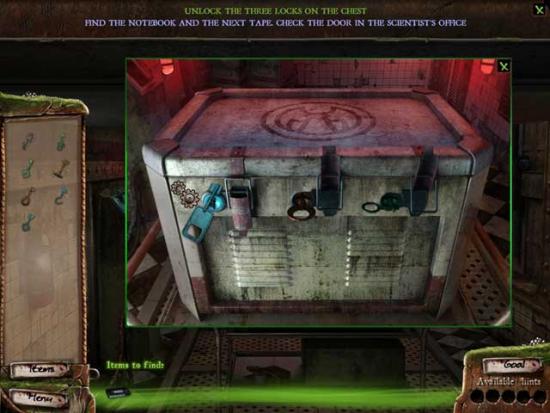
- Take a closer look at the handcuffs. They’re locked, but the hairpin in your pocket should do the trick!
- Take a closer look at your right pocket to enter a close-up. Pick up the Hairpin to add it to your inventory.
- Take a closer look at the handcuffs again. Use the Hairpin on the handcuffs to pick them and open the lock. For the left cuff, move the hairpin Up, Right, then Down. For the right cuff, move the hairpin Down, Right, then Up. The handcuffs are now gone.
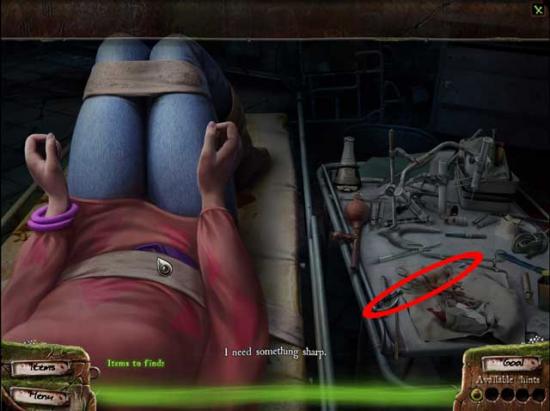
- Click on the Knife on the surgical tray, then use it on the bandages binding you to cut yourself free.
Surgery
- The room is dark, so you’ll need to find a way to switch on the lights. Take a closer look at the desk on the far wall, to the left.
- Click on the device on the desk: it’s a generator, but it needs more parts.
- Exit the desk, and take a closer look at the surgical tray near the bottom of the screen.
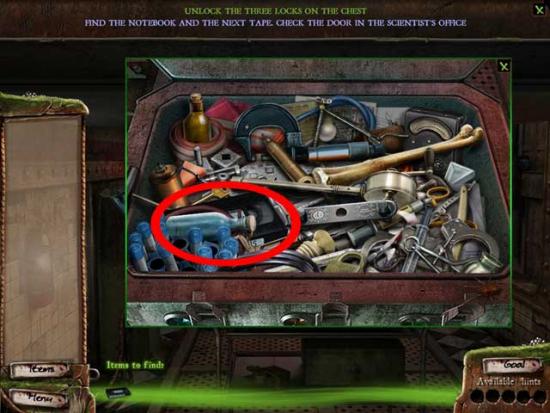
- Find the generator parts scattered on the surgical tray: their locations are shown below:
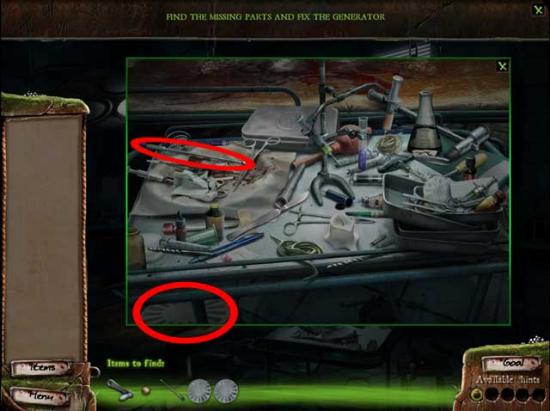
- Go back to the desk and take a closer look. Find the remaining parts scattered there: their locations are shown below:
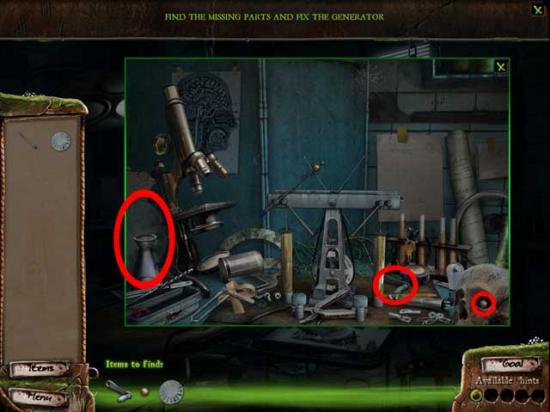
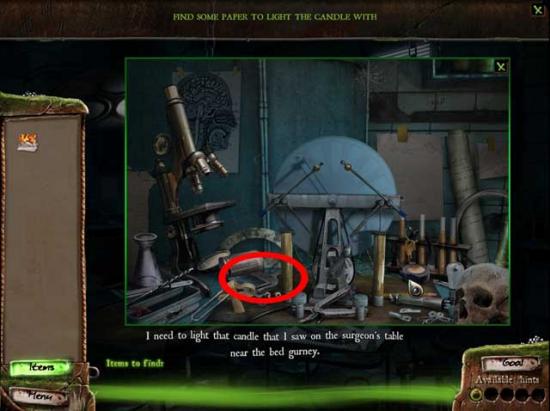
- Use all the parts on the generator to repair it. You’ll need paper for a spark, though. Return to the surgical tray and pick up the piece of paper to add it to your inventory:
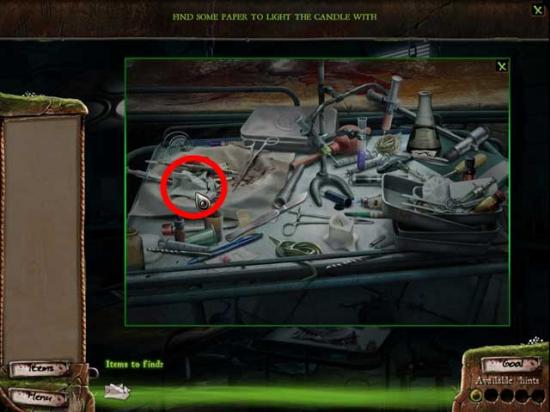
- Use the Paper on the generator to get the Flame, then return to the surgical tray and use the Flame on the Candle to restore light to the room.
- The door is locked, however take a closer look at the wall next to the wheelchair on the right.
- Click on the anchor bolting the wheelchair to the wall until it falls off, then take a closer look at the rotted wall.
- Find the objects needed to remove the rotted wall. Their locations are shown below:

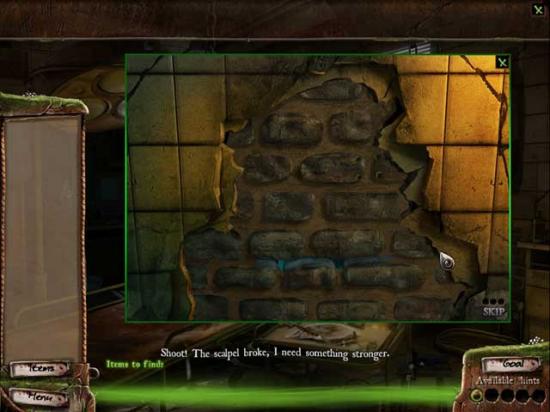
- Take a closer look at the wall again. Use the Hammer to crack the wall, then use the paint-scraper to remove the plaster and reveal the bricks underneath. Use the Scalple on the plaster between the bricks to remove them. However, it will break.
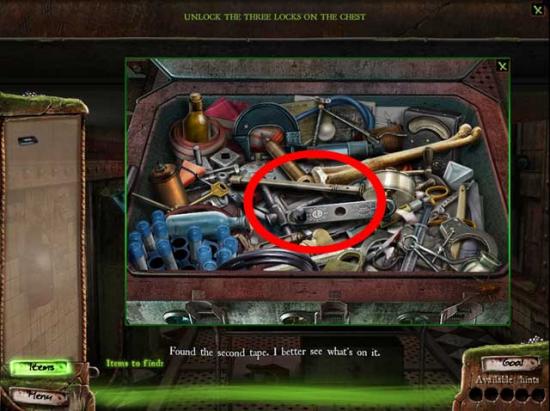
- Click on the surgical tray, then take a closer look at the tube lying in the middle. Click on it to discover which items you’ll need to make it into a strong tool for removing plaster.
- Find the items needed for the tool: their locations are shown below:
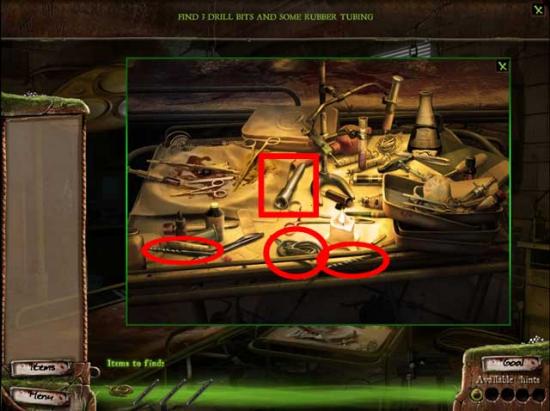
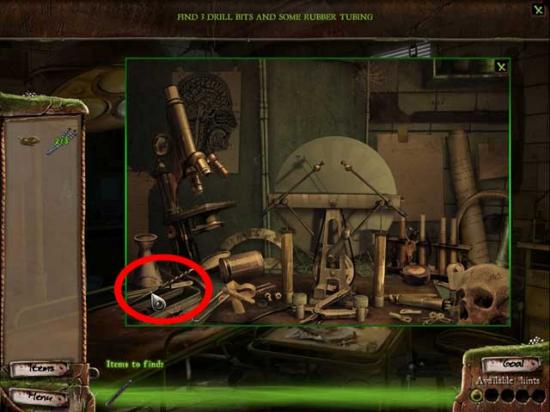
- Use the items on the tube to create the handmade drill. Click on it to add it to your inventory.

- Go back to the rotted section of wall. Use the handmade drill to remove the plaster between the bricks (holding down the mouse button as you move it back and forth) until a hole into the next room is cleared.
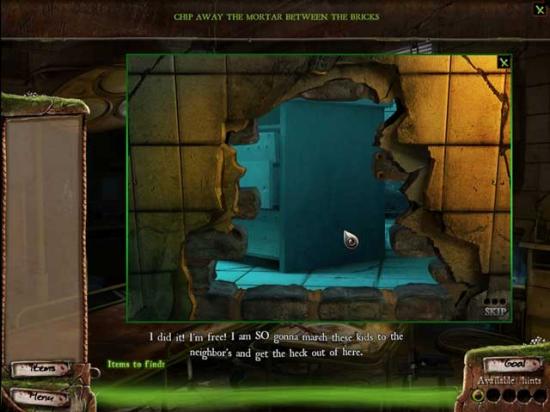
- Enter the new room.
Office
- Take a closer look at the door on the left: it’s locked. A Key will be added to your list of items to find.
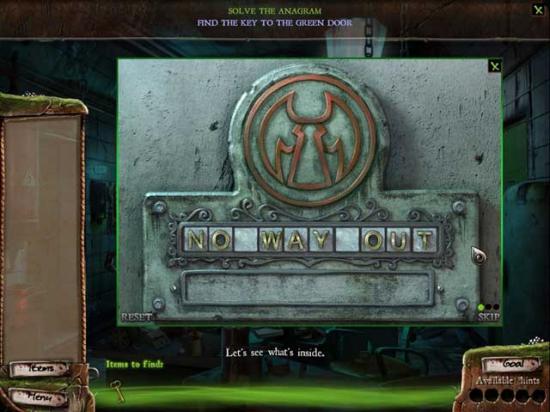
- Take a closer look at the safe panel in the far corner. It appears to be a sort of locking mechanism. Find the missing letters for the mechanism hidden throughout the room. Their locations are shown below:
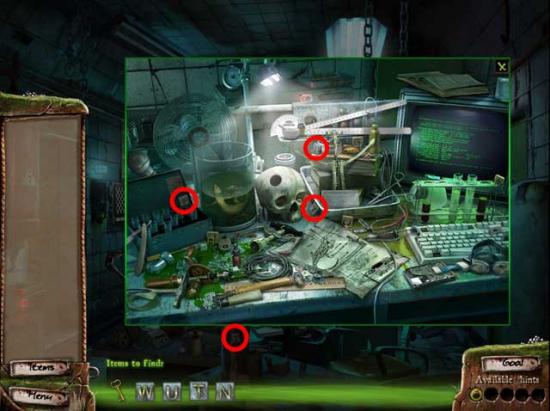
- Return to the locking mechanism. Use the letters you’ve found on the panel to activate a puzzle.
- Arrange the letters so that they spell “No Way Out” to solve the puzzle and open the safe.
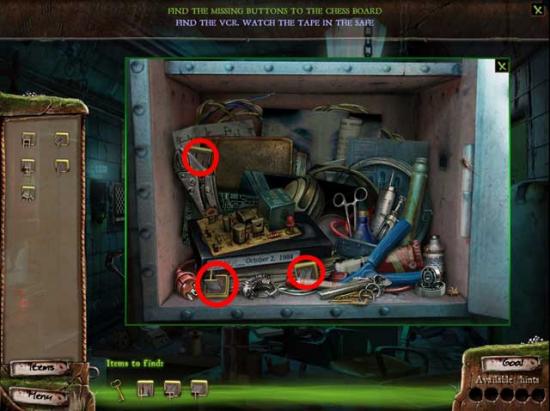
- Inside the safe is a videotape, but you’ll need to find a VCR before you can watch it.
- Exit the safe and take a closer look at the board on the wall to the immediate left of the safe, between the safe and the door on the left.
- It appears to be some sort of chess board, with the much-needed Key floating in a tube nearby. Several missing pieces from the board will add themselves to your to-find list.
- Find the pieces needed for the board puzzle. Their locations are shown below:
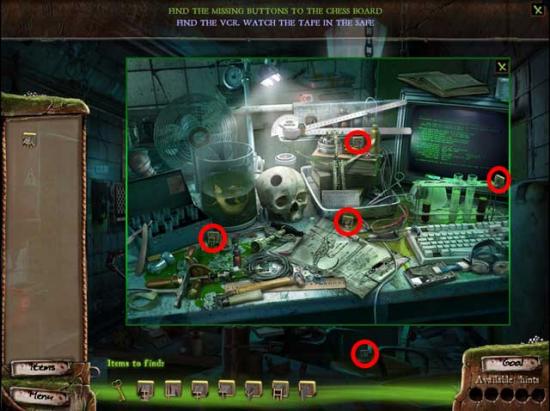
- Add the buttons to the chessboard on the wall to activate a puzzle. Press the buttons at the bottom of the board to move the knight onto the red square. There are multiple solutions. Moving it onto the final green square will reward you with the Key. Click on it to add it to your inventory.
- Use the Key on the lock on the door to the left to open it.
Office Corridor
- Proceed into the main Hall
Hall
- This is a large two-screen area that gives you access to many other rooms and corridors. From here, take the corridor on the left in the first screen, to the Video Room.
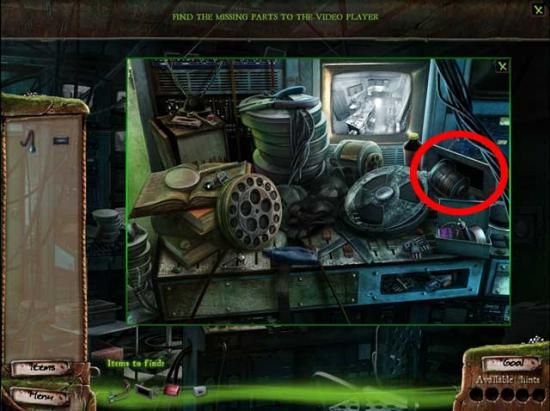
Video Room
- Click on the control panel at the front of the screen for a closer view.
- Click on it: it’s a broken video recorder. Find the pieces necessary to repair it. Their locations are shown below:

- Return to the Office for the remaining items.
Office
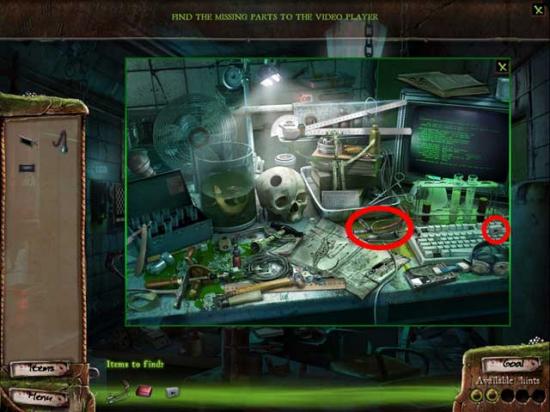

- Return to the Video Room to repair the VCR.
Video Room
- Repair the VCR. The locations of the various items are shown below:
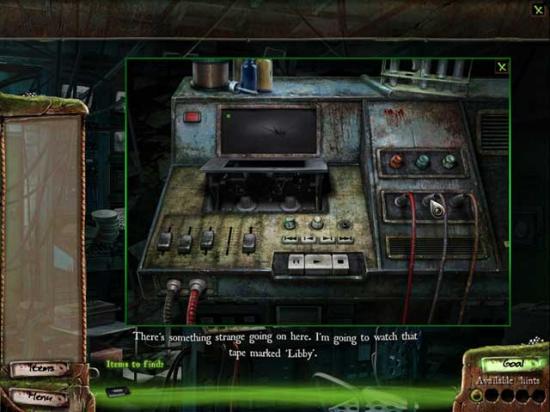
- Return to the Office to retrieve the Video Tape marked “Libby”.
Office
- Click on the safe in the back corner and collect the Video Tape.
- Return to the Video Room.
Video Room
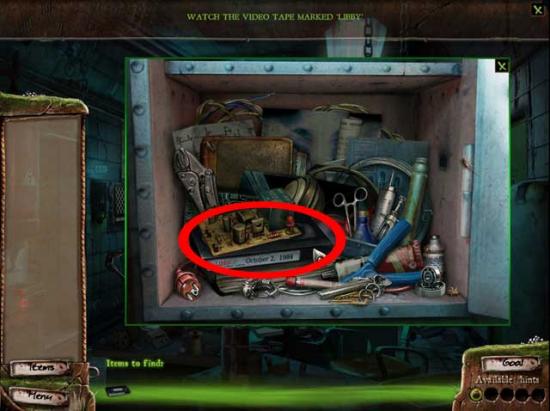
- Use the Video Tape on the VCR to watch it.
- A new Video Tape and a Notebook will be added to your list of items to find. Return to the Office.
Office
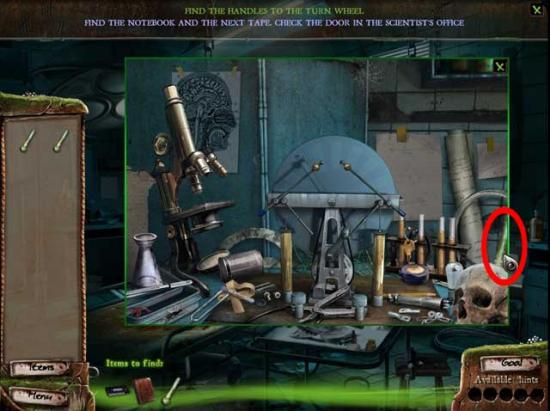
- Take a closer look at the red door with the turn wheel. The turn wheel is missing handles which will be added to your to-find list. Their locations are shown below:
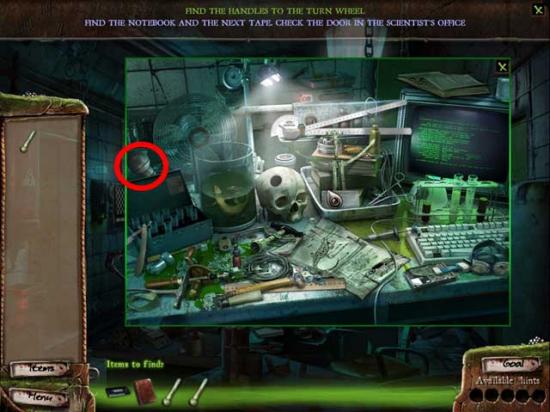
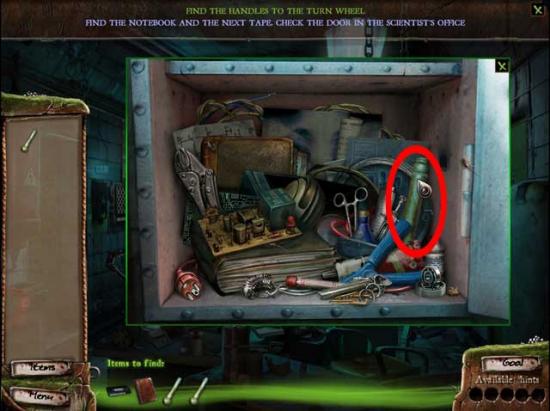
- Return to the Surgery room for the last handle.
Surgery
- Return to the Office.
Office
- Use the Handles on the door, then click on it to open it.
- Enter the Holding Cell.
Holding Cell
- The Notebook you’re looking for is located on a pedestal on the left. Take a closer look.
- Read the inside of the Notebook, then click out. An alarm will go off, and the room will lock you in.
- Find the keys for the lockbox. Their locations are shown below:
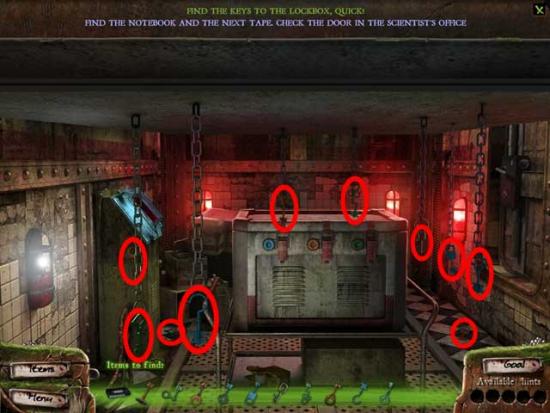
- Click on the box in the center of the room for a closer view.
- Place the correct key shape for each color in its respective lock: the solutions are shown below:
- Inside the box is the next Video Tape. Its location is shown below:
- Take a closer look at the door on the right: it’s locked and requires a Key. Check back inside the box in the middle of the room. The Key’s location is shown below:
- Use the Key on the door to unlock it and open it. Proceed through the Office and into the Video Room.
Video Room
- Use the Video Tape on the VCR to play it and watch the cutscene that ensues.
- Another Video Tape will be added to your to-find list, with the recommendation of searching in the Workshop.
- Proceed to the main Hall area.
Hall
- Click on the arrow on the left to access the second part of the area. Proceed down the Workshop Corridor.
Workshop Corridor
- Take a closer look at the door: it’s buckled. You’ll need some items in order to open it.
- Go back to the Office.
Office
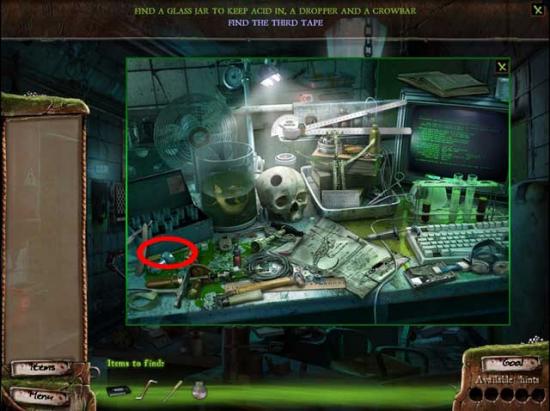
- Take a closer look at the desk. Pick up the Dropper and add it to your inventory.
- Enter the Holding Cell.
Holding Cell
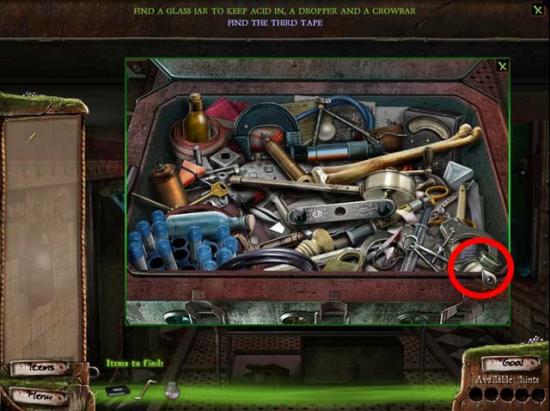
- Take a closer look at the box in the center of the room: pick up the Glass Jar inside and add it to your inventory.
- Proceed to the main Corridor area.
Corridor
- Enter the Food Storage area via the passage on the far left. Proceed into Food Storage.
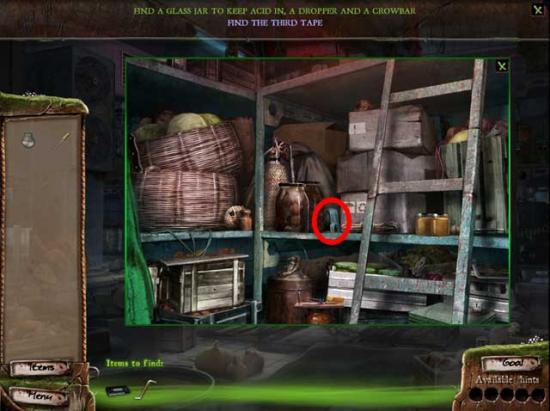
Food Storage
- Take a closer look at the shelves. Pick up the Crowbar and add it to your inventory.
- Return to the Workshop Corridor.
Workshop Corridor
- Use the Glass Jar on the area below the dripping acid to collect it, then use the Dropper to acquire the acid and use it on the door hinges.
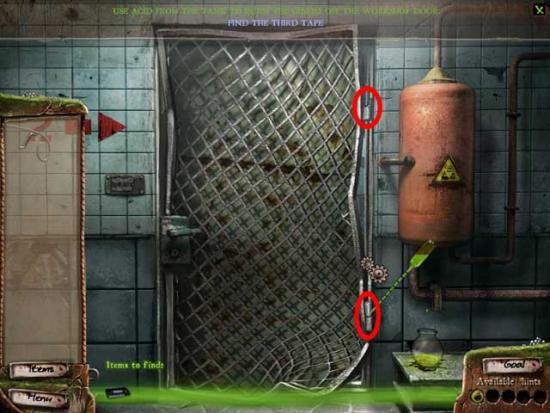
- Once the hinges are completely gone, use the Crowbar to pry the door open and gain access into the next room.
Workshop
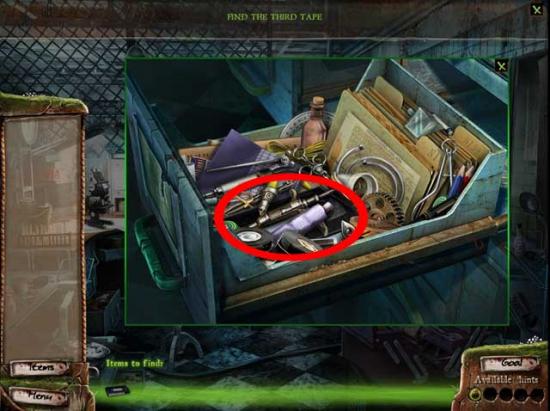
- Take a closer look at the drawers just beyond the body gurney.
- Pick up the Video Tape inside the file cabinet and add it to your inventory.
- Return to the Video Room.
Video Room
- Use the Video Tape on the VCR, then watch the cutscene that follows. Only two video tapes left to find.
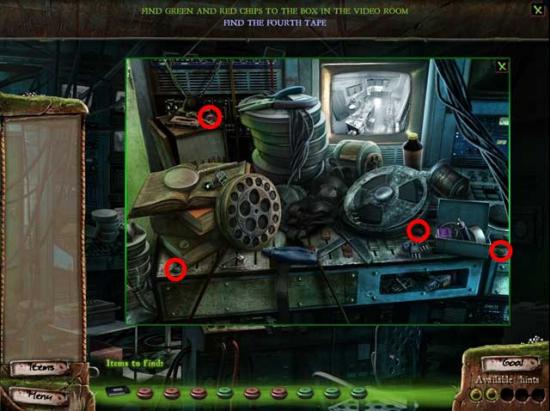
- Take a closer look at the box on the left.
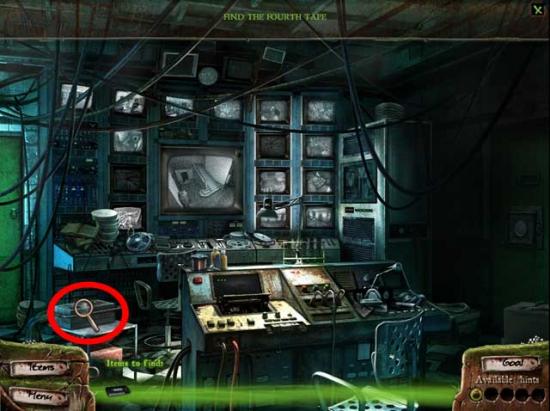
- Click on the box lid: you’ll need to find the missing red and green chips before you can activate the puzzle. Their locations are shown below:
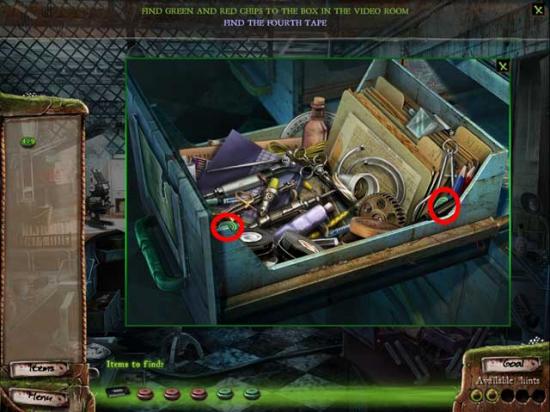
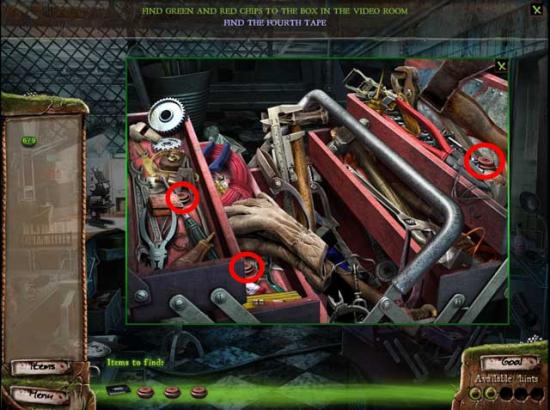
- Proceed into the Workshop to retrieve the rest of the buttons.
Workshop
- Look and the file cabinets and the toolbox near the front of the screen to find the rest of the buttons. Their locations are shown below:
- Return to the Video Room.
Video Room
- Click on the box on the left again for a closer view.
- Use the Buttons from your inventory on the box to activate a puzzle. Rotate the rings so that all the green buttons are in the center ring, and all the red buttons are on the outer rings. The solution is shown below:
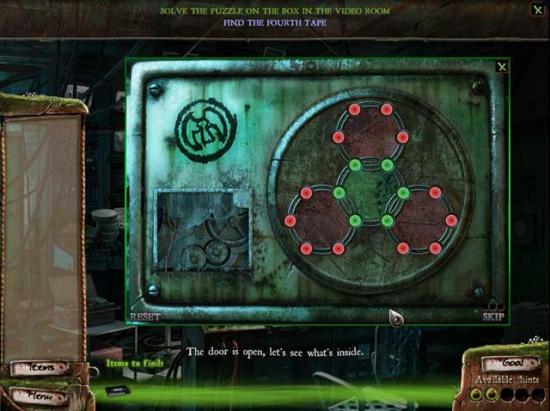
- The box will open. Inside is the fourth Video Tape, its location is shown below:
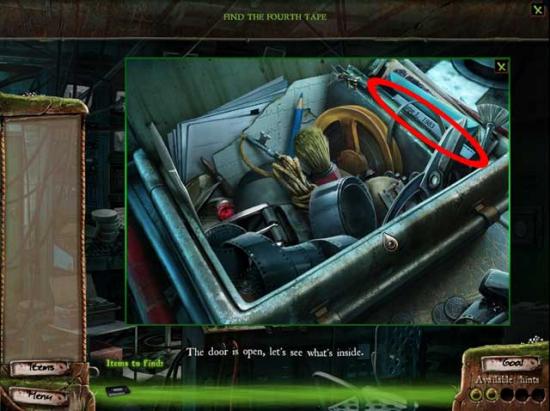
- Exit the close-up and use the Video Tape on the VCR for another cutscene.
- Now there’s just one Video Tape left to find. In the meantime, take a closer look at the door on the right.
- Click on the door: it needs four buttons. Their locations are shown below:
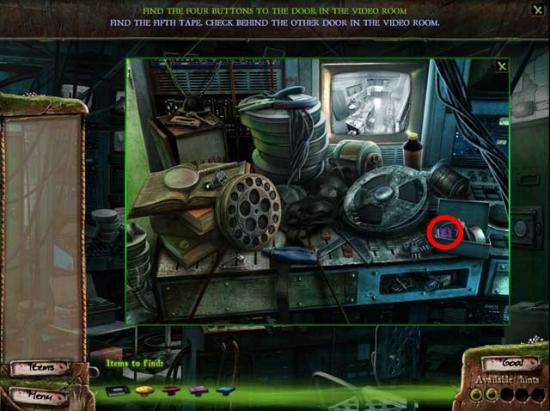
- Proceed to the Office Corridor for the remaining buttons.
Office Corridor
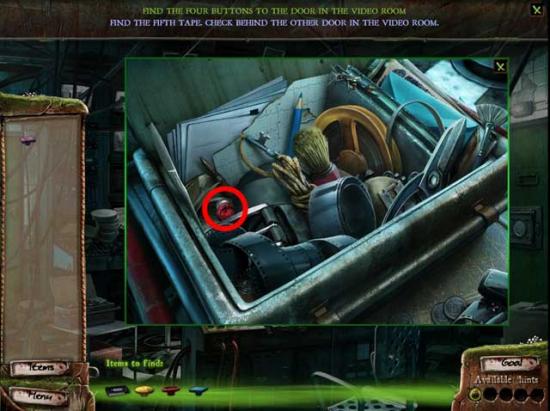
- Take a closer look at the red Fire Emergency box on the left.
- Collect the remaining two buttons inside. Their locations are shown below:
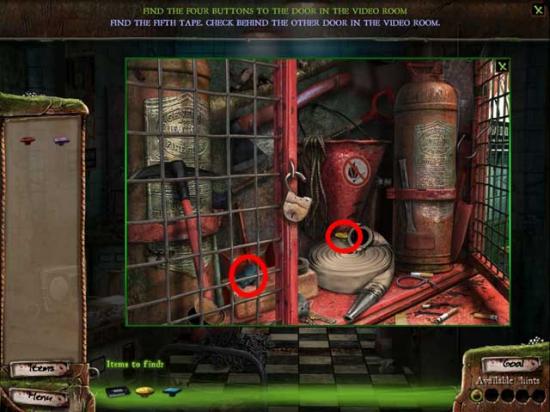
- Return to the Video Room.
Video Room
- Take a closer look at the door on the right.
- Place the buttons on the door: the solution is shown below:
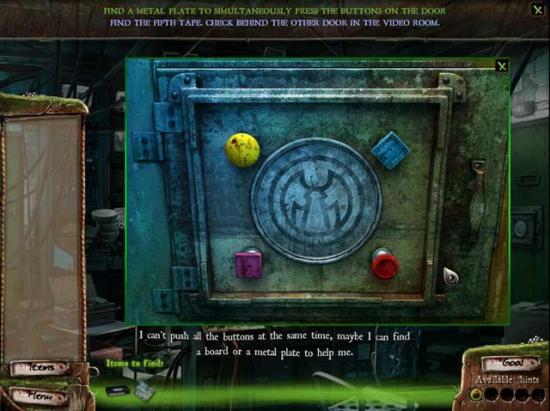
- You’ll need to find a way to push all the buttons at the same time. Your best bet is to check the Workshop.
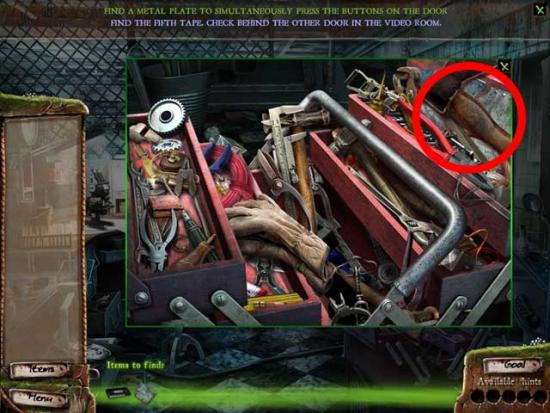
Workshop
- Take a closer look at the toolbox near the front of the screen. Pick up the Metal Plate inside and add it to your inventory.
- Return to the Video Room.
Video Room
- Take a closer look at the door on the right.
- Use the Metal Plate on the area over the buttons, then click on it to push it in.
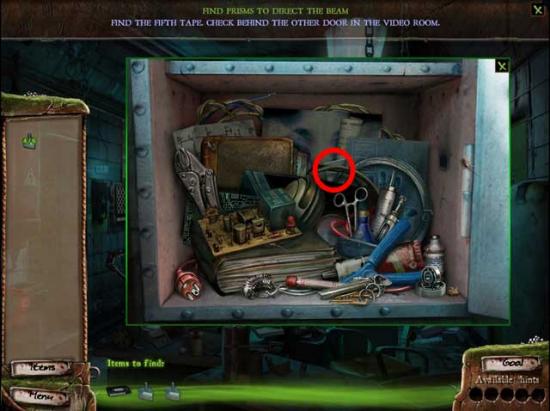
- A new puzzle will appear, but this one’s missing some prisms, which will be added to your to-find list. Their locations are shown below: go to the Workshop first to find them.
Workshop

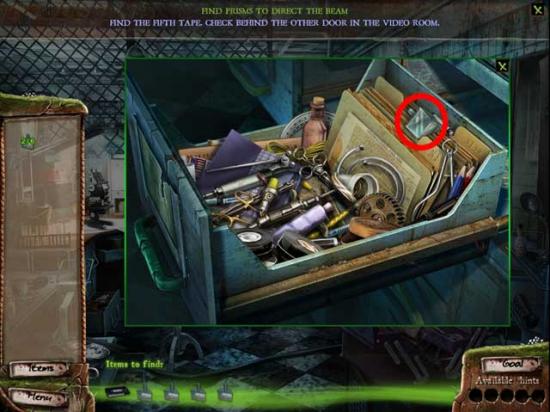
- Proceed to the Holding Cell for the next two prisms.
Holding Cell
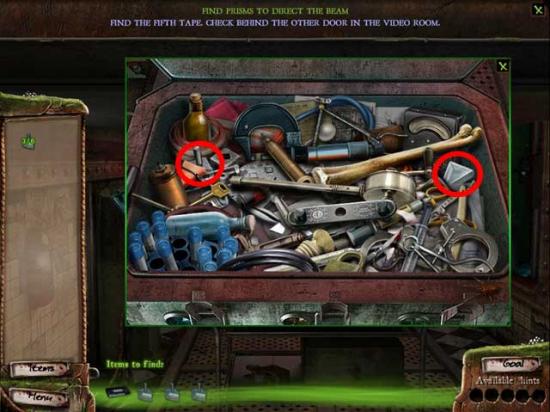
- Go to the Office for the final prism.
Office
- Take a closer look at the safe for the final prism. Its location is shown below:
- Return to the Video Room.
Video Room
- Take a closer look at the door on the right. Use the prisms from your inventory on the panel to activate a puzzle.
- Place the prisms on the grid so that the light beam shines from one side to the other: you’ll need to use all the prisms. The solution is shown below:
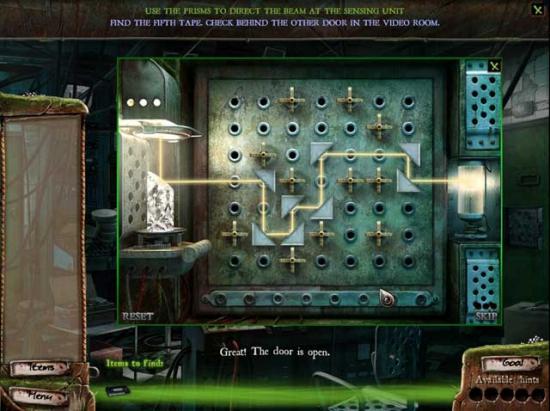
- The door is now unlocked. Continue into the Lobby.
Lobby
- The Laboratory is locked from here, so instead enter the room labeled Animal Test Room.
Animal Test Room
- Upon entering, the room will lock you in. You’ll have to find a way out!
- Take a closer look at the device inside the crib cage in the middle of the room.
- Take a closer look at the device: it seems to be missing four blocks. Exit the close up and find the four missing blocks: their locations are shown below:
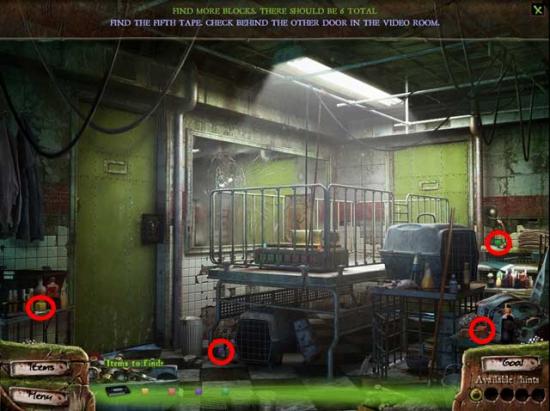
- Take a closer look at the device again.
- Use the blocks from your inventory on the device to activate a puzzle. The solution is shown below:
- The door to the Laboratory, the door on the left, is now unlocked. Click on it to enter.
Laboratory
- The last Video Tape is hidden here. Pick it up to add it to your inventory: its location is shown below:
- Exit to the Lobby and proceed into the Video Room.
Video Room
- Take a closer look at the VCR. Use the Video Tape on it to watch the fifth and final tape…
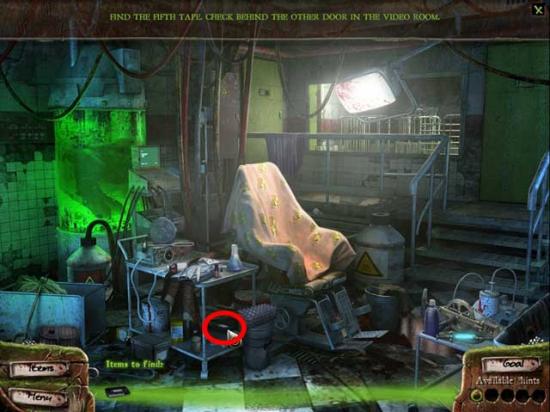
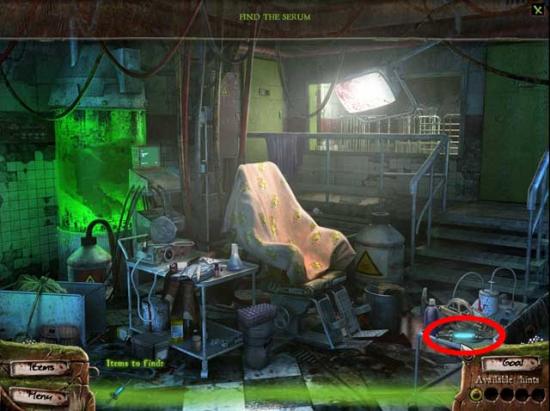
- There are no more Video Tapes left to find, but proceed back to the Laboratory to find the Serum that’s been added to your to-find list.
Laboratory
- Pick up the Serum and add it to your inventory: its location is shown below:
Part III: The Escape
Lobby
- Go directly to the Food Storage room.
Food Storage
- Take a closer look at the electrical device on the floor near the doorway.
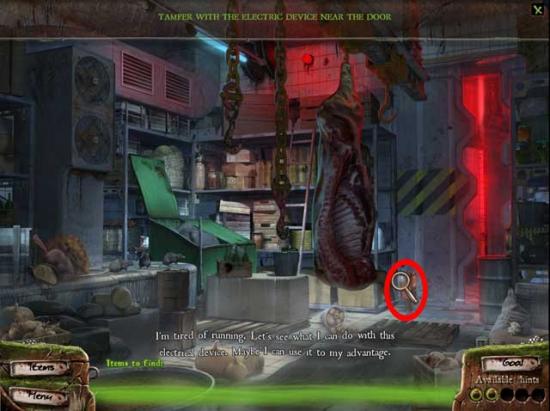
- Click on the device until you notice a puddle of water just below it. It seems perfect for a trap, doesn’t it? Several more items will be added to your to-find list.
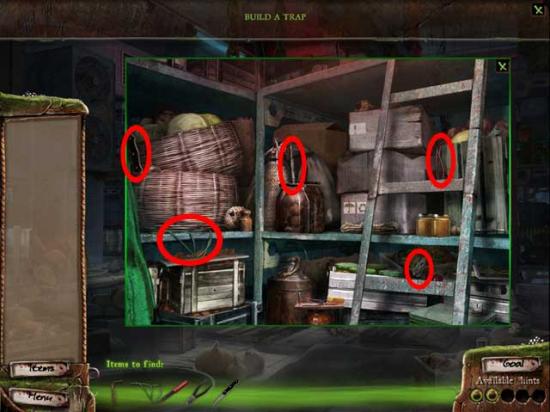
- Take a closer look at the shelves on the back wall.
- Find the items shown on your to-find list at the bottom of the screen. Their locations are shown below:
- Exit the close-up and return to the close-up of the electrical device.
- Click on the device to open the front panel. Place the Red and Green Wires on the device, then use the Knife to cut off the very ends so the wire is exposed. Click the Saudering Tool and use it on the Wires, then use the Pliers on the wire holding the lever to complete the trap.
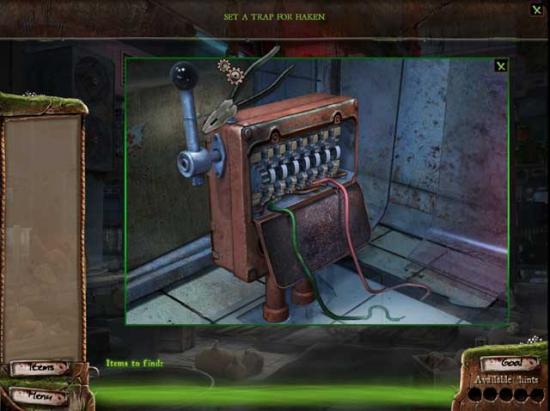
- Click the lever so it’s in the down position. The trap is now set.
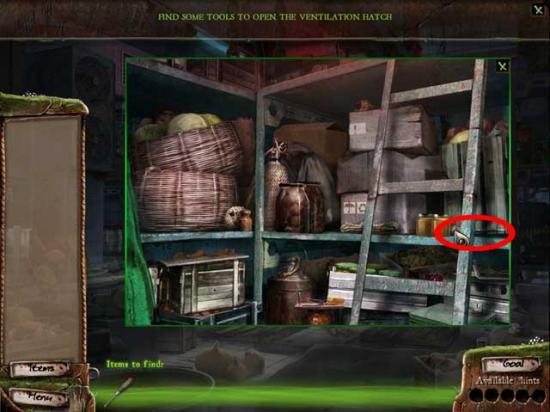
- Take a closer look at the ventilators on the left. Click on the grate covering the fan: you’ll need something to remove it.
- Take a closer look at the shelves near the back of the room. Pick up the Screwdriver hidden among them to add it to your inventory.
- Return to the close-up of the ventilators, and use the Screwdriver to remove the screws holding the grate in place.
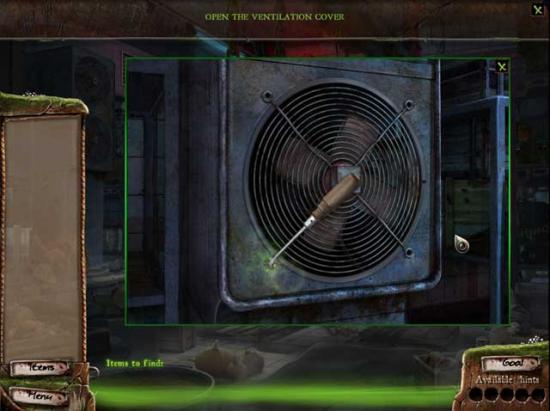
- Enter the Ventilation.
Ventilation
- Crawl through until you find your way out! If you need directions, they’re as follows: Forward, Right, Back, Forward, Forward, Forward, Back, Left, Forward, and Down.
Test Room
- Take a closer look at the door on the far end of the room and click on it: a Mop and a Rope should do the trick in blocking it. Their locations are shown below:
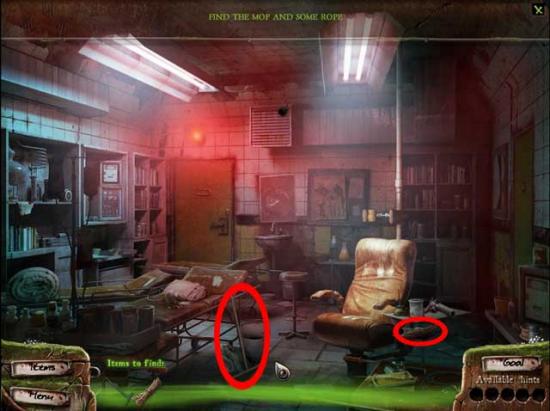
- Return to the close-up of the door. Use the Mop and the Rope on it to barricade it.
- Exit through the door on the right.
Elevator Corridor
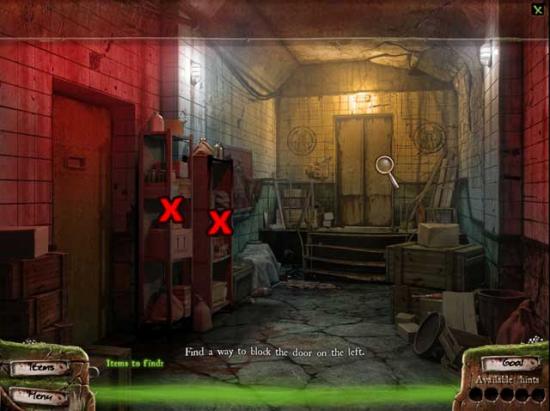
- Block the door on the left by clicking the two shelves marked with an “X” in the screenshot below.
- Take a closer look at the elevator.
- You’re going to need a Screwdriver to open the electrical panel. Exit the close-up.
- The location of the Screwdriver is shown here below:

- Return to the close-up view of the elevator panel.
- Use the Screwdriver on the screws holding the panel in place to open it, then enter a puzzle.
- Use the left click to rotate panels clockwise and the right click to rotate panels counter-clockwise. A panel can only be rotated when power is supplied to it. There’s a fair possibility you will need to reset the puzzle more than once to atone for this. The goal is to restore power to the “Maintenance” setting. The solution is shown below:
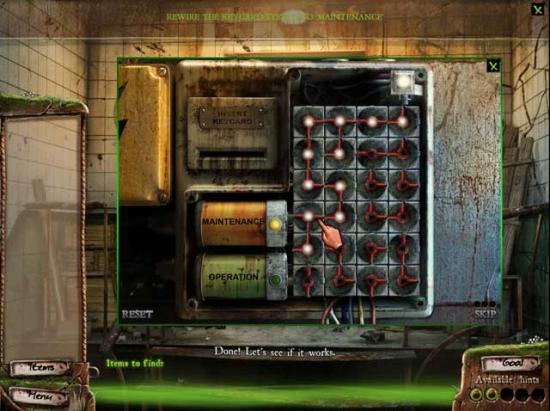
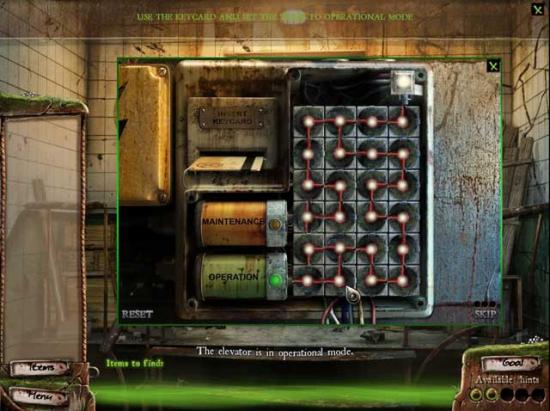
- A cutscene will ensue. Once it’s finished, pick up the Key Card lying on the floor, then take a closer look at the elevator panel again.
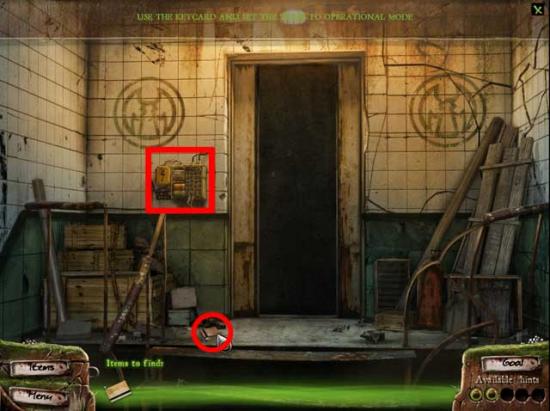
- Insert the Key Card, then arrange the panels in the same way as the fashion above, but so this time they connect with the “Operation” setting. The solution is shown below:
- A cutscene will follow, leaving you in the Twins’ Room.
Twins’ Room
- Proceed to the “Upstairs” area and watch what unfolds…
Congratulations! You’ve completed Campfire Legends: The Babysitter! To be continued…

More articles...
-
Best Horror Games On Itch.io – July 2026
Across a bounty of subgenres. -
Haze Seas Accessories Tier List [Best Accessories to Equip]
The accessories with the best stat buffs in Haze Seas.