![Digimon UP Tier List [Supports, Buddies, and Partners]](/wp-content/uploads/2026/07/digimon-up-tier-list.jpg "Digimon UP Tier List [Supports, Buddies, and Partners]")
Digimon UP Tier List [Supports, Buddies, and Partners]
These Digimon will get you UP the leaderboard.


![Haze Seas Boss Drops [Chances, Locations, and How to Spawn]](/wp-content/uploads/2026/07/haze-seas-boss-drops.jpg "Haze Seas Boss Drops [Chances, Locations, and How to Spawn]")

Welcome the Buried in Time walkthrough on Gamezebo. Buried in Time is a strategy time management game created by I-Play. This walkthrough includes tips and tricks, helpful hints, and a strategy guide on how to complete Buried in Time.
Welcome the Buried in Time walkthrough on Gamezebo. Buried in Time is a strategy time management game created by I-Play. This walkthrough includes tips and tricks, helpful hints, and a strategy guide on how to complete Buried in Time.
You will first be taken through a little tutorial in which you’re taught the basic actions. You can explore the map either by clicking and dragging, or by moving your cursor to the edge of the screen.

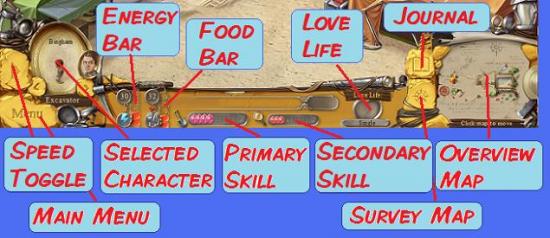
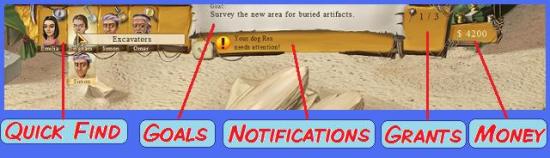
At the top left of the main window is your character quick find menu. Characters are organized according to skill. If you want to, say, find an excavator, hover your mouse over the image of Bingham (your main excavator) and a drop down menu will appear showing all characters with the excavating skill – both primary and secondary.
At the top of the window you will also see your current goal you are working towards, and recent notifications. Clicking on the notification will take you to the character or location relating to the notification. Only the most recent notification is shown. If you’ve missed any, click on the arrow button to the left of the notification bar to see other recent notifications.
To the right of the goals and notifications, you see a list of the grants you are currently working on. It will show you how many items need to be found to complete a grant and how many of these items you’ve currently found. Hover your cursor over your grants list to get more information.
At the bottom of your screen you will see the status bar of your currently selected character. In the middle it shows your character’s primary and secondary skill, and at what level they are for each skill (count the diamonds). To the left of the skills are your character’s energy and food bars. Too the right you will see if they are currently in love.
On the far bottom right of the main window is a little overview map. You can click anywhere on that map to be taken to that area instantly.
Next to the overview map is your journal button. Click on the journal button to get information on the storyline and your current collections of artifacts. In the journal menu you can also hire new archeologists and buy and upgrade tents.
On the far left you have your main menu button, where you can go to exit the game or change your sound volumes. Above the menu button is a speed toggle, which allows you to switch between normal game speed and fast speed.
Your characters will wander aimlessly around the map, very occasionally doing some work if they feel like it. Generally, you will need to tell them what to do. Set your characters to work by picking them up and dragging them to the place where you want them to work.
Clicking on a character will show you their status bar at the bottom of the screen. The middle of the status bar shows the kind of work your character can do. Each character has two skills, a primary and a secondary, which can be surveying (indicated by a blue and red dial), excavating (a spade), brushing (a brush), analyzing (a magnifying glass) or cooking (a knife and fork).
Doing the same work repeatedly will increase a character’s skill level. The tutorial says that you will find a character’s secondary skill when they reach level 3 in their primary skill, but for characters you can hire later on in the game this may be at a higher level.
Working will slowly decrease a character’s energy and food bars. When the energy bar drops below 25%, a little blue lightning bolt will appear over your character’s head, indicating they’re getting tired. However, you can make them work until their energy bar reaches 0%, after which they refuse to continue until you make them rest.
You can make characters rest by dragging them to one of your sleeping tents. They will then disappear for a bit until they are fully reenergized. If you don’t want them to disappear but you want to be able to disturb them during their rest, you can drop them on one of the sleeping mats outside instead. You can do this at any time, even if their energy is still higher than 25%. However, they are only able to reenergize to 80% when you do.
Characters will also refuse to work if they are hungry. When the food bar reaches 0%, a little knife and fork will appear over the character’s head, and you will get a notification at the top of the screen that one of your archeologists is hungry. Drop them on the food tent on the bottom right of the map to get them to eat.
They can only eat when there is food in the kitchen, which is indicated on a little banner on the food tent. Initially, only Jack the cook is providing the food, and he is a bit slow and can only have 2 lots of food in his tent at once. Later on you will be able to hire more cooks, who will be a lot faster and produce more food. The first cook will set up another kitchen tent. Drag the cooks to the kitchen tent to get them to prepare food. Drag your characters to Jack’s original food tent to get them to eat.
Occasionally you will be notified that a character is thinking of someone. When they do, drop them on one of the flower pots and they will pick a flower (provided the pots have flowers in them). Then drop them in the vicinity of the person they are thinking of, and if they’re lucky they will fall in love. Other times they will get their heart broken. When they’re in love, they won’t get tired or hungry! Nice! However, the archeologists are fickle, and love only lasts a few minutes.
The basic premise of the game is to uncover artifacts that are hidden in the sand. This is done in 4 steps:
1: First, you need to get your surveyors to scan the sand for hidden items. The blue progress bar in the character’s status bar will show you how far along the character is in their task. When the surveyor finds something, they will place a red flag on it.
Although many areas have more than one artifact hidden in them, your surveyors will only be able to find one artifact per scan. Therefore, you may have to scan one area multiple times to find all hidden items. If you click on the button with the compass sign on it in the bottom right of the window you will be taken to a little overview map. Areas that have been scanned and entirely depleted of artifacts are shown in red, so keep scanning until all areas are red.
2: Once a red flag has been placed, drop one of your excavators on the flag and they will start digging to find the artifact. If you leave them to their own devices, they will then start bringing the artifact to the brushing tent. If you’re in a hurry, you can pick them up and drop them on the brushing tent yourself.
3: The third step is to brush the artifact. If there are any artifacts waiting to be brushed, a little banner will appear on the brushing tent indicating how many items are waiting to be brushed. Drop a brusher on the brushing tent to get them to start work.
4: Finally, when the artifacts are brushed, they need to be analyzed. Brushed items will automatically be moved from the brushing tent to the analyzing tent, and a banner will appear on the analyzing tent. Drag one of your analyzers to the tent to get them to work. When an artifact is fully analyzed, you will be notified at the top of your screen.
Your characters can only work on artifacts that are at their skill level or below. The only time when you can find out the skill level of an artifact is when an excavation flag is placed on it.
Some artifacts are required for the puzzles to get you to the next level (see below), but most are part of collections for the museum. When you complete a collection, the museum will give you grant money which will allow you to hire more archeologists or upgrade your tents. Information on your collections can be found at the top right of the main window, next to the notifications bar, and in the collections tab of your journal.
This game consists of 9 levels, each of which is divided into two stages. First you will need to uncover new buildings. Apart from the first building (The King’s Gate), uncovering buildings is done in the same 4 steps as uncovering artifacts. The area first needs to be surveyed, then excavated, then the building needs to be brushed and finally analyzed.
A little banner on the building tells you what needs to be done next. You can find out what skill level is required for this building by hovering your mouse over the banner. For example, the building in the image below requires 1 level 1 surveyor.
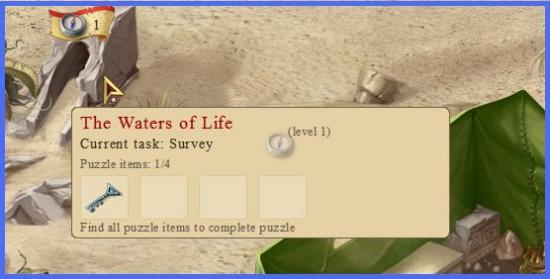
Drag and drop your surveyors onto the building to get them to start working. Once on site, they will wait patiently for you to find enough people for the job. While they are at work, you can keep track of their progress by hovering your cursor over the building.
When all stages of excavation are complete, a puzzle banner will appear on the building. To play the puzzles you first need to find a number of special puzzle artifacts. They can be found in the same way as regular artifacts, with the exception that their locations cannot be marked by your surveyors, but the dog will find them for you. Hovering your cursor over the building will show you how many puzzle items you have found (see previous image).
When you’ve found all artifacts for the puzzle, click on the puzzle banner to go to a mini game. Completing the mini game will unlock a new area on your map with a new building to uncover and new artifacts to find.
You will start out with two characters, Bingham and Simon, whose primary skills are excavating and brushing, respectively. At the start of level 2 Emilia, a primary surveyor, will join your team. The game requires you to hire two more characters: Omar, a primary analyst, and Priya, a primary cook. These are your basic 5 characters, who will be shown on the quick find menu at the top left of your main window.
After this, new archeologists will arrive at the camp entrance on a regular basis, and you can hire them on your initiative. To hire new characters you may have to increase the number of beds you have in your sleeping tents. You can buy a total of 3 tents, and upgrade those to have a maximum of 6 beds in them.
The strategy for hiring new people is a bit different than in I-Play’s previous game, Artist Colony. In Artist Colony hiring and training up more people meant more artworks were produced, meaning more money could be earned. However, in the present game there is only a limited amount of work that can be done; a finite number of artifacts to find. In order to uncover the buildings that will take you to the next level, you need multiple characters with specific skill levels. If you hire too many people too soon, and spread the workload over them evenly, you may find yourself struggling to find enough people of the required skill level to uncover the ruined buildings.
To complete the game, you only need 4 characters of each skill, with a minimum skill level of 6. So, I recommend designating 4 characters in each skill and training them up to level 6 before hiring any more people.
As characters can only work on artifacts of their current skill level or below, you may sometimes find yourself struggling to find enough work for your characters to do to train them up to the next level. In these cases you can upgrade your tents, which will increase the skill level of all characters working in that tent by 1. Upgrading your brushing and analyzing tents also means that more people can work in the tents at the same time.
Also keep an eye on the dog, as the artifacts relating to the next puzzle (which are found by the dog) will always be of a lower level than the skill level required to uncover the next building. So make sure you have your lower level characters work on those items.
You can earn money for upgrading your tents and hiring new people by completing the collections for the museum, and by picking the fortune flowers that pop up on a regular basis and bringing them to the fortune teller in the main camp.
Excavate areas marked with a red flag
Drag Bingham onto the first red flag to start digging. When he’s finished, you can either let him take the artifact to the brushing table at his own speed, or you can drag him there to speed things up a bit.
The brushing table will show the artifact that is next up to be brushed, and there will be a little bubble telling you how many artifacts in total there are waiting to be brushed. When the item is on the brushing table, drag Simon, your brusher, to the brushing table so he can start cleaning the artifact.
Excavate the ruins to the north
Next up is to excavate the ruined gate on the north end of the active screen.
While Simon is brushing, Bingham can continue excavating flag sites, or you can drag him to the ruined gate that’s sanded in and he will start excavating the gate. It doesn’t really matter which one you do first. I started on the ruins, and when Simon was done brushing I got Bingham to get him some more artifacts to brush before having him go back to the ruins. If you hover your mouse over the ruins, you will get a pop-up window showing you how the excavation is progressing.
When Bingham is done excavating the ruins, you will get a little cutscene. After that, the ruins will need brushing, so get Simon onto the job!
Meanwhile, Bingham can continue excavating those flagged sites. Once Bingham has been a level 3 excavator for a little while, his second skill is revealed: he is also an analyzer. Once an artifact has been excavated and brushed, it will automatically appear on the analyzing table. Drag Bingham to the analyzing table to have him analyze and identify the artifacts.
Find, brush and analyze the puzzle artifacts
Once Simon has finished brushing the ruins, you will need to find 4 artifacts that will allow you to solve the puzzle to open the gate. If you haven’t done so already, keep excavating, brushing and cleaning those artifacts! Simon will become an excavator too, at some point, so you can have him excavate those flags too.
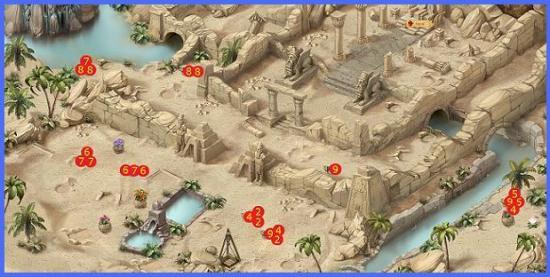
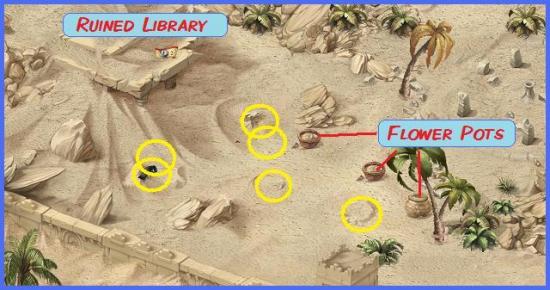
Locations of the puzzle artifacts are circled yellow in the image below.
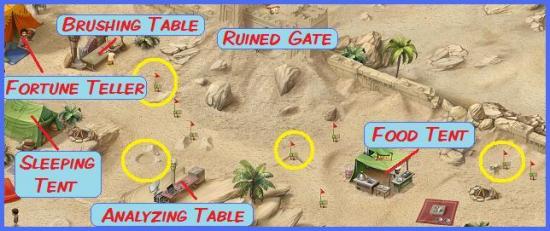
Hovering your mouse over the ruins will show you how many of the artifacts you’ve found. Some artifacts have nothing to do with the puzzle, but they will go into your collections inventory, which we will get to later.
Around this time the first fortune flower will appear. Drop someone on the flower and they will take it to the fortune teller for $100.
A bit later, a stray dog will arrive. The dog will help you find excavation sites for puzzle items later on. Give him any name you like.
The King’s Gate puzzle
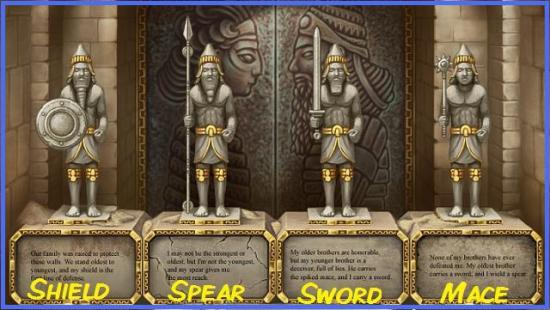
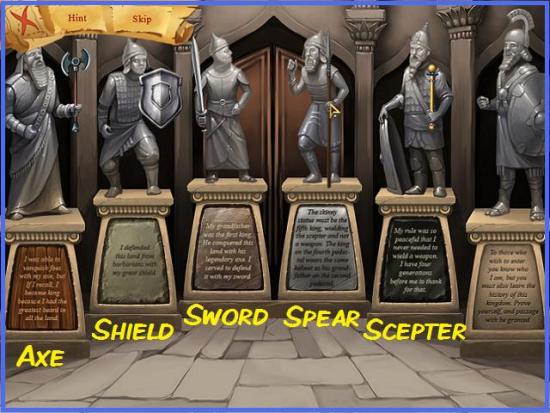
Once you’ve found the 4 artifacts for the puzzle, click on the ruined gate to go to the puzzle. You will find 4 statues of 4 brothers that are missing their information tablets and their weapons. These are scattered in the sand. The tablets give clues on which item goes onto which statue. Beware, though, that one of the brothers lies!
If you’re interested in the logic behind the puzzle, here it is:
If you don’t care about the logic, just solve the puzzle as in the image below.
Survey the new area for buried artifacts
After you’ve completed the King’s Gate puzzle, you will get a cutscene in which Emilia joins your team. Emilia is a surveyor. Drop her anywhere on the sand and she will start surveying the area around her for new buried artifacts. When she finds something, a red flag will appear on it, marking its location. After this you can get your excavators to dig it up etc.
The area behind the King’s Gate will now have opened. It also contains new brushing and analyzing tents. Any items that you hadn’t finished brushing or analyzing yet will now be in the new tents.
You will be told that a new archeologist has arrived. His name is Omar and he is an analyzer. To hire him, go into your menu, select the “upgrades” tab and click on the money bag by the sleeping tent to upgrade the sleeping tent to level 2. This gives you 2 new sleeping spaces. Then go to the “hire” tab and hire Omar.
You are also told that the university will fund your grants if you bring them completed collections of artifacts. You’ve already completed one collection of artifacts from the area outside the King’s Gate, which is the Ancient Toys collection. This has earned you $1500. You can find details of your collections in the “collections” tab of your journal. Incomplete collections you’ve started will also be listed at the top right of your window.
Maps with the locations of all collectable artifacts will be shown at the end of this walkthrough. Oddly enough, surveyors can only find artifacts for the museum. All artifacts relating to the puzzles will be found by the dog.
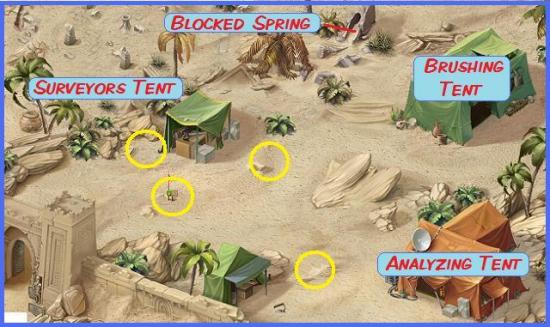
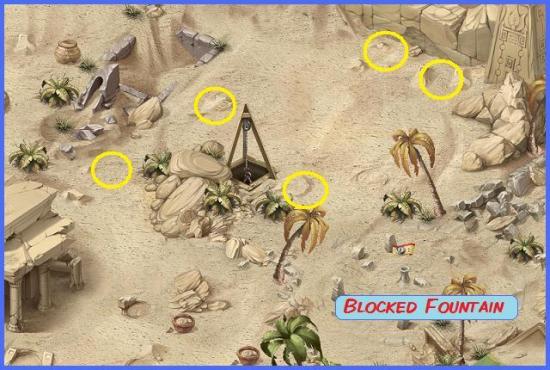
Uncover the spring to the north
A little into this task you will get another cutscene in which you are told about a blocked up spring. The spring, called the Waters of Life, is just north of the brushing tent.
Like the King’s Gate, the spring needs several steps to be uncovered. Most steps for uncovering structures from now on will require more than one person. Hovering your mouse over the structure that is to be uncovered will tell you how many of which kind of person you need for the next step. It doesn’t matter if the skills are primary or secondary, as long as they’re at the right level. Find the people and drop them on the structure – they will patiently wait for you there until you’ve found all the required people.
To uncover the spring you will need the following people (in order):
The Waters of Life puzzle
When the spring is cleared, you will need to find 4 keys to unlock the puzzle. Wait for the dog to find the locations and excavate, brush and analyze them. When you’ve found all keys, click on the spring to get to the puzzle.
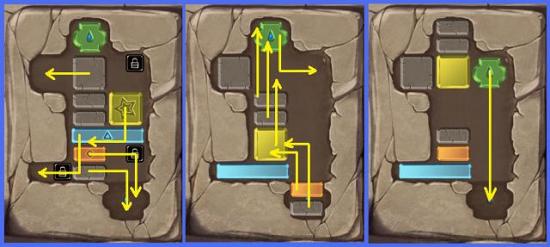
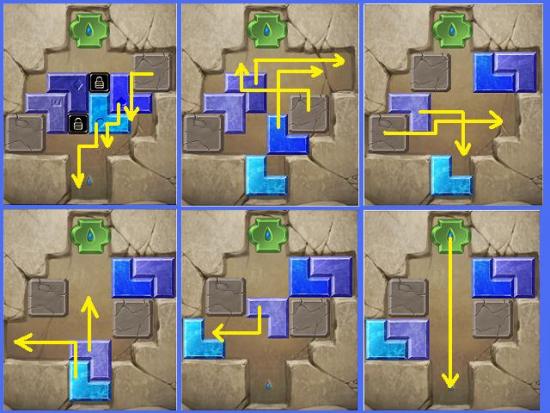
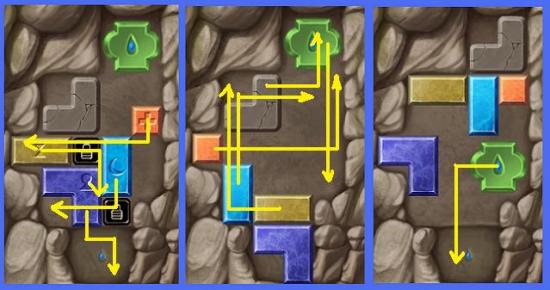
The Waters of Life puzzle is a block sliding puzzle in which you need to move the blocks around until you can move the green block at the top to the bottom right corner of the field.
First you need to unlock all the blocks by dragging the keys onto them, matching the color and symbol on the keys with the color and symbol on the blocks. The little square black blocks will disappear from the field. When all the blocks are unlocked, move them as in the images below (there are many other solutions, this is just one of them).
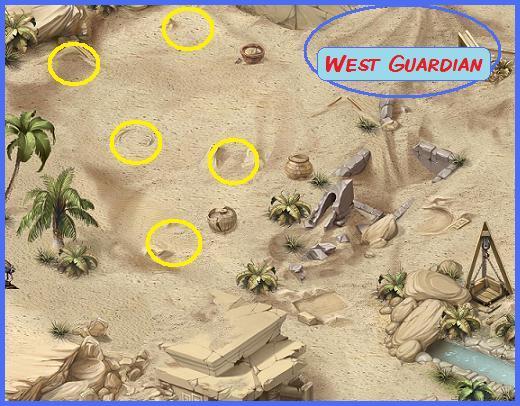
Uncover the building to the west
When you’ve finished the Waters of Life puzzle, you will get a new building to uncover in the far west of your screen. To uncover this building you need, in order:
Shortly after the cutscene a new worker arrives at camp. Her name is Priya and she is a cook. Go into your “hire” menu and hire her. She will set up a larger kitchen next to Jack and start preparing food at a faster rate than Jack can on his own.
After this, you can hire whomever you like. I recommend not going crazy on the hiring as it can be quite hard to keep track of all your workers. Also, if you spread the skills over a lot of people, you may struggle finding enough high level people for your puzzle excavations later in the game.
In this area there are some old flower pots. Drag someone onto the pot to grow flowers. Flowers may help your people fall in love, and when they are, they don’t get tired or hungry. Nice!
Words of Wisdom puzzle
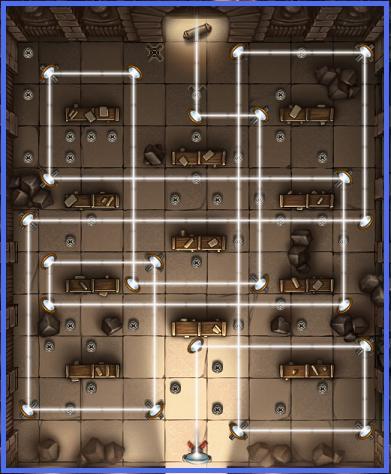
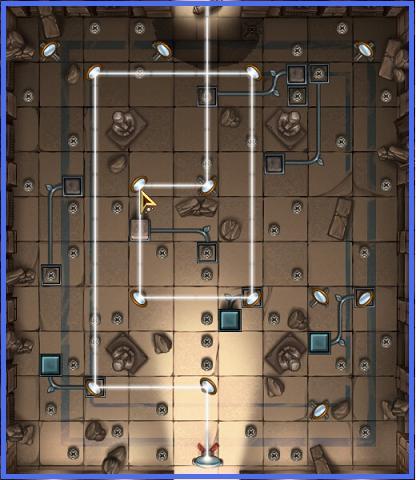
As soon as you’ve excavated the building in the west, which turns out to be a library, you will need to find 6 artifacts to help you complete the puzzle.
When you’ve found them all, click on the library to get to your first mirror puzzle. You need to place the mirrors in the holders on the ground and rotate them by clicking on them so they reflect a beam of light to each other. Some mirrors are already in place and can’t be moved or rotated. The aim is to direct the beam of light through the door at the top. The solution is shown in the image below.
Your next task is to uncover the fountain. To do this you will need, in order:
For the Royal Pool puzzle you need to find 5 keys. When you’ve found all keys, click on the fountain to go to the puzzle, which is another block puzzle. First unlock all the blocks by dragging the keys onto the blocks with a matching color and symbol. Then follow the steps below to find one of the many possible solutions.
Next you need to uncover the north statue. You will need, in order:
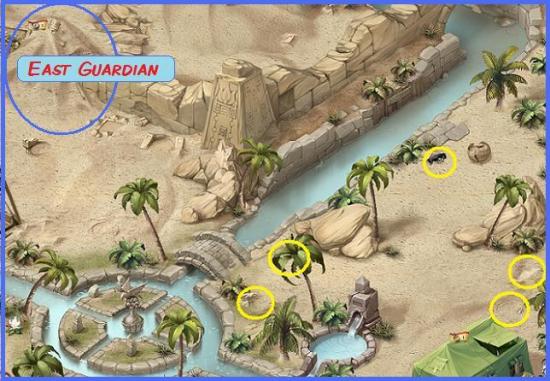
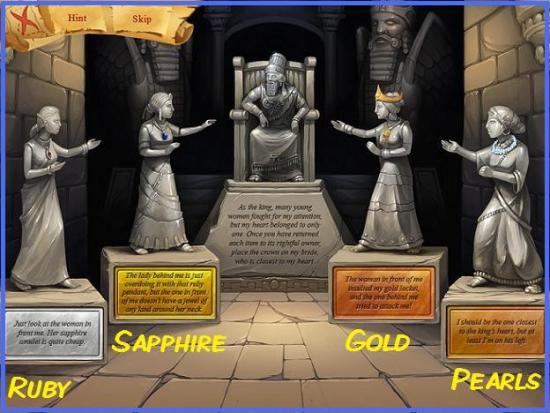
After you’ve uncovered the statue, you need to find 5 jewels to help you solve the East Guardian puzzle. This puzzle is similar to the King’s Gate puzzle in that you need to match tablets with information and other items with the correct statues.
Just in case you’re interested in the logic behind the solution:
Or just solve the puzzle as in the image below.
To uncover the second statue, you will need, in order:
You then need to find 5 artifacts for the puzzle. Click on the statue to get to another mirror puzzle like the Words of Wisdom puzzle in the library. Solution below.
To uncover the waterfall, you will need, in order:
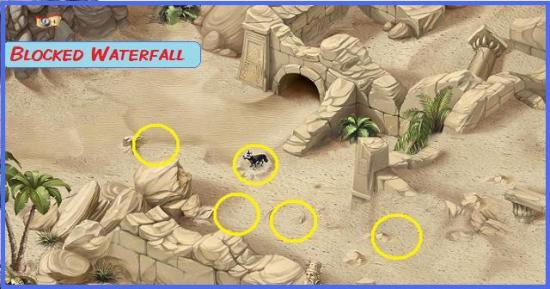
Once the waterfall has been uncovered, you need to find 5 keys for another block puzzle. Click on the waterfall to go to the puzzle, and unlock the blocks with the keys with the matching symbols and colors. Then follow the solution below.
To uncover the palace outer chamber you will need, in order:
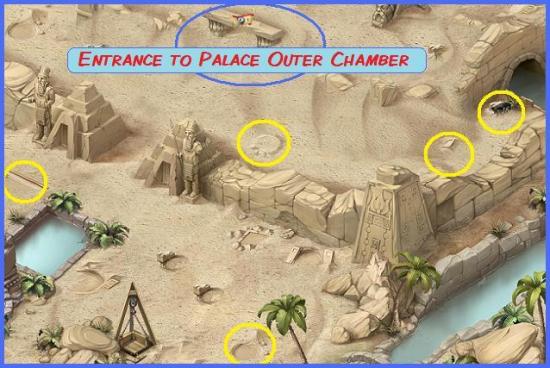
For the following puzzle you will need to find 5 weapons. Click on the puzzle banner of the palace outer chamber to get to another statue puzzle.
To uncover the palace inner chamber you will need, in order:
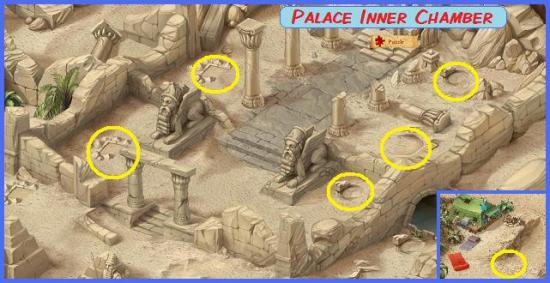
Then you will need to uncover 6 more artifacts to solve the last mirror puzzle in the Throne Room. Once you click on the Throne Room puzzle, you won’t be able to get back to find any artifacts you haven’t found yet, so do all your archeological business now before you go to the final puzzle.
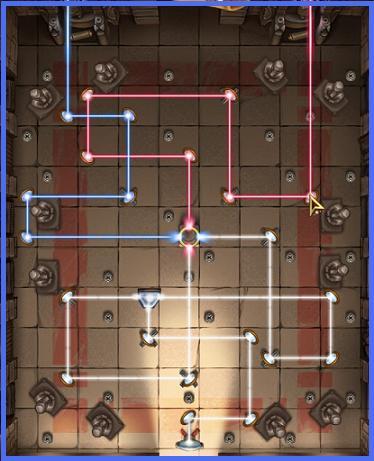
The Throne Room mirror puzzle is a little bit different from the previous two, as there are two statues that you have to hit with the light, but there is only one beam of light. Place the gold ring (the royal bracelet) in the middle of the field and rotate it so that the pink gems face north and south and the blue gems east and west. Then place the mirrors as in the image below, so that the prism splits the beam into two. These two beams are then passed through the ring to create a blue and a red beam, which are directed to the statues with matching color at the top.
There are 13 collections you can complete for the museum. Below is a list of all collections and artifacts, with the skill level needed to find them in brackets:
The locations of all the artifacts are shown in the images below. Note that only one artifact can be found each time a surveyor scans the area, so you have to scan and rescan the area to find all artifacts in each spot.