
Best Horror Games On Itch.io – July 2026
Across a bounty of subgenres.![Haze Seas Accessories Tier List [Best Accessories to Equip]](/wp-content/uploads/2026/07/haze-seas-accessories-tier-list.jpg "Haze Seas Accessories Tier List [Best Accessories to Equip]")
Haze Seas Accessories Tier List [Best Accessories to Equip]
The accessories with the best stat buffs in Haze Seas.
![[Roblox] Evomon Shiny Hunting Guide – Including Prismatic and Pris Shinies!](/wp-content/uploads/2026/06/evomon-shiny-hunting-guide.jpg "[Roblox] Evomon Shiny Hunting Guide – Including Prismatic and Pris Shinies!")

Brunhilda and the Dark Crystal Walkthrough
Welcome to the Brunhilda and the Dark Crystal walkthrough on Gamezebo. Brunhilda and the Dark Crystal is an Interactive Adventure/Hidden Object game played on PC, created by Twin Bottles and available at Codeminion. This walkthrough includes tips and tricks, helpful hints, and a strategy guide for how to complete Brunhilda and the Dark Crystal.


- Prefer Gamezebo on Google


Brunhilda and the Dark Crystal – Game Introduction
Welcome to the Brunhilda and the Dark Crystal walkthrough on Gamezebo. Brunhilda and the Dark Crystal is an Interactive Adventure/Hidden Object game played on PC, created by Twin Bottles and available at Codeminion. This walkthrough includes tips and tricks, helpful hints, and a strategy guide for how to complete Brunhilda and the Dark Crystal.
General Information
- From the Start screen, click on Options to adjust the SFX (Sound Effects), Music and Voice volumes. From there you can also turn the Demon’s Comments, Custom Cursor, Full Screen and Panoramic Screen on and off.
- You can access the unlocked Alchemy, Wizardry and Telepathy Minigames at the bottom of the Start screen.
- From the Start screen, click on Telekinesis (bottom right) to replay, or restart, a chapter.
- From the Menu, or by pressing Esc on your keyboard, during the game, you can also access Options and How to play, Save & exit and Play just a little longer.
- The Hint button (Demon’s Seal) recharges in about 25 seconds and is located at the bottom right.
- During the Minigames, the Skip button charges in about 60 seconds. It generally takes less time to complete the early Minigames, and your score will be much higher, if you play instead of skipping them.
- Click on the Zoom icon (magnifying glass), located below the Hint button, or right click anywhere on the screen, to turn on the Zoom feature; right click again, to turn it off.
- The initial Tutorial will take you through the basic game functions. If you need additional help, click on the Menu button, or press Esc on your keyboard, during the game, then click on How to play.
- Click anywhere on the screen to progress through the dialogs.
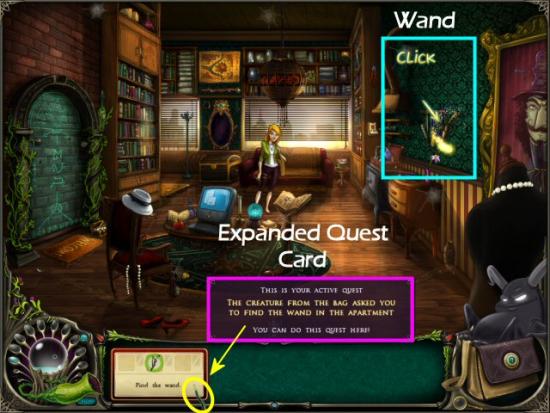
- Quest Cards (tasks and items to collect) appear at the bottom of the screen. Move your mouse cursor over them to get an expanded image. If you have more than one Quest Card, move your mouse cursor over the yellow arrow, at the left side of the Quest Cards, to expand them.
- The items you need to find are always the same, however they won’t necessarily be in the same place for each player.
Gameplay Notes
These can be skipped, during gameplay. However, you won’t unlock the bonus Minigames if you skip them or get very low scores.
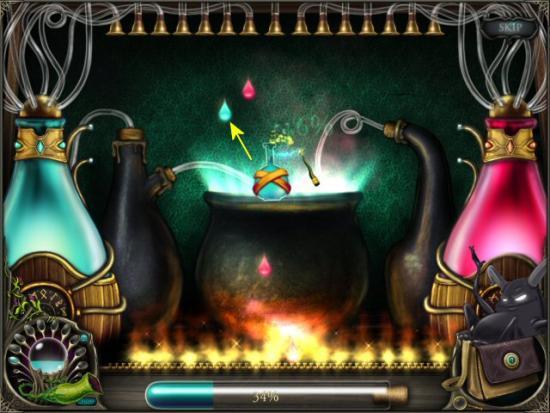
- Alchemy: This minigame is for making potions and elixirs. The key is to catch only the blue drops, miss the red drops and not let any blue drops fall to the bottom.
- Wizardry: This minigame is for casting spells. Click on the runes, in the book, that match the ones, at the bottom, as they scroll through. Try not to let any get all the way to the left and disappear.
- Telepathy: This minigame is for tuning the crystal balls. This is a “spot the difference,” with a twist. There are only 5 or 6 items to find, however the reception isn’t so good, and clarity fades in and out. Find all the differences to get the best reception, without any mis-clicks.
Game Tips
- There are a number of “Easter Eggs” (unexpected extras) throughout the game. Enjoy finding them all. The first one occurs on the Start screen – try clicking on any of the Fairies.
- If you are hearing abled, be sure not to click through the dialog or you’ll miss all of the humor. If you are non-hearing abled, all the dialog is provided in text boxes for each character.
- Don’t skip the Minigames (Alchemy, Wizardry and Telepathy), and strive to get the best score you can, so you’re sure to unlock all the replayable Minigames. If you skip Minigames, or get very low scores, you will not be able to play the bonus versions.
Gameplay Note
Some players have reported game crashes when they skip a number of Minigames, especially later in gameplay. If this occurs, DO let the publisher know and they will pass on the information to the developer. You can contact Codeminion at:
http://codeminion.com/en/contact/
You CAN restart the game with no ill effects. Other than having to replay the next scene after you skipped the minigame, you won’t lose any of your previous progress. To avoid any possible issues, you can always play the Minigames, instead of skipping them. None are very difficult and you will be able to unlock bonus, replayable versions.
Walkthrough – Chapter 1 – The journey begins…
The Lobby
You begin in the Lobby at your aunt’s Apartment building. Click anywhere on the screen to progress through the dialog.

When you’re finished, Brunhilda will enter the elevator and go up to her aunt’s Apartment. You’ll start in Tutorial Mode. Follow the prompts to continue through the each instruction.
The Apartment
Once inside the Apartment, click on the Bag, indicated at the back of the scene.
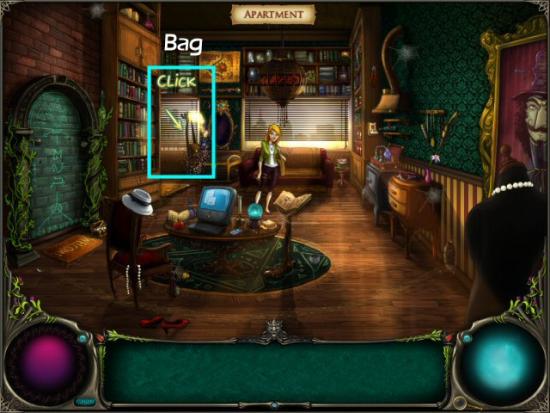
What’s this? A Fairy? Sure, it is…if you like them fat, lazy and sarcastic. LOL Meet Demon, your new, “best friend.” Next, click on The Wand of Telekinesis, indicated at the right side of the scene. At this point, you have the opportunity to Continue or Exit the Tutorial. I’d recommend continuing so you get a feel for the gameplay.
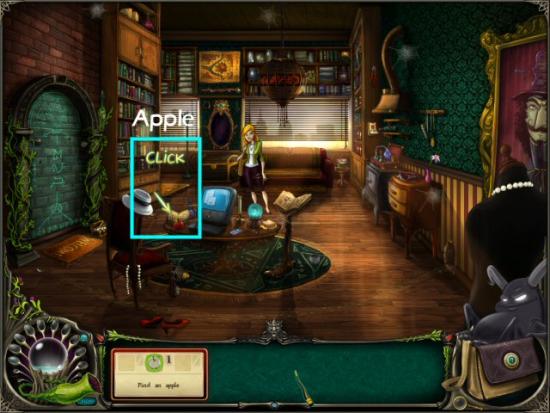
Demon is “starving;” click on the Apple so he’ll quit whining.
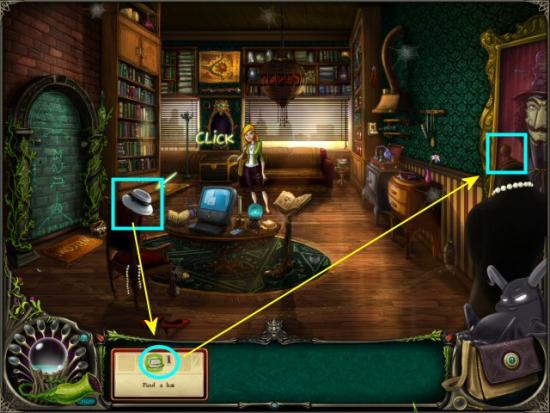
Click on the Hat, in the scene. Next, pick up the Hat and place it on the Mannequin.
Click on the Portal, to try to enter the Magical Realm.
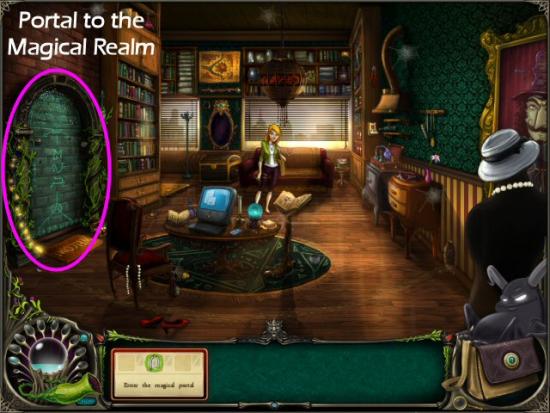
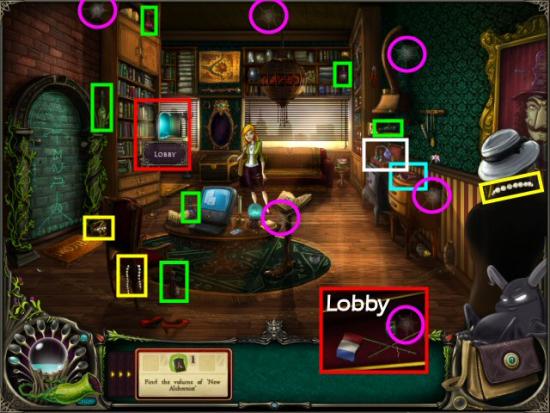
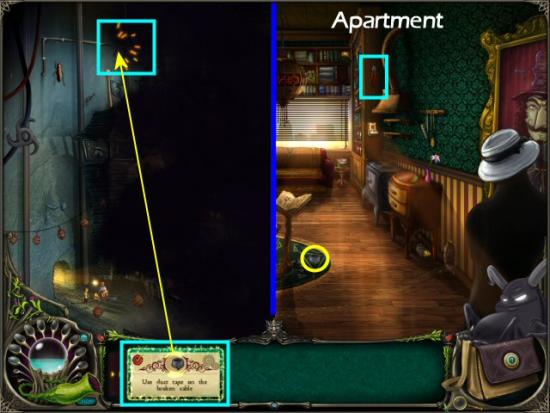
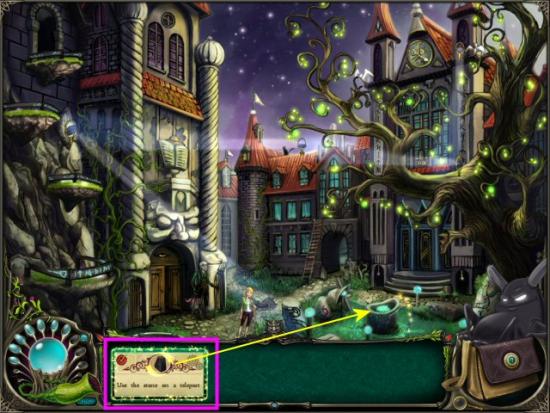
Unfortunately, The Nexus Stone is missing and you’re going to have to get it back from the Rats in Rathold. There’s no way you’ll fit through the entrance, not even if you went on a mega-diet. You’re going to have to make a Shrinking Elixir…but first, you need a few things. Collect the New Alchemist magazine (cyan), Pearls (yellow), Potions (green) and Spider Webs (magenta). You still need one more Spider Web; go to the Lobby (red) to collect it then return to the Apartment and collect the Alchemy Set (white).
Once you collect the Alchemy Set, you’ll begin your first Alchemy minigame in order to make the Shrinking Elixir. Move the bottle around the screen to collect the Blue drops before they hit the floor. Also, make sure to avoid the Red drops.
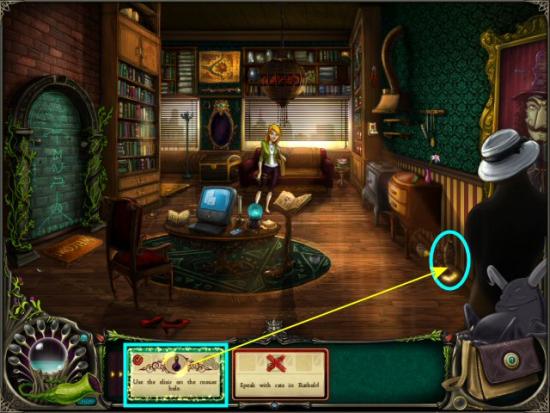
Now that you have the Shrinking Elixir, you can enter Rathold. Click on the Shrinking Elixir and use it on the entrance to the Rathold.
Rathold
Now that you’re inside Rathold, it’s pitch dark due to a power outage. Speak to the Rat Electrician, then return to the Apartment for the Pliers (cyan) and Duct Tape (yellow). Once back in Rathold, use the Duct Tape on the broken cable and turn on the lights.
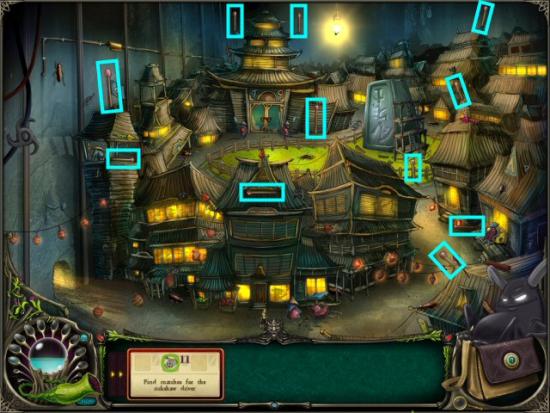
Speak to the Rat Rickshaw driver and help him find Matches (cyan) to repair his rickshaw. 28 children? Yikes! Note: items may be in different locations than the ones shown.
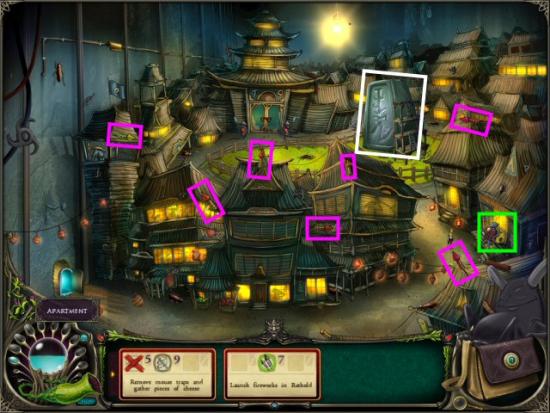
Head over to the Nexus Stone (white), but before you can nab it, one of the Rat Guards wants you to grease his palm with a little bit of “guanxi” (that’s Cheese, in Rat parlance. And, he needs you to get rid of some Mousetraps). Start with the Drunken Rat (green), who’s sitting on a nice, big, fat piece. He needs you to find his Fireworks, then you can have it. Once you’ve found all the Fireworks (magenta), pick up the piece of Cheese that he was sitting on. Note: items may be in different locations than the ones shown.
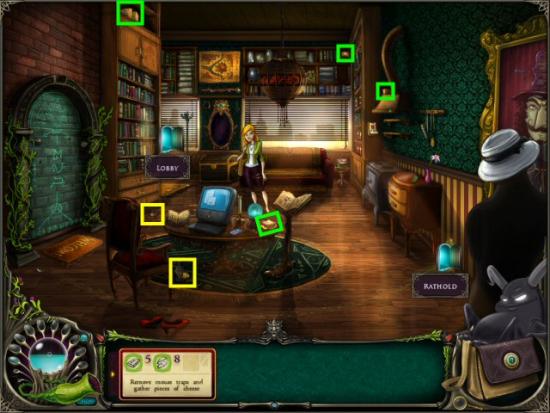
It looks like that was the only piece of Cheese in the Rathold. Return to the Apartment, collect the Cheese (green) and Mousetraps (yellow) from there, and the Lobby, then return to speak with the Rat Guard. Note: items may be in different locations than the ones shown.
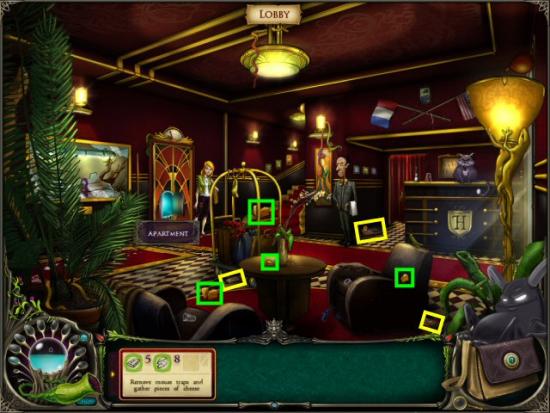
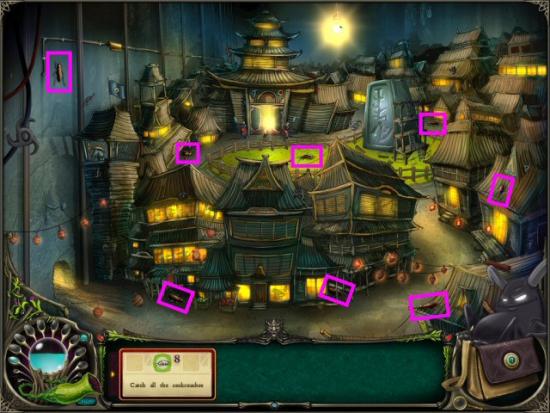
All set, right? Not quite. It seems you need to rid Rathold of all the Cockroaches before the Other Rat Guard will let you into the Rat Palace. Get rid of the Cockroaches (magenta), then enter the Rat Palace to talk to Master Tofu. Note: items may be in different locations than the ones shown.
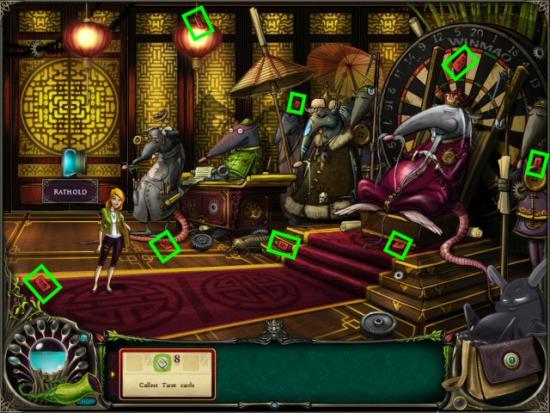
Rat Palace
Speak to Master Tofu, then find the Rat Mystic’s Tarot Cards (yellow). Note: items may be in different locations than the ones shown.
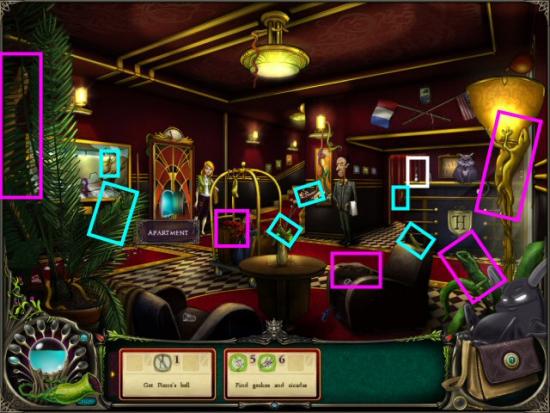
After speaking to the Rat Mystic and Master Tofu again, you need to get the Bell from Pierre in the Lobby.
Lobby
You speak to Pierre, but he’s not willing to give you the Bell unless you catch all the Cicadas (cyan) and Geckos (yellow) that escaped from his Terrarium. Collect them then speak with Pierre. You can pick now get the Bell (white). Return to the Rat Palace.
Rat Palace
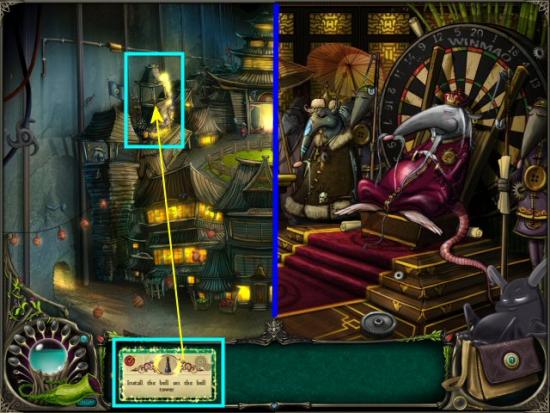
Speak with the Rat Mystic, install the Bell on the Bell Tower (cyan) then return to the Rat Palace.
Speak to Master Tofu; he’s not so sure about that Bell. The Rat Engineer has an idea that might work, but first he needs you to collect all the pieces of his Blueprints (cyan). Note: items may be in different locations than the ones shown.
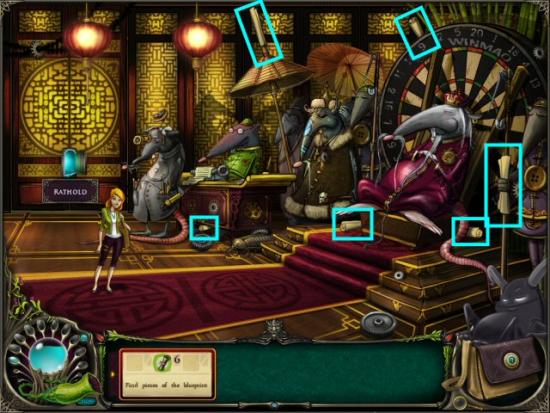
Now he needs you to collect some items for his device: Nails, an MP3 player and a Broom. Collect the Nails and MP3 Player, then head to the Lobby for the Broom.
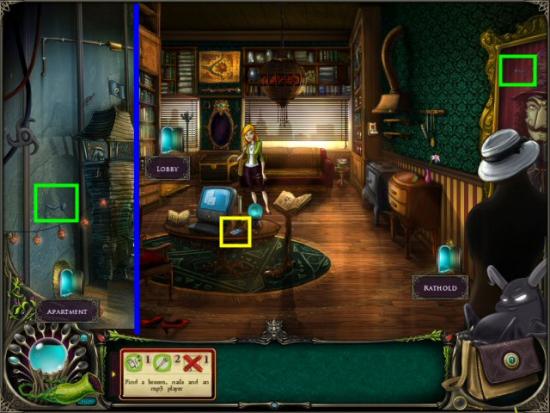
Lobby
Click on the Broom, but Pierre’s not going to let you have it so easily. He wants you to clean up the mess from yesterday’s party. Pick up the Balloons (magenta), Ribbons (white) and Cups (green), speak to Pierre then take the Broom (cyan). Note: items may be in different locations than the ones shown.

Rat Palace
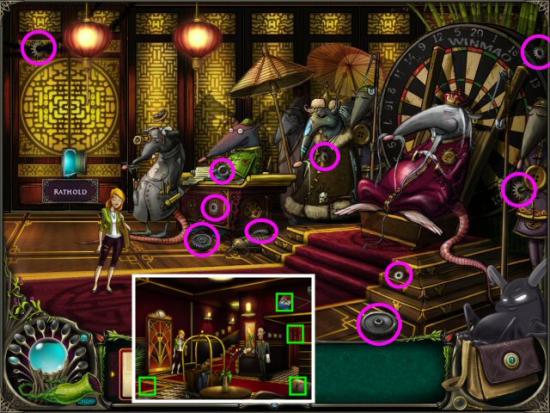
Return to the Rat Palace and speak to the Rat Engineer. Collect all the Cogs (magenta); now all that’s left is to get rid of the cat, Gruber. Go to the Lobby and click on all the X Marks (green). When you’re finished, return to the Rat Palace and speak to the Rat Engineer. The Rats have agreed to return the Nexus Stone and have left it back in the Apartment.
Rathold
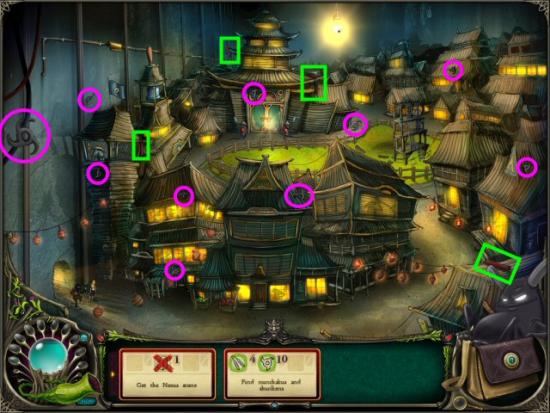
Before you can get into the Apartment, a Ninja Rat appears and insists you need to find his Nunchakus (green) and Shurikens (magenta), then he will let you pass. Note: items may be in different locations than the ones shown.
Apartment
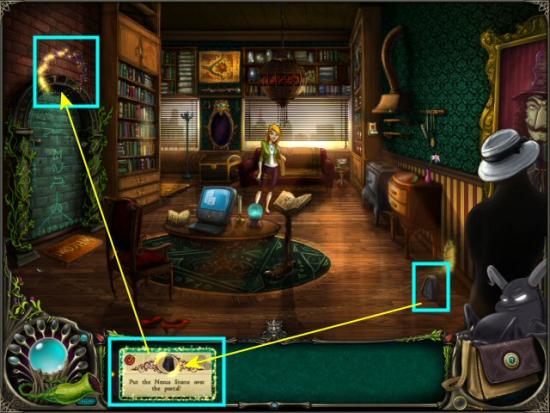
Pick up the Nexus Stone, place it in the Magical Portal then click on the Portal to enter.
Chapter 2 – Meeting the Great Wizard
Laboratory
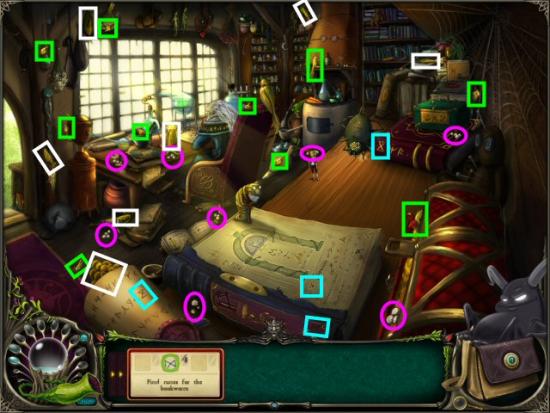
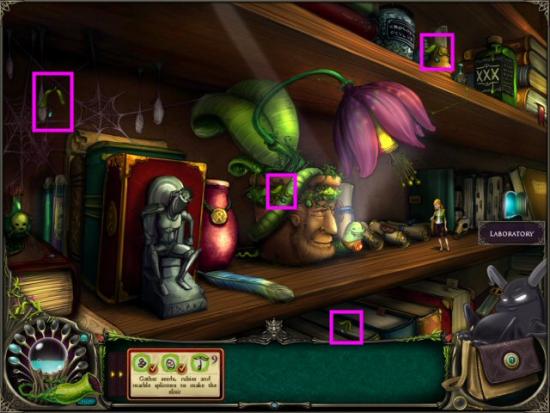
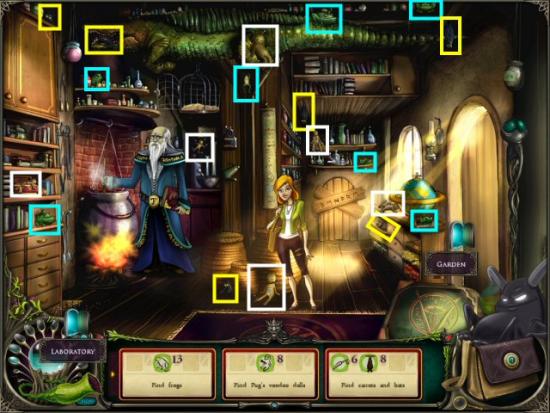
You made it through the Magic Portal, but it seems the damaged Nexus Stone has permanently shrunk you. The Bookworm overhears you and offers to help with an Enlarging Elixir, if you’ll find his favorite Runes (cyan) Next you need to collect some ingredients, but you’ll have to get past that big Spider.
Talk to the Spider and he agrees to let you pass if you get rid of all the Mothballs (magenta) that are killing his favorite snack.
Speak to him again and he asks you to talk to the Parrot about her children eating all his flies. Talk to the Parrot; she asks you to find her children, the Small Parrots (green), and Corn (white) for them to eat instead of Spider’s flies. When you’ve collected everything, talk to the Spider again and he’ll let you pass through to the Flower Pot.
Flower Pot
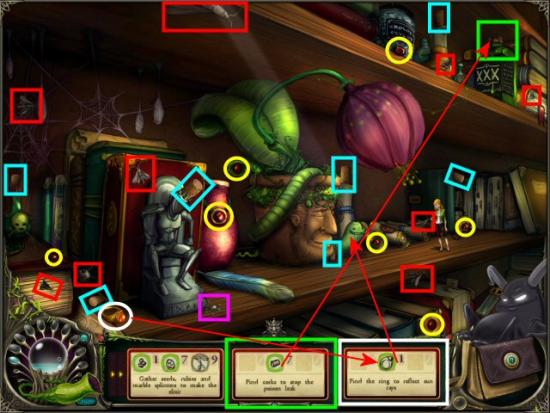
Click on the Light Flower and speak to the Caterpillar. Find all the Rubies (yellow), Corks (cyan) and the Marble Splinters (magenta). Use the Cork on the Bottle (green) to stop the poison dripping onto the Light Flower. Next, we need to get rid of all the Moths (red). Speak to the Caterpillar, get the Ring (white) and put it on the Caterpillar. Note: items may be in different locations than the ones shown.
Once the light hit the Light Flower it opened, but scattered the seeds all over the room. Collect the 4 seeds (magenta) then return to the Laboratory. Note: items may be in different locations than the ones shown.
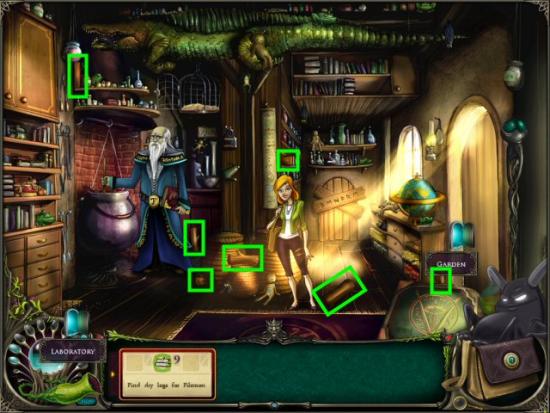
Laboratory
Collect the remaining 5 seeds (magenta), then speak to the Bookworm. Collect the Mortars (green) then speak to the Bookworm. Note: items may be in different locations than the ones shown.
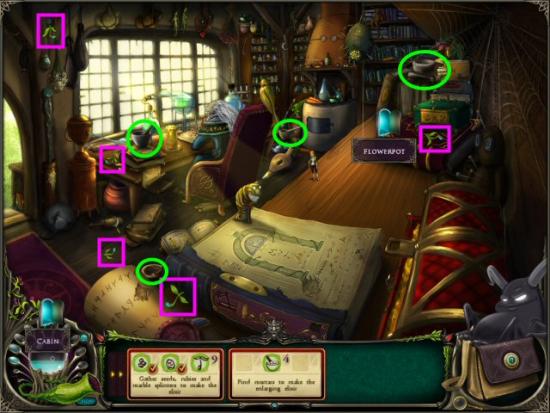
Time to make the Enlarging Elixir. This is your second Alchemy minigame. See the previous screenshot for an example. Filemon wants you to prepare for a journey…the one you’re going to make to save the Magical Realm…but first, he asks you to make him a cup of Herbal Tea. You can find Chamomile and Mint, in the Garden. Exit the Laboratory, into the Cabin, then go outside into the Garden.
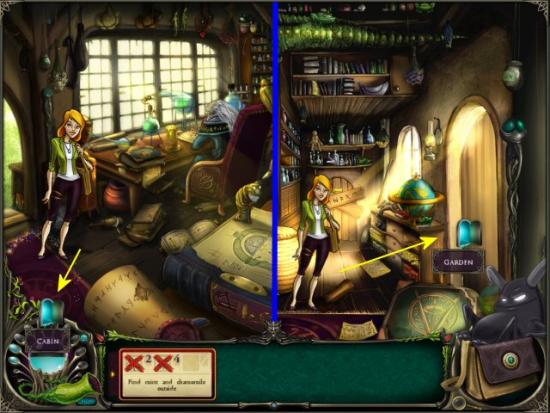
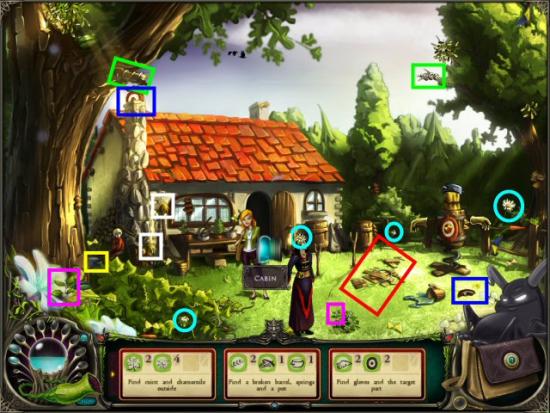
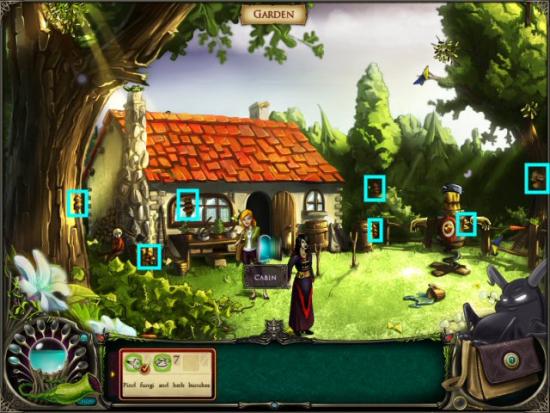
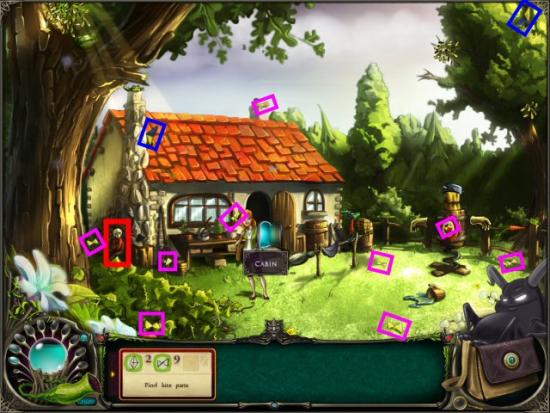
Garden
Collect the Mint (magenta) and Chamomile (cyan)…oops! We have a little problem. Seems Verena isn’t so nice and wants you to work for that Chamomile she’s got in her hair. Collect the Pot (yellow), Broken Barrel (red) and Springs (green). Well, seems that’s not enough for “her high and mighty rudeness;” collect the Broken Target (blue) and Gloves (white). Finally, she’ll give up the Chamomile she didn’t want, anyway. Now that you have everything, return to the Cabin. Note: items may be in different locations than the ones shown.
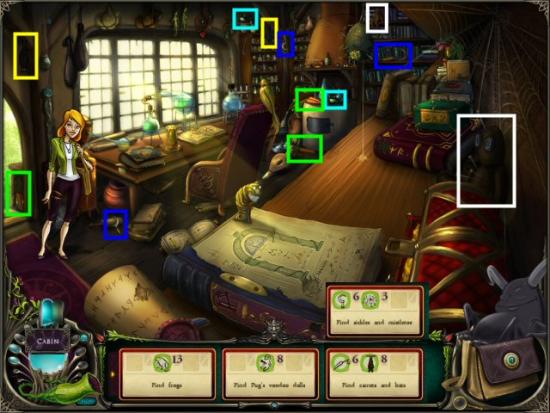
Cabin
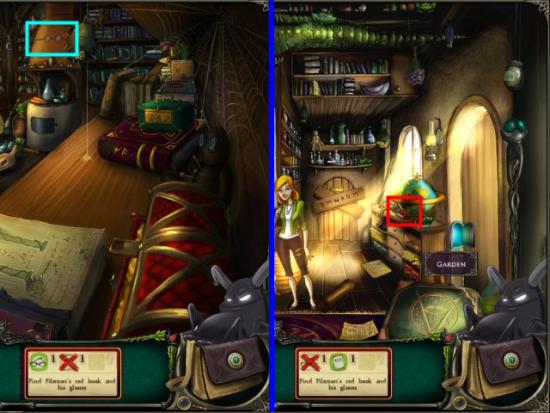
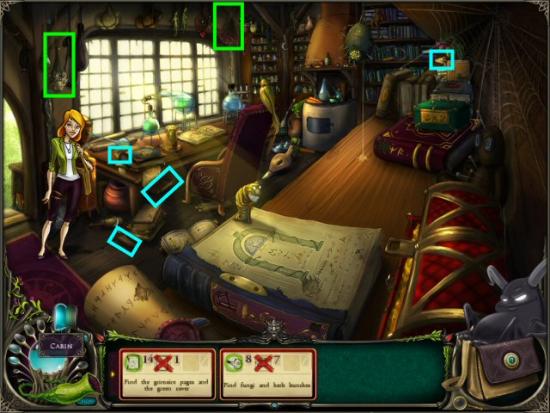
Speak to Filemon then collect his Glasses (cyan) and the Red Book (red).
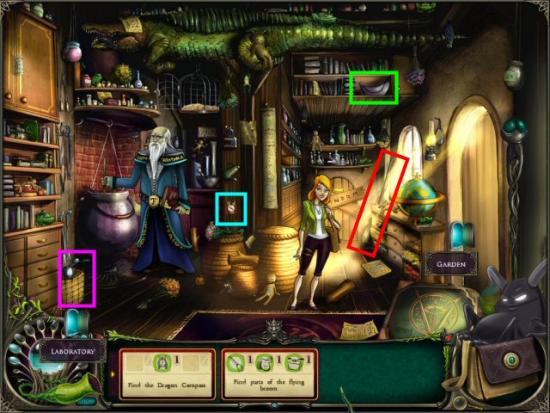
Collect the Dragon Compass (cyan) then collect the Broom (red), Saddle (green) and Basket (magenta).
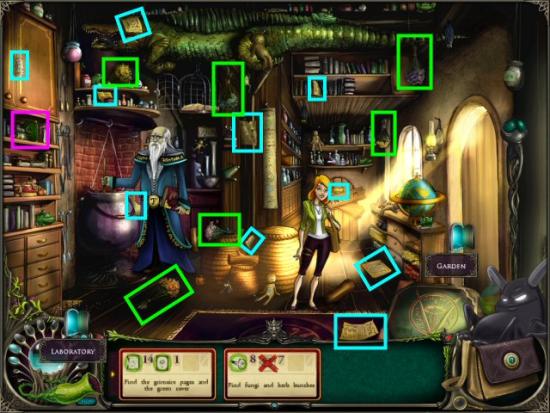
Collect the Grimoire Pages (cyan) and Green Cover (magenta), then collect the Herb Bunches (green).
Go into the Garden and collect the Fungi (cyan). Go back into the Cabin and speak to Filemon. Note: items may be in different locations than the ones shown.
Garden
Return to the Garden to prepare the Binding Spell. Click on the Broom (magenta).
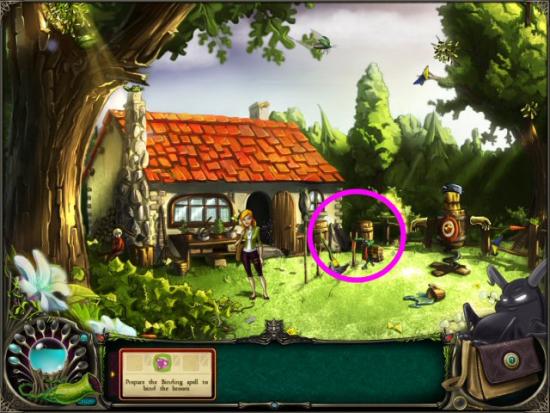
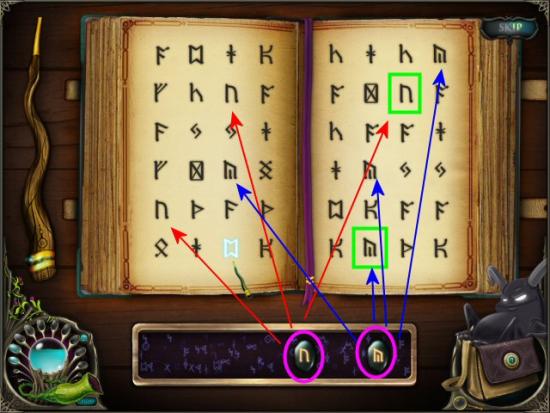
This starts your first Wizardry minigame. The object is to click on a Rune, in the book (green) that matches the Rune scrolling to left, below the book (magenta). Find all the Runes before they scroll all the way to the left and disappear. Note: the Runes in the book will change, randomly and if you mis-click. If you don’t see the next Rune you need in the book, wait a few seconds for them to change and one will appear. After you’ve prepared the Binding Spell, click on it, then use it on the Broom. Return to the Cabin and speak to Filemon.
Cabin
Collect the Logs (green), from the Cabin and the Laboratory, speak to Filemon then head outside to speak to Pug. Note: items may be in different locations than the ones shown.

Garden
Speak to Pug (red), then collect the Kite pieces (blue) and Tail Pieces (magenta).
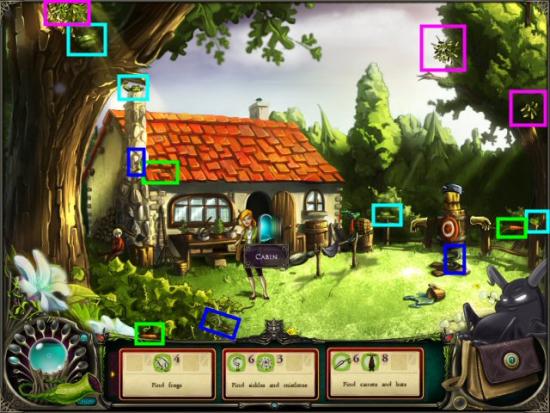
Cabin, Laboratory and Garden
Speak to Pug again, then collect the Frogs (cyan) from the Garden, Laboratory and Cabin, then speak to Filemon. Collect the Voodoo Dolls (white) from the Cabin and the Laboratory, then collect the Sickles (blue) from the Laboratory and Garden, and collect the Mistletoe (magenta) from the Garden. Return to the Cabin and use the Mistletoe on the Kettle. Collect the Bats (yellow) from the Cabin and Laboratory, and collect the Carrots (green) from the Garden and the Laboratory. Use them on the Kettle.
Once you’ve completed all your tasks, it’s time to head off to the Dragon Mountains. Return to the Garden and click on the Broom to get going.
Chapter 3 – Expect the Unexpected
While flying towards your destination, Verena shows up and blasts your Broom with some kind of spell, causing you to crash far short of your destination. I guess she’s the poster child for “Evil, little witch.” You crash land in the Woods.
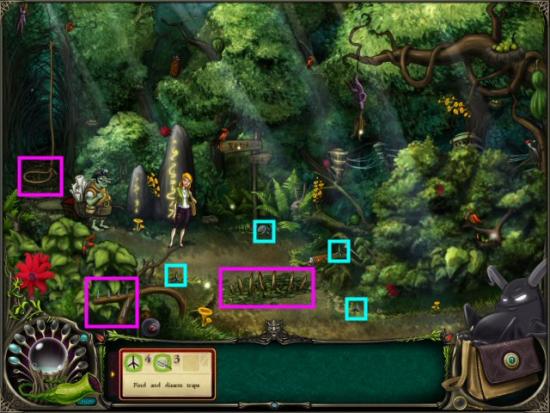
Woods
After speaking to the Goblin, collect the Caltrops (cyan) and Snares (magenta), then head to town. Note: items may be in different locations than the ones shown.
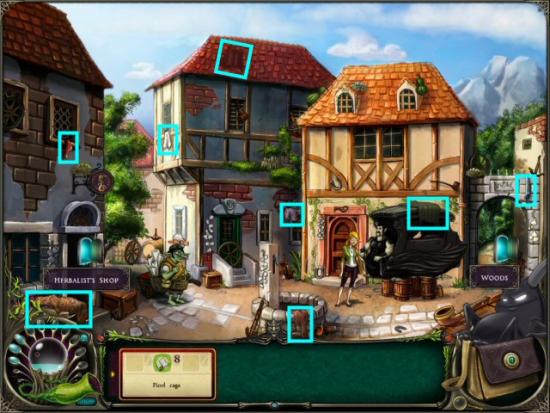
Hamlet
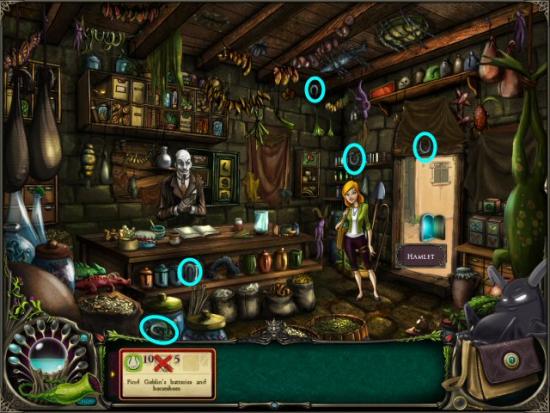
Speak to the Goblin and he tells you to check with the Herbalist to see if he has some Crystal Balls so you can contact Filemon and let him know what happened. Enter the Herbalist’s Shop, but he’s nowhere to be seen. A disembodied voice asks you to find some Rags (cyan) to plug the Holes in his shop. Return to the Herbalist’s Shop when you’re finished. Note: items may be in different locations than the ones shown.
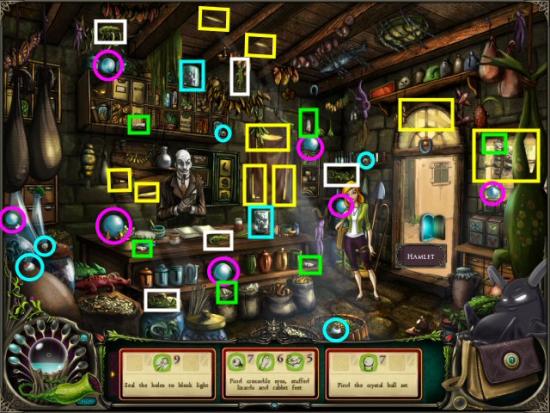
Herbalist’s Shop
Plug all the Holes (yellow) in the shop. After the Herbalist materializes, you’ll need to do some work for him before he’ll give up any Crystal Balls. Collect the Crocodile Eyes (cyan), Rabbit’s Feet (green) and Stuffed Lizards (white). Next, collect the Crystal Balls (magenta). It appears you need some Goblin Batteries to get the Crystal Balls to work. Exit the shop to go speak with the Goblin. Note: items may be in different locations than the ones shown.
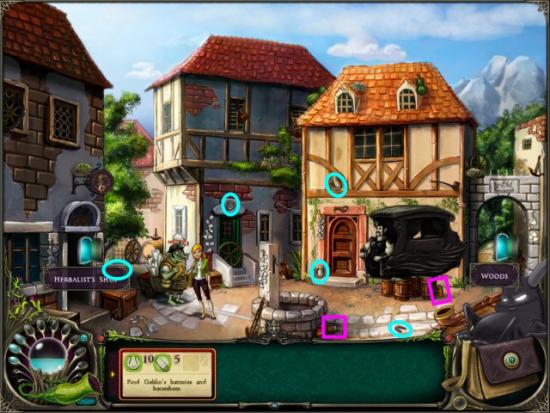
Hamlet, Herbalist’s Shop and Woods
Speak to the Goblin, then collect the Horseshoes (cyan) from the Herbalist’s Shop and the Hamlet, and collect the Batteries (magenta), from the Hamlet and the Woods. When you try to pick up the Batteries, a Fairy appears and asks you to find some Hares (white) as “guests” for their feast. Speak to the Fairy again and collect the remaining Batteries. Return to the Hamlet and Speak to the Goblin. Note: items may be in different locations than the ones shown. Note: items may be in different locations than the ones shown.
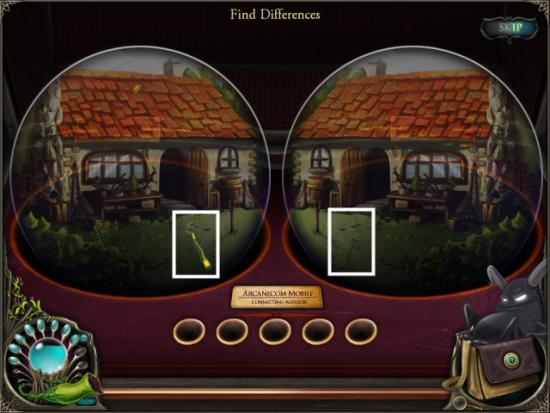
With the Batteries installed, it’s time to calibrate the Crystal Balls. This starts your first Telepathy minigame. The object is to find the 6 differences to tune the Crystal Balls, while avoiding any mis-clicks for the highest possible score. This is not timed, so wait until the picture is clearer to find the objects. Note: the differences are all objects inserted into the scene and may be different for each player. See the screenshot for an example. Note: your game will be different from the example (white) shown.
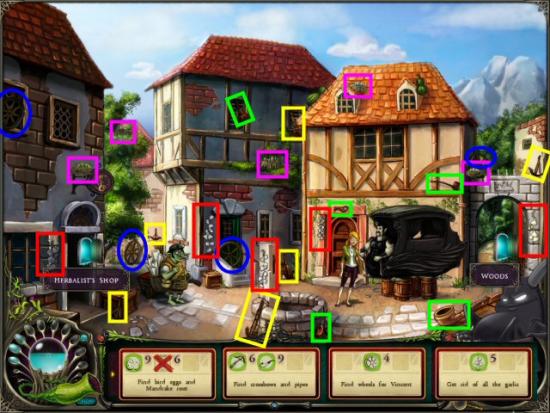
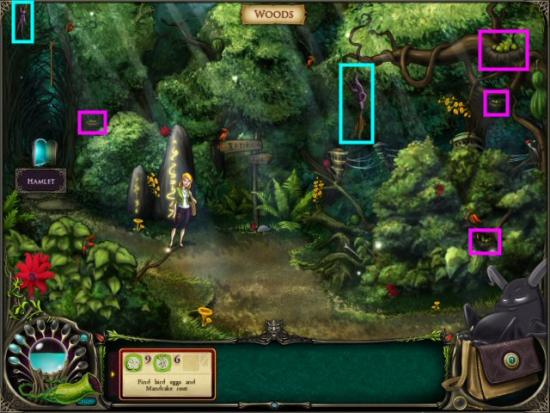
After speaking with Filemon, he tells you to talk to Vincent to find a way to Dragon Mountain. You speak to Vincent, then Demon pipes up that travelling in the carriage ain’t happening – motion sickness. Go see the Herbalist for a cure. Speak to the Herbalist who instructs you to find Mandragore Root (cyan) in his shop and in the Woods, and Bird Eggs (magenta) in the Hamlet and in the Woods. Note: items may be in different locations than the ones shown.
This starts your next Alchemy minigame. Move the bottle (your cursor) around the screen to collect the Blue drops before they hit the floor. Also, make sure to avoid the Red drops, to get the highest possible score. See the screenshot, in Chapter 1, for an example.
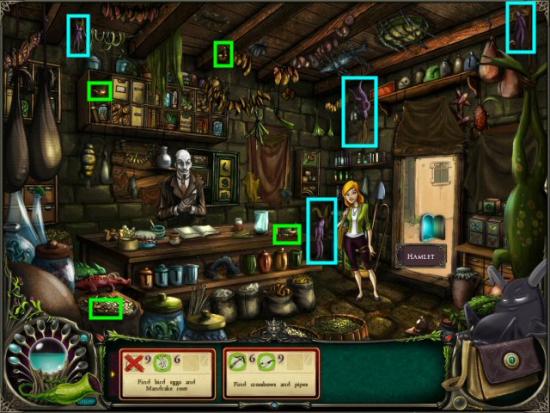
Speak to Vincent again, and he asks you to gather his Pipes (green) in the Herbalist’s Shop and the Hamlet, and his Crossbows (yellow) in the Hamlet. Next, find Vincent’s Wheels (blue). Go speak to the Herbalist about ingredients to enchant the Wheels…but seems he’s got an allergy to Garlic (red) and needs you to remove it from the Hamlet. Once that’s done, it’s time to enchant the Wheels. Note: items may be in different locations than the ones shown.
This starts your next Wizardry minigame. The object is to click on the Rune, in the book (green) that matches the Rune scrolling to left, below the book (magenta). Find the Runes before they scroll all the way to the left and disappear, to get the highest possible score. Note: the Runes in the book will change, randomly and if you mis-click. If you don’t see the next Rune you need in the book, wait a few seconds for them to change and one will appear. See the screenshot, in Chapter 2, for an example.
Hamlet and Woods
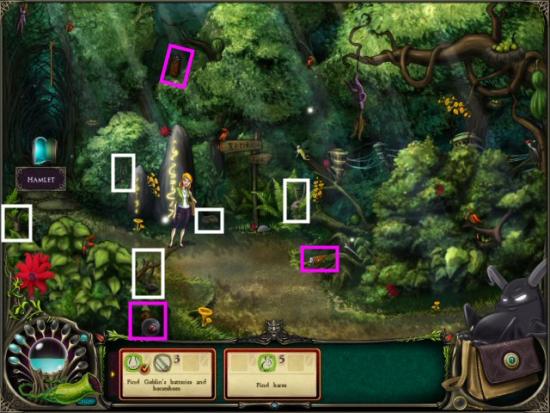
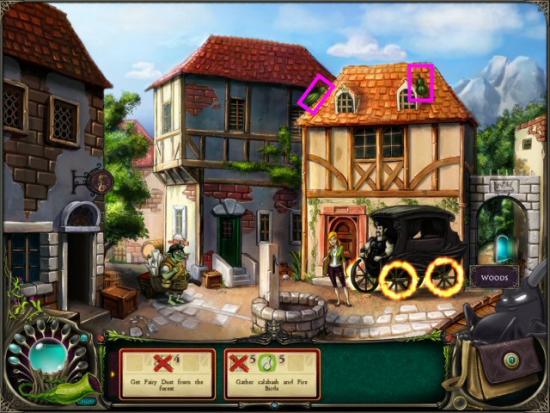
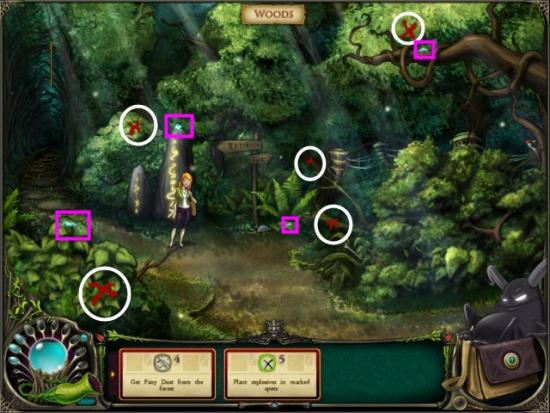
Now that Vincent’s Wheels are enchanted, he’ll need some fuel – Fairy Dust. Speak to the Goblin who informs you that you’ll need to get rid of those nasty Fairies if you want any Fairy Dust. You’ll need to create a blast loud enough to scare them away. Collect Calabashes (magenta) from the Hamlet and Woods, and collect Firebirds (yellow) from the Woods. Now you need Red Flower Petals (white) and Yellow Mushrooms (cyan) from the Woods. Note: items may be in different locations than the ones shown.
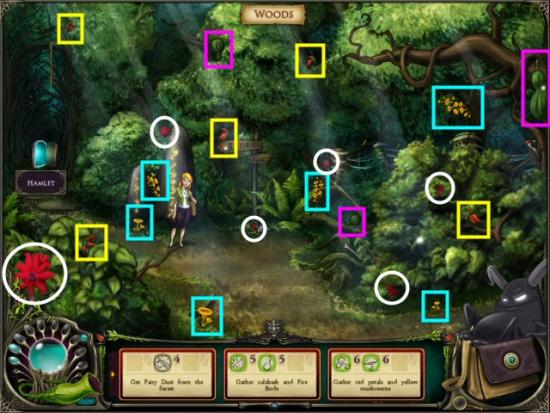
Once you have everything, speak to the Goblin who gives you the explosives. Return to the Woods, set the Explosives in the marked spots (white) then let ‘er rip! After the dust settles, collect the Fairy Dust (magenta). Note: the Fairy Dust won’t appear in the locations shown until after the explosion. Note: items may be in different locations than the ones shown.
Hamlet
Return to the Hamlet and speak to Vincent to get in the carriage and leave for the Dragon Mountains.
Chapter 4 – Dragon’s Lair
Vincent drops you off in the Village, close to the mountains, when who shows up but that nasty Verena. This witch definitely has metal problems – she sets fire to the whole Village!
Village
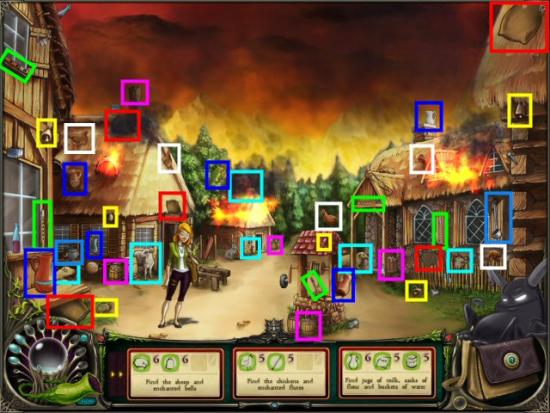
In order to save the Village, first you’re going to have to collect the Sheep (cyan) and Bells (yellow). Next, collect the Chickens (white) and Flutes (green). There has to be a way to save the Village…perhaps a few ingredients and a good spell will help. Collect the Jugs of Milk (blue), Sacks of Flour (red) and Buckets of Water (magenta). All that’s left is a Ladle and a Kettle (sky blue). Note: items may be in different locations than the ones shown.
Time to cast a spell and see if we can get that Sourdough to blow the water out of the well and put out all the fires. This starts your next Wizardry minigame. The object is to click on the Rune, in the book (green) that matches the Rune scrolling to left, below the book (magenta). Find the Runes before they scroll all the way to the left and disappear, to get the highest possible score. Note: the Runes in the book will change, randomly and if you mis-click. If you don’t see the next Rune you need in the book, wait a few seconds for them to change and one will appear. See the screenshot, in Chapter 2, for an example.
Cast the Spell on the well. Head out of town to the Bridge.
Bridge and Village
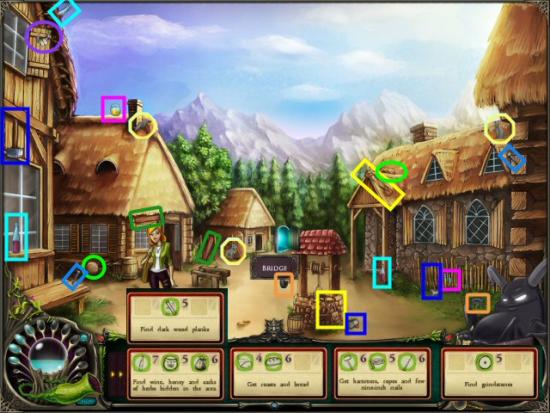
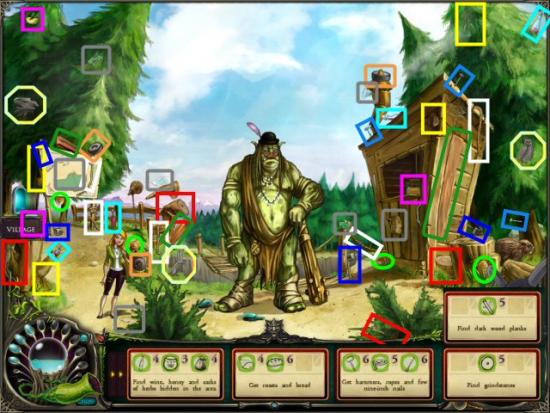
Speak to the Troll. You’re going to have to pay a toll to cross the Bridge…and he wants Honey Wine. Return to the Village and click on the Barrel. Collect Wine (cyan), Honey (magenta) and Sacks of Herbs (yellow) in the Village and at the Bridge. Time to create some Honey Wine. Note: items may be in different locations than the ones shown.
This starts your next Alchemy minigame. Move the bottle (your cursor) around the screen to collect the Blue drops before they hit the floor. Also, make sure to avoid the Red drops, to get the highest possible score. See the screenshot, in Chapter 1, for an example.
Speak to the Troll…now he wants some food. Collect the Bread (green) in the Village and at the Bridge and collect the Meat (red) at the Bridge. After he’s fed, you still can’t cross because there’s a hole in the Bridge. Collect Hammers (blue) in the Village and at the Bridge, Rope (white) at the Bridge, and Nails (sky blue) in the Village and at the Bridge. Note: items may be in different locations than the ones shown.
The Troll tells you that you need wood, but the Beaver’s the only one who can cut it. The Beaver says he can’t find his wood cutting denture (purple); get them from the Village. Those dentures are pretty dull and dirty; take them to the Grinding Wheel in the Village. Collect the Grindstones (orange) in the Village and at the Bridge, use them on the Grinding Wheel then return to the Bridge. Note: items may be in different locations than the ones shown.
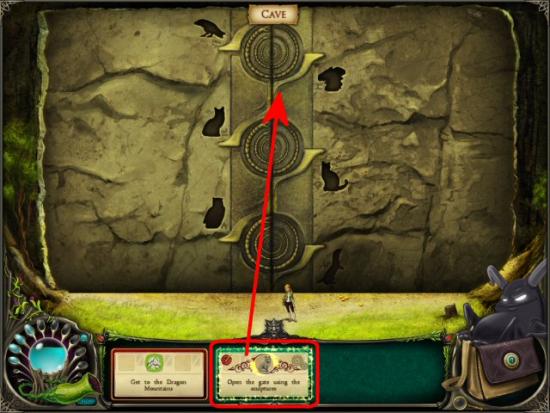
Find dark Wood Planks (dark green) for the Beaver to cut. Speak to the Troll then use the Wood Planks on the Bridge. Before heading to the Cave, collect the Map Pieces (grey). You’re now free to head to the Cave…you arrive, but it seems there’s a puzzle lock so you go back to the Village and Bridge to collect the Animal Figures (bright yellow) you need to unlock it. Note: items may be in different locations than the ones shown.
Cave
Use the Animal Figures anywhere on the Door to open it.
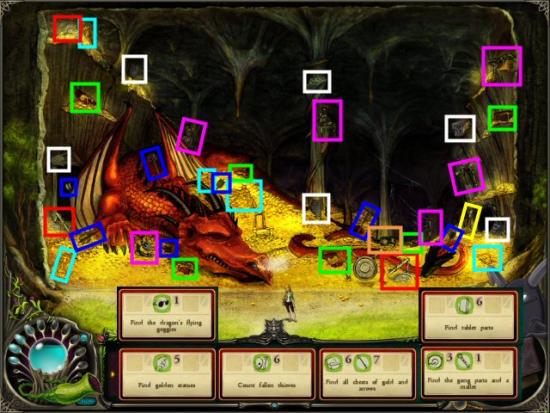
There’s the Dragon, all right, but it seems Verena’s been here, and now the Dragon won’t wake up. Listen to him talking in his sleep and find all his treasures.
Find the Golden Statues (cyan), Fallen Thieves (magenta), Chests of Gold (green), and Arrows (blue). Time to wake the Dragon; find all the Gong Pieces (white) and the Mallet (yellow). Use the Mallet on the Gong. Note: the Gong won’t appear until you’ve found all the parts. Note: items may be in different locations than the ones shown.
Finally, he’s awake. Now, you need to find the Tablet Pieces (white) that shows the locations of 2 of the Crystal Shards. Once that’s done, all we need to do is find the Dragon’s Flying Goggles (orange) and we’re off to the next location. Note: items may be in different locations than the ones shown.
Chapter 5 – A Land Wasted by Magic
After a rough landing, they’ve made it to the next location. Not very pretty…I guess that’s why they call it the Wasted Lands.
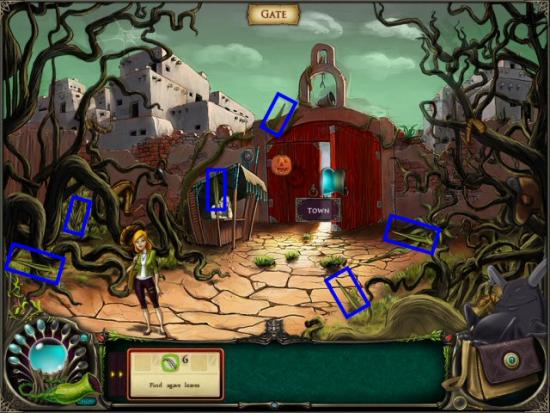
Gate
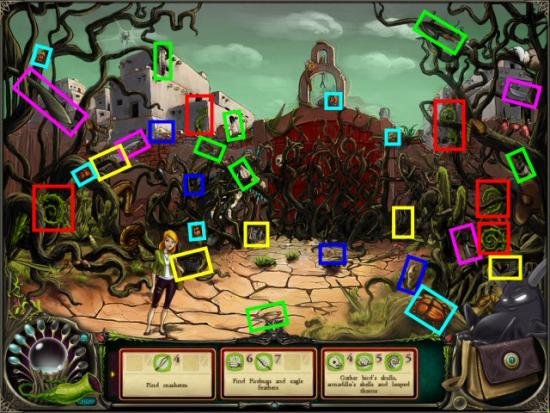
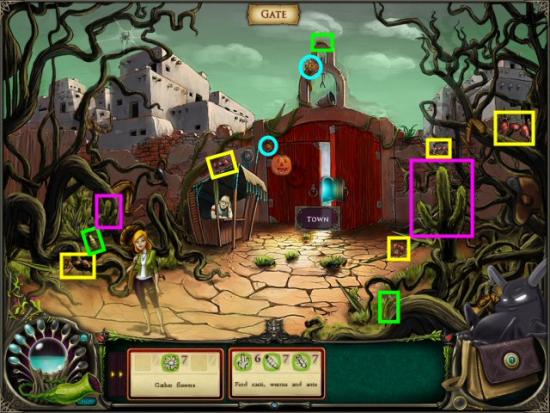
Talk to the Tribesman. Thorns have overgrown everything; find the Machetes (magenta). Use the Machetes on the Tribesman’s stand. In order to get rid of the rest of the thorns, we’re going to need to use an Inferno Spell. For that we need Firebugs (cyan) and Eagle Feathers (green). Note: items may be in different locations than the ones shown.
This starts your next Wizardry minigame. The object is to click on the Rune, in the book (green) that matches the Rune scrolling to left, below the book (magenta). Find the Runes before they scroll all the way to the left and disappear, to get the highest possible score. Note: the Runes in the book will change, randomly and if you mis-click. If you don’t see the next Rune you need in the book, wait a few seconds for them to change and one will appear. See the screenshot, in Chapter 2, for an example.
Use the Inferno Spell on the Gate to get rid of the rest of the Thorns. You’re all set, except you need a Totem and a Ticket to get in. Find the Bird Skulls (blue), Armadillo Shells (yellow) and Looped Thorns (red). Time to head inside. Note: items may be in different locations than the ones shown.
Town
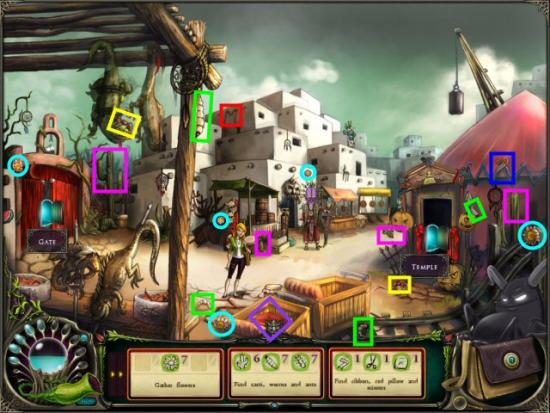
Speak to the Chief, then collect the Ancient Weapons (cyan). After you speak to the Chief, it’s time to redecorate the Temple. Collect the Pumpkins (red), then replace the Skulls (magenta) inside the Town and outside the Gate. Collect Ladders (green) inside the Town, Vultures (yellow) inside the Town and outside the Gate, Paint (blue) inside the Town and outside the Gate, and Brushes (purple) inside the Town. Use the Paint and Brushes on the Temple.
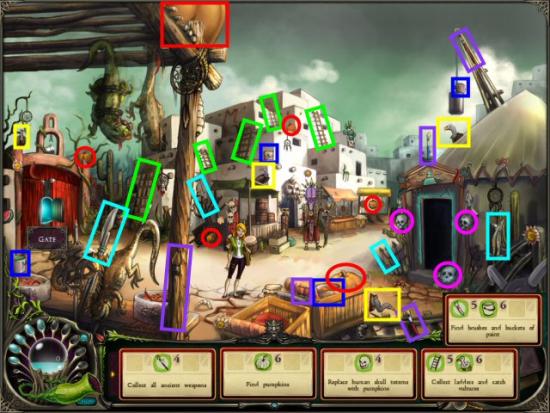

Collect the Flowers (cyan), inside the Town and outside the Gate, and use them on the Temple. Collect Cactus (magenta), Worms (green) and Ants (yellow) inside the Town and outside the Gate. Next, collect the Ribbon (red), Pillow (purple) and Scissors (blue) and use them on the Temple. You can now enter the Temple. Note: items may be in different locations than the ones shown.
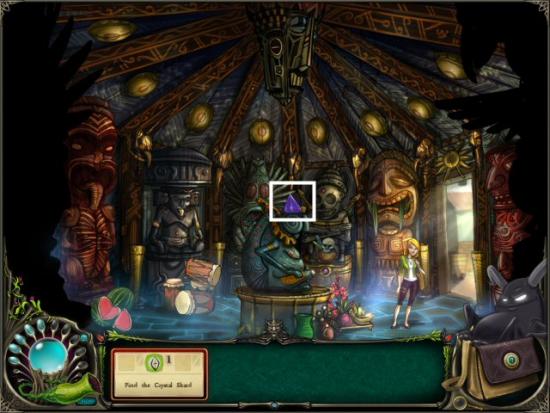
Temple
Enter the Temple. The god Oxytzl speaks to you. It appears all the gods have been neglected. Speak to each God, find his preferred offering, return to the Temple and use it on that god. Do each one, one at a time. Items are located in the Temple, inside the Town and outside the Gate. Note: items may be in different locations than the ones shown.
God of Thirst – collect Watermelons (cyan)
God of Thunder – collect Drums (red)
God of Nightmares – collect Dreamcatchers (magenta)
God of Death – collect Idols (green)
God of Pain – collect Agave Leaves (blue)
God of Spicy Food – collect Red Chilies (yellow)
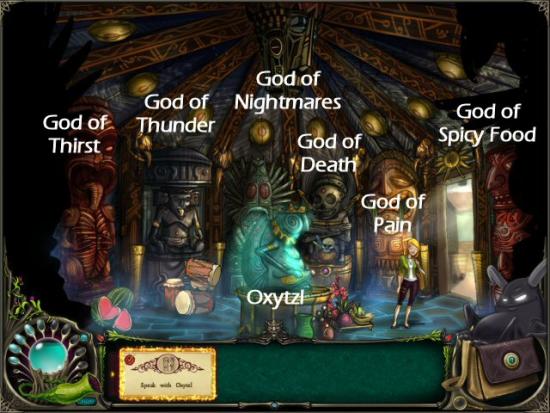
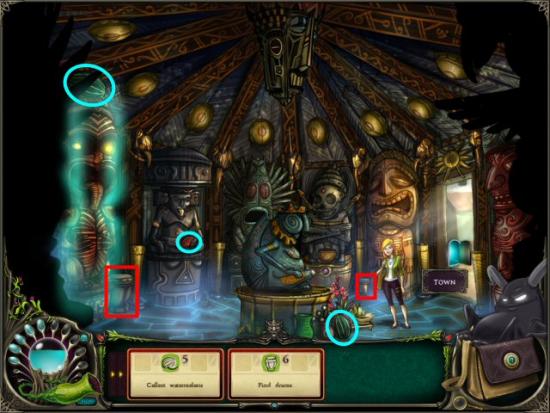
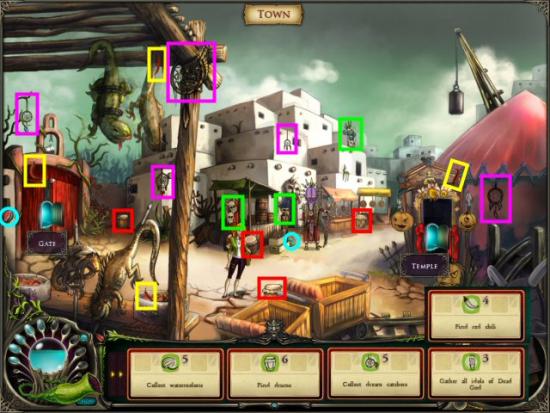
When you’re finished, speak with Oxytzl again and he will give you the Crystal Shard (white).
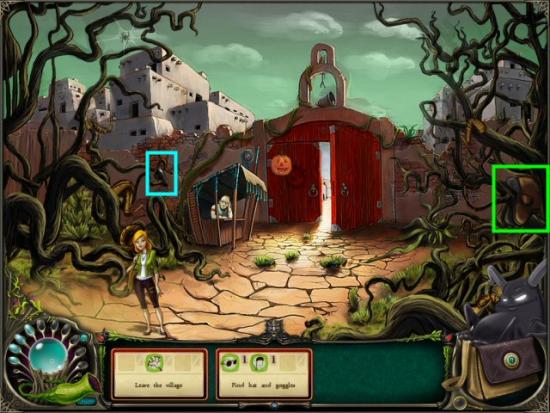
Exit the town, but before you can leave, Dragon asks you to find his Goggles (cyan) and Hat (green). Now you’re good to go.
Chapter 6 – Sultan’s Shard
Dragon wasn’t able to drop them very close, so Brunhilda and Demon had to walk…well, actually, Brunhilda had to walk carrying Demon…and, in this heat, they needed a Cooling Elixir.
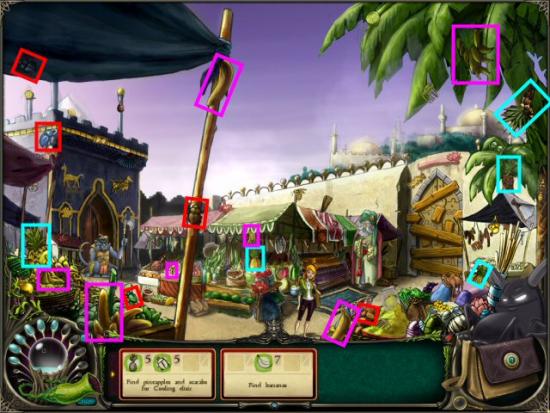
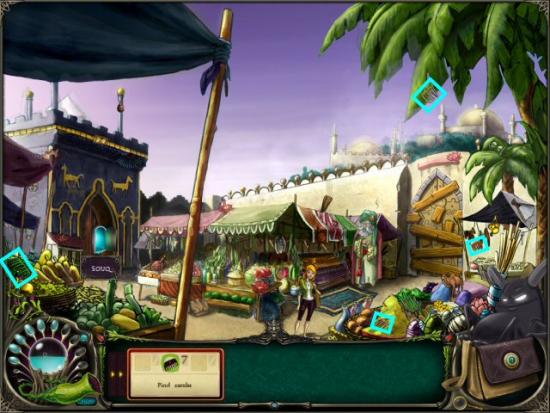
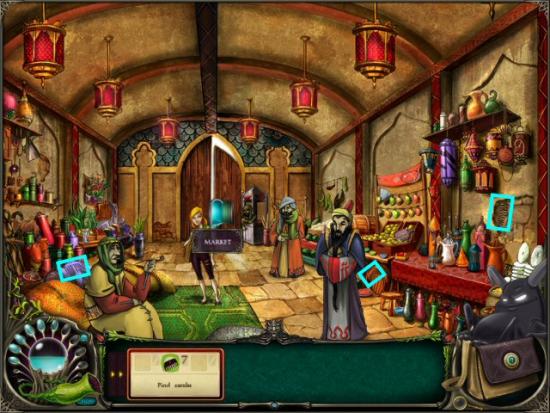
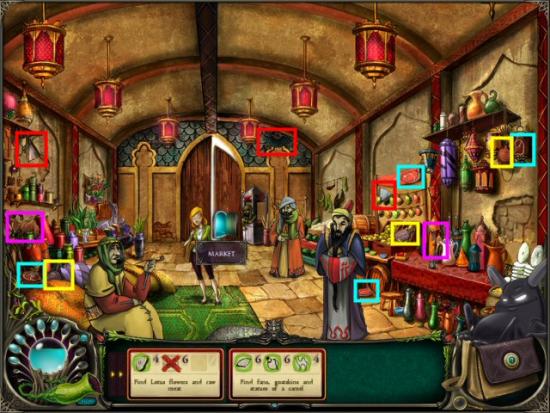
Market
Collect the Pineapples (cyan) and Scarabs (red) for the Cooling Elixir. Note: items may be in different locations than the ones shown. Note: items may be in different locations than the ones shown.
This starts your next Alchemy minigame. Move the bottle (your cursor) around the screen to collect the Blue drops before they hit the floor. Also, make sure to avoid the Red drops, to get the highest possible score. See the screenshot, in Chapter 1, for an example.
You try to get into the Sultan’s Palace, but it’s locked up tight. The Carpet Merchant offers one of his Carpets, but only if you can get his Insurance Rates lowered. Head over to the Souq. Well, that’s not looking so good, there’s a big, hungry Monkey blocking the way. Maybe if we collect some Bananas (magenta). Note: items may be in different locations than the ones shown.
That did the trick. Enter the Souq.
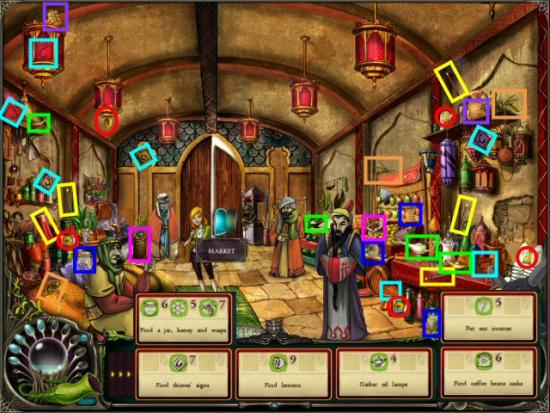
Souq
Speak to the Thief. Before he’ll help you, you need to collect Thieves’ Signs (cyan). Now, you need to each Merchant and find out what it will take for them to agree to higher Insurance Rates, so the Carpet Merchant’s rates will decrease. Talk to each one, collect the items then speak to him again. Note: items may be in different locations than the ones shown.
Lemon Merchant – Lemons (red)
Lamp Merchant – Lamps (green)
Spice Merchant – Coffee (magenta), Incense (yellow)
Speak to the Thief, again. He asks you to get rid of the Hourglass Merchant; too many practical jokes and the rest of the merchants can’t stand him. The Hourglass Merchant is terrified of Wasps. Perfect! Collect Jars (blue), Honey (purple) and Wasps (orange). Use them on the Hourglass Merchant. Speak to the Thief then return to the Market. Note: items may be in different locations than the ones shown.
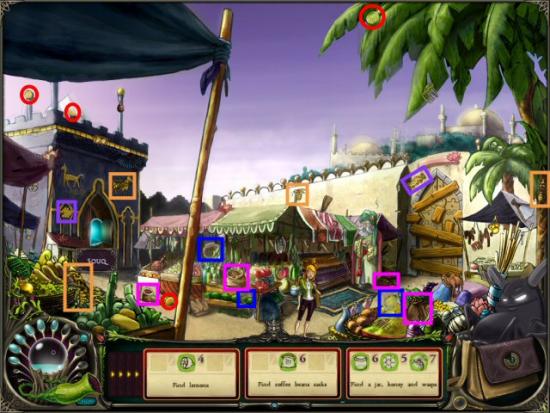
Market
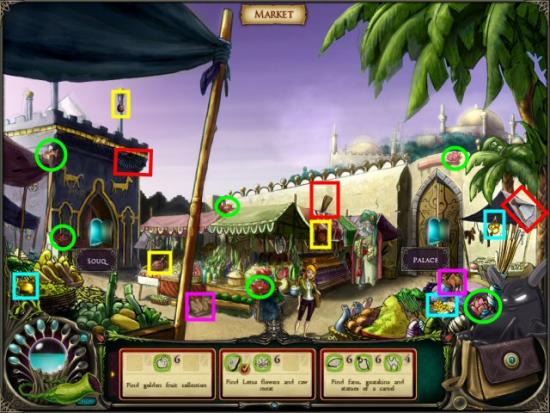
Speak to the Carpet Merchant. His carpets don’t seem to be “top of the line.” Collect Combs (cyan) in the Market and the Souq, then grab the Magic Carpet and fly over the wall. Note: items may be in different locations than the ones shown.
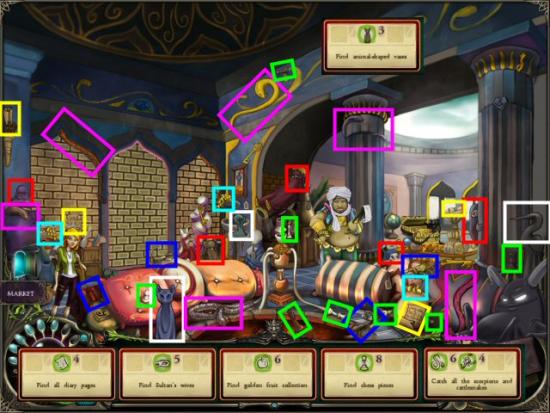
Palace
Speak to the Royal Bookkeeper and find everything he’s trying to account for. Collect the late Sultan’s Wives (red), Golden Fruit (cyan) in the Palace and in the Market, and the Chess Pieces (green), Snakes (magenta) and Scorpions (blue) in the Palace. Now we need to find the missing Diary Pages (yellow) and Animal Shaped Vases (white). Note: items may be in different locations than the ones shown.
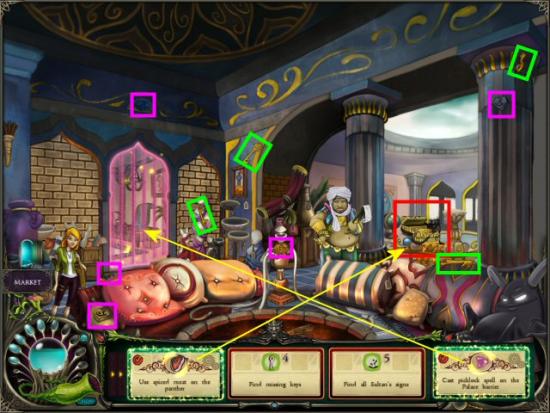
Try to open the Golden Chest (red), but that Panther isn’t letting you anywhere near it. Collect Lotus Flowers (green) from the Market, and Meat (cyan) from the Souq to make some Spiced Meat to put the Panther to sleep. Note: items may be in different locations than the ones shown.
Use the Spiced Meat on the Panther. Now that the Panther’s asleep we can get into the Golden Chest, but now we need to find some Keys (green). Next, collect the Sultan’s Signs (magenta). Note: items may be in different locations than the ones shown.
A door opened in the wall, but it’s protected by some kind of Barrier. Collect Fans (red), Camel Statues (magenta) and Goat Skins (yellow) from the Market and the Souq, to create a Spell to open it. Use the Spell on the Barrier.
Grab the Crystal Shard (cyan) and the Homing Stone (yellow) and we’re off to our next location.
Chapter 7 – Magic University
That Homing Stone got us here super quick, but looks like we stirred up some things.
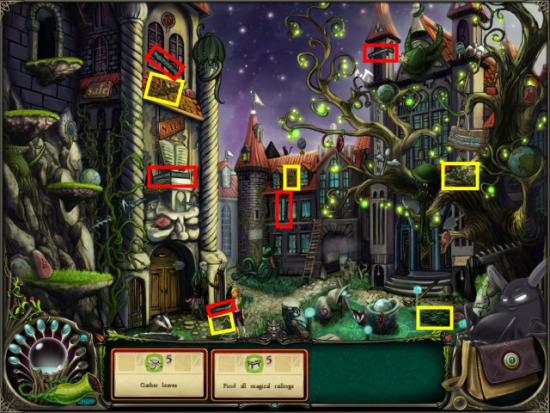
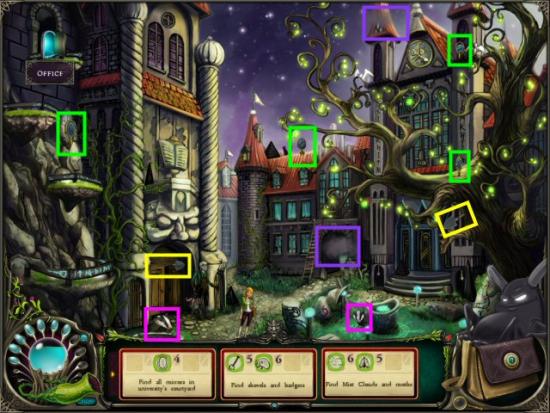
Courtyard
Speak to Marcellus then collect all the Leaves (yellow), then collect the Railings (red) for the Teleporter to Provost Bloomb’s Office. Note: items may be in different locations than the ones shown. Use the Railings on the Platforms
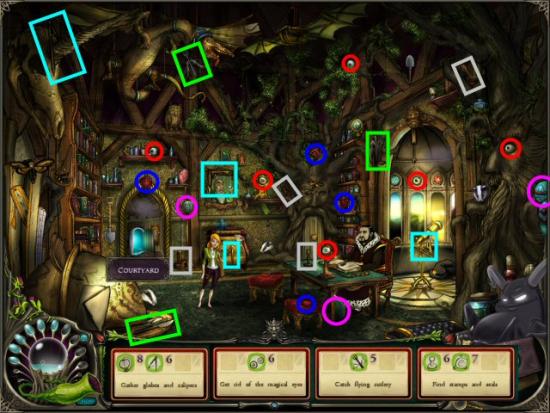
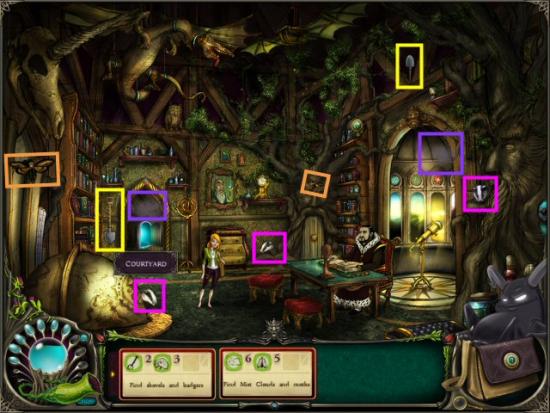
Office
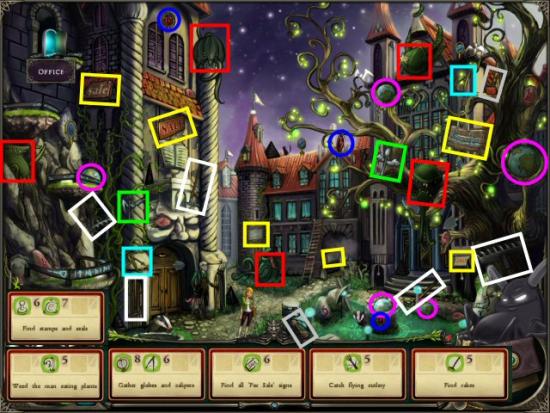
Speak to Provost Bloomb. His solution to saving the world is research. Sheesh! Collect the Globes (magenta) and Calipers (cyan) in the Office and Courtyard. Now he’s paranoid. We’ll have to put up with him if we want to get into the Library. Collect the Magical Eyes (red) in the Office. Note: items may be in different locations than the ones shown. Well, while Provost Bloomb is doing his bureaucratic busywork, let’s go talk to Marcellus.
Courtyard
Marcellus asks for help removing the For Sale Signs (yellow) in the Courtyard, the Flying Cutlery (green) in the Courtyard and in the Office, and the Rakes (white) and the Man Eating Plants (red) in the Courtyard. Note: items may be in different locations than the ones shown. Time to go see Provost Bloomb, again.
Office
Provost Bloomb needs Stamps (light grey) and University Seals (blue) from the Office and the Courtyard. Well, that made him…not happy, just more arrogant. Note: items may be in different locations than the ones shown. Let’s go speak to Marcellus; at least he can converse.
Courtyard
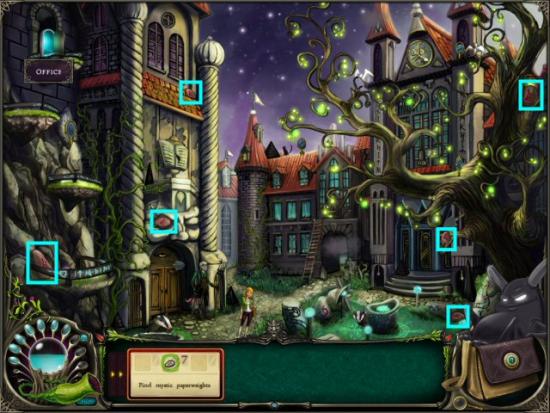
According to Marcellus, we need Mystic Paperweights (cyan) to keep the Rabid Grimoires at bay, in the Library. Note: items may be in different locations than the ones shown.
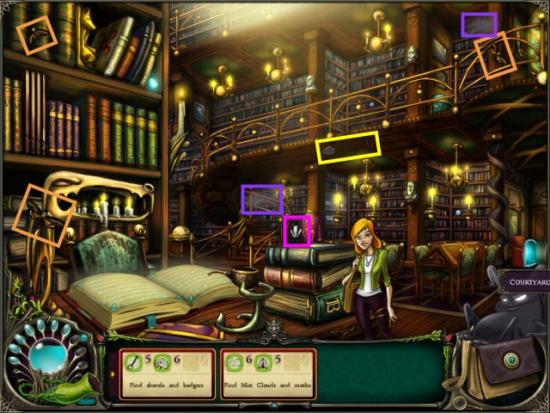
Library
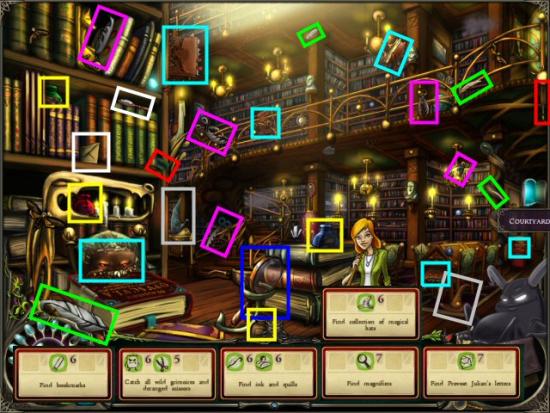
Speak to the Book and collect the Wild Grimoires (cyan) and Deranged Scissors (magenta). Now we need Ink (yellow) and Quills (green) from the Library and Office, Magnifiers (blue) from the Library, and Provost Julian’s Letters (white) and Bookmarks (red) from the Library and Office. Note: items may be in different locations than the ones shown.
Office
We found the last of the Bookmarks, and now we need the Magical Hats (light grey) from the Office and the Library. Now we have all the clues we need to determine where the Crystal Shard is buried.

Courtyard
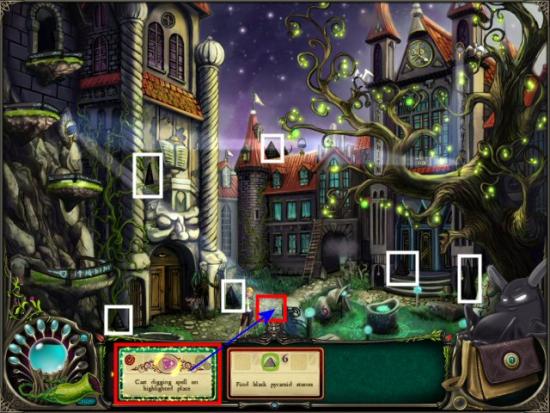
Locate the Mirrors (green). Now we need Shovels (yellow) and Badgers (magenta), from the Office, Courtyard and Library, to cast the Digging Spell. Note: items may be in different locations than the ones shown.
This starts your next Wizardry minigame. The object is to click on the Rune, in the book (green) that matches the Rune scrolling to left, below the book (magenta). Find the Runes before they scroll all the way to the left and disappear, to get the highest possible score. Note: the Runes in the book will change, randomly and if you mis-click. If you don’t see the next Rune you need in the book, wait a few seconds for them to change and one will appear. See the screenshot, in Chapter 2, for an example.
Cast the Digging Spell and grab the Crystal Shard (red). You’ll need to Teleport out; collect the Black Pyramid Stones (white). Now you’ll need the University’s Nexus Stone. Note: items may be in different locations than the ones shown.
Office
Provost Bloomb will only give you the Nexus Stone if you make him and elixir. Collect Moths (orange) from the Office and Library, and Mist Clouds (purple) from the Office, Library and Courtyard. Note: items may be in different locations than the ones shown.
This starts your next Alchemy minigame. Move the bottle (your cursor) around the screen to collect the Blue drops before they hit the floor. Also, make sure to avoid the Red drops, to get the highest possible score. See the screenshot, in Chapter 1, for an example.
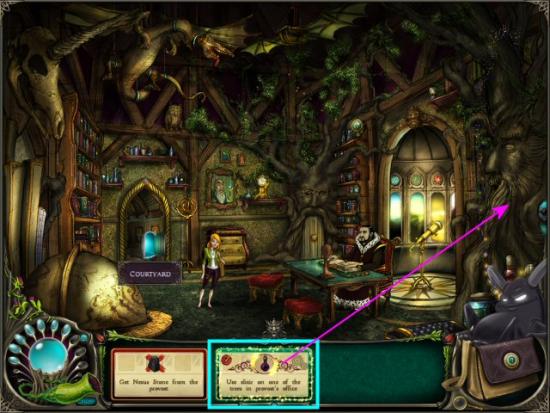
Use the Elixir on the Tree in Provost Bloomb’s Office, then return to the Courtyard.
Courtyard
Use the Nexus Stone on the Teleporter and you’re one step closer.
Chapter 8 – The Port of Halenburg
After a bumpy ride on the Teleporter, we land and need to work on getting passage on a ship to the Capital.
Docks
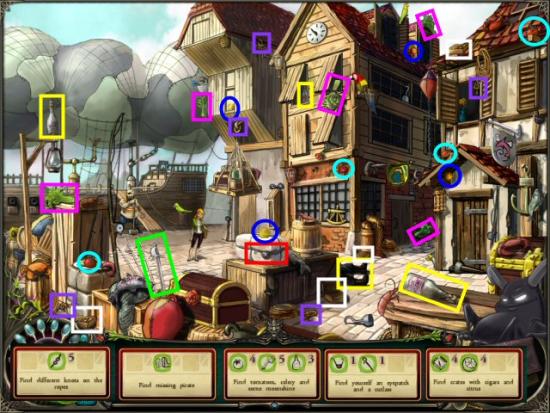
Click on the Boatswain (pronounced “bosun” by the way) and he tells you they’ve no room for passengers; they’re just waiting for one of the crew. Click on the boots of the missing Pirate (yellow). He has a nasty hangover, so collect Tomatoes (cyan), Celery (magenta) and Moonshine (yellow) for a cure…just like an Elixir. Note: items may be in different locations than the ones shown.
This starts your next Alchemy minigame. Move the bottle (your cursor) around the screen to collect the Blue drops before they hit the floor. Also, make sure to avoid the Red drops, to get the highest possible score. See the screenshot, in Chapter 1, for an example.
Use the Hair of the Dog Elixir on the Pirate. Looks like it didn’t help enough and a perfect opportunity for us to replace him. Speak to the Boatswain. Find an Eye Patch (red), Cutlass (green), Citrus (blue), Cigar Boxes (white) and Knots (purple). Note: items may be in different locations than the ones shown.
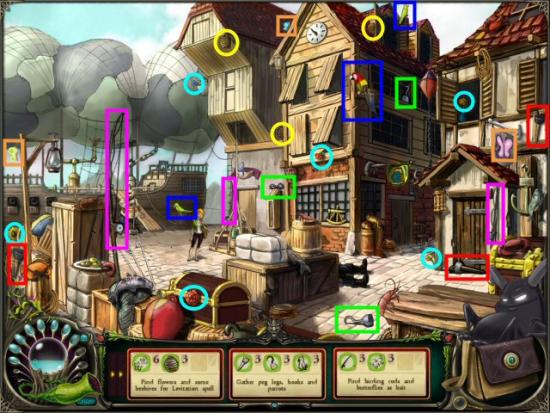
That last Knot made the crate crash into the dock, blocking the Portmaster’s office. Find Flowers (cyan) and Beehives (yellow) for a Levitation Spell.
This starts your next Wizardry minigame. The object is to click on the Rune, in the book that matches the Rune scrolling to left, below the book. Find the Runes before they scroll all the way to the left and disappear, to get the highest possible score. Note: the Runes in the book will change, randomly. If you don’t see the next Rune you need in the book, wait a few seconds for them to change and one will appear. See the screenshot, in Chapter 2, for an example.
Cast the Levitation Spell on the Crates. Enter the Portmaster’s Office and speak with him. Go back to the Docks and find Peg Legs (red), Pirate Hooks (green) and Parrots (blue). After speaking with the Portmaster and the Boatswain, again, find Birding Rods (magenta) and Butterflies (orange). Note: items may be in different locations than the ones shown. Speak to the Portmaster; we have to convince him to become the ship’s captain.
Office
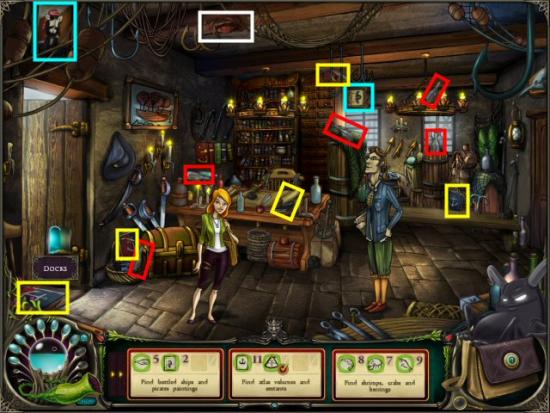
Find the Pirate Paintings (cyan) and Ships in Bottles (red). Note: items may be in different locations than the ones shown. Speak to the Portmaster then return to the Docks.
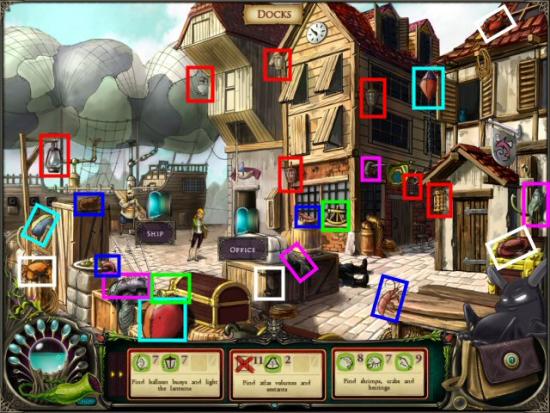
Docks, Office and Ship
Find Balloon Buoys (cyan) on the Docks and Ship, and Light the Lanterns (red) on the Docks. Speak to the Portmaster again and find the Sextants (green) on the Docks and the Atlases (yellow) in the Office and on the Ship. Note: items may be in different locations than the ones shown.
Ship
Speak to the new Captain and find the Anchors (red). Speak to him again and find Shrimp (blue), Crabs (white) and Herrings (magenta) on the Ship and the Docks. One Crab is in the Office. Note: items may be in different locations than the ones shown.

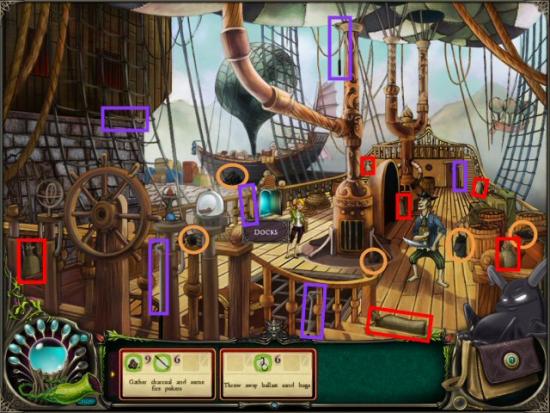
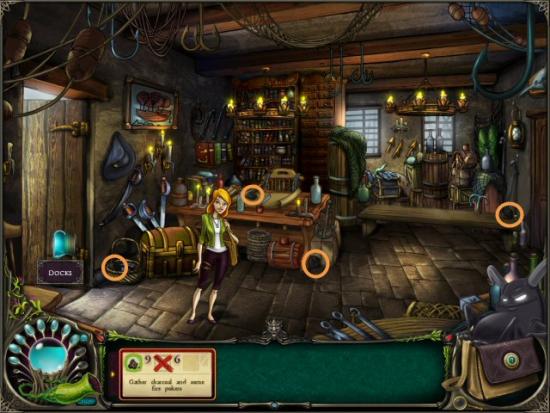
Speak to the Captain and find the Coal (orange) on the Ship and in the Office and Pokers (purple) on the Ship. Use the Pokers on the ship’s Furnace. Note: items may be in different locations than the ones shown.
This starts your next Telepathy minigame. The object is to find the differences to tune the Crystal Balls, while avoiding any mis-clicks for the highest possible score. This is not timed, so wait until the picture is clearer to find the objects. Note: the differences are all objects inserted into the scene. See the screenshot, in Chapter 3, for an example. Note: your game will be different from the example (white) shown.
After speaking with Pug, you find out Master Filemon has been arrested. Time to cut the Ballast Bags (red) and make haste to the capital.
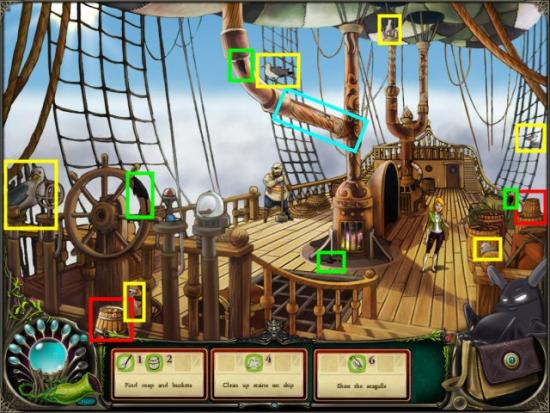
After you’re underway, speak to the Boatswain and collect the Mop (cyan) and Buckets (red). Speak to the Boatswain again then clean up the Stains (green). Speak to him again, then shoo off all the Sea Gulls (yellow).
Chapter 9 – Grey Stone Stronghold
You’ve arrived! Now to find out where they’re holding Master Filemon.
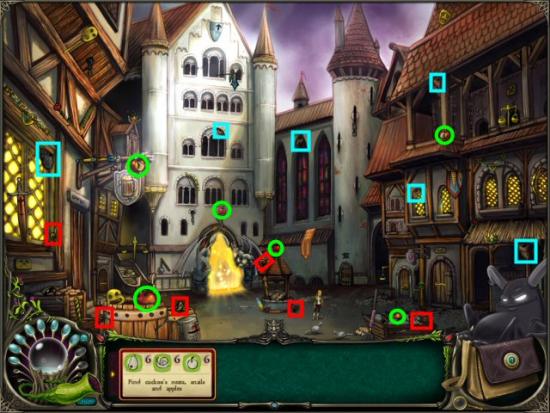
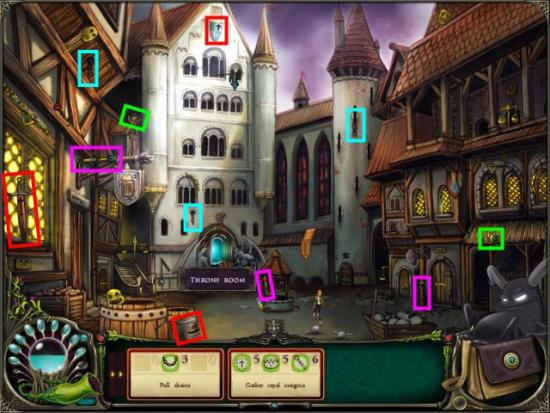
Courtyard
The Stone Gargoyles won’t let you pass. You’re going to have to make a Shadow Elixir so they won’t see you. Collect Cuckoo’s Nests (cyan), Snails (red) and Apples (green).
This starts your next Alchemy minigame. Move the bottle (your cursor) around the screen to collect the Blue drops before they hit the floor. Also, make sure to avoid the Red drops, to get the highest possible score. See the screenshot, in Chapter 1, for an example.
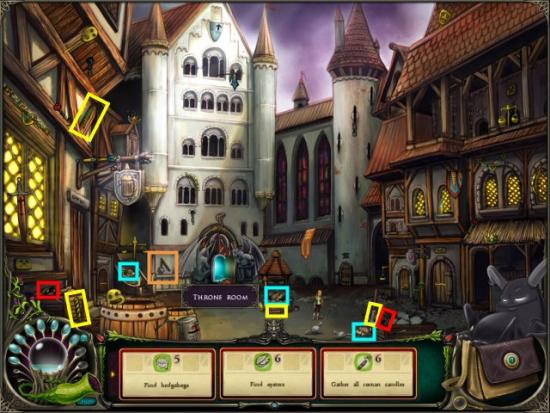
Use the Elixir on the Throne Room entrance.
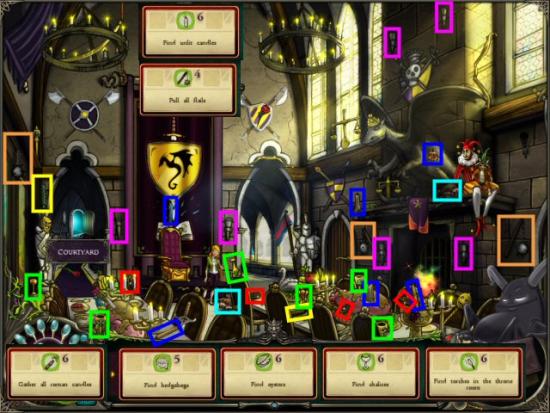
Throne Room
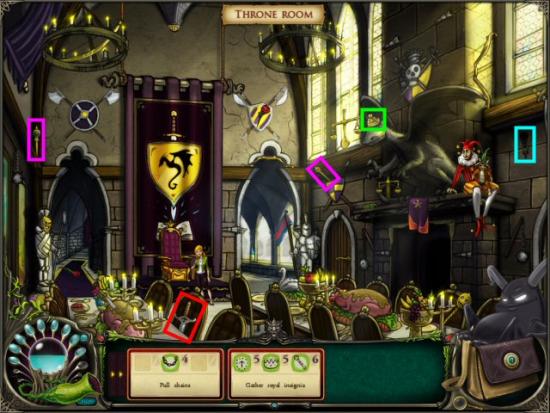
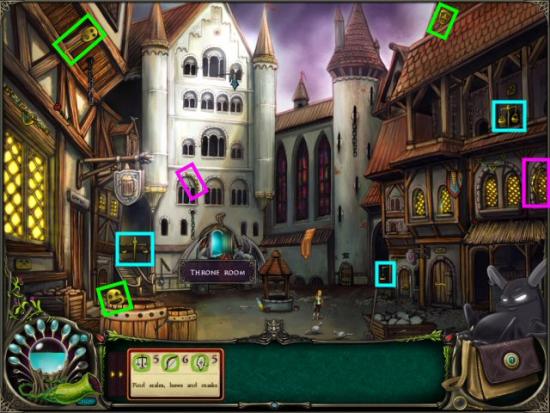
As soon as you enter, the King informs you that he’s locked Filemon in the Dungeon. The Jester offers to help, but first you need to help him with his practical jokes. You’ll need to find a number of items. Collect the items then speak to the Jester as you finish each task. Note: items may be in different locations than the ones shown. Once you’ve finished, enter the Crypt.
Hedgehogs (cyan) – Courtyard and Throne Room
Oysters (red) – Courtyard and Throne Room
Chalices (green) – Throne Room
Torches (magenta) – Throne Room
Roman Candles (yellow) – Courtyard and Throne Room
Unlit Candles (blue) – Throne Room
Flails (orange) – Courtyard and Throne Room
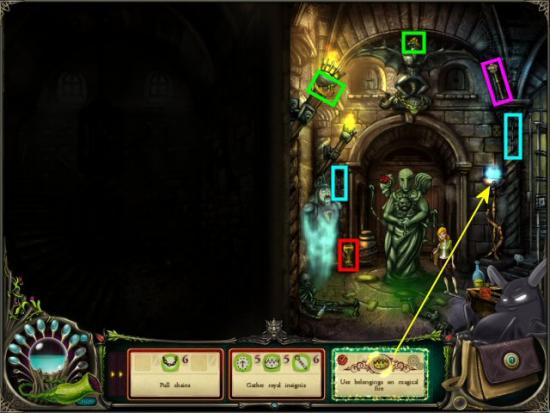
Crypt
Speak with the Ghost of a former king. He needs you to find a number of items. Collect the items then speak to the Ghost as you finish each task. Note: items may be in different locations than the ones shown. Once you’ve finished, use the items on the Magical Fire.
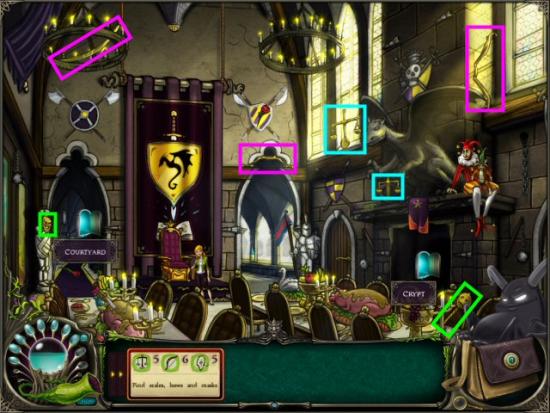
Chains (cyan) – Crypt, Throne Room and Courtyard
Royal Insignia (red) – Crypt, Throne Room and Courtyard
Crowns (green) – Crypt, Throne Room and Courtyard
Scepters (magenta) – Crypt, Throne Room and Courtyard
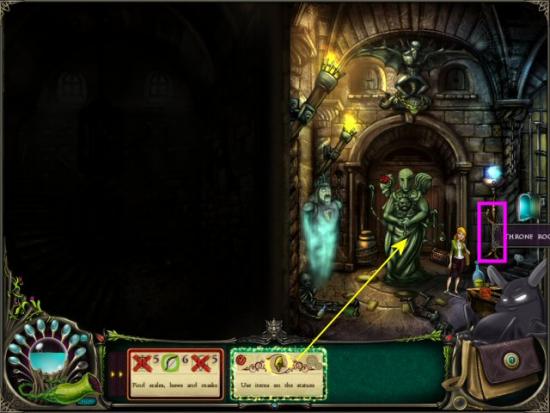
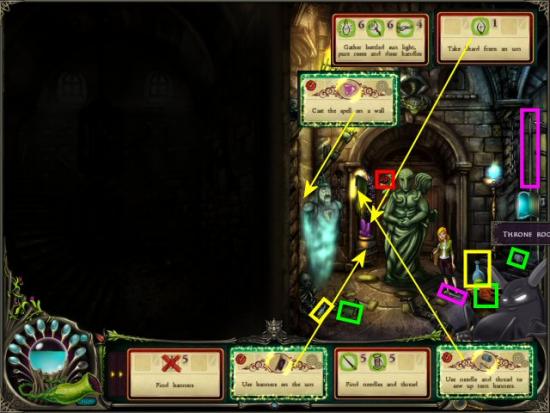
Speak to the Ghost and find the remaining items. He needs you to find a number of items. Collect the items then speak to the Ghost as you finish each task. Note: items may be in different locations than the ones shown. Once you’ve finished, use the items on the Statues.
Scales (cyan)
Bows (magenta)
Masks (green)
Speak to the Ghost then find the Banners (cyan) in the Throne Room and in the Courtyard. Use the Banners on the Urn. Next find Needles (magenta) in the Crypt and Courtyard, and Thread (green) in the Crypt, Throne Room and Courtyard. Use the Needles and Thread on the Torn Banners. Note: items may be in different locations than the ones shown.
You’ll need a Spell to break through the Wall. Find Bottled Sunlight (yellow) and Roses (red) in the Crypt, Throne Room and Courtyard, and Door Handles (orange) in the Throne Room and Courtyard. Note: items may be in different locations than the ones shown.
This starts your next Wizardry minigame. The object is to click on the Rune, in the book that matches the Rune scrolling to left, below the book. Find the Runes before they scroll all the way to the left and disappear, to get the highest possible score. Note: the Runes in the book will change, randomly. If you don’t see the next Rune you need in the book, wait a few seconds for them to change and one will appear. See the screenshot, in Chapter 2, for an example.
Use the Spell on the Wall.


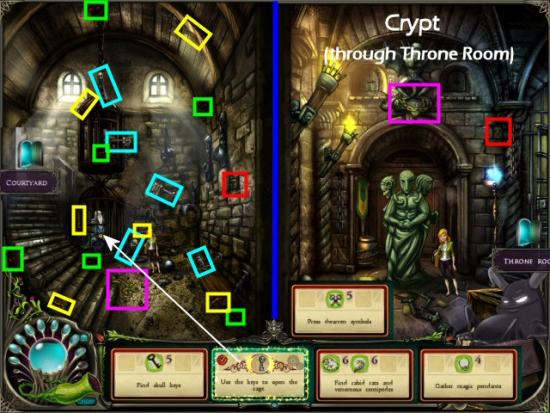
Dungeon
Master Filemon is locked in a cage in the Dungeon. To free him, find the Skeleton Keys (cyan). Use the Skeleton Key on the Cage. Find Rabid Rats (green) and Venomous Centipedes (yellow). Master Filemon uses a Spell and breaks through the door of the Dungeon. Find the Magic Pendants (magenta) in the Dungeon, Courtyard and Crypt. Then press the Dwarven Symbols (red) in the Crypt, Courtyard and Dungeon to open the Hidden Passage in the Throne Room
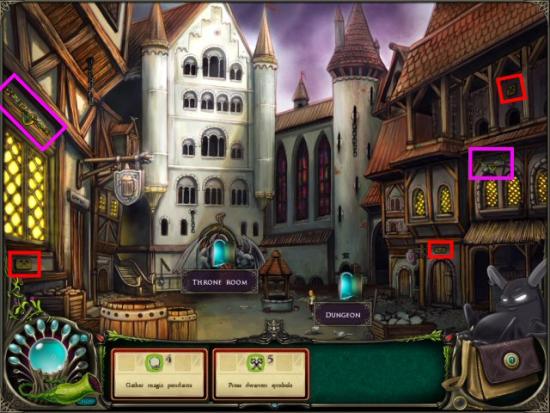
Throne Room
Enter the Hidden Passage (red).
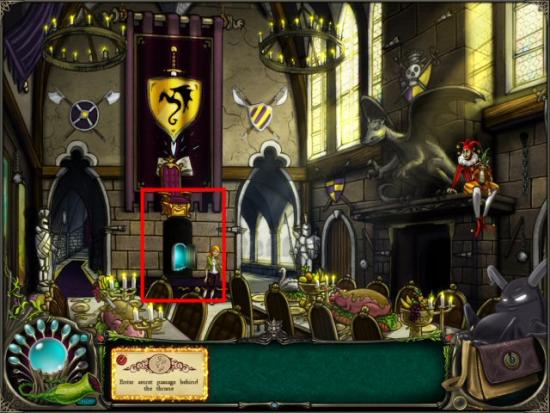
Chapter 10 – The Showdown!
We made it through the Hidden Passage, into The Cave. The King is trying to cast some kind of Spell.
The Cave
He’s cast a Statis Field Spell over the Dark Crystal so no one can get to it. Verena arrives and kills the King, but not to save the Dark Crystal…except to save it for herself. The battle begins!
In order to defeat Verena, we’ll need strong magic. Find the Pages to the King’s Grimoire (red).
Verena casts a Fireball Spell. Find the Buckets (cyan) and Green Roots (yellow) then cast the Rain Summoning Spell.
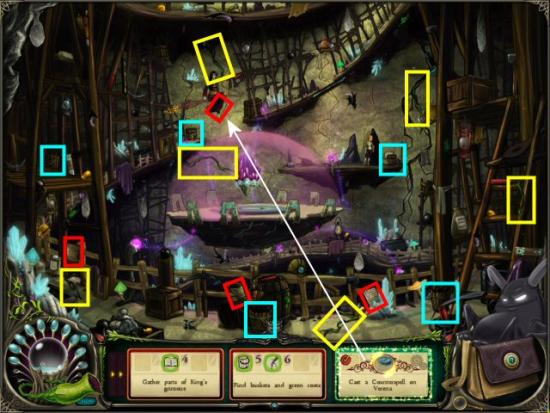
Verena casts a Battering Ram Spell. Find Mining Carts (cyan) and Heavy crates (yellow) then cast the Barricade Spell.
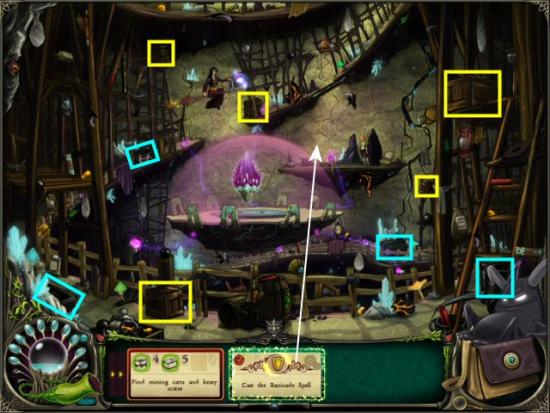
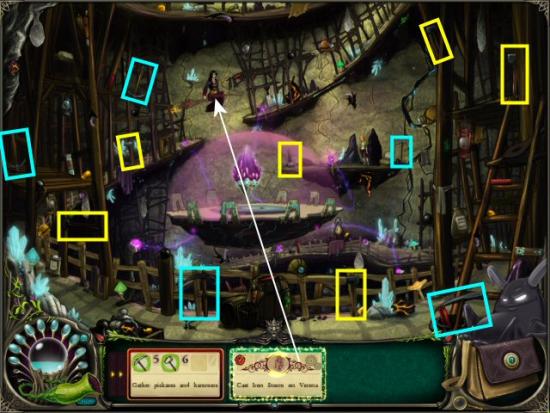
Verena casts a Lightning Spell. Find Pickaxes (cyan) and Hammers (yellow) then cast the Iron Storm Spell.
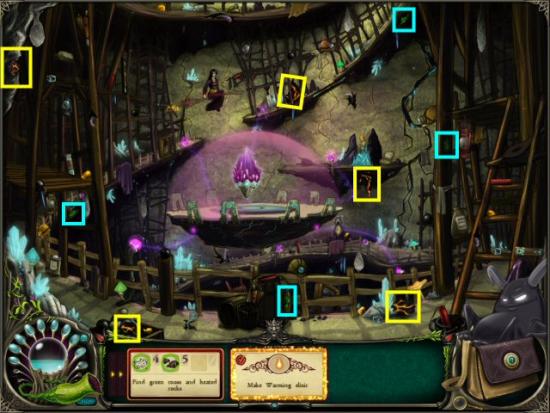
Verena casts a Freeze Spell. Find Green Moss (cyan) and Heated Rocks (yellow) for a Warming Elixir
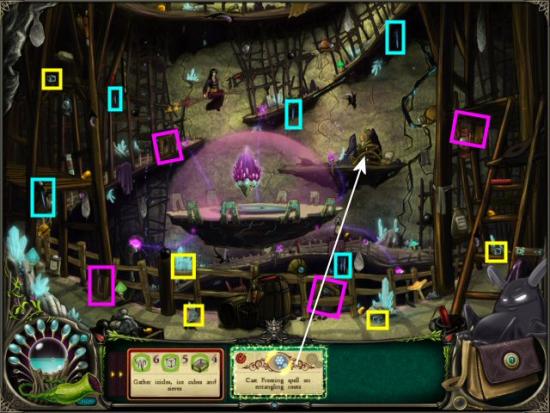
Verena casts an Entangling Spell. Find Icicles (cyan), Ice Cubes (yellow) and Sieves (magenta) then cast the Frost Spell.
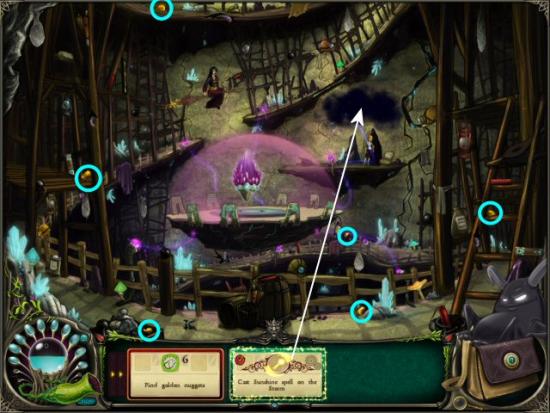
Verena casts a Storm Spell. Find Gold Nuggets (cyan) then cast the Sunshine Spell.
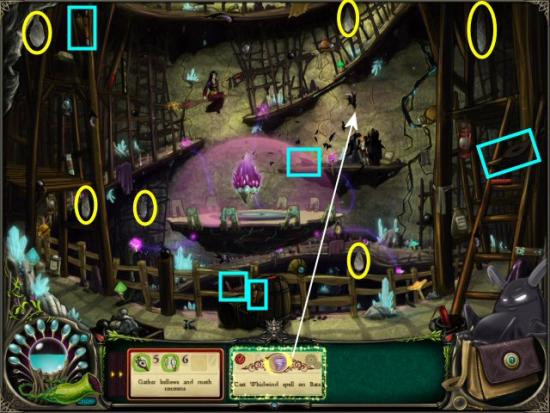
Verena casts a Bats Spell. Find Bellows (cyan) and Giant Moth Cocoons (yellow) then cast the Whirlwind Spell.
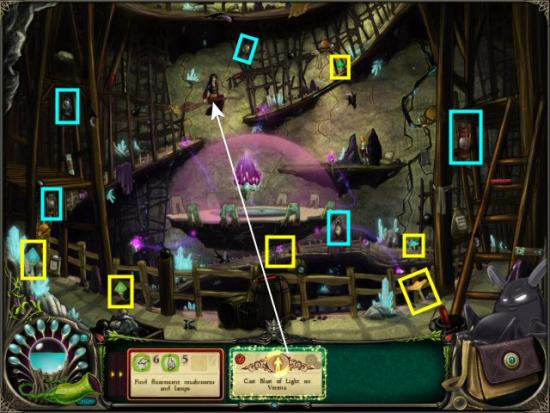
Verena casts a Bolts of Darkness Spell. Find Lanterns (cyan) and Fluorescent Mushrooms (yellow) then cast the Blast of Light Spell.
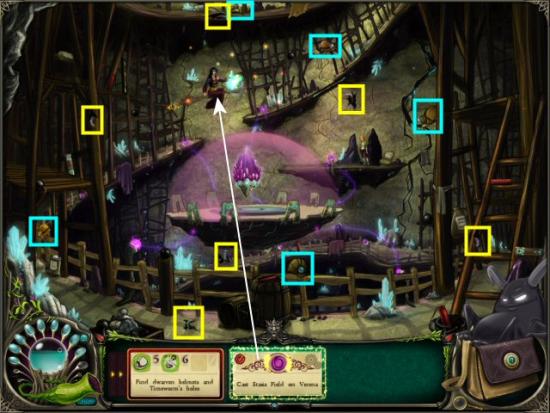
Verena prepares to cast some unknown but powerful spell. Find Dwarven Helmets (cyan) and Time Worms (yellow) then cast the Stasis Field Spell.
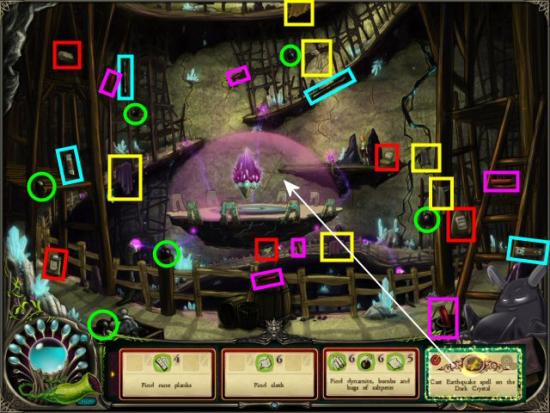
Well, looks like we took care of Verena, now we need to get access to the Dark Crystal. Find Rune Planks (cyan). The Isle that’s holding the Dark Crystal is too low; we need to boost the Lightning that’s holding it up. Find Cloths (yellow) to charge the Lightning. Now we need to break the Stasis Field with an Earthquake Spell. Find Dwarven Dynamite (magenta), Bombs (green) and Salt Peter (red) then cast the Earthquake Spell.
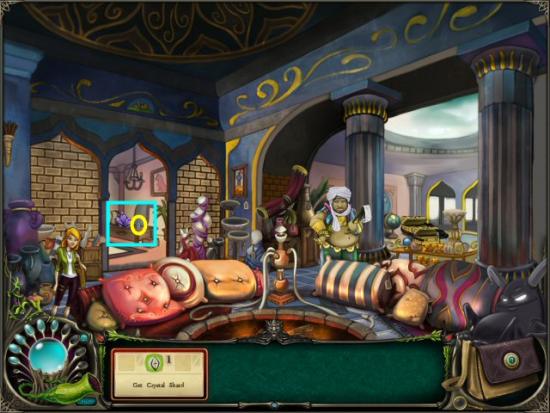
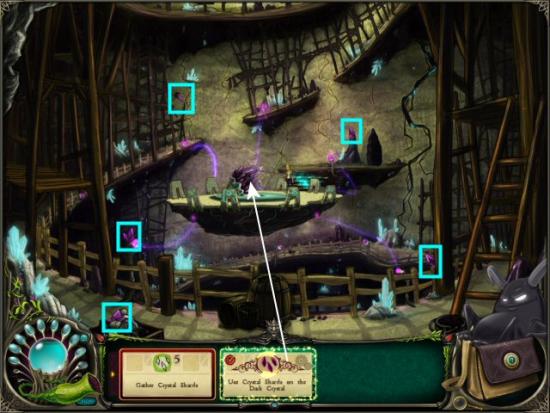
That did the trick, but now the Dark Crystal is damaged. Find the Crystal Shards (cyan) then use them on the Dark Crystal.
Congratulations! You’ve completed Brunhilda and the Dark Crystal. Watch the final scenes, the ending movie and the credits. You can now go back and replay individual chapters and any Minigames you unlocked.

More articles...
-
Best Horror Games On Itch.io – July 2026
Across a bounty of subgenres. -
Haze Seas Accessories Tier List [Best Accessories to Equip]
The accessories with the best stat buffs in Haze Seas.