![Hololive Dreams Tier List [Best Cards]](/wp-content/uploads/2026/07/hololive-dreams-tier-list.jpg "Hololive Dreams Tier List [Best Cards]")
Hololive Dreams Tier List [Best Cards]
The best cards for the best performances.


![Iron Soul Dungeon Weapon Tier List [Best Weapons]](/wp-content/uploads/2026/07/iron-soul-dungeon-weapon-tier-list.jpg "Iron Soul Dungeon Weapon Tier List [Best Weapons]")

Welcome to Gamezebo's walkthrough for Broken Sword: The Smoking Mirror, the second game in the Broken Sword series. In this adventure game, you follow George and his girlfriend, Nico, as they try to solve a mystery involving druglords, smuggled artifacts, and ancient curses. The story picks up 6 months after the end of the first game. Although George and Nico will recognize some of the characters from the earlier game, you don’t have to. RETURNING CHARACTERS These are the characters yo…

a:1:i:0;a:2:s:13:”section_title”;s:39:”Broken Sword 2: The Smoking Mirror Tips”;s:12:”section_body”;s:74664:”
Welcome to Gamezebo’s walkthrough for Broken Sword: The Smoking Mirror, the second game in the Broken Sword series. In this adventure game, you follow George and his girlfriend, Nico, as they try to solve a mystery involving druglords, smuggled artifacts, and ancient curses. The story picks up 6 months after the end of the first game. Although George and Nico will recognize some of the characters from the earlier game, you don’t have to.
RETURNING CHARACTERS
These are the characters you might recognize from the first game in the series.
George. Our hero! A young American who is easy-going and relaxed most of the time, but who finds himself pulled into strange adventures because of the actions of
Nico. George’s girlfriend, she is an investigative reporter from Paris. Daring and unafraid, she’ll tackle any mystery—but she always tells George it’s his fault when trouble occurs!
André Lobineau. A friend of Nico’s who would like to take George’s place as her boyfriend. George, understandably, doesn’t like him very much.
The Gendarme. A police officer that George and Nico met in their first adventure.
Duane. An American greeting card salesman who thought he was working for the CIA. Only he wasn’t. Or—maybe he was. Or maybe he was and didn’t know it. Or maybe he’s just crazy! He was the source of much of the comic relief in the first adventure.
Pearl. Duane’s wife. She’d be a typical American tourist if George’s CIA activities (or craziness, depending how you look at it), didn’t keep interfering. Her hobbies are shopping and sightseeing.
The other characters who are new to this game will be introduced as you go along.
GENERAL TIPS
There are no spoilers in this section. General tips will cover:
General Tips: Save Options
Whenever you move your cursor to the top of the screen, you will see a row of Game icons.

Thse are explained below. Listed from left to right
Game Options (blue square control panel). This is where you can change the volume for the music, special effects, etc. You can also have the dialog show as subtitles on the screen.
Windows Icon/Quit Game. If you click on the Windows icon, you will quit the game. Just remember there is no autosave! So if you want to save your game, use the SAVE icon first.
Save Icon (CD with arrow pointing in to center). This will bring up a set of numbered slots. Pick any slot and type a name for your save file. You can choose any name you like. After you enter the name, click on the skull button next to the save. If you don’t click on the skull, the save file won’t be created! Your character can die in the game, so it’s a good idea to create a save file at the start of each new location in case you have to restore. You should also save before starting any complex puzzle.
Restore icon (CD with arrow pointing out from center). This will bring up the save slots. First click on the name of the one you want to use. Then click on the skull button next to Restore. If you don’t click on the skull, the file won’t be restored.
Restart icon (circular arrow). This on the far right, where most games put the Exit Game icon. If you click on this, you will go all the way back to the first scene of the game, and you will not have saved your position! So don’t click this unless you really mean to.
General Tips: Navigation and Cursor Controls
Navigation is straightforward in this game. Just click anywhere you want your character to go. If your character is walking and you want to change where you’re going, or stop and talk to someone, just click your new target.
Scan the scene by moving the cursor around slowly. Important items have text labels. Anything that you can click on will have one of four cursor shapes:
Cross. You can left click here and your character will walk there. If you have activated something form your inventory by clicking on it first, you will see a picture of it next to your cursor. Then when you click on the cross, your character will walkt to that place and use the item there. If you rightclick on a cross, you will get more information about the location/item—this can be very important, so it’s a good idea to always do it.
Grabbing hand. There is something you can pick up here. It might go into inventory, or you might just be able to carry it around the scene and use it.
Pointing hand next to the word EXIT. Click here and you will exit the scene at that location.
Beckoning hand on the far right or far left of the scene. This tells you the scene can scroll in that direction. Click on the hand to move that way.
General Tips: Using your inventory
Inventory items are very easy to use in this game.
Move the cursor down to the bottom of the screen, and the row of inventory items will be revealed.
Right click on an item to get more information about this. Do this for every item, because this information can be essential to advancing in the game.
Left click on an item to pick it up by sticking it to your cursor.
Left click on its greyed out space in inventory to return it to inventory.
Left click on one item, then left click on another to combine them in inventory. Then right click the combination to find out more.
Some items will be used up when you use them, but some you’ll be able to pick up again and use in another scene.
When you scan a location, anything that has a grabbing hand can be picked up and either used immediately in the scene or put into inventory.
General Tips: Talking to People
Like all point and click adventures, you will need to talk to people you meet in your travels. Move your cursor slowly over the scene. Anyone you can talk to will get a text label. Note that this label changes as you learn more about them, so someone might first be labeled “Man” and then be labeled with their name later. If you see a mouth icon over the person, left click on it to talk to them.
If you can talk to the person at that time, a dialogue control will show down at the bottom of the screen where you usually see inventory. The leftmost squiggle will end the dialogue. The other icons indicate topics you can talk about. It’s up to you to choose the correct topics.
Usually you’ll be able to talk about all the topics, but some characters get tired of talking and finish a conversation early. So make sure you think about what you want to talk about next.
The icons that represent people don’t always look very much like that person. In particular, Nico’s icon and Professor Oubier’s icon don’t really look like them. That doesn’t mean anything in terms of the plot, it’s just the way they were drawn.
In some scenes you will have to talk to the same person several times. In between you need to talk to other people or do something else. Just click on the mouth icon over the character and the game will tell you whether there’s anything new to talk about.
You can also try talking to animals, just like you would in real life. So you can call a dog, try to distract a cat, etc. If there is a mouth icon on something, click it to talk to it.
General Tips: In-Game Hint System
Anything important will have a text label.
Right-click on an item to find out more about it. You will get most of your hints this way.
Right-click on an item after you put it into inventory to examine it more closely. If another item is revealed, right-click on that as well.
The cursor will change depending on what you can do with an item. If you can pick it up, the cursor will change to a grabbing hand.
Places where you can leave the scene to go to a new location usually have a text label of EXIT.
General Tips: Starting a new session from a restored game
I did run into a glitch where a couple of times the game just wouldn’t start. I would get the screen with the Restart/Restore options, but none of the skull buttons worked. If I just did an alt-tab to get off the screen, then closed the game launcher, and then tried again, it would work fine.
WALKTHROUGH (Spoilers!)
Colors:
Items that you can pick up and use from your inventory are highlighted in green.
Items that you need to click on or interact with in the environment are highlighted in blue. That includes exits.
Characters are in red.
Places are underlined.
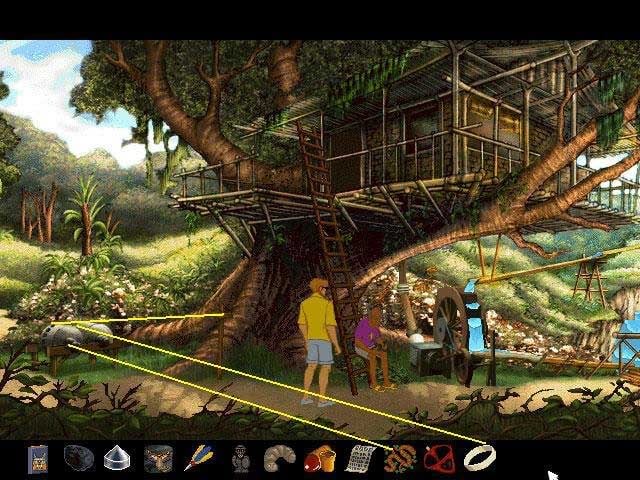
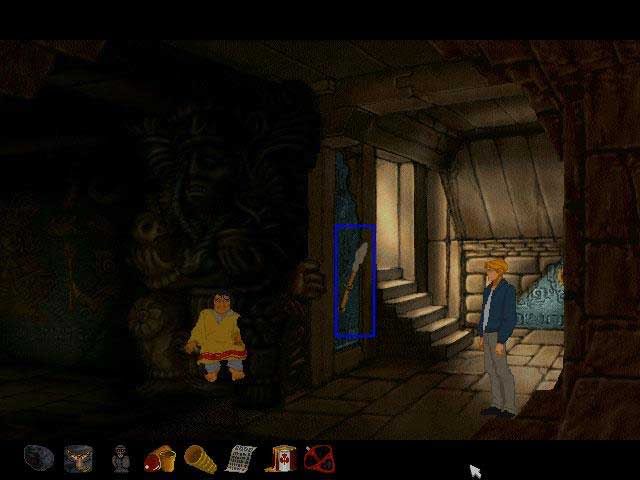
Paris: Oubier’s House, Upstairs
After an action-packed beginning, Nico has been kidnapped, and George is tied to a chair in a room where the carpet has been set on fire—and a poisonous spider is creeping towards him!
First you have to take care of the spider, preferably before it reaches you. Scan the room. The only thing you can reach is the bookcase. Right click on it, and you will discover that one side (the lower right corner) is just balanced on a block of wood. Kick the wood by left-clicking on it with the cursor. The bookcase will fall down and crush the spider.
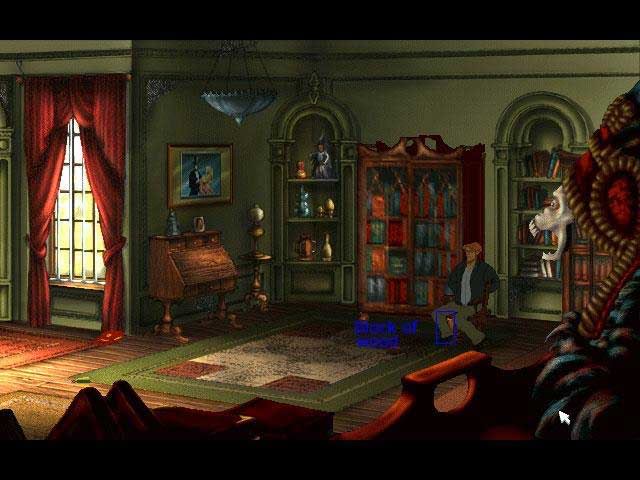
Now you have to get untied. You see a piece of metal sticking out of the wall where the bookcase used to be. Right click on it to examine it, then left click and George will use it to cut the ropes tieing him.
Walk over to the writing desk and open it. Take the tequila and drink it. You will spit out a worm. Pick up the worm and put it in your inventory.
There is a drawer in the writing desk. Open it and put the pot in your inventory. Right click on the pot in inventory and you will find a small key. You won’t be able to use it in this room, though.
Look around on the carpet. Pick up the poisoned dart.
Pick up Nico’s purse. Right click to examine Nico’s purse after it is in inventory and you will find several items inside it. Right click to examine each of these new items, and you will learn more about them. The note is from Lobineau, the Frenchman who wants to replace you as Nico’s boyfriend.
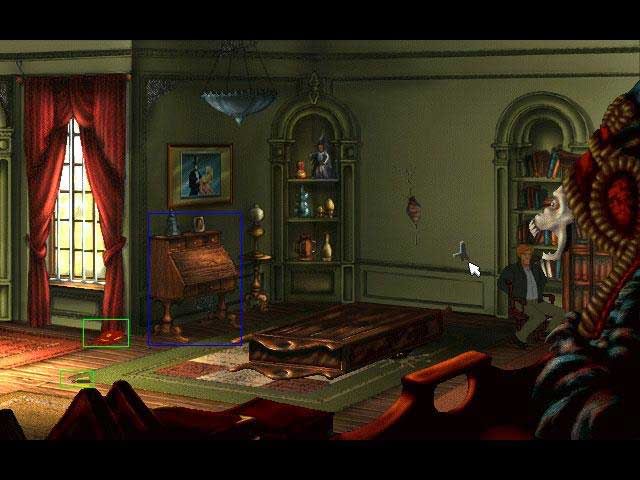
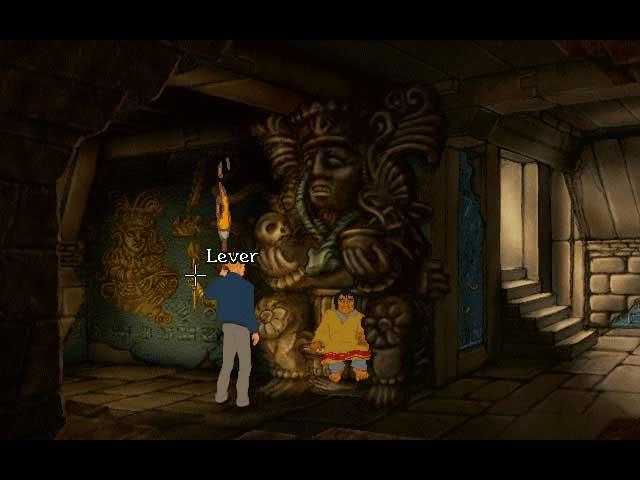
Keep walking left. You will see the fire blocking the door. There is a cabinet against the wall. Try to open it. It is locked!
Pick up the white siphon/seltzer bottle on the top of the cabinet. It needs a new gas canister to make the seltzer come out.
You can’t get out the windows because of the bars. Go back to the cabinet next to the fire. Use the dart to pick the lock. You will see two gas canisters for the siphon inside, but one has exploded from the heat. Try to pick up the unexploded gass cylinder. It is too hot to touch. Left click on the panties in your inventory, then use them to pick up the gas cylinder. It will go into your inventory. As always, right click on the new item in your inventory to get more information about it.
Left click on the gas cylinder in inventory and combine it with the siphon. Right click on the new combination item. Now you have water to put out the fire!
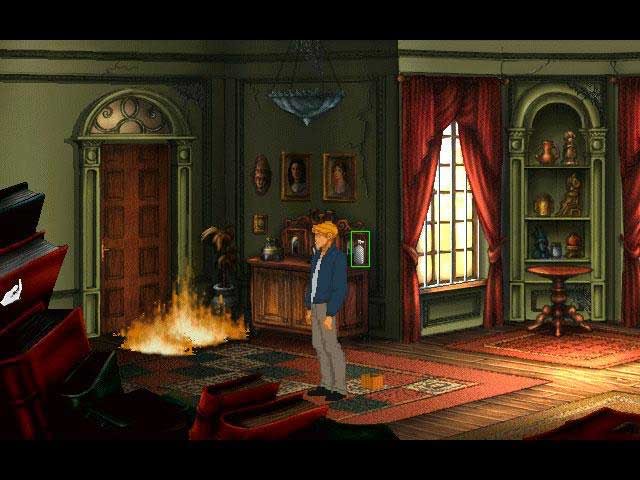
Left click on the siphon combination and left click on the fire. Now left click on the door to exit the room.
Paris: Oubier’s House, Entryway
You have escaped from the fire, but now you have to find Nico. I think this next scene exists only to teach you that you must right click on every object that goes into your inventory, or you can’t make progress in the game!
Go downstairs and look at the objects on the table. You will find a telephone telephone and a newspaper clipping. If you have right-clicked on Nico’s purse in inventory, gotten the note from Lobineau, and right clicked on the note to read it, you will have his phone number and can call him on the telephone.
Right click on the newspaper clipping in inventory and you will also find a bank statement for Oubier. Right click on it and you find out he has been making large cash withdrawals at an ATM in Marseille.
Now you just have to get out of the house and go meet Lobineau. Use the small key from inventory that you got by right clicking on the pot, and it will fit the door on the left.
Paris: the Café
When you arrive at the café, Lobineau is not there, but you recognize the gendarme from your last adventure in Paris.
Now you must have several conversations with the Waiter who is walking back and forth from the Café and with the gendarme. Eventually the waiter will tell you that the little bottle next to the gendarme is absinthe, and that Lobineau is a regular at the Café but has not been in yet today. The gendarme will tell you more about Professor Oubier. Just keep talking to both of them. At some point try to pick up the flask of absinthe, but you won’t be able to get it yet.

When Lobineau shows up, talk to him. He has a black coyote stone that he has been holding for Nico. You need to show him the pot that you found in the writing desk. He will tell you about the Glease Gallery.
After Lobineau leaves, continue talking to the gendarme. Eventually he will cover his eyes with his hands—then and only then can you pick up the flask of absinthe. If you don’t get it the first time, just keep talking to him until he covers his eyes again.
Finish your conversation with him; he is so drunk he won’t notice the absinthe is missing. As always, right click on any items you’ve added to your inventory to find out more about them.
Paris: Glease Gallery
Your goal here is to get all the way to the back of the gallery and examine the labels on the packing crates. To do this, you must first talk to everyone and look at everything, and then have conversations with the fat man and the gallery owner. Finally, you will have to distract the gallery owner so you can get into the back.
Come into the gallery and just look around at everything. You can talk to the Girls, but they don’t have anything to say.
Talk to the Fat Man. He will tell you more about the gallery owner. Show him the pot from your inventory.
Look at the desk, then try to walk towards the packing crates.
Talk to Glease, the gallery owner. He won’t let you into the back, but he will tell you more about Professor Oubier.
Go back to the Fat Man, Lane. While he is talking to you, he will sometimes hold his glass in the air. When he does, take the absinthe from your inventory and put some in the glass. You will have to do this two times. He will notice you doing it, but he will like the taste, so you’re OK.
Once you have a distraction and Glease comes over, go back and look at the packing crates. Make sure you right click on them. Move the cursor around until you find the label, then put it in your inventory. Right click on it.
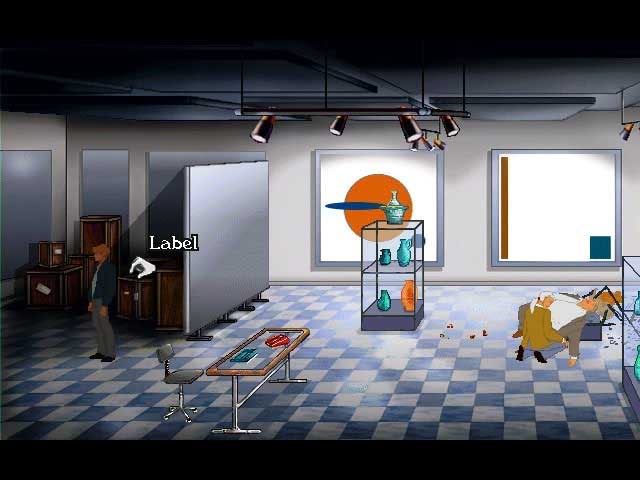
Talk to Glease some more if you haven’t finished your conversation. You will decide to go to Marseilles.
Marseilles: the Docks
The first puzzle in this location is intricate, but logical. The second is not logical, and your character will probably get killed before you figure it out. The third is straightforward and logical. So I recommend saving twice here—once when you first arrive at the docks, and once just after you manage to get over the fence. That way if you get killed trying to solve the second puzzle, you won’t have to go all the way through solving the first one again.
George arrives at the dock and sees a guard’s hut, a fence, and a guard dog. Your first task is to get past the guard and the dog. Start by looking at everything, including the dog. You can also try talking to the dog and the guard.
Look through the window of the hut and notice everything you can. In particular, you will see the dog biscuits and the trap door.
Also make sure you notice the chimney on the side of the hut.
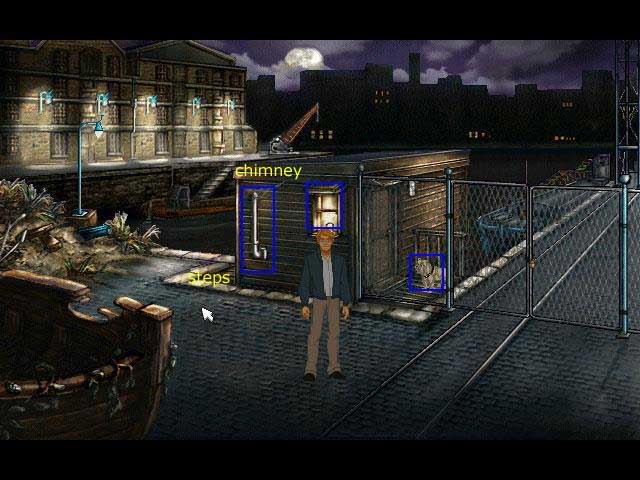
You want to block the chimney, but it’s too hot to touch. Go down the stepshut to the left of the .
You will find a boathook on the right side of the scene. Use it to pull in a bottle on the left side of the scene. The bottle is half full of water.
Go back up the steps. Use the bottle on the chimney once. Then remove the chimney cap and put it into inventory. Block the chimney with the empty bottle.
When the guard comes out of the hut because of the smoke, go back down the steps.
Now climb up into the hut through the trap door.
Pick up the dog biscuits and a piece of coal.
Go back down through the trap door.
Toss some biscuits to the dog. You will notice a platform on the left side of the dock. Pull it down with the boathook.
Use the dog biscuits to lure the dog onto the platform.
Use the boathook on the platform, and the dog will fall into the water.
Go back up the steps and climb over the fence.
Marseilles: The warehouses
As you walk along the docks, notice everything. Make sure you right click on the warehouse signs for maximum information.
Make a save file now, because you can get killed here even if you know what to do.
This next puzzle doesn’t make very much sense, but this is what you have to do.
Knock on the door of the warehouse. No one can hear you because the fan is too loud.
Go to the left of the warehouse and climb up the ladder. Look in the windows and examine the fan. You will overhear a conversation between Raul, the big man who kidnapped Nico, and a short man named Titipoco.
Use the boathook on the fan and it will stop.
Go back down and knock on the door to the warehouse. Raul answers the door. Talk to him.
When he shuts the viewport, very quickly go back up the ladder. If he sees you when he comes out, he will shoot you and you will have to restore and try again.
While you are up above, make your way along the roof until you come to the wine barrels. Put the attached clamp on the first barrel and it will fall into the bay. Conveniently, Raul will come and stand in exactly the right place to be hit by a barrel—twice. The second barrel will knock him into the water.
Go back down the ladder and go into the warehouse.
Marseille: Transglobal Warehouse, Inside, Lower Level
Look around and examine everything. In a drawer of the desk you will find a key, but it won’t fit anything.
Have a conversation with Titipoco. Notice that he has manacles around his legs. Use the key from inventory to unlock the manacles. The manacles will go into inventory.
Walk over to the elevator. Press the button and go up.
Marseille: Transglobal Warehouse, Inside, Upper Level
This puzzle will make sense once you understand that you have three different tasks here. First, you have to block the elevator so that no one can use it to come upstairs while you’re looking around. Second, you have to find the secret room where they are hiding Nico. And third, you have to find a way to get out of the warehouse other than going down the elevator.
Before you can move too far away from the elevator, you want to block it open so no one else can use it. Just grab one of the crates you see right in front of you and push it into place by the elevator.
This place is pretty dark. Press the light switch that is just above the elevator button.
Now you can see. Notice everything, using the right mouse button, too. You’ll see some scratches on the floor. This will lead you to a secret door in the wall. Examine it, and you’ll be able to open it and find Nico.
When you free Nico, you will end up with some tape and some rope in your inventory. There is also a small statue on the floor. Pick it up and put it in inventory. Right click to examine everything in inventory more closely.
Now you just need to get out of here. Notice everything about the statue in the middle of the room, the pulley above it, and the crates next to it. Attach the rope to the statue—but it won’t reach the pulley.
You need to raise the big statue higher. Use the tape to block the photocell in the elevator, then move that crate back next to the other crates. Slide the crate with air holes over to the crate you just moved. Push the other crate out of the way. Use the pulley lever to raise the statue. Attach the rope to the statue and the pulley.
Try pushing the big statue, but it’s too heavy. Talk to Nico, and she will help you push it. Go out the door to the roof.
Use the manacles on the cable and you will be able to slide down.
You will see a scene at the gallery where Lobineau gives you the black coyote stone, but you don’t need to do anything there. You’re on your way to Central America!
Quaramonte: Outdoor Market
You are now going to walk through four locations (outdoor market, police station, behind the jail, and mining company office) in a “lather, rinse, repeat” sequence, where all you have to do is keep talking to people. A lot of people. A lot of talking. You will have to talk to some characters 3 or 4 times. Nothing will ever happen except that you finish one conversation and go back and talk to another person. Don’t worry, you’re not stuck. It just takes a long time to get through this sequence. There are a lot of jokes, which help, but there’s no action at all.
Eventually, after you have talked to everyone you see at least twice, the General will take Nico to his apartment for an interview, the other police officer will take Pearl to the pyramids to go sightseeing, and Conchita, the woman in charge of the mining company office, will let you take a detonator from the cabinet in the back of her office.
But this will not happen until you have been in the police station at least 3 times, been in the mining company office at least 3 times, talked to guard by the ship at least twice, talked to everyone in the market, talked to the band members 3 times, talked to Pearl at least 3 times, and talked to Duane at least 3 times.
If you get bored, try giving your piece of coal to the goat. You’re going to learn a lot about different characters, but mostly you’re going to talk.
There are a few thngs you will need to do specifically:
Try to look at the chart in the police station. The General will tell you it’s not important, but this is why you have to get him out of the station.
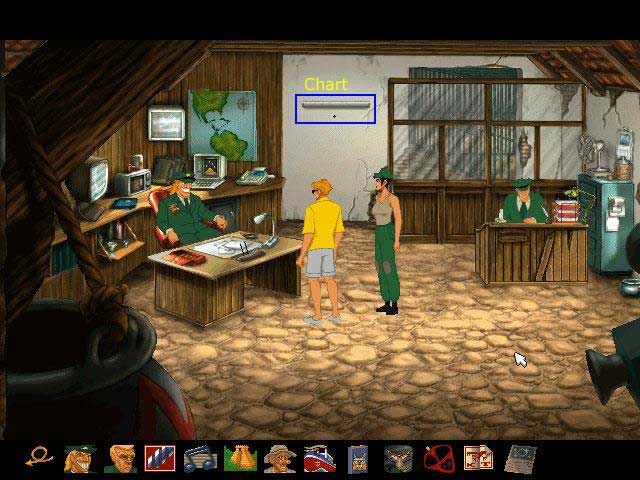
Ask Nico about the General. This will give you a clue about his achilles heel.
Look at the poster on the wall by the steps that lead up to the mining company.
Talk to Duane once while the professor is there and again after the professor has left. You will have to go away and come back before Duane will talk to you the second time.
Talk to Pearl at least 3 times until she agrees to go out to the pyramids if you get her a guide.
After Conchita wants to know more about the map, talk to Nico in the marketplace so she will agree to lure the General out of the station. This may take several conversations, because you have to have done everything else first.
When you finally get the detonator from Conchita, give it Duane.
Then go in the Police station and walk through the back and talk to Miguel.
Quaramonte: the General’s Apartment
Here you will play as Nico. Just notice everything around the apartment that has a text label and right click on it. Make conversation with the General. Eventually his mother, la Presidente, will come in. More conversation.
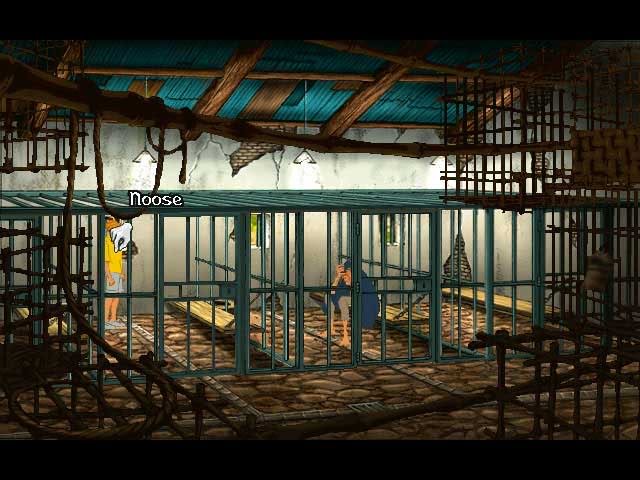
Quaramonte: Inside the Jail with Miguel
Ask Miguel for the noose. Put it in inventory.
Talk to Duane through the window.
Tie one end of the noose to the window. Now you need to give the other end of the noose to Duane. It’s hard to see because George is blocking the shot, but just move the cursor around until the text label for the noose comes up, then move it around until you get the label for Duane.
Quaramonte: the Treehouse (clearing below)
George comes to on the riverbank, but Nico is missing. Make your way to a clearing below a treehouse. Start by taking a creeper vine from the washing machine. Notice everything that has a label.
You can try calling, but no one seems to hear you. You decide to use a similar trick to the one that worked at the docks. You will see a pile of leaves just below the treehouse on the right. Put the newspaper clipping on top of them.
Now take the small statue from your inventory and put it on the iron wheel of the washing machine. This will create sparks that will start a fire.
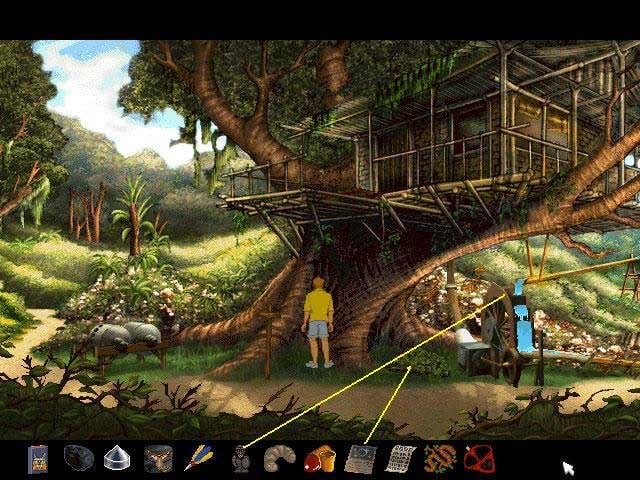
Father Hubert will come out of the treehouse. He tells you there is a sick woman inside who was bitten by a poisonous snake in the river. You realize the sick woman must be Nico.
Father Hubert tells you you can get a cure at a nearby village, but he won’t go with you because his clerical collar is wrinkled. Take the collar and put it in the press on the left side of the clearing.
Use the creeper to connect the two wheels of the press.
Pick up the wooden cross and use it to turn the press.
When the collar is pressed, return it to Father Hubert.
He still doesn’t want to go to the village. After some more conversation, you talk him into it, and you set off together.
Quaramonte: the Village in the Jungle
At the village, you will meet two guards. Father Hubert will talk to them briefly, then leave.
Now you need to get them to let you see the shaman. You need to give him a present. You can try everything, but what will work are the dog biscuits.
The guards will bring the empty box back and ask for more. You can try putting different things in the box and giving the combination to the guards, and you’ll get different jokes. But what will work is if you put the black coyote stone in the box. The guards will take you to see the Shaman.
Now you’re going to have a conversation with the Shaman where he will tell you the important plot points for the rest of the story. So just keep talking. Eventually he will give you the root for Nico.
Quaramonte: the Treehouse (2)
You return to the treehouse and climb up. Nico is too sick to chew the root.
Go back down to the clearing.
Put the chimney cap under the press.
Now put the root in the press and again use the wooden cross to turn it.
Take the crushed root back up to Nico and give it to her. She will start to feel better. Now the two of you will make plans for how to save the world. You will decide to separate. George will go to the Caribbean after the eagle stone and Nico will go to London after the jaguar stone.
Caribbean: Ketch’s Landing/The Beach
You can walk between three connected areas here: the lower beach, where Bronson the surveyor is working, the wooden pier, where Rio the fisherboy is fishing, and up the stairs to the patio for the Ketch Museum, where the Ketch sisters and their cat are sitting outdoors. You can go to these locations in any order, but you will need to talk to all the people a couple of times and do different tasks. I recommend talking to Bronson first, then Rio, then going up to see the Ketch sisters, because I think the story will make the most sense that way.
Talk to Bronson and try to get a look at his plans. Also notice his theodolite, a surveyor’s tool.
Walk along the wooden pier and talk to Rio. He will tell you more about Bronson.
Walk up the steps. Notice the cat and right click on it. Talk to the Ketch sisters. Notice the surveyor’s target on the flagpole on the building. Try to go in the door to the museum, but the sisters won’t let you.
Now you want to lure Bronson away from the beach so you can get a better look at his plans for the museum. The puzzle for doing this is intricate but logical. George wants to knock the target off the flagpole so Bronson will go up the steps and George can look at the plans while he’s away. George decides to do this by getting the ball from the cat. Step 1: get a fish from Rio to lure the cat.
So go talk to Rio and ask him to catch a fish for you. He needs bait. Give him the tequila worm.
Rio will first catch a bicycle. Take the bicycle inner tube and talk to Rio about it.
Rio will catch you another fish. Put the fish in inventory.
Go up the steps. Talk to the Ketch sisters, and they will eventually leave.
If you try just giving the fish to the cat, the cat will eat the fish but you still won’t get the ball. If this happens, you have to go back to Rio and get a second fish. Instead, climb the ladder and attach the inner tube to the flagpole that doesn’t have the target. Attach the other end of the inner tube fish to the. This will hang the fish from the flagpole and attract the cat. Now you can take the ball.
Look around the scene. You will see a V-shaped tree off to the left of the patio. Retrieve the inner tube, and use it to make a catapault/slingshot in the V-shaped tree. Shoot the ball at the flagpole.

The target will fall to the ground. Pick up the target and put it in inventory.
Bronson will come running up to find out why the target fell down. He will go up the ladder to put a target on the other flagpole. While he is up there, move the ladder so he can’t get down.
Go down the steps. Examine the plans, including a right click. Put Bronson’s plans into inventory. Also put the theodolite into inventory.
Go back up the steps to talk to the Ketch sisters. Bronson is still up on the roof. Show the Ketch sisters the plans. They will agree to let you in the museum now.
Go through the museum door.
London: British Museum
This puzzle made zero sense to me. But you do get some good information in the dialog, and a very useful obsidian knife that you’ll use for the rest of the game. Start out by right clicking the purse in your inventory. That will reveal a hair clip.
Now look at all the displays. Then talk to the attendant. He will tell you you need to talk to Professor Oubier, who comes in.
Talk to Professor Oubier. He leaves.
Talk to the attendant. He will take you over to look at the jaguar stone—but it’s been stolen! Take the small key from the display case and show it to the attendant.
Walk over to the display case next to the telephone. Use the small key and take the obsidian dagger.
Walk to the curtain on the right wall. Notice a door behind it. Use the obsidian knife to pry the door open. Go through the door.
Caribbean: Inside the Ketch Museum
There are several things to do in this room and most of them can be done in any order. So just start examining everything that has a text label. Make sure you use the right mouse key. Eventually, these are the things you will need to do.
Let Emily out of the sea chest. Talk to her.
Move the chart from the easel to the desk.
Move the lantern to the desk.
Examine the ship’s log closely.
Examine the portrait of Captain Ketch closely.
Take the quill pen and put it into inventory.
Ask Emily for the cross she wears. She will say no. Now you need to go get a present for her.
Go through the door and back down to the pier to talk to Rio. You know he and Emily are friends, so ask him what she would like. He says she would like a conch shell. He will trade you if you give him something to help catch a tiger fish.
Go back up the steps and give the quill pen to the cat. It will shred the feathers into fragments. Pick up the feather fragments.
Go back down to the pier and give the feather fragments to Rio. He will give you a conch shell.
Go back up the steps and give Emily the conch shell. She will give you the cross. Fit it into the pen holder on the writing desk.
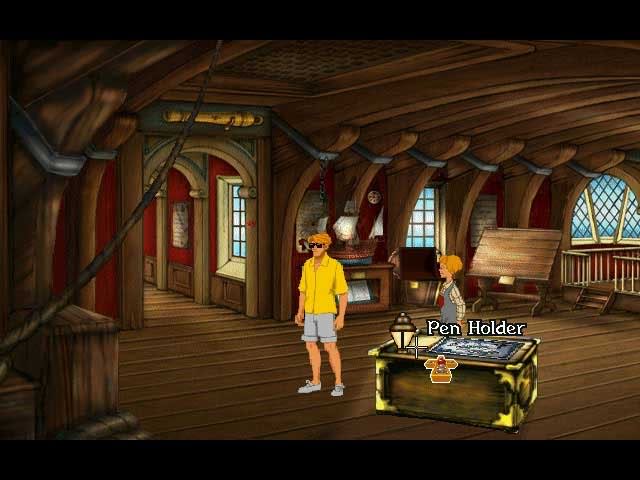
Go back down to the pier and talk to Rio. He will agree to take you to Zombie Island.
The Caribbean: Zombie Island, Landing Beach
When you get to the landing beach, Rio will stay in the boat. Get out and look around. You will see a rocky outcrop that is just a little out of reach.
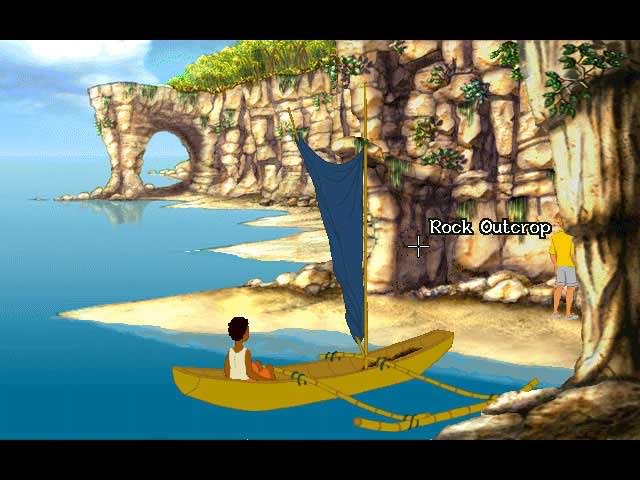
Look around Rio’s boat and notice the fishing nets. Talk to Rio. He will loan you a fishing net.
Throw the net over the rocky outcrop and you will be able to climb up.
London: Underground/Subway Station
Now you are playing as Nico. Her goal is to figure out how to get a train to stop at the station. There is also an Easter Egg where you can see a bonus scene with a character from an old Revolution Studios game, but it doesn’t have anything to do with the main plot. I thought this was a good puzzle, though—it’s logical, but not too obvious.
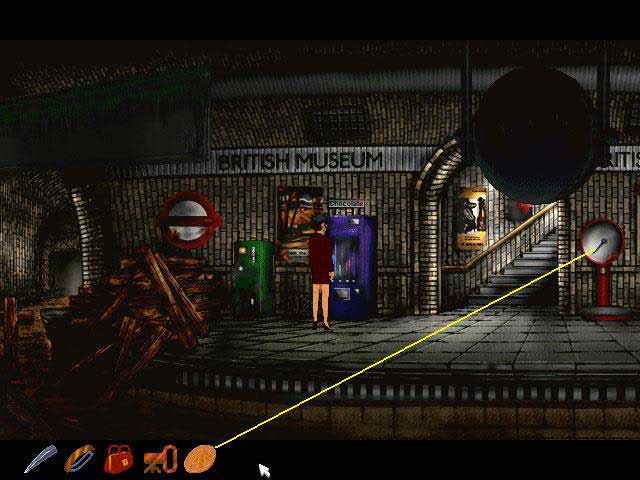
On the left you will see a candy machine. Examine it closely. There is a coin slot near the top which is jammed. Take the hairclip from your inventory and use it on the coin slot. A coin will fall to the bottom.
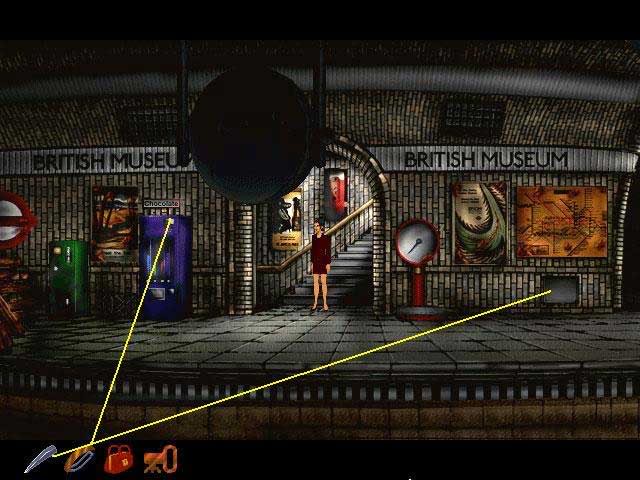
Take the coin and immediately put it back into the coin slot in the machine. Now you will get a bar of chocolate and the coin will come back as well. Score!
Examine the pile of wood on the left, called “sleepers.” You can’t get out that way.
Walk towards the right. A ghost will appear. It will have a mouth icon on it, but don’t try to talk to it—it will just disappear if you do. Instead, take the bar of chocolate and give it to the ghost. You have to be pretty quick about this. If you don’t get it in time, walk back to the candy machine, and this time click on the chocolate bar in inventory so it’s already attached to your cursor before you see the ghost. The ghost will not actually take the chocolate, but it will appreciate the gesture.
Now if you walk back over to the far left, a new exit will have opened up just behind the pile of wood. This is the Easter Egg. If you go in there, there is just a joke scene. You can skip it altogether if you want, it doesn’t matter to the plot.
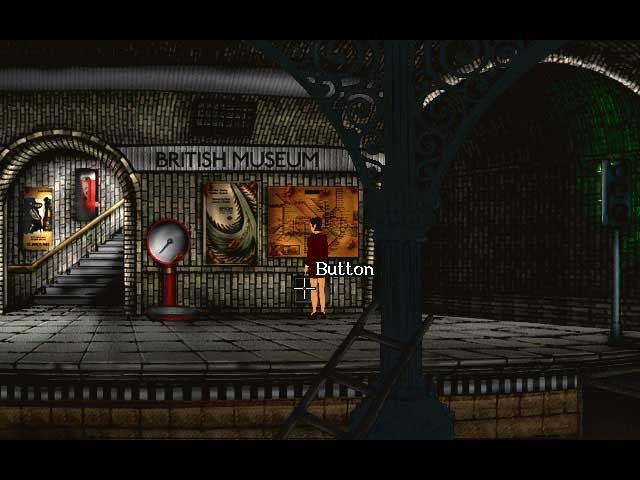
Now walk all the way to the right side of the platform. You will see a control panel on the wall, down low. Try to open it. You will be able to get it partly open if you use your obsidian knife, but it will still be slightly closed. You need something very thin.
Walk back to the left until you see the weight machine. Use the coin in the weight machine and you will get a slip of cardboard.
Walk back to the control panel and use the cardboard. The panel will open to reveal a button. Press the button, and a train will arrive.
The Carribbean: Zombie Island Maze
Now we come to a part of the story where George has to do two things. He has to find a place to put the surveyor’s target, and he has to find a place to put the theodolite. When he sights on the target, he’ll know where the treasure is.
In order to do these two things, you’re going to have to get him to several locations on the island, and the fact is you’re going to be going through a big maze in the swamp. Most scenes have 3 entrances and 3 exits, and the entrance you come in by will determine which exits you can get to.
You can easily spend 10 to 15 hours trying to figure out exactly what sequence to do everything in. So if you’re going to try this on your own, make notes so you don’t keep trying the same things over again.
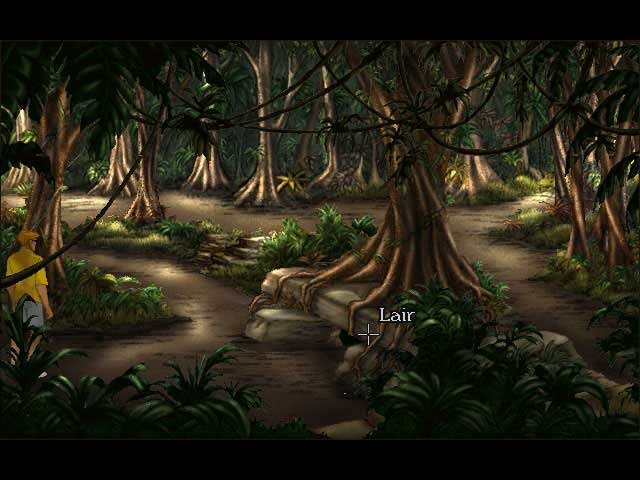
There are 5 locations in the maze: the clifftop, the swamp scene with reeds, the swamp scene with lair, the swamp scene with flowers, the rock needle clearing, and the theodolite plateau.
Here’s the full solution. Stage 1: find the place to put the target marker.
Start by heading out the exit on the lower right of the clifftop scene.

Keep walking along the path until you come to a boar blocking your way. You need to deal with it. George decides to make a blow-gun, so he goes looking for materials for that. After all, he already has a poisoned dart to use.
Head back to the left until you’ve returned to the clifftop. Now go through the exit at the top right of the scene.
Now you are in a swamp scene with reeds. Notice the swamp. Notice the reeds just above the swamp. Take a reed and put it in inventory. This will make a good blow gun.
Now exit the swamp scene with reeds through the exit at the top right. You will enter an almost identical looking swamp scene, except instead of there being reeds in the middle, there is a lair. This is the swamp scene with lair.
Take the reed from inventory and poke it into the lair. The animal there will bite it off. Examine the reed in inventory. Take the poisoned dart and put it in the reed. Now you have a blowgun.
Exit the swamp scene with lair through the bottom left exit. This will take you back to the swamp scene with reeds. Again, exit through the bottom left exit. This will bring you back to the clifftop.
Take the bottom right exit on the clifftop and go back and find the boar. Use the blowgun on the boar. Don’t bother trying to follow the boar to retrieve the dart—it runs into the brush and that’s the end of the dart for the rest of the game.
Continue up the path and you will see the rock needle clearing. Examine the rock needle. Clear off the vine.
In inventory, combine the vine, the fishing net, and the surveyor’s target marker. Take this combination and throw it up onto the rock needle. Now you have placed the marker.
Now you’re ready for stage 2: finding the place to set up the theodolite. Again, you can spend a lot of hours wndering through the swamp trying to figure it out. Or you can just follow these instructions.
Save now just in case you get lost and have to start over.
Leave the rock needle clearing through the exit at the upper left.
This will bring you back to the swamp scene with reeds, but this time, you’re at the top left. Which makes no sense in terms of geography, but it’s just the way this maze works. Go through the exit at the top right.
This brings you back to the swamp scene with lair, at the bottom left of it. Take the exit just above you, the exit at the middle left.
This will bring you to the swamp scene with flowers. You have come in on the bottom right. Go straight across and take the exit on the bottom left.
This brings you back to the swamp scene with reeds, but now you’re on the bottom right. Again, take the exit just above you, the exit at the middle right.
This brings you into the top left of the swamp scene with lair. Now you want to exit on the middle right. This is the only one where you have to be really careful to click in the correct place.
If you did it correctly, you will now enter the swamp scene with flowers from the middle left. Click on the exit on the middle right, and you will go out to the theodolite plateau.
Carribbean: Zombie Island, Theodolite Plateau
Examine the location carefully. You will notice Captain Ketch’s initials. Put the theodolite on the rock.
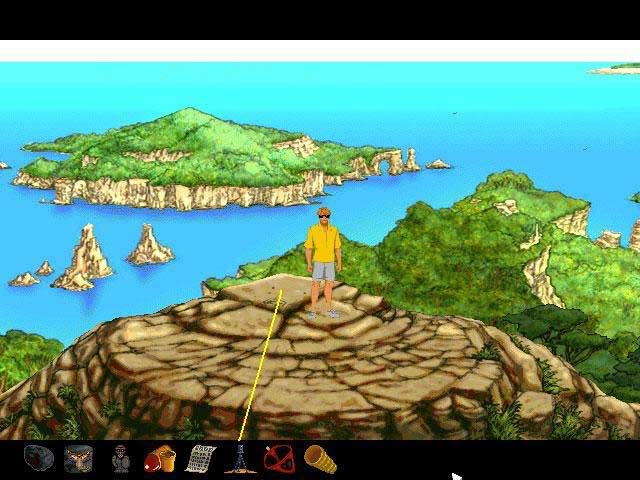
Now look through the theodolite. You can examine whatever you see, but mainly you need to keep going right until you see the flash from the markerpillars down near the bottom of the screen. Examine it, and examine the up above it. This will tell you where the treasure is.
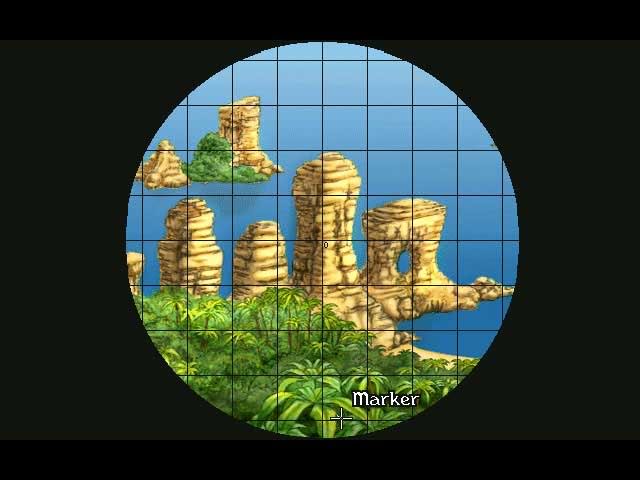
Click on the bottom of the screen to stop looking through the theodolite. A new exit has opened up on the right side. Use this exit to go down the hill again.
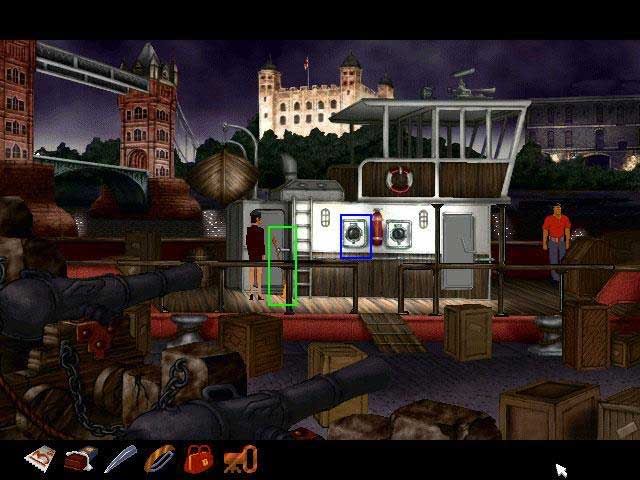
London: Docks/Karzac’s Ship
Now you are Nico again. You have gone to the docks to find Professor Oubier and get the jaguar stone from him. You find him on Karzac’s ship.
Save right now! If the guard from the ship sees you, he will shoot you, and you will have to restore. For some reason Nico moves about twice as slow in this scene as at any other time in the game, and it can really throw off your judgement as to how much time you have.
There is a guard who makes rounds by walking around the cabin on the deck. If he sees you, he will shoot you! Fortunately, he never looks behind himself, so you just have to wait for him to pass each time so Nico can move.
Nico needs to do 6 things to keep from getting shot. 1. Move from the first crate to the second crate. 2. Move from the crate to the ladder and get on top of the cabin. 3. Move back down to the deck and open the cupboard/closet door on the left of the cabin. 4. Go back up the ladder and hide on top of the cabin. 5. When the guard steps inside the cupboard to see why the door is open, quickly shut the door on him. 6. Grab the mop from the left side of the cabin and use it to wedge the door shut, trapping the guard inside. If you don’t move quickly enough for anyone of these 6 steps, the guard will catch you and shoot you.

Wait until the guard is just about to the guard on the right side of the deck, then click on the second crate.
Wait until the guard has passed the ladder, then click on the ladder and climb up on top of the cabin.
Wait until the guard has come all the way around again, then climb down the ladder and open the cupboard door.
Immediately climb right back up the ladder and hide on top of the cabin.
Wait for the guard to come around again and step into the cupboard. Click on the ladder to climb down, then shut the cupboard door on him.
Very very quickly grab the mop on the side of the cabin. Use it to wedge the cupboard door shut.
The other guard will never come over, so now you can go look in the porthole. You will see a conversation between Karzac and Professor Oubier.
After Karzac leaves, go into the cabin. Talk to Professor Oubier to make sure he is dead. Now you can put the jaguar stone into your inventory. Remember that the bad guys want to destroy the stones, and the good guys need the stones to trap the demon.
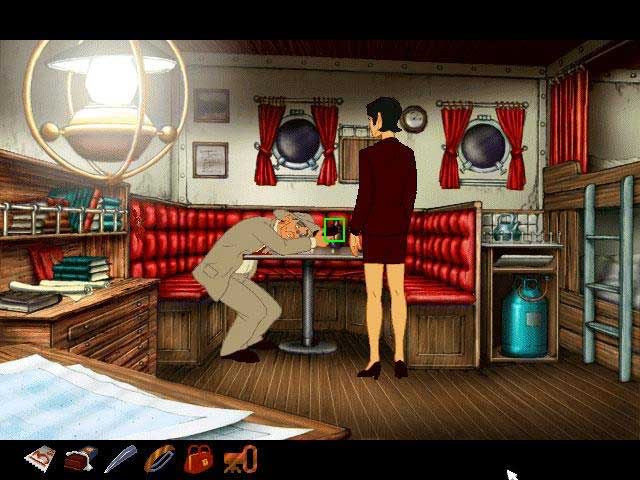
Karzac will return. You will have to stab him with the obsidian dagger to get away.
Carribbean: Zombie Island, Movie Set
Walk all the way to the left where the director, the cameraman, the main actors, the stuntman, and the snack table are. You need to talk to all the characters several times, and there will be a lot of jokes and a little bit of information. Make sure you notice the bush with a right click so you see there is a wasp’s nest there.
Eventually you need to get the stuntman to do the stunt. This is another intricate but basically logical puzzle.
Go to the snack table and pick up one bun and one pancake. Pick up the syrup which is on top of the table towards the right.
Combine the syrup with the pancake in inventory.
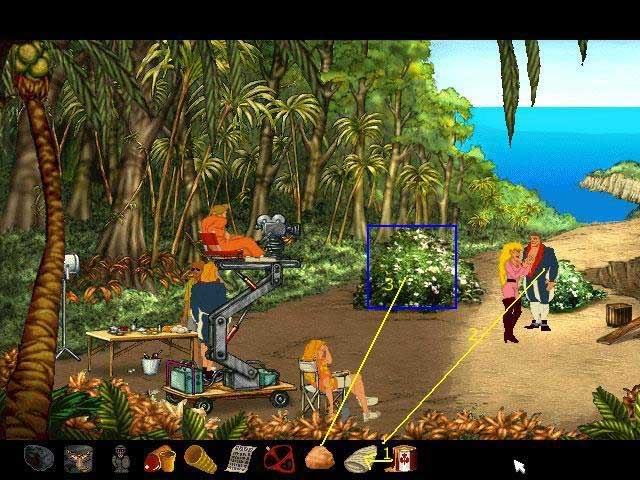
Give the pancake to the stuntman. He will complain about getting syrup on his face.
Throw the bun into the bush. Get another bun, and throw it into the bush also. The stuntman will now do the stunt, and you’ll all go to the next shooting location.
Carribbean: Zombie Island, Treasure Beach
Notice everything, including the cave in the pillar and the handheld camera.
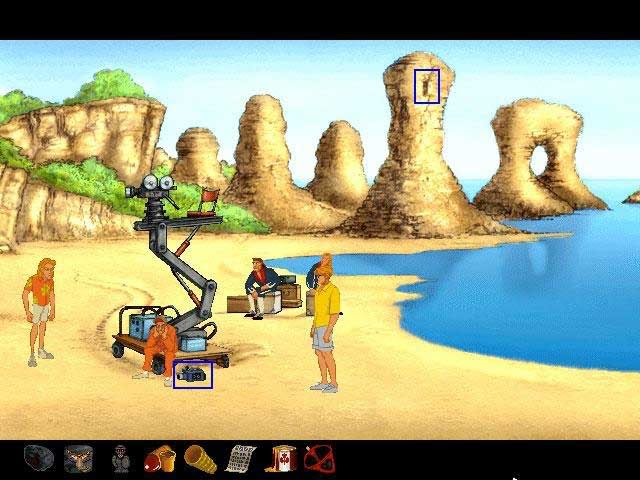
Try to go into the wardrobe tent—the Director will stop you.
Talk to everyone for however long it takes until the Director agrees to let you go into the cave in the pillar. Eventually you will find the eagle stone.
The Jungle: The Village (2)
Back in Central America, you are playing Nico again. She is looking for George. She will talk to Titipoco. She finds out that he has one of the 3 stones.
The other stone is lying in some hot ashes in a burned out hut. Try to pick up the stone—it is too hot.
Try to tip over the barrel of water next to it—it is too heavy.
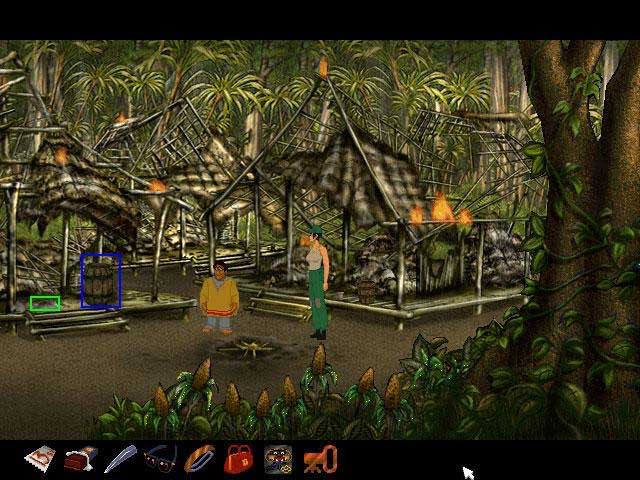
Talk to Titipoco and he will help you tip over the barrel. Now you can pick up the third stone. Time to go look for George!
The Pyramid: Base, Right Side, Top
There are three locations outside the pyramid. You start at the right side, where there is some equipment. You will also be able to walk to the Base on the left, and to find a way to the Top. You are still playing as Nico here, looking for George.
Walk left to the Base and talk to the guards. They will give you permission to hang out on the right side. Walk back to the right.
Now that Nico knows the General is on the top of the pyramid, she has to figure out a way to get up there to see what’s going on. There is a construction elevator/gantry on the right side, but it is not working. Start by picking up the rope, and giving it to Titipoco.
Titipoco will climb up the gantry, then loop the rope over. Take the ends of the rope and connect them to the engine.
Now the engine needs fuel. Look carefully at the generator on the left. You can cut the fuel line with your obsidian knife, but you need something to hold the fuel. You will find a cylinder on the generator that you can use.
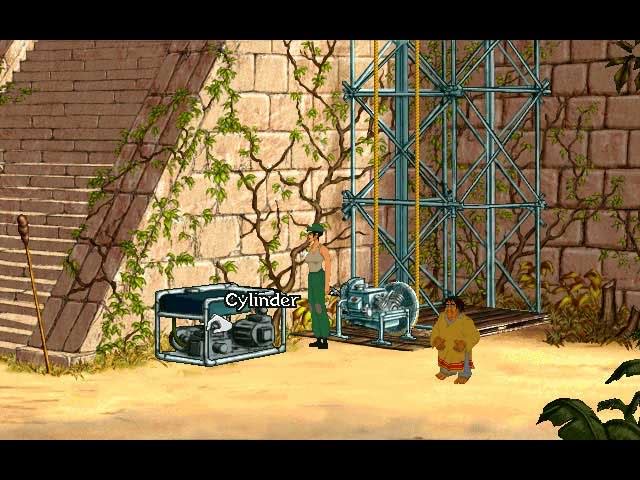
When you have filled the cylinder with fuel, you will need to remove the gas cap from the engine. Then you can pour in the fuel from the cylinder.
Push the button on the engine to turn it on. Test the elevator by pulling the lever forward.
Talk to Titipoco. He will walk over to the engine, then work the elevator for you by pulling the lever.
This will take you to the top of the pyramid. You will see George, the General, and Raul. Listen to what everyone is saying, but don’t try to talk to anyone. Take the ammo belt that is on top of the crates and go back down in the elevator.
Now you need to create a diversion. Take the torch that is standing right between the base and the right side of the pyramid. While holding the torch, talk to Titipoco.
Titipoco will light the torch. Put it down on the ground where the fuel has spilled from the cut fuel line on the left of the generator.
Put the ammo belt on top of the torch. The sound of the bullets will frighten away the guards. Now you can go up the steps to the top of the pyramid.
Talk to the General. Use the obsidian knife to free George. Now you, George, and Titipoco will go into the entry chamber of the pyramid.
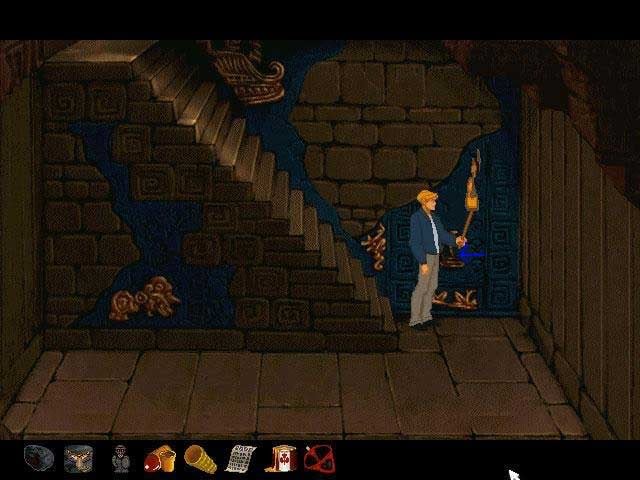
Pyramid, Entry Chamber
You are still playing as Nico.
Try to move the two levers on the back wall.
Then talk to George and he will help you work the levers.
Pyramid, Mayan Puzzle Room, Nico
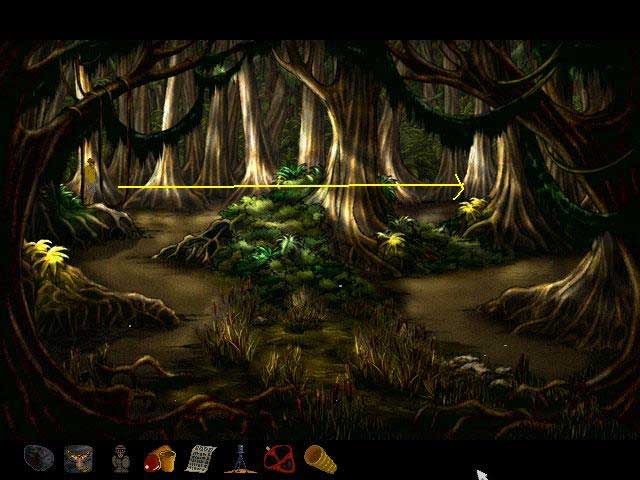
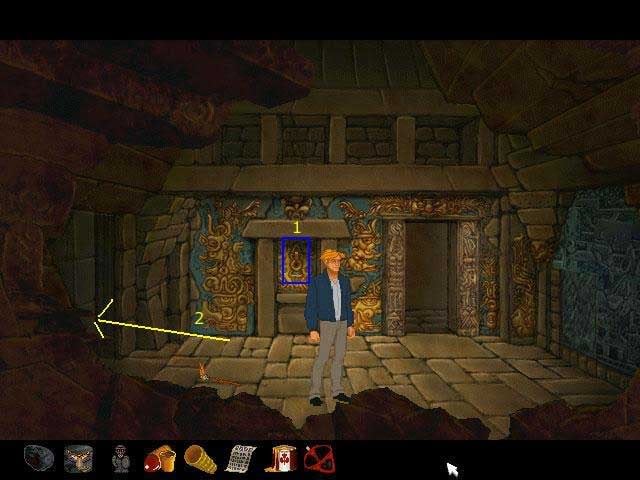
This is a fun puzzle, but it’s long. There is an Easter Egg that will let you skip it if you want, but only at the very beginning.
To skip the puzzle: walk over towards the right, then click on the spot shown in this screenshot.
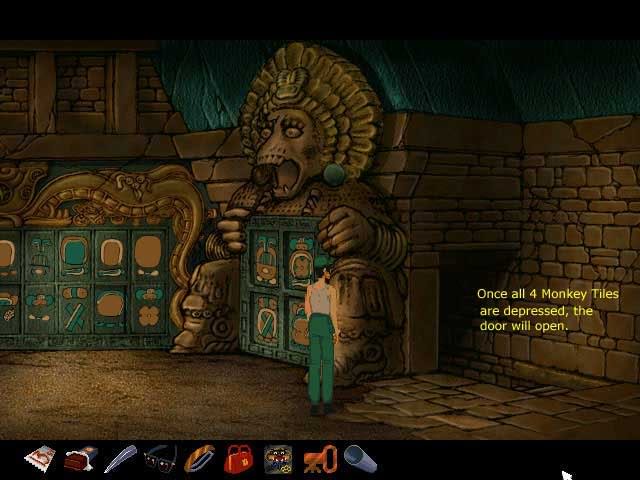
To do the puzzle, you have to work from right to left. Walk to the right and look at the 4 tiles on the Monkey Statue. We will call these the Monkey Tiles.
Look at the one in the top left corner, which we’ve marked A. Now you have to look at the ten tiles lined up to the left of the monkey statue on the wall. We will call these the Wall Tiles. See if you can figure out which two Wall Tiles, if put together, would make the same picture as Monkey Tile A. Got that? OK, now you have to look at the pictures on the two big disks to the left of the Wall Tiles. Pick one of the two Wall Tiles you want to use to match Monkey Tile A. Now you have to find the two pictures on the big disks that, when put together, will make the same picture as the Wall Tile you’re matching.
Once you have that all figured out, you have to spin the disks until the two pictures you want are both on the inside center position, right next to each other. Then walk over to the Wall Tiles and push in the picture that matches those two tiles. Walk back to the disks, and spin them so you line up the two pictures that match the other Wall Tile you’ll need. Go back to the Wall Tiles, and push that one in. Now you can push in Monkey Tile A.
You have to repeat this process for each of the four Monkey Tiles. So two wall tiles = 1 Monkey Tile. Two disk pictures = 1 Wall Tile. Turn the wheels until they match the first Wall Tile you need. Push it in. Turn the wheels until they match the second Wall Tile you need. Push that one in. Then push in the Monkey Tile.
So altogether you need to come up with 8 Disk patterns so you can push in 8 Wall tiles so you can push in 4 Monkey Tiles. Each tile is only used once. Here are the combinations you need:
A = 2 and 5
B = 3 and 10
C = 1 and 8
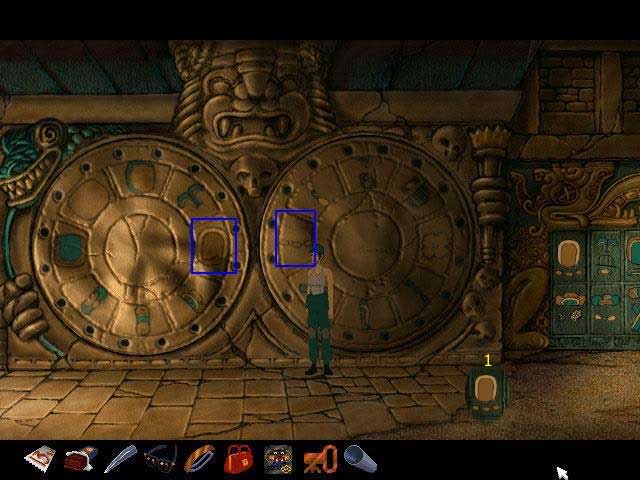

D = 6 and 9
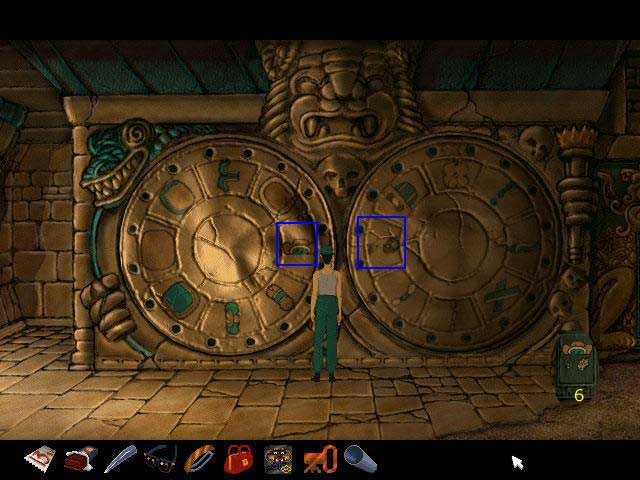
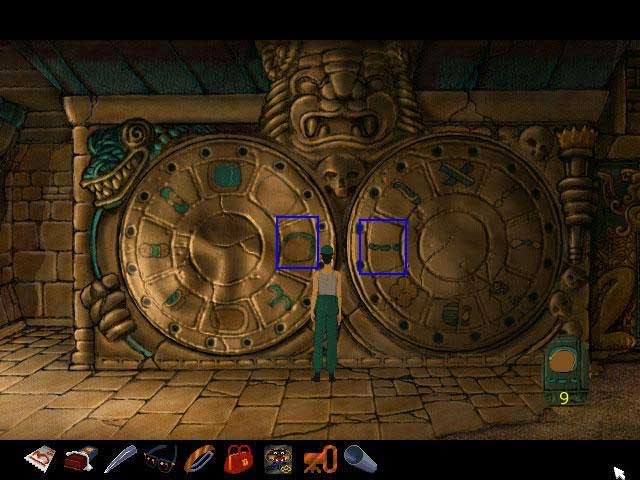
Wall Tiles 4 and 7 are not used.
Remember to push in each Wall Tile before resetting the disks, and to push in each Monkey Tile before starting on the next one.
Once all 4 Monkey Tiles are depressed, the door on the far right will open and you can go down the steps.
Pyramid, Throne Room
Now you are playing as George again. Titipoco is in the room with you. Take the torch off the wall. Talk to Titipoco and he will light the torch for you.
Pull the lever on the wall. George will end up alone in a different room.
Pyramid, Inner Rooms
George is alone in a set of linked inner rooms. You have to go through each room, pulling a lever to close the door you aren’t using to exit. When you get back to the original room, a secret room will have opened off on the right.
Save here in case you can’t find the secret room and have to start the sequence over.
Start by pulling the lever on the back wall. Then exit through the left door.
Pull the right lever to close the door you just came in through. Pull the left lever to open the other door. Exit through the door on the left.
Now you are in a corridor. Pull the bottom lever to close the door you just came through, then walk through the door on the bottom left.
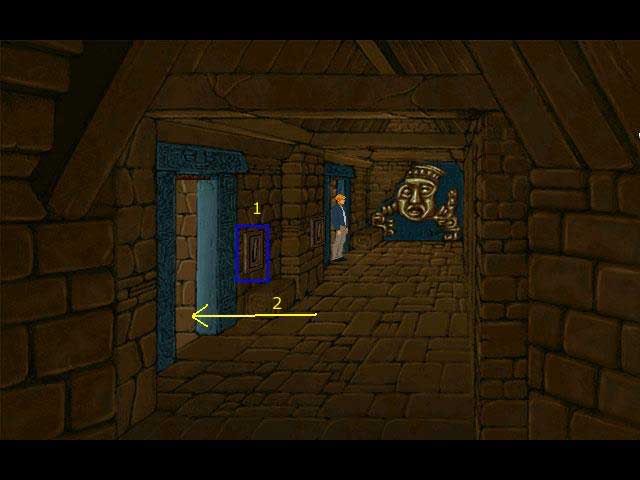
You are now back in the room George originally fell into, but this time there is an exit available on the right. First pick up your old torch from the floor and use it to light the torch on the right wall. Take this torch and walk through the right exit.
Walk down the stairs. When you come to a landing with a lever, pull the lever to reveal more stairs.
Keep walking downstairs. It may be marked “Certain Death,” but George has heard that before!
Watch the ending!
“;
