- Wondering how to get Monopoly GO! free rolls? Well, you’ve come to the right place. In this guide, we provide you with a bunch of tips and tricks to get some free rolls for the hit new mobile game. We’ll …
Best Roblox Horror Games to Play Right Now – Updated Weekly
By Adele Wilson
Our Best Roblox Horror Games guide features the scariest and most creative experiences to play right now on the platform!The BEST Roblox Games of The Week – Games You Need To Play!
By Sho Roberts
Our feature shares our pick for the Best Roblox Games of the week! With our feature, we guarantee you'll find something new to play!Type Soul Clan Rarity Guide – All Legendary And Common Clans Listed!
By Nathan Ball
Wondering what your odds of rolling a particular Clan are? Wonder no more, with my handy Type Soul Clan Rarity guide.
Break the Curse: The Crimson Gems Walkthrough
Break the Curse: The Crimson Gems is an adventure game created by GI Games. You will move from location to location solving mini-puzzles and picking up items to use in order to proceed in the game. Gamezebo’s strategy guide will provide you with detailed images, tips, information, and hints on how to play your best game.
Game Introduction – Break the Curse: The Crimson Gems
Break the Curse: The Crimson Gems is an adventure game created by GI Games. You will move from location to location solving mini-puzzles and picking up items to use in order to proceed in the game. Gamezebo’s strategy guide will provide you with detailed images, tips, information, and hints on how to play your best game.
General Tips
- This walkthrough is meant to be used as a guide to assist in solving mini-puzzles and acquiring all items in order to complete the game. You may explore locations in the order you wish, this walkthrough is written to take the most direct route to the game’s finish.
- Inventory objects will be written in CAPITALS and highlighted in yellow in the screenshots. The walkthrough will state, “Use the inventory item on the blah blah,” because it assumes you have the item. If you don’t have the item, on your keyboard, press CTRL+F (at the same time). In the text box, type the name of the item you are looking for and press ENTER. This will scan this page for the appearance of that word.
- Play the tutorial! It will explain gameplay elements.
- Often you need to perform an action (i.e., place or collect an inventory item) in order for the game to progress. Before assuming the game has a glitch, go through your inventory and see if you can place any of your items anywhere or look for an item to pick up, switch to flip, etc.
- The Menu button at the bottom right of the screen gives access to the options screen and can bring you back to the main menu.
- Items collected throughout the game go into your inventory, located at the bottom of your screen.
- Closing a window – To close the zoom-in windows, move your cursor outside the window so it points downwards, then click. Tip: If you can zoom in on the area again, you likely haven’t found everything you needed to find.
Difficulty Modes
- There are two difficulty modes.
- Casual Mode has faster filling Hint and Skip meters and sparkles indicate all active areas.
- Challenge Mode has slower filling Hint and Skip meters and there are no sparkles to indicate active areas.
- You cannot change the difficulty setting during the game.
Cursors
- The default cursor looks like an arrow.
- A magnifying glass indicates you can inspect the area more closely.
- A hand indicates you can pick up an item to add to your inventory.
- A large arrow indicates you can move in that direction.
- Move your cursor over every aspect of a scene and watch for it to change, it’s the only way to find everything, especially if playing in Challenge mode.
Mini-puzzles
- Restart a puzzle by pressing the Reset button.
- For more information on solving a puzzle, hover your mouse over the question mark.
- Puzzles can be skipped once the Skip meter fills (time depends on your mode of difficulty).
Journal and Tasks
- Your journal is located at the bottom right of the screen.
- The journal records your progress and contains clues to solve puzzles
- Your tasks/objectives are shown at the bottom right of the screen.
Hint and Skip
- The Hint button is located at the bottom left of the screen. After using a hint, the meter will recharge.
- Hints will point out what to focus on in the scene or what to do elsewhere.
- Skip allows you to skip mini-puzzles.
Chapter One
- After you press Play from the main menu, watch the cutscene.
- Select your difficulty. The option to play the tutorial is automatically selected. Although you can deselect, it is always recommended to play the tutorial.

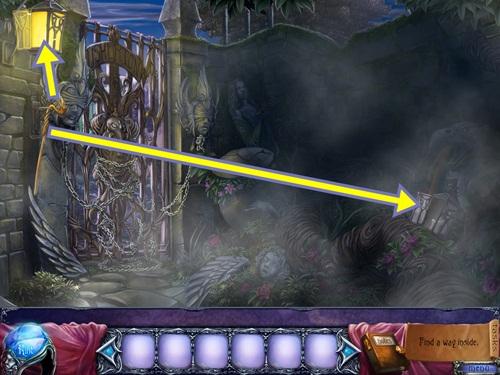
- Take the LAMPLIGHTER.
- Use the LAMPLIGHTER on the lit lantern, then use the LAMPLIGHTER (LIT) on the unlit lantern.
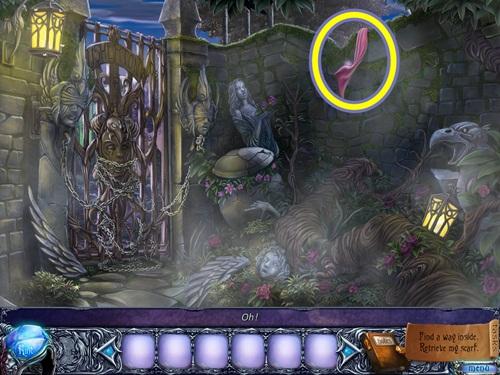
- Click on the scarf.
- Try to take the scarf.
- When the wall crumbles, go through the opening to the cemetery.
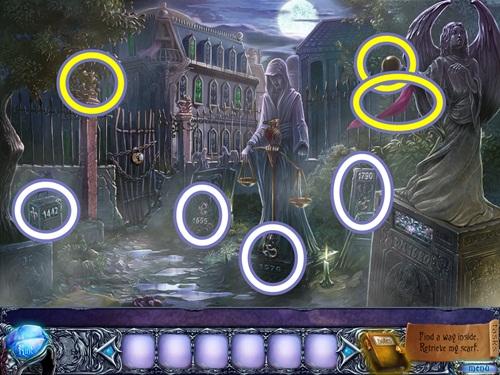
- Take the GLOBE and try to take the scarf.
- Note the symbols and dates on the gravestones.
- Click on the post at the top of the gate.
- A mini-puzzle starts.
- Rotate the rings so each symbol appears under its correct date (as shown on the gravestones). Because some rings affect others, start from the outermost ring and work your way inwards. Left-click to rotate the rings counter-clockwise and right-click to rotate the rings clockwise.
- Solution:
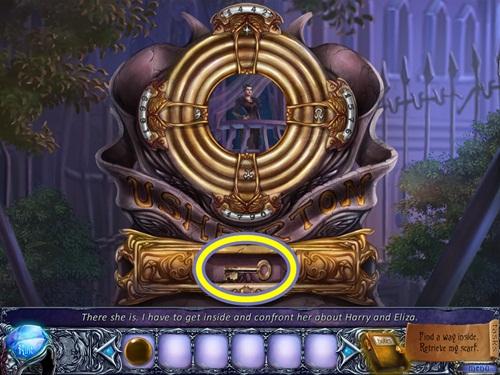
- Take the PADLOCK KEY.
- Use the PADLOCK KEY on the gate.
- Go through the gate.
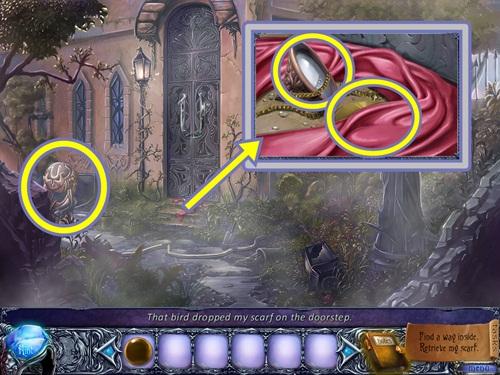
- Click on the steps.
- Take the scarf, HARRY’S POCKET WATCH, and the MIRROR.
- Click on the mirror spotlight.
- Add the MIRROR.
- A mini-puzzle starts.
- Adjust the mirrors so reflect the light beam to the far right mirror. Left-click to rotate the mirrors counter-clockwise, right-click to rotate the mirrors clockwise.
- Solution:
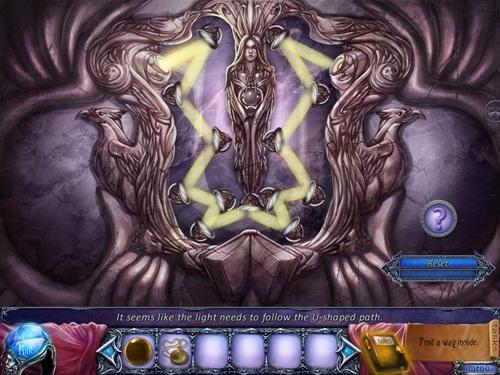
- Enter to the manor foyer.
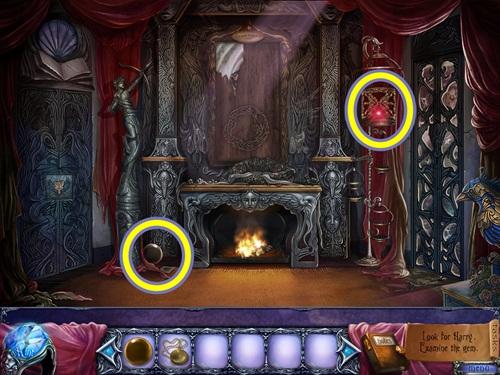
- Watch the cutscene.
- Take the GLOBE.
- Click on the birdcage.
- A mini-puzzle starts.
- Using the code key as a guide, the rectangle symbol equals one and the eye symbol equals three, remove the golden wings in order from 1 to 10.
- Solution:
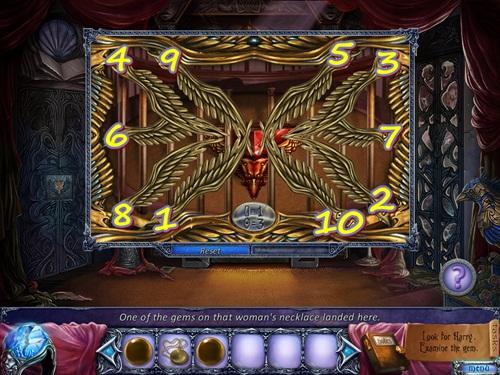
- Take the GEM.
- Move down two scenes to the cemetery.
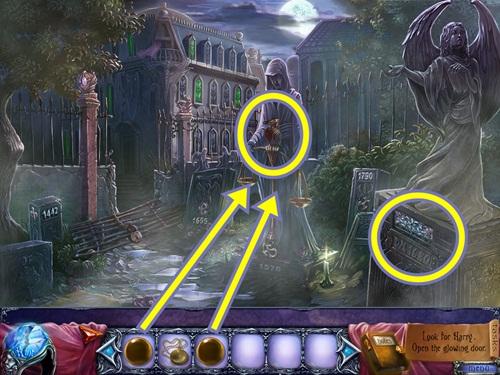
- Put the two GLOBES on the scales, then click on the bird statue.
- Take the FLEUR-DE-LIS KEY from its mouth.
- Click on the gravestone at the right.
- Insert the FLEUR-DE-LIS KEY.
- A mini-puzzle starts.
- Restore the plaque. Left-click a piece to select and place it, right-click to rotate the piece. When correctly placed, the piece locks.
- Solution:
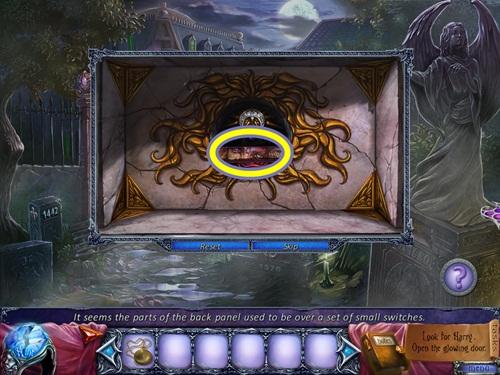
- Take the METAL STRIP.
- Move forward and enter the manor’s foyer.
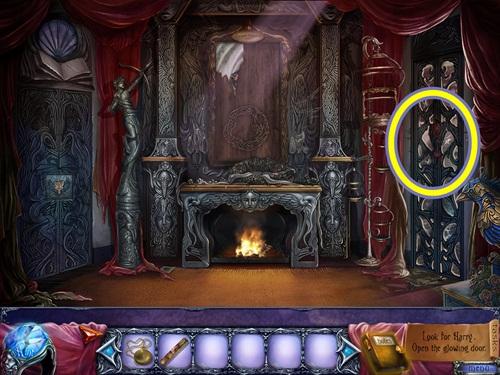
- Click on the right door.
- Go through the door into the courtyard.
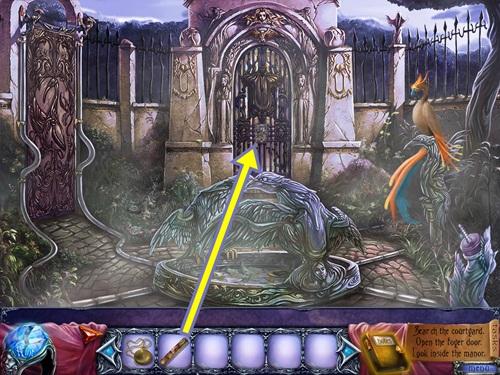
- Click through the dialogue.
- Click on the centre gate.
- Add the METAL STRIP.
- A mini-puzzle starts.
- Restore the image. Click on a strip to move it side-to-side. Use the tabs on either side to move the strips up or down. When a strip is positioned correctly, it will turn gold. It does not lock when positioned correctly. The top and bottom strip is already in the correct slot, you just need to click on it to move it to the correct position. Then use the tabs to move the other strips.
- Solution:
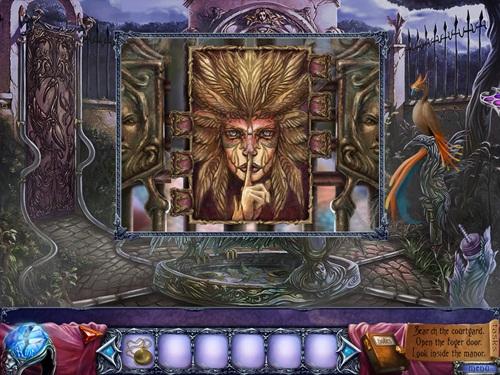
- Enter the crypt.
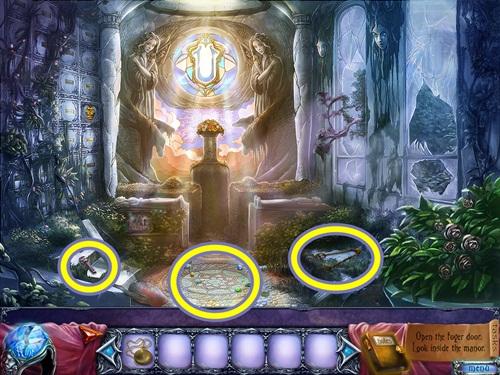
- Take the TONGS and the WRENCH.
- Click on the tiled floor.
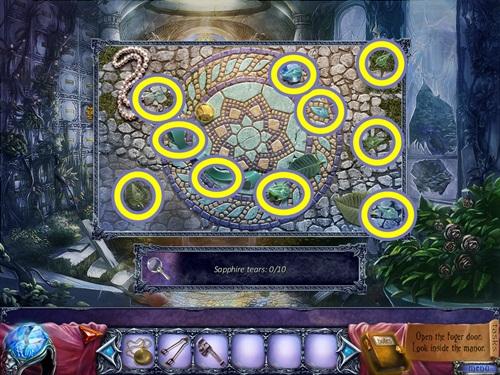
- Take the ribbon to combine with HARRY’S POCKET WATCH to get the PERFORMERS’ BELONGINGS. Find ten SAPPHIRE TEARS. Two are under the ribbon.
- Return to the manor’s foyer.
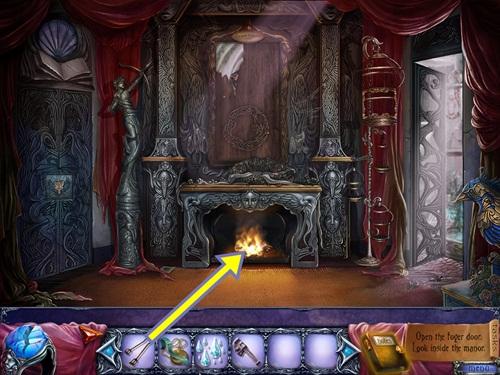
- Use the TONGS on the fireplace to get the RED-HOT MEDALLION.
- Go out to the courtyard.
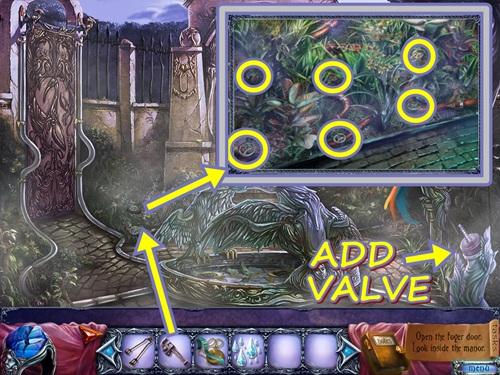
- Click on the patch of ground to the left of the fountain.
- Use the WRENCH to get the six valves.
- A VALVE is added to your inventory.
- Click on the statue at the far right.
- Add the VALVE.
- Turn the valve.
- When the fountain starts, click on it.
- Move the leaves and sticks (click to move).
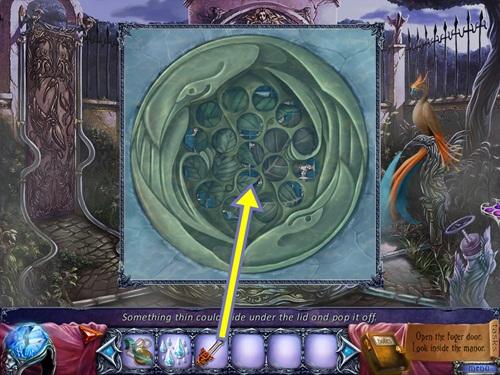
- Put the RED-HOT MEDALLION on the grid to cool, then take the MEDALLION.
- Return to the manor’s foyer.
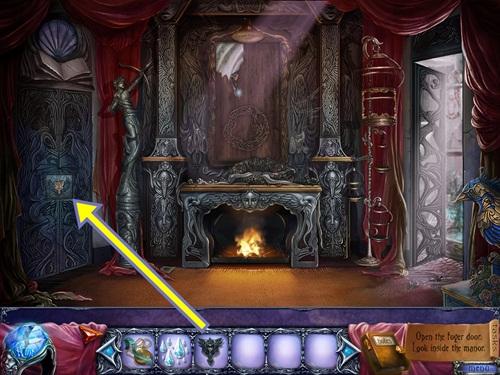
- Click on the left door.
- Add the MEDALLION.
- A mini-puzzle starts.
- Arrange the tiles so all adjacent colours are the same. Left-click two tiles to swap their positions, right-click a tile to rotate it. When a tile is correctly placed, it locks and glows blue. Start in the upper left side where two tiles are already locked.
- Solution:
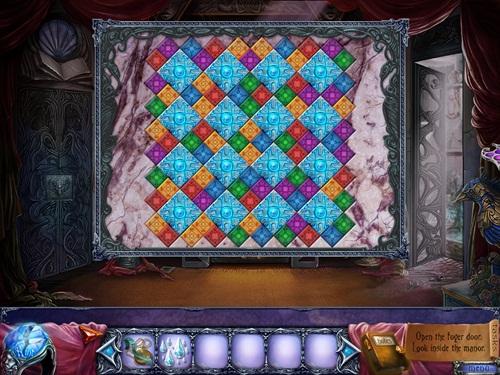
- Enter the collapsed hallway.
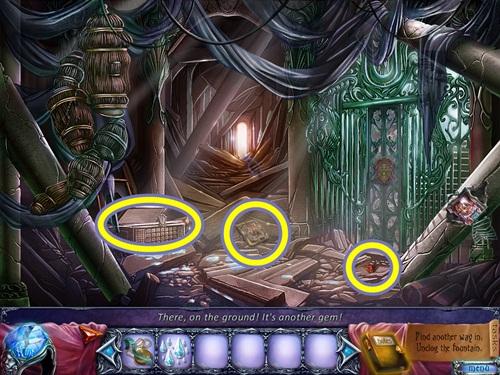
- Take the GEM and the RAPIER.
- Click on the picture frame on the floor.
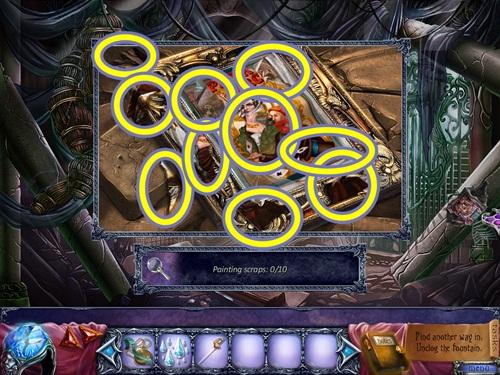
- Find 10 painting scraps.
- PAINTING SCRAPS are added to your inventory.
- Move down to the foyer.
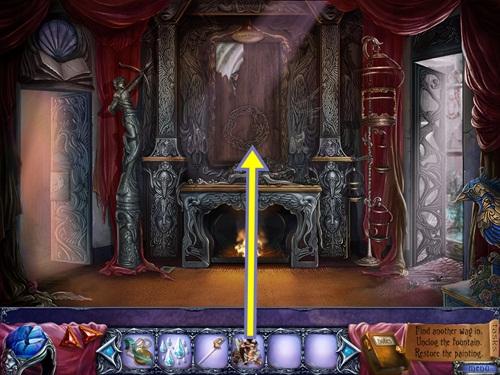
- Click on the frame above the fireplace.
- Add the PAINTING SCRAPS.
- A mini-puzzle starts.
- Restore the portrait. Left-click to select and place a piece, right-click to rotate.
- Solution:
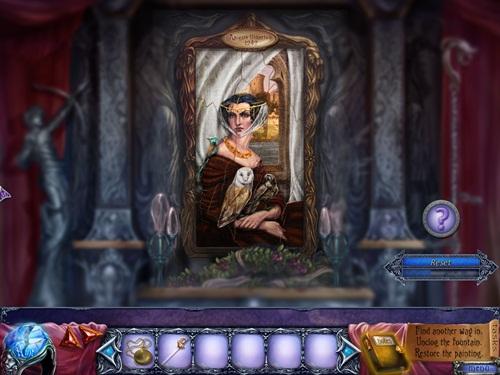
- Take the STONE TILES.
- Go left into the collapsed hallway.
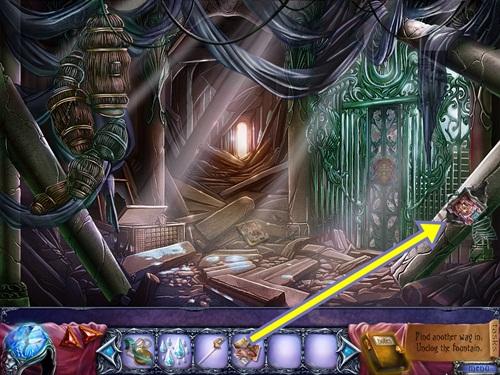
- Click on the collapsed pillar on the right.
- Add the STONE TILES.
- A mini-puzzle starts.
- Slide the tiles to recreate the image. Use the edges and grids of the panel to determine which slide belongs where.
- Solution:
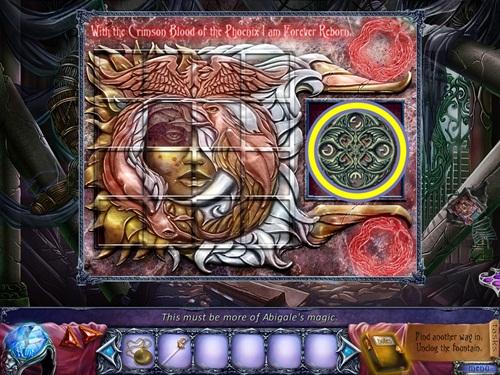
- Take the ORNAMENTED DISC.
- Return to the courtyard.
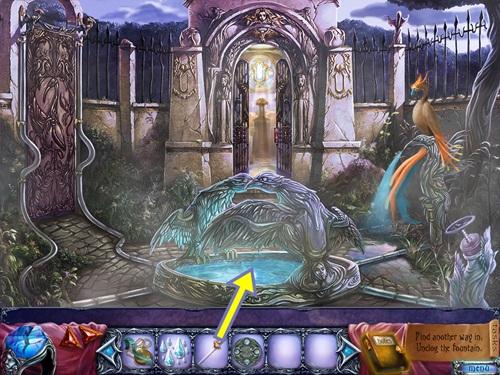
- Click on the fountain.
- Use the RAPIER to remove the drain lid.
- Move the leaves.
- A mini-puzzle starts.
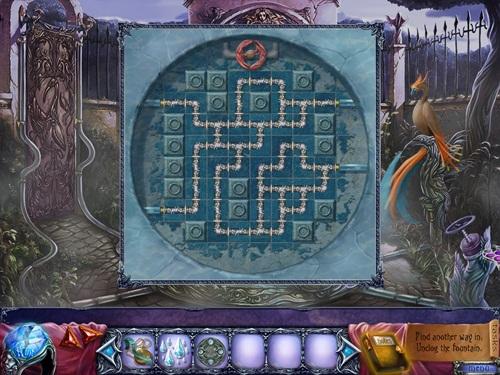
- Rearrange the pipes so there is a continuous flow of water from the four outer pipes. All pipe pieces must be used and connected. Click on two pipe pieces to swap their positions. You cannot rotate pipe pieces.
- Solution:
- Go through the archway into the aviary.
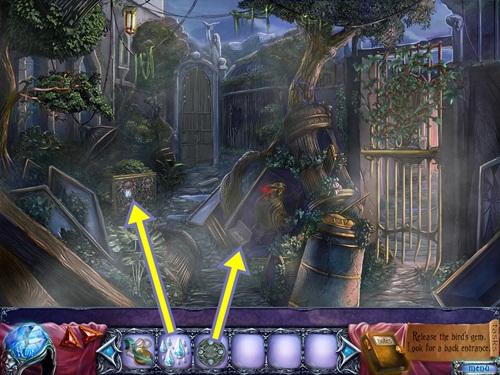
- Click on the chest.
- Add the SAPPHIRE TEARS.
- A mini-puzzle starts.
- Fill the grid with the provided tiles. All the tiles must be used and all grid squares must be filled. Left-click to select and place a tile set, right-click to rotate.
- Solution:
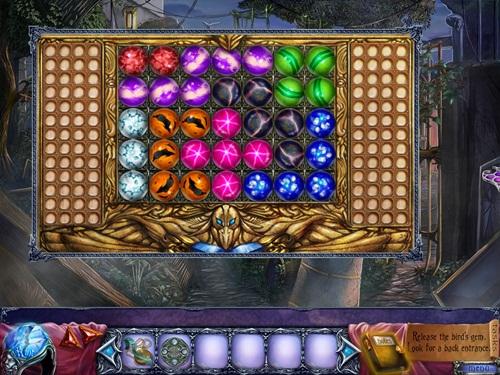
- Take the CROSS-SHAPED KEY.
- Click on the chest in front of the bird statue.
- Add the ORNAMENTED DISC.
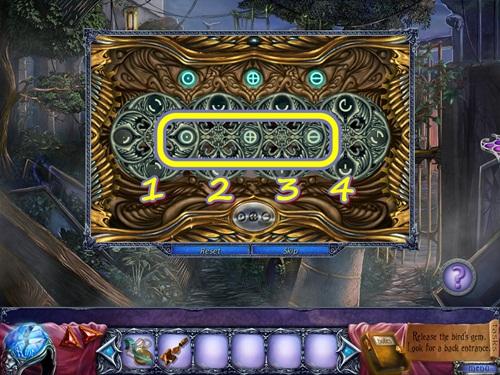
- A mini-puzzle starts.
- Rotate the discs to recreate the symbols that appear above the discs. Each disc has a portion of the symbol, recreate the symbols in the three spots that overlap. Assuming the discs are numbered 1-4 from left-to-right, disc 1 turns discs 1 and 4. Disc 2 turns discs 2, 3 and 4. Disc 3 turns only itself and disc 4 turns only itself.
- To solve the puzzle, from the starting position (click Reset if necessary), turn disc 1 two times, then turn disc 2 three times, then turn disc 3 two times and finally, turn disc 4 two times.
- Solution:
- Watch the cutscene.
- Click through the dialogue.
- Return to the crypt (move down, then move forward).
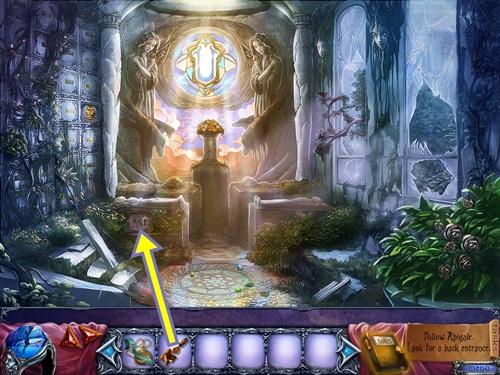
- Click on the panel on the side of the left tomb.
- Use the CROSS-SHAPED KEY.
- A mini-puzzle starts.
- Recreate the image by using the cross-shaped key to rotate its surrounding tiles. To complete the puzzle, start in one corner, then complete one side and work your way in the opposite direction.
- Solution:
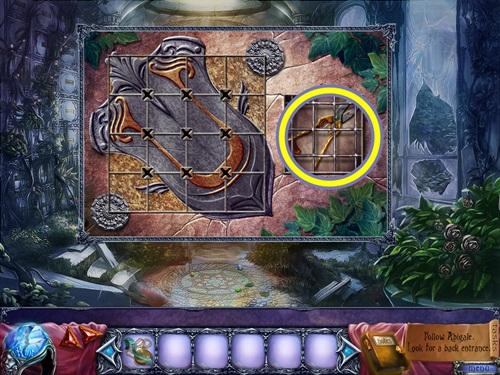
- Take the SHEARS.
- Return to the aviary (move down, then go through the left archway).
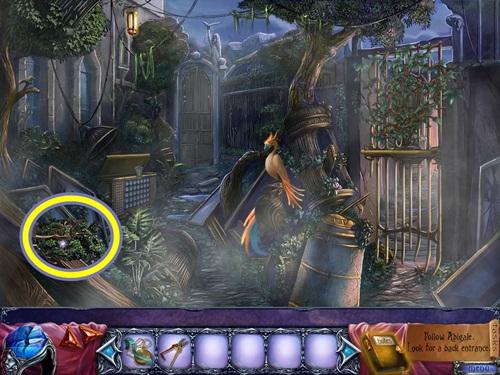
- Click on the debris at left.
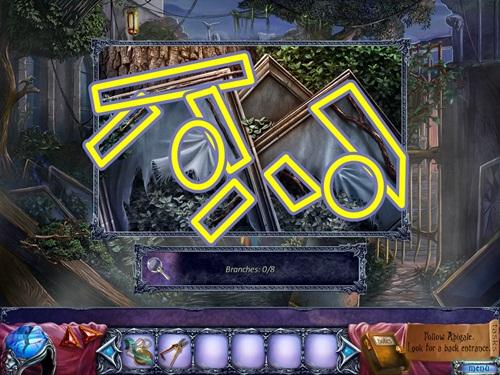
- Find eight branches. Move the canvas on the two frames to find two branches.
- A STICK is added to your inventory.
- Click on the right gate.
- Use the SHEARS.
- A mini-puzzle starts.
- Remove the branches, starting from the outermost to the innermost. When you hover your cursor over a branch, it lights up. Click to cut it. If it disappears, that was the correct branch, if it remains, remove another branch. Continue until all branches are gone.
- When Nevermore lifts the gate, add the STICK.
- Go through the gate to the carnival entrance.
Chapter Two
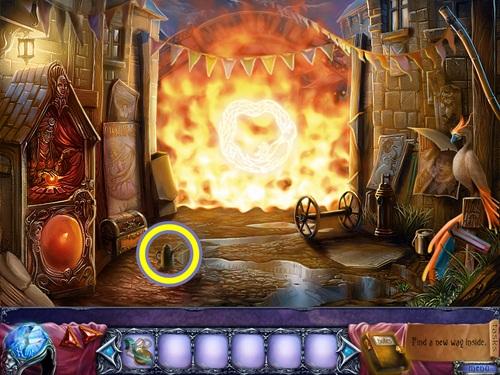
- Watch the cutscene.
- Click through the dialogue.
- Take the OIL CAN.
- Return to the aviary.
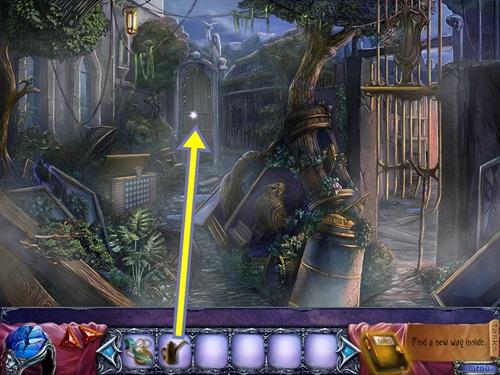
- Click on the far gate.
- Use the OIL CAN.
- Go through the gate to the backyard.
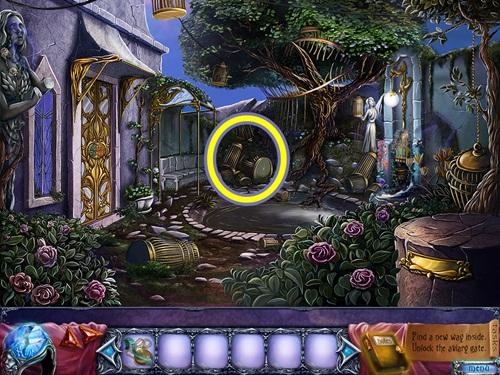
- Click on the pile of bird cages.
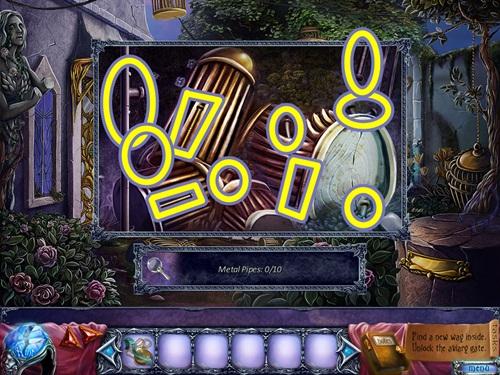
- Find the ten metal pipes.
- METAL PIPES are added to your inventory.
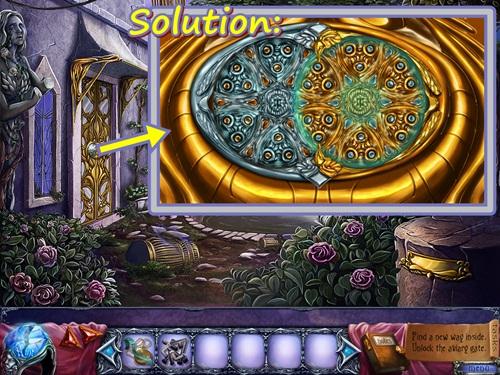
- Click on the door.
- A mini-puzzle starts.
- Rotate the discs so all the gold tiles are on the right and the silver tiles are on the left. In addition, the pieces between the tiles must also match. Begin by getting as many gold tiles and pieces on the right and as many silver tiles and pieces to the left. Then work at getting the last remaining tiles into their proper position.
- The solution is in the screenshot above.
- Go through the door into the trophy room.
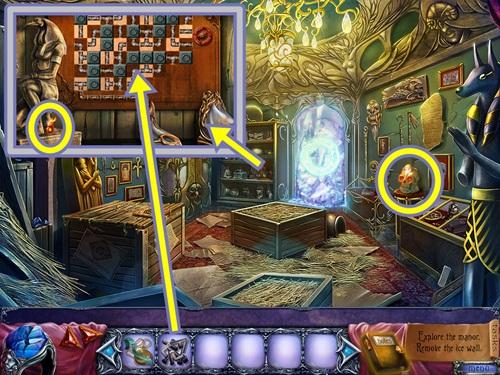
- Take the ORNAMENTED SKULL.
- Click on the back shelf.
- Take the FIRE FLOWER SEED.
- Add the METAL PIPES.
- Return to the backyard.
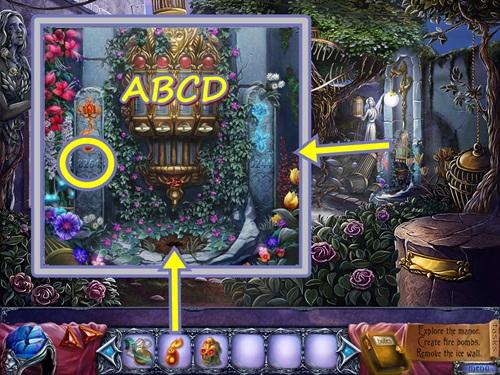
- Click on the plant watering device.
- Add the FIRE FLOWER SEED.
- A mini-puzzle starts.
- Transfer water between the tubes to make the numbers match the numbers below the fire flower image on the left. Click on a tube, then click on another tube to add water to it, if possible. To solve the puzzle, assuming the tubes are labelled A-D from left-to-right, press D then C. Then press C then A.
- Take the FIRE FLOWER.
- Return to the trophy room.
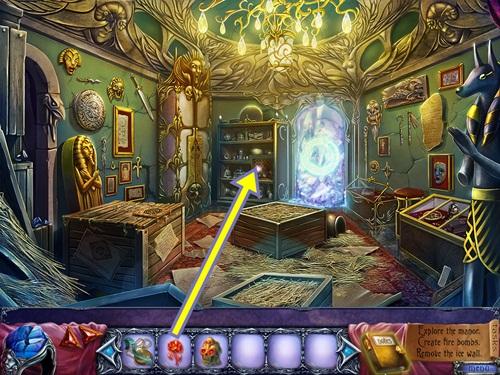
- Click on the back shelf.
- Add the FIRE FLOWER.
- A mini-puzzle starts.
- Rearrange the pipes to create a continuous, closed flow between the two beakers. You do not have to use all the pipes but the flow must be closed (i.e., no gaps).
- Solution:
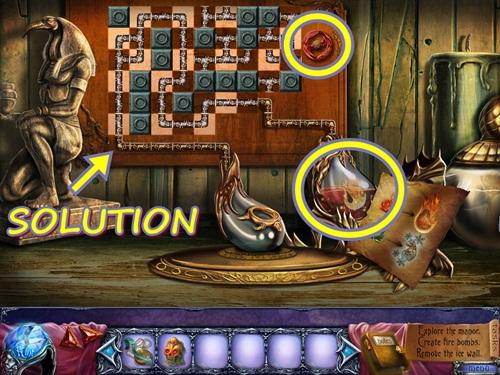
- Turn the red dial, then take the FIRE POTION.
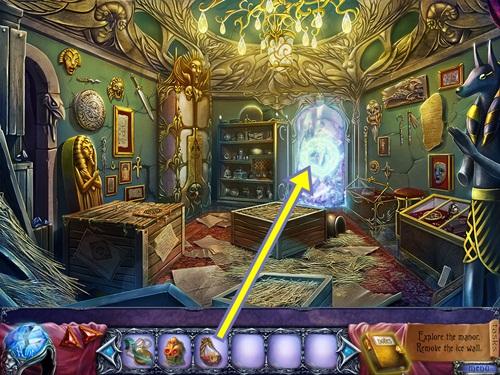
- Use the FIRE POTION on the ice wall.
- Go through the doorway to the library.
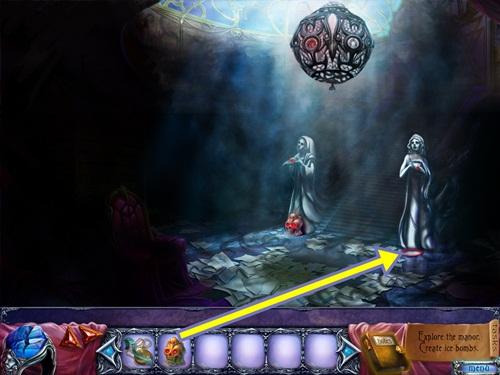
- Click on the statue on the right.
- Add the ORNAMENTED SKULL.
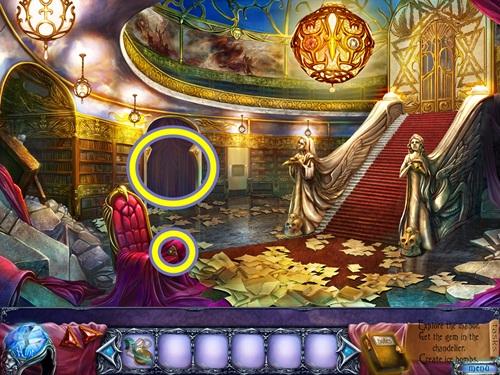
- Take the DEFORMED WOODEN MEDALLION (1/3).
- Click on the curtained doorway.
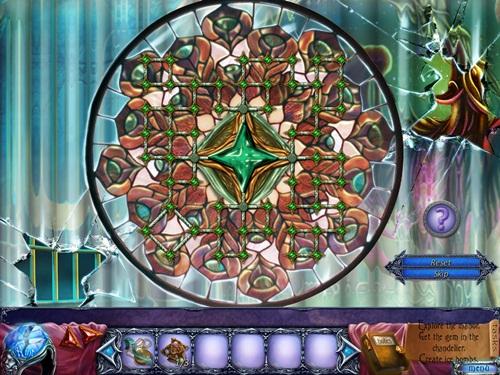
- A mini-puzzle starts.
- Rotate the crystal pieces so all the ends are connected. When a crystal piece’s ends are all connected, it glows green.
- Solution:
- Enter the room with the phoenix statue.
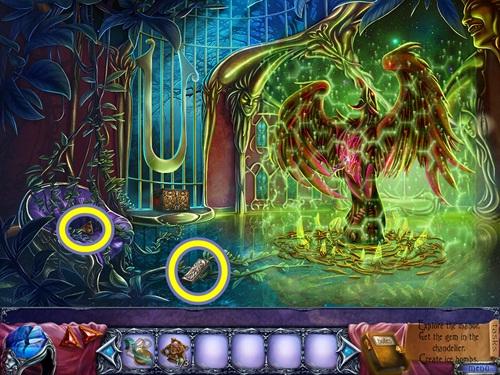
- Take the RECTANGULAR BLOCK and the DEFORMED WOODEN MEDALLION (2/3).
- Move down to the library.
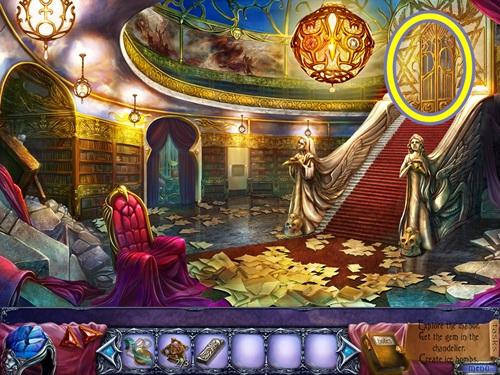
- Click on the door atop the stairs.
- Go up to the manor’s second floor.
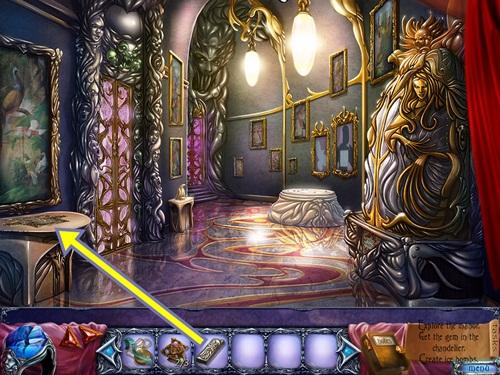
- Click on the table on the left.
- Add the RECTANGULAR BLOCK.
- A mini-puzzle starts.
- Slide the blocks so the central block (with the purple marble) can slide into the slot with the U-shaped key. Blocks can only slide in one direction, vertical blocks can only slide up and down and horizontal blocks can only move left and right. Click and drag to move the blocks.
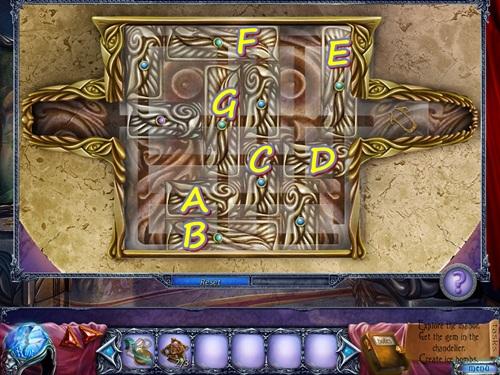
- Using the screenshot above as a guide:
- Move block A all the way left.
- Move block B all the way left.
- Move block C all the way down.
- Move block D all the way left.
- Move block E all the way down.
- Move block F all the way right.
- Move block G all the way up.
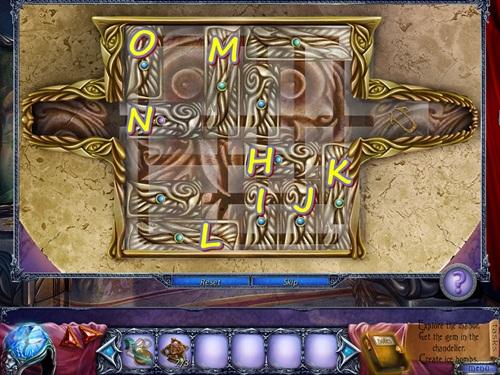
- Move block H all the way left.
- Move blocks I, J and K one spot up.
- Move block L all the way right.
- Move block M all the way down.
- Move block N all the way right.
- Move block O all the way down.
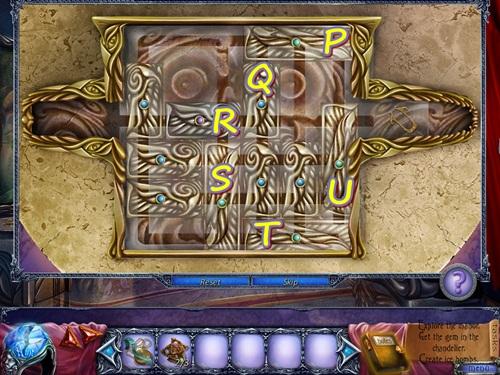
- Move block P all the way left.
- Move block Q all the way up.
- Move block R all the way right.
- Move block S all the way up.
- Move block T all the way left.
- Move block U all the way down.
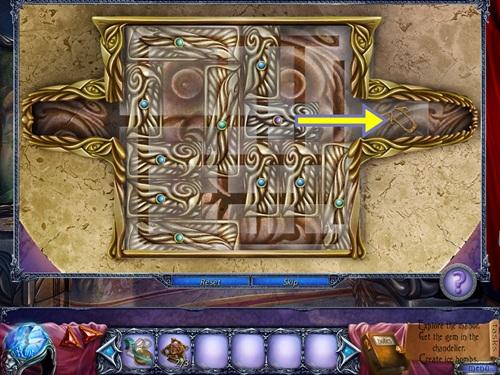
- Move the central block all the way right.
- Take the GLYPH KEY.
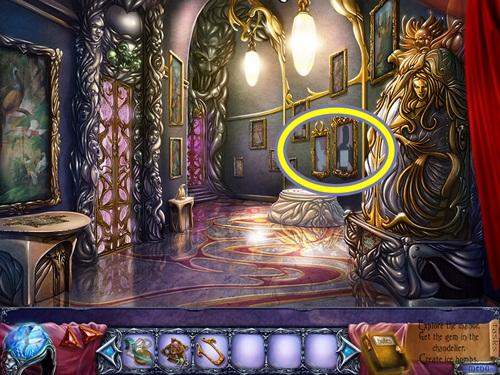
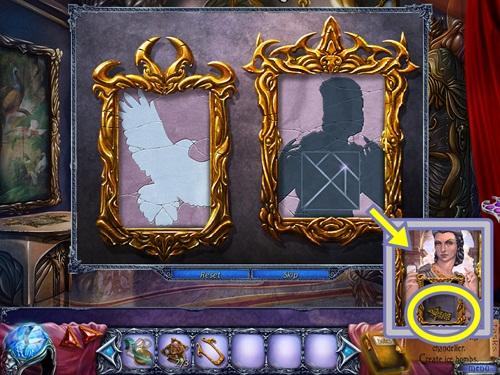
- Click on the empty frames.
- A mini-puzzle starts.
- Take the shapes from the left and place them into the space provided on the right.
- Take the ARROW-SHAPED KEY.
- Solution:
- Move down to the library.
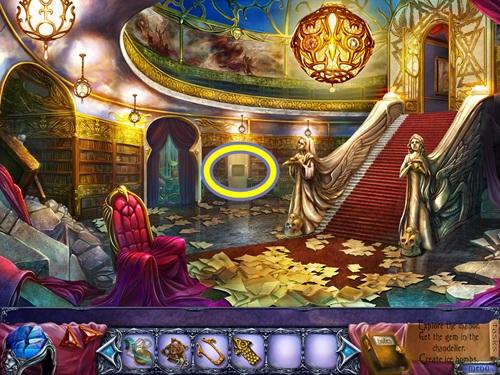
- Click on the panel.
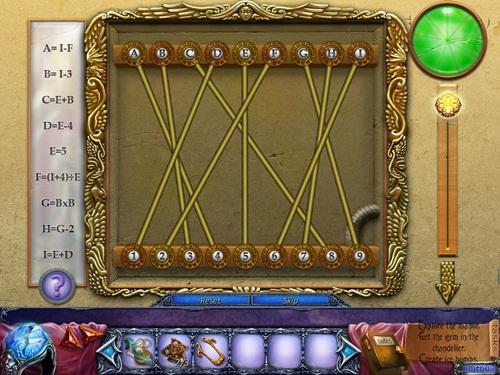
- Add the ARROW-SHAPED KEY.
- A mini-puzzle starts.
- Using the code on the left, determine the numeric equivalent of each letter. Start with the only definite, E=5. From there, use trial and error to determine what each letter stands for.
- A=5, B=3, C=8, D=1, E=5, F=2, G=9, H=7 and I=6.
- Once you’ve determined what number each letter represents, adjust the numbers to match their letters. Click on numbers to swap their positions.
- Solution:
- Press the down button.
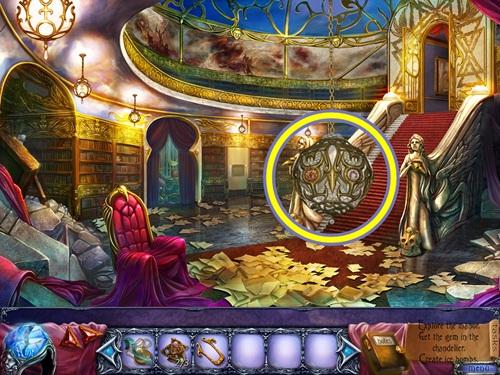
- Click on the lowered chandelier.
- A mini-puzzle starts.
- Untangle the chains (click and drag) by moving the gold discs into empty slots. When a chain is untangled, it appears as white, when it is tangled, it appears as red.
- Solution:
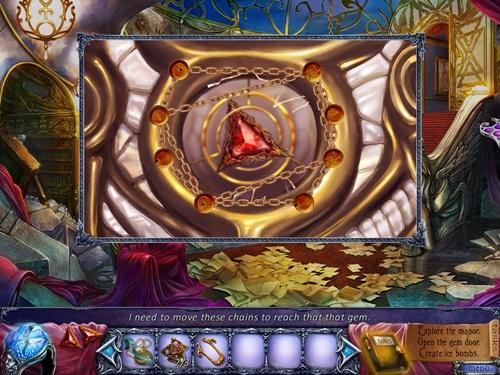
- Take the GEM.
Chapter Three
- Go up the stairs to the manor’s second floor.
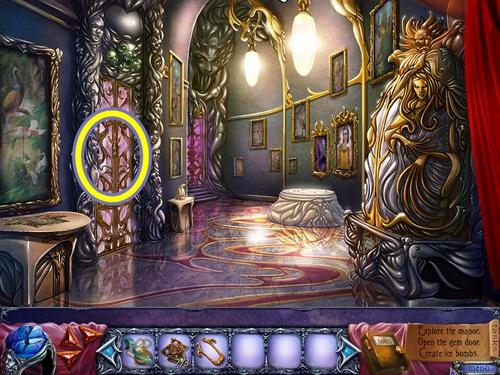
- Click on the far left door.
- Go through the door into the alchemy room.
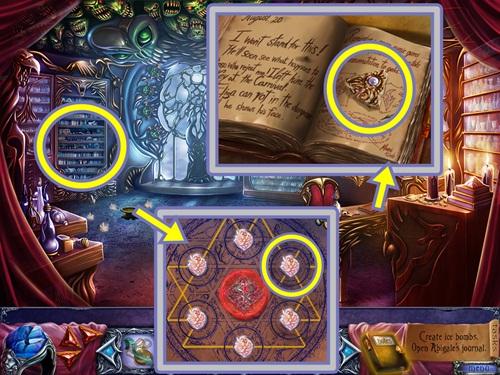
- Click on the journal on the desk.
- Add the GLYPH KEY.
- Read the entries.
- Click on the bottom right page to turn it.
- Take the DEFORMED WOODEN MEDALLION (3/3). Click anywhere outside the window to close it.
- Click on the ritual circle on the floor.
- Rotate the circle in the 1:00 position to fix the symbol.
- Take the GOLDEN SIGIL. Click anywhere outside the window to close it.
- Click on the left shelf.
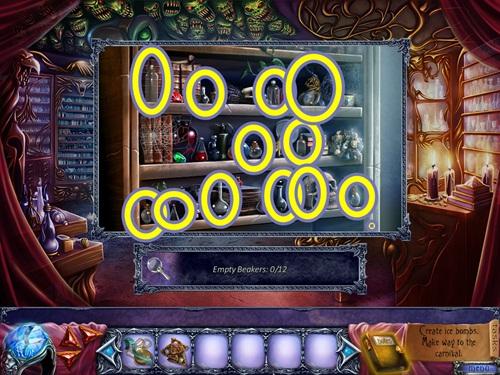
- Find the 12 empty beakers.
- An ALCHEMICAL BEAKER is added to your inventory.
- Move down three scenes to the trophy room.
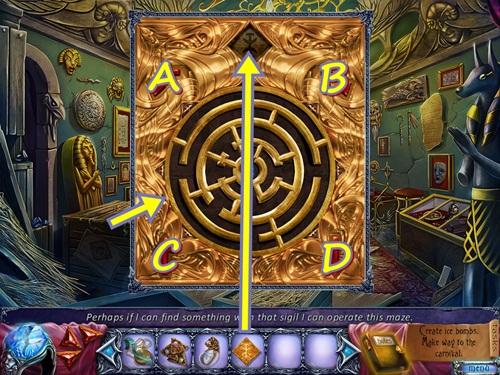
- Click on the chest.
- Add the GOLDEN SIGIL.
- A mini-puzzle starts.
- Rotate the maze using the arrows to get the marble into the centre.
- Using the screenshot above as a guide, press the arrows in the following order (click Reset, if necessary): B-B-D-A-A-A-A-C-A-A-D-B-D-B-D-A-A-A-A-C-A-A-A-D-B.
- Take the RUNIC GEM.
- Return to the alchemy room.
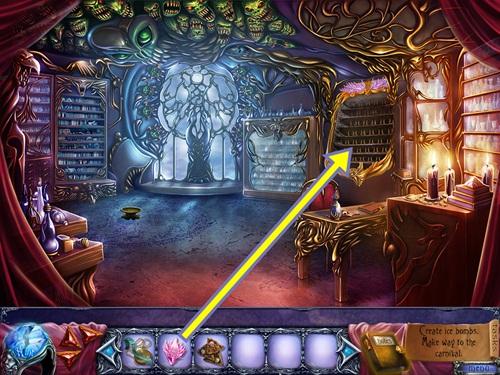
- Click on the potion shelf.
- Add the RUNIC GEM.
- A mini-puzzle starts.
- Charge all the crystals. Click on a crystal to either charge or decharge it and its surrounding crystals.
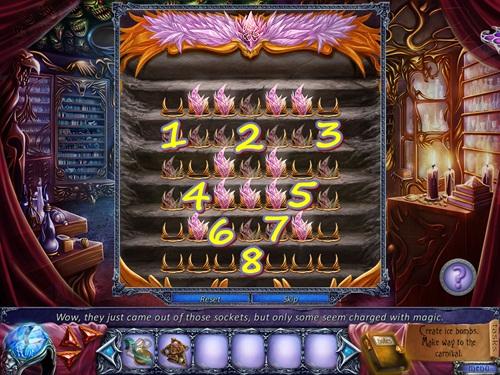
- Click on the crystals in the order shown in the screenshot above.
- Take the TRANSMUTATION CRYSTALS.
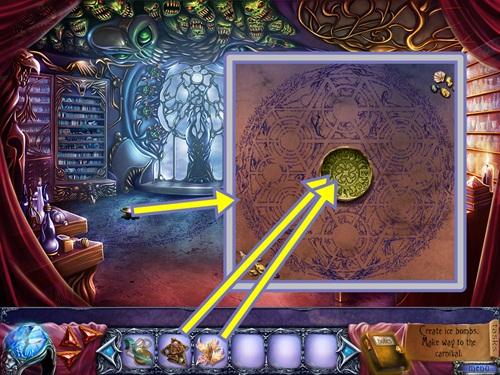
- Click on the ritual circle on the floor.
- Add the TRANSMUTATION CRYSTALS to the bowl, then add the DEFORMED WOODEN MEDALLIONS.
- A mini-puzzle starts.
- Rotate the rings to restore the symbol. Note moving some rings moves other rings. The symbol is made up of single and double lines and must match up.
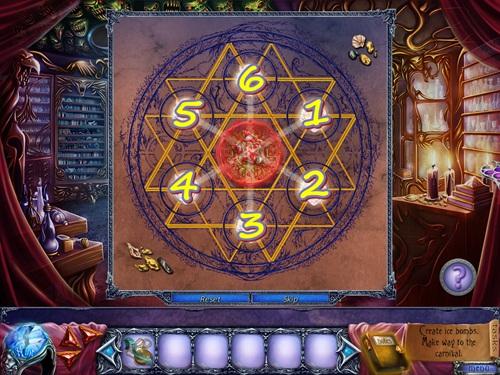
- In the screenshot above, the rings are labelled from 1-6. Align the rings in the following order: 6-5-1-4-3-2.
- Take the GOLDEN MEDALLION. Click anywhere outside the window to close it.
- Move down three scenes to the trophy room.
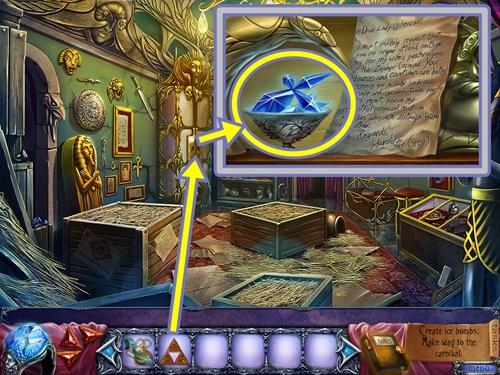
- Click on the door.
- Add the GOLDEN MEDALLION.
- Read the note.
- Take the ICE FLOWER SEED. Click anywhere outside the window to close it.
- Move down to the backyard.
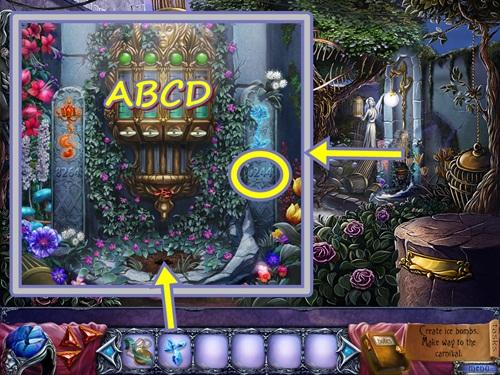
- Click on the plant watering device.
- Add the ICE FLOWER SEED.
- A mini-puzzle starts.
- Transfer water between the tubes to make the numbers match the numbers below the ice flower image on the right. Click on a tube, then click on another tube to add water to it, if possible. To solve the puzzle, assuming the tubes are labelled A-D from left-to-right, press B then C, D then B and A then D.
- Take the ICE FLOWER.
- Return to the trophy room.
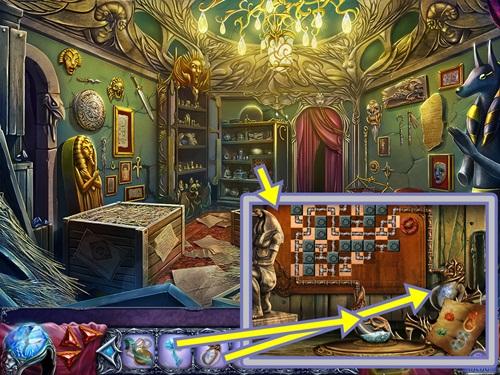
- Click on the back shelf.
- Add the ICE FLOWER and ALCHEMY BEAKER.
- A mini-puzzle starts.
- Rearrange the pipes to create a continuous, closed flow between the two beakers. You do not have to use all the pipes but the flow must be closed (i.e., no gaps).
- Solution:
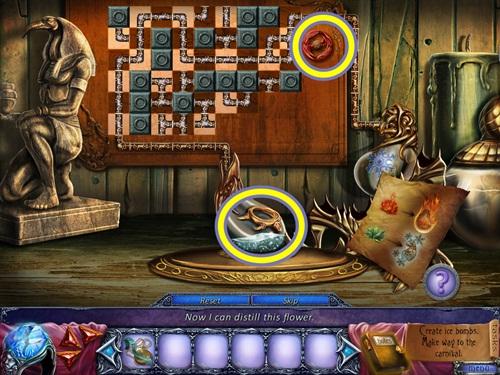
- Take the ICE POTION
- Return to the carnival entrance (move down two scenes, then go through the gate on the right).
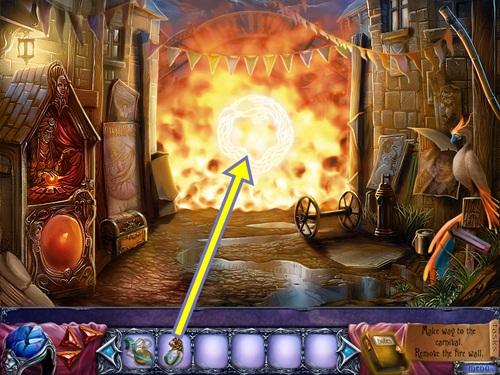
- Use the ICE POTION on the wall of fire.
- Click through the dialogue.
- Move through the entrance into the carnival.
Chapter Four
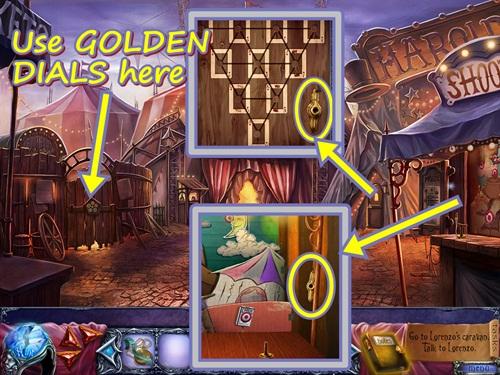
- Click on the shooting gallery.
- Take the GOLDEN DIALS (1/2).
- Move down.
- Click on the door to Harry’s workshop.
- Take the GOLDEN DIALS (2/2).
- Click anywhere outside the window to close it.
- Click on the gate on the left.
- Add the two GOLDEN DIALS.
- A mini-puzzle starts.
- Rotate the rings so the gems touching the connector pipes match the colour of the pipes. Click on a connector pipe to swap the position of the gems.
- Solution:
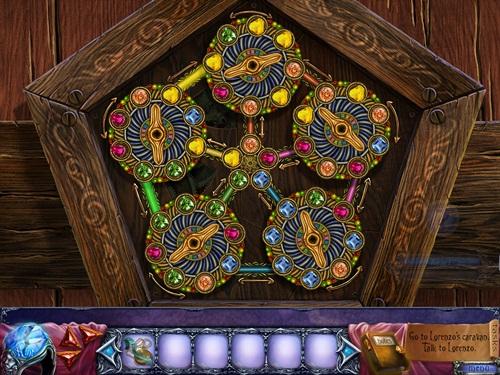
- Go through the gate.
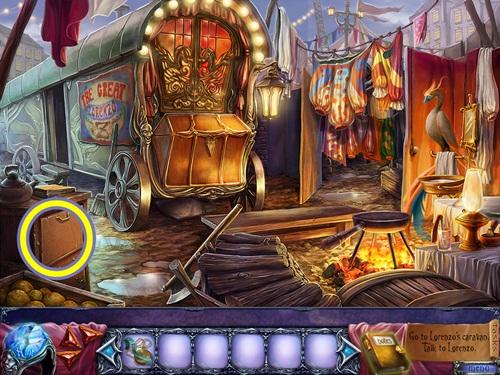
- Click on the cabinet to get the BAG OF PELLETS.
- Enter Lorenzo’s caravan.
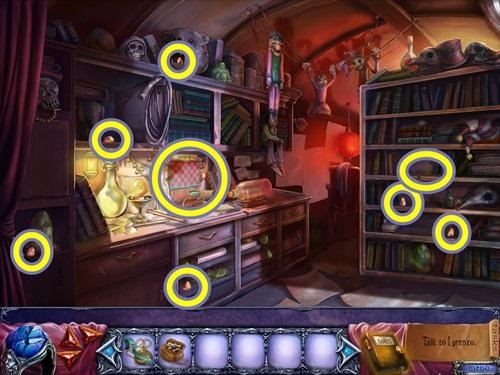
- Take the six pieces of AMBER RESIN and the HAIRBRUSH.
- Click on the checkerboard.
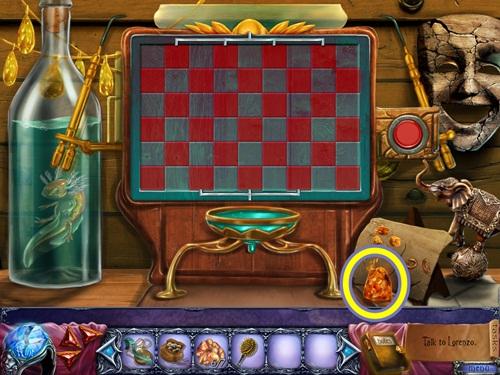
- Take the seventh piece of AMBER RESIN.
- Move down and move forward into the caravan.
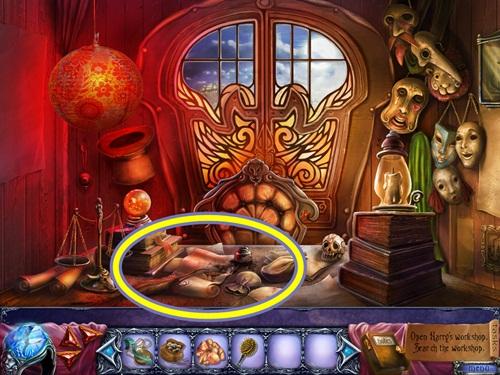
- Click through the dialogue.
- Click on the desk.
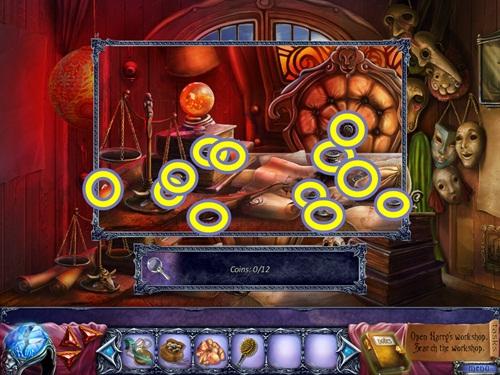
- Take the twelve coins.
- A COIN is added to your inventory.
- Move down four scenes to the carnival entrance.
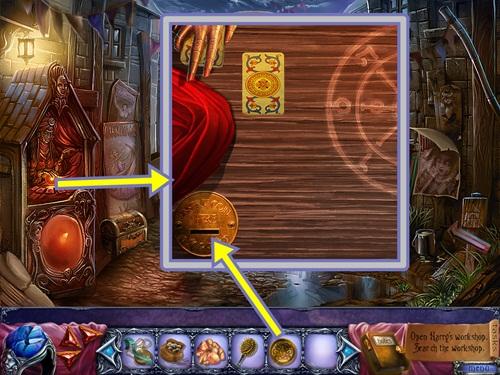
- Click on the fortune teller’s booth.
- Insert the COIN into the slot.
- A mini-puzzle starts.
- Flip the cards to find the pairs. Click on two cards to reveal their faces. If they don’t match, they will flip back over. Start from the top left and work your way right, from top to bottom. A trick to remember is to say the face/symbol out loud.
- Solution:
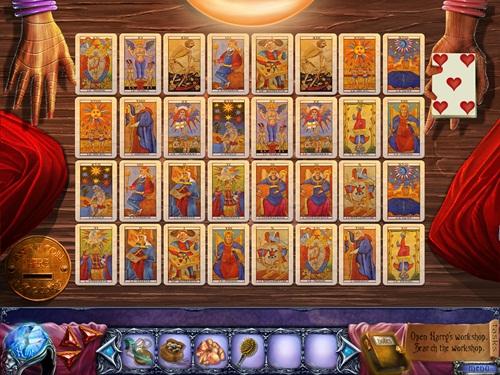
- Take the DECK OF CARDS.
- Move forward to the carnival.
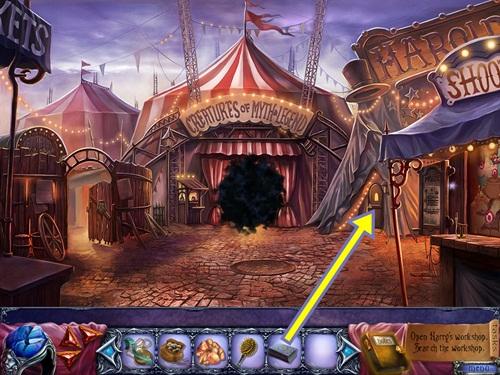
- Click on the door to Harry’s workshop.
- Add the DECK OF CARDS.
- A mini-puzzle starts.
- Rearrange the cards so they are in numerical order (and match their borders). Click on the triangle in between the cards to rotate them. Start in one corner and work outwards.
- Solution:
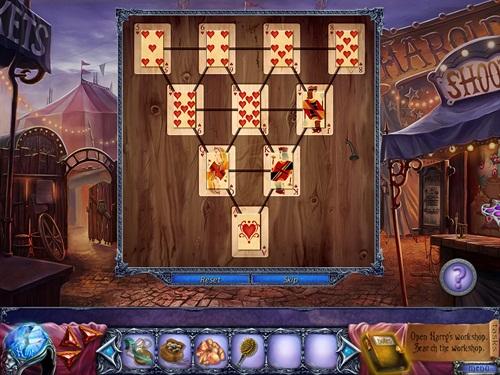
- Enter Harry’s workshop.
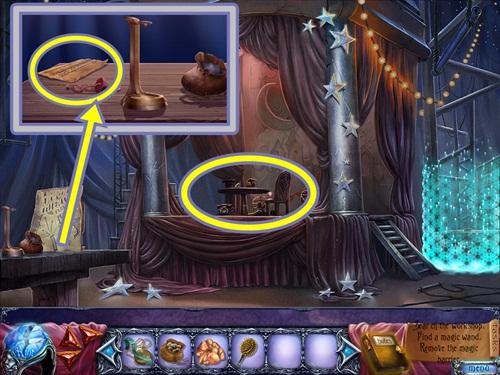
- Click on the table on the stage to release the demons.
- Click on the left table.
- Take the CARNIVAL CODE. Click anywhere outside the window to close it.
- Return to the scene outside Lorenzo’s caravan.
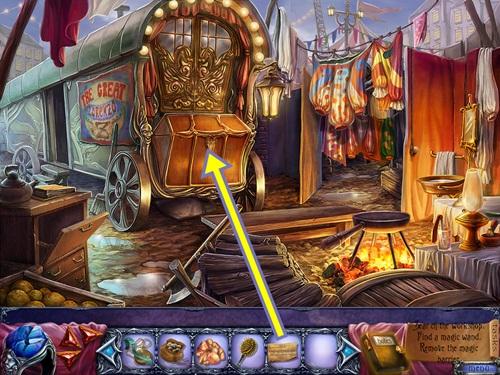
- Click on the chest attached to the caravan.
- Add the CARNIVAL CODE.
- A mini-puzzle starts.
- Click on the symbols to rotate them so the symbols shown are in the order written about in the code.
- Solution:
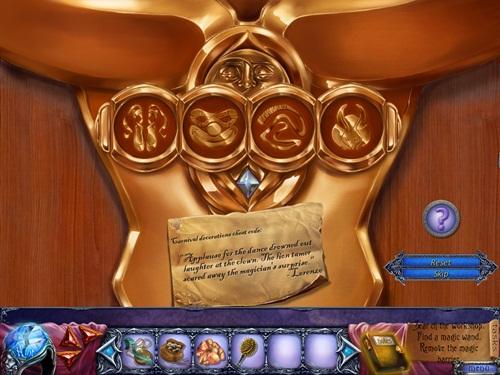
- The ZEPHYR CARNIVAL Z is added to your inventory.
- Return to the carnival entrance (move down two scenes).
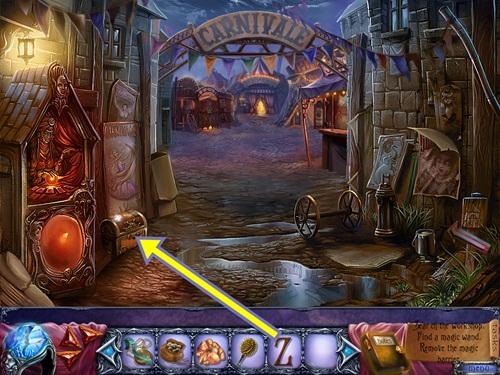
- Click on the chest.
- Add the ZEPHYR CARNIVAL Z to the inset.
- A mini-puzzle starts.
- Each tile has a number on its centre and pipes connected to its sides. Clicking on an unlit pipe lights it (and clicking on a lit pipe turns it off). To solve this puzzle, each tile must be connected by the amount of lit pipes that appears on the tile’s centre.
- Solution:
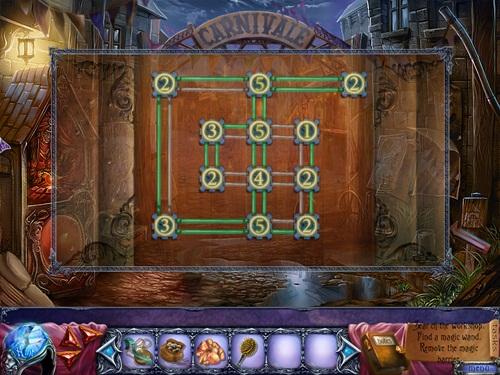
- A SLINGSHOT is added to your inventory.
- Move forward to the carnival.
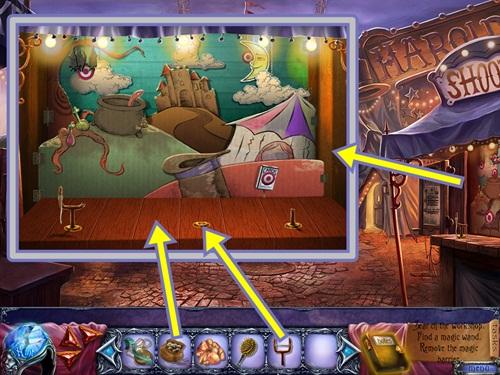
- Click on the shooting gallery.
- Add the SLINGSHOT and the BAG OF PELLETS.
- A mini-puzzle starts.
- Shoot (click on) the targets. Note some targets move and some appear after you’ve shot other targets. To shoot the cards at the bottom right, you have to shoot the single “cards” target, then three more appear. If you don’t shoot them quickly, they disappear and are replaced by the single “cards” target.
- When you are finished, the MAGIC WAND is added to your inventory.
- Enter Harry’s workshop.
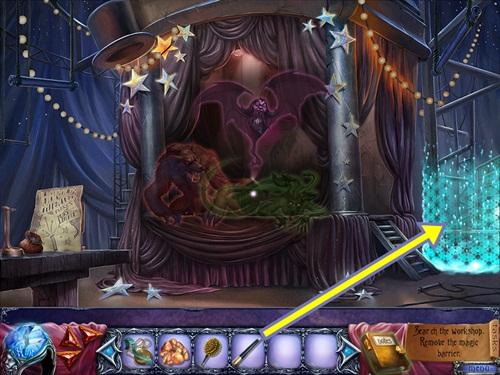
- Click on the magic barrier.
- Use the MAGIC WAND on the barrier.
- A mini-puzzle starts.
- This is similar to a match-3 game. Remove the tiles that have card symbols in them.
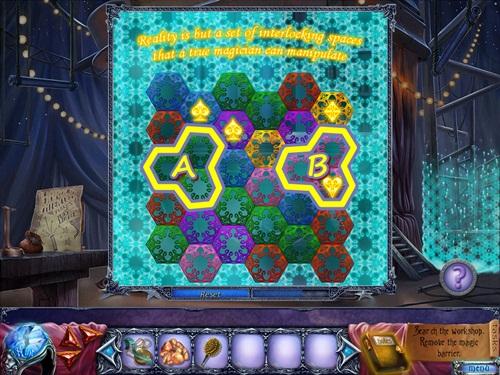
- Hover your cursor over the tiles to see how you can move them (A). Rotate the tiles to create groups of three of the same colour (B). This will remove them from the board. The reset button doesn’t work on this puzzle so step-by-step instructions aren’t possible as you will likely have already moved some tiles before consulting this walkthrough.
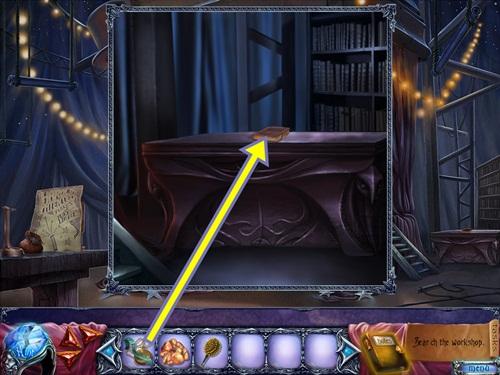
- When you are finished, click on the book.
- Add the PERFORMER’S BELONGINGS.
- A mini-puzzle starts.
- Adjust the time on the watch to match the times written in the diary. Adjust the times in order of events in Harry and Eliza’s relationship.
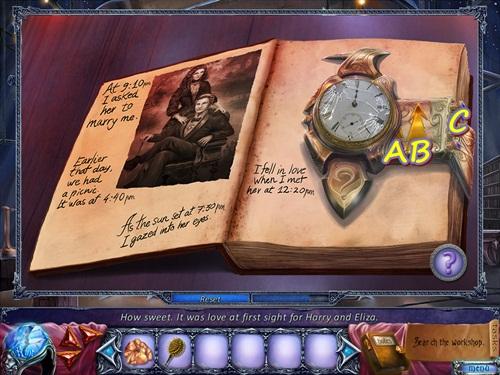
- To change the time, click on the small arrow (A) to change the hour hand and click on the large arrow (B) to change the minute hand. The times, in this order, are 12:20, 4:40, 7:30 and 9:10. After you set the time, click on its corresponding pin (C).
- When you are finished, turn the pages and read the entries.
- When you get to the back of the book, take the KEY IMPRINT.
- Return to Lorenzo’s caravan to talk to Lorenzo.
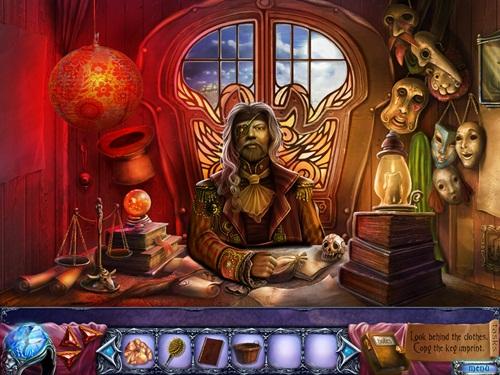
- Click through the dialogue.
- A CLOTHES BASKET is added to your inventory.
- Move down two scenes to outside the caravan.
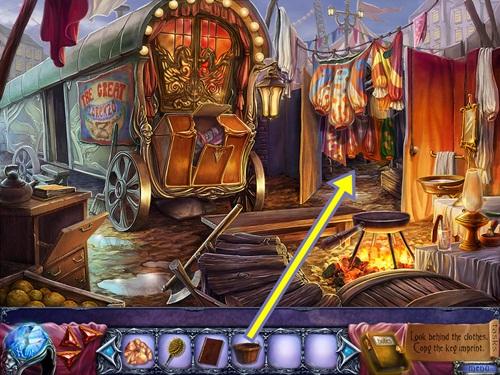
- Put the CLOTHES BASKET under the clothes.
- Click on the clothes to remove them (click twice).
- Click on the revealed shed.
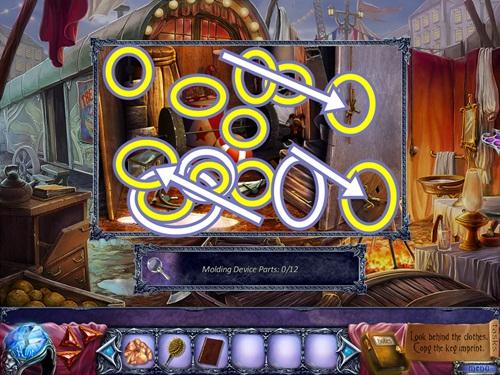
- Find the twelve molding device pieces. Remove the hose to access a molding device piece. Remove the paper to access a molding device piece. Use the key on the clear chest to access a molding device piece. Open the drawer to access a molding device piece. Use the wrench on the wheel to access a molding device piece. Use the knife to cut the rope to access a molding device piece.
- THE PARTS FOR LORENZO’S MOLDING DEVICE are added to your inventory.
- Enter the caravan.
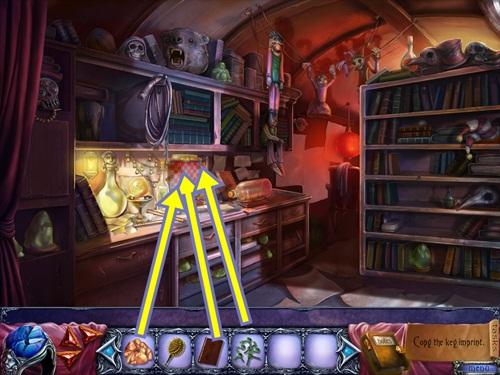
- Click on the checkerboard.
- Add THE PARTS FOR LORENZO’S MOLDING DEVICE, then the AMBER RESIN, then the KEY IMPRINT.
- A mini-puzzle starts.
- Rotate the pipes so there’s a continuous flow from the top pipes to the bottom pipes.
- Solution:
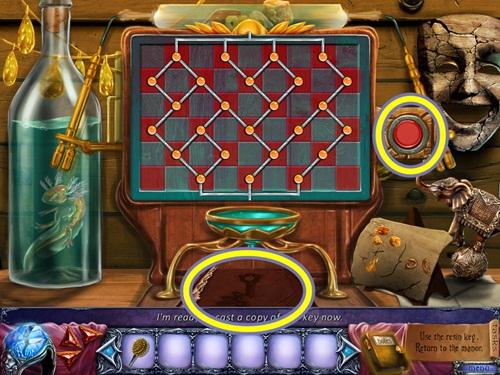
- Press the red button, then take the RESIN KEY.
- Return to the crypt (move down two scenes to the carnival where Nevermore will talk to you, then move down three scenes to the courtyard, then forward into the crypt).
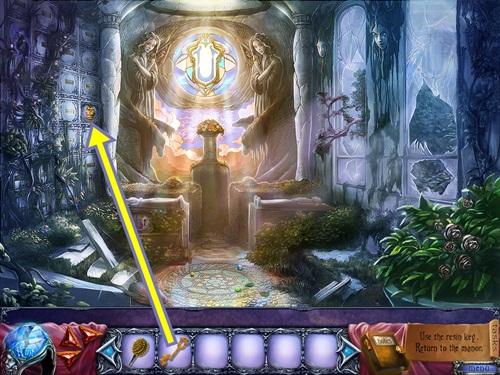
- Click on the tomb on the left wall.
- Add the RESIN KEY.
- Go down the stairs.
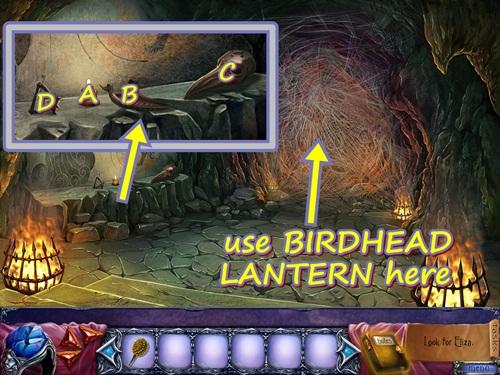
- Click on the shelf at the left.
- Recreate the lantern. Put the candle on the base, then add the skull top, then add the handle.
- Take the BIRDHEAD LANTERN.
- Use the BIRDHEAD LANTERN on the spider webs (do this three times).
- Go into the dungeon.
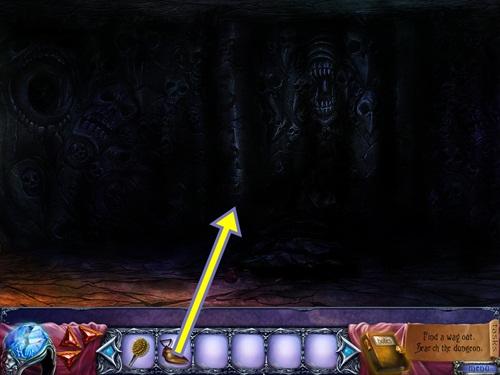
- Use the BIRDHEAD LANTERN.
- Watch the cutscene.
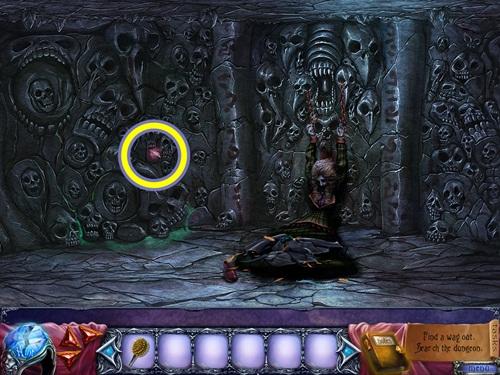
- Take the RUNIC GEM which causes the wall to crumble.
- Move forward into the sewer.
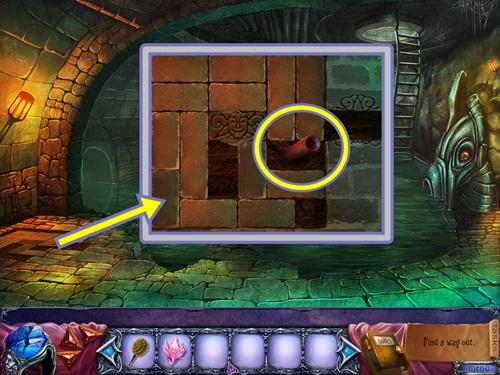
- Click on the ground at the left.
- Take the EMPTY FLARES.
- A mini-puzzle starts.
- Slide the bricks to uncover the item under the bricks and to get the symboled brick into the far right slot.
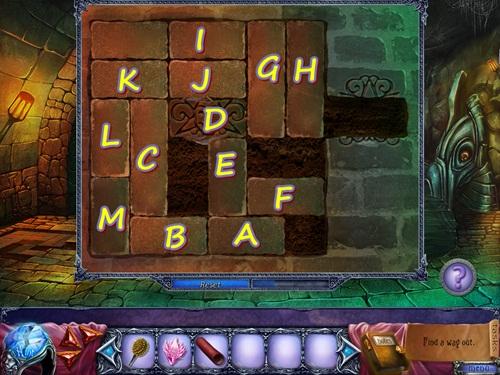
- Using the screenshot above as a guide, move the bricks in the following order (press Reset, if necessary):
- Move bricks A and B all the way right.
- Move brick C all the way down.
- Move brick D all the way left
- Move brick E all the way up.
- Move brick F all the way left.
- Move bricks G and H all the way down.
- Move bricks I, J and K all the way right.
- Move bricks L and M all the way up.
- Move bricks A and B all the way left.
- Move bricks G and H all the way down.
- Move brick D all the way right.
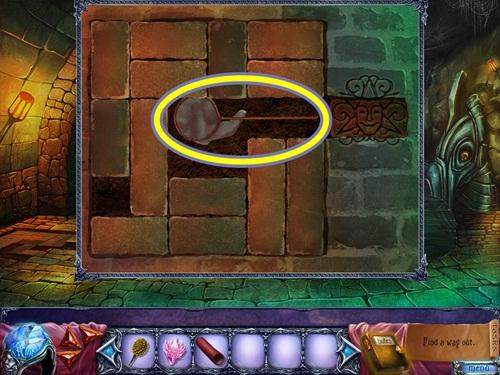
- Take the NET.
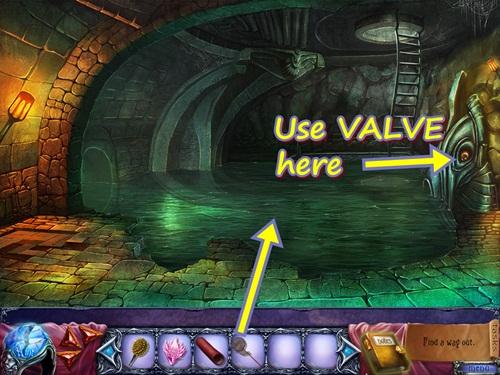
- Use the NET on the sewer water until you get the VALVE (click four times).
- Click on the contraption on the right.
- Add the VALVE, then turn it.
- Go up the ladder.
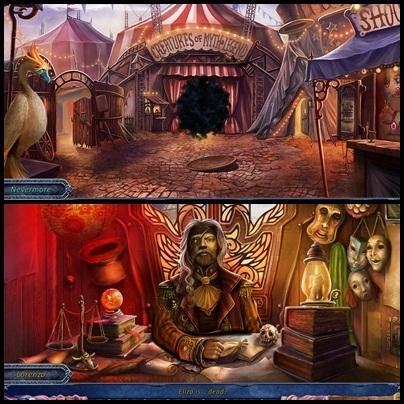
- Click through the dialogue.
- Return to Lorenzo’s caravan to talk to him.
- Click through the dialogue.
- Return to Harry’s workshop.
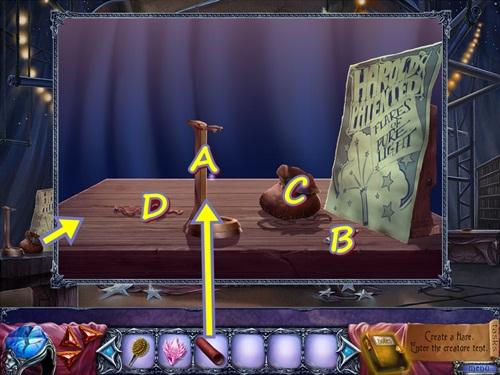
- Click on the table at left.
- Put the EMPTY FLARES on the holder (A).
- Dip the spoon (B) into the powder (C), then pour it into the empty flare.
- Place the cap (D) on the empty flare.
- Take HARRY’S FLARES.
- Move down to the carnival.
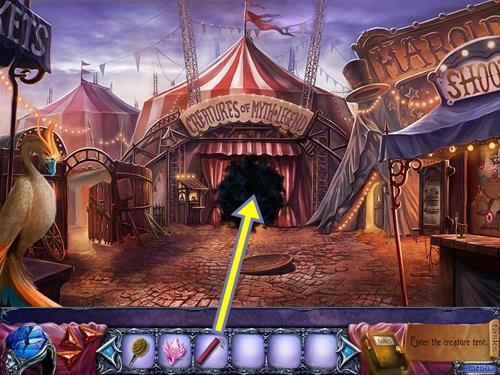
- Use HARRY’S FLARES on the Creatures of Myth and Legends tent.
- Enter the tent.
Chapter Five
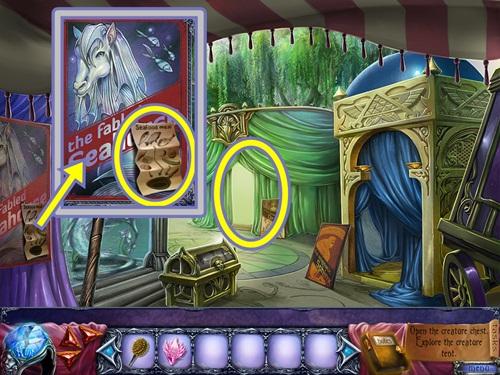
- Click on the fabled seahorse poster.
- Take the SEAHORSE MEAL RECIPE. Click anywhere outside the window to close it.
- Click on the lush Dryad’s tent.
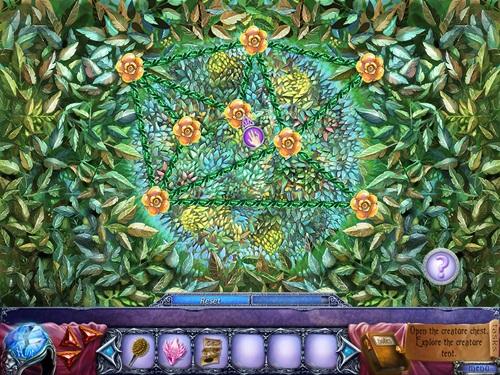
- A mini-puzzle starts.
- Untangle the vines so none overlap. Click and drag the roses to move the vines.
- Solution:
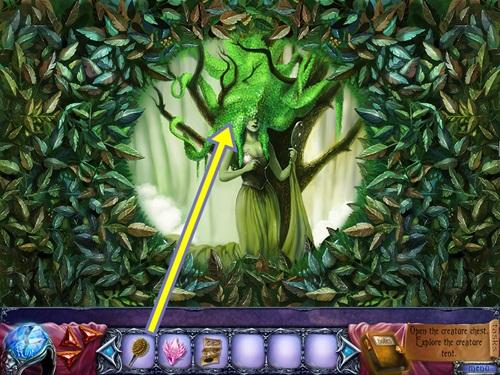
- Use the HAIRBRUSH on the Dryad.
- She gives you a MIRROR.
- Return to outside Lorenzo’s caravan.
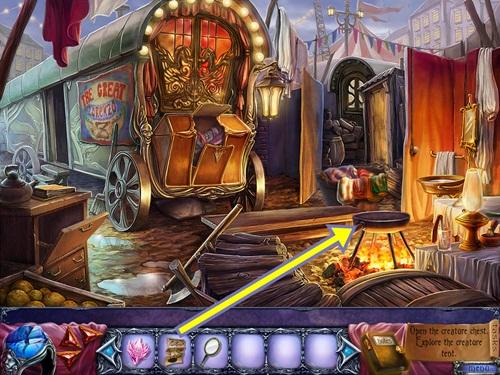
- Click on the barbecue.
- Add the SEAHORSE MEAL RECIPE.
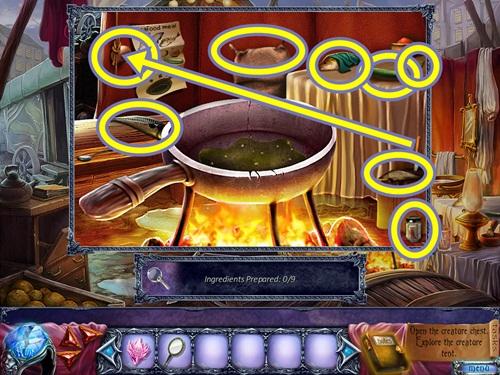
- Find the nine ingredients and put each in the frying pan. Use the knife to cut the rope to get the onion. Use the spoon to scoop the spices to add to the frying pan.
- The SEAHORSE’S SEAFOOD is added to your inventory.
- Return to Lorenzo to talk to him.
- Click through the dialogue.
- He gives you the SPHINX RIDDLE TICKET.
- Return to the Creatures of Myth and Legends tent.
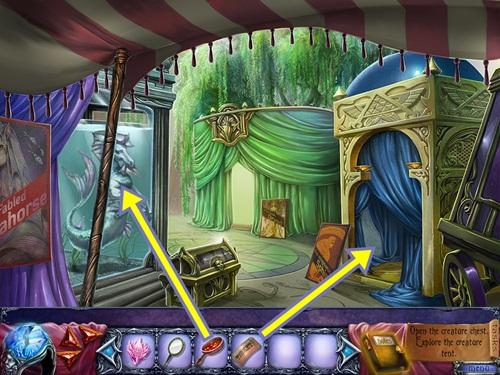
- Give the SEAHORSE’S SEAFOOD to the seahorse.
- GARLIC is added to your inventory.
- Click on the enigmatic sphinx’s tent.
- Add the SPHINX RIDDLE TICKET.
- A mini-puzzle starts.
- Make the bottom equation equal the top equation. Determine the value of the symbols at the top to solve the equation. Then add the symbols at the bottom to the blank equation. The symbols are numbered 1-5 from left-to-right.
- Solutions:
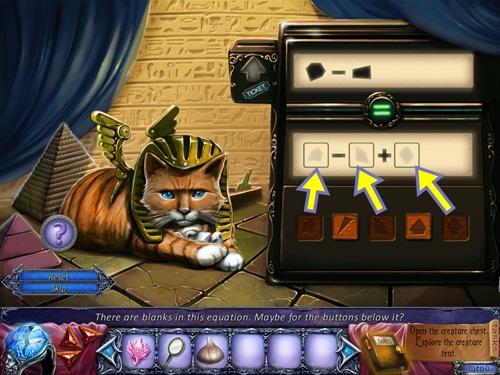
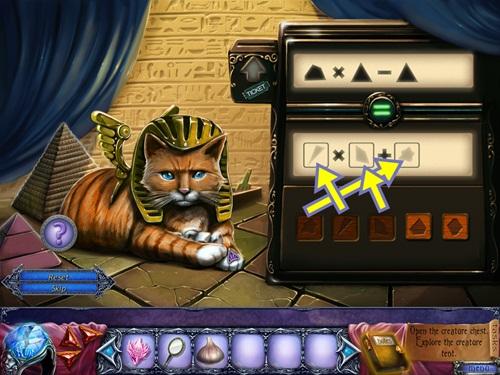
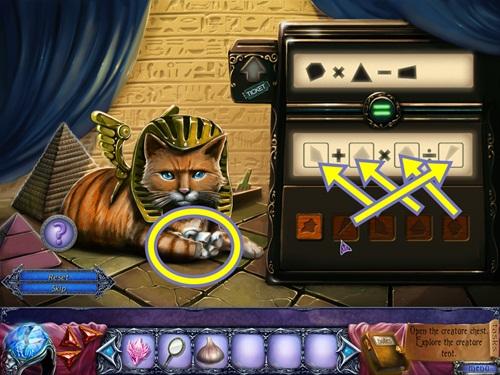
- Take the SILVER NUGGETS from the sphinx.
- Return to Harry’s workshop.
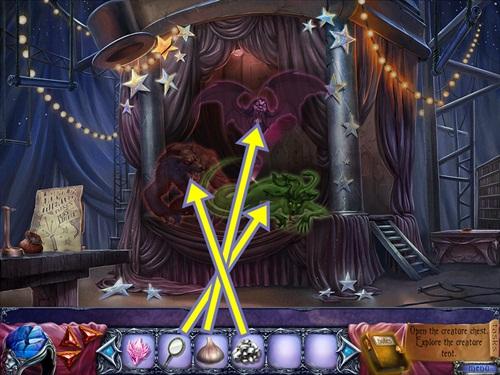
- If you haven’t already done so, click on the table on the stage to release the demons.
- Give the GARLIC to the vampire demon, the SILVER NUGGETS to the werewolf and the MIRROR to Medusa.
- Click on the table.
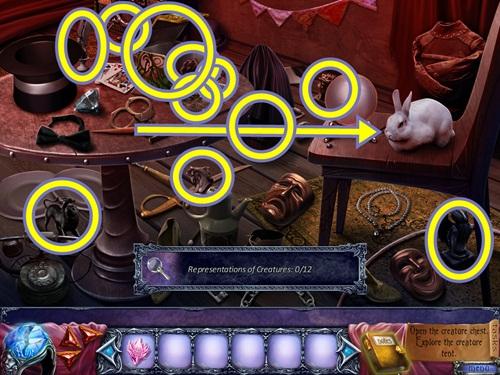
- Take the twelve representations of creatures. Lift cloth off cage to get a creature. Give the carrot to rabbit to get another creature.
- Take HARRY’S ILLUSION BOX. This uncovers another creature to take.
- CREATURE STATUETTES are added to your inventory.
- Return to the Creatures of Myth and Legends tent.
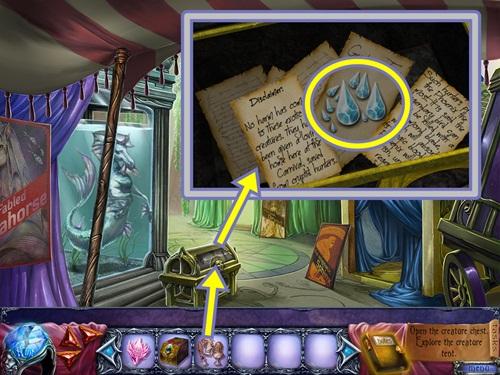
- Click on the chest.
- Add the CREATURE STATUETTES.
- Read the notes.
- Move the notes, then take the SAPPHIRE TEARS.
- Return to the room with the Phoenix statue, talking to Nevermore along the way (move down four scenes, go left, move forward, enter the manor, go forward into the library and go through the left doorway).
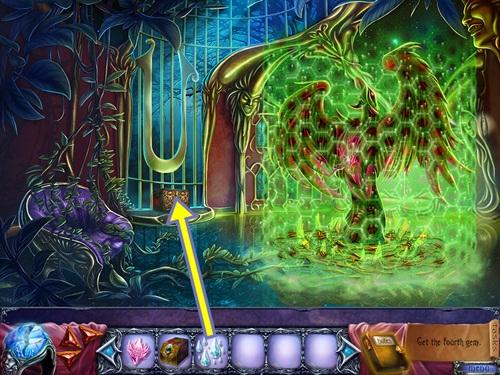
- Click on the chest.
- Add the SAPPHIRE TEARS.
- A mini-puzzle starts.
- Fill the grid with the provided tiles. All the tiles must be used and all grid squares must be filled. Left-click to select and place a tile set, right-click to rotate.
- Solution:
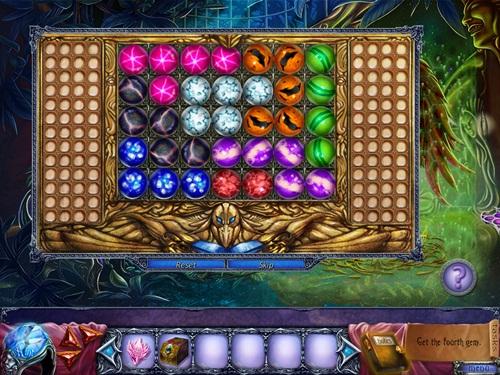
- Take the GEM.
- Go to the second floor of the manor.
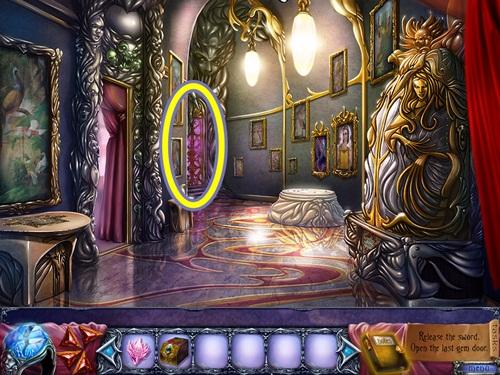
- Click on the door at the end of the hall.
- Enter the bird room.
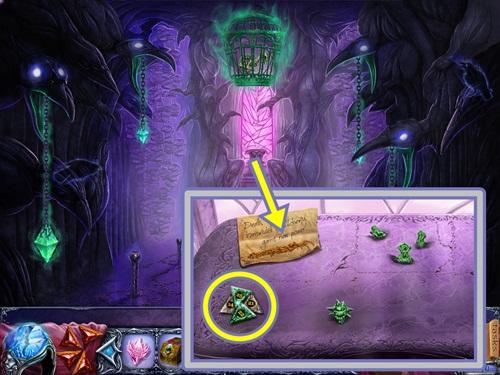
- Click on the altar.
- Take the NUMBERED TRIANGLE.
- Move down two scenes to the hallway.
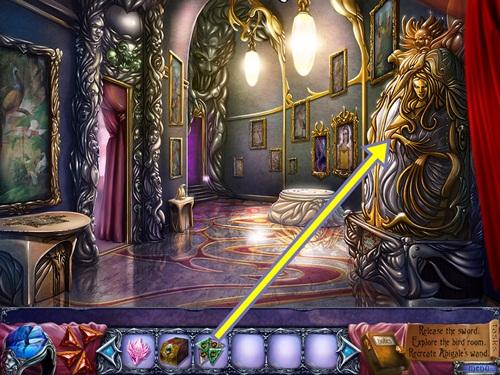
- Click on the contraption at the right.
- Add the NUMBERED TRIANGLE.
- A mini-puzzle starts.
- Arrange the discs so the numbers surrounding each triangle equals the number in its centre. Click on a triangle to rotate it.
- Solution:
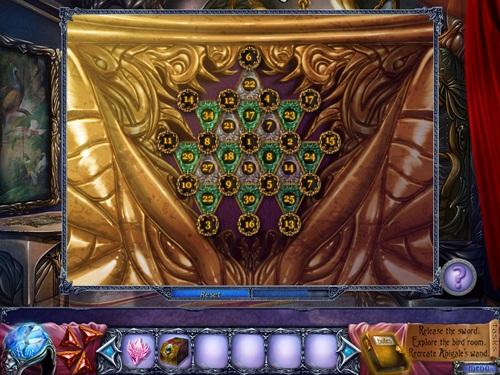
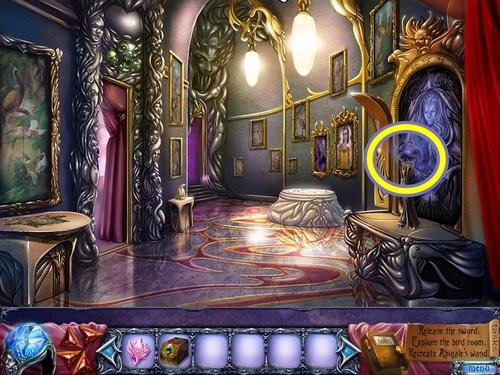
- Take the GLOWING ORB.
- Return to the bird room.
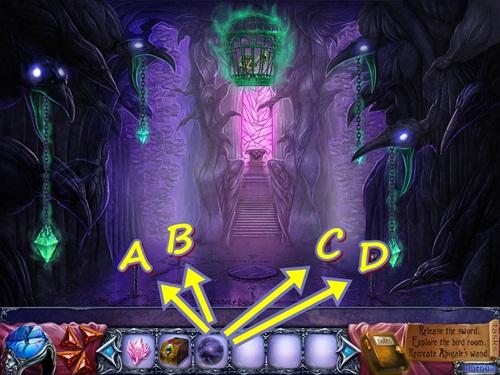
- Use the GLOWING ORB on the pedestals to raise the crystals into the bird statues’ mouths.
- Take the glowing orb and click on a pedestal to move the crystal.
- Using the screenshot above as a guide, assume the pedestals are labelled A-D, from left-to-right. Pedestal A moves crystals A and C and pedestal D moves crystals, while pedestals B and C only move their own crystals.
- First raise crystals A and D (doesn’t matter which order), then raise crystals B and C (doesn’t matter what order).
- When the bird cage falls, click on it.
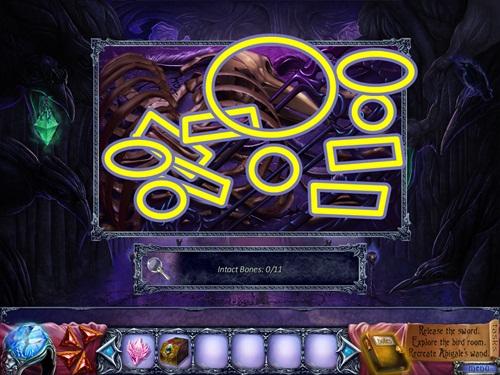
- Find eleven intact bones. Take the CAGE PARTS.
- BIRD BONES are added to your inventory.
- Click on the altar.
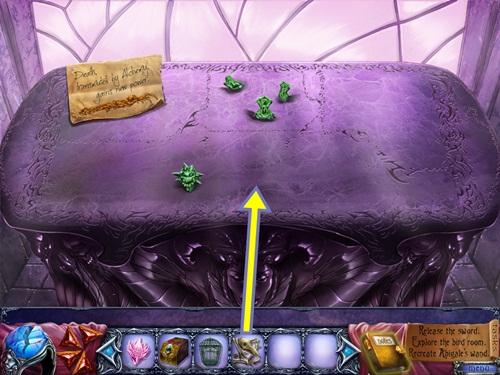
- Add the BIRD BONES.
- A mini-puzzle starts.
- Recreate the wand with the bird bones, using the crystals to connect the bones. One crystal is already in place. Pick up a bone and try to add an end to the crystal piece. If the bones doesn’t connect, put it back and try another bone.
- Solution:
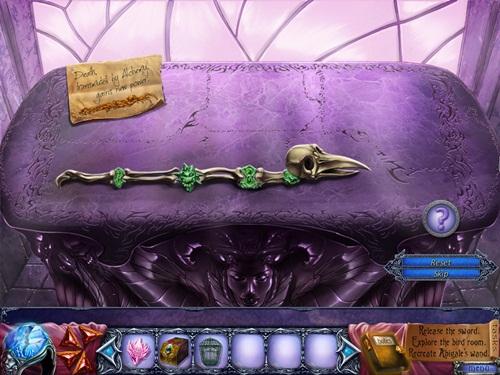
- Return to the alchemy room (off the second floor landing).
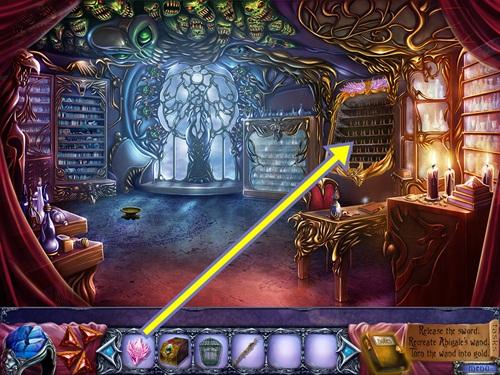
- Click on the potion shelf.
- Add the RUNIC GEM.
- A mini-puzzle starts.
- Charge all the crystals. Click on a crystal to either charge or decharge it and its surrounding crystals.
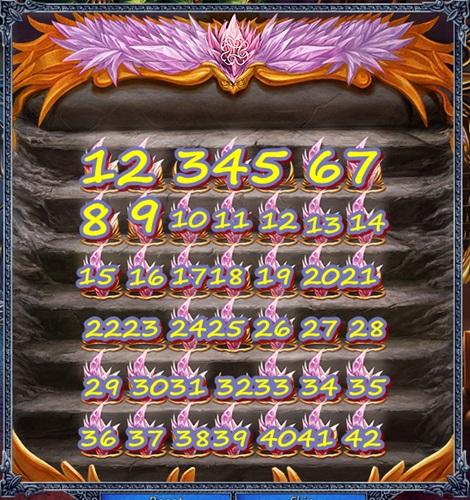
- The screenshot above has labelled all the slots from 1-42.
- Click on the following slots: 29-38-41-35-42-34-25-1-16-7-20-4-13-7-21-14-9-1-15-8.
- Take the TRANSMUTATION CRYSTALS.
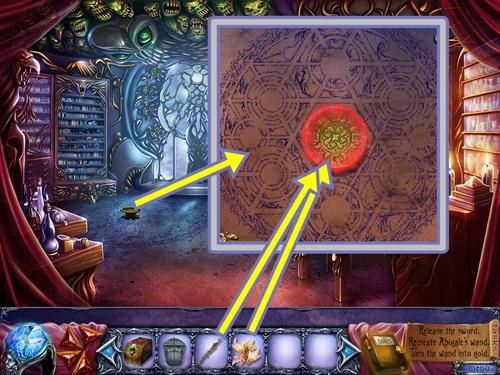
- Click on the ritual circle on the floor.
- Add the TRANSMUTATION CRYSTALS to the bowl, then add the MAGIC WAND.
- A mini-puzzle starts.
- Rotate the rings to restore the symbol. Note moving some rings moves other rings. The symbol is made up of single and double lines and must match up.
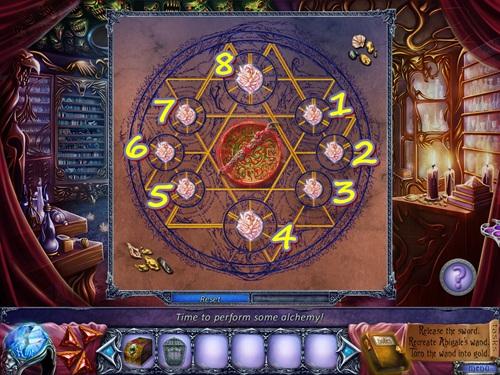
- In the screenshot above, the rings are labelled from 1-8. Align the rings in the following order: 2-8-3-1-5-4-6-7.
- Take ABIGALE’S GOLDEN WAND.
- Return to the Phoenix room.
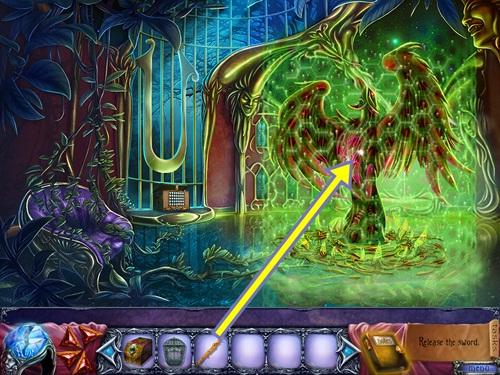
- Click on the Phoenix statue.
- Use ABIGALE’S GOLDEN WAND on the statue.
- A mini-puzzle starts.
- This is the same puzzle as the one in Harry’s workshop. Rotate the tiles to create groups of three to remove the tiles from the board. You must destroy eight of each tile colour. The reset button doesn’t work on this puzzle so step-by-step instructions aren’t possible as you will likely have already moved some tiles before consulting this walkthrough.
- When you are finished, take ABIGALE’S SWORD.
- Return to the collapsed hallway (move down six scenes to the manor’s foyer, then go through the door on the left).
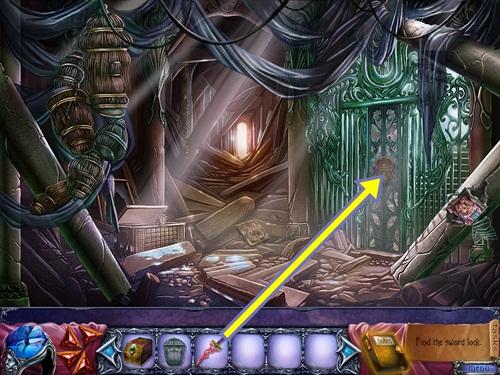
- Click on the door.
- Add ABIGALE’S SWORD.
- Go through the door.
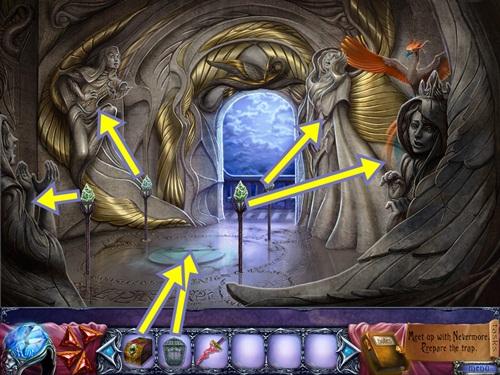
- Put the CAGE PARTS in the centre of the ritual area.
- A mini-puzzle starts.
- Note the order the statue’s light up and recreate the sequence on their corresponding crystals. This puzzle is random so a step-by-step solution is not possible.
- When you are finished, put HARRY’S ILLUSION BOX in the circle.
- Click on the box.
- A mini-puzzle starts.
- Rotate the rings so the ring segments match their background.
- Watch the cutscene.
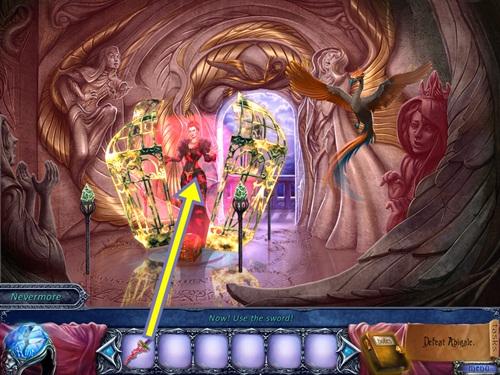
- Use ABIGALE’S SWORD on Abigale.
- A mini-puzzle starts.
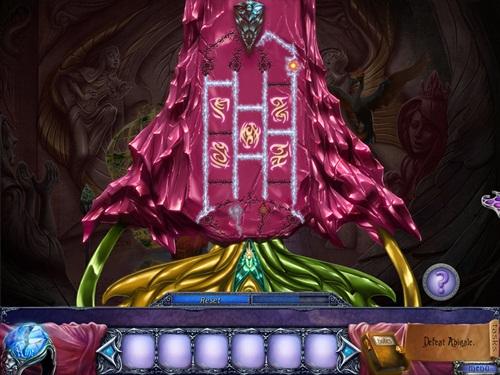
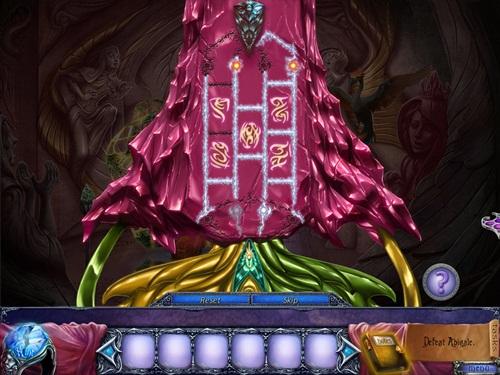
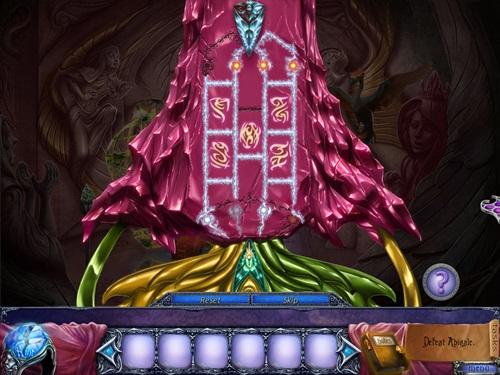
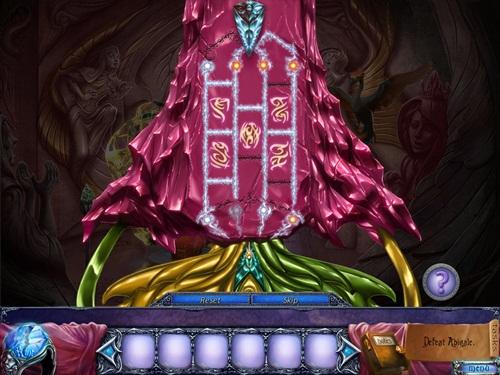
- Guide the tiny glowing orb along the track into the hole at the top. Click on the sword to release the orb and it will follow the track, turning at every opportunity. Click on the symbols to change the tracks. You must do this four times.
- Solutions:
- Watch the cutscene.
Congratulations! You have completed Gamezebo’s walkthrough for Break the Curse: The Crimson Gems. Be sure to check back often for game updates, staff and user reviews, user tips,
More articles...
Monopoly GO! Free Rolls – Links For Free Dice
By Glen Fox
Wondering how to get Monopoly GO! free rolls? Well, you’ve come to the right place. In this guide, we provide you with a bunch of tips and tricks to get some free rolls for the hit new mobile game. We’ll …Best Roblox Horror Games to Play Right Now – Updated Weekly
By Adele Wilson
Our Best Roblox Horror Games guide features the scariest and most creative experiences to play right now on the platform!The BEST Roblox Games of The Week – Games You Need To Play!
By Sho Roberts
Our feature shares our pick for the Best Roblox Games of the week! With our feature, we guarantee you'll find something new to play!Type Soul Clan Rarity Guide – All Legendary And Common Clans Listed!
By Nathan Ball
Wondering what your odds of rolling a particular Clan are? Wonder no more, with my handy Type Soul Clan Rarity guide.


