![Hololive Dreams Tier List [Best Cards]](/wp-content/uploads/2026/07/hololive-dreams-tier-list.jpg "Hololive Dreams Tier List [Best Cards]")
Hololive Dreams Tier List [Best Cards]
The best cards for the best performances.


![Iron Soul Dungeon Weapon Tier List [Best Weapons]](/wp-content/uploads/2026/07/iron-soul-dungeon-weapon-tier-list.jpg "Iron Soul Dungeon Weapon Tier List [Best Weapons]")

Welcome to Gamezebo's walkthrough of Born Into Darkness. TABLE OF CONTENTS: I. General Game Information II. Game Elements III. Walkthrough A. Chapter 1: Museum B. Chapter 2: Tomb of Lazarus C. Chapter 3: Cyprus D. Chapter 4: Dracula's Castle E. Chapter 5: Bathory House F. Chapter 6: Blythe Manor G. Chapter 7: Bartholomew's Lair General Game Information Hidden Object / Fragmented Object game where you look for pieces of objects and use the completed object…
a:1:i:0;a:2:s:13:”section_title”;s:30:”Born Into Darkness Walkthrough”;s:12:”section_body”;s:66982:”
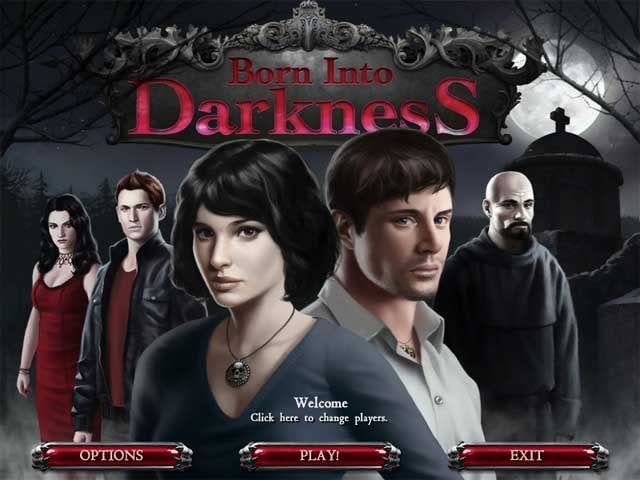
Welcome to Gamezebo’s walkthrough of Born Into Darkness.

TABLE OF CONTENTS:
I. General Game Information
II. Game Elements
III. Walkthrough
A. Chapter 1: Museum
B. Chapter 2: Tomb of Lazarus
C. Chapter 3: Cyprus
D. Chapter 4: Dracula’s Castle
E. Chapter 5: Bathory House
F. Chapter 6: Blythe Manor
G. Chapter 7: Bartholomew’s Lair
General Game Information
Game Elements
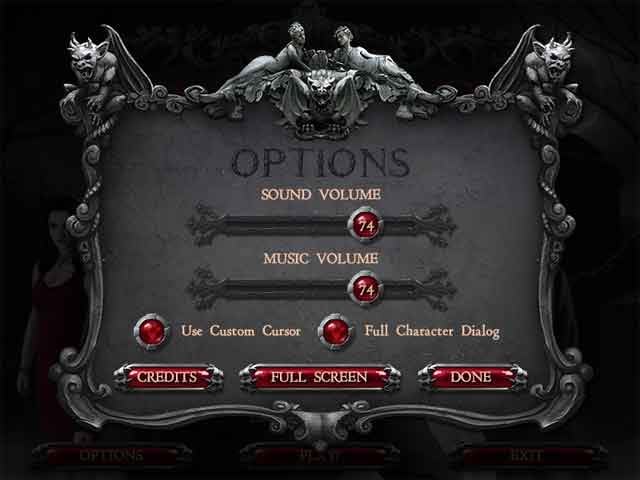
From here you can change the volume and screen display mode (full screen or windowed). You can opt to use the game’s custom cursor, or stick with your OS’ default cursor. If there is too much dialog in the game for your liking, you can turn it off here.
To know what pieces are needed to complete an object, simply click on the object’s silhouette in your inventory.
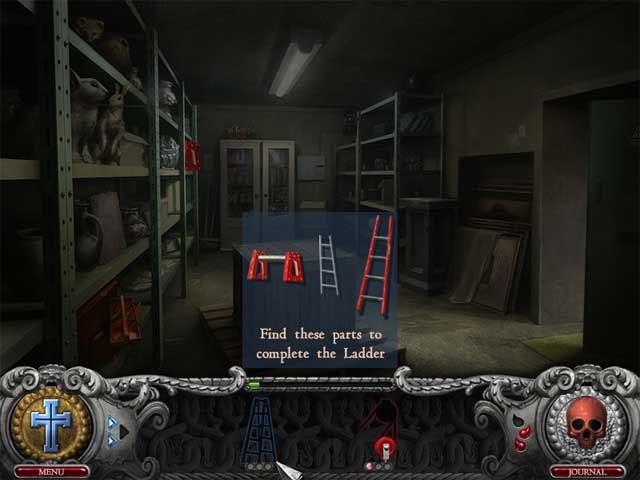
The circles below the silhouette indicate how many pieces you have found, and how many pieces are still needed to complete the object.

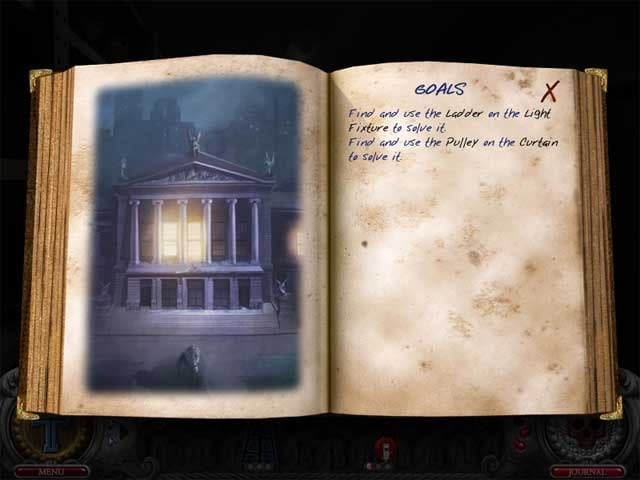
If you’re stuck and have no idea what to do next, click on the journal. It tells you what objects need to be found and where to use them in a scene.
The green level completion bar shows you your progress for the current scene.

If you can’t locate an object piece, click on a hint. You’re given 6 hints for every level – 3 blue hints, which can only be used for blue silhouetted objects, and 3 red hints, which can only be used for red silhouetted objects.


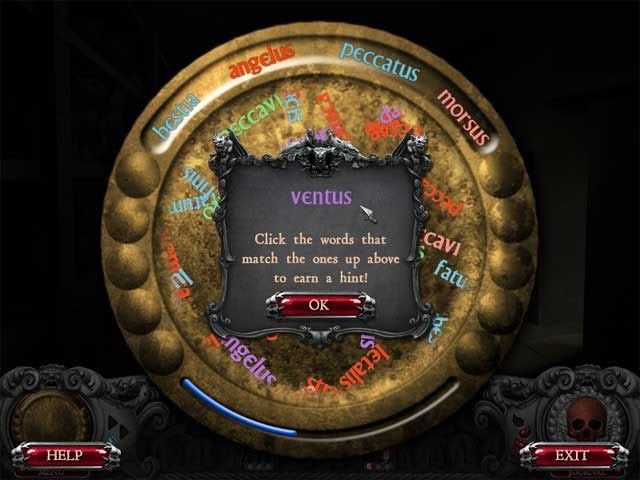
You can also earn hints by clicking on the medallions on either side of the screen. To earn blue hints, you’ll need to click on the right match from a group of floating Latin words. To earn red hints, you’ll need to click on ghosts that match those shown in the center.
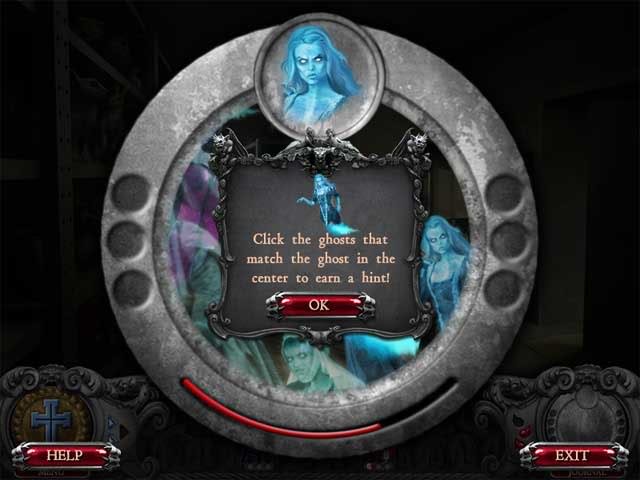
If you click on a wrong word or ghost, the cursor moves around wildly. You need to find all words or ghosts before the time is up on the meter.
WALKTHROUGH
Note: In this walkthrough, the objects are color-coded. The silhouette in the inventory is highlighted a particular color, and its corresponding object piece in the scene is encircled with the same color.
Chapter 1: Museum
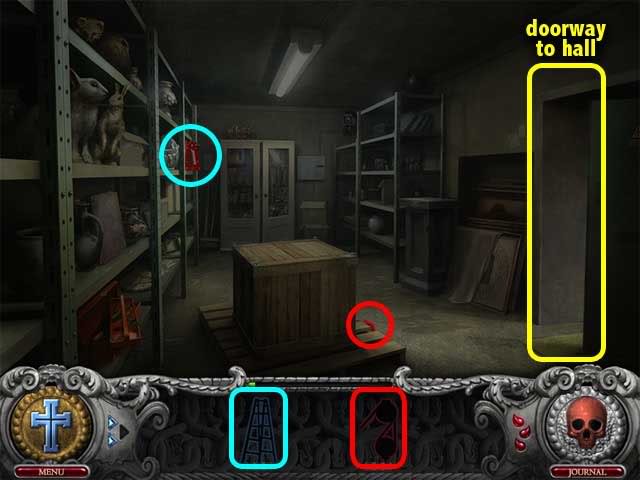
Storage Room – get the ladder piece and the pulley piece.
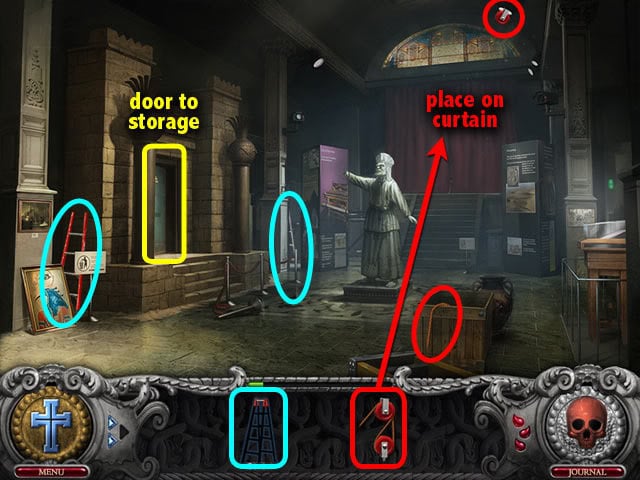
Hall – Get the two ladder pieces and the two pulley pieces. Use the pulley to open the Curtain.
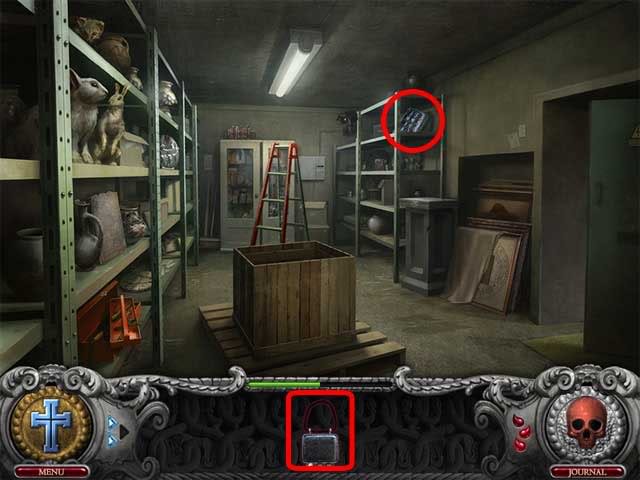
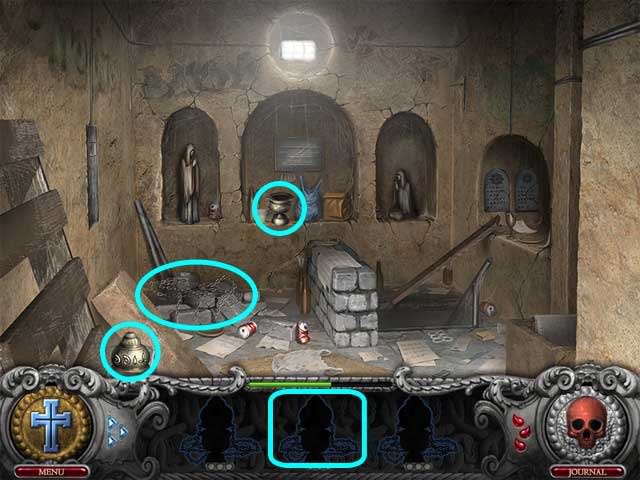
Storage Room – Use the ladder to fix the light fixture. Get the pliers piece and the two Gabriel statue pieces.
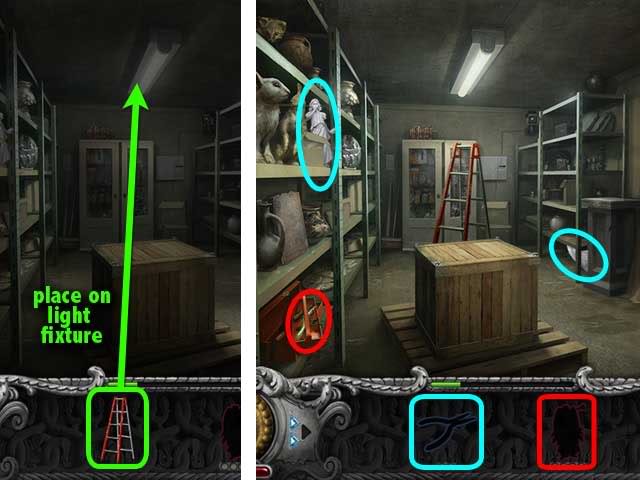
Hall – Get the pliers piece and the Gabriel statue piece.
Storage Room – Open the crate with the pliers. Get the two Michael statue pieces.
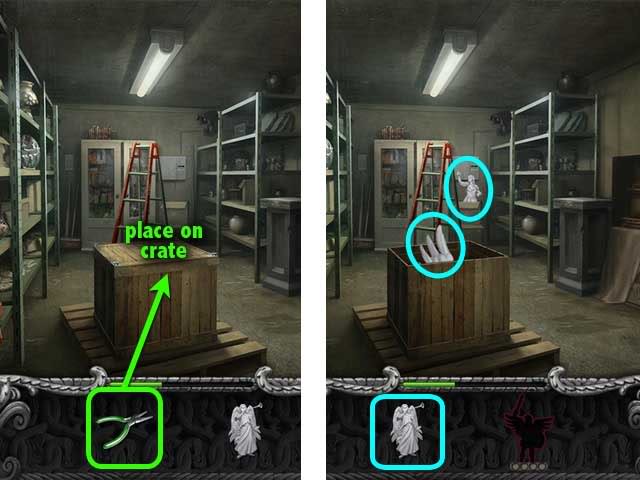
Hall – Get the two Michael statue pieces.
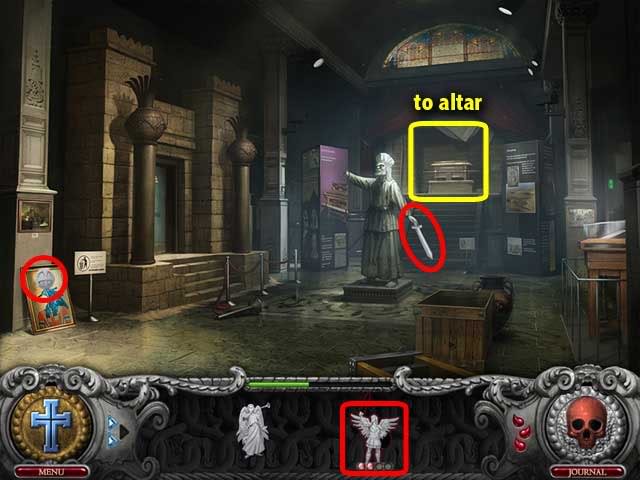
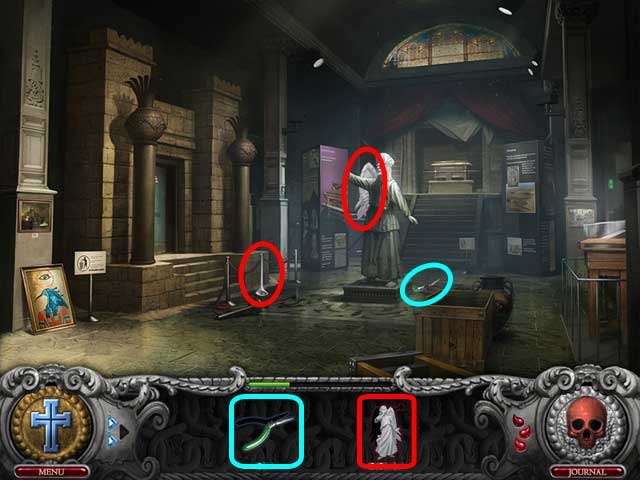
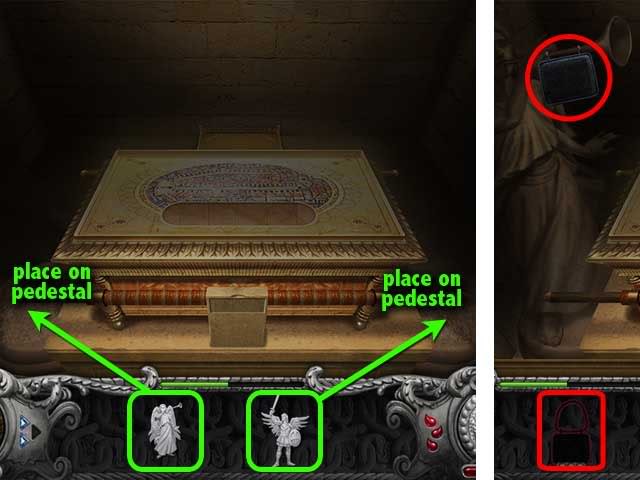
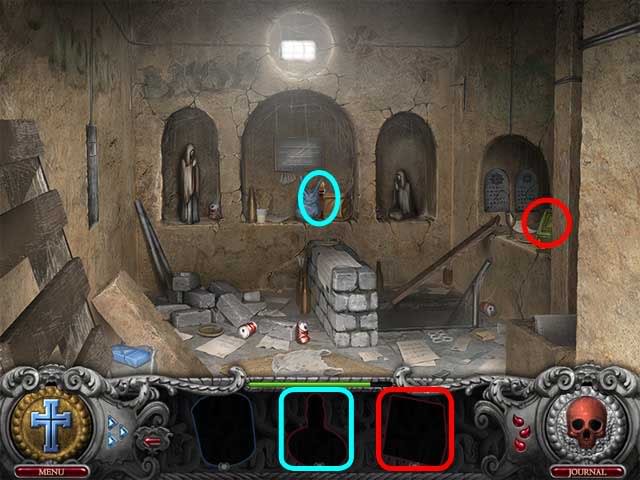
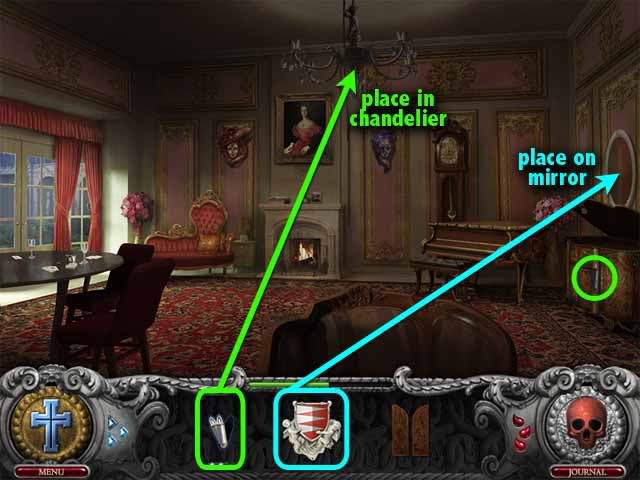
Altar – Put the Gabriel statue on the left statue pedestal, and the Michael statue on the right statue pedestal. Get the amulet piece that appears on the Gabriel statue.
Storage Room – Get the second piece of the amulet.
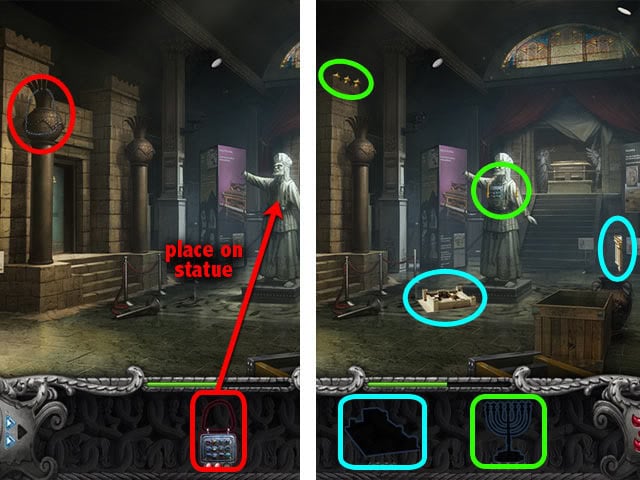
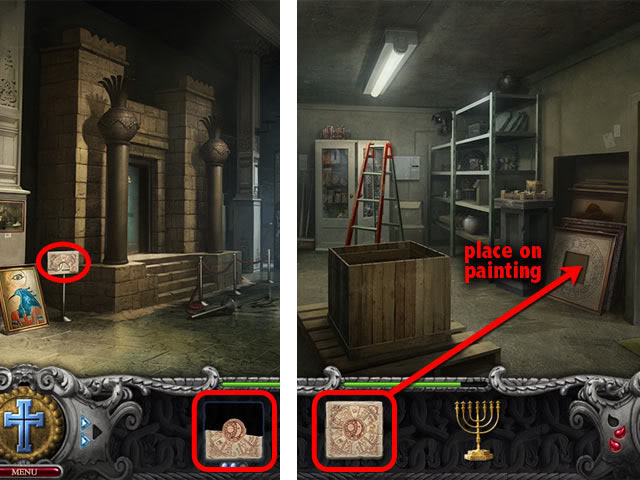
Hall – Get the last amulet piece. Place the amulet on the statue of the High Priest. Get the two pieces of the temple model and the two pieces of the menorah.
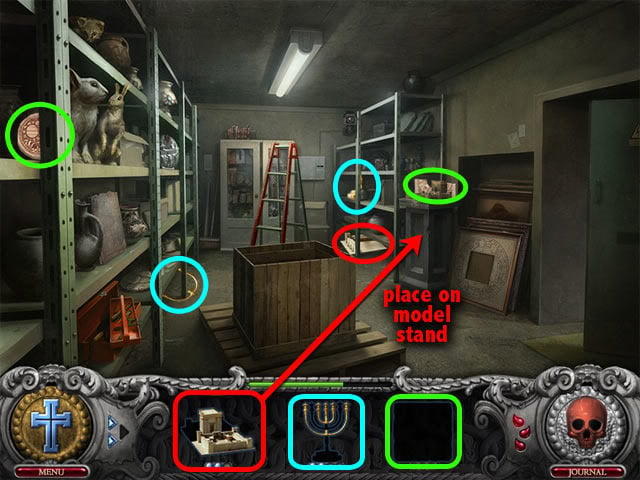
Storage Room – Get the two pieces of the menorah and the last piece of the temple model. Put the temple model on the model stand. After that, some fragments will appear. Get the two fragment pieces.
Hall – Get the last fragment piece. Go to the Storage Room and place the completed fragment in the painting.
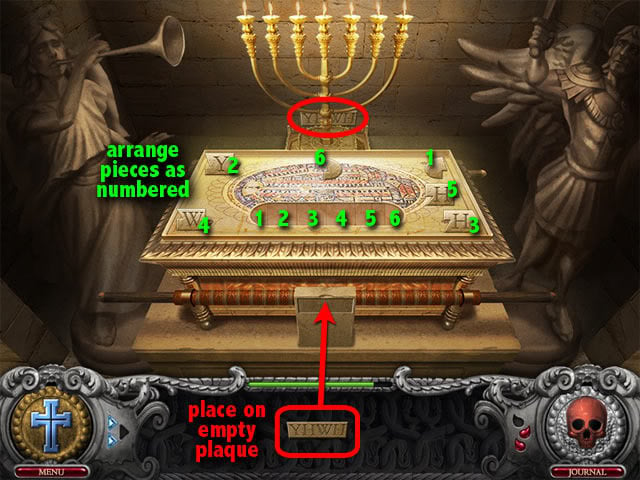
Altar – Place the menorah on the menorah stand. After that, pick up the matchstick and light the menorah with it.

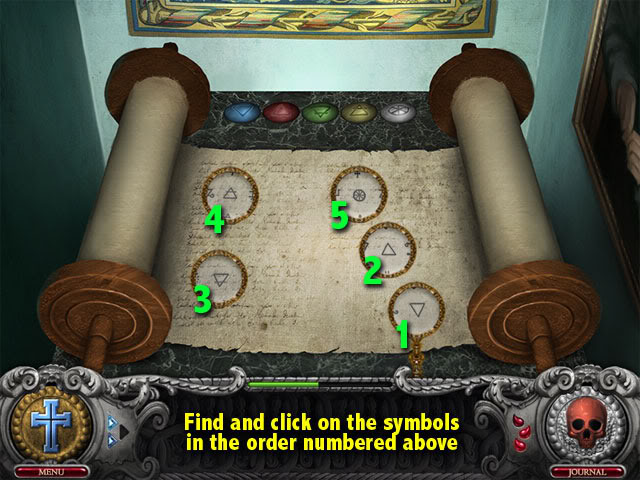
Letters mini-game – Take the name plaque and put it on the empty plaque. Arrange the letters on the platform to form the word on the plaque.
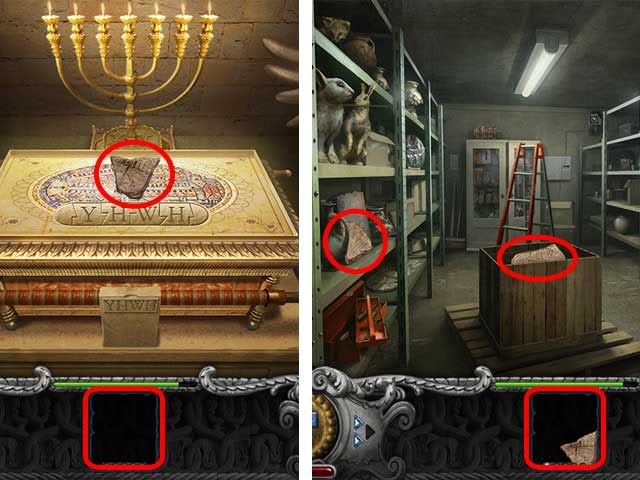
Altar – Get one tablet piece. In the Storage Room, get the two tablet pieces.
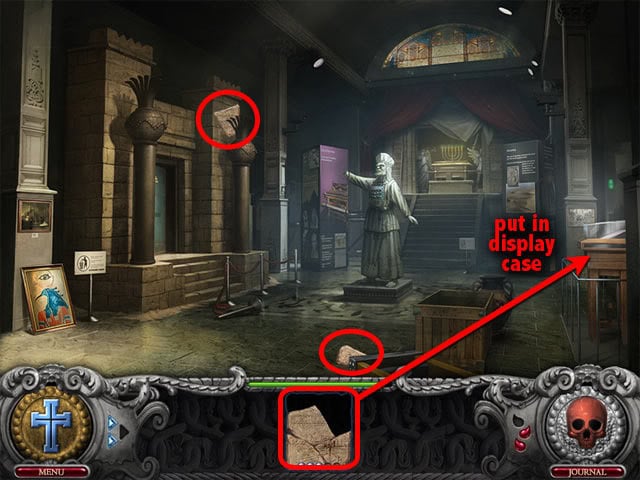
Hall – Get the last two pieces of the tablet. Put the completed tablet in the display case.
Chapter 2: Tomb of Lazarus
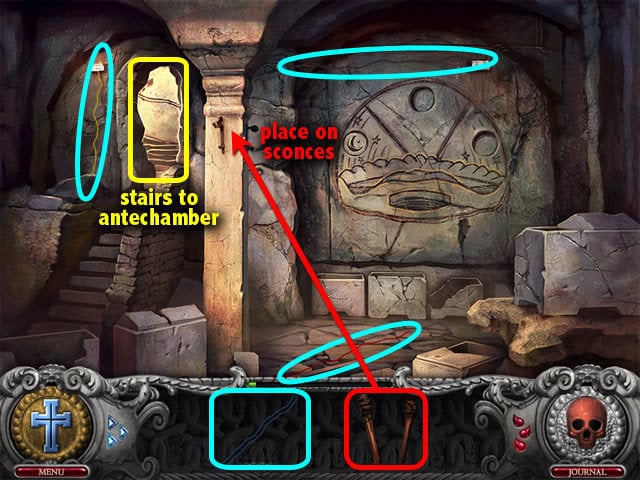
Antechamber – Get the two torches.
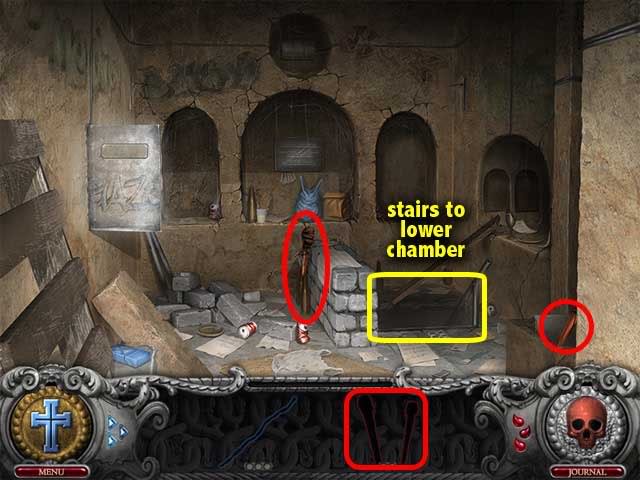
Lower Chamber – Get the three wires. Place the torches in the wall sconces.
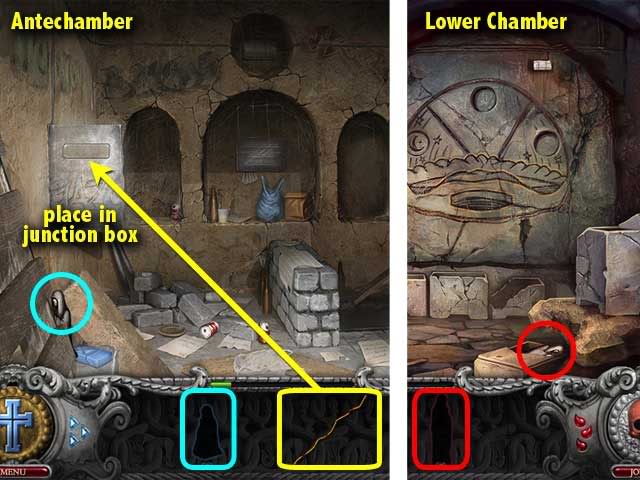
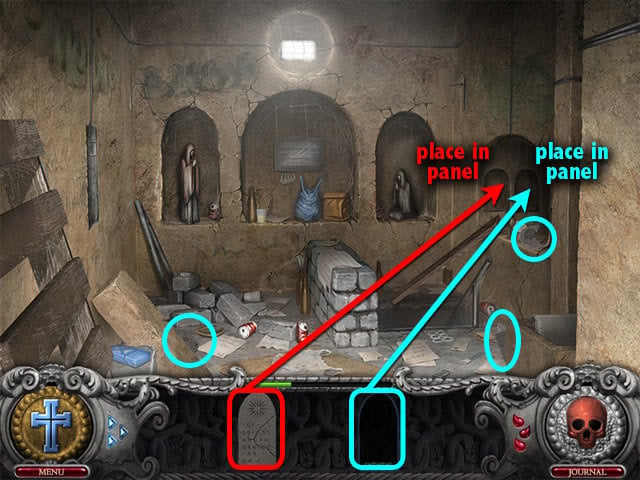
Antechamber – Put the wires in the junction box. Get the Miryam statue. Down in the Lower Chamber, get the Missing Sister statue.
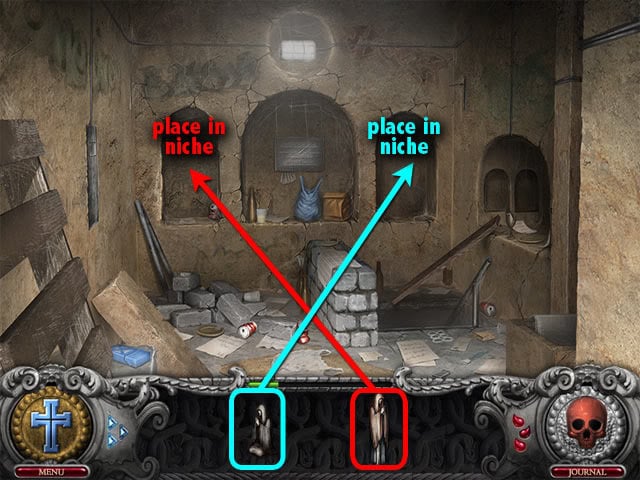
Antechamber – Put the Missing Sister statue on the left niche, and Miryam on the right niche.
Lower Chamber – Get the three pieces of the sacred text.
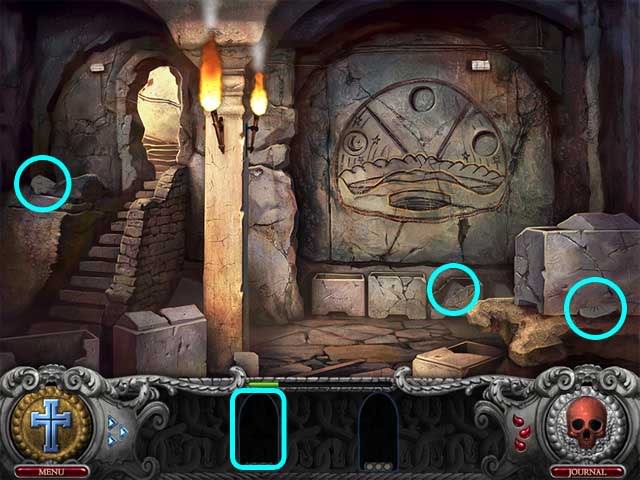
Antechamber – Get three more pieces of the sacred text. Place both sacred texts in the missing panels.
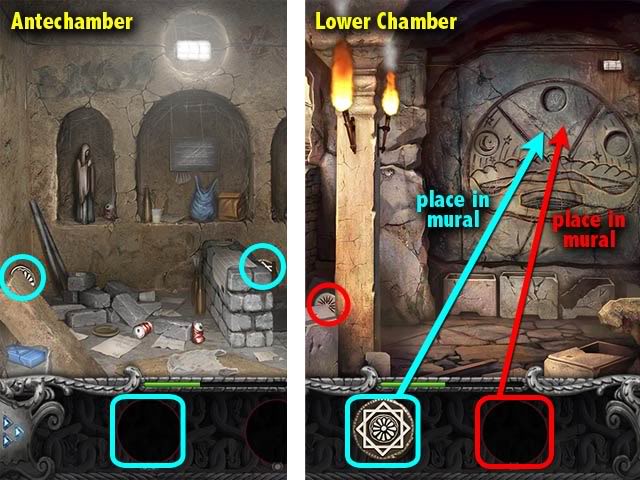
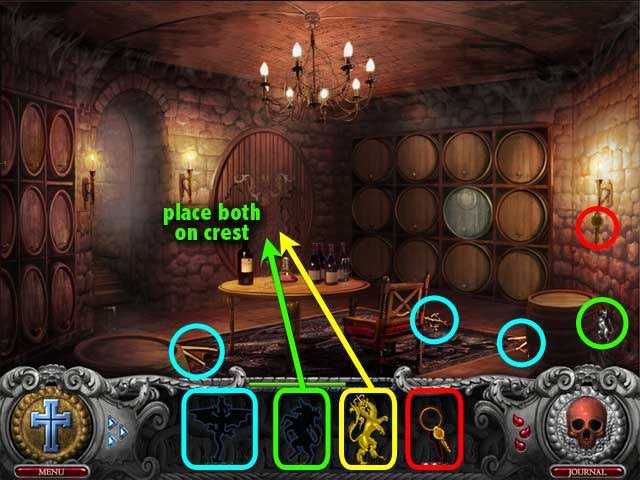
Antechamber – Get the two pieces of the sun sign. In the Lower Chamber, get the sign of the Magi. Place both signs in the mural.
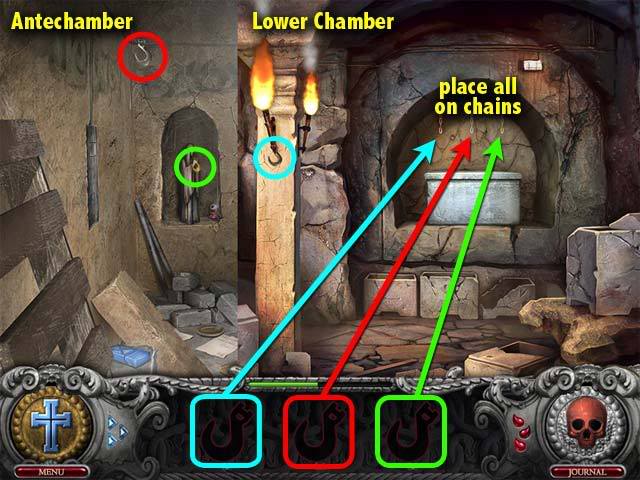
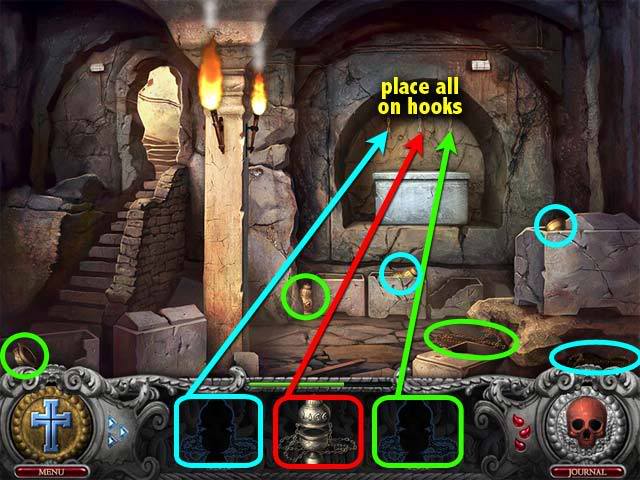
Antechamber – Get the silver and gold hooks. Go to the Lower Chamber and get the bronze hook. Place all hooks on the chains.
Antechamber – Get the three pieces of the silver censer.
Lower Chamber – Get the pieces of the bronze and gold censers (three pieces each). Place all censers on the hooks.
Antechamber – Get the vial and the jar.
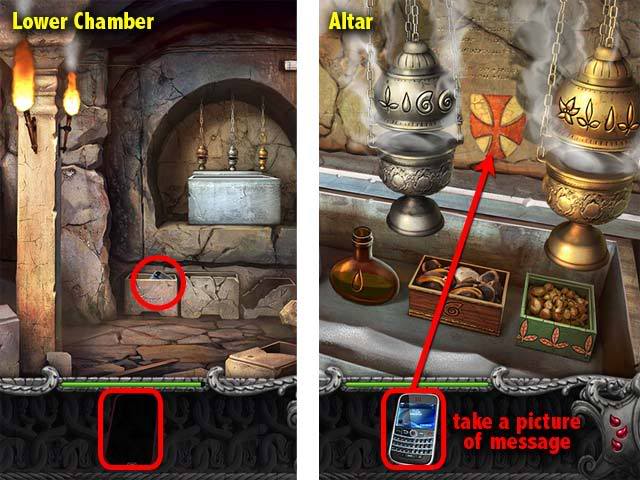
Lower Chamber – Get the casket and the urn. Click on the altar to zoom into it.
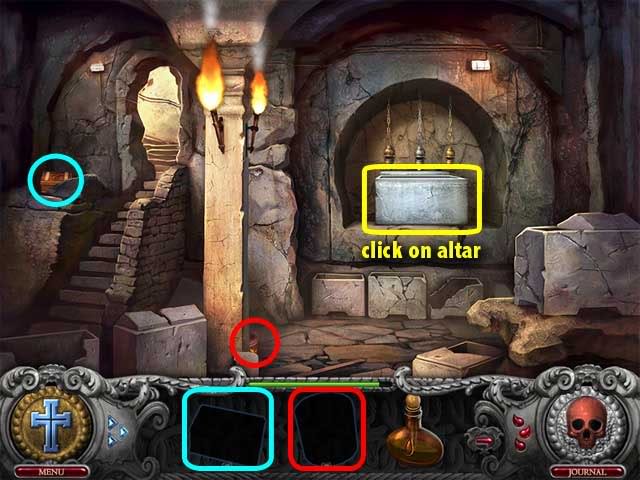
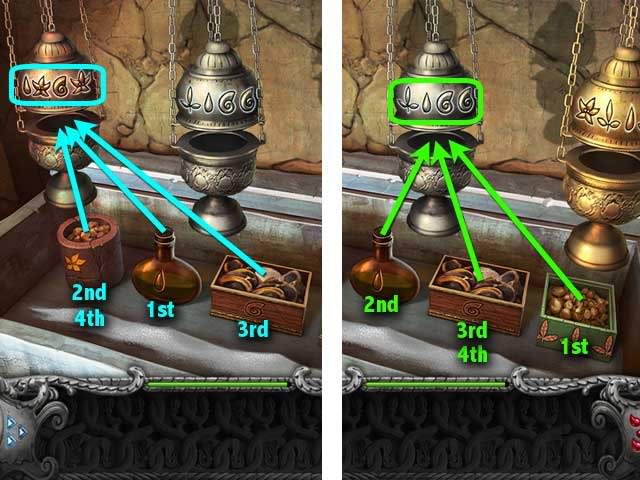
Altar – Place the vial, the jar, the casket and the urn on the altar shrine.
Censers mini-game – Add ingredients to the censers in the proper order. To add, first click on the ingredient then click on the censer. The symbol on censer will glow if the correct ingredient is added.
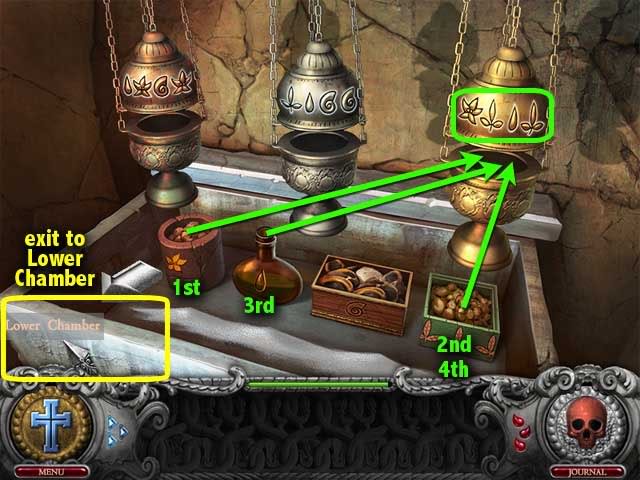
Lower Chamber – pick up the mobile phone. Go to the Altar and use the mobile phone to take a picture of the Crusader’s Message.
Chapter 3: Cyprus
Courtyard – Find the three pieces of the tapestry.
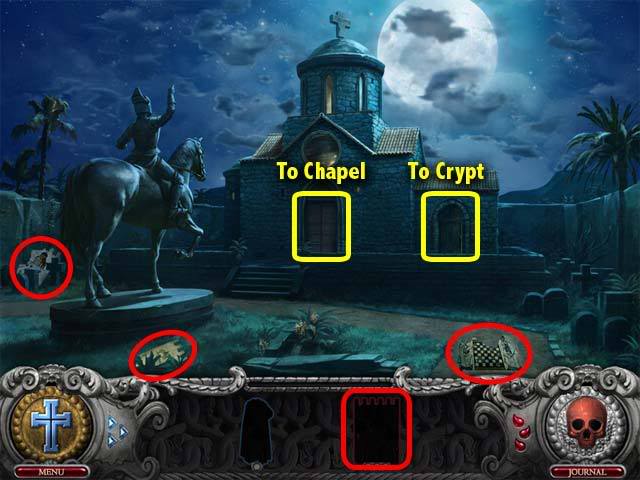
Crypt – Get the tabard.
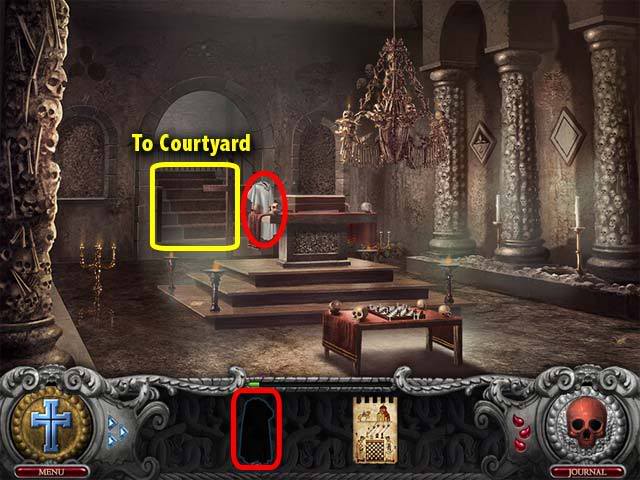
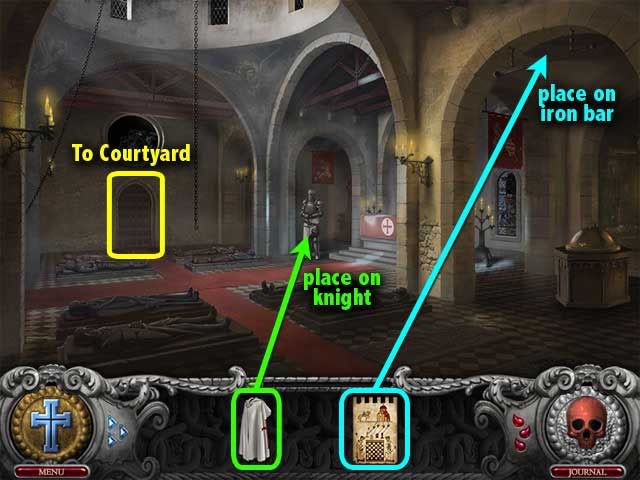
Chapel – Place the tabard on the knight, and the tapestry on the iron bar.
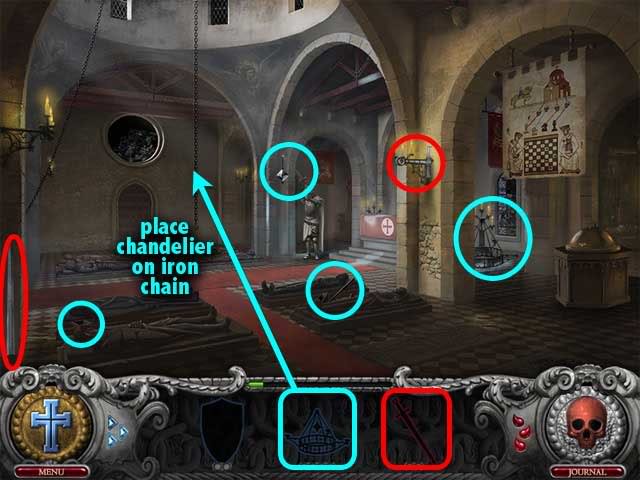
Chapel – Get the two pieces of the crusader’s sword, and the four pieces of the chandelier. Place the chandelier on the iron chain.
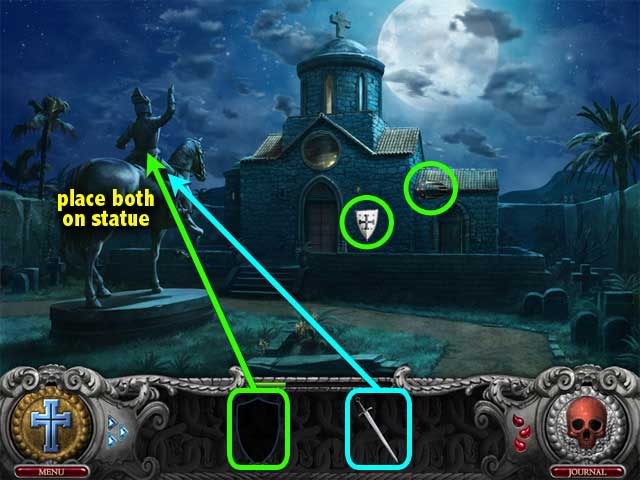
Courtyard – Get the two pieces of the crusader’s shield. Place both the shield and the sword on the crusader’s statue.
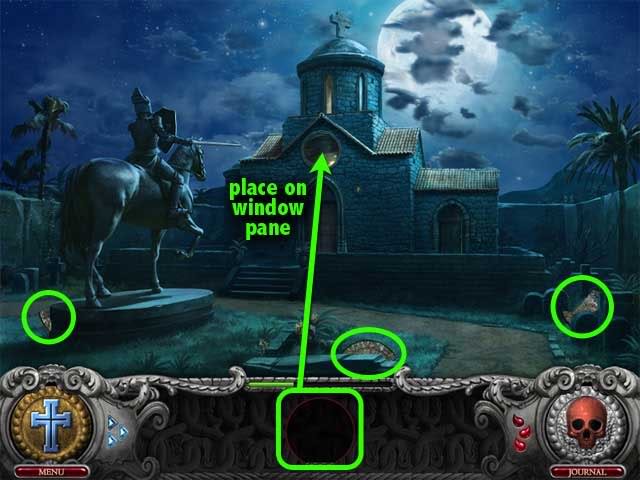
Courtyard – Pick up the three stained glass seal pieces. Place the completed stained glass seal on the window pane.
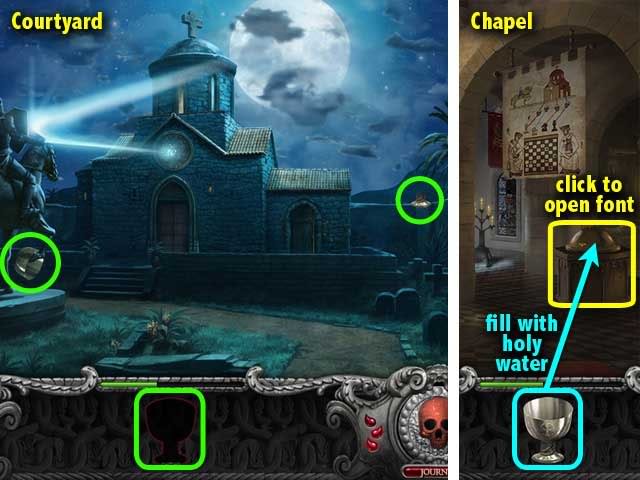
Courtyard – Get the two chalice pieces. In the Chapel, click on the font to open it. There’s holy water inside the font. Place the chalice in to fill it with holy water.
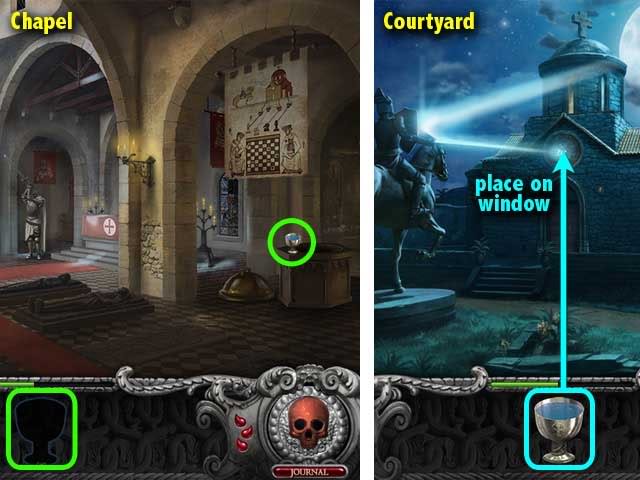
Chapel – Get the filled chalice that has holy water inside it. Go to the Courtyard and put holy water on the stained glass window.
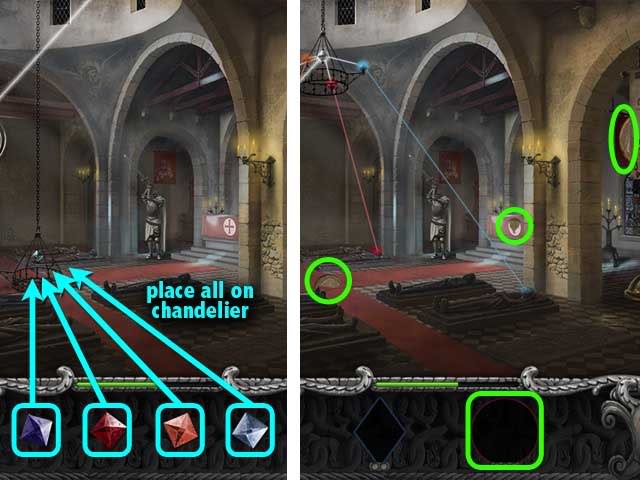
Courtyard – Find the north crystal and the south crystal. In the Crypt, find the east crystal and the west crystal.
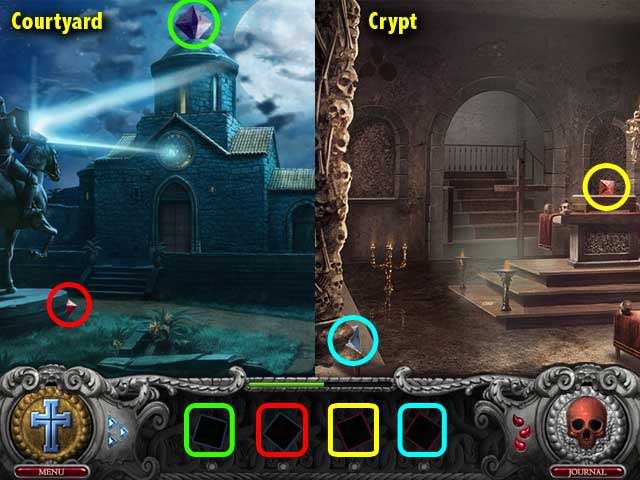
Chapel – Place the four crystals on the chandelier. The chandelier will rise up. Get the three pieces of the heraldic shield.
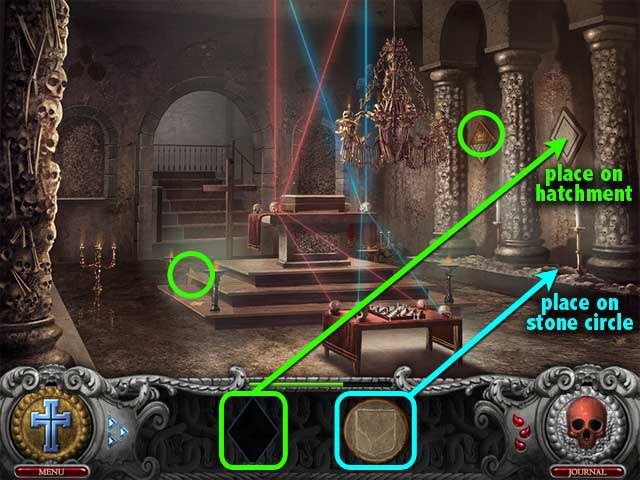
Crypt – Find the two pieces of the heraldic crest. Put the heraldic crest on the hatchment, and the heraldic shield on the stone circle.
Chapel – Pick up the white king. Go outside to the Courtyard and pick up the black king.

Crypt – Find the black knight and the white knight. Place all the chess pieces on the chess board.
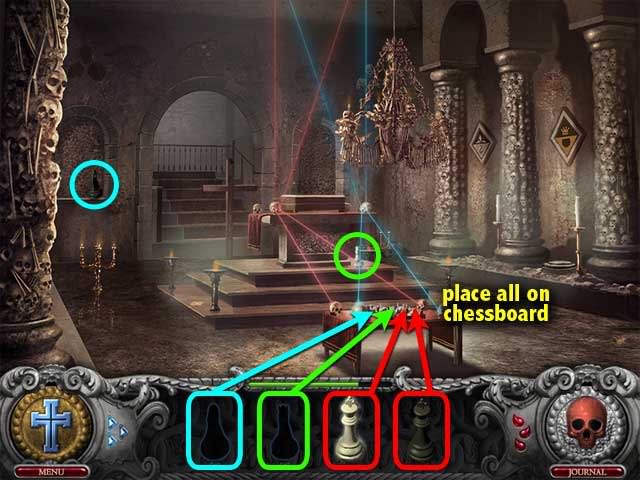
Chess board mini-game – Put chess pieces on their proper places on the chess board, as indicated on the tapestry hanging in the chapel.

Crypt – Nathaniel has been pinned by fallen rocks! Find the two lever pieces and place the lever on the fallen rocks to release Nathaniel.
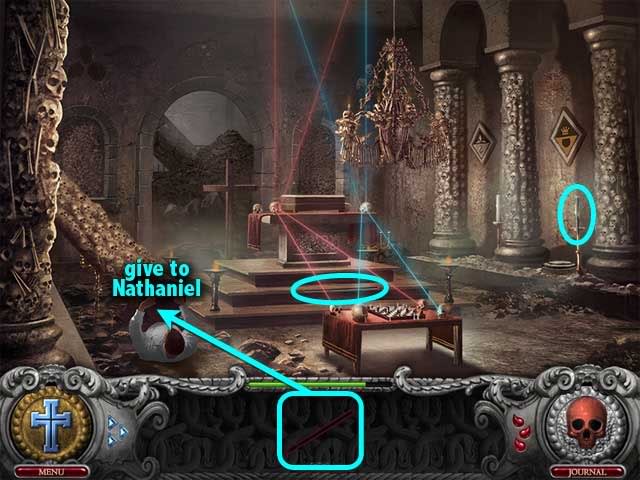
Crypt – Nathaniel has been hurt. Find the two pieces of bandages and use them on Nathaniel.
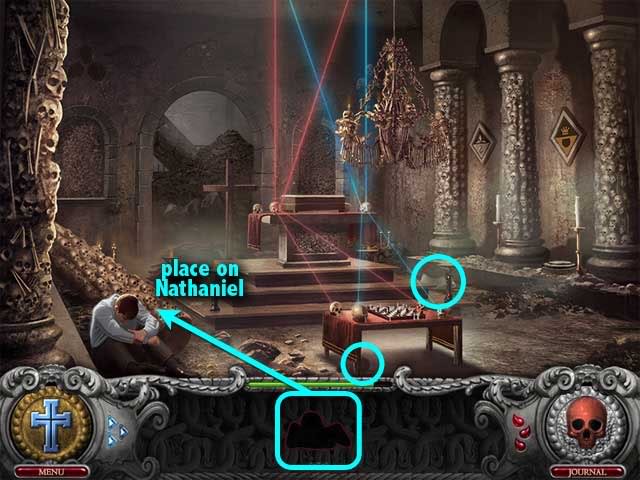
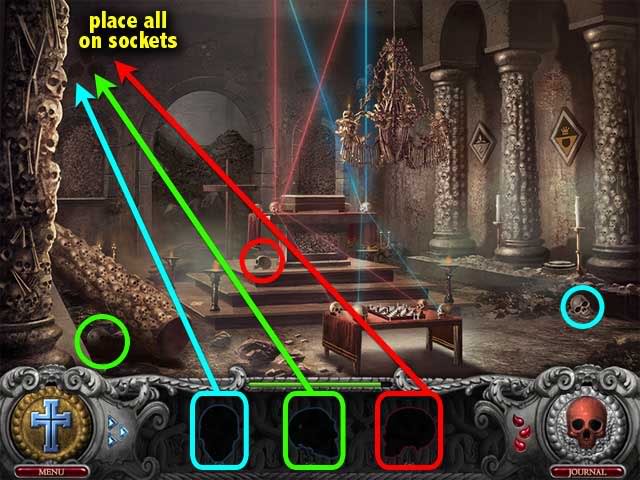
Crypt – Get the knight’s skull, the squire’s skull, and the bishop’s skull. Place them all in the three sockets on the wall.
Chapter 4: Dracula’s Castle
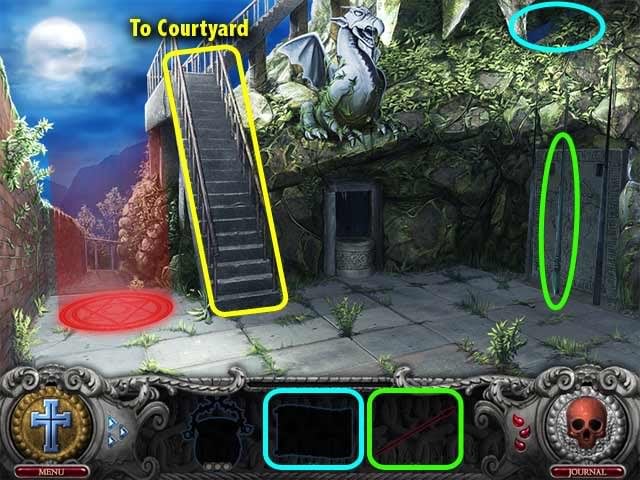
Path – Pick up the stone spear and the Wallachian flag.
Courtyard – Get the three pieces of the well bucket. Put the Wallachian flag on the flagpole, and place the stone spear on the statue of Vlad the Impaler.
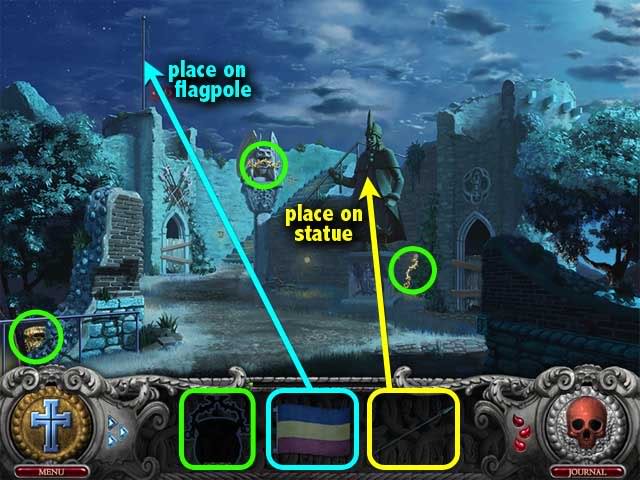
Courtyard – Get the gray skull and the black skull.
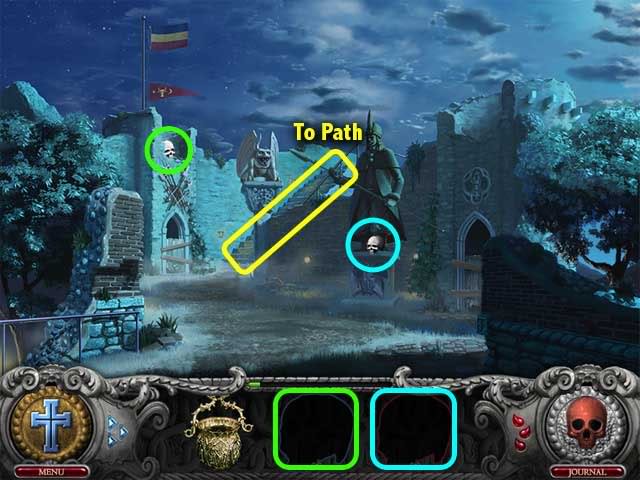
Path – Put the well bucket in the well. Get the white skull, and put the three skulls on the spikes.
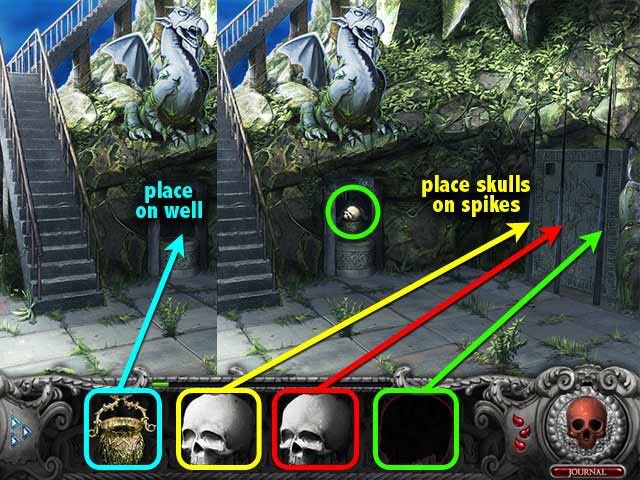
Courtyard – Get three pieces of the stone.

Path – Get three pieces of the other stone. Put both stones in the stone panels. The stone slab opens, revealing the doorway to an inner room. Get the rampant lion before leaving the area.
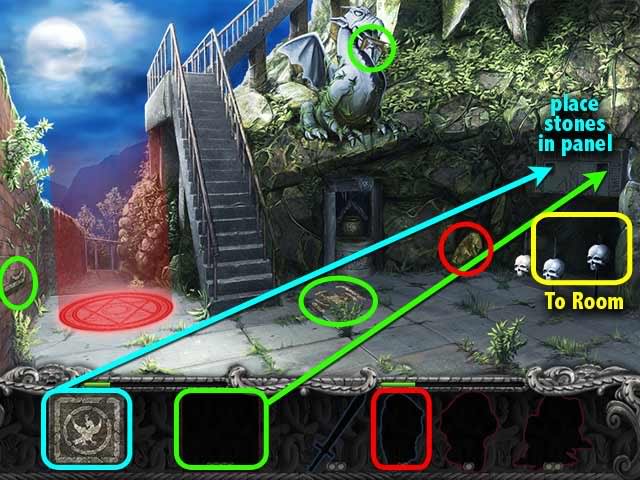
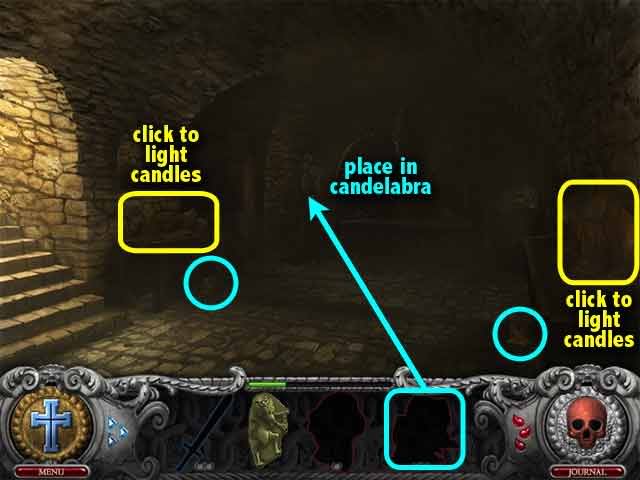
Room – Enter the inner room, but it is too dark to see. Click on the two sets of candles to light them up. Get the two pieces of the stone candles and place the completed candles on the candelabra.
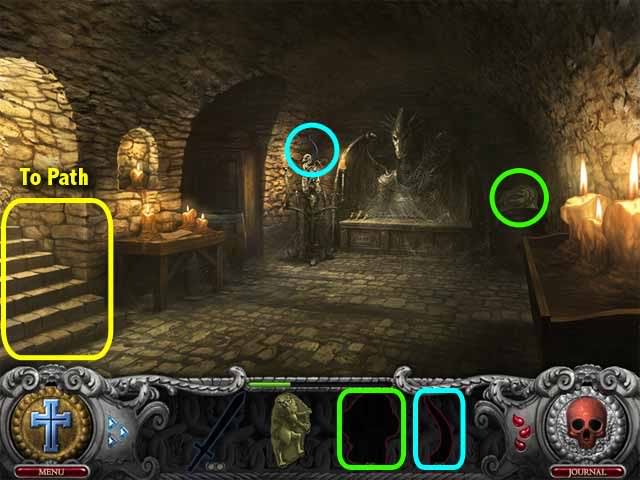
Room – Get the horn. Also, get the rampant stallion. Click on the stairs to go back up to the Path.
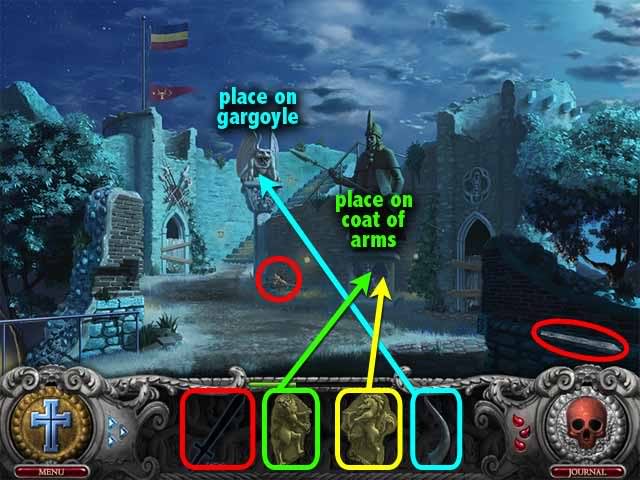
Courtyard – Get the two pieces of the rusted sword. Place the rampant lion and the rampant stallion on the coat of arms. Also, put the horn on the gargoyle.
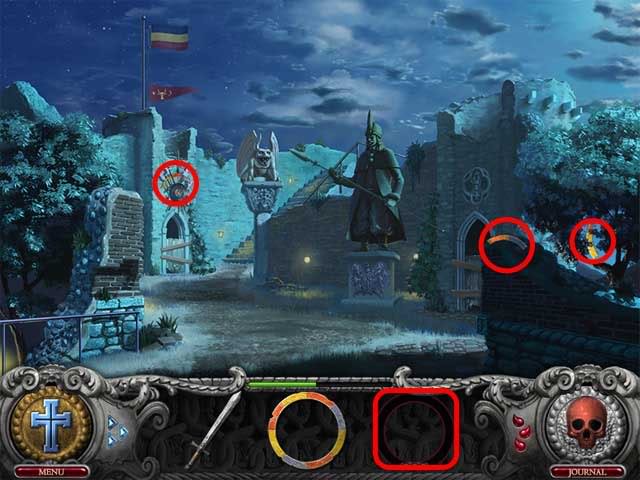
Courtyard – Get the shield and the two pieces of the halberd. Put both shield and halberd on the weapons. Find the three ring pieces.

Courtyard – Find three more ring pieces.
Room – Use the rusted sword to clear the cobwebs. Get the two pieces of the fang.
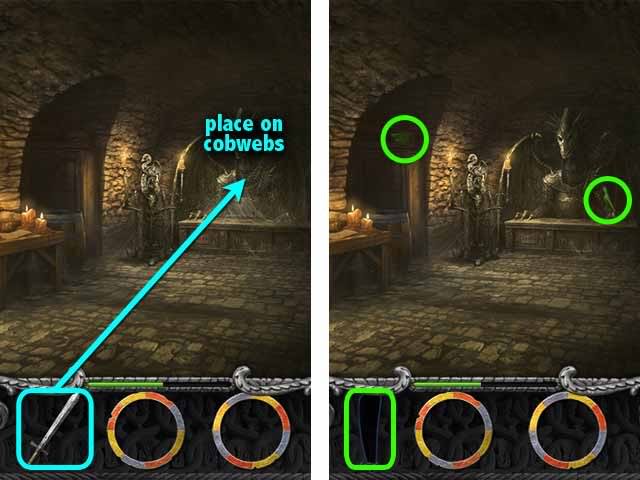
Path – Put the fang on the dragon. Get three pieces of the ring.
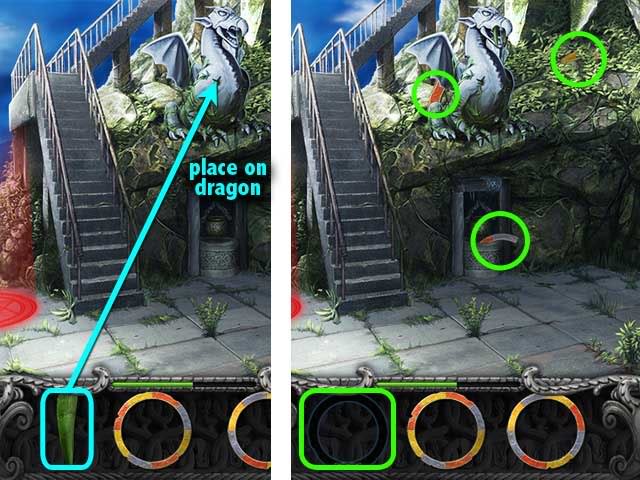
Room – Put the three rings on the altar.
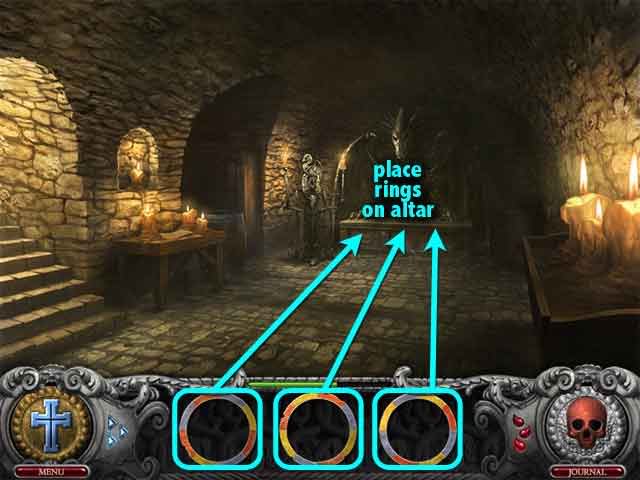
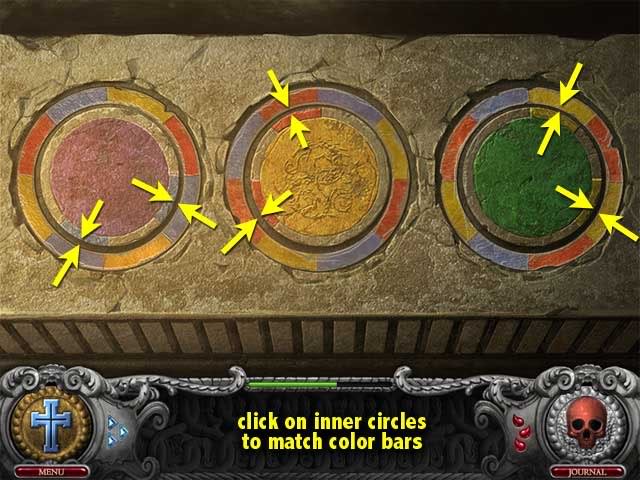
Rings mini-game – First, place the rings on the board.

Rotate the rings until the colors of the inner and outer colors bars are aligned. To rotate a ring, click on its inner circle.
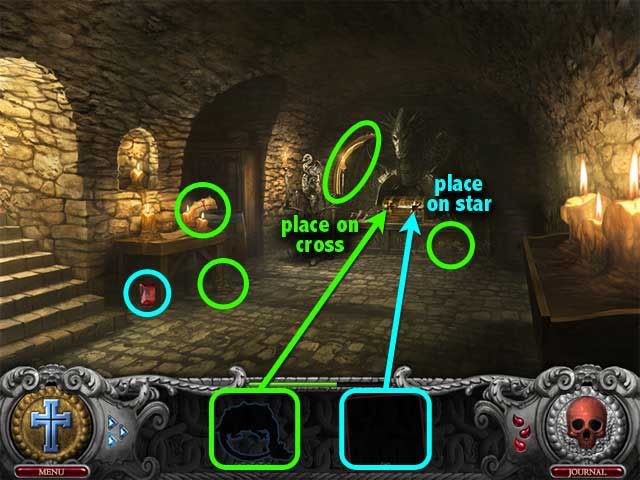
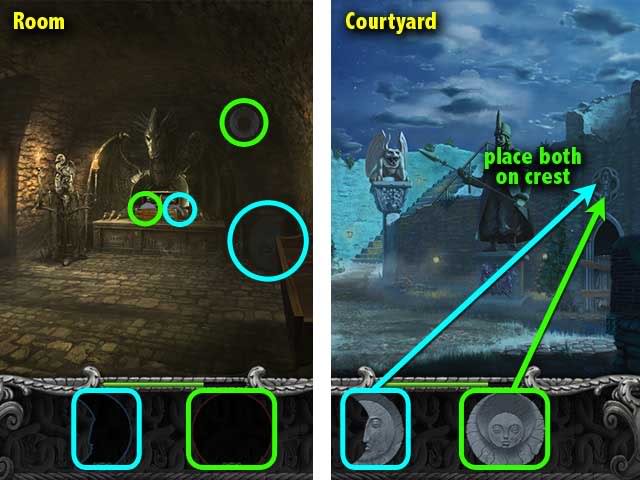
Room – Find the ruby and the four dragon badge pieces. Place the dragon badge on the cross, and the ruby on the star.
Room – Get the two pieces of the moon disk and the two pieces of the sun disk. Go to the Courtyard and place both disks on the Moldavia crest.
Courtyard – Get the medallion. Go to the Room and place the medallion on the scroll case.

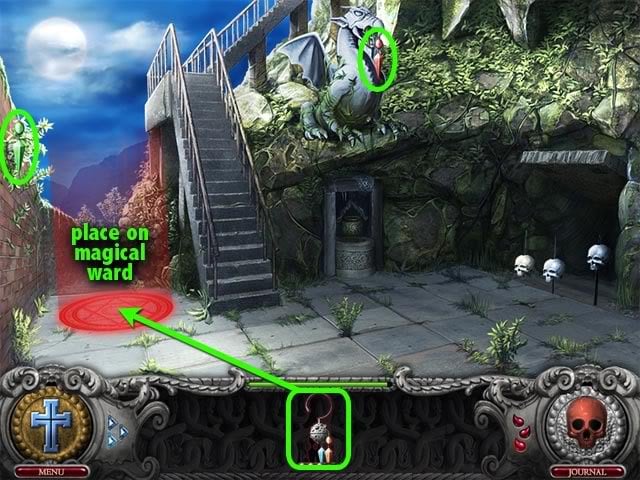
Path – Get the thick stick and use it on the fox. Get the three scroll scrap pieces.
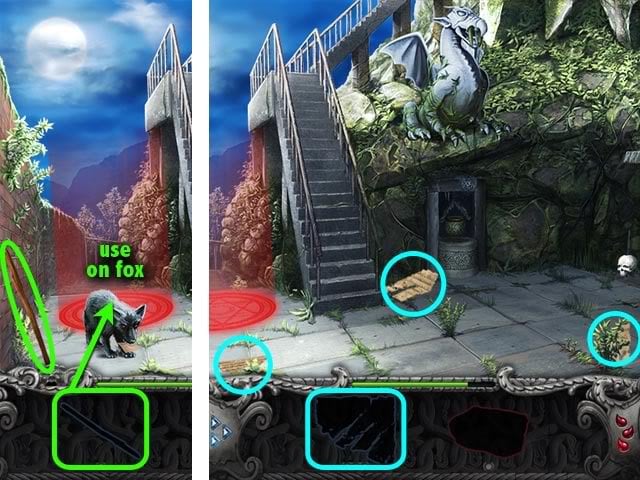
Courtyard – Get the heavy rock and use it on the fox. Get the two pieces of the dagger.
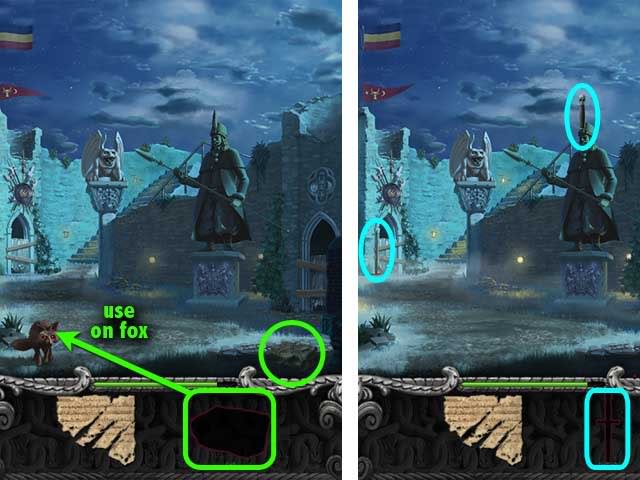
Courtyard – Use the dagger on Sebastian. Take the gypsy charm piece.
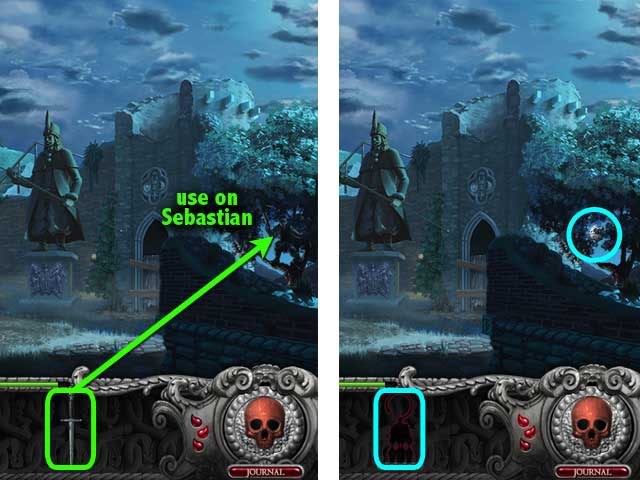
Room – Place the scroll scrap on the scroll. Get two of the gypsy charm pieces.

Path – Get the last two gypsy charm pieces, and place the completed gypsy charm on the magical ward.
Chapter 5: Bathory House
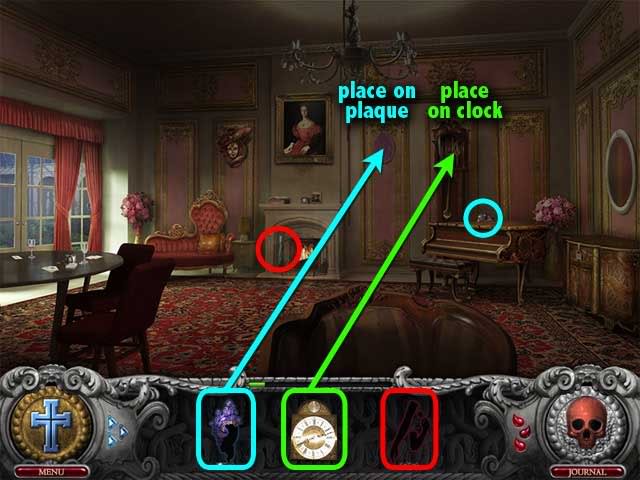
Gynaeceum – Get the clockface piece, and the two pieces of the scarlet mask. Place the completed scarlet mask on the crimson plaque.
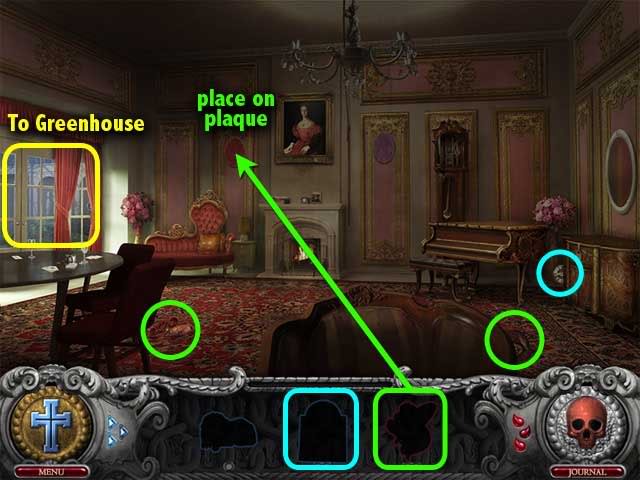
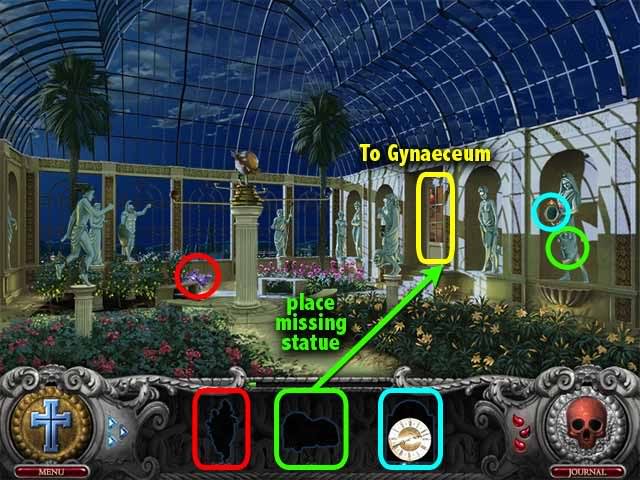
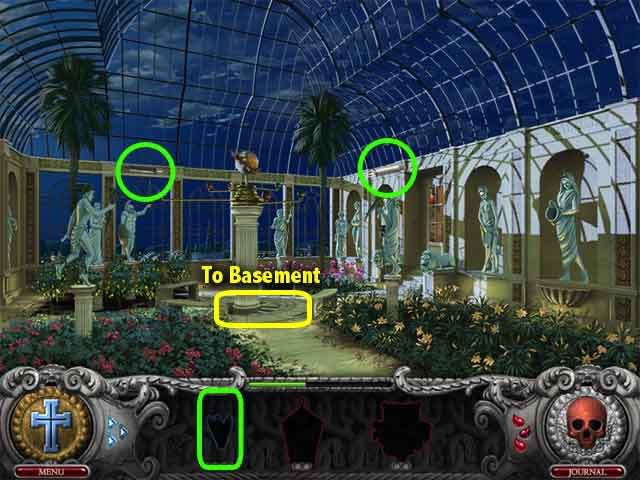
Greenhouse – Get the last clockface piece. Find a piece of the violet mask. Also, find the lion statue and place it on the missing statue spot.
Gynaeceum – Get the remaining violet mask piece and put the completed violet mask on the indigo plaque. Place the clockface on the grandfather clock. Find one arm of Venus.
Greenhouse – Find the other arm of Venus, and place the arms on the Venus statue. Get the two caduceus pieces and place the completed caduceus on the Mercury statue.
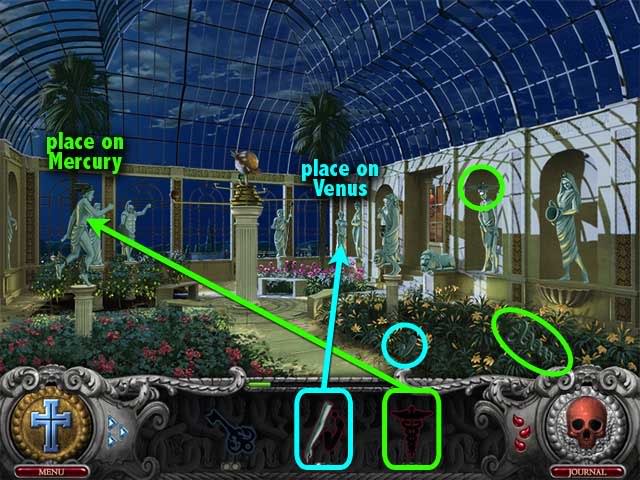
Gynaeceum – Get the two pieces of the armoire key and use it to open the armoire. Once it opens, take the piece of the scythe inside. Also, get the Mercury sphere.

Greenhouse – Get the two gladius pieces, and place the gladius on the Mars statue. Get the other scythe piece and place the scythe on the Saturn statue.
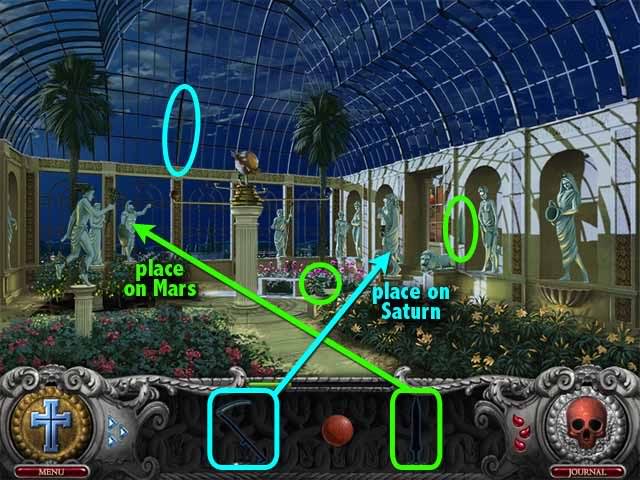
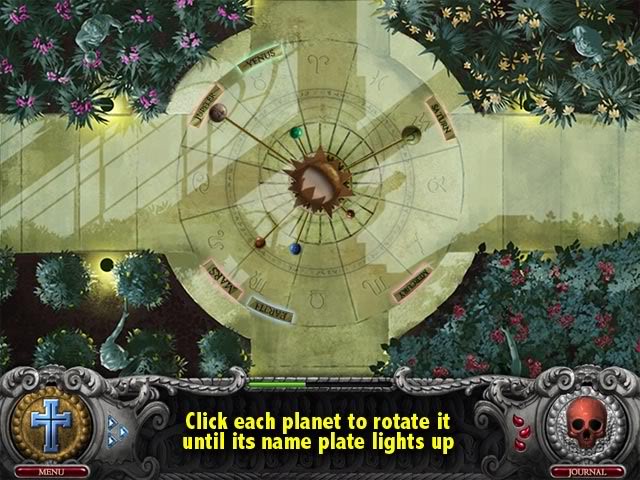
Gynaeceum – Take the Saturn and Mars spheres. Go to the Greenhouse and place all three spheres on the orrery.
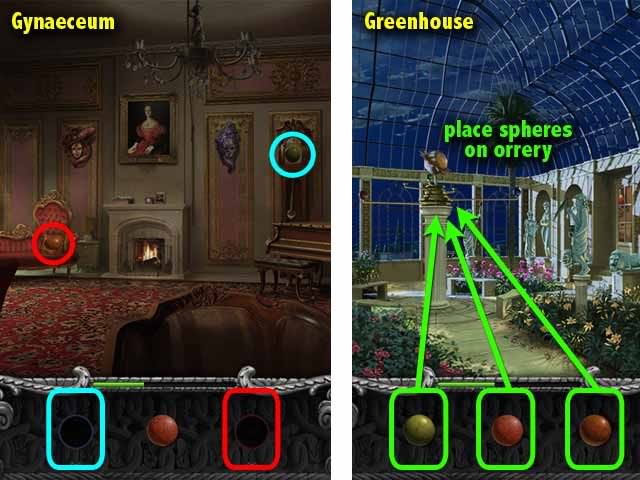
Orrery mini-game – Place the planets in their right spots. For reference, you may wish to check on how the statues are arranged in the orrery, and then place their respective planets according to the statues’ locations. Or, you can just keep rotating a planet until its name plate lights up.
Greenhouse – A secret stairway down into the basement just opened up! Before going in, find two of the three candles.
Basement – Get the two bronze lantern pieces, and place the lantern in the bronze lamp. Get the two pieces of the twin cherubs.
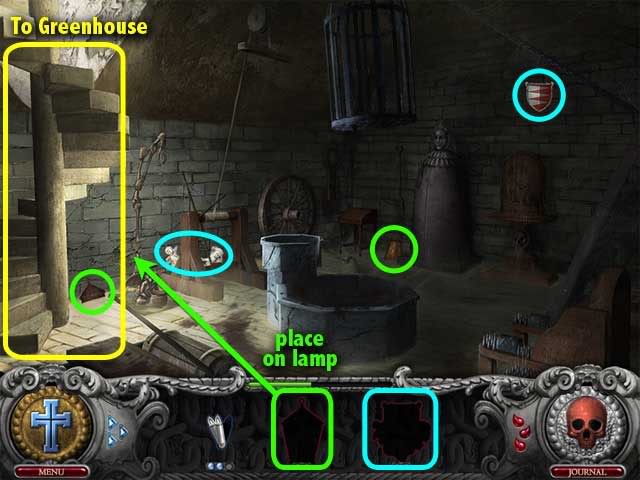
Greenhouse – Find the two panels.
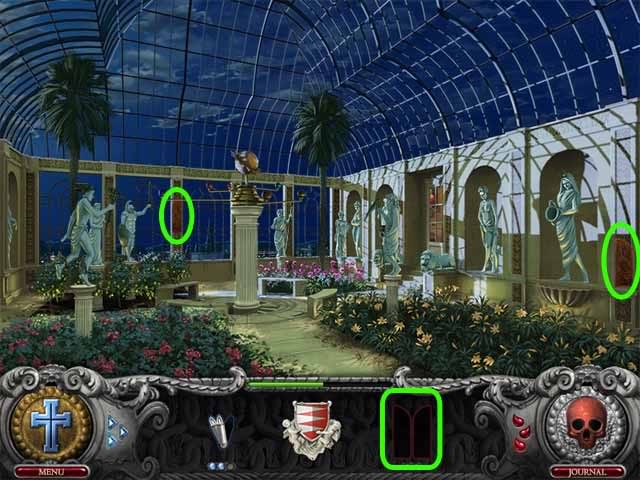
Gynaeceum – Get the last candle and put the three candles in the chandelier. Place the twin cherubs in the silvered mirror.
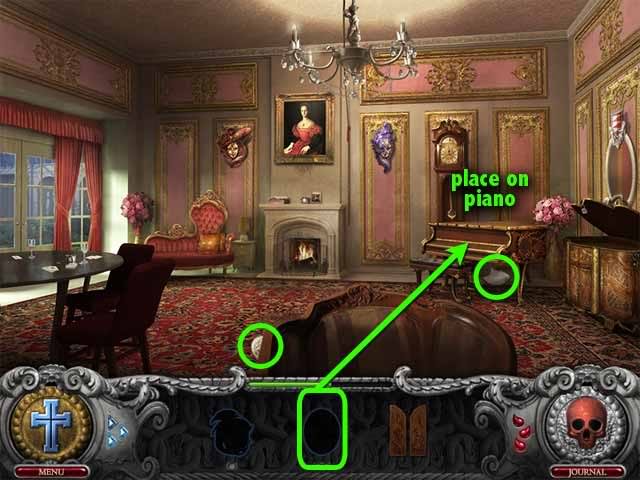
Gynaeceum – Get the two pieces of the ivory cameo, and place the completed cameo on the antique piano.
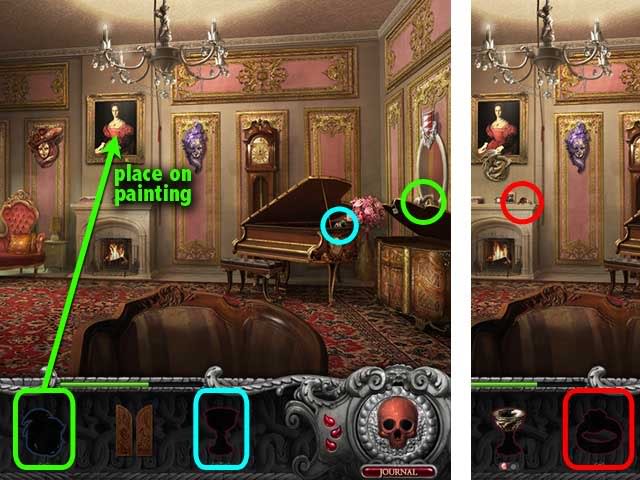
Gynaeceum – Get a piece of the chalice. Also, get the Bathory seal and place it on the Bathory painting. After that, get the signet ring on the shelf.
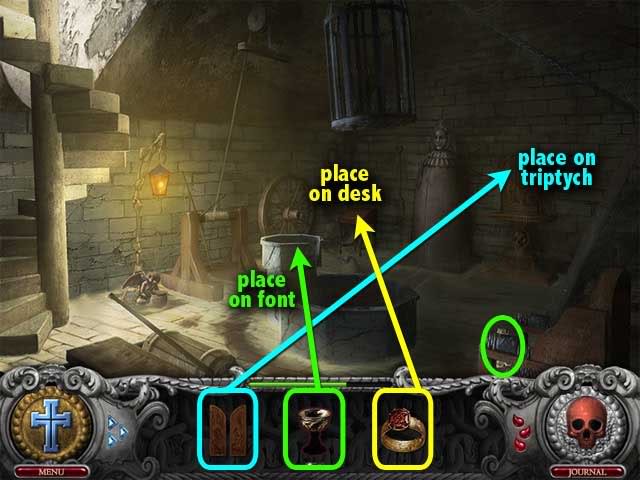
Basement – Get the other piece of the chalice, and place the chalice on the marble font. Place the panels on the triptych, and the signed ring on the locked desk.
Basement – Find the two pieces of the vanity mirror, and use it on the locked desk. Get one piece of the golden coin.
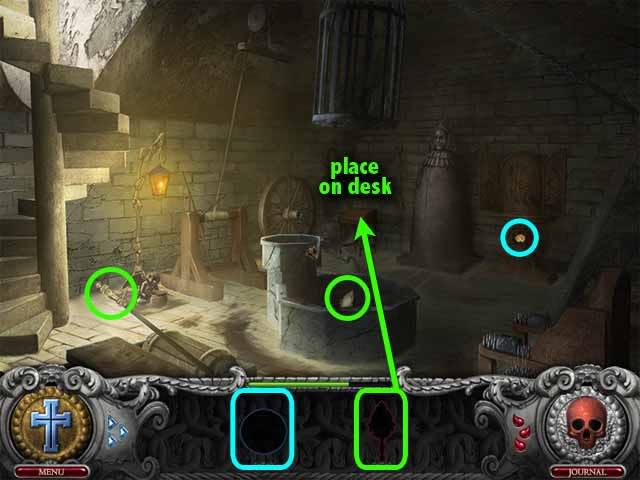
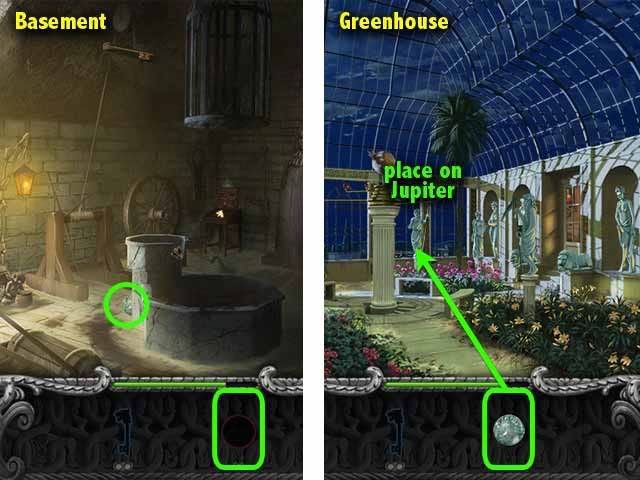
Greenhouse – Get the other piece of the golden coin, and put the completed golden coin in the garden fountain.
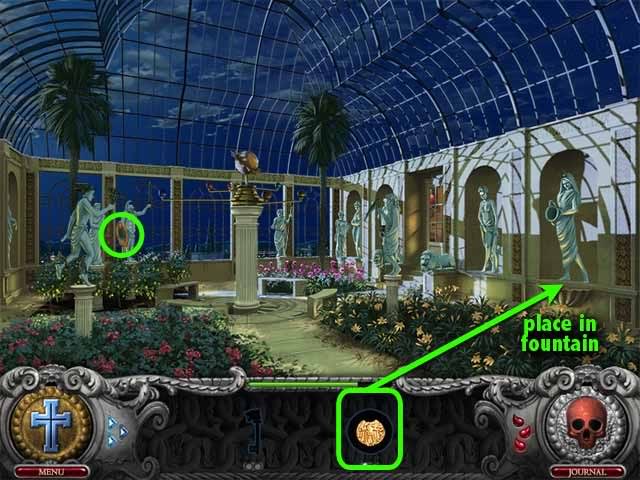
Basement – Get the crystal sphere. Go to the Greenhouse and put the crystal sphere on the Jupiter statue.
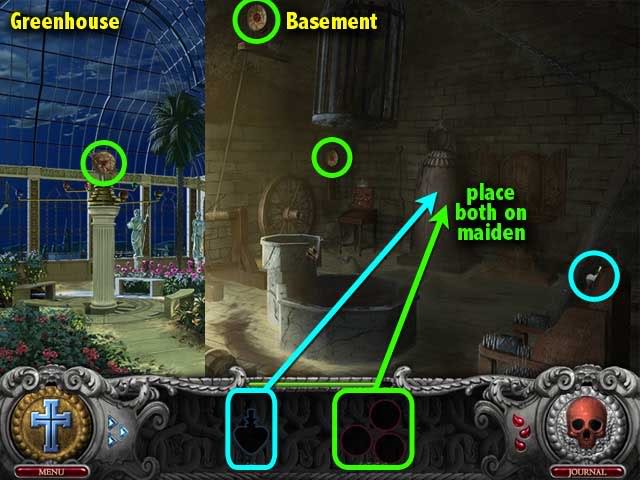
Basement – Get the two pieces of the dragon key, and two pieces of the tiger key. Put both keys on the rusty maiden.

Greenhouse – Find one disk. In the Basement, find the other two disks. Also get the vial of tears. Place the disks and vial of tears on the rusty maiden.
Tears mini-game: Rotate each disk so that the lines match up with each other, allowing blood tears to flow into the maiden’s eyes to enable her to cry.

Basement – Find the two locket pieces, and use the completed locket to open the journal.
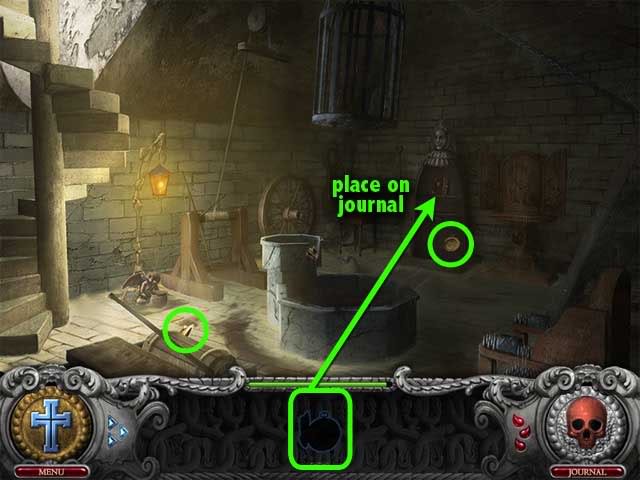
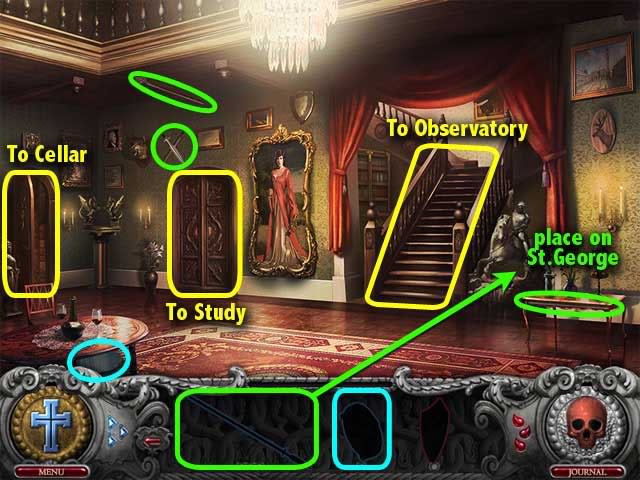
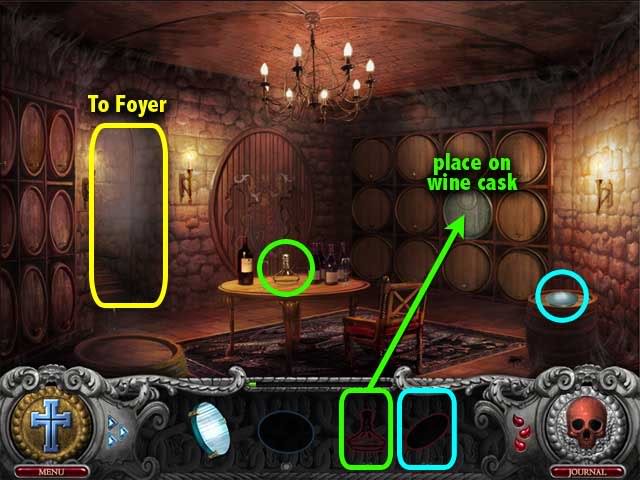
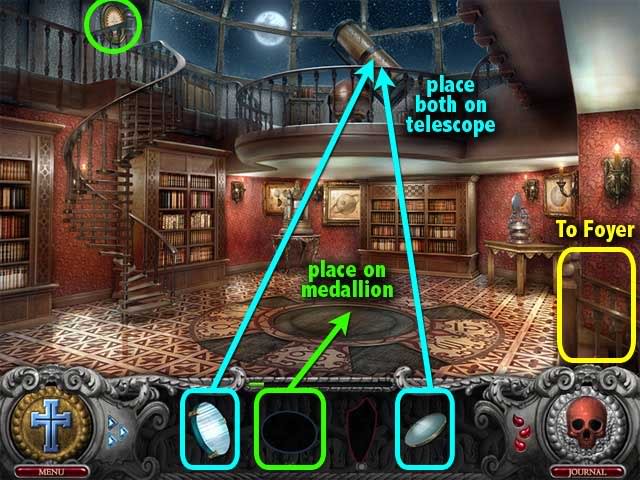
Chapter 6: Blythe Manor
Foyer – Get the three pieces of the lance and place it on St. George. After that, take the mirror.
Cellar – Get the decanter and put it in the wine cask. Also, get the lens.
Observatory – Put the mirror and the lens on the telescope. Get the sun and place it on the floor medallion.
Observatory – Get a piece of the dragon sword and the Leo piece. Find the three draco pieces and place the completed draco on the sun signs.
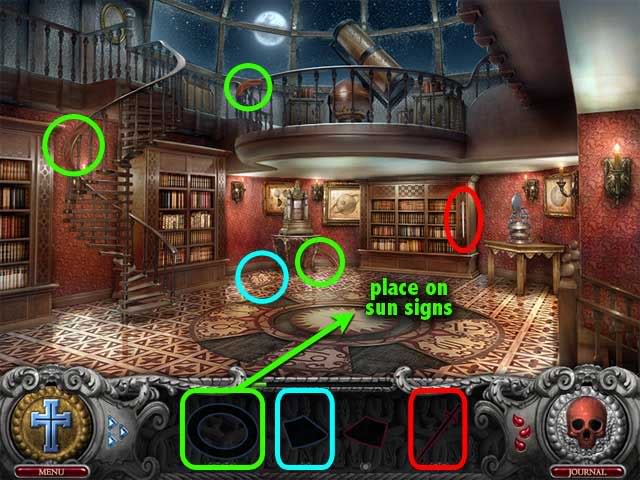
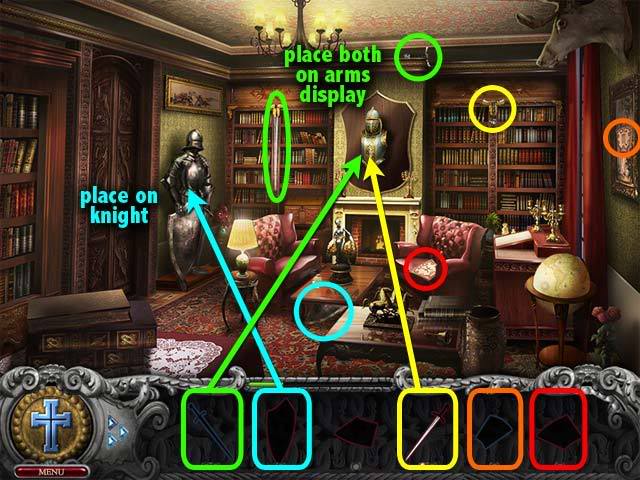
Study – Get the shield and put it on the gothic knight. Find the two pieces of the lion sword and the remaining piece of the dragon sword. Put both swords on the arms display. After that, take the Scorpio and Pisces pieces.
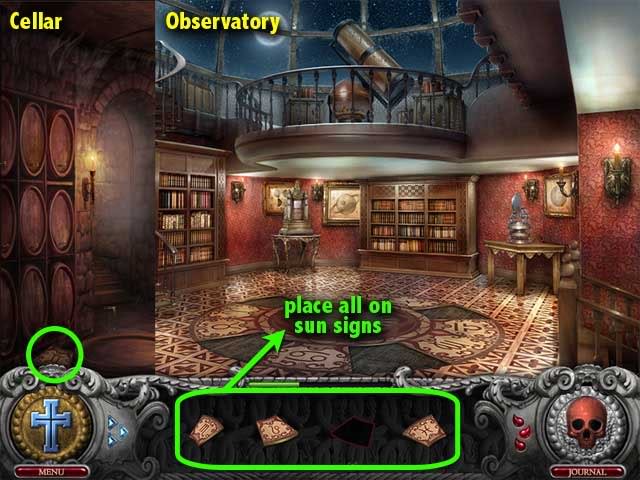
Cellar – Get the Gemini piece. Go to the Observatory and place the Leo, Scorpio, Pisces and Gemini pieces on the sun signs.
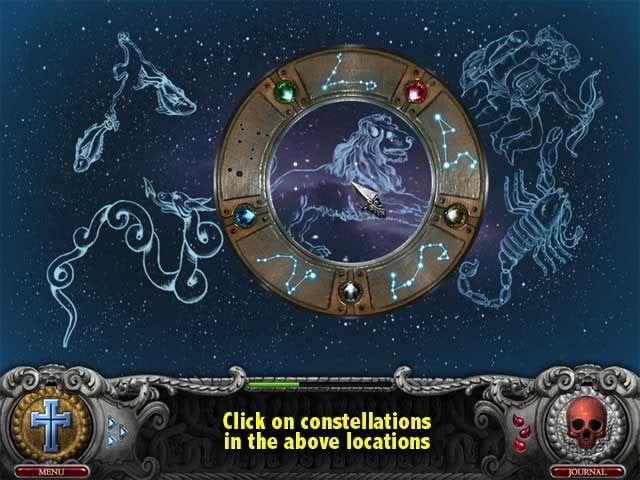
Sun Signs mini-game – Move the magnifying disc around the map of stars. Look for constellations that match those that are engraved around the disc. When you find a group of stars that match, click on it.
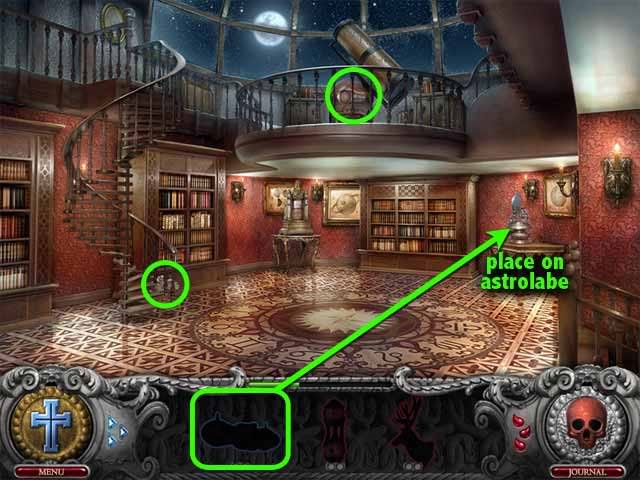
Observatory – Find the two pieces of the sextant and place the completed sextant on the astrolabe.
Study – Get the two pieces of the white stag.
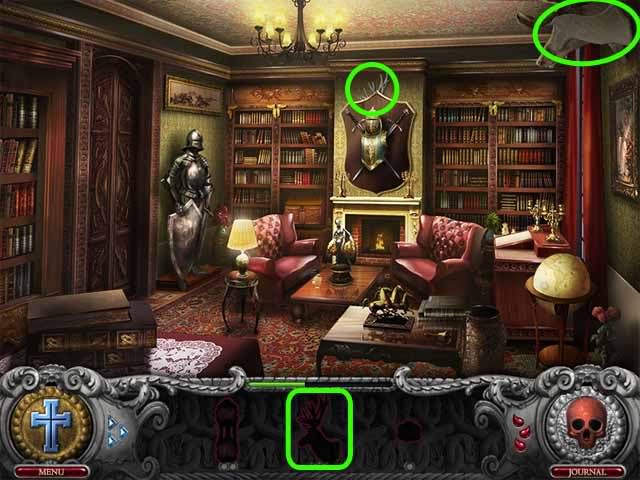
Foyer – Get the ink well. Find the two pieces of the hourglass and place the complete hourglass on the stand. Place the white stag on the plaque on the wall.
Cellar – Get the quill and the compass rose.
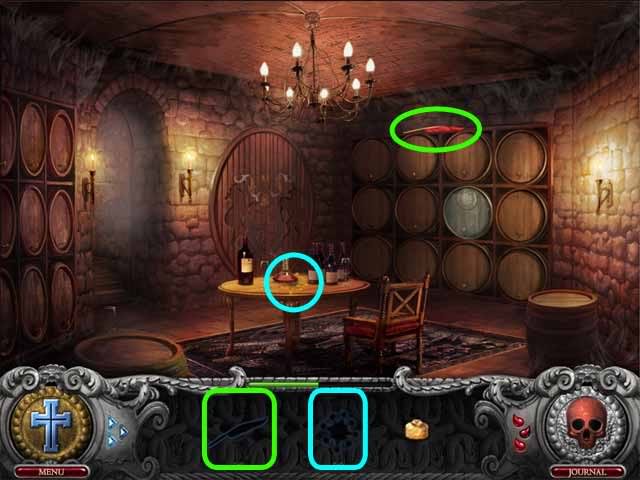
Study – Place the quill and the inkwell on the desk set. After that, get the sea dragon. Place the sea dragon and the compass rose on the Globe.
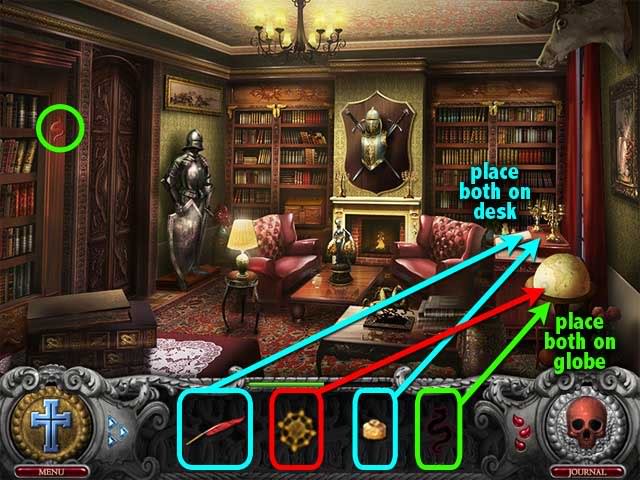
Globe mini-game – Place the tiles on the board. The colors of the crests should match on all touching sides. A tile will lock when it is in the right place.
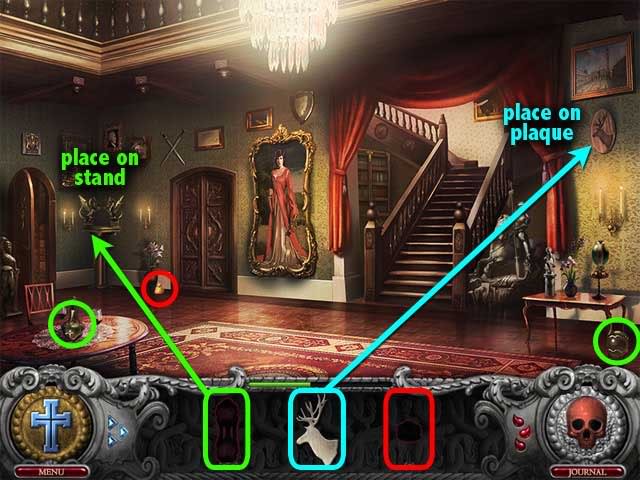
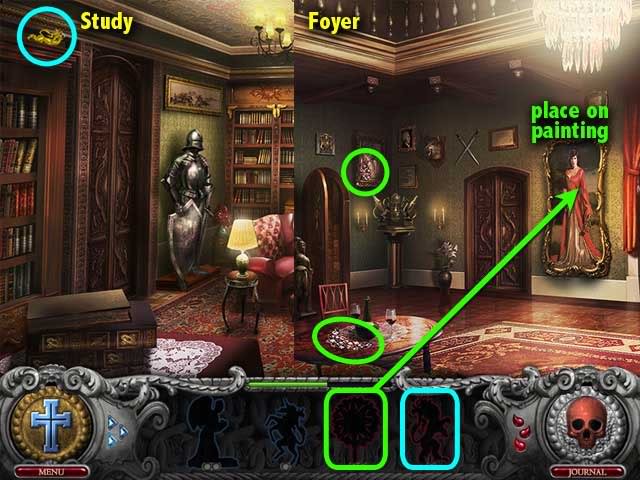
Study – Get the golden lion. In the Foyer, get the two pieces of the brooch and place the completed brooch on the painting of Amber.
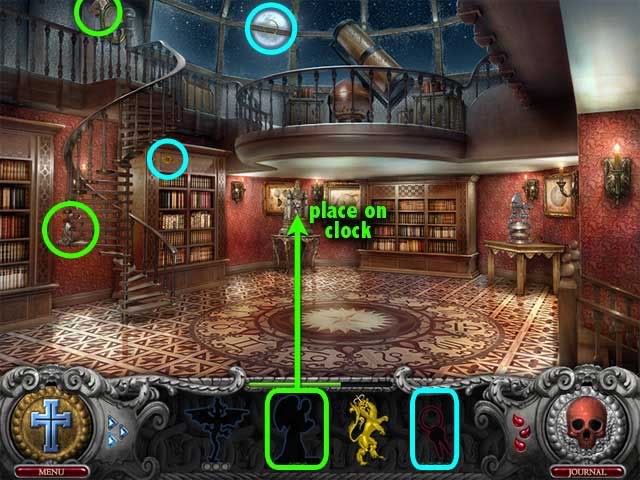
Observatory – Get the two pieces of the angel, and place the completed angel on the antique clock. Find two pieces of the journal keys.
Cellar – Get the three pieces of the dragon pin. Find the silver unicorn and the last piece of the journal keys. Place the silver unicorn and the golden lion on the crest.
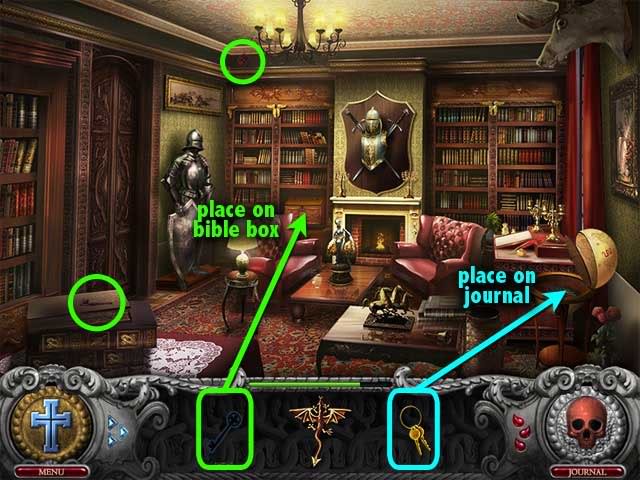
Study – Get the two pieces of the templar key. Use the journal key to open the journal, and use the templar key to open the bible box.
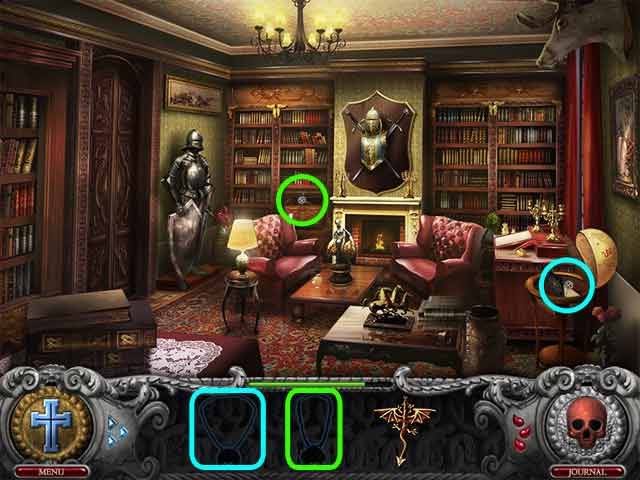
Study – Take the templar cross and the templar amulet.
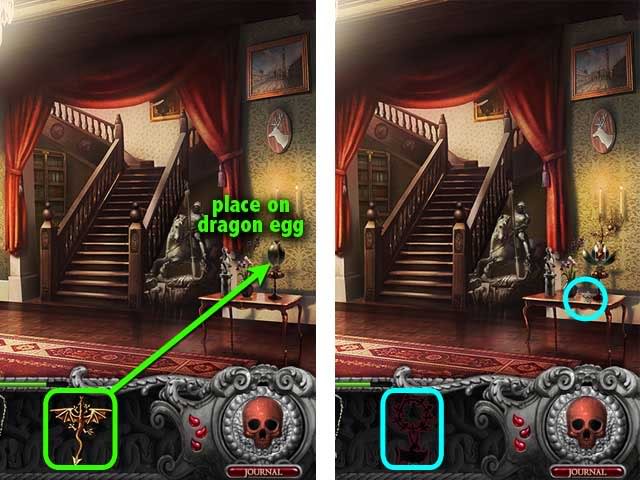
Foyer – Put the dragon pin on the dragon egg, and after that get the dragon medallion.
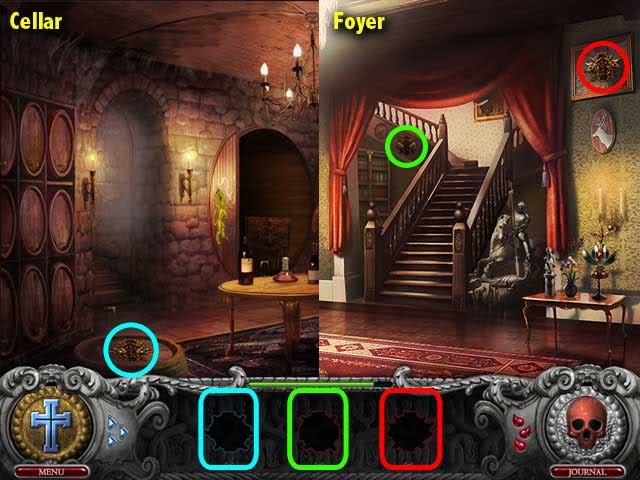
Cellar – Click on the alcove to enter the Inner Cellar. Put the dragon medallion and the templar amulet on the praying man. Put the templar cross on the seal of blood.
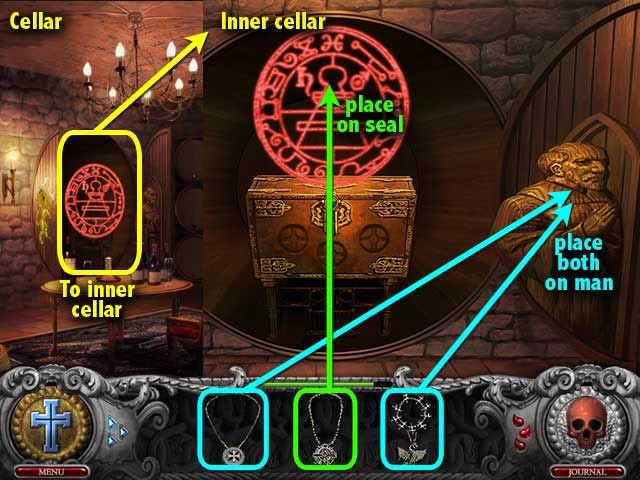
Cellar – Get the dragon cross. In the Foyer, get the lion cross and the unicorn cross.
Inner Cellar – Place the dragon cross, the lion cross, and the unicorn cross all on the locked chest.
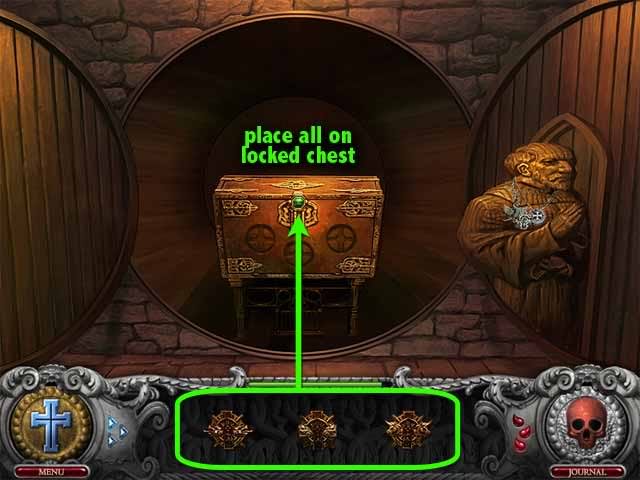
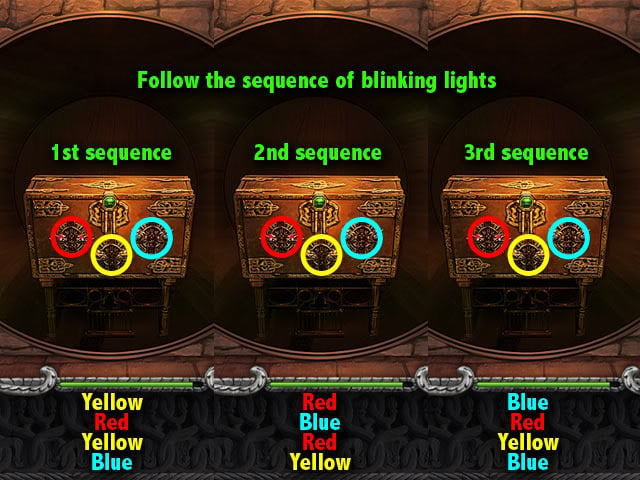
Locked Chest mini-game – Click on the crosses to follow the sequence of colored blinking lights. There are three sequences with 4 steps for each sequence.
Cellar – Get the two pieces of the crystal key. Go to the Inner Cellar and place the crystal key on the glass case.
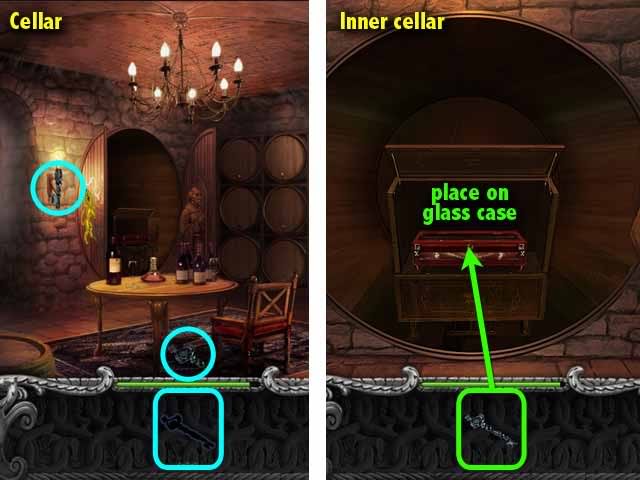
Inner Cellar – Take the Shroud of Lazarus. Exit to the Cellar and oh no! Nathanial is being held hostage by Andre. Give the Shroud of Lazarus to Andre.
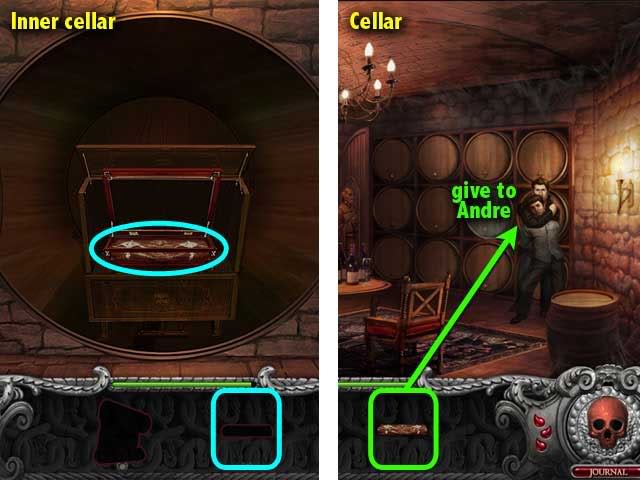
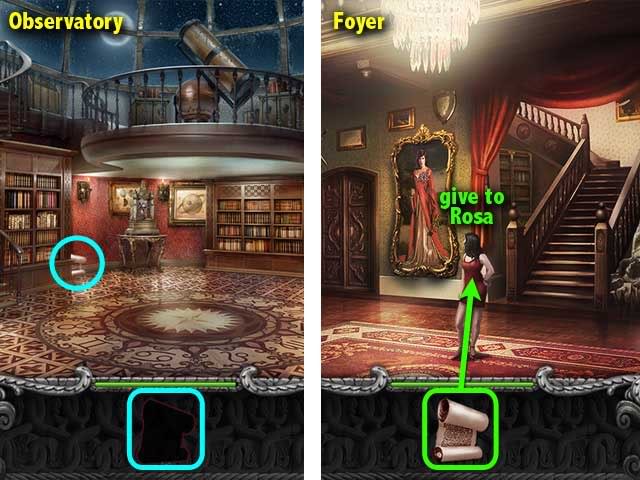
Observatory – Find the scroll. Go to the Foyer and give the scroll to Rosa.
Chapter 7: Bartholomew’s Lair
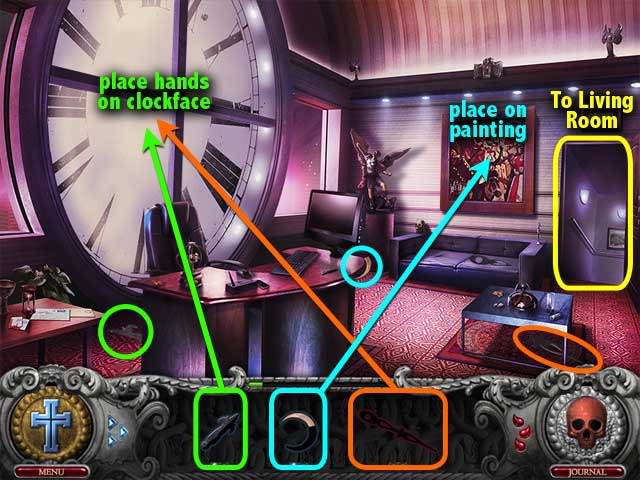
Living Room – Get a piece of the crescent moon. Take the two pieces of the Lochaber axe and place the completed axe on the axe handle. Get the ruby star and place it on the sculpture. After that, get the piece of the small clock arm.

Office – Get the other piece of the small clock arm. Find the two pieces of the large clock arm. Place both clock arms on the clockface. Get the remaining piece of the crescent moon and place the completed moon on the painting.
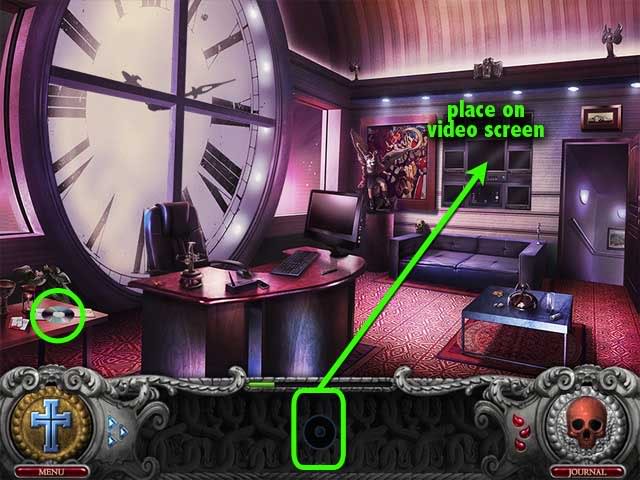
Office – Take the CD and use it on the video screen.
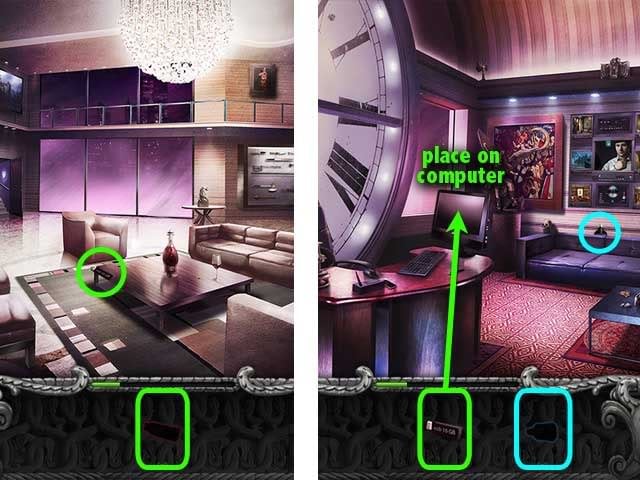
Living Room – Find the thumb drive. Go to the Office and use the thumb drive on the computer. After that, get the electronic key.
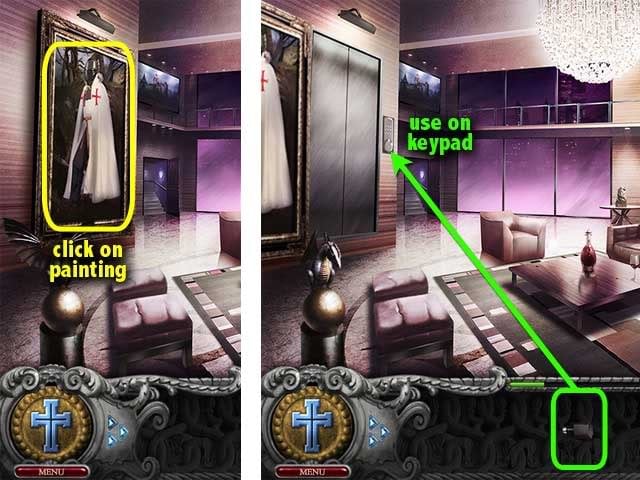
Living Room – Click on the large painting to reveal a secret elevator. Use the electronic key on the keypad.
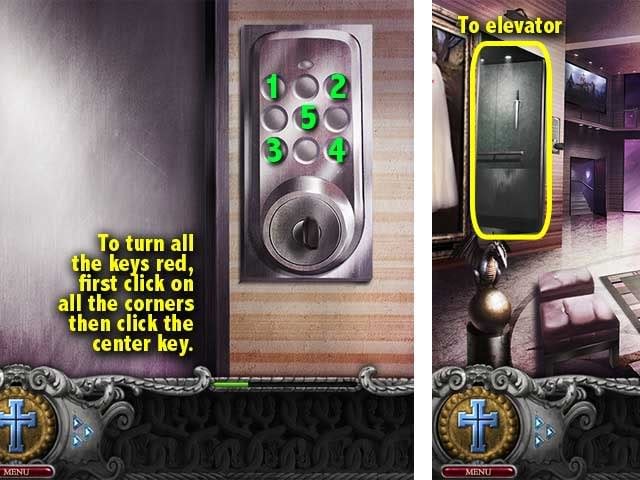
Keypad mini-game – All the keys in the keypad must be turned red. Some keys activate or de-activate other keys. Find the best combination of key punches that will grant you access to the elevator.
Gallery – You encounter Rosa and Andre once again. Get one piece of the blade.
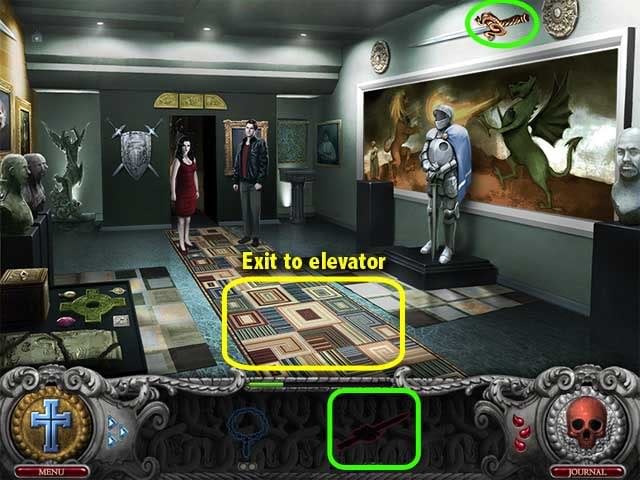
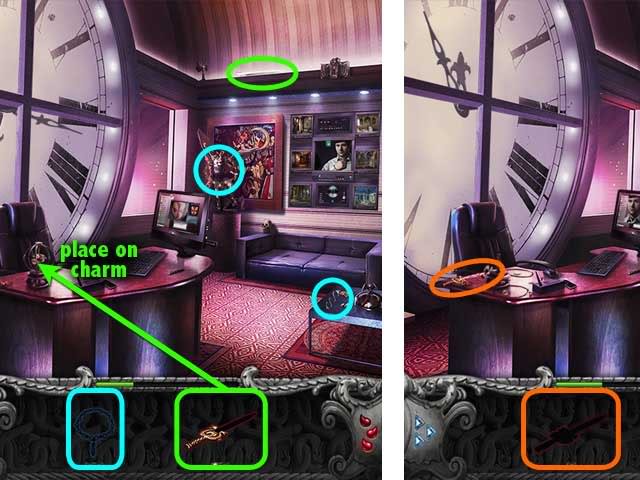
Office – Get the two amulet pieces and the other piece of the blade. Place the completed blade on the charm to enchant it. Pick up the enchanted blade.
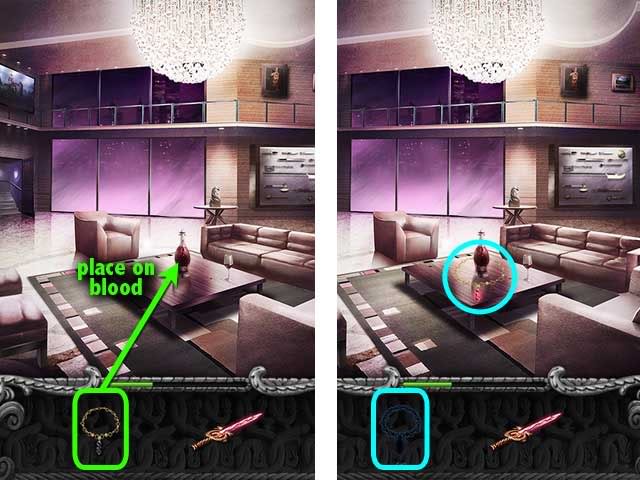
Living Room – Place the amulet on the blood to transform it. Pick up the blood amulet.
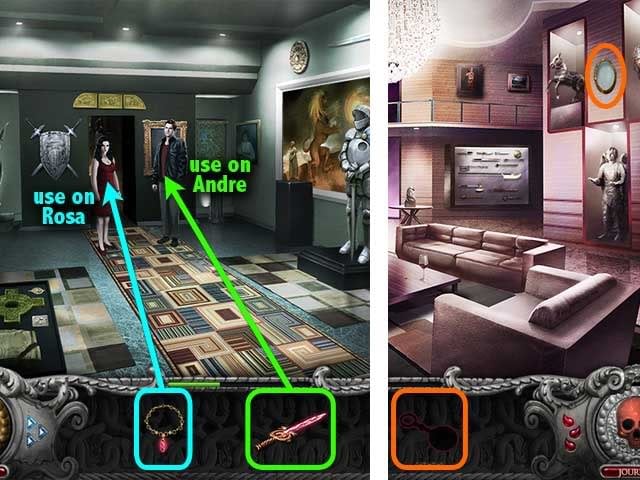
Gallery – Use the blood amulet on Rosa and the enchanted blade on Andre to get rid of them. Go to the Living Room and get a piece of the crystal lens.
Gallery – Find the three pieces of the scroll, and the last two pieces of the crystal lens. Place the completed scroll and crystal lens on the stand. Note the doorway to the inner lair and den, but there is no need to enter it yet.

Scroll mini-game – Move the magnifying lens around the scroll. When you see a symbol that matches the colored symbols on top, click it. However, symbols must be clicked on in the right order, following the colored symbols from left to right.
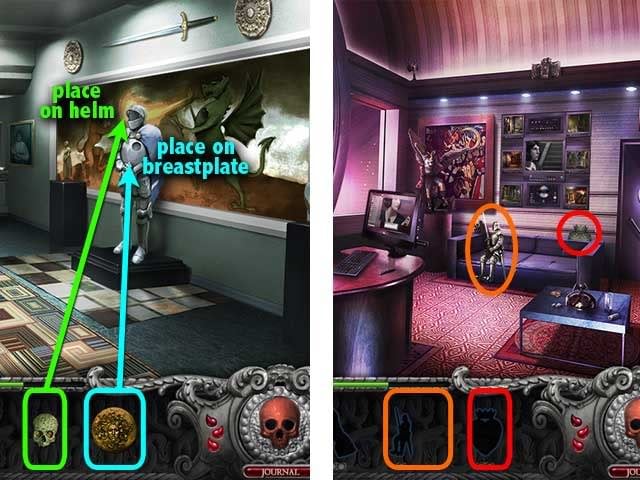
Gallery – Get the diamond, the white rose, and the medusa. In the Living Room, get the skull and place the white rose on the red rose.
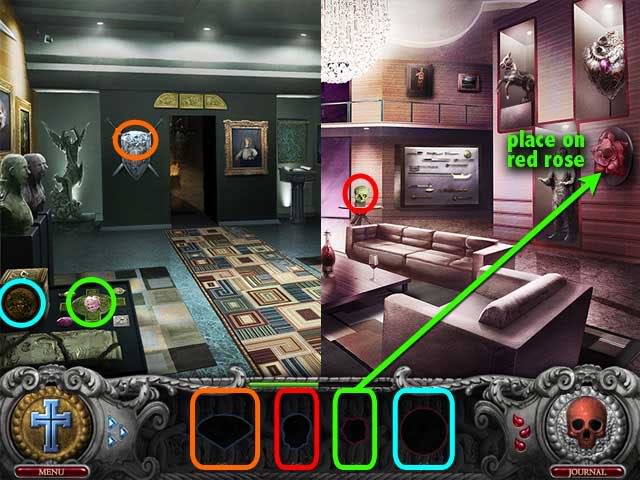
Gallery – Put the skull inside the Templar helm, and put the medusa on the Templar breastplate. Go to the Office and get the knight statue and one piece of the lion heart.
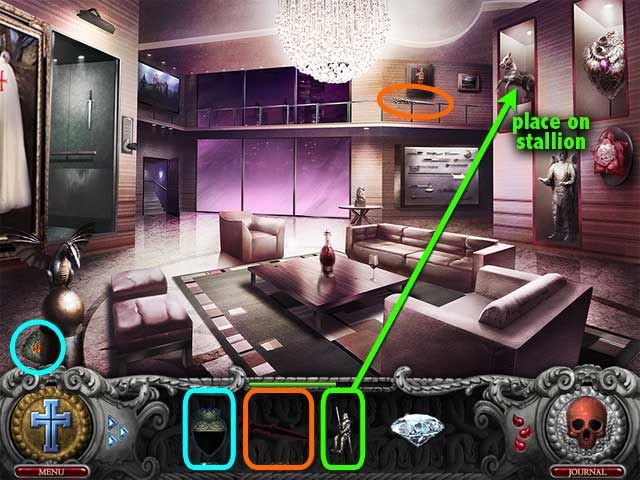
Living Room – Get the other piece of the lion heart. Put the knight statue on the charging stallion. Also, get one piece of the athame.
Den – Find the two incense pieces and place the completed incense on the brazier. Put the diamond inside the dragon. After that, take the two pieces of the dragon heart.
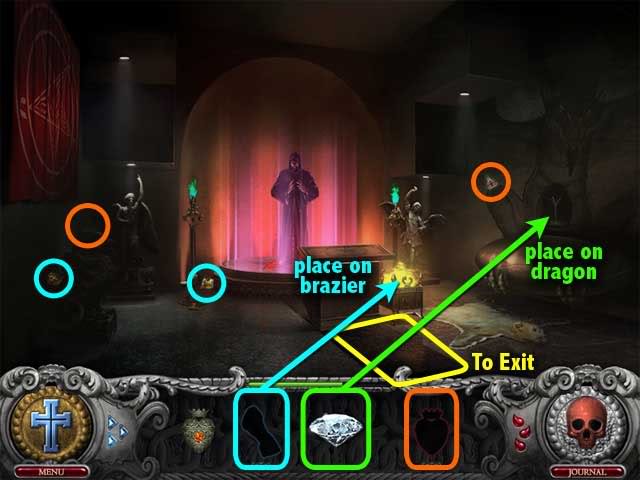
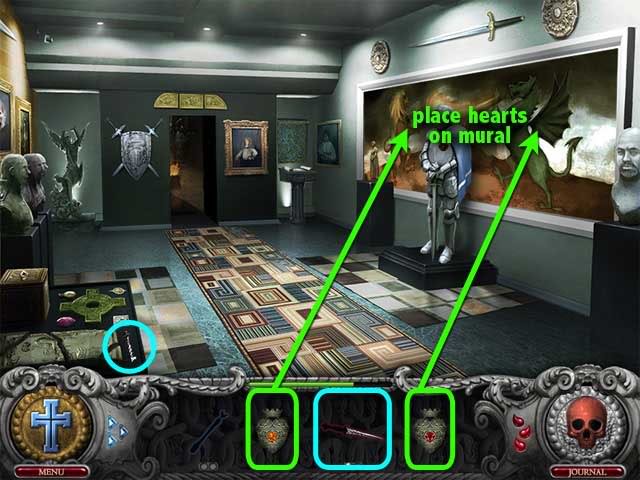
Gallery – Place the lion heart and the dragon heart on the mural. Take the remaining piece of the athame.
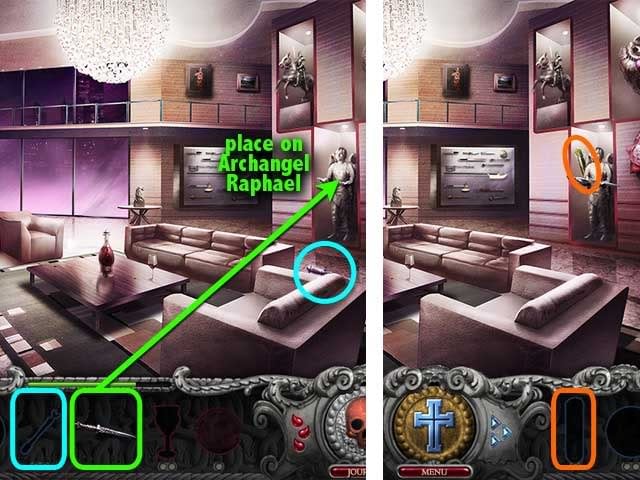
Living Room – Get one piece of the wand. Place the athame on Archangel Raphael. Take the air crystal that appears.
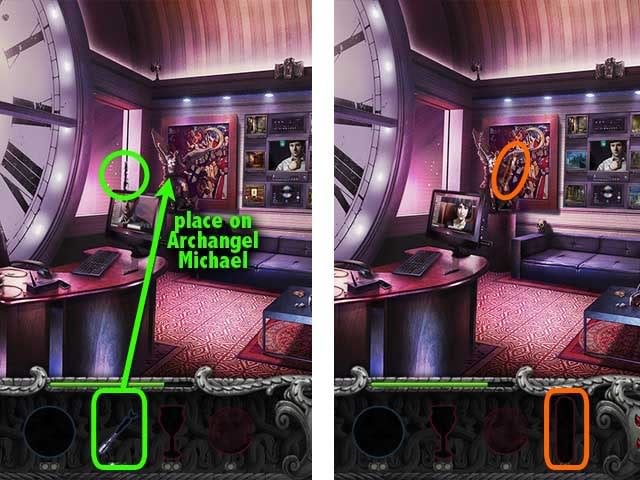
Office – Get the other piece of the wand. Place the completed wand on Archangel Michael. Take the fire crystal that appears.
Den – Get the two pentacle pieces, the two chalice pieces, and the orb. Place the orb on Lucipher and the chalice on Archangel Gabriel.
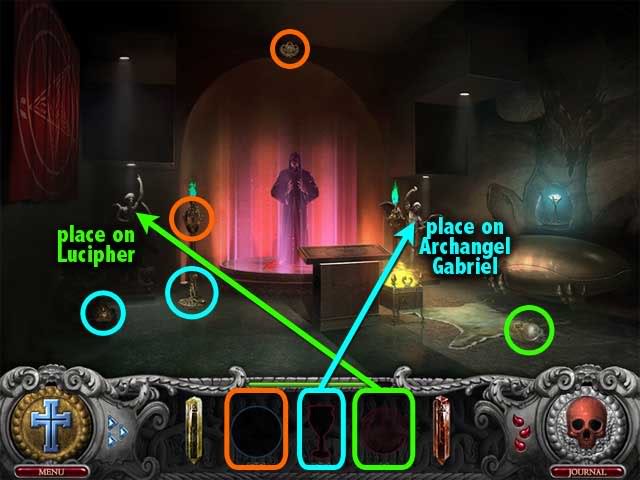
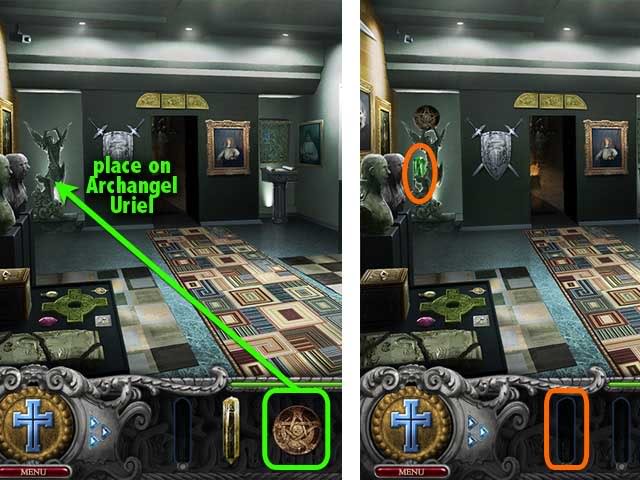
Gallery – Place the pentacle on Archangel Uriel. Take the earth crystal that appears.
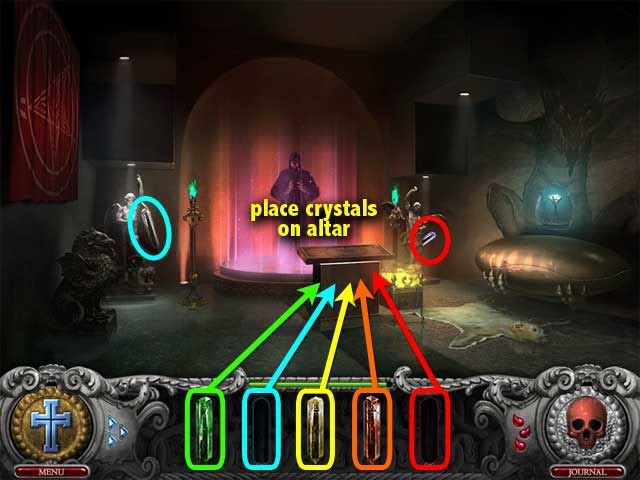
Den – Take the light crystal and the water crystal. Place the five crystals on the crystal altar.
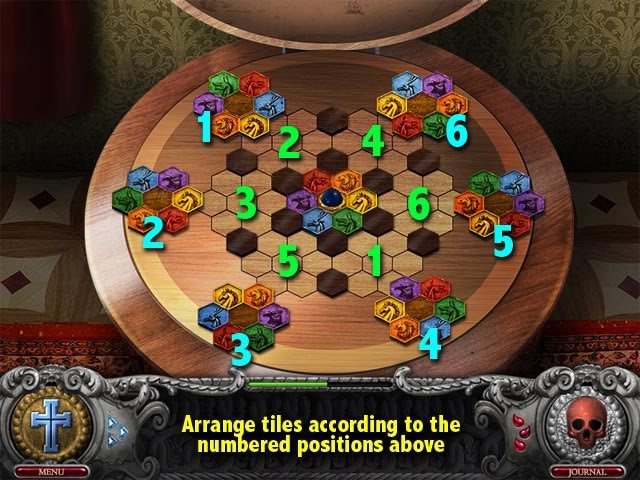
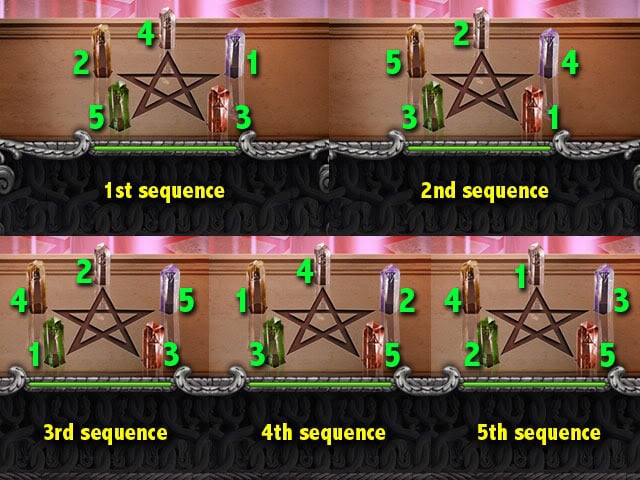
Crystals mini-game – A melody will be played on the crystals, a sequence which you’ll need to repeat – backwards. There are five melody sequences. If you complete a sequence correctly, a line will be drawn on the pentagram. Shown in the screenshot below are the five sequences played in reverse order.
Congratulations!
You have successfully completed Born Into Darkness.
“;
