
Best Horror Games On Itch.io – July 2026
Across a bounty of subgenres.![Haze Seas Accessories Tier List [Best Accessories to Equip]](/wp-content/uploads/2026/07/haze-seas-accessories-tier-list.jpg "Haze Seas Accessories Tier List [Best Accessories to Equip]")
Haze Seas Accessories Tier List [Best Accessories to Equip]
The accessories with the best stat buffs in Haze Seas.
![[Roblox] Evomon Shiny Hunting Guide – Including Prismatic and Pris Shinies!](/wp-content/uploads/2026/06/evomon-shiny-hunting-guide.jpg "[Roblox] Evomon Shiny Hunting Guide – Including Prismatic and Pris Shinies!")

Blood Oath Walkthrough
Welcome the Blood Oath walkthrough on Gamezebo. Blood Oath is a hidden object adventure game played on the PC developed by TechFront and published by Merscom. This walkthrough includes tips and tricks, helpful hints, and a strategy guide to how to complete Blood Oath.


- Prefer Gamezebo on Google

Blood Intro – Game Introduction
Welcome the Blood Oath walkthrough on Gamezebo. Blood Oath is a hidden object adventure game played on the PC developed by TechFront and published by Merscom. This walkthrough includes tips and tricks, helpful hints, and a strategy guide to how to complete Blood Oath.
General Tips
- It should be immediately noted that Chapter 8 of this guide deals with the end of the game and the alternate ending, and the decision to either feed or not to feed. For the purposes of this guide, “Not to Feed” was chosen. While the gameplay varies slightly between the two choices, most of the same items are shared between them and thus only one decision will be formally covered.
- This particular title features a series of achievements. All are locked at the beginning of the game yet their descriptions and requirements can be viewed from the main menu.
- A clicking penalty will be enforced if there is too much random or sporatic clicking.
- Hints are unlimited and recharge. You never have to worry about running out. Click on the Ankh at the bottom right corner of the screen to use a hint. If you don’t know what room to go to next, you can open the Map in your Book (Tome of Culadra) and click the hint button and it will reveal the next location.
- When searching for items, there will be an illuminated light above them on the list at the bottom of the screen if they can be found in that room. “Sets” will also become illuminated of a piece of it is in the room in which you’re standing.
- Interactive items will appear redder and redder the closer you bring the mouse: click on them to receive a hidden items list.
- The Book in the bottom left corner of the screen, also known as the Tome of Culadra, can offer you a few special features. One, you can review the story via the main journal area. Two, you can view a Map that will show you where you are and if there are blocked doors, etc. Lastly, you can choose “mini-game” to play a sort of bonus game that will give you play bonuses, such as faster hint recharging times. The Tome of Culadra will be elaborated upon further in this guide at the end of Chapter 1.
- Various Cards can be collected to add to the Tome of Culadra. These will be outlined with a square shape in the guide instead of a circle. If there are cards hidden in the room in which you’re standing, a gem on the cover of the book will glow. It will cease to glow once you’ve collected all the cards in the room. Keep an eye out: not only do they offer handy bonuses, but there’s an achievement for collecting all of them.
- Some areas and items can only be discovered in a particular order. Refer to the guide below for such items.
- Item locations in this guide will be marked with a colored X. Circled objects of the same color are to be used on the same colored X.
Chapter 1: The Tome of Culadra
GOAL: Search the room and find a way to escape.
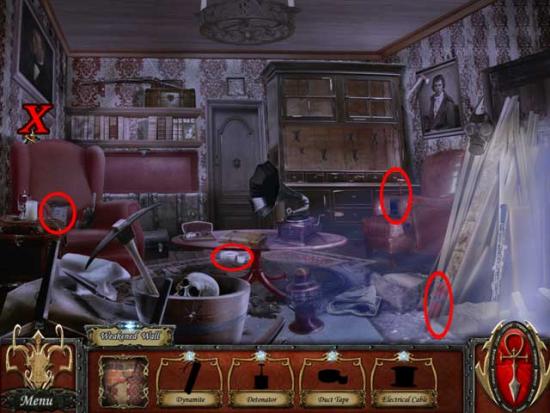
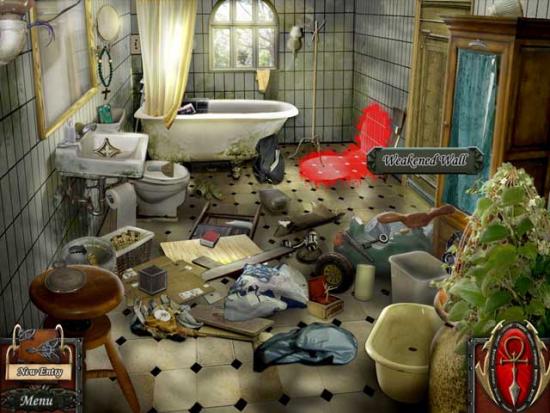
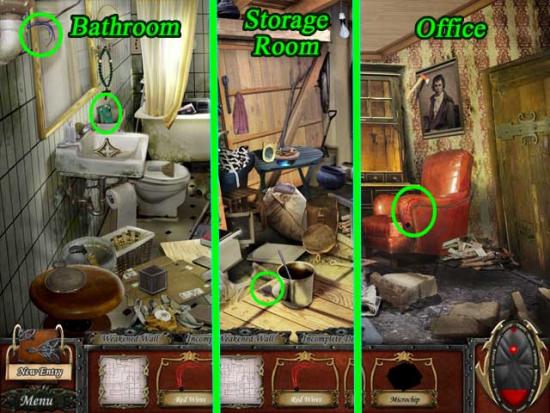
Office
- Click on the Weakened Wall (marked with an X) to open up the hidden object list. Find the Dynamite, Detonator, Duct Tape, and Electrical Cable, then use them on the wall. Their locations are shown and circled below:

GOAL: Get to the safe house before sunrise
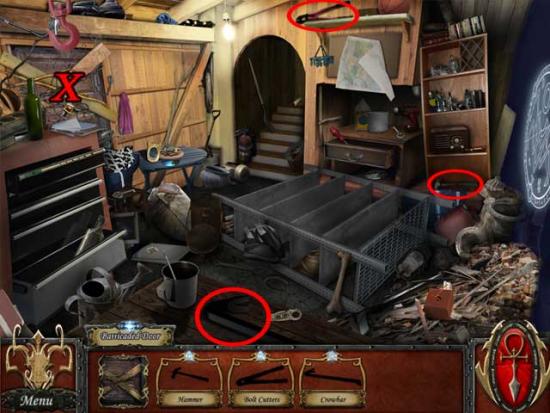
Storage Room
- Click on the Barricaded Door (marked with an X) to open up the hidden object list. Find the Hammer, Bolt Cutters, and Crowbar, then use them on the door. Their locations are shown and circled below:
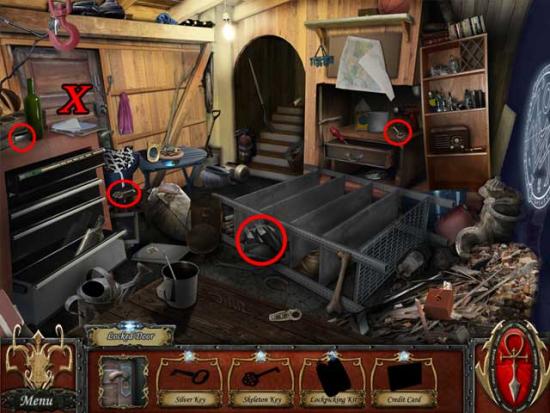
- Click on the Locked Door (formerly the Barricaded Door: marked with an X) to open up the hidden object list. Find the Silver Key, Skeleton Key, Lockpicking Kit, and Credit Card, then use them on the door. Their locations are shown and circled below:
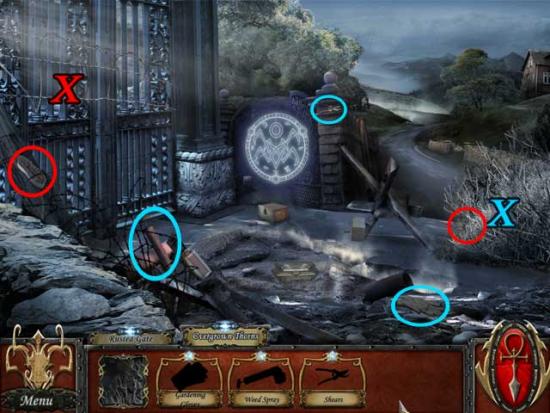
Pathway
- Click on the Rusted Gate (marked with a red X) to open up the hidden object list. Find the Wire Brush and Rust Solvent, circled in red below, then use them on the Rusted Gate. The Rust Solvent cannot be found until you’ve completed the Overgrown Thorns list (marked with a blue X). Find the Gardening Gloves, Weed Spray, and Sheers, then use them on the Overgrown Thorns.
GOAL: Find a way to become a stronger vampire.
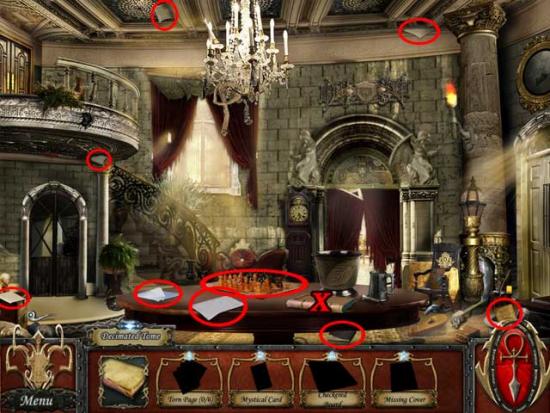
Entryway
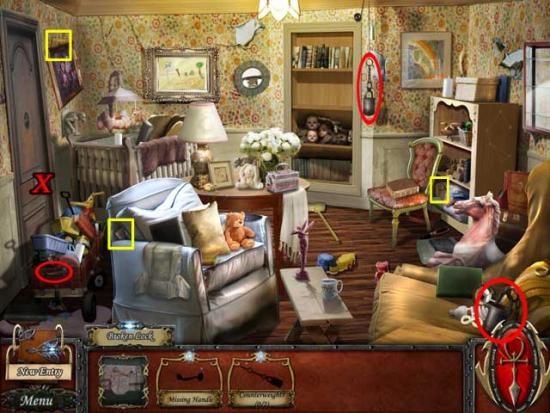
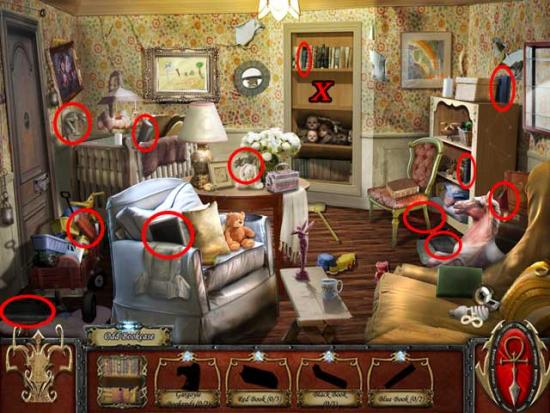
- Click on the Decimated Tome (marked with a red X) to open up the hidden object list. Find the Torn Page (x6), Mystical Card, Checkered Board, and Missing Cover, then use them on the Decimated Tome. Their locations are shown and circled below:
*An Explanation of the Tome of Culadra:*
The Tome of Culadra is a “living book” that will aid you throughout the course of the game. There are 3 main sections:
- Minigame: Earn bonuses by creating chains of symbols. Search rooms within the game for additional cards: the gem on the cover of the Tome will glow when there’s cards left in the room. Allign the cards so that the symbols touch their own kind (like dominos): this will earn you bonuses. Longer chains will provide stronger bonuses. Create a chain of 16 with all the symbols to earn the maximum number of bonuses. The following bonuses correspond with the following symbols:
? Ankh = Faster Hints
? Blood = Higher Scores
? Moon = Quicker Powers
? Death = Shorter Click Penalties
- Logbook: This section of the Tome concentrates on the story and events at hand. It may also contain subtle hints and explanations.
- Map: The Map can be viewed to show your current location and where you should go next. Specific doors and boundaries etc are shown on the map. If you don’t know where to go next, you can click the Hint button while the map is open and it will show you the next location.
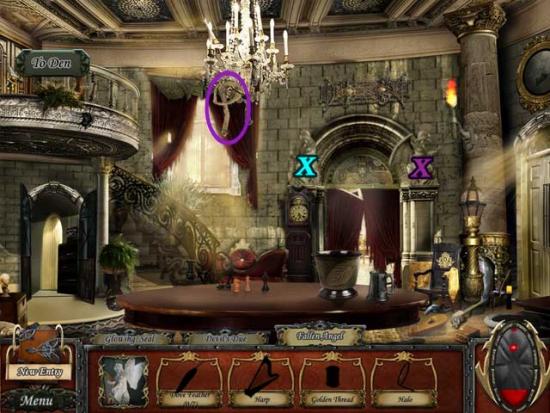
Chapter 2: Enhanced Strength
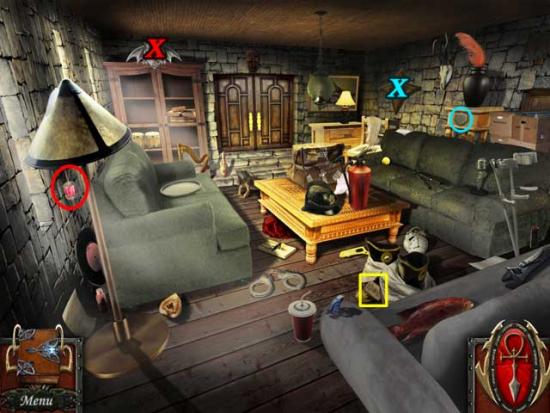
Den
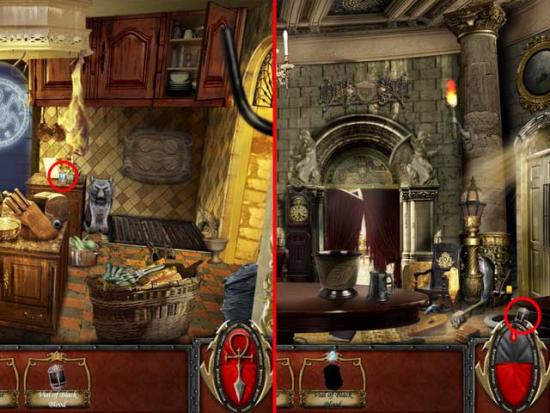
- The Card is squared in yellow. Click on the Thirsty Bat (marked with a red X) to open up the hidden object list. The Vial of Red Blood is located in the same room and circled below. Click on the Glowing Seal (marked with a blue X) to open up the hidden object list. The Lion Crest is located in the same room. Their locations are shown below:
- The other Vials of Blood for the Thirsty Bat are located in the Entryway and the Kitchen. Their locations are shown below:
- Return to the Thirsty Bat and use the Vials of Blood on it to retrieve the Bat Crest.
- Pick up the Bear Crest located in the Entryway.
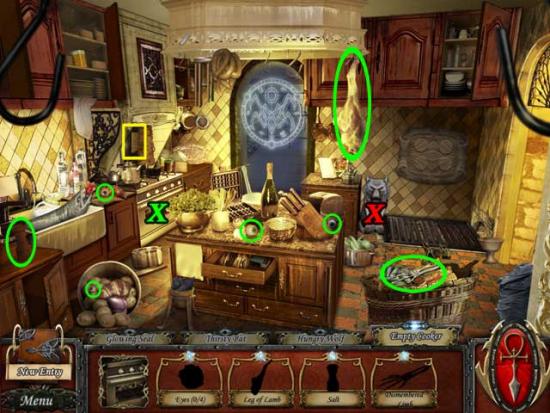
Kitchen
- Click on the Hungry Wolf (marked with a red X) to open up the hidden object list. Click on the Empty Cooker (marked with a green X) to open up another hidden object list. Find the Eyes x4, Leg of Lamb, Salt, and Dismembered Limb, then use them on the Empty Stove to retrieve the Stewed Meat.
- Return to the Den.
Den
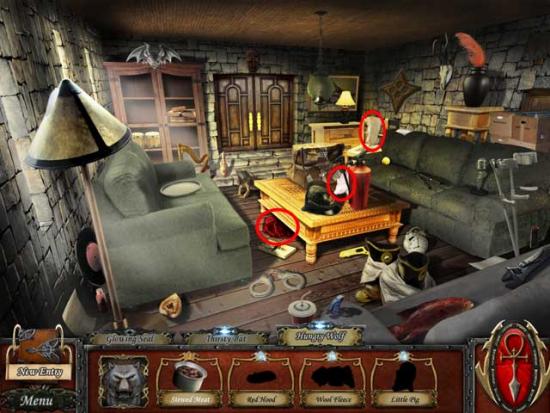
- Find the Red Hood, Wool Fleece, and Little Pig circled and shown below, then return to the Kitchen.
Kitchen
- Use the gathered food on the Hungry Wolf to retrieve the Wolf Crest, then return to the Den.
Den
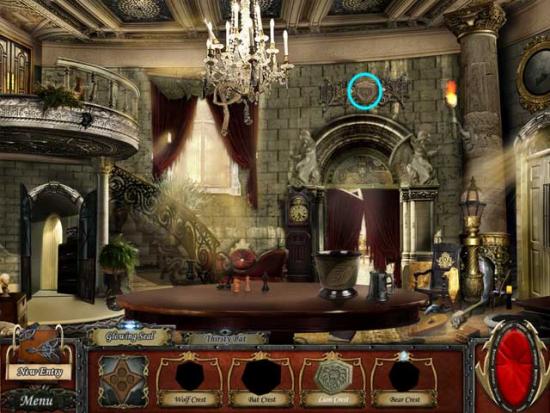
- Use the Crests on the Glowing Seal to earn a new ability: Enhanced Strength. You can now move large debris and lift heavy objects.
Chapter 3: Mist Form
GOAL: Retrieve Tristan’s note from the hallway for him.
Den
- Use Force, your newly found ability, on the stack of boxes on the right of the screen to clear a path to the Hallway.
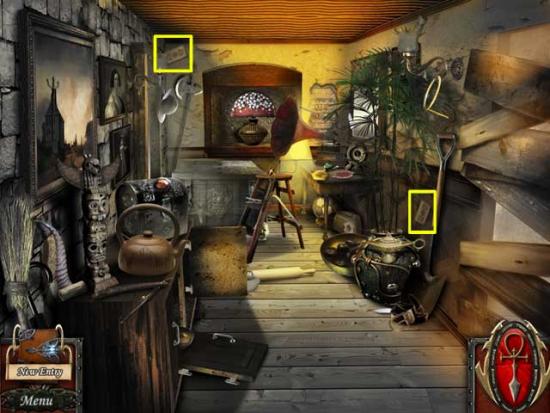
Hallway
- There are two Cards hidden in this room. Their locations are shown below:
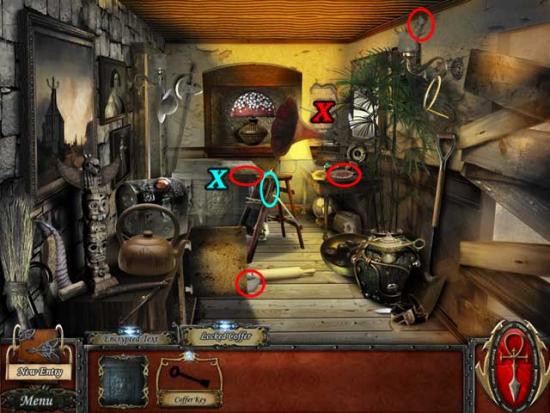
- Click on the Encrypted Text (marked with a red X) to open up the hidden object list. Next, click on the Locked Coffer (marked with a blue X) to open up another hidden object list. Find the Coffer Key to open it and reveal the Calligraphy Brush for the Encrypted Text. Find the Mortar, Annatto Seeds, and Pestle, then use them together with the Calligraphy Brush on the Encrypted Text .
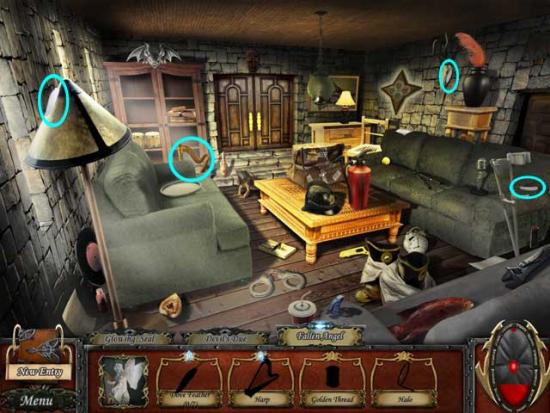
GOAL: Gain a new power from the kitchen’s glowing seal.
Kitchen
- Click on the Glowing Seal located next to the Hungry Wolf to open up a new hidden object list, then exit to the Entryway.
Entryway
- Click on the Devil’s Due (marked with a purple X) and the Fallen Angel (marked with a blue X) to open up new hidden object lists. The Snake Skin for the Devil’s Due is also located in the Entryway and circled below.
Den
- 3 of the 7 Dove Feathers and the Harp for the Fallen Angel are located here.
Hallway
- Another 3 of 7 Dove Feathers and the Halo for the Fallen Angel are located here. You can also find the Pitchfork and Goat Horn for the Devil’s Due.
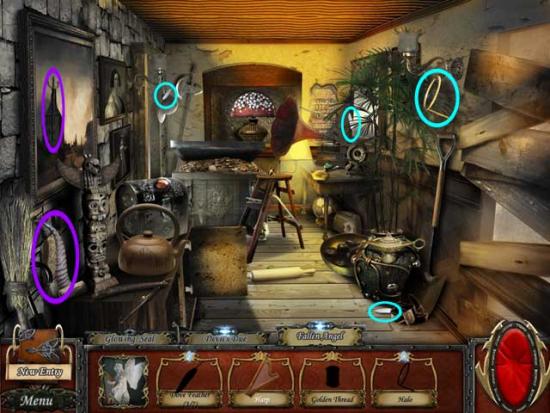
- Return to the Kitchen.
Kitchen
- The remaining Apple for the Devil’s Due, as well as the last Dove Feather and Golden Thread for the Fallen Angel are located here.
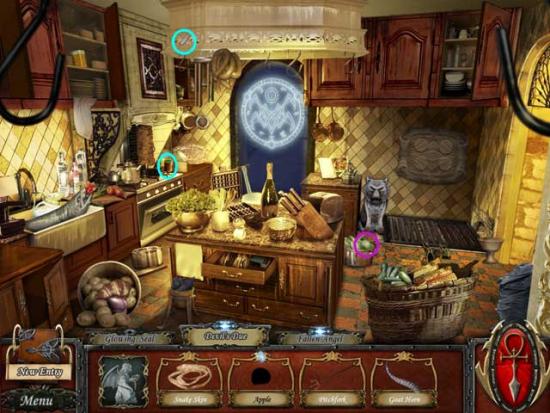
Entryway
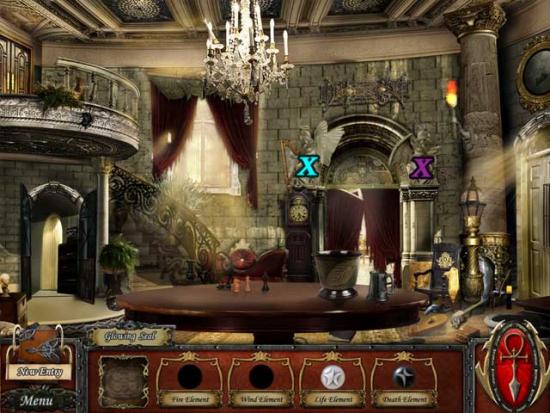
- Return the items to the Fallen Angel and the Devil’s Due to receive the Life Element and Death Element. These are for the Glowing Seal in the kitchen.
- Return to the Hallway upstairs.
Hallway
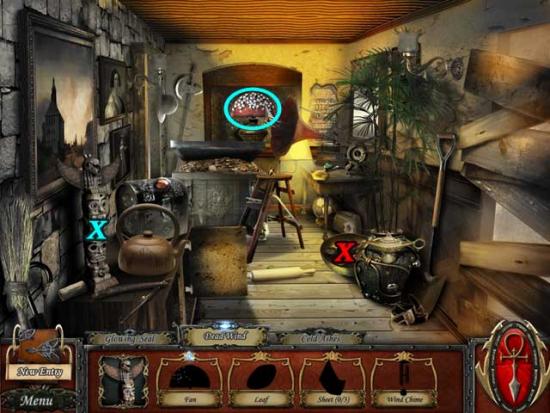
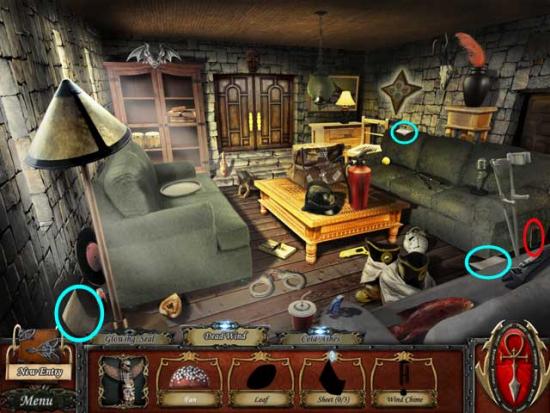
- Click on the Dead Wind (marked with a blue X) to open up a hidden object list, then click on the Dead Ashes (marked with a red X) to open up another hidden object list. The Fan for the Dead Wind is located in this room.
- Return to the Den.
Den
- The 3 Sheets for the Dead Wind and the Lighter Fluid for the Cold Ashes are located in this room.
Entryway
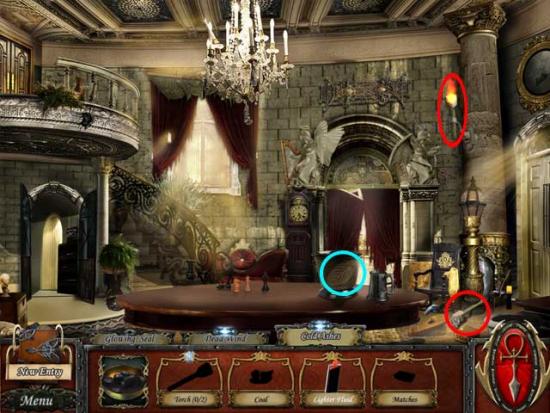
- The 2 Torches for the Cold Ashes and the Leaf for the Dead Wind are located in this room.
Kitchen
- The Wind Chime for the Dead Wind and the Coal and Matches for the Cold Ashes are located in this room.

- Return to the Hallway.
Hallway
- Return the items to the Dead Wind and the Cold Ashes to receive the Fire Element and Wind Element, then return to the Kitchen.
Kitchen
- Place the four Elements in the Glowing Seal to the right of the Hungry Wolf to earn a new ability: Mist Form. You can now turn into mist and gain access to other areas via small spaces.
Chapter 4: Day Walk
Kitchen
- Use your new ability Mist Form to pass between the bars of the grate in the floor next to the Hungry Wolf.
GOAL: Be judged by the Scales of Anubis.
Cellar
- The locations of the Cards in this room are shown below:
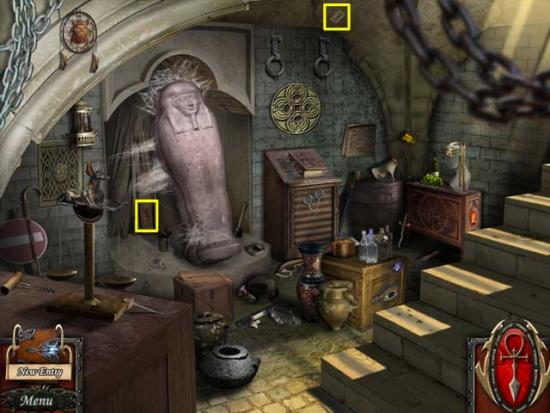
- Click on the Scales of Anubis (marked with a red X) to open up a new hidden object list. Neither of the items can be picked up yet.
- Click on the Sealed Sarcophagus (marked with a blue X) to open up another hidden object list. The locations of the Book of the Dead, Stone Chisel, and Stone Hammer are shown below. Once you’ve acquired all of them, use them on the Sealed Sarcophagus.
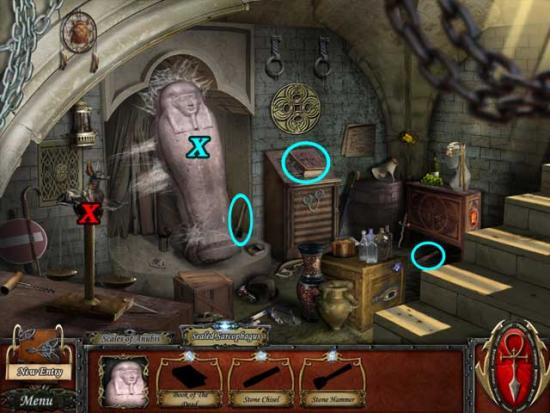
- Click on the Heart Chamber (marked with a green X) to open up another hidden object list. The location of the Sacrificial Dagger is shown below. Once acquired, use it on the Heart Chamber to obtain the Heart of an Innocent for the Scales of Anubis.
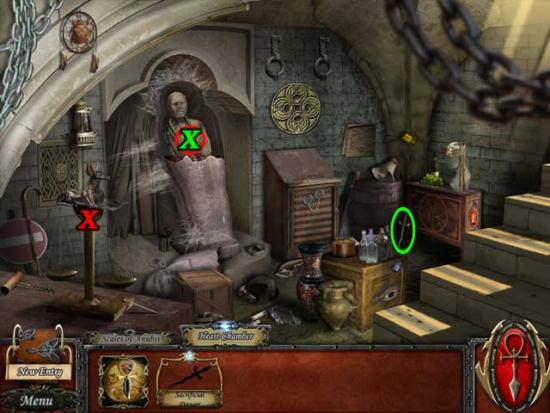
- Next, click on the Incomplete Headdress (marked with a pink X) to open up another hidden object list. The Stone Seal and the Wax Sealant are located in this room, their locations shown below:
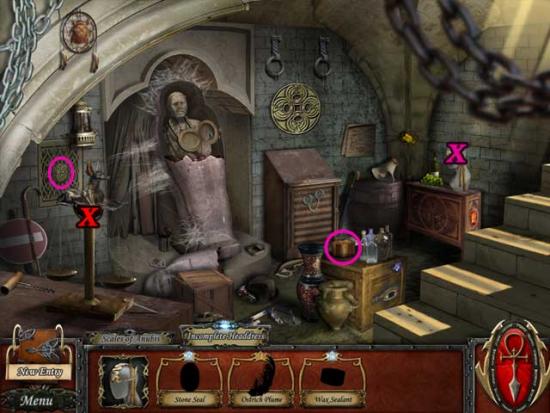
- The last piece of the Incomplete Headdress is not located in this room. Exit the Cellar and proceed up to the Den.
Den
- The Ostrich Plume needed for the Incomplete Headdress is located in this room.
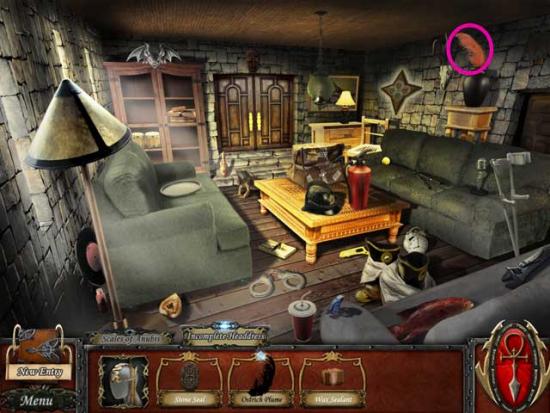
- Return to the Cellar.
Cellar
- Use the items on the Incomplete Headdress to complete it and acquire the Feather of Ma’at for the Scales of Anubis. Use the items on the Scales to complete the task and return up to the Kitchen.
GOAL: Gain the ability to walk in sunlight by acquiring Ra’s Mantle.
Kitchen
- Proceed up to the Hallway, then use Mist Form to gain access to the Bedroom.
Bedroom
- The locations of the Cards in this room are shown below:
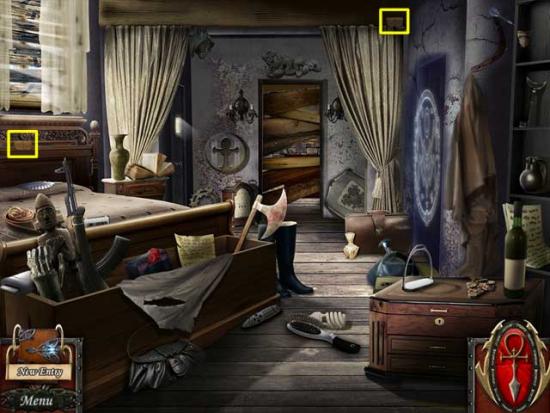
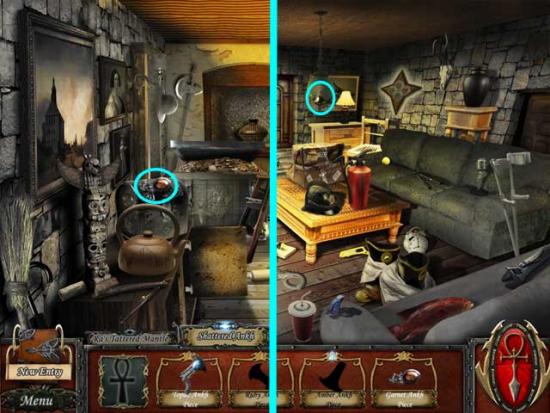
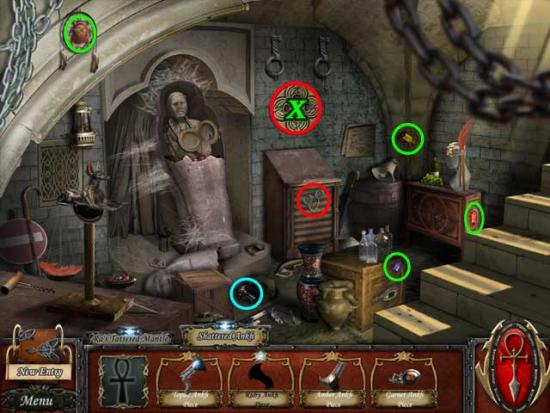
- Click on Ra’s Tattered Mantle (marked with a red X) to open a new hidden object list. Since none of these items are in the immediate vicinity, click on the Shattered Ankh (marked with a blue X) to open yet another object list. The Topaz Ankh Piece is located in this room and circled below.
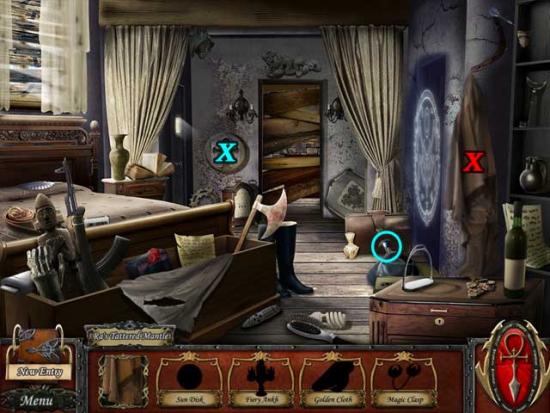
- The next two Ankh Pieces (Garnet and Amber) are located in the Hallway and Den respectively.
- Proceed back down to the Cellar.
Cellar
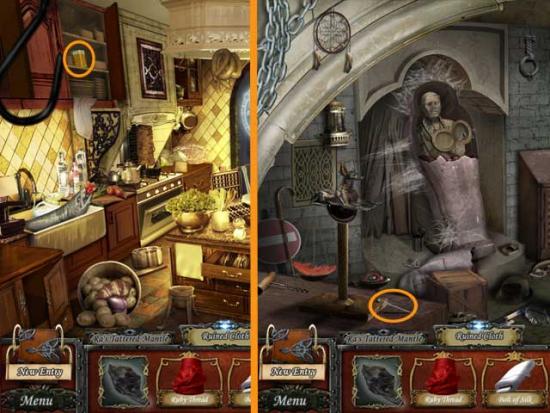
- The remaining Ruby Ankh Piece, as well as the Magic Clasp, are located in this room and shown below. Click on the Darkened Disk (marked with a green X) to open another hidden object list. The Golden, Bronze, Copper, and Amethyst Scarabs are all located in this room and shown below. Use them on the Darkened Disk to obtain the Sun Disk for Ra’s Tattered Mantle.
- Return to the Bedroom.
Bedroom
- Use the Ankh Pieces on the Shattered Ankh to obtain the Fiery Ankh for Ra’s Tattered Mantle. Next, click on the Ruined Cloth (marked with an orange X) to open a new hidden object list. Find the Ruby Thread and Bolt of Silk located in this room: their locations are shown below.
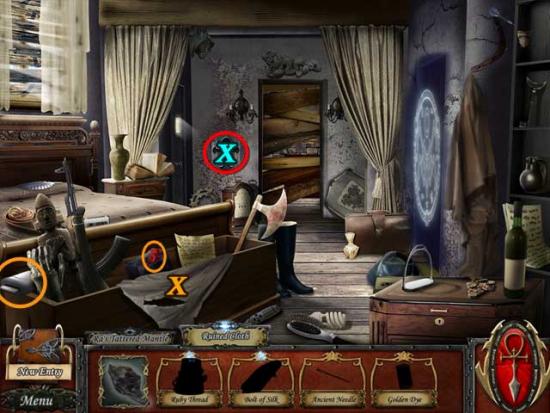
- The remaining Ancient Needle and Golden Dye needed for the Ruined Cloth are located in the Cellar and Kitchen respectively.
- Return to the Bedroom and use the items on the Ruined Cloth to patch it and obtain the Golden Cloth. The last item needed for Ra’s Tattered Mantle, use all of the objects on the Mantle to restore it and obtain a new ability: Day Walk, which will allow you to go outside while the sun is up.
Chapter 5: Bat Form
Entryway
- After a brief chat with Tristan, you will be given a new goal.
GOAL: Return to the Human Stronghold.
- Proceed out of the Entryway via Sunwalk, and proceed through the Pathway to the Storage Room. A rather easy task, wasn’t it?
GOAL: Acquire the vampire relic from the attic.
Storage Room
- If you didn’t try to enter the Hallway at the very beginning of the game, when you attempt to now, debris will fall and block the way. Use Force to clear it and proceed up to the Hallway.
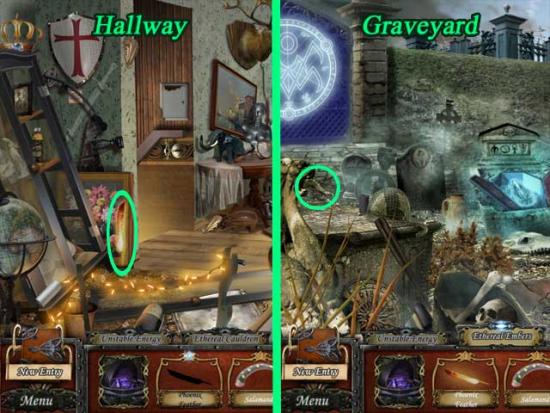
Hallway
- There are Cards in this room. Their locations are shown below.
- From here you may choose to enter the Bathroom via Mist Form or proceed up to the Attic.
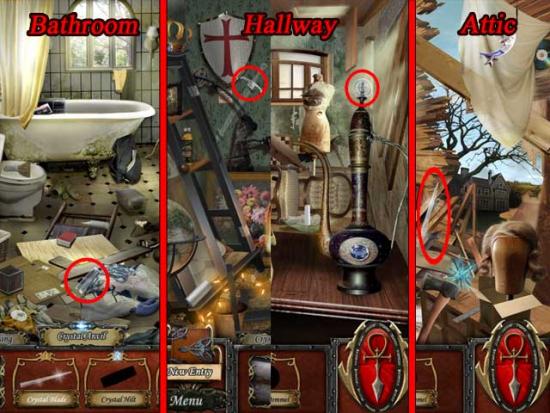
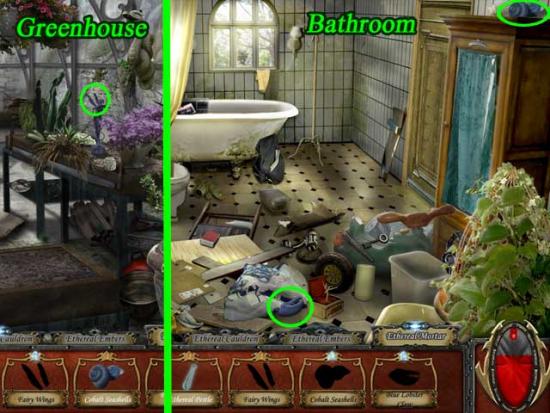
Bathroom
- While there’s nothing to do in here just yet, there are Cards located in this room. Their locations are shown below.
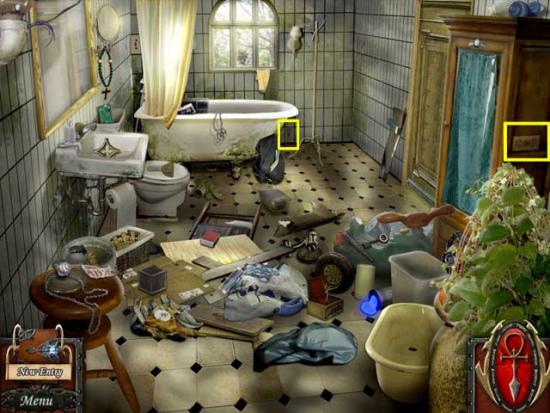
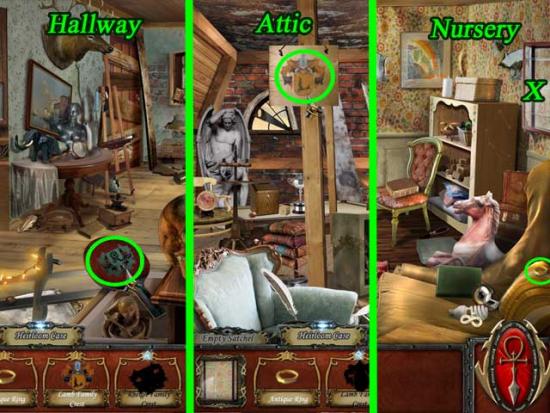
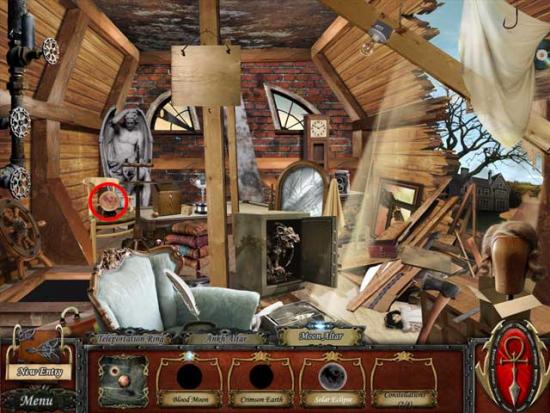
Attic
- The Card locations are squared below. Click on the Sealed Case (marked with a red X) to open a new hidden object list. The first Metal Key is located in this room and shown below.
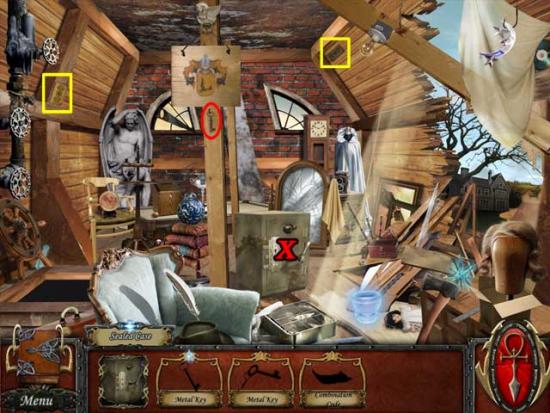
- The remaining Metal Key and Combination Code are located in the Hallway and Bathroom respectively. Their locations are shown below.
- Return to the Attic and use the items on the Sealed Case to unlock it and reveal the Dismantled Relic (later marked with a red X). Click on it to open another hidden object list. Since none of the needed items are in the immediate room, return to the Hallway.
Hallway
- Click on the Angel Wings (marked with a blue X) to open another hidden object list. The Dragon’s Claw is located in this room and shown below.
- Proceed to the Bathroom via Mist Form.
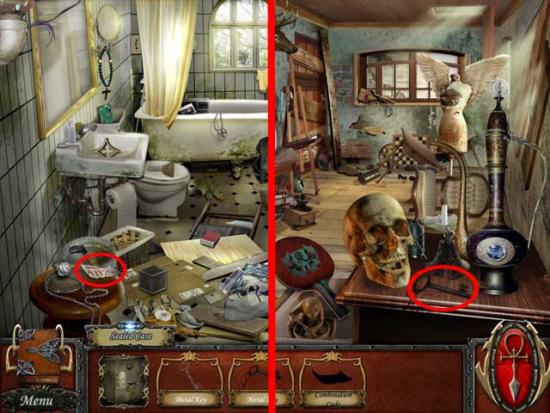
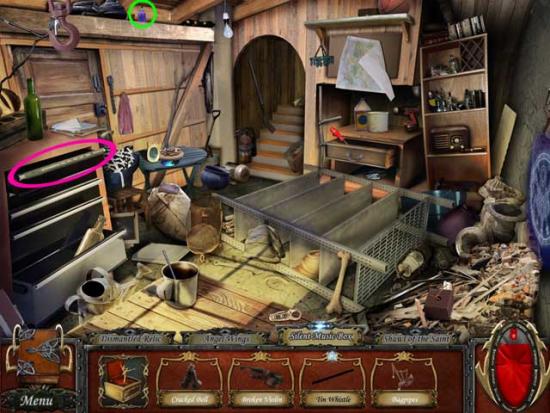
Bathroom
- The Hellfire Ash needed for the Angel Wings is located here and circled below. In here you will also find the Silent Music Box (marked with a pink X). Click on it to open a new hidden object list, though none required are located in this room.
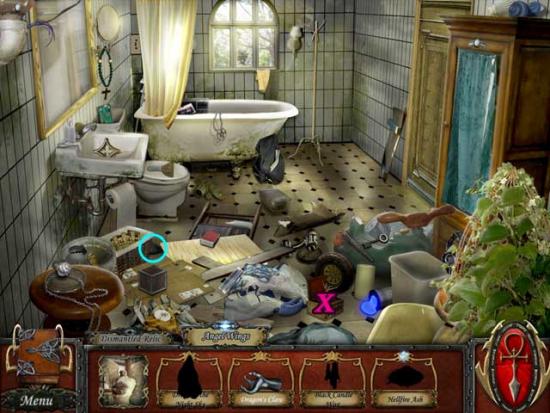
Hallway
- Return here to gather the Cracked Bell and Broken Violin needed for the Silent Music box. Their locations are shown below.
Attic
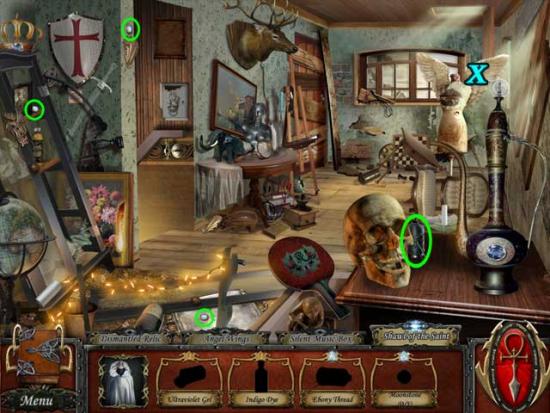
- Return to the Attic to find the Black Candle Wax needed for the Angel Wings, as well as the Bagpipes needed for the Silent Music Box. You may now also click on the Shawl of the Saint (marked with a green X) to open another hidden object list, though none of the items for it are located here.
- Return to the Hallway once again.
Hallway
- The Ebony Thread and 3 of the 5 required Moonstones for the Shawl of the Saint are located here. Their locations are shown below.
- Proceed down to the Storage Room.
Storage Room
- Located here is the Tin Whistle required to finish the items needed for the Silent Music Box, as well as the Indigo Dye needed for the Shawl of the Saint. Their locations are shown and circled below.
- Return once again to the Bathroom.
Bathroom
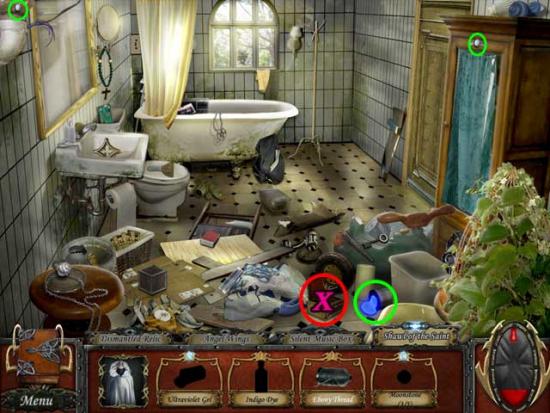
- Use the items needed on the Silent Music Box to obtain the Sonic Screech needed for the Dismantled Relic.
- Pick up the Ultraviolet Gel and the remaining 2 Moonstones to complete the items needed for the Shawl of the Saint.
- Return to the Attic.
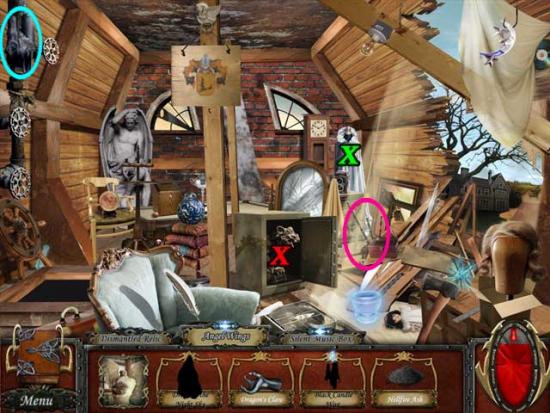
Attic
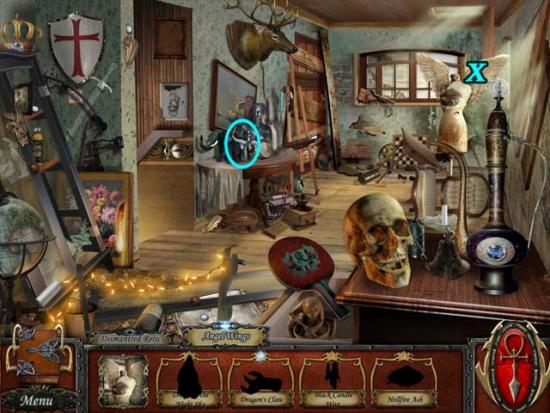
- Use the gathered items on the Shawl of the Saint to obtain the Drape of the Night Sky. This is the last item needed for the Angel Wings, so proceed back down to the Hallway.
Hallway
- Use the gathered items on the Angel Wings to obtain Demon Wings needed for the Dismantled Relic. Now you’ll be able to access the last two hidden object lists needed to obtain the last two items for the Dismantled Relic.
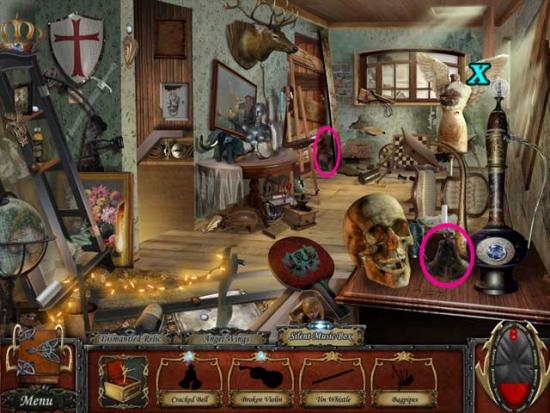
- Click on the Blank Scroll (marked with a green X) to obtain another hidden object list. The Crystallized Wind is located in the same room, so it’s been circled for you below.
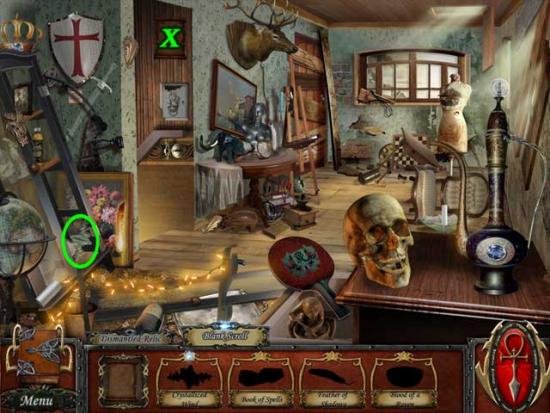
- The remaining items needed for the Blank Scroll (the Book of Spells, Feather of Shadows, and Blood of a Raven) are located in the Bedroom, Attic, and Greenhouse (accessible via the Bedroom) respectively. The Bedroom and Greenhouse are located in the Vampire Haven. Their locations are all shown below:
- Return to the Blank Scroll and use the items on it to obtain the Scroll of Dark Flight needed for the Dismantled Relic.
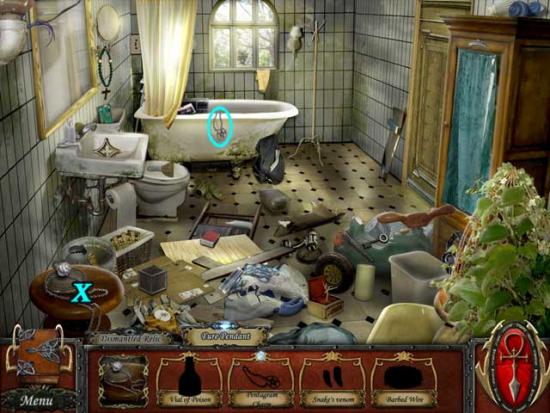
Bathroom
- Click on the Pure Pendant (marked with a blue X) to open another hidden object list. The Pentagram Charm is also located in this room, thus it’s been circled for you below.
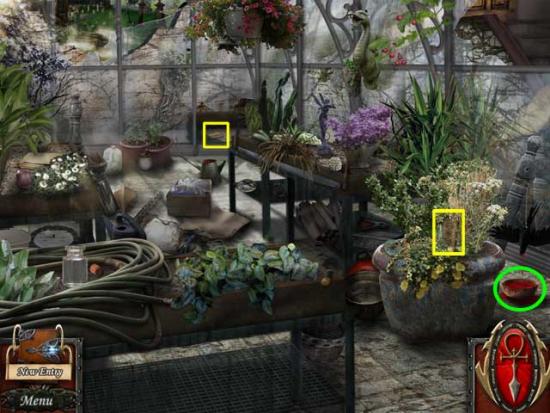
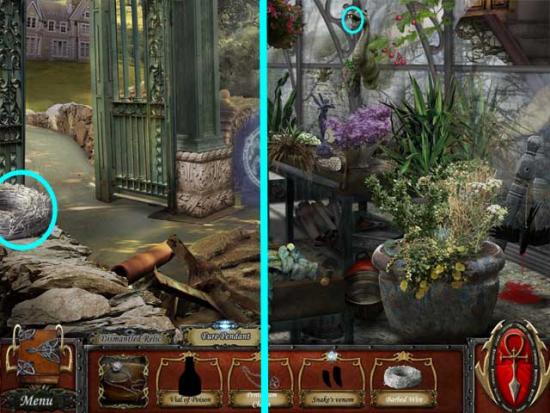
- The Barbed Wire and Snake’s Venom are located on the Pathway and in the Greenhouse respectively. Their locations are shown below:
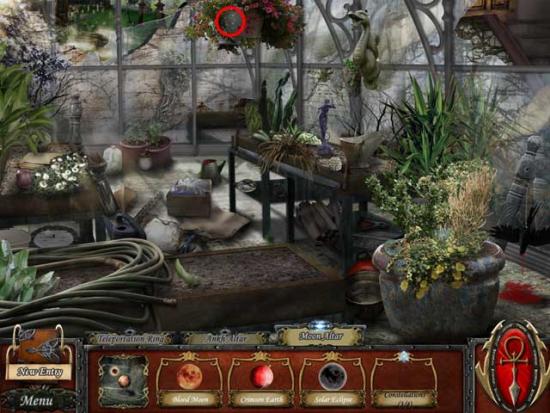
Greenhouse
- In order to get the remaining Vial of Poison needed for the Pure Pendant, you’ll need to accomplish another task first. Click on the Empty Vial (marked with a purple X) to open a new hidden object list. The Hemlock, Poison Ivy, Deadly Nightshade, and Green Bile are all located in this room and circled for you below.
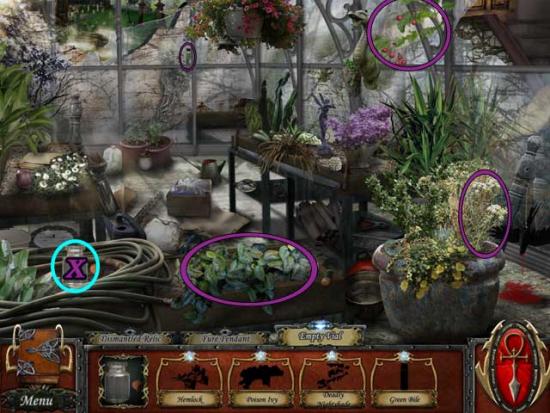
- Use these items on the Empty Vial to obtain the Vial of Poison and return to the Bathroom.
Bathroom
- Use the items on the Pure Pendant to defile it and obtain the Defiled Pendant: the last item needed for the Dismantled Relic. Proceed to the Attic.
Attic
- Once in the Attic, you’ll have an unexpected encounter with a certain someone, resulting in the loss of all your hard-earned items. But not to worry, return to the Entryway of the Vampire Haven to set things right.
Entryway
- After a brief conversation with Tristan, your items will be returned to you. Backtrack once again to the Attic of the Human Hold.
Attic
- Use the items on the Dismantled Relic to obtain a new ability: Bat Form. You can now fly to previously unaccessible areas.
Chapter 6: Break Magic Seals
Patio
- Fly to the Patio via the Attic. There’s not much you can do here now, except fly to the Graveyard from here, but the Cards in this location are shown below.
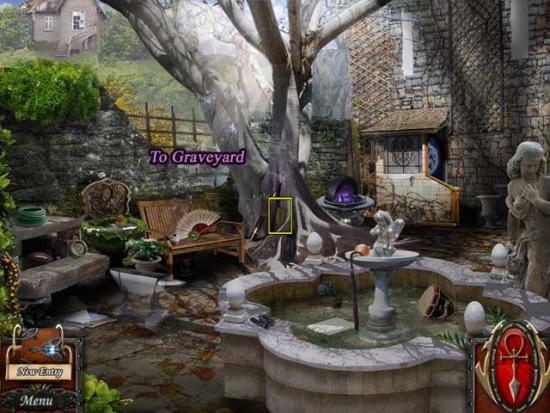
Graveyard
- The Card locations are shown below. Click on the Odd Tombstone (marked with a red X) to open a hidden object list. The Handbroom required is circled and shown below. Use it on the Odd Tombstone.
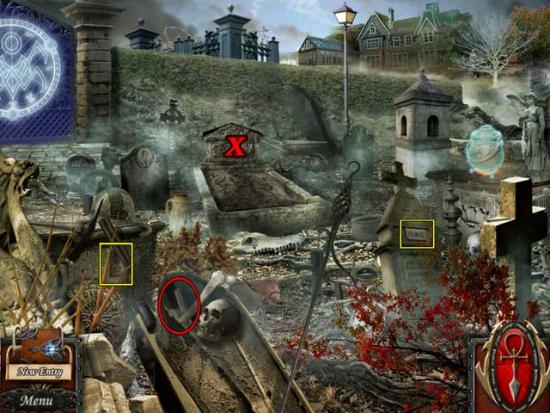
GOAL: Open the grave of Abraham Lamb-Rheigh.
- Click on the Hard Earth (marked with a red X) to open a hidden object list. The location of the Pick Axe is shown below.
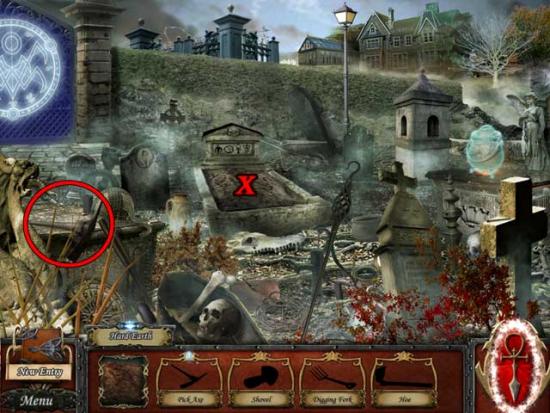
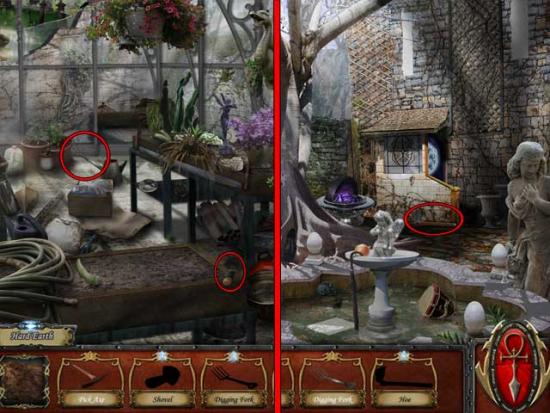
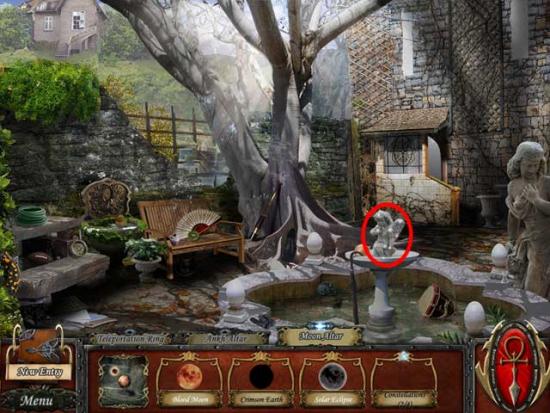
- The Shovel and the Digging Fork are located in the Greenhouse, and the Hoe is located on the Patio. Their locations are shown below:
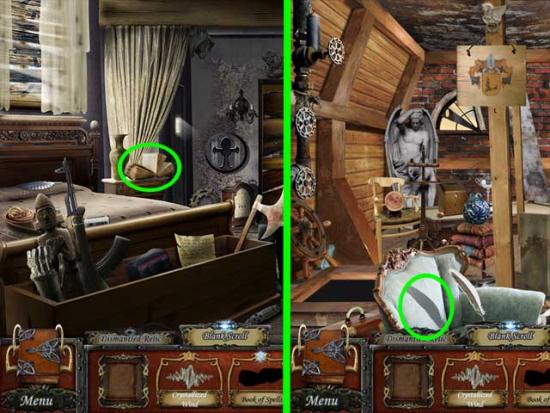
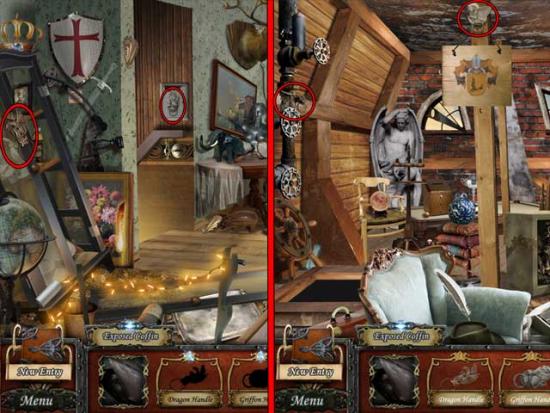
- Return to the grave and use the items on the Hard Earth. You will then reveal the Exposed Coffin. Click on it to open a new hidden object list. The Dragon & Griffon Handle are located in the Hallway of the Human Hold, while the Pegasus & Gargoyle Handle are located in the Attic. Their locations are shown below:
- Use the Handles on the Exposed Coffin to reveal the Crystal Casing. Click on it to open a new hidden object list.
- Fly to the Patio.
Patio
- Click on the Crystal Anvil to open a new hidden object list. The locations of the items needed are circled and shown in the screenshot below.
- Take the Sword Parts back to the Crystal Anvil and use them on it to forge the Crystal Sword.
Graveyard
- Use the Crystal Sword on the Crystal Casing to complete the current task.
GOAL: Absorb the chaotic energy within Abraham’s grave.
- Click on the Unstable Energy (marked with a purple X) to open a new hidden object list. Next, click on the Ethereal Cauldron (marked with a blue X) to open another hidden object list. The Crocodile Tears are located in the same area, so they’re circled below.
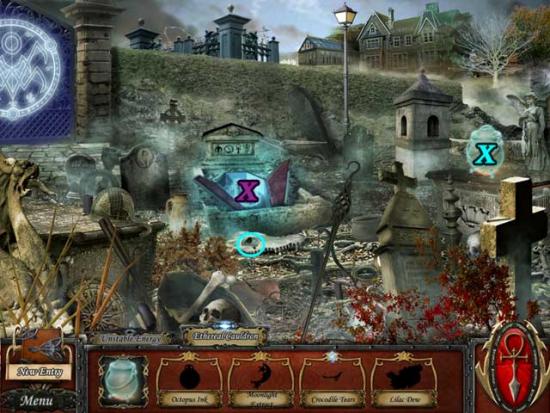
- The other Ethereal Cauldron items (Octopus Ink, Moonlight Extract, and Lilac Dew) are shown and circled in the following locations below.
Graveyard
- Return to the Graveyard and use the items on the Ethereal Cauldron to obtain the Ethereal Liquid needed for the Unstable Energy.
- Fly to the Patio.
Patio
- Click on the Ethereal Embers (marked with a teal X) to open a new hidden object list. The Salamander and Brimstone are located in the same area, so they’re circled and shown below.
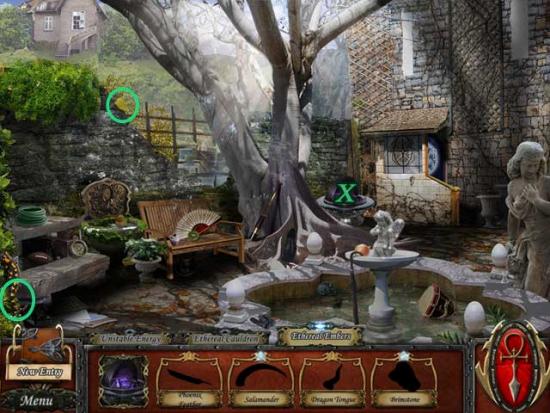
- The remaining Dragon Tongue and Phoenix feather are located in the following areas, shown below:
- Return to the Patio and use the items on the Ethereal Embers to obtain the Ethereal Flames needed for the Unstable Energy.
Attic
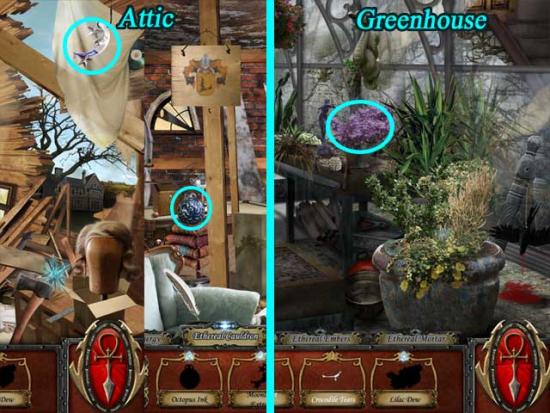
- Click on the Ethereal Chamber (circled in purple) to add it to your list of items needed for the Unstable Energy. Next, click the Ethereal Mortar (marked with a green X) to open a new hidden object list. The Ethereal Pestle is located in the same room, so it’s been circled for you below.
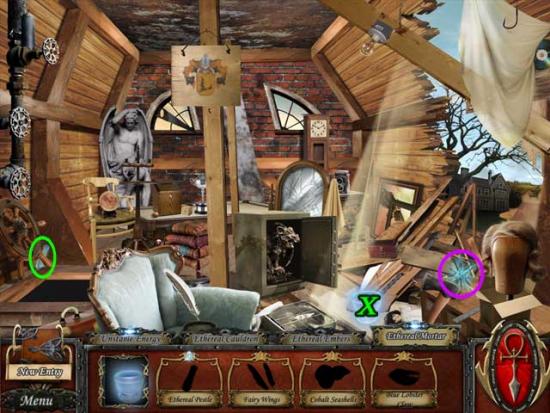
- The locations of the remaining Fairy Wings, Cobalt Seashells, and Blue Lobster Claw are circled and shown below.
- Return to the Attic and use the items on the Ethereal Mortar to acquire the Ethereal Powder.
Graveyard
- Return to the Graveyard and use the various items on the Unstable Energy. You will learn a new ability: Break Magic Seals. You can now break the remaining magic seals that block access to you in the game.
Chapter 7: Fates & Secrets
GOAL: Enter the Nursery and save Savanna Lamb-Rheigh.
- Return to the Storage Room. The fastest way to get there is to use Break Seal on the Graveyard seal, and enter via the Pathway.
Storage Room
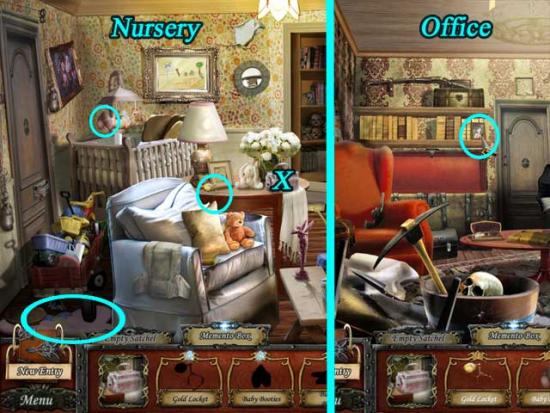
- Use Break Seal on the seal covering the entrance to the Office, then enter.
Office
- Now you’re back where you first started the game. Click on the Nursery to discover it’s locked from the other side. Exit the Office and proceed up to the Bathroom.
Bathroom
- Click on the Weakened Wall to open up a new hidden object list, then exit the Bathroom.
Hallway
- The Battery is located in the Hallway. Its location is shown below.
- Proceed back down to the Office and use Force on the pile of rubble on the right to clear a path to the Workshop.
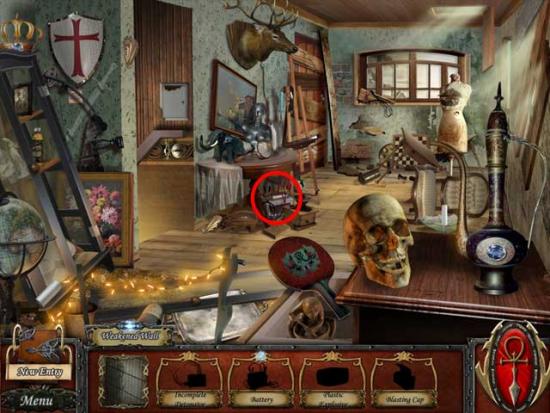
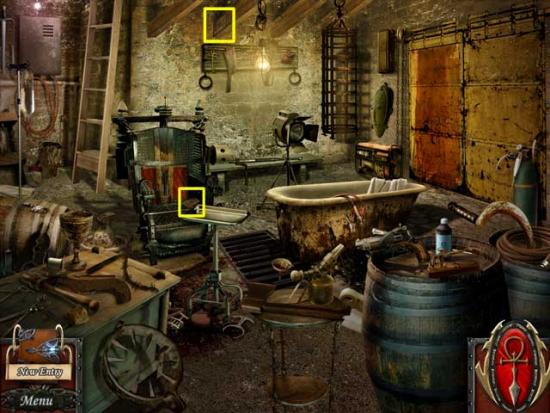
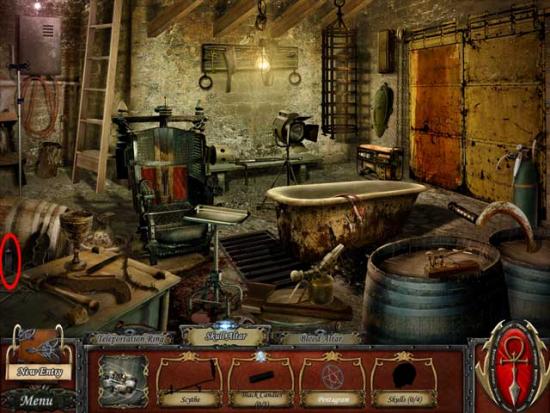
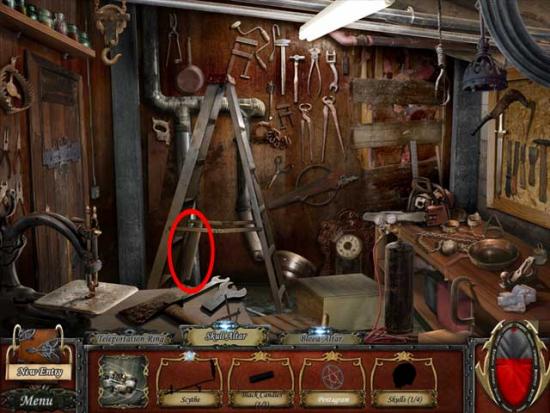
Workshop
- The locations of the Plastic Explosive and the Blasting Cap (as well as the Cards) are shown in the screenshot below. You’ll have a few more tasks to do before you can obtain the Incomplete Detonator, though.
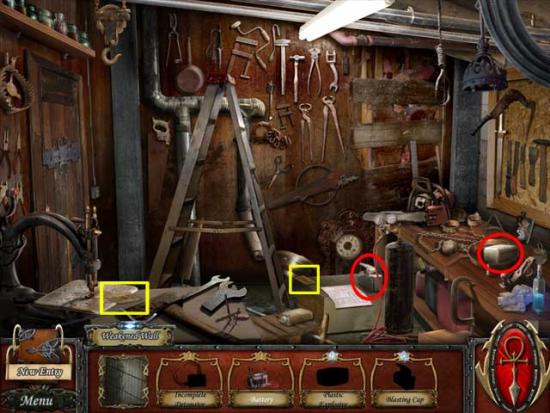
- Click on the Incomplete Detonator (marked by a blue X) to open a new hidden object list. All the items with the exception of the Complete Wiring are located in the same room and circled below. Don’t forget to click on the Wiring Instructions (marked with a green X).
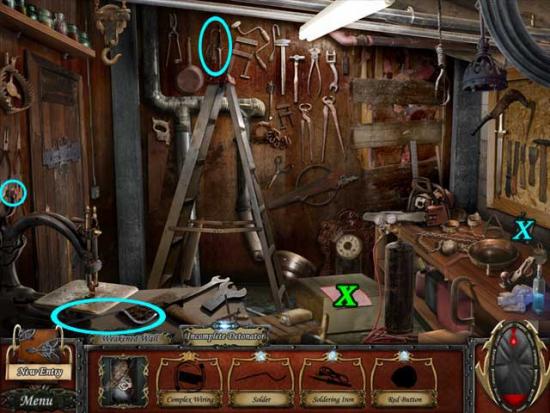
- Exit the Workshop and locate the items needed for the Wiring Instructions as shown below:
- Return to the Workshop and use the items on the Wiring Instructions to make the Complete Wiring, then use the items on the Incomplete Detonator to finish the explosives for the Weakened Wall.
Bathroom
- Use the explosives on the Weakened Wall to open up a pathway to the Nursery.
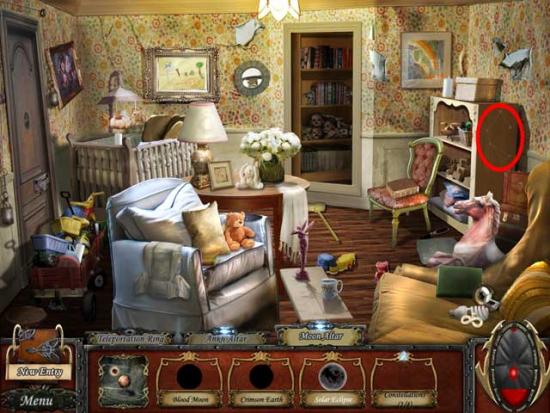
Nursery
- The Cards in this room are squared in the screenshot below. Click on the Broken Lock (marked with a red X) to open up a new hidden object list. The parts are all located in this room and circled below.
- Use the items on the Broken Lock to open it and proceed back into the Office.
Office
GOAL: Find the hidden room.
- Return to the Nursery
Nursery
- Click on the Odd Bookcase (marked with a red X) to open a hidden object list. All the objects are located in the room and circled for you below.
- Use the books on the Odd Bookcase to open a secret passage to the Torture Room.
Torture Room
- The Card locations for this room are shown below:
- Click on Medical Tray 1 (marked with a red X) to open a hidden object list. All the objects are located in the room and circled for you below.
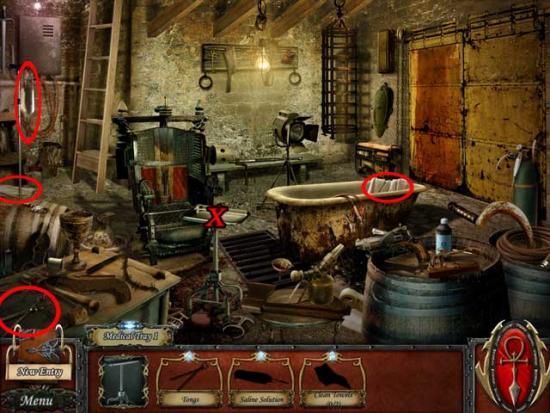
- Place the objects on the tray to gain access to Medical Tray 2.
- Click on Medical Tray 2 (marked with a blue X) to open a hidden object list. All the objects are located in the room and circled for you below.
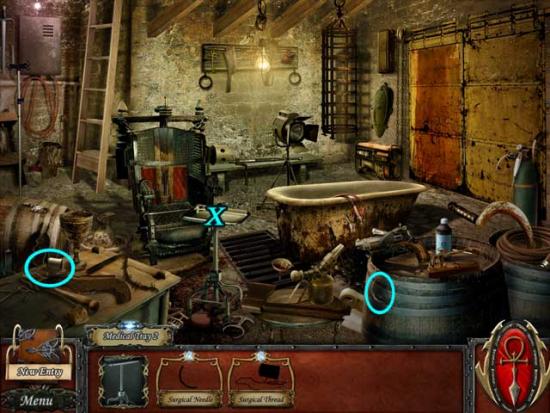
- Place the objects on the tray to gain access to Medical Tray 3.
- Click on Medical Tray 3 (marked with a green X) to open a hidden object list. All the objects (with one exception shown below) are located in the room and circled for you below.
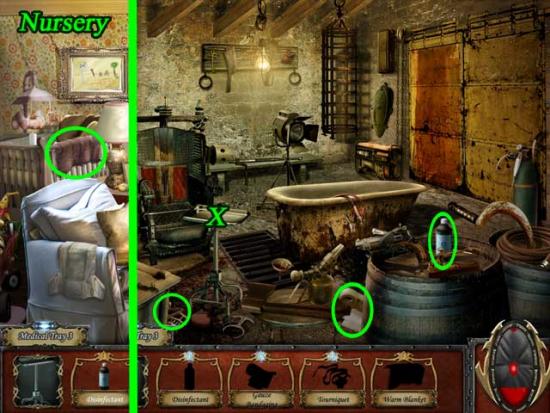
- Place the objects on the tray.
GOAL: Find a supply of blood in the library of the Vampire Haven.
- The Library can be accessed by using Seal Break in the Bedroom.
Library
- Well, things don’t go quite as planned.
GOAL: Escape the library and return to the torture room.
- The Cards located in the Library are shown below:
- Click the Unusable Switch (marked with a blue X) to open a hidden object list. The Pendulum and the Clock Key can be immediately picked up and are circled and shown below.

- Click on the Bent Face (marked with a green X) to open a hidden object list. All the objects for it are shown and circled below.
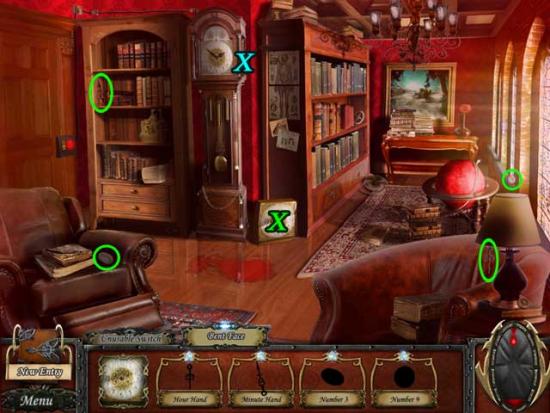
- Use the items on the Bent Face to reassemble it and add the Clock Face to your Unusable Switch items.
- Click the Broken Movements (marked with an orange X) to open a hidden object list. All the objects for it are shown and circled below.
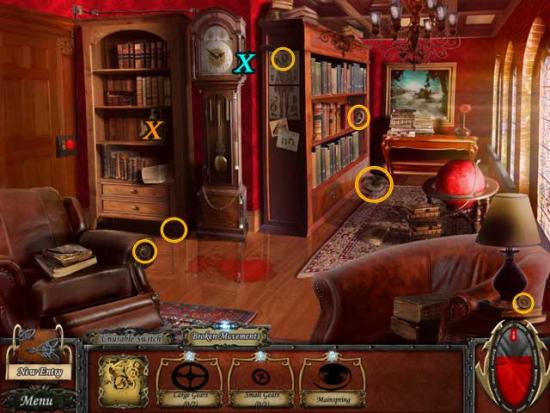
- Use the items on the Broken Movements to reassemble it and add the Clock Movements to your Unusable Switch items. Use the items on the Unusable Switch to fix it and escape. Return to the Torture Room.
Chapter 8: The Decision
At this point in the game, you will be faced with a decision: to feed, or not to feed. Depending on which you choose, the gameplay and story ending differ slightly, yet not enough for them to get two seperate sections. It should be noted that the decision “Not to Feed” was chosen for this particular guide. However, most of the items between the two endings are reoccuring and therefore, this guide may also apply to the alternate choice “to feed”.
GOAL: Help Kali save Savanna Lamb-Rheigh.
- Click on Paige’s Empty Gun to open a new hidden object list. None of the items are in this room, so backtrack to the Workshop.
Workshop
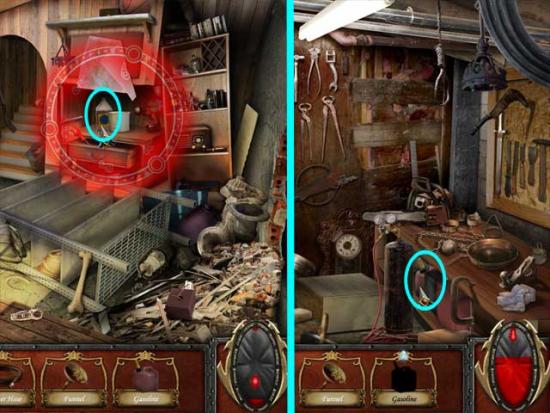
- Find the Ultraviolet Ink and 6 Holy Bullets needed for Paige’s Empty Gun in this room. Their locations are shown and circled below.
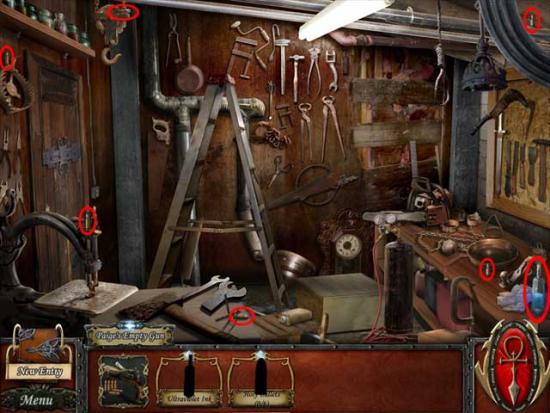
- Return to the Torture Room.
Torture Room
- Use the items on Paige’s Empty Gun to fix it.
- Click on the Disabled Generator (marked with a blue X) to open a new hidden object list. Two of the four required objects are in this room and shown in the screenshot below:
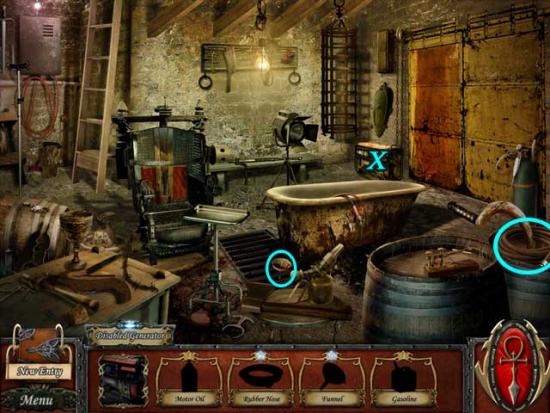
- The remaining two items are located in the Workshop and the Storage Room and shown below.
- Return to the Disabled Generator and use the items on it to open the path to the Crematorium.
Crematorium
- The final Cards are located in this room. Their locations are shown below:
- As an added bonus, the solution to the maximum number of bonuses by using the Cards in the minigame in your Book is as shown:

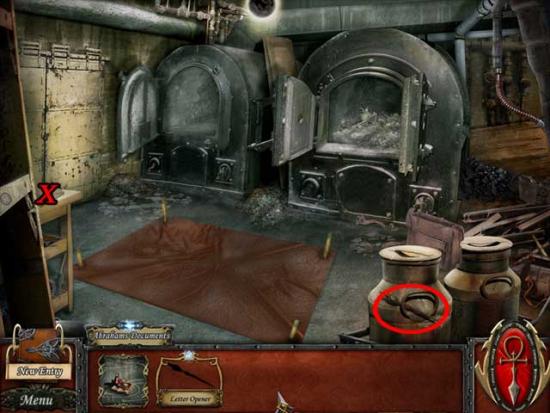
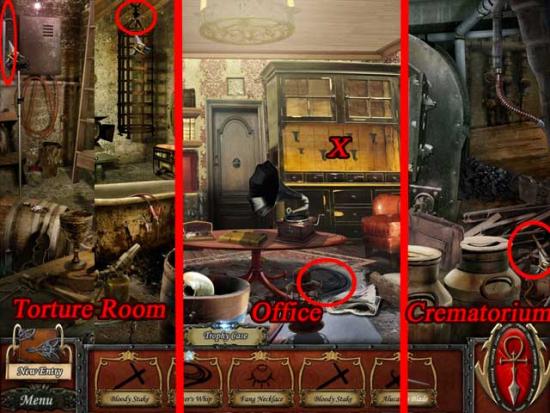
- Click on Abraham’s Documents (marked with a red X) to open a new hidden object list. Find and use the Letter Opener on the Documents. Its location is shown below.
GOAL: Save all evidence of your previous life as Dakota Lamb-Rheigh.
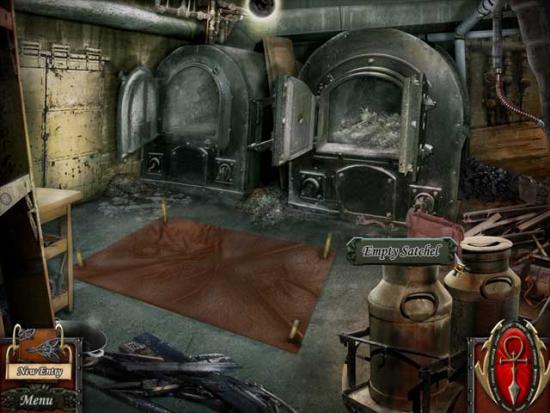
- Click the Empty Satchel to discover a new hidden object list.
Nursery
- Click on the Memento Box (marked with a blue X) to open a new hidden object list. Three of the objects are located in the room, while the location of the fourth is also shown below.
- Collect all the items to add the Mementos of Savanna to the Empty Satchel.
Nursery
- Click the Heirloom Case (marked with a green X) to open a new hidden object list. The locations of the items are shown below:
- Collect all the items to add the Family Heirlooms to the Empty Satchel.
Office
- Click on the Trophy Case (marked with a red X) to open a new hidden object list. The locations of the items are shown below:
- Collect all the items to add the Hunting Trophies to the Empty Satchel.
- Return to the Crematorium and add the various collections to the Empty Satchel.
GOAL: Create a portal to travel to the vampire citadel.
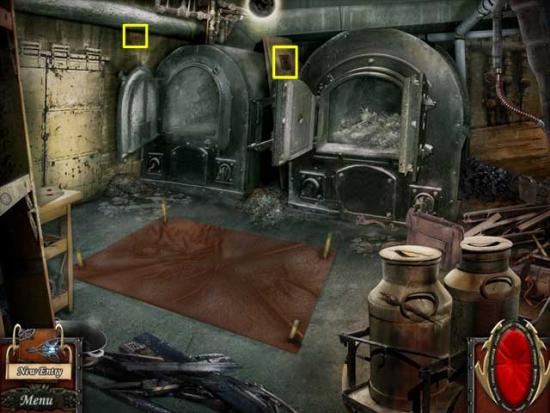
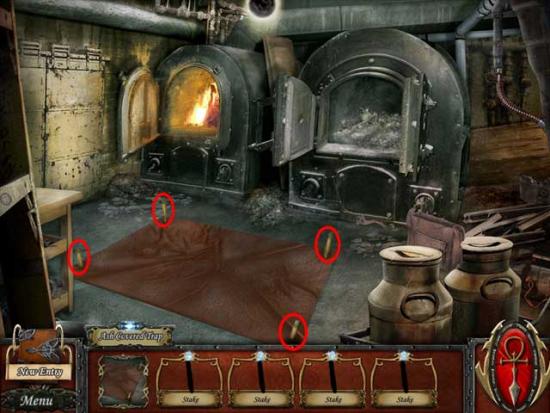
Crematorium
- Click on the Ash Covered Trap. Remove the four pegs circled in the screenshot below, then click on the trap again to clear it.
- Click on the Teleportation Ring to open a new object list. Click on the Ankh Altar and the Moon Altar to add their hidden object lists down below (Note: the other two will not become available until you finishe these).
- First, the Ankh Altar. The locations of the four needed items are as shown below:
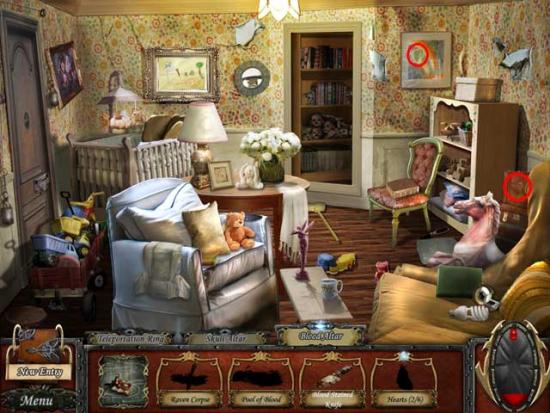
? Nursery: The Infinity Pendant and 3 of the 7 White Candles needed are located in this room as shown below:
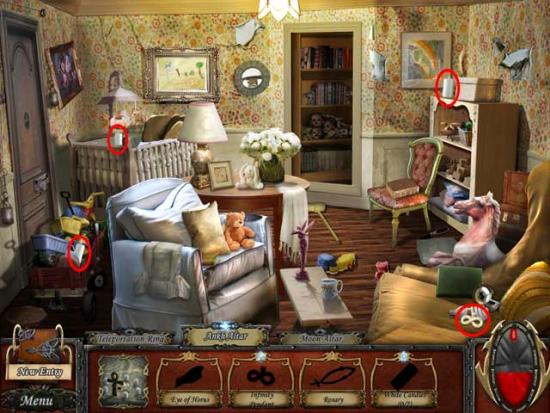
? Office/Hallway: 3 more White Candles can be found in these locations:
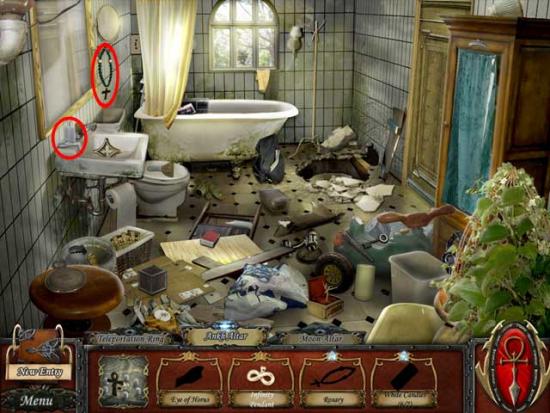
? Bathroom: the last White Candle and Rosary can be found here:
? Cellar: the Eye of Horus is located here:
- Second, the Moon Altar. The locations of the four needed items are as shown below:
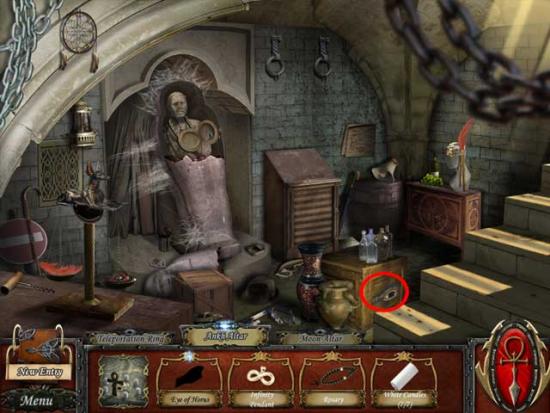
? Crematorium: the Solar Eclipse and one of the Constellations are located here:
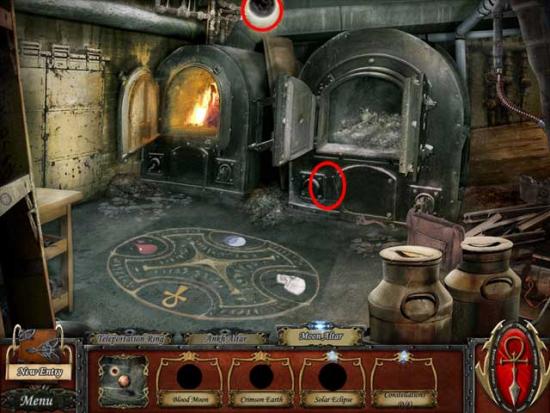
? Nursery: another Constellation can be found here:
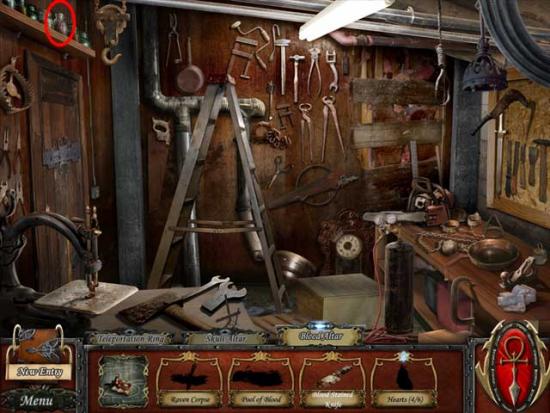
? Attic: the Blood Moon can be found here:
? Patio: another Constellation can be found here:
? Library: the Crimson Earth can be found here:
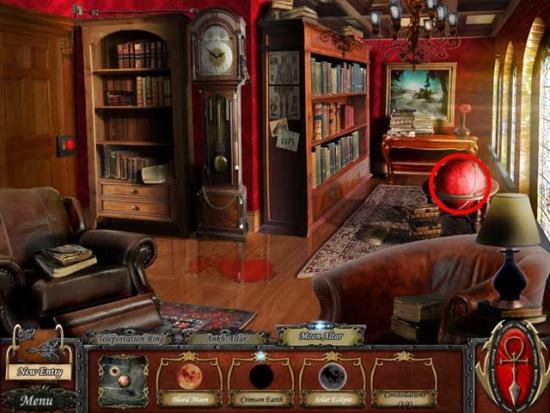
? Greenhouse: the last Constellation can be found here:
- Return to the Crematorium and place the items with the Ankh and Moon Altars.
Crematorium
- Click on the Skull and the Blood Altar to acquire their hidden object lists.
- First, the Skull Altar. The locations of the four needed items are as shown below:
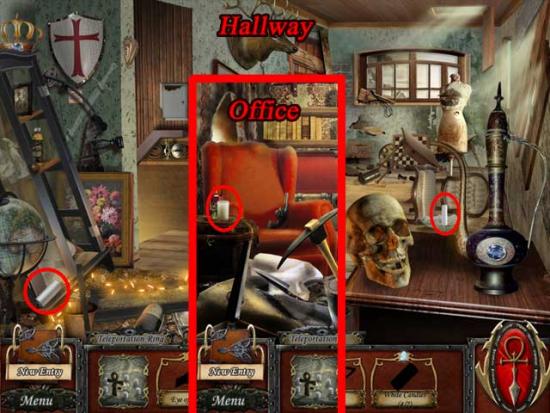
? Crematorium: the location of the Pentagram is shown below:
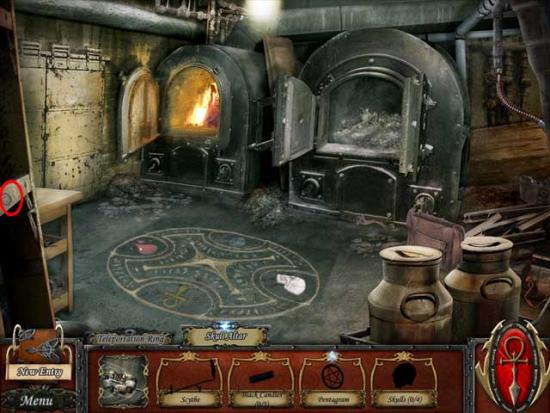
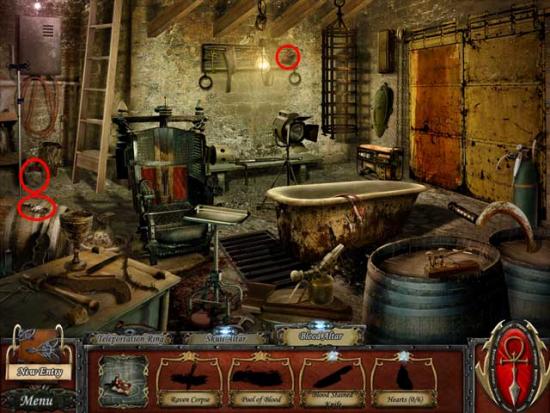
? Torture Room: one of the Black Candles is located here.
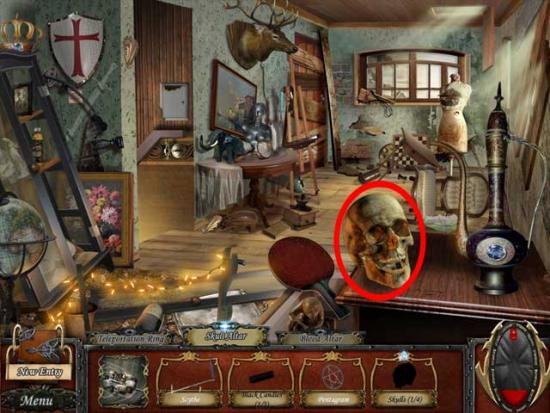
? Office: one of the Skulls is located here.
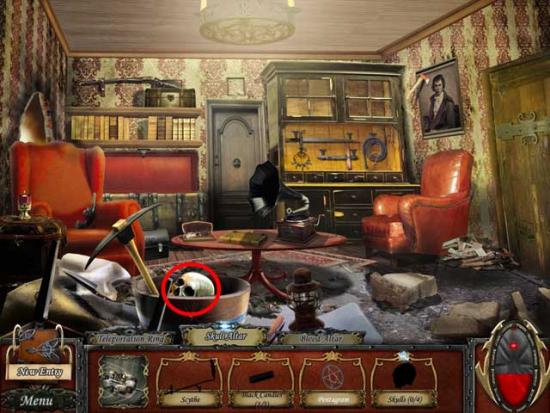
? Workshop: the Scythe is located here.
? Hallway: another Skull is located here.
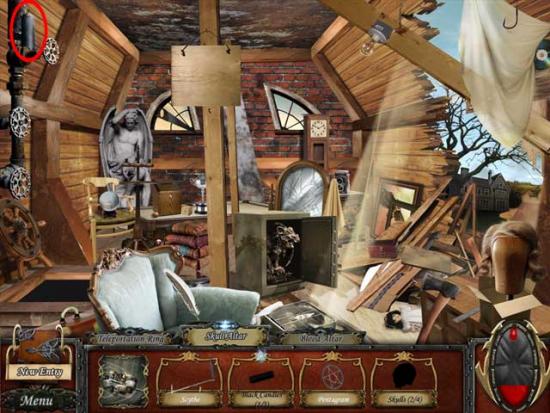
? Attic: another Black Candle is located here.
? Graveyard: the remaining 3 Black Candles and 2 Skulls are located here.
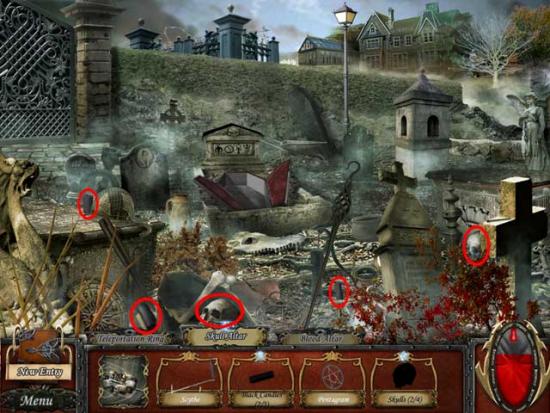
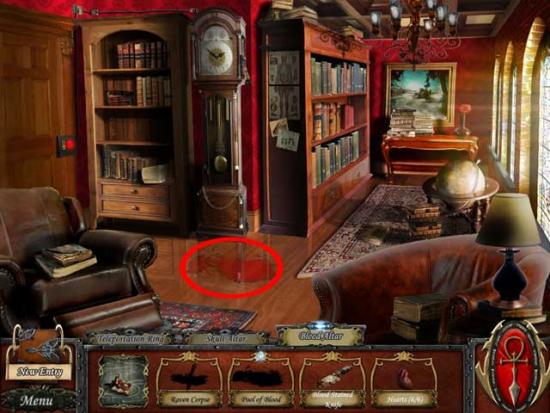
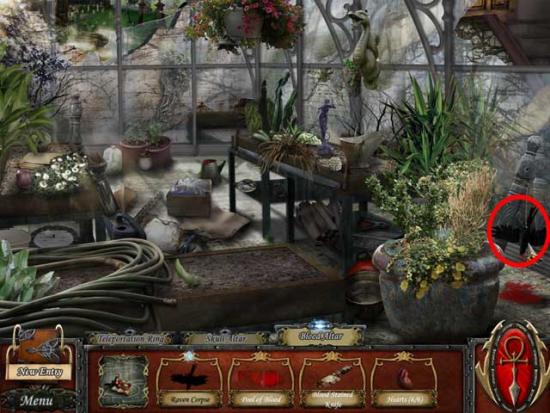
- Second, the Blood Altar. The locations of the four needed items are as shown below:
? Torture Room: the Blood Stained Knife and 2 Hearts are located here.
? Nursery: another 2 Hearts are located here.
? Workshop: another Heart is located here.
? Bathroom: the last Heart is located here.
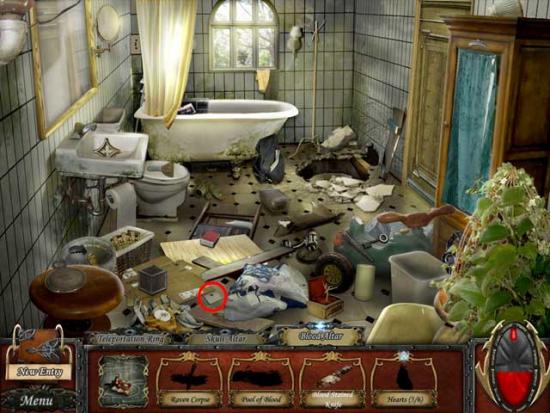
? Library: the Pool of Blood is located here.
? Greenhouse: the Raven Corpse can be found here.
- Return to the Crematorium and use the items on their proper Altars.
- Place the items in the Teleportation Ring, then click it to proceed.
Congratulations, you’ve completed the game! The End…?

More articles...
-
Best Horror Games On Itch.io – July 2026
Across a bounty of subgenres. -
Haze Seas Accessories Tier List [Best Accessories to Equip]
The accessories with the best stat buffs in Haze Seas.