![Digimon UP Tier List [Supports, Buddies, and Partners]](/wp-content/uploads/2026/07/digimon-up-tier-list.jpg "Digimon UP Tier List [Supports, Buddies, and Partners]")
Digimon UP Tier List [Supports, Buddies, and Partners]
These Digimon will get you UP the leaderboard.


![Haze Seas Boss Drops [Chances, Locations, and How to Spawn]](/wp-content/uploads/2026/07/haze-seas-boss-drops.jpg "Haze Seas Boss Drops [Chances, Locations, and How to Spawn]")

Welcome to the Blood and Ruby walkthrough on Gamezebo, written by Lynne Basinet. Blood and Ruby is an interactive, adventure hidden object game played on PC or Mac, created by hitpoint Studios and available at BigFish Games. This walkthrough includes tips and tricks, helpful hints, and a strategy guide for how to complete Blood and Ruby.
Welcome to the Blood and Ruby walkthrough on Gamezebo, written by Lynne Basinet. Blood and Ruby is an interactive, adventure hidden object game played on PC or Mac, created by hitpoint Studios and available at BigFish Games. This walkthrough includes tips and tricks, helpful hints, and a strategy guide for how to complete Blood and Ruby.
Copyright Information
This walkthrough was created by Lynne Basinet, for gamezebo.com, and is protected under US and International Copyright laws. Any unauthorized use, including re-publication, in whole or in part, without permission, is strictly prohibited.
Create your profile, adjust the options if you like and click Play to begin your adventure.

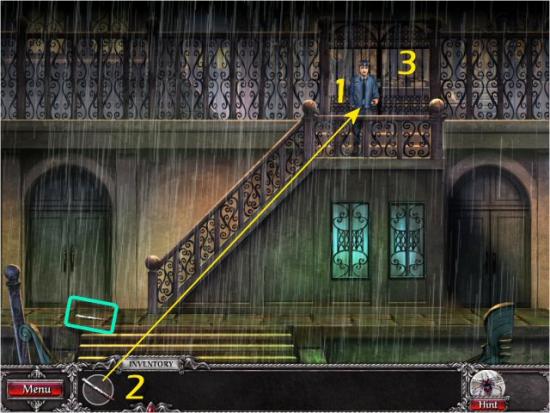
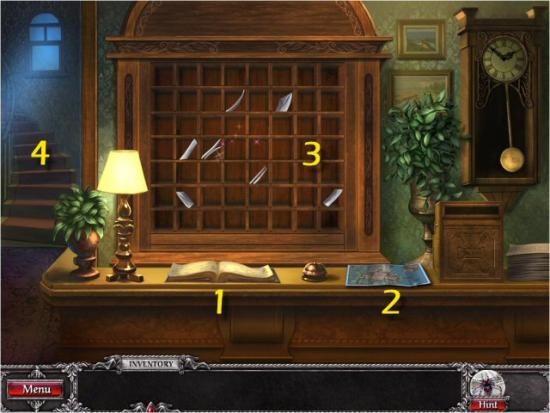
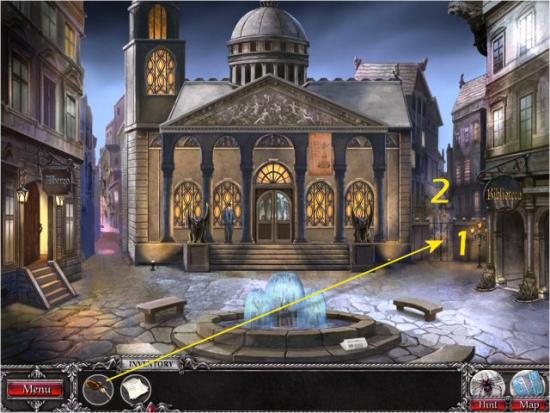
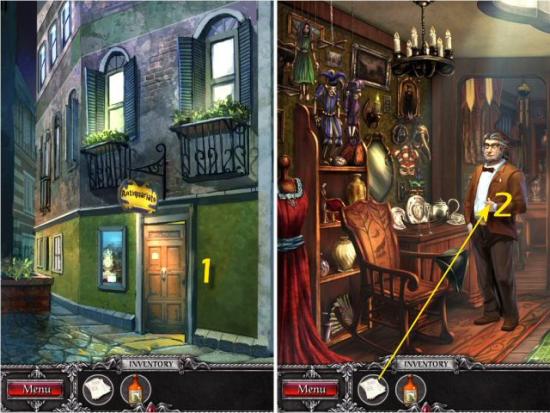
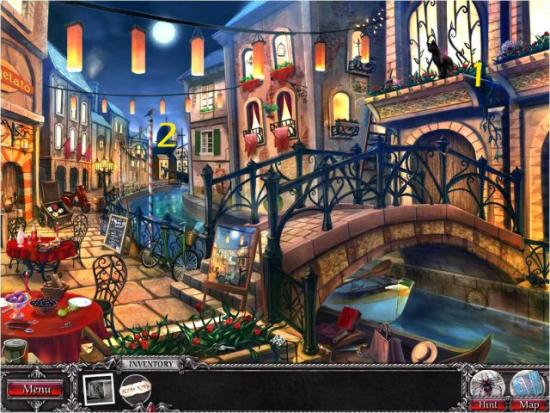
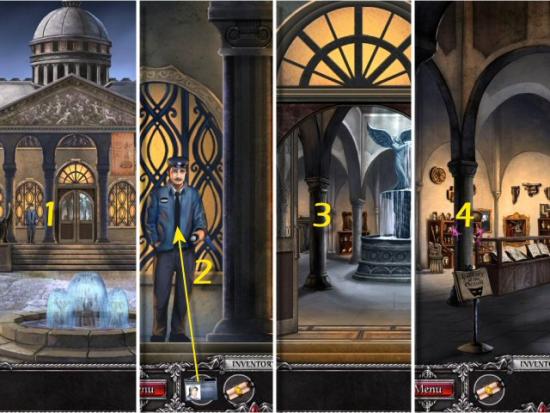
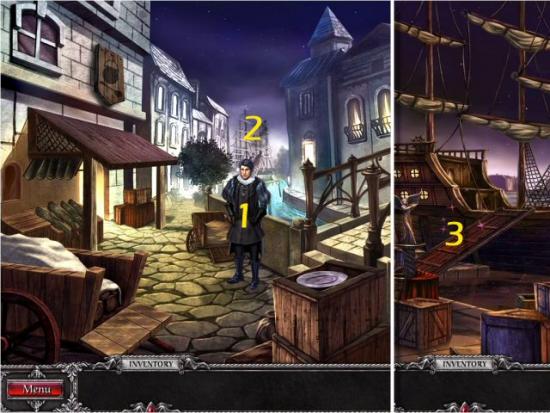
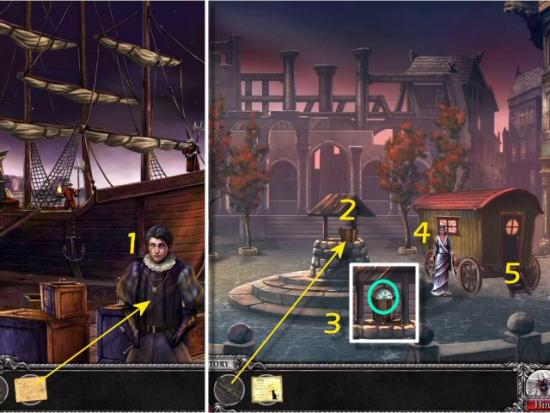
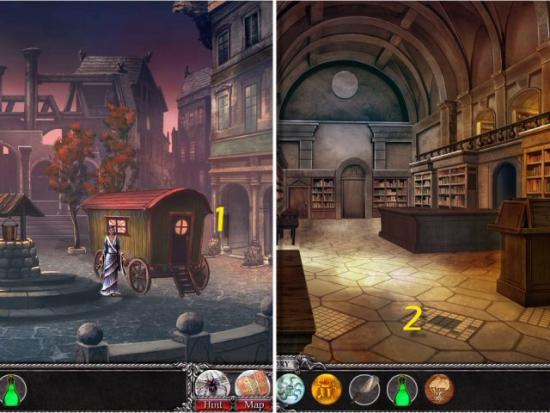
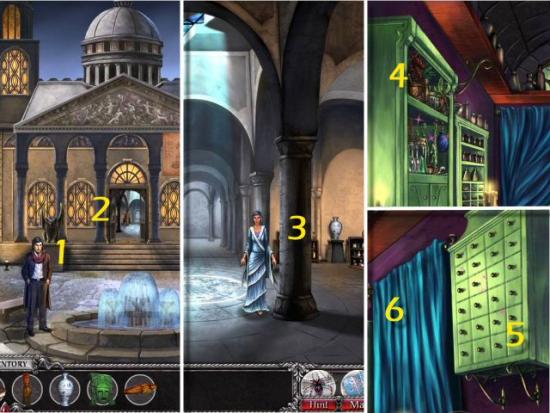
Speak to the Guard (1), collect the Letter Opener (click twice), give it to the Guard (2) and then proceed to the Courtyard (3).
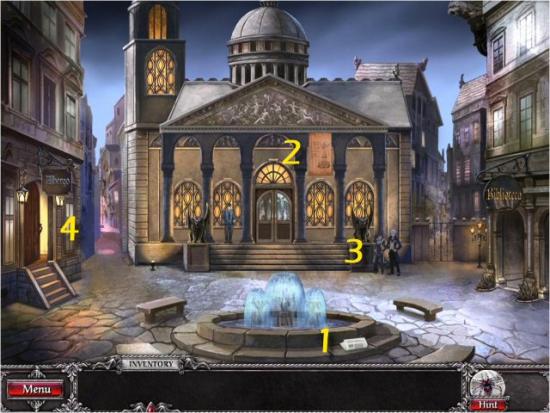
Click on the Newspaper (1), Poster (2), Ignacio and Lucia (3) and then enter the Hotel Albergo Lobby (4).
Click on the Guest Register (1), collect the Map (2) and then click on the Cubbyholes (3). When complete, continue upstairs to Marcus’ Hotel Room (4).
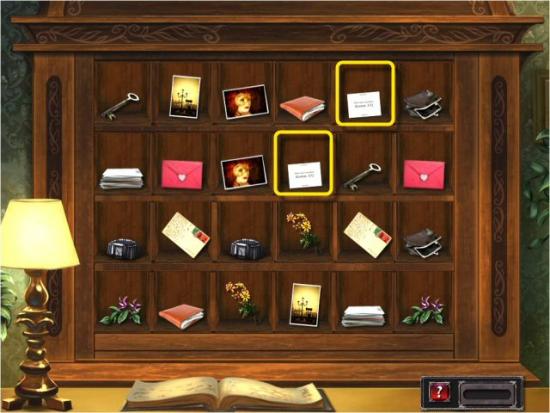
The object is to match 12 pairs of items to find Marcus Sinclair’s Room Number. Click on a Box and then click on another to make a match. Continue until you’ve matched all 12 pairs. Note that the arrangement of objects is random every time you play. Your minigame will probably not be the same as the screenshot. When complete, you’ll receive Marcus’ Room Number 301.
Find all the items in the list. Inventory Items: Wrought Iron Key, Receipts
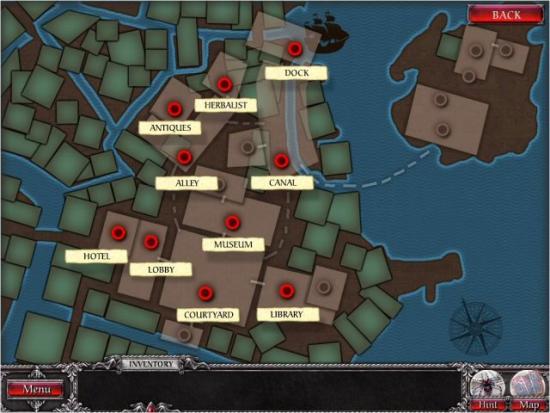
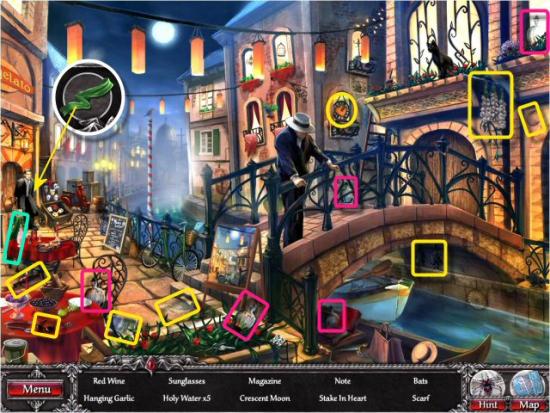
Return to the Courtyard, use the Key on the Gate (1) and continue to the Canal (2).
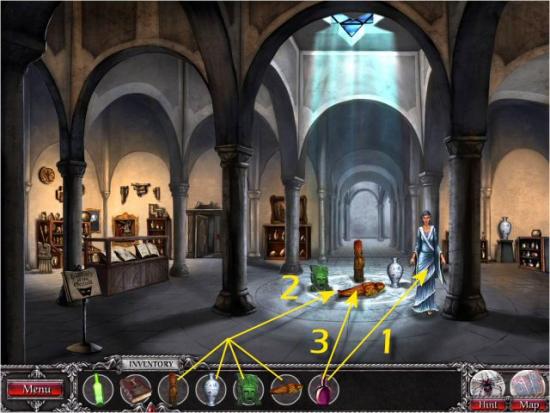
Find all the items in the list. Multiple Items: 5 bottles of Holy Water. Inventory Item: Scarf. Give the Scarf to Stratton and receive the Recipe. Return to the Plaza and then continue to the Alley.
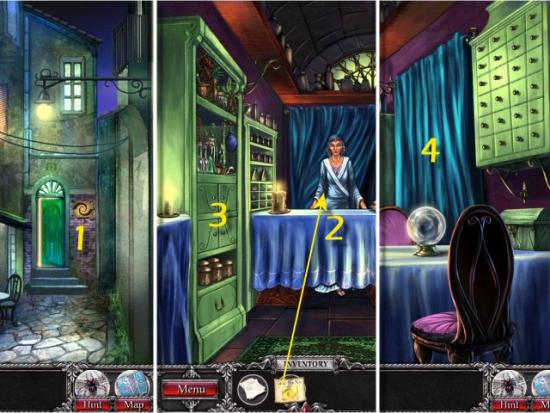
Enter the Herbalist Shop (1), give the Recipe to Orazia (2) and then click on the Shelves (3). When complete, click on the Curtains (4).
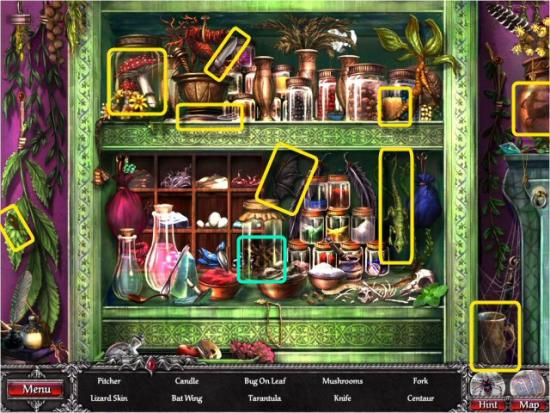
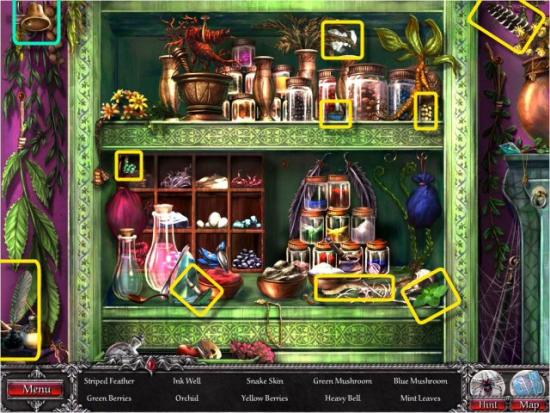
Find all the items in the list. Inventory Item: Potion Ingredients
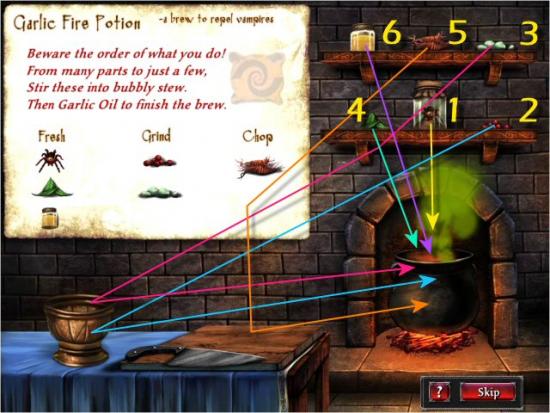
The object is to mix the Potion, following the Recipe. Note the phrase: “From many parts to just a few.” Use the ingredients with the most elements/items first, in the manner directed (fresh, grind or chop) and put them into the Cauldron. Once complete, you’ll receive the Garlic Fire Potion. The directions are as follows:
Return to the Alley, enter the Antique Shop (1) and give the Receipts to Argento (2).
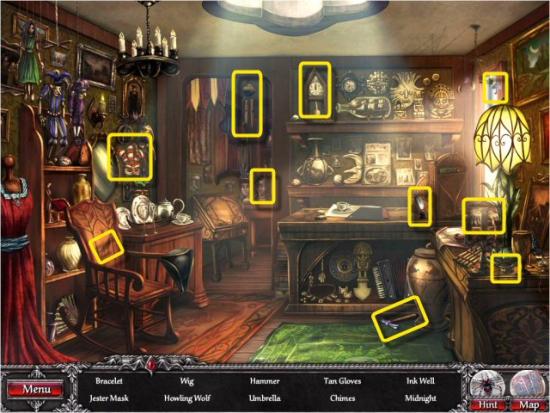
Find all the items in the list. Inventory Item: Marcus’ Journal.
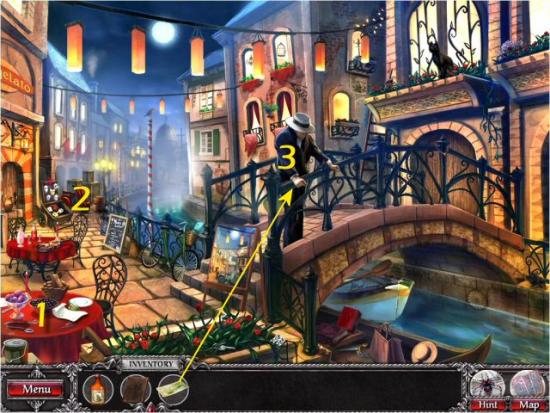
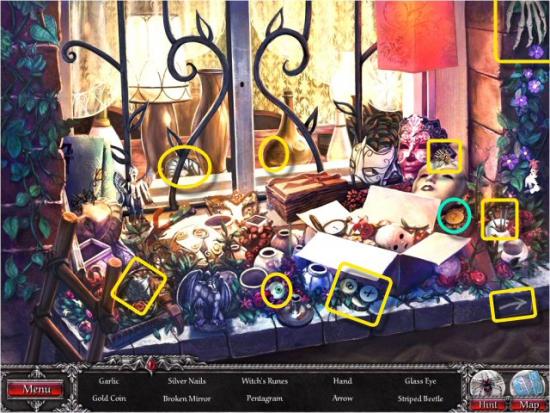
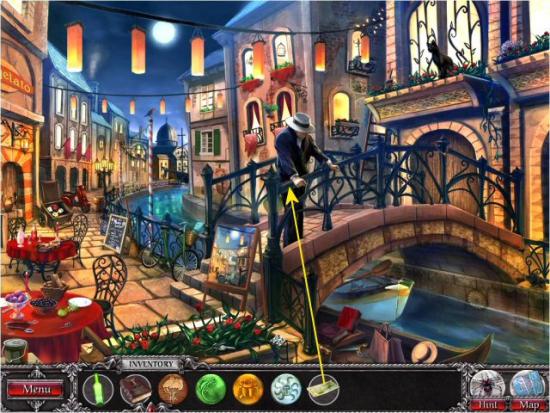
Return to the Canal, collect Stratton’s Note (1) and then click on the Masks (2). When complete, give the Gondola Ticket to the Gondolier (3).
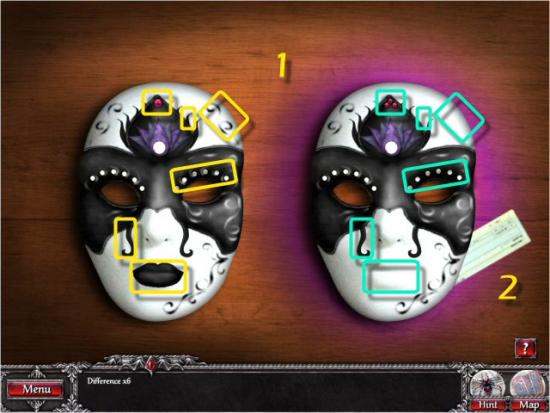
The object is to find 6 differences between the 2 Masks (1). You may click on either Mask. Once complete, collect the Gondola Ticket (2).
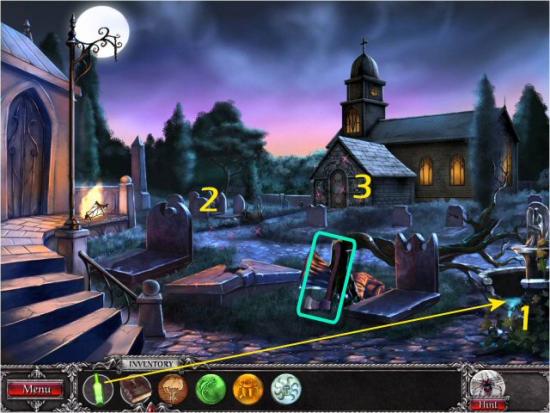
Click on the Gravestones (1) and find all the items in the list (2). Inventory Item: Photo

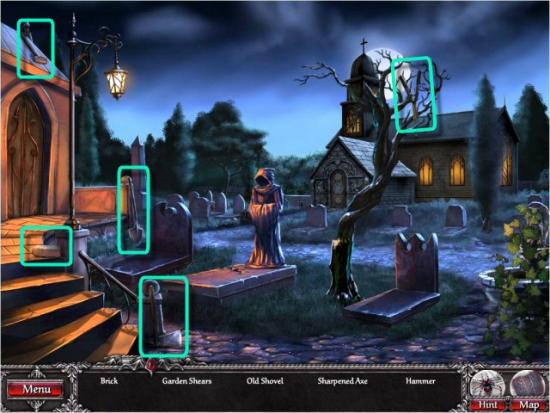
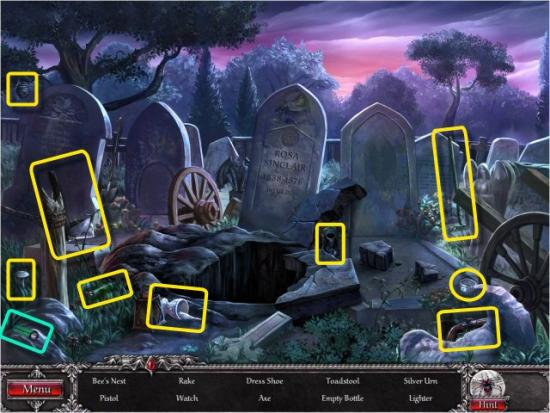
Find the 4 items to protect yourself: the Brick, Garden Shears, Old Shovel and Sharpened Axe.
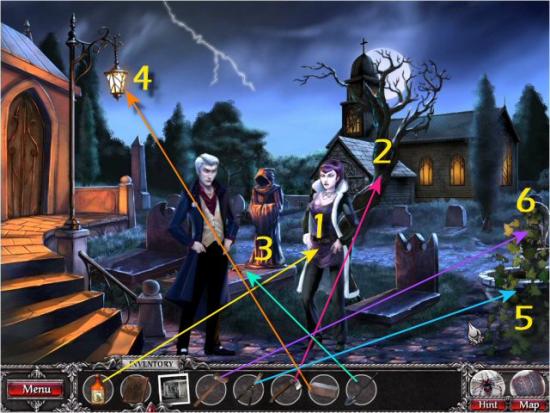
Use all your Weapons, in the order shown, to protect yourself from Ignacio and Lucia, as follows:
When complete, you’ll receive Marcus’ Key.
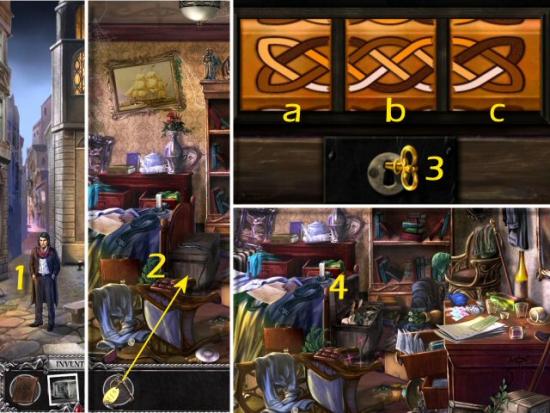
Speak to Stratton (1), return to Marcus’ Hotel Room, use Marcus’ Key on the Trunk (2) and then click on the Trunk. The object is to rearrange each of the Dials (a, b and c) so that they form a continuous image. Click on each Dial to rotate them into position. Note that the solution is always the same but the initial configuration will be different each time you play. When complete, click on the Key (3) and then click on the Open Trunk (4).
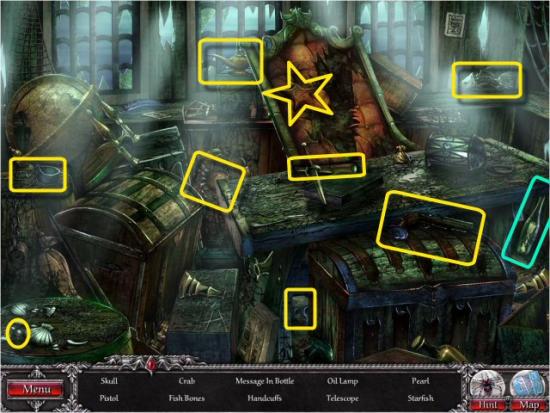
Find all the items in the list. Puzzle Item: Decoder. Note that the Decoder Puzzle will begin as soon as you click on it. If you wish to wait, exit (click back), find the rest of the items in the search list and then click on it again.

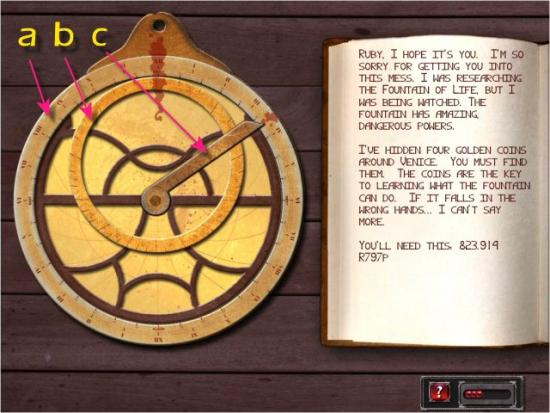
The object is to line up the elements on the Decoder (a, b and c) to solve the Coded Message. Click and drag the Decoder Rings and Pointer, in either direction, to the correct positions. When complete, you’ll receive the Numerical Code.
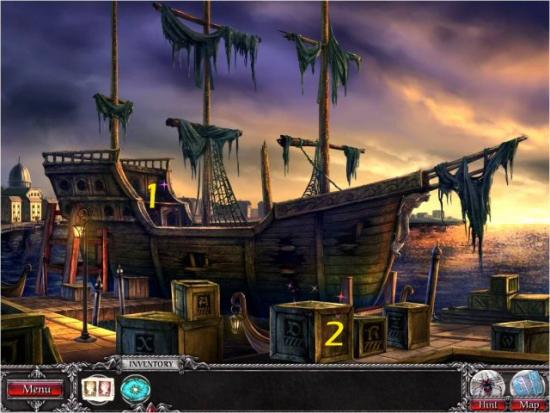
Return to the Canal and click on the Window Box (1). When complete, continue to the Docks (2).
Find all the items in the list. Inventory Item: Gold Coin.
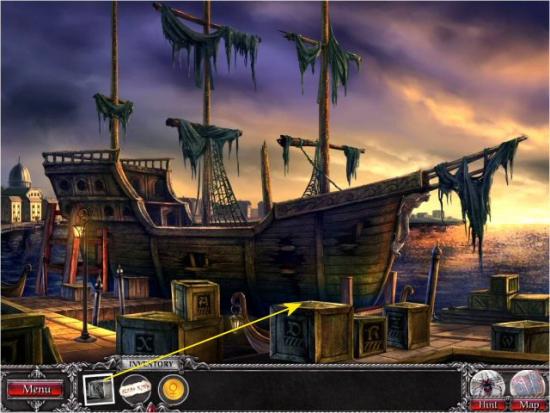
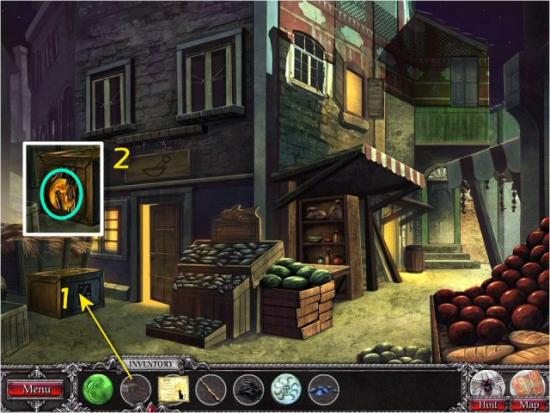
Use the Photo on the Crate (1 – click on the top of the Crate) and then click on it.
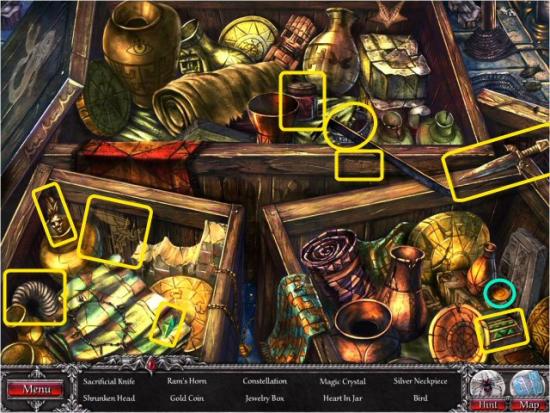
Find all the items in the list. Inventory Item: Gold Coin.
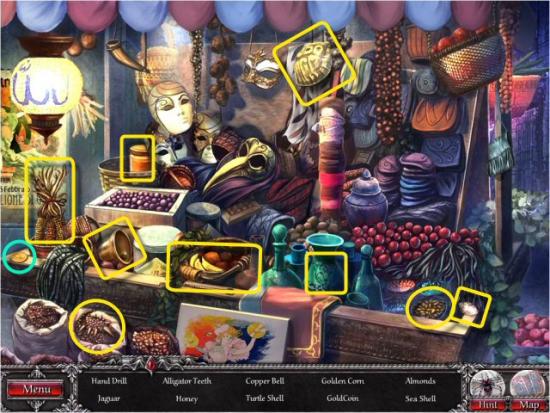
Return to the Alley, speak to Argento (1) and then click on the Antiques Cart (2).
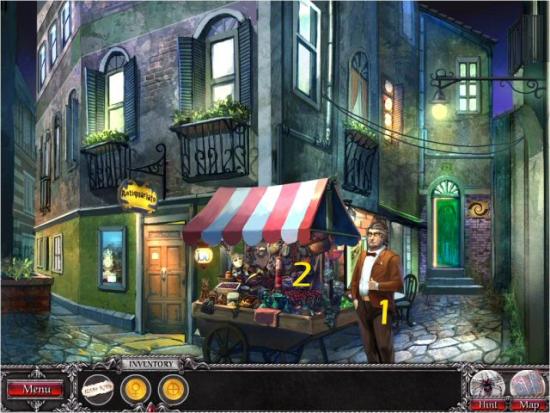
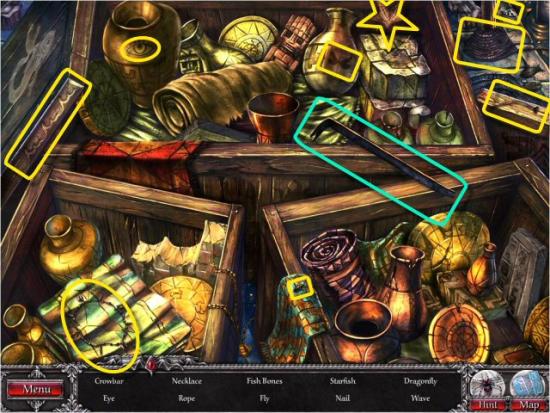
Find all the items in the list. Inventory Items: Gold Coin. When complete, Argento will give you a Map Piece.
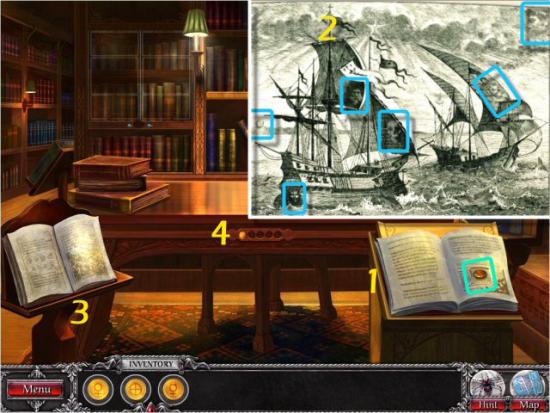
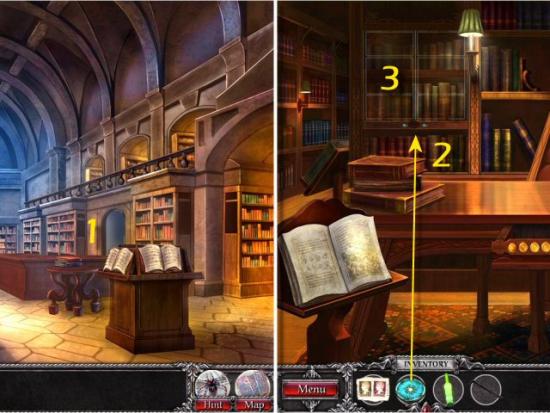
Go to the Library, use the Map Piece on the Desk (1) and then click on the Torn Map. The object is to reassemble the Map. Click and drag each piece into position, rotating them if necessary (click to rotate). Once a piece is in the correct position, it will lock into place. When complete (2), use the Numerical Code on the Map (3) and then click on the Door (4).

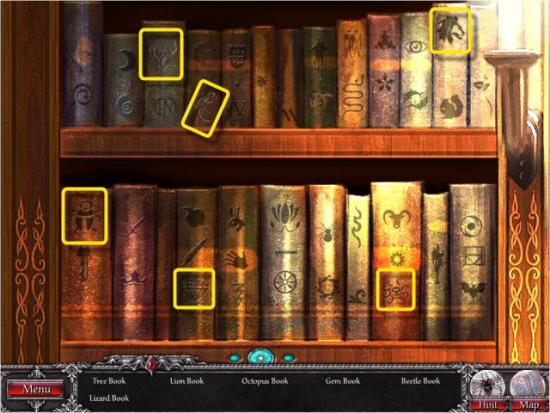
Click on the Book at the right (1 – click the right page), find the 6 Faces (2), click on the Book at the left (3 – click the left page) and then click on the Panel on the Desk (4).
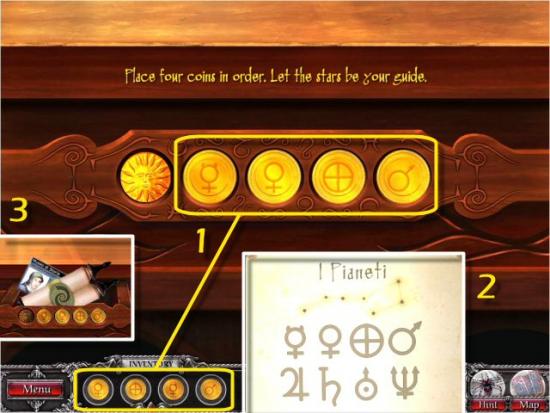
The object is to place the 4 Coins into the Slots (1), in the correct order, according to the Note. The Book on the left was your clue for this puzzle. The symbols on the Coins are the ancient, alchemical symbols for the Planets and the clue from the Book shows you the order of the Planets from the Sun (2). They are: Mercury, Venus, Earth, Mars, Jupiter, Saturn, Uranus and Neptune (Pluto isn’t included as it was demoted from a planet to a “dwarf planet” in 2006). Place the 4 Coins into the Slots. If you place the Coins incorrectly, simply click on 2 of them, to switch their places. When complete, collect the Scroll and the Pass Card (3).
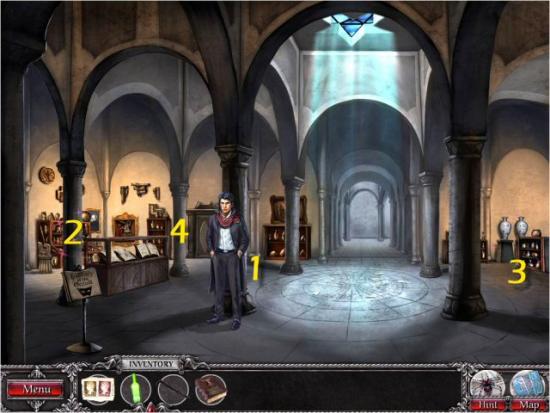
Return to the Courtyard, click on the Museum (1), show the Pass Card to the Guard (2), enter the Museum (3) and then click on Display at the left (4).
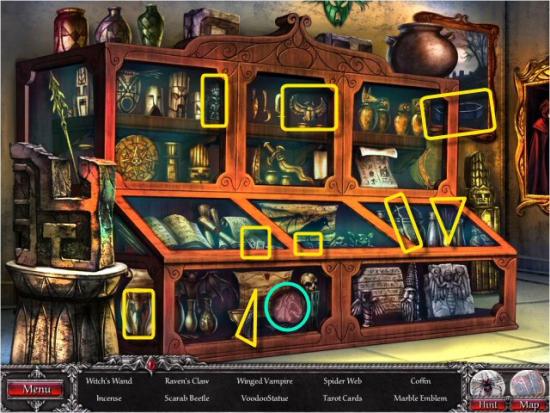
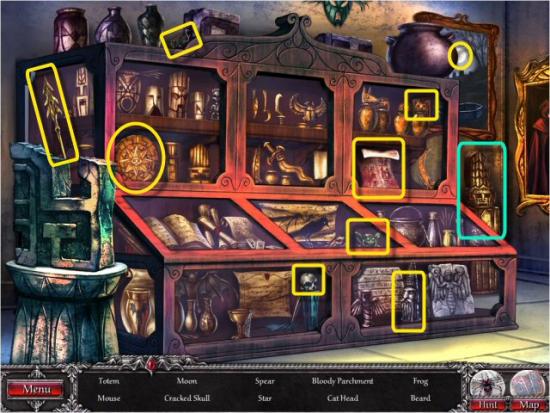
Find all the items in the list. Inventory Item: Marble (Lion) Emblem
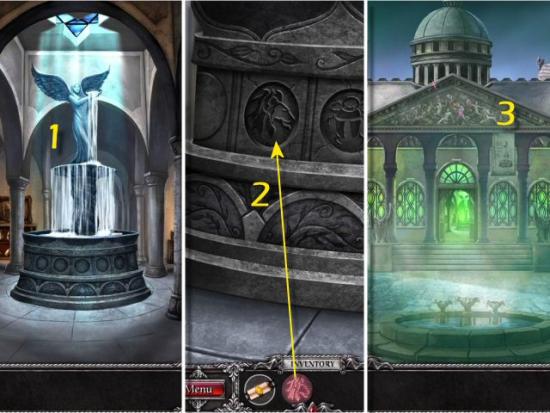
Click on the Fountain (1), use the Marble Emblem in its Empty Space (2), return to the Courtyard and then click on the Carving above the Museum Doors (3).
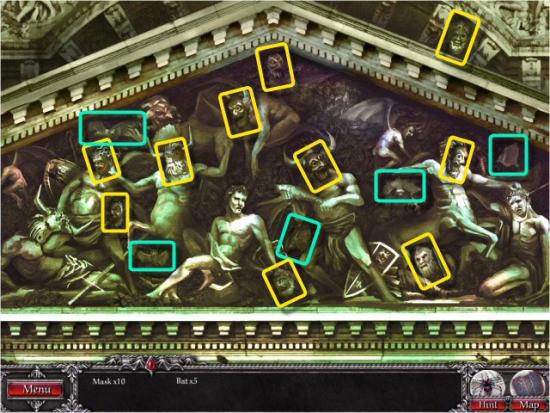
Find the 10 Masks (yellow) and 5 Bats (green).
Return to the Alley (note that you can’t go directly to the Antiques Shop), enter the Antiques Shop and find all the items in the list. Multiple Items: 5 Accordion Keys (pink), 3 Chimes (yellow). Inventory Item: all items will go into your inventory.
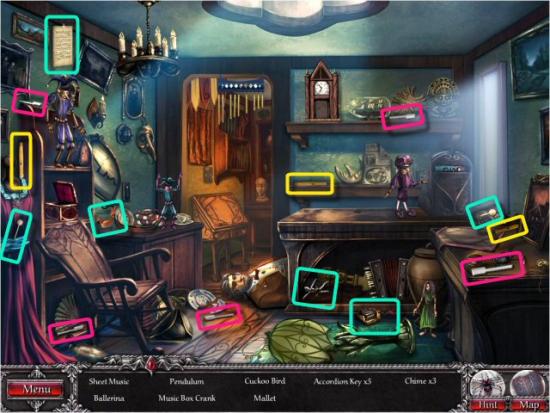
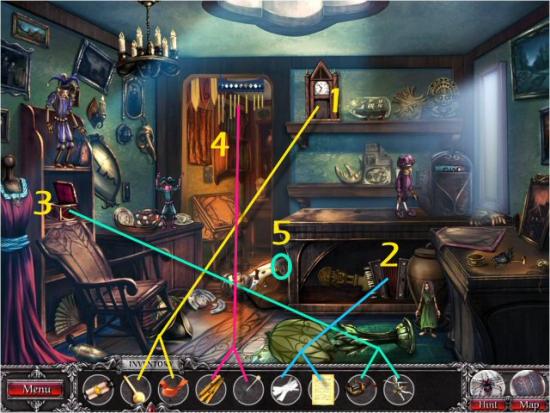
Use all the Items to repair the Musical Instruments and disable the Marionettes. Note that you may repair the Musical Instruments in any order you like, but you must use the associated Items in the correct order for each Musical Instrument.
When complete, collect the Amulet (5).
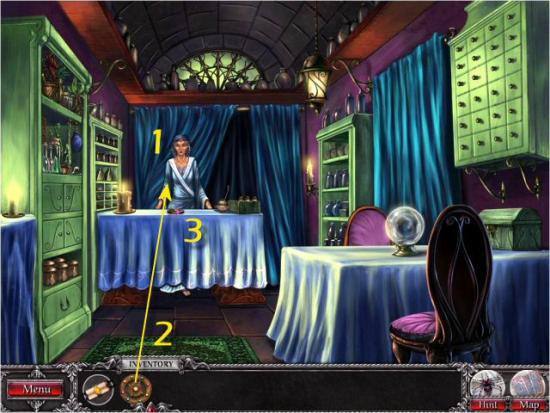
Enter the Herbalist Shop, speak to Orazia (1), show her the Amulet (2) and then click on it (3).
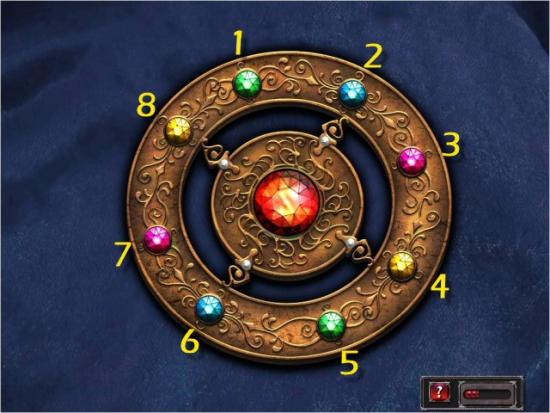
The object is to repeat the sequences as the Gems are illuminated. Watch the pattern and then repeat it by clicking on the correct Gems. You’ll play 4 rounds of 3, 4, 5 and 6 Gem sequences. The sequences are the same, every time you play. Click on the Gems, as follows:
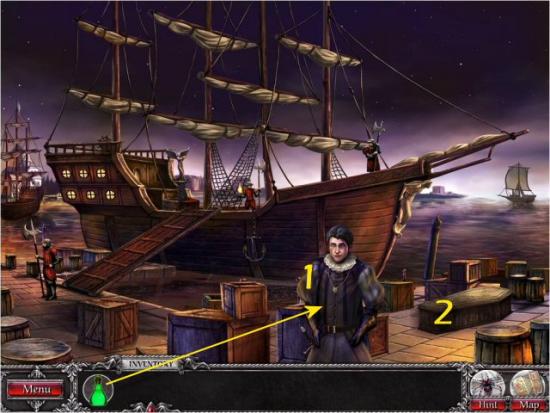
Speak to Stratton (1), continue to the Docks (2) and then click on the Gangplank (3).
The object is to move yourself (the Rose – blue) onto the Ship (the Cross – green) without being seen by the Guards (yellow). Click on an adjacent square (black arrows) to move. You can only move one square at a time. After you move, the Guards will move. If you’re about to be seen, or want to wait until a Guard passes or turns, click on the square you occupy (click on the Rose) to skip a turn. If you’re seen by a Guard, the puzzle will reset and you’ll begin again. Once complete, enter the Ship (click on the Gangplank again).
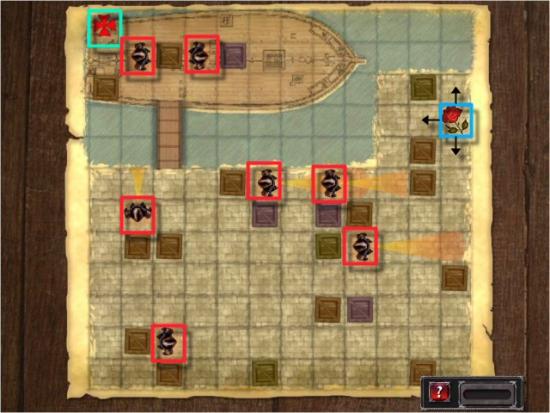
There are many solutions; click on the following for one video solution.
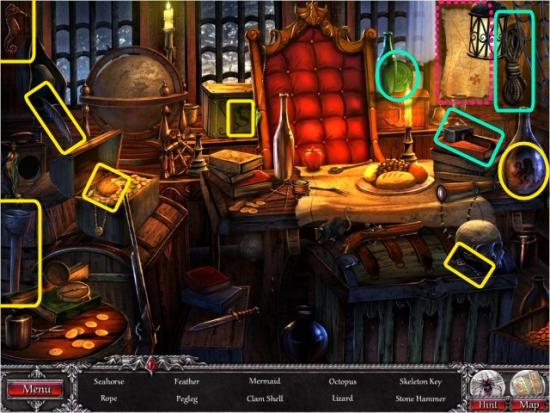
Find all the items in the list. Inventory Items: Rope, Stone Hammer, Jade (Lizard) Emblem. When complete, click on the Map (pink).
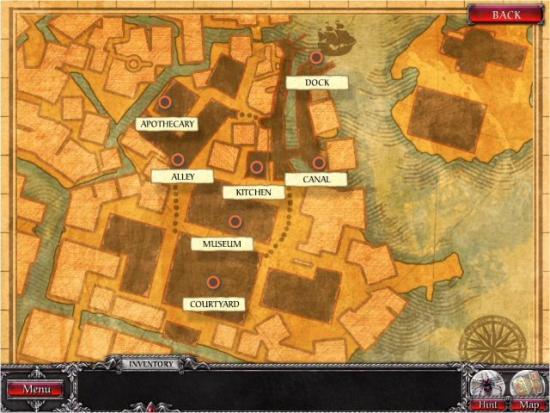
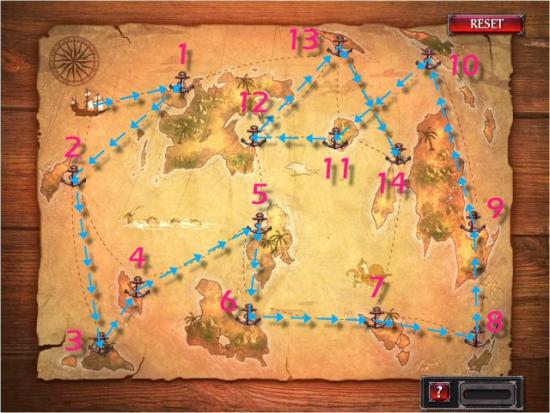
The object is to visit each of the Islands without retracing any paths. Click on the Anchor to move the Ship. You can only move to the next Island that is on a direct path (dotted line) from the Ship. Continue moving from Island to Island until you’ve visited them all. When complete, you’ll receive a Map Note. Note that there is more than one solution. The following screenshot is one solution.
Give the Map Note to Stratton (1), return to the Courtyard (note that new areas have opened up on the Map), use the Rope on the Bucket (2) and collect the Ceramic (Octopus) Emblem (3). Speak to Orazia (4) and then enter her Wagon (5).
Find all the items in the list. Inventory Item: Cat Fur (5 Black Cats). When complete, click on the Chest (pink).

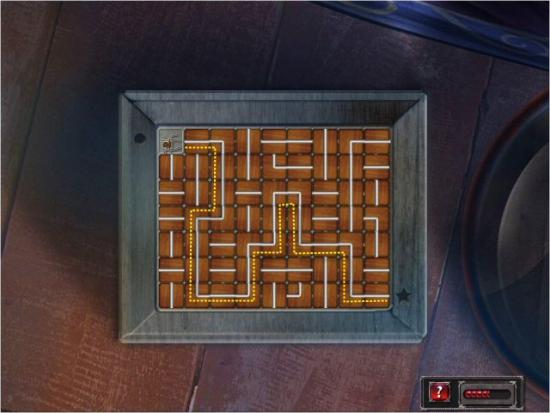
The object is to make a path for the Spider to reach the Star. Click on a Tile to rotate it clockwise. Note that you don’t need to connect all the lines and there is only one solution for this puzzle. When complete, you’ll receive the Magic Wand.
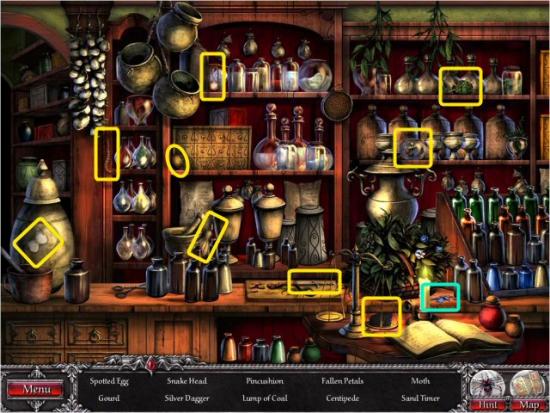
Go to the Apothecary and find all the items in the list. Inventory Item: Blue Petals (Fallen Petals).
Exit to the Alley, use the Stone Hammer on the Crate (1), collect the Gold (Scarab) Emblem (2) and then continue to the Kitchen.
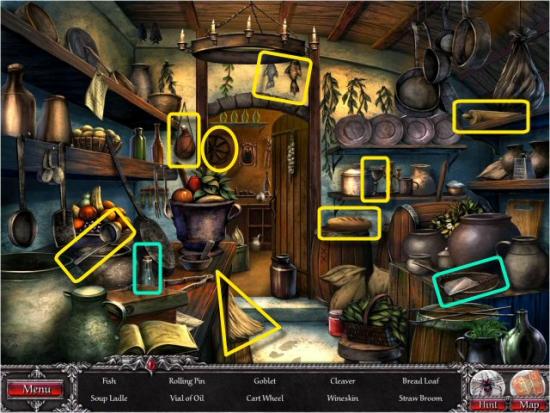
Find all the items in the list. Inventory Items: Magical Oil (Vial of Oil), Cleaver
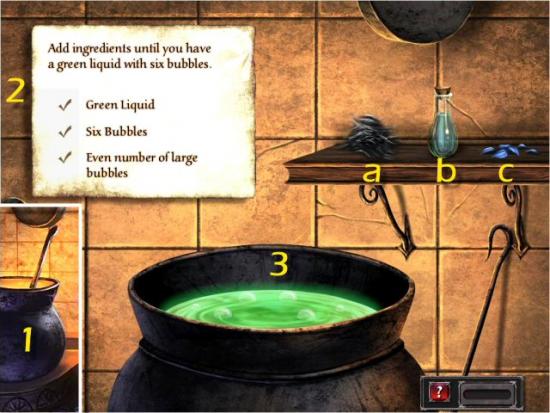
Return to the Courtyard, enter Orazia’s Wagon and click on the Cauldron (1 – on the left). The object is to create the Sleep Potion with correct properties (2). Click on an Ingredient (a – Cat Fur, b – Magic Oil or c – Blue Petals) and then click on the Cauldron (3) to begin mixing the potion.
The Cat Fur makes fewer bubbles, the Magic Oil makes the potion more blue and creates more bubbles and the Blue Petals make the potion more yellow and create larger bubbles. Depending on the order in which you use the ingredients, you may undo the changes made by the previous ingredient. It will take more or fewer steps to complete based on the order you use the ingredients. The solution may also be random and the following may not work for you. When complete, you’ll receive the Sleep Potion.
My solution was (read across, from left to right, in rows:
|
|
|
|
|
|
|
|
|
Exit the Wagon (click back), enter the Library (1) and then click on the Floor Tiles (2).
The object is to move the Tiles and uncover the Wooden (Tree) Emblem. Click and drag a Tile in the direction you want it to move. Continue until all the Tiles have been moved out of the way. This is a challenging puzzle, but not impossible. It just takes a bit of patience – it took me approximately 6 minutes to solve the puzzle.
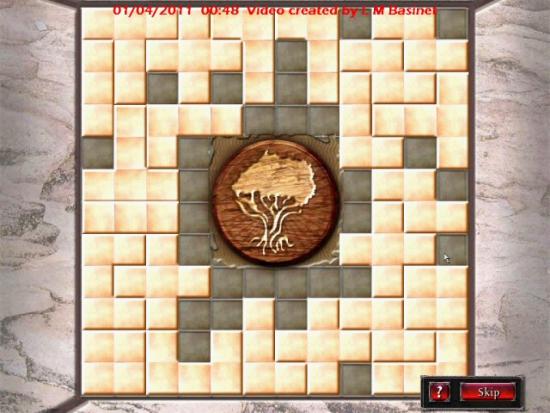
It would take far longer to plot out all the steps than to just solve it, so please watch the following video for my solution. Note that this isn’t a direct solution (I had several “undos,” although not that many) and I just moved the pieces as I went. If you haven’t the patience, you may skip it when the button is charged. When complete, you’ll receive the Wooden (Tree) Emblem.
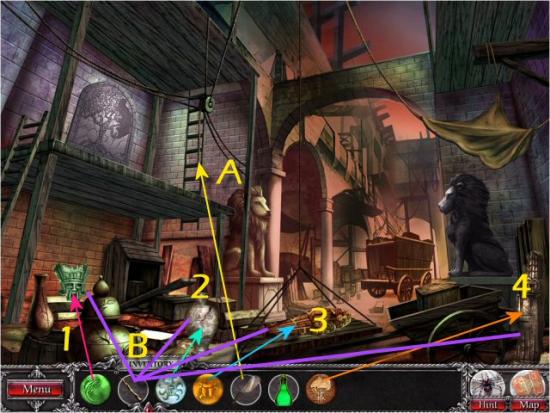
Continue to the Museum and use the Cleaver on the Rope (A). Use the Emblems on each of the associated objects, and then use the Magic Wand (B) on each of the objects:
Return to the Docks, give the Sleep Potion to Stratton (1) and then click on the Coffin (2).
Find all the items in the list. Inventory Items: all items, except for the Tar Bucket, go into inventory. When complete, click on the Door (pink) to close it.
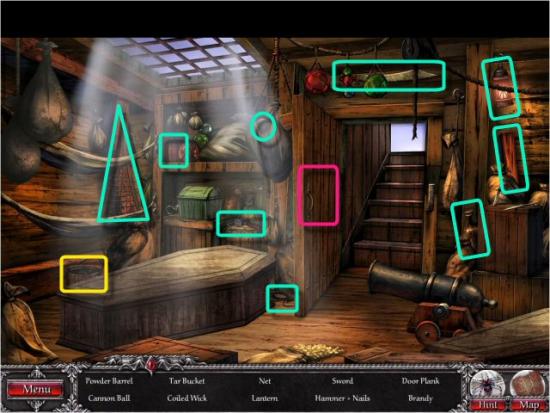
Use all the items in your Inventory to protect yourself.

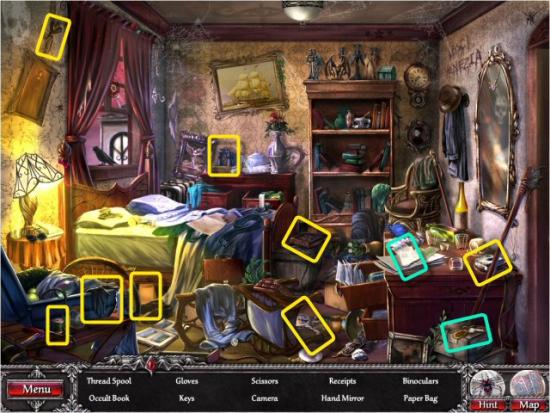
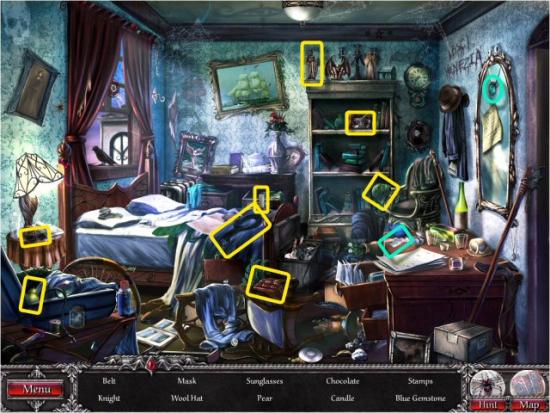
Return to Marcus’ Hotel Room and find all the items in the list. Inventory Items: Turquoise Gem (Blue Gem), Key Code (Stamps).
Return to the Docks and click on the Ship (1). When complete, click on the Crate (2).
Find all the items in the list. Inventory Item: Empty Flask (Message in a Bottle).
Find all the items in the list. Inventory Item: Crowbar.
Return to the Library, enter the Office (1), use the Turquoise Gem on the Lock (2) and then click on the Shelves (3).
Find all the items in the list. Inventory Item: Fountain Book.
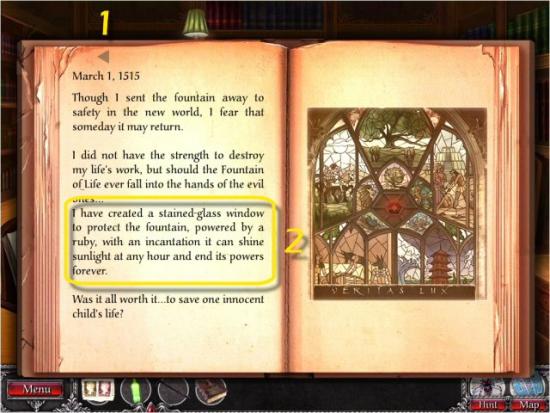
Read the entries by clicking on the left or right arrows (1). The final pages have information on how to destroy the Fountain (2).
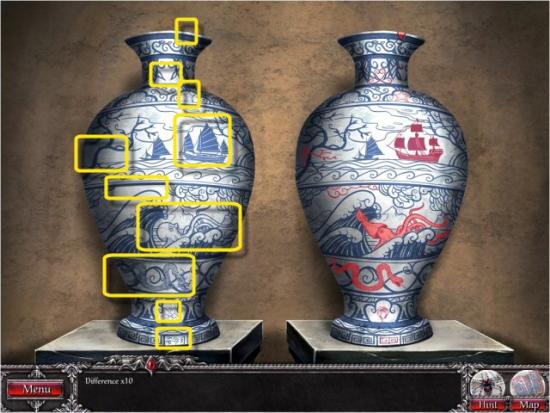
Return to the Museum, speak to Stratton (1) and then click on the Display Case (2). When complete, click on the Vases (3), complete that task and then click on the Door (4).
Find all the items in the list. Inventory Item: Totem Relic.
The object is to find 10 differences between the 2 Vases; you may click on either Vase. Once complete, you’ll receive the Vase Relic.
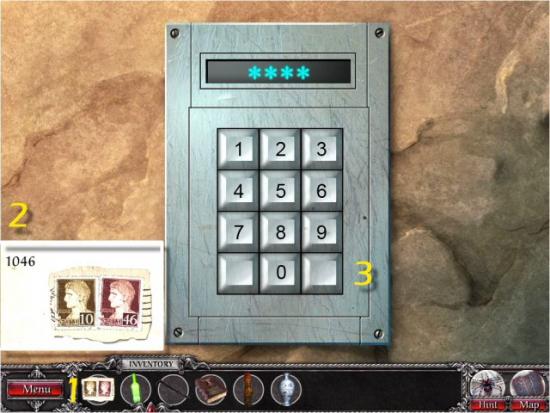
Click on the Stamps (1) to view the Key Code (2), enter the number, 1 – 0 – 4 – 6, on the Key Pad (3) and then enter the open door.
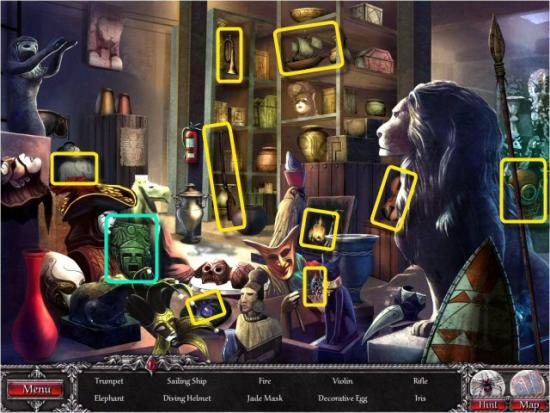
Find all the items in the list. Inventory Item: Jade Mask.
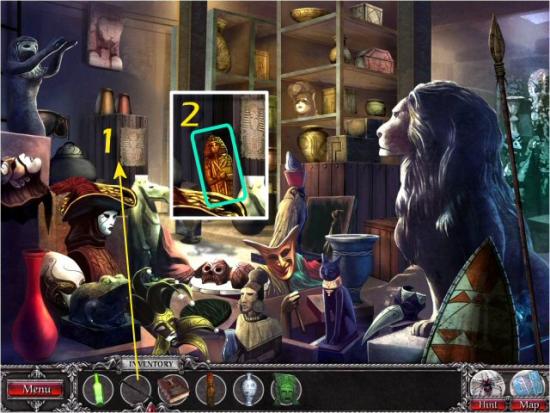
Use the Crowbar on the Crate (1) and collect the Coffin Relic (2).
Return to the Courtyard, speak to Stratton (1) and then return to the Museum (2 – click twice). Speak to Orazia (3), you’ll receive the Restoring Recipe and then return to the Herbalist Shop. Click on the Shelves (4 – on the left). When complete, click on the Cabinet (5 – on the right), complete that task and then click on the Curtains (6).
Find all the items in the list. Inventory Item: Bell
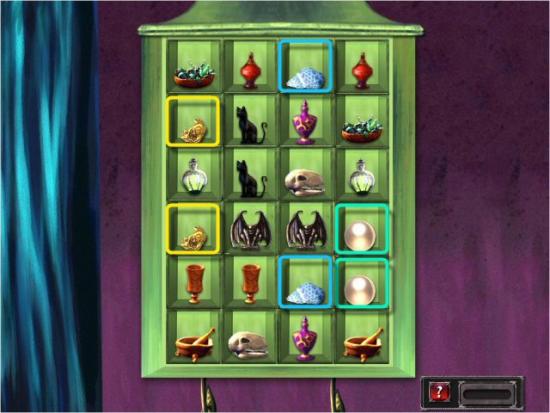
The object is to match 12 pairs of items to find the remaining ingredients for the Potion. Click on a Door and then click on another to make a match. Continue until you’ve matched all 12 pairs. Note that the arrangement of objects is random every time you play. Your minigame will probably not be the same as the screenshot. When complete, you’ll receive the Pearls, Shells and Gold.
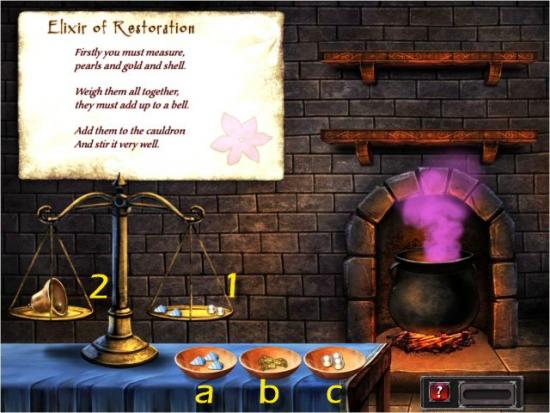
The object is to place the correct combination of Shells (a – lightest), Gold (b) and/or Pearls (c – heaviest) on the Scale (1) to equal the weight of the Bell (2). Click on one of the Items and it will automatically be placed on the Scale. My solution was 2 Pearls and 2 Shells. The solution is random each time you play, so your solution will probably not be the same. A good strategy would be to try the heaviest items (Pearls) first and then add the lighter ones (Gold and Shells), adding and removing them (click on each item on the Scale to remove it) until you get the correct combination. When complete, you’ll receive the Restoring Elixir. Note that you do not need to add the Ingredients to the Cauldron; it’s automatic.
Return to the Museum, show the Restoring Elixir to Orazia (1), use the Relics on the Floor (2) and then use the Restoring Elixir on the Relics (3). Speak to Orazia again and you’ll receive the Gondola Ticket.
Return to the Canal and give the Gondola Ticket to the Gondolier.
Collect the Chapel Axe, use the Empty Flask on the Fountain (1 – you’ll receive the Full Flask) and then click on the Gravestones (2). When complete, click on the Church Door (3).
Find all the items in the list. Inventory Item: Lighter
Find the missing Zodiac Symbols (they’ll automatically be placed on the Dials). The object is to align the Dials so that the top and bottom Zodiac Symbols match the other Dials. Click and drag each Dial, in either direction, to the correct positions. Note that there is only one solution and it’s the same every time you play. When complete, enter the Church.
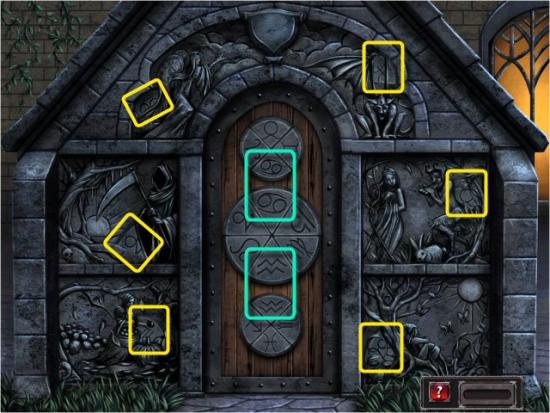
Use the Lighter on the 4 Torches (1) and then click on the Altar (2). When complete, use the Chapel Axe on the Door (3) and then enter the Chapel.

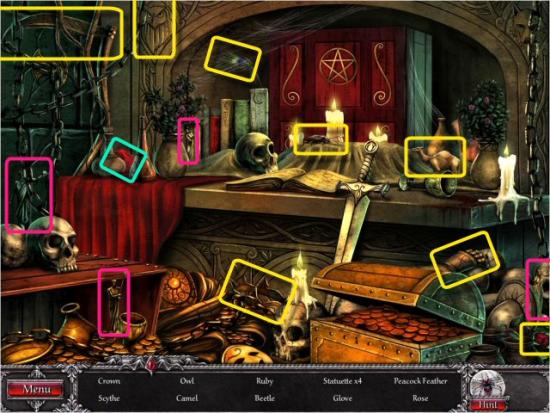
Find all the items in the list. Inventory Item: Ruby Stone, Empty Chalice.
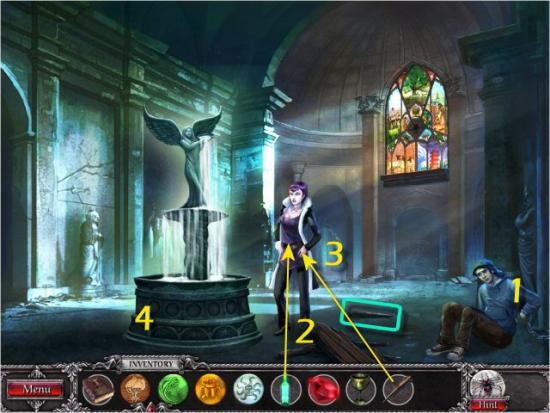
Speak to Marcus (1) then use the Holy Water (Full Bottle) on Lucia (2). Collect the Wooden Stake, use it on Lucia (3) and then click on the Fountain (4).
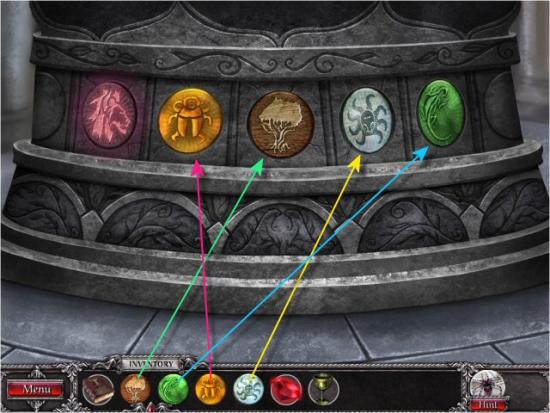
Place all the Emblems in their correct spots.
Use the Empty Chalice on the Fountain (1), use the Full Chalice on Marcus (2) and then click on the Stained Glass Window (3).
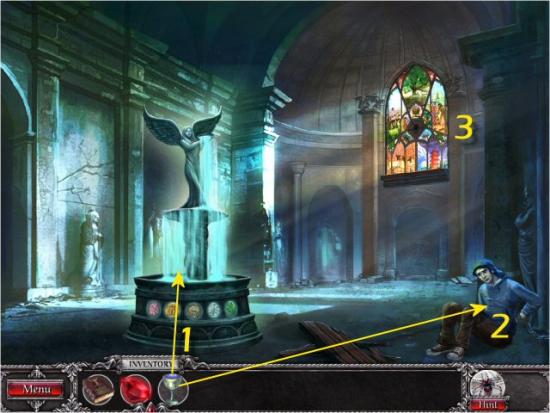
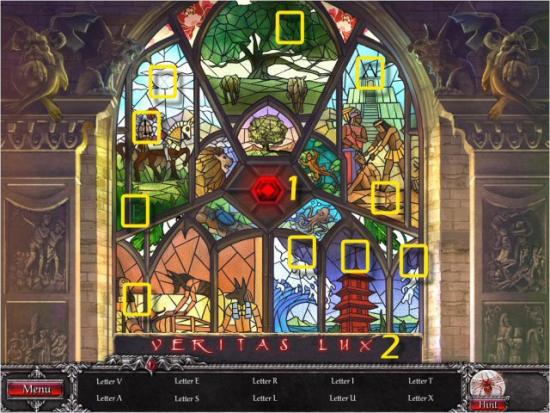
Use the Ruby in the center of the Window (1) and then find all the Letters of the Invocation (2).
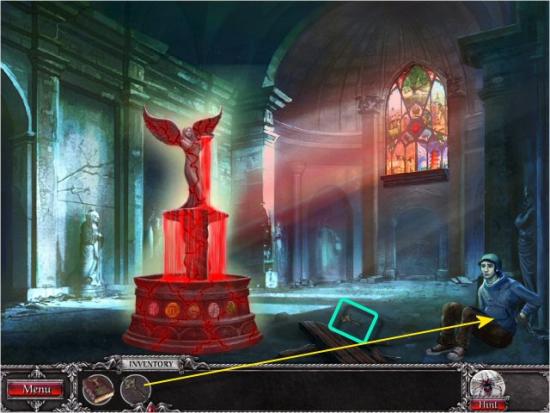
Collect the Key and then use it on Marcus.
Watch the ending movie and credits. Congratulations! You’ve completed Blood and Ruby.
