Bipo: Mystery of the Red Panda Tips Walkthrough

Check out our walkthrough for Bipo: Mystery of the Red Panda.   TIPS   You get four slots to save your game in. Use them all instead of saving your game over the same slot. This will allow you to restart from different points in the game if you need to. When the game tells you to save, it's a good idea to listen. The "ESC" key brings up your menu. You can investigate objects by either pressing the "c" key or the spacebar.   WORLD MAP Y…

By
Share this
  • Share this on Facebook
  • Share this on Twitter

a:1:i:0;a:2:s:13:”section_title”;s:35:”Bipo: Mystery of the Red Panda Tips”;s:12:”section_body”;s:19161:”Check out our walkthrough for Bipo: Mystery of the Red Panda.


TIPS


  • You get four slots to save your game in. Use them all instead of saving your game over the same slot. This will allow you to restart from different points in the game if you need to.
  • When the game tells you to save, it’s a good idea to listen.
  • The "ESC" key brings up your menu.
  • You can investigate objects by either pressing the "c" key or the spacebar.


WORLD MAP

  • You’ll start the game with a limited number of locations to visit. More locations will be revealed on the World Map as you progress.


WALKTHROUGH

SPOILER ALERT!!!
This section contains step-by-step instructions on how to beat the game and solve all of the puzzles. Stop reading if you don’t want spoilers about the plot or how to finish the game.

Bipo’s Room

  • This is where you’ll start the game. Investigate the gold piggybank below Bipo’s bed. Oh no! You’ll have to find a way to make some money.
  • Leave the tent and cross the bridge to the east to enter the World Map. Travel to the bakery.

Bakery

  • Go into the house and you’ll automatically have a conversation with Birdie, the baker. She asks you to travel to the Sea Cave and catch a snow towhee for her. (It’s a type of bird.)
  • Take note of the effect that Birdie’s cupcake has on poor Bipo. This will be important later on.
  • Go to the World Map, and visit the Sea Cave.

Sea Cave

  • Walk to the cave’s entrance on the left. When you try to enter, you’re told that it’s too cold to go in without a coat. I bet you could find someone in Town to make you a coat.
  • Before visiting the town, though, go out to the World Map and head over to the Cliffs.

Cliffs

  • Cross the bridge on the right and go down two sets of stone steps until you reach a beach.
  • Walk left until you see a set of stone steps leading up. If you like, you can go up and investigate a statue of a lady and read the sign next to it, but there’s nothing else to do here yet.
  • From the beach, continue on further left until you reach a cave opening. Enter the cave and follow the path as it leads you upstairs, around a curve, and outside.
  • Investigate the green plant to add the Warabi to your inventory.
  • Retrace your steps to the World Map and go to the Town.

Town

  • Visit the tailor (the house with the blue door and purple sign located directly south of where you enter the town). After some haggling, you’ll get a Winter Coat for your inventory.
  • Next, visit the grocery store, which is the building with the green door south of the tailor. Talk to the grocer and sell him the Warabi for 5 oolong.
  • Go to the table in the center of the grocery store and buy the fish bait for 5 oolong (investigate the pink jars on the table).
  • To the right of the grocery store is the library. Pop in and check it out if you want, but there’s nothing to do here yet.
  • Northeast of the library you’ll see a squirrel lying on the ground. Investigate it to trigger a funny sequence.
  • The last building in town is the home of the Nonsensical News Tribune newspaper, but no one’s there at the moment.
  • Northwest of the Tribune you’ll see a homeless guy. When you get some extra cash to spend, you can buy food at the grocery store and give it to the homeless man.
  • Now that you have the coat, go back to the Sea Cave

Sea Cave

  • After the first screen, you’ll encounter one of many ice puzzles. As long as he’s on ice, Bipo will keep sliding in one direction until he hits something. Use the arrow keys to move from one end of the room to the other.
  • The solution to the first ice puzzle is: R, D, R, U, L, D, R, D, L, D, R, D, R.
  • In the next room you’ll catch a glimpse of the snow towhee, but it runs ahead. Before going after it, stop and investigate the supplies in upper left corner of the room to pick up a rope.
  • Continue on until you reach a fork in the path. Go right.
  • Another ice puzzle. The solution for this one is: R, U, R, D, R, D, R, U, R, U, L, U, R, U, R, U, R, D, R. Take the item at the other side, which is an animal trap.
  • Go back through the ice puzzle room. The solution to get back is: L, D, L, U, L, U, L, D, L.
  • Now take the path you didn’t take the first time. You’ll encounter another ice puzzle. Make sure you’re at the top of the ledge before stepping onto the ice. The solution is: L, U, R, U, L, U, L, U, R, D, R, D, L, D, L, D, R, D, L, U.
  • In the next room you’ll finally corner the snow towhee. The goal of this puzzle is to chase the towhee into the trap you’ve laid. The pattern is as follows:
  • If you move Up, the bird moves Left.
  • If you move Down, the bird moves Right.
  • If you move Left, the bird moves Down.
  • If you move Right, the bird moves Up.
  • Use the pattern to guide the towhee into the cage. Keep in mind that even if Bipo reaches a wall, you can still press the arrow key in that direction and the towhee will move.
  • Once the bird is in the case, investigate. After the mysterious hooded figure appears and steals the cage, investigate the object it left behind to pick up the necklace.
  • Backtrack out of the cave. At the first ice puzzle, walk right at the bottom of the stairs in between the stair and the ice chunk, instead of walking straight down between the two ice chunks. The solution is: R, U, L, U, R, D, R, D, R, D, R.
  • At the next ice puzzle, walk L, D, L, U, R, U, L.
  • Go back to the bakery and tell Birdie what happened.
  • After that, it’s time to get a job. Go to Town and check the job board outside the Tribune’s office.

Town

  • According to the job board, the Tribune is looking for a news photographer. Go to the Tribune and speak with its owner, Mr. Shinbun. He offers you the job, but you need 50 oolong to rent a camera. Time to go fishing. Go to the World Map and visit the Fishing location.


Fishing

  • The sea hag who lives here will pay you for any fish you catch. Go up to the water and investigate to start fishing. Fish until you’ve used up all your bait, then sell the fish to the sea hag. Repeat until you have at least 150 oolong (50 to rent the camera, and 100 to pay off your loan at the tailor’s). You’ll have to go back to Town at least once to buy more bait.
  • Go back to town.


Town

  • Repay your loan at the tailor for 100 oolong, then give 50 oolong to Mr. Shinbun at the Tribune office to rent the camera.
  • Go to the World Map and head to Stufflebean Farm for your first photography assignment.

Stufflebean Farm

  • Walk right until you reach the bushes in front of the house. Go south around the bushes. When you reach the right place, the game will enter a cutscene.
  • You only have 3 shots to take something incriminating. You’ll see the woman walk past the window; a letter will fall on the floor. She’ll bend over to pick it up. When she faces the windows and holds the letter up to read it and her face turns red, snap the photo. Eventually she’ll walk away and the cutscene will end.
  • Go back to Town

Town

  • Take the photos back to Mr. Shinbun in the Tribune Office. He gives you some oolongs for them.
  • Go back to the office and talk to him again. He mentions rumors of ghosts in a mansion on top of the hill, and promises to pay for photos. He’ll give you a new camera that can take an unlimited number of pictures.
  • Leave town and go to the new location on the World Map, Dark Manor.

Dark Manor

  • Enter the manor, and investigate the writing table at lower left of screen. A ghost appears. You try to snap a photo but fail. Well, hopefully there will be others.
  • Now, go to the smaller mirror to the right of the big mirror on the center wall.
  • Investigate the mirror and you’ll get transported to a new room. See the six dolls sitting on the two tables in the lower half of the room? This is a puzzle to be solved.

Doll Puzzle

  • Hint: You have to rearrange the dolls in a certain order. It has something to do with the order of the paintings on the top wall.
  • Solution: You have to arrange the doll colors so they correspond with the colors of the paintings. Go to the right table of dolls and investigate. When you’re given the choice of how to arrange them, Select “Other” then “Yellow, Pink, Blue.” Go to the left table, and select “Pink, Blue, Yellow.”
  • Now, go back to the right-most mirror and investigate. You’ll be transported to new room with two glowing gems. Go to the room on the right and touch the large gem, making sure to save your game when prompted.

Dark Manor – Ghosts

  • Use your camera to take pictures of the ghosts before they attack you. Make sure the ghost is centered in the frame, and press the "c" key or space bar. If too many ghosts attack you (denoted by a red flick on the screen) then it’s Game Over.
  • You must take pictures of 10 ghosts to pass.

Town

  • After the ghost encounter, you’re automatically transported back to Bipo’s place for a night’s sleep. The next morning, go to the Town and take the photos to Mr. Shinbun at the Tribune office to get developed.
  • When you arrive at the town you’ll see the villagers talking about something. After they finish you’ll see Kit, the blue-haired guy, standing nearby. Talk to him, and later you’ll be able to visit him in her cabin.
  • Go to the Tribune office. There’s a letter in front of the door. Read it. It looks like Shinbun had to leave town, but he gives you back your 50 oolong deposit, and gives you a key to go to the backdoor and develop your photos. Sounds like a good idea!
  • Go through the back door of the Tribune office. After the scene, go to the World Map and travel to Kit’s House, which is east of the town.
  • Talk to Kit in the front yard, and get three new goals: 1) Find out what written on the letter that Mrs. Shufflebean was reading when you took her photograph; 2) Investigate the ancient texts in the library; nad 3) Check out the ruins.
  • Kit also gives you a better fishing rod. This allows you to catch the rare paddlefish, which are worth 200 oolong a piece.

Stufflebean Farm

  • Read the sign near the entrance to see that Mrs. Stufflebean is looking to hire a gardener.
  • Go back to the Town and ask the tailor to make you a gardener’s outfit. He wants 500 oolong for it, but with your new fishing rod you should be able to raise the money in no time.
  • After you get the outfit, return to Stufflebean farm. Save your game, and put on the outfit by selecting it from your inventory. Go to Mrs. Stufflebean’s house to apply for the job. Follow her out to the garden, then talk to her to begin work.

Stufflebean Farm – Planting Puzzle

  • This is a logic puzzle. Follow the instructions to make sure that you arrange the vegetables in such a way that all of the criteria are met.
  • To swap something out, just choose it again from the row along the top and drop it overtop of something else.
  • Solutions:
  • Row 1: turnip, carrot, turnip, carrot
  • Row 2: eggplant, eggplant, strawberry, cabbage
  • Row 3: carrot, carrot, carrot, cabbage
  • After Mrs. Stufflebean leaves, go into her house.
  • Investigate the map at the foot of the bed along the right wall. Click on the fireplace to learn that something was burning there recently. Click on the envelope to learn that something must have been inside it recently.
  • Time to visit the library.

Town

  • Go to the library and talk to the librarian to learn that he has a hankering for one of Birdie’s gooseberry cupcakes. Head out to the World Map and visit the bakery to buy one, then take it back to him.
  • After you give the cupcake to the librarian, he’ll have to use the bathroom. Once he leaves, investigate his desk to find a key.
  • Use the key to unlock the blue door on the right, and enter the back room. You’ll see four bookshelves along the back wall. Investigate the rightmost one and you’ll see a book, The Stone Maiden. The book reveals the background of the statue you saw at the Cliffs. Familiarize yourself with the story, then exit the room and return the key to the librarian’s desk.
  • Walk down the left side of the library. On your way out, you’ll see that there’s a red book on the ground in front of one third shelf from the bottom on the left. Pick it up and read it, studying the ancient signs and symbols. You can come back and read the book at any time by investigating the shelf, but it might be a good idea to write these symbols on a piece of paper.

Ruins

  • Go to the World Map and visit the Ruins.
  • You see the hooded figure again. After the confrontation, continue on to the ruins.
  • Walk into the room on the left and investigate the broken vase. You’ll receive a satchel of oolongs.
  • Head north up the path until you reach a larger building with an archway in, and a staircase leading down. Head down the staircase.
  • You’ll find yourself in an underground passageway. Go through the opening in the bottom, then walk right and down to the next room.

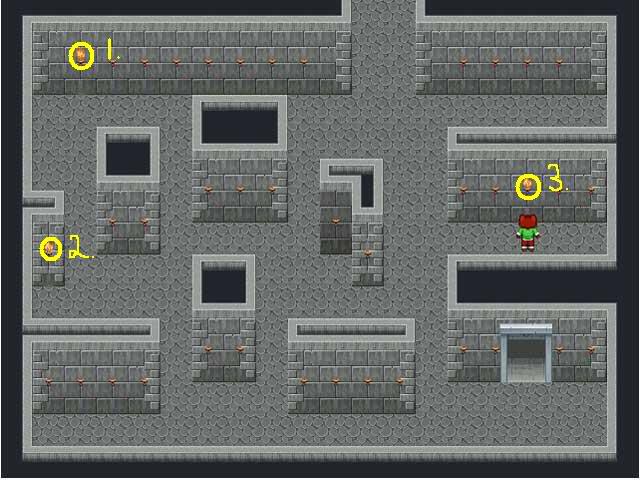
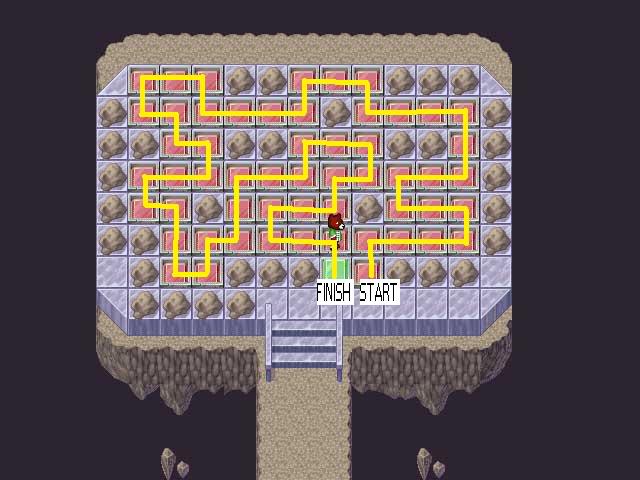
Ruins – Torch Puzzle

  • You have to light specific torches to unock the door
  • Hint: Look at the map in your inventory. The symbols on it correspond to the symbols you studied in the book at the library. You have to light certain torches in a certain order.
  • Solution: Light the following torches in order: (1) the left most torch in the top row of torches; (2) the left most torch in the middle row. (3) the middle torch in the row of 5 along the right wall in the middle.
  • See screenshot.

Ruins, Cont.

  • In the next room, walk towards the altar to trigger a scene.
  • Time to talk to Kit.

Kit’s House & Town

  • Go back to Kit’s place to talk to him. He suggests you investigate the forest, but you’ll have to take an umbrella with you.
  • Go to the grocery store in town and buy the umbrella that’s resting along the top wall.
  • Then, go out to the World Map and visit the Misty Forest.

Misty Forest

  • The misty forest is a bit of a maze. Take the path straight up, turn left and follow the curve around until you’re heading north again. Ignore the middle path that branches off to the left, and follow the top path around to the left. Folow it as it curves around and downward. When you’re met with another branching pathway (right or down), continue down and turn left. At the next fork (up or left), take the upper path, and follow it until you reach a part where the path branches left, up and right.
  • Take the left path and follow it around, ignoring the small dead-end path on your left and continuing up. At the fork, (left or up) take the left path again and walk all the way left, ignoring the two upward forks. It will lead you to a bridge. At the next screen, try to walk forward until a cutscene appears.
  • Now you’ll have to wind your way back through the maze. Go to the right all the way, then down, and follow the path as it curves. You’ll come to a small fork that leads to an obviously dead end path. Continue downwards and follow the path as it curves to the right and up. At the next fork (up, down, right), walk down all the way, then head right. At the fork, head up and to the left. Follow the path as it winds up and to the right and down. At the fork, continue down and follow the path as it curves around. At the next fork (down, right), walk right and follow the curve downward to exit the forest.

Dark Manor

  • Return to the Dark Manor as the guardian instructed you. You’ll face a puzzle.
  • Dark Manor – Stone Maiden Puzzle
  • Hint: The symbols correspond to the numbers in the red library book. You have to press them in the correct order to retell the story of the Stone Maiden as you read it in the library book in the secret room.
  • Solution: Press the buttons in the following order: lower right, upper left, lower left, upper right, center.

Dark Manor, Cont.

  • Inside the Mansion, investigate the small mirror on the right to find yourself in the doll room again. Investigate the mirror again to warp to the third room with the crystals. Touch the mirror once again to appear in a new area. Save your game.

Dark Manor – Puzzle

  • You must turn all the squares red by walking over them, but you can’t walk on a red square or it’s game over.
  • Solution: See diagram.
  • Click on the crystal and you’ll find yourself in a castle confronting the cloaked figure once again. On next screen, enter name of who you think the villain is.
  • It doesn’t seem to matter who you choose, so just make a guess. Congratulations, you’ve just finished the game! Watch the epilogue.

“;