- Wondering how to get Monopoly GO! free rolls? Well, you’ve come to the right place. In this guide, we provide you with a bunch of tips and tricks to get some free rolls for the hit new mobile game. We’ll …
Best Roblox Horror Games to Play Right Now – Updated Weekly
By Adele Wilson
Our Best Roblox Horror Games guide features the scariest and most creative experiences to play right now on the platform!The BEST Roblox Games of The Week – Games You Need To Play!
By Sho Roberts
Our feature shares our pick for the Best Roblox Games of the week! With our feature, we guarantee you'll find something new to play!All Grades in Type Soul – Each Race Explained
By Adele Wilson
Our All Grades in Type Soul guide lists every grade in the game for all races, including how to increase your grade quickly!
Biggest Little Adventure Walkthrough
Welcome to the Biggest Little Adventure walkthrough on Gamezebo. Biggest Little Adventure is a Hidden Object Game played on the PC created by Gamehouse Games and Absolutist. This walkthrough includes tips and tricks, helpful hints, and a strategy guide on how to complete Biggest Little Adventure.
General Tips
- This is a hidden object game that requires visiting several locations to collect inventory objects to complete a chapter.
- There is no timer and no score is kept.
- There are unlimited hints available and the hint icon fills quickly.
- The cursor will change to a gear mechanism when an area needs to be inspected or a puzzle needs solving.
- All puzzles can be skipped after the skip bar has filled.
Walkthrough
There is a dialogue sequence that introduces the characters and sets the storyline for play.
Chapter 1: New York

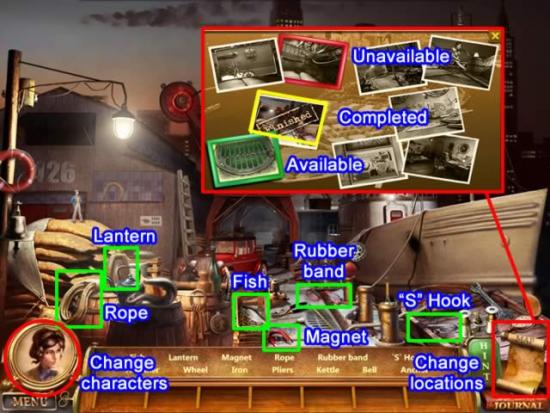
- Find the items listed. Some items go into inventory for later use.
- The items highlighted in green are inventory items: LANTERN, ROPE, FISH, MAGNET, RUBBER BAND, and “S” HOOK.
- Change locations by clicking the character icon, clicking the map icon, or follow an arrow. Louis is used for close-up areas (usually puzzles) and Ruby for the larger areas.
- Click the map icon to see the chapter progress or advance to the next location (see above inset).
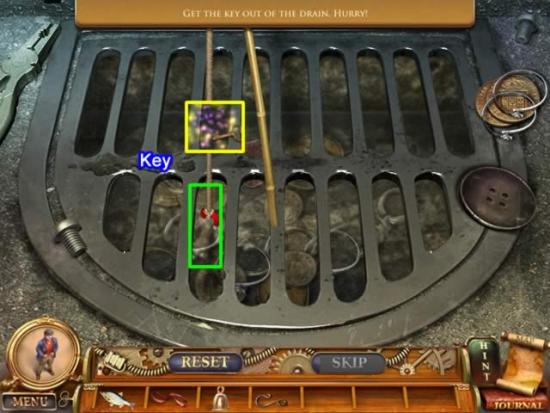
- Retrieve the key from the drain.
- Attach the ROPE to the stick found at the top of the grate.
- Attach the MAGNET to the rope.
- Lower the MAGNET between the slots and remove the objects covering the key. As more objects are removed, the bottom portion of the key can be seen in the position indicated in green above.
- Continue lowering the magnet until the KEY is retrieved.
Click the character icon to get Louis inside the car.
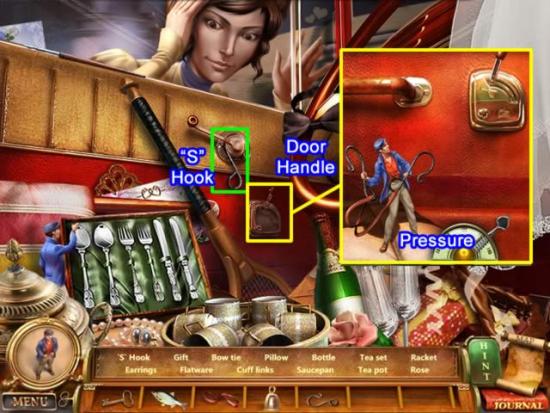
- Find the listed items. Inventory item: “S” HOOK.
- Click the door handle to enlarge the area.
To open the door:
- Click one “S” HOOK in the inventory tray and then click Louis. Louis is now holding the “S” HOOK.
- Click the RUBBER BAND and then click Louis.
- Click the other “S” HOOK then Louis. Louis now has a grappling hook to attach to the door handle.
- Click Louis to start the pressure gauge moving.
- When the pressure gauge approaches 180, click Louis again to throw the hook.
- One hook will attach to the door handle and Louis will hang off the other hook to release the car door.
Click the arrow to board the ship.
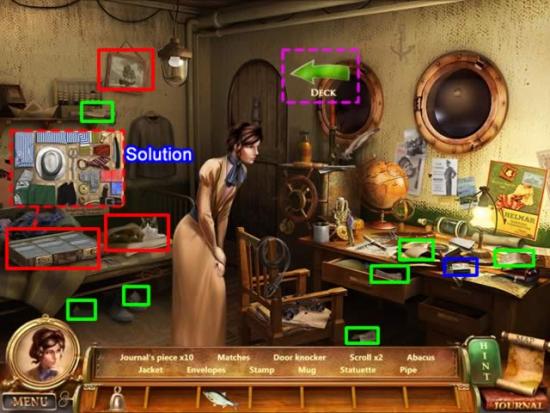
- Find the items listed. The locations of seven of the ten JOURNAL’S PIECES are outlined in green. The red outlined items contain hidden pieces.
- Click the crooked picture on the wall. A piece will fall to the floor.
- Feed the FISH to the cat. The cat will leave. Click the pillow to lift it and collect that piece.
- Click the suitcase. The missing piece is under the clothes. Click any item to remove the clothing. Retrieve the piece. Place each item as originally shown. The solution is shown above.
- The MATCHES are on the desk, outlined in blue.
Click the arrow to go on deck.
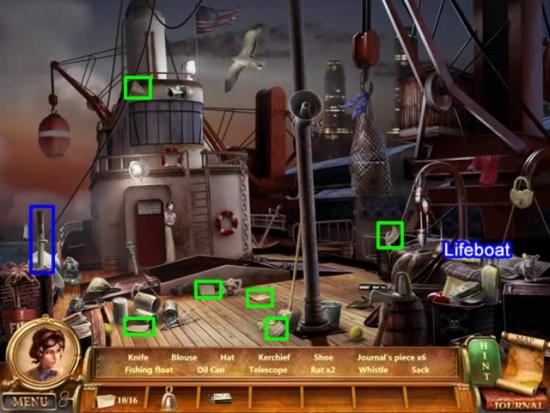
- Find the items listed. The locations of the six JOURNAL’S PIECES are outlined in green.
- The KNIFE is on the left side of the screen and is outlined in blue.
Click the Lifeboat to open this area.
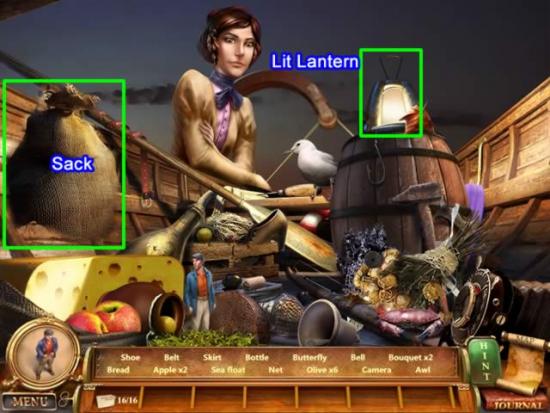
- Place the LANTERN on the barrel.
- Use the MATCHES to light it, revealing the list of items to find.
Many of the items are not currently displayed nor is there any indication that they are hidden.
- Use the KNIFE to slit the sack located on the left of the screen. All items on the list can now be collected.
Return to Louis’ quarters.
- Click the desk.
- Find 20 coins and paper currency.
You are now ready to assemble the 16 JOURNAL PIECES.
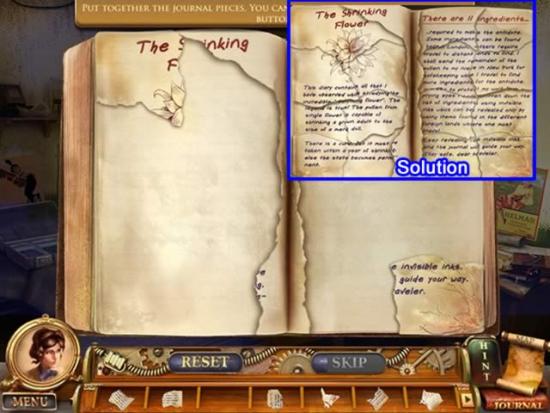
Solve the puzzle as you would a jigsaw puzzle:
- Start with the corners and outside pieces and work your way in.
- Right-click to rotate pieces.
The completed journal reveals how to find the antidote that will restore Louis’ stature.
The JOURNAL is now available. It will contain clues to solve puzzles and what to look for in future locations. Only information relevant to the current location or puzzle is displayed; you cannot review previous pages.
Click the LONDON location icon on the world map or the PLAY button to continue.
Chapter 2: London
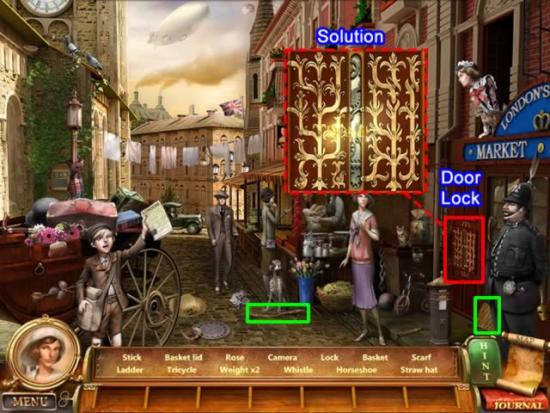
- Find the items indicated. Inventory items are the STICK and BASKET LID outlined in green.
- Click the door lock to solve the puzzle required to open the door. Rotate the pieces until they turn gold. The correct pattern is shown above.
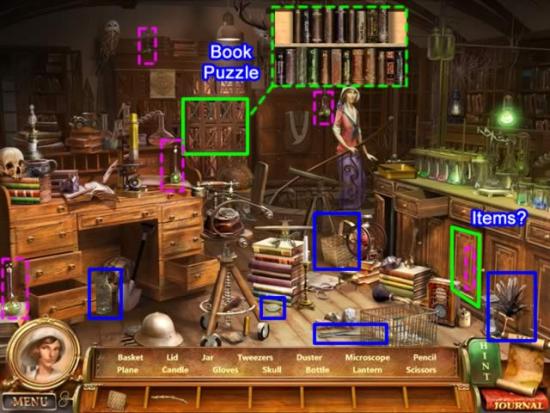
- Collect the items listed. Open the cabinet door on the work table to check if a listed item is hidden there. Inventory items outlined in blue above are: DUSTER, BASKET, JAR, JAR LID, and TWEEZERS.
- Click the book shelf gears in the back of the room to open the book puzzle.
- Use the DUSTER to clean off the books.
- Rearrange the books by swapping one with the other. The order is based on the gold letter on the spine of each book. A correctly placed book will not be locked into place, but a silver marker will appear on its spine. The books cannot be swapped between shelves. Place the books to spell the name of Ruby’s Uncle.
- SOLUTION. The top shelf spells N-A-T-H-A-N-I-E-L. The bottom shelf spells B-E-N-N-E-S-I-N-G-T-O-N
- A secret draw opens to reveal some JOURNAL PAGES and money. Take them both.
- A JOURNAL PAGE instructs you to collect eight GREEN FLASKS scattered throughout the lab and gives you a code.
- Five of the GREEN FLASKS are highlighted in dashed-pink in the above screenshot. One of them is behind the cabinet door.
- Click on the desk to open a puzzle.
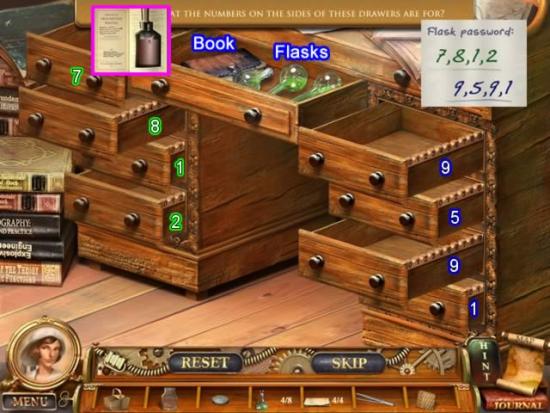
- Use the code from the journal to open the middle drawer of the desk.
- Start with the top-left drawer. Click until the number seven shows on the notches. Because the numbers start at zero, you will need to click eight times.
- Click the second drawer on the left nine times (8), the third two times (1), and the fourth three times (2).
- Repeat for the right side using the second set of numbers.
- When the center drawer opens, click the three GREEN FLASKS and the book.
- The book opens revealing a flask. Click the flask to discard it. The HOLLOW BOOK goes to inventory.
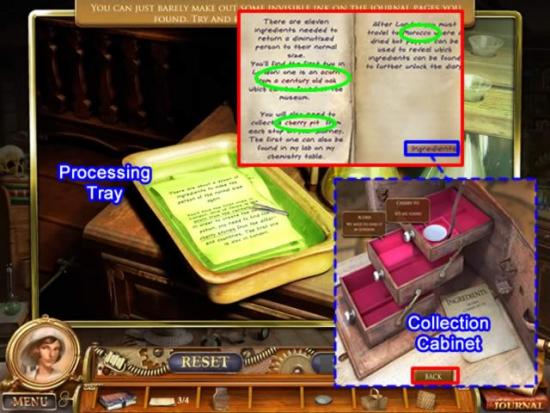
Move your cursor to the yellow processing tray on the work table. The cursor turns to gears. Click the gears to open the area.
- Place the liquid from the eight GREEN FLASKS in the tray.
- Add a JOURNAL PAGE to the tray to reveal the text on the page.
- After the pages are processed, use the TWEEZERS to remove the pages from the tray.
The text on the page gives instructions for the next tasks:
- Obtain an ACORN from a Century Oak and collect a CHERRY PIT.
- It also tells you your next location to search for ingredients will be Morocco.
- Click the “Instructions” text on the bottom right of the journal page. A collection cabinet appears. As you progress through the different locations, this will fill with the ingredients necessary to produce the antidote. Click the “Back” button to return to the journal.
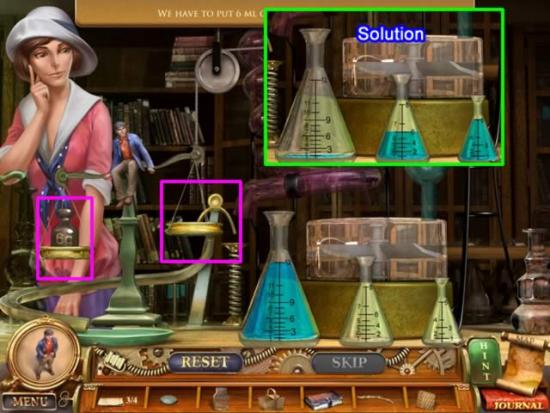
Move the cursor over the chemical vials on the work surface. The cursor turns to gears. Click the gears to open the area.
- Distribute the liquid in the 12 ml. beaker to obtain 6 ml. to balance the scale.
SOLUTION:
- Fill the 8 ml. beaker from the full 12 ml. beaker.
- Fill the 5 ml. beaker from the 8 ml. beaker. Three ml. remain in the 8 ml. beaker.
- Pour the contents of the 5 ml. beaker back into the 12 ml. beaker.
- Pour the remaining 3 ml. from the 8 ml. beaker into the now empty 5 ml. beaker.
- Again fill the 8 ml. beaker from the 12 ml. beaker.
- Top off the 5 ml. beaker from the 8 ml. beaker.
- Six ml. now remain in the 8 ml. beaker. Mission accomplished.
- Place the 8 ml. beaker containing the correct amount of fluid on the scale.
Collect the CHERRY PIT that drops into the plate. It will go into the antidote collection cabinet.
You may get instructions to go to Buckingham Palace. If so, disregard this. Click the Map icon and click on the Museum.
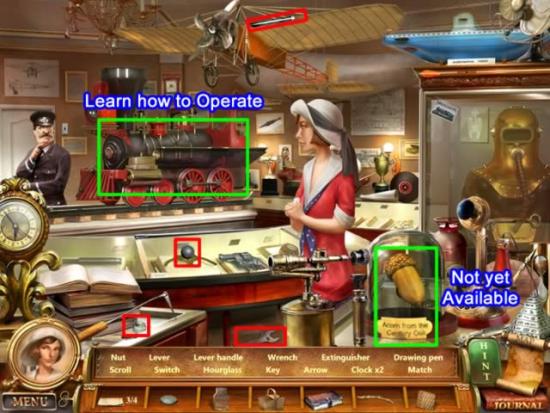
- Find the items indicated. Inventory items are the NUT, LEVER, LEVER HANDLE, and WRENCH (outlined in red).
- To get the ACORN, you must distract the guard by operating the train.
- Go to Buckingham Palace to find the train designer to learn how to operate the train.
Once at the Palace, you are instructed to return to Uncle Nathaniel’s lab to get the mice. Follow the arrows to return to the lab/office.
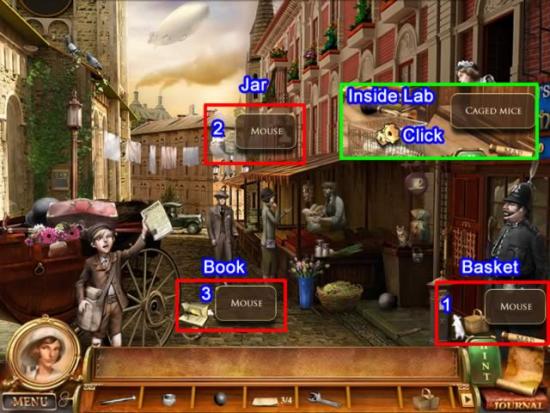
Inside the lab, place the cursor over the cage with the mice. The cursor will turn into gears. Click to free the mice (see insert above outlined in green).
Go back to the alley to capture the mice.
Mouse 1:
- In Inventory, click the BASKET LID and combine it with the BASKET.
- Capture the first mouse by clicking the BASKET WITH LID in Inventory and placing it on the mouse (highlighted in red above in the lower right corner).
- Click again and the TRAPPED MOUSE goes to Inventory.
Mouse 2:
- In Inventory, click the JAR LID and combine it with the JAR.
- Capture the second mouse by clicking the JAR WITH LID in Inventory and placing it on the mouse (highlighted in red above in the middle of the screen).
- Click again and the TRAPPED MOUSE goes to Inventory.
Mouse 3:
- In Inventory, click the STICK and combine it with the HOLLOW BOOK.
- Capture the third mouse by clicking the HOLLOWED BOOK WITH STICK in Inventory and placing it on the mouse (highlighted in red above on the lower left side).
- Click again and the TRAPPED MOUSE goes to Inventory.
Return to the Palace with the trapped mice to wreak havoc at the party.
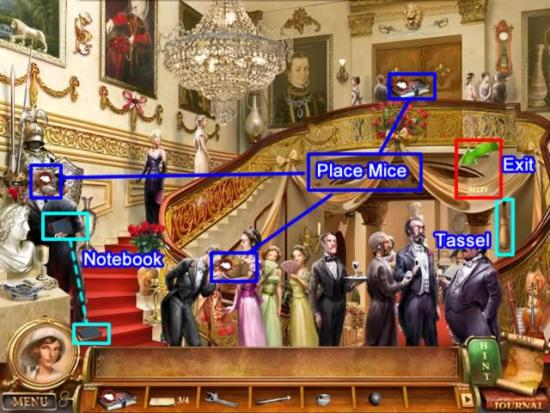
- Place the mice among the groups of partiers to get them to leave.
- Find the objects listed at the bottom of the screen in the now-deserted room.
- The train designer dropped his NOTEBOOK containing a diagram of how to work the train. The TASSEL also goes into Inventory.
Exit into the Alley and go back to the Museum.
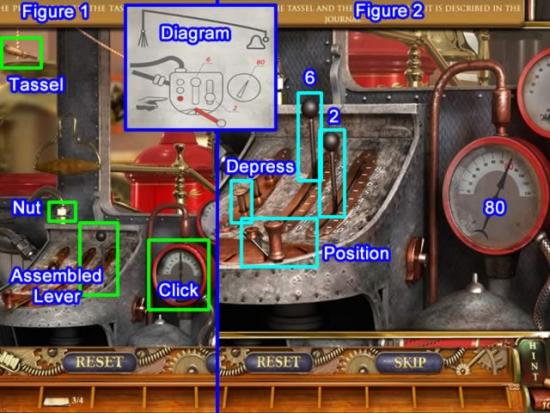
Click the train to access the area.
- Place the NUT for the hose as shown in Figure 1. Use the WRENCH to tighten it.
- Put the TASSEL on the end of the cord.
- Place the LEVER and the LEVER HANDLE next to the existing lever.
- Click the pressure gauge (outlined in green) in Figure 1 to open the area shown in Figure 2.
To raise the pressure on the gauge to 80, follow the diagram from the NOTEBOOK.
- Place the bottom lever in the second position on the dial.
- Move the left-hand lever to position 6.
- Move the right-hand lever to position 2. The pressure gauge now reads 80.
- Depress the bottom of the three buttons.
The train is now moving and the guard is distracted. Take the ACORN from the bell jar.
All items from London have been collected.
Chapter 3: Morocco
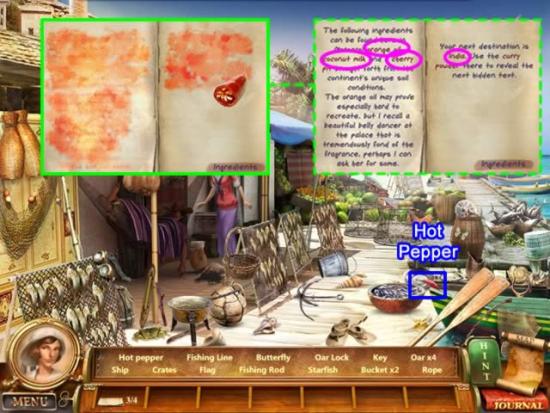
- After all the items are found, the HOT PEPPER goes into Inventory and the Journal opens.
- Place a blank JOURNAL PAGE from Inventory into the Journal.
- Rub the HOT PEPPER across the pages to reveal the writing.
- ORANGE OIL, COCOANUT MILK, and a CHERRY PIT are needed from Morocco.
Enlist the aid of the sleeping fisherman to help locate the Cocoanut Milk. The fisherman needs olive oil. Follow the arrow to the farm.
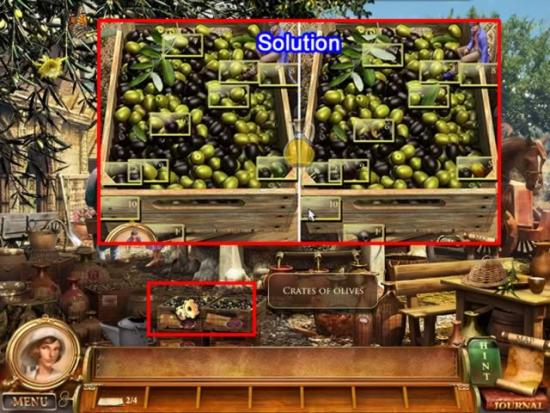
- Find the items listed.
- Click the crates of olives to open a spot-the-differences puzzle. The solution is shown in the inset above.
- Obtain OLIVE OIL.
Return to the Dock.
- Give the OLIVE OIL to the fisherman.
Visit the Fruit Stand at the end of the dock.
- Rid the stand of pests.
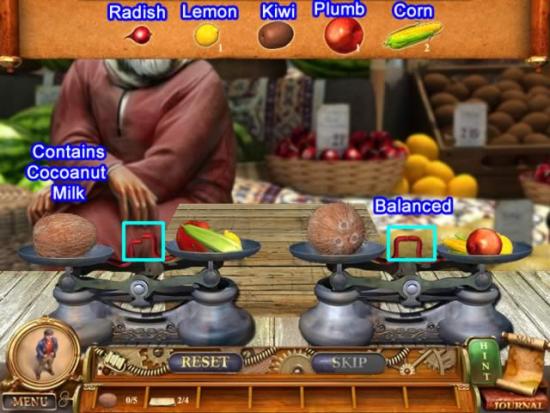
Find five cocoanuts containing milk. To do this, place the same vegetables on each scale. The scale that does not balance has a heavier cocoanut. That cocoanut contains milk. SOLUTION:
First Cocoanut:
- Corn, Plumb, Lemon.
Second and Third Cocoanut:
- 2 Plumbs, Kiwi.
Fourth Cocoanut:
- Kiwi, Plumb, Lemon, Radish
Fifth Cocoanut:
- 2 Corn, Radish
The COCOANUT MILK goes into the ingredient container cabinet.
Click the Map icon to go to the Outpost.
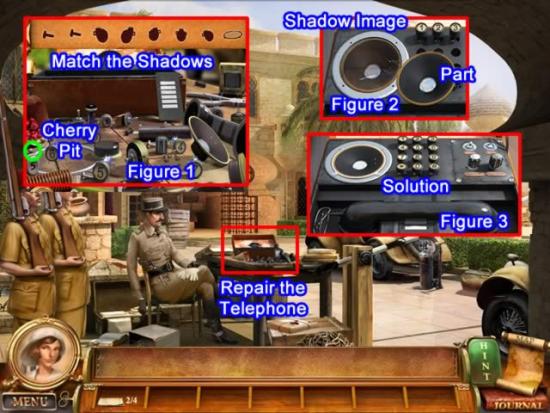
When you arrive, there will be a list of objects to find. None go into Inventory.
Click the telephone to active a puzzle.
Part 1: Click the telephone parts on the table that match their shadows displayed along the top.
- Each identified part goes into the telephone inventory.
- Collect the CHERRY PIT (highlighted in green).
Part 2: Take the items collected from the table and repair the telephone.
- Click a part from the puzzle inventory.
- When the piece is near where it needs to be placed, a shadow image will show you where to place the item (see Figure 2).
The repaired telephone is shown in Figure 3.
Click the Map icon to go to the Palace.
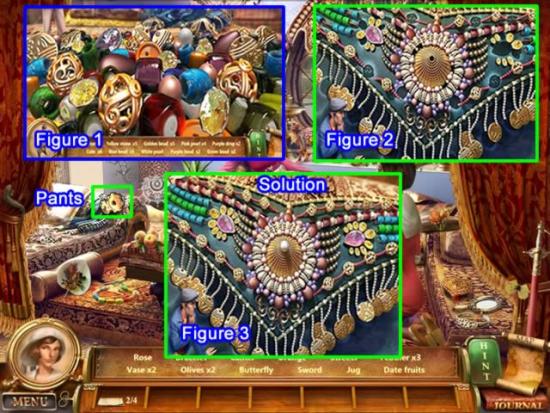
Find the objects listed. None go into Inventory.
Click the pants to activate a puzzle.
Part 1: Find the listed beads.
Part 2: Place the beads in the correct location on the pants.
- Click a bead from the puzzle inventory.
- When a bead is near where it needs to be placed, a shadow image will show you where to place the bead.
Figure 3 shows the finished pants.
Obtain the ORANGE OIL for the antidote.
Chapter 4: India
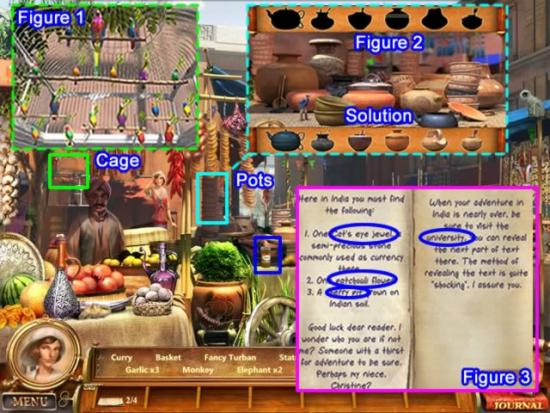
- Find the listed objects. CURRY goes to Inventory.
Cage Puzzle: Click the cage to activate the puzzle.
- Swap the birds so every bird is singing.
- Align the birds on each perch so each shares at least one color with the bird(s) next to it.
- There are several combinations that will solve this puzzle. Figure shows one of them.
- Receive a FEATHER for Inventory.
Pots Puzzle: Click the pile of pots to activate the puzzle.
- Click an object on the table to send it to its silhouette figure.
- The solution is shown at the bottom of the screen in Figure 2. (HINT: to get the bottom half of the first figure, click the top two bowls on the stack at the back center of the screen to access the dark blue handle part.)
Reveal the Journal page.
- Click to add a blank JOURNAL PAGE to the Journal.
- Click several times to sprinkle the CURRY over the writing on both pages.
- Use the FEATHER to remove the curry and reveal the writing on the page.
Quests for this location:
- Retrieve the CAT’S EYE JEWEL, PATCHOULI FLOWER, and CHERRY PIT.
- Visit the UNIVERSITY before leaving.
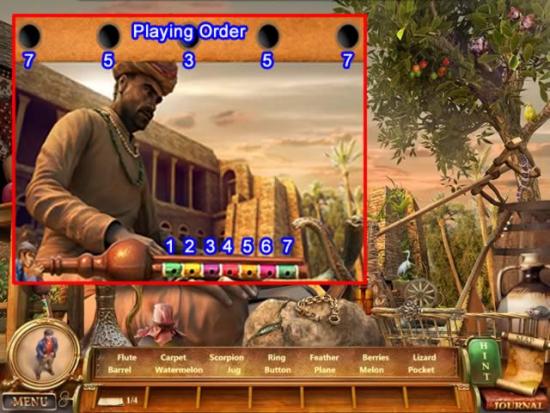
Finding all the items listed will open a find-the-note puzzle.
- Click a color on the flute. If it is correct, a green circle will appear around a dark hole at the top of the screen. A red “X” indicates an incorrect guess.
- Continue until all holes have a green circle around them. If you guess incorrectly, you will have to restart from the first hole. The notes will be the same, however, so repeat the correct guesses to the point of the mistake.
- SOLUTION: The inset above shows the correct order. Match the number on the pipe to the number on the green-circled hole to solve the puzzle.
The Snake Charmer invites you to his house.
- Find all the butterflies indicated.
- Get the CHERRY PIT that is hanging from the bicycle handlebars.
- Click the green arrow above the door to go to the University.
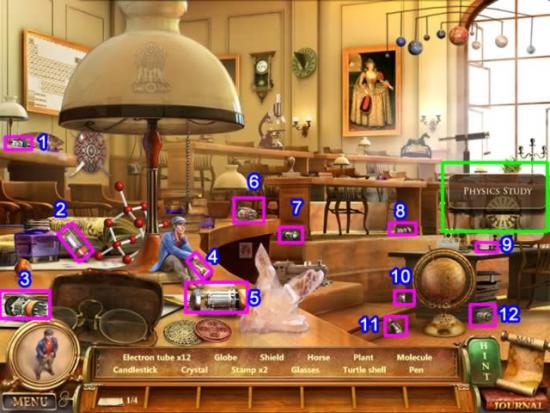
Once inside the class room, you are directed to the Physics Study table.
- Click the cursor gears to open the area.
- There is nothing to be done here yet.
- Return to the class room
Locate the 12 ELECTRON TUBES for Inventory. Their locations are highlighted and numbered in the above screen shot
NOTE: After collecting all the items in the scene, a message may appear to “Meet Ruby at the Library”. This cannot be done. There is no arrow to lead you out of the class room and no “Library” location on the map.
Click the Physics Study area again to open the puzzle.
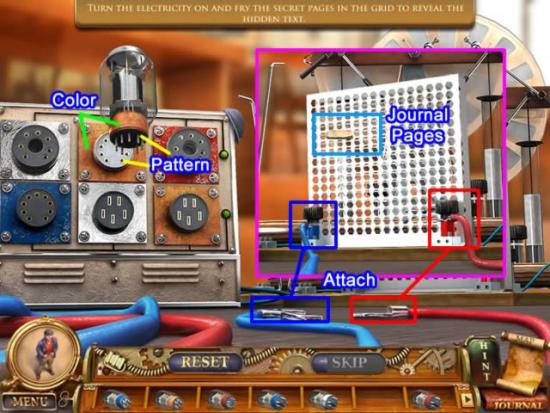
- Sort through the 12 ELECTRON TUBES in inventory. Only six will be needed.
- Match the color band on the tube with the background color on the tube panel.
- Match the connector pattern on the bottom of the tube with the pattern on the tube panel.
- Click to insert the correct tube color/pattern match into the corresponding tube panel.
- Correctly placing all six tubes will start the electricity and the unused tubes will disappear from inventory.
- Attach the blue and red cables to their corresponding colored pegs at the base of the grid.
- Place a JOURNAL PAGE in the electric grid to reveal the writing on the page.
- The pages insert themselves into the Journal.
Ruby appears in the class room with the PATCHAULI FLOWER.
Chapter 5: China
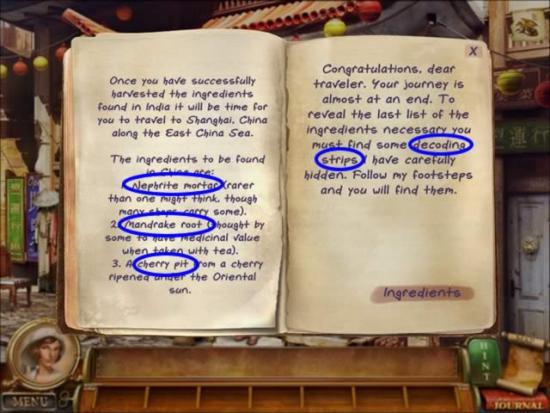
Unlike previous chapters, this chapter does not begin with a review of the Journal and the goals to accomplish in this location. Ruby engages immediately with a merchant and speaks of finding an item. It is a bit confusing.
Quests for this location:
- Find a NEPHRITE MORTAR, MANDRAKE ROOT, and CHERRY PIT.
- To decipher the Journal, collect DECODING STRIPS.
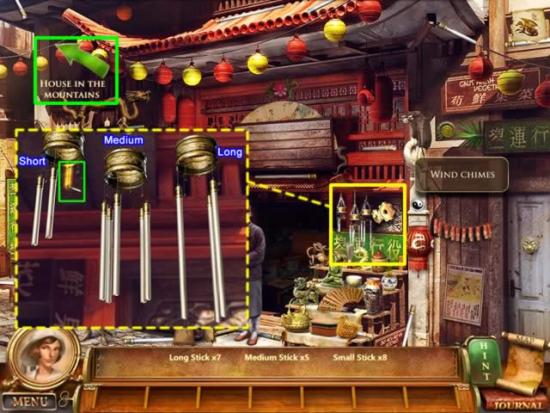
- Collect the different lengths of wind chime sticks.
- Place the cursor over the wind chimes. Click the gears to open the puzzle.
- Place all the short sticks on the chime on the left. When a stick is correctly placed, the cord it hangs from will be highlighted (see the green outline in the above insert).
- All medium sticks go on the middle chime.
- The long sticks go on the right chime.
No specific instructions are provided for your next move so click the arrow for the House in the Mountains.
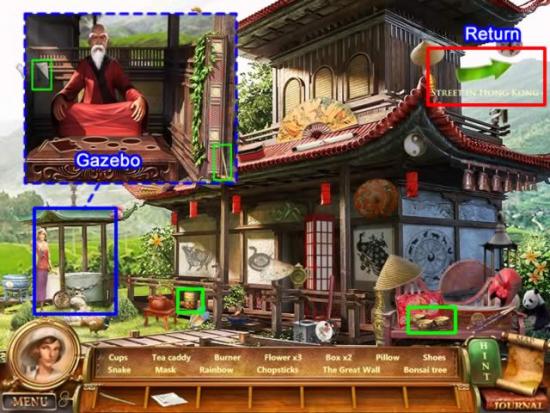
Enter the Gazebo and speak with the Calligrapher. You will need to collect items for his tea.
Prior to exiting the Gazebo, collect:
- The LINEN CLOTH and TEA SCOOP highlighted in green in the inset in the above screen shot.
From the ground, collect:
- CUPS and TEA CADDY
Click the arrow to return to the merchant to find more tea items.
Confusing discrepancy: The Journal says we’re in Shanghai, the arrow says Hong Kong. Oh well.
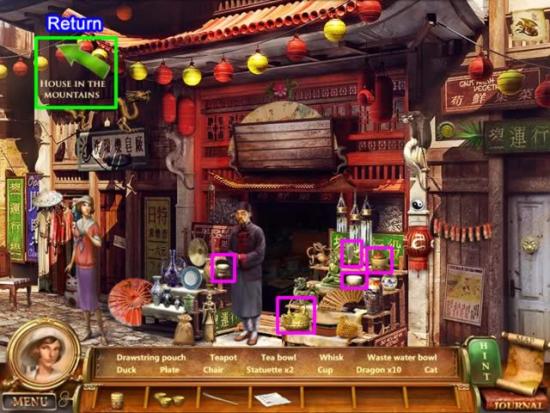
Find the items listed. Inventory items are highlighted in pink.
- DRAWSTRING POUCH, TEAPOT, TEA BOWL, WHISK, WASTE WATER BOWL
Click the green arrow to return to the calligrapher.
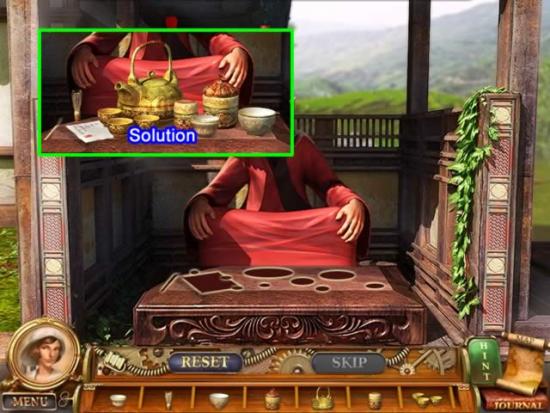
Place the items from Inventory in their correct spot.
If you’re not sure where an item goes, move the item over the table. The spot for the item will light up.
The solution is shown in the above insert.
You have now been taught calligraphy. Return to the merchant.
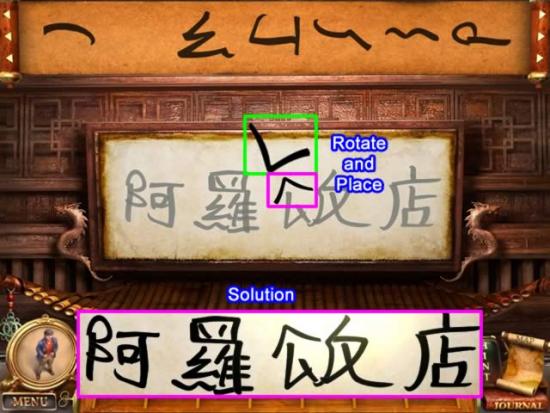
Click on the sign board to access the puzzle.
- Select a character from the top board.
- Right-click the character if it needs rotating to fit into the outline.
- Click to place.
- Continue through the characters. The solution is shown above.
The NEPHRITE MOTAR from the merchant is placed in the antidote collection box.
Click on the green arrow on the lower-right portion of the screen to travel to the Emperor’s Palace.
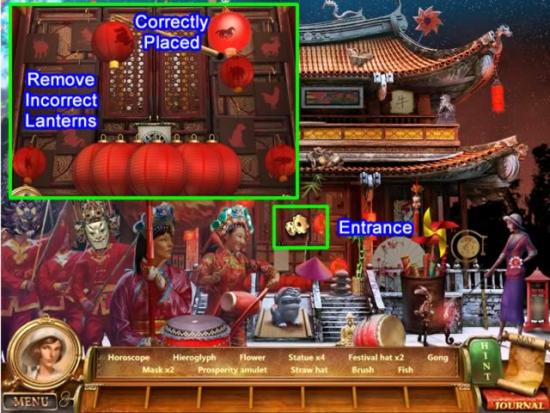
- Collect the listed items.
- Place the cursor on the Palace entrance to access the lantern puzzle.
Lantern Puzzle:
- Use the hooked stick to move the lanterns.
- Match the symbol on the spinning lantern to the image on the wall.
- A lantern is correctly positioned when it glows.
Placing all lanterns correctly provides access to the Palace.
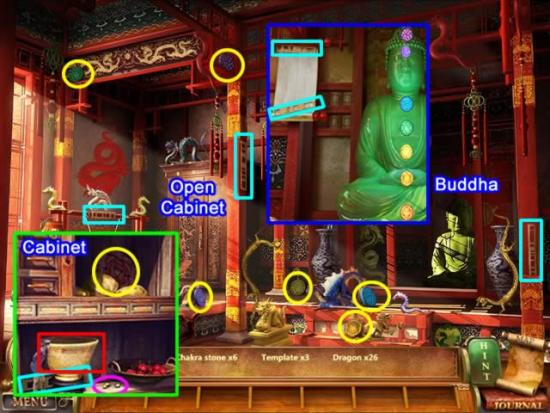
Open the cabinet. Collect:
- CHAKRA STONE (yellow)
- EMPORER’S CUP (red)
- CHERRY PIT (pink)
- TEMPLATE (aqua)
In addition to collecting all the dragons in the main room, collect:
- 6 CHAKRA STONES (yellow)
- 3 TEMPLATES (aqua)
Click the Buddha.
- Place the CHAKRA STONES on the Buddha by matching their color and image.
- The scroll will open. Collect the remaining two TEMPATES.
Return to the Hong Kong Street. Proceed to the House in the Mountains and the Calligrapher’s Gazebo.
Give the calligrapher the EMPORER’S CUP and receive the MANDRAKE ROOT in return.
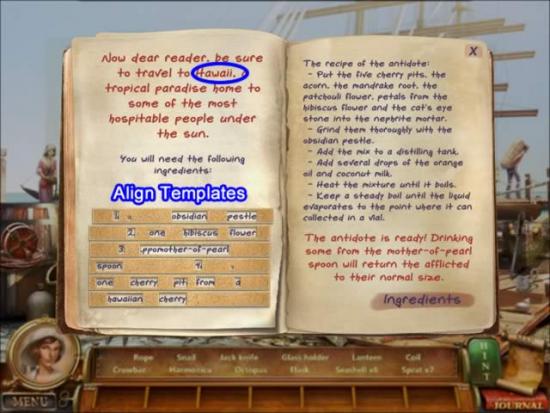
Align the TEMPLATES over the Journal text at the bottom of the page.
- When the correct template is placed over a line of text, it will glow. Clicking will lock the template into place.
Goals for the next location, Hawaii are:
Find an OBSIDIAN PESTLE, HIBISCUS FLOWER, MOTHER-OF-PEARL SPOON and a CHERRY PIT.
Chapter 6: Hawaii
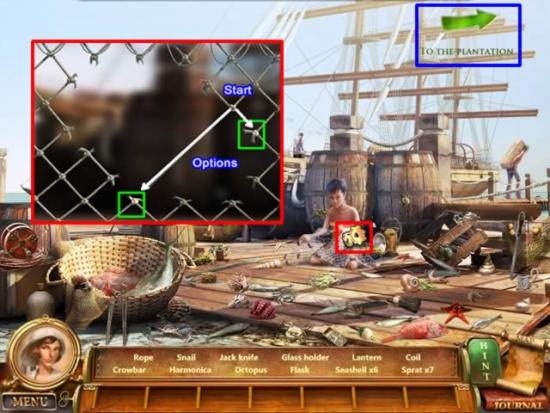
- Find the items listed. There are no items for Inventory.
- Click the boy to access the puzzle.
Mend the Net:
- At first all ends around the hole are glowing.
- Click any end to start. In the example shown above, there are two options (two glowing knots) for dragging the net line. It does not matter which you choose. There are no wrong ways to go.
- Click a glowing end to tie the knot. The next available option(s) will glow.
- Repeat the above steps until the hole is mended.
Receive the OBSIDIAN PESTLE for the antidote inventory from the boy for your mending efforts.
Click the green arrow to go to the Plantation.
Discuss the terms for obtaining the HIBISCUS FLOWER from the young man.
Follow the arrow to the Colonial House.
Enter the Gazebo and talk to the young lady.
- Find the list of objects inside the Gazebo.
- Exit to yard.
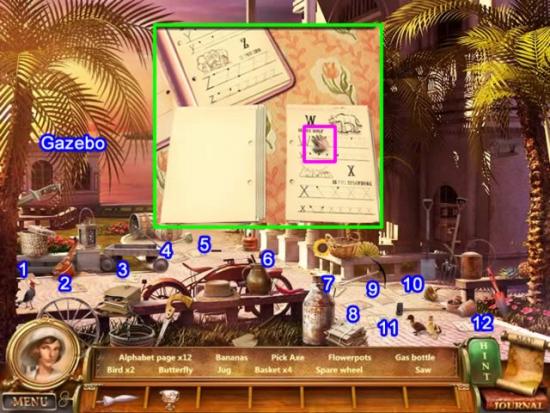
- Find the items listed. The locations of the 12 ALPHABET PAGES are numbered in the screen shot.
- Return to the Gazebo with the pages.
- Place the collected pages next to the alphabet book on the table to open the puzzle.
Book puzzle:
- Each page contains two letters in alphabetical order. The pages themselves are out of sequence.
- Flip through the stacks of pages and reassemble the book in ascending “Z” to “A” order.
The girl gives you the PARASOL for the young man at the plantation for fixing her book. She has the MOTHER-OF-PEARL SPOON you need, but would like you to make her a fruit salad in exchange for the spoon. She provides you with a SALAD VASE.
Return to the Plantation
Give the young man the PARASOL. He gives you the HIBISCUS FLOWER for the antidote.
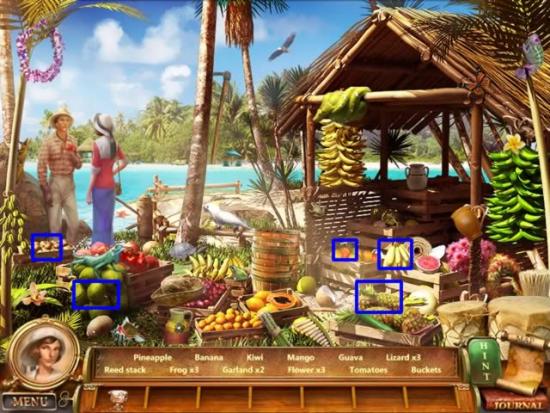
Find the items listed. The ingredients for the fruit salad, PINEAPPLE, BANANA, KIWI, MANGO and GUAVA are highlighted.
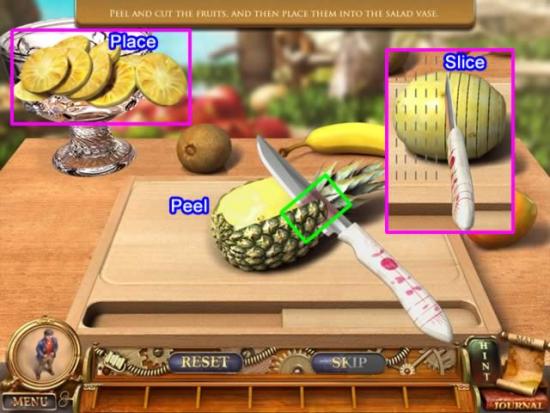
Prepare the fruit salad:
- Place the items from inventory onto the work surface.
- Select any fruit and place it on the cutting board.
- Click the knife.
- To peel the fruit, place the pink section of the knife on the fruit and drag it. You do not need to hold the mouse button down while dragging the knife.
- When it’s time to peel the other side of the fruit, the knife will return to the depression on the cutting board. Click the fruit and it will turn over. Click the knife and continue peeling.
- After the fruit has been peeled, grid lines appear on the area to be sliced. Place the knife on the lines and click.
- Place the sliced fruit in the salad vase.
- Repeat the above steps for each piece of fruit.
Return to the Colonial House Gazebo and give the girl her fruit salad. Accept the MOTHER-OF-PEARL SPOON for the antidote inventory.
Exit the Gazebo.
Follow the green arrow to the beach.
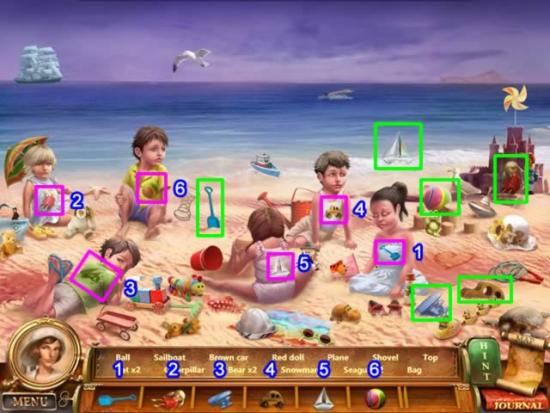
Match the children with their toys. Collect the listed items. Lost toys are:
- BALL, SAILBOAT, BROWN CAR, RED DOLL, PLANE, and SHOVEL (highlighted in green)
Each child has a picture (highlighted in pink) showing their toy.
- Take the toy from inventory and match it with the child. The numbers above the toys correspond with the child.
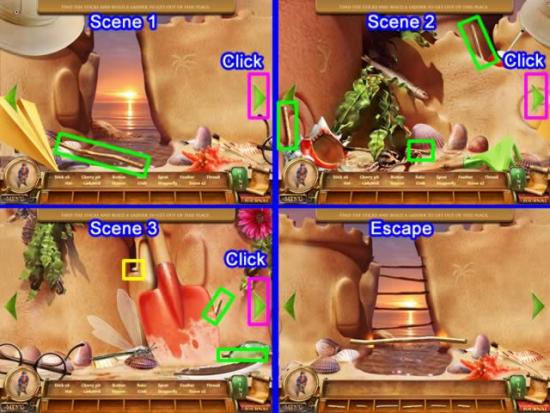
Help Louis escape the sand castle by collecting 6 STICKS (highlighted in green) from different areas of the castle.
Use the green arrows to navigate.
Scene 1:
- Collect 1 STICK.
- Click the arrow on the right side of the screen.
Scene 2:
- Collect 3 STICKS.
- Click the arrow on the right side of the screen.
Scene 3:
- Collect 2 STICKS.
- Collect the CHERRY PIT (highlighted in yellow).
- Click the arrow on the right side of the screen.
You are back to Scene 1 with the sticks in inventory.
- Build a ladder to escape by placing the sticks as shown in the last panel.
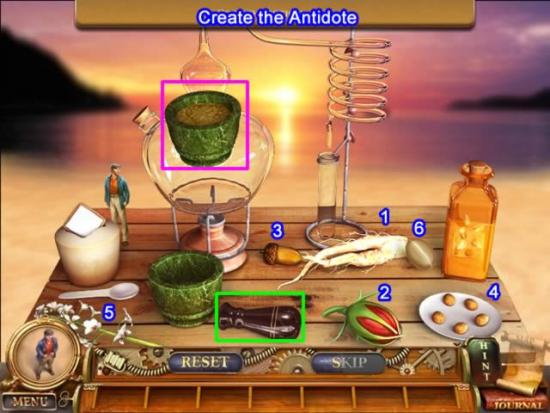
Prepare the antidote:
- Place each item from inventory on the work surface by clicking the item, then anywhere on the table. They will be displayed as shown above.
Combine the dry ingredients:
- Moving the cursor over the items will highlight the order in which the items should be added.
- Click the item and place it in the mortar. Only the needed parts will be added.
- Add the ingredients in this order (numbered 1-6 above): MANDRAKE ROOT, HIBISCUS BUD, ACORN, CHERRY PITS, PATCHOULI FLOWER, and CAT’S EYE JEWEL.
- Use the OBSIDIAN PESTLE to grind the ingredients.
- Click the mortar and drag it to the distilling tank. Click to add.
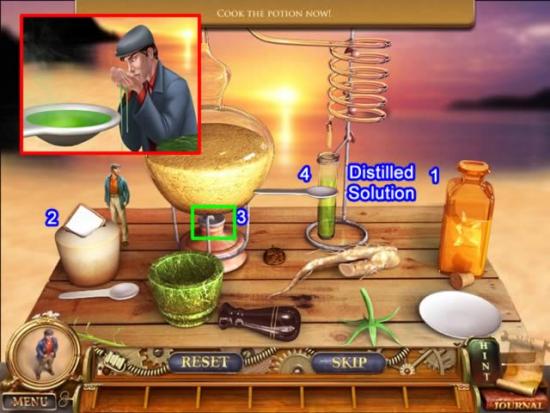
Complete the potion.
- Add the ORANGE OIL then the COCOANUT MILK.
- Click the base of the distilling tank to light the burner.
- The mixture will come to a boil and the distilled solution will fill the vile.
- Place the MOTHER-OF-PEARL SPOON on the vile. Click to get a spoonful.
Give the spoon to Louis and watch him grow.
Watch the ending scene clips to see what happens next.
Congratulations! You have finished Biggest Little Adventure.
More articles...
Monopoly GO! Free Rolls – Links For Free Dice
By Glen Fox
Wondering how to get Monopoly GO! free rolls? Well, you’ve come to the right place. In this guide, we provide you with a bunch of tips and tricks to get some free rolls for the hit new mobile game. We’ll …Best Roblox Horror Games to Play Right Now – Updated Weekly
By Adele Wilson
Our Best Roblox Horror Games guide features the scariest and most creative experiences to play right now on the platform!The BEST Roblox Games of The Week – Games You Need To Play!
By Sho Roberts
Our feature shares our pick for the Best Roblox Games of the week! With our feature, we guarantee you'll find something new to play!All Grades in Type Soul – Each Race Explained
By Adele Wilson
Our All Grades in Type Soul guide lists every grade in the game for all races, including how to increase your grade quickly!


