
Best Horror Games On Itch.io – July 2026
Across a bounty of subgenres.
Grow A Garden 2 Base Price List
What's the most valuable crop?![Evomon Best Starter [Leafbun, Blazpup, or Bubble?]](/wp-content/uploads/2026/06/evomon-best-starter.jpg "Evomon Best Starter [Leafbun, Blazpup, or Bubble?]")
Evomon Best Starter [Leafbun, Blazpup, or Bubble?]
Grass-type, Fire-type, or Water-type?
![[Roblox] Evomon Shiny Hunting Guide – Including Prismatic and Pris Shinies!](/wp-content/uploads/2026/06/evomon-shiny-hunting-guide.jpg "[Roblox] Evomon Shiny Hunting Guide – Including Prismatic and Pris Shinies!")
Big Brain Wolf Tips Walkthrough
Welcome to Gamezebo's strategy guide for Big Brain Wolf. This game mixes puzzles and an adventure story as the Wolf wanders a fairy tale kingdom to free his mother from a false accusation of murder! The game is divided into five chapters with 12 puzzles in each. This guide is divided into sections: General Tips (no spoilers)Chapter 1 WalkthroughChapter 2 WalkthroughChapter 3 WalkthroughChapter 4 WalkthroughChapter 5 WalkthroughComplete Alphabetical Index to Puzzle Solutions GEN…


- Prefer Gamezebo on Google

a:1:i:0;a:2:s:13:”section_title”;s:19:”Big Brain Wolf Tips”;s:12:”section_body”;s:62858:”
Welcome to Gamezebo’s strategy guide for Big Brain Wolf. This game mixes puzzles and an adventure story as the Wolf wanders a fairy tale kingdom to free his mother from a false accusation of murder! The game is divided into five chapters with 12 puzzles in each.
This guide is divided into sections:
- General Tips (no spoilers)
- Chapter 1 Walkthrough
- Chapter 2 Walkthrough
- Chapter 3 Walkthrough
- Chapter 4 Walkthrough
- Chapter 5 Walkthrough
- Complete Alphabetical Index to Puzzle Solutions
- To call up the genie, click on the lamp in the lower left of the screen, or press your Escape (ESC) key.
- To exit the game at any time, call up the Genie, then choose Save and Quit.
- There are two parts to the game: the adventure story and the individual puzzles.
- You can solve the adventure without solving all the puzzles, as some are optional.
- Each chapter has 12 puzzles, so there are 60 puzzles total.
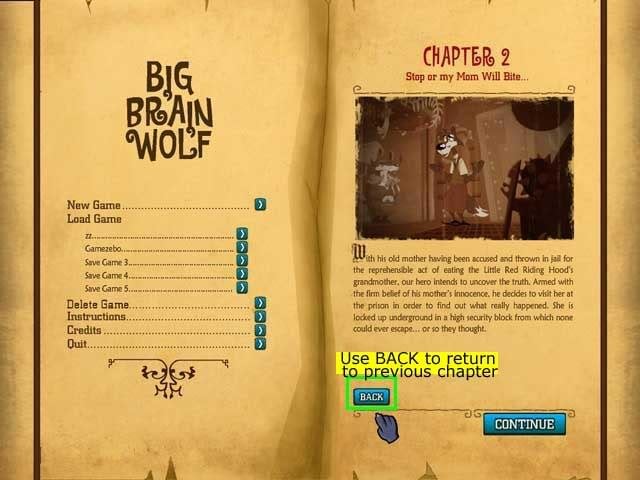
- If you want to go back to a previous chapter to solve optional puzzles you skipped the first time through, return to the main menu, then use the BACK button to go back to a previous chapter in the story. However, this is glitchy, as sometimes you can’t get to the exact scene or character you needed.

- There is nothing in the game to indicate where the puzzles are in a scene, so you pretty much just have to click on every single object you see, foreground and background.
- When you are doing a puzzle where you have to drag things to a specific spot, like letters into a crossword form, they may not always stick unless you get them in just the right spot.
- When you are doing a puzzle where you have to connect the dots, make sure each dot fills in before moving on to the next one.
- Read the instructions carefully! Many of the puzzles are easier than they appear at first because of restrictions. For example, you might have a crossword to fill in, but each letter can only go into the column it starts in.
- Although you are allowed to end conversations early, if you do, you may not be able to do one of the required puzzles. So it’s best to talk to all characters about all topics.
- If a conversation includes information in brackets, that’s sometimes information you’ll need in another part of the scene. For example, if it says "Give [the monkey] something" you’ll probably need to find the monkey and click on him. However, the game is a little inconsistent in this.
- Sometimes you think you have finished a conversation, but you will need to click on the character one more time to get more information. The game is inconsistent about this.
- Although we have numbered the puzzles in the walkthrough, you may be doing them in a different order if you skipped some optional puzzles and came back to them later. Each puzzle has its official name in a title bar at the top of the puzzle screen. For convenience, we have included a complete alphabetical index to all puzzle solutions at the end of the walkthrough.
- The Genie keeps a list of all the puzzles you have completed in his log. Anything you haven’t found is just marked LOCKED. This won’t tell you exactly where a missing puzzle is, but at least you’ll know if you found all 12 puzzles for a chapter, and since the puzzles are listed in the order they occur in a chapter, you’ll have some idea of where to look for the locked ones.
SPOILERS BELOW!!!!!!
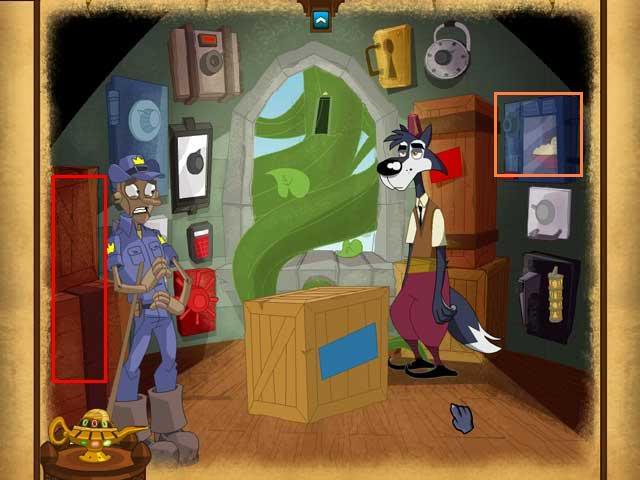
In the screenshots, blue objects are a required click, red objects are a required puzzle, orange objects are an optional puzzle, and green objects are an exit from the scene.
WALKTHROUGH
SCENE 1 – HOME
Rooms: Bedroom -> Office -> Kitchen
TUTORIAL
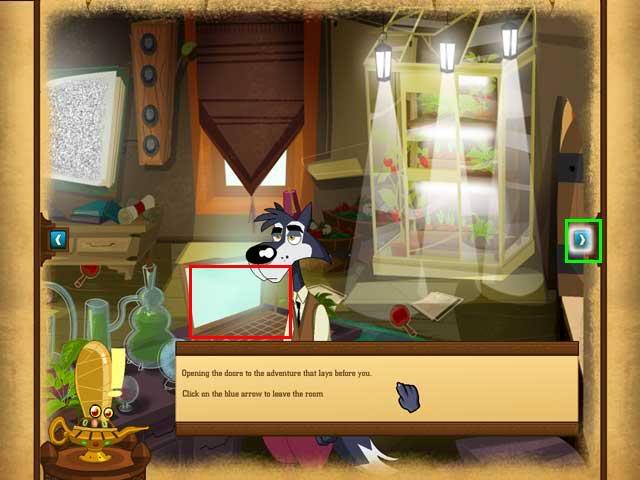
Follow the tutorial to learn how to play the game. All of the items that you need to interact with will be highlighted in white.
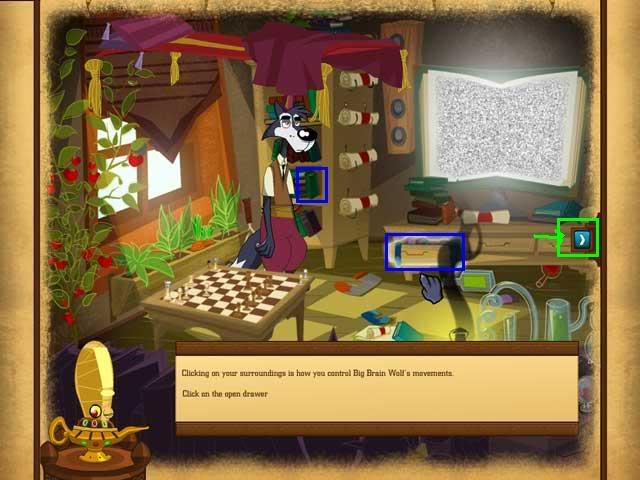
- Click on the open drawer.
- Click on the bookshelf.
- Click on the blue arrow on the right side of the screen to move to a new area.
- In the new area, click on the highlighted scroll sitting on the desk on the left.
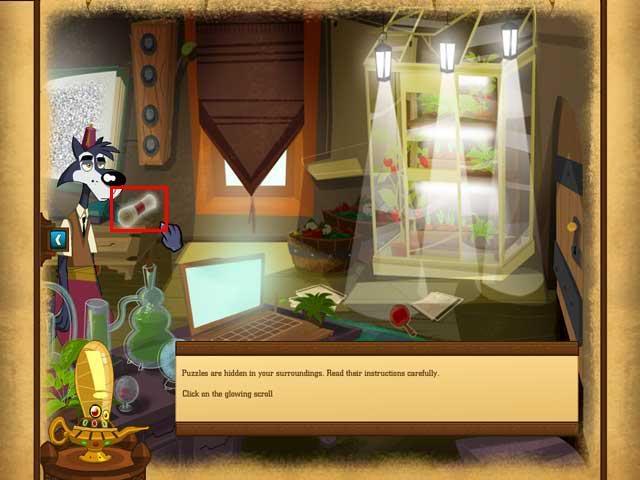
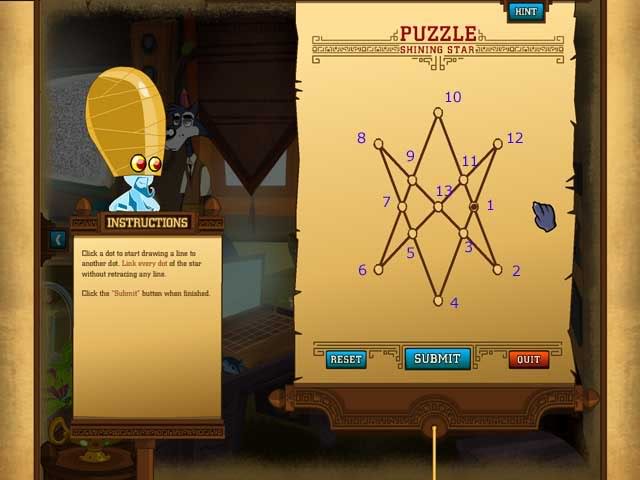
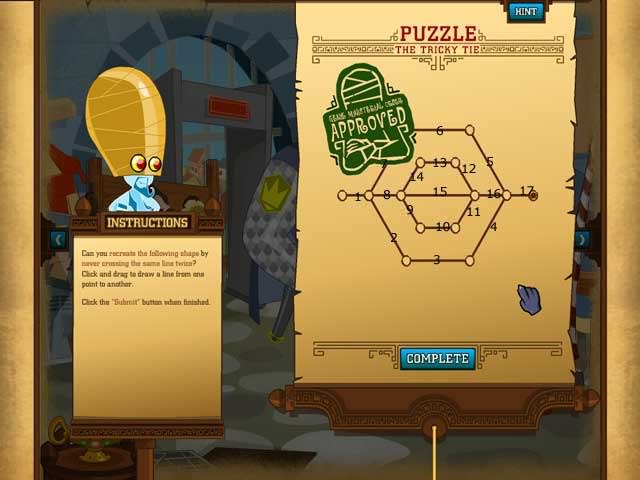
PUZZLE #1: SHINING STAR, Required
Solution:
This one is easier than it looks. Just trace around the outside of the star, then follow the lines on the inside. Starting at dot 1 on the diagram, the solution is to trace 1, 2, 3, 4, 5, 6, 7, 8, 9, 10, 11, 12, 1, 3, 13, 5, 7, 9, 13, 11, 1. Click submit, then complete.
- Next, click on the wooden laptop sitting on the gray desk.
- Try clicking on the door on the right – it’s locked.
- Click on the laptop again. This will trigger a puzzle.
PUZZLE #2: ACE SHUFFLE, Required
Solution:
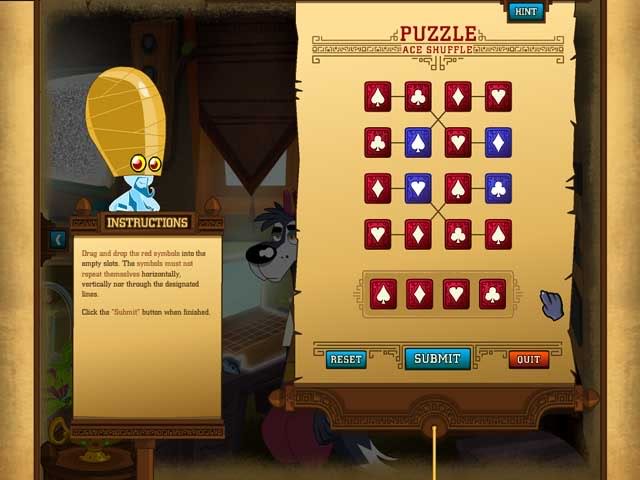
- After this puzzle, the door will open. Click on the blue arrow on the right to leave the room.
- The tutorial is now over, and items of interest will no longer glow white. It’s up to you to find them! Let’s start by going back to the very first room you visited, the bedroom.
- Click on the bubbling chemistry set in the lower right corner to launch an optional puzzle.
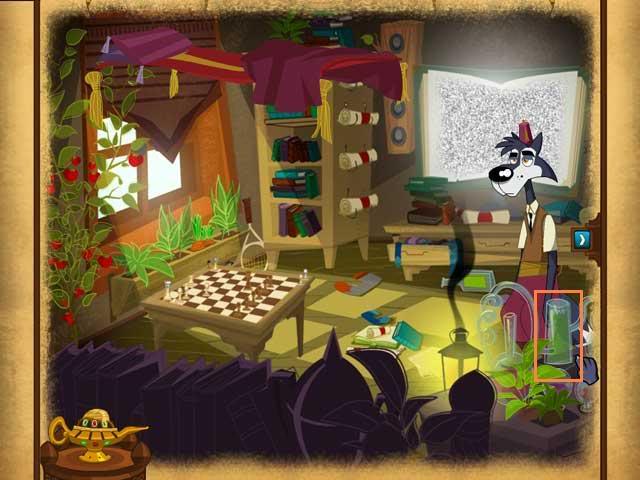
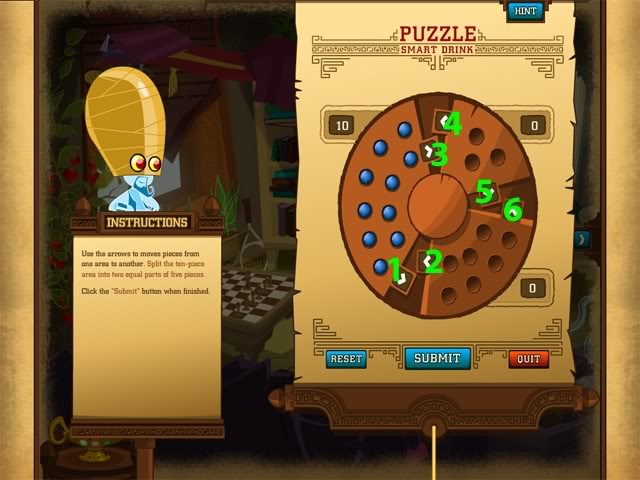
PUZZLE #3: Smart Drink, Optional (solution by Erin Bell)
Solution:
Refer to the screenshot below, where I’ve numbered each arrow from 1 to 6. Click the arrows in the following order: 3, 5, 1, 6, 4, 6, 4, 6, 1, 6, 4
- Use the blue arrow on the right to go into the Kitchen.
- Click on the fridge to launch The Fridge Note puzzle.
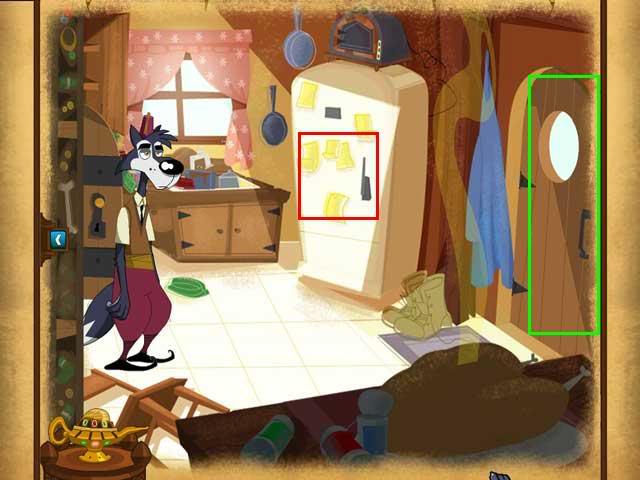
PUZZLE #4: The Fridge Note, Required
Instructions:
This is another one that’s easier to do than it looks at first, because each letter tile can only go into the same column it starts in.
Drag letters into the grid so that they for a phrase that answers the question "What do you say when a tasty-looking kid dressed in red asks you why your mouth is so big?"
When you drag a letter into the grid, the correct column that it belongs in will be highlighted. It’s up to you to figure out which row the letter belongs in.
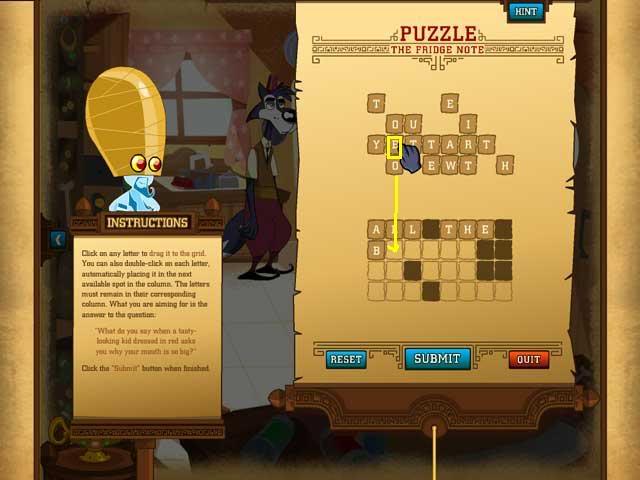
Solution: Spell out the following phrase: "ALL THE BETTER TO EAT YOU WITH"
Note: Even if you have more than one letter of the same type, it will need to go in a specific column, so pay attention to which boxes get highlighted.
SCENE 2 – PUB
Rooms: Pub -> Patio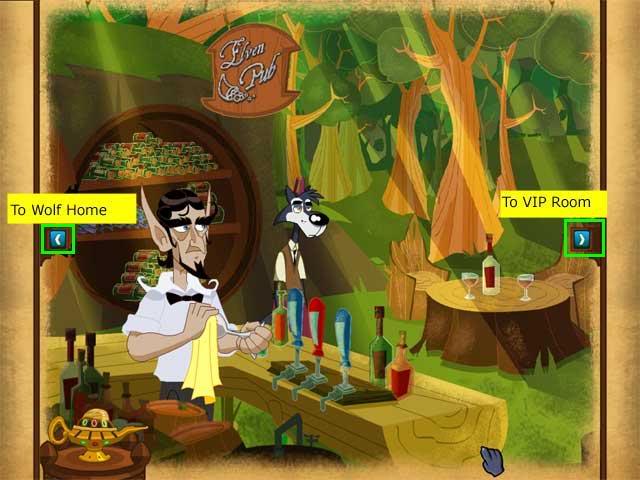
- Talk to the bartender in the first room, then walk right to the patio area.
- Talk to the Leprechaun completely.
- If you ask him "Do you miss Ireland?" he’ll mention that the bartender has a passphrase that he needs.
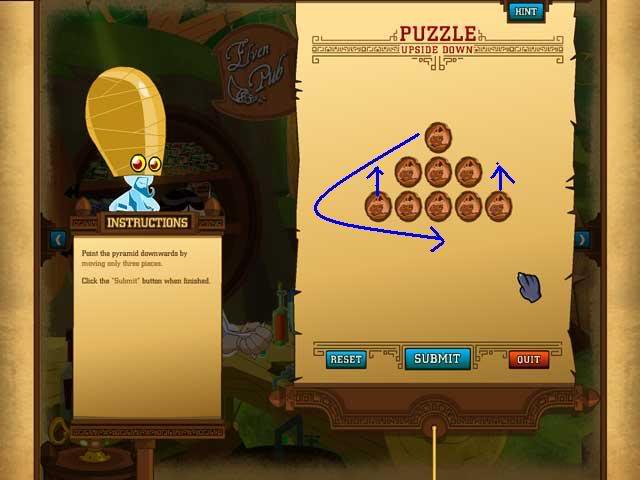
- Go left and talk to the bartender again. Now you will have the option to ask him to tell you the passphrase. This will initiate Puzzle #5: Upside Down.
PUZZLE #5: Upside Down, Required
Solution:
There are a couple of ways to do this, but the easiest is just to move the far right and far left coins from the third row up to the second row, then move the single coin from the first row down to the bottom.
- After you get the passphrase, walk right twice, past the Leprechaun, to the gate.
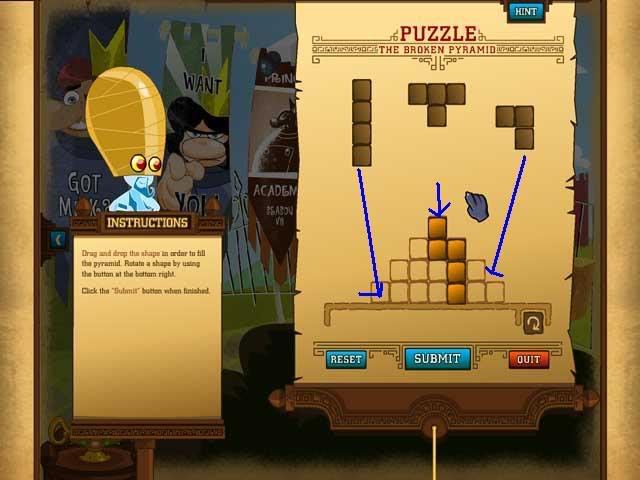
- Click on the yellow microphone box to the right of the gate to launch Puzzle #6.
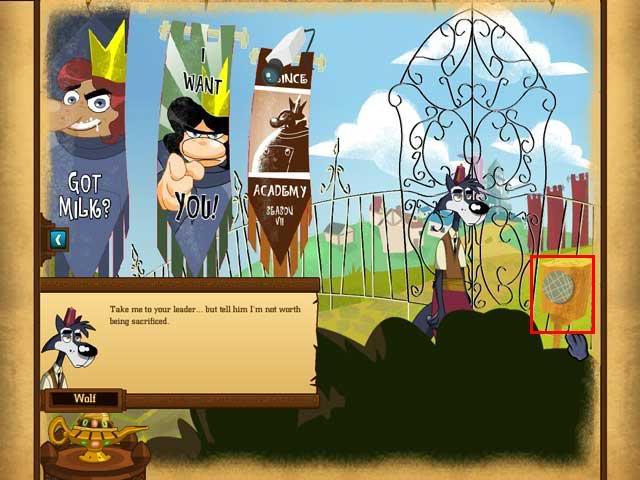
Solution:
See the screenshot below for how to fit the pieces.
- After completing this puzzle, the gate will open. Click on the path ahead to advance to the next scene.
SCENE 3 – FOUNTAIN
Views: Phonebooth -> Fountain -> Courtyard Steps
- Talk to the hitch-hiking fox in front of the phonebooth and ask him "Where are you going?" You’ll open up Puzzle #7.
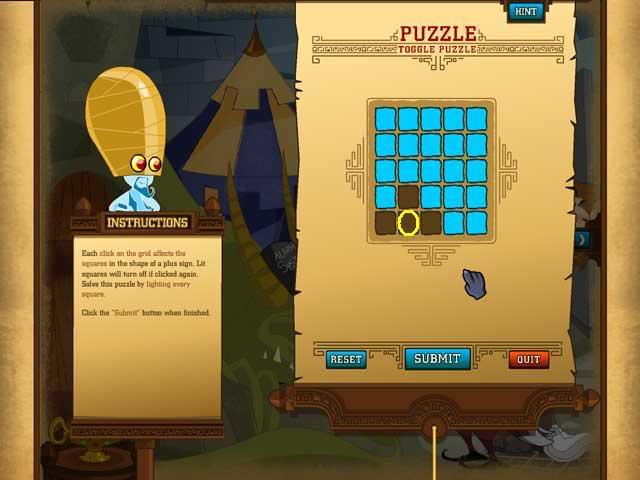
PUZZLE #7: TOGGLE PUZZLE STRIPE, Optional (Solution by Erin Bell)
Instructions:
Click any square on the grid (except for the locked square signs) to highlight the squares around it. Your goal is to light every square except for the locked ones.
Note: You can click on the locked squares to light squares around them.
Solution: Click the 4 corner squares, then the 2 inner squares needed to complete the puzzle.
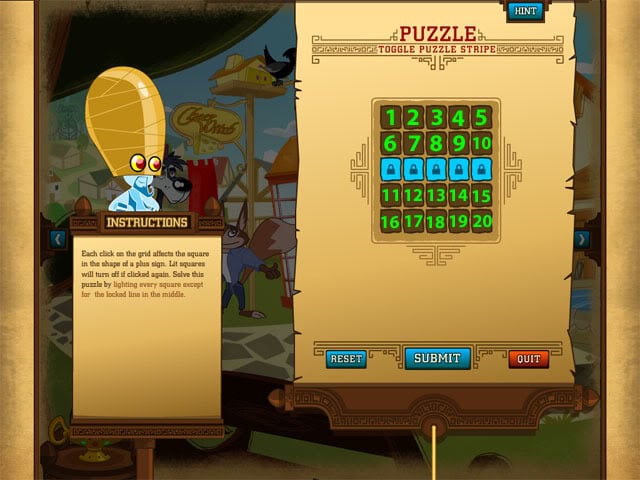
Refer to the screenshot above, where each square has been numbered, and click the squares in the following order: 1, 8, 5, 13 16, 20
- Walk over to the right and click on the tile marked in the screen shot. You will open another optional puzzle.
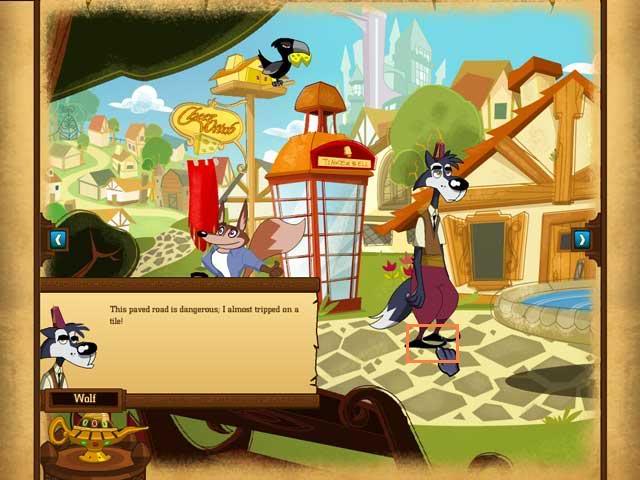
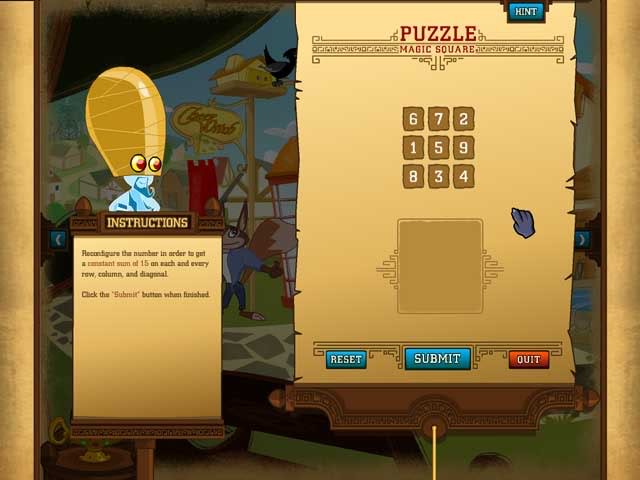
PUZZLE #8: Magic Square, Optional
Just put the 5 in the center.
- Walk two screens to the right until you’re in front of the courthouse steps, and click on the courthouse door to launch Puzzle #9.
PUZZLE #9: SWITCHING PLACES, Required. Solution by Erin Bell.
Solution:
Click on the squares in the following order:
blue, red, green
blue, red, green
blue, yellow, green, red
- After completing the puzzle, the door will open. Click on it to enter the courthouse.
SCENE 4 – COURTHOUSE
Rooms: Entrance -> Witness Stand -> Far right view
- Click on the row of elves in the lower left corner of the entrance to launch Puzzle #`0.
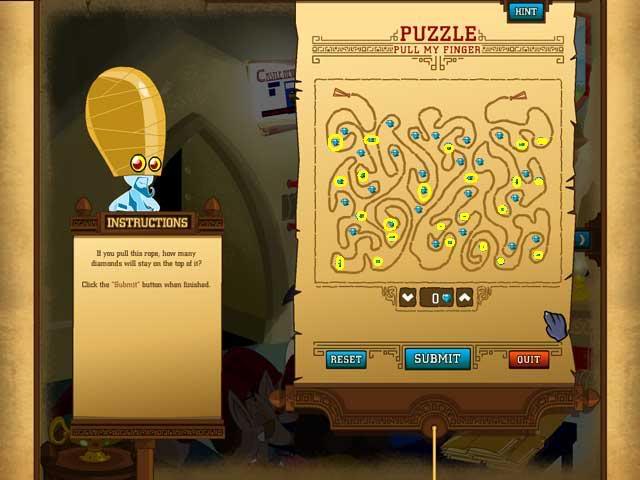
PUZZLE #10: PULL MY FINGER, Required
Instructions:
Figure out how many diamonds will stay on top of the rope if you pull it, and enter the number into the box.
Solution: 23
- Click on Pinocchio and listen to the arguments in the case. You cannot finish this chapter until you have done the Pull My Finger puzzle and then completed all the dialogue here, or the judge will not adjourn.
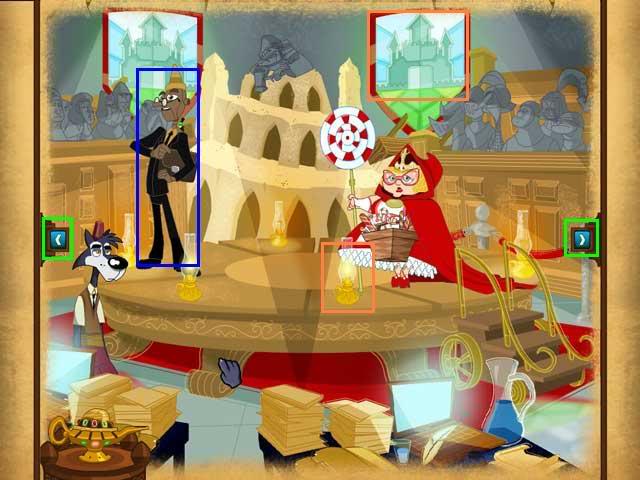
- Walk right one screen to the witness stand with Little Red Riding Hood.
- Click on the rightmost tapestry of the castle to launch Puzzle #11.
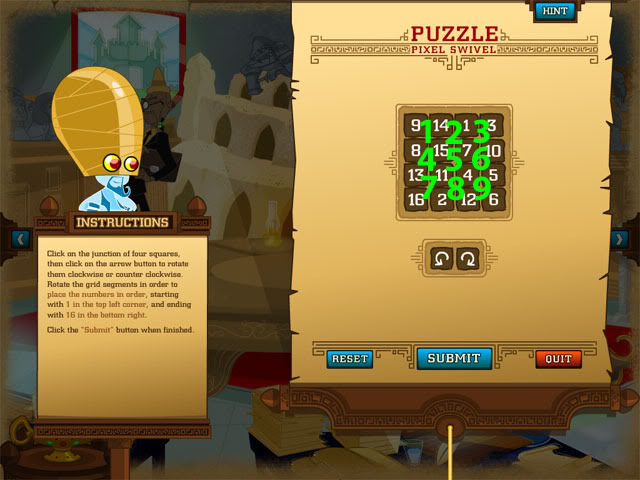
PUZZLE #11: PIXEL SWIVEL, Optional, Solution by Erin Bell
Solution:
There are nine possible quadrants that can be rotated here if you divide the grid into groups of four squares: (see screenshot below):
- Click on the lamp just to the left of Little Red Riding Hood to launch Puzzle #12
PUZZLE #12: Lamp Challenge, Optional
Solution:
34215
- Walk all the way right and talk to your mother. If you don’t see the conversational topic, "The session is over," then you either missed the required puzzle with the elves, or haven’t yet clicked on Pinocchio to hear the arguments in the case.
- When you talk to your mother she will tell you to come visit her in jail.
- Walk all the way to the left and exit the courthouse. This will end Chapter 1.
Views: Phonebooth -> Fountain -> Courtyard Steps
- You start out in front of the Courtyard steps.
- Try talking to the wolves. They won’t talk to you.
- Talk to the pigs. This will trigger a puzzle.
PUZZLE #13: The Greater Maze, Required
Solution:
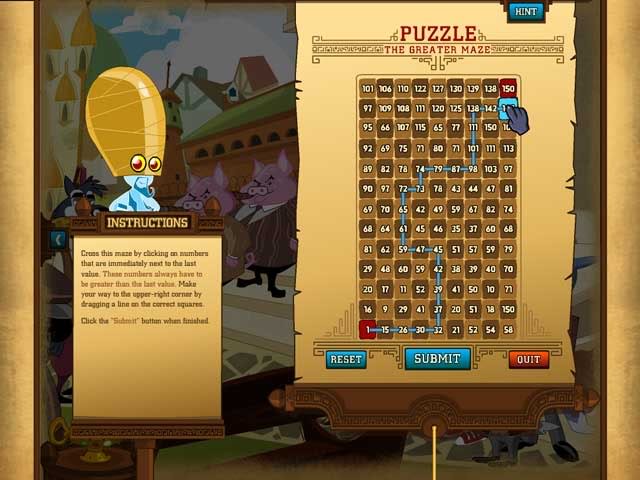
- After you solve the puzzle, the wolves will talk to you.
- Now go left to the fountain view and talk to the sheep there.
- Then go left again to the phonebooth view and talk to the sheep there. He will tell you to warn all his friends.
- Go back right and talk to the sheep by the fountain again. He will tell you how to get the cute lady sheep to talk to you.
- Go right again to the courthouse steps and talk to her.
- This time she will challenge you to a chess puzzle.
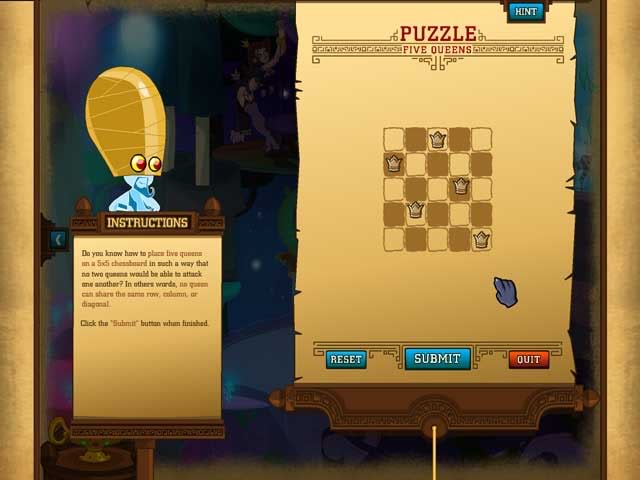
PUZZLE #14: Four Queens, Required
Solution:
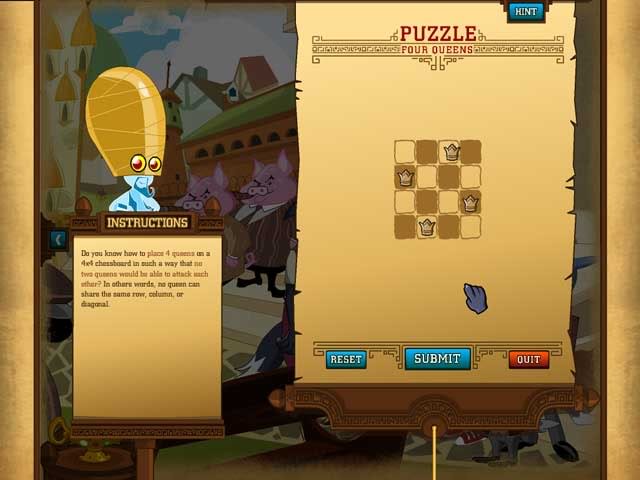
- After you solve the Four Queens puzzle, keep talking to Sara the Sheep. Eventually a new exit arrow will appear at the top of the scene. Do not take this exit yet or you will not be able to complete all the optional puzzles!
- Talk to the wolves one more time and tell them the sheep aren’t coming.
- Now use the blue arrows to go left twice, all the way back to the phone booth. Talk to the sheep there. This will trigger the next puzzle
PUZZLE #15: Safe Travel, Optional
Solution:
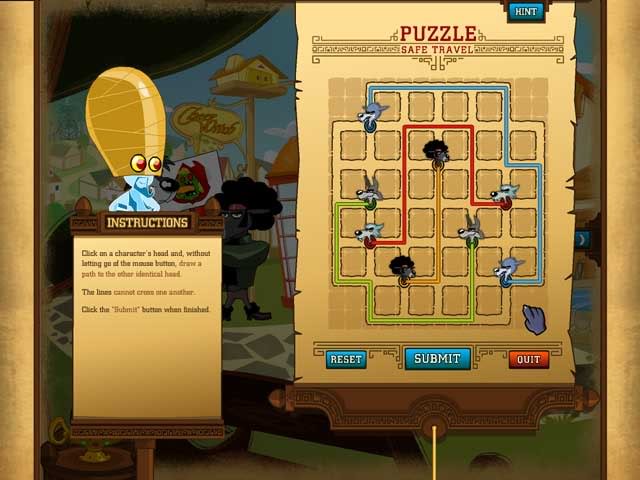
- After you solve the puzzle, use the blue arrows to walk back right twice to the courthouse steps.
- Then use the top arrow to go to the jail to see your mom.
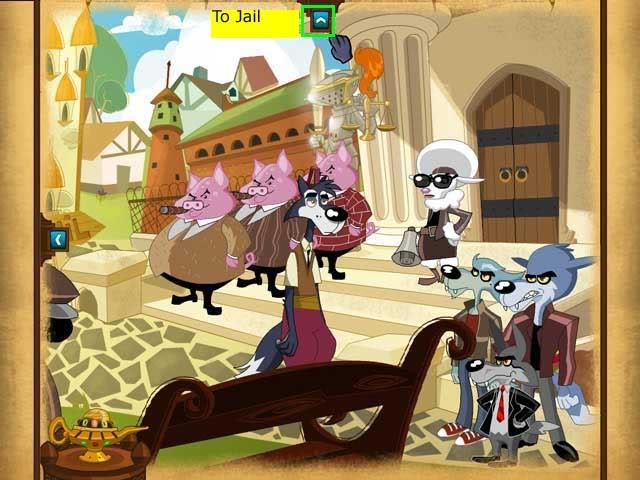
SCENE 2 – JAIL
Rooms: Entryway -> Mom’s cell
-> Sara’s cell
The steps to the left lead back out to the Fountain.
- Go through the black doorway at the back of the scene to enter Mom’s cell.
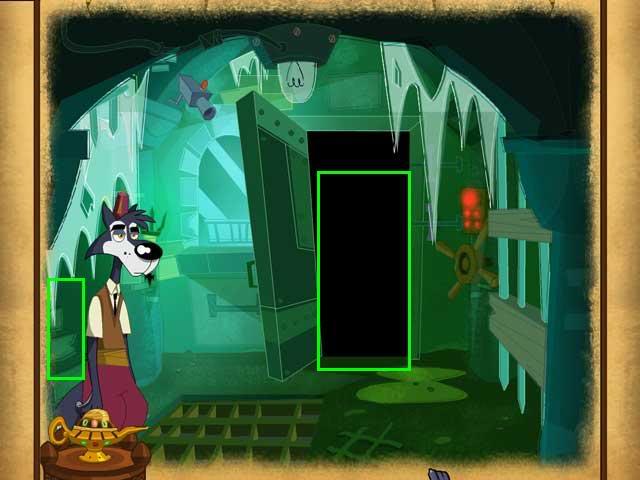
- There is an optional puzzle on the wall in the upper left.
PUZZLE #16: Tetraminos, Optional
Solution:
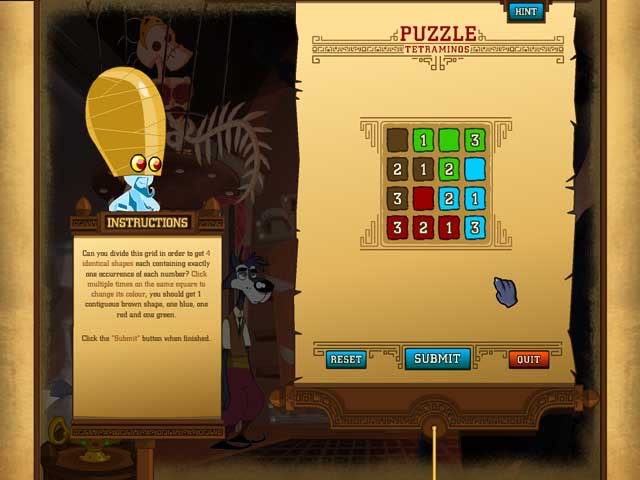
That didn’t help.
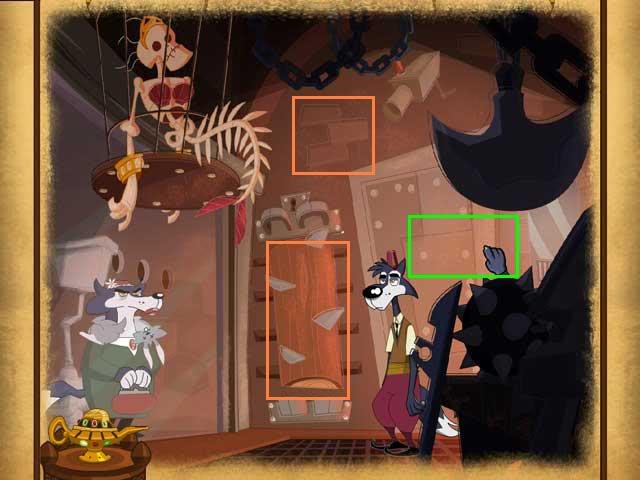
- Now click on the torture machine.
PUZZLE #17: Painless, Optional
Solution:
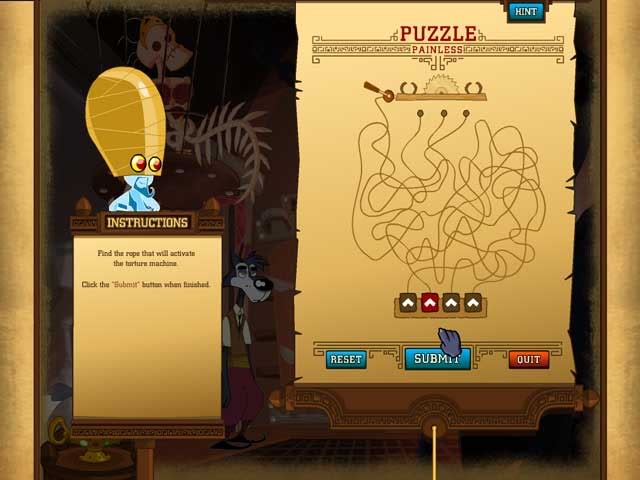
That didn’t help, either.
- Talk to your mother. She will tell you to go talk to Tom Thumb.
- Leave the cell through the door.
- Back in the jail entryway, you will be stopped by a Black Sheep who is there to rescue Sara, who got arrested while you were talking to your mom.
- You need to open the security lock for him, so click on it first. However, it’s wet.
- Click on the puddle of water on the floor. This will start a new Towers of Hanoi Puzzle.
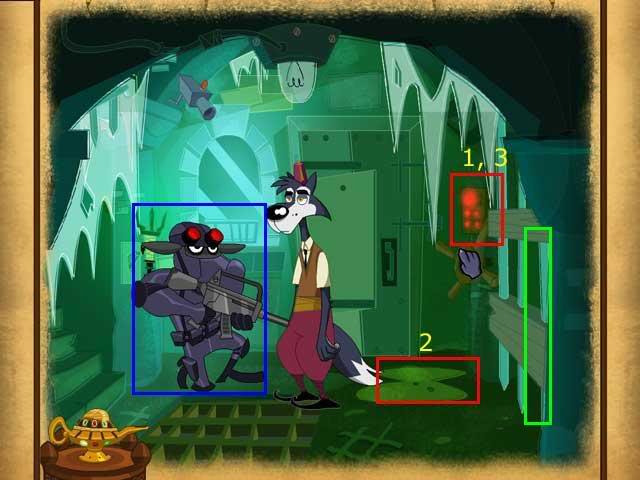
PUZZLE #18, Hanoi Stack, Required
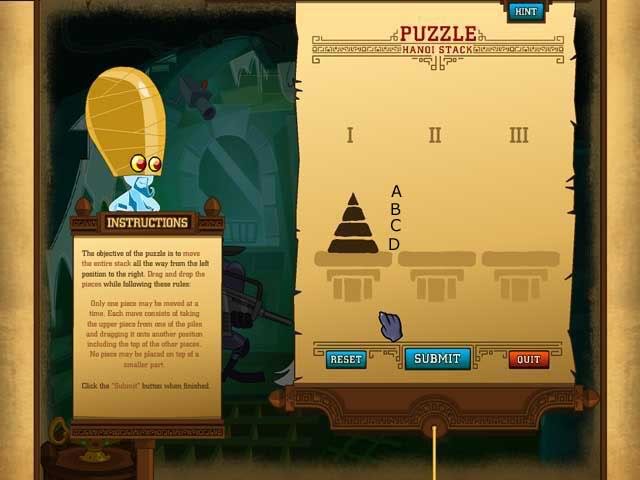
Solution:
AII, BIII, AIII
CII, AI, BII, CII
DIII, AIII, BI, AI
CIII, AII, BIII, AIII
- Now that the pipes are fixed, click on the security keypad to start that puzzle.
PUZZLE #19, One, Two, Three, Required
To do this, say each line out loud, ignoring any "s"
You’re going to read it like you’re counting the digits that are there.
So the first line is just a 1.
Read it out loud as "One ‘1’," and that’s the second line.
When you read line 2 out loud, you get "Two ‘1’s," so line three is 21.
Then when you read that out loud, you get "One ‘2’ one ‘1’" so line 4 is 1211.
Read that out loud, and you get "One 1 one 2 two 1s" so line 5 is 111221.
Read that out loud, and you get "Three 1s two 2s one 1." So the next line is 312211.
Read that out loud as "One 3 one 1 two 2s two 1s."
Solution:
13112221
- When you solve this puzzle, you will get a new arrow on the right. Use it to enter Sara’s Cell.
- Talk to Sara. She wants you to push the button to set off the explosives.
- First click on the dark cell in the back. This will trigger an optional puzzle, Genie Sets.
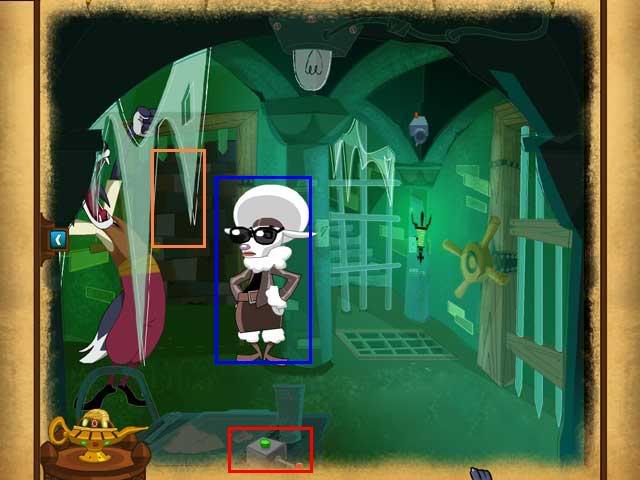
Puzzle #20, Genie Sets, Optional
Solution:

- Now go to press the button. This will trigger a required puzzle.
PUZZLE #21, Magic Wand Squares, Required
Solution:
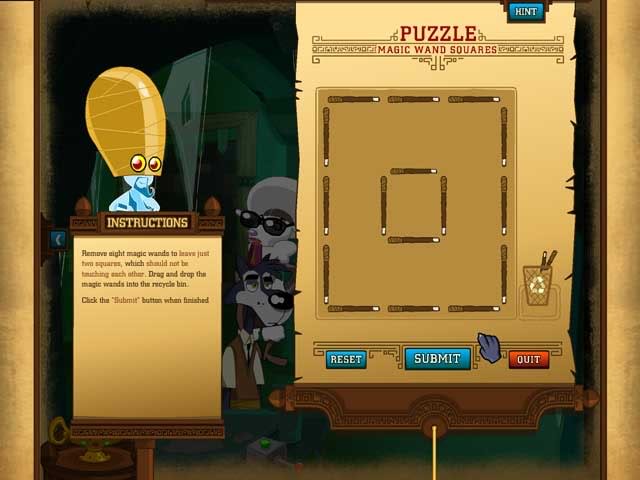
- This will blow a hole in the roof, and another Black Sheep agent will drop in.
- Talk to him, and he will tell you to go back into the jail entry and talk to the other agent.
- Go to the left, talk to the agent, then return.
- Now there will be a new arrow at the top of the scene. Use it to leave.
SCENE 3 Police Station
Views: Dragon > metal detector -> janitors’ closet
After blowing the tunnel from the jail, you find yourselves standing in the police station. You need to get out of here!
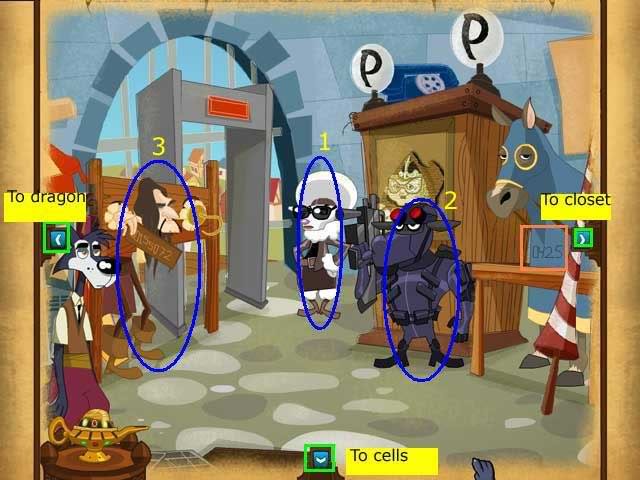
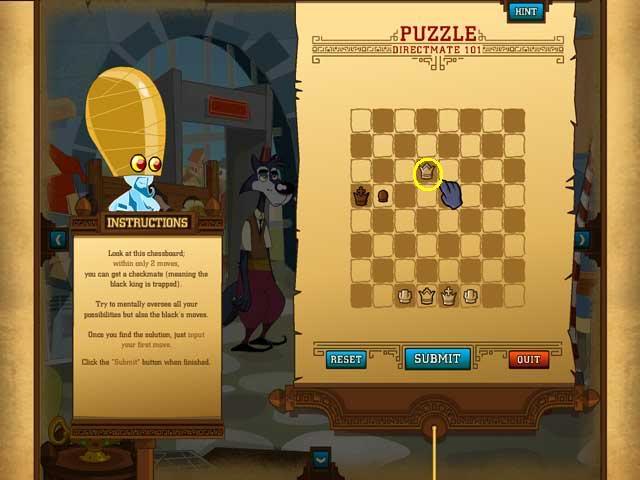
- Talk to Sara. This will trigger a chess puzzle.
The two flanking pieces are Rooks. Move the Q to d6 and click on SUBMIT.
- Finish the conversation with Sara.
- Talk to the Black Sheep agent-he will tell you to go first.
- Click on the horse to do an optional puzzle.
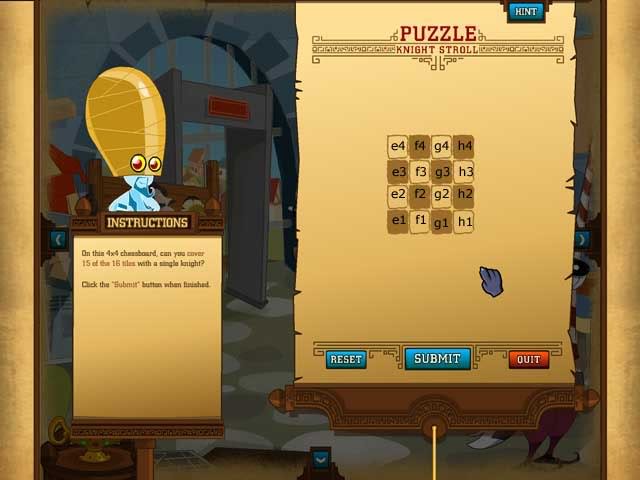
PUZZLE #23, Knight Stroll, Optional
This is a Knight’s Tour puzzle. Start with the knight on any square you like, click on each square you want to go to using legal Knight’s moves, and see if you can visit 15 of the 16 squares. Each time you click on the knight, it will show you the possible squares you can move to next.
There are many ways to solve this. This is one. We will start in the lower left square, e1, and go everywhere except the lower right square, h1.
E1,f3,h4,g2,e3,g4,h2,f1,g3,e4,f2,h3,f4,e2,g1
- Try to go through the metal detector. Captain Hook will talk to you.
- Click on him directly to continue the conversation. He will tell you you need a demagnetizer to get out. If he does not tell you about the demagnetizer, you haven’t finished your conversation with the Black Sheep agent yet. The sheep needs to tell you to go first before Hook will tell you about the demagnetizer.
- Use the arrow to go left by the dragon.
- The only locker that will open is the one in the top row, far right.
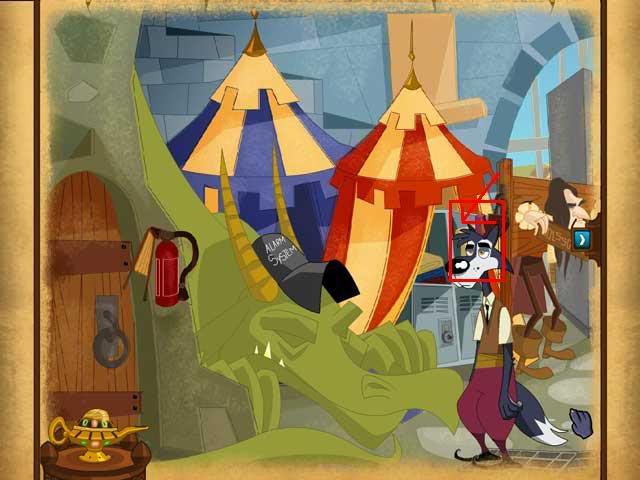
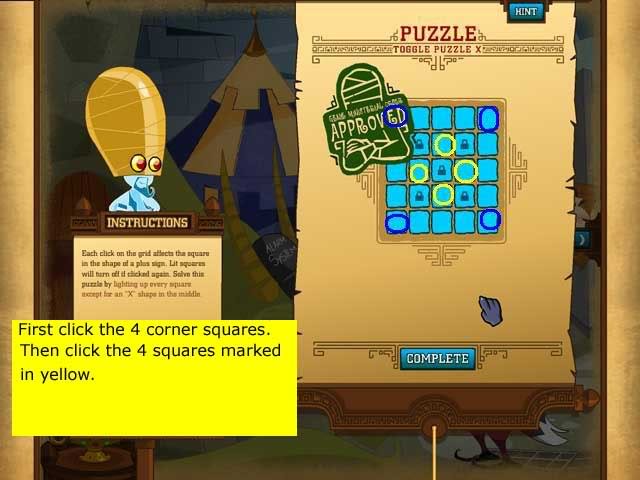
This will trigger the Toggle X puzzle.
PUZZLE #24, Toggle X, Required
Click the 4 corners, then 4 more squares.
Solution:
- Once you have the demagnetizer, go back to the right and talk to Captain Hook.
- Then talk to the Black Sheep to demagnetize him.
- A new arrow will appear at the top of the screen. You can now use it to leave the police HQ.
This will end chapter 2
CHAPTER 3 SCENE 1 – Forest Hideout
Views: Lumber Jack -> Cliff Edge
- Click on the logs behind the lumber jack. This will trigger a puzzle.
Solution:
Blue, red, brown,
blue, red, brown,
blue, red, yellow, green, brown,
blue, red, yellow, green, brown,
blue, red, yellow, green
- Go to the left to the cliff edge and talk to Sara. She wants water. This will open a puzzle.
PUZZLE #26, Thirst Quencher, Required
We’ll call the 3 containers A (80 capacity), B (50 capacity) and C (30 capacity).
Solution:
A into B.
B into C.
C into A.
A into B.
B into C.
C into A.
Now there are 40 ml in A and 40 in B. Submit.
- Talk to Sara until you’ve completed all conversations.
- Walk to the right and talk to the lumberjack. This will trigger a puzzle.
PUZZLE #27, Lumberjack Letters, Required
Remember that each letter can only be used in its original column.
Solution:
"Not by the hair of my chinny chin chin."
- Now you can talk to the lumberjack.
- After you finish talking to him, walk back left and talk to Sara.
- After you finish talking to Sarah, walk back to the right.
- This time there will be a new arrow on the right side of the scene. Use it to exit.
SCENE 2 – ELF LOUNGE/VIP ROOM
Rooms: Disco -> Stage
You will find yourself inside the VIP Room, which is called the Elf Lounge. You start out in the disco.
- Talk to the Cat. Now you need to find the right puzzle so you can get the door open.
- Click on the disco ball. This will trigger another puzzle.
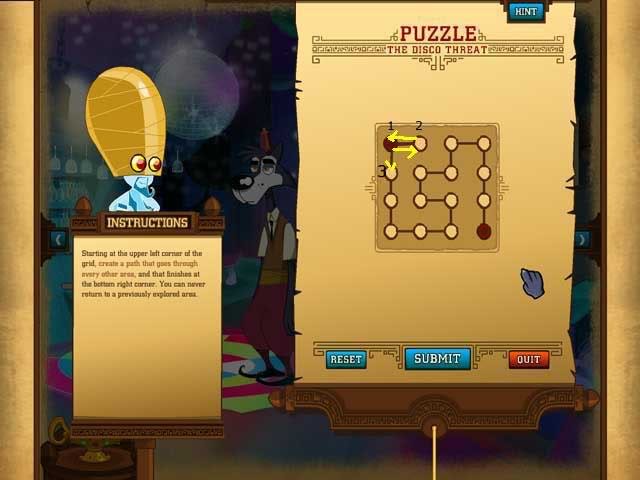
PUZZLE #28, Disco Threat, Required
This puzzle only makes sense once you realize that the first dot does NOT count as "explored" until you connect a line back to it.
So for your first move, connect 1 to 2, then come back to 1 again, and then draw the pattern shown.
Solution:
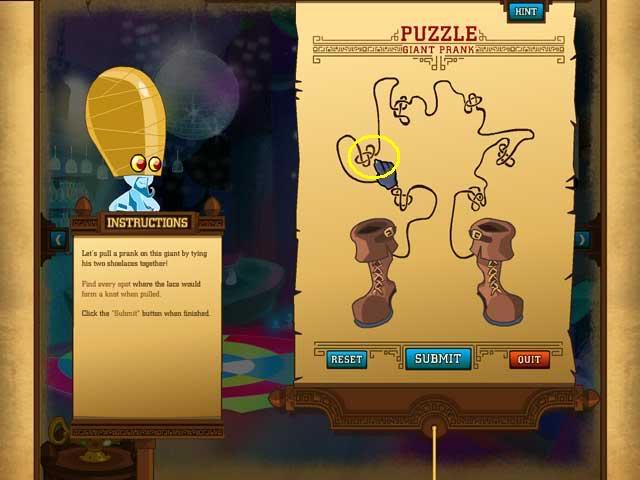
- Click on the giant’s shoes. This will trigger a puzzle.
PUZZLE #29, Giant Prank, Optional
Note that there is only one correct knot. It sometimes appears in different places on the string, but it always looks the same.
Solution:
- Now you can take the arrow to the right to the stage area.
- Click on the elf dancer at the top left, and you will trigger another puzzle.
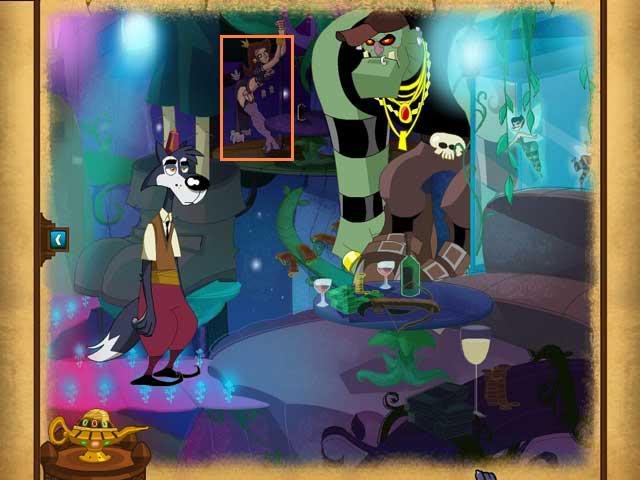
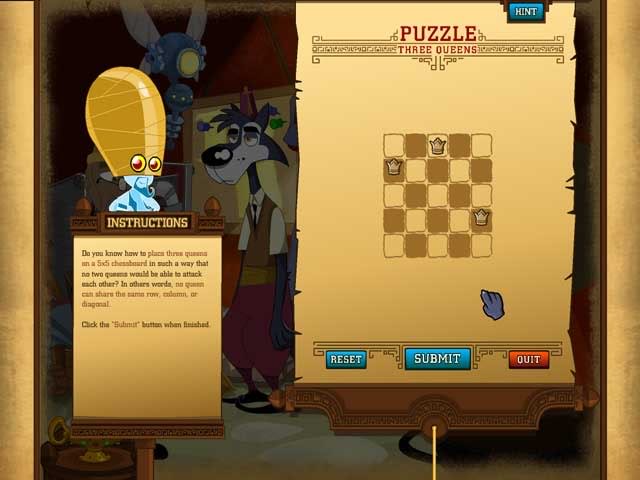
PUZZLE #30, 5 Queens, Optional
Solution:
- Go back left into the disco, then leave through the door.
SCENE 3 – Pub
Rooms: Pub -> Patio
You’re now back in the patio in front of the door to the VIP room.
- Talk to the leprechaun.
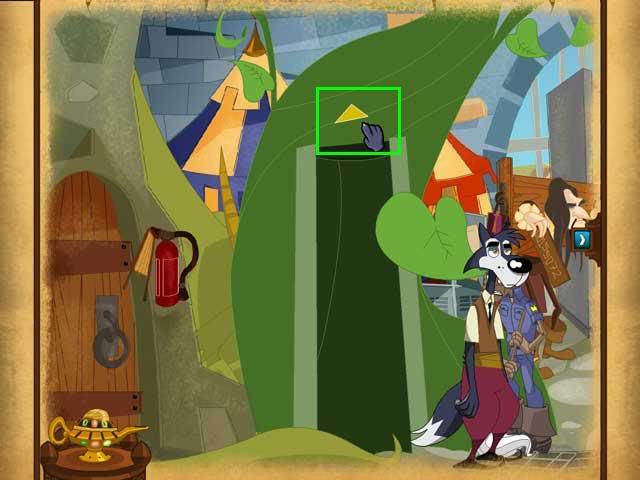
- Now before you do anything else, we need to go pick up an optional puzzle. Use the blue arrow to walk right to the gate.
- Click on the bush once. Read the dialog. When the dialog is finished, click the bush again. Wolf will say "I have an idea" and you will trigger a puzzle.
PUZZLE #31, Fresh Flowers, Optional
Solution:
2 tulips and 6 daisies
- Now walk left twice into the Pub’s main room.
- Talk to the short leader wolf, then the tall wolf on the left.
- He will tell you talk to the other wolves.
- Talk to the wolf on the far right, then talk to the leader wolf again.
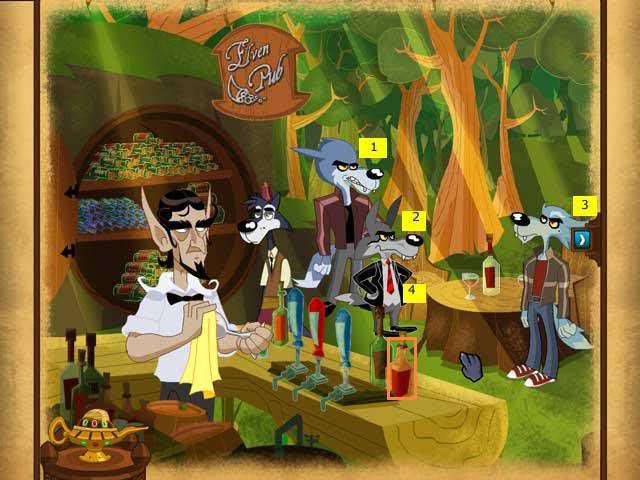
This will trigger a puzzle.
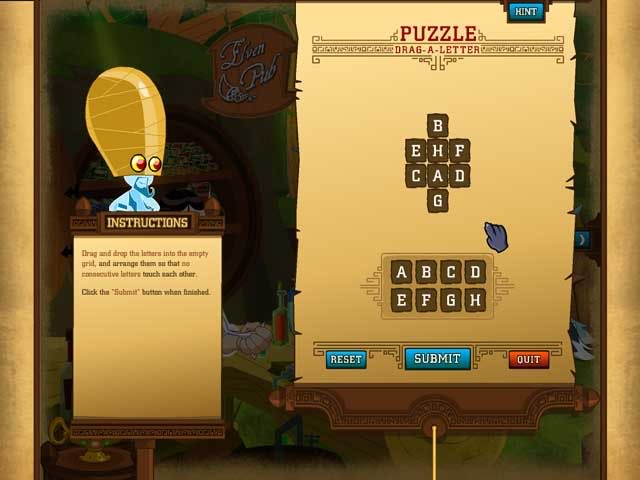
PUZZLE #32, Drag-a-Letter, Required
Solution:
- Now talk to the waiter
- Click on the red bottle on the far right side of the bar to trigger the next puzzle.
PUZZLE #33, Latin Squares, Optional
Solution:
1234
2341
3412
4123
- Talk to the wolves again
- Exit to the right to the patio.
- Click on the door to re-enter the VIP lounge. You will be able to get in this time.
SCENE 4 – ELF LOUNGE/VIP ROOM
Rooms: Disco -> Stage
- Go right through the Disco to the stage area.
- Talk to Tom Thumb. You will trigger another puzzle.
PUZZLE #34, Enclosed, Required
The instructions aren’t very clear on this one, but they mean if you tried a different shape like a hexagon or a rectangle, what would be the largest number of tiles you could enclose with the 12 pawns. If you take the square and rotate it so that it’s a diamond, the answer is 13.
Solution:
13
- Finish talking to Tom Thumb.
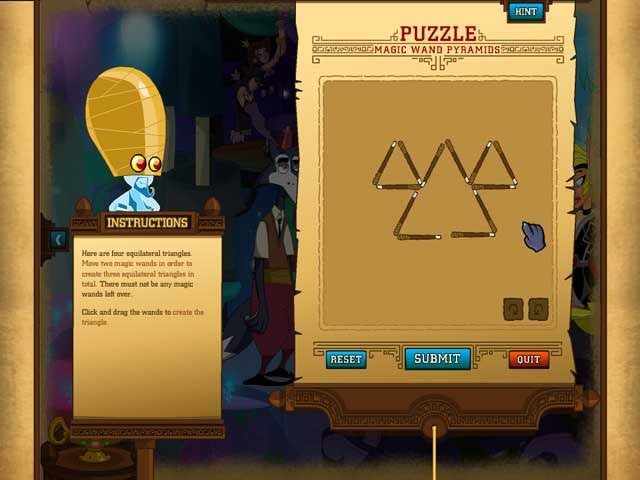
- Click on the blonde elf to the right of Tom to trigger another puzzle.
PUZZLE #35 Magic Wand Pyramids, Optional
Solution:
- Click on the ogre twice. This will trigger the next puzzle.
PUZZLE #36, Charming Patrol, Required
Solution:
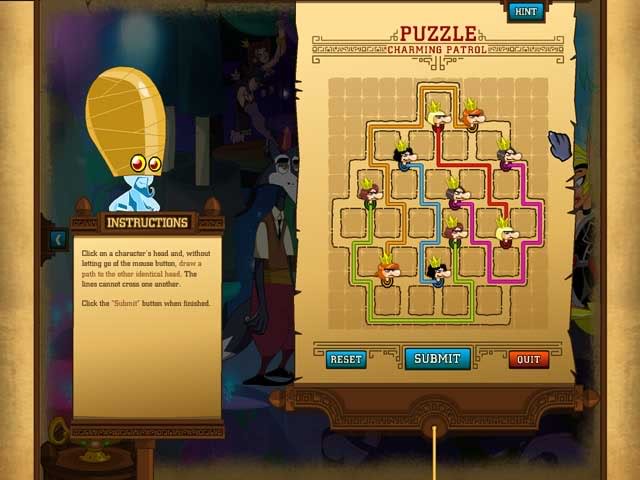
- After you solve the puzzle, talk to Tom again and tell him "It’s time for your part of the deal."
- He will give you a piece of mirror and open a secret exit on the right of the scene.
- Exit, stage right!
This will end Chapter 3.
CHAPTER 4 SCENE 1: Gepetto’s Workshop
Rooms: Gepetto’s Workbench <- Living room
- You start out in the living room. Talk to Pinocchio.
- Walk left.
- Talk to Gepetto. This will trigger a puzzle.
Solution:
513624
Click on the laptop on the desk on the right side of the room. This will trigger a puzzle.
Solution:
Qe3
- Finish talking to Gepetto, then
- Walk back right and talk to Pinocchio.
This will trigger a puzzle.
This is a sequence puzzle based on the number of strokes it takes to make each letter. So it starts I T A E. That’s 1 2 3 4. Look carefully to see where segments start and stop.
Solution:
C P K W
- The Fairy Godmother will appear. Talk to Pinocchio again, then
- Click on the Fairy Godmother to be transported to Charming HQ
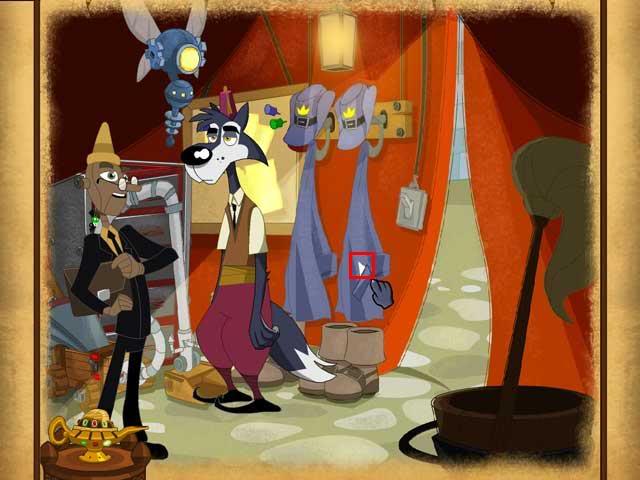
SCENE 2: Police HQ Closet
Rooms: Dragon > metal detector -> janitors’ closet
This is the same closet we saw before, but we’re looking at it from a different perspective.
- Talk to Pinocchio. He wants a disguise.
- Read the items on the bulletin board.
- Select a janitor’s uniform.
- Pinocchio will tell you you have to check the schedule.
- Click on the bulletin board again.
This will trigger a puzzle.
Solution:
- Talk to Pinocchio-he is hungry.
- There is something white sticking out of the pocket of one of the uniforms. Click on it to trigger the next puzzle.
This is just a larger Hanoi Towers puzzle.
Lettering the pieces A, B, C, D, E from top to bottom:
AII, BIII, AIII
CII, AI, BII, AII
DIII, AIII, BI, AI, CIII, AII, BIII, AIII, EII
AII, BI, AI, CII, AIII, BII, CII, DI
AI, BIII, AIII, CI, AII, BI, AI, EIII
AII, BIII, AIII, CII, AI, BII, AII, DIII
AIII, BI, AI, CIII
AII, BIII, AIII
- Keep talking to Pinocchio and examining the uniforms and eventually a blue exit arrow will appear on the right of the scene. When you go through it, you are back in police HQ.
SCENE 3: Police HQ
Rooms: Dragon > metal detector -> janitors’ closet
You start out right next to the closet.
First we need to do another optional puzzle. Click on the tools you can see on the back wall of the tent. This will trigger a puzzle.
PUZZLE #42, Shifting Places, Optional
Solution:
Blue, brown, green, red
Yellow, brown, green, red
Yellow, brown, blue, green, red
Yellow, brown, blue, red, green
- Walk left.
- Talk to Peter Pan. He will tell you where the mirror is.
- Talk to the guard. This will trigger a puzzle.
This one is really easy. Start at one of the end points of the long line that goes through the center. Go all the way around the outside. Then all the way around the inner dots. Then out the straight line to the other endpoint.
Solution:
- Now use the blue arrow to walk towards the dragon.
- Click on the dragon, and a new puzzle will open.
PUZZLE #44, Toggle (solution by Lizzie)
There are many different solutions for this. Lizzie posted the following in the forums, which is probably the simplest, although not the fastest.
Lettering the rows A-E from top to bottom, and the columns 1-5 from left to right.
Work your way across, lighting one row at a time.
B1, B2, B3, B4, B5
C1, C5
D1, D2, D4, D5
E2, E3, E5
Now everything except E1 and are lit.

Go back to the first row, and click A4, then A5. (Thanks, Lizzie!)
Then work your way across one row at a time again. Lizzie calls this "chasing the lights."
B3
C2, C3, C5
D1, D3, D5
E1, E2
An awesome solution!
- After you do the puzzle, talk to Pinocchio. Keep talking to him.
- He will drop a magic bean, and you will get a beanstalk elevator!
- Click the yellow UP arrow, and you be automatically transported to the Tower!
SCENE 4 – TOWER
Rooms: Tower room
You find yourself in a room full of safes and crates. Look around for mirror pieces.
- Click on the popcorn. This will trigger an optional puzzle.
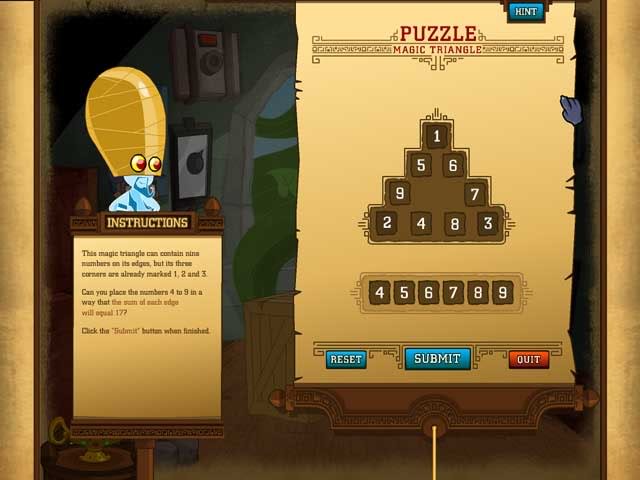
PUZZLE #45, Magic Triangle, Optional
Solution:
- Click on the crates behind Pinocchio. This will trigger a required puzzle.
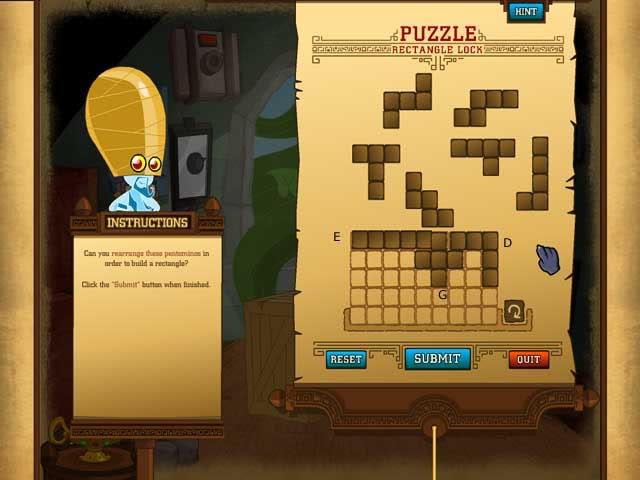
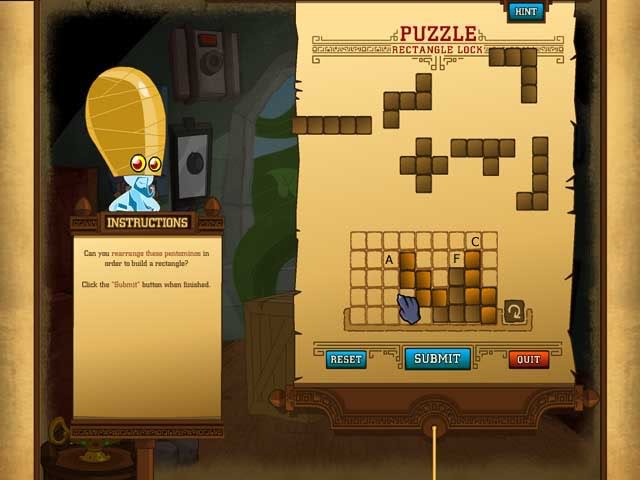
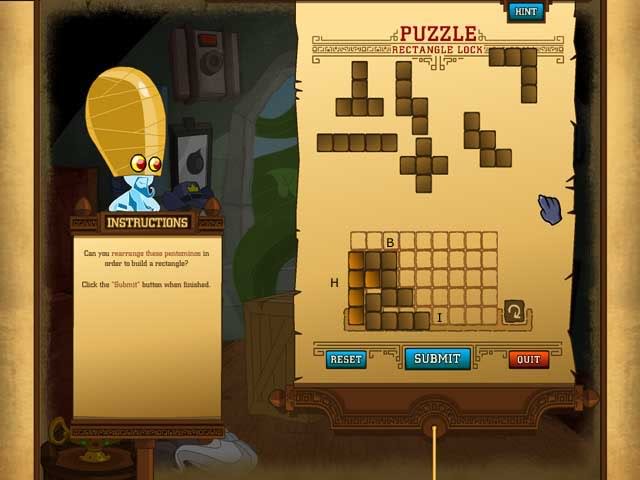
PUZZLE #46, Rectangle Lock, Required
This is just a regular fit the shapes puzzle. There is more than one solution. I have shown 3 shapes at a time so you can see where they go in the one I used.
Solution:

- OK, that wasn’t it. Now click on the elevator door on the beanstalk.
PUZZLE #47, Elevator Hoist, Optional
Solution:
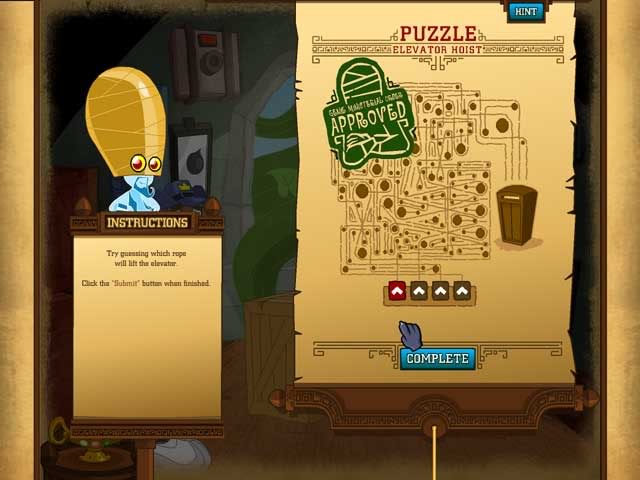
- Eventually, you have to do this sequence: click on large crate, click on small silver safe on right hand wall, then click on the large crate in the center of the floor again. This time it will open to reveal a chest.
- Wolf will refuse to look in the chest. Click on the black and silver "common" safe on the left side. It’s empty.
- Try the chest again.
- Eventually you will get a smaller chest, then broken mirror pieces.
- Click on the pieces to start a new puzzle.
PUZZLE #48, Go Round, Required
Section A has a capacity of 16.
Section B has a capacity of 9.
Section C has a capacity of 7.
Solution:
A into B.
B into C
C into A
B into C
A into B
B into C
C into A
B into C
A into B
B into C
C into A
B into C
A into B
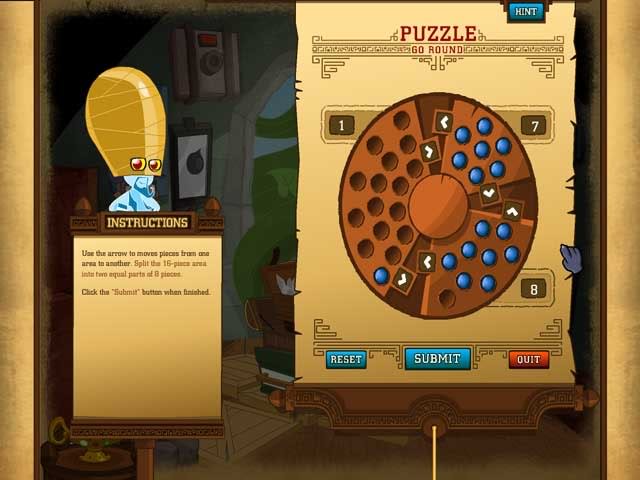
B into C
C into A
Done!
- You will have to click on Pinocchio a couple of times to get him to adjust the image in the mirror.
When he does, that will end Chapter 4.
You’re still in the tower scene where you left off in Chapter 4. Charmings have arrived.
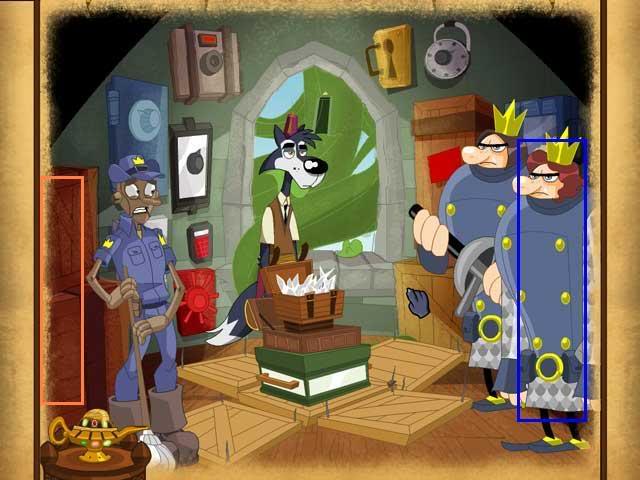
Click on the crates over on the left. This will trigger an optional puzzle.
An even bigger Hanoi Towers puzzle!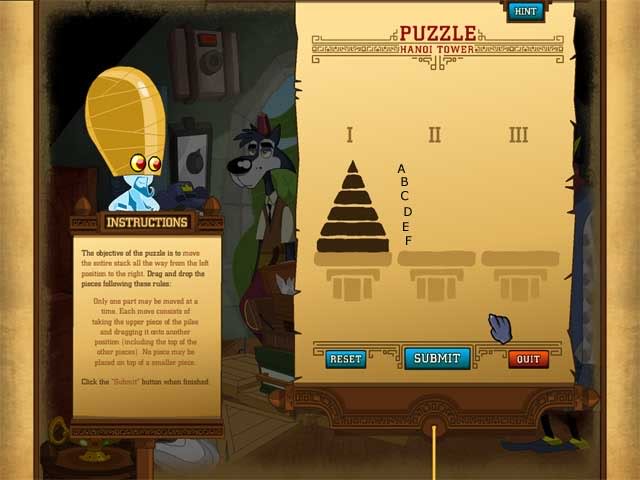
Solution:
AII, BIII, AIII
CII
AI, BII, AII, DIII
AIII, BI, AI, CIII
AII, BIII, AIII, EII
AI, BII, AII, CI, AIII, BI, AI, DII
AII, BIII, AIII, CII, AI, BII, AII, FIII
AIII, BI, AI, CIII, AII, BIII, AIII, DI
AI, BII, AII, CI, AIII, BI, AI, EIII
AII, BIII, AIII, CII, AI, BII, AII, DIII
AIII, BII, AI, CIII
AII, BIII
AIII
- Now talk to the Charming on the left, then the one on the right, then Pinocchio, and then keep talking to them until you are in a conversation with the charming on the right and it triggers a puzzle.
PUZZLE #50, Magic Wand Triangle, Required
You don’t have to rotate anything.
Leave the bottom three wands where they are.
Slide the top three down to make a triangle overlapping the bottom one, so you end up with a star of David. That gives you six tiny triangles at its points.
Solution:
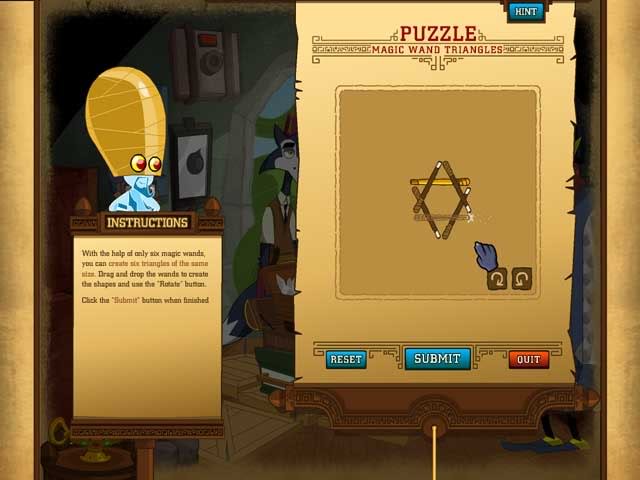
After you solve this, you will be transported to the Palace. Trapped in carbomite!
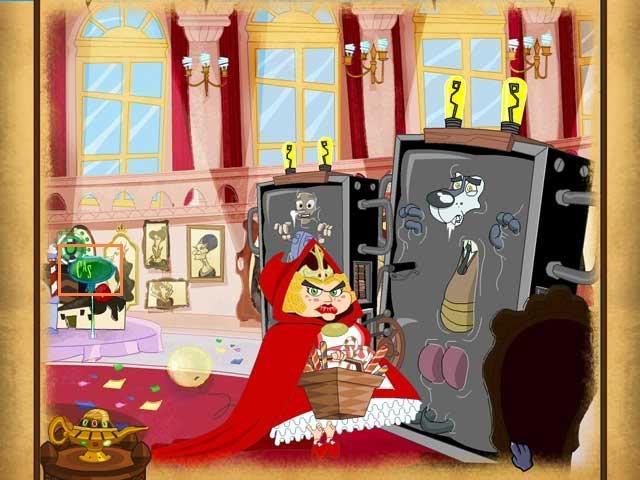
SCENE 2 – Palace
Views: far left -> center -> far right
- You start out on the far right. Before you talk to the princess, while you are still trapped in the carbomite, click on the Casino sign. This will trigger an optional puzzle, and you won’t be able to come back and get it later, so you have to do it now.
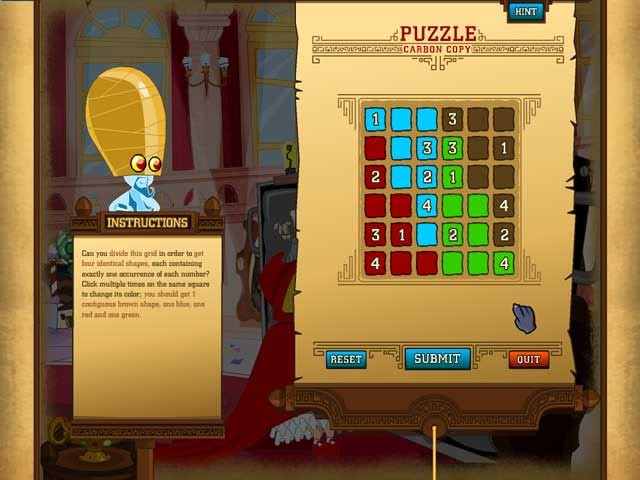
PUZZLE #51, Carbon Copy, Optional
Solution:
- Now you can talk to the Princess. A lot. Eventually you will trigger a puzzle.
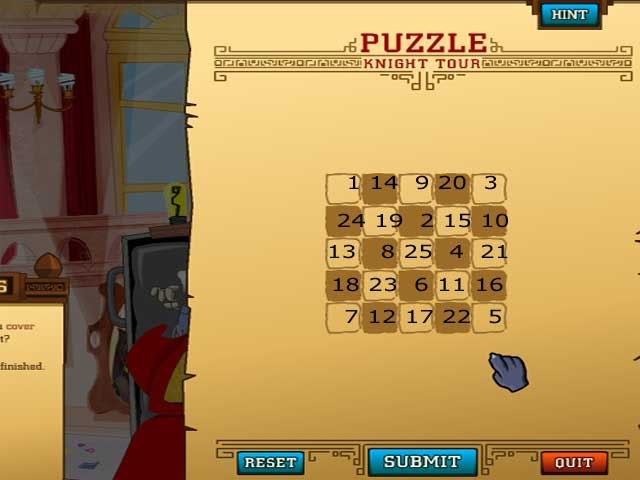
PUZZLE #52, Knight Tour, Required
This is a standard 5 x 5 Knight’s Tour. At least that’s what my friend tells me! Just click on the sequence shown in the screen shot.
Solution:
- Now the Princess will call the guards.
- Click on the casino again to trigger another puzzle.
PUZZLE #53, Try Your Luck, Optional
Remember each letter has to stay in its original column.
This is like those cell phone ads about the people throwing their money away. It’s not really a very funny joke, but I’m sure someone thought it was hilarious.
Solution:
"Because flushing cash down a toilet can actually clog the pipe."
- Click on the wizard who is the Police Commissioner. He will talk to everyone
- . Eventually go to the left side of the room.
- Talk to Sara. She tells you to play the mirror recording.
- This time when you click on the mirror, you get a different result. You see it in close-up, and Pinocchio tells you to go gather everyone.
- Click on the mirror once to leave the zoom screen.
- Talk to the first sheep on the left. He tells you to get the Charmings first.
- Meanwhile, click on the portrait on the far left. This will trigger a puzzle.
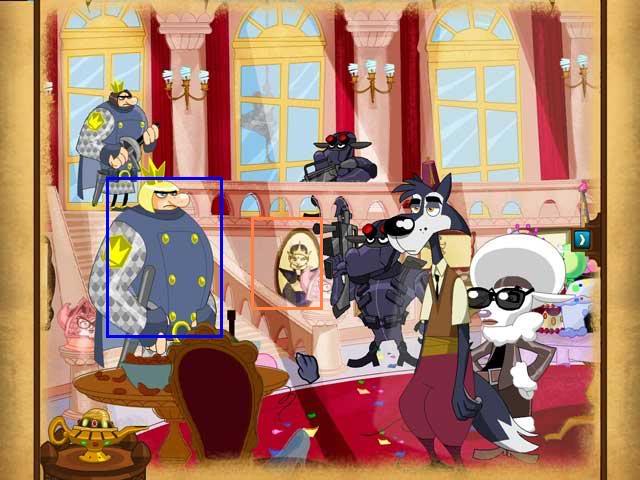
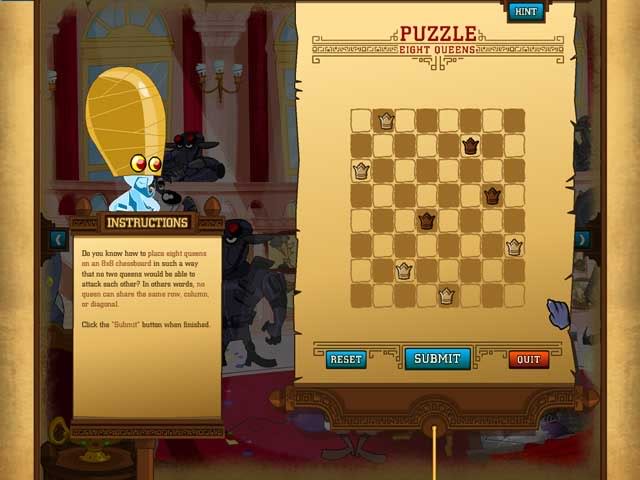
PUZZLE #54, 8 Queens, Optional
You cannot move the black queens, only the white ones.
Solution:
- Now take the blue arrow on the left of the scene (if it isn’t there yet, talk to everyone in the room first).
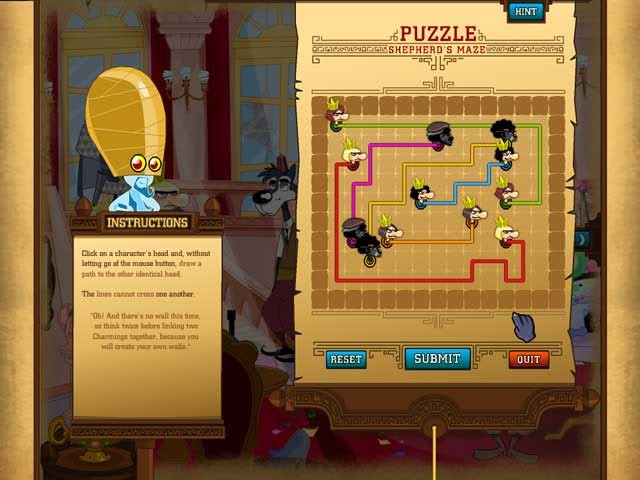
- Talk to the blond charming at the bottom of the stairs. This will trigger a new puzzle.
PUZZLE #55, Shepherd’s Maze, Required
Solution:
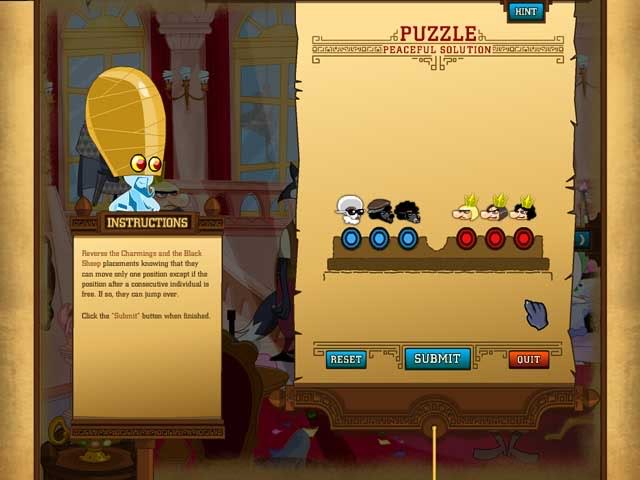
- Click on the sheep to your right. This will trigger the next puzzle.
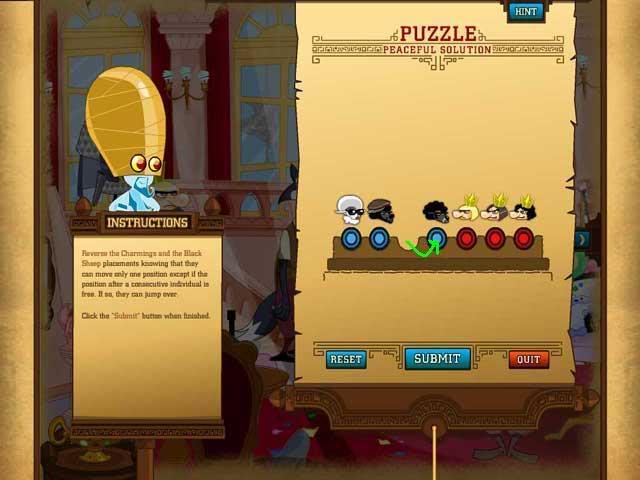
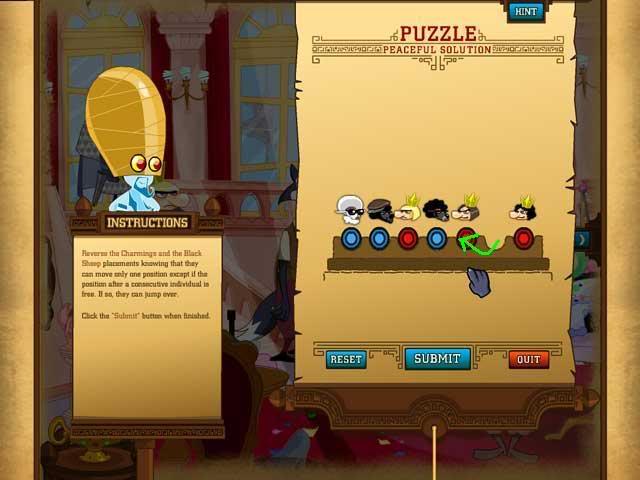
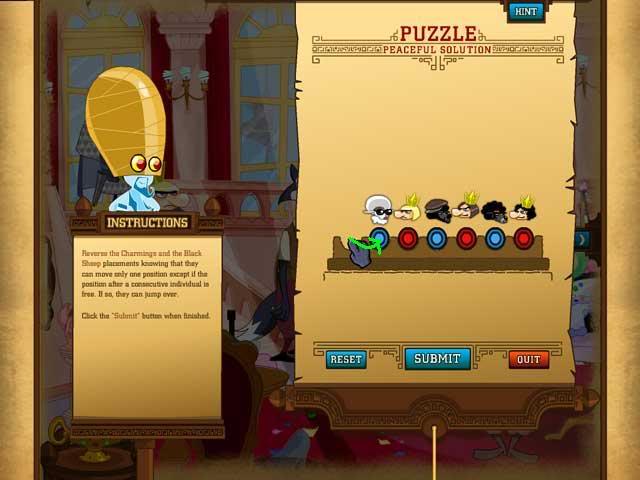
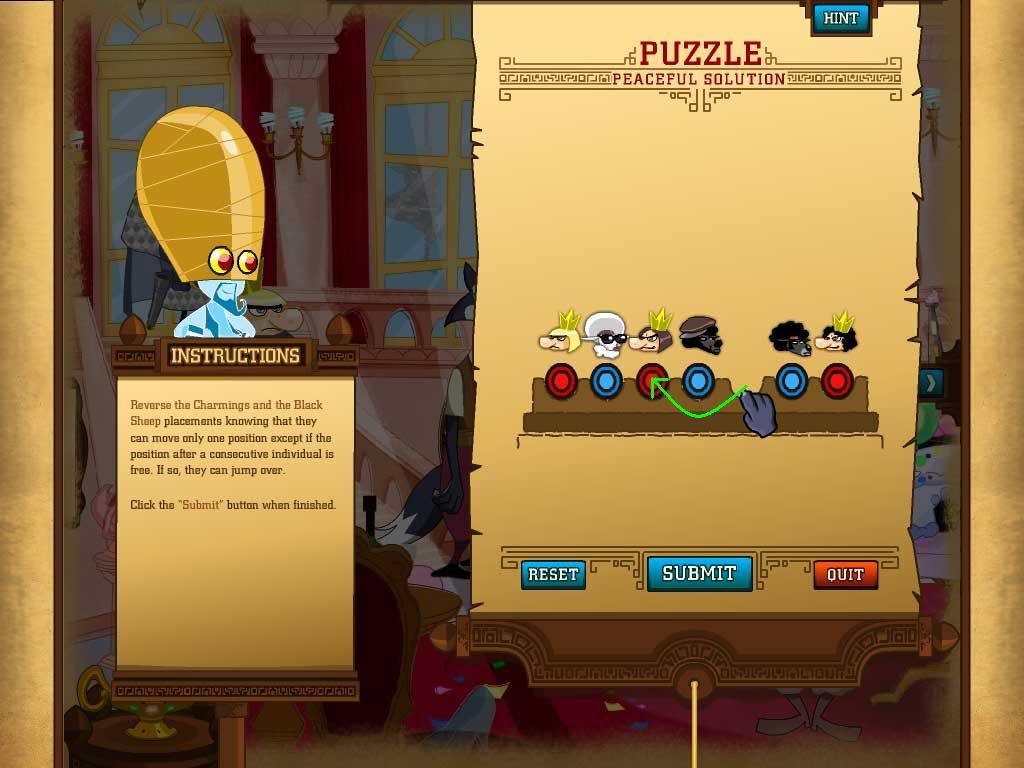
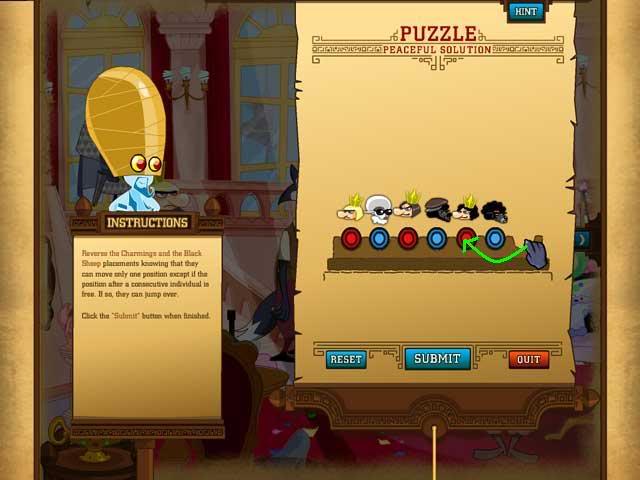
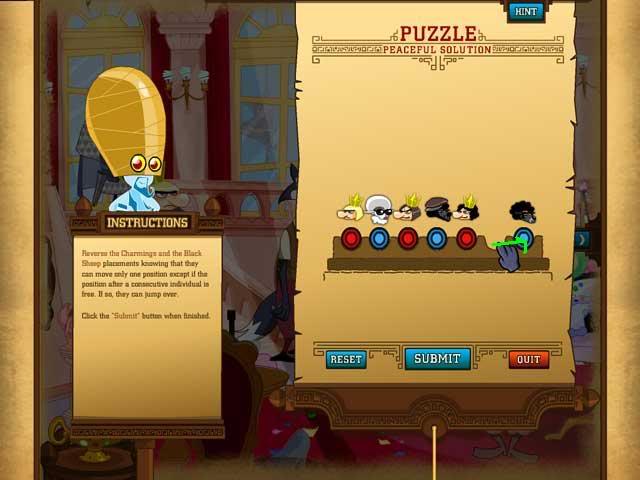
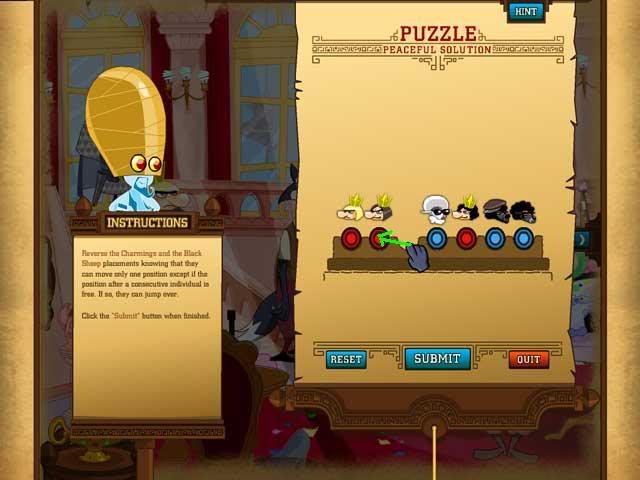
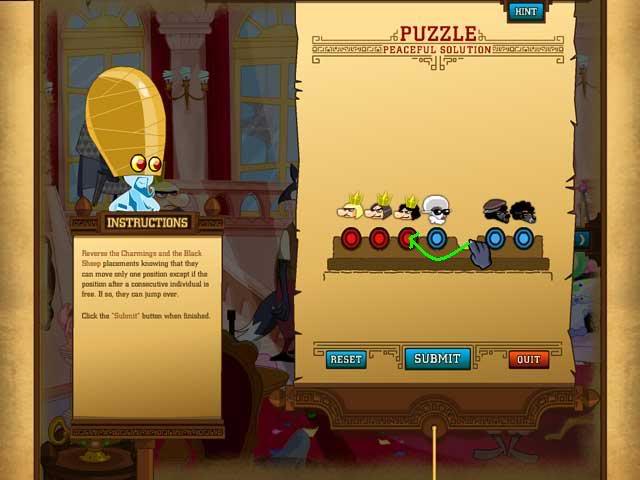
PUZZLE #56, Peaceful Solution, Required
There are different ways to do this depending on where you start, but they’re all pretty similar. Here’s the one I used.
Solution:


- Walk to the right and click on the mirror. This will trigger the next puzzle.
PUZZLE #57, Secret Code, Required
Solution:
MURDER
- Talk to Sara.
- Then walk to the right and
- Talk to Merlin.
- Merlin says he’s not sure you’re telling the truth.
- Talk to Pinocchio.
- Merlin will accept the evidence, and you will be automatically transported to the Fountain in front of the Phonebooth.
SCENE 3 Fountain
Views: Phonebooth -> Fountain -> Courtyard Steps
- Talk to Sara and the two sheep.
- Walk to the right.
- Talk to the two charmings. This will trigger the next puzzle.
PUZZLE #58, Serial Letters, Optional
OTTFFS = One Two Three Four Five Six
Solution:
SENT for Seven Eight Nine Ten
- Walk to the right in front of the courtyard steps.
- Talk to all the characters. Anytime they mention someone else, go back and talk to them again. Eventually you end up with this sequence.
- Talk to your mother, who tells you to talk to the other wolves.
- Talk to the little boss wolf, who tells you to talk to Tom Thumb.
- Talk to Tom Thumb, who mentions Pinocchio.
- Talk to Pinocchio, who mentions the Charmings.
- Next take a break from the sequence and talk to the lumberjack. This will trigger a puzzle.
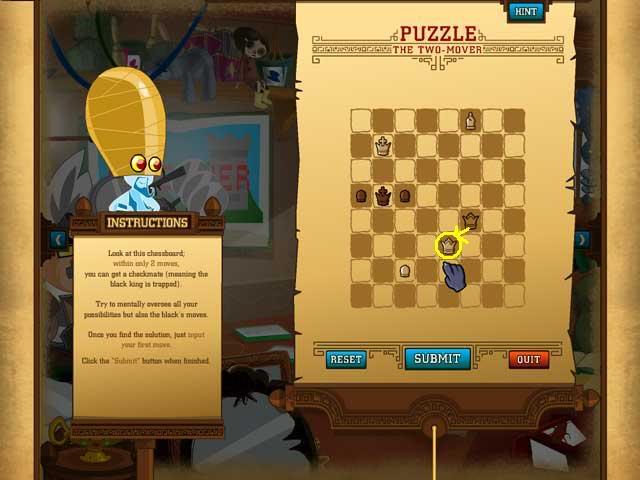
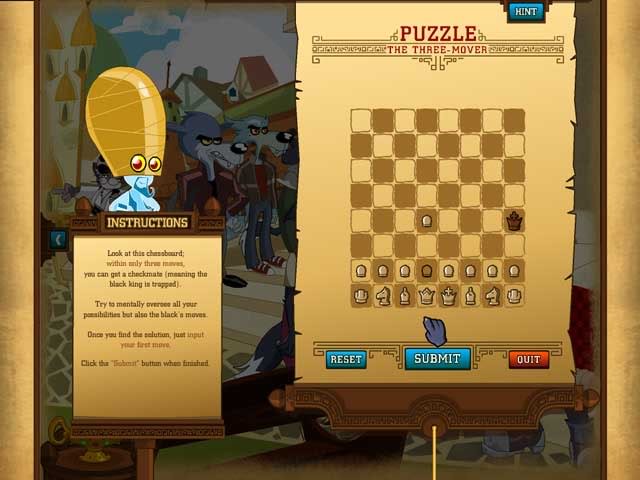
PUZZLE #59, The Three Mover, Optional
Solution:
d4
- Walk to the left and talk to the blond charming. He will mention the black sheep.
- Talk to the black sheep.
- Walk to the left and talk to Sara.
- This will trigger a puzzle and the end of the game.
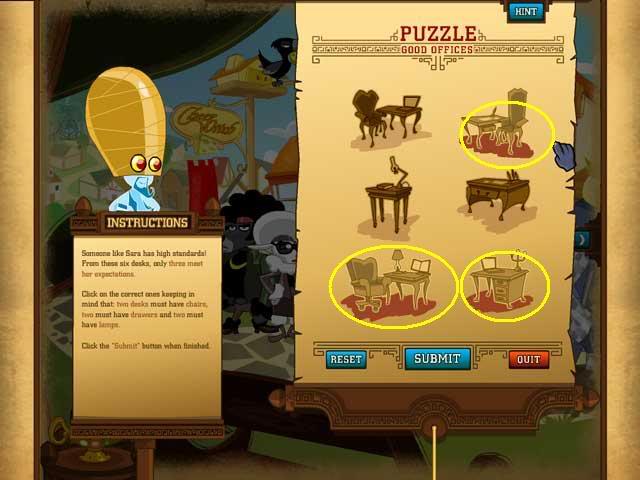
PUZZLE #60, Good Offices, Required
Solution:
COMPLETE ALPHABETICAL INDEX TO PUZZLE SOLUTIONS
For convenience, puzzles are listed alphabetically by title.
Four Queens (Ch2)
*Optional puzzle
“;

More articles...
-
Best Horror Games On Itch.io – July 2026
Across a bounty of subgenres. -
Grow A Garden 2 Base Price List
What's the most valuable crop? -
Evomon Best Starter [Leafbun, Blazpup, or Bubble?]
Grass-type, Fire-type, or Water-type?