
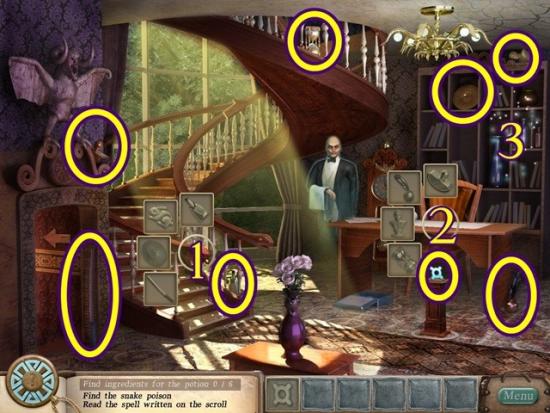
Best Horror Games On Itch.io – July 2026
Across a bounty of subgenres.![Haze Seas Accessories Tier List [Best Accessories to Equip]](/wp-content/uploads/2026/07/haze-seas-accessories-tier-list.jpg "Haze Seas Accessories Tier List [Best Accessories to Equip]")
Haze Seas Accessories Tier List [Best Accessories to Equip]
The accessories with the best stat buffs in Haze Seas.
![[Roblox] Evomon Shiny Hunting Guide – Including Prismatic and Pris Shinies!](/wp-content/uploads/2026/06/evomon-shiny-hunting-guide.jpg "[Roblox] Evomon Shiny Hunting Guide – Including Prismatic and Pris Shinies!")

Behind the Reflection Walkthrough
Welcome to the Behind the Reflection walkthrough on Gamezebo. Behind the Reflection is a hidden object/adventure game played on the PC created by Alawar Entertainment and Veles Studios. This walkthrough includes tips and tricks, helpful hints, and a strategy guide to how to complete Behind the Reflection.
Share this


- Prefer Gamezebo on Google


Behind the Reflection – Game Introduction
Welcome to the Behind the Reflection walkthrough on Gamezebo. Behind the Reflection is a hidden object/adventure game played on the PC created by Alawar Entertainment and Veles Studios. This walkthrough includes tips and tricks, helpful hints, and a strategy guide to how to complete Behind the Reflection.
How to Use this Walkthrough (Please read)
- This walkthrough is meant to be used as a guide to assist in solving mini-puzzles and acquiring all items in order to complete the game. You may explore locations in the order you wish, this walkthrough is written to take the most direct route to the game’s finish.
- Hidden object screenshots will only highlight the items to which an interaction is required and the inventory item you receive.
- Inventory objects are written in bold.
- The walkthrough will state, “Use the inventory item on the blah blah,” because it assumes you have the item. If you don’t have the item, on your keyboard, press CTRL+F (at the same time). In the text box, type the name of the item you are looking for and press ENTER. This will scan the page for the appearance of that word.
- Zooming in on areas opens small windows. Once you get the item or information you need, close it by clicking the X in the top right corner or anywhere off the window. The walkthrough will not include this instruction.
Gameplay and Tips
- This is a hidden object adventure game. You will move from location to location solving hidden object hunts, mini-puzzles and picking up items to use in order to proceed in the game.
- Click when you see a grabbing hand to trigger a hidden object hunt, either within the scene or on its own. Small circles containing objects will appear. Find the objects within each circle and place them on their circle. If a circle is light purple, it means the object isn’t available in that scene and you’ll have to find it elsewhere.
- Hover your mouse over every aspect of a scene and watch for your cursor to change.
- Items collected will be added to your inventory (located at the bottom of your screen). To use an inventory item, click on it and click on the area it needs to be used.
- Hidden object hunts provide a list of items to find. Click on the item to cross it off the list. Clicking Hint will highlight an item.
- Hint system – You have unlimited hints however it takes time to recharge between use. In hidden object scenes, hint will point out an object to find. In free roaming mode, hint will point out an object or puzzle to do (for mini object hunts) or will point you in the direction to go next.
- Mini-puzzles – Skip will complete the puzzle and move you forward. There seems to be no penalty. Leaving a puzzle and returning to it does not reset it.
- There is no timer or point system.
Walkthrough – Map

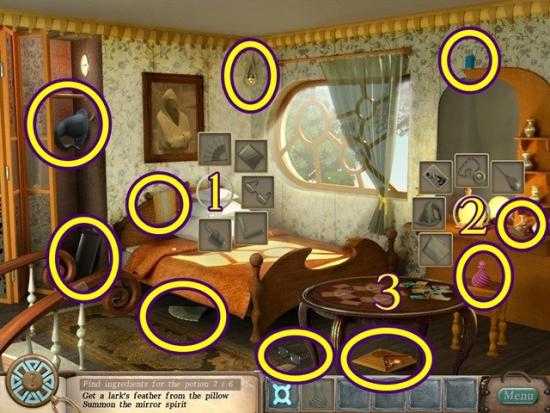
- Click on the man (1) and after the dialogue, click the doorbell (2). Take the ladder, then move the oxygen tank and take the rope. Click on the box with things.
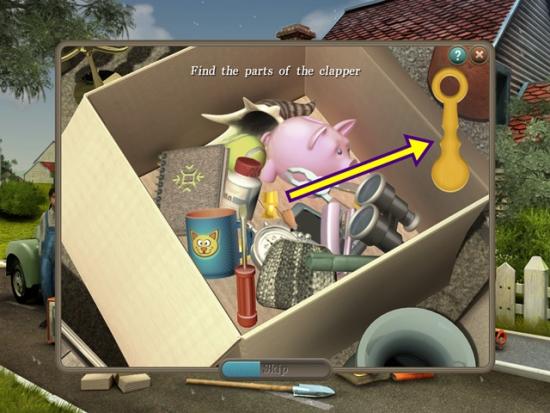
- Move your mouse around to move the box’s contents to find all the pieces for the clapper. Click on a clapper piece and it will automatically go towards completing the clapper. Once you are finished, the clapper is added to your inventory.
- Add the clapper to the doorbell.
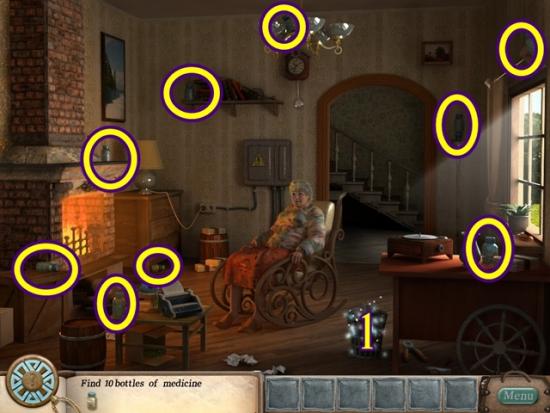
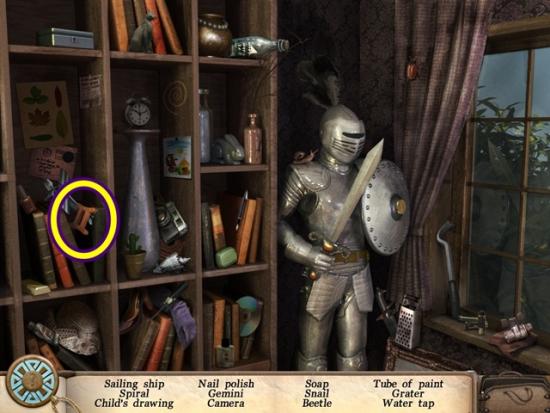
- Talk to the old lady. Find nine bottles of medicine. Click on the trash can (1) to start a hidden object hunt.
- Find all the items. A bottle of medicine is added to your inventory. Give the bottles to the old lady. Click through the dialogue.
- Take the map piece and place it on the map (match the shape).

- Click the safe (1). Note the scratched drawing on it. Close the window and click on the sign on the house (2) to start a mini object hunt. Take the scissors and mop. The number revealed is the safe combination.
- Click the bird (3) to start a mini object hunt. Take the net and feather. Click the bread to cut it, then take the bread crumbs. Click on the blueprint stand to make a bird feeder (4). Assemble the bird feeder step by step. To place pieces, click on them and then click the area where they should go.
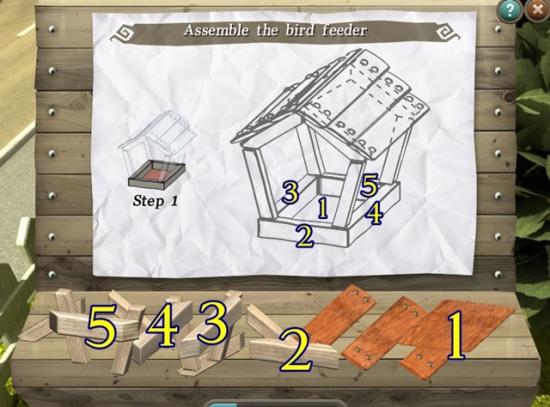
- Build the bird feeder. Step 1 – place the base (1), then the four sides (2, 3, 4, 5).

- Step 2 – place the sides (1, 2, 3, 4).
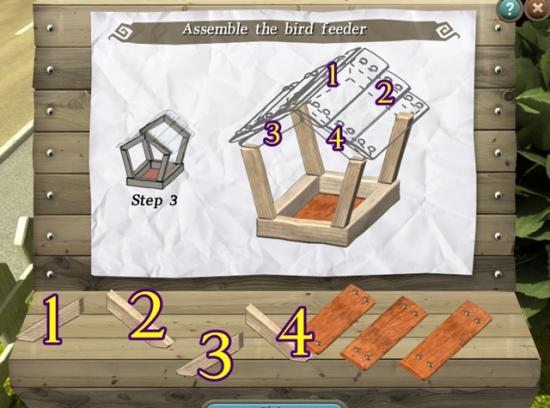
- Step 3 – place the roof. First place the supports (1, 2, 3, 4).

- Step 4 – place the roof. Click on a piece of roof and you’ll see it has both sides. Position them. The bird feeder is added to your inventory.
- Add the birdfeeder to the bird. Take the map piece and place it on the map (match the shape). Click on the safe and enter the combination found on the side of the house (use the up and down arrows). Take the map piece and place it on the map (match the shape). Enter the house (click on the arrow pointing into the house).
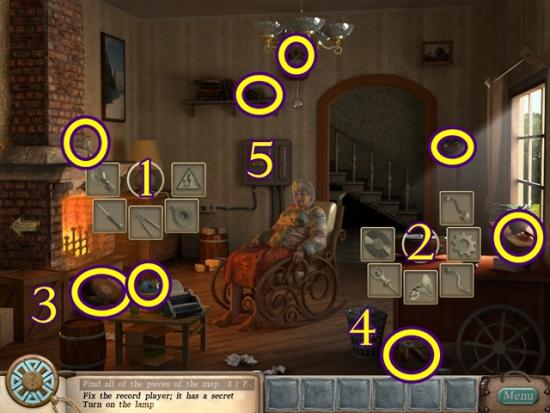
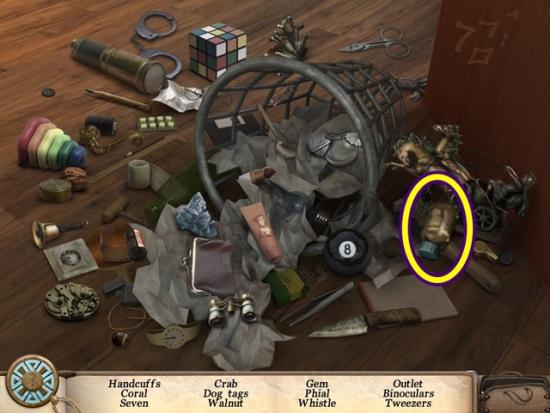
- Click on the lamp (1) and gramophone (2) to start a mini object hunt. Take all the available objects. Click on the crate (3) to get the speaker. Once the gramophone is complete, take the map piece and place it on the map (match the shape). Click on the garbage pail (4) to start a hidden object hunt.
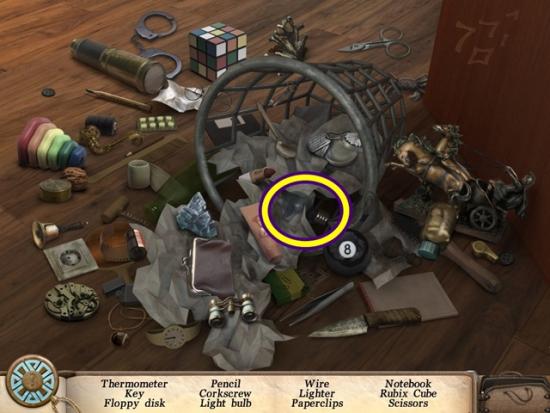
- Find all the items. A light bulb is added to your inventory. Place the light bulb on the lamp.
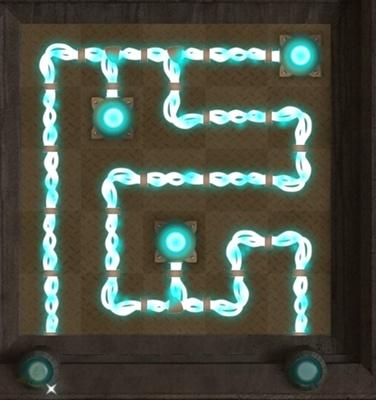
- Click the electrical panel on the wall. Mini-puzzle: Arrange the wires so there is one continuous flow of electricity. Solution:
- Place the warning sign on the lamp. Take the map piece and place it on the map (match the shape). Leave the house (click the left arrow) and go left again (click the left arrow).
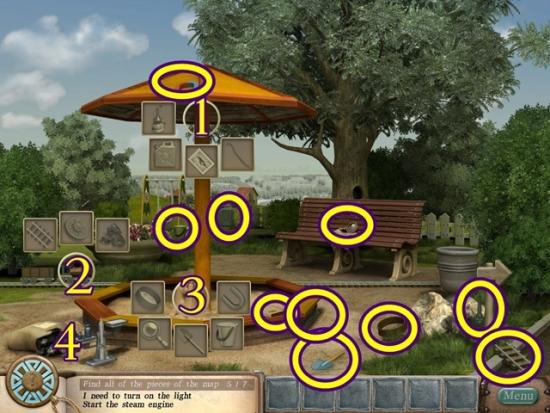
- Click the canopy (1), steam engine (2) and sand castle (3) to start a mini object hunt. Take all the available objects.
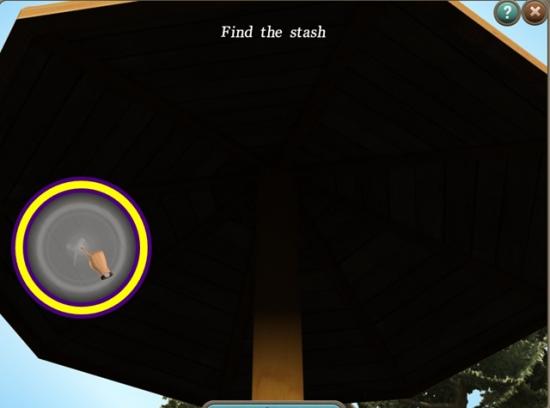
- When you finish the canopy, move your mouse around until you see the X. Click to take the map piece and place it on the map (match the shape).
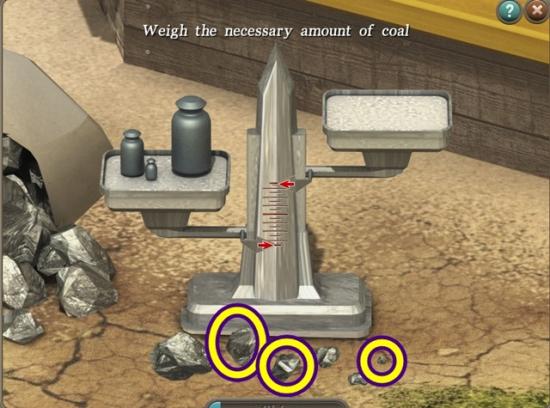
- When you finish the sand castle, take the wheel. Place the wheel on the steam engine. Click the scales (4). Mini-puzzle: Place the right amount of coals on the right scale so it weighs the same as the weights on the left scale. To solve it, place the pieces of coal circled in the screenshot below.
- Add the coal to the steam engine. When you finish the steam engine, take the map piece and place it on the map (match the shape).
Magic potion
- Click through the comic, then the dialogue.
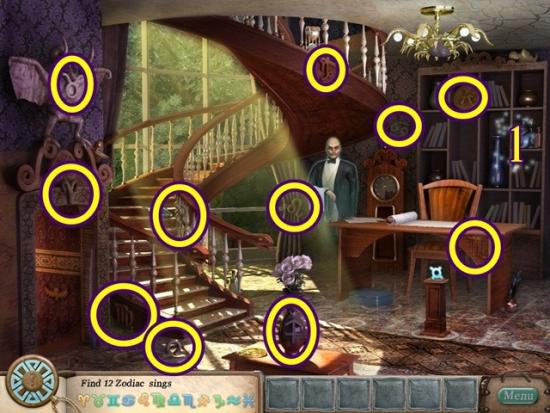
- Find the 11 visible zodiac signs. Click on the bookshelf (1) to start a hidden object hunt.
- Find all the items. A zodiac sign (Gemini) is added to your inventory.
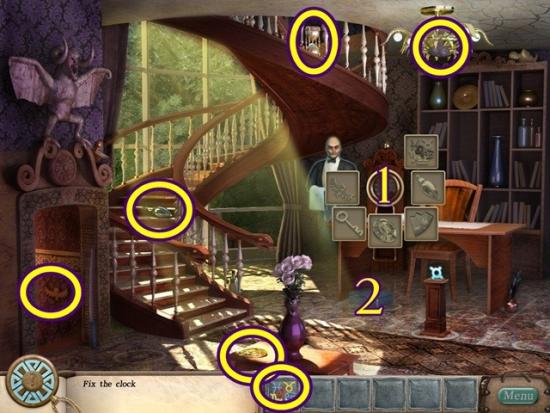
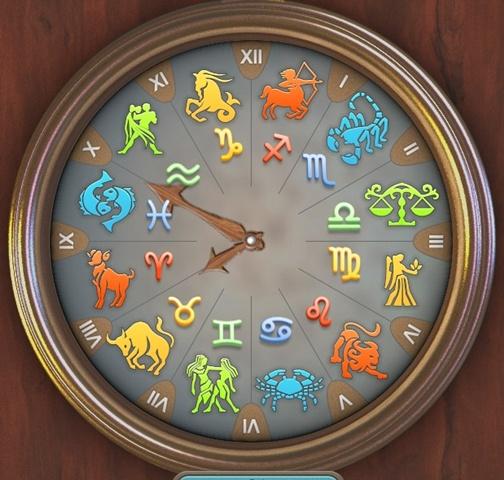
- Once you have the 12 zodiac signs (and prompted by the ghost), click on the clock (1) to start a mini object hunt. Find all the available objects. Click the metal box (2) to get the key. Put the zodiac signs on the clock. Once you have completed the clock, a mini-puzzle starts. Put the zodiac signs in chronological order. If you don’t know the zodiacal signs, perform an internet search. Click two zodiacal signs to swap their position. When a sign is in the right position, it’s drawing will light up.
- Solution:
- Once you’re done, click on the arrow to go down the stairs.
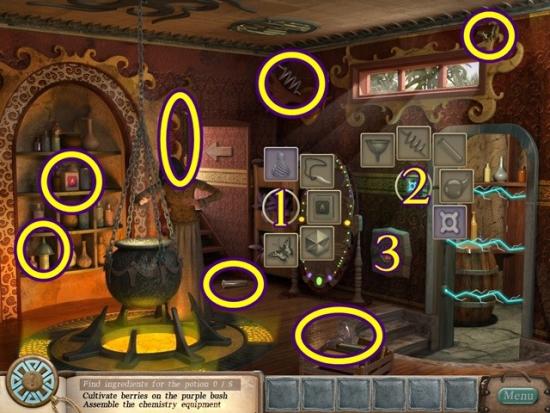
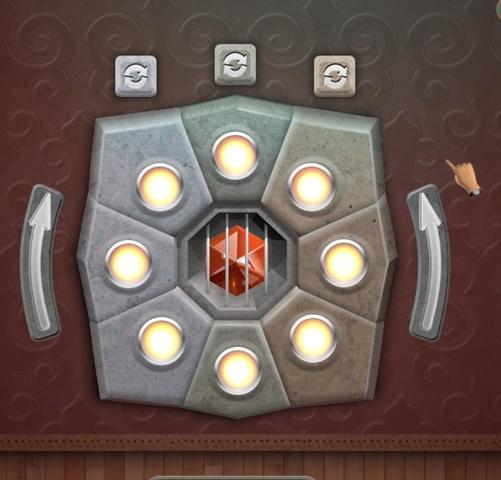
- Talk to the witch. Once you’ve finished, find the potion ingredients. Click the stand (1) and the science lab button (2) to start a mini object hunt. Take all the available objects. Click the wall cache (3). Mini-puzzle: Use the arrows to rotate the disc and then click the top buttons to turn on all the lights. Click the power buttons (top) to see what button turns what lights off. Then begin clicking the arrows rotate the disc and work at turning on all the lights. A step-by-step solution can’t be given because the puzzle doesn’t reset it when you close it, therefore by the time you get to this walkthrough; you’ve already moved the disc. Work at getting three lights in a row off, then rotate the disc so all three off lights are on once side, then click the appropriate power button to turn them all on.
- Solution:
- Add the gem to the stand. Go up the stairs (click the arrow).
- Take the key. Click the snakehead (1) and desk (2) to start a mini object hunt. Take all the available objects. Click on the bookshelf (2) to start a hidden object hunt.
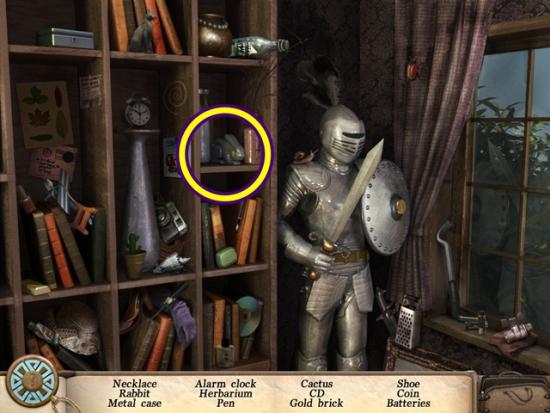
- Find all the items. A porcelain rabbit is added to your inventory. Add the porcelain rabbit to the snakehead.
- Once you’ve completed the snakehead, place the snake potion in its correct slot (match the shape).
- Once you’ve completed the desk, a mini-puzzle starts. Repeat the sequence as the symbols light up. You have to do this three times. If you make a mistake, you restart but the sequence will be different.
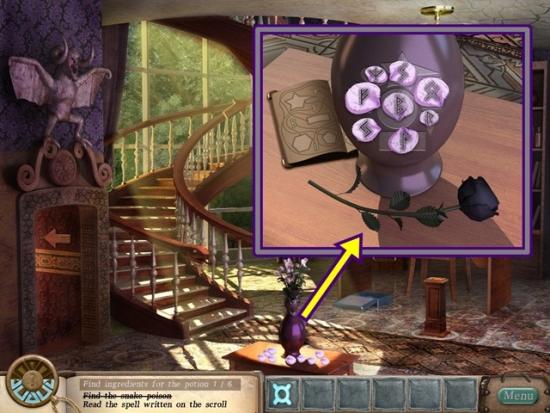
- Click the vase to start a mini puzzle. Place all the petals back on the vase. Click on the diagram to see the proper positions. Each symbol has a line connecting it to a shape. Follow the line to determine which petal goes where. When you’ve completed the puzzle, take the rose (potion ingredient) and place it in its correct slot (match the shape). Go up the stairs.
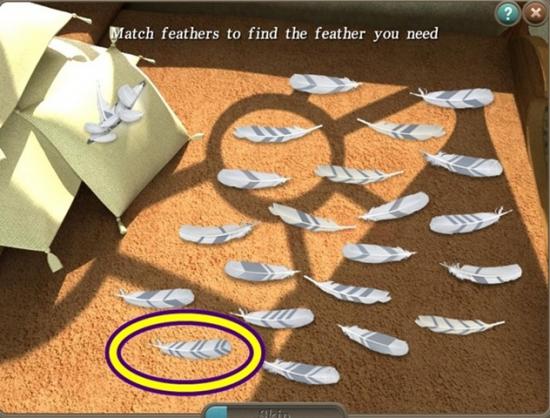
- Take the perfume. Click the pillows (1) and crystal ball (2) to start a mini object hunt. Take all the available objects. Click the envelope below the table to get the ghost locket. Once you’ve completed the pillows, a mini-puzzle starts. Match up all the feathers until you find the one without an identical mate. Click on a feather and then click on its identical mate to remove them. The screenshot below shows the feather without the mate.
- Click the table to start a mini-puzzle. Position each card so its symbol and rank match the symbols/ranks shown. Solution:
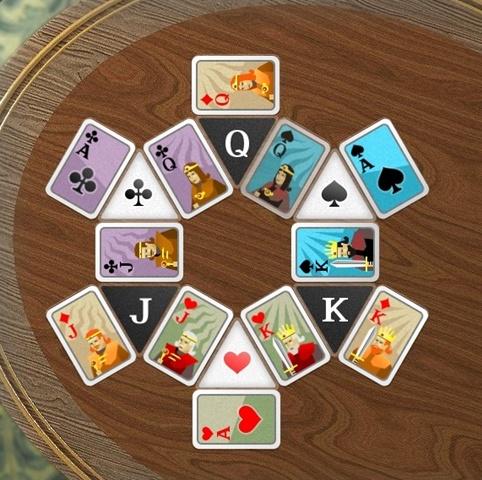
- The queen of spades is added to your inventory. Put the queen of spades on the crystal ball. Once you’ve completed the crystal ball, you release a small ghost that flies into the picture on the wall. Click on it and take the potion ingredient then place it in its correct slot (match the shape). Go down the stairs and return to the witch’s room.
- Place the perfume on the stand (1). Take the potion ingredient then place it in its correct slot (match the shape).
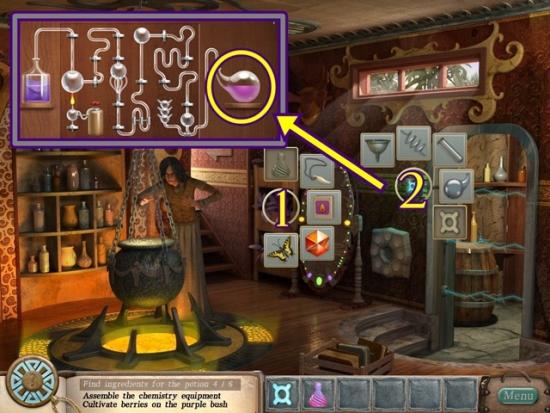
- Place the key on the science lab button (2). Mini-puzzle: Position all the lab equipment so the liquid from the flask on the left can flow into the retort on the right. The metal clasps go over the pegs and are what attach the equipment. Start with the positioning an item to connect with the flask on the left, then with the item to connect with the retort on the right. Continue until all the pieces are in place. Once completed, take the full retort (potion ingredient) and place it on its correct slot (match the shape).
Make soup
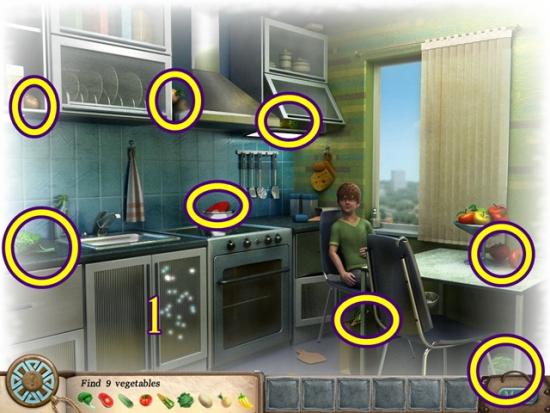
- Find the eight visible vegetables. Click on the bottom cupboard (1) to start a hidden object hunt.

- Find all the items. A cucumber is added to your inventory.
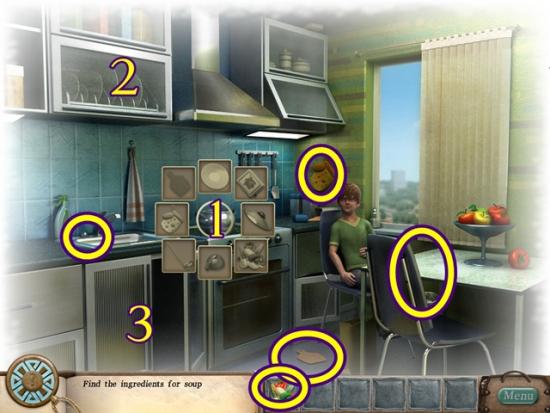
- Click the pot (1) to start a mini object hunt. Take all the available objects. Click the top cupboard (2) to start a mini-puzzle. Rearrange the plates so they go from smallest to biggest (left to right). A plate is added to your inventory. Click on the bottom cupboard (3) to start a hidden object hunt.
- Find all the items. A lid is added to your inventory. Add the lid and plate to the pot.
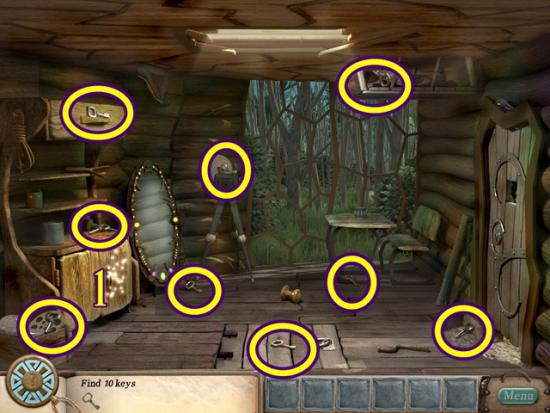
Keys
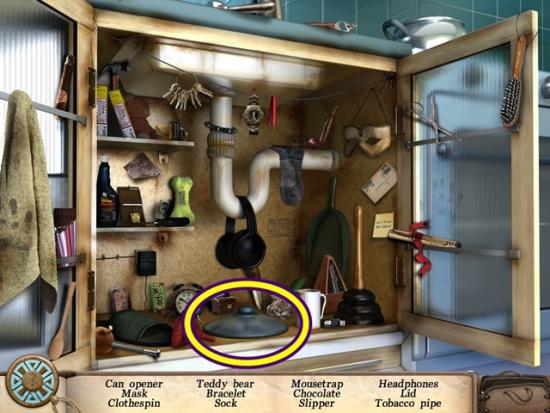
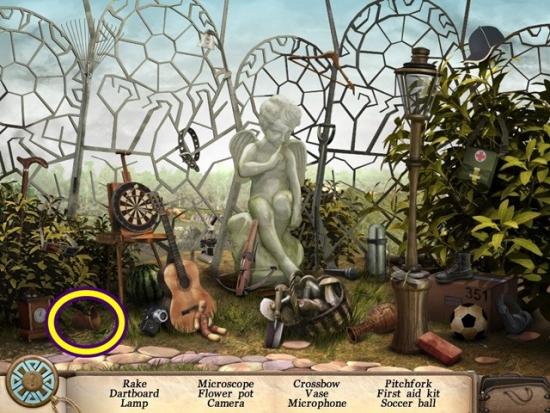
- Click the pedestal (1) to start a mini object hunt. Take all the available objects.
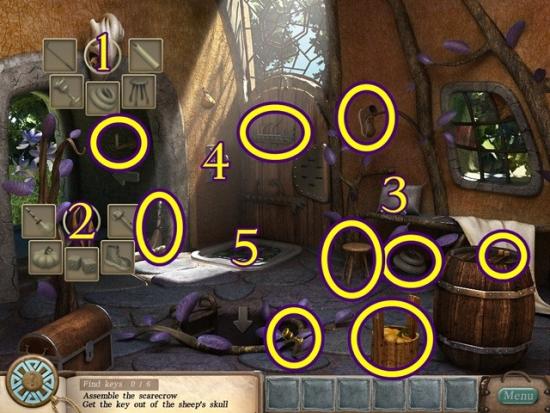
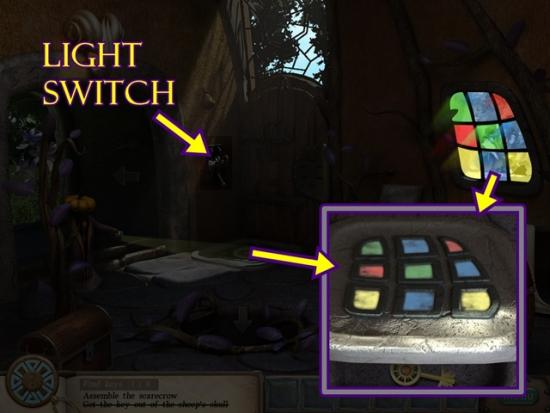
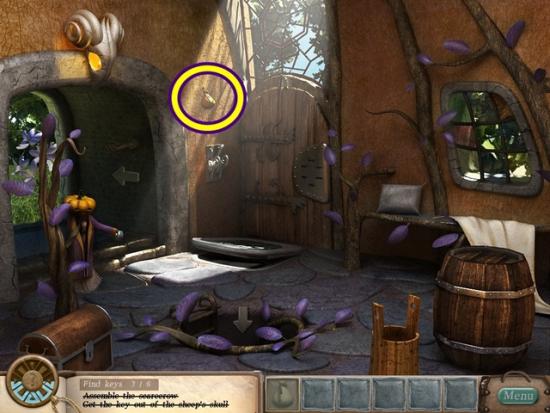
- Click the sheep skull (1) and scare crow (2) to start a mini object hunt. Take all the available objects. Click on the pillow (3) to reveal an object. Once you’ve completed the sheep skull, take the key from its eye and place it in its proper slot (match the shape). Once you’ve completed the scarecrow, turn off the light (4) and take note of the light coming through the window. Click on the rug (5) in front of the door.
- Mini-puzzle: Make the rug match the window. If you didn’t already, close the window and turn off the light and take note of the light coming through the window. Clicking on a tile changes its colour. Once you’ve completed the puzzle, take the key and place it in its proper slot (match the shape). Go down the hole.
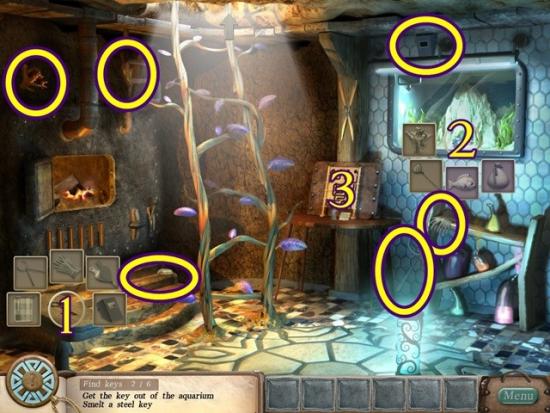
- The labels seem to be switched, soil should be pedestal and pedestal should be soil.
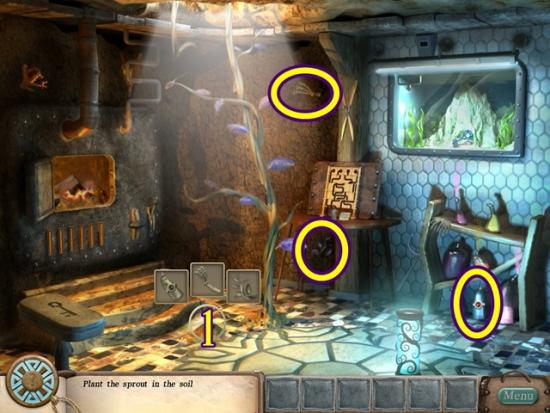
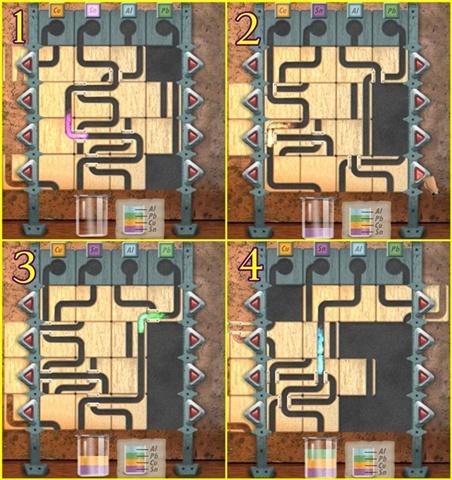
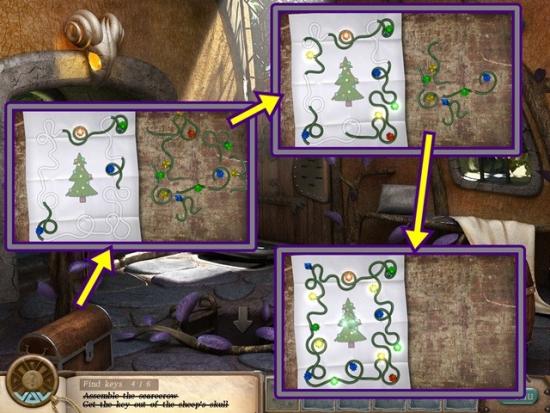
- Click the soil (1) and aquarium (2) to start a mini object hunt. Take all the available objects. Click the puzzle (3). Mini-puzzle: Slide the tiles to create one continuous flow from a chemical at the top into the flask at the bottom. You must do this four times in order to add all the chemicals into the flask. The system has you add the chemicals in a certain order (whatever chemical is flashing at the top). Solution:
- The alloy is added to your inventory. Add the alloy to the soil. Once you’ve completed the soil, take the key and place it in its proper slot (match the shape). Go up the stalk.
- Take the fish food from the wall. Go through the entryway (under the sheep skull).

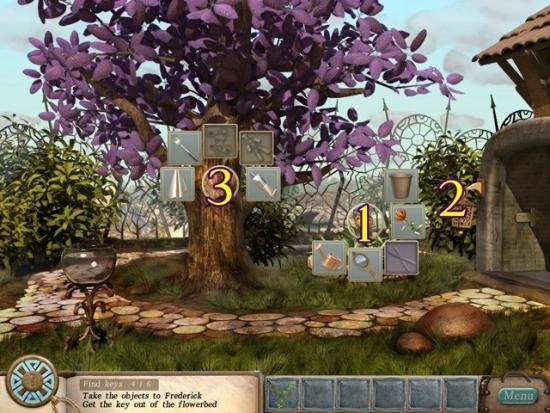
- Talk to Frederick (the tree). Take the fish. Click Frederick (1) and the flower bed (2) to start a mini object hunt. Take all the available objects. Click the bushes (3) to start a hidden object hunt.
- Find all the items. A flower pot is added to your inventory. Add the flower pot to the flower bed. Enter the house and go down the hole.
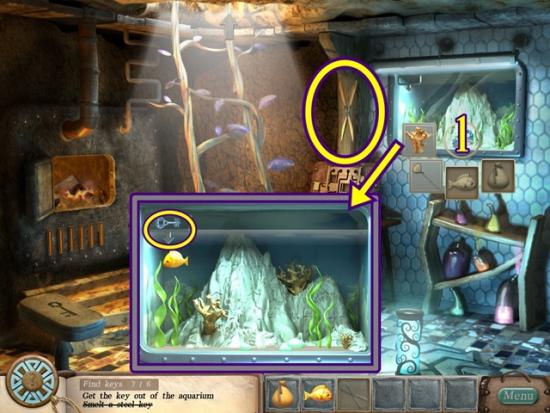
- Take the pruning shears. Add the plant food and fish to the aquarium (1). Mini-puzzle: Use the fish to push the key up into the top left hand area. Use your mouse to guide the fish. You have to click near the fish. Start by clicking downwards to bring the fish down to where the key is (bottom right). Get the fish as low as you can until he’s somewhat under the key and the key starts to move upward. Slowly move the fish to the left and up. Once the key is above the fish, move just a tiny bit towards the left. This will start the key “bouncing” and moving leftwards. Let it get ahead of the fish and then click just far enough to keep the fish directly under the key. Start to click left and upwards to move the key into position. This puzzle requires patience. Once you’ve moved the key into position, take the key and place it in its proper slot (match the shape).
- Go up the stalk.
- Click on the chest. Mini-puzzle: Place the garland pieces onto their position on the drawing. Start with the loop pieces, then add the larger pieces. Once you’ve completed the drawing, the garland is added to your inventory. Go outside.
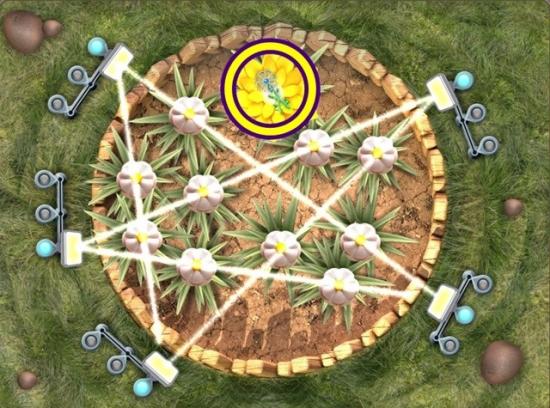
- Put the pruning shears on the flower bed (1). Mini-puzzle: Arrange the rays so a ray passes over each white flower. Click the three buttons on each panel to move the ray. Solution:
- Take the key and place it in its proper slot (match the shape). Click the bushes (2, screenshot above) to start a hidden object hunt.
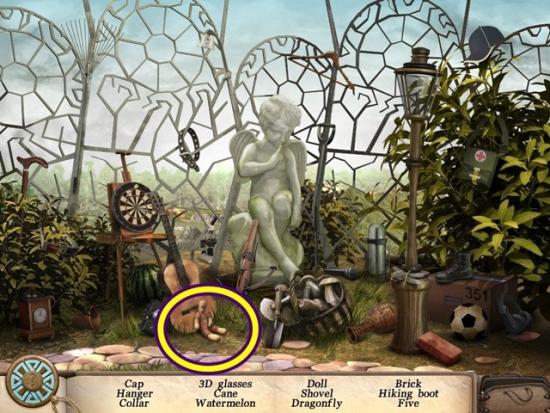
- Find all the items. A doll is added to your inventory.
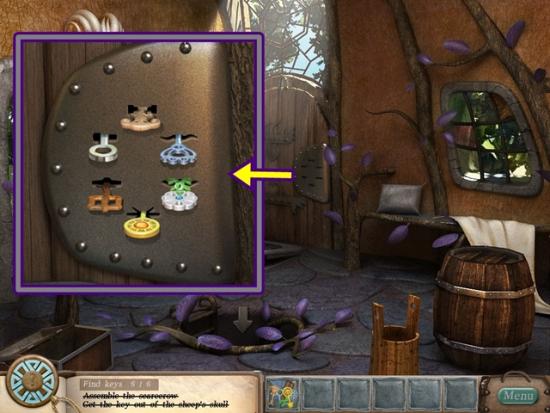
- Put the garland and doll on Frederick (3). Take the key and place it in its proper slot (match the shape). Go into the house.
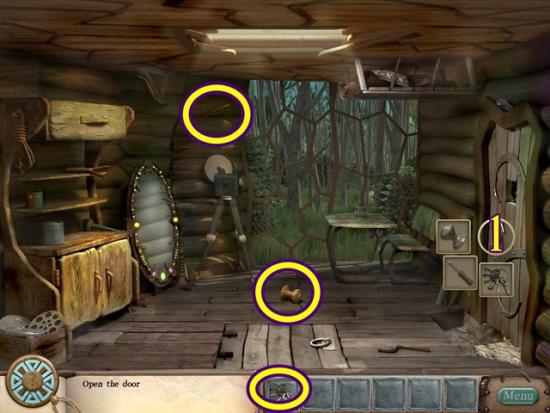
- Add the keys to the lock. Mini-puzzle: Put each key in its proper hole. Match the shape of the key (not the key head but the part that goes into the door) to the keyhole. A key will only fit (i.e., stay) in its proper position so if the key won’t stay, pick another hole. To place a key, put your mouse pointer over the hole so that the hole lights up, otherwise no key will fit.
Airship parts
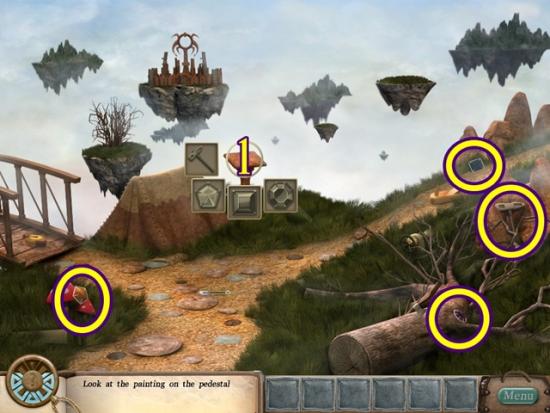
- Click the pedestal (1) to start a mini object hunt. Take all the available objects. Mini-puzzle: Uncover the tiles. To do so, take a gem and hover it over the tiles. When a tile turns into a colour that matches the gem, click to remove the tile.
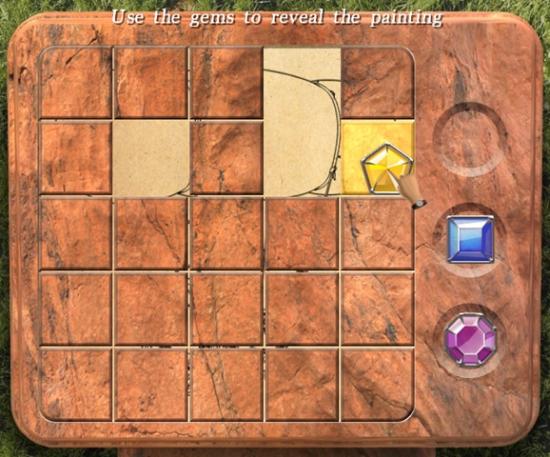
- For example, take the yellow gem and move it around the board. When a tile turns yellow, click and the tile will uncover and reveal a portion of a painting. Continue this way until all the tiles are uncovered.
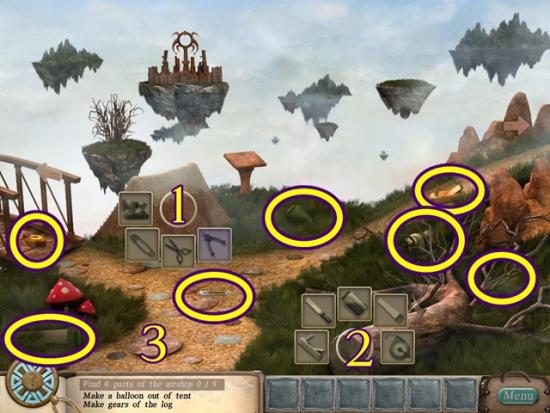
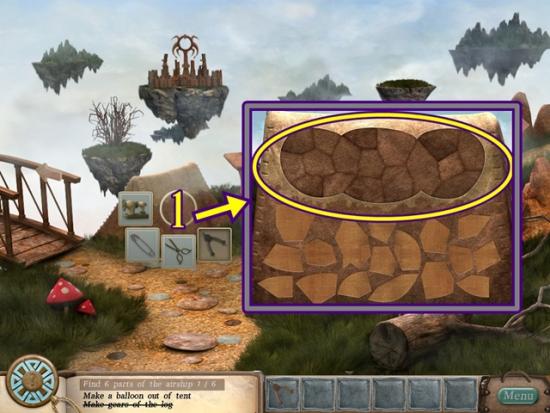
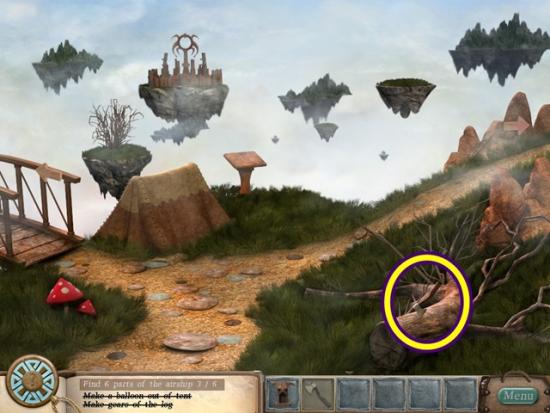
- Click the tent (1) and log (2) to start a mini object hunt. Take all the available objects. Click the stone (3) to reveal an object.
- Once you’ve completed the log, a mini-puzzle starts. Use the saw to cut the log. There are already notches on the log, just click on them (the notches) to cut the log. The three log pieces have a gear outline. If you hover over them, your mouse turns into a measuring tape. There’s nothing to measure, just click on the outside of the gear outline to remove the excess wood.
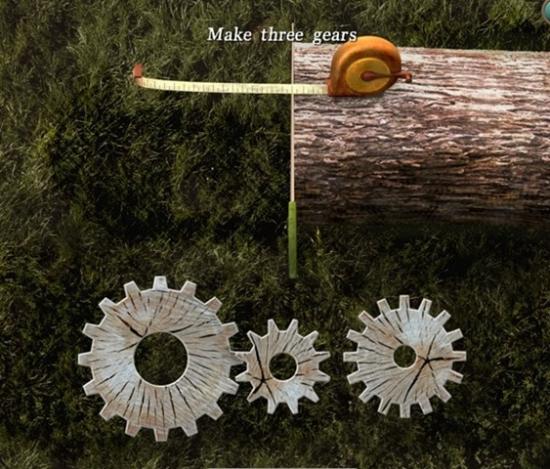
- Once you’ve finished, click the inside circle of the gear to remove the wood. Take the airship part and place it in its proper slot (match the shape). Take the path to the right.
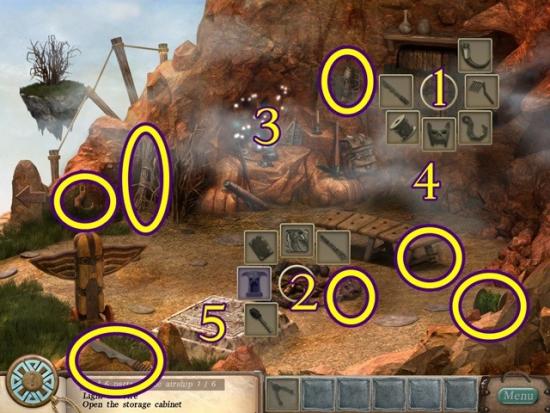
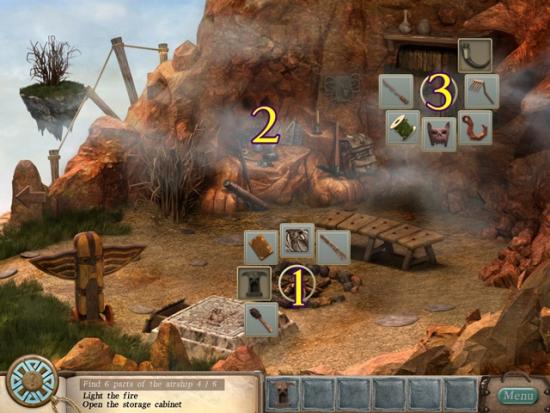
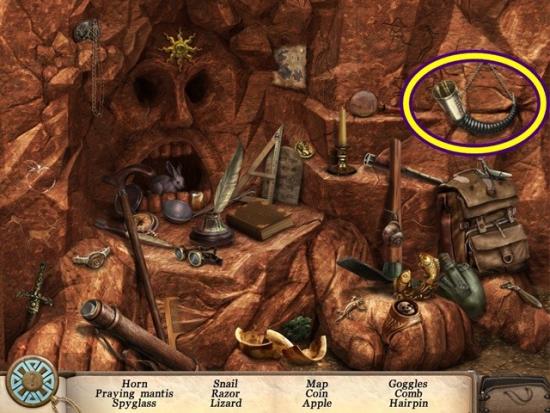
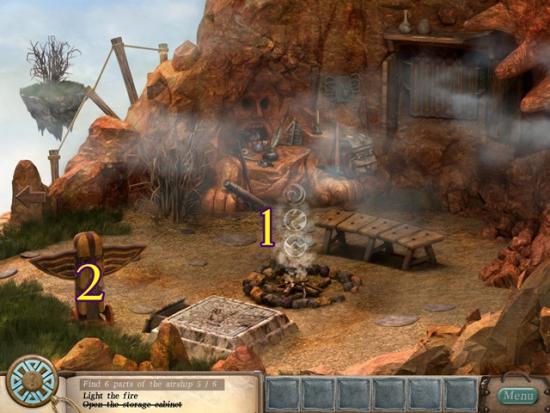
- Click the storage cabinet (1) and campfire (2) to start a mini object hunt. Take all the available objects. Click on the altar (3) to start a hidden object hunt.
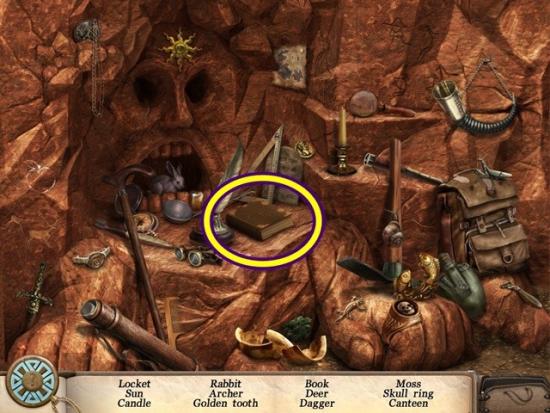
- Find all the items. A book is added to your inventory. Put the book on the campfire.
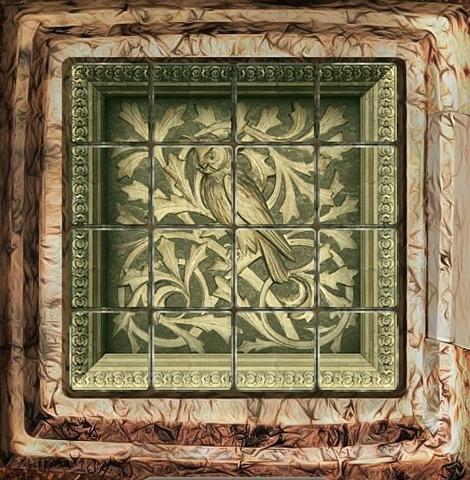
- Take the compass (4, screenshot above). Click the tiled pedestal (5, screenshot above). Mini-puzzle: Rearrange the tiles to reassemble the picture. Hover your mouse at the edge of a tile to have blue arrows appear. Click on the arrows to move the tile in that direction. When a tile becomes greenish, it’s locked in position. Start with positioning the frame border, then assemble the interior pieces.
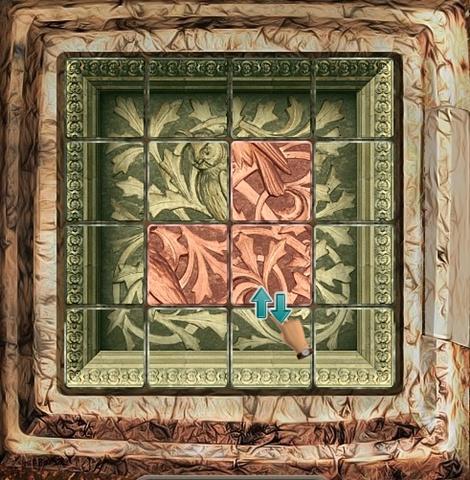
- Solution:
- A tile is added to your inventory. Add the tile to the campfire. Leave the scene by going left.
- Put the compass on the tent (1). Mini-puzzle: Place the pieces of canvas on the area at the top (like a jigsaw puzzle). Click on a piece and place it in the area. If it’s in the correct position, it will lock into place. Start with the edges.
- Once you’ve completed the puzzle, click on the canvas balloon (airship part) that you just completed and place it in its proper slot (match the shape). Leave the scene by going left.
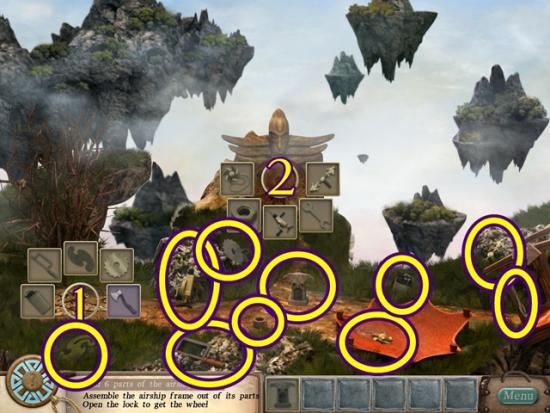
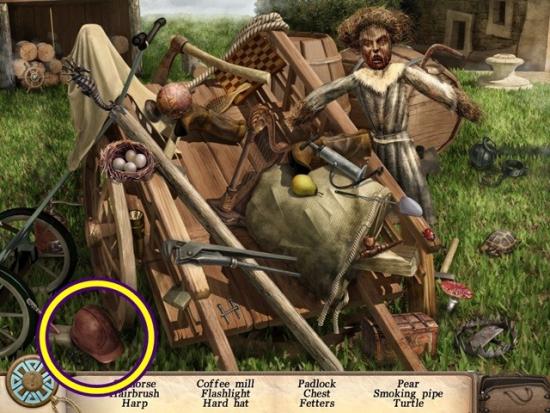
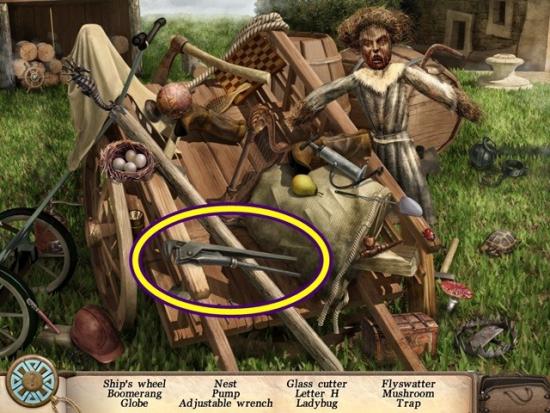
- Take the idol. Click the parts of a bicycle frame (1) and padlock (2) to start a mini object hunt. Take all the available objects. Once you’ve completed the padlock, you start a mini-puzzle. Rotate the rings to recreate the design. The centre piece is already locked so use that as a starting point. Once you’ve completed the puzzle, click on the wheel (airship part) and place it in its proper slot (match the shape). Leave the scene by going right.
- Take the axe. Go left.

- Put the axe on the parts of the bicycle frame (1). Mini-puzzle: Arrange the vines on the outline (similar to the garland puzzle earlier). Start with the larger, oddly shaped pieces, then add the rest. Once you’ve completed the puzzle, click on the airship part and place it in its proper slot (match the shape). Go right twice.
- Place the idol on the campfire. Click on the altar (2) to start a hidden object hunt.
- Find all the items. A horn is added to your inventory. Add the horn to the storage cabinet (3, screenshot above). Mini-puzzle: Click on the vine lengths and drag the end so it appears within the red tape (and the eyes light up). You have to make all the eyes light up. Begin by dragging the vines to see what vine affects what.
- Vine 1 moves vines 1 & 4
- Vine 2 moves vines 2 & 5
- Vine 3 moves vines 3 & 1
- Vine 4 moves vines 4 & 6
- Vine 5 moves vines 5 & 3
- Vine 6 moves vines 6 & 2
- It’s difficult to give a step by step solution as the puzzle doesn’t reset and if you are coming to this walkthrough for help, you’ve already moved the vines. Try adjusting the vines in the following order: 1-4-6-2-5-3. You’ve got some wiggle room with the red tape, slowly move a vine up or down if it’s corresponding vine is close to the red tape. Once you’ve completed the puzzle, click on the airship part and place it in its proper slot (match the shape).
- Take note of the smoke signals. Click on the idol. Click on the symbols on the idol so they match the smoke signals from the campfire.
Seashells
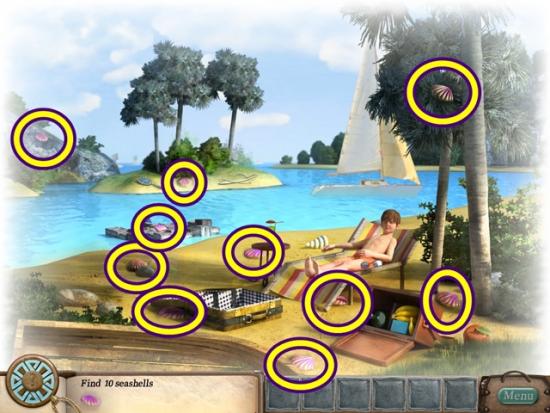
- Find ten seashells.
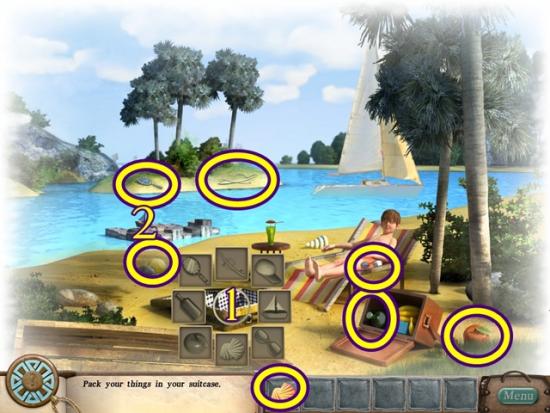
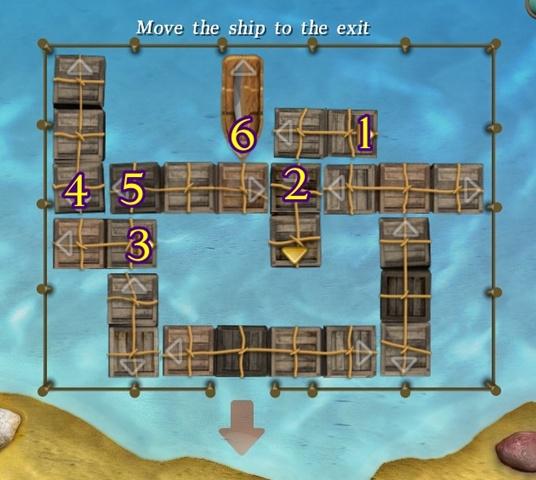
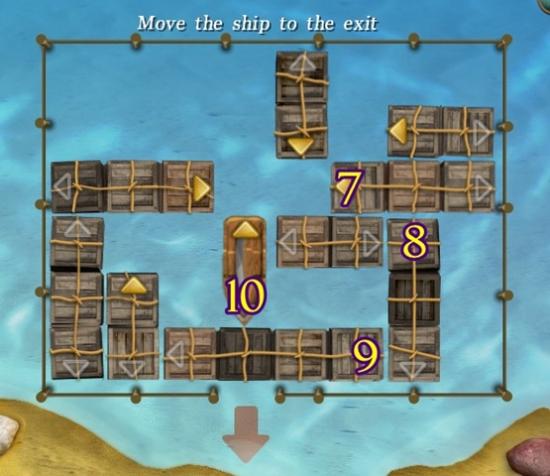
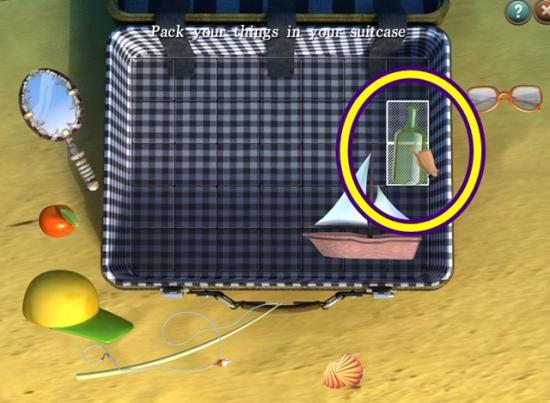
- Click the suitcase (1) to start a mini object hunt. Take all the available objects. Click on the small ship (2). Mini-puzzle: Move the crates to guide the ship out (down arrow). Click on a crate’s arrow to move it up/down or left/right. Arrows that are gold mean the crate can move in that direction (i.e., nothing is blocking it). For the screenshot solution below, the numbers are the order in which to click the crate. The numbers are also placed over the arrow to click. Clicking an arrow moves it only one space. For the solution below, move the crate as far as it can go in the direction indicated.
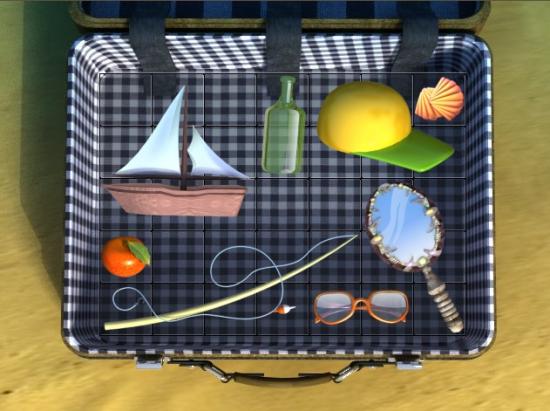
- The ship is added to your inventory. Add the ship to your suitcase. Mini-puzzle: Put all the items in the grid nothing overlaps. Example:
- Solution:
Tiles
- Find the nine visible keys. Click on the bottom cupboard (1) to start a hidden object hunt.
- Find all the items. A key is added to your inventory.
- Click the door (1) to start a mini object hunt. Take all the available objects. Once you’ve completed the door, a mini-puzzle starts. Use the keys in the correct sequence to unlock the door. You know the key is correct when the bar gets filled. Assuming the keys are numbered from 1-6 from left to right, the sequence of keys is: 6 – 1 – 5 – 2 – 4 – 3.
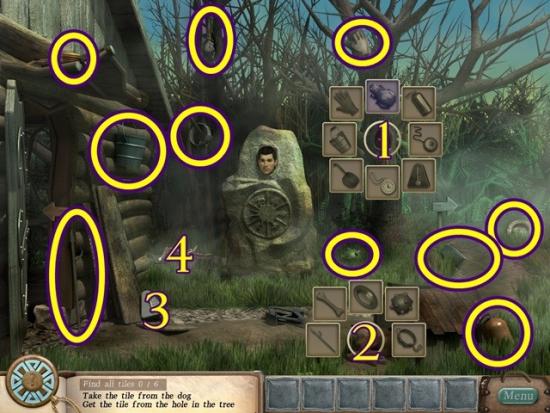
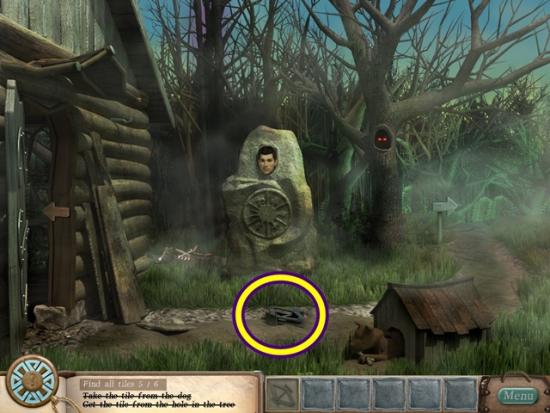
- Talk to the man. Click the hollow (1) and dog (2) to start a mini object hunt. Take all the available objects. Click the stone (3) to reveal an object. Click the skeleton (4) to start a mini-puzzle. Reassemble the skeleton. The skull is already in place. The white edges indicate where another bone should attach to it, as well as showing the shape of what should attach to it. Solution:
- The bone is added to your inventory. Add the bone to the dog. Take the tile and place it in its proper slot (match the shape). Go right.
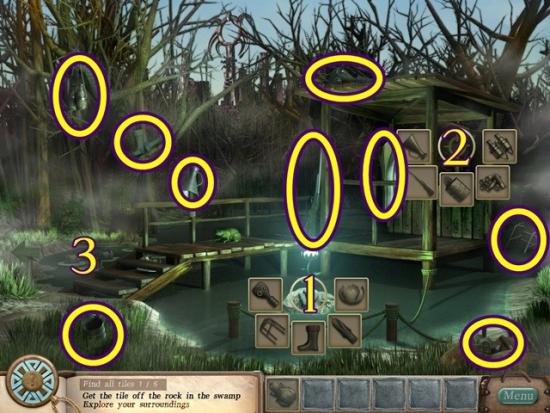
- Take the frog. Click the tussock in the swamp (1) and reticle (2) to start a mini object hunt. Take all the available objects. Once you’ve completed the reticle, a mini-puzzle starts. Your mouse turns into a reticle and you must shoot (click) the tin cans as they fall. They don’t get faster. Once you’ve shot 15 cans, a large tin can appears in front of you. Take the tile and place it in its proper slot (match the shape).
- Click the water lilies (4). Mini-puzzle: Click the buttons to rotate the flowers so each flower is resting on a leaf of the same colour.
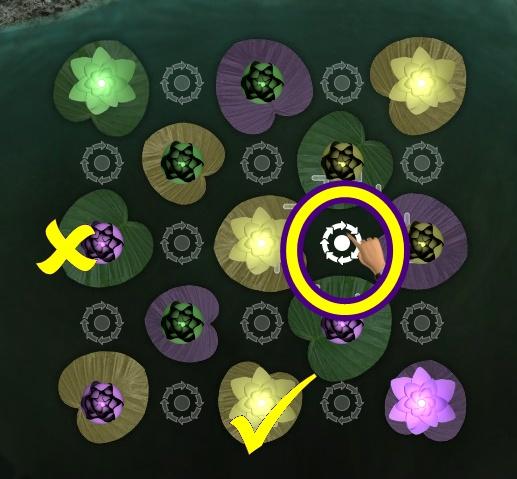
- When a flower is on its same coloured leaf, it blooms. There are many ways to solve this puzzle so a step-by-step solution can’t be provided. Start with the corners, then do the sides, then work on the middle. Solution:
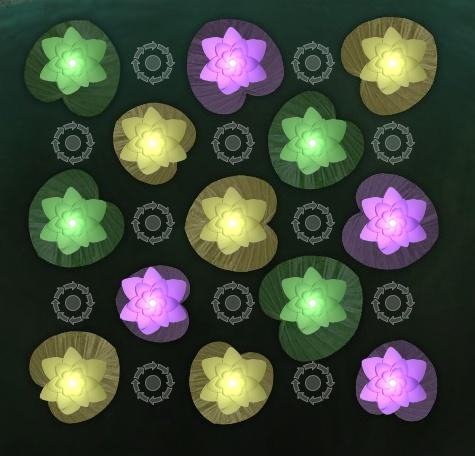
- The water lily is added to your inventory. Put the water lily on the tussock in the swamp. Take the tile and place it in its proper slot (match the shape). Go left.
- Put the frog on the hollow (1). Mini-puzzle: The frog’s tongue has to knock the key off the hook. If you click, the frog’s tongue shoots out. When the green bar is full (circled in screenshot below), the tongue will reach as far as it can. Let the frog swing so the green bar fills. Once it’s full, wait for the frog to be inline with the key (circle in screenshot below) and click. Its tongue will knock the key off the hook. The screenshot below is of just after knocking the key off, apologies for pressing PRINT SCREEN a second too late. Go left.
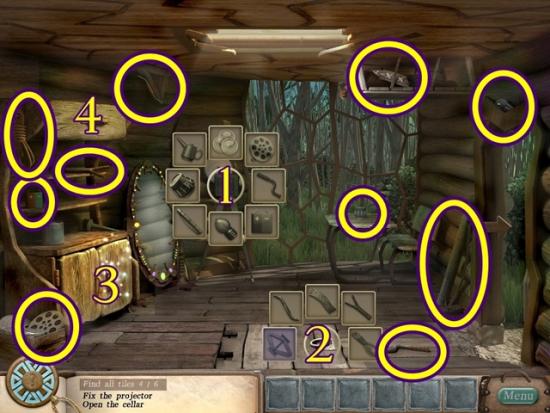
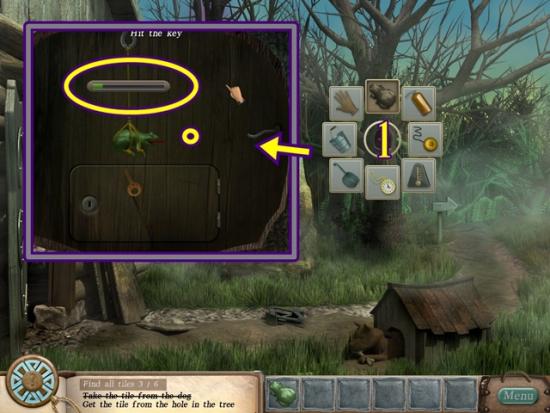
- Click the projector (1) and cellar (2) to start a mini object hunt. Take all the available objects. Click on the bottom cupboard (3) to start a hidden object hunt.
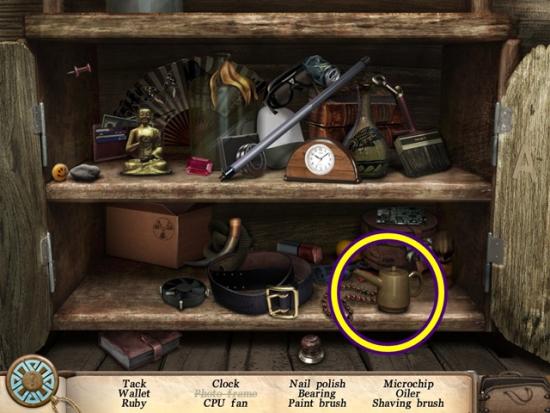
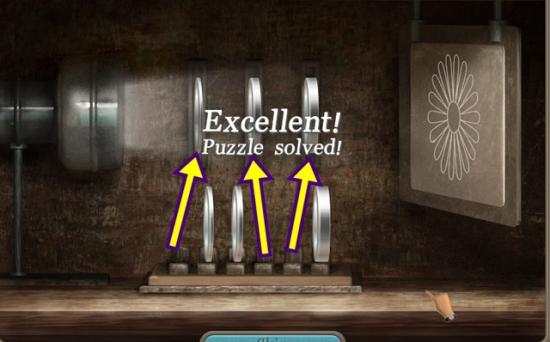
- Find all the items. An oiler is added to your inventory. Put the oiler on the projector. Click on the top cupboard (4). Mini-puzzle: Put the right combination of lenses to focus the projector’s projection. To solve this, I used trial and error. I started with placing the thickest lens in the third (from the left) position and then put the second thickest lens in the middle position and then tried all the other lenses. When that didn’t work, I removed the second thickest lens and added the third thickest lens and so forth. Solution:
- The lenses are added to your inventory. Put the lenses on the projector. Go right.
- Take the jack. Go left.

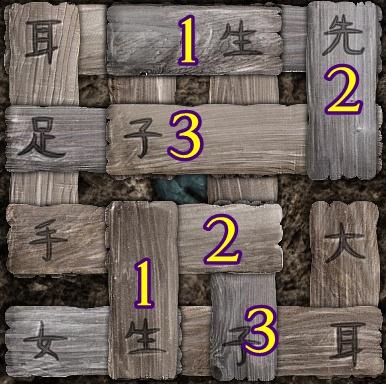
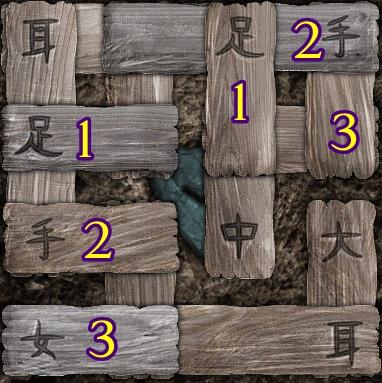
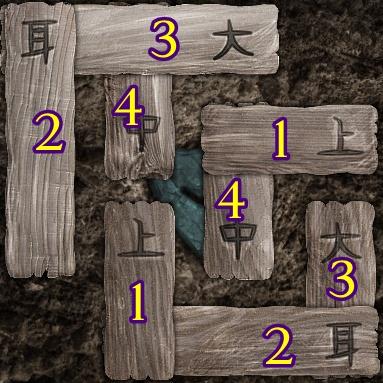
- Put the jack on the cellar (1). Mini-puzzle: Like mah-jong. Match boards with the same symbols. A board can only be removed if there are no other boards on it. Solution:
- Take the tile and place it in its proper slot (match the shape).
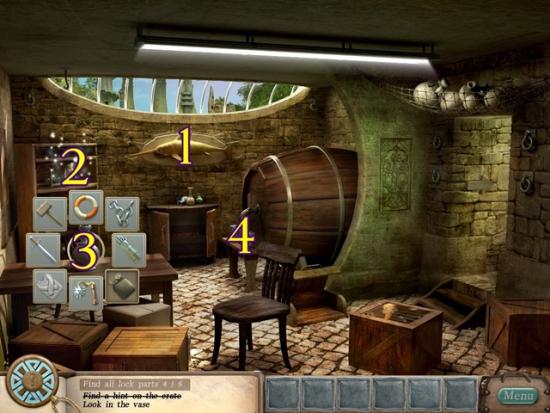
Lock parts
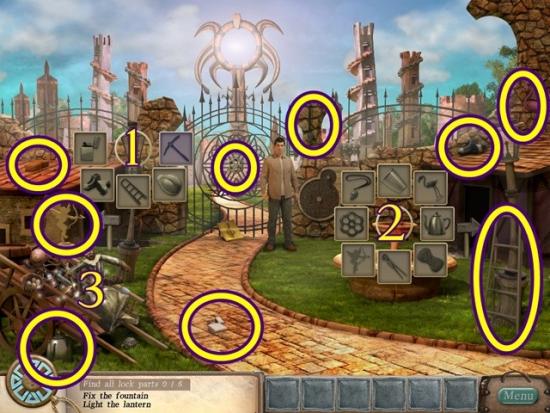
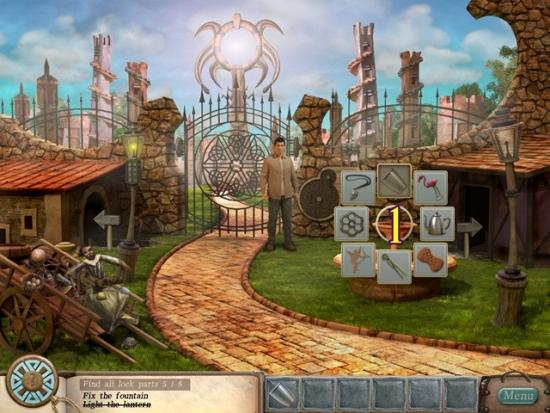
- Click the lantern (1) and fountain (2) to start a mini object hunt. Take all the available objects. Click on the cart (3) to start a hidden object hunt.
- Find all the items. Tip: “fetters” is a ball and chain. A hard hat is added to your inventory. Add the hard hat to the lantern. Go into the house on the right.
- Click the piano (1) and juicer (2) to start a mini object hunt. Take all the available objects. Take the pickaxe. Once you’ve completed the piano, take the lock part and put it in its proper position (match it to the drawing). Leave the house.
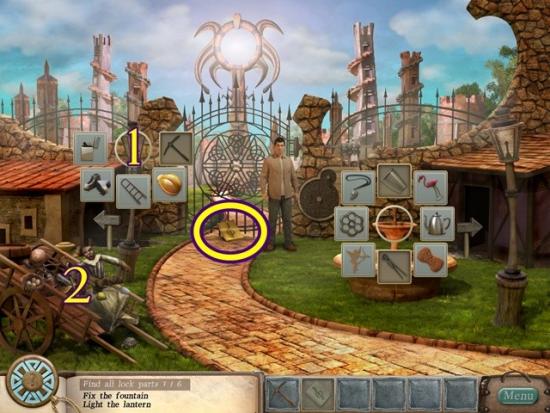
- Take the sheet music. Put the pickaxe on the lantern (1). Mini-puzzle: Align the shapes. Click on the arrows on either side to position the slots. Solution:
- Take the lock part and put it in its proper position (match it to the drawing). Click on the cart (3, screenshot above) to start a hidden object hunt.
- Find all the items. An adjustable wrench is added to your inventory. Add the adjustable wrench to the fountain. Enter the house on the right.
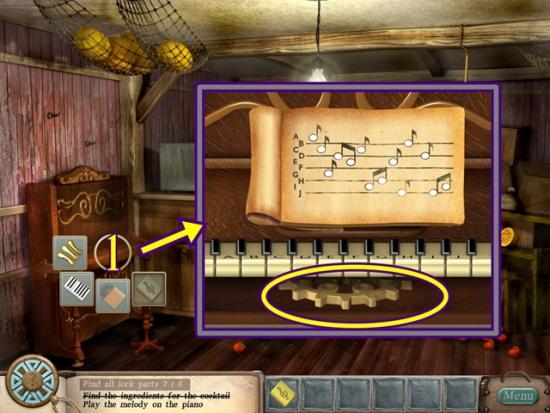
- Put the sheet music on the piano (1). Mini-puzzle: Play the piano according to the sheet music. The keys are all labelled, press them in the order shown on the sheet music. Pressing the right key makes the note light up. If you make a mistake, you start from the beginning. Solution: a c g d e c i h e j b d j i. Take the lock part and put it in its proper position (match it to the drawing). Leave the house, then go into the house on the left.
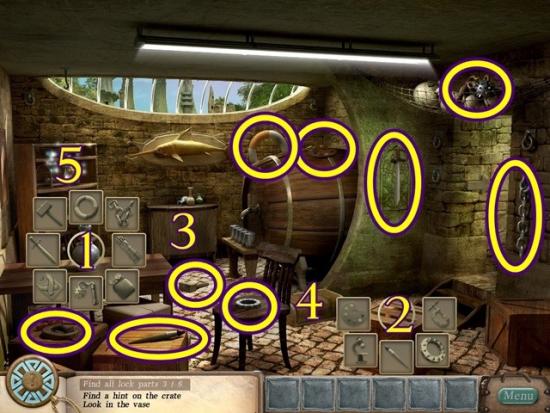
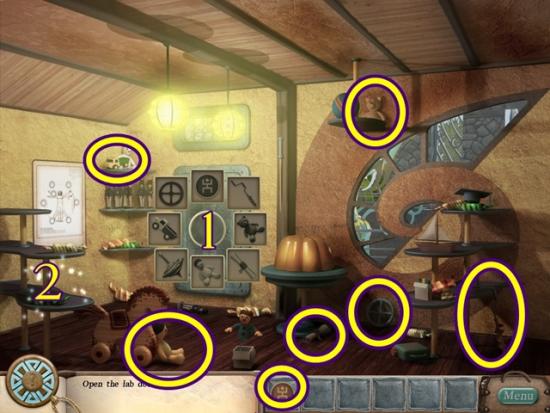
- Click the vase (1) and chest (2) to start a mini object hunt. Take all the available objects. Click the cabinet (3) and box (4) to reveal more objects. Click on the shelves (5) to start a hidden object hunt.
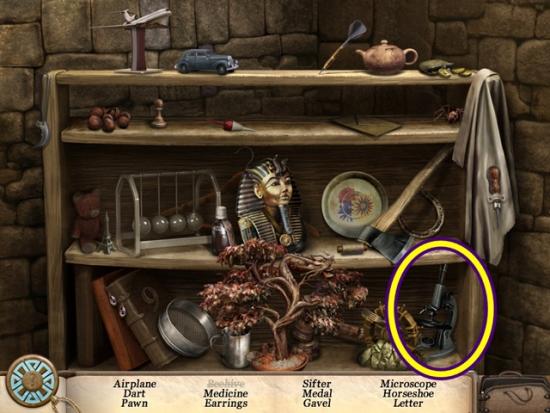
- Find all the items. A microscope is added to your inventory. Put the microscope on the chest. Mini-puzzle: Remove the boards in the correct order to reveal the picture. Clicking a board will flip it and its neighbour over. There are many possible solutions for this puzzle, start on the left side and work towards the right. When you are finished, it will show you a drawing of the shark on the wall and indicates you should press its eye. Close the window
- Click on the shark hanging on the wall (1). Click its eye. Take the lock part and put it in its proper position (match it to the drawing). Click on the shelves (2) to start a hidden object hunt.
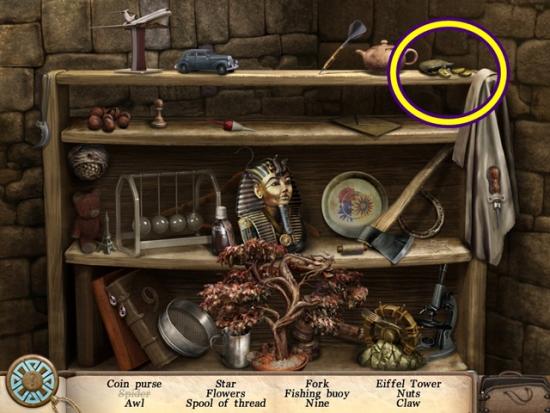
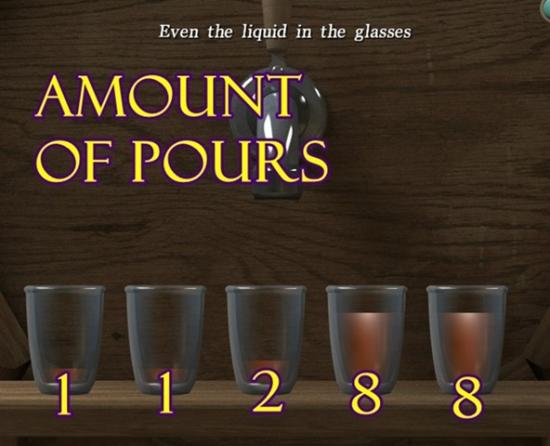
- Find all the items. A coin purse is added to your inventory. Add the coin purse to the vase (3). Take the lock part and put it in its proper position (match it to the drawing). Click on the glasses (4). Mini-puzzle: Pour water in the glasses so each glass contains the same amount. Take one glass and place it over another to pour liquid into it (when the area under the glass lights up, that’s when you can pour). Each click is one pour (think ounces of shots). The maximum each glass can contain is 8 pours. Each glass must have 1 pour (i.e., you cannot empty a glass). The screenshot below shows there are 20 pours in total. Each glass must contain four pours. Pour accordingly.
- The glass is added to your inventory. Go right.
- Put the glass on the fountain (1). Take the lock part and put it in its proper position (match it to the drawing).
Subjects

- Find the ten dolls.
- Click the door (1) to start a mini object hunt. Take all the available objects. Click on the shelves (2) to start a hidden object hunt.
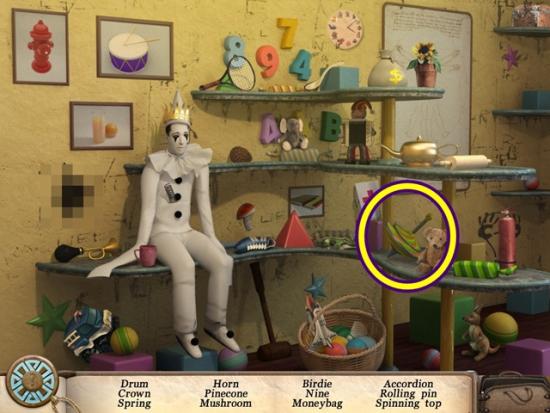
- Find all the items. A top is added to your inventory. Add the top to the door. Mini-puzzle: Arrange the dancing figures so each dancing figure disc matches the symbol beside it and the colour. Use the arrows to rotate the large circle and the smaller circles of dancing figure tiles. Arrange the coloured discs as shown in the screenshot below.
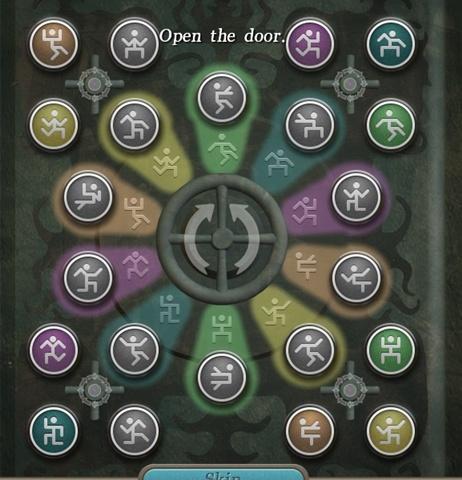
- Each coloured disc is near its spot on the large circle and in order of how it appears. Now you just have to rotate the large circle and turn the smaller circles to add the discs. Solution:

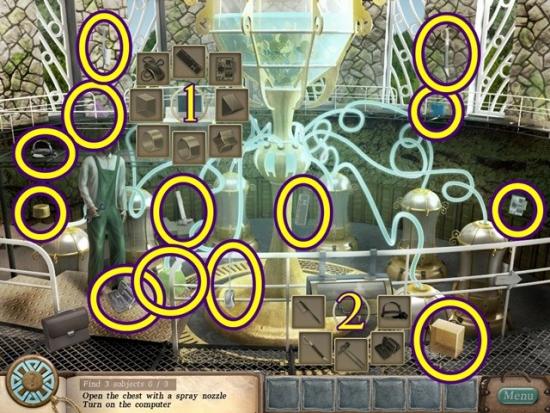
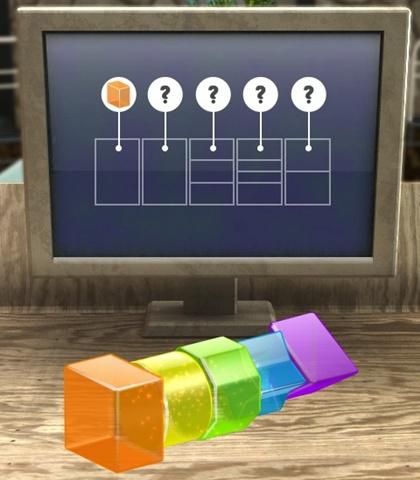
- Talk to the man. Click the computer (1) and storage (2) to start a mini object hunt. Take all the available objects. Once you’ve completed the storage, take the object and place it in its proper slot (match the shape). Once you’ve completed the computer, you start a mini-puzzle. Rearrange the shapes to form a key. The first shape is the orange box, as indicated in the drawing. Swap positions by clicking the white circle (arrow, in screenshot).
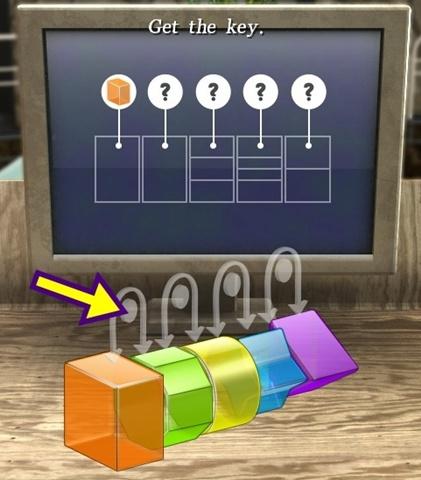
- Use trial and error to solve it. Solution:
- Take the object (key) and place it in its proper slot (match the shape). Go right.
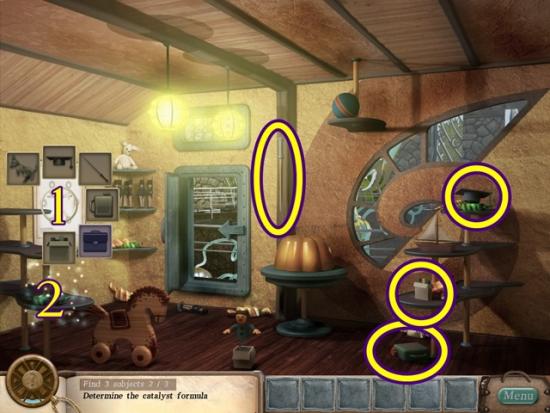
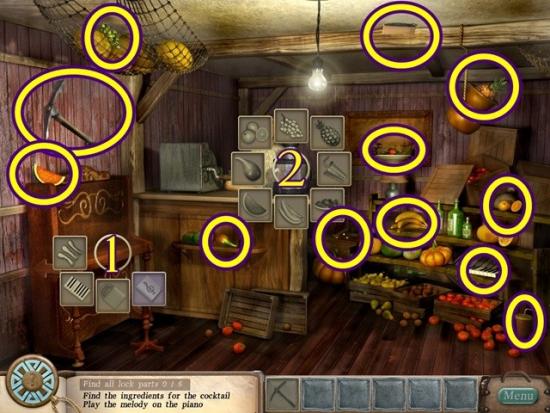
- Click the formula (1) to start a mini object hunt. Take all the available objects. Click on the shelves (2) to start a hidden object hunt.
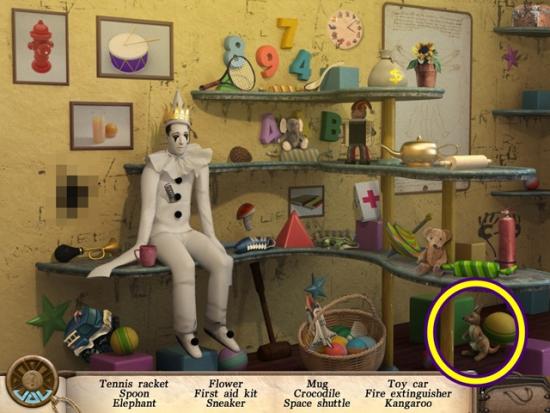
- Find all the items. A kangaroo is added to your inventory. Add the kangaroo to the formula. Go through the door.
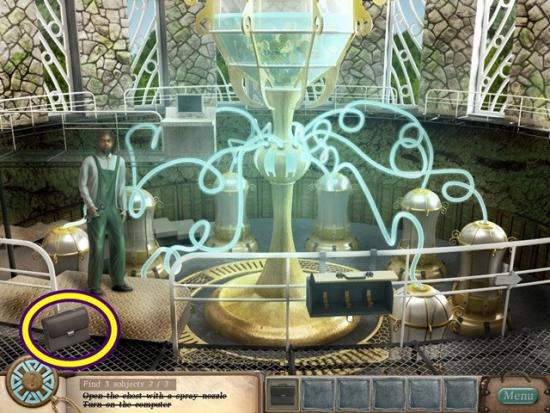
- Take the briefcase. Go right.
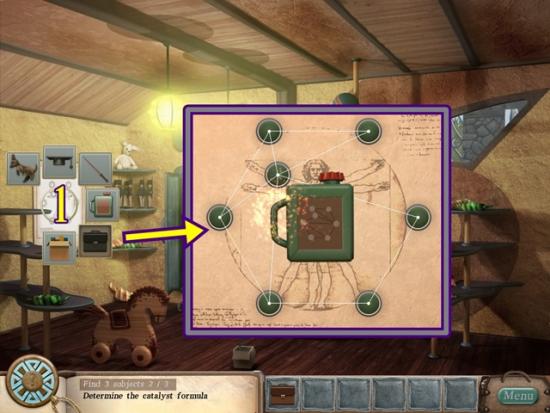
- Put the briefcase on the formula. Mini-puzzle: Arrange the rays so they don’t overlap. A white ray has no overlap, red rays do. Click on two green dots to swap their positions. Once you’ve solved the puzzle, take the catalyst and place it in its proper slot (match the shape). Go through the door.
Planetary symbols
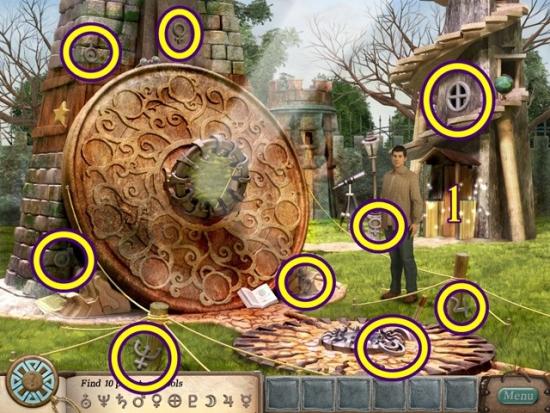
- Take the nine visible planetary symbols. Click on the porch (1) to start a hidden object hunt.
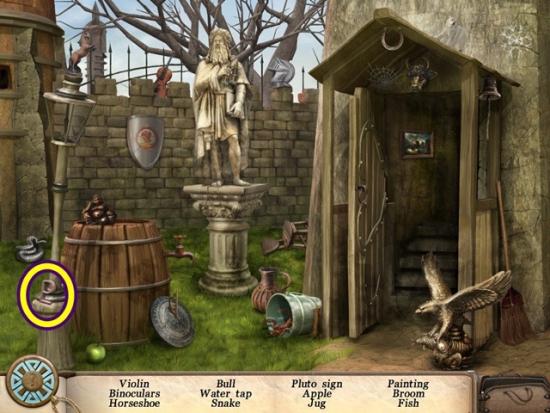
- Find all the items. A Pluto sign is added to your inventory.
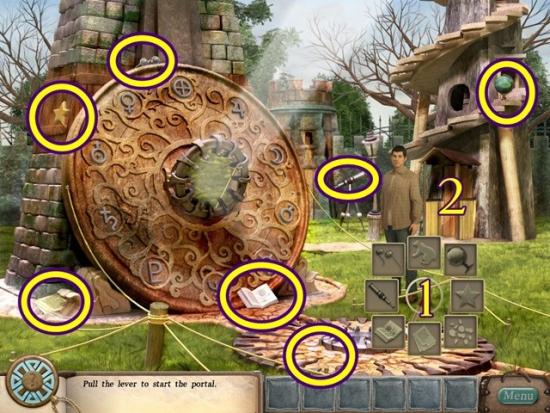
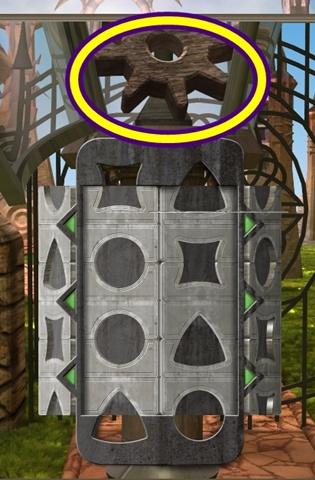
- Click the lever (1) to start a mini object hunt. Take all the available objects. The portal parts are difficult to see. They are to the left of the lever. Click on the porch (1) to start a hidden object hunt.
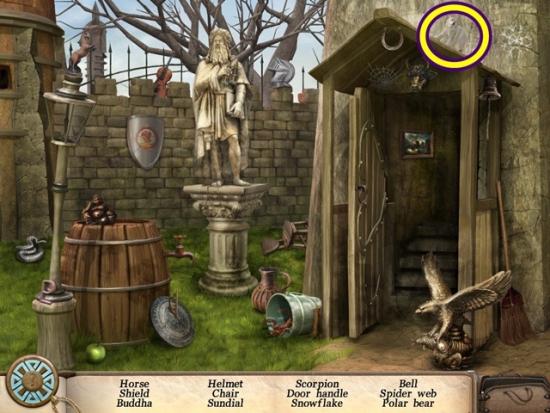
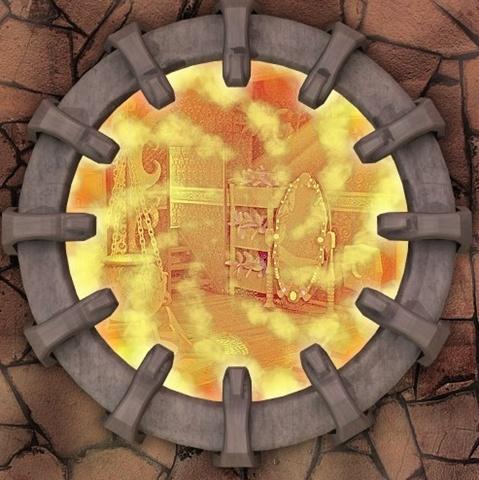
- Find all the items. A polar bear is added to your inventory. Put the polar bear on the lever. Mini-puzzle: Jigsaw puzzle. Arrange all the tiles so they complete the image of the witch’s cellar. Solution:
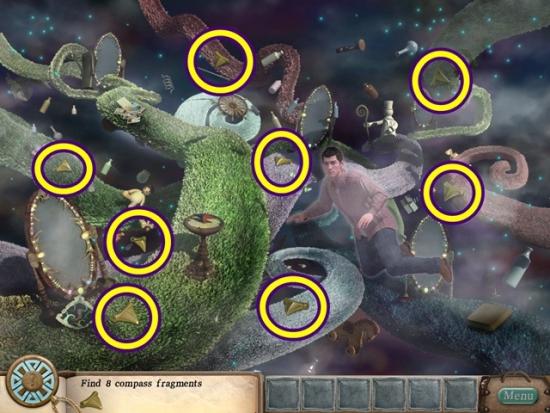
- Take the eight compass pieces.
The end!!!

More articles...
-
Best Horror Games On Itch.io – July 2026
Across a bounty of subgenres. -
Haze Seas Accessories Tier List [Best Accessories to Equip]
The accessories with the best stat buffs in Haze Seas.