- Wondering how to get Monopoly GO! free rolls? Well, you’ve come to the right place. In this guide, we provide you with a bunch of tips and tricks to get some free rolls for the hit new mobile game. We’ll …
Best Roblox Horror Games to Play Right Now – Updated Weekly
By Adele Wilson
Our Best Roblox Horror Games guide features the scariest and most creative experiences to play right now on the platform!The BEST Roblox Games of The Week – Games You Need To Play!
By Sho Roberts
Our feature shares our pick for the Best Roblox Games of the week! With our feature, we guarantee you'll find something new to play!Type Soul Clan Rarity Guide – All Legendary And Common Clans Listed!
By Nathan Ball
Wondering what your odds of rolling a particular Clan are? Wonder no more, with my handy Type Soul Clan Rarity guide.
Azada: Elementa Walkthrough
Welcome to the Azada: Elementa walkthrough on Gamezebo. Azada: Elementa is an adventure game with a limited number of hidden object scenes created by ERS Game Studio. This walkthrough includes tips and tricks, helpful hints and a strategy guide on how to complete Azada: Elementa.
Azada: Elementa – Game Introduction
Welcome to the Azada: Elementa walkthrough on Gamezebo. Azada: Elementa is an adventure game with a limited number of hidden object scenes created by ERS Game Studio. This walkthrough includes tips and tricks, helpful hints and a strategy guide on how to complete Azada: Elementa.
General Tips
- Play is mostly linear although there are some options for the order in which to explore locations and complete tasks. The black bar dialogue along the top of a scene often directs play movement.
- This guide completes tasks in the most efficient way possible. Not all inventory items are picked up when first encountered; tasks are completed when all required items have been assembled. To make it easier to find where this guide may differ from your own play, collected inventory items are CAPITALIZED and highlighted in white with a blue border in the screenshots.
- If you don’t have an item referenced in this guide, press and hold the “Ctrl” key while pressing the “F” key. This opens a Find area in your web browser. Type in the name of the object as it appears in this guide. Press the “Enter” key to find references to the item.
- Consult the game diary for story information, playing hints and tips to solve puzzles.
Options
- Adjust the music, sound and voice volume.
- Change the difficulty mode.
- Toggle the custom cursor, wide or full screen on or off.
Difficulty Modes
- There are three playing modes: Casual, Advanced or Fearless Hero.
- Casual mode offers the most assistance during play. Interactive locations are highlighted with sparkles; hint and skip buttons recharge quickly.
- Advanced mode increases the challenge. Interactive locations are not indicated; hint and skip buttons recharge more slowly.
- Fearless Hero mode offers the most challenging way to play. Interactive areas are not indicated; hint and skip buttons recharge very slowly. The black bar dialogue tips are not displayed.
- The playing mode may be changed at any point by clicking the “menu” button in the bottom left of the screen and then selecting “options”.
- This guide was written playing in casual mode.
Cursors
- The default cursor is an animated arrow. It can change into the following icons:
- A magnifying glass indicates an interactive area requiring closer inspection or a character that has information.
- A hand means an item may be opened or collected for inventory.
Hidden Object Scenes
- There are nine hidden object scenes and each is played twice.
- Items listed in red require interacting with the scene to reveal or create the item.
- Cursor icons in these scenes are the same as in the rest of the game.
- Listed items are randomly generated. This guide shows only the items needing interaction and the inventory object.
Hint and Skip Buttons
- The hint button is in the lower right of the screen.
- The hint may appear in the black-bar along the top of the scene or as a circle in the scene indicating the direction for the next action.
- The hint button can also be used in a hidden object scene.
- Puzzles may be skipped once the skip button has charged.
Diary
- The diary contains two sections: notes and tasks.
- Notes are updated with story information and hints for solving puzzles.
- Tasks are a list of immediate objectives that need completing. They can aid in determining the next step. Click a task for a more complete explanation.
Map
- An interactive map is obtained early in the game.
- Place the cursor over a location to view a thumbnail image of the area and the related tasks.
- The ledged shows complete, incomplete, undiscovered and areas with outstanding objectives.
My Pet
- You may name and further identify your pet during play. Find critter coins to buy accessories.
- View the number of coins collected from the tab on the left of the playing screen.
Azada’s Dwellers
- Animals encountered during play are automatically added to the book.
- View the information about the dwellers by clicking the dweller’s tab on the upper right side of the playing screen.
Amulet
- Collect amulet pieces to complete the air, water and fire amulets to save the mages.
Extras – Collector’s Edition only.
- Items such as wallpapers, screensavers, videos and music tracks are immediately available.
- Replay mini-games and hidden object scenes after they have been completed in the game.
- A bonus game is available after completing the main story.
Chapter 1: Entering Azada

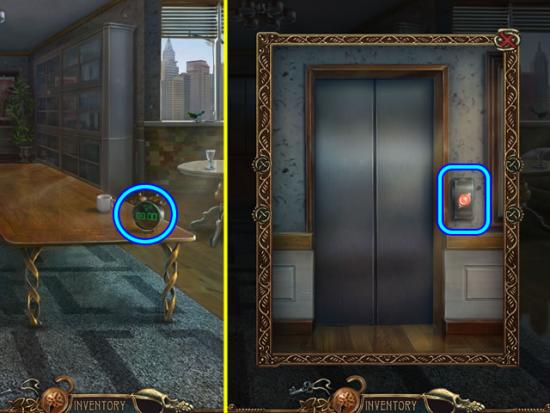
- Click the alarm clock to activate the scene.
- Zoom in on the elevator in the back wall.
- Press the button to summon the deliveryman.
- Click the deliveryman for instructions.
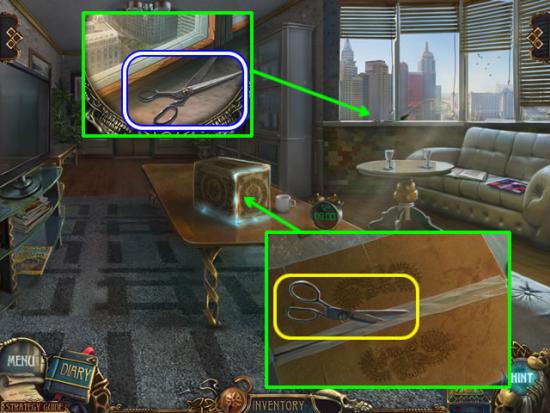
- Look at the window ledge; take the SCISSORS.
- Examine the box the deliveryman left.
- Use the SCISSORS to open the box; the SCISSORS automatically return to inventory.
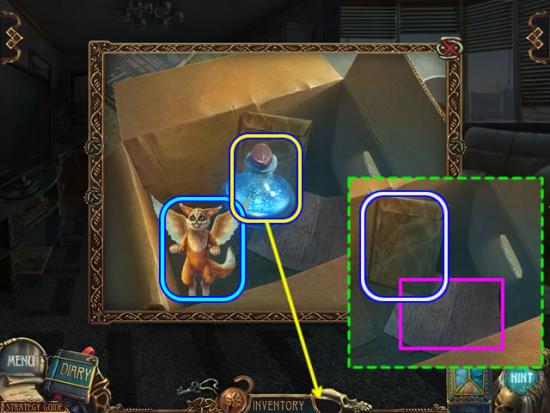
- Collect your helper and name it if you wish. The critter provides unasked for comments along the way.
- Take the bottle of magic potion. It attaches to the empty slot in the inventory tab.
- Take the ADDRESSED ENVELOPE.
- Pick up the piece of paper for a cutscene and further instructions.
- Enter the elevator and exit the building.
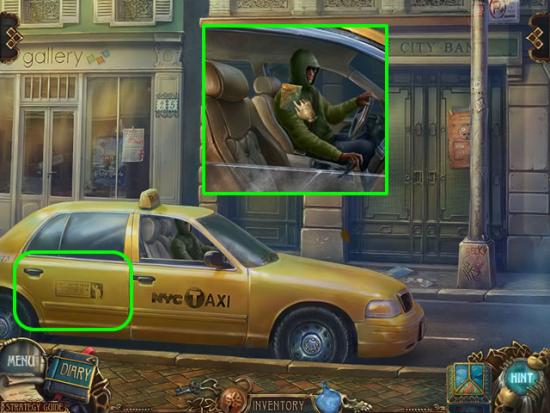
- Look closer at the taxi driver. Give him the ADDRESSED ENVELOPE.
- Open the rear taxi door and enter the cab.
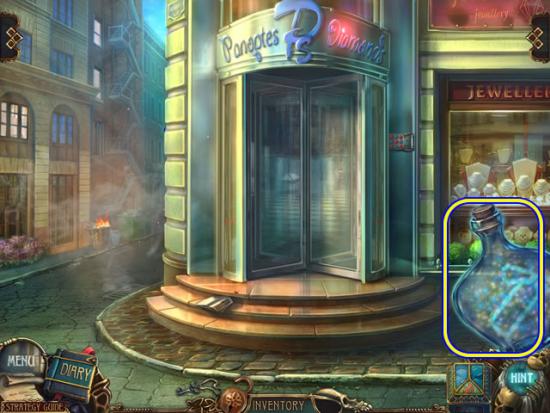
- Take the glowing magic bottle from the inventory tab.
- Move it around the scene to reveal a hidden area; click to open the area.
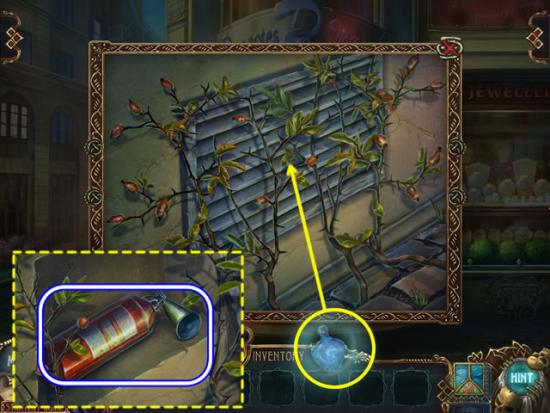
- The magic bottle is still glowing. This means it is still needed to interact with the scene.
- Place the bottle on the vines to dissolve them and gain access to the grate.
- Remove the grate and take the EXTINGUISHER.
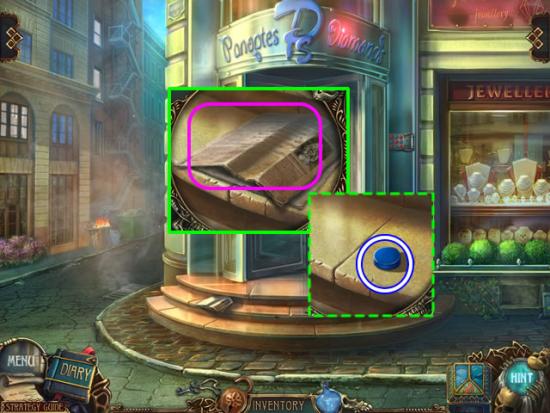
- Look at the newspaper on the steps.
- Read the paper for diary information.
- Take the BUTTON that was under the paper.
- Zoom in on the burning trash can on the left.
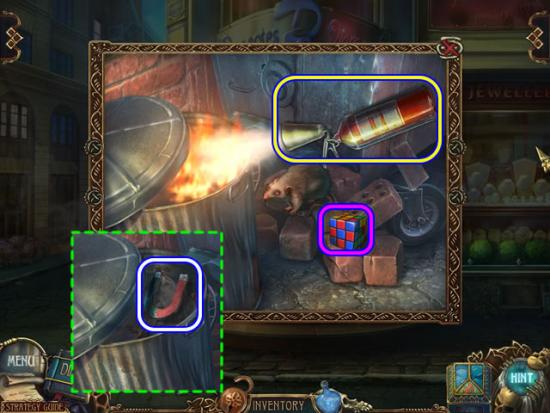
- The first dweller (the snitch rat) is added to the book
- Use the EXTINGUISHER on the flames.
- Take the MAGNET that is revealed.
- Note the pattern on the cube; click the cube to add the pattern to the notes section of the diary.
- Zoom in on the lock mechanism on the door.
- Insert the BUTTON in the empty slot; place the MAGNET on the buttons to open a puzzle.
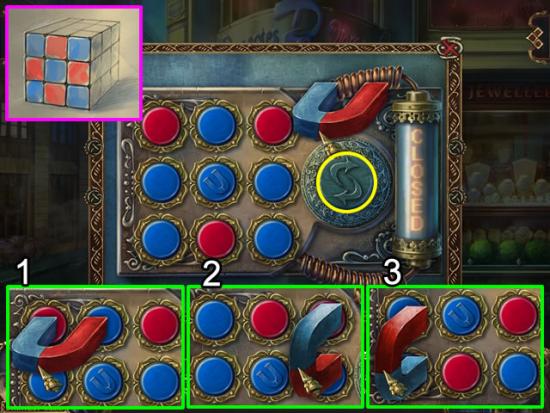
- Refer to the diagram in the diary if necessary.
- Use the magnet to change the colored dots. Each end of the magnet must be on a dot. The dot will switch to the color at the end of the magnet.
- Place the magnet on the double arrow button or right-click to reverse it.
- Solution: Put the blue end on the first button in the first row and the red end on the second button in the first row (1). Click to changes the colors.
- Right-click or rotate the magnet.
- Put the blue end on the third button in the top row and the red end on the third button in the second row (2). Click to change colors.
- Right-click or rotate the magnet twice.
- Put the red end on the first button in the second row so the blue end is on the first button in the bottom row (3). Click to change colors.
- The text in the tube on the right changes from “Closed” to “Open”.
- Click the figure that appears in the doorway.
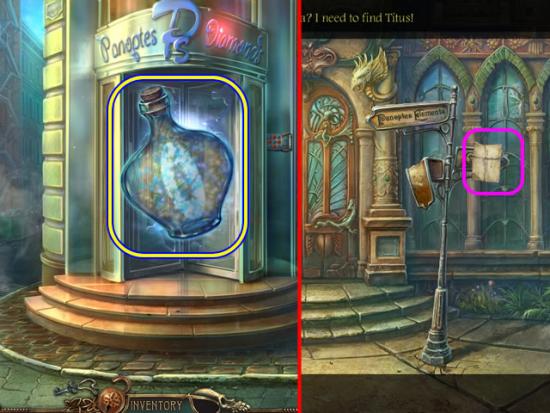
- Place the glowing magic bottle on the doorway to open a portal.
- Take the piece of paper from the street sign for diary information.
- Click the sign again to add a task to the diary.
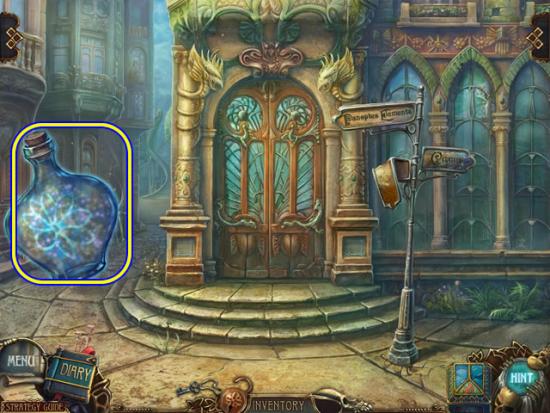
- Move the magic bottle around the scene.
- Click the flower to open a hidden area.
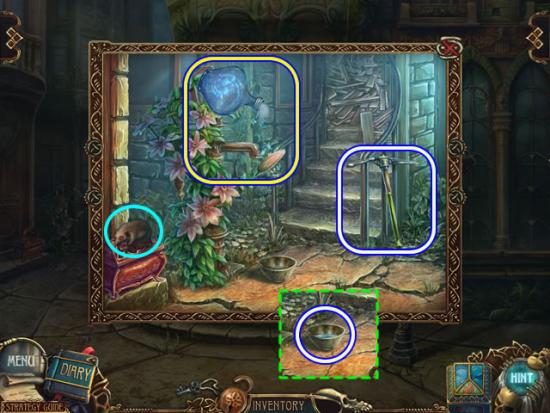
- Move the rat off the box to add an item to the task list.
- Take up the PICK.
- Pour the contents of the magic bottle on the flower to make it bloom.
- Click the blooming flower so the drops fall into the bowl. Pick up the BOWL WITH WATER.
- Exit the scene; go forward through the doors of the building.
- Click the character to view a cutscene; take the proffered map from his hand. The interactive map is now available. Use it to view incomplete tasks in different areas and to move around quickly.
- Explore the room to add tasks to the diary and the map.
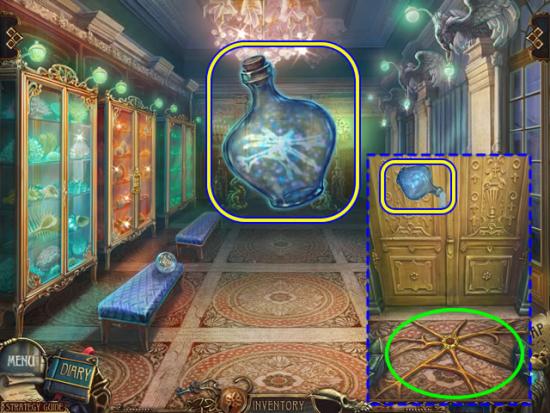
- Move the magic bottle around the room to locate the hidden area.
- Click to open the area; pour the contents of the bottle on the carpet to reveal a lock mechanism at the base of the double doors.
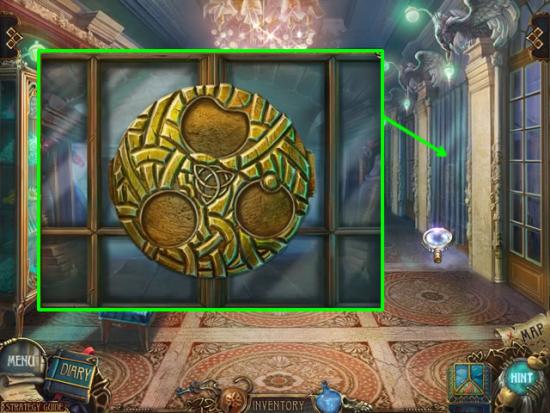
- Examine the curtains on the right.
- Click the curtains until a glass door appears; click the door to reveal a lock mechanism.
- Continue to explore the room to update the map and task list.
- Exit the building; go left.
Chapter 2: The Dog
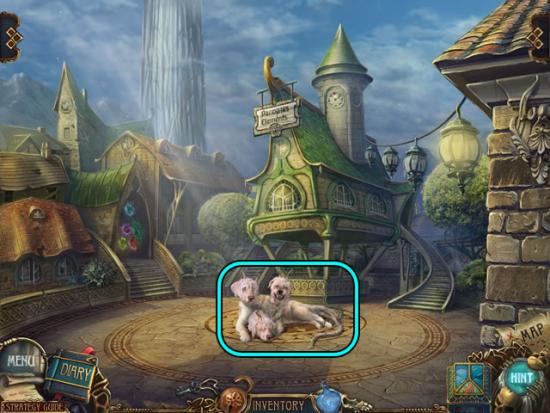
- Look closer at the three-headed dog to discover its needs.
- Go down; go right to the big crab area.
- Play the hidden object scene on the left by the covered wagon.
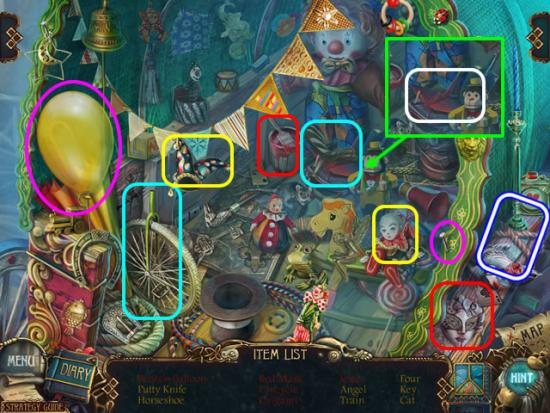
- Interaction items are highlighted in the same color for reference.
- Use the nail to puncture the balloon (pink); take the Broken Balloon.
- Put the paintbrush on the mask (red); take the Red Mask.
- Attach the seat to the wheel stem (aqua) to fix the Unicycle.
- Pick up the Origami bird (white) that was hidden behind the unicycle seat.
- Put the hat on the bald doll (yellow); take the Jester.
- Find the rest of the items on your list.
- Receive the PUTTY KNIFE for inventory.
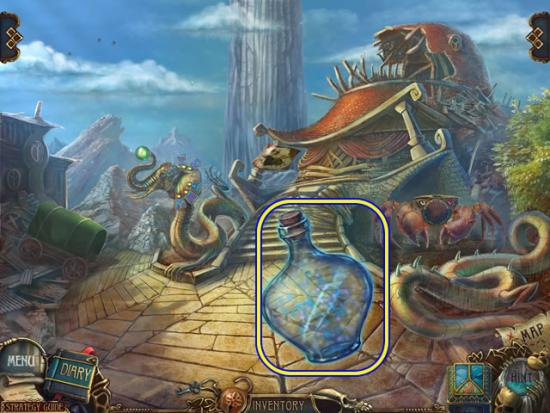
- Locate the carrot with the magic bottle.
- Click to open the scene.
- Pick up the piece of paper for the journal.
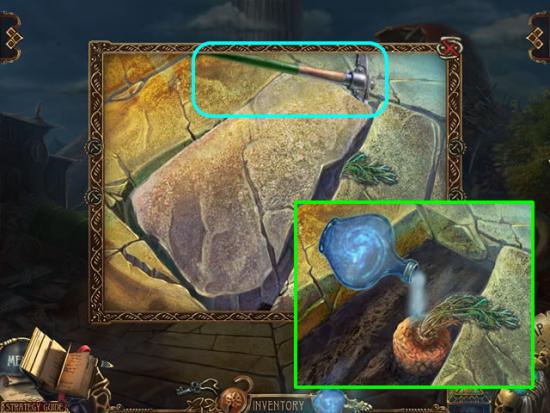
- Use the PICK to remove the stone.
- Use the contents of the magic bottle to rehydrate the carrot.
- Exit the interactive area; go down once.
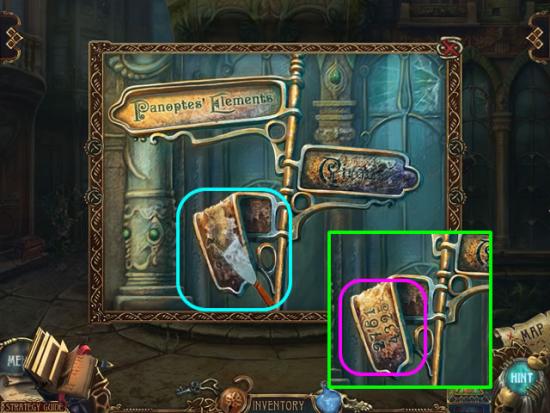
- Look at the street signs.
- Use the PUTTY KNIFE to remove the rust.
- The number set is added to the diary.
- Enter the building.
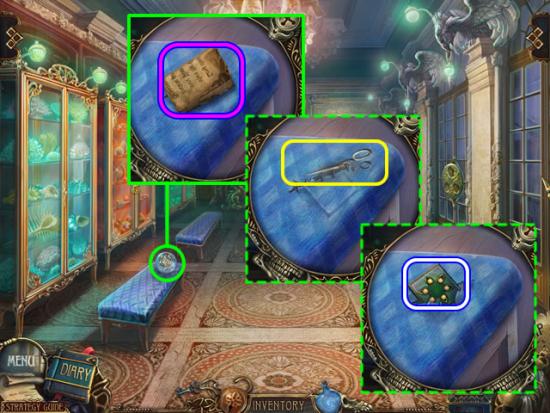
- Look closer at the ball on the bench.
- Click the ball to remove it; take the paper fragment for the diary.
- Use the SCISSORS to open the stitches securing the bench fabric; take the TILE.
- Look at the cabinet door.
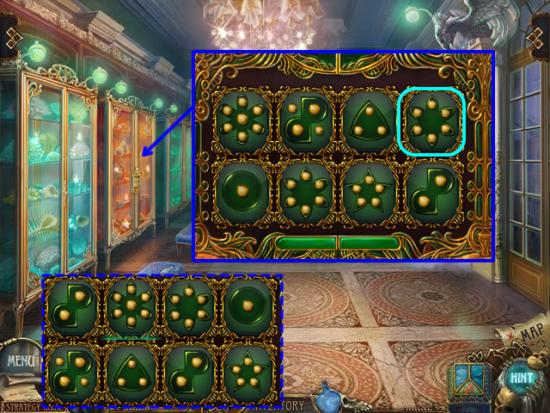
- Insert the TILE in the empty slot on the lock.
- Refer to the number set in the diary for the code.
- Click each tile until the number of dots on the tile corresponds to the same number in the same position in the top or bottom code set.
- Solution: Top row 2-7-6-1. Bottom row 4-3-2-5 (see dashed inset).
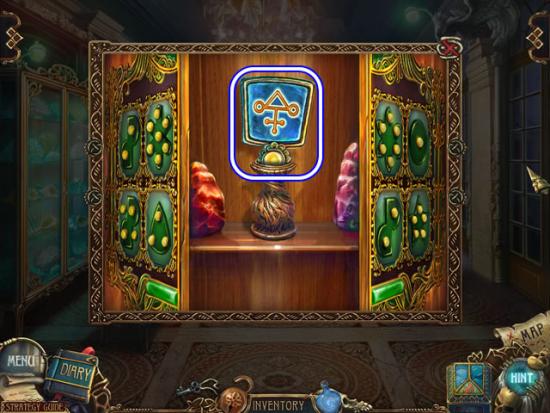
- Take the EARRING from the open cabinet.
- Exit the building; go right.
- Play the hidden object scene on the left by the covered wagon.
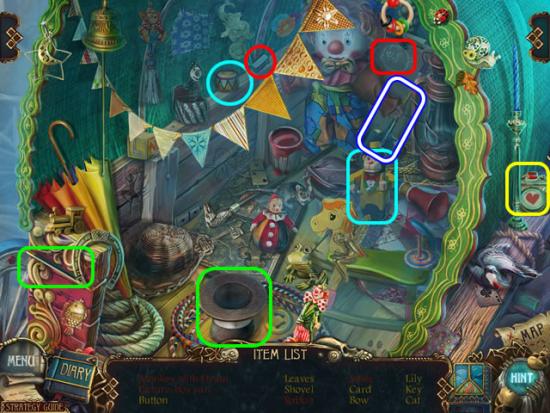
- Put the drum on the monkey to complete the Monkey with Drum (aqua).
- Click the button on the box three times (yellow); take the Picture Box Sun.
- Place the wand on the hat (green); withdraw the Rabbit.
- Use the chalk to draw a Smile on the face (red).
- Find the rest of the items on your list; receive a SHOVEL for inventory.
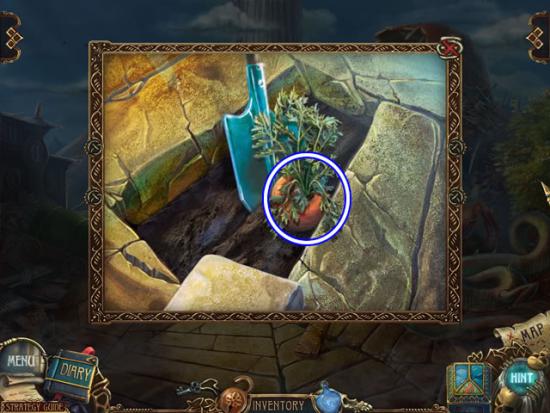
- Zoom in on the hole in the brick walk.
- Use the SHOVEL to remove the CARROT.
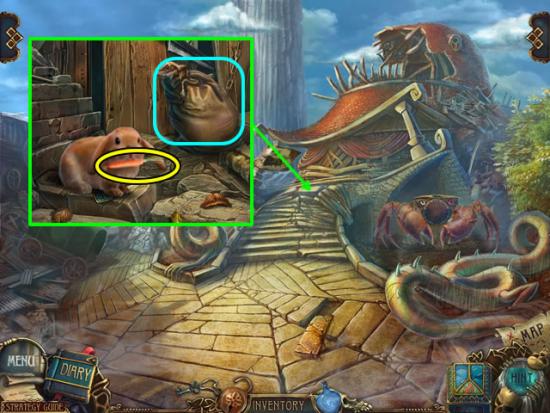
- Peer into the gap in the broken steps.
- Give the CARROT to the rabbit.
- Knock over the sack after the rabbit hops off.
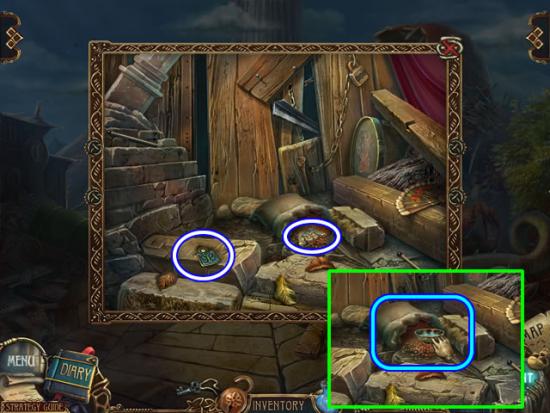
- Take the EARRING from the stone.
- Get the BOX LOCK PART from the spilled bag contents.
- Dip the BOWL WITH WATER into the bag contents; receive UNCOOKED OATMEAL for inventory.
- Zoom in on the elephant.
- Put the two EARRINGS in the empty slots to open a puzzle.
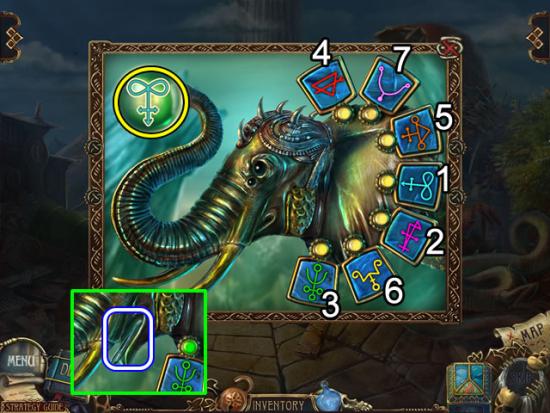
- Note the symbol that appears in the ball the elephant is holding to repeat the sequence.
- The sequence is three symbols followed by four symbols.
- The order is shown above; take the TWEEZERS from the elephant’s mouth.
- Go down once.
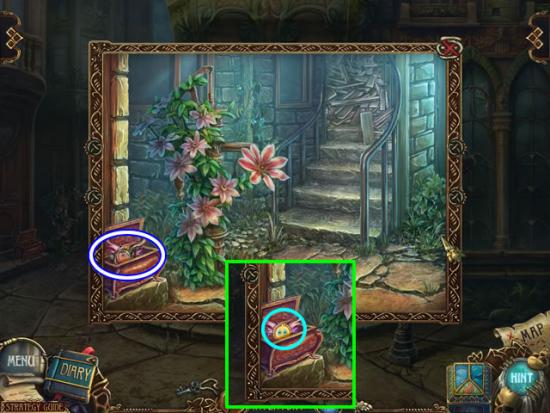
- Look closer at the box by the trashcan.
- Insert the BOX LOCK PART in the inset in the top of the box.
- Take the CRAB’S GLASSES from the box; the first critter coin is behind the glasses.
- Go right.
- Examine the crab; put the CRAB’S GLASSES on the crab to open a puzzle.
- The goal is to use the two directional arrows to rotate the maze and unite the coin halves.
- Please see the next screenshot for a solution.
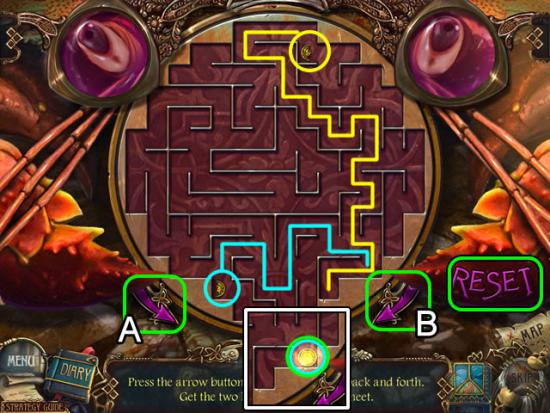
- The best strategy is to move one coin to the other. In this solution the choice is to move the top coin to the bottom right corner. Press the “Reset” button if necessary; press the A and B arrows in the following order:
- Yellow path: Ax2, Bx3, A, B, A, B, A, Bx2, Ax3, Bx2, Ax2, Bx2, Ax2 and B.
- Blue path: Ax2, B, Ax3, Bx2, Ax2, B and A. Both halves combine.
- Take the MAGIC STAFF from the compartment.
- Go down once; go forward to enter the house.
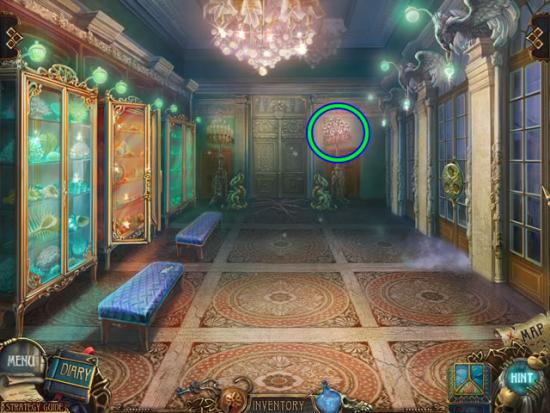
- Zoom in on the lights on the right rear wall to open a puzzle.
- The goal is to find the matching colored fireflies.
- Please see the next screenshot for the solution.
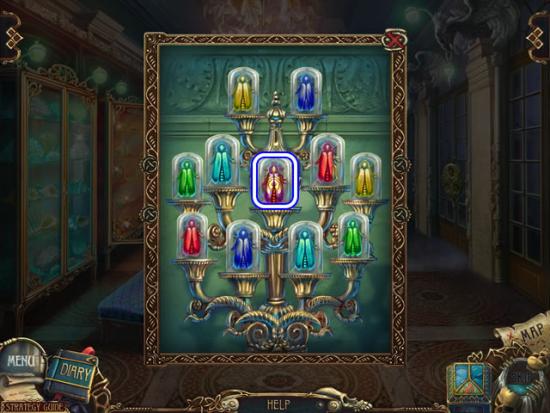
- Click the bulbs with the same colored bug to eliminate them.
- Receive the center FIREFLY.
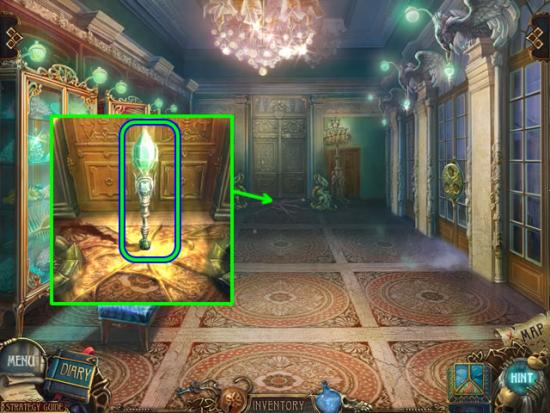
- Examine the door lock between the two dragons.
- Insert the MAGIC STAFF in the center slot to disarm the dragons.
- Go forward.
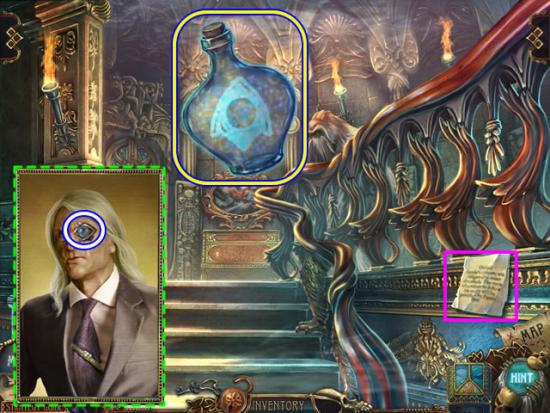
- Pick up the paper on the right for diary information.
- Use the magic bottle to find the hidden area.
- Pour the contents of the bottle on the portrait; take the LENS.
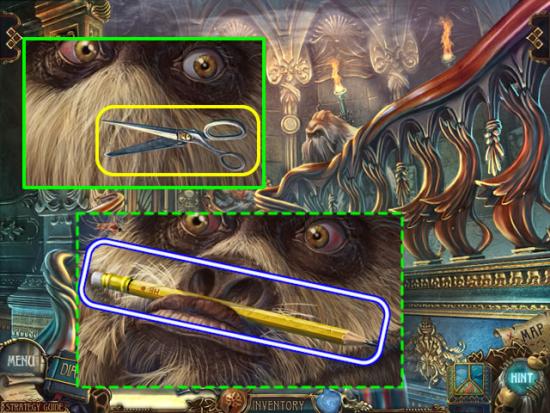
- Examine the hairy creature.
- Use the SCISSORS to find the PENCIL.
- Go forward through the doors at the top of the stairs.
- Click the window on the right to activate the scene.
- Speak to the woman.
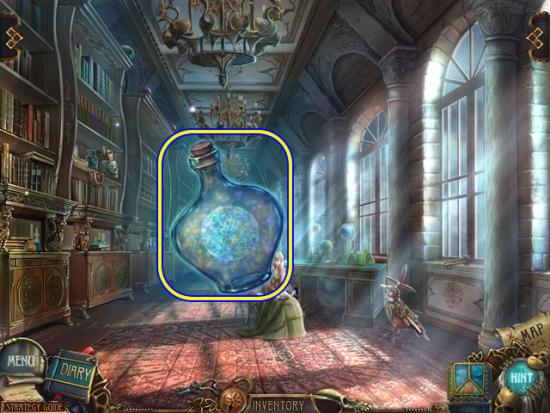
- Move the glowing magic bottle around the room to find the hidden area.
- Click to open the hidden area.
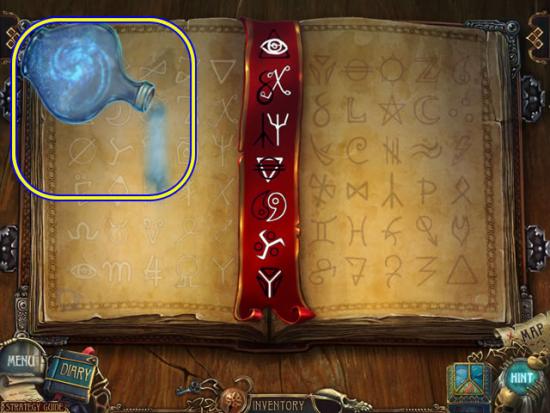
- Flip through the pages of the book to read about the three mages.
- Pour the contents of the magic bottle on the pages with the bookmark to reveal some runes.
- Exit the book.
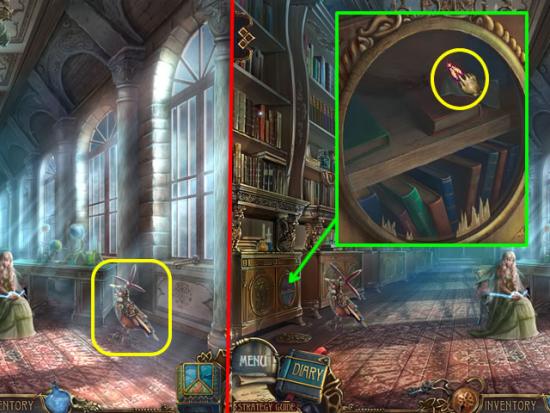
- Click the mechanical bird by the window to set it in motion.
- Look closer at the cabinet door where the bird poked out a panel.
- Place the FIREFLY in the area to activate a hidden object scene.
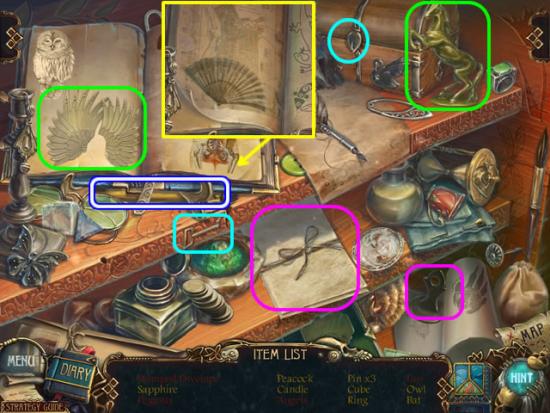
- Place the stamp on the tied papers (pink); take the Stamped Envelope.
- Put the wings on the horse (green) to create Pegasus.
- Use the key on the chest lock (aqua) to open the chest where the Angels are stored.
- Turn the page in the book (yellow) to find the Fan.
- Find the rest of the items on your list; receive a CANDLE for inventory.
- Go down once to exit the library.
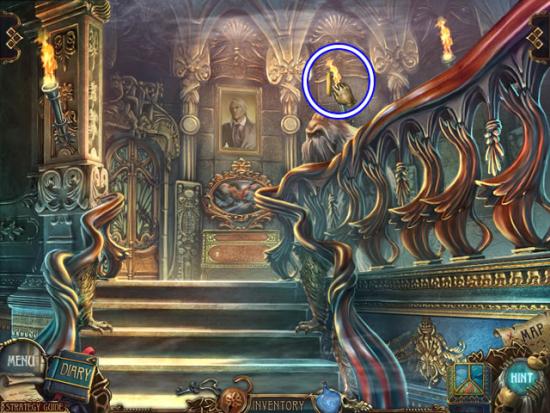
- Place the CANDLE on any of the three torches to get a BURNING CANDLE.
- Reenter the library.
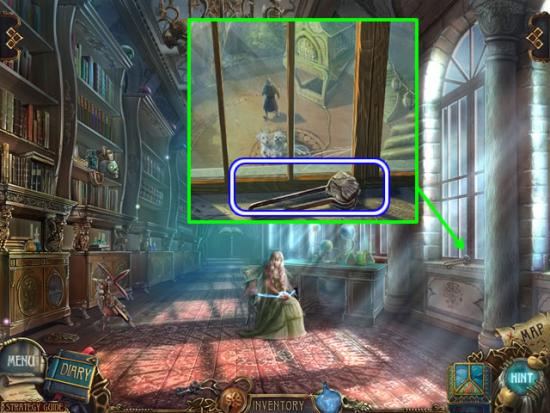
- Look at the window ledge; pick up the tongs holding the COAL.
- Zoom in on the desk by the woman.
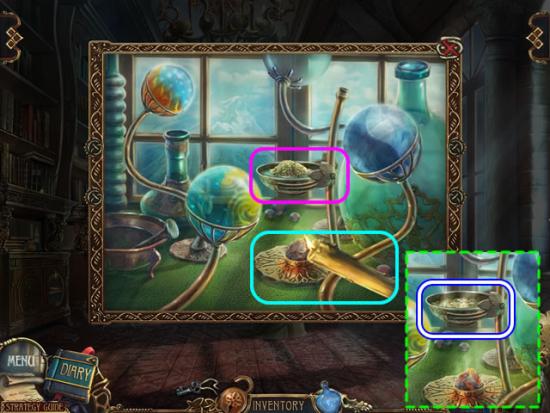
- Put the bowl of UNCOOKED OATMEAL in the holder.
- Put the COAL in the base slot; light the coal with the BURNING CANDLE.
- Take the COOKED OATMEAL.
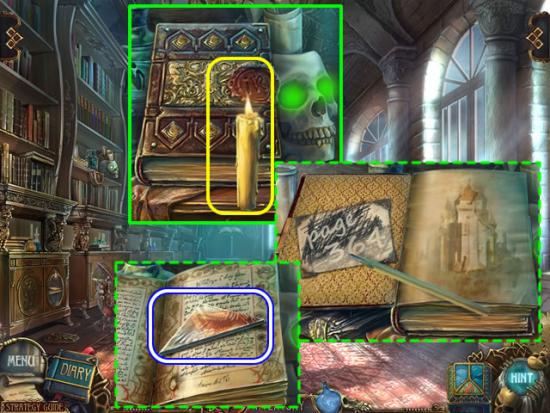
- Look at the bookshelves on the left with the skull on them.
- Use the BURNING CANDLE to melt the wax seal on the book.
- Use the PENCIL to reveal a page number.
- Turn the page for a brief message; turn the page again to find the PICTURE PART.
- Exit the library.
- Zoom in on the round picture beneath the portrait.
- Insert the PICTURE PART in the empty slot to open a puzzle.
- The goal is to rotate the sections to find the picture.
- Please see the next screenshot for the solution.
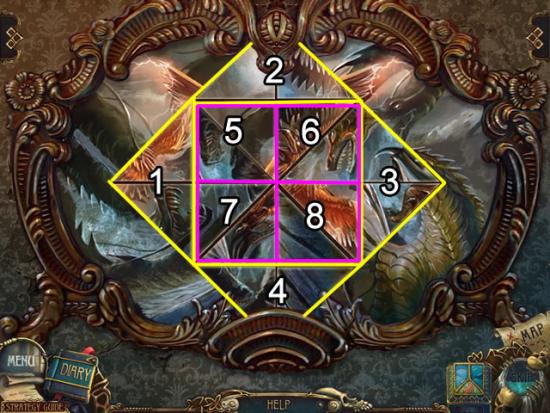
- Unfortunately, there is no reset button.
- The above screenshot shows the order in which to click the sections based on their original position.
- Rotate the outside triangles first and then the inner squares.
- The next screenshot shows the completed picture.
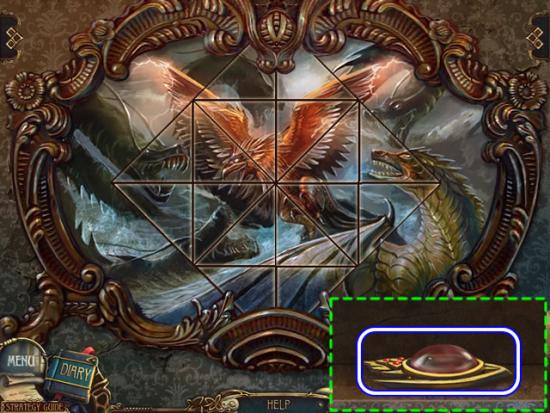
- Completing the picture opens a hidden compartment.
- Collect the critter coins; get the LENS.
- Go forward to the library; open the hidden object scene by the lower left cabinet.
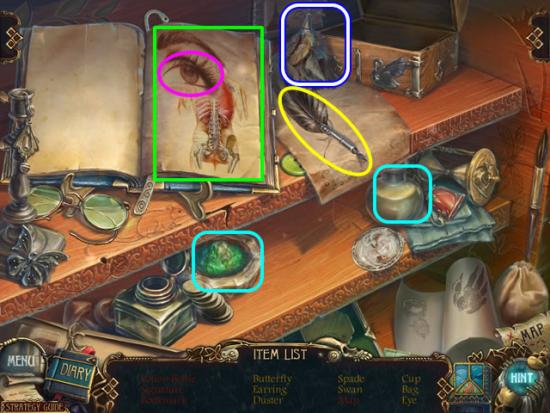
- Put the green crystals in the bottle (aqua); take the Potion Bottle.
- Pick up the quill pen (yellow) to create the Signature on the paper.
- Take the Eye on the book page.
- Turn the page (green) to find the Map; turn the page again to find the Bookmark.
- Find the rest of the items on your list; receive a DUSTER for inventory.
- Zoom in on the bookstand at the rear of the room.
- Place a LENS on each page of the book to open a puzzle.
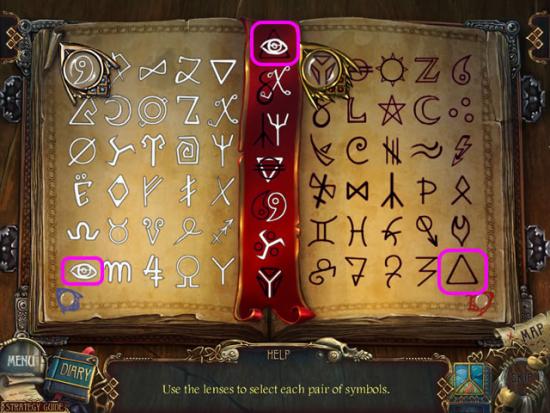
- The goal is to find the runes on the left and right pages that combine to form the symbols shown on the center bookmark.
- Drag a lens to a rune and click to place it. Correctly combined runes light up the symbol on the bookmark. Note that the white symbols on the bookmark are found on the left page and the dark symbols are on the right.
- The first two rune combinations are shown.
- Please see the next screenshot for the solution.
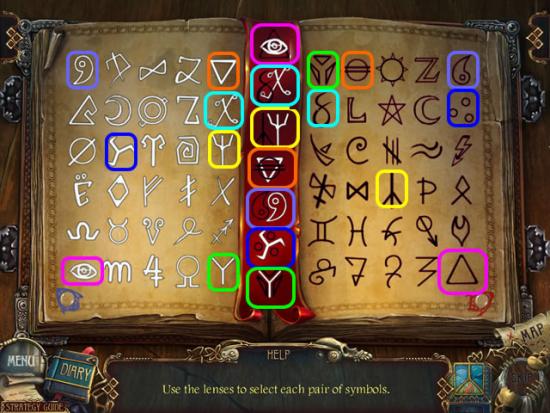
- The outline color on the bookmark corresponds to the color highlighting the two runes that it comprises.
- Completing this puzzle opens a new puzzle.
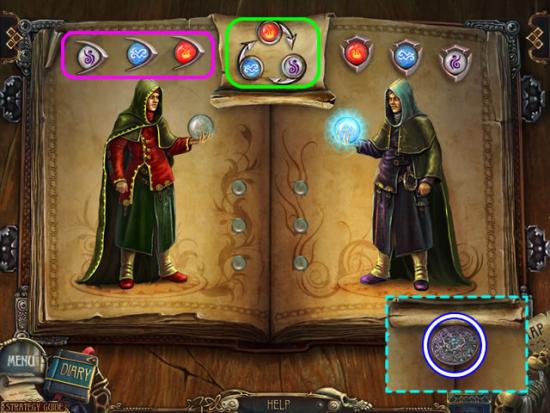
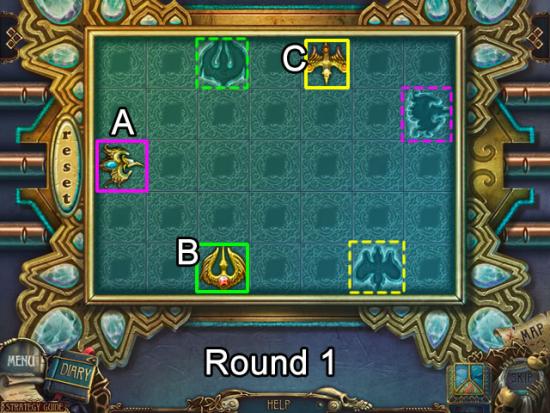
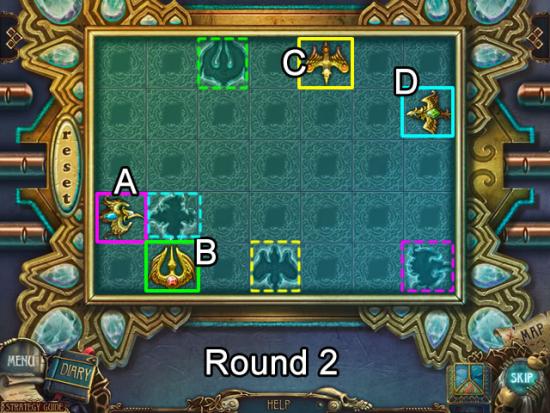
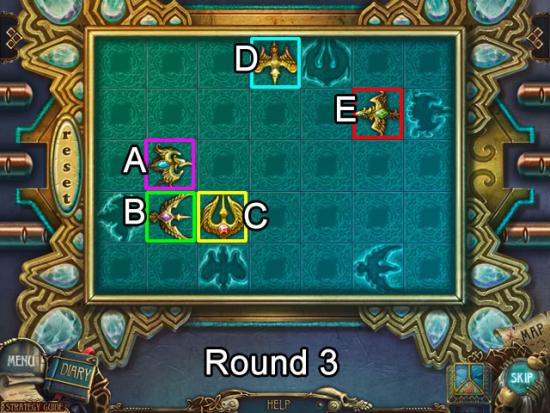
- The goal is to arm the wizard on the left with the correct elemental sphere to defeat the wizard on the right.
- Use the key in the center tab (green) to determine the correct sphere to select. Click one of the icons above the wizard’s head (pink) to select it. Selecting the correct sphere illuminates a green button on the page. There are three rounds.
- Solution: Select air (white), water (blue) and then fire (red).
- Take the LOCKET that appears at the top of the page.
- Zoom in on the bound woman.
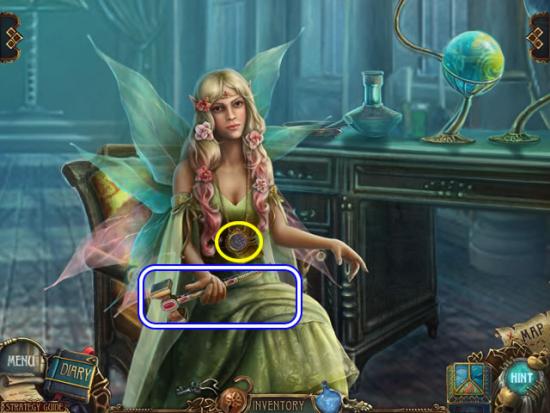
- Insert the LOCKET in the empty slot on the chain.
- Take the offered HAMMER.
- Go down three times to exit the building.
- Go up the street on the left side of the building to the plaza with the dog.
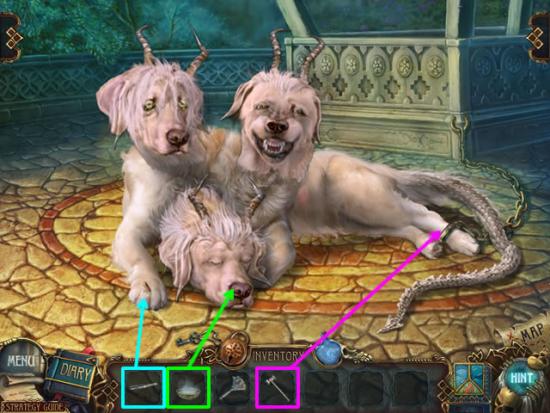
- Use the TWEEZERS to remove the thorn from the paw.
- Give the middle dog head the COOKED OATMEAL.
- Use the HAMMER to smash the chain holding the leg.
- The happy dog vanishes.
Chapter 3: The World of Fire
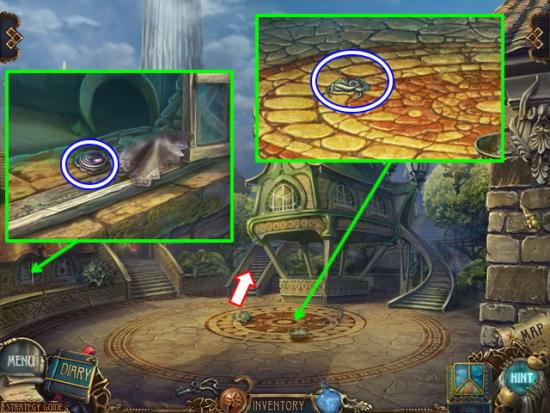
- Inspect the area where the dog was.
- Read the paper for diary information; take the SNAKE decoration.
- Zoom in and open the window on the left.
- Move the handkerchief to find the GEM.
- Go up the middle steps to the diamond mine.
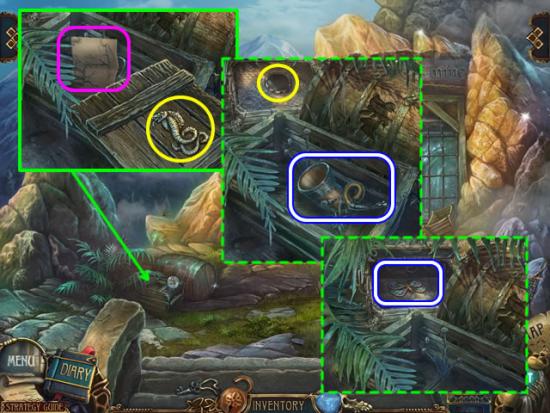
- Look closer at the wooden containers on the left.
- Burst the bubble on the first crate; read the document for diary information.
- Put the SNAKE in the crate inset; click again to remove the top to access the contents.
- Read the direction sheet; take the HORN.
- Put the GEM in the inset of the box behind the crate.
- Take the BUTTERFLY.
- Exit the area; go down once to the plaza.
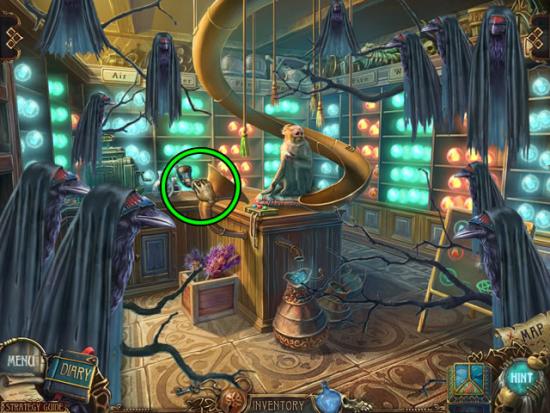
- Go up the stairs on the right to enter the shop.
- Use the HORN to scare off the raven minions.
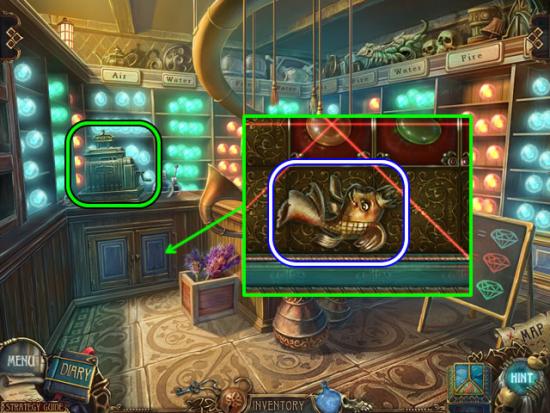
- Inspect the cash register to find some critter coins.
- Open the cabinet doors below the cash register; take the GOLDFISH.
- Exit the store; go up the middle stairs to the diamond mine.
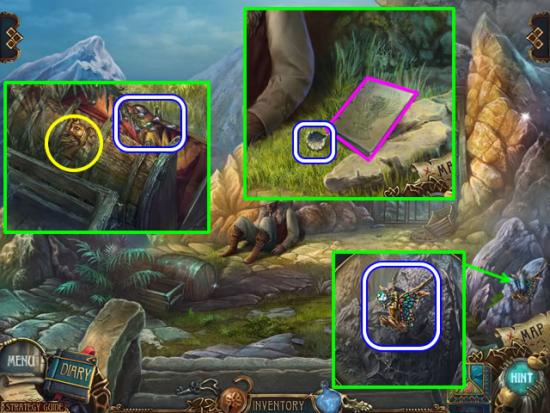
- Go back to the crates.
- Put the GOLDFISH in the barrel inset; take the STONES.
- Look at the sleeping miner.
- Take the owl diagram for diary notes and the SPOON for inventory.
- Inspect the rocks on the right.
- Shoo away the butterfly; take the AMULET.
- Go down once and left into the shop.
- Zoom in on the open cabinet; place the STONES on the grid to open a puzzle.
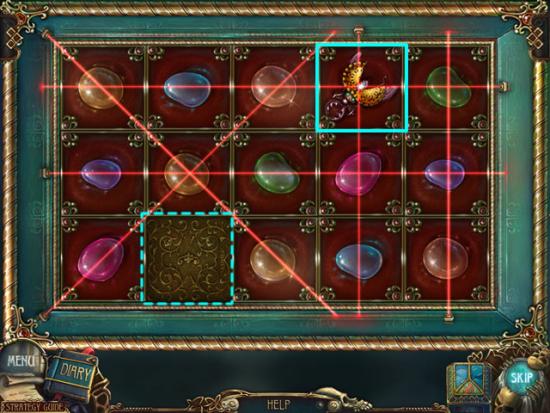
- The goal is to move the insect to the one square without lasers intersecting it.
- Side a stone onto the gold square to reach the insect. Next clear the stones in the path to the free square.
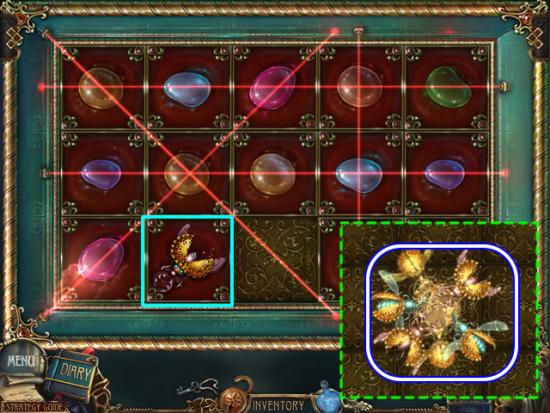
- Moving the insect to the laser-free square opens a compartment.
- Take the METAL EATERS.
- Exit the shop.
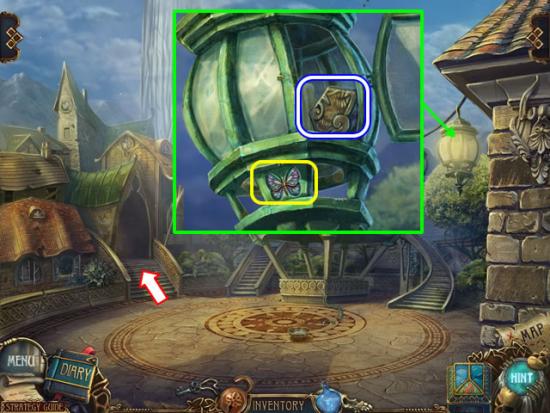
- After the cutscene, zoom in on the lantern.
- Insert the BUTTERFLY to unlock the pane.
- Open the pane and take the critter coin and the PUZZLE PIECE.
- Go up the stairs on the left.
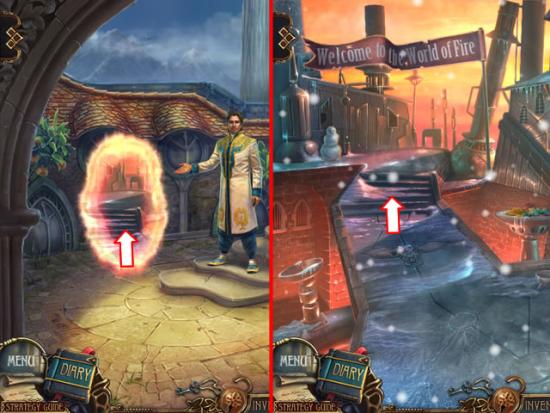
- Speak to Titus.
- Enter the portal to the World of Fire.
- Go forward up the steps to view a cutscene.
Chapter 4: The Plant Potion
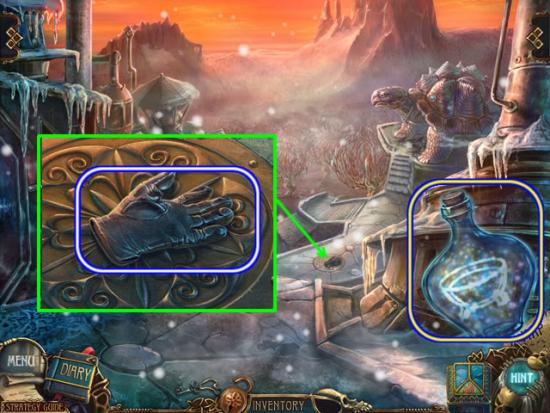
- Use the bottle to locate the hidden area.
- Open the stove to find part of the potion recipe.
- Take the GLOVE from the top of the manhole cover.
- Go forward to the turtle.
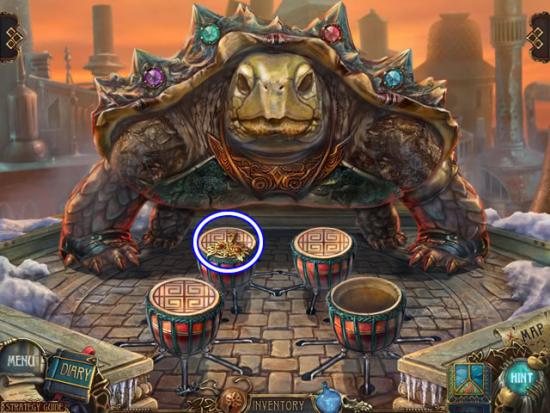
- Pick up the KEY from the drum.
- Go down two times to return to the portal entry.
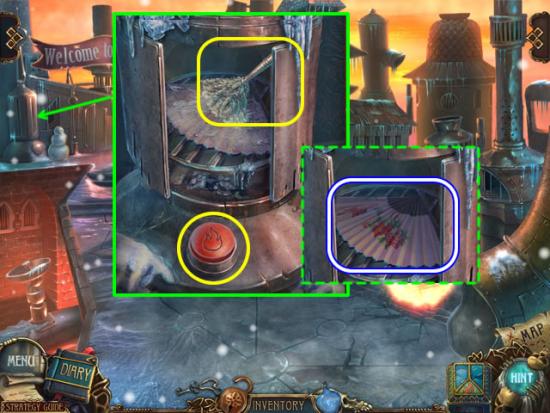
- Zoom in on the heater.
- Press the button to open the doors.
- Use the DUSTER to uncover a FAN.
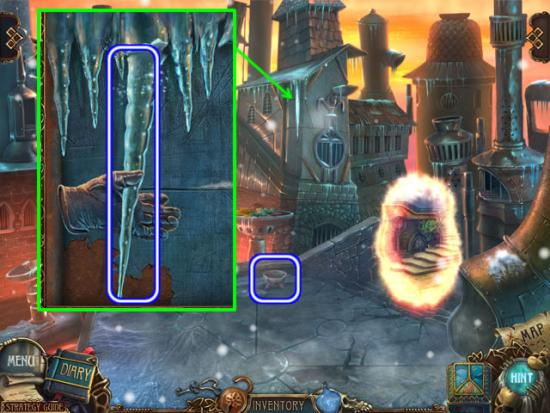
- Use the GLOVE to remove the ICICLE from the building.
- Pick up the BOWL.
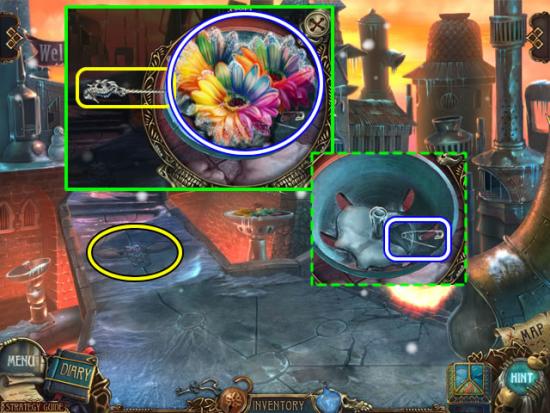
- Look at the pedestal.
- Use the SPOON to pry out the FLOWERS.
- Take the PIN that was hidden by the flowers.
- Zoom in on the owl carved in the street.
- Add the PUZZLE PIECE to open a puzzle.
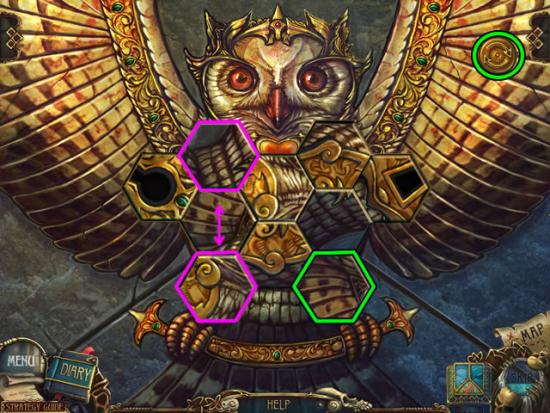
- The goal is to create an image that matches the drawing in the diary found at the diamond mine.
- Click any two pieces to swap them directly.
- Select a piece and then click the double arrow button it rotate it.
- Correctly positioned pieces lock into place.
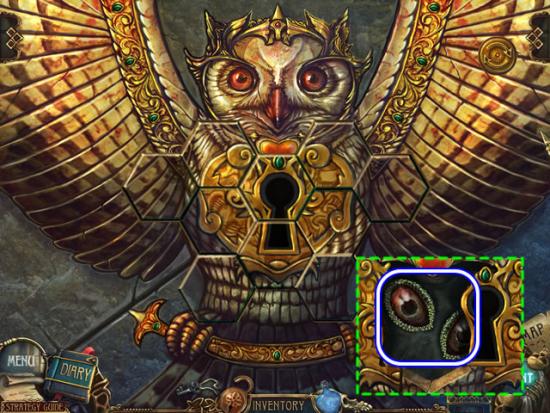
- Insert the KEY in the keyhole to open the center compartment.
- Take the TURTLE EYES.
- Go forward once.
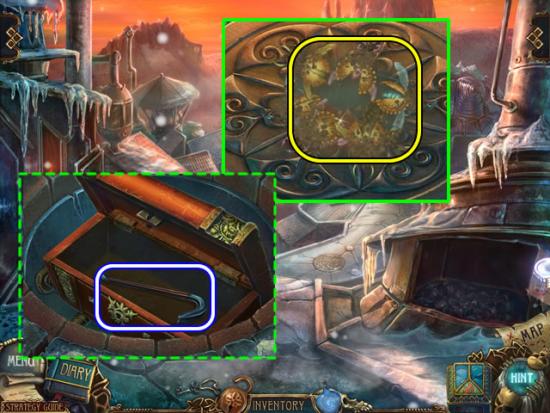
- Zoom in again on the manhole cover.
- Put the METAL EATERS on the cover to eat through it.
- Use the PIN to pick the lock on the box; take the CROWBAR.
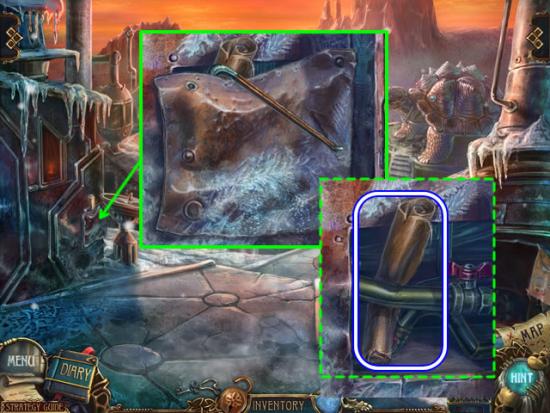
- Look closer at the side of the building.
- Use the CROWBAR to remove the metal plate; take the DRUM SKIN.
- Examine the turtle.
- Insert the TURTLE EYES and place the DRUM SKIN to open a puzzle.
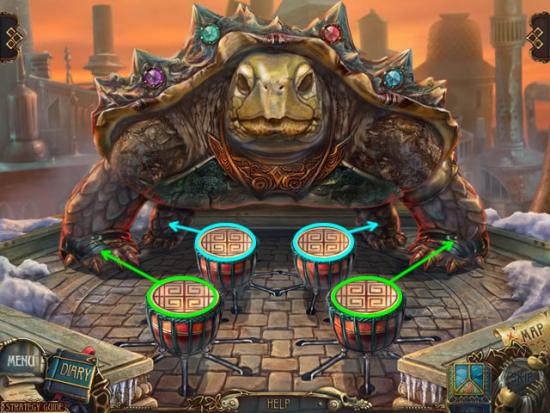
- The goal is to repeat the turtle stomps on the drums.
- The drum positions correspond to the turtle’s legs.
- A correctly struck drum flashes green. There are three randomly generated rounds.
- Completing the game opens the path below the turtle.
- Go forward for a cutscene.
- Give the fairy the AMULET to receive the HEALING RIB GRASS.
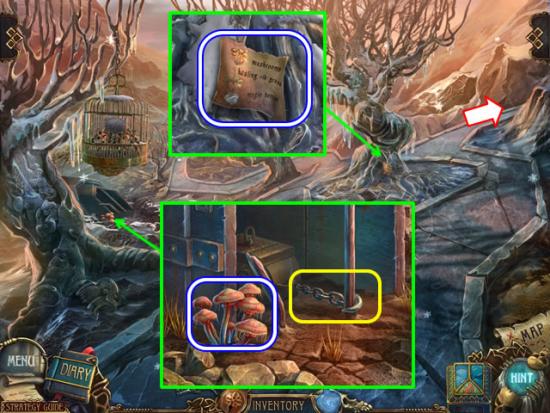
- Zoom in on the fire tree; pick up the RECIPE HALF.
- Look at the tree on the left.
- Pick the MUSHROOMS; pull the chain to see the box with the missing lock part.
- Note: You now have all the ingredients to complete the potion but it cannot be used until other scenes are completed. Continue your journey.
- Take the path on the right to the chair lift.
- Play the hidden object scene in the equipment on the left.
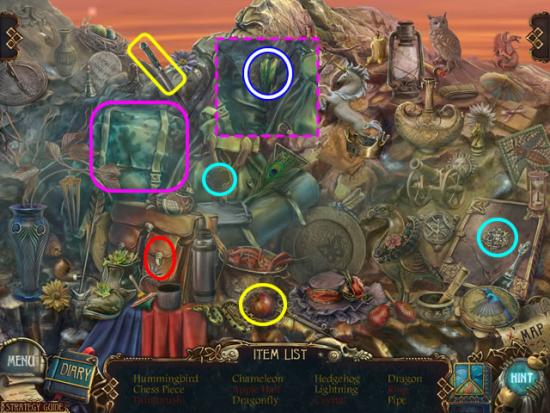
- Insert the decoration in the pack flap (aqua); take the Paintbrush.
- Use the knife to cut the apple (yellow); take the Apple Half.
- Move the pack (pink) to find the Crystal.
- Open the pouch (red) to find the Ring.
- Find the rest of the objects; the CRYSTAL goes to inventory.
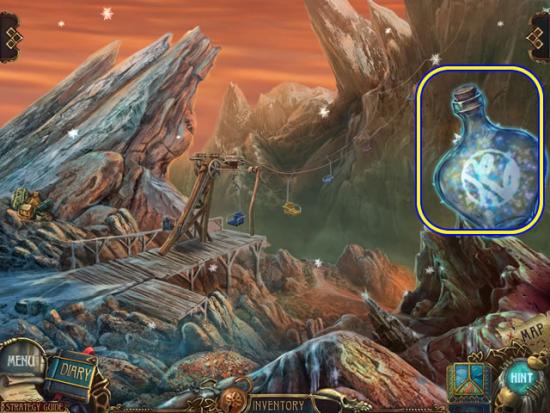
- Use the magic bottle to unlock the crystal plant.
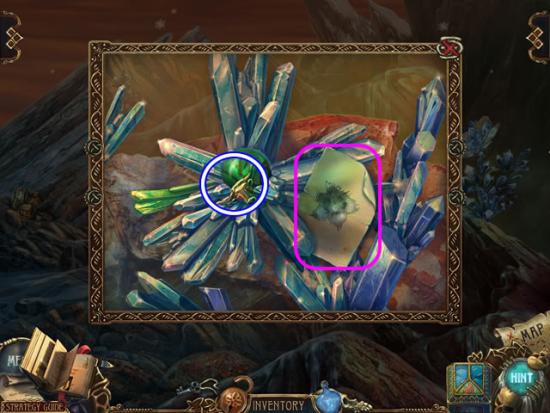
- Take the instructions for feeding a dragon.
- Pick up the BULL’S HEAD.
- Go down once.
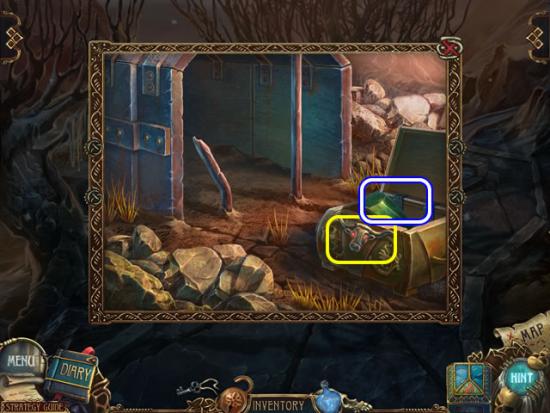
- Look again at the tree on the left.
- Insert the BULL’S HEAD in the box; take the CRYSTAL.
- Return to the chair lift; look again at the crystal plant.
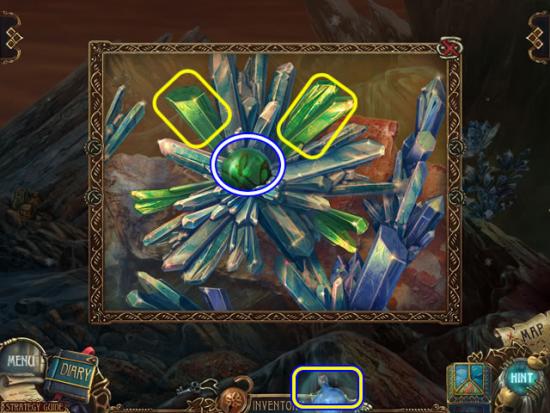
- Attach each CRYSTAL to the plant to activate the magic bottle.
- Pour the bottle contents on the center of the plant to trigger the crystals.
- Take the GREEN BALL.
- Go down once.
- Look at the center tree; put the GREEN BALL in the empty slot to open a puzzle.
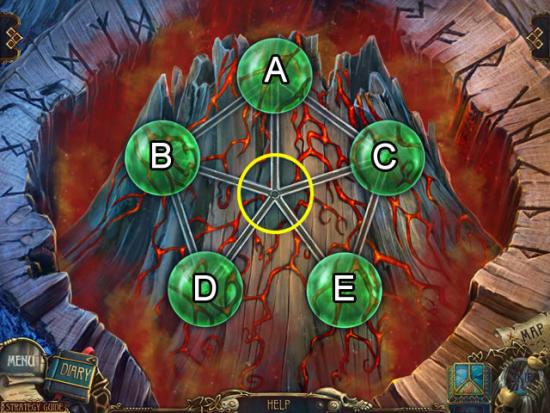
- The goal is to move the balls so the lines match the background pattern.
- Use the center slot to help position the balls. A correctly placed ball is highlighted.
- There is no reset button.
- Based on the beginning positions, here is one solution: D, B, A, C, E, D. Ball D is now correctly positioned. Continue: B, A, C, E, B, B. Balls E and B are correctly positioned. Finally: A, C, A.
- Please see the next screenshot for the final positions.
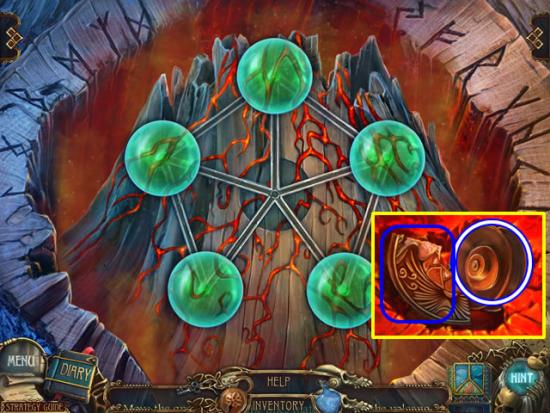
- Pick up the amulet fragment. It is automatically added to the box.
- Take the SPOOL.
- Go right to the chair lift; play the hidden object scene.
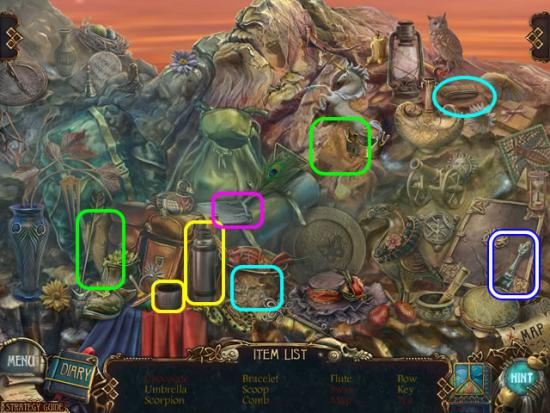
- Open the wrapper (pink) on the Chocolate.
- Use the brush to remove the dirt on the pot (aqua); take the Swan.
- Combine the two halves (green) to form a complete Map.
- Pour the contents of the thermos into the cup (yellow); take the Tea.
- Find the rest of the objects; the SCOOP goes to inventory.
- Go down two times to return to the stove in turtle area.
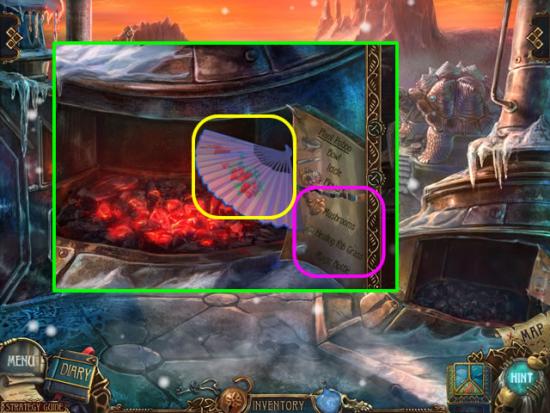
- Attach the RECIPE HALF to the door.
- Use the FAN to revive the coals.
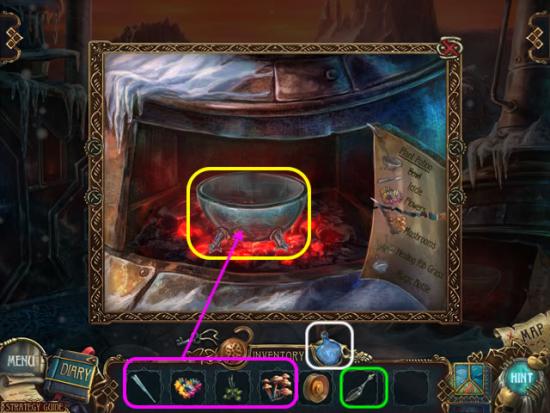
- Put the BOWL on the coals.
- Add the ICICLE, FLOWERS, MUSHROOMS and HEALING RIB GRASS to the bowl.
- Once all the ingredients have been added, the bottle begins to glow. Pour the contents of the bottle into the bowl.
- Take the bowl of PLANT-REVIVAL POTION from the coals.
- Dip the SCOOP into the coals; receive a SCOOP WITH COALS.
- Go down once. Zoom in on the fire tree.
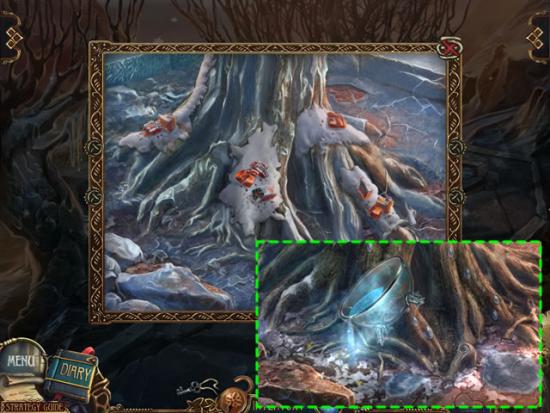
- Sprinkle the SCOOP WITH COALS on the icy tree; the empty SCOOP returns to inventory.
- Pour the bowl of PLANT-REVIVAL POTION on the exposed roots.
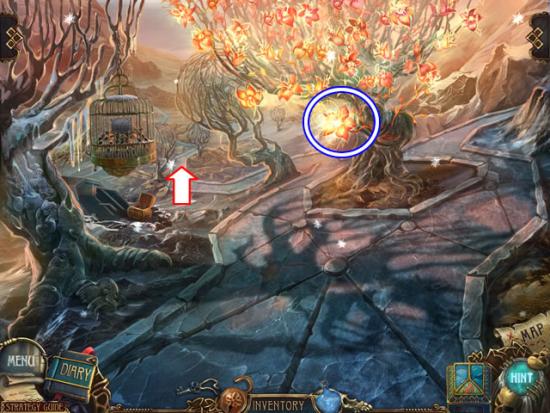
- Pluck the FIRE FLOWER from the blooming tree.
- After the cutscene, take the lower path.
Chapter 5: Rescuing the Fire Mage
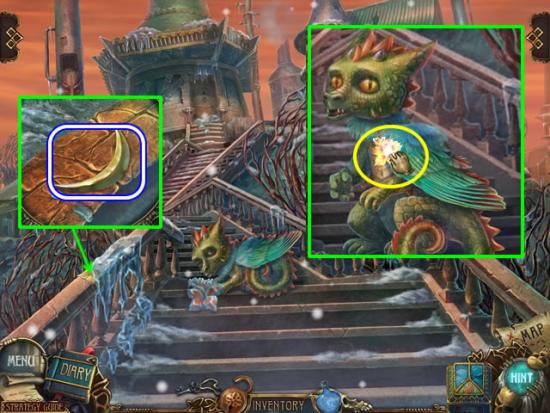
- Give the FIRE FLOWER to the dragon guarding the stairs.
- Take the instructions for the chair lift mechanism from the railing.
- Pick up the SHUTTERS MOON that was under the instructions.
- Continue up the stairs.
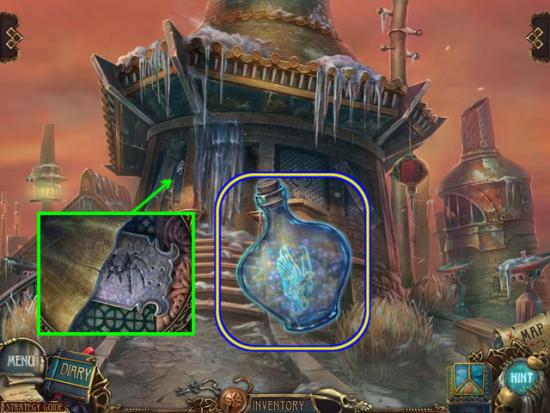
- Use the bottle to find the hidden area.
- Pour the contents of the bottle on the PHOENIX to free it.
- Examine the left shutter; take the NAMEPLATE.
- Go down three times to return to the stove by the turtle.
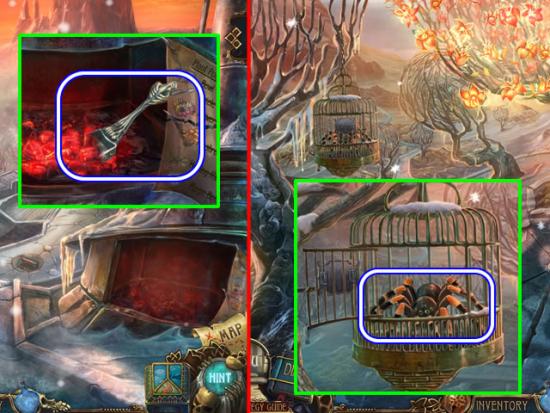
- Refill the SCOOP WITH COALS.
- Go forward once.
- Use the NAMEPLATE to open the spider’s cage; take the SPIDER.
- Go forward twice.
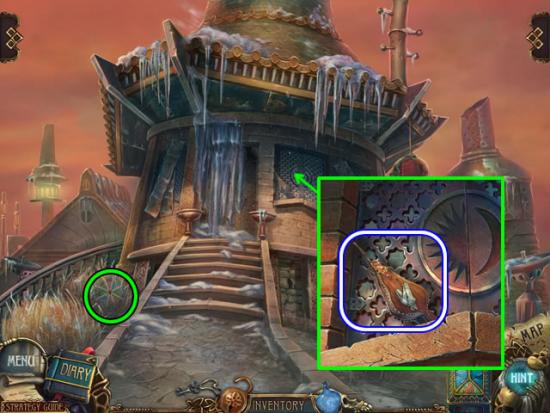
- Take the BELLOWS from the ledge of the window on the right.
- Examine the spider web to the left of the stairs.
- Put the SPIDER in the web to open a puzzle.
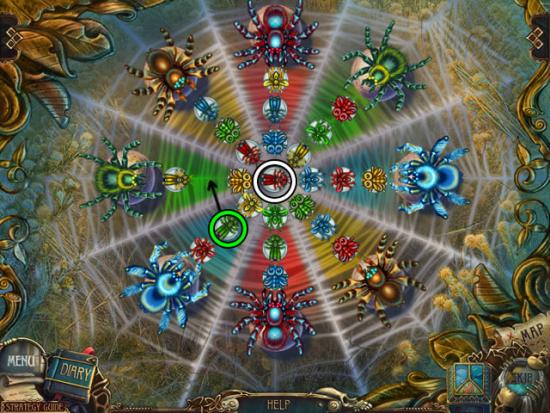
- The goal is move all the bugs to the web below their same colored spider.
- Begin by moving any bug to the empty center circle of the web. Next move an appropriately colored bug to the empty slot. Continue moving bugs to the empty slots based on bug and spider color.
- The next screenshot shows the completed web.
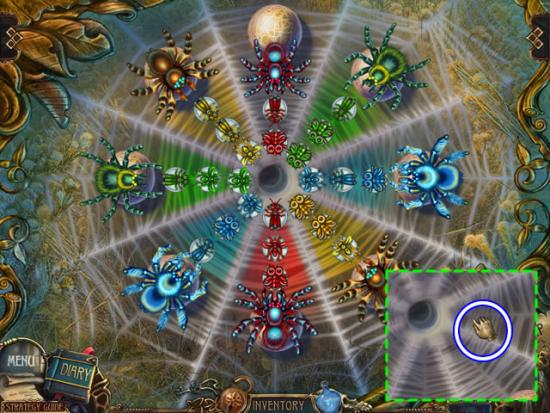
- After the spiders scurry down the center hole, pick up the empty SPIDER WEB.
- Go down once.
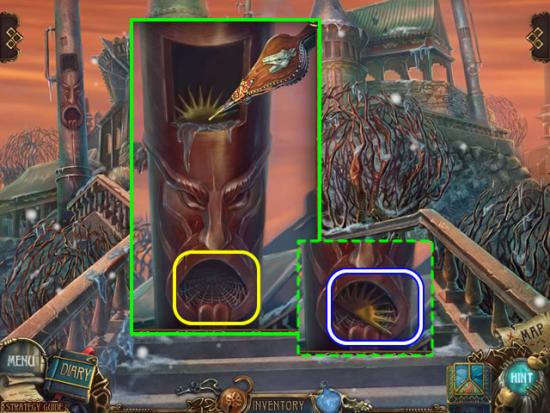
- Look at the pole.
- Put the SPIDER WEB in the mouth; use the BELLOWS to blow the decoration down the pipe.
- Pick up the SHUDDERS SUN from the mouth.
- Go forward.
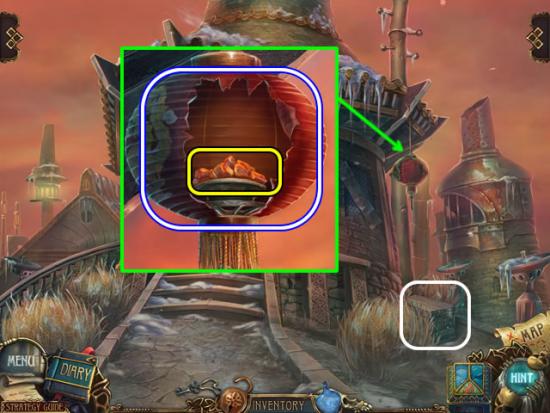
- Move the chest under the hanging lantern.
- Zoom in on the lantern; click to open it.
- Place the SCOOP OF COALS in the holder; take the LAMP.
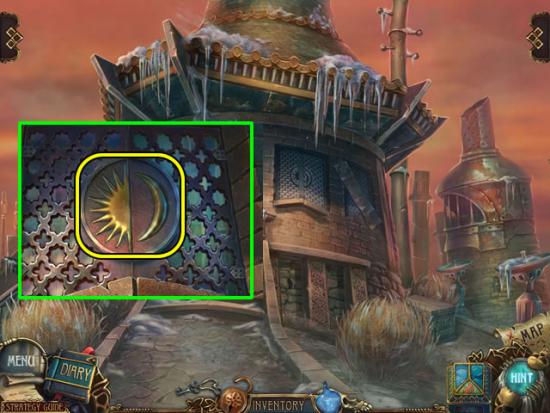
- Look at the shutters.
- Place the SHUTTERS SUN and SHUTTERS MOON in the insets.
- Enter the house through the open shutters.
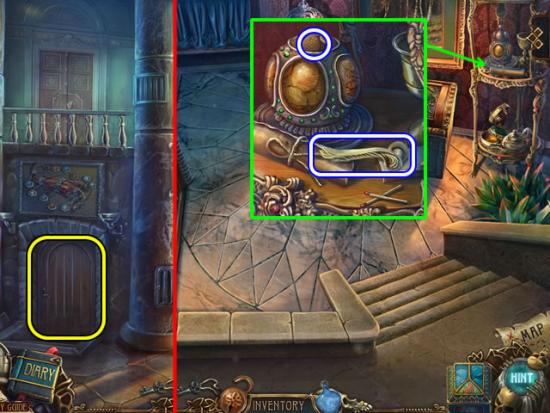
- Go through the door on the left.
- Examine the serving table.
- Remove the lid from the jar; take a COOKIE…or two or three.
- Pick up the HANDLE.
- Return to the main floor.
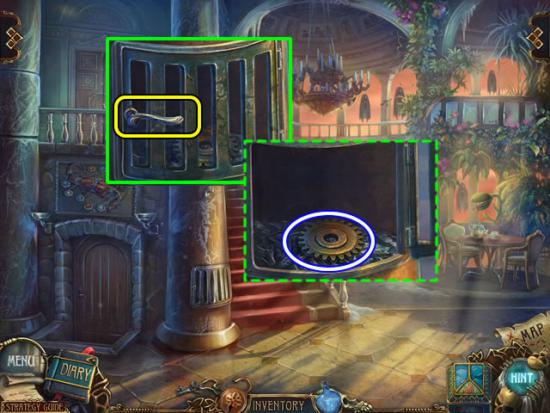
- Look at the column.
- Attach the HANDLE to the grate; take the GEAR from the column furnace.
- Go to the plant at the table.
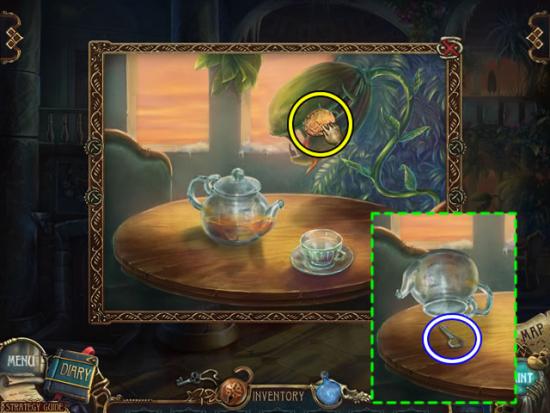
- Feed the COOKIE to the plant.
- Pour the tea into the cup.
- Shake the KEY out of the empty teapot.
- Go back down the steps.
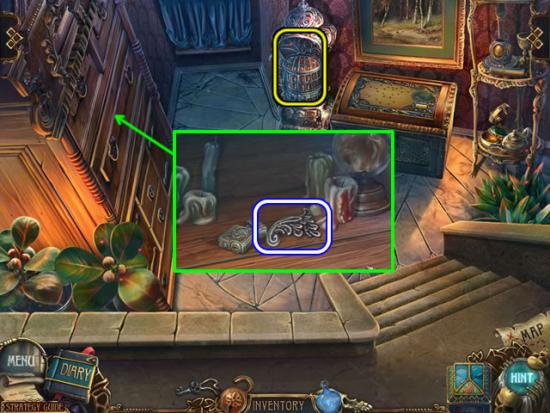
- Look at the locked cabinet.
- Use the KEY to open the shelf; take the CAGE PART.
- Look at the cage by the chest.
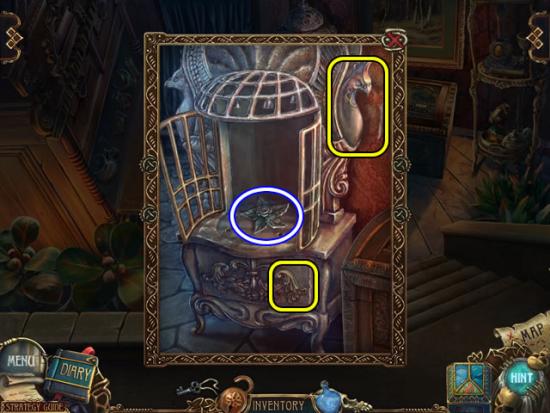
- Attach the PEACOCK to the side of the cage to open the door.
- Insert the CAGE PART in the empty slot on the base to deactivate the lasers; take the FLOWER decoration.
- Exit the cellar.
- Look at the doors at the top of the stairs.
- Insert the FLOWER in the inset to unlock the doors.
- Place the LAMP anywhere in the scene to illuminate the room.
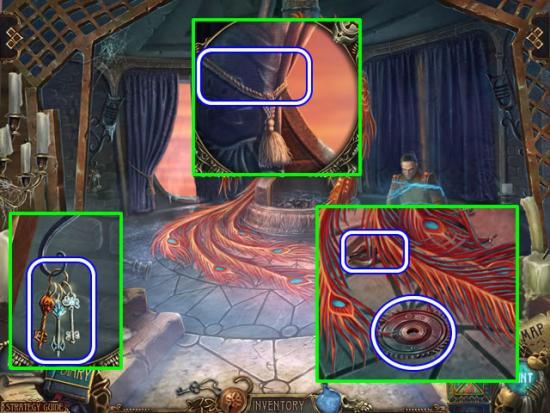
- Speak to the Fire Mage.
- Remove the ROPE securing the curtain.
- Take the KEYS hanging from the wrought iron decoration.
- Move the tail feathers to find the TONGS and the second GEAR.
- Exit the room.
- Zoom in on the dragon panel above the door to the cellar.
- Put the keys on the chained dragon to open a puzzle.
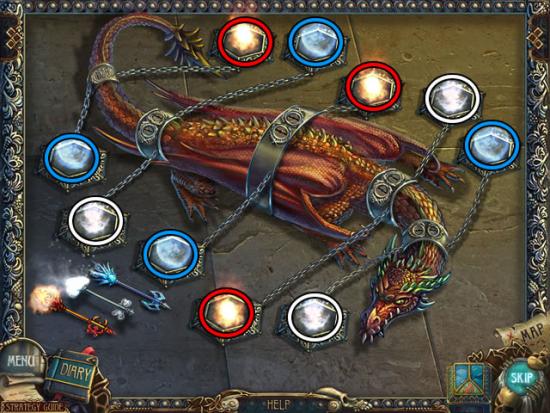
- The goal is to use the keys to unchain the dragon.
- Place the colored keys in the same colored glowing dish attached to each chain. Place them in pairs to unlock the shackles.
- Solving the puzzle opens the compartment doors; take the ENGINE from the compartment.
- Return to the chair lift.
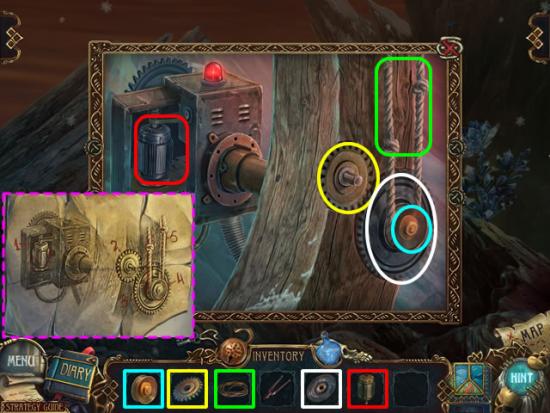
- Please refer to the diary notes if necessary for the assembly instructions.
- Place the ENGINE, small GEAR, large GEAR, SPOOL and ROPE in the appropriate places.
- Hop on the chair to cross the chasm.
- Play the hidden object scene in the cabin on the rocks on the right.
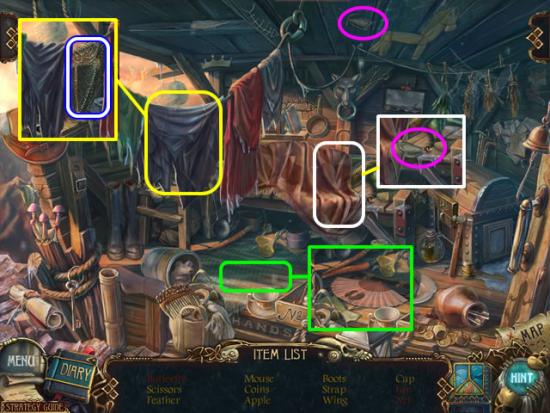
- Move the blue blanket (yellow) to find the net.
- Remove the floorboard (green) to discover the Fan.
- Lift the red blanket (white) to find a wing. Attach the wing to the body (pink) of the Butterfly.
- Find the rest of the listed items; receive the NET for inventory.
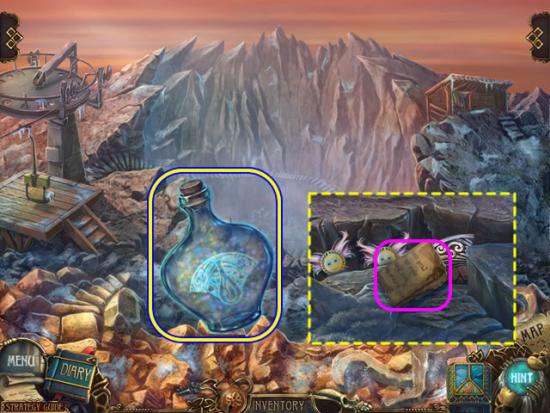
- Move the glowing bottle around the scene to find the hidden area.
- Burst the bubble; take the scrap of paper for journal information.
- Go forward.
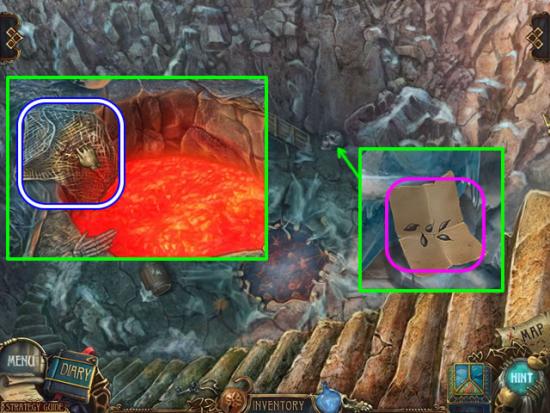
- Zoom in on the lava pit.
- Dip the NET in the lava; pick up the HOT NET with the TONGS.
- Look closer at the frozen skull; pick up the seed directions for the diary.
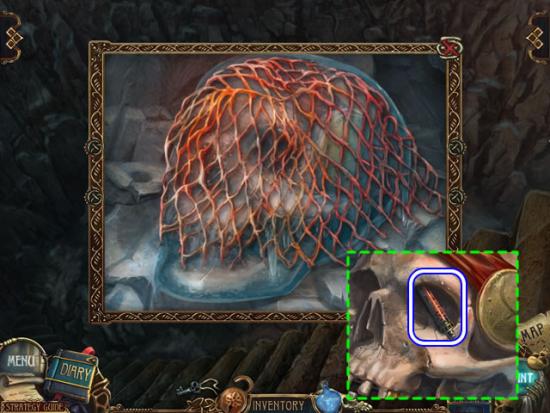
- Put the HOT NET on the frozen skull.
- Take the SOLDERING IRON.
- Exit the skull area; return to the house cellar.
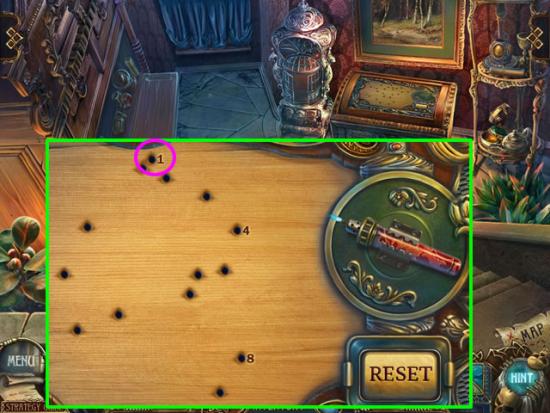
- Zoom in on the chest.
- Put the SOLDERING IRON on the chest to open a connect-the-dots puzzle.
- Put the iron on the dot labeled “1; click to begin. Use the numbered dots as a hint for the direction and number of dots in between.
- The next three screenshots show the solutions.
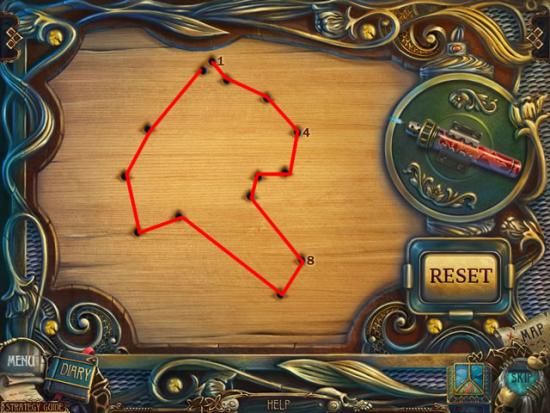
- Round one solution.
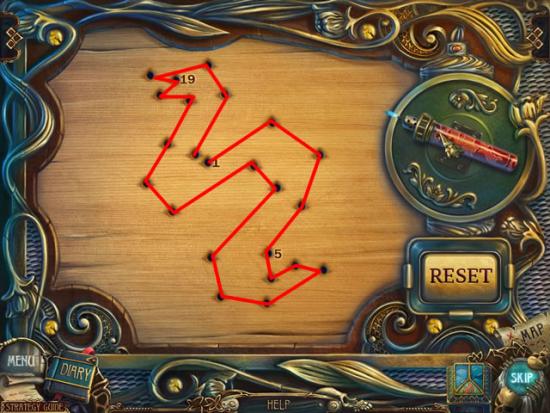
- Round two solution.
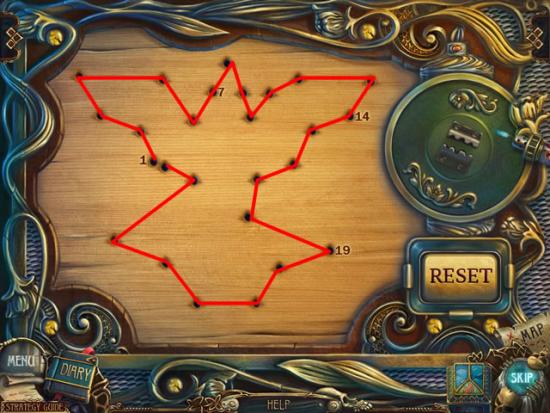
- Round three solution.
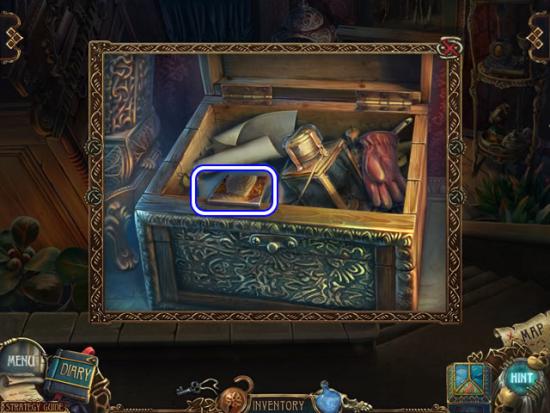
- Solving all three rounds opens the chest.
- Take the PICTURE PART.
- Return to the end of the chair lift.
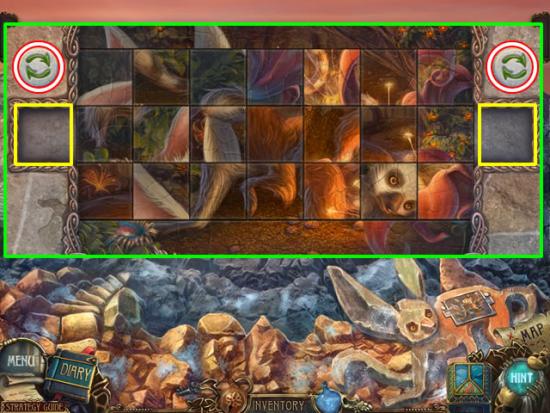
- Zoom in on the stone creature in the foreground.
- Add the PICTURE PART to open a puzzle.
- The goal is to slide and rotate the picture parts to reveal the picture.
- Use the top and bottom borders for help in placing the pieces. Slide a piece to either the left or the right empty squares and click the corresponding double arrow buttons to rotate pieces.
- The best strategy is to start in the middle and work toward each end.
- Please see the next screenshot for the solution.
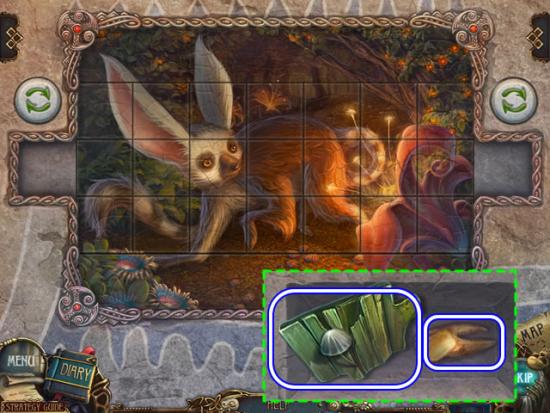
- Take the PICTURE PART and GOLD TOOTH from the compartment.
- Solving the puzzle activates a hidden object scene in the cabin on the rocks.
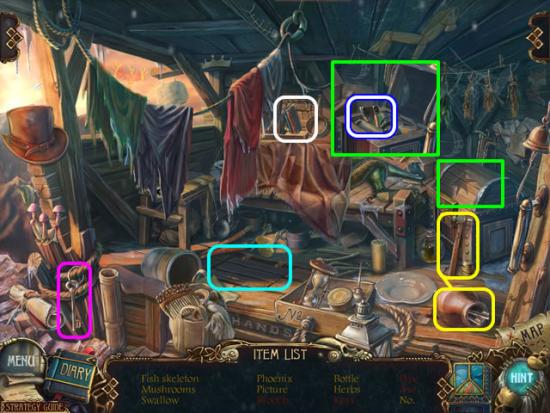
- Use the hammer to smash the vase (yellow) and expose the loose keys. Drag the key ring (pink) to the keys; take the Keys.
- Open the trap door to find the Brooch.
- Move the books (white) to find the Pipe.
- Open the chest and take the Axe.
- Find the rest of the listed objects; the AXE goes to inventory.
- Go forward.
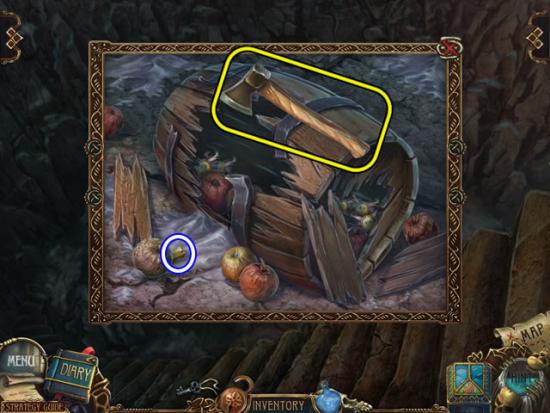
- Use the AXE to smash open the barrel at the bottom of the pit.
- Move the rotten apple to find the GOLD TOOTH.
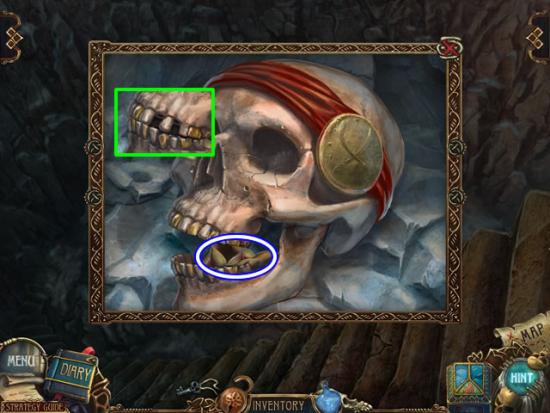
- Inspect the skull.
- Insert a GOLD TOOTH in each of the two gaps.
- Take the GRAIN from the open mouth.
- Go back once.
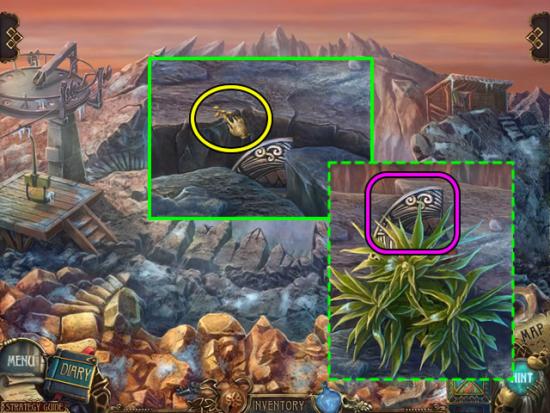
- Zoom in on the crevasse.
- Drop the GRAIN into the crack; the bottle begins to glow.
- Pour the contents of the bottle into the crack.
- Pick up the last fire amulet piece.
- Return to the Fire Mage’s chamber.
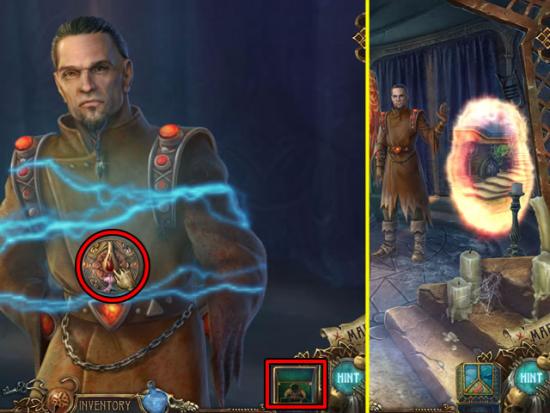
- Zoom in on the Fire Mage.
- Open the amulet box; select the fire amulet and place it on the mage.
- Zoom in again on the freed mage for one last request.
- Exit through the portal he provides.
- Speak to Titus; go down and forward to return to the diamond mine.
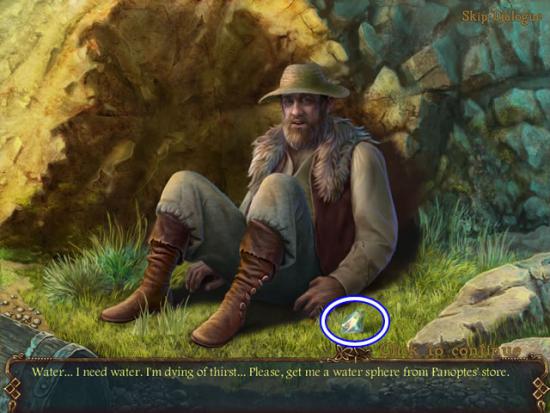
- Zoom in on the miner.
- Pick up the DIAMOND while the miner is speaking.
- Go down and left to return to the shop.
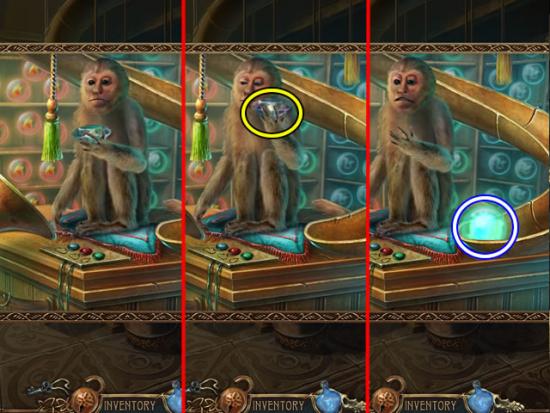
- Zoom in on the monkey.
- Attempt to take the diamond the monkey is holding.
- Give the monkey the DIAMOND; take the SPHERE OF WATER that rolls down the chute.
- Return to the miner.
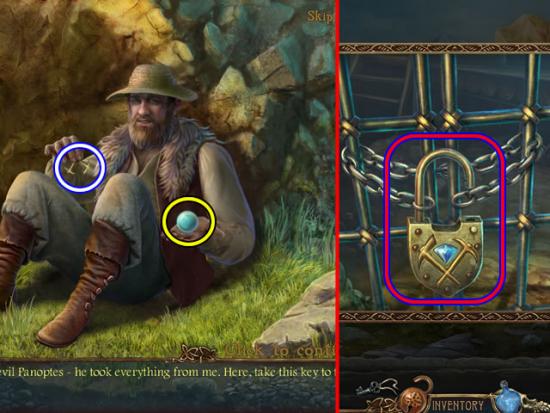
- Give the miner the SPHERE OF WATER; take the proffered KEY.
- Go to the mine entrance; remove the sign.
- Insert the KEY in the lock inset to unlock the chains.
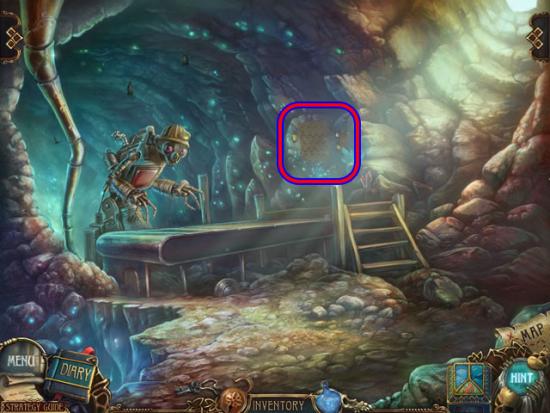
- Click the robot to receive permission to mine.
- Zoom in on the side of the mine to open a puzzle.
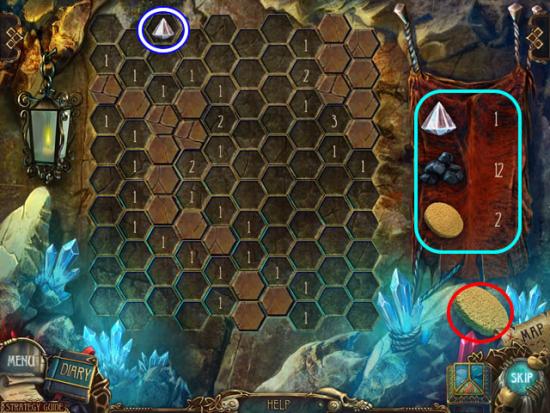
- The goal is to avoid uncovering a piece of coal while trying to find the diamond within the allotted number of tries.
- Click a polygon to begin the game. The numbers next to the sealed shapes indicate how many pieces of coal are near that game piece.
- The key on the right shows the number of diamonds available, the number of coal pieces and how many attempts are available before the board resets.
- Each time a piece of coal is found the board is covered in coal dust. Use the sponge in the lower right to clear the dust away and try again.
- The coal and diamond locations are random.
- Find a DIAMOND and return to the shop.
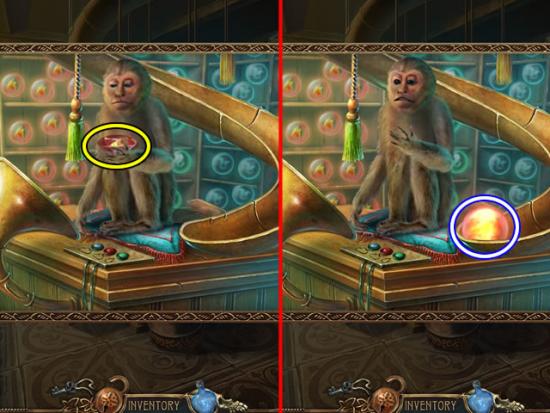
- Zoom in and give the monkey the DIAMOND.
- Take the SPHERE OF FIRE from the chute.
- Exit the shop; go to the portal and return to the Fire Mage’s chambers.
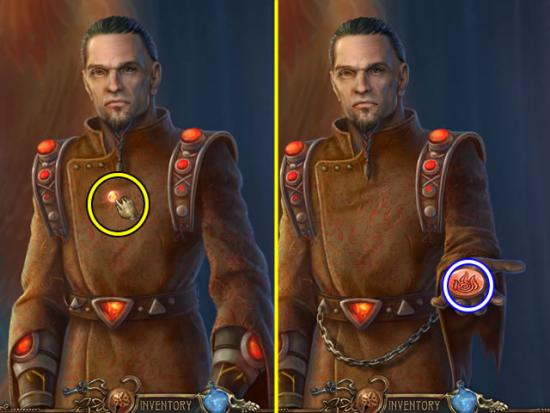
- Give the SPHERE OF FIRE to the Fire Mage.
- Take the FIRE RUNE the mage offers.
- Exit the World of Fire; speak with Titus and enter the new portal to continue the journey.
Chapter 6: Finding the Water Mage
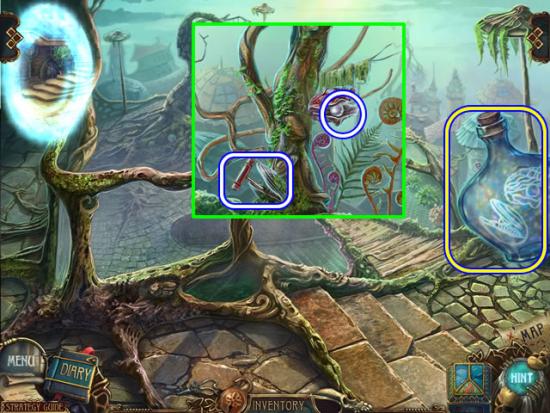
- Use the magic bottle to find the hidden area.
- Pour the contents of the bottle on the scene to open the shells.
- Take the PEARL and CORKSCREW.
- Go down to the crossroads.
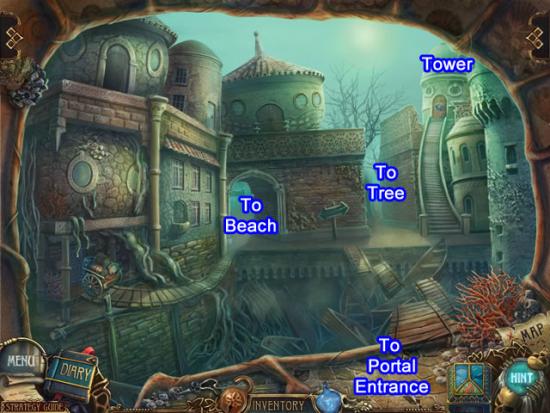
- It is a good idea to use this scene for orientation, as this world can be a bit confusing.
- Go forward to the tree.
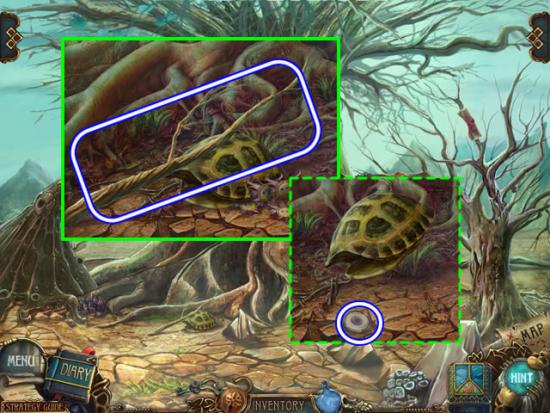
- Zoom in on the turtle shell.
- Take the BRANCH.
- Shake the empty shell; take the EYE.
- Go down once.
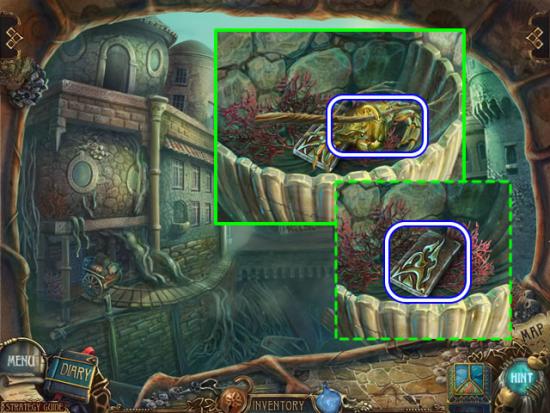
- Inspect the dry wall water holder.
- Use the BRANCH to retrieve the CRAB.
- Pick up the WELL PART.
- Go down once to the portal entrance.
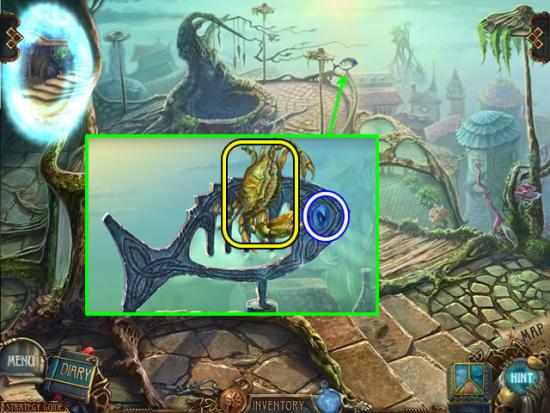
- Zoom in on the fish.
- Use the CRAB to retrieve the second EYE; the crab automatically returns to inventory.
- Go forward to the crossroads.
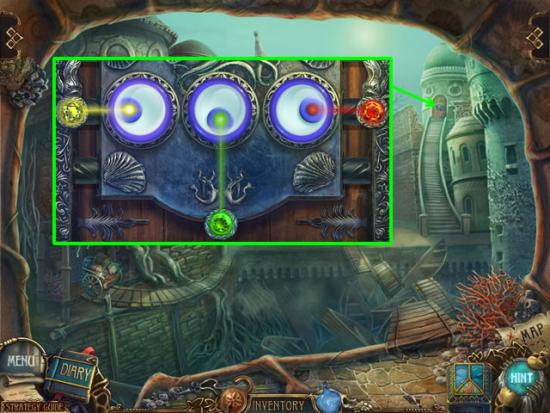
- Examine the door to the tower.
- Insert an EYE in each of the empty slots.
- Click the eyes until an eye is looking at each stone.
- Solution: Click the center eye once; click the right eye four times.
- Enter the shell tower.
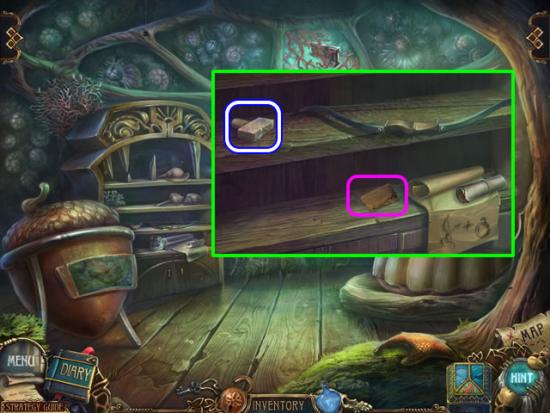
- Inspect the shelves.
- Pop the bubble; take the paper for diary information.
- Pick up the TAP KNOB.
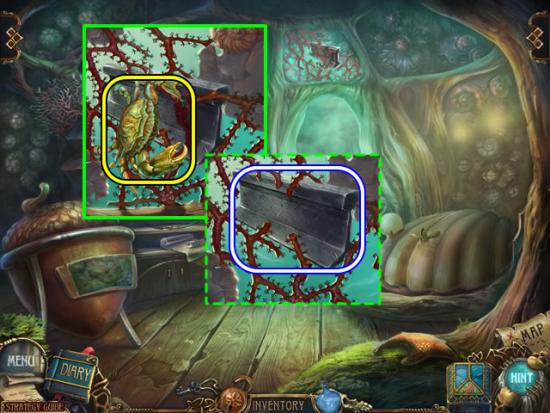
- Look at the area over the window.
- Use the CRAB to remove the coral; take the BEAM.
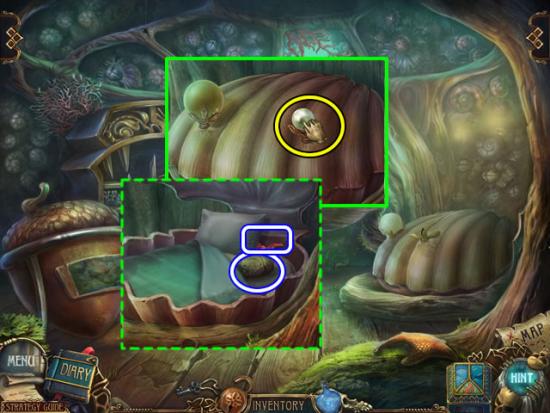
- Put the PEARL in the holder on the clamshell to open it.
- Pull back the cover; take the PATTERNED STONE and the red RIBBON.
- Exit the tower; go forward to the tree.
- Zoom in on the squirrel.
- Put the PICTURE PART on the tree to open a puzzle.
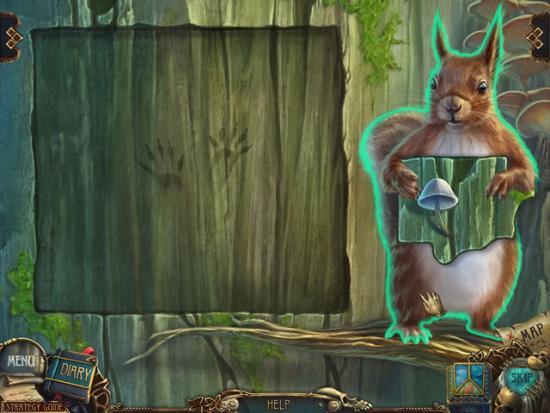
- Click the squirrel to rotate the puzzle pieces.
- Drag the pieces onto the tree to place them.
- Use the moss and grooves in the tree as a hint for placing the parts. A correctly placed piece locks into position.
- The solution is shown in the next screenshot.
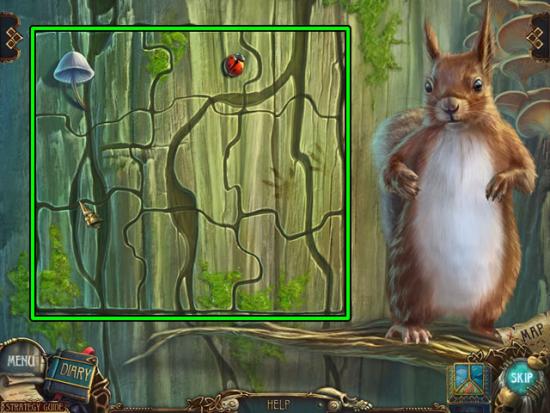
- Solving the puzzle opens a door at the base of the tree.
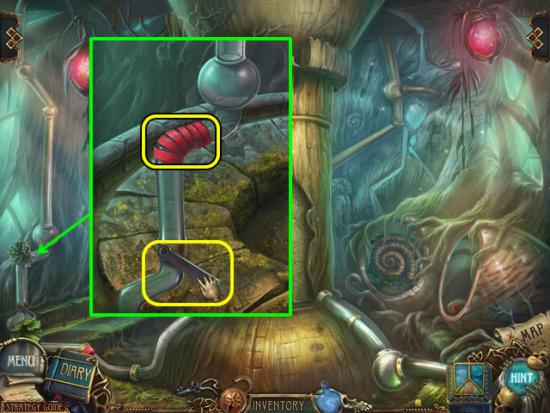
- Examine the mechanism on the left.
- Remove the flowers.
- Use the RIBBON to fix the pipe; pull the lever.
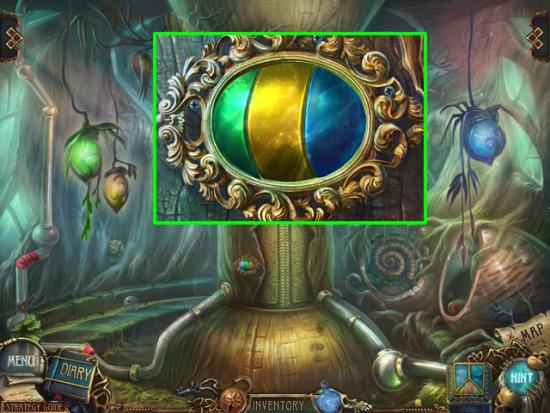
- Examine the control by the door.
- Scroll through the colored panels until they are in the same order as the three colored lanterns.
- Enter the Water Mage’s chambers.
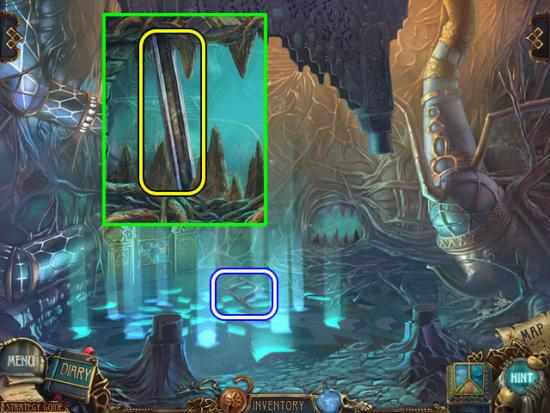
- Pick up the LADDER PART on the floor.
- Get closer to the snapping teeth.
- Use the BEAM to prop the teeth open and trigger a hidden object scene.
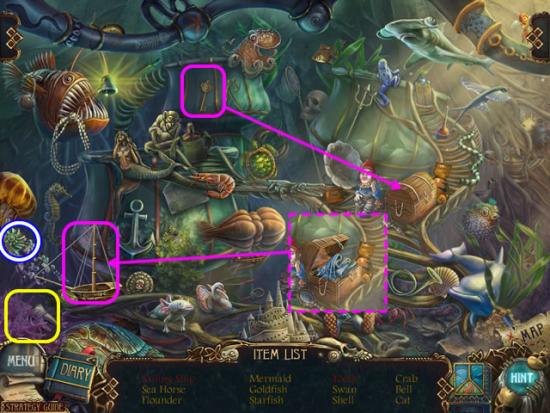
- Open the panel to find the key for the chest; take the cloth from the chest and add it to the boat. Take the Sailing Ship.
- Move the coral to find the Tooth.
- Find the rest of the listed objects. The SHELL goes to inventory.
- Exit the chambers.
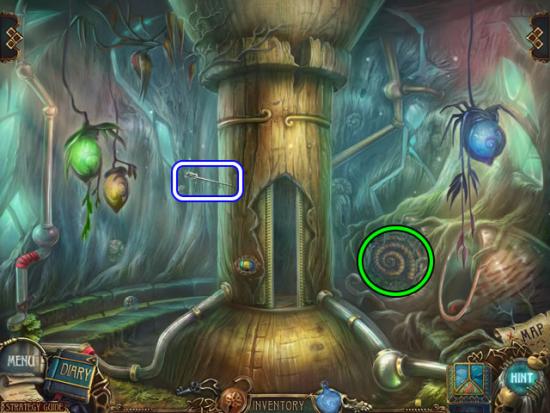
- Pluck the ARROW from the door pillar.
- Zoom in on the shell on the right.
- Put the SHELL in the center of the area to begin a puzzle.
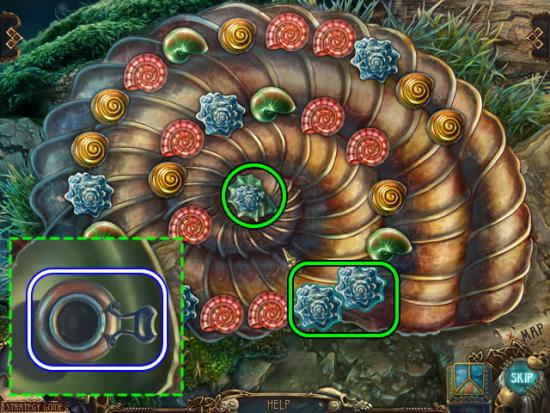
- The goal is to remove all the small colored shells.
- Aim the center shell at shells with the same pattern. Targeted shells glow. Click to fire the center shell. Form matches of three or more shells to remove them.
- Removing all the shells opens a compartment containing an EMPTY LANTERN.
- Return to the mage’s inner chambers.
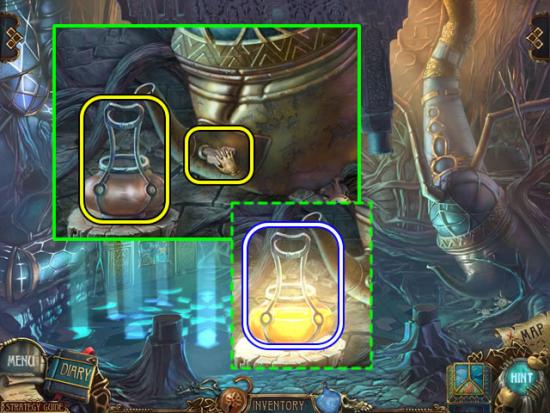
- Zoom in on the spout of the device on the right.
- Put the EMPTY LANTERN on the stump
- Insert the TAP KNOB in the slot; turn to fill the lantern.
- Take the LIGHTENING LANTERN.
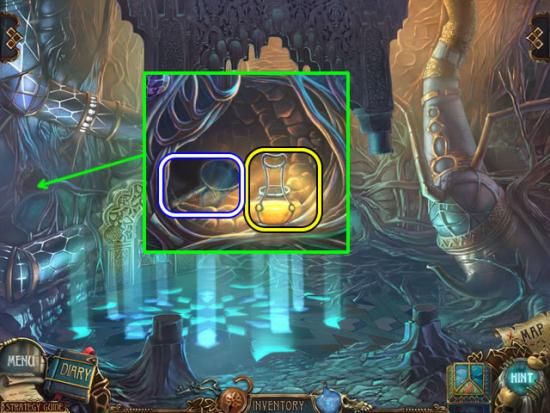
- Peer into the dark nook.
- Use the LIGHTENING LANTERN to illuminate the space; take the SCOOP NET.
- Exit the chambers.
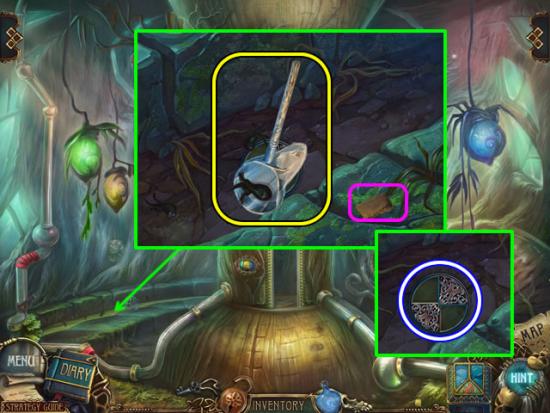
- Zoom in on the trough.
- Pop the bubble; take the paper for diary information.
- Use the SCOOP NET to scoop up all of the TADPOLES.
- Pick up the MAGIC DISK from the bottom of the trough.
- Return to the mage’s inner chambers.
- Zoom in on the door panel.
- Insert the MAGIC DISK to open a puzzle.
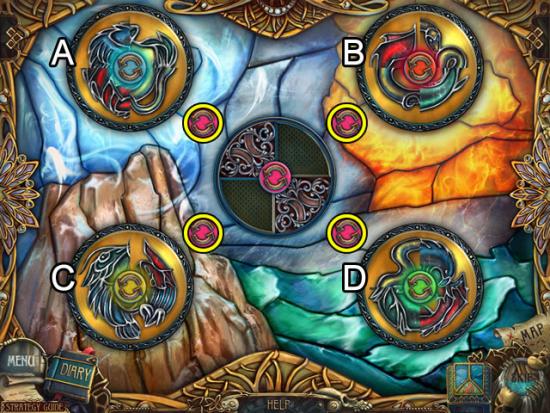
- The goal is to create images of four animals that match the element environments.
- Use the double arrow button to rotate the circles and the four outer arrow buttons to swap pieces in and out of the center circle.
- One strategy is to first sort all the pieces into the correct environment and then arrange the pieces to form the animal.
- Final images are (A) bird, (B) dragon, (C) snake and (D) fish.
- The next screenshot shows the solution.
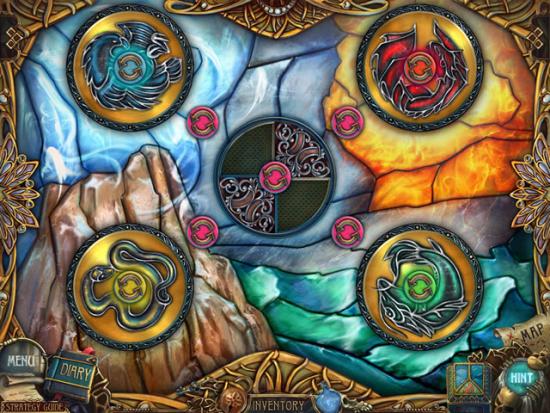
- When the image pieces are in the correct position the image circle locks.
- Enter the secret chamber and speak to the Water Mage.
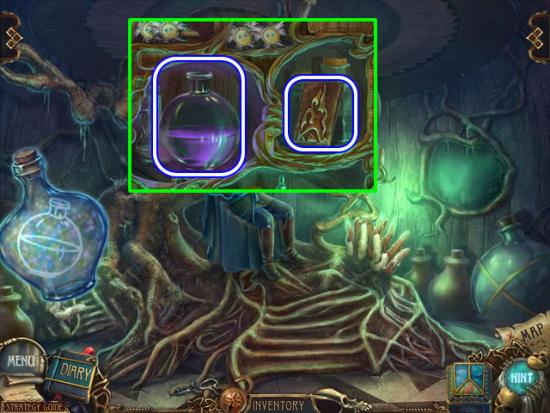
- Use the bottle to find the hidden area.
- Pour the contents of the bottle into the potion bottle; take the FOSSILIZATION POTION.
- Pick up the WELL PART.
- Now is a good time to use the Map to go back to the well at the portal entrance.
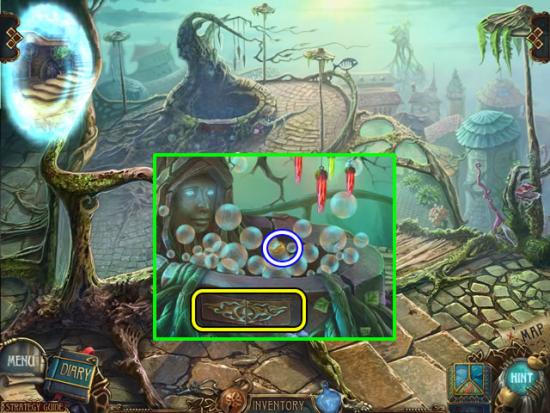
- Zoom in on the well.
- Insert each WELL PART in the inset.
- Pop the bubble that rises up; pop the second bubble to get the COIN.
- Go forward to the crossroads.
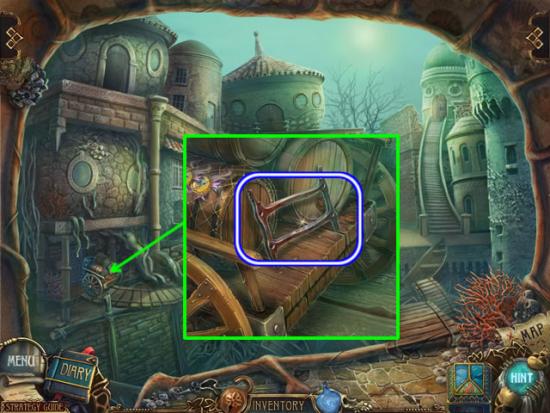
- Stop at the cart; pick up the LADDER PART.
- Go up the stairs to the tower.
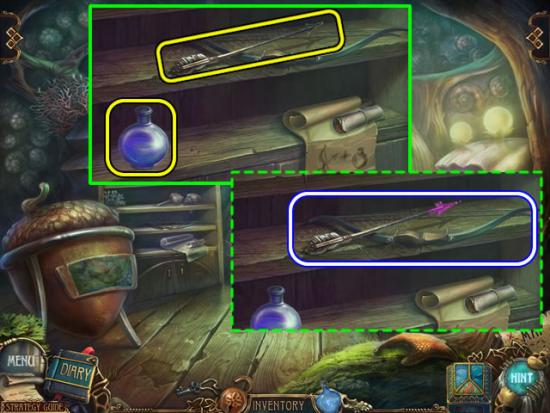
- Zoom in on the shelf.
- Put the ARROW on the bow.
- Put the FOSSILIZATION POTION on the shelf.
- Dip the arrow into the potion; the potion-treated arrow returns to the bow.
- Take the BOW OF PETRIFICATION.
- Exit the tower; go forward to the tree.
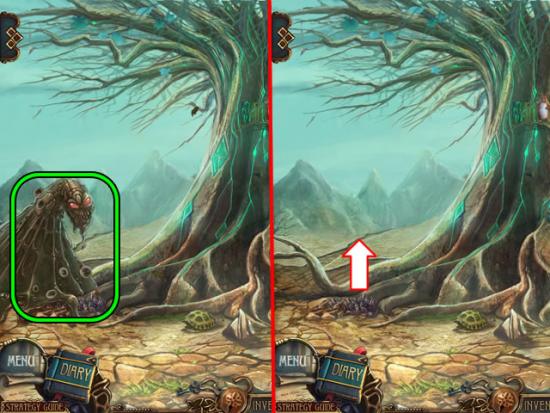
- Put the BOW OF PETRIFICATION on the monster.
- Go forward on the new path to the canyon.
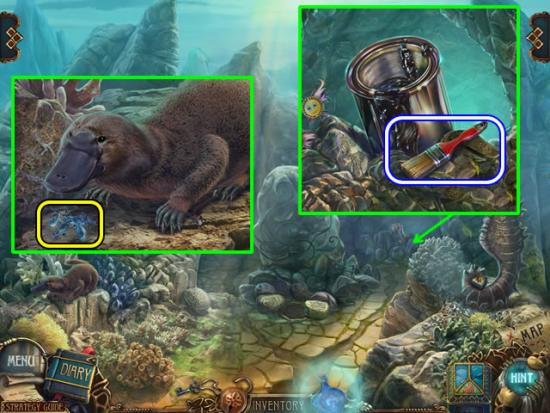
- Examine the rocks to the right of the big boulder.
- Pick up the brush; it dips itself in the resin producing a BRUSH WITH RESIN.
- Feed the TADPOLES to the platypus; find a ladder part on the rock after the platypus waddles off.
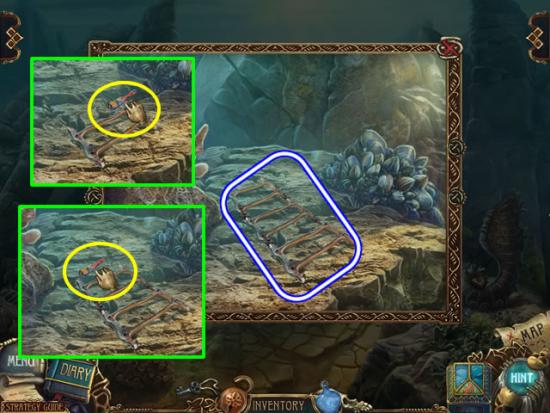
- Use the BRUSH WITH RESIN on the ladder part.
- Attach a LADDER PART to the resin end.
- Use the BRUSH WITH RESIN on the next section.
- Attach the other LADDER PART to the first two.
- Take the LADDER.
- Go down once.
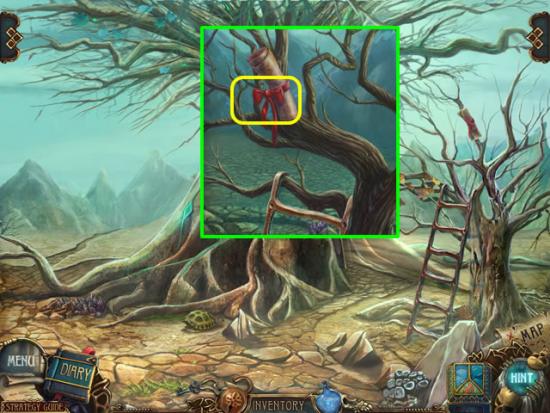
- Lean the LADDER against the tree;
- Remove the ribbon from the TICKET TO BEACH.
- Go down once to the crossroads and go through the archway.
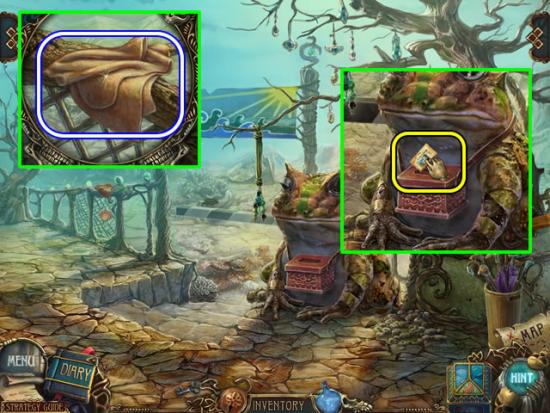
- Pick up the RAG from the top of the fence.
- Drop the TICKET TO BEACH into the ticket box around the frog’s neck.
- Head for the beach.
Chapter 7: Saving the Mermaid
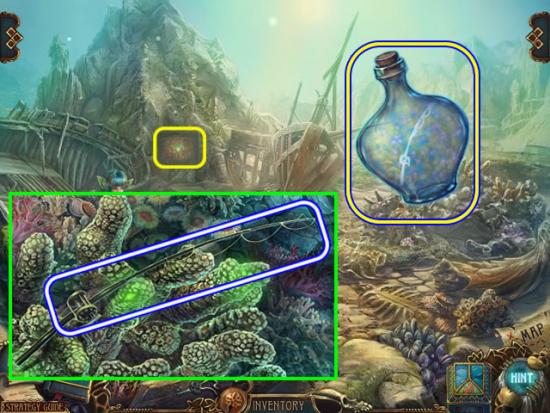
- Use the bottle to find the hidden area.
- Pour the magic from the bottle over the corals to release the FISHING ROD.
- Zoom in on the panel on the rocks to open a puzzle.
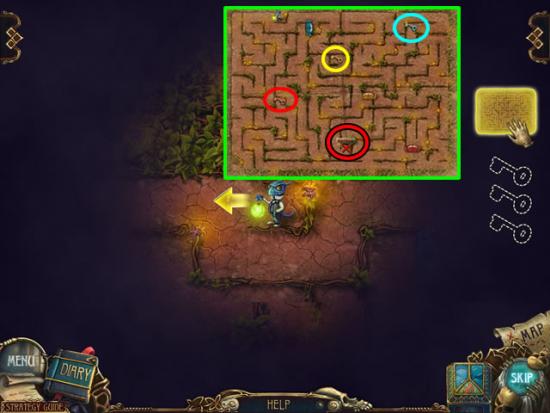
- The goal is to guide the creature through the darkened maze to the exit. Pick up keys to unlock the gates to open new portions of the maze.
- An overview map of the maze is available every 20 seconds that shows the creature’s current location.
- Pick up the blue key first and open the blue gate. Next find the yellow key for the yellow gate. Pick up the red key last to open the red gate and find the exit.
- The next screenshot shows the paths to follow.
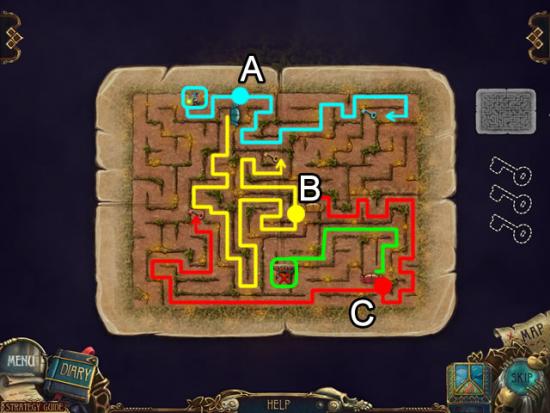
- Follow the blue path to the blue key.
- Retrace your steps to point “A”. Use the key to open the blue gate.
- Follow the yellow path to the yellow key.
- Retrace your steps to point “B”. Use the yellow key to open the yellow gate.
- Follow the red path to the red key.
- Retrace your steps to point “C”. Use the red key to open the red gate.
- Follow the green path to the exit.
- Solving the puzzle blasts the rock from the tunnel entrance.
- Enter the tunnel and play the hidden object scene in the alcove on the left.
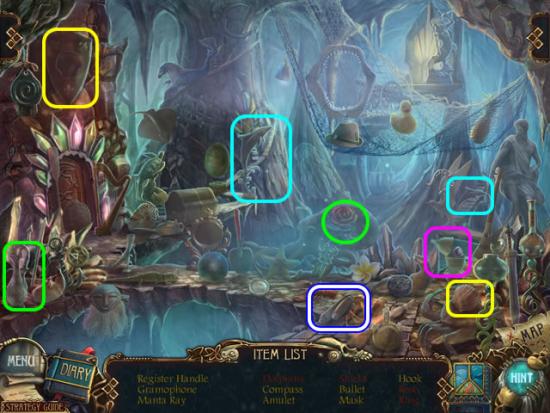
- Pair the Dolphins (aqua).
- Put the shell in the inset on the Shield (yellow).
- Put the flower in the vase (green); take the Rose.
- Open the box to find the Ring (pink).
- Find the rest of the listed objects; receive the REGISTER HANDLE for inventory.
- Exit the tunnel to the beach; go down once to the beach entrance.
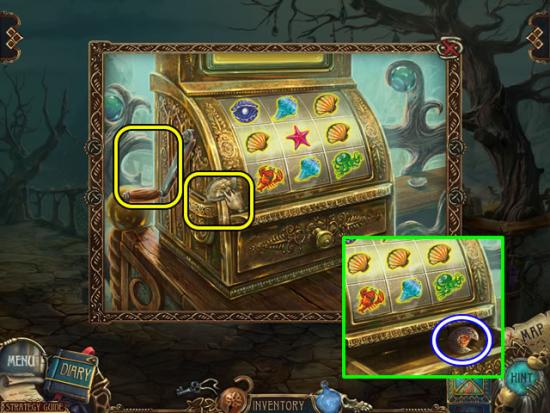
- Zoom in on the cash register.
- Insert the REGISTER HANDLE in the slot.
- Drop the COIN in the coin slot.
- Turn the register handle three times to open the drawer; take the CONCH.
- Go down once to the crossroads.
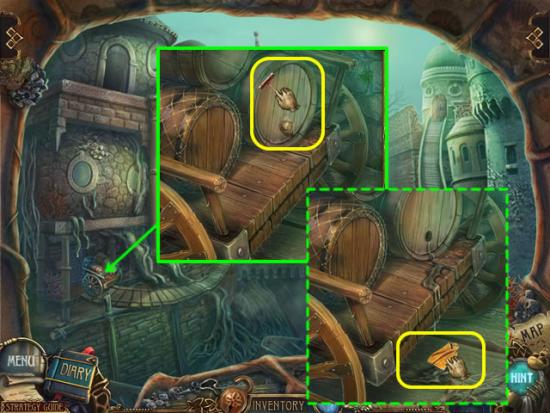
- Zoom in on the cart.
- Use the CORKSCREW to remove the barrel cork.
- Use the RAG to wipe up the spill; receive a WET RAG.
- Go up the steps to the tower.
- Look at the acorn in the left corner.
- Use the WET RAG to clear the area; put the CONCH on the board to open a puzzle.
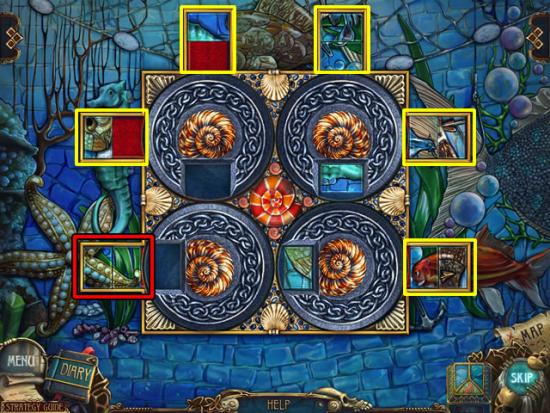
- The goal is to complete the picture by sliding the correct images pieces into the outside slots.
- Slide a piece into a conch slot and rotate the conch shells to move the picture piece to another location.
- The completed starfish is shown.
- The full picture is shown in the next screenshot.
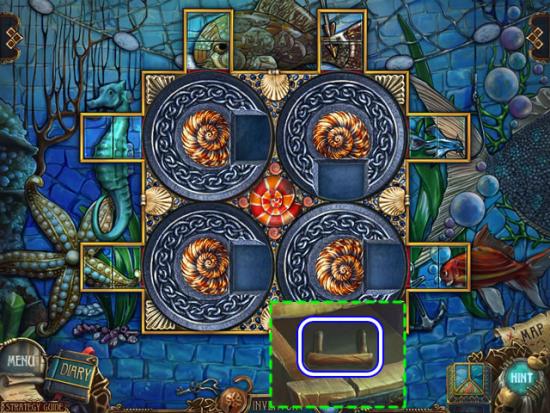
- Correctly solving the puzzle opens a drawer in the acorn.
- Take the LEVER from the drawer.
- Exit the tower.
- Go forward to the tree; enter the tree; go forward to the mage’s chambers and go through the archway on the left.
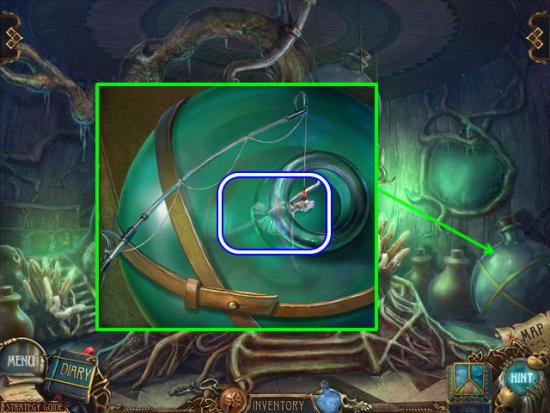
- Examine the bottle on the right.
- Pop the cork and use the FISHING ROD to snag the BALLERINA.
- Go down once to find a hidden object scene on the right.
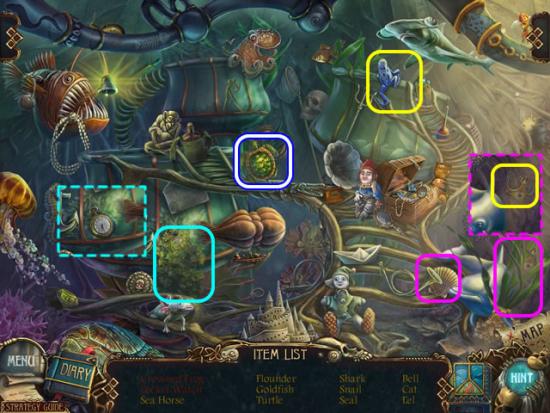
- Use the shell to cut the plant (pink) and find a crown.
- Drag the crown to the frog (yellow); take the Crowned Frog.
- Scrape the plant away front the ledge (aqua) to uncover the Pocket Watch.
- Find the rest of the listed items; the TURTLE goes to inventory.
- Return to the beach.
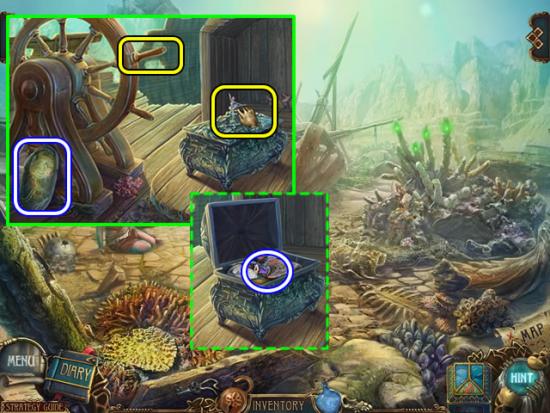
- Go on board the rotting ship.
- Pick up the PATTERNED STONE.
- Spin the ship’s wheel to open the compartment.
- Put the BALLERINA on the top of the box to open it; take the THREAD.
- Go down once to the beach entrance.
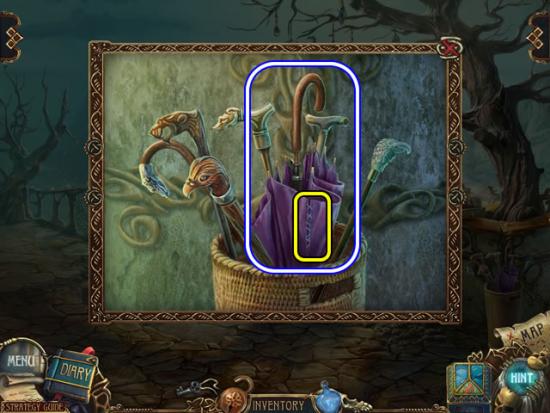
- Zoom in on the umbrella stand.
- Use the THREAD to repair the tear in the UMBRELLA.
- Go forward to the beach and enter the tunnel.
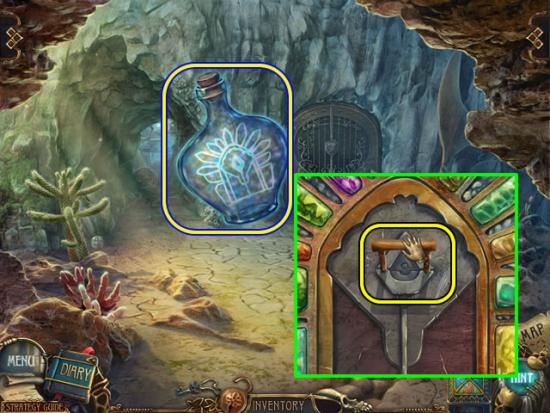
- Use the magic bottle to find the hidden area.
- Pour the contents of the bottle on the mechanism to remove the center panel.
- Insert the LEVER in the center slot; pull to open the door to the cave on the right.
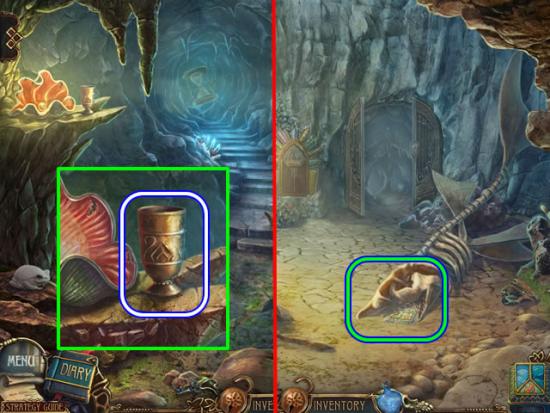
- Zoom in on the shell on the left; take the CUP.
- Go down once.
- Examine the area at the base of the skeleton.
- Put the TURTLE on the board to open a puzzle.
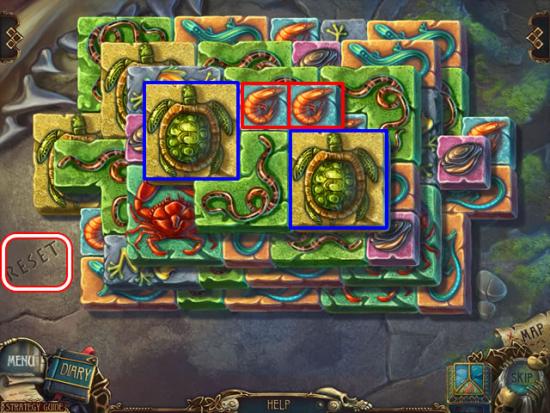
- The goal is to remove all the levels of tiles by matching pairs.
- Image tiles available for matching glow when the mouse moves over them. A match cannot be made if the image is blocked on two or more sides.
- Click Reset to start over if there are no more moves.
- The next series of screenshots show the correct pairings.
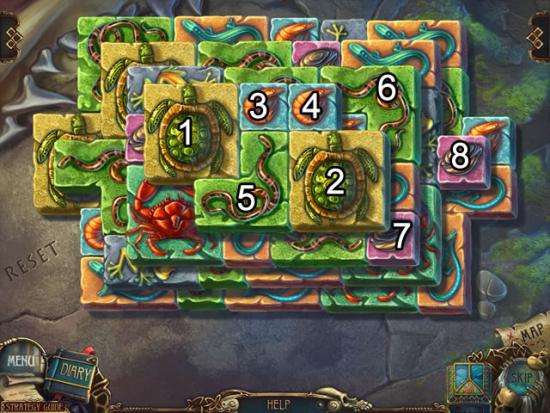
- Solution pairs 1-2 through 7-8.
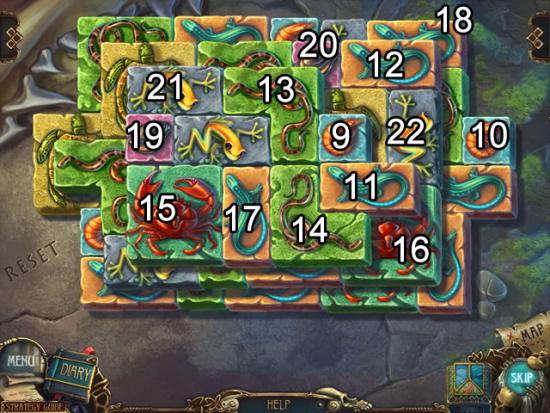
- Solution pairs 9-10 through 21-22.
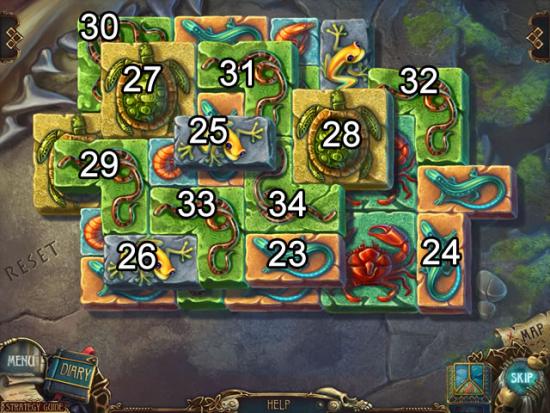
- Solution pairs 23-24 through 33-34.
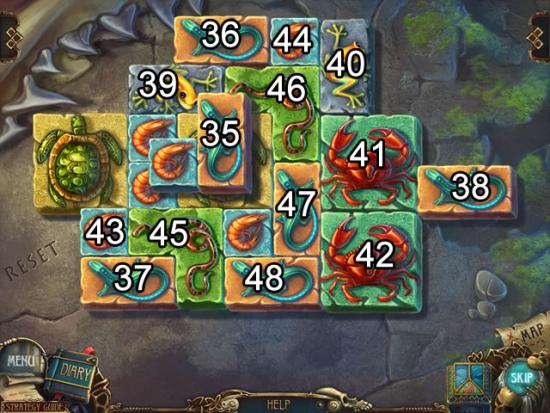
- Solution pairs 35-36 through 47-48.
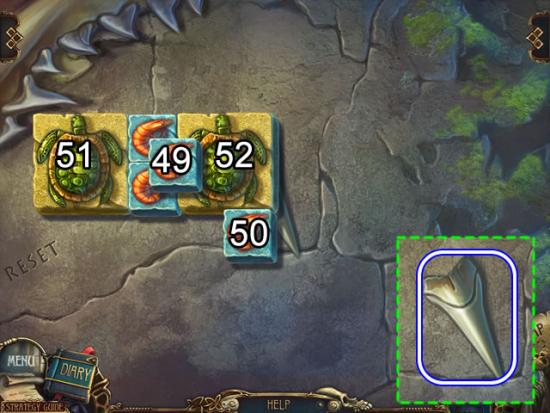
- Removing pairs 49-52 leaves two shrimp tiles. Remove them to finish the puzzle.
- Take the SHARK TOOTH.
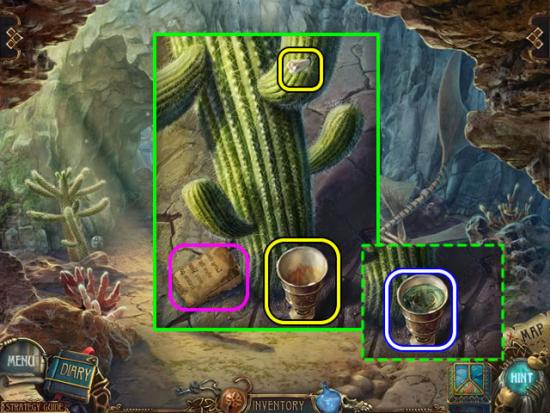
- Look closer at the cactus.
- Pop the bubble; take the paper for diary information.
- Put the CUP at the base of the cactus.
- Insert the SHARK TOOTH in the top cactus arm to tap the cactus.
- Pick up the cup of CACTUS JUICE.
- Exit the tunnel.
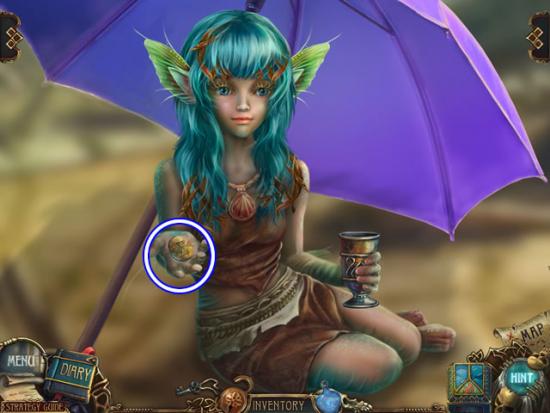
- Zoom in on the mermaid.
- Give her the UMBRELLA and the cup of CACTUS JUICE.
- Take the HOURGLASS PIECE.
- Go forward into the tunnel and play the hidden object scene.
Chapter 8: Restoring the World of Water
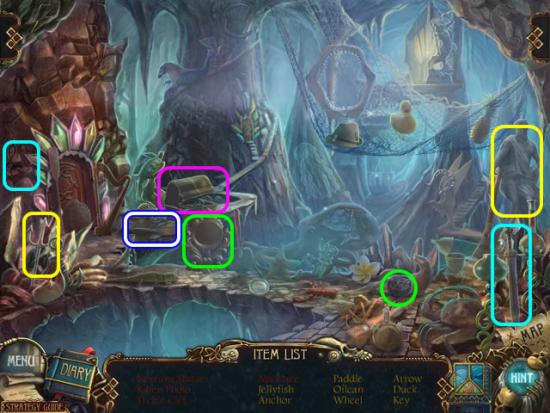
- Put the trident on the statue (yellow); take the Neptune Statue.
- Put the photo of the kitten in the frame (green); get the Kitten Photo.
- Use the sword to chisel out the Treble Clef (aqua).
- Open the trunk (pink) to find the Necklace.
- Find the rest of the listed items; receive the OILCAN for inventory.
- Enter the cave.
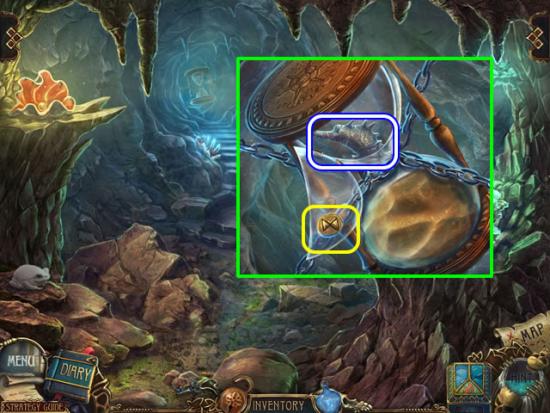
- Zoom in on the suspended hourglass.
- Affix the HOURGLASS PIECE to the upper globe; click to open the glass.
- Remove the critter coins to access the SEA-HORSE HEAD.
- Now is a good time to use the Map to return to the canyon above the tree.
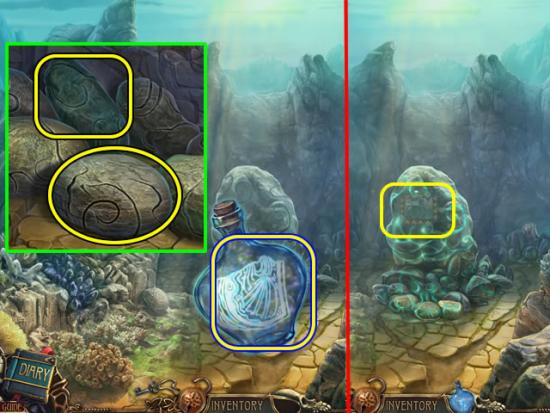
- Use the bottle to find the hidden area.
- Place each PATTERNED STONE in an empty slot.
- Pour the contents of the bottle over the stones to activate the area.
- Zoom in on the glowing rocks for a puzzle.
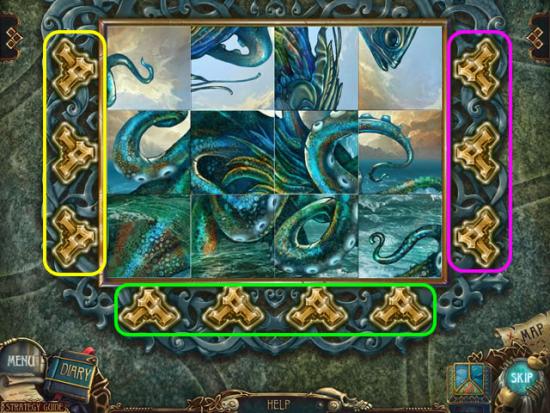
- The goal is to use the arrows to rotate the pieces to create a picture.
- The arrows on the left rotate each tile in that row one-quarter turn counter-clockwise; the arrows on the right rotate each tile in that row one-quarter turn clockwise. The arrows on the bottom rotate each tile in that column one-half turn.
- Unfortunately this puzzle does not have a reset button so a step-by-step solution cannot be provided.
- The next screenshot shows the completed picture.
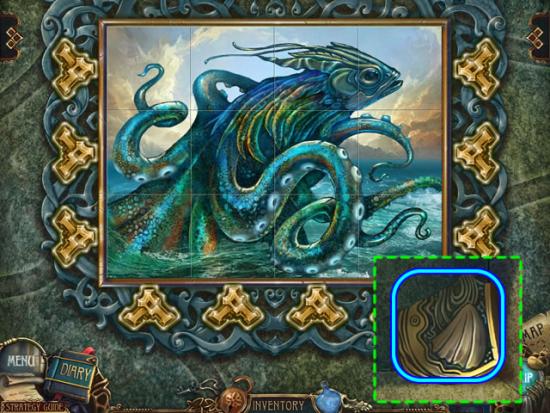
- Completing the picture opens a compartment.
- The AMULET PIECE goes into the amulet box.
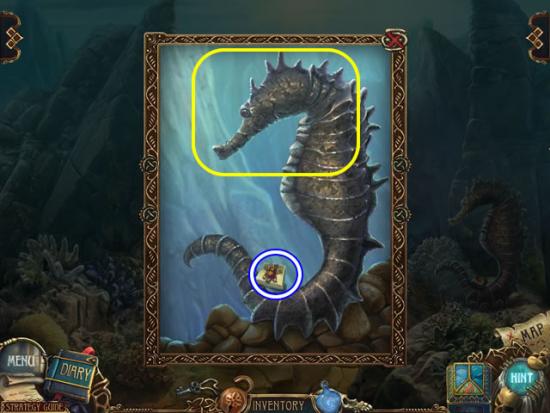
- Zoom in on the broken statue.
- Put the SEA-HORSE HEAD on the statue to uncoil its tail; take the PLATYPUS BUTTON.
- Return to the cave.
- Put the PLATYPUS BUTTON on the puzzle board on the right wall to start the puzzle.
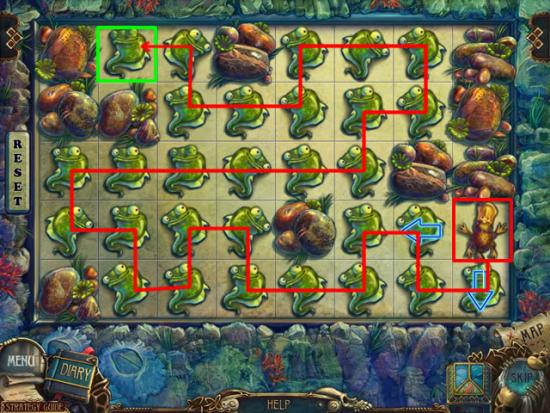
- The goal is use the platypus to clear the board and end up in the upper left corner without crossing an empty square.
- One solution is shown above.
- Take the AMULET PIECE from the compartment to complete the water amulet.
- Return to the bound water mage.
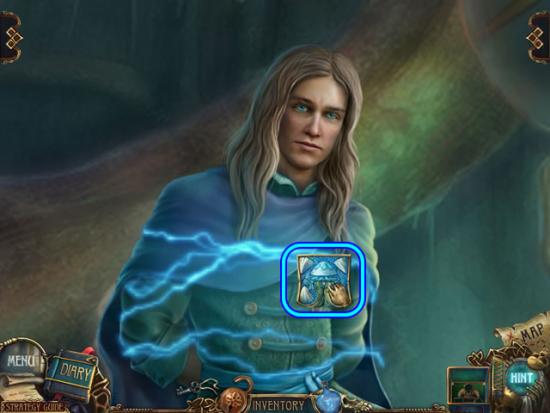
- Zoom in on the mage.
- Open the amulet chest; take the water amulet and place it on the mage.
- Speak to the mage for further instructions.
- Go through the open portal and return to the mine.
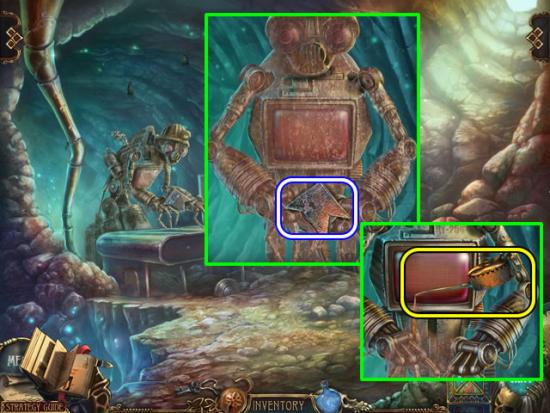
- Examine the robot.
- Take the ARROW.
- Use the OILCAN to remove the rust from the robot.
- Click the robot twice to activate it and receive permission to mine.
- Zoom in on the wall on the right to open the diamond-mining puzzle again.
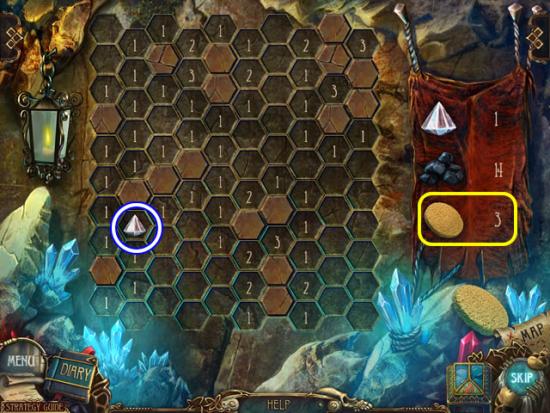
- Click the grid pieces to find the diamond while attempting to avoid the coal piles.
- This round is more difficult but there is an additional sponge available.
- Take the DIAMOND.
- Return to the shop.
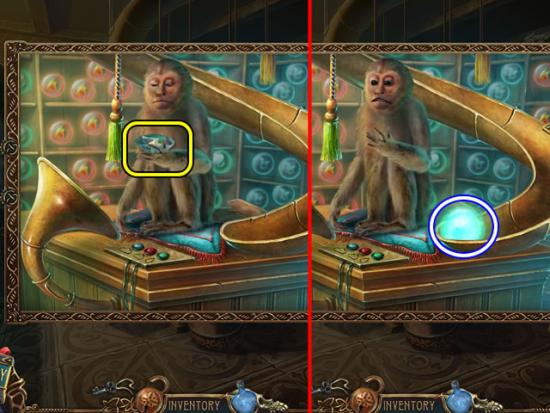
- Give the DIAMOND to the monkey; take the SPHERE OF WATER from the chute.
- Exit the shop; go up the steps and through the portal.
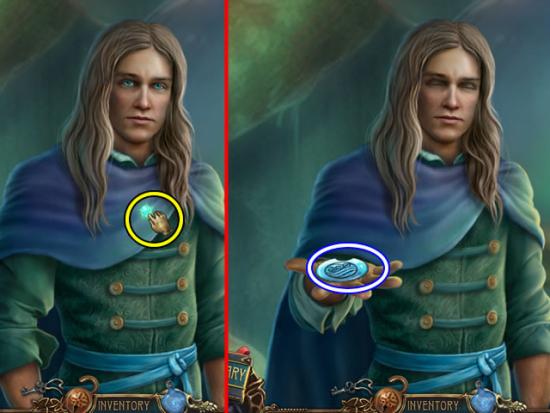
- Give the Mage of Water the SPHERE OF WATER to save the world.
- Take the proffered WATER RUNE.
- Exit the World of Water; speak to Titus; enter the new portal to continue the adventure.
Chapter 9: The World of Air
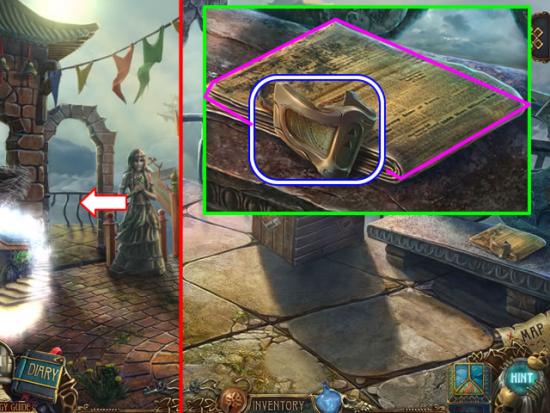
- Go through the arch on the left.
- Zoom in on the bench.
- Take the MASK; read the newspaper.
- Go down once.
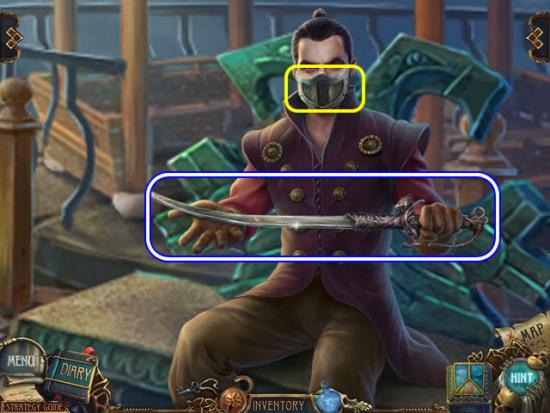
- Zoom in on the guard.
- Put the MASK on the guard; take the SWORD.
- Go through the arch on the left.
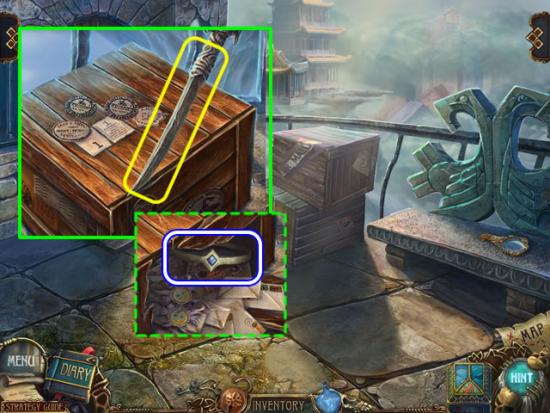
- Look closer at the crates.
- Click the top crate to move it.
- Use the SWORD to pry open the bottom crate; take the TIARA.
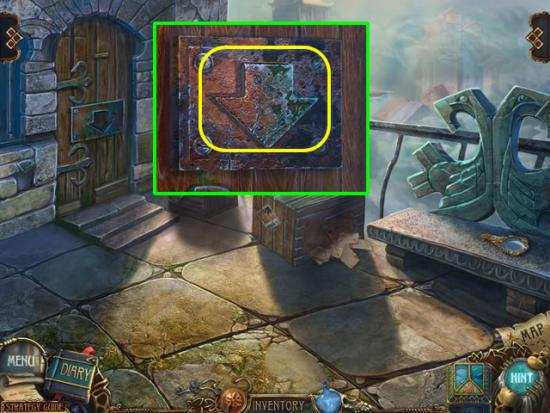
- Zoom in on the door.
- Insert the ARROW in the inset to open the door.
- Go forward; play the hidden object scene on the left side of the square.
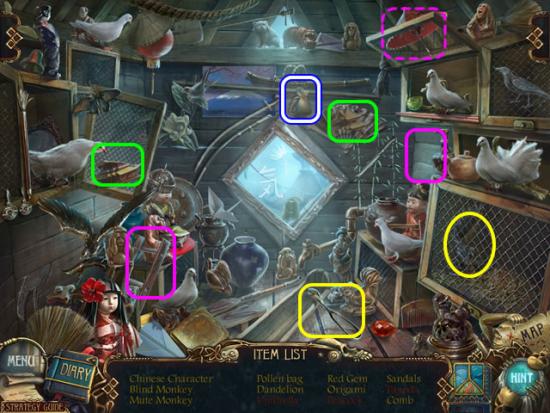
- Place the ladder against the wall (pink) to reach the Umbrella (dashed pink).
- Use the wire cutters to open the cage (yellow); take the Peacock.
- Put the top on the bottom of the Pagoda (green).
- Find the rest of the listed objects; receive a POLLEN BAG for inventory.
- Go down the steps to the floating buildings.
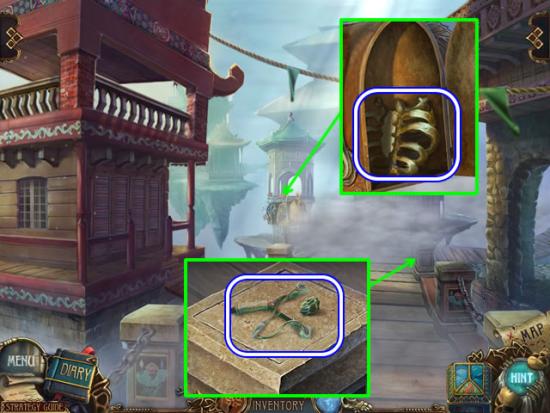
- Zoom in on the mailbox on the left.
- Open the mailbox; take the PTERODACTYL BONE.
- Look at the last post on the right; pick up the SLINGSHOT.
- Go down three times to return to the portal entrance.
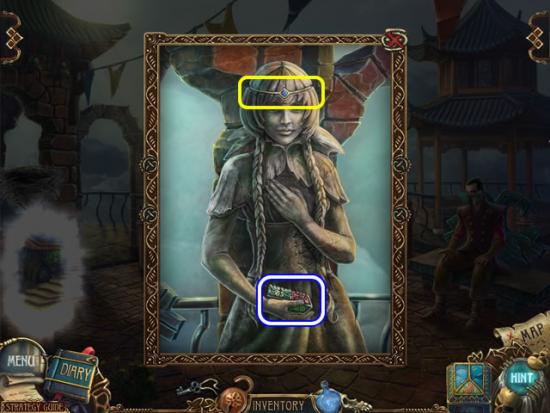
- Zoom in on the statue.
- Put the TIARA on her head; take the WINDMILL PART from her hand.
- Go forward down the steps.
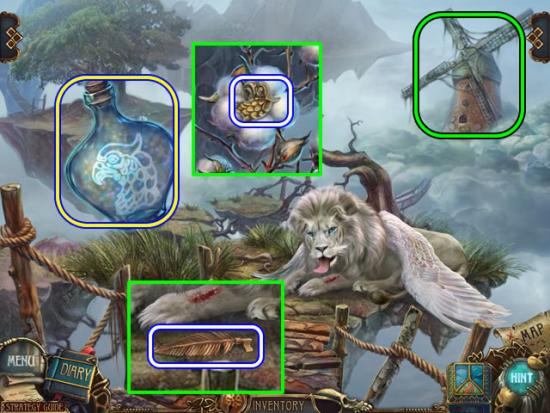
- Use the bottle to find the hidden area.
- Pour the bottle over the plant to make it bloom; take the EAGLE HEAD.
- Look at the wounded lion; pick up the KEY.
- Zoom in on the windmill.
- Attach the WINDMILL PART to open a puzzle.
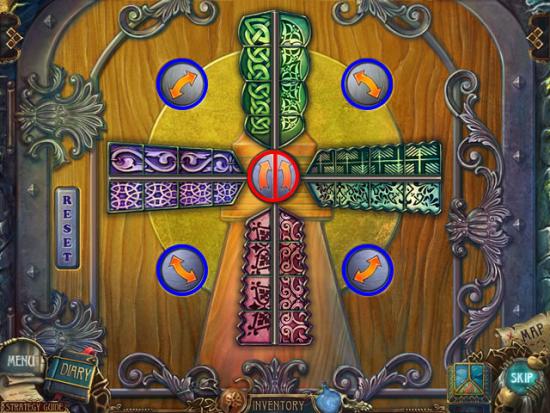
- The goal is to align the patterns and colors as shown above.
- Use the four outside arrows to swap two top panels. The center arrows rotate entire panels.
- The next screenshot gives a solution.
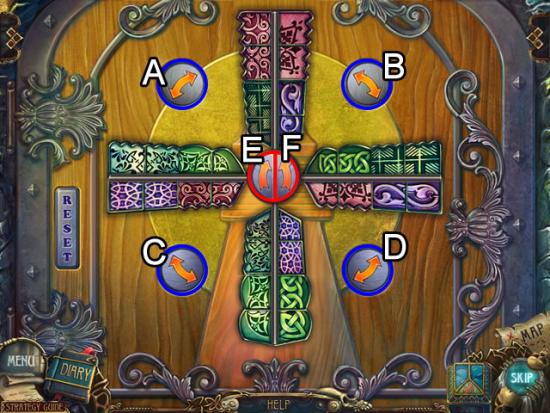
- Press the Reset button. Click the buttons in this order:
- A, B, C, D, Ex3, A, B, C, D, Fx2, A, Ex2, A, Ex3, Fx3, B and F.
- Enter the windmill.
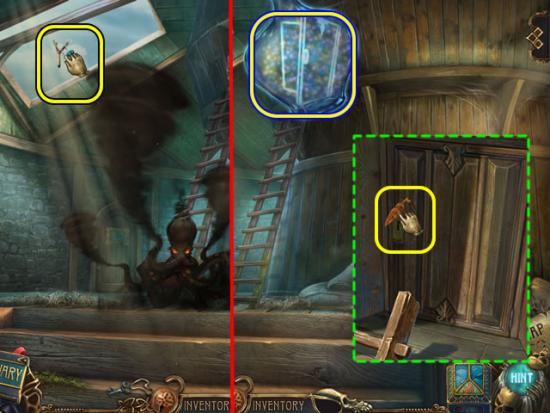
- Use the SLINGSHOT to break the window and suck out the whirlwind.
- Move the magic bottle around the scene to find the hidden area.
- Pour the contents of the bottle to the vines; insert the KEY in the door.
- Enter the attic.
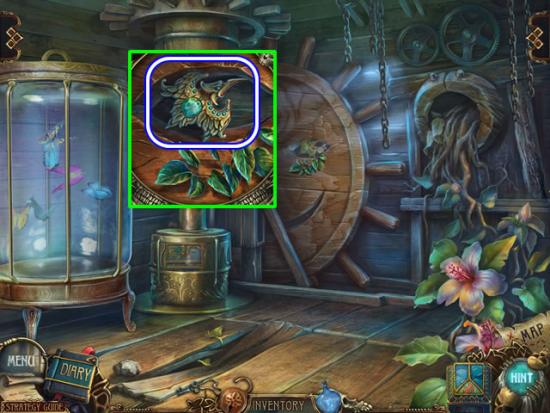
- Examine the back wall; take the BIRD.
- Exit the attic.
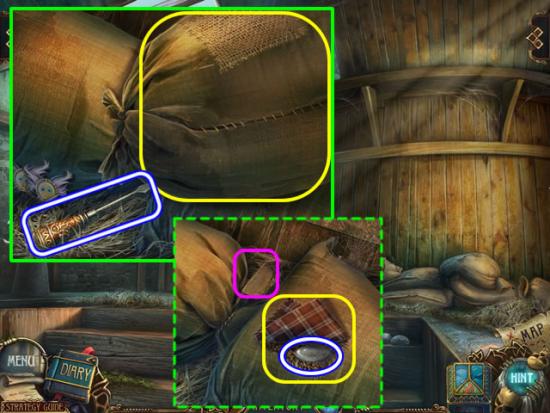
- Examine the pile of sacks.
- Pick up the SCREWDRIVER; click the top sack to move it.
- Pop the bubble and read the note.
- Open the patch on the sack; take the LENS.
- Zoom in on the door.
- Put the BIRD in the inset to open a puzzle.
- The goal is to put each bird in the slot matching its shape.
- The next three screenshots give solutions for each round.
- The birds can only move in the direction they are pointed. A bird can push one or more birds.
- Please make these moves: Ax2, Bx2, C, Ax2, Cx3, Ax2 and Bx2.
- Please make these moves: B, Ax2, C, Dx2, Bx2, D, B, A, Cx2, Dx2, Ax3 and Cx2.
- Please make these moves: D, Ex2, A, C, E, D, B, D, Cx2, Ax2, C, Ax3, Bx3, Ex2 and Dx2.
- Solving the puzzle opens the door.
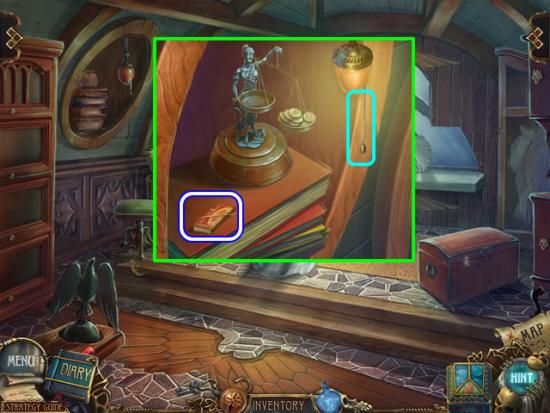
- Zoom in on the cubbyhole.
- Pull the chain to turn on the light; take the MATCHES.
- Open the (unlocked!) chest.
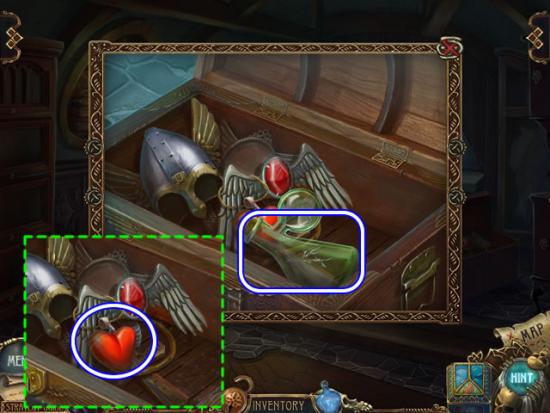
- Pick up the CLOUD COLLECTOR and the PENDANT.
- Exit the room.
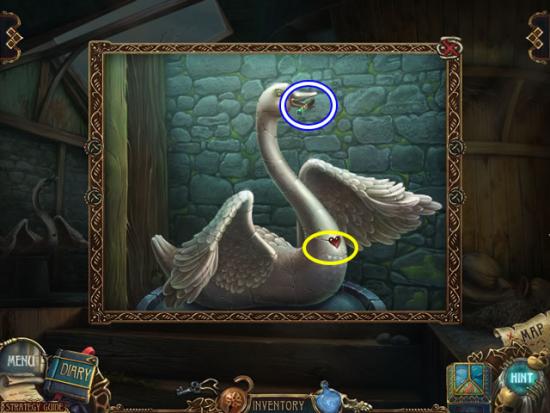
- Zoom in on the swan.
- Insert the PENDANT in the inset; take the MECHANISM PART from its mouth.
- Go down twice; go left through the arch.
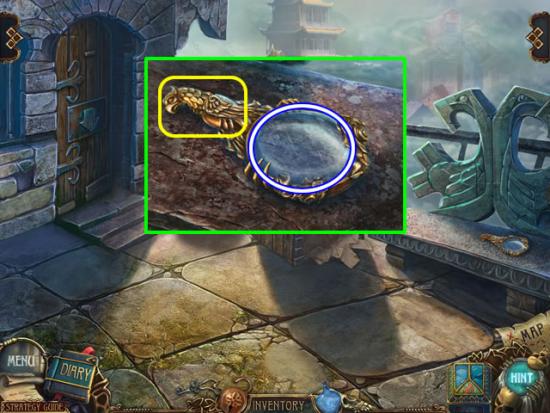
- Zoom in on the bench.
- Affix the EAGLE HEAD to the handle.
- Take the second LENS.
- Go down once.
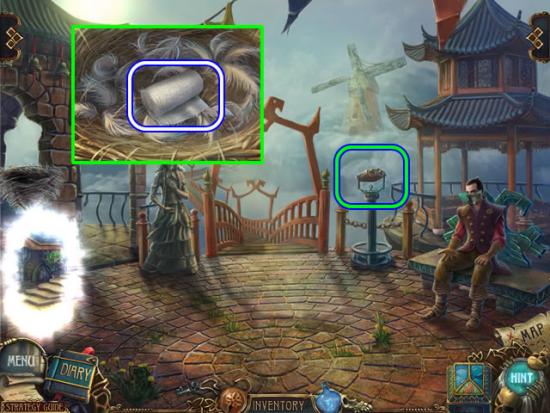
- Peer into the nest.
- Move the feathers to find the BANDAGE.
- Go to the binoculars stand.
- Put a LENS on each eyepiece to open a puzzle.
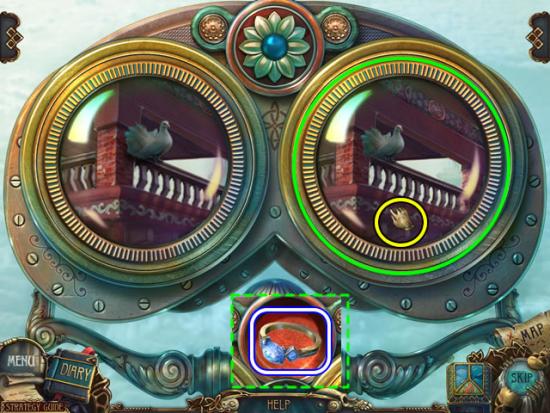
- Drag the view in the right lens until the scene matches the left lens.
- Correctly matching the view changes the image.
- There are nine rounds to this puzzle.
- Take the RING from the compartment.
- Go left twice and forward to the floating pagodas.
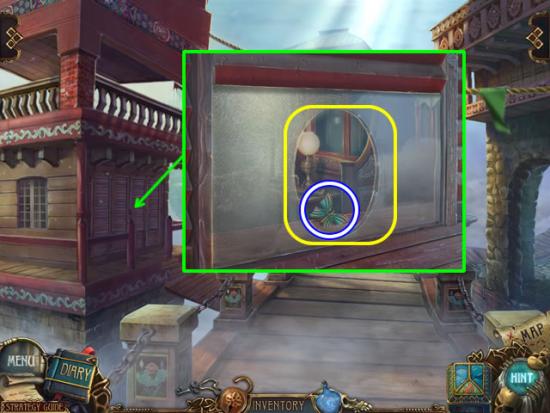
- Zoom in the building
- Lift the blinds; use the RING to cut the glass; take the BUTTERFLY.
- Go back to the top of the windmill.
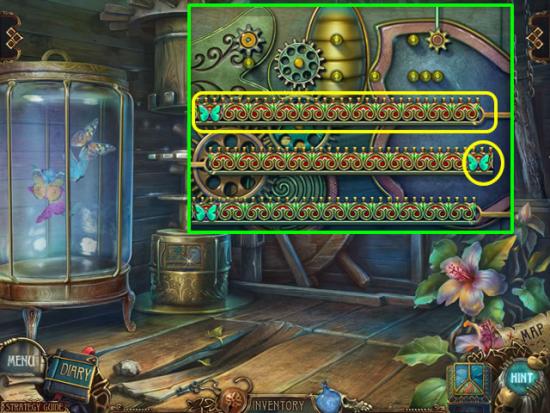
- Zoom in on the device by the butterfly cage.
- Attach the MECHANISM PART and insert the BUTTERFLY to open a puzzle.
- The goal is to remove the three mechanism bars by arranging an increasing number gears.
- The next screenshot shows the three needed gear placements.
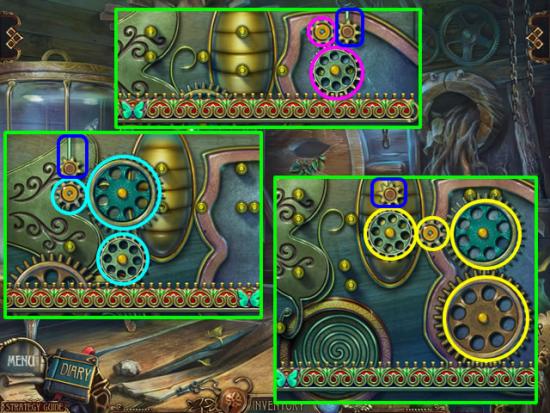
- Put the gears on the pins so it meshes with the other spinning gears. A gear cannot be placed on a pin if it will overlap an existing gear.
- Retracting the bars releases the butterflies.
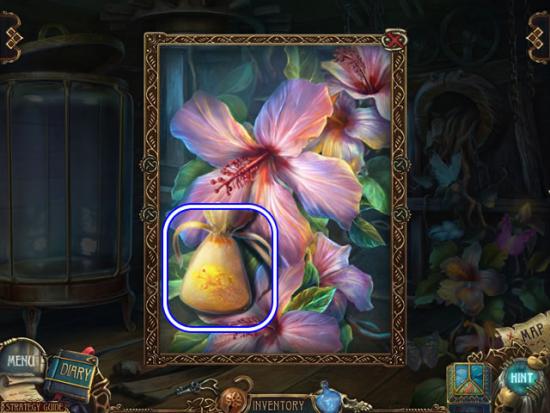
- Zoom in on the plant with the butterflies.
- Put the POLLEN BAG on the flower; receive a bag of HEALING POTION.
- Return to the wounded lion.
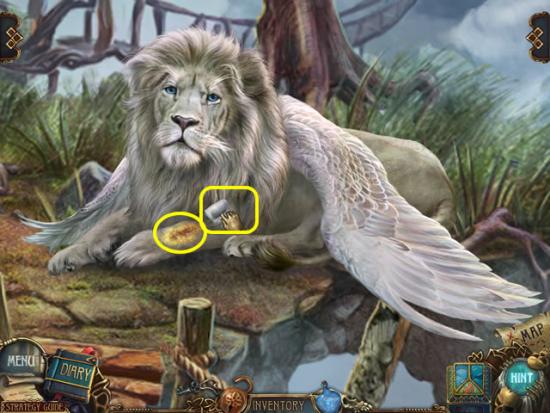
- Pour the bag of HEALING POTION on the wound and bind it with the BANDAGE.
- Pat the healed lion to ride it to the floating tree.
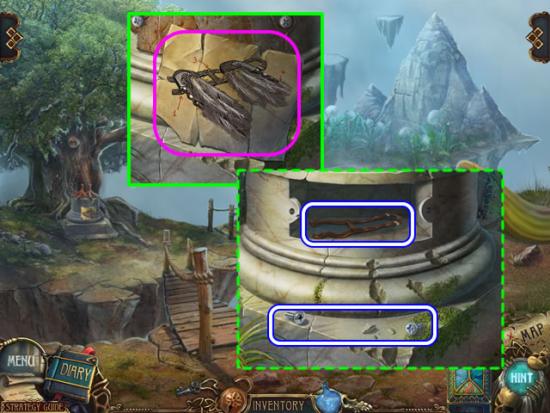
- Zoom in on the pedestal at the base of the tree.
- Take the wing harness directions for the diary.
- Use the SCREWDRIVER to remove the plate.
- Take the BELT from the compartment; pick up the SCREWS.
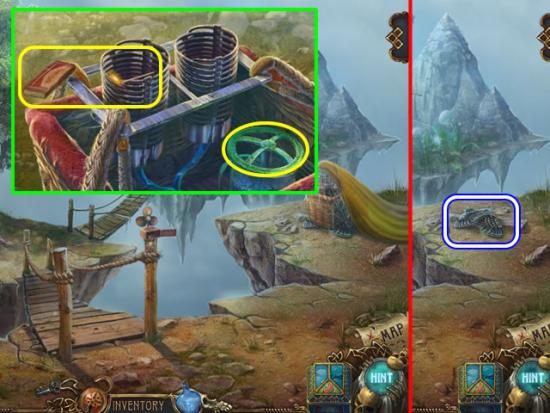
- Look in the hot air balloon basket.
- Turn the valve; ignite the burners with the MATCHES.
- Pick up the PEGASUS WINGS after the balloon takes off.
- Go forward.
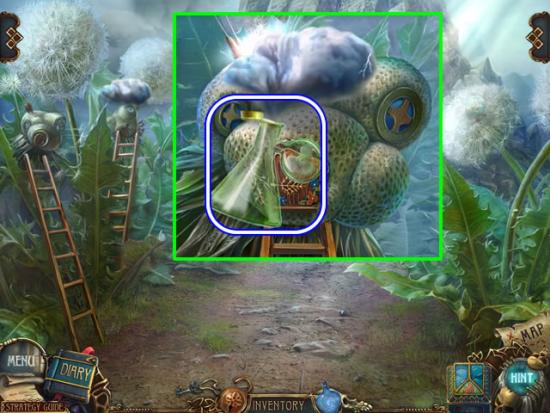
- Look closer at the top of the second ladder on the left.
- Use the CLOUD COLLECTOR to capture the CLOUD.
- Go down.
- Zoom in on the broken fan.
- Put the CLOUD in the fan compartment; take the FAN.
- Go forward.
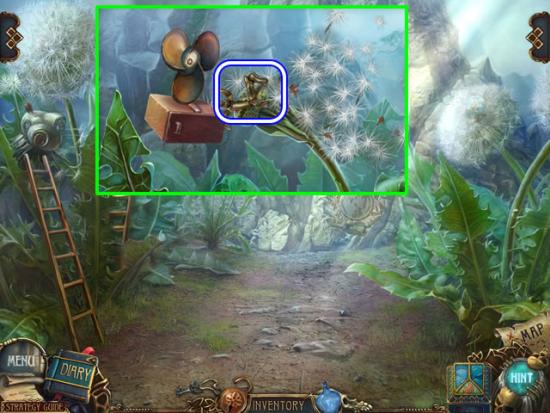
- Examine the dandelion on the right.
- Pop the bubble; take the note for the diary.
- Use the FAN to blow away the dandelion seeds; pick up the second PTERODACTYL BONE.
- Zoom in on the carving in the mountain.
- Put the PTERODACTYL BONES in the empty slots to open a puzzle.
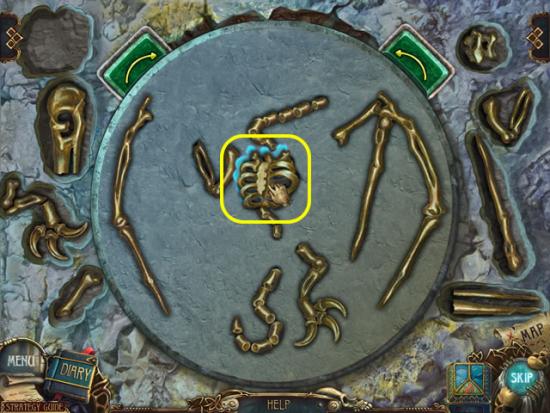
- The goal is to place the bones to reassemble the skeleton.
- Use the arrow buttons to rotate the wheel to position it next to the pieces. Drag a piece onto the wheel. A blue outline glows when a piece is correctly positioned.
- The placement order is shown in the next screenshot.
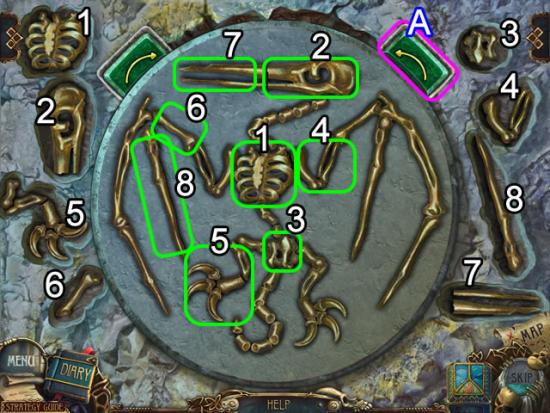
- Beginning at the opening puzzle position, place and click the rotation button (A) in this order:
- 1, A, 2, A, 3, Ax2, 4, A, 5, 6, A, 7 and 8.
- Take the DRAGON from the compartment.
- Return to the room in the windmill where the Air Mage is held captive.
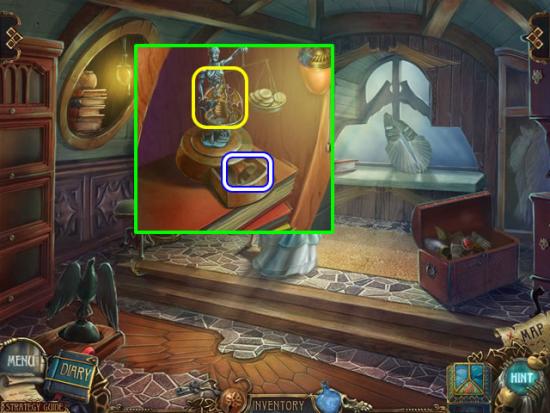
- Zoom in on the cubbyhole.
- Put the DRAGON on the scale; take the BELL from the compartment.
- Look closer at the workbench with the wings.
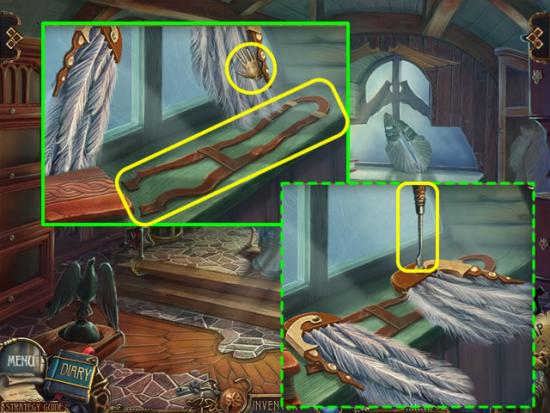
- Put the BELT on the workbench.
- Grab the wings to put them on the belt.
- Put the SCREWS in the wings and secure them with the SCREWDRIVER
- Take the ARTIFICIAL WINGS.
- Go to the bell plaza.
- Play the hidden object scene.
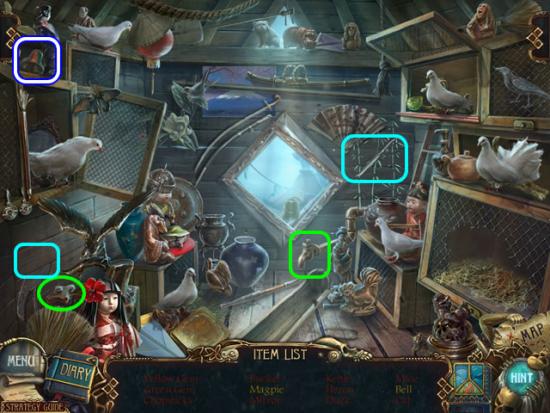
- Put the knob on the tap (green) to fill the trough with feed. The pigeons flock to the trough and uncover the Yellow Gen, Green Gem, Chopsticks, Bucket, Mirror, Kettle, Duck, Mice and Cat.
- Use the knife to carve a Heron in the wall (aqua).
- Find the rest of the listed objects; receive the BELL for inventory.
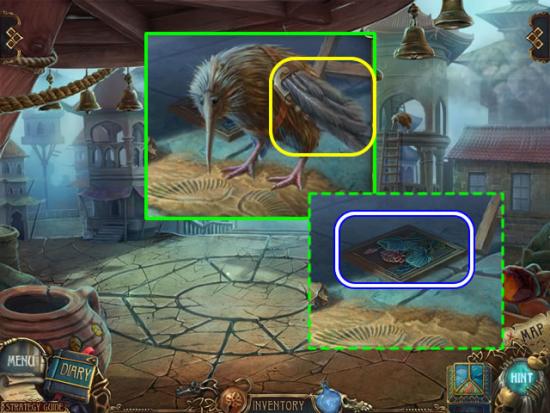
- Look at the kiwi bird.
- Fasten the ARTIFICIAL WINGS to the bird.
- Pick up the PILLAR PART.
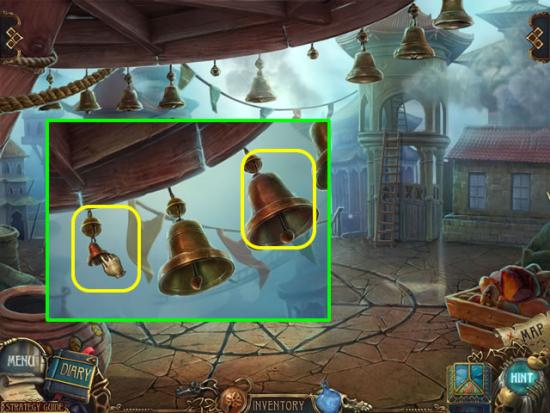
- Zoom in on the overhead bells.
- Hang the two BELLS to raise a statue in the plaza.
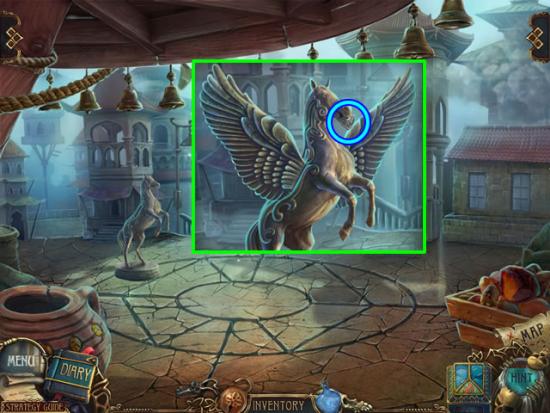
- Examine the statue.
- Insert PEGASUS WINGS on the statue; take the Amulet Piece from its mouth.
- Go forward.
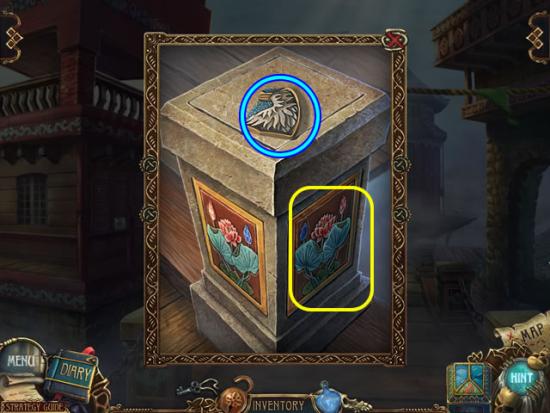
- Zoom in on the post.
- Insert the PILLAR PART; take the last Amulet Piece.
- Return to the Air Mage.
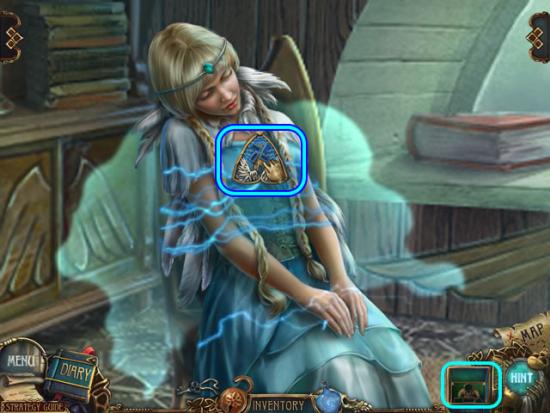
- Zoom in on the Air Mage.
- Open the Amulet Box; place the Air Amulet on the mage.
- Zoom in again to speak to the mage; go through the portal.
- Go to the mine entrance.
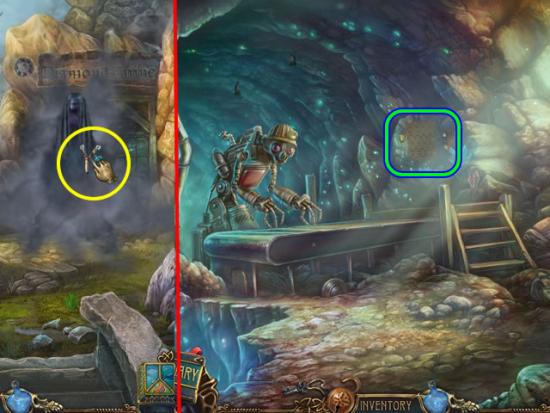
- Use the SLINGSHOT to chase away the raven.
- Enter the mine.
- Zoom in on the robot to get approval to mine.
- Open the puzzle on the wall.
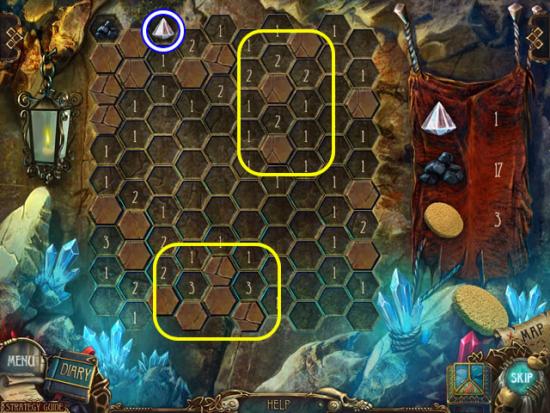
- This is the most difficult round to play.
- Pay close attention to the numbers to identify the coal pile locations.
- Take the DIAMOND.
- Return to the shop.
- Give the monkey the DIAMOND; take the SPHERE OF AIR from the chute.
- Go back through the portal to the Air Mage.
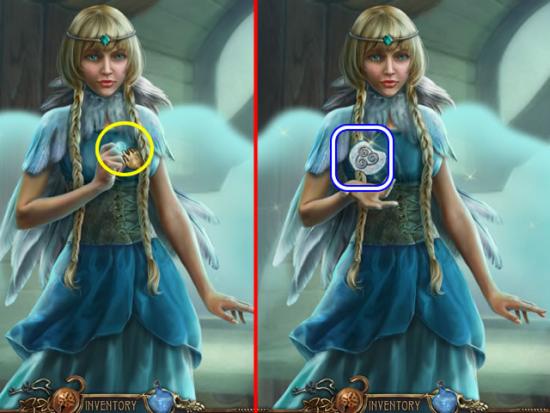
- Give the mage the SPHERE OF AIR; receive the AIR RUNE.
- Return to Azada through the portal.
Chapter 10: The Final Battle
AZ232
- Speak to the character for story information.
- Zoom in on the lock.
- Insert the AIR RUNE, FIRE RUNE and WATER RUNE in the slots to open the door.
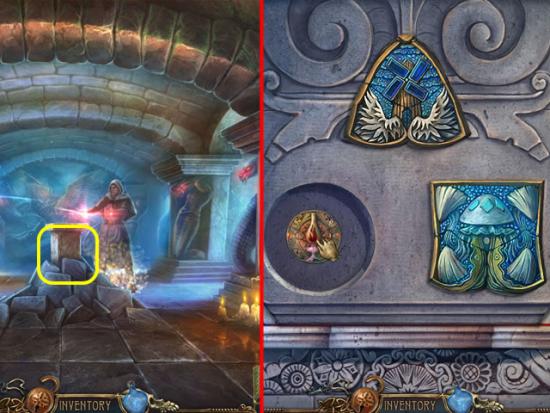
- Zoom in on the pedestal.
- Open the amulet box.
- Place the Air, Fire and Water Amulets in their same-shaped slots to open a puzzle.
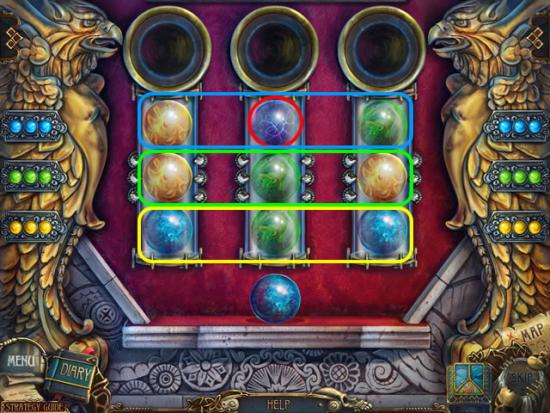
- The goal is to use the spare ball to drop the purple ball out of the tube and arrange the balls in each tube so they are in blue, green, yellow order.
- The next screenshot shows how to do this.
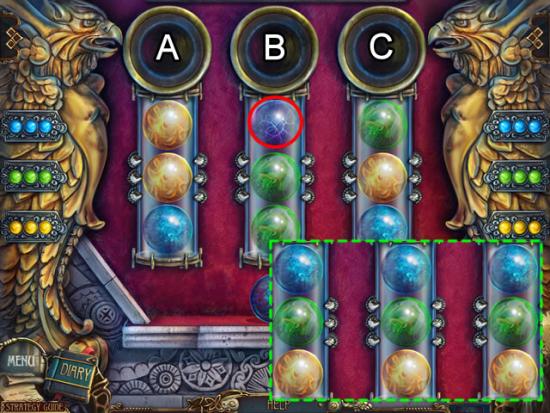
- Unfortunately, this game does not have a reset button.
- From the original starting position, drop the spare ball into the tubes in the follow order: Cx2, Bx2, Ax2, Cx3 and B.
- View the final cutscene.
Congratulations!
You have completed Gamezebo’s walkthrough for Azada: Elementa! You should be all set on your way to play your best game! Be sure to check back often for game updates, staff and user reviews, user tips, forums comments and much more here at Gamezebo!
More articles...
Monopoly GO! Free Rolls – Links For Free Dice
By Glen Fox
Wondering how to get Monopoly GO! free rolls? Well, you’ve come to the right place. In this guide, we provide you with a bunch of tips and tricks to get some free rolls for the hit new mobile game. We’ll …Best Roblox Horror Games to Play Right Now – Updated Weekly
By Adele Wilson
Our Best Roblox Horror Games guide features the scariest and most creative experiences to play right now on the platform!The BEST Roblox Games of The Week – Games You Need To Play!
By Sho Roberts
Our feature shares our pick for the Best Roblox Games of the week! With our feature, we guarantee you'll find something new to play!Type Soul Clan Rarity Guide – All Legendary And Common Clans Listed!
By Nathan Ball
Wondering what your odds of rolling a particular Clan are? Wonder no more, with my handy Type Soul Clan Rarity guide.


