
Best Horror Games On Itch.io – July 2026
Across a bounty of subgenres.
Grow A Garden 2 Base Price List
What's the most valuable crop?![Evomon Types Guide [Strengths, Weaknesses, Resistance]](/wp-content/uploads/2026/06/evomon-types.jpg "Evomon Types Guide [Strengths, Weaknesses, Resistance]")
Evomon Types Guide [Strengths, Weaknesses, Resistance]
Your companion guide during battles.
![[Roblox] Evomon Shiny Hunting Guide – Including Prismatic and Pris Shinies!](/wp-content/uploads/2026/06/evomon-shiny-hunting-guide.jpg "[Roblox] Evomon Shiny Hunting Guide – Including Prismatic and Pris Shinies!")
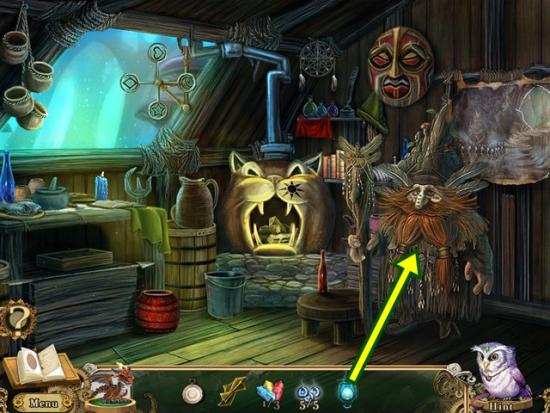
Awakening: The Goblin Kingdom Walkthrough
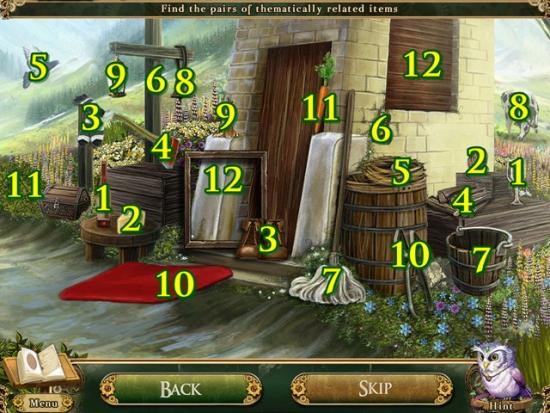
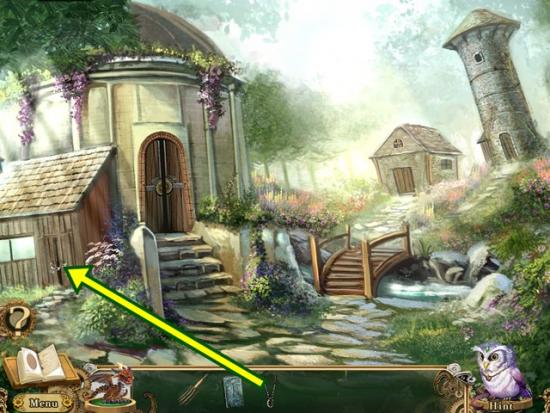
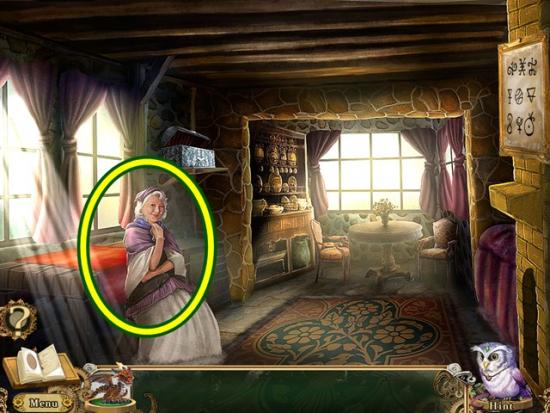
Welcome to the Awakening: the Goblin Kingdom walkthrough on Gamezebo. Awakening: the Goblin Kingdom is a hidden object/adventure game played on the PC created by Boomzap. This walkthrough includes tips and tricks, helpful hints, and a strategy guide to how to complete Awakening: the Goblin Kingdom.
Share this


- Prefer Gamezebo on Google

Awakening: The Goblin Kingdom – Game Introduction
Welcome to the Awakening: the Goblin Kingdom walkthrough on Gamezebo. Awakening: the Goblin Kingdom is a hidden object/adventure game played on the PC created by Boomzap. This walkthrough includes tips and tricks, helpful hints, and a strategy guide to how to complete Awakening: the Goblin Kingdom.
How to Use this Walkthrough (Please read)
- This walkthrough is meant to be used as a guide to assist in solving mini-puzzles and acquiring all items in order to complete the game. You may explore locations in the order you wish, this walkthrough is written to take the most direct route to the game’s finish.
- Play the tutorial!!!! This walkthrough will assume you have and won’t explain anything explained in the tutorial.
- Inventory objects will be written in bold. The walkthrough will state, “Use the inventory item on the blah blah,” because it assumes you have the item. If you don’t have the item, on your keyboard, press CTRL+F (at the same time). In the text box, type the name of the item you are looking for and press ENTER. This will scan this page for the appearance of that word.
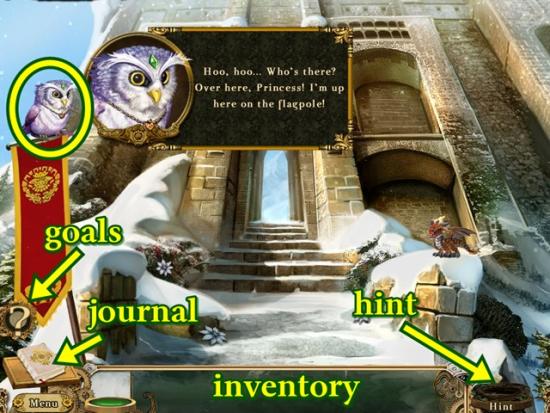
Gameplay and Tips
- This is a hidden object adventure game. You will move from location to location solving hidden object hunts, mini-puzzles and picking up items to use in order to proceed in the game.
- There are two difficulty settings, Normal allows the Hint and Skip puzzles meters to fill “normally” and no guidance is given. Casual has faster filling Hint and Skip meters and guidance is available. Sparkles aren’t very noticeable.
- The Menu button at the bottom left of the screen will bring you back to the main screen.
- Items collected throughout the game go into your inventory, located at the bottom of your screen.
- Closing a window – To close the zoom-in windows, click anywhere outside of the window.
- Mini-puzzles can be skipped once the Skip button fills.
- Hint system – Ran the Owl provides you with hints. Hints are available in the bottom right-hand of the screen.
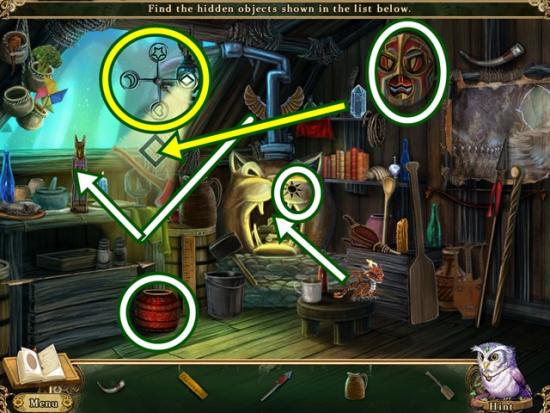
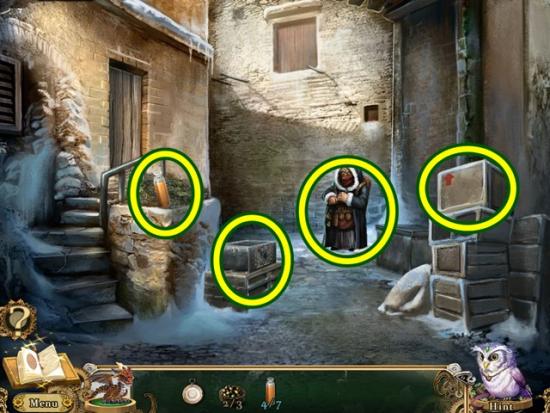
- Hidden object hunts provide a list of items to find. Click on items in the scene to cross them off the list. Items written in yellow mean the item isn’t readily available. You will have to look inside something (i.e., a box, a drawer, a door, etc.) or you have to perform an action. Once you have found all the hidden objects, an item is added to your inventory.
- Hidden objects screenshots will only highlight (yellow circles) the items added to your inventory.
- Journal – The journal is located in the bottom left corner. Your journal tracks your game’s progress and also provides hints and clues for puzzles. The “goal” tab shows your current goals. Click the Close button to close the journal.
- Achievements – This game has achievements. From the Main Menu screen, click the Achievements button and look them over.
Navigation and Naming Convention
- There is no map in this game. The name of each room appears when you hover your cursor over the entryway to the next scene/area. This walkthrough will use that naming convention and will state, “return to the blah blah” and will not explain the route to take.
- When you hover your mouse over action areas or inventory items, the name of the area/item appears at the top of the scene. This walkthrough will use that naming convention.
Chapter One
- From the main menu screen, press Play. Enter your name and choose a difficulty setting. Watch the cutscene.
- Read the journal entry. Click the arrow to turn the page. Click Close when you are done.
- Click Yes to play the tutorial. Even if you are a veteran of these types of games, play the tutorial. Sometimes there’s something different and the tutorial is where it’s explained. This walkthrough assumes you have played the tutorial and won’t explain concepts explained there.

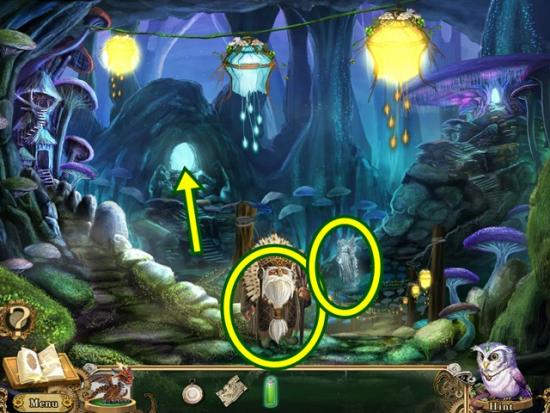
- Talk to the owl. Once he’s added as your hint system, click on the journal to read the latest entry. Click Close to close the journal.
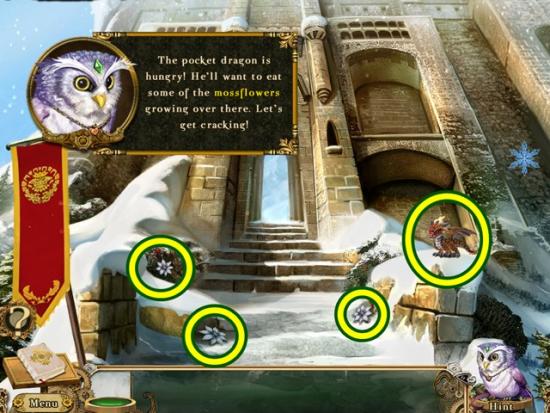
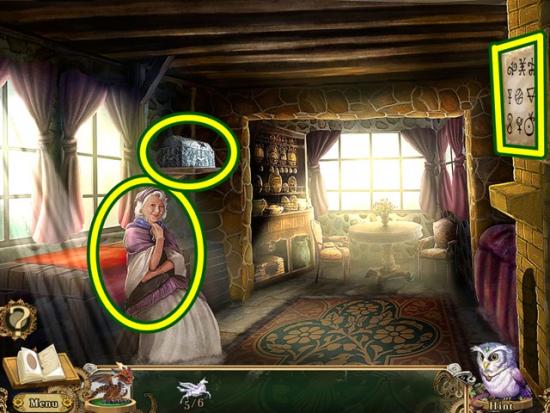
- Try to pick up the pocket dragon. Pick up the three mossflowers. Give the mossflowers to the pocket dragon. Take the pocket dragon. He’s added to the left of your inventory.
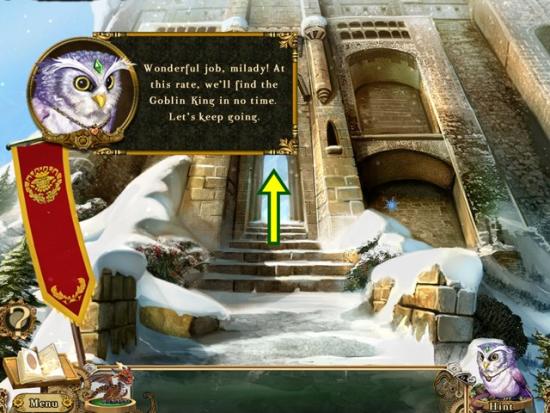
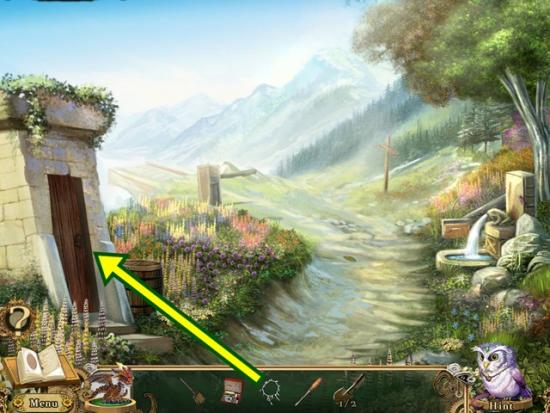
- Go through the doorway.
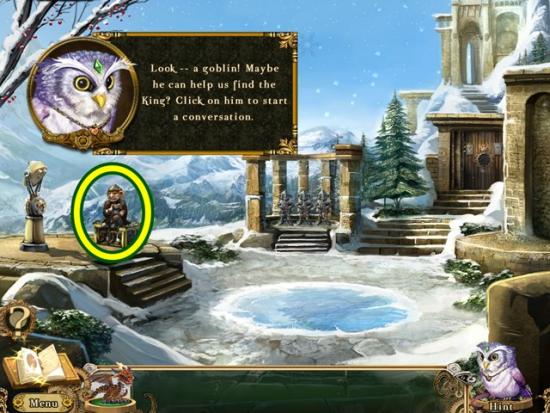
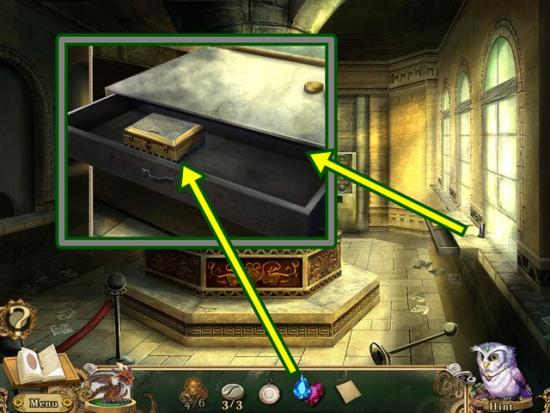
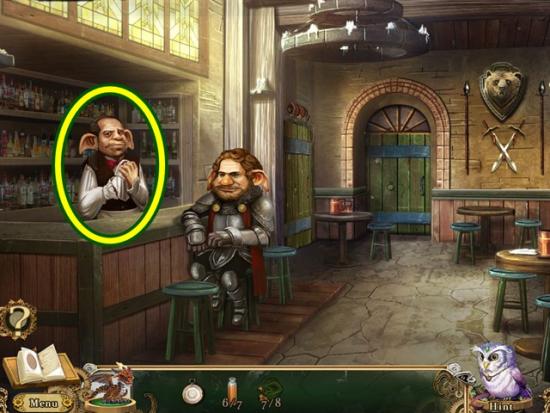
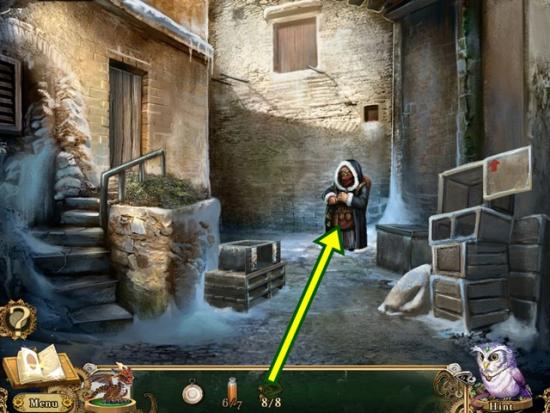
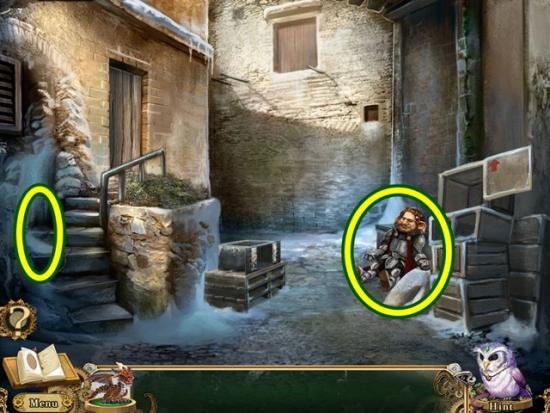
- Talk to the goblin. Once the goblin leaves, click on the box on which he was sitting.
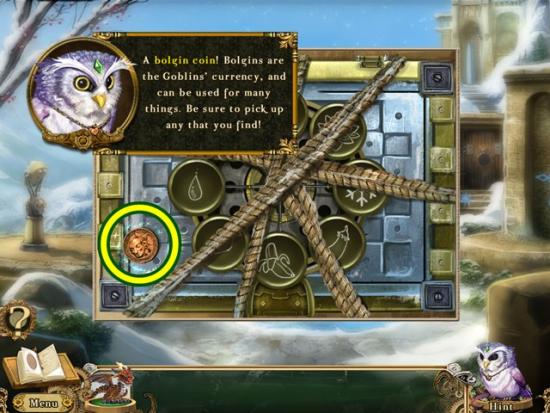
- Take the bolgin coin. Click anywhere outside of the window to close it.
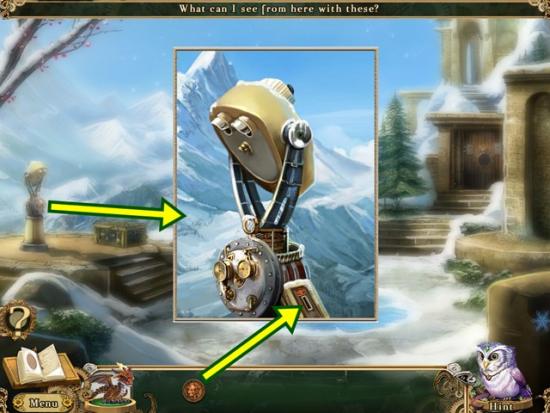
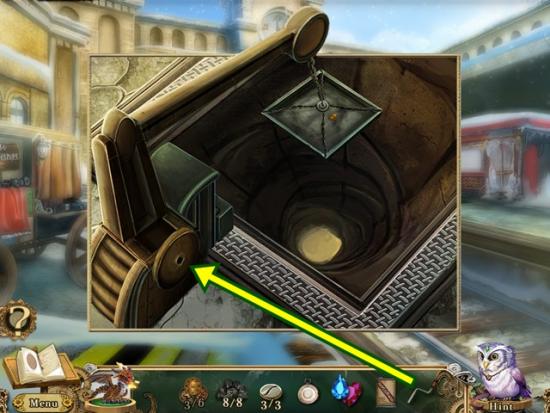
- Click on the telescope. Insert the bolgin coin.
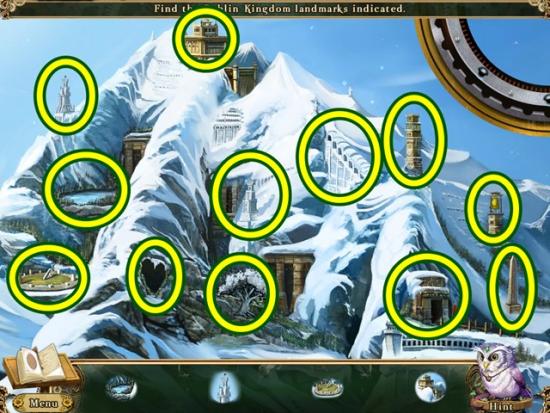
- Landmarks appear at the bottom of the screen. Move the lens around to find all the landmarks, then click on them when you see them.

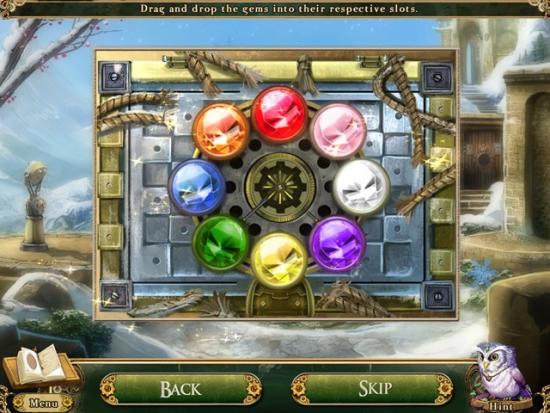
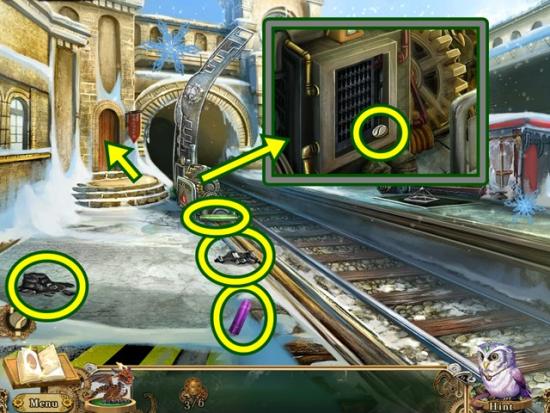
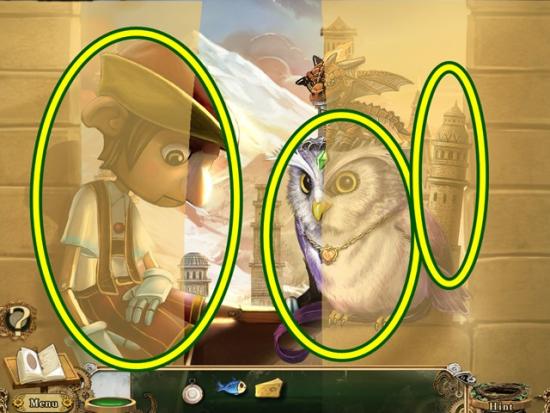
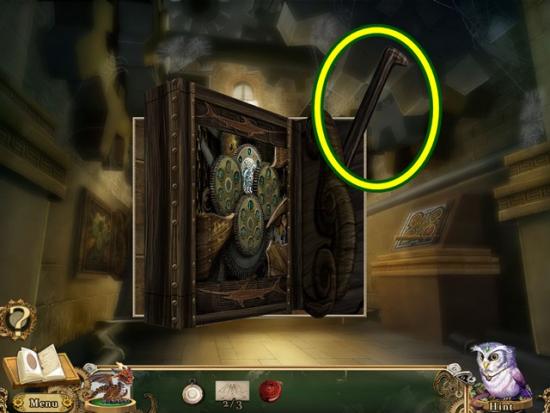
- Take the eight prism spheres from the telescope panel.
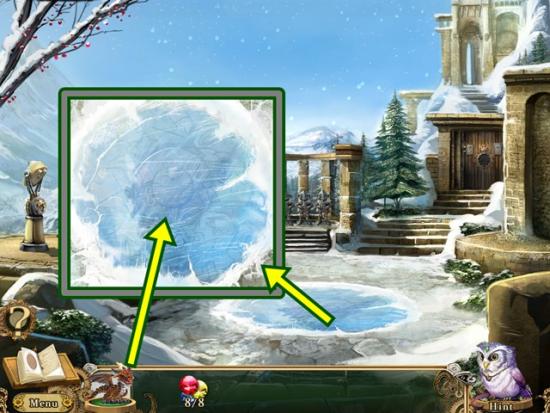
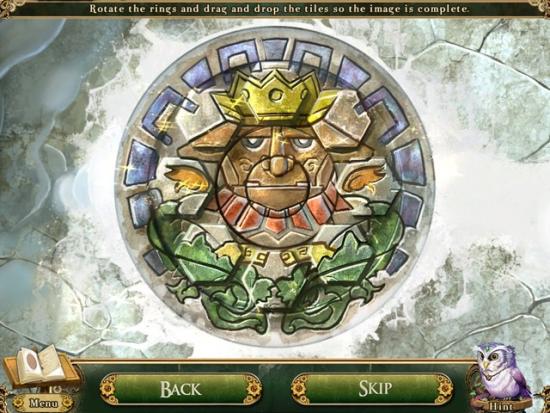
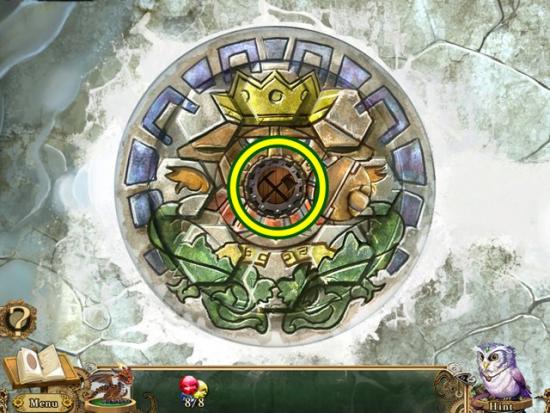
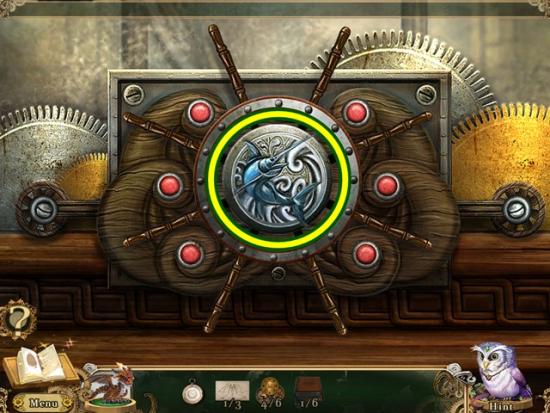
- Click on the icy patch. Use the pocket dragon to breathe fire on the ice (three clicks).
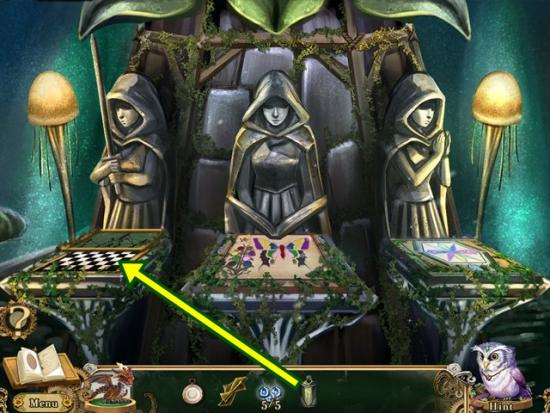
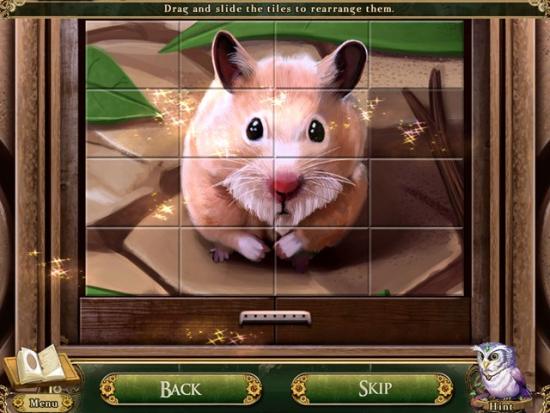
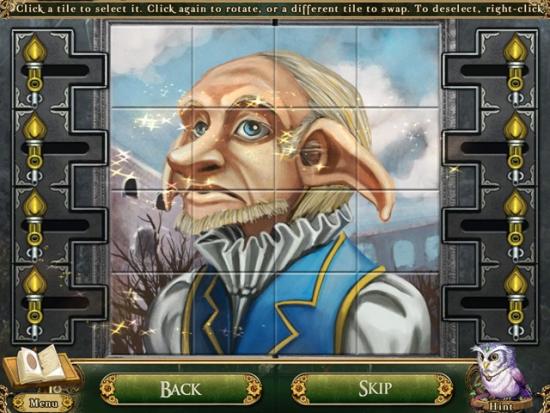
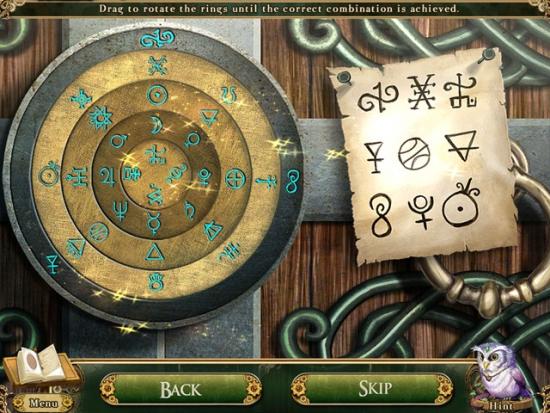
- A mini-puzzle starts. Rotate the rings to their proper position (use the centre piece as a guide), then rearrange the tiles to complete the image. To move a tile, click and drag it to the desired position, then release the mouse button and it will swap positions with that tile.
- Solution:
- When the middle panel moves, take the goblin shield.
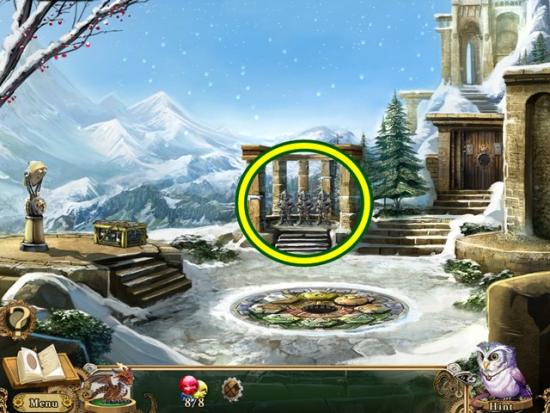
- Click on the goblin armour.
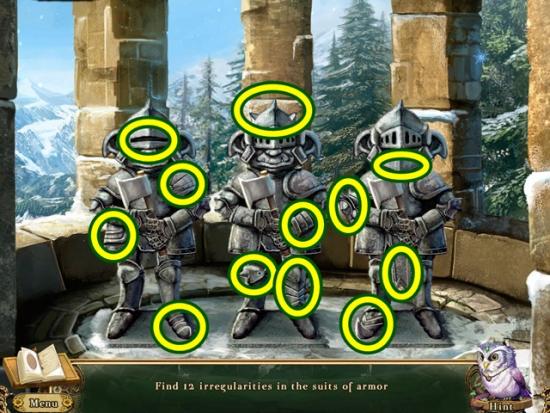
- Find the 12 differences between the suits of armour. Take the goblin axe that falls.

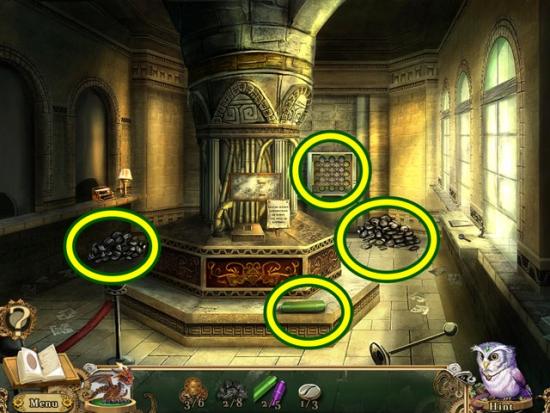
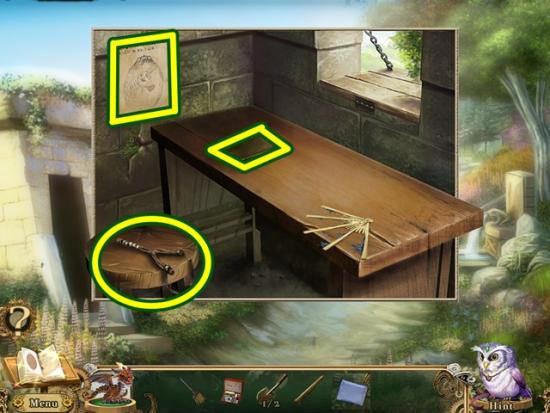
- Click on the crate where the goblin had been sitting.
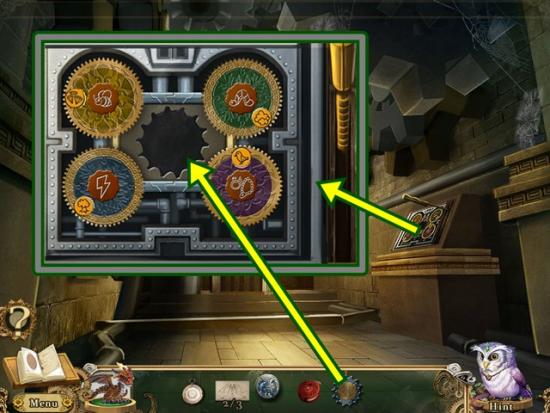
- Cut the rope with the goblin axe (four clicks). Take note of the symbols on each circle. Add the prism spheres.
- A mini-puzzle starts. Rearrange the prisms. Match the prisms’ colour to the images on each slot (i.e., the banana requires the yellow prism; the rose requires the red prism, etc.). Once a prism is in its proper slot, it can no longer be moved.
- Solution:
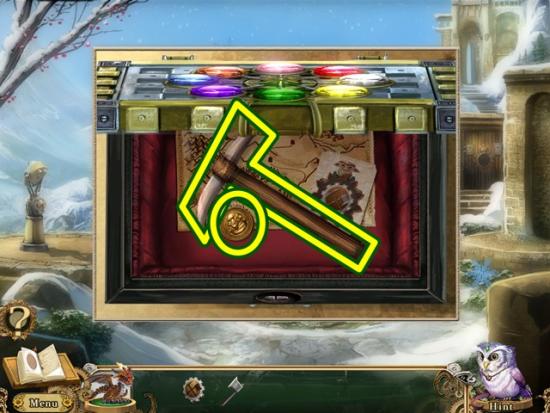
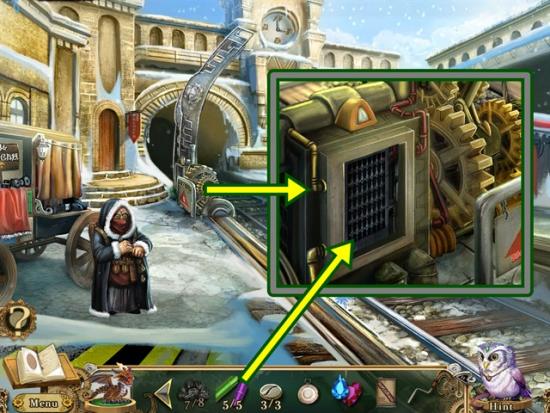
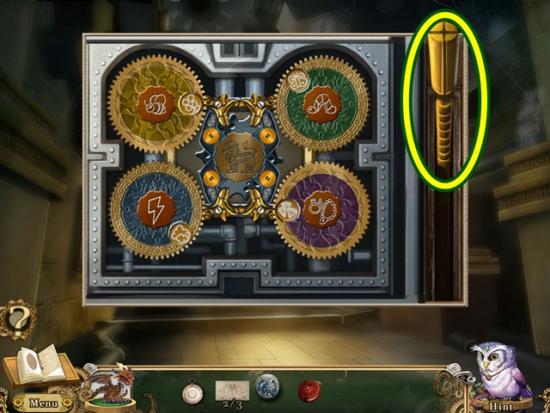
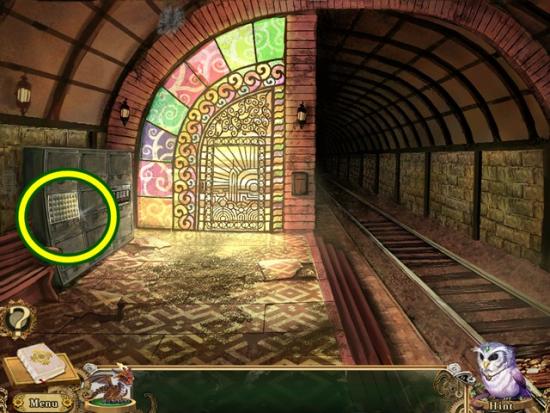
- Take the bolgin coin and pickaxe. Look at the goblin rail service map. Click on it to add it to your journal. Take note of the symbol.
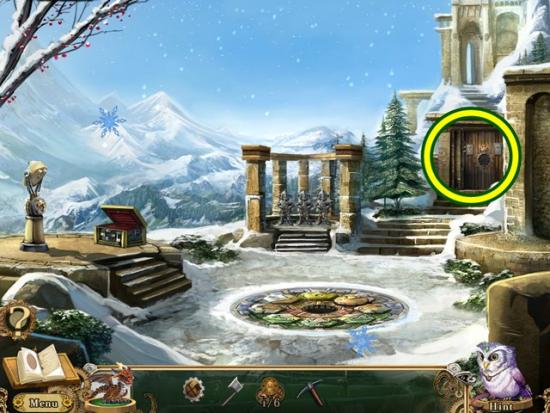
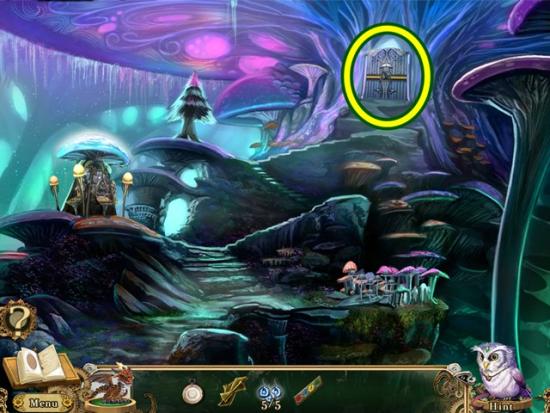
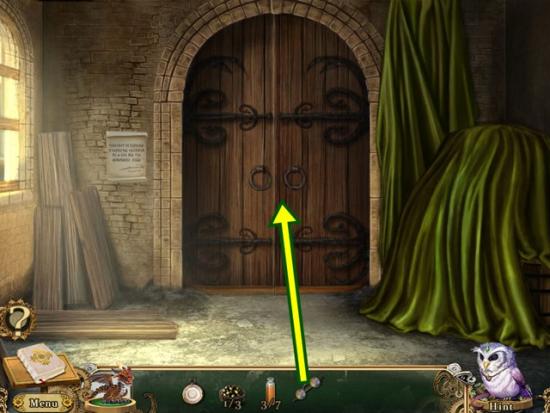
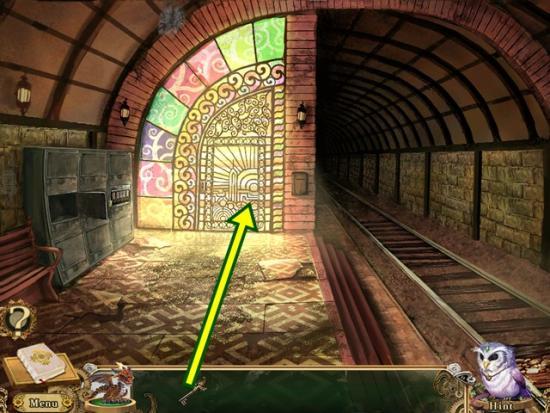
- Click on the goblin gate (the door).
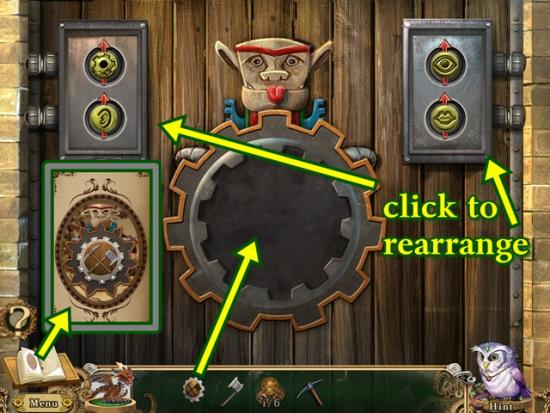
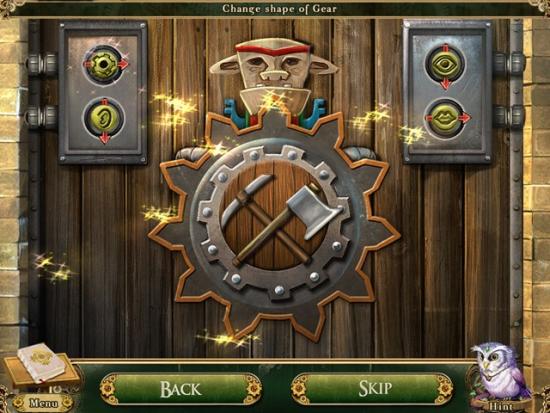
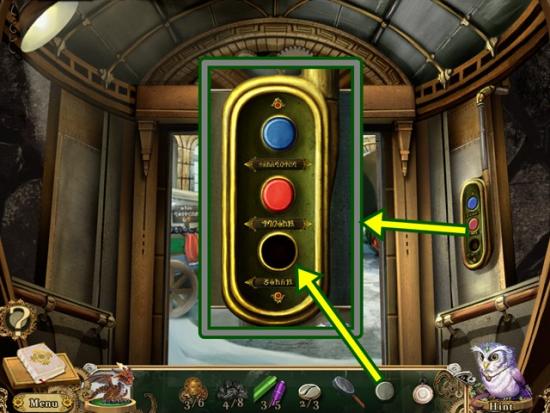
- Add the goblin shield to the open slot. Then add the goblin axe and the pickaxe. Rearrange the goblin’s ears, eyes and mouth and the shape of the shield to match the symbol from the goblin rail service map (check your journal).
- Solution:
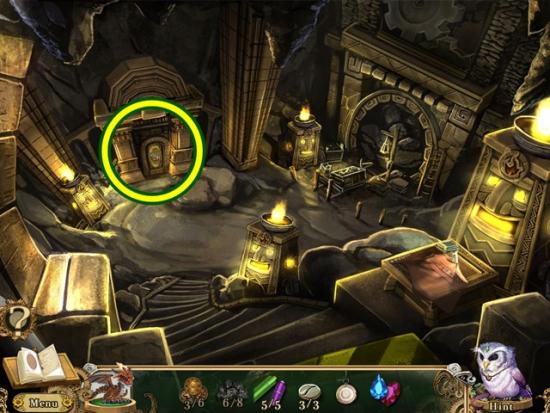
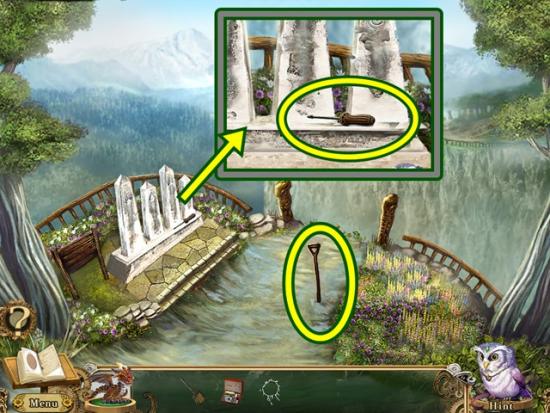
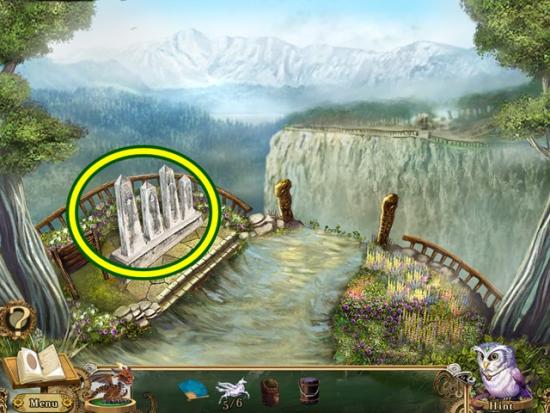
- Go through the arched walkway.
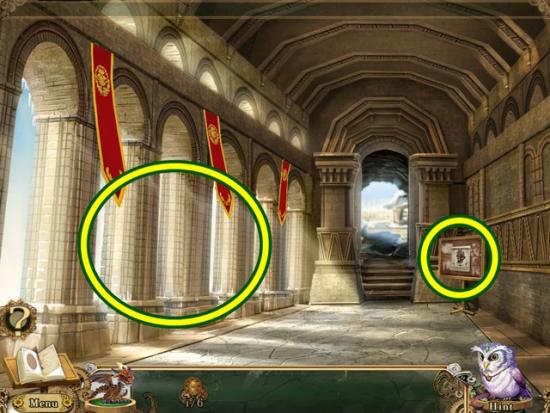
- Click the pillars on the left for a view of the goblin kingdom. Look around and to leave the scene, click south.
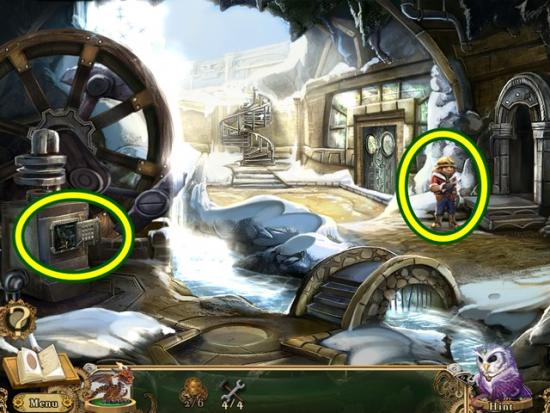
- Click on the flyer. Click on the close-up to add it to your journal. Go through the doorway to the generator room.
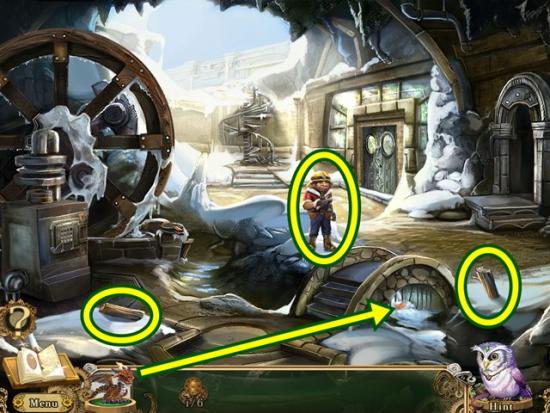
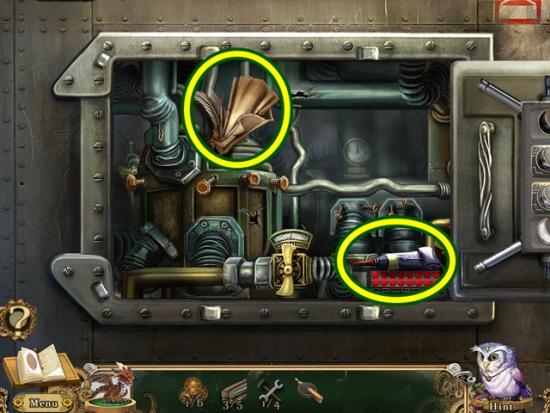
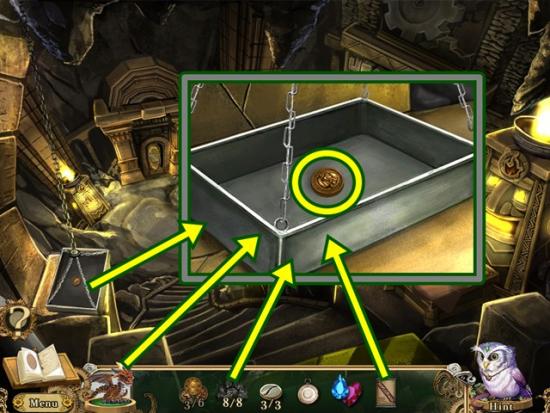
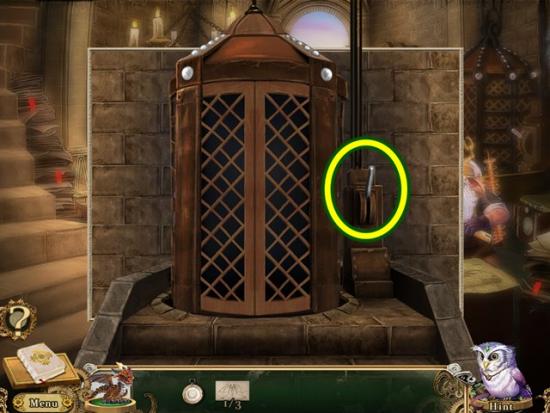
- Talk to the goblin engineer. Take the two pieces of firewood. Click on the grating under the tiny bridge.
- Use the pocket dragon to thaw the ice (two clicks). Take the goblin screwdriver (goblin work tools 1/4).
- Click on the frozen obstruction. Take the firewood and bellows. The pocket dragon cannot thaw this ice. Click anywhere outside of the window to close it.
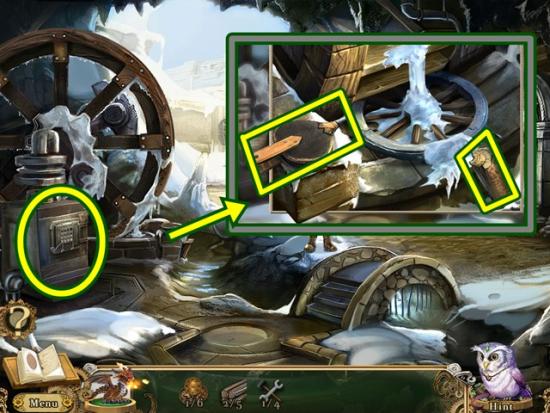
- Click the engine box.
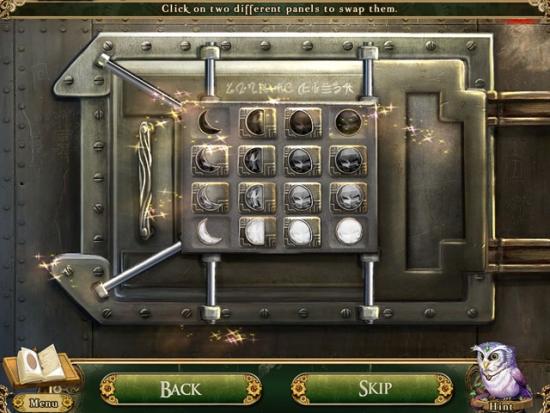
- A mini-puzzle starts. Rearrange the tiles so each row is one colour and shows the order of the moon phases (from crescent to full). Click on two tiles to swap their positions. Click on the scratching above the tiles for the hint, “dark to light.” Since the top row is black, the next row is the dark grey, the next row is light grey and the bottom row is white.
- Solution:
- When the panel opens, take the goblin sealant (goblin work tools 2/4) and the goblin blueprints. Click south to leave the scene.
- Give the goblin blueprints to the goblin engineer.
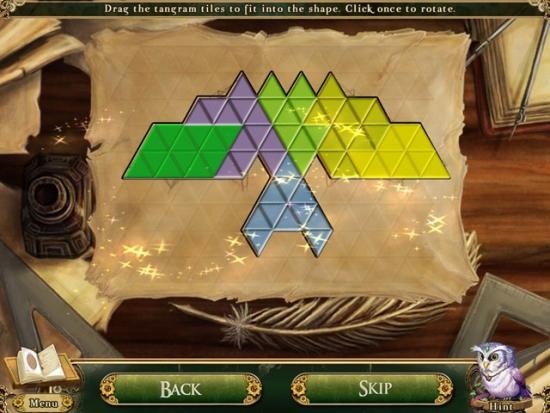
- A mini-puzzle starts. Click and drag the tangram tiles into the puzzle area. To rotate a tile piece, put your cursor over a tile piece and left-click. Right-clicking does nothing.
- Solution:

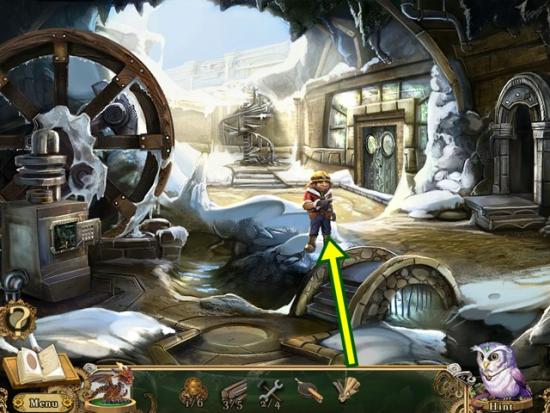
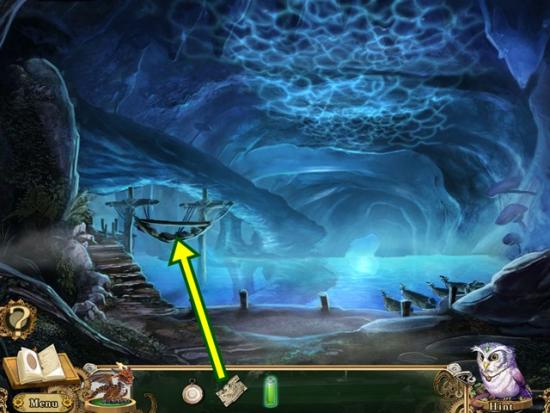
- Once the goblin engineer fixes the staircase, climb the stairs to the cistern.
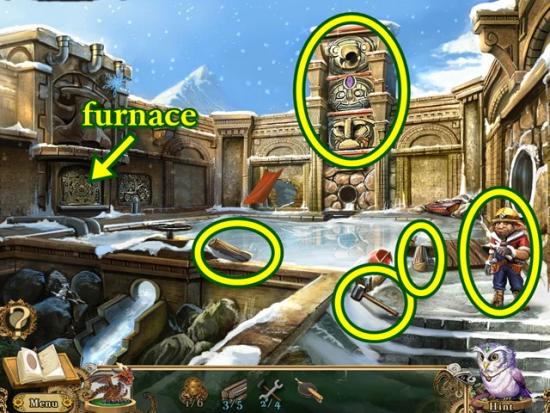
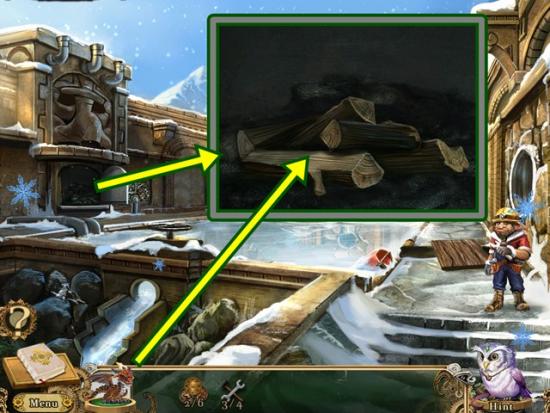
- Talk to the goblin engineer. Take the two pieces of firewood and the goblin hammer (goblin work tools 3/4). Click on the carved totem to add it to your journal. Click on the furnace.
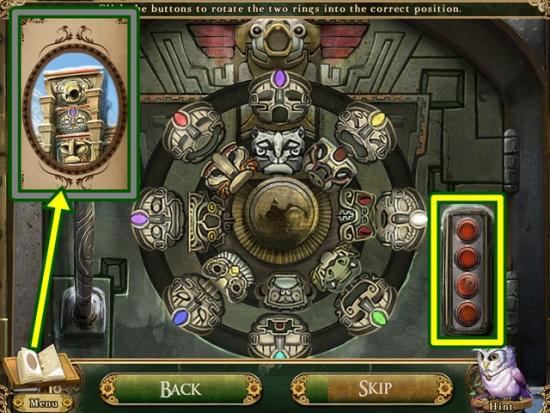
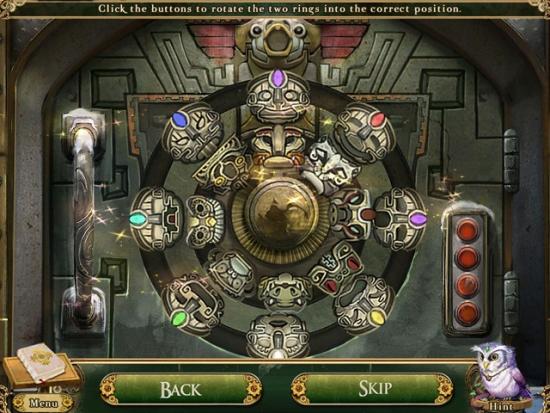
- A mini-puzzle starts. Rearrange the heads to match the carved totem (check your journal). Click the buttons to move the heads. The top button moves the inner circle clockwise three spaces. The second button moves the inner circle counter-clockwise two spaces. The third button moves the outer row clockwise two spaces. The fourth button moves the outer ring counter-clockwise three spaces.
- The starting position of this puzzle is different each play so a step by step solution cannot be given. Get used to the way the heads move and that will help solve this puzzle. You can be patient and just move each row clockwise until it the correct head eventually appears in the 12:00 position.
- Solution:
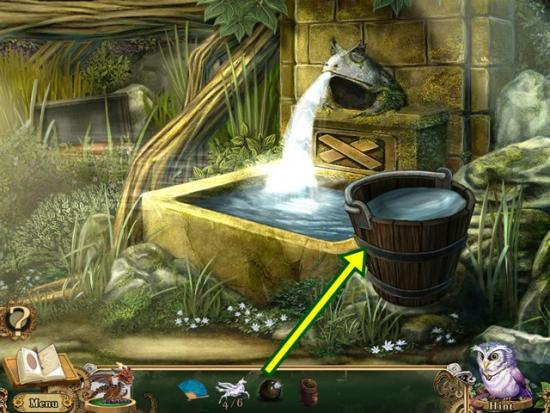
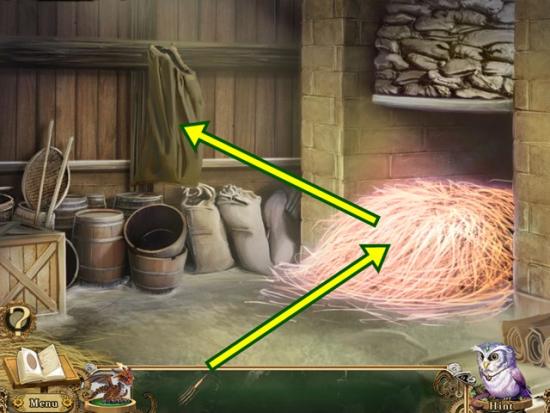
- Use the bellows to blow away the soot (four clicks). Take the bolgin coin and the gate handle. Add the firewood (possible only if you have all five pieces) and set it on fire with the pocket dragon. Leave the scene by going south.
- Go down the stairs to the generator room.
- Click on the greenhouse gate. Add the gate handle, then turn the handle to open the gate.
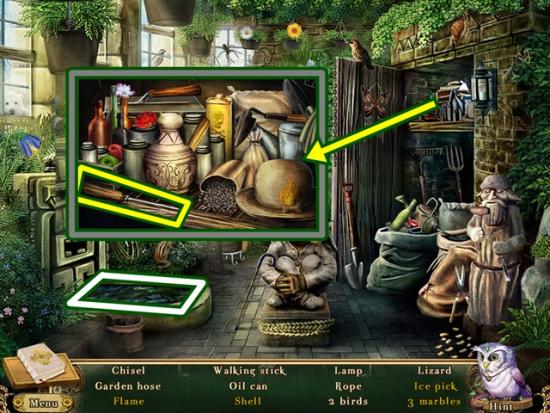
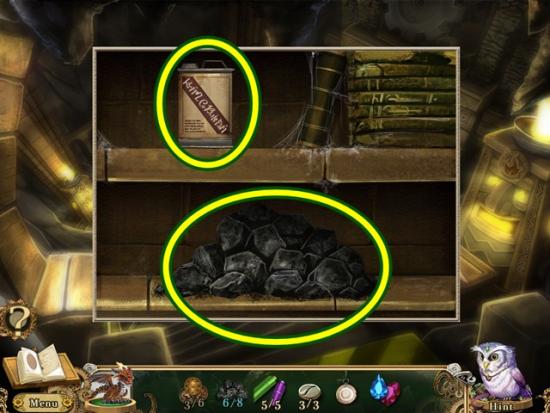
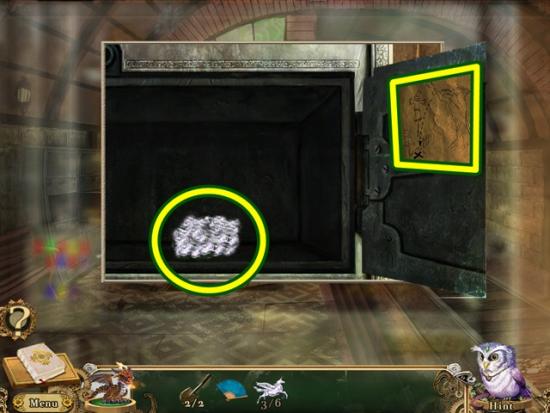
- A hidden object hunt starts. Find all the objects. Click on the fountain to find more objects. Click on the closet shelf to find more objects. An ice pick is added to your inventory.

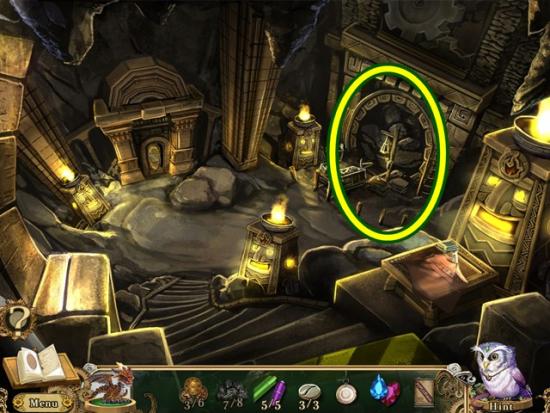
- Click the frozen obstruction. Use the ice pick to chip away the ice and take the wheelbarrow wheel. Go up the stairs to the cistern.

- Click on the rubble.
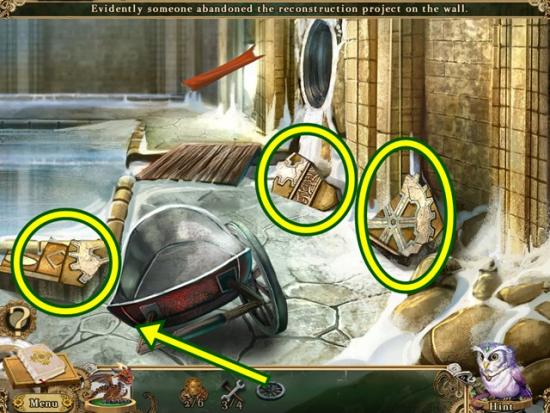
- Put the wheelbarrow wheel on the wheelbarrow. Put the stone blocks in the wheelbarrow. Push the wheelbarrow.
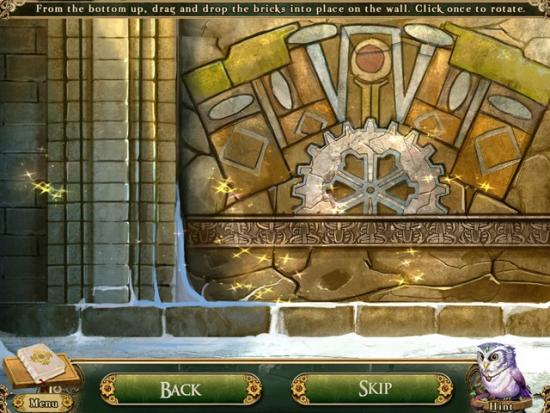
- A mini-puzzle starts. Fill the hole in the wall with the stone blocks. Click and drag to place them. Hover your mouse over a stone block and click to rotate it. Tip: Rotate the blocks over the puzzle area. If it’s in the right position and near enough to where it should be, it will automatically lock into place.
- Solution:
- Click on the furnace. If you haven’t done so already, add the five pieces of firewood. Use the pocket dragon to light the firewood.
- A mini-puzzle starts. Determine which valve handle belongs to which gauge. When a gauge’s needle is in the green zone, turn its valve handle.
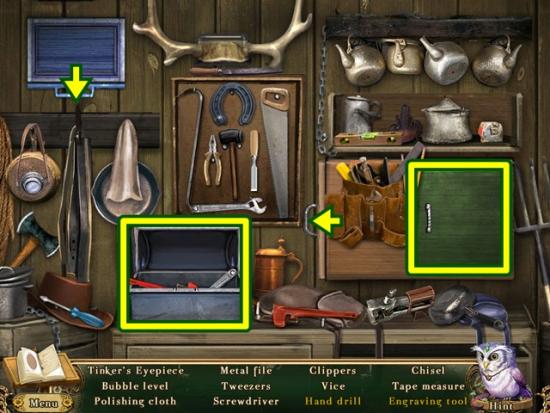
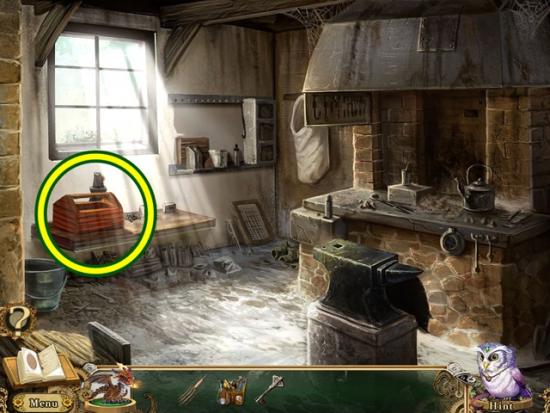
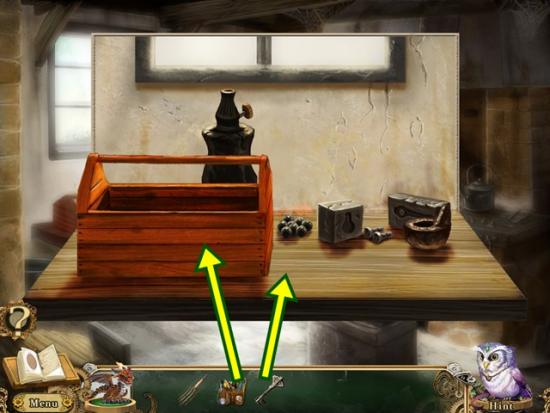
- Click on the goblin toolbox.
- A mini-puzzle starts. Select the parts that match the diagram.
- Solutions:
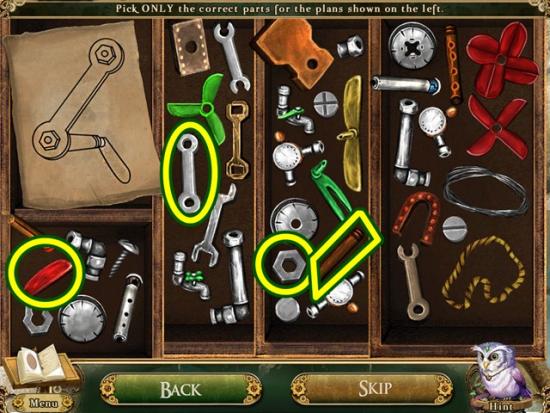
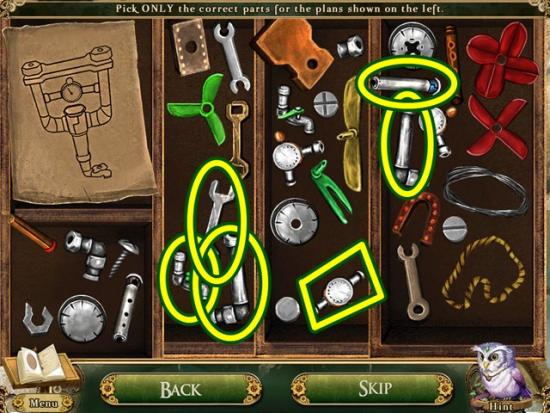
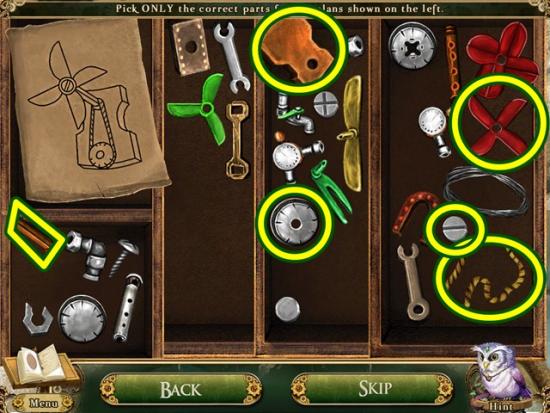
- A goblin wrench (goblin work tools 4/4) is added to your inventory.
- Go down the stairs to the generator room.
- Talk to the goblin engineer. Click on the engine box.
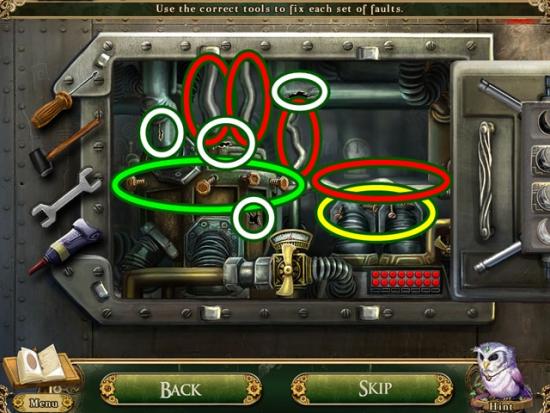
- Add the goblin work tools. A mini-puzzle starts. Use the correct tool to fix the engine. Use the sealant to fix the cracks (white highlights), the wrench to tighten the bolts (green highlights), the screwdriver to fasten the screws (yellow highlights) and the hammer to straighten the pipes (red highlights).
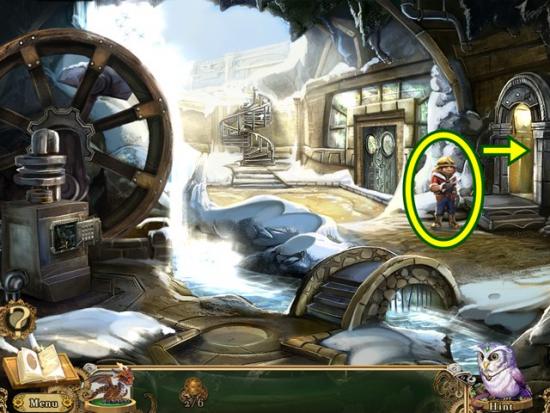
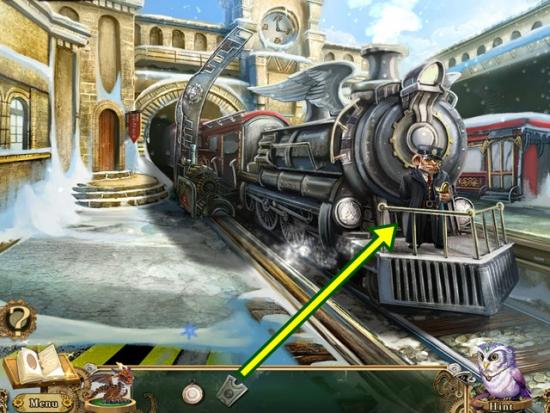
- Talk to the goblin engineer. Get in the elevator.
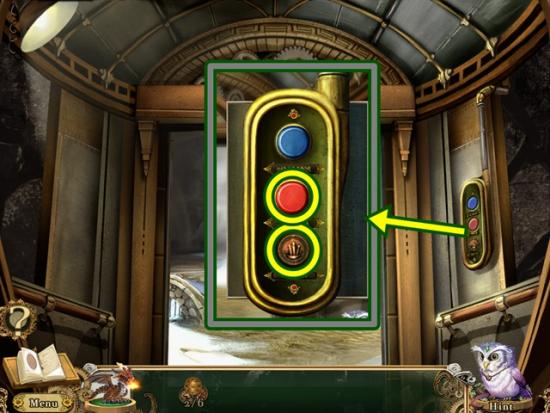
- Click on the elevator controls. Take the bolgin coin. Click the red button to the train station. When it stops, exit the elevator.
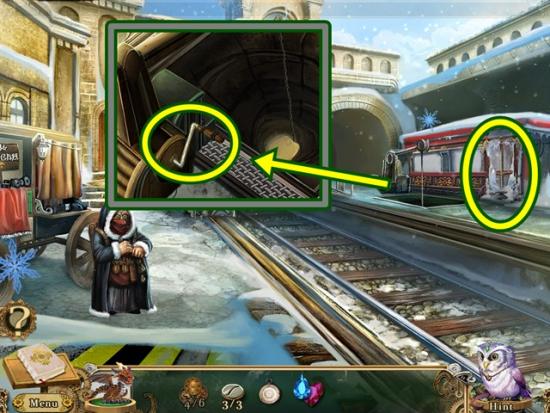
- Take the two steam pipe pieces and the two pieces of charcoal. Click on the raised bridge. Take the typewriter key.
- Enter the ticketing station.
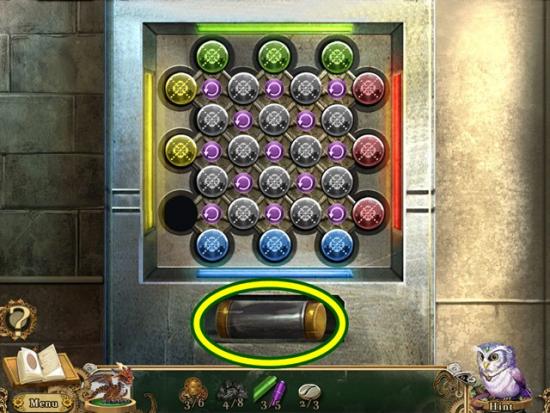
- Take the steam pipe and two pieces of charcoal. Click on the message capsule dispenser. A mini-puzzle starts. Rearrange the capsules so all the same coloured capsules are beside their matching bar. Clicking on a “spoke” rotates its four surrounding capsules clockwise. Getting capsules into the corners is difficult and takes some manoeuvring.
- Solution:
- Take the message capsule.

- Click on the ticketing machine.
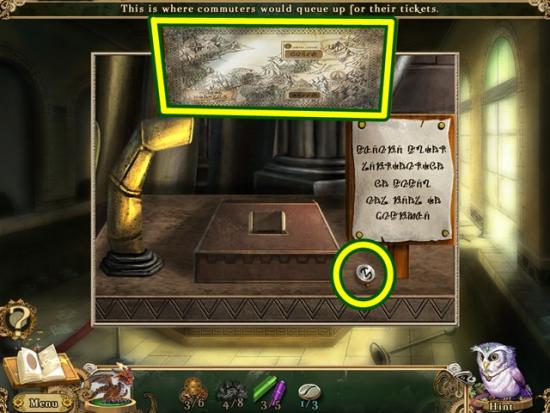
- Take the typewriter key. Click on the route map. Click anywhere on the map to add it to your journal. Click on any goblin “text” to learn more. Click south to leave the scene. Click anywhere outside of the window to close it.
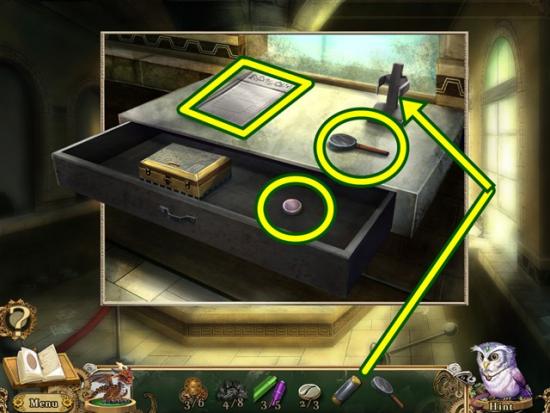
- Click on the clerk’s desk. Take the magnifying glass. Click on the goblin newspaper. Click on it again to add it to your journal. Open the drawer and take the elevator button. Place the message capsule on the message capsule stand. Click anywhere outside of the window to close it.
- Leave the scene (south).

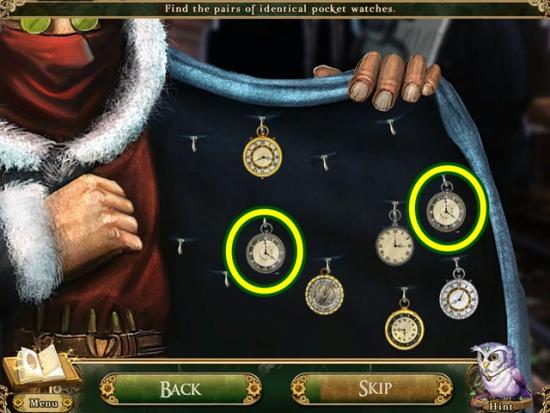
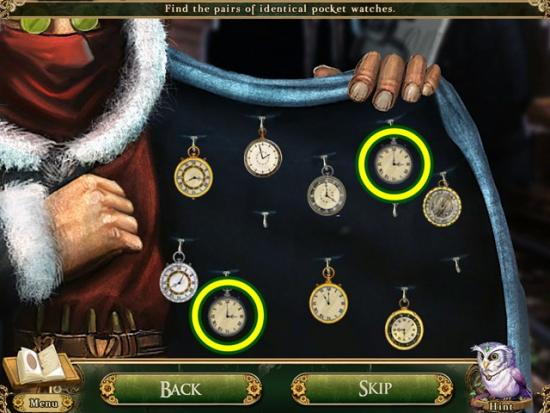
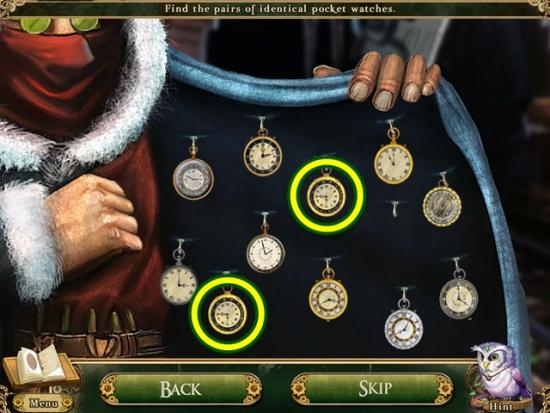
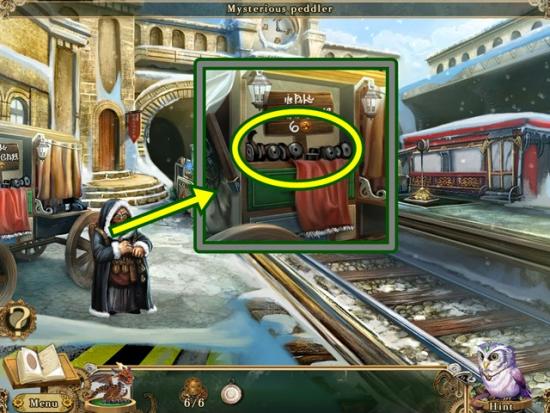
- Talk to the mysterious peddler. A mini-puzzle starts. Click on the pairs of identical watches.
- Solutions:
- The mysterious peddler gives you a pocket watch. Click anywhere outside of the window to close it. Go south to return to the elevator.
- Click on the elevator controls. Add the elevator button to the empty button socket. Click on the button to go to the mines.
- Exit the elevator when it arrives at the mines.
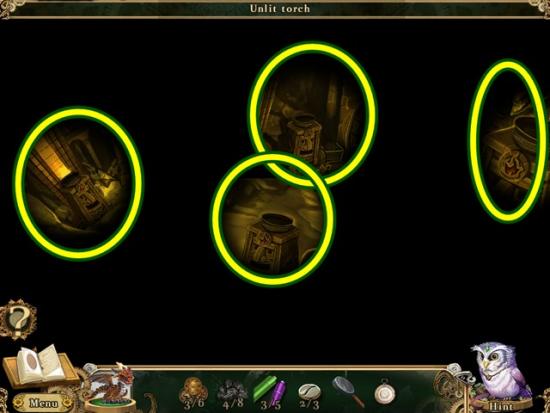
- Use the pocket dragon to light the four unlit torches. Move your cursor around the scene to locate them (remember everything is labeled at the top of the screen).
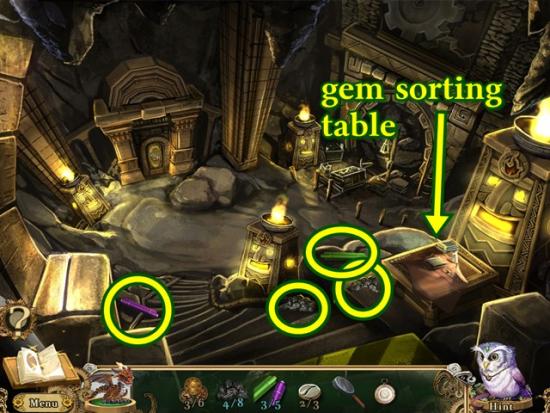
- Take the two steam pipes and the two pieces of charcoal. Click on the gem sorting table.
- Take the typewriter key. Use the magnifying glass on the unsorted gems. A mini-puzzle starts. It’s a match 3 puzzle. Swap gems to complete rows of three or more. Continue until every gem has a dark brown background. Focus on clearing the bottom rows as the movement will help clear the top rows. After a bit of inactivity, the game will give you a hint by shaking gems.
- Once you’ve completed the puzzle, you receive a gemstone collection.
- Click on the storeroom. A mini-puzzle starts. You have to enter the correct combination in order to open the safe.

- For the upper combination, the hint is the butterfly with the number 4 below it. Rotate the emerald code wheel so the butterfly is above the four. With that in place, match the symbols to the numbers shown.
- The hint for the lower combination is trickier. It shows a ruby 8 over a black 7 however there is no 8 on the ruby code wheel. One of the two empty spaces on the ruby code wheel must represent an 8. I solved this by trial and error. I placed the empty slot between the 5 and 13 over the black 7. On the combination, I then placed the proper ruby numbers for the 3 and the 6. Since there was no ruby number for the 1, I clicked through all the possibilities until the combination opened.
- Take the charcoal and fuel oil.
- Click on the collapsed mine tunnel.
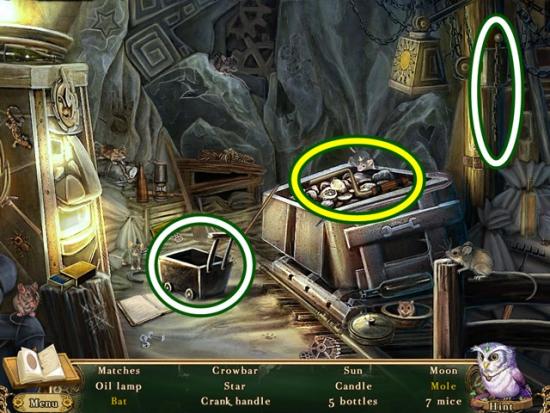
- A hidden object hunt starts. Find all the objects. Move the cart to get the mole. Lower the chain to reveal the bat. A crank handle is added to your inventory.
- Go south into the elevator. Click the elevator controls and click on the red button to go to the train station.
- Once you arrive, exit the elevator.
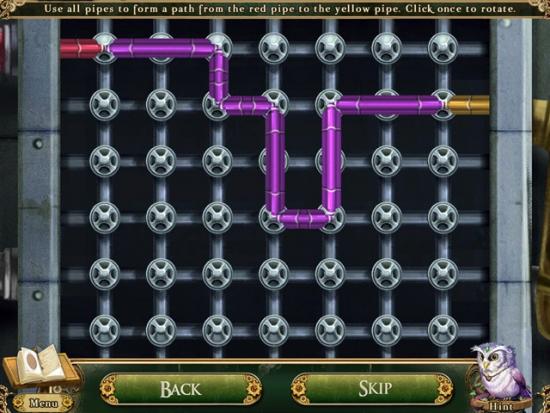
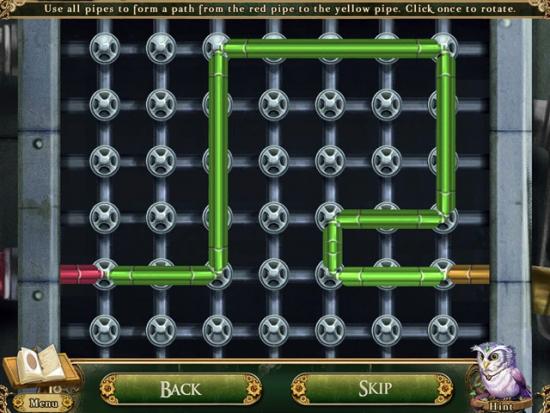
- Click on the raised bridge. Add the five steam pipes. A mini-puzzle starts. Use all the purple pipes to form a connection between the red pipe and the yellow pipe. Hover your mouse over a purple pipe and click once to rotate it. Once complete, use all the green pipes to form a connection between the red pipe and the yellow pipe.
- Solutions:
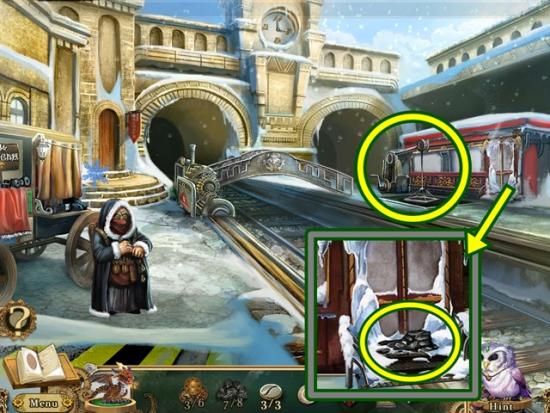
- When the bridge lowers, click on the frozen train carriage. Take the charcoal piece. Click anywhere outside of the window to close it. Click on the cargo crane.
- Add the crank handle to the winch assembly. Turn the crank handle. Click anywhere outside of the window to close it. Return to the mines via the elevator.
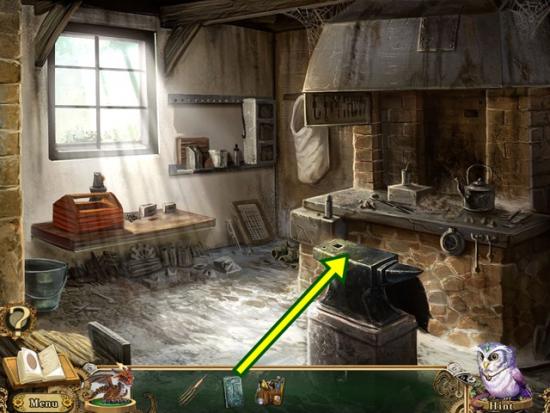
- Click on the charcoal brazier. Take the bolgin coin. Add the charcoal, then pour fuel oil over it. Light it on fire with the pocket dragon.
- Return to the train station.
- Click on the lowered cargo train. Turn the crank handle. Click on the train carriage and open the door.
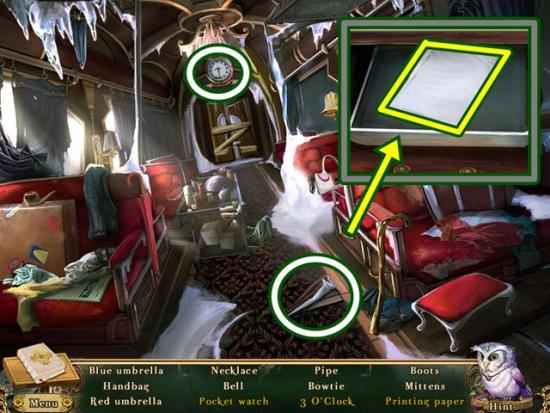
- A hidden object hunt starts. Find all the objects. Click on the clock until it reads 3:00, then click to take it. Click on the drawer under the seats to get the printing paper. Pull up the carpet to get the pocket watch. Printing paper is added to your inventory.
- Enter the ticketing station.
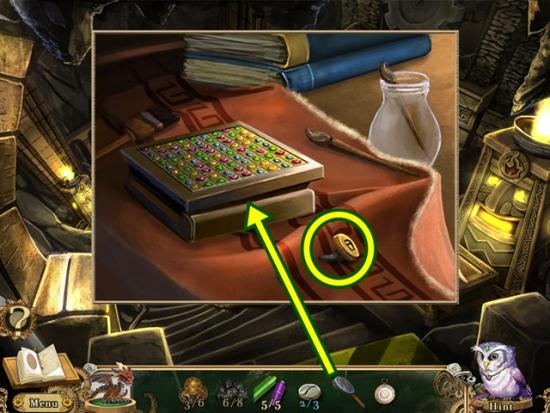
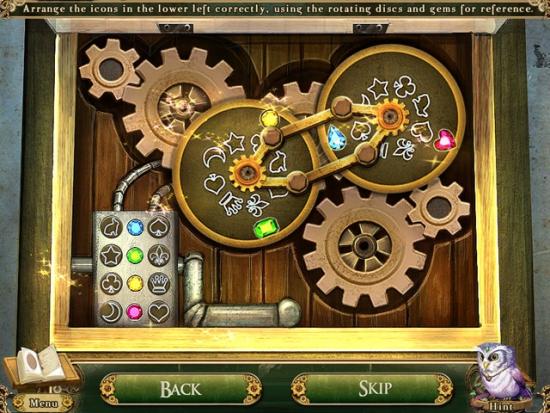
- Click on the clerk’s desk. Click on the ornamental jewel box. Add the gemstone collection. A mini-puzzle starts. Arrange the symbols in the lower left according to the rotating discs. Rotate the discs until there is a gem in the central area (see screenshot below for an example).
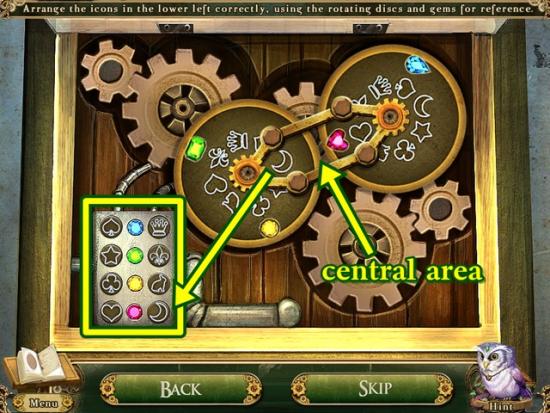
- Note the moon and heart symbols. In the lower left, move the moon and heart discs so they are on either side of the red gem. Do this for the other three coloured gems.
- Solution:
- Take the bolgin coin. Click anywhere outside of the window to close it.
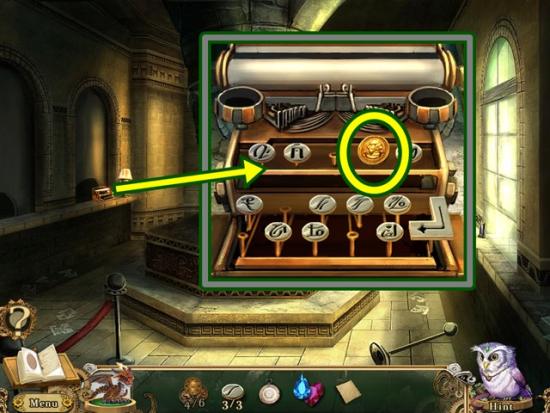
- Click on the typewriter. Take the bolgin coin. Click anywhere outside of the window to close it.
- Leave the ticketing station.
- Talk to the mysterious peddler. Buy the typewriter ink ribbon for six bolgin coins. Go back into the ticketing station.
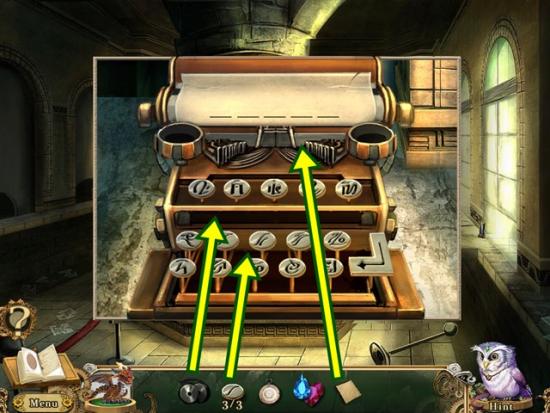
- Click on the typewriter. Add the typewriter keys, typewriter ink ribbon and the printing paper. A mini-puzzle starts. Type the destination code to Gobholme station. This information is in your journal. If it’s not, exit the typewriter game and click on the ticketing machine in the middle of the room and click on the route map. Click on it again to add it to your journal.
- Tip: Rather than try and write down the destination code, take a picture of it with your cell phone or digital camera so you can reference it while solving the puzzle.
- Once you’ve typed the destination code, press the Confirm Entry key.
- Solution:

- The printed station code is added to your inventory.
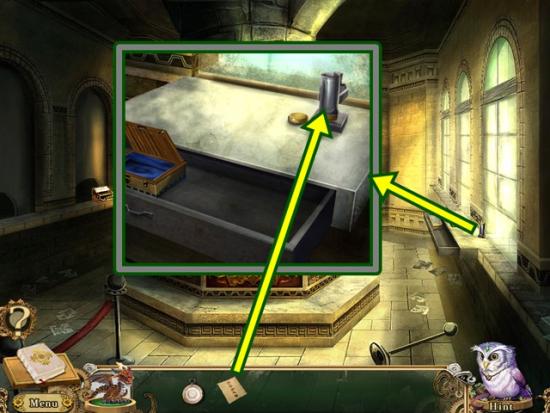
- Click on the clerk’s desk. If you haven’t done so already, place the message capsule on the message capsule stand. Add the printed station code to the message capsule, then take the completed message capsule.
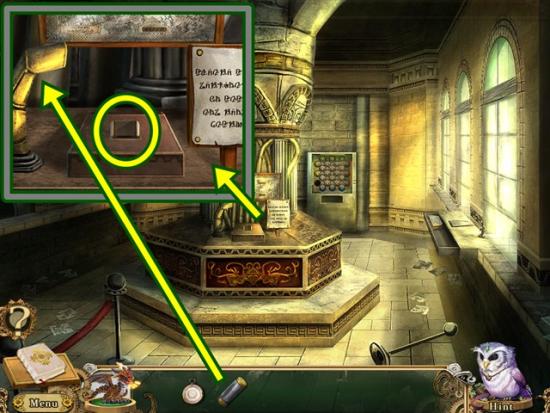
- Click on the ticketing machine. Put the completed message capsule in the message tube. Take the train ticket that appears. Leave the scene.
- Talk to the train conductor. Give him the train ticket.
- Watch the cutscene.
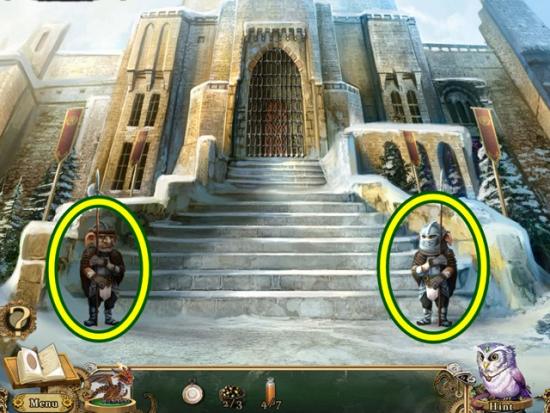
- Go forward towards the palace grounds.

- Talk to the palace guards (doesn’t matter which). Enter the palace.
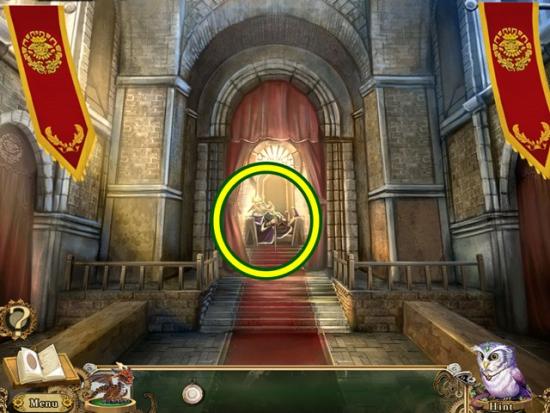
- Talk to King Grimble.
Chapter Two
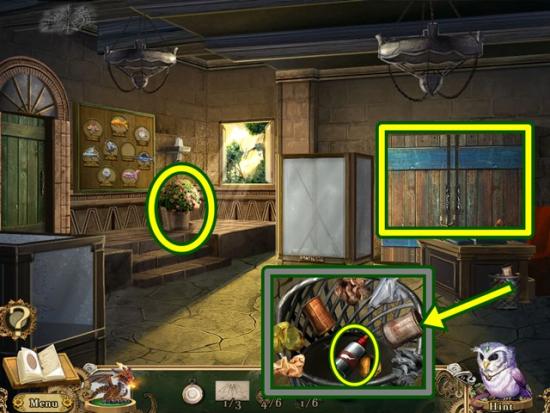
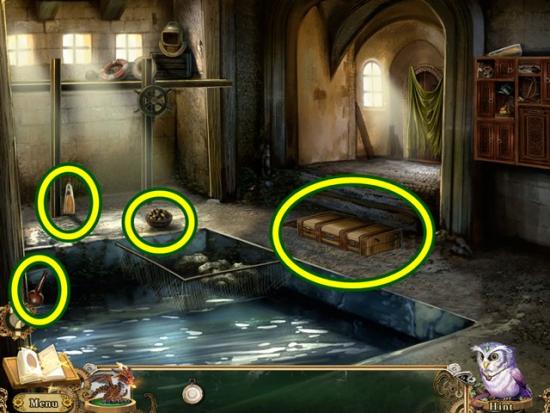
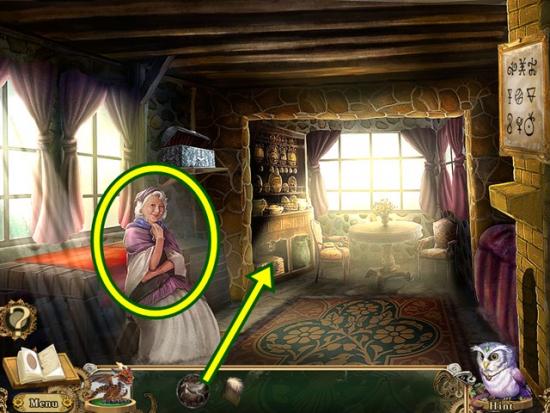
- Click on the round table. Take the cardboard fish and the cardboard cheese. Click anywhere outside of the window to close it. Click on the window.
- Talk to Ran. Ran and the pocket dragon return to you. Take the wooden puppet (1/3) and the replica tower. Click on the distant towers to add a journal entry.
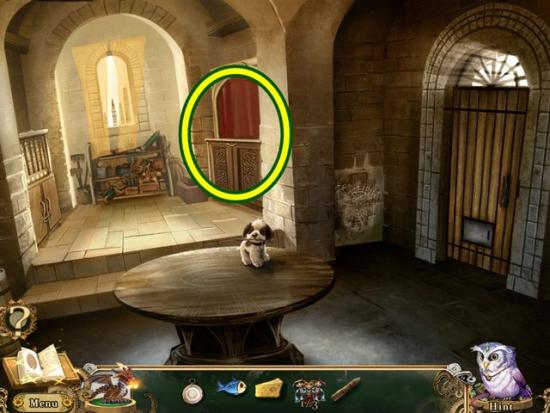
- Click on the diorama.
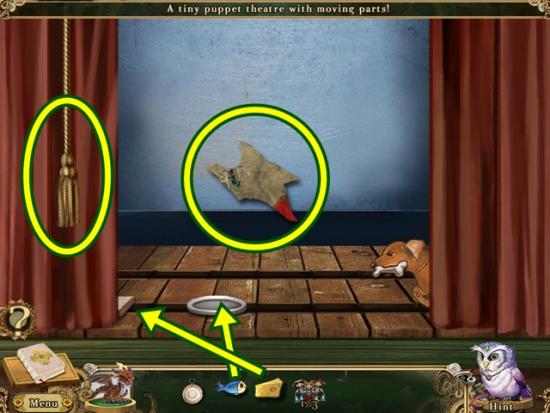
- Take the picture scrap (1/4). Pull the braided cord. Put the cardboard fish on the cardboard food bowl for the cat to come out. Put the cardboard cheese on the cardboard mousetrap for the mouse to appear. Wait for the animals to leave.
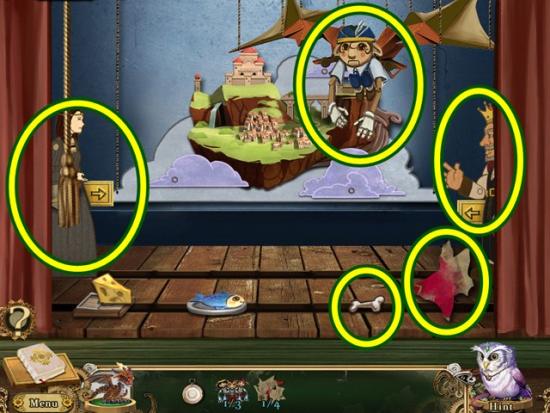
- Take the picture scrap (2/4), the wooden puppet (2/3) and toy bone. Click on the cardboard human royalty and drag them along the rails to the centre of the stage. Take the picture scrap (3/4). Click on the cardboard goblin king. Take the picture scrap (4/4). Click on the floating castle and flying machine.
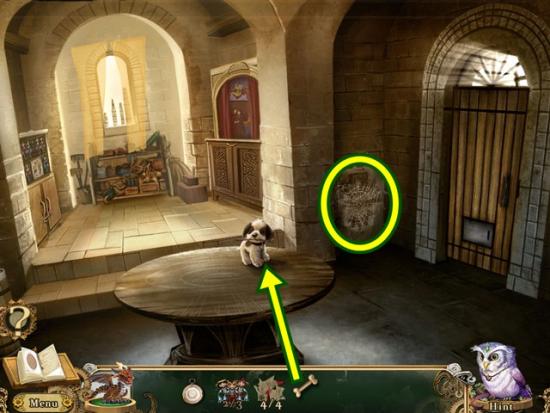
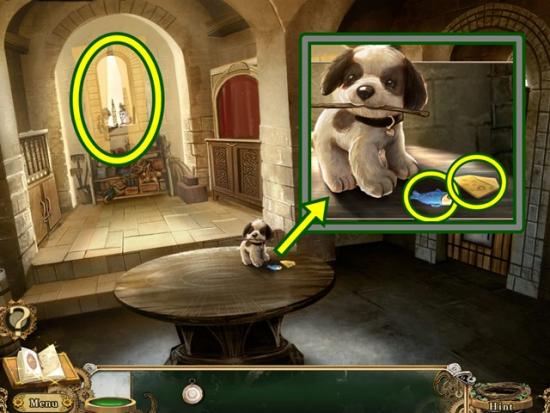
- Click on the round table. Give the dog the toy bone to get the forked stick.
- Click on the webbed over wall. Use the pocket dragon to burn away the webs (three clicks). A mini-puzzle starts. It’s a twist on a classic match two game. Click on two bricks to reveal their symbols. If the symbols have something in common, they will be smashed. Continue until all the bricks are smashed.
- Rabbit – carrot; table – chair; horse – horseshoe; bow – arrow; tree – leaf; hammer – nail; umbrella – rain cloud; socks – shoe; boat – water; sun – moon; flower – bee; feather – bird.
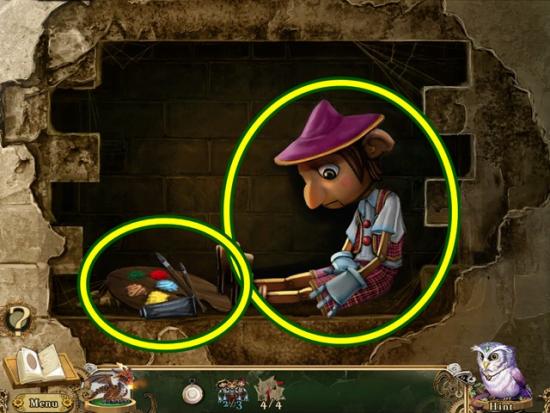
- Once you are finished, take the wooden puppet and the palette with paint.
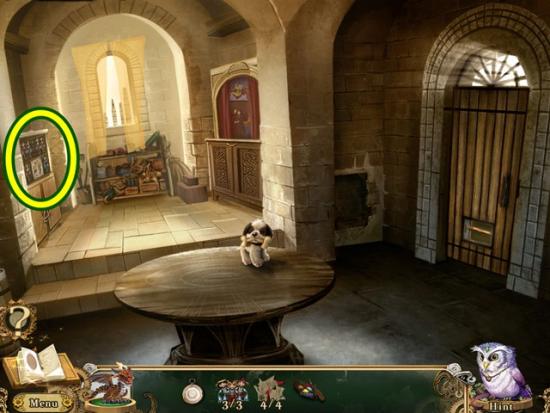
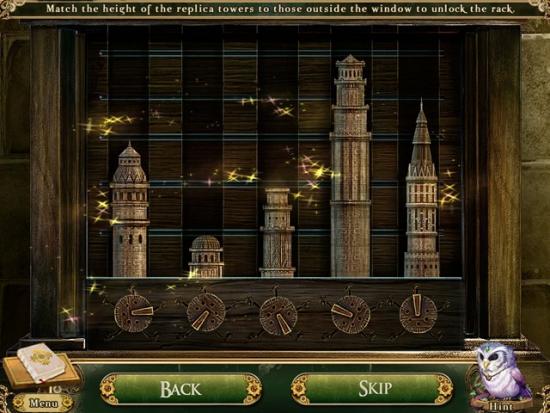
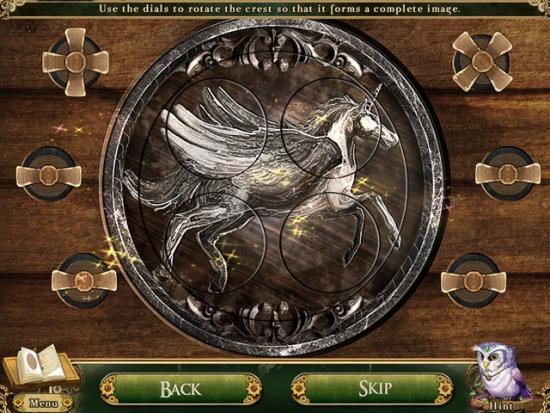
- Click on the puppet rack. Add the replica tower. A mini-puzzle starts. Adjust the heights of the towers to match the distant towers you saw out the window. The image is in your journal. If not, leave the scene and click on the window and click on the distant towers to add them to your journal. Tip: Take a picture of the journal entry with a digital camera, that way you can reference the image while solving the puzzle.
- Solution:
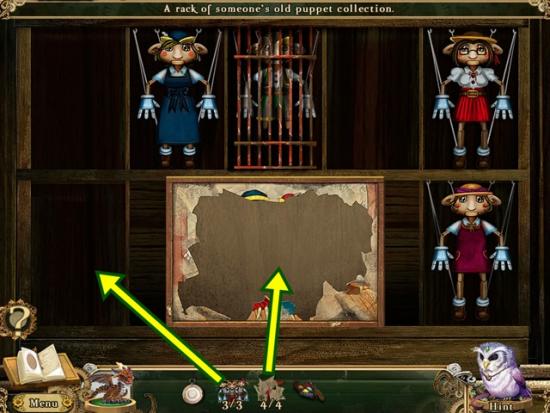
- Add the three wooden puppets to the puppet alcoves. Add the four picture scraps to the lightened patch. A mini-puzzle starts. Reassemble the pieces to complete the image.
- Solution:

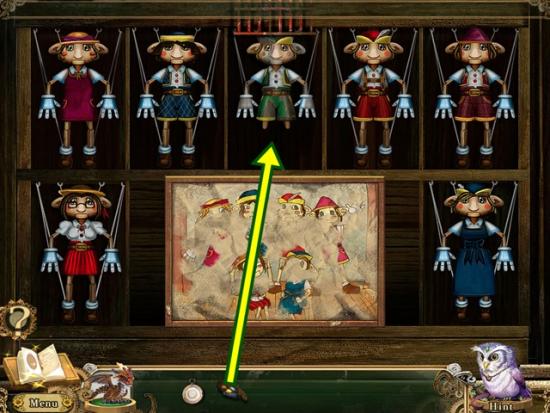
- A mini-puzzle starts again. Rearrange the puppets to match the picture.
- Solution:
- Use the palette with paint on the old puppet.
- A mini-puzzle starts. Repaint the puppet. Click on a colour and then click on an area of the puppet to paint it. You can only use the correct colour on an area so you can’t make a mistake. Click on another colour to switch.
- Solution:
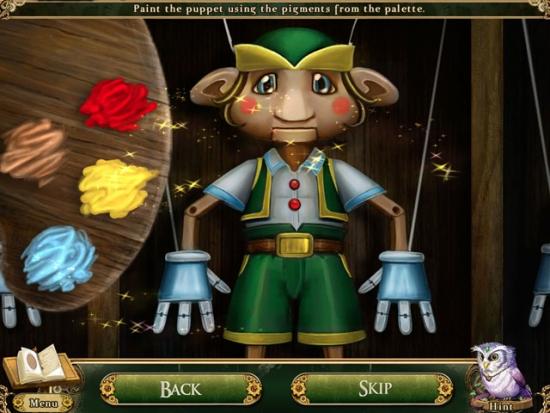
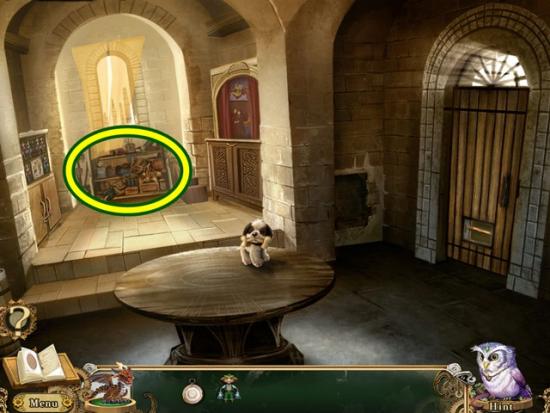
- Xim the magic puppet is added to your inventory. Put Xim on the pile of puppet parts.
- Find the objects described by the riddle at the bottom of the scene.
- The objects to find are gloves, an eye, a paintbrush, a spool of thread, boots, screwdriver, bottle of paint, pants and screws.
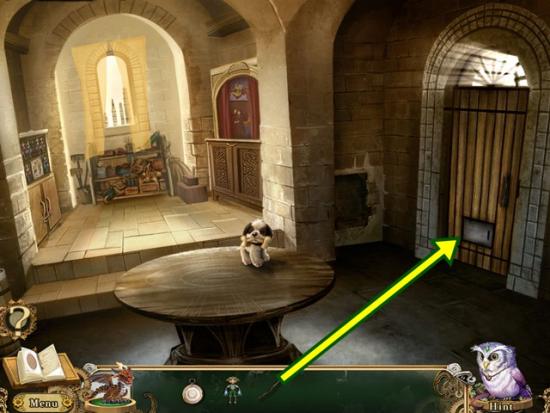
- Click on the door. Use the forked stick on the access slot, then let Xim crawl through the slot. Leave the cell.
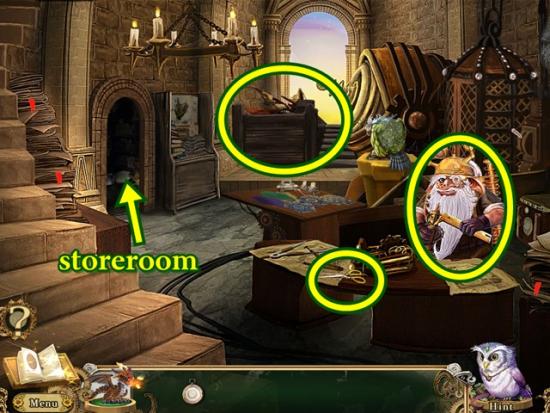
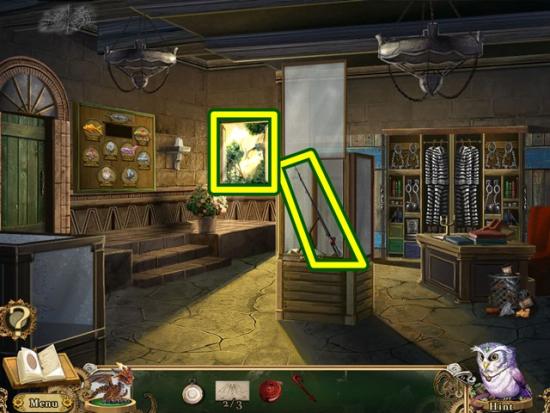
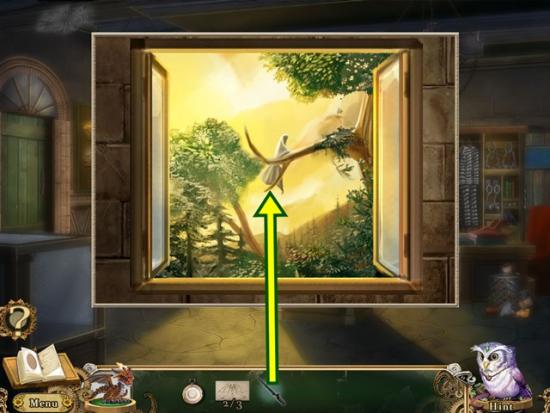
- Talk to the inventor. Take the scissors. Click on the balcony with flying machine. Take the flying machine blueprints (1/3). Click anywhere outside of the window to close it. Enter the storeroom.
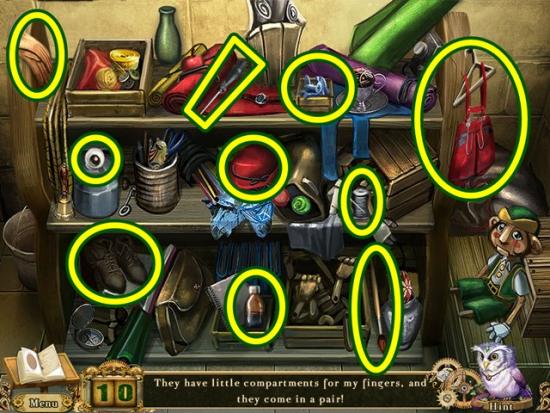
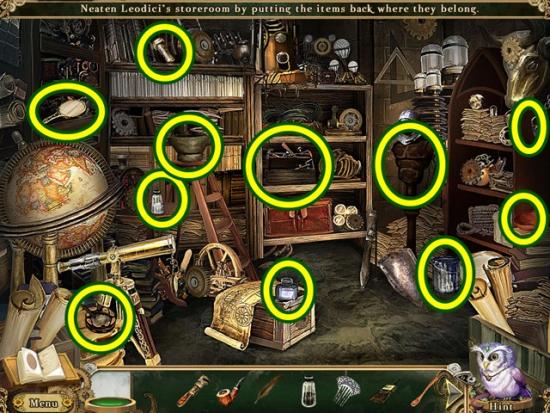
- A hidden object type hunt starts. Place the objects at the bottom of the screen where they belong in the scene.
- The pepper shaker goes with the salt shaker; the paintbrush goes in the paint can; the suit or armour goes on the dummy; the mortar goes in the pestle (stone bowl); the silver comb goes with the silver hand mirror; the nut goes with the bolt; the wooden spoon goes in the wooden bowl; the quill pen goes in the bottle of ink; the sword goes in its sheath; the wrench goes in the tool box; the iron key unlocks the padlock; the pipe goes in the ashtray.
- Solution:
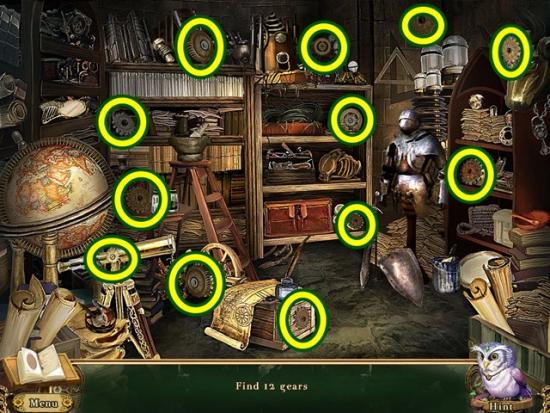
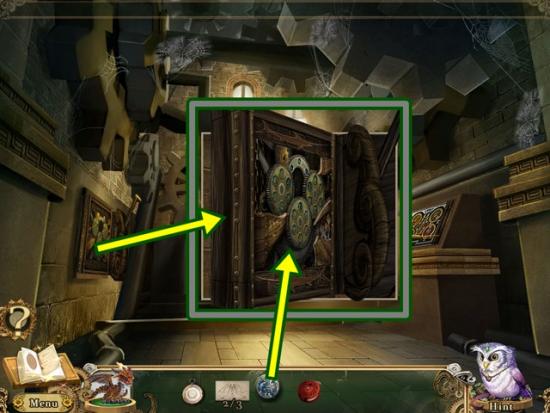
- Find 12 gears. The gear assembly is added to your inventory. The inventor gives you a brass cipher plate.
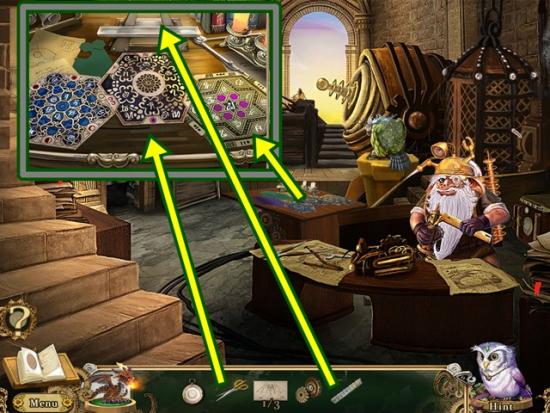
- Click on the drafting table. Add the scissors and brass cipher plate.
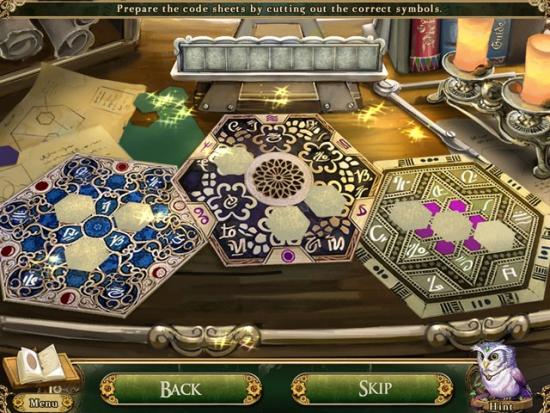
- A mini-puzzle starts. Your cursor is now a pair of scissors. Cut out the symbols according to the brass cipher plate.
- Solution:
- Code sheets are added to your inventory.
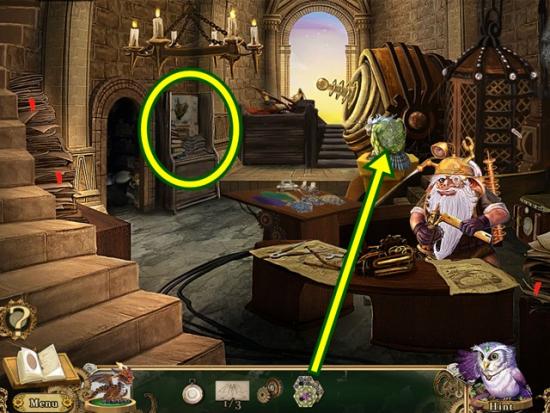
- Click on the cluttered corkboard. Click on the castle schematics to add an entry to your journal. Click anywhere outside of the window to close it. Click on the elevator control panel.
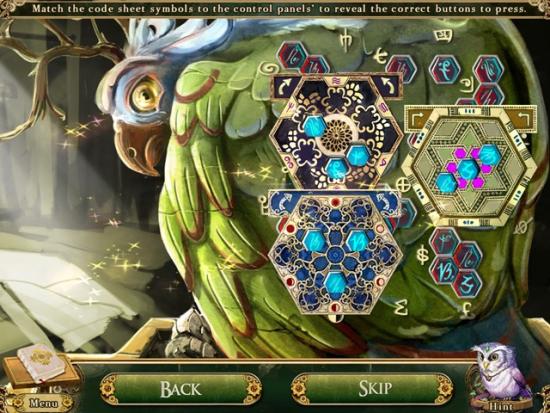
- Put the code sheets on the elevator control panel. A mini-puzzle starts. Place the code sheets on the panel to reveal the button combination. Note the symbols at the edge of the code sheets. Look for the matching symbol on the panel. Rotate the code sheet (if necessary) and place it next to its matching symbol. The code sheets lock when in the correct position. Once you’ve positioned the code sheets, press all the buttons.
- Solution:
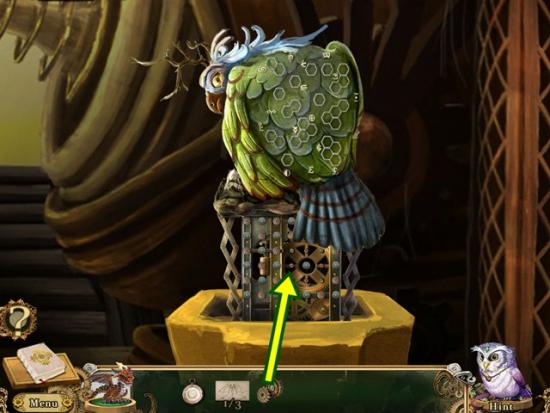
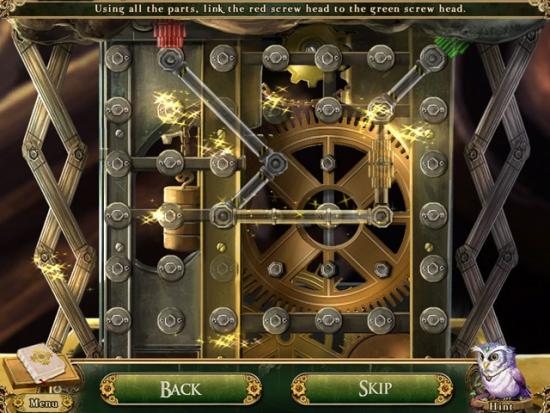
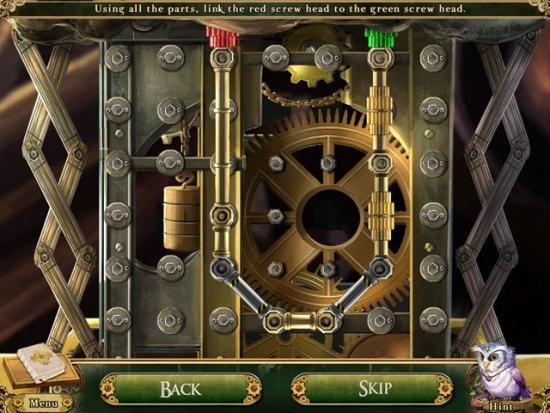
- Add the gear assembly to the broken control panel. A mini-puzzle starts. Use all the parts to connect the red screw head to the green screw head (similar to the steam pipe puzzle in Chapter One).
- Solutions:
- Pull the elevator call lever. Enter the elevator.
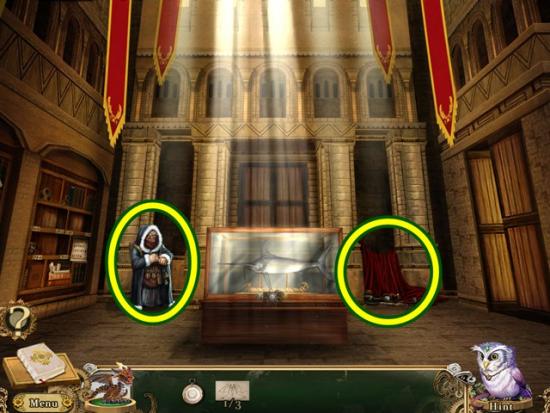
- Talk to the mysterious peddler. Click on the jumbled pile.

- A hidden object hunt starts. Find all the objects. Close the book to get the closed book. Click and drag the coins into the green purse to take the full coin purse. Click and drag the socks into the shoes to take the socks and shoes. Open the glasses case to take the glasses. Four bolgin coins and the Encyclopaedia Goblinnica, Volume 1 (1/6) are added to your inventory.
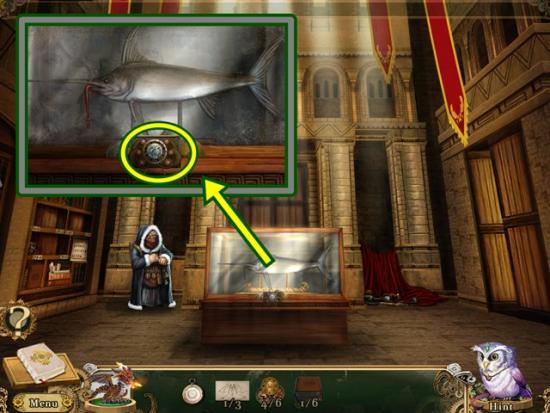
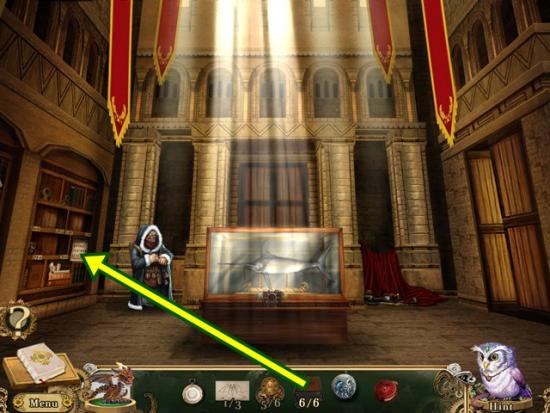
- Click on the large display case. Click on the swordfish crest. A mini-puzzle starts. Click on the buttons to release all the spokes. Each button controls different spokes. There are six buttons and eight spokes. Click the various buttons to determine which spokes they control.
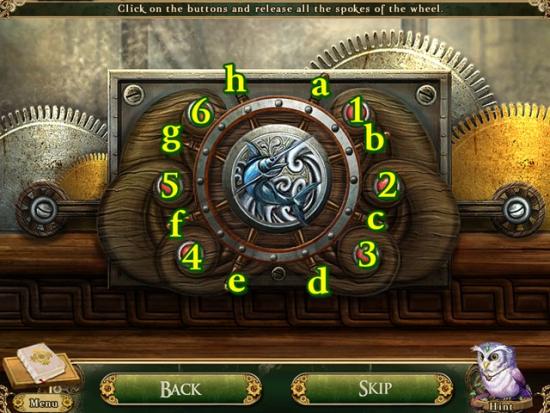
- In the screenshot above, the buttons and spokes are labelled.
- Button 1 controls spokes a and c.
- Button 2 controls spokes a, b and c.
- Button 3 controls spokes c and d.
- Button 4 controls spokes d and e.
- Button 5 controls spokes a and f.
- Button 6 controls spokes c, g and h.
- Buttons 2, 4, 5 and 6 must be pushed as they are the only ones that control b, e, f, g and h.
- In this order, press 2, 4, 5, 6, 1.
- Take the swordfish crest. Leave the display case.
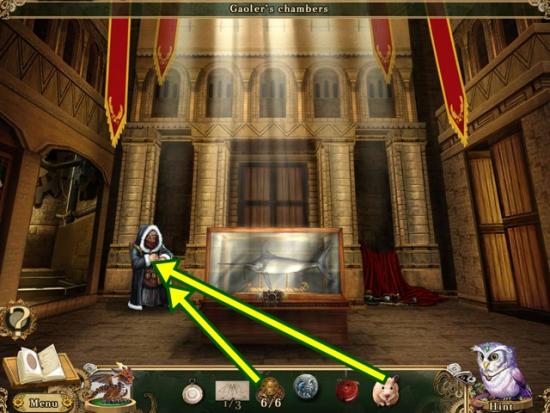
- Go through the door on the right to the gaoler’s chambers.
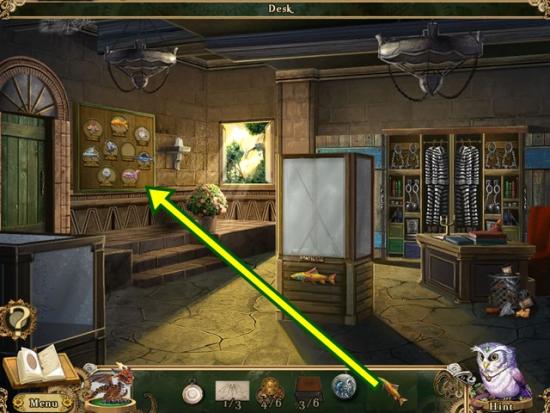
- Move the potted plant and take the Encyclopaedia Goblinnica, Volume 2 (2/6). Click on the wastepaper basket. Move the garbage out of the way to get the goblin superglue. Click on the armoire.

- Find the 12 differences. The Encyclopaedia Goblinnica, Volume 3 (3/6) is added to your inventory.
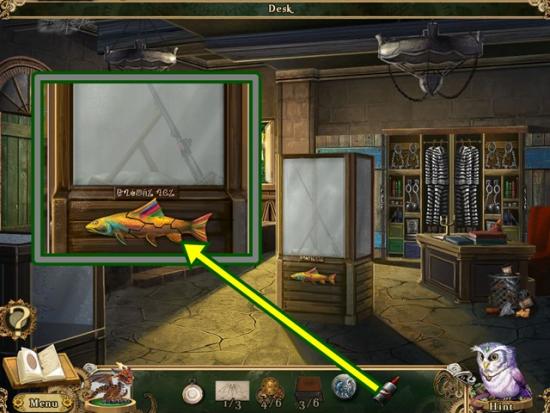
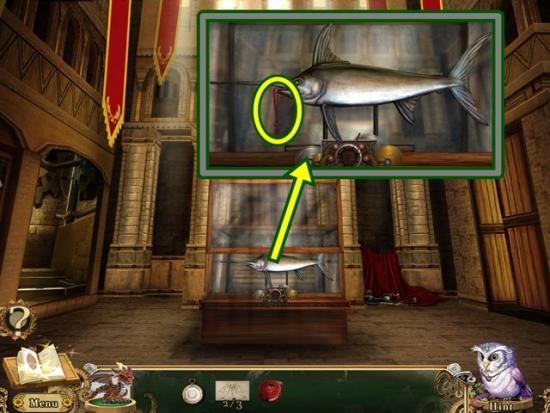
- Click on the display case. Use the goblin superglue to fix the broken trophy fish. A mini-puzzle starts. Your cursor is the glue. Seal the cracks on the fish. Click and drag the glue along the cracks. If you let go of the mouse button, you don’t have to start over again.
- The trophy fish is added to your inventory. Click anywhere outside of the window to close it.
- Click on the trophy wall. Add the trophy fish to the empty slot. A mini-puzzle starts. Rearrange the fish so they are in the correct position. Hover your mouse over the plaques to read the names of the fish that belong there. Use your knowledge of fish to place them. Start by positioning the fish whose names you know. Then use trial and error to position the rest.
- Solution:
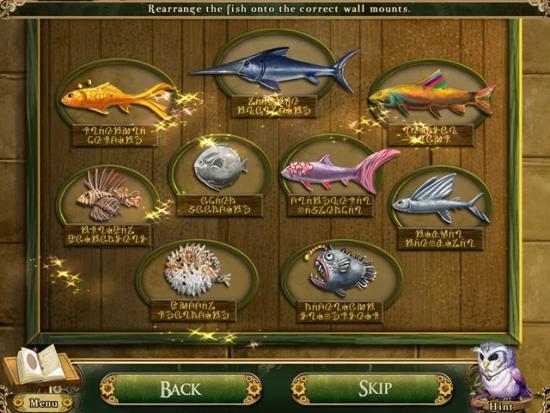
- Take the prize fishing reel that appears.
- Enter the registry room.
- Click on the filing cabinet. Click the folders until you discover where the next encyclopaedia is (the information will be added to your journal). Click the folders again until you find a folder full of personal information (added to your journal). Click anywhere outside of the window to close it.
- Check your journal to get the location of the encyclopaedia. Move your cursor around the scene to look for the shelf (the name appears at the top of the screen). When you find the shelf, click to get the Encyclopaedia Goblinnica, Volume 5 (4/6). Click on the stacked books and take the Encyclopaedia Goblinnica, Volume 6 (5/6). Then take the bolgin coin and toy crank. Return to the gaoler’s chambers.
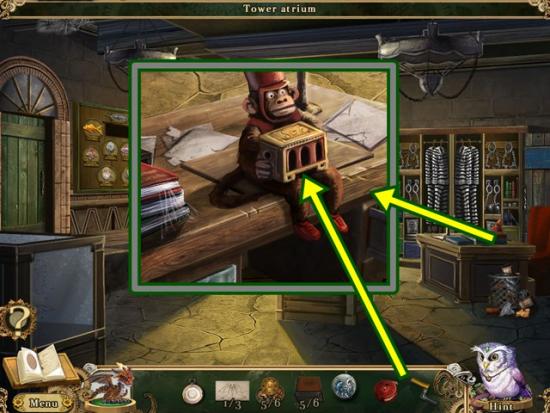
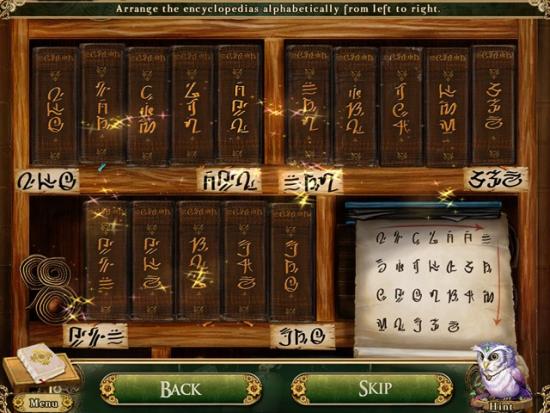
- Click on the desk. Click on the toy monkey. Add the toy crank to the organ box. Turn the crank. Take the Encyclopaedia Goblinnica, Volume 4 (6/6). Click anywhere outside of the window to close it. Return to the tower atrium.
- Click on the antique bookshelf. Add the goblin encyclopaedias. A mini-puzzle starts. Arrange the encyclopaedias alphabetically using the alphabet chart at the bottom right as a guide. Click on two books to swap their positions.
- Solution:
- Enter the secret chamber.
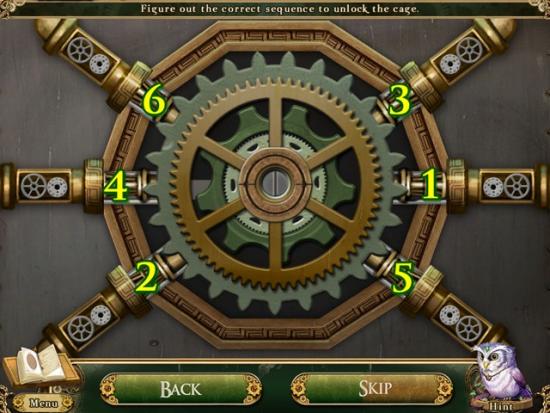
- Click on the rat cage. A mini-puzzle starts. Click on the levers in the proper sequence so they all pull back and the cage can be opened. Start by clicking on the levers. When one pulls out, that is your starting point (i.e., lever #1). With lever #1 pulled out, press another lever. If it is incorrect, all levers will go back to their original position. Click on the lever #1 again and repeat until a second lever remains pulled out. That becomes lever #2. Continue.
- Solution:
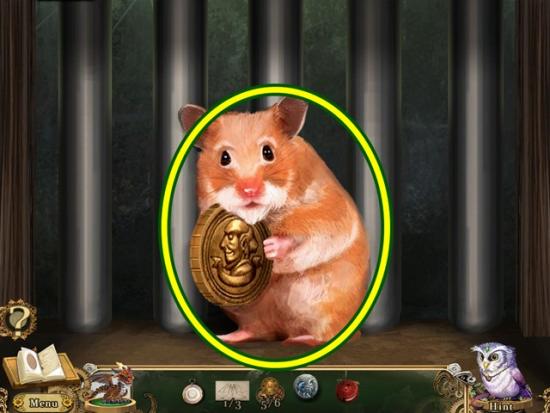
- Take Nibbles the hamster; you also receive a bolgin coin. Return to the tower atrium.
- Return Nibbles the hamster to the mysterious peddler. Give him six bolgin coins for the wrapped lockpicking set. Return to the gaoler’s chambers.

- Click on the desk. Use the wrapped lockpicking set to unlock the drawer. A mini-puzzle starts.
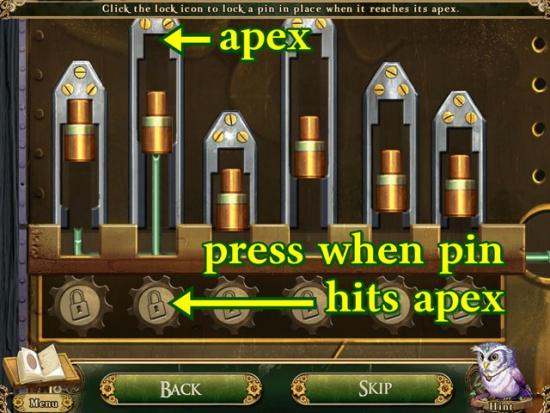
- The pins are being bounced upwards. When the pin hits the apex (top of the lock), click the lock button below it to lock it into place. Do this for all six pins.
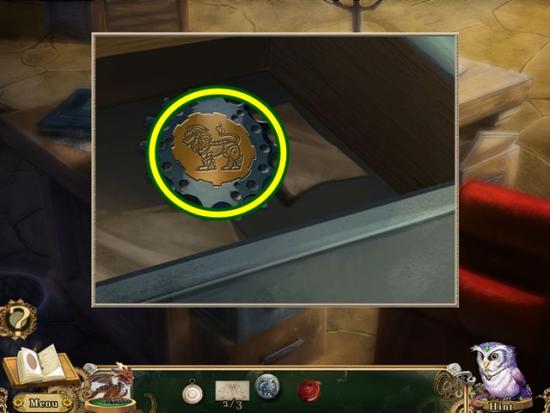
- A flying machine blueprint (2/3) is added to your inventory. Take the lion crest. Return to the secret chamber.
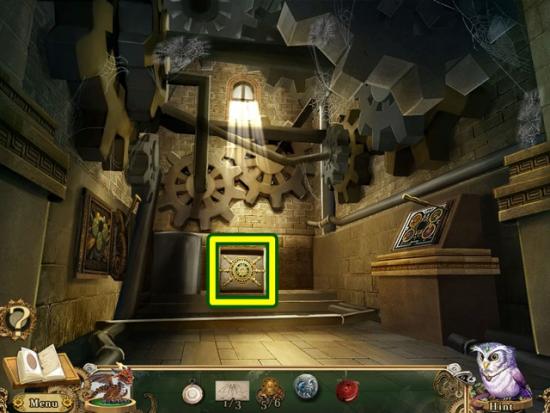
- Click on the golden gear lever. Add the lion crest. A mini-puzzle starts. Click on the symbol inside each disc to get a clue. Then rotate the discs to reveal a symbol that is connected to the larger symbol.
- Solution:
- Pull the gold gear lever.
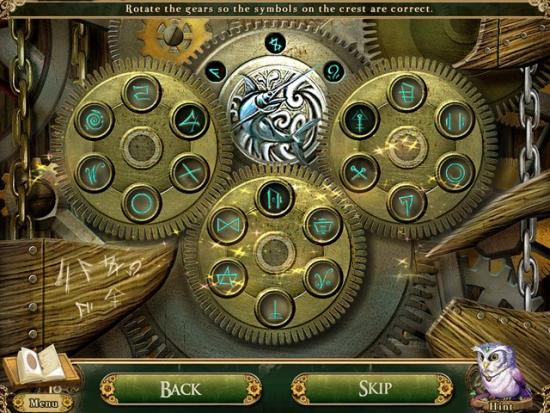
- Click on the silver gear lever. Add the swordfish crest. A mini-puzzle starts. Rotate the gears so the blue symbol matches the etching underneath.
- Solution:
- Pull the silver gear lever. Leave the scene.
- Click on the opened display case. Take the prize fishing hook. Enter the gaoler’s chambers.
- Click on the opened display case. Take the prize fishing rod. You now have the completed fishing rod. Click on the open window.
- Use the completed fishing rod to get the flying machine blueprint (3/3). Return to Leodici’s workshop (south from the tower atrium).

- Talk to the inventor. Click on the balcony with the flying machine.
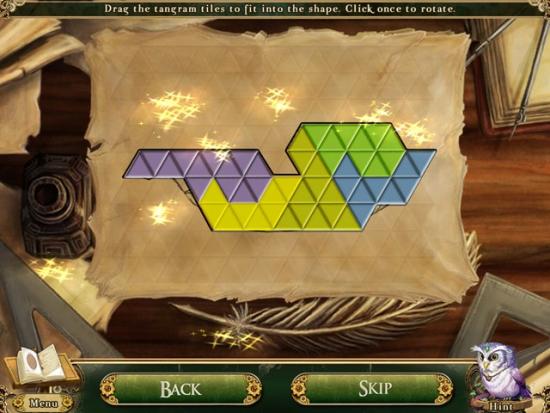
- Put the flying machine blueprints on the flying machine. A mini-puzzle starts. Another tangram puzzle.
- Solution:
- Talk to the inventor, then click to close the dialogue box.
- Watch the cutscene.
Chapter Three
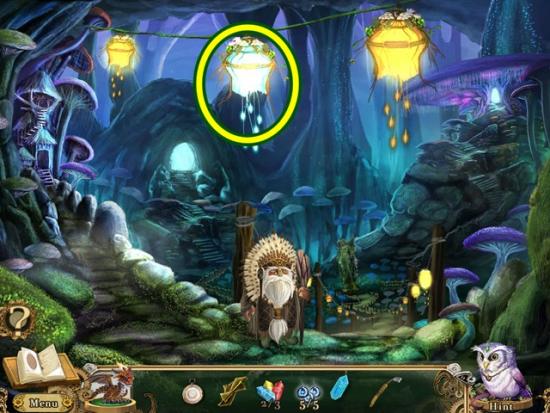
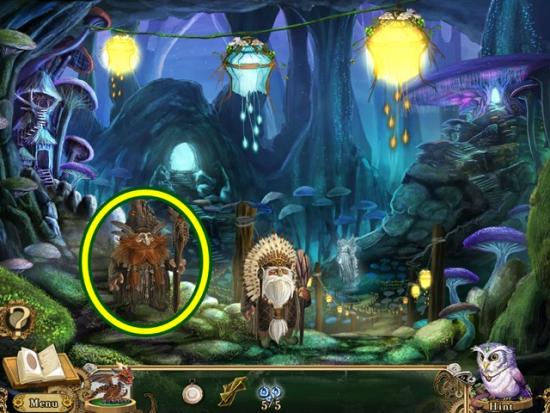
- Click through the dialogue. Take the empty glowspore lamp. Walk forward to the village square.
- Talk to the gnomish elder. Click on the Statue of the Oracle. Take the bark paper. Click south to leave the statue.
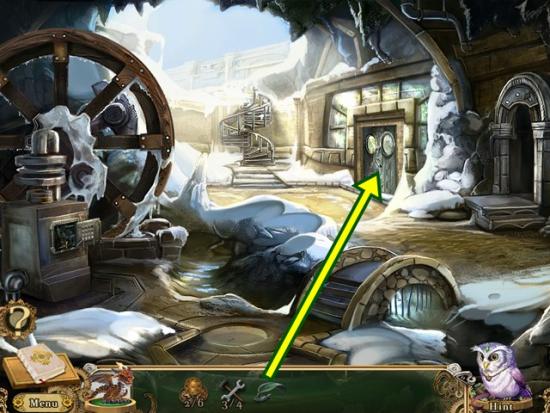
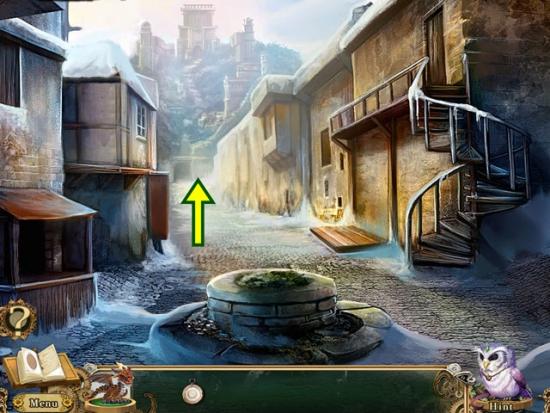
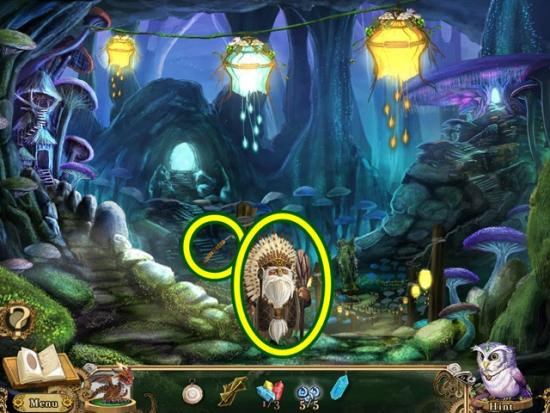
- Take the path to the left to the wise one’s hut.
- Talk to the wise one. Click on the planting trough. Take the potting soil. Click anywhere outside of the window to close it.
- Click on the painting. Click on it again to add it to your journal. Leave the hut.
- Take the path to the east to the ancient shrine.
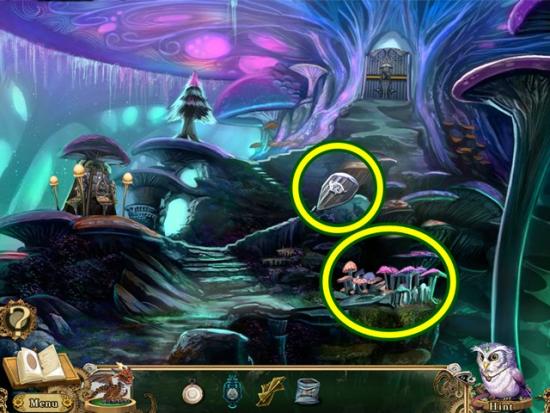
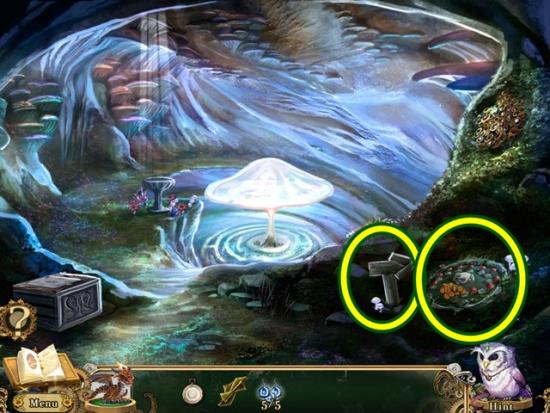
- Click on the battered goblin shield to add a journal entry. Click on the mushroom hedgerow.
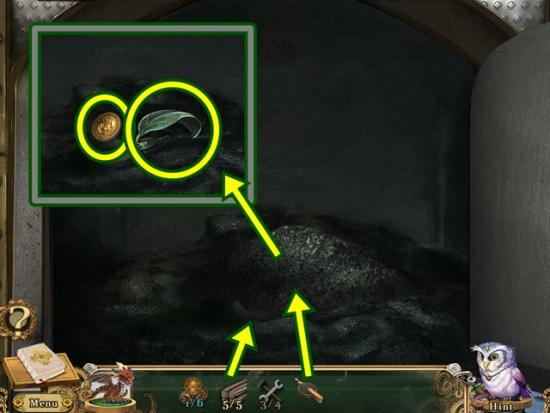
- Move the plant debris and take the glitterstone (1/3). Add the potting soil to the bare rock.
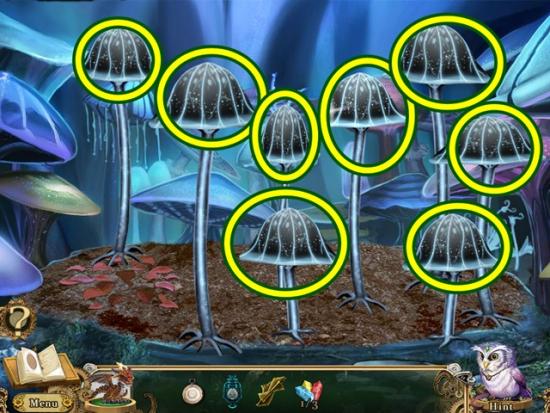
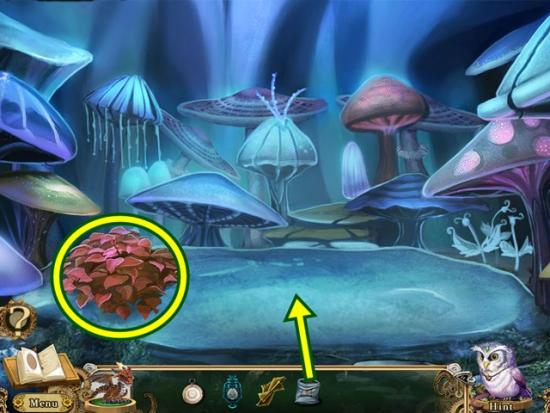
- Click on all the mushroom caps to get five inkcap mushroom spores.
- Once you’ve taken all the inkcap mushroom spores, click on the mushroom that is glowing silver.
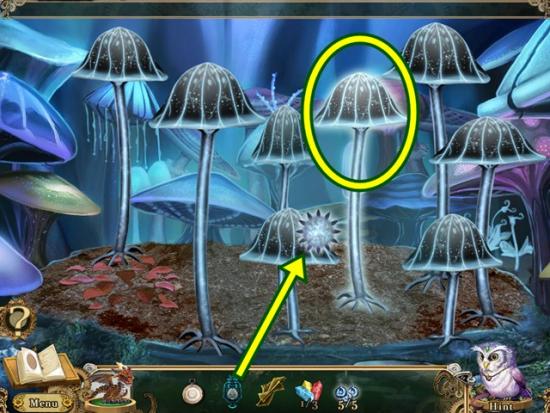
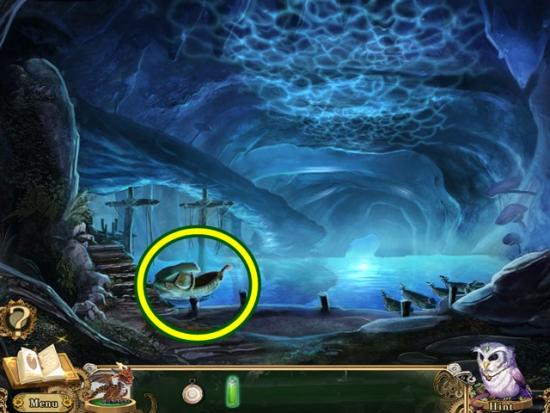
- Use the empty glowspore lamp to take the silver glowspore lamp.
- Return to the wise one’s hut.
- Give the silver glowspore lamp to the wise one.
- A hidden object hunt starts. Find all the objects. Rotate the mask’s eyes and mouth to match the picture below, then click to take it. Click and drag the wing’s to the totem, then click to take it. Knock over the basket to take the coloured beads. Use the pocket dragon to light a fire in the oven. Take the sun. Turn the mobile so the moon is in the lamp’s reflection. Move the crystal into its beam. A moongleam crystal is added to your inventory. Leave the wise one’s hut.
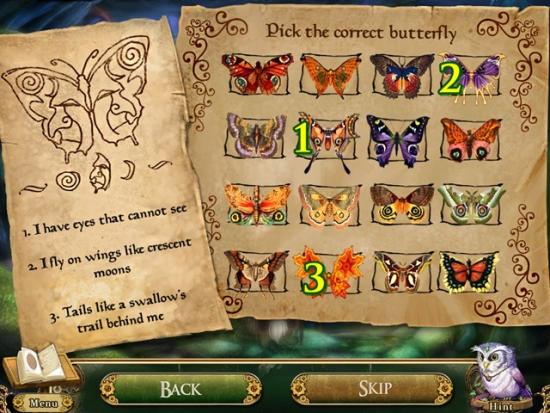
- Take the resin tapping knife. Talk to the gnomish elder. A mini-puzzle starts. Pick the correct butterfly based on the riddle clues on the left. There are three sets of clues.
- Solution:
- A glitterstone (2/3) is added to your inventory.
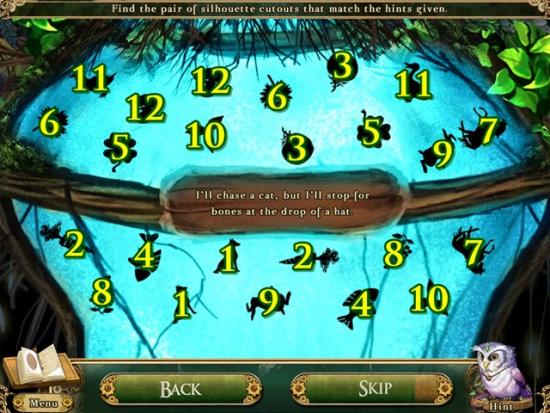
- Click on the glowspore lantern. A mini-puzzle starts. Select the silhouette pairs based on the riddles.
- Solution:
- A glitterstone (3/3) is added to your inventory. Return to the wise one’s hut.
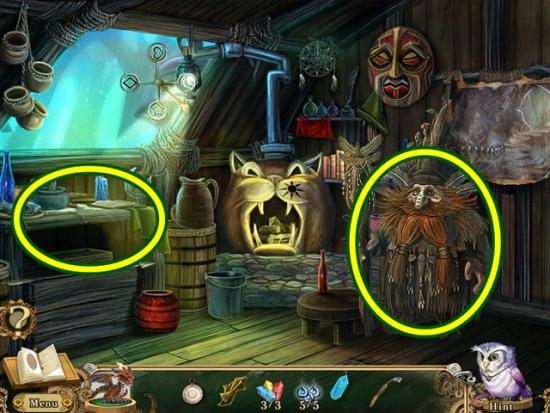
- Talk to the wise one. Click on the mortar and pestle.
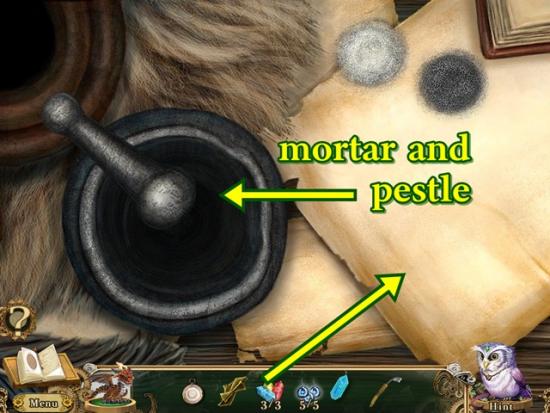
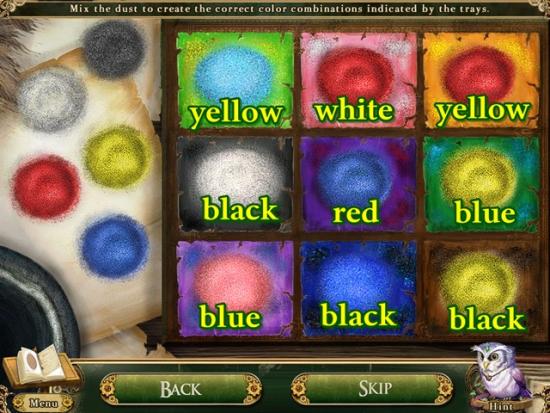
- Put the glitterstones on the table. One by one, drag a glitterstone into the mortar. Click and drag the pestle over the glitterstone until it eventually turns to dust. When you are finished, a mini-puzzle starts. In the trays on the right, glitterstone dust is sitting on a coloured background. Mix the dust on the left with the dust on the right so it matches its background.
- Solution:
- Glitterstone dust is added to your inventory. Leave the wise one’s hut.
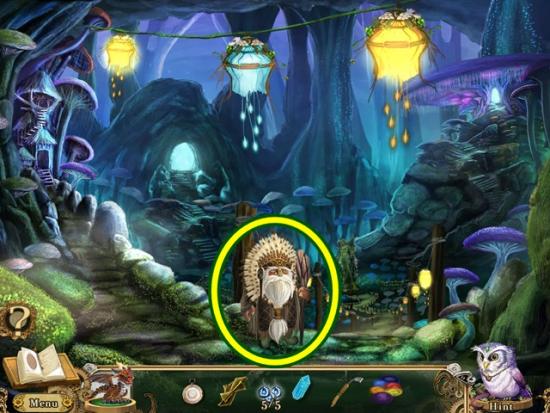
- Talk to the gnomish elder. Go to the ancient shrine (east).
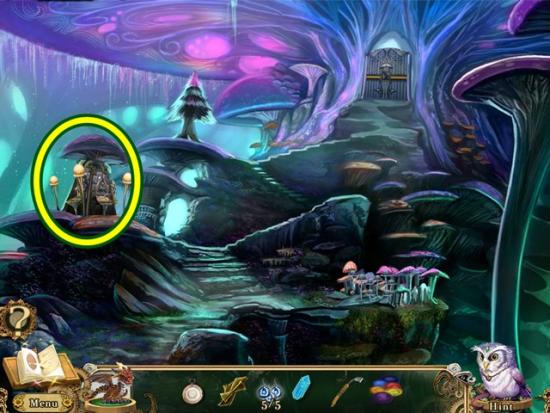
- Click on the Shrines to the Oracle.
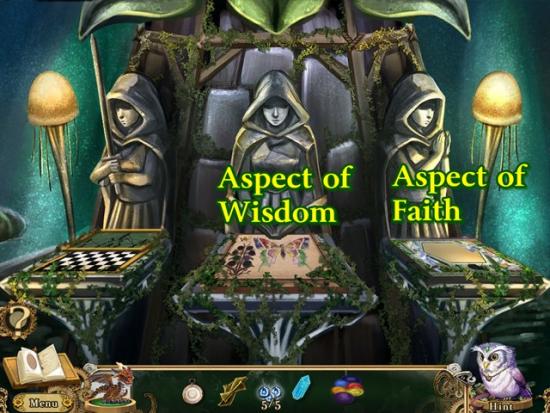
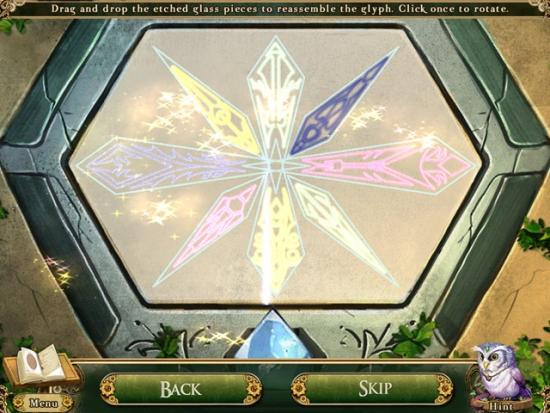
- Click on the table in front of the desecrated Aspect of Faith.
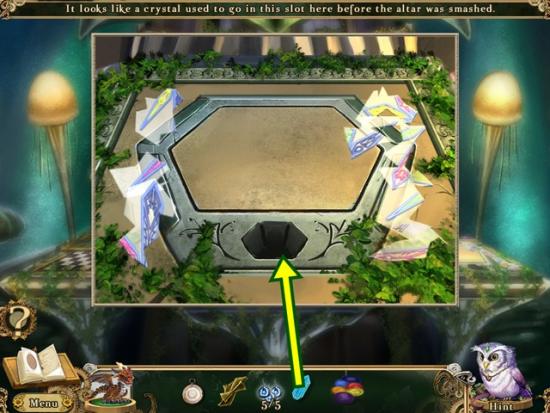
- Put the moongleam crystal in the empty depression. A mini-puzzle starts. Rearrange the pieces to complete the design.
- Solution:
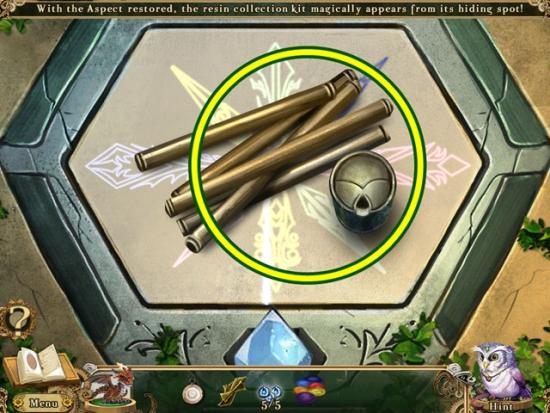
- Take the resin collection kit.
- Click on the table in front of the desecrated Aspect of Wisdom.
- Add the glitterstone dust.
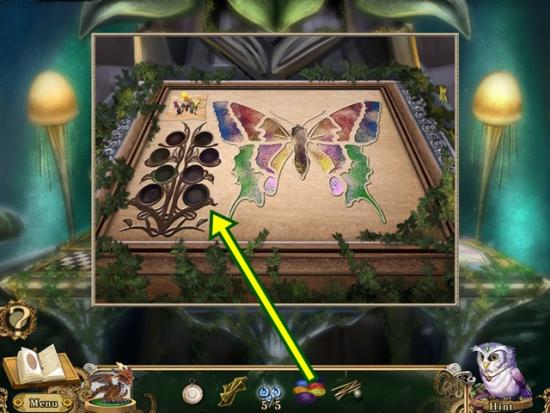
- A mini-puzzle starts. Colour the butterfly so it matches the images in the top left corner. Note the image in the corner is faded so if it looks like there’s just a bit of purple in an area, colour that area with purple, etc.
- Solution:
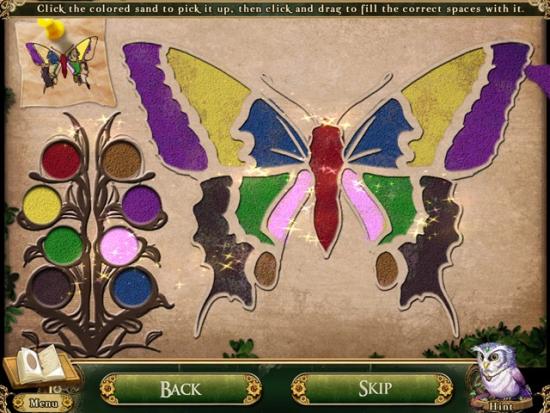
- The Aspect of Wisdom is restored. Leave the area.
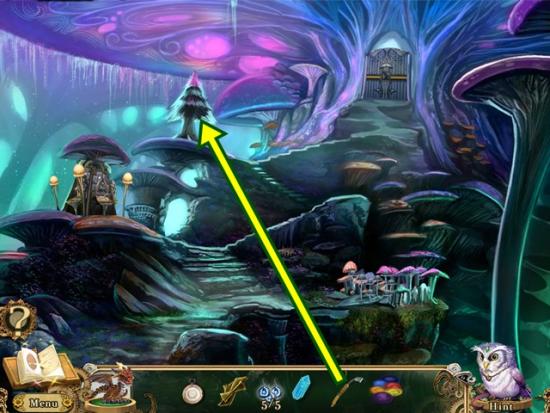
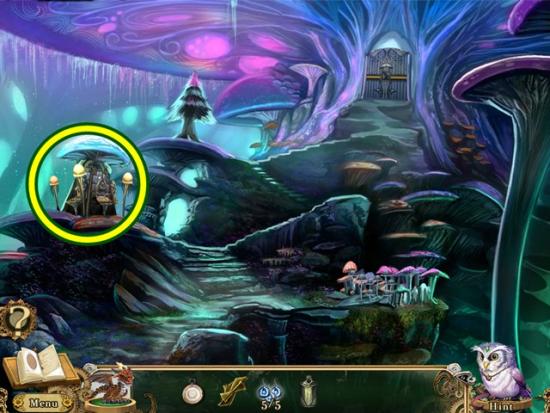
- Click on the golden needle pine tree. Use the resin tapping knife to scrape off the bark. Click and quickly move the knife back and forth. Do this very fast.
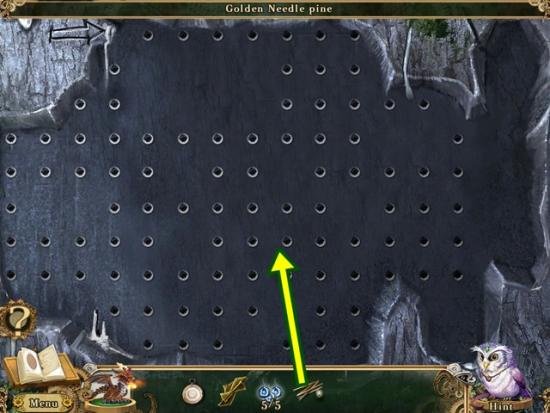
- Use the resin collection kit on the newly exposed area.
- A mini-puzzle starts. Use all the tubes to connect the resin tap (top left corner) to the collection cup (bottom right corner).
- Solution:

- Trollbane resin is added to your inventory.
- Click on the Shrines to the Oracle.
- Click on the table in front of the desecrated Aspect of Courage.
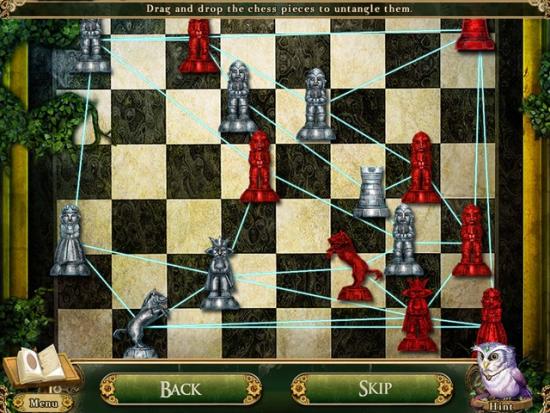
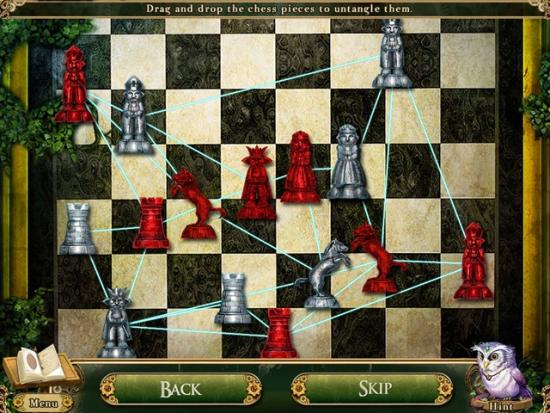
- Add the trollbane resin to the empty chess moulds. A mini-puzzle starts. Move the chess pieces around so none of the wires cross other wires. Blue wires means nothing is crossing them, red means another wire(s) is crossing them.
- Solutions:

- Return to the village square.
- Talk to the wise one (it doesn’t matter who you click on). Watch the cutscene. The wise one gives you instructions and an encryption plate. Return to the ancient shrine.
- Click on the gate to the sacred grove.
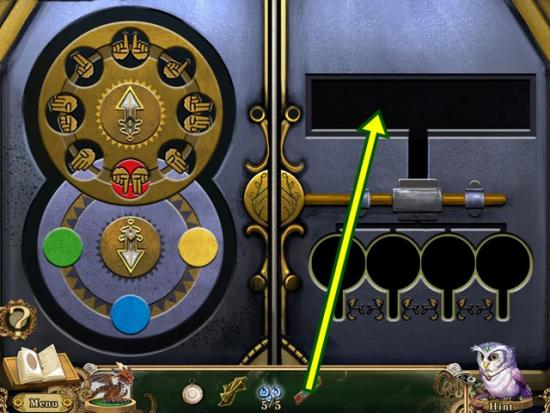
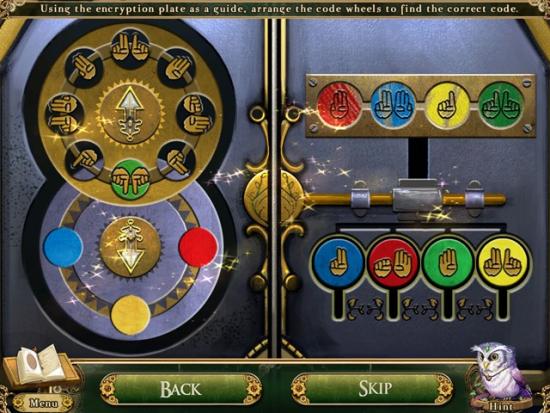
- Add the encryption plate to the empty slot. A mini-puzzle starts. Rotate the dials on the left so they recreate the symbols on the encryption plate.
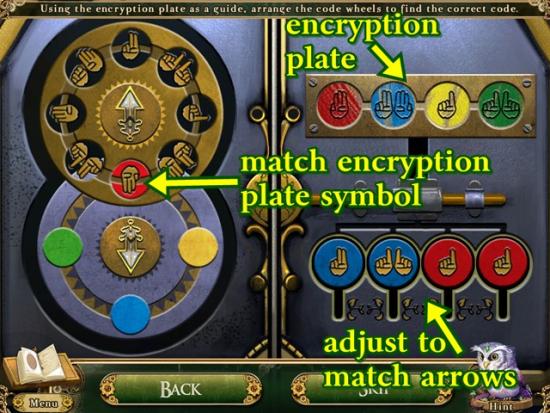
- In the screenshot above, the dials have been positioned to show the first symbol on the encryption plate (red background with three fingers showing). Take note of the symbol and colour the areas on the discs are pointing to. The up arrow is pointing to a hand showing two fingers and the down arrow is pointing to the colour blue. On the buttons below the encryption plate, click the one first one (from the left) until it shows hand with two fingers showing on a blue background. Do this for the remaining three symbols.
- Solution:
- Go through the door to the sacred grove.
- Click on the tourist sign: Fairy Ring. Click on the fairy ring. A mini-puzzle starts. Click on a mushroom for a hint. Move the bolgin coin with the hint’s symbol to that mushroom.
- Solution:
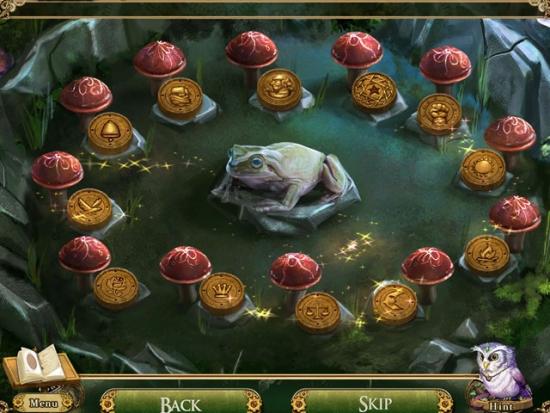
- A bolgin coin (1/4) and fairy ring spores are added to your inventory.

- Click on the lichen patch. A mini-puzzle starts. Click on all the matching dewdrops until only one remains.
- Remaining dewdrop:

- Pure dew-water is added to your inventory.
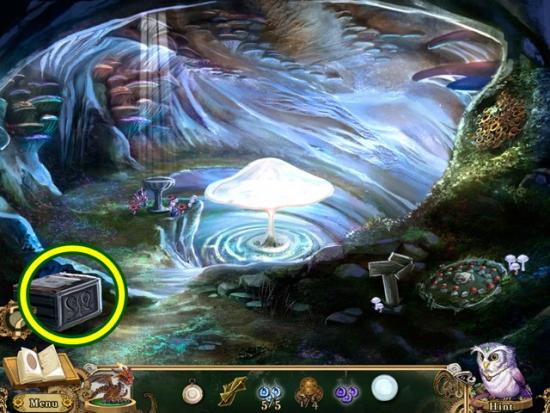
- Click on the ornate crate.
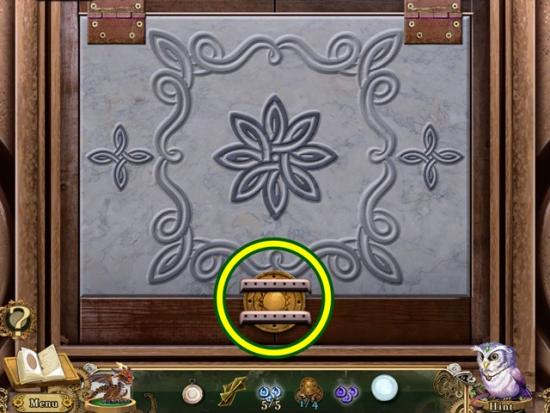
- Take the bolgin coin (2/4). Lift the latch cover. A mini-puzzle starts. Slide the tiles around to recreate the image.
- Solution:
- Click through the dialogue with the mysterious peddler. You don’t have enough coins yet, leave the scene (south).
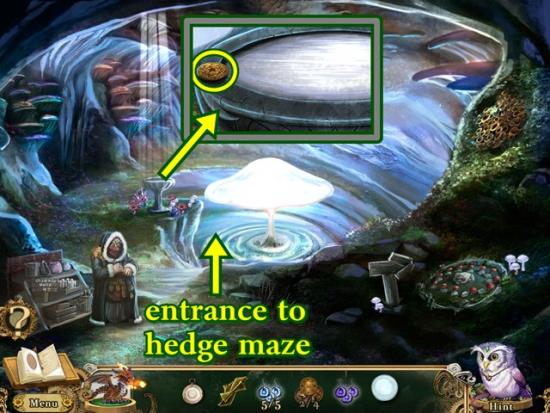
- Click the stone basin. Take the bolgin coin (3/4). Leave the scene (south). Go to the entrance to the hedge maze.
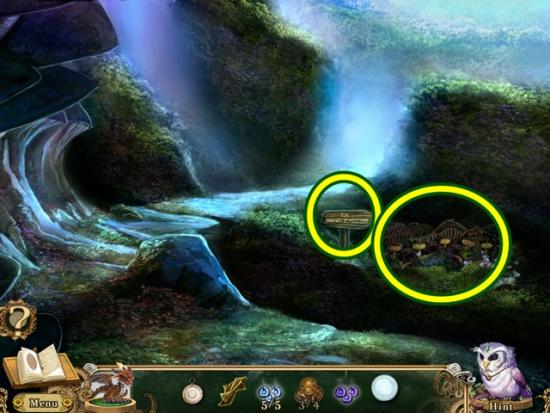
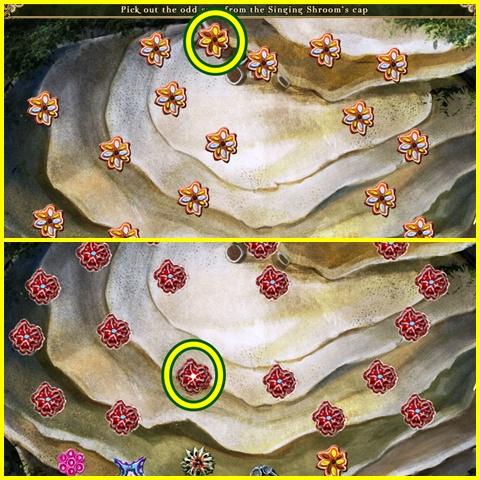
- Click the tourist sign: Singing Shrooms. Click on the singing shrooms.
- Wake up the shrooms by clicking on the glass chimes.
- A mini-puzzle starts. Clear the board of all the beads. Click on groups of two or more of like-coloured beads to destroy them and clear the board. Do this for all three glass chimes. If there are no moves left, the puzzle resets.
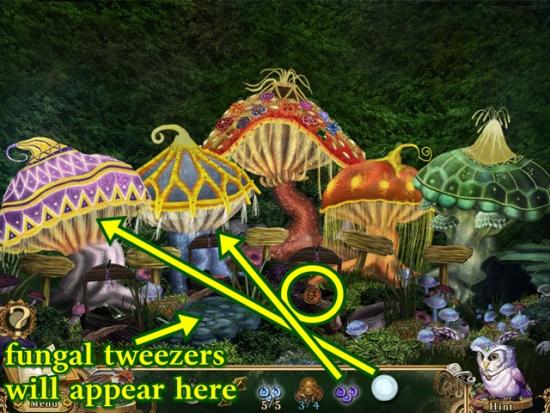
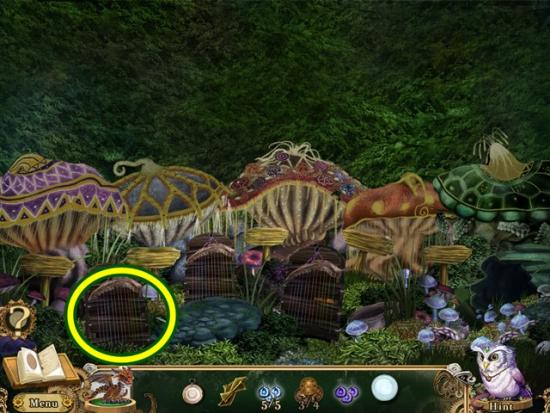
- Take the bolgin coin (4/4). Click on each singing shrooms for a hint as to what it needs. Give the tenor shroom (far left) the pure dew-water. Take the fungal tweezers that appear. Give the fairy ring spores to the bass shroom.
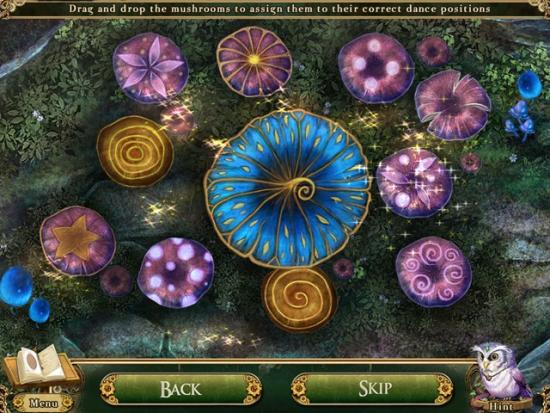
- A mini-puzzle starts. Each mushroom is covering a design. Click and drag a mushroom off its perch to reveal its design. Match the mushrooms up to their designs.
- Solution:
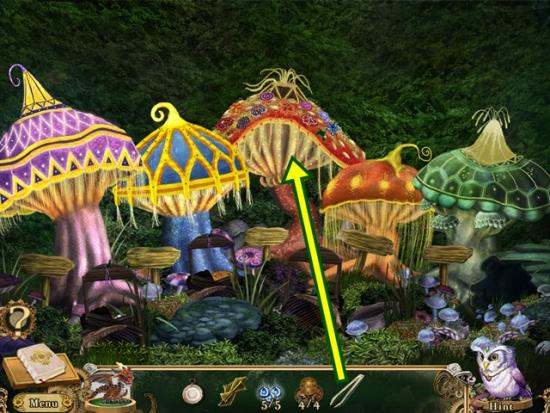
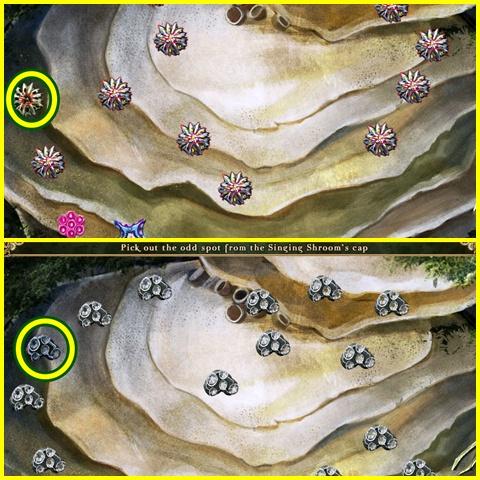
- Use the fungal tweezers on the lead shroom. A mini-puzzle starts. Use the tweezers to remove the spot that is different from the others.
- Solution:

- Leave the singing shrooms and return to the sacred grove.
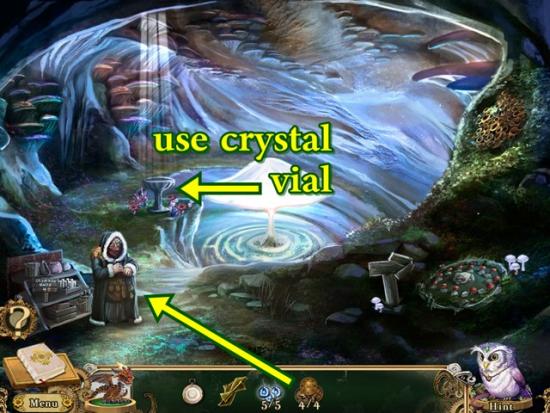
- Talk to the mysterious peddler. Buy the crystal vial for four bolgin coins. Click through the dialogue. Click on the stone basin.
- Use the crystal vial on the basin of liquid mojo. You now have a vial of liquid mojo and torn boat blueprints. Return to the wise one’s hut.
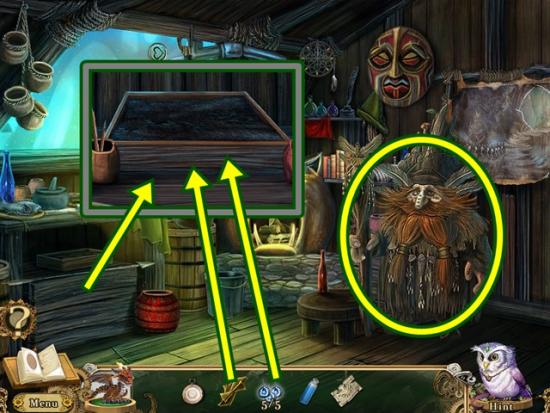
- Talk to the wise one. Click on the planting trough.
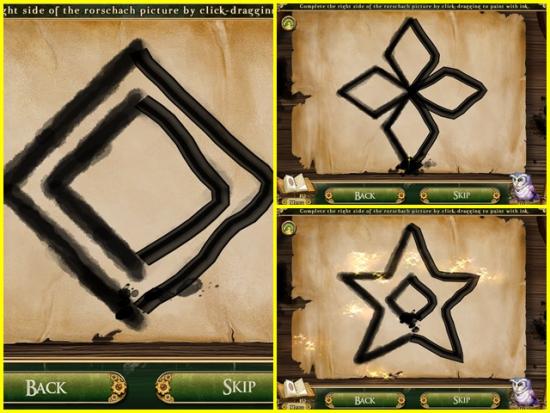
- Put the inkcap mushroom spores in the fungus planting trough. Add the bark paper. A mini-puzzle starts. Complete the design by using your cursor to click and drag a line of ink. Try not to let go of the mouse button as that could cause a break in the ink line and you won’t be able to complete the image. Click on the green arrow in the top left corner of the scene to reset the drawing.
- Solutions:
- Abstract drawings are added to your inventory. Return to the singing shrooms (through the ancient shrine, through the sacred grove and take the path through the pond to the entrance of the hedge maze).
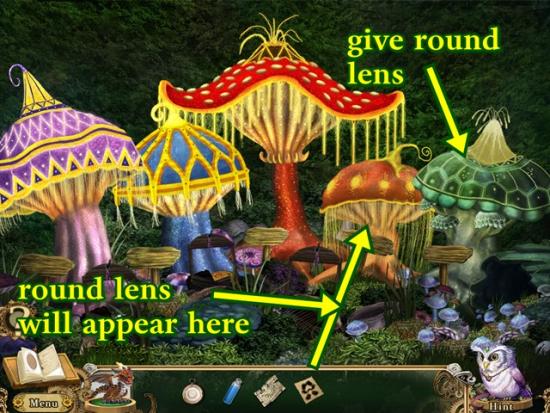
- Give the abstract drawings to the baritone shroom. Take the round lens that appears. Give the round lens to the chorus shroom. A mini-puzzle starts. Use the lens to find all the bugs that are listed at the bottom of the scene.
- Click on any shroom.
- Take note of the poem the singing shrooms read you, it’s the directions for the hedge maze. The information is highlighted in your journal. The directions for the hedge maze are right-right-up-left-up.
- Leave the singing shrooms. Enter the tangled hedge maze.
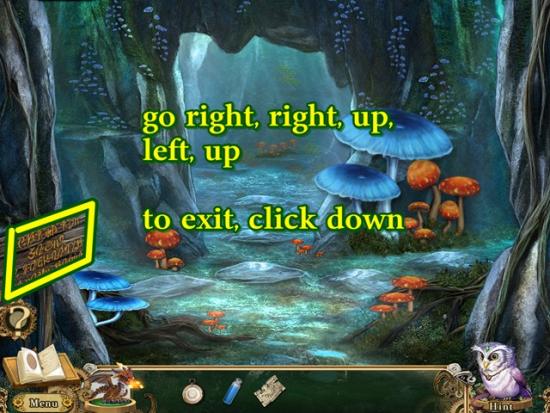
- Click on the sign to be told that if you get lost, click down to exit the maze.
- Follow the directions by going: right-right-up-left-up.
- Take the spore of the venerated toadstool.
- Return to the wise one’s hut. To exit the maze, click south (down).
- Give the wise one the vial of liquid mojo and the spore of venerated toadstool. The potion of goblin disguise is added to your inventory. Leave the wise one’s hut.
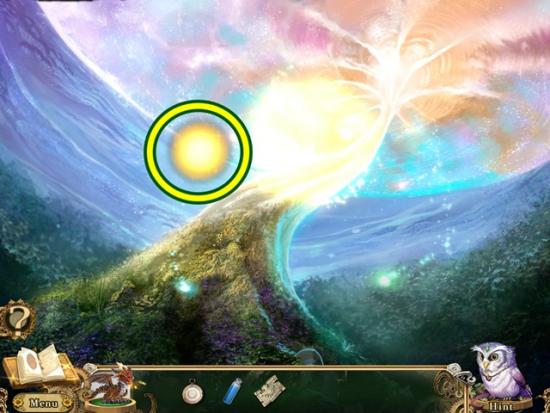
- Talk to the gnomish elder. Click on the Statue of the Oracle. Click on the statue to talk to the oracle. Leave the Statue of the Oracle.
- Take the path to the underground lake pier.
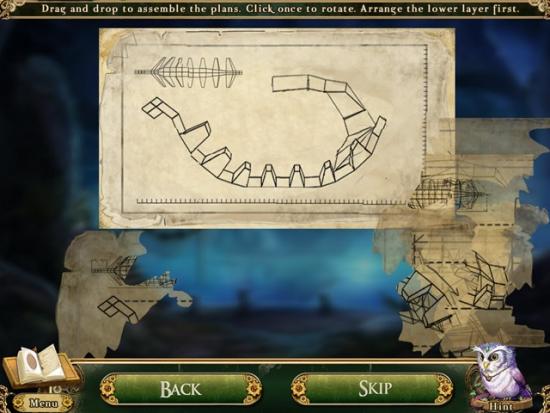
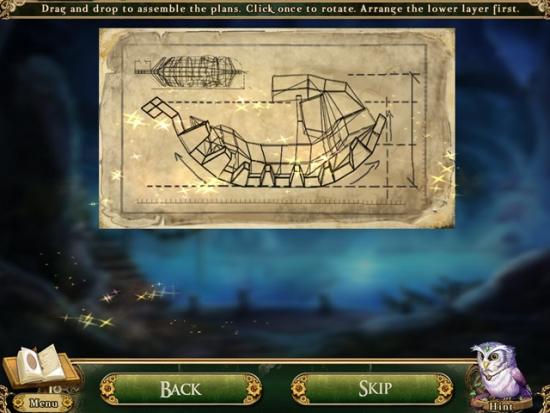
- Use the torn boat blueprints on the incomplete boat. A mini-puzzle starts. Rearrange the pieces to complete the image. There are two layers to this puzzle so keep in mind that not all pieces fit the puzzle right away.
- Solution to layer one:
- Solution to layer two:
- Tangram puzzle. Solution:
- Click on the finished boat. Watch the cutscene.
Chapter Four
- Take the delicious olives (1/3), the moonflower nectar (1/7) and the message in a bottle. The message in a bottle is added as an entry to your journal. Read the entry. Click on the locked wheelie bag. Try to open it.
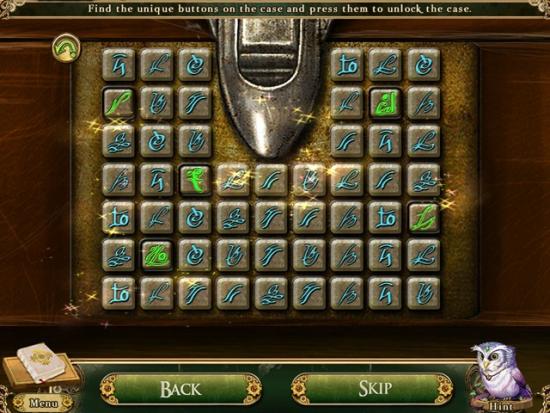
- A mini-puzzle starts. Find and press the buttons that only appear once. If you press a button that is incorrect, press it again to release it.
- Solution:
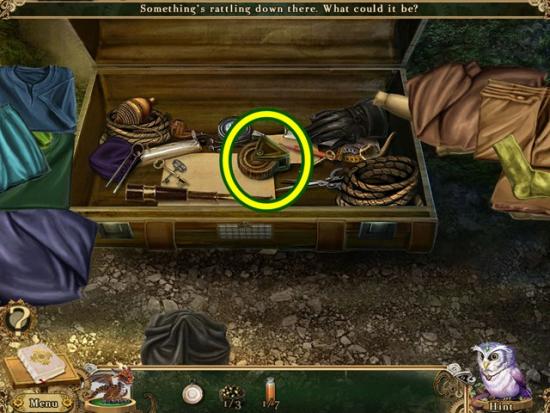
- Open the wheelie bag. Move the clothes (click and drag) out of the suitcase and take the wheelie bag caster. Put the wheelie bag caster on the wheelie bag.
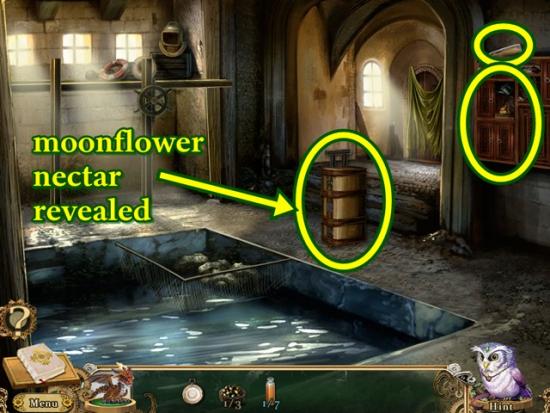
- Click on the wheelie bag to move it. Take the moonflower nectar (2/7) it was hiding. Now that the wheelie bag is under the wooden shelves, take the moonflower nectar (3/7). Click on the wooden shelves.

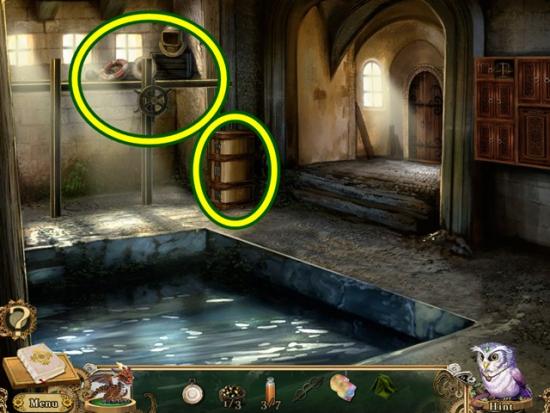
- A hidden object hunt starts. Find all the objects. Open the cupboards to reveal the items. Find the red paint and paint the anchor to take the red anchor. Attached the oar head to the oar handle to get the oar. Put the lead weight on the scales to get the unbalanced scales. Spectacle frames are added to your inventory.
- Click on the fishing net. A mini-puzzle starts. Click on the fish pairs that match the riddle provided. Riddle 1 is the two pairs of red fish. Riddle 2 is the butterfly fish. Riddle 3 is the zebra striped fish. Riddle 4 is the flat, round brown fish with the wobbly eye. Riddle 5 is the silver schools of fish. Riddle 6 is the amber (gold) fish with the long tails. Riddle 7 is the rainbow coloured fish.
- When you are finished, rainbow scales are added to your inventory.
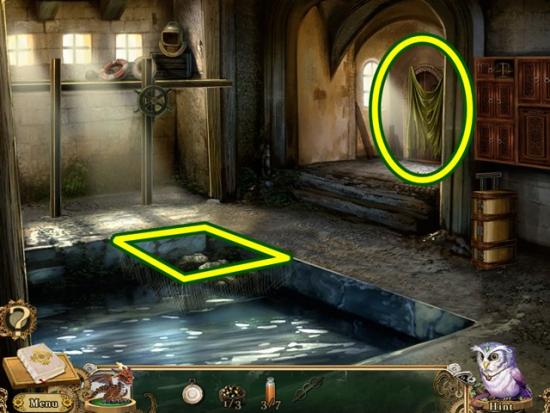
- Click the ragged curtains.
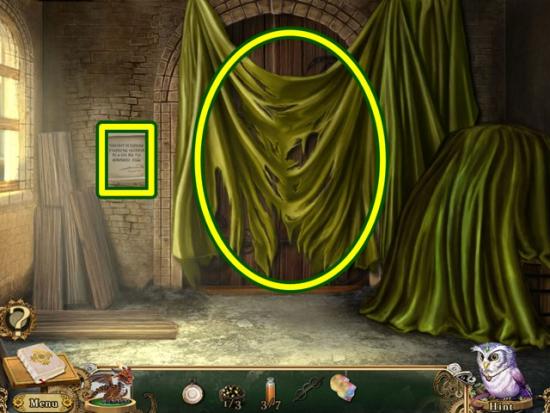
- Read the old handwritten note. Take the rag cloth. Click on the salt-encrusted wooden door. Leave the doorway.
- Move the wheelie cart over to the docking frame. Click on the docking frame. A mini-puzzle starts. A match 3 puzzle. Swap items to complete rows of three or more. Continue until every item has a light wood background. Focus on clearing the bottom rows as the movement will help clear the top rows. After a bit of inactivity, the game will give you a hint by shaking items.
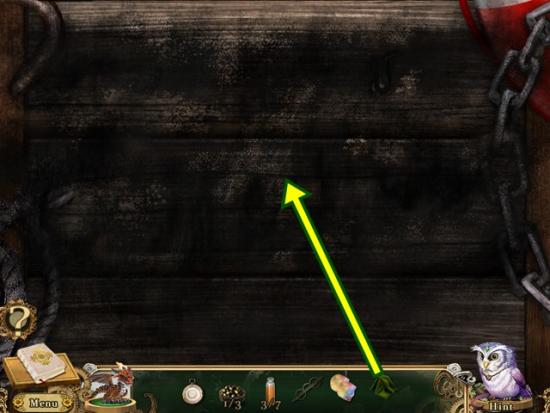
- Once you are done, use the rag cloth to clear the grime. Click on the cloth and move your mouse back and forth quickly to clean the surface. The cloth will disappear when you are done.
- Add the spectacle frames and rainbow scales to the newly cleaned surface. A mini-puzzle starts. Reassemble the rainbow pieces into the frames.
- Solution:
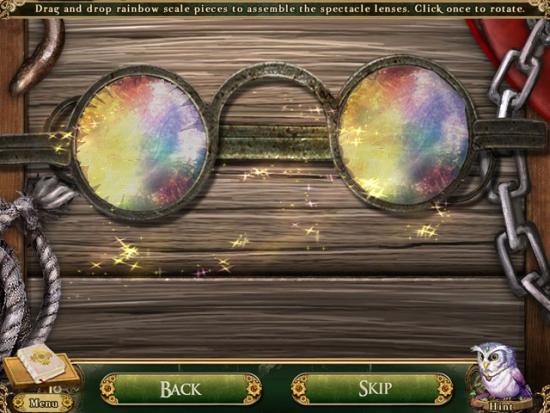
- Prismatic glasses are added to your inventory.
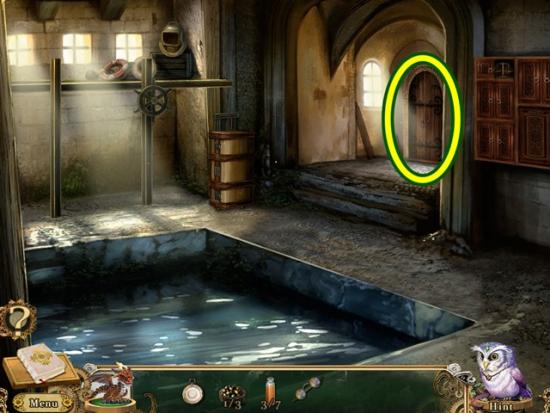
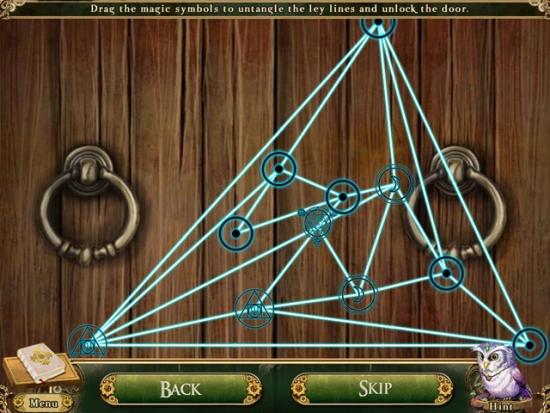
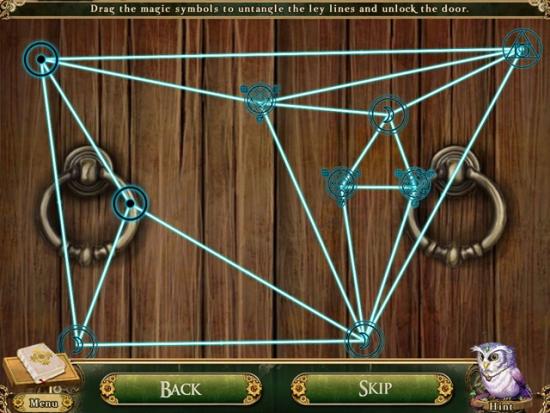
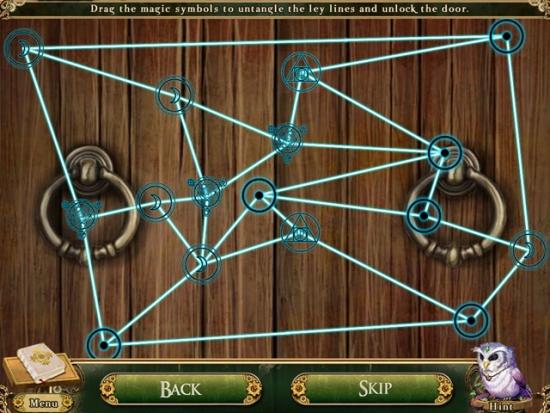
- Click on the salt-encrusted wooden door.
- Use the prismatic glasses on the door. A mini-puzzle starts. Drag the symbols around to untangle the lines.
- Solution:
- Go through the door to the town square.
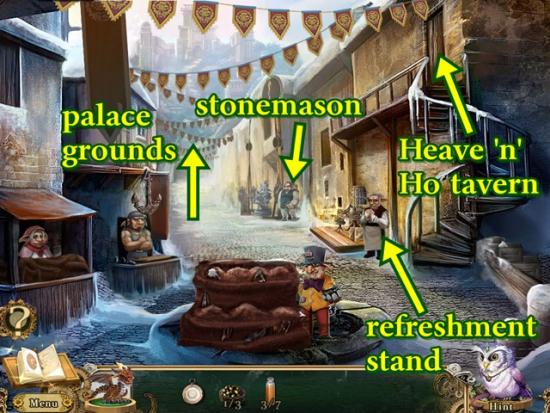
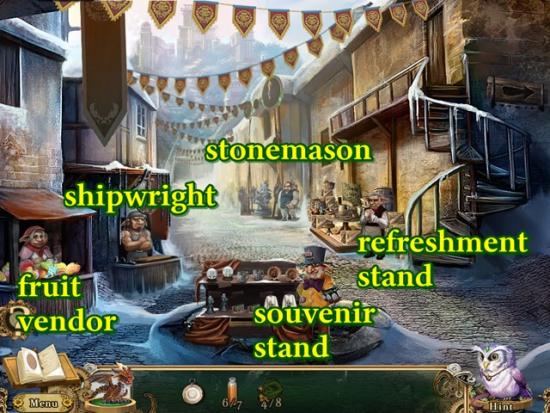
- Talk to all the goblins. You learn the refreshment stand needs olives and the stonemason needs to lift a stone block without a chain. Everyone else is busy. Go up the path to the palace grounds.
- Talk to the palace guards. Return to the town square. Go up the stairs into the Heave ‘n’ Ho tavern.
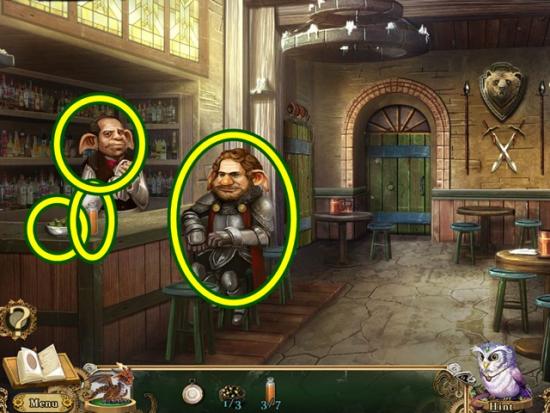
- Talk to the off-duty guard captain and the goblin bartender. Take the delicious olives (2/3) and the moonflower nectar (4/7). Leave the tavern.
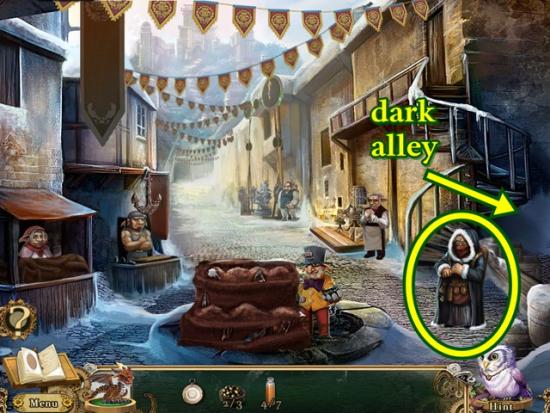
- Try to talk to the mysterious peddler. Go right to the dark alley.
- Talk to the mysterious peddler. Take the moonflower nectar (5/7). Press the loose wooden panel. Take the delicious olives (3/3). Click on the wooden pallets. Click on the secure container. A mini-puzzle starts. Rearrange the tiles to recreate the image. Tiles can be rotated and their positions can be changed. Click on two tiles to swap their positions. Once a tile is in its correct position, it becomes locked and cannot be moved.
- Solution:
- Take the moonflower nectar (6/7). Go south to the town square.
- Give the delicious olives to the refreshment stand.

- Find 12 tankards. Reassemble the broken tankard on the stool. Take the dishcloth from the stool and clean the dirty tankard. Move the draped covers from the crate to reveal two tankards. Take the filled tankard from the table and pour it down the sewer grate (click and drag).
- The refreshment stand owner gives you two bolgin coins (2/8).
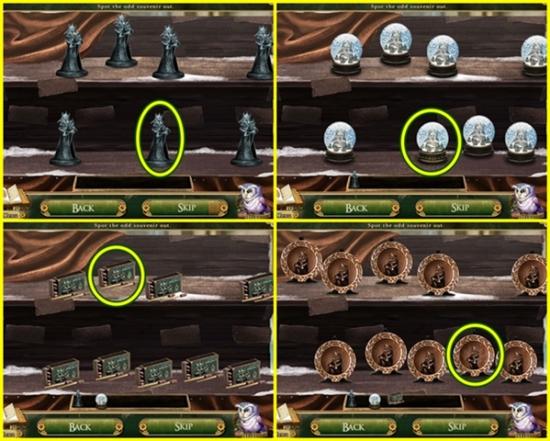
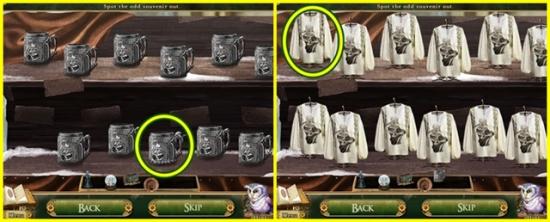
- Talk to the souvenir stand. A mini-puzzle starts. Select the souvenir that doesn’t match the others.
- Solution:
- The souvenir stand owner gives you two bolgin coins (4/8).
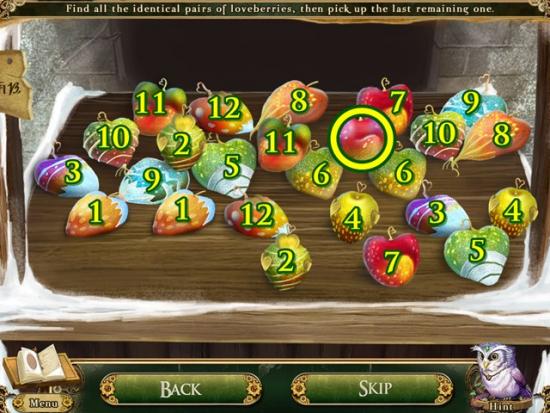
- Talk to the fruit vendor. A mini-puzzle starts. Find all the pairs of loveberries and then select the last remaining one. This puzzle is different each time you play however the final loveberry looks the same.
- Solution:
- The fruit vendor gives you a bolgin coin (5/8).
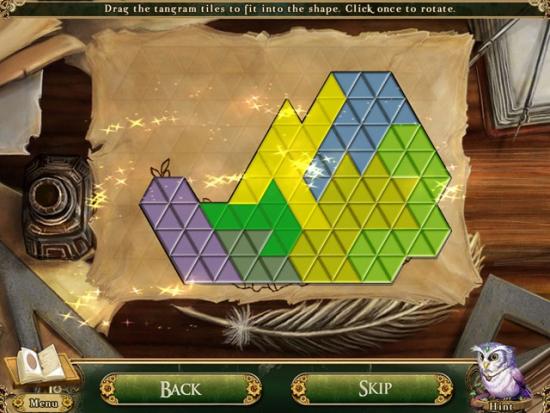
- Talk to the shipwright. A mini-puzzle starts. A tangram puzzle.
- Solution:
- The shipwright gives you heavy duty chains. Give the heavy duty chains to the stonemason. A mini-puzzle starts. When both dials are pointing to the green zone, turn the handle. Continue until the stone block has been fully lifted.
- The stonemason gives you two bolgin coins (7/8).
- Enter the Heave ‘n’ Ho tavern.
- Talk to the goblin bartender. Take note of the bartender’s instructions for the cellar maze.
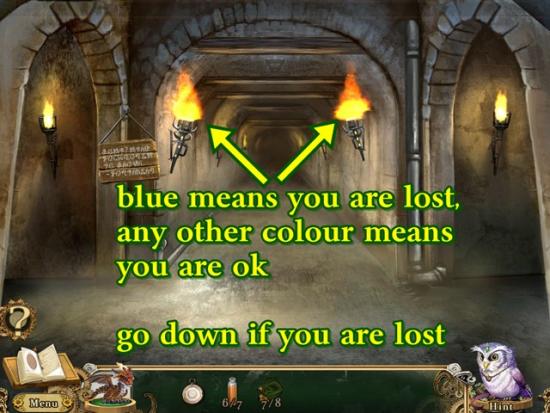
- You are automatically transported into the cellar maze. If you get lost, click down to start over again. Remember a blue fire means you are lost.
- Solution: Forward, right, forward, left, right, forward, left.
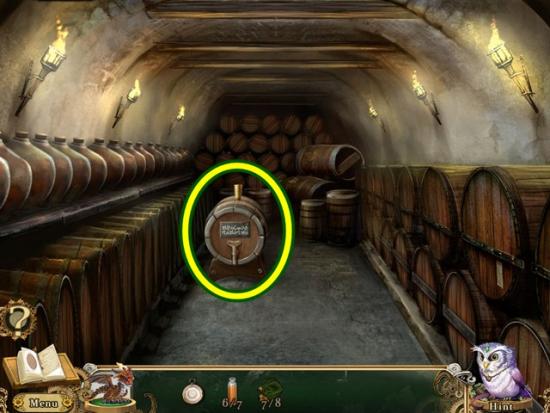
- Take the cask of Alex’s Finest 100-year old special. Click down to return to the tavern.
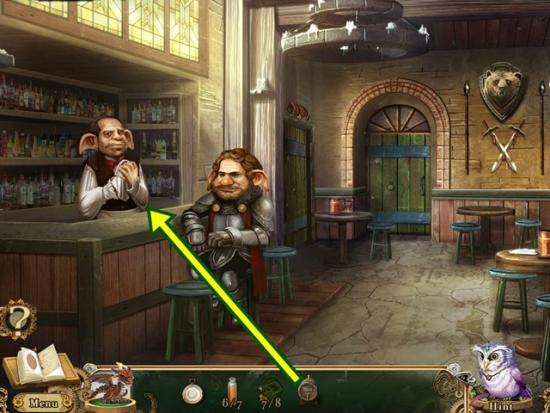
- Give the cask of Alex’s Finest 100-year old special to the goblin bartender. He gives you a bolgin coin (8/8). Return to the dark alley.
- Give the eight bolgin coins to the mysterious peddler. He gives you the sap of sleeping poppy. Take note of the peddler’s instructions. The pocket watch is taken and replaced by a clipped coin.
- Return to the tavern.
- Give the clipped coin to the shifty looking goblins. Click through the dialogue

- Once everyone has left, click on the cocktail bar. Take the moonflower nectar (7/7). Add the moonflower nectar into the empty nectar bottle.
- Using the recipe book (bottom right corner) as a guide, match the flasks at the bottom of the screen to their respective bottle. Once you’ve made a drink, click on the cocktail recipe book to turn the page. If the flask you need isn’t visible, click the arrow buttons at either side of the flasks list.
- Once you are done, you receive the unmixed cocktail.

- Pour the unmixed cocktail into the cocktail mixer. Pick it up and shake it (click and drag it up and down really fast). You now have the moon rock shooter cocktail.
- In the emptied drinks glass, pour the moon rock shooter cocktail and then add the sap of sleeping poppy. Tip: Use the tip of your cursor to pour the drink, don’t use the bottle as a guide.
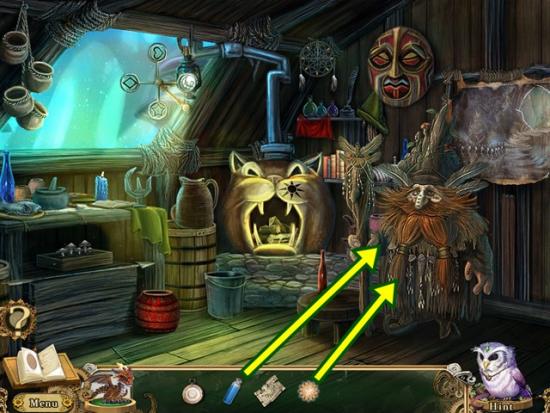
- Click on the unconscious guard captain to take his armour and disguise yourself. Click on the guard captain’s journal. It’s entered into your journal.
- Return to the palace grounds.
- Talk to the palace guards. A mini-puzzle starts. A quiz. Click on the box that has the correct answer. If you are wrong, click to remove your answer. Who is the inventor locked up in the Dark Tower? Leodici. What is the name of the magic puppet in the Dark Tower? Xim. What is the name of the giant toadstool in the Sacred Grove? Venerated Toadstool. What is the statue in the gnomish village called? The Oracle. What is the name of our future king? Grimble.
- Enter the palace.
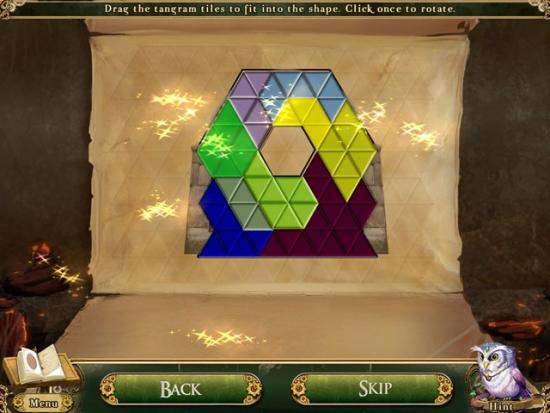
- Click on the goblin king’s throne. Use the pocket dragon on the wooden panel. Take the goblin blueprints. A mini-puzzle starts. A tangram puzzle.
- Solution:
- Click through the dialogue.
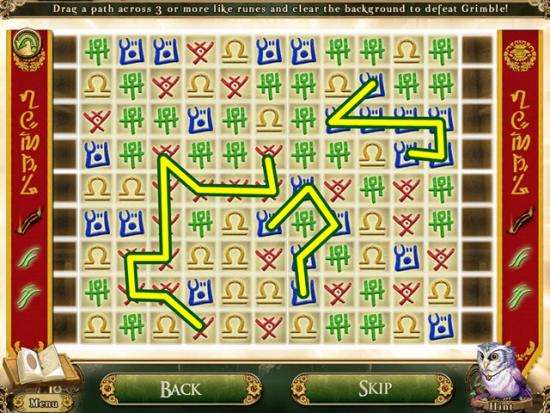
- A mini-puzzle starts. Draw a line through three or more runes to clear the board. You can draw the line up and down, then right to left then diagonally, as long as three or more are connected. Note you cannot double back.
- Example:
- Click through the dialogue.
- Watch the cutscene.
Epilogue
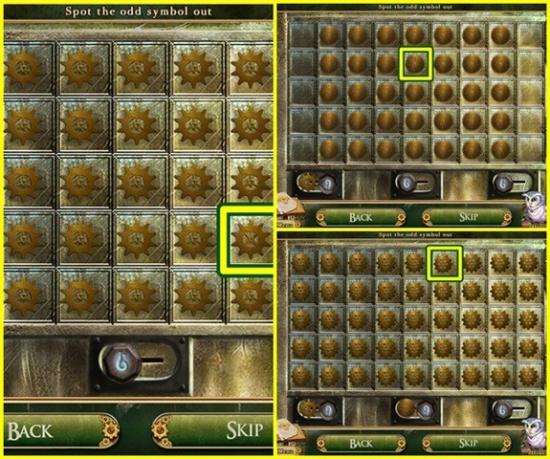
- Click on Locker 1. A mini-puzzle starts. Find the symbol that doesn’t match the others.
- Solutions:
- Take the bronze key.
- Click on the train station gate. Open the lock with the bronze key. Turn the key. Go through the door to the border crossing.
- Click on the dried out fountain.
- Find 12 pipes. Move the panel to reveal a pipe. Click on the crate to reveal a pipe. Move the leaves to reveal a pipe.
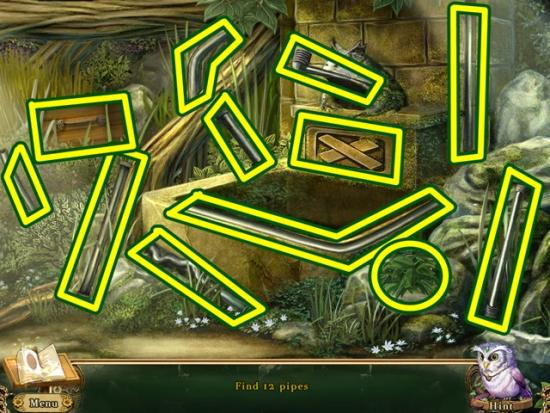
- Water pipes are added to your inventory.
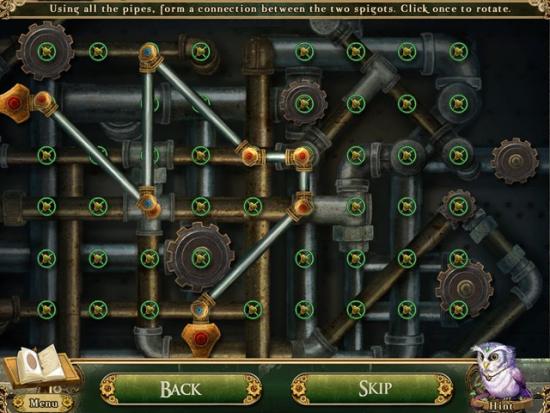
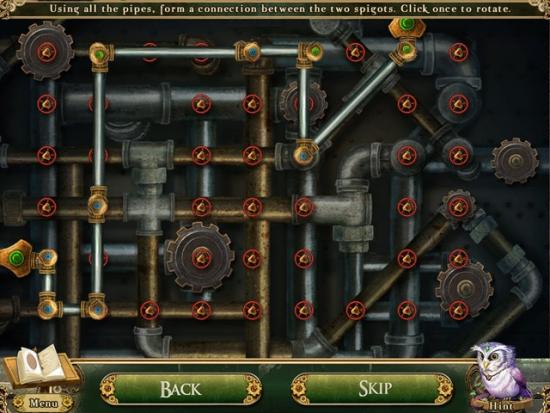
- Add the water pipes to the dried out fountain.
- A mini-puzzle starts. Use all the pipes to connect the two spigots.
- Solutions:
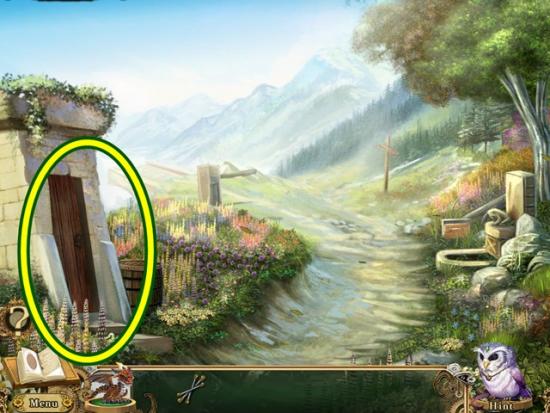
- Click on the checkpoint building.
- A mini-puzzle starts. Find the pairs of related items. Click to move the rug to reveal an item. Open the shutter to reveal an item. Move the leaves to reveal an item.
- Solution:
- A fireplace poker is added to your inventory. Click anywhere outside of the window to close it.
- Go toward the overgrown path.
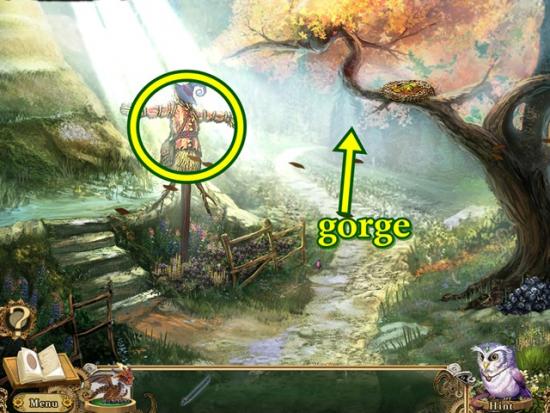
- Click on the scarecrow.
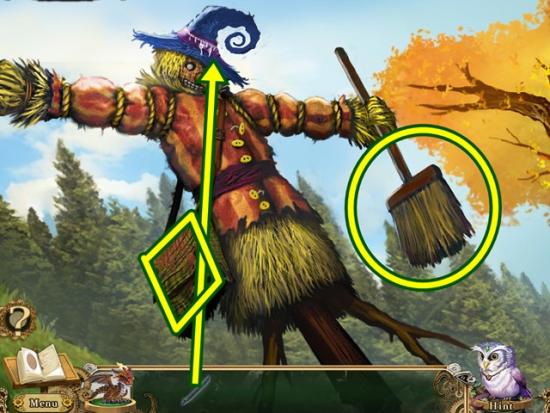
- Take the broom. Open the pouch and take the sewing kit. Use the fireplace poker on the hat to get the key ring.
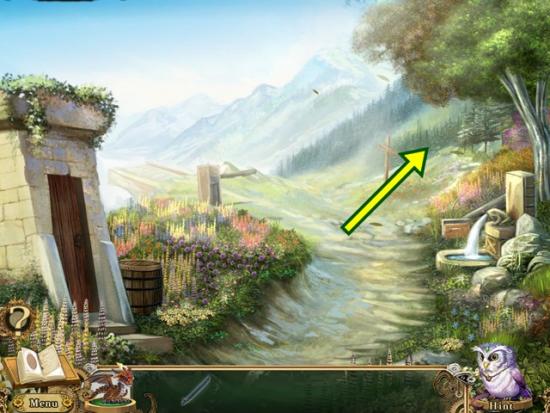
- Go forward towards the gorge.
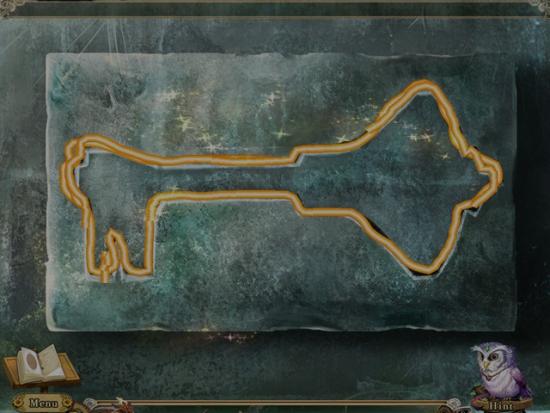
- Take the headless shovel. Click on the elemental altar. Take the screwdriver. Leave the elemental altar. Return to the border crossing.
- Click on the turnpike. Use the screwdriver to unscrew the screws. Take the turnpike. Go to the bridge.
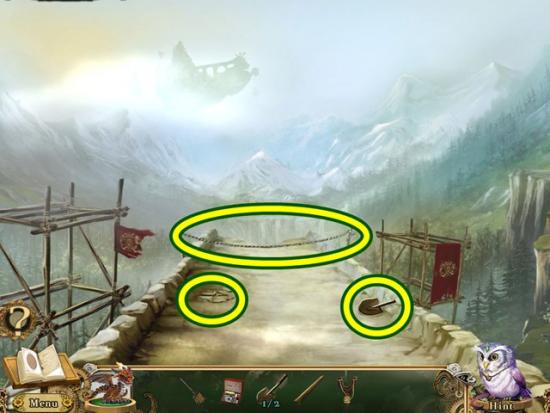
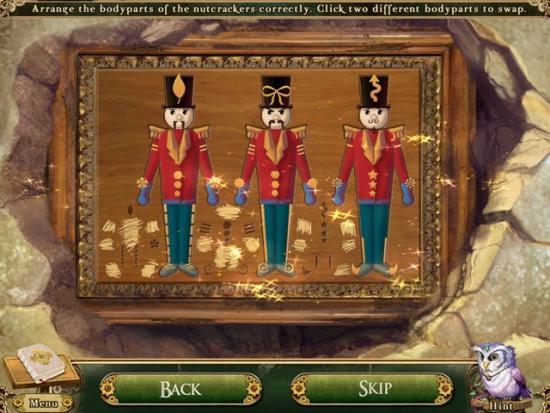
- Take the shovel head and the length of rope. Click on the loose mortar. Use the shovel on the loose mortar. Click on the locked box. A mini-puzzle starts. Rearrange the pieces of the nutcrackers. Note the clues scratched onto the box. Dress the nutcrackers according to the clues.
- Solution:
- Take the fold of silk.
- Return to the border crossing.
- Click on the checkpoint building. Use the key ring to unlock the door.
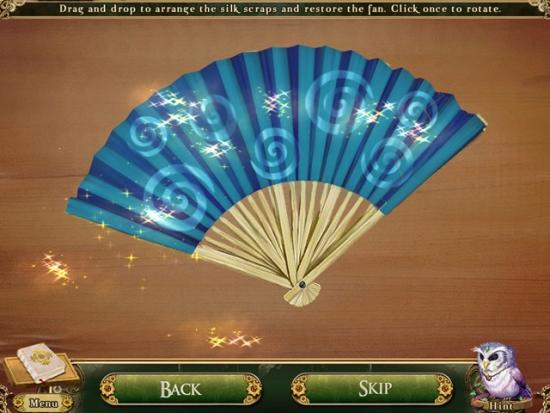
- Take the slingshot. Click on the worn poster. Click on the tourist guidebook. Click to turn the pages. When you get to the unicorn page, click on the scrap of paper to create a journal entry. Click anywhere outside of the window to close it. Click on the folding fan. Add the fold of silk to it. A mini-puzzle starts. Recreate the fan by dragging and dropping the pieces of silk.
- Solution:
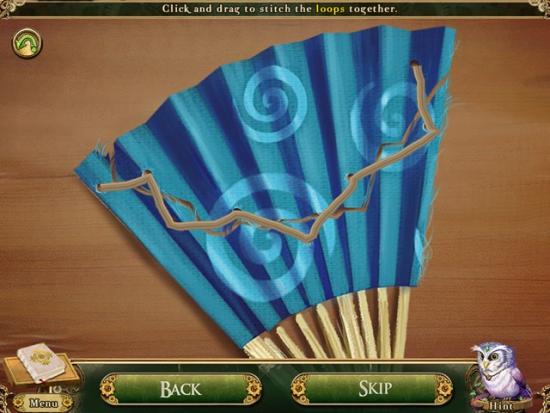
- Use the sewing kit to fix the folding fan. A mini-puzzle starts. Use your cursor to sew the fan back together. Click and drag your cursor from loop to loop to sew the folding fan back together.
- Solutions:
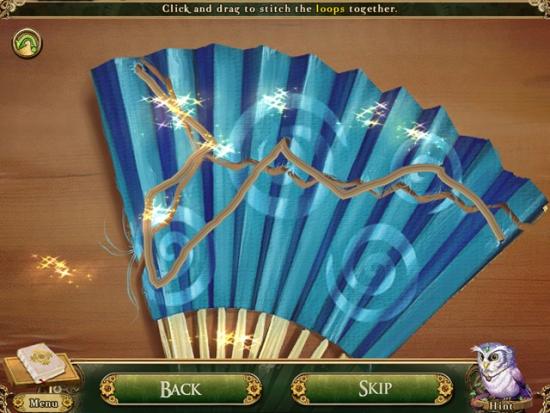
- The folding fan is added to your inventory. Take the crystal fragment (1/6).
- Go to the overgrown path.
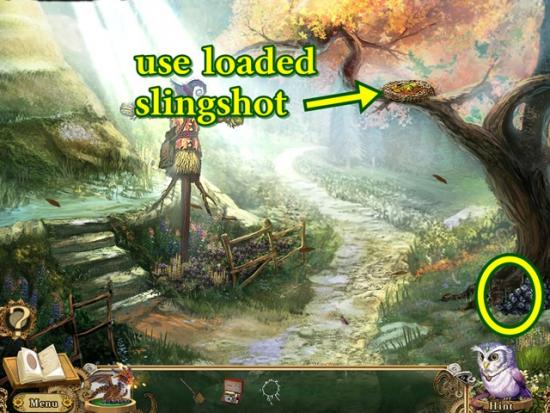
- Take the rocks. You now have a loaded slingshot. Use the loaded slingshot on the magpie’s nest. Click on the nest. Brush away the leaves and take the crystal fragment (2/6) and the locker keycard.
- Return to the train station. (south twice).
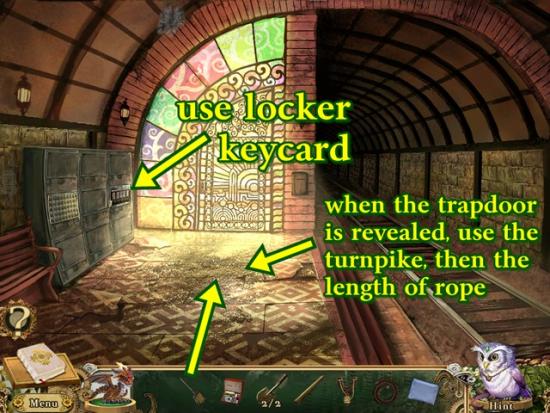
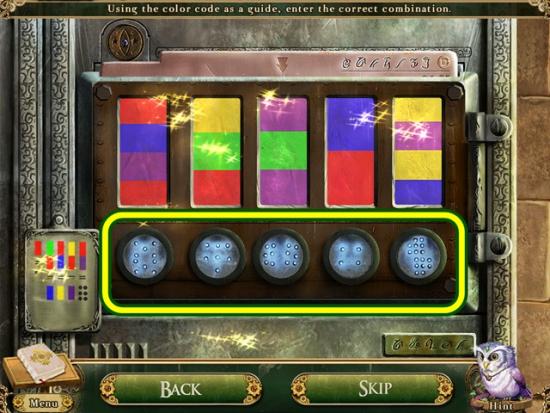
- Use the locker keycard on Locker 29.
- A mini-puzzle starts. Rearrange the panels to match the colour code (bottom left corner). Click on the colour code for a clue. The colours have a numerical value.
- From the colour code, we know that red = 1. Purple + red = 6. Since red = 1, purple = 5. Since yellow + red (1) = purple (5), yellow is 4. Red (1) + blue = yellow (4), blue is 3. Green + red (1) = blue (3), green = 2.
- Red = 1
- Green = 2
- Blue = 3
- Yellow = 4
- Purple = 5
- Add up the numbers for each panel. Click the button below the panel until it shows the sum of the panel above it.
- Solution:
- Take the crystal fragment (3/6). Click on the treasure map. Click on the treasure map again to add a journal entry.
- Sweep the dirty floor with the broom. Open the loose floor panels. Try to open the trapdoor. Use the turnpike on the door. Put the length of rope on the ladder. Go down into the storage cellar.
- Find the oil lamp, then use the pocket dragon to light it.
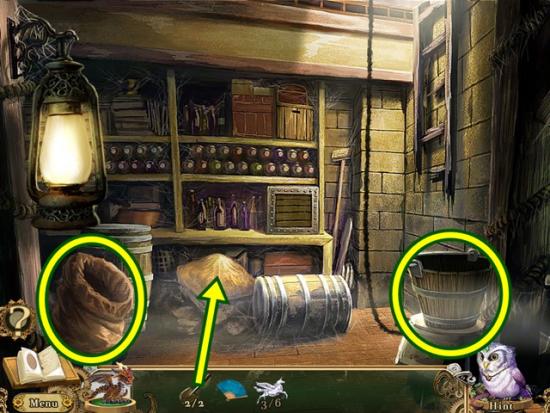
- Take the wooden bucket and the hemp sack. Click on the sacks of grain.
- Use the shovel to cut open the sacks of grain. Take the crystal fragment (4/6).
- Return to the overgrown path.
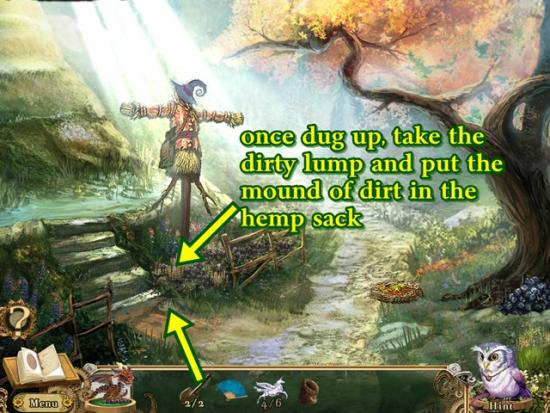
- Use the shovel to dig up the buried treasure (three clicks). Click on the unearthed area and take the dirty lump. Gather the mound of dirt in the hemp sack to get the sack of soil. Return to the border crossing.
- Click on the fountain. Fill the wooden bucket with water (put it in the water, not just under the spout). The full bucket goes on the edge of the fountain. Put the dirty lump in the full bucket, then take the crystal fragment (5/6). Take the full bucket and fill it with water again to get the bucket of water.
- Go to the gorge (take the overgrown path, then go north).
- Click on the elemental altar.
- On the Altar of Fire, use the pocket dragon. On the Altar of Water, use the bucket of water. On the Altar of Earth, use the sack of soil. On the Altar of Wind, use the folding fan.
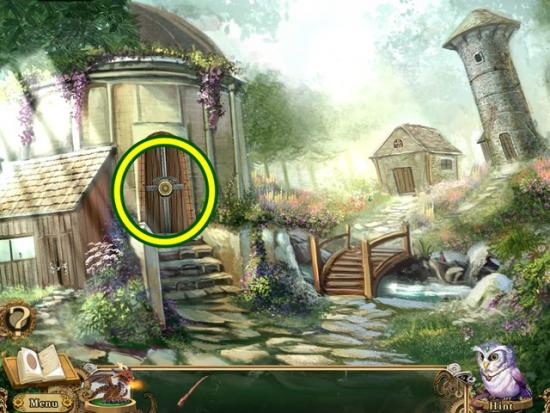
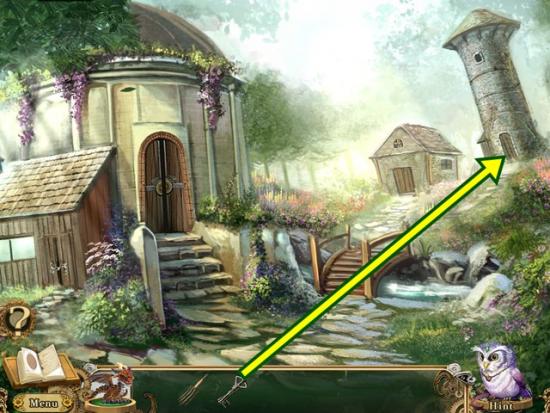
- Take the bridge to the hamlet.
- Enter the weathered lodge.
- Talk to the old caretaker. A mini-puzzle starts. Mah-jong. Click on matching sets of tiles to clear them. Your goal is to match the two tiles that have keys on them. Only tiles that are lit can be selected. If you leave the puzzle, you must start over. The top left corner has a few features. Shuffle tiles will shuffle the tiles. You can only use this once per game. Undo last will undo your last movement. Open pairs tells you how many pairs you can currently select. Plan your moves wisely. Focus on the location of the two keys and clearing the areas around them. You have to play three games.
- Once you are finished, the old caretaker gives you a crystal fragment (6/6).
- Click on the painting. Click on it again to add a journal entry.
- Click on the silver box.
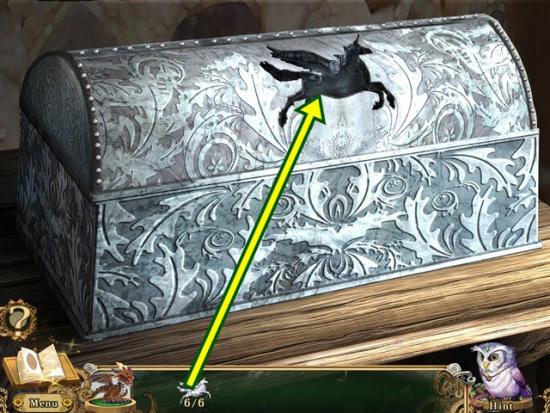
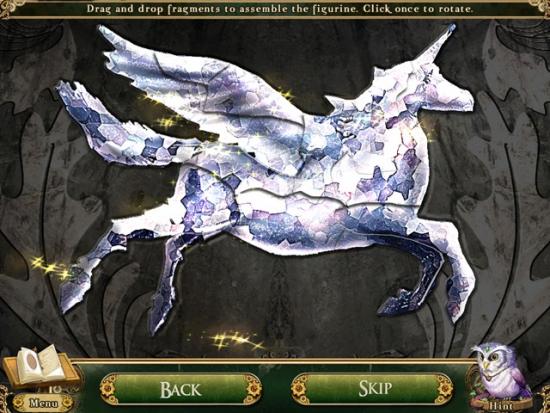
- Put the crystal fragments in the inlay. A mini-puzzle starts. A jigsaw puzzle. Rearrange the pieces to complete the unicorn figurine.
- Solution:
- When the box opens, take the unicorn horn. Leave the scene to go back into the hamlet.
- Click on the stables. A mini-puzzle starts.
- Note: If a mini-puzzle doesn’t start, you need to go back into the weathered lodge and click on the painting on the right side wall. Click on it again to add a journal entry.
- Take note of the symbols on the outside ring of the disc. They are the same as the left column of the journal sketch. Rotate the inner rings to line up the symbols. To solve this puzzle, from the sketch, start with the symbol in the top left corner. Find it on the outer ring. Now take note of the two symbols to its right (on the sketch). Find those symbols on the rings. Rotate the rings so those two symbols line up with the appropriate outer ring’s symbol. Do this for the next two.
- Solution:
- Enter the stables.
- Take the pitchfork. Remove the tarp. Click on the stone statue.
- Place the unicorn horn. Wait for the key to drop from the unicorn’s mouth. The smithy key is added to your inventory.

- Click on the feed trough. Take the pressed iron plate. Leave the feed trough. Click on the door to the blacksmithy. Unlock it with the smithy key.
- Click on the tool rack.
- A hidden object hunt starts. Find all the objects based on their silhouettes at the bottom of the screen. A bolt cutter is added to your inventory.
- Return to the hamlet.
- Click on the tinker’s shed. Use the bolt cutters to cut the lock. Enter the shed.
- A hidden object hunt starts. Find all the objects. Slide the panel down to reveal an item. Open the cabinet to reveal an item. Look in the toolbox. Select the proper handle for the engraving tool. Place the handle on the engraving tool (line up your cursor, not the handle itself). Take the engraving tool. Slide the panel out to get an item.
- Tinker’s tools are added to your inventory. Return to the blacksmith.
- Click on the anvil. Place the pressed iron plate. Use the pocket dragon on the plate. A mini-puzzle starts. Use the pocket dragon (click and drag) to heat the outline of the key. It’s hard to see all the corners and turns. If you do a complete line and the puzzle doesn’t end, use the dragon on any of the exposed outline. Continue covering up all the exposed outline areas until the puzzle ends.
- Solution:
- A rough iron key is added to your inventory.
- Click on the tool bench.
- Add the tinker’s tools to the bench, then add the rough iron key. A mini-puzzle starts. Finish the key using the tools.
- Start with the metalworking chisel. Click on the key head, the area just below it and the lock area.
- Take the hand drill. Drill three holes in the lock area.
- Take the engraving tool. Click on all the ornate areas.
- Finish with the polishing cloth. Click on all the scuffed areas.
- Solution:
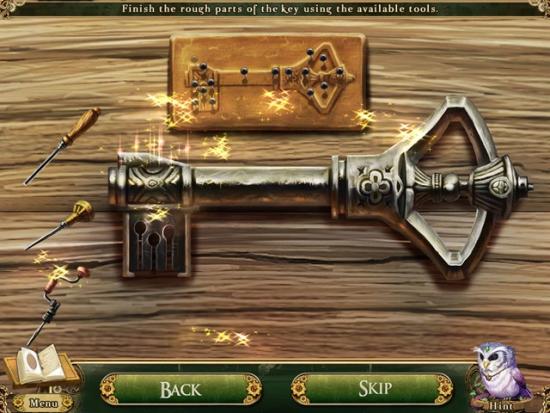
- The iron key is added to your inventory. Return to the hamlet.
- Click on the feed silo. Use the iron key to open the lock. Enter the feed silo.
- Gather the iridescent haystack with the pitchfork. Put the hay into the sack. Do this until all the hay is gone. Take the ebony crest that is revealed. Take the sack of iridescent hay.
- Return to the weathered lodge.
- Talk to the old caretaker. Click on the grooming kit display. Add the ebony crest to the case. A mini-puzzle starts. Recreate the image by turning the dials which control the discs and rings. Rotate the rings and take note of what they move. Get the outer area positioned first, then work on the unicorn. I can’t give a step-by-step solution for this puzzle as you may the disc positions will be different.
- Solution:
- When the grooming kit display opens, take the diamond key and the grooming kit. Return to the stables.
- Click on the feed trough. Add the sack of iridescent hay. Click on the tackle rack. Unlock it with the diamond key. Take the unicorn tackle. Pull the lever down. Use the grooming kit on the unicorn. A mini-puzzle starts. Groom the unicorn. Use the mane comb on its mane and tail. Use the currying comb on its wings. Use the hoof pick on its hooves. Use the dandy brush on its body.
- When you are done, add the unicorn tackle.
- Return to the weathered lodge.
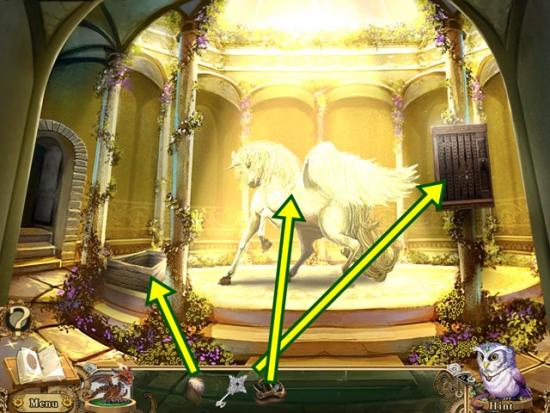
- Talk to the old caretaker. Return to the bridge (south four times, then north to the bridge).

- Click on the unicorn.
The end!

More articles...
-
Best Horror Games On Itch.io – July 2026
Across a bounty of subgenres. -
Grow A Garden 2 Base Price List
What's the most valuable crop? -
Evomon Types Guide [Strengths, Weaknesses, Resistance]
Your companion guide during battles.