- Wondering how to get Monopoly GO! free rolls? Well, you’ve come to the right place. In this guide, we provide you with a bunch of tips and tricks to get some free rolls for the hit new mobile game. We’ll …
Best Roblox Horror Games to Play Right Now – Updated Weekly
By Adele Wilson
Our Best Roblox Horror Games guide features the scariest and most creative experiences to play right now on the platform!The BEST Roblox Games of The Week – Games You Need To Play!
By Sho Roberts
Our feature shares our pick for the Best Roblox Games of the week! With our feature, we guarantee you'll find something new to play!All Grades in Type Soul – Each Race Explained
By Adele Wilson
Our All Grades in Type Soul guide lists every grade in the game for all races, including how to increase your grade quickly!
Awakening: The Dreamless Castle Walkthrough
Check out the official Gamezebo strategy guide for Awakening: The Dreamless Castle.
General Information
Main Menu

- The player button at the bottom-left corner of the main menu displays the profile window. Select the New Profile button to create a profile, the Delete button to delete the selected profile from the list or the OK button to to exit the profile window with the selected profile.
- The Start Game button starts the game with the currently selected profile.
- Goblinjong is a mini-game which is unlocked once the game has been completed.
- The Settings button displays a window where there are options to change the language (English, French, Dutch or Spanish), view credits, toggle full screen mode and system cursors, and adjust the volume for sound and music. The credits can also be viewed from the settings window.
- The Credits button shows a list of the people who made this game.
- The Quit button exits the game if Yes is selected or returns to the main menu if No is selected.
Normal Locations
- Move the cursor around the screen until it changes. The default cursor is the yellow pointer arrow, which is displayed when no action can be performed or when an object can be picked up. Other cursors include directional arrows to move to a new location and a magnifying glass to give a description of an object.
- Single left click on an area when a cursor is shown to perform an action.
- A single sparkle shows the location of an interesting object.
- Stars show the location of a hidden object location.
- The Journal above the Menu button at the bottom-left corner of the screen displays notes that have been taken throughout the game.
- The menu button can be selected at the bottom-left corner of the screen to display the game menu. From here you can resume the game, view game settings, display a help window or return to the main menu.
- Any items that have been collected will be stored in the inventory window at the bottom of the screen. Select an inventory item by left clicking it or return it to the inventory with a right click. All items that are stored in the inventory are used on another object in the game.
- After Mira has been freed from the jewelry box, she can be selected at the bottom-right corner of the screen to reveal the location of an area that should be examined next or a hidden object.
Hidden Object Locations
- The aim in these locations is to find all of the objects that are displayed in the list. It is not possible to give the exact locations for many of the hidden objects as the list is random each time that the game is played.
- One object is always in the same place in every hidden object location. This object is added to the inventory after the hidden object location has been completed.
- Mira the fairy can can be selected at the bottom-right corner of the screen to reveal the location of a hidden object. After using a hint, it takes 60 seconds before the hint level fills up and another hint can be used.
- Clicking five times in the wrong area causes the mouse cursor to move randomly for four seconds.
Mini-Games
- There are various mini-games in the main adventure which must be solved in order to make further progress with the main game.
- Completing a mini-game causes a new object to appear in the location where the mini-game was solved.
- The skip button becomes active two minutes after the mini-game has started. When active, the skip button can be pressed to pass the puzzle.
Skipping mini-games adds ten minutes to the total time played.
Bedroom
Bedroom
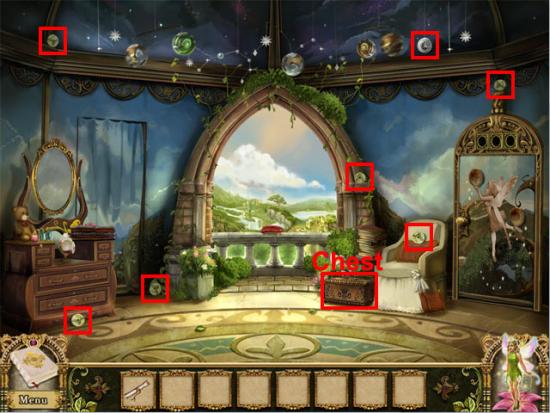
The game starts in the bedroom. Move forward to the balcony and take the small key on the pillow. Move back to the bedroom. Examine the jewelry box on the dresser at the left side of the room. Use the small key on the box to release the fairy, Mira. She gives you a note from the queen and can now be selected to reveal hints on the locations of important and hidden objects. Examine the chest to see six grooves. Exit the view of the chest. Find the six golden discs and the moon orb:
Examine the chest and use the gold discs on the grooves. Rotate the discs to the correct positions:
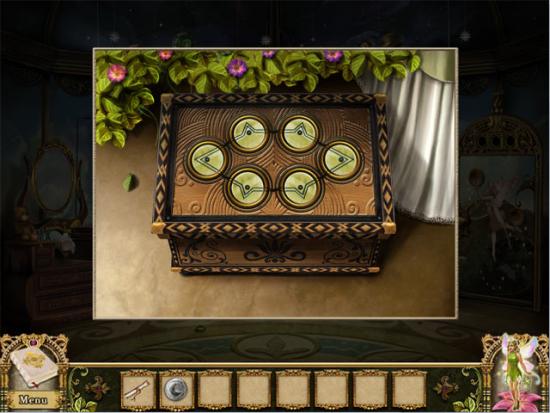
Take the sun orb from the chest. Examine the sparkling mirror to see that it is old and dusty. Stars will now appear on the closet at the right side of the mirror. Examine the closet to enter a hidden object location. Select the handkerchief:
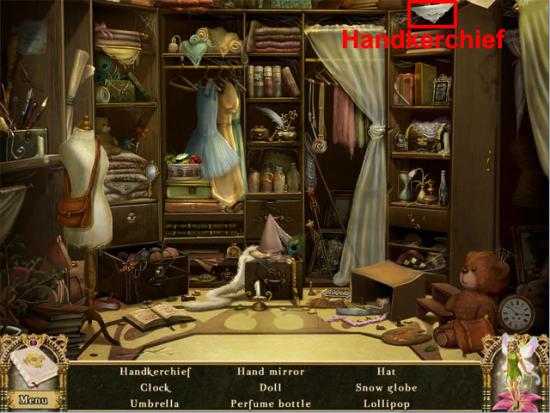
Find all of the remaining hidden objects on the list and the handkerchief will be added to the inventory. Examine the mirror and use the handkerchief on it twice to clean it. Take the magic rune:
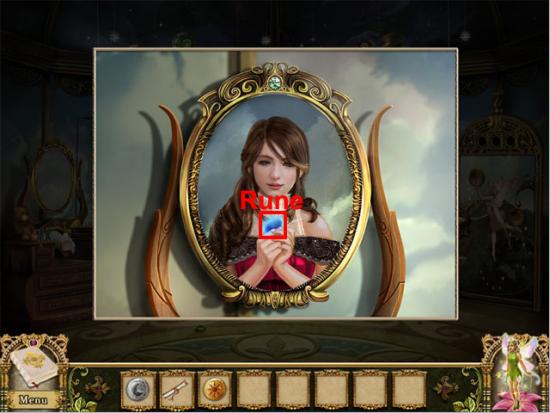
Symbols are shown at the top of the mirror in the order snowflake, heart and butterfly. Exit the view of the mirror. Examine the bedroom door at the right side of the room. Use the moon orb on the moon recess and the sun orb on the sun recess. Select the door and symbols will appear at the top. Put the symbols in the correct order and then select the handle:
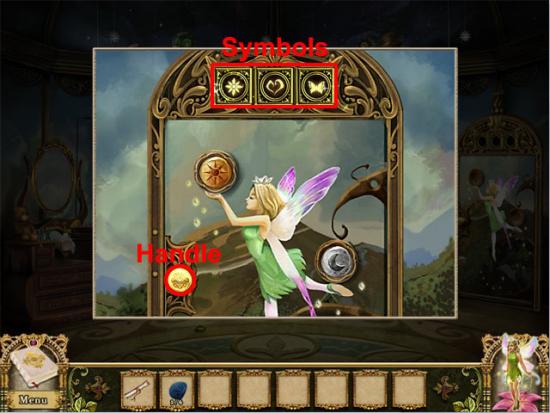
Go through the doorway to the south tower landing.
South Tower Landing, Lobby, and Guest Room
South Tower Landing
Examine the panel:
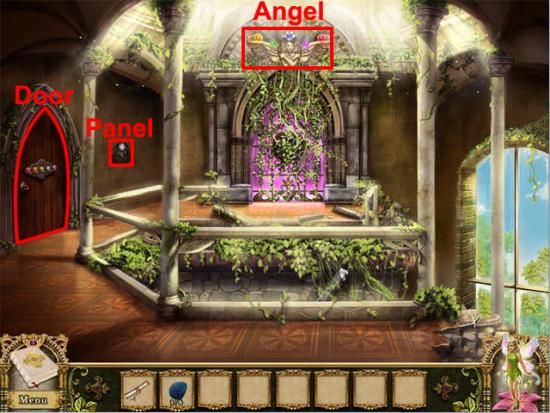
Press the switch in the middle of the panel and then select the engraving to take the glass disc. Exit the view of the panel. Examine the angel. The angel holds gems on her wings in the order yellow, green, blue, purple and red. Examine the door at the left side of the room and put the gems in the following order:
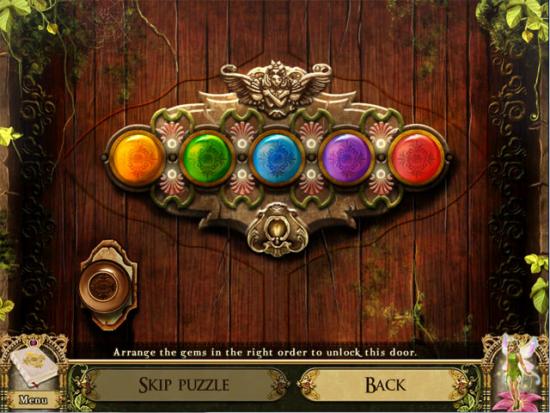
Select the doorknob to open the door. Enter the guest room.
Guest Room
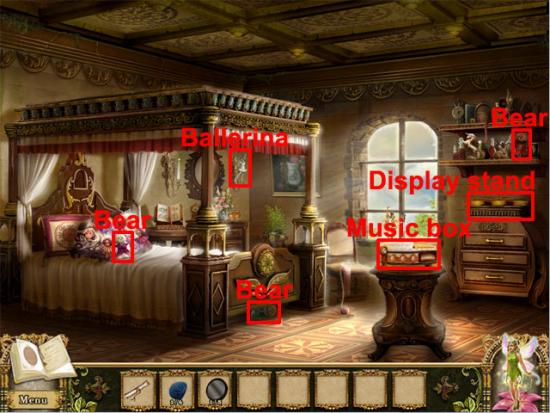
Take the ballerina and the three teddy bears:
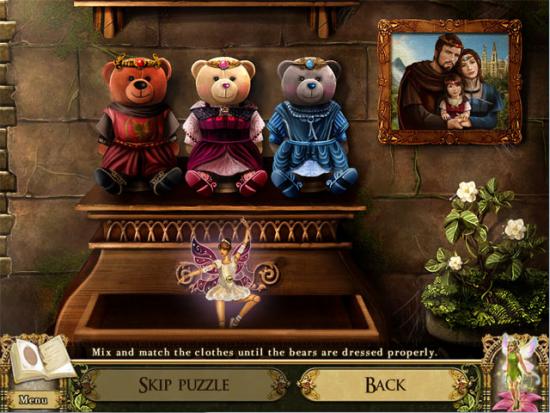
Examine the display stand. Use the teddy bears on the stand. Match the correct clothes to the bears and then take the ballerina:
Examine the music box. Use the ballerinas on the half-empty stage. Examine the ballerinas and repeat the three sequences of notes that are played. Examine the wreath and then examine it again in the close-up:
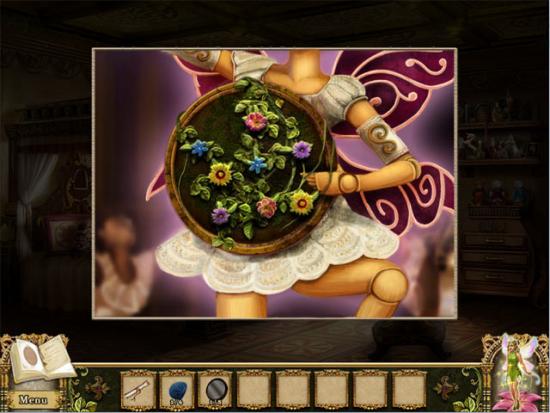
Flowers are now blooming in the other room. Exit the view of the wreath and move back to the south tower landing.
South Tower Landing
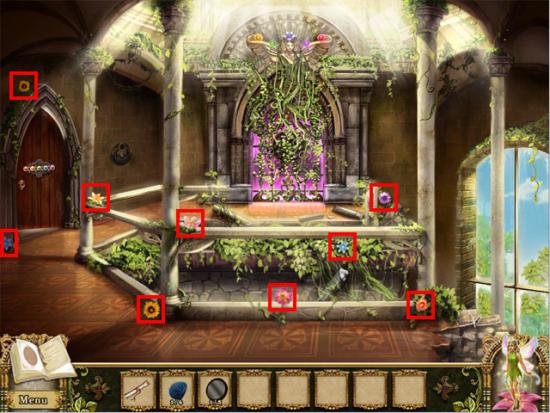
Find the nine flowers:
Examine the vine door at the back of the room. Use the flowers on the dead wreath. Put the flowers in the positions that were shown on the wreath held by the ballerina:
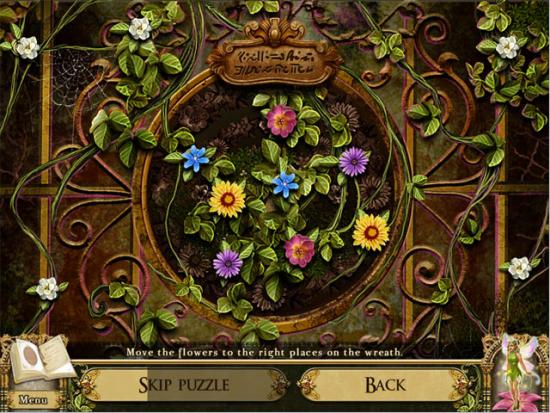
Go through the portal to enter the south tower lobby.
South Tower Lobby
Talk to the guard to play the Goblinjong mini-game. The aim is to match pairs of tiles to reveal the pair of keys, and then match the pair of keys to move onto the next round. Complete three rounds of the mini-game and the silver key will be added to the inventory. Take the three chunks of stone:
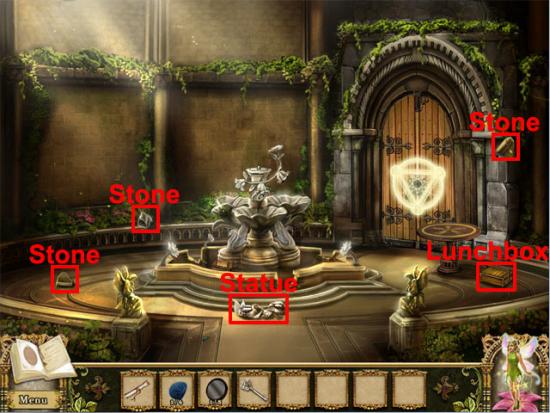
Examine the lunchbox and take the fourth chunk of stone. Examine the broken statue below the fountain to see an outline. Put all of the statue pieces in the correct places on the outline:
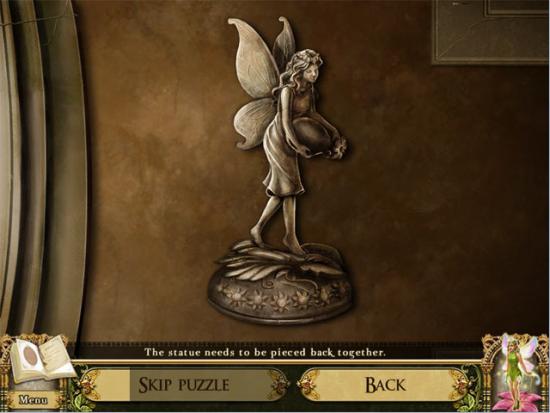
Use the four stone pieces on the fountain. Use the fairy figurine on the pedestal. Examine the treasure chest in the fountain:
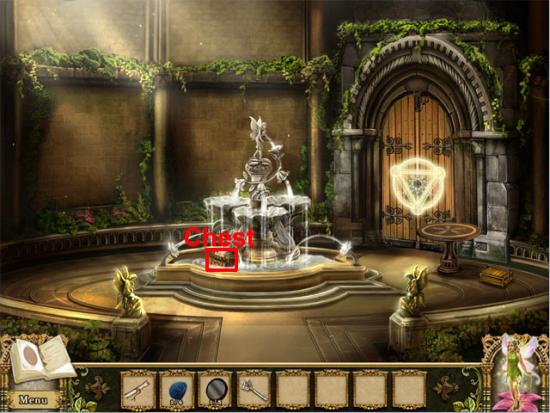
Take the sun from the treasure chest. Examine the tower door and use the sun on the glass disc. Take the magic rune. Go through the doorway to enter the garden.
Garden and Carriage House Exterior
Garden
Take the shovel leaning against the angel statue:
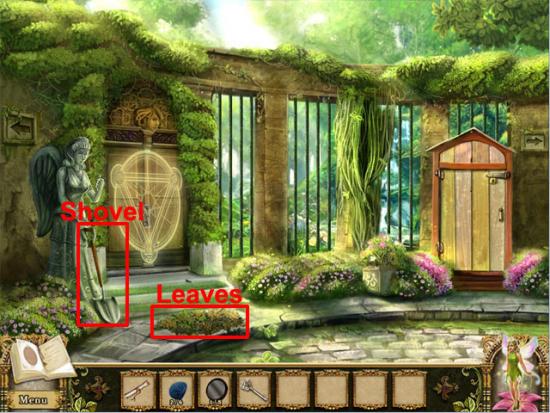
Move right to the carriage house area.
Outside Carriage House
Find the six parts of the swing seat:
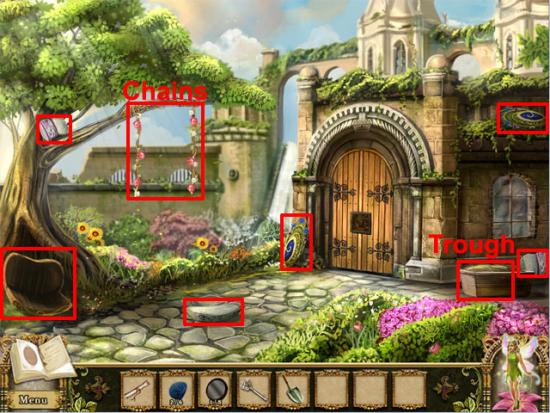
Use the swing seat on the chains. Examine the swing seat and take the puzzle pieces. Examine the trough and select the hay three times to reveal a crowbar. Take the crowbar. Move left to the garden.
Garden
Use the silver key on the wooden shed. Examine the wooden shed to enter a hidden object location. Select the rake:
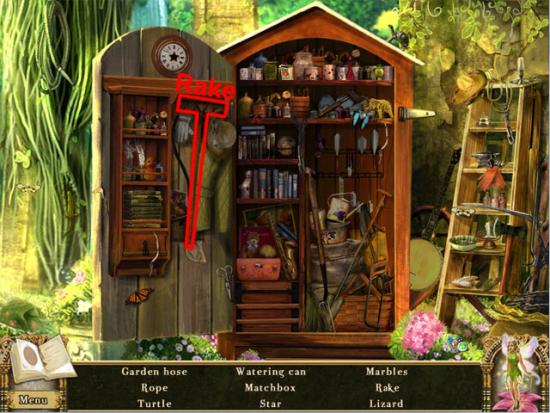
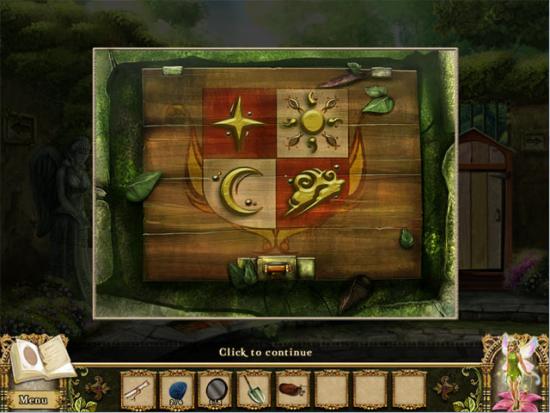
Find all of the remaining hidden objects on the list and the rake will be added to the inventory. Use the rake on the leaves to reveal a loose tile. Use the crowbar on the loose tile to reveal a trapdoor. Examine the trapdoor to see a crest with missing symbols. Exit the view of the trapdoor and find the four missing symbols:
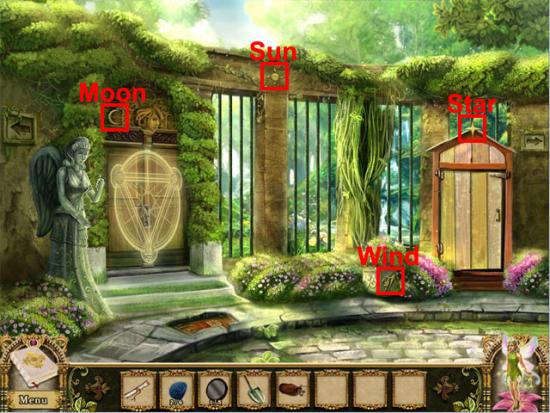
Examine the trapdoor and put the symbols in the correct locations:
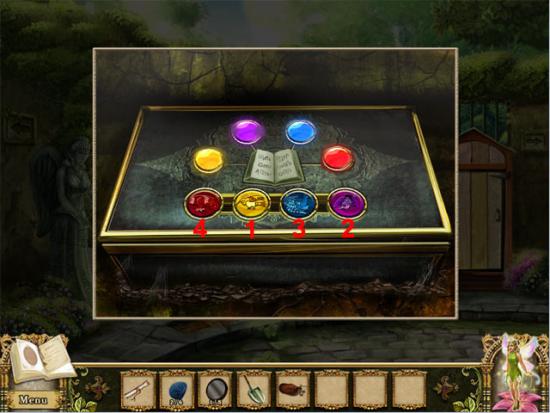
Press the buttons in the order shown below:
Take the shield from the trapdoor. Use the shield on the guardian angel statue and then take the vial of tears:
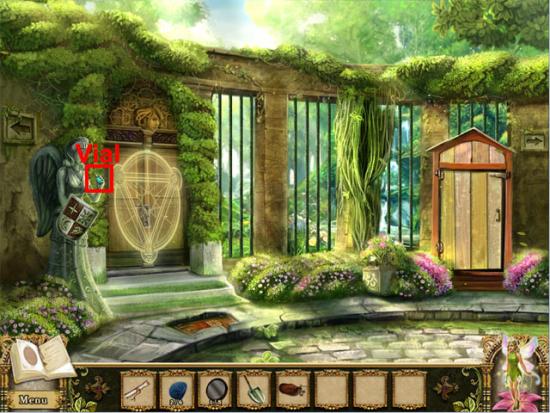
Move left to the pond.
Pond and Carriage House
Pond
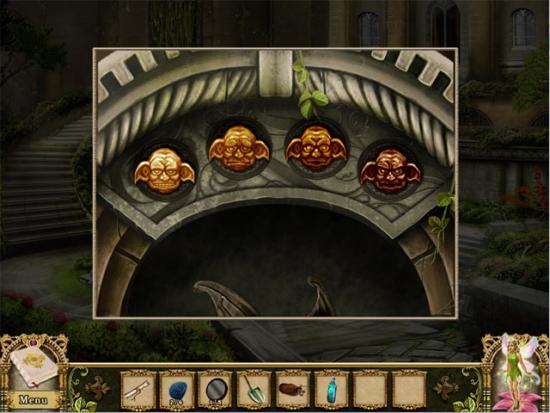
Examine the goblin heads above the fountain:
Move right twice to the carriage house area.
Outside Carriage House
Use the puzzle pieces on the carriage house door. Swap the pieces to make the picture shown below:
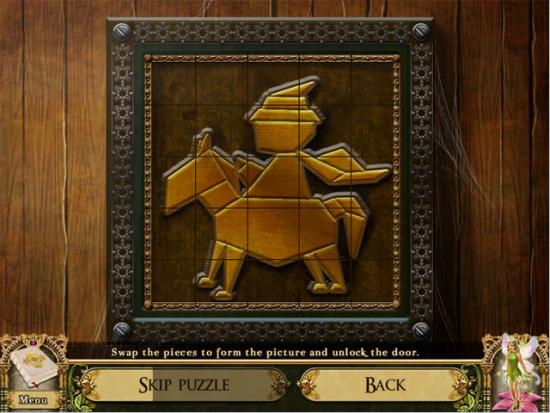
Go through the doorway to enter the carriage house.
Carriage House
The following hotspots are available:
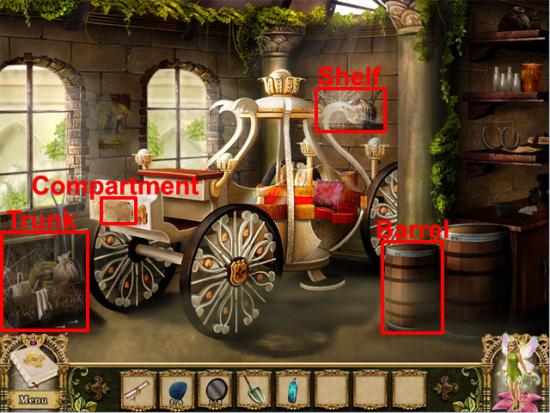
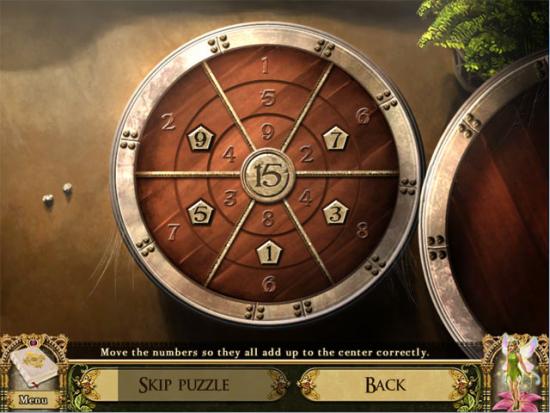
Examine the barrel and move the numbers so that all numbers in a straight line add up to 15:
Take the feather duster and the potion of rapid growth from the barrel. Use the feather duster on the trunk, the carriage compartment and the shelf. Examine the trunk to enter a hidden object location. Select the watering can:
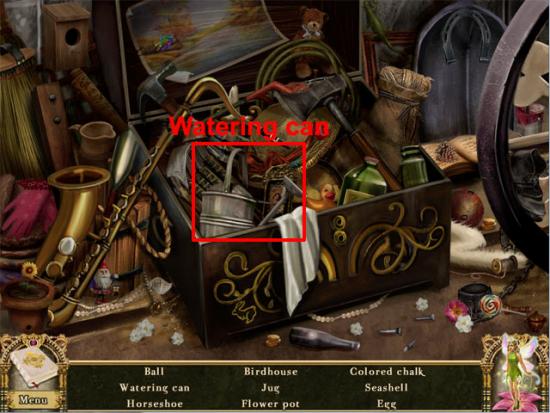
Find all of the remaining hidden objects on the list and the watering can will be added to the inventory. Examine the carriage compartment to see an outline. Put all of the unicorn pieces in the correct places on the outline:
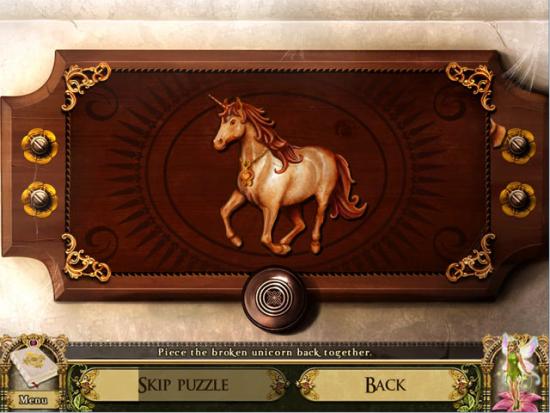
Take the heart locket from the compartment. Examine the tin can on the shelf. Put the goblin heads in the following order:
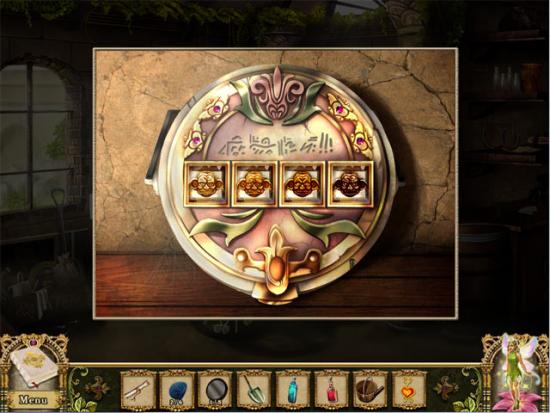
Find the pair of beans that are identical. The location of the identical beans is random with every new game. Complete the five rounds of this mini-game to receive the magic beans. Move back and left twice to the pond.
Pond
Examine the pigeon:
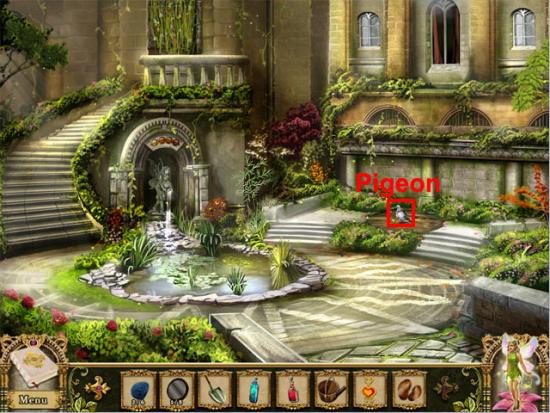
Use the note from the Fairy Queen on the pouch on the back of the pigeon. Use the shovel on the soil where the pigeon flew away from. Use the magic beans on the hole in the soil. Use the watering can on the fountain to fill it. Use the filled watering can on the planted seeds and small sprouts will appear. Use the potion of rapid growth on the small sprouts to make the vine grow up to the window. Select the window at the top of the vine to enter the alchemy lab.
Alchemy Lab, Pond, and Garden
Alchemy Lab
Talk to the alchemist: He wants you to take the stone behind the wall and place it in the magnifier on his desk. The following hotspots are available:
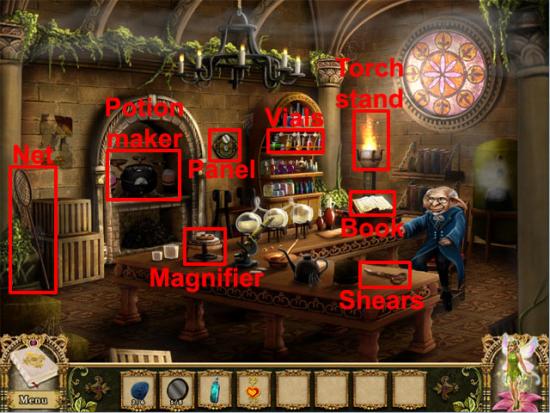
Take the butterfly net and the shears. Examine the panel on the wall. Press the switch in the middle of the panel and then select the engraving to find a glass disc. Exit the view of the panel. Move back to the pond.
Pond
Use the butterfly net on the pond. Find the pairs of butterflies that are identical. The location of the butterflies are random with every new game. After every pair of butterflies has been found, select the purple butterfly. Use the shears on the vines at the top of the stairs three times to reveal a stone wall. Examine the wall. Swap the pieces to make the picture shown below:
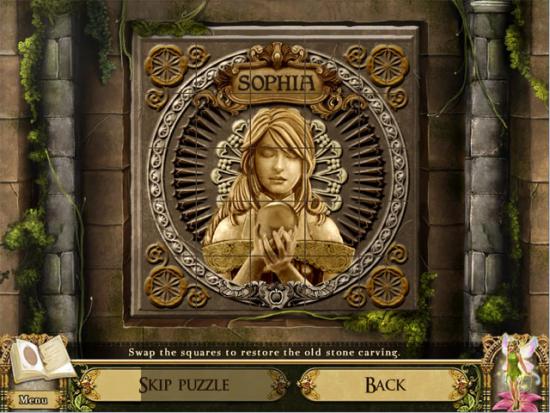
Take the magic stone. Enter the alchemy lab.
Alchemy Lab
Examine the magnifier. Use the magic stone on the magnifier: The alchemist asks you to make a potion of corrosion. Examine the vials. Select a colour from the top shelf and then select an empty vial to add the colour. Put the following colours in the empty vials to make the potion of corrosion:
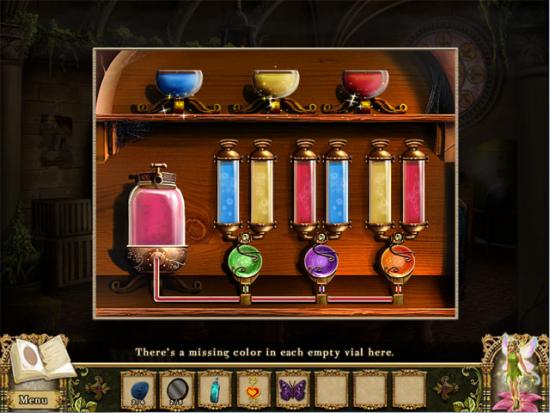
Examine the magnifier and use the potion of corrosion on the magic stone to reveal a magic rune. Take the rune and the alchemist will disappear. Examine the alchemy book to see a recipe for a spell. Exit the view of the book and examine the potion maker. Put the heart locket, vial of tears and butterfly on the potion plates to make the potion of pure heart:
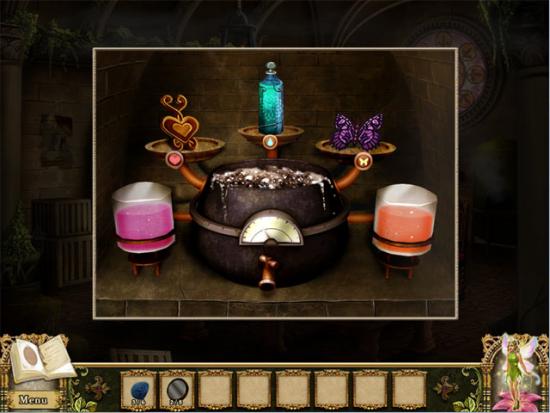
Examine the torch stand and take the fire salamander. Move back and right to the garden.
Garden
Use the potion of pure heart on the magic field. Go through the doorway to enter the kitchen.
Kitchen, Pond, and Hallway
Kitchen
Examine the panel on the wall:
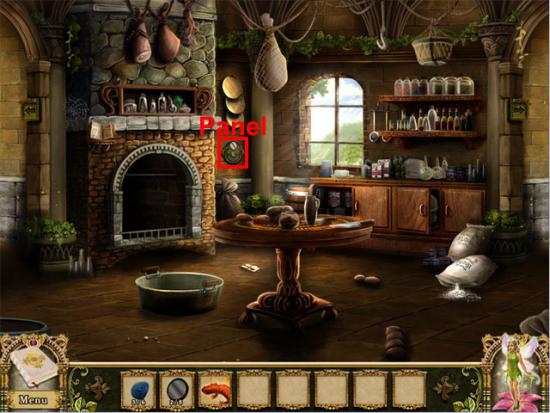
Press the switch in the middle of the panel and then select the engraving to find a glass disc. Exit the view of the panel. Move left to the pantry.
Pantry
Talk to the goblin: He wants you to make him a bowl of vegetable stew. The following hotspots are available:
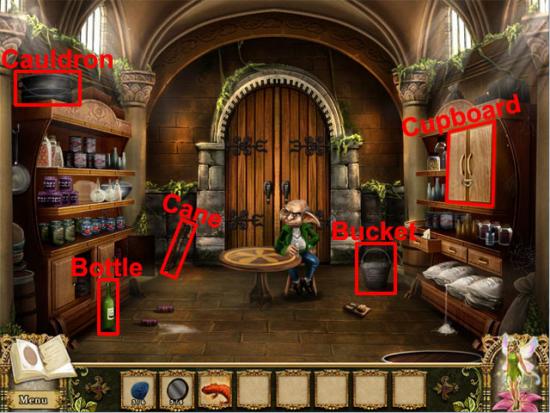
Take the bottle, cane and bucket. Use the cane on the cauldron to tip it over. Take the firewood and the dirty cauldron on the floor. Move back to the kitchen.
Kitchen
Find the ten vegetables:
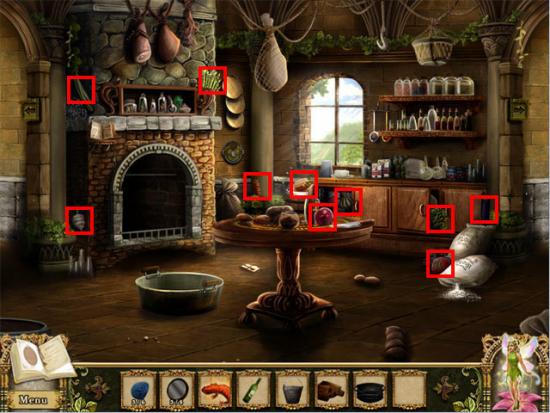
Use the firewood and the fire salamander on the fireplace and a key will appear. Take the key in front of the fireplace. Move back and left to the pond.
Pond
Use the bucket on the fountain to get the bucket of water. Move right, forward into the kitchen and left to the pantry.
Pantry
Examine the cupboard at the right side of the room. Use the key from the kitchen fireplace on the cupboard and then select the cupboard to open it. Take the rag and the soap:
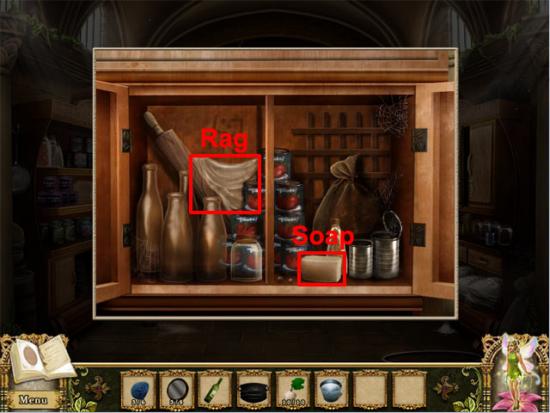
Move back and right to the hallway.
Hallway
Take the food bowl:
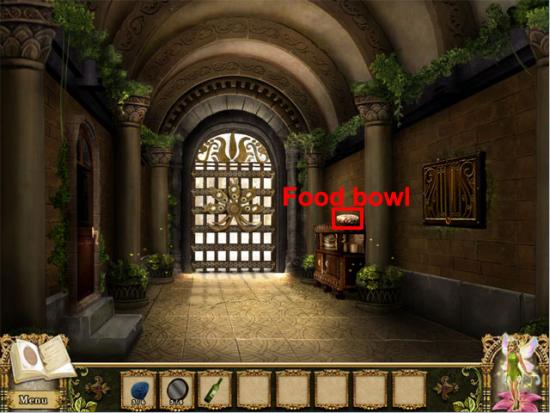
Move back to the kitchen.
Kitchen, Pantry, and Wine Cellar
Kitchen
Examine the washbasin on the floor. Use the bucket of water on the washbasin to fill it with water. Use the dirty cauldron on the washbasin. Use the soap and the rag on the cauldron to take the clean cauldron. Use the clean cauldron on the fireplace. Use the vegetable on the clean cauldron to start the vegetable mini-game. The aim in the mini-game is to add the ingredients in the same order that they are displayed on the screen. There are six rounds in the mini-game, with one additional ingredient to add in each round. After completing the mini-game, use the food bowl on the cooking stew in the cauldron. Move left to the pantry.
Pantry
Give the bowl of goblin stew to the goblin and he will disappear. Take the candle on the table:
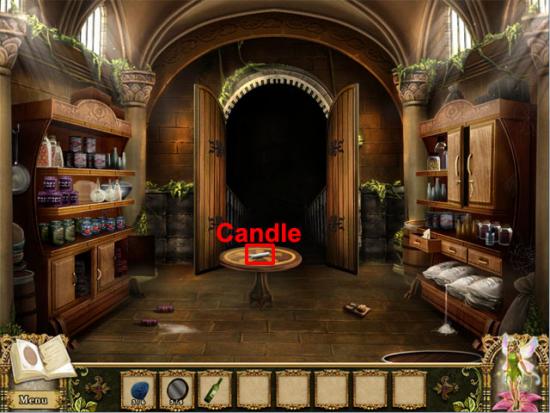
Move back to the kitchen.
Kitchen
Use the candle on the cooking stew in the fireplace to light the candle. Move left to the pantry.
Pantry
Use the lit candle on the darkness in the doorway to enter the wine cellar.
Wine Cellar
Take the can of oil and use it on the lamp to light the room:
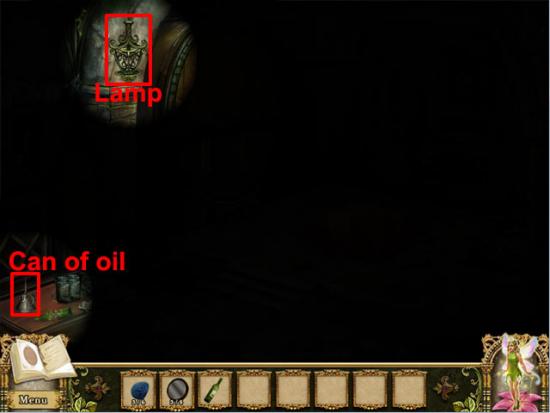
Select the red tapestry to reveal a drunk goblin. Talk to the goblin: He wants a drink. Take the tap and use it on the tap area on the barrel to make the wine tap:
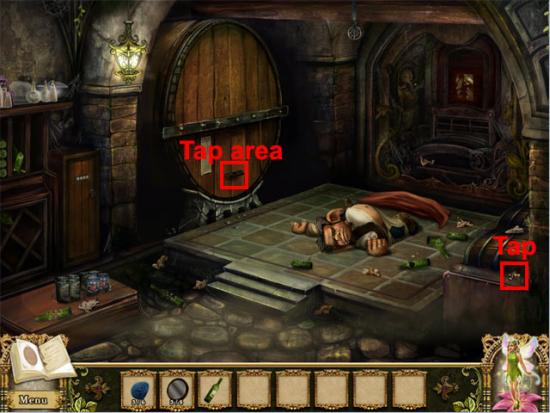
Use the wine bottle on the wine tap to fill it with wine. Use the wine bottle on the drunk goblin and he will disappear. Find the eight pieces of paper:
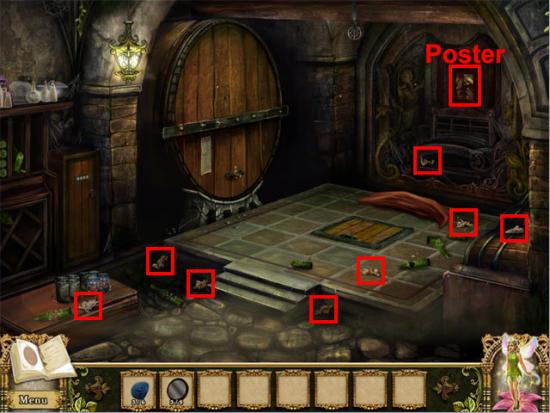
Use the piece of paper on the poster to see an outline. Put all of the pieces of paper in the correct places on the outline:
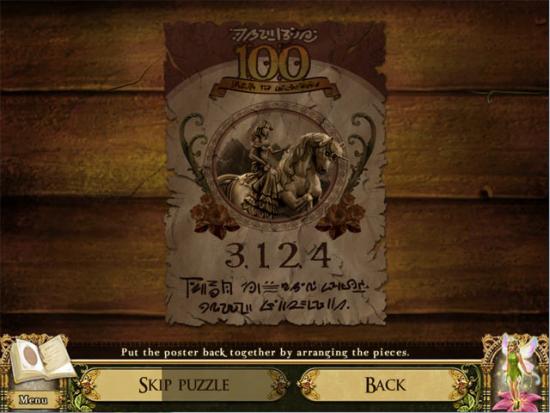
Examine the locker at the left side of the wine cellar. Enter the combination 3124 from the goblin poster:
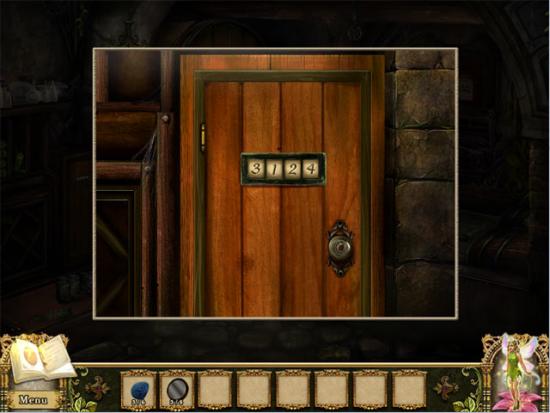
Select the doorknob to open the locker. Take the sledgehammer and rope from the locker. Use the rope on the pulley and the sledgehammer on the wine cask:
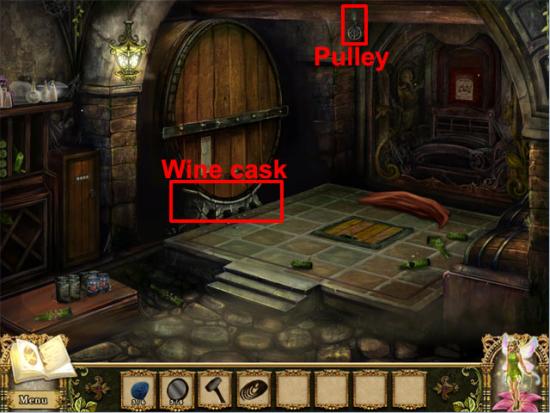
Go down the trapdoor to enter the secret passage.
Secret Passage and Gambling Den
Secret Passage
Examine the steel door and a goblin will ask you to find ten Bolgin coins. Find the ten coins:
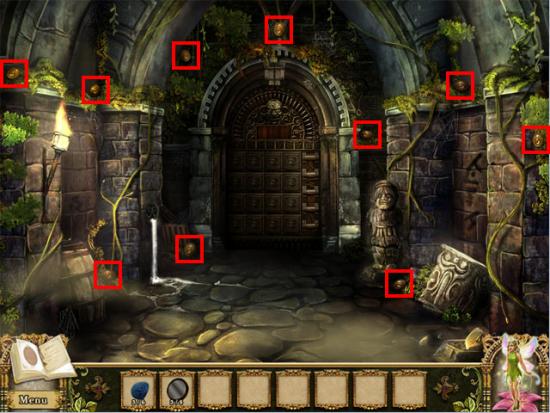
Use the Bolgin coins on the steel door to play the goblin tile mini-game. The aim is to watch the tiles that the goblin appears in and then select those tiles in the same order. There are five rounds in this mini-game, with the number of tiles to remember ranging from 3 to 7. Exit the view of the door after completing the mini-game and the door will open. Go through the doorway to enter the gambling den.
Gambling Den
Talk to the thug: He wants you to find the real coins in the chest. The following hotspots are now available:
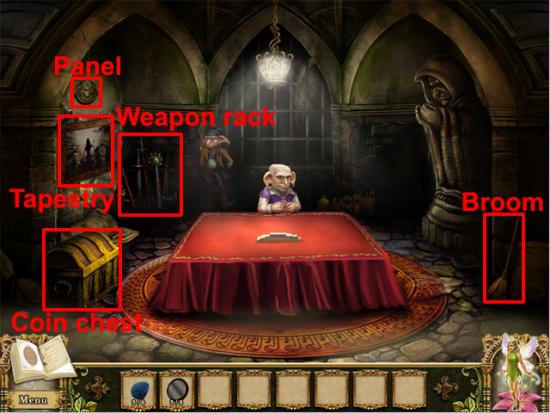
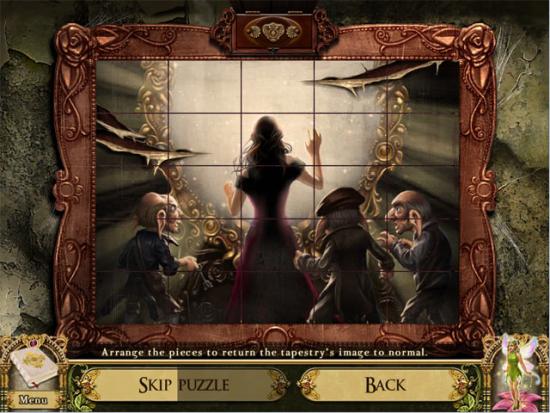
Examine the panel on the wall. Press the switch in the middle of the panel and then select the engraving to find a glass disc. Exit the view of the panel. Examine the tapestry. Swap the pieces to make the picture shown below:
Take the chest key at the top of the tapestry. Use the chest key on the coin chest. Examine the coin chest. Find the pair of coins that are identical. The location of the coins is random with every new game. Complete the four rounds of this mini-game to receive the fake Bolgins. Give the fake Bolgins to the thug and he will say that you can now speak to the gambler. Talk to the gambler to play Goblinjong. Match pairs of tiles to reveal the pair of keys, and then match the pair of keys to move onto the next round. Complete three rounds of the mini-game and the scrap paper will appear on the table. Take the mace from the weapon rack and the broom from the right wall. Examine the scrap of paper on the table to see a statue painted in different colours. Examine the right side of the carpet:
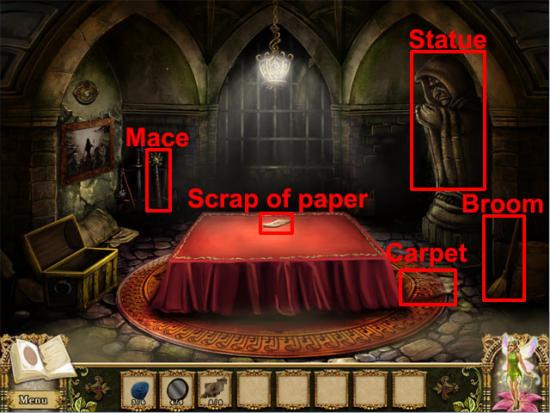
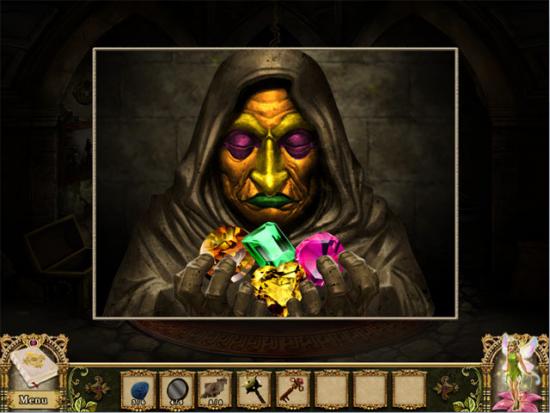
Use the broom on the dust below the carpet to reveal an iron key. Take the iron key. Examine the statue. Select a jewel and click on a section of the face to paint the section in that colour. The aim is to paint the statue in the same way that was shown on the scrap of paper on the table:
Move right to the secret library.
Secret Library and Hallway
Secret Library
Take the dusty book from the bookshelf and use it on the reading table:
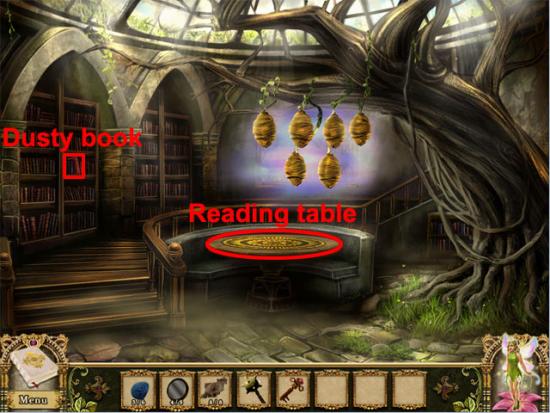
Examine the dusty book to see six symbols. Exit the view of the book and find the six symbols:
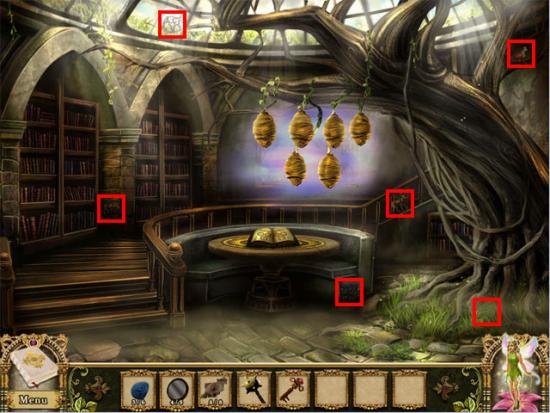
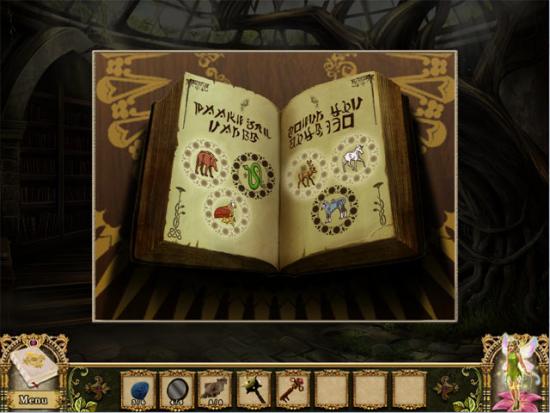
Examine the dusty book and use the animal symbols in the correct locations. Left click to see four of the symbols light up:
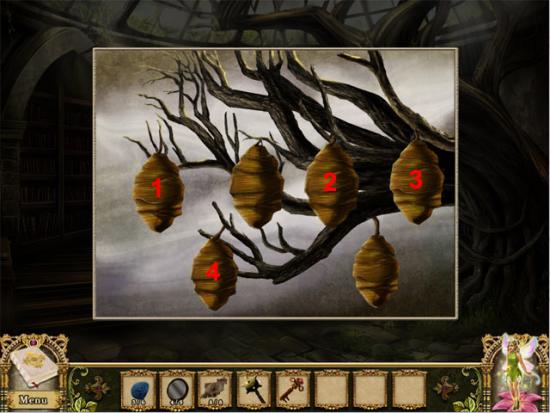
Examine the cocoons above the reading table. Remembering the order of the illuminated animal symbols from the dusty book, press the cocoons in the following order:
Examine the mystical drawing on the wall to enter a hidden object location. Select the cross:
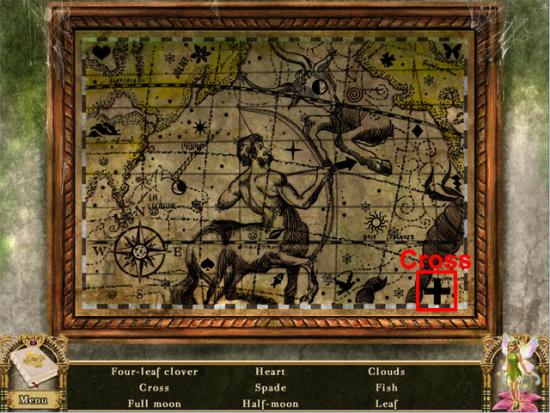
Find all of the remaining hidden objects on the list and the cross will be added to the inventory. Examine the dumbwaiter on the wall:
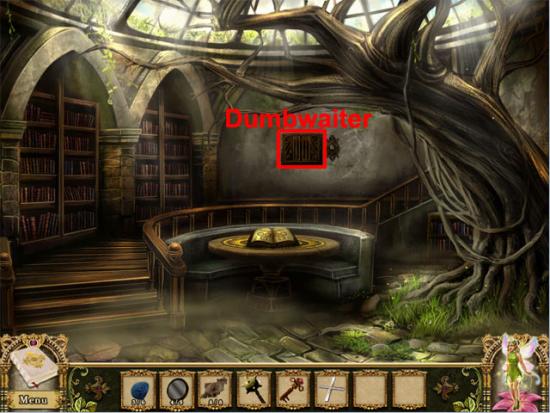
Press the blue button to see the magic rune vanish up the chute. Exit the view of the dumbwaiter. Move back five times and right to the hallway.
Hallway
Examine the dumbwaiter on the wall:
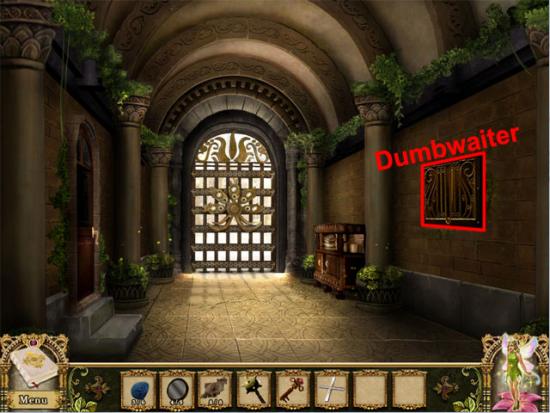
Use the old key on the keyhole at the bottom of the dumbwaiter. Left click to open the dumbwaiter. Take the magic rune and the fairy carving from the dumbwaiter. Examine the locked door at the left side of the hallway. Use the cross on the groove in the window of the door. Click to rotate the tiles to the following positions:
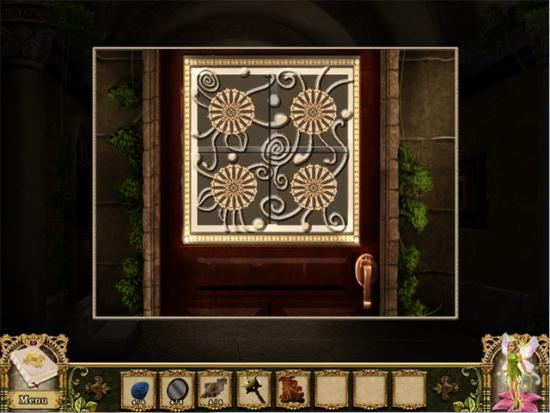
Select the handle to open the door to the parlour. Enter the parlour.
Parlour and Mirror Room
Parlour
The following hotspots are available:
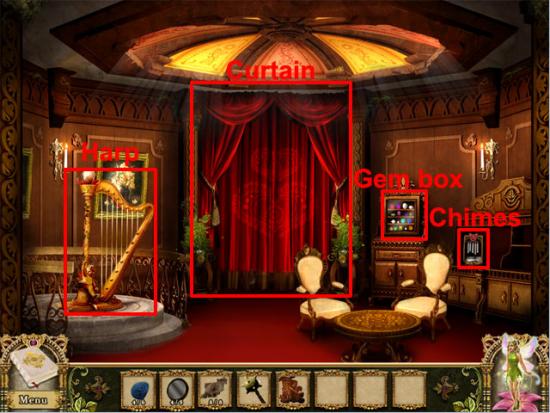
Examine the harp and repeat the four sequences of notes that are played to reveal the mirror. Take the axe below the mirror. Examine the gem box to play the gem mini-game. The aim is to match 2 or more gems together in the correct order so that all of the gems disappear. There are three rounds of this mini-game to complete.
Round 1:
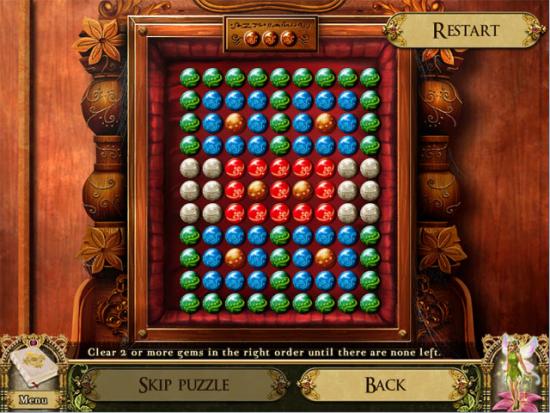
Correct order: Red, both grey groups, both blue groups, both brown groups and green.
Round 2:
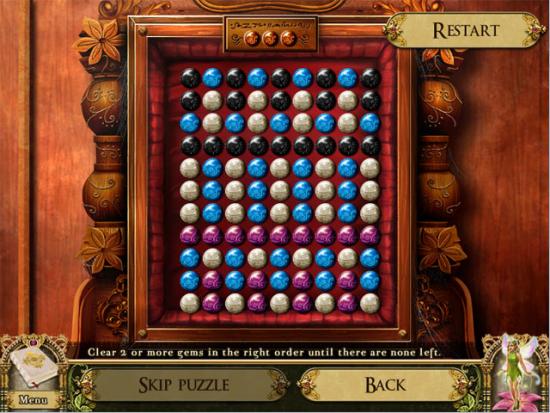
Correct order: Bottom four purple groups, bottom blue group, purple, white, blue and black.
Round 3:
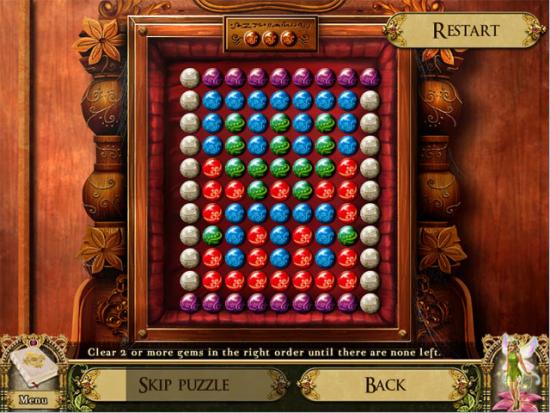
Correct order: Top and then bottom blue group, three red groups, green, both grey groups and purple.
After completing the third round of the mini-game, left click to open the drawer below the gem box. Examine the drawer to see a piece of paper with a riddle on it. Exit the view of the drawer and examine the mirror. Remembering the riddle from the drawer, put the symbols in the following order:
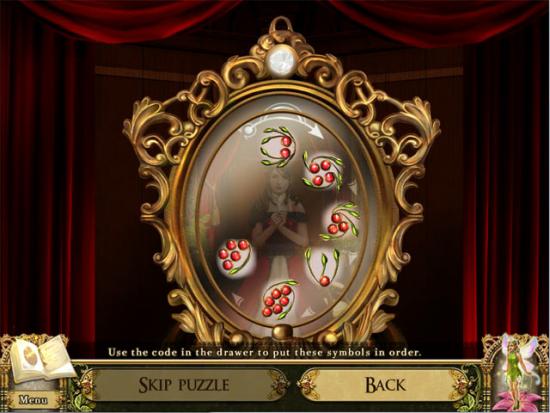
Enter the mirror room.
Mirror Room
The following hotspots are available:
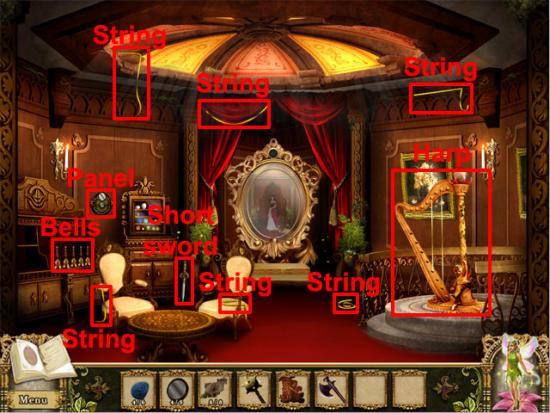
Examine the panel on the wall. Press the switch in the middle of the panel and then select the engraving to find a glass disc. Exit the view of the panel. Take the short sword. Find the six strings in the room. Use the harp strings on the harp. Examine the harp and repeat the four sequences of notes that are played to receive the sparkling crystal. Examine the gem box to play the mini-game. The aim is same as the normal parlour gem box: Match 2 or more gems together in the correct order so that all of the gems disappear. There are three rounds of this mini-game to complete.
Round 1:
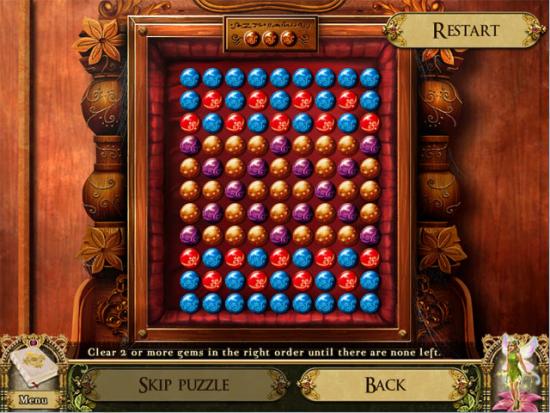
Correct order: Three middle brown groups, two top red groups, purple, both brown groups, bottom blue group, red and blue.
Round 2:
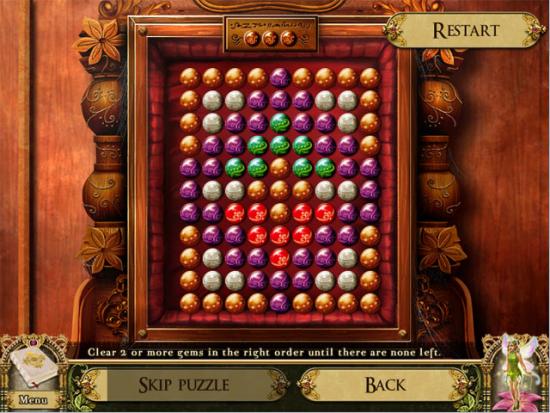
Correct order: Five brown groups (leaving middle group until last), six grey groups (from top to bottom), red, purple and green.
Round 3:
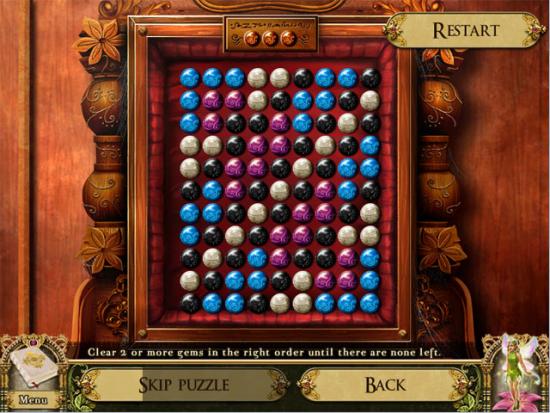
Correct order: Four purple groups (from top to bottom), two bottom blue groups, two bottom grey groups, bottom black group, four grey groups (from top to bottom), top-left and top-right black groups, both blue groups and black group.
After completing the third round of the mini-game, left click to open the drawer below the gem box. Examine the drawer to see a piece of paper with a riddle on it. Exit the view of the drawer. Examine the bells. Select the bells until each one displays a number. Examine the bells to see a code:
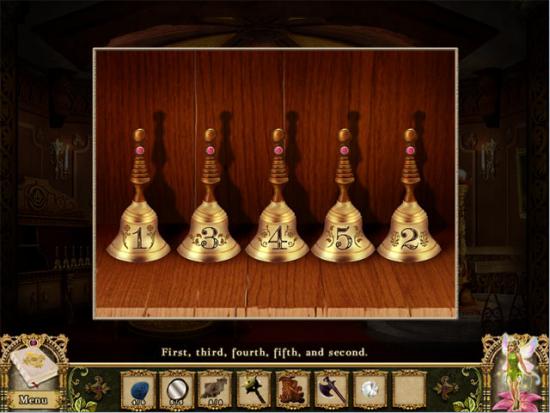
Exit the view of the bells. Use the sparkling crystal on the slot above the mirror. Examine the mirror. Remembering the riddle from the drawer, put the symbols in the following order:
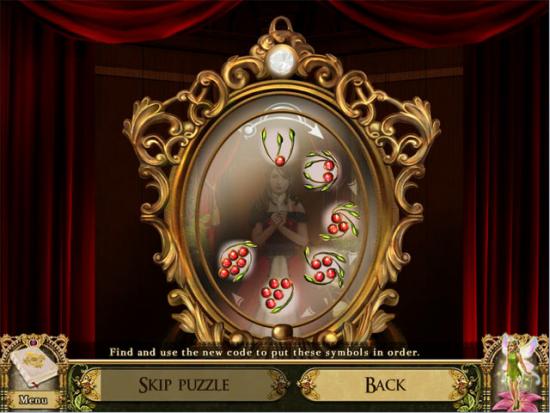
Enter the mirror to return to the normal parlour.
Parlour
Examine the chimes. Pull the chimes in the order that was seen on the bells in the mirror parlour:
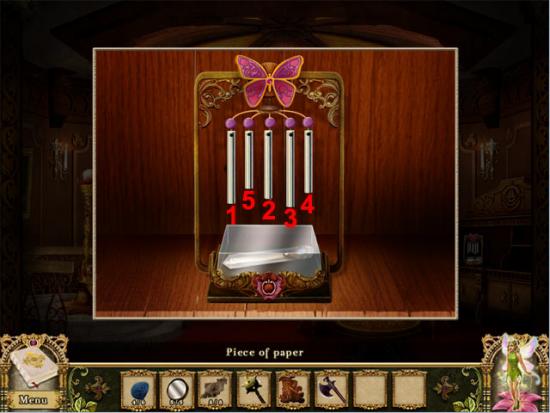
Press the button after pulling the chimes correctly to receive the prism. Move back to the hallway.
Great Hall
Hallway
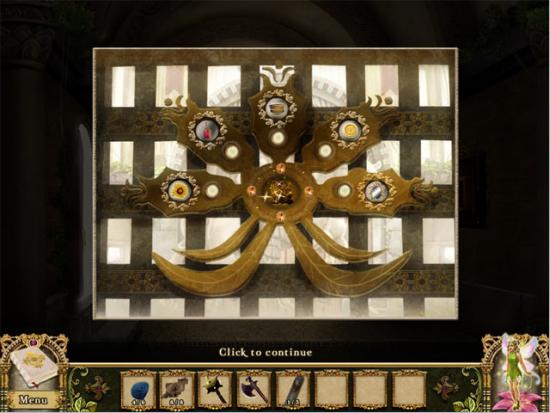
Examine the portcullis. Use the glass disc on the slots. If any of the lights next to the discs are off, make sure that the switch on every panel where you found the glass discs have been pressed. Use the fairy carving on the notch in the middle of the portcullis. When the switch on all five panels has been pressed and the glass discs and fairy carving have been inserted, the portcullis will look like the one shown in the image below:
Go through the doorway to enter the entrance hall.
Entrance Hall
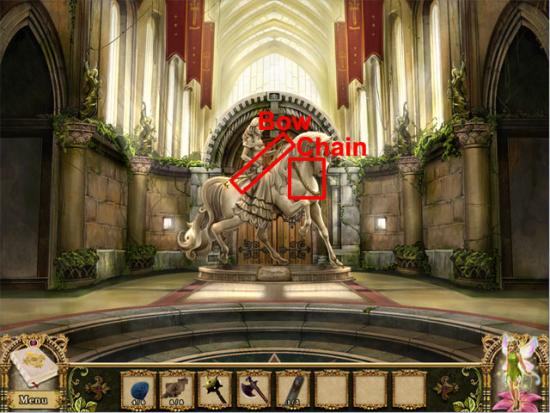
Take the bow and the gold chain:
Move left to the great hall left.
Great Hall Left
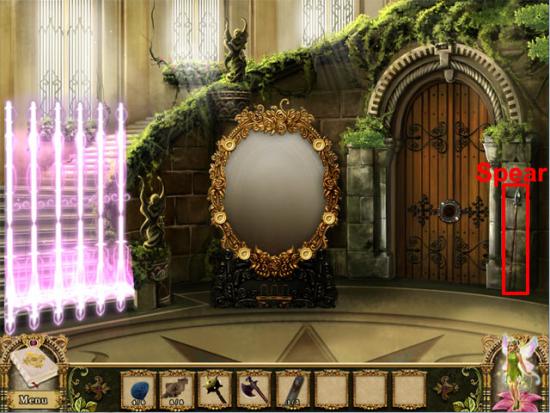
Take the spear:
Move back and right to the great hall right.
Great Hall Right
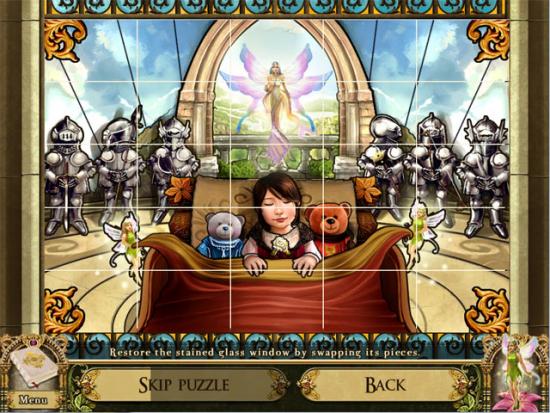
Examine the stained glass window. Swap the pieces to make the picture shown below:
Take the dagger from the table:
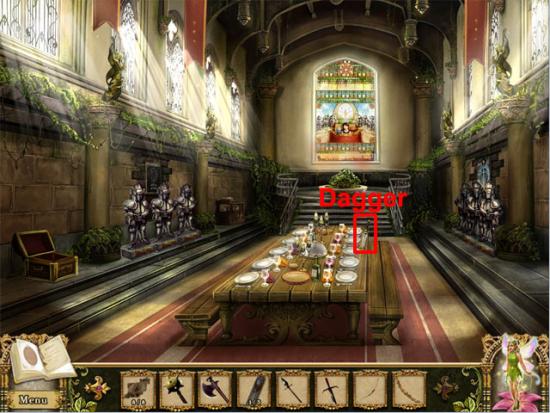
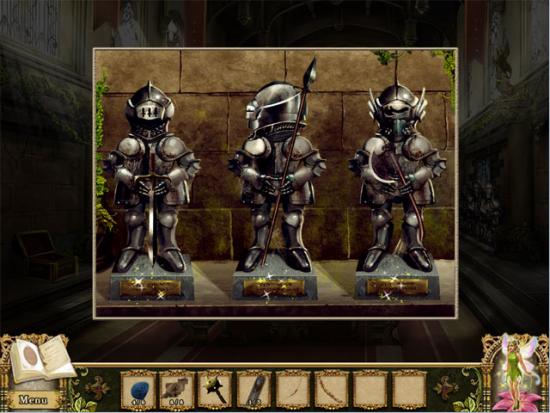
Examine the suits of armour at the left side of the hall. The plaques below the suits of armour give hints on what weapon each armour should hold, and the stained glass window shows which way the helmet should be facing. Use the short sword on the left armour, the spear on the middle armour and the axe on the right armour. Move the left helmet to face forward, the middle helmet to face left and the right helmet to face forward:
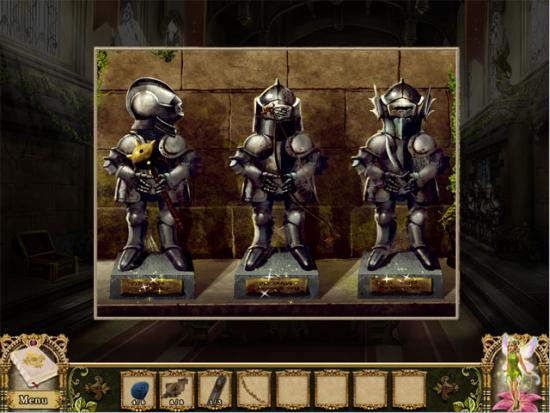
A pattern will be shown in the bricks after the weapons and helmets have been correctly placed. Examine the suits of armour at the right side of the hall. Use the mace on the left armour, the bow on the middle armour and the dagger on the right armour. Move the left helmet to face right, the middle helmet to face forward and the right helmet to face forward:
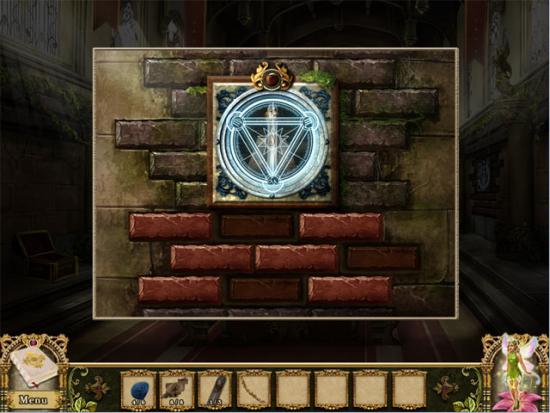
Remembering the pattern that was shown in the bricks after the weapons and helmets were correctly placed on the left suits of armour, make the following pattern on the bricks:
Press the button above the prism and then take the prism. Examine the chest at the bottom-left corner of the room. Use the gold chain on the chest to reveal the third prism. Take the prism. Move back and left to the great hall left.
Great Hall Left
Examine the slots below the mirror. Use the prisms on the empty slots. Move the prisms to the following positions:
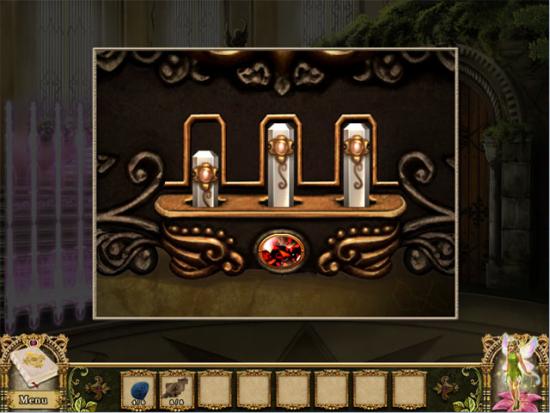
Press the red button to remove the magic field in front of the left stairs. Go upstairs to the second floor landing.
Second Floor Landing and Art Gallery
Second Floor Landing
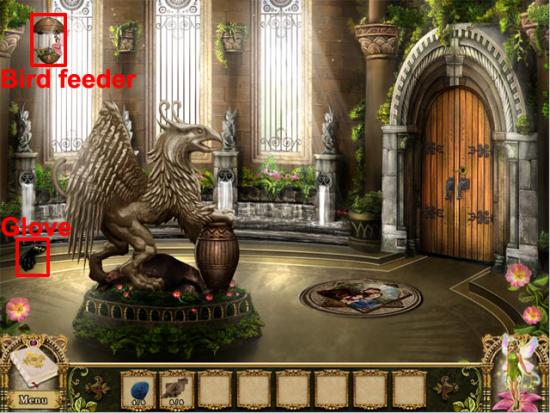
Take the glove and the birdfeeder:
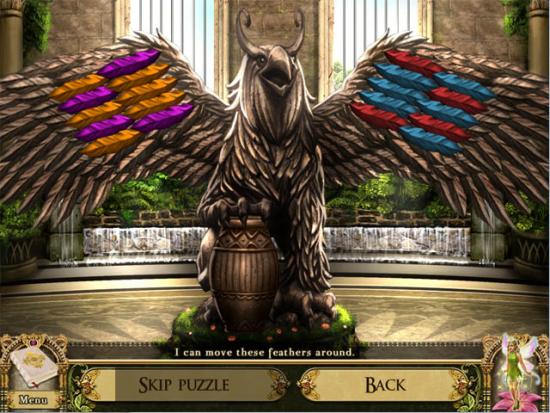
Examine the griffin to start the feather mini-game. The aim is to swap the feathers on the right wing so that they match the layout of the feathers on the left wing:
Examine the griffin and take the potion of true sight and the scratched coin from the vase. Examine the mosaic on the floor. Swap the pieces to make the picture shown below:
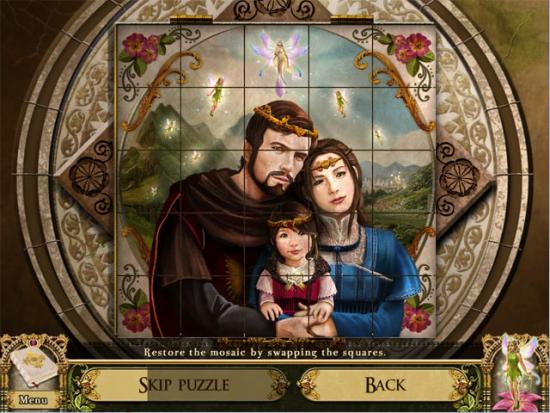
Take the net from the mosaic. Use the net on the flying keys at the top-left corner of the door:
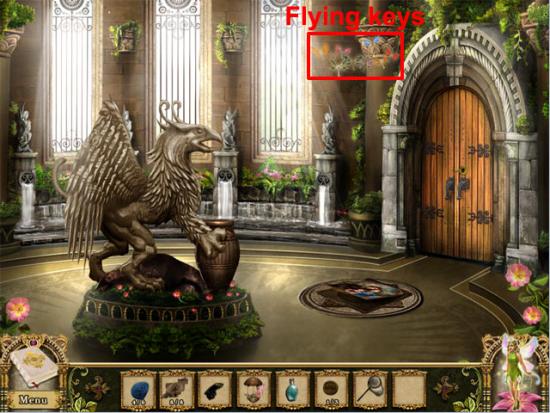
Find the pairs of flying keys that are identical. The location of the flying keys are random with every new game. After every pair of flying keys has been found, select the final flying key. Use the flying key on the door to unlock it. Go through the doorway to enter the art gallery.
Art Gallery
Take the basket on top of the statue:
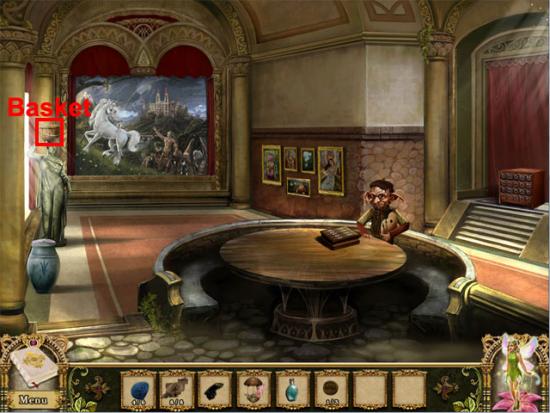
Talk to the curator to play another gem mini-game. The aim is same as the parlour and mirror parlour gem boxes: Match 2 or more gems together in the correct order so that all of the gems disappear. There are three rounds of this mini-game to complete.
Round 1:
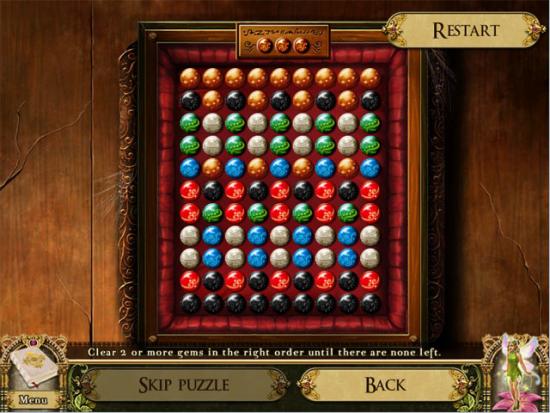
Correct order: Nine grey groups (from top to bottom), brown, five red groups, bottom black group, blue, green and black.
Round 2:
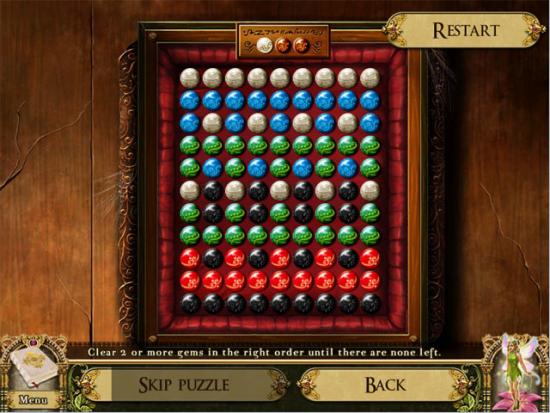
Correct order: Both green groups (from top to bottom), horizontal grey group, blue, red, black and white.
Round 3:
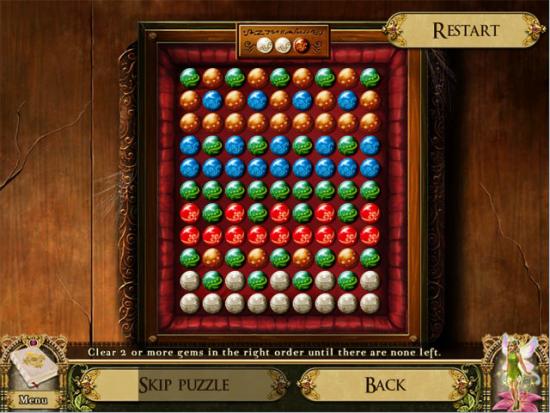
Correct order: Grey, brown group, three green groups (from top to bottom), red, blue and four brown groups.
After completing the third round of the mini-game, left click and the curator will disappear. Examine the open box to see a nursery rhyme. Exit the view of the box and move back twice to go downstairs to the great hall left.
Great Hall and Art Gallery
Great Hall Left
Examine the potted plant at the left side of the mirror:
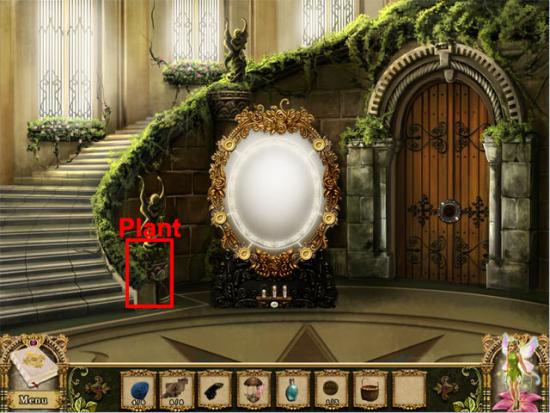
Use the glove on the object in the soil to take the jar handle. Go upstairs and forward to return to the art gallery.
Art Gallery
The following hot spots are available:
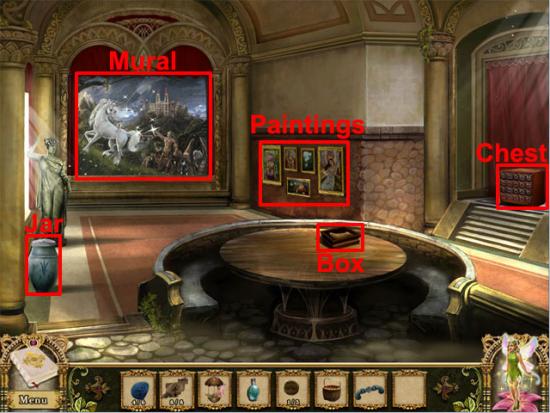
Examine the mural to enter a hidden object location. Select the scratched coin:
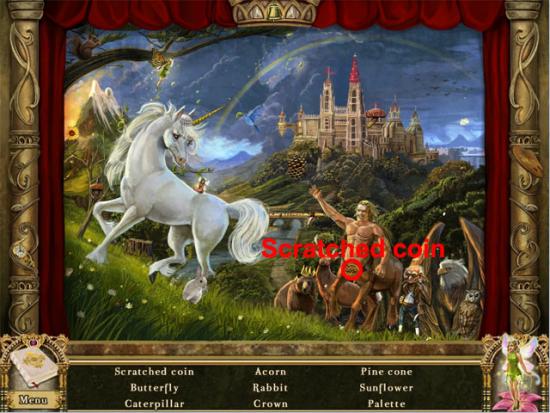
Find all of the remaining hidden objects on the list and the scratched coin will be added to the inventory. Examine the paintings on the wall and swap the tiles to make the following pictures:
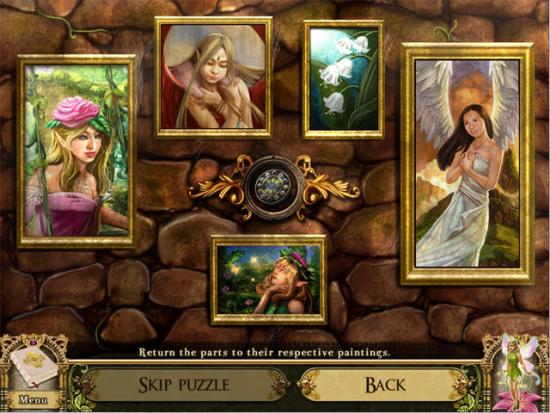
Take the starry disc after all of the tiles have been correctly swapped. Examine the chest of drawers. Remembering the nursery rhyme from the open box, select the drawers to change them to the following positions:
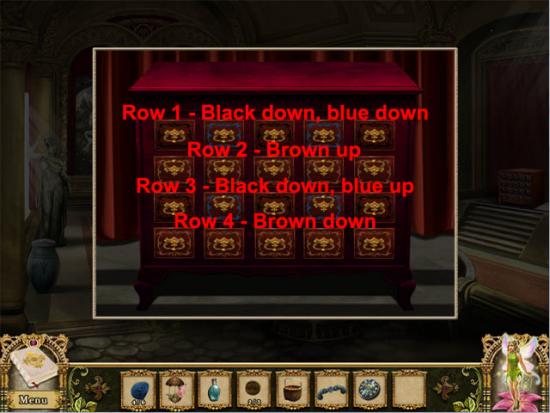
Take the handkerchief from the top drawer. Examine the jar at the left side of the room. Use the handkerchief on the jar to see two holes. Use the jar handle on the holes and then left click to remove the lid. Take the scratched coin from the jar. Move back twice to go downstairs to the great hall left.
Great Hall Left
Examine the tower door. Use the starry disc on the slot and then left click to open the door. Go through the doorway to enter the north tower lobby.
North Tower Lobby, Carriage House Exterior, and Entrance Hall
North Tower Lobby
Talk to the dragon keeper to play Goblinjong. Match pairs of tiles to reveal the pair of keys, and then match the pair of keys to move onto the next round. Complete three rounds of the mini-game to receive the dragon egg. Examine the lunchbox:
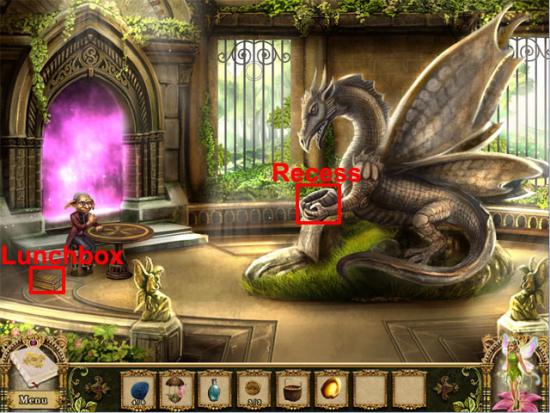
Take the breadcrumbs from the lunchbox. Examine the recess to play the beetle mini-game. Find the pairs of beetles that are identical. The location of the beetles are random with every new game. After every pair of beetles has been found, select the final beetle to add the golden beetle to the inventory. Move back five times to the garden and right to the carriage house area.
Outside Carriage House
Use the basket on the fairy ring:
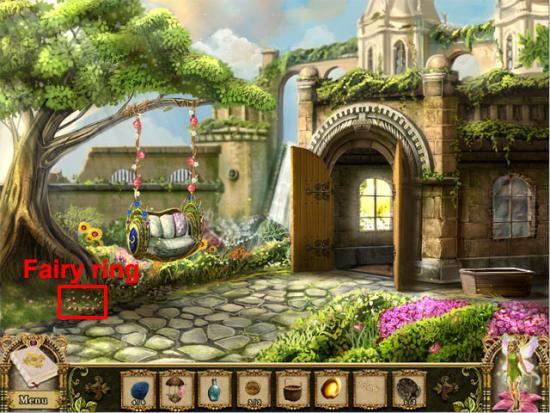
The aim in the mushroom mini-game is to watch the order that the mushroom appears in and then select those mushrooms in the same order. There are five rounds in this mini-game, with the number of mushrooms to remember ranging from 3 to 7. Complete the five rounds of the mini-game to receive the mushroom. Move left, forward into the kitchen, right and forward to the entrance hall.
Entrance Hall
Examine the left window:
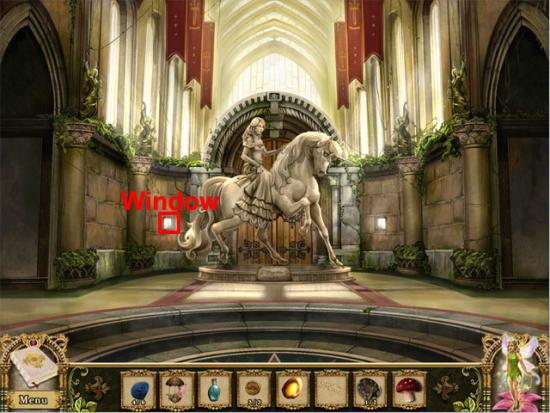
Use the bird feeder on the hook and the breadcrumbs on the dish. Left click and the pigeon will fly over to the left window. Examine the left window and take the golden beetle from the pigeon’s beak. Move left and go through the doorway to enter the north tower lobby.
North Tower Lobby
Use the dragon egg on the recess. Select the dragon egg to reveal the baby faerie dragon. Use the mushroom on the baby faerie dragon and the magic rune will appear. Take the magic rune on the floor:
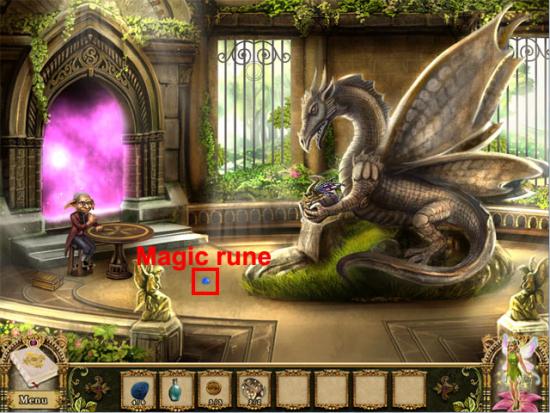
Talk to the dragon keeper and he will disappear. Go through the portal to enter the observatory.
Observatory and Great Hall
Observatory
Examine the sphere in the illuminated area and use the golden beetles on the grooves. Left click to light the room. Talk to the astronomer: He tells you to find the book of truth and place it on the book stand. The following hotspots are now available:
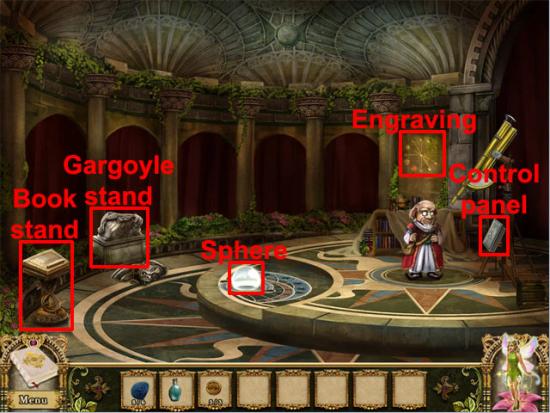
Examine the gargoyle stand and put all of the pieces in the following positions:
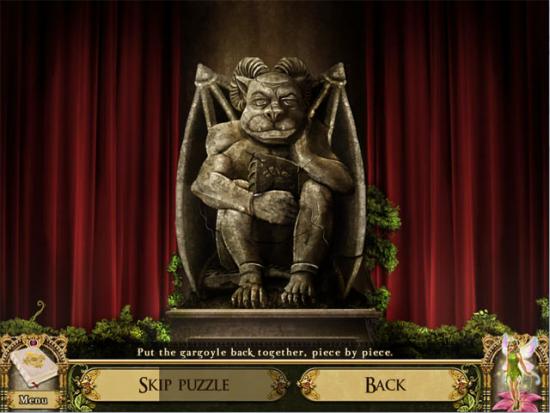
Left click to restore the gargoyle. Examine the gargoyle and use the scratched coins on its mouth. Take the book of truth. Use the book of truth on the book stand. Examine the book of truth and use the potion of true sight on it to reveal symbols. Examine the sphere to see ten star shapes on the floor. Exit the view of the sphere and find the ten stars:
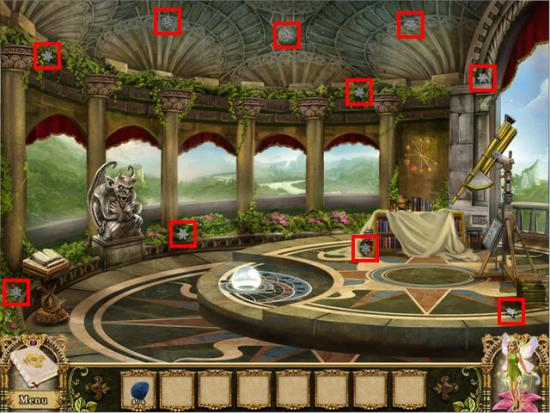
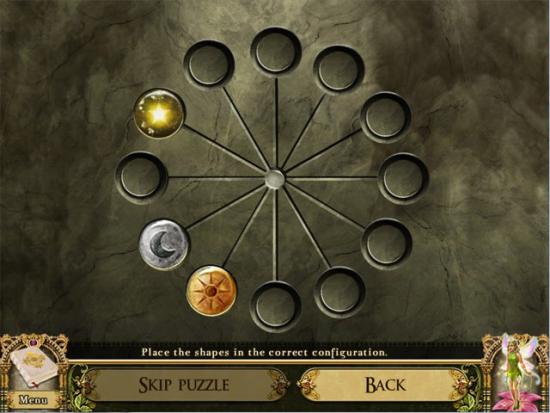
Examine the sphere and use the twinkling stars on the floor. Left click to see the sky map. Examine the engraving on the wall to see the alignment of the star, moon and sun. Exit the view of the engraving and examine the control panel next to the telescope. Put the star, moon and sun shapes in the following slots:
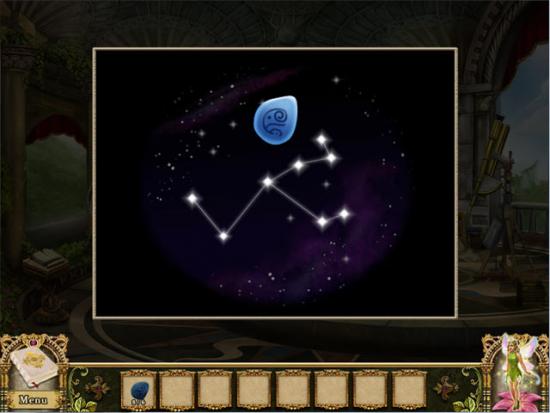
Left click and the telescope will now be focuses. Examine the telescope to see a constellation. Exit the view of the telescope and examine the sky map. Remembering the constellation seen through the telescope, light the following stars:
Take the magic rune after the correct stars have been selected. Move back twice to the great hall left.
Great Hall Left
Examine the mirror. Use the six magic runes on the mirror and the crown will appear. Take the crown. Move back to the entrance hall.
Entrance Hall
Examine the statue of the princess. Use the crown on the statue and then left click to open the castle doors. Go through the castle doorway to complete the game.
Congratulations! You have finished Awakening: The Dreamless Castle.
More articles...
Monopoly GO! Free Rolls – Links For Free Dice
By Glen Fox
Wondering how to get Monopoly GO! free rolls? Well, you’ve come to the right place. In this guide, we provide you with a bunch of tips and tricks to get some free rolls for the hit new mobile game. We’ll …Best Roblox Horror Games to Play Right Now – Updated Weekly
By Adele Wilson
Our Best Roblox Horror Games guide features the scariest and most creative experiences to play right now on the platform!The BEST Roblox Games of The Week – Games You Need To Play!
By Sho Roberts
Our feature shares our pick for the Best Roblox Games of the week! With our feature, we guarantee you'll find something new to play!All Grades in Type Soul – Each Race Explained
By Adele Wilson
Our All Grades in Type Soul guide lists every grade in the game for all races, including how to increase your grade quickly!


